

Page 1
1
INSTALLATION, QUICK START
INSTALLATIE, SNEL AAN DE SLAG
INSTALLATION, HURTIG START
INSTALLASJON, RASK INNFØRING
ASENNUS, PIKAOPAS
ÜZEMBE HELYEZÉS, RÖVID
KEZDÉSI ÚTMUTATÓ
INSTALACE, NÁVOD VE ZKRATCE
INSTALACJA, SKRÓCONA
INSTRUKCJA OBSŁUGI
,
INŠTALÁCIA, ÚVODNÁ PRÍRUČKA
INSTALLATION, DÉMARRAGE RAPIDE
AUFSTELLUNG, KURZANLEITUNG
INSTALLAZIONE, GUIDA RAPIDA
INICIO RÁPIDO PARA LA INSTALACIÓN
INSTALAÇÃO, GUIA DE INICIAÇÃO RÁPIDA
INSTALLATION, SNABBGUIDE
AMW 583
All manuals and user guides at all-guides.com
all-guides.com
Page 2
2
Table of contents
IMPORTANT INFORMATION 5
BEFORE MOUNTING 5
ENVIRONMENTAL HINTS 5
MOUNTING THE APPLIANCE 6
PRIOR TO CONNECTING 6
AFTER CONNECTING 6
BEFORE FIRST USE 7
IMPORTANT SAFETY INSTRUCTIONS 7
READ CAREFULLY AND KEEP FOR FUTURE REFERENCE 7
IMPORTANT PRECAUTIONS 8
GENERAL 8
CAREFUL 8
PUSH PUSH KNOBS 8
ACCESSORIES 9
GENERAL 9
CHOOSING COOKING CONTAINER 9
SPONGE 9
WIRE SHELF 9
BAKING & DRIP TRAY 9
STEAM TRAY 9
WATER CONTAINER 9
APPLIANCE FEATURES 10
All manuals and user guides at all-guides.com
Page 3

3
CONTROL PANEL 10
KEY LOCK 11
MESSAGES 12
SHORTCUTS 13
ON / OFF / PAUSE 14
KITCHEN TIMER 14
CHANGING SETTINGS 15
LANGUAGE 15
CLOCK SETTING 16
BRIGHTNESS 16
VOLUME 17
ECO 17
CALIBRATE 18
DURING COOKING 19
SPECIALS 20
DOUGH PROVING 21
DESCALING 22
DRAIN 23
FINISHING 24
REHEAT 25
STEAM DEFROST 26
All manuals and user guides at all-guides.com
Page 4
4
MANUAL 28
STEAM 29
FORCED AIR + STEAM 30
FORCED AIR 31
ASSISTED MODE 32
MEAT 33
POULTRY 34
FISH / SHELLFISH 35
POTATOES 36
VEGETABLES 37
RICE / GRAIN 39
PASTA 40
EGGS 41
PIZZA / PIE 42
DESSERTS 43
BREAD/CAKES 44
MAINTENANCE & CLEANING 46
GENERAL 46
DISHWASHER SAFE 46
REMOVING THE SHELF SUPPORTS 47
DISHWASHER UNSAFE 47
REPLACING THE OVEN LIGHT BULB 47
TROUBLE SHOOTING GUIDE 48
DATA FOR TEST HEATING PERFORMANCE 48
TECHNICAL SPECIFICATION 48
All manuals and user guides at all-guides.com
Page 5

5
IMPORTANT INFORMATION
T
HIS APPLIANCE COMPLIES to current
safety standard.
PLEASE KEEP the instruction for use manual and
mounting instructions in a safe place for future
reference.
PLEASE PAS S these instructions on to the new
owner in case you should sell the appliance
BEFORE MOUNTING
R
EAD THIS MANUAL CAREFULLY. This will ensure you
make full use of the technical benefits this ap-
pliance has to offer and enables you to operate
it in a safe and proper way. A incorrect use may
lead to injury or damaged objects
U
NPACK THE APPLIANCE and dispose of the packag-
ing in an environmentally responsible manner.
ENVIRONMENTAL HINTS
T
HE PACKI NG BOX may be fully re-
cycled as confirmed by the re-
cycling symbol. Follow lo-
cal disposal regulations. Keep
potentially hazardous pack-
aging (plastic bags, polysty-
rene etc.) out of the reach of chil-
dren.
THIS APPLIANCE is marked according to the Euro-
pean directive 2002/96/EC on Waste Electrical
and Electronic Equipment (WEEE). By ensuring
this product is disposed of correctly, you will
help prevent potential negative consequences
for the environment and human health, which
could otherwise be caused by inappropriate
waste handling of this product.
THE SYMBOL on the product,
or on the documents ac-
companying the product,
indicates that this appliance
may not be treated as house-
hold waste. Instead it shall be
handed over to the applica-
ble collection point for the
recycling of electrical and
electronic equipment.
DISPOSAL must be carried
out in accordance with lo-
cal environmental regulations for waste dis-
posal.
FOR MORE DETAILED INFORMATION about treatment,
recovery and recycling of this product, please
contact your local city office, your household
waste disposal service or the shop where you
purchased the product.
B
EFORE SCRAPPING, cut off the mains cord so that
the appliance cannot be connected to the
mains.
All manuals and user guides at all-guides.com
Page 6
6
PRIOR TO CONNECTING
ENSURE THAT THE APPLIANCE IS NOT DAMAGED. Check
that the oven door closes firmly against the
door support and that the internal door seal is
not damaged. Empty the oven and clean the
interior with a soft, damp cloth.
AFTER CONNECTING
T
HE FIRST TIME THE OVEN IS SWITCHED ON, you will be
asked to set the language and current time.
Follow the instructions under the headline
“Changing settings” in this instructions for use.
The appliance is ready to use after these two
steps have been taken.
The manufacturers are not liable for any
problems caused by the user’s failure to ob-
serve these instructions.
D
O NOT OPERATE THIS APPLIANCE if it has a damaged
mains cord or plug, if it is not working proper-
ly, or if it has been damaged or dropped. Do
not immerse the mains cord or plug in water.
Keep the cord away from hot surfaces. Electri-
cal shock, fire or other hazards may result.
E
NSURE the oven cavity is empty before mount-
ing.
C
HECK THAT THE VOLTAGE on the rating plate corre-
sponds to the voltage in your home.
T
HE OVEN CAN BE OPERATED ONLY if the oven door is
firmly closed.
THE EARTHING OF THIS APPLIANCE is compulsory. The
manufacturer will accept no responsibility for
injury to persons, animals or damage to ob-
jects arising from the non-observance of this
requirement.
MOUNTING THE APPLIANCE
THE APPLIANCE shall only be used when it is
built-in (mounted) properly.
FOLLOW THE SUPPLIED separate mounting in-
structions when installing the appliance.
IMPORTANT INFORMATION
INSTALLING (MOUNTING) of this appliance in places that are not per-
manent such as ships, caravans, busses and so on, may only be
carried out by a professional if it is ensured that the conditions
on the place permit a safe use of the appliance.
All manuals and user guides at all-guides.com
all-guides.com
Page 7
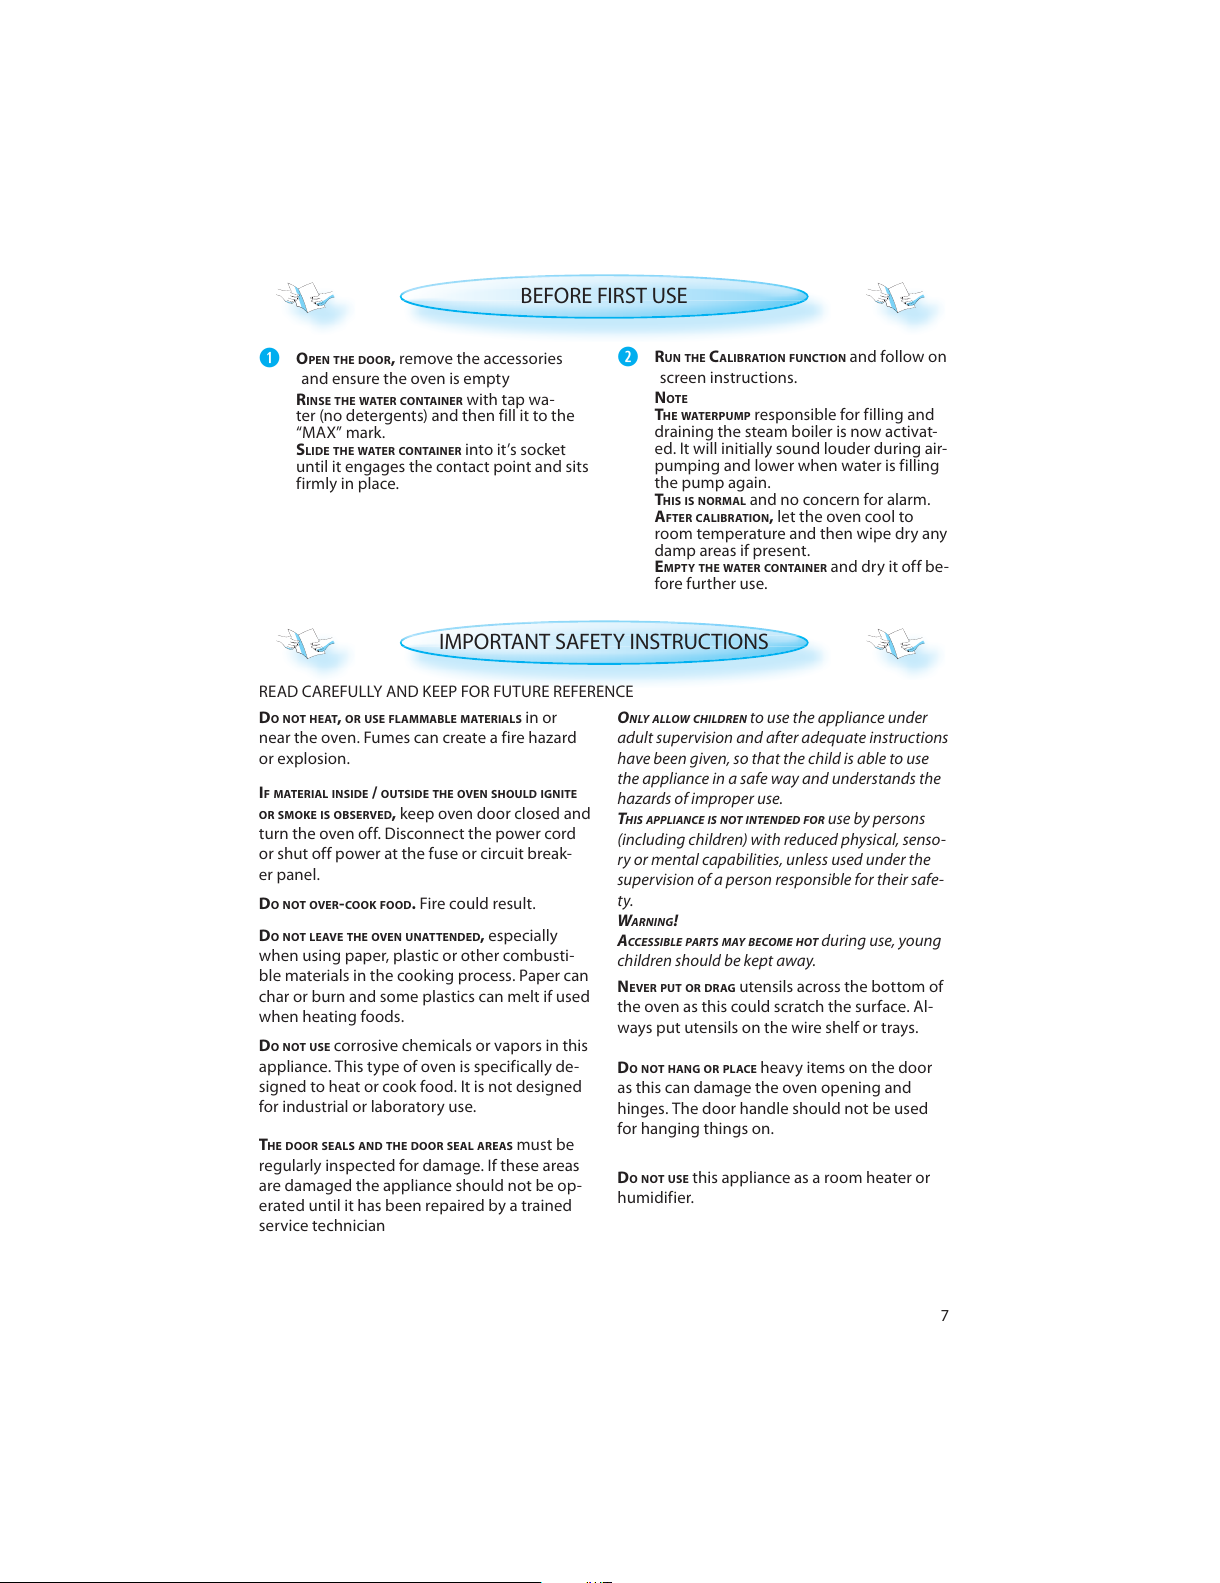
7
IMPORTANT SAFETY INSTRUCTIONS
DO NOT HEAT, OR USE FLAMMABLE MATERIALS in or
near the oven. Fumes can create a fire hazard
or explosion.
D
O NOT OVER-COO K FOOD. Fire could result.
D
O NOT LEAVE THE OVEN UNATTENDED, especially
when using paper, plastic or other combusti-
ble materials in the cooking process. Paper can
char or burn and some plastics can melt if used
when heating foods.
I
F MATERIAL INSIDE / OUTSIDE THE OVEN SHOULD IGNITE
OR SMOKE IS OBSERVED, keep oven door closed and
turn the oven off. Disconnect the power cord
or shut off power at the fuse or circuit break-
er panel.
READ CAREFULLY AND KEEP FOR FUTURE REFERENCE
O
NLY ALLOW CHILDREN to use the appliance under
adult supervision and after adequate instructions
have been given, so that the child is able to use
the appliance in a safe way and understands the
hazards of improper use.
THIS APPLIANCE IS NOT INTENDED FOR use by persons
(including children) with reduced physical, senso-
ry or mental capabilities, unless used under the
supervision of a person responsible for their safe-
ty.
WARNING!
ACCESSI BLE PART S MAY BECOME HOT during use, young
children should be kept away.
D
O NOT USE corrosive chemicals or vapors in this
appliance. This type of oven is specifically de-
signed to heat or cook food. It is not designed
for industrial or laboratory use.
N
EVER PUT OR DRAG utensils across the bottom of
the oven as this could scratch the surface. Al-
ways put utensils on the wire shelf or trays.
DO NOT HANG OR PLACE heavy items on the door
as this can damage the oven opening and
hinges. The door handle should not be used
for hanging things on.
T
HE DOOR SEALS AND THE DOOR SEAL AREAS must be
regularly inspected for damage. If these areas
are damaged the appliance should not be op-
erated until it has been repaired by a trained
service technician
BEFORE FIRST USE
OPEN THE DOOR, remove the accessories
and ensure the oven is empty
R
INSE THE WATER CONTAIN ER with tap wa-
ter (no detergents) and then fill it to the
“MAX” mark.
S
LIDE THE WATER CON TAINER into it’s socket
until it engages the contact point and sits
firmly in place.
D
O NOT USE this appliance as a room heater or
humidifier.
RUN THE CALIBRATION FUNCTIO N and follow on
screen instructions.
N
OTE
THE WATER PUMP responsible for filling and
draining the steam boiler is now activat-
ed. It will initially sound louder during air-
pumping and lower when water is filling
the pump again.
THIS IS NORMAL and no concern for alarm.
AFTER CALIBRATION, let the oven cool to
room temperature and then wipe dry any
damp areas if present.
EMPTY THE WATER CON TAINER and dry it off be-
fore further use.
All manuals and user guides at all-guides.com
Page 8
8
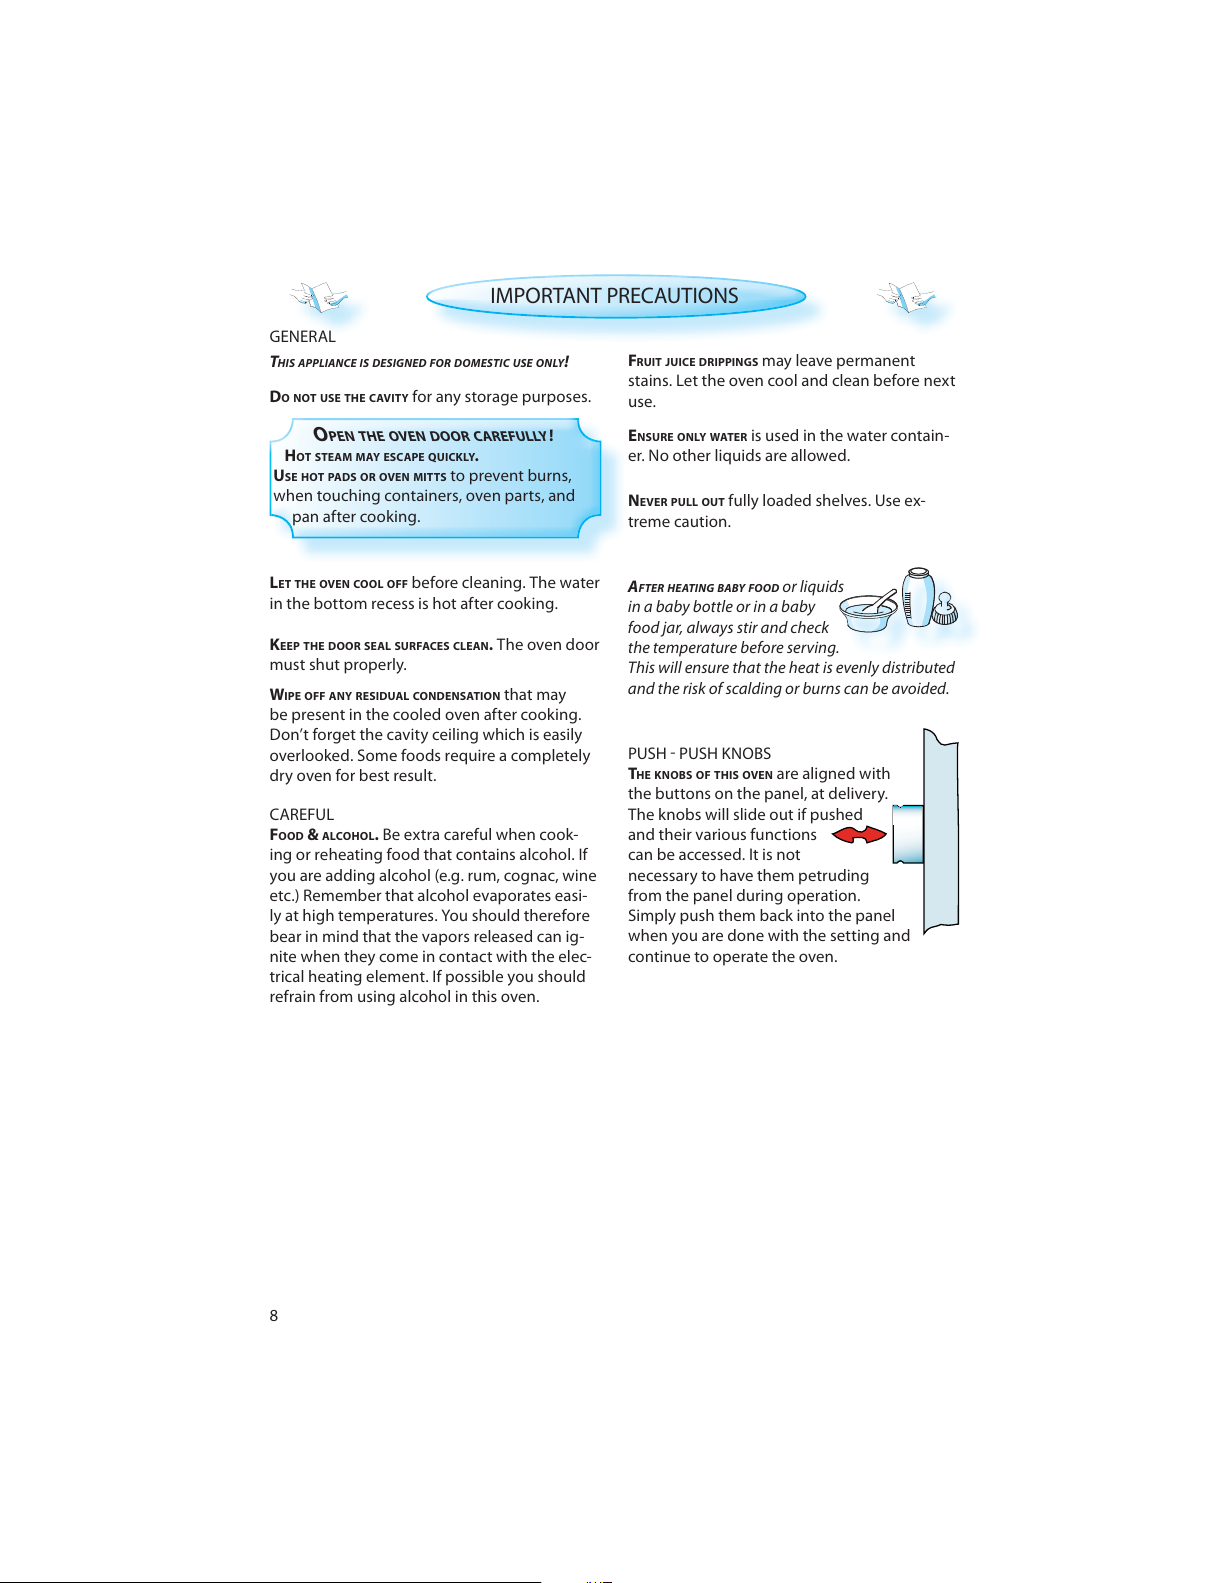
PUSH PUSH KNOBS
THE KNOBS OF THIS OVEN are aligned with
the buttons on the panel, at delivery.
The knobs will slide out if pushed
and their various functions
can be accessed. It is not
necessary to have them petruding
from the panel during operation.
Simply push them back into the panel
when you are done with the setting and
continue to operate the oven.
GENERAL
THIS APPLIANCE IS DESIGNED FOR DOMESTIC USE ONLY!
CAREFUL
F
OOD & ALCOHOL. Be extra careful when cook-
ing or reheating food that contains alcohol. If
you are adding alcohol (e.g. rum, cognac, wine
etc.) Remember that alcohol evaporates easi-
ly at high temperatures. You should therefore
bear in mind that the vapors released can ig-
nite when they come in contact with the elec-
trical heating element. If possible you should
refrain from using alcohol in this oven.
A
FTER HEATING BABY FOOD or liquids
in a baby bottle or in a baby
food jar, always stir and check
the temperature before serving.
This will ensure that the heat is evenly distributed
and the risk of scalding or burns can be avoided.
IMPORTANT PRECAUTIONS
DO NOT USE THE CAVITY for any storage purposes.
FRUIT JUICE DRIPPINGS may leave permanent
stains. Let the oven cool and clean before next
use.
L
ET THE OVEN COOL OFF before cleaning. The water
in the bottom recess is hot after cooking.
KEEP THE DOOR SEAL SURFACES CLEAN. The oven door
must shut properly.
W
IPE OFF ANY RESIDUAL CONDENS ATION that may
be present in the cooled oven after cooking.
Don’t forget the cavity ceiling which is easily
overlooked. Some foods require a completely
dry oven for best result.
E
NSURE ONLY WATER is used in the water contain-
er. No other liquids are allowed.
N
EVER PULL OUT fully loaded shelves. Use ex-
treme caution.
O
PEN THE OVEN DOOR CAREFULLY
!
HOT STEAM MAY ESCAPE QUICKLY.
USE HOT PADS OR OVEN MITTS to prevent burns,
when touching containers, oven parts, and
pan after cooking.
All manuals and user guides at all-guides.com
Page 9
9
ACCESSORIES
GENERAL
T
HERE ARE a number of accessories available on
the market. Before you buy, ensure they are
suitable for cooking with steam.
E
NSURE THAT THERE IS a space of at least 30 mm
between the upper rim of the container and
the cavity ceiling to allow sufficient steam en-
trance to the container.
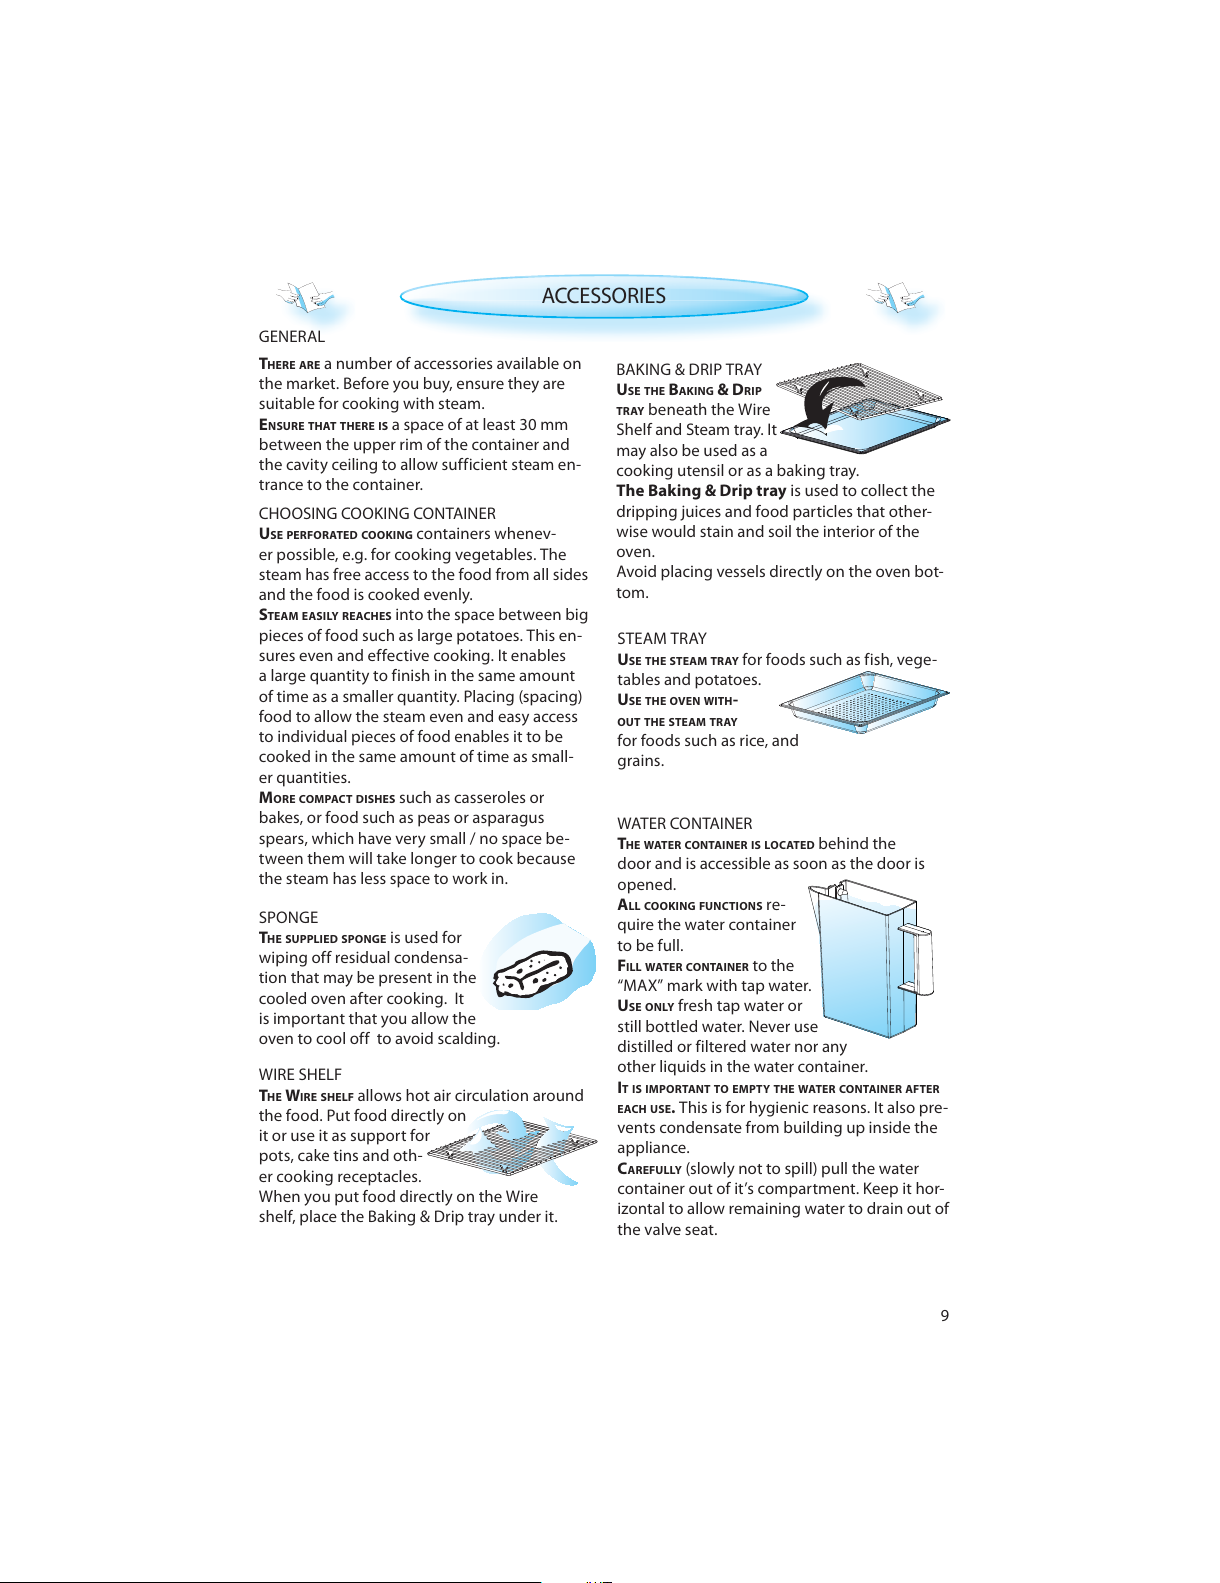
STEAM TRAY
U
SE THE STEAM TRAY for foods such as fish, vege-
tables and potatoes.
USE THE OVEN WITH-
OUT THE STEAM TRAY
for foods such as rice, and
grains.
WATER CONTAINER
T
HE WATER CONTAI NER IS LOCATED behind the
door and is accessible as soon as the door is
opened.
ALL COOKI NG FUNCTION S re-
quire the water container
to be full.
FILL WATER CONTAIN ER to the
“MAX” mark with tap water.
USE ONLY fresh tap water or
still bottled water. Never use
distilled or filtered water nor any
other liquids in the water container.
IT IS IMPORTANT TO EMPTY THE WATER CO NTAINER AFTER
EACH USE. This is for hygienic reasons. It also pre-
vents condensate from building up inside the
appliance.
CAREFULLY (slowly not to spill) pull the water
container out of it’s compartment. Keep it hor-
izontal to allow remaining water to drain out of
the valve seat.
CHOOSING COOKING CONTAINER
U
SE PERFORATED COOK ING containers whenev-
er possible, e.g. for cooking vegetables. The
steam has free access to the food from all sides
and the food is cooked evenly.
STEAM EASILY REACHES into the space between big
pieces of food such as large potatoes. This en-
sures even and effective cooking. It enables
a large quantity to finish in the same amount
of time as a smaller quantity. Placing (spacing)
food to allow the steam even and easy access
to individual pieces of food enables it to be
cooked in the same amount of time as small-
er quantities.
MORE COMPACT DISHES such as casseroles or
bakes, or food such as peas or asparagus
spears, which have very small / no space be-
tween them will take longer to cook because
the steam has less space to work in.
SPONGE
T
HE SUPPLIED SPONGE is used for
wiping off residual condensa-
tion that may be present in the
cooled oven after cooking. It
is important that you allow the
oven to cool off to avoid scalding.
BAKING & DRIP TRAY
USE THE BAKING & DRIP
TRAY beneath the Wire
Shelf and Steam tray. It
may also be used as a
cooking utensil or as a baking tray.
The Baking & Drip tray is used to collect the
dripping juices and food particles that other-
wise would stain and soil the interior of the
oven.
Avoid placing vessels directly on the oven bot-
tom.
WIRE SHELF
THE WIRE SHELF allows hot air circulation around
the food. Put food directly on
it or use it as support for
pots, cake tins and oth-
er cooking receptacles.
When you put food directly on the Wire
shelf, place the Baking & Drip tray under it.
All manuals and user guides at all-guides.com
Page 10
10
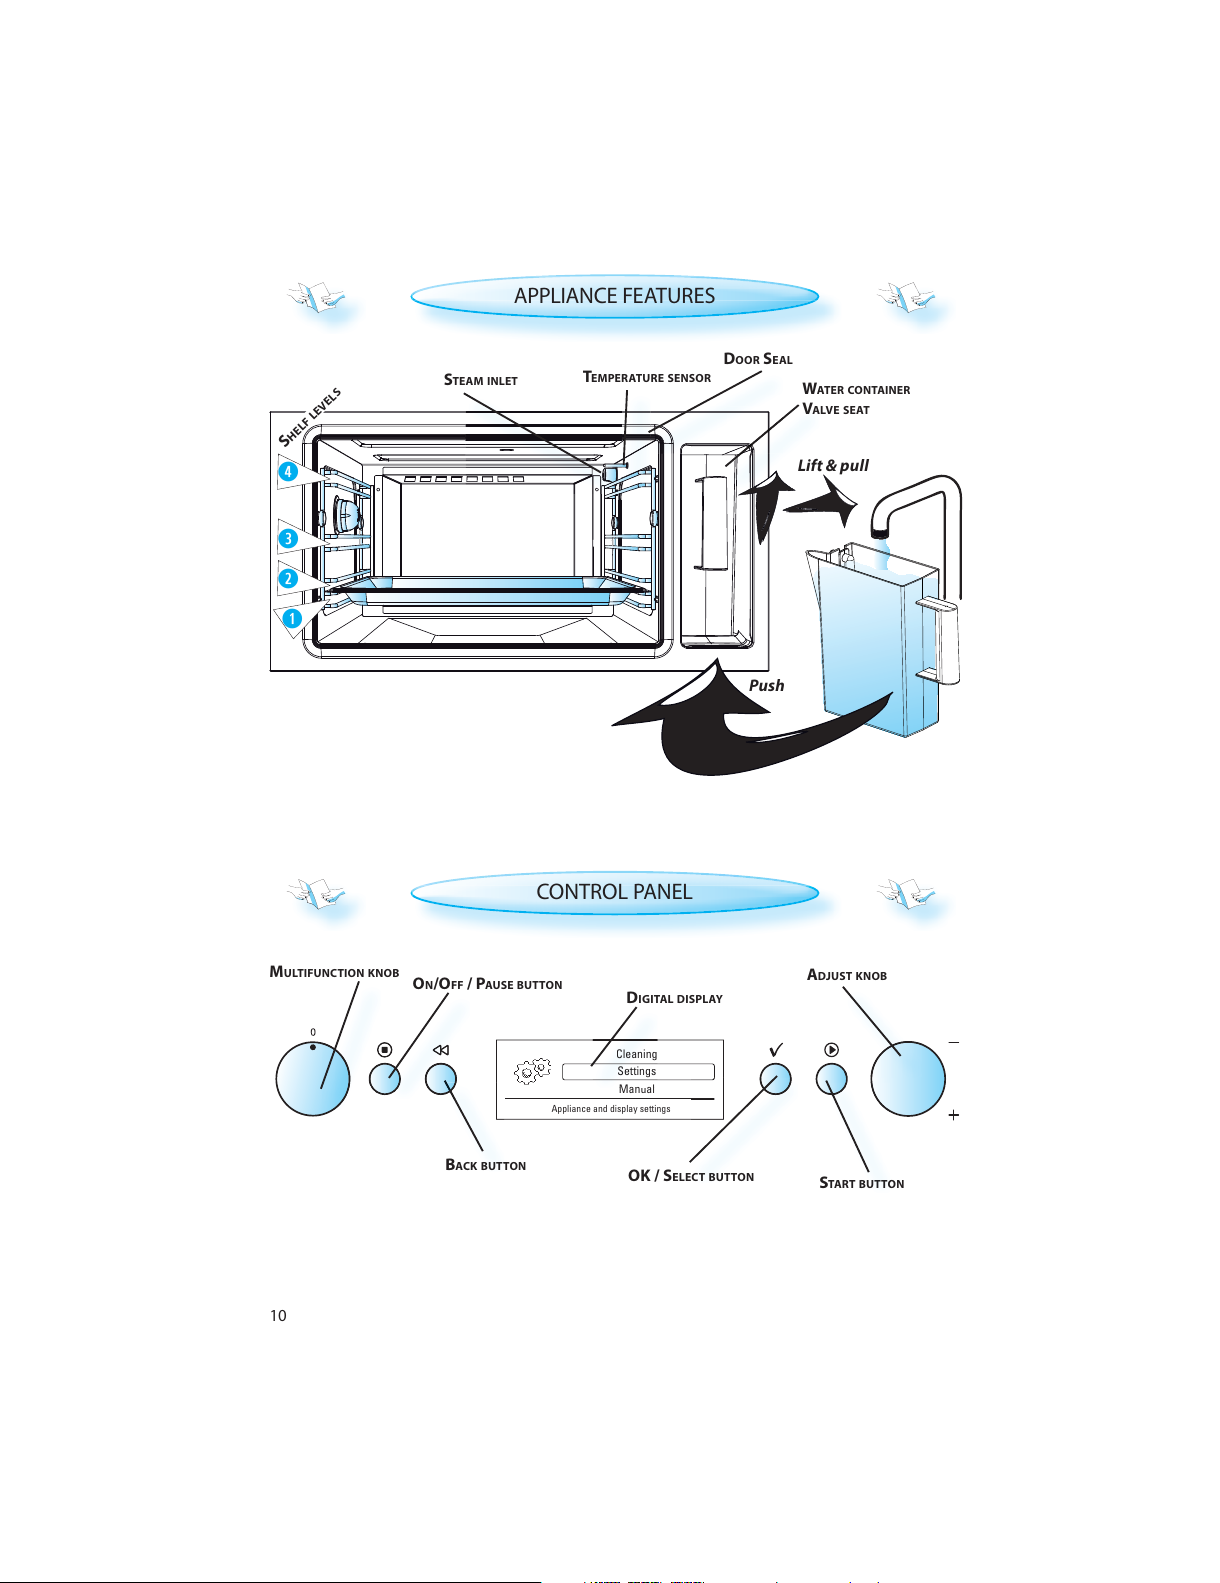
CONTROL PANEL
DIGITAL DISPLAY
MULTIFUNCTION KNOB
BACK BUTTON
OK / SELECT BUTTON
START BUTTON
ADJUST KNOB
ON/OFF / PAUSE BUTTON
APPLIANCE FEATURES
TEMPERATURE SENSOR
DOOR SEAL
WATER CONTAINER
VALVE SEAT
S
HELF
LEVELS
STEAM INLET
Lift & pull
Push
Settings
Manual
Cleaning
Appliance and display settings
VA
Lift
RE SENSO
R
CT BUTT
ON
S
ettin
gs
C
leanin
g
TART BUTT
O
BA
C
K BUT
T
All manuals and user guides at all-guides.com
Page 11
11
Key Lock
has been activated
Key Lock
has been deactivated
19:30
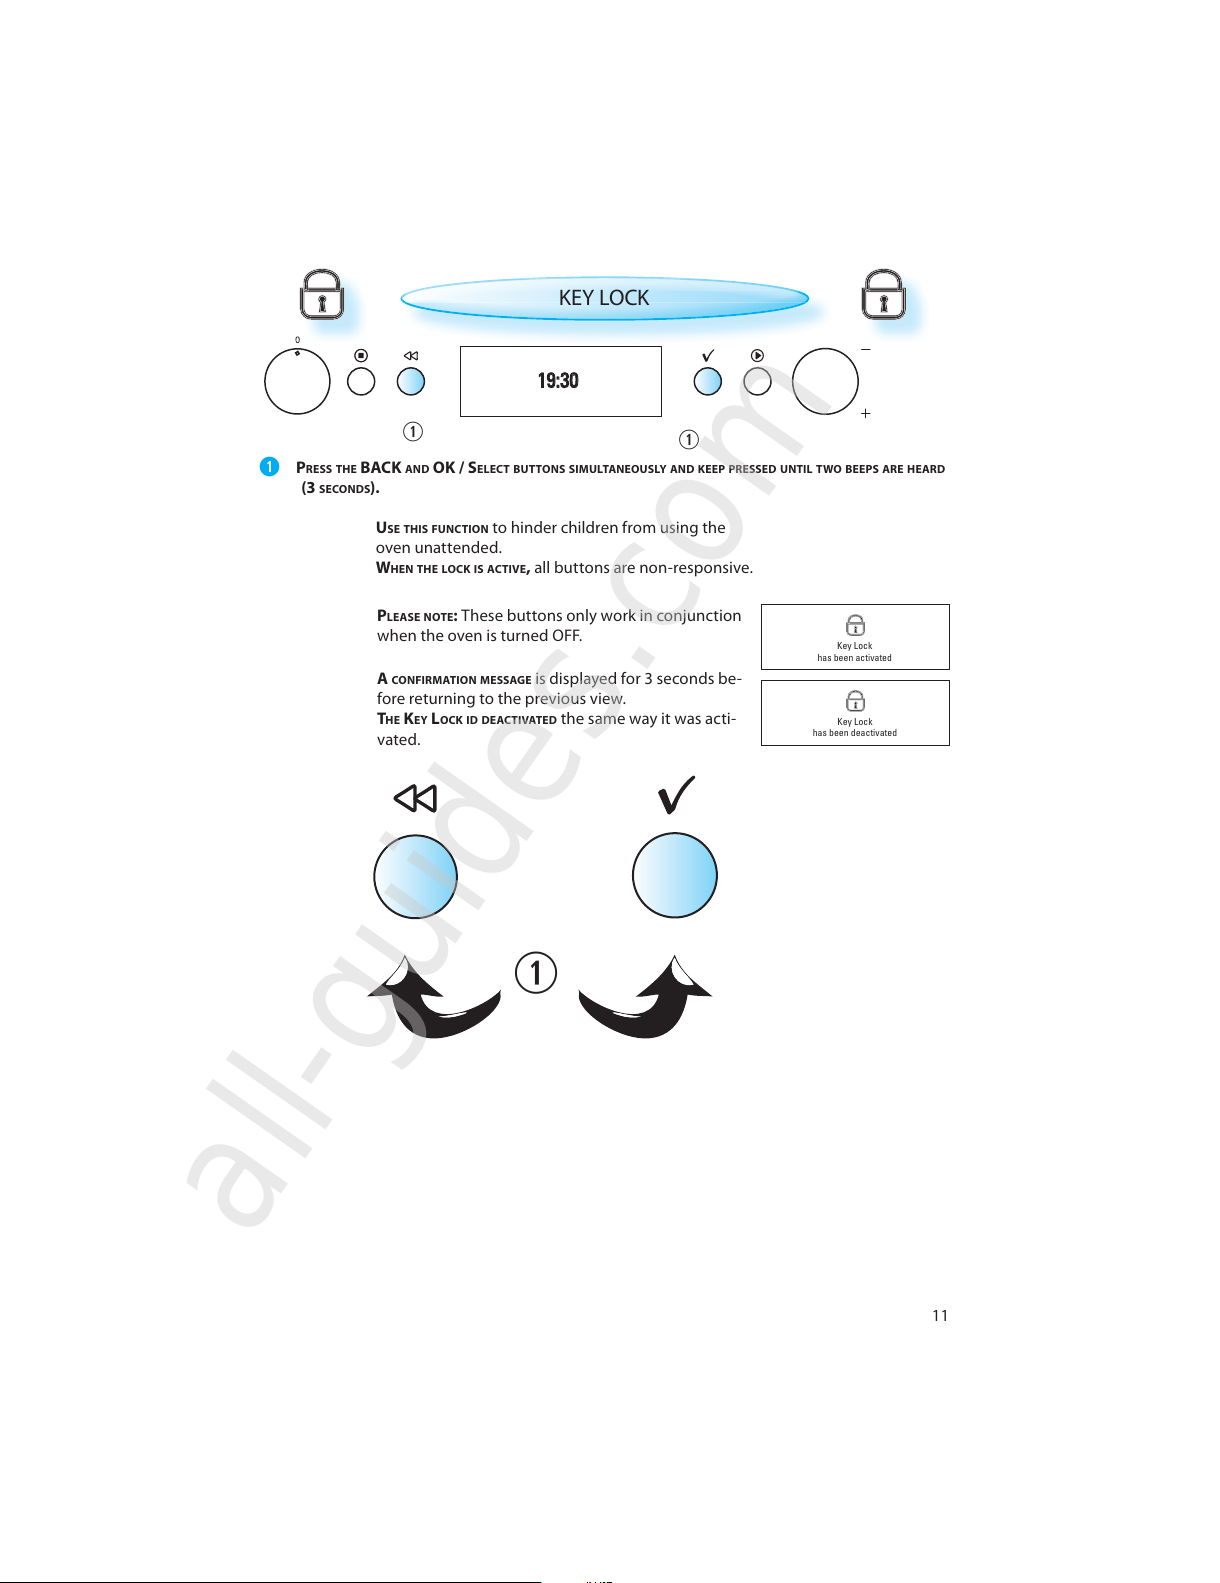
KEY LOCK
PRESS THE BACK AND OK / SELECT BUTTONS SIMULTANEOUSLY AND KEEP PRESSED UNTIL TWO BEEPS ARE HEARD
(3 SECONDS).
U
SE THIS FUNCTION to hinder children from using the
oven unattended.
WHEN THE LOCK IS ACTIVE, all buttons are non-responsive.
A
CONFIR MATION MESSAGE is displayed for 3 seconds be-
fore returning to the previous view.
THE KEY LOCK ID DEACTIVATED the same way it was acti-
vated.
P
LEASE NOTE: These buttons only work in conjunction
when the oven is turned OFF.
All manuals and user guides at all-guides.com
all-guides.com
Page 12
12
Do not open oven door
during calibration
Please turn food
Empty and refill
container with water
Cooking nearly finished
Please check on food
Please stir food
Please remove and empty the container
Press OK/Select button when done
Draining Boiler
25%
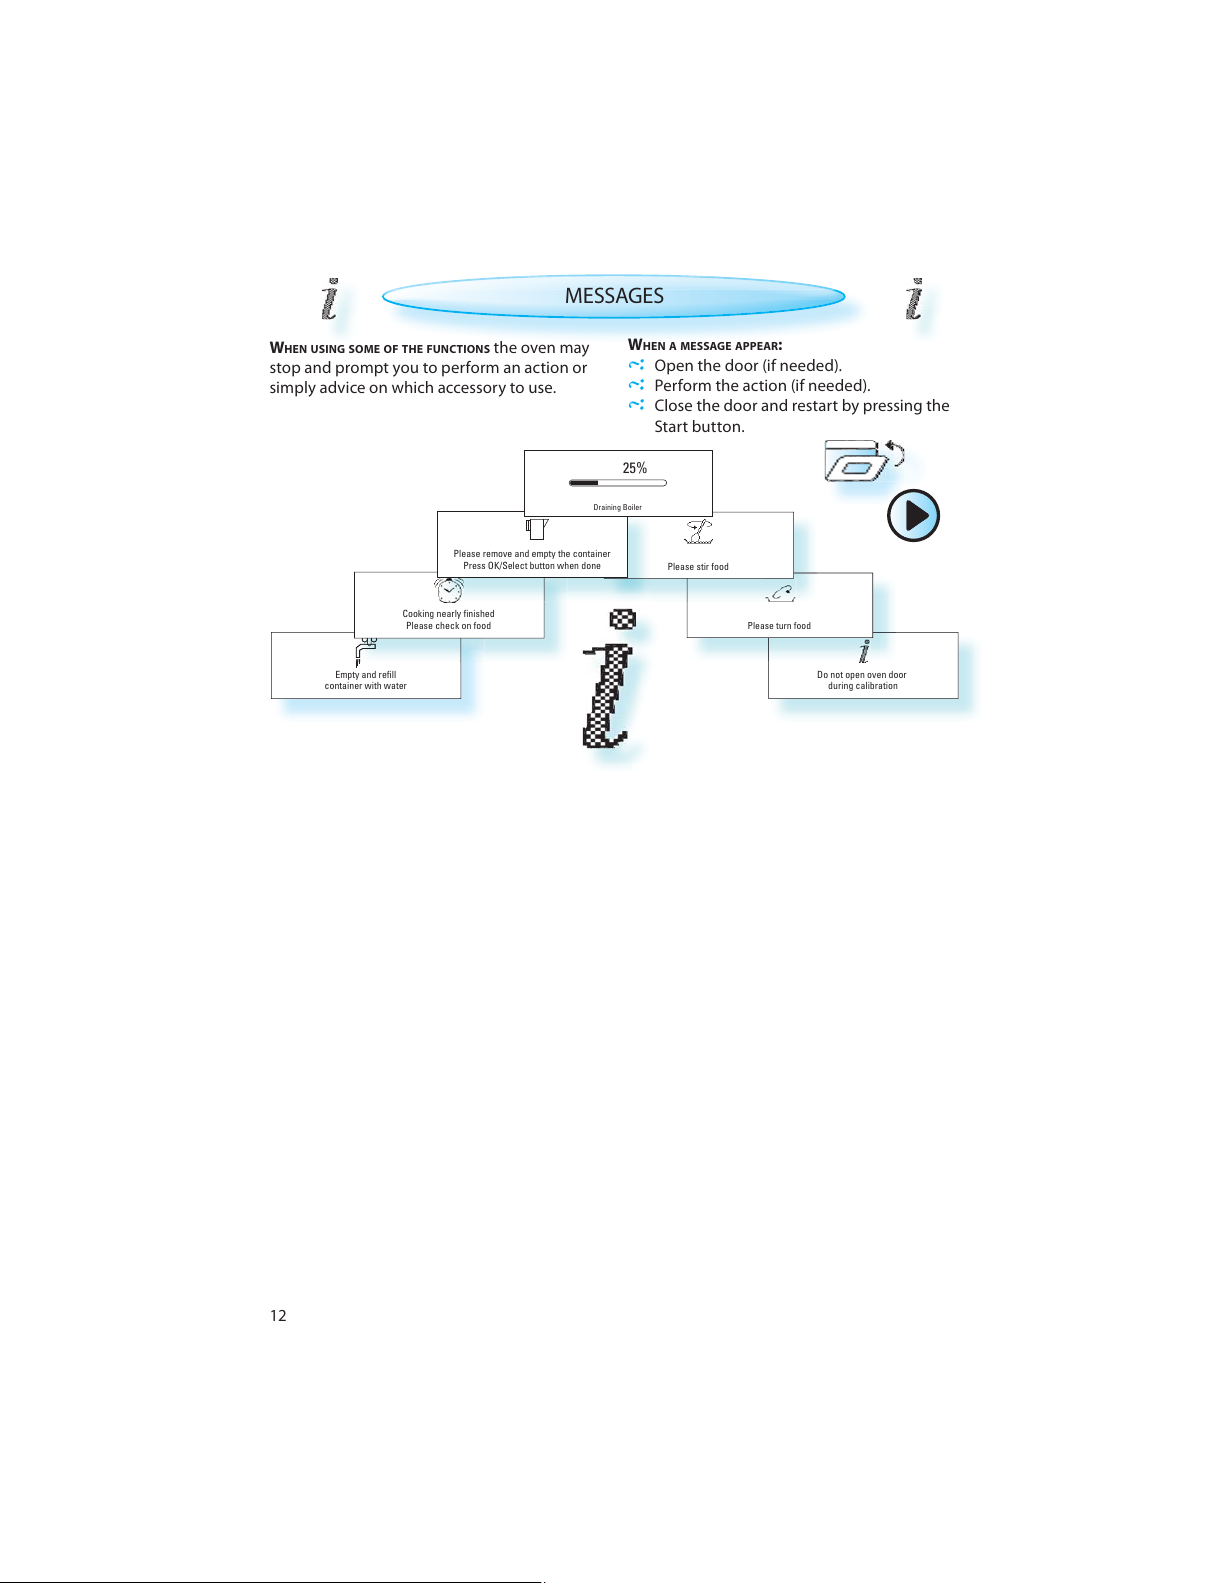
WHEN USING SOME OF THE FUNCTIONS the oven may
stop and prompt you to perform an action or
simply advice on which accessory to use.
MESSAGES
WHEN A MESSAGE APPEAR:
Open the door (if needed).
Perform the action (if needed).
Close the door and restart by pressing the
Start button.
All manuals and user guides at all-guides.com
Page 13
13
Boiled Eggs
Your most used cooking functions
Bulgur
Shortcut
Shortcut
Shortcut
Your most used cooking functions
Bulgur
Boiled Eggs
Asparagus
Your most used cooking functions
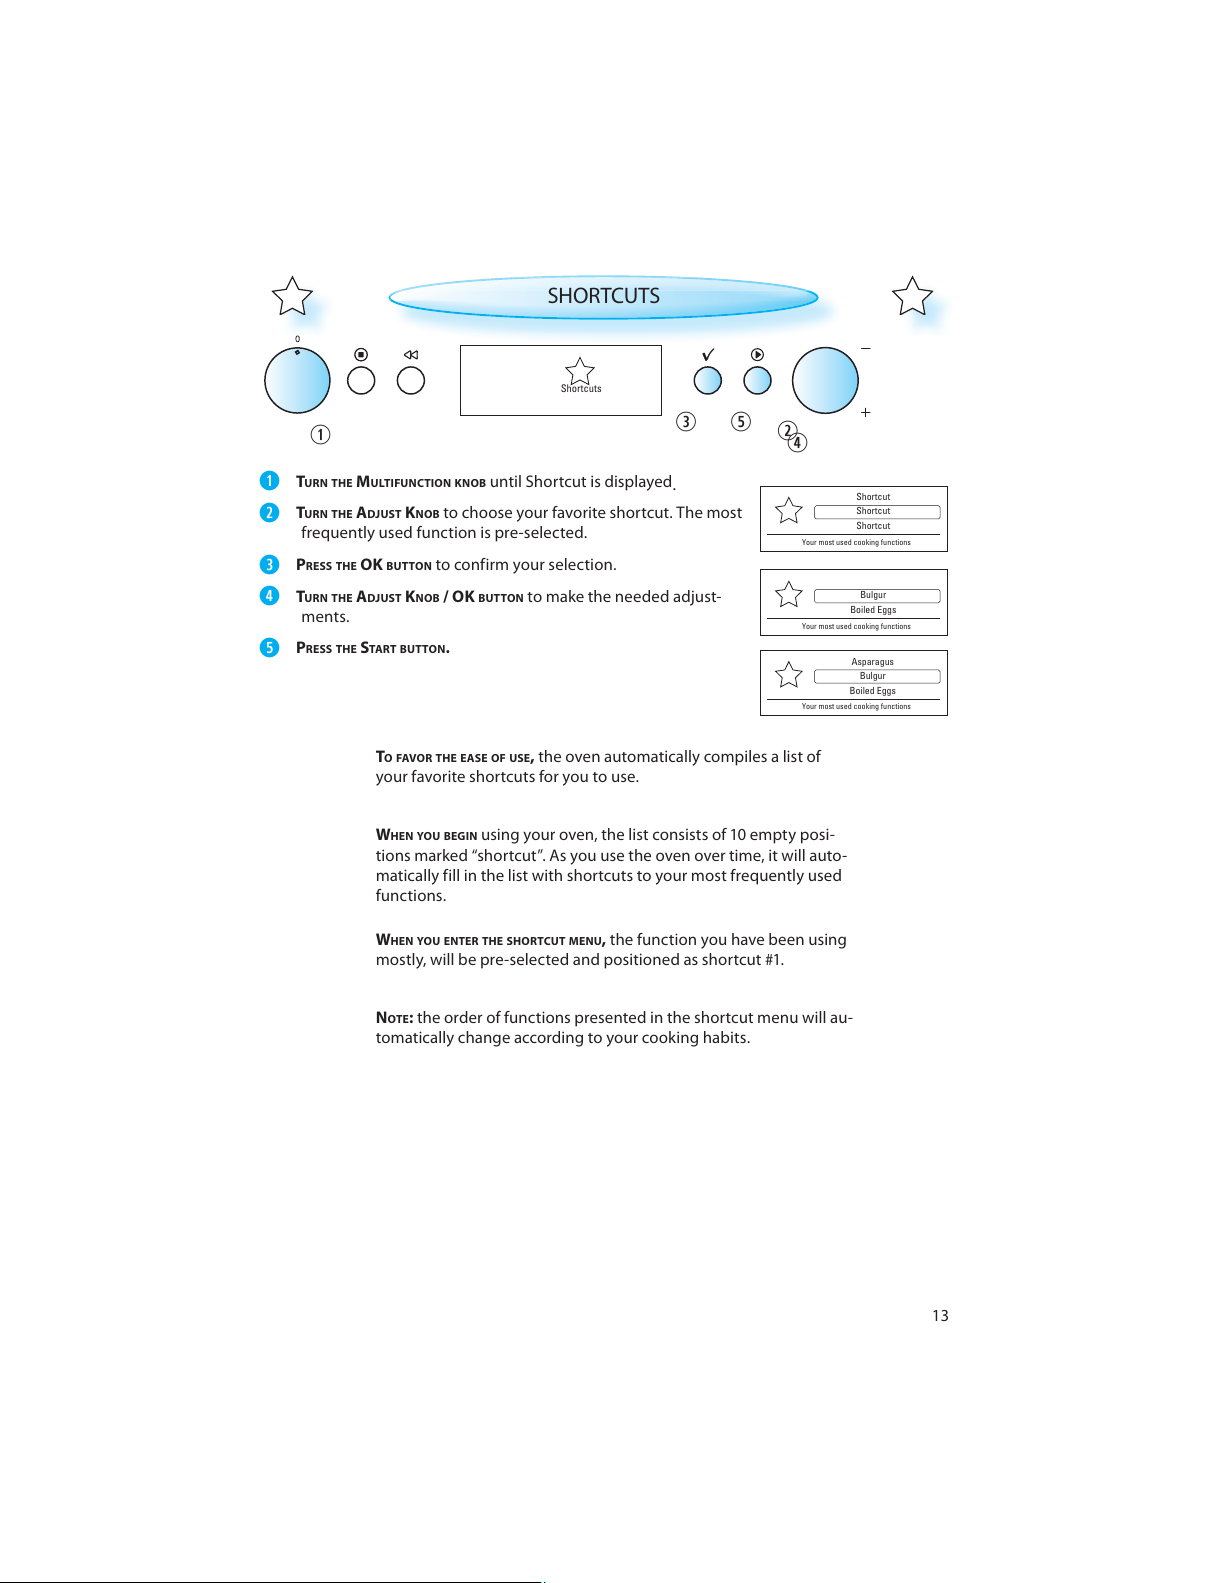
SHORTCUTS
TO FAVOR THE EASE OF USE, the oven automatically compiles a list of
your favorite shortcuts for you to use.
TURN THE MULTIFUNCTION KNOB until Shortcut is displayed
.
TURN THE ADJUST KNOB to choose your favorite shortcut. The most
frequently used function is pre-selected.
PRESS THE OK BUTTON to confirm your selection.
TURN THE ADJUST KNOB / OK BUTTON to make the needed adjust-
ments.
PRESS THE START BUTTON.
WHEN YOU BEGIN using your oven, the list consists of 10 empty posi-
tions marked “shortcut”. As you use the oven over time, it will auto-
matically fill in the list with shortcuts to your most frequently used
functions.
W
HEN YOU ENTER THE SHORTCUT MENU, the function you have been using
mostly, will be pre-selected and positioned as shortcut #1.
N
OTE: the order of functions presented in the shortcut menu will au-
tomatically change according to your cooking habits.
Shortcuts
All manuals and user guides at all-guides.com
Page 14
14
Timer
00 : 59 : 59
00 : 00 : 00
Turn +/- to prolong, OK to switch off
THE APPLIANCE IS TURNED ON/OFF OR
PAUSED using the On/Off button.
ON / OFF / PAUSE
WHEN THE APPLIANCE IS TURNED OFF , all but one
button are non-responsive. Only the OK but-
ton (see Kitchen Timer) will work. The 24 hour
clock is displayed.
W
HEN THE APPLIANCE IS TURNED ON , all
buttons function normally and the
24 hour clock is not displayed.
N
OTE: The oven behavior may differ from the
above described, depending on the ECO func-
tion being turned ON or OFF (see ECO for more
information).
THE DESCRIPTIONS IN THIS IFU assume that the
oven is turned ON .
U
SE THIS FUNCTION when you need a kitchen timer to measure ex-
act time for various purposes such as standing times for roasts and
cooking on cook top.
THIS FUNCTION IS ONLY AVAILAB LE when the oven is
switched off or in standby mode.
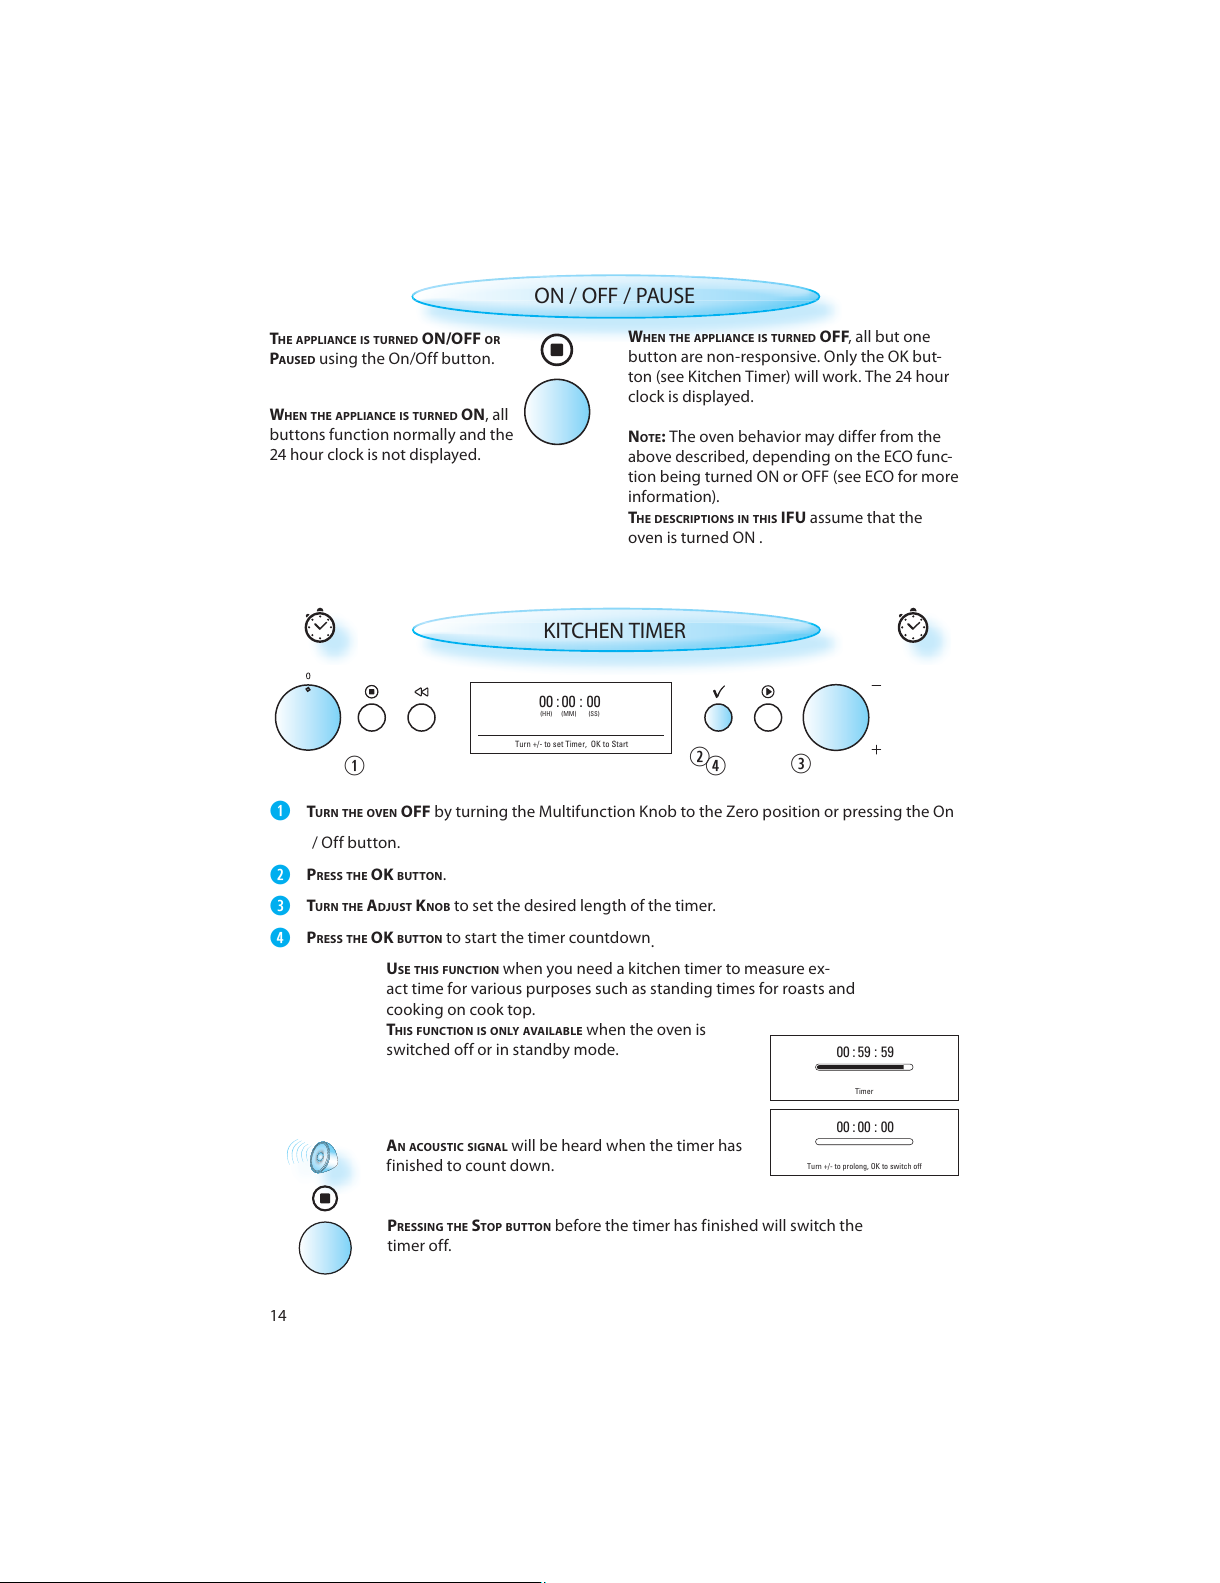
KITCHEN TIMER
TURN THE OVEN OFF by turning the Multifunction Knob to the Zero position or pressing the On
/ Off button.
PRESS THE OK BUTTON .
TURN THE ADJUST KNOB to set the desired length of the timer.
PRESS THE OK BUTTON to start the timer countdown
.
AN ACOUSTI C SIGNAL will be heard when the timer has
finished to count down.
P
RESSING THE STOP BUTTON before the timer has finished will switch the
timer off.
00 : 00 : 00
(HH) (MM) (SS)
Turn +/- to set Timer, OK to Start
All manuals and user guides at all-guides.com
Page 15
15
English
Français
Türkçe
Please select language
Language
has been set
Settings
Language
Time
Calibrate
Appliance and display settings
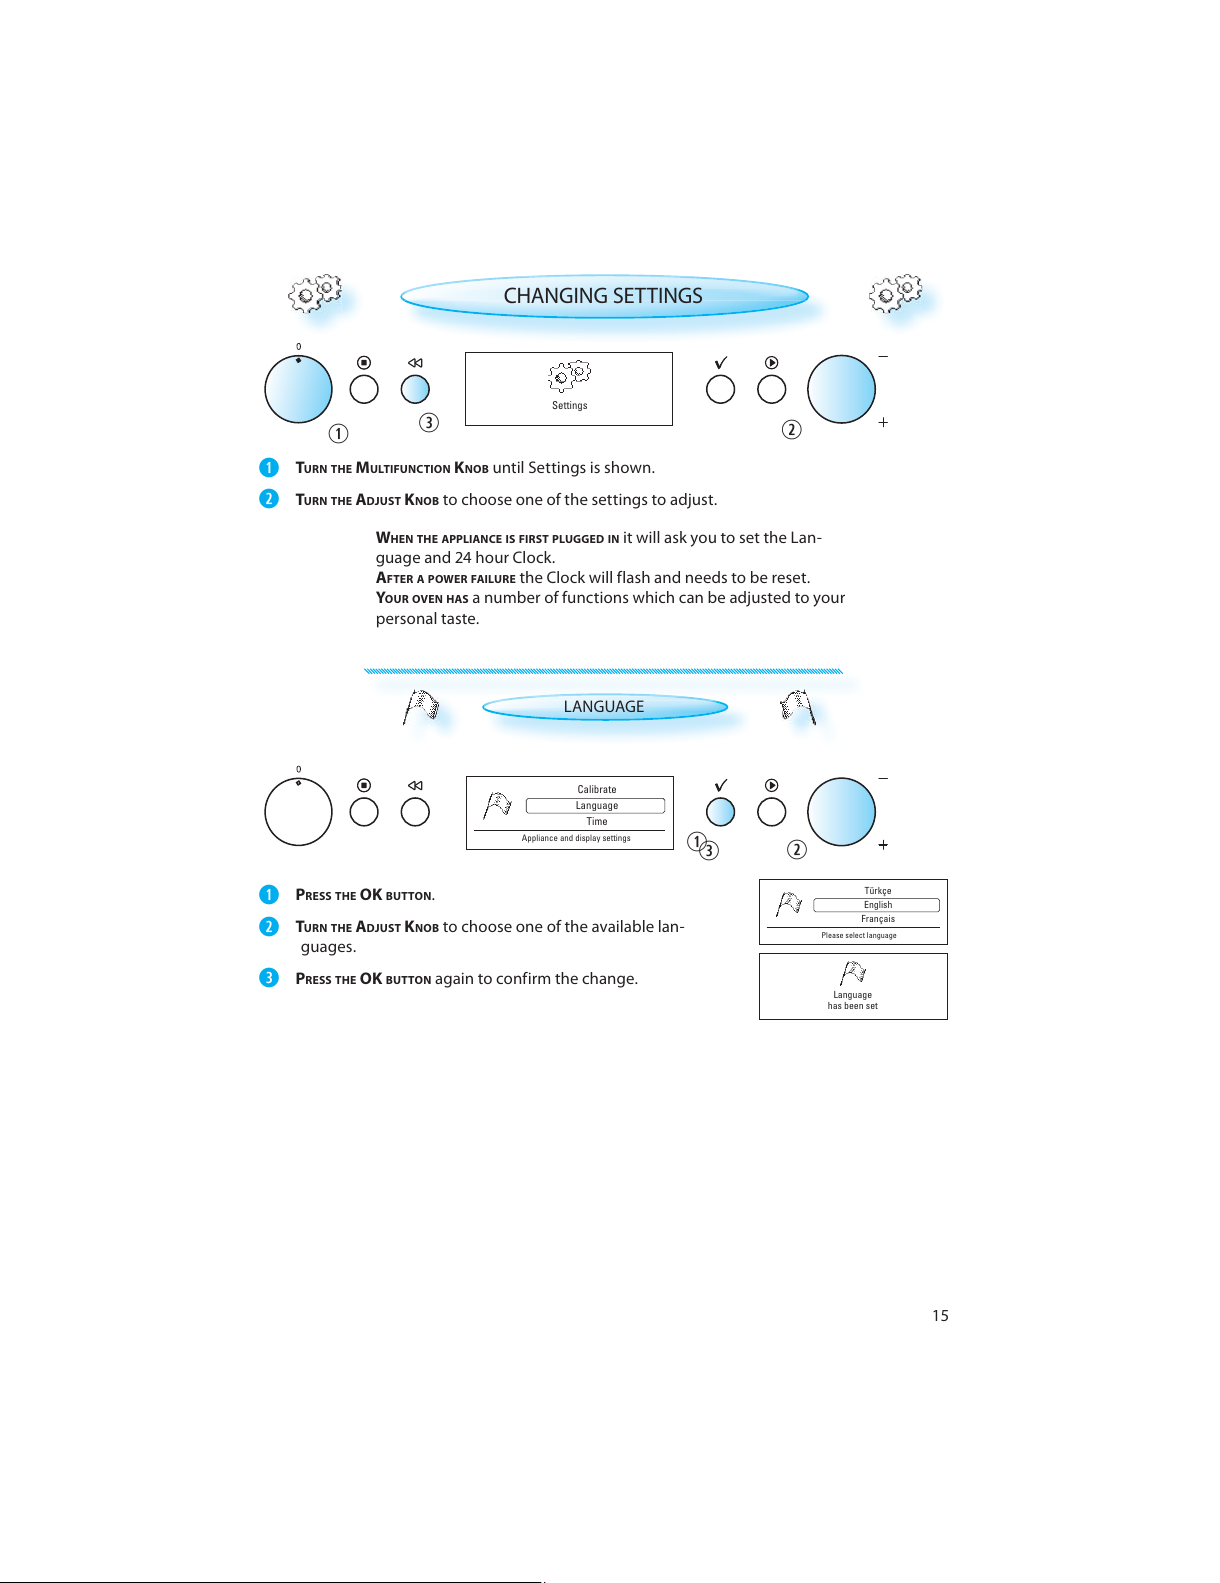
WHEN THE APPLIANCE IS FIRST PLUGGED IN it will ask you to set the Lan-
guage and 24 hour Clock.
AFTER A POWER FAILUR E the Clock will flash and needs to be reset.
YOUR OVEN HAS a number of functions which can be adjusted to your
personal taste.
CHANGING SETTINGS
TURN THE MULTIFUNCTION KNOB until Settings is shown.
TURN THE ADJUST KNOB to choose one of the settings to adjust.
LANGUAGE
PRESS THE OK BUTTON .
TURN THE ADJUST KNOB to choose one of the available lan-
guages.
PRESS THE OK BUTTON again to confirm the change.
All manuals and user guides at all-guides.com
Page 16
16
Press +/- to set time, OK when done
12 : 30
(HH) (MM)
Time
has been set
Medium
Low
High
For normal living conditions
Brightness
has been set
Press +/- to set time, OK when done
00 : 00
(HH) (MM)
Language
Time
Calibrate
Appliance and display settings
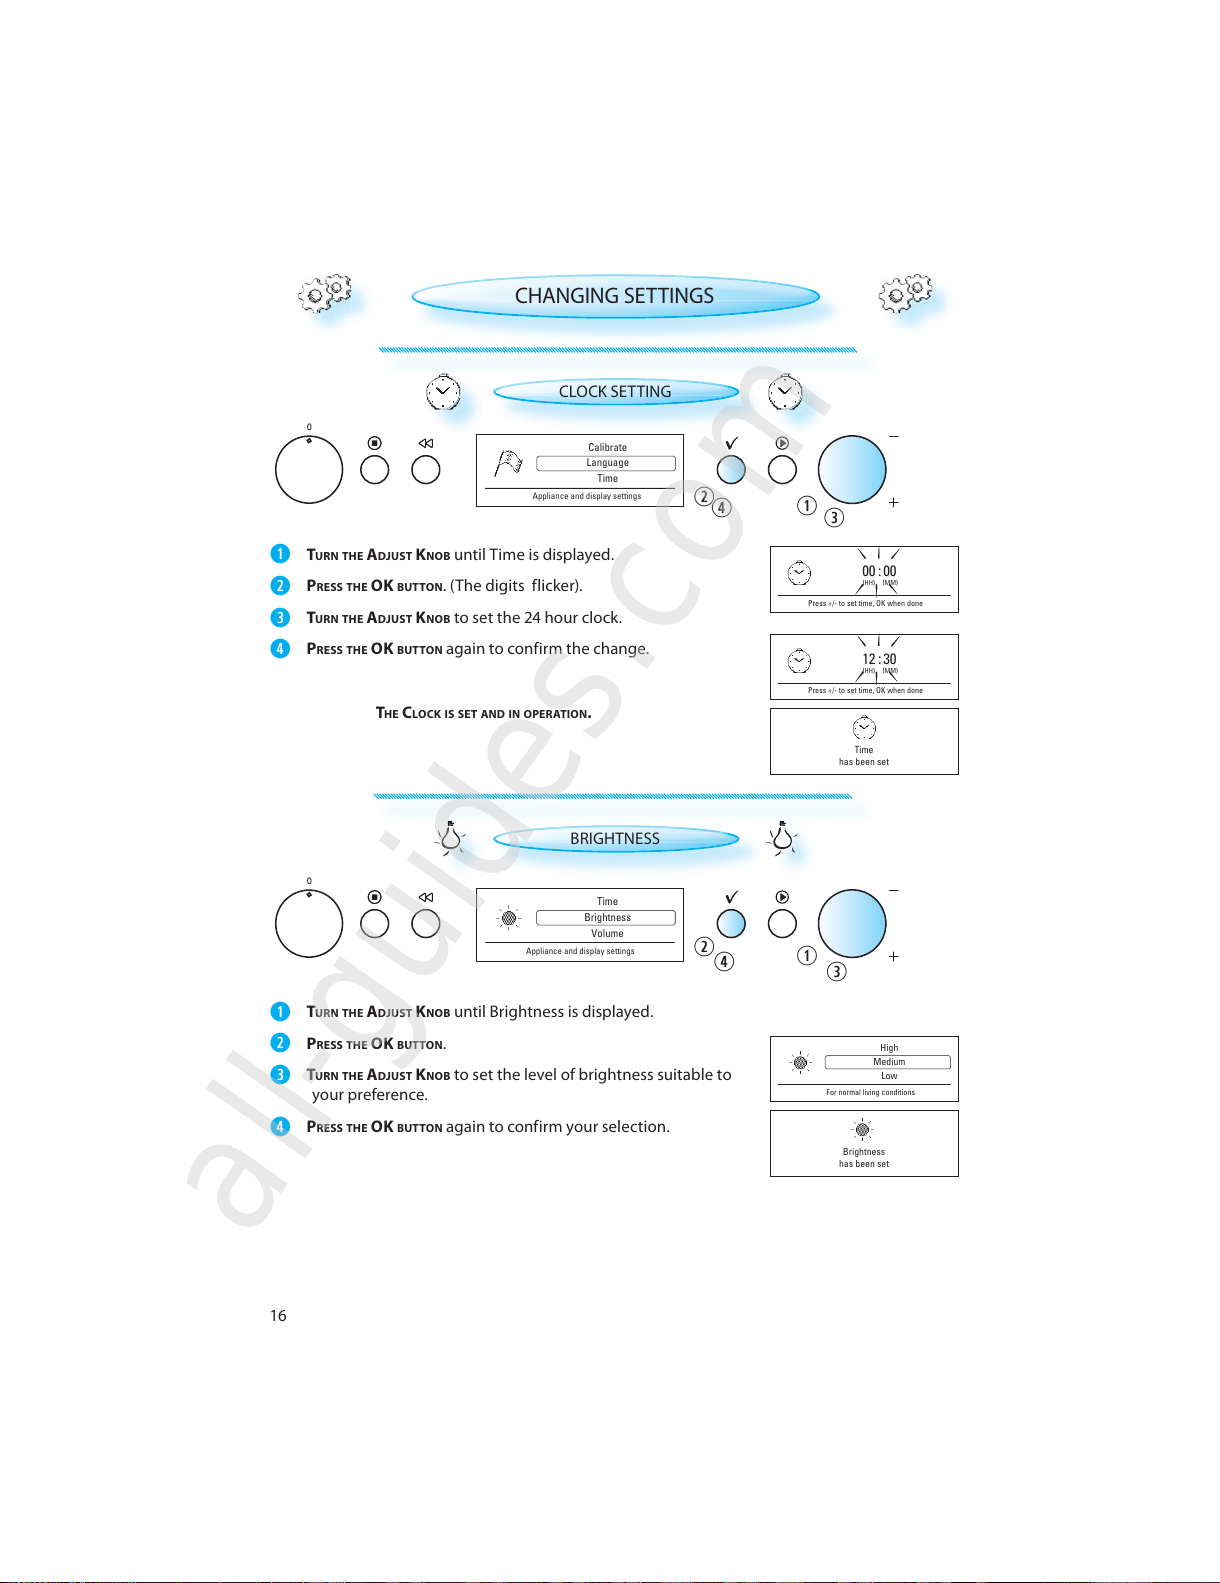
CLOCK SETTING
TURN THE ADJUST KNOB until Time is displayed.
PRESS THE OK BUTTON . (The digits flicker).
TURN THE ADJUST KNOB to set the 24 hour clock.
PRESS THE OK BUTTON again to confirm the change.
CHANGING SETTINGS
BRIGHTNESS
TURN THE ADJUST KNOB until Brightness is displayed.
PRESS THE OK BUTTON .
TURN THE ADJUST KNOB to set the level of brightness suitable to
your preference.
PRESS THE OK BUTTON again to confirm your selection.
T
HE CLOCK IS SET AND IN OPERATION.
Brightness
Volume
Time
Appliance and display settings
All manuals and user guides at all-guides.com
all-guides.com
Page 17
17
On
Off
Minimal power consumption
e
Eco Mode
has been set
e
e e
Low
High
For normal living conditions
Medium
Volume
has been set
Eco Mode
is active
e
Volume
Eco Mode
Brightness
Appliance and display settings
Eco Mode
Calibrate
Volume
Appliance and display settings
e
CHANGING SETTINGS
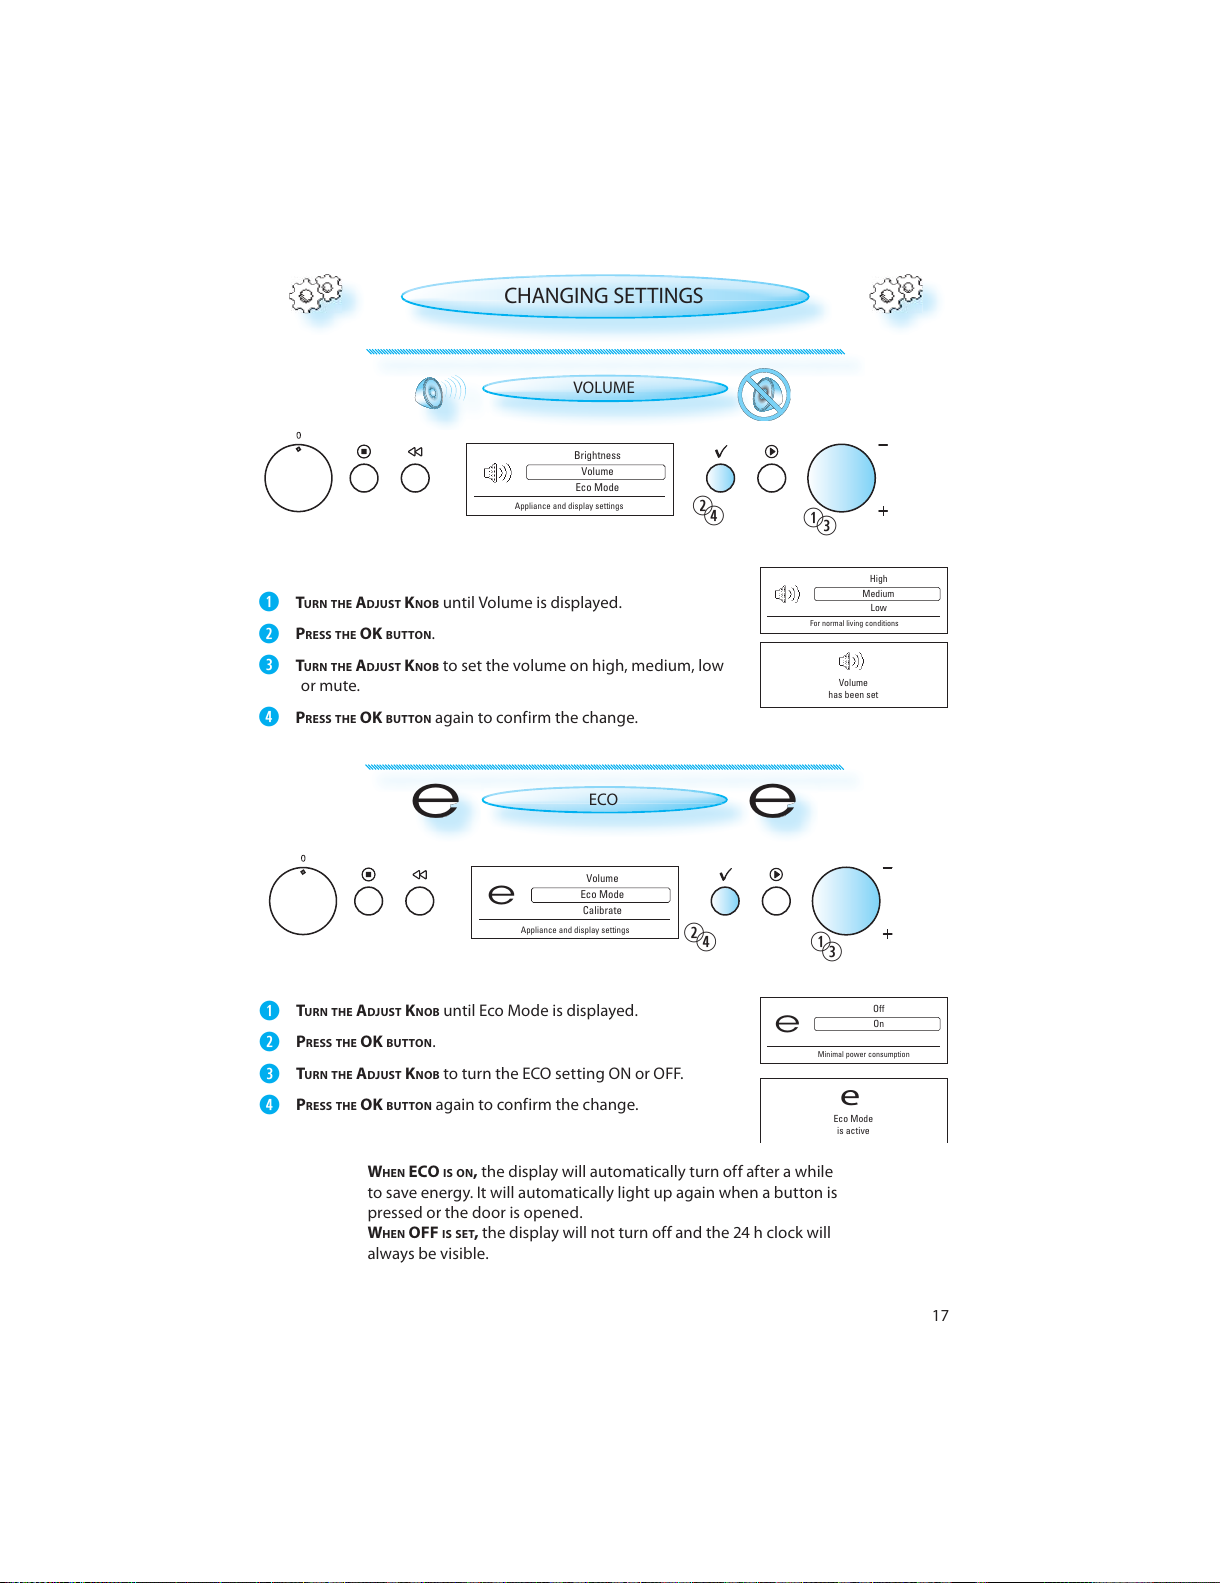
ECO
TURN THE ADJUST KNOB until Eco Mode is displayed.
PRESS THE OK BUTTON .
TURN THE ADJUST KNOB to turn the ECO setting ON or OFF.
PRESS THE OK BUTTON again to confirm the change.
W
HEN ECO IS ON, the display will automatically turn off after a while
to save energy. It will automatically light up again when a button is
pressed or the door is opened.
WHEN OFF IS SET, the display will not turn off and the 24 h clock will
always be visible.
VOLUME
TURN THE ADJUST KNOB until Volume is displayed.
PRESS THE OK BUTTON .
TURN THE ADJUST KNOB to set the volume on high, medium, low
or mute.
PRESS THE OK BUTTON again to confirm the change.
All manuals and user guides at all-guides.com
Page 18
18
Do not open oven door
during calibration
END TIME
COOK TIME
00:10
14:22
Calibrate
Calibrate
Language
Eco Mode
Calibration of water boiling point
CHANGING SETTINGS
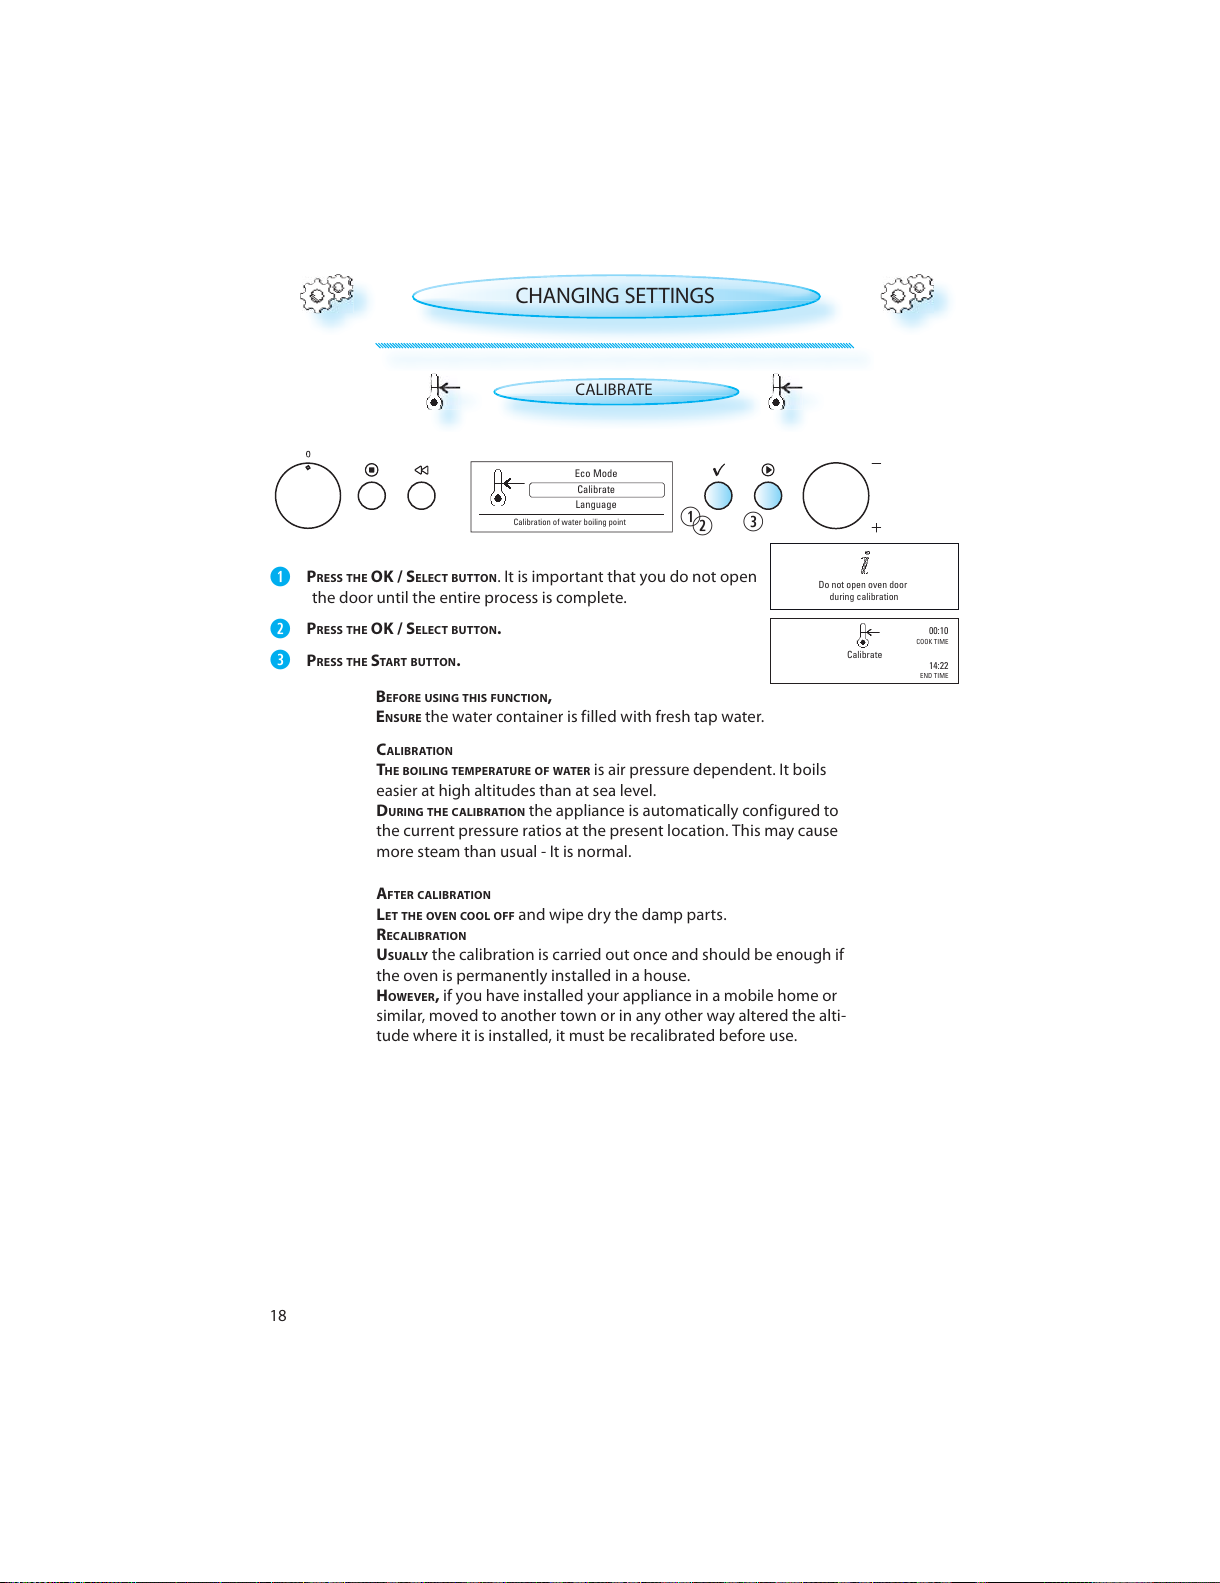
CALIBRATE
PRESS THE OK / SELECT BUTTON . It is important that you do not open
the door until the entire process is complete.
PRESS THE OK / SELECT BUTTON.
PRESS THE START BUTTON.
C
ALIBRATION
THE BOILING TEMPERATURE OF WATER is air pressure dependent. It boils
easier at high altitudes than at sea level.
DURING THE CALIBRATION the appliance is automatically configured to
the current pressure ratios at the present location. This may cause
more steam than usual - It is normal.
A
FTER CALIBRATION
LET THE OVEN COOL OFF and wipe dry the damp parts.
RECALIBRATION
USUALLY the calibration is carried out once and should be enough if
the oven is permanently installed in a house.
HOWEVER, if you have installed your appliance in a mobile home or
similar, moved to another town or in any other way altered the alti-
tude where it is installed, it must be recalibrated before use.
B
EFORE USING THIS FUNCTION ,
ENSURE the water container is filled with fresh tap water.
All manuals and user guides at all-guides.com
Page 19
19
DURING COOKING
O
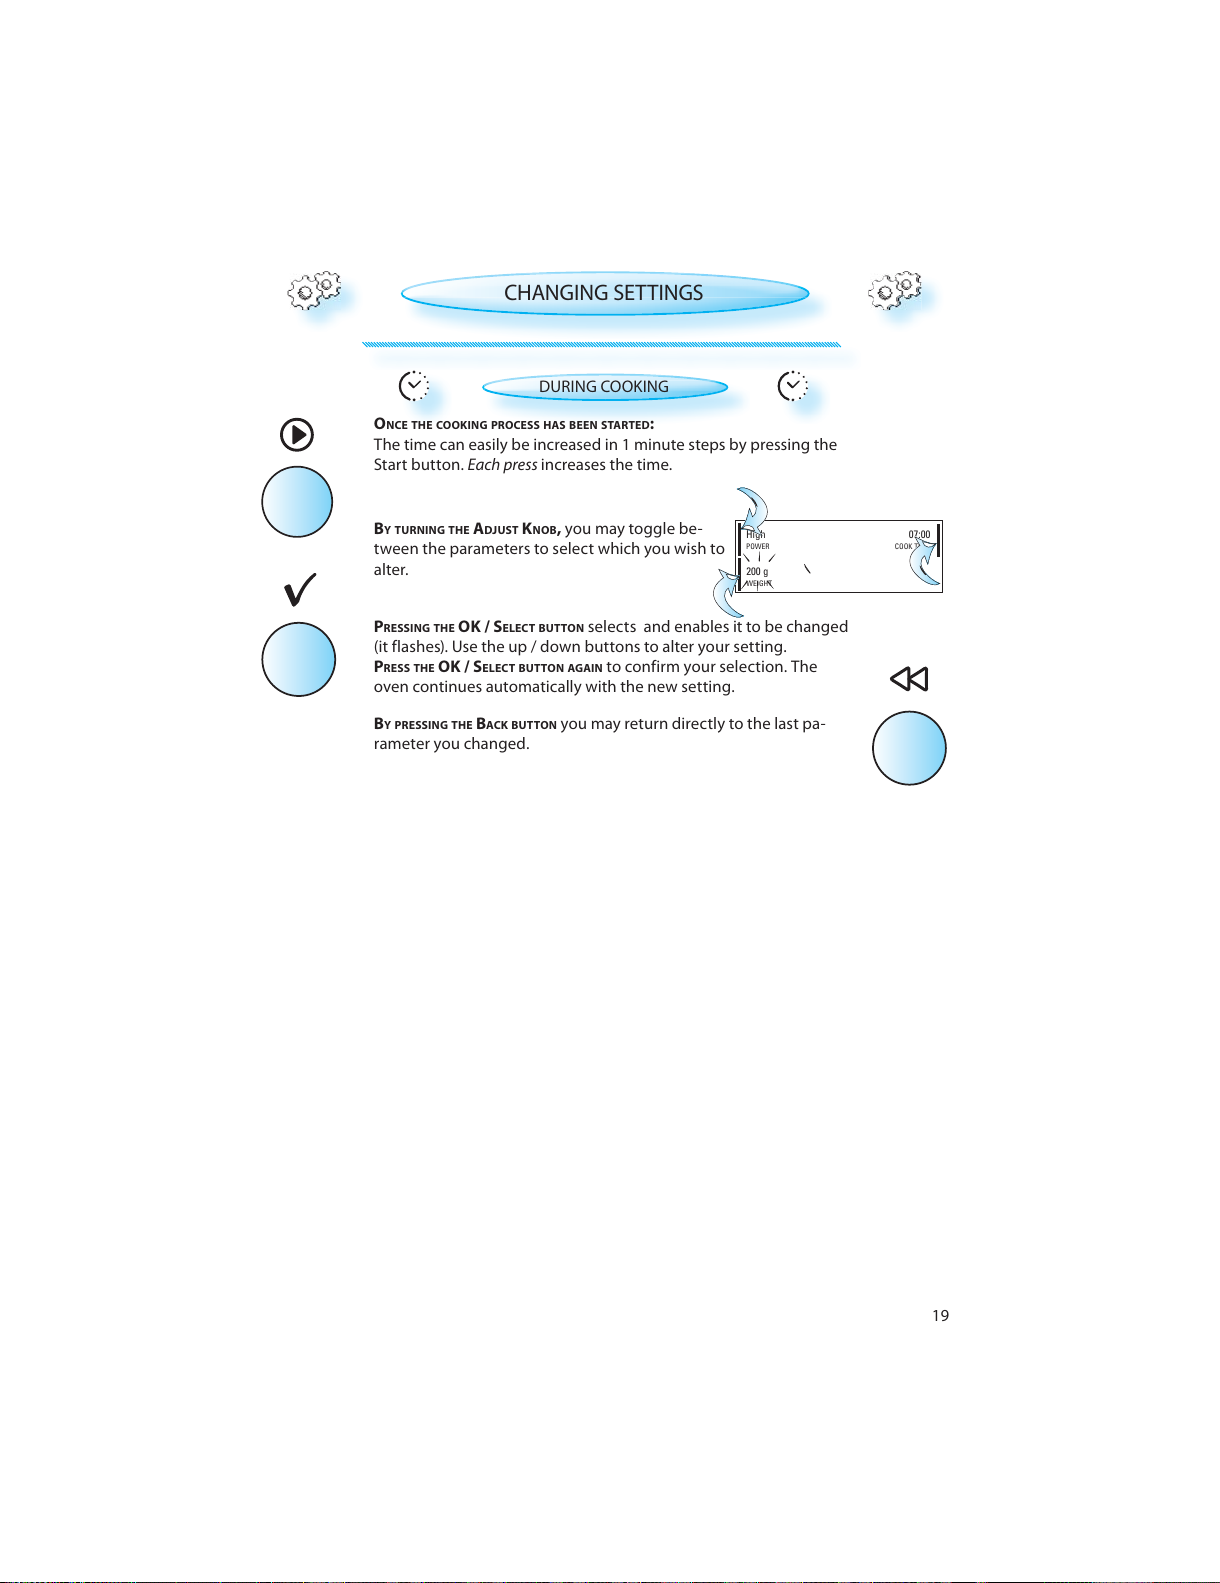
NCE THE COOKIN G PROCESS HAS BEEN STARTED:
The time can easily be increased in 1 minute steps by pressing the
Start button. Each press increases the time.
B
Y TURNING THE ADJUST KNOB, you may toggle be-
tween the parameters to select which you wish to
alter.
P
RESSING THE OK / SELECT BUTTON selects and enables it to be changed
(it flashes). Use the up / down buttons to alter your setting.
PRESS THE OK / SELECT BUTTON AGAIN to confirm your selection. The
oven continues automatically with the new setting.
B
Y PRESSING THE BACK BUTTON you may return directly to the last pa-
rameter you changed.
CHANGING SETTINGS
WEIGHT
200 g
POWER COOK TIME
High 07:00
All manuals and user guides at all-guides.com
Page 20
20
Specials
SPECIALS
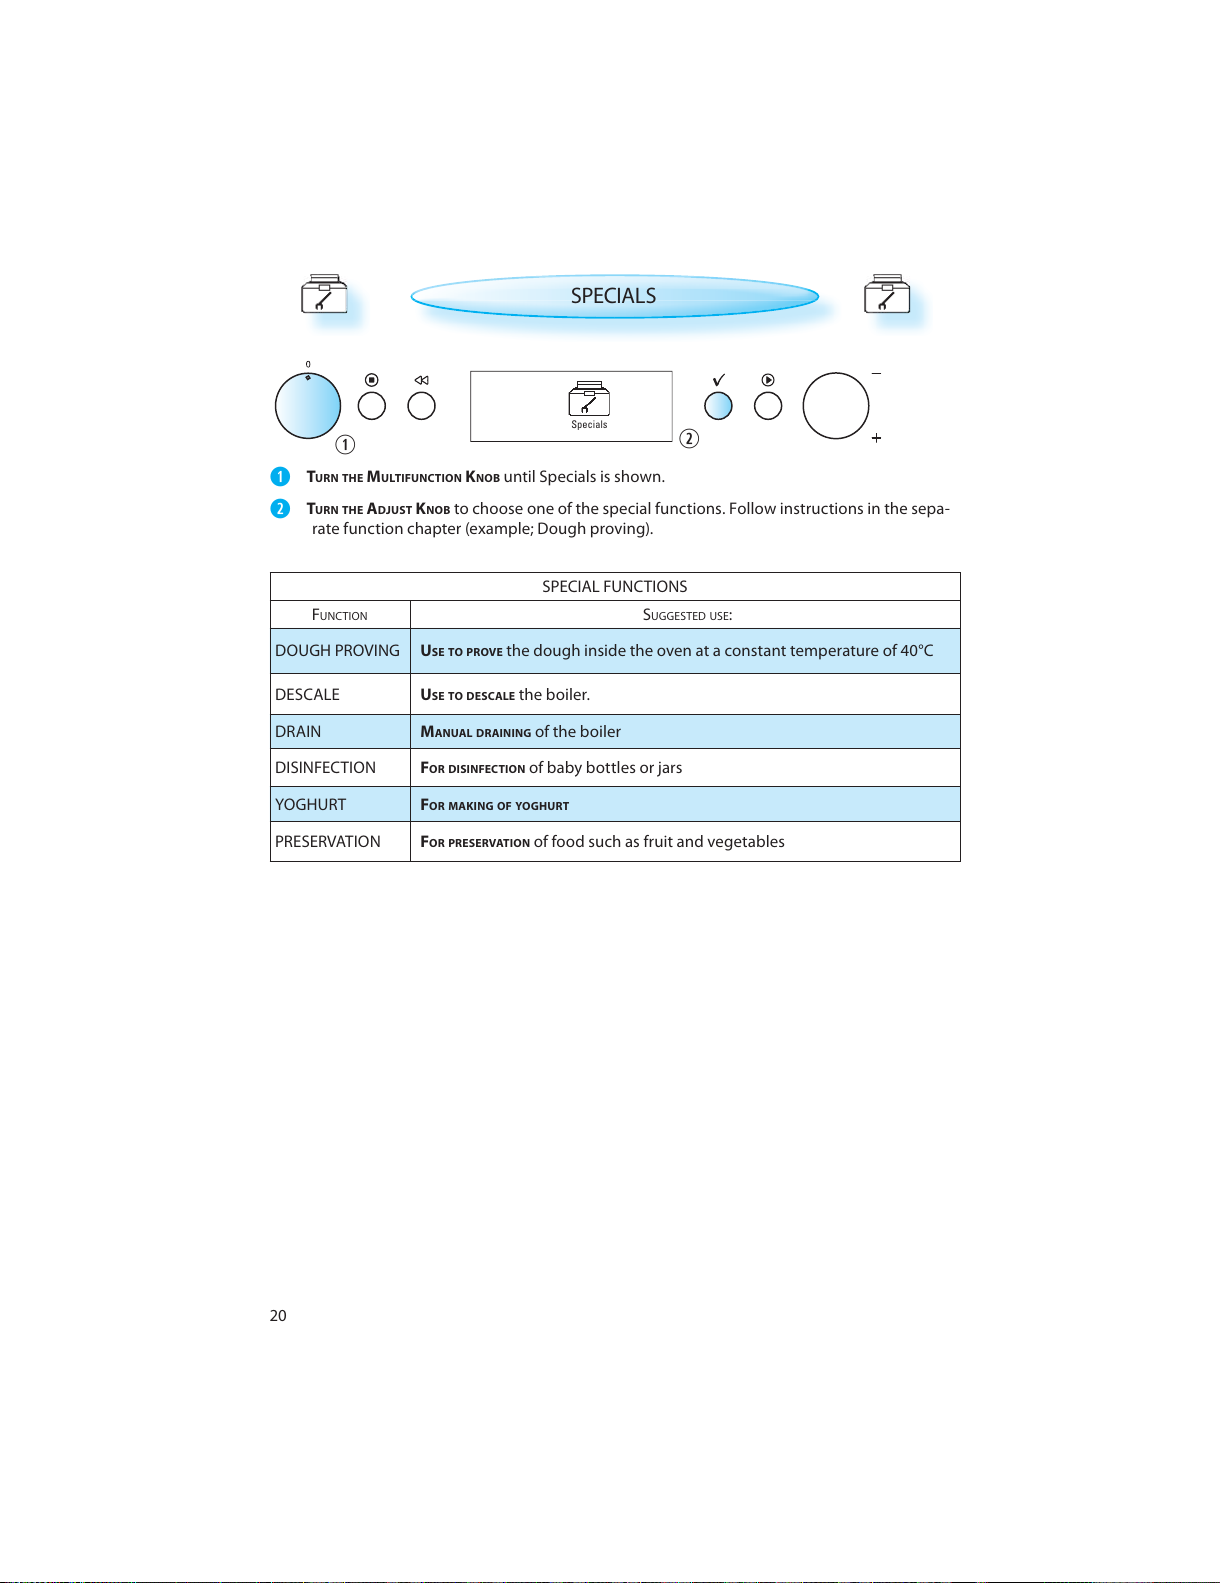
TURN THE MULTIFUNCTION KNOB until Specials is shown.
TURN THE ADJUST KNOB to choose one of the special functions. Follow instructions in the sepa-
rate function chapter (example; Dough proving).
SPECIAL FUNCTIONS
F
UNCTION SUGGESTED USE:
DOUGH PROVING U
SE TO PROVE the dough inside the oven at a constant temperature of 40°C
DESCALE USE TO DESCALE the boiler.
DRAIN M
ANUAL DRAINING of the boiler
DISINFECTION FOR DISINFECTION of baby bottles or jars
YOGH URT F
OR MAKING OF YOGHUR T
PRESERVATION FOR PRESERVATION of food such as fruit and vegetables
All manuals and user guides at all-guides.com
Page 21
21
TEMPERATURE
END TIME
COOK TIME
40°C 00:20
13:35
Proving
Proving
Re-generation
Descale
For dough proving
SPECIALS
DOUGH PROVING
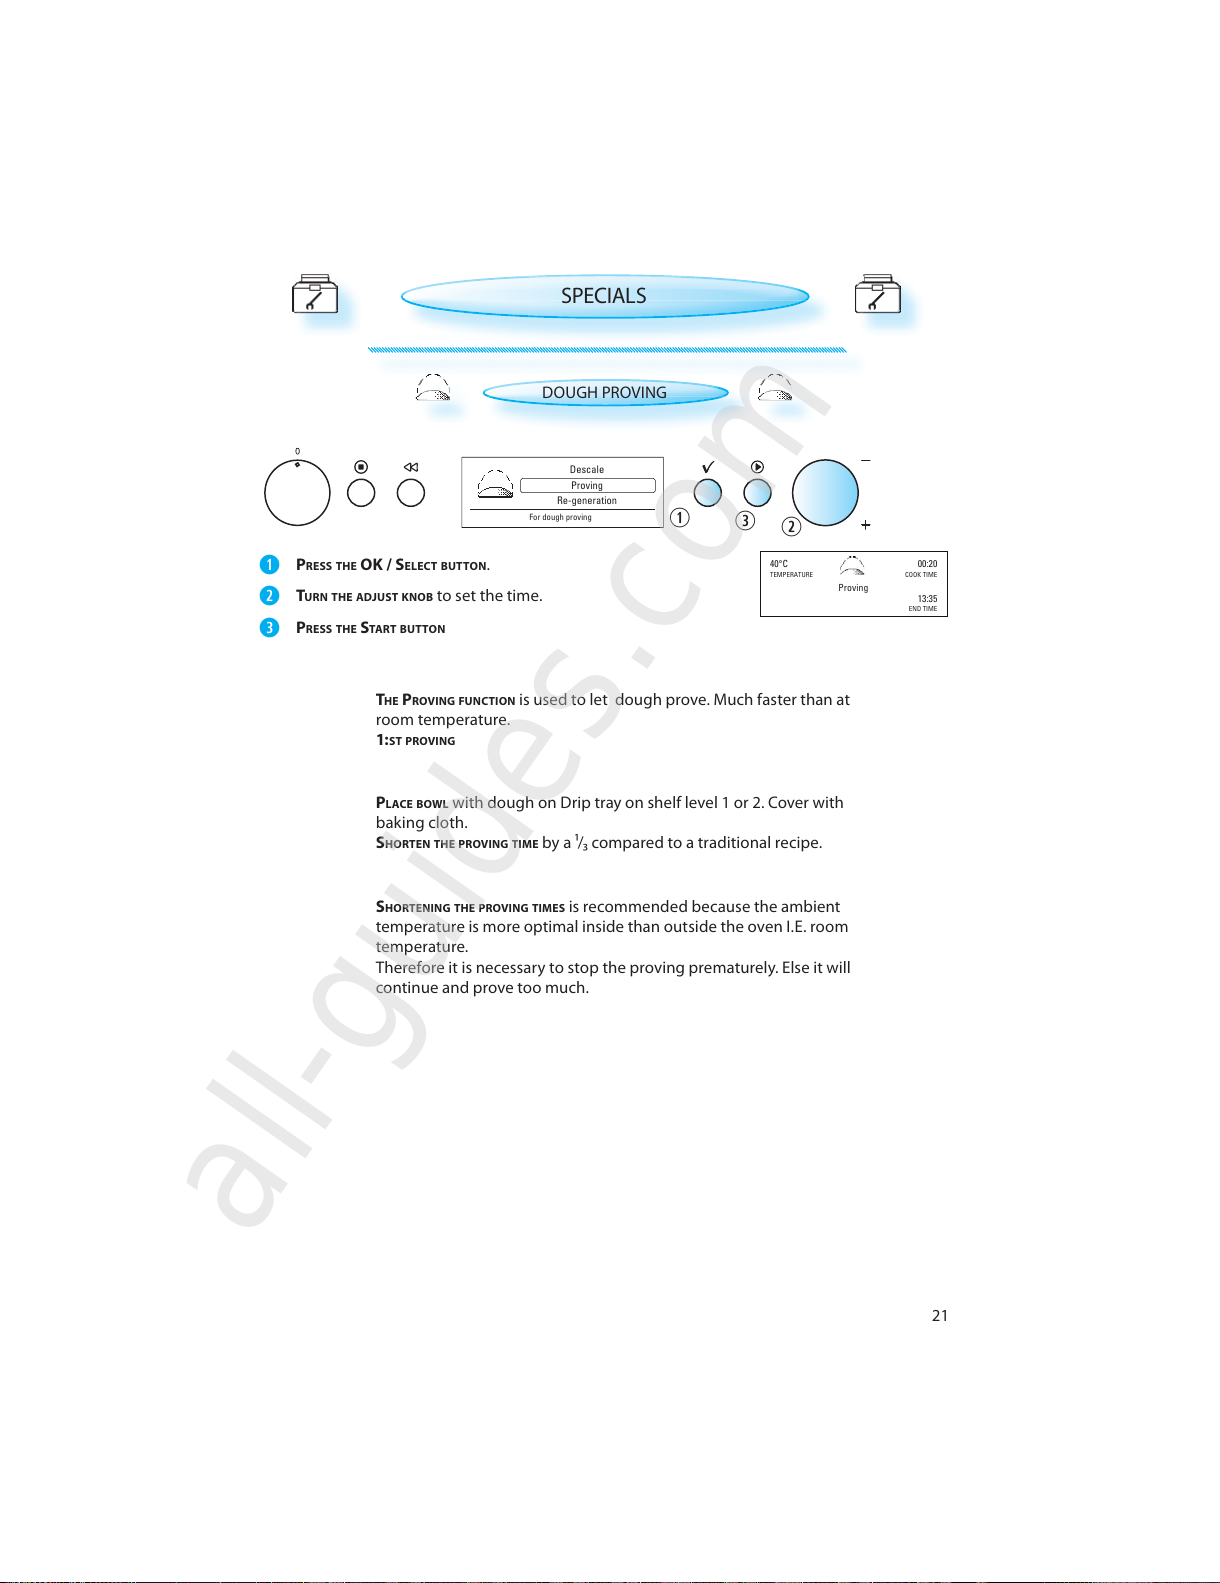
PRESS THE OK / SELECT BUTTON .
TURN THE ADJUST KNOB to set the time.
PRESS THE START BUTTON
THE PROVING FUNCTIO N is used to let dough prove. Much faster than at
room temperature.
1:ST PROVING
PLACE BOWL with dough on Drip tray on shelf level 1 or 2. Cover with
baking cloth.
SHORTEN THE PROVING TIME by a ¹/ compared to a traditional recipe.
S
HORTENING THE PROVING TIMES is recommended because the ambient
temperature is more optimal inside than outside the oven I.E. room
temperature.
Therefore it is necessary to stop the proving prematurely. Else it will
continue and prove too much.
All manuals and user guides at all-guides.com
all-guides.com
Page 22
22
Descale needed.
Press <OK> to descale, <back> to cancel
Empty and refill
container with descaler
PHASE
END TIME
PHASE TIME
1/3 00:32
11:10
Descaling
Empty and refill
container with water
Please remove and empty the container
Press OK/Select button when done
PHASE
END TIME
PHASE TIME
2/3 00:06
11:10
Rinsing
Descaling
Proving
Drain
For descaling the boiler
DESCALING
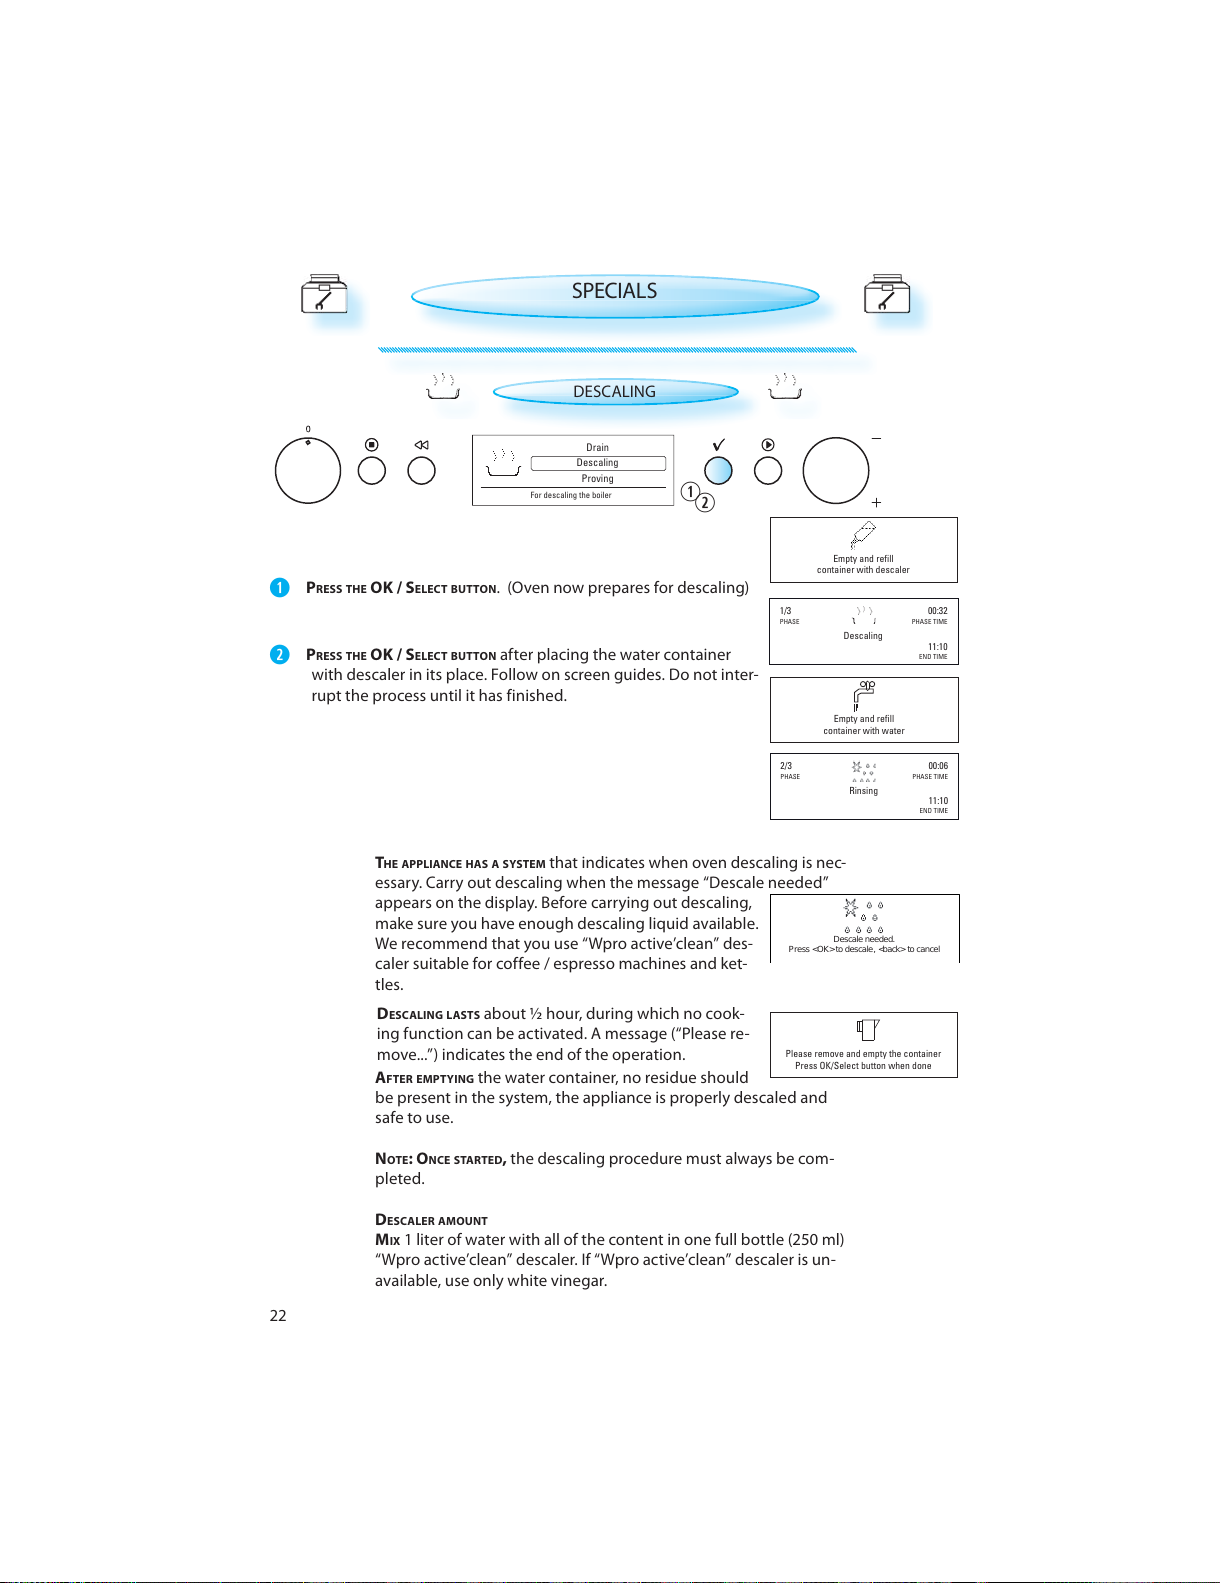
PRESS THE OK / SELECT BUTTON . (Oven now prepares for descaling)
T
HE APPLIANCE HAS A SYSTEM that indicates when oven descaling is nec-
essary. Carry out descaling when the message “Descale needed”
appears on the display. Before carrying out descaling,
make sure you have enough descaling liquid available.
We recommend that you use “Wpro active’clean” des-
caler suitable for coffee / espresso machines and ket-
tles.
PRESS THE OK / SELECT BUTTON after placing the water container
with descaler in its place. Follow on screen guides. Do not inter-
rupt the process until it has finished.
D
ESCALING LASTS about ½ hour, during which no cook-
ing function can be activated. A message (“Please re-
move...”) indicates the end of the operation.
A
FTER EMPTYING the water container, no residue should
be present in the system, the appliance is properly descaled and
safe to use.
NOTE: ONCE STARTED, the descaling procedure must always be com-
pleted.
DESCALER AMOUNT
MIX 1 liter of water with all of the content in one full bottle (250 ml)
“Wpro active’clean” descaler. If “Wpro active’clean” descaler is un-
available, use only white vinegar.
SPECIALS
All manuals and user guides at all-guides.com
Page 23
23
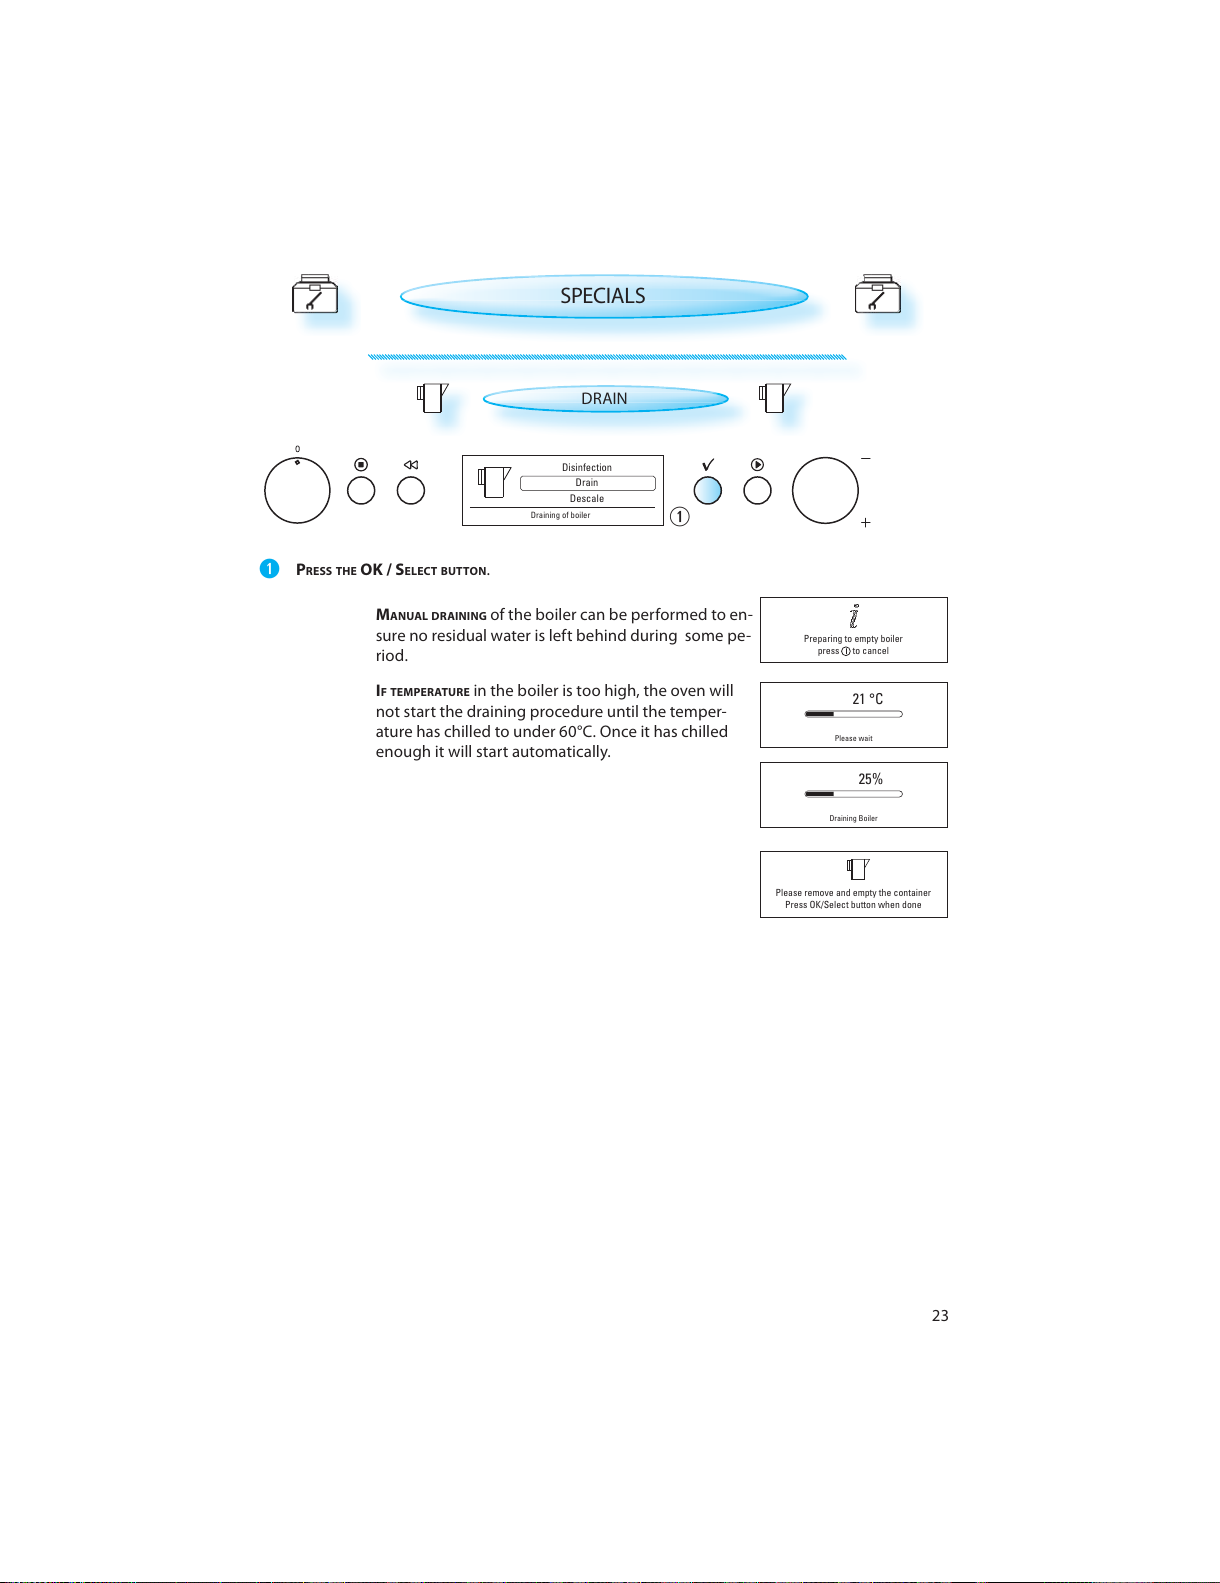
Preparing to empty boiler
press to cancel
Draining Boiler
25%
Please remove and empty the container
Press OK/Select button when done
Please wait
21 °C
Drain
Descale
Disinfection
Draining of boiler
SPECIALS
DRAIN
PRESS THE OK / SELECT BUTTON .
M
ANUAL DRAINING of the boiler can be performed to en-
sure no residual water is left behind during some pe-
riod.
I
F TEMPERATURE in the boiler is too high, the oven will
not start the draining procedure until the temper-
ature has chilled to under 60°C. Once it has chilled
enough it will start automatically.
All manuals and user guides at all-guides.com
Page 24
24
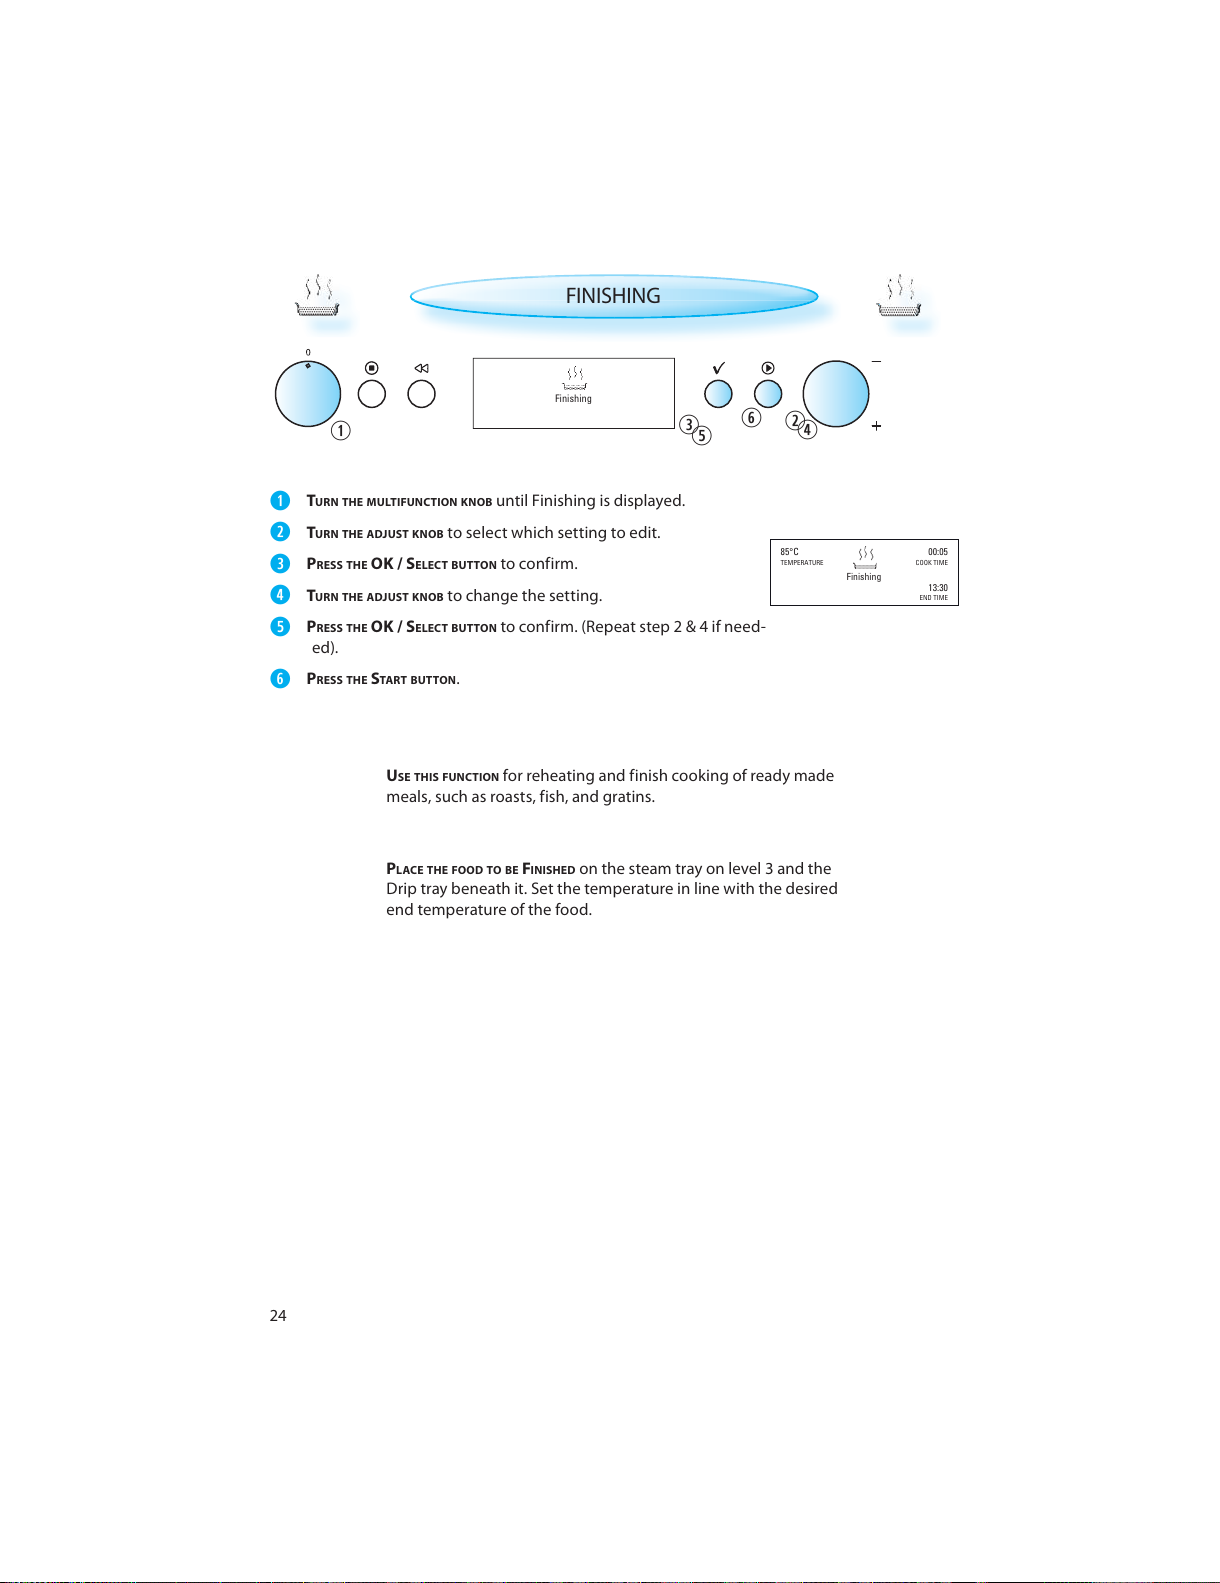
TEMPERATURE
END TIME
COOK TIME
85°C 00:05
13:30
Finishing
Finishing
FINISHING
TURN THE MULTIFUNCTION KNOB until Finishing is displayed.
TURN THE ADJUST KNOB to select which setting to edit.
PRESS THE OK / SELECT BUTTON to confirm.
TURN THE ADJUST KNOB to change the setting.
PRESS THE OK / SELECT BUTTON to confirm. (Repeat step 2 & 4 if need-
ed).
PRESS THE START BUTTON .
U
SE THIS FUNCTION for reheating and finish cooking of ready made
meals, such as roasts, fish, and gratins.
P
LACE THE FOOD TO BE FINISHED on the steam tray on level 3 and the
Drip tray beneath it. Set the temperature in line with the desired
end temperature of the food.
All manuals and user guides at all-guides.com
Page 25
25
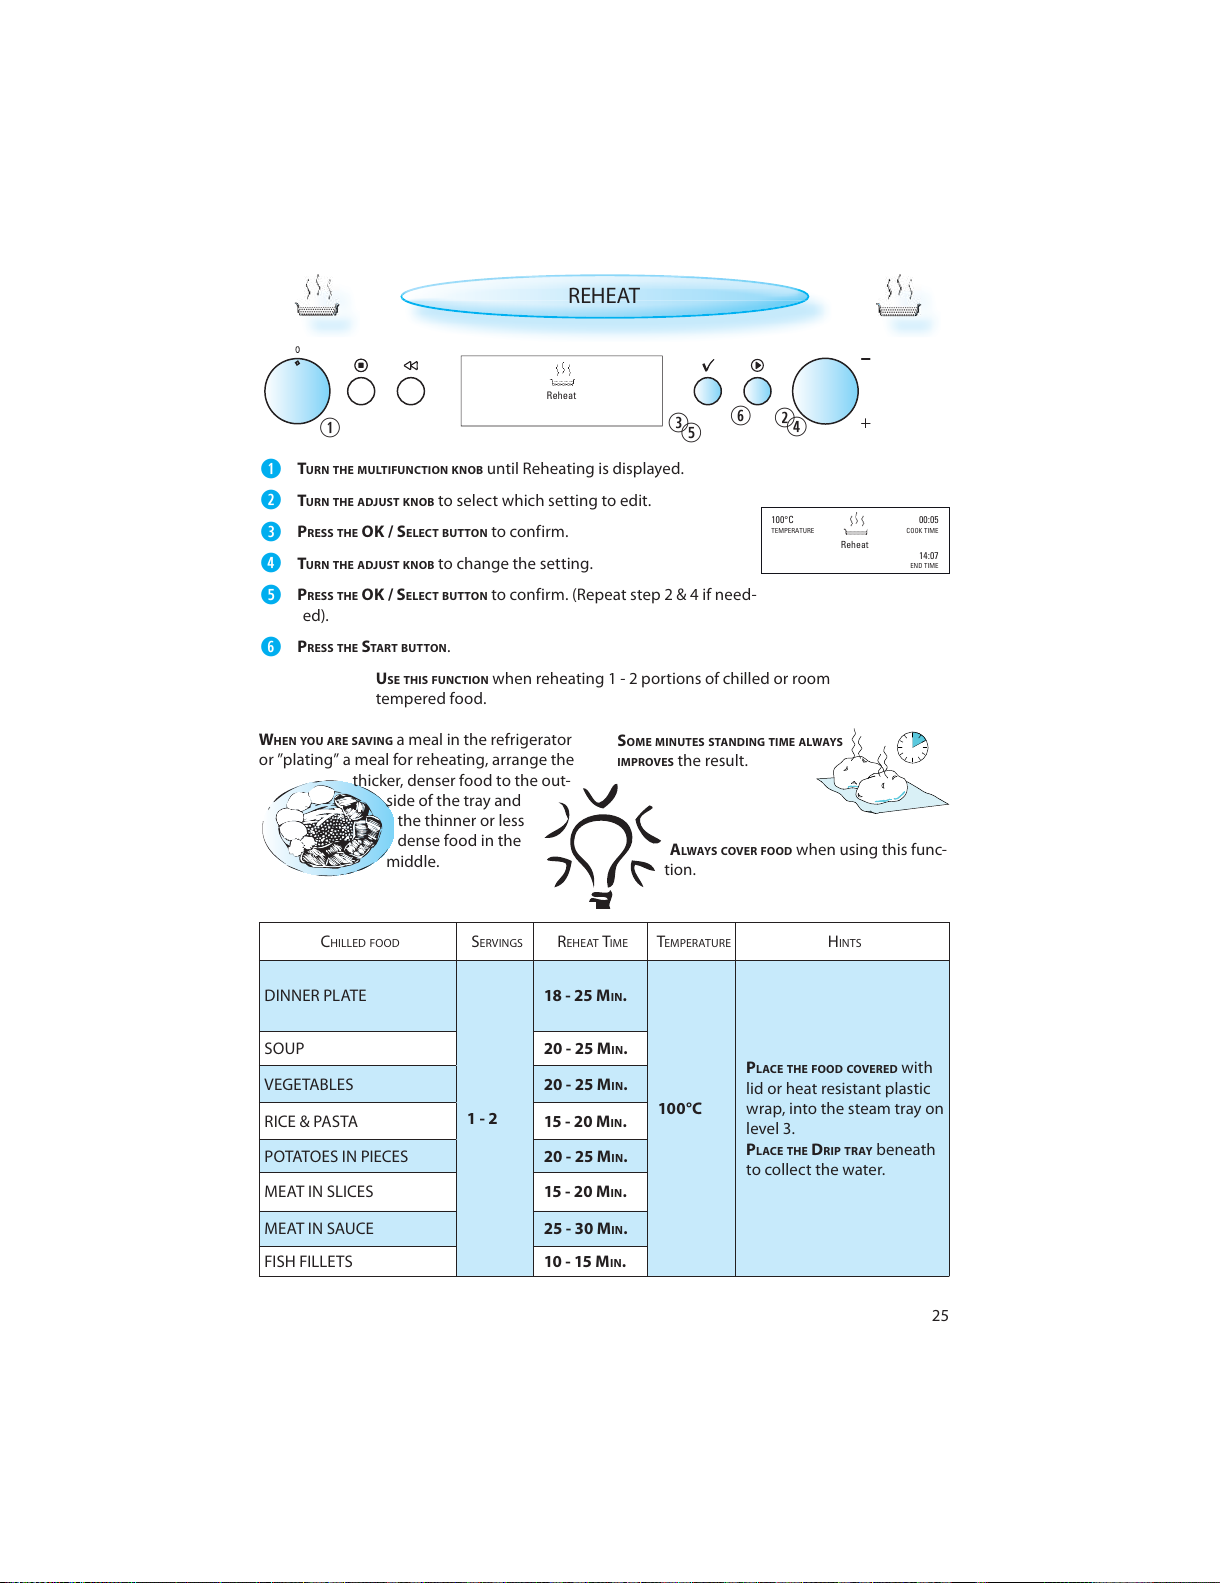
TEMPERATURE
END TIME
COOK TIME
100°C 00:05
14:07
Reheat
Reheat
REHEAT
TURN THE MULTIFUNCTION KNOB until Reheating is displayed.
TURN THE ADJUST KNOB to select which setting to edit.
PRESS THE OK / SELECT BUTTON to confirm.
TURN THE ADJUST KNOB to change the setting.
PRESS THE OK / SELECT BUTTON to confirm. (Repeat step 2 & 4 if need-
ed).
PRESS THE START BUTTON .
USE THIS FUNCTION when reheating 1 - 2 portions of chilled or room
tempered food.
W
HEN YOU ARE SAVING a meal in the refrigerator
or ”plating” a meal for reheating, arrange the
thicker, denser food to the out-
side of the tray and
the thinner or less
dense food in the
middle.
A
LWAYS COVER FOOD when using this func-
tion.
S
OME MINUTES STANDING TIME ALWAYS
IMPROVES the result.
CHILLED FOOD SERVINGS REHEAT TIME TEMPERATURE HINTS
DINNER PLATE
1 - 2
18 - 25 MIN.
100 °C
P
LACE THE FOOD COVERED with
lid or heat resistant plastic
wrap, into the steam tray on
level 3.
PLACE THE DRIP TRAY beneath
to collect the water.
SOUP 20 - 25 M
IN.
VEGETABLES 20 - 25 M
IN.
RICE & PASTA 15 - 20 M
IN.
POTATOES IN PIECES 20 - 25 M
IN.
MEAT IN SLICES 15 - 20 M
IN.
MEAT IN SAUCE 25 - 30 M
IN.
FISH FILLETS 10 - 15 M
IN.
All manuals and user guides at all-guides.com
Page 26
26
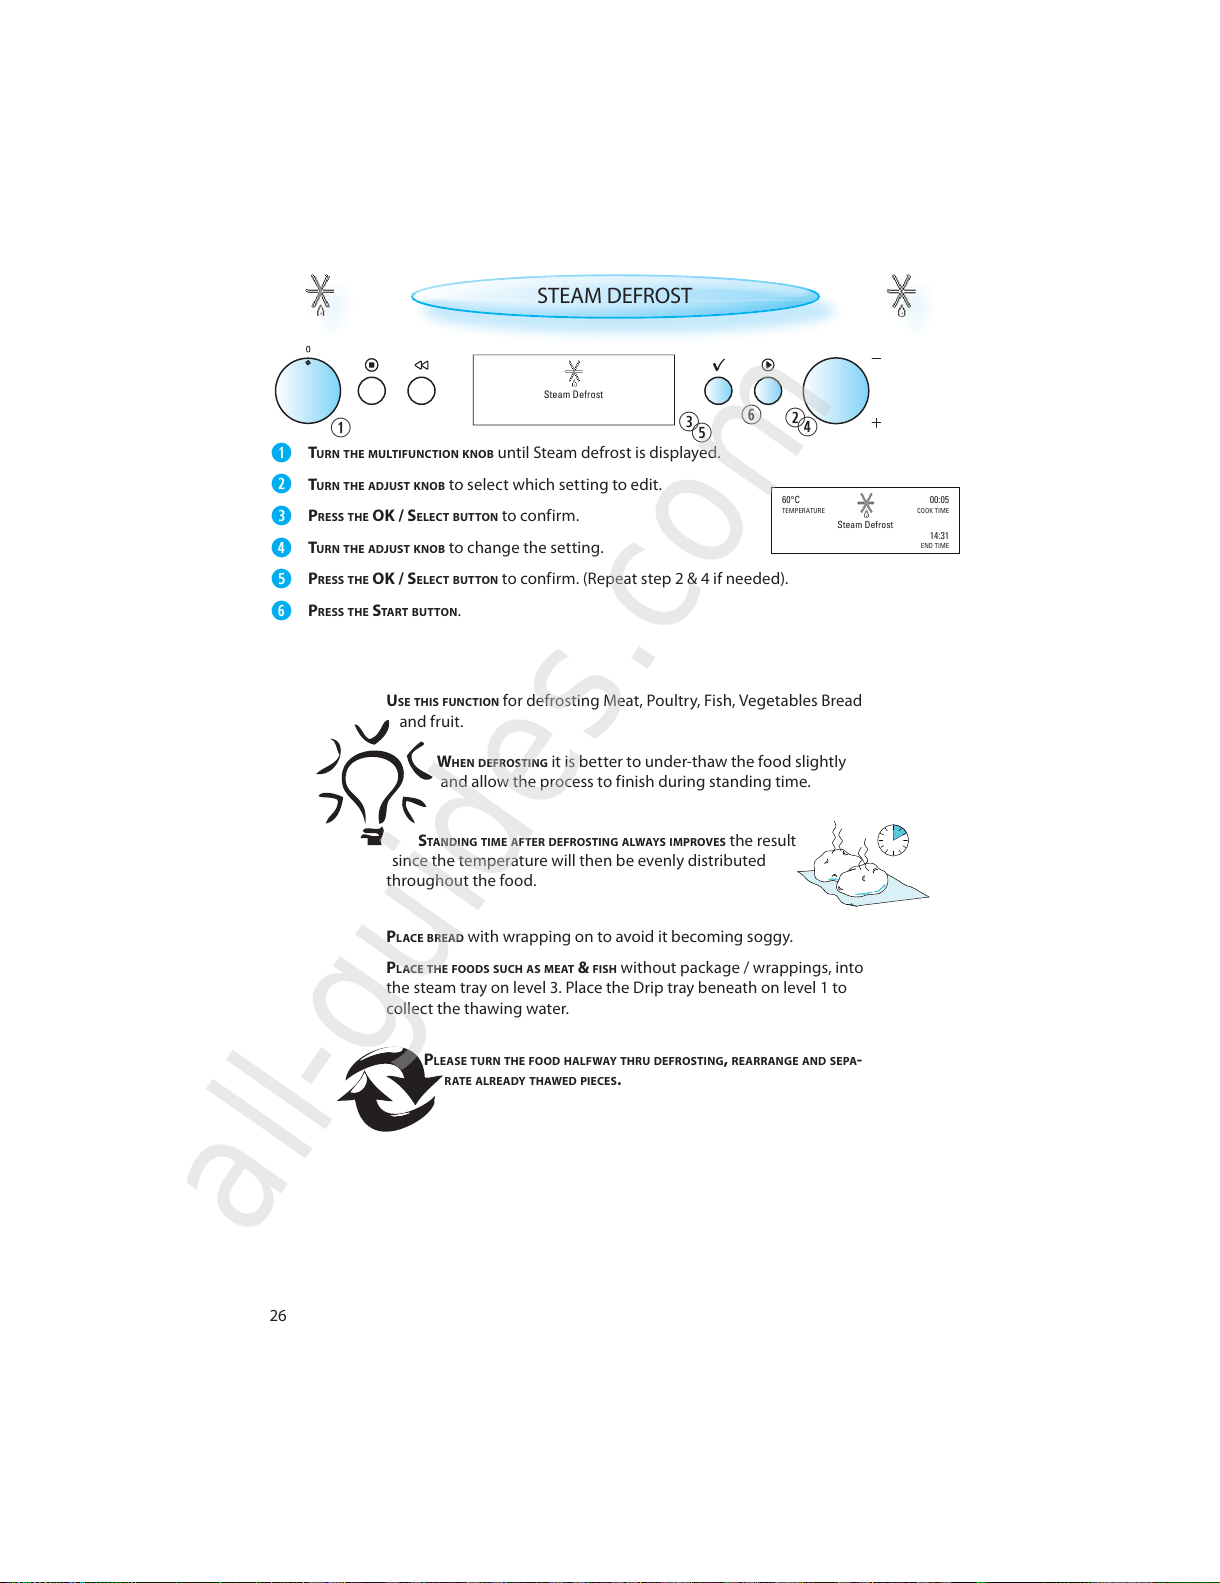
TEMPERATURE
END TIME
COOK TIME
60°C 00:05
14:31
Steam Defrost
Steam Defrost
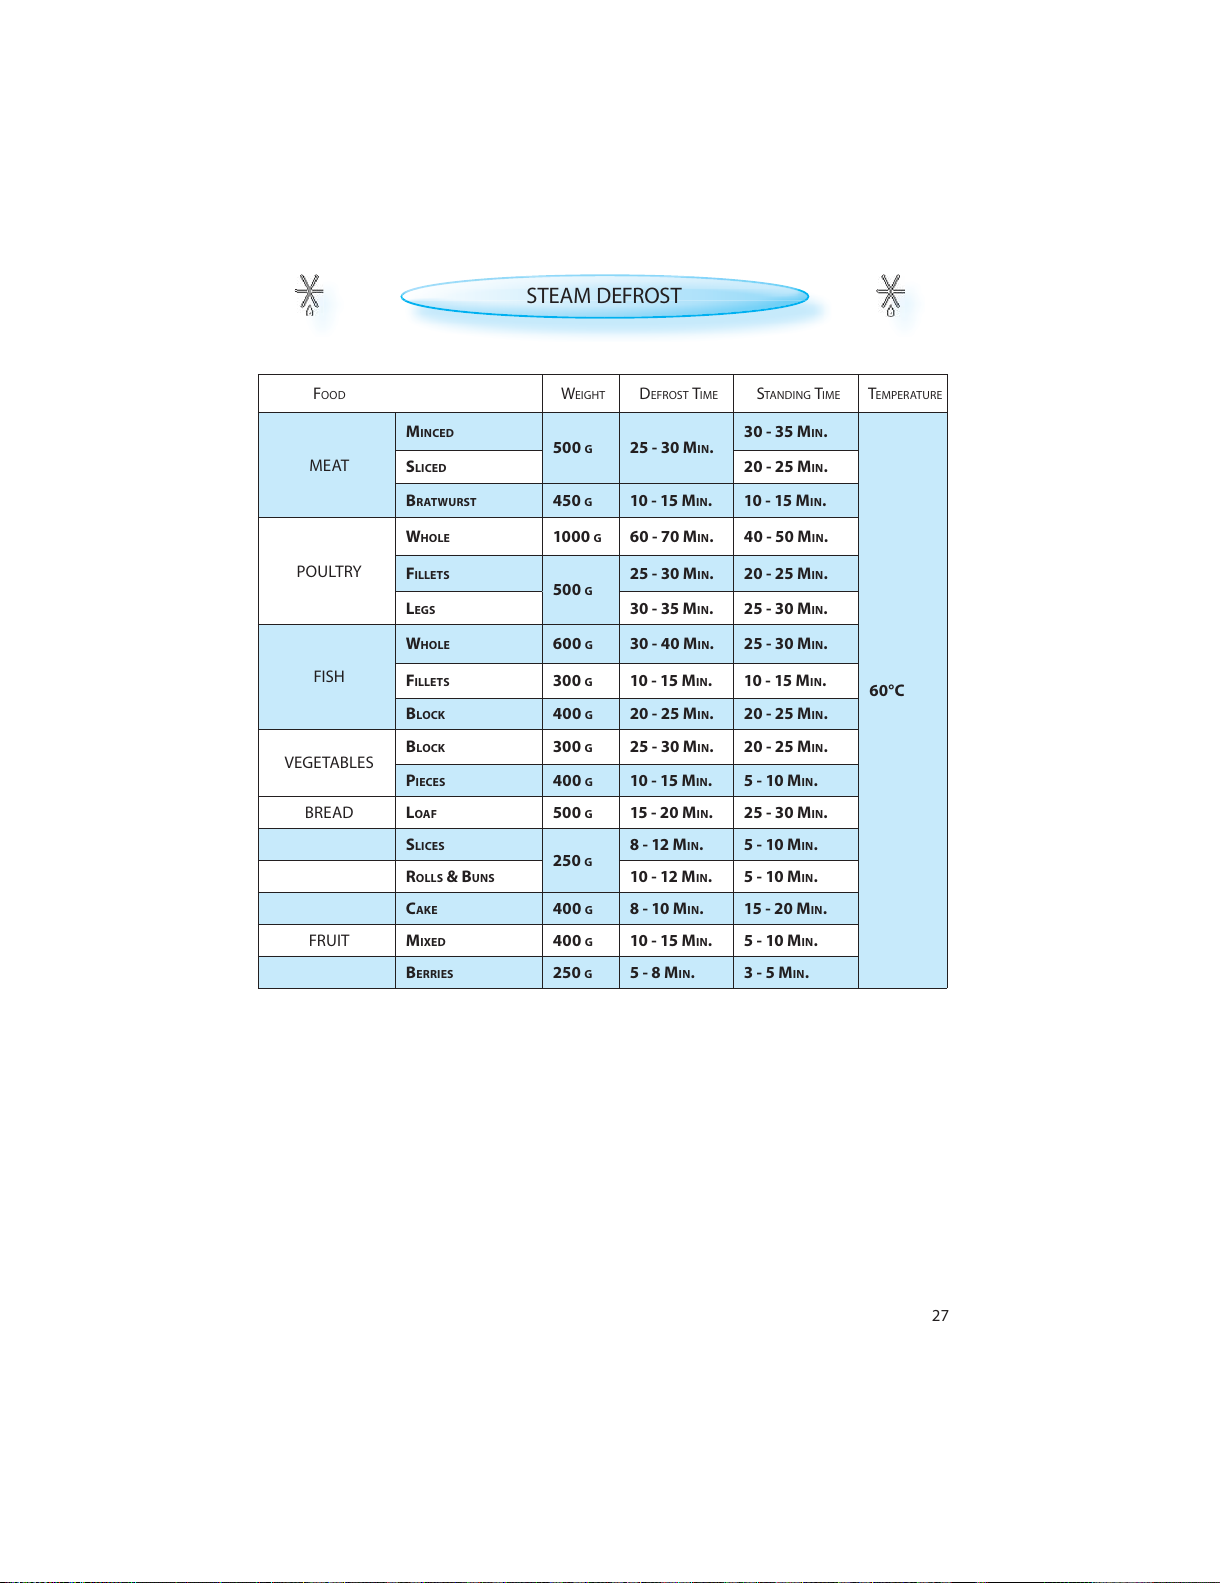
STEAM DEFROST
TURN THE MULTIFUNCTION KNOB until Steam defrost is displayed.
TURN THE ADJUST KNOB to select which setting to edit.
PRESS THE OK / SELECT BUTTON to confirm.
TURN THE ADJUST KNOB to change the setting.
PRESS THE OK / SELECT BUTTON to confirm. (Repeat step 2 & 4 if needed).
PRESS THE START BUTTON .
U
SE THIS FUNCTION for defrosting Meat, Poultry, Fish, Vegetables Bread
and fruit.
W
HEN DEFROSTING it is better to under-thaw the food slightly
and allow the process to finish during standing time.
STAND ING TIME AFTER DEFROSTING ALWAYS IMPROVES the result
since the temperature will then be evenly distributed
throughout the food.
P
LACE BREAD with wrapping on to avoid it becoming soggy.
PLACE THE FOODS SUCH AS MEAT & FISH without package / wrappings, into
the steam tray on level 3. Place the Drip tray beneath on level 1 to
collect the thawing water.
P
LEASE TURN THE FOOD HALFWAY THRU DEFROSTING, REARRANGE AND SEPA-
RATE ALREADY THAWED PIECES.
All manuals and user guides at all-guides.com
all-guides.com
Page 27
27
STEAM DEFROST
FOOD WEIGHT DEFROST TIME STAND ING TIME TEMPERATURE
MEAT
M
INCED
500 G 25 - 30 MIN.
30 - 35 M
IN.
60°C
S
LICED 20 - 25 MIN.
B
RATWURST 450 G 10 - 15 MIN. 10 - 15 MIN.
POULTRY
W
HOLE 1000 G 60 - 70 MIN. 40 - 50 MIN.
F
ILLETS
500 G
25 - 30 MIN. 20 - 25 MIN.
L
EGS 30 - 35 MIN. 25 - 30 MIN.
FISH
W
HOLE 600 G 30 - 40 MIN. 25 - 30 MIN.
F
ILLETS 300 G 10 - 15 MIN. 10 - 15 MIN.
B
LOCK 400 G 20 - 25 MIN. 20 - 25 MIN.
VEGETABLES
B
LOCK 300 G 25 - 30 MIN. 20 - 25 MIN.
P
IECES 400 G 10 - 15 MIN. 5 - 10 MIN.
BREAD L
OAF 500 G 15 - 20 MIN. 25 - 30 MIN.
S
LICES
250 G
8 - 12 MIN. 5 - 10 MIN.
R
OLLS & BUNS 10 - 12 MIN. 5 - 10 MIN.
C
AKE 400 G 8 - 10 MIN. 15 - 20 MIN.
FRUIT M
IXED 400 G 10 - 15 MIN. 5 - 10 MIN.
B
ERRIES 250 G 5 - 8 MIN. 3 - 5 MIN.
All manuals and user guides at all-guides.com
Page 28
28
Manual
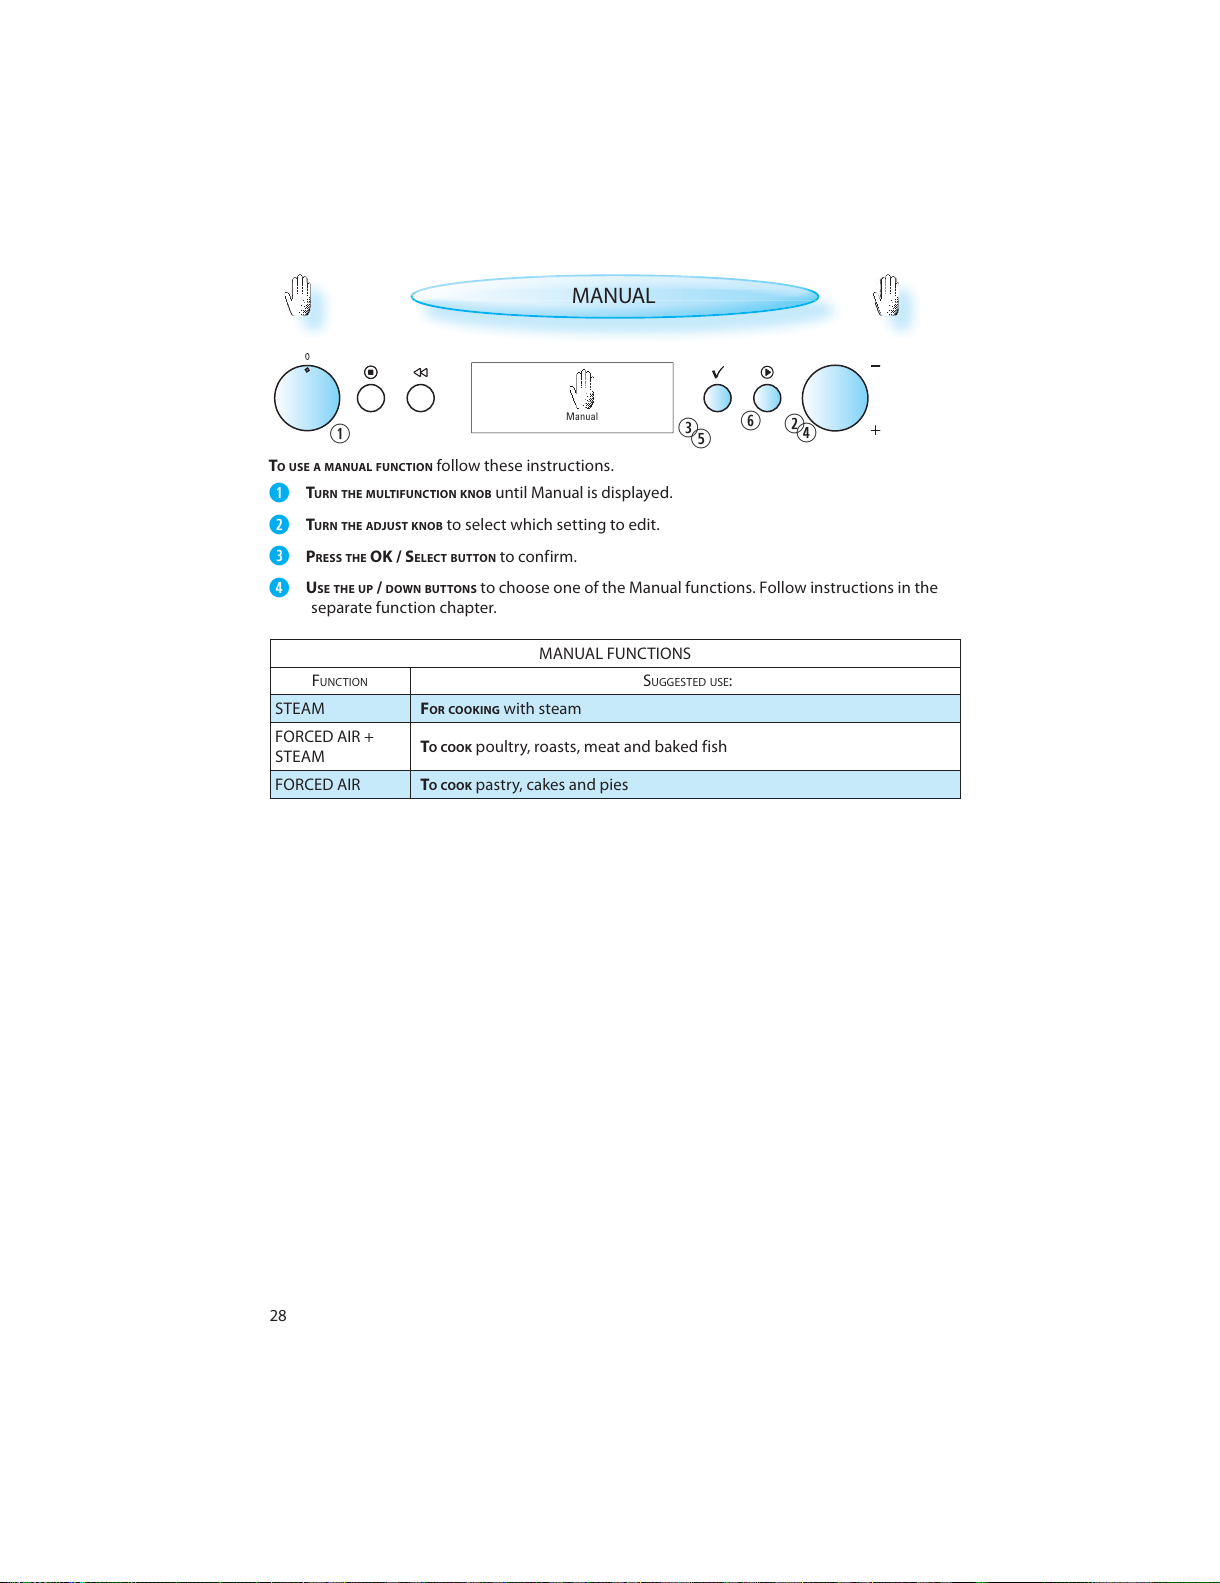
MANUAL
TO USE A MANUAL FUNCTIO N follow these instructions.
TURN THE MULTIFUNCTION KNOB until Manual is displayed.
TURN THE ADJUST KNOB to select which setting to edit.
PRESS THE OK / SELECT BUTTON to confirm.
USE THE UP / DOWN BUTTONS to choose one of the Manual functions. Follow instructions in the
separate function chapter.
MANUAL FUNCTIONS
F
UNCTION SUGGESTED USE:
STEAM F
OR COOKIN G with steam
FORCED AIR +
STEAM
T
O COOK poultry, roasts, meat and baked fish
FORCED AIR T
O COOK pastry, cakes and pies
All manuals and user guides at all-guides.com
Page 29
29
TEMPERATURE
END TIME
COOK TIME
100°C 00:20
15:53
Steam
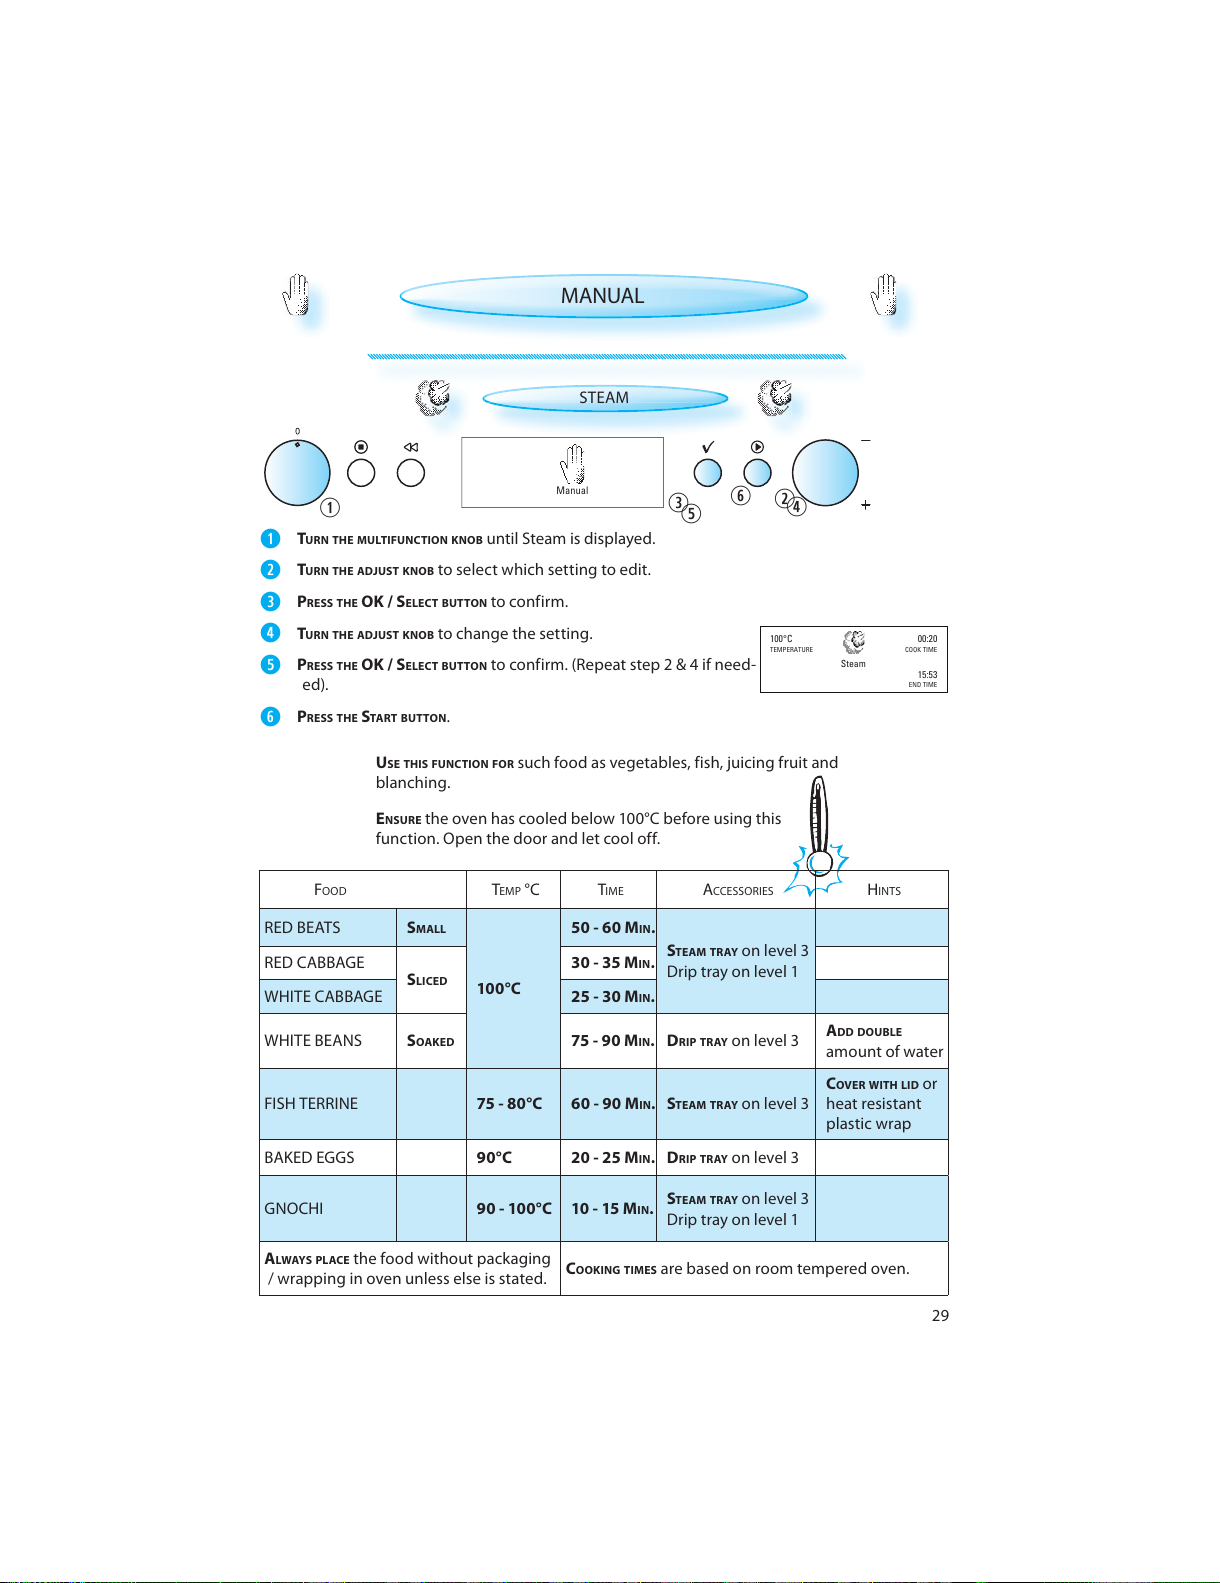
MANUAL
STEAM
TURN THE MULTIFUNCTION KNOB until Steam is displayed.
TURN THE ADJUST KNOB to select which setting to edit.
PRESS THE OK / SELECT BUTTON to confirm.
TURN THE ADJUST KNOB to change the setting.
PRESS THE OK / SELECT BUTTON to confirm. (Repeat step 2 & 4 if need-
ed).
PRESS THE START BUTTON .
U
SE THIS FUNCTION FOR such food as vegetables, fish, juicing fruit and
blanching.
Manual
ENSURE the oven has cooled below 100°C before using this
function. Open the door and let cool off.
FOOD TEMP °C TIME ACCESSORIES HINTS
RED BEATS SMALL
100 °C
50 - 60 M
IN.
S
TEAM TRAY on level 3
Drip tray on level 1
RED CABBAGE
S
LICED
30 - 35 MIN.
WHITE CABBAGE 25 - 30 M
IN.
WHITE BEANS S
OAKED 75 - 90 MIN.DRIP TRAY on level 3
ADD DOUBLE
amount of water
FISH TERRINE 75 - 80°C 60 - 90 M
IN.STEAM TRAY on level 3
COVER WITH LID or
heat resistant
plastic wrap
BAKED EGGS 90°C 20 - 25 MIN.DRIP TRAY on level 3
GNOCHI 90 - 100°C 10 - 15 MIN.
STEAM TRAY on level 3
Drip tray on level 1
ALWAYS PLACE the food without packaging
/ wrapping in oven unless else is stated.
C
OOKING TIMES are based on room tempered oven.
All manuals and user guides at all-guides.com
Page 30
30
Forced Air + Steam
Steam
Forced Air
For cooking poultry, roasts, meats and baked fish
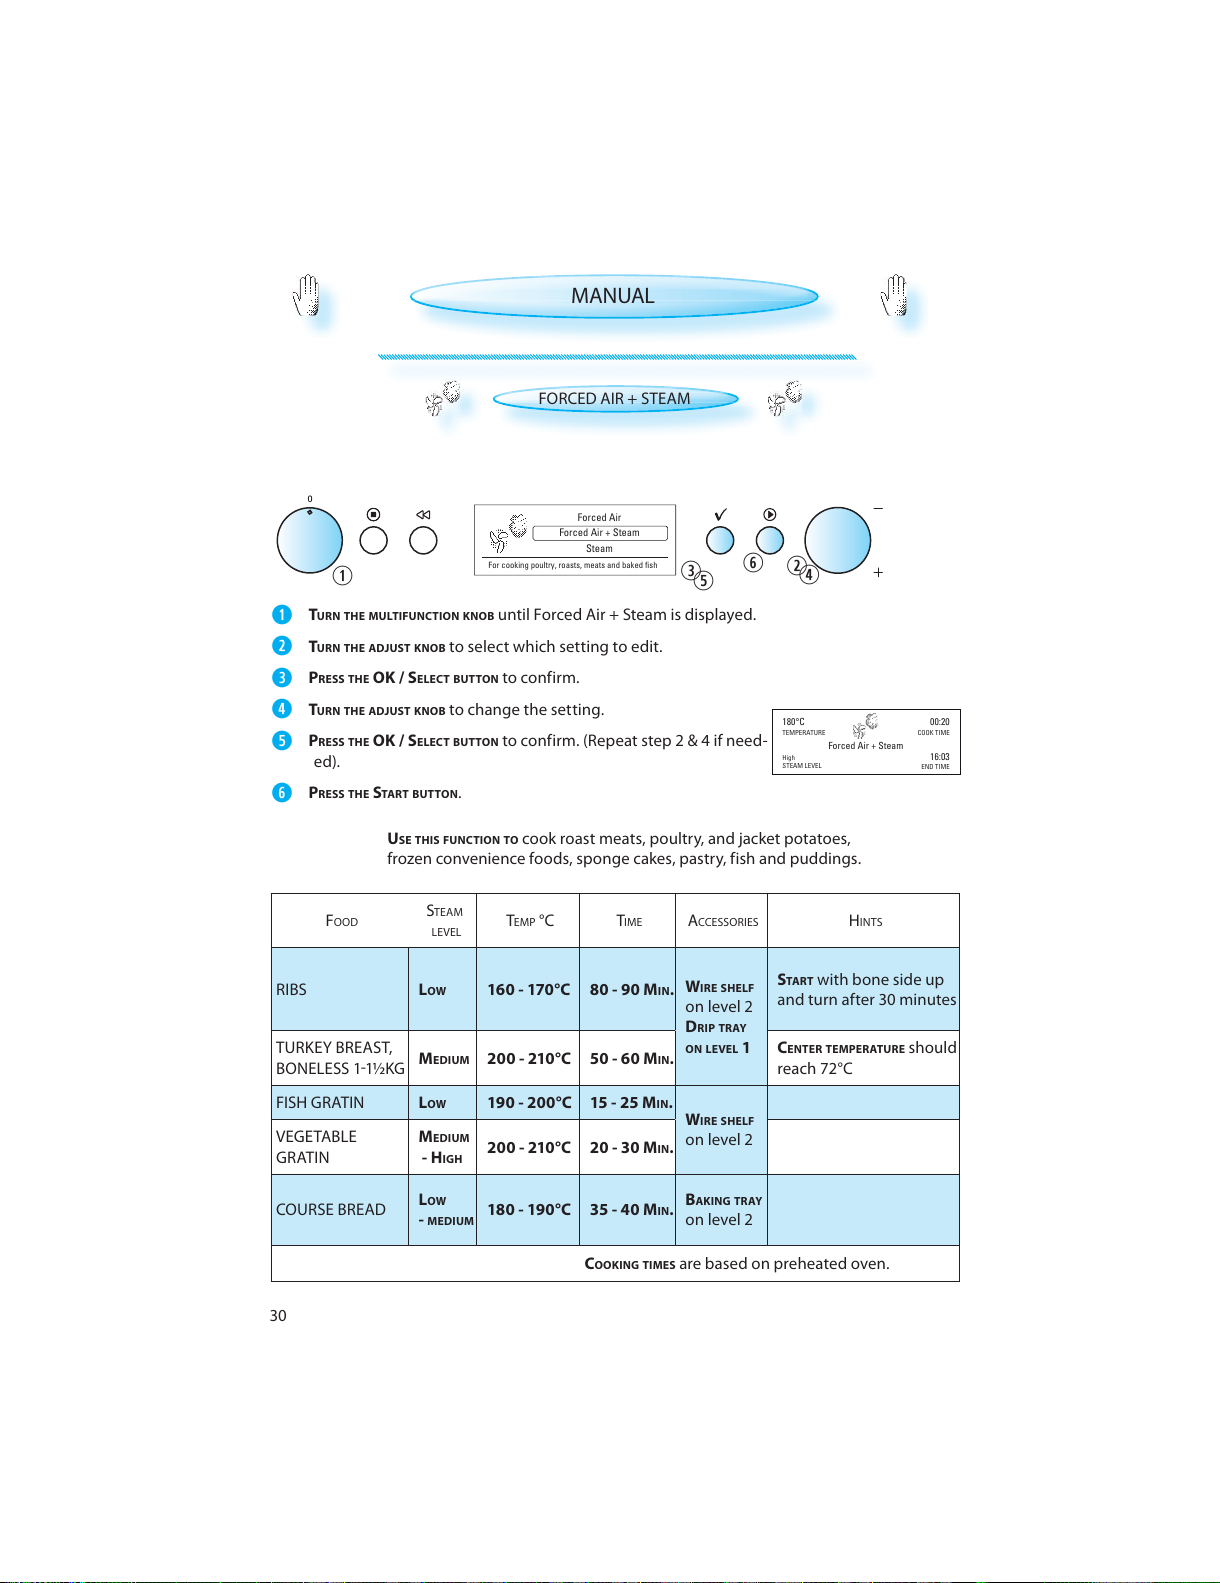
TURN THE MULTIFUNCTION KNOB until Forced Air + Steam is displayed.
TURN THE ADJUST KNOB to select which setting to edit.
PRESS THE OK / SELECT BUTTON to confirm.
TURN THE ADJUST KNOB to change the setting.
PRESS THE OK / SELECT BUTTON to confirm. (Repeat step 2 & 4 if need-
ed).
PRESS THE START BUTTON .
U
SE THIS FUNCTION TO cook roast meats, poultry, and jacket potatoes,
frozen convenience foods, sponge cakes, pastry, fish and puddings.
FOOD
STEAM
LEVEL
TEMP °C TIME ACCESSORIES HINTS
RIBS LOW 160 - 170°C 80 - 90 MIN.
W
IRE SHELF
on level 2
DRIP TRAY
ON LEVEL 1
S
TAR T with bone side up
and turn after 30 minutes
TURKEY BREAST,
BONELESS 11½KG
MEDIUM 200 - 210°C 50 - 60 MIN.
CENTER TEMPERATURE should
reach 72°C
FISH GRATIN L
OW 190 - 200°C 15 - 25 MIN.
W
IRE SHELF
on level 2
VEGETABLE
GRATIN
M
EDIUM
- HIGH
200 - 210°C 20 - 30 MIN.
COURSE BREAD
L
OW
- MEDIUM
180 - 190°C 35 - 40 MIN.
BAKING TRAY
on level 2
C
OOKING TIMES are based on preheated oven.
TEMPERATURE
END TIME
COOK TIME
180°C 00:20
16:03
Forced Air + Steam
High
STEAM LEVEL
MANUAL
FORCED AIR + STEAM
All manuals and user guides at all-guides.com
Page 31
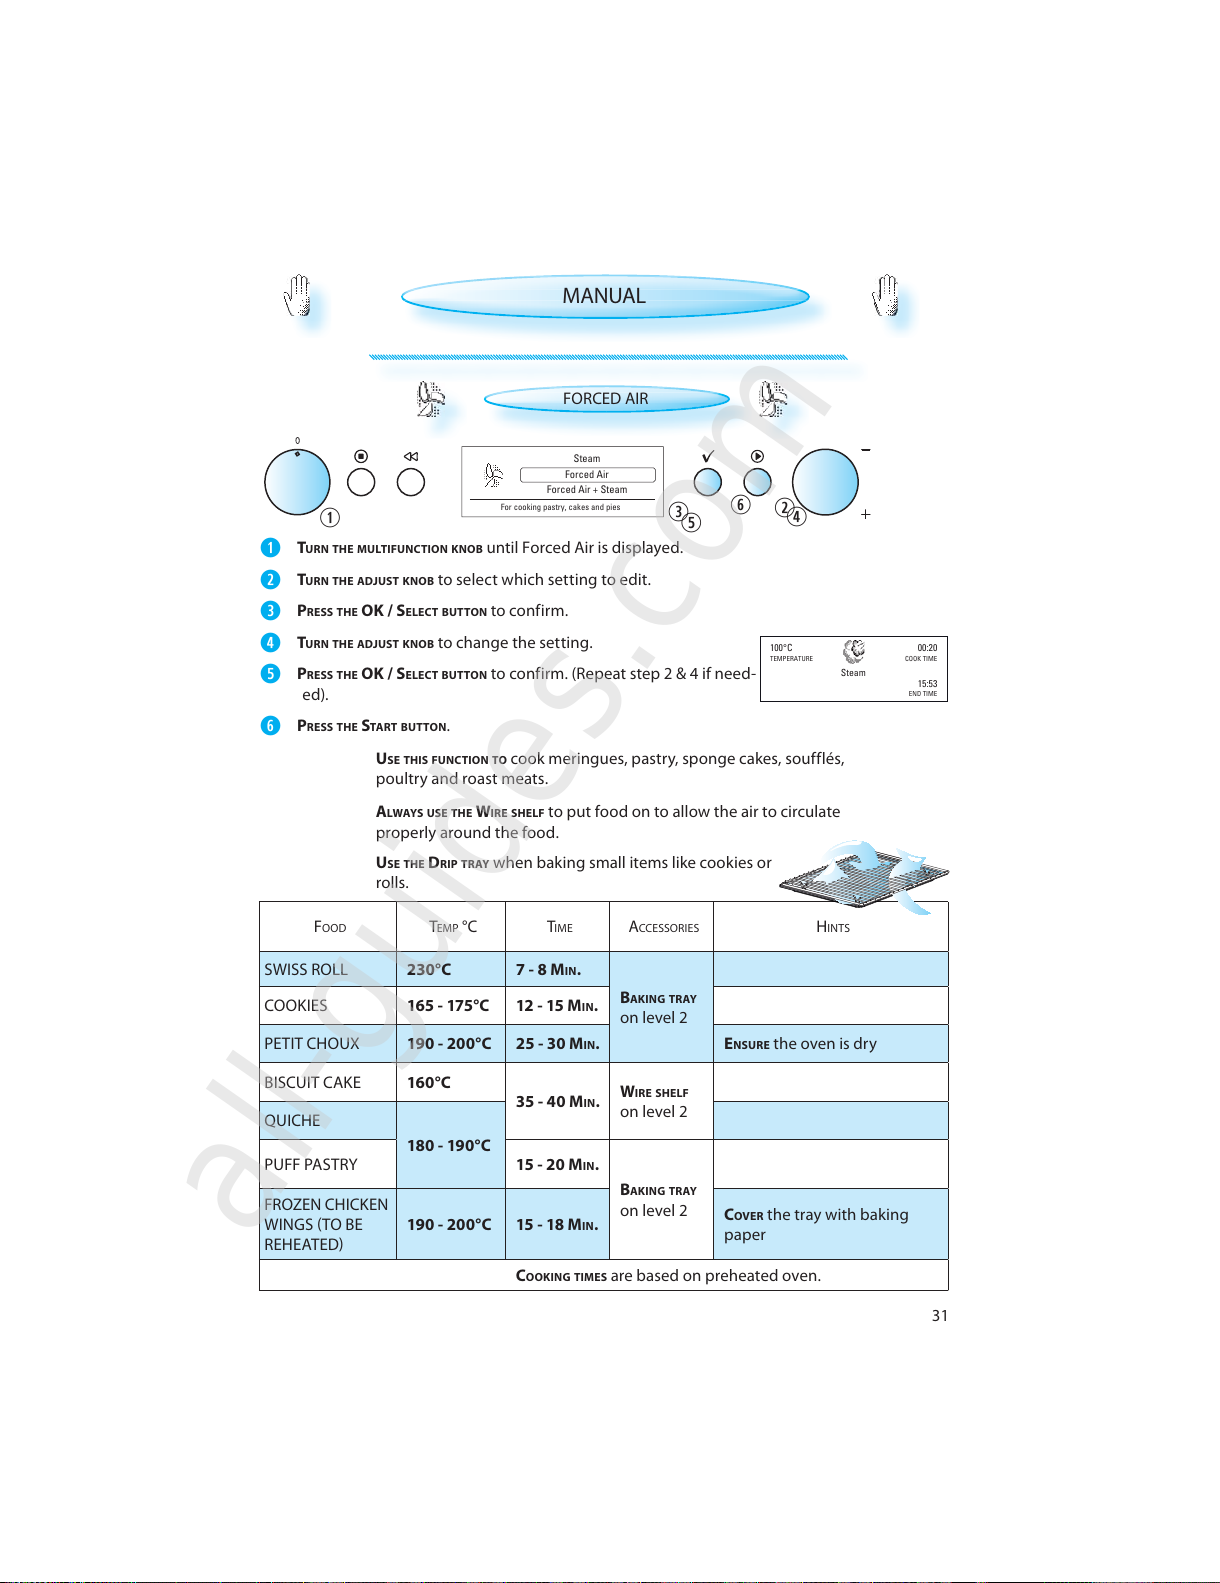
31
TEMPERATURE
END TIME
COOK TIME
100°C 00:20
15:53
Steam
Forced Air
Forced Air + Steam
Steam
For cooking pastry, cakes and pies
TURN THE MULTIFUNCTION KNOB until Forced Air is displayed.
TURN THE ADJUST KNOB to select which setting to edit.
PRESS THE OK / SELECT BUTTON to confirm.
TURN THE ADJUST KNOB to change the setting.
PRESS THE OK / SELECT BUTTON to confirm. (Repeat step 2 & 4 if need-
ed).
PRESS THE START BUTTON .
USE THIS FUNCTION TO cook meringues, pastry, sponge cakes, soufflés,
poultry and roast meats.
A
LWAYS USE THE WIRE SHELF to put food on to allow the air to circulate
properly around the food.
U
SE THE DRIP TRAY when baking small items like cookies or
rolls.
FOOD TEMP °C TIME ACCESSORIES HINTS
SWISS ROLL 230°C 7 - 8 MIN.
B
AKING TRAY
on level 2
COOK IES 165 - 175°C 12 - 15 M
IN.
PETIT CHOUX 190 - 200°C 25 - 30 M
IN.ENSURE the oven is dry
BISCUIT CAKE 160° C
35 - 40 M
IN.
WIRE SHELF
on level 2
QUICHE
180 - 190°C
PUFF PASTRY 15 - 20 M
IN.
B
AKING TRAY
on level 2
FROZEN CHICKEN
WINGS TO BE
REHEATED
190 - 200°C 15 - 18 M
IN.
C
OVER the tray with baking
paper
C
OOKING TIMES are based on preheated oven.
MANUAL
FORCED AIR
All manuals and user guides at all-guides.com
all-guides.com
Page 32
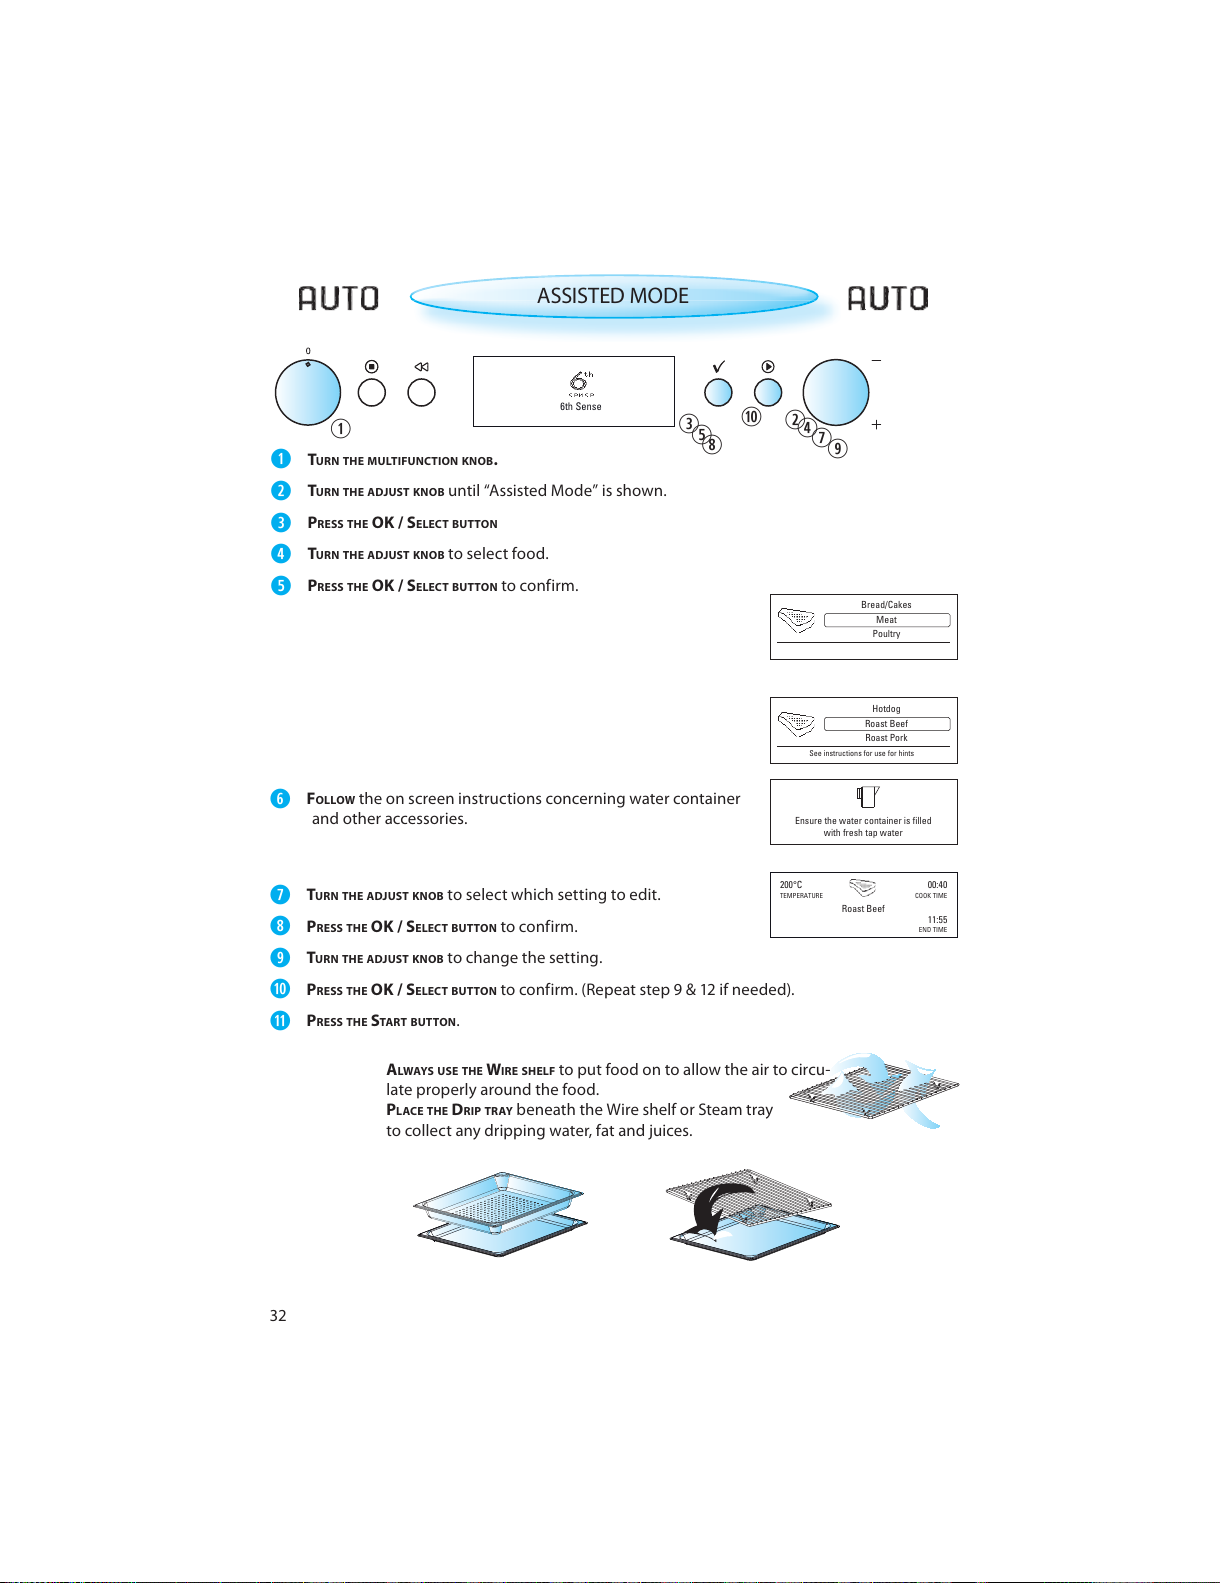
32
6th Sense
Meat
Poultry
Bread/Cakes
Roast Beef
Roast Pork
Hotdog
See instructions for use for hints
TEMPERATURE
END TIME
COOK TIME
200°C 00:40
11:55
Roast Beef
Ensure the water container is filled
with fresh tap water
ASSISTED MODE
TURN THE MULTIFUNCTION KNOB.
TURN THE ADJUST KNOB until “Assisted Mode” is shown.
PRESS THE OK / SELECT BUTTON
TURN THE ADJUST KNOB to select food.
PRESS THE OK / SELECT BUTTON to confirm.
FOLLOW the on screen instructions concerning water container
and other accessories.
TURN THE ADJUST KNOB to select which setting to edit.
PRESS THE OK / SELECT BUTTON to confirm.
TURN THE ADJUST KNOB to change the setting.
PRESS THE OK / SELECT BUTTON to confirm. (Repeat step 9 & 12 if needed).
PRESS THE START BUTTON .
A
LWAYS USE THE WIRE SHELF to put food on to allow the air to circu-
late properly around the food.
PLACE THE DRIP TRAY beneath the Wire shelf or Steam tray
to collect any dripping water, fat and juices.
All manuals and user guides at all-guides.com
Page 33
33
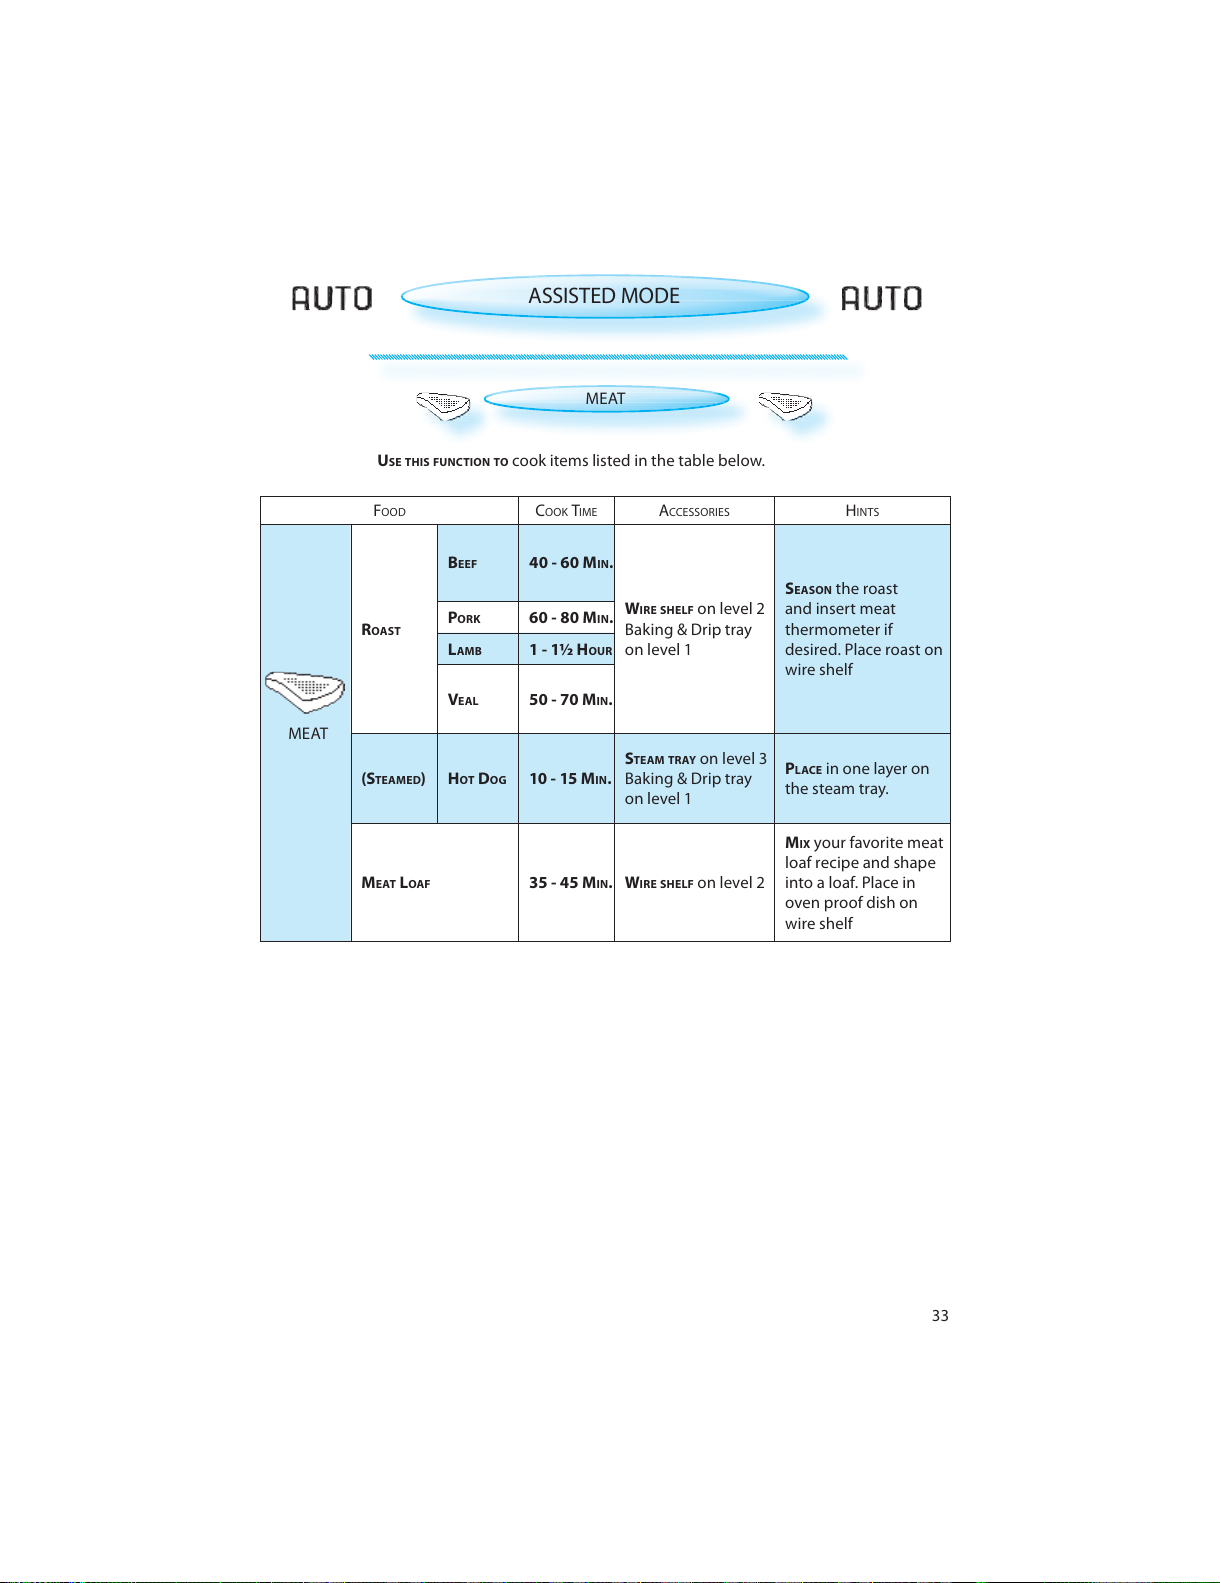
ASSISTED MODE
MEAT
U
SE THIS FUNCTION TO cook items listed in the table below.
FOOD COOK TIME ACCESSORIES HINTS
MEAT
R
OAST
BEEF 40 - 60 MIN.
W
IRE SHELF on level 2
Baking & Drip tray
on level 1
SEASON the roast
and insert meat
thermometer if
desired. Place roast on
wire shelf
P
ORK 60 - 80 MIN.
L
AMB 1 - 1½ HOUR
VEAL 50 - 70 MIN.
(S
TEAMED)HOT DOG 10 - 15 MIN.
STEAM TRAY on level 3
Baking & Drip tray
on level 1
PLACE in one layer on
the steam tray.
M
EAT LOAF 35 - 45 MIN.WIRE SHELF on level 2
MIX your favorite meat
loaf recipe and shape
into a loaf. Place in
oven proof dish on
wire shelf
All manuals and user guides at all-guides.com
Page 34
34
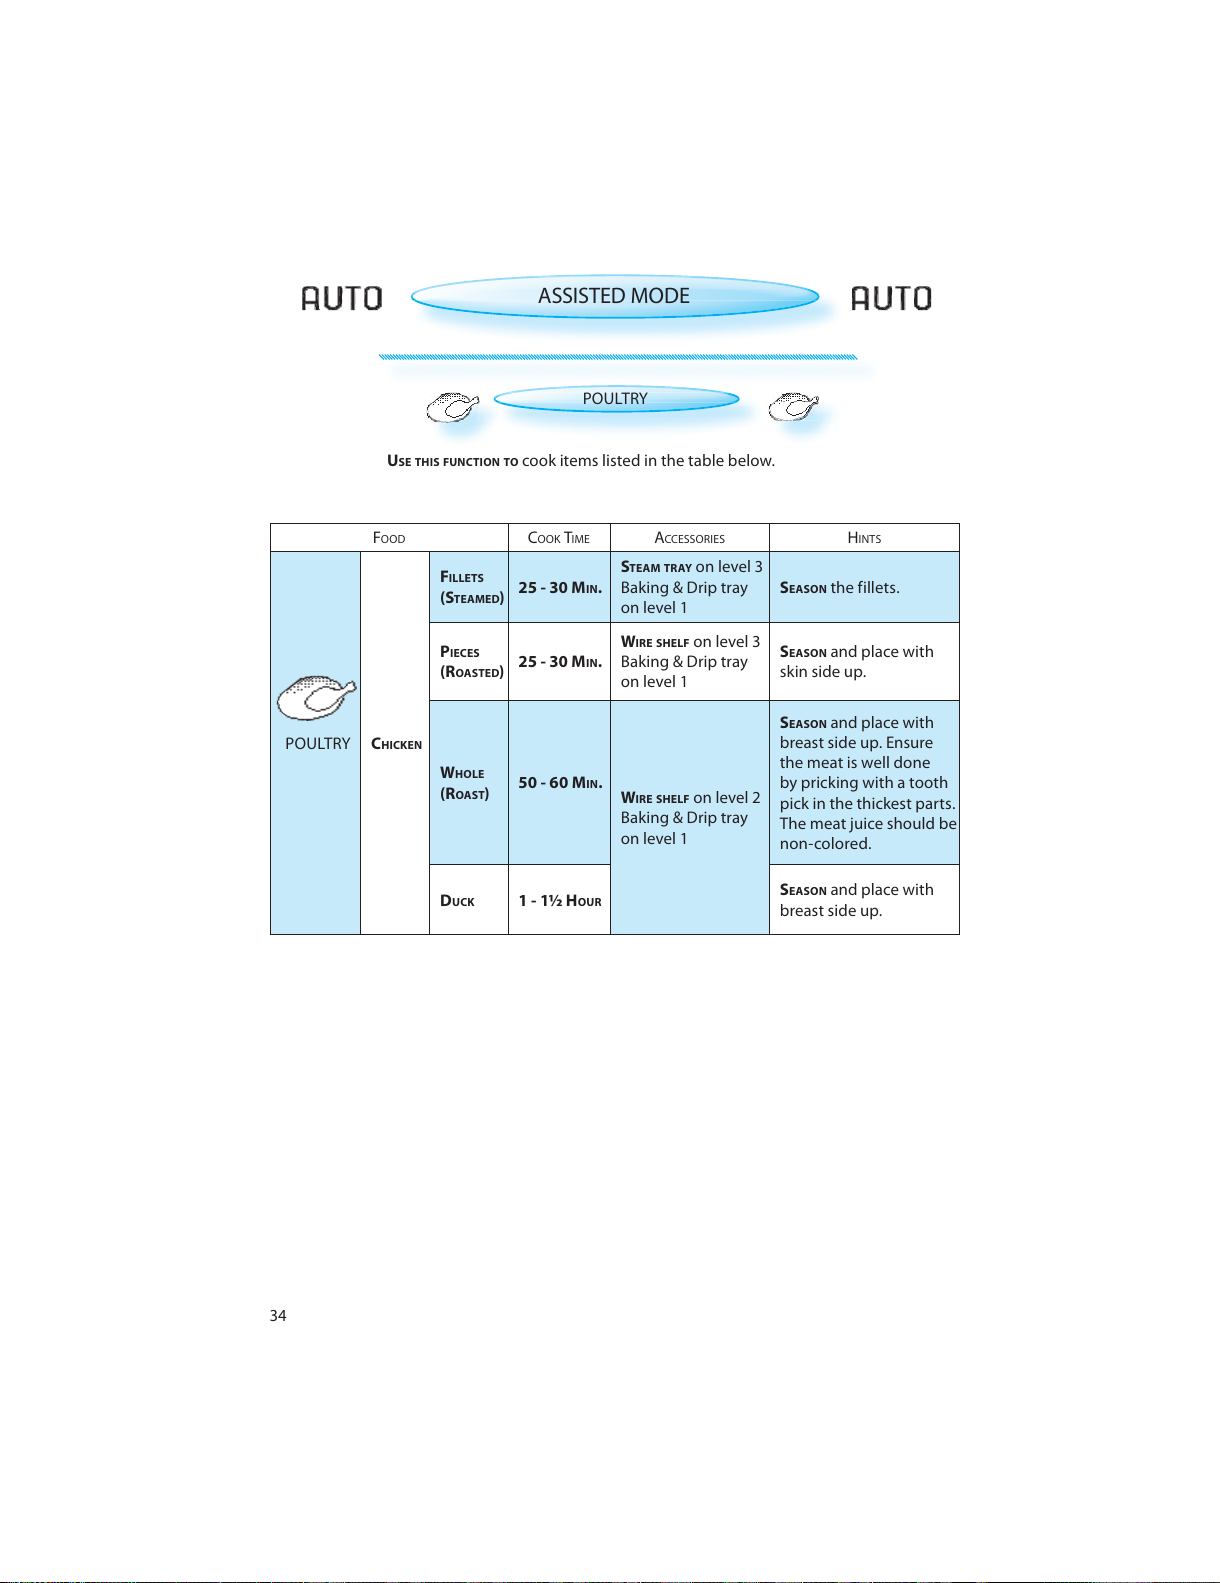
ASSISTED MODE
POULTRY
U
SE THIS FUNCTION TO cook items listed in the table below.
FOOD COOK TIME ACCESSORIES HINTS
POULTRY CHICKEN
FILLETS
(STEAMED)
25 - 30 MIN.
STEAM TRAY on level 3
Baking & Drip tray
on level 1
SEASON the fillets.
P
IECES
(ROASTED)
25 - 30 MIN.
WIRE SHELF on level 3
Baking & Drip tray
on level 1
SEASON and place with
skin side up.
W
HOLE
(ROAST)
50 - 60 MIN.
WIRE SHELF on level 2
Baking & Drip tray
on level 1
SEASON and place with
breast side up. Ensure
the meat is well done
by pricking with a tooth
pick in the thickest parts.
The meat juice should be
non-colored.
D
UCK 1 - 1½ HOUR
SEASON and place with
breast side up.
All manuals and user guides at all-guides.com
Page 35
35
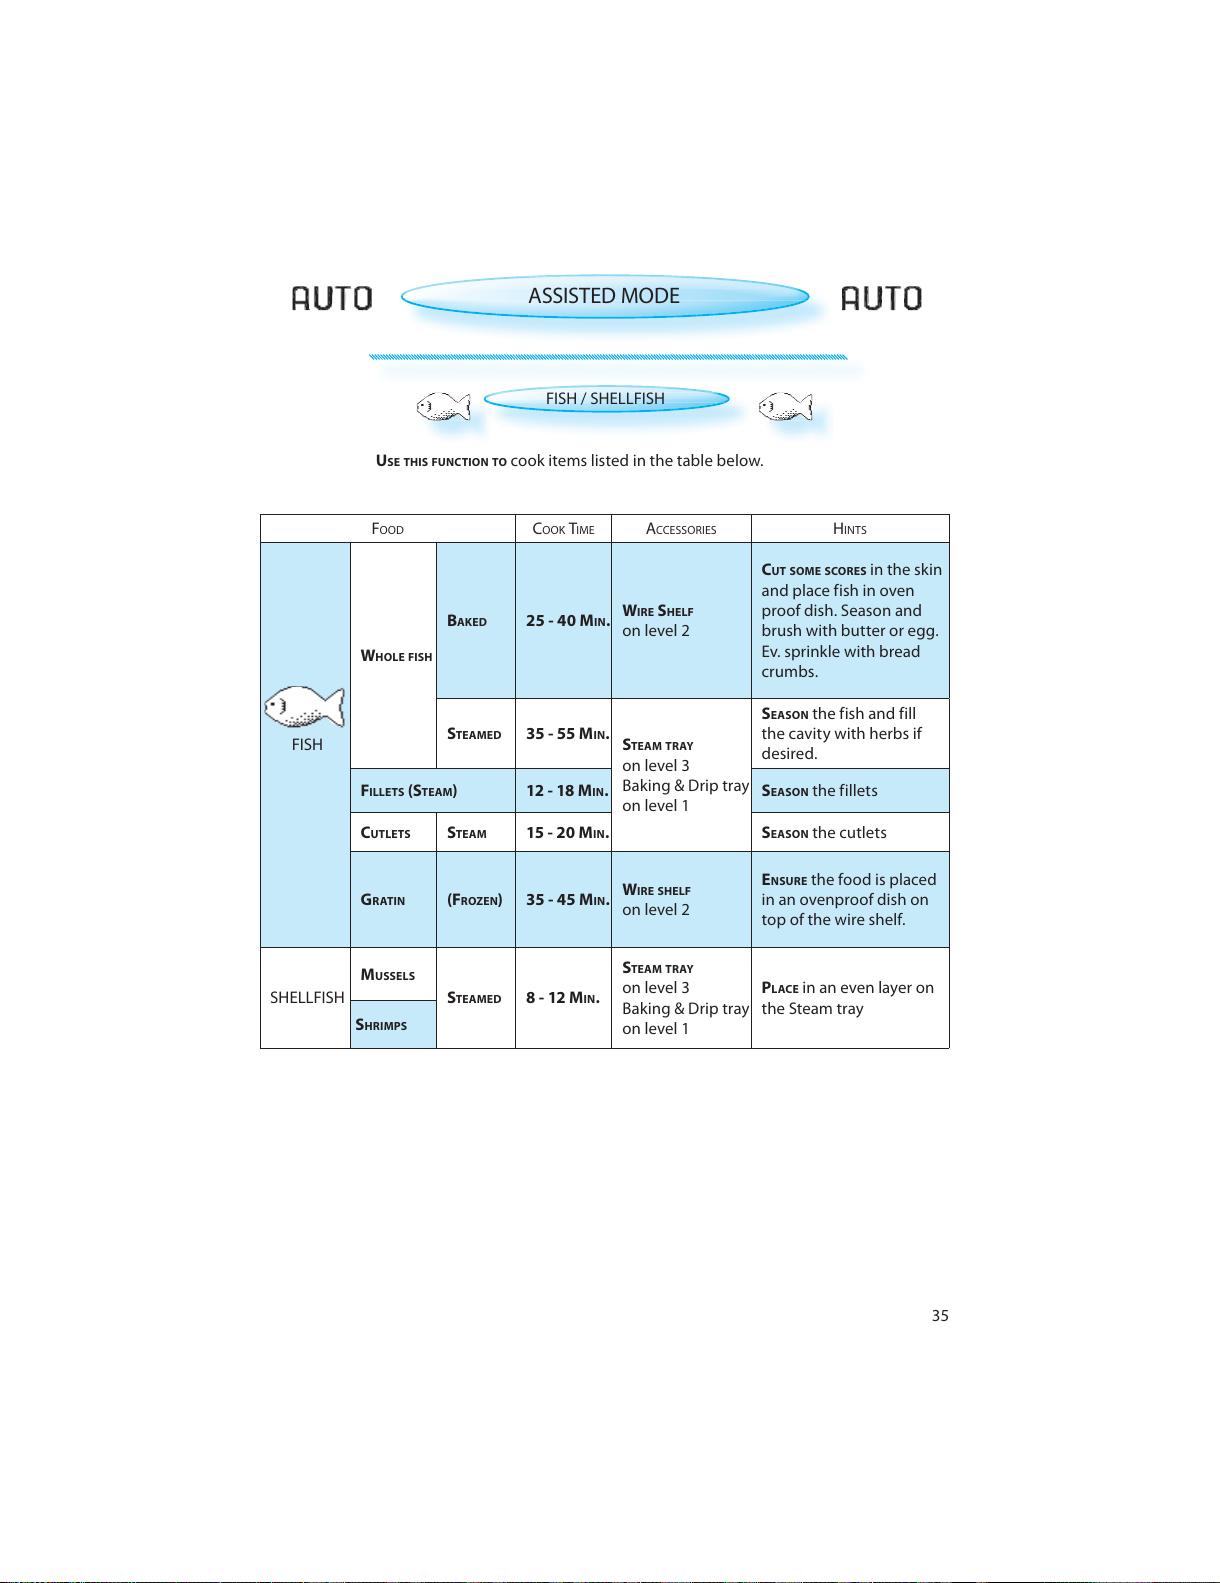
ASSISTED MODE
FISH / SHELLFISH
U
SE THIS FUNCTION TO cook items listed in the table below.
FOOD COOK TIME ACCESSORIES HINTS
FISH
W
HOLE FISH
BAKED 25 - 40 MIN.
WIRE SHELF
on level 2
CUT SOME SCORES in the skin
and place fish in oven
proof dish. Season and
brush with butter or egg.
Ev. sprinkle with bread
crumbs.
S
TEAMED 35 - 55 MIN.
S
TEAM TRAY
on level 3
Baking & Drip tray
on level 1
S
EASON the fish and fill
the cavity with herbs if
desired.
F
ILLETS (STEAM) 12 - 18 MIN.SEASON the fillets
C
UTLETS STEAM 15 - 20 MIN.SEASON the cutlets
G
RATIN (FROZEN) 35 - 45 MIN.
WIRE SHELF
on level 2
ENSURE the food is placed
in an ovenproof dish on
top of the wire shelf.
SHELLFISH
M
USSELS
STEAMED 8 - 12 MIN.
STEAM TRAY
on level 3
Baking & Drip tray
on level 1
PLACE in an even layer on
the Steam tray
S
HRIMPS
All manuals and user guides at all-guides.com
Page 36
36
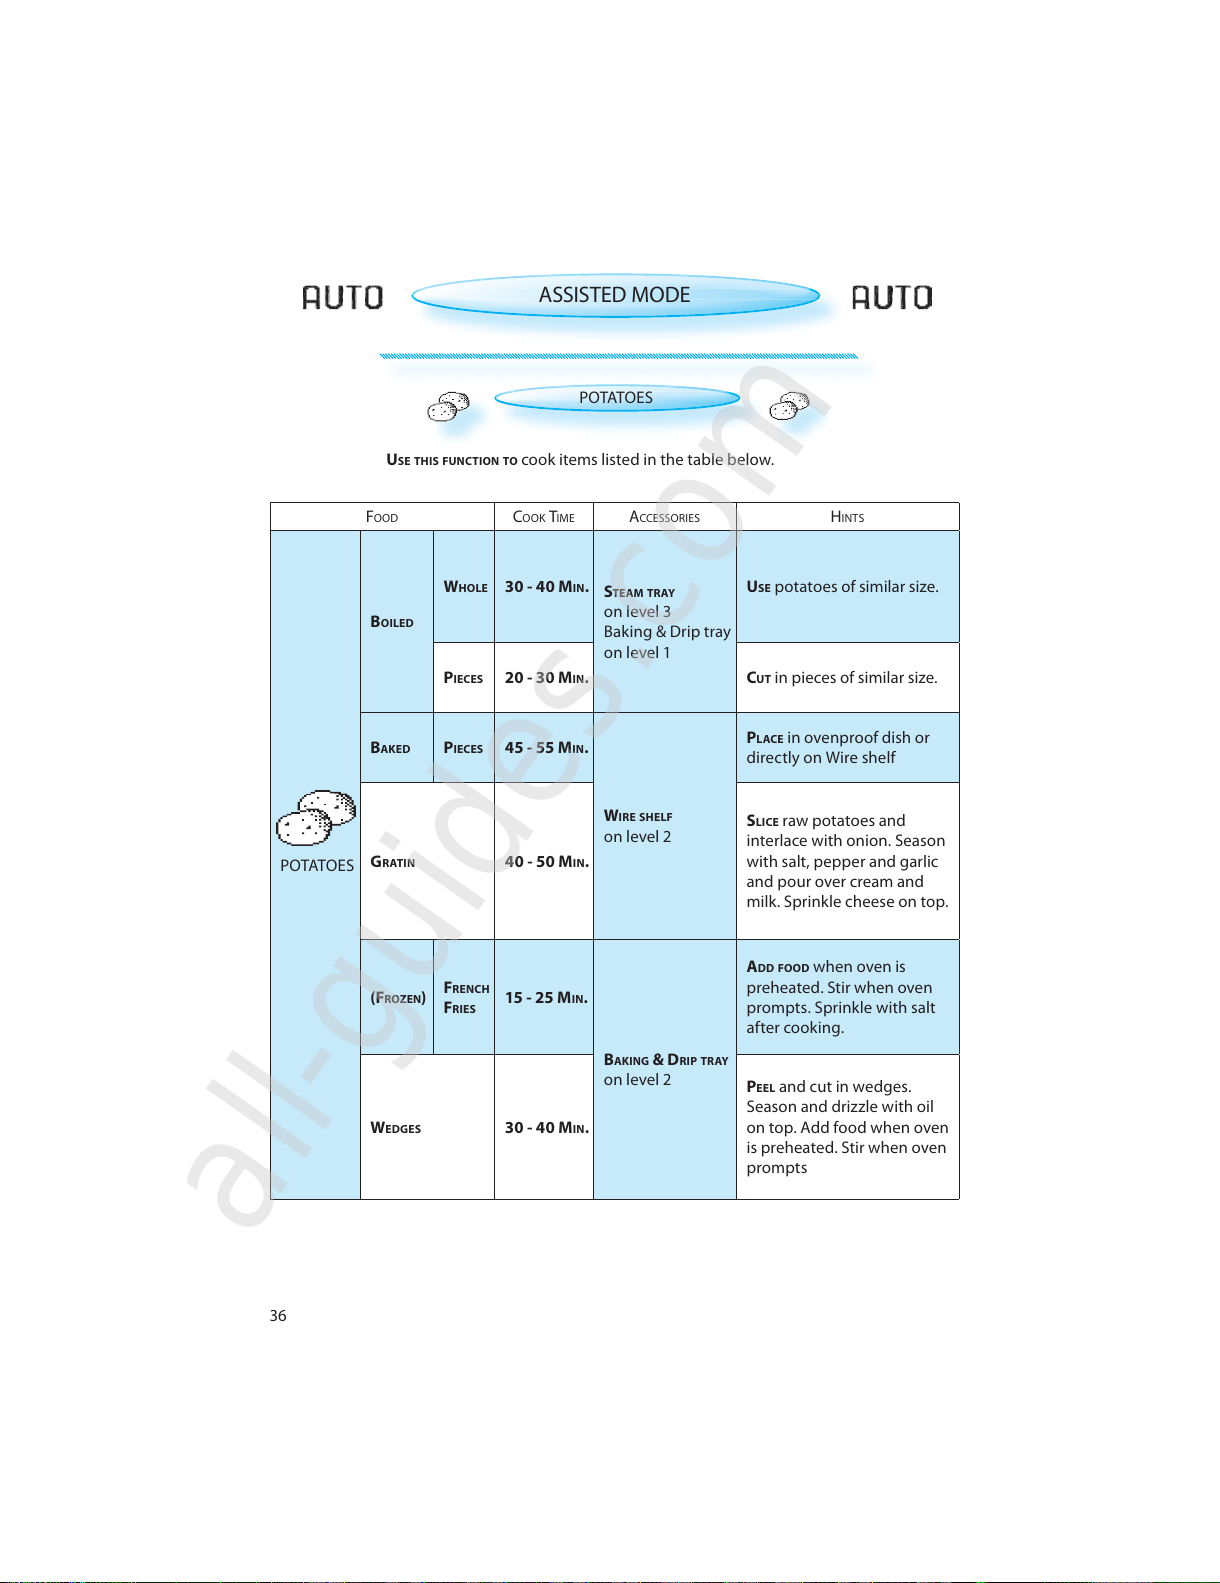
ASSISTED MODE
POTATOES
U
SE THIS FUNCTION TO cook items listed in the table below.
FOOD COOK TIME ACCESSORIES HINTS
POTATOES
B
OILED
WHOLE 30 - 40 MIN.
S
TEAM TRAY
on level 3
Baking & Drip tray
on level 1
U
SE potatoes of similar size.
P
IECES 20 - 30 MIN.CUT in pieces of similar size.
B
AKED PIECES 45 - 55 MIN.
W
IRE SHELF
on level 2
P
LACE in ovenproof dish or
directly on Wire shelf
G
RATIN 40 - 50 MIN.
SLICE raw potatoes and
interlace with onion. Season
with salt, pepper and garlic
and pour over cream and
milk. Sprinkle cheese on top.
(F
ROZEN)
FRENCH
FRIES
15 - 25 MIN.
B
AKING & DRIP TRAY
on level 2
A
DD FOOD when oven is
preheated. Stir when oven
prompts. Sprinkle with salt
after cooking.
W
EDGES 30 - 40 MIN.
PEEL and cut in wedges.
Season and drizzle with oil
on top. Add food when oven
is preheated. Stir when oven
prompts
All manuals and user guides at all-guides.com
all-guides.com
Page 37
37
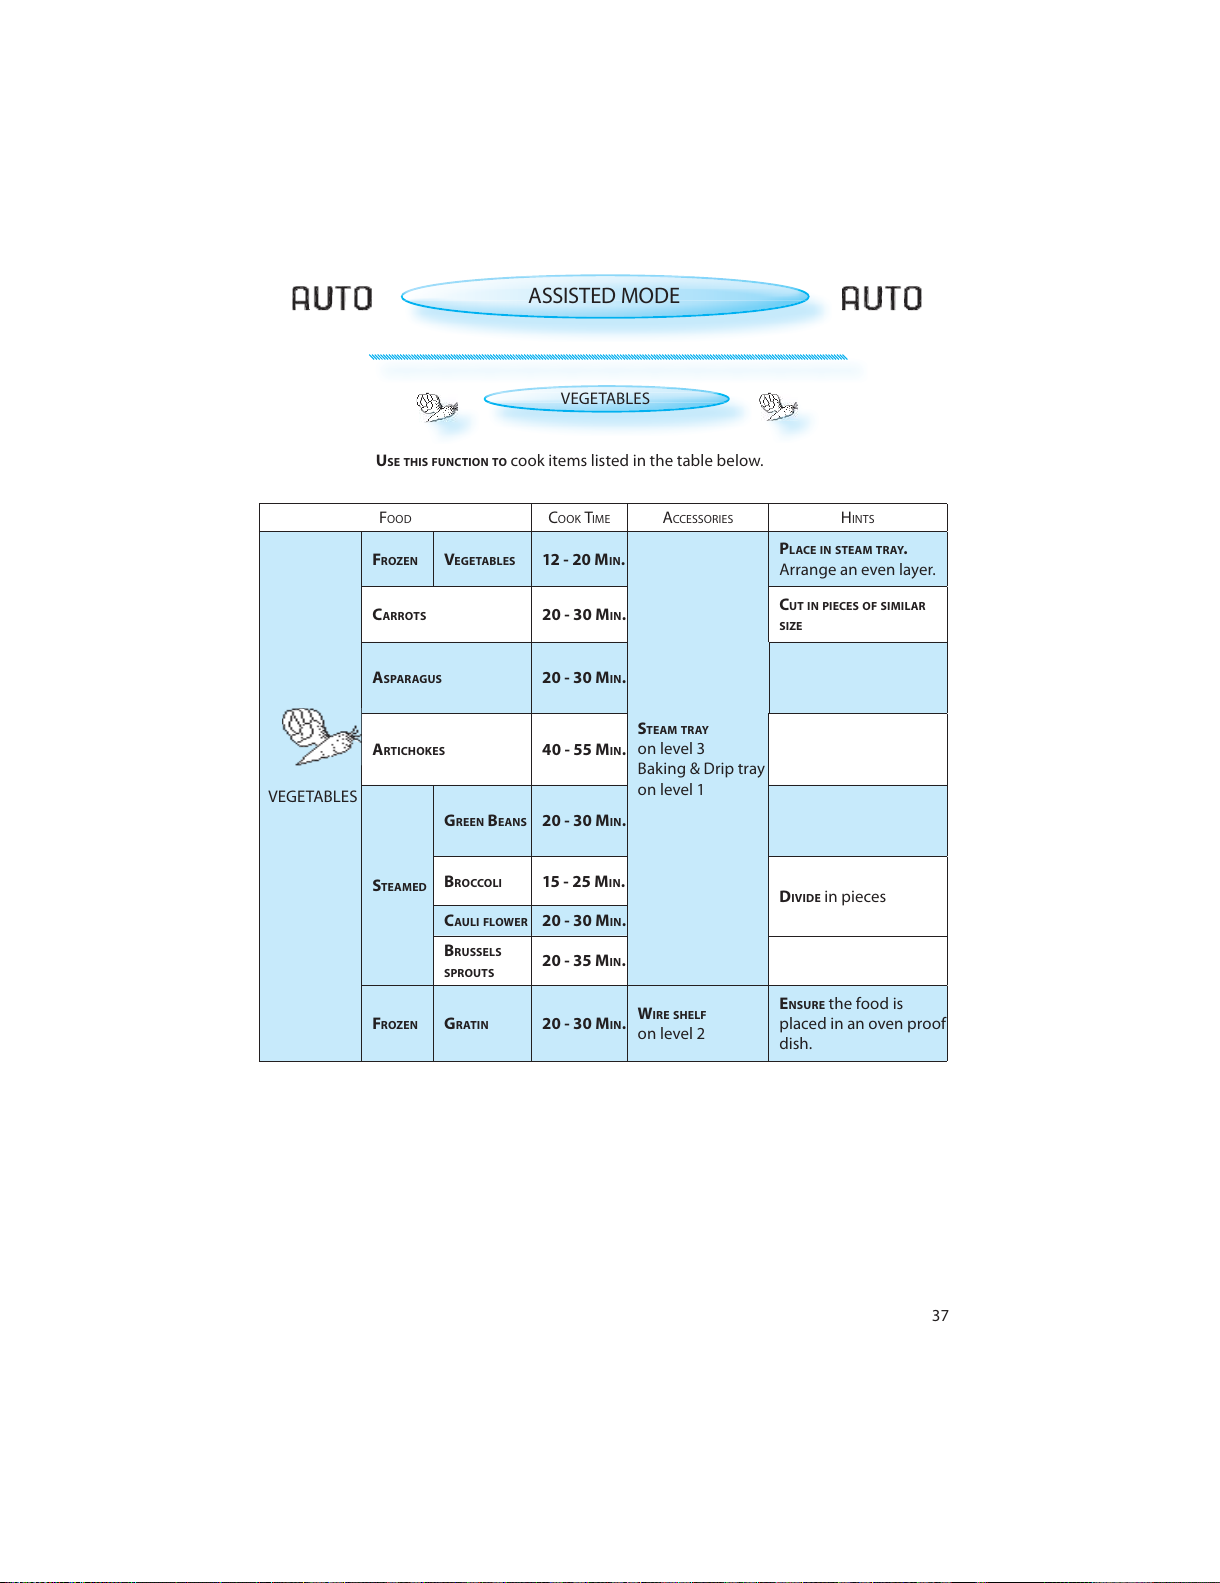
ASSISTED MODE
VEGETABLES
U
SE THIS FUNCTION TO cook items listed in the table below.
FOOD COOK TIME ACCESSORIES HINTS
VEGETABLES
FROZEN VEGETABLES 12 - 20 MIN.
S
TEAM TRAY
on level 3
Baking & Drip tray
on level 1
P
LACE IN STEAM TRAY.
Arrange an even layer.
CARROTS 20 - 30 MIN.
CUT IN PIECES OF SIMILAR
SIZE
ASPARAGUS 20 - 30 MIN.
A
RTICHOKES 40 - 55 MIN.
S
TEAMED
GREEN BEANS 20 - 30 MIN.
B
ROCCOLI 15 - 25 MIN.
D
IVIDE in pieces
C
AULI FLOWER 20 - 30 MIN.
B
RUSSELS
SPROUTS
20 - 35 MIN.
F
ROZEN GRATIN 20 - 30 MIN.
WIRE SHELF
on level 2
ENSURE the food is
placed in an oven proof
dish.
All manuals and user guides at all-guides.com
Page 38
38
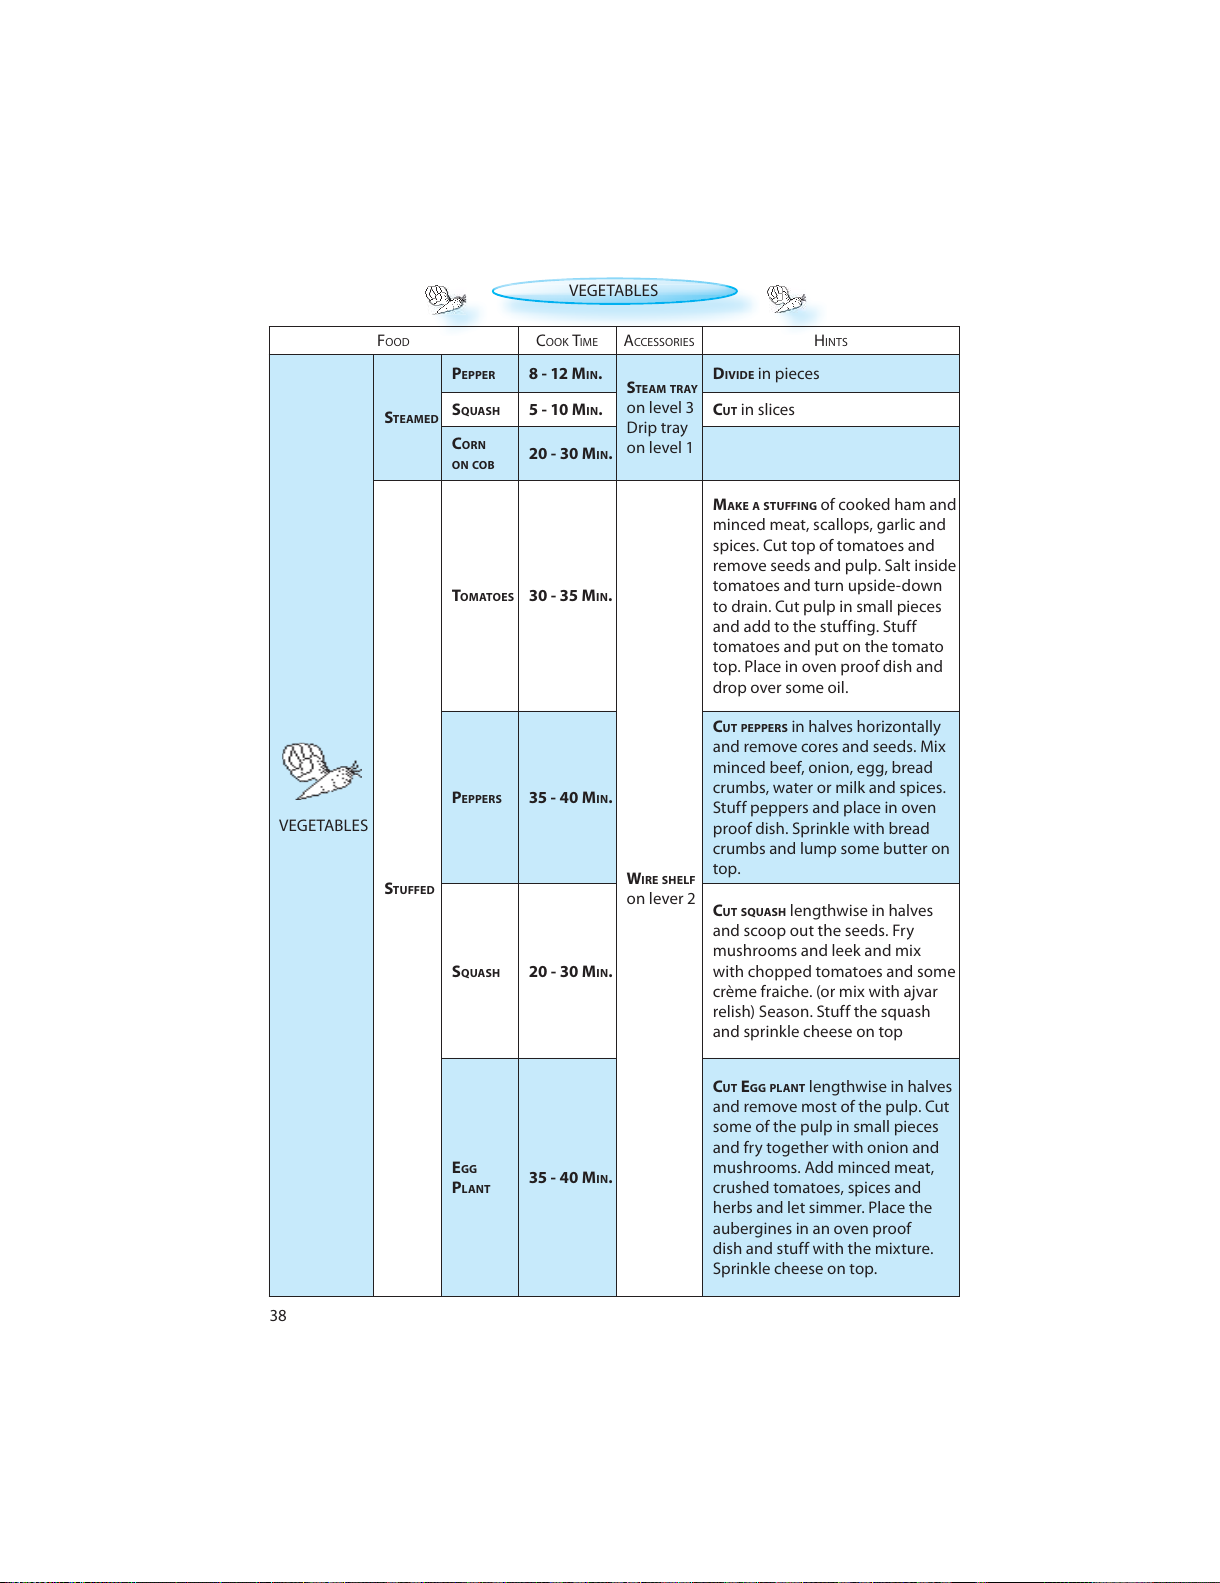
VEGETABLES
FOOD COOK TIME ACCESSORIES HINTS
VEGETABLES
S
TEAMED
PEPPER 8 - 12 MIN.
S
TEAM TRAY
on level 3
Drip tray
on level 1
D
IVIDE in pieces
S
QUASH 5 - 10 MIN.CUT in slices
C
ORN
ON COB
20 - 30 MIN.
S
TUFFED
TOMATOES 30 - 35 MIN.
W
IRE SHELF
on lever 2
M
AKE A STUFFING of cooked ham and
minced meat, scallops, garlic and
spices. Cut top of tomatoes and
remove seeds and pulp. Salt inside
tomatoes and turn upside-down
to drain. Cut pulp in small pieces
and add to the stuffing. Stuff
tomatoes and put on the tomato
top. Place in oven proof dish and
drop over some oil.
P
EPPERS 35 - 40 MIN.
CUT PEPPERS in halves horizontally
and remove cores and seeds. Mix
minced beef, onion, egg, bread
crumbs, water or milk and spices.
Stuff peppers and place in oven
proof dish. Sprinkle with bread
crumbs and lump some butter on
top.
S
QUASH 20 - 30 MIN.
CUT SQUASH lengthwise in halves
and scoop out the seeds. Fry
mushrooms and leek and mix
with chopped tomatoes and some
crème fraiche. (or mix with ajvar
relish) Season. Stuff the squash
and sprinkle cheese on top
E
GG
PLANT
35 - 40 MIN.
C
UT EGG PLANT lengthwise in halves
and remove most of the pulp. Cut
some of the pulp in small pieces
and fry together with onion and
mushrooms. Add minced meat,
crushed tomatoes, spices and
herbs and let simmer. Place the
aubergines in an oven proof
dish and stuff with the mixture.
Sprinkle cheese on top.
All manuals and user guides at all-guides.com
Page 39
39
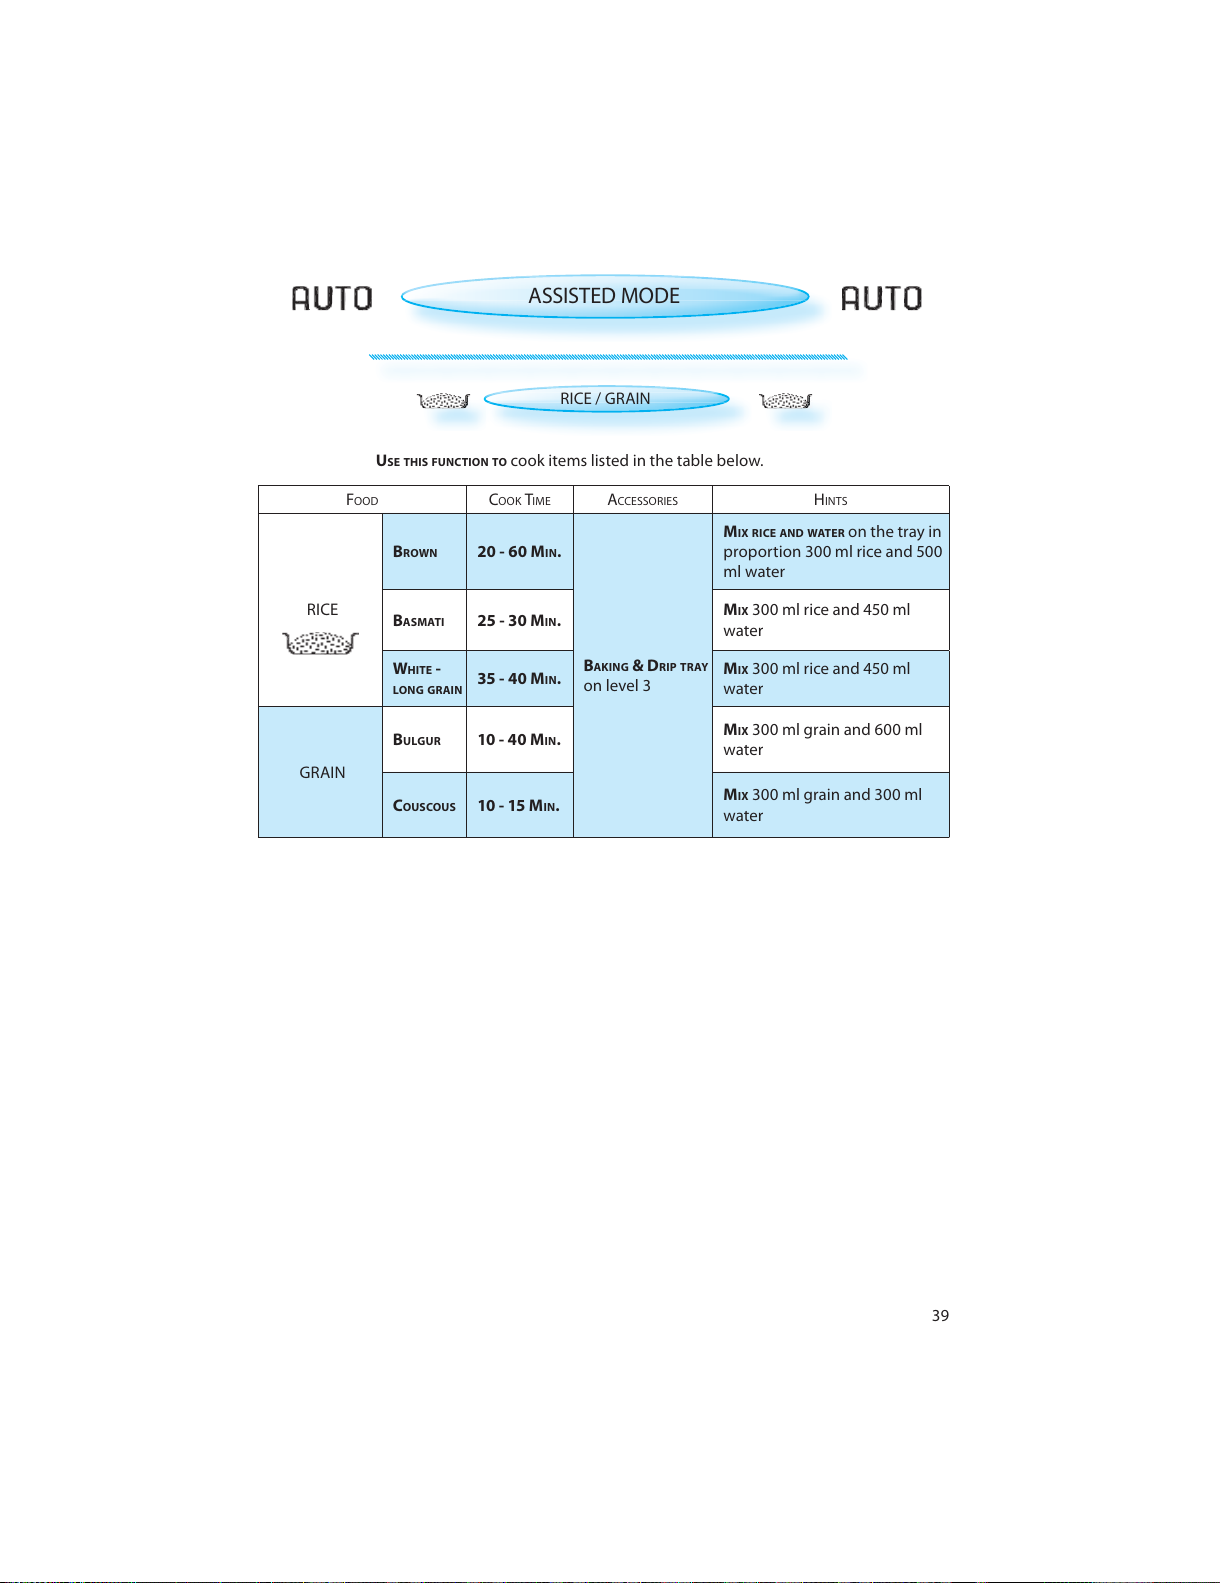
ASSISTED MODE
RICE / GRAIN
U
SE THIS FUNCTION TO cook items listed in the table below.
FOOD COOK TIME ACCESSORIES HINTS
RICE
B
ROWN 20 - 60 MIN.
B
AKING & DRIP TRAY
on level 3
M
IX RICE AND WATER on the tray in
proportion 300 ml rice and 500
ml water
B
ASMATI 25 - 30 MIN.
MIX 300 ml rice and 450 ml
water
W
HITE -
LONG GRAIN
35 - 40 MIN.
MIX 300 ml rice and 450 ml
water
GRAIN
B
ULGUR 10 - 40 MIN.
MIX 300 ml grain and 600 ml
water
COUSCOUS 10 - 15 MIN.
MIX 300 ml grain and 300 ml
water
All manuals and user guides at all-guides.com
Page 40
40
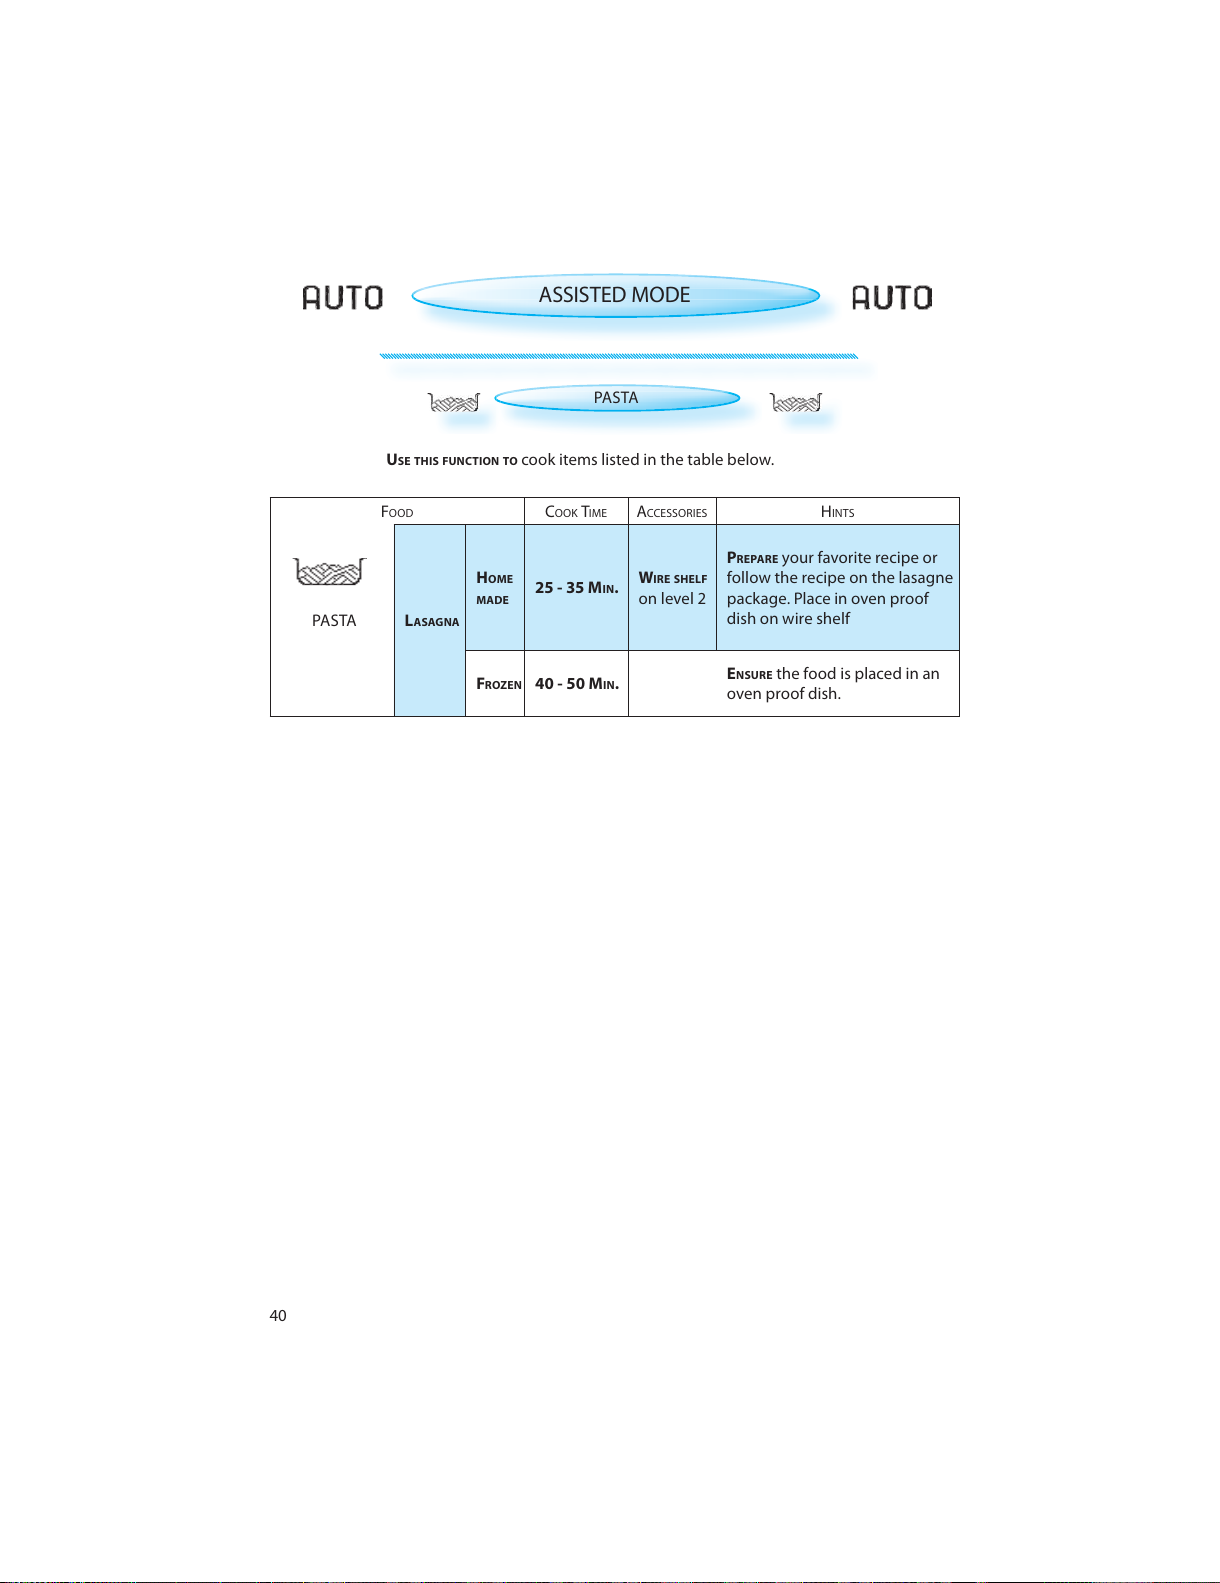
ASSISTED MODE
PAS TA
U
SE THIS FUNCTION TO cook items listed in the table below.
FOOD COOK TIME ACCESSORIES HINTS
PAS TA LASAGNA
HOME
MADE
25 - 35 MIN.
WIRE SHELF
on level 2
PREPARE your favorite recipe or
follow the recipe on the lasagne
package. Place in oven proof
dish on wire shelf
F
ROZEN 40 - 50 MIN.
ENSURE the food is placed in an
oven proof dish.
All manuals and user guides at all-guides.com
Page 41
41
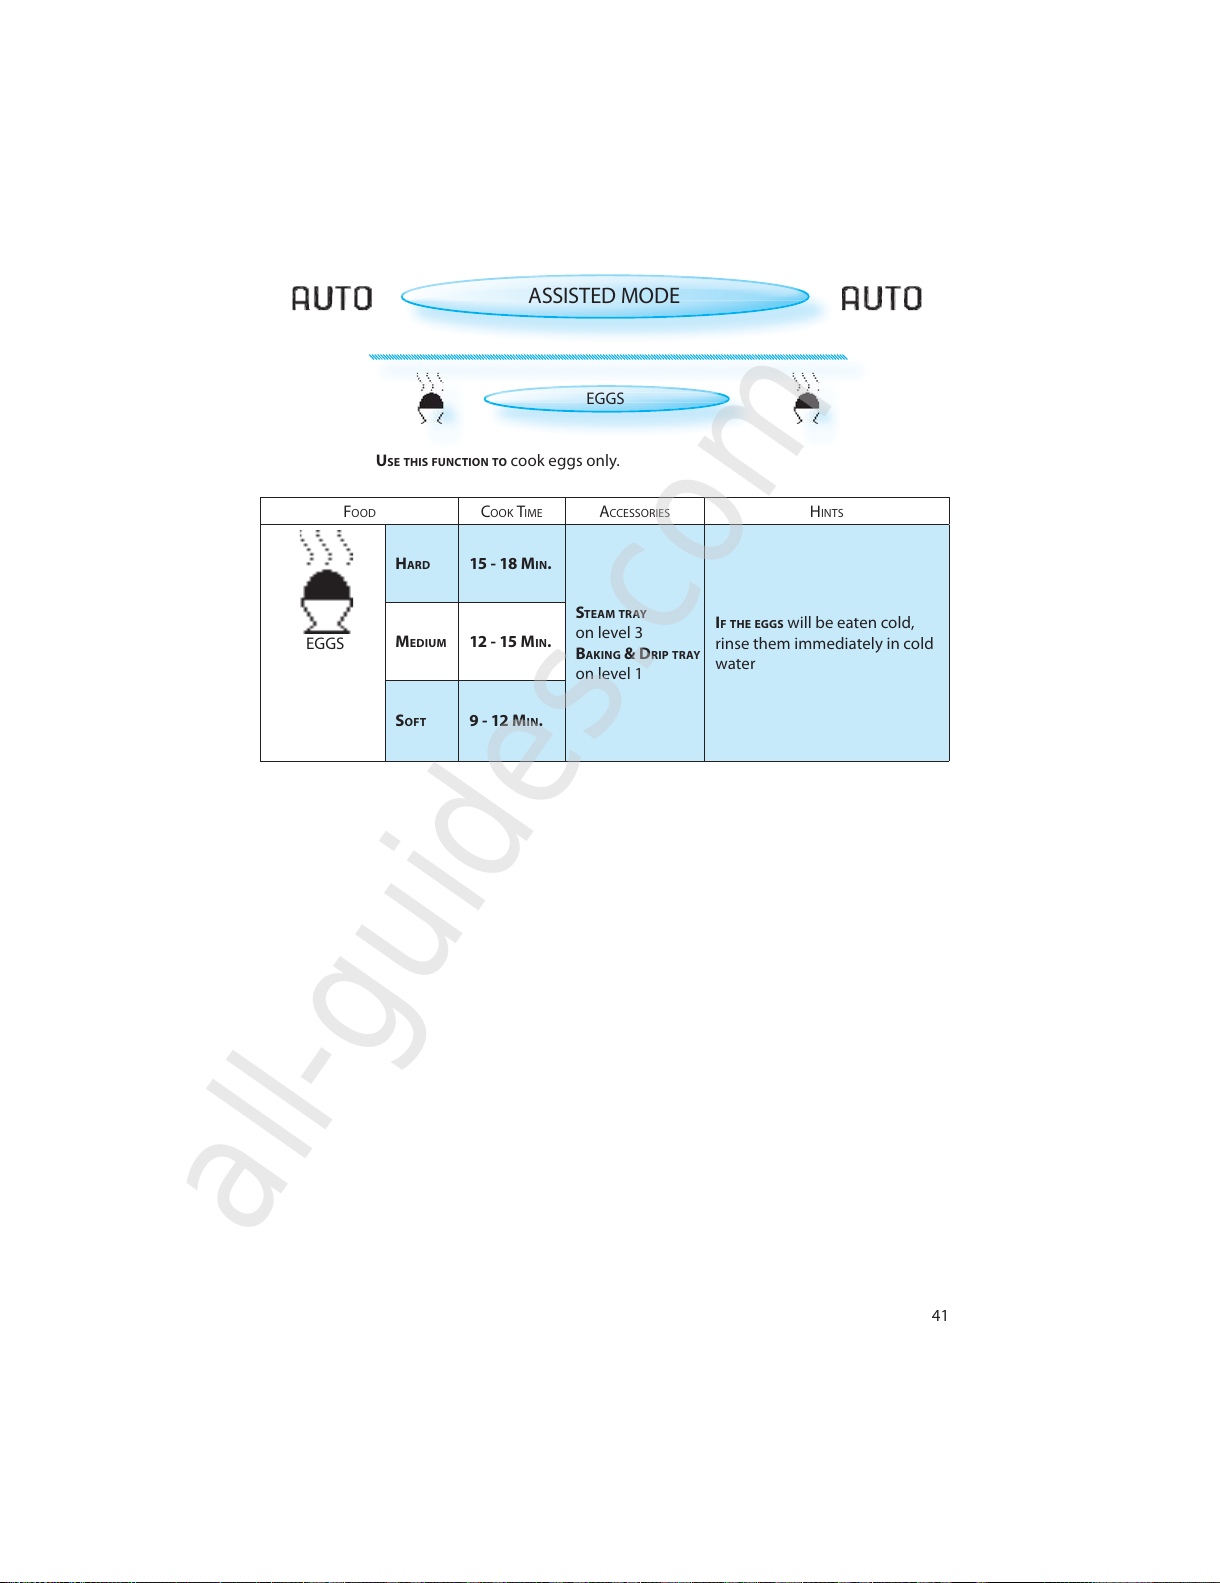
ASSISTED MODE
EGGS
U
SE THIS FUNCTION TO cook eggs only.
FOOD COOK TIME ACCESSORIES HINTS
EGGS
HARD 15 - 18 MIN.
STEAM TRAY
on level 3
BAKING & DRIP TRAY
on level 1
IF THE EGGS will be eaten cold,
rinse them immediately in cold
water
M
EDIUM 12 - 15 MIN.
SOFT 9 - 12 MIN.
All manuals and user guides at all-guides.com
all-guides.com
Page 42
42
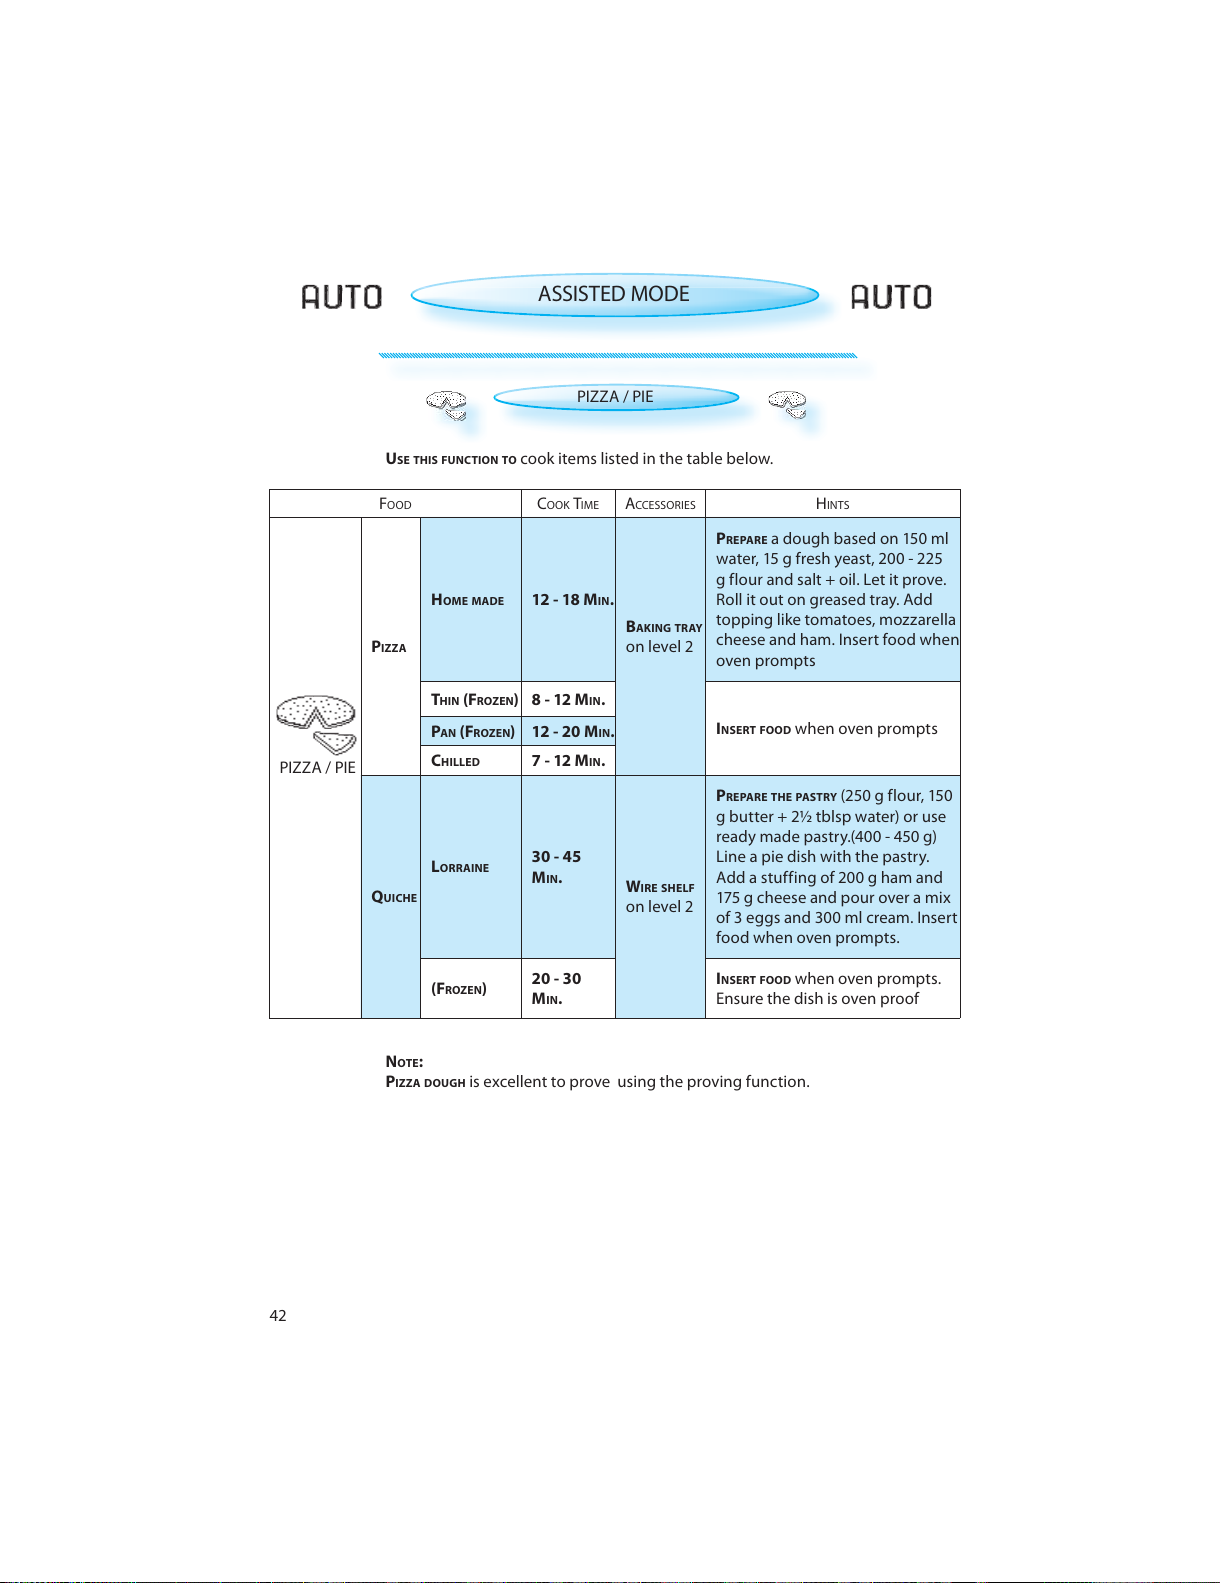
ASSISTED MODE
PIZZA / PIE
U
SE THIS FUNCTION TO cook items listed in the table below.
N
OTE:
PIZZA DOUGH is excellent to prove using the proving function.
FOOD COOK TIME ACCESSORIES HINTS
PIZZA / PIE
P
IZZA
HOME MADE 12 - 18 MIN.
B
AKING TRAY
on level 2
P
REPARE a dough based on 150 ml
water, 15 g fresh yeast, 200 - 225
g flour and salt + oil. Let it prove.
Roll it out on greased tray. Add
topping like tomatoes, mozzarella
cheese and ham. Insert food when
oven prompts
T
HIN (FROZEN) 8 - 12 MIN.
I
NSERT FOOD when oven prompts
P
AN (FROZEN) 12 - 20 MIN.
C
HILLED 7 - 12 MIN.
Q
UICHE
LORRAINE
30 - 45
MIN.
W
IRE SHELF
on level 2
P
REPARE THE PASTRY (250 g flour, 150
g butter + 2½ tblsp water) or use
ready made pastry.(400 - 450 g)
Line a pie dish with the pastry.
Add a stuffing of 200 g ham and
175 g cheese and pour over a mix
of 3 eggs and 300 ml cream. Insert
food when oven prompts.
(F
ROZEN)
20 - 30
MIN.
INSERT FOOD when oven prompts.
Ensure the dish is oven proof
All manuals and user guides at all-guides.com
Page 43
43
ASSISTED MODE
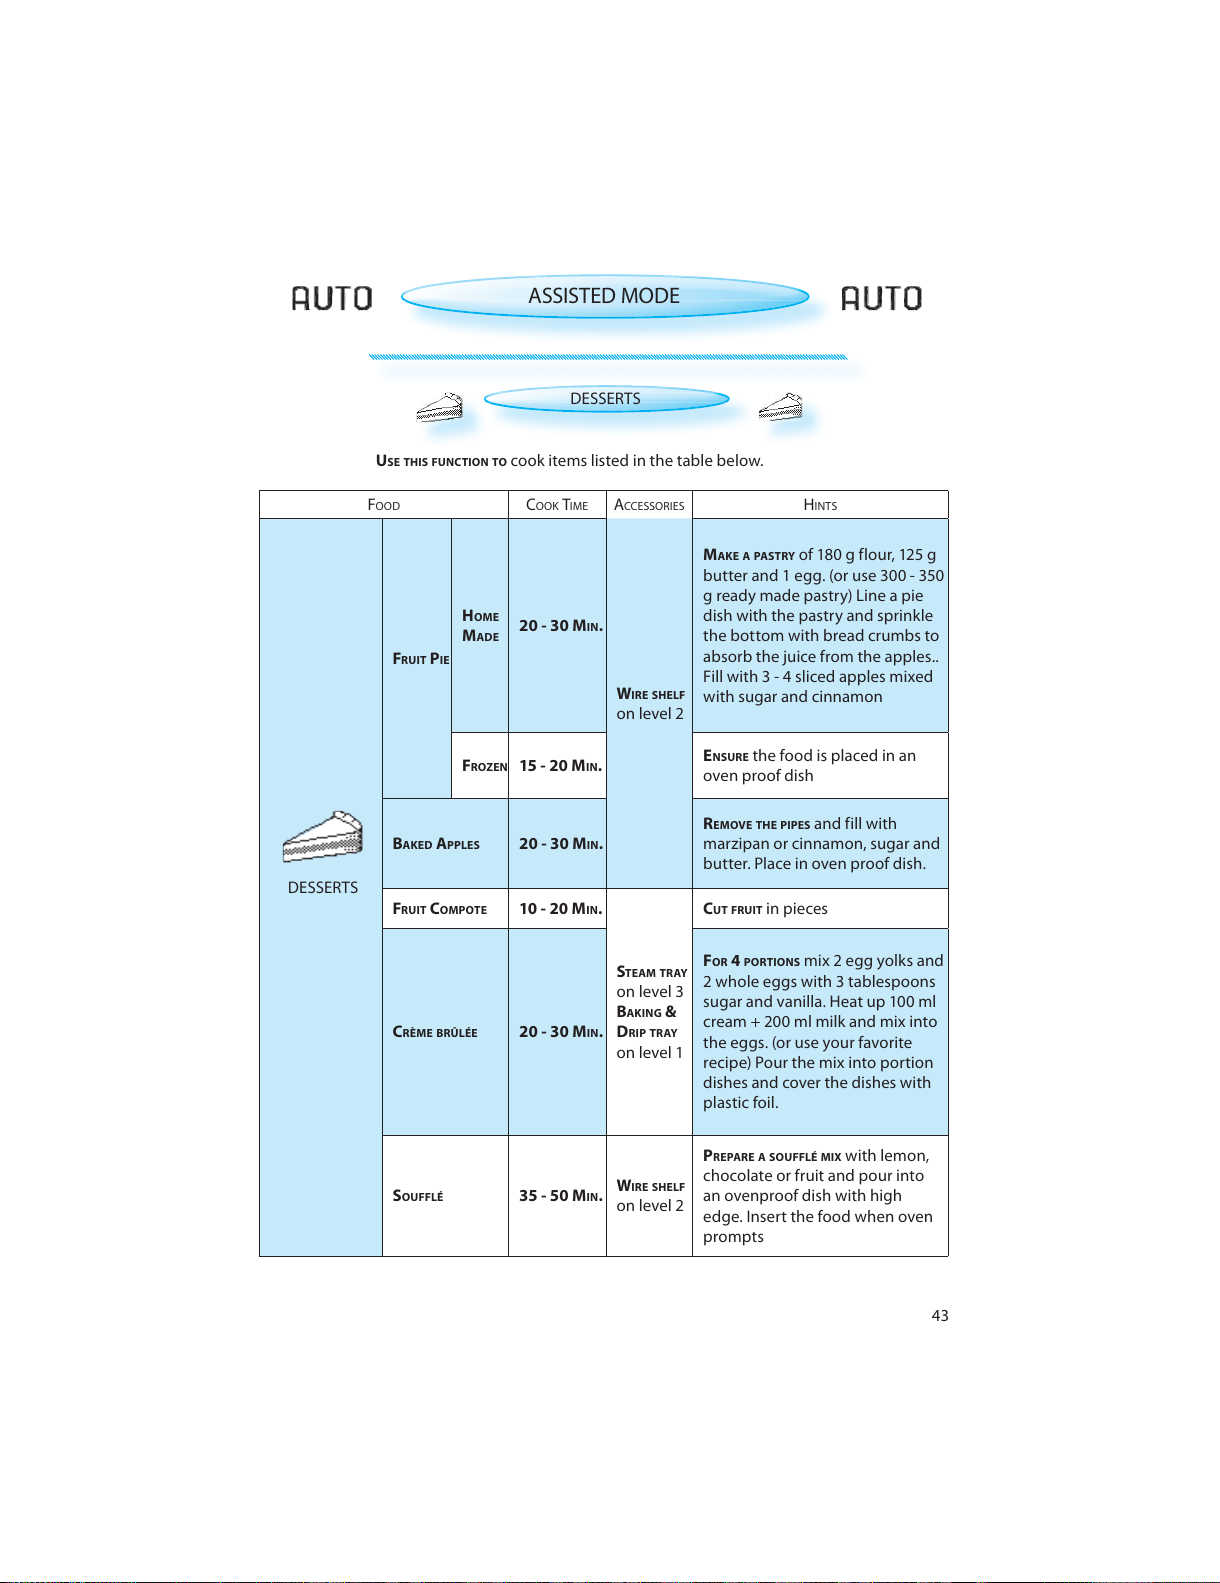
DESSERTS
U
SE THIS FUNCTION TO cook items listed in the table below.
FOOD COOK TIME ACCESSORIES HINTS
DESSERTS
FRUIT PIE
HOME
MADE
20 - 30 MIN.
W
IRE SHELF
on level 2
M
AKE A PAST RY of 180 g flour, 125 g
butter and 1 egg. (or use 300 - 350
g ready made pastry) Line a pie
dish with the pastry and sprinkle
the bottom with bread crumbs to
absorb the juice from the apples..
Fill with 3 - 4 sliced apples mixed
with sugar and cinnamon
F
ROZEN 15 - 20 MIN.
ENSURE the food is placed in an
oven proof dish
B
AKED APPLES 20 - 30 MIN.
REMOVE THE PIPES and fill with
marzipan or cinnamon, sugar and
butter. Place in oven proof dish.
F
RUIT COMPOTE 10 - 20 MIN.
S
TEAM TRAY
on level 3
BAKING &
DRIP TRAY
on level 1
C
UT FRUIT in pieces
C
RÈME BRÛLÉE 20 - 30 MIN.
FOR 4 PORTIONS mix 2 egg yolks and
2 whole eggs with 3 tablespoons
sugar and vanilla. Heat up 100 ml
cream + 200 ml milk and mix into
the eggs. (or use your favorite
recipe) Pour the mix into portion
dishes and cover the dishes with
plastic foil.
S
OUFFLÉ 35 - 50 MIN.
WIRE SHELF
on level 2
PREPARE A SOUFFLÉ MIX with lemon,
chocolate or fruit and pour into
an ovenproof dish with high
edge. Insert the food when oven
prompts
All manuals and user guides at all-guides.com
Page 44
44
ASSISTED MODE
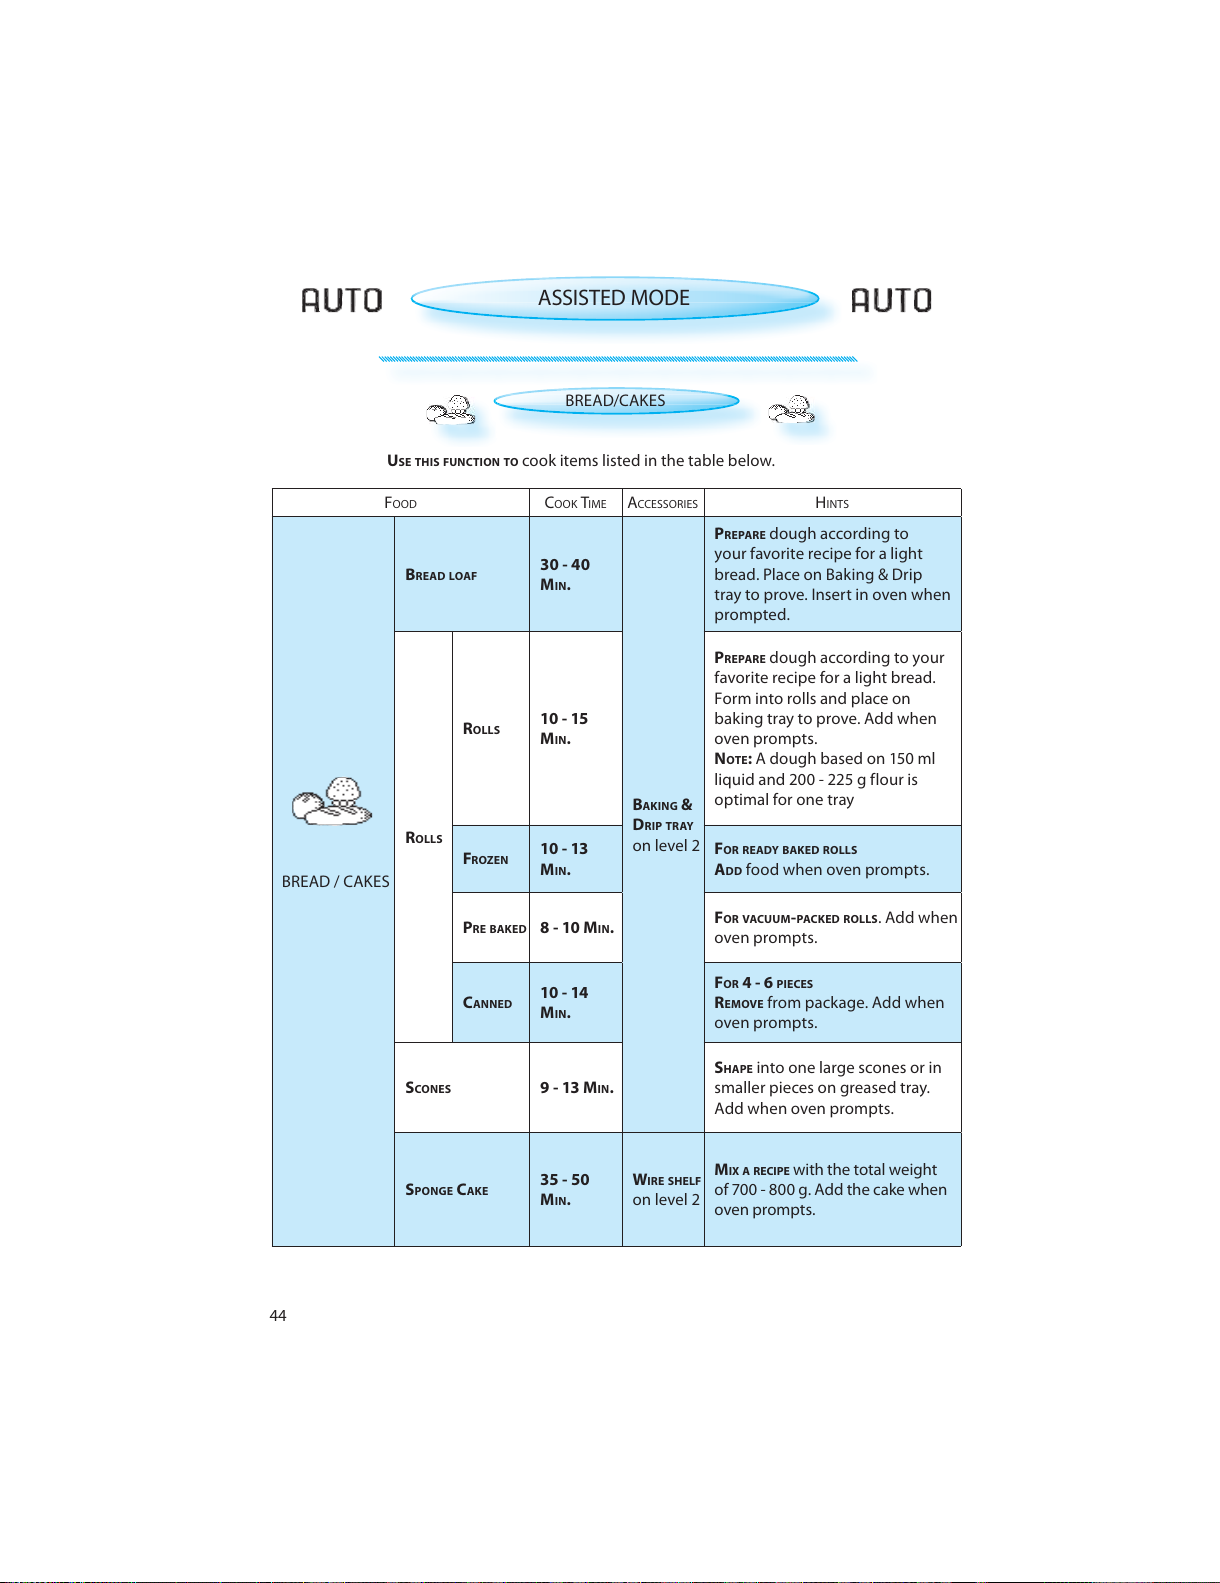
BREAD/CAKES
U
SE THIS FUNCTION TO cook items listed in the table below.
FOOD COOK TIME ACCESSORIES HINTS
BREAD / CAKES
B
READ LOAF
30 - 40
MIN.
B
AKING &
DRIP TRAY
on level 2
P
REPARE dough according to
your favorite recipe for a light
bread. Place on Baking & Drip
tray to prove. Insert in oven when
prompted.
R
OLLS
ROLLS
10 - 15
M
IN.
PREPARE dough according to your
favorite recipe for a light bread.
Form into rolls and place on
baking tray to prove. Add when
oven prompts.
NOTE: A dough based on 150 ml
liquid and 200 - 225 g flour is
optimal for one tray
F
ROZEN
10 - 13
MIN.
FOR READY BAKED ROLLS
ADD food when oven prompts.
P
RE BAKED 8 - 10 MIN.
FOR VACUUM -PACK ED ROLLS . Add when
oven prompts.
C
ANNED
10 - 14
MIN.
FOR 4 - 6 PIECES
REMOVE from package. Add when
oven prompts.
S
CONES 9 - 13 MIN.
SHAPE into one large scones or in
smaller pieces on greased tray.
Add when oven prompts.
S
PONGE CAKE
35 - 50
MIN.
WIRE SHELF
on level 2
MIX A RECIPE with the total weight
of 700 - 800 g. Add the cake when
oven prompts.
All manuals and user guides at all-guides.com
Page 45
45
ASSISTED MODE
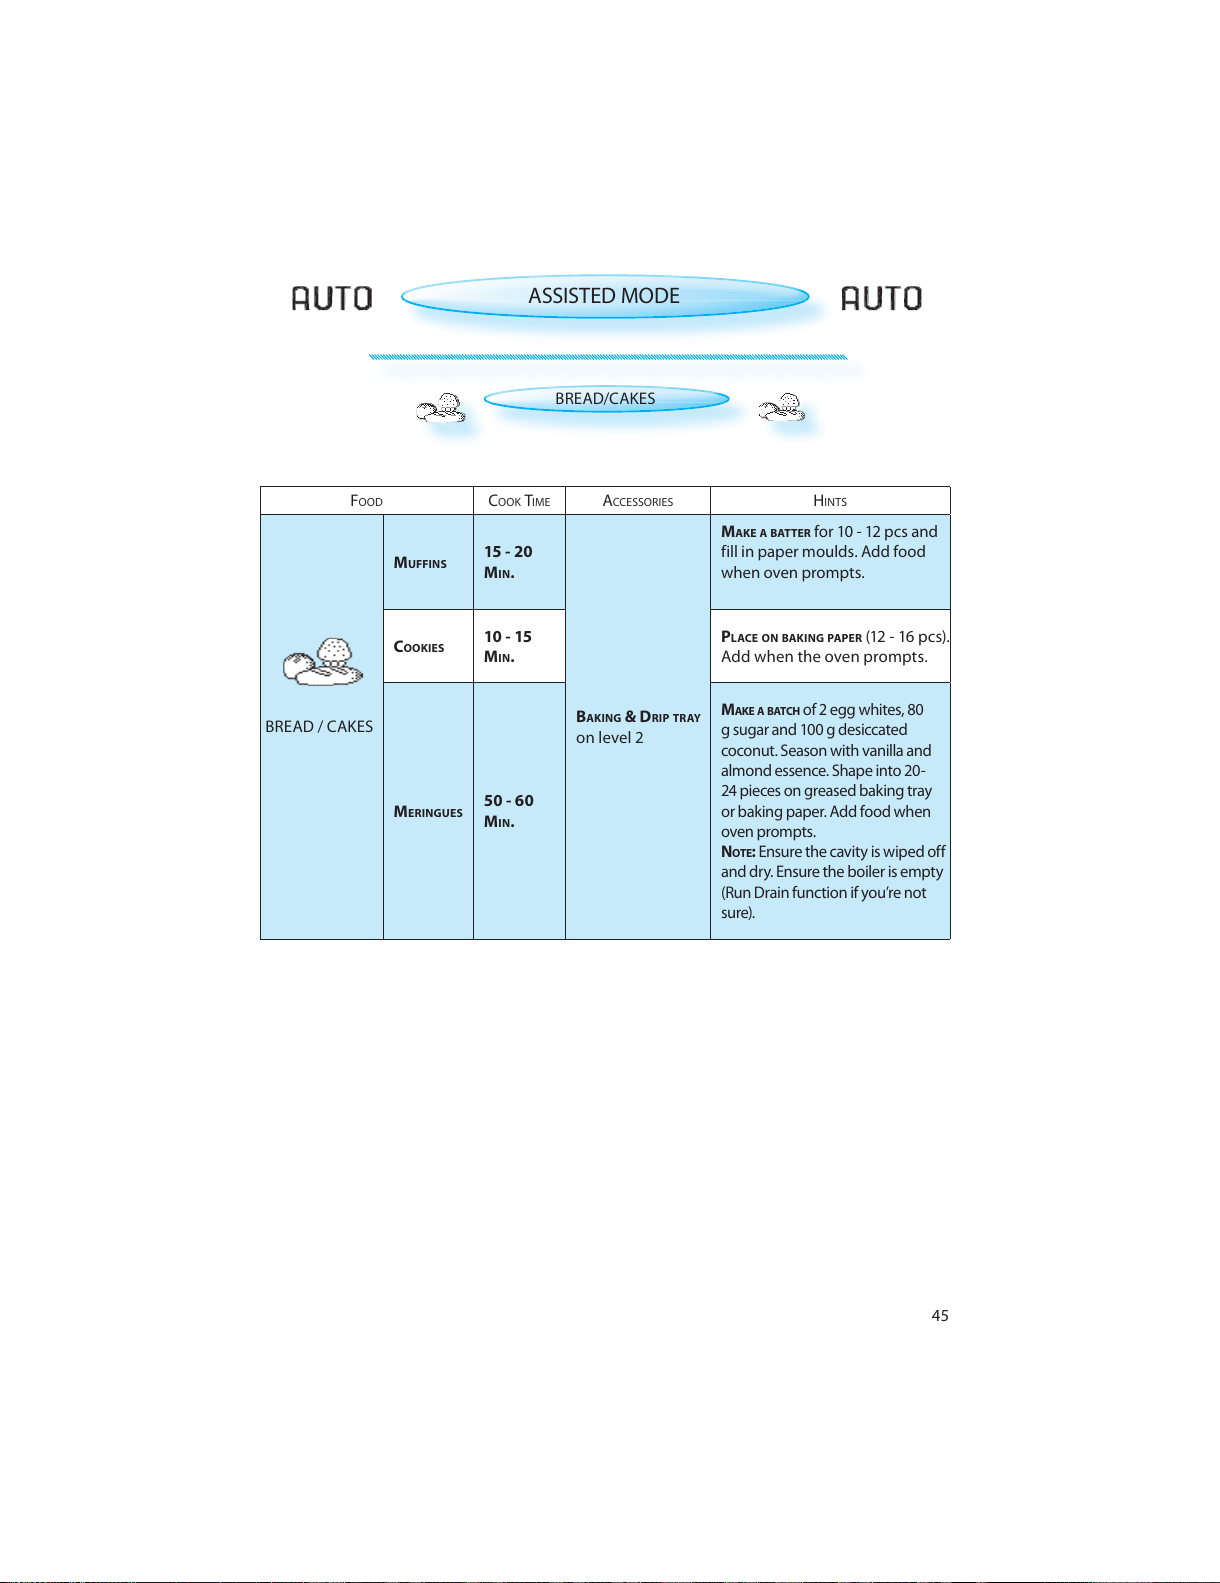
BREAD/CAKES
FOOD COOK TIME ACCESSORIES HINTS
BREAD / CAKES
M
UFFINS
15 - 20
MIN.
B
AKING & DRIP TRAY
on level 2
M
AKE A BATTER for 10 - 12 pcs and
fill in paper moulds. Add food
when oven prompts.
C
OOKIES
10 - 15
MIN.
PLACE ON BAKING PAPE R (12 - 16 pcs).
Add when the oven prompts.
M
ERINGUES
50 - 60
MIN.
MAKE A BATCH of 2 egg whites, 80
g sugar and 100 g desiccated
coconut. Season with vanilla and
almond essence. Shape into 20-
24 pieces on greased baking tray
or baking paper. Add food when
oven prompts.
NOTE: Ensure the cavity is wiped of f
and dry. Ensure the boiler is empty
(Run Drain function if you’re not
sure).
All manuals and user guides at all-guides.com
Page 46
46
MAINTENANCE & CLEANING
CLEANING IS THE ONLY MAINTENANCE normally re-
quired.
FAILURE TO MAINTAIN THE OVEN in a clean condition
could lead to deterioration of the surface that
could adversely affect the life of the appliance
and possibly result in a hazardous situation.
D
O NOT USE METAL SCOURING PADS , ABRA-
SIVE CLEANSERS, steel-wool pads,
gritty washcloths, etc. which
can damage the control pan-
el, and the interior and exteri-
or oven surfaces. Use a sponge with a mild deter-
gent or a paper towel with spray glass cleaner.
Apply spray glass cleaner to a paper towel.
DO NOT SPRAY directly on the oven.
A
T REGULAR INTERVALS, especially if spill
overs have occurred, remove the
shelves, the shelf support and
wipe the interior of the oven
clean. Don’t forget the cavity ceiling
(which is easily overlooked).
REMOVE, EMPTY AND DRY the water container af-
ter each use.
S
ALTS ARE ABRASIVE and if deposited in the cook-
ing compartment, rust could develop in plac-
es. Acid sauces like ketchup, mustard or salted
foods e.g. cured roasts, contain chloride and
acids. These affect steal surfaces. It’s a good
idea to clean the cooled down oven cavity af-
ter each use.
U
SE A MILD DETERGENT, water and a soft cloth to
clean the interior surfaces, front and rear of the
door and the door opening.
D
O NOT ALLOW GREASE or food particles to build
up around the door and door seal. Failure to
keep the seal clean may result in damage on
the fronts or adjacent units, due to the door
not closing properly during operation.
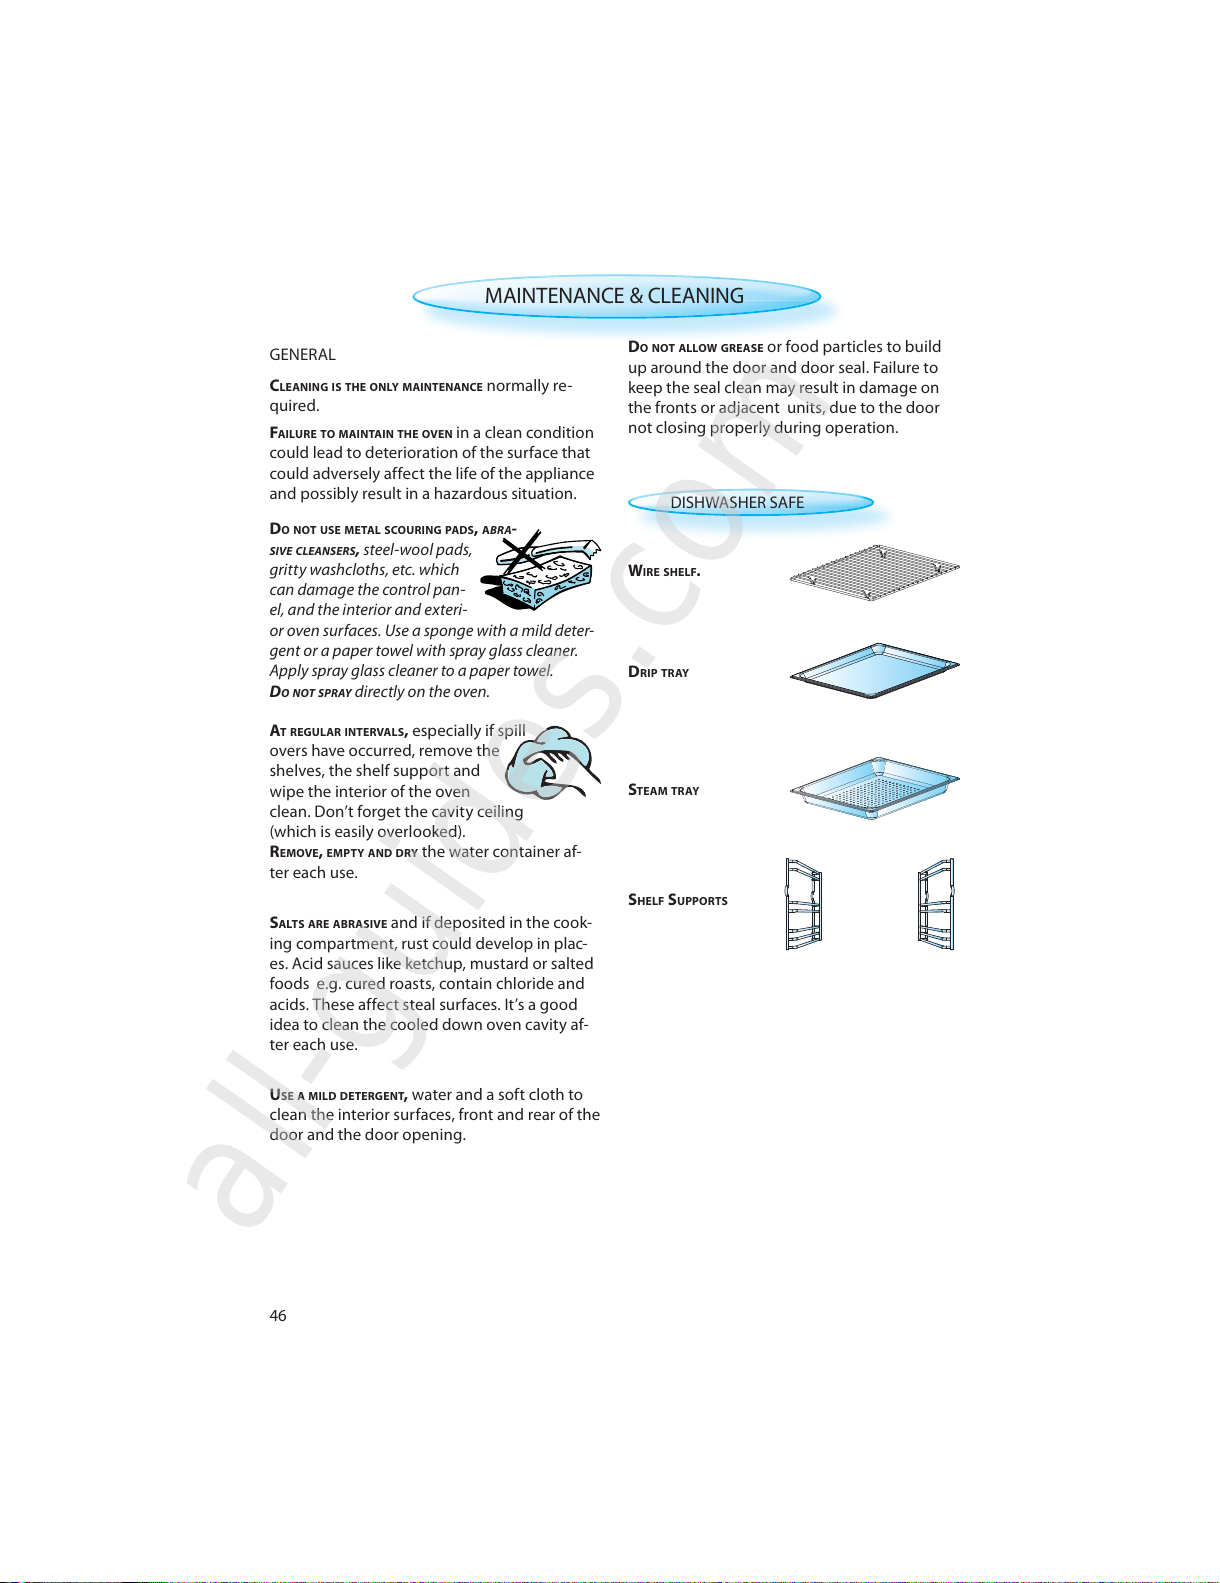
DISHWASHER SAFE
D
RIP TRAY
STEAM TRAY
SHELF SUPPORTS
GENERAL
WIRE SHELF.
All manuals and user guides at all-guides.com
all-guides.com
Page 47
47
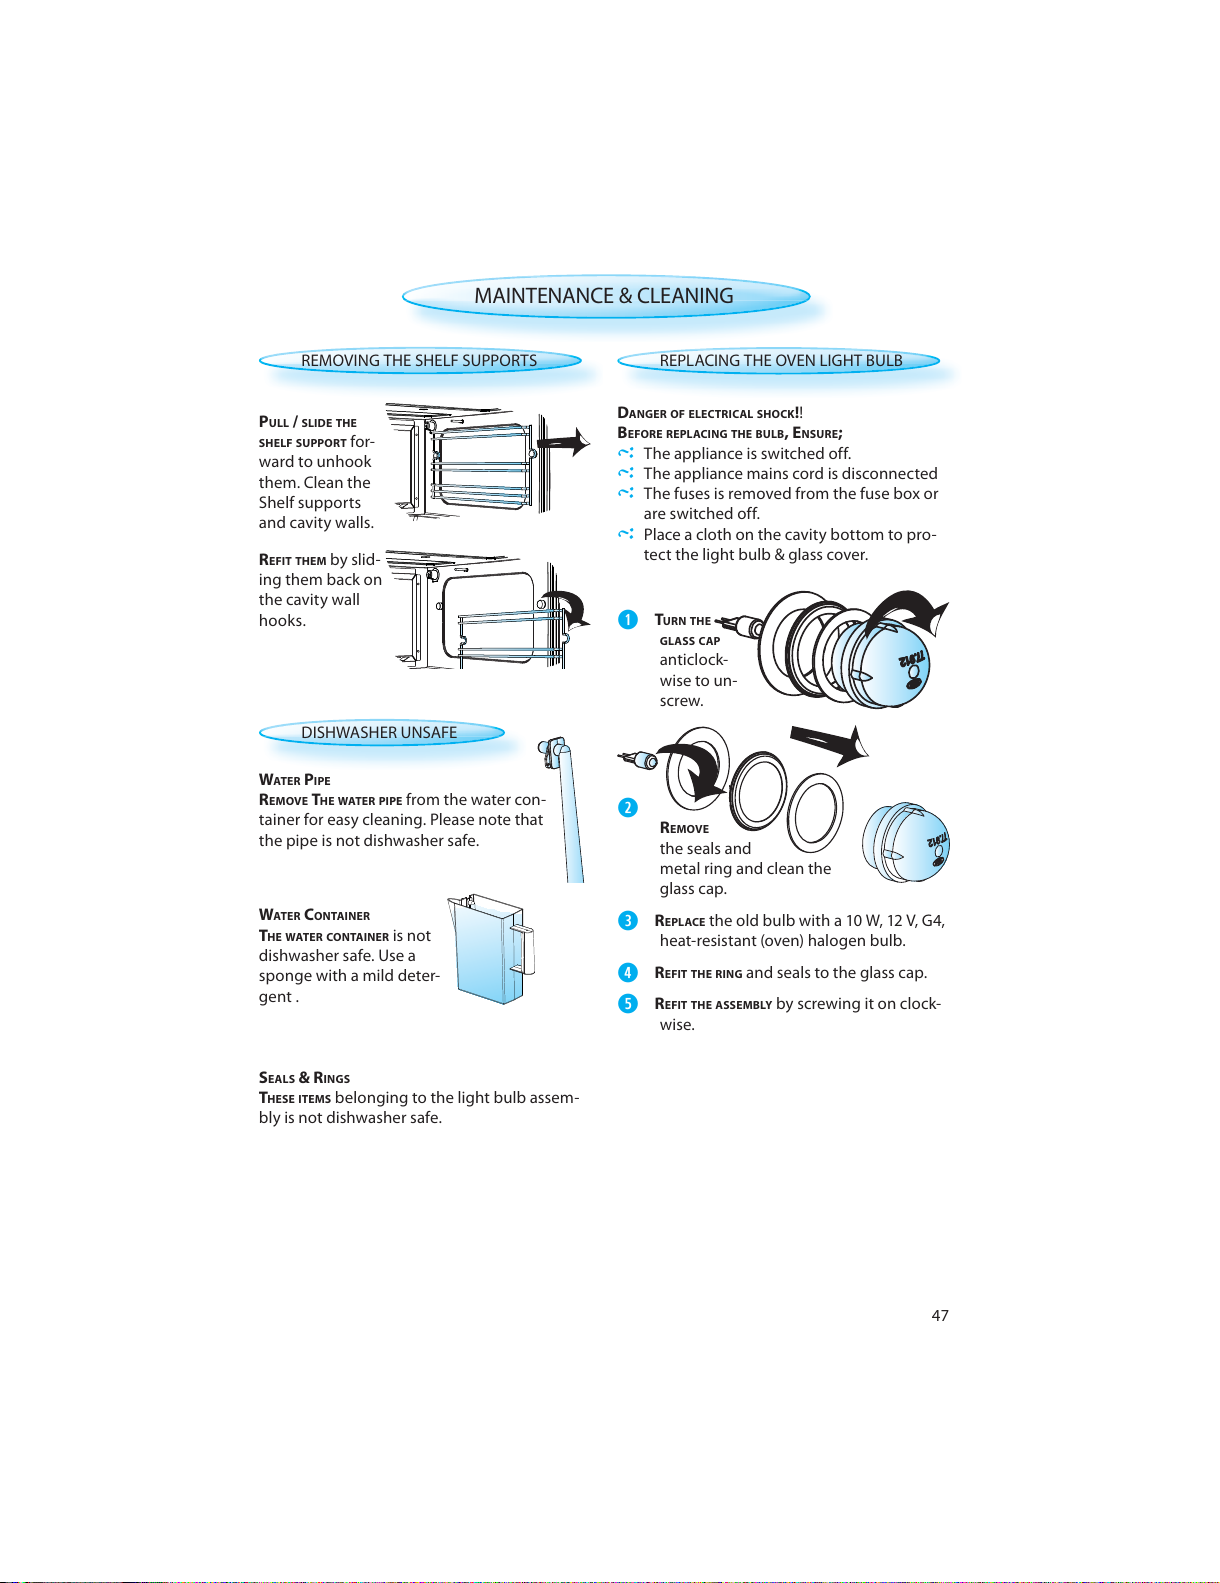
PULL / SLIDE THE
SHELF SUPPORT for-
ward to unhook
them. Clean the
Shelf supports
and cavity walls.
REMOVING THE SHELF SUPPORTS
R
EFIT THEM by slid-
ing them back on
the cavity wall
hooks.
D
ANGER OF ELECTRICAL SHOCK! !
B
EFORE REPLACING THE BULB, ENSURE;
The appliance is switched off.
The appliance mains cord is disconnected
The fuses is removed from the fuse box or
are switched off.
Place a cloth on the cavity bottom to pro-
tect the light bulb & glass cover.
REPLACING THE OVEN LIGHT BULB
TURN THE
GLASS CAP
anticlock-
wise to un-
screw.
REMOVE
the seals and
metal ring and clean the
glass cap.
REPLACE the old bulb with a 10 W, 12 V, G4,
heat-resistant (oven) halogen bulb.
REFIT THE RING and seals to the glass cap.
REFIT THE ASSEMBLY by screwing it on clock-
wise.
DISHWASHER UNSAFE
W
ATE R PIPE
REMOVE THE WATER PIPE from the water con-
tainer for easy cleaning. Please note that
the pipe is not dishwasher safe.
S
EALS & RINGS
THESE ITEMS belonging to the light bulb assem-
bly is not dishwasher safe.
WATER CONTAINER
THE WATER CO NTAINER is not
dishwasher safe. Use a
sponge with a mild deter-
gent .
MAINTENANCE & CLEANING
All manuals and user guides at all-guides.com
Page 48
48
GB
4619- 694- 74721
Whirlpool is a registered trademark of Whirlpool, USA.
© Whirlpool Sweden AB 2009. All rights reserved
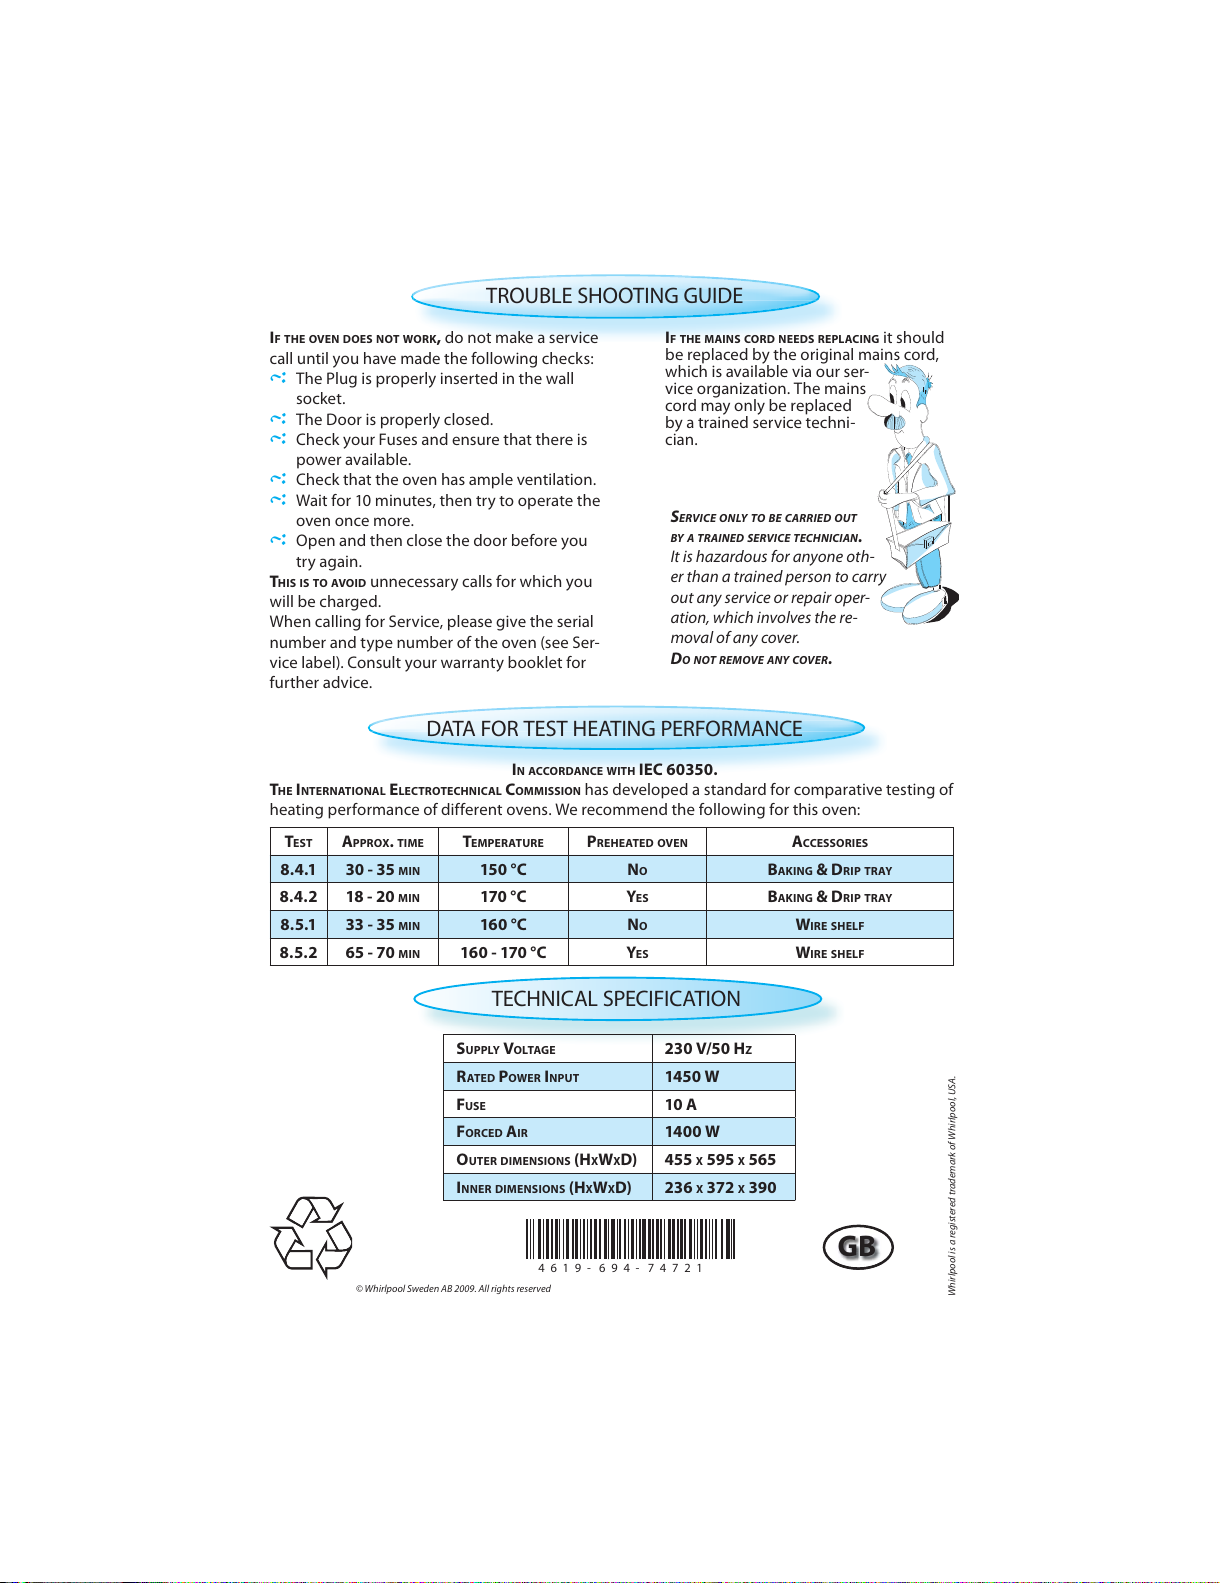
TROUBLE SHOOTING GUIDE
IF THE OVEN DOES NOT WORK, do not make a service
call until you have made the following checks:
The Plug is properly inserted in the wall
socket.
The Door is properly closed.
Check your Fuses and ensure that there is
power available.
Check that the oven has ample ventilation.
Wait for 10 minutes, then try to operate the
oven once more.
Open and then close the door before you
try again.
THIS IS TO AVOID unnecessary calls for which you
will be charged.
When calling for Service, please give the serial
number and type number of the oven (see Ser-
vice label). Consult your warranty booklet for
further advice.
I
F THE MAINS CORD NEEDS REPLACING it should
be replaced by the original mains cord,
which is available via our ser-
vice organization. The mains
cord may only be replaced
by a trained service techni-
cian.
S
ERVICE ONLY TO BE CARRIED OUT
BY A TRAINED SERVICE TECHNICIAN .
It is hazardous for anyone oth-
er than a trained person to carry
out any service or repair oper-
ation, which involves the re-
moval of any cover.
DO NOT REMOVE ANY COVER.
TECHNICAL SPECIFICATION
SUPPLY VOLTAGE 230 V/50 HZ
RATE D POWER INPUT 145 0 W
F
USE 10 A
F
ORCED AIR 1400 W
O
UTER DIMENSIONS (HXWXD) 455 X 595 X 565
I
NNER DIMENSIONS (HXWXD) 236 X 372 X 390
DATA FOR TEST HEATING PERFORMANCE
IN ACCORDAN CE WITH IEC 60350.
THE INTERNATIONAL ELECTROTECHNICAL COMMISSION has developed a standard for comparative testing of
heating performance of different ovens. We recommend the following for this oven:
TEST APPROX. TIME TEMPERATURE PREHEATED OVE N ACCESSORIES
8.4.1 30 - 35 MIN 150 °C NO BAKING & DRIP TRAY
8.4.2 18 - 20 MIN 170 °C YES BAKING & DRIP TRAY
8.5.1 33 - 35 MIN 160 °C NO WIRE SHELF
8.5.2 65 - 70 MIN 160 - 170 °C YES WIRE SHELF
All manuals and user guides at all-guides.com
 Loading...