

Page 1
INDEXGB
BEFORE USING THE COOKTOP Page 11
HINTS FOR PROTECTING THE ENVIRONMENT Page 11
PRECAUTIONS AND GENERAL SUGGESTIONS Page 11
ENERGY SAVING HINTS Page 12
CLEANING AND MAINTAINING THE COOKTOP Page 12
TROUBLE-SHOOTING GUIDE Page 13
AFTER-SALES SERVICE Page 13
INSTALLATION Page 14
NATIONAL SAFETY REGULATIONS Page 16
10
Page 2
BEFORE USING THE COOKTOP
x For best use of your cooktop please
read the instructions for use carefully
and keep them in a safe place.
x Packaging material (plastic bags, polystyrene
parts, etc.) must be stored out of the reach
of children as it is potentially dangerous.
HINTS FOR PROTECTING THE ENVIRONMENT
1. Packaging
The packaging material is 100% recyclable
andismarkedwiththerecyclingsymbol
Ù
to identify the type of material which must
be delivered to the local collection centres.
2. Electrical appliances
The cooktop has been manufactured with
recyclable material. Dispose of it following
the local regulations for the disposal of
waste. Before disposing of it make it
unusable by cutting off the supply cable.
PRECAUTIONS AND GENERAL SUGGESTIONS
x
Before any cleaning or maintenance,
switch off the electricity supply to the
cooktop.
x
Use of a gas appliance produces heat
and humidity in the room where it is
installed. Make sure that the room is
well ventilated or install a cooker hood
with air duct.
x
If the cooktop is used for a long time
extra ventilation may be required (open
a window or increase the hood
ventilation).
x
Keep children away when the
appliances are ON.
x
After using the cooktop turn the knob
to the OFF position “0” and press the
ON/OFF button (see separate Product
Card) to switch the cooktop off. Turn
off the main gas supply tap or the
cylinder tap.
x
If the cooktop is used for too long the
display indicates “H” and the cooktop
switches off until the electronic
components have cooled down.
The indication “H” then flashes. Turn the
knob to “0” and if necessary switch on
again.
x Check that the cooktop was not damaged
during transport.
x Please ensure that the installation and
the gas/electrical connection have been
carried out by a qualified technician,
following the manufacturer’s
instructions and in compliance with
local safety regulations.
x
Attention: the cover (where provided)
could break if overheated. Before closing
it turn all the burners off.
EU declaration of conformity
x This cooktop is intended to come into
n
contact with food products and conforms
with European Directive 89/109/EEC.
x This cooktop (Class 3) has been designed for
use only as a cooking appliance. Any other
use (room heating) is to be considered
incorrect and consequently dangerous.
x This cooktop has been designed,
manufactured and put on the market in
conformity with:
- Safety requirements of the “Gas” Directive
90/ 396/EEC.
- Safety requirements of the “Low Voltage”
Directive 73/23/EEC.
- Protection requirements of the Directive on
Electromagnetic Compatibility 89/336/EEC.
- Requirements of Directive 93/68/EEC.
These instructions are only valid for
those countries of destination whose
identification symbols appear on the
cover of the instruction booklet and on
the appliance.
11
Page 3
ENERGY SAVING HINTS
x
The cooktop has burners and/or hot plate with
different diameters. Use pans with base of the
same diameter or slightly larger than that of the
burners or hot plate.
x
Only use flat-bottomed pans. Using pans with
concave or convex bases is not recommended.
x
The pans must be kept away from the control
area.
Burner Ø container
Highspeed(Large) from24to26cm
Mediumspeed(Medium) from16to22cm
Auxiliary (Small) from 8 to 14 cm
x
If possible, leave covers on pans during cooking.
x
Boil vegetables, potatoes, etc. with little water to
save energy.
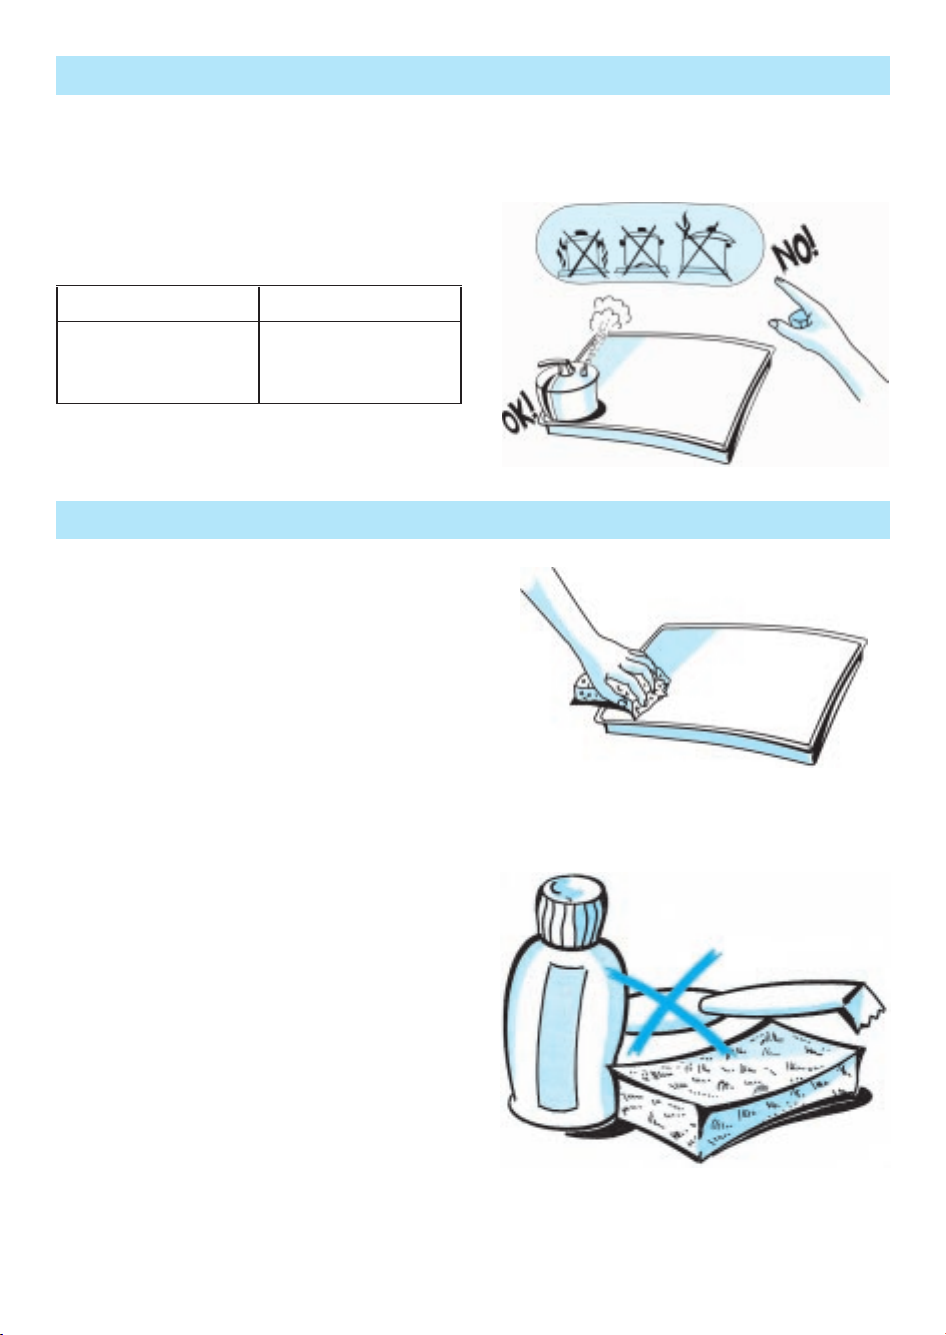
CLEANING AND MAINTAINING THE COOKTOP
Cleaning the cooktop and grids
x
Before cleaning the cooktop switch it off
and wait f or it to cool down.
x
Clean with a cloth moistened in hot water
andsoaporinwaterandliquiddetergent.
x
Do not use abrasive, corrosive or chlorine
based products or steel-wool pads.
x
Do not l eave acid or alkaline substances
(vinegar, salt, lemon juice, etc.) on the
cooktop.
x
Pressure cookers help to save energy and are
quicker than traditional pans.
Cleaning the burners
1.
Remove the grid.
2.
Lift and remove the cap.
3.
Remove the burner pulling it upwards.
4.
Put to soak in hot water and liquid detergent.
5.
Rinse and dry carefully.
6.
Make sure that none of the burner openings
are blocked.
7.
Replace the burner, cap and grid.
N.B.: To avoid damage to the electric
ignition, do not use it when the burners are
not in place.
12
Page 4

TROUBLE-SHOOTING GUIDE
The burner does not light:
y Is the gas supply t ap switched on?
y Has the gas supply (methane) been cut off?
y Is the cylinder empty? (Liquid gas).
y Are the burner openings clogged?
y Have the cap or burner been positioned
correctly after cleaning? (See the section:
cleaning and maintaining the cooktop).
AFTER-SALES SERVICE
Before contacting the After-Sales Service:
1. See whether you can solve the problem
yourself (see “Trouble-shooting guide”).
2. Switch the appliance on again to see
whether the problem has been dealt with.
3. If it has not, contact the After-Sales Service.
Always give:
x the type of fault or any error code No.
x the cooktop model
x the Service number (this is the
number after the word “Service” on
the serial number plate under the
cooktop and on the guarantee).
x your complete address
x your telephone number and
telephone prefix.
y Is there a power cut?
y Has there been a gas leak (AL)?
Turn off the main gas t ap and ventilate the
room until the alarm signal stops.
y Has the cooktop been switched on? (Pilot
light under the ON/OFF button lit up).
l
ERROR CODE No.
The cooktop has a self-diagnosis memory
so that it can signal fault situations, giving
the error code No. on the display, where
the indication “F” appears follows by two
numbers.
If any repairs are r equired, please contact an
authorised customer service centre, as
indicated in the warranty.
In the unlikely e vent that an operation or repair
is carried out by an unauthorised technician,
always request a certification of the job carried
out and insist on the use of original spare
parts.
Failure to comply with these instructions
may compromise the safety and quality of
the product.
13
Page 5

INSTALLATION
Technical information for the installer
This cooktop can be fitted into a working
surface from 20 to 55 mm thick.
Insert a separator panel so that there is a
minimum distance of 145 mm from the upper
part of the working surface to the upper part
of the separator.
Note: Before installation make sure that the
local distribution conditions (gas type and
pressure) and the cooktop adjustments are
compatible (see rating plate).
x
Any c olumn unit must be at least 100 mm
away from the edge of the cooktop.
x
Before installing the cooktop, remove any
protective film. The coatings of the walls of
the unit or appliances next to the cooktop
must be heat resistant (protection against
heat “Y” according to standards EN 60335-2-6).
Assembly
x
Apply the supplied gasket to the cooking
hob (unless i t has already been fitted), after
having cleaned its surface as shown in the
relevant figure.
x
The i nstallation must conform to the local
standards in force.
x
In the room where the cooktop is installed
there must be enough air for correct gas
combustion (see injector tables on the
Product Card).
x
The natural flow of air must occur through
a s uitable opening which must be:
- Permanent and made in the outside walls
of the room to be ventilated, in an area
away from sources of pollution.
- Made so that the opening outlets, both
inside and outside the wall, cannot be
blocked, even accidentally.
- Protected with grids, metal net, etc. so as
not to reduce the useful section indicated
above.
- Situated at roughly floor level and such as
not to cause disturbance to the correct
operation of the combustion product
removal devices.
To fasten the cooking hob, use brackets
supplied with it.
1. Fit the brackets into the relevant bores and fasten
them by m eans of their screws.
2. Make an opening in the worktop, respecting the
dimensions A or B indicated in the enclosed
product description sheet. I f the opening made is
of size
back part of the bottom of the surface.
3. Install the cooking hob in the worktop.
14
remove the two spacerscfrom the
a
a
C
Page 6

INSTALLATION
Electrical connection
Warning: the electrical supply cable and
the plug must be suitable for the
cooktop’s power consumption and the
cable must be long enough so that the
cooktop can be extracted upwards.
x The electrical connections must conform
to local regulations.
x The voltage and power absorbed data
are given on the rating plate.
x Earthing the appliance is obligatory by
law.
The manufacturer declines any
responsibility for damage to people,
pets and goods deriving from failure to
observe the rules given above.
x On installation fit an all-pole switching
device with contact opening distance of
at least 3 mm.
x The supply cable must be replaced with
one of the same characteristics. This
must be done by the After-Sales Service
or a qualified electrician.
Gas supply connection
The gas supply system must conform to
the local regulations in force (see
“National reference standards” section).
To connect the cooktop to the gas mains or
cylinder use a r igid copper or steel pipe with
connections conforming to local r egulations or a
flexible stainless steel hose with continuous wall
conforming to local regulations. Use gasket
for the connection.
Theflexiblemetaltubesmustbeatmost
2mlong.
Attention: If a flexible stainless steel hose
is used, it must be installed so that it
cannot come into contact with a movable
part of the unit and is not obstructed and
so that its whole l ength can be inspected.
a
A
15
Page 7

INSTALLATION
Adaptation to different types of gas
If a gas different from that indicated on the label
is used, adapt the cooktop to t his new function.
To replace the injectors consult the After-Sales
Service or a trained technician.
Injectors not supplied can be obtained from the
After-Sales Service.
1. Connect the cooktop to the on-off tap with a
tube which is suitable for the gas to be used
according to the regulations in force.
2. Replace the injectors (see Product Card),
proceeding as follows:
x Remove the grids (A).
x Extract the burner bodies (B).
x With a Ø 7 socket spanner (C) unscrew the
injector to be replaced.
x Replace with the injector provided for the
new type of gas and reassemble in (D).
x Reassemble the burner bodies and the girds.
x Cancel the calibration indication (set for ....
gas) on the rating plate and position the
plate for the new type of gas near the gas
mains connection. This is to be found in the
bag of injectors supplied.
3. Select the type of gas (see Product Card) on
the basis of the injectors selected in point 3,
proceeding as follows:
x Make sure that the button
Card) is O FF.
x Turn all the knobs to the minimum search
position.
x Keep button -
+
3timeswithin 5 seconds then
=
release. The display shows the type of gas
adjusted in the factory or the last g as
selected.
If the buttons are not selected within 10
seconds, the procedure finishes without
changes.
pressed and press b utton
)
(see Product
U
x To select a different type of gas p ress
button +
sequence C1 f C2 f C3 f C4 f C5.
x To save the type chosen, keep button -
pressed down and press button +
3 times within 5 seconds then release: the
saving is confirmed by an acoustic signal.
4. Automatically adjust the minima (see Product
Card).
choosing according to the
=
f
)
=
NATIONAL SAFETY REGULATIONS
U.K.
Provision for ventilation
The room containing this appliance should have
an air supply in accordance with the current
B.S. 5440: Part 2.
All rooms require a permanent vent in addition
to the openable window. If there are other fuel
burning appliances in the same room, B.S. 5440:
Part 2 should be consulted to determine the
requisite air vent requirements.
If the appliance is installed in a cellar or
basement, it is advisable to provide an air vent
of effective area 6 5 cm, irrespective of the
room volume.
16
Gas Safety Regulations
It is law t hat all gas appliances are installed by
competent persons in accordance with the
current gas safety regulations. Failure to install
appliances correctly could lead to prosecution.
It is in your own interest, and that of safety, to
ensure that the law is complied with.
The hob should be installed in accordance with
the Gas Safety (Installation and Use)
Regulations, the Building Regulations issued by
the Department of the Environment and the
Building Standards (Scotland) (Consolidation)
Regulations issued by the S cottish Development
Department. In the U.K. CORGI registered
installers work to safe standards of practice.
 Loading...