

Page 1

Instructions for
Installation and Use
Contents
Safety Instructions, 3-4
The main parts of your Double Oven, 5
Controls, 6
The electronic programmer, 7
Grill Pan and Handle, 8
Operation when using the Top Oven for Grilling, 9
Guide to Grilling, 10
Using the Top Oven as a Convection Oven, 11
Operation when using the Top Oven as a Convection Oven, 12
Using the Bottom Oven for Fan Cooking, 13
Using the Bottom Oven for Other Functions,
Oven Temperature Charts, 15-16
Care and Cleaning, 17
Installation, 18-21
Troubleshooting, 22
Built-under Electric
double oven
14
Page 2

Page 3
Safety Information
When used properly your appliance is completely
safe but as with any electrical product there are
certain precautions that must be observed.
PLEASE READ THE PRECAUTIONS BELOW
BEFORE USING YOUR APPLIANCE.
Always
Always make sure you remove all packaging
and literature from inside the oven and grill
compartments before switching on for the first time.
Always make sure you understand the controls
prior to using the appliance.
Always keep children away from the appliance
when in use as the surfaces will get extremely hot
during and after cooking.
Always make sure all controls are turned off when
you have finished cooking and when not in use.
Always stand back when opening an oven door to
allow any build up of steam or heat to disperse.
Always use dry, good quality oven gloves when
removing items from the oven/grill.
Always take care to avoid heat/steam burns when
operating the controls.
Always turn off the electricity supply at the wall
switch before cleaning and allow the appliance to
cool.
Always make sure the shelves are in the correct
position before switching on the oven.
Always keep the oven and grill doors closed when
the appliance is not in use.
Always take care when removing utensils from
the top oven when the main oven is in use as the
contents may be hot.
Always keep the appliance clean as a build up of
grease or fat from cooking can cause a fire.
Always follow the basic principles of food handling
and hygiene to prevent the possibility of bacterial
growth.
Always keep ventilation slots clear of obstructions.
Always refer servicing to a qualified appliance
service engineer.
During use the oven becomes hot. Care should be
taken to avoid touching heating elements inside
the oven.
SAFETY ADVICE
IN THE EVENT OF A CHIP PAN OR ANY OTHER
PAN FIRE:
1. TURN OFF THE COOKER APPLIANCE AT THE
WALL SWITCH.
2. COVER THE PAN WITH A FIRE BLANKET OR
DAMP CLOTH, this will smother the flames and
extinguish the fire.
3. LEAVE THE PAN TO COOL FOR AT LEAST 60
MINUTES BEFORE MOVING IT. Injuries are often
caused by picking up a hot pan and rushing
outside with it. NEVER USE A FIRE EXTINGUISHER
TO PUT OUT A PAN FIRE as the force of the
extinguisher is likely to tip the pan over. Never use
water to extinguish oil or fat fires.
Never
Never leave children unsupervised where a
cooking appliance is installed as all cooking
surfaces will be hot during and after use.
Never allow anyone to sit or stand on any part of
the appliance.
Never store items above the appliance that
children may attempt to reach.
Never remove the oven shelves whilst the oven is
hot.
Never heat up unopened food containers as
pressure can build up causing the container to
burst.
Never store chemicals, food stuffs or pressurised
containers in or on the appliance, or in cabinets
immediately above or next to the appliance.
Never operate the grill with the door closed as this
will cause the appliance to overheat.
Never use the appliance as a room heater.
Never use the grill to warm plates.
Never dry any items on the oven doors.
Never install the appliance next to curtains or other
soft furnishings.
Never allow children to play with the appliance
controls.
Never use 'steam cleaners'.
Children should be supervised to ensure that they do
not play with the appliance.
! The appliance should not be operated by people
(including children) with reduced physical, sensory
or mental capacities, by inexperienced individuals or
by anyone who is not familiar with the product. These
individuals should, at the very least, be supervised by
someone who assumes responsibility for their safety or
receive preliminary instructions relating to the operation
of the appliance.
! The appliance must be used by adults only for the
preparation of food, in accordance with the instructions
outlined in this booklet. Any other use of the appliance
(e.g. for heating the room) constitutes improper use
and is dangerous. The manufacturer may not be
held liable for any damage resulting from improper,
incorrect and unreasonable use of the appliance.
SAFETY INSTRUCTIONS
3
Before using the appliance, read these safety
instructions. Keep them nearby for future
reference.
These instructions and the appliance itself provide
important safety warnings, to be observed at all
times. The manufacturer declines any liability for
failure to observe these safety instructions, for
inappropriate use of the appliance or incorrect
setting of controls.
Very young children (0-3 years) should be kept
away from the appliance. Young children (3-8
years) should be kept away from the appliance
unless continuously supervised. Children from 8
years old and above and persons with reduced
physical, sensory or mental capabilities or lack of
experience and knowledge can use this appliance
only if they are supervised or have been given
instructions on safe use and understand the
hazards involved. Children must not play with the
appliance. Cleaning and user maintenance must
not be carried out by children without supervision.
WARNING: The appliance and its accessible
parts become hot during use. Care should be taken
to avoid touching heating elements. Children less
than 8 years of age must be kept away unless
continuously supervised.
N ever leave the appliance unattended
during food drying. If the appliance is suitable
for probe usage, only use a temperature probe
recommended for this oven - risk of re.
Keep clothes or other ammable materials
away from the appliance, until all the components
have cooled down completely - risk of re. Always
be vigilant when cooking foods rich in fat, oil or
when adding alcoholic beverages - risk of re. Use
oven gloves to remove pans and accessories. At
the end of cooking, open the door with caution,
allowing hot air or steam to escape gradually
before accessing the cavity - risk of burns. Do not
obstruct hot air vents at the front of the oven - risk
of re.
Exercise caution when the oven door is in the
open or down position, to avoid hitting the door.
PERMITTED USE
CAUTION: The appliance is not intended to
be operated by means of an external switching
device, such as a timer, or separate remote
controlled system.
This appliance is intended to be used in
household and similar applications such as: sta
kitchen areas in shops, oces and other working
environments; farm houses; by clients in hotels,
motels, bed & breakfast and other residential
environments.
No other use is permitted (e.g. heating rooms).
IMPORT
ANT TO BE READ AND OBSERVED
This appliance is not for professional use. Do
not use the appliance outdoors.
Do not st
ore explosive or ammable substances
(e.g. gasoline or aerosol cans) inside or near the
appliance - risk of re.
INSTALLATION
The appliance must be handled and installed by
two or more persons - risk of injury. Use protective
gloves to unpack and install - risk of cuts.
Installation, including water supply (if any)
and electrical connections, and repairs must
be carried out by a qualied technician. Do not
repair or replace any part of the appliance unless
specically stated in the user manual. Keep
children away from the installation site. After
unpacking the appliance, make sure that it has
not been damaged during transport. In the event
of problems, contact the dealer or your nearest
After-sales Service. Once installed, packaging
waste (plastic, styrofoam parts etc.) must be
stored out of reach of children - risk of suocation.
The appliance must be disconnected from the
power supply before any installation operation risk of electrical shock. During installation, make
sure the appliance does not damage the power
cable - risk of re or electrical shock. Only activate
the appliance when the installation has been
completed.
Carry out all cabinet cutting works before tting
the appliance in the furniture and remove all wood
chips and sawdust. Do not obstruct the minimum
gap between the worktop and the upper edge of
the oven - risk of burns.
Do not remove the oven from its polystyrene foam
base until the time of installation.
After installation, the bottom of the appliance
must no longer be accessible - risk of burn.
Do not install the appliance behind a decorative
door - risk of re.
ELECTRICAL WARNINGS
The rating plate is on the front edge of the oven
(visible when the door is open).
It must be possible to disconnect the appliance
from the power supply by unplugging it if plug
is accessible, or by a multi-pole switch installed
upstream of the socket in accordance with the
wiring rules and the appliance must be earthed
in conformity with national electrical safety
standards.
Do not use extension leads, multiple sockets
or adapters. The electrical components must not
be accessible to the user after installation. Do not
use the appliance when you are wet or barefoot.
Do not operate this appliance if it has a damaged
power cable or plug, if it is not working properly,
or if it has been damaged or dropped.
Page 4

If the supply cord is damaged, it must be
4
replaced with an identical one by the manufacturer,
its service agent or similarly qualied persons in
order to avoid a hazard - risk of electrical shock.
In case of replacement of power cable, contact
an authorized service center.
CLEANING AND MAINTENANCE
WARNING: Ensure that the appliance is switched
o and disconnected from the power supply
before performing any maintenance operation;
never use steam cleaning equipment - risk of
electric shock.
Do not use harsh abrasive cleaners or metal
scrapers to clean the door glass since they can
scratch the surface, which may result in shattering
of the glass.
Ensure the appliance is cooled down before
any cleaning or maintenance. - risk of burn.
WARNING: Switch o the appliance before
replacing the lamp - risk of electrical shock.
DISPOSAL OF PACKAGING MATERIALS
The packaging material is 100% recyclable and is marked with the
recycle symbol . The various parts of the packaging must therefore
be disposed of responsibly and in full compliance with local authority
regulations governing waste disposal.
DISPOSAL OF HOUSEHOLD APPLIANCES
This appliance is manufactured with recyclable or reusable materials.
Dispose of it in accordance with local waste disposal regulations.
For further information on the treatment, recovery and recycling of
household electrical appliances, contact your local authority, the
collection service for household waste or the store where you purchased
the appliance. This appliance is marked in compliance with European
Directive 2012/19/EU, Waste Electrical and Electronic Equipment (WEEE).
By ensuring this product is disposed of correctly, you will help prevent
negative consequences for the environment and human health.
symbol on the product or on the accompanying documentation
The
indicates that it should not be treated as domestic waste but must be
taken to an appropriate collection center for the recycling of electrical
and electronic equipment.
ENERGY SAVING TIPS
Only preheat the oven if specied in the cooking table or your recipe.
Use dark lacquered or enamelled baking trays as they absorb heat better.
Food requiring prolonged cooking will continue to cook even once the
oven is switched o.
ECO DESIGN DECLARATION
This appliance meets the Eco Design requirements of European
Regulations n.65/2014 and 66/2014 in conformity to the European
standard EN 60350-1.
Page 5
The main parts of your
Controls
A B C
Grill
Setting
Control
Top Oven
Temperature
Control
Main Oven Temperature
And Function Control
MAIN OVEN PILOT LIGHT
TOP OVEN
PILOT LIGHT
GRILL
PILOT
LIGHT
Cooling Fan
A gentle flow of air will be blown below the control
panel when the grill control is used and after a short
period of time when the ovens are used.
Note: Whenever the appliance has been used, the
cooling fan may run on or restart itself after all the
controls have been turned off. This indicates that the
appliance is still warm.
Oven Interior Lights
The oven lights are operated when their respective
oven control is used.
The main oven has a light only position.
Slow Cooking
The main oven has a „Slow Cook Setting” this can
be used for slow cooking, keeping food warm and
warming plates for a short period.
Element and Fan Cut Off
The oven is fitted with a safety device which
disconnects the heating element and oven fan when
the door is opened.
The heating element and oven fan will not operate until
the oven door is closed.
Note: It is advisable to check that all oven controls
have been switched off when you have finished
using the appliance.
Control
Knob
Description Function
A Grill Setting Control
Selects the heat at which the grill will cook the food.
Grill Settings Control:
MIN - MAX
B Top Oven Temperature Control
Selects the cooking temperature (Degrees Centigrade)
when using the top oven as a conventional oven.
C
Main Oven Temperature &
Function Control
Fan Only Setting
-This is used to decrease the amount of time required to
defrost food items.
Oven Light Only
-
Switches on the Main Oven Interior Light Only
Main Oven Temperature Scale
(In Degrees Centigrade).
- When cooking select the required
cooking temperature.
D
Timer*
Electronic
Timer*
Manual
To use the timer, the buzzer must be wound up by
turning the knob one full turn clockwise; then turn
it back to the desired time so that the number of
minutes on the knob matches the reference mark
on the panel.
D Timer Control*
*Available only on certain models
5
Double Oven
GRILL PILOT
Top Oven
Grill
Setting
Control
Grill Element
Top Oven Door
TOP OVEN
PILOT LIGHT
LIGHT
Top Oven
Temperature Control
Bottom oven Temperature &
Function Control
Electronic
Timer
BOTTOM OVEN PILOT LIGHT
Inner Door Glass
Oven Light
Oven Light*
Grill Pan & Food Support*
*Available only on certain models
Oven Shelves
Door Switch
Bottom Oven Door
Page 6
Controls
6
GRILL
PILOT
LIGHT
PILOT LIGHT
A B C
Top Oven Grill
Setting
Control
Control
Knob
A Grill Setting Control
Top Oven Temperature Control
B
Description Function
TOP OVEN
Top Oven
Temperature
Control
BOTTOM OVEN PILOT LIGHT
Electronic
Timer*
Selects the heat at which the grill will cook the food.
Grill Settings Control:
MIN - MAX
Selects the cooking temperature (Degrees Centigrade)
when using the top oven as a conventional oven.
Bottom Oven
Temperature
And Function
Control
C
Cooling Fan
A gentle flow of air will be blown below the control
panel when the grill control is used and after a short
period of time when the ovens are used.
Note: Whenever the appliance has been used, the
cooling fan may run on or restart itself after all the
controls have been turned off. This indicates that the
appliance is still warm.
Oven Interior Lights
Bottom Oven Temperature
& Function Control
The oven lights are operated when their
respective oven control is used.
The bottom oven has a light only position.
Fan Only Setting
- This is used to decrease the amount of time required to
defrost food items.
Oven Light Only
-
Switches on the Bottom Oven Interior Light Only
Bottom Oven Temperature Scale
(In Degrees Centigrade).
- When cooking select the required
cooking temperature.
Slow Cooking
The bottom oven has a „Slow Cook Setting”
this can be used for slow cooking, keeping
food warm and warming plates for a short
period.
*Available only on certain models
Page 7
The electronic
Grill Pan and Handle
Using the grill pan kit
The grill pan handle is detachable from the pan to
facilitate cleaning and storage. Fix the pan handle
securely before use:
1. Fit the handle to the grill pan so that the external
‘hooks’ embrace the edge of the pan (fig. 1)
2. Make sure that the middle part of the handle fits
exactly the protruding support of the pan (fig .2)
and holds the pan from the bottom.
The food must be placed on the rack in the grill pan.
Position the grill pan on top of the oven rack. The best
results are achieved by placing the oven rack on the
uppermost shelves. Pouring a little water into the grill
pan will make the collection of grease particles more
efficient and prevent the formation of smoke.
1
2
Top Oven Shelf Positioning for Grilling
DO NOT PLACE FOOD/UTENSILS DIRECTLY ON THE OVEN FLOOR
ENSURE SHELVES ARE FITTED THE CORRECT WAY UP
5
4
3
2
1
5
4
3
2
1
NOTE:
- Preheat the grill if indicated on grill chart.
- The grill pan must be placed on the correct shelf
and positioned centrally under the grill element.
- Leave the control at MAX for toast, and for fast
cooking of foods.
- For thicker foods requiring longer cooking, turn the
switch to a lower setting after the initial sealing on
both sides at MAX. The thicker the food, the lower
the control should be set.
- DO NOT line the grill pan with aluminium foil, as
this increases the amount of fat spitting which can
cause a fire.
- After use always return the grill control to the OFF
(0) position.
7
programmer*
END OF
COOKING icon
DURATION
DECREASE TIME
The Top Oven and Bottom Oven can be controlled
by the automatic timer. When the timer control has
been set for one oven, it is possible to use the other
icon
button
DISPLAY
•• ••
SET TIME
button
CLOCK icon
TIMER icon
INCREASE TIME
button
oven only during the same automatic cooking
programme.
Setting the clock
The clock may be set when the oven is switched off or
when it is switched on, provided that the end time of a
cooking cycle has not been programmed previously. After
the appliance has been connected to the mains,
or after a blackout, the
digits on the DISPLAY will begin to flash.
1. Press the button several times until the and
the four digits on the display begin to flash.
2. Use the “+” and “-” buttons to adjust the time; if you
press and hold either button, the display will scroll through
the values more quickly, making it quicker and easier to set
the desired value.
3. Wait for 10 seconds or press the
finalise the setting.
icon and the four numerical
icon
button again to
Setting the minute minder
This function does not interrupt cooking and does
not affect the oven; it is simply used to activate the
buzzer when the set amount of time has elapsed.
1. Press the button several times until the
and the three digits on the display begin to flash.
2. Use the “+” and “-” buttons to set the desired time; if you
press and hold either button, the display will scroll through
the values more quickly, making it quicker and easier to set
the value.
3. Wait for 10 seconds or press the button again to
finalise the setting.
The display will then show the time as it counts down.
When this period of time has elapsed the buzzer will be
activated.
*Available only on certain models
icon
Programming cooking
A cooking mode must be selected before
programming can take place.
Programming the cooking duration
1. Press the button several times until the
and the three digits on the DISPLAY begin to flash.
2. Use the “+” and “-” buttons to set the desired
duration; if you press and hold either button, the
display will scroll through the values more quickly,
making it quicker and easier to set the value.
3. Wait for 10 seconds or press the
finalise the setting.
4. When the set time has elapsed, the text END appears
on the DISPLAY, the oven will stop cooking and a buzzer
sounds. Press any button to stop the buzzer and turn all
control knobs to the 0 position.
• For example: it is 9:00 a.m. and a time of 1 hour and
button again to
icon
15 minutes is programmed. The programme will
stop automatically at 10:15 a.m.
Setting the end time for a cooking mode
A cooking duration must be set before the cooking
end time can be scheduled.
1. Follow steps 1 to 3 to set the duration as detailed above.
2. Next, press the button until the icon and the four
digits on the DISPLAY begin to flash.
3. use the “+” and “-” buttons to adjust the cooking end
time; if you press and hold either button, the display will
scroll through the values more quickly, making it quicker
and easier to set the desired value.
4. Wait for 10 seconds or press the
finalise the setting.
5. When the set time has elapsed, the text END appears on
the DISPLAY, the oven will stop cooking and a buzzer
sounds.Press any button to stop it. Programming has been
set when the and buttons are illuminated. The
DISPLAY shows the cooking end time and the cooking
duration alternately.
• For example: It is 9:00 a.m. and a duration of 1 hour
has been programmed. 12:30 is scheduled as the
end time. The programme will start automatically at
11:30 a.m.
Cancelling a programme
To cancel a programme:
• press the button until the icon corresponding to
the setting you wish to cancel and the digits on the
display are flashing. Press the “-” button until the
digits 00:00 appear on the display.
• Press and hold the “+” and “-” buttons; this will
cancel all the settings selected previously,
including timer settings.
button again to
Page 8
Grill Pan and Handle
8
Using the grill pan kit
The grill pan handle is detachable from the pan to
facilitate cleaning and storage.
Fit the handle to the grill pan so that the external
‘hooks’ embrace the edge of the pan (fig. 1)
Make sure that the middle part of the handle fits
exactly the protruding support of the pan (fig .2)
and holds the pan from the bottom.
The food must be placed on the rack in the grill pan.
Position the grill pan on top of the oven rack. The best
results are achieved by placing the oven rack on the
uppermost shelves. Pouring a little
drinking
water into
the grill pan will make the collection of grease particles
more efficient and prevent the formation of smoke.
1
2
Top Oven Shelf Positioning for Grilling
ENSURE SHELVES ARE FITTED THE CORRECT WAY UP
5
4
3
2
1
5
4
3
2
1
NOTE:
- Preheat the grill if indicated on grill chart.
- The grill pan must be placed on the correct shelf and
positioned centrally under the grill element.
- Leave the control at MAX for toast, and for fast
cooking of foods.
- For thicker foods requiring longer cooking, turn the
switch to a lower setting after the initial sealing on
both sides at MAX. The thicker the food, the lower the
control should be set.
- After use always return the grill control to the OFF
(1) position.
Page 9

Operation when using the
Guide to Grilling
FODD
PREHEAT
FOR ONE
MINUTE
SHELF POSITION
FROM THE BASE
OF THE OVEN
SETTING
APPROXIMATE
COOKING TIME
PAN TO BE
USED
Toasting of Bread
Products
Setting
MAX
5 Setting MAX 5 - 10 minutes
Grill pan and food
support
Small cuts of
meat, Sausage,
Bacon
Setting
MAX
4 or 5
Setting MAX for
5-8 minutes then
reduce to lower
setting
10 - 25 minutes
Grill pan and food
support
Chops etc.
Gammon steaks
Setting
MAX
4
Setting MAX for
10 minutes then
reduce to lower
setting
20 - 35 minutes
Grill pan and food
support
Fish: Whole
Fillets
Fingers
Setting
MAX
3
4 or 5
4 or 5
Setting MAX
8 - 12 minutes
10 - 15 minutes
10 - 20 minutes
Grill pan and food
support
Pre-cooked
potato products
Setting
MAX
4 or 5
Setting MAX or
lower setting
15 - 20 minutes
Grill pan and food
support
Pizzas
Setting
MAX
3 or 4
Setting MAX or
lower setting
10 - 20 minutes
Grill pan and food
support
Browning of food
eg. Cauliflower
Cheese
Setting
MAX
3 or 4 Setting MAX 10 - 20 minutes
Dish placed
directly on the
shelf
Your cooker is not fitted with a conventional grill.
Hotpoint have developed a Solarplus high speed grill
which is designed to reduce your grilling times. It is
quicker because it takes less time to warm up from
cold. Conventional grills require 5 minutes pre-heat
before food can be placed beneath them, but for
normal grilling the Solarplus grill can be used directly
from cold without any pre-heat.
However, when toasting, optimum performance is
achieved by pre-heating the grill for about 1 minute.
NOTE: You will notice that the grill elements are
protected by a wire mesh. This stops you from
touching live parts.
DO NOT under any circumstances insert objects
into the grill mesh as this could damage the
element wire, break the glass tubes or if the grill is
on, cause electric shock.
During use, the wire mesh may become soiled. DO
NOT attempt to clean it while the grill is still on. Turn off
at the control and allow to cool before cleaning. Care
must be taken to ensure the grill mesh is not distorted -
do not store the grill pan handle on the food grid when
the shelf is in the highest position.
IMPORTANT:
Grilling should never be undertaken with the grill/
top oven door closed.
*Available only on certain models
9
Top Oven for Grilling
TOP OVEN
Step 1
GRILL
PILOT
LIGHT
Top Oven
Setting
Control
Ensure oven timer is set to manual. Place the
shelf in the correct position (see Grilling Guide).
TOP OVEN
PILOT LIGHT
A B C
Top Oven
Grill
Temperature
Control
Step 2
Place the food/grill pan on the shelf, positioned centrally under the grill element. Leave
the top oven door fully open. Turn knob (A),
clockwise for FULL grill or anti-clockwise for
HALF grill, to select the Grill Setting (MIN MAX).
Grill Controls Example:
NOTE:
Step 3
The Grill Pilot Light is on when grill is used.
Ensure knob (B) is in „0 position”. The grill and the
top oven cannot work simultaneously
= High Grill Setting
Do not grill with the
grill/top
After use, turn the grill
control (A) to the off
position (0).
oven door closed.
Page 10

Guide to Grilling
10
Your cooker is not fitted with a conventional grill:
Solarplus high speed grill which is designed to reduce
your grilling times. It is quicker because it takes less time
to warm up from cold. Conventional grills require 5
minutes pre-heat before food can be placed beneath
them, but for normal grilling the Solarplus grill can be
used directly from cold without any pre-heat.
However, when toasting, optimum performance is
achieved by pre-heating the grill for about 1 minute.
FOOD
Toasting of Bread
Products
Small cuts of
meat, Sausage,
Bacon
Chops etc.
Gammon steaks
Fish: Whole
Fillets
Fingers
Pre-cooked
potato products
Pizzas
PREHEAT
FOR ONE
MINUTE
Setting
MAX
Setting
MAX
Setting
MAX
Setting
MAX
Setting
MAX
Setting
MAX
SHELF POSITION
FROM THE BASE
OF THE OVEN
5 Setting MAX 5 - 10 minutes
4 or 5
4
3
4 or 5
4 or 5
4 or 5
3 or 4
SETTING
Setting MAX for
5-8 minutes then
reduce to lower
setting
Setting MAX for
10 minutes then
reduce to lower
setting
Setting MAX
Setting MAX or
lower setting
Setting MAX or
lower setting
APPROXIMATE
COOKING TIME
10 - 25 minutes
20 - 35 minutes
8 - 12 minutes
10 - 15 minutes
10 - 20 minutes
15 - 20 minutes
10 - 20 minutes
PAN TO BE
USED
Grill pan and food
support
Grill pan and food
support
Grill pan and food
support
Grill pan and food
support
Grill pan and food
support
Grill pan and food
support
Browning of food
eg. Cauliflower
Cheese
Setting
MAX
3 or 4 Setting MAX 10 - 20 minutes
Dish placed
directly on the
shelf
Page 11

Using the Top Oven as
Operation when using the Top
Oven as a Convection Oven
Step 1 Check that the timer is in manual.
Step 2 Place the shelf in the correct position (see
Oven Temperature Charts).
Step 3 Select the required cooking temperature
(100°C-MAX) using control (B) (see Top
Oven Temperature Charts). The pilot light
() will immediately come on, and remain
on until the oven reaches the required tem-
perature. The light will then automatically
go off and on during cooking as the oven
thermostat maintains the correct tempera-
ture.
Step 4 Place the food on the shelf directly below
the element ensuring the oven door is
closed.
NOTE: At the end of your cooking, always return
control (B) to the OFF (O) position.
A B C
Top Oven Temperature Control
PLATE WARMING
Place the plates/dishes on shelf position 1 from the
base of the top oven, and turn top oven temperature
control (B) to 100°C for 10-15 minutes.
Never use the grill setting control (A) when warming
plates.
TOP OVEN UTENSILS
Do Not use: Meat Pans and Baking Trays larger than
225mm x 300mm (9”x12”)
DO NOT use the grill pan or main oven meat pan as
a meat pan in the top oven, as the air circulation will
be seriously restricted.
D
11
a Convection Oven
The top oven should be used to cook small quantities
of food. The oven is designed so that the grill element
operates at a reduced heat output, this is combined
with a heating element situated underneath the floor
of the oven. To ensure even cooking of the food it is
important that cooking utensils are positioned correctly
on the oven shelf so that the element is directly
above. As a guide, the front of the utensil should be
approx.100mm (4”) from the front of the shelf.
SHELF POSITIONING
ENSURE SHELVES ARE FITTED THE CORRECT WAY UP
5
4
3
2
1
There should always be at least 25mm (1 inch)
between the top of the food and the grill element.
5
4
3
2
1
Page 12

Operation when using the Top
12
Oven as a Convection Oven
A B C
Top Oven Temperature Control
Step 1
Step 2
Step 3
Step 4
NOTE: At the end of your cooking, always return
control (B) to the OFF (O) position.
Check that the timer is in manual.
Place the shelf in the correct position (see
Oven Temperature Charts).
Select the required cooking temperature
(100°C-MAX) using control (B) (see Top
Oven Temperature Charts). The pilot light
() will immediately come on, and remain
on until the oven reaches the required
tem-perature. The light will then
automatically go off and on during
cooking as the oven thermostat maintains
the correct tempera-ture.
Place the food on the shelf directly below
the element ensuring the oven door is
closed.
PLATE WARMING
Place the plates/dishes on shelf position 1 from the
base of the top oven, and turn top oven temperature
control (B) to 100°C for 10-15 minutes.
Page 13

Using the Bottom Oven
Using the Main Oven for
Other Functions
FAN ONLY SETTING
DEFROSTING FROZEN MEAT & POULTRY
Joints of meat and whole birds should be defrosted
slowly, preferably in a refrigerator (allowing 5-6 hours
per lb.) or at room temperature (allowing 2-3 hours
per lb.). Frozen meat or poultry must be completely
defrosted before cooking in the oven. However, to
decrease the amount of time required to defrost food
items, a nonheating fan only setting may be selected
for the main oven only.
OPERATION: TO ASSIST IN DEFROSTING:
Place food in the oven and close the oven door.
Turn the Main Oven Temperature and Function Control
(C) clockwise to the
setting.
This defrosts by circulating the air around the food,
time to defrost will depend on type and size of the
food.
NOTES: DO NOT defrost meat and poultry by
warming the food through.
Foods ideally suited to defrosting using the fan only
setting are cream/cream cakes, butter cream filled
cakes, gateaux, cheese cakes, iced cakes, quiches,
pastries, biscuits, bread, croissants, fruit and many
delicate frozen foods. If fish, meat and poultry are to
be defrosted using the fan only setting, where possible
it is recommended that the food should be small and
thin.
The items should be placed so that the maximum
amount of surface area is exposed to the circulating
air, and that they are turned regularly to ensure even
defrosting.
Larger cuts of meat and poultry may be defrosted by
using the fan only setting up to a maximum weight of 2
kg (4lb 8oz).
It is important to wash both meat and poultry and
cooking utensils immediately after defrosting and
before cooking. Food should be cooked immediately
after defrosting.
It is very important to strictly adhere to the basic
principles of food handling and hygiene to prevent
the possibility of bacterial growth.
LIGHT ONLY SETTING
When the Main Oven Temperature & Function Control
(C) is turned clockwise to the setting, the main
oven light only will illuminate.
! Do not use the oven lamp as/for ambient lighting.
After selecting any of the oven programs, the parame-
ter setting of the product is activated. It optimizes the
performance of cooking, but could result in a delayed
ignition of fan and heating elements.
!
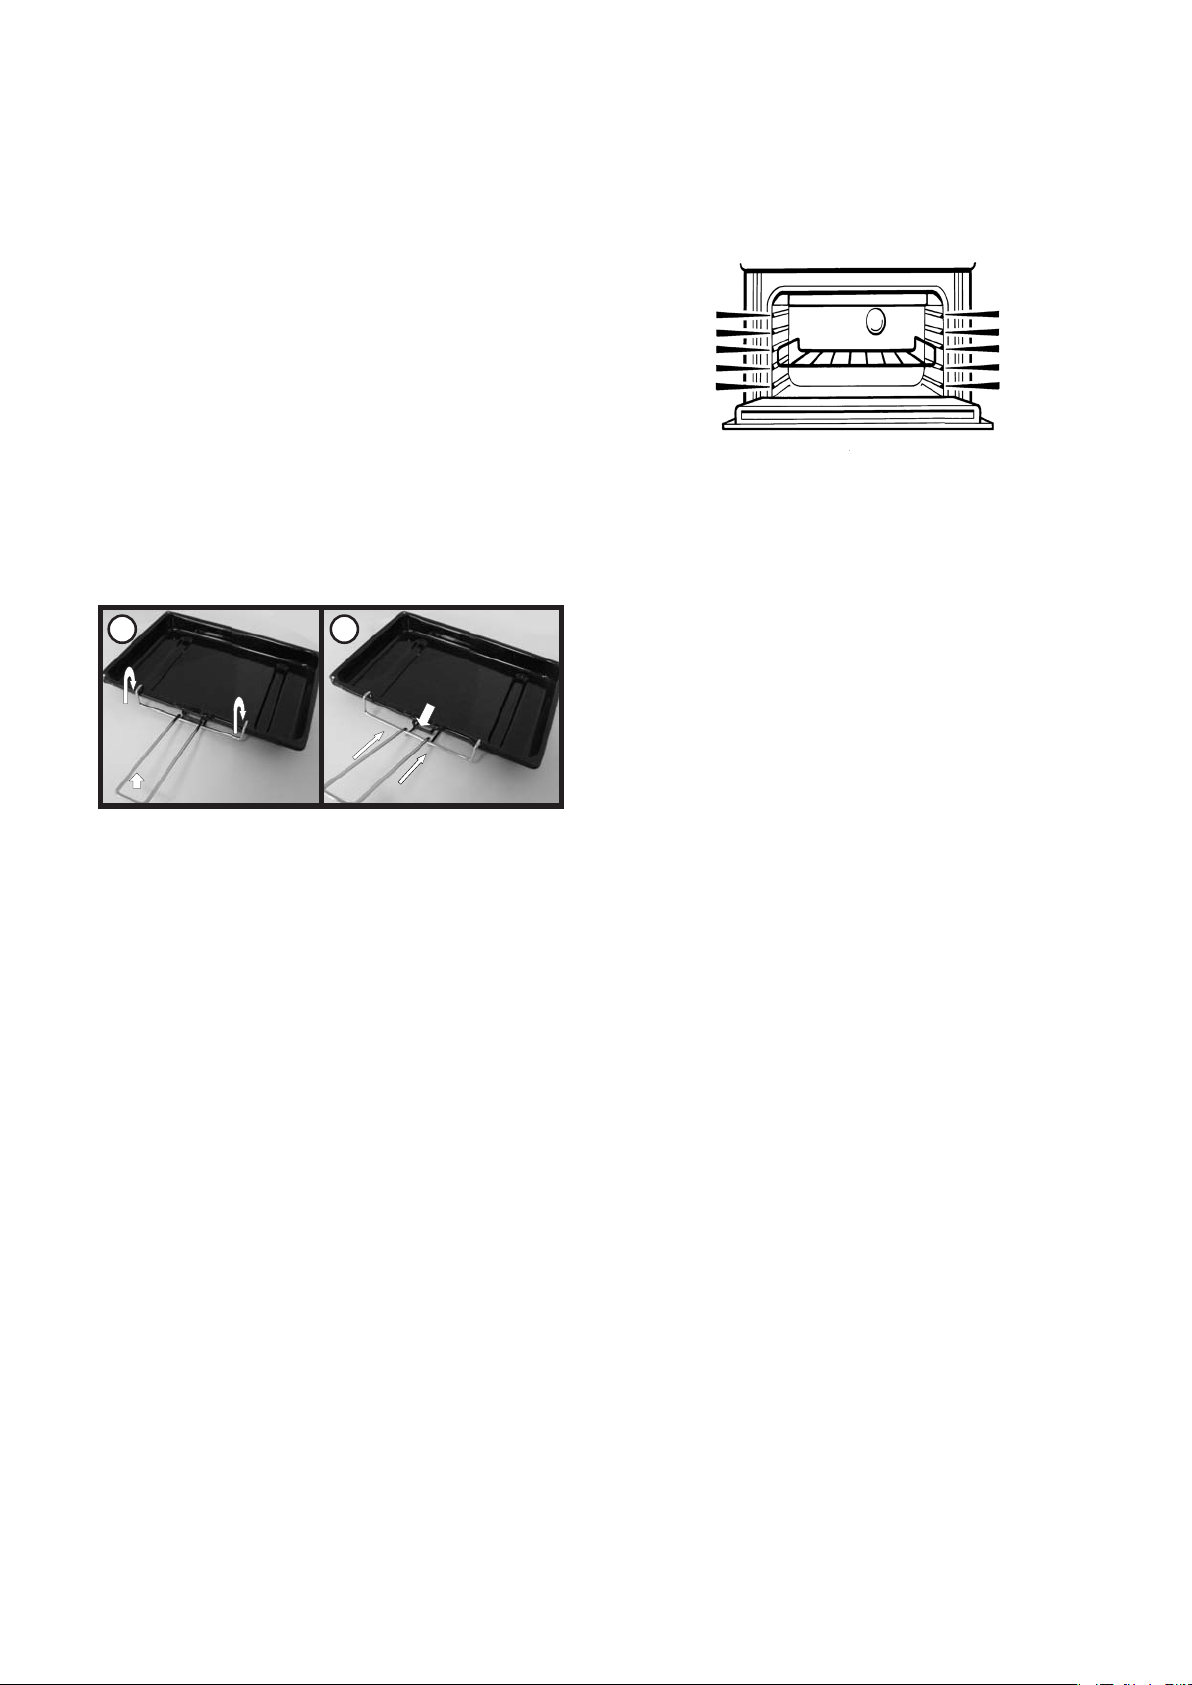
WARNING! The oven is provided with WARNING! The oven is provided with
a stop system to extract the racks and
prevent them from coming out of the
oven.(1)
As shown in the drawing, to extract them
completely, simply lift the racks, holding
them on the front part, and pull (2).
13
for Fan Cooking
Since a circular fan oven heats up more quickly and generally
cooks food at a lower temperature than a conventional oven,
pre-heating is often unnecessary.
For guides on „pre-heating”, „cooking temperatures” and
„cooking times” see „Oven Temperature Charts” later in book.
BOTTOM OVEN SHELF POSITIONING FOR FAN OVEN
foods will cook satisfactorily on any shelf position, due
to even distribution of he at in the bottom oven, but
the shelves mu st be evenly spaced.
(N.B.
Maximum 2 shelves in the bottom oven).
BOTTOM FAN OVEN OPERATION
Step 1
Step 2
Step 3
Step 4
Check that the timer is in manual.
Place the shelf/shelves in the correct position (see Bottom Oven Temperature
Charts. Place the fo od centrally on the
shelf ensu-ring the oven door is fully
closed. Select the required cooking
temperatu-re (80°C - MAX) by turning
control (C) clo ckwise. The pilot light (•)
will imme-diately come on, and remain
on until the oven reaches t he required
temperature. The light will then
automatically go off and on during
cooking as t he oven thermostat
maintains the correct temperature.
Most
TEMPERATURE & TIME
When two shelves are in use to cook large quantities of
food, it may be necessary to increase the cooking times
given in the temperature charts by a few minutes, to allow
for the loss of heat due to extra time taken to load the oven,
and the larger mass of food. Baking trays should have an
even gap around the oven.
C
Bottom Oven Temperature
And Function Control
Note: When you have finished using your cooker,
always return the controls to their OFF position (O).
Page 14

Using the Bottom Oven
14
for Other Functions
‚S’ SLOW COOK SETTING
This is used for slow cooking, keeping food warm and
warming plates for short periods.
OPERATION:
1.
Place the prepared food in the bottom oven
and ensure the door is fully closed.
2.
Select Slow Cooking Temperature ‚S’ by turning
the Main Ov en Temperature & Function Control
(C) clockwise.
FAN ONLY SETTING
DEFROSTING FROZEN MEAT & POULTRY Joints of
meat and whole birds should be defrosted slowly,
eferably in a refrigerator (allowing 5-6 hours per
pr
lb.) or at room temperature (allowing 2-3 hours per
lb.). Frozen meat or poultry must be completely
defrosted before cooking in the oven. However, to
decrease the amount of time required to defrost food
items, a no-heating fan only setting
may be selected for the bottom oven only.
OPERATION: TO ASSIST IN DEFROSTING:
Place food in the oven and close the oven door. Turn
the Bottom Oven Temperature and Function Control
(C) clockwise to the setting.
This defrosts by circulating the air around the food,
time to defrost will depend on type and size of the
food.
LIGHT ONLY SETTING
When the Bottom Oven Temperature & Function
setting, the Control (C) is turned clockwise to
the bottom oven light only will
illuminate.
Page 15

Oven Temperature
15
Chart - Meat
Food
Note: Up to two shelves may be used in this oven. The position of these is not important
providing they are evenly spaced.
Fan Oven Cooking
Meat Pre-heat
Beef No 160/180 20-25 mins per 450g (1lb) + 20 mins extra.
Lamb No 160/180 20-30 mins per 450g (1lb) + 25 mins extra.
Pork No 160/180 20-30 mins per 450g (1lb) + 25 mins extra.
Chicken/Turkey up to 4kg (8lb) No 160/180 15-20 mins per 450g (1lb) + 20 mins extra.
Turkey up to 5.5kg (12lb) No 150/160 12-14 mins per 450g (1lb) +12 mins extra.
Turkey over 5.5kg (12lb) No 150 10 mins per 450g (1lb) e.g. 10kg (22lb) = 264 mins
Casserole Cooking No 140 1½ - 2 hrs
Temperature °C
Time (approx.)
Food Top Oven Convection Cooking
Meat Pre-heat Temperature °C Time (approx.)
Beef/ Lamb
(Slow Roasting)
Beef/ Lamb
(Foil Covered)
Pork
(Slow Roasting)
Pork
(Foil Covered)
Poultry/Game
(Slow Roasting)
Poultry/Game
(Foil Covered)
Casserole
Cooking
Yes 170/180 35 mins per 450g (1lb) + 35 mins over 1
Yes 180/190 35 mins per 450g (1lb) 1
Yes 170/180 40 mins per 450g (1lb) + 40 mins over 1
Yes 190/200 40 mins per 450g (1lb) 1
Yes 170/180 25-30 mins per 450g (1lb) + 25 mins over 1
Yes 195/200 25-30 mins per 450g (1lb) 1
Yes 150 2-2½ hrs 1
Position From
Base of Oven
COOKING MEAT/POULTRY IN THE TOP OVEN
Small joints of meat up to 1.5Kg (3 lbs) and poultry up to 3.6Kg (8lbs) can be roasted in a small meat pan in the top oven.
Beef
Rare 60°C Medium 70°C Well Done 75°C 90°C 80°C 90°C
Pork Lamb Poultry
Page 16

Oven Temperature
16
Charts - Baking
Fan Oven Cooking
Baking
Food Pre-heat Temperature °C Time in mins.
Scones Yes 210/220 10-15 mins
Small Cakes Yes 170/180 20-25 mins approx
Victoria Sandwich Yes 160/170 20-30 mins
Sponge Sandwich (Fatless) Yes 180/190 15-20 mins
Swiss Roll Yes 190/200 10-15 mins
Semi-rich Fruit cakes No 140/150 60-75 mins
Rich Fruit Cakes No 130/140 Depending on size
Shortcrust Pastry No 180/190 Depending on use
Puff Pastry Yes 190/200 Depending on use
Yorkshire Pudding Yes 180/190 30-45 mins
Individual Yorkshire Pudding Yes 190/200 20-45 mins
Milk Pudding No 130/140 90-120 mins
Baked Custard No 140/150 35-45 mins
Bread Yes 200/210 20-30 mins
Meringues No 80/90 180-240 mins
Note: Up to two shelves may be used in this oven. The position of these is not
important providing they are evenly spaced.
Baking Top Oven Convection Cooking
Food Pre-heat Temperature °C Time in mins. Position from Base of Oven
Scones Yes 210/220 10-15 mins 3
Small Cakes Yes 180/190 20-25 mins 3
Victoria Sandwich Yes 170/180 20-30 mins 3
Sponge Sandwich (Fatless) Yes 180/190 20-25 mins 3
Swiss Roll Yes 200/210 10-15 mins 3
Semi-rich Fruit cakes Yes 150/160 60-75 mins 2
Rich Fruit Cakes Yes 140/150 150-180 mins 2
Shortcrust Pastry Yes 190/200 Depending on use 3
Puff Pastry Yes 200/210 Depending on use 2
Yorkshire Pudding Yes 190/200 30-45 mins 1 or 2
Individual Yorkshire Pudding Yes 200/210 20-30 mins 1 or 2
Milk Pudding Yes 140/150 90-120 mins 3
Baked Custard Yes 150/160 40-50 mins 2
Bread Yes 200/210 30-40 mins 1 or 2
Meringues Yes 100 180-210 mins 3
Page 17

Care and Cleaning
17
Do not use steam cleaning
equipment.
Use protective gloves
during all operations.
Carry out the required
operations with the oven
cold.
Disconnect the appliance
from the power supply.
EXTERIOR SURFACES
•
Clean the surfaces with a damp microfibre cloth.
If they are very dirty, add a few drops of pH-neutral
detergent. Finish off with a dry cloth.
•
Do not use corrosive or abrasive detergents. If any of
these products inadvertently comes into contact with
the surfaces of the appliance, clean immediately with
a damp microfibre cloth.
INTERIOR SURFACES
•
After every use, leave the oven to cool and then
clean it, preferably while it is still warm, to remove any
deposits or stains caused by food residues. To dry any
condensation that has formed as a result of cooking
foods with a high water content, allow the oven to
cool completely and then wipe it with a cloth or
sponge.
•
The door can be easily removed and refitted to
facilitate cleaning of the glass.
•
Clean the glass in the door with a suitable liquid
detergent.
Do not use wire wool,
abrasive scourers or
abrasive/corrosive cleaning
agents, as these could
damage the surfaces of the
appliance.
ACCESSORIES
Soak the accessories in a washing-up liquid solution
after use, handling them with oven gloves if they are
still hot. Food residues can be removed using a
washing-up brush or a sponge.
REPLACEMENT OF THE OVEN LAMP
TOP OVEN LAMP
BOTTOM OVEN LAMP
Disconnect the oven from the power supply.
Unscrew the cover from the light, replace the bulb (25W
- 230V - T 300 °C - E14) and screw the cover back on the
light.
Reconnect the oven to the power supply.
The bulb used in the product is specifically designed for
domestic appliances and is not suitable for general room
lighting within the home (EC Regulation 244/2009). Light
bulbs are available from our After-sales Service.
If using halogen bulbs, do not handle them with your
bare hands as your fingerprints could cause damage. Do
not use the oven until the light cover has been refitted.
Page 18

Installation
x
6
90°C
1
8
Page 19

550
19
25
720
705
550
115
243
345
595
140-170
570
860-890
600
570mm
to top of plinth
A minimum distance of 25mm should be maintained between the front face of the cabinet side and the front face of the
plinth.
Page 20

Wall
20
Fixing Bracket
Cooker
Top View
Hob Cable
to
2
85°C
2.5mm
heat resistant cable
BS 6141 Table 15
1mm min
Double pole
control switch
Cable size to suit
current rating of
appliance/s
Connector
Cabinet Doors
box
4mm
2
Cable
Page 21

2
1
Page 22

TROUBLESHOOTING
22
Any problems that arise or faults that occur can often b
Before contacting the After-sales Service, check the following table to see whether you can resolve the problem
yourself.
If the problem persists, contact your nearest Afte r-sales Service Centre.
e resolved easily.
Read the safety instructions carefully before carrying out any of the following work
PROBLEM POSSIBLE CAUSE REMEDY
Power cut.
Check for the presence of mains
electrical power and whether the
The oven is not working.
Disconnection from the
oven is connected to the electricity
supply. Turn off the oven and restart
mains. Malfunction.
it to see if the problem persists.
AFTER-SALES SERVICE
BEFORE CONTACTING OUR
AFTER-SALES SERVICE
1.
Check whether you can resolve the problem
yourself using any of
Troubleshooting section.
2.
Turn off the oven and restart it to see if the
problem persists.
the measures described in the
To receive assistance, call the number given on the
warranty leaflet enclosed with the product or follow
the instructions on our website. Be prepared to
provide:
•
a
brief description of the problem;
•
the exact model type of your product;
•
the assista nce code (the number following the word
SERVICE on the identification plate attached to the
product, which can be seen on the inside edge
when t he oven door is open);
•
your full address;
•
a contact telephone number.
Please note: If repairs are required, contact an
authorised service centre that is
original spare parts and perform repairs correctly.
Please refer to the enclosed warranty leaflet for more
information on the warranty.
guaranteed to use
Page 23

Page 24

Printed in Italy
400011156725
 Loading...