

Whirlpool AGB 586WP, AGB 501WP, AGB 502WP, AGB 586, AGB 587 Installation, Operating And Maintenance Instructions
...Page 1

001_03
Installation, operating and
maintenance instructions
03/2006
ELECTRIC COOKERS
AGB 501/WP · AGB 502WP
AGB 586/WP · AGB 587/WP · AGB 585/WP
AGB 582/WP
AGB 487/WP · AGB 496/WP · AGB 497/WP
AGB 588/WP
AGB 503/WP · AGB 498/WP · AGS 655/WP
Page 2

001-03 - Electric cookers
2
Models and dimensionsi page. 3
Technical data 10
Installation instructions 12
Installation 12
Legal and technical requisites 12
Installation 12
Wiring 12
Unipotential 12
Using the appliance 13
Ignition 13
Cleaning and taking care of the
appliance 14
What to do if not using the appliance
for a long time 14
What to do if something goes wrong 14
Maintenance 14
WEEE Directive 15
Wiring diagrams 16-46
Warning 47
INDEX
Page 3
001-03 - Electric cookers
3
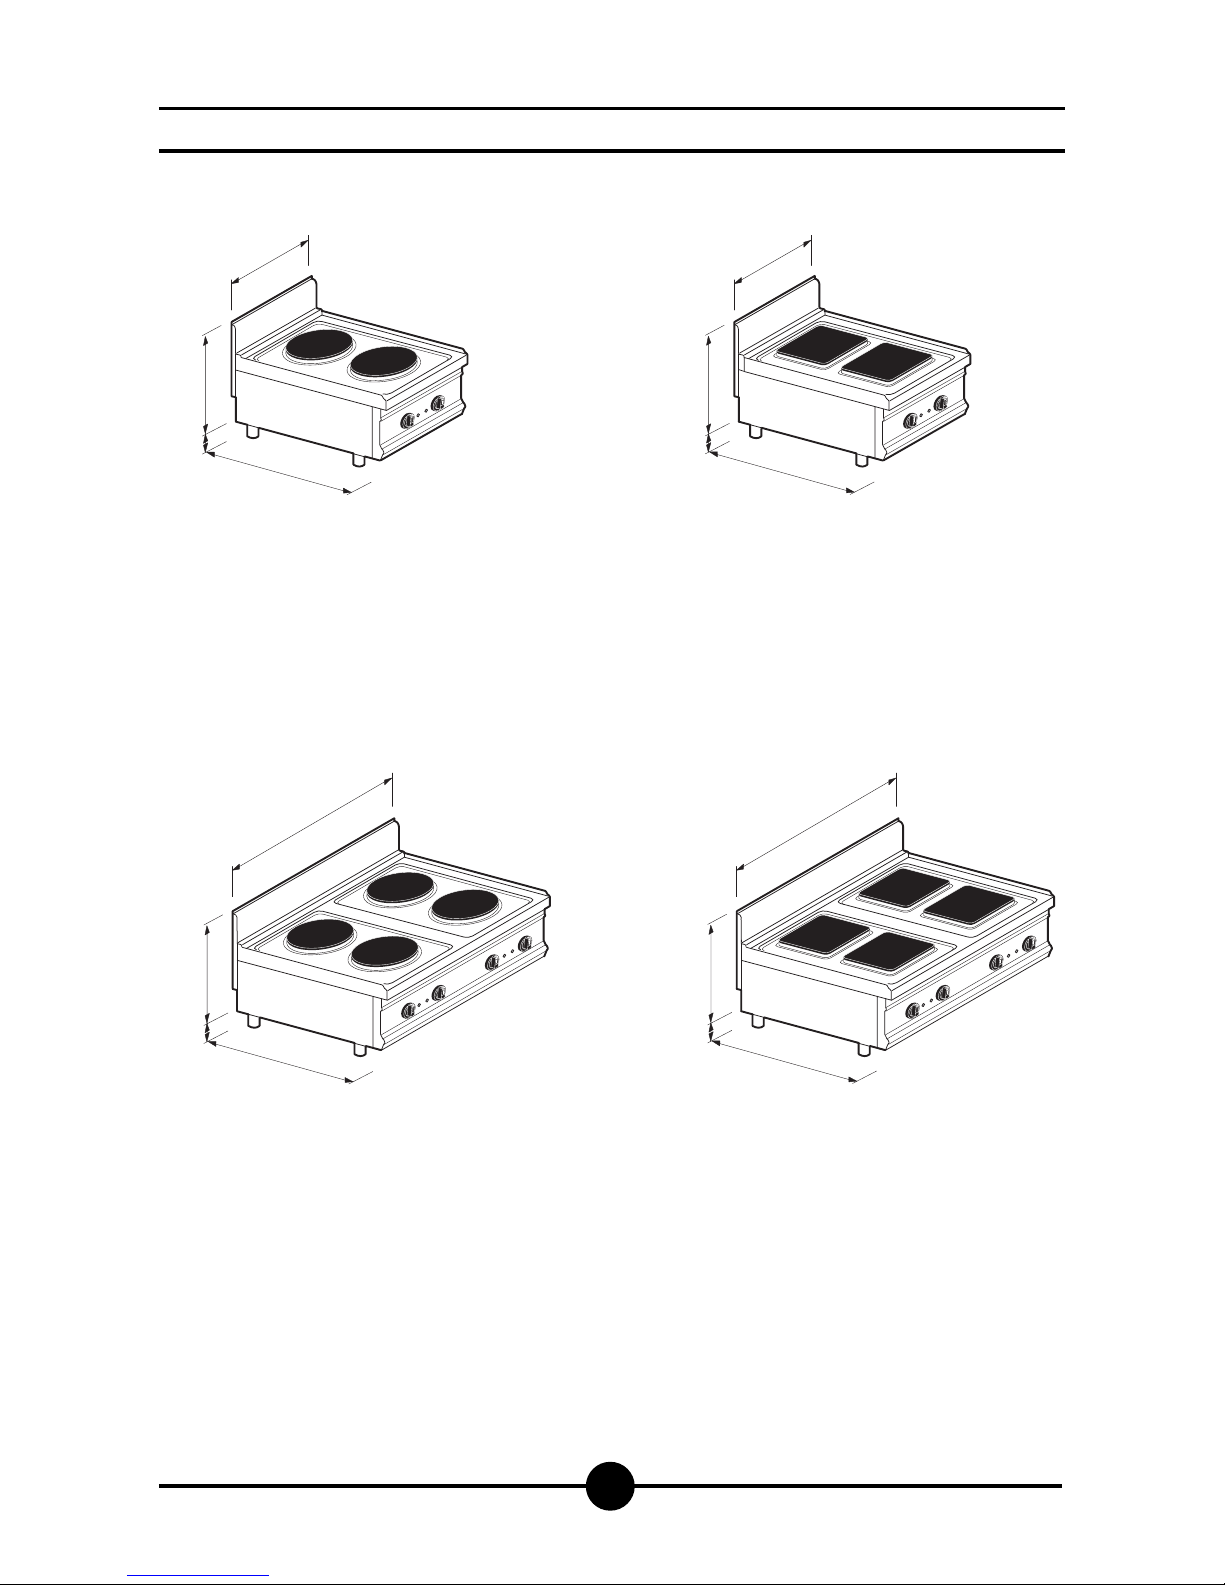
Dimensions
AGB 587/WP
Weight approx.23 kg
800
40030
655
AGB 586/WP
Weight approx.18 kg
800
400
400
40030
655
40030
655
40030
655
Page 4
001-03 - Electric cookers
4
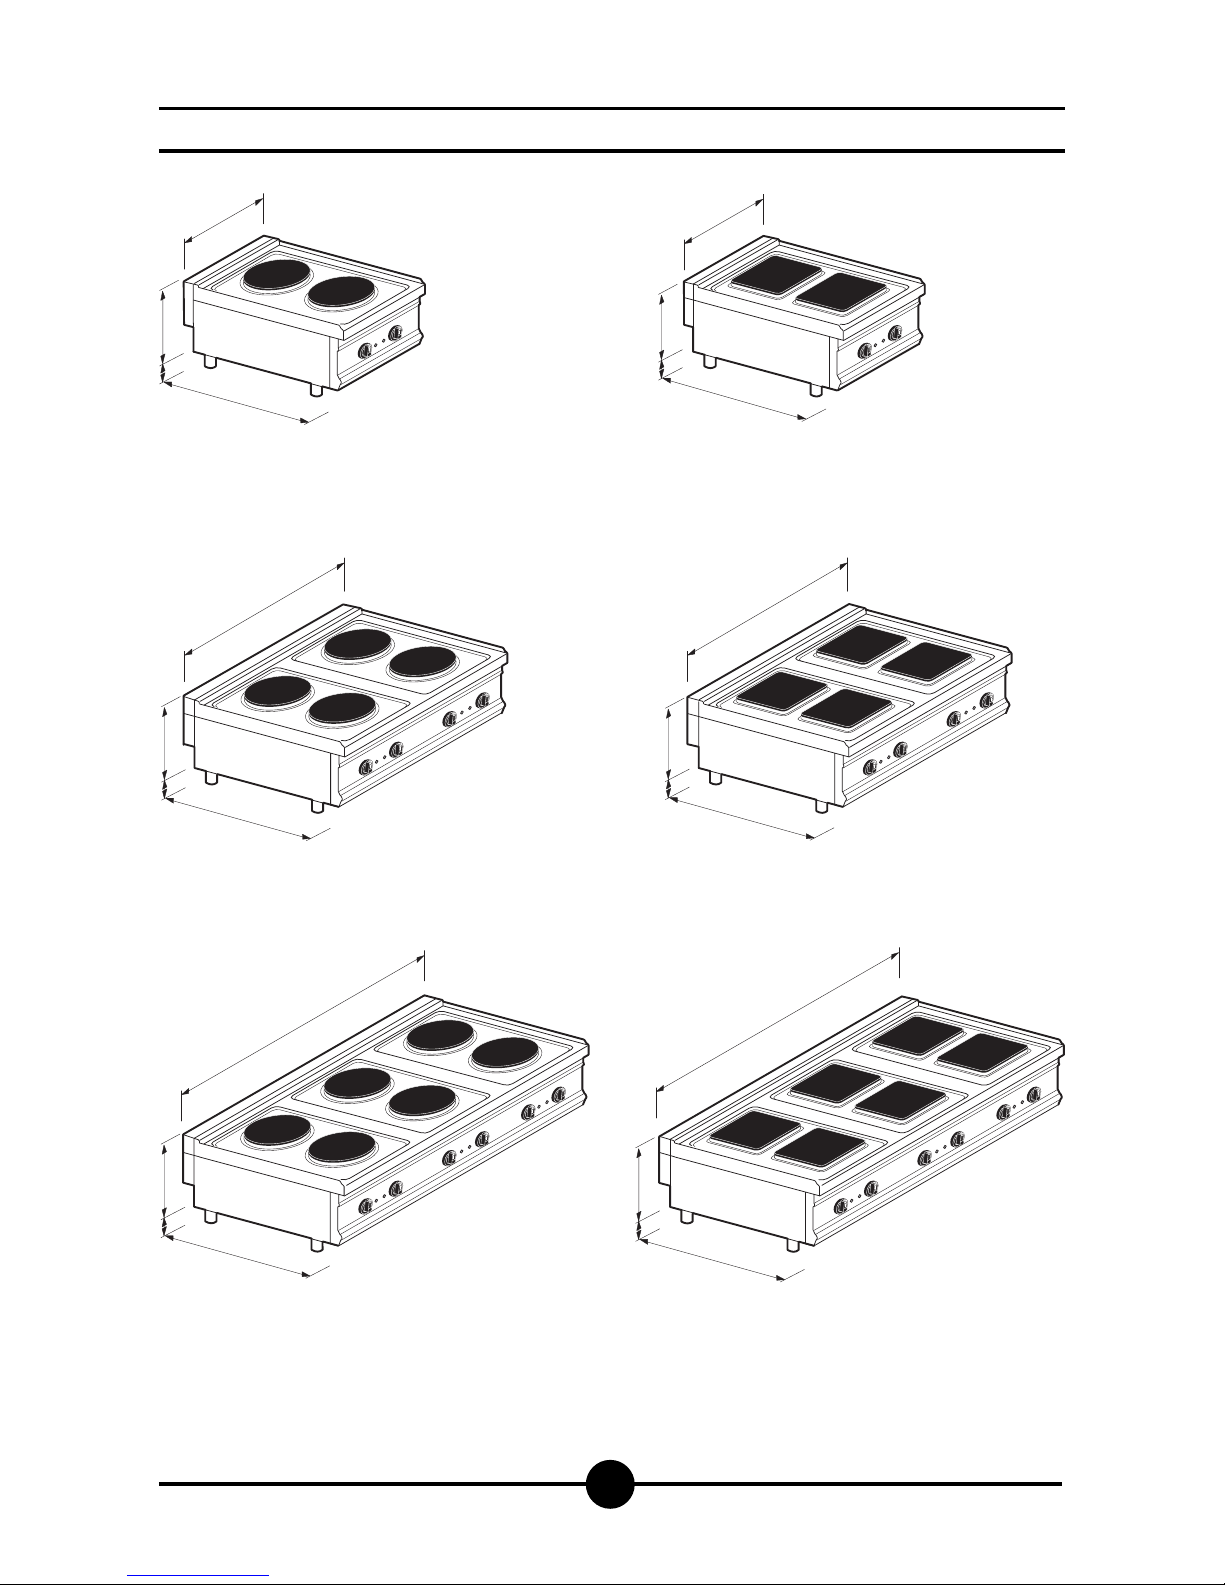
Dimensions
AGB 502/WP
Weight approx.30,8 kg
800
290
30
700
AGB 501/WP
Weight approx.17,5 kg
800
400
29030
700
400
29030
700
290
30
700
1200
1200
290
30
700
290
30
700
Page 5
001-03 - Electric cookers
5
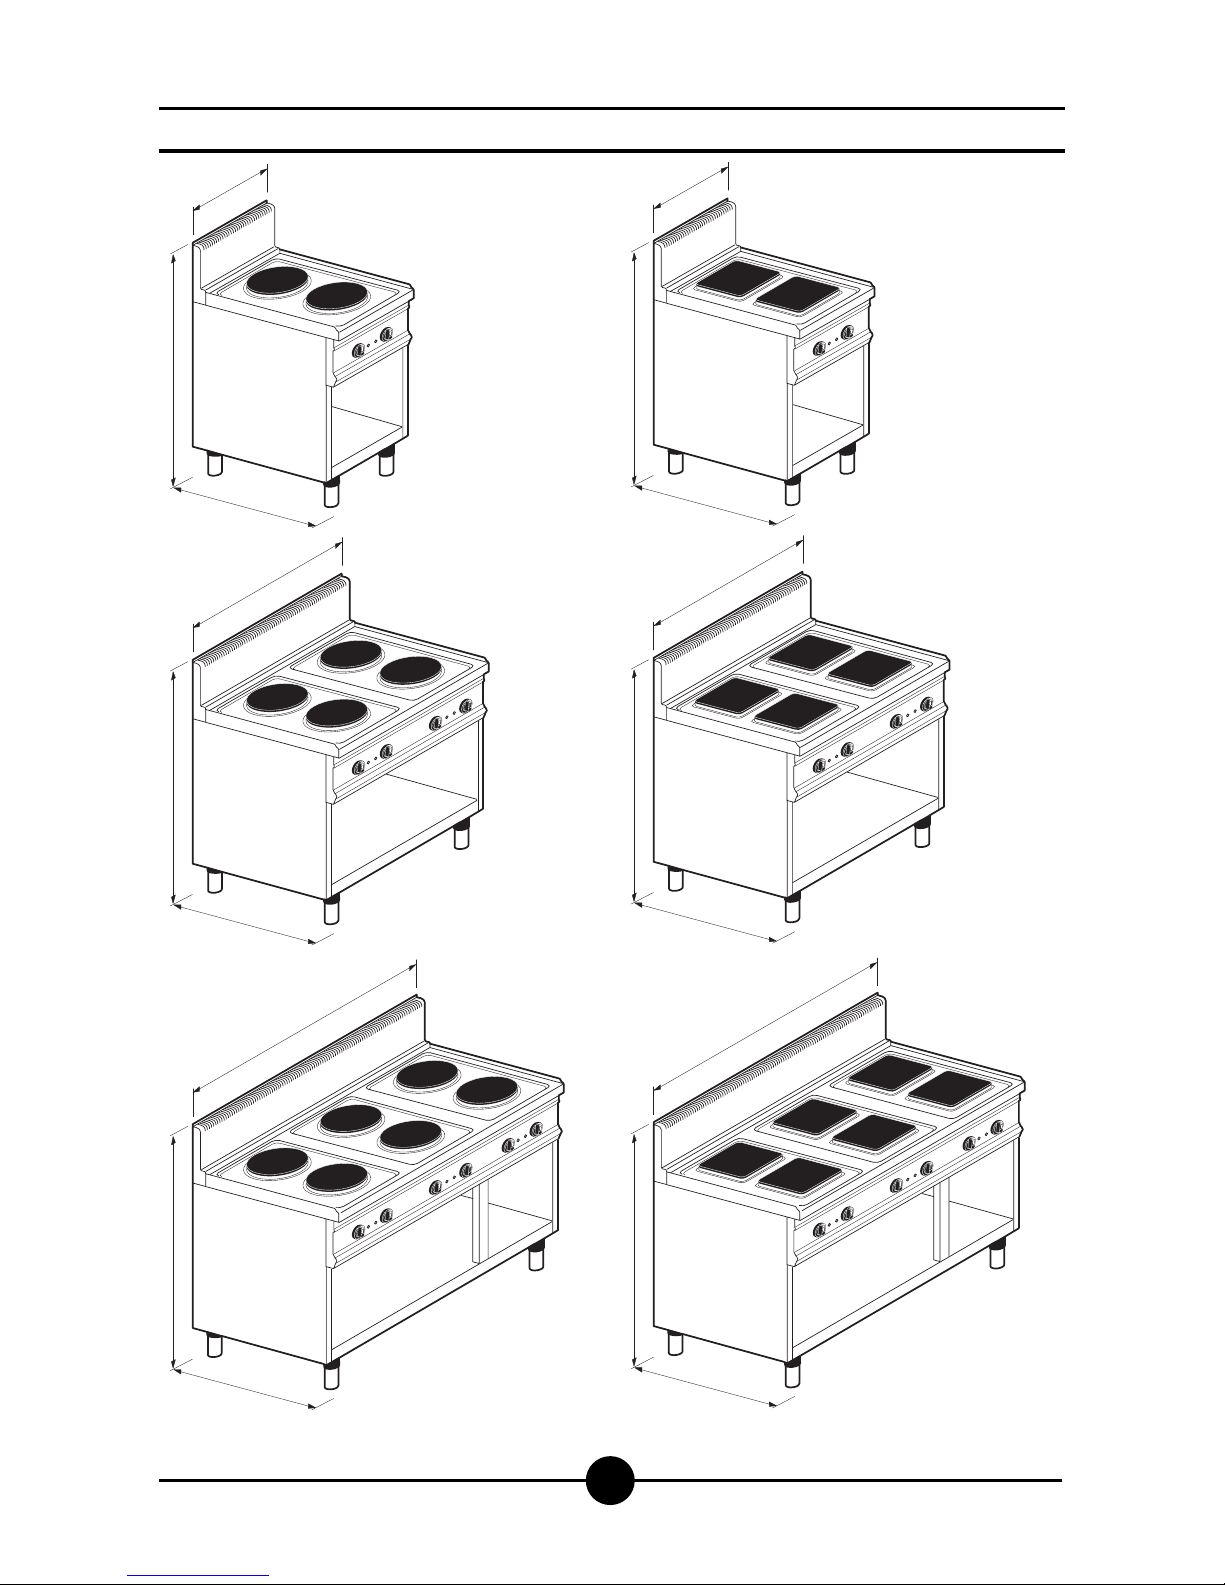
Dimensions
8
0
0
1080
700
1
2
0
0
1080
700
4
0
0
1080
700
8
0
0
1080
700
4
0
0
1080
700
1
2
0
0
1080
700
Page 6
001-03 - Electric cookers
6
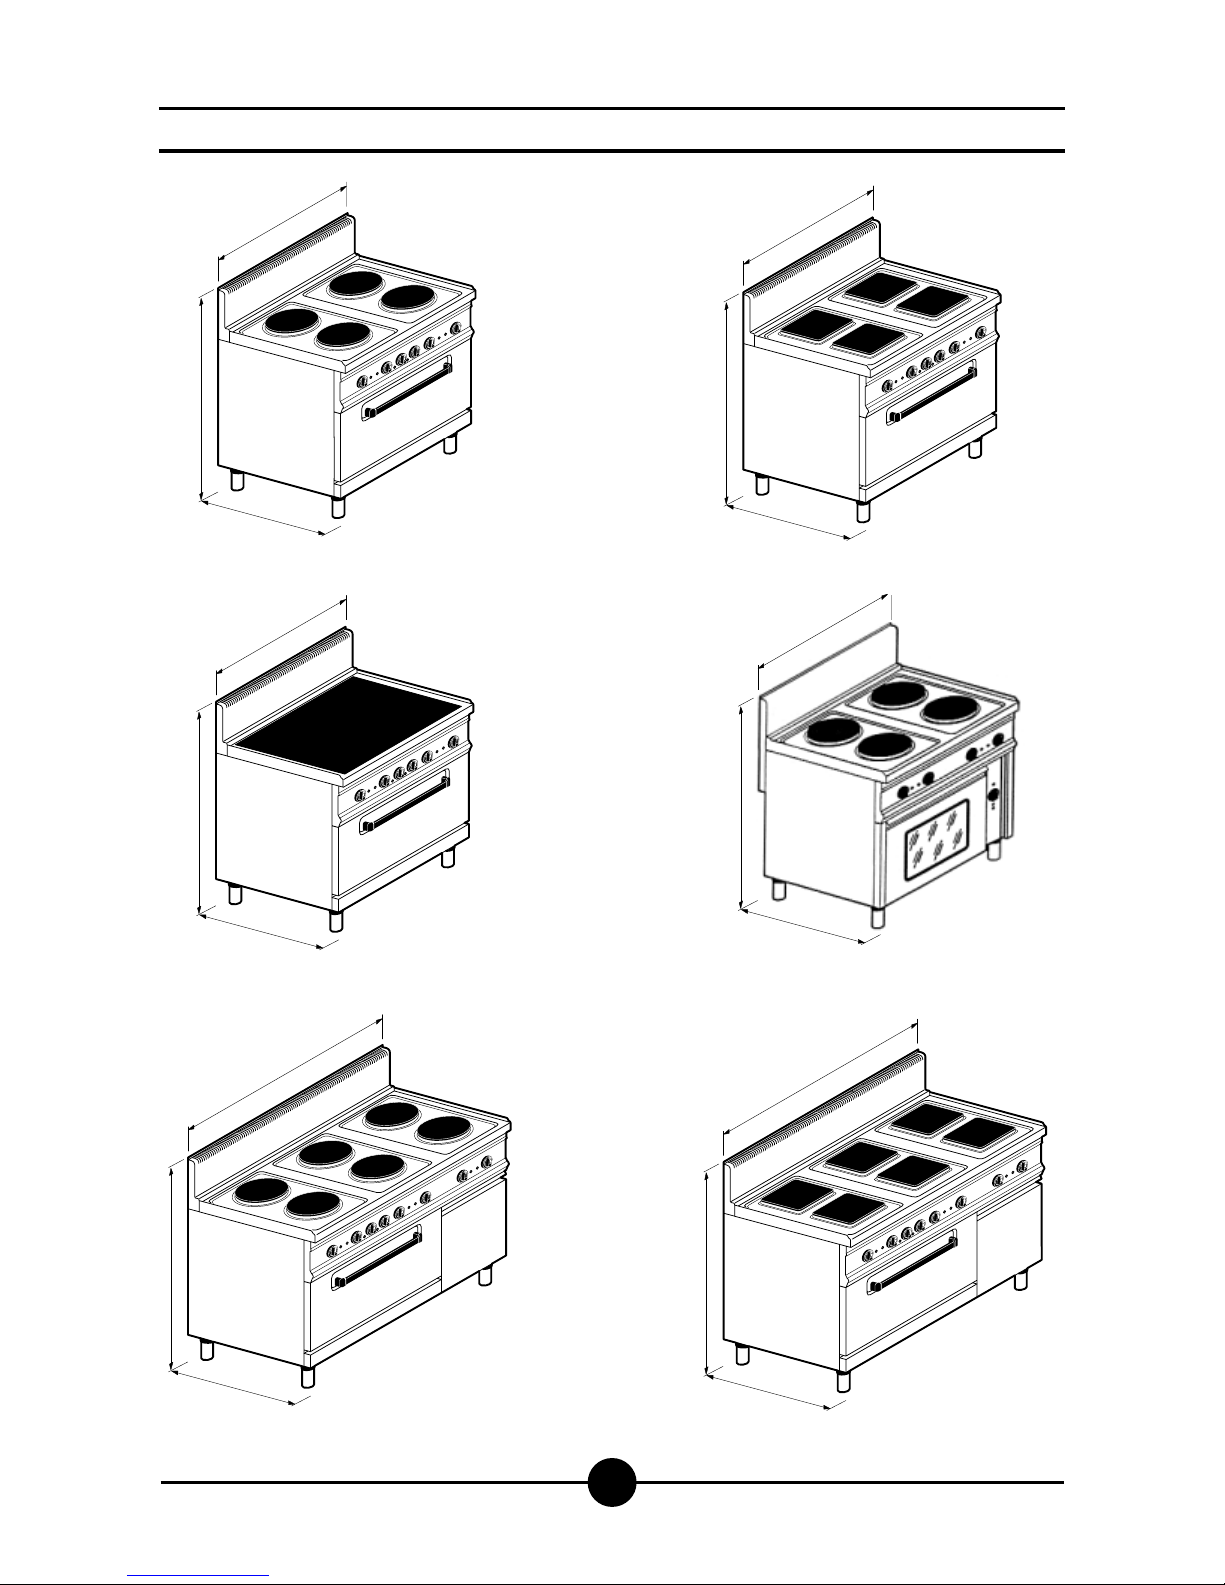
Dimensions
1200
1080
700
1200
1080
700
800
1080
700
AGB 487/WP
AGB 496/WP
Weight approx.109 kg / 93 kg
800
1080
700
800
1080
700
AGB 585/WP
Weight approx.94kg
AGB 497/WP
Weight approx.116 kg
800
1080
655
Page 7
001-03 - Electric cookers
7
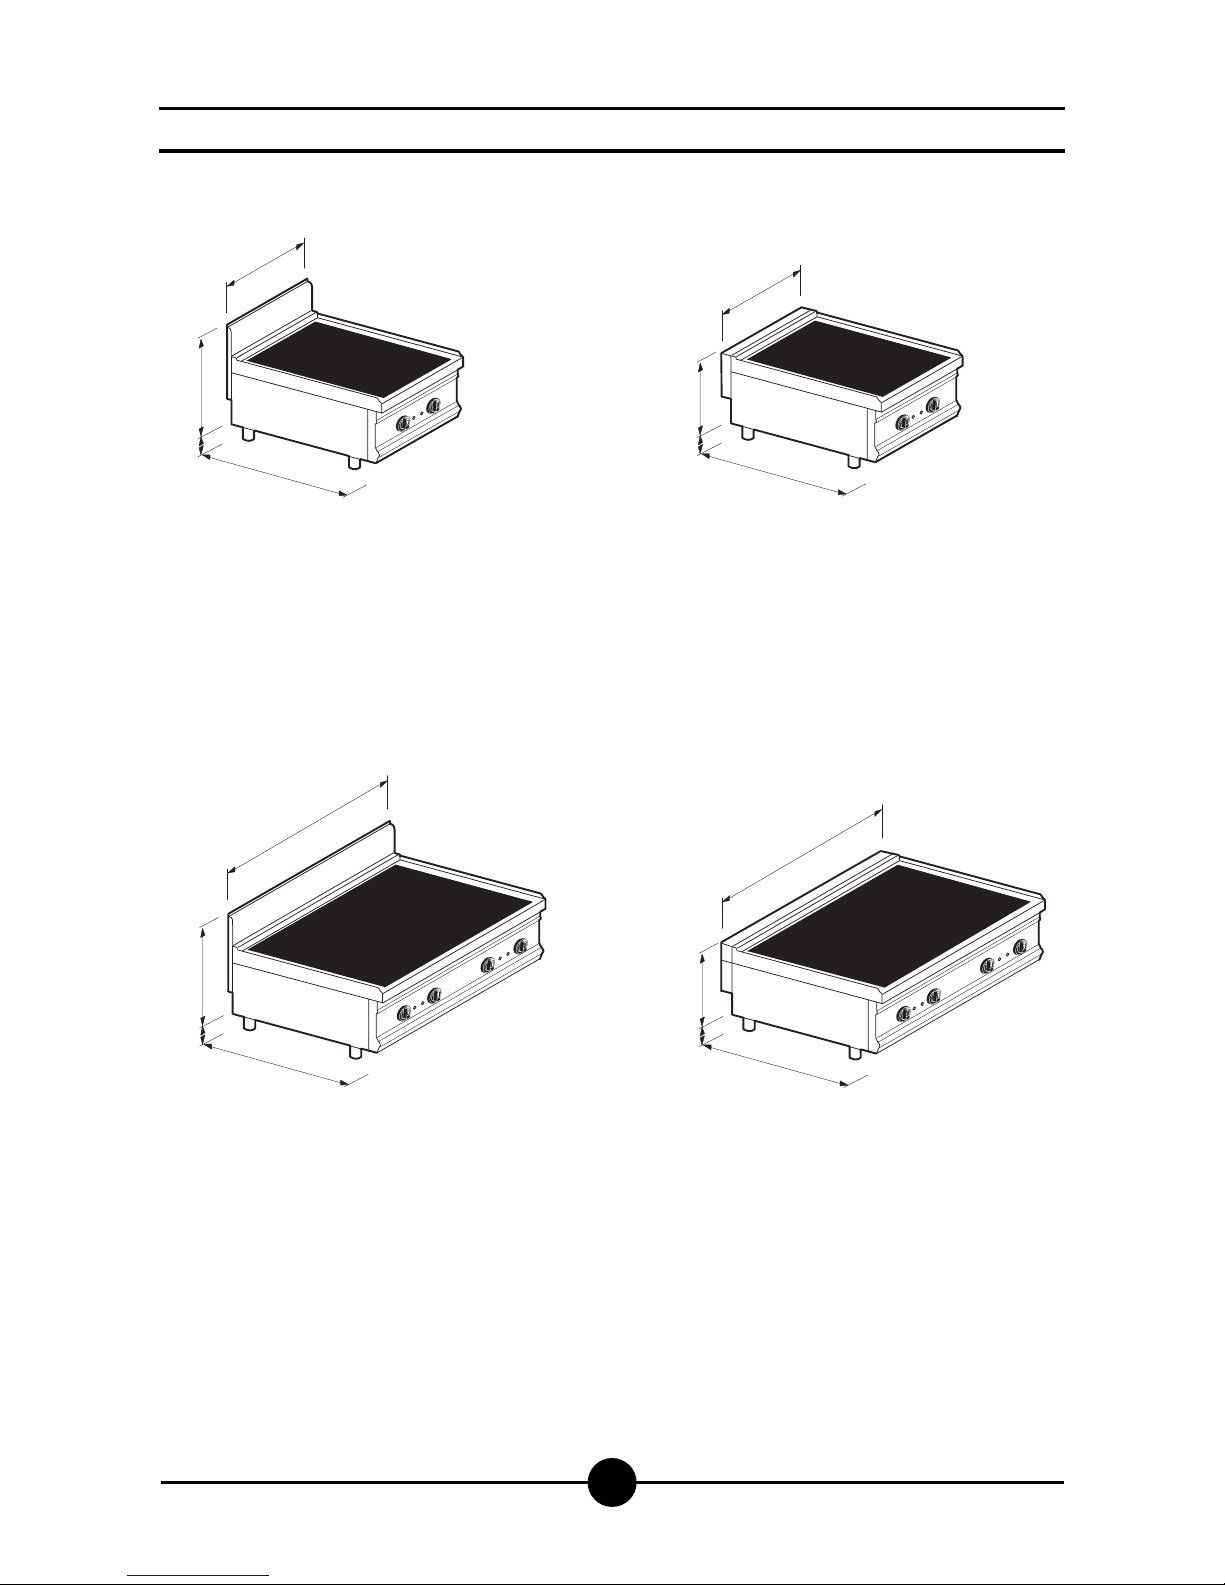
Dimensions
800
40030
655
400
40030
655
800
290
30
700
400
290
30
700
AGB 588/WP
Weight approx.22,3 kg
AGB 503/WP
Weight approx.21 kg
AGS 655/WP
Weight approx.38 kg
Page 8
001-03 - Electric cookers
8
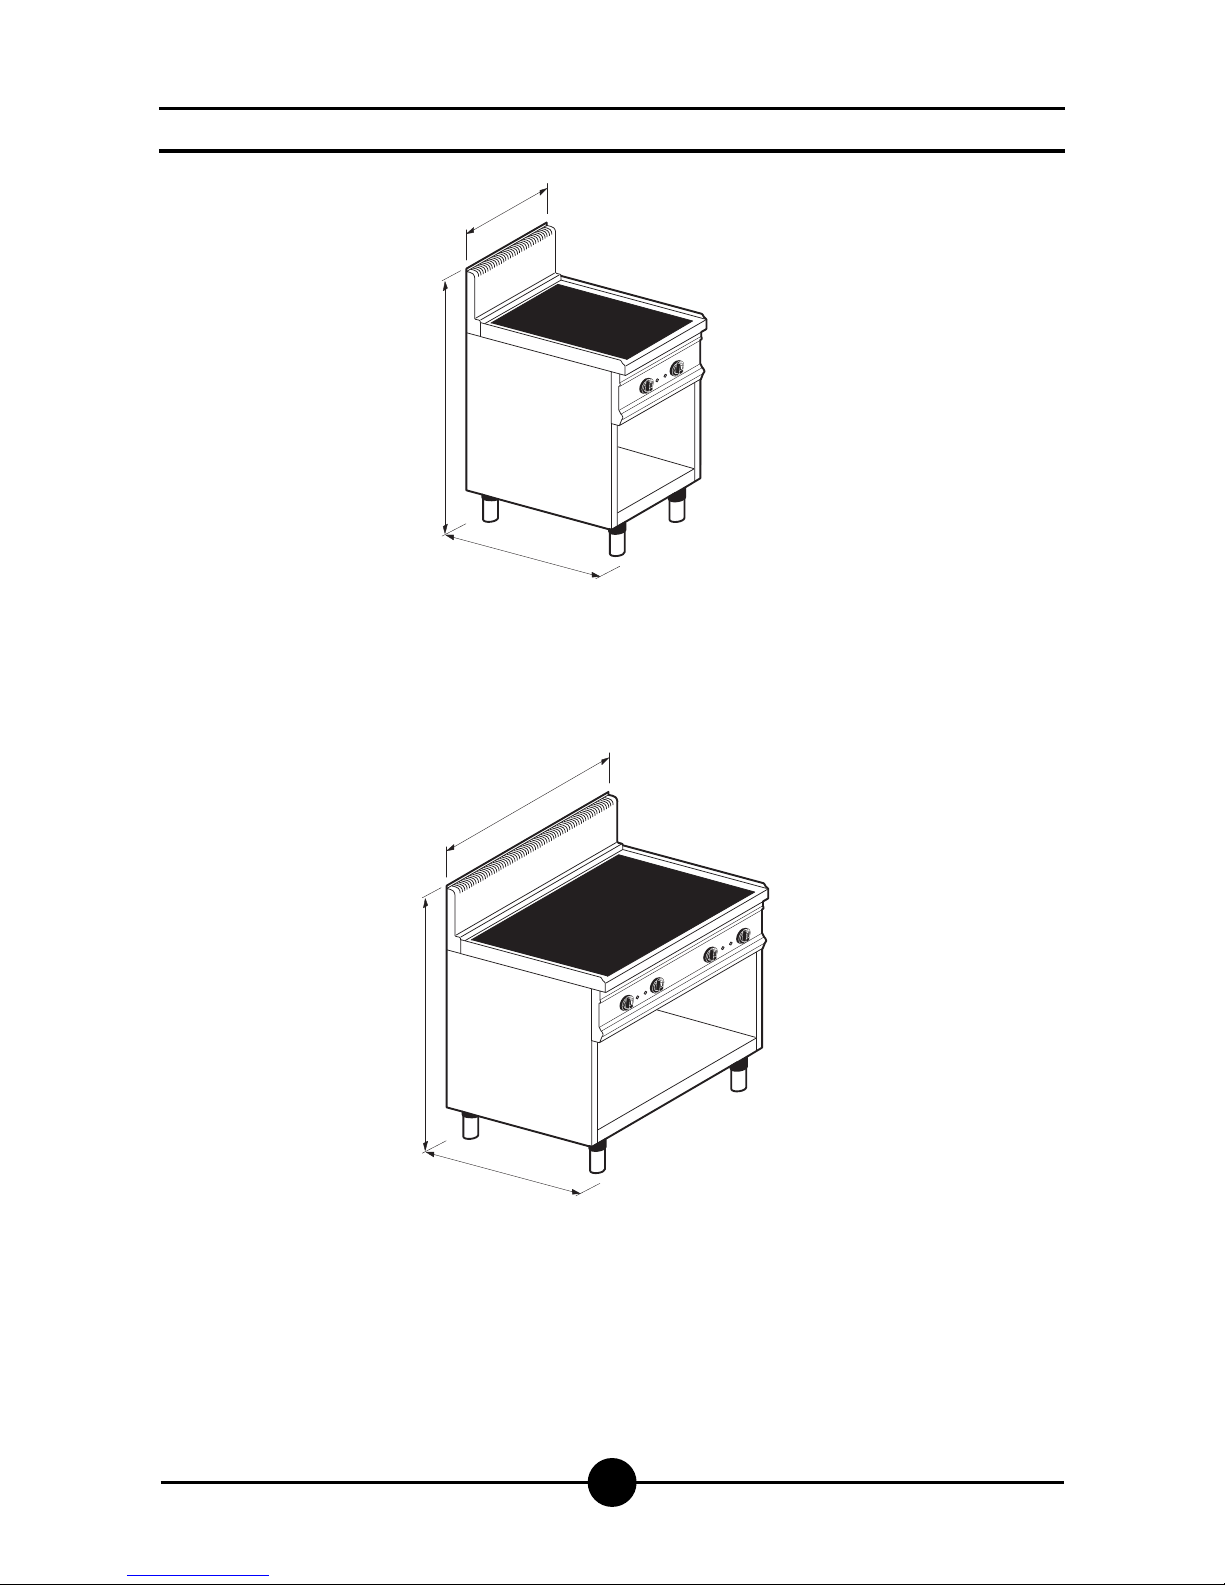
Dimensions
800
1080
700
400
1080
700
Page 9
001-03 - Electric cookers
9
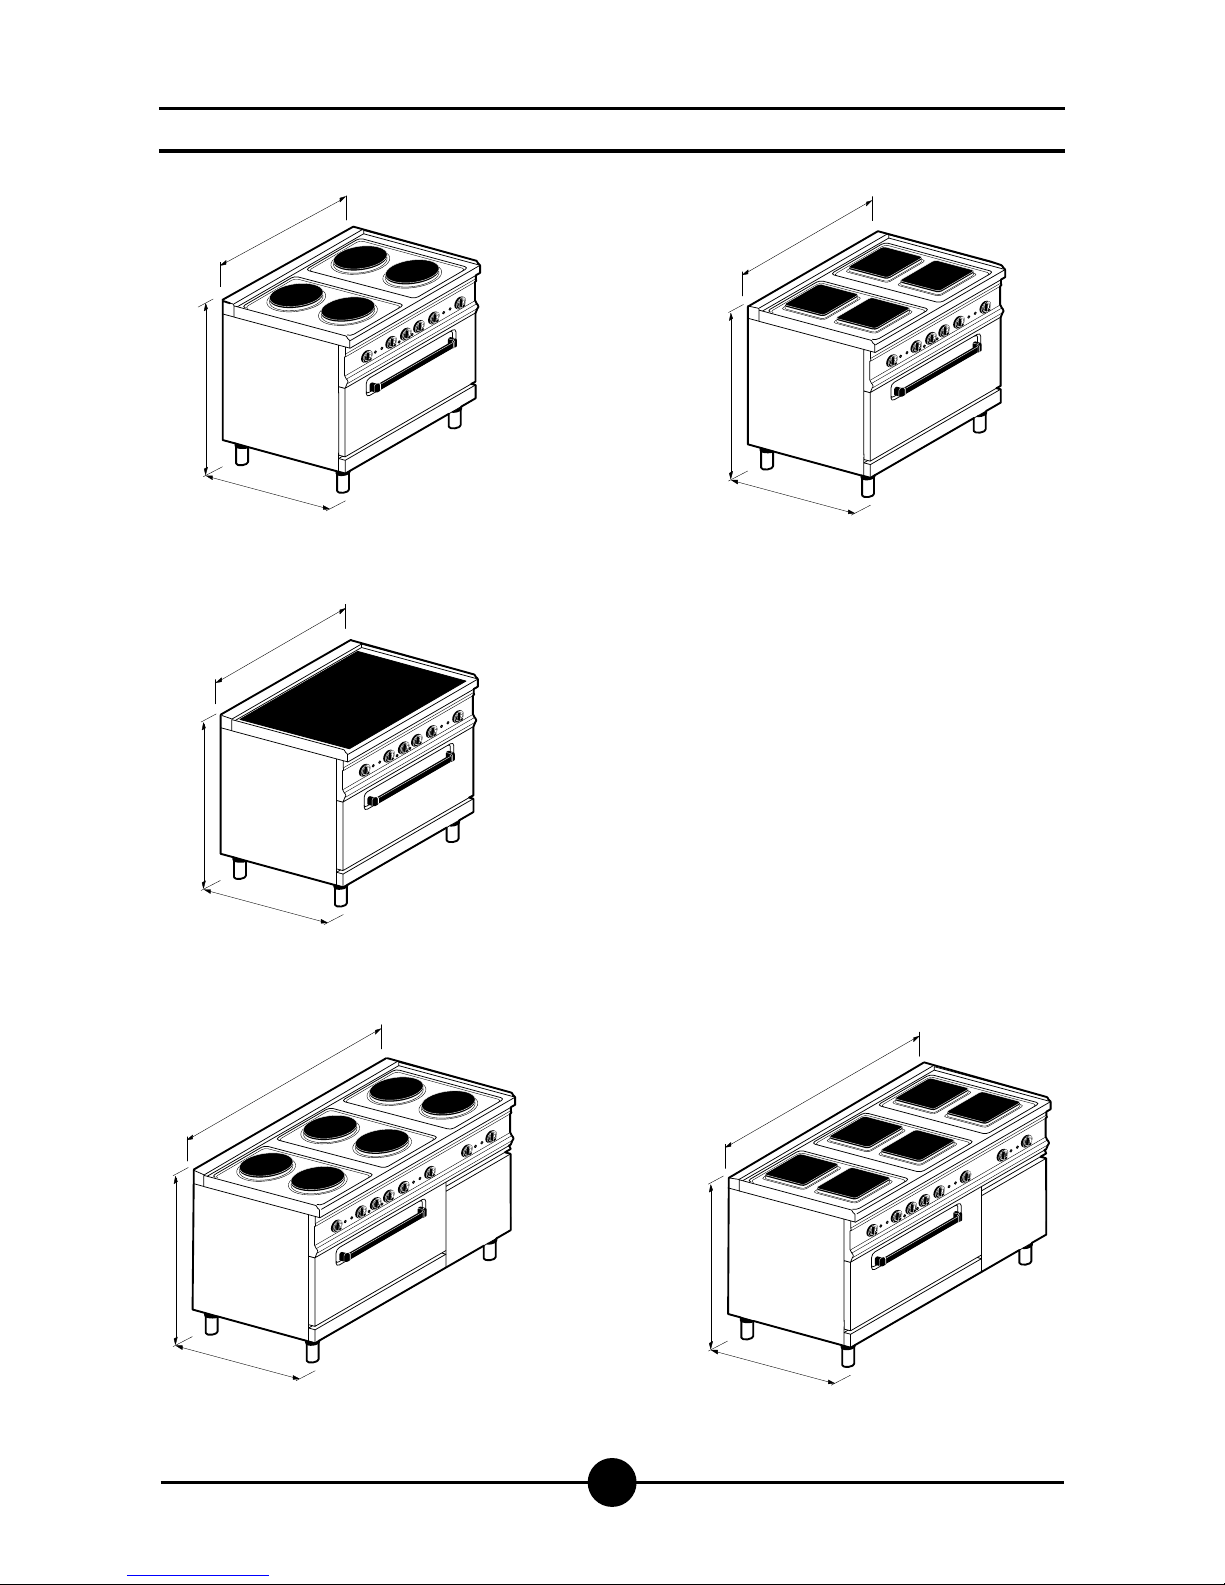
1200
870
615
1200
870
615
800
870
615
800
870
615
800
870
615
Dimensions
Page 10
001-03 - Electric cookers
10
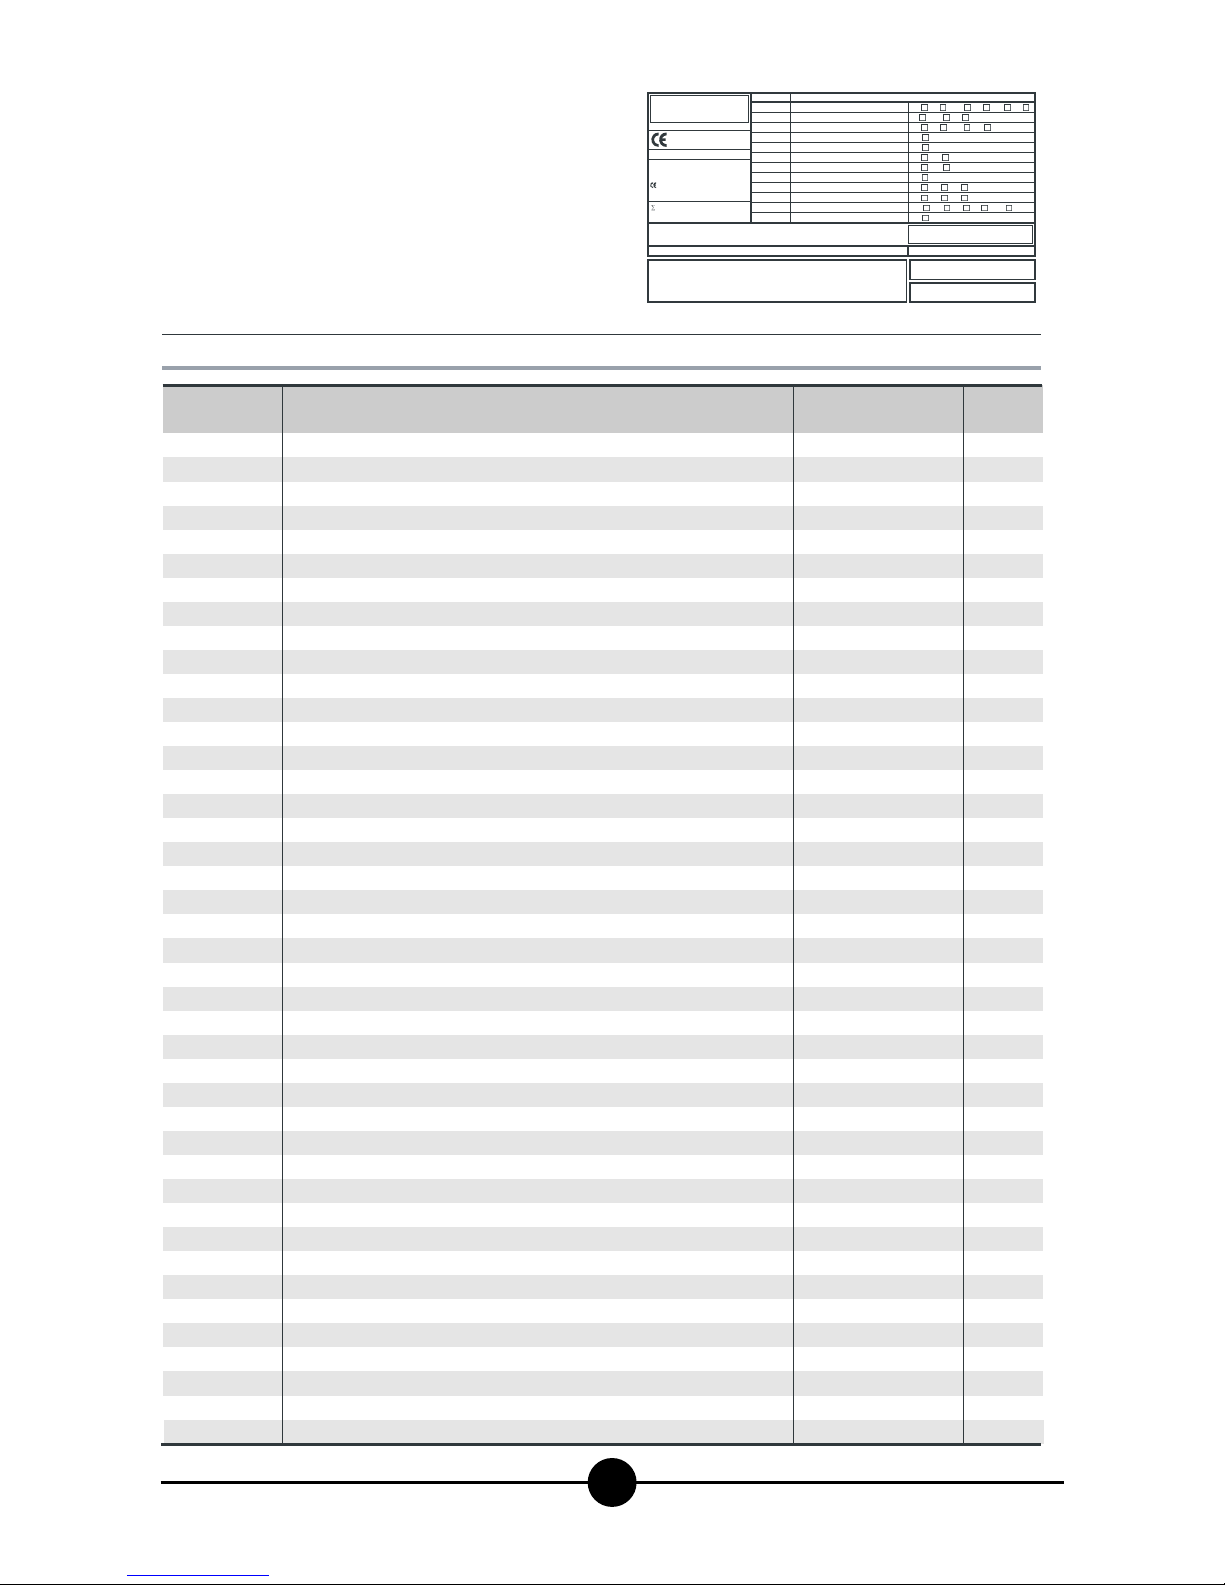
Data of appliances
The data plate is located on the front of the appliance and
on the control panel. It contains all necessary reference
data such as the name of the manufacturer.
3 - TECHNICAL DATA
Version
Electric range - 2 plates on open stand
Electric range - 2 square plates on open stand
Electric range - 4 plates on open stand
Electric range - 4 square plates on open stand
Electric range - 6 plates on open stand
Electric range - 6 square plates on open stand
Electric range - 2 plates
Electric range - 2 square plates
Electric range - 4 plates
Electric range - 4 square plates
Electric range - 6 plates
Electric range - 6 square plates
Electric range - 2 plates
Electric range - 2 square plates
Electric range - 4 plates
Electric range - 4 square plates
Electric range - 4 plates - oven 2/3 for grid 44 x 33
Electric range 4 plates - electric convection oven 1/1 GN multifunction
Electric range 4 square plates - electric convection oven 1/1 GN multifunction
Electric pyroceramic range 4 plates on el. convection oven 1/1 GN multifunction
Electric range 6 plates - electric convection oven 1/1 GN multifunction
Electric range 6 square plates - electric convection oven 1/1 GN multifunction
Electric range 4 plates - electric oven 2/1 GN
Electric range 4 plates - electric convection oven 1/1 GN
Electric range 4 square plates - electric oven 2/1 GN
Electric range 4 square plates - electric convection oven 1/1 GN
Electric pyroceram range 4 plates - 2/1 GN electric oven
Electric pyroceram range 4 plates - electric 1/1 GN convection oven
Electric range 6 plates - 2/1 GN electric oven - neutral unit
Electric range 6 plates - 1/1 GN electric convection oven
Electric range 6 plates - 1/1 GN electric convection oven - neutral unit
Electric range 6 square plates - 2/1 GN electric oven - neutral unit
Electric range 6 square plates - 1/1 GN electric convection oven
Electric range 6 square plates - 1/1 GN electric convection oven - neutral unit
Electric pyroceramic range with 2 plates
Electric pyroceramic range with 4 plates
Electric pyroceramic range with 2 plates
Electric pyroceramic range with 4 plates
Electric pyroceramic range with 2 plates - neutral unit
Electric pyroceramic range with 4 plates - neutral unit
Work surface on GN 2/1 electric oven
Pair of upright GN 2/1 electric ovens
Dim.: LxWxH
400 x 700 x 875
400 x 700 x 875
800 x 700 x 875
800 x 700 x 875
1200 x 700 x 875
1200 x 700 x 875
400 x 700 x 300
400 x 700 x 300
800 x 700 x 300
800 x 700 x 300
1200 x 700 x 300
1200 x 700 x 300
400 x 615 x 300
400 x 615 x 300
800 x 615 x 300
800 x 615 x 300
800 x 650 x 875
800 x 615 x 870
800 x 615 x 870
800 x 615 x 870
1200 x 615 x 870
1200 x 615 x 870
800 x 700 x 875
800 x 700 x 875
800 x 700 x 875
800 x 700 x 875
800 x 700 x 875
800 x 700 x 875
1200 x 700 x 875
1200 x 700 x 875
1200 x 700 x 875
1200 x 700 x 875
1200 x 700 x 875
1200 x 700 x 875
400 x 615 x 300
800 x 615 x 300
400 x 700 x 300
800 x 700 x 300
400 x 700 x 875
800 x 700 x 875
1000 x 700 x 875
1000x 700 x 1420
0051
TIPO/TYPE
CAT/KAT GAS/GAZ G30 G31 G20 G25
II2H3B/P P mbar 30 30 20 -
II2H3+ P mbar 30 37 20--
II2H3+ P mbar 28 37 20 -
25II2L3B/P P mbar 30 30
II2ELL3B/P P mbar 50 50 20 20
II2E+3+ P mbar 28 37 20 25
II2H3B/P P mbar 50 50 20 -
I2E P mbar - - 20 -
--II2H3B/P P mbar 30 30
II2H3+ P mbar 28 37 20 -
--
--
I3B/P P mbar 30 30
I3+ P mbar 28 37
SE FI DK CZ SK SI
IT CH PT
ES IE GB GR
NL
DE
FR BE
AT CH
LU
EE LV LT
EE LV LT
NO MT CY IS HU
CY
MOD.
MOD.
ART.
N.
N.
Qn kW
m3/h
MADE IN ITALY
Predisposto a gas: - Gas preset: - Prevu pour gaz:
Eingestelt für Gas: - Preparado para gas: -
Geschuckt voor:
V AC kW Hz
THE APPLIANCE MUST BE CONNECTED IN COMPLIANCE WITH THE LAWS IN FORCE
AND INSTALLED IN A WELL-VENTILATED ROOM. READ THE INSTRUCTION MANUALS
BEFORE INSTALLING AND USING THE APPLIANCE.
THE APPLIANCE MUST BE INSTALLED BY QUALIFIED PERSONNEL.
Model
AGB 501/WP
AGB 502/WP
AGB 586/WP
AGB 587/WP
AGB 585/WP
AGB 582/WP
AGB 487/WP
AGB 496/WP
AGB 497/WP
AGB 588/WP
AGB 503/WP
AGS 655/WP
AGB 498/WP
Page 11
001-03 - Electric cookers
11
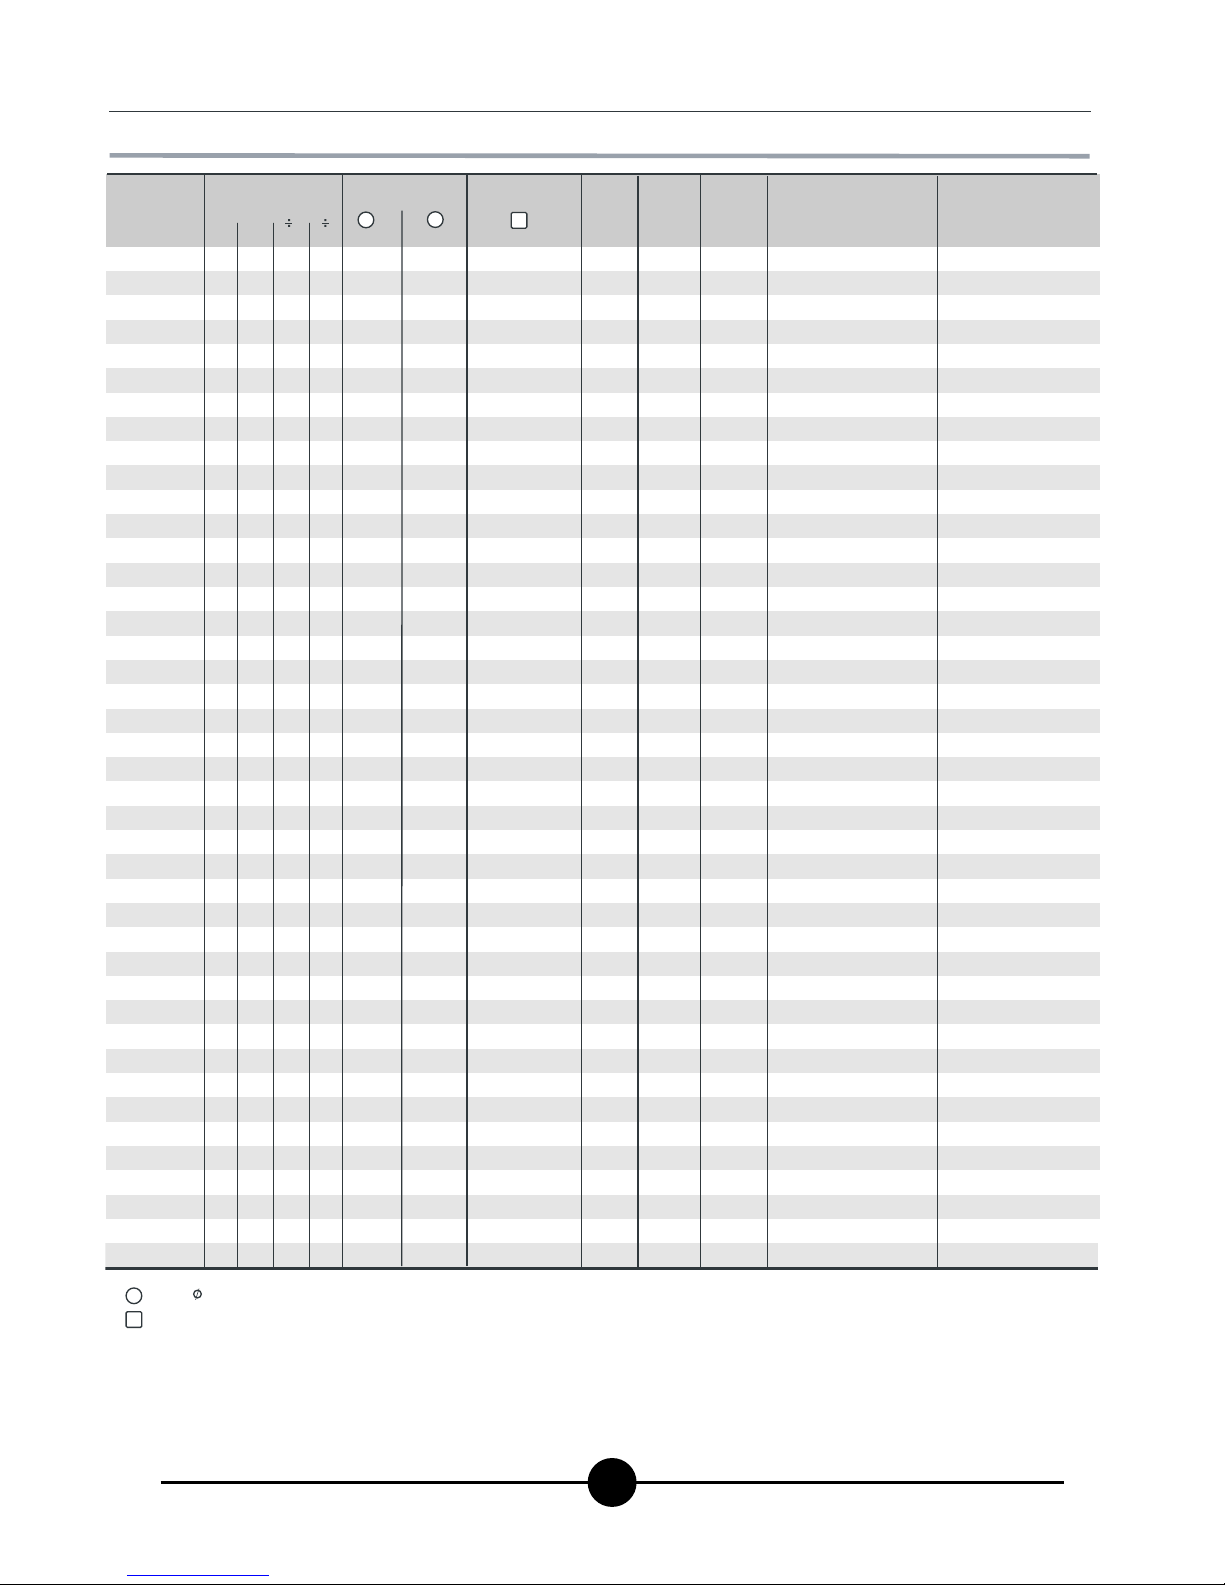
TABLE 1
Resistance (W) Voltage rating
230 V 3 AC o 400 V 3N AC
230 V 3 AC o 400 V 3N AC
230 V 3 AC o 400 V 3N AC
230 V 3 AC o 400 V 3N AC
230 V 3 AC o 400 V 3N AC
230 V 3 AC o 400 V 3N AC
230 V 3 AC o 400 V 3N AC
230 V 3 AC o 400 V 3N AC
230 V 3 AC o 400 V 3N AC
230 V 3 AC o 400 V 3N AC
230 V 3 AC o 400 V 3N AC
230 V 3 AC o 400 V 3N AC
230 V 3 AC o 400 V 3N AC
230 V 3 AC o 400 V 3N AC
230 V 3 AC o 400 V 3N AC
230 V 3 AC o 400 V 3N AC
230 V 3 AC o 400 V 3N AC
230 V 3 AC o 400 V 3N AC
230 V 3 AC o 400 V 3N AC
230 V 3 AC o 400 V 3N AC
230 V 3 AC o 400 V 3N AC
230 V 3 AC o 400 V 3N AC
230 V 3 AC o 400 V 3N AC
230 V 3 AC o 400 V 3N AC
230 V 3 AC o 400 V 3N AC
230 V 3 AC o 400 V 3N AC
230 V 3 AC o 400 V 3N AC
230 V 3 AC o 400 V 3N AC
230 V 3 AC o 400 V 3N AC
230 V 3 AC o 400 V 3N AC
230 V 3 AC o 400 V 3N AC
230 V 3 AC o 400 V 3N AC
230 V 3 AC o 400 V 3N AC
230 V 3 AC o 400 V 3N AC
230 V 3 AC o 400 V 3N AC
230 V 3 AC o 400 V 3N AC
230 V 3 AC o 400 V 3N AC
230 V 3 AC o 400 V 3N AC
230 V 3 AC o 400 V 3N AC
230 V 3 AC o 400 V 3N AC
230 V 3 AC o 400 V 3N AC
230 V 3 AC o 400 V 3N AC
Lead wire / Section
4 x 2.5 mm
2 o
5 x 1.5 mm
2
4 x 2.5 mm
2 o
5 x 1.5 mm
2
4 x 6 mm
2 o
5 x 2.5 mm
2
4 x 6 mm
2 o
5 x 2.5 mm
2
4 x 6 mm
2 o
5 x 2.5 mm
2
4 x 6 mm
2 o
5 x 2.5 mm
2
4 x 2.5 mm
2 o
5 x 1.5 mm
2
4 x 2.5 mm
2 o
5 x 1.5 mm
2
4 x 6 mm
2 o
5 x 2.5 mm
2
4 x 6 mm
2 o
5 x 2.5 mm
2
4 x 6 mm
2 o
5 x 2.5 mm
2
4 x 6 mm
2 o
5 x 2.5 mm
2
4 x 2.5 mm
2 o
5 x 1.5 mm
2
4 x 2.5 mm
2 o
5 x 1.5 mm
2
4 x 6 mm
2 o
5 x 2.5 mm
2
4 x 6 mm
2 o
5 x 2.5 mm
2
4 x 6 mm
2 o
5 x 2.5 mm
2
4 x 6 mm
2 o
5 x 2.5 mm
2
4 x 6 mm
2 o
5 x 2.5 mm
2
4 x 6 mm
2 o
5 x 2.5 mm
2
4 x 10 mm
2 o
5 x 6 mm
2
4 x 10 mm
2 o
5 x 6 mm
2
4 x 6 mm
2 o
5 x 2.5 mm
2
4 x 6 mm
2 o
5 x 2.5 mm
2
4 x 6 mm
2 o
5 x 2.5 mm
2
4 x 6 mm
2 o
5 x 2.5 mm
2
4 x 6 mm
2 o
5 x 2.5 mm
2
4 x 6 mm
2 o
5 x 2.5 mm
2
4 x 10 mm
2 o
5 x 6 mm
2
4 x 6 mm
2 o
5 x 4 mm
2
4 x 6 mm
2 o
5 x 4 mm
2
4 x 10 mm
2 o
5 x 6 mm
2
4 x 6 mm
2 o
5 x 4 mm
2
4 x 6 mm
2 o
5 x 4 mm
2
4 x 2.5 mm
2 o
5 x 1.5 mm
2
4 x 2.5 mm
2 o
5 x 1.5 mm
2
4 x 2.5 mm
2 o
5 x 1.5 mm
2
4 x 2.5 mm
2 o
5 x 1.5 mm
2
4 x 2.5 mm
2 o
5 x 1.5 mm
2
4 x 2.5 mm
2 o
5 x 1.5 mm
2
4 x 2.5 mm
2 o
5 x 1.5 mm
2
4 x 2.5 mm
2 o
5 x 1.5 mm
2
1200
-
-
-
-
-
-
-
-
-
-
-
-
-
-
-
-
-
-
-
1
-
-
-
-
-
-
-
-
-
-
-
-
-
-
-
1
-
-
-
-
-
-
1800
-
-
-
-
-
-
-
-
-
-
-
-
-
-
-
-
-
-
-
1
-
-
-
-
-
-
2
2
-
-
-
-
-
-
1
1
-
2
-
2
-
-
700
2100
-
-
-
-
-
-
-
-
-
-
-
-
-
-
-
-
-
-
-
-
-
-
-
-
-
-
-
-
-
-
-
-
-
-
1
-
-
-
-
-
-
-
1000
2500
-
-
-
-
-
-
-
-
-
-
-
-
-
-
-
-
-
-
-
2
-
-
-
-
-
-
2
2
-
-
-
-
-
-
-
2
2
2
2
2
-
-
Plates
1
-
2
-
3
-
1
-
2
-
3
-
2
-
4
-
4
4
-
-
3
-
2
2
-
-
-
-
3
3
3
-
-
-
-
-
-
-
-
-
-
-
-
2
-
4
-
6
-
2
-
4
-
6
-
2
-
4
-
-
4
-
-
6
-
-
4
4
-
-
-
-
-
6
6
6
-
-
-
-
-
-
-
-
Oven
2500 W
-
-
-
-
-
-
-
-
-
-
-
-
-
-
-
-
44x33
1
1
1
1
1
-
1
-
1
-
1
-
1
1
-
1
1
-
-
-
-
-
-
-
-
Oven
5900 W
-
-
-
-
-
-
-
-
-
-
-
-
-
-
-
-
-
-
-
-
-
-
1
-
1
-
1
-
1
-
-
1
-
-
-
-
-
-
-
-
1
2
plates 22
square plates 22x22
Power
4.6 kW
5.2 kW
9.2 kW
10.4 kW
13.8 kW
15.6 kW
4.6 kW
5.2 kW
9.2 kW
10.4 kW
13.6 kW
15.6 kW
4.0 kW
5.2 kW
8.0 kW
10.4 kW
10.5 kW
10.5 kW
12.9 kW
10.5 kW
16.3 kW
18.1 kW
15.1 kW
11.7 kW
16.3 kW
12.9 kW
14.5 kW
11.1 kW
19.7 kW
16.3 kW
16.3 kW
21.5 kW
18.1 kW
18.1 kW
3.9 kW
8.0 kW
5.0 kW
8.6 kW
5.0 kW
8.6 kW
5.9 kW
11.8 kW
Model
AGB 501/WP
AGB 502/WP
AGB 586/WP
AGB 587/WP
AGB 585/WP
AGB 582/WP
AGB 487/WP
AGB 496/WP
AGB 497/WP
AGB 588/WP
AGB 503/WP
AGS 655/WP
AGB 498/WP
2000 W
2600 W
Plates
square
2600 W
1
-
2
-
3
-
1
-
2
-
3
-
-
-
-
-
-
-
-
-
3
-
2
2
-
-
-
-
3
3
3
-
-
-
-
-
-
-
-
-
-
-
round
Page 12

001-03 - Electric cookers
12
Before beginning installation, remove all packaging from
the appliance. Some parts are protected with an adhesive
film which should be carefully removed.
Any remnants of glue should be thoroughly cleaned using
suitable substances such as benzine.
Under no circumstances should abrasive substances be
used.
Fit the legs to the appliance. The appliance must be levelled using a spirit level.
Slight irregularities can be levelled by adjusting the feet
themselves.
The main switch or plug should be located in the vicinity of
the appliance and easy of access.
We recommend installing the machine under a range hood
so that all the fumes are removed as quickly as possible.
Make sure that all fire prevention standards and safety precautions are strictly adhered to.
Legal and technical requisites
When installing the appliance, the following safety standards must be adhered to:
- Local accident prevention standards
- Current CEI standards.
Installation
Installation, start-up and maintenance should only be carried out by expert personnel.
All work required to install the appliance should be carried
out in compliance with all local standards and regulations.
The manufacturers decline all responsibility where poor
performance is due to incorrect installation in disregard of
the above conditions.
Warning!
In compliance with international regulations, when
connecting the appliance to the mains power supply, a
device with a minimum aperture of 3 mm between contacts must be fitted upstream of the appliance, allowing omnipolar disconnection of the appliance from
the mains.
Wiring
When choosing the lead wire, make sure it has the following characteristics: it should be at least of the H07 RNF type and its section should be large enough for the appliance (see "Technical specifications and dimensions",
page 11). Wire entry on top models is on the back wall,
and underneath all other models. In both cases the terminal board is at the front, behind the control panel.
Pass the wire through the core hitch and wire clamp, plug
the leads into their terminals on the board and secure
them. The earth lead must be a little longer than the others
so that it is the last lead to disconnect if the wire clamp
breaks.
Unipotential
The appliance must be connected up to a unipotential
system.
The connection screw is located on all top models at the
back on yhe right hand side, while in other models it is
located underneath the appliance on the right hand side.
It is labelled.
Warning!
The manufacturers cannot be held responsible for any
damage due to inadequate or incorrect installation.
Under such circumstances the guarantee will be considered null and void.
INSTALLATION INSTRUCTIONS
Page 13
001-03 - Electric cookers
13
Warning!
- Beware of inexpert handling!
- Never leave the hotplates on unused!
- Only use flatbottomed pots and pans, and make sure
that the diameter of the pan is never smaller than the
diameter of the hotplate it is being used on..
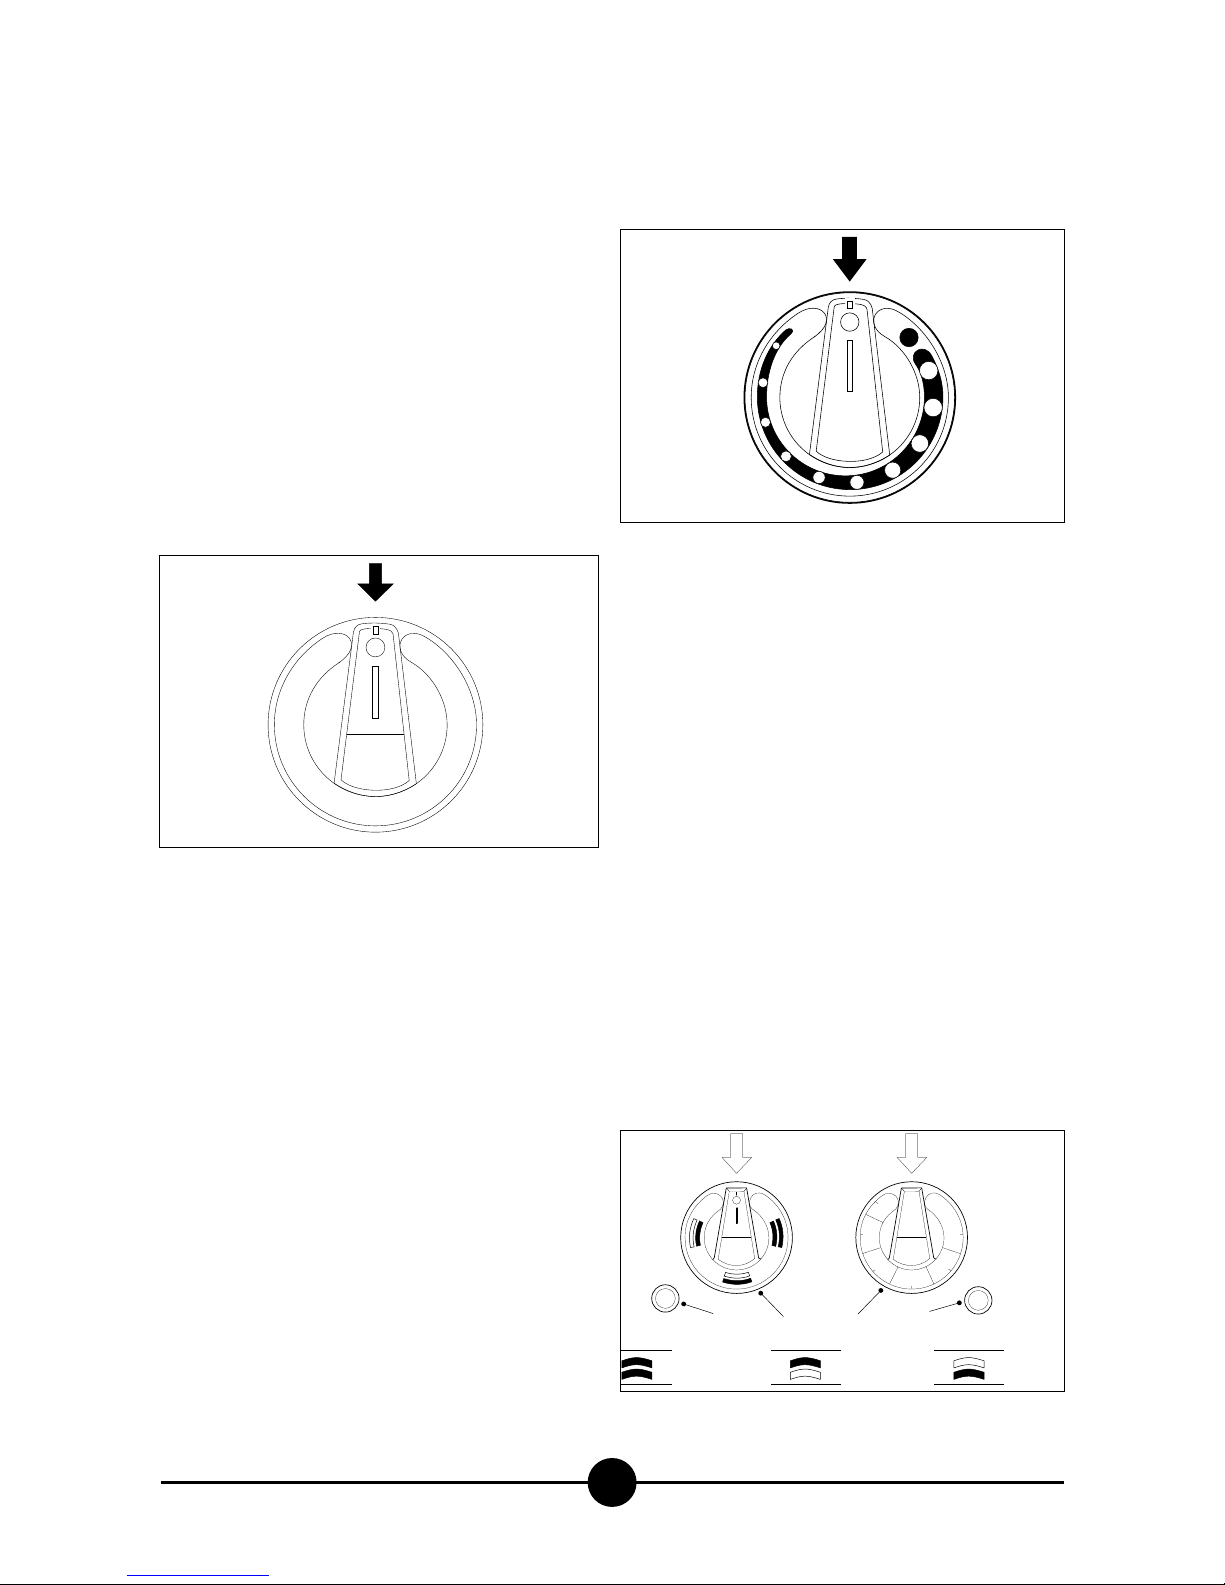
Ignition (Fig.1)
Turn on the switch upstream of the appliance.
Hot plates
Turn the knob corresponding to the hotplate you wish to
use, to a number between 1 and 6. The pilot lamp will light
up as soon as the appliance is on. We advise first turning
the hotplate up to maximum temperature. Once this has
been reached, turn the knob to the required heat To turn
any hotplate off, simply turn the knob back to "0".
6 to begin cooking max. 5/10 min;
5 for high temperature cooking;
4 for medium temperature cooking;
3 to continue cooking large quantities;
2 to continue cooking small quantities;
1 to keep food hot or melt butter;
0 hotplate off.
Pyroceram model use (Fig. 2)
Turn on the appliance using the switch at the top.
Single power plates:
Rotate the knob for the plate required in a clockwise direction, remembering that the thinner part of the "comet" corresponds to the minimum amount of power and the thicker
part corresponds to the maximum amount. The pilot lamp
will come on indicating that the heating element has been
turned on.
Position ● corresponds to the fixed “on” setting of the heating element.
Double power plates:
Turn the knob for the plate required in a clockwise direction, remembering that the thinner part of the "comet" corresponds to the minimum amount of power and the thicker
part corresponds to the maximum amount. In this way,
only the central part of the heating element will be turned
on (1200 w). By rotating the knob the whole way and returning it to the position required, the external part of the heating element will also be automatically switched on (2200
w). The pilot lamp will come on indicating that the heating
element has been turned on. In order to return to reduced
power mode, turn the plate off and then on again.
Oven (Fig. 3)
Turn knob (A) to the type of cooking required.
Turn thermostat (B) to the required temperature.
Pilot lamp (C) will light up, indicating that the appliance is
on.
Pilot lamp (D) will light up, indicating that the resistances
are working; as soon as the required temperature is reached, it goes off.
When the resistances come on again, it lights up once more. To turn the oven off, turn both knobs back to their original position.
USING THE APPLIANCE
1
2
3
4
5
6
1
3
0
0
2
5
0
2
0
0
1
5
0
1
0
0
5
0
B
C
Suola e cielo
Top and bottom
Sole et ciel
Ober- und Hunterhitze
Cielo
Top
Ciel
Nur Oberhitze
Suola
Bottom
Sole
Nur Hunterhitze
A
D
2
3
Page 14
001-03 - Electric cookers
14
The required temperature may be chosen by turning knob
24: warning light 26 comes on and goes out when the elements are switched on. To turn off the oven, turn the two
knobs to position ● (zero).
CLEANING AND TAKING CARE OF THE
APPLIANCE
Warning!
Never clean the appliance with jets of water, whether
direct or pressurised.
Thoroughly clean the appliance every evening after use.
Daily cleaning means better performance and a longer
useful life.
Before starting to clean the appliance, disconnect from
the mains.**
Remove all the extractable parts from the oven and wash
separately. All steel parts should be washed in warm water, using a neutral detergent. Avoid using abrasive or
corrosive detergents which could damage the steel.
What to do if not using the appliance
for a long time
Thoroughly clean and dry the machine as described.
Disconnect the power supply**
What to do if something goes wrong
If anything goes wrong, immediately turn the appliance
off, then turn off the power supply at the switch located
upstream of the appliance, and call the aftersales department
MAINTENANCE
All maintenance should be carried out by qualified personnel only. Before carrying out any maintenance work,
unplug the appliance or turn off the switch upstream of
the appliance**.
NOTE**
Models with a voltage of 230 V 3 AC have 2 lead wires; remember to cut off both power lines when disconnecting
these models; if only one or other of these leads is disconnected the appliance will stay live.
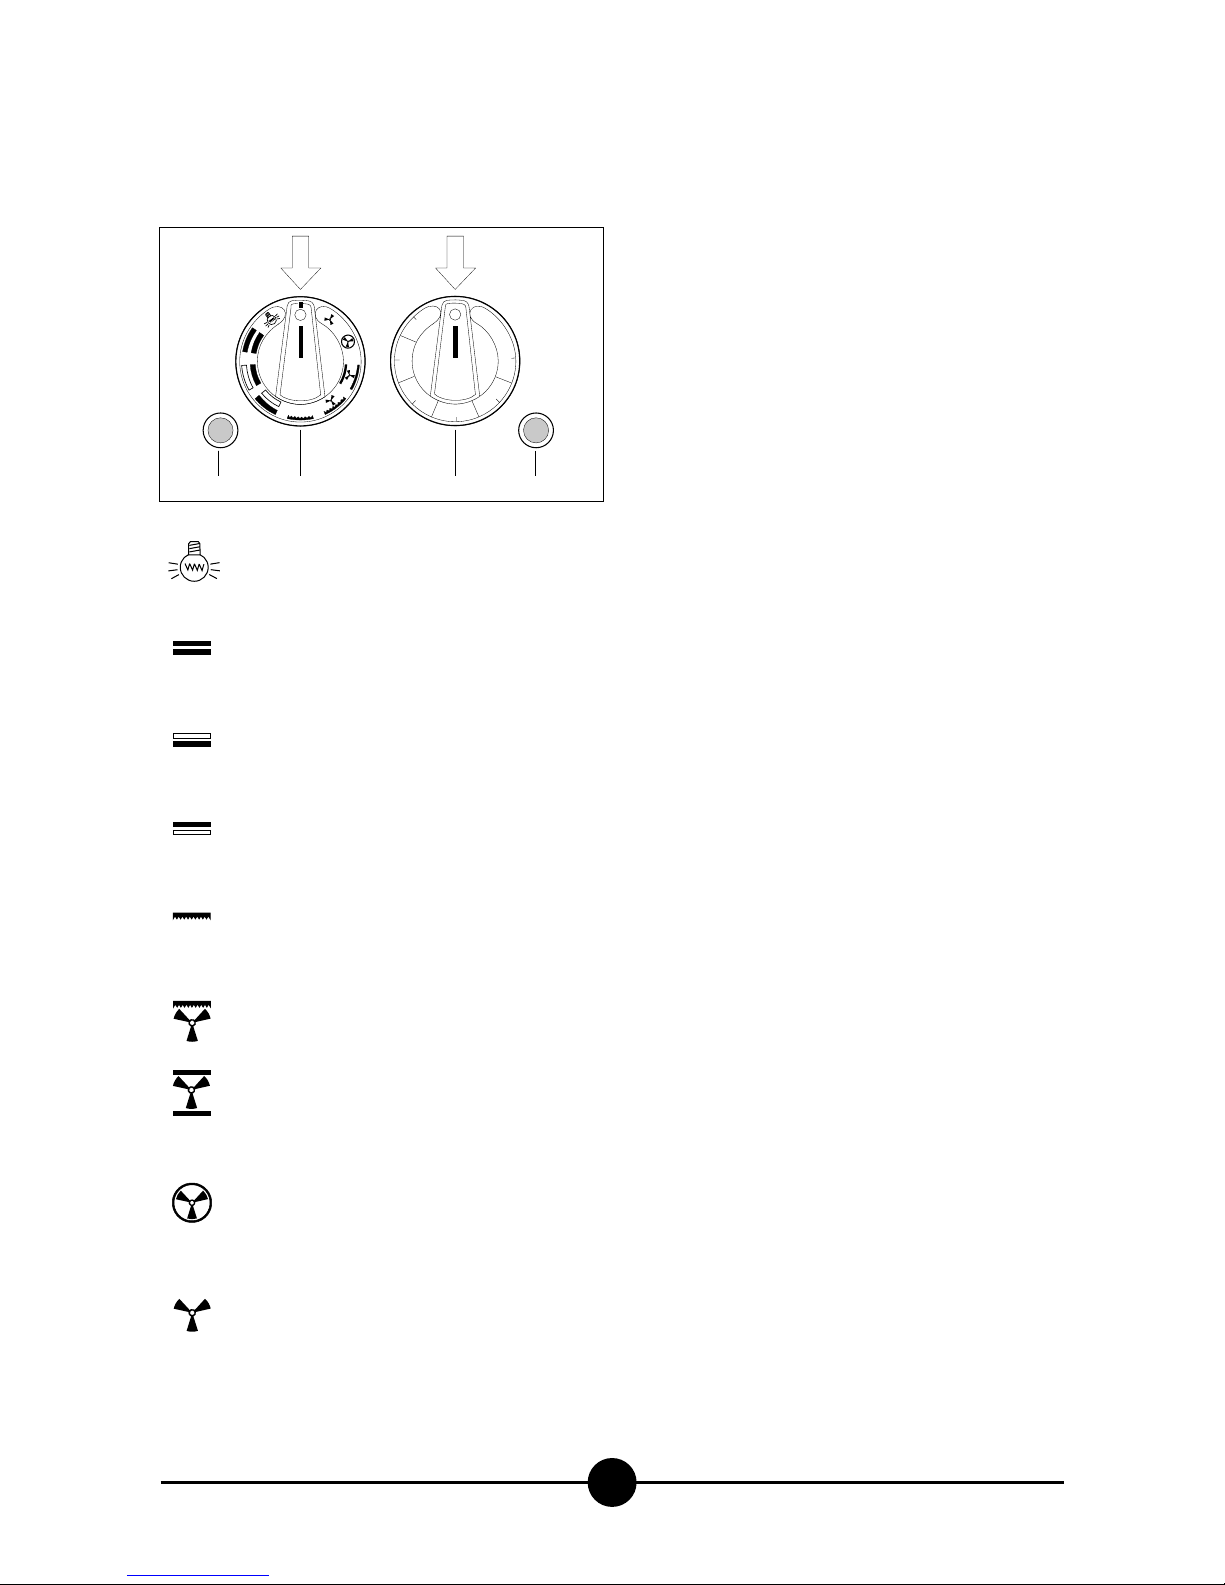
Turning the electric oven on and of
(Fig. 4)
Select the type of heating required by turning knob 23,
bearing in mind that the indicator light 25 stays on in all
positions.
This symbol indicates that the two interior oven lights are on without any type of heating selected
(optional).
Heating is both from above (ceiling element) and
below (floor element). This is the traditional
cooking mode.
The bottom heating element is switched on
(floor element). Heat therefore rises from bottom to top.
Heating is from top to bottom, as the top element
is switched on (ceiling element).
In this position the "grill" element, placed at the
top of the oven over the ceiling element, is switched on.
As in the previous position with the fan switched
on (convection).
In this position the ceiling element (above), the
floor element (below) and the fan are all switched
on (convection).
Convection cooking
In this position the heat is produced by a circular
element placed on the back of the oven around
the fan.
Defrosting mode
No heating element is in operation; only the fan is
switched on to quickly defrost frozen foods.
3
0
0
2
5
0
2
0
0
1
5
0
1
0
0
5
0
24 2623 25
4
Page 15

THE 2002/96/EC DIRECTIVE (WEEE):
information to users
This informational note is meant only for owners
of equipment marked with the symbol shown in
Fig. A on the adhesive label featuring the technical specifications applied on the actual product
(the label also giving the serial number).
This symbol indicates that the product is classified, according to the regulations in force, as an item of electrical and
electronic equipment and conforms to EU Directive
2002/96/EC (WEEE) meaning that, at the end of its service
life, it must be treated separately from domestic waste, i.e.
it must be handed in free of charge to a separate waste
electrical and electronic equipment collection centre or returned to the reseller when buying a new equivalent item
of equipment.
The user is responsible for delivering the unit at the end of
its life to the appropriate collection facilities. Failure to do
so shall result in the user being subject to the penalties
prescribed by the legislation in force on waste.
Suitable separated collection so that the unit no longer
used can be sent off for environmentally compatible recycling, treatment and disposal helps avoid possible negative effects on the environment and on health and facilitates
the recycling of the product's component materials.
For more detailed information on available collection systems, contact the local waste disposal service or the
shop you purchased the unit from.
Producers and importers fulfil their responsibility for environmentally compatible recycling, treatment and disposal
both directly and by joining a collective scheme.
001-03 - Electric cookers
15
Page 16
P3 P1 P2 P3 P1 P2
1mA 2 3 4
L1 L2 L3 N
56
H1
5
211234
43
R2
B1
H1
5
211234
43
Line input terminal board
Hotplate commutator
Pilot lamp
Pilot lamp (voltage)
Hotplate 2600 W
mA
B1
H1
H2
R1
R1
R2R2
400 V 3N AC
AGB 501/WP
AGB 586/WP
Hotplate 2000 W
R2
6
5
4
3
2
1
0
B1
5
P3 P1 P2
21334
2600 w
1800 w
1200 w
600 w
400 w
270 w
6
5
4
3
2
1
0
B1
5
P3 P1 P2
21334
2000 w
1150 w
850 w
300 w
220 w
175 w
R1
R2
001-03 - Electric cookers
16
Wiring diagrams
Page 17
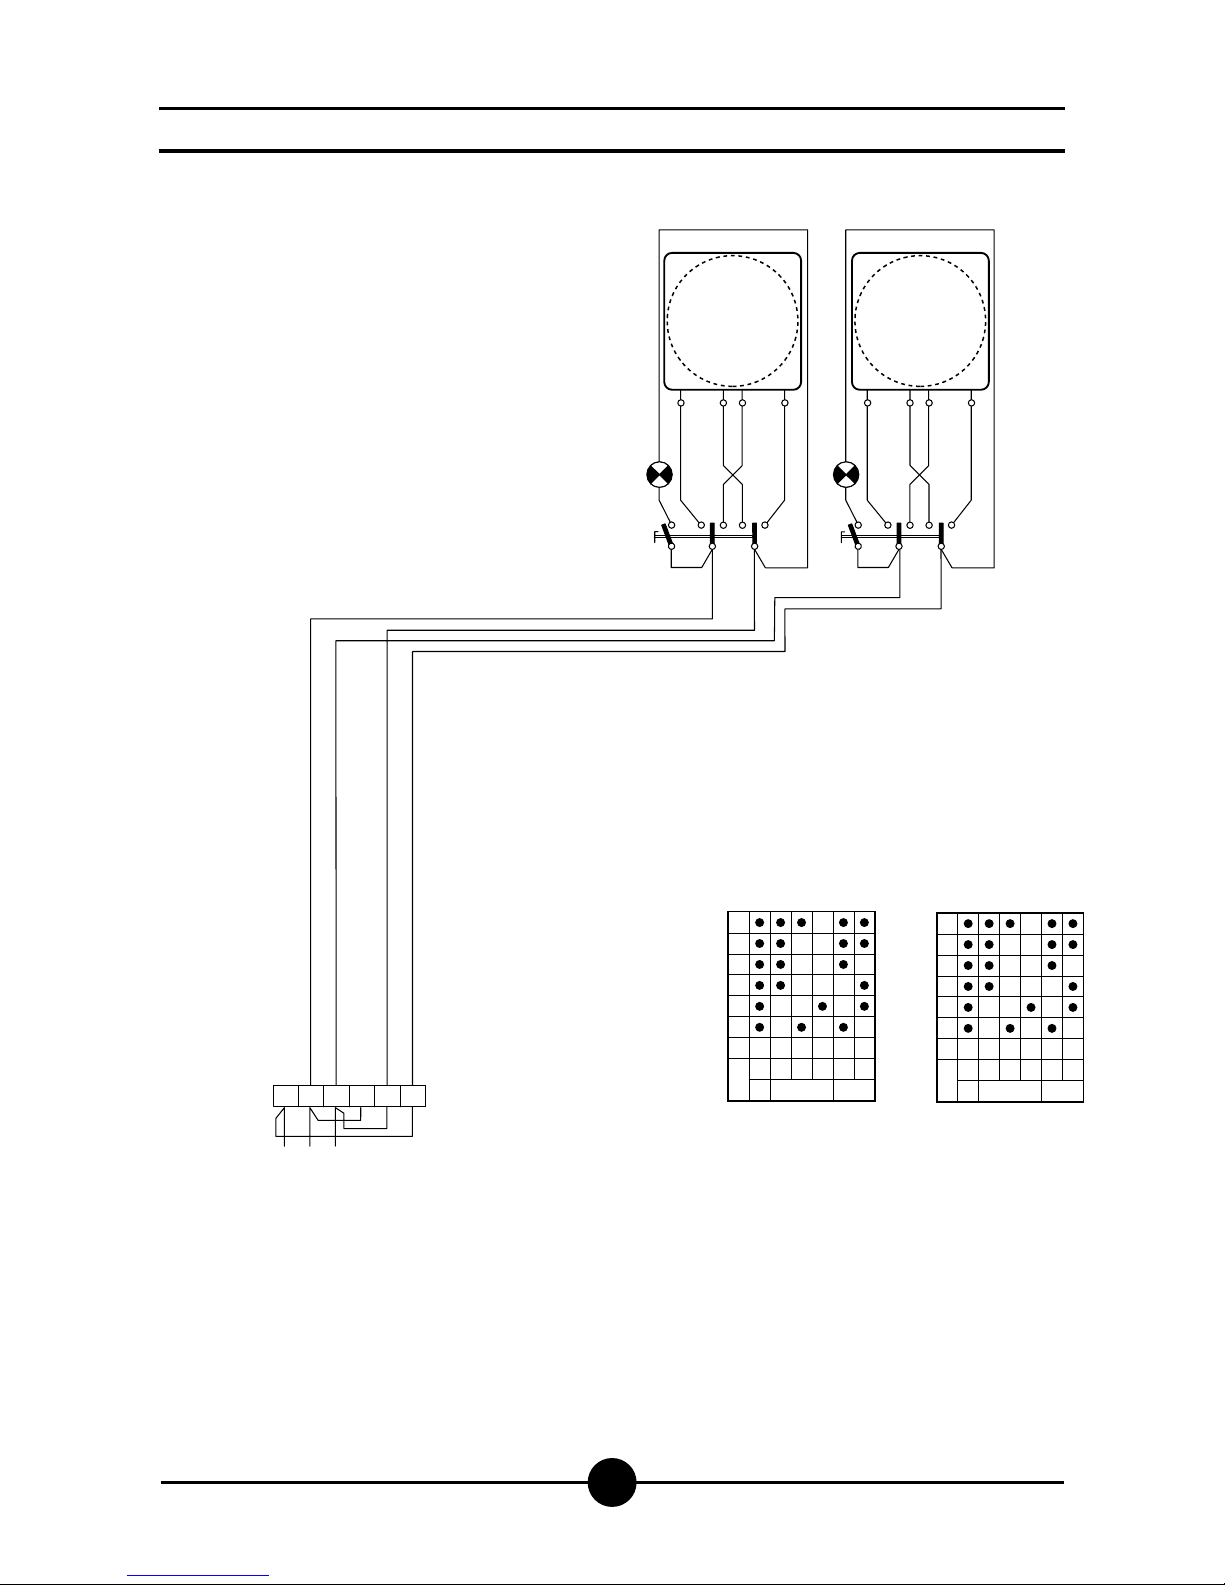
001-03 - Electric cookers
17
Wiring diagrams
L1 L2 L3
R1
2
B1
H1
P3 P1 P2
52134
31 4
N2
N3 N1
R2
R2 R2
2
B1
H1
P3 P1 P2
52134
31 4
N2
N3 N1
1mA 2 3 4 56
230 V 3 AC
AGB 501/WP
AGB 586/WP
Line input terminal board
Hotplate commutator
Pilot lamp
Pilot lamp (voltage)
Hotplate 2600 W
mA
B1
H1
H2
R1
Hotplate 2000 W
R2
6
5
4
3
2
1
0
B1
5
P3 P1 P2
21334
2600 w
1800 w
1200 w
600 w
400 w
270 w
6
5
4
3
2
1
0
B1
5
P3 P1 P2
21334
2000 w
1150 w
850 w
300 w
220 w
175 w
R1
R2
Page 18
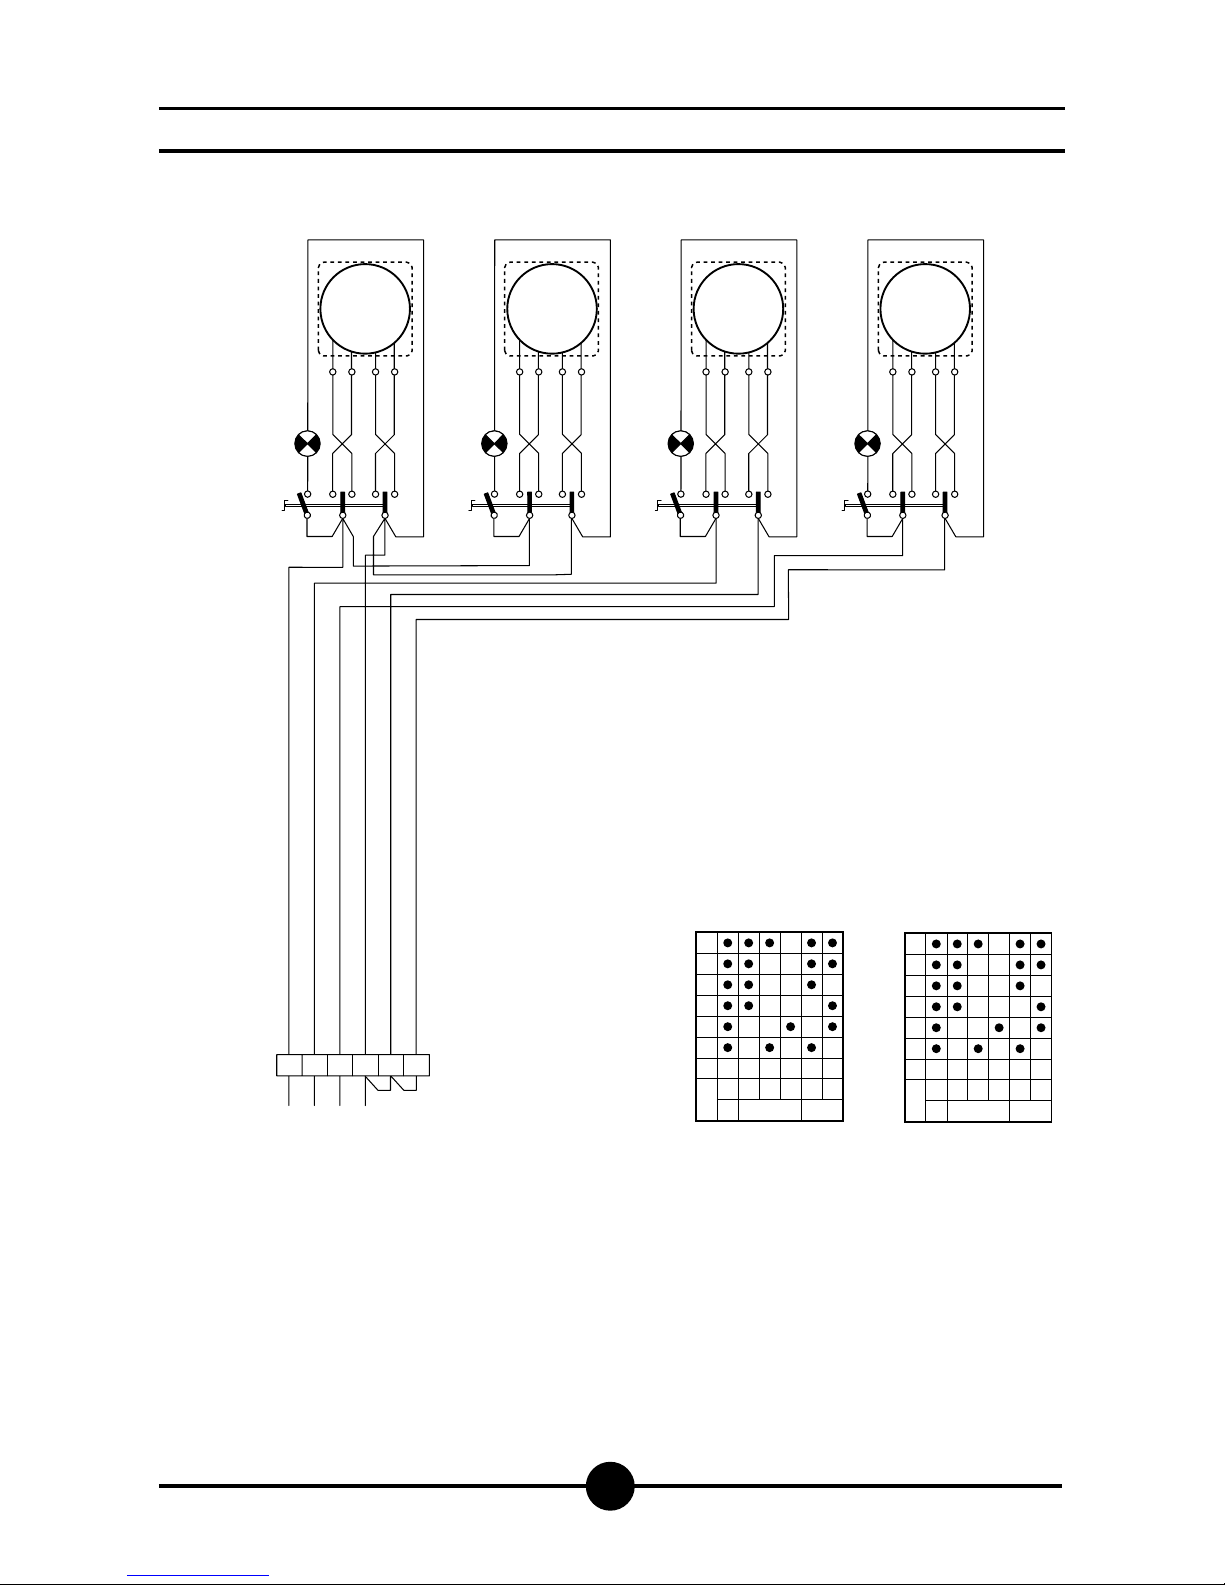
001-03 - Electric cookers
18
Wiring diagrams
P3 P1 P2 P3 P1 P2 P3 P1 P2 P3 P1 P2
1mA 2 3 4
L1 L2 L3 N
56
B1
H1
5
211234
43
B1
H1
5
211234
43
B1
H1
5
211234
43
R2
B1
H1
5
211234
43
Line input terminal board
Hotplate commutator
Pilot lamp
Pilot lamp (voltage)
Hotplate 2600 W
mA
B1
H1
H2
R1
R1R1R2
R2R2R2R2
400 V 3N AC
AGB 502/WP
AGB 587/WP
Hotplate 2000 W
R2
6
5
4
3
2
1
0
B1
5
P3 P1 P2
21334
2600 w
1800 w
1200 w
600 w
400 w
270 w
6
5
4
3
2
1
0
B1
5
P3 P1 P2
21334
2000 w
1150 w
850 w
300 w
220 w
175 w
R1
R2
Page 19
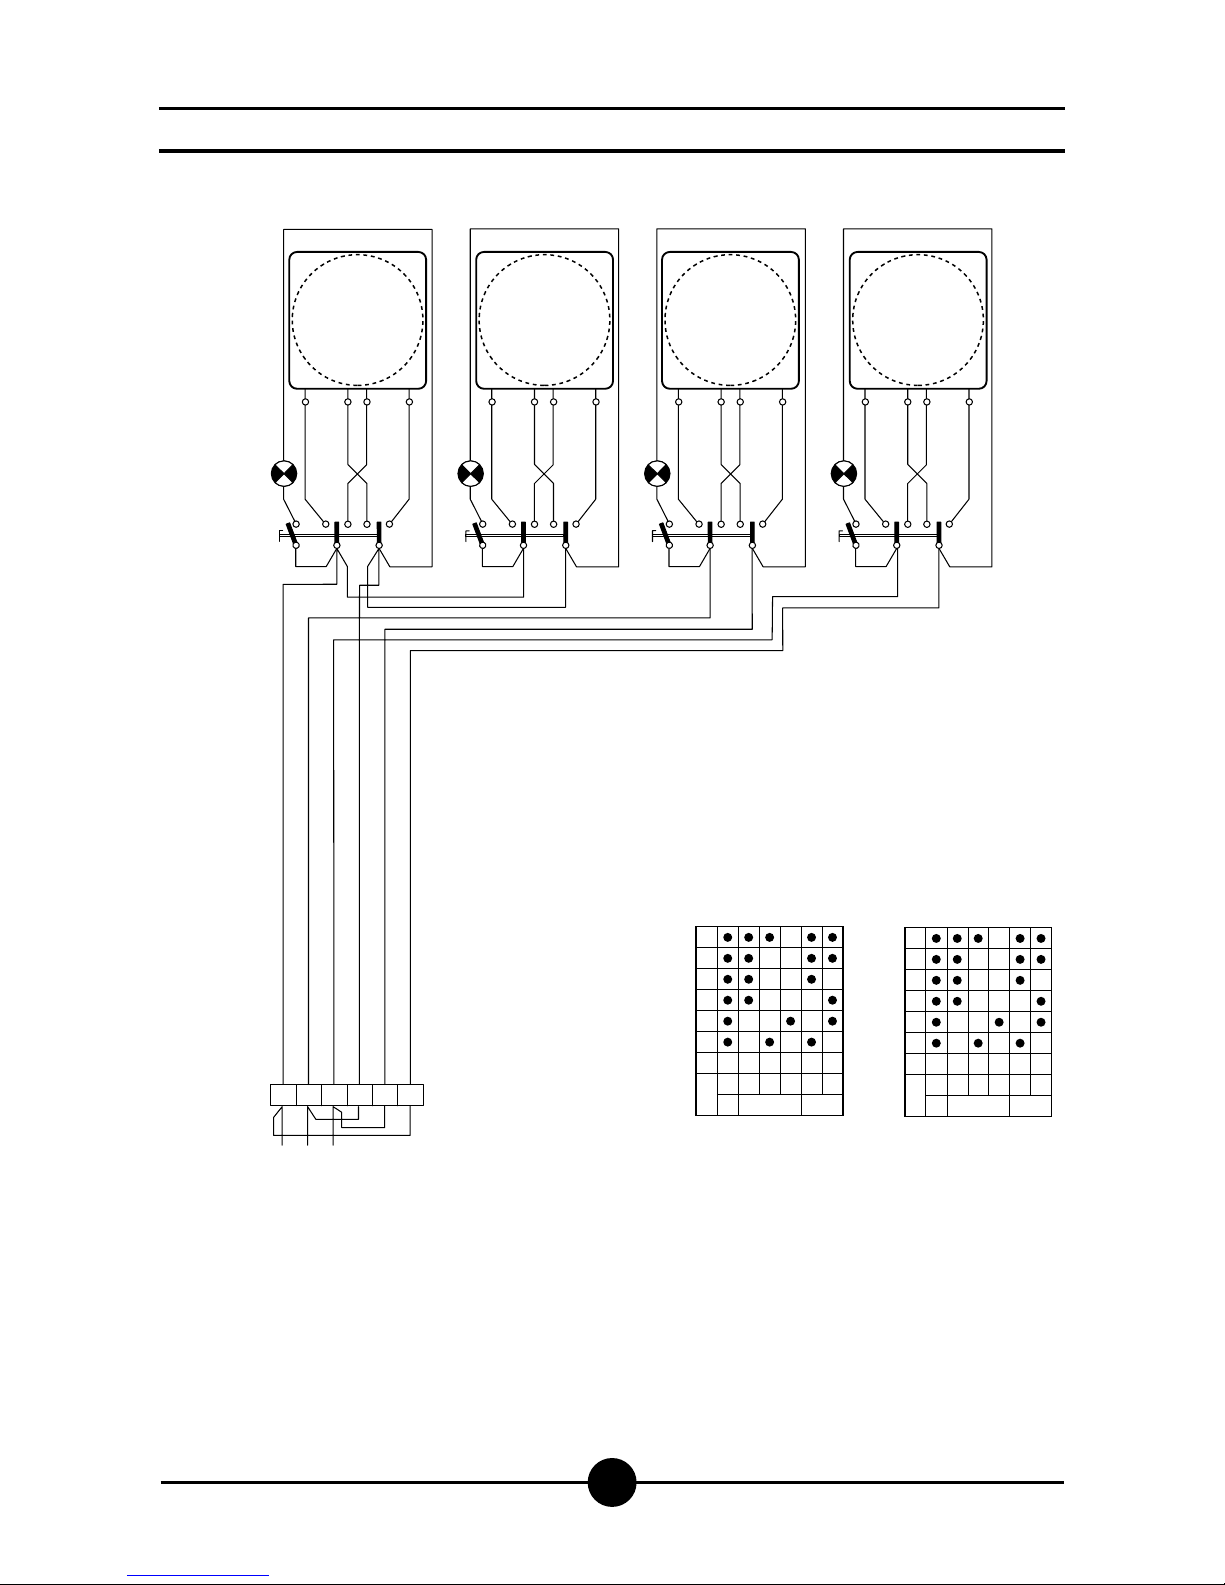
001-03 - Electric cookers
19
Wiring diagrams
L1 L2 L3
R2
2
B1
H1
P3 P1 P2
52134
31 4
N2
N3 N1
R1
2
B1
H1
P3 P1 P2
52134
31 4
N2
N3 N1
R1
2
B1
H1
P3 P1 P2
52134
31 4
N2
N3 N1
R2
R2
R2 R2 R2
2
B1
H1
P3 P1 P2
52134
31 4
N2
N3 N1
1mA 2 3 4 56
230 V 3 AC
AGB 502/WP
AGB 587/WP
Line input terminal board
Hotplate commutator
Pilot lamp
Pilot lamp (voltage)
Hotplate 2600 W
mA
B1
H1
H2
R1
Hotplate 2000 W
R2
6
5
4
3
2
1
0
B1
5
P3 P1 P2
21334
2600 w
1800 w
1200 w
600 w
400 w
270 w
6
5
4
3
2
1
0
B1
5
P3 P1 P2
21334
2000 w
1150 w
850 w
300 w
220 w
175 w
R1
R2
Page 20
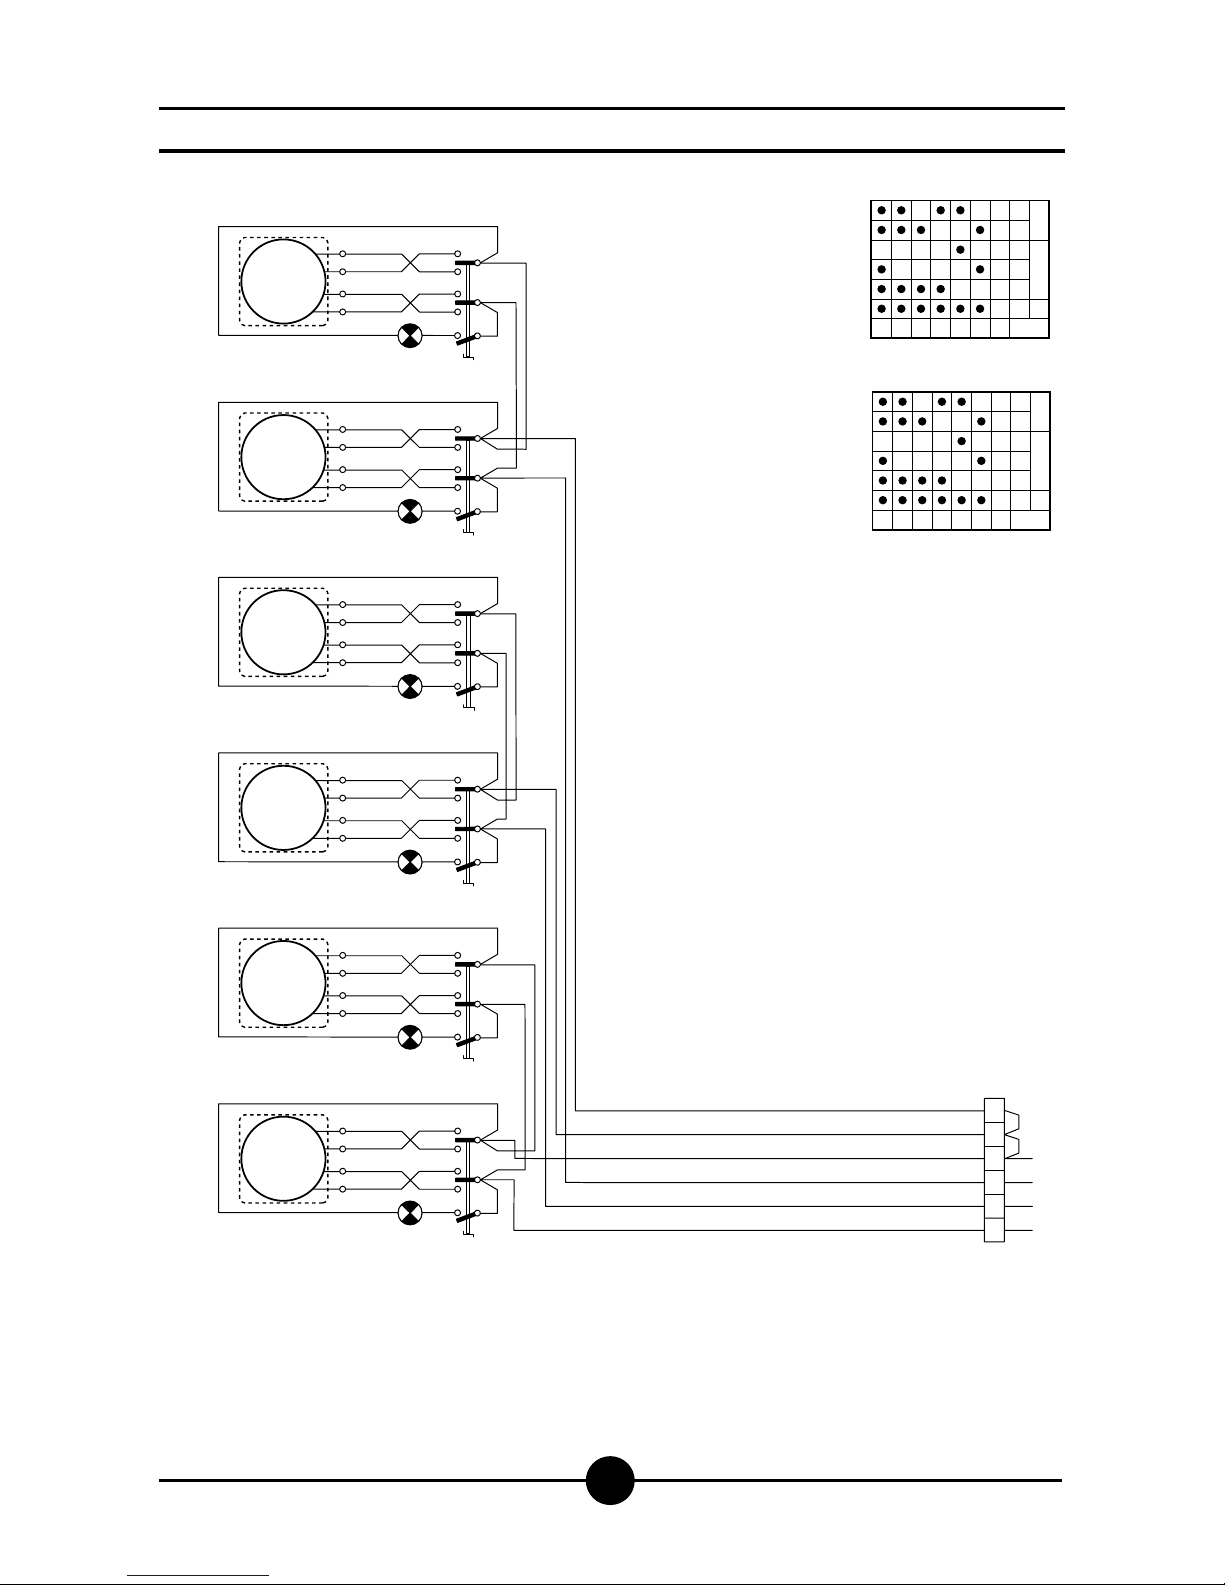
001-03 - Electric cookers
20
Wiring diagrams
P3 P1 P2 P3 P1 P2 P3 P1 P2 P3 P1 P2 P3 P1 P2 P3 P1 P2
1mA 2 3 4
L1 L2 L3 N
56
B1
H1
5
21
12
34
43
B1
H1
5
21
12
34
43
B1
H1
5
21
12
34
43
B1
H1
5
21
12
34
43
B1
H1
5
21
12
34
43
R2
B1
H1
5
21
12
34
43
Line input terminal board
Hotplate commutator
Pilot lamp
Pilot lamp (voltage)
Hotplate 2600 W
mAB1H1H2R1
R1R1R2R2R1
400 V 3N AC
Hotplate 2000 W
R2
6543210
2600 w
1800 w
1200 w
600 w
400 w
270 w
B1
5
P3 P1 P2
21334
6543210
B1
5
P3 P1 P2
21334
2000 w
1150 w
850 w
300 w
220 w
175 w
R2
R1
Page 21
001-03 - Electric cookers
21
Wiring diagrams
2
B1
H1
P3 P1 P2
52134
31 4
N2
N3 N1
2
B1
H1
P3 P1 P2
52134
31 4
N2
N3 N1
2
B1
H1
P3 P1 P2
52134
31 4
N2
N3 N1
2
B1
H1
P3 P1 P2
52134
31 4
N2
N3 N1
2
B1
H1
P3 P1 P2
52134
31 4
N2
N3 N1
R2
2
B1
H1
P3 P1 P2
52134
31 4
N2
N3 N1
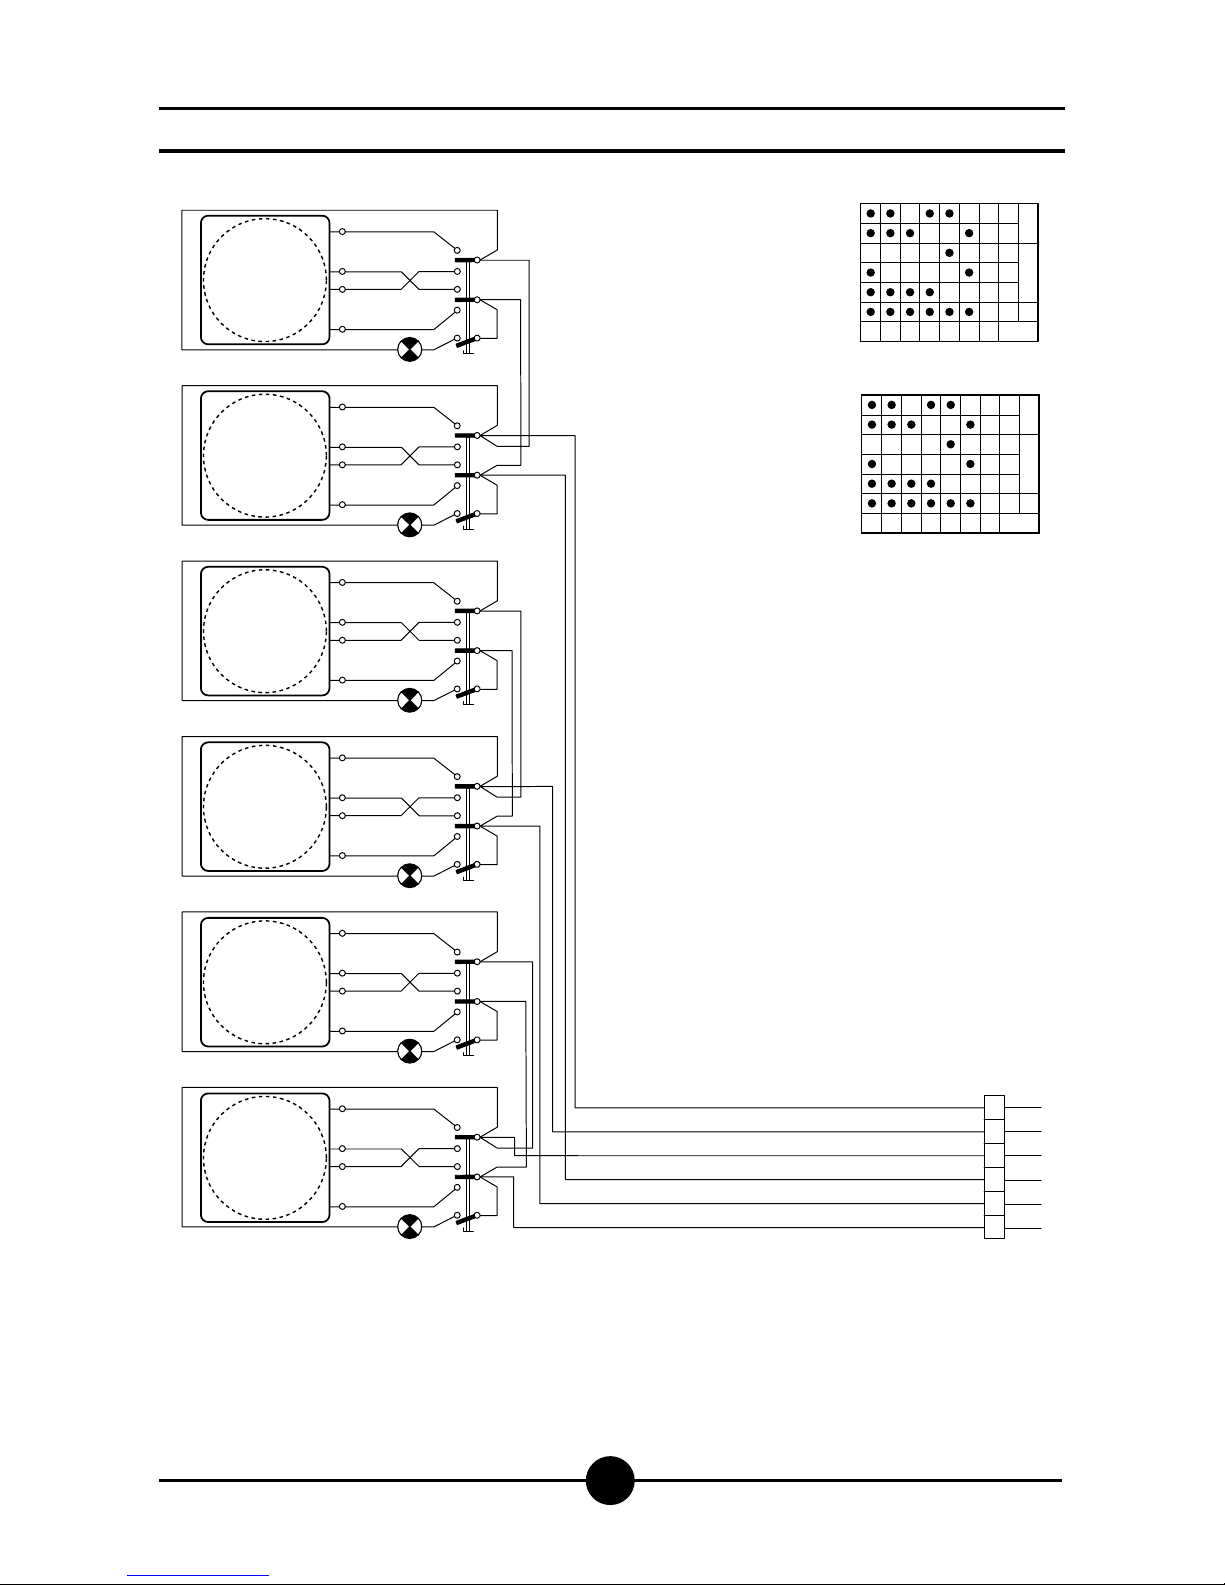
1m2 3 4 56A
L1 L2 L3
R1R1R2R2R1
L1 L2 L3
230 V 3 AC
Line input terminal board
Hotplate commutator
Pilot lamp
Pilot lamp (voltage)
Hotplate 2600 W
mAB1H1H2R1
Hotplate 2000 W
R2
6543210
2600 w
1800 w
1200 w
600 w
400 w
270 w
B1
5
P3 P1 P2
21334
6543210
B1
5
P3 P1 P2
21334
2000 w
1150 w
850 w
300 w
220 w
175 w
R2
R1
Page 22
001-03 - Electric cookers
22
Wiring diagrams
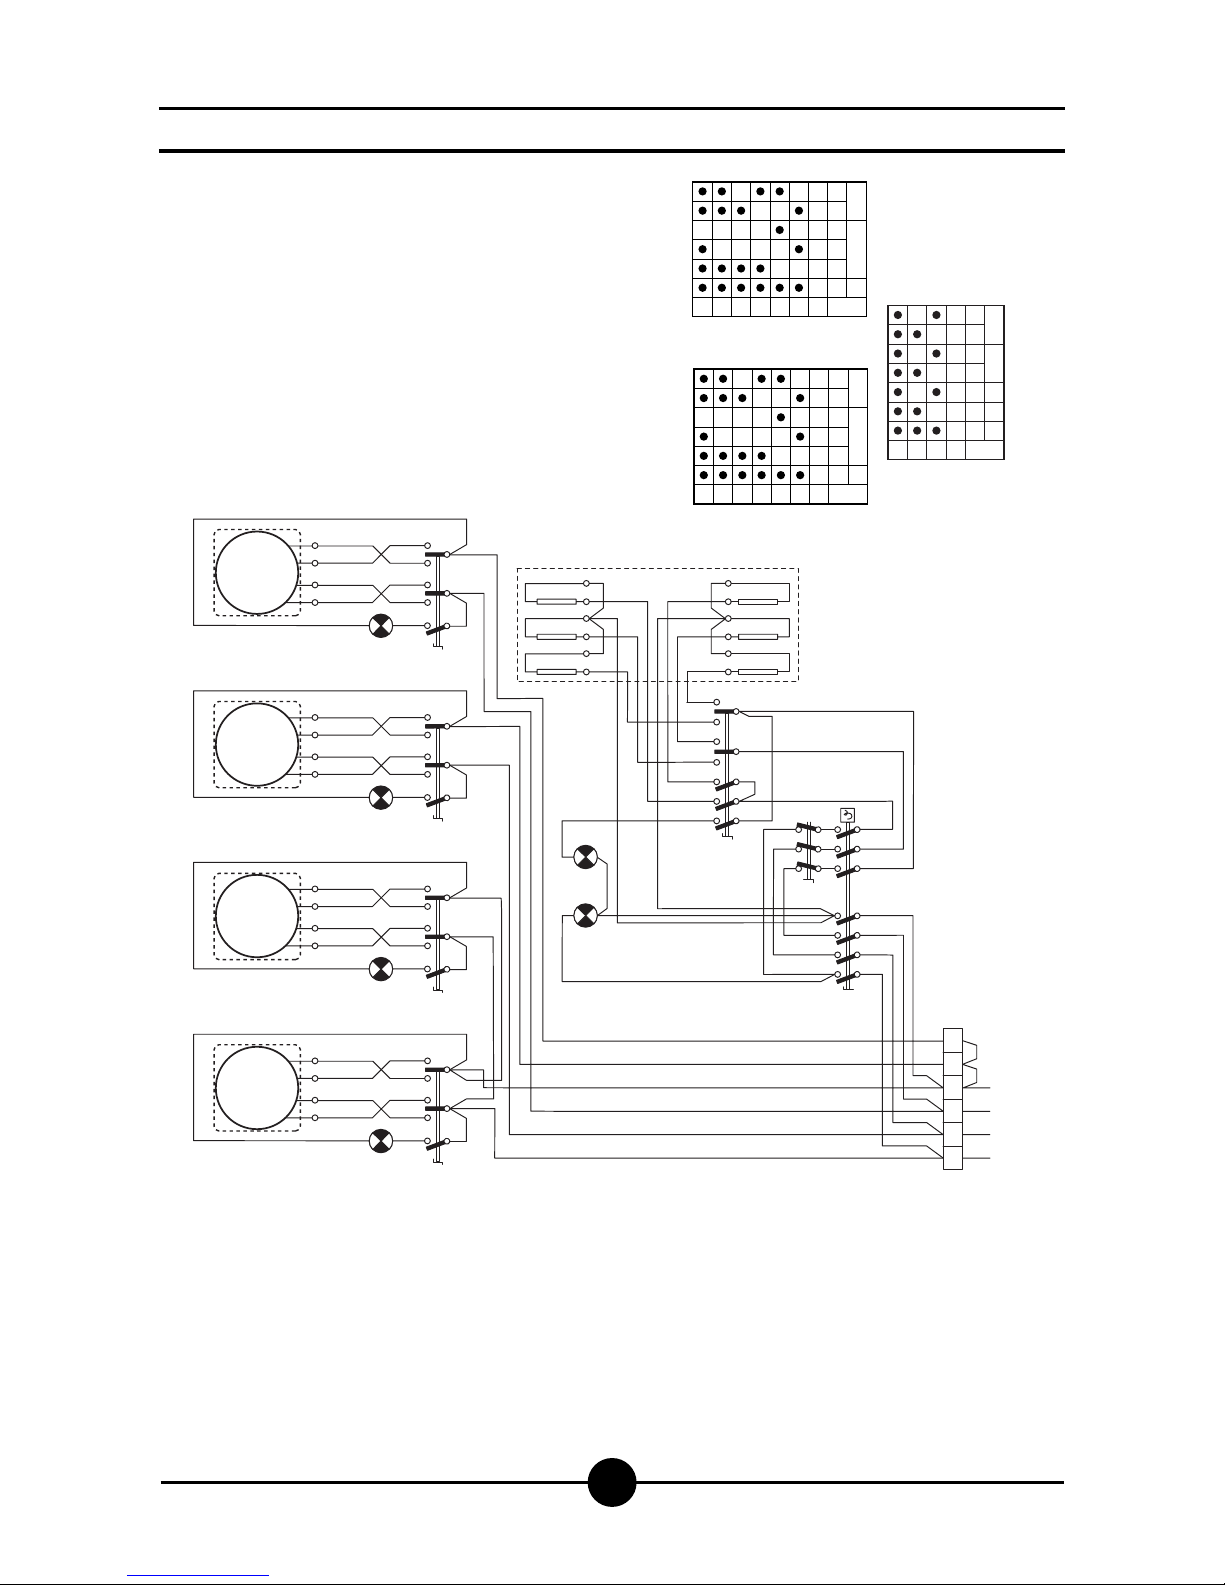
P3 P1 P2 P3 P1 P2 P3 P1 P2 P3 P1 P2
P1
1
P2
2
P3
3
P4
4
1mA 2 3 4
L1 L2 L3 N
56
P3
5
P4
6
P6
P5
P2
7
2134
1 3 52 4 6
1 3 52 4 6
R3
R2
321
0
B3
5
P3 P5P4 P2P6
672134
5 21
12
34
43
5 21
12
34
43
5 21
12
34
43
R2
H1
5 21
12
34
43
Line input terminal board
Hotplate commutator
Switch EGO
Commutateur EGO
Thermostat EGO
Pilot lamp
Pilot lamp (voltage)
Hotplate 2600 W
Oven resistance
Safety thermostat
mAB1B2B3F1H1H2
R1
R2-3
F2
R1R1R2
B1
H1
B1
H1
B1
H1
B1
H1
H2
B3
F2
F1
B2
400 V 3N AC
AGB 487/WP
Hotplate 2000 W
R1
6543210
2600 w
1800 w
1200 w
600 w
400 w
270 w
B1
5
P3 P1 P2
21334
6543210
B1
5
P3 P1 P2
21334
2000 w
1150 w
850 w
300 w
220 w
175 w
R2
R1
Page 23
001-03 - Electric cookers
23
Wiring diagrams
L1 L2 L3
135246
321
0
B3
5
P3 P5P4 P6P6
672134
R2
2
P3 P1 P2
52134
31 4
N2
N3 N1
R1
2
P3 P1 P2
52134
31 4
N2
N3 N1
P1
1
P2
2
P3
3
P4
4
F1
R1
2
P3 P1 P2
52134
31 4
N2
N3 N1
R2
2
P3 P1 P2
52134
31 4
N2
N3 N1
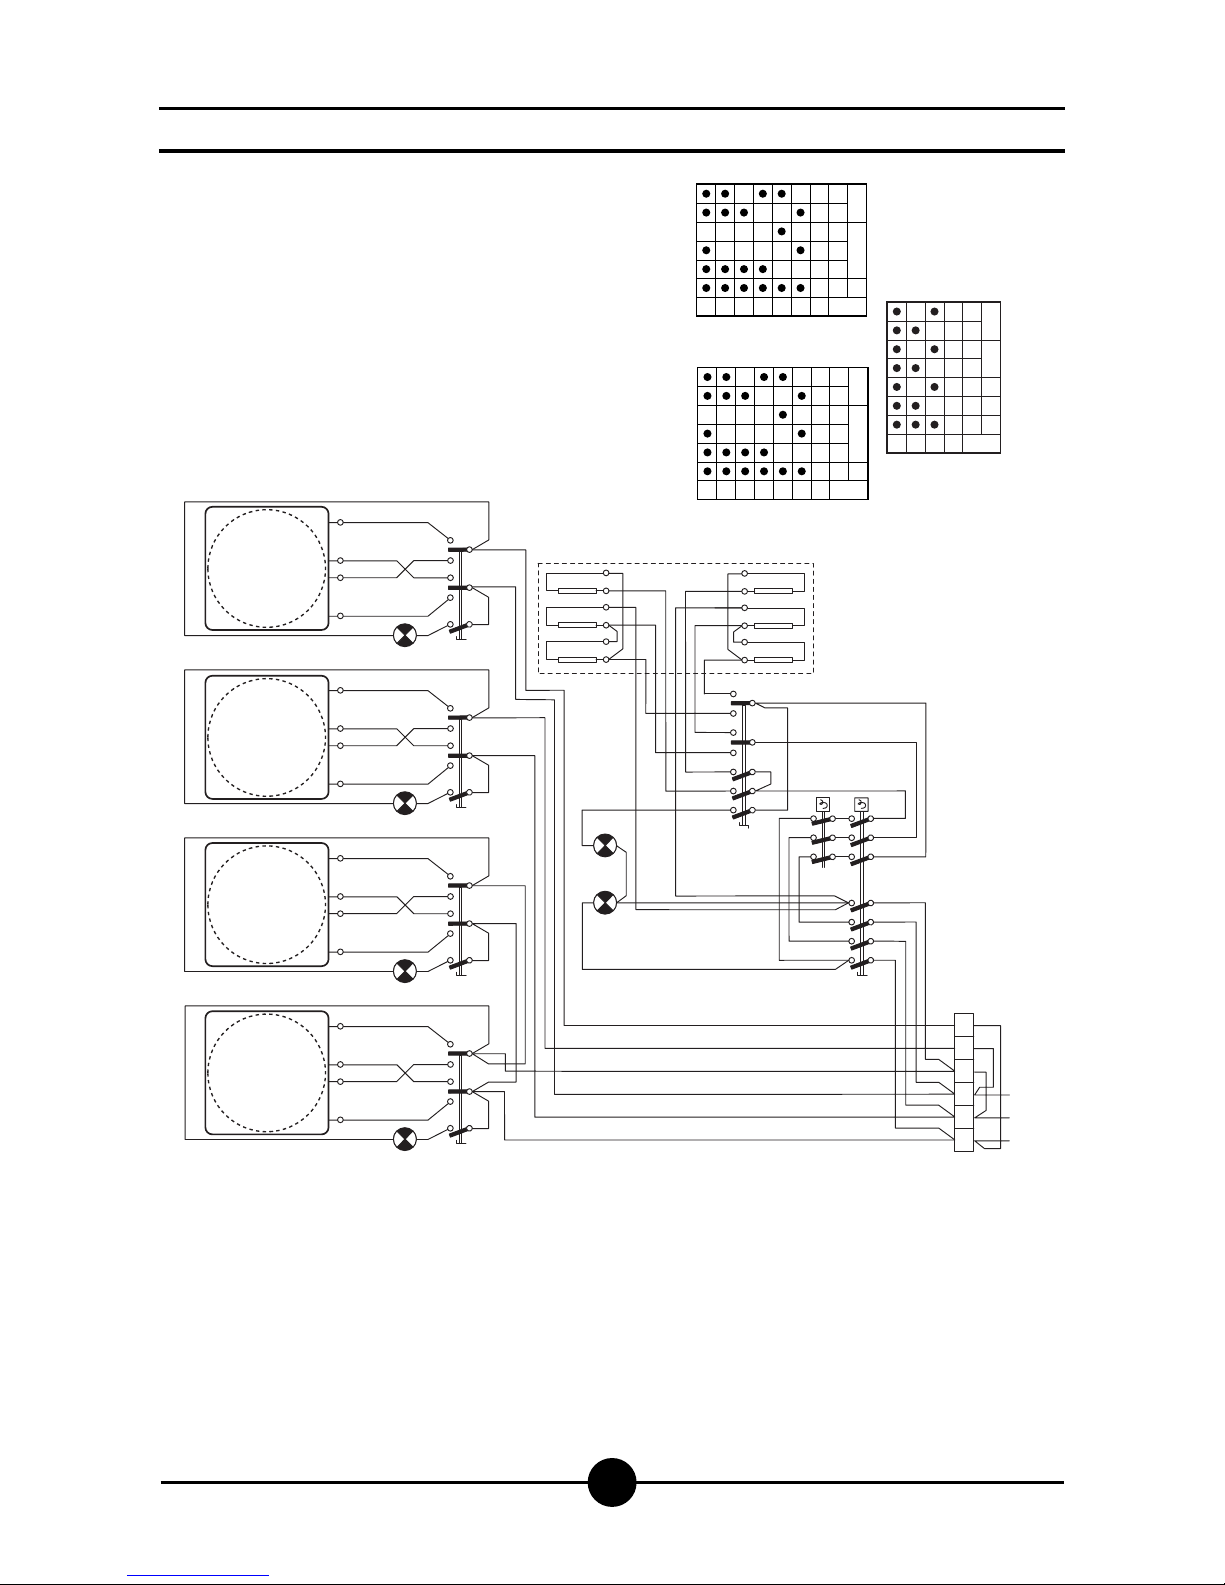
1mA 2 3 4 56
P3
5
P4
6
P6
P5
P2
7
2134
F2
R3
R2
135246
H1
B1
H1
B1
H1
B1
H1 H2
B3
B2
230 V 3 AC
AGB 487/WP
Line input terminal board
Hotplate commutator
Switch EGO
Commutateur EGO
Thermostat EGO
Pilot lamp
Pilot lamp (voltage)
Hotplate 2600 W
Oven resistance
Safety thermostat
mAB1B2B3F1H1H2
R1
R2-3
F2
Hotplate 2000 W
R2
6543210
2600 w
1800 w
1200 w
600 w
400 w
270 w
B1
5
P3 P1 P2
21334
6543210
B1
5
P3 P1 P2
21334
2000 w
1150 w
850 w
300 w
220 w
175 w
R2
R1
Page 24
001-03 - Electric cookers
24
Wiring diagrams
P3
P4
P5
P6
P2
5
6
7
2
1
3
4
B3
012
3
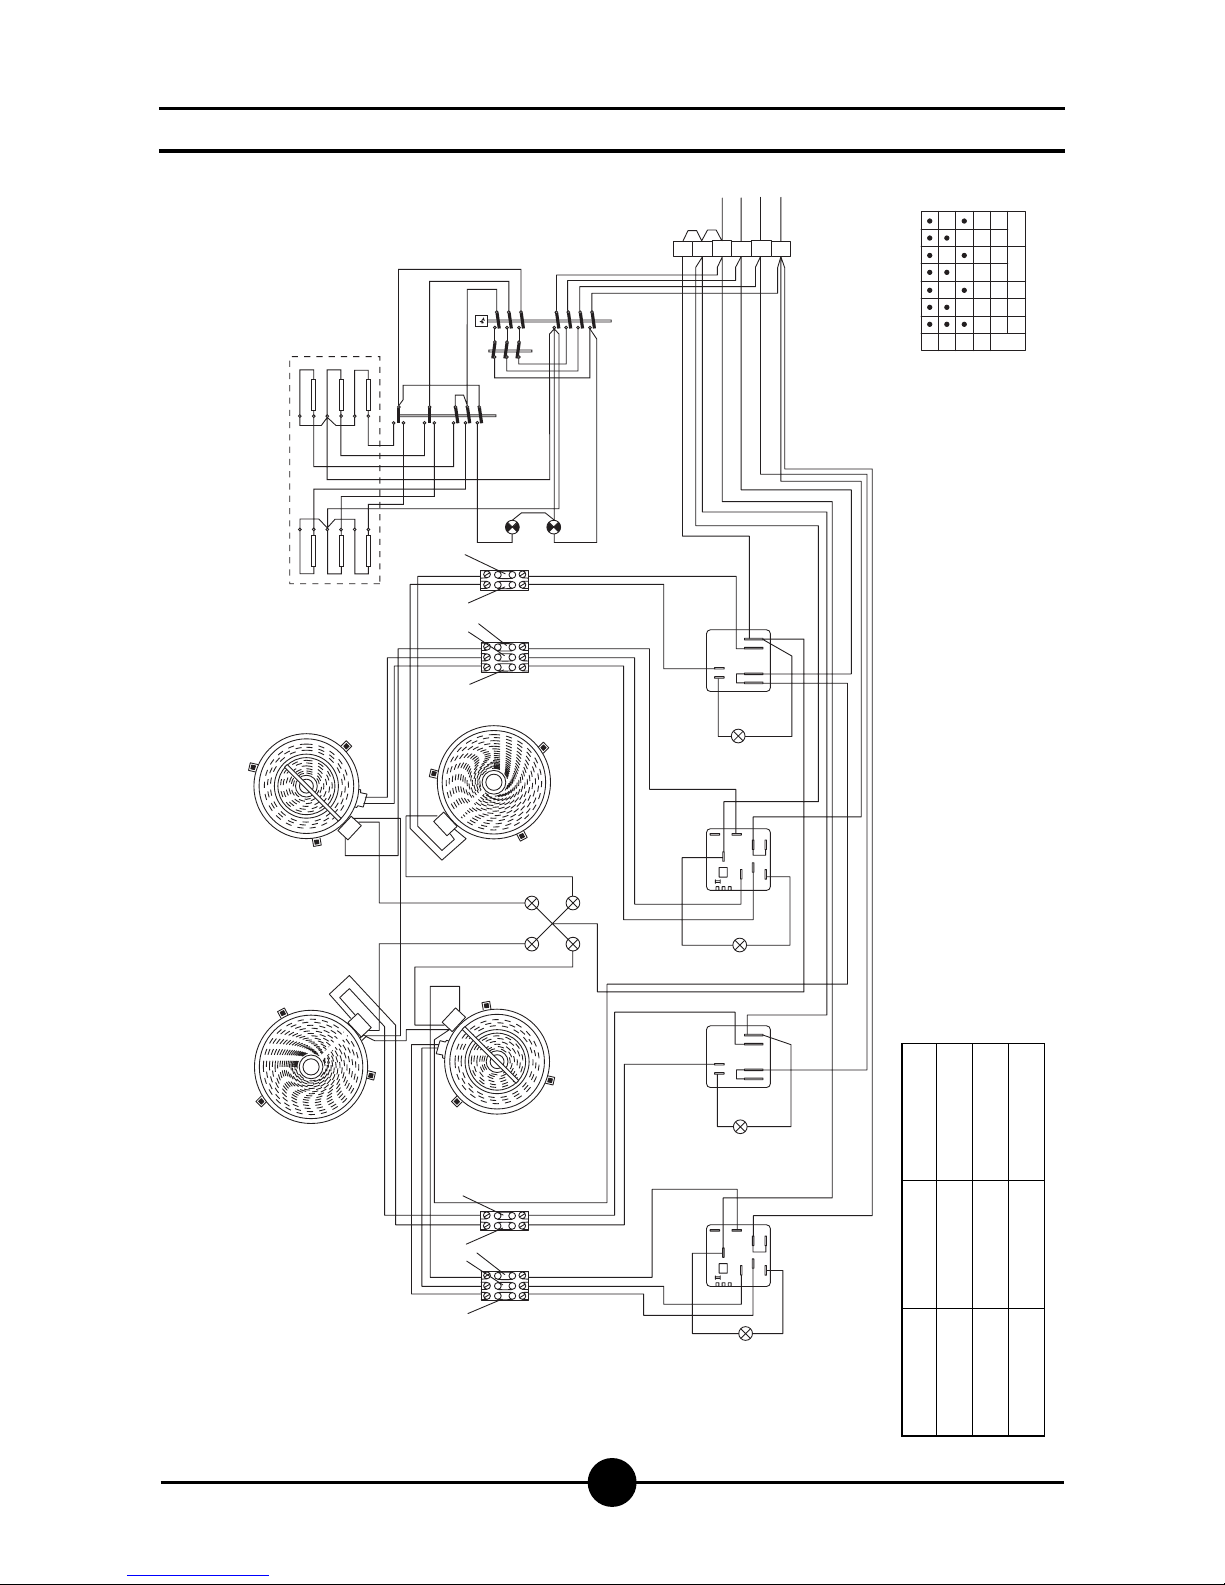
400 V 3N AC
P1
50 55
P2
S1
S2
10
2
1
P1
P2
5
S
4
50.17
P1
50 55
P2
S1
S2
10
2
1
P1
P2
5
S
4
50.17
H1
B2
H1
B1
H1
B2
H1
B1
R2
1
2
3
4
R1
4
R2
R1
2
1
3
12345
6
R
4
12345
6
R
3
5672134
B
3
P3
P
4
P6
P5
P2
F2
F1
P4
P3P2
P1
B4
432
1
H1
H2
mA
2
3
4
5
6
1
L1
L2
L3
H3 H3
0
0
0
0
00
0
0
00
0
0
0
0
0
0
00
0
0
0
0
00
N
mA Line arrival terminal board
B1 Single power plate energy regulator
B2 Double power plate energy regulator
B3 Commutator
B4 Switch
F1 Thermostat
F2 Safety thermostat
H1 Pilot lamp
H2 Pilot lamp (voltage)
H3 Residual heat pilot lamp
R1 1800 W heating element
R2 1000/2500 W double power heating element
R3 Lower oven heating elements
R4 Upper oven heating elements
Terminal 4a
Terminal 4
Terminal 2
Residual heat
lamps
Color cables
Color cables
Color cables
Color cables
Blue section 1.5 mm
2
White section 1.5 mm
2
Red section 1.5 mm
2
Green section 1 mm
2
Page 25
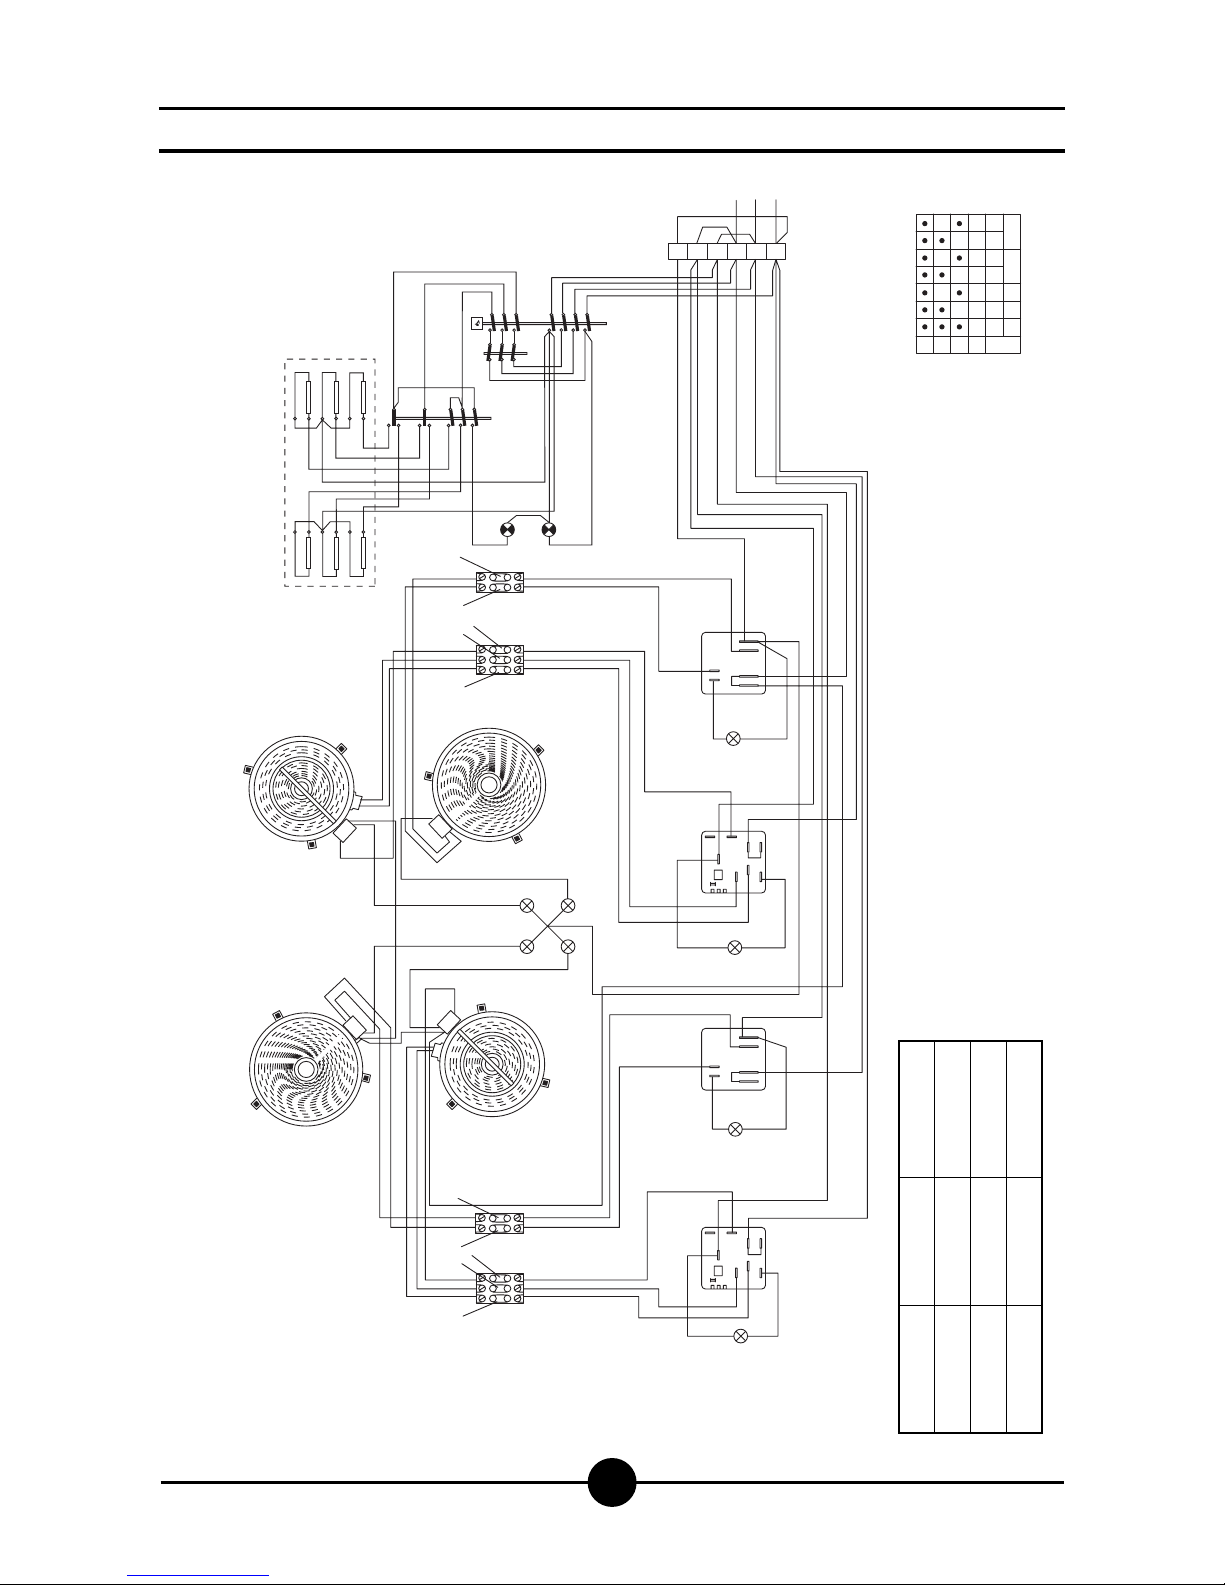
001-03 - Electric cookers
25
Wiring diagrams
P3
P4
P5
P6
P2
5
6
7
2
1
3
4
B3
012
3
230 V 3 AC
P1
50 55
P2
S1
S2
10
2
1
P1
P2
5
S
4
50.17
P1
50 55
P2
S1
S2
10
2
1
P1
P2
5
S
4
50.17
H1
B2
H1
B1
H1
B2
H1
B1
R2
1
2
3
4
R1
4
R2
R1
2
1
3
12345
6
R
4
12345
6
R3
5672134
B3
P
3
P4
P
6
P
5
P
2
F2
F1
P4P3P2P1
B4
432
1
H1
H
2
mA
2
3
4
5
6
1
L1
L2
L3
H3 H3
0
0
0
0
00
0
0
00
0
0
0
0
0
0
00
0
0
0
0
00
mA Line arrival terminal board
B1 Single power plate energy regulator
B2 Double power plate energy regulator
B3 Commutator
B4 Switch
F1 Thermostat
F2 Safety thermostat
H1 Pilot lamp
H2 Pilot lamp (voltage)
H3 Residual heat pilot lamp
R1 1800 W heating element
R2 1000/2500 W double power heating element
R3 Lower oven heating elements
R4 Upper oven heating elements
Terminal 4a
Terminal 4
Terminal 2
Residual heat
lamps
Color cables
Color cables
Color cables
Color cables
Blue section 1.5 mm
2
White section 1.5 mm
2
Red section 1.5 mm
2
Green section 1 mm
2
Page 26
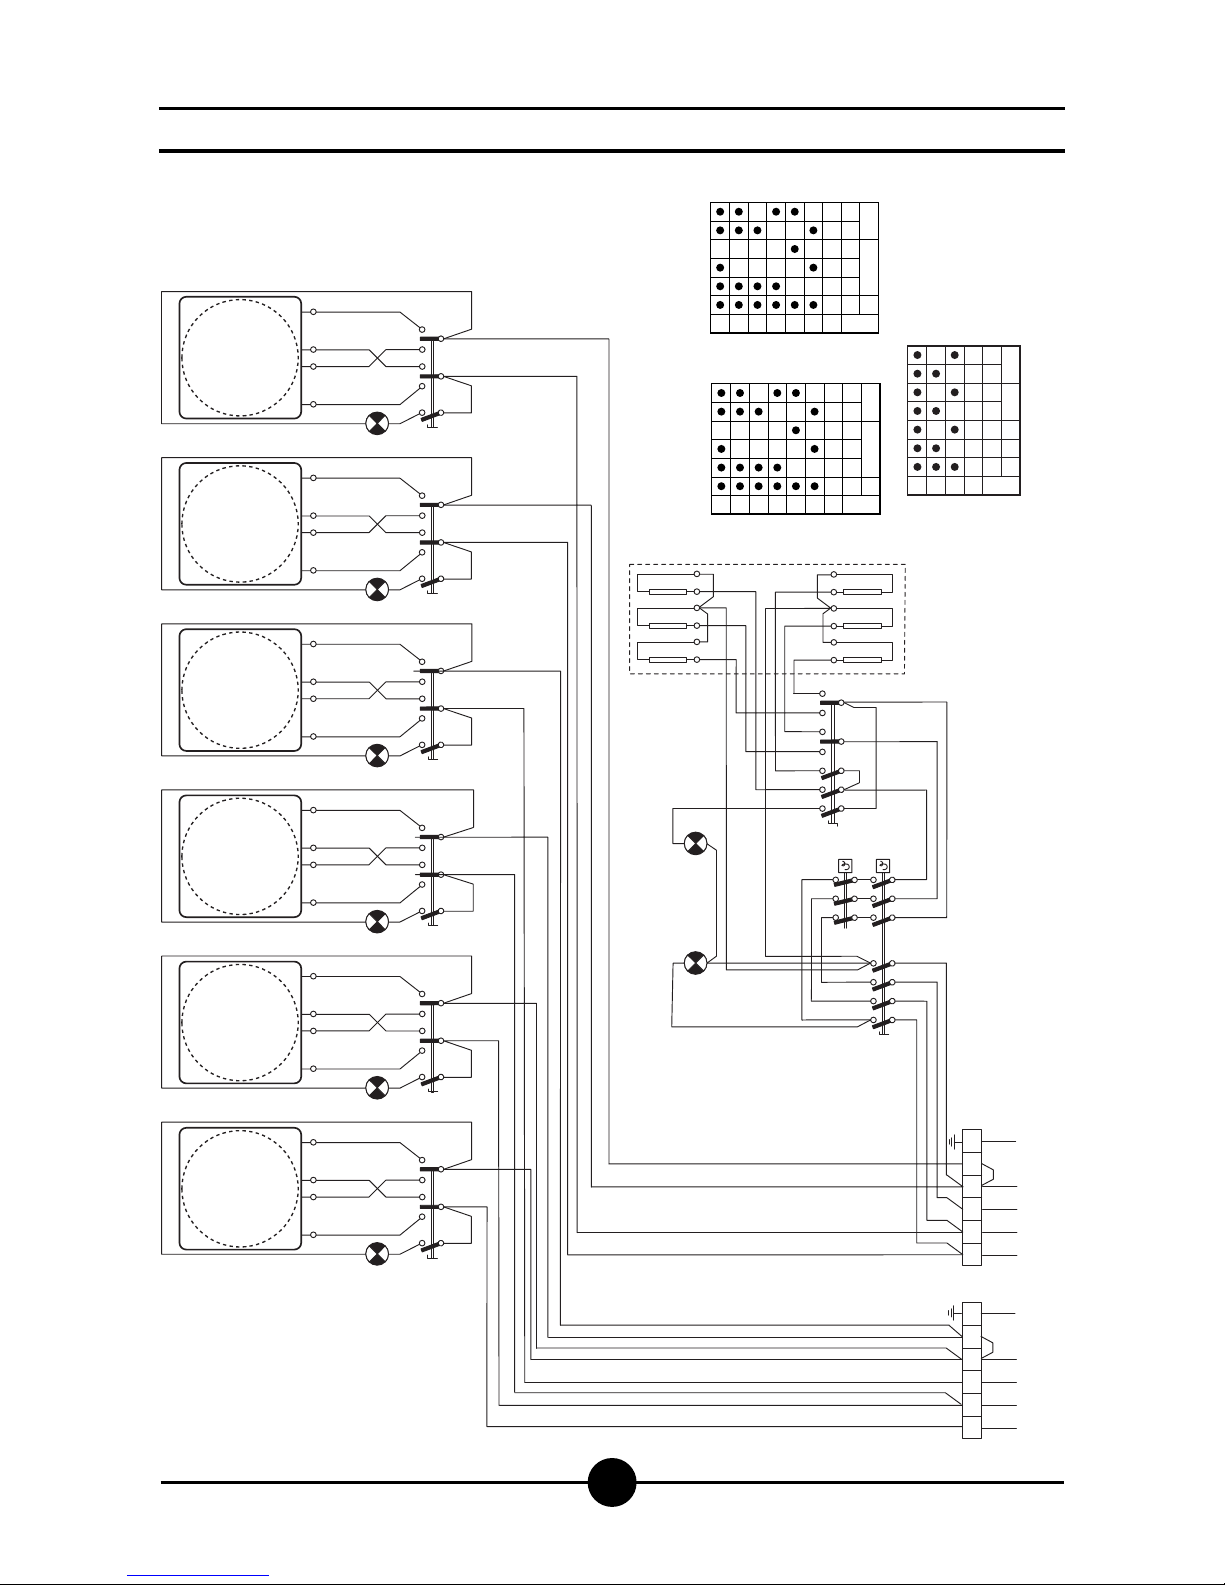
001-03 - Electric cookers
26
Wiring diagrams
Line input terminal board
Hotplate commutator
Switch EGO
Commutator EGO
Thermostat EGO
Pilot lamp
Pilot lamp (voltage)
Hotplate 2600 W
Oven resistance
Safety thermostat
mAB1B2B3F1H1H2
R1
R2-3
F2
Hotplate 2000 W
R2
2
H1
P3 P1 P2
52134
31 4
N2
N3 N1
2
P3 P1 P2
52134
31 4
N2
N3 N1
P1
1
P2
2
P3
3
P4
4
F1
2
P3 P1 P2
52134
31 4
N2
N3 N1
2
P3 P1 P2
52134
31 4
N2
N3 N1
2
P3 P1 P2
52134
31 4
N2
N3 N1
R2
2
P3 P1 P2
52134
31 4
N2
N3 N1
2 3 4 56
B3
P3
5
P4
6
P6
P5
P2
7
2134
F2
L1 L2 L3
321
0
B3
5
P3 P5P4 P6P6
672134
R1R1R2R2R1
13524 6
R3
R2
13524 6
N
B1
H1
B1
H1
B1
H1
B1
H1
B1
H1 H2
B2
H1
B1
400 V 3N AC
6543210
2600 w
1800 w
1200 w
600 w
400 w
270 w
B1
5
P3 P1 P2
21334
6543210
B1
5
P3 P1 P2
21334
2000 w
1150 w
850 w
300 w
220 w
175 w
R2
R1
2 3 4
56
L1 L2 L3
N
mA
1
1
mA
Page 27
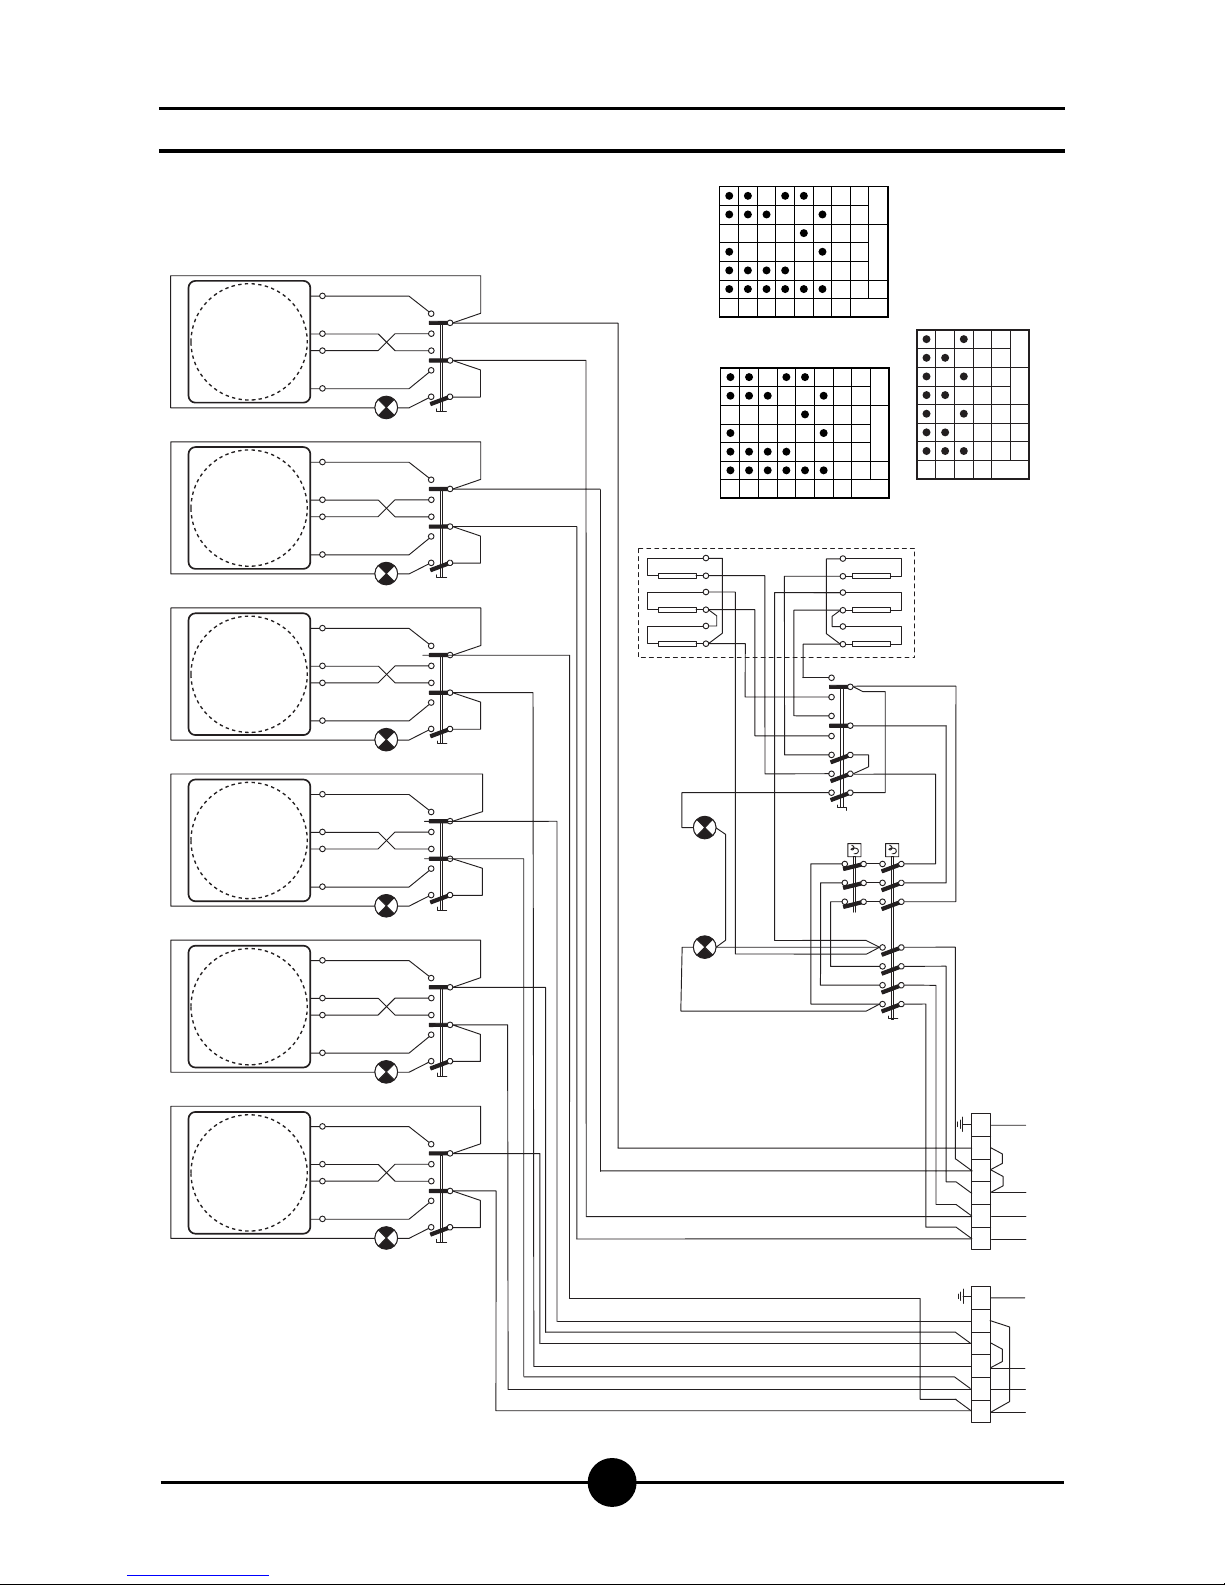
001-03 - Electric cookers
27
Wiring diagrams
Line input terminal board
Hotplate commutator
Switch EGO
Commutator EGO
Thermostat EGO
Pilot lamp
Pilot lamp (voltage)
Hotplate 2600 W
Oven resistance
Safety thermostat
mAB1B2B3F1H1H2
R1
R2-3
F2
Hotplate 2000 W
R2
2
H1
P3 P1 P2
52134
31 4
N2
N3 N1
2
P3 P1 P2
52134
31 4
N2
N3 N1
P1
1
P2
2
P3
3
P4
4
F1
2
P3 P1 P2
52134
31 4
N2
N3 N1
2
P3 P1 P2
52134
31 4
N2
N3 N1
2
P3 P1 P2
52134
31 4
N2
N3 N1
R2
2
P3 P1 P2
52134
31 4
N2
N3 N1
2 3 4 56
B3
P3
5
P4
6
P6
P5
P2
7
2134
F2
L1 L2 L3
321
0
B3
5
P3 P5P4 P6P6
672134
R1R1R2R2R1
13524 6
R3
R2
13524 6
B1
H1
B1
H1
B1
H1
B1
H1
B1
H1 H2
B2
H1
B1
230 V 3 AC
6543210
2600 w
1800 w
1200 w
600 w
400 w
270 w
B1
5
P3 P1 P2
21334
6543210
B1
5
P3 P1 P2
21334
2000 w
1150 w
850 w
300 w
220 w
175 w
R2
R1
2 3 4 56
L1 L2 L3
1
1
mA
mA
Page 28
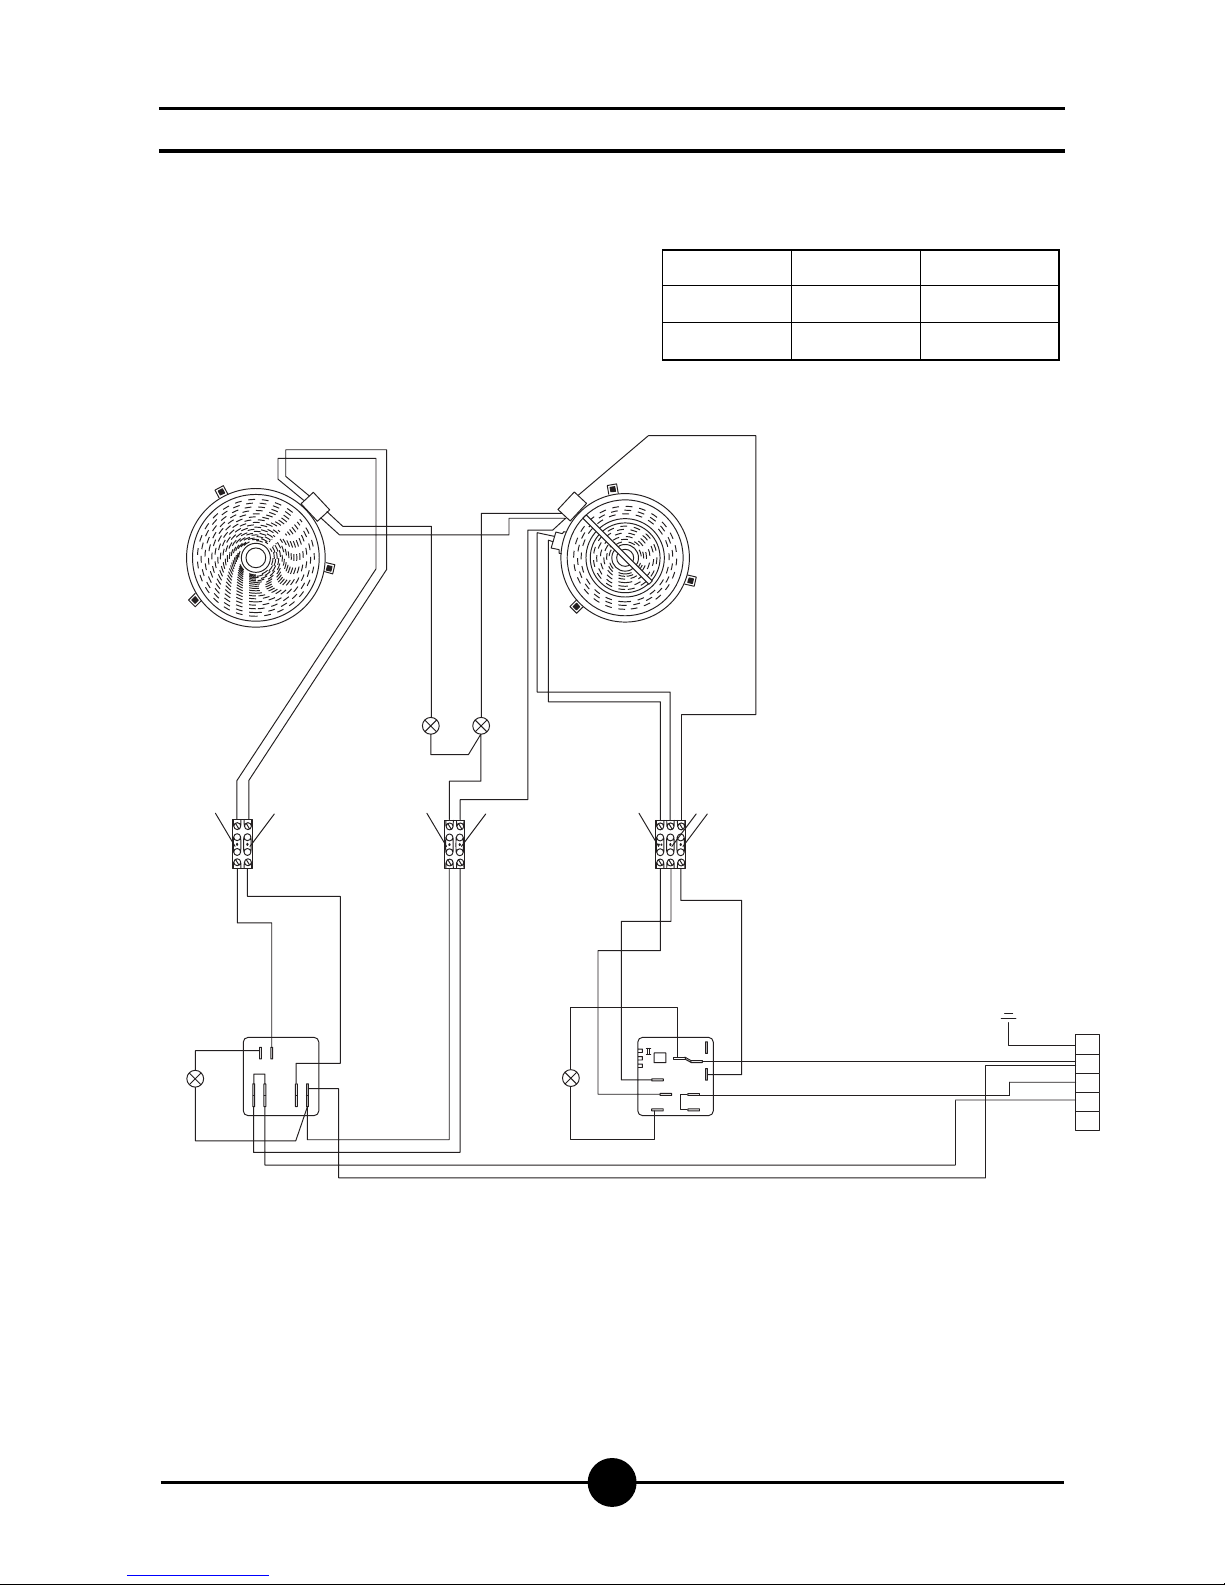
001-03 - Electric cookers
28
Wiring diagrams
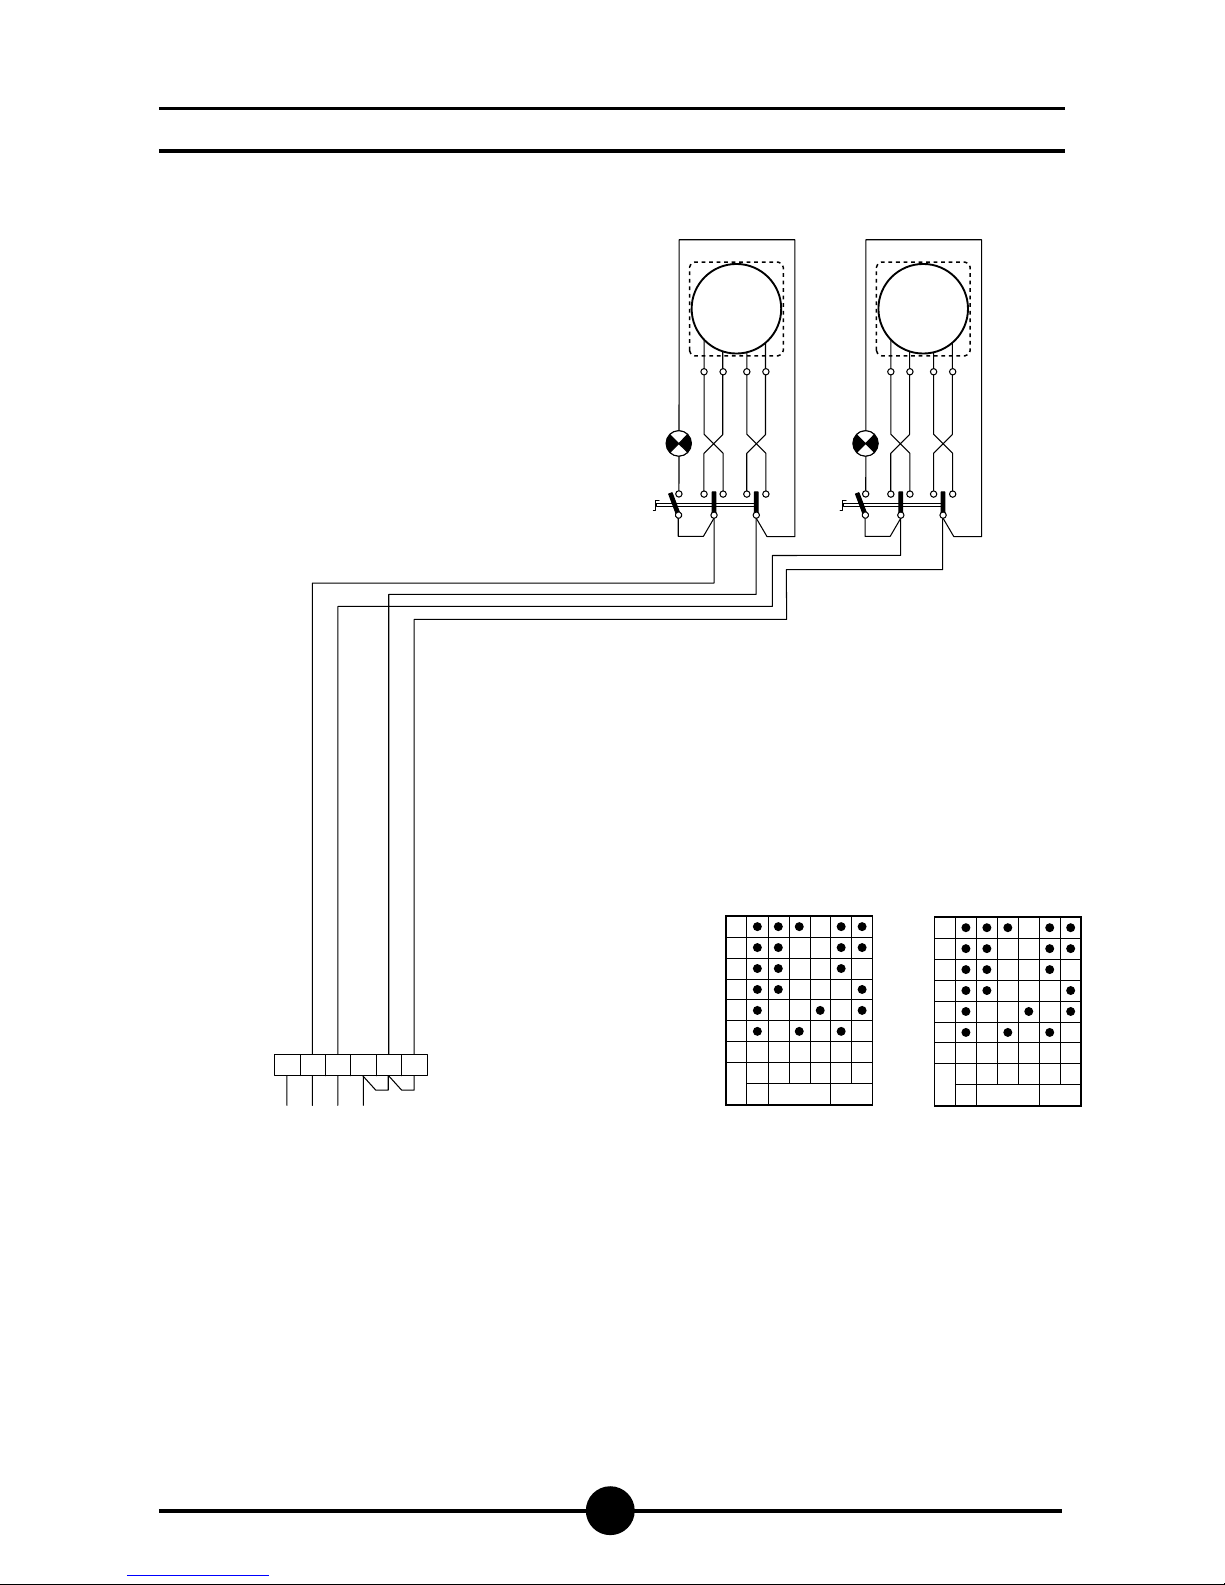
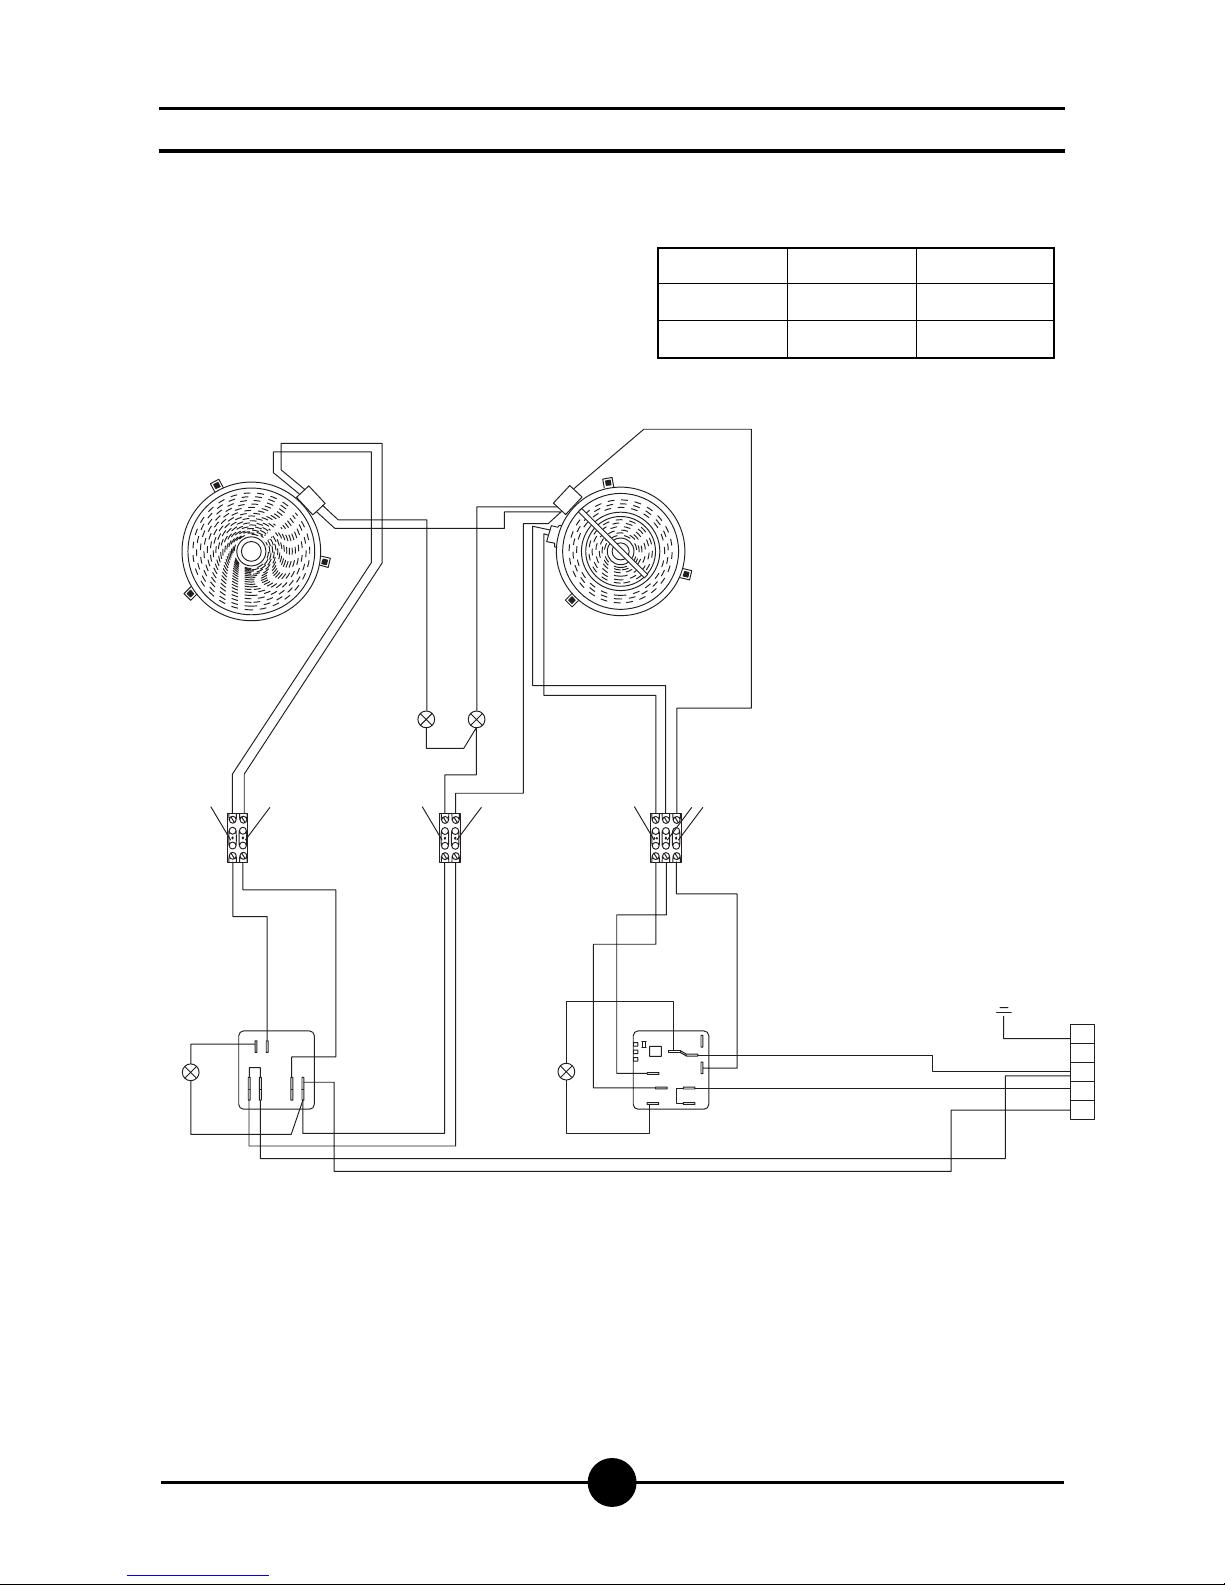
AGB 588/WP
mA Line input terminal board
B1 Energy regulator
H1 Pilot lamp
H2 Residual heat pilot lamp
R1 1800 W cooking plate front
R2 700/2100 W cooking plate rear
Plate N 2
Plate N 1
Residual heat
pilot lamp
Cable color
Cable color
Cable color
Green
Red
White
Black
N
L1
L2
L3
mA
1
2
R2
R1
P1
P2
S
S
4
50.17
H1
B1
P1
50 55
P2
S1
S2
40
2
4
H1
2
2
T
1
4
2
H
S
2
H
S
2
1
B2
H2
H2
0
0
0
0
0000
400 V 3N AC
4
40
Page 29
001-03 - Electric cookers
29
Wiring diagrams
AGB 588/WP
1
2
R2
R1
P1
P2
S
S
4
50.17
H1
B1
P1
50 55
P2
S1
S2
40
2
4
H1
2
2
1
4
2
H
S
2
H
S
2
1
B2
H2
H2
0
0
0
0
0000
230 V 3 AC
N
L1
L2
L3
mA
T
mA Line input terminal board
B1 Energy regulator
H1 Pilot lamp
H2 Residual heat pilot lamp
R1 1800 W cooking plate front
R2 700/2100 W cooking plate rear
Plate N 2
Plate N 1
Residual heat
pilot lamp
Cable color
Cable color
Cable color
Green
Red
White
Black
Page 30
001-03 - Electric cookers
30
Wiring diagrams
P1
5055
P2
S1
S2
10
2
1
P1
P2
5
S
4
50.17
P1
5055
P2
S1
S2
10
2
1
P1
P2
5
S
4
50.17
N
L1
L2
L3
mA
R2
H2
1
2
3
4
R3
4
R2
R1
2
1
3
T
44A2
2
4
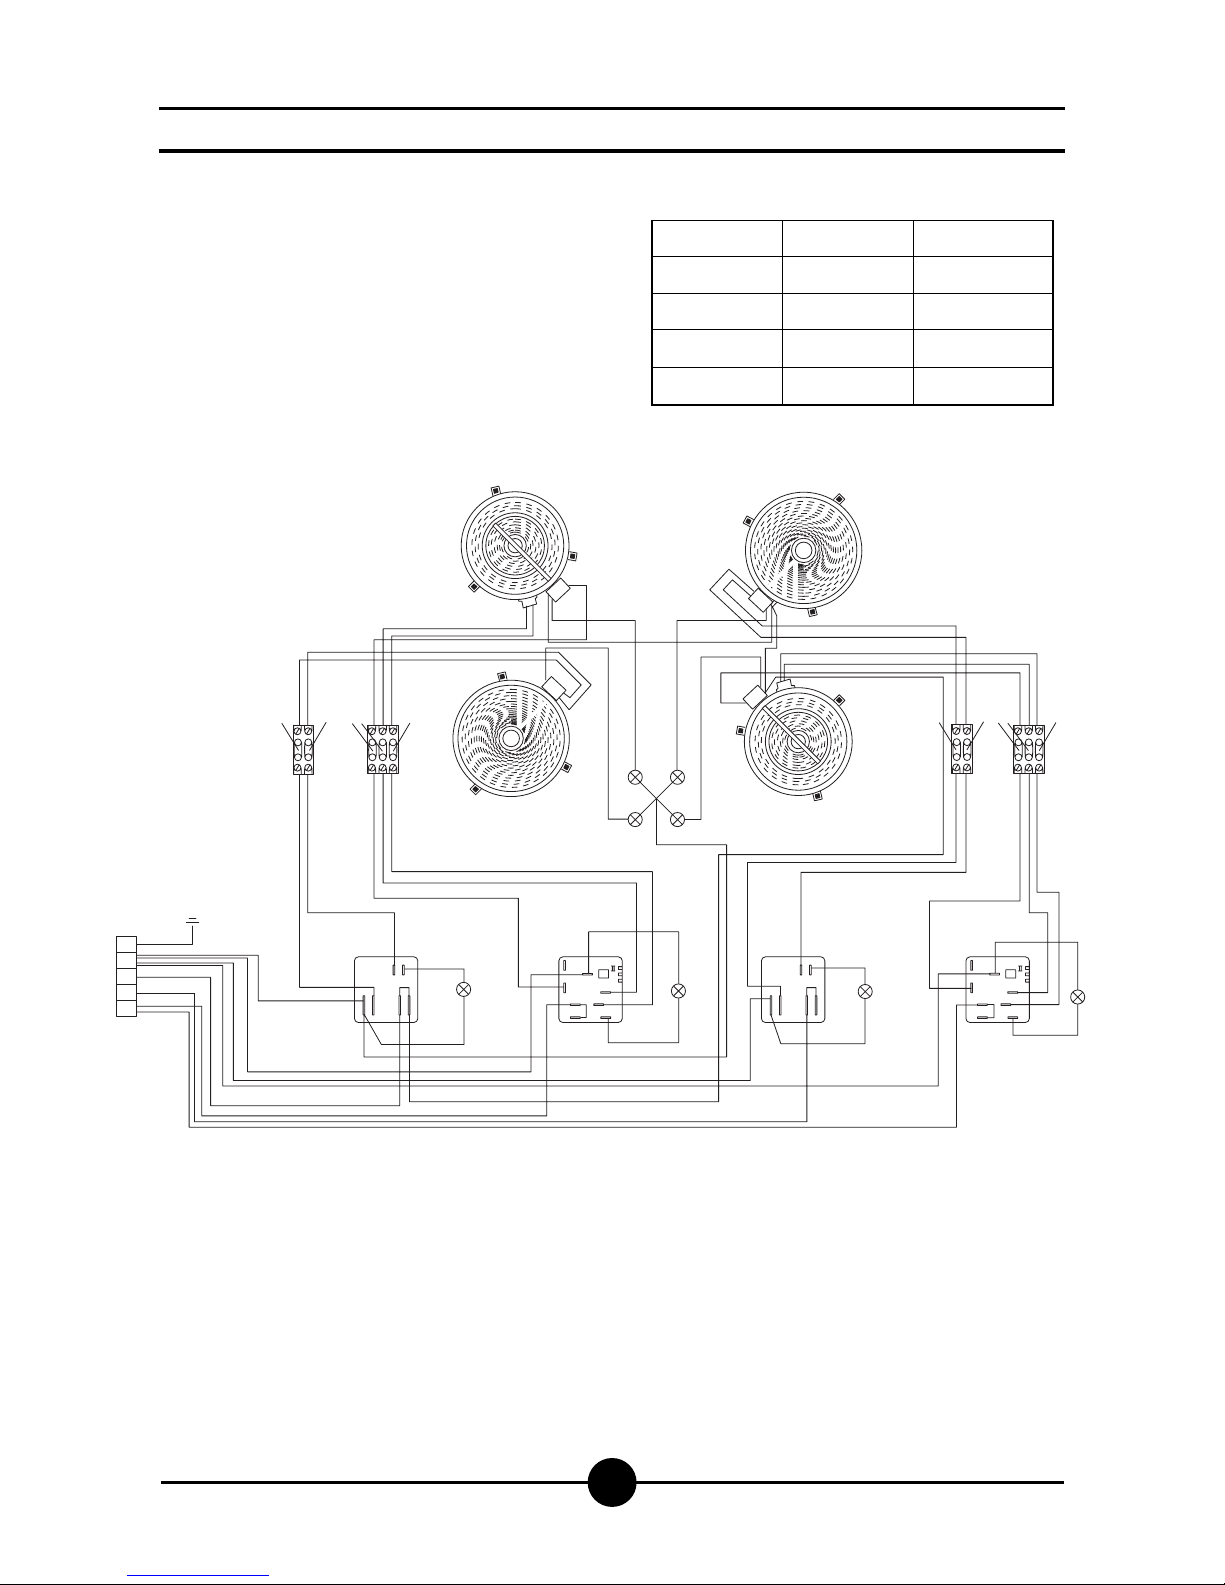
400 V 3N AC
B2
B1
B2
B1
H1
H1
H1
H1
R3 1200 W cooking plate
2
4
44A2
Plate N 1
Plate N 2
Plate N 3
Plate N 4
Residual heat
lamp
Mamut N 0
White
Black
Mamut N 1
Mamut N 2
Mamut N 3
Mamut N 4
Grey
Green
Red
Purple
mA Line arrival terminal board
B1 Single power plate energy regulator
B2 Double power plate energy regulator
H1 Pilot lamp
H2 Residual heat pilot lamp
R1 1800 W cooking plate
R2 1000/2500 W double power cooking plate
Page 31
001-03 - Electric cookers
31
Wiring diagrams
P1
5055
P2
S1
S2
10
2
1
P1
P2
5
S
4
50.17
P1
5055
P2
S1
S2
10
2
1
P1
P2
5
S
4
50.17
N
L1
L2
L3
mA
R2
H2
1
2
3
4
R3
4
R2
R1
2
1
3
T
44A2
2
4
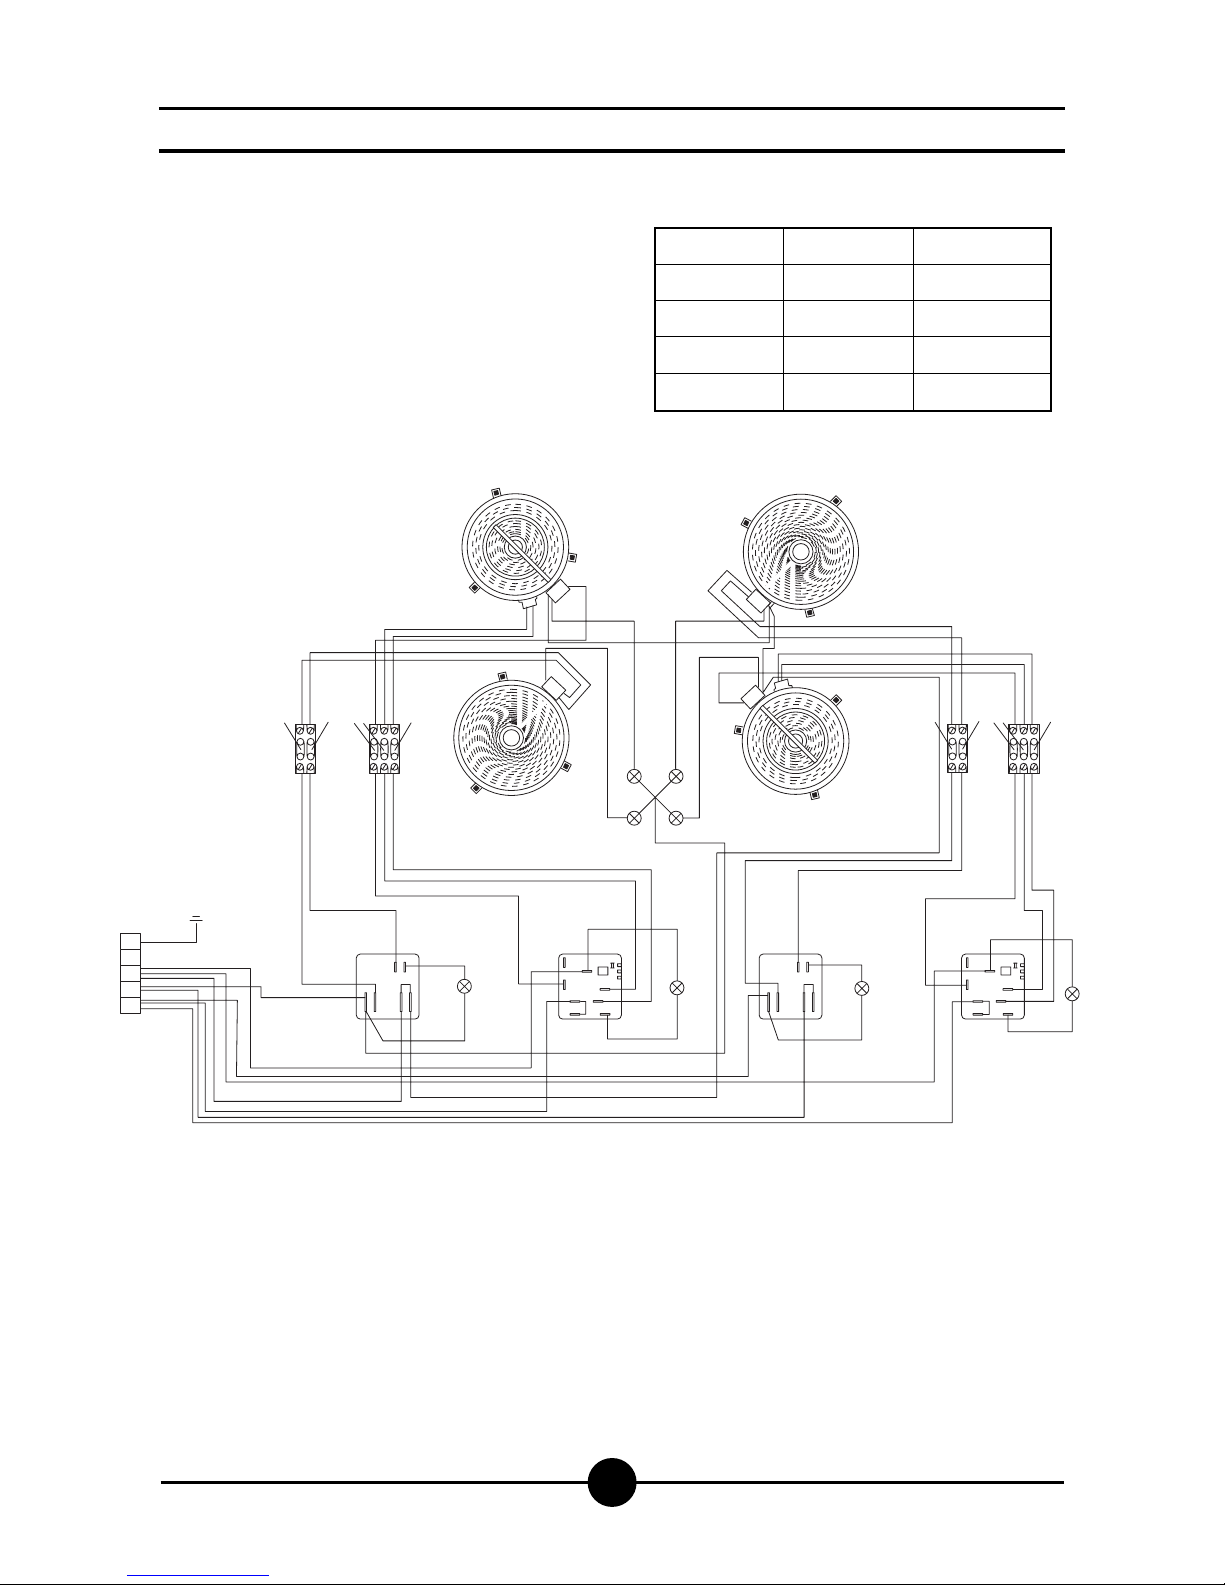
230 V 3 AC
B2
B1
B2
B1
H1
H1
H1
H1
2
4
44A2
R3 1200 W cooking plate
Plate N 1
Plate N 2
Plate N 3
Plate N 4
Residual heat
lamp
Mamut N 0
White
Black
Mamut N 1
Mamut N 2
Mamut N 3
Mamut N 4
Grey
Green
Red
Purple
mA Line arrival terminal board
B1 Single power plate energy regulator
B2 Double power plate energy regulator
H1 Pilot lamp
H2 Residual heat pilot lamp
R1 1800 W cooking plate
R2 1000/2500 W double power cooking plate
Page 32
001-03 - Electric cookers
32
Wiring diagrams
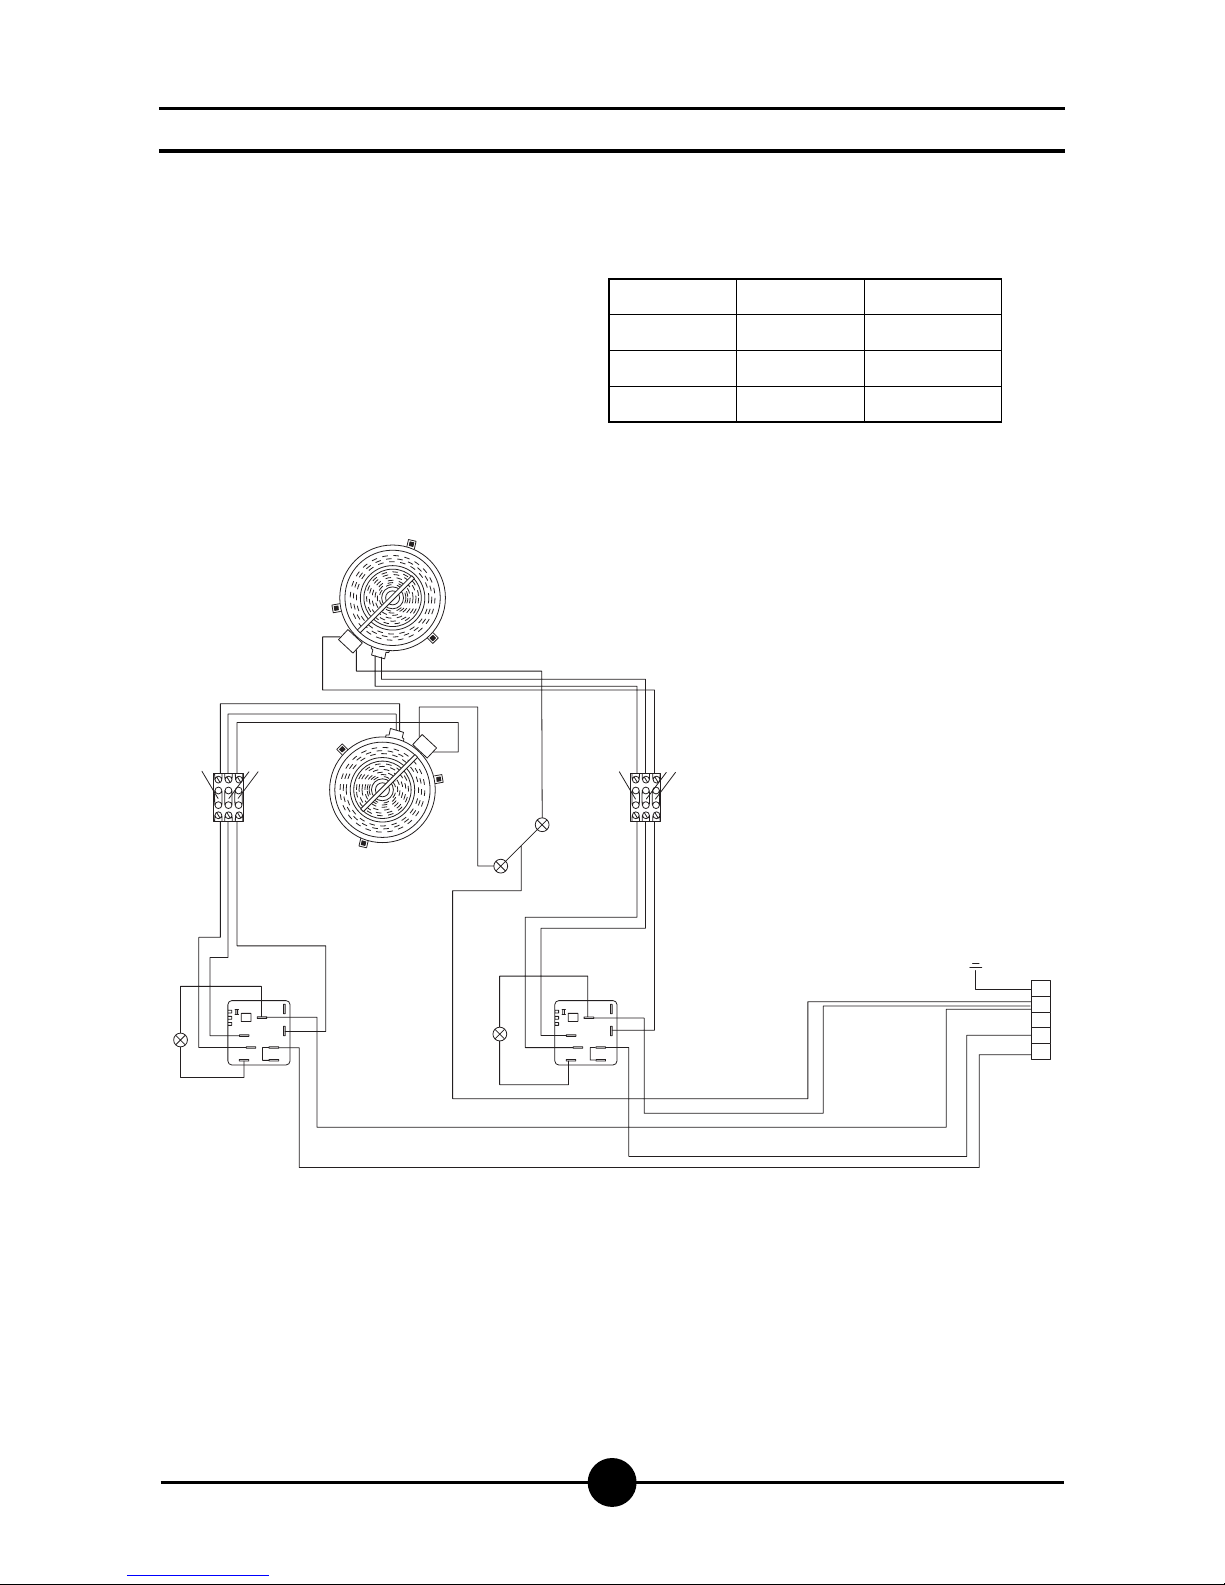
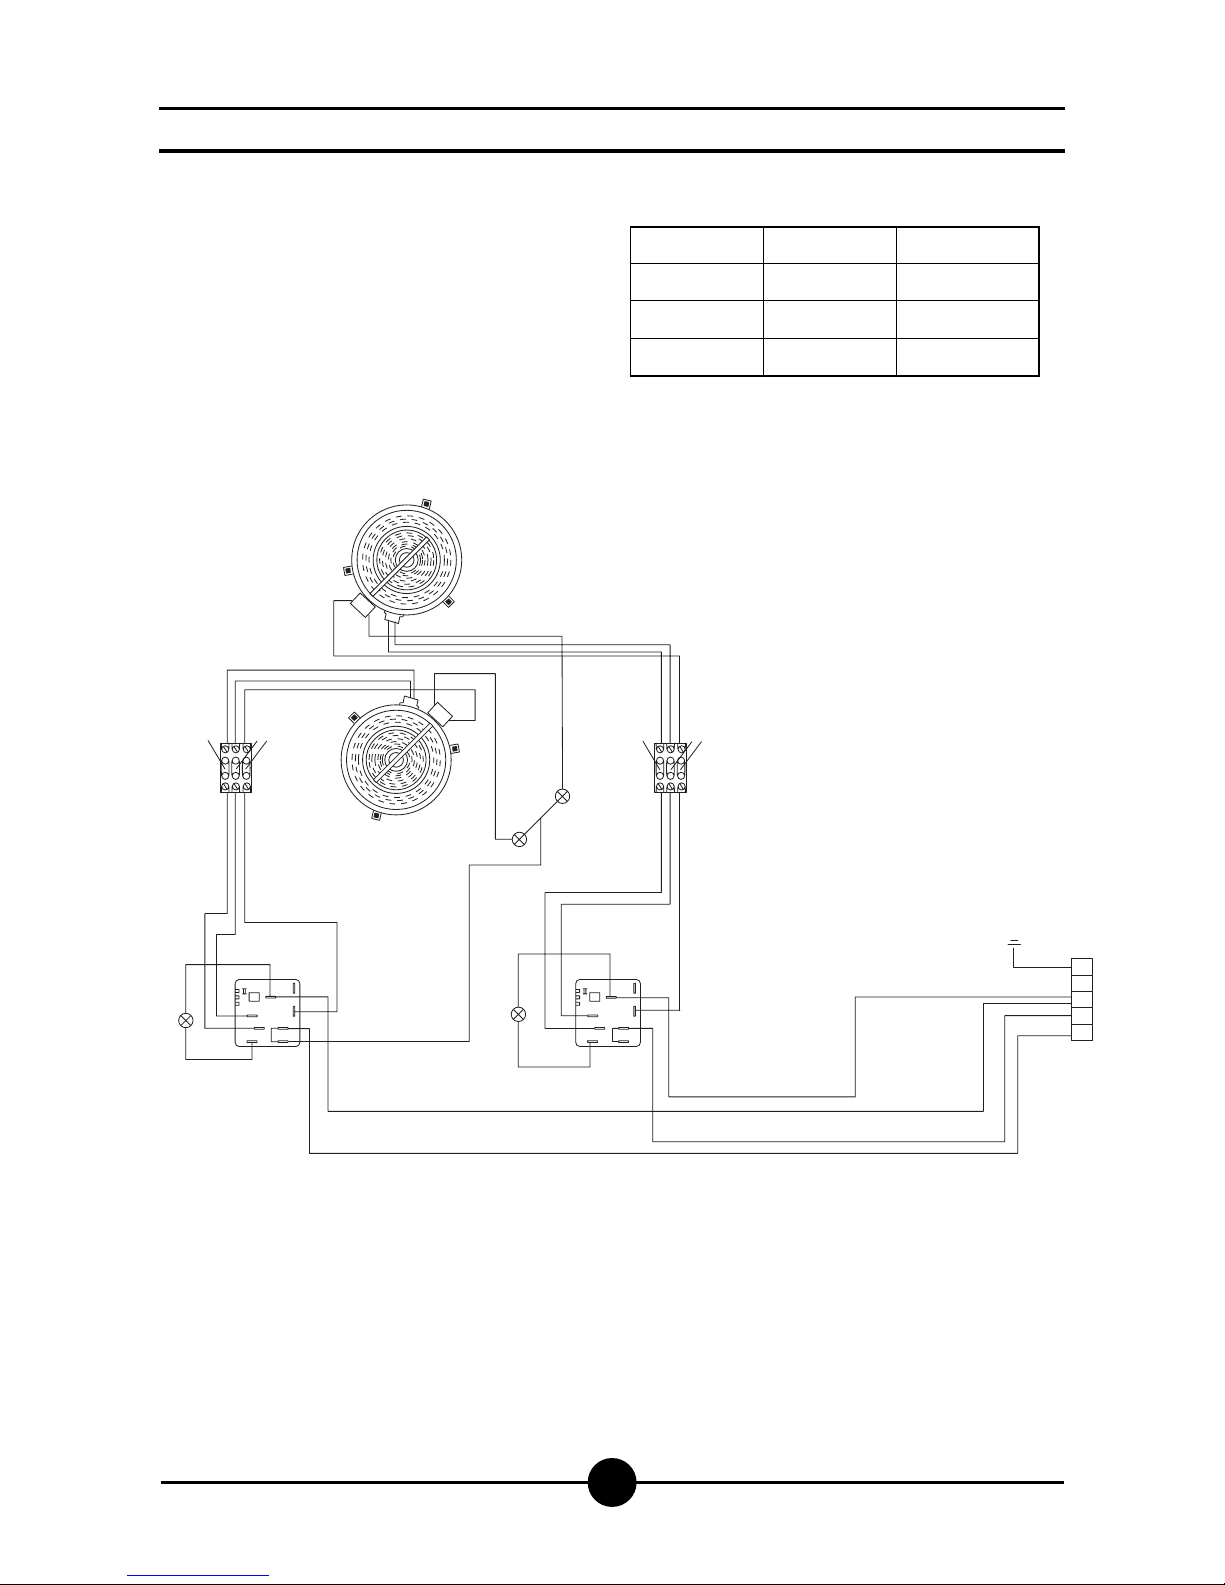
AGB 503/WP
P1
50 55
P2
S1
S2
10
2
1
P1
50 55
P2
S1
S2
10
2
1
N
L1
L2
L3
mA
H1
B2
H1
B2
R1
H2
1
3
R1
1
3
T
44A2
44A2
400 V 3N AC
mA Line arrival terminal board
B1 Single power plate energy regulator
B2 Double power plate energy regulator
H1 Pilot lamp
H2 Residual heat pilot lamp
R1 1000
/
2500 W double power cooking plate
Terminal 4a
Terminal 4
Terminal 2
Residual heat
lamps
Color cables
Color cables
Color cables
Color cables
Blue section 1.5 mm
2
White section 1.5 mm
2
Red section 1.5 mm
2
Green section 1 mm
2
Page 33
001-03 - Electric cookers
33
Wiring diagrams
AGB 503/WP
P1
50 55
P2
S1
S2
10
2
1
P1
50 55
P2
S1
S2
10
2
1
N
L1
L2
L3
mA
H1
B2
H1
B2
R1
H2
1
3
R1
1
3
T
44A2
44A2
230 V 3 AC
mA Line arrival terminal board
B1 Single power plate energy regulator
B2 Double power plate energy regulator
H1 Pilot lamp
H2 Residual heat pilot lamp
R1 1000/2500 W double power cooking plate
Terminal 4a
Terminal 4
Terminal 2
Residual heat
lamps
Color cables
Color cables
Color cables
Color cables
Blue section 1.5 mm
2
White section 1.5 mm
2
Red section 1.5 mm
2
Green section 1 mm
2
Page 34
001-03 - Electric cookers
34
Wiring diagrams
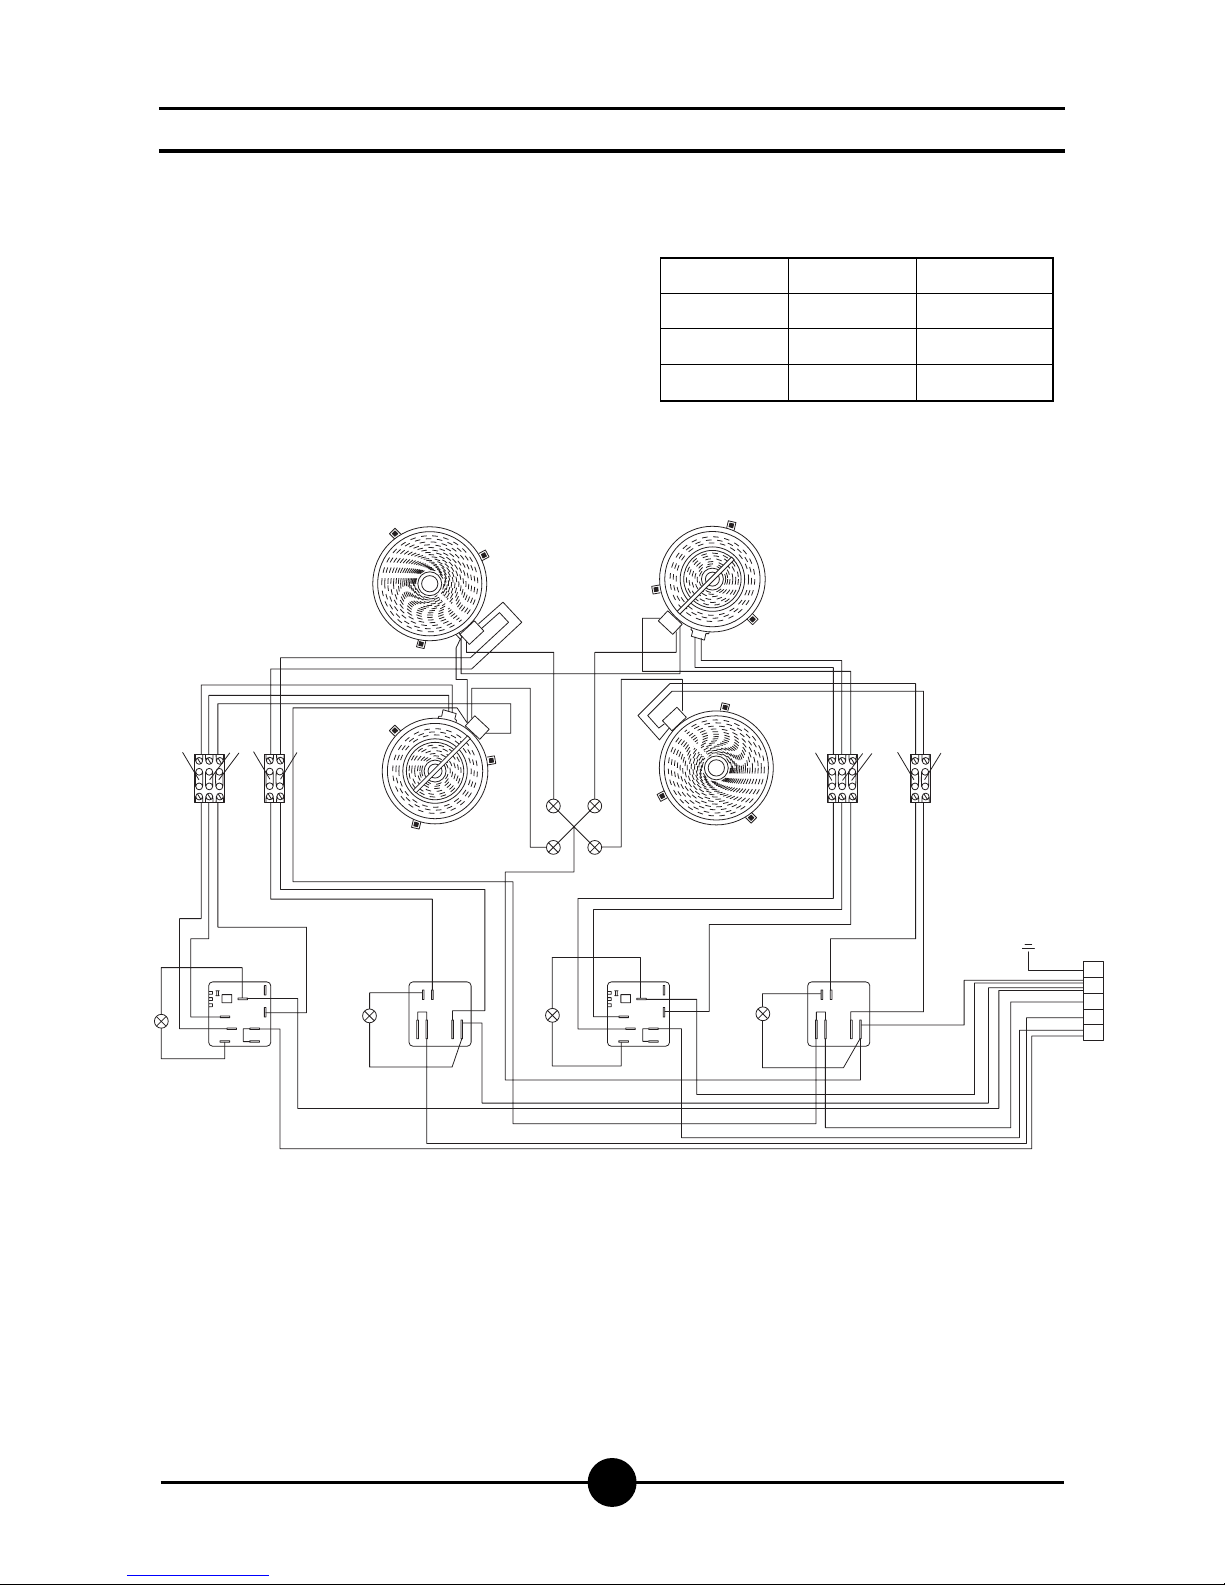
mA Line arrival terminal board
B1 Single power plate energy regulator
B2 Double power plate energy regulator
H1 Pilot lamp
H2 Residual heat pilot lamp
R1 1800 W cooking plate
R2 1000/2500 W double power cooking plate
AGS 655/WP
P1
50 55
P2
S1
S2
10
2
1
P1
P2
5
S
4
50.17
P1
50 55
P2
S1
S2
10
2
1
P1
P2
5
S
4
50.17
N
L1
L2
L3
mA
R2
H2
1
2
3
4
R1
4
R2
R1
2
1
3
T
44A2
2
4
44A2
2
4
400 V 3N AC
B2
B1
B2
B1
H1
H1
H1
H1
Terminal 4a
Terminal 4
Terminal 2
Residual heat
lamps
Color cables
Color cables
Color cables
Color cables
Blue section 1.5 mm
2
White section 1.5 mm
2
Red section 1.5 mm
2
Green section 1 mm
2
Page 35
001-03 - Electric cookers
35
Wiring diagrams
P1
50 55
P2
S1
S2
10
2
1
P1
P2
5
S
4
50.17
P1
50 55
P2
S1
S2
10
2
1
P1
P2
5
S
4
50.17
N
L1
L2
L3
mA
R2
H2
1
2
3
4
R1
4
R2
R1
2
1
3
T
44A2
2
4
44A2
2
4
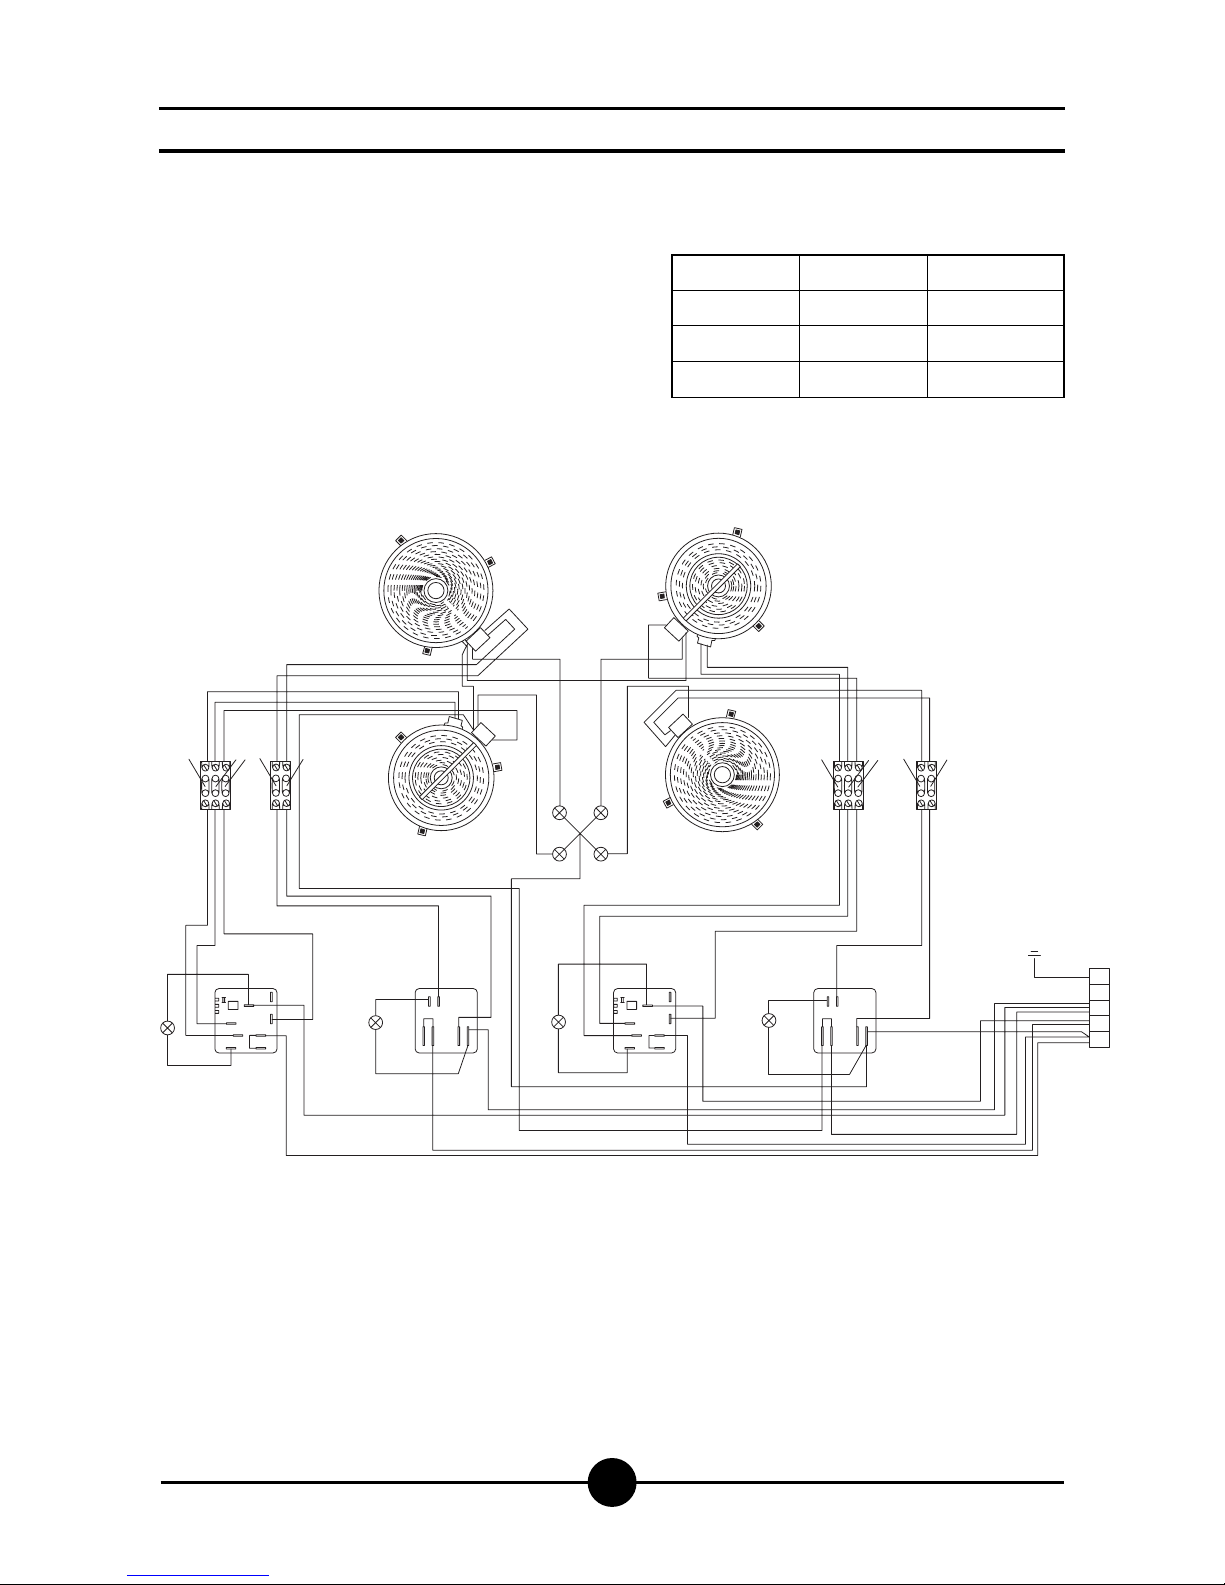
AGS 655/WP
230 V 3 AC
B2
B1
B2
B1
H1
H1
H1
H1
mA Line arrival terminal board
B1 Single power plate energy regulator
B2 Double power plate energy regulator
H1 Pilot lamp
H2 Residual heat pilot lamp
R1 1800 W cooking plate
R2 1000/2500 W double power cooking plate
Terminal 4a
Terminal 4
Terminal 2
Residual heat
lamps
Color cables
Color cables
Color cables
Color cables
Blue section 1.5 mm
2
White section 1.5 mm
2
Red section 1.5 mm
2
Green section 1 mm
2
Page 36
001-03 - Electric cookers
36
Wiring diagrams
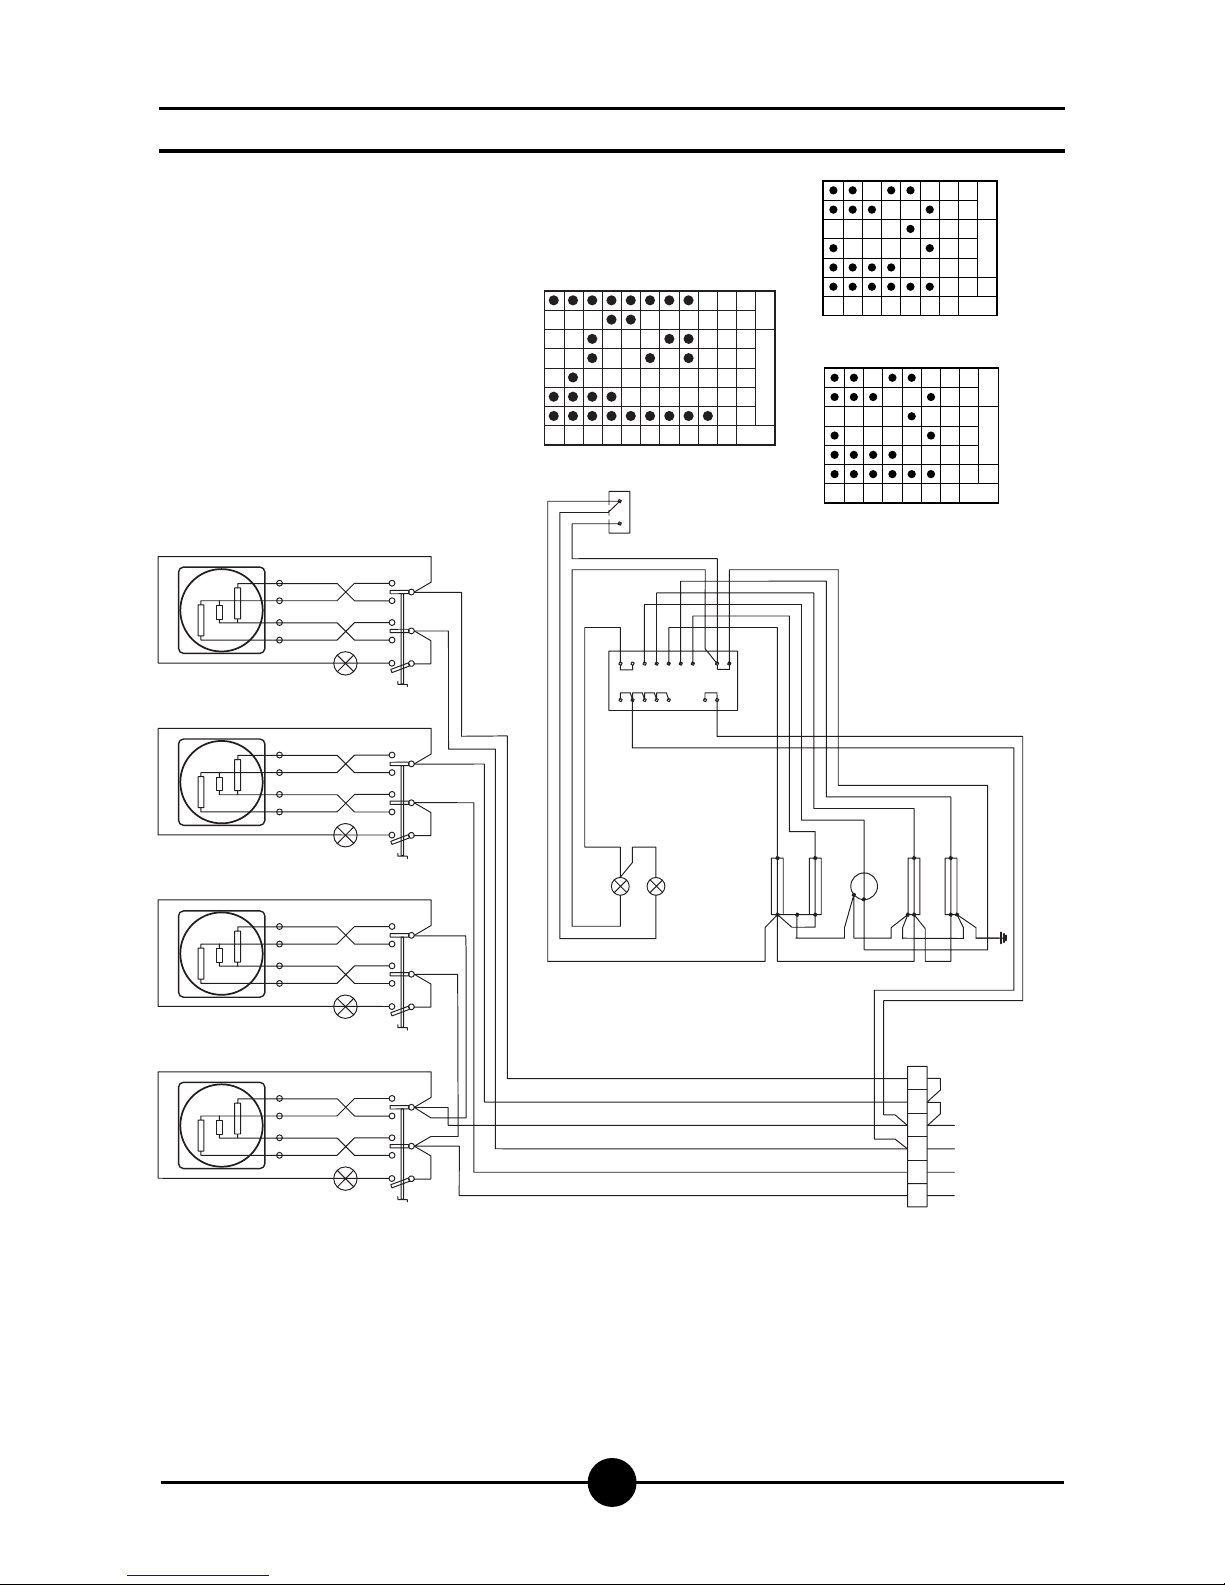
987654321
0
B1
5
P3-P4-P5-P6-P1 P2
672134
400 V 3N AC
P3 P1 P2 P3 P1 P2 P3 P1 P2 P3 P1 P2
1mA 2 3 4
L1 L2 L3 N
56
B1
H1
5
21
12
34
43
B1
H1
5
21
12
34
43
B1
H1
5
21
12
34
43
R2
B1
H1
5
21
12
34
43
R1R1R2
R2R2R2R2
21
567
2
P3
P4P5P6
P1
P2
134
B3
H2
H1
RC
RG
MV
~
RV
RS
F1
H1
B1
H1
B1
H1
B1
H1
B1
F1
B3
H1
H2
Line imput terminal board
Hot plate commutator
Switch
Thermostat
Pilot lamp
Pilot lamp (voltage)
Hot plate 2600 W
Ceiling element
Grill element
Floor element
Fan element
Fan motor
mA
B1
B3
F1
H1
H2
R1
RC
RG
RS
RV
MV
Hot plate 2000 W
R2
AGB 496/WP
AGB 582/WP
6543210
2600 w
1800 w
1200 w
600 w
400 w
270 w
B1
5
P3 P1 P2
21334
6543210
B1
5
P3 P1 P2
21334
2000 w
1150 w
850 w
300 w
220 w
175 w
R2
R1
Page 37
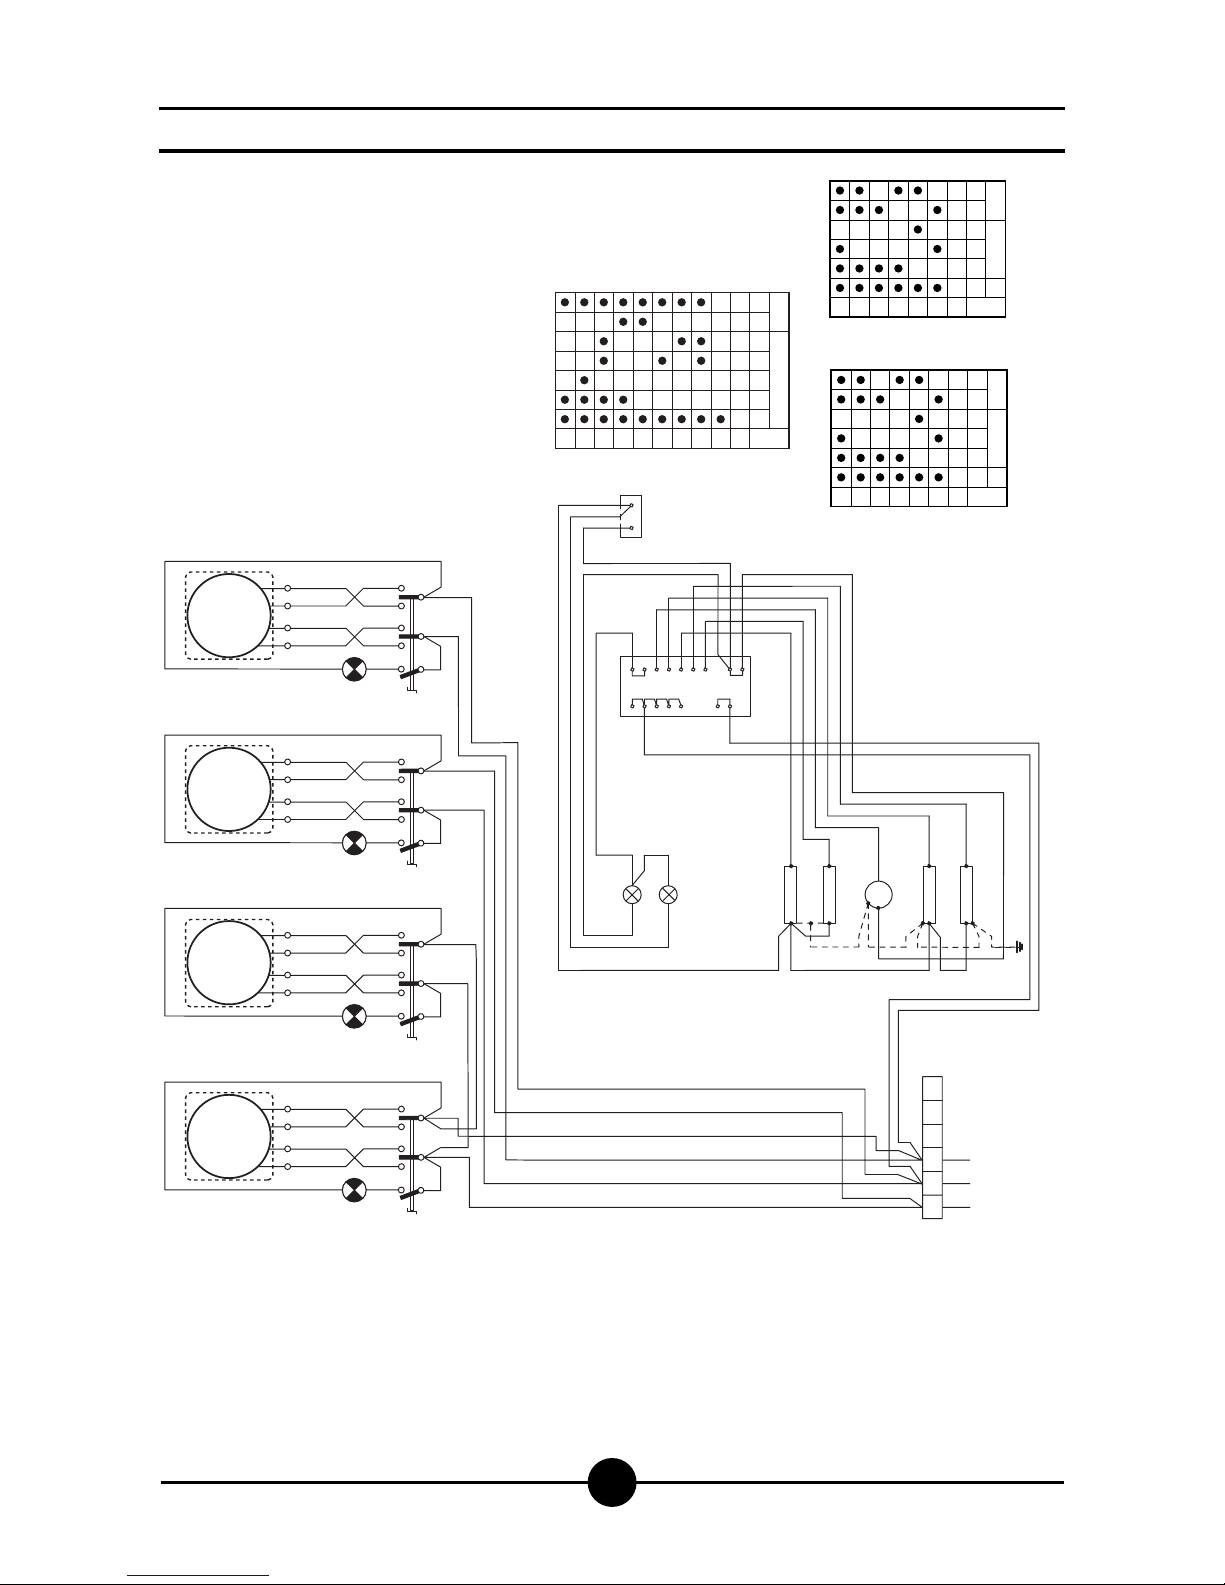
001-03 - Electric cookers
37
Wiring diagrams
987654321
0
B1
5
P3-P4-P5-P6-P1 P2
672134
230 V 3 AC
P3 P1 P2 P3 P1 P2 P3 P1 P2 P3 P1 P2
1mA 2 3 4
L1 L2 L3
56
B1
H1
5
21
12
34
43
B1
H1
5
21
12
34
43
B1
H1
5
21
12
34
43
R2
B1
H1
5
21
12
34
43
R1R1R2
R2R2R2R2
21
567
2
P3
P4P5P6
P1
P2
134
B3
H2
H1
RC
RG
MV
~
RV
RS
F1
H1
B1
H1
B1
H1
B1
H1
B1
F1
B3
H1
H2
Line imput terminal board
Hot plate commutator
Switch
Thermostat
Pilot lamp
Pilot lamp (voltage)
Hot plate 2600 W
Ceiling element
Grill element
Floor element
Fan element
Fan motor
mA
B1
B3
F1
H1
H2
R1
RC
RG
RS
RV
MV
Hot plate 2000 W
R2
AGB 496/WP
AGB 582/WP
6543210
2600 w
1800 w
1200 w
600 w
400 w
270 w
B1
5
P3 P1 P2
21334
6543210
B1
5
P3 P1 P2
21334
2000 w
1150 w
850 w
300 w
220 w
175 w
R2
R1
Page 38
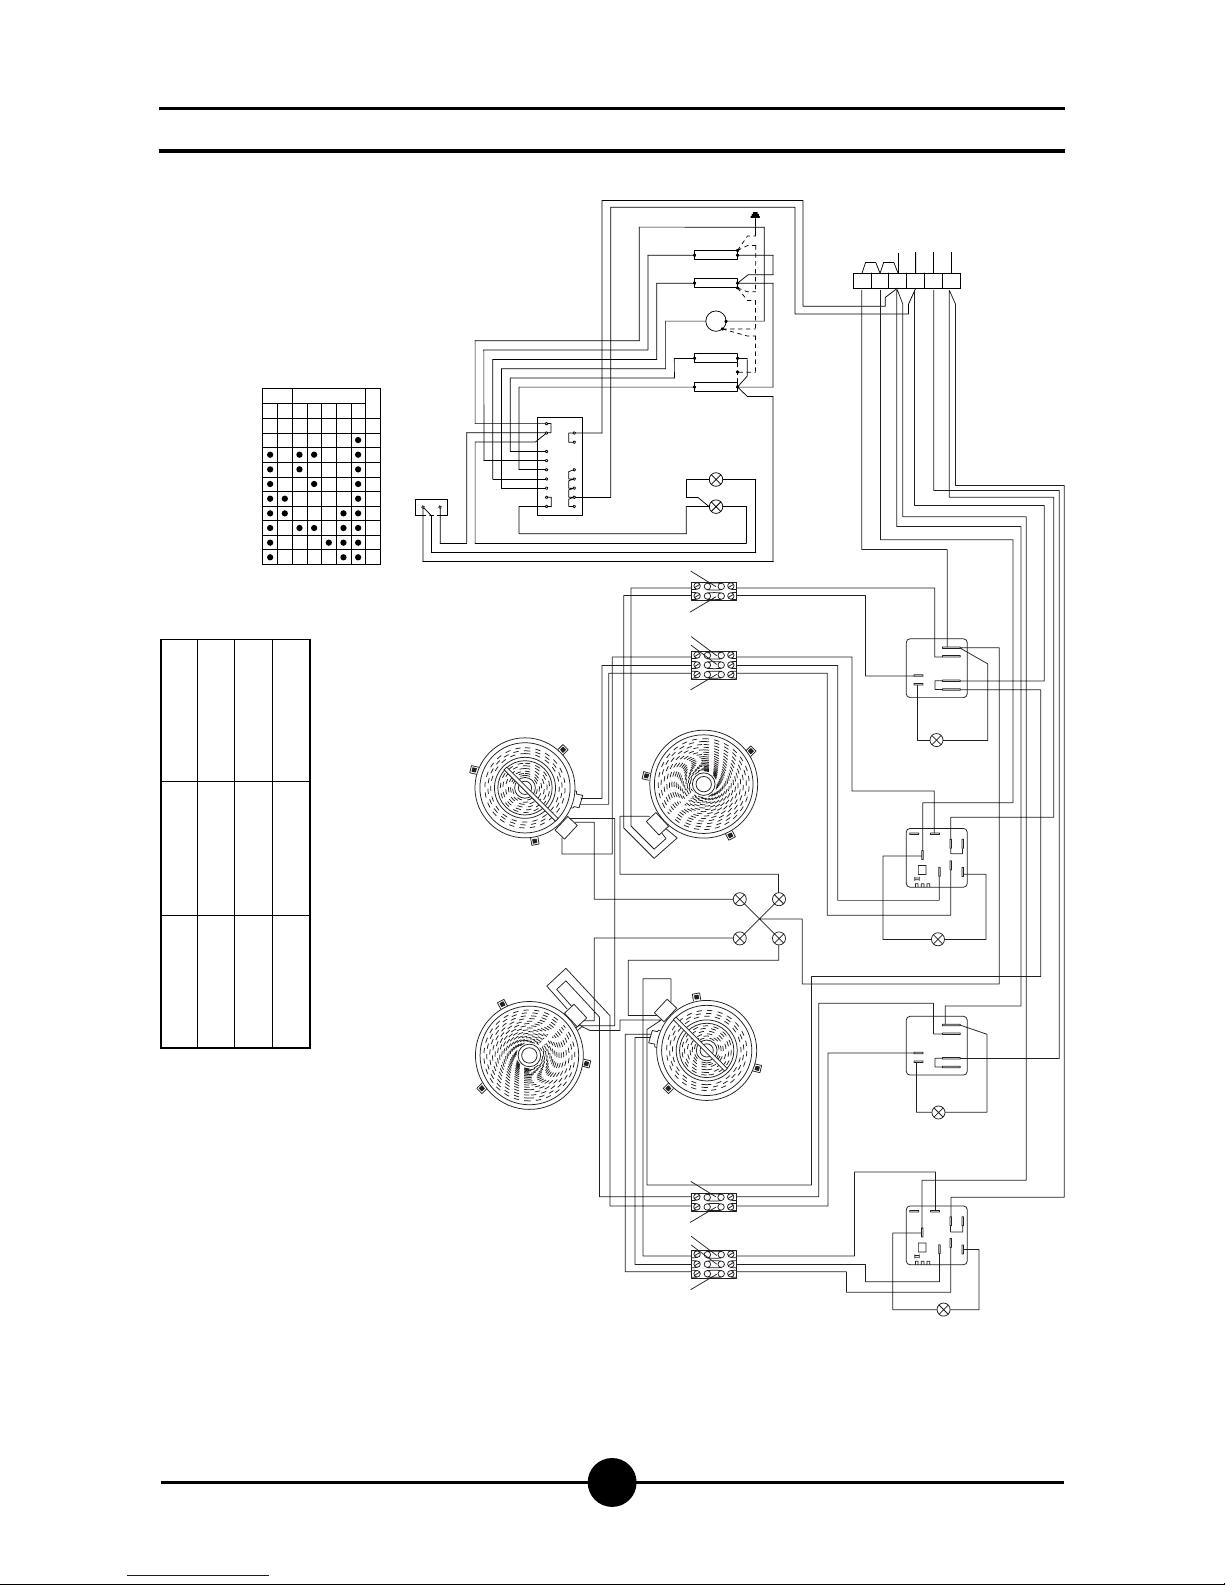
001-03 - Electric cookers
38
Wiring diagrams
9
8
7
6
5
4
3
2
1
0
B1
5
P3-P4-P5-P6-P1 P2
672134
1mA 2 3 4
L1 L2 L3
56
21
5
6
7
2
P3
P4
P5
P6
P1
P2
1
3
4
B3
RC
RG
MV
~
RV
RS
F1
1mA 2 3 4
L1 L2 L3
56
N
P1
50
55
P2
S1
S2
10
2
1
P1
P2
5
S
4
50.17
P1
50
55
P2
S1
S2
10
2
1
P1
P2
5
S
4
50.17
H1
H3
1
2
3
4
H3
2
1
3
4
00
00
00
00
00
0
0
0
00
0
0
0
0
00
0
0
0
AGB 497/WP
400 V 3N AC
R1
R1
R2
R2
B1
B1
B2
B2
H1
H1
H1
H1
H1
H2
B3
F1
mA Line arrival terminal board
B1 Single power plate energy regulator
B2 Double power plate energy regulator
B3 Commutateur oven
F1 Thermostat
H1 Pilot lampe
H2 Pilot lampe (voltage)
H3 Residual heat pilot lamp
R1 2500 W heating element
R2 1200/2200 W double power heating element
RC Ceiling element
RG Grill element
RS Floor element
RV Fan element
MV Fan motoring elements
Terminal 4a
Terminal 4
Terminal 2
Residual heat
lamps
Color cables
Color cables
Color cables
Color cables
Blue section 1,5 mm
2
White section 1,5 mm
2
Red section 1,5 mm
2
Green section 1 mm
2
Page 39
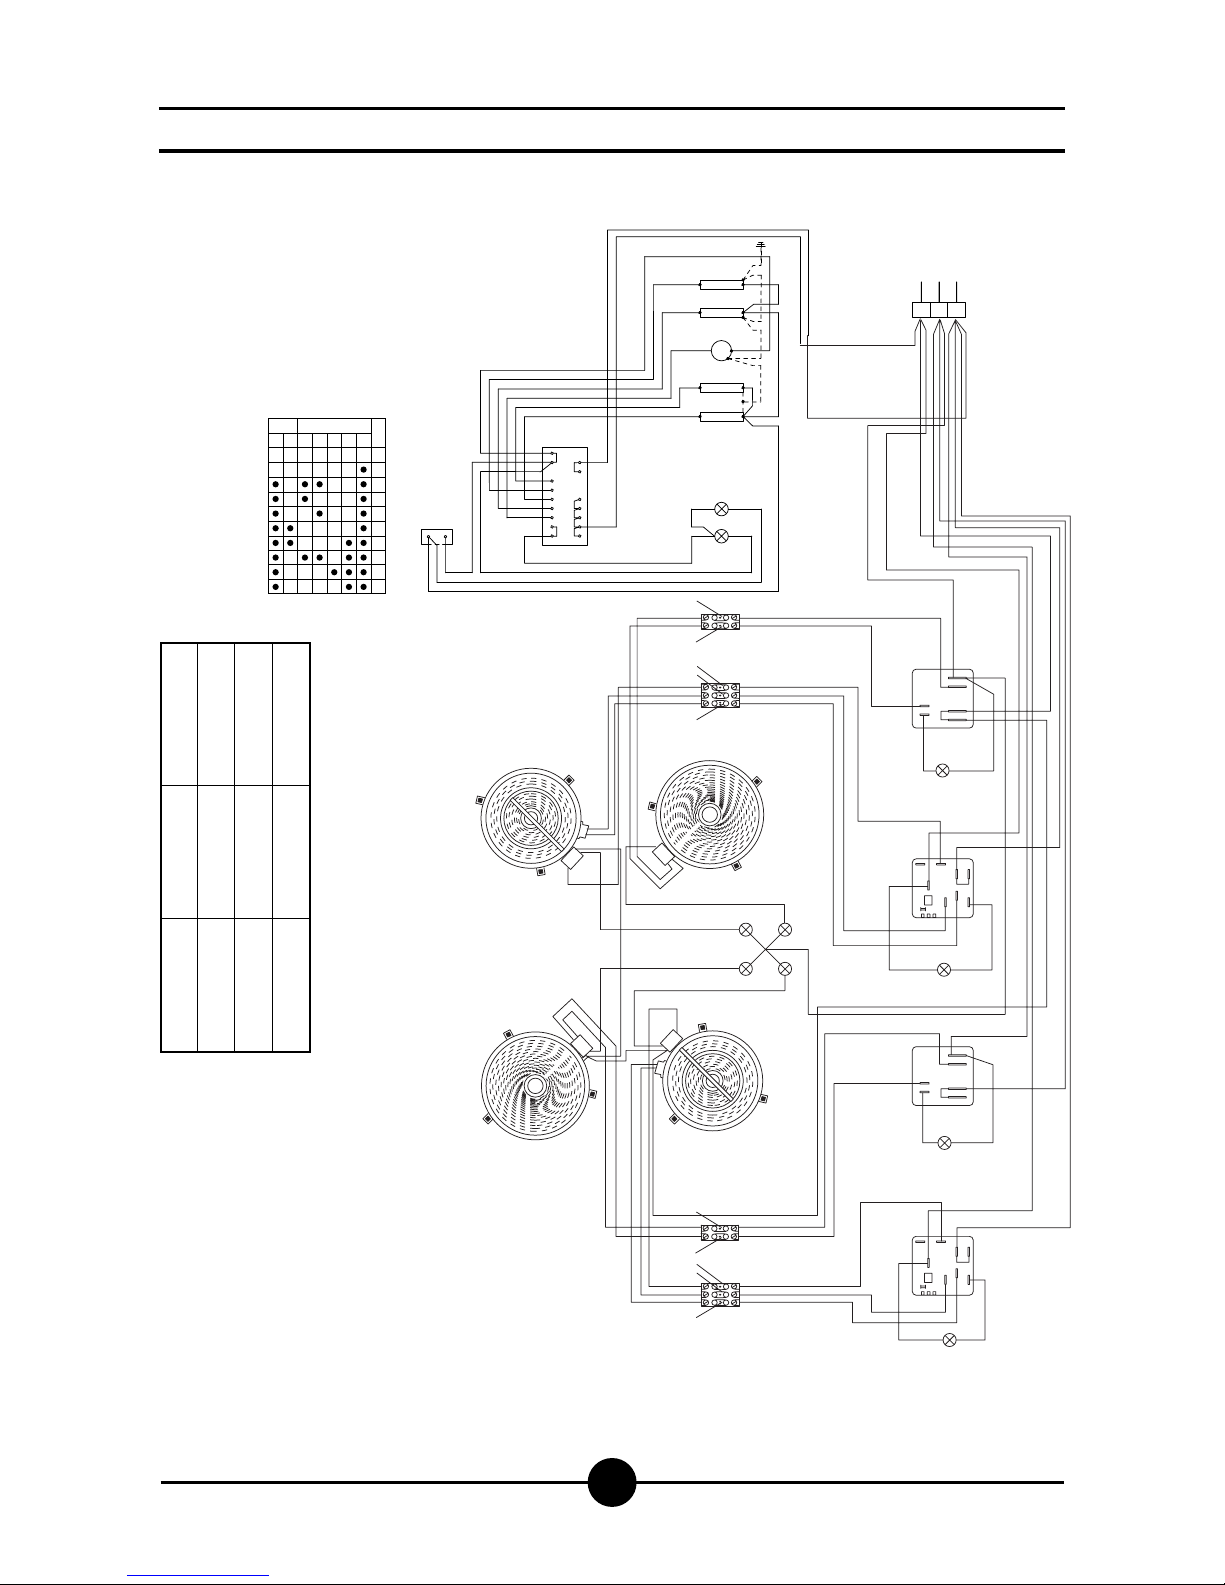
001-03 - Electric cookers
39
Wiring diagrams
9
8
7
6
5
4
3
2
1
0
B1
5
P3-P4-P5-P6-P1 P2
672134
1mA 23
L1 L2 L3
21
5
6
7
2
P3
P4
P5
P6
P1
P2
1
3
4
B3
RC
RG
MV
~
RV
RS
F1
1mA 23
L1 L2 L3
P1
5055
P2
S1
S2
10
2
1
P1
P2
5
S
4
50.17
P1
5055
P2
S1
S2
10
2
1
P1
P2
5
S
4
50.17
H3
1
2
3
4
4
2
1
3
H3
0
00
0
0
0
0
00
0
0
0
AGB 497/WP
230 V 3 AC
B3
F1
H1
R2
R2
R1
R1
B2
B2
B1
B1
H1
H1
H1
H1
H2
mA Line arrival terminal board
B1 Single power plate energy regulator
B2 Double power plate energy regulator
B3 Commutateur oven
F1 Thermostat
H1 Pilot lampe
H2 Pilot lampe (voltage)
H3 Residual heat pilot lamp
R1 2500 W heating element
R2 1200/2200 W double power heating element
RC Ceiling element
RG Grill element
RS Floor element
RV Fan element
MV Fan motoring elements
Terminal 4a
Terminal 4
Terminal 2
Residual heat
lamps
Color cables
Color cables
Color cables
Color cables
Blue section 1,5 mm
2
White section 1,5 mm
2
Red section 1,5 mm
2
Green section 1 mm
2
Page 40
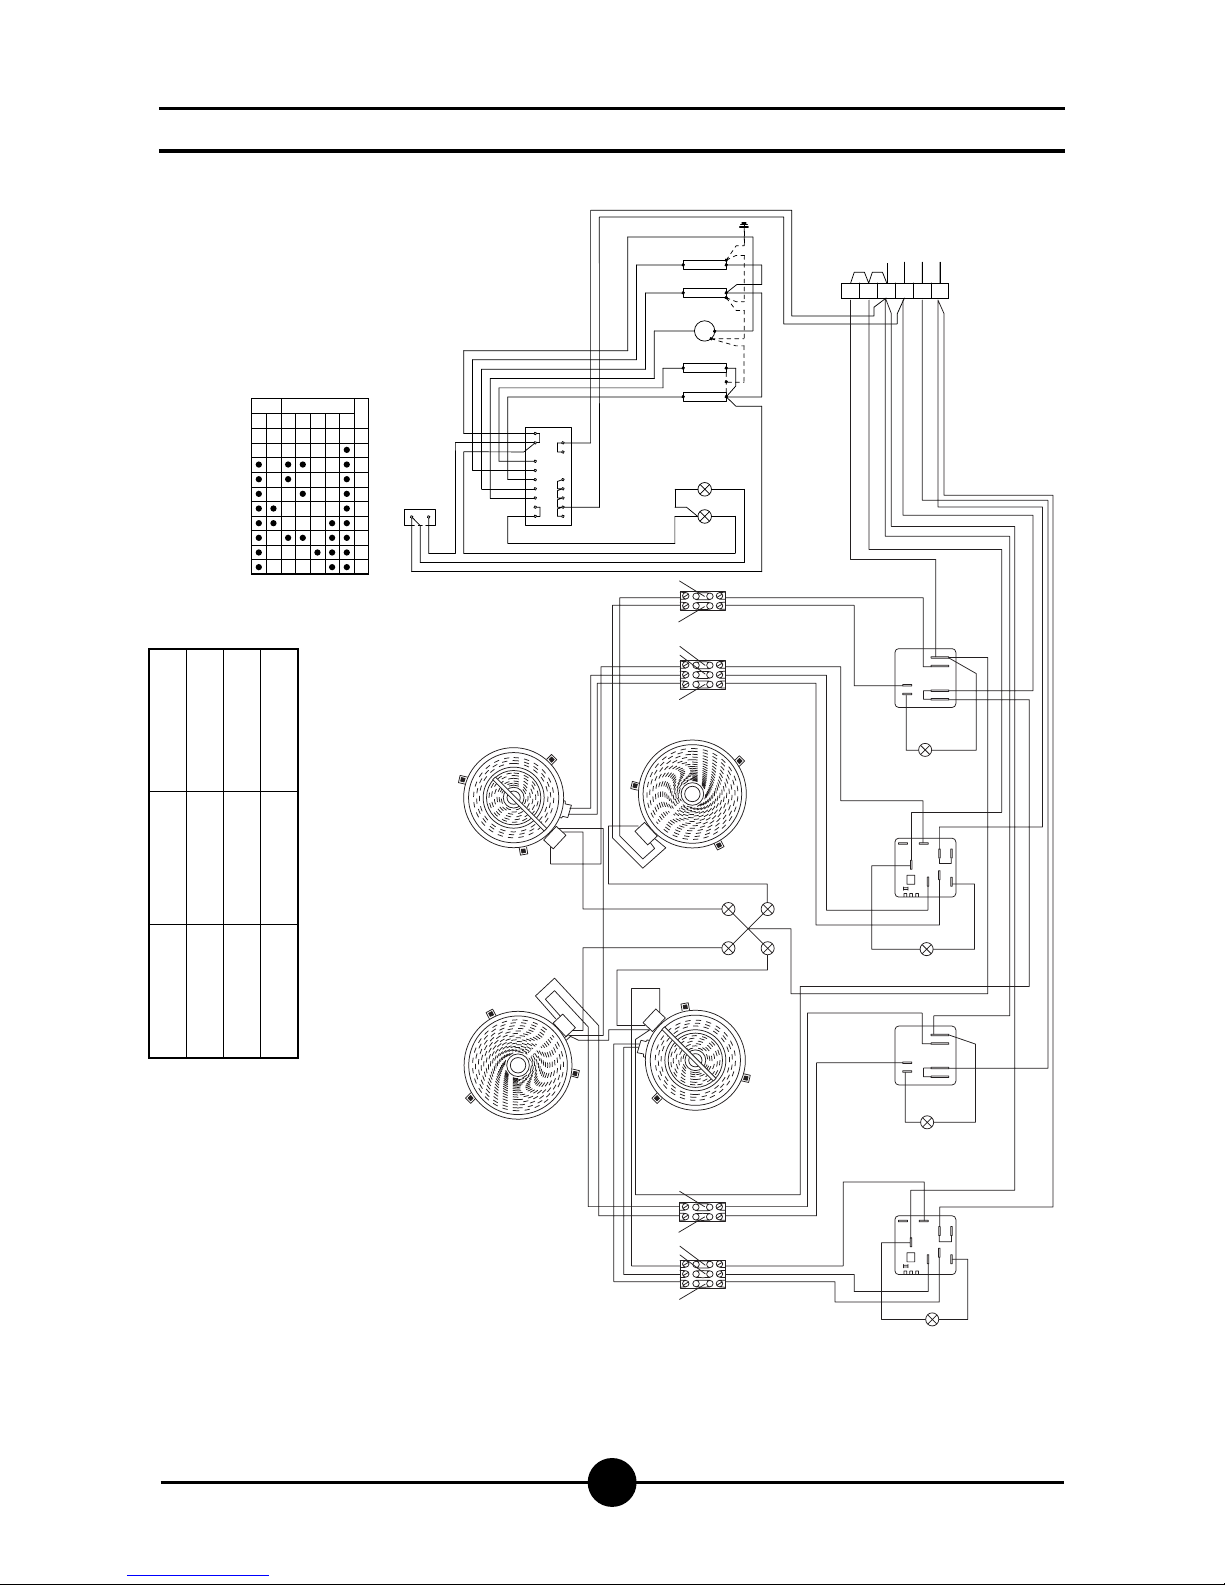
001-03 - Electric cookers
40
Wiring diagrams
9
8
7
6
5
4
3
2
1
0
B1
5
P3-P4-P5-P6-P1 P2
672134
1mA 2 3 4
L1 L2 L3
56
21
5
6
7
2
P3
P4
P5
P6
P1
P2
1
3
4
B3
RC
RG
MV
~
RV
RS
F1
1mA 2 3 4
L1 L2 L3
56
N
P1
50
55
P2
S1
S2
10
2
1
P1
P2
5
S
4
50.17
P1
50
55
P2
S1
S2
10
2
1
P1
P2
5
S
4
50.17
H1
H3
1
2
3
4
H3
2
1
3
4
00
00
00
00
00
0
0
0
00
0
0
0
0
00
0
0
0
400 V 3N AC
R2
R2
R1
R3
B1
B1
B2
B2
H1
H1
H1
H1
H1
H2
B3
F1
mA Line arrival terminal board
B1 Single power plate energy regulator
B2 Double power plate energy regulator
B3 Commutateur oven
F1 Thermostat
H1 Pilot lampe
H2 Pilot lampe (voltage)
H3 Residual heat pilot lamp
RC Ceiling element
RG Grill element
RS Floor element
RV Fan element
MV Fan motoring elements
Terminal 4a
Terminal 4
Terminal 2
Residual heat
lamps
Color cables
Color cables
Color cables
Color cables
Blue section 1,5 mm
2
White section 1,5 mm
2
Red section 1,5 mm
2
Green section 1 mm
2
R3 1200 W cooking plate
R1 1800 W cooking plate
R2 1000/2500 W double power cooking plate
Page 41
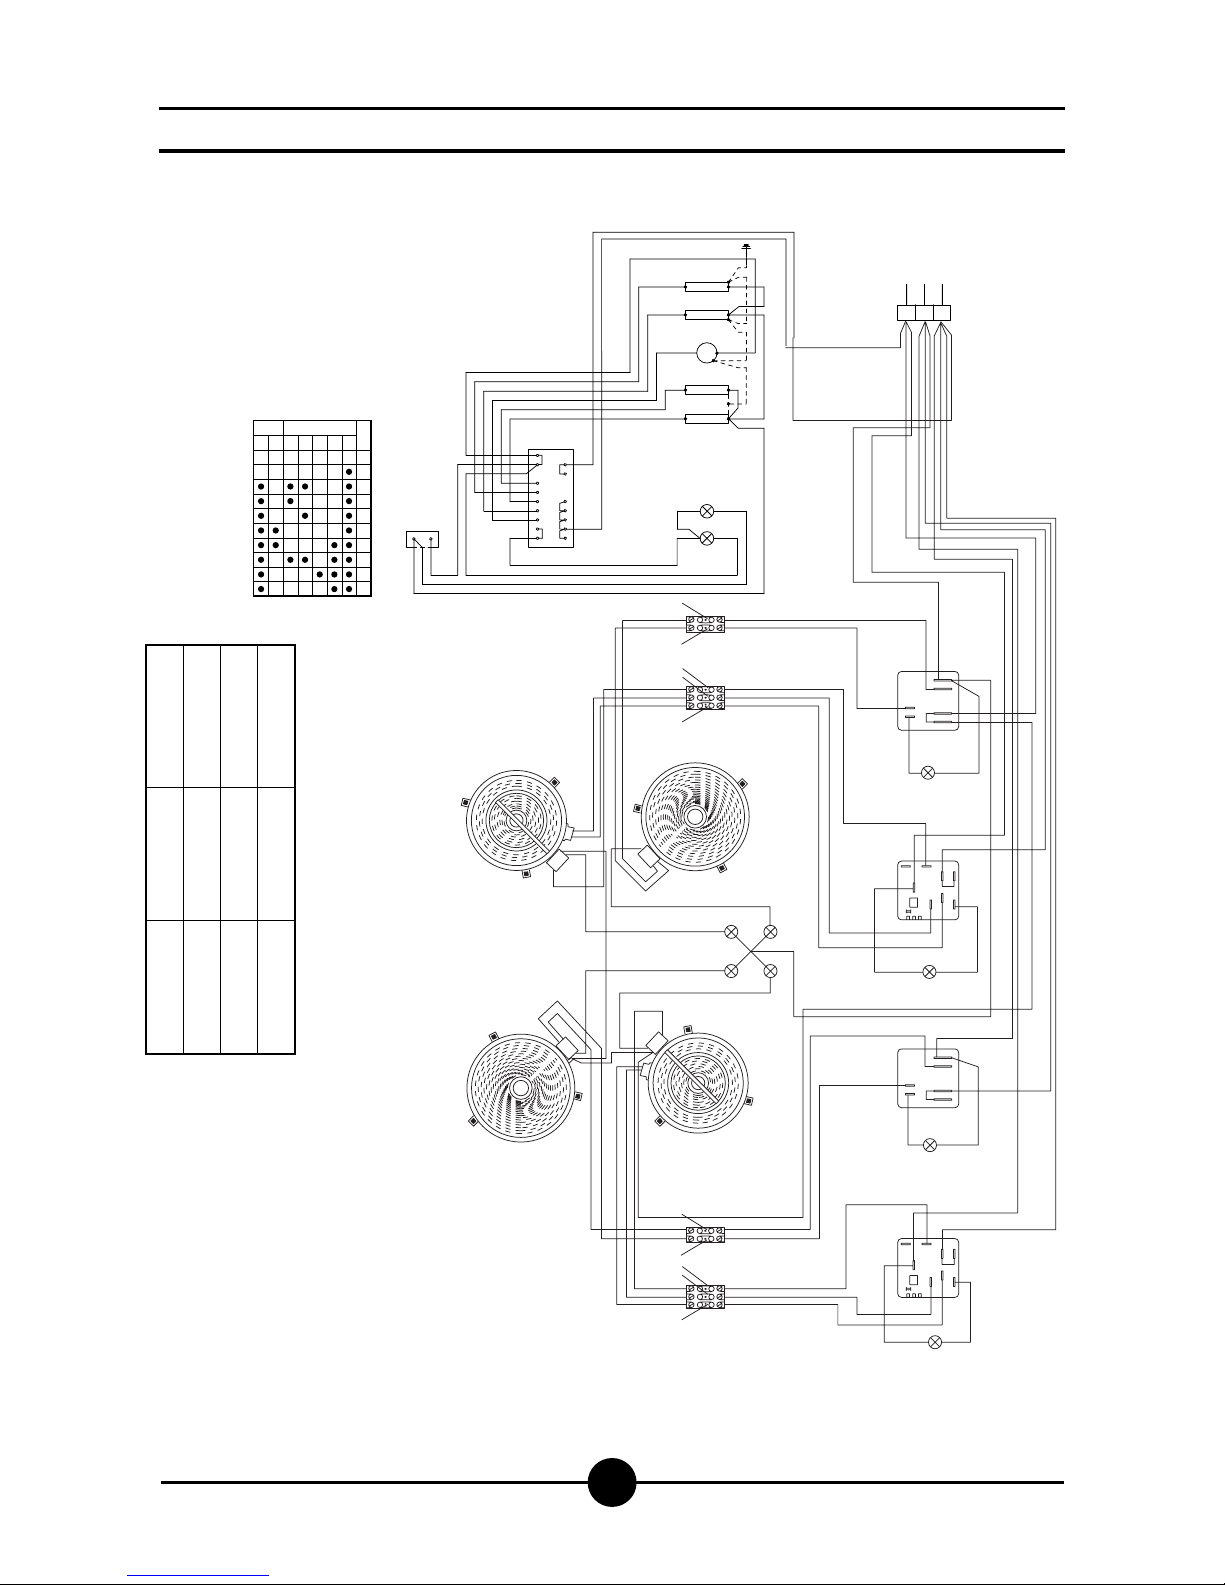
001-03 - Electric cookers
41
Wiring diagrams
9
8
7
6
5
4
3
2
1
0
B1
5
P3-P4-P5-P6-P1 P2
672134
1mA 23
L1 L2 L3
21
5
6
7
2
P3
P4
P5
P6
P1
P2
1
3
4
B3
RC
RG
MV
~
RV
RS
F1
1mA 23
L1 L2 L3
P1
5055
P2
S1
S2
10
2
1
P1
P2
5
S
4
50.17
P1
5055
P2
S1
S2
10
2
1
P1
P2
5
S
4
50.17
H3
1
2
3
4
4
2
1
3
H3
0
00
0
0
0
0
00
0
0
0
230 V 3 AC
B3
F1
H1
R1
R3
R2
R2
B2
B2
B1
B1
H1
H1
H1
H1
H2
Terminal 4a
Terminal 4
Terminal 2
Residual heat
lamps
Color cables
Color cables
Color cables
Color cables
Blue section 1,5 mm
2
White section 1,5 mm
2
Red section 1,5 mm
2
Green section 1 mm
2
mA Line arrival terminal board
B1 Single power plate energy regulator
B2 Double power plate energy regulator
B3 Commutateur oven
F1 Thermostat
H1 Pilot lampe
H2 Pilot lampe (voltage)
H3 Residual heat pilot lamp
RC Ceiling element
RG Grill element
RS Floor element
RV Fan element
MV Fan motoring elements
R3 1200 W cooking plate
R1 1800 W cooking plate
R2 1000/2500 W double power cooking plate
Page 42
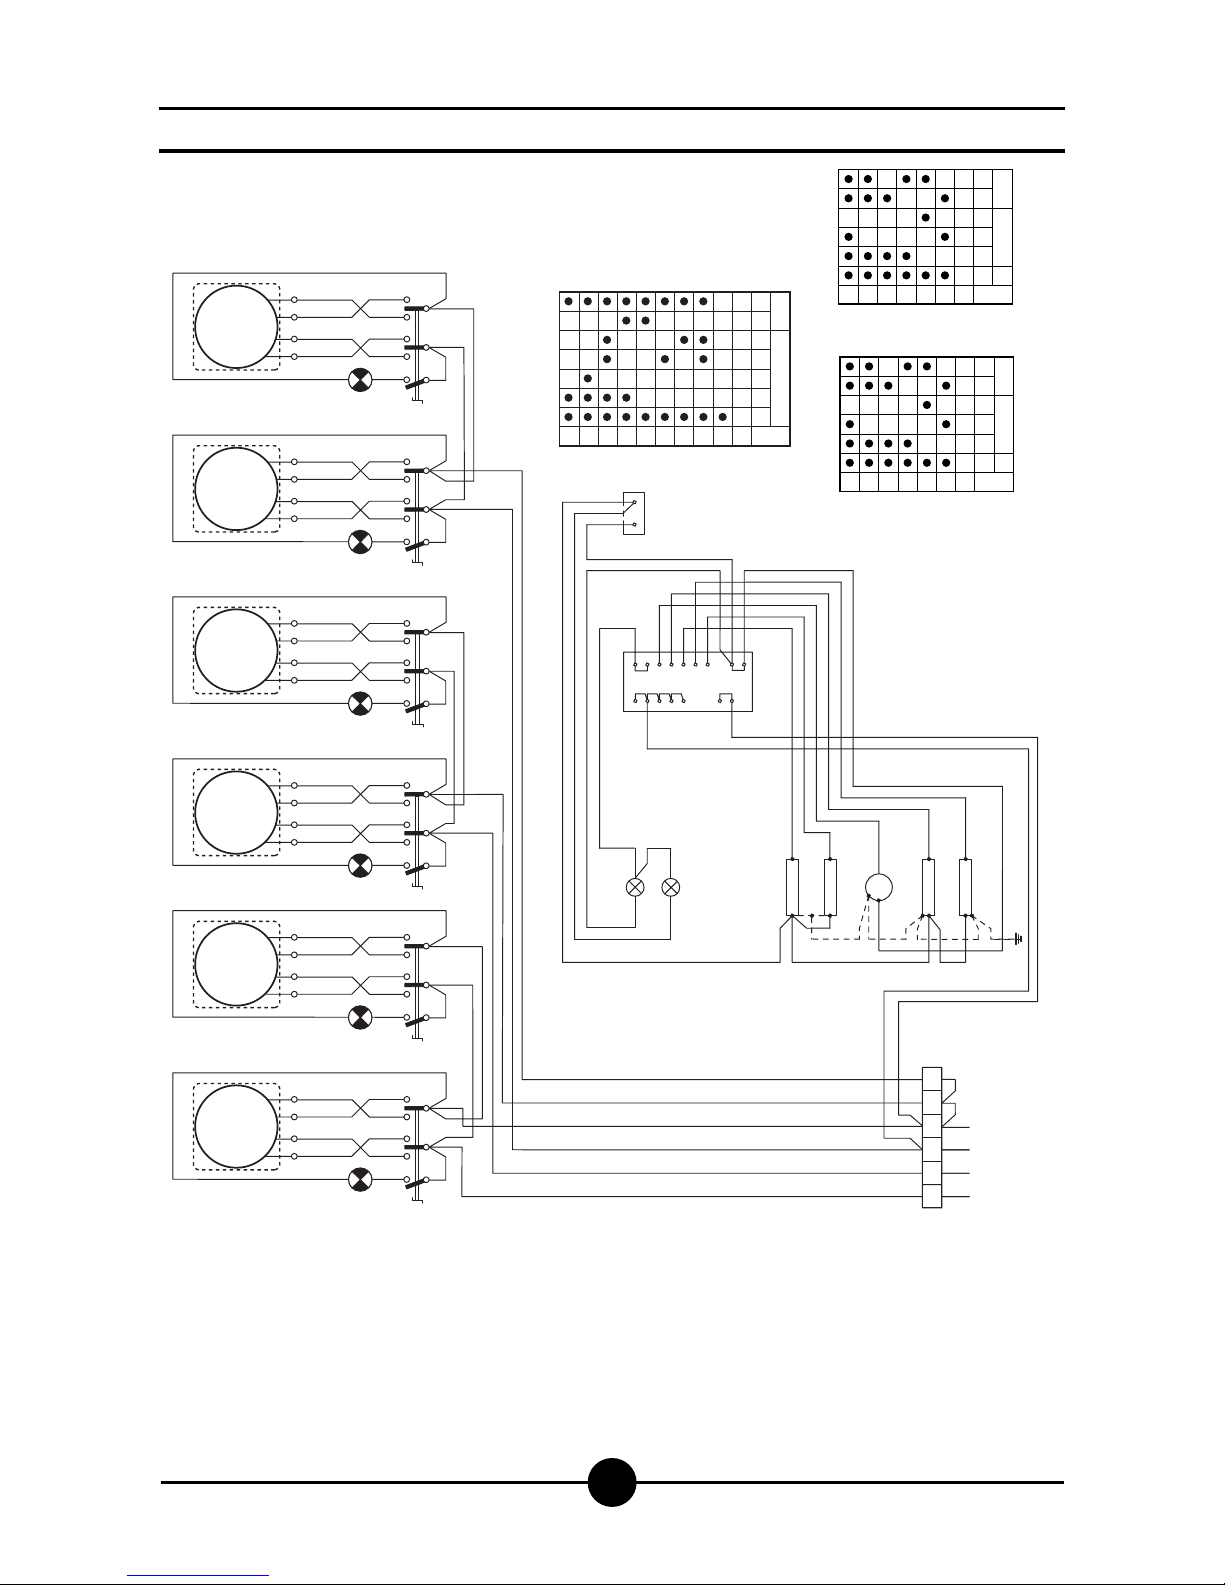
001-03 - Electric cookers
42
Wiring diagrams
987654321
0
B1
5
P3-P4-P5-P6-P1 P2
672134
400 V 3N AC
1mA 2 3 4
L1 L2 L3
56
21
567
2
P3
P4P5P6
P1
P2
134
RC
RG
MV
~
RV
RS
P3 P1 P2 P3 P1 P2 P3 P1 P2 P3 P1 P2 P3 P1 P2 P3 P1 P2
1mA 2 3 4
L1 L2 L3
56
N
5 21
12
34
43
5 21
12
34
43
5 21
12
34
43
5 21
12
34
43
5 21
12
34
43
R2
5
21
12
34
43
R1R1R2R2R1
H1
B1
H1
B1
B3
H2
H1
H1
B1
H1
B1
H1
B1
H1
B1
F1
Line input terminal board
Hot plate commutator
Switch
Thermostat
Pilota lamp
Pilota lamp (voltage)
Hot plate 2600 W
Ceiling element
Grill element
Floor element
Fan element
Fan motor
mA
B1
B3
F1
H1
H2
R1
RC
RG
RS
RV
MV
Hot plate 2000 W
R2
6543210
2600 w
1800 w
1200 w
600 w
400 w
270 w
B1
5
P3 P1 P2
21334
6543210
B1
5
P3 P1 P2
21334
2000 w
1150 w
850 w
300 w
220 w
175 w
R2
R1
Page 43
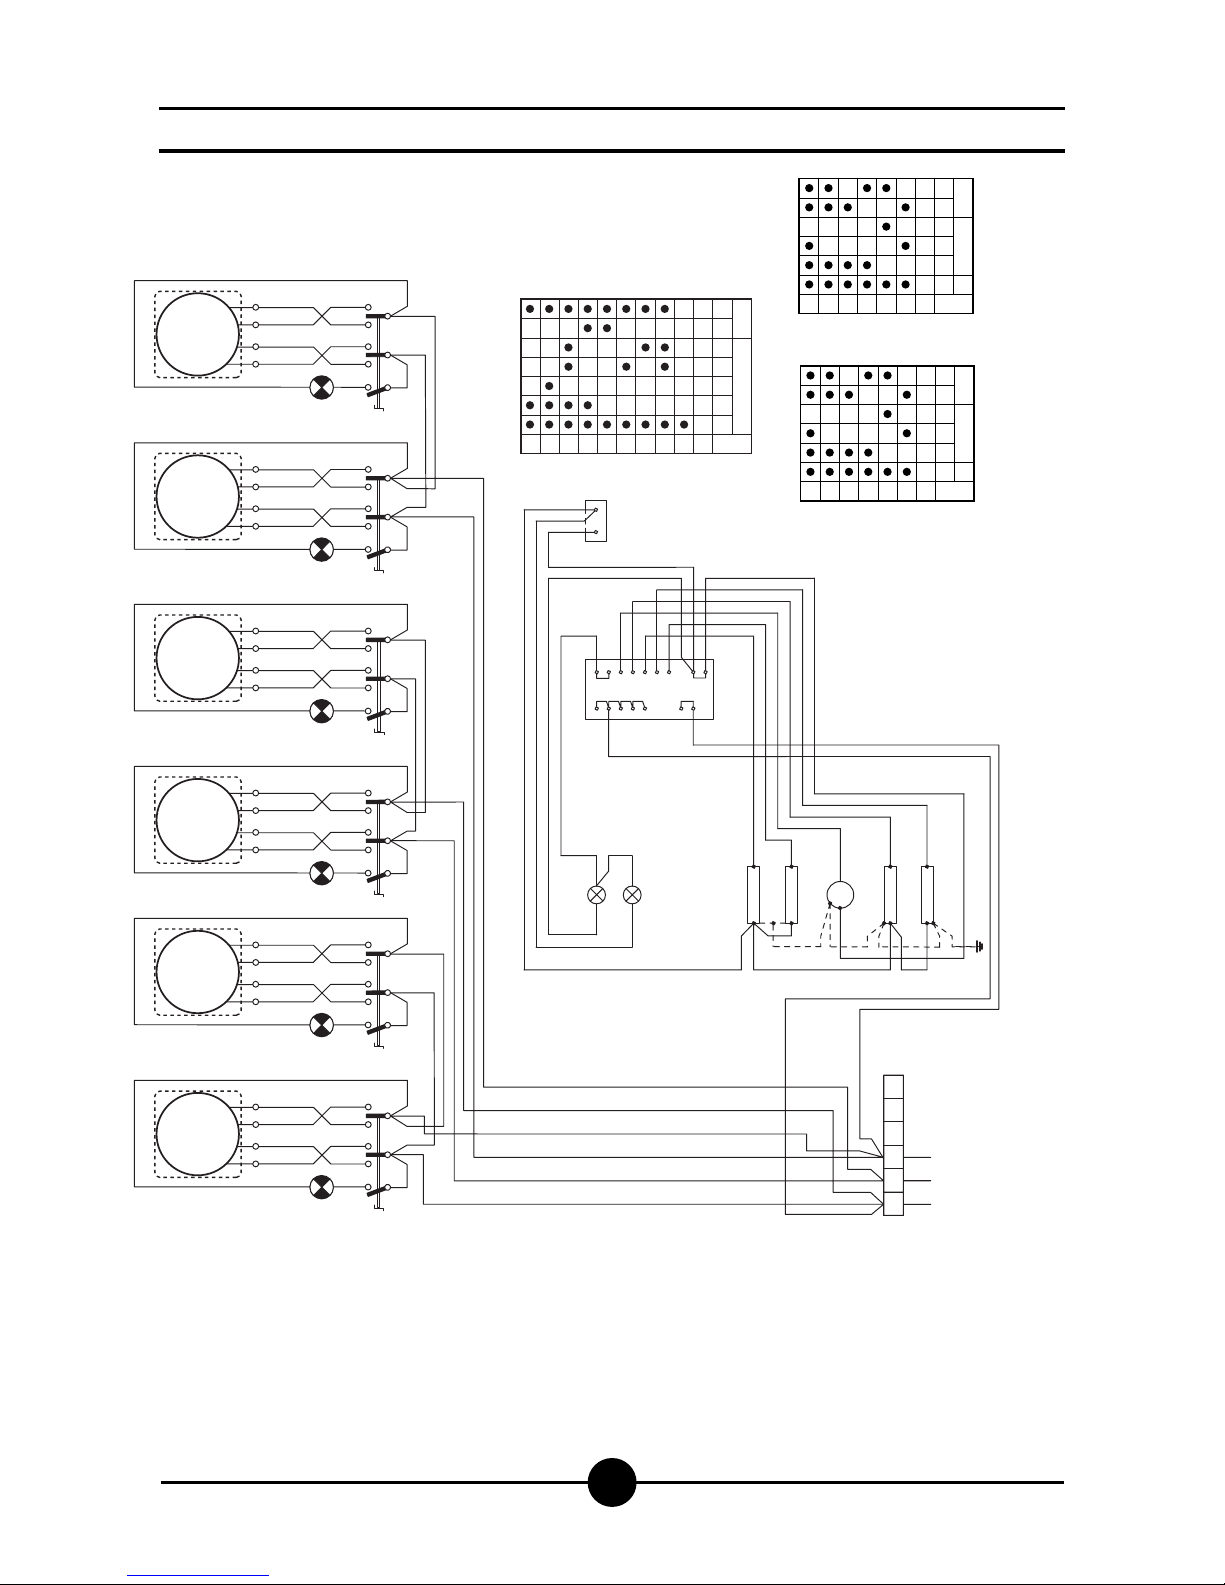
001-03 - Electric cookers
43
Wiring diagrams
987654321
0
B1
5
P3-P4-P5-P6-P1 P2
672134
230 V 3 AC
1mA 2 3 4
L1 L2 L3
56
21
567
2
P3
P4P5P6
P1
P2
134
RC
RG
MV
~
RV
RS
P3 P1 P2 P3 P1 P2 P3 P1 P2 P3 P1 P2 P3 P1 P2 P3 P1 P2
1mA 2 3 4
L1 L2 L3
56
5 21
12
34
43
5 21
12
34
43
5 21
12
34
43
5 21
12
34
43
5 21
12
34
43
R2
5
21
12
34
43
R1R1R2R2R1
H1
B1
H1
B1
B3
H2
H1
H1
B1
H1
B1
H1
B1
H1
B1
F1
Line input terminal board
Hot plate commutator
Switch
Thermostat
Pilota lamp
Pilota lamp (voltage)
Hot plate 2600 W
Ceiling element
Grill element
Floor element
Fan element
Fan motor
mA
B1
B3
F1
H1
H2
R1
RC
RG
RS
RV
MV
Hot plate 2000 W
R2
6543210
2600 w
1800 w
1200 w
600 w
400 w
270 w
B1
5
P3 P1 P2
21334
6543210
B1
5
P3 P1 P2
21334
2000 w
1150 w
850 w
300 w
220 w
175 w
R2
R1
Page 44
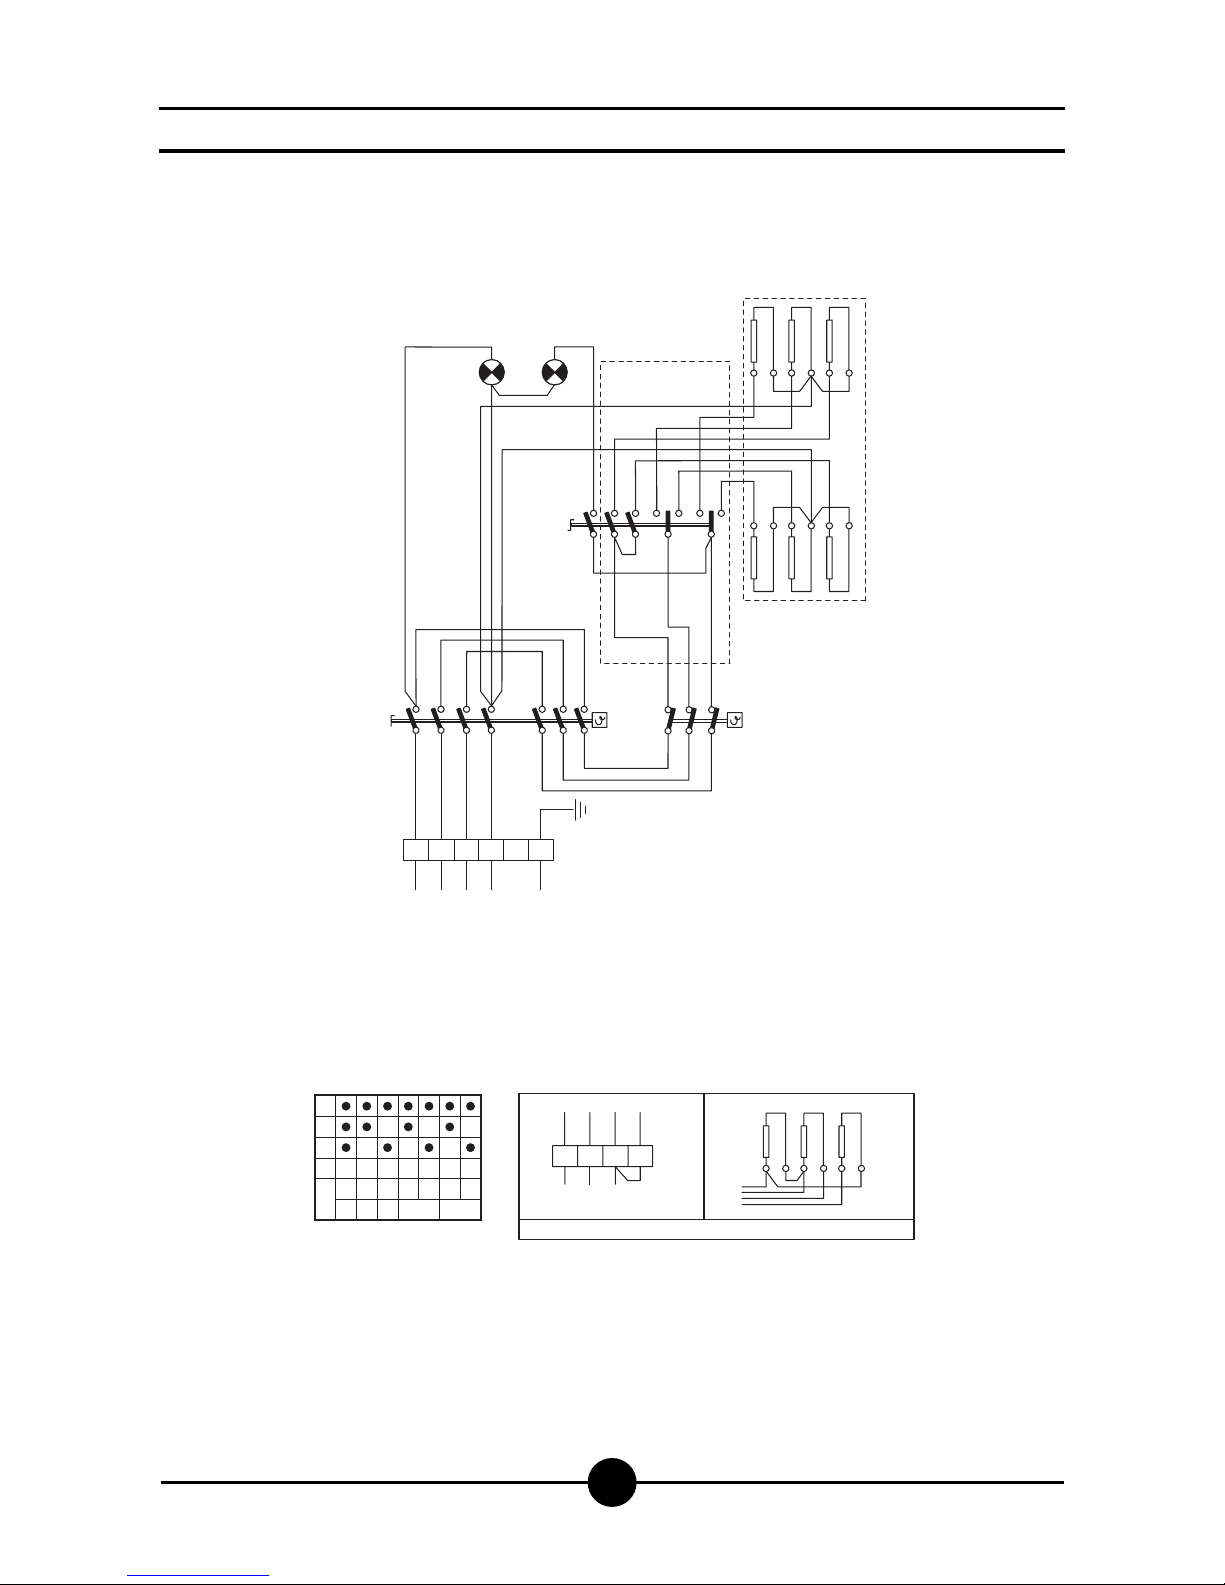
001-03 - Electric cookers
44
Wiring diagrams
400 V 3N ~ 8.48 A
L1
mA L2 L3 N T
3
2
1
0
B2
5
P3 P5P4 P2P6
67213
4
B1
P1
1
P22P33P4
4
F1
B2
P3
5
P46P6P5P2
7
213 4
1 3 52 4 6
1 3 52 4 6
R2
R1
H1 H2
F2
230 V 3 ~ 14.75 A
13524 6
R1/R2
1 mA234
L1 L 2
L3
AGB 498/WP
Connected power: 5.9 kW 230/400
Terminal
Switch
Selector
Thermostat
Indicator light (power)
Indicator light (heating)
Oven heating element
Temperature limiter
mA
B1
B2
F1
H1
H2
R1-2
F2
Page 45
001-03 - Electric cookers
45
Wiring diagrams
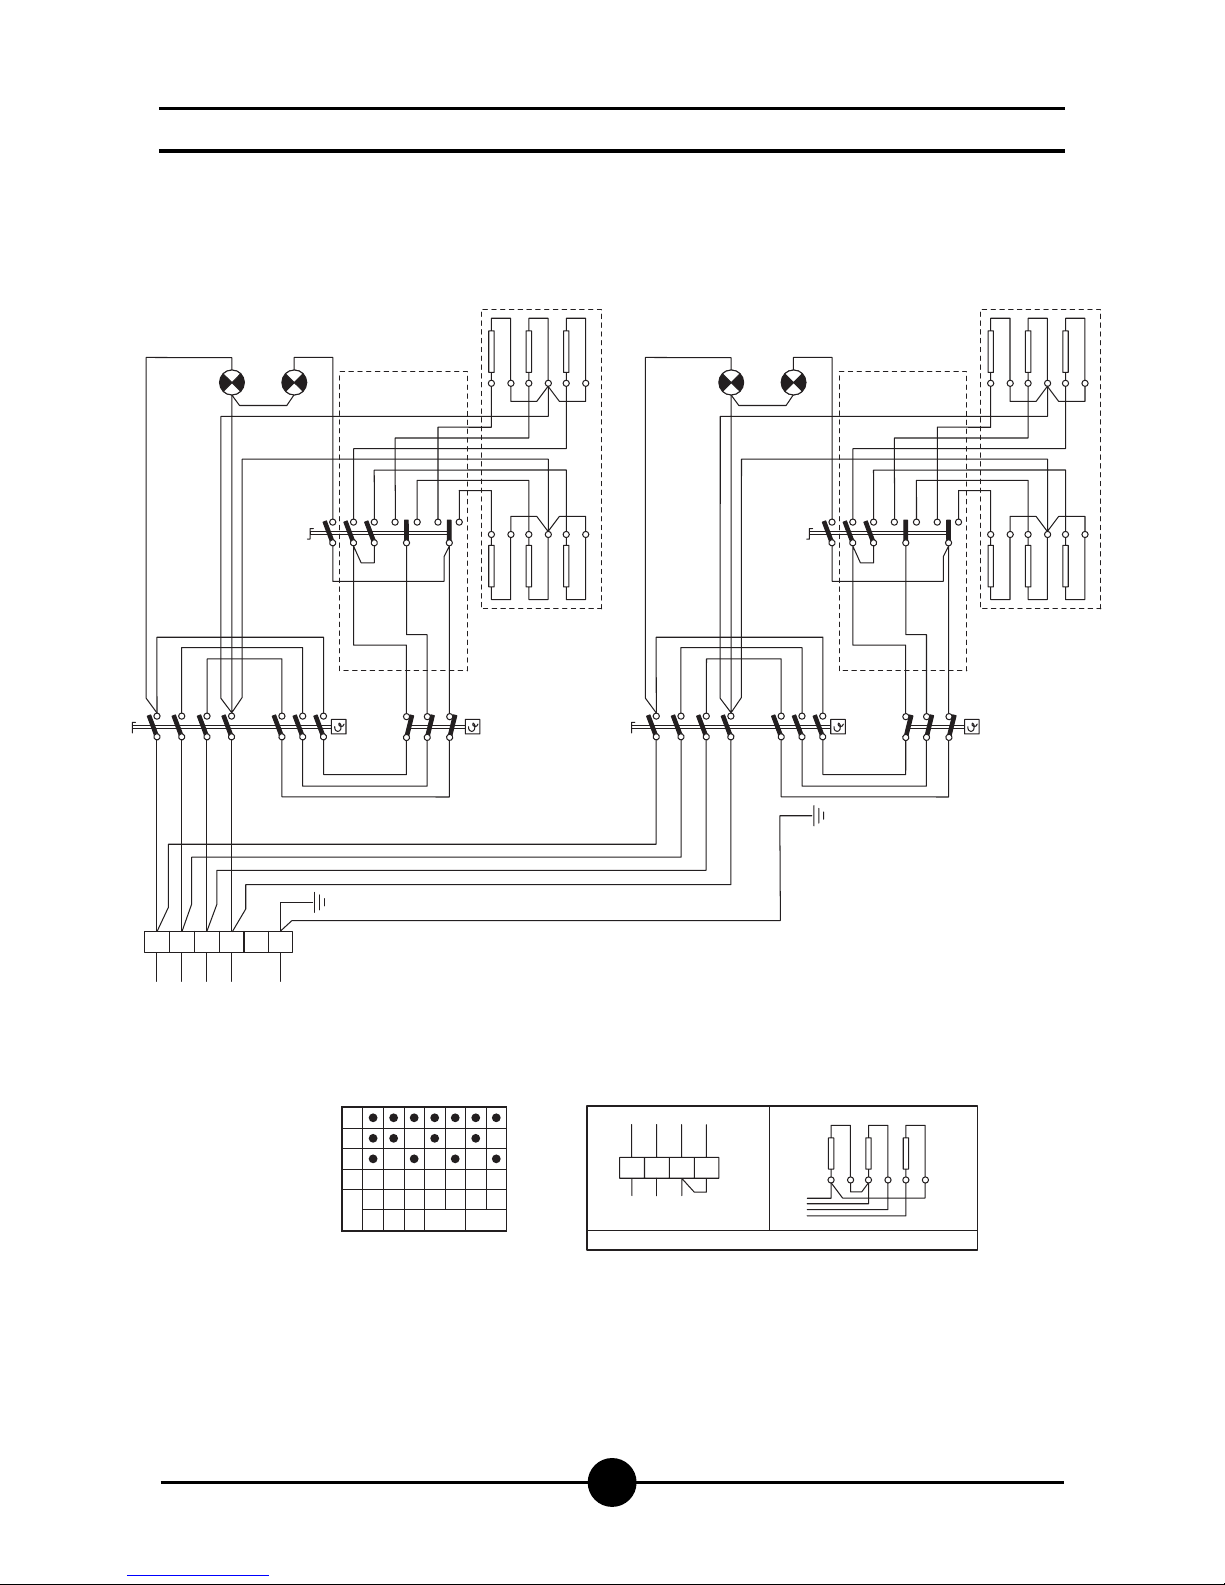
400 V 3N ~ 8.48 A
L1
mA L2 L3 N T
3
2
1
0
B2
5
P3 P5P4 P2P6
67213
4
B1
P1
1
P22P33P4
4
F1
B2
P3
5
P46P6P5P2
7
213 4
1 3 52 4 6
1 3 52 4 6
R2
R1
H1 H2
F2
230 V 3 ~ 14.75 A
13524 6
R1/R2
1 mA234
L1 L 2
L3
B1
P1
1
P22P33P4
4
F1
B2
P3
5
P46P6P5P2
7
213 4
1 3 52 4 6
1 3 52 4 6
R2
R1
H1 H2
F2
Connected power: 5.9 kW 230/400
Terminal
Switch
Selector
Thermostat
Indicator light (power)
Indicator light (heating)
Oven heating element
Temperature limiter
mA
B1
B2
F1
H1
H2
R1-2
F2
Page 46
001-03 - Electric cookers
46
Wiring diagrams
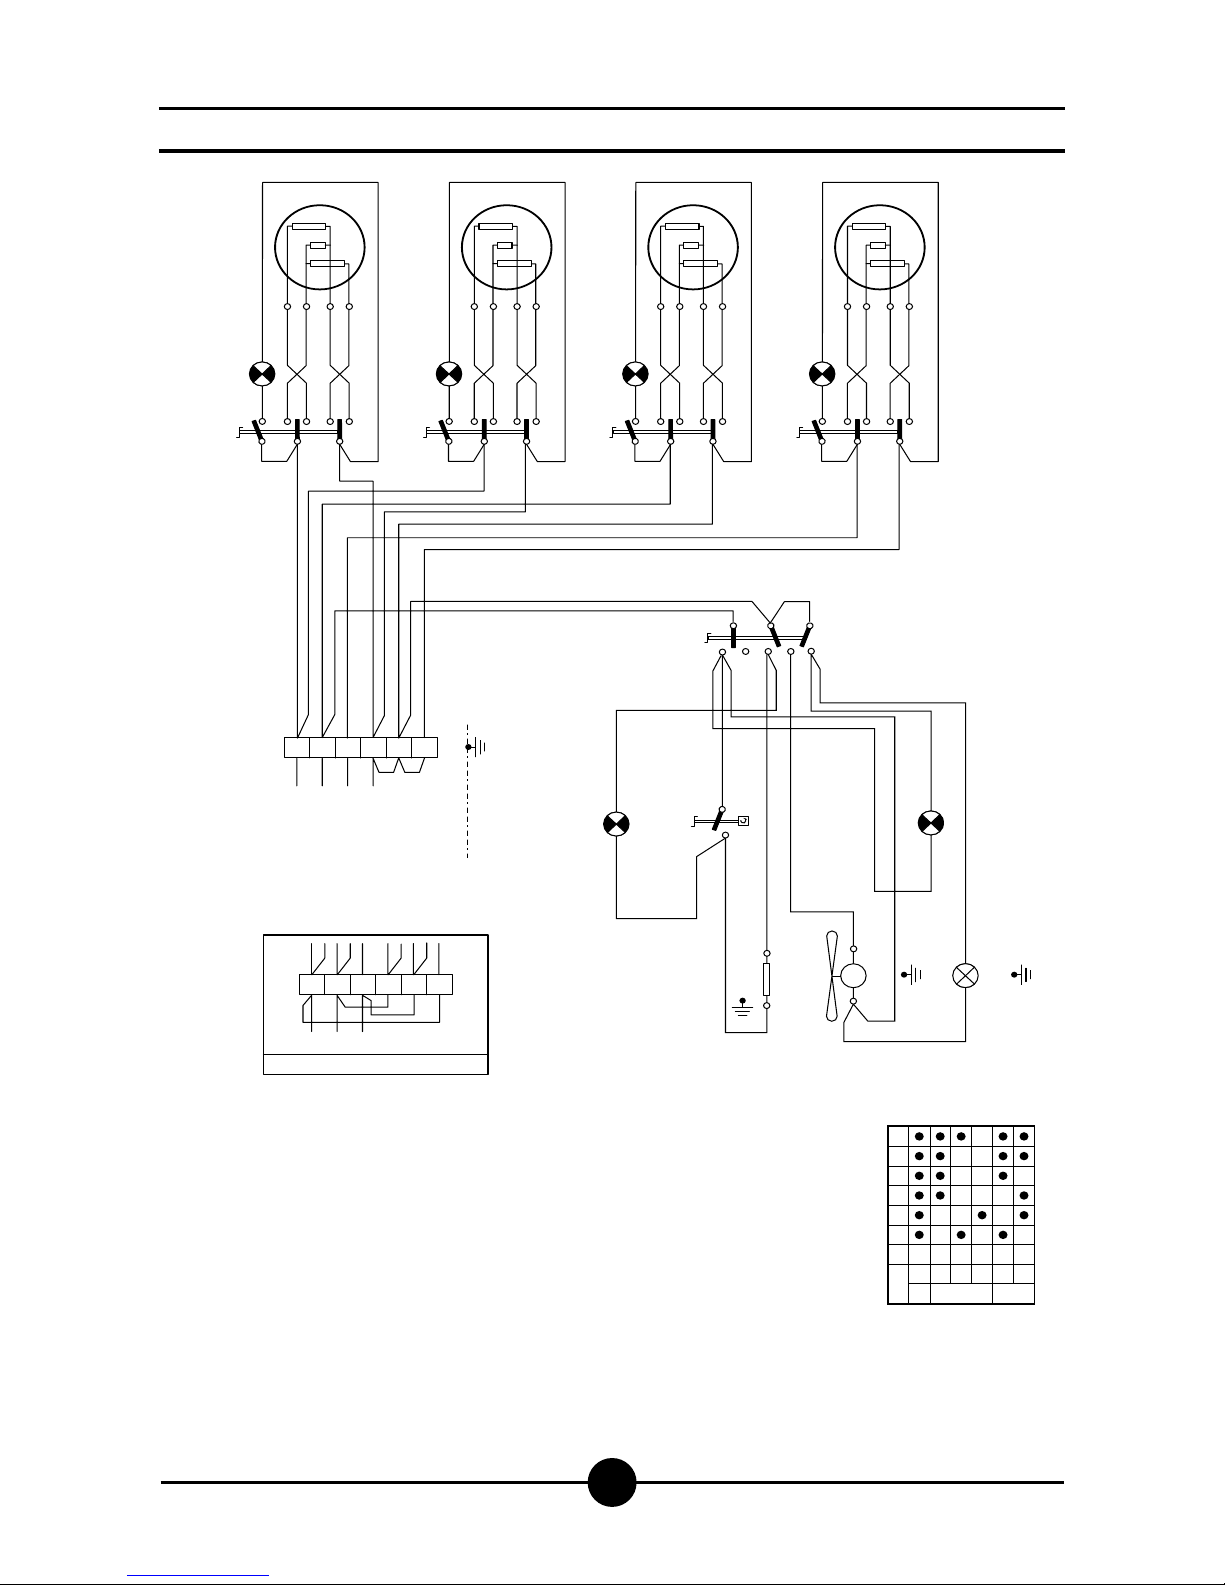
mA Line arrival terminal board
B1 Hotplate commutator
B2 Oven commutator
F1 Oven thermostat
H1 Orange pilot lamp
H2 Green pilot lamp
H4 Oven light
M1 Oven fan
R2 Hotplate 2000 W
R3 Oven resistance
P3 P1 P2 P3 P1 P2 P3 P1 P2 P3 P1 P2
P1
400 V 3N AC(22,8 A)
P2 P3
1mA 2 3 4
L1 L2 L3 N
56
230 V 3 AC(41 A)
L1 L2 L3
1mA2 3 4 56
B1
H1
5
211234
43
B1
H1
5
211234
43
B1
H1
5
211234
43
R2
B1
H1
5
211234
43
AGB 585/WP
R2R2R2
B1
F1
M
~
M1
R3
H4
H2
H1
4
3
1
2
H1
H1 H1 H1
B1 B1 B1 B1
B2
H1 H2F1
6
5
4
3
2
1
0
B1
5
P3 P1 P2
21334
2000 w
1150 w
850 w
300 w
220 w
175 w
R2
Page 47

001-03 - Electric cookers
47
WARNING
DUE TO ITS POLICY OF CONTINUAL PRODUCT IMPROVEMENT, THE MANUFACTURER RESERVES THE RIGHT
TO MAKE ANY CHANGES DEEMED NECESSARY.
THE MANUFACTURER CANNOT BE HELD RESPONSIBLE IF THE INSTRUCTIONS CONTAINED IN THIS MANUAL ARE NOT OBSERVED.
THIS DOCUMENTATION IS ONLY INTENDED FOR
QUALIFIED TECHNICIANS WHO ARE AWARE OF THE
RESPECTIVE SAFETY REGULATIONS.
WHIRLPOOL EUROPE srl
V.le Guido Borghi, 27
I – 21025 Comerio – VA
 Loading...