

Page 1
TABLE OF CONTENTSGB
DESCRIPTION OF THE APPLIANCE Page 9
BEFORE USING THE FREEZER Page 9
PRECAUTIONS AND GENERAL SUGGESTIONS Page 10
HOW TO OPERATE YOUR FREEZER Page 10
HOW TO DEFROST AND MAINTAIN THE FREEZER Page 11
TROUBLE SHOOTING GUIDE Page 13
AFTER-SALES SERVICE Page 13
INSTALLATION Page 14
DOOR REVERSIBILITY Page 14
To get full satisfaction of your appliance, please read carefully your instruction manual.
Customer Care Line
(Local) London
Outside London 0345-898989
081-649-8989
8
Page 2
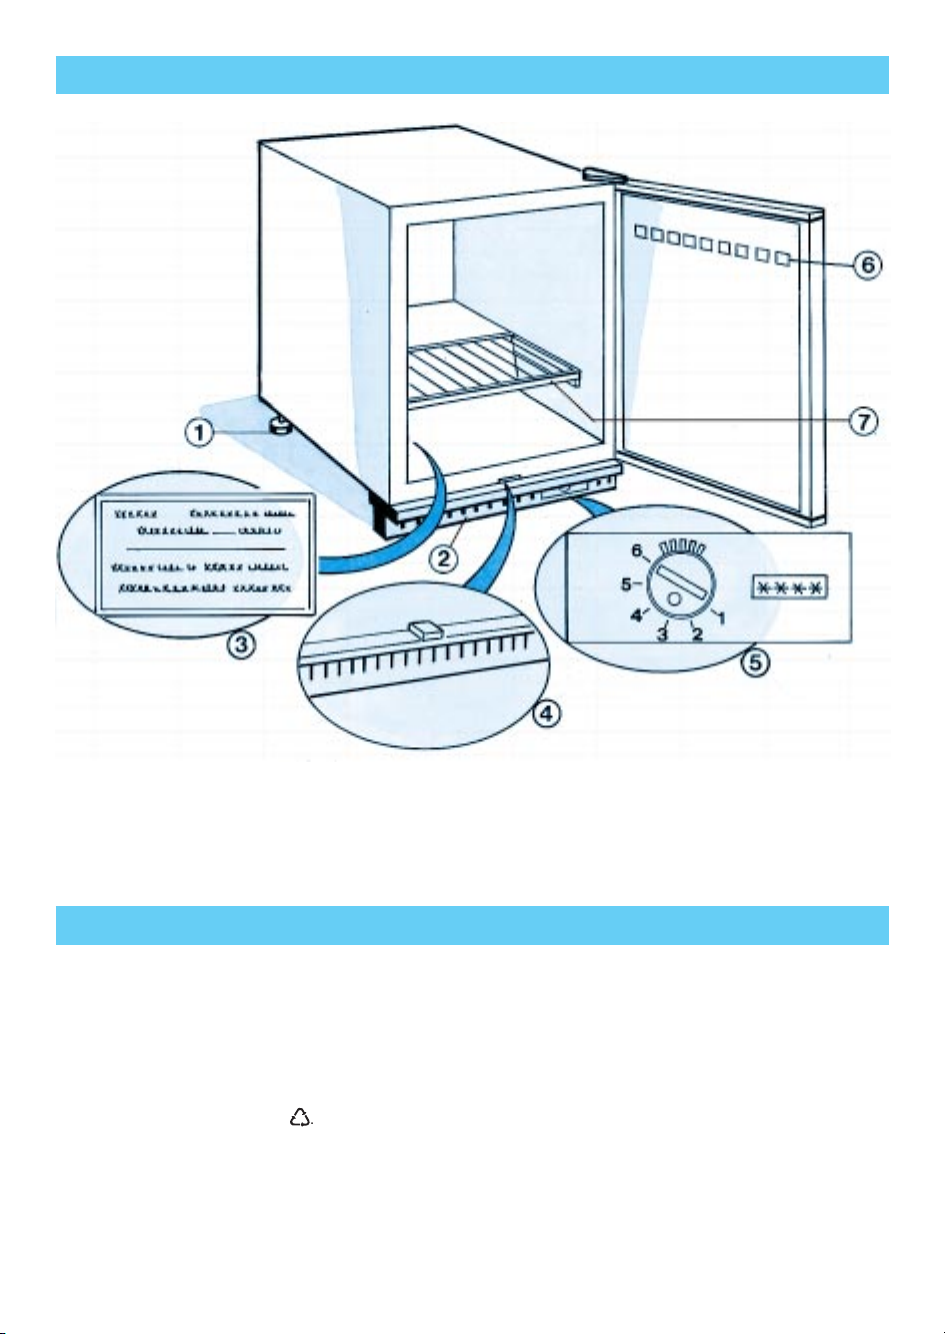
DESCRIPTION OF THE APPLIANCE
1. Adjustable feet
2. Plinth
3. Rating plate
4. Defrost drain
BEFORE USING THE FREEZER
x After unpacking, please ensure that the
appliance is undamaged and that the door
closes tightly.
Any damage must be reported to your
dealer within 24 hours of receipt of the
appliance.
x The package is recyclable and is marked
with the recycling symbol
Ù
.
5. Thermostat control knob
6. Food storage calendar
7. Shelf
x The appliance is built with re-usable material.
When scrapping, follow the local
environmental protection regulations. Render
the freezer inoperative by cutting the powercable off and take the freezer to the local
disposal centres so that refrigeration
compounds be properly treated to avoid any
air pollution.
x Please ensure that the installation and the
electrical connection has been carried out
following the manufacturer†s instructions and
in compliance with local safety regulations.
9
Page 3
PRECAUTIONS AND GENERAL SUGGESTIONS
x Only use the freezer for the storage of frozen
food and for freezing fresh food.
x After installation, please make sure that the
freezer does not stand on the supply cord.
x Do not store glass containers with carbonated
drinks in the freezer as they may explode.
x Do not eat ice cubes or ice lollies immediately
after their removal from the freezer, as they
may cause “cold” burns.
x Before any cleaning or maintenance operation,
disconnect the freezer by switching off the
electricity at the mains or by pulling the plug.
Conformity declaration
x This appliance incorporates parts intended to
come into contact with foodstuffs in
compliance with EEC directive 89/109.
x This appliance conforms to EEC directive
87/308 on radio-interference.
HOW TO OPERATE THE FREEZER
STORAGE OF FROZEN FOODS
1. The internal temperature is controlled by the
thermostat. Higher numbers correspond to
colder temperatures.
Turn the thermostat control knob to position
3 to obtain the correct storage temperature.
Under normal conditions (ambient
temperature included between +20
o
+25
C) we recommend that you kept your
food frozen at that setting.
2. Load frozen inside the freezer. Before using it
for the first time, operate the freezer empty
for two to three hours.
o
Cand
Information
This appliance is free of HCFC’s (refrigerant circuit
contains R 34 a) or free of HFC’s (refrigerant
circuit contains R 600 a - Isobutane). For more
details, please refer to the rating plate on the
appliance.
For appliance with Isobutane
(R 600 a)
The refrigerant Isobutane is a natural gas of high
environmental compatibility but which is
inflammable. Therefore, it is essential to ensure
that the ducts of the refrigerant circuit do not get
damaged.
Information on frozen foods
When buying frozen food, make sure that:
1. Wrapperorpacketisintactasthefoodmay
deteriorate. If a package bulges or sags or has
spots of moisture on it, it may not have been
kept cold enough and the contents may have
lost their original quality.
2. Use thermical bags or cold boxes for
transport.
3. Frozen food should be purchased last.
4. When at home, store them in the freezer
immediately.
Important
x Any food, even if partially thawed, cannot be
re-frozen but must be eaten within 24 hours.
10
x Any appreciable rise in temperature of frozen
food may shorten the storage life indicated on
the package.
x Always follow instructions on the package to
store frozen food.
Page 4

HOW TO OPERATE THE FREEZER
FREEZING FRESH FOOD
This appliance, marked by the
allows freezing of a given quantity of fresh food
up to an ambient temperature of +32
The quantity of fresh food which can be frozen
at an ambient temperature of +25
period is stated on the rating plate.
ç
o
C in a 24/h
symbol,
o
C.
How to operate
1.24 hours prior to freeze fresh food, set the
X
thermostat control knob to position
(see opposite figure).
2. Wrap and seal food in:
- aluminium foil;
- plastic-coated paper;
- non-permeable plastic wraps;
- polyethylene containers with tight fitting
lids;
- freezing jars.
Airormoisturemustnotbeallowedinorout
the package.
3. Place food in the lower section of the freezer
under the direct contact with the walls, while
having enough space for air to circulate
around packages.
Be careful to leave enough room at the front
so the door can close tightly.
4.24 hours later, at completion of freezing, set
X
the thermostat control knob to the normal
setting 3 (-18
o
C).
YYYYY
X
X
ç
1
4
Storage time of frozen food
Storage time will vary according to the quality of
the food, the type of packaging or wrap used
and the storage temperature (see chart located
on the inner door).
11
Page 5

HOW TO DEFROST AND MAINTAIN YOUR FREEZER
We suggest you defrost your freezer once ice
build up reaches about 3 mm in thickness.
1. 24 hours prior to defrosting, set the
thermostat control knob to position 6 so that
food can reach the coldest temperature.
2. Remove food from the freezer, wrap them
into several layers of newspaper and put
them into the refrigerator or in a cold place.
3. Disconnect the appliance from the
mains supply.
4. Leave the freezer door open.
5.Place a basin under the defrost drain to
X
collect the defrost water.
6. When the ice starts to melt, you can
accelerate defrosting by scraping the inner
walls with the plastic scraper supplied with
the freezer.
Do not use sharp or cutting instruments
to scrape the ice off. Any damage caused
to the appliance, is not covered by the
guarantee.
7. Clean the inside of the freezer with a sponge
dampened in a solution of warm water and
vinegar. Do not use abrasives, detergents
or soaps.
8. Rinse and dry carefully.
9. Reconnect the appliance to the mains.
10. Operate the freezer for 2 to 3 hours prior to
loading food and leave the thermostat
control knob to position 6.
11. After 24 hours, set the thermostat control
knob to its usual operating position 3.
x Clean the inside when defrosting.
x Clean the outside with a soft cloth dampened
in water.
x Periodically clean the condenser (radiator)
situated at the rear of the freezer and the
plinth with a vacuum cleaner or a brush.
X
5
For prolonged absences
1. Empty all items from the freezer.
2. Disconnect it from the mains.
3. Defrost and clean the inside.
4. Leave the door open to prevent any bad
odour.
Condensation
If the freezer is installed in humid or badly
ventilated rooms (cellar, garage) under particular
humidity conditions (higher than 85%) there may
be some condensation forming on the appliance
walls.
In extreme cases, you may notice water droplets.
This phenomena does not affect the operation
and the performance of the appliance.
12
Power failure
If it is expected to last more than 12 hours: leave
the food in the freezer and keep the door shut.
If it lasts more than 12 hours and any food start
to thaw, try to use it as soon as possible or cook
and refreeze it.
Page 6

TROUBLE SHOOTING GUIDE
1. The temperature in the compartment is
not cold enough
x Is the food preventing a proper door closing?
x Is the freezer too close to a heat source?
x Are the condenser and the plinth clean?
x Is the layer of frost on the walls too thick?
x Is the ambient temperature too low (lower
than +15
o
C)?
Inthiscase,itmaybeusefultosetthe
thermostat control knob towards position 6 to
allow the compressor to work longer and
provide the adequate storage temperature.
If after these checks, the temperature remains
warm, please contact our After Sale Service and
keep the freezer door closed.
2. The compressor works continuously.
x Is the thermostat control knob set to position
6?
x Is the ambient temperature too warm (higher
than +32
x Did you open the door frequently?
o
C)?
AFTER-SALES SERVICE
Before calling for Service:
1. Check the Trouble-Shooting Guide carefully to
see if you can correct the fault yourself.
2. Re-operate the appliance to check if the fault
has cleared itself.
3. The freezer does not operate.
x Is there a power failure?
x Is the freezer well plugged?
x Isthefuseblown?
x Is the supply cord broken?
For Great Britain only
Check that the plug fuse is well fitted. A 3 A
fuse must be used.
Check removable plugs for loose connections
and tighten them if necessary. Loose connections
can overheat the plug.
4. The freezer is excessively noisy.
x Is the freezer in contact with other furniture or
appliances?
x Are the parts in the back in contact with each
other?
Attention: Under normal conditions, the cooling
system of the freezer may cause some noise.
If both attempts fail, please call for Service.
Describe the fault and give the model N
Service N
phone N
o
of your appliance, your address and
o
.
o
and
13
Page 7

INSTALLATION
x Do not install the freezer close to any heat
source.
x Place it in a dry and well ventilated space.
x Make sure that the appliance is well levelled
andadjusttherearfeet,ifnecessary.
x Never cover the plinth. You must leave at
least a 50 mm gap, if the appliance is installed
under a kitchen furniture.
x Fit the shelves inside the appliance.
x Let the appliance stand for 1 hour prior to
connecting it to the electricity supply.
Electrical connection
x Check that the voltage on the rating plate
corresponds to the voltage in your home.
x The earthing of the freezer is compulsory
by law.
The Manufacturer will accept no liability
for damage to persons or to objects
arising from the non-observance of this
requirement.
x If the plug and the wall socket do not comply,
have the socket replaced by a qualified
technician.
x Do not use adapters, multipole sockets or
extension cords.
X
1
Door reversibility
1.
Remove the plinth unscrewing 6 screws and
X
the electrical housing unscrewing 2 screws.
2.
Tilt the appliance backwards and remove the
lower right hinge.
3.
Remove the door from the pin of the top
X
hinge.
4.
Remove the screw cover, the screws and the
top right hinge.
5.
Remove the 3 clips covering the holes of the
left screws.
6.
Fix the hinge to the top left hand side, using
thesamescrewstotightenit.
7.
Reposition the clips and the screws cover in
the relevant holes.
8.
Fit the door in the pin of the top hinge.
9.
Mount the lower hinge on the left hand side
X
in the holes already provided on the
appliance.
10.
Retighten the plinth and the electrical housing
into position.
14
X
X
3
9
 Loading...