

Whirlpool ADP 962/3 GRM, ADP 962/3 WHM INSTRUCTION FOR USE
GB
E
ADP 962
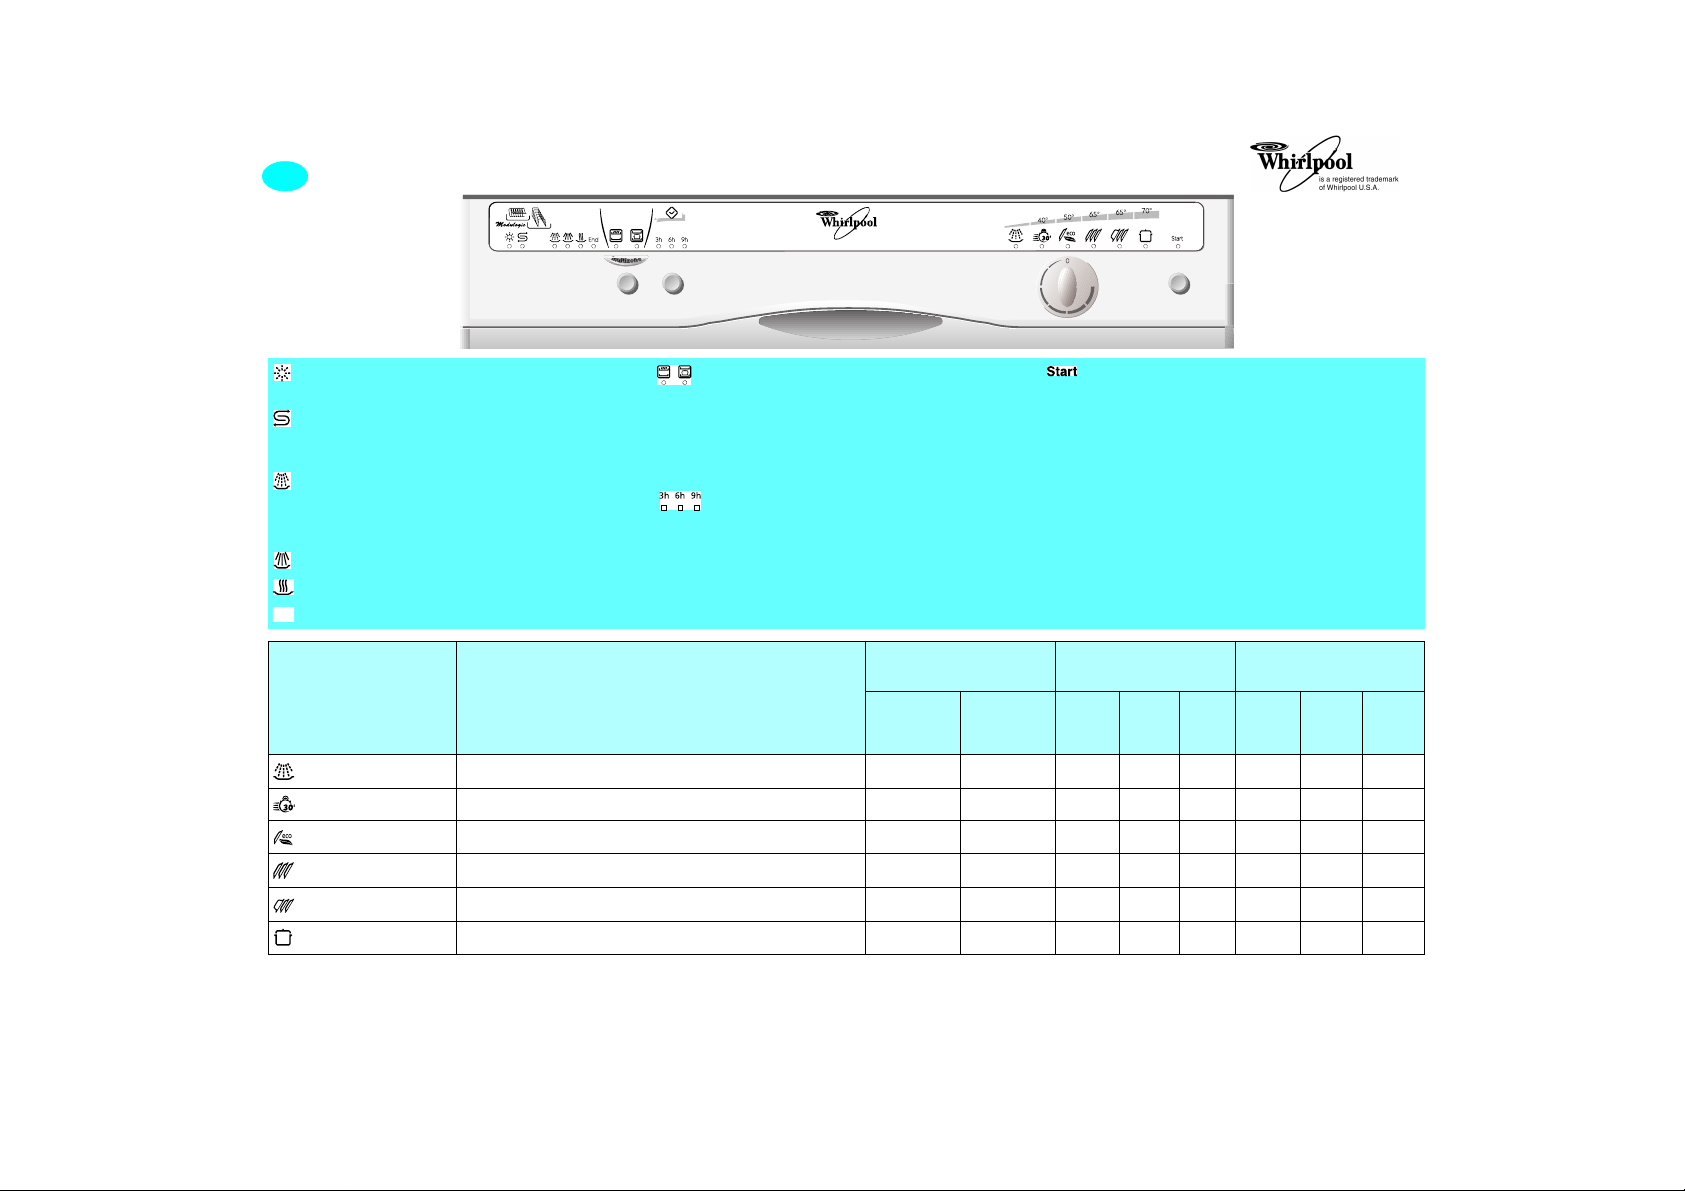
PROGRAMME CHART
Rinse aid level indicator
Add rinse aid.
Salt level indicator
Add regeneration salt.
Prewash
Only lights up for programmes with prewash (the symbol
“+” in the table below indicates that detergent must be
added).
Half Load / Multizone button
Load the upper or lower rack only.
This function can be used with any programme.
Press once = upper rack
Press twice = lower rack
Press 3 times = Off (half load function deactivated).
Delayed start button
Starts the dishwasher at the set time.
It is possible to programme a delay of 3 - 6 - 9 hours.
Start button indicator lamp
Switches on when the dishwasher is operating.
Flashes when a fault occurs.
Switches off at the end of the programme.
Rinsing / Washing
Drying
nd
Programme end
Programme
Symbol and
temperature
Prewash
Rapid 40° C
Eco 50° C
Universal 65° C
Normal 65° C
Intensive 70° C
*) Values for normal conditions. Values may vary in relation to usage, e.g.: different loads, water temperatures, water hardness and power supply voltage.
2)
1)
Crockery to be washed later.
Lightly soiled crockery with no dried-on food.
Normally or heavily soiled crockery with dried-on food.
Normally soiled crockery.
Normally or heavily soiled crockery.
Heavily soiled pans and saucepans.
Load
Crockery and cutlery
Detergent
Pre-wash
(small
compartment)
- - 5.0 0.02 9 4.2 0.02 9
- + 13.0 0.85 30 13.0 0.75 30
+ + 17.0 1.35 85 14.2 1.28 83
- + 13.0 1.45 73 11.0 1.38 71
+ + 21.0 1.64 93 17.0 1.55 90
+ + 21.5 1.70 93 18.2 1.60 90
Pre-wash
(large
compartment)
Consumption *
Normal load
Water
Energy
(Liter)
(kWh)
Time
(Min.)
Consumption *
Half load
Water
Energy
(Liter)
(kWh)
Time
(Min.)
1) Programme recommended when using detergents of type A (non enzyme-based detergents).
2) Programme recommended when using detergents of type B (enzyme-based detergents).
Reference programme for Test Instit ute andenergy label.
(We reserve the right to make technical modifications)
5019 100 91132

Quick Reference Guide
GB
Daily check list
1. Arrange crockery so that items do
not touch each other.
2. Load cups at an angle to facilitate
water circulation.
3. In general, place the cutlery in the
basket with the handles positioned
downwards, but ensure that sharp
knives and forks that might cause
injury are placed in the basket with
the handles positioned upwards.
4. Make sure the water je t can reach
all loaded items and that the spray
arms turn freely.
5. Turn on the water supply tap before
starting the dishwasher.
Important:
• Switch off the dishwasher: once the
“Start” indicator lamp has
switched off. If you switch off the
dishwasher during a wash cycle,
when switched on again the
dishwasher resumes the cycle from
where it was interrupted.
• If a fault occurs or you wish to
change the current programme,
press the “START” button fo r about
5 seconds until the Start indicator
lamp switches off ! Refer to the
“Troubleshooting Guide” in these
user instructions to remedy any
problems.
• If regeneration salt is to be
added, IMMEDIATELY
start a
washing programme, to
eliminate any residual salt.
Upper rack
Crockery holders:
• Down: cups and long-stemmed
glasses.
• Up: plates.
Cutlery holder for long utensils:
• Up: glass holder (gently lift up and
release).
• Down: large cutlery (gently lift up).
• Place knives with blades facing
downwards.
Glass holder:
• The glass holder can be moved
sideways.
• Below: small glasses.
• Above: long-stemmed glasses.
Half load button / Multizone:
If only the upper rack is to be loaded,
remove the cutlery basket from the
lower rach and place it in the upper
one.
Height adjustment:
(The dishwasher is delivered with the
upper rack in the top position).
The rack height can also be changed
when loaded.
• To lower: pull out the two side
handles and gently lower the rack.
• To raise: pull up the two side
handles until the rack clicks into
place.
• The rack must be level on both
sides.
Lower rack
Half load button / Multizone:
Loading the lower rack only: greater
washing power, particularly for plates
and saucepans.
Cutlery basket:
The cutlery basket can be removed to
increase available space.
Plate holders:
• The plate holders may be removed
to increase available space.
• To remove: pull the handle up.
• To reposition: simply insert in the
required position (normal or
crosswise).
 Loading...