How it Works
Log In / Sign Up
Buy Points
How it Works
FAQ
Contact Us
Questions and Suggestions
Users
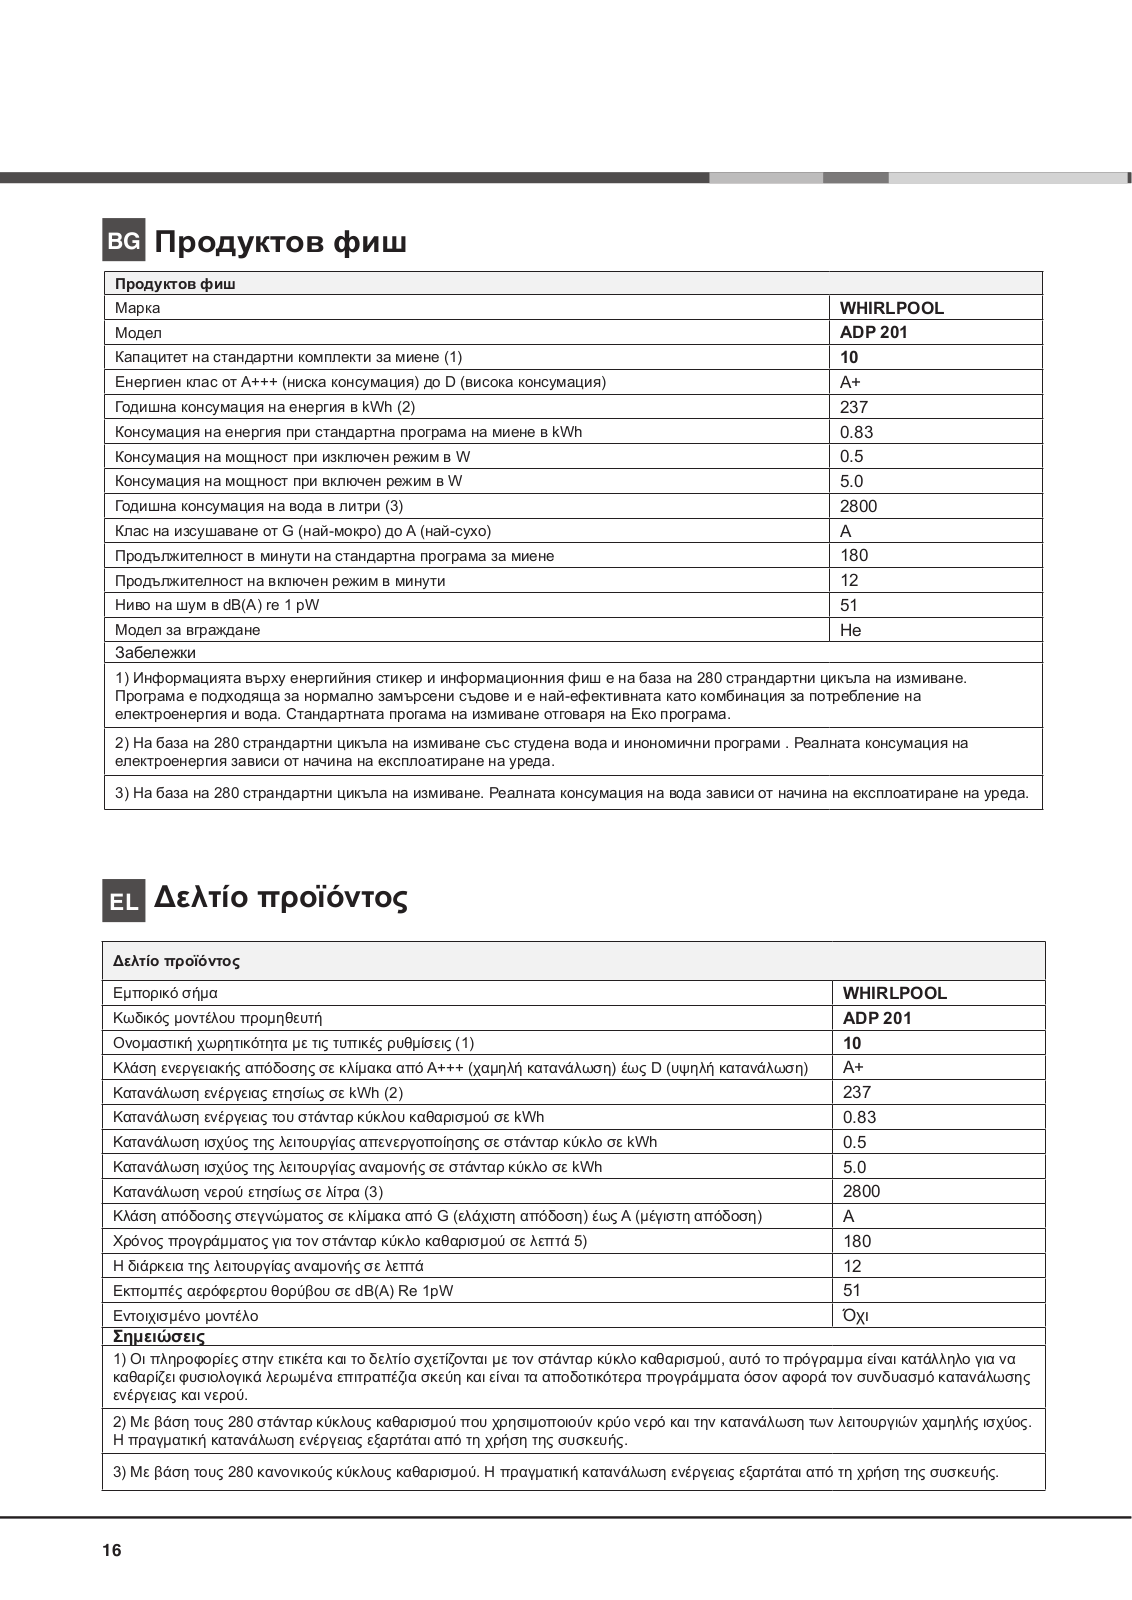
WHIRLPOOL
Loading...
A
ADN518
2
ADN519
2
ADN520
ADO15
ADO25
ADO30
ADO40
ADO50
ADORINA L
2
ADORINA L, 297
4
ADORINA S
ADORINA SL
3
ADORINA SL 298
4
ADORINA SL, 299
4
ADORINA T
2
ADORINA T 120
5
ADORINA T 160
4
ADORINA TA 155
4
ADORINA TA 200
2
ADORINA TE
4
ADORINA TEK
2
ADORINA TK 156
2
ADP 100
3
ADP 100 IX
16
ADP 100 WH
12
ADP 1073 IX
ADP 1073 WH
ADP 1077
ADP 1077 IX
3
ADP 1077 WH
14
ADP 130 IX
4
ADP 130 WH
5
ADP 1640 WH
3
ADP 1656 GRM
2
ADP 1656 WHM
ADP 1730 IX
4
ADP 1740 AL
9
ADP 1740 GR
8
ADP 1740 WH
8
ADP 1830/5 IX M
2
ADP 1830/6 IX M
3
ADP 1830 IX
3
ADP 1831 IX
3
ADP 18 PC IX
3
ADP 1967 ALM
8
ADP 1967 GRM
9
ADP 1967 WHM
6
ADP 200 WH
3
ADP 201
ADP 201 IX
ADP 201 WH
2
ADP 221 WH
3
ADP 2240 WH
3
ADP 2300
2
ADP 2300 A WH
4
ADP 2300 SL
7
ADP 2300 WH
10
ADP 2304
2
ADP 2306 WH
ADP 2307 WH
2
ADP 2310 WH
4
ADP 2315
2
ADP 2315 BL
ADP 2315 SL
2
ADP 2315 WH
2
ADP 232 S WH
2
ADP 233
ADP 233 WH
8
ADP 2340
ADP 2340/1 WH
9
ADP 2340 WH
4
ADP 2341/1 WH
3
ADP 236 WH
2
ADP 241 S WH
2
ADP 242
2
ADP 242 S WH
4
ADP 242 WH
2
ADP 243
ADP 243 S WH
ADP 2440/1 WH
2
ADP 2440 AL
5
ADP 2440 BR
4
ADP 2440 WH
7
ADP 2441/1 WH
4
ADP 2442 WH
3
ADP 2521 WHM
3
ADP 252 S WH
6
ADP 252 WH
7
ADP 253
ADP 253 GR
11
ADP 253 WH
9
ADP 2540/1 WH
3
ADP 2540 WH
7
ADP 2541 WH
5
ADP 2549 WH
2
ADP 2550
ADP 2550 WH
ADP 2552
ADP 2552 BR
3
ADP 2552 SIL
3
Loading...
Loading...
Nothing found
ADP 201 WH
User Manual
68 pgs
13.73 Mb
0
User Manual
84 pgs
15.63 Mb
0
Table of contents
Loading...
WHIRLPOOL ADP 201 WH User Manual
...
WHIRLPOOL User Manual
Download
Specifications and Main Features
Frequently Asked Questions
User Manual
Download
Loading...
+
58
hidden pages
Unhide
You need points to download manuals.
1 point = 1 manual.
You can buy points or you can get point for every manual you upload.
Buy points
Upload your manuals
 Loading...