

WHIRLPOOL ADMC 1918/IX User Manual
ADMC 1918/IXADMC 1918/IX

Instructions for
Installation and Use
Electric built-in
double oven
Contents
GB
English
Instruction, 2
Important Safety Instructions, 3
Installation, 6
Tall Cabinet Ventilation, 7
Features, 9
Controls, 10
Multifunction Selector Switch, 11
The electronic programmer, 12
Grill Pan and Handle, 13
Conventional Grilling, 14
Operation when using the Top Oven for Grilling
Using the Top Oven as a Convection Oven, 16
Operation when using the Top Oven as a
Convection Oven, 17
Top Oven Cookery Notes, 17
Top Oven Temperature Charts, 18
Main Oven - Fan Grilling, 20
Using the Main Oven for Other Functions, 22
Main Oven - Convention Oven,
Main Oven - Fan Oven, 23
Main Oven - Fan Oven Cookery Notes, 24
Main Oven Temperature Chart, 25
Main Oven Griling, 27
Care and Cleaning, 28
If Something Goes Wrong?, 31
If it Still Won't Work/ Disposal of the appliance, 32
23
, 15
2
IMPORTANT SAFETY INSTRUCTIONS
Before using the appliance carefully read Health and Safety and Use and Care guides.
Keep these instructions close at hand for future reference.
These instructions shall also be available on website: www.whirlpool.eu
GB
YOUR SAFETY AND THAT OF OTHERS IS VERY IMPORTANT
This manual and the appliance itself provide important safety warnings, to be read and observed at all times.
DANGER
WARNING
All safety warnings give specific details of the potential risk present and indicate how to reduce risk of injury,
damage and electric shock resulting from improper use of the appliance. Carefully observe the following
instructions:
-
Failure to observe these instructions may lead to risks. The Manufacturer declines any liability for injury to persons
or damage to property if these advices and precautions are not respected.
Very young (0-3 years) and young children (3-8 years) shall be kept away unless continuously supervised.
-
Children from 8 years and above and persons with reduced
-
of experience and knowledge can use this appliance only if they are supervised or have been given
instructions on safe appliance use and if they understand the hazards involved. Children shall not play
with the appliance. Cleaning and user maintenance shall not be made by
- This appliance is designed solely for use as a domestic appliance for
permitted (e.g.: heating rooms).
The appliance and its accessible parts become hot during use, young children should be kept away.
-
Do not allow the appliance to come intocontact with cloths or other flammable materials until all the components
have cooled down completely."
- Overheated oils and fats catch fire easily. Always remain vigilant
Never leave the appliance unattended during food drying.
WARNING : DO NOT HEAT OR COOK WITH SEALED JARS OR CONTAINERS IN THE APPLIANCE.
WARNING : DO NOT HEAT OR COOK WITH SEALED JARS OR CONTAINERS IN THE APPLIANCE.
WARNING : DO NOT HEAT OR COOK WITH SEALED JARS OR CONTAINERS IN THE APPLIANCE.
THE PRESSURE THAT BUILDS UP INSIDE MIGHT CAUSE THEM TO EXPLODE, DAMAGING THE APPLIANCE.
THE PRESSURE THAT BUILDS UP INSIDE MIGHT CAUSE THEM TO EXPLODE, DAMAGING THE APPLIANCE.
THE PRESSURE THAT BUILDS UP INSIDE MIGHT CAUSE THEM TO EXPLODE, DAMAGING THE APPLIANCE.
- If alcoholic beverages are used when cooking foods (e.g. rum,
evaporates at high temperatures. As a result, there is a risk that vapours released by the alcohol may catch fire
upon coming into contact with the electrical heating element.
This is the safety alert symbol.
This symbol alerts you to potential hazards that can kill or hurt you and others.
All safety messages will follow the safety alert symbol or the word “DANGER” or “WARNING.” These words
Indicates a hazardous situation which, if not avoided, will cause serious injury.
Indicates a hazardous situation which, if not avoided, could cause serious injury.
physical, sensory or mental capabilities or lack
when cooking foods rich in fat and oil.
cognac, wine), remember that alcohol
children without supervision.
cooking food. No other type of use is
(e.g. rum, wine).
mean:
During and after use, do not touch the heating elements or interior
-
Use oven gloves to remove pans and accessories, taking
-
If the appliance is suitable for probe usage, Only use the temperature probe recommended for this oven.
-
care not to touch the heating elements.
surfaces of the appliance - risk of burns.
INTENDED USE OF THE PRODUCT
This appliance is designed solely for domestic usage. To aim the appliance as professional use is forbidden.
-
The manufacturer declines all responsibility for innapropriate use or incorrect setting of the controls.
This appliance is intended to be used in household and similar applications such as:
-
- Staff kitchen areas in shops, offices and other working environments;
- Farm houses;
- By clients in hotels, motels and other residential environments;
- Bed and breakfast type environments.
CAUTION : THE APPLIANCE IS NOT INTENDED TO BE OPERATED BY MEANS OF AN EXTERNAL TIMER
CAUTION : THE APPLIANCE IS NOT INTENDED TO BE OPERATED BY MEANS OF AN EXTERNAL TIMER
CAUTION : THE APPLIANCE IS NOT INTENDED TO BE OPERATED BY MEANS OF AN EXTERNAL TIMER
SEPARATE REMOTE CONTROLLED SUPPLY SYSTEM.
SEPARATE REMOTE CONTROLLED SUPPLY SYSTEM. SEPARATE REMOTE CONTROLLED SUPPLY SYSTEM.
Do not use the appliance outdoors.
-
Do not store explosive or flammable substances such as aerosol cans and do not place or use gasoline or other
-
flammable materials in or near the appliance: a fire may break out if the appliance is inadvertently switched on.
3

GB
INSTALLATION
Installation and repairs must be carried out by a qualified technician, in compliance with the
-
manufacturer's instructions and local safety regulations. Do not repair or replace any part of the
appliance unless specifically stated in the user manual.
Children should not perform installation operations. Keep children away during installation of the
-
appliance. Keep the packaging materials (plastic bags, polystyrene parts, etc.) out of reach of
children, during and after the installation of the appliance.
Kitchen units in contact with the appliance must be heat resistant (min 90°C).
-
Carry out all cabinet cutting works before fitting the appliance in the furniture and carefully remove
-
Use protective gloves to perform all unpacking and installation operations.
-
After unpacking the appliance, make sure that it has not been damaged during transport. In the
-
event of problems, contact the dealer or your nearest After-sales Service.
After unpacking the appliance, make sure that the appliance door closes properly.
-
In the event of problems, contact the dealer or your nearest After-sales Service. To prevent any
damage, only remove the oven from its polystyrene foam base at the time of installation.
The appliance must be handled and installed by two or more persons.
-
The appliance must be disconnected from the power supply before carrying out any installation operation.
-
During installation, make sure the appliance does not damage the power cable.
-
After installation, the bottom of the appliance must no longer be accessible.
-
For correct appliance operation, do not obstruct the minimum gap between the worktop and
-
Only activate the appliance when the installation procedure has been completed.
-
the upper edge of the oven.
ELECTRICAL WARNINGS
all wood chips and sawdust.
Make sure the voltage specified on the
-
on the front edge of the oven (visible when the door is open).
For installation to comply with current safety regulations, an omnipolar switch with minimum contact gap of 3mm
-
is required.
Regulation require that the appliance is earthed. It must be possible to disconnect the appliance from the power
-
supply by unplugging it if plug is accessible, or by means of an accessible multi- pole switch installed upstream
of the socket in conformity with national electrical safety standards.
-
For appliances with fitted plug, if the plug is not
not use extension leads, multiple sockets or adapters. Do not connect the appliance to a socket which can be
operated by remote control.
The power cable must be long enough for connecting the appliance, once fitted in its housing, to the main power
-
Do not pull the power supply cable.
-
-
If the power cable is damaged it must be
replaced by a qualified technician in compliance with the manufacturer instruction and current safety
regulations.
Do not operate this appliance if it has a
-
been damaged or dropped. Do not immerse the mains cord or plug in water. Keep the cord away from hot
The electrical components must not be accessible
-
Do not touch the appliance with any wet part of the body and do not operate it when barefoot.
-
CORRECT USE
At the end of cooking, exercise caution when opening the appliance door, letting the hot air or steam exit
-
graduallybefore accessing the appliance. Do not obstructtheventapertures.
Contact an authorized service center.
rating plate corresponds to that of your home. The rating plate is
suitable for you socket outlet, contact a qualified technician. Do
replaced with an identical one. The power cable must only be
damaged mains cord or plug, if it is not working properly, or if it has
to the user after installation.
CLEANING AND MAINTANCE
The appliance must bedisconnected from the power supply before carrying out any cleaning or
-
Never use steam cleaning equipment.
-
Use protective gloves for cleaning and maintenace operations.
-
Ensure the appliance is cooled down before carrying out any cleaning or mainteinance operation.
-
Ensure
-
Do not use harsh abrasive cleaners or sharp metal scrapers to clean the appliance door glass since they
-
can scratch the surface, which may result in shattering of the glass.
maintenance
that the appliance is switched off before replacing the lamp to avoid the possibility of electric shock.
surfaces.
operation.
supply.
4
DISPOSAL OF PACKAGING MATERIALS
The packaging material is 100% recyclable and is marked with the recycle symbol ( ). The various parts of
-
the packaging must therefore be disposed of responsibility and in full compliance with local authority
regulations governing waste disposal.
SCRAPPING OF HOUSEHOLD APPLIANCES
When scrapping the appliance, make it unusable by cutting off the power cable and removing the doors and
-
shelves (if present) so that children cannot easily climb inside and become trapped.
This appliance is manufactured with recyclable ( ) or reusable materials. Dispose of it in accordance with
local waste disposal regulations.
-
For further information on the treatment, recovery and recycling of household electrical appliances, contact
your competent local authority, the collection service for household waste or the store where you purchase
This appliance is marked in compliance with European Directive 2012/19/EU, Waste Electrical and
-
Electronic Equipment (WEEE).
-
By ensuring this product is disposed of correctly, you will help prevent potential negative
consequences for the environment and human health, which could otherwise be caused by
inappropriate waste handling
The symbol
-
as domestic waste but must be taken to an appropriate collection center for the recycling of electrical and
on the product or on the accompanying documentation indicates that it should not be treated
this product.
of
the appliance.
electronic
GB
equipment.
ENERGY SAVING TIPS
This appliance meets the Eco Design requirements of European Regulations n. 65/2014,
conformity to the European standard EN 60350-1.
Top Oven
Declared energy consumption for
Main Oven
Declared energy consumption for
Voltage and Frequency
AFTER-SALES SERVICE
Before calling the After-Sales Service
1. See if you can eliminate the problem on your own (see “Troubleshooting Guide”).
2. Switch the appliance off and on again to see if the problem persists.
If the fault persists after the above checks, contact your nearest After-Sales Service.
Specify: the type of fault;
• exact type and model of oven;
• the After-Sales Service number (the number given after the word “Service” on the dataplate) located inside
the storage compartment flap. The service number is also given in the warranty booklet;
• your full address;
• your telephone number.
For repairs, contact an Authorised After-Sales Service, indicated in the warranty.
If any work is carried out by technicians not belonging to the Manufacturer's authorised After-Sales Service
centres, request a receipt specifying the work performed and make sure the replacement parts are original.
Failure to comply with these instructions can compromise the safety and quality of the product.
Usable Volume: 42Litres
Natural convection Class
Usable Volume: 70 Litres
Natural convection Class
220-240V~ 50-60 Hz
heating mode: Conventional
heating mode: Conventional
heating mode: Conventional
heating mode: Fan Oven
heating mode: Fan Oven heating mode: Fan Oven
and n. 66/2014 in
5

GB
The appliance must not be installed behind
a decorative door in order to avoid overheating
The appliance must not be installed behind
a decorative door in order to avoid overheating
Installation
Electrical Connections
The installer must check that the voltage shown on
the rating plate corresponds with the house
electricity supply. The oven must be supplied via
a suitable double pole isolating switch, having a
contact separation of at least 3mm in all poles
placed in a readily accessible position adjacent to
the oven. If the oven is to be wired into a
connector unit, this may be positioned behind the
oven providing the following requirements are met:
i) The connector unit must not project from the wall
more than 25mm.
ii) The top of the connector must not be more than
130mm above floor level.
Remove the terminal cover at the rear base of the
cooker. Pass the cable through the cable clamp and
connect to the appropriate terminals provided.
Allow sufficient cable for any future servicing.
Tighten the screws on the cable clamp and replace
the cover. Make main connections in the connector
unit or oven control unit.
This appliance must not be installed over any other
appliance that generates heat such as a plinth
heater.
Note:
Due to many different types of installation,
a mains cable is not supplied with this product.
The installer will fit the correct type and length of
cable.
Important
It is essential that the lower cupboard is constructed in
the manner illustrated i.e. having side, back, and roof
panels so joined as to provide no apertures which
could permit access to the oven unit when installed.
1. General
The appliance is designed for mounting at a appropriate
level into an oven housing which must be secured to
the backing wall.
2. Ventilation
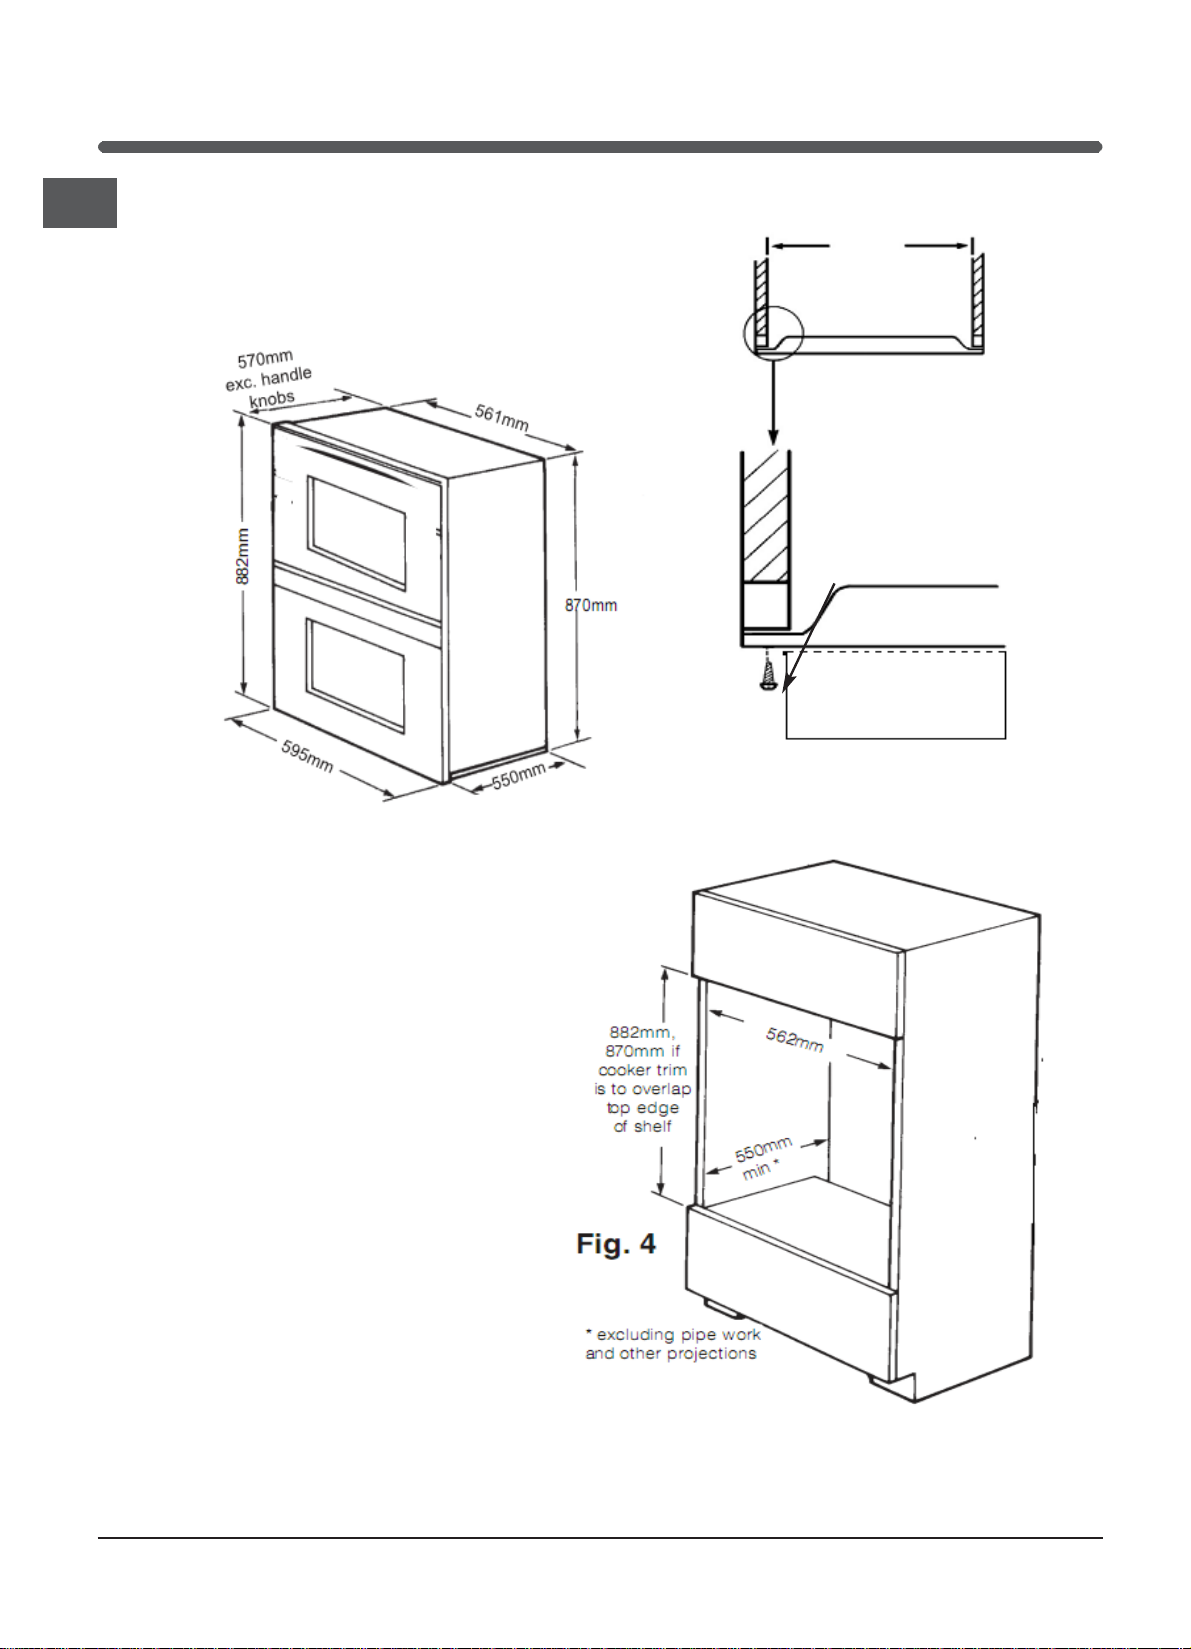
a. The oven housing unit cabinet dimensions must
comply with fig. 4.
b. An air gap of 50mm minimum must be provided at
the rear of any top or bottom cupboards or shelves
(see fig. 1).
c. It is necessary that the cabinets are provided with
unobstructed ventilation, i.e. from adjacent
cabinetry. This can be done by either raising the
base of the cabinets using the adjusting feet (or
spacers) or alternatively by providing a slot in the
cabinet plinth to the dimensions in fig. 1.
d. The air gap at rear allows the warmed air to pass out
of the inner cabinet space. Where it is intended to fit
cupboards above the oven unit to ceiling height, it is
essential that the warmed air is exhausted through
the front of the cabinet (see fig. 1).
e. If an oven unit is installed adjacent to a tall cabinet,
steam escaping from the oven when the door is
opened could condense on and maybe stain the
adjacent surface. To prevent permanent staining, the
adjacent surface should be made of a material that is
heat resisting and easy to clean. Adjacent tall cabinets
should not be deeper than the oven housing cabinet.
3. Final Installation
a. Using a spirit level, check that the housing cabinet
is level from side to side and from front to back in
its installed position.
b. Correct any unevenness by placing spacers under
the bottom of the cabinet. Make sure that the cabinet
rests firmly on the floor without rocking.
c. Before the oven is fitted, the cabinet must be firmly
secured to the backing wall for stability.
d. The oven unit should now be lifted (this is a two
person lift) into the cabinet and pushed fully home.
e. Finally, the oven is secured to the cabinet by means
of the four Phillips C/SK Head screws - two through
each side trim.
f. Remove all packaging material from the grill and
oven interior.
The appliance must not be installed behind
a decorative door in order to avoid overheating
List of loose items:
4 x Phillips C/SK Head No. 6 x 25mm screws.
6
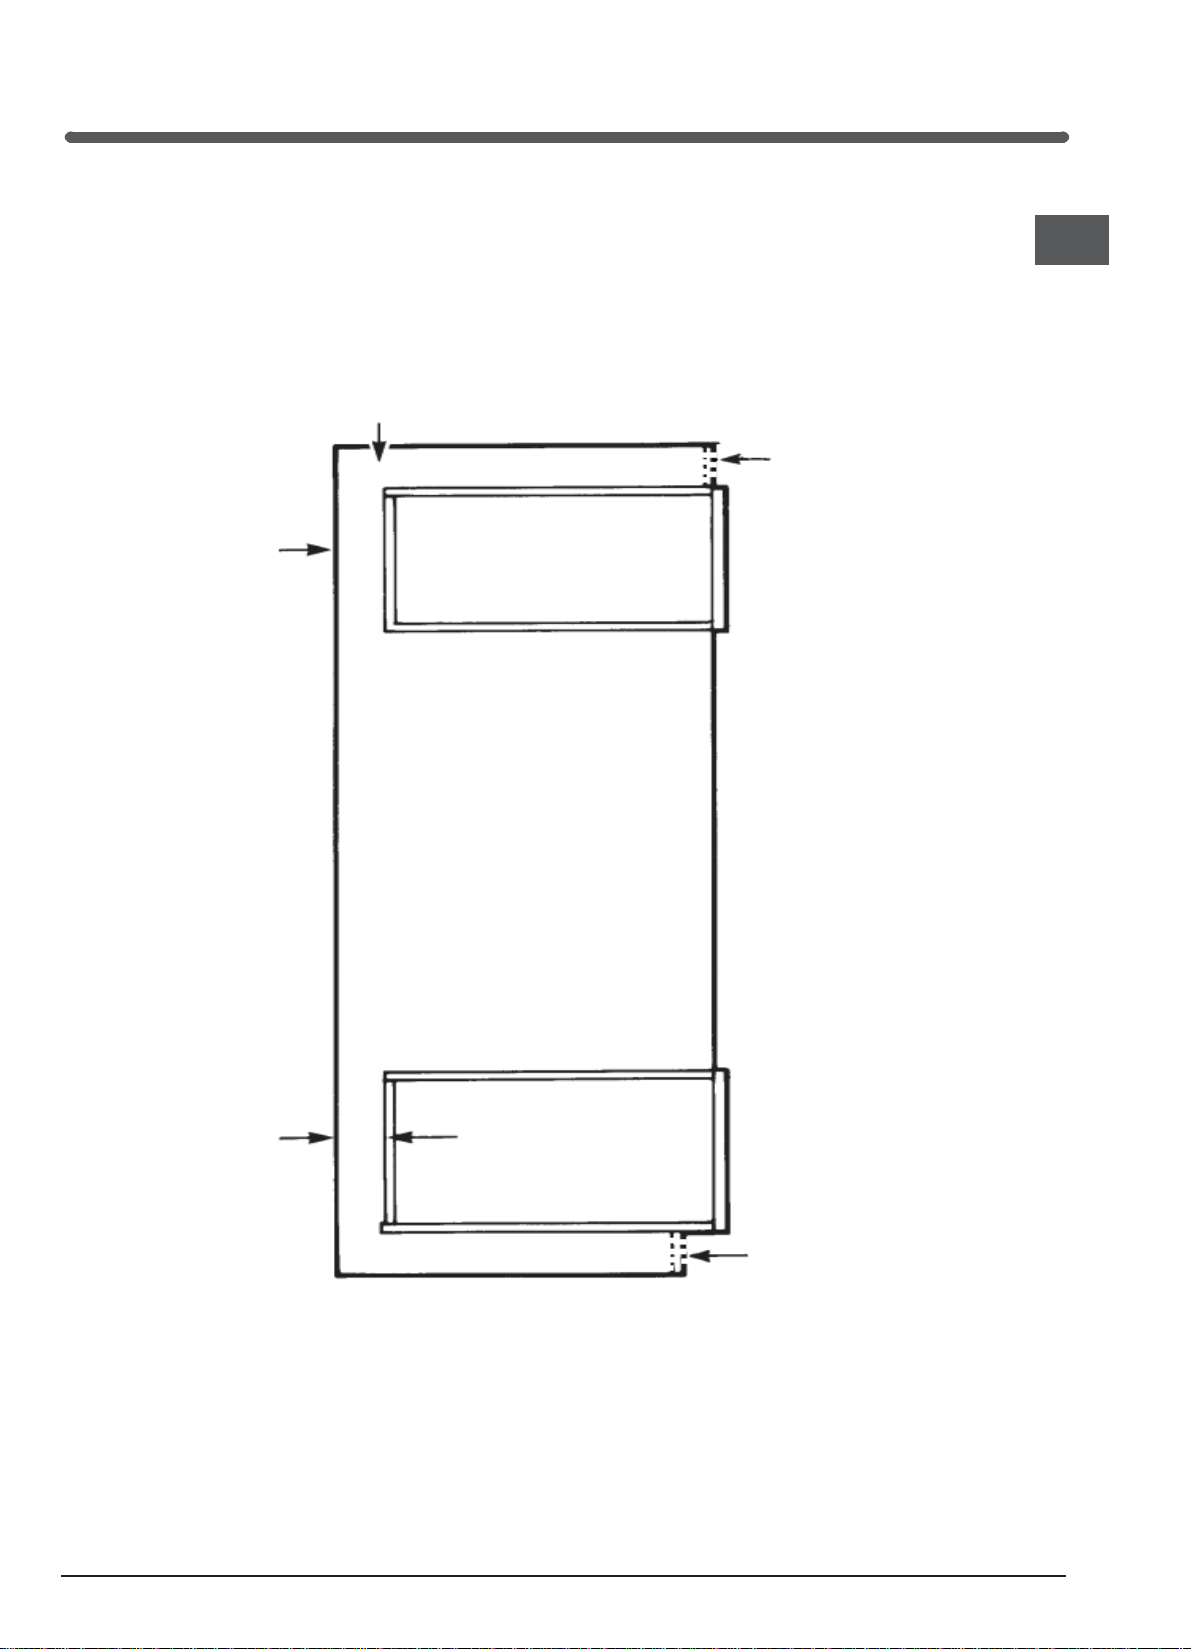
Tall Cabinet Ventilation
t
GB
Fig. 1
Ventilation Slot required
here if cabinet does not
fit to ceiling - 51mm x 457mm min. area
50 mm
Air Gap
Ventilation Slot
required
here if the cabinet does no
fit to the ceiling
- 51mm x 457mm min.
area
50 mm
Air Gap
Ventilation Slot
required here
- 51mm x 457mm
min. area
7
GB
562mm
Viewed down through cabinet
Cabinet
No. 6x25mm screw
(4 supplied)
Fig. 2
870mm
Front Frame
Oven door
Fig. 3
8
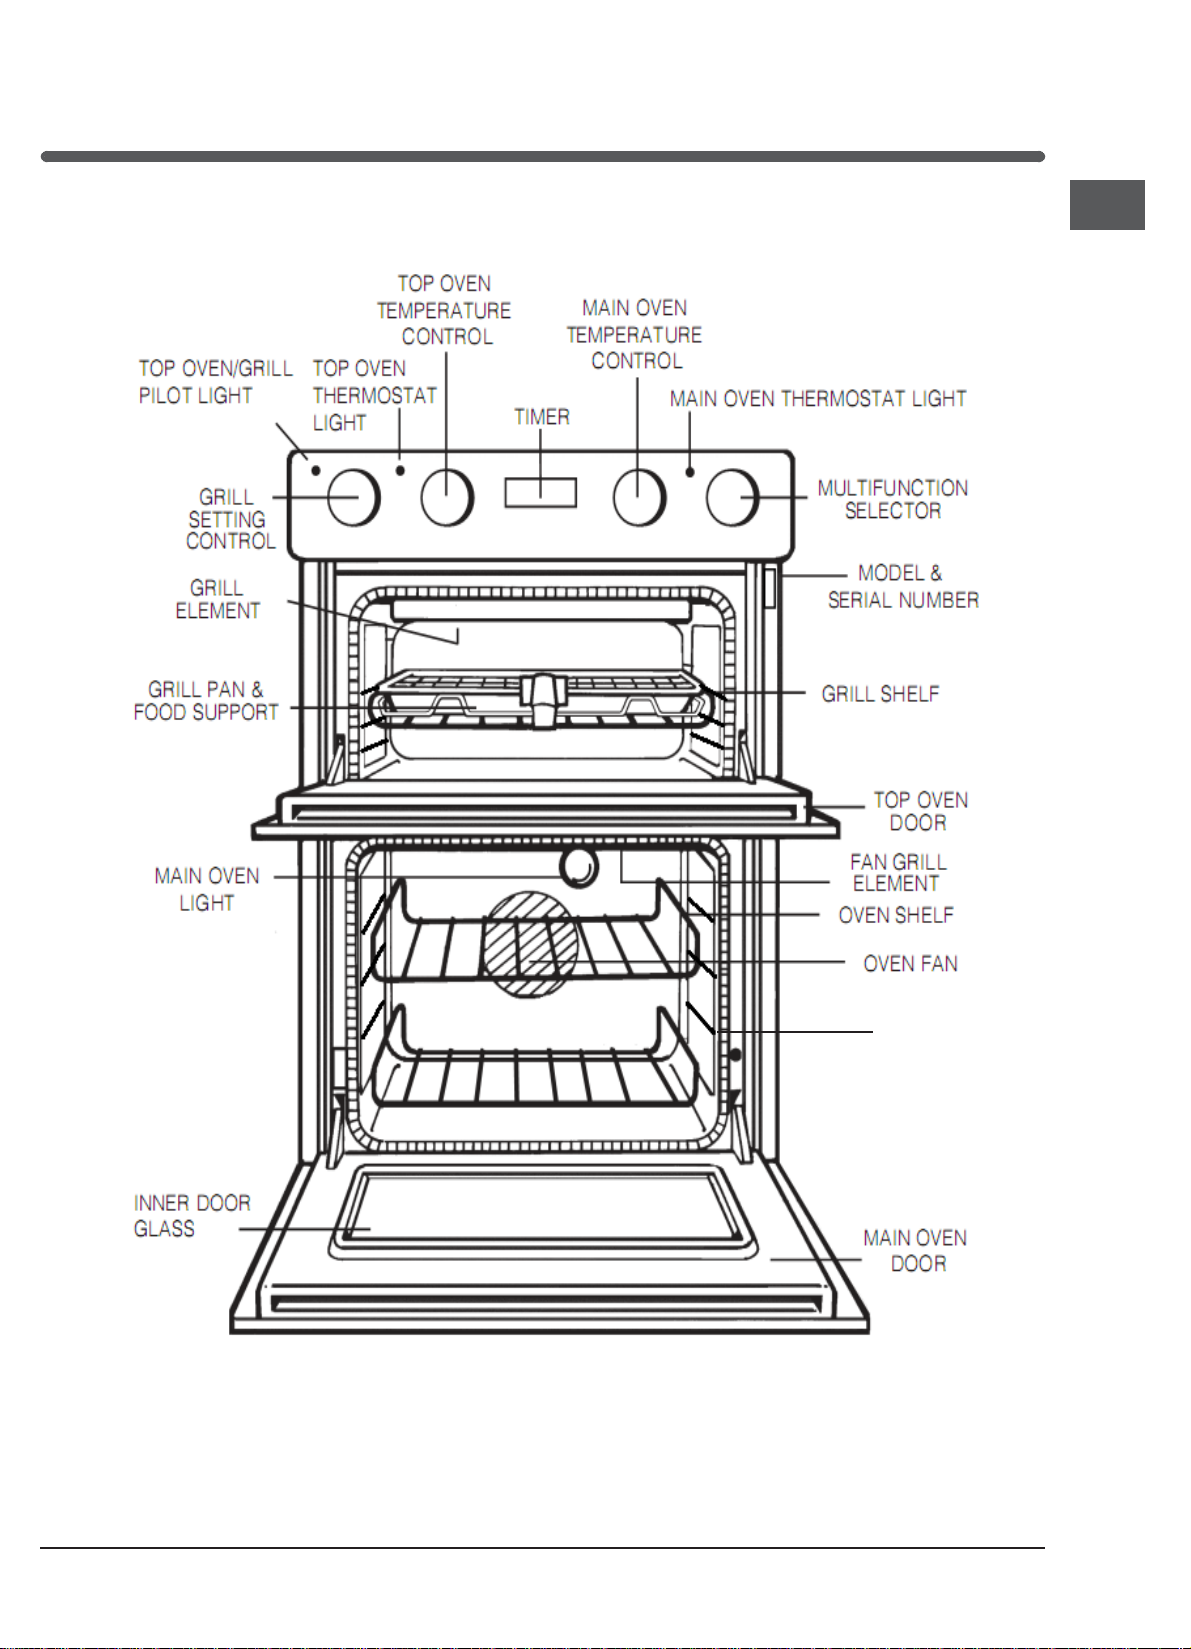
Features
WARNING: DO NOT TOUCH THE GLASS DOORS WHEN THE OVEN IS IN USE AS
THESE AREAS CAN BECOME HOT.
GB
SHELF
NEVER line the shelves, floor or sides of the oven or grill with aluminium foil as
overheating and damage may result.
9

GB
Controls
MAIN OVEN TEMPERATURE
C
CONTROL
TOP OVEN
THERMOSTAT
LIGHT
TOP OVEN/GRILL
PILOT LIGHT
A
GRILL SETTING
CONTROL
B
TOP OVEN TEMPERATURE
CONTROL
IMPORTANT
Before using your oven in the ordinary way,
ALWAYS make sure that the timer has been set to
MANUAL operation. Unless this is done, the main
oven cannot heat up. Before seeking assistance,
make sure this is done (refer to oven timer
operation).
MAIN OVEN
TIMER
THERMOSTAT
LIGHT
D
MULTIFUNCTION
SELECTOR
TOP OVEN TEMPERATURE CONTROL
Turn the control clockwise to set the top oven
thermostat to the required temperature.
An indicator light will illuminate. This will remain on
until the oven reaches the required temperature. This
light will then cycle on and off as the thermostat
maintains control of the oven thermostat.
MULTIFUNCTION SELECTOR
Rotate the control knob in either direction to the
required function. Many of the functions will also
require the main oven thermostat to be set before
the oven will heat up.
MAIN OVEN TEMPERATURE CONTROL
This is used in addition to the multifunction selector.
This is used for the functions: fan oven, fan grill, half
grill and full grill and convection oven.
Turn the control clockwise to set the oven thermostat
to the required temperature.
If the timer is set correctly and the selector switch
set to a suitable function an indicator light will
illuminate (Fan Oven, Convection Oven and Fan
Grilling modes only). This will remain on until the
oven reaches the required temperature. This light will
then cycle on and off as the thermostat maintains
control of the oven temperature.
GRILL CONTROL
The grill control is designed to provide variable heat
control of either both grill elements on together or the
single left-hand grill element only.
To set the grill power, turn the grill control:
FULLFULL
- clockwise for
or
- anti-clockwise for
MAX.
COOLING FAN
A gentle flow of air will be blown below the control
panel when the grill control is used and after a short
period of time when the ovens are used.
Note: Whenever the appliance has been used, the
cooling fan may run on or restart itself after all the
controls have been turned off. This indicates that the
appliance is still warm.
FULL grill to any setting MIN - MAX,
FULLFULL
HALFHALF
HALF grill to any setting MIN -
HALFHALF
10
 Loading...