

Page 1
Quick reference guide
Chart
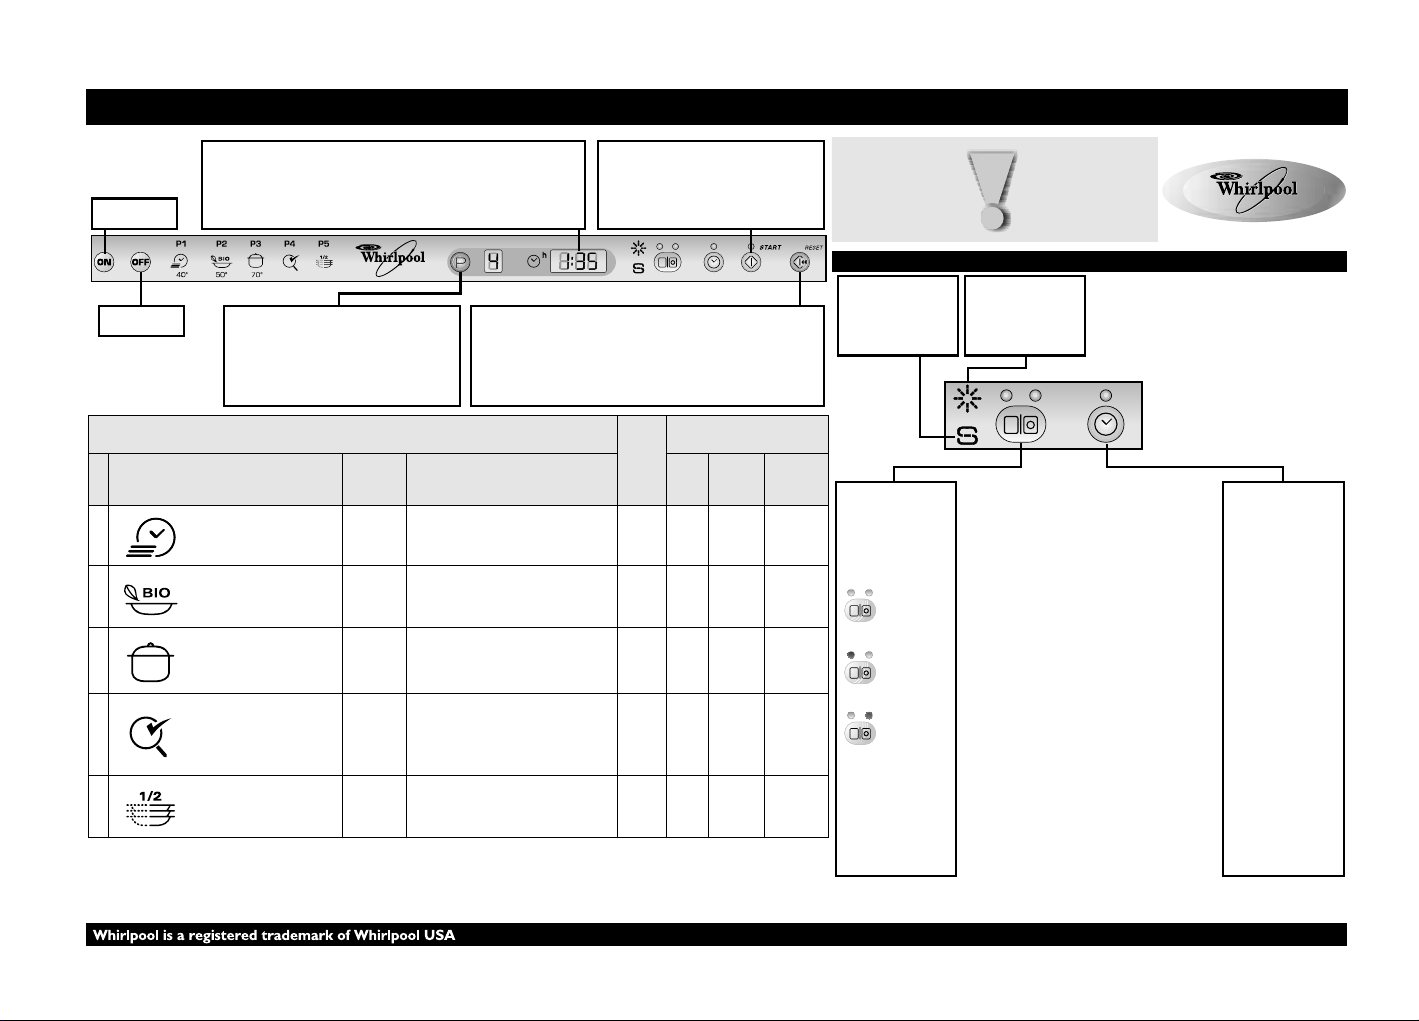
BUTTON
BUTTON
P
1
2
3
4
ON
OFF
FAULT INDICATION AND WASH TIME DISPLAY
In normal operation it indicates the remaining time (h:mm), whereas with
“Delayed start” selected it indicates the time remaining until programme
start (hh).
If “F..” appears on the display, see chapter “What to do if...”.
PROGRAMME SELECTION BUTTON
Press button “P” (repeatedly) until the
required programme number appears on
the display (see “Table of programmes”
below).
RESET BUTTON
For programme change or indication of faults.
Press this button to cancel a started programme and selected extra
options. Press this button to cancel the main fault indicators “F..”
also refer to the chapter “What to do if...”. The programme can then
be selected and started.
Table of programmes
50°C
3)
Available
options
Delay
Delay Normally soiled crockery. X 17.0 1.13 195
Delay
Delay
Loading instructions Litres Kwh
Lightly soiled crockery, with no driedon food.
*
Not recommended tablets use.
Recommended programme for heavily
soiled crockery, especially suitable for
pots and pans.
Normally or heavily soiled crockery,
with additional antibacterial wash.
Programme interruption (e.g. due to
door opening) can compromise
elimination of germs.
Programmes
Quickwash 40°C
2)
Bio
Intensive 70°C
Antibacterial
START BUTTON
The indicator lights up during operation,
flashes when a fault occurs and goes off at
the end of the programme.
(see at right for options description)
Deter-
gent
X*13.0 0.65 30
X 17.0 1.75 150
X 17.0 1.60 120
Consumption
Minutes
BEFORE USING THE APPLIANCE FOR THE
FIRST TIME CAREFULLY READ THIS QUICK
REFERENCE GUIDE AND THE INSTALLATION
INSTRUCTIONS! THE GUARANTEE IS NOT
APPLICABLE IF FAULTS ARE CAUSED BY
INCORRECT USE OF THE APPLIANCE.
Options and display description
SALT INDICATOR
When lit, the salt
reservoir needs to be
refilled.
1)
SET THE
DETERGENT
Press this button
(repeatedly) to set the
type of detergent used.
Powder, gel
(standard)
Detergent
with rinse aid
Detergent
with salt +
rinse aid
RINSE AID
INDICATOR
When lit, the rinse aid
dispenser needs to be
refilled.
DELAYED START
BUTTON
Press the button
(repeatedly) to delay
the start of the
programme.
Adjustable from 1 to 24
hours. With each press
of the button, the
delayed start indicator
increases by one hour
and after 24 resets
from 00. Then press
the START button. The
dishwasher will start
after the set time.
Ideal for washing a half load of lightly
5
1) Programme data obtained in conformity with European standard EN 50242, obtained under normal conditions (without additional
options) and may vary depending on conditions. Differences of up to 20 minutes are possible with sensor programmes as a result of
the appliance’s automatic calibration system.
2) Reference programme for energy label in compliance with EN 50242 regulations. - Note for T esting Institutes: for detailed information on
the EN/Standard loading comparison test and other tests, contact the following address: “[email protected]”.
3) The antibacterial action has been tested by the Institut Pasteur of Lille (France), based on the NF EN 13697 standard of Nov ember 2001.
Half Load 50°C
Delay
or normally soiled crockery.
X 13.0 0.90 130
5019 396 01760ADG 9100
GB
-1-
Page 2
How to set water hardness in order to always assure the best cleaning results
*
before the first wash
only
Switch on the appliance
- Select the 2nd programme “P2” - consult the table of programmes.
- Press the START button for at least 5 seconds until the START indicator lamp flashes.
- The water hardness setting is shown on the display (if present) or the START button flashes.
- With each successive touch of the START button the setting increases and when it reaches 7 it returns to 1 again.
- The appliance must be switched off to memorise the new setting.
water hardness has been changed
or if the
First time use
10
S
E
L
1
3
5
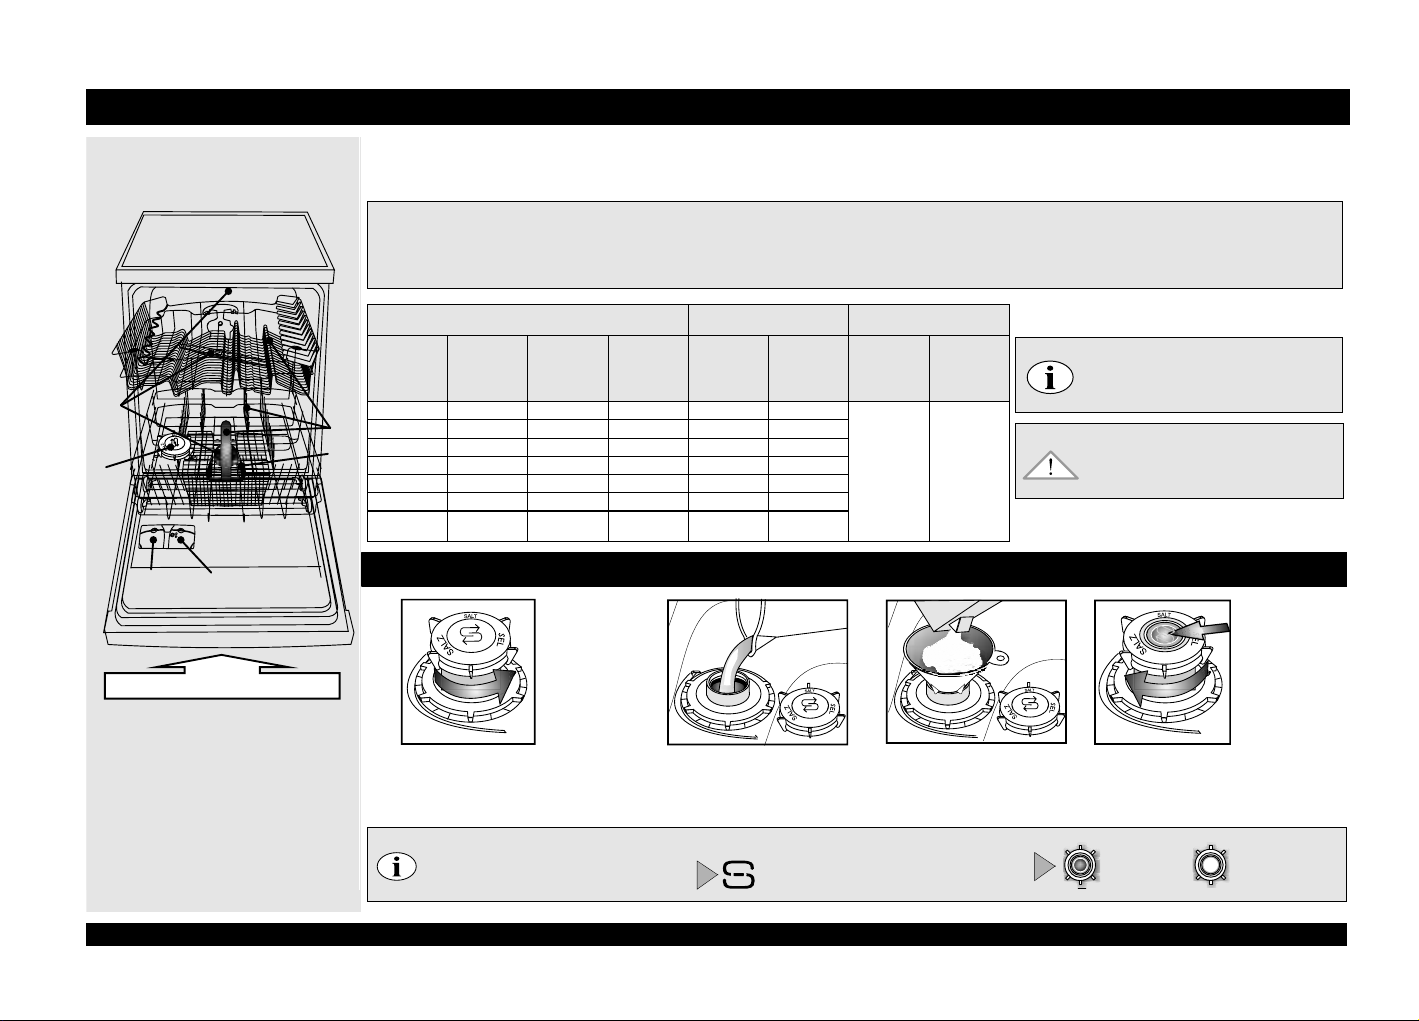
1- salt reservoir
2- rinse aid dispenser
3- detergent dispenser
4- racks system
5,6,7,8- available functions on the panel
9- filters
10- spray arms
2
7
9
86
1.
Ask your water supply company what the
hardness
is...
German
degrees °dH
0 - 5 0 - 9 0 - 6.3 Soft 1 1x
6 - 10 10 - 18 7 - 12.6 Medium 2 2x
4
11 - 15 19 - 27 13.3 - 18.9 Average 3 3x
16 - 21 28 - 37 19.6 - 25.9 Medium-hard 4 4x
22 - 28 38 - 50 26.6 - 35 Hard 5 5x
29 - 35 51 - 63 35.7 - 44.1 Very hard 6 6x
36 - 60 64 - 107 44.8 - 74.9
French
degrees °fH
degrees °eH
Filling the salt reservoir -
1
The salt level indicator lamp may remain lit for the
duration of several wash cycles. If the water
hardness level falls within category (soft), no salt is
required.
Visual indicator
(depending
on model).
Unscrew cap.
water
English
Water
hardness
Extremely
hard
Dissolve limescale (not necessary if water hardness level is set to “soft”!)
Fill the salt reservoir
with water before the
first wash only .
Salt indicator (depending on the model)
2.
...enter this value on your
dishwasher
Dishwasher
with display:
insert value in
the display
Dishwasher
display: count
START button
led flashes
7 7x
The indicator lamp on the control panel lights up
when SALT NEEDS TO BE ADDED.
without
Suggestions for detergent use
Gel or Powder
(rinse aid and
salt)
go to step 1
(see “Daily
check”)
Tablets
if extra salt is
needed go to
step 1
(see “Daily
check”)
Add salt
(never add detergent!).
min. 1.5 kg
max. 2 kg
Water hardness level is factory set for
medium hard water (a number “4” is
shown on the display or the START
indicator lamp flashes 4 times).
Even if you use tablets which include salt,
you must still add salt since such detergents
are not effective enough at softening hard
water.
Daily check
Visual indicator
(depending on
model). Screw
on the cap. Salt
residues around
cap need to be
removed.
orange: OK.
clear: NEEDS TO
BE ADDED
GB
-2-
Page 3
Adding rinse aid
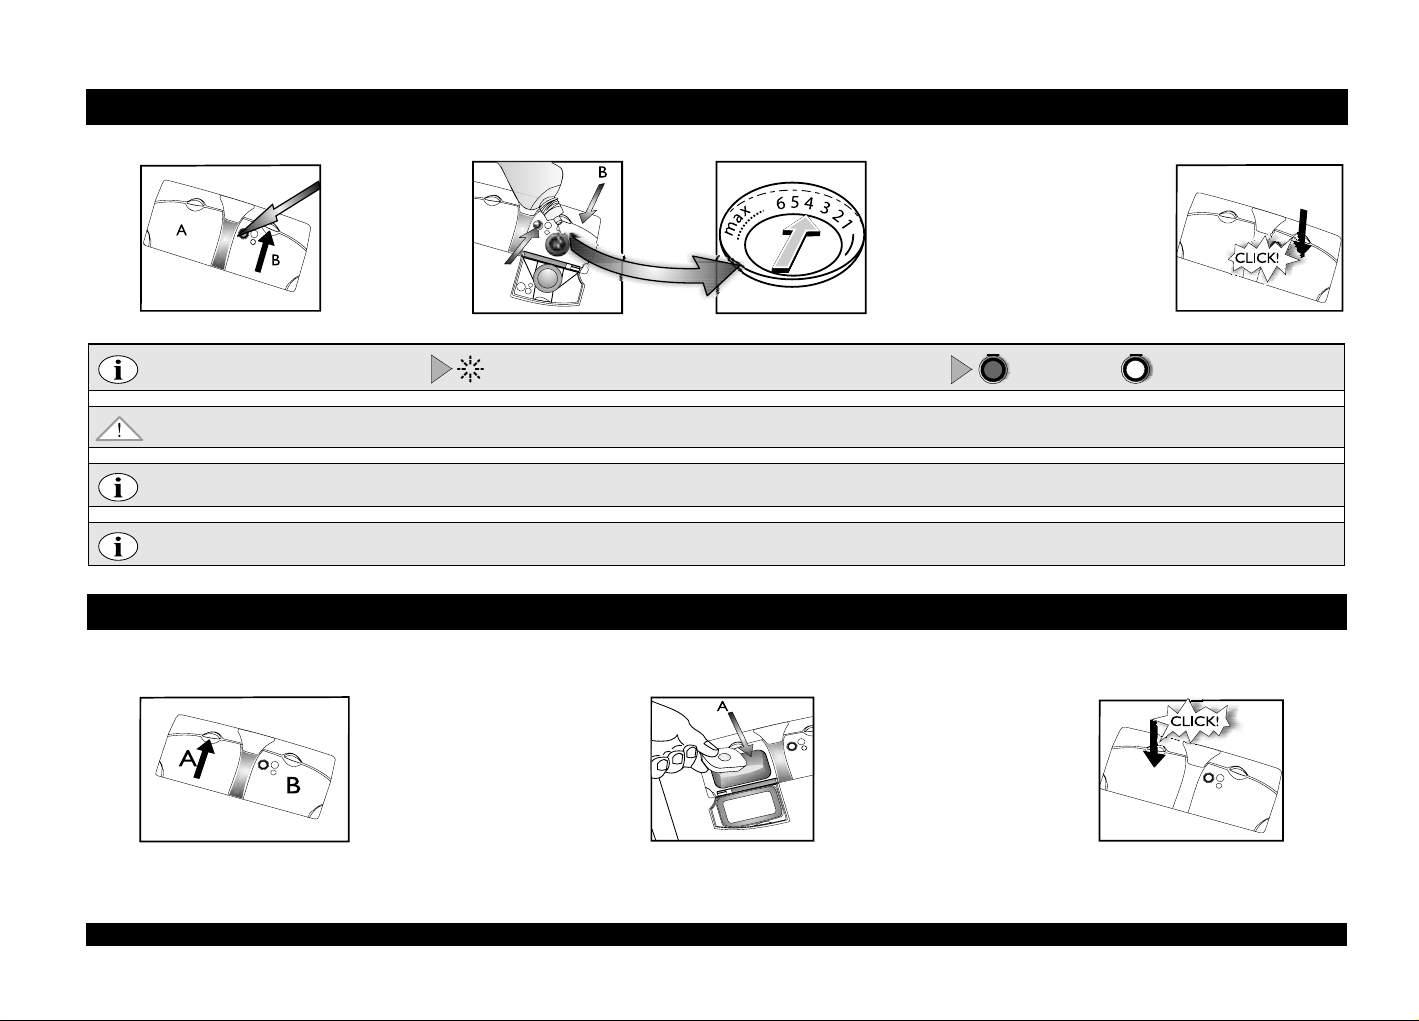
(not necessary when you use tablets). How to adjust the rinse aid dosage regulator
Daily check
2
Rinse aid indicator (depending on model)
Only use rinse aids recommended for use in domestic dishwashers. Immediately wipe away any rinse aid spilt accidentally. This prevents the formation of excess suds which can cause a fault function of the
appliance.
If there are streaks: reduce the dosage by turning the dial to a lower setting (1-3). If crockery is not perfectly dry: increase the dosage by turning the dial to a higher setting (5-6). Plastic dishes have more difficulty
drying and a higher rinse aid setting will not improve the situation.
Detergents with rinse aid incorporated may be effective only with longer programmes. In the case of shorter programmes, detergent residue may be a problem (if necessary, use powder detergent). Detergents
with rinse aid incorporated tend to form excess suds.
Adding detergent -
3
Visual
indicator B
If required, open
the cover
(press lever).
The indicator lamp on the control panel lights up when RINSE AID NEEDS
TO BE ADDED.
Use only detergent specifically for dishwashers in accordance with the supplier’s recommendations.
Open the cover A
(press lever).
Only fill the
detergent dispenser
prior to starting a
wash programme.
Add rinse aid
to max.
line ~100 ml
Tablet / gel / powder
Use one tablet per one cycle, only placed in
detergent dispenser.
All types of tablets can be used, but for 2 in 1
type adding of salt is mandatory.
The rinse aid dosage can be adjusted to the
detergent used. The lower the setting, the less
rinse aid is dispensed (factory setting: position 4).
Press the lever to open the cover. Using a coin or
similar object, turn the arrow to the desired
setting. After adjusting the rinse aid setting, shut
the cover again.
dark: OK. clear: NEEDS TO BE ADDED
Daily use
GB
-3-
Page 4
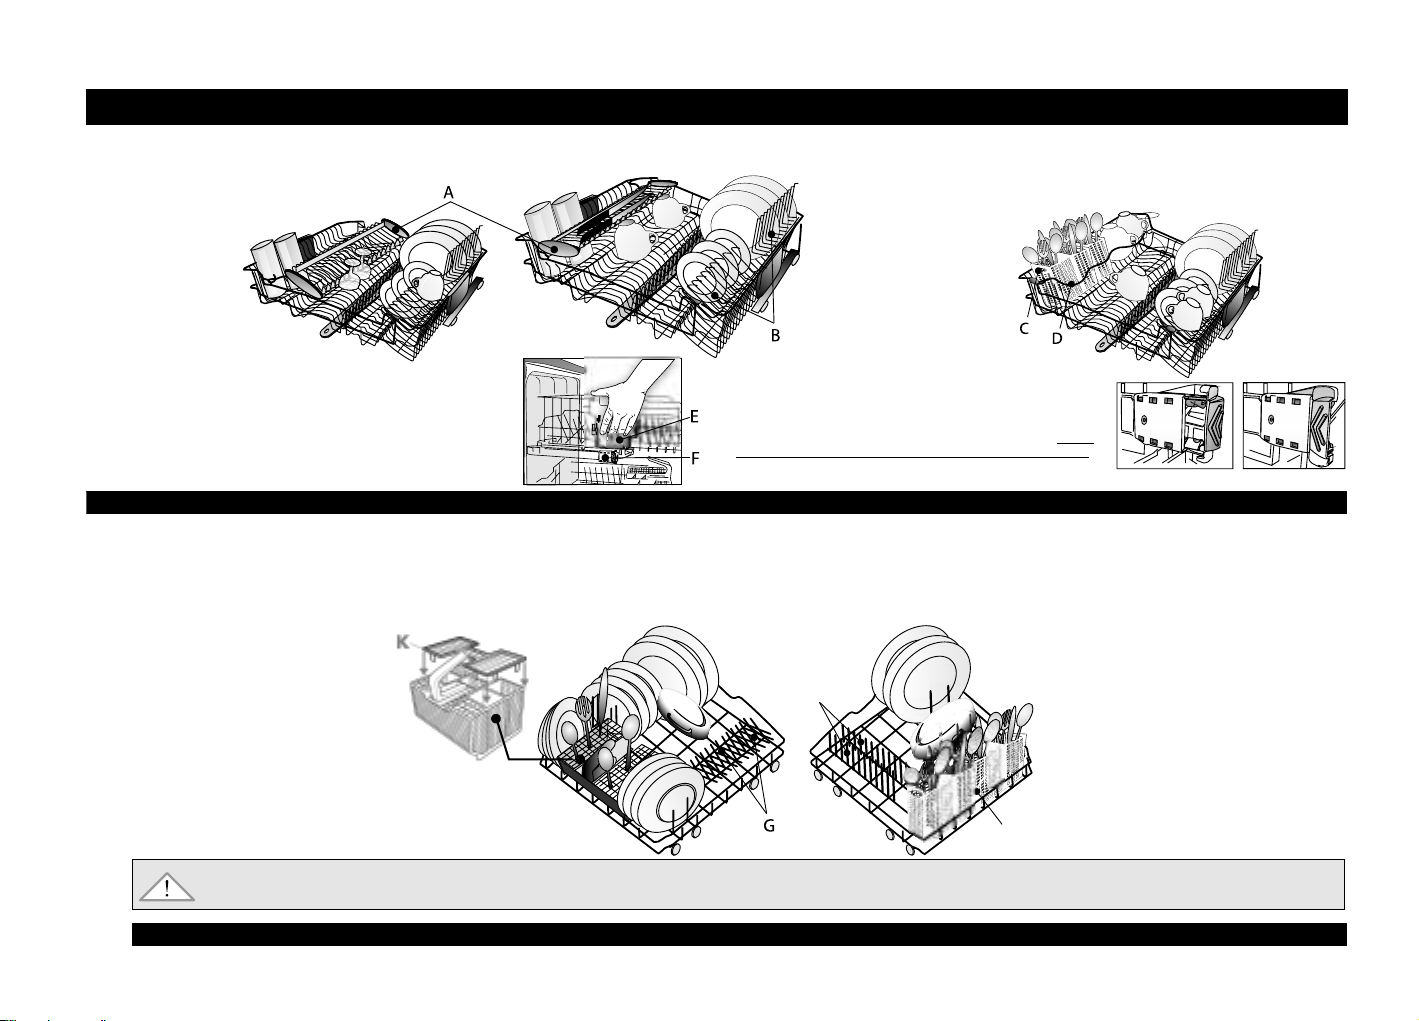
How to load UPPER RACK
(In some models only)
A - Multipurpose support: Different positions for long
utensils, cups and glasses.
4
B - Adjustable flaps: In horizontal position for cups/long utensils,
in raised position for plates and stemware.
How to load the racks
(In some models only)
C - Cutlery basket: It can be placed in the upper rack when the
“Half load/Multizone” is selected.
D - Adjustable glass holder
How to adjust upper rack height (if available)
- It could be useful to lift up upper rack to have more space in
lower rack or bring it down to load long stem glasses.
- Grasp and take out the two lateral handles (E) (must be on same
level) and lift up or take down the upper rack.
How to load LOWER RACK
(depending on the model)
G - Foldable plate holders: They can be folded down to load pots
or
H- Fixed plate holders
I - Cutlery basket (or J model)
K - Grid: Helps to keep the cutlery separate for better washing results.
Arrange crockery so that water does not collect in cavities, ensuring that the spray arms turn freely. Only use dishwasher-proof crockery and dishes. Do not use the dishwasher for washing wooden
items, aluminium, tin, silver cutlery or decorated crockery (unglazed). In the baskets, dishes (e.g. plates, bowls, pots) must be placed in a correct way to let water flow down!
5
Switching on the appliance
How to remove upper rack (if available)
- It could be useful to remove upper rack to load bulky items in
lower rack.
- Open the two retainers (F) to take off the upper rack. When
the upper rack is in place the retainers must always be closed.
F - CLOSED
F - OPEN
H
I
J
GB
-4-
Page 5
Select programme
Overview of programmes
The max. possible number of programmes is illustrated in this overview. The corresponding programmes for your appliance can be found on the panel (page 1).
6
Wash cycle
The dishwasher door must be closed and the water tap open.
To load crockery, open the door with caution:
7
Close the door again.
The programme resumes the cycle from where it was interrupted.
Switch off the appliance Everything o.k. ...
Exercise caution when opening the door: beware of hot steam.
Only press the OFF button once the START indicator lamp has switched off.
8
All the indicator lamps switch off. Unload the appliance, starting from the lower rack in order to avoid any residual drips of water falling onto crockery below.
Quick, permanent or alternating
Choose programme according to the attached Table of programmes (page 1).
Duration of the programme depends on the external conditions in the apartment, temperature and pressure etc.
Beware of hot steam!
The wash cycle can be interrupted at any time by pressing RESET (see chapter “What to do if”).
Change the programme in progress:
• Press the RESET button.
• Close the door.
• (Water drains for up to 60 seconds).
• Open the door.
• Select a new programme.
• Press the START button.
Maintenance and care
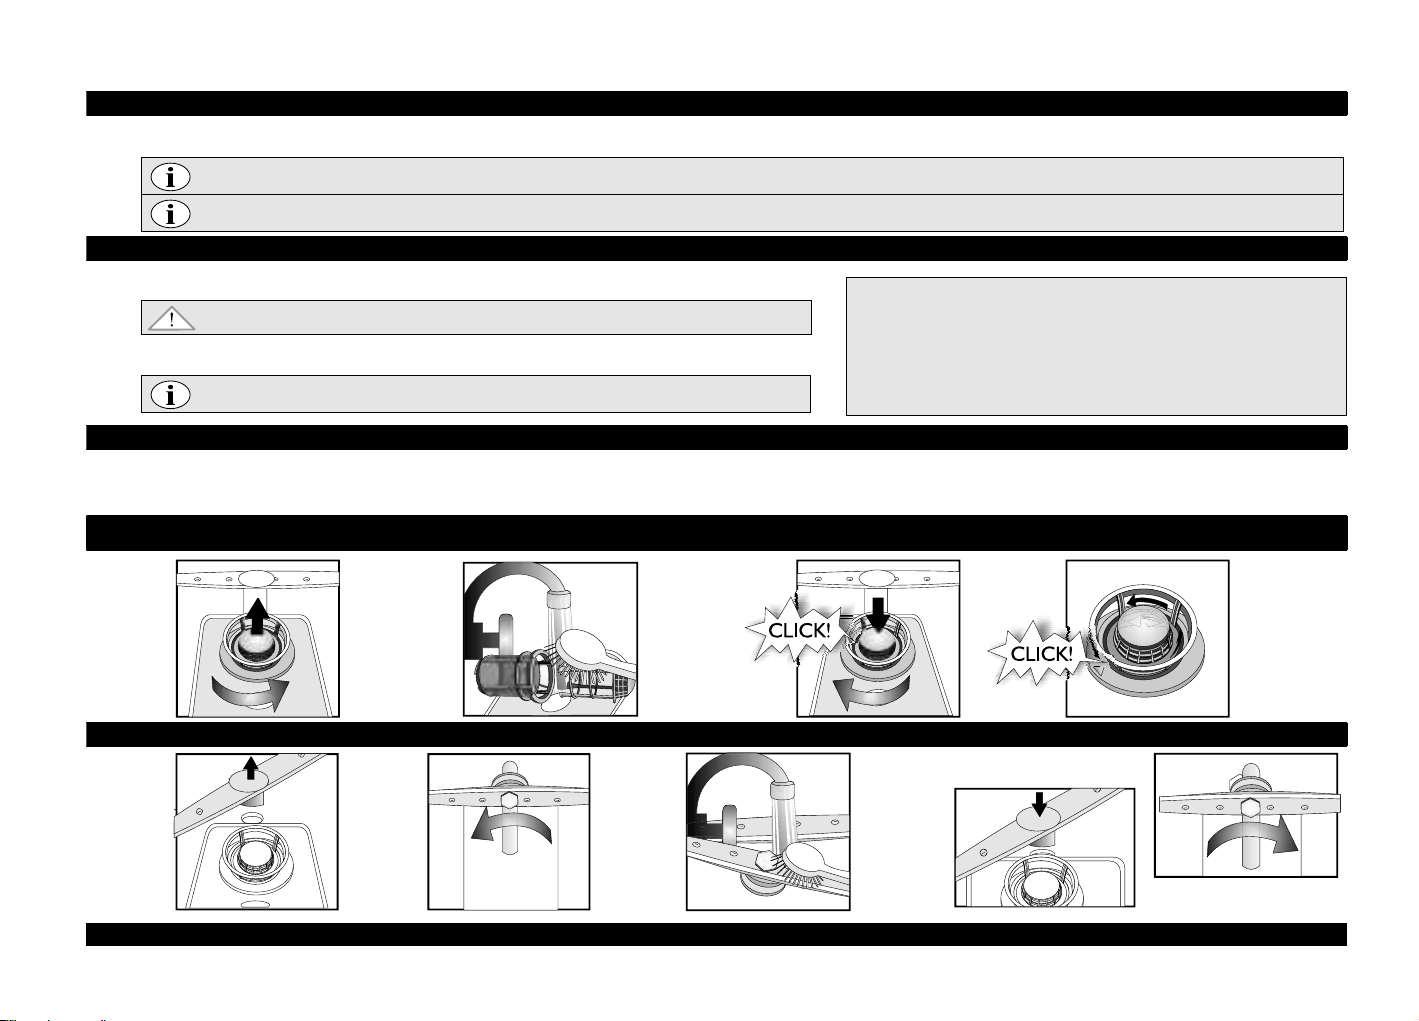
9
Filters
check and
clean if
necessary
Rectifying minor faults yourself ...
10
Spray arms
Remove
blockages/
deposits.
Rotate filter
cylinder , remove
filter system ...
Pull
lower arm
upwards ...
Rinse under
running water ...
Unscrew
upper arm ...
Clean spray
nozzles under
running water
(use toothpicks
if necessary) ...
Insert
Insert lower arm ...
Maintenance and care
Screw on filter
system
NOTE MARK!
Screw on upper arm tightly
GB
-5-
Page 6
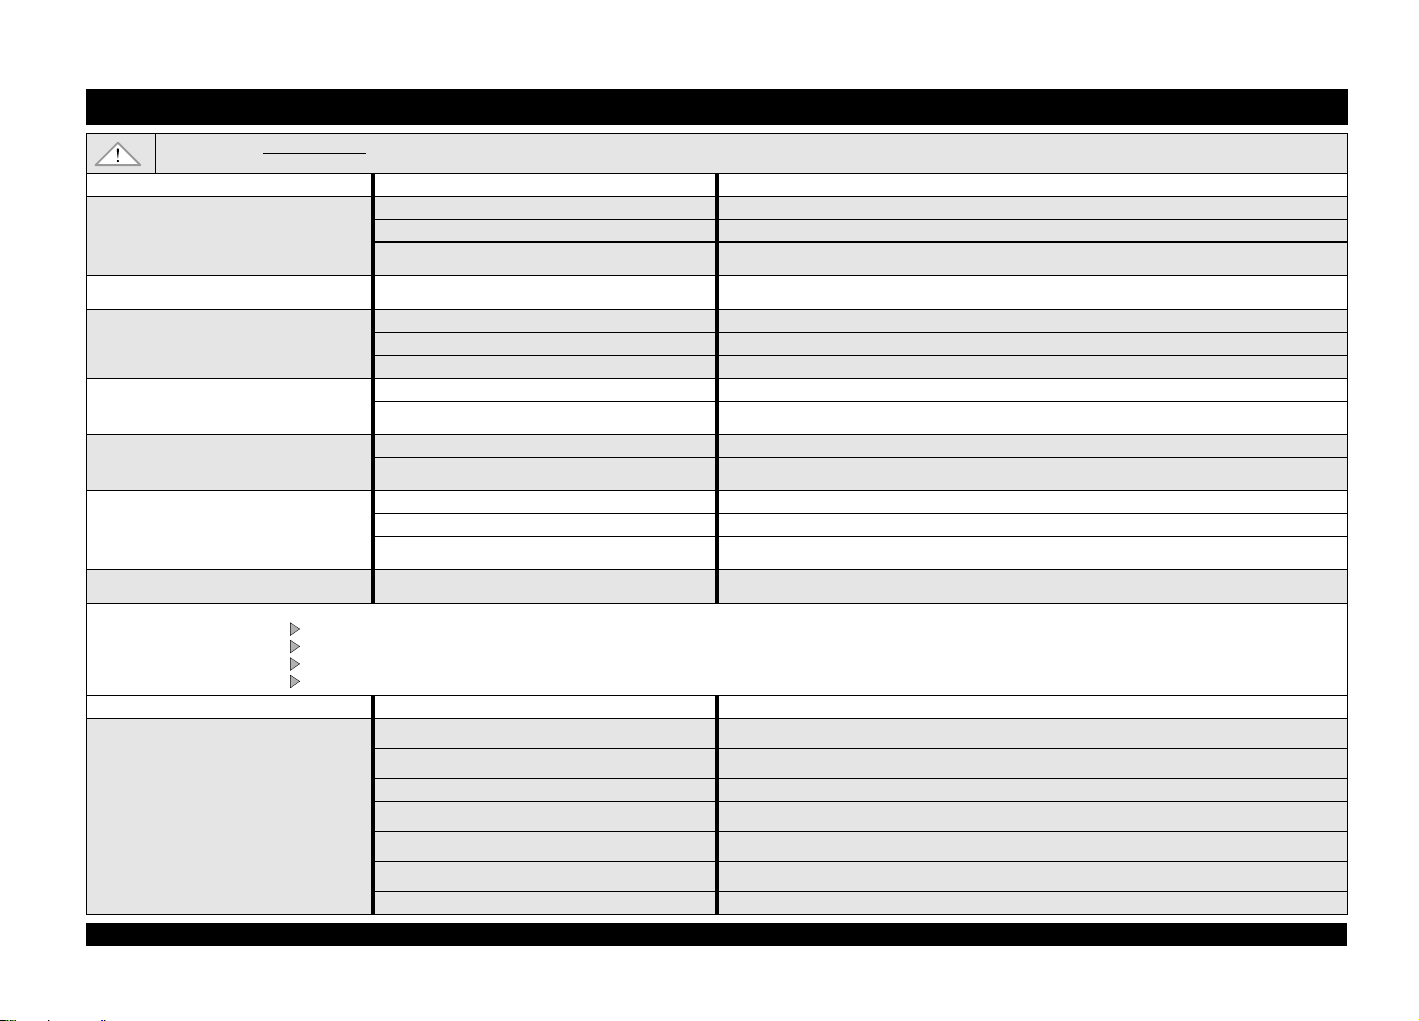
If a fault occurs, before restoring normal appliance operation contacting the After-sales Service, make the following checks to try and remedy the problem. Most faults can be remedied by
taking the following courses of action, quickly restoring normal appliance operation.
...is not working/will not start
...shows “F1” on the display or the START
indicator lamp flashes once
...shows “F4” on the display or the START
indicator lamp flashes 4 times
...shows “F6” on the display or the START
indicator lamp flashes 6 times
...shows “F7” on the display or the START
indicator lamp flashes 7 times
...shows “F8” on the display or the START
indicator lamp flashes 8 times
...shows other “F” faults on the display or
the START indicator lamp flashes Xx times
After taking the above course of action, the fault message must be reset. In the majority of cases the fault is thus eliminated.
RESET: Press the START button for approx. 2 seconds until the indicator lamp switches off or press the RESET button (depending on model)
...are not perfectly clean/have food residues
The appliance... Possible causes... Solutions...
Close the door.
Water drains automatically for up to 60 seconds.
The appliance is now ready to be restarted.
Crockery and cutlery... Possible causes... Solutions...
- The appliance must be switched on. - Check the household circuit fuse if there is no power supply.
- The dishwasher door doesn't close. - Check if the dishwasher’s door is closed.
- Delayed start function is ON.
- The water supply temperature is below 3°C. - Check that the water supply temperature is above 3°C.
-Dirty filters. -Clean the filters.
- Kinked drain hose. - The drain hose must not be kinked.
- Syphon hose connection closed. - The closure disk of the syphon hose connection must be removed.
- Water tap closed. - The water tap must be open.
- Kinked water inlet hose or clogged inlet filters.
- Water pressure too low. - The water tap must be fully open during water inlet (minimum capacity: 0.5 litres per minute).
- Kinked water inlet hose or clogged inlet filters.
- Dirty or clogged filters. - The filters must not be dirty or clogged.
- Too little water in the dishwasher’s water system. - Concave items (e.g. bowls, cups) must be arranged facing downwards in the rack.
- Drain hose incorrectly fitted.
- Many different causes. - Reset the appliance (see below).
- Too little space between dishes (incorrect arrangement
of the concave items in the rack).
- Too little detergent; detergent too old or incorrectly
stored.
- Temperature not high eno ugh for heavily soiled crockery. - For heavily soiled crockery , select a wash programme with a higher temperature (see table in chapter “Chart” on page 1).
- Loading of the dishwasher using lower and upper rack
at the same time with “Half load/Multizone” function.
- Frequent use of Eco 50°C.
- Clogged spray arms; filters dirty or not fitted correctly.
- Spray arms impeded by crockery or cutlery. - The spray arms must be able to turn freely and must not be impeded by crockery or cutlery.
- Check whether the “Delayed start” function (if available) has been selected. If it has, the appliance will only
start once the set time has elapsed. If necessary, set the delayed start to “0” (RESET the appliance).
- The water inlet hose must not be kinked and the relative inlet filter in the water tap connector must not be
clogged.
- The water inlet hose must not be kinked and the relative inlet filter in the water tap connector must not be
dirty.
- The drain hose must be fitted correctly (for high mounted appliances, leave min. 200-400 mm from the
lower edge of the appliance) - see installation instructions.
- Arrange crockery so that items do not touch each other. Concave items (e.g. bowls, cups) must be
arranged facing downwards in the rack.
- If necessary, use more detergent, observing the manufacturer’s indications as regards dosage. Always store
detergent in a dry place and do not store it for excessively long periods of time.
- If you se lec t the “Half lo ad/Multizone” function (if available), remember to load only the upper rack or
only the lower rack to increase washing power and thus obtain optimum wash results.
- In the event of frequent use of the Eco 50°C programme (if available), from time to time select the
Intensive 70°C programme (if available).
- The spray arms must not be clogged, the filters must not be dirty and must be fitted correctly (see
chapters 9 and 10).
What to do if...
GB
-6-
Page 7
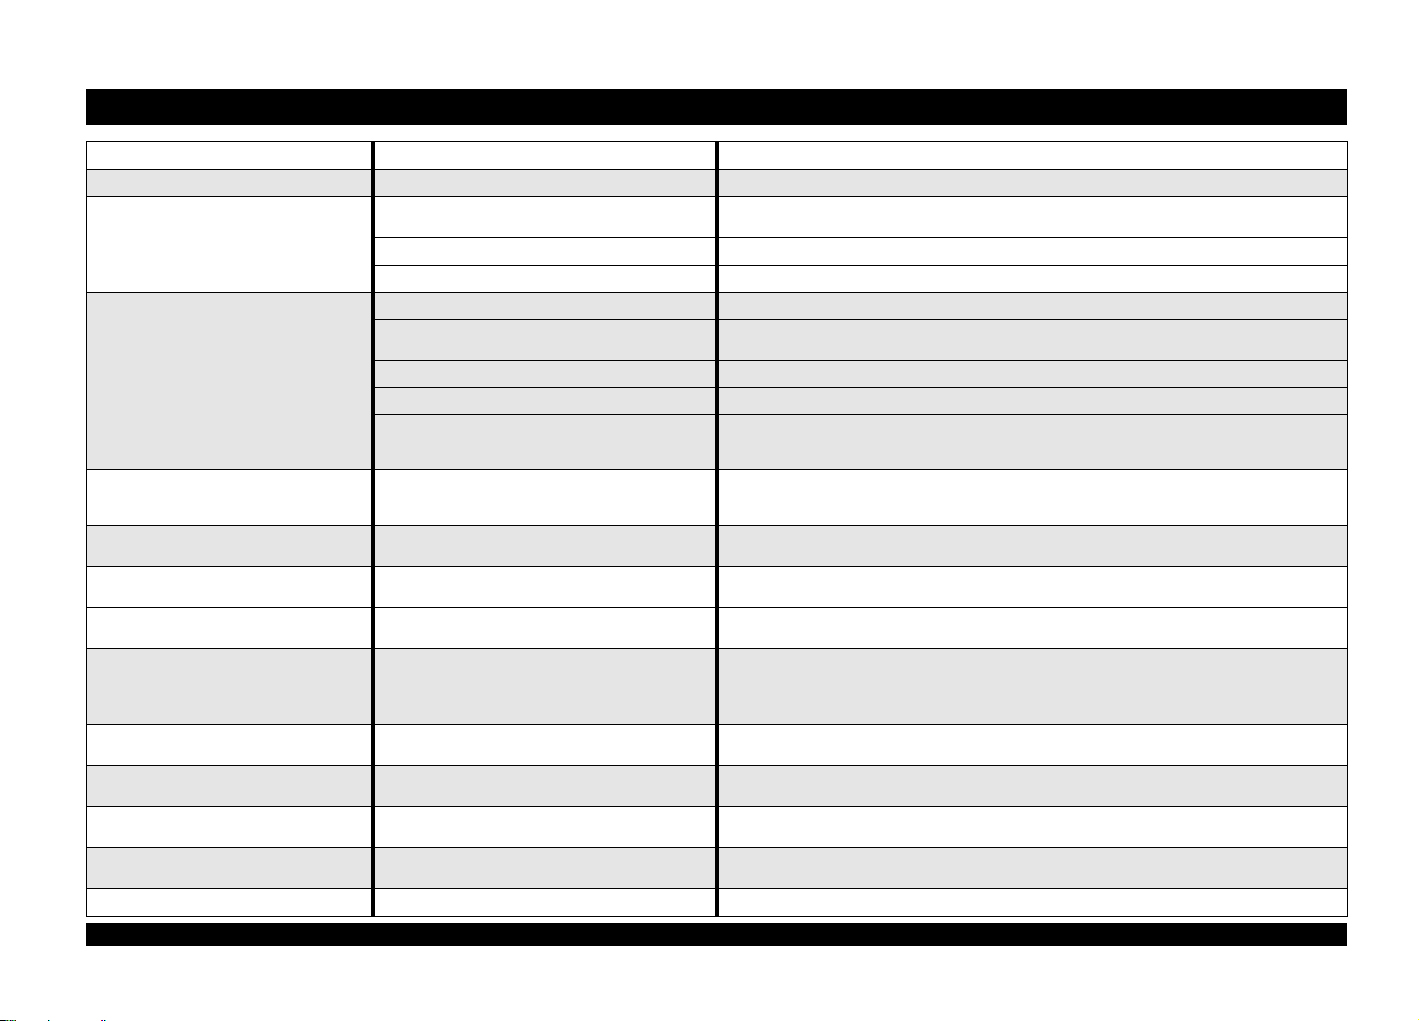
What to do if...
Crockery and cutlery... Possible causes... Solutions...
...salt indicator lit
...have deposits: regeneration salt residue
...are not dry
...have discoloured plastic parts
...opaque glasses, etc
...removable deposits on glasses
...glasses not sparkling
...permanent deposits on glasses
...tea cups darken and dirt does not
disappear after washing in dishwasher
...rust marks
...other marks
...streaks
...suds - Unsuitable dosage of detergent/rinse aid. - Only use the amount of detergent/rinse aid required, since excessive amounts can lead to excess suds.
- Use tablets for soft water. - Set “Detergent type” option; if this option is not available, it is normal for the salt indicator to light up.
- Water too hard. - In areas with very hard water, more regeneration salt needs to be added (see page 2 “How to set water
- Salt reservoir cap open. - Close the salt reservoir cap properly.
- Not enough rinse aid. - If you use a combined action detergent, try adding more rinse aid.
- Plastic containers dry badly. - Synthetic materials do not dry well; if wet at end of cycle, wipe dry.
- Clean dishes left in dishwasher for a long time after end
of cycle (e.g. when using “delayed start” function).
- Incorrect arrangement of the concave items in the rack. - Arrange crockery so that water does not collect in cavities.
- Incorrect dosage the rinse aid. - Increase the dosage of rinse aid - see page 3, chapter “Adding rinse aid”.
- Rapid programme selected. - The rapid programme is intended for quickly washing lightly soiled dishes. If used for a full load of medium/
- Tomato/Carrot juice. - Tomato sauce, for example, can lead to discolouring of plastic parts. P owder detergent is recommended as
- Dishes unsuitable for washing in dishwashers
(porcelain),
- Usage of incorrect programmes for glasses. - Dishes should be put together, to avoid touching each other. Do not put glassware together in baskets.
- Not conform of glasses to washing in dishwashers
(porcelain).
- The phenomenon of iridization of glass dishes appears
in light (the effect of rainbow).
- Not known. - This phenomenon is inevitable. Theine alters colours permanently.
- Pre-wash programme not used. - Salty or acidic food residues can cause rust marks even on stainless steel cutlery. To avoid this, always use
- Rinse aid dosage too low. - In the presence of marks, increase the rinse aid dosage (see page 3, step 2). If you use a combined action
- Rinse aid dosage too high. - In the presence of streaks, reduce the rinse aid dosage (see page 3, step 2). If you use a combined action
hardness”).
- In this situation, the presence of drops of water on dishes and on the sides of the dishwasher is normal. T ry
releasing the door 5 minutes before removing the dishes.
heavy soiled dishes, the dishes may not dry completely. If so, select a standard-length programme. For best
results, open the door after the end of the programme and wait 15 minutes before unloading the dishwasher.
it allows slightly higher doses to be used for improved whitening. Programmes with higher wash
temperatures should be used.
- Only use dishwasher-proof crockery and dishes.
Use suitable programme for glass.
- Some kinds of glass cannot be washed in the dishwasher.
- This phenomenon is irreversible. We recommend in future:
- Change the control of system of dosage of softener.
- Be careful – follow recommended detergent dosage.
- For combined action tablets see detergent producer’s recommendations.
the pre-wash programme if the dishes are to be washed later.
detergent, try adding more rinse aid.
detergent which includes rinse aid, do not add any additional rinse aid.
GB
-7-
Page 8
Disconnect the mains plug
If, after carrying out the above checks, the fault persists, switch off the appliance, disconnect the mains plug and turn off the water tap.
Contact the After-sales Service (see warranty).
Before contacting our After-Sales Service, take note of the following:
- the description of the fault,
- the appliance type and model,
- the service code (the number indicated on the adhesive rating plate) inside the door on the right-hand side:
Precautions and general recommendations
1. Packing
The packaging materials are 100% recyclable and marked with the recycling symbol .
2. Removing the packaging and inspecting the contents
After unpacking, make sure that the dishwasher is undamaged and that the door closes correctly. If in doubt,
contact a qualified technician or your local retailer.
3. Before using the dishwasher for the first time
- The appliance is designed to operate at ambient temperatures of between 5°C and 45°C.
- This dishwasher has been tested by the manufacturer to ensure it functions correctly. Such testing may
leave slight drips/water marks which will disappear with the first wash.
4. Energy and water savings
- Do not rinse crockery under running water.
- Always fully load the dishwasher before running it or select the “Half load/Multizone” function (if available).
- If ecological energy sources are available such as solar panel heating, heat pumps or centralised heating
systems, the appliance may be connected to the hot water mains up to a maximum temperature of 60°C.
Make sure the water inlet hose is of the correct type (“70°C Max” or “90°C Max”).
5. Child safety
- Keep the packaging materials out of the reach of children.
- Children must not be allowed to play with the dishwasher.
- Store the detergent, rinse aid and salt out of the reach of children.
6. Safety warnings
- The appliance is not intended for use by children or physically or mentally impaired persons, unless
adequately supervised by a responsible adult capable of guaranteeing safe use of the appliance.
- Do not operate the appliance in the open air.
- Do not store flammable materials in close proximity to the dishwasher.
- The water in the dishwasher is not potable.
- Do not use solvents inside the dishwasher: risk of explosion!
- Be careful when the door is open: risk of tripping!
- The open dishwasher door can only support the weight of the loaded rack when pulled out. Do not rest
objects on the open door or sit or stand on it.
- S harp items that might cause injury (e.g. knives), must be placed in the cutlery basket with the sharp end
facing downwards. Long-handled utensils must be arranged horizontally in the upper rack, with the sharp
end facing away from the front of the appliance.
We reserve the right to make technical modifications.
- Before cleaning or carrying out maintenance, switch off the appliance, disconnect the mains plug and turn
off the water tap; also after programme end in the event of any malfunction.
- Repairs and technical modifications must be carried out exclusively by a qualified technician.
7. Resistance to frost
If the appliance is placed in surroundings exposed to the risk of frost, it must be drained completely. Turn off
the water tap, remove the inlet and outlet hoses, and let all the water drain away. Make sure there is at least
1 kg of dissolved regeneration salt in the salt reservoir, to protect the appliance from temperatures of up to
-21°C. When the programme resumes, an error message may be displayed. “F1”/START indicator flashes
once: pour half a litre of warm water into the bottom of the dishwasher. “F6”/START indicator flashes 6
times: the appliance must remain at an ambient temperature of min. 5°C for at least 24 hours. After
eliminating these faults, RESET the appliance (see chapter “What to do if...”).
8. Disposal
- The appliance is manufactured using recyclable materials. If you decide to scrap the dishwasher , it must be
disposed of in compliance with local waste disposal regulations. Make it unusable by cutting off the power
cord. To prevent situations of potential danger to children (e.g. danger of suffocation), break the lock of the
door so that it can no longer be closed.
- This appliance is marked according to the European directive 2002/96/CE on Waste Electrical and
Electronic Equipment (WEEE). By ensuring that this appliance is scrapped suitably, you can help prevent
potentially damaging consequences for the environment and health. Unsuitable disposal of an appliance of
this type as household waste could have detrimental effects on the environment. The symbol on the
appliance, or on documentation enclosed with the appliance, indicates that this product must not be
treated as household waste, but must be delivered to the nearest collection centre for the recycling of
electrical and electronic appliances. Disposal must be carried out in accordance with local environmental
regulations for waste disposal. For further information on the treatment, recovery and recycling of this
appliance, contact your competent local authority, the collection service for household waste or the shop
where you purchased the appliance.
EC Declaration of conformity
This appliance has been designed, constructed and distributed in compliance with the safety requirements of
EC Directives: 2006/95/CE, 89/336/CE, 93/68/CE and 2002/95/CE (RoHS Directive).
Loading Capacity: 12 place settings.
What to do if...
GB
-8-
 Loading...