

Whirlpool ACM 879 IX, ACM921 WH, ACM 924 WH, ACM 924 IX, ACM 879 WH INSTALLATION INSTRUCTIONS
Page 1

INSTRUCTIONS FOR USE
INSTALLATION INSTRUCTIONS
BEFORE USING THE APPLIANCE
PRECAUTIONS AND GENERAL ADVICE
ENERGY SAVING TIPS
OVEN ACCESSORIES
CLEANING AND MAINTENANCE
TROUBLESHOOTING GUIDE
AFTER-SALES SERVICE
For best use of the oven, carefully read the operating instructions and keep them for future
consultation.
67
Page 2
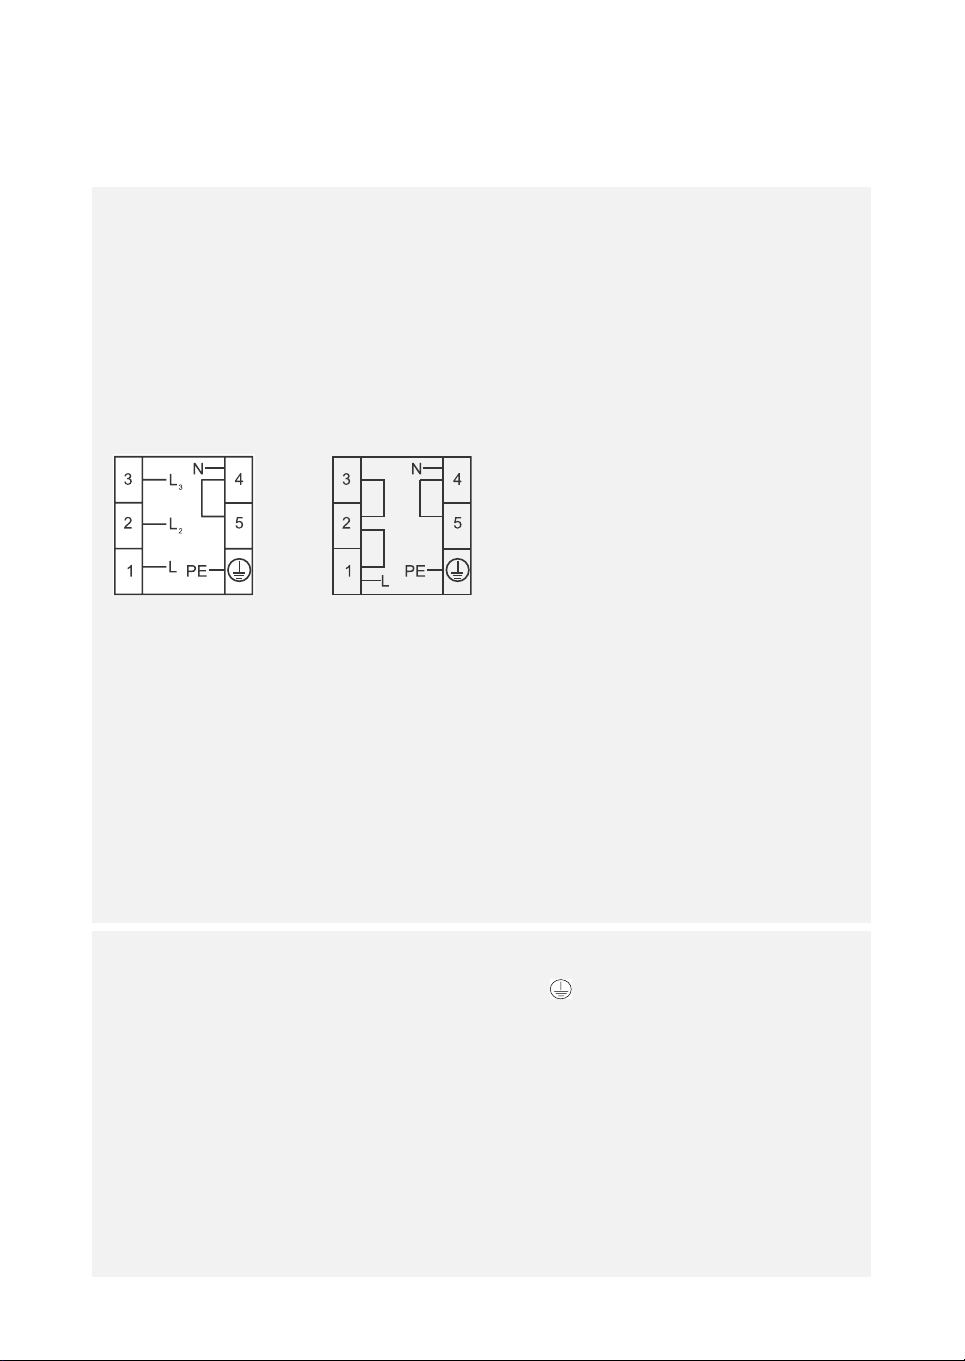
INSTALLATION INSTRUCTIONS
Electrical connection
Before connecting the appliance, make sure:
the mains voltage in your home matches that specified on the appliance dataplate;
1.
the electrical system adequate for appliance max. power absorption specified on the dataplate;
2.
the house electrical system is suitably earthed.
3.
• Connect the appliance to the power supply by means of a suitable disconnecting switch with
min. contact opening distance allowing complete disconnection in category III overvoltage
conditions, in compliance with the installation regulations.
After installation, the electrical components must only be accessible with the use of a special tool.
Notes:
The power cable must be H05VV-F type and electric connections must be in compliance with below
electric information.
3 x 2.5 mm² 220 V ~ 50 Hz 5 x 1.5 mm² 380 V~, 3N 50 Hz
3 x 2.5 mm² 230 V ~ 50 Hz 5 x 1.5 mm² 400 V~, 3N 50 Hz
3 x 2.5 mm² 240 V ~ 50 Hz 5 x 1.5 mm² 415 V~, 3N 50 Hz
Instructions for the installer
Warning
• Disconnect the appliance from the power supply before carrying out any repairs or
operation.
• Installation must be carried out by a qualified technician, in compliance with the current
safety regulations.
• The appliance must be earthed.
The Manufacturer declines any liability for injury or damage to people or property due to non-compliance
with the above-mentioned regulations. The appliance dataplate is located at the bottom right of frame of
the oven cavity and visible with the door open. Adjustment conditions are given on a label on the packing.
Do not use the oven door for handling operations, or for removing the appliance from the packing.
ELECTRICAL CONNECTION AND SAFETY
For the electrical connection, make sure to follow the instructions given below:
The earth wire must be connected to the earth terminal ( ). If there is no approved earthed
•
electrical outlet in the place where the appliance is to be installed, immediately contact to our
Authorised Service.
The earthed electrical outlet must be close to the appliance. Do not use extension cords.
•
The power cable must not touch hot parts of the product.
•
If the power cable is damaged, contact a Qualified Service Centre. The cable must be replaced by the
•
Authorised Service.
An incorrect electrical connection could damage your appliance. Such damage is not covered by the
•
warranty.
The appliance is arranged for a 230 Volt power supply. If the power supply voltage is different,
•
immediately contact to our authorised service.
The power cable must not touch hot parts of appliance, otherwise it may become damaged.
This situation could cause short circuiting.
The manufacturer declines any liability for damage and loss due to failure to comply with the following
safety regulations.
68
Page 3
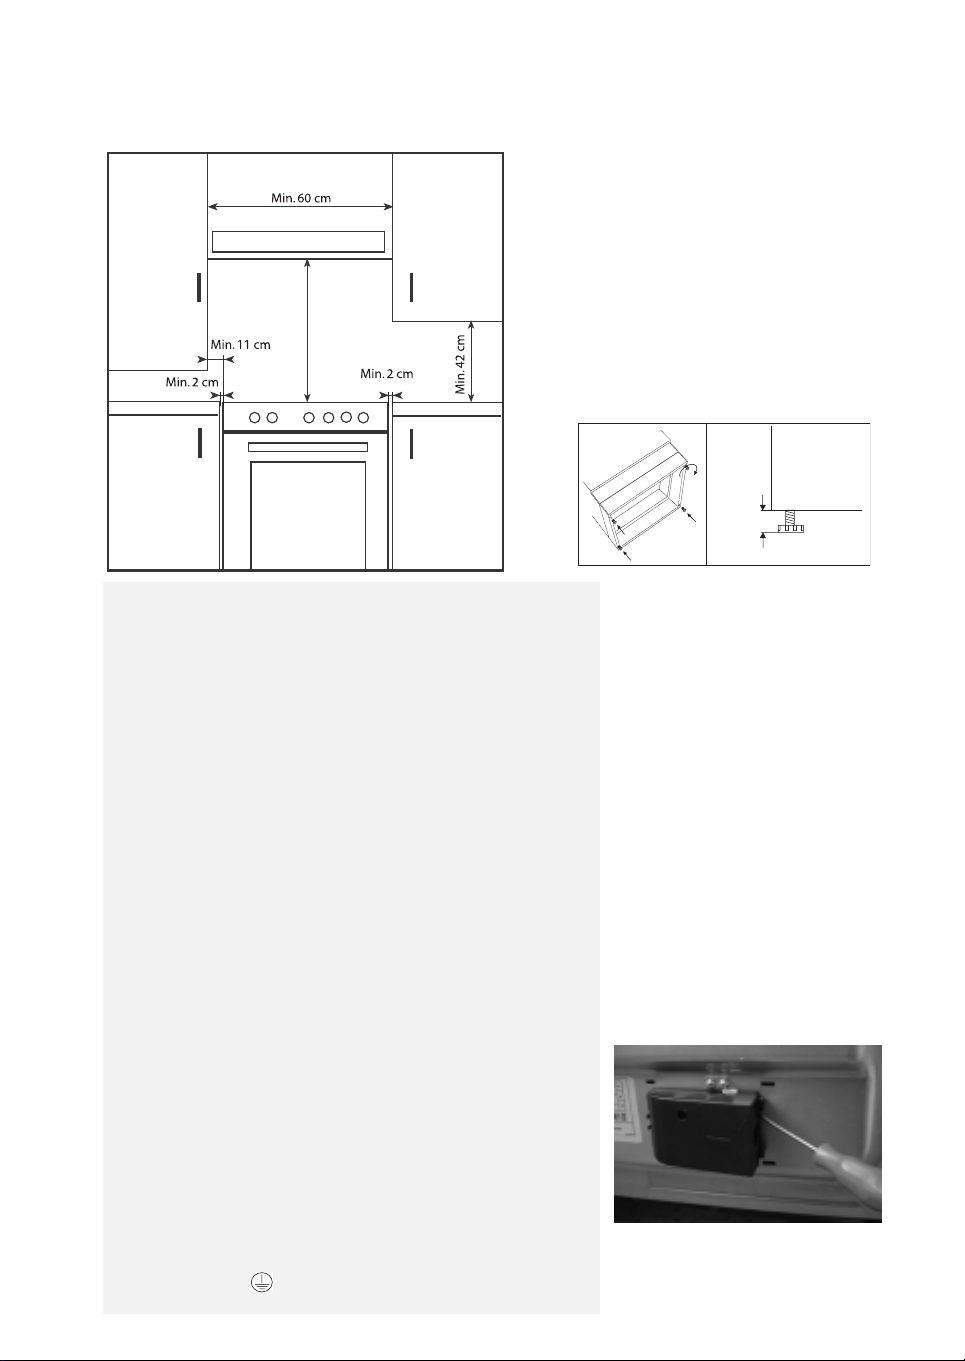
Min. 50 cm (depending on the model)
Min. 65 cm
Fig. 1
Installation
Important
: The covering of the cabinets must be in heat
resistant (min. 90°C) material.
If the appliance is installed next to kitchen cabinets, ensure the
minimum clearances indicated in the following figure.
There are certain points to pay attention to when positioning the
cooker. Make sure to take into consideration the following
recommendations, in order to prevent any problems and
hazardous situations that may occur!
The cooker can be positioned near other cabinets provided their
height does not exceed the hob level.
In selecting a position for the cooker, make sure the appliance is
not placed next to a refrigerator and that there are no flammable
or combustible materials in the vicinity, such as curtains, etc.
which can quickly catch fire.
A minimum space of 20 mm between the metal rear cover of the
cooker and the wall is required to ensure air circulation.
If the counter tops are higher than hob level, they should be at
least 110 mm from the sides of the cooker.
To fit them, tilt the appliance and screw the 4 feet in the special
threads located in the corners
(see Fig. 2).
Connecting the appliance to the power supply
Open the terminal board (see Fig. 3), unscrew the cable clamp
screw.
Strip approx. 70 mm. of the cable sheath from the power
•
supply cable
Strip approx. 10 mm. of sheath from the conductors
•
Insert the cable into the cable clamp and connect the
•
conductors to the terminal block as indicated in the diagram
printed on the label close to the main box
Secure the power cable by means of the cable clamp
•
Close and refit the main box plastic cover
•
the yellow-green earth wire must be connected to the
NOTE:
srew with symbol .
Max.
adjustment
15 mm
Fig. 2
Fig. 3
69
Page 4
BEFORE USING THE APPLIANCE
Remove the accessories from the oven and heat
•
it at 200°C for about two hours to eliminate the
smell of protective grease and insulating
materials. Keep the window open during this
operation.
Before use, remove:
•
- stickers located on the front of the appliance
and on the oven door, except the dataplate;
- cardboard protection and protective plastic
film on the control panel and other parts of
the appliance;
- any stickers on the accessories
(e.g. under the drip-tray).
1. Packing
The packing material is completely recyclable, and
is marked with the recycling symbol , which
identifies it as a type of material that must be sent
to local waste-disposal centres.
2. Product
This appliance is marked in compliance with
European Directive 2002/96/EC on Waste
Electrical and Electronic Equipment (WEEE).
By ensuring that this appliance is correctly
scrapped, the user can help prevent potentially
harmful consequences for the environment and the
health of people.
The symbol on the appliance or accompanying
documentation indicates that this product must not
be treated as household waste, but must be taken
to a collection centre for the recycling of electrical
and electronic appliances.
Disposal must be carried out in accordance with
the local environmental regulations on waste
disposal.
For more detailed information about the
treatment, recovery and recycling of this product,
please contact your competent local authority, the
household waste collection service or the shop
where you purchased the appliance.
70
Page 5

PRECAUTIONS AND GENERAL ADVICE
The appliance is not intended for use by children
The appliance is designed solely for domestic
•
use for cooking food. No other use is allowed.
The Manufacturer declines all liability for
inappropriate use or incorrect setting of the
controls.
Any repairs or adjustments must be carried out
•
exclusively by a qualified technician.
Never expose the oven to atmospheric agents.
•
Do not place heavy objects on the door as they
•
could damage the oven compartment and
hinges. Do not cling to the door.
Do not hang anything heavy on the oven door
•
handle.
• Do not cover the oven floor with aluminium
foil or other objects.
The oven door must close properly. The door
•
seals must be kept clean.
Do not pour water directly inside a hot oven. The
•
enamel coating could become damaged.
Fruit juice dripping from the baking tray may
•
leave permanent stains. It is advisable to clean
the appliance before reusing it.
To prevent the oven coating from being
•
scratched, do not drag pots and pans across the
bottom of the oven.
The accessible parts of the appliance may
•
become very hot during use. Keep children
away.
Never use abrasive materials or substances to
•
clean the GLASS, as they could damage it.
The unit becomes very hot during use. Do not
•
touch the heating elements in the oven.
Residual condensation after cooking could
•
eventually damage the oven and surrounding
kitchen units. We recommend that you:
- set the lowest temperature;
- cover food;
- remove food from the oven;
- dry wet parts when the oven is cool.
• Caution: The front panel and oven door
handle become hot when the appliance is
used for a long time at high temperatures.
Do not touch the appliance with wet parts of the
•
body or use it when barefoot.
Do not pull the appliance or the power cable to
•
unplug it.
• Do not allow children to touch:
- the controls and the appliance in general,
especially during and immediately after use:
risk of injury;
-packing (bags, polystyrene, metal parts,
etc.);
- any appliance to be scrapped.
•
or persons with limited physical, sensory or
mental abilities or without experience and
knowledge of it, unless they are under the
supervision of or instructed in its use by a person
responsible for their safety.
Make sure the electrical cables of any other
•
appliances used near the oven do not touch hot
parts or get caught in the oven door.
Do not place flammable materials in the oven or
•
nearby, due to the risk of fire if the oven is
inadvertently switched on.
Use oven gloves to remove pans and accessories
•
when the oven is hot.
If alcoholic beverages (e.g. rum, cognac, wine, etc.)
•
are added when roasting or baking cakes, etc.,
remember that alcohol evaporates at high
temperatures. Vapours released by the alcohol
may catch fire on coming into contact with the
electrical heating element.
Do not heat or cook foods in closed containers.
•
The pressure created inside could cause them to
explode, damaging the oven.
Do not use containers made of synthetic
•
material for cooking (except for packages
specifically designed for this purpose; see the
manufacturer's instructions). They could melt at
high temperatures.
Always pay attention when cooking with oil and
•
grease. Oil and fat can overheat and catch fire!
Never pull out fully loaded shelves. Use extreme
•
caution.
DECLARATION OF CONFORMITY
• This appliance is suitable for contact with
foodstuffs and complies with EEC (EC)
Regulation no. 1935/2004.
• This appliance is designed for cooking only.
Any other use (e.g. for room heating) is
deemed improper and potentially
dangerous.
• This appliance has been designed,
manufactured and marketed in compliance
with:
- the safety objectives of Low Voltage
Directive 2006/95/EC (which replaces
73/23/EEC as amended).
- the protection requirements of EMC
Directive 89/336/EEC;
- the requirements of Directive
93/68/EEC.
71
Page 6
ENERGY SAVING TIPS
The cooking hob is equipped with cooking zones and hotplates of different diameters (depending on
•
the model). Use pots and pans whose bottom diameter is equal to that of the hotplate/cooking zone,
or slightly larger.
Only use flat-bottomed pots and pans.
•
Pots and pans must not protrude over the control panel.
•
If possible, keep pans covered when cooking.
•
Cook vegetables, potatoes, etc. with a small amount of water in order to reduce cooking time.
•
Using a pressure cooker will further reduce energy consumption and cooking time
OVEN ACCESSORIES
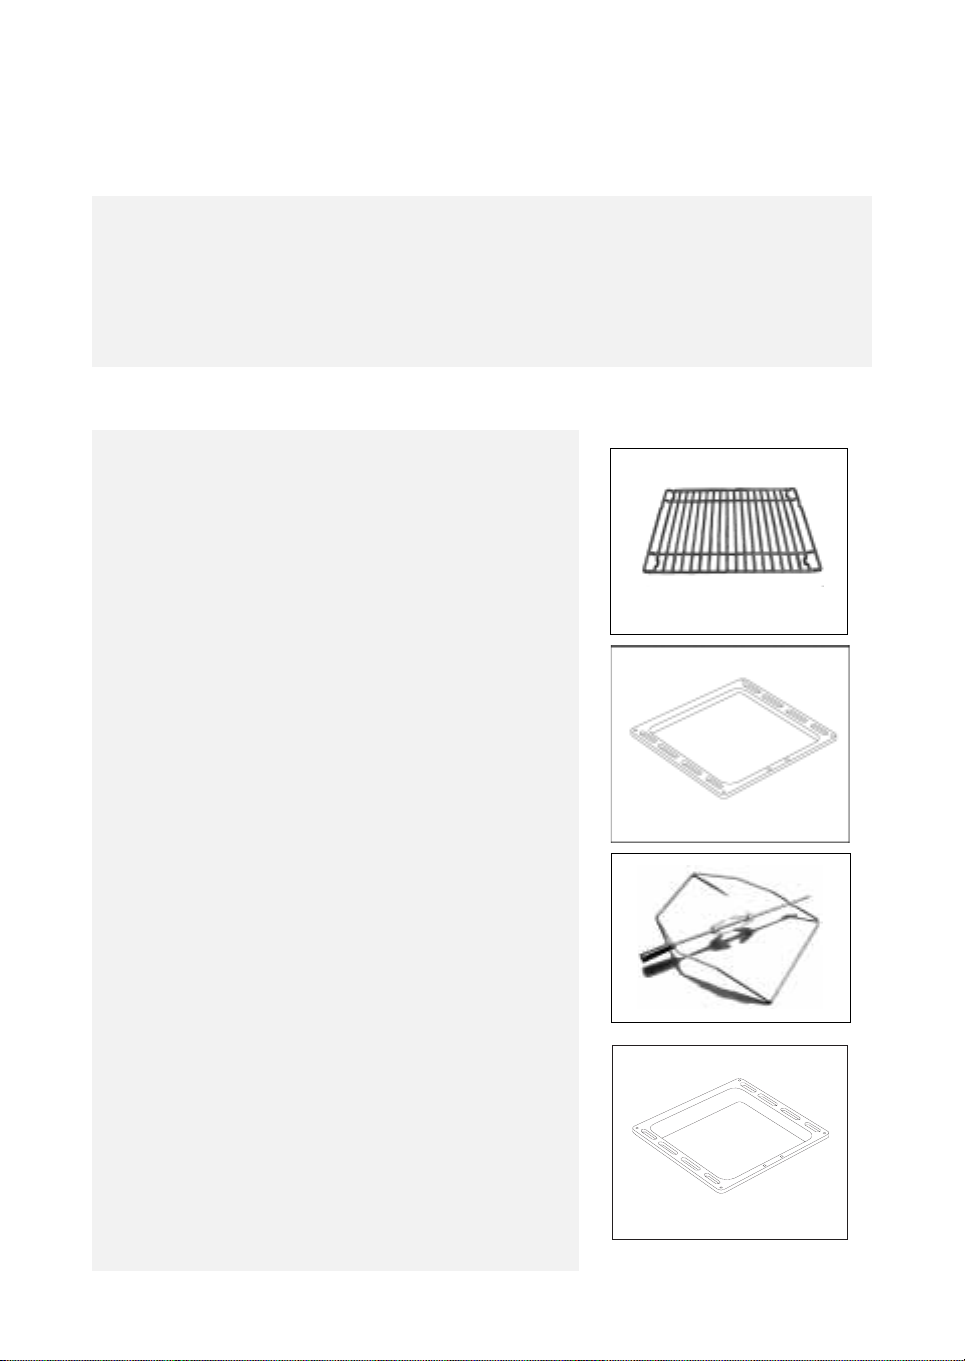
The accessories supplied depend on the model. The
accessories provided with the oven are listed in the
Product Description Sheet provided separately (under
Accessories).
Wire shelf (1)
The wire shelf can be used to grill food or as a support for baking
trays, cake tins and other cooking containers. It can be placed on
any of the runners in the oven.
Baking tray (2)
For baking biscuits, cakes and pizzas.
This tray can also be used for collecting fat and any scraps of
food when placed under the grill; pour a little water in the driptray to prevent spatters of fat and smoke.
Fig. 1
Turnspit (3)
Use the turnspit as indicated in the relevant chapter in the
Product Description Sheet supplied separately.
Drip tray (4)
Used for collecting fat and any scraps of food when placed under
the grill, pour a little water into the drip tray to prevent spatters
of fat and smoke.
The drip tray can be used as a container for cooking meat,
chicken and fish with or without vegetables.
72
Fig. 2
Fig. 3
Fig. 4
Page 7

CLEANING AND MAINTENANCE
Disconnect the appliance from the power supply before
carrying out any cleaning operation.
Clean using a cloth moistened with warm soapy water or
•
diluted liquid detergent.
Do not use abrasive, corrosive or chlorine products, or steel
•
wool.
Do not use steam cleaners.
•
Do not use flammable products.
•
Do not leave acid or alkaline substances such as vinegar, salt,
•
lemon juice, etc., on the hob.
Stainless steel surface
Clean with a specific commercial product.
•
Cleaning the electric hotplates (depending on the
model)
The electric hotplates must be cleaned when they are lukewarm.
•
Wipe them with a cloth moistened with water and salt, and
•
polish with a cloth moistened with oil.
Cleaning the glass-ceramic cooktop
It is good practice to clean the cooktop after each use. Always
wait for the cooktop to cool completely before cleaning. This will
prevent the build-up of dirt and make cleaning easier.
Important:
equipment.
Use a clean cloth, absorbent kitchen wipes and washing up
•
liquid or a specific glass-ceramic cleaner.
Remove difficult to remove dirt with the supplied scraper tool
•
and specific cleaning products.
Food spills should be cleaned off before they bake onto the
•
glass-ceramic surface.
Foods with high sugar content (toffee, fruit juice, jam, etc.)
•
that boil over while cooking, or spattered sugar stains must be
removed immediately using a scraper.
Do not use abrasive products, bleach, oven-cleaner spray or
•
metal pan scourers.
The cooktop should be treated periodically with a proprietary
•
brand of protective wax for glass-ceramic surfaces.
Oven cleaning
After cooking, wait for the oven to cool then clean it to
•
prevent the accumulation of cooking residuals.
For stubborn grime, use a specific oven cleaning product,
•
following the instructions given on the package.
Clean the outside of the oven with a sponge and lukewarm water.
•
• Do not use abrasive products or steel wool.
Clean the door glass with a liquid detergent.
•
Soak the accessories in water with washing up detergent
•
immediately after use. Food residues can be easily removed
using a brush or sponge.
never clean the appliance using steam cleaning
73
Page 8
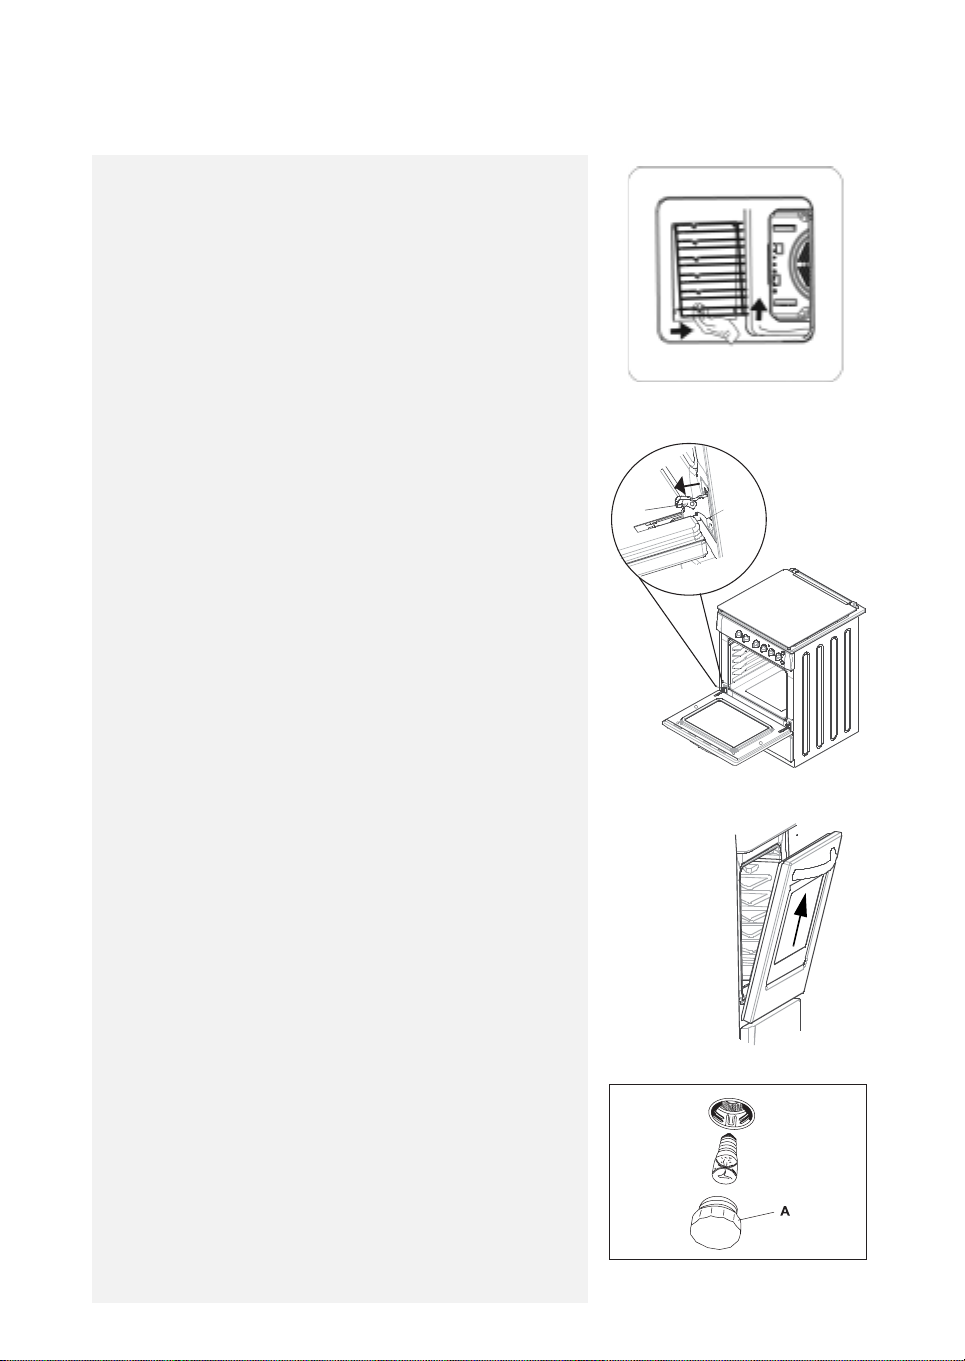
Removing the side grids (depending on models)
Grip the bottom part of the side grids and pull towards the middle
of the oven. Lift upwards to completely remove.
Pull the side grid as shown in the picture (fig. 1). After releasing it
from clips, lift up.
Carry out the above steps in reverse order to refit the side grid.
Caution:
original sides. The notches on the grids must be close to the front,
not rear.
After cleaning, be sure that the grids are fitted in their
Fig. 1
Removing the door
Caution: When carrying out the following operations it is
advisable to wear protective gloves. Carefully follow these
instructions to prevent injury and/or damage to the oven
door and hinges.
Pay attention to the oven door hinges: risk of injuring
hands!
Open the oven door
Fully open the saddle brackets
While opening the saddle brackets, use a metal tool such as
handle side of a spoon for easy opening.
Close the door almost completely (Fig. 3), and remove by pulling
it outwards.
Proceed in reverse order to refit the door. Make sure the
NOTE:
saddle brackets are lowered before closing the oven door.
saddle
bracket
saddle
bracket
(see detail A)
DETAIL A
Fig. 2
Replacing the rear oven lamp:
Disconnect the oven from the power supply.
1.
After the oven has cooled down, unscrew (anticlockwise) the
2.
lamp cover A (Fig. 4).
Replace the lamp (see note).
3.
Refit the lamp cover.
4.
Reconnect the oven to the power supply.
5.
Note: Only use 25 W/230 V E-14 type T300°C lamps
available from the After-Sales Service.
Important: Do not use the oven until the lamp cover has
been refitted.
74
Fig. 3
Fig. 4
Page 9

TROUBLESHOOTING GUIDE
1. The appliance does not work:
Check the mains power supply and that the
•
appliance is electrically connected.
Switch the appliance off and on to see if the
•
problem persists.
AFTER-SALES SERVICE
Before calling the After-Sales Service
See if you can eliminate the problem on your
1.
own (see “Troubleshooting Guide”).
Switch the appliance off and on again to see if the
2.
problem persists.
If the fault persists after the above checks,
contact your nearest After-Sales Service.
Specify:
the type of fault;
•
exact type and model of oven;
•
the After-Sales Service number (the number
•
given after the word “Service” on the dataplate)
located at the bottom right of frame of the oven
cavity and visible with the door open. The
service number is also given in the warranty
booklet;
your full address;
•
your telephone number.
•
IMPORTANT:
Check that the oven selector is not turned to
•
“0” or to the “lamp” symbol .
If the oven does not switch on, check that the
•
cooking time programmer (depending on the
model) is set to manual mode (see instructions
on Product Description Sheet).
For repairs, contact an
Service
If any work is carried out by technicians not
belonging to the Manufacturer's authorised AfterSales Service centres, request a receipt specifying
the work performed and make sure the
replacement parts are
Failure to comply with these instructions can
compromise the safety and quality of the product.
, indicated in the warranty.
Authorised After-Sales
original.
75
 Loading...