

INSTALLATION INSTRUCTIONS
ELECTRIC DRYER
INSTRUCCIONES DE INSTALACIÓN
SECADORA ELÉCTRICA
INSTRUCTIONS D'INSTALLATION
SECHE-LINGE ELECTRIQUE
Table of Contents . . . . . . . . . . . . . . . . . . . . . . . . . . . . . . . . . . . . . . . . . . . . . . . . . . . . . . . .2
Índice . . . . . . . . . . . . . . . . . . . . . . . . . . . . . . . . . . . . . . . . . . . . . . . . . . . . . . . . . . . . . . . . 11
Table des matières . . . . . . . . . . . . . . . . . . . . . . . . . . . . . . . . . . . . . . . . . . . . . . . . . . . . . . 20
8528095 Rev A
8528095 Rév A
IMPORTANT: Save for local electrical inspector's use.
IMPORTANTE:
Guarde para tener a disposición del inspector de electricidad local.
IMPORTANT : Conserver ces instructions à l’usage de l’inspecteur des installations
électriques local.
2
TABLE OF CONTENTS
DRYER SAFETY
DRYER SAFETY............................................................................ 2
INSTALLATION REQUIREMENTS .............................................. 3
Tools and Parts .......................................................................... 3
Location Requirements.............................................................. 3
Electrical Requirements ............................................................ 4
Venting Requirements .............................................................. 5
INSTALLATION INSTRUCTIONS – ELECTRIC DRYER.......... 7
Install Ventwork ..........................................................................7
Prepare Dryer..............................................................................7
Electrical Connection..................................................................8
Level and Exhaust the Dryer ......................................................9
Check Operation ......................................................................10
Your safety and the safety of others are very important.
We have provided many important safety messages in this manual and on your appliance. Always read and obey all safety
messages.
This is the safety alert symbol.
This symbol alerts you to potential hazards that can kill or hurt you and others.
All safety messages will follow the safety alert symbol and either the word “DANGER” or “WARNING.”
These words mean:
You can be killed or seriously injured if you don't immediately
DANGER
follow instructions.
can be killed or seriously injured if you don't
You
WARNING
All safety messages will tell you what the potential hazard is, tell you how to reduce the chance of injury, and tell you what can
happen if the instructions are not followed.
instructions.
follow
IMPORTANT SAFETY INSTRUCTIONS
To reduce the risk of fire, electric shock, or injury to persons when using the dryer, follow basic precautions,
WARNING:
including the following:
■ Read all instructions before using the dryer.
■ Do not place items exposed to cooking oils in your dryer.
Items contaminated with cooking oils may contribute to
a chemical reaction that could cause a load to catch fire.
■ Do not dry articles that have been previously cleaned in,
washed in, soaked in, or spotted with gasoline, drycleaning solvents, other flammable, or explosive
substances as they give off vapors that could ignite or
explode.
■ Do not allow children to play on or in the dryer. Close
supervision of children is necessary when the dryer is
used near children.
■ Before the dryer is removed from service or discarded,
remove the door to the drying compartment.
■ Do not reach into the dryer if the drum is moving.
■ Do not install or store the dryer where it will be exposed
to the weather.
■ Do not tamper with controls.
■ Do not repair or replace any part of the dryer or attempt
any servicing unless specifically recommended in this
Use and Care Guide or in published user-repair instructions that you understand and have the skills to carry out.
■ Do not use fabric softeners or products to eliminate static
unless recommended by the manufacturer of the fabric
softener or product.
■ Do not use heat to dry articles containing foam rubber or
similarly textured rubber-like materials.
■ Clean lint screen before or after each load.
■ Keep area around the exhaust opening and adjacent sur-
rounding areas free from the accumulation of lint,dust,
and dirt.
■ The interior of the dryer and exhaust vent should be
cleaned periodically by qualified service personnel.
■ See installation instructions for grounding requirements.
SAVE THESE INSTRUCTIONS
3
Location Requirements
IMPORTANT: Observe all governing codes and ordinances.
■ Check code requirements: Some codes limit or do not permit
installation of clothes dryers in garages, closets, or sleeping
quarters. Contact your local building inspector.
■ Make sure that lower edges of the cabinet, plus the back and
bottom sides of the dryer, are free of obstructions to permit
adequate clearance of air openings for combustion air. See
“Recessed Area and Closet Installation Instructions” for
minimum spacing requirements.
NOTE: The dryer must not be installed in an area where it will be
exposed to water and/or weather. If room temperature is below
7º C (45º F), automatic cycles may not shut off.
■ Maximum slope under entire dryer should not be more than
2.5 cm (1") . If slope is greater than 2.5 cm (1") , install
Extended Dryer Feet Kit, Part No. 279810. Clothes may not
tumble properly and automatic sensor cycles may not operate
correctly if dryer is not level. Floor must be able to support
dryer weight of 79.4 kg (175 lbs).
INSTALLATION REQUIREMENTS
Recessed Area and Closet Installation Instructions
This dryer may be installed in a recessed area or closet. For
recessed area and closet installations, minimum clearances can
be found on the serial tag on the dryer.
The installation spacing is in centimeters (inches) and is the
minimum allowable. Additional spacing should be considered for
ease of installation, servicing, and compliance with local codes
and ordinances.
If closet door is installed, the minimum unobstructed air opening
in the top and bottom is required. Louvered doors with equivalent
air openings are acceptable.
The dryer must be exhausted outdoors.
No other fuel-burning appliance may be installed in the same
closet as the dryer.
Tools and Parts
Gather the required tools and parts before starting installation.
Read and follow the instructions provided with any tools
listed here.
Tools needed
■ Flat-blade screwdriver
■ Phillips screwdriver
■ Adjustable wrench that opens to 2.5 cm (1")
■ Hex-head socket wrench
■ Level
■ 1/4" socket wrench or 1/4" nut driver
■ Utility knife
■ Vent clamps
■ Pipe-joint compound resistant to LP gas
■ Caulk gun and caulk (for installing new exhaust vent)
■ Tin snips
Parts supplied
Remove parts bag from dryer drum. Check that all parts were
included.
■ 4 leveling legs
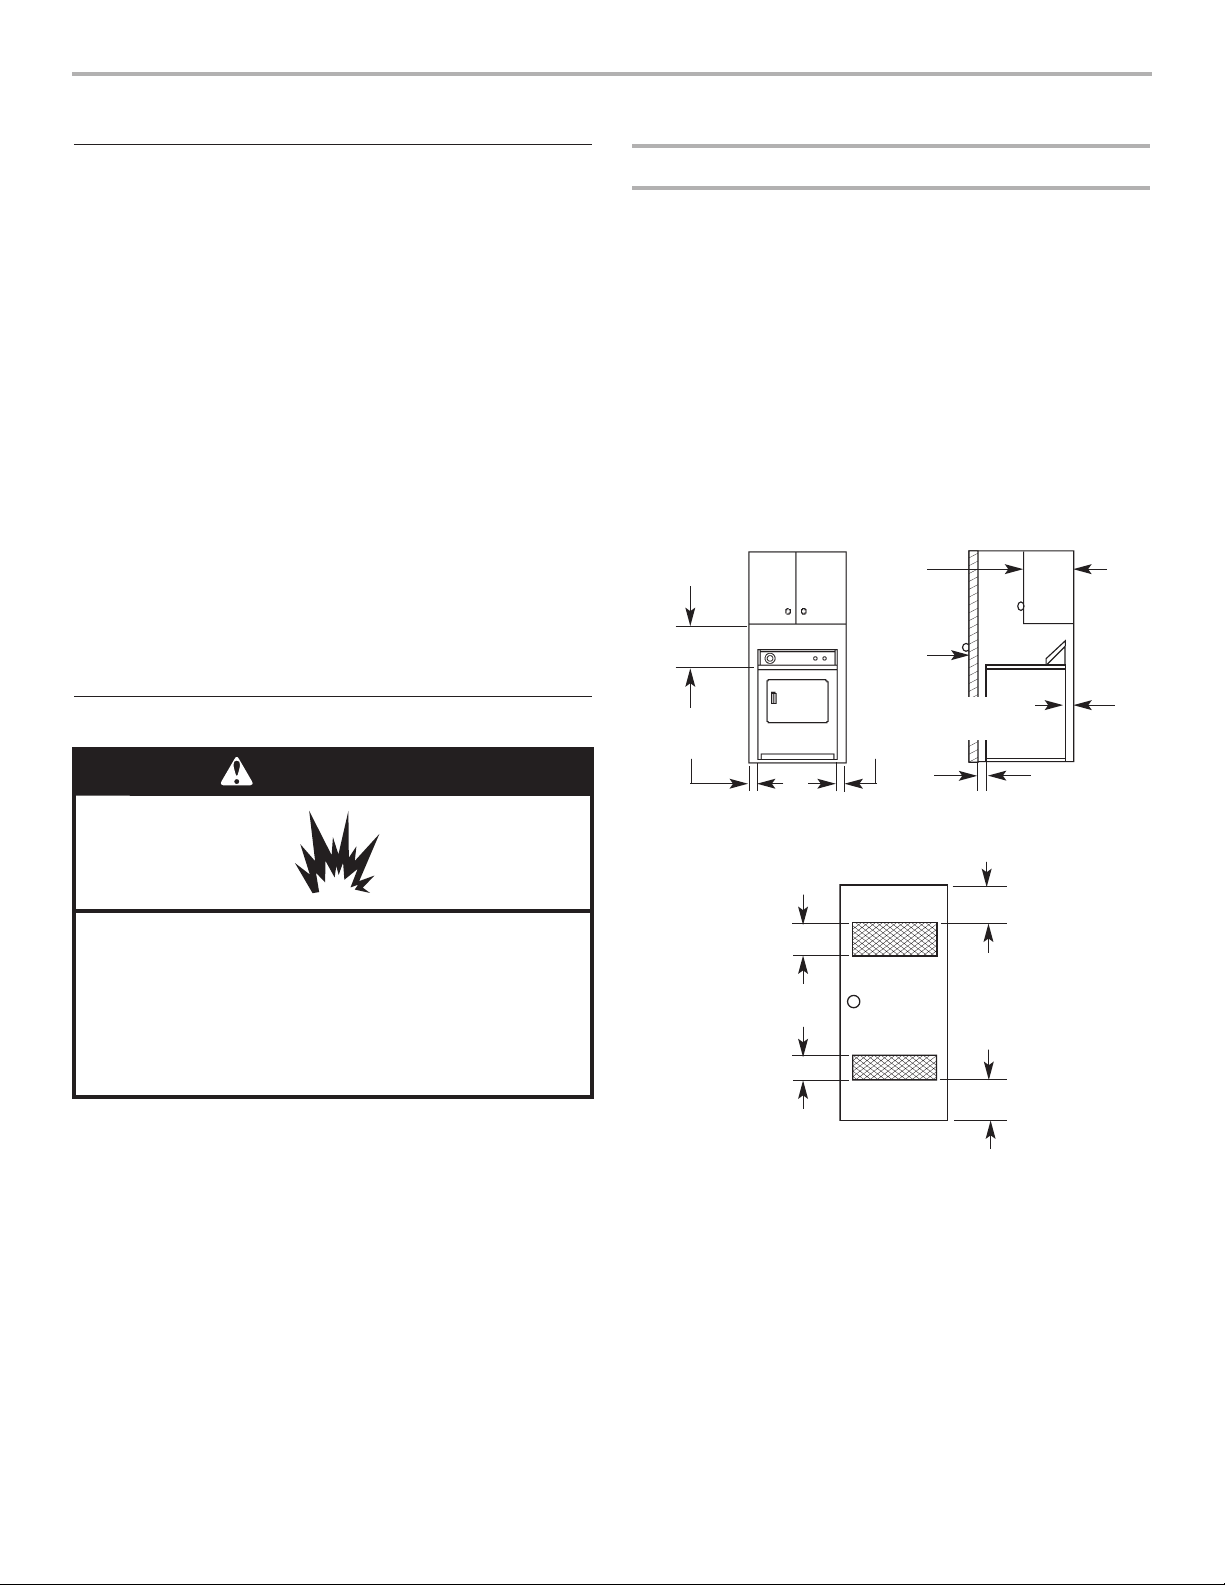
Recessed front view Closet side view
Minimum Installation Clearances
Additional clearances for wall, door and floor moldings may be required or if
external exhaust elbow is used.
closet
door
Front
View
7.6 cm (3")
7.6 cm (3")
155 cm
2
(24"2)
310 cm
2
(48"2)
*Opening is the minimum for a closet door.
Louvered doors with equivalent air openings are acceptable.
2.5 cm (1")
Closet
door
35.6 cm
(14") max.
2.5 cm (1")
2.5 cm (1")
45.7 cm
(18")*
10.2 cm
(4")
WARNING
Explosion Hazard
Keep flammable materials and vapors, such as
gasoline, away from dryer.
Place dryer at least 46 cm (18 inches) above the floor
for a garage installation.
Failure to do so can result in death, explosion, or fire.
4
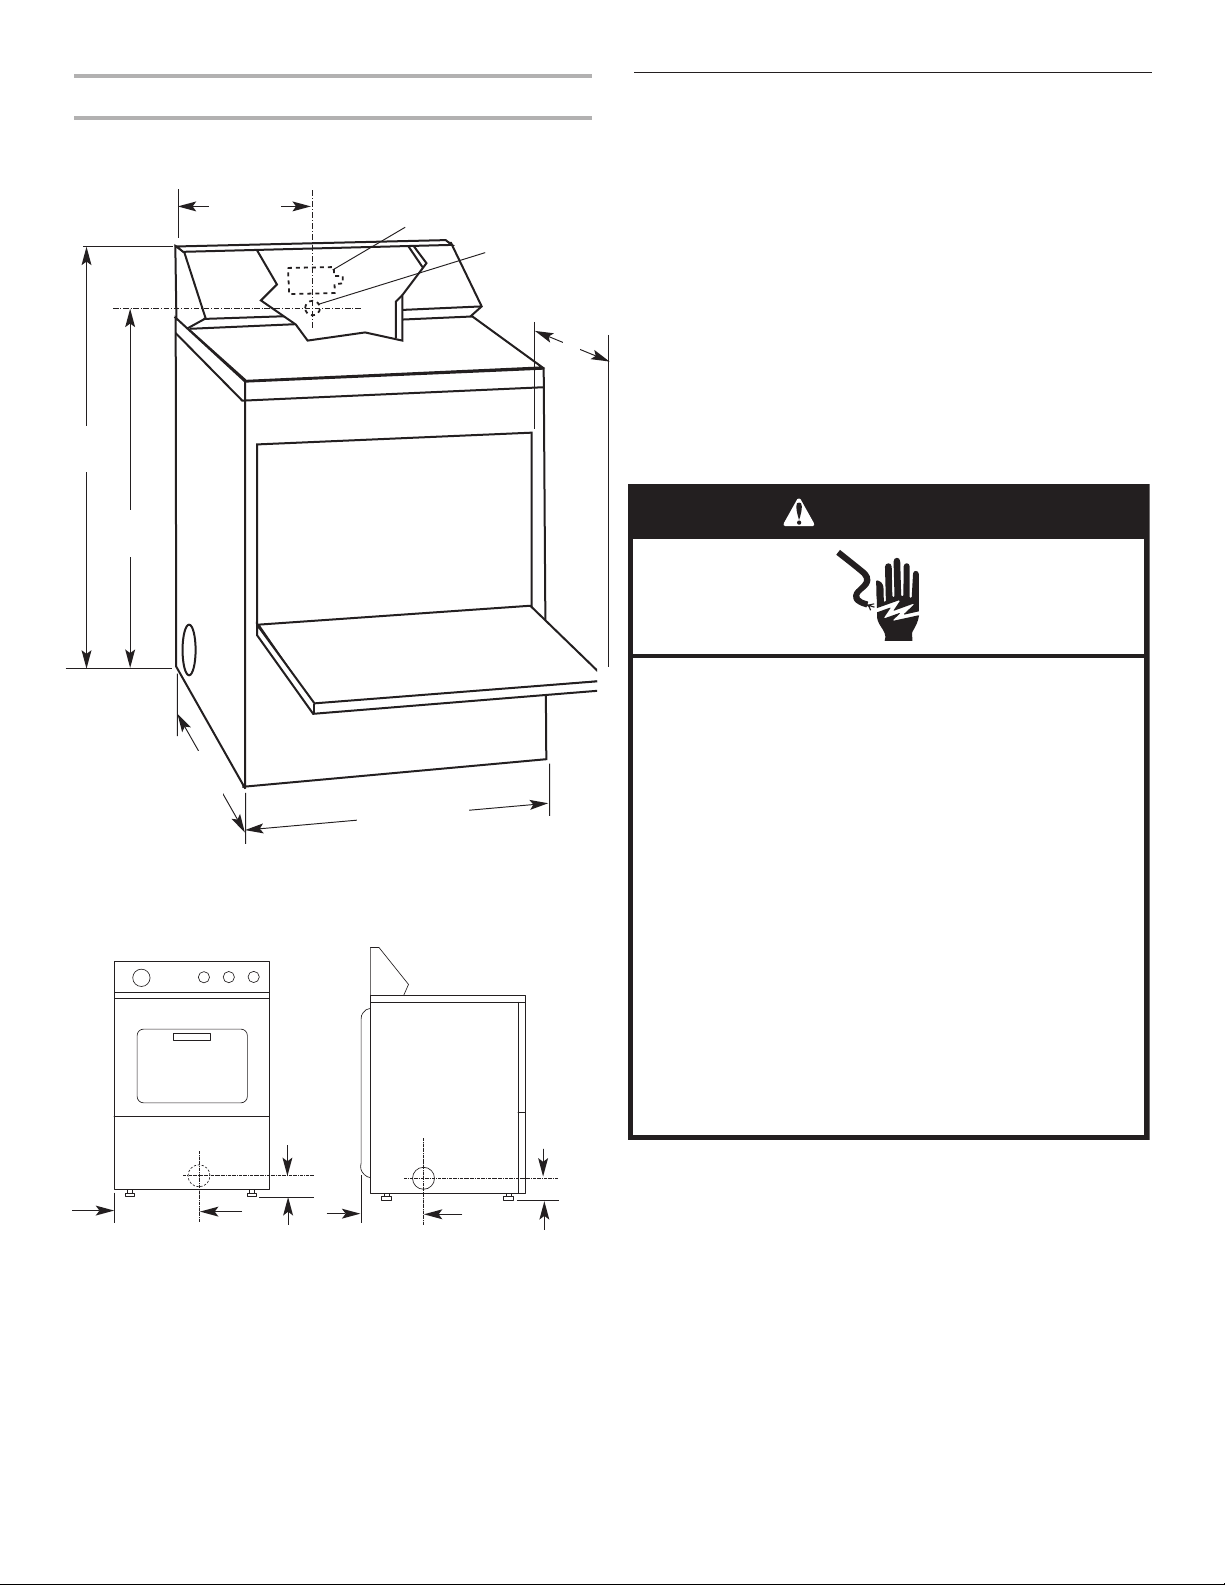
Product Dimensions
74.3 cm
(29-1/4")
terminal block cover
power supply
cord/cable
strain relief
109.5 cm
(43-1/8")
27.9 cm
(11")
Dimensions shown with feet extended 2.5 cm (1") from
bottom of dryer.
97.2 cm
(38-1/4")
68.6 cm (27")
35.6
cm
(14")
left or right
side exhaust
back
exhaust
10.8 cm
(4-1/4")
26 cm
(10-1/4")
35.9 cm
(14-1/8")
10.2 cm
(4")
Exhaust dimensions
The dryer door
extends 35.6 cm (14")
from the front of the
dryer when fully
opened.
Electrical Requirements
Important: Observe all governing codes and ordinances.
This dryer is supplied/fitted with an electricity supply cord and
European 16A plug. It should be connected to electricity supply
socket at the voltage shown on the rating plate. The minimum
supply fuse capacity should be 16A. The dryer must be
positioned so that the plug is accessible. If the fitted plug is not
used, the electrical connection must be carried out by a
competent electrician in accordance with local or national codes.
If the supply cord is damaged, it must be replaced with a
specially terminated cord by an authorized service agent or a
similarly competent person.
Do not use an adapter.
Do not use an extension cord.
If codes permit and an additional earth bond wire is used, it is
recommended that a qualified electrician determine that the earth
bond, path is adequate.
WARNING
Electrical Shock Hazard
Electrical earthing is required on this dryer.
Do not earth to a gas pipe.
Do not change the power supply cord plug. If it does
not fit the outlet, have a proper outlet installed by a
qualified electrician.
Do not have a fuse in the neutral or earthing circuit.
Do not use an extension cord with this dryer.
Check with a qualified electrician to be sure the dryer is
properly earthed.
Do not connect plug end of power supply cord into a
live receptacle before connecting power supply cord to
dryer terminal block.
Do not reuse old power supply cord.
Failure to follow these instructions could result in
death, fire, or serious injury.
5
Recommended Earthing Method
■ It is your responsibility to contact a qualified electrical installer
to ensure that the electrical installation is adequate and in
conformance with the National Electrical Code, ANSI/NFPA 70,
latest edition, and all local codes and ordinances.
Venting Requirements
WARNING: To reduce the risk of fire, this dryer MUST BE
EXHAUSTED OUTDOORS.
■ The dryer vent must not be connected into any gas vent,
chimney, wall, ceiling, or a concealed space of a building, or
any other vent used for venting.
■ Do not use an exhaust hood with a magnetic latch.
■ Do not install flexible metal vent in enclosed walls, ceilings or
floors.
■ 10 cm (4") heavy metal vent and clamps must be used.
■ Use clamps to seal all joints. Vent must not be connected or
secured with screws or other fastening devices which extend
into the interior of the vent. Do not use duct tape.
IMPORTANT: Observe all governing codes and ordinances.
Use a heavy metal vent. Do not use plastic or metal foil vent.
Rigid metal vent is recommended to prevent crushing and
kinking.
Flexible metal vent must be fully extended and supported when
the dryer is in its final position. Remove excess flexible metal vent
to avoid sagging and kinking that may result in reduced airflow
and poor performance.
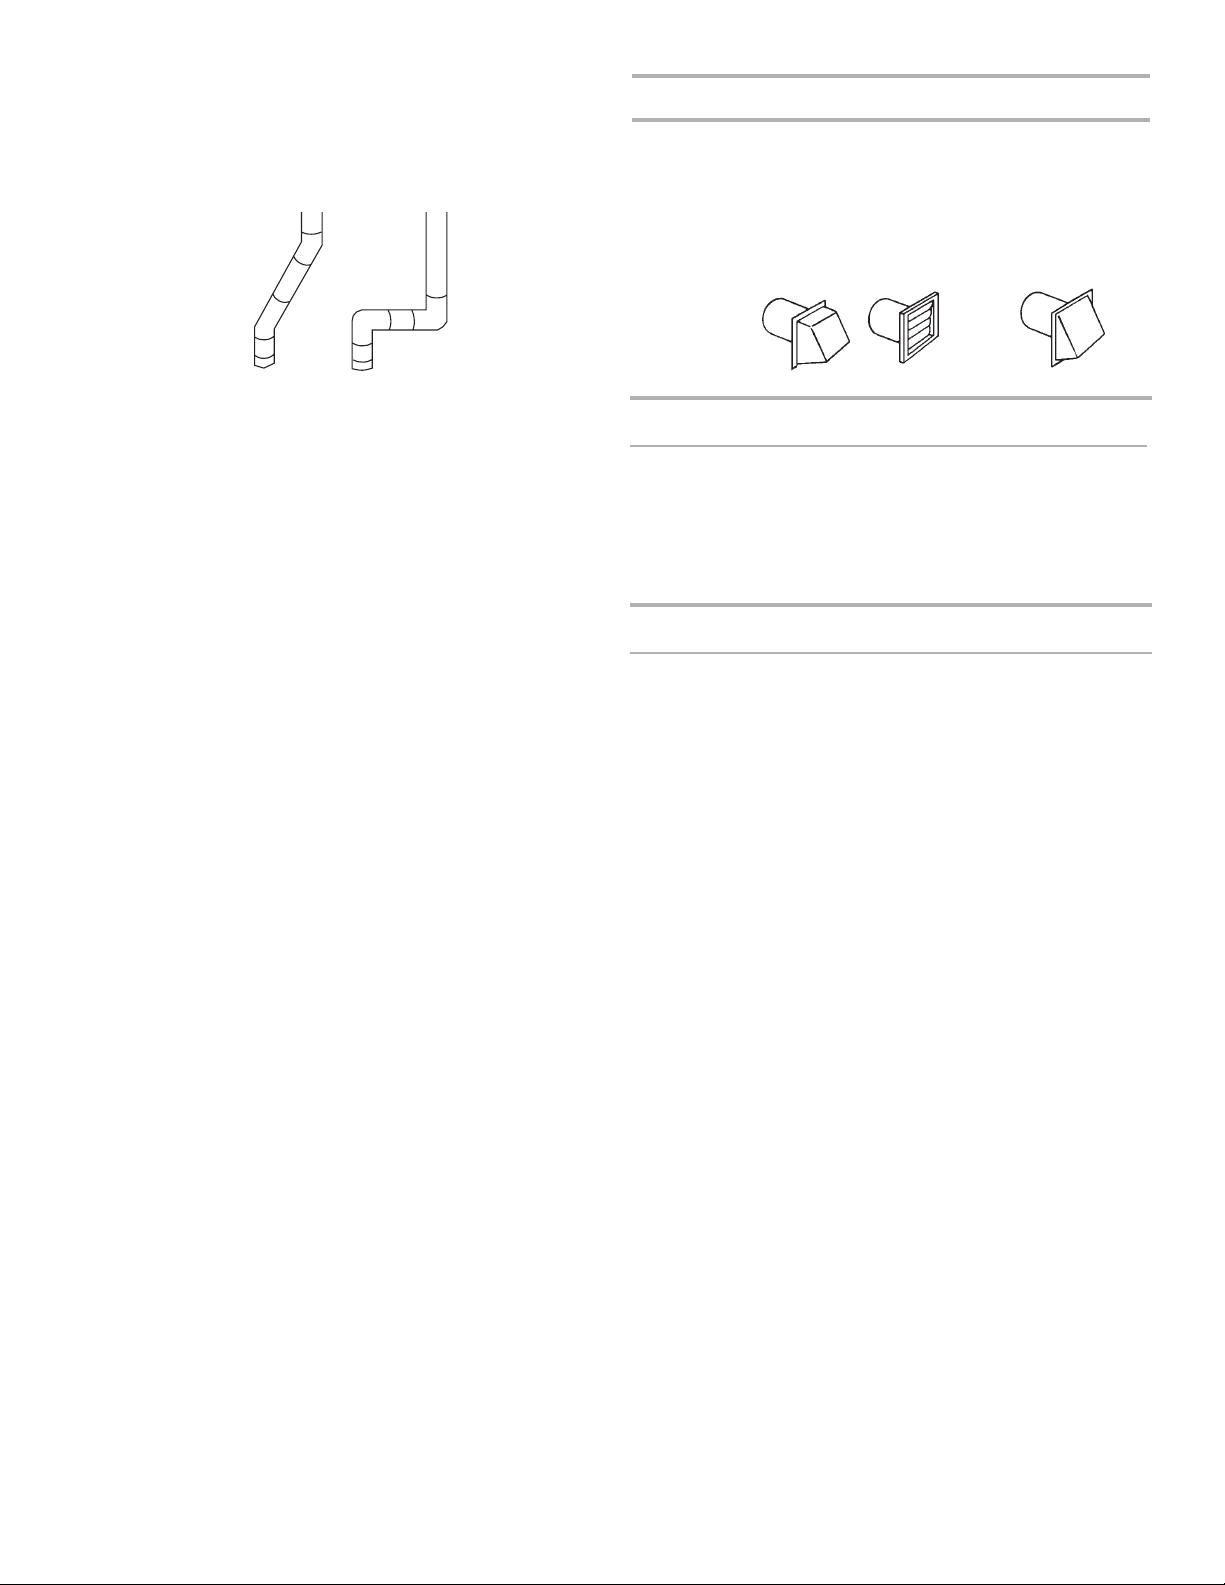
An exhaust hood should cap the vent to prevent rodents and
insects from entering the home or business.
Exhaust hood must be at least 30.5 cm (12") from the ground or
any object that may be in the path of the exhaust (such as
flowers, rocks or bushes).
WARNING
Fire Hazard
Use a heavy metal vent.
Do not use a plastic vent.
Do not use a metal foil vent.
Failure to follow these instructions can result in death
or fire.
EARTHING INSTRUCTIONS
■
For an earthed, cord-connected dryer:
This dryer must be earthed. In the event of a malfunction or
breakdown, earthing will reduce the risk of electric shock by
providing a path of least resistance for electric current. This
dryer uses a cord having an equipment-earthing conductor
and an earthing plug. The plug must be plugged into an
appropriate outlet that is properly installed and earthed in
accordance with all local codes and ordinances.
■
For a permanently connected dryer:
This dryer must be connected to a earthed metal, permanent
wiring system, or an equipment-earthing conductor must be
run with the circuit conductors and connected to the
equipment-earthing terminal or lead on the dryer.
WARNING: Improper connection of the equipment-
earthing conductor can result in a risk of electric shock.
Check with a qualified electrician or service representative or
personnel if you are in doubt as to whether the dryer is
properly earthed. Do not modify the plug on the power
supply cord: if it will not fit the outlet, have a proper outlet
installed by a qualified electrician.
SAVE THESE INSTRUCTIONS
6
Vent System Length
Maximum length of vent system depends upon the type of vent
used, number of elbows and type of exhaust hood. The maximum
length for both rigid and flexible vent is shown in the chart.
For vent systems not covered by the vent specification chart
(such as multiple unit hookups, plenums, and power-assist fans),
see Whirlpool Service Manual, “Exhausting Whirlpool Dryers,”
Part No. LIT603197, available from your Whirlpool parts
distributor.
If dryer is installed in a confined area, such as a bedroom,
bathroom or closet, provision must be made for enough air for
combustion and ventilation. (Check governing codes and
ordinances.) See “Recessed Area and Closet Installation
Instructions” in the “Location Requirements” section.
A four-inch outlet hood is preferred. However, a 6.4 cm (2¹⁄₂")
outlet exhaust hood may be used. A 6.4 cm (2¹⁄₂") outlet creates
greater back pressure than other hood types. For permanent
installation, a stationary vent system is required.
No. of 90° turns
No. of 90° turns
Flexible Metal Vent
10.2 cm (4") Diameter Exhaust Hoods
Maximum Vent Length
15.8 m (52 ft.)
13.4 m (44 ft.)
11.0 m (36 ft.)
8.2 m (27 ft.)
6.1 m (20 ft.)
9.4 m (31 ft.)
7.9 m (26 ft.)
6.7 m (22 ft.)
6.1 m (20 ft.)
5.5 m (18 ft.)
0
1
2
3
4
0
1
2
3
4
13.4 m (44 ft.)
11.0 m (36 ft.)
8.5 m (28 ft.)
6.4 m (21 ft.)
4.3 m (14 ft.)
7.0 m (23 ft.)
5.5 m (18 ft.)
4.3 m (14 ft.)
3.7 m (12 ft.)
3.0 m (10 ft.)
Box Hood and
Louvered Style
Angled Hood Style
Box Hood and
Louvered Style
Angled Hood Style
Rigid Metal Vent
If using an existing vent system, clean lint from the entire length
of the system and make sure exhaust hood is not plugged with
lint. Replace any plastic or metal foil vent with rigid metal or
flexible metal vent.
Plan installation to use the fewest number of elbows and turns.
Avoid making 90º turns.
Allow as much room as possible when using elbows or making
turns. Bend vent gradually to avoid kinking.
The vent can be routed up, down, left, right, behind the dryer or
straight out the back of the dryer.
Service check: Back pressure in any exhaust system used must
not exceed 15.2 mm (0.6") in water column, measured with an
incline manometer at the point that exhaust vent connects to
dryer.
The exhaust outlet is located at the center of the rear of the dryer.
The design of the flue system should ensure that any condensate
formed when operating the appliance is either retained and
subsequently evaporated or discharged. Following these
installation instructions should adequately meet this requirement.
A
B
Exhaust Air Flow
A. Better
B. Good
7
INSTALLATION INSTRUCTIONS – ELECTRIC DRYER
Install Ventwork
1. Install exhaust hood. Use caulking compound to seal exterior
wall opening around exhaust hood.
2. Connect exhaust vent to hood. (Exhaust vent MUST fit inside
hood.) Secure vent to hood with a 100 mm (4") clamp.
3. Run exhaust vent to dryer location. Use the straightest path
possible. Avoid 90° turns. Use 100 mm (4") clamps to secure
vent peices. Tin snips may be needed to cut vent to required
length.
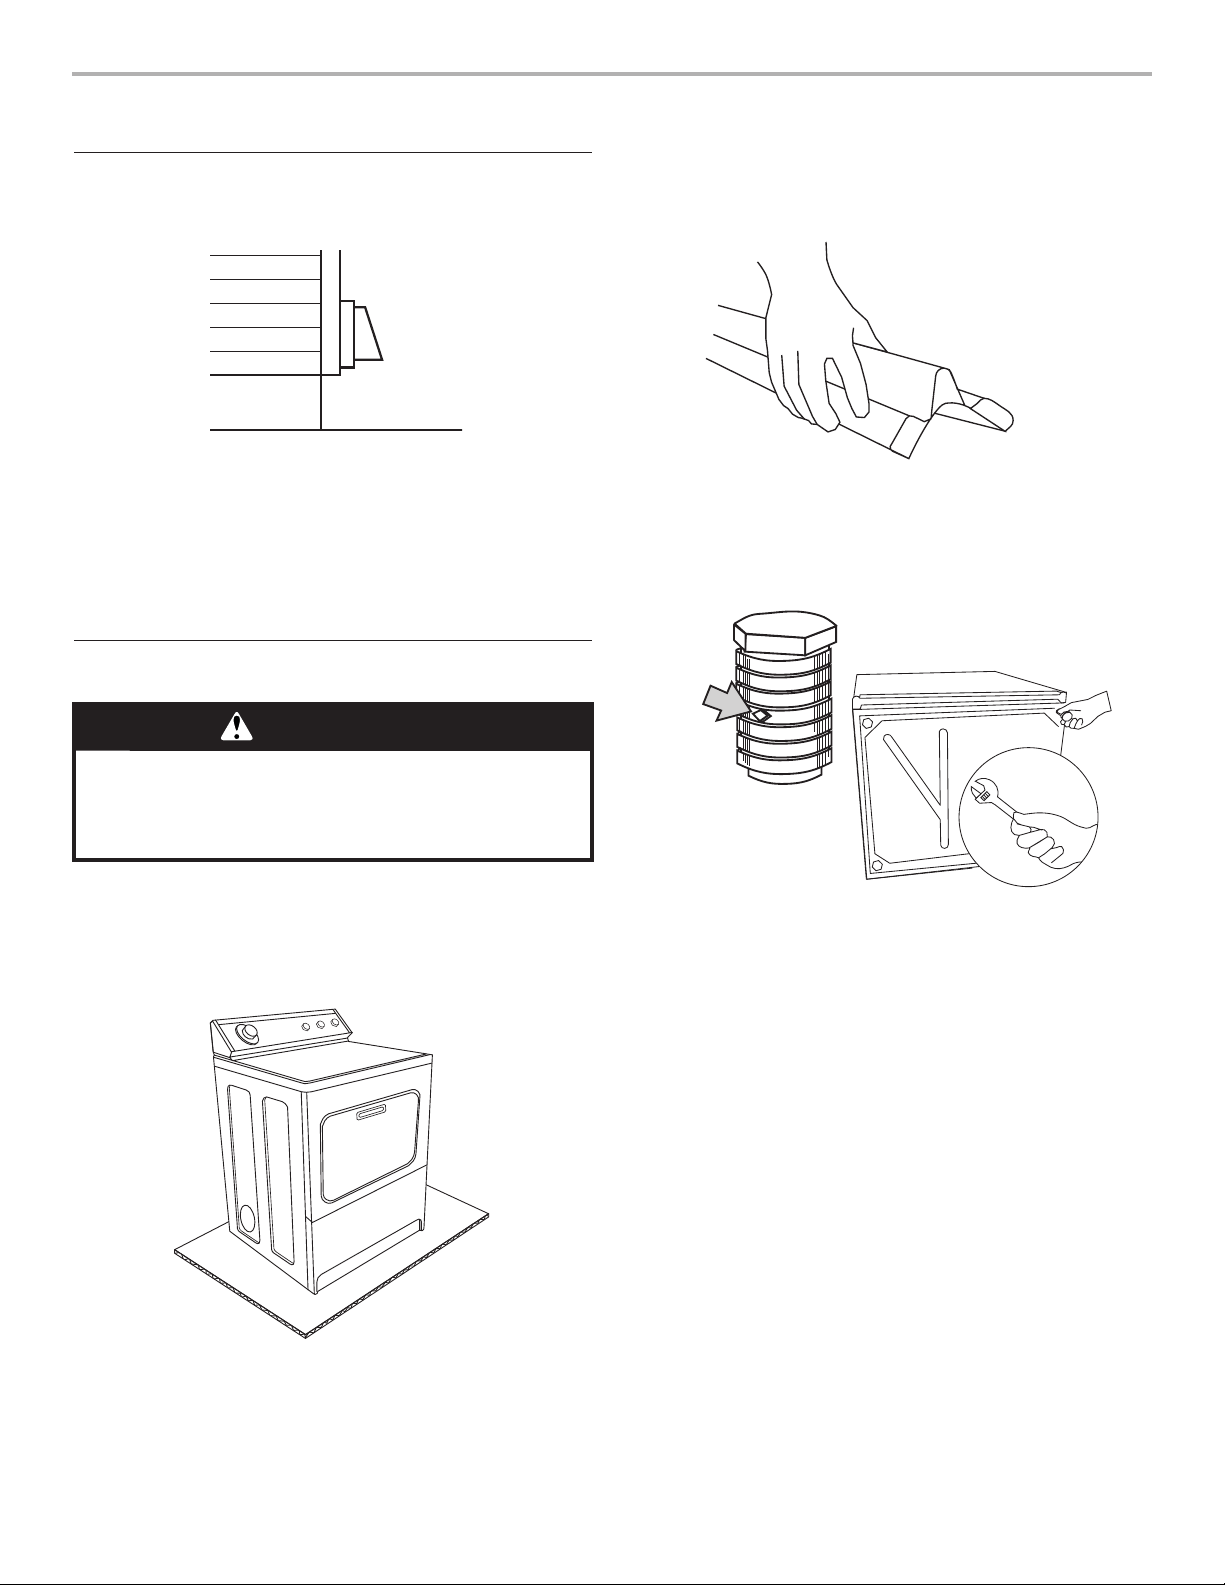
2. Take two cardboard corners from dryer carton and place
them on floor in back of dryer. Firmly grasp body of dryer
and gently lay it on its back on the cardboard corners.
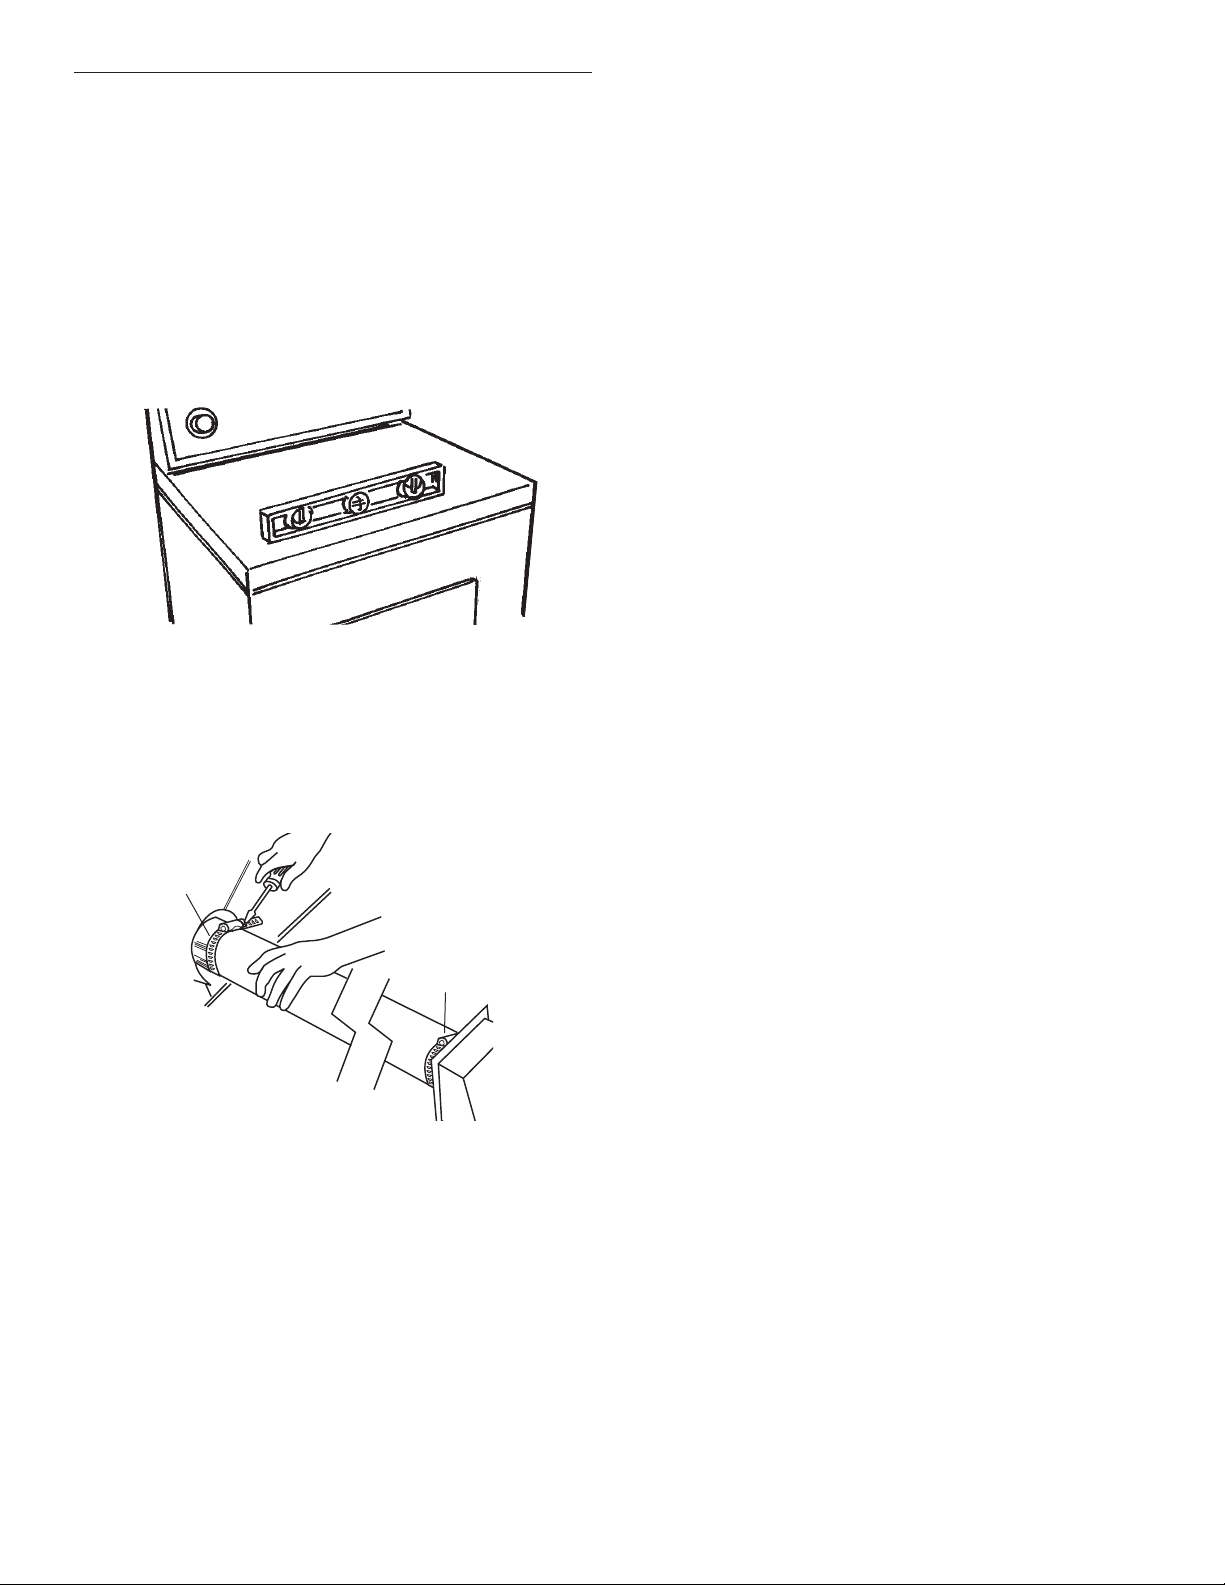
3. Start to screw legs into holes by hand. Use an adjustable
wrench or 2.5 cm (1") hex-head socket wrench to finish
turning legs until you reach the ridge with the diamond
marking.
4. Stand dryer up on cardboard or hardboard.
diamond
marking
Prepare Dryer
1. Remove tape from dryer cabinet. Open dryer door and
remove tape from dryer drum. (Not all dryer drums are
taped.) Remove drying rack, if included. Turn dryer drum
counterclockwise to make sure all tape was removed. Wipe
drum with damp cloth to remove any dust.
WARNING
Excessive Weight Hazard
Use two or more people to move and install dryer.
Failure to do so can result in back or other injury.
8
Electrical Connection
Plug supply cord into an earthed outlet. It should be connected to
an electricity supply socket at the voltage shown on the rating
plate. The minimum supply fuse capacity should be 16A. The
dryer must be positioned so that the plug is accessible. If the
fitted plug is not used, the electrical connection must be carried
out by a competent electrician in accordance with local or
national codes.
If the supply cord is damaged, it must be replaced with a
specially terminated cord by an authorized service agent or a
similarly competent person.
Do not use an adapter.
Do not use an extension cord.
Important: Observe all governing codes and ordinances.
If codes permit and an additional earth bond wire is used, it is
recommended that a competent electrician determine that the
earth bond path is adequate.
WARNING
Electrical Shock Hazard
Electrical earthing is required on this dryer.
Do not earth to a gas pipe.
Do not change the power supply cord plug. If it does
not fit the outlet, have a proper outlet installed by a
qualified electrician.
Do not have a fuse in the neutral or earthing circuit.
Do not use an extension cord with this dryer.
Check with a qualified electrician to be sure the dryer is
properly earthed.
Do not connect plug end of power supply cord into a
live receptacle before connecting power supply cord to
dryer terminal block.
Do not reuse old power supply cord.
Failure to follow these instructions could result in
death, fire, or serious injury.
9
Dryer must be level to reduce noise and assure proper
performance.
Slide dryer onto cardboard or hardboard before moving across
floor to prevent floor damage.
1. Move dryer close to its permanent location. Leave enough
room to connect exhaust vent. Remove cardboard or
hardboard from under dryer.
2. Check levelness of dryer by placing a level on top of dryer,
first side to side, then front to back. If dryer is not level,
adjust dryer legs up or down.
3. If legs are not long enough to level dryer, order Extended
Dryer Feet Kit, Part No. 279810 (sold two legs per kit), from
your dealer.
4. Connect exhaust vent to exhaust outlet in dryer. The exhaust
vent must fit over the dryer exhaust outlet and inside the
exhaust hood vent.
Use 100 mm (4") vent clamps to seal all joints and to secure
exhaust vent to dryer exhaust outlet.
5. Move dryer into final position.
Level and Exhaust the Dryer
10.2 cm (4")
clamp
10.2 cm (4")
clamp

10
1. Check that you:
■ did not skip any steps.
■ installed all parts.
■ properly installed dryer legs.
■ leveled dryer.
■ have secured all exhaust vent joints with 100 mm (4")
clamps.
■ have all the tools you started with.
2. Plug power supply cord into earthed outlet or connect direct
wire to power supply. Turn power supply on.
3. Read the Use and Care Guide to fully understand your new
dryer. Select a full heat cycle (not the air cycle) and start
dryer. After five minutes, open dryer door. You should feel
heat inside dryer.
If dryer does not operate properly, check the following:
■ electrical supply is connected.
■ house fuse is intact and tight; or circuit breaker has not
tripped.
■ dryer door is closed.
■ controls are set in a running or “On” position.
■ start button has been pushed firmly.
If dryer makes an unusual noise, check that the dryer is level.
Check Operation
Te chnical Specification
Moving dryer to a new location?
Check with a licensed electrician to confirm that supply voltage
at new home matches voltage specified on the model/serial
rating plate.
Shut off
electrical supply
to dryer.
Disconnect
power supply
cable from dryer.
Tape top
to cabinet.
Ta pe
door to
front
panel.
Tur n
leveling
legs all the
way in.
Slide dryer onto cardboard or hardboard
before moving it across the floor to
prevent damaging floor covering.
(see rating plate in door opening for full model details)
220-240V ~ 50 Hz, 1ph
3100W, IPX4
Clothes capacity: 9.1 kg max.

ÍNDICE
SEGURIDAD DE LA SECADORA
SEGURIDAD DE LA SECADORA.............................................. 11
REQUISITOS DE INSTALACIÓN .............................................. 12
Piezas y herramientas.............................................................. 12
Requisitos de ubicación .......................................................... 12
Requisitos eléctricos................................................................ 13
Requisitos de ventilación ...................................................... 14
INSTRUCCIONES DE INSTALACIÓN – SECADORA
ELÉCTRICA ............................................................................ 16
Instalación de la ventilación ....................................................16
Preparación de la secadora......................................................16
Conexión eléctrica ....................................................................17
Nivelación y ventilación de la secadora ..................................18
Verifique el funcionamiento......................................................19
11
Su seguridad y la seguridad de los demás es muy importante.
Hemos incluido muchos mensajes importantes de seguridad en este manual y en su electrodoméstico. Lea y obedezca
siempre todos los mensajes de seguridad.
Este es el símbolo de advertencia de seguridad.
Este símbolo le llama la atención sobre peligros potenciales que pueden ocasionar la muerte o una lesión
a usted y a los demás.
Todos los mensajes de seguridad irán a continuación del símbolo de advertencia de seguridad y de la palabra
“PELIGRO” o “ADVERTENCIA”.
Estas palabras significan:
Si no sigue las instrucciones de inmediato, usted puede morir
PELIGRO
ADVERTENCIA
o sufrir una lesión grave.
Si no sigue las instrucciones, usted puede morir o sufrir una
lesión grave.
Todos los mensajes de seguridad le dirán el peligro potencial, le dirán cómo reducir las posibilidades de sufrir una lesión y lo
que puede suceder si no se siguen las instrucciones.
INSTRUCCIONES IMPORTANTES DE SEGURIDAD
A fin de reducir el riesgo de incendio, descarga eléctrica o de daño a las personas que usen la secadora,
ADVERTENCIA:
deben seguirse las precauciones básicas, incluidas las siguientes:
■ Lea todas las instrucciones antes de usar la secadora..
■ No coloque los objetos expuestos a aceite para cocinar en
su secadora. Los objetos expuestos a aceites para cocinar
pueden contribuir a una reacción química que podría causar
que una carga se inflame.
■ No seque artículos que ya se hayan limpiado, lavado,
remojado o manchado con gasolina, disolventes de limpieza
en seco, u otras sustancias inflamables o explosivas ya que
despiden vapores que pueden encenderse o causar una
explosión.
■ No permita que jueguen los niños sobre o dentro de la
secadora. Es necesaria la cuidadosa vigilancia de los niños
toda vez que se use la secadora cerca de ellos.
■ Quite la puerta de la secadora al compartimiento de secado
antes de ponerla fuera de funcionamiento o de descartarla.
■ No introduzca las manos en la secadora cuando el tambor
está en movimiento
■ No instale o almacene esta secadora donde estará expuesta
a la intemperie.
■ No trate de forzar los controles.
■ No repare o reemplace ninguna pieza de la secadora ni trate
de repararla a menos que esto se recomiende
específicamente en este Manual de uso y cuidado o en
instrucciones de reparación publicadas para el usuario que
usted comprenda y sólo si cuenta con la experiencia
necesaria para llevar a cabo dicha reparación.
■ No utilice suavizantes de telas o productos para eliminar el
estático de prendas a menos que lo recomiende el
fabricante de suavizante de telas o del producto en uso.
■ No utilice calor para secar prendas que contengan espuma
de caucho o materiales de caucho con textura similar.
■ Limpie el filtro de pelusa antes y después de cada carga.
■ Mantenga el área alrededor de la abertura de ventilación y
entrada y las áreas adyacentes a esta abertura sin pelusa,
polvo o tierra.
■ La parte interior de la secadora y el ducto de escape se
deben limpiar periódicamente. Esta limpieza la debe llevar
a cabo un reparador calificado.
■ Vea la instrucciones de instalación para los requisitos de
conexión a tierra.
GUARDE ESTAS INSTRUCCIONES

Requisitos de ubicación
IMPORTANTE: Observe todos los códigos y reglamentos
aplicables.
■ Verifique los requisitos de los códigos. Algunos códigos
limitan, o no permiten, la instalación de la secadora en
garajes, clósets o en dormitorios. Póngase en contacto con el
inspector de construcciones de su localidad.
■ Asegúrese de que los bordes inferiores del armario, además
de la parte posterior y los lados de la secadora, estén libres
de obstrucciones, para permitir el espacio adecuado de
aberturas para la combustión de aire. Vea “Instrucciones para
la instalación empotrada o en clóset” para los requisitos
mínimos de espacio.
NOTA: No debe instalarse la secadora en un área en donde
pueda estar expuesta al agua y/o a la intemperie. Es posible que
los ciclos automáticos no se apaguen si la temperatura de la
habitación es inferior a 7º C (45º F).
REQUISITOS DE INSTALACIÓN
Instrucciones para la instalación empotrada o en
clóset
Esta secadora podrá instalarse en un área empotrada o en un
clóset. Para las instalaciones en áreas empotradas o clósets, se
pueden encontrar los espacios mínimos en la etiqueta de la serie
de la secadora.
El espacio de instalación es en centímetros (pulgadas) y es el
mínimo permitido. Debe considerarse espacio adicional para
facilitar la instalación, el servicio técnico y el cumplimiento de los
códigos y ordenanzas locales.
Si se ha instalado la puerta del clóset, se requieren aberturas
mínimas de ventilación sin obstrucciones en la parte superior e
inferior de la puerta. Se aceptan puertas tipo persianas con
aberturas de aire equivalentes.
La secadora deberá ventilarse al exterior.
No se puede instalar otro electrodoméstico que usa combustible
en el mismo clóset en que se encuentra la secadora.
Piezas y herramientas
Reúna las herramientas y piezas necesarias antes de comenzar la
instalación. Lea y siga las instrucciones provistas con cualquiera
de las herramientas enlistadas aquí.
Herramientas necesarias
■ Destornillador de hoja plana
■ Destornillador Phillips
■ Llave de tuercas ajustable que se abra a 2,5 cm (1")
■ Llave de tubo de cabeza hexagonal
■ Nivel
■ Llave de tubo de 1/4" o llave de tuercas de 1/4"
■ Cuchillo para uso general
■ Abrazaderas para ducto
■ Pegamento para tuberías resistente a gas L.P.
■ Pistola y masilla para calafateo (para instalar el nuevo ducto
de escape)
■ Tijeras para lata
Piezas suministradas
Retire la bolsa de piezas del tambor de la secadora. Verifique
que estén todas las piezas.
■ 4 patas niveladoras
Vista frontal del lugar empotrado Vista lateral del clóset
Espacios mínimos para la instalación
Se podrían necesitar espacios libres adicionales para las molduras de la pared,
de la puerta y del piso, o si se usa un codo externo de ventilación.
Puerta
del clóset
Vista
frontal
7,6 cm (3")
7,6 cm (3")
155 cm
2
(24"2)
310 cm
2
(48"2)
* La abertura es la mínima para la puerta del clóset.
Se aceptan puertas tipo persianas con aberturas de aire equivalentes.
2,5 cm (1")
Puerta del
clóset
35,6 cm
(14") máx.
2,5 cm (1")
2,5 cm (1")
45,7 cm
(18")*
10,2 cm
(4")
■ El declive máximo debajo de toda la secadora deberá ser de
menos de 1" (2,5 cm). Si el declive es mayor que 1" (2,5 cm),
instale el juego de extensión de patas de la secadora, Pieza
No. 279810. La ropa quizás no rote adecuadamente y los
ciclos del sensor automático posiblemente no funcionen
debidamente si la secadora no está nivelada. El piso deberá
ser lo suficientemente fuerte como para soportar el peso de la
secadora de 79,4 kg (175 lbs.).
12
ADVERTENCIA
Peligro de explosión
Mantenga los materiales y vapores inflamables, tales
como la gasolina, alejados de la secadora.
Coloque la secadora a un mínimo de 46 cm sobre el
piso para la instalación en un garaje.
No seguir esta instrucción puede ocasionar la muerte,
explosión o incendio.

13
Medidas del producto
74,3 cm
(29-1/4")
tapa del bloque de
terminal
protector de
cables del
cable/cordón
de suministro
de energía
109,5 cm
(43-1/8")
27,9 cm
(11")
Las medidas que se muestran son con las patas
extendidas a 2,5 cm (1") de la parte inferior de la secadora.
97,2 cm
(38-1/4")
68,6 cm (27")
35,6
cm
(14")
ventilación lateral a
la izquierda o a la
derecha
Ducto de escape
posterior
10,8 cm
(4-1/4")
26 cm
(10-1/4")
35,9 cm
(14-1/8")
10,2 cm
(4")
Dimensiones del ducto de escape
La puerta de la secadora se
extiende 35,6 cm (14") del
frente de la misma cuando
está completamente abierta.
Requisitos eléctricos
Importante: Observe todos los códigos y reglamentos aplicables.
Esta secadora está provista de un cable de suministro
eléctrico y un enchufe europeo de 16A. Deberá ser
conectada al receptáculo de suministro eléctrico con el
voltaje que se muestra en la placa de clasificación. La
capacidad mínima del fusible de suministro deberá ser de
16A. La secadora deberá colocarse de manera que el
enchufe esté accesible. Si no se usa el enchufe provisto, la
conexión eléctrica deberá llevarse a cabo por parte de un
electricista capacitado, según los códigos locales o
nacionales.
Si se ha dañado el cable de suministro, deberá reemplazarse con
un cable especialmente terminado, por parte de un agente de
servicio autorizado u otra persona similarmente calificada.
No use un adaptador.
No use un cable eléctrico de extensión.
Si los códigos lo permiten y se emplea una ligadura de conexión
a tierra adicional, es recomendable que un electricista calificado
determine si la trayectoria de conexión a tierra de la ligadura es
adecuada.
Peligro de choque eléctrico
Se requiere una conexión eléctrica a tierra para esta
secadora.
No conecte a tierra a un tubo de gas.
No cambie el enchufe del cable de suministro de
energía. Si no encaja en el contacto, consulte a un
electricista competente para instalar un contacto
adecuado.
No tenga un fusible en el circuito neutro o de conexión
a tierra.
No use un cable eléctrico de extensión con esta
secadora.
Verifique con un electricista calificado para asegurarse
de que la secadora esté conectada a tierra como es
debido.
No conecte el extremo del enchufe del cable de
suministro eléctrico en un contacto activado, antes de
conectar el cable de suministro eléctrico al bloque de
terminal de la secadora.
No vuelva a usar un cable de suministro eléctrico viejo.
No seguir estas instrucciones puede ocasionar la
muerte, incendio o lesiones graves.
ADVERTENCIA

14
INSTRUCCIONES PARA LA CONEXIÓN A TIERRA
■
Para la conexión de una secadora mediante cable
eléctrico conectado a tierra:
Esta secadora debe estar conectada a tierra. En el caso de
funcionamiento defectuoso o avería, la conexión a tierra
reducirá el riesgo de choque eléctrico al proporcionar una
vía de menor resistencia para la corriente eléctrica. Esta
secadora usa un cable que cuenta con un conductor para la
conexión a tierra del equipo y un enchufe de conexión a
tierra. El enchufe debe conectarse en un contacto apropiado,
que esté debidamente instalado y conectado a tierra de
acuerdo con todos los códigos y ordenanzas locales.
■
Para la conexión permanente de una secadora:
Esta secadora debe estar conectada a un sistema de
cableado de metal permanente, conectado a tierra, o se
debe tender un conducto para la conexión a tierra del equipo
con los conductores de circuito y conectado al terminal de
tierra del equipo o al conductor de suministro de la
secadora.
ADVERTENCIA: La conexión indebida del conductor
para la conexión a tierra del equipo puede ocasionar un
riesgo de choque eléctrico.
Si no está seguro de que la conexión a tierra de la secadora
es la adecuada, verifíquela con un electricista o
representante o personal de servicio competente. No
modifique el enchufe del cable de suministro de energía: si
no encaja en el contacto, consulte a un electricista
competente para instalar un contacto adecuado.
GUARDE ESTAS INSTRUCCIONES
Método recomendado de conexión a tierra
■ Usted es responsable de ponerse en contacto con un
instalador eléctrico calificado para asegurarse de que la
instalación eléctrica sea adecuada y de conformidad con el
National Electrical Code (Código Nacional Eléctrico),
ANSI/NFPA 70 - última edición y con todos los códigos y
ordenanzas locales.
Requisitos de ventilación
ADVERTENCIA: Para reducir el riesgo de incendio, esta
secadora DEBE VENTILARSE HACIA EL EXTERIOR.
■ El ducto de escape de la secadora no debe conectarse en
ningún ducto de escape de gas, chimenea, pared, techo o el
espacio oculto de un edificio ni ningún otro ducto que se use
para la ventilación.
■ No use capotas de ventilación con pestillos magnéticos.
■ No instale un ducto de escape de metal flexible en paredes,
techos o pisos encerrados.
■ Se debe usar un ducto de escape de metal pesado de 10 cm
(4") y abrazaderas.
■ Utilice abrazaderas para sellar todas las juntas. No debe
conectarse ni asegurarse el ducto de escape con tornillos ni
con ningún otro dispositivo que se extienda hacia el interior
de dicho ducto. No utilice cinta para ductos.
IMPORTANTE: Observe todos los códigos y reglamentos
aplicables.
Use un ducto de escape de metal pesado. No use ducto de
escape de plástico o de hoja de metal.
Se recomienda un ducto de escape de metal rígido para evitar
que se aplaste o se tuerza.
El ducto de escape de metal flexible debe extenderse y
sostenerse por completo cuando la secadora está en su
ubicación final. Quite el exceso del ducto de metal flexible para
evitar que se doble y se tuerza, lo cual podría dar lugar a una
reducción del flujo de aire y a un rendimiento insuficiente.
Una capota de ventilación debe tapar el ducto de escape para
evitar el ingreso de roedores e insectos a la casa o comercio.
La capota de ventilación debe estar por lo menos a 30,5 cm (12")
de distancia del piso o de cualquier objeto que pudiese estar en
el trayecto del ducto de escape (como flores, rocas o arbustos,
etc).
ADVERTENCIA
Peligro de Incendio
Use un ducto de escape de metal pesado.
No use un ducto de escape de plástico.
No use un ducto de escape de aluminio.
No seguir estas instrucciones puede ocasionar la
muerte o incendio.

15
Largo del sistema de ventilación
La longitud máxima del sistema de ventilación depende del tipo
de ducto que se use, el número de codos y el tipo de capota de
ventilación. La longitud máxima para el ducto de escape rígido y
flexible se muestra en el cuadro.
Para los sistemas de escape que no estén cubiertos en el cuadro
de especificación de la ventilación (tales como para conexión de
múltiples unidades, plénums y ventiladores de potencia), vea el
Manual de servicio de Whirlpool, “Ventilación de múltiples
secadoras”, Pieza N° LIT603197, disponible en el distribuidor de
partes Whirlpool.
Si la secadora está instalada en un área cerrada tal como un
dormitorio, baño o clóset, deberán tomarse las provisiones
necesarias para que haya aire suficiente para la combustión y la
ventilación. (Verifique los códigos y reglamentos aplicables.) Vea
“Instrucciones para la instalación empotrada o en clóset” en la
sección "Requisitos de ubicación”.
Se prefiere una capota de salida de cuatro pulgadas. Aún así,
podrá usarse una salida de escape de 6,4 cm (2¹⁄₂"). Una salida
de 6,4 cm (2¹⁄₂") ocasiona mayor contrapresión que los otros
tipos de capotas. Para una instalación permanente, se necesita
un sistema fijo de ventilación.
N° de vueltas de
90°
N° de vueltas
de 90°
Ducto de escape de metal flexible
1Capotas de ventilación de 10,2 cm (4") de diámetro
Longitud máxima del ducto de escape
15,8 m (52 pies)
13,4 m (44 pies)
11 , 0 m (36 pies)
8,2 m (27 pies)
6,1 m (20 pies)
9,4 m (31 pies)
7, 9 m (26 pies)
6,7 m (22 pies)
6,1 m (20 pies)
5,5 m (18 pies)
0
1
2
3
4
0
1
2
3
4
13,4 m (44 pies)
11 , 0 m (36 pies)
8,5 m (28 pies)
6,4 m (21 pies)
4,3 m (14 pies)
7, 0 m (23 pies)
5,5 m (18 pies)
4,3 m (14 pies)
3,7 m (12 pies)
3,0 m (10 pies)
Capota de
ventilación tipo
caja y tipo persiana
Capota de
ventilación angular
Capota de
ventilación tipo
caja y tipo persiana
Capota de
ventilación angular
Ducto de escape de metal rígido
Si se usa un sistema de ventilación existente, limpie la pelusa que
está en toda la longitud del sistema y asegúrese de que la capota
de ventilación no esté obstruida con pelusa. Reemplace cualquier
ducto de escape de plástico o de hoja de metal por uno de metal
rígido o de metal flexible.
Planifique la instalación a fin de usar el menor número posible de
codos y vueltas. Evite giros de 90º.
Cuando use codos o haga vueltas, deje todo el espacio que sea
posible. Doble el ducto gradualmente para evitar torceduras.
El ducto de escape puede ser dirigido hacia arriba, hacia abajo, a
la izquierda, derecha, detrás de la secadora o directamente hacia
atrás por la parte posterior de la misma.
Verificación de servicio: La presión posterior en cualquier sistema
de escape no deberá exceder los 15,2 mm (0,6") en la columna
de agua, medida con un manómetro inclinado en el punto en que
el ducto de escape se conecta con la secadora.
La salida de escape está ubicada en el centro de la parte
posterior de la secadora.
Al diseñar el sistema de tubería, deberá asegurarse de que la
condensación que se forme cuando el aparato esté en
funcionamiento, quedará retenida y se evaporará posteriormente
o se desechará. Al seguir estas instrucciones de instalación, este
requisito se cumplirá adecuadamente.
A
B
Flujo de aire de escape
A. Mejor
B. Bueno

16
INSTRUCCIONES DE INSTALACIÓN – SECADORA ELÉCTRICA
Instalación de la ventilación
1. Instale la capota de ventilación. Emplee una masilla de
calafateo para sellar la abertura de la pared externa
alrededor de la capota de ventilación.
2. Conecte el ducto de escape a la capota de ventilación. (El
ducto de escape DEBE encajar dentro de la capota.)
Asegure el ducto de escape a la capota de ventilación con
una abrazadera de 100 mm (4").
3. Extienda el ducto de escape a la ubicación de la secadora.
Use la trayectoria más recta posible. Evite giros de 90º.
Utilice abrazaderas de 100 mm (4") para asegurar las piezas
del ducto. Tal vez necesite tijeras para lata para cortar el
ducto en la longitud necesaria.
2. Tome dos esquinales de cartón de la caja de la secadora y
colóquelos sobre el piso, en la parte posterior de la secadora.
Sujete con firmeza el cuerpo de la secadora y colóquela sobre
su parte posterior, encima de los esquinales de cartón.
3. Comience a atornillar las patas con la mano. Use una llave
de tuercas ajustable o una llave de tubo de cabeza
hexagonal de 2,5 cm (1") para terminar de atornillar las patas
hasta alcanzar la marca en forma de diamante.
4. Ponga la secadora de pie sobre el cartón o madera dura.
dmarca en
forma de
diamante
Preparación de la secadora
1. Saque la cinta adhesiva del gabinete de la secadora. Abra la
puerta de la secadora y retire la cinta adhesiva del tambor
de la secadora. (No todos los tambores de la secadora están
pegados con cinta adhesiva.) Saque el estante de secado, si
está incluido. Gire hacia la izquierda el tambor de la
secadora, para asegurarse de que se haya quitado toda la
cinta adhesiva. Pásele un paño húmedo al tambor para
quitar el polvo.
ADVERTENCIA
Peligro de peso excesivo
Use dos o más personas para mover e instalar la
secadora.
No seguir esta instrucción puede ocasionar una lesión
en la espalda u otro tipo de lesiones.

17
Conexión eléctrica
Enchufe el cable de suministro en un contacto de conexión a
tierra. Deberá ser conectada a un receptáculo de suministro
eléctrico en el voltaje que se muestra en la placa de clasificación.
La capacidad mínima del fusible de suministro deberá ser de
16A. La secadora deberá colocarse de manera que el enchufe
esté accesible. Si no se usa el enchufe provisto, la conexión
eléctrica deberá llevarse a cabo por parte de un electricista
capacitado, según los códigos locales o nacionales.
Si se ha dañado el cable de suministro, deberá reemplazarse con
un cable especialmente terminado, por parte de un agente de
servicio autorizado u otra persona similarmente calificada.
No use un adaptador.
No use un cable eléctrico de extensión.
Importante: Observe todos los códigos y reglamentos aplicables.
Si los códigos lo permiten y se emplea una ligadura de conexión
a tierra adicional, es recomendable que un electricista
competente determine si la trayectoria de conexión a tierra de la
ligadura es adecuada.
Peligro de choque eléctrico
Se requiere una conexión eléctrica a tierra para esta
secadora.
No conecte a tierra a un tubo de gas.
No cambie el enchufe del cable de suministro de
energía. Si no encaja en el contacto, consulte a un
electricista competente para instalar un contacto
adecuado.
No tenga un fusible en el circuito neutro o de conexión
a tierra.
No use un cable eléctrico de extensión con esta
secadora.
Verifique con un electricista calificado para asegurarse
de que la secadora esté conectada a tierra como es
debido.
No conecte el extremo del enchufe del cable de
suministro eléctrico en un contacto activado, antes de
conectar el cable de suministro eléctrico al bloque de
terminal de la secadora.
No vuelva a usar un cable de suministro eléctrico viejo.
No seguir estas instrucciones puede ocasionar la
muerte, incendio o lesiones graves.
ADVERTENCIA

18
La secadora deberá estar nivelada para reducir el ruido y
asegurarse un rendimiento adecuado.
Deslice la secadora sobre cartón o madera dura antes de
desplazarla por el piso, para evitar que se dañe el mismo.
1. Trasládela cerca de su ubicación permanente. Deje suficiente
espacio para conectar la ventilación de escape. Quite el
cartón o madera que se encuentra debajo de la secadora.
2. Revise la nivelación de la secadora colocando un nivel en la
parte superior de la misma, primero de lado a lado y luego
del frente hacia atrás. Si la secadora no está nivelada, ajuste
las patas de la misma hacia arriba o hacia abajo.
3. Si las patas no son lo suficientemente largas como para
nivelar la secadora, pida un Juego de extensión de las patas
de la secadora, Pieza N° 279810 (se venden dos patas por
juego), en su distribuidor.
4. Conecte el ducto de escape a la salida de aire de la
secadora. El ducto de escape debe encajar sobre la salida
de aire de la secadora y dentro de la capota de ventilación.
Utilice abrazaderas para ducto de 100 mm (4") para sellar todas
las uniones y asegurar el ducto de escape a la salida de escape
de la secadora.
5. Mueva la secadora a su posición final.
Nivelación y ventilación de la secadora
abrazadera de 10,2
cm (4")
abrazadera de
10,2 cm (4")

19
1. Verifique que usted:
■ no se haya salteado ningún paso..
■ haya instalado todas las piezas.
■ haya instalado las patas niveladoras como es debido.
■ haya nivelado la secadora.
■ haya asegurado todas las uniones del ducto de escape con
abrazaderas de 100 mm (4").
■ tenga todas las herramientas con las que empezó.
2. Enchufe el cable de suministro de energía en el contacto de
conexión a tierra o conecte el alambre directo al suministro
de energía. Encienda el suministro de energía.
3. Lea el Manual de uso y cuidado para entender en su
totalidad cómo funciona la nueva secadora. Seleccione un
ciclo completo de calor (no un ciclo de aire) y ponga la
secadora en marcha. Después de cinco minutos, abra la
puerta de la secadora. Deberá sentir el calor en el interior de
la secadora.
Si la secadora no funciona adecuadamente, revise lo siguiente:
■ que el suministro eléctrico esté conectado.
■ que el fusible de la casa esté intacto y ajustado, o que no se
haya disparado el cortacircuitos.
■ que la puerta de la secadora esté cerrada.
■ que los controles estén fijados en una posición de
funcionamiento u "On" (encendido).
■ que se haya presionado con firmeza el botón de puesta en
marcha.
Si la secadora hace un ruido raro, revise si está nivelada.
Verifique el funcionamiento
Especificaciones técnicas
¿Va a mover la secadora a otro lugar?
Verifique con un electricista autorizado para confirmar que el
suministro de voltaje de la nueva casa coincida con el voltaje
especificado en la placa de clasificación de modelo/serie.
Cierre el
suministro
eléctrico a la
secadora.
Desconecte el
cable de
suministro de
energía de la
secadora.
Pegue la
parte
superior al
gabinete
con cinta
adhesiva.
Pegue la
puerta al
panel
frontal
con cinta
adhesiva
Gire las
patas
niveladoras
completam
ente hacia
adentro.
Deslice la secadora hacia un cartón o una
madera antes de desplazarla por el piso para
evitar que se dañe el revestimiento del mismo.
(vea la placa de clasificación en la abertura de la puerta para
obtener detalles completos acerca del modelo)
220-240V ~ 50 Hz, 1ph
3100W, IPX4
Capacidad de ropa: 9,1 kg. máx.

20
TABLE DES MATIERES
SECURITE DU SECHE-LINGE
SECURITE DU SECHE-LINGE.................................................. 20
EXIGENCES D'INSTALLATION ................................................ 21
Outillage et pièces .................................................................. 21
Exigences d'emplacement ...................................................... 21
Spécifications électriques........................................................ 22
Exigences concernant l’évacuation ........................................ 23
INSTRUCTIONS D’INSTALLATION – SECHE-LINGE
ELECTRIQUE .......................................................................... 25
Installation du dispositif d’évacuation......................................25
Préparation du sèche-linge ......................................................25
Raccordement électrique ........................................................26
Réglage de l’aplomb et évacuation du sèche-linge ................27
Contrôle du fonctionnement ....................................................28
Votre sécurité et celle des autres sont très importantes.
Nous donnons de nombreux messages de sécurité importants dans ce manuel et sur votre appareil électroménager.
Assurez-vous de toujours lire tous les messages de sécurité et de vous y conformer.
Voici le symbole d'alerte de sécurité.
Ce symbole d'alerte de sécurité vous signale les dangers potentiels de décès et de blessures graves.
Tous les messages de sécurité suivront le symbole d'alerte de sécurité et le mot “DANGER” ou “AVERTISSEMENT”.
Ces mots signifient :
Risque possible de décès ou de blessure grave si vous ne
DANGER
suivez pas immédiatement les instructions
Risque possible de décès ou de blessure grave si vous ne
AVERTISSEMENT
Tous les messages de sécurité vous diront quel est le danger potentiel, comment réduire le risque de blessure et ce qui peut se
produire en cas de non-respect des instructions.
suivez pas les instructions.
IMPORTANTES INSTRUCTIONS DE SECURITE
Afin de réduire le risque d'incendie, de choc électrique ou de blessures corporelles lors de
AVERTISSEMENT :
l'utilisation du sèche-linge, il convient d'observer certaines précautions fondamentales, notamment :
■ Lire toutes les instructions avant d'utiliser le sèche-linge.
■ Ne pas entreposer d’articles tâchés d’huile de cuisson
dans votre sèche-linge. Les articles couverts d’huile de
cuisson peuvent provoquer une réaction chimique et
enflammer la charge de vêtements.
■ Ne pas sécher d'articles qui ont été précédemment
nettoyés, lavés, trempés ou tachés avec de l'essence, des
solvants pour nettoyage à sec ou d'autres substances
inflammables ou explosives; ces substances dégagent des
vapeurs qui pourraient s'enflammer ou exploser.
■ Ne pas laisser des enfants jouer sur le sèche-linge ou à
l'intérieur de celui-ci. Une surveillance attentive des enfants
est nécessaire lorsque le sèche-linge est utilisé à proximité
d’enfants.
■ Ôter la porte ou le couvercle du sèche-linge avant de le
retirer pour entretien ou de le mettre au rebut.
■ Ne pas accéder à l’intérieur du sèche-linge pendant le
fonctionnement du tambour.
■ Ne pas installer ou entreposer le sèche-linge dans un
endroit où il sera exposé aux intempéries.
■ Ne pas effectuer d'intervention non autorisée sur les
commandes.
■ Ne pas réparer ou remplacer une quelconque pièce du
sèche-linge ou effectuer tout entretien qui ne serait pas
expressément recommandé dans le Guide d'utilisation et
d'entretien ou dans des instructions de réparation par
l'utilisateur que vous comprenez et que vous êtes capables
d'exécuter.
■ Ne pas utiliser d’adoucissants ou de produits pour éliminer
l’électricité statique à moins que ce ne soit recommandé
par le fabricant de l’adoucissant ou du produit.
■ Ne pas sécher à la chaleur des articles contenant du
caoutchouc mousse ou des matières similaires.
■ Nettoyer le filtre à peluches avant ou après chaque charge.
■ La zone située autour de l’ouverture d’évacuation et les
zones adjacentes doivent être propres, exemptes de
peluches et poussières.
■ L’intérieur du sèche-linge et le ventilateur d’évacuation
doivent être nettoyés régulièrement par un personnel
d’entretien qualifié..
■ Voir les instructions d’installation pour les spécifications
de mise à la terre.
CONSERVEZ CES INSTRUCTIONS

21
Exigences d'emplacement
IMPORTANT : Observer les dispositions de tous les codes et
règlements en vigueur
■ Vérifier les exigences des codes : Certains codes limitent ou
n’autorisent pas l’installation d’un sèche-linge dans un
garage, un placard ou une chambre à coucher. Communiquer
avec l’inspecteur des bâtiments local.
■ S’assurer que les rebords inférieurs de la caisse, les côtés
arrière et inférieurs du sèche-linge, sont bien dégagés pour
permettre une évacuation adéquate de l’air de combustion.
Voir la section “Instructions d’installation dans un
encastrement ou un placard” pour connaître les dimensions
d’espacement minimum.
REMARQUE : Le sèche-linge ne doit pas être installé ou
entreposé dans un endroit où il sera exposé à l’eau et/ou aux
intempéries. Si la température ambiante est inférieure à 7ºC
(45ºF), les programmes automatiques peuvent ne pas s’arrêter.
EXIGENCES D'INSTALLATION
Instructions d’installation dans un encastrement ou
un
Ce sèche-linge peut être installé dans un encastrement ou un
placard. Pour les installations dans un encastrement ou un
placard, les dimensions minimales sont indiquées sur l’étiquette
du numéro de série du sèche-linge.
Les dimensions d’installation sont en centimètres et constituent le
minimum applicable. Un espace supplémentaire peut être
nécessaire pour faciliter l’installation, l’entretien et pour observer
les codes et règlements locaux.
Si une porte de placard est installée, une ouverture d’évacuation
de l’air minimale est nécessaire dans les parties supérieure et
inférieure. Les portes à claire-voie offrant des ouvertures
équivalentes sont acceptables.
Le sèche-linge doit être évacué à l’extérieur.
Aucun autre appareil consommant un combustible ne doit être
installé dans le même placard que le sèche-linge.
Outillage et pièces
Rassembler les outils et pièces nécessaires avant de commencer
l’installation. Lire et suivre les instructions fournies avec les outils
indiqués ici.
Outils nécessaires
■ Tournevis à lame plate
■ Tournevis Phillips
■ Clé à molette ouverture : 2,5 cm (1")
■ Clé à douille hexagonale
■ Niveau
■ Clé à douille ou tourne-écrou de 0,63 cm (¹⁄₄")
■ Couteau universel
■ Brides de serrage pour conduit d’évacuation
■ Composé d’étanchéité des raccords filetés – résistant au GPL
■ Pistolet à calfeutrage et composé de calfeutrage (pour
l’installation d’un nouveau conduit d’évacuation)
■ Cisaille de ferblantier
Pièces fournies
Retirer le sac de pièces du tambour du sèche-linge. Vérifier la
présence de toutes les pièces.
■ 4 pieds de réglage de l’aplomb
Vue encastrée de face Vue latérale du placard
Dégagements de séparation minimums
Des espacements supplémentaires pour le mur, la porte et les plinthes peuvent
être nécessaires si on utilise un coude d’évacuation externe.
Porte du
placard
Vue de
face
7.6 cm (3")
7.6 cm (3")
155 cm
2
(24"2)
310 cm
2
(48"2)
*Dimension minimale pour une porte de placard.
Les portes à claire-voie offrant des ouvertures équivalentes sont acceptables.
2.5 cm (1")
Porte du
placard
35.6 cm
(14") max.
2.5 cm (1")
2.5 cm (1")
45.7 cm
(18")*
10.2 cm
(4")
■ L’inclinaison maximale sous le sèche-linge doit être inférieure
à 2,5 cm (1"). Si l’inclinaison est supérieure à 2,5 cm (1"),
installer l'ensemble de pieds d’extension, pièce no 279810. Si
le sèche-linge n'est pas de niveau, le linge peut ne pas
culbuter convenablement et les programmes automatiques
commandés par détecteur peuvent ne pas fonctionner
correctement. Le sol doit pouvoir supporter le poids du sèchelinge 79,4 kg (175 lbs).
Instructions d’installation dans un encastrement ou
un placard
AVERTISSEMENT
Risque d'explosion
Garder les matières et les vapeurs inflammables, telle
que l'essence, éloignées du sèche-linge.
Placer le sèche-linge au moins 46 cm au-dessus du sol
pour une installation dans un garage.
Le non-respect de ces instructions peut causer un
décès, une explosion ou un incendie.

22
Dimensions du produit
74.3 cm
(29-1/4")
couvercle du boîtier
de branchement
cordon
d’alimentatio
n/serre-câble
109.5 cm
(43-1/8")
27.9 cm
(11")
Dimensions illustrées avec pieds allongés à 2,5 cm (1")
sous le sèche-linge.
97.2 cm
(38-1/4")
68.6 cm (27")
35.6
cm
(14")
Conduit d'évacuation à
gauche ou à droite
Evacuation
par l’arrière
10.8 cm
(4-1/4")
26 cm
(10-1/4")
35.9 cm
(14-1/8")
10.2 cm
(4")
Dimensions pour l’évacuation
La porte du sèchelinge dépasse de 35,6
cm par rapport à
l’avant du sèche-linge
lorsqu’elle est
complètement ouverte.
Spécifications électriques
Important : Observer les dispositions de tous les codes et
règlements en vigueur.
Ce sèche-linge est équipé d’un cordon d’alimentation
électrique et d’une prise de 16 A respectant les normes
européennes. Il doit être connecté à une prise de courant
correspondant au voltage indiqué sur la plaque signalétique.
La capacité minimale du fusible d’alimentation doit être de
16 A. Le sèche-linge doit être installé de façon à ce que la
prise soit accessible. Si la prise correspondante n’est pas
utilisée, la connexion électrique doit être effectuée par un
électricien compétent conformément aux codes locaux et
nationaux.
Si le cordon d’alimentation est endommagé, il doit être remplacé
par un cordon à embout spécifique par un agent d’entretien
autorisé ou une personne compétente similaire.
Ne pas utiliser un adaptateur.
Ne pas utiliser un câble de rallonge.
Si les codes le permettent et si on utilise un conducteur distinct
de liaison à la terre, il est recommandé qu’un électricien qualifié
vérifie la qualité de la liaison à la terre.
AVERTISSEMENT
Risque de choc électrique
Une mise à la terre est nécessaire sur ce sèche-linge.
Ne pas utiliser une tuyauterie de gaz pour le
raccordement à la terre.
Ne pas changer la prise du cordon d’alimentation. Si
elle ne correspond pas à la prise de sortie, la faire
installer par un électricien qualifié.
Ne pas installer de fusible dans le circuit neutre ou de
liaison à la terre.
Ne pas utiliser un câble de rallonge avec ce
sèche-linge.
Consulter un électricien qualifié pour s’assurer que le
sèche-linge est correctement branché.
Ne pas connecter le cordon d’alimentation à une prise
sous tension avant de le connecter au boîtier de
connexion du sèche-linge.
Ne pas réutiliser un cordon d’alimentation usagé.
Le non-respect de ces instructions peut causer un
décès, un incendie ou une blessure grave.

23
Méthode recommandée de mise à la
terre
■ Vous devez contacter un installateur électrique qualifié pour
garantir une installation conforme au code électrique national,
ANSI/NFPA 70, dernière édition, et aux autres codes et
règlements locaux.
Exigences concernant l’évacuation
AVERTISSEMENT : Pour réduire le risque d’incendie, ce
sèche-linge doit EVACUER L’AIR A L’EXTERIEUR.
■ Le conduit d'évacuation du sèche-linge ne doit pas être
connecté à une évacuation de gaz, une cheminée, un mur, un
plafond, un vide de construction ou tout autre orifice
d’évacuation.
■ Ne pas utiliser un clapet d’évacuation à fermeture
magnétique.
■ Ne pas installer le conduit métallique flexible dans les cavités
fermées des murs, plafonds ou sols.
■ Utiliser un conduit d’évacuation métallique robuste de 10 cm
(4") et des brides de fixation.
■ Utiliser des brides pour sceller tous les joints. Le conduit
d'évacuation ne doit pas être connecté ou fixé avec des vis
ou avec tout autre dispositif de serrage qui se prolonge à
l'intérieur du conduit. Ne pas utiliser de ruban adhésif pour
conduit.
IMPORTANT : Observer les dispositions de tous les codes et
règlements en vigueur.
Utiliser un conduit d'évacuation en métal lourd. Ne pas utiliser de
conduit de plastique ou de métal très mince.
On recommande d’utiliser un conduit métallique rigide pour
réduire les risques d’écrasement et de déformation.
Un conduit métallique flexible doit être totalement déployé et
soutenu lorsque le sèche-linge est à sa position finale. Enlever
tout excès de conduit flexible pour éviter tout affaissement et
déformation susceptible de réduire la capacité d’évacuation et le
rendement.
Te rminer le conduit d’évacuation par un clapet de décharge pour
empêcher les rongeurs et insectes d’entrer dans l’habitation ou le
local.
Le clapet de décharge doit être situé à au moins 30,5 cm (12")
au-dessus du sol ou de tout autre objet susceptible de se trouver
sur le trajet de l’air humide rejeté (par exemple, fleurs, roches ou
buissons, etc.).
Méthode recommandée de mise à la terre
INSTRUCTIONS DE LIAISON A LA TERRE
■
Pour un sèche-linge relié à la terre et connecté par un
cordon :
Ce sèche-linge doit être relié à la terre. En cas d'anomalie
de fonctionnement ou de panne, la liaison à la terre réduira
le risque de choc électrique en offrant au courant électrique
un itinéraire d'évacuation de moindre résistance. Ce
sèche-linge est alimenté par un cordon électrique
comportant un conducteur relié à la terre et une fiche de
liaison à la terre. La fiche doit être branchée sur une prise de
courant appropriée qui est bien installée et reliée à la terre
conformément à tous les codes et règlements locaux.
■
Pour un sèche-linge raccordé en permanence :
Ce sèche-linge doit être raccordé à un système de câblage
permanent en métal relié à la terre ou un conducteur relié à
la terre doit être en fonction avec les conducteurs de circuit
et raccordés à la borne de liaison à la terre ou la borne sur
le sèche-linge.
AVERTISSEMENT: Un raccordement inapproprié
du conducteur de liaison à la terre peut causer un risque de
choc électrique.
En cas de doute concernant la liaison à la terre du
sèche-linge, consulter un électricien qualifié, un agent ou
personnel d’entretien. Ne pas modifier la fiche sur le cordon
d’alimentation : si elle ne correspond pas à la prise de sortie,
faire installer une prise appropriée par un électricien qualifié.
CONSERVER CES INSTRUCTIONS
AVERTISSEMENT
Risque d'incendie
Utiliser un conduit d'évacuation en métal lourd.
Ne pas utiliser de conduit d’évacuation en plastique.
Ne pas utiliser de conduit d’évacuation en feuille de
métal.
Le non-respect de ces instructions peut causer un
décès ou un incendie.

24
Longueur du système d’évacuation
La longueur maximale du système d’évacuation dépend du type
de conduit utilisé, du nombre de coudes et du type de clapet
d’évacuation. La longueur maximale des conduits rigides et
flexibles est illustrée sur le tableau.
Pour les systèmes d’évacuation non illustrés dans le tableau de
spécification (notamment les raccordements multiples, les
plénums, et les ventilateurs motorisés), voir dans le Manuel
d’entretien Whirlpool la section “Evacuation des sèche-linge
Whirlpool”, pièce n° LIT603197, disponible chez votre revendeur
de pièces Whirlpool.
Si le sèche-linge est installé dans une zone confinée, telle qu’une
chambre, une salle de bain ou un placard, prévoir un espace
suffisant pour la combustion et la ventilation de l’air. (Vérifier les
dispositions des codes et règlements en vigueur.) Voir
“Instructions d’installation dans un encastrement ou un placard”
dans la section “Exigences d’emplacement”.on Instructions” in
the “Location Requirements” section.
Il est préférable d’utiliser un clapet d’évacuation de 10,16 cm (4").
Cependant, on peut utiliser un clapet d’évacuation de 6,4 cm
(2 ¹⁄₂"). Une sortie de 6,4 cm (2 ¹⁄₂") cause davantage de contrepression que les autres types d’installation. Pour une installation
permanente, un système d’évacuation fixe est requis.
Nbre de
changements de
direction à 90°
Nbre de
changements de
direction à 90°
Conduit métallique flexible
Clapets d’évacuation – Diamètre de 10,2 cm
Longueur maximale du conduit
15.8 m (52 ft.)
13.4 m (44 ft.)
11.0 m (36 ft.)
8.2 m (27 ft.)
6.1 m (20 ft.)
9.4 m (31 ft.)
7.9 m (26 ft.)
6.7 m (22 ft.)
6.1 m (20 ft.)
5.5 m (18 ft.)
0
1
2
3
4
0
1
2
3
4
13.4 m (44 ft.)
11.0 m (36 ft.)
8.5 m (28 ft.)
6.4 m (21 ft.)
4.3 m (14 ft.)
7.0 m (23 ft.)
5.5 m (18 ft.)
4.3 m (14 ft.)
3.7 m (12 ft.)
3.0 m (10 ft.)
Clapet de type
boîte et à
persiennes
Clapet incliné
Clapet de type
boîte et à
persiennes
Clapet incliné
Conduit métallique rigide
Lors de l’utilisation d’un système de décharge existant, nettoyer
et éliminer les peluches sur toute la longueur du système et veiller
à ce que le clapet de décharge ne soit pas obstrué par une
accumulation de peluches. Remplacer tout conduit de plastique
ou de feuille métallique par un conduit métallique rigide ou
souple.
Planifier l'installation pour introduire le nombre minimal de coudes
et de changements de direction.
Eviter les changements de direction à 90º.
Si des coudes ou changements de direction sont utilisés, prévoir
autant d'espace que possible. Plier le conduit graduellement pour
éviter de le déformer.
On peut acheminer le conduit d’évacuation vers le haut, vers le
bas, vers la gauche, vers la droite ou en ligne droite depuis
l’arrière du sèche-linge.
Vérification d’entretien : La contre-pression de tout système
d’évacuation ne doit pas excéder 15,2 mm (0.6") dans la colonne
d’eau (mesure obtenue à l’aide d’un manomètre au point de
connexion entre le conduit d’évacuation et le sèche-linge).
La sortie d’évacuation est située au centre de la partie arrière du
sèche-linge.
La conception du système d’évacuation doit permettre à toute
condensation formée pendant le fonctionnement de l’appareil
d’être retenue puis évaporée et évacuée. En suivant ces
instructions d’installation, ces exigences sont convenablement
respectées.
A
B
Débit de l’air évacué
A. Optimal
B. Correct

25
INSTRUCTIONS D’INSTALLATION – SECHE-LINGE ELECTRIQUE
Installation du dispositif d’évacuation
1. Installer le clapet d’évacuation. Calfeutrer l’ouverture murale
à l’extérieur autour du clapet d’évacuation.
2. Raccorder le conduit d’évacuation au clapet. (Le conduit
d’évacuation DOIT s’insérer dans le clapet.) Fixer ensemble
le conduit et le clapet avec une bride de 100 mm (4").
3. Acheminer le conduit d’évacuation jusqu’à l’emplacement du
sèche-linge. Utiliser l’itinéraire le plus rectiligne possible.
Eviter les changements de direction à 90º. Utiliser des brides
de 100 mm (4") pour fixer les pièces du conduit. Des cisailles
de ferblantier peuvent être nécessaires pour couper le
conduit à la longueur désirée.
2. Placer deux cornières découpées dans le carton du sèche-
linge sur le sol à l’arrière du sèche-linge. Agripper fermement
le corps du sèche-linge et l’allonger doucement sur sa partie
postérieure sur les cornières de carton.
3. Commencer à visser les pieds manuellement. Utiliser une clé
à molette ou un tourne-écrou de 2,5 cm (1") pour finir de
fixer les pieds jusqu’à atteindre le bord du symbole
(losange).
4. Placer le sèche-linge en position verticale sur le carton ou le
panneau dur.
Symbole de
losange
Préparation du sèche-linge
1. Retirer le ruban adhésif de la caisse du sèche-linge. Ouvrir la
porte du sèche-linge et retirer le ruban adhésif du tambour.
(Tous les tambours de sèche-linge ne sont pas couverts de
ruban adhésif.) Retirer la grille de séchage, si présente.
Tourner le tambour du sèche-linge dans le sens inverse des
aiguilles d’une montre pour s’assurer que tout le ruban
adhésif a été retiré. Essuyer le tambour avec un chiffon
humide pour retirer toute la poussière.
AVERTISSEMENT
Risque du poids excessif
Deux personnes ou plus sont nécessaires pour
déplacer et installer le sèche-linge.
Le non-respect de cette instruction peut causer une
blessure au dos ou d’autres blessures.

26
Raccordement électrique
Brancher le cordon d’alimentation dans une prise reliée à la terre.
Il doit être connecté à une prise de courant correspondant au
voltage indiqué sur la plaque signalétique. La capacité minimale
du fusible d’alimentation doit être de 16 A. Le sèche-linge doit
être installé de façon à ce que la prise soit accessible. Si la prise
correspondante n’est pas utilisée, la connexion électrique doit
être effectuée par un électricien compétent conformément aux
codes locaux et nationaux.
Si le cordon d’alimentation est endommagé, il doit être remplacé
par un cordon à embout spécifique par un agent d’entretien
autorisé ou une personne compétente similaire.
Ne pas utiliser un adaptateur.
Ne pas utiliser un câble de rallonge.
Important : Observer les dispositions de tous les codes et
règlements en vigueur.
Si les codes le permettent et si on utilise un conducteur distinct
de liaison à la terre, il est recommandé qu’un électricien qualifié
vérifie la qualité de la liaison à la terre.
AVERTISSEMENT
Risque de choc électrique
Une mise à la terre est nécessaire sur ce sèche-linge.
Ne pas utiliser une tuyauterie de gaz pour le
raccordement à la terre.
Ne pas changer la prise du cordon d’alimentation. Si
elle ne correspond pas à la prise de sortie, la faire
installer par un électricien qualifié.
Ne pas installer de fusible dans le circuit neutre ou de
liaison à la terre.
Ne pas utiliser un câble de rallonge avec ce
sèche-linge.
Consulter un électricien qualifié pour s’assurer que le
sèche-linge est correctement branché.
Ne pas connecter le cordon d’alimentation à une prise
sous tension avant de le connecter au boîtier de
connexion du sèche-linge.
Ne pas réutiliser un cordon d’alimentation usagé.
Le non-respect de ces instructions peut causer un
décès, un incendie ou une blessure grave.

27
Le sèche-linge doit être d’aplomb pour réduire le bruit et
garantir un fonctionnement correct.
Faire glisser le sèche-linge sur le carton ou le panneau dur
avant de le déplacer, pour empêcher d’endommager le sol.
1. Approcher le sèche-linge de son emplacement final. Laisser
suffisamment d’espace pour connecter le conduit
d’évacuation. Retirer le carton ou le panneau dur situé sous
le sèche-linge.
2. Placer un niveau au-dessus du sèche-linge pour vérifier
l’aplomb, d’un côté à l’autre puis de l’avant vers l’arrière. Si
le sèche-linge n'est pas d’aplomb, ajuster les pieds vers le
haut ou vers le bas.
3. Si les pieds ne sont pas assez longs pour obtenir un aplomb
correct du sèche-linge, commander un Ensemble de pieds
d’extension pour sèche-linge, pièce n° 279810 (deux pieds
par ensemble), chez un revendeur.
4. Connecter le conduit d’évacuation à la bouche d’évacuation
du sèche-linge. Le conduit d’évacuation du sèche-linge doit
être fixé sur la bouche d’évacuation du sèche-linge et dans
le clapet d’évacuation.
Utiliser des brides de conduit de 100 mm (4") pour calfeutrer
tous les joints et fixer le conduit d’évacuation à la bouche
d’évacuation du sèche-linge.
5. Placer le sèche-linge à son emplacement final.
Réglage de l’aplomb et évacuation du sèche-linge
Bride de
10,2 cm (4")
Bride de
10,2 cm (4")

1. Vérifier que :
■ aucune étape n’a été oubliée.
■ toutes les pièces sont installées.
■ les pieds de nivellement sont correctement installés.
■ le sèche-linge est d’aplomb.
■ tous les joints du conduit d’évacuation sont fixés avec des
brides de 100 mm.
■ tous les outils sont présents.
2. Brancher le cordon d’alimentation dans la prise de liaison à
la terre ou connecter la prise directe à l’alimentation
électrique. Ouvrir la source d'alimentation.
3. Lire le Guide d’utilisation et d’entretien pour bien
comprendre le fonctionnement de votre nouveau sèchelinge. Sélectionner un programme complet avec chaleur (pas
le programme de séchage à l’air) et mettre en marche le
sèche-linge. Après cinq minutes, ouvrir la porte du sèchelinge. On doit ressentir de la chaleur à l’intérieur du sèchelinge.
Si le sèche-linge ne fonctionne pas correctement, vérifier ce qui
suit :
■ la prise de courant est correctement alimentée.
■ les fusibles du domicile sont intacts et serrés; ou le
disjoncteur n’est pas déclenché.
■ la porte du sèche-linge est fermée.
■ les commandes sont réglées à la position de marche ou
“ON”.
■ le bouton Start (mise en marche) a été enfoncé fermement.
Si le sèche-linge fait un bruit anormal, vérifier s’il est d’aplomb.
Contrôle du fonctionnement
Caractéristiques techniques
Vous déménagez et déplacez votre sèche-linge dans une
ouvelle habitation?
Consulter un électricien agréé pour vérifier que le voltage du
nouveau domicile correspond au voltage spécifié sur la plaque
signalétique du modèle.
Déconnecter
l’alimentation
électrique du
sèche-linge.
Débrancher le
câble
d’alimentation
du sèche-linge.
Coller le
haut du
sèche-linge
à la caisse
avec du
ruban
adhésif.
Coller la
porte au
panneau
avant
avec du
ruban
adhésif.
Rétracter
complètem
ent les
pieds de
réglage de
l’aplomb.
Faire glisser le sèche-linge sur le carton
ou le panneau dur avant de le déplacer
sur le sol, pour empêcher
d’endommager le revêtement de sol.
((voir la plaque signalétique dans l’ouverture de la porte pour des
détails complets sur le modèle)
220 – 240 V ~ 50 Hz, 1ph
3 100 W, IPX4
Capacité de charge : 9,1 kg max.
Printed in U.S.A.
Impreso en EE.UU
Imprimé aux E.-U.
08/2006
8528095 Rev A
8528095 Rév. A
© 2006
 Loading...