

Page 1

Whirl
Use & Care Guide
Third level wash(on some models)
Top rack.
Spray
tower ■
Water inlet opening
Rack bumper -----------
Bottom rack ■ Heating element
Detergent
dispenser.
Filter system
— screen
(not shown)
Silverware
------
protector
basket
Overfill
Rinse agent
dispenser
Access
panel
Door color
panel
8300 & 8400 SERIES DISHWASHERS
Lower
spray arm
Model and
serial number
label
(on right side)
Page 2

Con te nts
Page
Important Safety Instructions
Operating Instructions . 3
Before starting your dishwasher................ 3
Starting your dishwasher
To add a dish after starting
Changing a cycle setting ................................... 4
What happens in each cycle ............................. 5
What happens in each option
Proper Loading ..................................................... 7
Adding Detergent...................................................... 9
Using Rinse Agent Dispenser
For Best Results
Special tips...................................................... 11
Common Dishwashing Problems . 13
If You Need Service Or Assistance . 15
Whirlpool Dishwasher Warranty . 16
Thank you for buying a Whirlpool appliance.
Please complete and mail the Owner Regis
tration Card provided with this product.
Then complete the form below. Have this informa
tion ready if you need service or call with a
question.
• Copy model and serial numbers from label
(see diagram on front cover) and purchase date
from sales slip.
• Keep this book and sales slip together in a
handy place.
................................................
©1992 Whirlpool Corporation
..............................
........... ......................
.............. ..........
...........................
..............................
4
11
10
3
4
6
It is your responsibility to be sure your
dishwasher:
• Is installed by a qualified instalier.
• Has been installed where it is protected from
the elements.
• Has been installed on a floor strong enough to
support its weight.
• Has been properly connected to electricity, water
and drain.*
• Has been properly electrically grounded.*
• Has had all hang tags and temporary labels
removed.
• Is not used by children or anyone unable to
operate it properly.
• Is properly maintained.
*See Installation Instructions for complete
information.
Model Number
Serial Number
Purchase Date
Service Company Phone Number
If you need service, first see the “Service or
Assistance” section of this book. After checking
"Service or Assistance,” additional help can be
found by calling our Consumer Assistance Center
telephone number, 1-800-253-1301, from any
where in the U.S.
Page 3

Imp ort an t Sa fe ty I nst ruc tio ns
▲warning
• Read all instructions before using
the dishwasher.
• Properly connect to electricity and water.
• DISHWASHER MUST BE ELECTRICALLY
GROUNDED. Read the Installation Instructions
for details.
• Be sure your dishwasher is installed on a
level floor that will hold the weight, and in an
area suitable for its size and use.
• When discarding an old dishwasher, always
remove the door to prevent accidental
entrapment or suffocation.
• REMEMBER, use your dishwasher only for
the job it was designed to do.
• Store dishwasher detergent in a cool, dry
place WHERE CHILDREN CANT REACH IT.
• Use ONLY detergents and rinse agents
recommended for use in a dishwasher.
• Locate sharp items and knives so that they are
not likely to damage door seal or cut the user.
• DO NOT let children play in or on the
dishwasher.
• DO NOT reach into the area below the
bottom rack until the heating element has
cooled tor at least 20 minutes.
To reduce the risk of fire, electrical shock, or injury when using your dishwasher, follow basic precautions including the following:
- SAVE THESE INSTRUCTIONS
• DO NOT wash plastic items unless marked
“Dishwasher Sate" or the equivalent. If not
marked, check manufacturer's
recommendations.
• DO NOT use your dishwasher unless all
enclosure panels are properly in place.
• DO NOT sit on, stand on or abuse the
dishwasher door or dish racks.
• DO NOT tamper with controls.
• If hot water has not been used recently
(usually two weeks or longer), hydrogen
gases may build up in the water heater
and the hot water pipes. HYDROGEN
GAS IS EXPLOSIVE. To prevent injury or
damage, before using your dishwasher,
turn on all hot water faucets and allow
water to run for several minutes. This
will allow gases to escape. Do not
smoke or use any open flame near the
faucet while it is open.
• Disconnect electrical power to the dish
washer before attempting to service.
• DO NOT store or use gasoline or other flam
mable vapors and liquids in the vicinity of this
or any other appliance. The tumes can create
a fire hazard or explosion.
Ope rat in g In st ruct ion s
The drawings in this book may vary slightly from your dishwasher model. They
are designed to show the different features of all the models covered by this book.
NOTE: Your model may not include all the features shown.
Before starting your dishwasher
1. Properly load the top and bottom racks, and
silvenware basket. See pages 7 and 8.
2. Spin the Lower Spray Arm with lower rack in
place to make sure nothing will stop it from turn
ing freely.
3. Add detergent. See page 9.
4. Check rinse agent dispenser. See page 10.
5. Push door firmly when closing and it will
automatically latch.
6. Run hot water at sink nearest dishwasher until
it is hot. Turn it off.
Page 4
Operating Instructions
Continued
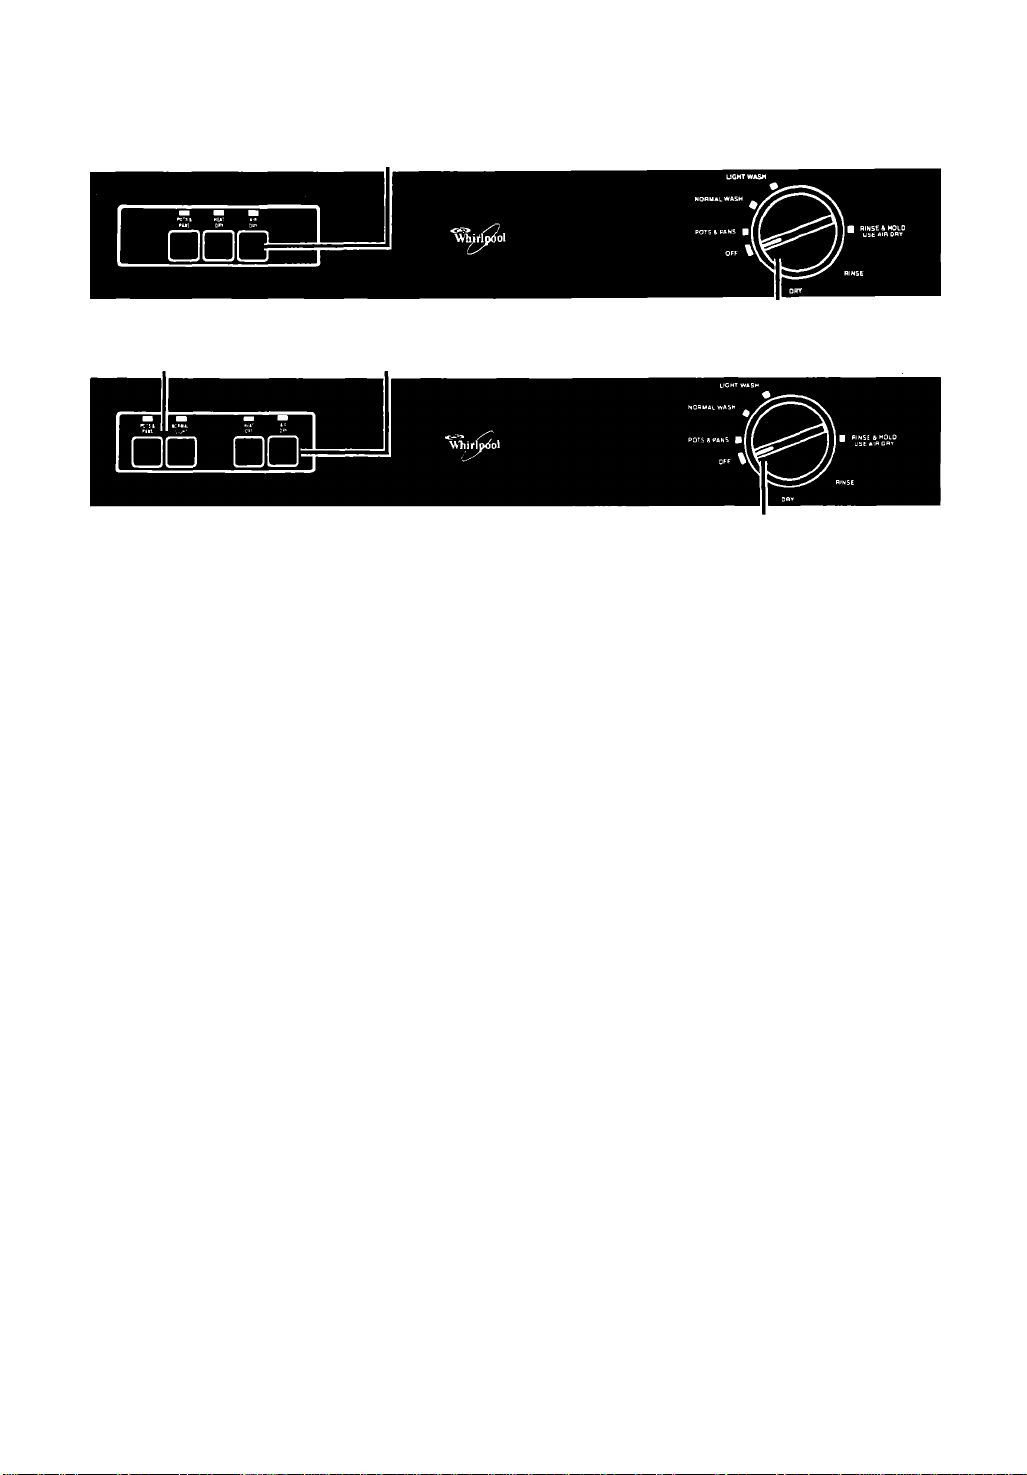
Selector buttons
8300 Series Models
Cycle selector buttons Option selector buttons
8400 Series Models
Starting your dishwasher
1. Select a drying option. (See page 6.) The
indicator above the button will show red when
that option has been selected.
NOTE: Select AIR DRY for the Rinse & Hold
Cycle.
For the 8300 series models, the Heat Dry
Option is automatically selected with the Pots
& Pans Cycle.
2. For the 8300 series models, if the Pots &
Pans Cycle will be used, push the POTS &
PANS button. The indicator above the button
will show red.
For the 8400 series models, push a Cycle
Selector button for the desired cycle. Normal
Wash, Light Wash and Rinse & Hold Cycles
share the same button. The Cycle Control Knob
determines which cycle operates.
3. Turn the Cycle Control Knob clockwise to point
to a desired cycle. You will feel a definite stop at
each cycle mark. The dishwasher will automati
cally start the cycle you selected.
NOTE: If the door is latched, you will hear cycles
start and stop as the knob passes each cycle
mark. This is normal and will not hurt the dish
washer. If you prefer, you can set cycles with the
door unlatched.
Cycle control knob
Cycle control knob
To add a dish after starting
1. To be sure that added item is washed and
rinsed, make sure the Cycle Control Knob has
not passed LIGHT WASH.
2. Lift up on the door latch to unlatch door and
stop the cycle. Don’t open the door until the
spray arms stop spinning.
3. Open the door and add the dish.
4. Close the door. Do not latch it. Wait 30
seconds for air in the dishwasher to warm up.
This helps reduce the amount of moisture that
can come from fhe vent when restarting the
cycle.
5. Press door in to latch it. This dishwasher will
start where it stopped.
Changing a cycle setting
You can change a setting anytime during
any cycle.
1. Lift up on the door latch to unlatch the door
and stop the cycle.
2. Turn the Cycle Control Knob clockwise to the
cycle you want.
3. Be sure the detergent dispensers are filled
properly for the new cycle. When changing dial
from LIGHT WASH to NORMAL WASH or
POTS & PANS setting, detergent is released.
Reload covered section of dispenser before
starting Normal Wash Cycle or Pots & Pans
Cycle.
4. Close and latch the door. The dishwasher will
automatically start the new cycle.
Page 5
What happens in each cycle
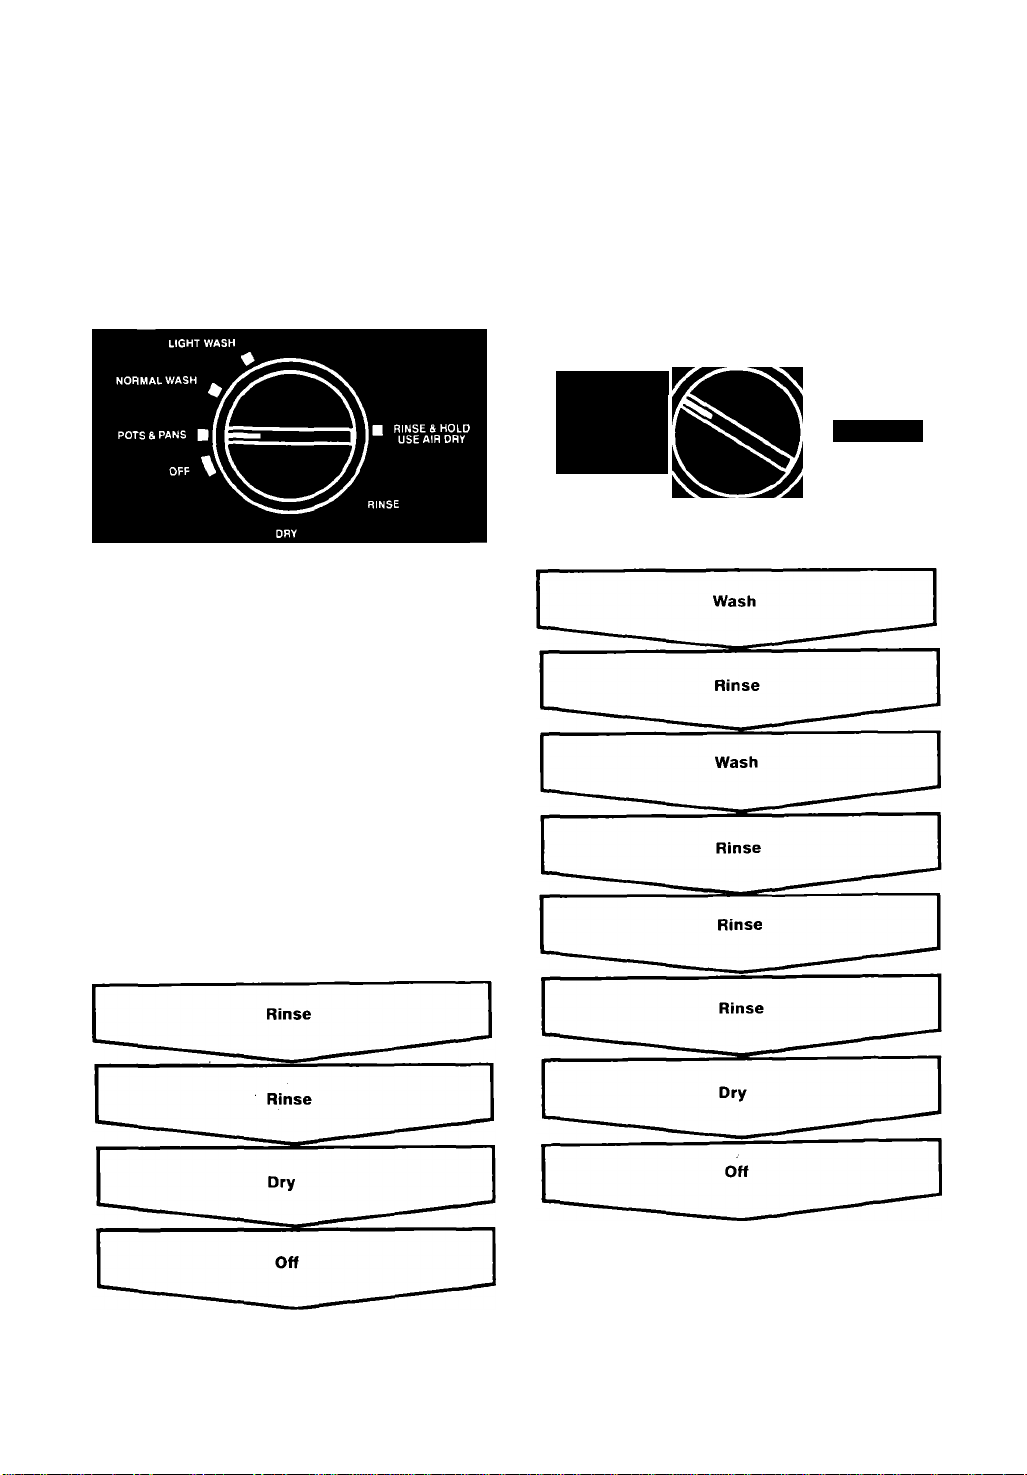
Pots & Pans Cycle
A double wash for maximum cleaning of cookedon or baked-on foods. The Heat Dry Option is
automatically selected during this cycle. Cycle
time is about 89 minutes.
Normal Wash Cycle
A double wash for moderate to heavily soiled
loads. (The Energy Guide Label is based or^this
cycle.) Cycle time* is about 81 minutes.
NORMAL WASH ^
Wash
Rinse
Rinse
Wash
Rinse
POTS & PANS ■ I
OFF %
RINSE & HOLD
USE AIR DRY
'Cycle time includes heated dry times.
Page 6
Operating Instructions
Continued
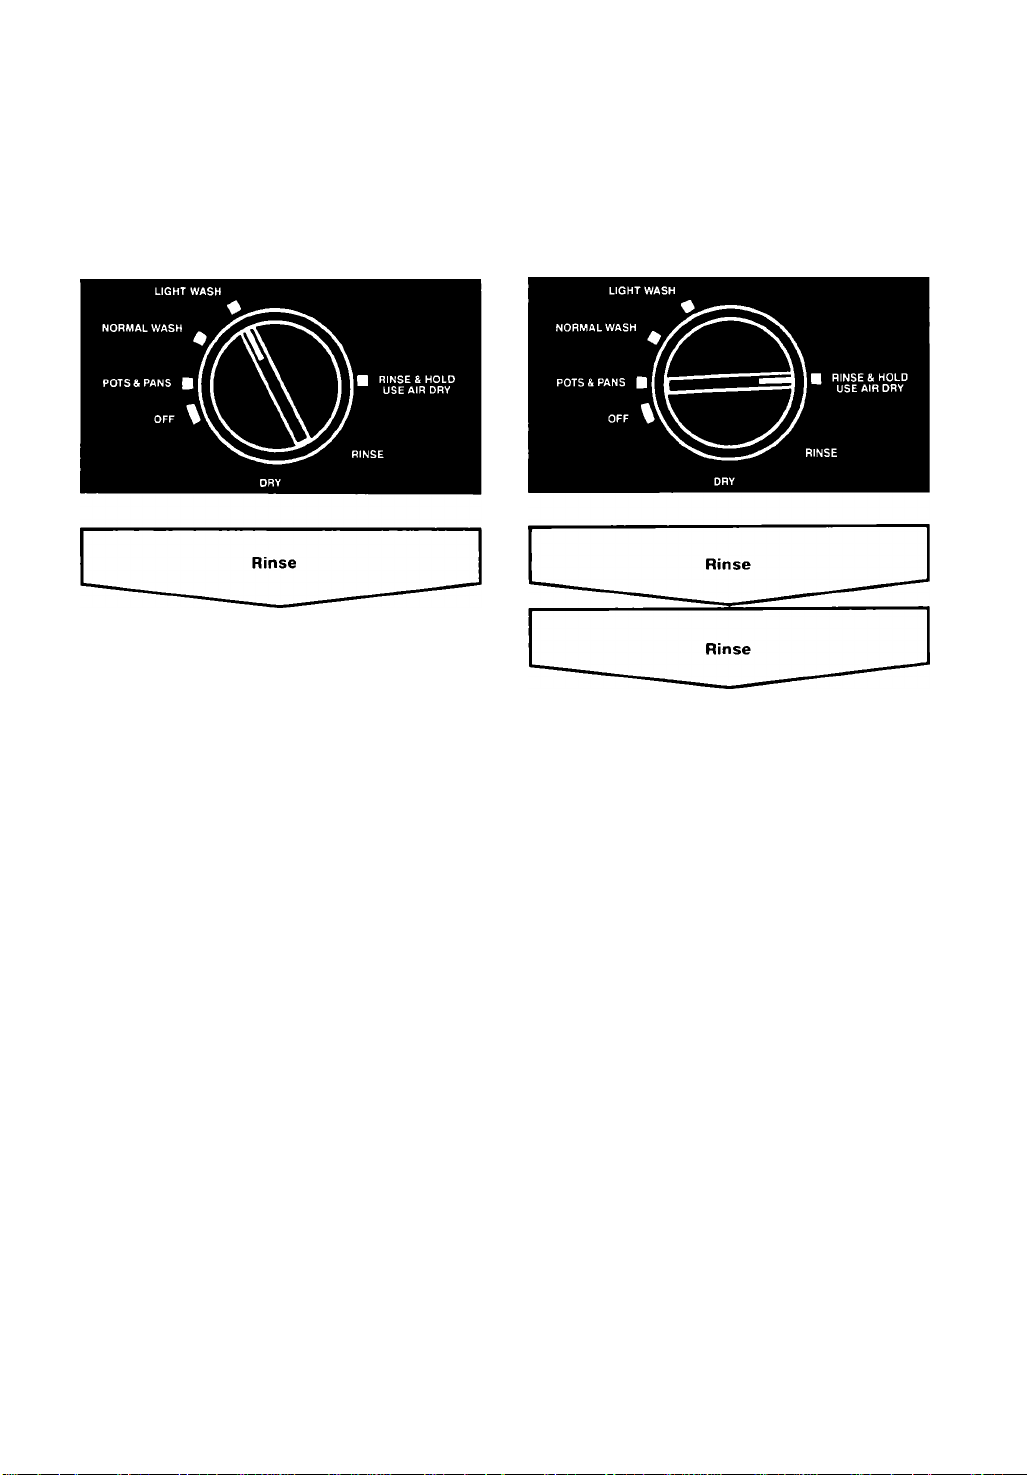
Low Energy Wash Cycle
A single wash for light to moderately soiled loads.
Cycle time* is about 73 minutes.
Wash
Rinse
Rinse & Hold Cycle
For rinsing a few items to be washed one or more
days later. Cycle time is about 10 minutes. Do not
use detergent. Use Air Dry Option only. Heat Dry
Option may cause food to bake on dishes.
Off
Rinse
Rinse
Dry
Off
'Cycle time includes heated dry time.
What happens in each option
Heat Dry Option
If the Heat Dry Option is selected, air in the dish
washer is heated during the “dry" part of the cycle.
For best drying results, use a liquid rinse agent
such as Jet-Dry.®
Air Dry Option
If the Air Dry Option is selected, air in the dish
washer is not heated. Using this option helps save
energy, but dishes take longer to dry (overnight)
and some water spotting may result. Some items
(such as plastics) may need towel drying. For best
drying results, use a liquid rinse agent such as
Jet-Dry.®
NOTE: For the 8300 series models, the Air Dry
Option cannot be selected for Pots & Pans Cycle.
Page 7
Pro pe r L oad ing
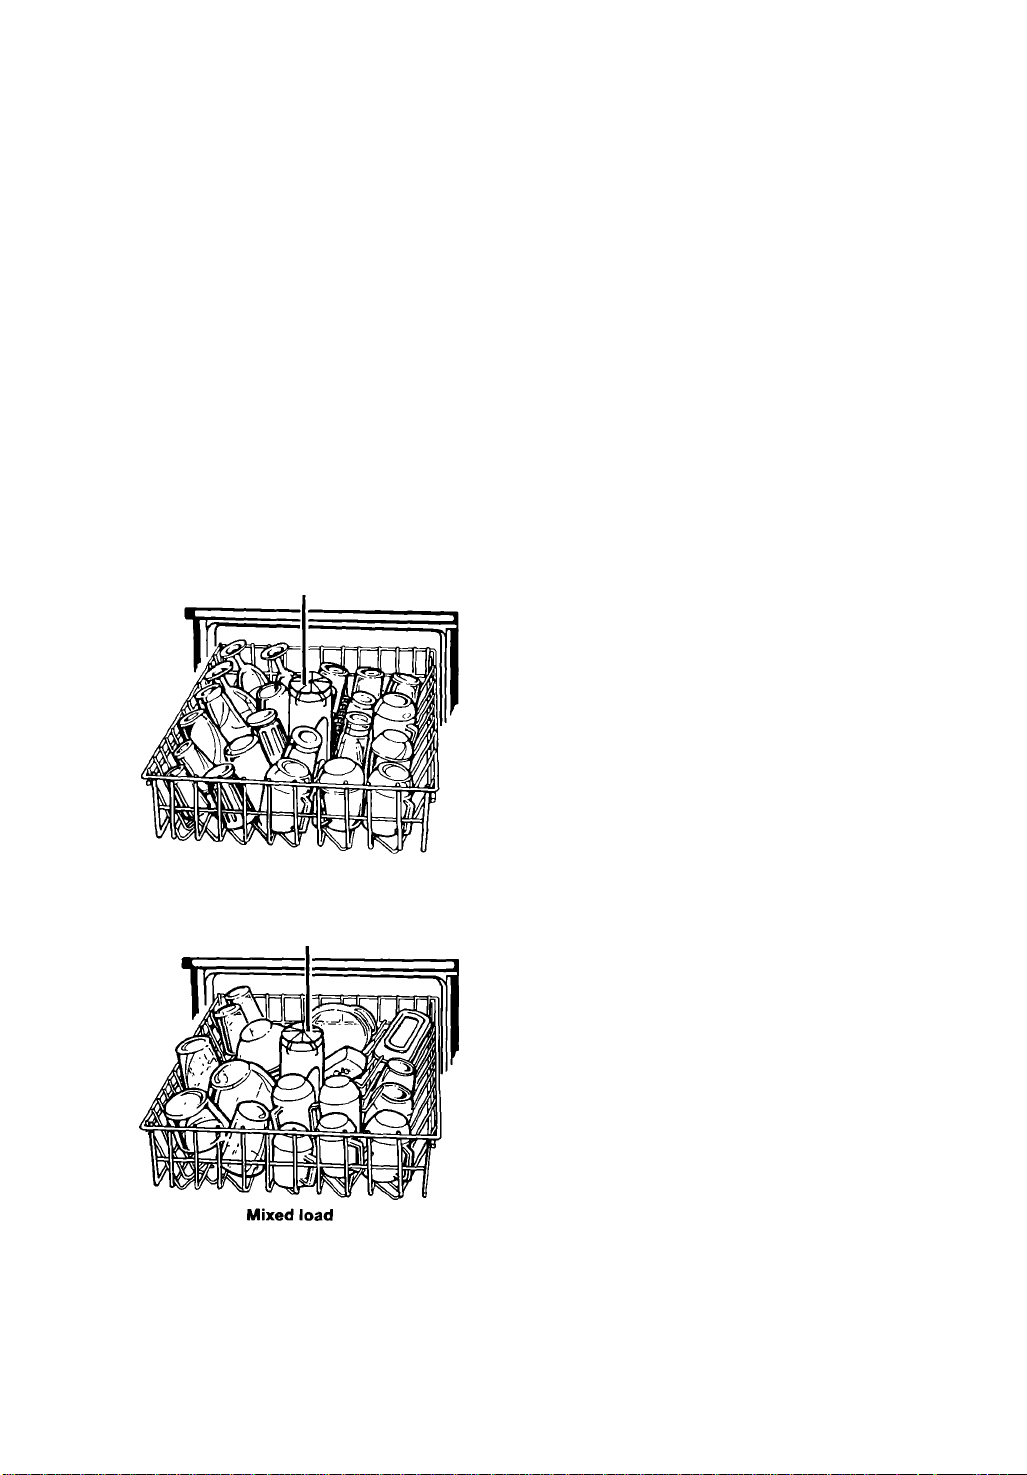
Do not cover third level wash
Cup and glass load
Preparation for loading
It is not necessary to rinse dishes before
putting them into the dishwasher. Just
remove large pieces and quantities of food and
bones. The filtering system helps keep food parti
cles out of the wash water. Small particles'are
flushed away as water is pumped out. Larger parti
cles are trapped on the filter system screen. Refer
to “Dishwasher care & cleaning” on page 12for
filter screen cleaning instructions.
Always load dishes so soiled surfaces are
reached by spray from rotating spray arm. Water
must be able to drain off completely for best drying
results. Be careful to separate items so spray can
reach all surfaces.
Top rack loading
The lop rack is designed for cups, glasses and
smaller items. Some models have a third level
wash to improve washability. Do not cover the third
level wash when loading the top rack.
Cup and glass load
• Place so open ends face down for cleaning and
draining.
• Load glasses in top rack only. Bottom rack is
not designed for glasses. Damage may occur.
• Place items in the rows between prongs. Plac
ing them over the prongs can lead to breakage.
• Be sure lightweight items are held firmly in place.
• China, crystal and other delicate items must not
touch each other during dishwasher operation.
Damage may occur.
Do not cover third level wash
Mixed load
• Load plastic items only in the top rack.
Only plastic items marked “dishwasher safe"
are recommended.
• Load plastic items so the force of the spray does
not move them during the cycle.
• Plastic items can be melted in the bottom rack.
Utensil load
• Small bowls, pans and other utensils can be
placed in the top rack.
Page 8
Proper Loading
Continued
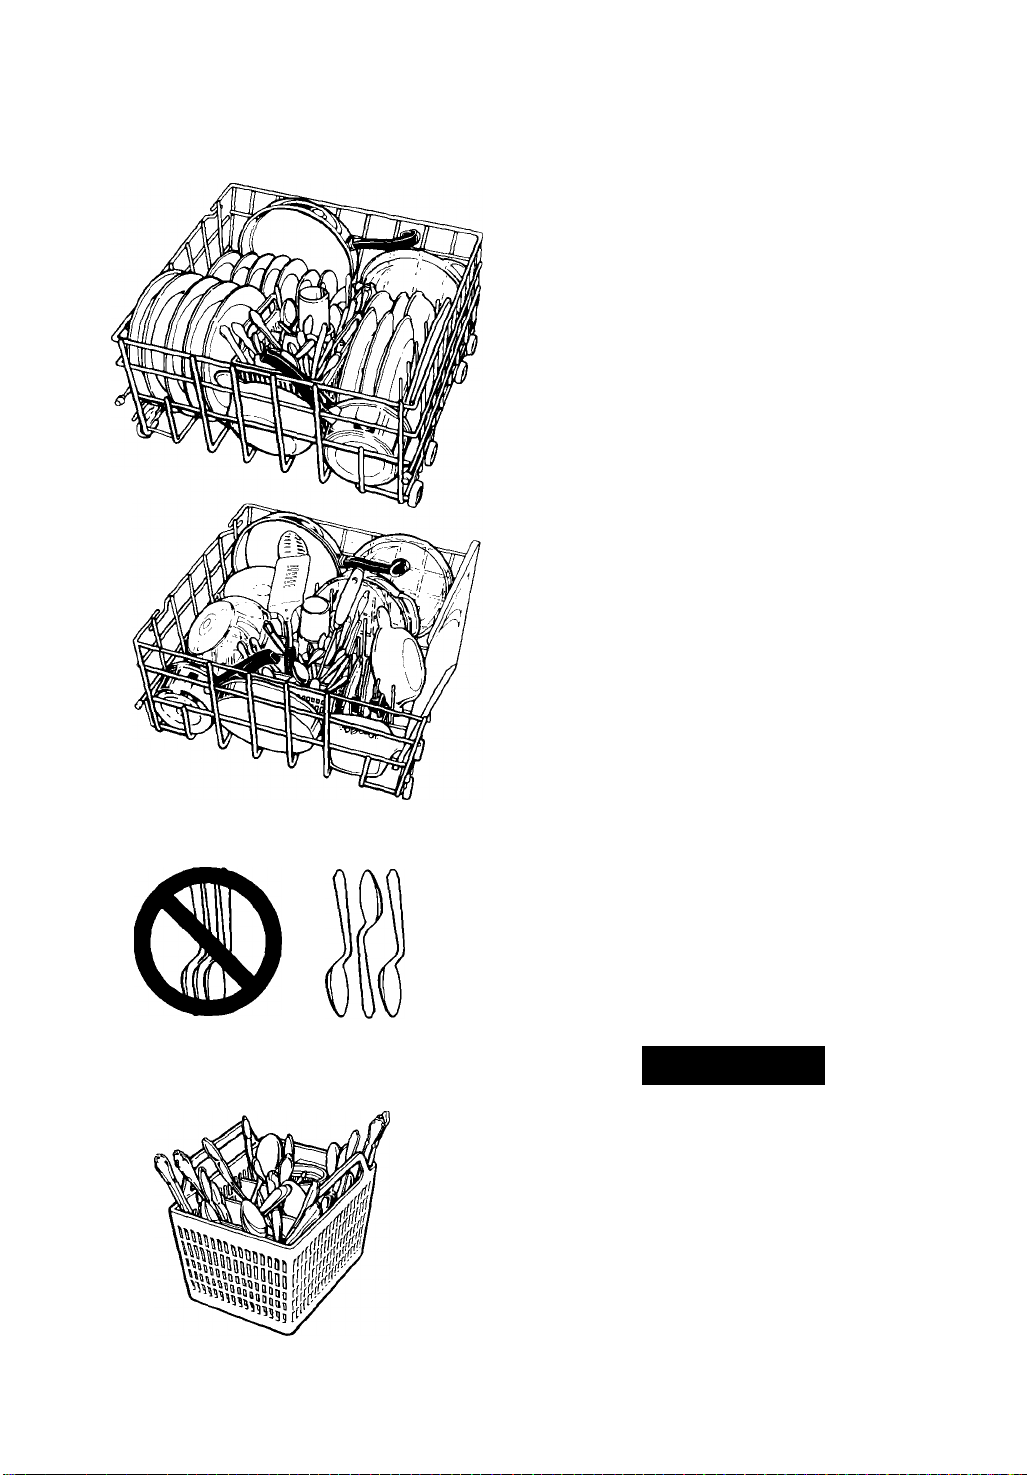
Mixed load
Utensil load
Bottom rack loading
Items with cooked-on or dried-on food should
be loaded in the bottom rack, with soiled surfaces
facing inward to the spray.
Mixed load
• Make sure pot handles and other items do not
stop rotation of the lower spray arm. Spray arm
must move freely.
• Load items so they do not block or cover the
spray tower.
• Securely place heavily soiled cookware face
down in rack.
Dish load
• Place plates, soup bowls, etc., between prongs
and facing inward to the spray.
• Do not place items directly over spray tower.
Utensil load
• Load cookie sheets, cake pans and other large
items at sides and back. Loading such items in
front may keep water spray from reaching
detergent dispenser.
NOTE:
• Do not load glasses, cups or plastic items in the
bottom rack.
• When lower rack is removed, replace with
bumpers in front.
Silverware basket loading
Load the silverware basket while it's in or out of
the bottom rack. The loaded basket should be in
the center front (over the spray tower) of the
bottom rack.
Load forks and spoons so they don't nest
together. Spray can't reach nested items.
Mix items in each section of the basket with
some pointing up and some down.
Small items - baby bottle caps, jar lids, etc. -
can be put in any section.
Awarning
Personal Injury Hazard
To avoid cuts from sharp items (knives,
forks, skewers, etc.), make sure these items
are put in point down.
Page 9
Add ing De te rge nt
What kind of detergent to use
Use automatic dishwasher detergent only.
Other detergents are too mild and much too sudsy
to work in the dishwasher.
Different brands of dishwasher detergent have
different amounts of phosphorus for softening
water. If water is hard and phosphorus content is
low (6.0% or less), you may need to use more
detergent or use a brand with a higher phosphorus
content (8.7% or higher).
Do not add detergent until you are ready to
wash Fresh automatic dishwasher detergent
is necessary for best washing results.
Store detergent tightly closed in a cool, dry place.
Cover
Cover Latch
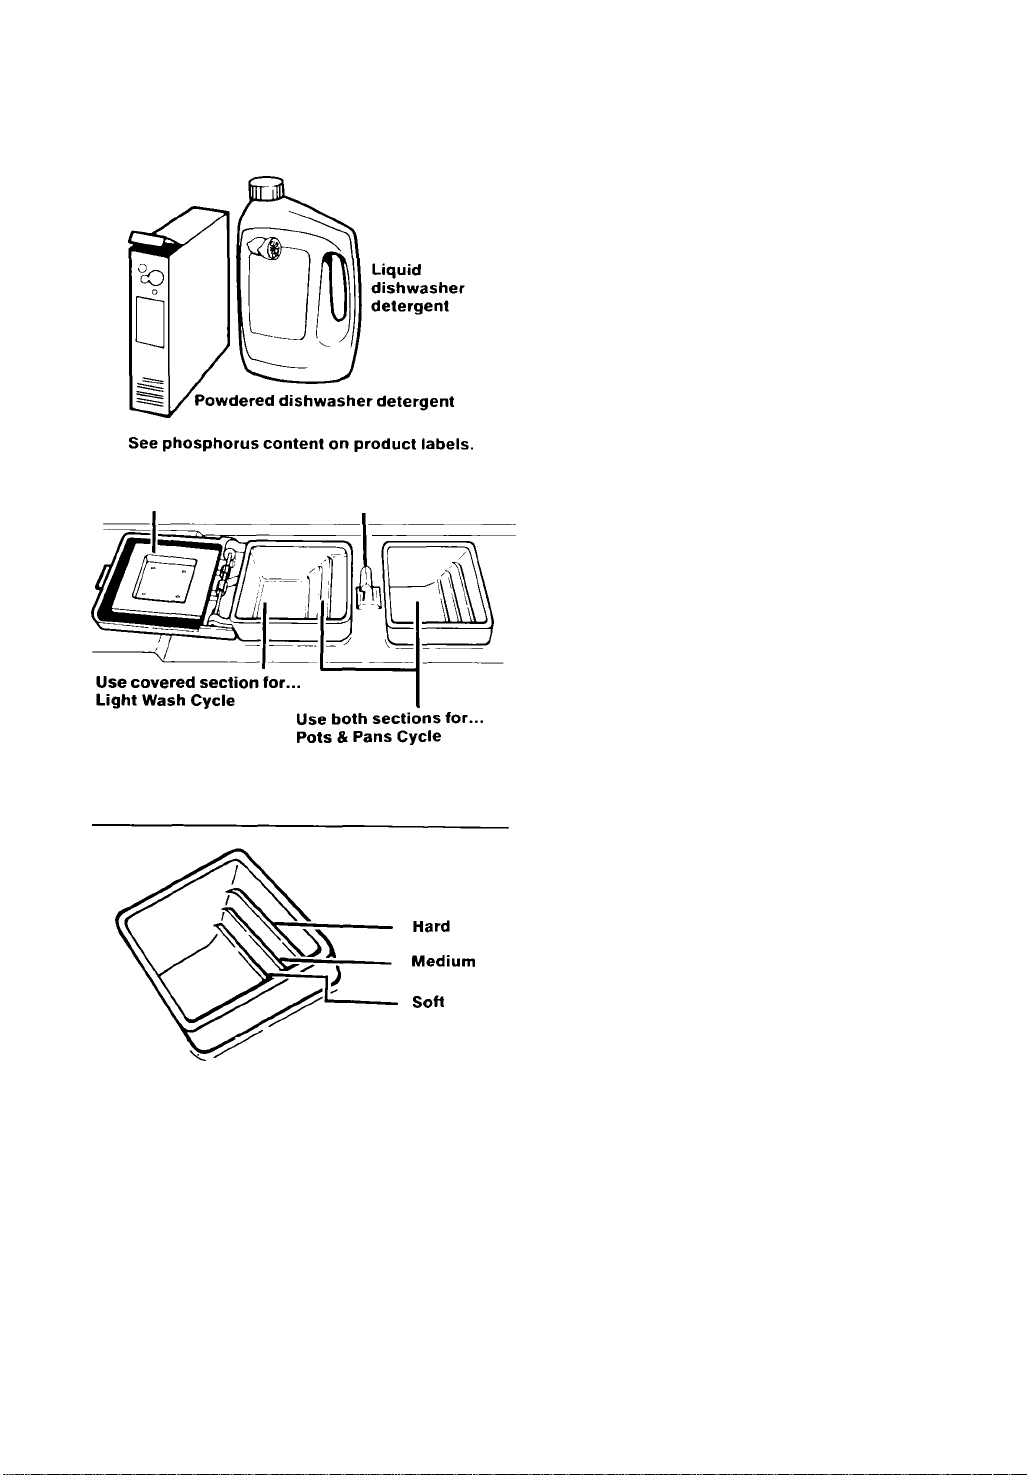
Normal Wash Cycle
The detergent dispenser
The detergent dispenser has one section with a
cover and one without.
• Put detergent in both sections for cycles with
two washes.
• Put detergent in the covered section only for
cycles with one wash.
• Push the cover down until it is latched.
Detergent in the open section falls into the dish
washer when the door is closed. The covered
section opens automatically when the main
wash starts.
NOTE: It is normal for cover to open partially
when dispensing detergent. The cover will open
fully when the door is opened.
How much detergent to use
The amount of detergent to use depends on the
hardness of your water. If too little is used, dishes
won't be clean. However, if too much is used in
soft water, glassware will begin to etch.
Find out your water’s hardness by asking your
local water department, water softener company
or county extension agent.
• HARD - Fill 1 or both sections to top line if water
hardness is 8 or more grains per gallon, or 136 or
more parts per million.
• MEDIUM - Fill 1 or both sections to middle line if
water hardness is 5 to 7 grains per gallon, or 85
to 119 parts per million.
• SOFT - Fill 1 or both sections to bottom line if
water hardness is 0 to.4 grains per gallon, or 0 to
68 parts per million.
Page 10
Us ing Ri nse Ag ent Di spen se r
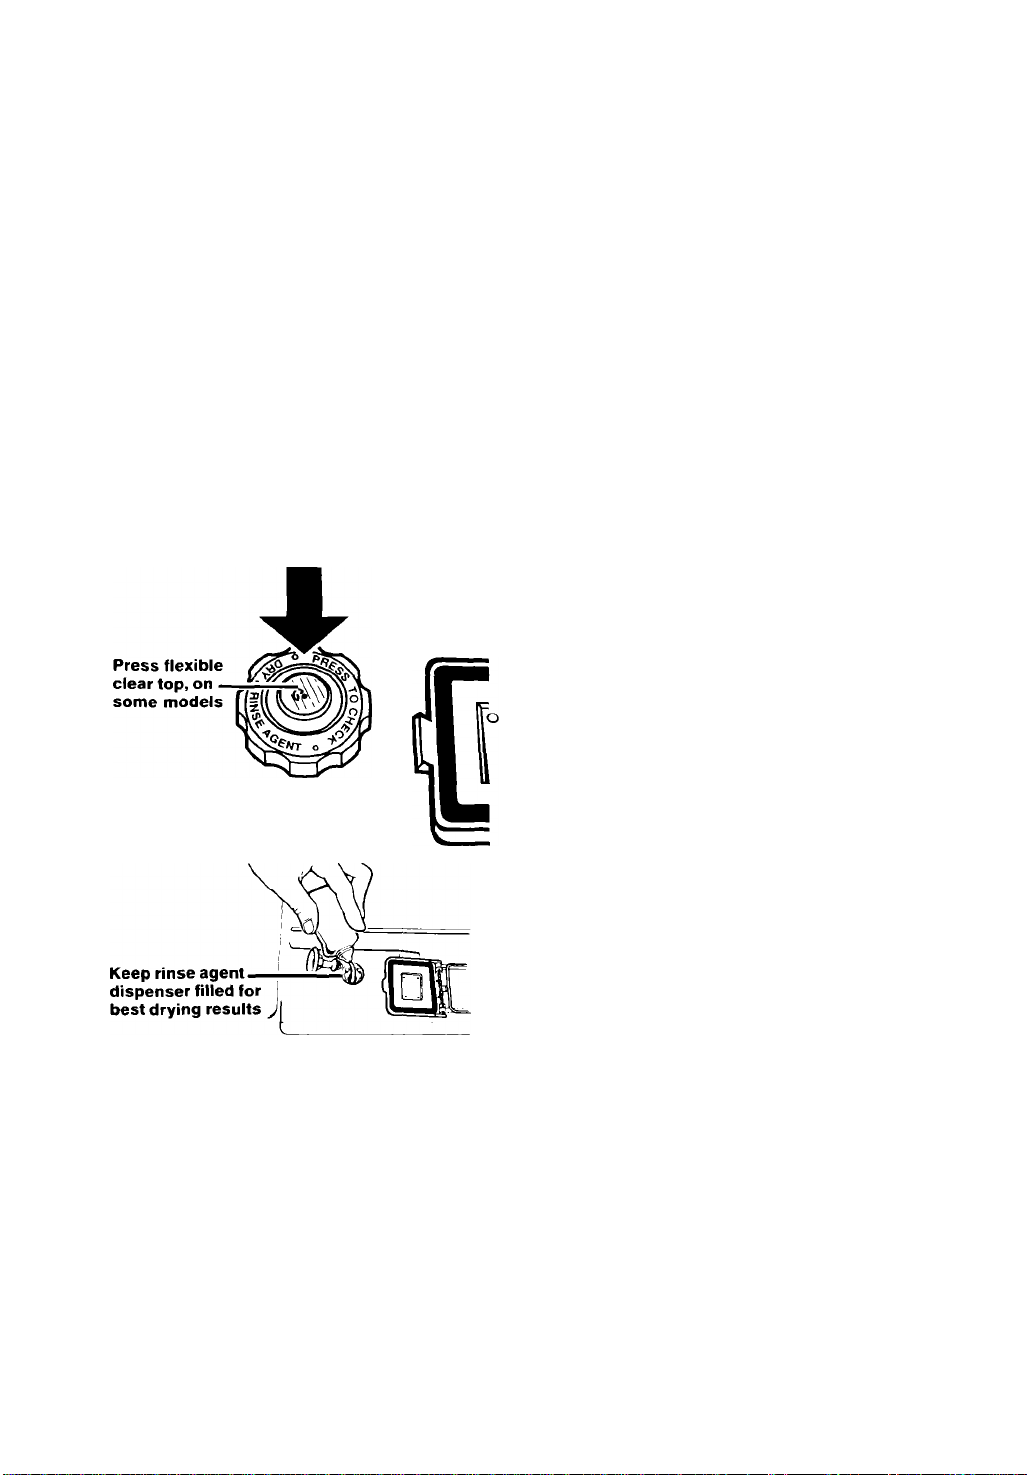
Rinse agent dispenser
Keep the rinse agent dispenser filled with a liquid
rinse agent such as Jet-Dry* A rinse agent
greatly improves the drying of dishes by
helping water flow off of them during the
last rinse. A rinse agent also keeps water from
forming droplets and drying as spots. A small
amount of rinse agent is automatically released
into the rinse wafer during the final rinse of each
cycle.
For best drying results, check the
dispenser periodically to see if it needs
refilling.
To check dispenser
The center of the Fill Indicator Cap will be clear
when dispenser needs refilling. An “E” will also
be visible inside the dispenser when the cap is
removed and the dispenser is empty.
On some models:
1. Press the flexible clear top of the Fill Indicator
Cap to draw rinse agent info cap.
NOTE: You may need to press cap two or
three times to remove all of the air bubbles
from the cap.
2. When rinse agent does not show in cap, even
after pressing flexible cap several times,
dispenser needs refilling.
10
To fill dispenser
The dispenser will hold 6 ounces of rinse agent.
Under normal conditions, this will last about 3
months. You do not have to waif until the dispenser
is empty to refill it, but do not overfill it.
Make sure the dishwasher door is fully open
before removing the Fill Indicator Cap. Do not fill
past the smallest opening in the lower part of the
dispenser. If you overfill, excess rinse agent can
come out. This will not harm the dishwasher, but
could cause over-sudsing. Clean up any spilled
rinse agent with a damp cloth. Replace the Fill
Indicator Cap and keep it tightly closed.
NOTE: Because your dishwasher is designed to
use a liquid rinse agent, you do not need to use a
solid or bar-type rinse agent.
K Registered Trademark of Benckiser Consumer Products, Inc.
Page 11

For Be st Res ult s
Hot water is a must
Hot water dissolves and activates the dishwashing
detergent. Hot water dissolves grease on dishes
and helps dry glasses spot-free. Make certain
loads are washed in hot water.
Maintain a 140°F (60°C) water supply at central
water heater. To check water temperature, turn on
hot water faucet nearest the dishwasher. Let water
run until it is as hot as possible, then check with a
candy or meat thermometer. If the temperature at
the faucet is below 135°F (57°C), have a qualified
person raise the water heater thermostat setting.
Quiet operating tips
To avoid thumping and clattering noises during
operation:
• Make sure lightweight load items are secured
in the rack.
• Make sure pot lids and handles, pizza pans,
cookie sheets, etc. do not touch interior walls,
interfere with the spray arm rotation or cover
spray tower
• Load dishes so they don’t touch one another.
NOTE: Keep sink drain plugs inserted during
dishwasher operation to prevent noise transfer
through drains.
Special tips
Remember, use your dishwasher only for the
job it was designed to do. Some items are not
dishwasher safe or may require special care.
Read these special tips for the following items:
Aluminum: Aluminum loses its bright, shiny
appearance and darkens in color due to minerals
in the water and the alkalinity of the dishwasher
detergent. Colored aluminum may fade.
TIPS: If washed in the dishwasher avoid
placing directly in front of detergent dispenser
where it could be sprinkled with undissolved
detergent, causing spotting, pitting, and
discoloration. Follow utensil manufacturer's
cleaning instructions.
China: Check manufacturer’s recommendations.
Hand-painted, metal-trimmed, and antique china
fade due to high water temperatures and alkaline
detergent solution in the dishwasher,
NOTE: Delicate, antique items should not be
washed in the dishwasher.
TIPS: Load china carefully. Do not allow
pieces to touch each other. Test one piece by
washing it daily in the dishwasher for several
weeks. Then compare it with the rest of the
set to see if colors have changed.
Crystal and decorative glasses: Crystal can
break from sudden exposure to high water temper
ature. Metal trim and colorful decoration on glass
will fade in time when washed in the dishwasher.
NOTE: Delicate, antique items should not be
washed in the dishwasher. ~
TIPS: Load crystal carefully in top rack
only. Be sure to load a few larger items in the
bottom rack to reduce amount of force of
water spray reaching glassware from lower
spray arm. Use the shortest cycle.
Flatware: Salty and acidic food may tarnish
silver and stainless flatware if allowed to remain
on the utensils. A film may form on sterling silver
and silver plate items washed in a dishwasher.
This film is caused by reaction of silver with
chlorine in the detergent. Gold flatware is not
dishwasher safe. The adhesive used in some
flatware with hollow handles is not heat resistant,
causing the handles to come off in the dishwasher.
Wash by hand
TIPS: Rinse flatware as soon as possible,
especially if it is not to be washed right away.
Dishwasher detergent may remove antique
finishes. Wash by hand. Tarnish and film
build-up can be removed with silver polish.
Cast iron utensils: The seasoned finish will be
removed in the dishwasher. Rusting will result.
TIPS: Wash by hand. To re-season, coat with
unsalted fat and heat in a slow oven for an
hour or two.
Plastics: Many plastics will have ‘Dishwasher
Safe" written on them. Some plastics are heat
sensitive and may melt or warp.
TIPS: If in doubt, try one piece. Place in
upper rack only. Air Dry Option provides
additional protection.
Non-stick finish utensils: Most can be washed
in the dishwasher.
TIPS: Follow manufacturer's suggestions.
Wood: Many wooden items will crack and warp or
lose their finish.
TIPS: Do not wash cutting boards, wooden
salad bowls or knives with wooden handles in
the dishwasher.
Pewter or pewter-like materials: Items may
streak, discolor, and pit.
TIPS: To keep pewter at its very best, hand
wash with mild detergent.
11
Page 12
For Best Results Continued
Energy saving tips
You can help save energy if you:
1. Wash full loads. Running a half-filled dish
washer uses the same amount of electricity and
hot water as a fully loaded machine.
2. Use the Light Wash Cycle for moderately
soiled loads. It uses less hot water and energy
than the Normal Wash Cycle.
3. Air dry dishes when you don't need a rapid
drying cycle. Allow longer drying times (over
night). Use a rinse agent to improve drying.
4. Load correctly for best washing results.
Incorrect loading may cause poor washing and
the need to rewash all or part of the load.
5. Do not pre-rinse normally soiled dishes.
Select the correct cycle for the load and use the
recommended amount of detergent for good
washing results without hand rinsing.
6. Use your dishwasher during off-peak hours.
Local utilities recommend this to avoid heavy
usage of energy at certain times of day.
Dishwasher care & cleaning
Exterior - Regular use of a soft, damp cloth or
sponge and a mild detergent is all that is neces
sary, in most cases, to keep the outside of your
dishwasher nice looking and clean.
Interior - Hard water minerals may cause a white
film to build-up on the inside surfaces, especially
just beneath the door area. To clean dishwasher
interior:
1. Apply powdered dishwasher detergent to a
damp sponge to make a paste.
OR
2. Use liquid automatic dishwasher detergent and
clean with damp sponge.
Wear rubber gloves. Do not use any type of
cleanser other than automatic dishwasher de
tergent because it may cause foaming or sudsing.
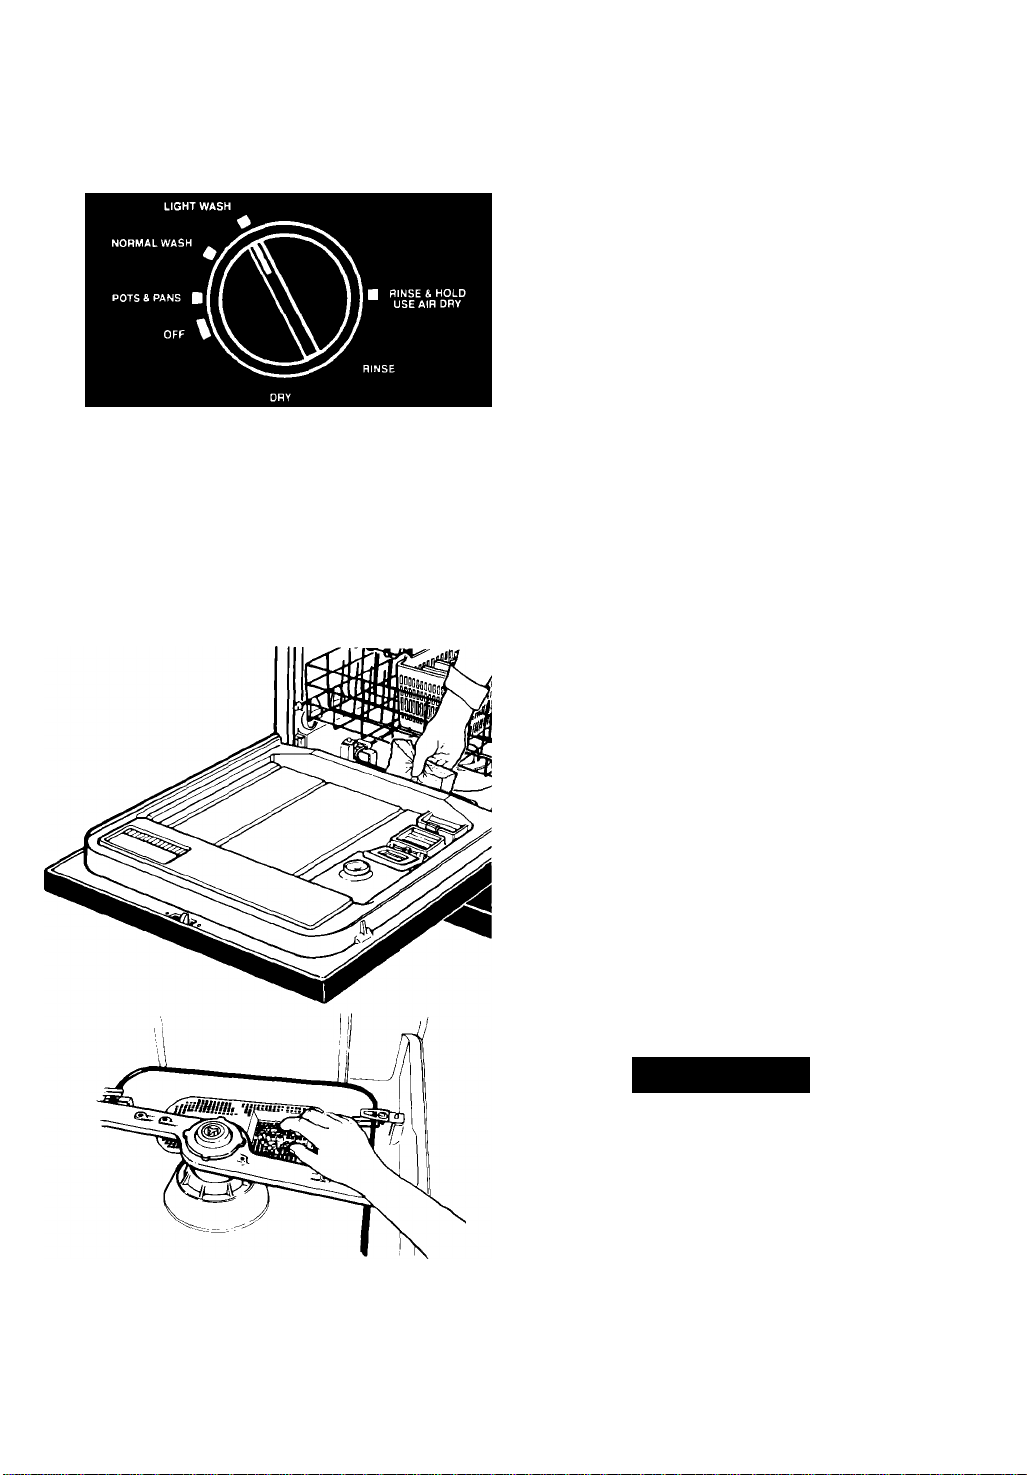
. Filter Screen - The filter system requires
periodic cleaning as needed. To clean screen:
12
^WARNING
Personal Injury Hazard
Wait at least 20 minutes after a cycle for the
heating element to cool down. Failure to do
so can result in burn injuries.
1. Unload and slide bottom rack forward. (Remove
bottom rack if necessary to reach filter screen.)
2. Remove collected particles from the screen with
your fingers or paper towel.
3. Return bottom rack to original position.
Page 13

Com mon Di shw ash in g Pr obl ems
Spotting and filming
Hard water
Fill detergent dispensers to capacity. Use
dishwasher detergent with highest available
phosphorus content. May be necessary to
install water softener.
To remove spots and film, try a vinegar rinse...
1. Wash and rinse load as usual. Use Air Dry
Option.
2. Remove all metal items.
3. Put 2 cups (500 mL) white vinegar in a
container on the bottom rack.
4. Run dishwasher through a complete washing
cycle.
Water is not hot enough
Water temperature should be at least 140^F
(60°C). Set water heater thermostat to a higher
setting. Run water at sink until hot before starting.
Not enough detergent, or improper
detergent
Use more dishwasher detergent Use detergent
with highest available phosphorus con
tent...especially with hard water.
“Old” detergent
Use only fresh dishwasher detergent. Store
tightly closed container, in cool, dry place
Discard old detergent. Do not fill dispensers
until ready to start dishwasher.
Improper loading
Make sure dishes and glassware are loaded
so spray reaches all surfaces and items drain
properly. Do not overload. Do not nest items.
Make sure large items do not block spray from
reaching detergent dispensers.
No rinse agent
Does the rinse agent dispenser need filling?
See instructions on page 10.
AIR DRY Setting used
Drying without heat may result in some spotting
of glasses and silver.
Small particles deposited on items
Spray arm not rotating freely
Check spray arm to make sure it turns freely
after loading. Be sure a utensil has not prevented
its turning.
“Old” detergent
Use only fresh dishwasher detergent. Store
tightly closed container, in cool, dry place.
Discard old detergent. Do not fill dispensers
until ready to start dishwasher.
Not enough detergent, or improper
detergent
Use more dishwasher detergent. Use detergent
with highest available phosphorus content...
especially with hard water.
Water is not hot enough
Water temperature should be at least 140°F
(60°C). Set water heater thermostat to a higher
setting. Run water at sink until hot before starting
Water pressure may be low, dishwasher is
not filiing properly
If water pressure is low, do not use water for other
purposes while dishwasher is running (to assure
correct fills).
Dishes not dry
No rinse agent
Does the rinse agent dispenser need filling?
See instructions on page 10.
Water is not hot enough
Water temperature should be at least 140°F
(60° C). Set water heater thermostat to a higher
setting. Run water at sink until hot before starting.
Improper loading
Make sure dishes and glassware are loaded
so spray reaches all surfaces and items drain
properly. Do not overload. Do not nest items.
AIR DRY Setting used
Allow more time when using Air Dry Option, or
use Fleat Dry Option. Plastic items may need
towel drying.
Black marks on dishes
Aluminum utensils rubbing against items
during washing
Use care in loading aluminum utensils,
especially any lightweight foil container. Place so
they do not touch dishes. Remove black marks
with plastic scouring pad and a mild abrasive
cleanser.
Chipping or breaking glassware
Improper loading
Do not overload. Load glasses in the top rack only.
Load between prongs, not over them. Glasses
loaded over prongs will not be supported and may
chip or break.
13
Page 14

Common Dishwashing Problems
Continued
Dishes not washing clean
Water is not hot enough
Water temperature should be at least 140°F
(60°C). Set water heater thermostat to a higher
setting. Run water at sink until hot before starting.
Improper loading
Make sure dishes and glassware are loaded
so spray reaches all surfaces and items drain
properly Do not overload. Do not nest items.
Make sure large items do not block spray from
reaching detergent dispensers.
Spray arm not rotating freely
Check spray arm to make sure it turns freely
after loading. Be sure a utensil is not sticking out
the bottom of the silverware basket and blocking
the spray arm from turning.
Not enough detergent or improper
detergent
Use more dishwasher detergent. Use detergent
with highest available phosphorus content...
especially with hard water.
“Old” detergent
Use only fresh dishwasher detergent. Store
tightly closed container, in cool, dry place.
Discard old detergent. Do not fill dispensers
until ready to start dishwasher.
Water pressure may be low, dishwasher is
not filling properly
If water pressure is low, do not use water for other
purposes while dishwasher is running (to assure
correct fills).
2. Start dishwasher and unlatch door to stop it
when it has filled for the wash part of the cycle.
3. Add 'A to '/2 cup (120 to 240 mL) of citric acid
crystals (usually available in drugstores).
4. Close and latch door to complete cycle.
Permanent solution: Install an iron or
manganese filter or water softener to home
water supply.
Rust spots on stainless steel - OR - Dark
spots on flatware: stainless steel, silver
plate, or sterling
Allowing salty or acidic foods such as
mayonnaise, vinegar, fruit juices, salad
dressings, milk products to remain on
flatware
Rinse flatware that is to stand for several hours
before washing (use the Rinse & Hold Cycle).
Clean stained items with silver polish and re-wash.
Do not put stainless steel and silver flatware in
the same silverware basket compartment. Direct
contact between these metals can cause perma
nent damage to the silver.
Undissolved detergent coming in contact
with flatware
Remove spots with silver polish. Avoid spilling
concentrated detergent on wet flatware.
Bronze tarnish on silverplate
Silverplate is worn off. Exposed base metal
takes on a bronzed hue
Remove tarnish with silver polish. Have silver
replated.
Cloudy film on glassware, etching permanent corrosion
Too much detergent in soft water
Check tor rainbow hue on glasses. A rainbow
hue is the first sign of etching (corrosion of glass).
Reduce the amount of dishwasher detergent.
Use a detergent with a lower phosphorus content.
Inadequate rinsing
If water pressure is low do not use water for other
purposes while dishwasher is running (to assure
correct water fills). Make sure dishes and glass
ware are loaded properly to assure adequate
rinsing and draining. Do not overload.
Dishes & interior of dishwasher
yellow or brown
Iron or manganese in water
Temporary remedy:
1. Set empty dishwasher for a “one wash” cycle.
14
Water left in bottom of dishwasher
above grate
Dishwasher cycle not completed
Allow dishwasher to complete cycle. Some
remaining water is normal and keeps seals
from drying.
Clogged drain air gap
Some plumbing codes require use of a drain air
gap between an undercounter dishwasher and
the drain system of the house. The air gap is usu
ally located above the sink or on the top of the
counter near the dishwasher to prevent the pos
sibility of water backing up from the drain into the
dishwasher due to a plugged drain. The drain air
gap is not a part of the dishwasher and is not
covered by the dishwasher warranty. The drain air
gap should be kept clean to ensure proper drain
ing of the dishwasher.
Page 15

If You Ne ed Ser vic e O r A ssi sta nce
We suggest you follow these steps;
1. Before calling for assistance...
Performance problems often result from little
things you can find and fix yourself without tools
of any kind.
If your dishwasher will not run, or stops
during a cycle:
• Is the door tightly closed and securely latched?
• Has the cycle been correctly set?
• Is the indicator above the POTS & PANS button
white, if you are using the Pots & Pans Cycle?
See page 4.
• Is the water turned on?
• Have you checked your home's main fuses or
circuit breaker box?
• Is the dishwasher wired into a live circuit with the
proper voltage?
• If the motor has stopped because of an overload,
it will automatically reset itself within a few min
utes. If the motor does not start, call for service.
If dishwasher won’t fill:
• Is overfill protector stuck in “up” position?
Overfill protector should move up and down
freely. Press down to release.
If water remains in the dishwasher:
• Has the cycle completed?
• A small amount of remaining water is normal.
• Is drain air gap clogged?
If detergent remains in the covered
detergent cup:
• Is the bottom rack in backwards? (The rack
bumpers should be at the front.)
• Is the dishwasher detergent fresh and dry
without lumps?
• Is the cycle completed?
If white residue appears on front of
access panel:
• Is more detergent being used than needed? See
page 9 for recommended amounts of detergent.
• Some liquid detergents develop excess foam
and build up on exterior of access panel. Try a
different brand to reduce foaming and eliminate
build-up. -
If dishes aren’t as dry as you expected:
• Is the rinse agent dispenser filled? Using a rinse
agent greatly improves drying. (See page 10.)
2. If you need assistance*...
Call Whirlpool Consumer Assistance Center
telephone number. Dial free from anywhere
in the U.S.:
1-800-253-1301
and talk with one of our trained consultants.
The consultant can instruct you in how to obtain
satisfactory operation from your appliance or,
if service is necessary, recommend a qualified
service company in your area.
If you prefer, write to:
Mr. William Clark
Consumer Assistance Representative
Whirlpool Corporation
2000 M-63
Benton Harbor, Ml 49022 _
Please include a daytime phone number in your
correspondence.
3. If you need service*...
__
Whirlpool has a nationwide
/ -y" network of authorized
WlllTHKiOl Whirlpool®“ service com-
SERVICE panies. Whirlpool service
technicians are trained to
fulfill fhe product warranty and provide after
warranty service, anywhere in the United States.
To locate the authorized Whirlpool service com
pany in your area, call our Consumer Assistance
Center telephone number (see Step 2) or look in
your telephone directory Yellow Pages under:
APPLIANCES - HOUSEHOLD - ELECTRICAL APPLIANCES -
MAJOR - SERVICE & REPAIR MAJOR - REPAIRING & PARTS
WHIRLPOOL APPLIANCES
XYZ SERVICE CO
123 MAPLE
4. If you need FSP’ replacement parts*...
OR
WASHING MACHINES, DRYERS
& IRONERS - SERVICING
AUTHORIZED WHIRLPOOL SERVICE
SERVICE COMPANIES
..................
999-9999
FSP is a registered trademark of Whirlpool
Corporation for quality parts. Look for this symbol
of quality whenever you need a replacement pari
for your Whirlpool appliance. FSP replacement
parts will fit right and work right, because they are
made to the same exacting specifications used to
build every new Whirlpool appliance.
To locate FSP replacement parts in your area,
refer to Step 3 above or call the Whirlpool
Consumer Assistance Center number in Step 2.
5. If you are not satisfied with how the
problem was solved^.
• Contact the Major Appliance Consumer Action
Panel (MACAP). MACAP is a group of indepen
dent consumer experts that voices consumer
views at the highest levels of the major appliance
industry.
• Contact MACAP only when the dealer, autho
rized servicer and Whirlpool have failed to resolve
your problem.
Major Appliance Consumer Action Panel
20 North Wacker Drive
Chicago, IL 60606
• MACAP will in turn inform us of your action.
When requesting assistance, please provide:
model number, serial number, dale of purchase,
and a complete description of the problem. This
information is needed in order to better respond
to your request.
15
Page 16

WHI RLP OOL ^
Dis hw ashe r W ar ran ty
LENGTH OF WARRANTY WHIRLPOOL WILL PAY FOR
FULL ONE-YEAR WARRANTY
From Date of Purchase
FULL TWENTY-YEAR
WARRANTY
From Date of Purchase
WHIRLPOOL WILL NOT PAY FOR
A. Service calls to;
1. Correct the installation of the dishwasher.
2. Instruct you how to use the dishwasher.
3. Replace house fuses or correct house wiring or plumbing.
B. Repairs when dishwasher is used in other than normal, single-family household use.
C. Pickup and delivery. This product is designed to be repaired in the home.
D. Damage to dishwasher caused by accident, misuse, fire, flood, acts of God or use of
products not approved by Whirlpool.
E. Repairs to parts or systems caused by unauthorized modifications made to the appliance.
WHIRLPOOL CORPORATION SHALL NOT BE LIABLE FOR INCIDENTAL OR CONSEQUENTIAL
DAMAGES. Some states do not allow the exclusion or limitation of incidental or consequential damages so
Ihis limitation or exclusion may not apply to you. This warranty gives you specific legal rights, and you may
also have other rights which vary from state to state.
Outside the United States, a different warranty may apply. For details, please contact your authorized
Whirlpool distributor or military exchange.
If you need service, first see the “Service or Assistance" section of this book. After checking “Service or
Assistance," additional help can be found by calling our Consumer Assistance Center telephone number,
1-800-253-1301, from anywhere in the U.S.
FSP® replacement parts and repair labor to correct defects
in materials or workmanship. Service must be provided by an
authorized Whirlpool” service company.
FSP replacement parts and repair labor for the DURAPERM™
tub and/or inner door should they fail to contain water due to
defective materials or workmanship.
B/92
J Registered Trademark/TM Trademark/SM Service Mark of Whirlpool Corporation
Part No. 3369274 Rev. A
©1992 Whirlpool Corporation Printed in U.S.A.
 Loading...