

Page 1
ELECTRIC AND GAS
DRYERS
Use & Care Guide
For questions about features, operation/performance,
parts, accessories or service, call: 1-800-253-1301
or visit our website at...www.whirlpool.com
Table of Contents .. .. ..... .. ..... .. ..... .. ..... .. .... ... .... ... .... ... .... .. ..... .. ..... 2
8314841B
Page 2

TABLE OF CONTENTS
DRYER SAFETY.......................................................................... 3
PARTS AND FEATURES............................................................5
CHECKING YOUR VENT............................................................ 6
USING YOUR DRYER................................................................. 7
Starting Your Dryer.......................................................................7
Stopping and Restarting..............................................................7
Loading Clothes...........................................................................8
Drying, Cycle, and Temperature Tips..........................................8
CYCLE DESCRIPTIONS................................................ ..... ...... ..8
Automatic Drying Cycle ...............................................................8
Timed Drying Cycle......................................................................9
Temperature Settings...................................................................9
Additional Features....................................................................10
Drying Rack (Optional purchase)...............................................10
CARING FOR YOUR DRYER................................................... 11
Cleaning the Lint Screen............................................................11
Cleaning the Dryer Interior.........................................................11
Removing Accumulated Lint from Inside the Dryer Cabinet.....11
Changing the Drum Light...........................................................12
TROUBLESHOOTING............................................................... 12
ASSISTANCE OR SERVICE .......................................... ..... ......14
WARRANTY............................ ..... ...... ..... .................................. 15
2
Page 3
DRYER SAFETY
Your safety and the safety of others are very important.
We have provided many important safety messages in this manual and on your appliance. Always read and obey all
safety messages.
This is the safety alert symbol.
This symbol alerts you to potential hazards that can kill or hurt you and others.
All safety messages will follow the safety alert symbol and either the word “DANGER” or
“WARNING.” These words mean:
You can be killed or seriously injured if you don't
immediately follow instructions.
You can be killed or seriously injured if you don't
follow instructions.
All safety messages will tell you what the potential hazard is, tell you how to reduce the chance of injury, and tell you
what can
happen if the instructions are not followed.
WARNING: For your safety, the information in this manual must be followed to minimize
the risk of fire or explosion, or to prevent property damage, personal injury, or death.
Do not store or use gasoline or other flammable vapors and liquids in the vicinity of this
–
or any other appliance.
WHAT TO DO IF YOU SMELL GAS:
–
Do not try to light any appliance.
•
Do not touch any electrical switch; do not use any phone in your building.
•
Clear the room, building, or area of all occupants.
•
Immediately call your gas supplier from a neighbor's phone. Follow the gas supplier's
•
instructions.
If you cannot reach your gas supplier, call the fire department.
•
Installation and service must be performed by a qualified installer, service agency, or
–
the gas supplier.
3
Page 4

IMPORTANT SAFETY INSTRUCTIONS
To reduce the risk of fire, electric shock, or injury to persons when using the dryer, follow basic
WARNING:
precautions, including the following:
■ Read all instructions before using the dryer.
■ Do not place items exposed to cooking oils in
your dryer. Items contaminated with cooking oils
may contribute to a chemical reaction that could
cause a load to catch fire.
■ Do not dry articles that have been previously
cleaned in, washed in, soaked in, or spotted with
gasoline, dry-cleaning solvents, other flammable,
or explosive substances as they give off vapors
that could ignite or explode.
■ Do not allow children to play on or in the dryer.
Close supervision of children is necessary when
the dryer is used near children.
■ Before the dryer is removed from service or dis-
carded, remove the door to the drying compartment.
■ Do not reach into the dryer if the drum is moving.
■ Do not install or store the dryer where it will be
exposed to the weather.
■ Do not tamper with controls.
SAVE THESE INSTRUCTIONS
■ Do not repair or replace any part of the dryer or
attempt any servicing unless specifically recommended in this Use and Care Guide or in published
user-repair instructions that you understand and have
the skills to carry out.
■ Do not use fabric softeners or products to eliminate
static unless recommended by the manufacturer of
the fabric softener or product.
■ Do not use heat to dry articles containing foam rubber
or similarly textured rubber-like materials.
■ Clean lint screen before or after each load.
■ Keep area around the exhaust opening and adjacent
surrounding areas free from the accumulation of lint,
dust, and dirt.
■ The interior of the dryer and exhaust vent should be
cleaned periodically by qualified service personnel.
■ See Installation Instructions for grounding require-
ments.
4
Page 5
PARTS AND F EATURES
4
5
6
1
2
3
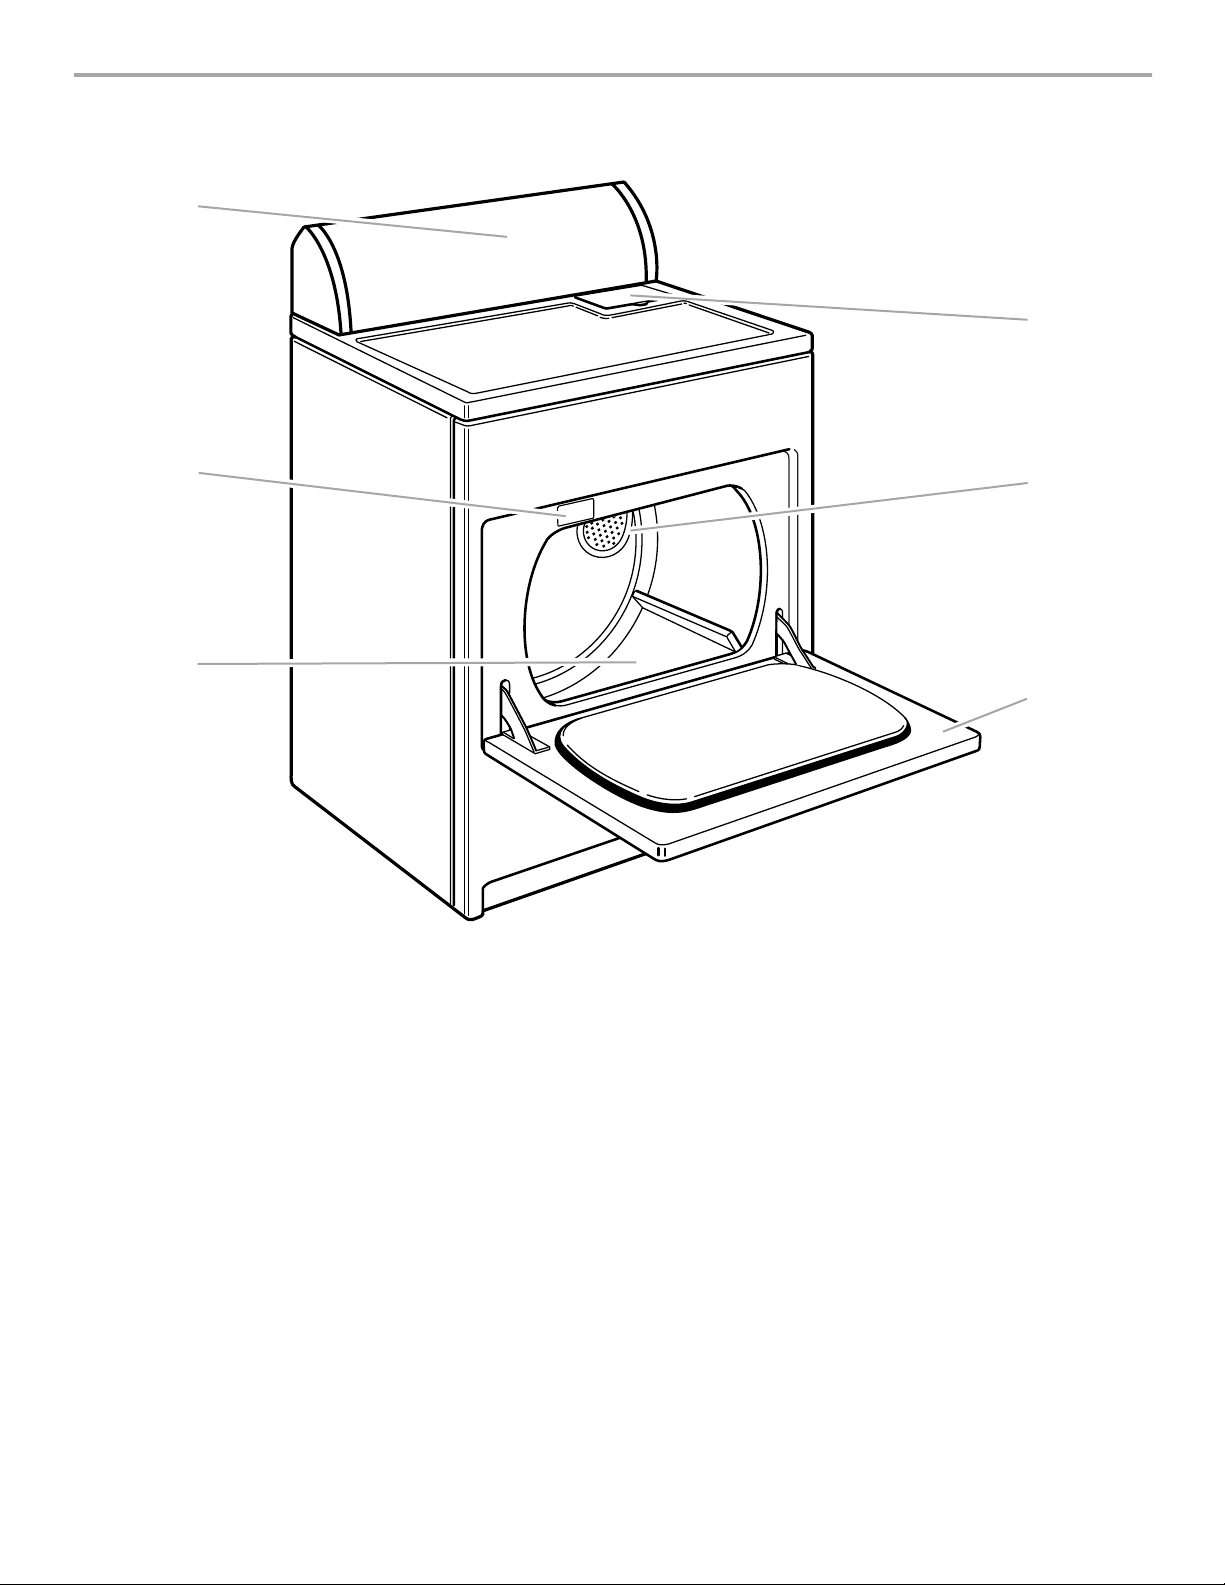
1. Control panel
2. Model and serial number label
3. Dryer drum
4. Lint sc reen
5. Exhaust grill
6. Wide-opening door
Additional features
ACCUDRY™ sensor drying
WRINKLE SHIELD™ feature
WRINKLE SHIELD™ Plus selector
SENSEON™ electronic sensor
End of Cycle Signal selector
Drum light
Optional purchase
Drying rack
5
Page 6
CHECKING
YOUR VENT
Your dryer must be properly installed and vented to achieve
maximum drying efficiency and shorten drying times. Use the
minimum recommended installation cl earances (found in your
Installation Instructions) to avoid blocking the flow of combustion
and ventilatio n air. R efer to your Installation Instructions for more
information.
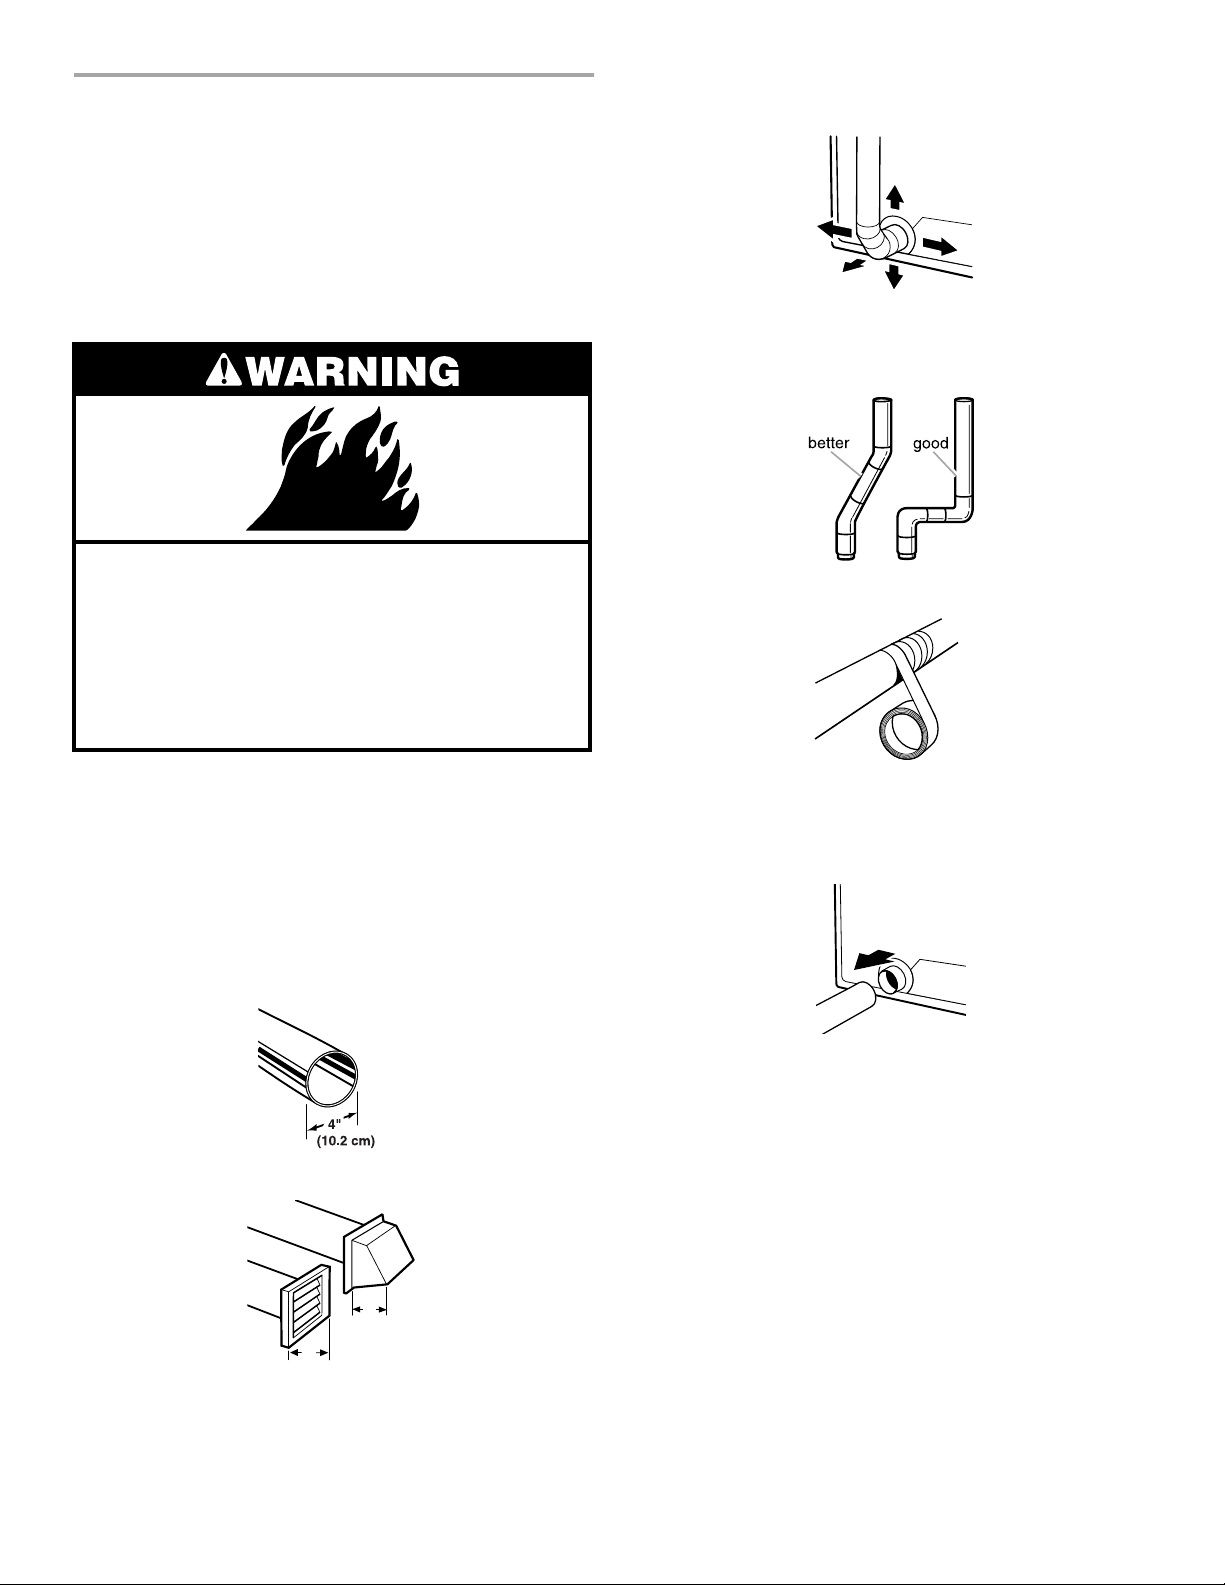
3. The exhaust vent can be routed up, down, left, right, or
straight out the back of the dryer. Space requirements are
listed in your Installation Instructions.
4. Use the straightest path possible when routing the exhaust
vent. Use the fewest number of elbows and turns. Allow room
when using elbows or making turns. Bend vent gradually to
avoid kinking.
Fire Hazard
Use a heavy metal vent.
Do not use a plastic vent.
Do not use a metal foil vent.
Failure to follow these instructions can result in
death or fire.
If the dryer is not properly installed and vented, it will not be
covered under the warranty.
NOTE: Ser vice calls caused by improper venting will be paid for
by the customer, whether it was a paid installation or selfinstalled.
1. Do not use plastic vent or metal foil vent. Use 4 in. (10.2 cm)
metal or flexible metal vent. Do not kink or crush flexible
metal vent. It must be completely extended to allow adequate
exhaust air to flow. Check vent after installation. Refer to your
Installation Ins tructions for proper length requirements of
vent.
2. Use a 4 in. (10.2 cm) exhaust hood. Smaller hoods increase
drying times.
2
5. Use duct tape to seal all joints. Do not use screws to secure
vent. Lint may catch on screws.
6. Clean exhaust vent periodically, depending on use, but at
least every 2 years, or when installing your dryer in a new
location.
■ Disconnect vent from the dryer and clean one section at a
time until you reach the exhaust hood.
■ To clean out lint, use the hose attachment on your
vacuum, or a pole or wire with a feather duster or rag
attached.
■ Be sure the flapper on the outside end of vent moves
freely.
■ When cleaning is complete, be sure to follow the
Installation Instructions supplied with your dryer for final
product check.
1
4"
(10.2 cm)
4"
(10.2 cm)
6
Page 7
USING YOUR DRYER
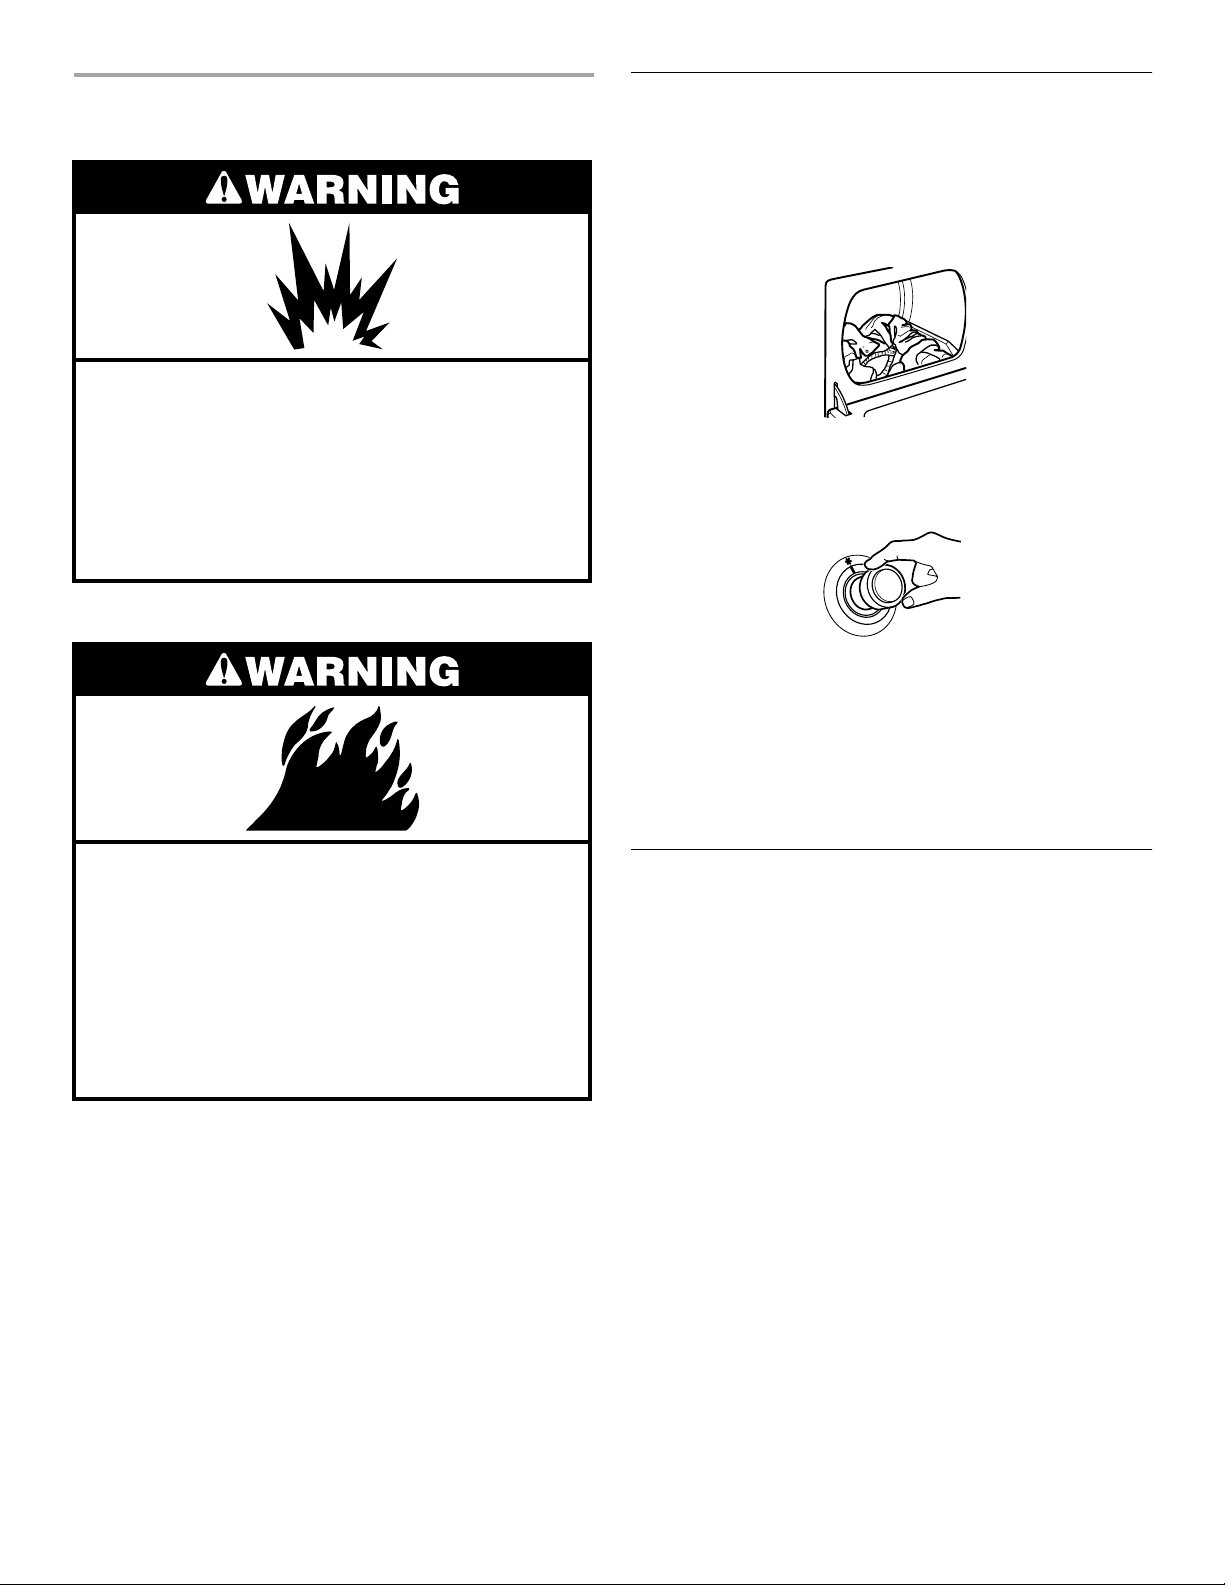
Explosion Hazard
Keep flammable materials and vapors, such as
gasoline, away from dryer.
Do not dry anything that has ever had anything
flammable on it (even after washing).
Failure to follow these instructions can result in
death, explosion, or fire.
Starting Your Dryer
Before u sing y our dr yer, wipe the dryer drum with a damp cloth t o
remove dust from storing and shipping. The following steps
provide an overview for operating your dryer. Specific directions
for each step are provided in the following sections.
1. Load clothes loo sely in to the d ryer and close the door. Do not
pack the dryer. Allow space for clothes to tumble freely.
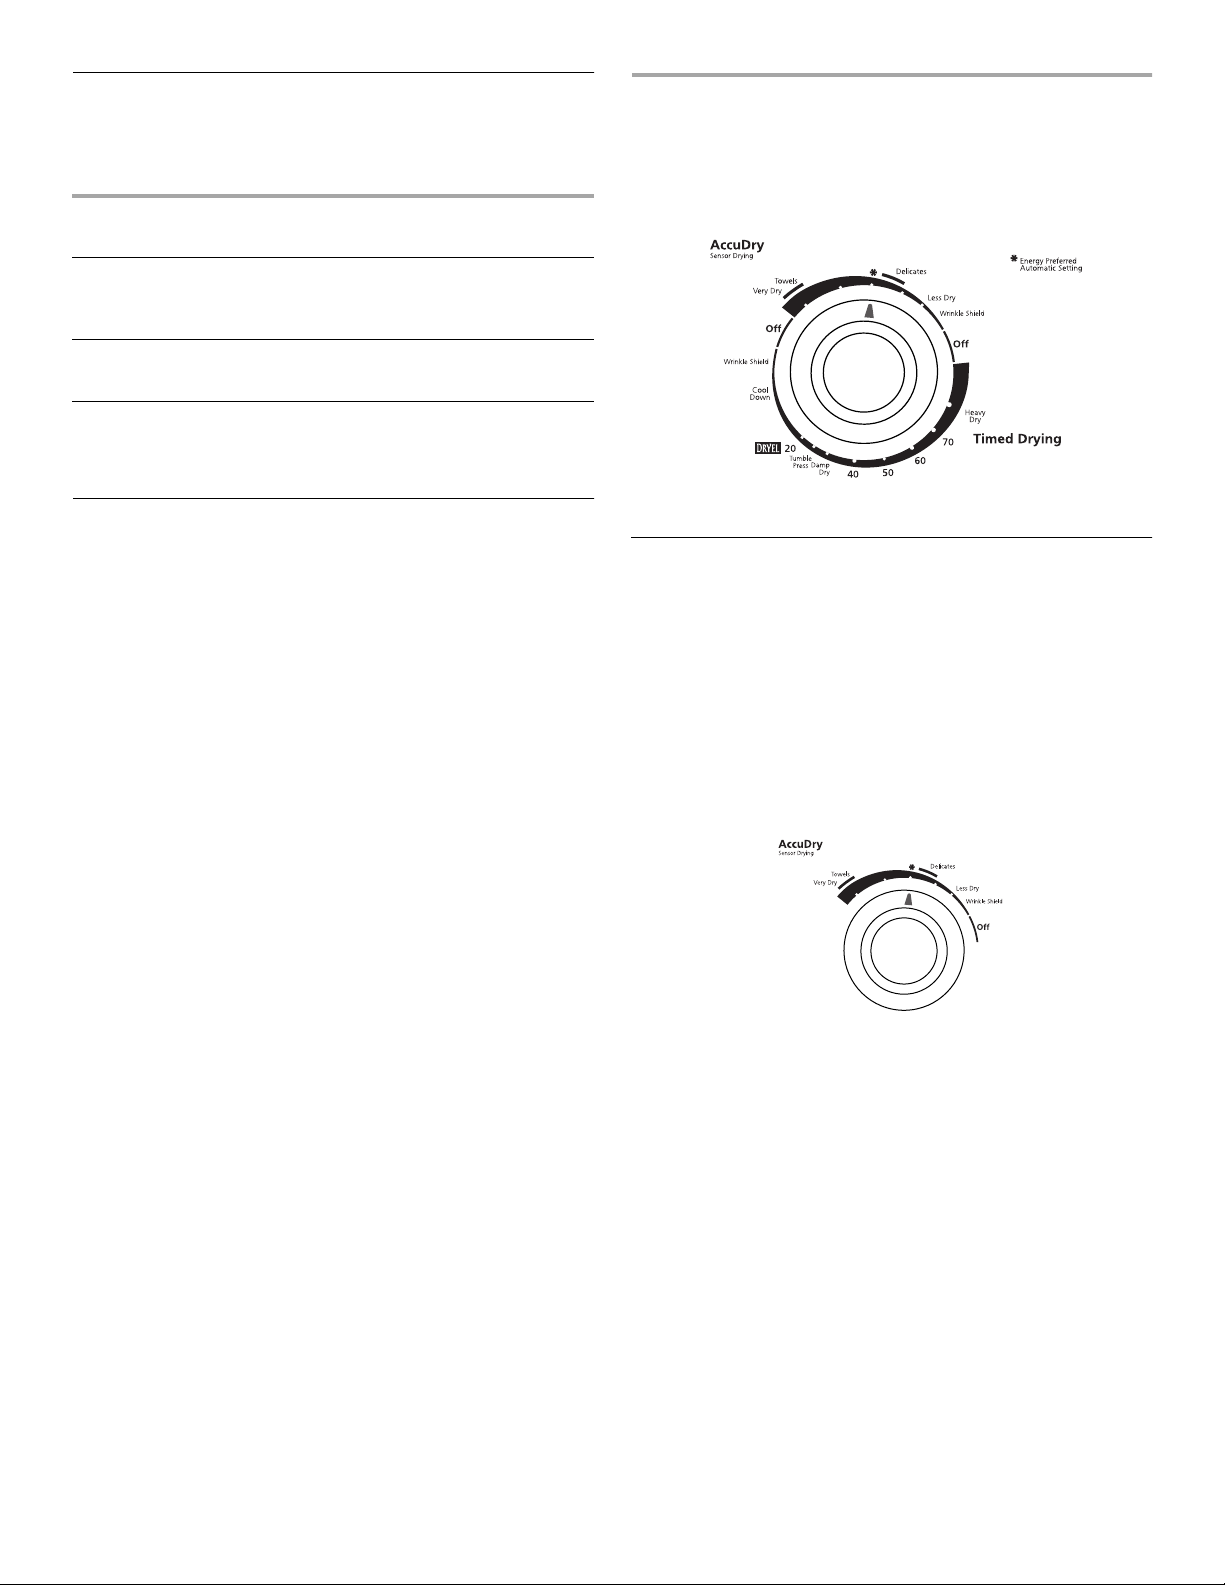
2. Turn the Cycle Control knob to the recommended cycle for
the type of load being dried. Use the Energy Preferred
Automatic Setting (
and Temperature Tips.”
3. Select a Temperat ure setting. See “Temperatu re Set tings.”
4. (OPTIONAL ST EP) Se t t he WR I NKLE S H IEL D ™ Plus selector
to the desired setting. See “Additional Features.”
5. (OPTIONAL STEP) Set the End of Cycle Signal to the desired
setting. The signal is hel pful when drying permanent press or
synthetics. Pr omptly r emove thes e items fr om the drye r at the
end of the cycle to prevent wrinkles.
6. Push the START button.
) to dry most loads. See “Drying, Cycle
*
Fire Hazard
No washer can completely remove oil.
Do not dry anything that has ever had any type of
oil on it (including cooking oils).
Items containing foam, rubber, or plastic must be
dried on a clothesline or by using an Air Cycle.
Failure to follow these instructions can result in
death or fire.
Stopping and Restarting
You can stop your dryer any time during a cycle.
To stop your dryer
Open the dryer door or turn the Cycle Control knob to OFF.
NOTE: The Cycle Control knob should point to an Off area when
the dryer is not in use.
To restart you r drye r
1. Close the door.
2. Select a new cycle and temperature (if desired).
3. Push START.
7
Page 8
Loading Clothes
Load clothes loosely into the dryer. Do not pack the dryer. Allow
space for clothes to tumble freely. The following chart shows
examples of balanced loads that would allow for proper tumbling.
Heavy work
clothes
3 pair of pants, 4 pair of jeans, 2 pair of
overalls, 3 shirts
CYCLE DESCRIPTIONS
Your dryer uses the Temperature selector with the Cycle Control
knob to design a drying cycle to provide the shortest, most
efficient drying time and best fabric care for your load.
Delicates
Towels
Mixed Load
3 camisoles, 1 robe, 4 slips,
6 undergarments, 2 sets of sleepwear,
1 child’s outfit
10 bath towels, 10 hand towels, 14 wash
cloths, 1 bath mat
3 double sheets, 4 pillowcases,
8 T-shirts, 6 pair of shorts, 2 blouses,
8 handkerchiefs
Drying, Cycle, and T emperature Tips
Select the correct cycle and temperature for your load.
Cool Down tumbles the load without heat during the last few
minutes of all cycles to make the load easier to handle.
Drying tips
■ Follow care label directions when th ey are available.
■ If you use fabric softener sheets, use only those lab eled
“dryer safe.” Follow package instruction s.
■ Remove the load from the dryer as soon as tumbling stops, to
reduce wrinkling. This is especially important for permanent
press, knits, and synthetic fabrics.
Cycle and temperature tips
■ Dry most loads using the Energy Preferred Automatic
Setting (
■ Use a High Heat setting for drying heavyweight items such as
towels and work clothes.
■ Use a Medium Heat setting for drying medium weight items,
such as sheets, underwear, permanent press fabrics, and
some knits.
■ Use a Low Heat setting for drying lightweight items such as
lingerie, blouses, dresses, and some knits.
■ Use a no-heat (air) setting for rubber, plastic, or heat-sensitive
fabrics.
■ Line dry bonded or laminated fabrics.
NOTE:
various loads, refer to the care label directions. If you are unsure
of the temperature to select for a load, select a lower setting
rather than a higher setting.
), if available on your dryer.
*
If you have questions about drying temperatures for
Cycle Control knob
Automatic Drying Cycle
The automatic cycle uses the ACCUDRY™ electronic control
sensor that senses the moisture in your load and shuts off the
dryer when the selected dryness is reached. The Cycle Control
knob does not move until the load is almost dry. After the cool
down, the knob automatically turns to an Off area and tumb ling
stops.
Your most frequently used Temperature settings, Normal and
High, when used with the automatic cycle, are enhanced with the
SENSEON™ drying system to provide the shortest drying time.
See “Temperature Settings.”
Dry most loads using the Energy Preferred Automatic Setting (
■ If the load is drier than you like, select a setting closer to
Less Dry the next time yo u dry a similar load.
■ If the load is not as dry as you like, complete drying using the
Timed Drying cycle. The next time you dry a similar load,
select a setting closer to Very Dry.
Drying time with the automatic cycle varies according to
NOTE:
the type of fabric, size of load, an d temperature setting. See
“Drying, Cycle and Temperature Tips.”
*
).
Towels
Use this setting to thoroughly dry extra heavy items, such as
mattress pads, quilts or towels. Set the Temperature sele ctor at
High heat.
Delicates
Use this setting to dry small loads or lightweight items. Set the
Temperature selector at Ex-Low heat.
8
Page 9
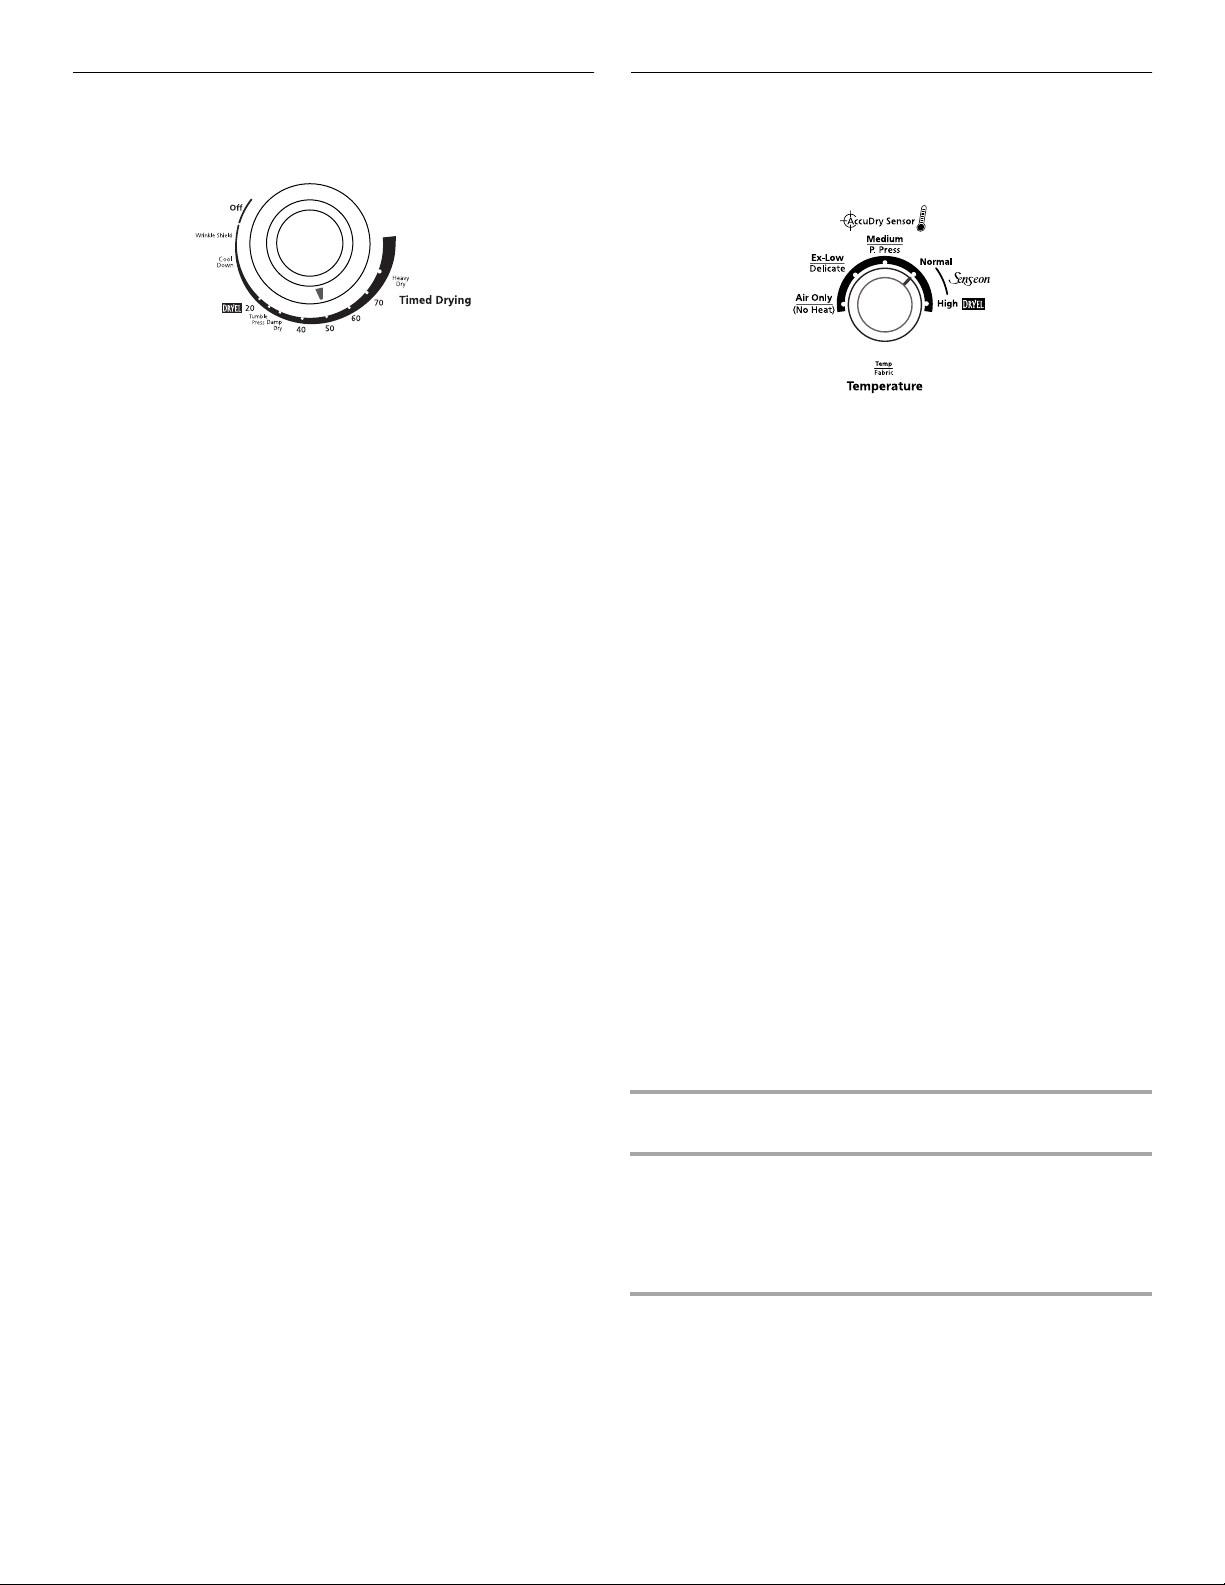
Timed Drying Cycle
Use the Timed Drying cycle to complete drying if items are still
damp after the automatic cycle.
Timed Drying is also useful for:
■ Heavyweight and bulky items, such as bedspreads and work
clothes and large loads that require a long dry ing time. Set
the Temperature selec tor to a heat setting that matches the
care label directions.
■ Lightweight items, such as lingerie, blouse s, and knits that
require a short drying time. Set the Temperature selector at
Ex-Low heat.
Heavy Dry
Use this setting to thoroughly dry large or heavy items, such as
thick bath towels or robes. Set the Temperature selector at High
heat.
®
DRYEL
When using DRYEL fabric care, select the DRYEL cycle setting
and the DRYEL temperature setting. DRYEL fabric care, when
used in accordance with the manufacturer’s directions, has been
tested and approved for use in full-size dryers built by Whirlpool
Corporation.
Damp Dry
Use this s e tti ng to dry items to damp le ve l o r t o dry items that do
not require an entire drying cycle. Damp dry items such as jeans
(to prevent stiffness) or cotton clothes (to make pressing easier).
set the Temperature selector at High heat.
TUMBLE PRESS® setting
Use this setting to remove wrinkles from items, such as clothes
packed in a suit cas e or it em s wr inkle d fr om being le ft i n the drye r
too long. Set the Temperature selector at Ex-Low or Medium
heat, depending on the fabrics in your load.
fabric care system
T emperature Settings
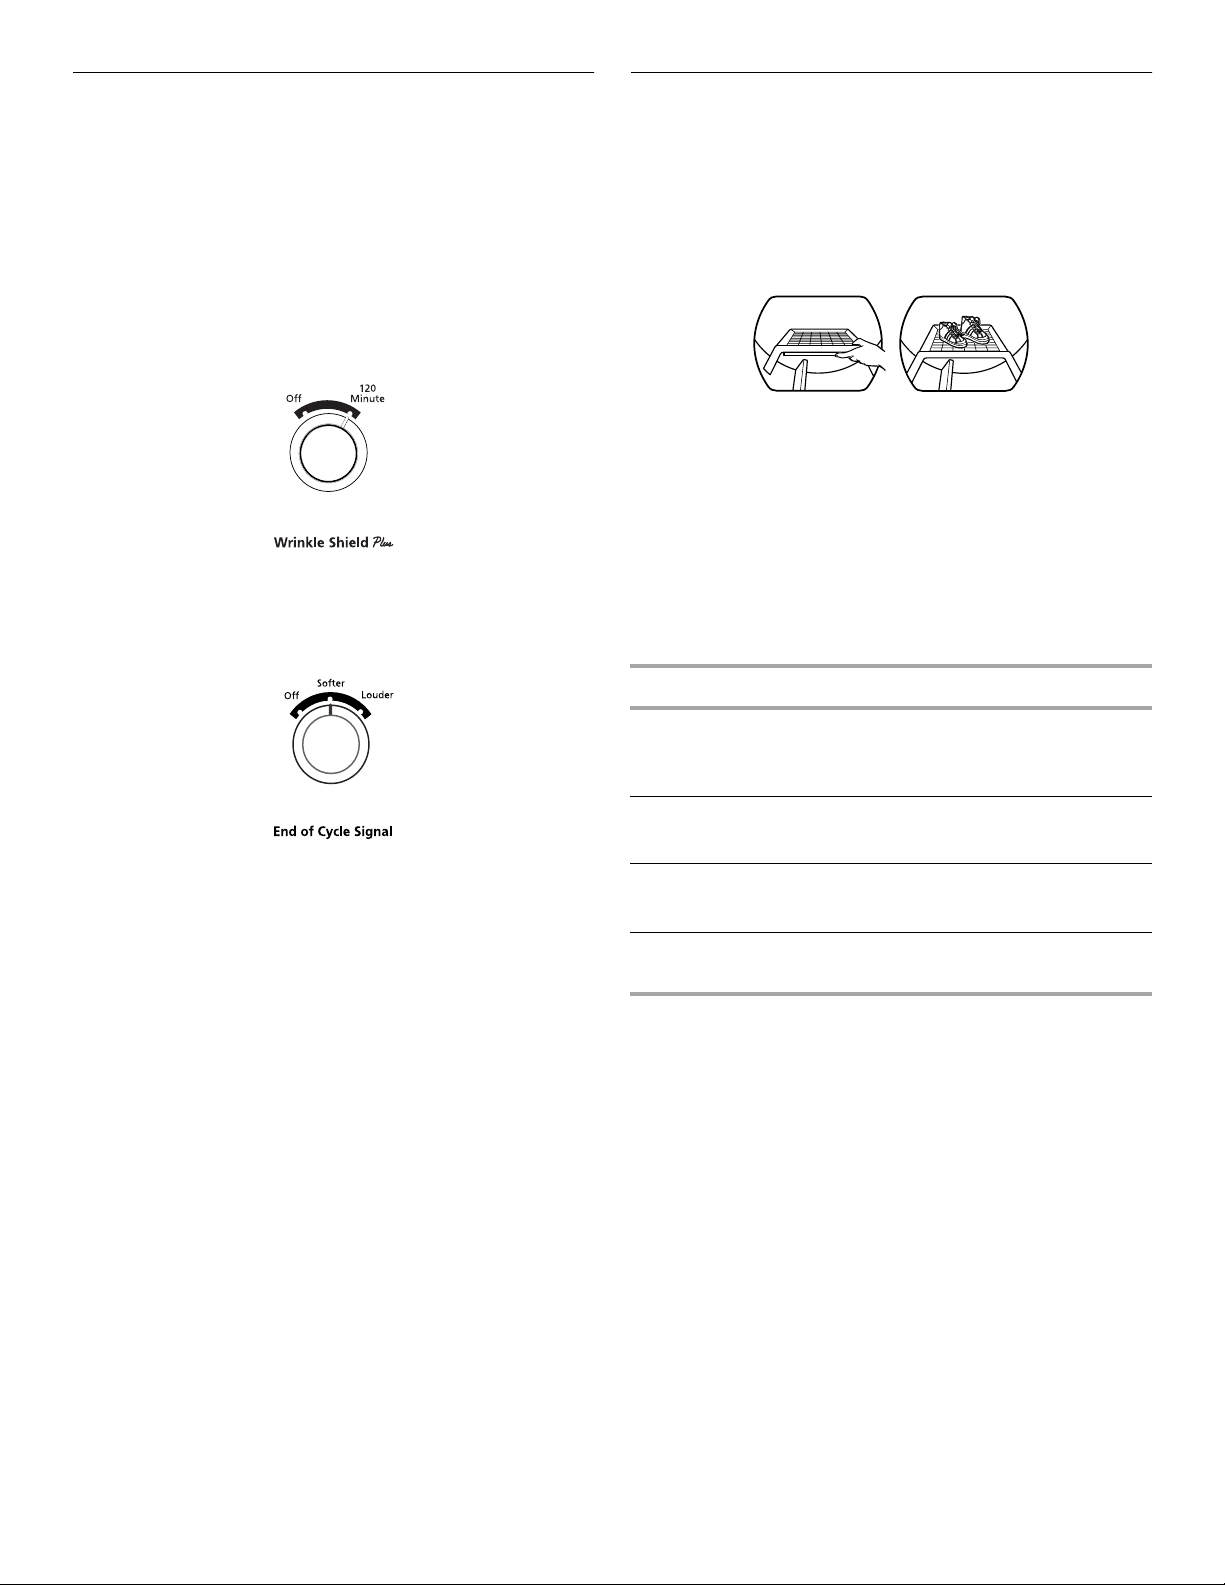
The Temperature selector allows you to select a drying
temperature that matches the fa brics in your load and provides
the shortest, most efficient drying time.
SENSEON™ Drying System
The SENSEON drying system uses electronic sensors to detect
the size and types of fabrics in your load to provide the shortest
drying time. When used with the automatic drying cycle (see
“Automatic Drying Cycle”), the SENSEON setting provides the
shortest drying time and best fabric care for your load.
■ The Normal setting, when used with the Energy Preferred
Automatic Setting (*), provides medium heat to evenly dry
sturdy casual clothes, such as khakis and cotton jerseys, in
the shortest time. When used with the Timed Drying cycle,
Normal provides medium heat for your selected drying time.
■ The High setting, when used with the Energy Preferred
Automatic Setting (
heavyweight items, such as jeans, corduroys or work clothes,
in the shortest time. Whe n used with the Timed Drying cycle,
High provides high heat for your selected drying time.
Medium/P. Press
Select this medium temperature setting to dry lightweight to
medium weight to synthetic or no-iron items, such as sheets,
shirts or dresses.
Extra Low/Delicate
Select this extra low temperature setting to gently dry special
care items, such as lingerie, blouses or sweaters.
Air Only (No Heat)
Use this unheated temperature setting for items that require
drying without heat, such as rubber, plastic and sheer fabrics.
When using Air Only, select a drying time with the Timed Drying
cycle. See the chart for examples of items that can be dried using
the Air Only setting.
), provides high heat to thoroughly dry
*
Type of Load Air Only setting*
Foam rubber - pillows, padded bras,
stuffed toys
Plastic - shower curtains, tablecloths
Rubber-backed rugs
Olefin, polypropylene, sheer nylon
*Reset cycle to complete drying, if needed.
When using Air Only
■ Check to see that coverings are securely stitched.
■ Shake and fluff pillows by hand period ically during cycle.
■ Dry item completely. Foam rubber pillows are slow to dry.
(minutes)
20 - 30
20 - 30
40 - 50
10 - 20
9
Page 10
Additional F eatures
You can select the following options to help ensure the best
fabric care for your load.
WRINKLE SHIELD™ Plus setting
When you are unable to remove a load of clothes from the dryer
as soon as it stops, wrinkles can form. The WRINKLE SHIELD
Plus setting periodically tumbles, rearranges and fluffs the load
without heat for up to 120 minutes. A signal will sound
periodically w hen WRINKLE SHIELD Plus setting is o n , if t he E nd
of Cycle Signal is selected. The signal and the tumbling will end
when you open the dryer door, or turn the Cycle Control knob to
Off.
End of Cycle Signal
If
the End of Cycle Signal is selected, the signal sounds when a cycle
is complete. If WRINKLE SHIELD™ Plus setting is selected, the signal
sounds every few minutes. The signal stops when you open the door.
Drying Rack (Optional purchase)
You can order a drying rack by calling
contacting the dealer from whom you purchased your dryer.
The rack is useful for machine drying items you would not
necessarily want to tumble dry (for example, sweaters).
To use the drying rack
Slide rear pegs into the dimples on the back wall of the dry er.
1.
Lower the front legs to rest on the dryer opening.
Put the wet items on top of the rack. Leave space between
2.
the items so air can reach all the surfaces. Close the door.
Do not allow items to hang over the edge of the rack.
NOTE:
Select the Timed Drying cycl e and the Air Only temperature
3.
setting.
Push the START button.
4.
You must remove rack for normal tumbling. Do not use
NOTE:
the automatic cycle with the drying rack.
This chart shows examples of items that can be rack dried and
the suggested cycle, temperature setting and drying time. Actual
drying time will depend on the amount of moisture items hold.
Rack Dry Cycle Temp Time*
1-800-442-9991
or by
Turn the knob to select a Softer or Louder signal or to turn the
End of Cycle Signal Off.
Wool Sweaters
Block to shape and lay flat on
the rack
Stuffed toys or pillows
Cotton or polyester fiber filled
Stuffed toys or pillows
Foam rubber filled
Sneakers or canvas shoes
*(Minutes). Reset cycle to complete drying, if needed.
Timed
Drying
Timed
Drying
Timed
Drying
Timed
Drying
Low 60
Low 60
Air
Only
Air
Only
90
90
10
Page 11
CARING FOR YOUR DRYER
Cleaning the Lint Screen
Every load cleaning
The lint screen is located on the top of the dryer. Clean it before
each load. A screen blocked by lint can increase drying time.
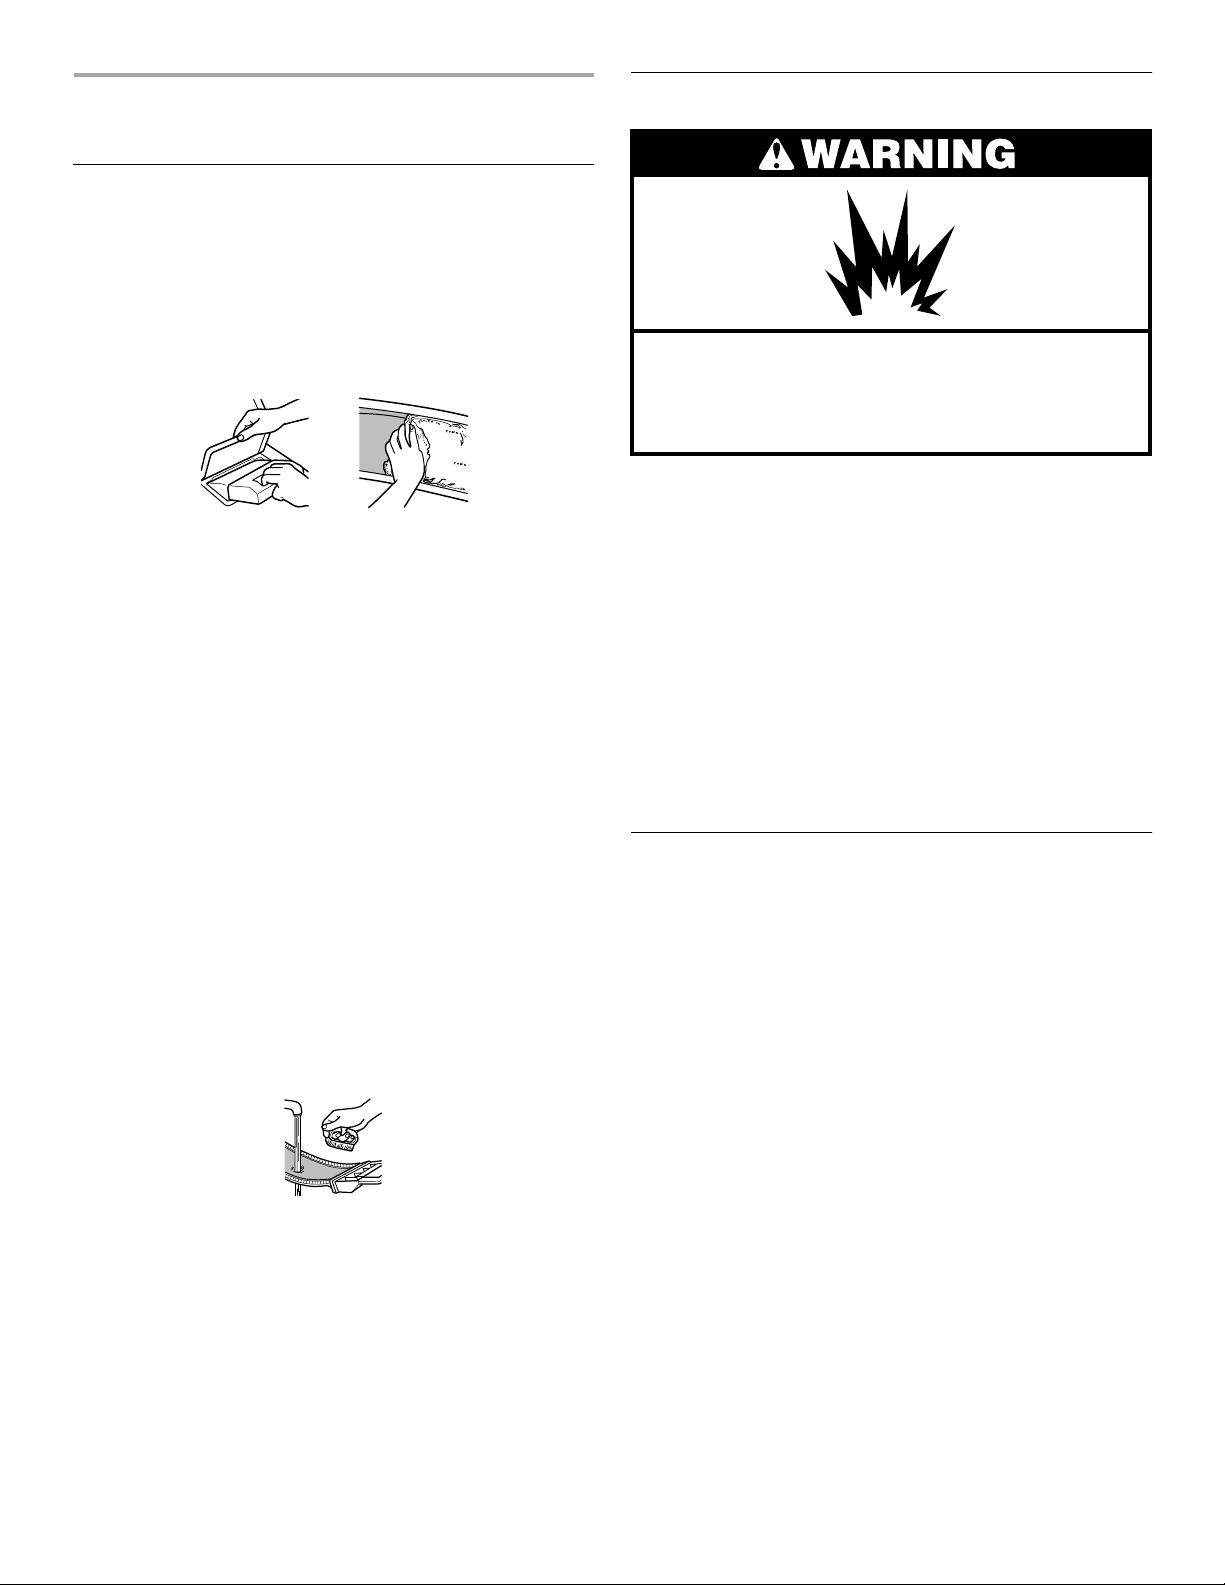
To clean
Pull the lint screen towards you. Roll lint off the screen with
1.
your fingers. Do not rinse or wash screen to remove lint. Wet
lint is hard to remove.
Push the lint screen firmly back into place.
2.
IMPORTANT:
■ Do not run the dryer with the lint screen loose, damaged,
blocked, or missing. Doing so can cause overheating and
damage to both the dryer and fabrics.
■ Some towels made of synthetic fibers and natural fibers
(polyester and cotton bl ends) may shed more lint than other
towels, causing your dryer’s lint screen to fill up faster. Be
sure to remove lint from the lint screen before and after drying
new towels.
■ If lint falls off the screen into the dryer during removal, check
the exhaust hood and remove the lint. See “Checking Your
Vent.”
As needed cleaning
Laundry detergent and fabric softener residue can build up on the
lint screen. This buildup can cause longer drying times for your
clothes, or cause the dryer to stop before your load is completely
dry. The screen is probably clogged if lint falls off the screen.
Clean the lint sc re en wit h a nyl on brus h eve ry six months or mor e
frequently if it becomes clogged due to a residue buildup.
Cleaning the Dryer Interior
Explosion Hazard
Use nonflammable cleaner.
Failure to do so can result in death, explosion,
or fire.
To clean dryer drum
Make a paste with powdered laundry detergent and very
1.
warm water.
Apply paste to a s oft cloth.
2.
OR
Apply a liquid, non-flammable household cl eaner to the
stained area and rub wit h a soft cloth until all excess dye is
removed.
Wipe drum thoroughly with a damp cloth.
3.
Tumble a load of clean cloths or towels to dry drum.
4.
Garments which contain unstable dyes, such as denim
NOTE:
blue jeans or brightly colored cotton items, may discolor the
dryer interior. These stains are not harmful to your dryer and will
not stain future loads of clothes. Dry unstable d ye items inside
out to prevent dye transfer.
Removing Accumulated Lint from Inside the
Dryer C abinet
Lint should be removed every two years, or more often,
depending on dryer usage. Cleaning should be done by a
qualified perso n.
To wash
Wet both sides of lint screen with hot water.
1.
Wet a nylon brush with hot water and liquid detergent. Scrub
2.
lint screen with the brush to remove residue buildup.
Rinse screen with hot water.
3.
4. Thoroughly
screen in dryer.
dry lint screen with a clean towel. Rep lace
11
Page 12
Changing the Drum Light
If your dryer has a dr um light, the dryer light automatically turns
on inside the dryer drum when you open the door.
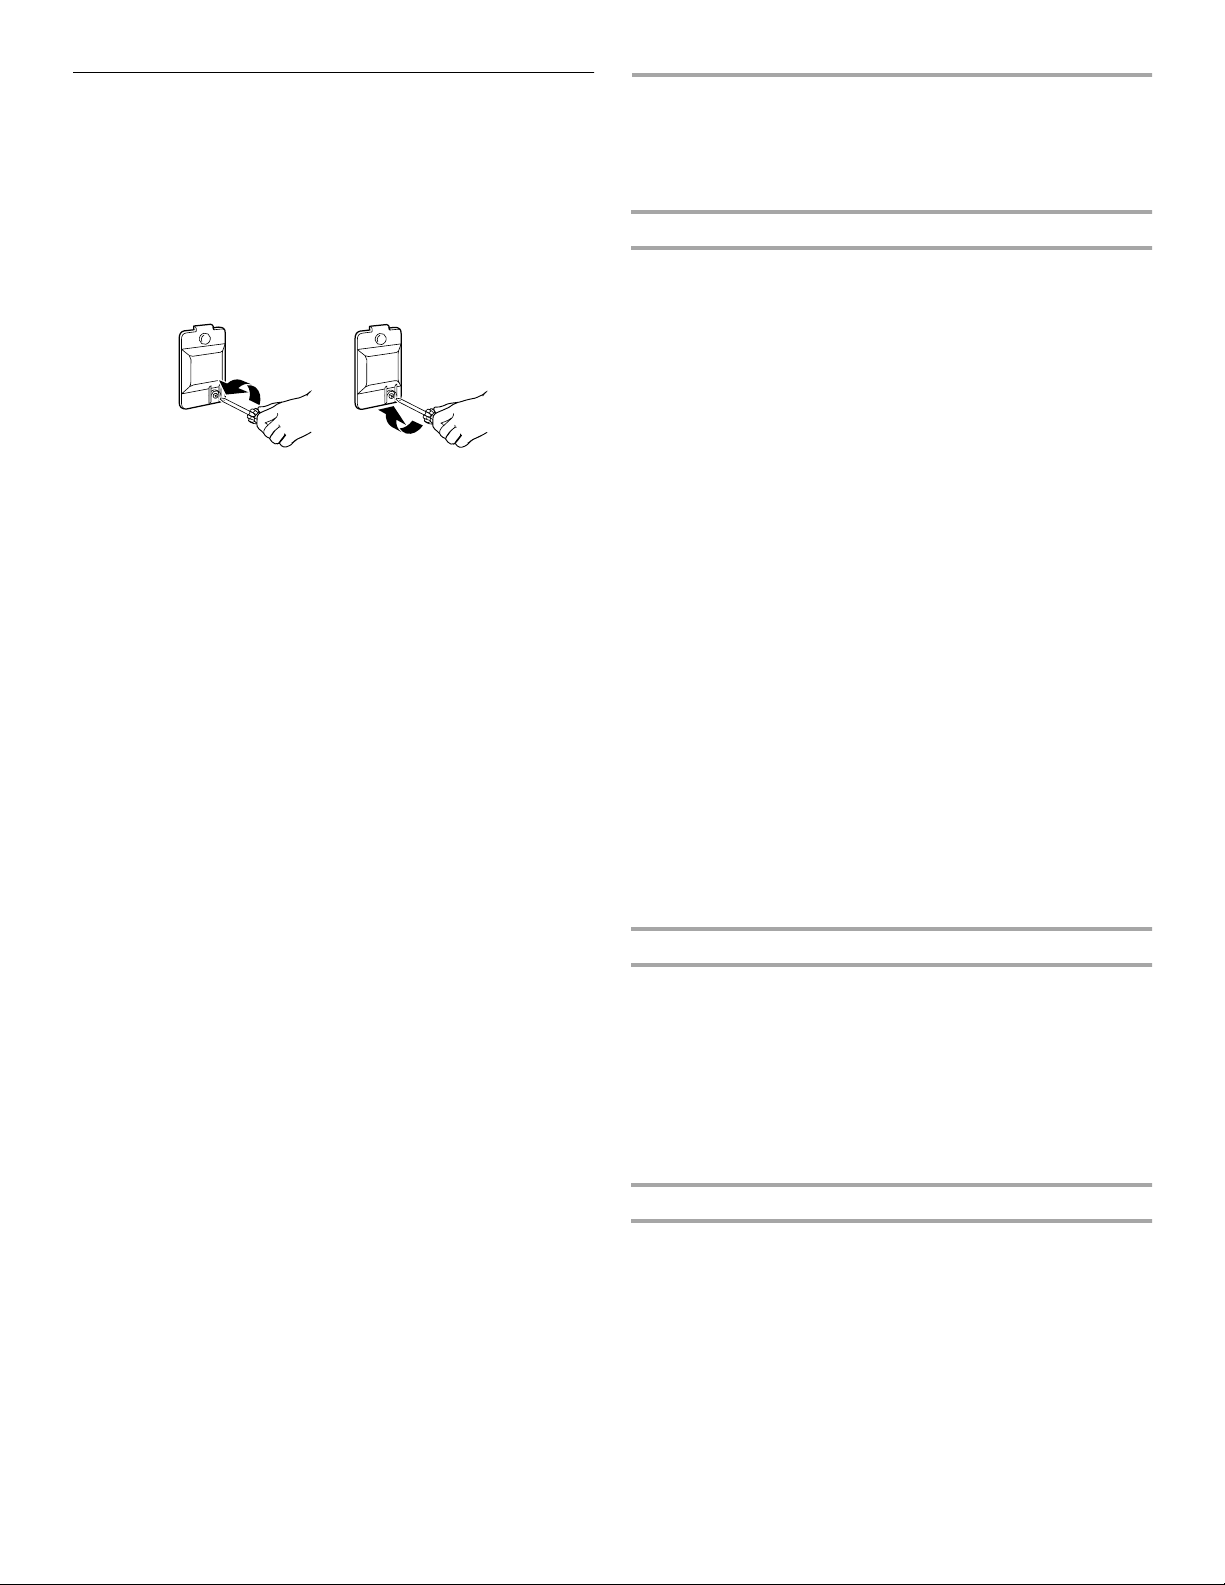
To change the drum light
Unplug dryer or disconnect power.
1.
Open the dryer door. Locate the light bulb cover on the back
2.
wall of the dryer. Remove the screw located i n the lower right
corner of the cover. Remove the cover.
Turn bulb counterclockwise. Replace the bulb with a 10-watt
3.
appliance bulb only. Replace the cover.
Plug in dryer or reconnect power.
4.
TROUBLESHOOTING
First try the solutions suggested here and possibly avoid
the cost of a service call...
Clothes are not drying satisfactorily
■
Check the following:
Is the lint screen clogged with lint?
Is the exhaust vent or outside exhaust hood clogged with lint,
restricting air movement? Run the dryer for 5-10 minutes.
Hold your hand under the outside exhaust hood to check air
movement. If you do not feel air movement, clean exhaust
system of lint or replace exhaust vent with heavy metal or
flexible metal vent. See “Inst a lla t ion Ins tructions.”
Is the exhaust vent crushed or kinked? Replace with heavy
metal or flexible metal vent. See “Installation Instructions.”
Has a fuse blown, or a circuit breaker tripped? Electric dryers
use 2 household fuses or breakers. The drum may be turning,
but you may not have heat.
Has an air dry cycle been selected? Select the right cycle for
the types of garments being dried. See “Drying, Cycle and
Temperature Tips.”
For gas dryers, is the valve open on the supply line?
Are fabric softener sheets blocking the grill? Use only one
fabric softener sheet, and use it only once.
■
Is the dryer located in a room with temperature below
45ºF (7ºC)?
Proper operation of dryer cycles requires temperatures above
45ºF (7ºC).
■
Was a cold rinse water used? Was the load very wet?
Expect longer drying times with items rinsed in cold water
and with items that hold moisture (cottons).
■
Is the load too large and heavy to dry quickly?
Separate the load to tumble freely.
Dryer will not run
■
Check the following:
Is the power cord plugged in?
Has a fuse blown, or has a circuit breaker tripped?
Was a regular fuse used? Use a time-delay fuse.
Is the dryer door firmly closed?
Was the START button firmly pressed?
Is a cycle selected?
Unusual so und s
■
Has the dryer had a period of non-use?
If the dryer hasn’t been used for a while , t here may be a
thumping sound during the first few mi nutes of operation.
■
Is it a gas dryer?
The gas valve clicking is a normal operating sound.
12
Page 13

Lint on load
Garment damage
■ Is the lint screen clogged?
Clean lint screen. Check for air movement.
■ Is the load properly sorted?
Sort lint givers (towels, chenille) from lint takers (corduroy,
synthetics). Also sort by color.
■ Is the load too big or too heavy?
Dry smaller loads so lint can be carri ed to the lint screen.
■ Was the load overdried?
Use correct dryer settings for load type. Overdrying can
cause lint-attracting static electricity. See “Drying, Cycle, and
Temperature Tips.”
■■■■ Was paper or tissue left in pockets?
Clean out pockets before drying.
■ Is pilling being mistaken for lint?
Pilling (surface fuzz) is caused by normal wear and
laundering.
Stains on load or color change
■ Was dryer fabric softener properly used?
Add dryer fabric softener sheets at the beginning of the cycle.
Fabric softener sheets added to a partially-dried load can
stain your garments.
■ Were items soiled when placed in the dryer?
Items should be clean before being dried.
■ Were items properly sorted?
Sort light colors from dark colors. Sort colorfast items from
noncolorfast items.
■ Check the following:
Were zippers, snaps, and hooks left open?
Were strings and sashes tied to prevent tangling?
Were care label instructions followed?
Were item s damaged before drying?
Items shrinking
■ Was the dryer overloaded?
Dry smaller loads that will tumble freely.
■ Did the load overdry?
Check the manufacturer’s care label. Match dryer setting to
load type. See “Drying, Cycle, and Temperature Tips.”
Loads are wrinkled
■■■■ Was the load removed from dryer at the end of the cycle?
■■■■ Was the dryer overloaded?
Dry smaller loads that will tumble freely.
■ Did the load overdry?
Check the manufacturer’s care label. Match dryer setting to
load type. See “Drying, Cycle, and Temperature Tips.”
Odors
■ Have you recently been painting, staining or varnishing in
the area where your dryer is located?
If so, ventilate the area. When the odors or fumes are gone
from the area, re-wash and dry the clothing.
■ If the dryer is electric, is it being used for the first time?
The new electric heating element may have an odor. The odor
will be gone after the first cycle.
■ If the dryer is gas, there may be a gas leak.
Turn off the gas supply line, leave your house, and then call
your local gas company.
13
Page 14

ASSISTANCE OR SERVICE
Before calling for assistance or service, please check
“Troubleshooting.” It may save you the cost of a service call. If
you still need help, follow the instructions below.
When calling, please know the purchase date and the complete
model and serial number of your appliance. This information will
help us to better resp o nd to you r r e q ue st .
If you need replacement parts
If you need to order replacement parts, we recommend that you
only use FSP
and work right because they are made with the same precision
used to build every new WHI RLPOOL GOLD
locate factory specified replacement parts in your area, call our
Customer Interaction Center at
designated service center.
For assistance
Call the Whirlpool Customer Interaction Center toll free:
1-800-253-1301.
Our consultants provide assistance with:
■ Features and specifications on our full line of appliances
■ Installation information
■ Use and mai n t enance procedures
■ Accessory and repair parts sales
■ Specialized customer assistance (Spanish speaking, hearing
impaired, limited vision, etc.)
■ Referrals to local dealers, repair parts distributors, and
service companies. Whirlpool designated service technicians
are trained to fulfill the product warranty and provide afterwarranty service, anywhere in the United States.
To locate the Whirlpool designated service company in your area,
you can also look in your telephone directory Yellow Pages.
®
factory specified parts. These parts will fit right
®
appliance. To
1-800-253-1301
, or your nearest
For further assistance
If you need further assistance, you can write to Whirlpool
Corporation with any questions or concerns at:
Whirlpool Corporation
Customer In te ra ction Center
553 Benson Road
Benton Harbor, MI 49022-2692
Please include a daytime phone number in your correspondence.
14
Page 15

®
WHIRLPOOL GOLD
DRYER WARRANTY
ONE-YEAR FULL WARRANTY
For one year from the date of purchase, when this dryer is operated and maintained according to instru ctions attached to or furnished
with the product, Whirlpool Corporation will pay for FSP® replacement parts and repair labor to correct defects in mat erials or
workmanship. Service must be provided by a Whirlpool d e signated service company.
Whirlpool Corporation will not pay for:
Service calls to corre ct the in stallati on of yo ur dryer, including venting. Heavy 4 in. (10.2 cm) metal ex haust ven t must be us ed. Refer
1.
to the venting section of this manual and your Installation Instructions.
Service calls to instruct you how to use your dryer, to replace house fuses or correct house wiring or reset circuit breakers, or to
2.
replace owner accessible light bulbs.
Repairs when your dryer is used in other than normal, single-family household use.
3.
Damage resulting from accident, alteration, misuse, abuse, fire, floods, acts of God, improper installation (including, but not limited
4.
to, venting with plastic or flexible foil), installation not in accordance with local electrical and plumbing codes, or use of products not
approved by Whirlpool Corporation.
Replacement parts or repair labor costs for unit s operated outside the United States.
5.
Pickup and delivery. This product is designed to be repaired in the home.
6.
Repairs to parts or systems resulting from unauthorized modifications made to the appliance.
7.
WHIRLPOOL CORPORATION SHALL NOT BE LIABLE FOR
INCIDENTAL OR CONSEQUENTIAL DAMAGES.
Some states do not allow the exclusion or limitation of incid ental
or consequentia l damages , so this exclu sion or limi tation may not
apply to you. Thi s warranty giv es you spe cific legal rights and you
may also have other rights which vary f rom st ate to state.
Keep this book and your sales slip together for future
reference. You must provide proof of purchase or
installation date for in-warranty service.
Write down the following information about your dryer to better
help you obtain assistance or service if you ever need it. You will
need to know your complete model number and serial number.
You can find this information on the model and serial number
label/plate, located on your appliance as shown in “Parts and
Features.”
Outside the 50 United States, this warranty does not apply.
Contact your authorized Whirlpool dealer to determine if
another warranty applies.
If you need service, first see “Troubleshooting.” Additional help
can be found by checking “Assi stance or Service,” or by calling
our Customer Interaction Center at
anywhere in the U.S.A. or write: Whirlpoo l Corpor ation, Custom er
Interaction Center, 553 Benson Road, Benton Harbor, MI 49022-
2692.
Dealer name_____________ ___ ___________________ ___ ______________
Address__________________________ ____ ___________________ ___ ____
Phone number_________________ ___ ___________________ ____ _______
Model number ______________ ___ _________________________________
Serial number __________________________________________________
Purchase date __________________________________________________
1-800-253-1301
, from
3/00
15
 Loading...