

Whirlpool 66126277 User Manual

®
PORTABLE
AIR CONDITIONER
Use & Care Guide
For questions about features, operation/performance, parts,
accessories or service call: 1-800-253-1301
or visit our website at... www.whirlpool.com
In Canada, call for assistance, installation
and service, call: 1-800-807-6777
or visit our website at... www.whirlpool.ca
ACONDICIONADOR DE
AIRE PORTÁTIL
Manual de uso y cuidado
Si tiene preguntas respecto a las características, funcionamiento,
rendimiento, partes, accesorios o servicio técnico,
o visite nuestro sito web en... www.whirlpool.com
llame al: 1-800-253-1301
66126277
CLIMATISEUR
PORTATIF
Guide d’utilisation et d’entretien
Au Canada, pour assistance, installation ou service,
Table of Contents/Índice/Table des matières ...... 2
composez le 1-800-807-6777
ou visitez notre site web à... www.whirlpool.ca

TABLE OF CONTENTS
AIR CONDITIONER SAFETY .........................................................3
INSTALLATION REQUIREMENTS................................................4
Parts .............................................................................................4
Location Requirements................................................................4
Electrical Requirements ............................................................... 5
INSTALLATION INSTRUCTIONS..................................................6
Unpack the Air Conditioner.......................................................... 6
Install Portable Air Conditioner ....................................................6
PORTABLE AIR CONDITIONER USE...........................................8
Starting Your Portable Air Conditioner ........................................8
Using the Remote Control .........................................................10
ÍNDICE
SEGURIDAD DEL ACONDICIONADOR DE AIRE......................16
REQUISITOS DE INSTALACIÓN.................................................17
Piezas .........................................................................................17
Requisitos de ubicación.............................................................17
Requisitos eléctricos..................................................................18
INSTRUCCIONES DE INSTALACIÓN.........................................19
Desempaque el acondicionador de aire....................................19
Instalación del acondicionador de aire portátil..........................19
CÓMO USAR SU ACONDICIONADOR DE AIRE PORTÁTIL....21
Cómo poner en marcha su acondicionador de aire portátil ....21
Cómo usar el control remoto .....................................................23
Normal Sounds...........................................................................12
PORTABLE AIR CONDITIONER CARE ......................................12
Draining the Air Conditioner.......................................................12
Cleaning the Air Filter .................................................................12
Cleaning the Outside..................................................................13
Storing After Use ........................................................................13
TROUBLESHOOTING ..................................................................13
ASSISTANCE OR SERVICE.........................................................14
In the U.S.A. ...............................................................................14
In Canada ...................................................................................14
WARRANTY ..................................................................................15
Sonidos normales.......................................................................25
CÓMO CUIDAR SU ACONDICIONADOR DE AIRE PORTÁTIL26
Desagüe del acondicionador de aire .........................................26
Limpieza del filtro de aire ...........................................................26
Limpieza del exterior ..................................................................26
Almacenamiento después del uso.............................................26
SOLUCIÓN DE PROBLEMAS......................................................27
AYUDA O SERVICIO TÉCNICO...................................................28
En los EE.UU. .............................................................................28
GARANTÍA.....................................................................................29
TABLE DES MATIÈRES
SÉCURITÉ DU CLIMATISEUR ....................................................30
EXIGENCES D’INSTALLATION...................................................31
Pièces.........................................................................................31
Exigences d’emplacement.........................................................31
Spécifications électriques..........................................................32
INSTRUCTIONS D'INSTALLATION ...........................................33
Déballage du climatiseur............................................................33
Installation du climatiseur portatif..............................................33
UTILISATION DU CLIMATISEUR PORTATIF.............................35
Mise en marche du climatiseur portatif .....................................35
Utilisation de la télécommande..................................................37
Sons normaux ............................................................................39
ENTRETIEN DU CLIMATISEUR PORTATIF...............................40
Vidange du climatiseur...............................................................40
Nettoyage du filtre à air..............................................................40
Nettoyage de la partie extérieure...............................................40
Remisage après utilisation .........................................................40
DÉPANNAGE.................................................................................41
ASSISTANCE OU SERVICE.........................................................42
Aux États-Unis............................................................................42
Au Canada..................................................................................42
GARANTIE.....................................................................................43
2
AIR CONDITIONER SAFETY
Your safety and the safety of others are very important.
We have provided many important safety messages in this manual and on your appliance. Always read and obey all safety
messages.
This is the safety alert symbol.
This symbol alerts you to potential hazards that can kill or hurt you and others.
All safety messages will follow the safety alert symbol and either the word “DANGER” or “WARNING.”
These words mean:
You can be killed or seriously injured if you don't immediately
DANGER
WARNING
All safety messages will tell you what the potential hazard is, tell you how to reduce the chance of injury, and tell you what can
happen if the instructions are not followed.
IMPORTANT SAFETY INSTRUCTIONS
WARNING:
Plug into a grounded 3 prong outlet.
To reduce the risk of fire, electrical shock or injury when using your air conditioner, follow these basic precautions:
follow instructions.
can be killed or seriously injured if you don't
You
instructions.
Do not use an extension cord.
follow
Do not remove ground prong.
Do not use an adapter.
Unplug air conditioner before servicing.
Use two or more people to move and install air conditioner.
SAVE THESE INSTRUCTIONS
3
INSTALLATION REQUIREMENTS
Parts
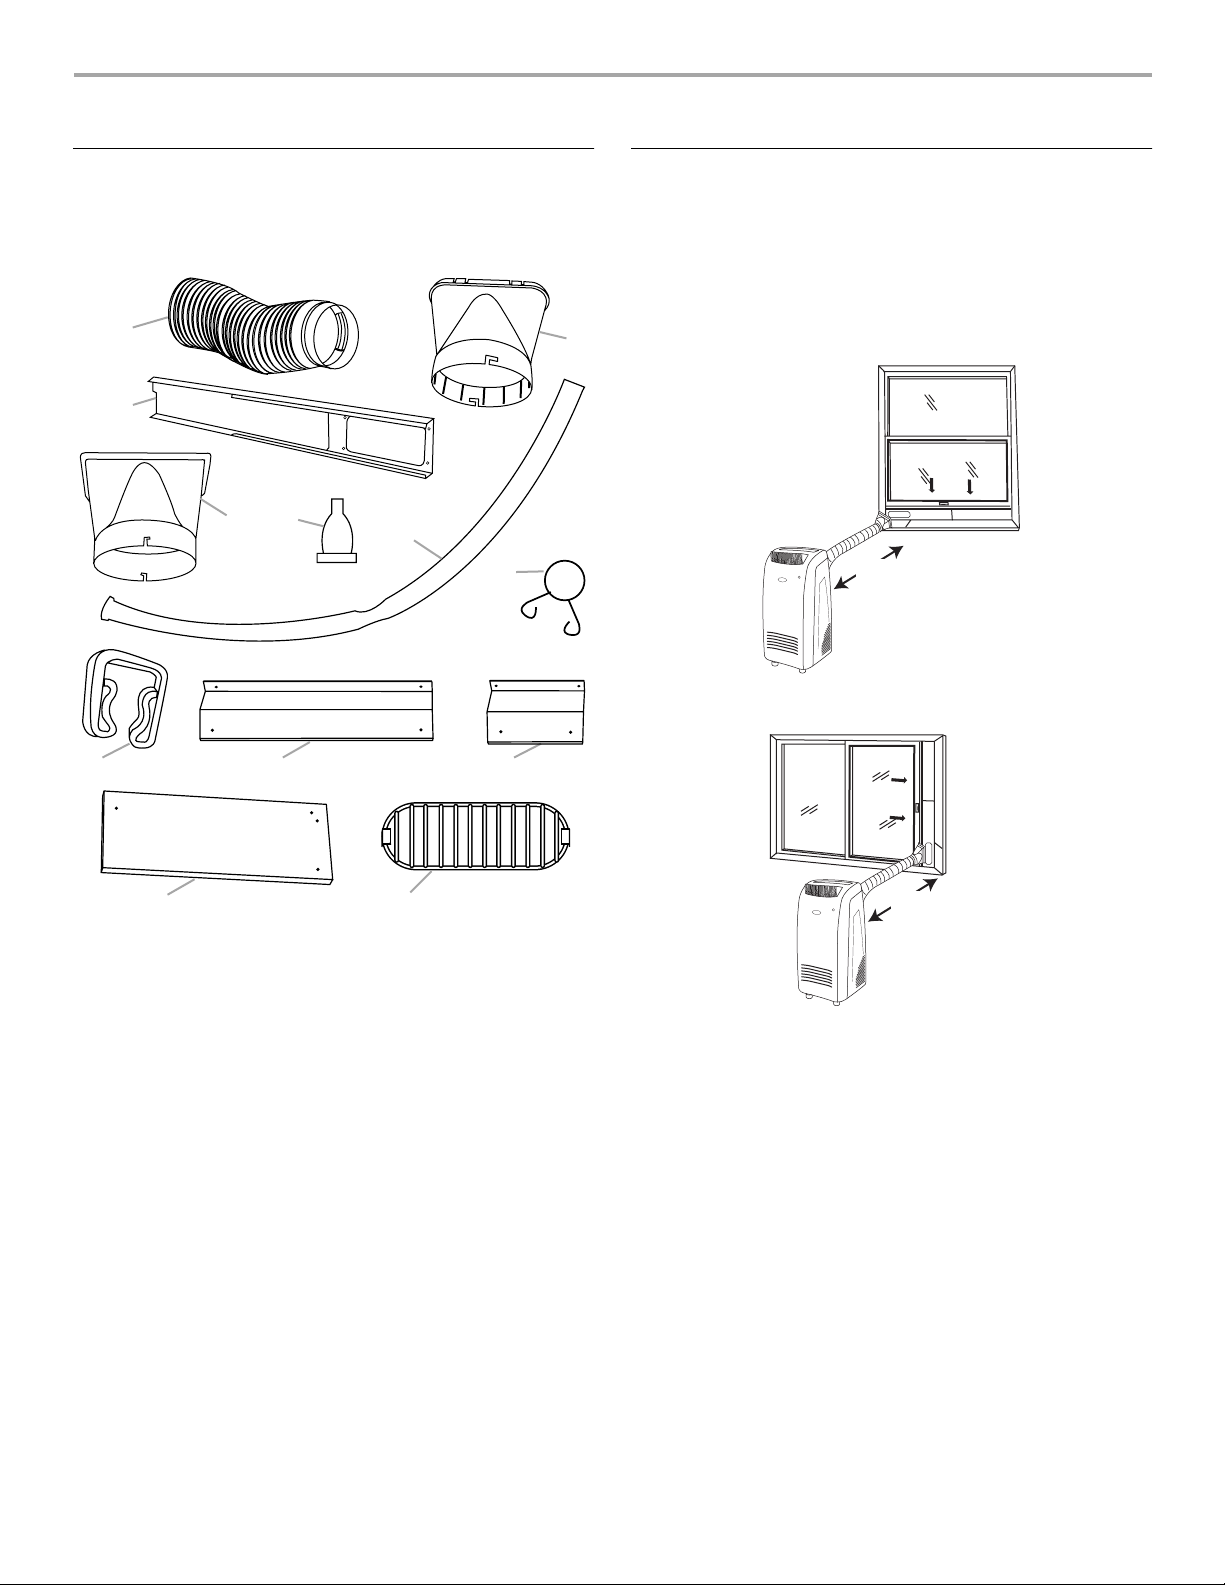
Parts supplied
Check that all parts are included in parts package.
A
C
D
E
F
Location Requirements
■ The flexible exhaust hose allows placement of the air
conditioner between 21⁵⁄₈" and 70⁵⁄₈" (55 cm and 180 cm)
from window or door.
■ Portable air conditioners are designed as supplemental
heating and cooling to local areas within a room.
Vertical Slide Window
B
5
/8
G
Horizontal Slide Window
21 " - 705/8"
(55 - 180 cm)
H
K
A. Flexible exhaust hose
B. Window exhaust adapter
C. Window slider kit (3)
D. Exhaust adapter
E. Drain hose plug
F. Drain hose
I J
L
G. Drain hose clamp (2)
H. Drain hose clip
I. Vertical rain cover bracket
J. Horizontal rain cover bracket
K. Rain cover
L. Outlet grille
5
/8
21 " - 705/8"
(55 - 180 cm)
■ To ensure proper ventilation, keep the required distance from
the return air outlet to the wall or other obstacles at least
21⁵⁄₈" (55 cm).
■ Do not block air outlet.
■ Provide easy access to grounded 3 prong outlet.
4
Electrical Requirements
B
WARNING
Electrical Shock Hazard
Plug into a grounded 3 prong outlet.
Do not remove ground prong.
Do not use an adapter.
Do not use an extension cord.
Failure to follow these instructions can result in death,
fire, or electrical shock.
■ The portable air conditioner should be connected to a 115 V,
60 Hz, 15- or 20-amp fused grounded 3 prong outlet.
■ The use of a time-delay fuse or time-delay circuit breaker is
recommended.
■ All wiring must comply with local and national electrical
codes and be installed by a qualified electrician. If you have
any questions, contact a qualified electrician.
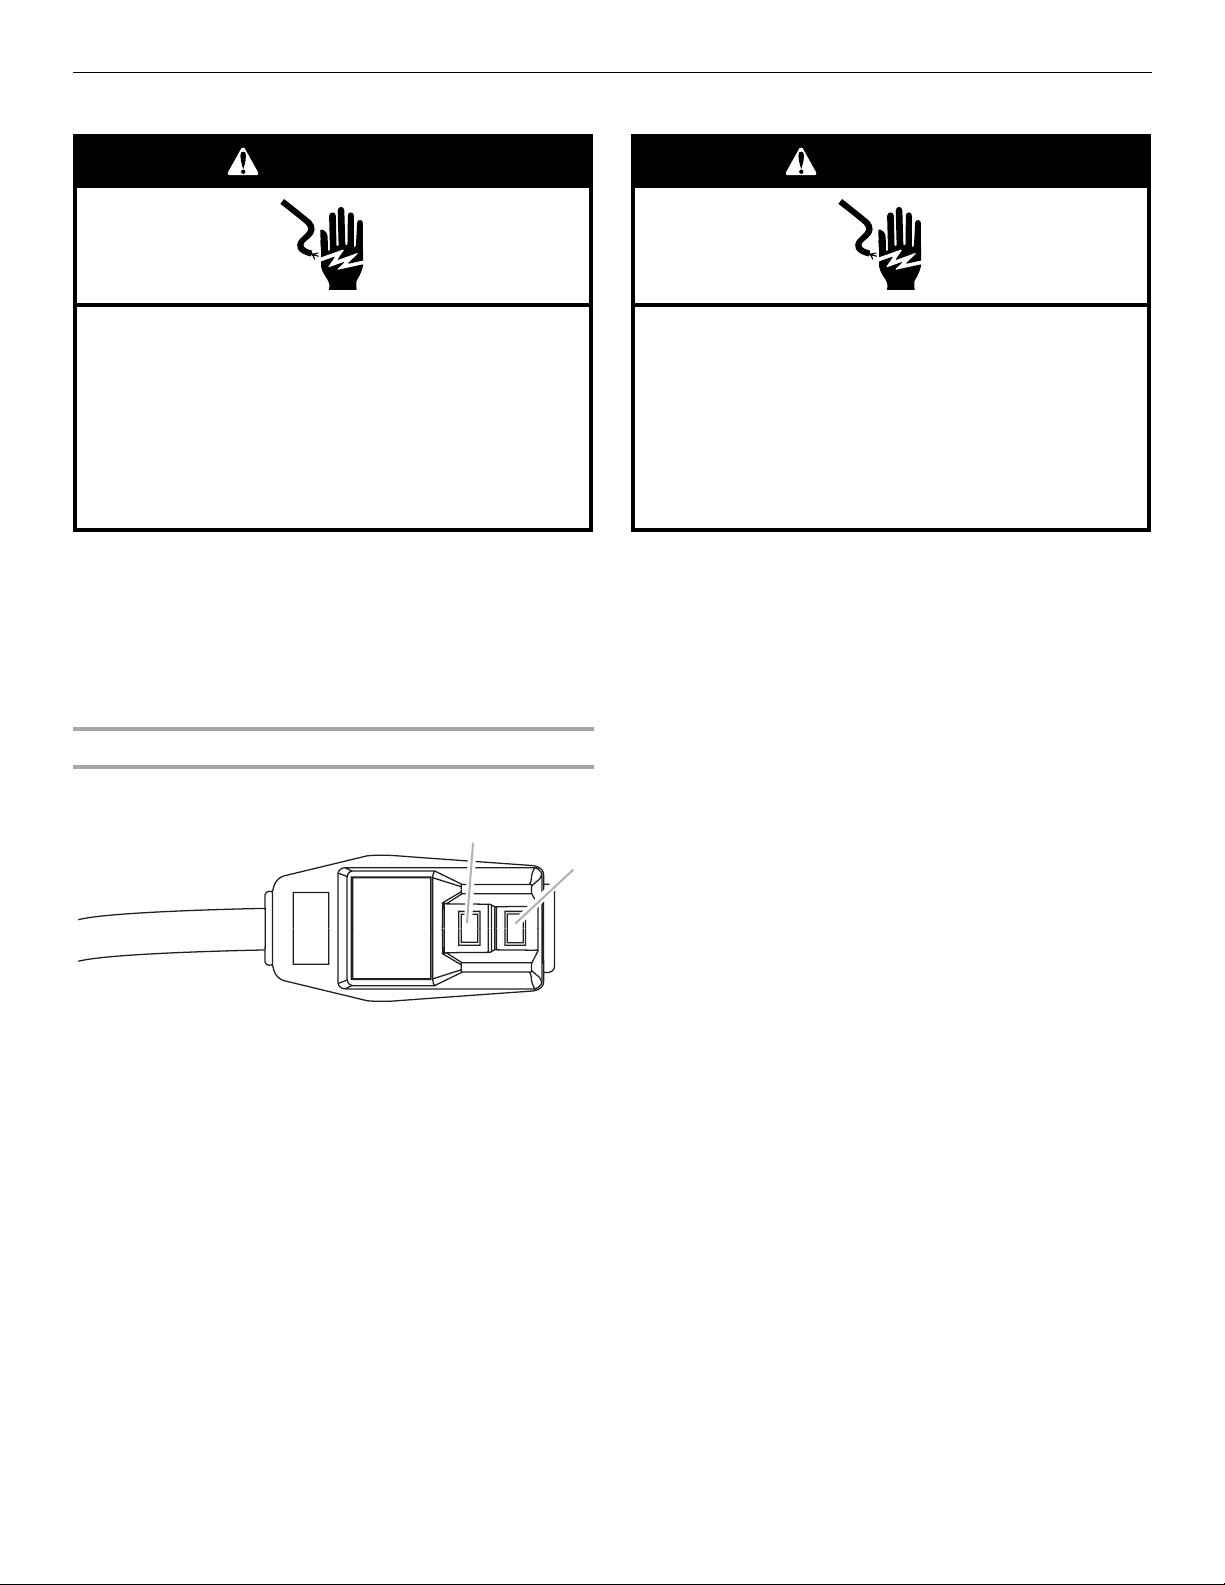
Power Supply Cord
NOTE: Yo ur un it’s device may differ from the one shown.
A
RESET
TEST
A. Test button
B. Reset button
WARNING
Electrical Shock Hazard
Plug into a grounded 3 prong outlet.
Do not remove ground prong.
Do not use an adapter.
Do not use an extension cord.
Failure to follow these instructions can result in death,
fire, or electrical shock.
To test your power supply cord:
1. Plug power supply cord into a grounded 3 prong outlet.
2. Press RESET.
3. Press TEST (listen for click; Reset button will trip and pop
out).
4. Press and release RESET (listen for click; Reset button will
latch and remain in). The power supply cord
operation.
NOTES:
■ The Reset button must be pushed in for proper operation.
■ The power supply cord must be replaced if it fails to trip when
the test button is pressed or fails to reset.
■ Do not use the power supply cord as an off/on switch. The
power supply cord is designed as a protective device.
■ A damaged power supply cord must be replaced with a new
power supply cord obtained from the product manufacturer
and must not be repaired.
■ The power supply cord contains no user serviceable parts.
Opening the tamper-resistant case voids all warranty and
performance claims.
is ready for
This room air conditioner is equipped with a power supply cord
required by UL. This power supply cord contains state-of-the-art
electronics that sense leakage current. If the cord is crushed, the
electronics detect leakage current and power will be
disconnected in a fraction of a second.
5
INSTALLATION INSTRUCTIONS
B
D
E
C
WARNING
Excessive Weight Hazard
Use two or more people to move and install
air conditioner.
Failure to do so can result in back or other injury.
Install Portable Air Conditioner
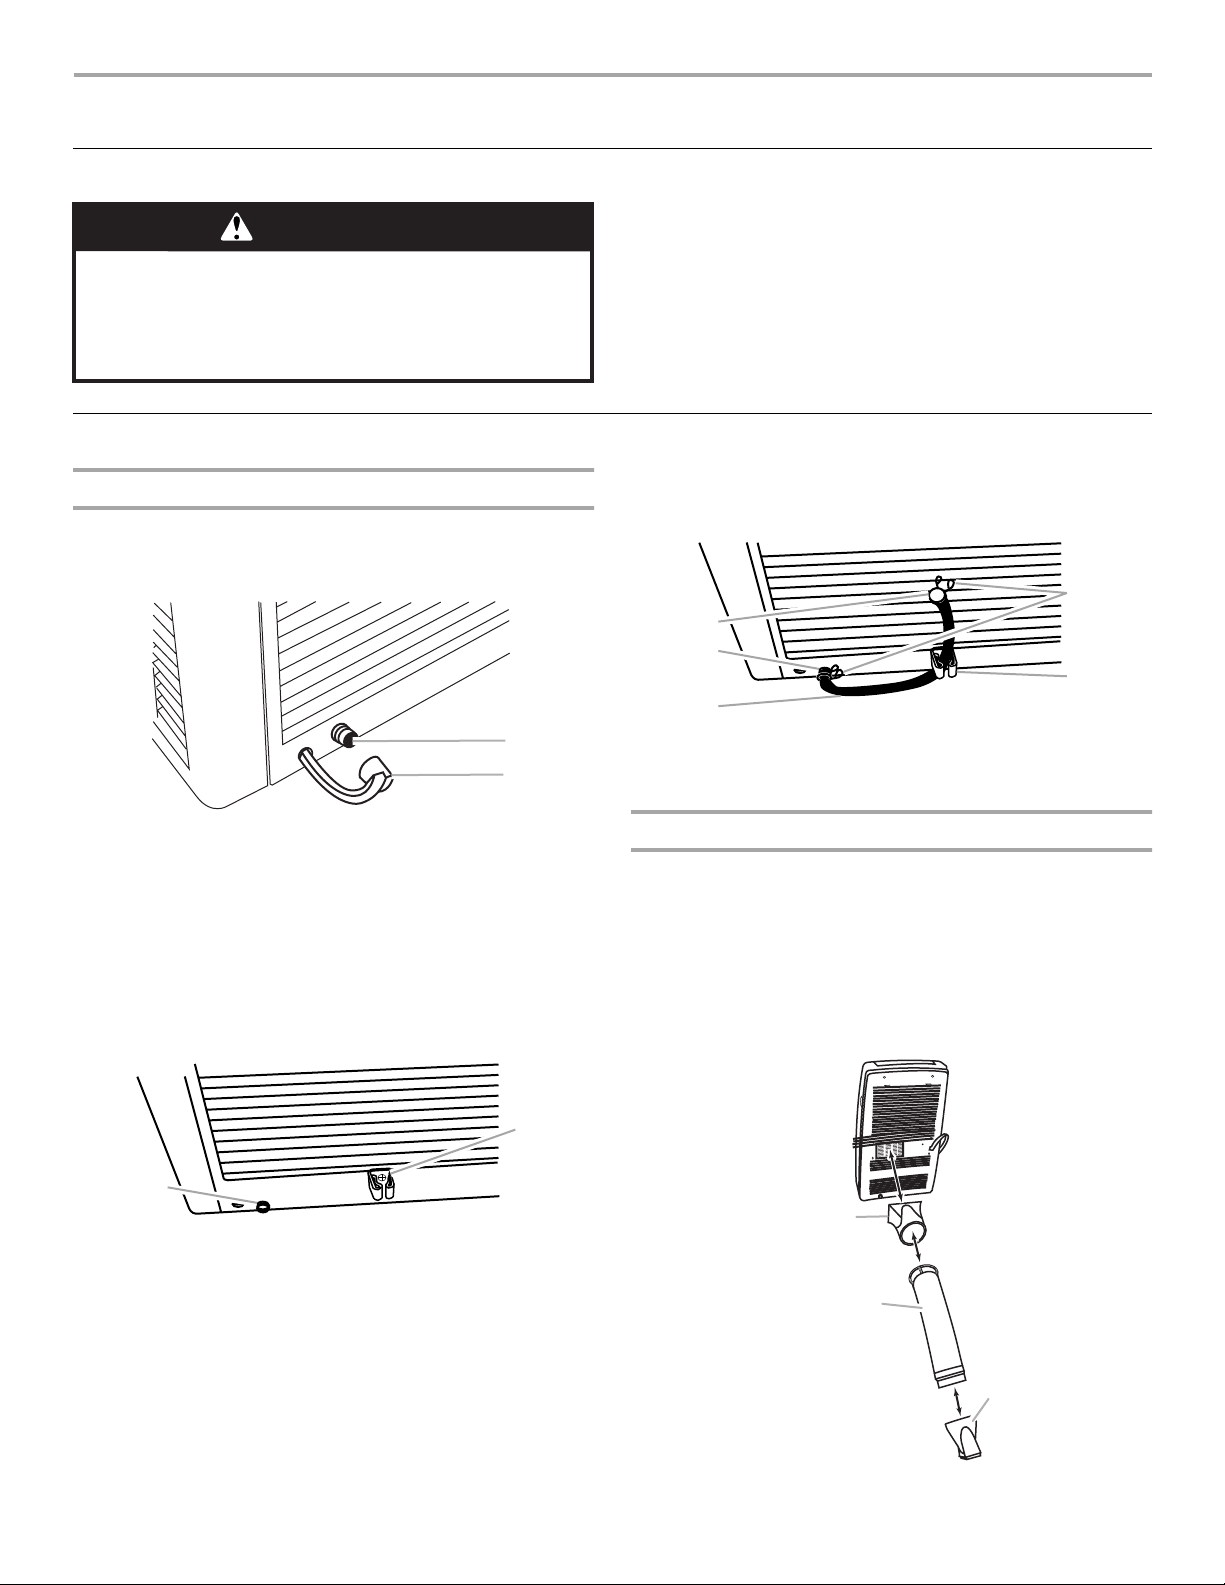
Install Drain Hose
1. Remove drain cap from drain port.
Drain Cap
Unpack the Air Conditioner
Remove packaging materials
■ Remove and dispose of/recycle packaging materials.
Remove tape and glue residue from surfaces before turning
on the air conditioner. Rub a small amount of liquid dish soap
over the adhesive with your fingers. Wipe with warm water
and dry.
■ Do not use sharp instruments, rubbing alcohol, flammable
fluids, or abrasive cleaners to remove tape or glue. These
products can damage the surface of your air conditioner.
5. Snap the free end of the drain hose into the drain hose clip.
Drain Hose
A
B
A
B
A. Drain port
B. Drain cap
2. Attach one end of the drain hose to the drain port with the
clamp. See Drain Hose graphic.
3. Insert the drain plug into the other end of the drain hose and
secure with clamp. See Drain Hose graphic.
4. Attach the drain hose clip to the back panel of the air
conditioner near the drain port with the screw provided.
Drain Hose Clip
A
A. Drain port
B. Attach drain hose clip with screw provided.
C
A. Drain plug
B. Drain port
C. Drain hose
D. Clamps
E. Drain hose clip
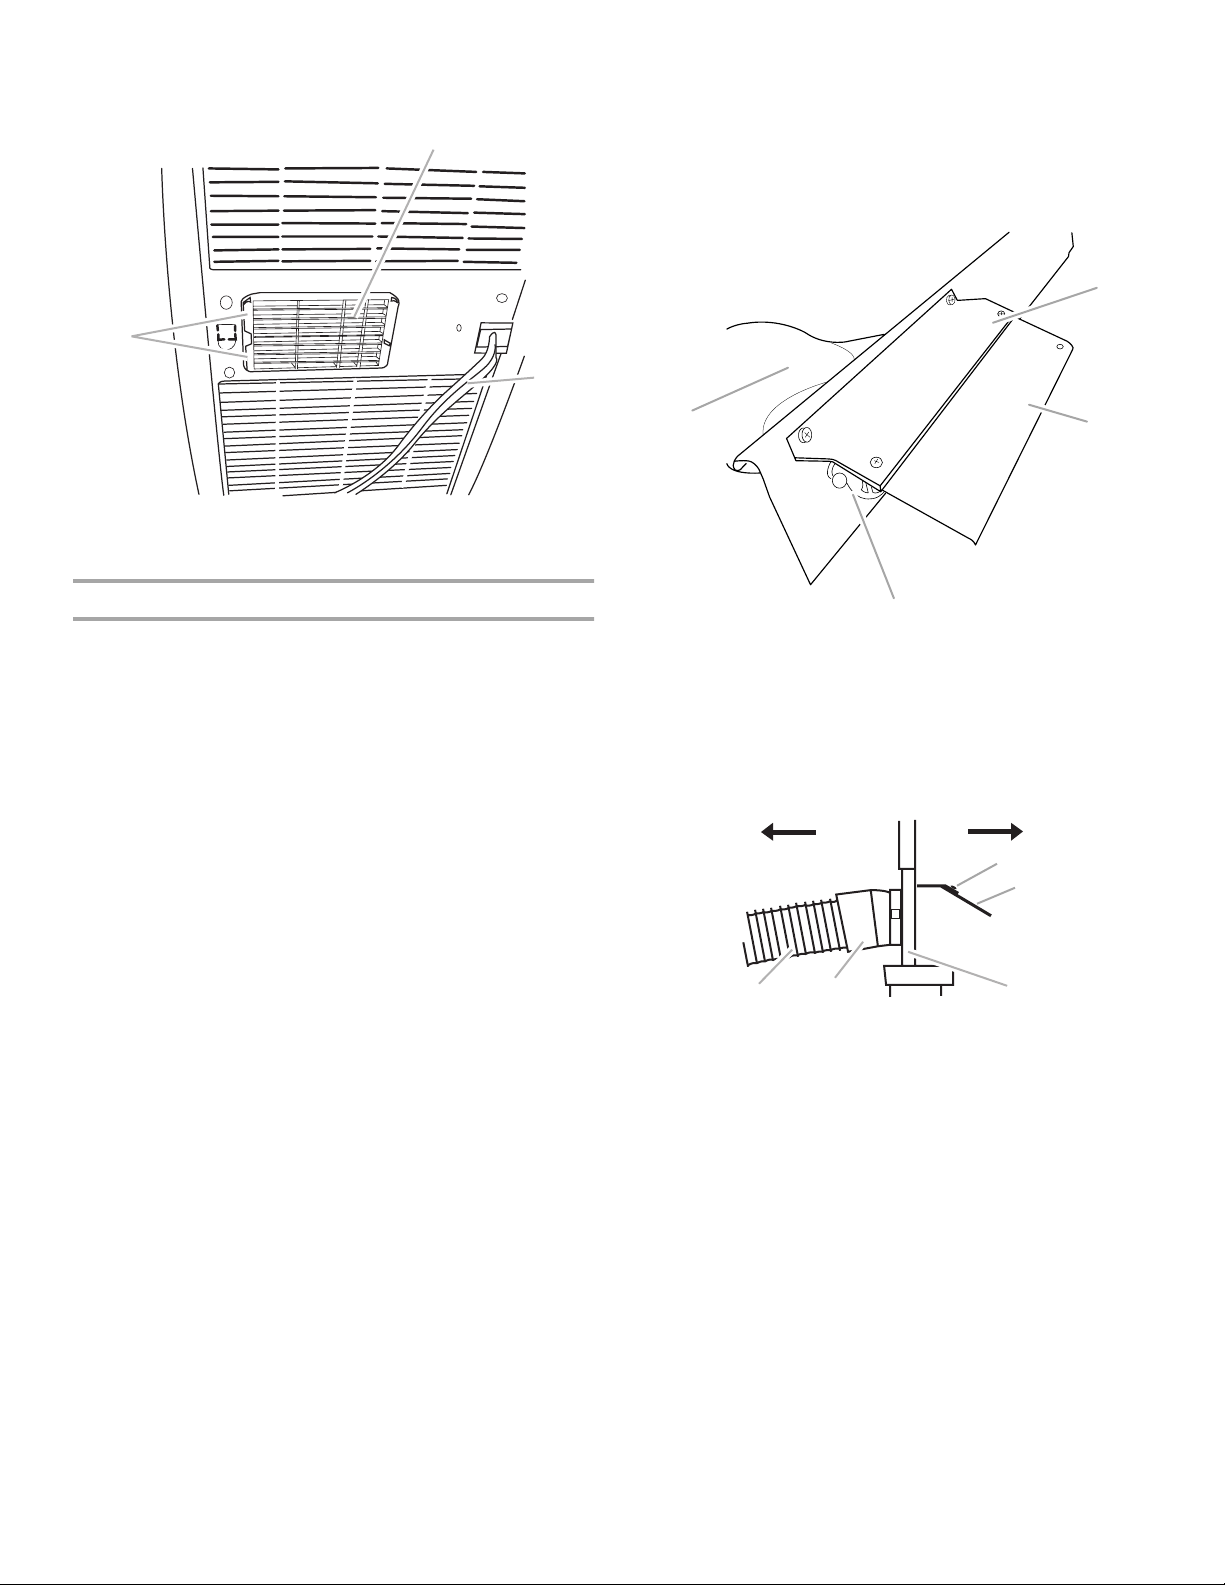
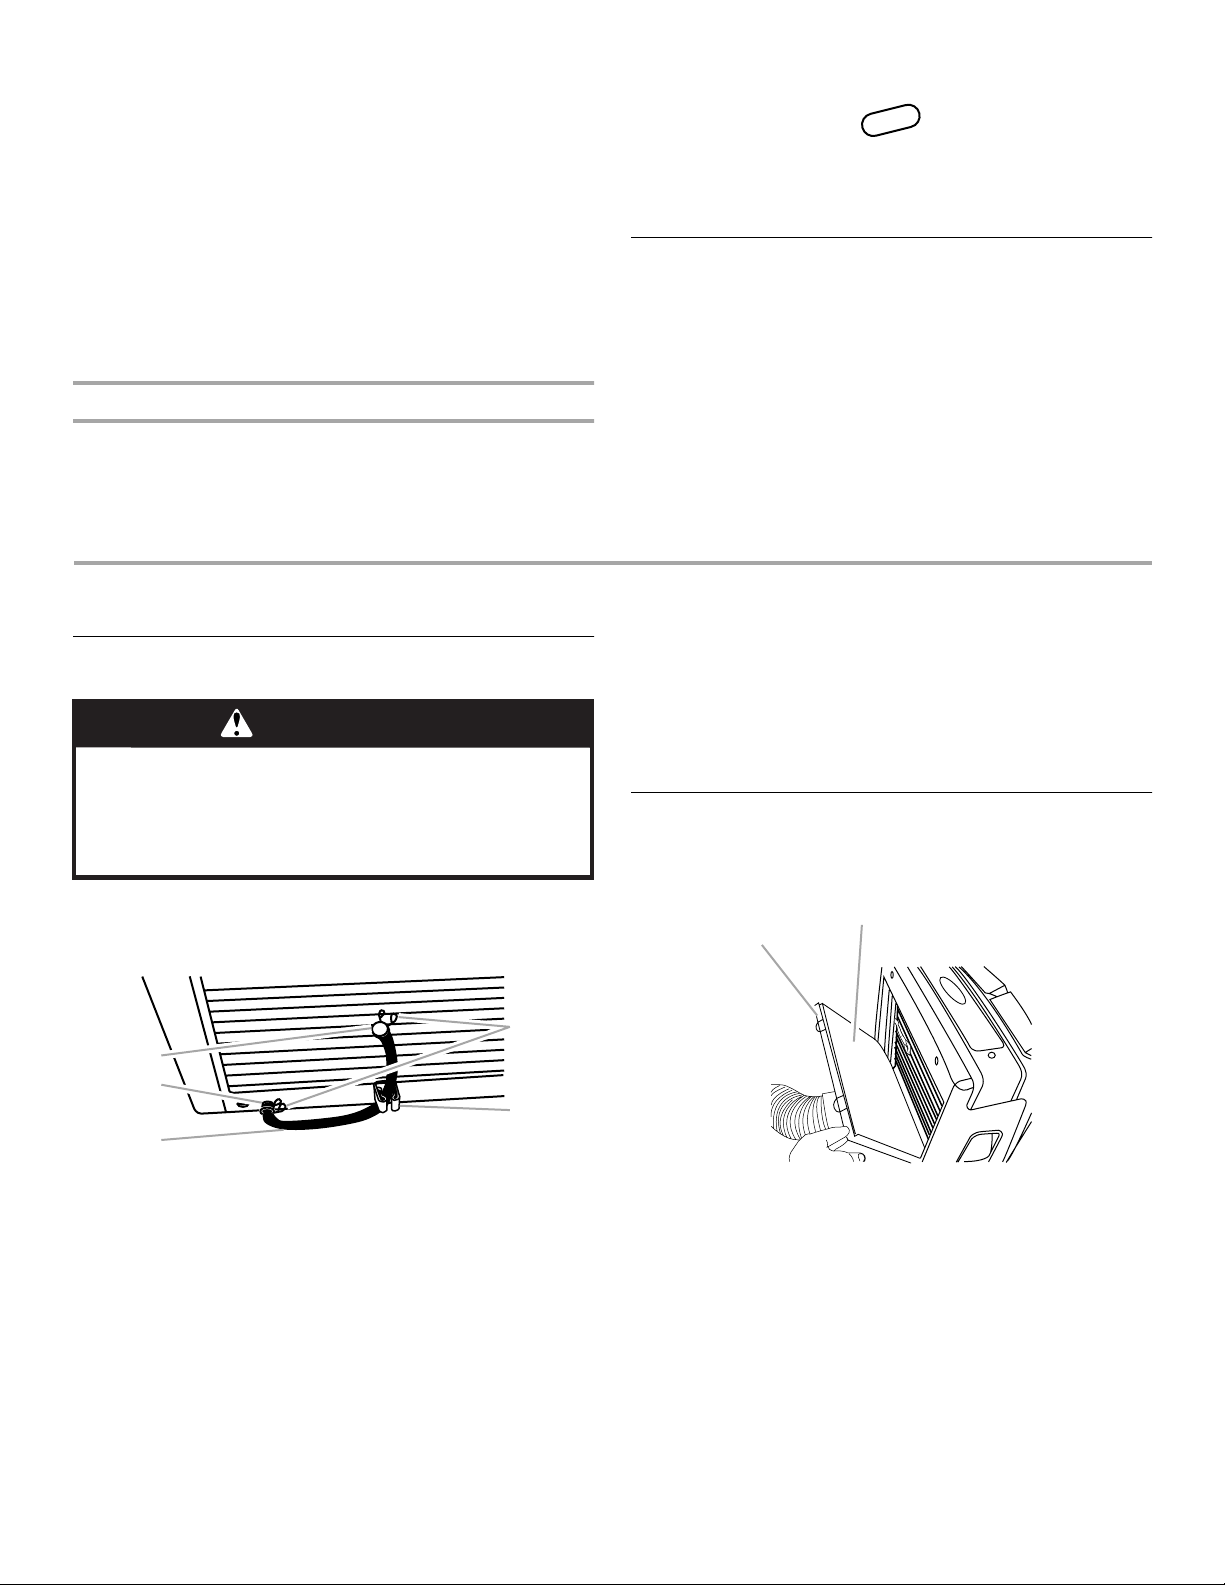
Install Exhaust Hose and Adapter
1. Roll air conditioner to its selected location. See “Location
Requirements.”
2. Insert one end of the flexible exhaust hose into the exhaust
adapter.
3. Twist clockwise to lock hose into place.
4. Insert the other end of the flexible exhaust hose into the
window exhaust adapter.
5. Twist clockwise to lock hose into place.
A
B
6
A. Exhaust adapter
B. Flexible exhaust hose
C. Window exhaust adapter
6. Slide the exhaust adapter with flexible exhaust hose attached
C
A
D
into the slots on each side of the appliance exhaust.
B
A
4. Attach the rain cover bracket assembly to the window slider
kit with the screws and nuts provided.
NOTE: The holes in the window slider kit are positioned for
attaching either the vertical slide window rain cover bracket
or the horizontal slide window rain cover bracket.
Rain Cover Assembly
A. Slot for mounting exhaust adapter
B. Appliance exhaust
C. Power cord
Window Installation
Your window slider kit has been designed to fit most standard
vertical and horizontal window applications. However, it may be
necessary for you to modify some aspects of the installation
procedures for certain types of windows.
1. Insert the window exhaust adapter into the window slider kit.
2. Attach the outlet grille to the window exhaust adapter with
the 2 screws provided.
3. Attach the rain cover to the horizontal or vertical rain cover
bracket (depending on installation) with the screws and nuts
provided.
D
B
C
A. Rain cover bracket
B. Rain cover
C. Outlet grille
D. Window exhaust adapter
5. Open the window.
6. Place the window slider kit into the window, extending it to fit
the width of the window. Be sure the rain cover bracket
assembly is on the outside of the window.
AB
C
G
A. To air conditioner
B. Outdoors
C. Screw provided
D. Rain cover bracket assembly
F
E. Window slider kit
F. Window exhaust adapter
G. Flexible exhaust hose
E
7. Close the window onto the window slider kit to secure.
7
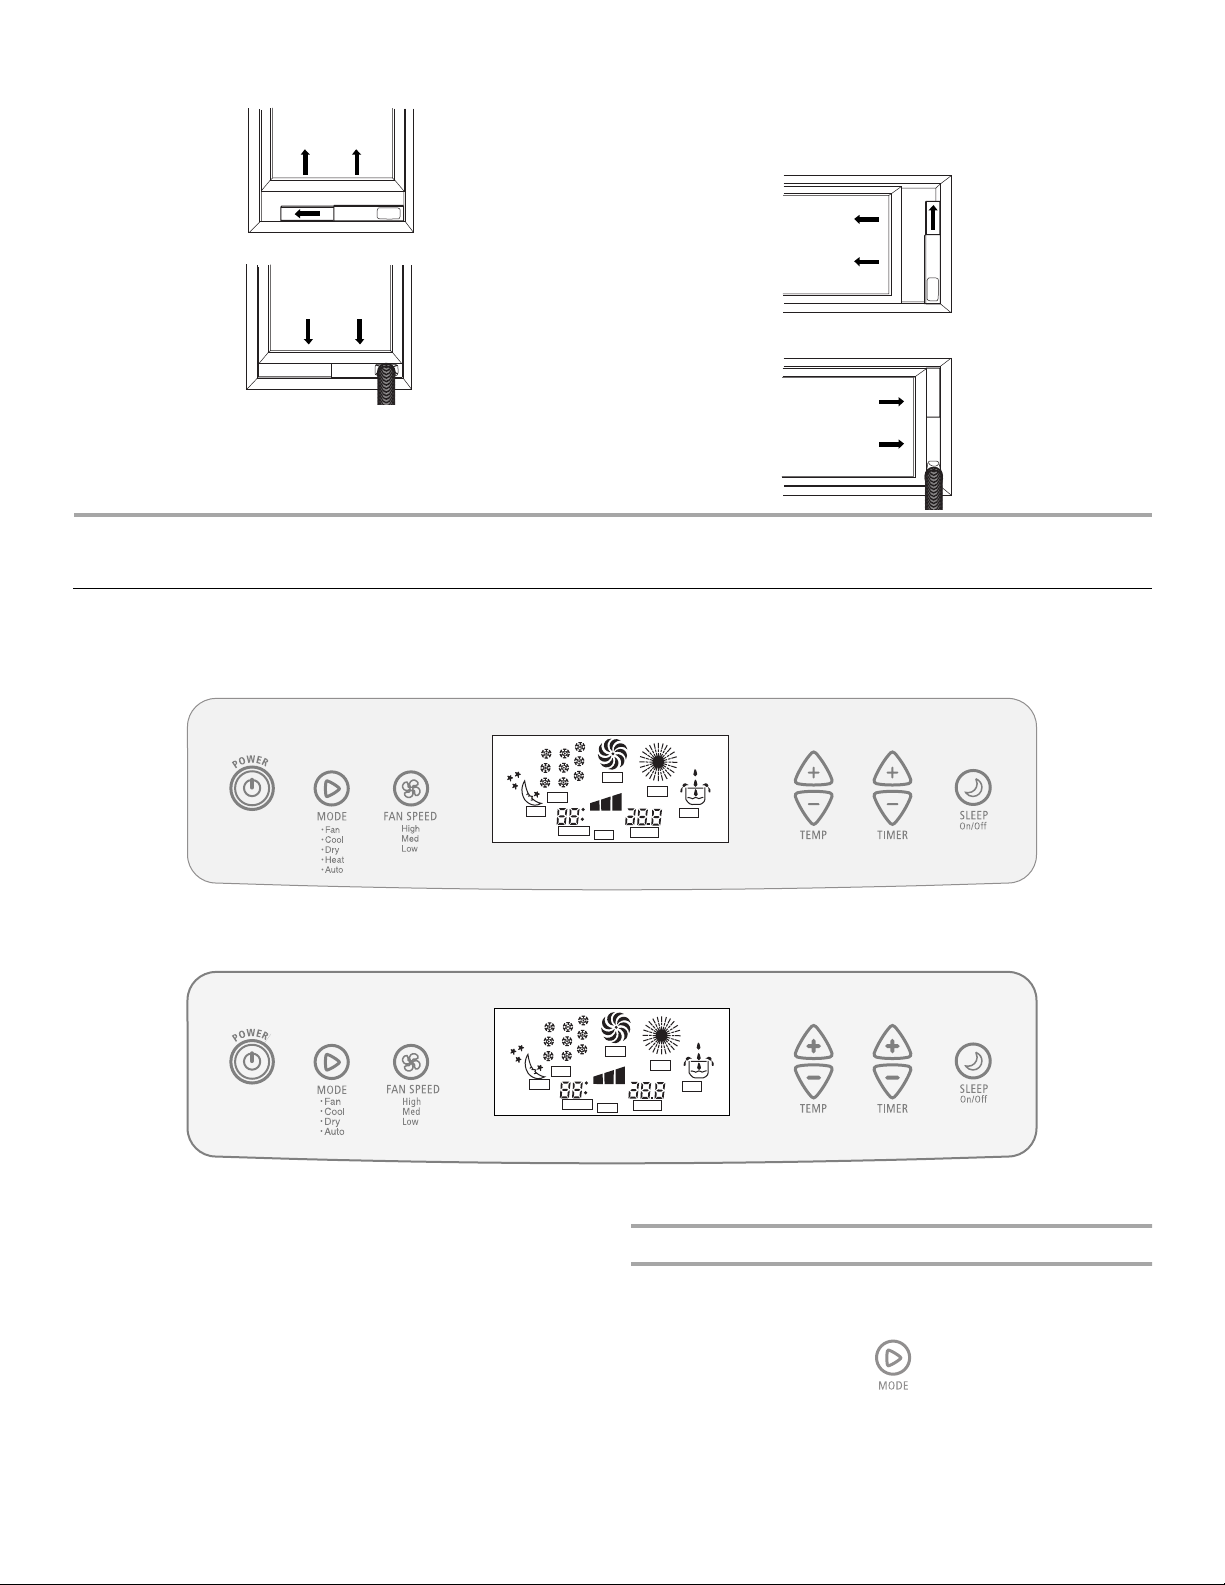
Vertical Slide Window Horizontal Slide Window
For casement window installation, the window slider kit may be
installed vertically with the window slider kit opening at the
bottom.
PORTABLE AIR CONDITIONER USE
Starting Your Portable Air Conditioner
Models with Heat
COOL
SLEEP
SET TEMP
Models without Heat
COOL
SLEEP
SET TEMP
NOTES:
■ In the event of a power failure, your air conditioner will
operate at the previous settings when the power is restored.
■ When changing modes while air conditioner is operating, the
fan will run for 3 to 5 minutes before restarting. If a button is
pressed during this time, the fan will run for another 3 to
5minutes.
■ In Cool or Dry mode, the compressor and fan will stop when
room temperature reaches set temperature.
FAN
HEAT
C
LMH
F
C
F
AUTO
LMH
AUTO
ON
DRY
OFF
SET TIME
FAN
HEAT
DRY
ON
OFF
SET TIME
Mode
Press MODE to choose Fan, Cool, Dry, Heat (heating models
only) or Auto.
8
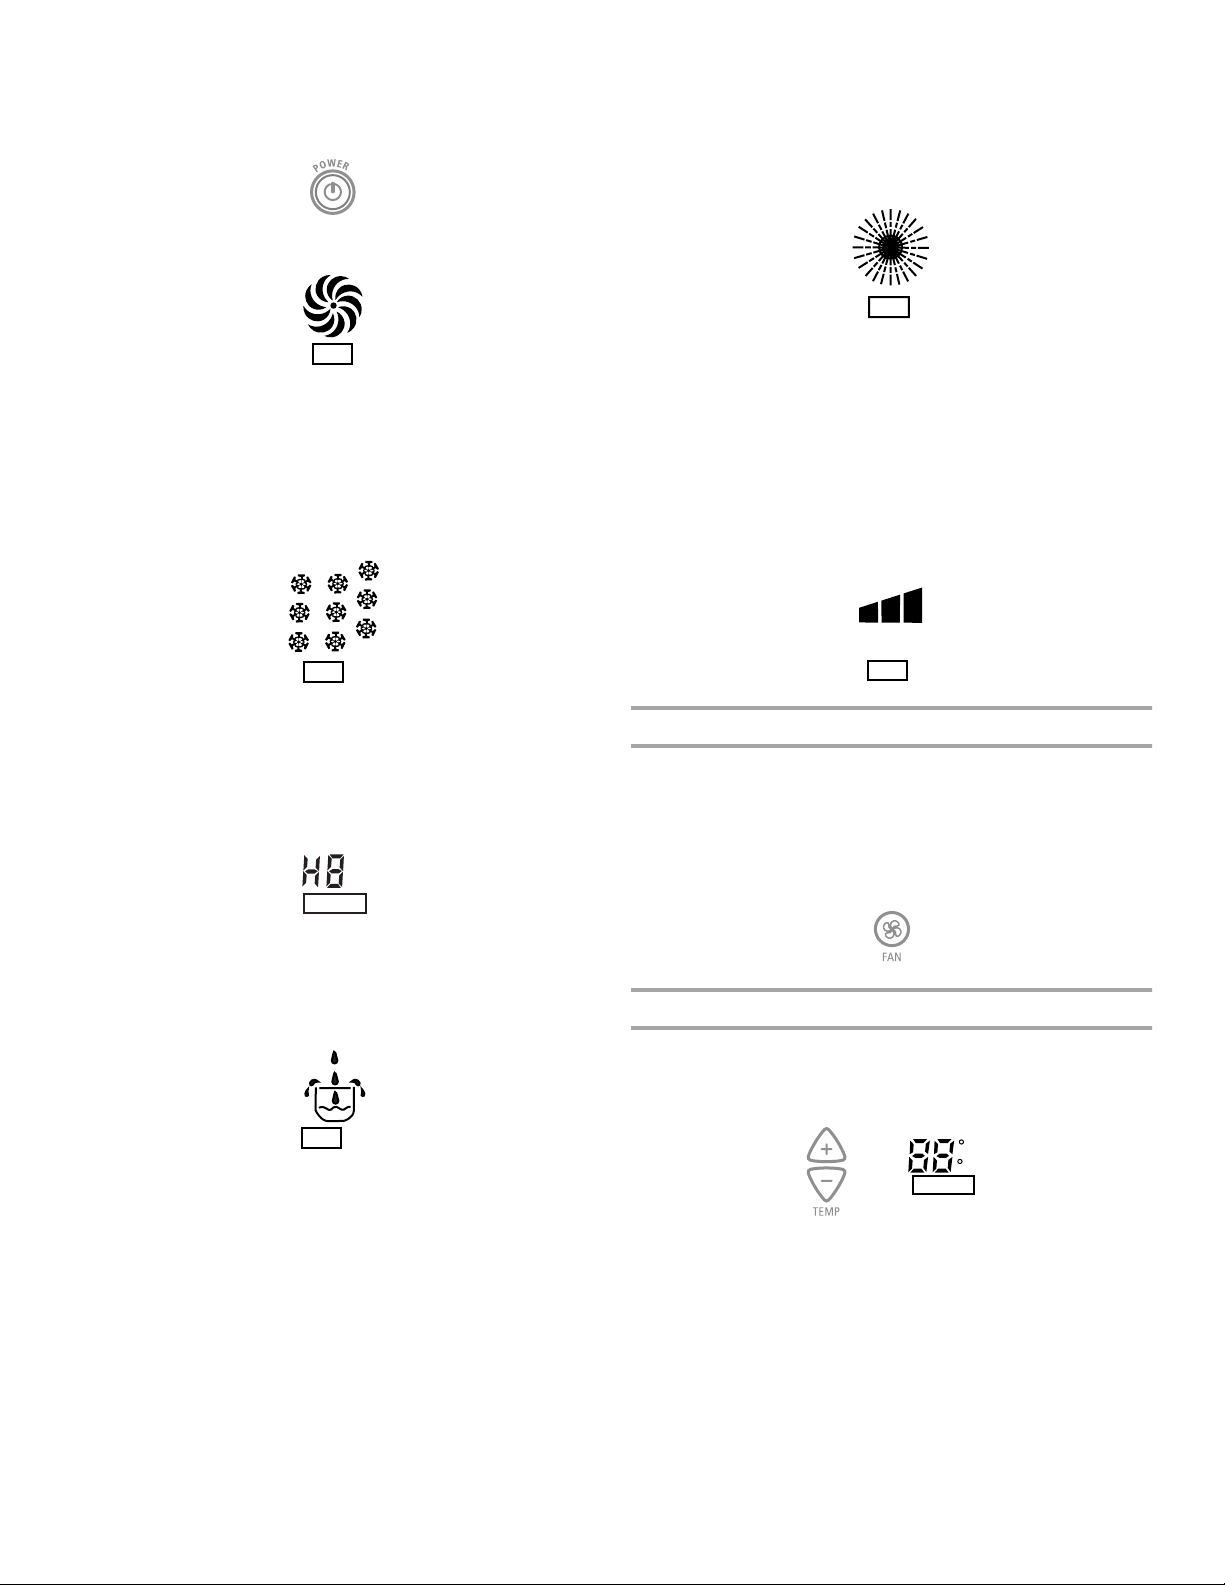
Fan Only Mode
Serves only to move air. Fan speed is set by user.
1. Press POWER to start the air conditioner.
2. Press MODE to choose Fan.
Heat Mode (Heating Models Only)
Heat mode heats the room. Temperature and fan speed are set
by user.
1. Press POWER to start the air conditioner.
2. Press MODE to choose Heat.
HEAT
FAN
3. Choose fan speed. See “Fan Speed.”
Cool Mode
Cool mode cools the room. Temperature and fan speed are set
by the user.
1. Press POWER to start the air conditioner.
2. Press MODE to choose Cool.
COOL
3. Choose fan speed. See “Fan Speed.”
4. Choose temperature. See “Temperature.”
5. When “H8” is displayed, the unit water reservoir is full. The air
conditioner will turn off automatically. See “Portable Air
Conditioner Care” for directions on draining the air
conditioner.
SET TEMP
3. Choose fan speed. See “Fan Speed.”
4. Choose temperature. See “Temperature.”
Auto Mode (Cooling Only)
Auto mode cools the room by varying fan speeds and turning
compressor on and off.
NOTE: The temperature and fan speed cannot be set when using
Auto mode.
1. Press POWER to start the air conditioner.
2. Press MODE to choose Auto.
LMH
AUTO
Fan Speed
1. Press FAN to set the fan speed.
2. Choose High, Med or Low.
■ High—Maximum airflow
■ Med—Intermediate airflow
■ Low—Minimum airflow
Dry Mode
The Dry mode dehumidifies the room. Fan runs on Low only.
1. Press POWER to start the air conditioner.
2. Press MODE to choose Dry.
DRY
3. When “H8” is displayed, the unit water reservoir is full. The air
conditioner will turn off automatically. See “Portable Air
Conditioner Care” for directions on draining the air
conditioner.
Temperature
1. Press the TEMP plus button to increase the temperature 1º.
2. Press the TEMP minus button button to decrease the
temperature 1º.
C
F
SET TEMP
NOTES:
■ In the Cool mode, the temperature can be set between 61ºF
(16ºC) and 86ºF (30ºC).
■ In Fan Only mode, the temperature cannot be set.
■ The temperature display cannot be changed to Celsius (ºC).
9
Timer Delay
To set the Timer for a 1- to 24-hour delay until the air
conditioner turns off (the air conditioner must be On):
1. Press the TIMER plus button. Display will show remaining
hours before air conditioner will turn off.
3. Press SLEEP.
4. Press the Timer plus or minus button to change delay time
(0.5 to 24 hours).
ON
OFF
SET TIME
2. Press the plus or minus button to adjust the delay time (1 to
24 hours).
3. To turn off the Timer, press the plus or minus button until no
delay time appears in the display.
To set the Timer to turn on the air conditioner, keeping
previous settings:
1. Turn off air conditioner.
2. Press the TIMER plus button. Display will show remaining
hours before air conditioner will turn on.
3. Press the plus or minus button to change delay time (1 to
24 hours).
4. To turn off the Timer, press the plus or minus button until no
delay time appears in the display.
To set the Timer to turn on the air conditioner, changing
the previous settings:
1. Turn on air conditioner.
2. Adjust Mode to Fan, Cool, Heat (heating models only) or
Auto.
NOTE: The temperature and fan speed cannot be set when
using Auto mode.
3. Adjust Fan Speed to High, Med or Low.
4. Adjust temperature between 64°F (18ºC) and 86°F (30ºC).
5. Wait 3 seconds before turning off air conditioner.
6. Press the TIMER plus button. Display will show remaining
hours before air conditioner will turn on.
7. Press the plus or minus button to change delay time (1 to
24 hours).
8. To turn off the Timer, press the plus or minus button until no
delay time appears in the display.
To clear Timer delay program:
NOTE: Air conditioner can be either on or off.
Press the plus or minus button until no delay time appears in the
display.
To see or change the delay time (in hours):
■ The remaining time will display as long as the Timer is
activated.
■ Press the plus or minus button to increase or decrease the
time.
SLEEP
5. To cancel the Sleep mode, press SLEEP again.
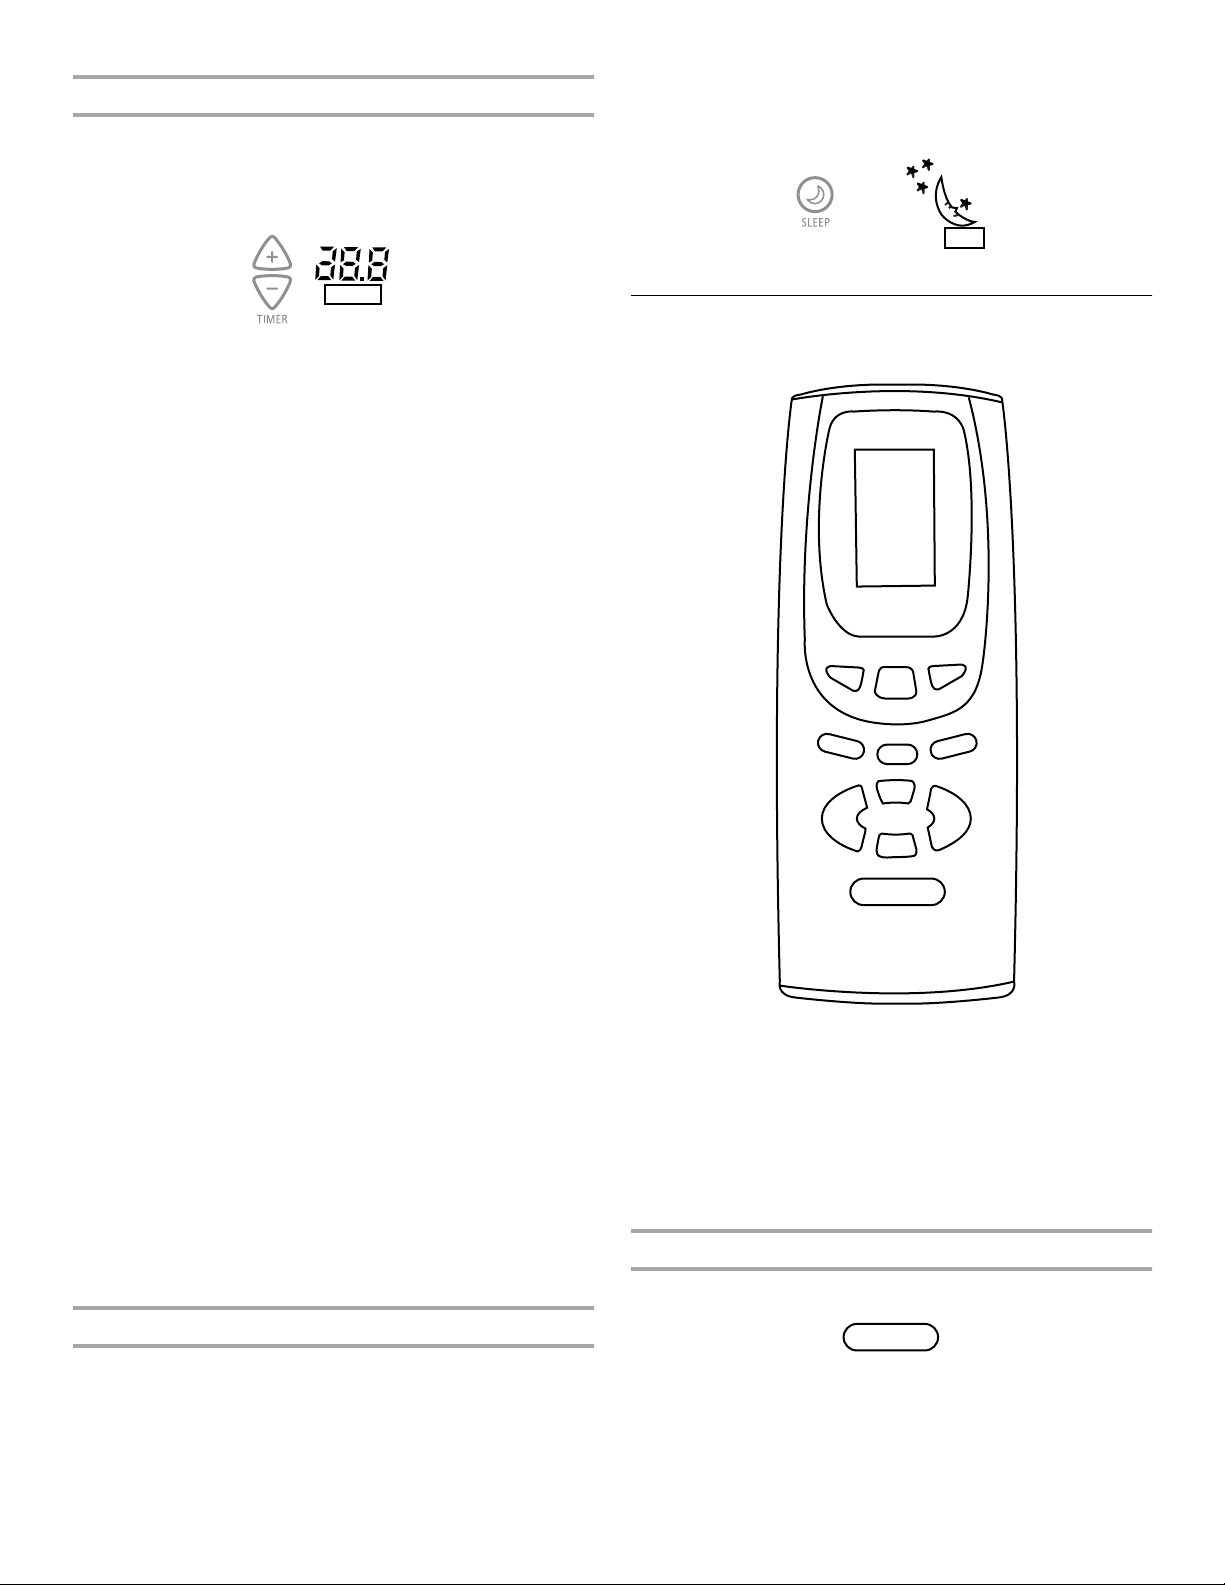
Using the Remote Control
NOTE: Remote control may vary in appearance
MODE
TIMER
+ºF
POWER
NOTES:
■ Two AAA batteries (included) power the remote control. Do
not use rechargeable batteries. Replace batteries after
6 months of use, or when the remote control starts to lose
power.
■ To operate the air conditioner with the remote control, aim the
remote control at the signal receptor from no more than 23 ft
(7 m) away.
To Turn the Air Conditioner On or Off
Press POWER.
SEND
DRY
Hr
Min
FAN
SLEEP
-ºF
Sleep Mode
When Sleep mode is activated, the set temperature will
automatically increase at intervals until the timer turns off the
Sleep mode.
1. Press POWER to start the air conditioner.
2. Press MODE to choose Cool or Heat (heating models only).
10
POWER
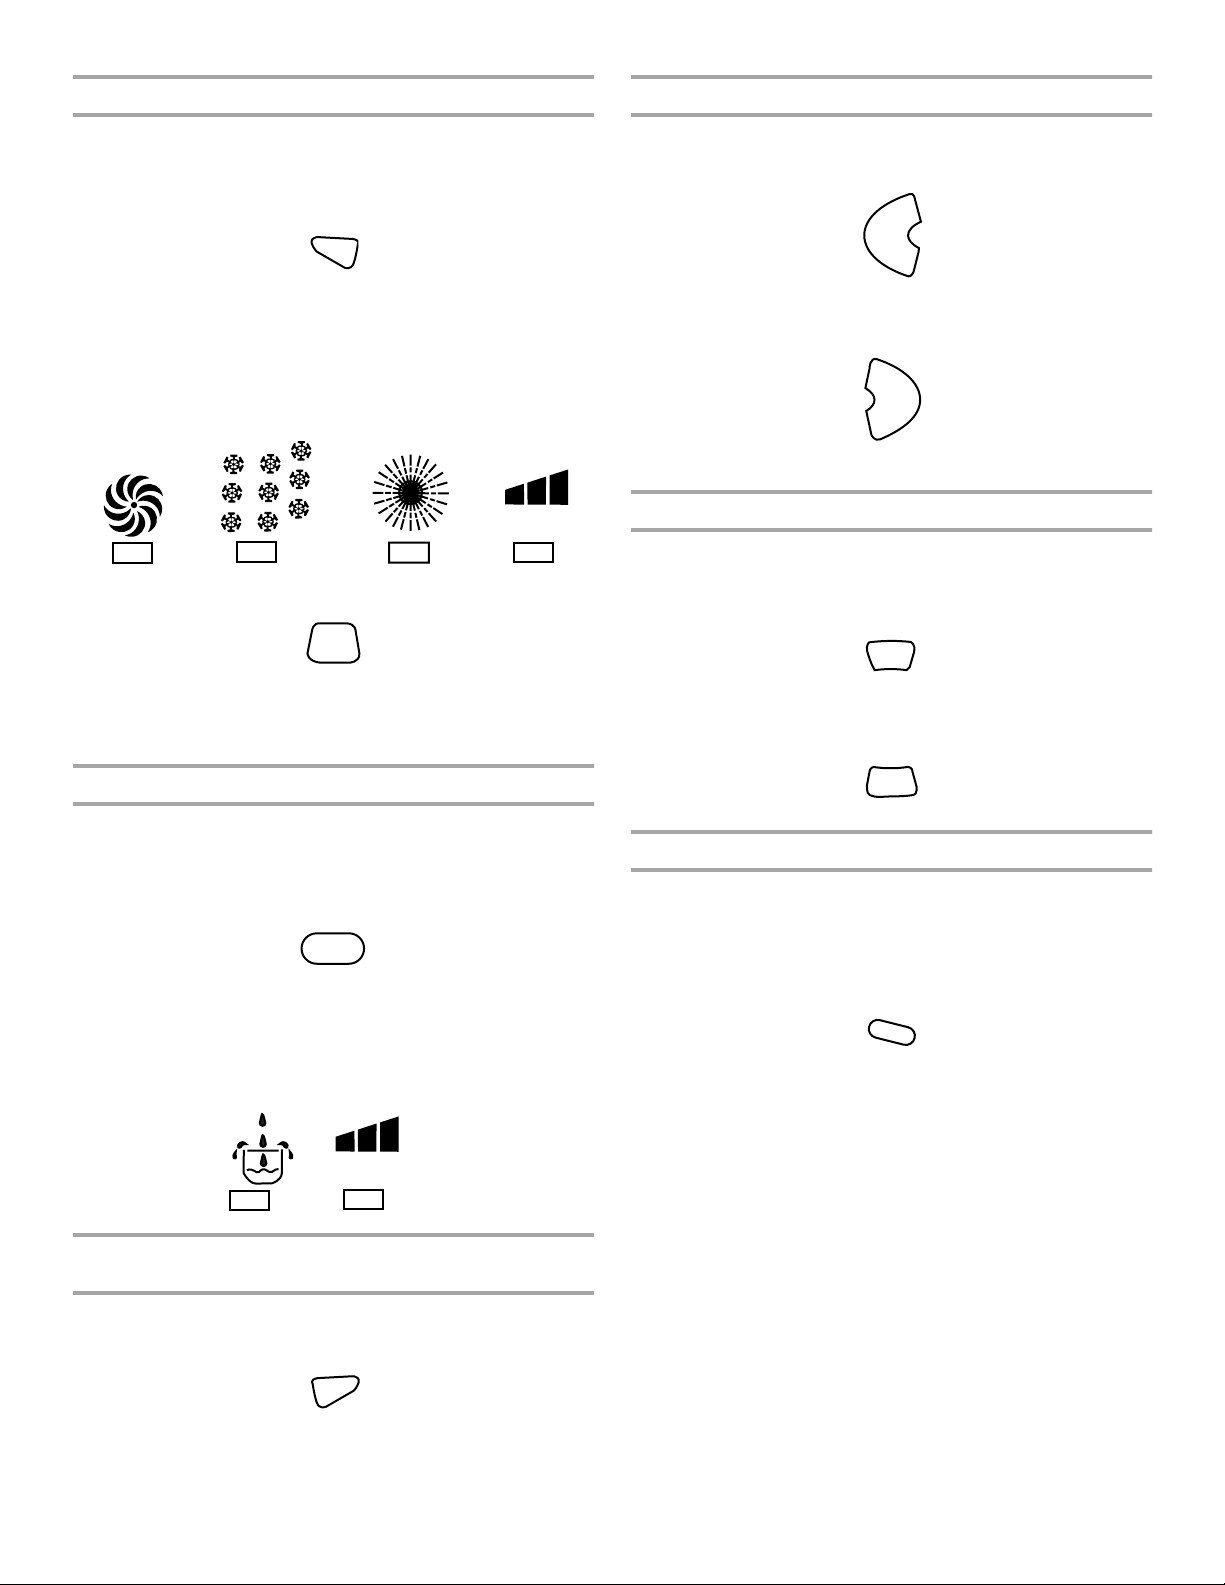
To Select the Mode
To Set the Temperature
NOTE: To select Dry mode, see “To select the Dry mode” later in
this section.
1. Press MODE to choose Fan, Cool, Heat (heating models only)
or Auto.
MODE
The following symbols will be displayed.
■ Fan—Fan mode.
■ Snowflake—Cool mode.
■ Sun—Heat mode (heating models only).
■ Tria ng le —Auto mode.
LMH
FAN
COOL
HEAT
AUTO
2. Press SEND to activate the mode.
SEND
3. To adjust the temperature or fan speed, select -ºF, + ºF or
FAN.
4. Press SEND.
To raise the temperature:
Press the plus button to increase the temperature 1º.
+ºF
To lower the temperature:
Press the minus button to decrease the temperature 1º.
-ºF
NOTE: Press SEND to activate temperature change.
To Set the Time of Day
Time of day is always displayed on the remote control display.
1. Press the Hr button until the correct hour appears on the
display.
Hr
2. Press the Min button until the correct minutes appear on the
display.
To Select Dry Mode
NOTE: The Send button does not have to be pressed to activate
the Dry mode.
1. Press POWER to start the air conditioner.
2. Press DRY to select the Dry mode.
DRY
The following symbols will be displayed.
■ Te a rd r op —Dry mode
■ Tria ng le —Auto mode
NOTE: Pressing DRY again will select the Auto mode.
LMH
DRY
AUTO
To Select the Fan Speed (Fan, Cool or Heat [heating
models only])
1. Press FAN.
2. Choose High, Med or Low.
FAN
3. Press SEND to activate the fan speed.
Min
To Set the Timer Delay
To set the Timer to turn on the air conditioner, keeping
previous settings:
1. Turn off air conditioner.
2. Press TIMER. Remote control display will show remaining
hours before air conditioner will turn on.
TIMER
3. Press the Hr button to change delay time (1 to 18 hours).
4. Press SEND. Remote control display will show remaining
hours before air conditioner will turn on.
To set the Timer to turn on the air conditioner, changing
the previous settings:
1. Turn on air conditioner.
2. Adjust Mode to Fan, Cool, Dry, Heat (heating models only) or
Auto.
3. Press SEND.
4. Adjust Fan Speed to High, Med or Low.
5. Press SEND.
6. Adjust temperature between 64°F (18ºC) and 86°F (30ºC).
7. Press SEND.
8. Wait 3 seconds before turning off air conditioner.
11
9. Press TIMER. Remote control display will show remaining
D
E
hours before air conditioner will turn on.
10. Press the Hr button to change delay time (1 to 18 hours).
11. Press SEND. Remote control display will show remaining
hours before air conditioner will turn on.
To clear Timer delay program:
1. Press TIMER until the time of day appears in the display.
2. Press SEND.
To see or change the remaining time (in hours):
■ The delay time will display as long as the Timer is activated.
■ Press the Hr button to change the time.
To Select Sleep Mode
When Sleep mode is activated, the set temperature will
automatically increase at intervals until the timer turns off the
Sleep mode.
1. Press POWER to start the air conditioner.
2. Press MODE to choose Cool or Heat (heating models only).
PORTABLE AIR CONDITIONER CARE
Draining the Air Conditioner
WARNING
Excessive Weight Hazard
Use two or more people to move and install
air conditioner.
Failure to do so can result in back or other injury.
NOTE: When “H8” is displayed, the air conditioner must be
drained. The air conditioner will not operate until the water is
drained from the unit.
3. Press SLEEP.
SLEEP
4. Press the Hr button to change the delay time (1 to 7 hours).
5. Press SEND.
6. To cancel the Sleep mode, press SLEEP again.
Normal Sounds
When your air conditioner is operating normally, you may hear
sounds such as:
■ Droplets of water hitting the condenser, causing a pinging or
clicking sound. The water droplets help cool the condenser.
■ Air movement from the fan.
■ Clicks from the thermostat cycle.
■ Vibrations or noise due to poor wall or window construction.
■ A high-pitched hum or pulsating noise caused by the modern
high-efficiency compressor cycling on and off.
7. After draining the reservoir, replace the drain plug and clamp.
8. Snap the drain hose back into the drain hose clip.
9. Reposition air conditioner.
10. Reconnect the flexible exhaust hose.
11. Plug in air conditioner or reconnect power.
12. Press POWER to start the air conditioner.
Cleaning the Air Filter
1. Press POWER to turn off the air conditioner.
2. Open the filter panel and lift off the filter.
B
A
A
B
C
A. Drain plug
B. Drain port
C. Drain hose
1. Press POWER to turn off the air conditioner.
2. Unplug air conditioner or disconnect power.
3. Disconnect the flexible exhaust hose.
4. Move the air conditioner to a drain location or outside.
5. Remove the drain hose from the drain hose clip.
NOTE: If the drain hose was not installed, remove the drain
cap from the drain port. See “Install Portable Air Conditioner.”
6. Remove the clamp and drain plug.
D. Clamp
E. Drain hose clip
12
A. Filter panel
B. Filter
3. Use a vacuum cleaner to clean the filter. If filter is very dirty,
wash filter in warm water with a mild detergent.
NOTE: Do not wash filter in the dishwasher or use any
chemical cleaners.
4. Air dry filter completely before replacing to ensure maximum
efficiency.
5. Place the filter back on the filter panel.
6. Close the filter panel.
Cleaning the Outside
1. Unplug air conditioner or disconnect power.
2. Remove the filter and clean separately. See “Cleaning the Air
Filter.”
3. Wipe outside of air conditioner with a soft, damp cloth.
4. Plug in air conditioner or reconnect power.
5. Press POWER to start the air conditioner.
1. Remove drain plug and drain water completely.
2. Run air conditioner with fan only for approximately 12 hours
to dry the air conditioner.
3. Unplug air conditioner.
4. Remove flexible exhaust hose and store with air conditioner
in a clean, dry area. See “Installation Instructions.”
5. Remove window kit and store with air conditioner in a clean,
dry area. See “Installation Instructions.”
6. Remove the filter and clean. See “Cleaning the Air Filter.”
7. Clean the outside of air conditioner. See “Cleaning the
Outside.”
8. Reinstall filter.
9. Remove the batteries and store the remote control with air
conditioner in a clean, dry area.
Storing After Use
TROUBLESHOOTING
Before calling for service, try the suggestions below to see whether you can solve your problem without outside help.
Air conditioner will not operate
WARNING
Electrical Shock Hazard
Plug into a grounded 3 prong outlet.
Do not remove ground prong.
Do not use an adapter.
Do not use an extension cord.
Failure to follow these instructions can result in death,
fire, or electrical shock.
■ The power supply cord is unplugged. Plug into a grounded
3 prong outlet. See “Electrical Requirements.”
■ Time-delay fuse or circuit breaker of the wrong capacity
is being used. Replace with a time-delay fuse or circuit
breaker of the correct capacity. See “Electrical
Requirements.”
■ The power supply cord has tripped (Reset button has
popped out). Press and release RESET (listen for click; Reset
button will latch and remain in) to resume operation.
■ A household fuse has blown, or a circuit breaker has
tripped. Replace the fuse, or reset the circuit breaker. See
“Electrical Requirements.”
■ The Power button has not been pressed. Press POWER.
■ The local power has failed. Wait for power to be restored.
Air conditioner blows fuses or trips circuit breakers
■ Too many appliances are being used on the same circuit.
Unplug or relocate appliances that share the same circuit.
■ You are trying to restart the air conditioner too soon after
turning off air conditioner. Wait at least 3 minutes after
turning off air conditioner before trying to restart the air
conditioner.
■ You have changed modes. Wait at least 3 minutes after
turning off air conditioner before trying to restart the air
conditioner.
Air conditioner power supply cord trips (Reset button
pops out)
■ Disturbances in your electrical current can trip (Reset
button will pop out) the power supply cord. Press and
release RESET (listen for click; Reset button will latch and
remain in) to resume operation.
■ Electrical overloading, overheating, cord pinching or
aging can trip (Reset button will pop out) the power
supply cord. After correcting the problem, press and release
RESET (listen for click; Reset button will latch and remain in)
to resume operation. If the power cord fails to reset, contact a
service technician.
NOTE: A damaged power supply cord must be replaced with a
new power supply cord obtained from the product manufacturer
and must not be repaired.
Air conditioner seems to run too much
■ Is there a door or window open? Keep doors and windows
closed.
■ The current air conditioner replaced an older model. The
use of more efficient components may cause the air
conditioner to run longer than an older model, but the total
energy consumption will be less. Newer air conditioners do
not emit the “blast” of cold air you may be accustomed to
from older units, but this is not an indication of lesser cooling
capacity or efficiency. Refer to the efficiency rating (EER) and
capacity rating (in Btu/h) marked on the air conditioner.
13

■ The air conditioner is in a heavily occupied room, or heat-
producing appliances are in use in the room. Use exhaust
vent fans while cooking or bathing and try not to use heatproducing appliances during the hottest part of the day.
Portable air conditioners are designed as supplemental
cooling to local areas within a room. A higher capacity air
conditioner may be required, depending on the size of the
room being cooled.
Air conditioner runs for a short time only, but room is not
cool
■ Set temperature is close to room temperature. Lower set
temperature. See “Portable Air Conditioner Use.”
Air conditioner runs, but does not cool
■ The filter is dirty or obstructed by debris. Clean the filter.
ASSISTANCE OR SERVICE
Before calling for assistance or service, please check
“Troubleshooting.” It may save you the cost of a service call. If
you still need help, follow the instructions below.
When calling, please know the purchase date and the complete
model and serial number of your appliance. This information will
help us to better respond to your request.
■ Air outlet is blocked. Clear air outlet.
■ Set temperature is too high. Lower set temperature.
Air conditioner cycles on and off too much
■ The air conditioner is not properly sized for your room.
Check the cooling capabilities of your portable air
conditioner. Portable air conditioners are designed as
supplemental cooling to local areas within a room.
■ The filter is dirty or obstructed by debris. Clean the filter.
■ There is excessive heat or moisture (open container
cooking, showers, etc.) in the room. Use a fan to exhaust
heat or moisture from the room. Try not to use heatproducing appliances during the hottest part of the day.
■ The louvers are blocked. Install the air conditioner in a
location where the louvers are free from curtains, blinds,
furniture, etc.
■ The outside temperature is below 64°F (18°C). Do not try to
operate your air conditioner in the cooling mode when the
outside temperature is below 64°F (18°C).
If you need replacement parts
If you need to order replacement parts, we recommend that you
use only FSP
right and work right because they are made with the same
precision used to build every new WHIRLPOOL
To locate FSP® replacement parts in your area, call us or your
nearest Whirlpool designated service center.
®
replacement parts. FSP
®
replacement parts will fit
®
appliance.
In the U.S.A.
Call the Whirlpool Customer eXperience Center
toll free: 1-800-253-1301 or visit our website at
www.whirlpool.com.
Our consultants provide assistance with:
■ Features and specifications on our full line of appliances.
■ Installation information.
■ Use and maintenance procedures.
■ Accessory and repair parts sales.
■ Specialized customer assistance (Spanish speaking, hearing
impaired, limited vision, etc.).
■ Referrals to local dealers, repair parts distributors, and
service companies. Whirlpool designated service technicians
In Canada
Call the Whirlpool Canada LP Customer Interaction Centre toll
free: 1-800-807-6777, or visit our website at www.whirlpool.ca.
Our consultants provide assistance with:
■ Features and specifications on our full line of appliances.
■ Use and maintenance procedures.
■ Accessory and repair parts sales.
■ Referrals to local dealers, repair parts distributors, and
service companies. Whirlpool Canada LP designated service
technicians are trained to fulfill the product warranty and
provide after-warranty service, anywhere in Canada.
are trained to fulfill the product warranty and provide afterwarranty service, anywhere in the United States.
To locate the Whirlpool designated service company in your
area, you can also look in your telephone directory Yellow
Pages.
For further assistance
If you need further assistance, you can write to Whirlpool
Corporation with any questions or concerns at:
Whirlpool Brand Home Appliances
Customer eXperience Center
553 Benson Road
Benton Harbor, MI 49022-2692
Please include a daytime phone number in your correspondence.
For further assistance
If you need further assistance, you can write to Whirlpool
Canada LP with any questions or concerns at:
Customer Interaction Centre
Whirlpool Canada LP
1901 Minnesota Court
Mississauga, Ontario L5N 3A7
Please include a daytime phone number in your correspondence.
14
 Loading...