

Whirlpool 5VWT59SFYW, 5VM9BXGFYA, 5VM1BXGFYA, 5VM1BXGFYW, 5VM9BXGFYW Installation Instructions
...Page 1
REVERSIBILITY KIT INSTRUCTIONS
Parts Included:
Brand badge removal tool
Brand badge template
Hole cover decal (color coordinated to exterior)
Tools Needed:
Scissors
Masking tape
Freezer Door
1. Using the removal tool (provided), remove the brand badge
from the freezer door by lifting up the right-hand side and
peeling the badge away from the door from right to left.
NOTE: To avoid scratching the door, do not use a sharp or
metallic object to pry the brand badge from the door.
2. Rub a small amount of liquid dish soap over any adhesive
residue with your fingers. Rinse the door with warm water and
dry with a soft cloth.
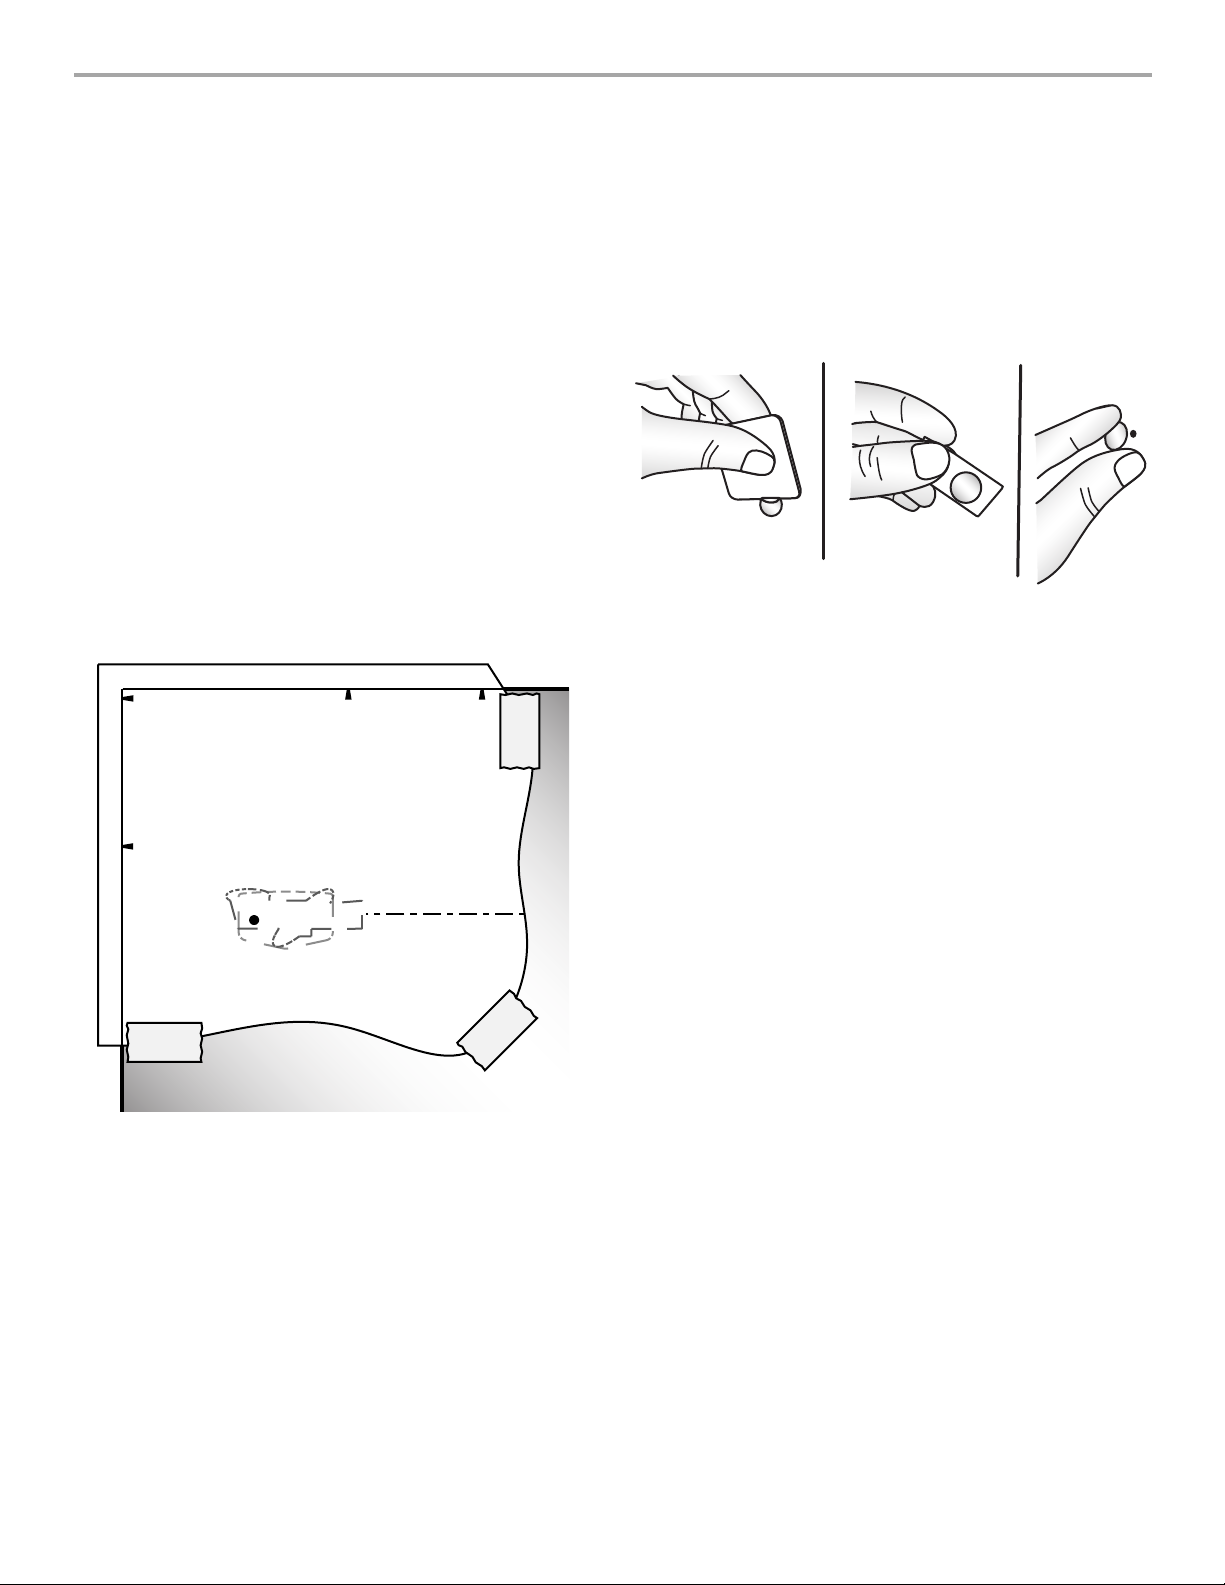
3. Cut the template along the dotted lines that match the shape
of the brand badge.
4. Align the edges of the template with the side and top of the
freezer door and tape the template to the door.
NOTE: When the template is correctly aligned, the hole in the
door, where the handle was, will be within the cutout of the
template, as shown.
Refrigerator Door
1. Remove the decal covering the hole on the opposite side of
the door, where the refrigerator door handle will be installed,
and discard the decal.
2. Rub a small amount of liquid dish soap over any adhesive
residue with your fingers. Rinse the door with warm water and
dry with a soft cloth.
3. After installing the door handle on the opposite side, cover the
remaining hole with the decal that matches the color of the
refrigerator exterior.
5. Using the cutout as a guide, press the brand badge onto the
freezer door making sure that the hole is completely covered.
6. Slowly remove the template.
W10478133A
Page 2
INSTRUCTIONS DE LA TROUSSE DE RÉVERSIBILITÉ
Pièces fournies :
Outil de retrait de l'insigne de la marque
Gabarit de l'insigne de la marque
Transfert de cache pour les trous (couleur assortie à l'extérieur)
Outillage nécessaire :
Ciseaux
Ruban adhésif de masquage
Porte du congélateur
1. A l'aide de l'outil de retrait (fourni) de l'insigne, retirer l'insigne
de la marque de la porte du congélateur en soulevant le côté
droit et en décollant l'insigne de la porte, de droite à gauche.
REMARQUE : Afin d'éviter d'érafler la porte, ne pas utiliser
d'objet pointu ou métallique pour arracher l'insigne de la
marque de la porte.
2. Frotter une petite quantité de savon liquide à vaisselle sur
les résidus d’adhésif avec les doigts. Rincer la porte à l'eau
tiède et sécher avec un chiffon doux.
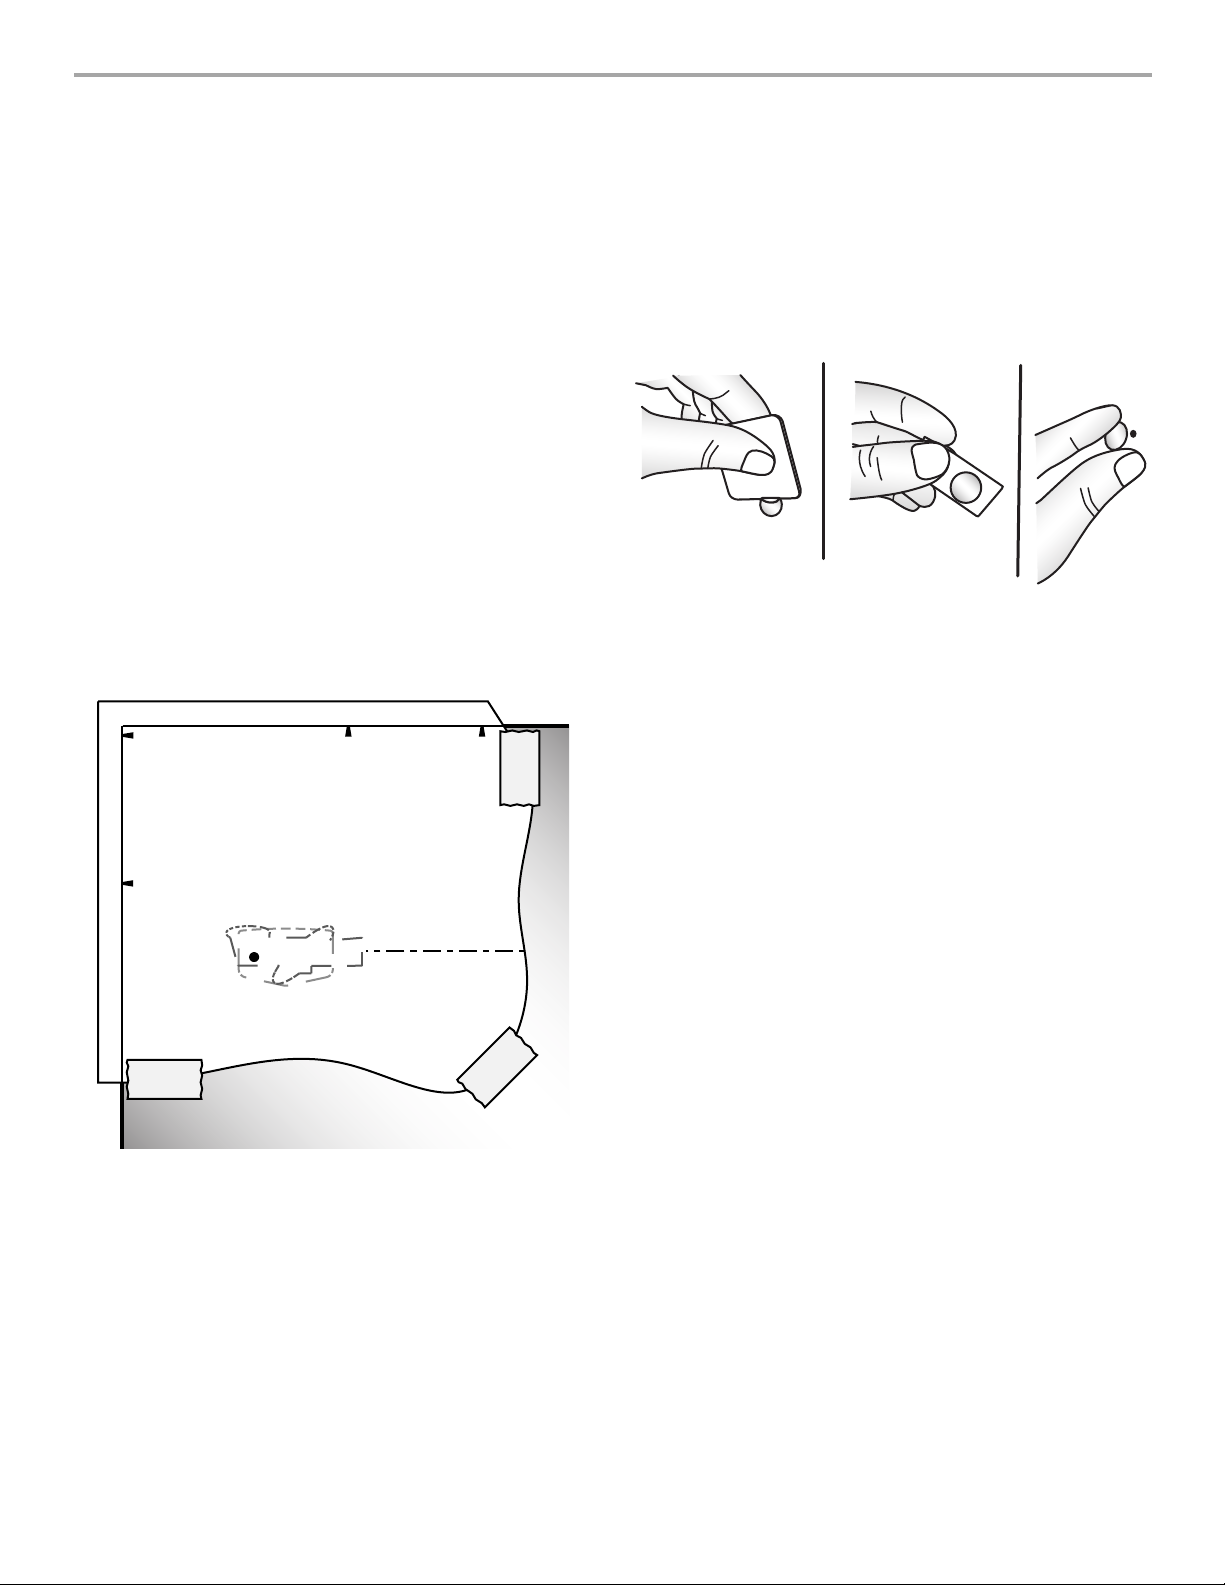
3. Couper le gabarit le long des pointillés qui correspondent
à la forme de l'insigne de la marque.
4. Aligner les bords du gabarit avec les parties latérale et
supérieure de la porte du congélateur et fixer le gabarit
sur la porte à l'aide de ruban adhésif.
REMARQUE : Une fois le gabarit correctement aligné,
le trou dans la porte, à l'emplacement de la poignée, se
trouvera dans l'ouverture découpée du gabarit, tel qu'illustré.
Porte du réfrigérateur
1. Retirer le transfert qui recouvre le trou du côté opposé
de la porte, là où la poignée de la porte du réfrigérateur
doit être installée, et jeter le transfert.
2. Frotter une petite quantité de savon liquide à vaisselle sur
les résidus d’adhésif avec les doigts. Rincer la porte à l'eau
tiède et sécher avec un chiffon doux.
3. Après avoir installé la poignée de porte du côté opposé,
recouvrir le trou restant avec le transfert assorti à la couleur
de l'extérieur du réfrigérateur.
5. En utilisant cette ouverture comme guide, appuyer l'insigne
de la marque sur la porte du congélateur, en veillant à ce que
le trou soit entièrement recouvert.
6. Retirer lentement le gabarit.
Page 3
ﺱﺎﻜﻌﻧﻻﺍ ﺔﻴﻠﺑﺎﻗ ﺕﺍﻭﺩﺃ ﺕﺎﻤﻴﻠﻌﺗ
ﺔﺟﻼﺜﻟﺍ ﺏﺎﺑ
ﺐﻧﺎﺠﻟﺍ ﻲﻓ ﺓﺩﻮﺟﻮﻤﻟﺍ ﺔﺤﺘﻔﻟﺍ ﻲﻄﻐﺗ ﻲﺘﻟﺍ ﺔﻋﻮﺒﻄﻤﻟﺍ ﺓﺭﻮﺼﻟﺍ ﺔﻟﺍﺯﺈﺑ ﻢﻗ
.ﺎﻬﻨﻣ ﺺﻠﺨﺗ ﻢﺛ ،ﺔﺟﻼﺜﻟﺍ ﺏﺎﺑ ﺾﺒﻘﻣ ﺖﻴﺒﺜﺗ ﻪﻴﻓ ﻢﺘﻴﺳ ﻱﺬﻟﺍ ﺏﺎﺒﻠﻟ ﺮﺧﻵﺍ
ﻥﻮﺑﺎﺻ ﻦﻣ ﺮﻴﻐﺻ ﺭﺪﻗ ﻡﺍﺪﺨﺘﺳﺎﺑ ﻚﻌﺑﺎﺻﺄﺑ ﺔﻘﺻﻻ ﺎﻳﺎﻘﺑ ﻱﺃ ﻚﺤﺑ ﻢﻗ
.ﺔﻤﻋﺎﻧ ﺵﺎﻤﻗ ﺔﻌﻄﻘﺑ ﻪﻔﻔﺟﻭ ﺊﻓﺍﺩ ءﺎﻤﺑ ﺏﺎﺒﻟﺍ ﻞﺴﻏﺍ .ﻞﺋﺎﺴﻟﺍ ﻕﺎﺒﻃﻷﺍ
ﺔﻴﻘﺒﺘﻤﻟﺍ ﺔﺤﺘﻔﻟﺍ ﺔﻴﻄﻐﺘﺑ ﻢﻗ ،ﺮﺧﻵﺍ ﺐﻧﺎﺠﻟﺍ ﻲﻓ ﺏﺎﺒﻟﺍ ﺾﺒﻘﻣ ﺖﻴﺒﺜﺗ ﺪﻌﺑﻭ
.ﺔﺟﻼﺜﻠﻟ ﻲﺟﺭﺎﺨﻟﺍ ءﺰﺠﻟﺍ ﻥﻮﻟ ﻊﻣ ﻖﻓﺍﻮﺘﺗ ﻲﺘﻟﺍ ﺔﻋﻮﺒﻄﻤﻟﺍ ﺓﺭﻮﺼﻟﺎﺑ
.1
.2
.3
(
ﻲﺟﺭﺎﺨﻟﺍ ءﺰﺠﻟﺍ ﻊﻣ ﻖﺴﺘﻣ ﻥﻮﻟ) ﺔﺤﺘﻔﻟﺍ ءﺎﻄﻐﻟ ﺔﻋﻮﺒﻄﻤﻟﺍ ﺓﺭﻮﺼﻟﺍ
ﺔﻟﺍﺯﻹﺍ ﺓﺍﺩﺃ ﻡﺍﺪﺨﺘﺳﺎﺑ ﺪﻤﺠﻤﻟﺍ ﺏﺎﺑ ﻰﻠﻋ ﻦﻣ ﺔﻳﺭﺎﺠﺘﻟﺍ ﺔﻣﻼﻌﻟﺍ ﺔﻟﺍﺯﺈﺑ ﻢﻗ
ﻦﻣ ﺔﻣﻼﻌﻟﺍ ﺔﻟﺍﺯﺇﻭ ﻰﻠﻋﻷ ﻦﻤﻳﻷﺍ ﺐﻧﺎﺠﻟﺍ ﻊﻓﺭ ﻖﻳﺮﻃ ﻦﻋ (ﺓﺩﻮﺟﻮﻤﻟﺍ
.ﺭﺎﺴﻴﻟﺍ ﻰﻟﺇ ﻦﻴﻤﻴﻟﺍ ﻦﻣ ﺏﺎﺒﻟﺍ ﻰﻠﻋ
ﺔﻣﻼﻌﻟﺍ ﺔﻟﺍﺯﻹ ﻲﻧﺪﻌﻣ ﻭﺃ ﺩﺎﺣ ﻢﺴﺟ ﻱﺃ ﻡﺍﺪﺨﺘﺳﺍ ﺐﻨﺠﺗ
.ﺏﺎﺒﻠﻟ ﺵﺪﺧ ﺙﻭﺪﺤﻟ ﺎًﻌﻨﻣ ،ﺏﺎﺒﻟﺍ ﻰﻠﻋ ﻦﻣ ﺔﻳﺭﺎﺠﺘﻟﺍ
ﻥﻮﺑﺎﺻ ﻦﻣ ﺮﻴﻐﺻ ﺭﺪﻗ ﻡﺍﺪﺨﺘﺳﺎﺑ ﻚﻌﺑﺎﺻﺄﺑ ﺔﻘﺻﻻ ﺎﻳﺎﻘﺑ ﻱﺃ ﻚﺤﺑ ﻢﻗ
.ﺔﻤﻋﺎﻧ ﺵﺎﻤﻗ ﺔﻌﻄﻘﺑ ﻪﻔﻔﺟﻭ ﺊﻓﺍﺩ ءﺎﻤﺑ ﺏﺎﺒﻟﺍ ﻞﺴﻏﺍ .ﻞﺋﺎﺴﻟﺍ ﻕﺎﺒﻃﻷﺍ
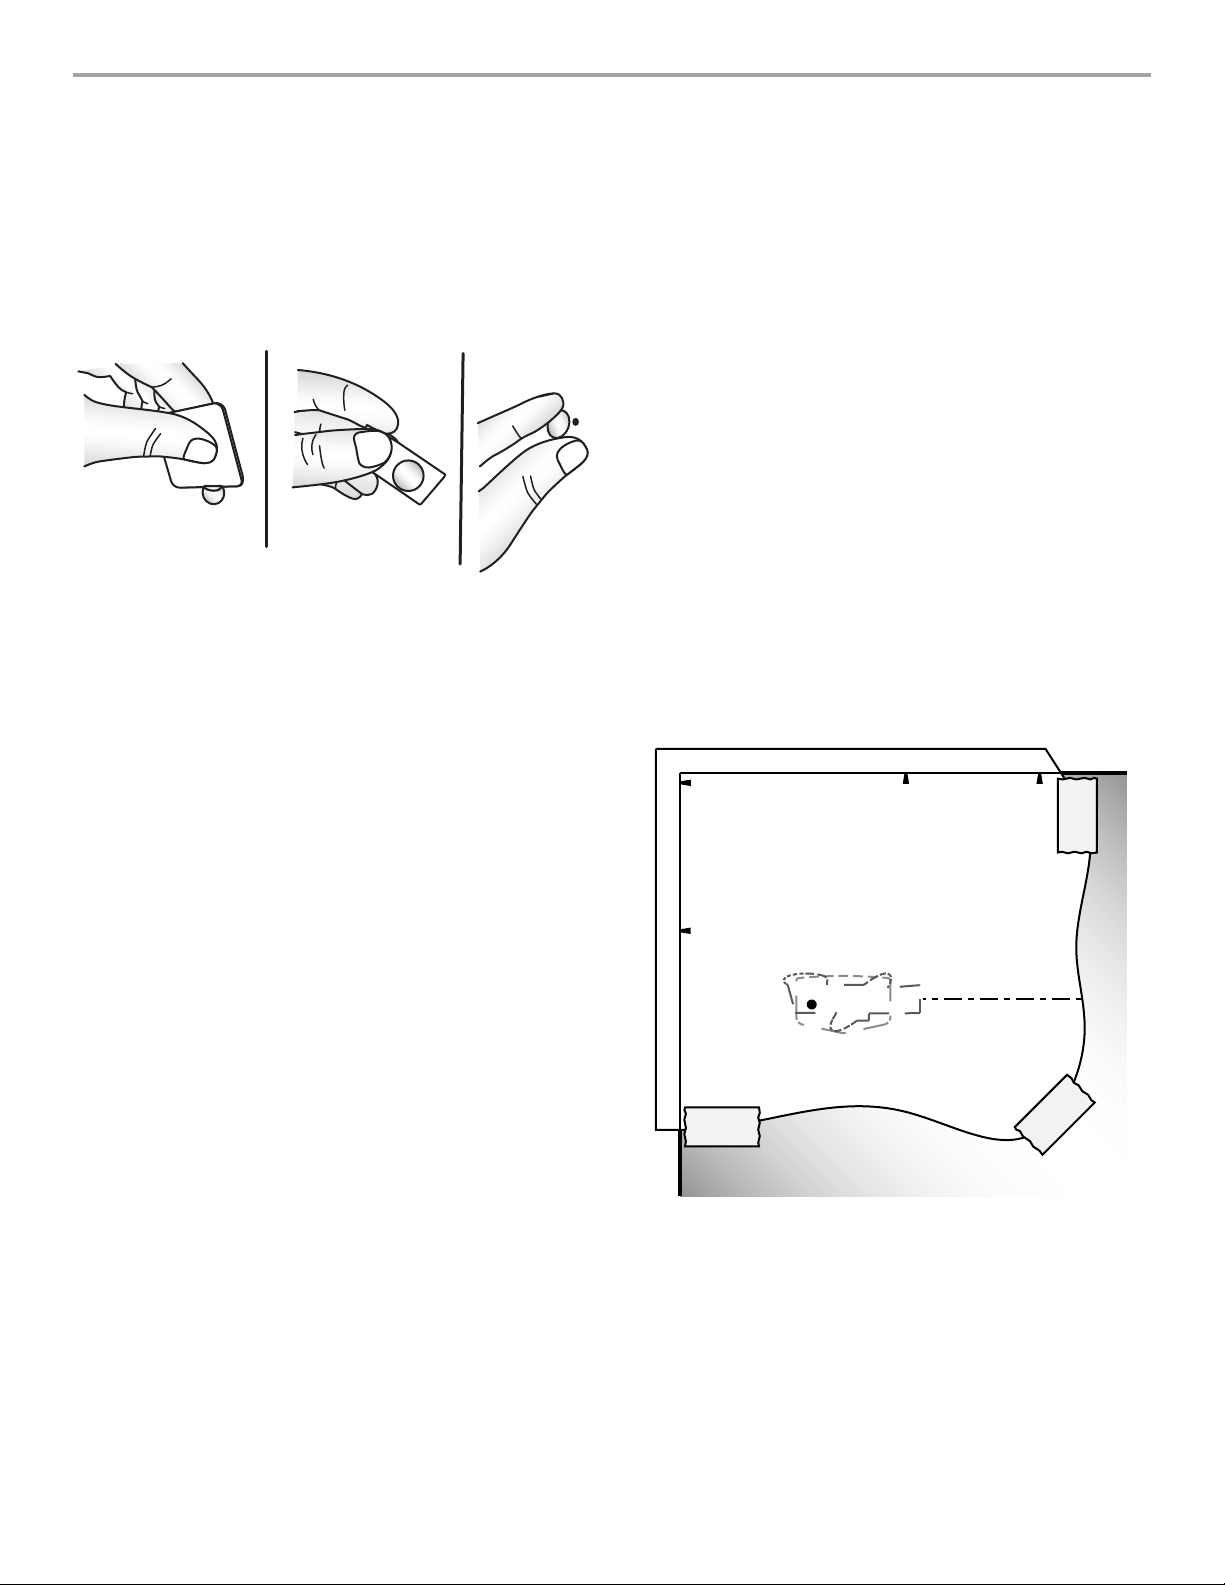
ﺔﻣﻼﻌﻟﺍ ﻞﻜﺷ ﻊﻣ ﻖﻓﺍﻮﺘﺗ ﺚﻴﺤﺑ ﺔﻄﻘﻨﻤﻟﺍ ﻁﻮﻄﺨﻟﺍ ﻝﻮﻄﺑ ﺐﻟﺎﻘﻟﺍ ﻊﻄﻗﺍ
ﺐﻟﺎﻘﻟﺍ ﺖﺒﺛﻭ ﻩﻼﻋﺃﻭ ﺪﻤﺠﻤﻟﺍ ﺏﺎﺑ ﺐﻧﺎﺟ ﻊﻣ ﺐﻟﺎﻘﻟﺍ ﻑﺍﻮﺣ ﺓﺍﺫﺎﺤﻤﺑ ﻢﻗ
،ﺏﺎﺒﻟﺎﺑ ﺓﺩﻮﺟﻮﻤﻟﺍ ﺔﺤﺘﻔﻟﺍ ﻥﻮﻜﺘﺳ ،ﺐﻟﺎﻘﻟﺍ ﺓﺍﺫﺎﺤﻣ ﻂﺒﺿ ﻝﺎﺣ ﻲﻓ
.ﺢﺿﻮﻣ ﻮﻫ ﺎﻤﻛ ،ﺐﻟﺎﻘﻠﻟ ﻊﻄﺘﻘﻤﻟﺍ ﻞﻜﺸﻟﺍ ﻞﺧﺍﺩ ،ﺾﺒﻘﻤﻟﺍ ﺎﻬﺑ ﺪﺟﻮﻳ ﻲﺘﻟﺍ
:
ﺔﻨﻤﻀﺘﻤﻟﺍ ءﺍﺰﺟﻷﺍ
ﺔﻳﺭﺎﺠﺘﻟﺍ ﺔﻣﻼﻌﻟﺍ ﺔﻟﺍﺯﺇ ﺓﺍﺩﺃ
ﺔﻳﺭﺎﺠﺘﻟﺍ ﺔﻣﻼﻌﻟﺍ ﺐﻟﺎﻗ
:
ﺔﺑﻮﻠﻄﻤﻟﺍ ﺕﺍﻭﺩﻷﺍ
ﺺﻘﻣ
ﻒﻴﻠﻐﺗ ﻂﻳﺮﺷ
ﺪﻤﺠﻤﻟﺍ ﺏﺎﺑ
)
:
ﺔﻈﺣﻼﻣ
.ﺔﻳﺭﺎﺠﺘﻟﺍ
.ﺏﺎﺒﻟﺍ ﻰﻠﻋ ﻂﻳﺮﺸﺑ
:
ﺔﻈﺣﻼﻣ
.1
.2
.3
.4
12/3
Printed in Mexico
Imprimé au Mexique
ﻚﻴﺴﻜﻤﻟﺍ ﻲﻓ ﺖﻌﺒﻃ
ﺔﻣﻼﻌﻟﺍ ﻰﻠﻋ ﻂﻐﺿﺍ ،ﻞﻴﻟﺪﻛ ﻊﻄﺘﻘﻤﻟﺍ ﻞﻜﺸﻟﺍ ﻡﺍﺪﺨﺘﺳﺍ ﻖﻳﺮﻃ ﻦﻋ
.ﺔﻠﻣﺎﻛ ﺔﺤﺘﻔﻟﺍ ﺔﻴﻄﻐﺗ ﻦﻤﻀﺗ ﺚﻴﺤﺑ ﺪﻤﺠﻤﻟﺍ ﺏﺎﺑ ﻰﻠﻋ ﺔﻳﺭﺎﺠﺘﻟﺍ
.ءﻂﺒﺑ ﺐﻟﺎﻘﻟﺍ ﺔﻟﺍﺯﺈﺑ ﻢﻗ
W10478133A
All rights reserved.
Tous droits réservés.
.ﺔﻇﻮﻔﺤﻣ ﻕﻮﻘﺤﻟﺍ ﻊﻴﻤﺟ
© 2012.
.5
.6
Page 4
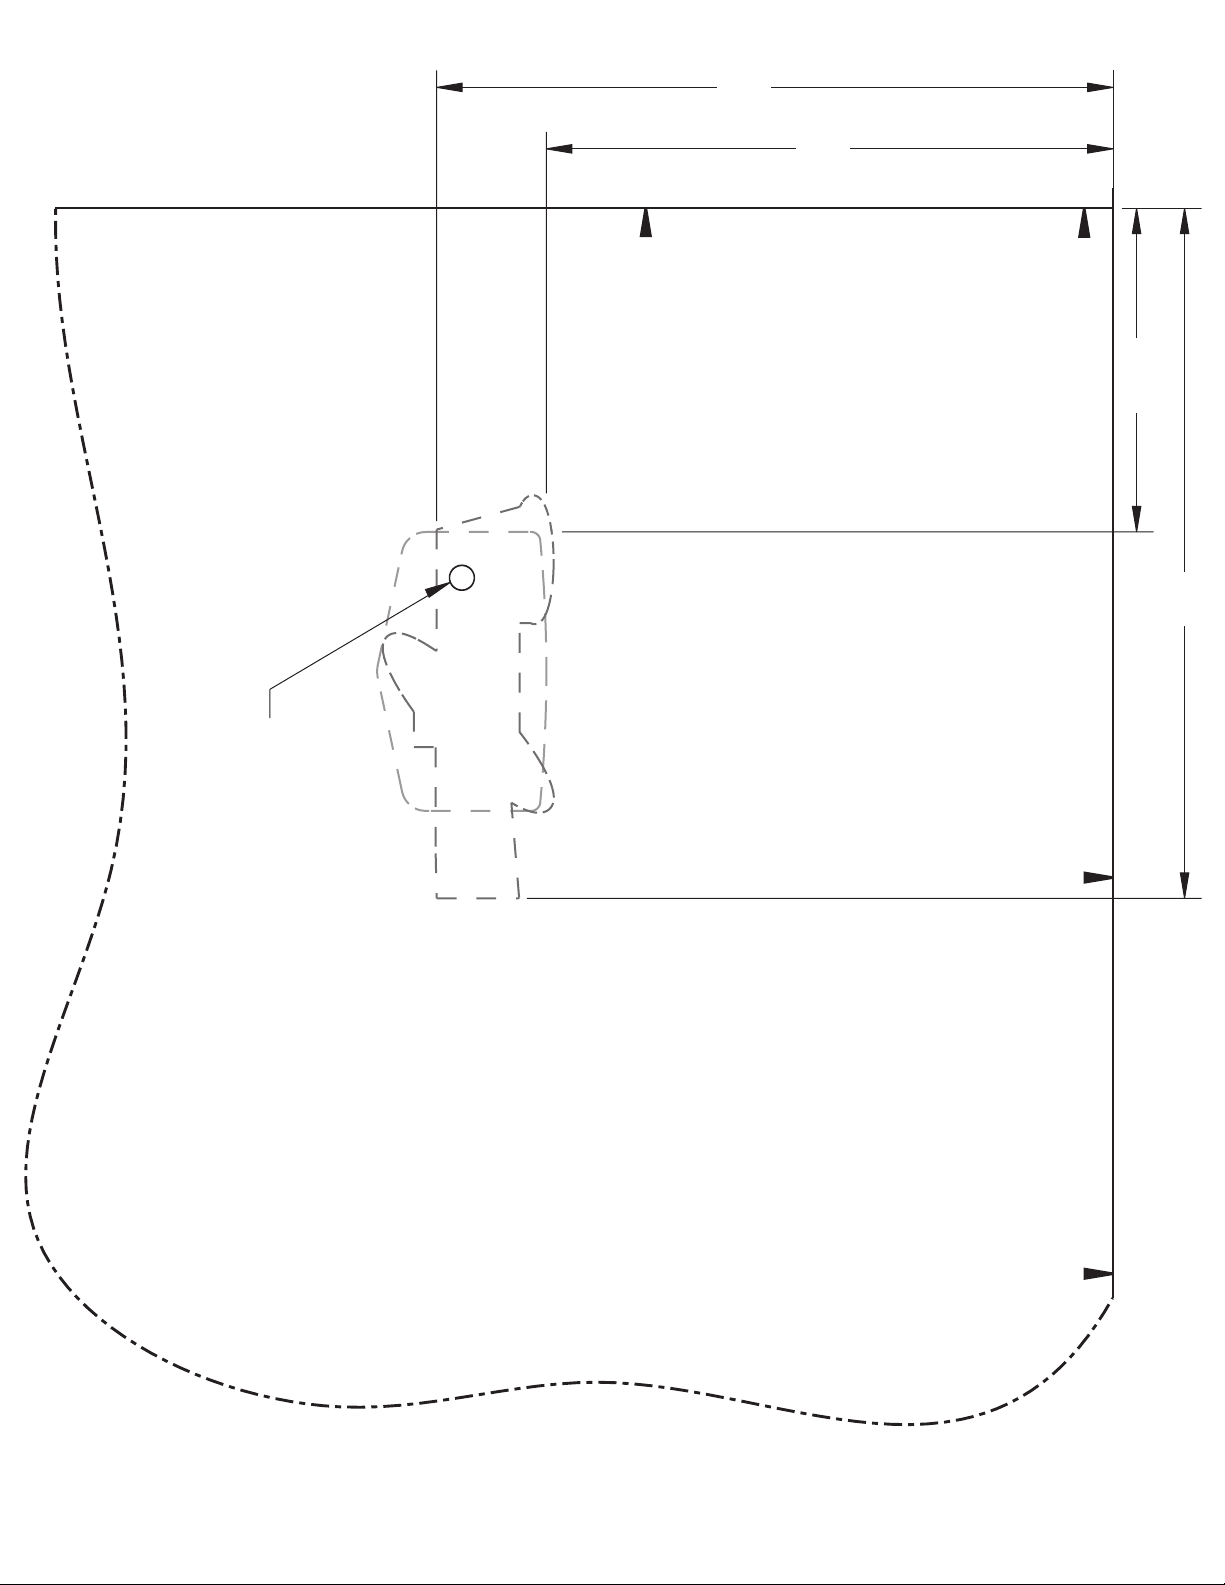
(11.9 cm)
4¹¹⁄₁₆"
(9.99 cm)
3¹⁵⁄₁₆"
Align with side of the door.
Aligner avec le côté de la porte.
.ﺏﺎﺒﻟﺍ ﺐﻧﺎﺟ ﻊﻣ ﺓﺍﺫﺎﺤﻤﻟﺎﺑ ﻢﻗ
(5.7 cm)
2¹⁄₄"
(12.2 cm)
4¹³⁄₁₆"
Ideal position of hole
(
Position idéale du trou
ﺡﺍﺮﺘﻗﺎﻛ ﺔﺤﺿﻮﻣ
)
ﺔﺤﺘﻔﻠﻟ ﻞﻀﻓﻷﺍ ﻊﺿﻮﻟﺍ
(
shown as suggestion
(
suggérée
)
)
Align with top of the door.
Aligner avec le sommet de la porte.
.ﺏﺎﺒﻟﺍ ﻰﻠﻋﺃ ﻊﻣ ﺓﺍﺫﺎﺤﻤﻟﺎﺑ ﻢﻗ
 Loading...