

Page 1
Use And Care
“¥□
A Mote To You 2
o o O I oo Ol
Understanding
Safety 3
Kr towing Your
Dryer's Features 5
Operating Your
Dryer 6
(firing For Your
Dryer 11
La undry Tips 15
tf You Need
Assistance
Or Service 21
Warranty 24
1-800-253-1301
Cal I us with questions or comments.
PART NO. 3396311
ELECTRIC AND GAS DRYERS
%
93
Page 2

A NOTE TO YOU
A Note To You
Thank you for buying an Estate® appliance.
You have purchased a quality, world-class home appliance. Yean; of engineering experience have
gone into its manufacturing. Use this Use and Care Guide to safe y and efficiently operate and
maintain your appliance. Complete and mail the Ownership Registration Card provided with your
appliance. This will help us notify you about any new information on your appliance.
Your safety is important to us.
This guide contains safety symbols and statements. Please pay special attention to these symbols
and follow any instructions given. Here is a brief explanation of th i use of each symbol.
AWARNING
This symbol will help alert you to such
dangers as personal injury, burns, fire and
electrical shock.
This symbol will help you avoid actions
which could cause product damage
(scratches, dents, etc.) and damage to
your personal property.
Acaution
Our Consumer Assistance Center, 1-800-253-1301, is toll-free 24 hours a day.
If you have a question concerning your appliance’s operat on, or if you need service,
first see “If You Need Assistance Or Service" on page 21. If you reed further help, call us. When
calling, you will need to know your appliance’s complete model number and serial number. You
can find this information on the model and serial number label (see diagram on page 5). For your
convenience, we have included a handy place below for you to record these numbers, the pur
chase date from the sales slip and your dealer’s name and telephone number. Keep this book and
the sales slip together in a safe place for future reference.
Model Number
Serial Number
Purchase Date
Dealer Name .
Dealer Phone
Page 3

UNDERSTANDING SAFETY
Understanding Safiîty
^WARNING
-Do not store or use gasoline or other flammalsle vapors and liquids
in the vicinity of this or any other appliance.
-WHAT TO DO IF YOU SMELL GAS:
• Do not try to light any appliance.
• Do not touch any electrical switch; do not use any phone in your
building.
• Clear the room, building or area of all occupants.
• Immediately call your gas supplier from a neighbor’s phone.
Follow the gas supplier’s instructions.
• If you cannot reach your gas supplier, call tiie fire department.
Installation and service must be performed by i qualified installer,
service agency or the gas supplier.
For your safety the informaticn in this manuai must
be foiiowed to minimize the risk of fire or explosion
or to prevent property damage, personal injury or
loss of life.
Page 4

UNDERSTANDING SAFETY
IMPORTANT SAFETY INSTRUCTIONS
Awarning
Read all instructions before using your dryer.
Do not machine wash or machine dry items
cleaned, washed, soaked in, or spotted with
wax, paint, gasoline, oil, dry cleaning
solvents, and other flammable fluids. The
fumes can create a fire hazard or explosion.
Always hand wash and line dry items
containing these materials.
Do not allow children to operate, play with or
crawl inside your dryer. Supervise children
when your dryer is used near children.
Do not reach into a dryer if the drum
is moving.
When removing from service or discarding
a dryer, always remove the door to prevent
accidental entrapment.
Do not dry rubber, rubber-like, and heat
sensitive materials with heat.
To reduce the risk of fire, electrical shcck, or injury to persons when
using your dryer, follow basic precautic ns, including the following:
• Install and/or store dryer where it will not
• Do not tamp er with the controls.
• You are responsible for making sure that
• Use only fab ic softeners specifically
• Do not allow lint to build-up inside the dryer
• Clean lint SCI een before or after each load.
• Do not let du 3t, lint, paper, rags, chemicals,
• Dryer must ba electrically grounded. See
Understanding your responsibilities
• Never operate the dryer if:
-it is not working right (i.e. noisy,
too hot).
-it is damaged.
- parts are missing.
-all panels are not in place.
-the lint screen is loose, damaged or
missing.
• Unplug the power supply cord or turn off
electrical power before attempting to
service your dryer. Shut off gas valve if
you have a gas dryer.
• Do not wash or dry items that are soiled
with vegetable or cooking oil. These items
may contain some oil after laundering.
Due to the remaining oil, the fabric may
smoke or catch fire by itself.
• Store flammable solvents or fluids away
from your dryer.
• Dry cleaning solvents or fluids should
never be put directly into your dryer.
• Be sure that vour dryer:
*See the Install ation Instructions for com
plete informati 3n.
be exposed o the weather.
your dryer is installed, repaired and has
parts replaced by a qualified person.
labeled as not being harmful to the dryer.
or exhaust system. Cleaning should be
done periodii:ally by a qualified person.
etc. pile up a ound or under the dryer.
the Installaticn Instructions.
-is properly nstalled and leveled on a
floor that c;m support the weight in a
well-ventilated room.*
-is connected to the proper outlet and
electrical supply.*
-is properly :onnected to fuel and
exhaust sy: terns (gas dryers must be
vented outc oors).*
-is not Instal ed against draperies or
curtains, or on carpet.*
-is located ir an area where the tempera
ture is above 45°F (7°C).
-is properly maintained.
-is used only for jobs normally expected
of home clothes dryers.
-is not used :y anyone unable to operate
it properly.
- SAVE THESE INSTRUCTION 3 -
Page 5
KNOWING YOUR DRYER’S FEATURES
Knowing Your Dryer's Features
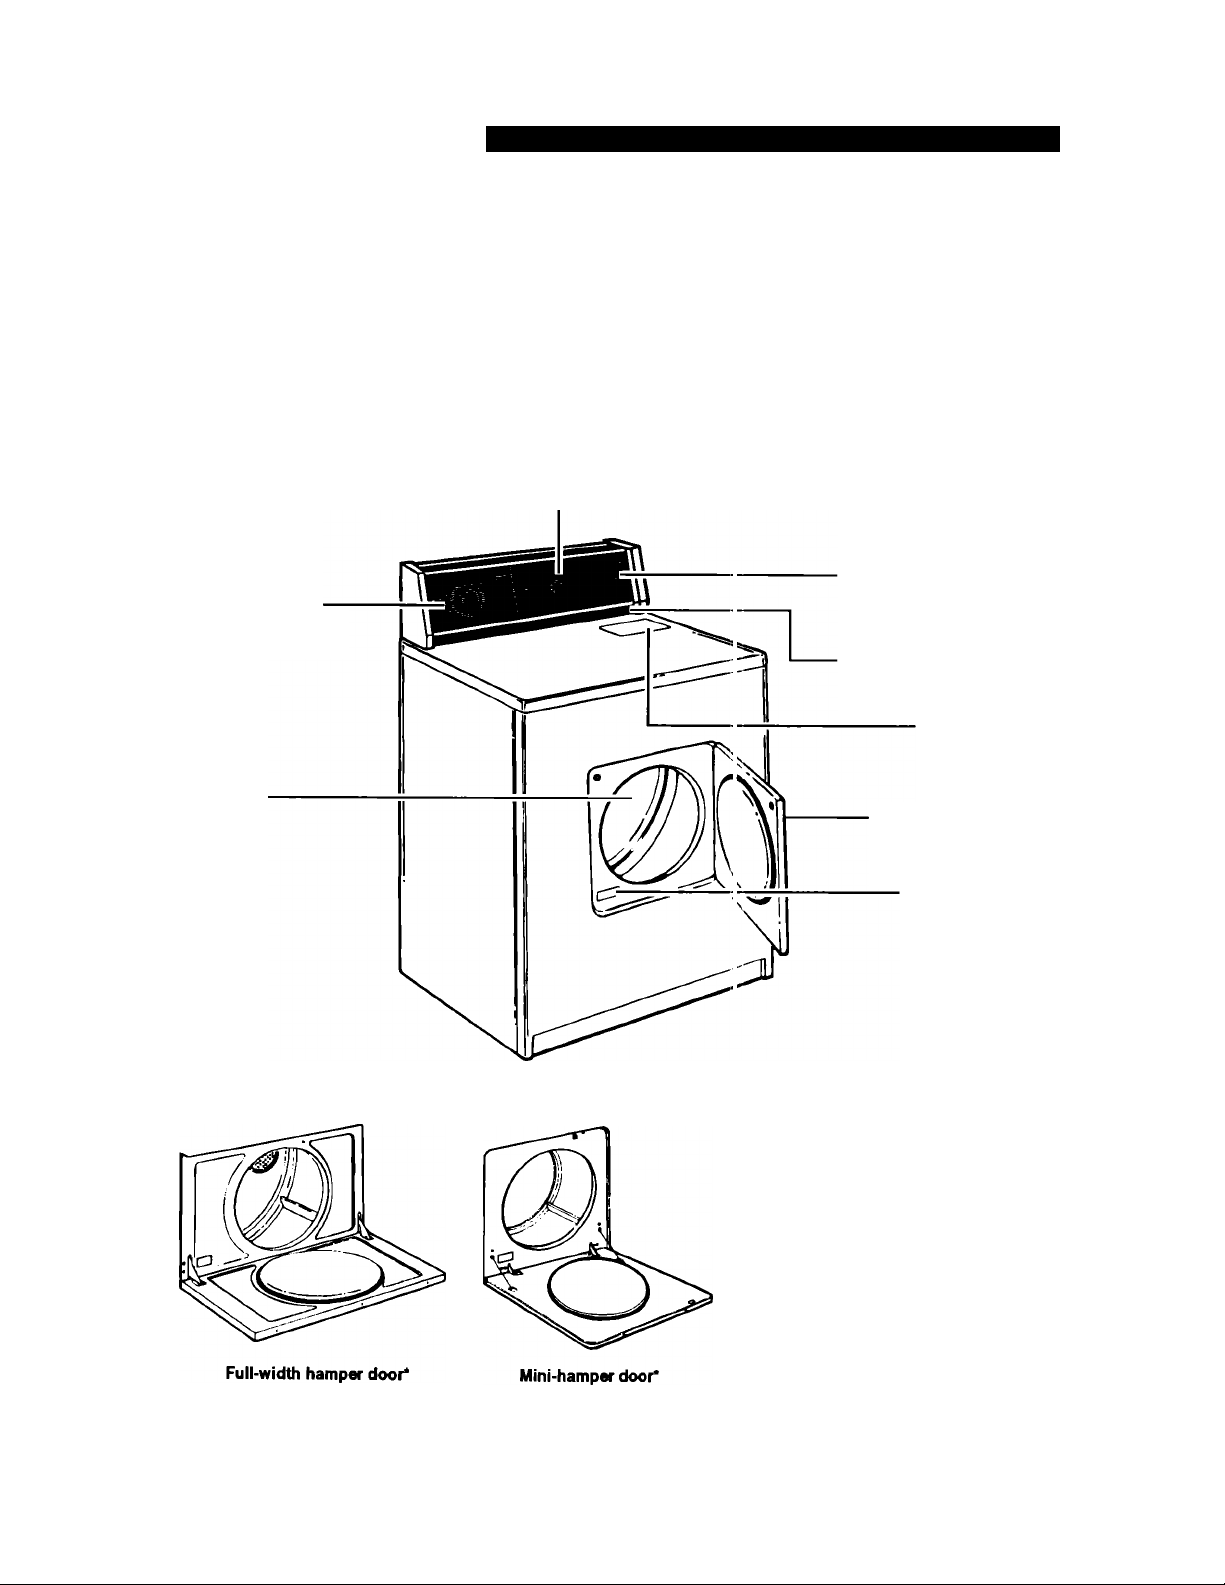
The parts and features of your dryer are illustrated below. Become familiar with all parts and
features before using your dryer.
NOTE: The drawings in this book may vary from your dryer model They are designed to show the
different features of all models covered by this book. Your model nay not include all features.
Temperature selector*
Start button
Cycle control knob
(may include
temperature settings*)
(may include End of
cycle signal selector*)
Consumer Assistance
Center number
(1-800-253-1301)
Dryer drum
Other doors:
Lint screen
Side-swing door*
Model and serial
number label
Lint signal*
‘Available on some models
Page 6
OPERATING YOUR DRYER
Operating Your Dryer
In This Section
Before starting your dryer
Starting your dryer
Stopping your dryer
Restarting your dryer
The information in this section helps you learn to use your dryer evidently and safely. Refer to
“Laundry Tips” on page 15 for additional control setting, sorting, ard loading information.
.............
.........................
.......................
.....................
...................
Page
..................
..................
..................
6 Understanding y< >ur cycles
6 Selecting the rigi it cycle
End of cycle sign al
6
6
...............
........................
........
Page
.................
.................
...............
7
9
10
Before starting your dryer
Wipe the dryer drum with a damp cloth before If your dryer has a Consumer Buy Guide,
using to remove dust from storing and remove it and place it with your Use and Care
shipping. Guide.
Starting your dryer
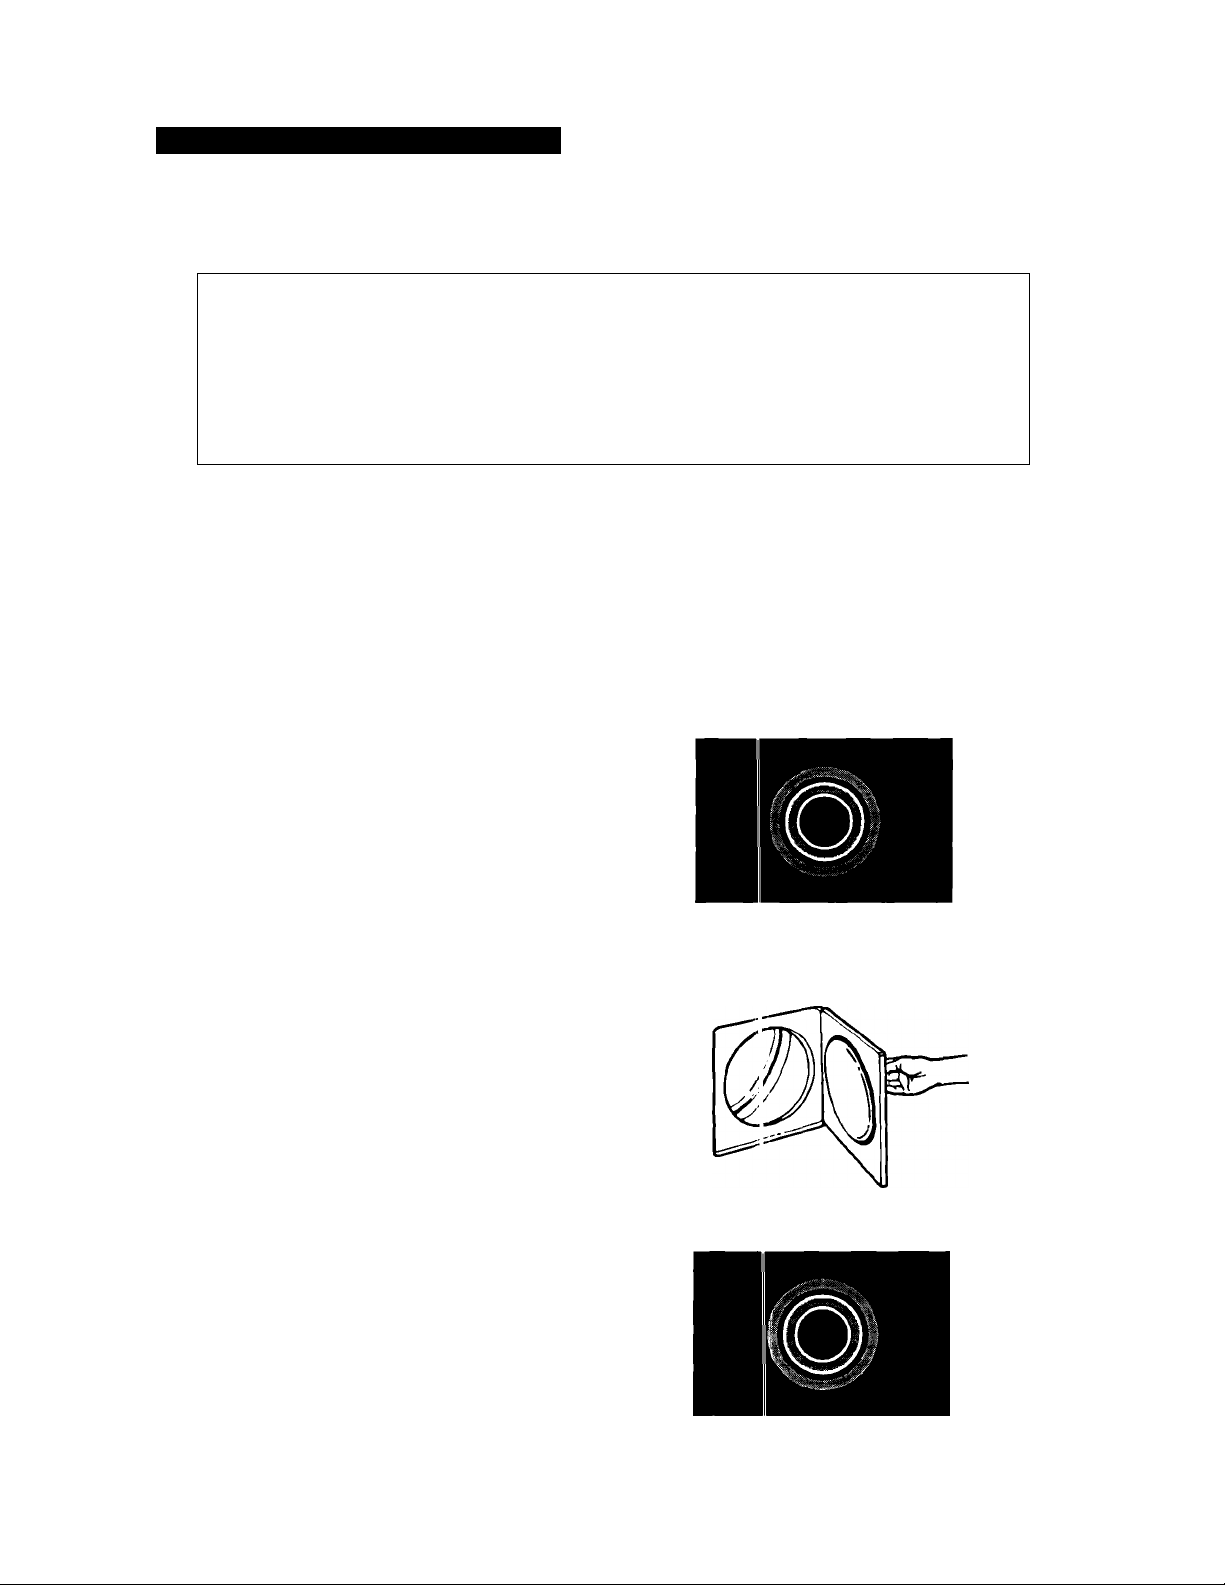
1. Load clothes into the dryer and close the
door.
2. Turn the Cycle Control Knob either way to
the desired setting. (If your dryer has a
Temperature Selector, set the selector to
the desired setting.)
3. Push the Start Button.
NOTE: Your dryer stops automatically when a
cycle ends.
Push to start
Stopping your dryer
You can stop your dryer any time during a cycle.
Open the dryer door or turn the Cycle Control
Knob to OFF.
NOTE: The Cycle Control Knob should point to
an OFF area when the dryer is not in use. If you
want to stop the dryer before the cycle is
finished, turn the Cycle Control Knob to an OFF
area.
Restarting your dryer
1. Close the door.
2. Select a new cycle and temperature (if
necessary).
3. Press the Start Button.
Push to start
Page 7
Understanding your cycles
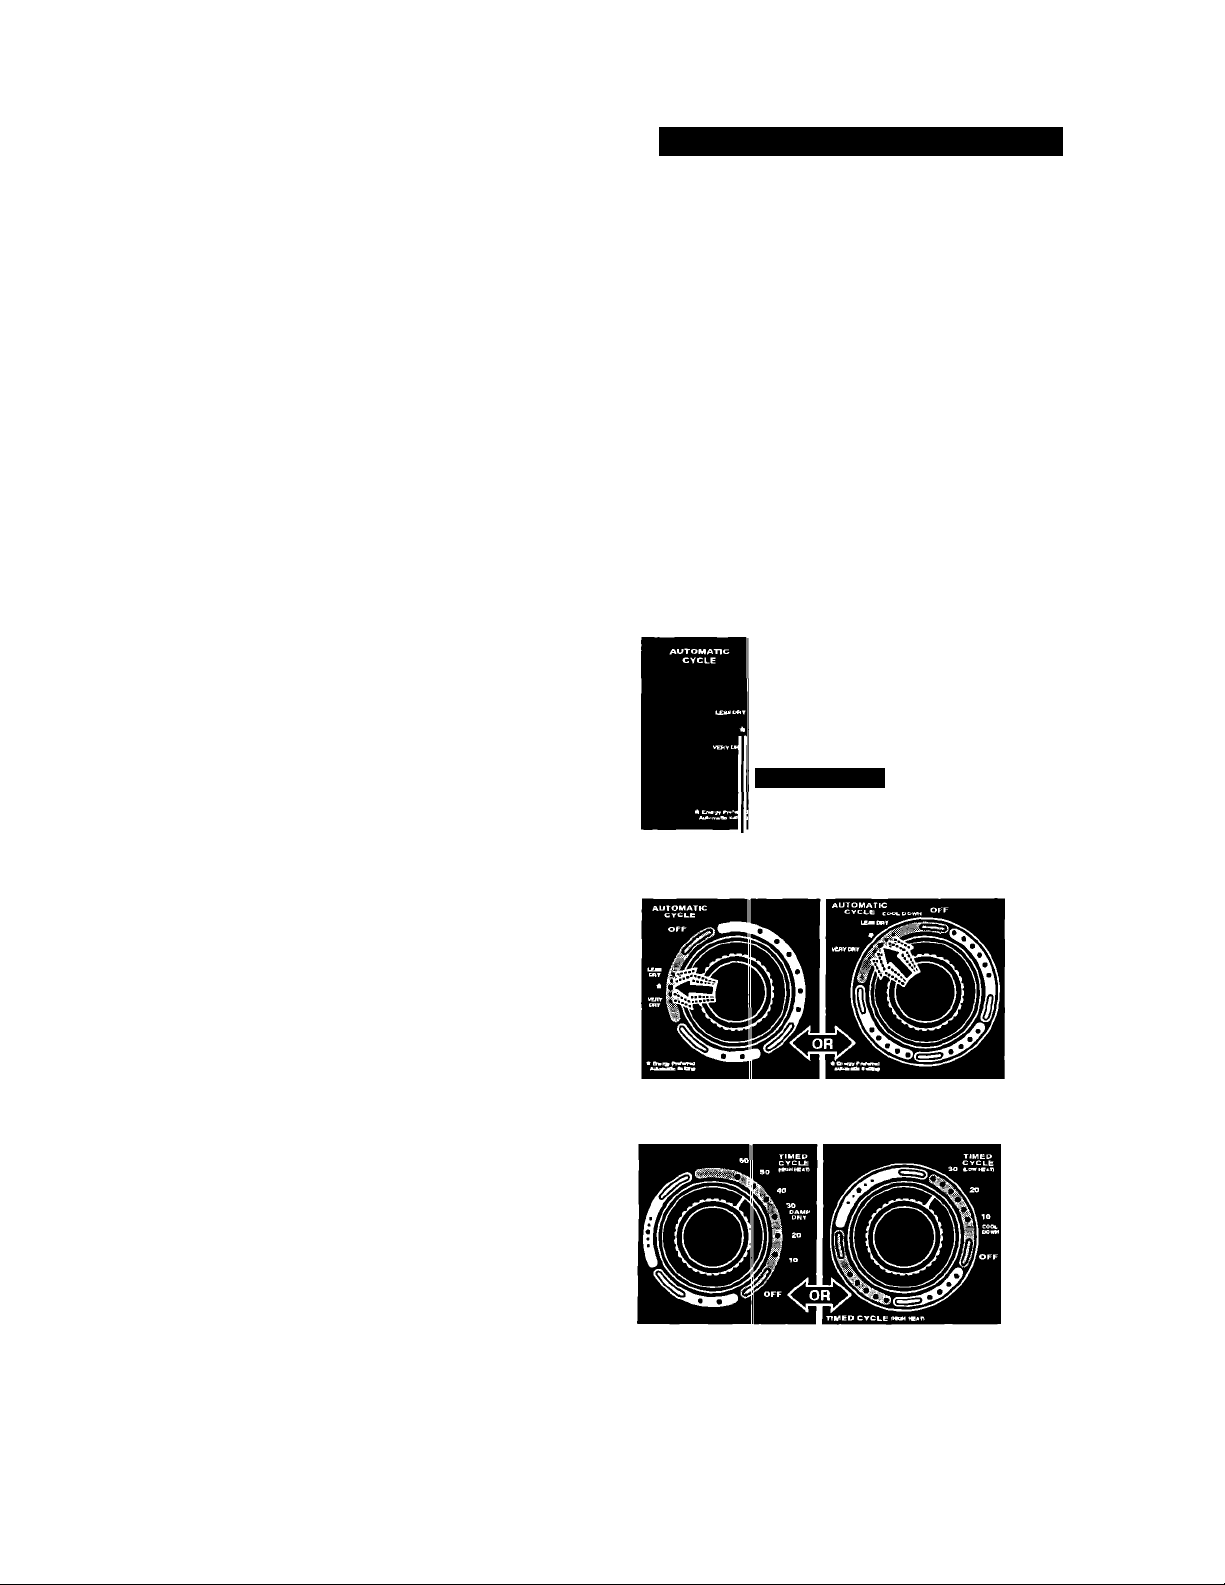
See the chart below for descriptions of the
cycles that are on your dryer. See page 9 for
help in selecting the right cycle.
NOTES:
• Use the Energy Preferred Automatic
Setting (•) to dry most loads.
• The last few minutes of all cycles are without
heat to make the load easier to handle.
• To help redi.ce wrinkling, remove the load
from the dryijr as soon as tumbling stops.
This is impoitant for permanent press,
knits, and synthetic fabrics.
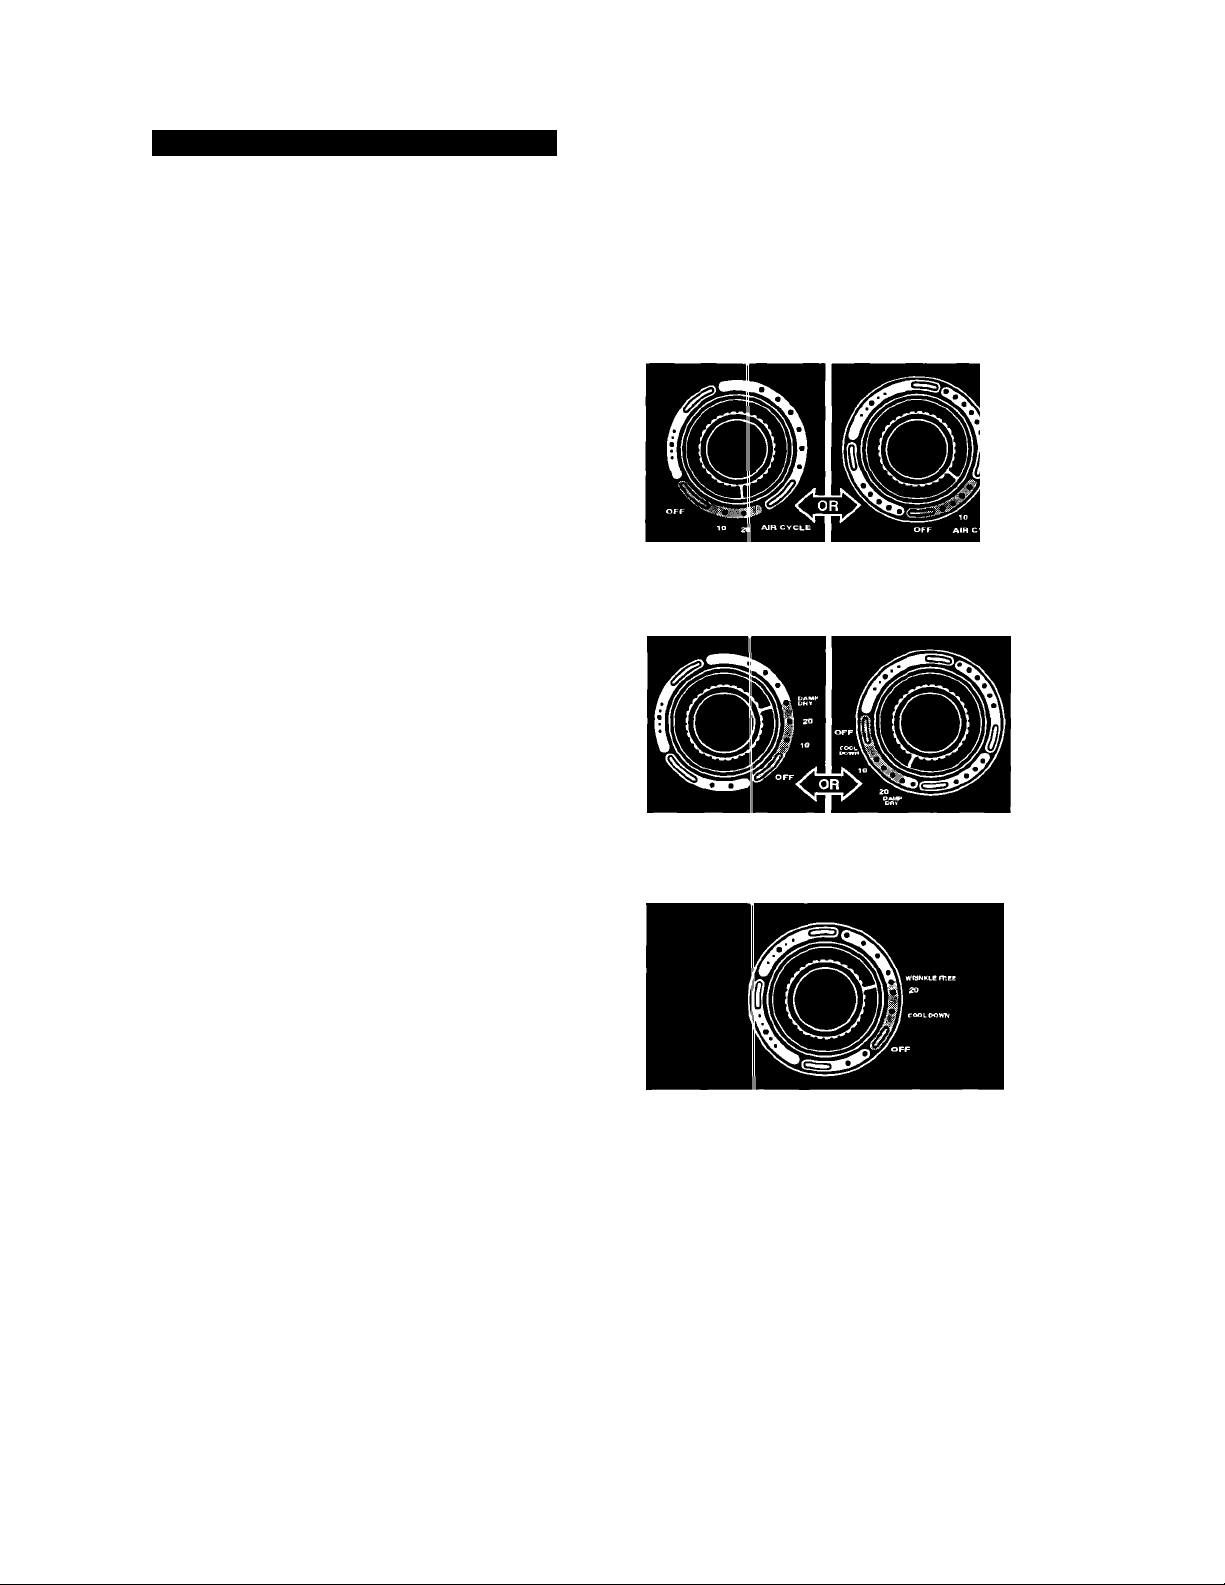
• Shaded arec s in the illustrations show
cycle locatio is.
OPERATING YOUR DRYER
CYCLES
(cycle names may vary with model)
Automatic cycle(s)
Use your automatic cycle to dry most
loads.
• Your automatic cycle(s) shuts off when the
selected dryness is reached.
• The Cycle Control Knob will not move until
the load is almost dry and the cool-down
portion of the cycle has been reached. After
the cool-down, the Cycle Control Knob
automatically moves to an OFF area and
tumbling stops.
The Energy Preferred Automatic Setting(*)
correctly dries most loads.
• If the load is drier than you like, select a
setting closer to LESS DRY the next time
you dry a similar load.
• If the load is not as dry as you like, com
plete drying using a Timed cycle. Select a
setting closer to VERY DRY the next time
you dry a similar load.
NOTE: Some models offer high heat and low
heat automatic cycles. Select the cycle to
match your load.
CYCLE CONTROL KNOB
(settincs may vary with model)
Energy preferred automatic aetting
Timed cycle(s)
Use your Timed cycle to complete drying if
some items are damp after automatic drying.
Timed drying is also useful to dry delicate
items that require a short drying time.
NOTE: Some models offer high heat and low
heat timed cycles. Select the cycle to match
your load.
continued on next page
Page 8
OPERATING YOUR DRYER
CYCLES
(cycle names may vary with model)
Air cycle (no heat)
The Air cycle is unheated. Use this cycle to
fluff or air dry bedding, plastic tablecloths,
foam pillows, sneakers, etc. See Warning on
page 9.
Using the Damp Dry cycle
(on tome models)
Use this cycle to dry items to damp level or to
dry damp items that do not require an entire
drying cycle. Two examples are heavy
cottons, such as jeans, which you do not
want to become stiff, or cotton clothes which
are easier to press when damp.
Using the Wrinkle Free cycle
(on soma models)
The Wrinkle Free cycle removes wrinkles
from clothes that have been packed in a
suitcase, or from items not removed from the
dryer at the end of a cycle. As soon as the
dryer stops, fold or put the items on hangers.
CYCLE CONTROL KNOB
(settings may vary with model)
Page 9
Selecting the right cycle
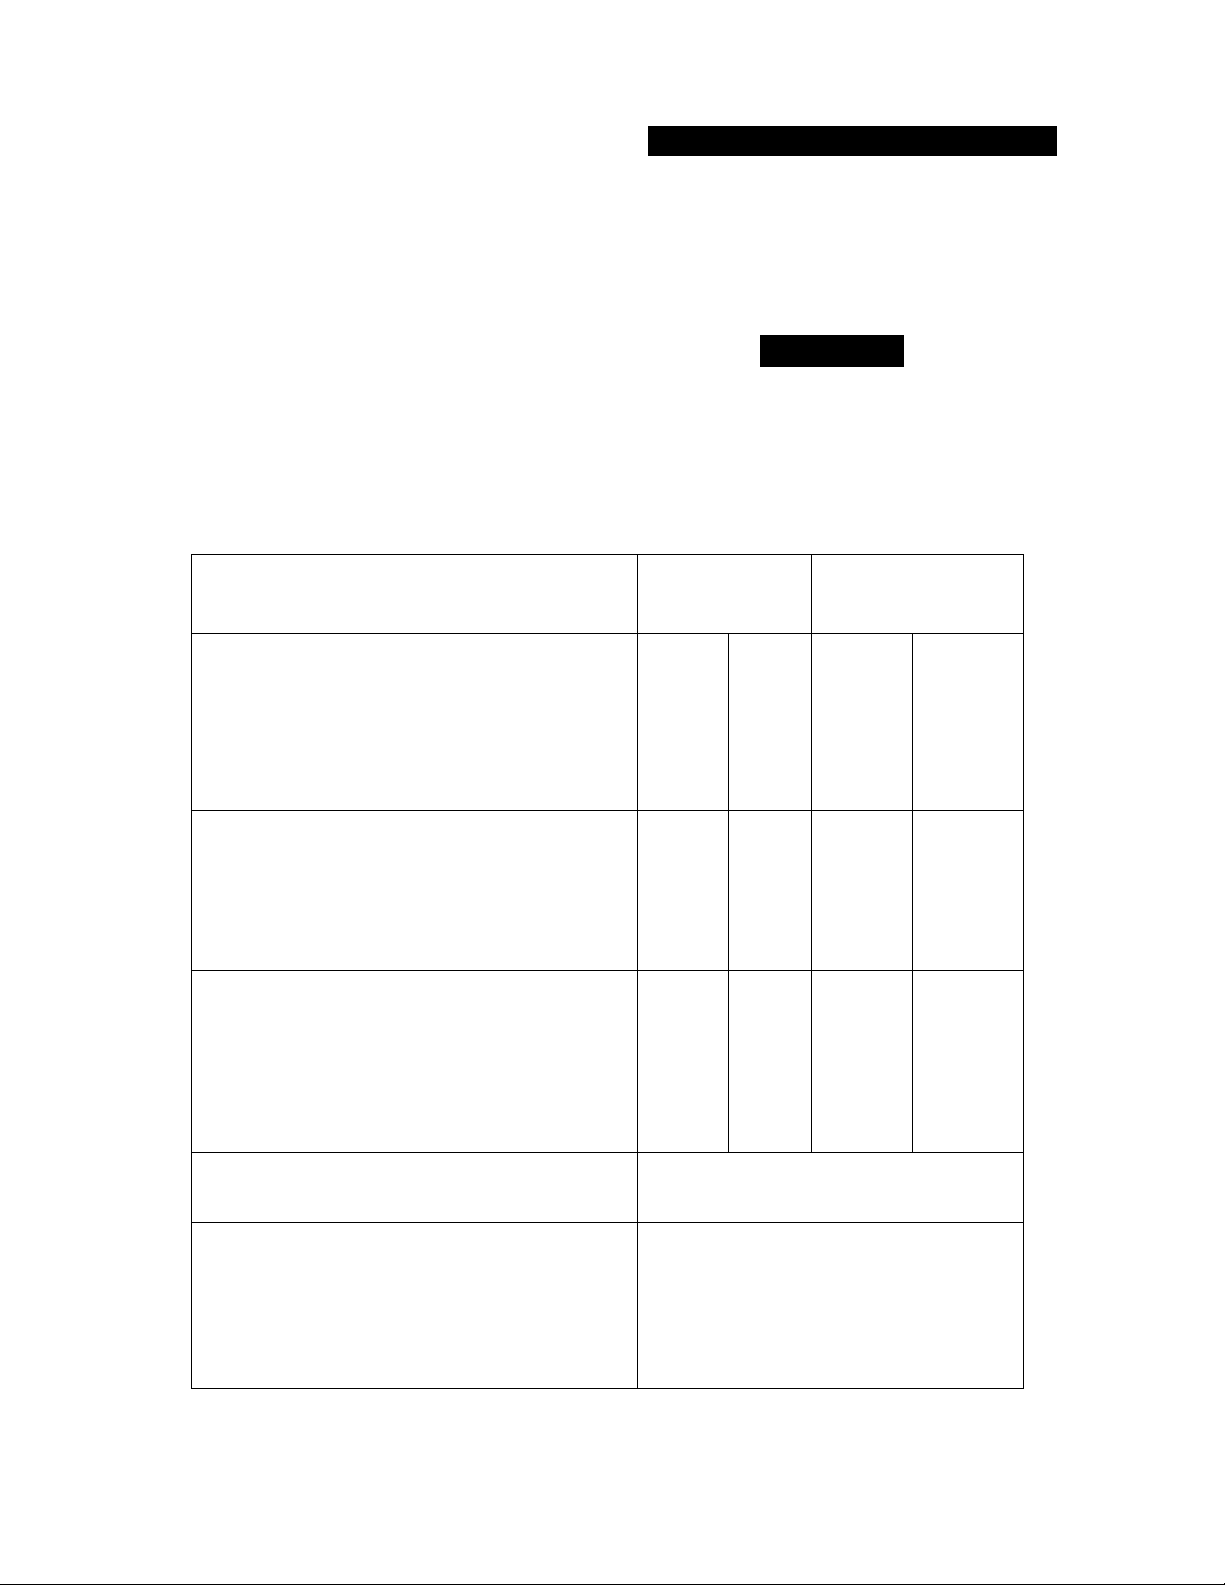
Use the chart below to guide you when making
drying selections. Use a timed cycle only if the
recommended automatic cycle is not available
on your dryer. (Your model may have cycles
with one or two temperature settings.)
• Do not overdry. Overdrying can cause
shrinkage, static cling, and damage to some
fabrics.
operating your dryer
WARNING
Fire Hazard
Do not dry I" eat-sensitive fabrics, plastic,
rubber, or some stuffed items with heat.
Use the Air :ycle, or line dry.
Failure to do so could result in fire or
damaged itc ms.
TYPE OF LOAD
Check mark (y) denotes the reconmended setting. Select
the setting available on your dryer.
COTTONS AND LINENS
Extra Heavy-Bedspreads, mattress pads, quilts
Heavyweight-Towels, jeans, corduroys, work
clothes
Mediumweight-Sheets, cotton underwear,
diapers
Lightweight-Batistes, organdies, lingerie
PERMANErfT PRESS, SYNTHETICS AND
BLENDS
Heavyweight-Work clothes, jackets, raincoats
Mediumweight-Shirts, play clothes, sheets,
slacks
Lightweight-Lingerie, blouses, dresses
KNITS
Heavyweight-Cottons, rayons, blends, T-shirts,
slacks, shirts
Mediumweight-Synthetics (polyester, acrylic,
etc.), dress slacks, skirts, sweaters
Lightweight-Synthetics (polyester, acrylic, etc.)
and blends, lingerie, blouses, dresses
AUTO CYCLE(S)
High Low
/
/
/
/
✓
/
/
✓
y
TIMED CYCLE(S)
minutes
High Low
/20 / 30
/20
/20
/ 30
/ 30
DELICATE FABRICS
Sheer curtains (2 or 3 panels), gauze, lace, etc.
RUBBER, PLASTIC, HEAT-SENSmVE
FABRICS
Foam Rubber-Pillows, bras, stuffed toys
Plastic-Shower curtains, tablecloths
Rubber-backed rugs
Olefin, Polypropylene, Sheer nylon
Use Air cycle, 20-30 min
Use Air cycle, 20-30 min
Use Air cycle, 20-30 min
Use Air cycle, 40-50 min
Use Air cycle, 10-20 min
Page 10
OPERATING YOUR DRYER
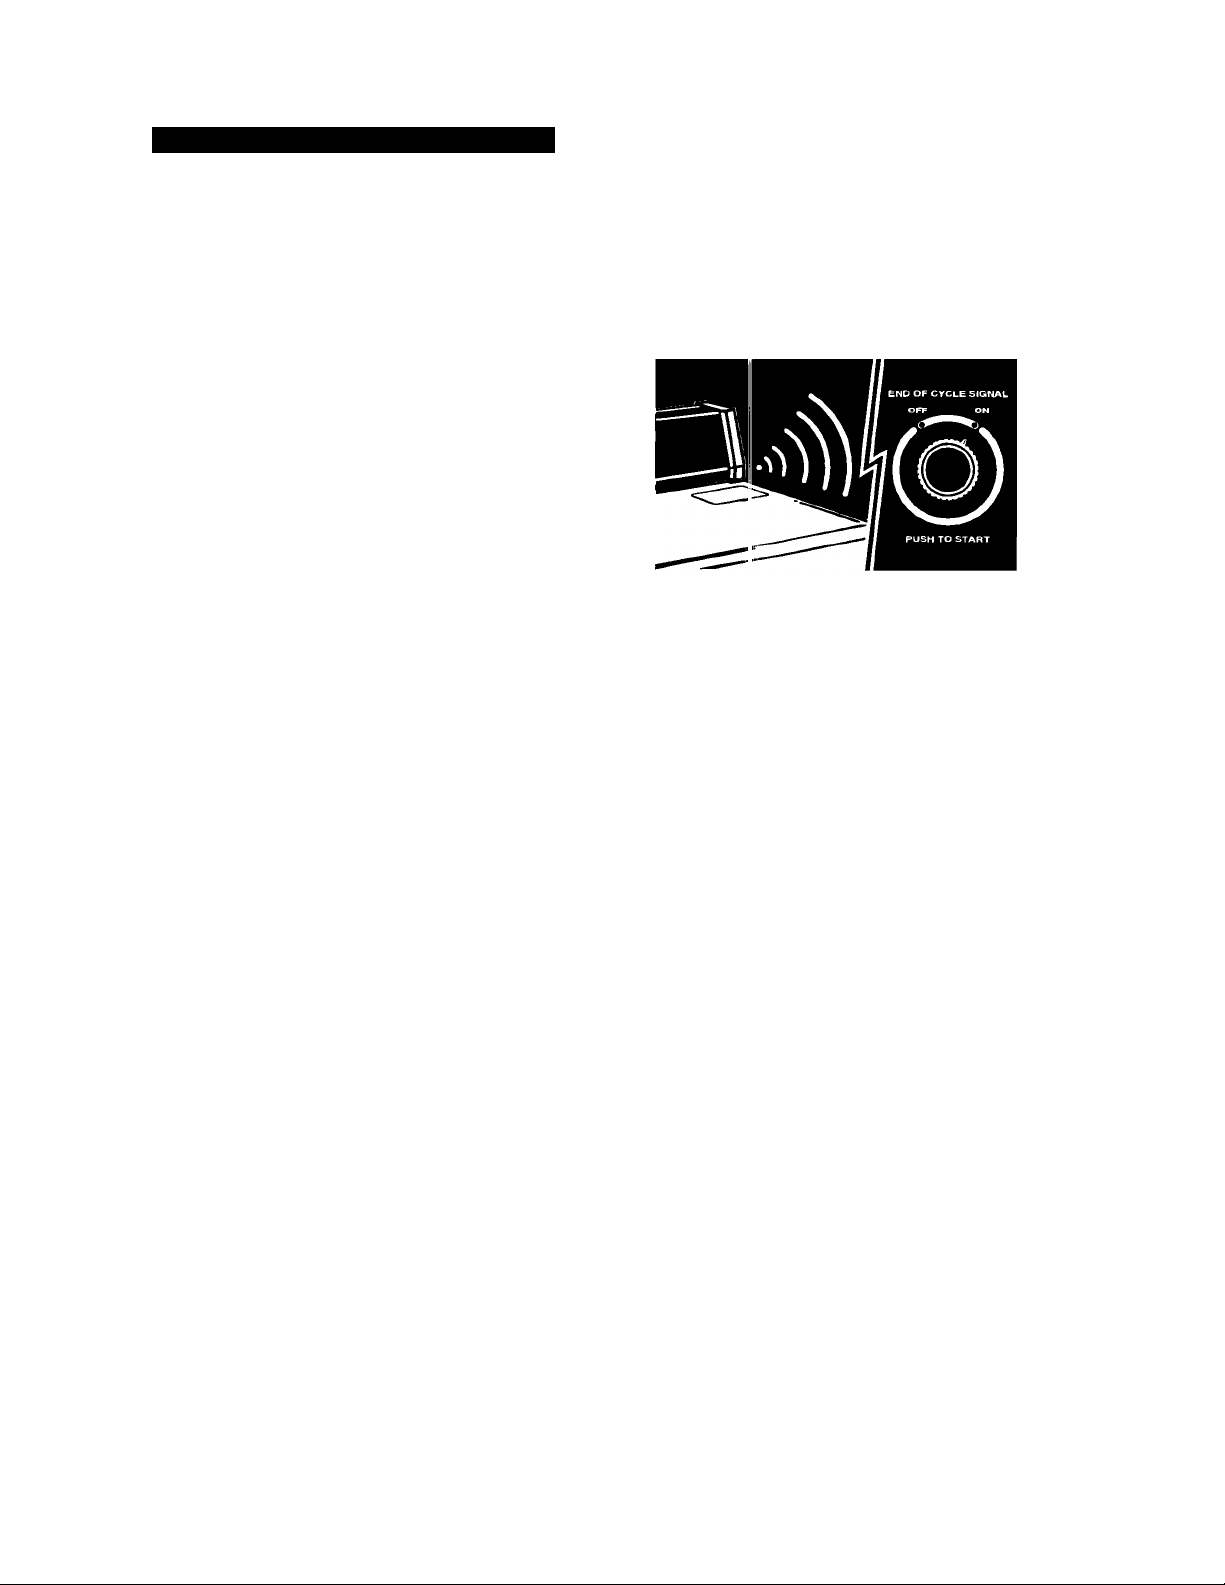
End of cycle signal
(on some models)
The dryer sounds a signal to let you know when
the cycle is finished. The signal is helpful when
you are drying permanent press, synthetics, and
other items that should be taken out as soon as
the dryer stops.
The signal is not adjustable but can be turned
off (on some models). If your model has an End
of Cycle Signal selector:
• Turn the Start Button (End of Cycle Signal
Selector) to ON if you desire a signal; turn to
OFF if you do not desire a signal.
10
Page 11
CARING FOR YOUR DRYER
Caring For Your Dr^^er
In This Section
Maintenance-every load...
Dryers require regular maintenance. Follow the suggestions belovr to maintain your dryer properly.
Page
.....
11
Maintenance-ae needed ...
Page
.....12
Maintenance-every load
Cleaning the lint screen
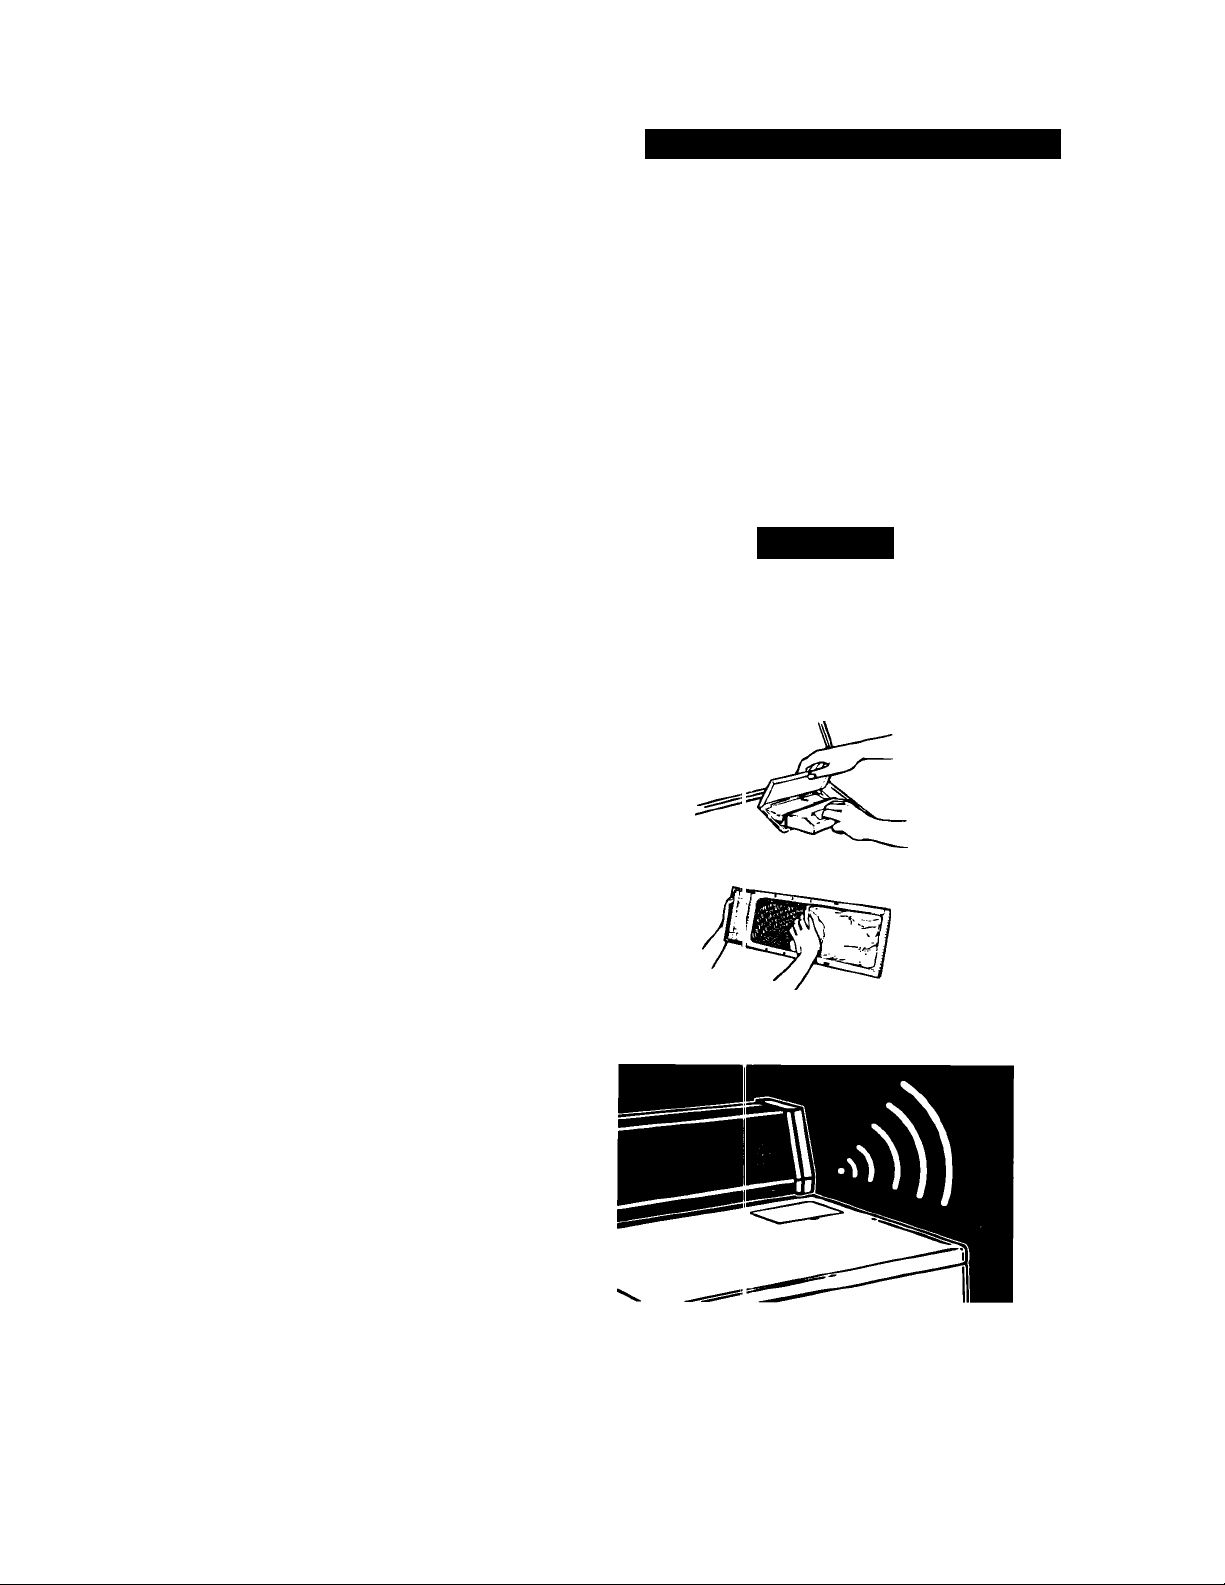
The lint screen is located under a lid on top of
the dryer. Clean It before each load. A screen
blocked by lint can increase drying time.
1. Open the lid and pull the lint screen straight
out.
2. Roll lint off the screen with your fingers. Do
not rinse or wash the screen to remove lint.
Wet lint is hard to remove.
3. Push the lint screen firmly back into place
and close the lid.
Product and Fabric Damage Hazard
Do not run the dryer with the lint screen
loose, dama ged, blocked or missing.
Doing so can cause overheating and
damage to both the dryer and fabrics.
CAUTION
Lint signal
(on soma models)
Restricted airflow reduces drying efficiency.
The signal (a whistle tone) lets you know If the
airflow is restricted.
• Turn off the dryer and clean the lint screen.
NOTE: Clean your lint screen before each
load. Do not wait for the lint signal. The lint
signal indicates excessive lint present on your
lint screen. If you wait for the lint signal before
you clean the lint screen, drying efficiency will
be reduced.
11
Page 12
CARING FOR YOUR DRYER
Maintenance-as needed
Use the following suggestions about cieaning
and lint removal to maintain your dryer and
keep it operating efficientiy.
Cleaning a clogged lint screen
Laundry detergents and fabric softeners can
cause a residue build-up on the lint screen. A
clogged lint screen can extend drying times.
Clean the lint screen every six months or more
frequently if it becomes clogged due to a
residue build-up. Use the following method:
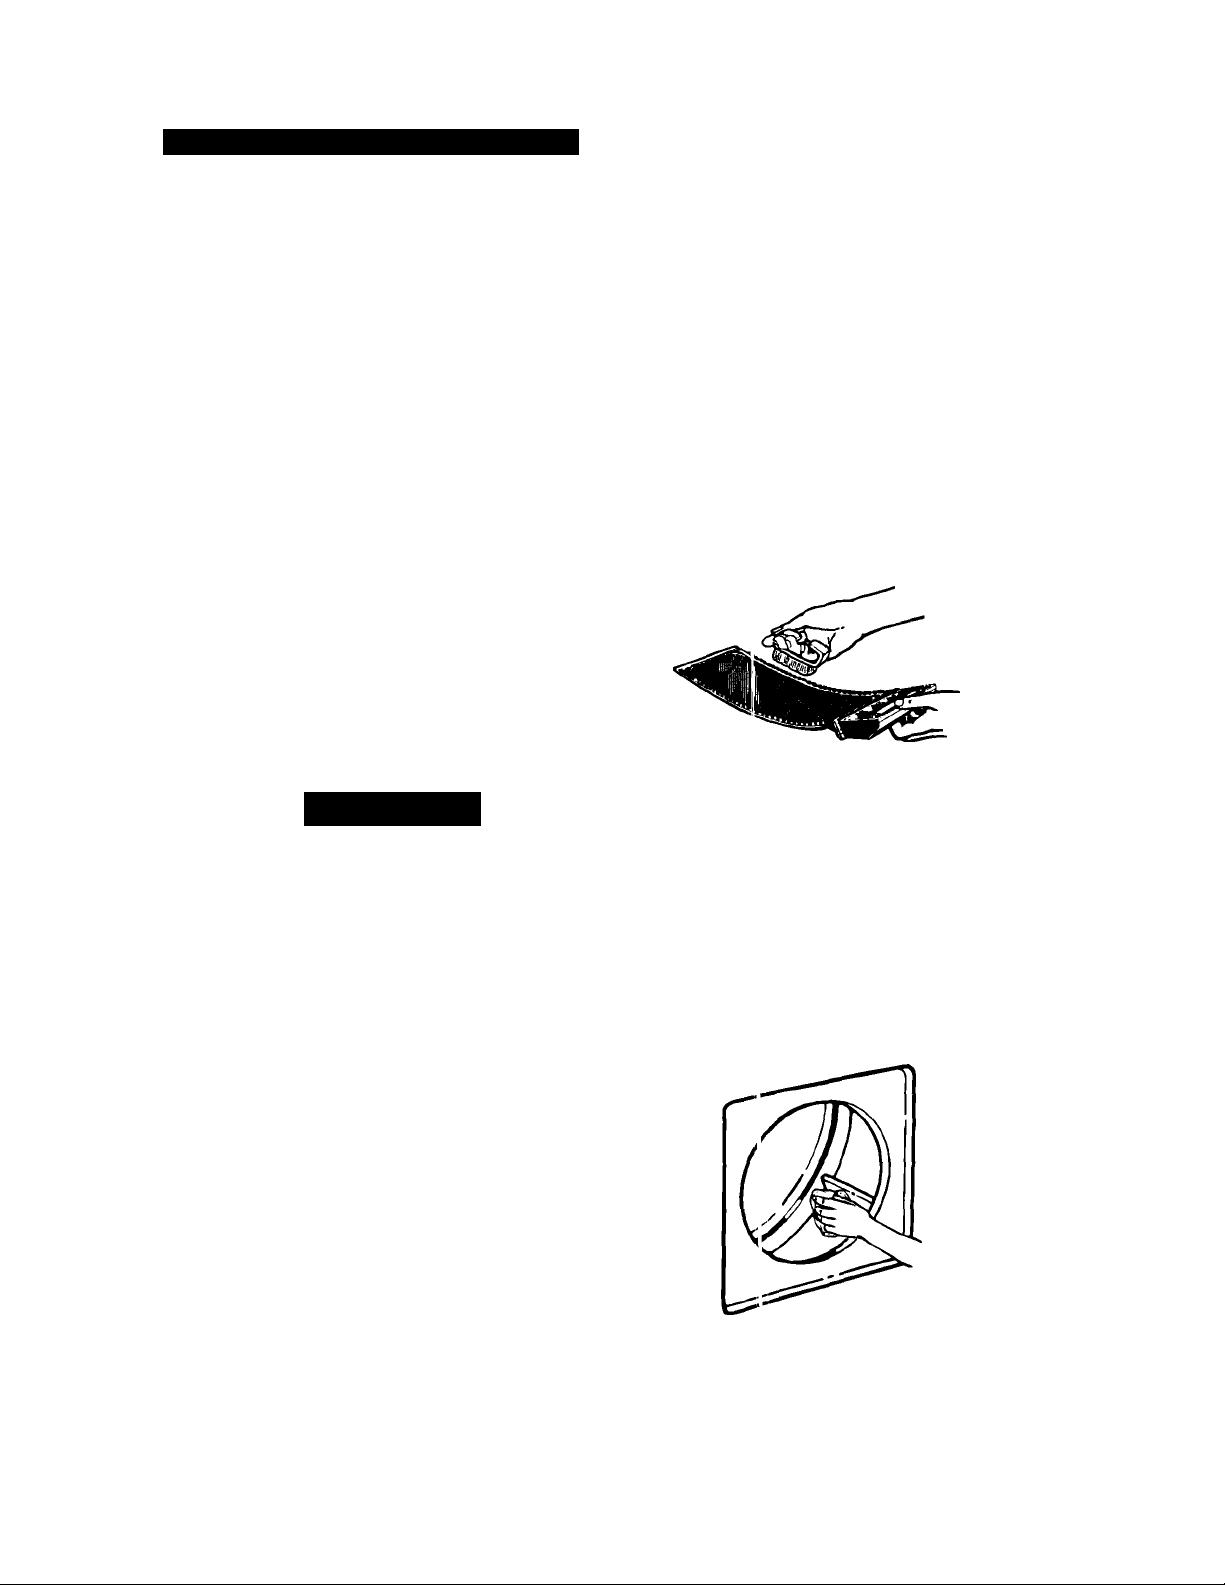
1. Wet both sides of lint screen with hot water.
2. Wet a nylon brush with hot water and liquid
detergent.
3. Scrub lint screen with the brush until all
residue buiid-up is removed.
4. Rinse with hot water.
5. Thoroughly dry lint screen with a clean
towel and replace in dryer.
Cleaning the dryer interior
^WARNING
Electrical Shock,
Personal Injury and Fire Hazard
• Turn off the electrical power before
cleaning the interior.
• Make sure the dryer is cool.
• Use nonflammable cleaner.
Failure to do so could result in electrical
shock or injury, fire or explosion.
Garments which contain unstable dyes, such
as denim blue jeans or brightly colored cotton
items, may discolor the dryer interior. If you
want to remove stains from dryer drum, use
powdered laundry detergent.
1. Make a paste with detergent and very warm
water.
2. Apply paste to a soft cloth and scrub area
until all excess dye is removed.
3. Wipe thoroughly with a damp cloth.
4. Tumble a load of rags to dry.
Cleaning the dryer exterior
Wipe with a soft, damp cloth.
12
Page 13
CARING FOR YOUR DRYER
Removing accumulated lint
Lint can gather inside the dryer and be a fuei
for fire. It is recommended that iint be removed
every 2 to 3 years, or more often, depending
on dryer usage. Cleaning should be done by a
qualified person. If you have any questions,
please call our Consumer Assistance Center
at 1-800-253-1301.
For all electric dryers, or gas dryers which
have a lower front access panel
NOTE: See page 14 if your dryer is gas and
has a full front panel.
1. Unplug the power supply cord or turn off the
electrical power.
2. Remove back panel (electric) or lower front
access panel (gas). See the Installation
Instructions.
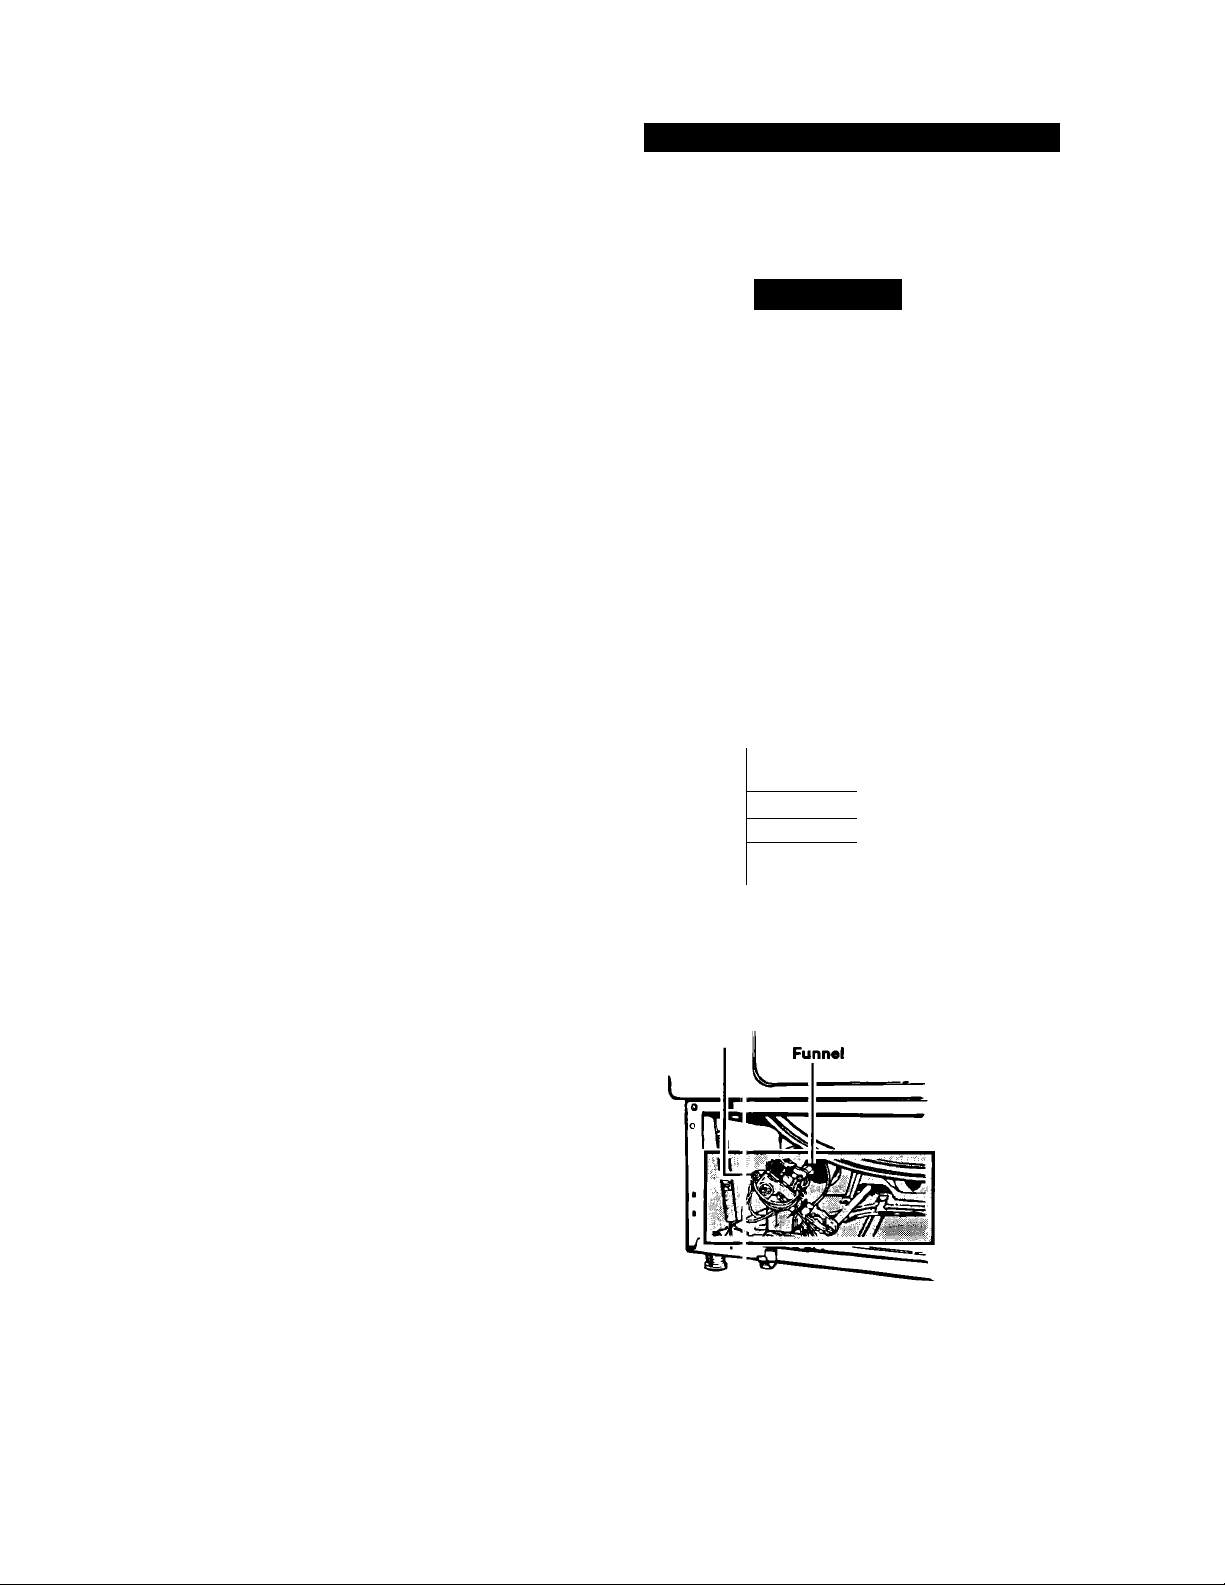
3. Remove lint from shaded area in illustration
with a soft brush or vacuum cleaner. Avoid
damaging wires, thermostats (electric),
funnel (gas) or ignitor (gas).
4. Replace panel; reconnect and level dryer
again, if necessary.
WARNING
Electrical Shock and Personal Injury
• Unplug the power supply cord or turn off
the electrical power before removing
dryer pane s.
• Make sure the dryer is cool.
• Dryer parti; can have sharp edges. Use
care when handling.
• When repliicing front panel after lint
removal, tf e wire clips holding the door
switch wires must be anchored to top of
front and s de panels. Wires MUST NOT
touch rotat ng drum. (See page 14,
Step 7.)
Failure to do so could result in electrical
shock or personal injury.
Thermoa :ats
Electric dryer with back panel removed
Ignitor
Hazard
Heater
Heat element
terminals
111
111
11
Gas dryer with lower front access panel
removed
13
Page 14
CARING FOR YOUR DRYER
If your dryer Is gas and has a full front
panel, remove front panel as follows
1. Unplug the power supply cord or turn off the
electrical power.
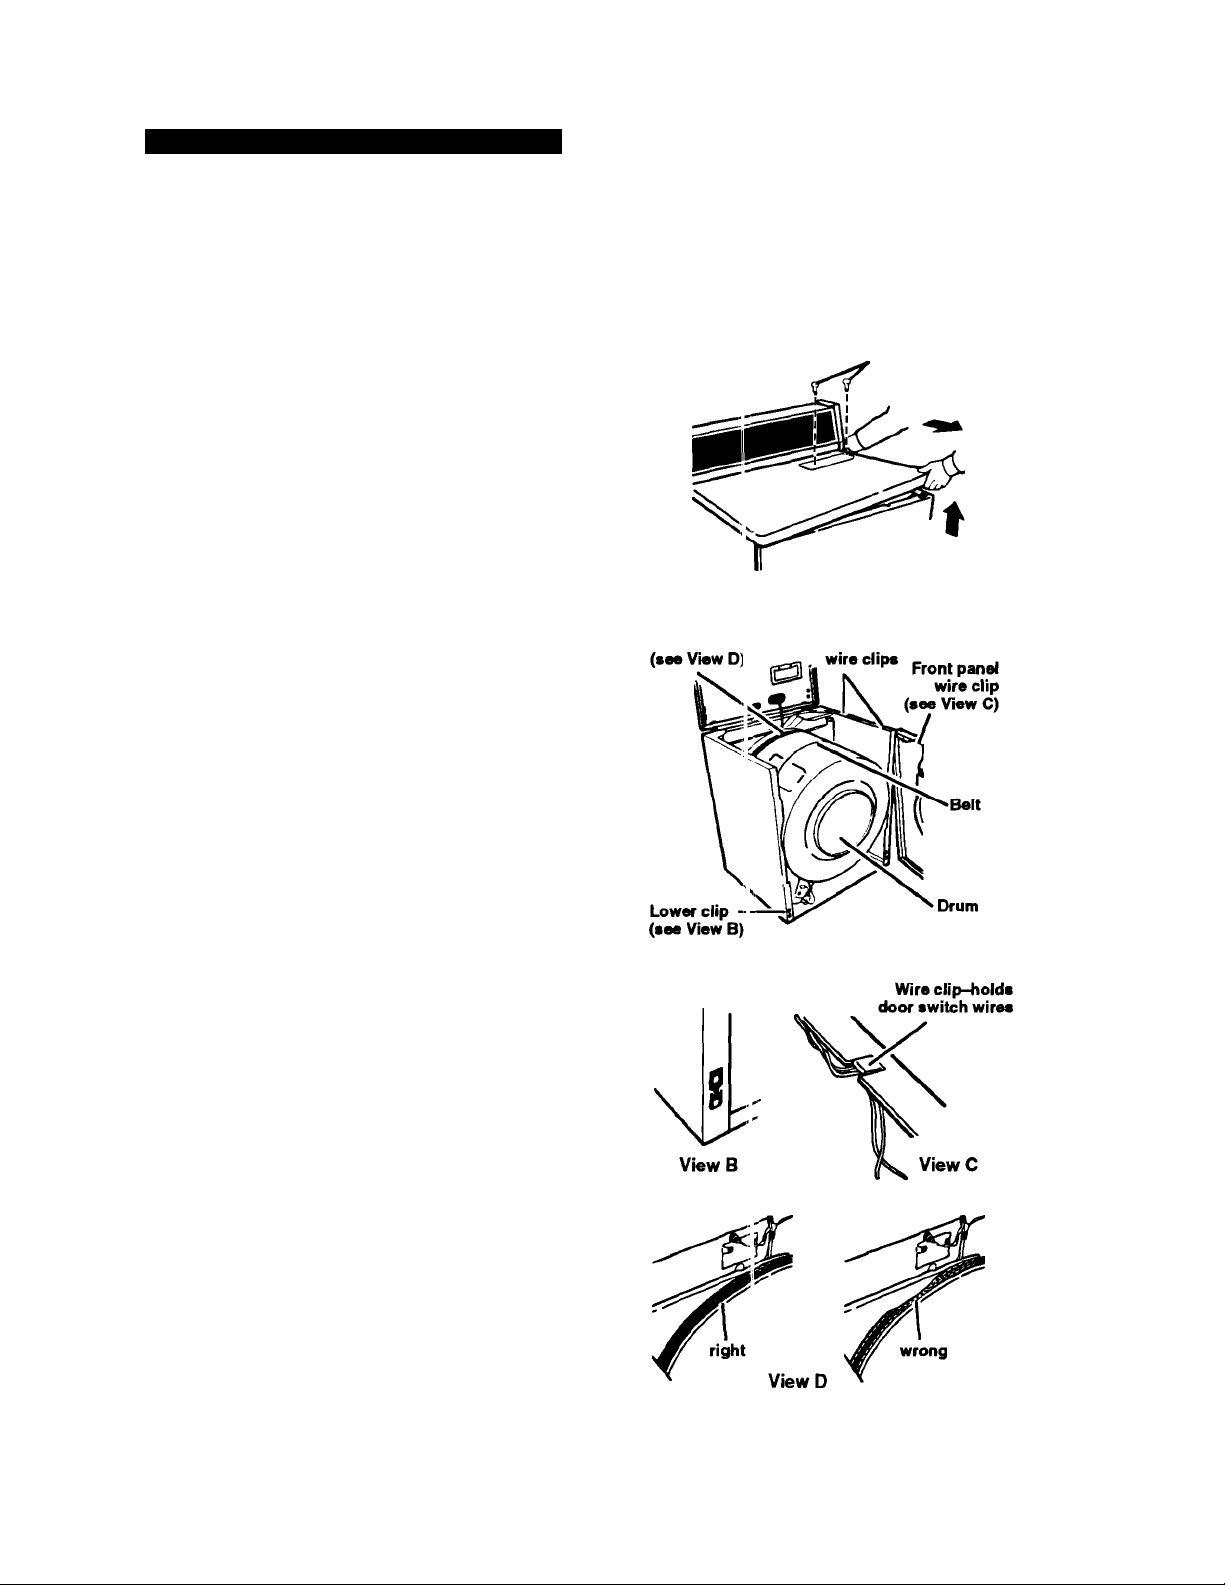
2. Open lint screen iid. Remove two screws
from iint screen area.
3. Open top by pulling fonward and up at each
front comer (see View A). Rest raised top
against wall behind dryer (top is hinged
at rear).
4. Remove two internai screws from front
panel flanges (near top front corners). Lift
front panel slightly, lifting off lower clips (see
View B). Slowly pull front panel forward,
disengaging panel from drum. (Drum will
drop slightly.)
5. Move front panel aside and rest edge
against side of dryer. Avoid disconnecting
wire clips (see View C) or damaging wires.
6. Remove lint from area shown in “gas dryer”
illustration on page 13 with soft brush or
vacuum cleaner. Avoid damaging wires,
funnel or Ignitor.
7. Reassembie in reverse order. Before
closing the top, check the foiiowing:
-Drum seal must be flared out (see View
D) and properly positioned against panel
at back of drum. Rotate drum counter
clockwise one fuii turn to check drum seal.
-Belt should be centered and tight on
dryer drum.
-Wire ciips which hoid the door switch
wires must be anchored in slot in top of
front panel (see View C) and along top
edge of side panei. Door wires must not
touch drum when dryer is operating. See
Warning, page 13.
8. Repiace top panei and iint screen screws.
Top and front panels must be securely in
place before operating dryer.
9. Reconnect power and levei dryer again
(if necessary).
NOTE: Call our Consumer Assistance Center
at 1-800-253-1301 for assistance or more
information.
Remove ecrews
before opening top
View A
Drum seal Side panei
14
Page 15
Laundry Tips
LAUNDRY TIPS
In This Section
Before you dry
Drying epecial-care items
Using dryer fabric softeners
This section reviews proper drying techniques, gives you additional drying information, and
discusses causes or solutions to common drying probiems.
..................................
...............
...........
Before you dry
Before using your dryer, see pages 3 and 4 for
Important Safety Information.
Drying tips
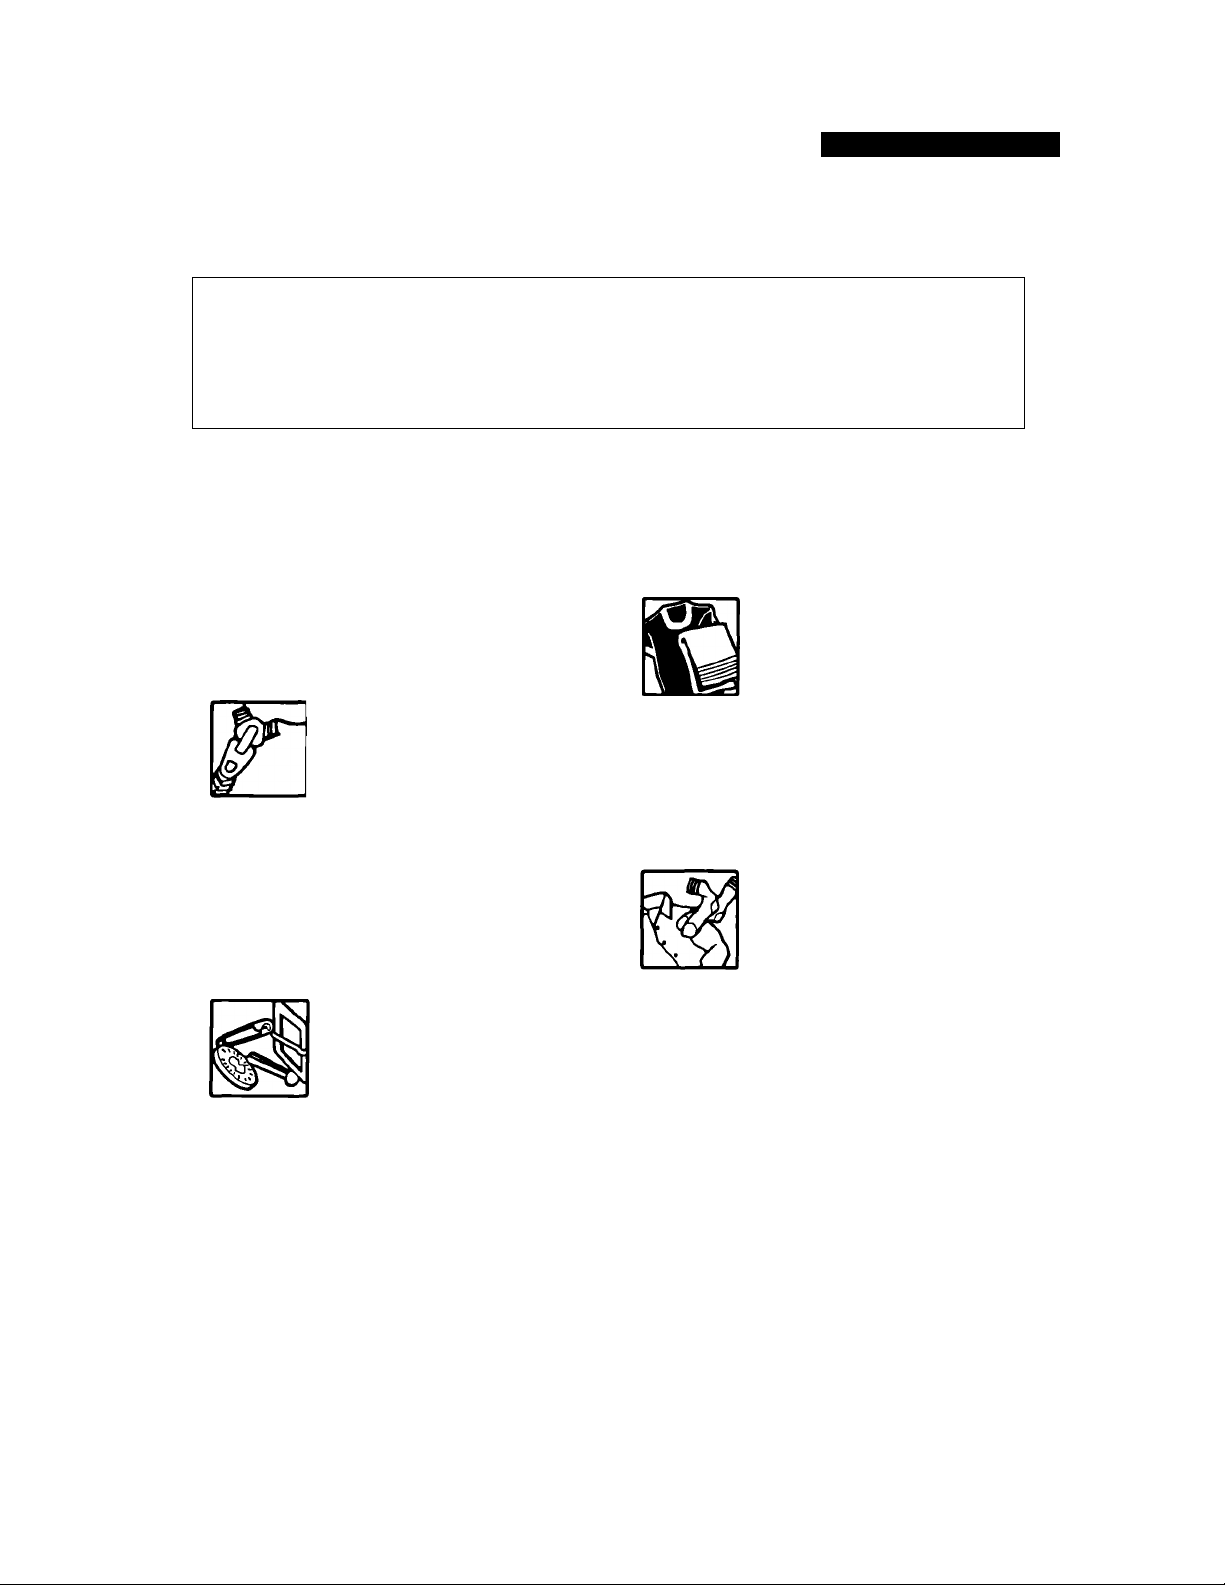
• Close zippers, snaps, and hooks to avoid
snagging other items. Remove
pins, buckles, and other hard
objects to avoid scratching the
dryer drum. Remove heatsensitive trim that can be
damaged by drying.
• Check garments to make sure all spots and
stains were removed during the wash. If
stains were not removed, do not tumbie dry.
Heat may permanently set stain. Soiied items
can also leave stains on the dryer drum.
These stains can be picked up by other items
in the load.
• Empty all pockets. Sharp or heavy objects
can damage your washer or
dryer. Do not lay these objects
on your washer or dryer after
emptying pockets. Turn pockets
of heavy items inside out for
even drying.
• Tie strings and sashes so they wiii not
tangle.
• Turn lint takers and dark items inside out to
help prevent lint pickup.
• Piace small items such as baby socks or
hankies in a mesh bag for easier removal.
• Articles to be ironed should be removed from
the dryer while still damp.
Page Page
...............
...............
...............
15 Saving energy
16 Vacation care
18 Solving launder ing problems
...................................
....................................
.........
Sorting
• Separate da-k from light colors; colorfast
from noncolorfast. Items
properly sorted for washing are
usually properly sorted for
drying. Separate heavy fabrics
(denim, toweis) from light fabrics
(synthetics, permanent press).
• Separate lini givers (toweis, chenille) from
lint takers (corduroy, synthetics, permanent
press). When possibie, turn lint takers inside
out.
Load size s
• Mix large iter is with smailer items. Load the
dryer by the amount of space
items take up, not by their
weight. Do not overload the
dryer. Overcrowding causes
uneven drying and wrinkling,
and can cauue items to wear out faster
(because of pilling).
• You may nee d to rearrange large items
(sheets, blan<ets, tablecloths) during a cycie
to reduce balling or roiiing up.
• Reduce wrinkling of permanent press and
synthetics by drying smalier ioads and
removing items from the dryer as soon as
tumbling stops.
• For better tumbling action when drying only a
few small items, add one or two iint-free
towels. This cilso prevents small, lightweight
items from bi icking airflow.
.............
.............
.............
18
18
19
15
Page 16

LAUNDRY TIPS
Drying special-care items
Most garments and household textiles have care labels with laundering Instructions. Always follow
label directions when they are available. General drying Instructio is for some special washables
are included in this section.
Air drying
(heat sensitive
items)
Heat-sensItIve
fabrics
• Olefin, polypropy
lene, sheer nylon
• Cotton and
canvas shoes
Pillows, stuffed
toys
• Feather, foam,
polyester
Plastic, rubber Items
• Shower curtains,
tablecloths, baby
panties
Scatter rugs
Heat sensitive fabrics, plastic, rubber or some stuffed items require drying
without heat. Use an Air setting or line dry. The Air setting is useful for
fluffing bedding and pillows, and dusting craperies and clothing. See
Warning on page 9.
Follow care label directions.
If shoes can be machine laundered;
1. Place several bath towels in the dryer to act as a buffer, or place shoes
on drying rack if your dryer has one.
2. If rubber or foam rubber materials are part of the shoe, use an Air
setting. For other materials, see page 9 for cycle, time, and tempera
ture recommendations.
3. Remove shoes from dryer while still damp and allow to air dry.
If manufacturer recommends machine was hing, dry one pillow at
a time and:
1. Make sure coverings are securely stitched.
2. Shake and fluff the items by hand several times during the cycle.
3. Make sure pillows are completely dry. Faather pillows take a long time
to dry.
Follow care label directions.
Follow care label directions.
Blankets and
woolens
•Cotton, rayon,
synthetic blankets
• Electric blankets,
electric sheets,
woolen blankets,
washable woolen
garments
16
Machine drying knitted woolens is not reco
when wet and allow to air dry. Line dry blar
over two lines. Pin edges together and stra
turn the blanket over, repin and restraighte
Dry as recommended for permanent press
If manufacturer recommends machine dryir
1. Place one or two dry towels in the dryer
high setting. This will dry blankets faster
2. Put blanket in dryer with warm towels. S
3. Check after 10 minutes. Remove when £
tumbling can cause shrinking and pilling
4. Place blanket on flat surface or over two
stretch to original size and shape.
5. When completely dry, brish gently to rai
cool iron if needed.
nmended. Block to shape
ikets in shade on a breezy day
ghten them. When partly dry.
When dry, brush nap.
fabrics on page 9.
ig:
and preheat 3-5 minutes on a
and help avoid pilling,
at control for 20 minutes,
till damp. Overdrying and long
lines to finish drying. Gently
;e nap. Press binding with
Page 17
LAUNDRY TIPS
Curtains,
slipcovers
• Draperies,
slipcovers
• Sheers, some
synthetic curtains
• Bonded or
laminated fabrics
Diapers, baby
clothes
Elastic items
Fiberglass
materials
Flame-
retardant
finishes
Napped Items
• Corduroy,
velveteen
Remove drapery weights and hooks before laundering.
For slipcovers, replace while still slightly damp. They will dry to fit tightly.
Dry only a few minutes.
1. Leave room in dryer for load to fluff.
2. Remove from dryer while slightly damp Do not overdry.
Dry only a few minutes.
Line dry these items.
Wash and dry small items in a mesh bag c r pillowcase for convenient
handling.
1. Dry according to manufacturer’s instruc:ions.
2. Remove diapers and cotton knit items while still slightly damp. They
will feel softer, shrink less, and be easier to fold.
Remove from dryer while still slightly dampi.
Do not machine wash or dry fiberglass ma erials. Small particles can stick
to fabrics washed or dried in following loacs and cause skin irritation.
Some items have been treated with a flam 5-retardant finish to improve
their resistance to burning. Such items are clearly labeled. To retain
flame-retardant qualities through continuoi s use and washing, clean and
dry according to the manufacturer’s instructions.
Dry separately or with similar colors to avo d lint transfer. Follow care
label directions.
1. Dry according to manufacturer’s instructions.
2. Remove from dryer while there is still a race of moisture.
3. Smooth, reshape and air dry before putting away.
Quilted, downfilled Items
Snowsuits,
Jackets
• Nylon,
polyester-base
Tinted, dyed or
noncolorfast
items
Follow care label instructions.
1. Dry one at a time.
2. Remove from dryer and shake or fluff th 5 item during the drying cycle.
3. Smooth and reshape before putting away.
Check label for fiber content, then follow c£ re label directions.
Dry according to manufacturer’s instructions.
1. Dry garment for about 10 minutes. Remove and turn inside out. Dry for
10 more minutes.
2. Remove from dryer immediately and hang on a nonrusting hanger to
finish drying. This will help eliminate wrii kies.
Dry according to fabric, weight and care lake! instructions. Wipe the dryer
drum carefully to remove any dye or lint that can be transferred to other
loads. See “Cleaning the dryer interior” on page 12.
continued on next page
17
Page 18
LAUNDRY TIPS
Towels
Washable knits
Select cycle according to fabric type. Some towels, particularly those
made of a blend of synthetic fibers and natural fibers (polyester and
cotton blends), may shed more lint than o her towels causing your dryer’s
lint screen to get full faster. Be sure to remove lint from the dryer lint
screen before and after drying new towel:; .
Do not overdry knits. Overdrying can cau::e shrinking and static cling.
1. Select cycle according to fabric and construction.
2. Turn synthetics and blends inside out v^hen drying to avoid pilling.
3. Remove cotton and rayon knits while s ill slightly damp. Stretch into
shape and lay flat to finish drying.
Using dryer fabric softeners
Dryer fabric softeners are recommended for • Clear, greasi:
reducing static cling (static can also be re- fabric softenn
duced by not overdrying) and for softening item during ti
fabrics. Always follow package instructions causes a sta
carefully. liquid detergn
• Put fabric softener sheet on top of the load • Some fabric ;
before starting the dryer. Do not add a screen and s.
fabric softener sheet after the cycle has labeled as di
started. Instant heat can cause the fabric
softener to spot fabrics.
i-like spots can result from the
ir sheet becoming tangled in an
imbling. If fabric softener
n, wet the stain and rub with
mt or bar soap, rewash.
lOfteners can clog the lint
ow drying. Use fabric softeners
/er safe.
Saving energy
• Use your automatic cycle to dry most loads.
• Dry only full loads without overdrying.
• Avoid overloading dryer, adding wet items to
a partly dried load, or opening the door
unnecessarily.
• Plan your laundry to dry one load after
another. A warm dryer shortens drying time.
Vacation care
1. Unplug power supply cord or turn off
electrical power supply.
2. Clean lint screen.
18
' Shorten dryit g times by exhausting dryer
properly and cleaning exhaust duct and
outside exha jst hood as needed.
-Keep the lir t screen clean.
- Use your di yer in a room where room air
temperaturi! is above 45°F (7°C).
-Sort loads by fabric weight and type.
Page 19
LAUNDRY TIPS
Solving laundering problems
Most laundering problems are easily solved. Check the following list for problems you may have
and possible causes. If you need additional help, check the ‘Assistance or Service” section of this
book.
PROBLEM
Greasy
spots
Lint
CHECK IF
Dryer fabric softeners
were used
Undiluted washer fabric
softener was used
Enough detergent was used
Items were clean before they
were dried
Lint screen is clogged
Load is properly sorted
Static electricity is
attracting lint
Load is too big or heavy
Paper or tissue was in pocket
Enough detergent was used
Pilling is being mistaken for lint
CAUSES/SOLUTIONS
Follow manufacturer’s directions carefully.
Dilute fabric softener before adding to
the final rinsi».
Use enough detergent to hold soil in the
wash water until it drains away. Undrained
soil can stick to outer tub of the washer and
cause greaser spots with next load.
Soiled items can stain other items in the
load. They c m also leave stains on the
dryer drum that can be picked up by items
in later loads . Dryer heat may permanently
set these stains.
Clean lint sc een. (See page 11.)
Sort lint-give s (bath towels, etc.) from lint-
takers (synti etics, permanent press).
Use fabric softener in the washer’s final
rinse. Use correct dryer settings for fabric.
Overdrying synthetics can cause lintattracting static electricity.
Dry smaller Dads. When items can’t tumble
freely, air is unable to carry lint to lint
screen.
Empty pockc ts carefully. A small scrap of
paper can c<: use a lot of lint.
Use enough detergent to hold the lint in the
water until it drains away. Base detergent
amount on v.ater hardness and soil in wash
load.
Pilling (surfa :e fuzz) is caused by normal
wear and laundering. Pills do not break
away easily rom the fabric and can often
collect lint. Synthetic fabrics are more likely
to pill than others, especially at neckbands,
elbows and Knees.
continued on next page
19
Page 20

LAUNDRY TIPS
PROBLEM
Shrinking
Slow drying There is a large amount of
Items are overdried Remove itoms while there is still a trace
Fabric type and quality is
suitable for drying
moisture in the load to be
dried
Cold rinse water is used A load rinsod in cold water will take
Room air temperature is
below 45“F (7°C)
Dryer is exhausted according
to Installation Instructions
Lint screen is clogged
Exhaust duct or outside
exhaust hood is clogged
Proper electrical supply is
used
CHECK IF C AUSES/SOLUTIONS
of moisture. Some items should be
removed while damp, then shaped and air
dried.
Some knits are stretched during manufac
turing. Wa.‘ hing and drying returns them
to the original size. This is normal. Check
quality of g iirment before buying. Follow
fabric care label directions carefully.
Some item!! hold more moisture than
others (cotlons more than polyester).
They take 1 :mger to dry. Full loads take
longer to diy than small loads of the same
fabric.
slightly lone er to dry than a warm one.
Cold rinses, however, help save energy
and reduce wrinkling more than warm
rinses do.
Install dryei in a room where the air
temperaturo is warmer than 45°F (7“C).
Cold air inc eases drying time and may
cause wrinl< les not to be removed.
Install and oxhaust your dryer according
to the Installation Instructions provided.
Clean lint screen before or after
each use.
Clean if nee ded.
Properly connect the dryer to a grounded
electrical circuit that meets the electrical
requirements stated in the Installation
Instructions
Static
electricity
20
Load is overdried
Fabric softener is used
Synthetics, synthetic blends,
permanent press and knits are
in load
Remove items while there is still a trace
of moisture.
Use a fabric softener and follow package
directions Ccirefully.
Synthetics, !!ynthetic blends, permanent
press and knits build up static electricity.
Use a fabric softener and be careful not to
overdry the oad.
Page 21
IF YOU NEED ASSISTANCE OR SERVICE
If You Need Assistcince
Or Service
1. Before calling for assistance ...
Is the power cord plugged in?
Is lint screen clogged with lint?
Is exhaust duct or outside exhaust hood cloggecl with lint?
1
Have you blown a fuse or tripped the circuit breaker?
Q
If you need more help, check the chart below.
PROBLEM CHECK THE FOL .OWING
Dryer will not run Is the power cord firmly plugged into i live circuit with proper
voltage?
Has a household fuse blown or circui breaker tripped? Has a
time-delay fuse been used?
Is the dryer door firmly closed?
Did you firmly push the Start Button?
Are the controls set in an ON position ?
Dryer will not heat
Drying time too long
Is the cycle in the last few minutes? ( There is no heat during that
time.)
Has a household fuse blown or circuil breaker tripped? Has a
time-delay fuse been used?
If you have a gas dryer, are the valve » open on both the dryer and
the supply line?
Is your lint screen clean? (See the “Slow drying" section of the
table on page 20 for additional inforrr iJtion.)
Is your exhaust duct or outside exhaust hood clogged with lint?
21
Page 22

IF YOU NEED ASSISTANCE OR SERVICE
2. If you need assistance* ...
Call our toU-fraa numbar. Dial tolMraa from
anywhara In tha U.SJk.:
1-800-253-1301
and talk with one of our trained conaultants.
The consultant can instruct you in how to
obtain satisfactory operation from your appli
ance or, if service is necessary, recommend a
qualified service company in your area.
If you prefer, write to:
Mr. William Clark
Consumer Assistance Representative
Whirlpooi Corporation
2000 M-63
Benton Harbor, Ml 49022
Please include a daytime phone number in
your correspondence.
4. If you need FSP* replece-
FSP is a registered trademark of Whiripool
Corporation for quality parts. Look for this
symbol of quality whenever you need a
replacement part for your Estate* appliance.
FSP replacement parts will fit right and work
right, because they are made to the same
exacting specifications used to build every new
Estate appliance.
area, refer to Step 3 above or call our toll-free
telephone number in Step 2.
5. If you are not satisfied with
• Contact the Major Appliance Consumer
3. If you need service* ...
Contact the deaier from whom you purchased
the appliance or the authorized sar\^r in your
area. For help finding an authorized servicer in
your area, call our toll-free telephone number
in Step 2.
*Whan asking for help or aarvica:
Please provide a detailed description of the
probiem, your appliance’s complete model
and serial numbers and tha purchase date.
(See page 2.) This information wiN help us
respond properly to your recpjast.
• Contact MACAP only when the dealer,
• MACAP will in turn inform us of your action.
ment parts ...
To locate FSP replacement parts in your
how the probiem was
soived ...
Action Panei (MACAP). MACAP is a group of
independent consumer experts that voices
consumer views at the highest ievels of the
major appiiance industry.
authorized servicer and Whiripool have failed
to resolve your problem.
Major Appliance Consumer Action Panel
20 North Wacker Drive
Chicago, IL 60606
22
Page 23

ESTATE*
Dryer Warranty
LENGTH OF WARRANTY
FULL ONE-YEAR
WARRArrTY
From Date of Purchase
WHIRLPOOL WILL NOT PAY FOR
A. Service calls to:
1. Correct the installation of your dryer.
2. Instruct you how to use your dryer.
3. Replace house fuses or correct house wiring or plumbing.
4. Replace owner accessible light bulbs.
B. Repairs when your dryer is used in other than normal, single-family household use.
C. Pickup and delivery. Your dryer is designed to be repaired in the home.
D. Damage to your dryer caused by accident, misuse, fire, flood, ac ts of God or use of products
not approved by Whirlpool.
E. Repairs to parts or systems caused by unauthorized modificat ons made to the appliance.
WHIRLPOOL CORPORATION SHALL NOT BE LIABLE FOR INCI CENTAL OR CONSEQUENTIAL
DAMAGES. Some states do not allow the exclusion or limitation of incidental or consequential
damages, so this iimitation or exclusion may not apply to you. This /warranty gives you specific legal
rights, and you may also have other rights which vary from state to state.
Outside the United States, a different warranty may apply. For details, please contact your
authorized Whirlpool distributor or military exchange.
If you need service, first see the “Assistance or Service” section of his book. After checking
“Assistance or Service,” additional help can be found by calling our Consumer Assistance Center
telephone number,
1-8iD0-253-1301, from anywhere in the U.S.A.
WHIRLPOOL WILL PAY FOR
FSP* replacement parts and repair Isbor to correct defects in
materials or workmanship. Service m jst be provided by an
authorized Whirlpool®“ service company.
8-92
PART NO. 3396311
01993 Whirlpool Corporation
0
Printed on recycled paper-
10% post consumer waste
50% recovered materials
• Registered Trademark/SM Service Mark of Whirlpool. 'orporation.
PHnted in U.SJL
 Loading...