

Page 1
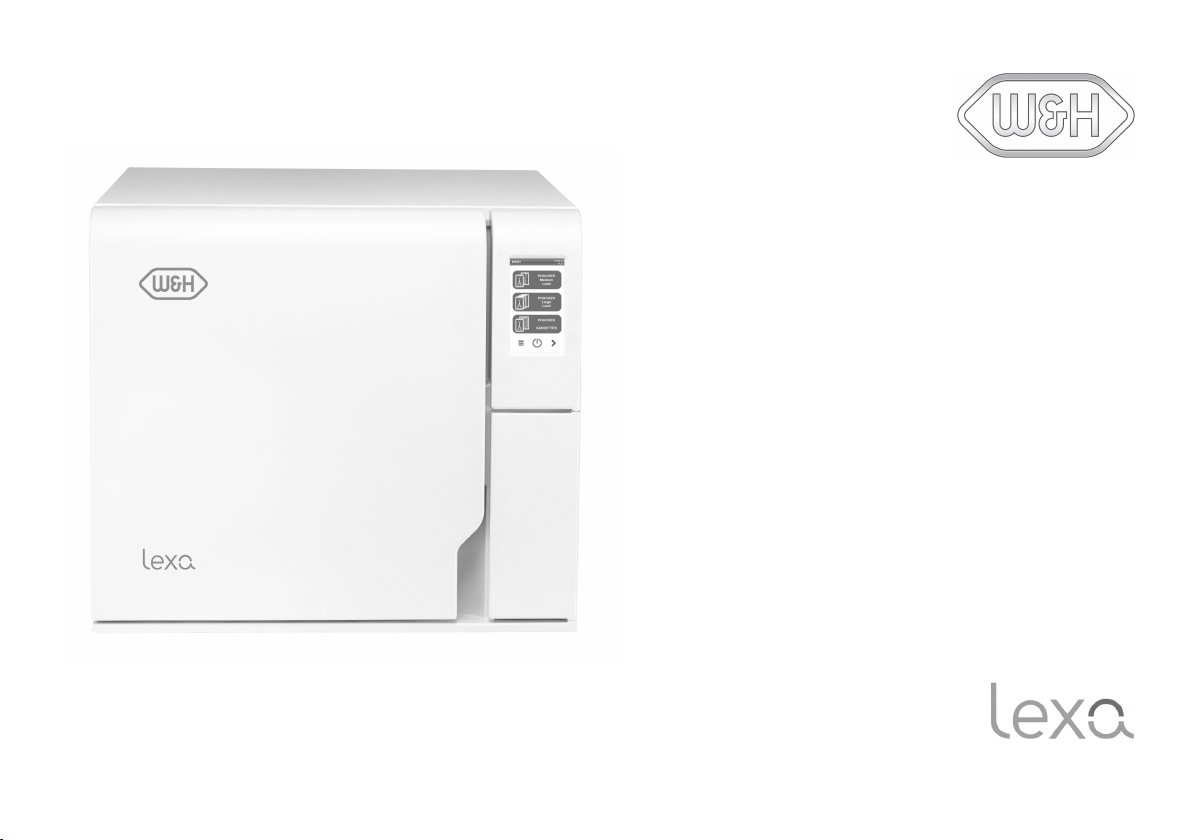
Instructions for Use
MN-111 - ENG - Rev14
MN-111
Page 2

Page 3

Table of contents
Conformity 5
Symbols and messages 6
Introduction 8
About this manual 8
Use restrictions 9
Safety information 12
Safety warnings 12
Responsibility 14
Getting started 15
Unpacking 15
Handling 18
Product description 19
Installing the sterilizer 23
Operating the sterilizer 27
User interface menu 28
Sterilizer setup 34
ioDent 35
User authentication (optional) 35
EliTrace (optional) 36
USB pen drive 37
Standby mode 37
Administrator 38
User management (optional) 38
Traceability options (optional) 39
Hide/Unhide a cycle 40
Managing printers 41
Printer selection (optional) 41
Label printer selection (optional) 41
Label printer usage (optional) 42
Label content description 44
Sterilization cycles 45
Load maintenance and preparation 45
Typical loads 48
Prepare the sterilizer 48
Sterilization cycle management 49
Unloading 54
Sterilization cycle report 54
Maintenance 59
Warnings for maintenance operations 59
User maintenance 59
Monthly or 50-cycle maintenance 61
1200-cycle or yearly maintenance 64
Extraordinary maintenance 67
Disposal 68
Diagnostics 69
Errors 69
Lexa| Instructions for Use |MN-111 ENG Rev14 |03/04/2023 |© W&H Sterilization Srl iii
Page 4
Troubleshooting 74
Emergency door opening 80
Technical data 83
Sterilization programs 83
Sterilization program phases 89
Technical data 92
Recommendations for validation 93
Diagrams 94
Water quality 95
Accessories, spare parts, consumables 96
Authorized W&H service partners 98
Documentation forms 99
W&H installation check-list 99
iv Lexa| Instructions for Use |MN-111 ENG Rev14 |03/04/2023 |© W&H Sterilization Srl
Page 5
Conformity
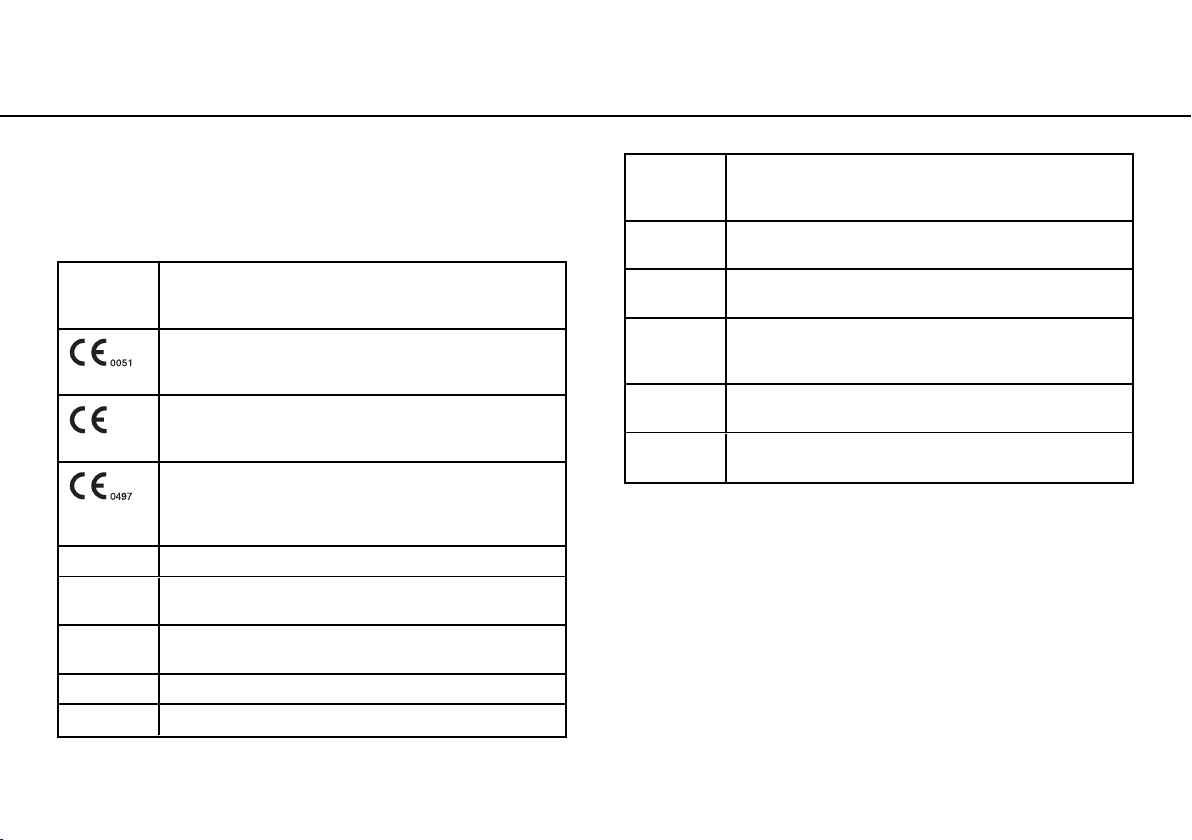
CONFORMITY TO EUROPEAN AND AMERICAN REGULATIONS,
STANDARDS AND DIRECTIVES
Sterilizer conforms with the following Regulations, Standards and
Directives:
Standards
and
Directives
2014/68/EU
2012/19/EU
CSA C22.2 No.
61010-1
UL 61010-1
ASME
EN 13060
Description
Medical Device Regulation (MDR) / Regulation (UE) n. 2017/745
for medical devices. Class IIb devices, in accordance with the Rule
16 – ANNEX VIII of the above Regulation
For Device in compliance with Machinery Directive (2006/42/EC),
Low Voltage Directive (2014/35/EU) and Electomagnetic
Compatibility Directive (2014/30/EU)
Pressure Equipment Directive (PED) / Directive 2014/68/EU (PED
– Pressure Equipment Directive) for every sterilization chamber
designed and manufactured in conformity to the ANNEX 1 and to
the procedure described in the moduleD1 Annex III
Waste Electrical and Electronic Equipment Directive (WEEE)
Safety requirements for electrical equipment for measurement,
control and laboratory use, general requirements
Safety requirements for electrical equipment for measurement,
control and laboratory use, general requirements
Boiler and pressure vessel code
Small steam sterilizers
Standards
and
Directives
ANSI/AAMI
ST55
IEC 61010-1
IEC 61010-2040
IEC 61326-1
IEC 61770
Description
Table-top steam sterilizers
Safety requirements for electrical equipment for measurement,
control and laboratory use, general requirements
Safety requirements for electrical equipment for measurement,
control and laboratory use; particular requirements for sterilizers
and washer-disinfectors used to treat medical materials
Electrical equipment for measurement, control and laboratory use
- EMC requirements; general requirements
Electric appliances connected to the water mains - Avoidance of
backsiphonage and failure of hose-sets
Note: every new sterilizer is delivered with a Declaration of Conformity and a
Warranty Card.
Lexa| Instructions for Use |MN-111 ENG Rev14 |03/04/2023 |© W&H Sterilization Srl 5
Page 6
Symbols and messages
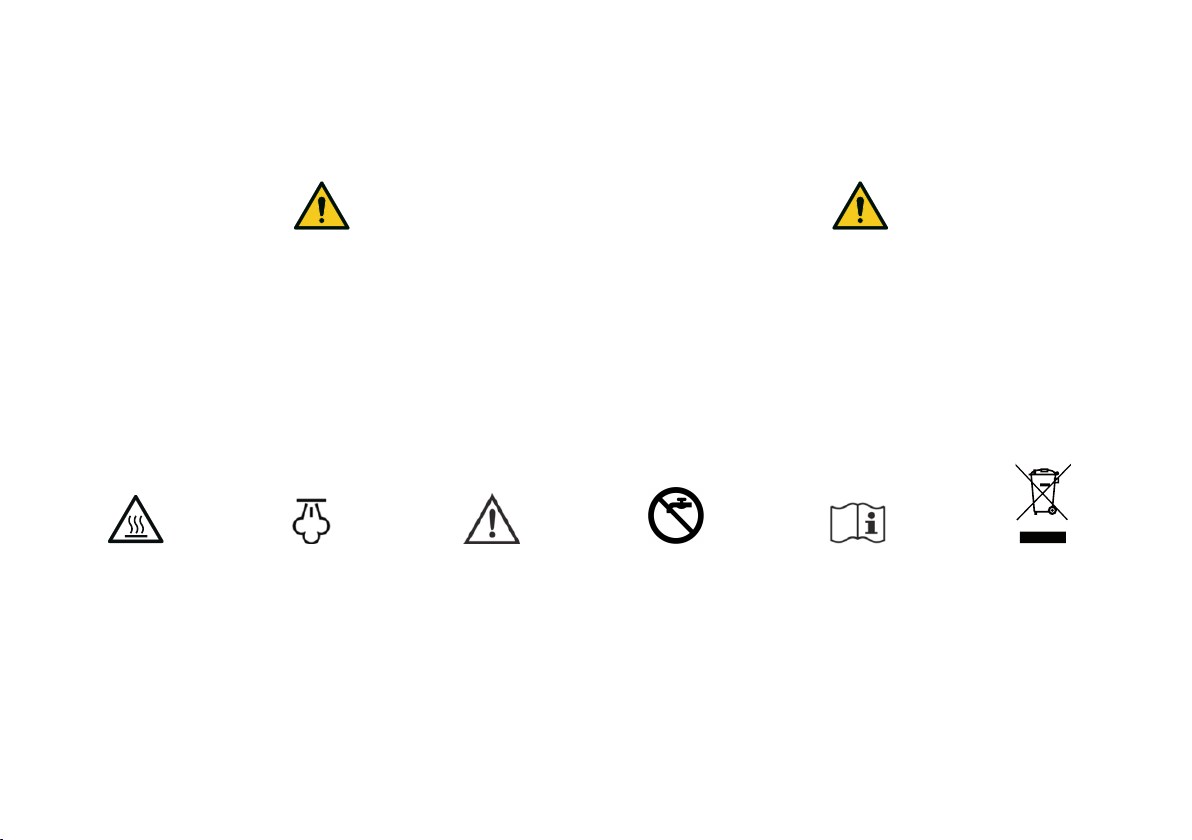
SAFETY SYMBOLS USED IN THIS MANUAL
WARNING: indicates a hazardous situation that, if not avoided, could
result in death or serious injury.
Related to a sterilizer, these warnings indicate hazardous situations
that could result in non-sterile conditions (e.g. non-sterile instruments)
which could lead to fatal personal injury.
CAUTION: indicates a hazardous situation that, if not avoided, could
result in minor or moderate injury.
SYMBOLS DISPLAYED ON THE PRODUCT
Hot surfaces!
Risk of burns.
Hot steam!
Risk of burns.
Consult the
Instructions for Use
for important
cautionary
information.
Don't use drinking
water to fill the clean
water tank; use
distilled or
demineralized water
only.
Consult the
Instructions for Use.
Disposal / Do not
dispose of with normal
waste.
PROPERTY DAMAGE MESSAGES
Notice: indicates information considered important, but not hazard-related. Typically to avoid damage to the product.
6 Lexa| Instructions for Use |MN-111 ENG Rev14 |03/04/2023 |© W&H Sterilization Srl
Page 7
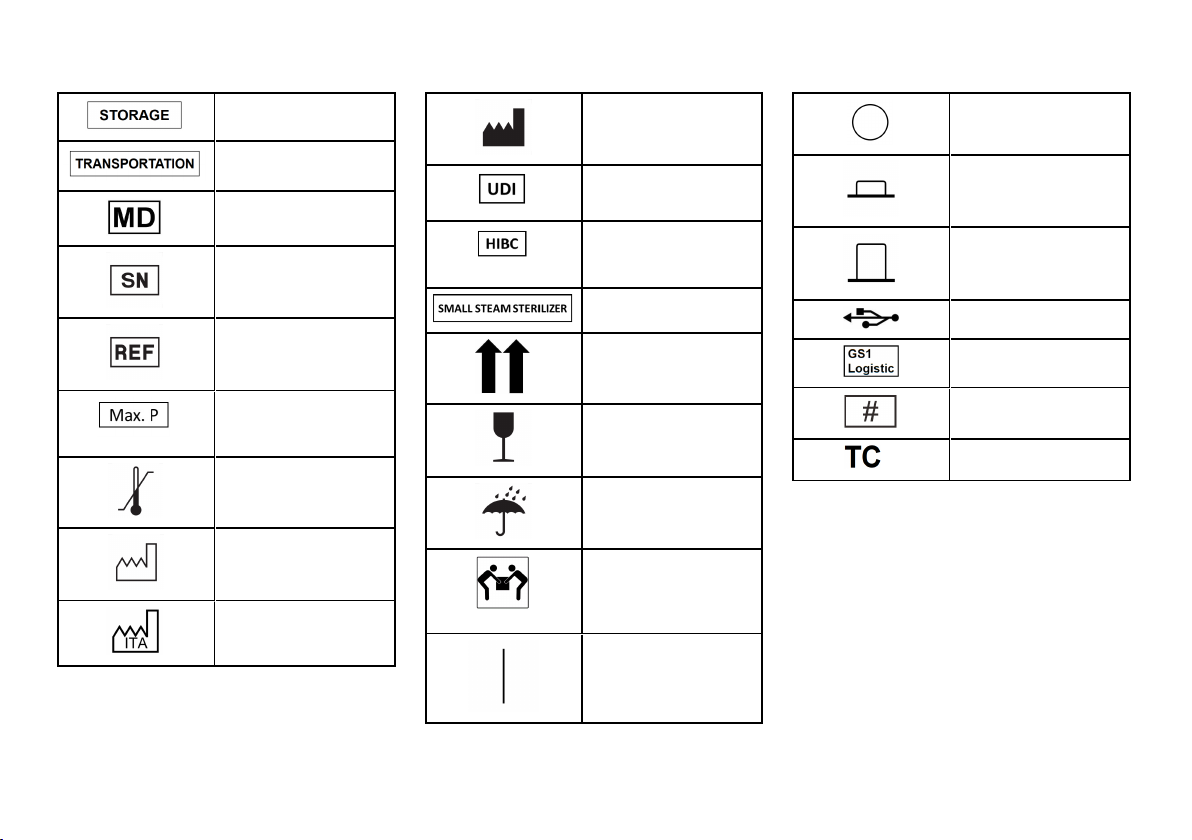
Storage
Transportation
Medical Device
Only for MDR devices
Serial Number
Catalogue number
Max. pressure / Max.
allowable working pressure
(MAWP)
Temperature between XX °C
and XX °C
Manufacturing date (YYYYMM-DD)
Country of manufacture
Manufacturer
Unique Device Identification
Health industry bar code in
accordance with HIBC
Standard
Small Steam Sterilizer
This side up
Fragile, handle with care
Keep dry
The sterilizer must be
transported by two
authorized technicians due
to its heavy weight
ON (supply) IEC 604175007
OFF (supply) IEC 604175008
IN-position of bistable push
control IEC 60417-5268
OUT- position of bistable
push control IEC 604175269
USB connection
GS1 datamatrix for logistic
purpose
Sterilizer type or model
Test connection
Lexa| Instructions for Use |MN-111 ENG Rev14 |03/04/2023 |© W&H Sterilization Srl 7
Page 8
Introduction
CONTENTS
This section deals with the following subjects:
About this manual 8
Use restrictions 9
About this manual
FOR YOUR SAFETY AND THE SAFETY OF YOUR PATIENTS
The purpose of this manual is to provide information about Lexa
sterilizers to ensure:
n proper installation and set-up
n optimal use
n safe and reliable operation
n compliance with regular maintenance and servicing
requirements
Please carefully read the safety information (see "Safety warnings"
on page12).
OBLIGATIONS WITH REGARD TO THIS MANUAL
This manual is an integral part of the product and accompanies it for
its entire working life. It must be consulted in all situations related to
the life cycle of the product, from its delivery through to
decommissioning. For this reason, it should always be accessible to
operators both online and offline.
Contact customer service in the event the manual is unavailable. If
the device is transferred, always attach the manual for the new
owner.
MANUAL CONTENT
This manual contains the Instructions for Use and for maintenance
of the following sterilizer versions:
n MN-111 100–125 V ac
n MN-111 200–240 V ac
DISCLAIMER
All pictures, graphics and illustrations provided in this manual are for
the comprehension of the text. They are not meant to be an accurate
representation of product details. Thus, they should be taken as
indicative only, and may differ from the actual product.
For any suggestions or remarks please send an email to
[email protected].
COPYRIGHT NOTICE
Copyright ©, W&H Sterilization Srl
All rights reserved in all countries.
All drawings, images and texts contained in this manual are the
property of the manufacturer. Even partial duplication of drawings,
images or text is prohibited.
8 Lexa| Instructions for Use |MN-111 ENG Rev14 |03/04/2023 |© W&H Sterilization Srl
Page 9

The information contained in this document is subject to change
without prior notice.
Use restrictions
INTENDED USE
For Medical Device in accordance with Regulation EU 2017/745:
The small steam sterilizers are intended for the sterilization of
invasive and non-invasive medical devices. The devices are
intended for professional use by trained people only.
For other purposes out of the scope of Regulation EU 2017/745:
The small steam sterilizers are intended for the sterilization of
devices other than invasive and non-invasive medical ones. The
small steam sterilizers are intended for the sterilization in veterinary
practices. They are also intended to be used for materials and
equipment which are likely to come into contact with blood or body
fluids, e.g. implements used by beauty therapists, tattooists, body
piercers and hairdressers.
The devices are intended for professional use by trained people
only.
For North American market:
The Lexa is designed for pressurized steam sterilization of medical
and pouched dental instruments, including dental handpieces,
porous and hollow loads.
Introduction
Lexa| Instructions for Use |MN-111 ENG Rev14 |03/04/2023 |© W&H Sterilization Srl 9
Page 10
Introduction
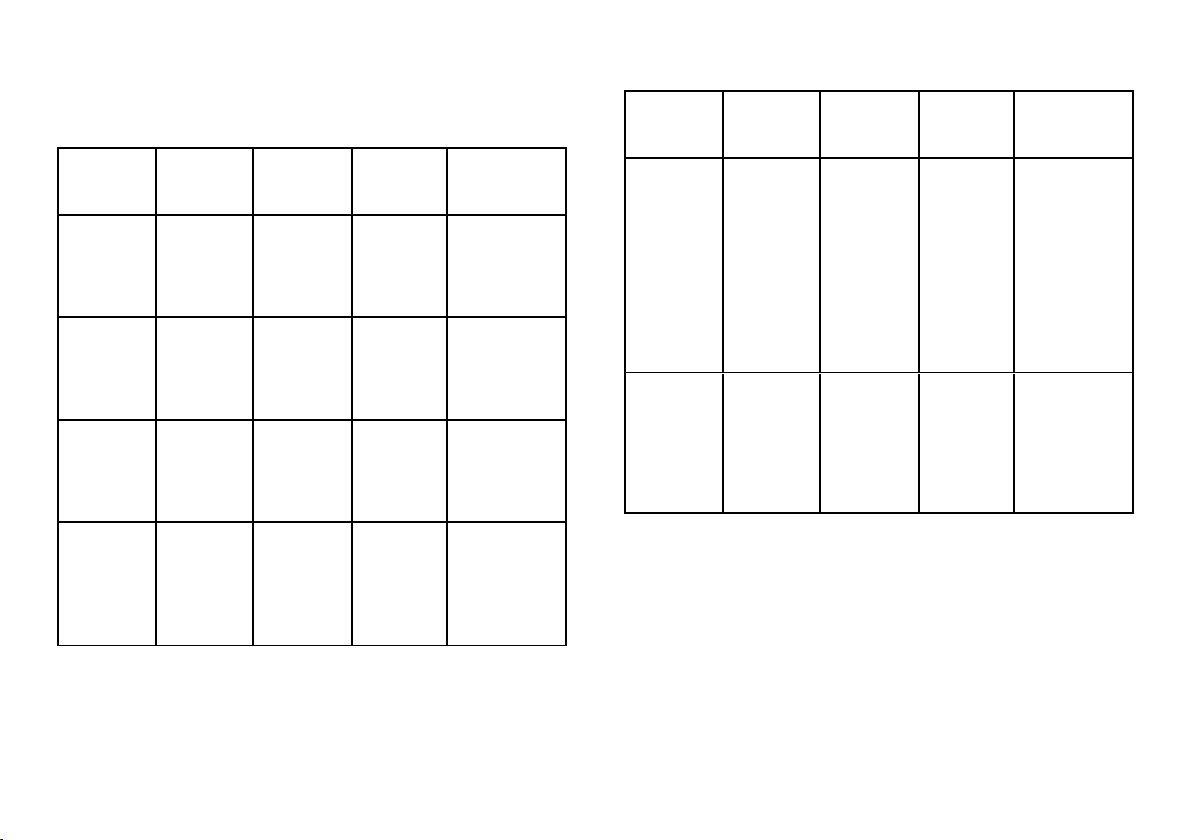
Key program features, including sterilization time, temperature and
recommended load type are listed in the following table:
Program
Pouches
Medium Load
Pouches
Large Load
Pouches &
Wrapped
Cassettes
Wrapped
Cassettes
Type of Load
and Load
weight
Instruments
and dental
handpieces,
up to 3 lbs
(1.4 kg).
Instruments
and dental
handpieces,
up to 6 lbs
(2.7 kg).
Instruments
and dental
handpieces,
up to 11 lbs
(5 kg).
Instruments
and dental
handpieces,
up to 14 lbs
(6.3 kg).
Sterilization
Temperature
270 °F
(132 °C)
270 °F
(132 °C)
270 °F
(132 °C)
270 °F
(132 °C)
Sterilization
Time
4 minutes
4 minutes
4 minutes
4 minutes
Drying Time
(recommended)
25 minutes
30 minutes
35 minutes
40 minutes
Program
Low
Temperature
Unwrapped
Type of Load
and Load
weight
Textiles, up to
4.4 lbs (2 kg),
or
instruments
and dental
handpieces
requiring low
temperature,
up to 5 lbs
(2.3 kg).
Instruments
and dental
handpieces,
up to 18 lbs
(8.1 kg).
Unwrapped,
naked.
Sterilization
Temperature
250 °F
(121 °C)
270 °F
(132 °C)
Sterilization
Time
30 minutes
4 minutes
Drying Time
(recommended)
30 minutes
8 minutes
See "Sterilization programs" on page83 for the full list of key
program features, including sterilization time, temperature, drying
time and recommended load type.
10 Lexa| Instructions for Use |MN-111 ENG Rev14 |03/04/2023 |© W&H Sterilization Srl
Page 11
USER QUALIFICATION
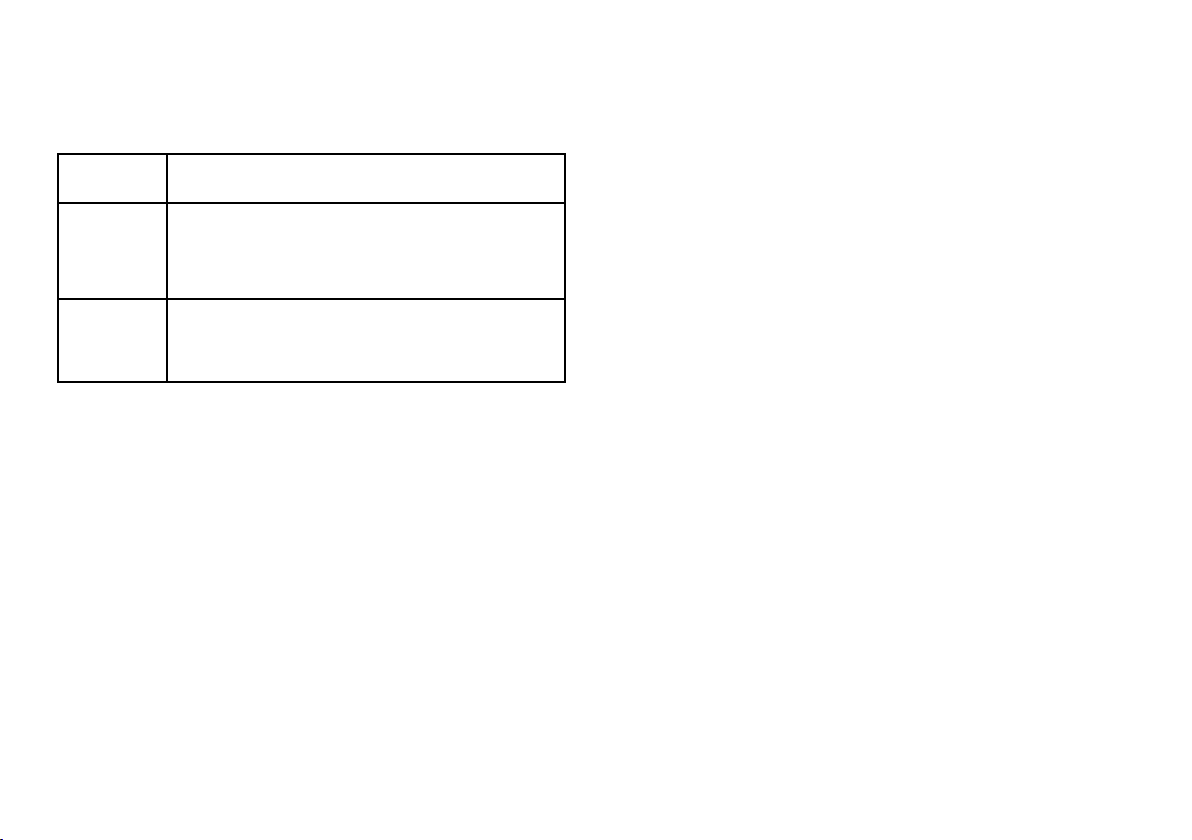
The users who may operate the sterilizer are the following.
Introduction
User
qualification
Head of the
clinic/practice
Trained
operators
Competences
Legally responsible for:
n the efficiency of the hygiene protocol in place
n the sterilization process
n the operators' training and training documentation
n the correct operation and maintenance of the equipment
n Regularly attend the training for operating and using the
sterilizer safely.
n Use the sterilizer according to the Head of the
clinic/practice's instructions.
Lexa| Instructions for Use |MN-111 ENG Rev14 |03/04/2023 |© W&H Sterilization Srl 11
Page 12
Safety information
CONTENTS
This section deals with the following subjects:
Safety warnings 12
Responsibility 14
Safety warnings
THERMAL HAZARDS
n The chamber automatically begins to heat to
high temperature as soon as the sterilizer is
switched on – risk of burns!
n The trays and the sterilization load are hot at
the end of each cycle. Use tray or cassette
holders to empty the sterilization chamber.
n Always wear appropriate PPE during use of the
sterilizer (e.g. gloves for cleaning, maintenance,
etc...).
ELECTRICAL RISKS
n Do not pour water or any other liquids over the
sterilizer (risk of electrical short circuits).
n Switch off the sterilizer and unplug the mains
cable before inspecting, carrying out
maintenance or servicing the sterilizer.
n Ensure that the power receptacle the sterilizer
is connected to is properly grounded.
n All electric devices connected to the sterilizer
shall be of Insulation Class II (double insulated)
or higher.
n Use only the power cord provided by the
manufacturer.
IMPROPER USE OF THE STERILIZER
n The sterilizer must not be used in presence of
explosive or flammable gases, vapors, liquids
or solids.
n The sterilizer has not been designed for the
sterilization of foodstuff or waste.
n Do not exceed the maximum load weight limits
as specified in this manual (see "Run a
sterilization cycle" on page49).
n Do not drink any water that has been inside the
sterilizer.
12 Lexa| Instructions for Use |MN-111 ENG Rev14 |03/04/2023 |© W&H Sterilization Srl
Page 13
Safety information
TAMPERING
n Do not remove the name plate or labels from
the sterilizer.
n Repairs, maintenance or service must be
carried out by authorized service providers
always using genuine spare parts.
REQUIREMENTS
n All accessories connected to the sterilizer shall
be FDA cleared.
n Use only the power cord set and accessories
provided by the manufacturer.
n Serious incidents that have occurred in relation
to this medical device should be reported to the
manufacturer and competent authority in the
country where the incident occurred.
n In case of malfunction of the sterilizer, contact
an authorized technician or the manufacturer.
CYBER SECURITY
The device is designed in such a way that a cyber-attack or software
failure does not compromise the safety in relation to the intended
use. A successful cyber-attack cannot result in direct patient harm:
in fact, the device is not in contact with patients.
The device does not share any data (sensible and not sensible)
related to patients.
To further protect the device and minimize successful cyber-attacks,
the following precautions have been taken:
n the access to the device operating system is not possible (user
access to the operating system is disabled);
n a firewall is active on the device; all the device network
connections (to and from the external world) are managed by
the firewall which, following specific rules, filters them and
blocks everything that is not strictly necessary for the device;
n the update/install operations are only possible using signed
and encrypted software, provided by W&H;
n during the normal use, the operating system and the
application (responsible for the device functionalities) are
located in a read- only memory, so to avoid intentional
corruption;
n all the sterilization data are secured by means of checksum
controls.
In order to minimize the possibility of cyber- attacks, it is user
responsibility to apply the following measures:
n software update/install shall be done by authorized and trained
personnel only;
n it is recommended to activate a firewall on the router/modem
used for the internet connection.
Note: further security information is mentioned in the MDS2 document,
which is available on request.
Lexa| Instructions for Use |MN-111 ENG Rev14 |03/04/2023 |© W&H Sterilization Srl 13
Page 14

Safety information
Responsibility
USER RESPONSIBILITY
n The user is responsible for the proper installation, the correct
use and maintenance of the sterilizer in accordance with these
Instructions for Use.
n The safety devices of the sterilizer are impaired when the
product itself is not installed, used and serviced in accordance
with these Instructions for Use.
n The Instructions for Use updated to the latest version is always
available at www.wh.com.
n Keep these Instructions for Use for future reference.
MANUFACTURER RESPONSIBILITY
n The manufacturer can only accept responsibility for the safety,
reliability and performance of the product when the product
itself is installed, used and serviced in accordance with the
Instructions for Use.
n Servicing by unauthorized persons invalidates all claims under
warranty and any other claims.
14 Lexa| Instructions for Use |MN-111 ENG Rev14 |03/04/2023 |© W&H Sterilization Srl
Page 15
Getting started
CONTENTS
This section deals with the following subjects:
Unpacking 15
Handling 18
Product description 19
Installing the sterilizer 23
Operating the sterilizer 27
User interface menu 28
Sterilizer setup 34
ioDent 35
User authentication (optional) 35
EliTrace (optional) 36
USB pen drive 37
Standby mode 37
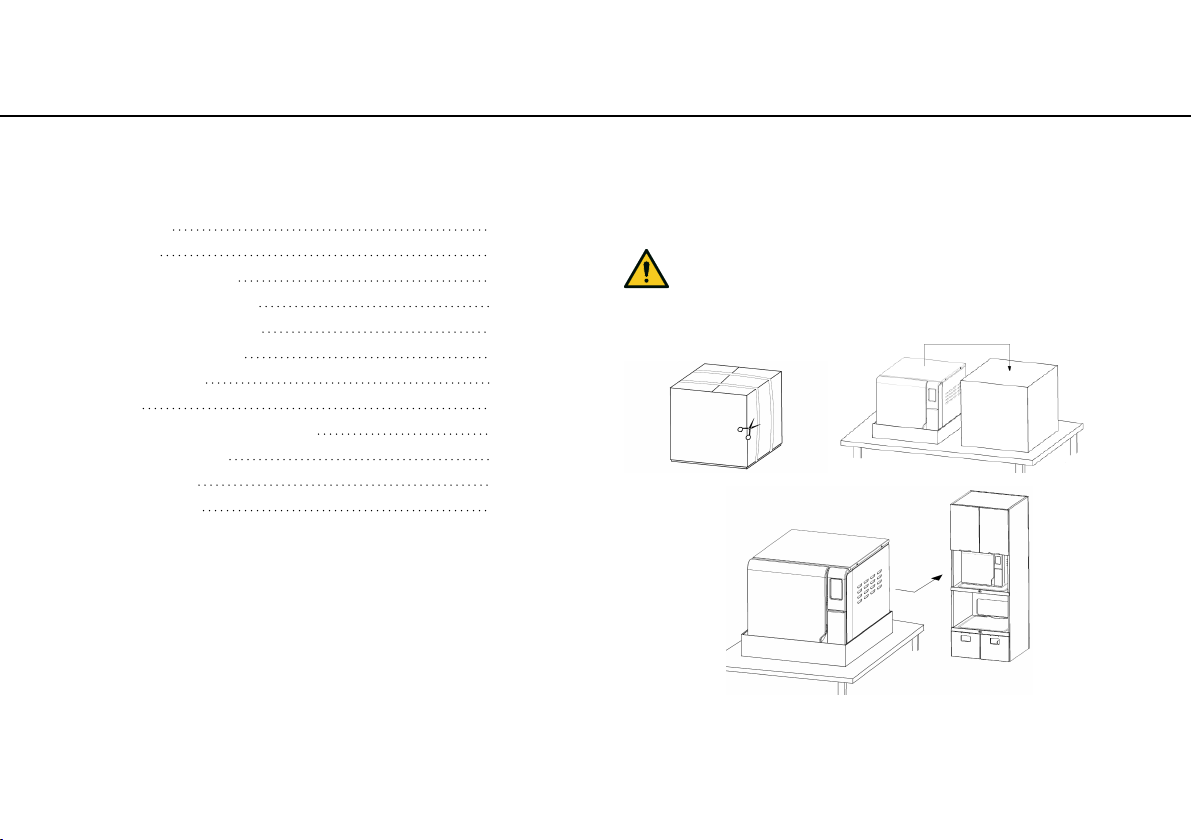
Unpacking
UNPACK THE STERILIZER
CAUTION! Heavy product. The sterilizer must be removed
from the box and transported by two authorized technicians.
Weight: 105.8 lbs (48 kg)
Lexa| Instructions for Use |MN-111 ENG Rev14 |03/04/2023 |© W&H Sterilization Srl 15
Page 16
Getting started
WARNINGS
Notice: check the external conditions of the box and the sterilizer. In
case of any damage, immediately contact the dealer or shipping
agent that has carried out the transport. Keep the packaging for
shipping or transporting the sterilizer in the future.
Note: the packaging of the product is environmentally friendly and can be
disposed of by industrial recycling companies.
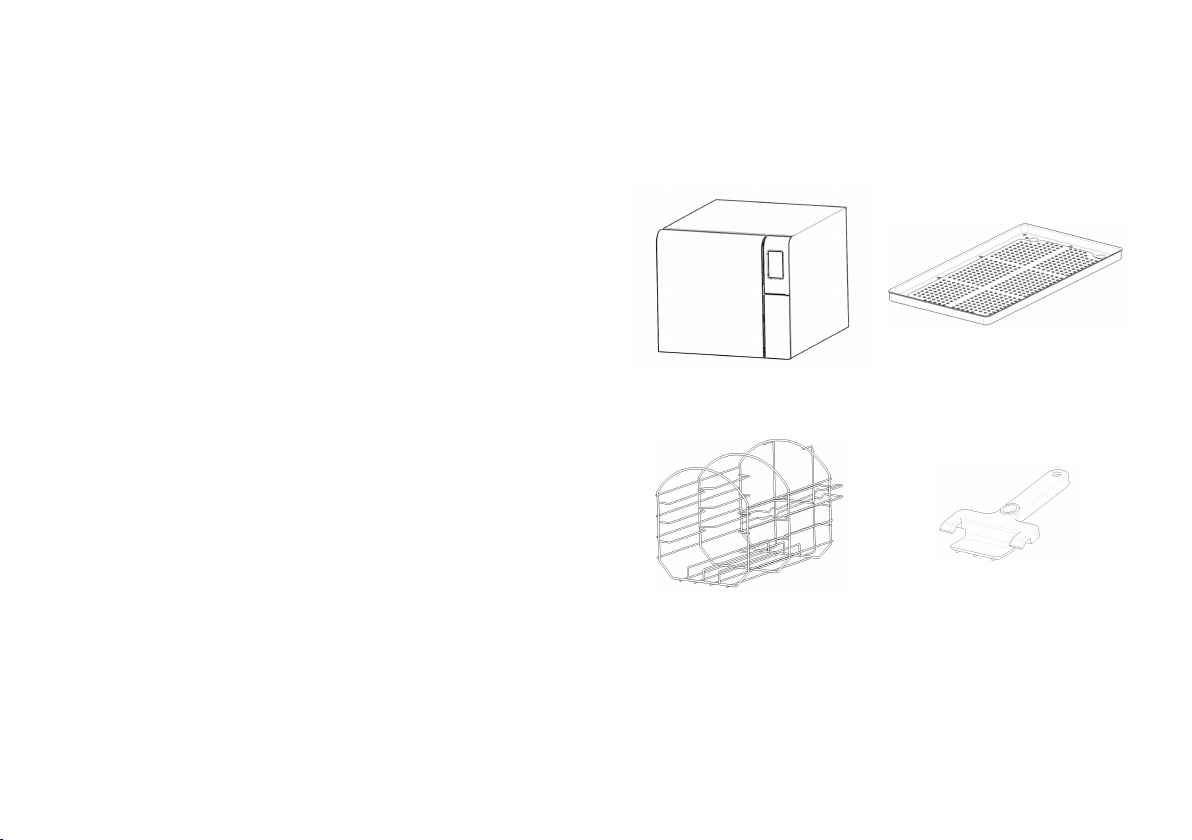
CONTENTS OF THE PACKAGING
Sterilizer Trays (four)
Chamber rack Tray holder
16 Lexa| Instructions for Use |MN-111 ENG Rev14 |03/04/2023 |© W&H Sterilization Srl
Page 17
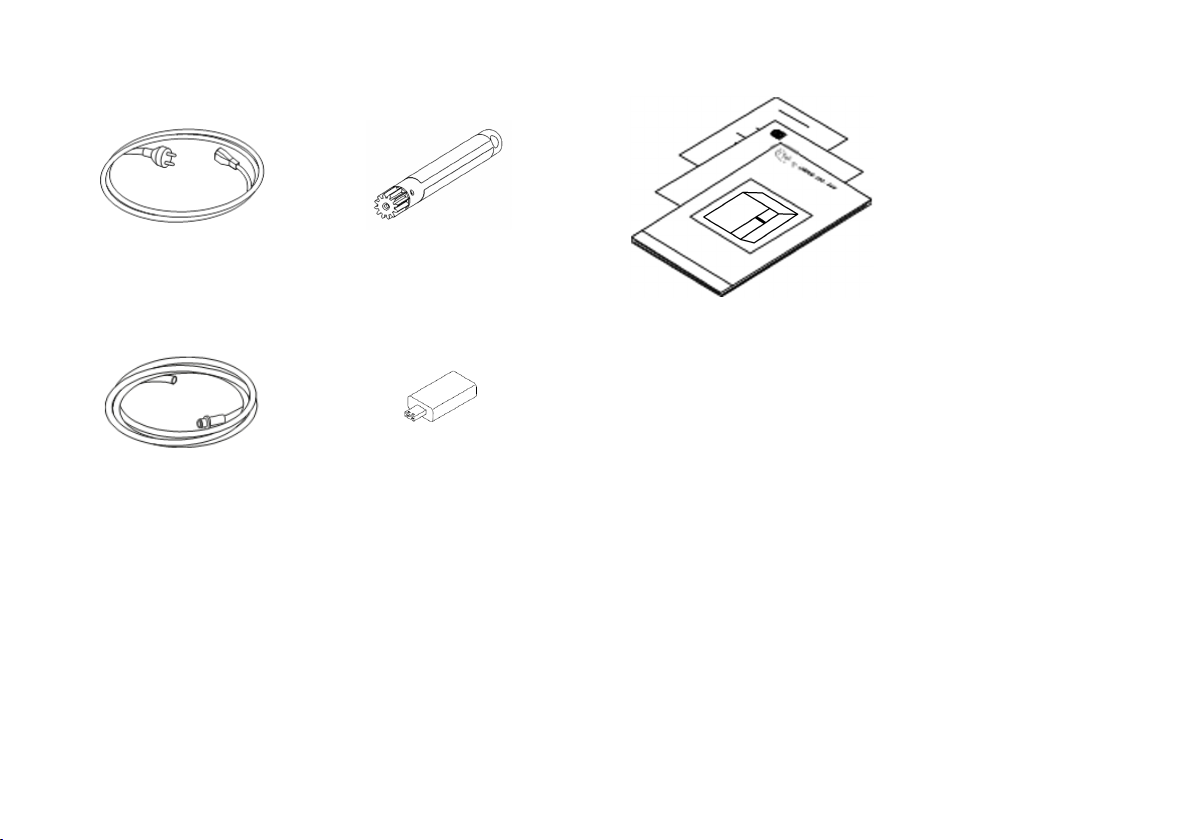
Power cord Emergency door opening tool
Drain tube USB pen drive loaded with
Instructions for Use
Getting started
This manual, declaration of
conformity, warranty card, work
test report
ITEMS NOT PROVIDED WITH THE STERILIZER
The following items are not provided:
n Water container to capture waste water during manual tank
draining (volume larger than 1.84 gal (7 l)).
n LAN cable for connecting the sterilizer to a network (optional).
See "Accessories, spare parts, consumables" for a full list of optional
accessories.
Lexa| Instructions for Use |MN-111 ENG Rev14 |03/04/2023 |© W&H Sterilization Srl 17
Page 18

Getting started
Handling
HOW TO RELOCATE THE STERILIZER
Before transport:
n Completely drain both water tanks (see "Draining the used and
clean water tank" on page67).
n Allow the sterilization chamber to cool down.
n Use original packaging when shipping or transporting the
sterilizer. Replacement packaging materials are available from
Service W&H.
18 Lexa| Instructions for Use |MN-111 ENG Rev14 |03/04/2023 |© W&H Sterilization Srl
Page 19
Product description
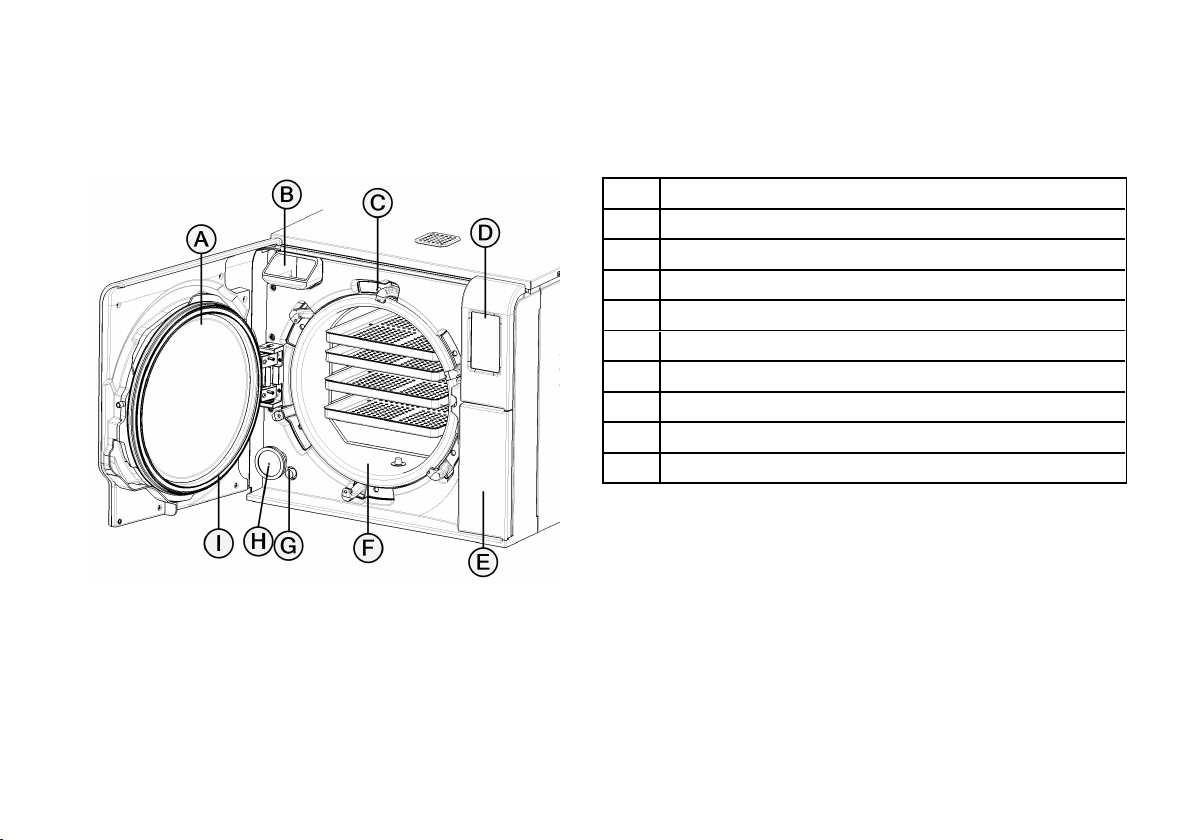
FRONT VIEW
Part Description
Chamber door
A
Clean water tank
B
Door locking system
C
Touch screen
D
Service door
E
Sterilization chamber
F
G
Safety thermostat reset
HEPA filter
H
Door gasket
I
Getting started
Lexa| Instructions for Use |MN-111 ENG Rev14 |03/04/2023 |© W&H Sterilization Srl 19
Page 20
Getting started
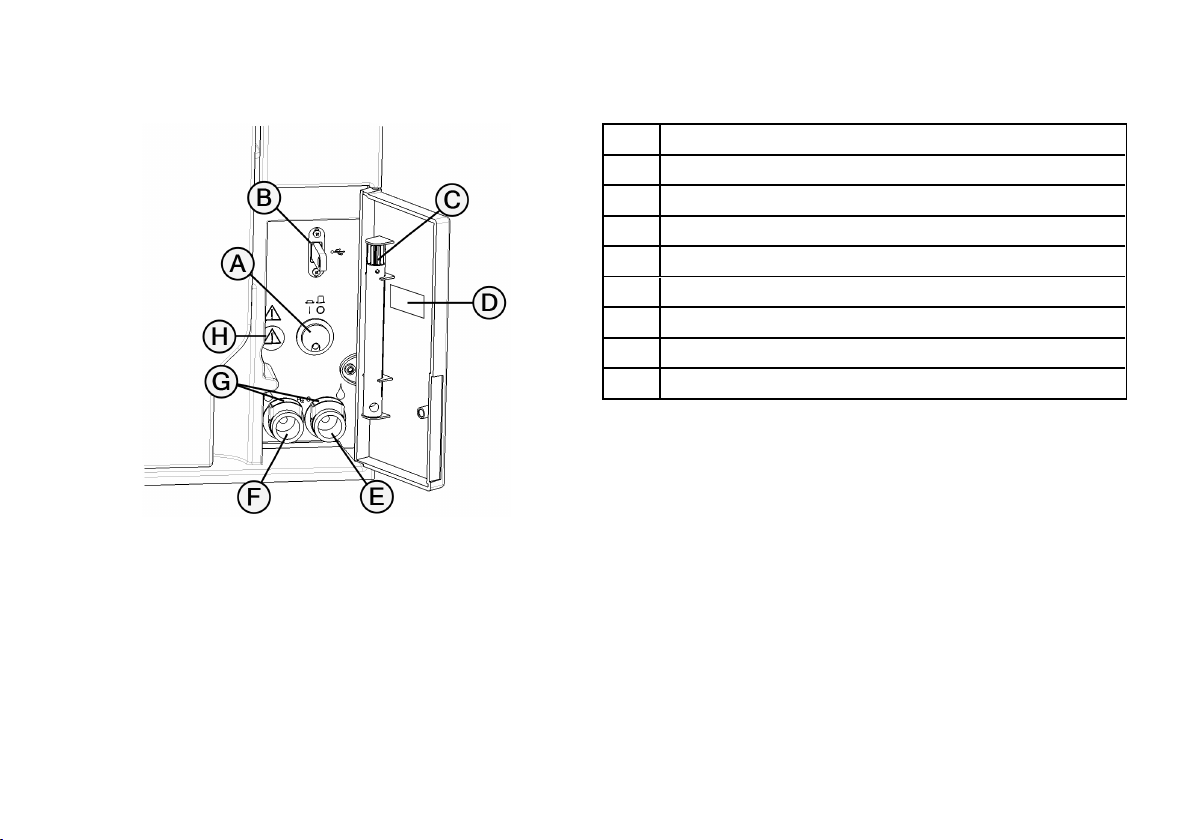
COMPONENTS BEHIND THE SERVICE DOOR
Part Description
Mains switch
A
USB port
B
Emergency door opening tool
C
Identification label
D
Used water drain connection (grey)
E
Clean water drain connection (blue)
F
Drain tube release buttons
G
Port for emergency door opening tool
H
20 Lexa| Instructions for Use |MN-111 ENG Rev14 |03/04/2023 |© W&H Sterilization Srl
Page 21
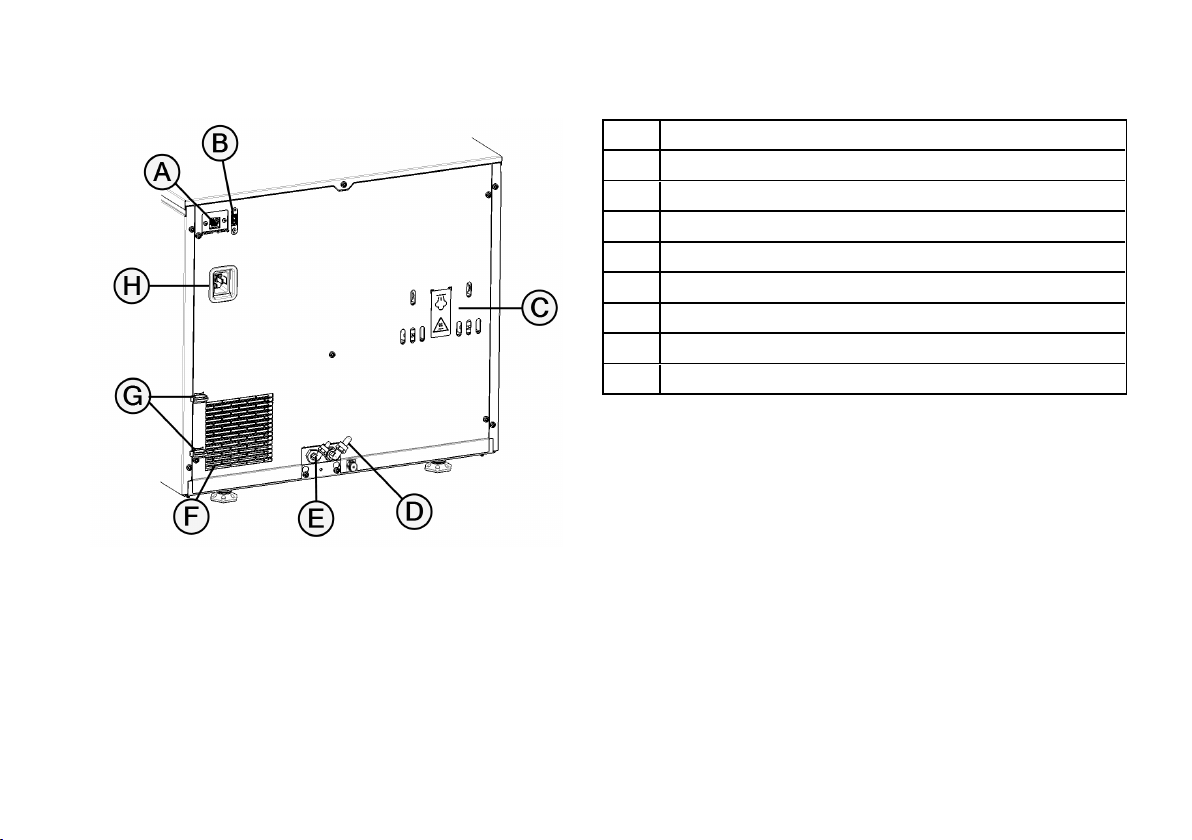
REAR VIEW
Part Description
A
LAN port (KIT)
B
USB port
C
Pressure safety valve cover
D
Used water drain (optional)
E
Water supply inlet (optional)
F
Condenser grid
Power cord guides
G
Power cord socket
H
Getting started
Lexa| Instructions for Use |MN-111 ENG Rev14 |03/04/2023 |© W&H Sterilization Srl 21
Page 22
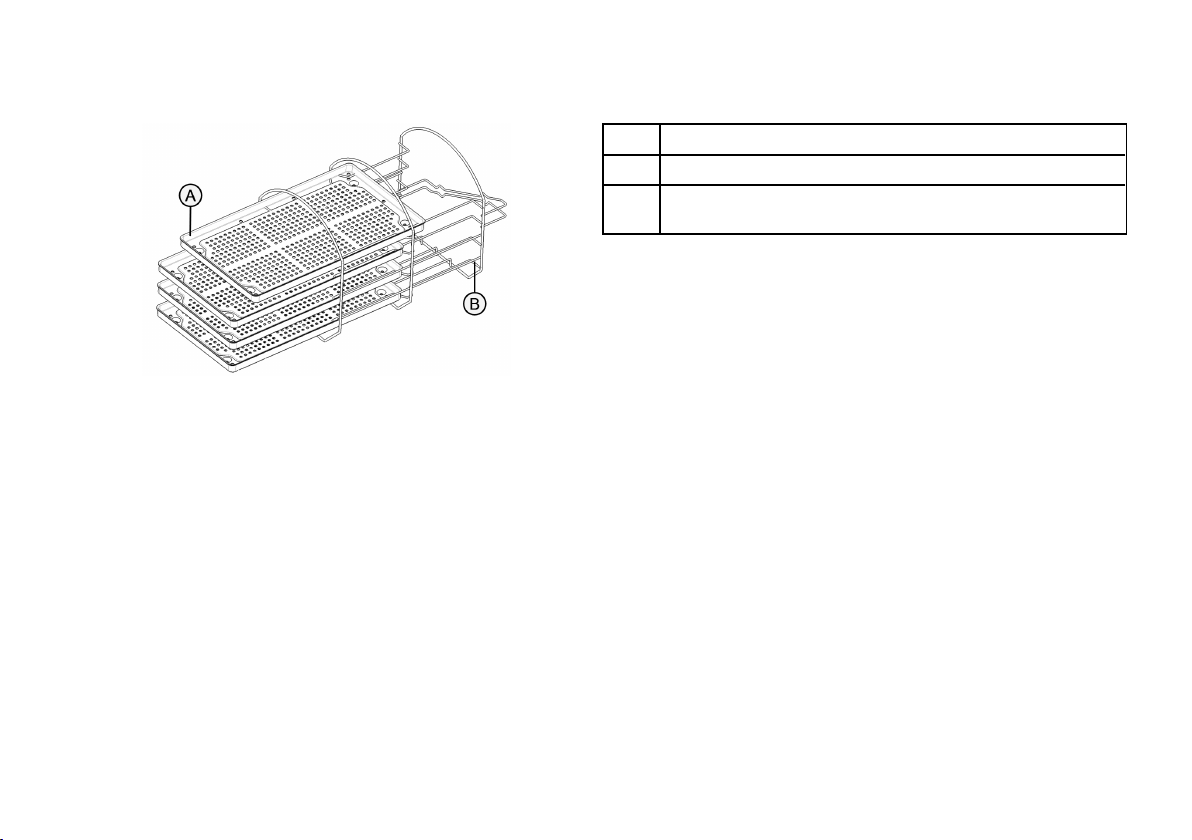
Getting started
CHAMBER ACCESSORIES
Part Description
A
Tray
B
Chamber rack. It can host trays or cassettes inserted horizontally or
vertically.
22 Lexa| Instructions for Use |MN-111 ENG Rev14 |03/04/2023 |© W&H Sterilization Srl
Page 23
Getting started
Installing the sterilizer
LOCATION REQUIREMENTS
Notice:
Do not place the sterilizer so that it is difficult to operate the controls
behind the service door. Do not place the sterilizer so that it is
difficult to disconnect the power cord.
Leave the condenser grid (rear side of the sterilizer) free from
anything that might obstruct the air passage.
Surface materials should be water resistant. If sterilization cycles
will be continuous, pay attention to the surrounding materials: steam
can damage them.
The sterilizer must operate in absence of explosive atmospheres.
The sterilizer must operate in a well ventilated room (indoor), far
from sources of heat and from flammable materials.
Place the sterilizer on a flat and level surface.
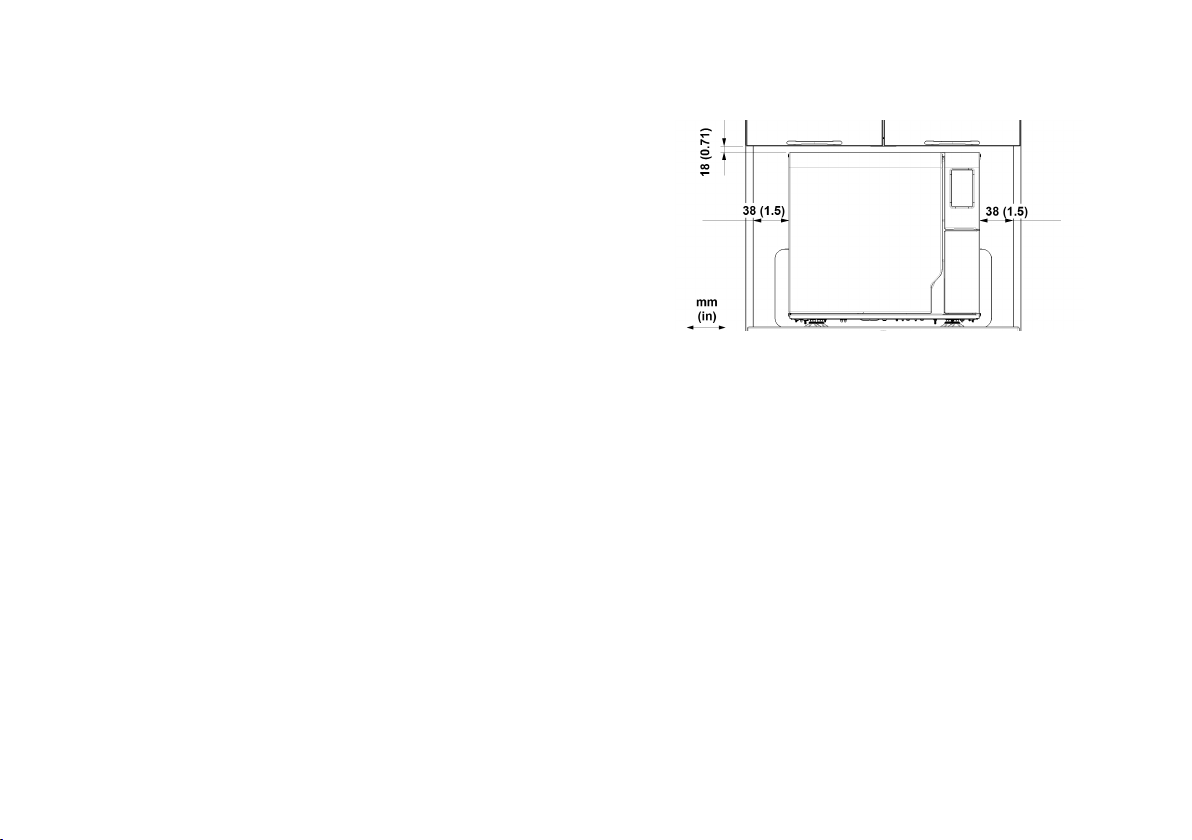
Clearance requirements to ensure proper air circulation:
ELECTRICAL CONNECTIONS
All the cables and tubes connected on the rear side of the sterilizer
must be placed far from the condenser grid (e.g. using the available
guides).
Notice:
Connect the sterilizer to a dedicated line. Do not use cable
extensions nor multiple sockets/adapters.
Ensure that external and internal surfaces are free from moisture or
condensation before connecting to power.
The installation of the sterilizer shall be performed by two authorized
technicians using PPE (Personal Protective Equipment) according to
applicable standards.
The electrical power supply of the sterilizer must fulfill all applicable
standards in the country of use, and must comply with the data label
on the back of the sterilizer.
Lexa| Instructions for Use |MN-111 ENG Rev14 |03/04/2023 |© W&H Sterilization Srl 23
Page 24

Getting started
WATER CONNECTIONS
The sterilizer clean water tank can be filled manually by the user or
automatically with a water supply system . The water supply system
must deliver demineralized or distilled water meeting the
specifications listed in these instructions. Do not add any
chemical/additive to the water.
The manufacturer’s warranty is void if the sterilizer was used with
water containing either chemical additives, or contaminant levels
exceeding those listed in these instructions. See "Feed water
specifications (ANSI/AAMI and AAMI TIR34)" on page95.
Notice: the maintenance of the external water filling system must be
done in exact accordance with the Instructions for Use given with the
relevant system.
WATER TANKS
At every cycle the sterilizer uses new fresh water and, at the end of
the cycle, discharges it. Thus, the sterilizer is fitted with two water
tanks : the clean water tank and the used water tank.
For this reason is necessary to periodically fill the clean water tank
and draining the used water tank.
FILLING THE CLEAN WATER TANK
Notice:
Before carrying out the following steps, make sure that the sterilizer
has completed the cycle in progress.
Always wear appropriate PPE during use of the sterilizer (e.g. gloves
for cleaning, maintenance, etc...).
1 If switched-off, switch the sterilizer ON. If the clean water tank is
almost empty, an alert appears on the display.
2 Open the chamber door.
3 Fill the clean water tank with a water container (app. 1.7 gal
(6.4 l)).
Notice: the water must be demineralized or distilled meeting
the specifications listed in these instructions (see "Feed water
specifications (ANSI/AAMI and AAMI TIR34)" on page95). Do not
add any chemical / additive to the water.
Notice: take care not to pour the clean water out of the tank.
4 Once the clean water tank is almost full, an audible tone
sounds; stop filling.
24 Lexa| Instructions for Use |MN-111 ENG Rev14 |03/04/2023 |© W&H Sterilization Srl
Page 25
Getting started
DRAINING THE USED AND CLEAN WATER TANKS
Notice:
Before carrying out the following steps, make sure that the sterilizer
has completed the cycle in progress.
Always wear appropriate PPE during use of the sterilizer (e.g. gloves
for cleaning, maintenance, etc...).
1 If the used water tank is almost full, an alert appears on the
display.
2 Open the service door at the front of the sterilizer.
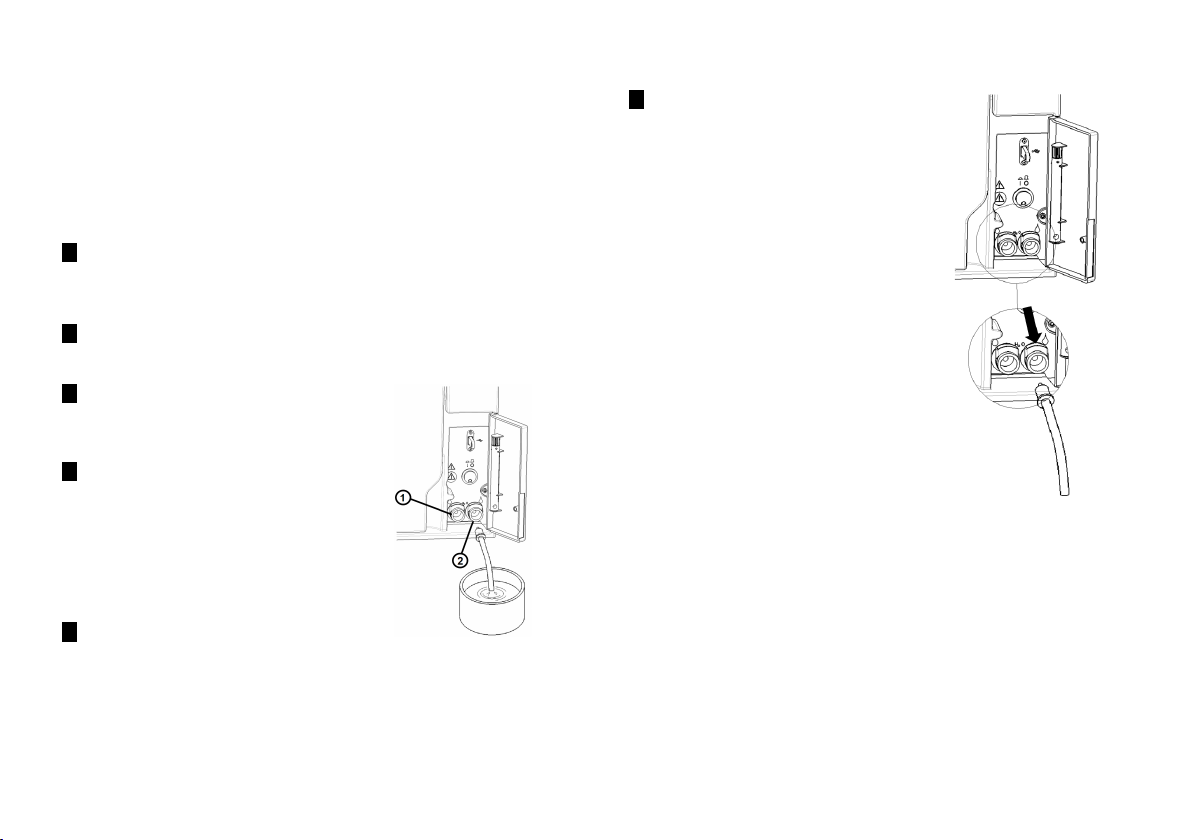
3 Put a container (1.84 gal (7 l) min)
below the sterilizer and insert into it
the free end of the drain tube.
4 Plug the other end of the drain tube
into the drain connector until it
clicks. Make sure that the connector
is firmly engaged.
Use left connector (blue, 1) for the
clean water and the right connector
(grey, 2) for the used water.
5 Let the water flow from the tank
completely.
6 Press the push-button on top of the
quick connector to dislodge the
drain tube.
Lexa| Instructions for Use |MN-111 ENG Rev14 |03/04/2023 |© W&H Sterilization Srl 25
Page 26
Getting started
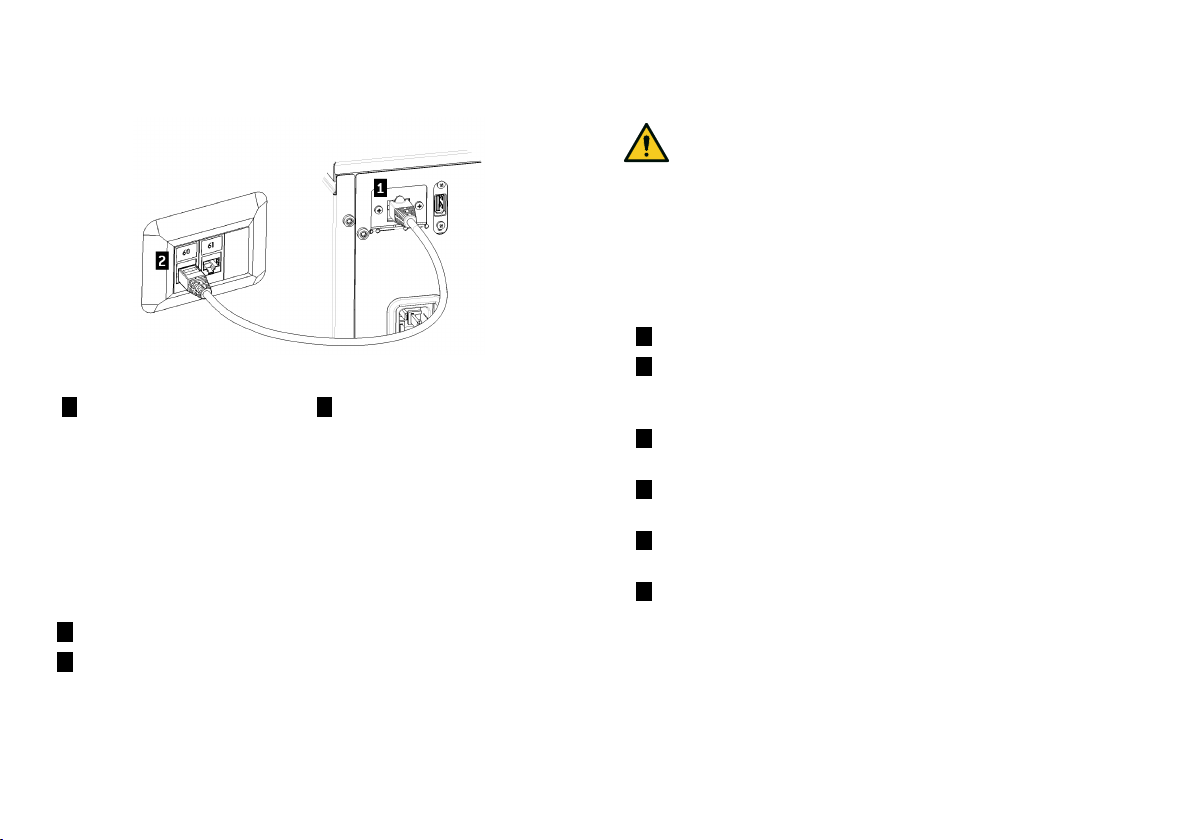
LAN CONNECTION (OPTIONAL)
1 Insert a standard Ethernet
cable in the LAN port of the
sterilizer.
2 Insert the other end of the
cable in the LANport of your
computer or computer
network: when the sterilizer
will be switched on it will
connect automatically to the
LAN.
WI-FI CONNECTION
For the Wi-Fi connection proceed as follows:
1 Insert the Wi-Fi dongle key in the USB port.
2 Read the Instructions for Use provided with the Wi-Fi dongle key.
INSTALLING THE STERILIZER
WARNING! In case of sterilizer malfunctions immediately
unplug the sterilizer and call for service. Do not attempt to
repair the sterilizer by yourself.
Notice:
Please ensure that all installation requirements are met before
plugging the sterilizer. See "Connection diagrams" on page94.
No other devices should be connected to the sterilizer power panel
circuit.
1 Place the sterilizer on a sturdy, flat and level surface.
2 Open the chamber door, remove all items from the sterilizer
chamber except the chamber rack. Remove all plastic covers
from trays.
3 Connect the auto-fill and auto-drain tubes in the rear of the
sterilizer (optional).
4 Connect the Ethernet cable or the Wi-Fi dongle key in the rear of
the sterilizer (optional).
5 Attach the power cord to the socket in the rear of the sterilizer
and route the cord through the cable guides.
6 Connect the power cord to a wall outlet. For power supply
requirements, see "Technical data" on page92.
26 Lexa| Instructions for Use |MN-111 ENG Rev14 |03/04/2023 |© W&H Sterilization Srl
Page 27
Getting started
Operating the sterilizer
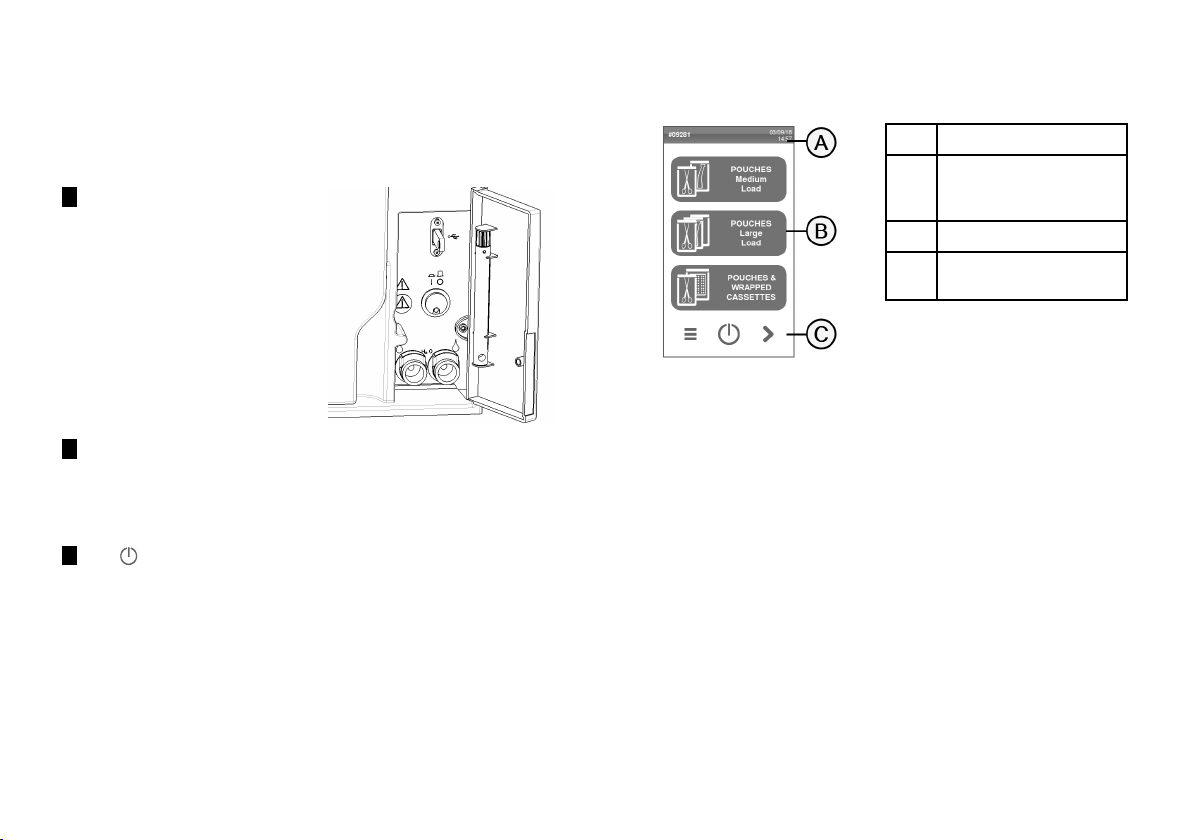
POWER THE STERILIZER ON/OFF
1 Press the power switch behind
the service door: once
switched ON, the visual
indicator on the power switch
turns green.
2 After a quick autotest the sterilizer automatically turns in
Standby mode. See "Standby mode" on page37.
Note: at the first start-up of the sterilizer, the Guided Configuration
procedure automatically appears; see "Sterilizer setup" on page34.
3 Tap . The homepage appears with the enabled sterilization
cycles.
HOMEPAGE DESCRIPTION
Part Description
Title/purpose of the screen,
A
or the cycle number and the
current date and time.
Available cycles and tests.
B
Additional buttons used to
C
navigate the menu.
Lexa| Instructions for Use |MN-111 ENG Rev14 |03/04/2023 |© W&H Sterilization Srl 27
Page 28
Getting started
User interface menu
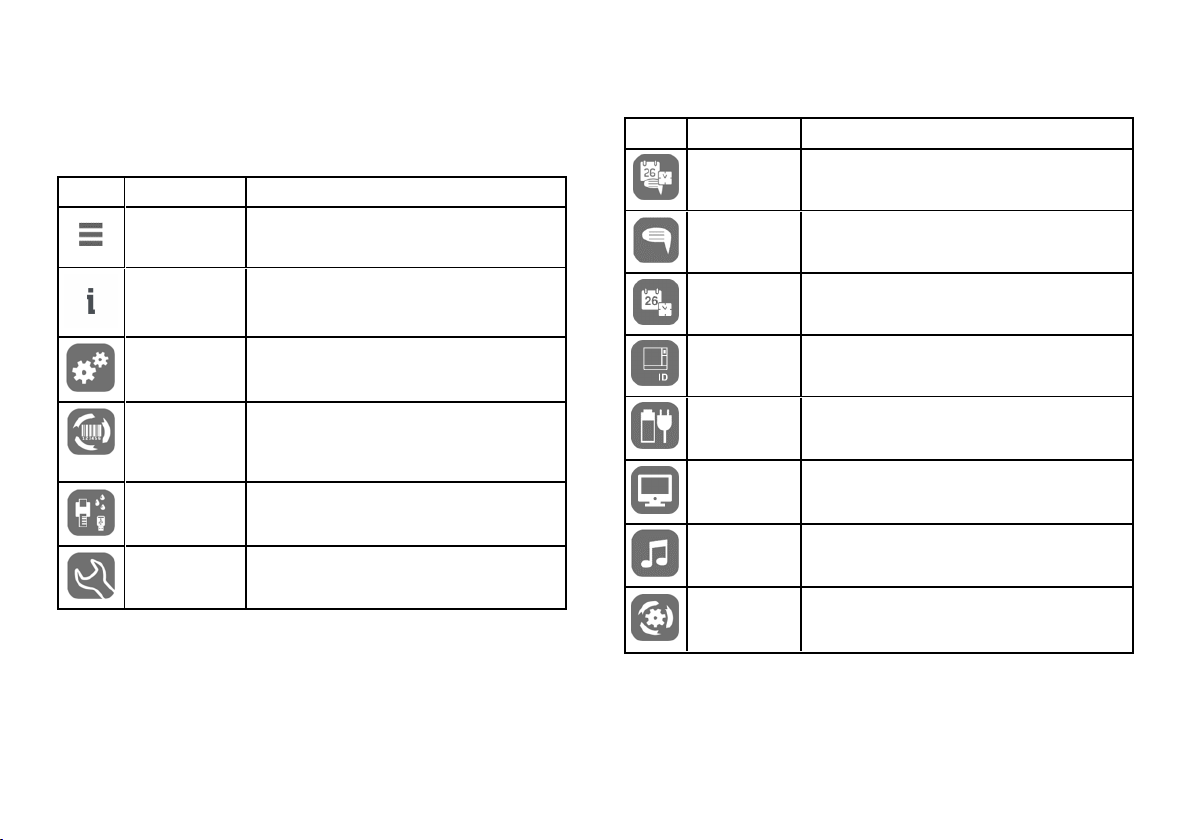
MAIN MENU FUNCTIONS
Icon Label Function
Menu
System Info
Device Settings
Traceability
Accessories
Maintenance
Opens the menu.
n Shows the system information.
n During a cycle, shows the cycle parameters.
Opens the pages to sterilizer management.
Opens the pages to:
n monitor the performed cycle data.
n manage users.
n set the label printing options.
Opens the pages to accessories management.
Carries out the maintenance procedure.
DEVICE SETTINGS MENU FUNCTIONS
Icon Label Function
Device
Language
Date & Time
Sterilizer Name
Energy
Management
Display
Audio
Cycle
Opens the pages to set the device.
Sets device language.
Sets date and time format, current date and time and
time zone.
Sets the sterilizer name.
Changes the standby mode delay.
Sets the display brightness.
Manages the sterilizer sounds.
Opens the pages to manage cycles.
28 Lexa| Instructions for Use |MN-111 ENG Rev14 |03/04/2023 |© W&H Sterilization Srl
Page 29
Getting started
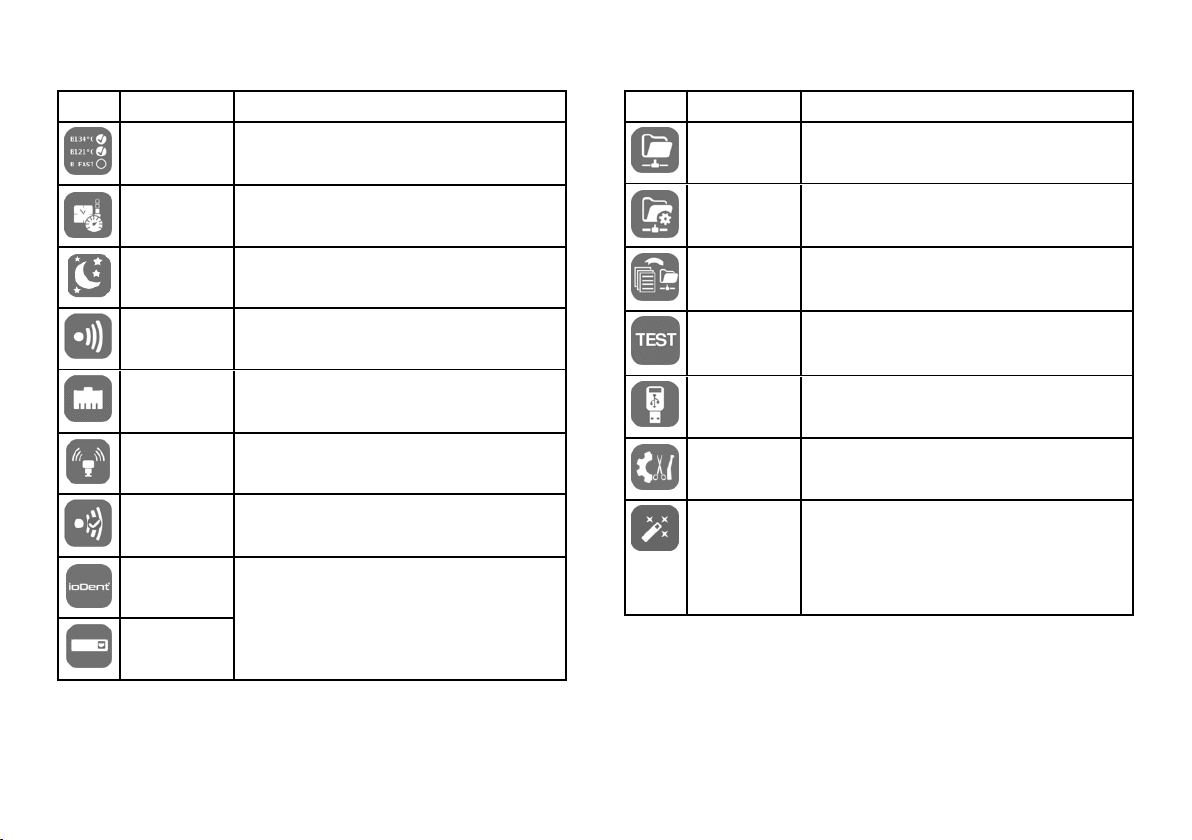
Icon Label Function
Cycle Exclusion
Measurement
Units
Daily Cycle
Program
Connectivity
Ethernet
WI-FI
Network Status
Sets the cycles menu.
Sets the unit of measure (temperature, water
conductivity and pressure).
Programs a sequence of cycles to be run on daily
basis.
Opens the pages to manage the network connection.
Manages the Ethernet network.
Allows wireless network selection and configuration.
Only with a network connection set. Provides
information about the network status.
IoDent
Only if this service is supported in the country of use,
and if the sterilizer is connected to it. Shows the
status of the connection with the W&H monitoring
Akidata status
server.
Icon Label Function
Remote Data
Storage
Settings
Only with a network connection set. Opens the page
to manage the remote storage.
Only with a network connection set. Sets the
parameters of the network location.
Save all
Only with a network connection set. Copies all the
files in the specified location in the network.
Test
Only with a network connection set. Checks if the
files can be copied to the specified location.
USB options
Traceability
Enables/disables USB warning messages.
Chooses if the sterilizer is master or slave.
Settings
Guided
Configuration
Allows to start the configuration of:
n language.
n network connection.
n time zone settings.
n date & time settings.
n sterilizer name.
Lexa| Instructions for Use |MN-111 ENG Rev14 |03/04/2023 |© W&H Sterilization Srl 29
Page 30
Getting started
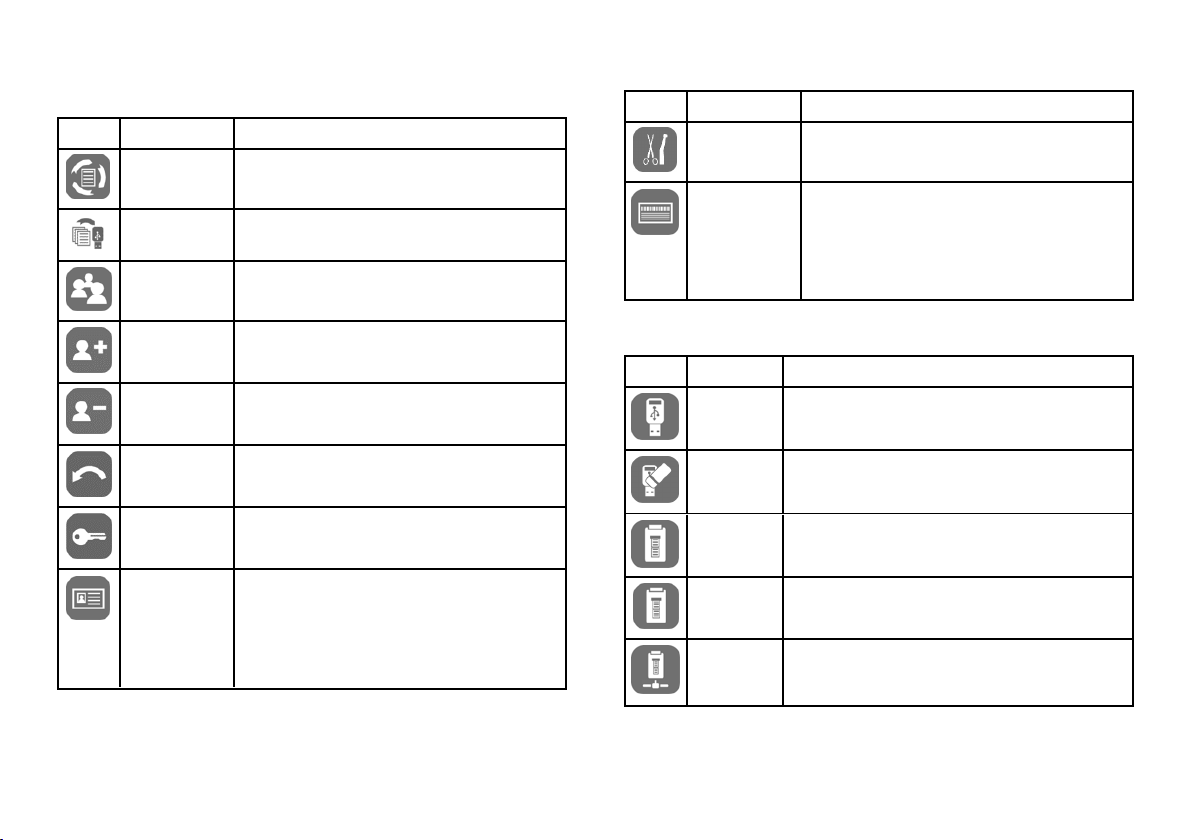
TRACEABILITY MENU FUNCTIONS
Icon
Label
Cycle History
Save
User
Management
Add User
Delete User
Reset user PIN
code
Change your
PIN code
Options
Shows all the sterilization cycles and tests and prints
reports and labels.
Saves all the sterilization cycle reports in the USB
pen drive.
Optional, activated with a special code. Permits
manage the users.
Administrator only. Adds a user.
Administrator only. Deletes a user.
Administrator only. Resets a user PIN code.
Changes the PIN code.
Optional, activated with a special code. Administrator
only. Permits the following:
n Identifies and saves the operator who starts
the cycle and releases the load.
n Protects with a password the cycle start, the
cycle stop and the load release.
Function
Icon
Label
EliTrace
Label Printer
Allows to manage the instrument database.
Optional, activated with an activation code.
n Enables/disables the printing of the labels.
n Sets the automatic or manual printing of the
labels.
n Sets the maximum storage time of the
wrapped sterilized items.
ACCESSORIES MENU FUNCTIONS
Icon Label Function
USB Pen
Drive
Format
Label Printer
Local Printer
Shared
Printer
Opens the formatting page of the USB pen drive.
Formats the USB pen drive.
Optional, activated with an activation code. Permits to
select the label printer and sets the printout layout.
Selects a printer connected to the sterilizer.
Selects a printer connected to another sterilizer
(connected via local network).
Function
30 Lexa| Instructions for Use |MN-111 ENG Rev14 |03/04/2023 |© W&H Sterilization Srl
Page 31
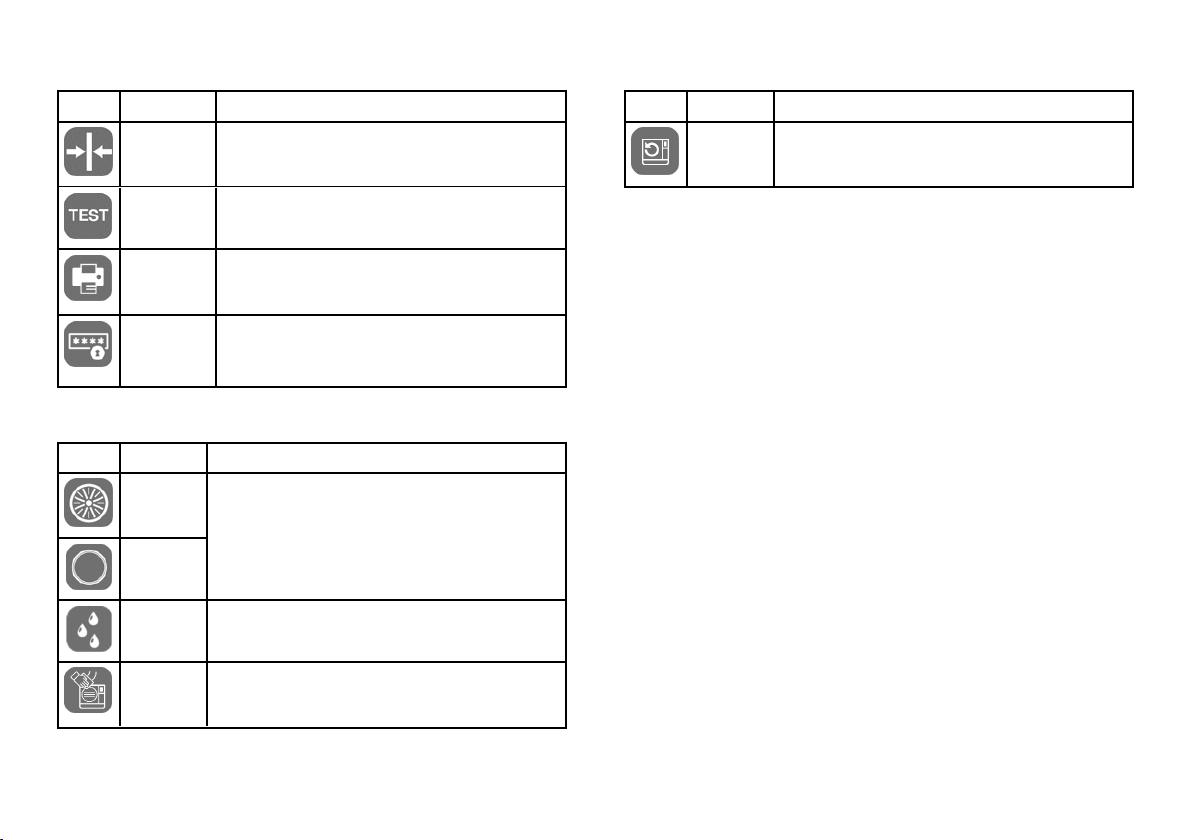
Getting started
Icon Label Function
Calibration
Test
Printer
Adjusts the label printer to the edge of the label.
Prints a test label.
Selects the printer model connected to the sterilizer. The
icon appears disabled if the printer/Ethernet cable/Wi-Fi
dongle key is not connected.
Special
Codes
Saves the codes issued by the manufacturer to activate
special functions.
Note: only for technical support..
MAINTENANCE MENU FUNCTIONS
Icon Label Function
Bact. Filter
Door
Gasket
Water
Chamber
Cleaning
n Shows the status of the consumables.
n Resets the cycle counter.
n Displays the consumable replacement procedure
videos.
Shows the water information (conductivity, clean water
tank level and dirty water tank remaining capacity).
n Shows the status of the cleaning operations.
n Resets the cycle counter.
n Displays the cleaning procedure videos.
Icon Label Function
System
Installs and upload the software.
Update
Lexa| Instructions for Use |MN-111 ENG Rev14 |03/04/2023 |© W&H Sterilization Srl 31
Page 32
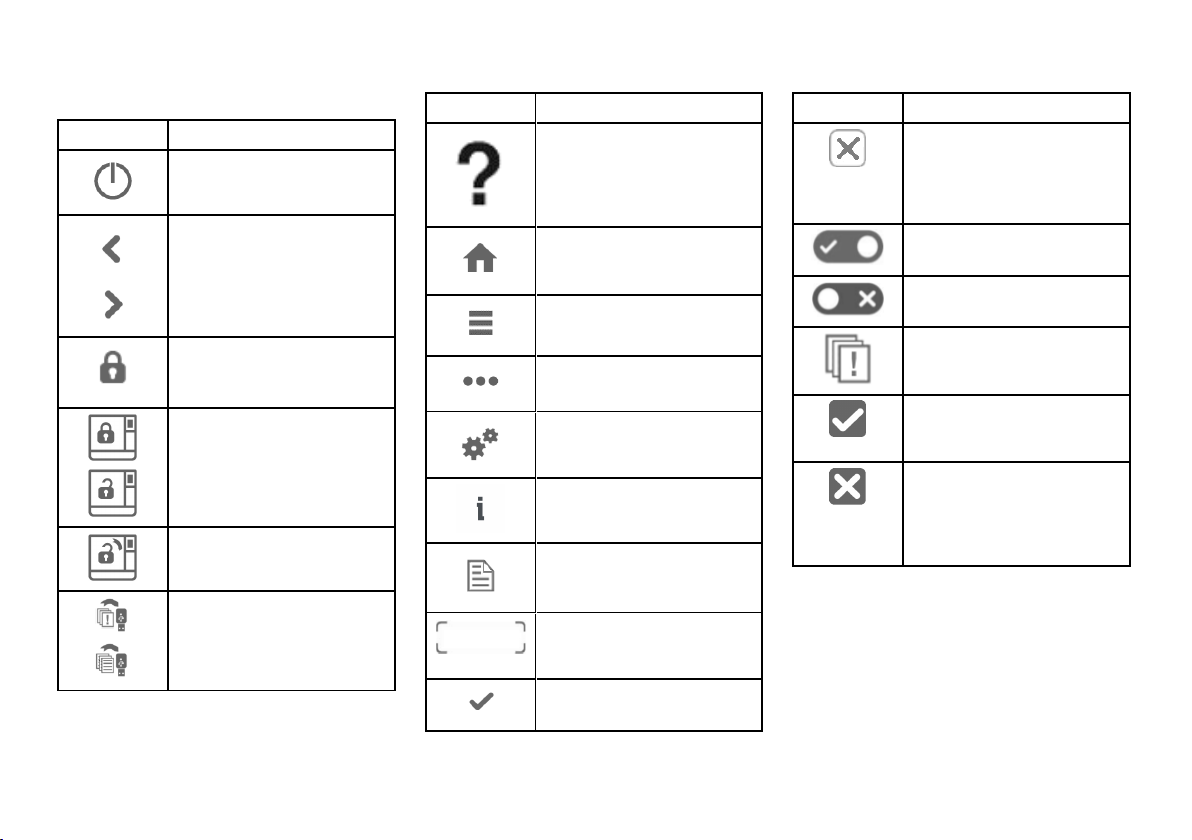
Getting started
COMMON COMMANDS AND ICONS
Icon Function
Enters/exits the standby mode.
Moves to the previous/next screen.
Indicates that the chamber door is
locked.
Indicates that the chamber door is
locking/unlocking.
Indicates that the chamber door is
unlocked and can be open.
Copy the error log/reports to the
USB pen drive.
Icon Function
Gives information about the current
function.
Opens the homepage.
Accesses to the sub-menus.
Opens a screen with other
settings/options.
Provides access to the SETTING
screen of a specific area.
Shows the list of all operating
parameters of the sterilizer.
Shows a sterilization summary.
Indicates the value that may be
changed and appears by clicking on
it.
Confirms the active option and
saves a setting or a parameter.
Icon Function
n Aborts the action/function.
n Moves to the previous screen
without confirming/making
any changes nor saving any
parameters.
Indicates that the option is ON and
allows to set it OFF by touching it.
Indicates that the option is OFF and
allows to set it ON by touching it.
Shows the error log.
Confirm the active option. Saves a
setting or a parameter. Answers YES
to a question.
Aborts the action/function. Moves to
the previous screen without
confirming/making any changes
nor saving any parameters.
Answers NO to a question.
32 Lexa| Instructions for Use |MN-111 ENG Rev14 |03/04/2023 |© W&H Sterilization Srl
Page 33
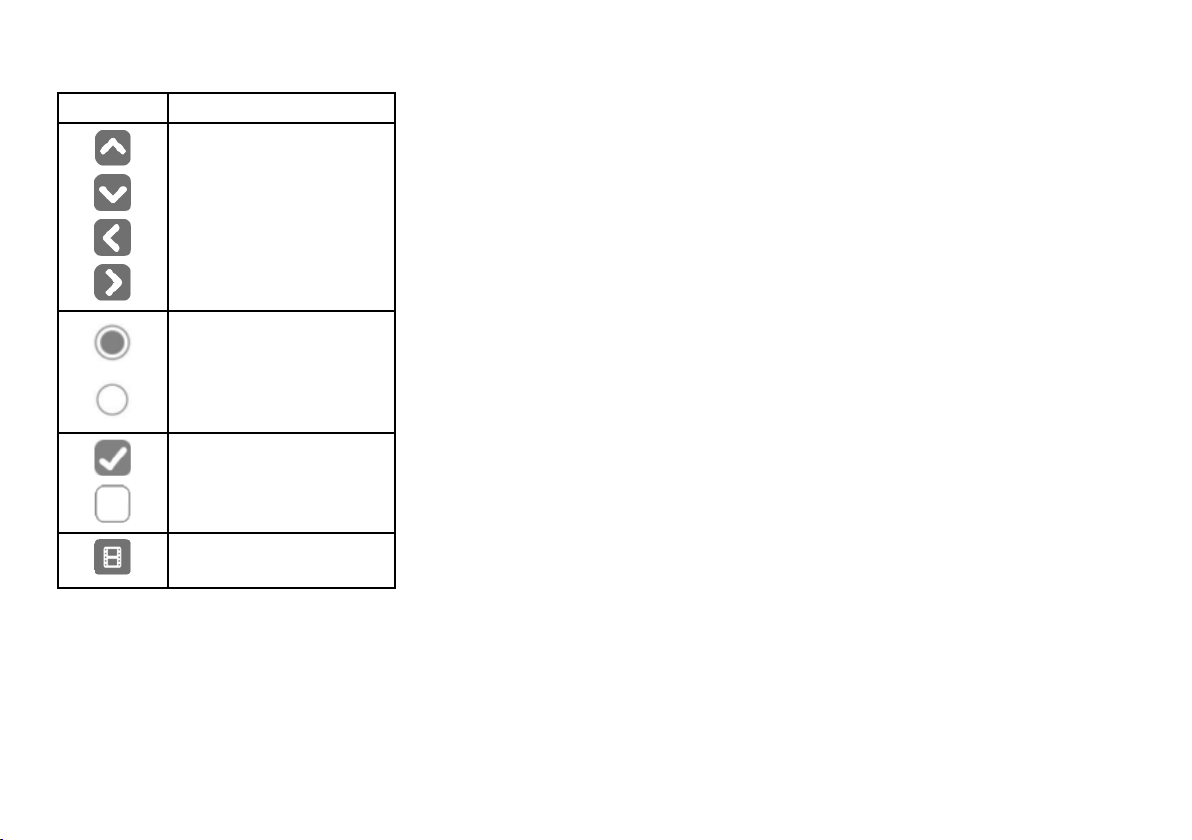
Icon Function
Increases/decreases the value.
Indicates that the option is
active/not active.
Indicates that the option is
enabled/disabled.
Show an animation about the
replacement procedure.
Getting started
Lexa| Instructions for Use |MN-111 ENG Rev14 |03/04/2023 |© W&H Sterilization Srl 33
Page 34
Getting started
Sterilizer setup
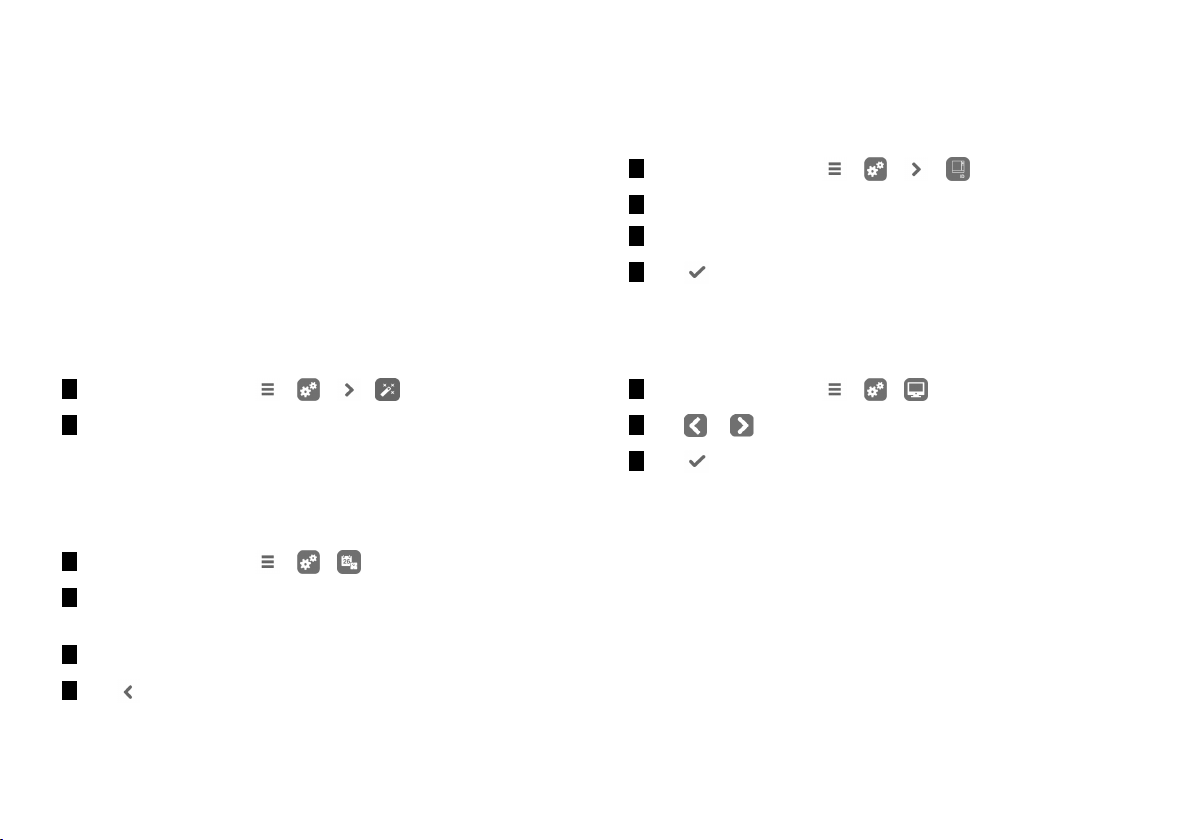
GUIDED CONFIGURATION
At the first start- up of the sterilizer, the Guided Configuration
procedure automatically appears; this procedure allows to set some
parameters of the unit, such as:
n Language
n Network connection (where applicable)
n Time zone settings
n Date & time settings
n Sterilizer name
At any time, to force the Guided Configuration:
1 On the homepage, tap > > >
2 Follow the Guided Configuration on the sterilizer screen.
SET THE DATE AND TIME
To change the date and time format, current date and time and time
zone:
1 On the homepage, tap > >
2 Tap the value you want to change (format, time, date and/or
time zone).
3 Tap the desired value.
SET THE STERILIZER NAME
To change the sterilizer name that appears in the cycle reports:
1 On the homepage, tap > > >
2 Tap the text box: a keyboard appears.
3 Enter the new sterilizer name.
4 Tap to confirm.
SET THE DISPLAY BRIGHTNESS
To change the display brightness:
1 On the homepage, tap > >
2 Tap or to change the value.
3 Tap to confirm.
CONNECT TO A NETWORK
If you connect through an Ethernet cable, in most cases the sterilizer
will connect to the network automatically. If it does not connect
automatically, or if you are using a Wi-Fi dongle key, follow the
following procedure under supervision of your IT manager / network
administrator.
4 Tap to confirm and go back to the previous page.
34 Lexa| Instructions for Use |MN-111 ENG Rev14 |03/04/2023 |© W&H Sterilization Srl
Page 35
Getting started
1 On the homepage, tap > > > .
2 If the connection is through the Ethernet cable, tap : the
TCP/IP screen appears.
3 If the connection is through Wi-Fi dongle key, tap : after a
while, the sterilizer shows the available networks found. Choose
the network, enter the credentials in the following screen, then
tap to confirm:the TCP/IP screen appears.
Note: the and icons are disabled if the connectivity means
(cable or Wi-Fi dongle key) are not properly plugged.
Note: in the TPC/IP screen, the icon is visible only if you make
any change. The Wi-Fi icon at the bottom isn't visible if you connect
through Ethernet cable.
4 If your network supports dynamic IP addresses (ask your
ITmanager), enable the options Dynamic both in IP
Configuration and in the DNS Configuration fields, then tap
to confirm: all entry fields are disabled.
5 If your network does not support dynamic IP addresses (ask
your ITmanager), enable the options Static both in IP
Configuration and in the DNS Configuration fields. Tap on
each entry field and enter the IP addresses (ask your IT
manager for details). Then tap to confirm.
ioDent
DESCRIPTION
It allows to save the data securely and automatically on the cloud
and it ensures intelligent and networked reprocessing of
instruments, with a wide selection of smart solutions and options.
ACCESS TO IODENT
For the ioDent access proceed as follows:
1 On the homepage, tap > > > > .
Note: for more information see the dedicated documentation.
User authentication (optional)
FUNCTION AVAILABILITY
To access the user management functions a special code must be
entered. The special code is required only at the first access to the
User Management ( ) or the Options ( ) menus: after the code
was entered, the function is enabled and there is no need to enter
the code again.
If you want to disable the function another special code must be
entered.
Note: for more information contact your dealer.
Lexa| Instructions for Use |MN-111 ENG Rev14 |03/04/2023 |© W&H Sterilization Srl 35
Page 36
Getting started
PIN MANAGEMENT
PIN “0000” is assigned as default to each new user. It has to be
changed at the first login. When the PIN is reset the default value
“0000” is reassigned.
CHANGE YOUR PIN
Change your PIN the first time you use the sterilizer and if your PIN
has been reset. This will prevent other users to use your account.
1 On the homepage, tap > > >
2 Tap your user name.
3 Enter your current PIN and tap to confirm.
4 Tap .
5 Enter your new PIN and tap to confirm:a confirmation
message with your new PIN appears.
6 Tap and then to go back to the previous page.
WHAT TO DO IF YOU FORGET YOUR PIN
If... Then...
you are a common user contact the administrator
you are the administrator contact your authorized service provider
EliTrace (optional)
FUNCTION AVAILABILITY
To access the EliTrace functions the EliTrace activation code must be
entered. The activation code is required only at the first access to
the EliTrace ( ) menu: after the code was entered, the function is
enabled and there is no need to enter the code again.
To acquire the activation code please refer to the activation code
instructions.
DESCRIPTION
EliTrace allows to know exactly which instruments were sterilized
and link them to a specific cycle.
ACCESS TO ELITRACE
For the EliTrace access proceed as follows:
1 On the homepage tap > > >
Note: for more information see the dedicated documentation.
36 Lexa| Instructions for Use |MN-111 ENG Rev14 |03/04/2023 |© W&H Sterilization Srl
Page 37
Getting started
USB pen drive
DESCRIPTION
A USB pen drive is available to be installed in order to automatically
record all the sterilization cycle reports. The USB pen drive can be
inserted equally into the front or rear port.
Notice: periodically remove the USB pen drive to save the cycle data
on a computer or on another safe support.
FORMAT THE USB PEN DRIVE
1 Insert the USB pen drive in one USB port.
2 On the homepage, tap > > >
3 Tap .
4 Tap to confirm: all data will be erased.
5 Tap to confirm and go back to the previous page.
Notice: formatting erases all data from the pen drive. Be sure you
have already saved your data on a safe support before formatting.
Standby mode
DESCRIPTION
When in Standby mode, the sterilizer display remains dark and the
sterilizer chamber is not heated to save energy. If the sterilizer is not
used for three hours, it automatically switches to Standby mode.
ENTER THE STANDBY MODE MANUALLY
1 Homepage
2 Tap .
EXIT THE STANDBY MODE
Tap or open or close the chamber door.
CHANGING STANDBY MODE DELAY TIME
1 On the homepage, tap > >
2 Tap or to change the delay time.
3 Tap to confirm and go back to the previous page.
Lexa| Instructions for Use |MN-111 ENG Rev14 |03/04/2023 |© W&H Sterilization Srl 37
Page 38
Administrator
CONTENTS
This section deals with the following subjects:
User management (optional) 38
Traceability options (optional) 39
Hide/Unhide a cycle 40
User management (optional)
FUNCTION AVAILABILITY
To access the user management functions a special code must be
entered. The special code is required only at the first access to the
User Management ( ) or the Options ( ) menus: after the code
was entered, the function is enabled and there is no need to enter
the code again.
If you want to disable the function another special code must be
entered.
Note: for more information contact your dealer.
WHO CAN MANAGE USERS AND RESET THEIR PIN
Only a user with administrator rights can create and delete users and
reset the PIN code of a user to "0000".
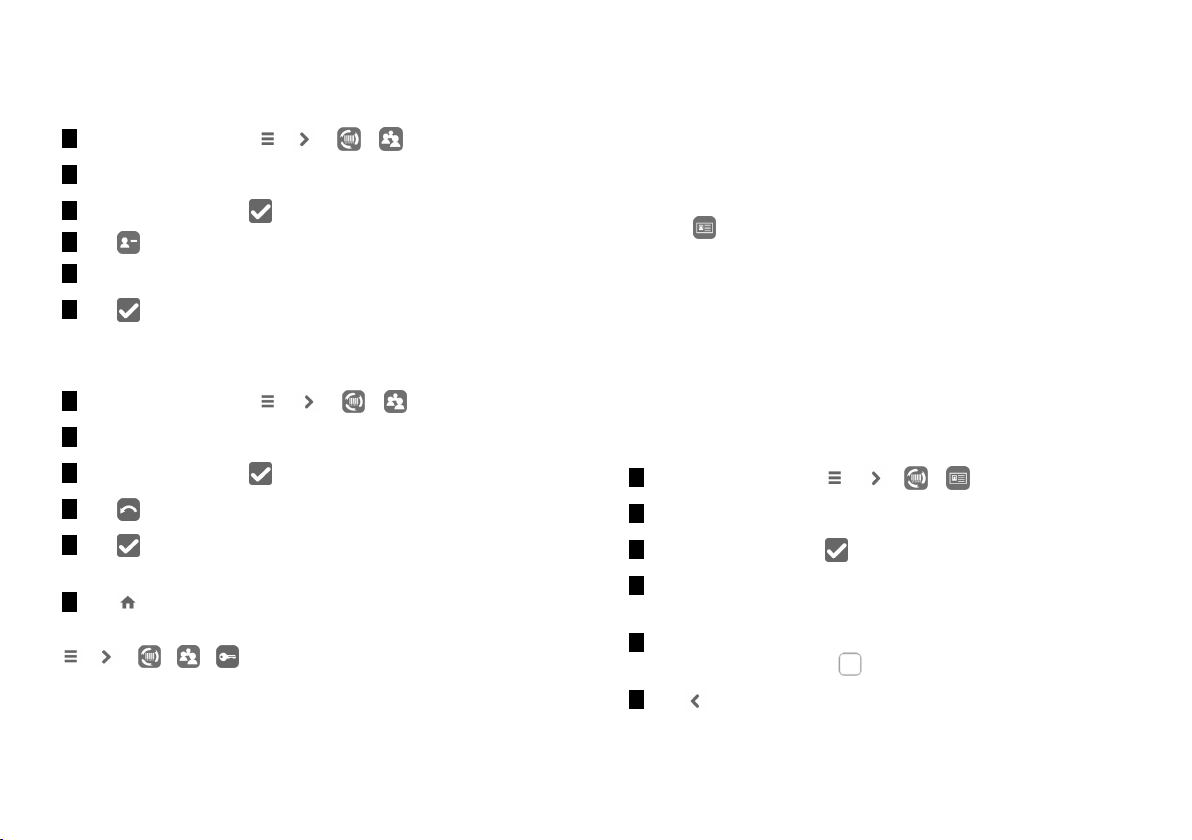
ADD A USER
1 On the homepage, tap > > >
2 Tap your user name.
3 Enter the PIN and tap to confirm.
4 Tap .
5 Tap the text box:a keyboard appears.
6 Enter the new user name and tap to confirm.
7 If desired, tap to give the administrator authority to the new
user.
8 Tap to confirm:the PIN of the new user is set to "0000" and
a confirmation message appears.
9 Tap and then to go back to the previous page.
10 Tap to return to the homepage.
38 Lexa| Instructions for Use |MN-111 ENG Rev14 |03/04/2023 |© W&H Sterilization Srl
Page 39
Administrator
DELETE A USER
1 On the homepage, tap > > >
2 Tap your user name.
3 Enter the PIN and tap to confirm.
4 Tap .
5 Tap the user name you want to delete.
6 Tap to confirm.
RESET A USER PIN
1 On the homepage, tap > > >
2 Tap your user name.
3 Enter the PIN and tap to confirm.
4 Tap and the user name for which you want to reset the PIN.
5 Tap to confirm:the PIN is set to "0000" and a confirmation
message appears.
6 Tap to return to the homepage.
Note: remember the user to change its PIN before reusing the sterilizer (
> > > > ).
Traceability options (optional)
FUNCTION AVAILABILITY
To access the user management functions a special code must be
entered. The special code is required only at the first access to the
Options ( ) menus: after the code was entered, the function is
enabled and there is no need to enter the code again.
If you want to disable the function another special code must be
entered.
Note: for more information contact your dealer.
WHO CAN SET THE TRACEABILITY OPTIONS
Only a user with administrator rights can set the traceability options.
SET THE TRACEABILITY OPTIONS
1 On the homepage, tap > > >
2 Tap your user name.
3 Enter your PIN and tap to confirm.
4 Tap the information to be requested to the users at the
beginning and at the end of the cycle.
5 If you want the user to check the load and release it as valid at
the end of the cycle, tap .
6 Tap to confirm and go back to the previous page.
Lexa| Instructions for Use |MN-111 ENG Rev14 |03/04/2023 |© W&H Sterilization Srl 39
Page 40
Administrator
Hide/Unhide a cycle
WHO CAN HIDE/UNHIDE A CYCLE
Only a user with administrator rights can hide a cycle or make it
available to users on the homepage.
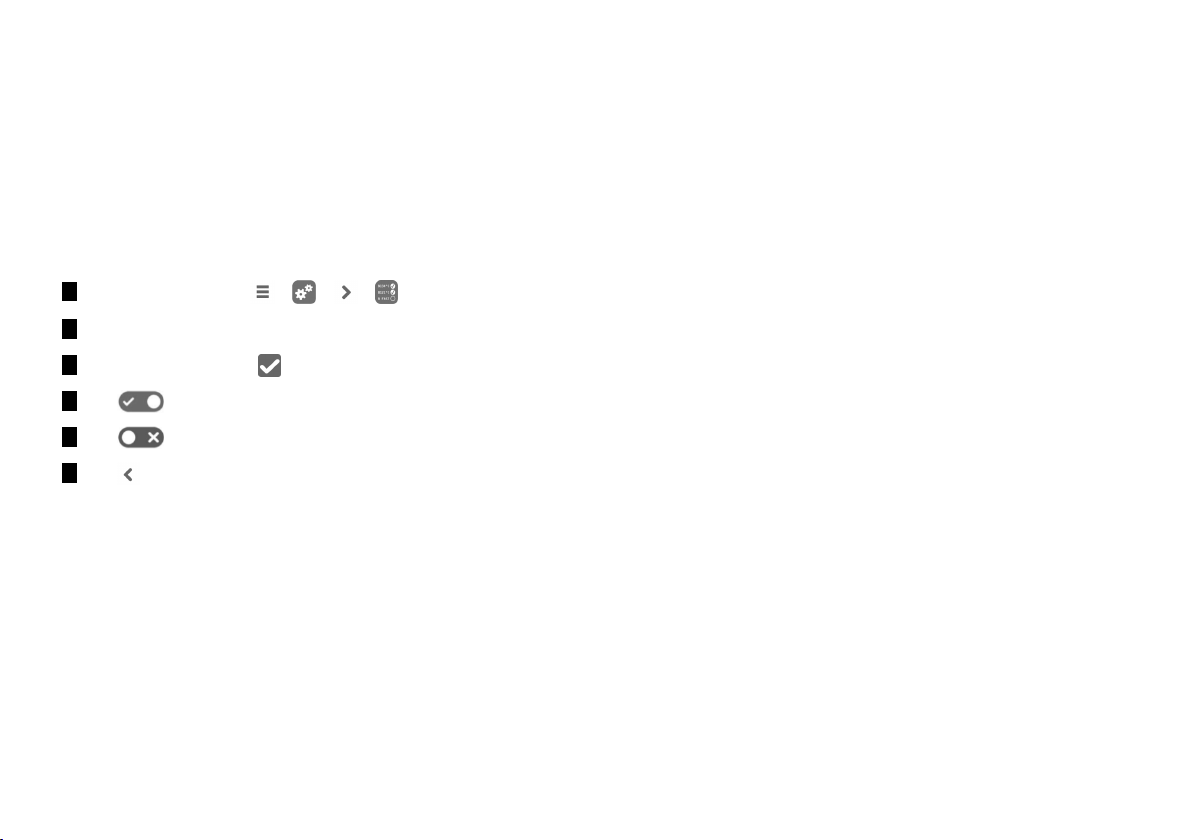
HIDE/UNHIDE A CYCLE
1 On the homepage tap > > >
2 Tap your user name.
3 Enter your PIN and tap to confirm.
4 Tap to hide a cycle from the homepage.
5 Tap to unhide a cycle from the homepage.
6 Tap to confirm and go back to the previous page.
40 Lexa| Instructions for Use |MN-111 ENG Rev14 |03/04/2023 |© W&H Sterilization Srl
Page 41
Managing printers
CONTENTS
This section deals with the following subjects:
Printer selection (optional) 41
Label printer selection (optional) 41
Label printer usage (optional) 42
Label content description 44
Printer selection (optional)
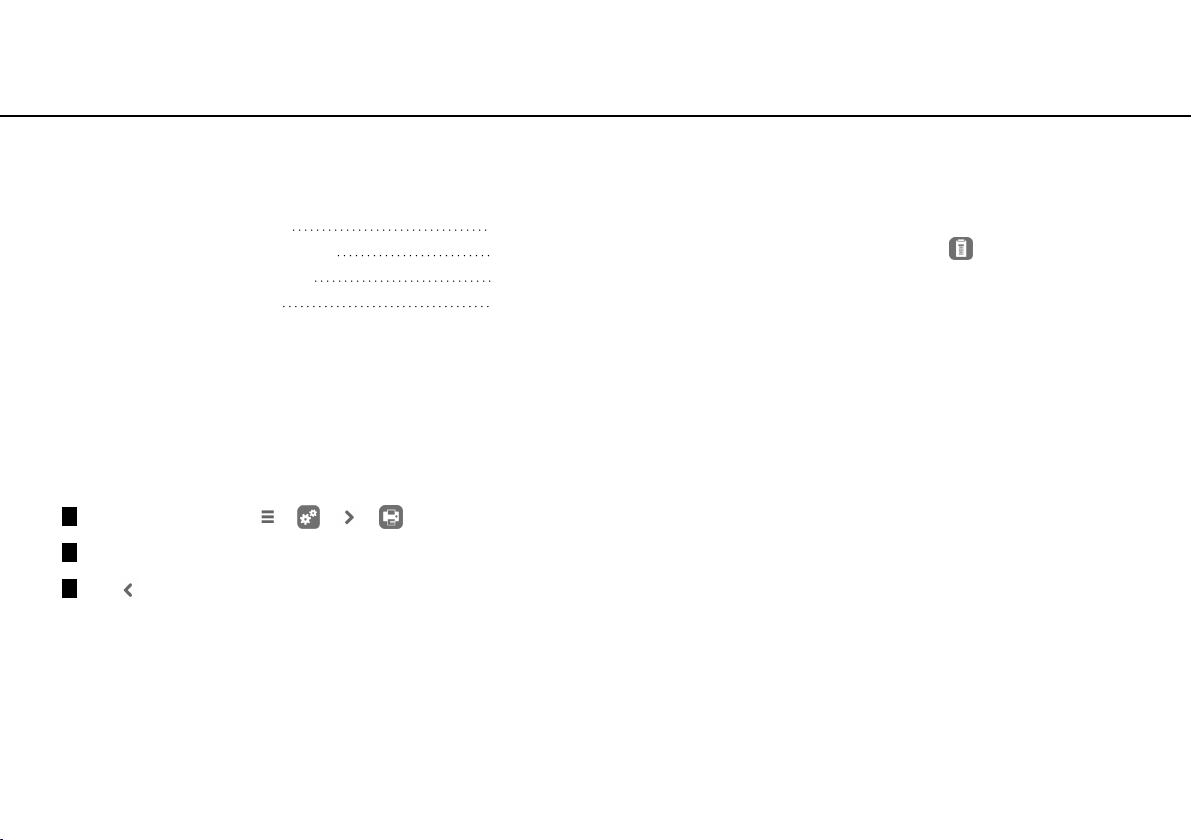
SELECT THE PRINTER
Note: the sterilizer only supports the specific printer models available
through manufacturer/distributor.
1 On the homepage, tap > > >
2 Tap the model of the printer to use.
3 Tap to confirm and go back to the previous page.
Label printer selection (optional)
FUNCTION AVAILABILITY
The first time you access the Label Printer ( ) menu, you will be
requested to enter an activaction code. To require the activation
code, please refer to the activation code instructions provided with
the label printer.
LABEL PRINTER SETUP
Labels can be printed by a local label printer or (only with a LAN
connection set) a shared label printer. The local label printer is
connected to the sterilizer, while the shared label printer is
connected to another sterilizer in the network.
Lexa| Instructions for Use |MN-111 ENG Rev14 |03/04/2023 |© W&H Sterilization Srl 41
Page 42
Managing printers
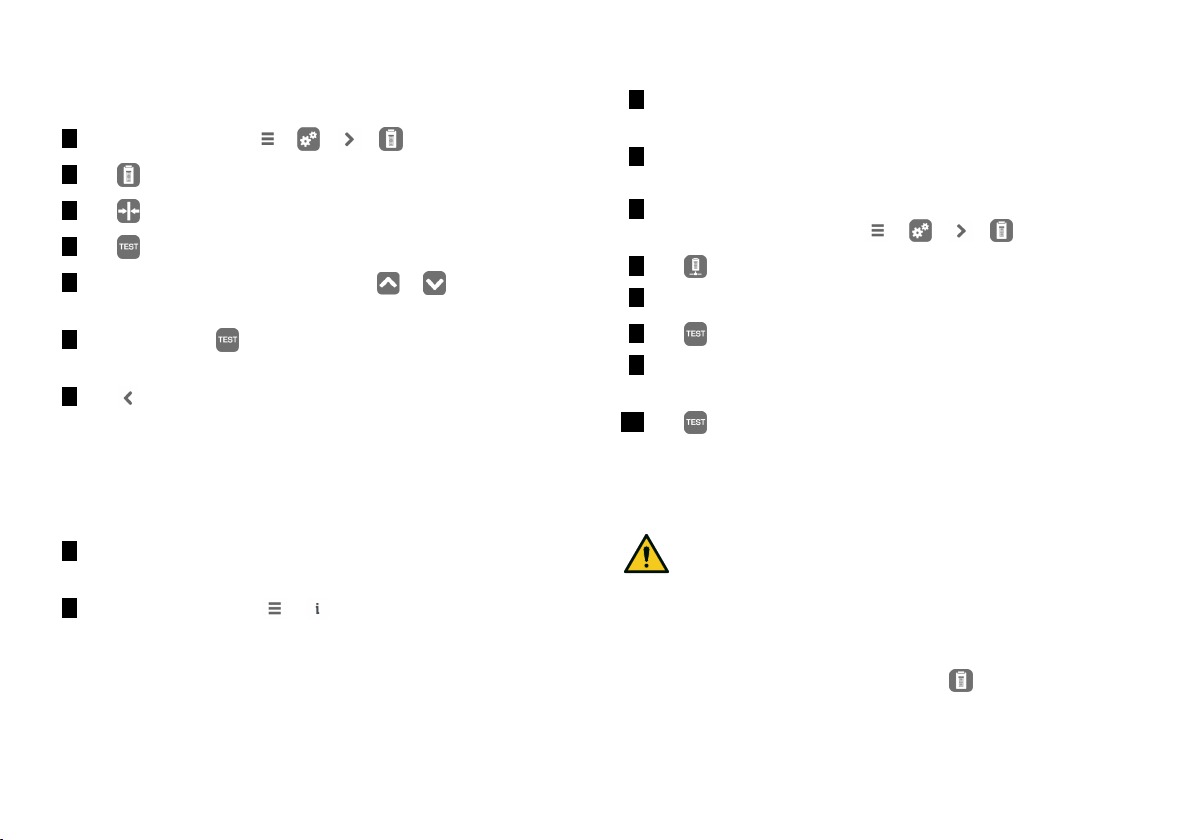
SELECT AND CALIBRATE A LOCAL LABEL PRINTER
1 On the homepage, tap > > >
2 Tap :the local printer is located automatically.
3 Tap to center the printout properly in the label area.
4 Tap to print a test label.
5 If the printout is not duly centered, tap or to center it
horizontally (x) and vertically (y).
6 If necessary, tap to print another test label and repeat step
4.
7 Tap to confirm the settings and go back to the previous
page.
SELECT A SHARED LABEL PRINTER
Note: function available only if the LAN/Wi-Fi connection has been activated
(optional).
1 Ensure the sterilizer to which the printer is physically
connected is ON and no cycle is running.
2 From that sterilizer, tap > .
3 Depending on the LAN connection, take note of the Ethernet or
Wi-Fi IP address.
4 Do not switch OFF the sterilizer until the whole procedure is
complete.
5 From the sterilizer from which the printer is not physically
connected, tap homepage > > > > .
6 Tap .
7 Tap the text box and enter the IP address previously noted.
8 Tap to confirm.
9 From the sterilizer to which the printer is connected, confirm
the printer sharing.
10 Tap again to print a test label.
Label printer usage (optional)
CAUTION! For your safety and the safety of your patients
use a storage time compliant with the recommendations of
the manufacturers of the containters/packaging used, and
with applicable norms and rules.
FUNCTION AVAILABILITY
The first time you access the Label Printer ( ) menu, you will be
requested to enter an activaction code. To require the activation
42 Lexa| Instructions for Use |MN-111 ENG Rev14 |03/04/2023 |© W&H Sterilization Srl
Page 43
Managing printers
code, please refer to the activation code instructions provided with
the label printer.
AUTOMATIC PRINTING OPTION
The automatic printing option permits to automatically print a preset
number of labels after a successful sterilization cycle. The labels are
printed only after the user has identified him/herself (with password
if required) and the load has been checked and released, if these
options have been enabled by the administrator.
For the automatic label printing, a maximum storage time in weeks
can be set. This value is used to calculate the expiry date to be
printed on the labels (see "Label content description" on the next
page).
SET THE AUTOMATIC LABEL PRINTING
1 On the homepage, tap > > >
2
Activate Automatic printing.
3 Tap or to set the maximum storage time and the number
of labels to be printed automatically.
4 Tap to confirm and go back to the previous page.
SET THE MANUAL LABEL PRINTING
The manual printing option permits the user at the beginning of a
sterilization cycle to set manually the number of labels to print.
1 On the homepage, tap > > >
2
Activate Manual printing.
3 Tap to confirm and go back to the previous page.
DISABLE THE LABEL PRINTING
If the label printing is disabled, no label can be printed at the end of
a sterilization cycle.
1 On the homepage, tap > > >
2
Activate Disabled.
3 Tap to confirm and go back to the previous page.
Lexa| Instructions for Use |MN-111 ENG Rev14 |03/04/2023 |© W&H Sterilization Srl 43
Page 44
Managing printers
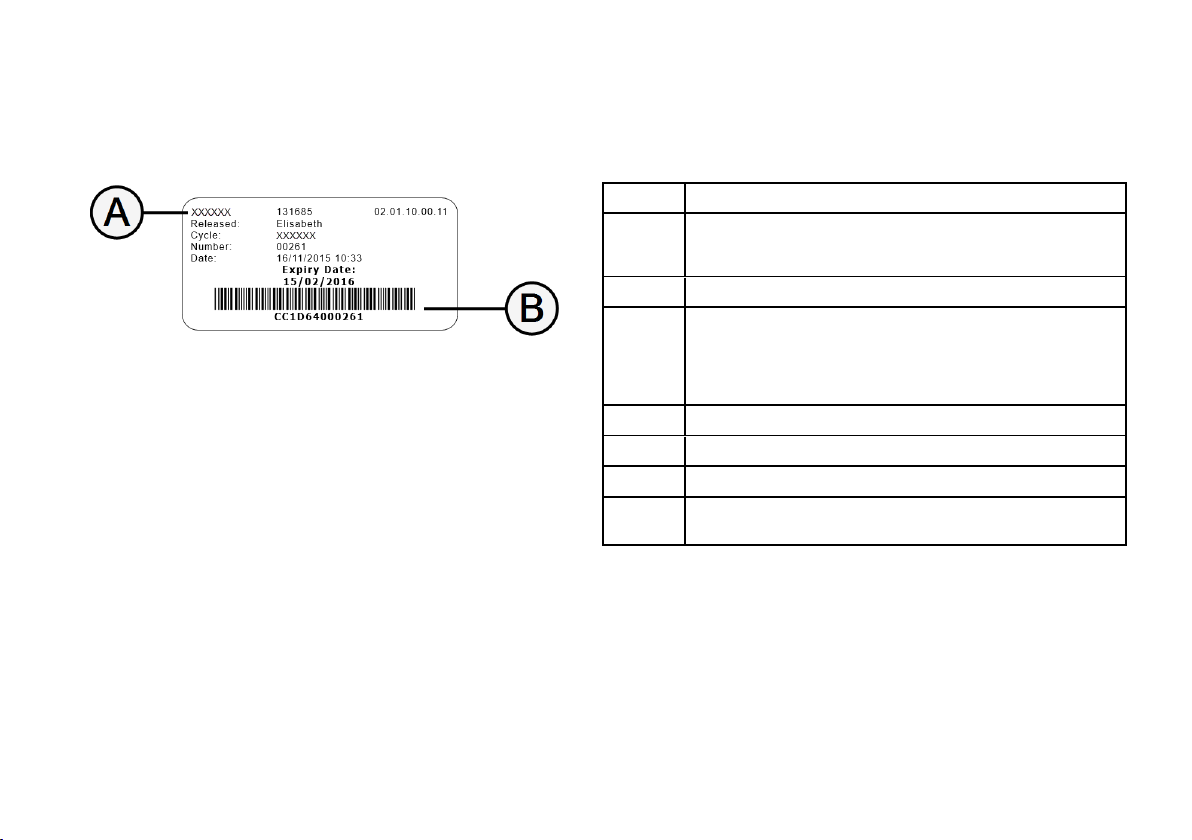
Label content description
STRUCTURE
Part Description
A
B
Released
n Sterilizer model
n Serial number
n Software release
Traceability code (alphanumerical and bar code)
Depending on the traceability settings, this field may contain one of the
following elements:
n the user who released the cycle
n the user who started the cycle
n the sterilizer ID
Cycle
Number
Date
Expiry
date
Cycle name
Cycle number
Date and time of cycle start
n Expiry date of the bag/package.
n The cycle outcome if a storage time is not set.
44 Lexa| Instructions for Use |MN-111 ENG Rev14 |03/04/2023 |© W&H Sterilization Srl
Page 45
Sterilization cycles
CONTENTS
This section deals with the following subjects:
Load maintenance and preparation 45
Typical loads 48
Prepare the sterilizer 48
Sterilization cycle management 49
Unloading 54
Sterilization cycle report 54
Load maintenance and preparation
WARNINGS
WARNING! Any residual of chemicals (like cleaning and
disinfection products), could affect the purity of the
steam and consequently the whole sterilization process.
If necessary, the load shall be cleaned and lubricated in
accordance with the instrument manufacturer’s
instructions.
Notice: any residual of chemicals could seriously damage the
sterilizer. The manufacturer’s warranty is void in case of damage
caused by chemicals.
DENTAL HANDPIECE EXTERNAL DISINFECTION
This procedure reduces the risk of infection during cleaning and
maintenance of the dental handpieces.
n Wear protective gloves during disinfection.
n Avoid using abrasive disinfectants (pH-value 2.5 – 9; no
chlorine based disinfectants).
n Use disinfectant wipes rather than spray disinfection.
n Do not immerse handpieces in disinfectants.
n Residual disinfectants on handpieces can cause extensive
damage to your instrumentation during sterilization (oxidation,
alteration of technical characteristics of seals, rubbers, fiber
optics, etc.).
Lexa| Instructions for Use |MN-111 ENG Rev14 |03/04/2023 |© W&H Sterilization Srl 45
Page 46
Sterilization cycles
DENTAL HANDPIECE EXTERNAL CLEANING
This procedure involves the removal of residues (blood, dentine,
etc.) that adhere to critical areas such as spray outlets, light ports,
knurling etc.
n Wear protective gloves during cleaning.
n Refer to the instructions of the instrument manufacturer.
n Use a soft, damp brush and take care not to scratch the surface
of the light ports.
DENTAL HANDPIECE LUBRICATION
Once the dental handpieces has been disinfected, cleaned and dried
(free from residues), it must be lubricated prior to sterilization.
Follow manufacturer’s instructions for proper lubrication.
PACKAGING
In order to preserve sterility, rotating instruments should be
wrapped/bagged prior to sterilization. Follow the manufacturer’s
packing instructions when using sterilization packaging.
CLEANING THE INSTRUMENTS
Clean all instruments thoroughly prior to sterilization. If possible,
clean instruments immediately after use; always follow the
instrument manufacturer ‘s instructions. Remove all traces of
disinfectants and detergents. Rinse and dry carefully all
instruments.
The instruments and tubes must be carefully rinsed and dried prior
to sterilization.
CORRECT LOAD PLACEMENT
WARNING! Do not overload trays and the chamber. Adhere
to the maximum load weight limits (see "Sterilization
programs" on page83).
Wrap items with porous wrapping materials to facilitate steam
penetration and drying (e.g. sterilization bags for autoclaves).
WARNING! Always use the chamber rack. Failing to use the
chamber rack can damage the unit and could affect
adequate steam circulation.
Follow these requirements:
Load type Placement
Hinged instruments (e.g.,
forceps, extraction pliers, etc.)
Tubes Place tubes on a tray allowing the ends to
Cassettes
In open position
remain open. Do not bend tubes.
Cassettes can be placed vertically or horizontally
into the chamber rack (vertical placement
enhances drying). When placing cassettes
horizontally, slide them into the rack position
without putting them on trays (if size allows) to
enhance drying. When sterilizing double-decker
cassettes, place them in the lowest rack position
as there is more space height-wise.
46 Lexa| Instructions for Use |MN-111 ENG Rev14 |03/04/2023 |© W&H Sterilization Srl
Page 47
Sterilization cycles
Load type Placement
Pouched items
Items made from different
materials (stainless steel,
carbon steel, aluminium, etc.)
Instruments manufactured
from carbon steel
Chemical/biological indicator
and Helix strip/s
On trays allowing adequate space in-between
bags. Ensure that packs do not touch the walls of
the chamber. Place sterilization pouched items
with the paper side facing up.
On separate trays or wrapped/pouched.
Place paper among them and the trays to avoid
rusty spots.
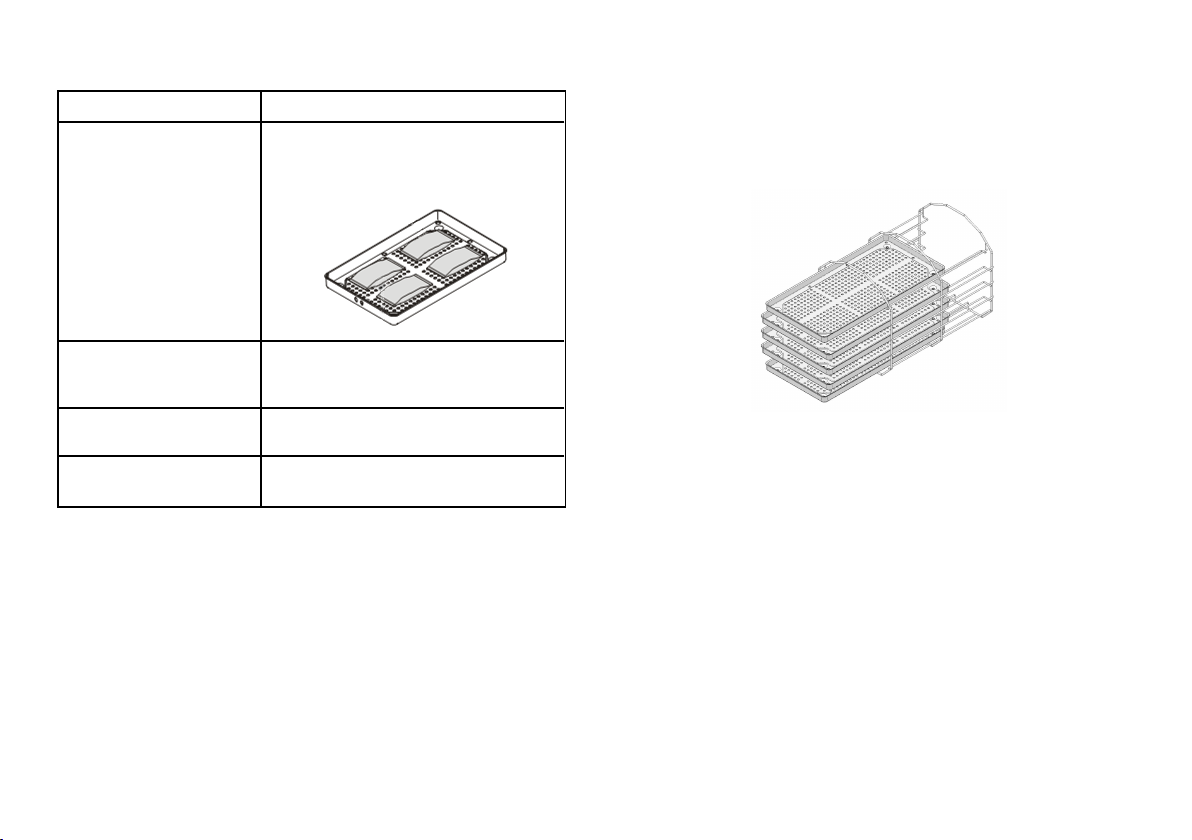
For more information see the dedicated
documentation.
PARTIAL LOAD
If the chamber is just partially loaded, place the load in such a way
that the space in-between the trays is maximized. Spread items
evenly on multiple trays. Below is a example with three trays.
Lexa| Instructions for Use |MN-111 ENG Rev14 |03/04/2023 |© W&H Sterilization Srl 47
Page 48
Sterilization cycles
Typical loads
EXAMPLES
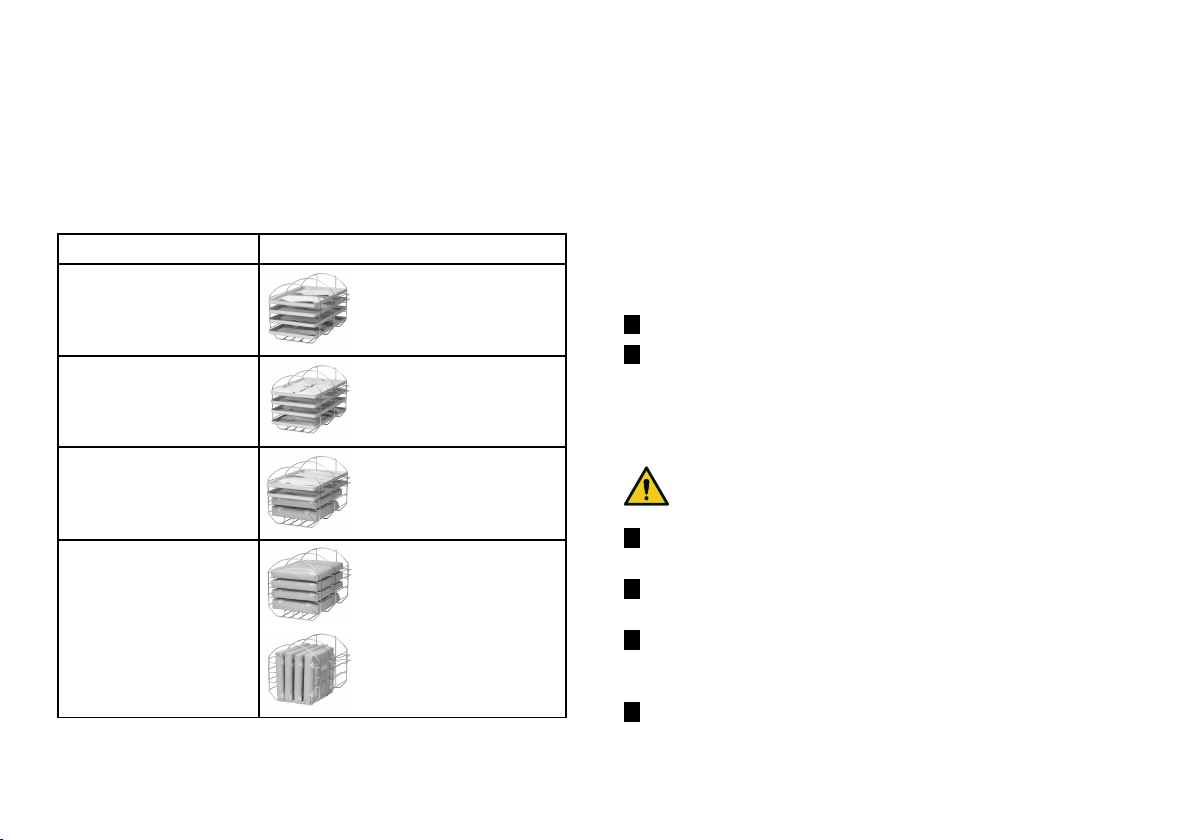
An example of a typical load used during the tests performed by
W&H is reported below:
Program Load example
Pouches Medium Load
Pouches Large Load
Pouches & Wrapped Cassettes
Wrapped Cassettes
Prepare the sterilizer
WARNINGS
Notice: use only distilled or demineralized water (see "Water quality"
on page95 for technical requirements). Do not add any chemical /
additive to the water.
FILLING THE CLEAN WATER TANK
If no water system is connected you have to fill the tank:
1 Switch the sterilizer ON and open the chamber door.
2 Fill the clean water tank with distilled or demineralized water
until the sterilizer makes a sound. See "Technical data" on
page92for the tank volume.
INSERTING THE CHAMBER RACK INTO THE STERILIZER
CAUTION! Risk of burns. Before touching the chamber rack or
contents, ensure the sterilization chamber is not hot.
1 Open the chamber door and align the chamber rack at the
center/bottom of the chamber.
2 Push the chamber rack gently into position until it clicks into
place.
3 Insert cassettes horizontally or vertically, or insert trays. See
"Load maintenance and preparation" on page45 for load
requirements .
4 Close the door.
48 Lexa| Instructions for Use |MN-111 ENG Rev14 |03/04/2023 |© W&H Sterilization Srl
Page 49

Sterilization cycles
5 Turn the sterilizer ON: after the initialization the homepage
appears.
GENERAL RECOMMENDATIONS
Follow these recommendations to obtain the most from the drying:
n Ensure the paper side of the sterilization bags faces up, and
that the space in-between bags is enough.
n To enjoy the full benefit of short cycle times when only one
tray is used, always place the load on the upper tray of the
chamber rack and remove all other trays from the chamber.
Sterilization cycle management
RUN A STERILIZATION CYCLE
Note: if the user management and the label printer functions are enabled,
you might be requested to enter your PIN code during the following
procedure.
Lexa| Instructions for Use |MN-111 ENG Rev14 |03/04/2023 |© W&H Sterilization Srl 49
Page 50
Sterilization cycles
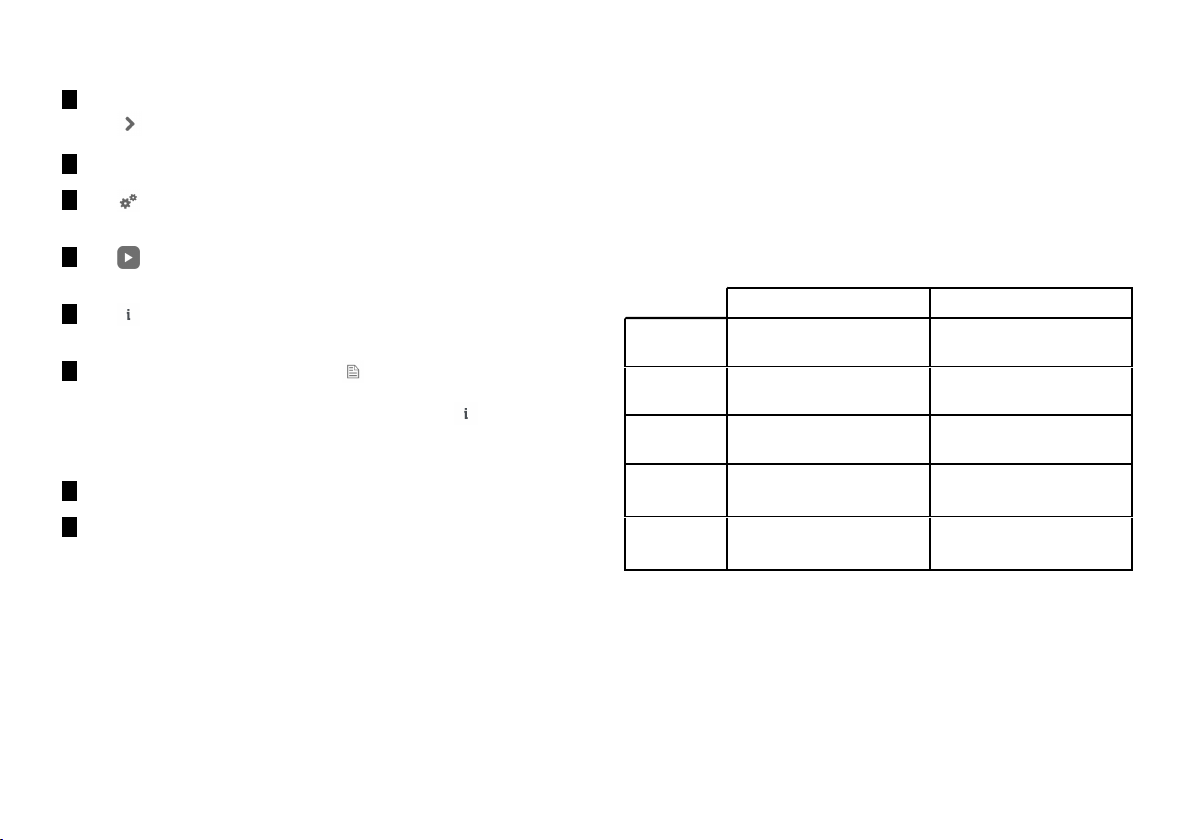
1 On the homepage, tap the desired cycle.
Tap to display further cycles on the next page, if any.
2 Check the cycle requirements.
3 Tap to set a different start time. See "Delay the sterilization
cycle start" on the next page.
4 Tap : the door locks. If you have not set a different start time,
the cycle starts immediately.
5 Tap to view the cycle information. See "View the cycle
parameters" on page52.
6 The sterilization is completed. Tap to view the cycle
summary (to check the cycles values manually, see
"STERILIZATION CYCLE MONITORING" below) or tap to view
the cycle information. See "View the cycle parameters" on
page52.
7
Tap OPEN: the door unlocks and the homepage appears.
8 If required, enter your credentials and confirm the load release.
Note : the load release is possible only if the cycle is completed
successfully.
Note: the user visually checks that pouches are intact and dry. It is even
possible to identify the user who releases the load, accepts the cycle
plateau time, cycle minimum temperature and cycle minimum pressure.
Note: during the load release it is also possible to accept or reject the Helix
strip, biological indicator and chemical indicator results (for more
information see the dedicated documentation).
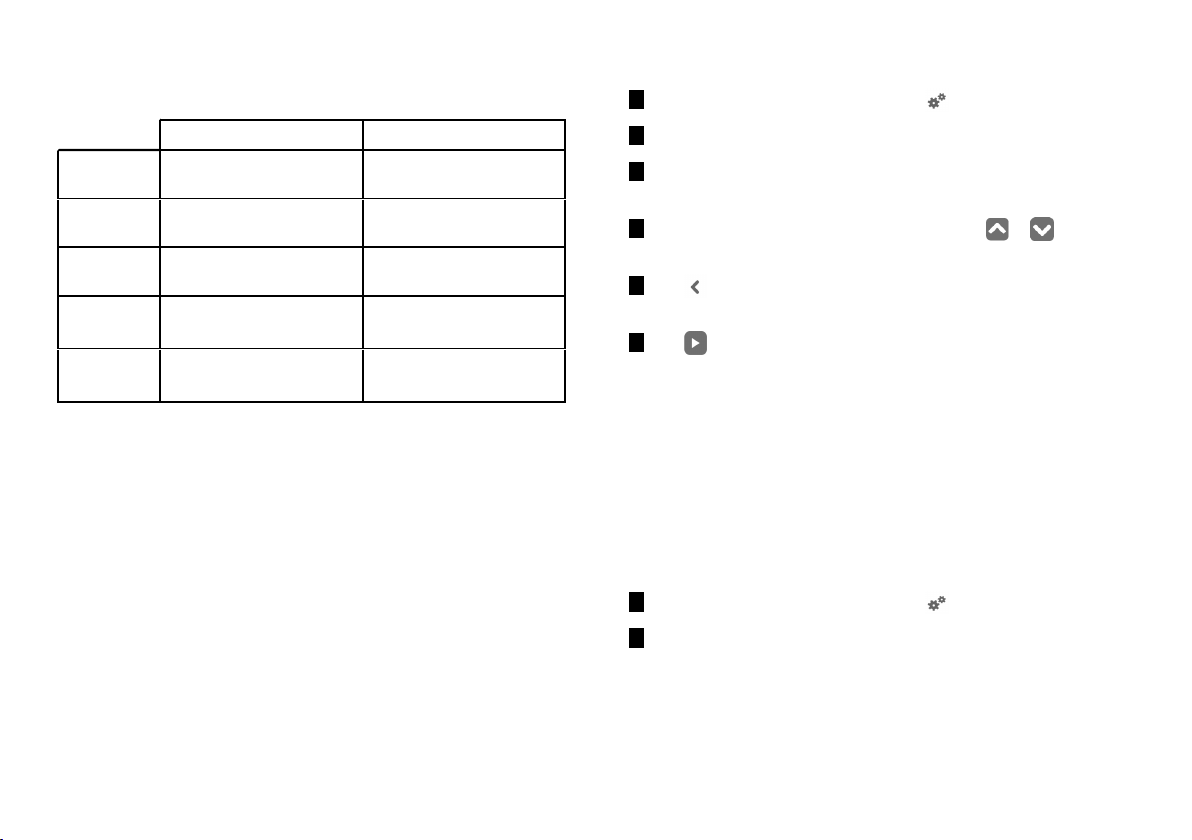
STERILIZATION CYCLE MONITORING
Even if the sterilization process is automatically monitored by the
software and the values of temperature, pressure and duration are
controlled, there is the possibility to check the values manually. See
the table below for the correct values of the temperature, pressure,
and duration in order to confirm manually the proper execution of
the cycle.
US - Canada version
270 °F (132 °C) cycles 250 °F (121 °C) cycles
Duration
(minutes)
Min.
temperature
Max.
temperature
Min. pressure
Max. pressure
4
270 °F (132 °C) 250 °F (121 °C)
275 °F (135 °C) 255 °F (124 °C)
26.68 psi at 270 °F
(1.84 bar) at (132 °C)
30.45 psi at 275 °F
(2.1 bar) at (135 °C)
(1.028 bar) at (121 °C)
30
14.9 psi at 250 °F
17.83 psi at 255.2 °F
(1.23 bar) at (124 °C)
50 Lexa| Instructions for Use |MN-111 ENG Rev14 |03/04/2023 |© W&H Sterilization Srl
Page 51
Sterilization cycles
Standard version
269.6 °F (132 °C) cycles 249.8 °F (121 °C) cycles
Duration
(minutes)
Min.
temperature
Max.
temperature
Min. pressure
Max. pressure
4
269.6 °F (132 °C) 249.8 °F (121 °C)
275 °F (135 °C) 255.2 °F (124 °C)
26.68 psi at 269.6 °F
(1.84 bar) at (132 °C)
30.45 psi at 275 °F
(2.1 bar) at (135 °C)
(1.028 bar) at (121 °C)
30
14.9 psi at 249.8 °F
17.83 psi at 255.2 °F
(1.23 bar) at (124 °C)
DELAY THE STERILIZATION CYCLE START
You may schedule the start of the sterilization cycles at a certain
date and time (e.g., if you want to load the sterilizer in the evening
and run standard sterilization cycle early the next morning before
office hours). You can set the cycle start date and time and enable or
disable it for each cycle.
1 On the homepage, tap the cycle and .
2
Tap Start cycle at.
3 If you want to change the start time, tap the time or the date: a
settings page opens.
4 Tap the number you want to change and tap or to
increase it or decrease it.
5 Tap to confirm. This date and time become the scheduled
default start time for all next sterilization cycles.
6 Tap to lock the door; a new page appears.
Note: if nothing else is pressed, the cycle will start at the programmed
time. The page allows also to start the cycle immediately ("Start now") or to
delete the operation and the programmed cycle ("Stop").
SET THE DRYING TIME
Drying time is set by default for each sterilization program. The
default drying time for each sterilization program can only be
increased from the default value.
1 On the homepage, tap the cycle and .
2 Tap the drying time: a settings page opens.
Lexa| Instructions for Use |MN-111 ENG Rev14 |03/04/2023 |© W&H Sterilization Srl 51
Page 52
Sterilization cycles
3 Tap or to increase the minutes or decrease them.
Note: for the minimum value of the drying time for each cycle see
Sterilization cycles.
4 Tap to confirm and go back to the previous page. If
Remember next time is selected, this becomes the new fixed
value.
VIEW THE CYCLE PARAMETERS
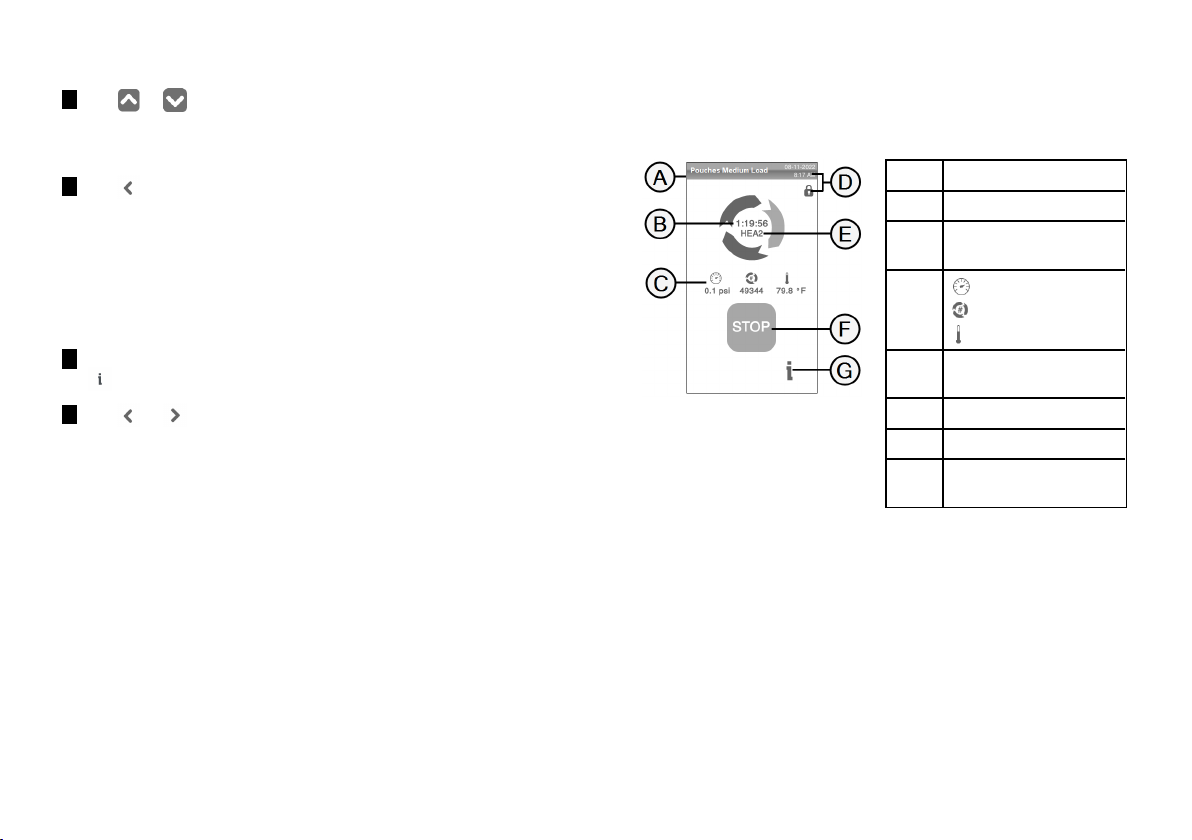
You can check the real time cycle parameters or the cycle
parameters at the end of the cycle. Following is an example:
1 While the sterilization cycle is running or when cycle ends tap
: the cycle information page opens.
2 Tap or to scroll the pages.
STERILIZATION CYCLE PAGE
Following are the information displayed while a cycle is running:
Part Description
Sterilization cycle name
A
Countdown clock (time until
B
the cycle completion)
C
D
E
F
G
: chamber pressure
: cycle counter
: chamber temperature
Date and time and door
securely locked symbol
Current cycle phase
Stop button
Button to open the cycle
information page
52 Lexa| Instructions for Use |MN-111 ENG Rev14 |03/04/2023 |© W&H Sterilization Srl
Page 53
Sterilization cycles
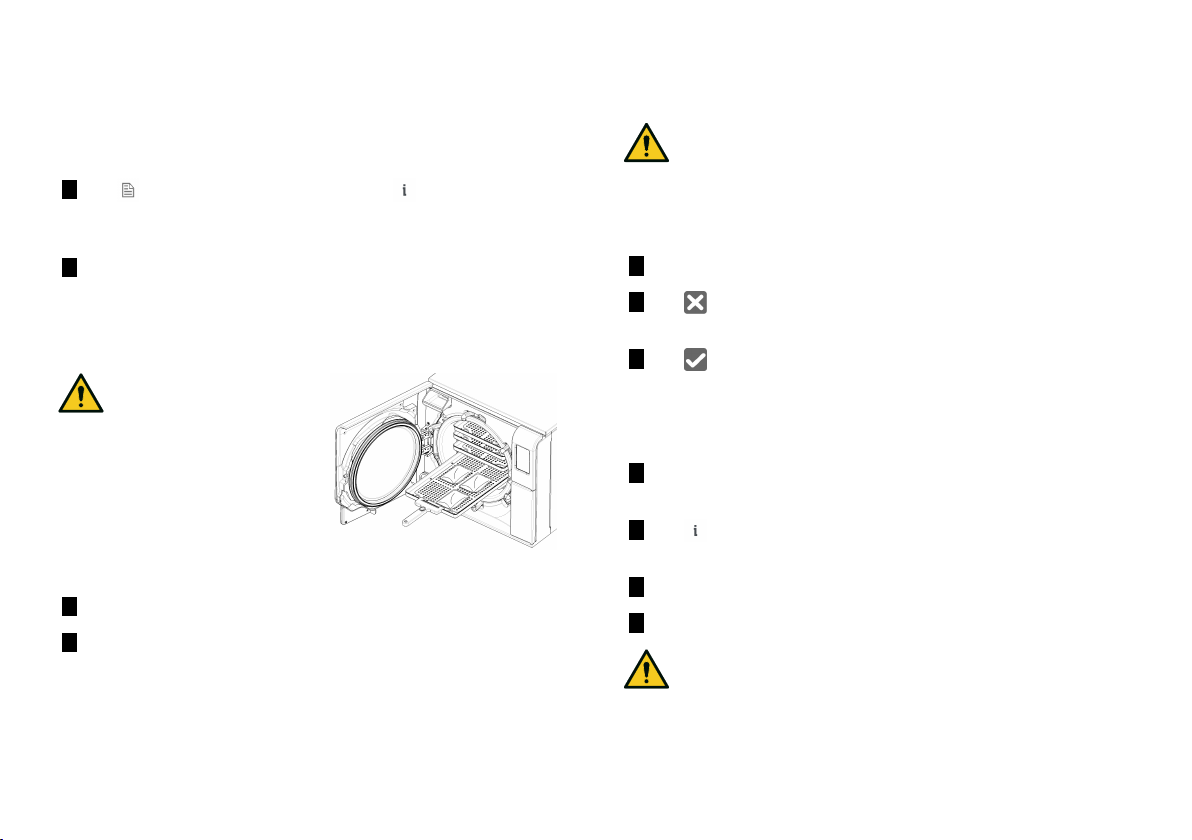
END OF A STERILIZATION CYCLE
When a cycle is successfully finished, the "Cycle completed"
message appears on the screen. To end the cycle:
1 Tap to view the cycle summary or tap to view the cycle
parameters. See "View the cycle parameters" on the previous
page.
2
Tap OPEN to open the door: the door unlocks and the home
page appears.
Note: if an error message appears see "Troubleshooting" on page74
CAUTION! Hot surfaces.
Burnings. Do not touch the
chamber, the internal side
of the door and the internal
fittings. Use the tray holder
or cassette holder or
gloves for high
temperatures or adequate
protection to remove the
load!
3 Open the chamber door.
4 Remove the load and stock it.
STOP A STERILIZATION CYCLE
WARNING! You can stop the cycle at any time. Instruments
must not be considered sterile if this occurs before the
DRY phase.
A cycle can be manually aborted at any time. To stop a cycle:
1
Tap STOP: a confirmation request appears.
2 Tap to abort the stop command. The cycle continues
programmed.
3 Tap to abort the cycle: the sterilizer starts a reset phase.
Notice: do not switch off the sterilizer during the reset phase: it
takes some time to reset the system and reach safe conditions in
the sterilizer chamber.
4 Check the message. See "Messages of a stopped sterilization
cycle" on the next page.
5 Tap to view the cycle parameters. See "View the cycle
parameters" on the previous page.
6 Open the chamber door.
7 Reprocess the load if necessary.
CAUTION! Hot steam. Wait the steam to dissipate before
opening the door.
Lexa| Instructions for Use |MN-111 ENG Rev14 |03/04/2023 |© W&H Sterilization Srl 53
Page 54
Sterilization cycles
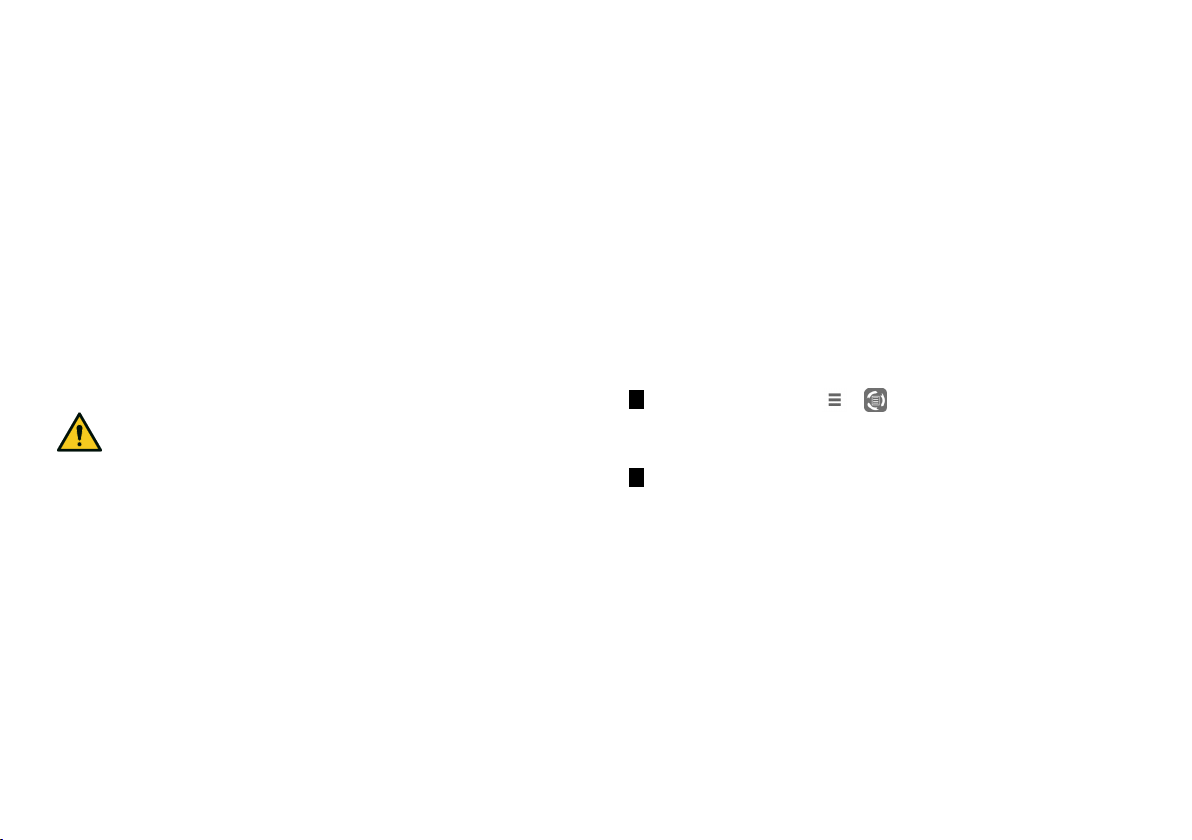
Note: water could be present in the chamber when opening the door. To
prevent spilling place a towel below the chamber door.
MESSAGES OF A STOPPED STERILIZATION CYCLE
Following are the messages:
n Load not sterile: Do not use items on patients!
n Drying interrupted: The load might be wet. Wet items are for
immediate use only!
Unloading
WARNINGS
CAUTION! Risk of burns. Before touching, ensure the
sterilization chamber is cold. Always use the tray holder.
Sterilization cycle report
WHERE CYCLE DATA ARE STORED
The sterilizer stores in memory the summarized reports of the last
400 cycles and the analytical reports of the last 5 cycles. All reports
can also be saved on the USB pen drive or in a specific remote folder
in the network if the sterilizer is connected to a LAN (optional). A
minimum of 10000 cycles are storable in the provided USB.
STORED REPORT FORMAT
The summarized reports are stored in HTML format and the analytical
reports in SCL format. All parameters are recorded every second.
WHAT HAPPENS WITH UNSAVED CYCLES
If for any reason (e.g. USB memory full, USB pen drive disconnected,
etc.) some cycles cannot be saved, no alert is shown. If still stored in
memory, the unsaved cycles will be copied in a working USB pen
drive connected to the sterilizer as soon as a new cycle starts.
VIEW CYCLE HISTORY
To view the sterilization cycle history:
1 On the homepage, tap > : all the sterilization cycles are
listed with number, date, time and sterilization program. The
interrupted sterilization cycles appear in red.
2 Scroll the list and tap the desired sterilization cycle: the report
opens.
54 Lexa| Instructions for Use |MN-111 ENG Rev14 |03/04/2023 |© W&H Sterilization Srl
Page 55
Sterilization cycles
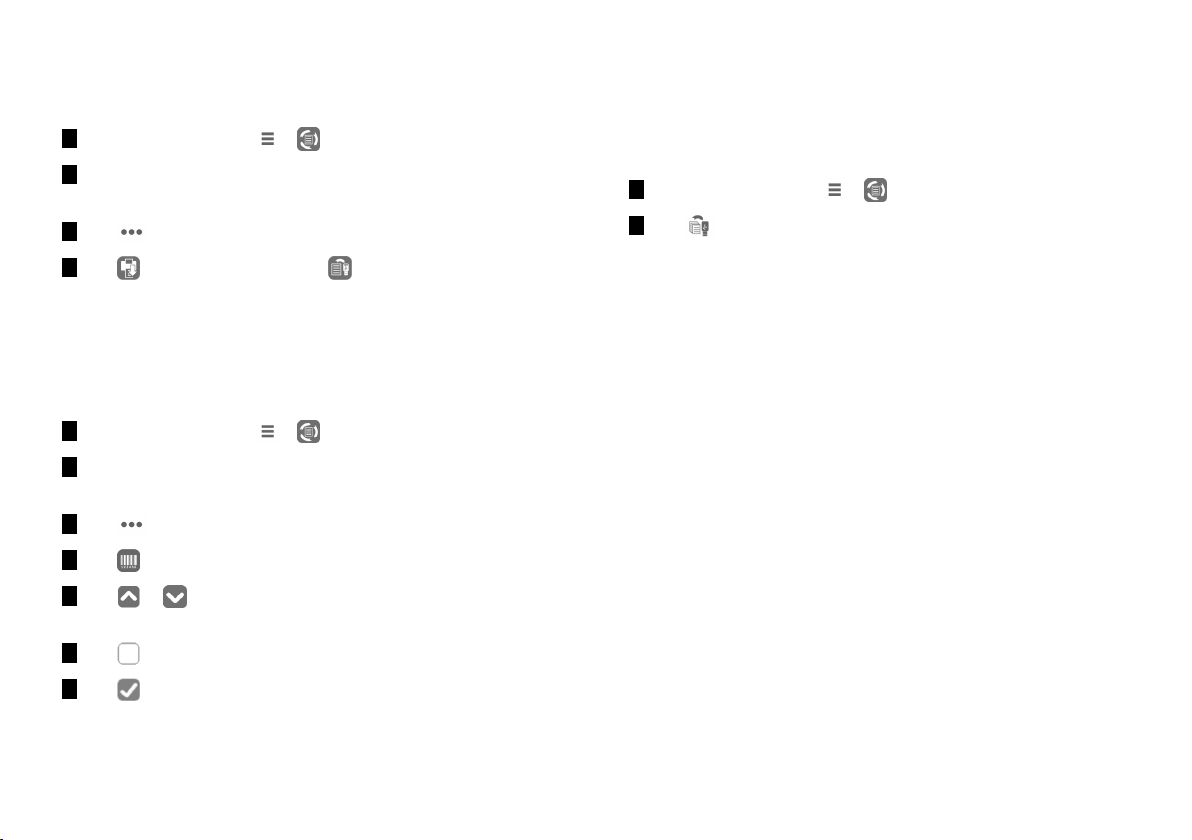
PRINT OR SAVE A CYCLE REPORT ON THE USB PEN DRIVE
1 On the homepage, tap >
2 Scroll the list and tap the desired sterilization cycle: the report
opens.
3 Tap .
4 Tap to print the report, or tap to save the report on the
USB pen drive.
PRINT LABELS FOR A SPECIFIC CYCLE
Note: function available only with the Label printer activation code.
1 On the homepage, tap >
2 Scroll the list and tap the desired sterilization cycle: the report
opens.
3 Tap .
4 Tap to print traceability labels for the selected cycle.
5 Tap or to increase or decrease the number of label to be
printed.
6 Tap to save the set number for the next time.
SAVE ALL THE CYCLE REPORTS ON THE USB PEN DRIVE
The number of reports that can be saved on the USB pen drive
depends upon the USB capacity. To save all the cycle reports:
1 On the homepage, tap >
2 Tap : after the confirmation all sterilization cycle reports are
stored in the USB.
7 Tap to print the labels required.
Lexa| Instructions for Use |MN-111 ENG Rev14 |03/04/2023 |© W&H Sterilization Srl 55
Page 56
Sterilization cycles
SET THE REMOTE FOLDER FOR SAVING THE REPORTS
To activate the remote storage and set the necessary parameters do
the following:
1 On the homepage, tap > > > >
2 Tap to enable the remote data storage:the first four
fields in the page and the check box turn dark grey.
3
In Path enter the name of the shared folder followed by the
sub-folder name, if any, where to save reports. Do not enter the
full path.
Note: The folder name must include letters and numbers only. Do not
use other characters like space-bar, slash, accent, etc.
4 Enter the host name or the IP address: if the data are complete,
the fields highlight.
5 Not mandatory. Enter the domain name.
6 Tap to require the authentication credentials to access the
remote storage folder and enter the user name and password.
7 Tap to save.
8 Tap to go back to the previous page.
9 To check if the parameters entered are valid, see "Test the data
storage " below.
TEST THE DATA STORAGE
Note: the test function is available only if the remote data storage is
enabled. See "Set the remote folder for saving the reports" above.
1 On the homepage, tap > > >
2 Tap :a sequence of tests is automatically performed.
3 In case a test fails, check the relevant settings and tap to
repeat the test sequence, if the error persists call your IT
manager.
4 Tap to go back to the previous page.
SAVE ALL THE CYCLE REPORTS IN A REMOTE FOLDER
Note: the save all function is available only if the remote data storage is
enabled. See "Set the remote folder for saving the reports" above.
Only the last 400 cycles in HTML and 5 cycles in SCL in the sterilizer
memory can be saved in the remote folder.
1 On the homepage, tap > > > >
2 Tap to start the remote saving.
56 Lexa| Instructions for Use |MN-111 ENG Rev14 |03/04/2023 |© W&H Sterilization Srl
Page 57
Sterilization cycles
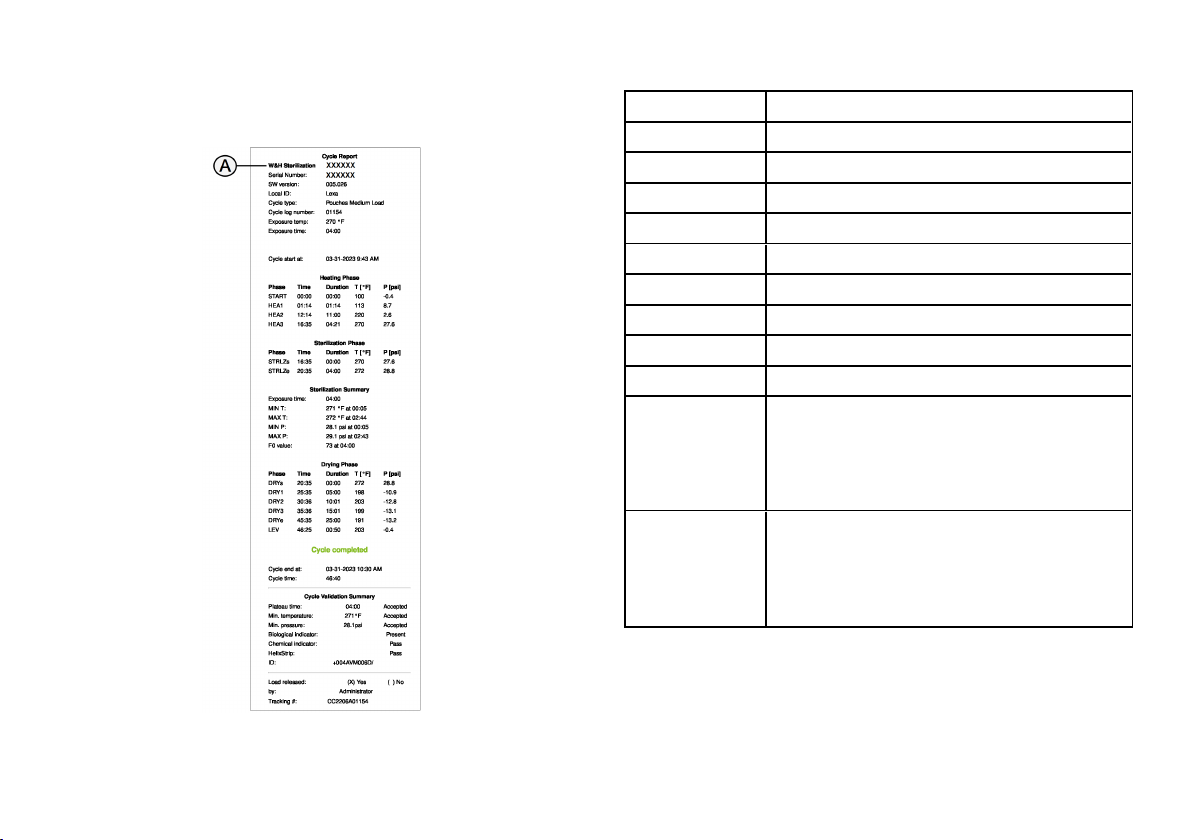
CYCLE REPORT STRUCTURE
Following the structure of a cycle report:
Data Description
A
Serial Number
SW version
Local ID
Cycle type
Cycle log number
Exposure temp
Exposure time
Cycle start at
Heating Phase
Sterilizer brand and model
Sterilizer serial number
Software version number
Surgery – practice – doctor name
Name of the executed cycle
Cycle counter
Programmed exposure temperature
Programmed exposure time
Cycle start date and time
Phase: conditioning phases (steam pressure pulses). See
"Sterilization program phases" on page89.
n Time: phase duration
n Partial: xxxxxxx
n T [F°]: maximum temperature
n P [psi] : maximum pressure
Sterilization phase
Phase: sterilization phase. See "Sterilization program
phases" on page89.
n Time: phase duration
n Partial: xxxxxxx
n T [F°]: maximum temperature
n P [psi] : maximum pressure
Lexa| Instructions for Use |MN-111 ENG Rev14 |03/04/2023 |© W&H Sterilization Srl 57
Page 58
Sterilization cycles
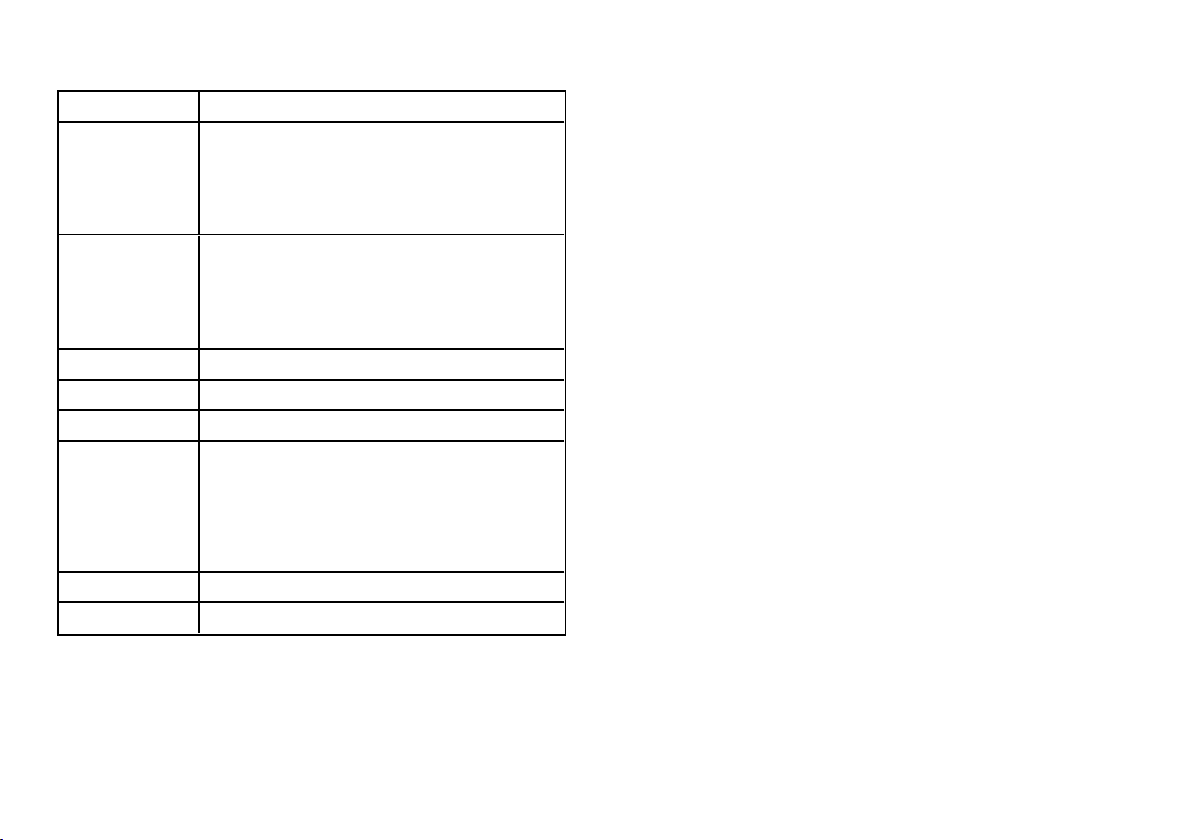
Data Description
Sterilization
Summary
Drying Phase
Exposure time
n MINT: Min. temperature
n MAX T: Max. temperature
n MIN P: Min. pressure
n MAX P: Max. pressure
n F0 value
Phase: Exhausting drying phase. See "Sterilization program
phases" on page89
n Time: phase duration
n Partial: xxxxxxx
n T [F°]: maximum temperature
n P [psi] : maximum pressure
"Cycle completed"
Cycle end at
Cycle time
Cycle Validation
Summary
Signature
Tracking
Cycle end conditions (Cycle outcome)
Cycle end date and time
Cycle duration
Cycle validation (you can choose to accept or reject the
results):
n Plateau time
n Min. temperature
n Chemical indicator
n Biological indicator
n Helix strip/s
Operator signature
Tracking code for traceability
58 Lexa| Instructions for Use |MN-111 ENG Rev14 |03/04/2023 |© W&H Sterilization Srl
Page 59
Maintenance
CONTENTS
This section deals with the following subjects:
Warnings for maintenance operations 59
User maintenance 59
Monthly or 50-cycle maintenance 61
1200-cycle or yearly maintenance 64
Extraordinary maintenance 67
Disposal 68
Warnings for maintenance operations
WARNINGS
WARNING! Turn the sterilizer OFF and remove the power
cord before beginning any maintenance. Follow all health,
safety, cross-infection and cross-contamination
protocols.
Maintenance operation shall be done at illumination level
of 215 lx (±15 lx) to 1500 lx (±15 lx).
Before making any operation, ward off unauthorized
personnel from the working area.
CAUTION! Before accessing the chamber and the connected
parts, be sure that the sterilizer is cold.
Notice: follow the instructions in this chapter when carrying out any
maintenance on the sterilizer.
User maintenance
MAINTENANCE BY THE USER
1200
1
Operation
Cleaning the door gasket and the chamber face
side. See "Cleaning the door gasket and the
chamber face side" on page61
Clean the chamber, trays and the rack. See
"Cleaning the chamber and the chamber
accessories" on page62
Cleaning the chamber filters. See "Cleaning the
chamber filters" on page63
Cleaning the external surfaces of the sterilizer.
See "Cleaning the external surfaces of the
sterilizer" on page63
2
Replace the door gasket. See "Replacing the door
gasket" on page64
Replace the HEPAfilter. See "Replacing the HEPA
filter" on page66
Frequency1Cycles
Monthly 50
2
Yearly
1
: whichever occurs first.
Lexa| Instructions for Use |MN-111 ENG Rev14 |03/04/2023 |© W&H Sterilization Srl 59
Page 60
Maintenance
2
: even if the maximum cycle number is not reached, it is recommended to
replace the consumable parts every year, or if they appear worn or
damaged, or if the filters are clogged or discolored.
EXPIRED MAINTENANCE
The sterilizer monitors the wear of consumables by counting the
number of cycles executed since the last replacement.
When the number of cycles is close to the maximum, a pre-alert
about the concerned consumable is displayed. Please check that
you have the requested spare part available, buy one if not. When
the maximum number of cycles has been met, a message to replace
the consumable will be displayed.
1 Tap to see an animated replacement procedure.
2 When you have replaced the consumable tap to confirm: the
executed cycle counter is reset.
REPLACE THE CONSUMABLE BEFORE THE MAINTENANCE DUE
DATE
If you replace the consumables before the request of replacement
appears, you should manually reset the counters through the
following procedure.
1 On the homepage, tap >
2 Select the consumable you want to replace: a message appears
showing the current worked hours of the part.
3 Tap to see an animated replacement procedure.
4 When you have replaced the consumable tap to confirm: the
executed cycle counter is reset.
60 Lexa| Instructions for Use |MN-111 ENG Rev14 |03/04/2023 |© W&H Sterilization Srl
Page 61
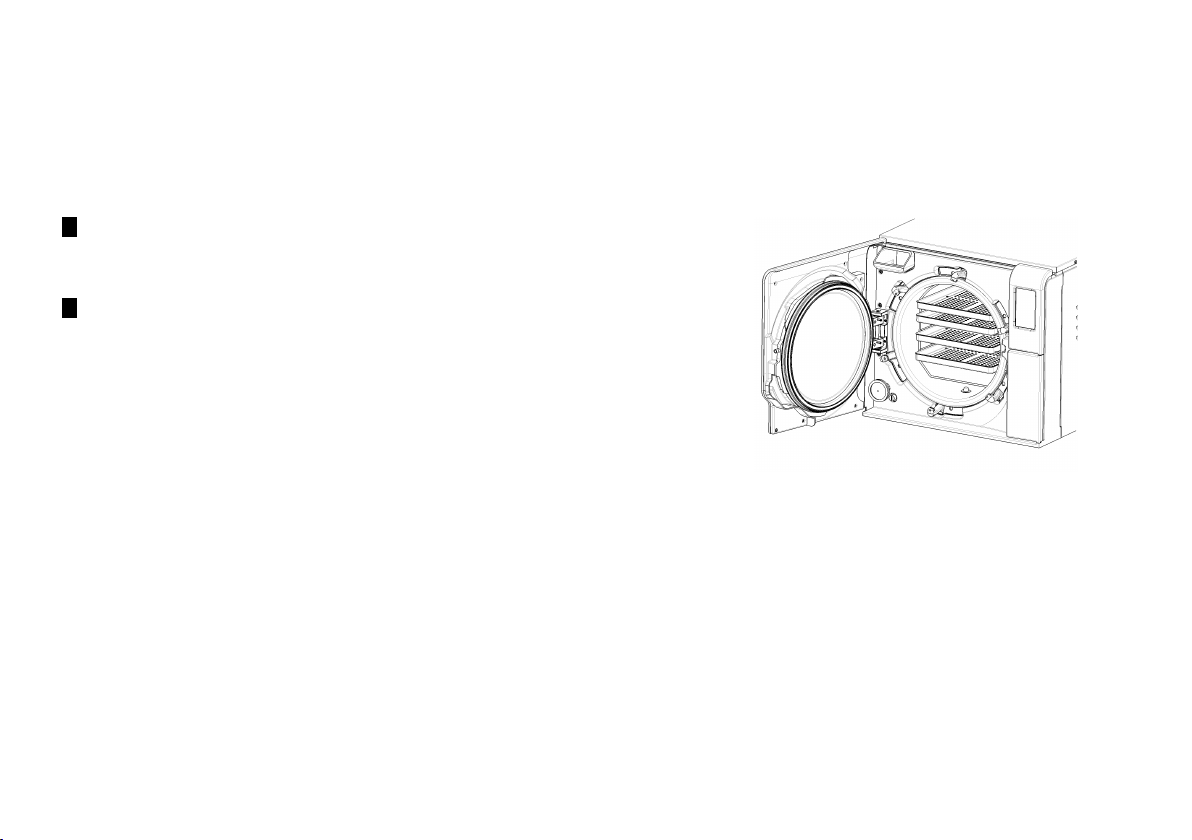
Monthly or 50-cycle maintenance
CLEANING THE DOOR GASKET AND THE CHAMBER FACE SIDE
Proceed as follows:
1 Clean the door gasket and the outer edge of the chamber with a non-abrasive
cloth moistened with clean water.
Notice: do not use abrasive products, cutting tools or sharp objects.
1 Rinse with clean water.
Note: when the seal is new it might be necessary to hold the door gently closed at the
sterilization start.
Maintenance
Lexa| Instructions for Use |MN-111 ENG Rev14 |03/04/2023 |© W&H Sterilization Srl 61
Page 62
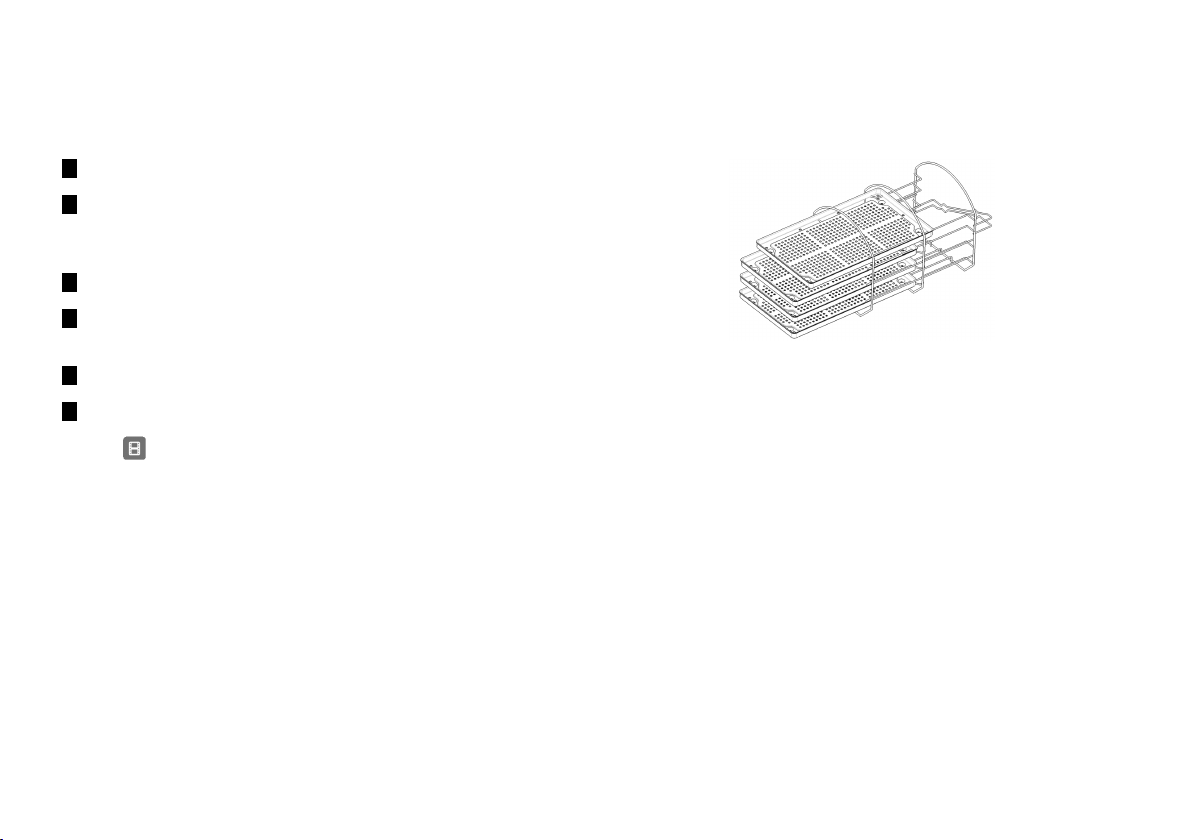
Maintenance
CLEANING THE CHAMBER AND THE CHAMBER ACCESSORIES
Proceed as follows:
1 Remove the trays and the chamber rack.
2 Clean the chamber with a damp sponge and a mild detergent
solution paying attention not to bend or damage the temperature
probe inside the sterilizer chamber.
3 Rinse with water.
4 Clean the trays and the chamber rack with a damp sponge and a
mild detergent solution.
5 Rinse with water.
6 Reposition all pieces of the chamber accessories properly.
Note: tap to see the animated cleaning procedure.
Note: the trays and the tray holder may also be cleaned in a washer disinfector.
62 Lexa| Instructions for Use |MN-111 ENG Rev14 |03/04/2023 |© W&H Sterilization Srl
Page 63
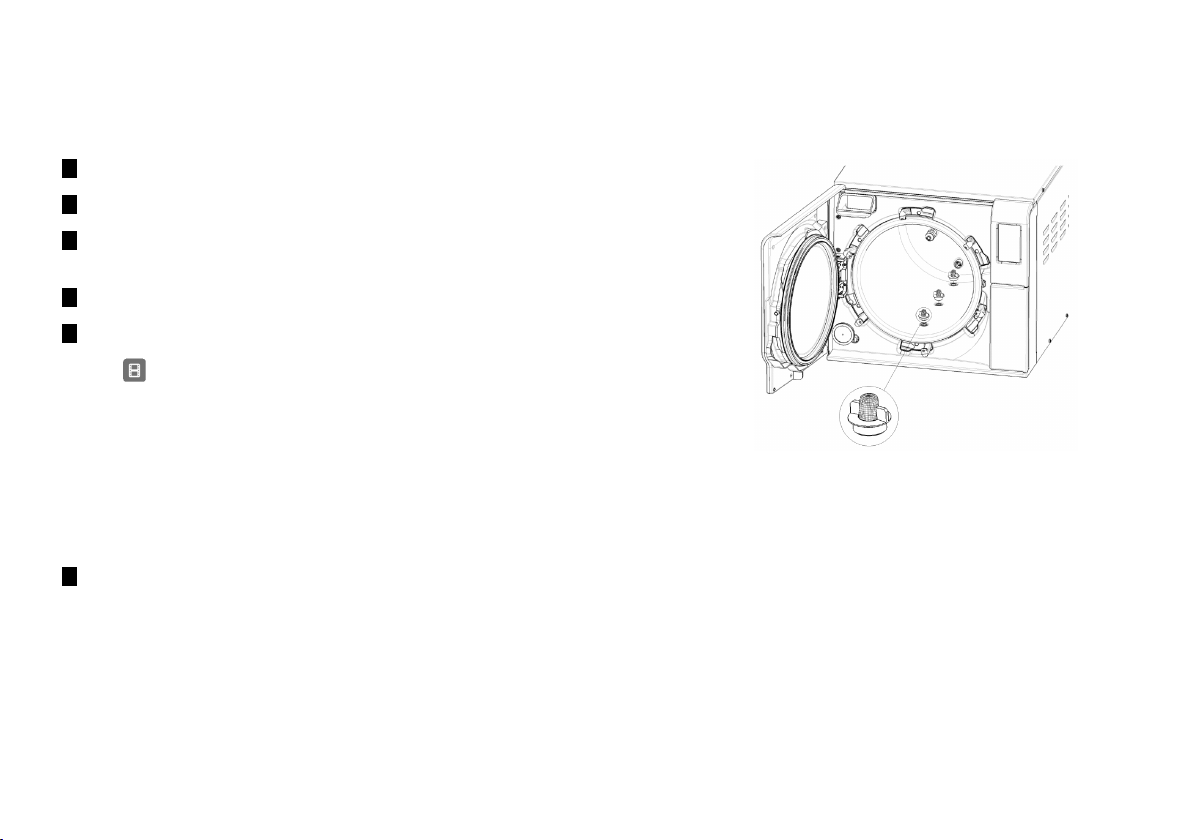
CLEANING THE CHAMBER FILTERS
Proceed as follows:
1 Allow the sterilization chamber to cool down.
2 Empty the sterilizer chamber by removing the trays and the rack.
3 Remove the filters at the bottom of the chamber (bottom/center) by unscrewing
them.
4 Rinse the filters with tap water.
5 Insert the filters in their original position, screwing them into place.
Note: tap to see the animated cleaning procedure.
CLEANING THE EXTERNAL SURFACES OF THE STERILIZER
Proceed as follows:
1 Clean all external sterilizer covers with a slightly damp cloth moistened with
water. For better cleaning results, clean with W&H MC-1000 cleaning solution.
Notice: never use any other disinfectant, detergent or abrasive product, as they
might result aggressive for the external covers and damage them.
Maintenance
Lexa| Instructions for Use |MN-111 ENG Rev14 |03/04/2023 |© W&H Sterilization Srl 63
Page 64
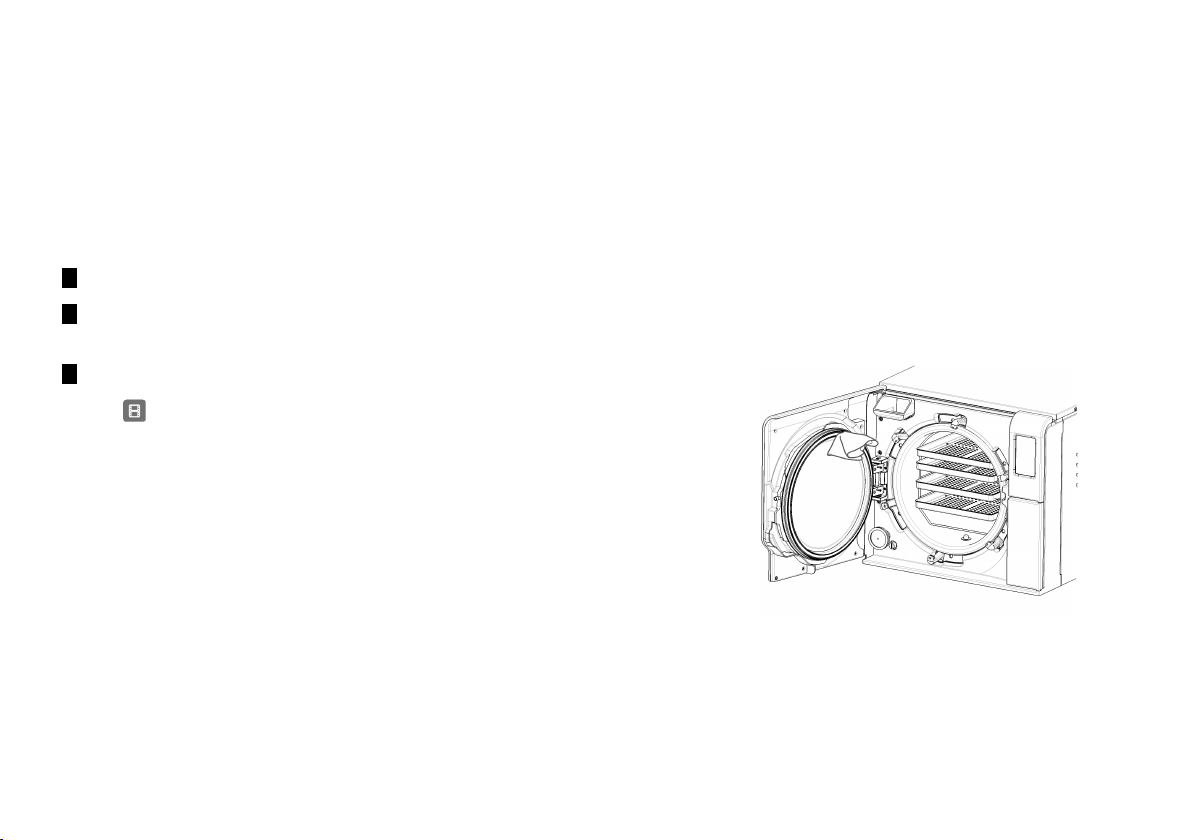
Maintenance
1200-cycle or yearly maintenance
REPLACING THE DOOR GASKET
Notice: the door gasket needs to be replaced every 1200 sterilization cycles or once a year, whichever come first. A replacement message alerts
when replacement is due. If the consumables is replaced prior to the message, you have to reset the consumable cycle counter.
Proceed as follows:
1 Open the chamber door.
2 Remove the used door gasket by hand.
3 Carefully clean the seal seat and the inside face of the chamber door.
Note: tap to see the animated replacement procedure.
64 Lexa| Instructions for Use |MN-111 ENG Rev14 |03/04/2023 |© W&H Sterilization Srl
Page 65
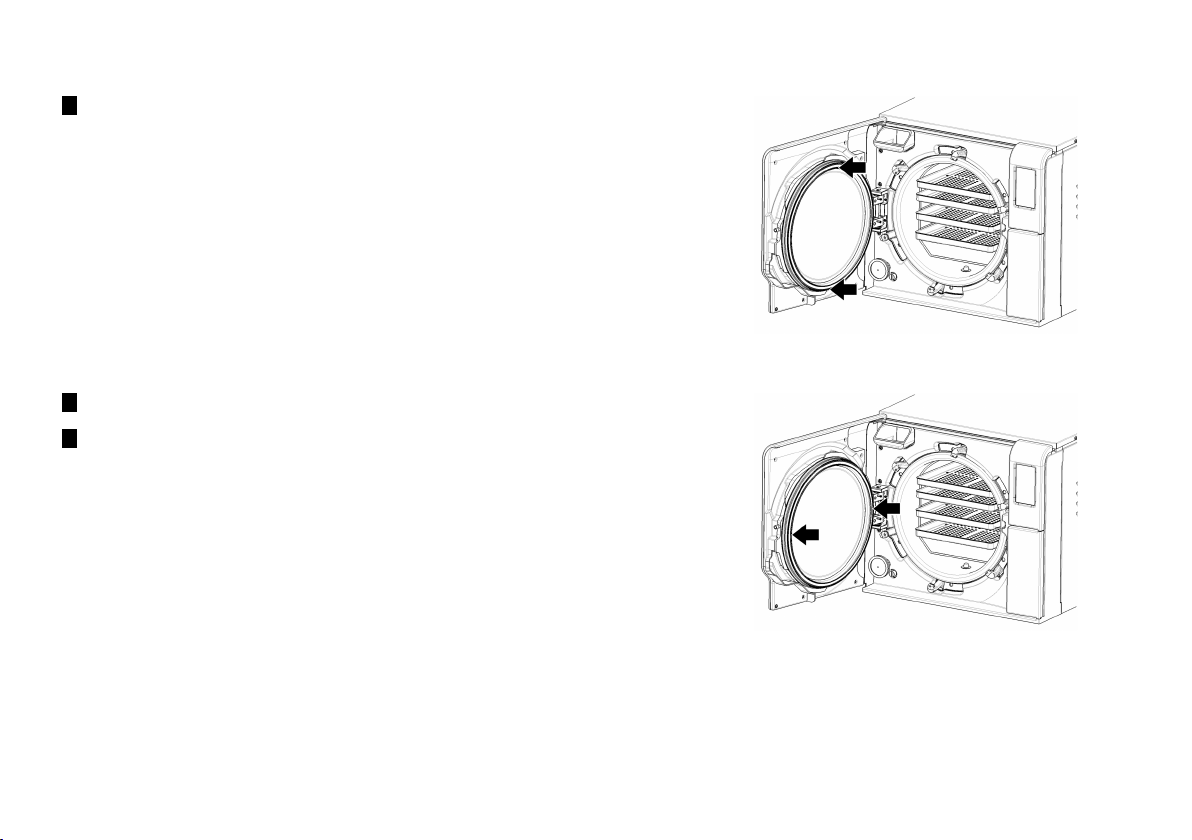
4 Insert the new seal and press first up and down.
5 Press left and right.
6 Make sure the door gasket is seated evenly.
Maintenance
Lexa| Instructions for Use |MN-111 ENG Rev14 |03/04/2023 |© W&H Sterilization Srl 65
Page 66
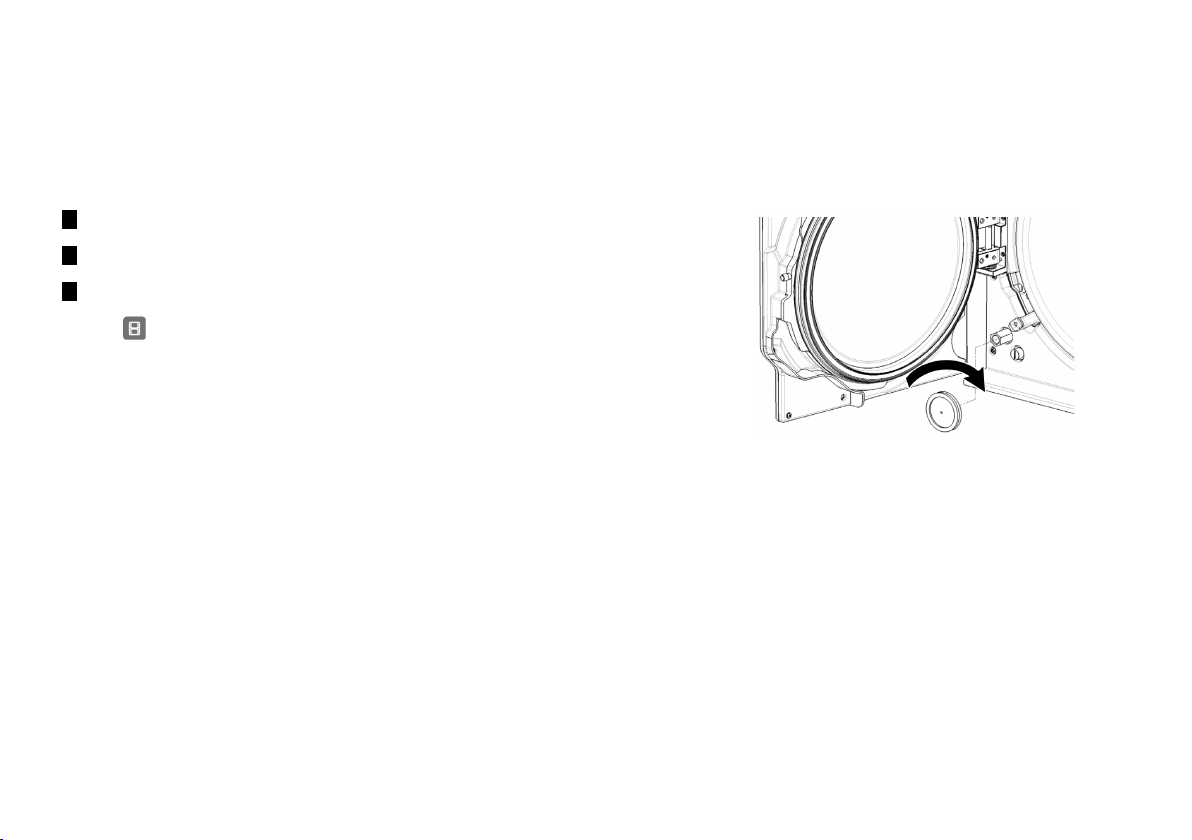
Maintenance
REPLACING THE HEPA FILTER
Notice: the HEPA filter needs to be replaced every 1200 sterilization cycles or once a year, whichever come first. A replacement message alerts
when replacement is due. If the consumables is replaced prior to the message, you have to reset the consumable cycle counter.
Proceed as follows:
1 Open the sterilizer door.
2 Unscrew the HEPA filter by hand (counter-clockwise).
3 Screw on the new HEPA filter (clockwise) and tighten it snug.
Note: tap to see the animated replacement procedure.
66 Lexa| Instructions for Use |MN-111 ENG Rev14 |03/04/2023 |© W&H Sterilization Srl
Page 67
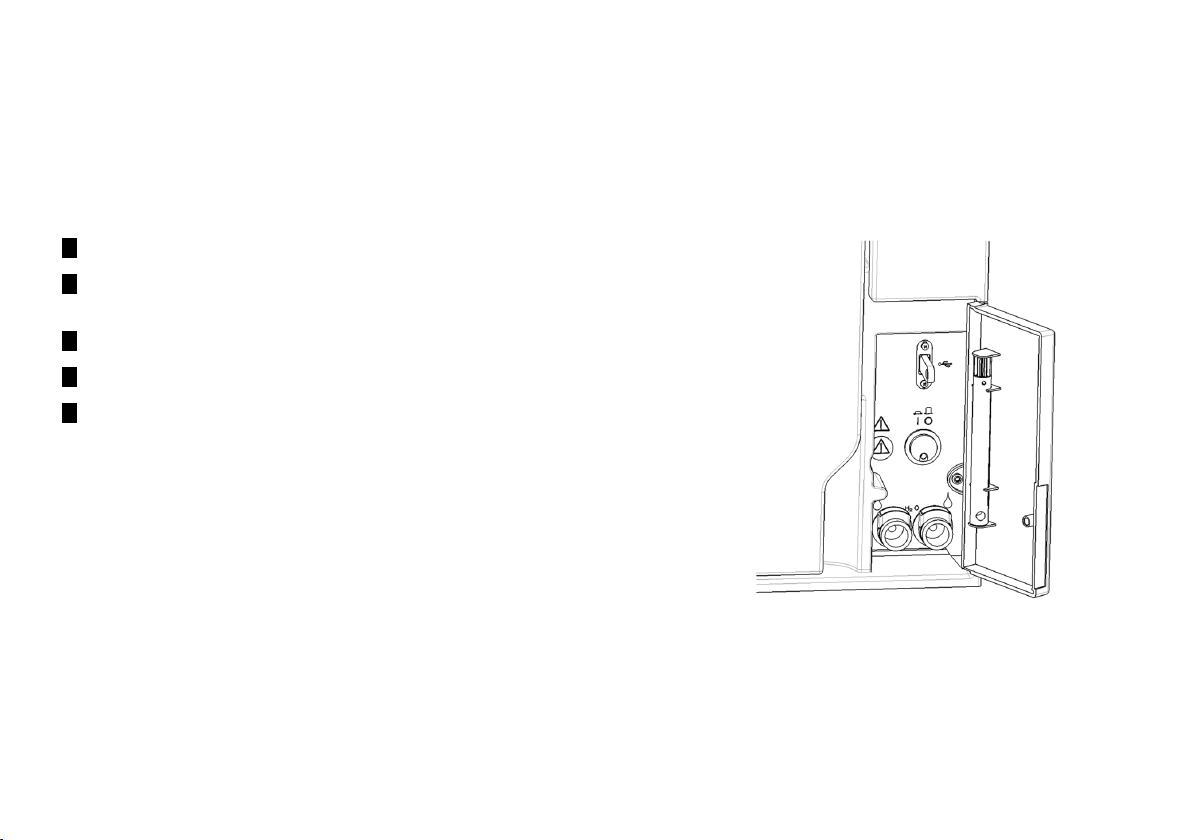
Maintenance
Extraordinary maintenance
DRAINING THE USED AND CLEAN WATER TANK
If you left accidentally the tanks full for more than seven days or if you plan not to use the sterilizer for at least seven days, you have to drain the
tanks.
1 Open the sterilizer service door.
2 Put a container below the sterilizer (1.84 gal (7 l) minimum) and place the end of
the drain tube in it.
3 To drain the used water, insert the drain tube connector in the grey connection.
4 To drain the clean water, insert the drain tube connector in the blue connection.
5 When the water has been completely drained, press the release button to remove
the drain tube and close the service door.
Lexa| Instructions for Use |MN-111 ENG Rev14 |03/04/2023 |© W&H Sterilization Srl 67
Page 68

Maintenance
Disposal
DISPOSAL RESPONSIBILITY
n Separate the various components according to the materials they are made of
n Drop the sterilizer with a company that specializes on the recycling of related products
n Do not abandon the sterilizer in unsecured places
n Always refer to current/applicable laws and rules in the country of use
The same instructions apply to disposal of all used consumable parts.
MATERIALS
The sterilizer is mainly built from fiber-reinforced polymers, metals and electric / electronic components.
68 Lexa| Instructions for Use |MN-111 ENG Rev14 |03/04/2023 |© W&H Sterilization Srl
Page 69
Diagnostics
CONTENTS
This section deals with the following subjects:
Errors 69
Troubleshooting 74
Emergency door opening 80
Errors
CHECKS AND ACTIONS
Notice: for any error not listed in this table, contact technical service.
Code Description Actions
0xx
10x
Load cannot be considered sterile. See "End of a sterilization cycle" on page53 Repeat the cycle.
Check if the mains switch or network circuit breaker is OFF.
Check if the mains cable is properly connected.
Switch the sterilizer OFF and ON.
Set date and time, then switch the sterilizer OFF and ON.
Ensure that the sterilizer fan is not blocked.
See error "13x to 16x" on the next page. Repeat the cycle.
If the problem persists, contact technical service.
If the problem persists, contact technical service.
Lexa| Instructions for Use |MN-111 ENG Rev14 |03/04/2023 |© W&H Sterilization Srl 69
Page 70
Diagnostics
Code Description Actions
12x
Wait before opening the chamber door. Allow the sterilization chamber to cool down. Repeat the cycle.
Switch the sterilizer OFF and ON.
If the problem persists, contact technical service.
Clean the chamber and the chamber furniture from residuals of detergents, disinfectants and other
chemicals.
Replace the clean water if it is suspected to be contaminated with chemicals.
Ensure all the load is clean rinsed and free from any chemicals before sterilizing.
13x to 16x
Check water level in the clean water tank. Reset the safety thermostat.. Repeat the cycle.
Switch the sterilizer OFF and ON.
If the problem persists, contact technical service.
Clean the door gasket and the chamber face side.
Check if the load placed in the sterilization chamber complies with the MAXIMUM WEIGHT LIMITS.
Clean the chamber and the chamber furniture from residuals of detergents, disinfectants and other
chemicals.
Replace the clean water if it is suspected to be contaminated with chemicals.
Ensure all the load is clean rinsed and free from any chemicals before sterilizing.
18x
2xx
Chamber filters clogged. Remove and clean the chamber filters. See error "13x to 16x" above. Repeat the cycle.
HEPA filter clogged. Check and replace if necessary.
If the problem persists, contact technical service.
Switch the sterilizer OFF and ON. Repeat the cycle.
Wait for the chamber to cool down. Reset the safety thermostat (see "Extraordinary maintenance" on
If the problem persists, contact technical service.
page67).
3xx
Check the door gasket. Clean or replace it if necessary. Repeat the cycle.
Clean the chamber face side.
If the problem persists, contact technical service.
Check the load does not exceed the MAXIMUM WEIGHT LIMITS.
70 Lexa| Instructions for Use |MN-111 ENG Rev14 |03/04/2023 |© W&H Sterilization Srl
Page 71
Code Description Actions
4xx
Clean water error (bad quality, clean tank low level, high consumption of water). Repeat the cycle.
Drain and/or refill the clean water tank.
If the problem persists, contact technical service.
Check the door gasket. Clean or replace it if necessary.
5xx
Check if there are hurdles on the door locking area (chamber rack, loads, objects, …). Repeat the cycle.
Check the door gasket (wrong placed).
If the problem persists, contact technical service.
Check if the door can move freely without touching the trays or the load when closing.
Switch the sterilizer OFF and ON.
990
The cycle has been aborted by the user. Re-process the load.
Diagnostics
Lexa| Instructions for Use |MN-111 ENG Rev14 |03/04/2023 |© W&H Sterilization Srl 71
Page 72
Diagnostics
MESSAGES AND ALERTS
Notice: for any error not listed in this table, contact technical service.
Message/Alert Description Action
Fill clean water tank.
Drain used water tank.
Please close the door.
Non-conform water
Poor water quality detected.
Replace with higher quality
water, or equipment damage
may occur.
Door Gasket must be replaced in
... cycles.
Do you want to replace it now?
HEPA Filter must be replaced in
... cycles.
Do you want to replace it now?
There is not enough water in the tank to perform a
cycle.
The used water tank is full. Drain the water tank as requested.
The door must be locked, but you didn't close it. Close the door so it can be locked.
The clean water quality is bad (conductivity
between 15 and 50 μS/cm).
The clean water quality is very bad (conductivity
more than 50 μS/cm).
These are pre-alerts advising that one of the
consumables has to be replaced within a small
number of cycles.
Fill the water tank as requested.
You may run a cycle but the water must be replaced soon, otherwise the unit will
automatically lock-out to prevent damage.
Running a cycle is inhibited to prevent damage. Replace the clean water.
Tap if you have the consumable available for replacement.
Tap if you don't have the consumable in stock and must order one. In this case, the
pre-alert will appear again after some cycles.
See "Maintenance" on page59.
72 Lexa| Instructions for Use |MN-111 ENG Rev14 |03/04/2023 |© W&H Sterilization Srl
Page 73
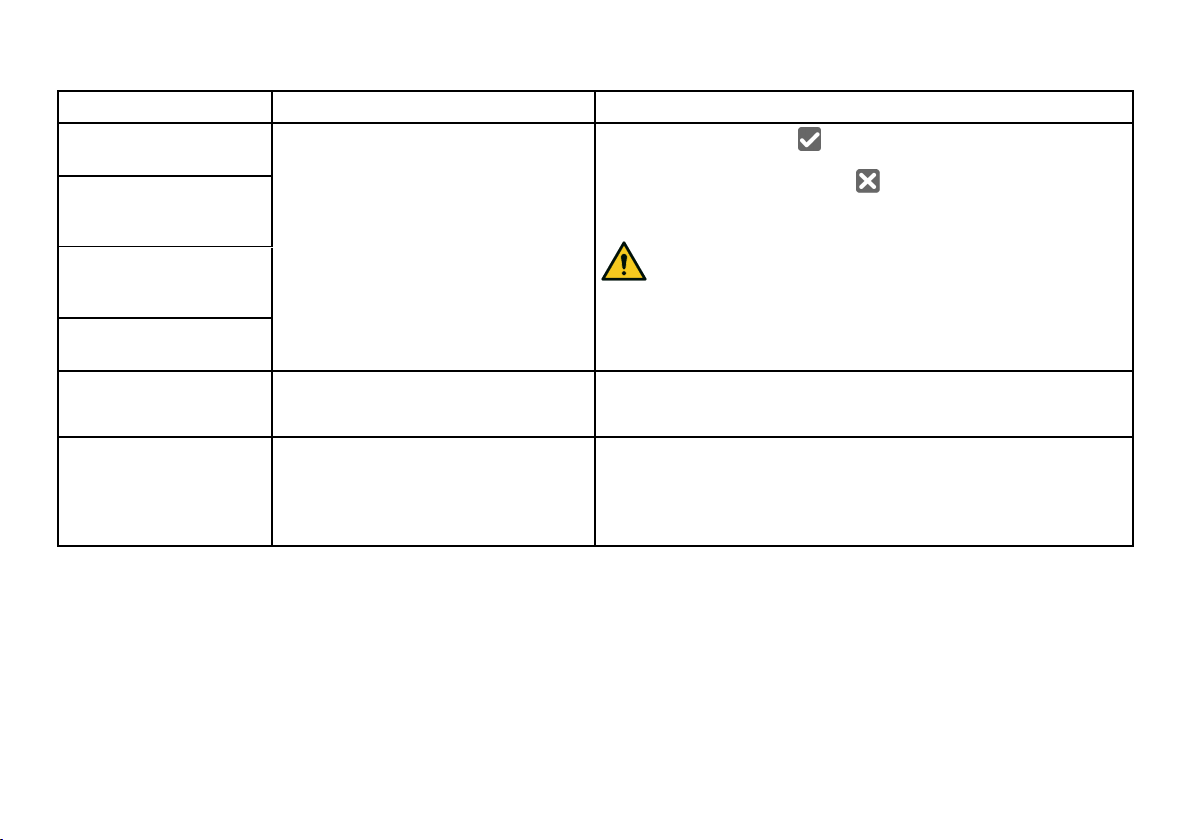
Message/Alert Description Action
Door Gasket replacement is due.
Do you want to replace it now?
Have you replaced the door
gasket?
Press YES to reset the counter.
Have you replaced the HEPA
filter?
These messages advise that one consumable must
be replaced.
Replace the consumable and tap to reset the counter (See "Maintenance" on
page59).
If you don't replace the consumable, press .
In this case, you may still use the sterilizer but the message will appear again after
some cycles.
CAUTION! Operating the sterilizer with expired consumables could be
dangerous and could damage the sterilizer.
Press YES to reset the counter.
HEPA Filter replacement is due.
Do you want to replace it now?
Possible leak detected.
Please run Vacuum Test.
Please check:
- Not to overload the sterilizer
- The door gasket
Air was detected in the chamber: a vacuum leak is
suspected. The cycle was completed but a vacuum
test is required.
This message advises you that the pressure inside
the chamber did not drop as expected in the first 30
seconds of drying phase.
Run a vacuum test.
Call for service if an anomaly is detected.
Check the door gasket correct positioning and make sure don't overload the sterilizer
chamber.
If the problem persists, contact technical service.
If the problem persists contact
the service.
Diagnostics
Lexa| Instructions for Use |MN-111 ENG Rev14 |03/04/2023 |© W&H Sterilization Srl 73
Page 74
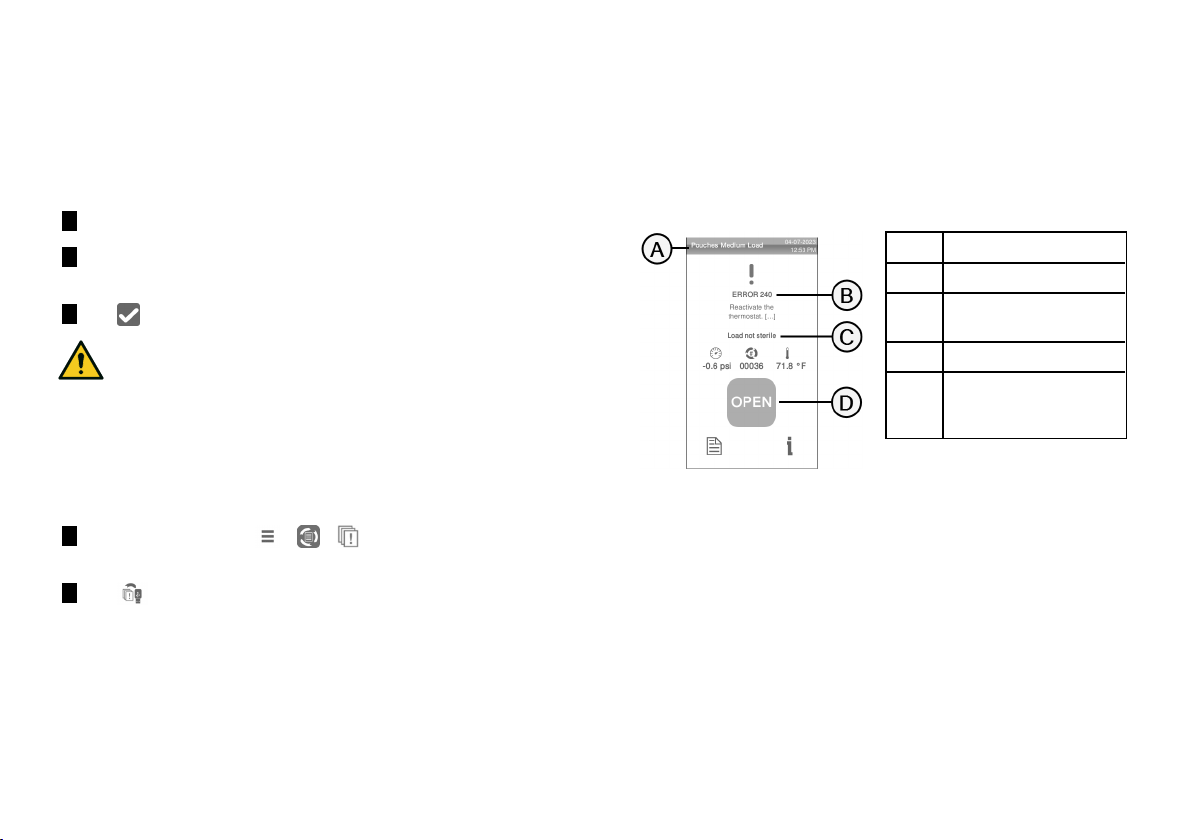
Diagnostics
Troubleshooting
MANAGING ERRORS
If during a sterilization cycle an error occurs do the following:
1
Wait until the OPEN button appears.
2 At the end of the reset phase, you may open the door. A pop
appears requiring a confirmation.
3 Tap to open the door.
CAUTION! Do not switch off the sterilizer during the reset
phase: it takes some minutes to reset the system and
reach safe conditions in the sterilizer chamber.
Notice: water could be present in the chamber when opening the
door: prevent spilling (e.g., place a towel below the chamber door).
VIEW AND SAVE THE ERROR LOG
1 On the homepage, tap > > : a list of the last errors
appears.
2 Tap to save the list in the USB pen drive.
ERROR PAGE
During the sterilization cycle, the sterilizer is continuously monitored
by a control system. If an anomaly is detected, the cycle is aborted
automatically, and the sterilizer starts a reset phase.
The following page appears:
Part Description
A
Current sterilization cycle
B
Error number, See
on page69
Warning messages.
C
Open button that appears
D
after the reset phase had
finished.
"Errors"
.
74 Lexa| Instructions for Use |MN-111 ENG Rev14 |03/04/2023 |© W&H Sterilization Srl
Page 75
WARNING MESSAGES
Message Description
Load not
sterile
The load is not sterile.
Diagnostics
WARNING! Do not use items on patients!
Drying
interrupted
Lexa| Instructions for Use |MN-111 ENG Rev14 |03/04/2023 |© W&H Sterilization Srl 75
The load might be wet.
WARNING! Wet items are for immediate use only!
Page 76
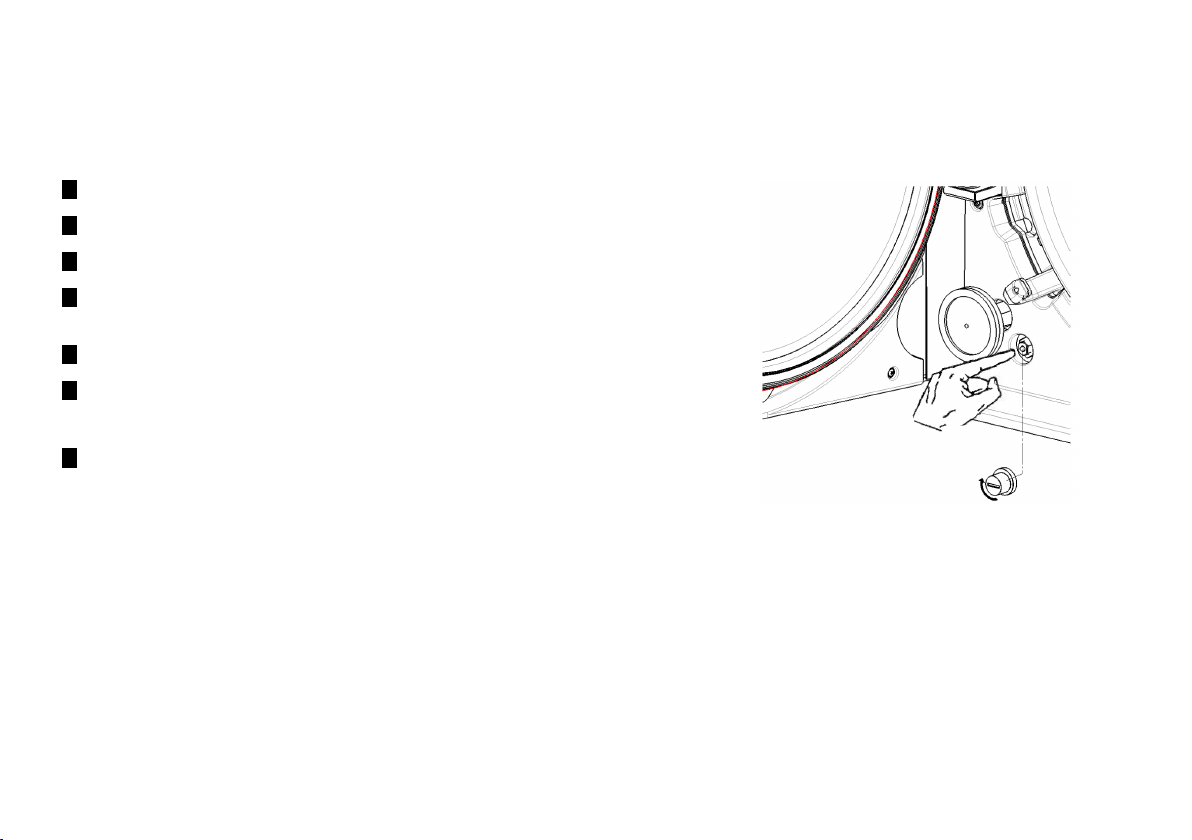
Diagnostics
RESET THE SAFETY THERMOSTAT
The sterilizer is fitted with a safety thermostat to prevent it from overheating. If the safety thermostat operates because of too high temperatures,
the error 240 or a timeout error is displayed. The thermostat must be reset manually. Proceed as follows:
1 Switch the sterilizer OFF and remove the mains cable.
2 Wait for the sterilizer to cool down.
3 Open the sterilizer door.
4 Unscrew the cap and push on the reset button of the thermostat switch; a click
sound indicates that the thermostat switch has been reset.
5 Screw the cap.
6 Connect the mains cable and switch the sterilizer ON.
Note: if the thermostat operates repeatedly, contact technical service.
7 Wait for the sterilizer to finish the error reset phase and follow the instructions on
the display.
76 Lexa| Instructions for Use |MN-111 ENG Rev14 |03/04/2023 |© W&H Sterilization Srl
Page 77
TROUBLESHOOTING TABLE
Note: if your problem is not resolved, call your authorized service provider.
Notice: before sending the sterilizer for technical service, remove the mains cable, empty both water tanks and use the original or appropriate packaging.
Problem Possible cause Solutions
The sterilizer remains switched
OFF.
Water is leaking at the front of the
sterilizer.
The cycle commences but there
is no pressure/temperature rise.
At the end of the cycle, there is
residual water in the chamber.
The mains switch or network circuit breaker is OFF. Activate the mains switch or network circuit breaker (ON).
No voltage at the socket. Check the electric circuit.
The power cord is not connected properly. Check and connect the power cord properly.
Leaks through the chamber door gasket. Clean or replace the door gasket.
Clean the chamber face side.
Internal leak. Contact technical service.
The safety thermostat switch is open. Reset the safety thermostat switch. See "Extraordinary maintenance" on page67
Electric - electronic fault. Contact technical service.
Sterilizer not properly leveled. Properly level the surface the sterilizer is placed on.
Overloaded chamber. Comply with the maximum load weight limits for each type of load. Always use the
chamber rack for trays and cassettes. See "Load maintenance and preparation" on
page45
Chamber filters clogged. Remove and clean the chamber filters.
One or more chamber filter caps not well-positioned. Mount the chamber filter caps properly (see "User maintenance" on page59).
Load incorrectly placed. See "Load maintenance and preparation" on page45
Diagnostics
Lexa| Instructions for Use |MN-111 ENG Rev14 |03/04/2023 |© W&H Sterilization Srl 77
Page 78
Diagnostics
Problem Possible cause Solutions
Corrosion or spots on
instruments.
Instruments are turning brown or
black.
The cycle report printer does not
work.
No cycles are stored in the cycle
history menu.
When starting a cycle, the
chamber door locks but re-opens
immediately. The “Open the door”
message appears.
Tap water on instruments when placed in the
Ensure that instruments are dry before they are placed in the sterilizer.
sterilizer.
Use of water of poor quality or water containing
Drain both water tanks. Use water of good quality. See "Water quality" on page95.
chemical substances.
Organic or chemical residues on the instruments. Clean, rinse and dry instruments before placing them in the sterilizer. See "Load
maintenance and preparation" on page45
Chamber, trays, chamber rack dirty. Clean the chamber and wash the chamber furniture.
Contact between instruments of different materials. Ensure that instruments of different materials do not touch (aluminium, carbon or
stainless steel, etc.); place them on different trays or cassettes or pouch them. See
"Load maintenance and preparation" on page45
Scale deposits on the chamber. Clean the chamber and use water of good quality. See "Water quality" on page95
Incorrect temperature selected. Select a sterilization cycle featuring a lower sterilization temperature. Follow the
instructions of the instrument manufacturer.
Printer not properly connected or not powered. Check the data and the power connection to the printer.
An electronic board was replaced by service. None. The memory of the old board cannot be restored. Save periodically the history on
the USB pen drive and on another safe support.
Door gasket not properly placed; seal sticking out. Ensure that the door gasket is evenly inserted on the entire circumference.
Door jammed by external objects or by the load
itself.
Remove any objects interfering with the chamber door. Check the door does not force
against the load or the chamber furniture.
78 Lexa| Instructions for Use |MN-111 ENG Rev14 |03/04/2023 |© W&H Sterilization Srl
Page 79
Problem Possible cause Solutions
When the sterilizer is connected
to an automated water supply
system: there is no clean water in
the tank, but the automatic water
filling does not fill the water.
The sterilizer enters the standby
mode immediately after opening
the chamber door.
At the end of the cycle the
display reads “Open the door” but
opening the door is impossible.
The sterilization process phase of
a sterilization cycle was longer
than expected.
Warning about USB saving (HTML
and SCL files).
Warning about programmed
maintenance.
Water fill system not connected. Connect the water fill system to the sterilizer. See "Water quality" on page95
When the water fill system attempted to fill the
tank, water was temporarily unavailable.
Since water tank filling is attempted only once in-between cycle execution, this event
inhibits water feeding. Switch the sterilizer OFF and then ON again.
Check the external water supply system.
Check for water leaks from the sterilizer.
Faulty MIN water level sensor in the clean water
Call service.
tank.
The chamber door has not been opened after the
Press the standby button to exit.
previous cycle had finished and the standby mode
delay has expired.
The HEPA filter is clogged. See “"Emergency door opening" on the next page”.
Contact technical service if the problem persists.
Remove the HEPA filter to get the pressure released. Replace the filter.
Note: The HEPA filters need to be replaced every 1200 cycles.
The chamber temperature dropped below the
Wait for cycle completion. If the problem occurs frequently, contact technical service.
minimum threshold and the software performed a
successful recovery.
The USB pen drive is not connected or not properly
connected to the sterilizer.
A component shall be replaced for the programmed
maintenance of the sterilizer.
Check presence and connection of the USB pen drive.
If the problem persist, call service.
Call service to order the requested component (door gasket, HEPA filter…).
See "User maintenance" on page59
Diagnostics
Lexa| Instructions for Use |MN-111 ENG Rev14 |03/04/2023 |© W&H Sterilization Srl 79
Page 80
Diagnostics
Emergency door opening
WARNING ABOUT OPENING THE DOOR IN EMERGENCY
WARNING! High pressure. Risk of explosion, jet of hot steam, sudden opening of the door. Carry out the following procedure only if
necessary and only when NO RESIDUAL PRESSURE IS IN THE CHAMBER. Any attempt to open the door while the unit is still hot or
under pressure could expose the operator and the surrounding personnel to serious risk.
CAUTION! High temperature. Risk of burns. Carry out the following procedure only when the sterilizer has completely cooled down. The
sterilizer should be unplugged from the mains power supply for at least 3 hours before executing this procedure.
Notice: carry out this procedure only as indicated and with the sterilizer in the indicated conditions. Any attempt to open the door in a different
way can seriously damage the sterilizer.
OPENING TOOL
The door locking system is electrically activated. In case the door remains locked due to a black-out or an electric fault, an auxiliary unlocking
procedure is available.
OPEN THE DOOR IN EMERGENCY
1 Unplug the sterilizer and wait at least three hours.
80 Lexa| Instructions for Use |MN-111 ENG Rev14 |03/04/2023 |© W&H Sterilization Srl
Page 81
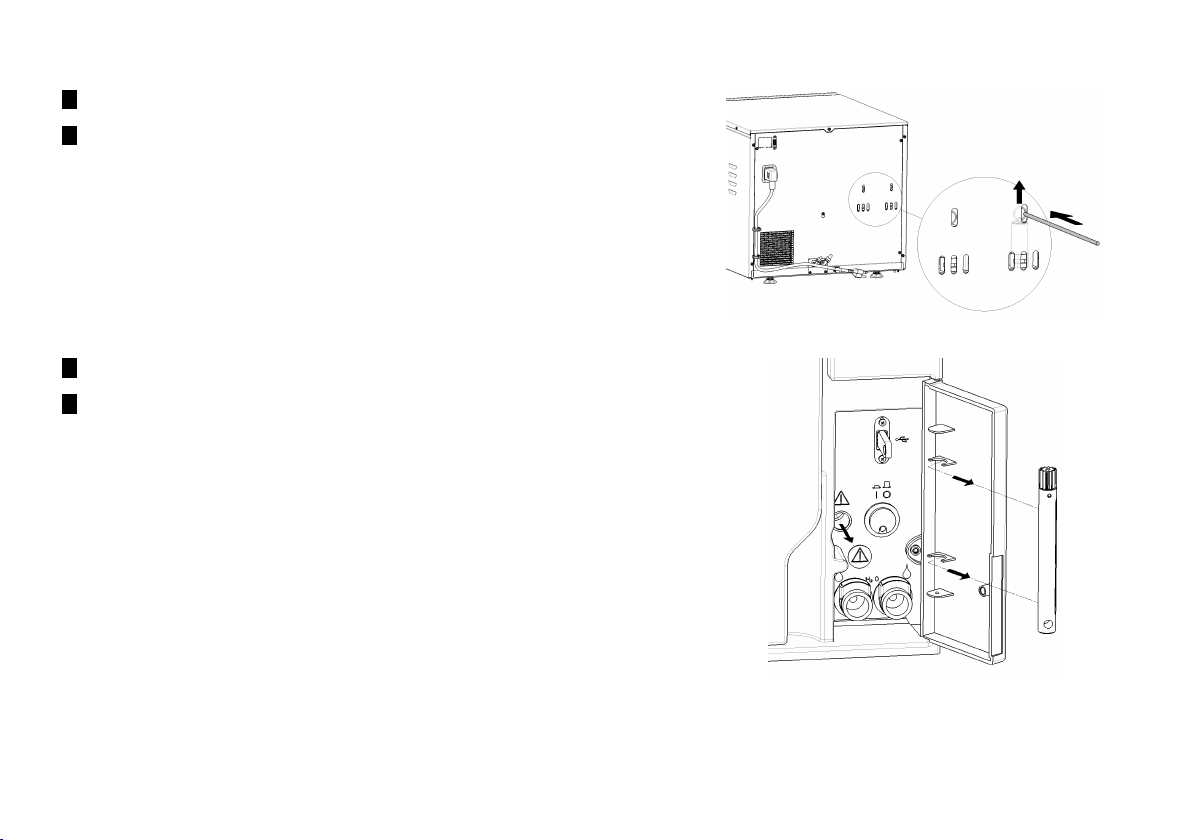
2 Remove the power connection (back side).
3 Release the chamber pressure through the ring of the safety valve (sterilizer rear
side) or wait three hours until the pressure has naturally decreased to the
environment pressure.
4 Extract the opening tool placed behind the service door.
5 Remove the cap.
Diagnostics
Lexa| Instructions for Use |MN-111 ENG Rev14 |03/04/2023 |© W&H Sterilization Srl 81
Page 82
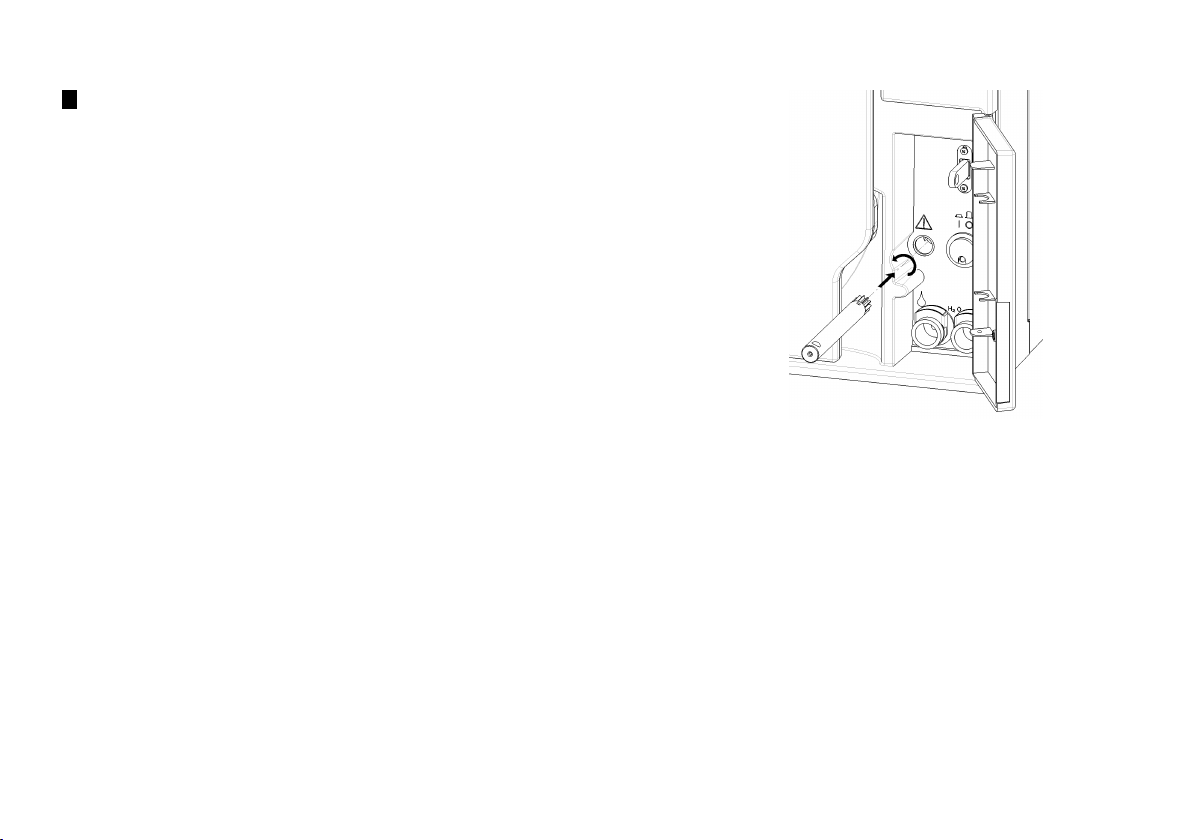
Diagnostics
6 Insert the opening tool into the hole and then turn it counterclockwise until the
door is unlocked (proceed slowly until it stops).
82 Lexa| Instructions for Use |MN-111 ENG Rev14 |03/04/2023 |© W&H Sterilization Srl
Page 83
Technical data
CONTENTS
This section deals with the following subjects:
Sterilization programs 83
Sterilization program phases 89
Technical data 92
Recommendations for validation 93
Diagrams 94
Water quality 95
Accessories, spare parts, consumables 96
Authorized W&H service partners 98
Sterilization programs
WARNINGS
WARNING! For your safety and for the safety of your patients:
Never process objects different from those specified in the cycle program table and never exceed the maximum load weight limits
specified in it. Such actions could result in non-sterile conditions at the end of the cycle, could expose people to the hazard of
cross-infections, are considered as an improper use of the sterilizer for which the manufacturer cannot be hold responsible.
An improper use of these profiles will result in wet load at the end of the cycle, exposing the load to a contamination due to
improper storage.
The display reminds the maximum permitted load before starting a cycle. All indications of sterile load or successful completion of
the cycle that are given on the display at the end of the cycle are not valid if the type and quantity of the load are not complied
with.
Lexa| Instructions for Use |MN-111 ENG Rev14 |03/04/2023 |© W&H Sterilization Srl 83
Page 84
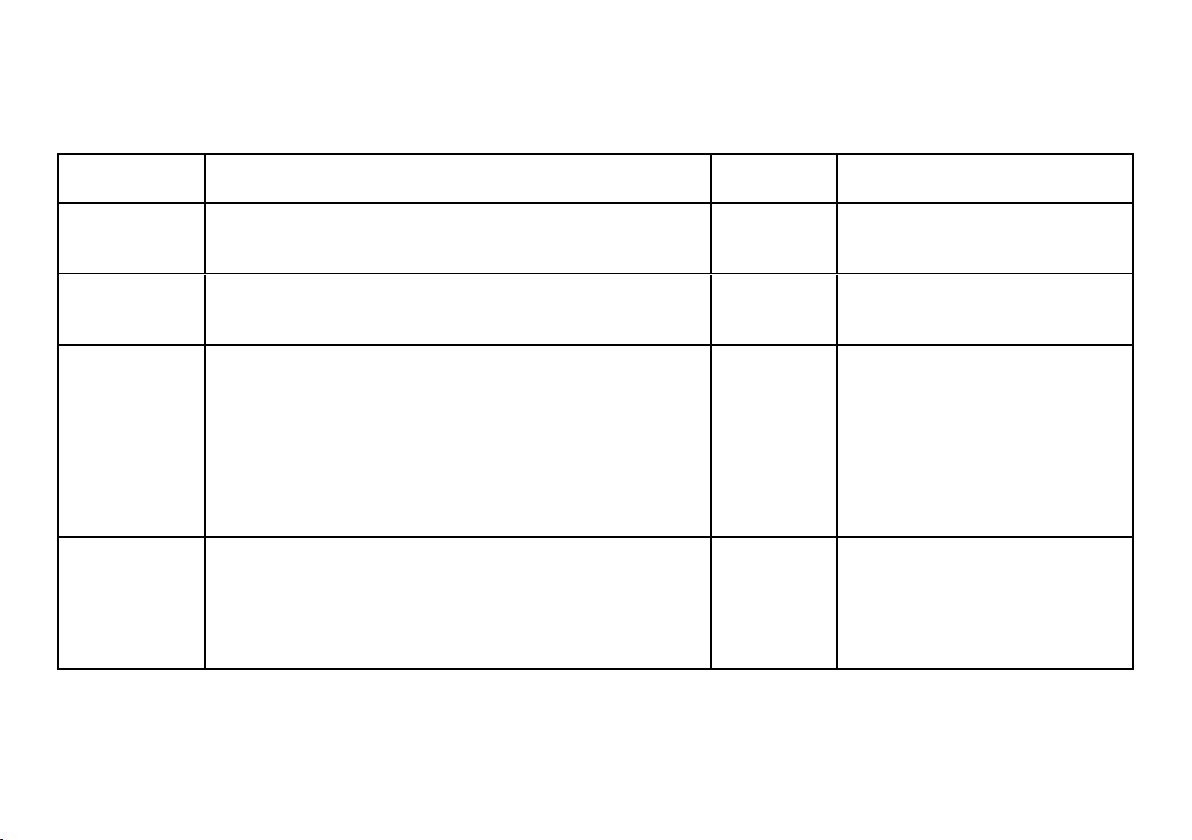
Technical data
STANDARD STERILIZATION PROGRAMS
The sterilizer offers six preset FDA cleared sterilization programs that comply with the American National Standard ANSI/AAMI ST55.
Program Recommended use
Pouches Medium
Load
Pouches Large Load
Pouches & Wrapped
Cassettes
Wrapped Cassettes
Instruments and dental handpieces, up to 3 lbs (1.4 kg).
Pouches, wrapped, unwrapped and naked.
Instruments and dental handpieces, up to 6 lbs (2.7 kg).
Pouches, wrapped, unwrapped and naked.
Instruments and dental handpieces, up to 11 lbs (5 kg).
Pouches, wrapped, unwrapped and naked.
Instruments and dental handpieces, up to 14 lbs (6.3 kg).
Pouches, wrapped, unwrapped and naked.
Sterilization
Temperature
270 °F
(132 °C)
270 °F
(132 °C)
270 °F
(132 °C)
270 °F
(132 °C)
Load example
40 pouched instruments (probes, explorers,
mirrors, etc.),
4 pouched dental handpieces.
80 pouched instruments (probes, explorers,
mirrors, etc.),
8 pouched dental handpieces.
40 pouched instruments (probes, explorers,
mirrors, etc.),
8 pouched dental handpieces,
2 wrapped Hygiene cassettes (8” x 5.5” | 20.3
mm x 13.8 mm),
1 wrapped Restorative cassette (8” x 11” | 20.3
mm x 27.9 mm),
2 wrapped Exam cassettes (8” x 3” | 20.3 mm x
7.6 mm).
4 wrapped Hygiene cassettes (8” x 5.5” | 20.3
mm x 13.8 mm),
2 wrapped Restorative cassettes (8” x 11” |
20.3 mm x 27.9 mm),
4 wrapped Exam cassettes (8” x 3” | 20.3 mm x
7.6 mm)
1
84 Lexa| Instructions for Use |MN-111 ENG Rev14 |03/04/2023 |© W&H Sterilization Srl
Page 85
Technical data
Program Recommended use
Low Temperature
Unwrapped
1
: mixture of instruments and/or packages within each program may vary. Not to exceed maximum load weight.
Textiles, up to 4.4 lbs (2 kg), or instruments and dental handpieces requiring low
temperature, up to 5 lbs (2.3 kg).
Pouches, wrapped, unwrapped and naked.
Instruments and dental handpieces, up to 18 lbs (8.1 kg). Unwrapped, naked.
The instruments sterilized with this cycle cannot be stored: they must be used
immediately after being sterilized.
Sterilization
Temperature
250 °F
(121 °C)
270 °F
(132 °C)
Load example
65 pouched instruments (probes, explorers,
mirrors, etc.),
6 pouched dental handpieces.
80 unwrapped instruments (probes, explorers,
mirrors, etc.),
8 unwrapped dental handpieces.
1
CUSTOM STERILIZATION PROGRAMS
WARNING! The custom programs are not FDA cleared and it is the responsibility of the user to validate these programs.
The sterilizer provides the following custom programs. These programs are disabled by default.
Program Sterilization Temperature
Custom A
Custom B
Custom C
1
: these are profiles defined by ANSI/AAMI ST55 as dynamic-air-removal (steam-flush pressure-pulse). These profiles can be enabled by the user. Some of the
1
1
1
250 °F (121 °C) 15–60 minutes 30–60 minutes
270 °F (132 °C ) 4–30 minutes 3–60 minutes
273 °F (134 °C) 3–30 minutes 3–60 minutes
Sterilization Time
(settable)
parameters can be adjusted by the user according to his needs (Plateau/Sterilization phase, dry time, etc.). These cycles are not FDA cleared.
Drying time
(settable)
Lexa| Instructions for Use |MN-111 ENG Rev14 |03/04/2023 |© W&H Sterilization Srl 85
Page 86
Technical data
STERILIZATION PROGRAM OPTIONS (200–240 V AC VERSION)
WARNING! The sterility of items processed unwrapped is compromised on exposure to non-sterile environments. Ensure that items
are dry when removed from the sterilizer. If the default drying time is not adequate for the load to be sterilized, additional drying
time can be added (see "Sterilization cycle management" on page49). To load properly the sterilizer see "Prepare the sterilizer" on
page48.
Unwrapped
Sterilization temperature
Sterilization program type according ANSI/AAMI ST55
Sterilization program type according EN 13060
Sterilization time (minutes)
Drying time (minutes)
Total program duration (min)
Full loaded including drying time
86 Lexa| Instructions for Use |MN-111 ENG Rev14 |03/04/2023 |© W&H Sterilization Srl
1
270 °F (132 °C) 270 °F (132 °C) 270 °F (132 °C) 270 °F (132 °C) 270 °F (132 °C) 250 °F (121 °C)
Dynamic-air-
removal: SFPP
Class S Class S Class S
4' 4' 4' 4' 4' 30'
Range: 8–99'
Recommended:
8'
26–30' 43–46' 48–52' 53–58' 58–63' 73–76'
Pouches Medium
Load
Dynamic-air-
removal: SFPP
Range: 25–99'
Recommended:
25'
Pouches Large
Load
Dynamic-air-
removal: SFPP
Range: 30–99'
Recommended:
30'
Pouches & Wrapped
Cassettes
Dynamic-air-
removal: SFPP
Class S Class S Class S
Range: 35–99'
Recommended:
35'
Wrapped
Cassettes
Dynamic-air-
removal: SFPP
Range: 40–99'
Recommended:
40'
Low Temperature
Gravity
displacement
Range: 30–99'
Recommended:
30'
Page 87
Technical data
Unwrapped
Load type
Maximum load weight (excluding trays)
1
: The total cycle time may vary depending on the type of load (solid or porous), the load weight, and other factors.
Pouched, wrapped instruments and
dental handpieces
Unwrapped instruments and dental
handpieces
Wrapped cassettes
Unwrapped cassettes
Textiles
No Yes Yes Yes Yes Yes
Yes Yes Yes Yes Yes Yes
No Yes Yes Yes Yes Yes
Yes Yes Yes Yes Yes Yes
No No No No
instruments:
18 lb (8.1 kg)
Pouches Medium
Load
instruments:
3 lb (1.4 kg)
Pouches Large
Load
instruments:
6 lb (2.7 kg)
Pouches & Wrapped
instruments:
included cassettes
STERILIZATION PROGRAM OPTIONS (100–125 V AC VERSION)
WARNING! The sterility of items processed unwrapped is compromised on exposure to non-sterile environments. Ensure that items
are dry when removed from the sterilizer. If the default drying time is not adequate for the load to be sterilized, additional drying
time can be added (see "Sterilization cycle management" on page49). To load properly the sterilizer see "Prepare the sterilizer" on
page48.
Sterilization temperature
Sterilization program type according ANSI/AAMI ST55
Unwrapped
270 °F (132 °C) 270 °F (132 °C) 270 °F (132 °C) 270 °F (132 °C) 270 °F (132 °C) 250 °F (121 °C)
Dynamic-air-
removal: SFPP
Pouches Medium
Load
Dynamic-air-
removal: SFPP
Pouches Large
Load
Dynamic-air-
removal: SFPP
Pouches & Wrapped
Dynamic-air-
removal: SFPP
Cassettes
11 lb (5 kg)
Cassettes
Wrapped
Cassettes
No
instruments:
14 lb (6.3 kg )
included
cassettes
Wrapped
Cassettes
Dynamic-air-
removal: SFPP
Low Temperature
Yes
instruments:
5 lb (2.2 kg)
included trays
or textile:
4.4 lb (2 kg)
Low Temperature
Gravity
displacement
Lexa| Instructions for Use |MN-111 ENG Rev14 |03/04/2023 |© W&H Sterilization Srl 87
Page 88
Technical data
Sterilization program type according EN 13060
Sterilization time (minutes)
Drying time (minutes)
Total program duration (min)
1
Unwrapped
Pouches Medium
Load
Class S Class S Class S Class S Class S Class S
4' 4' 4' 4' 4' 30'
Range: 8-99'
Recommended:
8'
Range: 25–99'
Recommended:
25'
30–39' 47–53'
Pouches Large
Pouches & Wrapped
Load
Range: 30–99'
Recommended:
Range: 35–99'
Recommended:
30'
52–58' 57–64' 62–71' 75–79'
Full loaded including drying time
Load type Pouched, wrapped instruments and
No Yes Yes Yes Yes Yes
dental handpieces
Unwrapped instruments and dental
Yes Yes Yes Yes Yes Yes
handpieces
Wrapped cassettes
Unwrapped cassettes
Textiles
Maximum load weight (excluding trays)
No Yes Yes Yes Yes Yes
Yes Yes Yes Yes Yes Yes
No No No No No Yes
instruments:
18 lb (8.1 kg)
instruments:
3 lb (1.4 kg)
instruments:
6 lb (2.7 kg)
instruments:
included cassettes
1
: the total cycle time may vary depending on the type of load (solid or porous), the load weight, and other factors.
Cassettes
35'
11 lb (5 kg)
Wrapped
Cassettes
Range: 40–99'
Recommended:
40'
instruments:
14 lb (6.3 kg)
included
cassettes
Low Temperature
Range: 30–99'
Recommended:
30'
instruments:
5 lb (2.2 kg)
included trays
or textile:
4.4 lb (2 kg)
88 Lexa| Instructions for Use |MN-111 ENG Rev14 |03/04/2023 |© W&H Sterilization Srl
Page 89
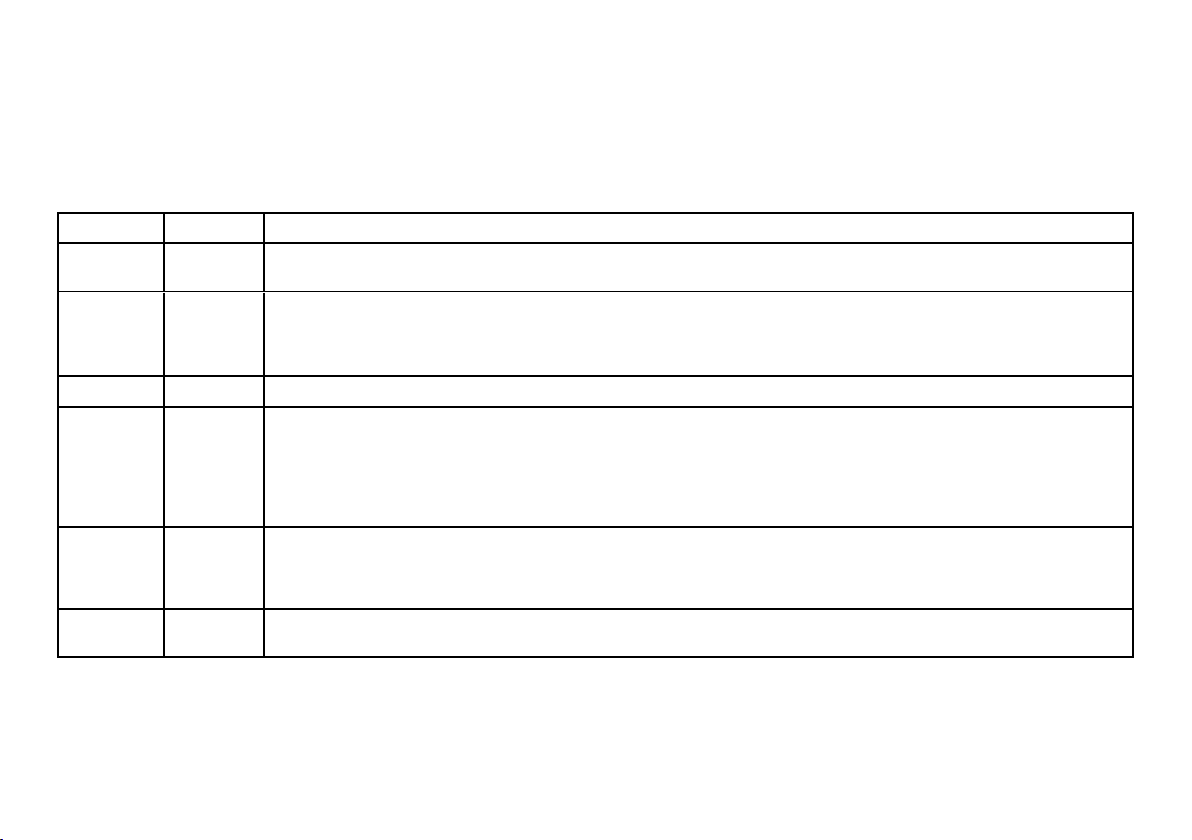
Sterilization program phases
LEGEND OF THE STERILIZATION PROGRAM PHASES
Following is the description of the sterilization phases.
Code Phase Description
PHE Pre-heating
HEA1
HEA2
HEA3 Pressure rise
STLZ Sterilization
DRY Exhausting
LEV
phase
Heating
phase (steam
pressure
pulses)
phase
drying phase
Levelling
phase
Pre-heating of the sterilizer steam generator and chamber. This phase is not considered a part of the cycle.
Initial heating phase to remove the air from the sterilization chamber. Air is removed using pressure pulses followed by discharge phases. The
iteration of these phases reduce the percentage of air inside the chamber and determinates the correct sterilization conditions.
Heating phase to achieve the sterilization conditions (pressure and temperature) for the selected cycle.
Sterilization condition (pressure and temperature) maintained for the time specified for the selected cycle. During this phase the unit controls
the theoretical temperature (pressure converted in temperature, because of physical behaviour of water) and the steam temperature inside the
chamber. The value must be between the sterilization temperature band, and the difference between them must be lower than 3.6 °F (2 °C). If
the temperature drops below the sterilization temperature band a restart process procedure is automatically executed by the sterilizer
(according to ST55). The sterilizer controls the sterilization condition through steam generation. The steam generation is controlled by a PID, that
modulates the electrical power using as feedback the instant average between theoretical and internal temperature.
The objective of this phase is to dry the load placed in the sterilizer chamber. The drying phase is divided in two step:
n The first step is the depressurization phase, when most of the steam is removed from the chamber. The second step is the drying of the
load.
n Duration of the DRY phase depends on the selected profile.
Pressure inside the sterilization chamber is leveled to the atmospheric pressure.
Technical data
Lexa| Instructions for Use |MN-111 ENG Rev14 |03/04/2023 |© W&H Sterilization Srl 89
Page 90
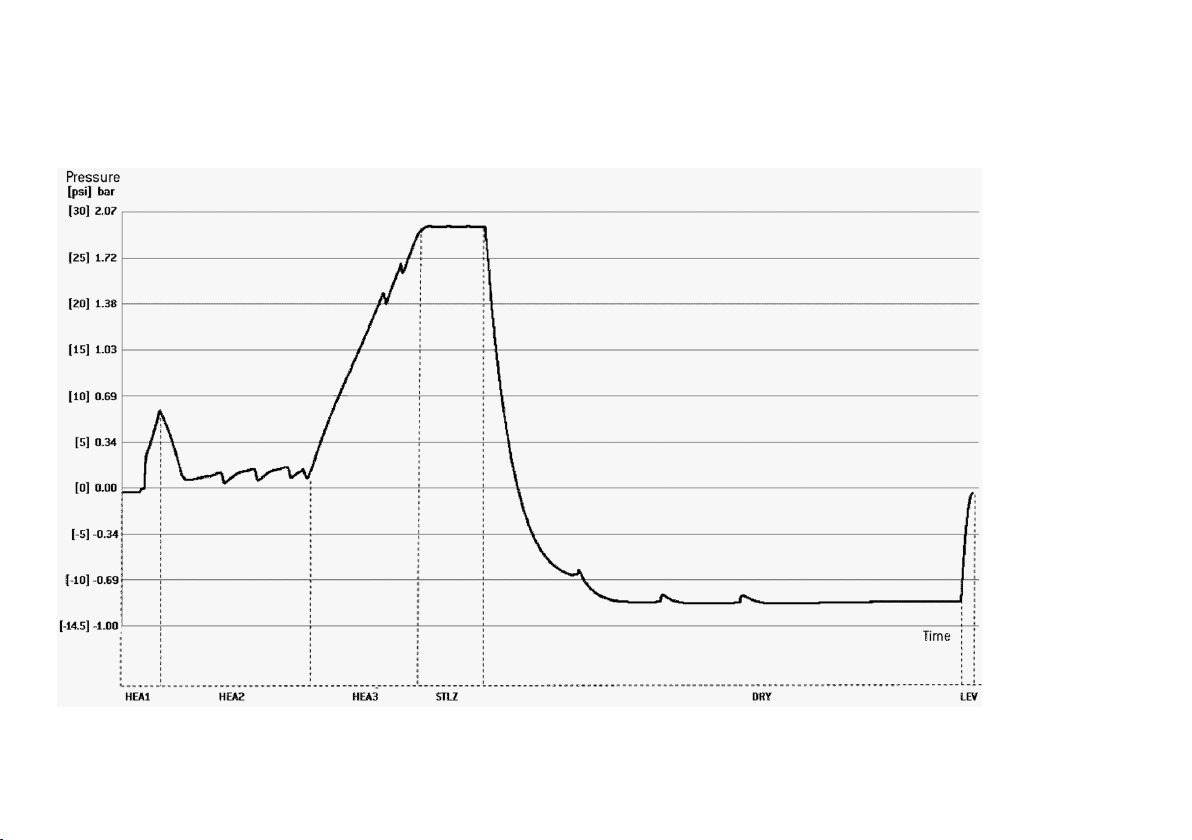
Technical data
HIGH TEMPERATURE PRESSURE PROFILE
All programs with the sterilization phase at 270 °F (132 °C) feature the same basic pressure profile 270 °F (132 °C). The duration of the drying
phase differ between the various programs.
90 Lexa| Instructions for Use |MN-111 ENG Rev14 |03/04/2023 |© W&H Sterilization Srl
Page 91
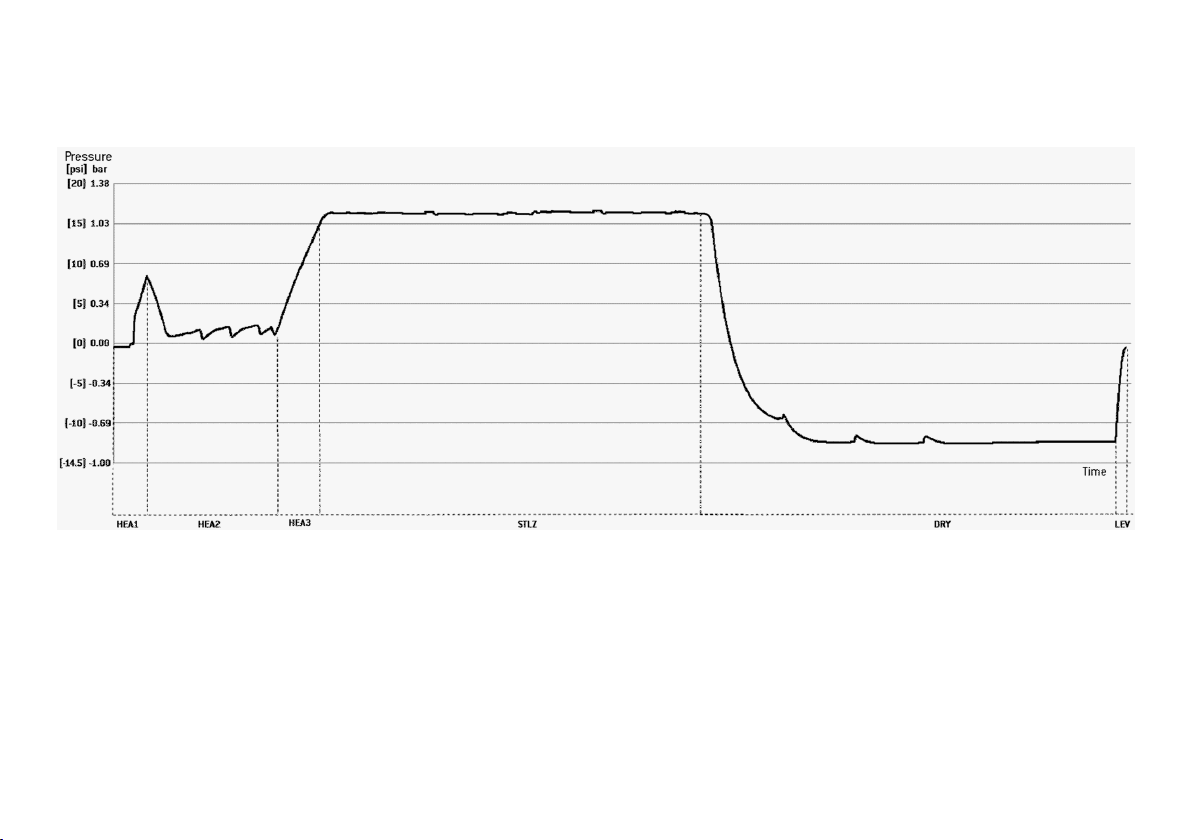
LOW TEMPERATURE PRESSURE PROFILE
Low Temperature sterilization program features the following pressure profile 250°F (121 °C).
Technical data
Lexa| Instructions for Use |MN-111 ENG Rev14 |03/04/2023 |© W&H Sterilization Srl 91
Page 92

Technical data
Technical data
WATER SUPPLY SYSTEM
Temperature
Pressure
Flow
POWER SUPPLY SYSTEM
Nominal voltage and Max.
current
Overvoltage category
Protection required
Communication with other
devices
Features
Max. heat output
INSTALLATION REQUIREMENTS
Working temperature
Working relative humidity
max. 95 °F (35 °C)
min. 29 psi - max. 124.7 psi (min. 2 bar – max. 8.6 bar)
min. 0.066 - max. 0.132 gal/min (min. 0.25 – max. 0.5 l/min)
200–240 V ac (±10%), 50/60 Hz, 10 A, single-phase
100–125 V ac (±10%), 50/60 Hz, 12 A, single-phase
II
Suitable circuit breaker and a Ground Fault Circuit Interrupter
(GFCI). All protection devices must be certified according to
applicable standard. A grounded connection is essential.
2 USB ports - 1 LAN port (optional)
Fully micro-processor controlled, process evaluation system
according to EN13060.
Programmable standby mode.
3000 kJ/h
From +41 °F to +104 °F (from +5 °C to +40 °C)
Max. RH 80% up to 88 °F (31 °C), linearly decreasing to 50% at 104
°F (40 °C)
Storage temperature / rel.
humidity
Max altitude
Min. atmospheric
pressure
Overall dimensions
Min. space required
(feet in forward position)
Size of the door
movement
Weight empty
Max. weight (fully loaded)
Weight per support area
Environment pollution
Usage environment
From -4 °F to +140 °F (from -20 °C to +60 °C) / 0–90 % (with empty
tanks)
3000 m asl
8.7 psi (0.6 bar)
W: 19.3’’/H: 17.9’’/D: 24.2’’ (W: 49 cm/H: 46 cm/D: 62 cm)
W: 22.5’’/H: 18.9’’/D: 20.1’’ (W: 57 cm/H: 48 cm/D: 51 cm)
W: 21.5’’/H: 16.4’’/D: 15.6’' (W: 55 cm/H: 42 cm/D: 38 cm)
105.8 lbs (48 kg)
155 lbs (70.3 kg)
41.5 kN/m
Degree 2
Indoor
STERILIZER CHAMBER
Pressure safety valve
Safety thermostats
Total volume
Usable space *
HEPA filter
37.7 psi (2.6 bar)
356 °F (180 °C)
~7.4 gal, Ø: 11’’/D: 18’’ ~28 l, Ø: 279.5 mm/D: 456.8 mm
W: 9.05"/H: 9.05"/D: 15.35" (W: 230 mm/H: 230 mm/D: 390 mm)
0.3 µm
STEAM GENERATOR
Pressure safety valve
Safety thermostats
72.51 psi (5 bar)
446 °F (230 °C)
2
92 Lexa| Instructions for Use |MN-111 ENG Rev14 |03/04/2023 |© W&H Sterilization Srl
Page 93
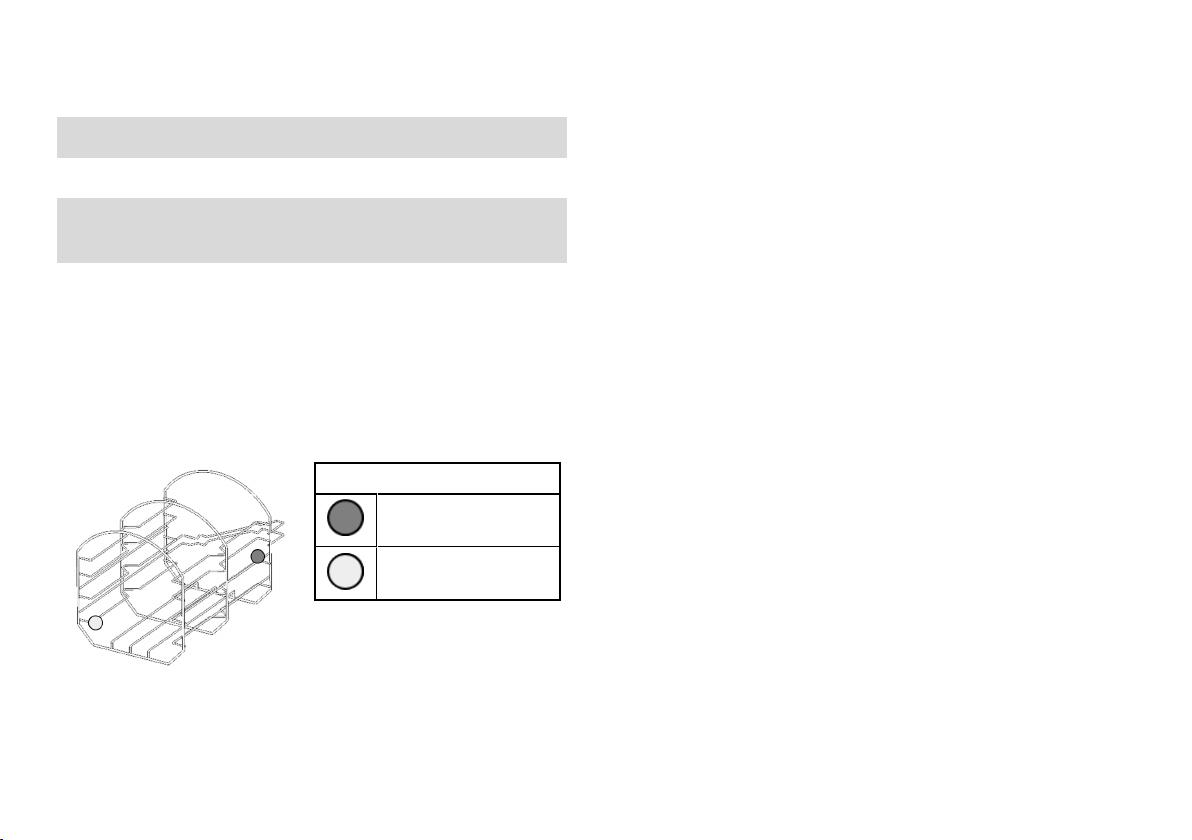
DISTILLED OR DEMINERALIZED WATER
Water quality
Average water
consumption
Tank volume
*: usable space with standard rack and trays. With optional racks and trays,
see Accessories, spare parts, consumables.
See the Test instructions service book (conductivity : < 10μS/cm,
Total Dissolved Solids: < 6.5 ppm)
0.17 to 0.2 gal/cycle (0.65 to 0.75 litres/cycle)
Clean water 1.7 gal (6.4 l)
Min. water charge (clean water): 0.29 gal (1.1 l)
Used water 1.77 gal (6.7 l)
Recommendations for validation
TEST VALIDATION POINTS
Part Description
Hottest points
Coldest points
Technical data
Lexa| Instructions for Use |MN-111 ENG Rev14 |03/04/2023 |© W&H Sterilization Srl 93
Page 94
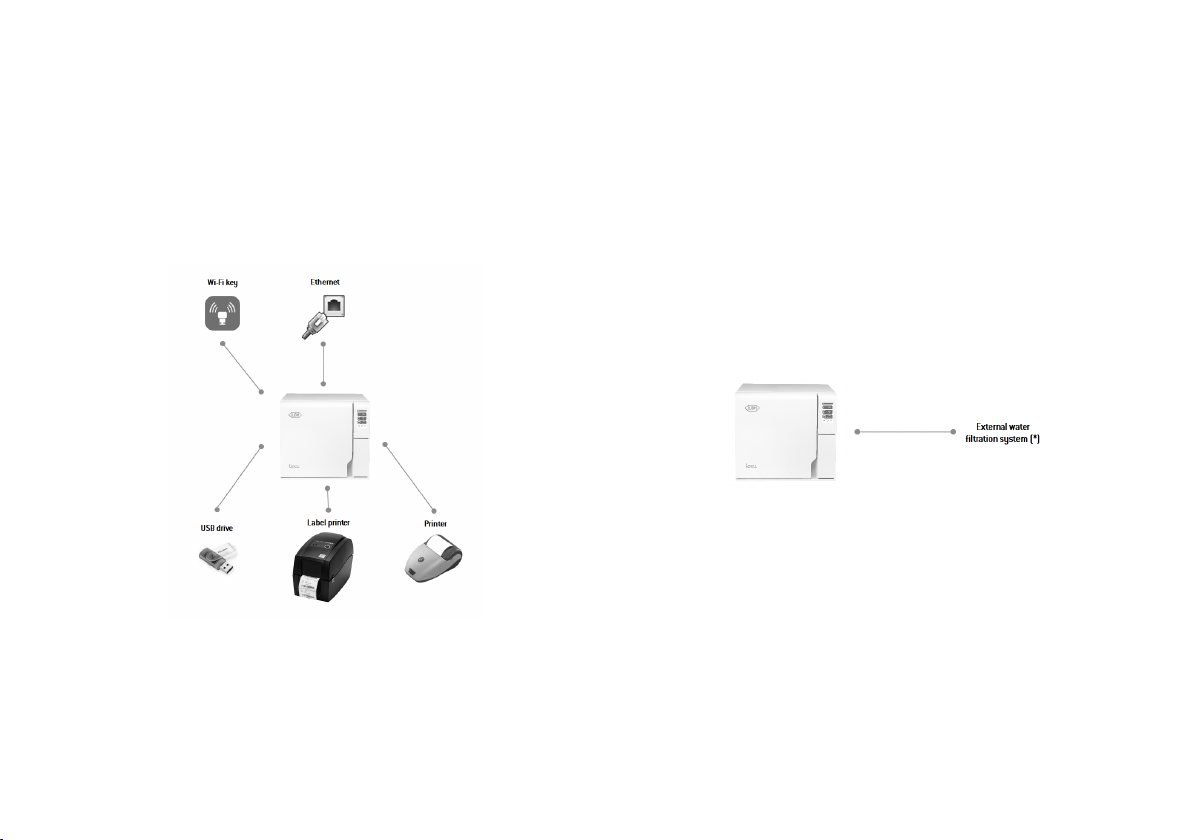
Technical data
Diagrams
CONNECTION DIAGRAMS
Data communication Water system
(*): for water requirements see "Water quality" on the next page.
94 Lexa| Instructions for Use |MN-111 ENG Rev14 |03/04/2023 |© W&H Sterilization Srl
Page 95
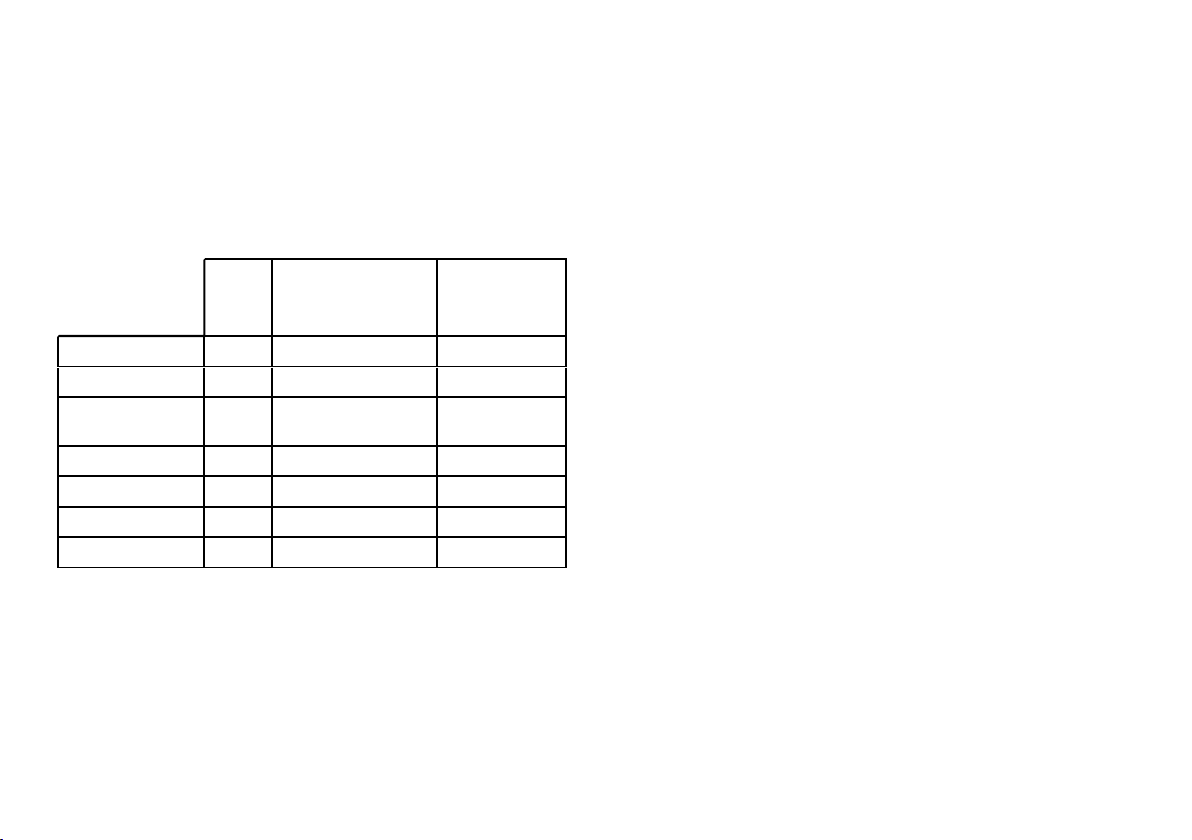
Technical data
Water quality
FEED WATER SPECIFICATIONS (ANSI/AAMI AND AAMI TIR34)
The table below lists the specifications for the water used for steam
sterilization according ANSI/AAMI ST55 and AAMI TIR34. Following is
the Table 1 AAMI TIR34.
Utility water
Hardness
Conductivity
Total Dissolved
Solids
4
pH
Chlorides
Bacteria
Endotoxin
Units
µS/cm < 500 < 10
cfu/mL n/a, <10
EU/mL n/a, <20
flushing/ washing/
rinsing
mg/L < 150
ppm < 350 < 6.5
mg/L < 250 < 1
Note 1: this is the quality of water that might come from the tap but might
need some form of treatment to achieve these specifications.
Note 2: if this is the final rinse prior to sterilization of a critical device.
Note 3: if hardness is greater than 150 mg/L, a water softener is
recommended unless used for washing and the cleaning chemistry is
1
3
6 – 9 5 – 7
5
5
Critical water
finale rinse
/steam
< 1
< 10
< 10
2
capable of handling higher levels of hardness.
Note 4: for boiler-treated steam, most boilers are treated to maintain a pH of
7.5 or 8.5. Any treatment of water that goes into boilers should be in
accordance with the sterilizer and boiler manufacturers' written IFU.
Note 5: after high-level disinfection.
Notice:
The use of water with a conductivity greater than 10μS/cm (6.5
ppm) may affect the sterilization process and damage the sterilizer.
The use of water with a conductivity greater than 50μS/cm, or not
complying with the specifications in the table above, may strongly
affect the sterilization process and seriously damage the sterilizer.
The manufacturer’s warranty is void if the sterilizer was used with
water containing contaminant or chemical levels exceeding those
listed in the table above.
Lexa| Instructions for Use |MN-111 ENG Rev14 |03/04/2023 |© W&H Sterilization Srl 95
Page 96
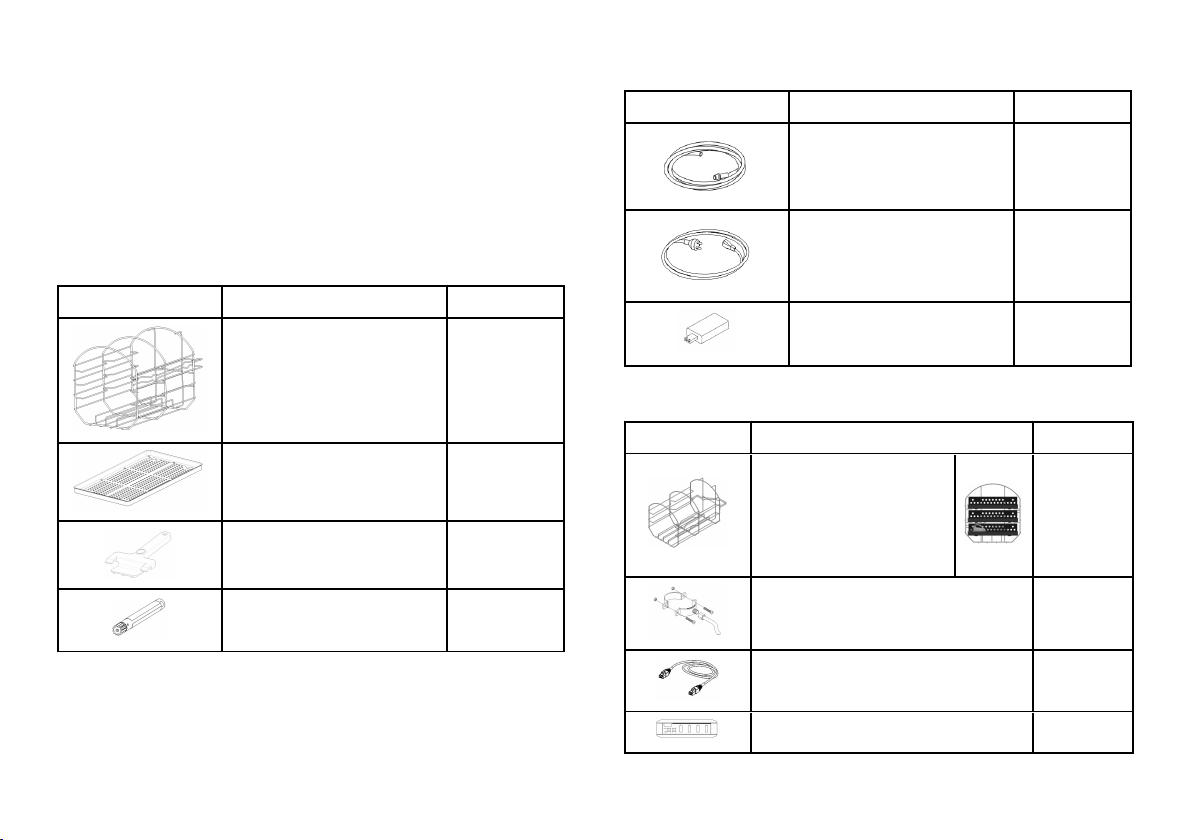
Technical data
Accessories, spare parts, consumables
Note: use only accessories, spare parts and consumables recommended by
W&H.
Note: before purchasing, check that the accessories fulfill all applicable
standards in the country of use.
LIST OF PARTS PROVIDED WITH THE STERILIZER
Picture Part Part number
Standard chamber rack
Large aluminium tray
Tray holder
Emergency door opening tool
F523030X
F523211X
F523001X
S520009X
Picture Part Part number
Drain tube
Mains cable (125 V)
Mains cable (250 V)
USB pen drive
LIST OF ACCESSORIES AND SPARE PARTS
Picture Part Part number
Optional chamber rack for 3
trays / 3 taller cassettes or 4
standard cassettes
Usable space - Tray / Cassette
size (mm):
n 207 x 48 x 48
Drain tube kit with fittings
Network data cable RJ45 (3 m)
S230903X
U380119X
U380120X
V000004X
F523036X
A812110X
A801500X
USB hub (4 ports)
96 Lexa| Instructions for Use |MN-111 ENG Rev14 |03/04/2023 |© W&H Sterilization Srl
19721129
Page 97
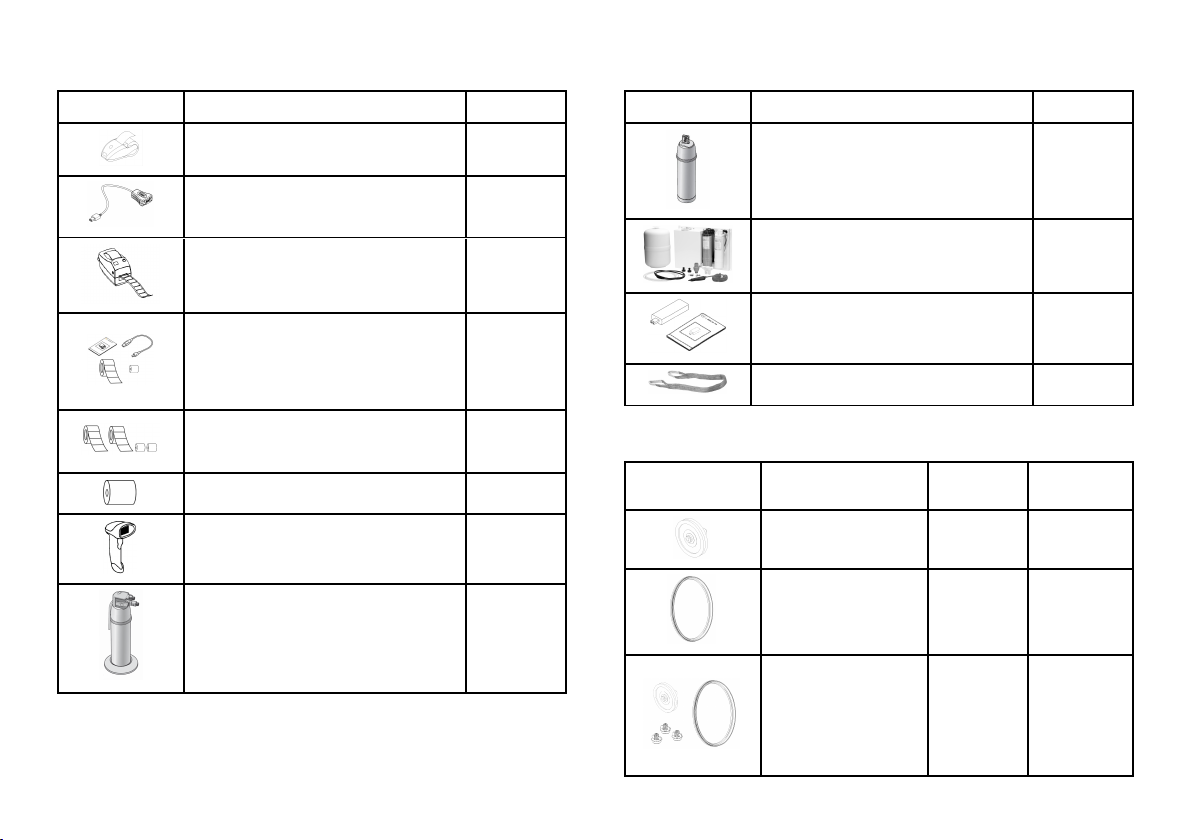
Technical data
Picture Part Part number
Serial printer
USB adapter for serial printer
Label printer (label printer only)
Label printer USB connection kit
n USB connection cable
n 1 roll of 2100 labels
n 1 wax/resin ribbon
n activation code instructions
Label printer consumable kit
n 2 rolls of 2100 labels
n 2 wax/resin ribbons
Roll of thermal paper
QR code / Bar code reader for labels
Multidem C27 water demineralizer
19721108
A801503X
19721109
19721131
A810513X
A810504X
19721132
19723112
Picture Part Part number
Multidem resin cartridge
Osmo water demineralizer (220 V)
Osmo water demineralizer (110 V)
Wi-Fi dongle key
Lifting strap
CONSUMABLES
Picture Part Part number
HEPAfilter (bagged)
Door gasket
Maintenance kit
W322400X Every 1200
F460535X Every 1200
X050334X -
A812016X
19721134
19721135
19721137
F602001X
When replace
it
cycles
cycles
Components:
n 1 HEPA filter
n 1 door gasket
n Chamber filter (set
of 3 pieces)
Lexa| Instructions for Use |MN-111 ENG Rev14 |03/04/2023 |© W&H Sterilization Srl 97
Page 98
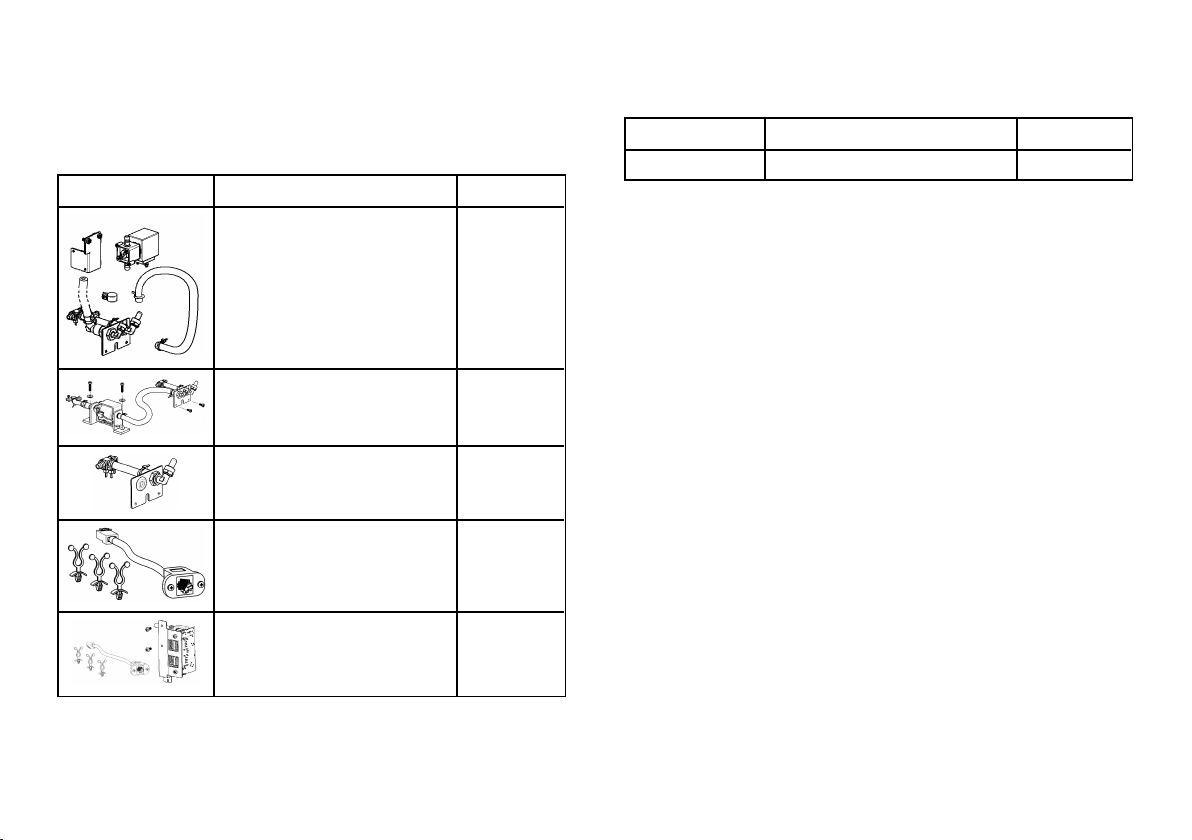
Technical data
OPTIONAL KITS
Notice: The kits must be installed by service technicians authorized
by the manufacturer.
Picture Part Part number
Auto-fill kit with valve
Auto-fill kit with pump (110 V)
Auto-fill kit with pump (220 V)
Auto-drain kit
LANcable kit
USB-Ethernet socket hub assembly
X051302X
X051303X
X051304X
X051331X
X051301X
X051337X
ACTIVATION CODES
Activation code Description Part number
EliTrace Activates theEliTrace function.
19730018
Authorized W&H service partners
A list and a map with your nearest W&H service partner are available
at www.wh.com.
98 Lexa| Instructions for Use |MN-111 ENG Rev14 |03/04/2023 |© W&H Sterilization Srl
Page 99
Documentation forms
CONTENTS
This section deals with the following subjects:
W&H installation check-list 99
W&H installation check-list
QUESTIONS
N. Question Answer
Responsibility
1 Was the head of the clinic/practice present during all the in-
service?
Packaging and content
2 Is the packaging of the sterilizer undamaged? Yes No
3 When unpacked, is the sterilizer undamaged? Yes No
4 Are all the contents of the package available (sterilizer ship-
with)?
5 Are all the ordered accessories available with the sterilizer? Yes No
6 Have you removed all the protection covers from the
sterilizer and from all the ship-with?
Yes No
Yes No
Yes No
N. Question Answer
Completeness of the Instructions for Use
7 Were all sections of the Instructions for Use of the sterilizer
covered and explained during the in-service?
Workplace suitability
8 Is the allocated countertop for the sterilizer levelled and flat? Yes No
9 Are the recommended ventilation indications of the allocated
area for the sterilizer respected?
10 Are the required minimum clearances respected? Yes No
11 Have you explained which water quality is required for the
use of the sterilizer? Check and measure the μS/cm of the
water.
Involvement of the Head of the clinic/pratice
12 Have you shown the Head of the clinic/practice the
procedure for filling and draining the main and used water
tanks?
13 Have you shown the Head of the clinic/practice how to
program the sterilizer?
14 Have you shown the Head of the clinic/practice the cycle
options?
15 Have you shown the Head of the clinic/practice what the
messages and alarms mean?
Yes No
Yes No
Yes No
Yes No
Yes No
Yes No
Yes No
Lexa| Instructions for Use |MN-111 ENG Rev14 |03/04/2023 |© W&H Sterilization Srl 99
Page 100
Documentation forms
N. Question Answer
16 Have you shown the Head of the clinic/practice how to
Yes No
manually abort a cycle?
17 Have you shown the Head of the clinic/practice the
Yes No
maintenance program and procedures?
18 Have you shown the Head of the clinic/practice how to use
Yes No
all of the accessories?
19 Have you shown the Head of the clinic/practice the
Yes No
advantages of having a USB connection for a pen drive?
20 Have you suggested to the Head of the clinic/practice to
Yes No
periodically backup the data, stored on the USB pen drive
and/or in a PC, on another safe support?
21 Have you shown the head of the clinic/practice the
Yes No
advantages of having a Ethernet connection (remote data
saving)?
22 Have you explained to the head of the clinic/practice the
Yes No
correct load type for each available sterilization program?
23 Have you shown the head of the clinic/practice how to
Yes No
prepare and place the load in the sterilizer chamber?
24 Have you explained to the head of the clinic/practice to use
Yes No
only original parts and accessories on the sterilizer?
25 Have you shown and explained to the head of the
Yes No
clinic/practice the safety advise section?
N. Question Answer
Check
26 Have you executed a Pouches & Wrapped Cassettes 270 °F
(132 °C) with the tray rack and trays inserted?
27 Are all connections to the sterilizer well positioned and
plugged (accessories, etc…)?
INSTALLATION INFORMATION
MN-111 Serial Number:
Date:
Purchased from:
Installed by:
Dr./Clinic name:
Address:
Phone:
Receiver's signature:
Installer's signature:
Yes No
Yes No
100 Lexa| Instructions for Use |MN-111 ENG Rev14 |03/04/2023 |© W&H Sterilization Srl
 Loading...