

Page 1

MEAT CUBER/
TENDERIZER
ELECTRIC GRINDER ATTACHMENT*
Fits Weston Commercial Grade Electric Meat Grinders*
*Commercial grade electric meat grinders with
motors up to 1-1/2 hp. Weston brand commercial
grinders model no. 08-0801-W, 08-1201-W, 08-2201-W
and 08-3201-W. All sold separately.
Due to constant factory
improvements, the product pictured
might differ slightly from the
product received.
Grinder sold separately
Page 2
4
5
9
6
6
1
3
2
11a
11
7
8
7a
8a
10
13
12
-2-
Page 3
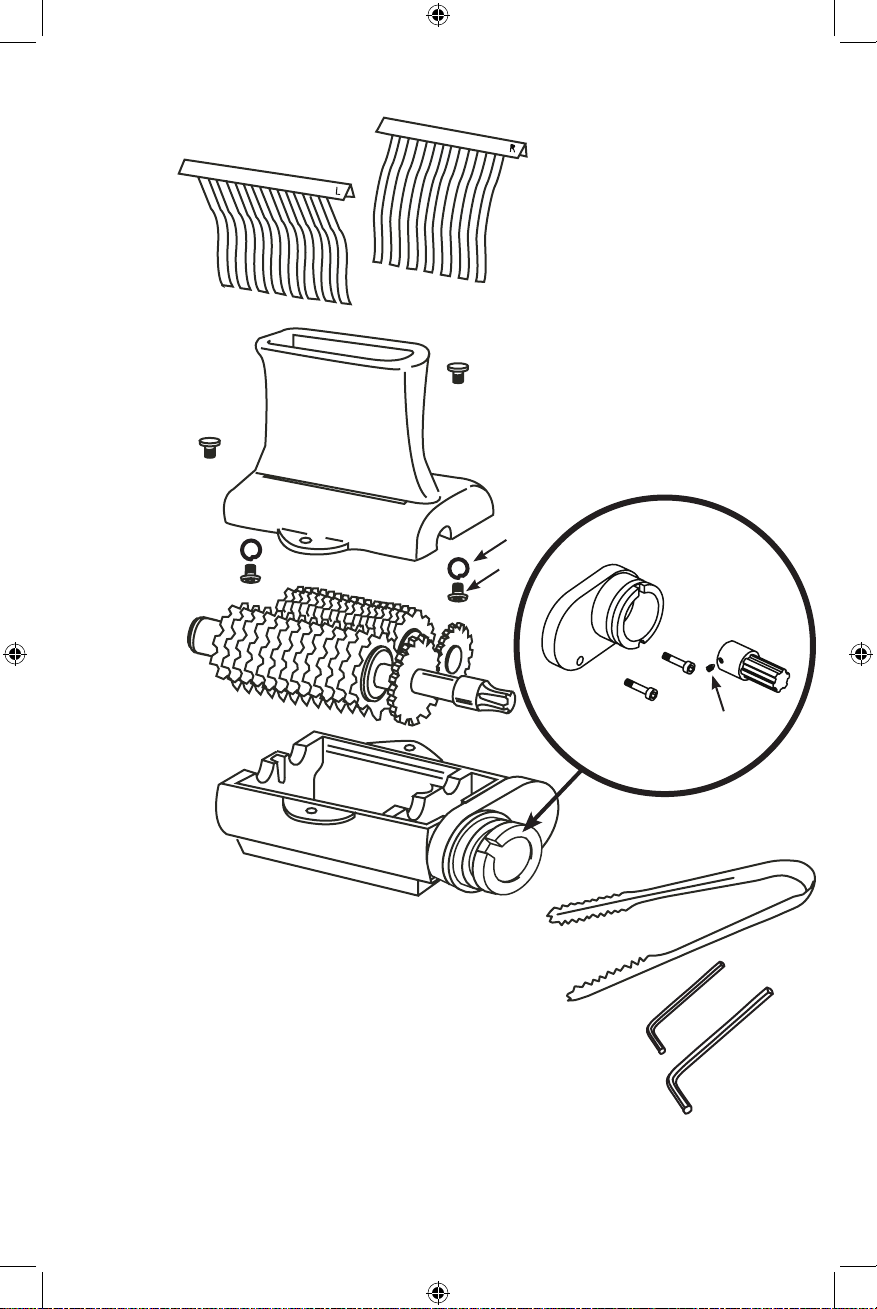
COMPONENT LIST
DIAGRAM NO. PART DESCRIPTION
1 Bottom Housing
2 Top Housing
3 Stainless Steel Blade Rack Assembly
4 Stainless Steel Left Comb
5 Stainless Steel Right Comb
6 Housing Thumbscrew (2)
7 Grinder Adapter (Installed on housing from factory)
7a Adapter Mounting Screw (2)
8 Shaft Adapter
8a Shaft Adapter Set Screw
9 Chute
10 Stainless Steel Tongs
11 Chute Screw (2)
11a Chute Lock Washers (2)
12 Allen Wrench/Chute & Adapter Screws
13 Allen Wrench/Blades & Shaft Adapter
If any components of this unit are broken, the unit does not operate properly or you
need a replacement instruction manual, visit us on the web at
WestonBrands.com
-3-
Page 4
IMPORTANT SAFEGUARDS
1. NOTE: It is IMPORTANT TO
FOLLOW ALL of the manufacturers
instructions for the grinder that will be
used. Failure to do so may cause injury!
2. CAUTION SHARP BLADES!
Wear Kevlar, cut-resistant gloves (Sold
Separately) when handling the Blade
Assembly.
3. NEVER REACH INTO the
Tenderizer. Doing so could cause
serious injury. ALWAYS USE THE
PROVIDED TONGS.
4. KEEP FINGERS CLEAR OF THE
BLADES AT ALL TIMES. Failure to
do so may result in personal injury. The
Cutting Blades/Blade Assembly is very
sharp. Wear Kevlar, cut-resistant gloves
(Sold Separately) when handling the
Blades.
5. DO NOT press or push meat into
the Chute with your ngers or any other
object. Doing so may cause personal
injury and/or damage to the unit.
6. NEVER use ngers to scrape food
away from the Tenderizer while in
operation. SEVERE INJURY MAY
RESULT.
7. DO NOT push the Tongs or other
utensils into the Blades.
8. NEVER LEAVE THE Tenderizer
UNATTENDED. Close supervision is
necessary when any appliance is used
near children. This appliance is NOT to be
used by children.
9. NEVER use any accessories or parts
from other manufacturers. Doing so will
VOID YOUR WARRANTY.
10. Thoroughly clean all parts that will
come into contact with food before using
the Tenderizer. Wash all parts by hand
and dry thoroughly. Wear Kevlar, cutresistant gloves (Sold Separately) when
handling the Blades.
11. DO NOT attempt to tenderize or slice
meat with bones or other hard items.
Damage to the machine will occur.
12. TIE BACK loose hair and clothing,
and roll up long sleeves before operating
the Tenderizer. REMOVE ties, rings,
watches, bracelets, or other jewelry before
operating.
13. WEAR EYE PROTECTION. Wear
safety glasses. Everyday eye glasses are not
safety glasses. Safety glasses conform to
ANSI Z87.1 requirements. Note: approved
safety glasses have Z87 printed or stamped
on them.
14. DO NOT use the Tenderizer while
under the inuence of drugs, medications
or alcohol.
SAVE THESE INSTRUCTIONS!
Refer to them often and use them to instruct others.
WARNING! Before cleaning, assembling or disassembling the grinder,
make sure the PLUG IS REMOVED FROM THE OUTLET/POWER SOURCE!
ALWAYS unplug the grinder when not in use.
-4-
Page 5
WARNING! Before cleaning, assembling or disassembling the grinder,
make sure the PLUG IS REMOVED FROM THE OUTLET/POWER SOURCE!
ALWAYS unplug the grinder when not in use.
CLEANING INSTRUCTIONS
NOTE: It is IMPORTANT TO FOLLOW ALL of the
manufacturers instructions for the grinder that will be used.
Failure to do so may cause injury!
1. Thoroughly wash all parts in soapy water. Rinse with
clean water. Dry all parts immediately. NOTE: DO NOT
immerse the Blade Assembly in sudsy water where
they cannot be seen. To prevent injury, keep the Blade
Assembly visible at all times. CAUTION: The Blades
are very sharp!
2. Coat all metal parts with a food grade silicone spray.
HELPFUL HINT: A long, skinny brush is helpful when cleaning the Blade Assembly.
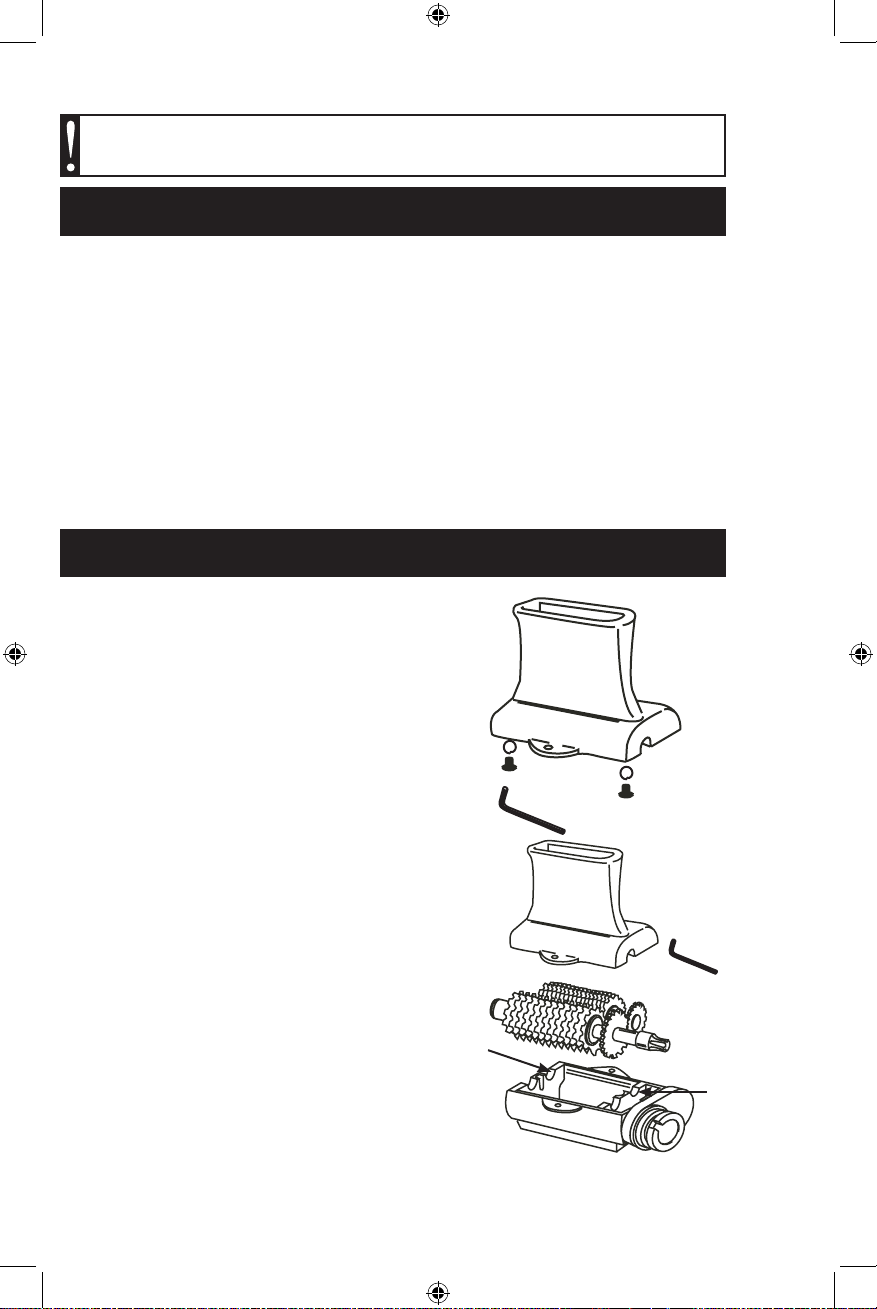
ASSEMBLY INSTRUCTIONS
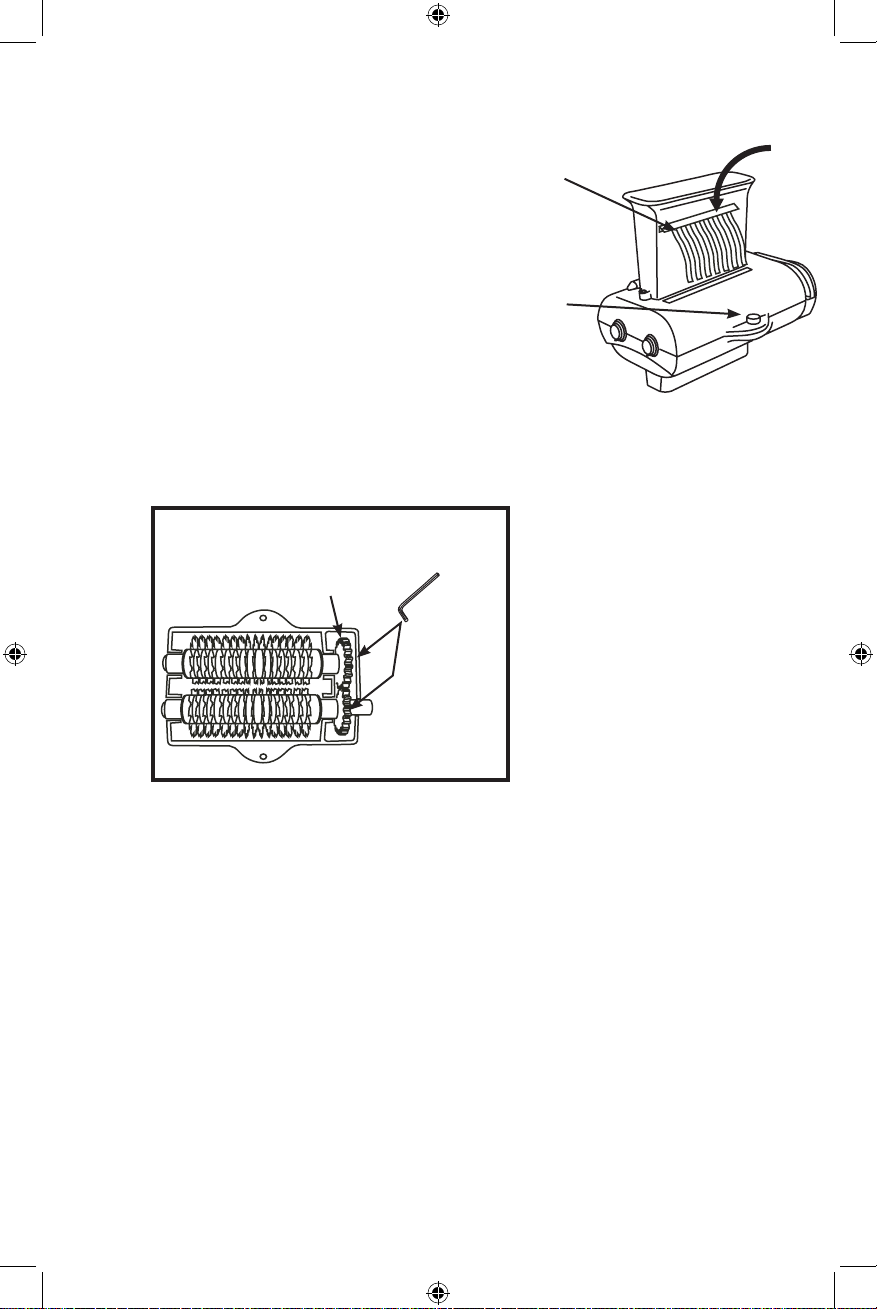
1. Install the Chute to the Top Housing
using an Allen Wrench and the 2 Chute
Screws and Lock Washers (Figure A).
2. Insert the Blade Assembly into the
Lower Housing, guiding the Drive Shaft
into the journals. Make sure the gears
and the blades of the Blade Assembly
are properly meshed together and resting
in the journals (Figure B). NOTE: The
Tenderizer Blade is a 2-piece set. The
Jerky Slicer Blade is a single piece (sold
separately).
3. Using the Allen Wrench/Blades &
Shaft Adapter, tighten the Shaft Adapter
Set Screw to secure the Shaft Adapter to
the Drive Shaft.
Top
Housing
Journals
Chute
Top
Housing
Lower
Housing
Allen
Wrench
Figure A
Chute Screws
(2) & Lock
Washers (2)
Figure B
Allen
Wrench
Blade
Assembly
Drive Shaft
Shaft
Adapter
Journals
-5-
Page 6
4. Position the Top Housing onto the
Lower Housing and line up the screw
holes.
5. Secure the Top Housing to
the Lower Housing using the 2
Housing Thumbscrews. DO NOT
OVERTIGHTEN! (Figure C).
6. Insert the Left Comb and Right Comb
into the Top Hosing (Figure C).
NOTE: The Left Comb is marked with
an “L” on the upper portion of the
Comb. The Top Housing is marked with
an “L Comb” and “R Comb” to aid in Comb
installation.
7. To change Blades, follow “Assembly
Instructions” as outlined.
NOTE: Periodically the gears on the
Blades need to be tightened. Use the
Allen Wrench to tighten the screw on the
gears.
Gears
Combs
Housing
Thumbscrews (2)
Figure C
-6-
Page 7

WARNING! Before cleaning, assembling or disassembling the grinder,
make sure the PLUG IS REMOVED FROM THE OUTLET/POWER SOURCE!
ALWAYS unplug the grinder when not in use.
ATTACHING TO THE GRINDER
NOTE: It is IMPORTANT TO FOLLOW ALL of the manufacturers instructions for the grinder
that will be used. Failure to do so may cause injury!
1. Unscrew the head locking knob of the electric grinder until the end of the threads
are no longer protruding into the grinder output housing.
2. Line up the grinder pin with the Shaft Adapter notch on the electric grinder. Line
up the Shaft Adapter splines with the grinder output housing (Figure D).
NOTE: You may have to reposition the Cuber/Tenderizer Shaft splines so that
they match up with the grinder output shaft. Make sure the grinder head locking knob
lines up with the groove in the side of the electric grinder adapter.
3. Once the Cuber/Tenderizer Attachment is properly positioned on to the electric
grinder, tighten the grinder head locking knob (Figure E).
Figure D
Grinder
Shaft Adapter
Notch
Pin
Shaft Adapter
Splines
Output Shaft
Splines
-7-
Head Locking
Knob of Grinder
Figure E
Page 8

ONE-YEAR LIMITED WARRANTY
This warranty applies to products purchased and used in the U.S. and Canada. This is the only
express warranty for this product and is in lieu of any other warranty or condition.
This product is warranted to be free from defects in material and workmanship for a period of
one (1) year from the date of original purchase. During this period, your exclusive remedy is
repair or replacement of this product or any component found to be defective, at our option. If
the product or component is no longer available, we will replace with a similar one of equal or
greater value.
This warranty does not cover unauthorized repairs or service to products, products sold
“as-is” by retailers, glass, filters, wear from normal use, use not in conformity with the printed
directions, or damage to the product resulting from accident, alteration, abuse, or misuse.
This warranty extends only to the original consumer purchaser or gift recipient and is not
transferable. Keep the original sales receipt, as proof of purchase is required to make a
warranty claim. This warranty is void if the product is subjected to any voltage and waveform
other than as specified on the rating label (e.g., 120V ~ 60 Hz).
We exclude all claims for special, incidental and consequential damages caused by breach of
express or implied warranty. All liability is limited to the amount of the purchase price. Every
implied warranty, including any statutory warranty or condition of merchantability or
fitness for a particular purpose, is disclaimed except to the extent prohibited by law, in
which case such warranty or condition is limited to the duration of this written warranty.
This warranty gives you specific legal rights. You may have other legal rights that vary
depending on where you live. Some states or provinces do not allow limitations on implied
warranties or special, incidental, or consequential damages, so the foregoing limitations may
not apply to you.
To make a warranty claim, do not return this appliance to the store. Please call 1.800.814.4895
(001.216.901.6801 outside the US) or visit WestonBrands.com. For faster service, locate the
model, type, and series numbers on your appliance.
-8-
Page 9

ABLANDADOR/CORTADOR
DE CARNE EN CUBOS
ADITAMENTO PARA MOLINO ELÉCTRICO*
Se ajusta a los Molinos Eléctricos de Carne de Grado Comercial de Weston*
*Molinos eléctricos de carne de grado comercial con motores
de hasta 1-1/2 hp. Molino eléctrico de carne de grado comercial de la marca Weston Modelos No. 08-0801-W, 08-1201-W,
08-2201-W y 08-3201-W. Todos se venden por separado.
Debido a constantes mejoras en la
fábrica, el producto que se muestra
puede ser ligeramente diferente del
producto recibido.
El molino se vende por separado.
Page 10

4
5
9
6
6
INSTRUCCIONES EN ESPAÑOL
3
2
11a
11
7
8
7a
8a
10
13
12
¡ADVERTENCIA! Antes de limpiar, ensamblar o desarmar el molino , cerciórese de
que LA CLAVIJA ESTÉ RETIRADA DEL TOMACORRIENTE O FUENTE DE ENERGÍA.
SIEMPRE desconecte el molino cuando no esté en uso.
-10-
Page 11

LISTA DE COMPONENTES
NÚMERO EN EL DIAGRAMA
DESCRIPCIÓN PARTE NO.
1 Gabinete inferior
2 Gabinete superior
3
4 Peine izquierdo de acero inoxidable
5 Peine derecho de acero inoxidable
6 Tornillo de mano de la carcasa (2)
7
7a Tornillo de montaje del adaptador (2)
8 Adaptador del eje
8a Tornillo de sujeción del adaptador del eje
9 Vertedor
10 Pinzas de acero inoxidable
11 Tornillo del vertedor (2)
11a Arandelas del vertedor (2)
12
13 Llave Allen/Navajas y adaptador del eje
Conjunto de la rejilla de navajas de acero inoxidable
Adaptador del molino (Instalado de fábrica en el gabinete)
Llave Allen/Tornillos del vertedor y del adaptador
INSTRUCCIONES EN ESPAÑOL
Si cualquier componente de esta unidad está descompuesto, si la unidad no funciona debidamente o si
necesita un reemplazo del instructivo,
visítenos en la Web en
WestonBrands.com
-11-
Page 12

SALVAGUARDIAS IMPORTANTES
1. NOTA: Es IMPORTANTE SEGUIR
TODAS las instrucciones de los
fabricantes para el molino que se vaya a
utilizar. Dejar de hacerlo puede causar
lesiones.
2. ¡CUIDADO, NAVAJAS
FILOSAS! Use guantes de Kevlar
resistentes a los cortes (se venden por
separado) al manejar el conjunto de
navajas.
3. NUNCA META LA MANO EN el
Ablandador. Hacerlo podría causarle
lesiones graves. USE SIEMPRE LAS
PINZAS QUE SE ADJUNTAN.
4. MANTENGA LOS DEDOS
LEJOS DE LAS NAVAJAS EN TODO
MOMENTO. No hacerlo puede causar
lesiones. El conjunto de navajas y
navajas de corte es muy loso. Use
guantes de Kevlar resistentes a los
cortes (se venden por separado) al
manejar las navajas.
5. NO presione ni empuje la carne
en el vertedero con los dedos o algún
otro objeto. Hacerlo puede causarle
lesiones y daños en el aparato.
6. NUNCA use los dedos para raspar
INSTRUCCIONES EN ESPAÑOL
el alimento del ablandador mientras
esté en funcionamiento. PUEDEN
PRODUCIRSE LESIONES GRAVES.
7. NO empuje las pinzas ni otros
utensilios en las navajas.
8. NUNCA DEJE SIN SUPERVISIÓN
el ablandador. Es necesaria la
supervisión cercana cuando se use
cualquier aparato cerca de niños. Este
aparato NO DEBE ser usado por niños.
9. NUNCA use ningún accesorio o
partes de otros fabricantes. Hacerlo
ANULA LA GARANTÍA.
10. Limpie cuidadosamente todas las
partes que entren en contacto con los
alimentos antes de usar el ablandador.
Lave a mano todas las partes y séquelas
bien. Use guantes de Kevlar resistentes
a los cortes (se venden por separado) al
manejar las navajas.
11. NO trate de ablandar o rebanar
carne con hueso u otras partes duras.
Eso dañaría la máquina.
12. RECÓJASE el pelo suelto y la
ropa y enróllese las mangas antes de
manejar el ablandador. QUÍTESE la
corbata, anillos, relojes, brazaletes y
demás joyería antes de manejarlo.
13. USE PROTECCIÓN EN LOS
OJOS. Utilice gafas de seguridad. Los
anteojos ópticos no son protección de
seguridad. Las gafas de seguridad cumplen
con los requerimientos de la norma ANSI
Z87.1. Nota: Las gafas de seguridad
aprobadas tienen impresa o estampada la
clave Z87.
14. NO use el ablandador bajo los
efectos de drogas, medicamentos o
alcohol.
¡GUARDE ESTAS INSTRUCCIONES!
¡ADVERTENCIA! Antes de limpiar, ensamblar o desarmar el molino , cerciórese de
que LA CLAVIJA ESTÉ RETIRADA DEL TOMACORRIENTE O FUENTE DE ENERGÍA.
SIEMPRE desconecte el molino cuando no esté en uso.
Consúltelas con frecuencia y úselas para enseñarles a otros.
-12-
Page 13

¡ADVERTENCIA! Antes de limpiar, ensamblar o desarmar el molino , cerciórese de
que LA CLAVIJA ESTÉ RETIRADA DEL TOMACORRIENTE O FUENTE DE ENERGÍA.
SIEMPRE desconecte el molino cuando no esté en uso.
INSTRUCCIONES DE LIMPIEZA
NOTA: Es IMPORTANTE SEGUIR TODAS las instrucciones de
los fabricantes para el molino que se vaya a utilizar. Dejar de
hacerlo puede causar lesiones.
1. Lave cuidadosamente todas las partes en agua
caliente y jabonosa. Enjuague con agua limpia.
Seque todas las piezas de inmediato. NOTA: NO
sumerja el conjunto de navajas en agua jabonosa
donde no pueda verlo. Para evitar lesiones, mantenga
visible el conjunto de navajas en todo momento.
ADVERTENCIA: ¡Las navajas son muy losas!
2. Revista todas las partes de metal con un rocío de
silicona para alimentos.
CONSEJO ÚTIL: Un cepillo largo y delgado es muy útil para limpiar el conjunto
de navajas.
INSTRUCCIONES DE ENSAMBLADO
1. Instale el vertedor en el gabinete
superior utilizando una llave Allen y los
2 tornillos del vertedor y las arandelas
(Figura A).
2. Inserte el conjunto de navajas en
el gabinete inferior, guiando el eje de
transmisión en los cojinetes. Revise que
los engranes y las navajas del conjunto
de navajas estén bien acomodados y
apoyados en los cojinetes (gura B). NOTA:
La navaja ablandadora es un juego de dos
piezas. La navaja rebanadora de cecina
es una sola pieza (se vende por separado).
3. Utilizando la llave Allen/Navajas y
adaptador del eje, apriete el tornillo
de ajuste del adaptador del eje para
asegurar el adaptador del eje al eje de
transmisión.
Gabinete
Superior
Cojinetes
Gabinete
Vertedor
Gabinete
Superior
Inferior
Llave
Allen
Figura A
Tornillos del
vertedor
(2) y
Arandelas (2)
Figura B
Conjunto de
Navajas
Eje de transmisión
Adaptador del
Llave
Allen
Eje
INSTRUCCIONES EN ESPAÑOL
Cojinetes
-13-
Page 14

4. Coloque el gabinete superior encima
del gabinete inferior y alinee los agujeros
de los tornillos.
5. Fije el gabinete superior en el
gabinete inferior usando los 2 tornillos
de mano para el gabinete. ¡NO LOS
APRIETE EN EXCESO! (Figura C).
6. Inserte el peine izquierdo y el peine
derecho en el gabinete superior (Figura
C).
NOTA: El peine izquierdo está marcado
con una "L" en la parte superior del peine.
El gabinete superior tiene las marcas
"L Comb" y "R Comb" (peine izquierdo y
derecho, respectivamente) para ayudar en
su instalación.
7. Para cambiar las navajas, siga las
"Instrucciones de ensamble" como se
indica.
NOTA: Los engranes de las navajas
necesitan apretarse periódicamente.
Apriete el tornillo de los engranes con la
llave Allen.
Engranes
INSTRUCCIONES EN ESPAÑOL
Peines
Tornillos de mano
del Gabinete (2)
Figura C
-14-
Page 15

¡ADVERTENCIA! Antes de limpiar, ensamblar o desarmar el molino , cerciórese de
que LA CLAVIJA ESTÉ RETIRADA DEL TOMACORRIENTE O FUENTE DE ENERGÍA.
SIEMPRE desconecte el molino cuando no esté en uso.
COLOCACIÓN DEL MOLINO
NOTA: Es IMPORTANTE SEGUIR TODAS las instrucciones de los fabricantes para el molino
que se vaya a utilizar. Dejar de hacerlo puede causar lesiones.
1. Aoje la perilla de bloqueo del cabezal del molino eléctrico hasta que el extremo
de las roscas no sobresalga en el gabinete de salida del molino.
2. Alinee el pasador del molino con la muesca del adaptador del eje en el molino
eléctrico. Alinee las tiras del adaptador del eje con el gabinete de salida del molino
(Figura D).
NOTA: Puede ser que deba volver a colocar las tiras del eje del cortador en
cubos/ablandador de manera que coincidan con el eje de salida del molino.
Asegúrese de que la perilla de bloqueo del cabezal del molino esté alineado con la
muesca en el costado del adaptador del molino eléctrico.
3. Una vez que el aditamento del cortador en cubos/ablandador esté colocado
de forma apropiada en el molino eléctrico, apriete la perilla de bloqueo del cabezal
del molino (Figura E).
Figura D
Adaptador
del eje
Muesca
Tiras del
adaptador
del eje
Tiras de la
salida del eje
-15-
Cabezal
Perno
Perilla de blo-
queo del cabezal
del molino
Figura E
INSTRUCCIONES EN ESPAÑOL
Page 16

Grupo HB PS, S.A. de C.V.
Monte Elbruz No. 124 – 401
Col. Polanco V Sección, Miguel Hidalgo
Ciudad de México, C.P. 11560
GARANTÍA PARA PRODUCTOS COMPRADOS EN MÉXICO
PRODUCTO: MARCA: MODELO:
Grupo HB PS, S.A. de C.V. cuenta con Centros de Servicio autorizados. Por favor consulte en la lista anexa el nombre y dirección
de los establecimientos en la República Mexicana en dónde usted podrá hacer efectiva la garantía, obtener partes, componen
consumibles y accesorios; así como también obtener servicio para productos fuera de garantía. Para mayor información llame al:
• Esta garantía ampara, todas las piezas y componentes del producto que resulten con defecto de fabricación incluyendo la mano
de obra.
• Grupo HB PS, S.A. de C.V. se obliga a reemplazar, reparar o reponer, cualquier pieza o componente defectuoso; proporcionar la
mano de obra necesaria para su diagnóstico y reparación, todo lo anterior sin costo adicional para el consumidor.
• Esta garantía incluye los gastos de transportación del producto que deriven de su cumplimiento dentro de su red de servicio.
• Esta garantía no ampara el reemplazo de piezas deterioradas por uso o por desgaste normal, como son: cuchillas, vasos, jarras,
filtros, etc.
• Grupo HB PS, S.A. de C.V. no se hace responsable por los accidentes producidos a consecuencia de una instalación eléctrica
defectuosa, ausencia de toma de tierra, clavija o enchufe en mal estado, etc.
Esta garantía no será efectiva en los siguientes casos:
a) Cuando el producto se hubiese utlizado en condiciones distintas a las normales. (Uso industrial, semi-industrial o comercial.)
b) Cuando el producto no hubiese sido operado de acuerdo con el instructivo de uso.
c) Cuando el producto hubiese sido alterado o reparado por personas no autorizadas por Grupo HB PS, S.A. de C.V. el
fabricante nacional, importador o comercializador responsable respectivo.
El consumidor puede solicitar que se haga efectiva la garantía ante la propia casa comercial donde adquirió su producto, siempre y
cuando Grupo HB PS, S.A. de C.V. no cuente con talleres de servicio.
• Para hacer efectiva la garantía, lleve su aparato al Centro de Servicio Autorizado más cercano a su domicilio (consulte la lista
anexa).
• Si no existe Centro de Servicio Autorizado en su localidad llame a nuestro Centro de Atención al Consumidor para recibir instrucciones de cómo hacer efectiva su garantía.
FECHA DE
ENTREGA
SELLO DEL
VENDEDOR
DÍA___
MES___
AÑO___
Ciudad de México
ELECTRODOMÉSTICOS
Av. Plutarco Elias Calles No. 1499
Zacahuitzco, Benito Juárez, Ciudad de México, C.P. 09490
Tel: 55 5235 2323
CASA GARCÍA
Av. Patriotismo No. 875-B
Mixcoac, Benito Juárez, Ciudad de México, C.P. 03910
Tel: 55 5563 8723
Centro de Atención al Consumidor: 800 95 30 121
Grupo HB PS, S.A. de C.V. le otorga a partir de la fecha de compra:
PROCEDIMIENTO PARA HACER EFECTIVA LA GARANTÍA
• Si desea hacer comentarios o sugerencias con respecto a nuestro servicio o tiene alguna
queja derivada de la atención recibida en alguno de nuestros Centros de Servicio Autorizados, por favor dirigirse a:
GARANTÍA DE 1 AÑO.
COBERTURA
LIMITACIONES
EXCEPCIONES
QUEJAS Y SUGERENCIAS
GERENCIA INTERNACIONAL DE SERVICIO - 800 95 30 121
Email: mexico.service@WestonBrands.com
CENTROS DE SERVICIO AUTORIZADOS
Nuevo León
FERNANDO SEPÚLVEDA REFACCIONES
Ruperto Martínez No. 238 Ote.
Col. Centro, Monterrey, N.L., C.P. 64000
Tel: 81 8343 6700
Jalisco
SERVICIOS DE MANTENIMIENTO CASTILLO
Garibaldi No. 1450
Ladrón de Guevara, Guadalajara, Jalisco, C.P. 44660
Tel: 33 3825 3480
-16-
Page 17

ACCESSOIRE CUBEUSE/
ATTENDRISSEUR DE VIANDE
Compatible avec les hachoirs à viande électriques Weston de qualité commerciale*
POUR HACHOIR ÉLECTRIQUE*
*Les hachoirs à viande électriques de qualité commerciale
avec moteurs allant jusqu'à 1-1/2 hp. Les modèles de
hachoirs Weston de qualité commerciale nº 08-0801-W, 081201-W, 08-2201-W et 08-3201-W sont vendus séparément.
En raison des améliorations constantes
apportées à l'usine, le produit illustré
peut légèrement différer de celui que
vous avez acheté.
Hachoir vendu séparément
Page 18

4
5
9
6
6
2
11a
11
7
INSTRUCTIONS EN FRANÇAIS
3
1
7a
8
8a
10
13
12
AVERTISSEMENT! Avant de procéder au nettoyage, au montage ou au démontage
du hachoir, s'assurer que la FICHE A ÉTÉ RETIRÉE DE LA PRISE/SOURCE
D'ALIMENTATION! TOUJOURS débrancher le hachoir lorsqu'il n'est pas utilisé.
-18-
Page 19

LISTE DES PIÈCES
SCHÉMA Nº DESCRIPTION PIÈCE
1 Boîtier inférieur
2 Boîtier supérieur
3
4 Peigne gauche acier inoxydable
5 Peigne droit acier inoxydable
6 Vis moletée pour le boîtier (2)
7
7a Vis de xation pour l'adaptateur (2)
8 Adaptateur de l'arbre
8a Vis de réglage de l'adaptateur de l'arbre
9 Chute
10 Pinces en acier inoxydable
11 Vis de chute (2)
11a Rondelles de blocage pour la chute (2)
12 Clé Allen/Vis de la chute et de l'adaptateur
13 Clé Allen/Lames et adaptateur de l'arbre
Si l'un des composants de cette unité est endommagé, si l'unité ne fonctionne pas
ou si vous avez besoin d'un manuel d'instruction de remplacement, visitez notre site Web à
Ensemble support de lame en acier inoxydable
Adaptateur de hachoir (installé sur le boîtier à l'usine)
WestonBrands.com
INSTRUCTIONS EN FRANÇAIS
-19-
Page 20

PRÉCAUTIONS IMPORTANTES
1. REMARQUE: Il est IMPORTANT DE
RESPECTER TOUTES les instructions du
fabricant fournies pour le hachoir à utiliser.
Le non respect de ces instructions peut
entraîner des blessures!
2. ATTENTION! LES LAMES SONT
TRANCHANTES! Porter des gants
Kevlar, résistant aux coupures, (vendus
séparément) lorsque vous manipulez les
lames.
3. NE JAMAIS METTRE LES MAINS
dans l'attendrisseur. Il y a risque de
graves blessures. TOUJOURS UTILISER
LES PINCES FOURNIES.
4. TOUJOURS TENIR LES DOIGTS À
L'ÉCART DES LAMES. Le non respect
de ces instructions peut entraîner des
blessures. L'ensemble lames de coupe/
lame est tranchant. Portez des gants
Kevlar, résistant aux coupures, (vendus
séparément) lorsque vous manipulez les
lames.
5. NE PAS appuyer ni pousser la viande
dans la chute avec les doigts ou tout
autre objet. Il y a risque de blessures
personnelles et/ou de dommages à l'unité.
6. NE JAMAIS utiliser les doigts pour
enlever la nourriture de l'attendrisseur
INSTRUCTIONS EN FRANÇAIS
en marche. VOUS RISQUEZ DE VOUS
BLESSER SÉRIEUSEMENT.
7. NE PAS pousser les pinces ou tout
autre ustensile dans les lames.
8. NE JAMAIS LAISSER
L'ATTENDRISSEUR SANS
SURVEILLANCE. Toujours superviser
les appareils en présence d'enfants. Cet
appareil NE DOIT PAS être utilisé par des
enfants.
9. NE JAMAIS utiliser des accessoires
ou des pièces d'autres fabricants. Si cette
consigne n'est pas respectée, VOTRE
GARANTIE SERA ANNULÉE.
10. Nettoyez bien toutes les pièces qui
entrent en contact avec les aliments avant
d'utiliser l'appareil. Lavez toutes les pièces
à la main et séchez-les bien ensuite.
Portez des gants Kevlar, résistant aux
coupures, (vendus séparément) lorsque
vous manipulez les lames.
11. NE PAS attendrir ni couper de viande
non désossée ou tout autre produit
alimentaire dur. La machine pourrait subir
des dommages.
12. ATTACHER les cheveux et les
vêtements et retrousser les manches
longues avant de mettre l'appareil en
marche et d'utiliser la attendrisseur.
RETIRER les cravates, bagues, montres,
bracelets ou autres bijoux avant d'utiliser
la machine.
13. PORTER UNE PROTECTION POUR
LES YEUX. Porter des lunettes de sécurité. Les
lunettes de vue ne sont pas des lunettes de sécurité.
Les lunettes de sécurité doivent être conformes aux
exigences de la norme ANSI Z87.1. Remarque:
Les lunettes de sécurité agréées ont la marque Z87
imprimée ou gravée dessus.
14. NE PAS utiliser l'attendrisseur/
trancheuse de viande à lanière sous
l'inuence de l'alcool ou d'une drogue
quelconque.
CONSERVER CES INSTRUCTIONS!
Se reporter souvent à ces instructions et les communiquer aux autres.
AVERTISSEMENT! Avant de procéder au nettoyage, au montage ou au démontage
du hachoir, s'assurer que la FICHE A ÉTÉ RETIRÉE DE LA PRISE/SOURCE
D'ALIMENTATION! TOUJOURS débrancher le hachoir lorsqu'il n'est pas utilisé.
-20-
Page 21

AVERTISSEMENT! Avant de procéder au nettoyage, au montage ou au démontage
du hachoir, s'assurer que la FICHE A ÉTÉ RETIRÉE DE LA PRISE/SOURCE
D'ALIMENTATION! TOUJOURS débrancher le hachoir lorsqu'il n'est pas utilisé.
INSTRUCTIONS DE NETTOYAGE
REMARQUE: Il est IMPORTANT DE RESPECTER TOUTES les
instructions du fabricant fournies pour le hachoir à utiliser. Le
non respect de ces instructions peut entraîner des blessures!
1. Lavez soigneusement toutes les pièces dans de l'eau
savonneuse. Rincez à l'eau fraîche. Séchez toutes
les pièces immédiatement. REMARQUE: NE PAS
immerger l'ensemble de lames dans l'eau savonneuse
où il est impossible de les voir. Pour éviter toute
blessure, l'ensemble de lames doit toujours être visible.
ATTENTION: Les lames sont particulièrement
tranchantes!
2. Enduisez les pièces métalliques d'une couche de
silicone de qualité alimentaire.
CONSEIL UTILE: Une brosse longue et mince est recommandée pour le
nettoyage de l'ensemble de lames.
INSTRUCTIONS D'ASSEMBLAGE
1. Installez la Chute sur le boîtier
supérieur avec la clé Allen et les 2 viset
rondelles de blocage de la chute (Figure
A).
2. Insérez l'ensemble de lames dans
le boîtier inférieur, en guidant l'arbre
d'entraînement dans les tourillons.
Assurez-vous que les engrenages et
les lames de l'ensemble de lames
sont correctement reliés ensemble et
reposent bien sur les tourillons (gure B).
REMARQUE: La lame de l'attendrisseur
est un ensemble composé de 2 pièces. La
lame de la trancheuse de lanières de
viande est un ensemble monopièce (vendu
séparément).
3. Avec la clé Allen/lames et adaptateur
d'arbre, resserrez la vis de l'adaptateur
d'arbre pour xer l'adaptateur de l'arbre
sur l'arbre d'entraînement.
Boîtier
supérieur
Tourillons
inférieur
Chute
Boîtier
supérieur
Boîtier
Clé
Allen
Figure A
Vis de la
chute
(2) et ron-
delles
de blocage (2)
Figure B
Ensemble de
lames
Arbre
d'entraînement
Adaptateur
d'arbre
Clé
Allen
Tourillons
INSTRUCTIONS EN FRANÇAIS
-21-
Page 22

4. Placez le boîtier supérieur sur le
boîtier inférieur et faites correspondre les
trous des vis.
5. Sécurisez le boîtier supérieur sur
le boîtier inférieur à l'aide des 2 vis
moletées du boîtier. NE PAS SERRRE
AVEC EXCÈS! (Figure C).
6. Insérez le peigne gauche et le peigne
droit sur le boîtier supérieur (Figure C).
REMARQUE: La pince gauche est
indiquée par la lettre L (pour Left, gauche)
sur la partie supérieure de la pince. Les
indications L-Comb (Pince gauche) et
R-Comb (Pince droite) gurent sur le
boîtier supérieur pour faciliter l'installation
de la pince.
7. Pour changer les lames, procédez selon
les instructions de montage.
REMARQUE: Vous devez régulièrement
serrer l'engrenage des lames. Pour ce
faire, utilisez la clé Allen.
Engrenage
Pinces
Vis moletées (2)
du boîtier
INSTRUCTIONS EN FRANÇAIS
Figure C
-22-
Page 23

AVERTISSEMENT! Avant de procéder au nettoyage, au montage ou au démontage
du hachoir, s'assurer que la FICHE A ÉTÉ RETIRÉE DE LA PRISE/SOURCE
D'ALIMENTATION! TOUJOURS débrancher le hachoir lorsqu'il n'est pas utilisé.
FIXATION AU HACHOIR
REMARQUE: Il est IMPORTANT DE RESPECTER TOUTES les instructions du fabricant
fournies pour le hachoir à utiliser. Le non respect de ces instructions peut entraîner des
blessures!
1. Dévissez le bouton de verrouillage de la tête du hachoir électrique jusqu'à ce que
les lets ne soient plus visibles sur le boîtier de sortie du hachoir.
2. Alignez la goupille du hachoir sur l'encoche de l'adaptateur de l'arbre marquée
sur le hachoir électrique. Alignez les cannelures de l'adaptateur de l'arbre au
boîtier de sortie du hachoir (Figure D).
REMARQUE: Il peut s'avérer nécessaire de repositionner les cannelures de
l'arbre pour cubeuse/attendrisseur an de garantir la correspondance à l'arbre de
sortie du hachoir. Assurez-vous que le bouton de verrouillage de la tête de broyeur
correspond bien à la rainure sur le côté de l'adaptateur du hachoir électrique.
3. Une fois que l'accessoire cubeuse/attendrisseur est correctement positionné
sur le hachoir électrique, serrez le bouton de verrouillage de la tête du hachoir
(Figure E).
Figure D
Adaptateur
d'arbre
Encoche
Cannelures de
l'adaptateur
d'arbre
Cannelures
de l'arbre de
sortie
-23-
Hachoir
Goupille
Bouton de verrouillage
de la tête du hachoir
Figure E
INSTRUCTIONS EN FRANÇAIS
Page 24

GARANTIE LIMITÉE D’UN AN
Cette garantie s’applique aux produits achetés et utilisés aux États-Unis et au Canada. Il
s’agit de l’unique garantie explicite pour ce produit et elle remplace toute autre garantie ou
condition.
Ce produit est garanti comme étant exempt de tout vice matériel ou de main-d’œuvre
pendant une période d’un (1) an à partir de la date d’achat initiale. Pendant cette période,
votre seul recours consiste en la réparation ou au remplacement de ce produit ou de tout
composant trouvé défectueux, à notre discrétion. Si le produit ou composant n’est plus
disponible, nous le remplacerons par un produit similaire de valeur égale ou supérieure.
Cette garantie ne couvre pas les réparations ou l’entretien non autorisés des produits, les
produits vendus « tels quels » par les détaillants, le verre, les filtres, l’usure découlant d’un
usage normal, un usage non conforme aux instructions imprimées ou des dommages
au produit découlant d’un accident, d’une modification, d’un abus ou d’une utilisation
inadéquate. Cette garantie s’applique uniquement à l’acheteur d’origine ou au bénéficiaire
d’un cadeau et elle est non transférable. Conserver le reçu d’achat original, car il est
nécessaire pour effectuer une réclamation sous garantie. Cette garantie est annulée si le
produit est soumis à toute tension et à toute autre forme d’onde autre que celle spécifiée
sur l’étiquette des spécifications nominales (p. ex., 120 V ~ 60 Hz).
Nous excluons toutes les réclamations pour des dommages particuliers, accessoires et
indirects causés par une violation d’une garantie explicite ou implicite. Toute responsabilité
se limite à la somme du prix d’achat. Toute garantie implicite, y compris toute garantie
légale ou condition de qualité marchande ou de conformité à un usage particulier,
est déclinée sauf dans la mesure où la loi l’interdit; dans ce cas, une telle garantie
ou condition se limite à la durée de cette garantie écrite.
Cette garantie vous donne des droits légaux spécifiques. Vous pouvez bénéficier d’autres
droits reconnus par la loi variant selon l’endroit où vous habitez. Certains états ou
certaines provinces ne permettent pas les limitations sur les garanties implicites ou les
dommages particuliers, accessoires ou indirects, il est donc possible que les limitations
précédentes ne s’appliquent pas à vous.
Ne pas retourner cet appareil au magasin lors d’une réclamation au titre de cette garantie.
Téléphoner au 1.800.814.4895 (001.216.901.6801) hors des États-Unis ou visiter
WestonBrands.com. Pour un service plus rapide, trouvez le numéro de modèle, le type
d’appareil et les numéros de série sur votre appareil.
-24-
Page 25

NOTES
Page 26

NOTES
Page 27

NOTES
Page 28

PLEASE INSPECT THIS PACKAGE THOROUGHLY FOR MISSING PARTS OR ANY PRODUCT DAMAGE.
IF YOUR PRODUCT CONTAINS SHIPPING DAMAGE, PLEASE CONTACT RETAILER FOR ASSISTANCE.
For all other questions regarding product usage, missing parts, product damage, difculty or warranty activation,
please contact the Weston Brands Customer Service Team:
Weston Brands, LLC, Southern Pines, NC 28387
Please DO NOT return this item to the retailer before contacting
SAVE THESE INSTRUCTIONS!
Refer to them often and use them to instruct others.
ATTENTION!
WestonBrands.com
Customer.Service@WestonBrands.com
Weston Brands Customer Service.
REVISE COMPLETAMENTE EL ENVASE Y COMPRUEBE QUE NO FALTEN PARTES O QUE ALGÚN
PRODUCTO ESTÉ DAÑADO. SI EL PRODUCTO ESTÁ DAÑADO POR EL TRANSPORTE, SOLICITE
Para todas aquellas preguntas referentes al uso del producto, partes faltantes, daño del producto, dicultad
o activación de la garantía, comuníquese con el equipo de servicio al cliente de weston Brands:
Weston Brands, LLC, Southern Pines, NC 28387
NO devuelva este artículo al vendedor minorista antes de comunicarse con Servicio al Cliente de
Consulte estas instrucciones y úselas para enseñar sobre el uso de este producto a otras personas.
VEUILLEZ INSPECTER CET EMBALLAGE AVEC SOIN POUR Y DÉTECTER
SI DES PIÈCES ONT ÉTÉ ENDOMMAGÉES PENDANT LE TRANSPORT, VEUILLEZ
Pour toutes les autres questions concernant l’utilisation du produit, les pièces manquantes, les problèmes ou
l’activation de la garantie, veuillez communiquer avec l’équipe du service clientèle des produits Weston:
Veuillez communiquer avec le service clientèle des produits Weston AVANT de retourner
¡GUARDE ESTAS INSTRUCCIONES!
TOUTE PIÈCE MANQUANTE OU ENDOMMAGÉE.
COMMUNIQUER AVEC LE DÉTAILLANT POUR OBTENIR DE L’AIDE.
Weston Brands, LLC, Southern Pines, NC 28387
CONSERVER CES DIRECTIVES!
Veuillez les consulter fréquemment et les utiliser pour la formation.
¡ATENCIÓN!
ASISTENCIA AL DISTRIBUIDOR.
WestonBrands.com
Customer.Service@WestonBrands.com
Weston Brands.
ATTENTION!
WestonBrands.com
Customer.Service@WestonBrands.com
cet appareil au détaillant.
840349200 06/2020
 Loading...