

Page 1

manual
MEAT CUBER/TENDERIZER
07-3101-W-A
DUE TO CONSTANT FACTORY IMPROVEMENTS, THE PRODUCT PICTURED MIGHT DIFFER
SLIGHTLY FROM THE PRODUCT IN THIS BOX. 012015
Page 2

GENERAL SAFETY RULES
COMPONENT LIST
CLEANING INSTRUCTIONS
ASSEMBLY
DIRECTIONS FOR USE
FOOD SAFETY
WARRANTY INFORMATION
3
4-5
6
6-7
8
9
10
REGLAS IMPORTANTES DE SEGURIDAD
LISTA DE COMPONENTES
INSTRUCCIONES DE LIMPIEZA
INSTRUCCIONES DE MONTAJE
INSTRUCCIONES DE USO
SEGURIDAD DE LOS ALIMENTOS
INFORMACIÓN DE GARANTÍA WESTON
IMPORTANTES RÈGLES DE SÉCURITÉ
DESCRIPTION DE LA PIÈCE
INSTRUCTIONS DE DÉMONTAGE ET D’ENTRETIEN
INSTRUCTIONS D’ASSEMBLAGE
MODE D’EMPLOI
SÉCURITÉ ALIMENTAIRE
INFORMATION SUR LA GARANTIE
TABLE OF CONTENTS / ÍNDICE / TABLE DES MATIÈRES
12
14-15
16
16-17
18
19
20
22
24-25
26
26-27
28
29
30
2
Page 3

GENERAL SAFETY RULES
READ AND FULLY UNDERSTAND ALL INSTRUCTIONS AND WARNINGS
PRIOR TO USING THIS UNIT. YOUR SAFETY IS MOST IMPORTANT!
FAILURE TO COMPLY WITH PROCEDURES AND SAFE GUARDS MAY
RESULT IN SERIOUS INJURY OR PROPERTY DAMAGE. REMEMBER:
YOUR PERSONAL SAFETY IS YOUR RESPONSIBILITY!
1. CAUTION SHARP BLADES! Wear Kevlar, cut-resistant gloves (Sold
Separately) when handling the Blade Assembly.
2. NEVER REACH INTO the Tenderizer/Jerky Slicer. Doing so could cause
serious injury. ALWAYS USE THE PROVIDED TONGS.
3. KEEP FINGERS CLEAR OF THE BLADES AT ALL TIMES. Failure to do so
may result in personal injury. The Cutting Blades/Blade Assembly is very sharp.
Wear Kevlar, cut-resistant gloves (Sold Separately) when handling the Blades.
4. DO NOT press or push meat into the Chute with your ngers or any other
object. Doing so may cause personal injury and/or damage to the unit.
5. NEVER use ngers to scrape food away from the Tenderizer/Jerky Slicer while
in operation. SEVERE INJURY MAY RESULT.
6. DO NOT push the Tongs or other utensils into the Blades.
7. NEVER LEAVE THE Tenderizer/Jerky Slicer UNATTENDED. Close
supervision is necessary when any appliance is used near children. This
appliance is NOT to be used by children.
8. NEVER use any accessories or parts from other manufacturers. Doing so will
VOID YOUR WARRANTY.
ENGLISH INSTRUCTIONS
9. Thoroughly clean all parts that will come into contact with food before using
the Tenderizer/Jerky Slicer. Wash all parts by hand and dry thoroughly. Wear
Kevlar, cut-resistant gloves (Sold Separately) when handling the Blades.
10. DO NOT attempt to tenderize or slice meat with bones or other hard items.
Damage to the machine will occur.
11. TIE BACK loose hair and clothing, and roll up long sleeves before operating
the Tenderizer/Jerky Slicer. REMOVE ties, rings, watches, bracelets, or other
jewelry before operating.
12. DO NOT use the Tenderizer/Jerky Slicer while under the inuence of drugs,
medications or alcohol.
SAVE THESE INSTRUCTIONS
3
Page 4

WARNING!
Protective/cut-resistant
gloves are recommended
whenever handling the
Blade assembly!
13
6
5
7
ENGLISH INSTRUCTIONS
16
16a
1
11
10
2
15a
15
4
8
16a
3
16
12
14
15a
9
15
19
17
18
4
Page 5

COMPONENT LIST
DIAGRAM NUMBER PART DESCRIPTION PART NUMBER
1 BOTTOM HOUSING 07-3184-A
2 TOP HOUSING 07-3181-A
3 HANDLE 07-3125-A
4 STAINLESS STEEL BLADE RACK
ASSEMBLY
5 STAINLESS STEEL LEFT COMB 07-3119
6 STAINLESS STEEL RIGHT COMB 07-3118
7 HOUSING THUMBSCREW (2) 07-3166
8 HANDLE THUMBSCREW 07-3145
9 C-CLAMP (2) 07-3105
10 BASE 07-3111
11 LEFT SUPPORT LEG 07-3179-L-A
12 RIGHT SUPPORT LEG 07-3179-R-A
13 CHUTE 07-3182-A
14 STAINLESS STEEL TONGS 07-3151
15 CHUTE AND BASE SCREW (6) 07-3183
15A CHUTE AND BASE LOCK WASHERS (6) N/A
16 LEG SCREW (4) 07-3180
16A LEG LOCK WASHERS (4) N/A
17 ALLEN WRENCH/CHUTE & BASE
SCREWS
18 ALLEN WRENCH/LEG SCREWS 07-3185
19 ALLEN WRENCH/BLADES 07-3186
ADDITIONAL ACCESSORIES
AVAILABLE
If any components of this unit are broken, the unit does not operate properly or you
need a replacement instruction manual, visit us on the web at
Or call Weston Brands, LLC Toll Free at 1-800-814-4895
Monday thru Friday 8:00am-5:00pm ET. Outside the U.S. call 001-440-638-3131
PART DESCRIPTION PART NUMBER
JERKY SLICER BLADES 07-3302-W
MOTOR ATTACHMENT 01-0103-W
WestonProducts.com
07-3103
ENGLISH INSTRUCTIONS
07-3178
5
Page 6

CLEANING INSTRUCTIONS
1. Thoroughly wash all parts in soapy water. Rinse with clean water. Dry all parts
immediately. NOTE: DO NOT immerse the Blade Assembly in sudsy water where
they cannot be seen. To prevent injury, keep the Blade Assembly visible at all
times. CAUTION: The Blades are very sharp!
2. Coat all metal parts with a food grade silicone spray.
HELPFUL HINT: A long, skinny brush is helpful when cleaning the Blade
Assembly.
ASSEMBLY INSTRUCTIONS
1. Connect the Left and Right Legs
to the Base using the provided Allen
ENGLISH INSTRUCTIONS
Wrench and 4 Base Screws and Lock
Washers. FIGURE A
2. Using an Allen Wrench and 4 Leg
Screws and Lock Washers, attach
the Left and Right Legs to the Lower
Housing. FIGURE A
3. Install the Chute to the Top
Housing using an Allen Wrench
and the 2 Chute Screws and Lock
Washers. FIGURE B
Allen
Wrench
Leg Screws (4) &
Lock Washers (4)
Legs
Lower
Housing
FIGURE A
Base
Base Screws (4)
and Lock Washers (4)
Allen
Wrench
FIGURE B
Chute
Top
Housing
Allen
Wrench
Chute Screws (2) &
Lock Washers (2)
6
Page 7

4. Insert the Blade Assembly into the Lower
Housing, guiding the Drive Shaft into the
journals. Make sure the gears and the
blades of the Blade Assembly are properly
meshed together and resting in the journals
(FIGURE C). NOTE: The Tenderizer Blade
is a 2-piece set. The Jerky Slicer Blade is a
single piece (sold separately).
5. Position the Top Housing onto the
Lower Housing and line up the screw
holes.
6. Secure the Top Housing to the
Lower Housing using the 2 Housing
Thumbscrews. DO NOT OVERTIGHTEN!
FIGURE D
7. Insert the Left Comb and Right Comb
into the Top Housing. FIGURE D
NOTE: The Left Comb is marked with an
“L” on the upper portion of the Comb. The
Top Housing is marked with an “L Comb”
and “R Comb” to aid in Comb installation.
8. Install Handle onto the Blade Drive
Shaft. Secure the Handle to Drive Shaft
with the Handle Thumbscrew. FIGURE E
9. To change Blades, follow “Assembly
Instructions” as outlined.
Housing
Journals
Lower
Housing
Combs
Housing
Thumbscrews (2)
Top
FIGURE C
Blade
Assembly
Drive Shaft
Journals
FIGURE D
ENGLISH INSTRUCTIONS
NOTE: Periodically the gears on the
Blades need to be tightened. Use the
Allen Wrench to tighten the screw on the
gears.
Gears
Gears
Jerky blades sold separately
FIGURE E
Drive Shaft
Handle
Thumbscrew
Handle
7
Page 8
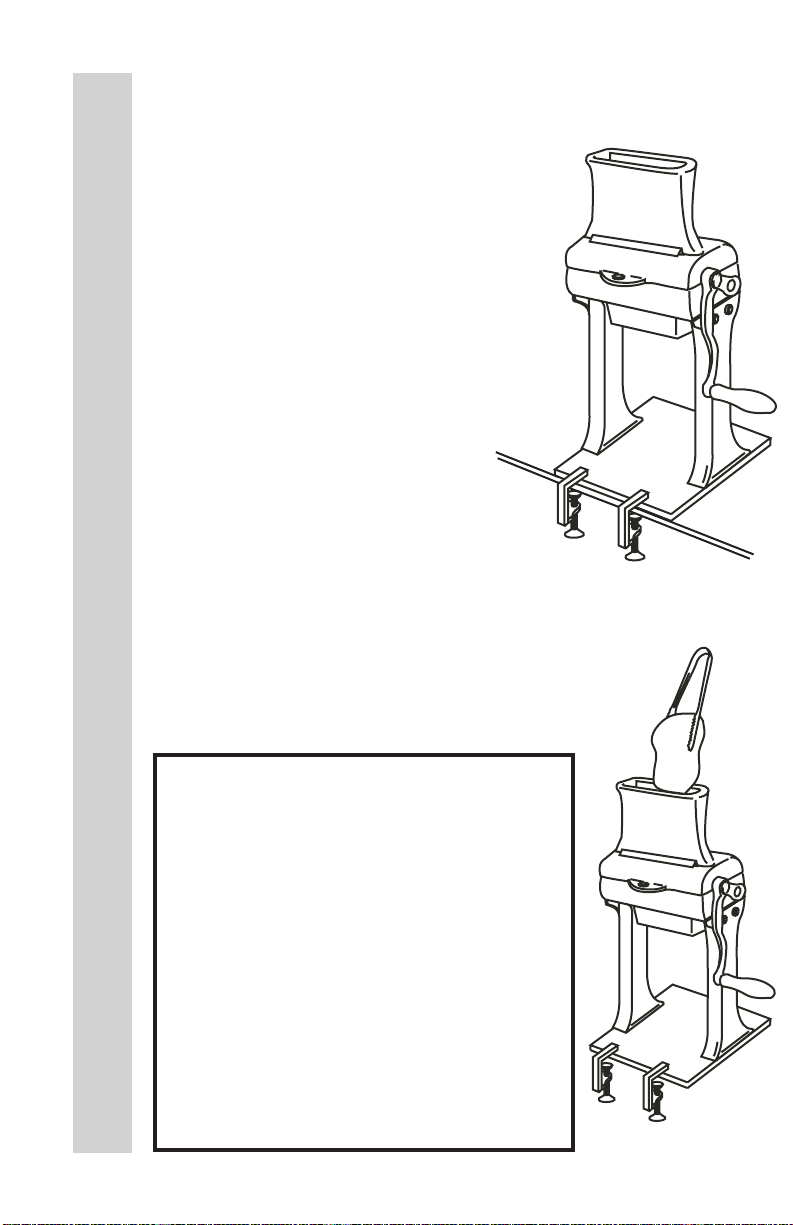
DIRECTIONS FOR USE
1. Secure the Base to the work surface
with the 2 C-Clamps. Make sure the
Handle can freely rotate. FIGURE F
2. Make sure the Combs are properly
installed. DO NOT use the Tenderizer/
Jerky Slicer without the Combs in place.
3. Meat cuts should be 11/4” (3.2 cm)
thick or less. Cuts of meat that are too
thick may damage the Blades. Remove
all bones or hard items in the meat
before tenderizing or cubing. Damage
to the unit may occur if bones or hard
objects are pushed through.
ENGLISH INSTRUCTIONS
4. Using the Tongs, insert meat into the
opening at the top of the Chute until
the meat contacts the Blades. Do not
allow the Tongs to contact the Blades.
FIGURE G
5. While facing the Tenderizer/Jerky
Slicer with the Handle to the right, rotate
the Handle CLOCKWISE to tenderize or
slice the meat. The Blades will pull meat
through the Tenderizer/Jerky Slicer. DO
NOT force meat into the Blades.
FIGURE F
Base
C-Clamps
FIGURE G
6. It may be necessary to pass the meat
through the Cuber/Tenderizer several
times to obtain the desired results.
You may also pass the meat through
at different angles if a different result is
desired.
! NEVER REACH INTO the Tenderizer/Jerky
Slicer. Doing so could cause serious injury.
ALWAYS USE THE PROVIDED TONGS.
! KEEP FINGERS CLEAR OF THE BLADES AT
ALL TIMES. Failure to do so may result in personal
injury. The Tenderizer/Jerky Slicer is very sharp.
! DO NOT press or push meat into the Chute with
your ngers or any other object. Doing so may cause
personal injury and/or damage to the unit.
! NEVER use ngers to scrape food away from
the Tenderizer/Jerky Slicer while in operation.
SEVERE INJURY MAY RESULT.
! DO NOT push the Tongs or other utensils into the
Blades.
! Remove all bones or hard items in the meat before
tenderizing/cubing. Damage to the unit may occur if
bones or hard objects are pushed through.
8
Tongs
Page 9

There are basic rules to follow when handling food.
FOOD SAFETY
They are COOK, SEPARATE, CLEAN, and CHILL.
COOK
It’s crucial to cook food to a safe internal temperature to destroy bacteria that is present.
The safety of hamburgers and other foods made with ground meat has been receiving a lot
of attention lately, and with good reason. When meat is ground, the bacteria present on the
surface is mixed throughout the ground mixture. If this ground meat is not cooked to at least
160oF to 165oF (71oC to 74oC), bacteria will not be destroyed and there’s a good chance you
will get sick.
Solid pieces of meat like steaks and chops don’t have dangerous bacteria like E. coli on the
inside, so they can be served more rare. Still, any beef cut should be cooked to an internal
temperature of at least 145oF (63oC) (medium rare). The safe temperature for poultry is 165oF
(75oC) and solid cuts of pork should be cooked to 145oF (63oC).
SEPARATE
Foods that will be eaten uncooked and foods that will be cooked before eating MUST
ALWAYS be separated. Cross-contamination occurs when raw meats or eggs come in
contact with foods that will be eaten uncooked. This is a major source of food poisoning.
Always double-wrap raw meats and place them on the lowest shelf in the refrigerator so
there is no way juices can drip onto fresh produce. Then use the raw meats within 1-2 days
of purchase, or freeze for longer storage. Defrost frozen meats in the refrigerator, not on the
counter.
When grilling or cooking raw meats or sh, make sure to place the cooked meat on a clean
platter. Don’t use the same platter you used to carry the food out to the grill. Wash the utensils
used in grilling after the food is turned for the last time on the grill, as well as spatulas and
spoons used for stir-frying or turning meat as it cooks.
Make sure to wash your hands after handling raw meats or raw eggs. Washing hands with
soap and water, or using a pre-moistened antibacterial towelette is absolutely necessary after
you have touched raw meat or raw eggs. Not washing hands and surfaces while cooking is a
major cause of cross-contamination.
CLEAN
Wash your hands and work surfaces frequently when you are cooking. Washing with soap
and warm water for at least 15 seconds, then dry with a paper towel.
CHILL
Chilling food is very important. The danger zone where bacteria multiply is between 40oF and
140oF (4oC and 6oC). Your refrigerator should be set to 40oF (4oC) or below; your freezer should
be 0oF (-17oC) or below. Simple rule: serve hot foods hot, cold foods cold. Use chang dishes
or hot plates to keep food hot while serving. Use ice water baths to keep cold foods cold. Never
let any food sit at room temperature for more than 2 hours - 1 hour if the ambient temperature
is 90oF (32oC) or above. When packing for a picnic, make sure the foods are already chilled
when they go into the insulated hamper. The hamper won’t chill food - it just keeps food cold
when properly packed with ice. Hot cooked foods should be placed in shallow containers and
immediately refrigerated so they cool rapidly. Make sure to cover foods after they are cool.
ENGLISH INSTRUCTIONS
NOTE: Special considerations must be made when using venison or other wild game, since it
can become heavily contaminated during eld dressing. Venison is often held at temperatures
that could potentially allow bacteria to grow, such as when it is being transported. Refer to
the USDA Meat and Poultry Department for further questions or information on meat and
food safety.
9
Page 10

WESTON WARRANTY INFORMATION
Weston Brands, LLC warrants to the ORIGINAL RETAIL PURCHASER of this product that if operated in accordance
with the printed instruction accompanying it, then for a period of 1 year from the date of purchase, the product shall be free
The Warranty Card, along with a copy of the original receipt, must be received by Weston Brands, LLC within 30 days
from purchase date for the warranty to apply. Failure to send the completely lled out Warranty Card, along with a copy of
The product must be delivered to or shipped freight prepaid to Weston Brands, LLC for warranty services, in either
its original packaging or similar packaging affording an equal degree of protection. Damage due to shipping is not the
responsibility of the company. Weston Brands, LLC charges a $35.00 per hour bench charge. NOTE: No repairs will
be started without the authorization of the customer. The return shipping cost to the customer will be added to the repair
Prior to returning the product for Warranty Repair, the product must be thoroughly cleaned and free from any food
particles or other debris. Failure of the purchaser to comply with this standard will result in the unit being returned without
Weston Brands, LLC will repair (or at its discretion, replace) the product free of charge, if in the judgment of the
New or rebuilt replacements for factory defective parts will be supplied for one (1) year from the date of purchase.
For non-warranty repairs, contact Weston Brands, LLC’s Customer Service at 1-800-814-4895 M-F 8am-5pm ET
(outside of the United States 001-440-638-3131) to obtain a Return Merchandise Authorization Number (RMA Number).
Weston Brands, LLC will refuse all returns that do not contain this number. DO NOT RETURN THE UNIT WITHOUT
LIMITATIONS: The warranty is void if the product is used for any purpose other than that for which it is designed.
The product must not have been previously altered, repaired, or serviced by anyone else other than Weston Brands,
LLC. If applicable, the serial number must not have been altered or removed. The product must not have been subjected
to accident in transit or while in the customer’s possession, misused, abused, or operated contrary to the instructions
contained in the instruction manual. This includes failure caused by neglect of reasonable and necessary maintenance,
improper line voltage and acts of nature. This warranty is not transferable and applies only to U.S. and Canadian sales.
Except to the extent prohibited by applicable law, no other warranties whether expressed or implied, including
warranty merchantability and tness for a particular purpose, shall apply to this product. Under no circumstances shall
Weston Brands, LLC be liable for consequential damages sustained in connection with said product and Weston Brands,
LLC neither assumes nor authorizes any representative or other person to assume for it any obligation or liability other than
such as is expressly set forth herein. Any applicable implied warranties are also limited to the one (1) year period of the
This warranty covers only the product and its specic parts, not the food or other products processed in it. Weston is
not responsible for missing or damaged parts on discounted/clearance, resale or nal sale items where the seller may not
SAVE THIS WARRANTY INFORMATION FOR YOUR RECORDS!
from defects in material and workmanship.
the original receipt, will void the warranty.
invoice.
repair. In some cases, a $50 cleaning surcharge may apply.
company, it has been proven to be defective as to seller’s labor and material, within the warranty period.
Replacement parts are warranted for the remainder of the original warranty period.
PROPER AUTHORIZATION FROM WESTON BRANDS LLC.
limited warranty.
CUT ALONG THE DOTTED LINE AND SEND THE WARRANTY CARD ALONG WITH A COPY OF YOUR
be able to guarantee full functionality or completeness of the unit.
ORIGINAL PURCHASE RECEIPT TO:
Weston Brands, LLC / WARRANTY
20365 Progress Drive, Strongsville, OH 44149 USA
SEND THIS CARD ALONG WITH A COPY OF YOUR ORIGINAL PURCHASE RECEIPT TO:
WESTON WARRANTY CARD
WESTON BRANDS, LLC / WARRANTY, 20365 PROGRESS DRIVE, STRONGSVILLE, OH 44149 USA
Customer Name:
Address:
City/State/Zip/Country:
Telephone Number:
E-Mail Address:
Original Date of Purchase:
Product Model #:
Serial # (if applicable):
I have read the warranty information. Initial here:
Copy of Receipt
Included
Page 11

ABLANDADORA/CORTADORA
EN CUBOS DE CARNE
manual
07-3101-W-A
DEBIDO A CONSTANTES MEJORAS EN LA FÁBRICA, EL PRODUCTO QUE SE MUESTRA PUEDE
SER LIGERAMENTE DIFERENTE DEL PRODUCTO EN ESTA CAJA. 012015
Page 12

REGLAS IMPORTANTES DE SEGURIDAD
LEA Y ENTIENDA COMPLETAMENTE TODAS LAS INSTRUCCIONES Y
ADVERTENCIAS ANTES DE UTILIZAR ESTA UNIDAD. ¡SU SEGURIDAD
ES LO MÁS IMPORTANTE! NO SEGUIR LOS PROCEDIMIENTOS
Y PRECAUCIONES PUEDE PROVOCAR LESIONES GRAVES Y
DAÑOS MATERIALES. RECUERDE: ¡SU SEGURIDAD PERSONAL ES
1. ¡CUIDADO, NAVAJAS FILOSAS! Use guantes de Kevlar resistentes a los
cortes (se venden por separado) al manejar el conjunto de navajas.
2. NUNCA META LA MANO EN el Ablandador/Rebanador de cecina. Hacerlo
podría causarle lesiones graves. USE SIEMPRE LAS PINZAS QUE SE
ADJUNTAN.
3. MANTENGA LOS DEDOS LEJOS DE LAS NAVAJAS EN TODO MOMENTO.
No hacerlo puede causar lesiones. El conjunto de navajas y navajas de corte
es muy loso. Use guantes de Kevlar resistentes a los cortes (se venden por
separado) al manejar las navajas.
INSTRUCCIONES EN ESPAÑOL
4. NO presione ni empuje la carne en el vertedero con los dedos o algún otro
objeto. Hacerlo puede causarle lesiones y daños en el aparato.
5. NUNCA use los dedos para raspar el alimento del ablandador/rebanador de
cecina mientras esté en funcionamiento. PUEDEN PRODUCIRSE LESIONES
GRAVES.
6. NO empuje las pinzas or other ni otros utensilios en las navajas
7. NUNCA DEJE SIN SUPERVISIÓN EL ablandador/rebanador de cecina. Es
necesaria la supervisión cercana cuando se use cualquier aparato cerca de
niños. Este aparato NO DEBE ser usado por niños.
RESPONSABILIDAD DE USTED!
8. NUNCA use accesorios o partes de otros fabricantes. Hacerlo ANULA LA
GARANTÍA.
9. Limpie cuidadosamente todas las partes que entren en contacto con los
alimentos antes de usar el ablandador/rebanador de cecina. Lave a mano todas
las partes y séquelas bien. Use guantes de Kevlar resistentes a los cortes (se
venden por separado) al manejar las navajas.
10. NO trate de ablandar o rebanar carne con hueso u otras partes duras. Eso
dañaría la máquina.
11. RECÓJASE el pelo suelto y la ropa y enróllese las mangas antes de manejar
el ablandador/rebanador de cecina. QUÍTESE la corbata, anillos, relojes,
brazaletes y demás joyería antes de manejarlo.
12. NO USE el ablandador/rebanador de cecina bajo los efectos de drogas,
medicamentos o alcohol.
¡GUARDE ESTAS INSTRUCCIONES!
12
Page 13

Page 14

¡ADVERTENCIA!
¡ADVERTENCIA!
Siempre que se use el
conjunto de navajas
se recomienda usar
guantes de protectores y
resistentes a los cortes.
13
6
5
INSTRUCCIONES EN ESPAÑOL
16
16a
7
2
15a
15
4
8
16a
1
3
16
11
12
10
14
14
15a
9
15
19
17
18
Page 15

LISTA DE COMPONENTES
NÚMERO DE DIAGRAMA DESCRIPCIÓN DE LA PIEZA NÚMERO DE PIEZA
1 GABINETE INFERIOR 07-3184-A
2 GABINETE SUPERIOR 07-3181-A
3 MANGO 07-3125-A
4 CONJUNTO DE LA REJILLAS DE NAVAJAS
DE ACERO INOXIDABLE
5 PEINE IZQUIERDO DE ACERO INOXIDABLE 07-3119
6 PEINE DERECHO DE ACERO INOXIDABLE 07-3118
7 TORNILLO DE MANO DEL GABINETE (2) 07-3166
8 TORNILLO DE MANO DEL MANGO 07-3145
9 TORNILLO DE BANCO (2) 07-3105
10 BASE 07-3111
11 PATA DE SOPORTE IZQUIERDA 07-3179-L-A
12 PATA DE SOPORTE DERECHA 07-3179-R-A
13 VERTEDOR 07-3182-A
14 PINZAS DE ACERO INOXIDABLE 07-3151
15 TORNILLO DEL VERTEDOR Y DE LA BASE (6) 07-3183
15A VERTEDOR Y ARANDELAS DE LA BASE (6) N/A
16 TORNILLO DE LA PATA (4) 07-3180
16A ARANDELAS DE LA PATA (4) N/A
17 LLAVE ALLEN/TORNILLOS DEL VERTEDOR
Y DE LA BASE
18 LLAVE ALLEN/TORNILLOS
DE LA PATA
19 LLAVE ALLEN/NAVAJAS 07-3186
ACCESORIOS ADICIONALES
DESCRIPCIÓN DE LA PIEZA NÚMERO DE PIEZA
DISPONIBLES
NAVAJAS DE LA REBANADORA DE CECINA 07-3302-W
MOTOR ACCESORIO 01-0103-W
Si cualquier componente de esta unidad está roto, si no funciona debidamente, o si necesita un
O llame a Weston Brands LLC larga distancia sin costo 1-800-814-4895
De lunes a viernes, de 8:00 am a 5:00 pm tiempo del ET. Fuera de Estados Unidos llame
instructivo de repuesto, visítenos en la Web en
WestonProducts.com
al 001-440-638-3131
07-3103
07-3178
07-3185
INSTRUCCIONES EN ESPAÑOL
15
Page 16

INSTRUCCIONES DE LIMPIEZA
1. Lave cuidadosamente todas las partes en agua caliente y jabonosa.
Enjuague con agua limpia. Seque todas las piezas de inmediato. NOTA: NO
sumerja el conjunto de navajas en agua jabonosa donde no pueda verlo. Para
evitar lesiones, mantenga visible el conjunto de navajas en todo momento.
ADVERTENCIA: ¡Las navajas son muy losas!
2. Revista todas las partes de metal con un rocío de silicona para alimentos.
CONSEJO ÚTIL: Un cepillo largo y delgado es muy útil para limpiar el conjunto de
navajas.
INSTRUCCIONES DE MONTAJE
1. Conecte las patas izquierda
y derecha a la base, usando la
llave Allen que se proporciona y
4 tornillos de base y arandelas.
INSTRUCCIONES EN ESPAÑOL
FIGURA A
2. Usando la llave Allen y 4 tornillos
de pata y 4 arandelas, je las patas
izquierda y derecha al gabinete
inferior. FIGURA A
Tornillos de pata (4)
y arandelas (4)
Llave
Allen
Gabinete
inferior
FIGURA A
3. Instale el vertedor en el
gabinete superior usando la Allen
Wrench and the 2 llave Allen y 2
tornillos de vertedor y arandelas.
FIGURA B
16
Base
Gabinete
superior
Patas
Llave
Allen
Vertedor
Llave
Allen
Tornillos de la base (4)
y arandelas (4)
FIGURA B
Tornillos del vertedor (2)
y arandelas (2)
Page 17

4. Inserte el conjunto de navajas en el
gabinete inferior guiando el eje de trasmisión
en los cojinetes. Revise que los engranes y
las navajas del conjunto de navajas estén
bien acomodados y apoyados en los cojinetes
(FIGURA C). NOTA: La navaja ablandadora
es un juego de dos piezas. La navaja
rebanadora de cecina es una sola pieza (se
vende por separado).
5. Coloque el gabinete superior encima del
inferior y alinee los agujeros de los tornillos.
6. Fije el gabinete superior en el inferior
usando los dos tornillos de mano para el
gabinete. ¡NO LOS APRIETE EN EXCESO!
FIGURA D
7. Inserte el peine izquierdo y el derecho en
el gabinete superior. FIGURA D
Gabinete
superior
Cojinetes
Gabinete
inferior
FIGURA C
Conjunto de
navajas
Eje de
transmisión
Cojinetes
NOTA: El peine izquierdo está marcado con
una “L” en la parte superior. El gabinete
superior tiene las marcas “L Comb” y
“R Comb” (peine izquierdo y derecho,
respectivamente) para ayudar en su
instalación.
8. Instale el mango en el eje de trasmisión
de las navajas. Fije el mango en el eje
Tornillos de mano
de trasmisión con el tornillo de mano del
mango. FIGURA E
9. Para cambiar las navajas siga las
“Instrucciones de ensamble” como se indica.
NOTA: Los engranes de las navajas
necesitan apretarse periódicamente. Apriete
el tornillo de los engranes con la llave Allen.
Engranes
Engranes
Peines
del gabinete (2)
FIGURA D
FIGURA E
Eje de
transmisión
Tornillo de
mano del
mango
INSTRUCCIONES EN ESPAÑOL
Mango
17
Page 18

INSTRUCCIONES DE USO
1. Fije la base a la supercie de trabajo con
los dos tornillos de banco. Revise que el
mango pueda girar libremente. FIGURA F
2. Revise que los peines estén debidamente
instalados. NO use el ablandador y rebanador
de cecina sin los peines instalados.
3. Los cortes de carne deben ser de 3.2 cm
(11/4”) de grosor o menos. Los cortes de
carne demasiado gruesos pueden dañar
las navajas. Quite todos los huesos y otras
piezas duras de la carne antes de ablandarla
o cortarla en cubos. El aparato puede dañarse
si le empujan huesos u objetos duros.
4. Con las pinzas inserte la carne en la
abertura superior del vertedero hasta que la
carne toque las navajas. No permita que las
pinzas toquen las navajas. FIGURA G
INSTRUCCIONES EN ESPAÑOL
5. Con la ablandadora/rebanadora de cecina
con el mango a la derecha, gire el mango en
sentido de las manecillas para ablandar o
rebanar la carne. Las navajas empujan a la
carne a través de la ablandadora/rebanadora
de cecina. NO meta a fuerzas la carne en las
navajas.
6. Puede ser necesario pasar la carne varias
veces por la cortadora en cubos/ablandadora
para lograr los resultados deseados. También
puede pasar la carne en diferentes ángulos si
desea un resultado diferente.
Base
Tornillo
de
banco
FIGURA F
FIGURA G
Pinzas
18
! NUNCA META LA MANO EN el Ablandador/
Rebanador de cecina. Hacerlo podría causarle
lesiones graves. USE SIEMPRE LAS PINZAS QUE SE
ADJUNTAN.
! MANTENGA LOS DEDOS LEJOS DE LAS NAVAJAS
EN TODO MOMENTO. No hacerlo puede causar
lesiones. La ablandadora/rebanadora de cecina
ablandadora/rebanadora de cecina
! NO presione ni empuje la carne en el vertedero con
los dedos o algún otro objeto. Hacerlo puede causarle
lesiones y daños en el aparato.
! NUNCA use los dedos para raspar el alimento del
Tenderizer/Jerky Slicer mientras esté en funcionamiento.
PUEDEN PRODUCIRSE LESIONES GRAVES.
! NO empuje las pinzas ni otros utensilios en las
navajas.
! Quite todos los huesos y otras piezas duras de la carne
antes de ablandarla o cortarla en cubos. El aparato
puede dañarse si le empujan huesos u objetos duros.
Page 19

SEGURIDAD DE LOS ALIMENTOS
Hay que seguir ciertas reglas básicas al manejar alimentos.
Las reglas son COCINAR, SEPARAR, LIMPIAR y ENFRIAR.
COCINAR
Es muy importante cocinar los alimentos a una temperatura interna que destruya cualquier
bacteria que esté presente. Últimamente se ha puesto mucha atención en la higiene de
las hamburguesas y otros alimentos elaborados con carne molida y con razón. Cuando se
muele la carne, las bacterias presentes en la supercie se revuelven en toda la mezcla de la
carne molida. Si la carne molida no se cuece a por lo menos 71°C a 74°C (160°F - 165°F),
no se destruyen las bacterias y hay una buena posibilidad de enfermarse.
Las piezas de carne sólida, como los letes y las chuletas, no tienen en su interior bacterias
peligrosas como le E. coli, por lo que pueden servirse menos cocidas. Aun así, cualquier
corte de vacuno debe cocinarse a una temperatura interna de por lo menos 63°C (145°F)
(medio cocido). La temperatura recomendable para las aves es de 75°C (165°F) y los cortes
sólidos de carne de puerco deben cocinarse a 71°C (160°F).
SEPARAR
SIEMPRE DEBE separar los alimentos que se comen crudos y los que se vayan a cocer
antes de comerse. La contaminación cruzada se presenta cuando la carne o los huevos
crudos entran en contacto con alimentos que se van a consumir sin cocimiento. Ésta es una
importante causa de intoxicaciones. Siempre use una doble envoltura para la carne cruda
y colóquela en la repisa más baja del refrigerador, para que no haya manera de que su
jugo gotee en las verduras frescas. Use la carne cruda 1 o 2 días después de comprarla, o
congélela para guardarla más tiempo. Descongele la carne congelada en el refrigerador, no
en el mesón de la cocina.
Cuando ase o cocine carne o pescado crudo, coloque la carne ya cocida en un platón
limpio. No use el mismo platón que usó para llevar la carne al asador. Lave los utensilios
usados en el asador después de haber volteado los alimentos por última vez, así como las
cucharas y espátulas usadas para freír o para voltear la carne al estarla cocinando.
No olvide lavarse las manos después de manejar carne o huevos crudos. Es absolutamente
necesario lavarse las manos con agua y jabón o usar una toallita húmeda antibacteriana
después de tocar carne o huevos crudos. No lavarse las manos o las supercies cuando se
cocina es una causa importante de contaminación cruzada.
LIMPIAR
Lávese las manos y las supercies de trabajo con frecuencia mientras esté cocinando.
Lávese con agua tibia y jabón durante por lo menos 15 segundos; después séquese con
una toalla de papel.
INSTRUCCIONES EN ESPAÑOL
ENFRIAR
Es muy importante enfriar los alimentos. La zona de peligro para la multiplicación de
bacterias está entre los 4 °C y 60 °C (40 °F - 140 °F). El refrigerador debe estar a 4 °C (40
°F) o menos; el congelador debe estar a -17 °C (0 °F) o menos. Regla básica: sirva calientes
los alimentos calientes y sirva fríos los alimentos fríos. Use platos calientes para mantener
caliente la comida a la hora de servirla. Use baños de agua con hielo para mantener fría
la comida fría. Nunca deje ningún alimento a temperatura ambiente por más de 2 horas;
o por más de 1 hora si la temperatura ambiente es de 32 °C (90 °F) o superior. Cuando
empaque para un picnic, asegúrese de que la comida ya esté fría cuando la meta en la
canasta aislada. La canasta no enfría la comida; sólo la mantiene fría si está debidamente
empacada con hielo. Los alimentos cocidos calientes deben colocarse en recipientes bajos
y refrigerarse de inmediato para que se enfríen rápidamente. No olvide cubrir los alimentos
una vez que se enfríen..
NOTA: Debe tener especial consideración al usar venado y otra carne de caza, ya que
puede contaminarse durante la preparación de campo. El venado suele mantenerse a
temperaturas que podrían permitir el crecimiento de bacterias, como cuando se transporta.
Consulte con el Departamento de Carnes y Aves de la USDA si tiene más preguntas o
quiere más información sobre higiene de carne y alimentos.
19
Page 20

INFORMACIÓN DE GARANTÍA WESTON
¡GUARDE ESTA INFORMACIÓN DE GARANTÍA PARA SUS REGISTROS!
Weston Brands, LLC garantiza al COMPRADOR AL DETALLE ORIGINAL de este producto que si funciona en cumplimiento
con las instrucciones impresas adjuntas, entonces por un período de 1 año desde la fecha de compra, el producto se
La Tarjeta de Garantía, junto con una copia del recibo original debe ser recibida por Weston Brands, LLC dentro de 30 días
desde la fecha de compra para hacer efectiva la garantía. Si no se envía la Tarjeta de Garantía completamente llena, junto
El producto debe ser enviado o despachado mediante ete prepagado a Weston Brands LLC para efectuar los servicios
establecidos en la garantía, en su envase original o en un envase similar que garantice igual grado de protección. El daño
producto del despacho no es responsabilidad de la compañía. Weston Brands, LLC cobra $35.00 por concepto de mesón por
hora. NOTA: Las reparaciones no se iniciarán sin la autorización del cliente. El costo por despacho de devolución al cliente se
Antes de devolver el producto para la Reparación según la Garantía, el producto debe estar completamente limpio y libre de
partículas de alimentos u otros fragmentos. El incumplimiento del comprador respecto de esta norma resultará en el envío de
la unidad sin reparación. En algunos casos, podría aplicar un sobrecargo de $50 por concepto de limpieza.
Weston Brands, LLC reparará (o a su decisión, cambiará) el producto sin cobro, si a juicio de la compañía, se ha demostrado
que está defectuoso respecto de la mano de obra y material del vendedor, dentro del período de garantía.
Los cambios de productos nuevos o reacondicionados por partes defectuosas de fábrica serán suministrados por un (1) año
desde la fecha de compra. Las partes cambiadas están garantizadas por el resto del período original de garantía.
Para las reparaciones que no estén cubiertas en la garantía, comuníquese con Servicio al Cliente de Weston Brands, LLC al
1-800-814-4895 de lunes a viernes, desde las 8 a.m. hasta las 5pm ET (Desde fuera de los Estados Unidos comuníquese
al 001-440-638-3131) para solicitar un Número de Autorización de Devolución de la Mercadería (Número RMA). Weston
Brands, LLC rechazará todo envío que no contenga este número. NO DEVUELVA LA UNIDAD SIN LA AUTORIZACIÓN DE
LIMITACIONES: La garantía queda invalidada si el producto se utiliza para algún objetivo que no sea aquél para el cual
está diseñado. El producto no debe haber sido previamente alterado, reparado, ni tampoco se le debe haber hecho servicio
técnico por cualquier otra persona que no sea de Weston Brands, LLC. Si corresponde, no se debe alterar o eliminar el
número de serie. El producto no debe estar sujeto a accidentes durante el transporte o estando en posesión del cliente, no
debe ser mal usado, mal tratado, u operado en forma contraria a las instrucciones de este manual. Esto incluye toda falla
causada por negligencia de mantención razonable o necesaria, voltaje de línea inadecuado o actos de la naturaleza. Esta
Salvo en la medida en que lo prohíba la ley correspondiente, ninguna otra garantía expresa o implícita, incluyendo
comerciabilidad o aptitud de la garantía para un objetivo en particular, aplicará a este producto. Bajo ninguna circunstancia
Weston Brands, LLC será responsable de daños emergentes sostenidos en conexión con dicho producto y Weston Brands
LLC no asume ni autoriza a ningún representante u otra persona a asumir por él ninguna obligación o responsabilidad que no
sea aquella expresamente establecida en esta tarjeta de garantía. Toda garantía correspondiente implícita también se limita a
Esta garantía cubre sólo el producto y sus partes especícas, no cubre los alimentos u otros productos procesados en
él. Weston no se hace responsable por partes faltantes o dañadas en productos con descuento/en oferta, reventa, o en
promoción nal, sobre los cuales el vendedor puede no ser capaz de garantizar una funcionalidad completa, o la integridad de
CORTE POR LA LÍNEA PUNTEADA Y ENVÍE LA TARJETA DE GARANTÍA JUNTO CON UNA COPIA DE SU RECIBO DE
considerará libre de defectos respecto del material y mano de obra.
con una copia del recibo original, anulará la garantía.
agregará a la factura por reparación.
WESTON BRANDS, LLC.
garantía es intransferible y sólo se aplica a ventas realizadas en Estados Unidos y Canadá.
un período de un (1) año de la garantía limitada.
Weston Brands, LLC / WARRANTY
20365 Progress Drive, Strongsville, OH 44149 USA
la unidad.
COMPRA ORIGINAL A
ENVÍE ESTA TARJETA JUNTO CON UNA COPIA DE SU RECIBO DE COMPRA ORIGINAL A: WESTON
TARJETA DE GARANTÍA WESTON
BRANDS, LLC/WARRANTY, 20365 PROGRESS DRIVE. STRONGSVILLE, OH 44149 USA
Nombre del Cliente:
Dirección:
Ciudad/Estado/Código Zip/País:
Número Telefónico:
Dirección de Correo Electrónico:
Fecha de Compra Original:
Modelo del Producto #:
# de Serie (Si corresponde):
Copia del recibo
incluido
Page 21

ATTENDRISSEUR
MANUEL
UNIQUE À VIANDE
07-3101-W-A
PARCE QUE NOS PRODUITS BÉNÈFICIENT DE PERFECTIONNEMENTS CONSTANTS APPORTÉS
EN USINE, LES ILLUSTRATIONS PRÉSENTES PEUVENT ÊTRE LÉGÈREMENT DIFFÉRENTES DU
PRODUIT REÇU. 012015
Page 22

IMPORTANTES RÈGLES DE SÉCURITÉ
LIRE ET COMPRENDRE COMPLÈTEMENT TOUTES LES DIRECTIVES
ET AVERTISSEMENTS AVANT D’UTILISER CE PRODUIT. LE PLUS
IMPORTANT EST VOTRE SÉCURITÉ! LE DÉFAUT D’OBSERVER LES
PROCÉDURES ET MISES EN GARDE PEUT ENTRAINER DES BLESSURES
GRAVES OU DES DOMMAGES MATÉRIELS. N’OUBLIEZ PAS : VOTRE
SÉCURITÉ PERSONNELLE EST VOTRE RESPONSABILITÉ!
1. Avant la toute première utilisation de l’attendrisseur, laver à fond toutes les
pièces conformément à la section INSTRUCTIONS DE DÉMONTAGE ET
D’ENTRETIEN de ce guide.
2. Avant d’utiliser l’attendrisseur, regarder s’il est parfaitement assemblé, toutes
les pièces solidement en place.
3. Pour éviter d’endommager l’attendrisseur, NE PAS attendrir une viande qui
contient des os ou des objets durs, tels les plombs de chasse.
4. L’attendrisseur de viande n’est pas un jouet ! GARDER LES ENFANTS
HORS DE PORTÉE !
INSTRUCTIONS EN FRANÇAIS
5. NE JAMAIS insérer les doigts, ni des corps étrangers dans la goulotte.
6. Pour éviter les blessures ou les dégâts matériels, NE PAS forcer la viande
dans les lames.
7. LES LAMES DES ATTENDRISSEURS SONT TRÈS COUPANTES ! Porter
des gants en Kevlar résistants aux coupures durant la manipulation des
rouleaux attendrisseurs.
8. NOUER les cheveux longs, les vêtements amples, retrousser ses manches,
enlever sa cravate et les bijoux (bagues, bracelets, montre…) avant d’utiliser
l’attendrisseur.
9. Ne JAMAIS poser un accessoire ou une pièce d’un autre fabricant avec
l’attendrisseur de viande. Un tel ajout endommagera l’outil et annulera la
garantie.
10. Une utilisation impropre ou une modication de l’attendrisseur annuleront
également la garantie.
11. Cet attendrisseur de viande est réservé à un usage domestique ; un usage
commercial annulera la garantie.
12. Ne pas utiliser l’attendrisseur après avoir pris des médicaments ou de
l’alcool.
CONSERVER CES DIRECTIVES!
22
Page 23

Page 24

AVERTISSEMENT!
Des gants en (bre
aramide), résistants
aux coupures, sont
recommandés lorsque
l’on manipule les rouleaux
de lames !
13
6
5
7
INSTRUCTIONS EN FRANÇAIS
16
16a
1
11
10
2
15a
15
4
8
16a
3
16
12
14
24
15a
9
15
19
17
18
Page 25

DESCRIPTION DE LA PIÈCE
NUMÉRO DE SCHÉMA DESCRIPTION DE LA PIÉCE NUMÉRO DE LA PIÉCE
1 BOÎTIER INFÉRIEUR 07-3184-A
2 BOÎTIER SUPÉRIEUR 07-3181-A
3 MANIVELLE 07-3125-A
4 ENSEMBLE DE ROULEAUX ATTENDRISSEURS 07-3103
5 GRIFFE GAUCHE 07-3119
6 GRIFFE DROITE 07-3118
7 VIS À OREILLES DE LA MANIVELLE 07-3166
8 BRIDES EN C (2) 07-3145
9 BASE 07-3105
10 PIED D’APPUI GAUCHE 07-3111
11 PIED D’APPUI DROITE 07-3179-L-A
12 GOULOTTE 07-3179-R-A
13 PINCE EN ACIER INOXYDABLE 07-3182-A
14 VIS DE GOULOTTE ET DE LA BASE (6) 07-3151
15 GOULOTTE ET RONDELLES-FREINS DE LA
BASE (6)
15A VIS DU PIED D’APPUI (4) N/A
16 RONDELLES-FREINS DES PIEDS D’APPUI (4) 07-3180
16A CLÉ HEXAGONALE POUR VIS DE GOULOTTE N/A
17 CLÉ HEXAGONALE POUR VIS DE PIED D’APPUI 07-3178
18 CLÉ HEXAGONALE POUR VIS DE LAMES 07-3185
19 LLAVE ALLEN/NAVAJAS 07-3186
ACCESSOIRES
DESCRIPTION DE LA PIÉCE NUMÉRO DE LA PIÉCE
ADDITIONNELS DISPONIBLES
LAMES POUR TRANCHEUSE DE LANIÈRES
DE VIANDE
ACCESSOIRE À MOTEUR 01-0103-W
N’hésitez pas à visiter notre site Web WestonProduct.com/support si un composant est cassé,
Veuillez appeler Weston Brands, LLC au numéro sans frais : 1-800-814-4895
l’outil fonctionne mal, ou pour commander un nouveau mode d’emploi.
WestonProducts.com
Du lundi au vendredi: de 8h00 à 17h00 ET. En dehors des États-Unis, veuillez
appeler le 001-440-638-3131
07-3183
07-3302-W
INSTRUCTIONS EN FRANÇAIS
25
Page 26

INSTRUCTIONS DE DÉMONTAGE ET D’ENTRETIEN
1. Laver à fond toutes les pièces dans de l’eau savonneuse. Rincer à l’eau claire.
Sécher les pièces immédiatement. REMARQUE : Ne pas plonger hors de vue les
rouleaux dans l’eau savonneuse. Pour éviter de se blesser, ne jamais perdre de
vue les rouleaux. MISE EN GARDE : Les lames sont très coupantes !
2. Vaporiser sur les pièces métalliques de la silicone alimentaire pour les protéger
contre la corrosion.
Conseil avisé : Une brosse longue et mince est utile pour nettoyer les rouleaux.
INSTRUCTIONS D’ASSEMBLAGE
1. Visser les pieds gauche et
droit à la base (clé hexagonale, 4
vis et rondelles-freins de la base
fournies, cf. FIGURE A).
INSTRUCTIONS EN FRANÇAIS
2. Visser les pieds gauche et
droit au boîtier inférieur (clé
hexagonale, 4 vis et rondellesfreins de pieds fournies, cf.
FIGURE A).
3. Visser la goulotte sur le boîtier
supérieur (clé hexagonale, 2 vis
et rondelles-freins de goulotte
fournies, cf. FIGURE B).
Vis de pieds (4) et
rondelles-freins (4)
Clé hexagonale
d’appui
Pied
Boîtier
inférieur
FIGURE A
26
Pied d’appui droite
Clé hexagonale
Boîtier
supérieur
Goulotte
Clé hexagonale
Vis de la base (4) et
rondelles-freins (4)
FIGURE B
Vis de goulotte (2) et
rondelles-freins (2)
Page 27

4. Déposer l’ensemble de lames dans
le boîtier inférieur, l’axe d’entraînement
sur les tourillons : les roues et les lames
doivent parfaitement s’engrener et
reposer sur les tourillons (cf. FIGURE
C). REMARQUE : L’ensemble de lames
de l’attendrisseur est en 2 pièces.
L’ensemble de lames de la trancheuse à
viande séchée est monobloc.
5. Enler la manivelle sur l’arbre des
rouleaux attendrisseurs.
Tourillons
6. Joindre le boîtier supérieur au boîtier
inférieur avec les 2 vis à serrage à main.
VEILLER À NE PAS TROP SERRER !
FIGURE D
7. Insérer les griffes gauche et droite dans
leboîtier supérieur. FIGURE D
Remarque : Les griffes et le boîtier
supérieur sont marqués L (gauche) et D
(droit) pour guider la mise en place.
Goulotte
Boîtier
inférieur
FIGURE C
Rapports
de lame
Axe
d’entraînement
de lame
Tourillons
INSTRUCTIONS EN FRANÇAIS
8. Enler la manivelle sur l’axe
d’entraînement, puis la xer avec la vis à
serrage à main. FIGURE E
9. Pour changer l’ensemble de lames,
suivre les instructions d’assemblage 4-8.
REMARQUE : Les roues de lames
doivent être périodiquement
resserrées. Resserrer la vis des roues
avec la clé hexagonale.
Roues
Gears
Lames pour trancheuse
à viande séchée et pour
attendrisseur vendues
séparément.
Vis à oreilles du
boîtier (2)
FIGURE D
FIGURE E
L’axe d’entraîne-
ment
Vis à oreilles
de la manivelle
Manivelle
27
Page 28

MODE D’EMPLOI
1. Accrocher le socle au plan de travail
avec les 2 brides en C. S’assurer que la
manivelle tourne librement. FIGURE F
2. Regarder si les griffes ont été
insérées au bon endroit. Ne pas utiliser
l’attendrisseur de viande sans les griffes
en place.
3. L’épaisseur des morceaux de viande
ne doit pas être supérieure à 2,5 cm (1
po) : des morceaux trop épais risquent
d’endommager les lames. Une
utilisation impropre ou une modication
de l’attendrisseur annuleront également
la garantie.
4.Insérer la viande dans la goulotte,
jusqu’à ce qu’elle touche les lames.
Pour éviter les blessures ou les dégâts
matériels, NE PAS forcer la viande dans
INSTRUCTIONS EN FRANÇAIS
les lames. FIGURE G
5. Tourner la manivelle DANS LE SENS
DES AIGUILLES D’UNE MONTRE pour
attendrir la viande. La viande traversera
les rouleaux de l’attendrisseur. Ne pas
forcer la viande dans les rouleaux; les
lames risquent d’être endommagées !
6. Il faut parfois passer la viande
plusieurs fois dans l’attendrisseur
pour obtenir les résultats souhaités.
Par ailleurs, pour varier ces résultats,
engager la viande à des angles
différents.
Pied d’appui
gauche
Pied d’appui
droite
Pince en acier
inoxydable
FIGURE F
FIGURE G
28
! NE JAMAIS METTRE LES MAINS dans
l’attendrisseur/la trancheuse, au risque de subir de
graves blessures. TOUJOURS UTILISER LA PINCE
FOURNIE.
! TOUJOURS GARDER LES DOIGTS À BONNE
DISTANCE DES LAMES pour éviter de se blesser.
Ces lames sont très coupantes.
! NE PAS enfoncer ou pousser la viande dans la
goulotte avec les doigts ou un objet, au risque de
subir des blessures ou d’endommager l’attendrisseur
à viande.
! NE JAMAIS déloger les aliments avec les doigts
pendant l’utilisation de l’attendrisseur/la trancheuse
à viande séchée. DES BLESSURES GRAVES
POURRAIENT SURVENIR.
! NE PAS pousser la pince ou d’autres ustensiles
contre les lames.
! Une utilisation impropre ou une modication de
l’attendrisseur annuleront également la garantie.
Page 29

SÉCURITÉ ALIMENTAIRE
Il y a des règles fondamentales à suivre lors de la manipulation d’aliments.
Elles sont CUIRE, SÉPARER, NETTOYER, et REFROIDIR RAPIDEMENT.
CUIRE
Il est crucial de cuire les aliments à une température interne sûre pour détruire les bactéries qui sont
présentes. La sécurité des hamburgers et autres aliments faits avec de la viande hachée a reçu
dernièrement beaucoup d’attention, et pour une bonne raison. Quand la viande est hachée, les bactéries
présentes sur la surface sont mélangées dans l’ensemble du mélange haché. Si cette viande hachée n’est
pas cuite jusqu’à au moins 71oC à 74oC (160oF à 165oF), les bactéries ne seront pas détruites et il y a
une forte chance que cela vous rendra malade.
Des morceaux solides de viande comme des steaks et côtelettes n’ont pas de bactéries dangereuses
comme E. coli à l’intérieur, donc ils peuvent être servis plus saignants. Quand même, tout morceau de
bœuf doit être cuit à une température interne d’au moins 63oC (145oF) (mi-saignant).La température
sûre pour la volaille est 75oC (165oF) et les morceaux de viande entier de porc doivent être cuits à 71oC
(160oF).
SÉPARER
Les aliments qui seront mangés crus et les aliments qui seront cuits avant d’être mangés DOIVENT
TOUJOURS être séparés. La contamination croisée se produit quand des viandes crues ou des œufs
viennent en contact avec des aliments qui seront mangés crus. Ceci est une source principale d’intoxication
alimentaire. Enveloppez toujours deux fois les viandes crues et placez-les sur l’étagère la plus basse dans
le réfrigérateur de manière qu’aucun jus ne puisse goutter sur les fruits et légumes crus. Puis utilisez
les viandes crues entre 1 et 2 jours après l’achat, ou congelez-les pour les conserver plus longtemps.
Décongelez les viandes congelées dans le réfrigérateur, pas sur le comptoir.
Quand vous grillez ou cuisez des viandes ou des poissons crus, assurez-vous de mettre la viande cuite
sur un plat propre. N’utilisez pas le même plat que vous avez utilisé pour transporter les aliments avant de
les mettre sur le grill. Lavez les ustensiles utilisés pour griller après que les aliments sont tournés pour la
dernière fois sur le grill, aussi bien que les spatules et cuillers utilisées pour faire sauter à feu vif en remuant
ou pour tourner la viande au fur et à mesure qu’elle cuit.
Assurez-vous de bien laver vos mains après avoir manipulé des viandes crues ou des œufs crus. Se laver
les mains avec du savon et de l’eau, ou utiliser une lingette antibactérienne pré-humidiée est absolument
nécessaire après avoir touché de la viande crue ou des œufs crus. Ne pas se laver les mains et les
surfaces pendant la cuisine est une cause majeure de contamination croisée.
NETTOYER
Lavez fréquemment vos mains et les surfaces de travail lorsque vous cuisinez. Lavez avec du savon et de
l’eau chaude pendant au moins 15 seconds, puis séchez avec une serviette en papier.
INSTRUCTIONS EN FRANÇAIS
REFROIDIR RAPIDEMENT
La réfrigération rapide des aliments est très importante. La zone de danger où les bactéries se multiplient
est entre 4oC et 60oC (40oF et 140oF). Votre réfrigérateur doit être réglé à 4oC (40oF) ou en-dessous;
votre congélateur doit être à -17oC (0oF) ou en-dessous. Une règle simple : servir chaud les aliments
chauds, servir froid les aliments froids. Utilisez des réchauds ou plaques chauffantes pour garder les
aliments chauds pendant le service. Utilisez des bains d’eau glacée pour garder au froid les aliments
froids. Ne jamais laisser des aliments à la température ambiante pendant plus de deux (2) heures - 1 heure
si la température ambiante est 32oC (90oF) ou au-dessus. Lorsque vous emballez les aliments pour un
pique-nique, assurez-vous que les aliments sont déjà refroidis rapidement lorsqu’ils sont mis dans le panier
à pique-nique isotherme. Le panier à pique-nique ne refroidira pas les aliments – il garde simplement les
aliments froids lorsqu’il est emballé correctement avec de la glace. Les aliments cuits chauds doivent
être placés dans des conteneurs peu profonds et immédiatement réfrigérés pour qu’ils se refroidissent
rapidement. Assurez-vous de bien couvrir les aliments après qu’ils sont froids.
REMARQUE : Des considérations particulières doivent prises lors de l’utilisation de venaison ou d’autre
gibier sauvage, puisqu’ils peuvent devenir très contaminés durant l’opération de dépouille. La venaison est
souvent gardée à des températures qui pourraient potentiellement permettre la croissance de bactéries,
tel que lorsque celle-ci est transportée. Se référer au Département de la viande et de la volaille de l’USDA
(USDA Meat and Poultry Department) pour d’autres questions ou informations sur la sécurité de la viande
et des aliments.
29
Page 30

INFORMATION SUR LA GARANTIE
CONSERVEZ CETTE INFORMATION SUR LA GARANTIE POUR VOS DOSSIERS!
Weston Brands, LLC garantit à l’ACHETEUR AU DÉTAIL D’ORIGINE de ce produit contre tout défaut en
matériau et en main-d’œuvre pendant un (1) an a partir de la date d’achat à condition qu’il soit utilisé conformément
La Carte de Garantie, avec une copie du reçu original, doivent être reçus par Weston Brands, LLC dans les
trente (30) jours à partir de la date d’achat pour que la garantie puisse s’appliquer. Le manque d’envoyer la Carte de
Le produit doit être livré à ou expédié franco de port à Weston Brands, LLC pour les services de garantie, soit
dans son emballage d’origine ou un emballage similaire offrant un degré de protection équivalent. Les dommages
causés par l’expédition ne sont pas la responsabilité de la société. Weston Brands, LLC charge 35,00 $ par heure
pour frais de service. REMARQUE : Aucune réparation ne sera commencée sans l’autorisation du client. Les frais
Avant de renvoyer le produit pour une réparation sous garantie, bien nettoyer le produit pour qu’il soit exempt de
toute particule alimentaire ou autres débris. Si l’acheteur ne respecte pas cette consigne, le produit lui sera renvoyé
Weston Brands, LLC réparera (ou à sa discrétion, remplacera) le produit sans frais, si à l’opinion de la société, il a
Des remplacements neufs ou remis en état pour les pièces d’usine défectueuses seront fournis pendant un (1)
an à partir de la date d’achat. Les pièces de remplacement sont garanties pour le reste de la période de garantie
Pour les réparations non garanties, veuillez contacter le Service à la clientèle de Weston Brands, LLC au numéro
sans frais 1-800-814-4895, du lundi au vendredi, de 8h00 à 17h00 ET (en dehors des États-Unis : 001-440-638-
3131) pour obtenir une Autorisation de retour d’article (Numéro RMA). Weston Brands, LLC refusera tous les retours
qui ne contiennent pas ce numéro. NE PAS RENVOYER CET APPAREIL SANS L’AUTORISATION CORRECTE
LIMITATIONS : La garantie est annulée si le produit est utilisé pour toute raison autre que pour laquelle il est
conçu. Le produit ne doit pas avoir été antérieurement modié, réparé, ou entretenu par quelqu’un autre que
Weston Brands, LLC. Le cas échéant, le numéro de série ne doit pas être modié ou enlevé. Le produit ne doit pas
avoir été soumis à un accident en transit ou pendant qu’il est en la possession du client, mal utilisé, mal traité, ou
utilisé contrairement aux directives contenues dans le manuel d’utilisation. Ceci comprend la défaillance causée
par la négligence d’un entretien raisonnable et nécessaire, une tension de secteur incorrecte et des catastrophes
naturelles. Cette garantie n’est pas transférable et s’applique seulement aux ventes américaines et canadiennes.
À l’exception des cas où la loi en vigueur l’interdit, aucune autre garantie, expresse ou implicite, y compris
les garanties relatives au caractère adéquat pour la commercialisation ou un usage particulier, ne s’appliquera à
ce produit. Weston Brands, LLC ne sera en aucun cas responsable des dommages indirects liés au dit produit
et Weston Brands, LLC n’a aucune obligation ni responsabilité autre que celles expressément établies dans la
présente, et n’autorise aucun représentant ou autre personne à les assumer pour lui. Toutes garanties implicites
Cette garantie couvre seulement le produit et ses pièces spéciques, pas les aliments ou autres produits traités
dans celui-ci. Weston n’est pas responsable des pièces manquantes ou endommagées pour les articles réduits/
en solde ou les articles naux de vente où le vendeur peut ne pas être en mesure de garantir l’ensemble de la
DÉCOUPEZ LE LONG DE LA LIGNE POINTILLÉE ET ENVOYEZ CETTE CARTE DE GARANTIE AVEC UNE
Garantie complètement remplie avec une copie du reçu original annulera la garantie.
sans avoir été réparé. Dans certains, la somme de 50 dollars sera facturée pour le nettoyage.
été prouvé être défectueux en matériau et en main d’œuvre dans la période de garantie.
applicables sont aussi limitées à la période d’un (1) an de la garantie limitée.
aux directives imprimées qui y sont jointes.
d’expédition de retour seront ajoutés à la facture de réparation.
originale.
DE Weston Brands, LLC.
fonctionnalité ou l’intégralité de l’unité.
COPIE DE VOTRE REÇU D’ACHAT ORIGINAL À :
Weston Brands, LLC / WARRANTY
20365 Progress Drive, Strongsville, OH 44149 USA
ENVOYEZ CETTE CARTE DE GARANTIE AVEC UNE COPIE DE VOTRE REÇU D’ACHAT ORIGINAL À:
CARTE DE GARANTIE
WESTON BRANDS, LLC / WARRANTY, 20365 PROGRESS DRIVE, STRONGSVILLE, OH 44149 USA
Nom du Client:
Adresse:
Province/Code postal/Région:
Numéro de téléphone:
Adresse de courrier électronique:
Date d’achat d’origine:
No de modèle du produit:
No de série (s’il y a lieu):
J’ai lu les informations relatives à la garantie. Initiales ici:
Copie du reçu incluse
Page 31

Page 32

PLEASE INSPECT THIS PACKAGE THOROUGHLY FOR MISSING PARTS OR ANY PRODUCT DAMAGE.
IF YOUR PRODUCT CONTAINS SHIPPING DAMAGE, PLEASE CONTACT RETAILER FOR ASSISTANCE.
For all other questions regarding product usage, missing parts, product damage, difculty or warranty activation,
U.S. Residents Customer Service Line: 1-800-814-4895 (Outside U.S. Call: 001-440-638-3131)
please contact the Weston Brands Customer Service Team:
Weston Brands LLC, 20365 Progress Drive, Strongsville, Ohio 44149
Please DO NOT return this item to the retailer before contacting
SAVE THESE INSTRUCTIONS!
Refer to them often and use them to instruct others.
ATTENTION!
8:00 am to 5:00 pm ET, Monday thru Friday
CustomerService@WestonProducts.com
WestonProducts.com
Weston Brands Customer Service.
VEUILLEZ INSPECTER CET EMBALLAGE AVEC SOIN POUR Y DÉTECTER
SI DES PIÈCES ONT ÉTÉ ENDOMMAGÉES PENDANT LE TRANSPORT, VEUILLEZ
Pour toutes les autres questions concernant l’utilisation du produit, les pièces manquantes, les problèmes ou
l’activation de la garantie, veuillez communiquer avec l’équipe du service clientèle des produits Weston:
Numéro de téléphone du service clientèle pour les résidents des É.-U. : 1-440-638-3131
Numéro de téléphone à l’extérieur des É.-U. : 001-440-638-3131 Weston Brands LLC,
Veuillez communiquer avec le service clientèle des produits Weston AVANT de retourner cet appareil au détaillant.
Revise completamente el envase y compruebe que no falten partes o que algún producto esté dañado.
Para todas aquellas preguntas referentes al uso del producto, partes faltantes, daño del producto, dicultad
Línea de Servicio al Cliente para Residentes de EE.UU.: 1.800.814.4895 (Fuera de EE.UU., llame al: 001-
NO devuelva este artículo al vendedor minorista antes de comunicarse con Servicio al Cliente de
si el producto está dañado por el transporte, solicite asistencia al distribuidor.
o activación de la garantía, comuníquese con el equipo de servicio al cliente de weston Brands:
1-440-638-3131) Weston Brands LLC, 20365 Progress Drive, Strongsville, Ohio 44149
TOUTE PIÈCE MANQUANTE OU ENDOMMAGÉE.
COMMUNIQUER AVEC LE DÉTAILLANT POUR OBTENIR DE L’AIDE.
20365 Progress Drive, Strongsville, Ohio 44149
CONSERVER CES DIRECTIVES!
Veuillez les consulter fréquemment et les utiliser pour la formation.
desde las 8:00 am hasta las 5:00 pm ET, de lunes a viernes
ATTENTION!
de 8:00 à 17:00 HNE, du lundi au vendredi.
CustomerService@WestonProducts.com
WestonProducts.com
¡ATENCIÓN!
CustomerService@WestonProducts.com
WestonProducts.com
Weston Brands.
Consulte estas instrucciones y úselas para enseñar sobre el uso de este producto a otras personas.
¡GUARDE ESTAS INSTRUCCIONES!
 Loading...