

Page 1
If any components of this unit are broken, do not operate properly,
or for product returns, please contact Weston Products LLC at
A T T E N T I O N !
1-800-814-4895
(Outside the U.S. call 440-638-3131).
For the online catalog, log onto WestonSupply.com.
Exc lusiv ely impo rte d by Wes ton P rod ucts LLC Stro ngs ville , O hio
SAVE THESE INSTRUCTIONS!
Refer to them often and use them to instruct others.
STAINLESS STEEL
FOOD MILL
MODEL NO. 61-0101-W
REV032310
Page 2
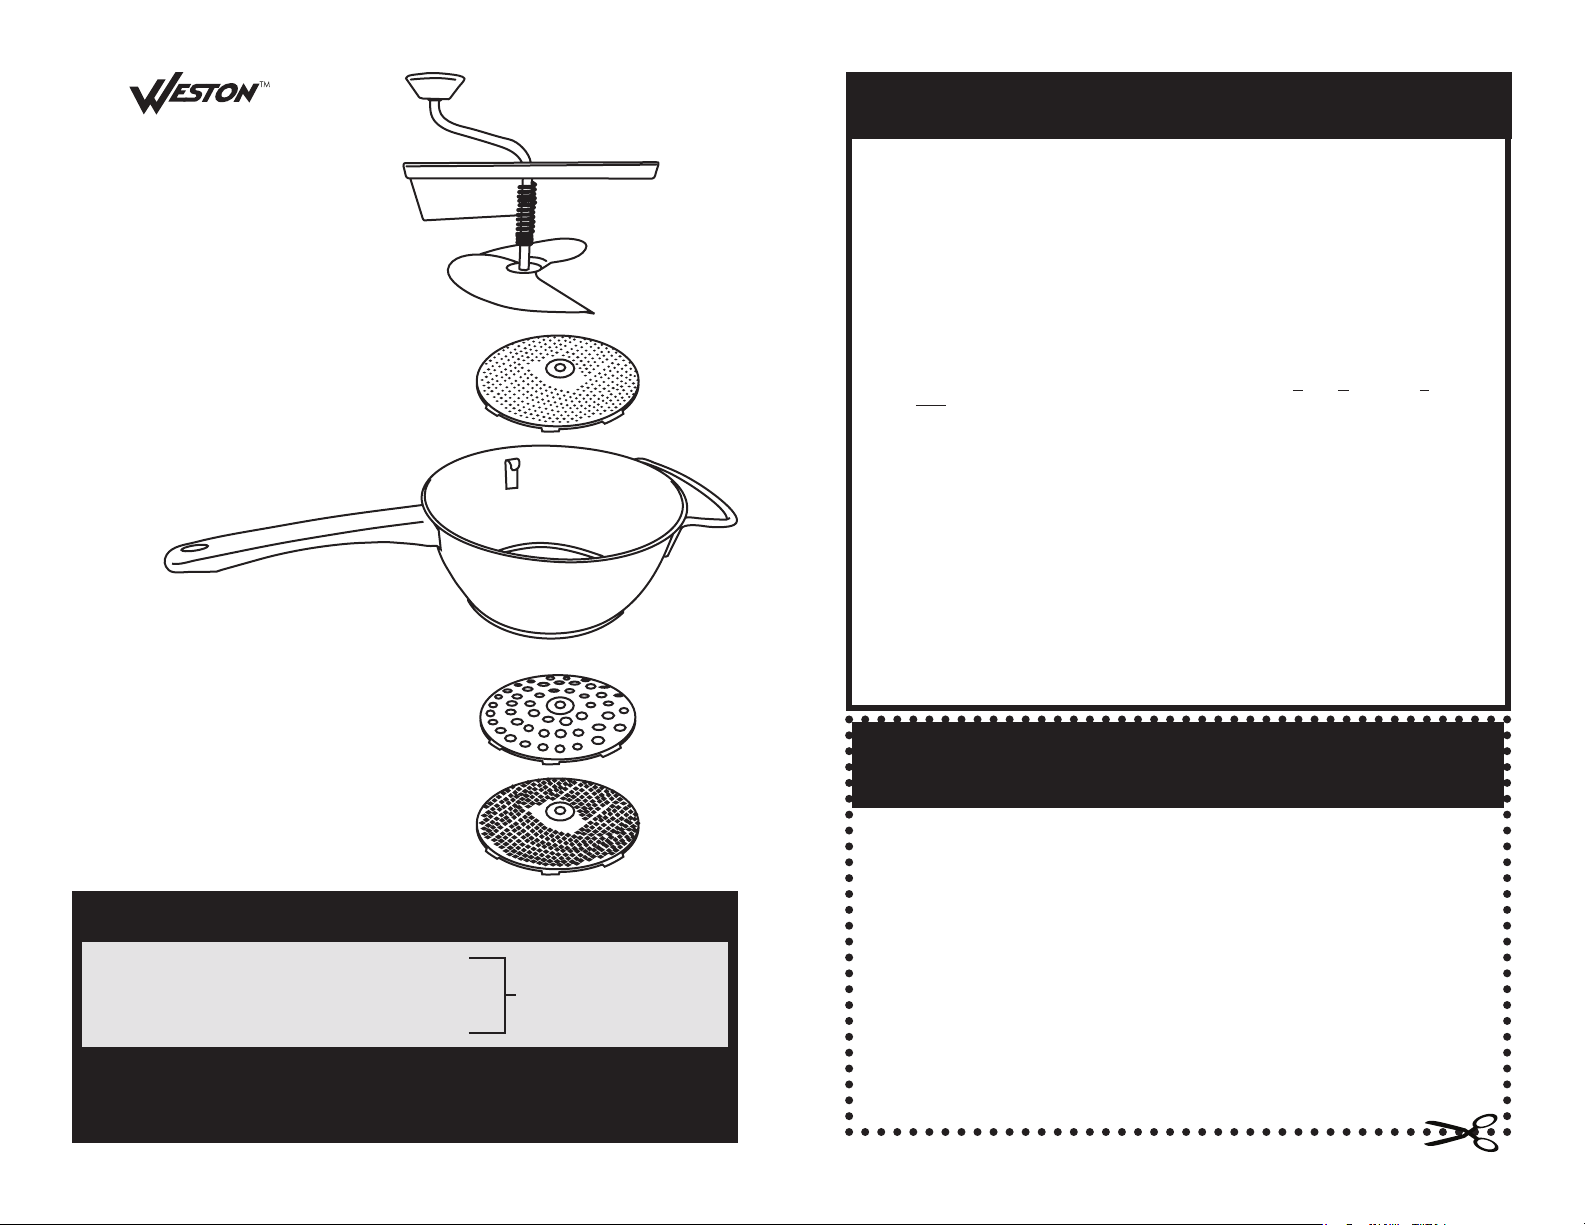
STAINLESS STEEL
FOOD MILL
Fine Milling Disc
1/16” (2 mm)
Mill Housing
Coarse Milling Disc
5/16” (8 mm)
Medium Milling Disc
1/8” (3 mm)
Handle & Blade Assembly
Remains as one-piece
WESTON WARRANTY INFORMATION
SAVE THIS WARRANTY INFORMATION FOR YOUR RECORDS!
Weston Products LLC warrants to the ORIGINAL RETAIL PURCHASER of this product that if operated in
accordance with the printed instruction accompanying it, then for a period of 1 year from the date of purchase,
the product shall be free from defects in material and workmanship.
The Warranty Card, along with a copy of the original receipt, must be received by Weston Products LLC
within 30 days from purchase date for the warranty to apply. Failure to send the completely lled out Warranty
Card, along with a copy of the original receipt, will void the warranty.
The product must be delivered to or shipped freight prepaid to Weston Products LLC for warranty services,
in either its original packaging or similar packaging affording an equal degree of protection. Damage due to
shipping is not the responsibility of the company. Weston Products LLC charges a $35.00 per hour bench
charge. NOTE: No repairs will be started without the authorization of the customer. The return shipping cost
to the customer will be added to the repair invoice.
Weston Products LLC will repair (or at its discretion, replace) the product free of charge, if in the judgment
of the company, it has been proven to be defective as to seller’s labor and material, within the warranty period.
New or rebuilt replacements for factory defective parts will be supplied for one (1) year from the date of
purchase. Replacement parts are warranted for the remainder of the original warranty period.
For non-warranty repairs, contact Weston Products LLC’s Customer Service at 1-800-814-4895 M-F
8am-5pm EST (outside of the United States 440-638-3131) to obtain a Return Merchandise Authorization
Number (RMA Number). Weston Products LLC will refuse all returns that do not contain this number. DO
NOT RETURN THE UNIT WITHOUT PROPER AUTHORIZATION FROM WESTON PRODUCTS LLC.
LIMITATIONS: The warranty is void if the product is used for any purpose other than that for which it is
designed. The product must not have been previously altered, repaired, or serviced by anyone else other
than Weston Products LLC. If applicable, the serial number must not have been altered or removed. The
product must not have been subjected to accident in transit or while in the customer’s possession, misused,
abused, or operated contrary to the instructions contained in the instruction manual. This includes failure
caused by neglect of reasonable and necessary maintenance, improper line voltage and acts of nature. This
warranty is not transferable and applies only to U.S. and Canadian sales.
Except to the extent prohibited by applicable law, no other warranties whether expressed or implied,
including warranty merchantability and tness for a particular purpose, shall apply to this product. Under no
circumstances shall Weston Products LLC be liable for consequential damages sustained in connection with
said product and Weston Products LLC neither assumes nor authorizes any representative or other person to
assume for it any obligation or liability other than such as is expressly set forth herein. Any applicable implied
warranties are also limited to the one (1) year period of the limited warranty.
This warranty covers only the product and its specic parts, not the food or other products processed in it.
CUT ALONG THE DOTTED LINE AND SEND THE WARRANTY CARD ALONG WITH A COPY OF YOUR ORIGINAL
PURCHASE RECEIPT TO:
20365 Progress Drive, Strongsville, OH 44149
Weston Products LLC
WESTON WARRANTY CARD
SEND T HIS CAR D ALONG WITH A COPY OF YOUR ORIGIN AL PURCHASE RE CEIPT TO :
WESTON WARRANTY, WESTON PRODUCTS LLC , 20365 PROGRESS DRI VE, STR ONGSVILLE, OH 44149
Customer Name: _________________________________
COMPONENT LIST
Coarse Milling Disc 5/16” (8 mm)
Medium Milling Disc 1/8” (3 mm)
Fine Milling Disc 1/16” (2 mm)
If an y compo ne nts of th is un it are br ok en or t he unit d oes n ot operat e
Monday thru Friday 8:00am-5:00pm EST. Outside the U.S. call 440-638-3131
prope rl y, ca ll Weston P roduc ts LLC Toll Free at
1-800-814-4895
3
-2-
Milling Discs
Set of 3
Part No.
61-0102
Address: _______________________________________
City/State/Zip: ___________________________________
Telephone Number: (_________) ____________________
E-Mail Address: _________________________________
Original Date of Purchase: ______/________/________
Product Model #: _________________________________
Serial # (if applicable): ______________________
-7-
Page 3

RECIPES
GENERAL SAFETY RULES
WARNING!
READ AND FULLY UNDERSTAND ALL
INSTRUCTIONS AND WARNINGS PRIOR TO
USING THIS UNIT. YOUR SAFETY IS MOST
IMPORTANT! FAILURE TO COMPLY WITH
PROCEDURES AND SAFE GUARDS MAY
RESULT IN SERIOUS INJURY OR PROPERTY
DAMAGE. REMEMBER: YOUR PERSONAL
SAFETY IS YOUR RESPONSIBILITY!
MANGO SALSA
1-1/2 cups mangoes
1-1/2 cups tomatoes 2 Tbsp minced cilantro
2 Tbsp lime juice 1 tsp minced peeled ginger
1 Tbsp nely chopped seeded jalapeno peppers
.
Mash the mangoes in the Food Mill with the Coarse Disc
.
Disgard the skins
.
Mash the tomatoes in the Food Mill with the Coarse Disc
.
Disgard the skins
.
Combine all of the ingredients in a glass or plastic container
.
Cover and chill
SPÄTZLE DUMPLINGS
2 cups all-purpose our 1 teaspoon salt 2 eggs
3/4 cup milk
.
Stir together the our and salt
.
Combine eggs and milk; stir into the our mixture
.
Place the Food Mill over a large saucepan of boiling water
.
Pour the batter into the Food Mill with the Coarse Disc
.
Turn the Handle with one hand, keeping the Food Mill gently in place with the other
.
Cook for approximately 2-3 minutes, generally, spätzle swimming on the surface
are sufciently cooked
.
Drain and placed into a serving dish
.
Stir in some melted butter or margarine
WARM BLUEBERRY SAUCE
1 cup fresh blueberries 1-1/2 cup sugar
1 zest of lemon 2 Tbsp fresh lemon juice
.
Mash the blueberries in the Food Mill with the Fine Milling Disc
.
Disgard the skins
.
Blend with the lemon juice
.
Fold the sugar and the lemon zest into the blueberry mixture
.
Pour the mixture into a saucepan and heat on a medium heat, stirring constantly,
until it comes to a boil
.
Serve warm over scones or pancakes
-6-
1. BEFORE AND AFTER each use,
disassemble and wash all parts of the
Food Mill that come into contact with
food. Wash in warm soapy water. Rinse
with clear water. Dry immediately. The
Food Mill is TOP RACK dishwasher
safe.
2. Check that all parts are operating
properly, and perform the intended
functions. Check for alignment of
moving parts or any other conditions
that may affect the operation. If the
product is not working properly contact
Customer Service.
SAVE THESE INSTRUCTIONS!
6
5
Refer to them often and use them to instruct others.
ADDITIONAL ACCESSORIES AVAILABLE
Stainless Steel Mandoline Slicer 01-0006
Heavy Duty Slaw Board & Cabbage Shredder 70-1401-W
Deluxe 5-Piece Canning Kit 83-2017-W
These products and many more products can be ordered by visiting
Monday thru Friday 8:00am-5:00pm EST. Outside the U.S. call 440-638-3131
W e s t o n S u p p l y . c o m or by calling
Weston Products LLC Toll Free at 1-800-814-4895
3. NEVER use ngers to scrape
food away from the Milling Disc
while the unit is in operation. Severe
injury may result.
4. DO NOT attempt to grind bones,
nuts or other hard items. Grinding
other food than what the Food
Mill was intended for will void the
warranty.
5. The Manufacturer declines any
responsibility in the case of improper
use of this unit.
CLEANING
.
It is best to clean the Food Mill immediately after use to prevent food from drying
in the holes of the Discs.
.
To clean, ush away the particles with a strong stream of warm water. A ne bristle
brush with warm, dish-soap water should be used to gently remove any remaining
residue. Flush the Food Mill with warm, clean water and dry immediately.
.
Store the Food Mill and Discs in the box in a clean, dry area to prevent damage
to the product.
.
The Food Mill and Discs are top-rack dishwasher safe.
-3-
Page 4

ASSEMBLY & USE INSTRUCTIONS
1. Place the Milling Disc of your choice into
the center of the Food Mill with the smooth,
dome shaped surface facing up (Figure 1).
2. Insert the Handle Pin (gure 2)(located on
the bottom of the Handle Assembly) into the
center hole of the Milling Disc (Figure 3).
3. Position the Locking Bar so that both
sides of the Locking Bar are located beside
both Locking Tabs (Figure 4).
4. Firmly push down on the Locking Bar
and rotate clockwise, until it is lined up with the
Locking Tabs.
5. Slowly release the Locking Bar and make
sure it is properly connected to the Locking
Tabs (Figure 5).
6. Place the Food Mill over a bowl or sauce
pan and add the food to be milled into the Food
Mill.
7. Turn the Handle clockwise, turning the
Blades over the Milling Disc to mill the food.
Milling Disc
Handle Assembly
Handle Pin
Figure 1
Figure 2
Figure 3
8. Place the Food Mill over a bowl or sauce
pan and add the food to be milled into the Food
Mill (Figure 6).
Figure 6
9. Turn the Handle clockwise, turning the
Blades over the Milling Disc.
10. The mashed food will fall through the
perforations and into the bowl (Figure 7). It
may be necessary to scrape food off of the
outside of the Milling Disc and into the bowl
Figure 7
using a rubber spatula.
11. Discard any skin, seeds or ber left in the
Food Mill after mashing is complete.
12. It is best to clean the Food Mill immediately
after use to prevent food from drying in the
holes of the Milling Disc.
CHANGING DISCS
1. Carefully press down on the Locking Bar and rotate the Locking Bar counterclockwise to release the Handle Assembly from the Food Mill Housing.
2. Remove the Milling Disc from the bottom of the Food Mill Housing.
PRIOR TO USING: It is best to pre-soften some
foods prior to use. If the food is rm like potatoes, apples
or pears, remember to soften them by steaming or baking
to tenderness before using them in the Food Mill.
-4-
Locking Tab
Locking Bar
Blades
Handle
Figure 4
Figure 5
3. Place the new Milling Disc into the center of the Food Mill with the smooth,
dome shaped surface facing up.
4. Follow the Assembly instructions numbers 2 – 5 to complete the assembly of the
Food Mill.
-5-
 Loading...