

Page 1
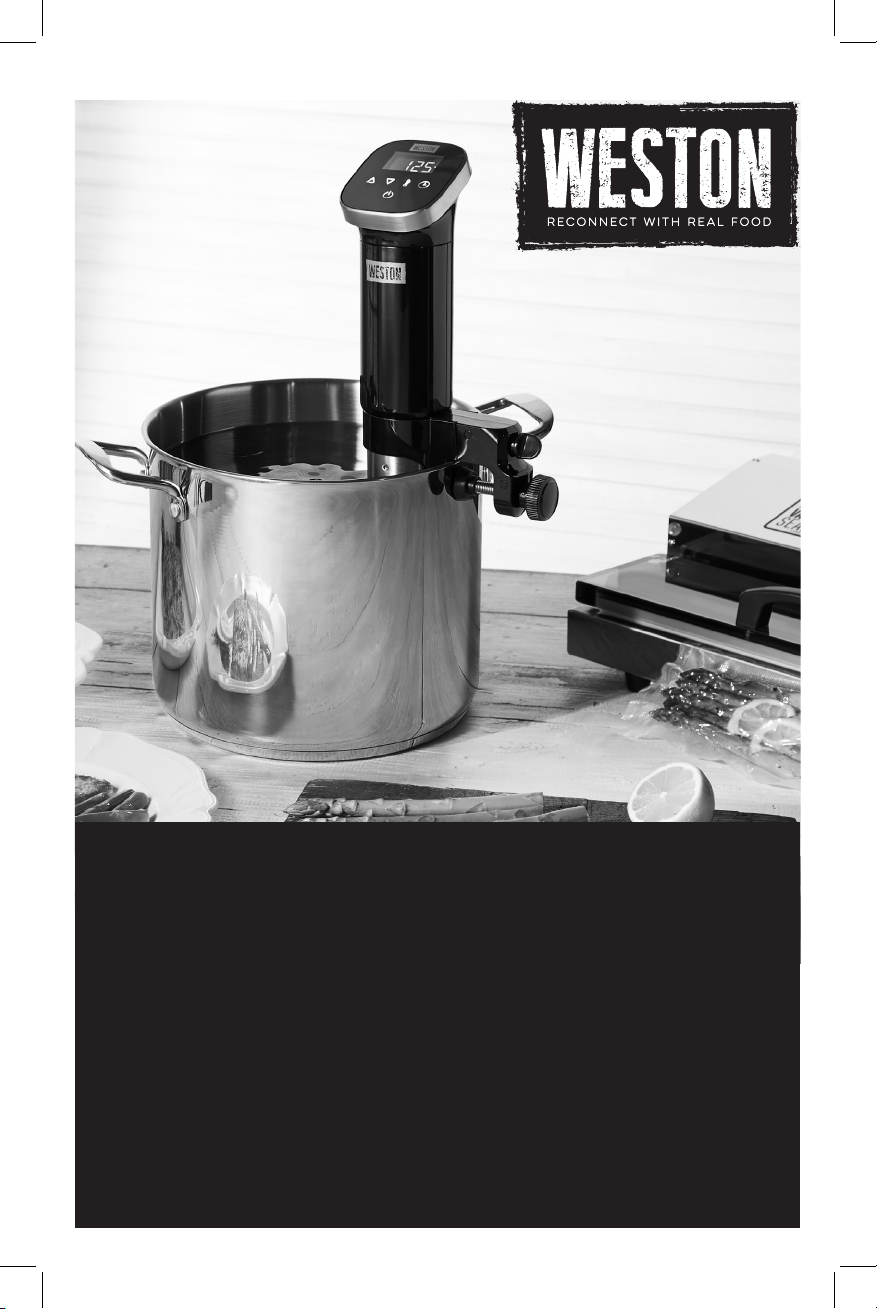
SOUS VIDE IMMERSION
CIRCULATOR
36200
840299600
DUE TO CONSTANT FACTORY IMPROVEMENTS, THE PRODUCT PICTURED MIGHT DIFFER
SLIGHTLY FROM THE PRODUCT IN THIS BOX.
840299600 ENv10.indd 1 1/29/19 12:22 PM
Page 2

IMPORTANT SAFEGUARDS ���������������������������������������������������������������������������������������������������������������������������������3
COMPONENT LIST ���������������������������������������������������������������������������������������������������������������������������������������������4
DISPLAY/CONTROL PANEL ���������������������������������������������������������������������������������������������������������������������������������5
SETUP ���������������������������������������������������������������������������������������������������������������������������������������������������������������6
INSTRUCTIONS FOR USE ������������������������������������������������������������������������������������������������������������������������������������7
SOUS VIDE FAQ AND TIPS ����������������������������������������������������������������������������������������������������������������������������������9
SOUS VIDE CHART ��������������������������������������������������������������������������������������������������������������������������������������������11
CLEANING INSTRUCTIONS �������������������������������������������������������������������������������������������������������������������������������� 13
TABLE OF CONTENTS
TROUBLESHOOTING ������������������������������������������������������������������������������������������������������������������������������������������13
RECIPES ���������������������������������������������������������������������������������������������������������������������������������������������������������� 14
WESTON WARRANTY ��������������������������������������������������������������������������������������������������������������������������������������18
2
840299600 ENv10.indd 2 1/29/19 12:22 PM
Page 3

IMPORTANT SAFEGUARDS
When using electrical appliances, basic safety precautions should always be
followed to reduce the risk of re, electric shock, and/or injury to persons, including
the following:
1. Read all instructions.
2. This appliance is not intended for use
by persons (including children) with
reduced physical, sensory, or mental
capabilities, or lack of experience
and knowledge, unless they are
closely supervised and instructed
concerning use of the appliance by a
person responsible for their safety.
3. Close supervision is necessary
when any appliance is used by or
near children. Children should be
supervised to ensure that they do not
play with the appliance.
4. Do not touch hot surfaces. Use
handles or knobs.
5. To protect against electrical shock,
do not immerse cord, plug, or main
housing in water or other liquid.
6. Unplug from outlet when not in use
and before cleaning. Allow to cool
before putting on or taking off parts.
7. Do not operate any appliance with
a damaged supply cord or plug, or
after the appliance malfunctions
or has been dropped or damaged
in any manner. Supply cord
SAVE THESE INSTRUCTIONS
replacement and repairs must be
conducted by the manufacturer,
its service agent, or similarly
qualied persons in order to avoid a
hazard. Call the provided customer
service number for information on
examination, repair, or adjustment.
8. The use of accessory attachments
not recommended by the appliance
manufacturer may cause injuries.
9. Do not use outdoors.
10. Do not let cord hang over edge
of table or counter, or touch hot
surfaces, including stove.
11. Do not place on or near hot gas or
an electric burner, or in a heated
oven.
12. Extreme caution must be used when
moving an appliance containing hot
oil or other hot liquids.
13. To disconnect immersion circulator,
turn OFF ( ); then remove plug from
wall outlet.
14. Do not use appliance for other than
intended use.
15. Heater and heat shield may remain
hot after unit is turned off.
ENGLISH INSTRUCTIONS
Other Consumer Safety Information
This appliance is intended for household use only. This appliance is only intended
for the preparation, cooking, and serving of foods. This appliance is not intended for use
with any nonfood materials or products.
w WARNING
This appliance is provided with a grounded
(3-prong) plug to reduce the risk of electric
shock. The plug ts only one way into a
grounded outlet. Do not defeat the safety
purpose of the plug by modifying the plug
in any way or by using an adapter. If the
plug does not t into the outlet, have an
electrician replace the outlet.
The length of the cord used on this
appliance was selected to reduce the
hazards of becoming tangled in or tripping
Electrical Shock Hazard:
over a longer cord. If a longer cord is
necessary, an approved extension cord
may be used. The electrical rating of
the extension cord must be equal to or
greater than the rating of the appliance
and should be a grounding-type, 3-wire
cord. Care must be taken to arrange
the extension cord so that it will not
drape over the countertop or tabletop
where it can be pulled on by children or
accidentally tripped over.
3
840299600 ENv10.indd 3 1/29/19 12:22 PM
Page 4
1
5
2
ENGLISH INSTRUCTIONS
3
4
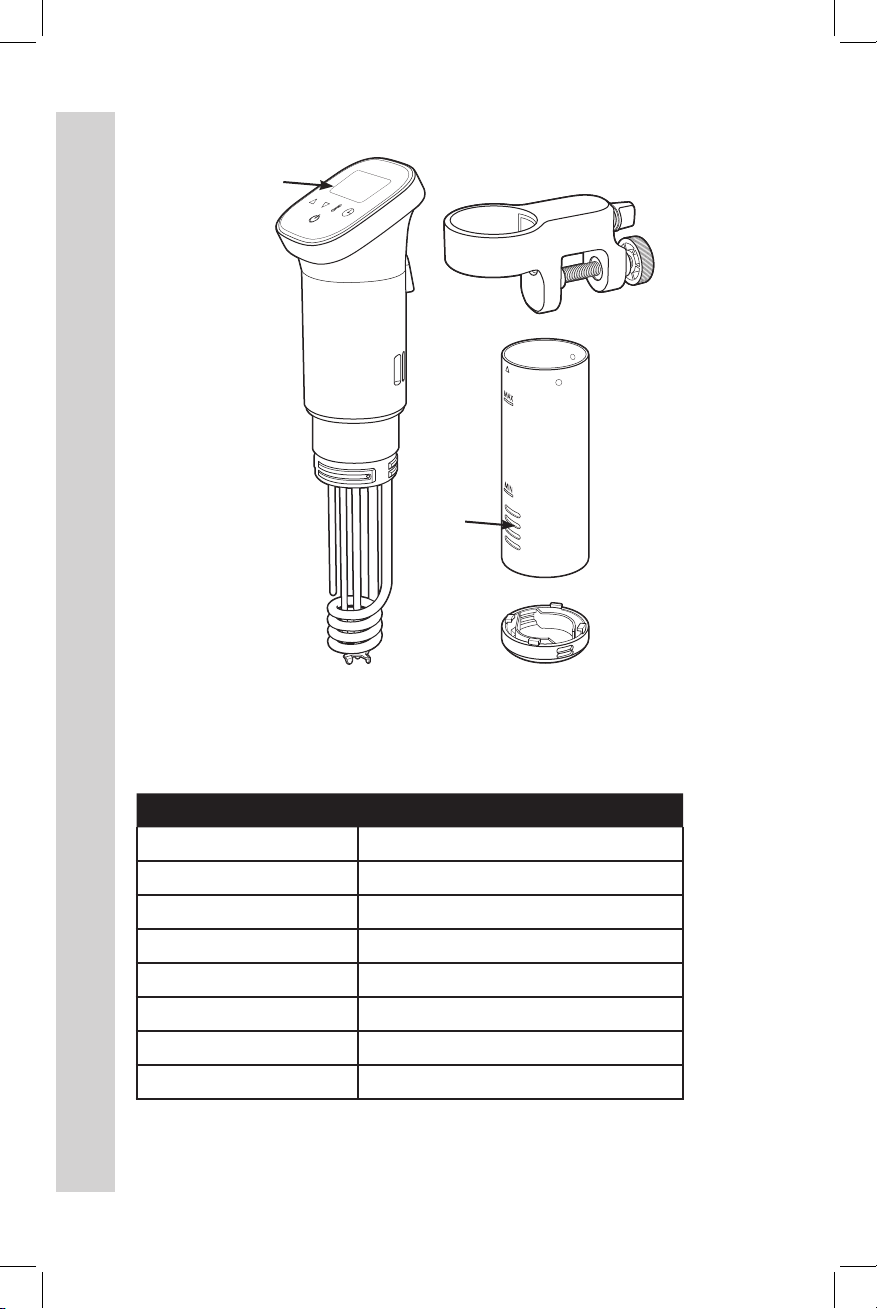
COMPONENT LIST
DIAGRAM NUMBER PART DESCRIPTION
1 DISPLAY/CONTROL PANEL
2 MAIN HOUSING
3 HEATER
4 CIRCULATOR PROPELLER
5 ADJUSTABLE VESSEL CLAMP
6 HEAT SHIELD
7 WATER INLET
8 WATER OUTLET CAP
If any components of this unit are broken, the unit does not operate properly, or you
need a replacement instruction manual, visit us on the web at
WestonSupply.com
Or call Weston Brands LLC Toll Free at 1-800-814-4895
Monday thru Friday 8:00am-5:00pm ET. Outside the U.S. call 001-216-901-6801.
6
7
8
4
840299600 ENv10.indd 4 1/29/19 12:22 PM
Page 5
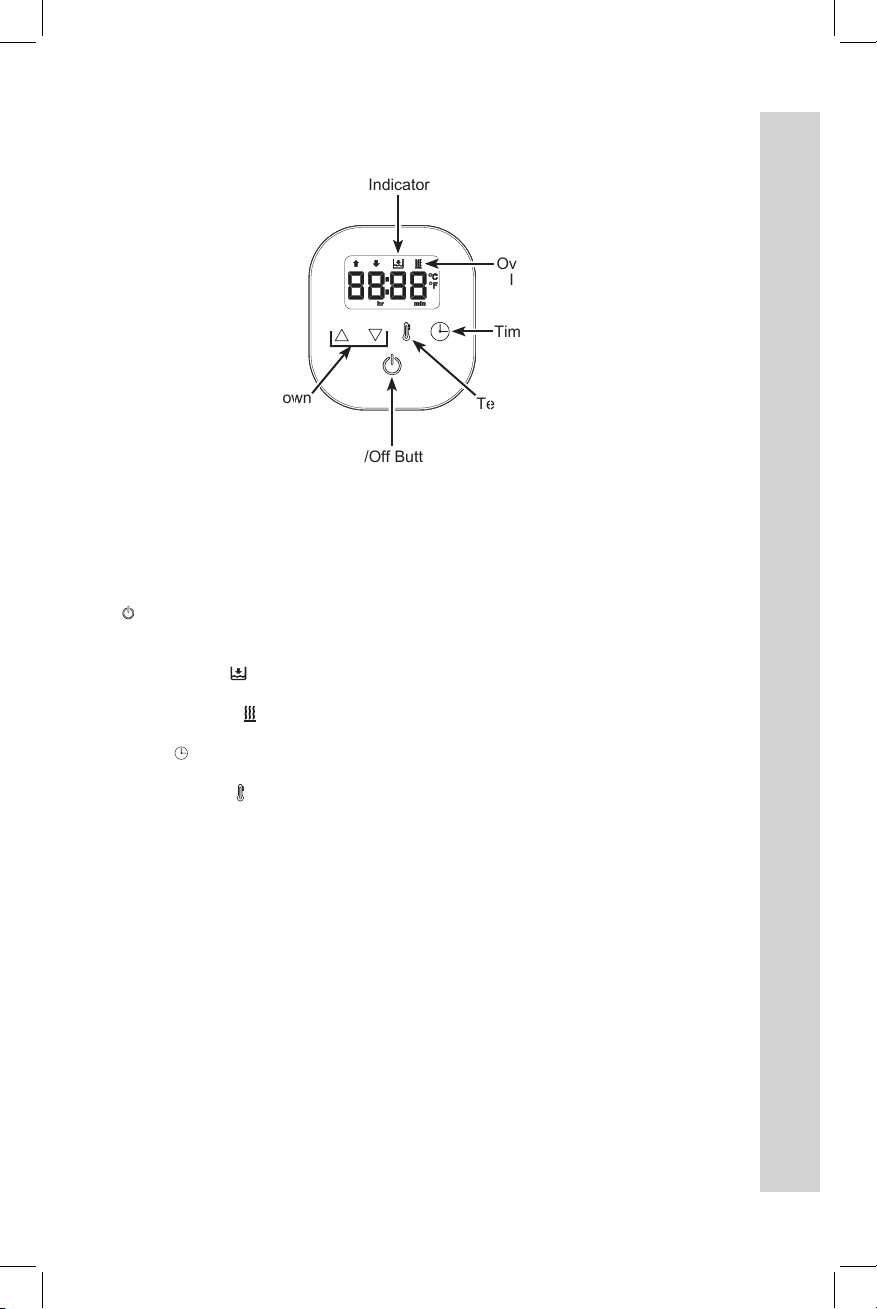
Low Water
Indicator
Overheating
Indicator
Timer Button
Up and Down
Arrows
On/Off Button
Temperature
Button
DISPLAY/CONTROL PANEL
On/Off ( ) Button – Powers the circulator on and off.
Up and Down Arrows – Adjusts time and temperature. Time increases by 10-minute
intervals for the first hour, then 1-hour intervals after.
Low Water Indicator ( ) – Illuminates when water level is below minimum water line.
Circulator will chime continuously until water is added.
Overheating Indicator ( ) – Illuminates if water is above set temperature. Circulator will
chime until water cools to set temperature.
Timer Button ( ) – Sets cooking time. Default cook time is 0 hours; maximum cook
time is 99 hours.
Temperature Button
(52°C). Temperature range is 86–210°F (30–99°C).
Additional Functions
• Fahrenheit/Celsius Shift – Hold both arrow buttons at the same time.
• Short Press on button – Less than one second.
• Long Press on button – More than one second.
( )
– Sets cooking temperature. Default temperature
is 125°F
ENGLISH INSTRUCTIONS
5
840299600 ENv10.indd 5 1/29/19 12:22 PM
Page 6
SETUP
w WARNING
To reduce the risk of electrical shock,
do not immerse main housing or control/
display in water.
IMPORTANT: Do not plug in the circulator
until the following steps have been
completed.
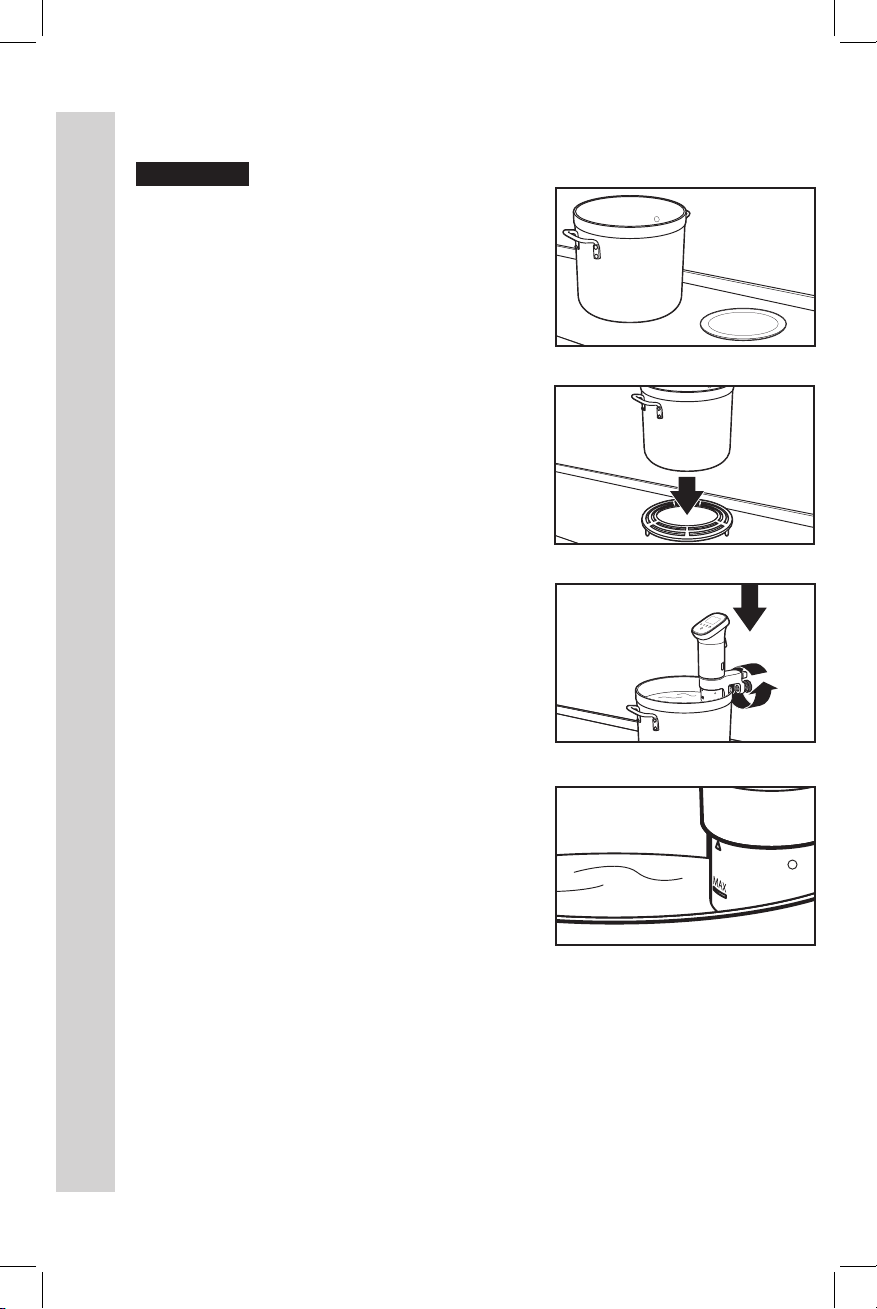
1. Select a cooking vessel large enough for
your sealed food with room to allow water
to circulate between and around the sealed
bags. Have a plate ready for sealed food
when finished cooking. (FIGURE 1)
ENGLISH INSTRUCTIONS
2. Make sure cooking vessel is on a stable,
level, and heat-resistant surface. Use a
kitchen towel, pot holder, or trivet under
vessel. (FIGURE 2)
3. Use the Clamp to secure the circulator
inside the cooking vessel. Water will
circulate even if the water outlet cap is
resting on the vessel bottom. Make sure
circulator is securely clamped.
NOTE: Do not overtighten. Do not operate
without circulator clamped in place.
(FIGURE 3)
4. Fill vessel with water between MIN and
MAX lines on circulator.
NOTE: You will need to adjust the water
level between MIN and MAX once sealed
food is added. (FIGURE 4)
Electrical Shock Hazard.
FIGURE 1
FIGURE 2
FIGURE 3
FIGURE 4
6
840299600 ENv10.indd 6 1/29/19 12:22 PM
Page 7

INSTRUCTIONS FOR USE
Plunger
Knob
PREHEAT
w WARNING
Do not immerse above the MAX line.
1. Plug circulator into an outlet not used by another device. The On/Off ( )
Button will light up. Make sure cord is safely positioned.
2. Press On/Off ( ) Button. Control buttons will illuminate and LCD display will
show current water temperature.
3. Follow programming instructions for setting time and temperature to cook your
recipe.
4. To set a desired temperature, press the Temperature Button once. Default
Temperature of 125°F (52°C) will be displayed. Press Up or Down Arrows to
select desired temperature. Press Temperature Button again to complete, or it
will automatically set after 5 seconds.
5. To select a cooking time, long-press the Timer Button until it chimes. Press Up
or Down Arrow to select desired time.
6. To adjust temperature, time, or to turn off, see directions on page 8.
7. To start circulator, short-press the On/Off ( ) Button. Circulator will chime
once and begin to heat water bath to set temperature.
8. LCD will display current water temperature; On/Off ( ) Button will ash
repeatedly indicating that water bath is heating.
9. When set cooking temperature is reached, circulator will chime 3 times, and
display will alternate between 00:00 and temperature every 5 seconds. Place the
sealed food into cooking vessel.
Electrical Shock Hazard.
ENGLISH INSTRUCTIONS
COOK
1. Once cooking temperature is reached and sealed food is securely placed into
cooking vessel, press Timer ( ) Button to start timer. On/Off ( ) and Timer ( )
Buttons will flash simultaneously.
2. Current water temperature and cooking time with a down arrow will alternate
on display every 5 seconds. It is normal for cooking temperature to fluctuate a
few degrees during cooking process.
3. When cooking timer is finished, circulator will chime 3 times and timer will
display an up arrow; time will start counting up.
4. Time will now display how much time has passed since cooking time ended.
Circulator will continue to maintain water temperature.
5. On/Off ( ) and Timer ( ) Buttons will flash simultaneously, and the circulator
will chime 3 times every ten minutes as a reminder that the cooking time has
finished.
ON/OFF DURING COOKING PROCESS:
1. To turn off heater and pump, short-press On/Off ( ) Button.
2. To turn off circulator, long-press On/Off ( ) Button.
7
840299600 ENv10.indd 7 1/29/19 12:22 PM
Page 8

WHEN COOKING IS FINISHED:
1. Turn off and unplug circulator. CAUTION: Water will be hot.
2. Remove sealed food using tongs and place on a plate.
3. After food is removed, let water cool. Remove circulator by releasing clamp and follow
recommended cleaning instructions.
4. Discard cooking water after it is fully cooled.
ADJUST TEMPERATURE
1. To adjust or view water temperature during preheat, long-press Temperature ( )
Button. Temperature ( ) Button will flash.
2. Adjust cooking temperature up or down with arrow buttons.
3. To return to preheat, short-press the Temperature ( ) Button.
ENGLISH INSTRUCTIONS
ADJUST TIMER
1. To adjust or view timer during preheat, long-press Timer ( ) Button. Timer Button
will flash.
2. Adjust timer up or down with arrow buttons.
3. To return to preheat, short-press Timer ( ) Button.
TURN OFF
1. To turn off heater and pump, short-press On/Off ( ) Button.
2. To turn off circulator, long-press On/Off ( ) Button.
8
840299600 ENv10.indd 8 1/29/19 12:22 PM
Page 9

SOUS VIDE FAQ AND TIPS
How do I vacuum-seal food before cooking sous vide?
• Most foods cooked sous vide are sealed in bags using a vacuum sealer.
Use heat-safe bags labeled as suitable for sous vide. Follow vacuum sealer
manufacturer directions for vacuum-sealing bags.
• Any foods cooked with more than a small amount of liquid should not be
vacuum-sealed.
• When cooking fish, do not vacuum the bags tightly. About 75% is desirable, or use
the water displacement method.
• Food may be sealed in bags in advance and stored in the refrigerator overnight
before cooking to save time.
Can I sous vide without a vacuum sealer?
• Yes. Vacuum sealers are not required for foods cooked sous vide.
• Bags that are heat-safe, BPA-free, and PVC-free are safe for sous vide cooking.
Most name-brand resealable bags and bags made for vacuum sealing will list their
information on the package.
• Any foods cooked for less than 8 hours can be sealed in heat-safe, resealable
plastic bags using the water displacement method:
1. Place food in bag and remove as much as air as possible.
2. Close bag leaving a 1-inch (2.5-cm) opening at the top.
3. Carefully submerge the bottom of bag in water until food is covered.
The pressure of the water will squeeze the air out of the bag.
4. Do not allow any water to enter the bag.
5. Gently squeeze any remaining air out of bag and seal.
• Canning jars are recommended for foods such as pudding, egg bites,
cheesecakes, or foods poached in broth or oil.
• Plastic wrap can be used for rolled meat and vegetable recipes, or when you want
the food to retain a particular shape.
Why is the water bath taking so long to reach the selected temperature?
• We recommend always filling the vessel with warm water when starting. When
cooking at higher temperatures, around 150°F (66°C) or above, you may want to fill
the vessel with hot water. A small amount of boiling water can be added if desired
to speed up the heating process further. The temperature of the water can be
checked at any time during the heating process by pressing the Temperature
( ) Button. If water is hotter than the selected temperature, the Overheating ( )
Indicator will illuminate. Add ice cubes to lower temperature.
Is food safe to eat even though it is cooked at a lower temperature than I use in
other cooking methods?
• Yes. Cooking sous vide is just as safe as traditional cooking methods. While the
higher cooking temperatures of traditional methods may pasteurize your food more
quickly, those high temperatures may also dry out food and yield an uneven and
less appetizing result.
• Times and temperatures provided in the chart on page 11 are what is necessary
for pasteurization. Food safety is determined by a combination of what you are
cooking, how long you cook it, and at what temperature.
• To minimize any risk of foodborne illness, always start with the freshest possible
foods and use safe handling practices. For more information on safe internal
cooking and pasteurization temperatures, consult foodsafety.gov or fsis.usda.gov.
ENGLISH INSTRUCTIONS
9
840299600 ENv10.indd 9 1/29/19 12:22 PM
Page 10

Can frozen foods be cooked sous vide without thawing first?
• Yes, but keep in mind that adding frozen food to the water bath will lower the water
temperature. A general rule is to add an extra hour to the cooking time in order to
allow meat to fully thaw and reach the desired temperature.
How can I ensure that food cooks thoroughly?
• Make sure water reaches the temperature specified in the recipe before adding
sealed food.
• Make sure all food, bags, and containers are completely submerged in the water
and that the food in each bag does not touch. Secure bags into place to allow
water to circulate by using a rack, clipping them to the pot, or adding a butter knife
inside each bag before sealing.
• Follow recommended cooking times to ensure that the food reaches the desired
temperature.
How long can food be left cooking when using the sous vide method?
• Recommended cooking times for sous vide ensure that the food reaches the
desired temperature. The benefit of sous vide cooking is that the water bath will
ENGLISH INSTRUCTIONS
hold the food at the desired temperature for a long period of time. This allows
more flexibility in serving times. The circulator can be programmed for up to 99
hours. Keep in mind that although the food is held at that temperature, the food will
continue to cook and will change texture.
• Usually you will see a range of optimal cooking times. This indicates the minimum
cooking time required and the maximum time that the food is at the ideal texture.
• When cooking eggs or seafood, do not hold in water bath for more than 1 hour
after cooking.
Should meats be seared before cooking sous vide or after?
• Searing food cooked sous vide is optional. Some foods benefit from searing and
others do not. Meats, poultry, and fish can be more appealing in appearance and
flavor with searing. Searing can be done before or after cooking. Searing after
cooking is more common. It ensures that the food reaches the desired temperature.
• Searing can be done both before AND after cooking sous vide. Steaks seared
before and after cooking have a more evenly browned surface.
• Quickly sear meats and vegetables in a preheated cast iron pan, grill pan, or on a
grill grate.
10
840299600 ENv10.indd 10 1/29/19 12:22 PM
Page 11

SOUS VIDE CHART
NOTE:
• For thicker meat, chicken, and sh, cooking times will be longer.
• Visit foodsafety.gov or fsis.usda.gov for more information on safe internal cooking
temperatures.
FOOD AND DONENESS TEMPERATURE TIME
Steak (1 to 1 1/4-inch thick)
Very rare to rare 125°F (52°C) 1 to 3 hours
Medium-rare
Medium 140°F (60°C) 1 to 4 hours
Medium-well 150°F (66°C) 1 to 4 hours
Well-done 155°F (68°C) 1 to 4 hours
130°–135°F (54°–57°C)
1 to 4 hours
Pork
Shoulder/Boston Butt, well-done, 3–4 lbs. 185°F (85°C) 8 to 10 hours
Tenderloin, medium, 1 1/2–2 lbs. 145°F (63°C) 2 to 4 hours
Loin, medium, 2–3 lbs. 150°F (66°C) 3 to 4 hours
Boneless chops, medium, 3/4-inch thick 140°F (60°C) 1 to 2 hours
Bone-in chops, medium, 1-inch thick 145°F (63°C) 1 to 2 hours
Bone-in ribs, 1 full rack, 3–4 lbs. 165°F (74°C) 12 to 14 hours
Chicken, boneless white meat (5 to 6 ounces)
Very soft and juicy 140°F (60°C) 1 to 3 hours
Tender and juicy 150°F (66°C) 1 to 3 hours
Firm and juicy 160°F (71°C) 1 to 3 hours
Chicken, boneless dark meat (5 to 6 ounces)
Tender and juicy 167°–170°F (75°–77°C) 1 1/2 to 3 hours
Fish (5 to 6 ounces)
Very lightly cooked, medium-rare and tender 110°–120°F (43°–49°C) 30 to 40 minutes
Medium, tender and aky 122°–130°F (50°–54°C) 30 to 40 minutes
Well-done, rm and aky 135°–140°F (57°–60°C) 30 to 40 minutes
Fruits
Apples, halved and cored 185°F (85°C) 1 1/2 hours
Pears, halved and cored 185°F (85°C) 1 1/2 hours
ENGLISH INSTRUCTIONS
11
840299600 ENv10.indd 11 1/29/19 12:22 PM
Page 12

FOOD AND DONENESS TEMPERATURE TIME
Vegetables
Asparagus spears 185°F (85°C) 10 minutes
Beets, cut into 2-inch pieces 185°F (85°C) 2 1/2 to 3 hours
Broccoli (small orets) 185°F (85°C) 30 to 40 minutes
Carrots, cut into 2-inch pieces 185°F (85°C) 30 to 45 minutes
Cauliower (small orets) 185°F (85°C) 1 to 1 1/2 hours
Cherry or grape tomatoes, halved 185°F (85°C) 20 to 30 minutes
Corn on the cob 185°F (85°C) 30 to 45 minutes
Mushrooms, halved 195°F (91°C) 1 hour
Onions, cut into 2-inch pieces 185°F (85°C) 1 to 1 1/2 hours
Potatoes, cut into 2-inch pieces 185°F (85°C) 2 to 2 1/2 hours
Spinach leaves 185°F (85°C) 5 minutes
Squash, cut into 2-inch pieces 185°F (85°C) 1 to 1 1/2 hours
ENGLISH INSTRUCTIONS
Tomatoes, halved 185°F (85°C) 20 to 30 minutes
12
840299600 ENv10.indd 12 1/29/19 12:22 PM
Page 13

CLEANING INSTRUCTIONS
w WARNING
immerse above the MAX line.
NOTE: Unplug and cool water completely
before removing circulator and water from the
cooking vessel.
1. Remove the circulator from the cooking
vessel by turning the knob on clamp
counterclockwise until loosened, then sliding
the circulator off. (FIGURE 1)
2. Remove the vessel clamp by turning the
thumb screw counterclockwise and sliding it
down the heat shield. (FIGURE 2)
3. Remove cooled heat shield by turning
counterclockwise until unlocked. Slide off.
(FIGURE 3)
4. Wipe the main housing with a damp cloth.
Do not use abrasive cleaners or metal scouring
pads. Do not immerse in water to clean.
(FIGURE 4)
5. Clean heat shield with hot soapy water,
then dry thoroughly, or wash in top rack of
dishwasher. DO NOT use the “SANI” setting
when washing in the diswasher. “SANI” cycle
temperatures could damage your product.
6. To replace the heat shield, slide over
the heater, line up the arrows, and turn
clockwise until the shield locks firmly into
place. (FIGURE 5)
Electrical Shock Hazard. Unplug before cleaning, and do not
FIGURE 1
FIGURE 2
ENGLISH INSTRUCTIONS
FIGURE 3
FIGURE 4
TROUBLESHOOTING
Display does not turn on.
• Is the unit plugged in? Test that the
electrical outlet is working with a lamp in
known working order.
• Was the ON/OFF button pressed?
Sous vide food is cooked unevenly.
• Ensure all air is removed from the food
pouch and the pouch is fully submerged
under water.
Overheating ( ) indicator is illuminated.
• Water temperature is too hot. Remove
some of the water and add cooler tap
water or ice cubes until is no longer
illuminated.
840299600 ENv10.indd 13 1/29/19 12:22 PM
FIGURE 5
13
Page 14

RECIPES
Sous Vide Steak with Chimichurri Sauce SERVES 4
STEAK
4 (1” to 1 1/2”-thick) boneless steaks, such as
tenderloin, strip, ribeye, or porterhouse
Salt and coarse black pepper
Vegetable oil
1. Set circulator temperature to 132°F (56°C) for medium-rare and timer for 1 to 2 1/2
ENGLISH INSTRUCTIONS
hours. Adjust temperature if desired doneness is more rare or well-done.
2. Pat steaks dry with paper towels and season with salt and black pepper.
3. Place each steak in a heat-seal bag. Vacuum tightly and seal.
4. When water reaches set temperature, add steak to water bath and short-press
Timer ( ) Button to start timer.
5. Make chimichurri sauce. Using a food chopper or small food processor, chop onion,
garlic, and oregano until nely chopped. Add olive oil, vinegar, lemon juice, salt, and
peppers and process until blended. Add parsley and pulse until nely minced but not
pureed. Set aside.
6. When cooking time has ended, remove bags from water and open. Pat steaks dry
with paper towels.
7. In a large skillet on high, heat oil. Sear steaks on each side until well-browned, 30 to
45 seconds each side.
8. Serve steaks with chimichurri sauce.
TEST KITCHEN TIP:
For evenly browned steaks, sear them before and after cooking sous vide. Searing steaks
twice may add a few minutes to your preparation time, but will yield a beautifully browned
exterior. If you are short on time and only wish to sear once, sear after sous vide for best
results.
CHIMICHURRI SAUCE
1/2 small onion, quartered
3 cloves garlic
2 tablespoons (6 g) fresh oregano leaves
3/4 cup (177 ml) olive oil
3 tablespoons (44 ml) red wine vinegar
3 tablespoons (45 ml) lemon juice
1 teaspoon (6 g) salt
1/4 teaspoon (0.6 g) coarse black pepper
1/4 teaspoon (0.5 g) dried crushed red pepper
1 cup (5.3 g) lightly packed at-leaf (Italian)
parsley
14
840299600 ENv10.indd 14 1/29/19 12:22 PM
Page 15

Sous Vide Salmon with Spinach and Parsley-Lemon Butter SERVES 4
PARSLEY-LEMON BUTTER
1 cup (225 g) unsalted butter,
softened
1/4 cup (5 g) nely chopped
fresh at-leaf parsley
1 tablespoon (15 ml) fresh
lemon juice
2 cloves garlic, minced
1 teaspoon (6 g) salt
1/4 teaspoon (0.6 g) coarse
black pepper
1. Set circulator temperature to 125°F (52°C) and timer for 25 minutes. Adjust
temperature if desired doneness is more rare or well-done.
2. Make the parsley-lemon butter. Add all ingredients to the bowl of a food processor.
Pulse several times or until smooth. Transfer butter to a sheet of plastic wrap and roll
into a log. Refrigerate until ready to use.
3. In a large bowl, whisk together water, salt, and sugar until sugar and salt are
dissolved. Add salmon and ice. Refrigerate for 20 to 30 minutes.
4. Remove salmon from the brine and rinse with cold water. Pat the salmon dry with
paper towels.
5. Add one salmon llet and about 1 tablespoon (15 ml) of the parsley-lemon butter to
each of 4 heat-seal bags. Seal bags but do not vacuum completely. 75% vacuum is
desirable for sh.
6. Divide spinach, olive oil, and salt evenly between 2 heat-seal bags. Vacuum lightly
and seal.
7. When circulator reaches set temperature, add the salmon and spinach pouches to
water and short-press Timer ( ) Button to start timer.
8. When cooking time has ended, remove pouches from water and open.
9. If a sear is desired on the salmon, pat dry with paper towels and sear in a large skillet
over medium-high heat with olive oil or butter.
10. Serve salmon over spinach with parsley-lemon butter.
SALMON
4 salmon llets, 5 to 6 ounces
(142 to 170 g) each
4 cups (946 ml) water
1/2 cup (144 g) kosher salt
1/4 cup (50 g) sugar
3 cups (652 g) ice cubes
SPINACH
5 ounces (142 g) baby spinach
1 teaspoon (5 ml) olive oil
1/8 teaspoon (0.7 g) salt
ENGLISH INSTRUCTIONS
Sous Vide Egg Bites with Red Peppers and Feta SERVES 6
6 large eggs
1 tablespoon (15 ml) sour cream
1/2 cup (122 g) crumbled feta cheese
1/2 teaspoon (3 g) kosher salt
1/8 teaspoon (0.3 g) ground black pepper
1/8 teaspoon (0.2 g) dried crushed red pepper
1. Set circulator temperature to 172°F (78°C) and timer for 1 hour.
2. In a blender or food processor, add eggs, sour cream, feta, salt, black pepper, and
crushed red pepper. Blend or process at medium speed until mixture is smooth, about
20 seconds.
3. Add the roasted red peppers and basil to the egg mixture and pulse briey to combine.
4. Spray the inside of the jars with nonstick cooking spray.
5. Divide egg mixture evenly among jars. Seal jars with lids.
6. When water reaches set temperature, add jars to water bath and short-press Timer
( ) Button to start timer.
7. When cooking time has ended, remove jars from water and open.
8. If desired, remove egg bites from jars by gently sliding a butter knife around edge of
jar and inverting onto a serving dish. Egg bites may be placed under a broiler for a
few minutes if a browned surface is desired.
840299600 ENv10.indd 15 1/29/19 12:22 PM
1/4 cup (28 g) nely chopped roasted red
peppers
2 tablespoons (5.3 g) nely chopped fresh
basil
Equipment needed:
6 (4-ounce) canning jars with lids
15
Page 16

RECIPES
Sous Vide Chicken with Asparagus and Brown Butter SERVES 4
BROWN BUTTER
1 cup (225 g) unsalted butter
2 tablespoons (4.8 g) fresh
thyme leaves
2 tablespoons (3.4 g) fresh
rosemary
2 tablespoons (4 g) chopped
fresh sage leaves
4 cloves garlic, minced
1. Set circulator temperature to 145°F (63°C) for 1 hour.
2. In a small saucepan over medium heat, heat 1 cup (237 ml) butter and cook until
butter is lightly browned, 3 to 4 minutes.
3. Add herbs and garlic, reduce heat to low, and cook for an additional 2 minutes. Strain
ENGLISH INSTRUCTIONS
about 4 tablespoons (59 ml) of butter into a small bowl and reserve. Strain remainder
into a separate container to reserve for serving.
4. In a small bowl, combine 3 tablespoons (54 g) kosher salt and 1 tablespoon (12.5 mg)
sugar. Season chicken breasts generously with the salt mixture.
5. Using reserved 4 tablespoons (59 ml) of brown butter, brush each chicken breast with
about 1 tablespoon (15 ml) of butter. Place each chicken breast in a heat-seal bag.
Vacuum tightly and seal.
6. Add asparagus, oil, and salt to a heat-seal bag. Vacuum tightly and seal.
7. When water reaches set temperature, add chicken and asparagus pouches to water
bath and short-press Timer ( ) Button to start timer.
8. When cooking time has ended, remove pouches from water and open.
9. Pat the chicken breasts dry with paper towels. Heat a large skillet on medium-high.
Add 1 tablespoon (15 ml) oil. When oil begins to shimmer, add chicken to pan skinside down. Sear chicken until skin is crispy and browned. Turn chicken and sear other
side until browned. If desired, slice chicken before plating.
10. To serve, place asparagus on plates and top with chicken. Drizzle with reserved
brown butter.
CHICKEN
4 skin-on boneless chicken
breasts
3 tablespoons (54 g) kosher
salt
1 tablespoon (12.5 g) sugar
1 tablespoon (15 ml)
vegetable oil
ASPARAGUS
1 pound (454 g) asparagus,
trimmed
1 tablespoon (15 ml) olive oil
1/4 teaspoon (1.5 g) kosher
salt
16
840299600 ENv10.indd 16 1/29/19 12:22 PM
Page 17

Sous Vide Turkey Breast with Orange-Rosemary Butter SERVES 6
ORANGE-ROSEMARY BUTTER
1/4 cup (57 g) unsalted butter, softened
1 tablespoon (14 ml) honey
1 teaspoon (0.7 g) chopped fresh rosemary
Zest of 1 navel orange
1/2 teaspoon (3 g) salt
1/8 teaspoon (0.3 g) ground black pepper
1/8 teaspoon (0.2 g) crushed red pepper
1. Set circulator temperature to 145°F (64°C) and timer for 2 1/2 hours.
2. In a small bowl, stir together all ingredients for the orange-rosemary butter.
3. Gently separate skin from turkey breasts, leaving one side of skin attached to the
breast, and sprinkle all over with kosher salt.
4. Rub orange-rosemary butter on turkey under and on top of the skin.
5. Place each turkey breast half in a heat-seal bag and add rosemary sprig.
Vacuum tightly and seal.
6. When water reaches set temperature, add turkey to the water and short-press
Timer ( ) Button to start timer.
7. When cooking time has ended, remove bags from water and open.
8. Pat the turkey breasts dry with paper towels.
9. Heat a broiler on high and broil turkey breasts, skin side up, until browned and crispy,
about 5 minutes.
10. Slice turkey breasts and serve while hot.
TURKEY
1 (5 to 6-pound [2.3 to 2.7 kg]) turkey breast,
deboned and halved, or 2 boneless turkey
breast halves (1 1/2 to 2 pounds [0.7 to
0.9 kg] each), skin on
1 1/2 teaspoons (9 g) kosher salt
2 sprigs fresh rosemary
Sous Vide Short Ribs
RIBS
4 pounds (18 kg) bone-in short
ribs (about 8 to 12 ribs),
divided
2 teaspoons (10 ml) sesame
oil, divided
2 teaspoons (12 g) kosher salt
1 teaspoon (2 g) black pepper
1. Set circulator temperature to 165°F (74°C) and timer for 12 hours.
2. Season ribs with salt and pepper. Divide ribs into 4 separate heat-seal bags and add
1/2 teaspoon sesame oil to each bag. Vacuum tightly and seal.
3. In a small bowl, combine dry rub ingredients. Rub half of the dry rub on both sides of
the ribs, reserving the other half for after sous vide.
4. In a small bowl, whisk all ingredients until blended. Refrigerate until needed.
5. Remove ribs from the bags and place on a plate, pat dry, and rub both sides of the
ribs with remaining dry rub. In a large skillet over high, heat oil until shimmering. Sear
ribs on each side until well browned, 30 to 45 seconds each side.
6. Baste with the basting sauce, then turn every 5 minutes, basting each time until ribs
are done.
TEST KITCHEN TIP:
Shred and serve over Jasmine rice. Discard fat and bones. Garnish with sliced green
onions and cilantro.
DRY RUB
2 tablespoons (25 g) brown
sugar
2 teaspoons (5 g) Chinese
5 spice powder
2 teaspoons (6 g) garlic powder
2 teaspoons (5 g) onion powder
2 teaspoons (7 g) mustard
powder
2 teaspoons (12 g) kosher salt
1 teaspoon (2.3 g) black pepper
BASTING SAUCE
1/4 cup (59 ml) soy sauce
2 tablespoons (29 ml) honey
Zest and juice of one lime
1 teaspoon (5 ml) sesame oil
1/2 teaspoon (2.5 ml) sh
sauce
1 teaspoon (1.8 g) red pepper
akes
ENGLISH INSTRUCTIONS
17
840299600 ENv10.indd 17 1/29/19 12:22 PM
Page 18

ONE-YEAR LIMITED
WESTON WARRANTY
This warranty applies to products purchased and used in the U.S. and Canada. This is the only express warranty
for this product and is in lieu of any other any other warranty or condition. This product is warranted to be free from
defects in material and workmanship for a period of one (1) year from the date of original purchase. During this period,
your exclusive remedy is repair or replacement of this product or any component found to be defective, at our option.
If the product or component is no longer available, we will replace with a similar one of equal or greater value.
This warranty does not cover unauthorized repairs or service to products, products sold “as-is” by retailers, glass,
filters, wear from normal use, use not in conformity with the printed directions, or damage to the product resulting from
accident, alteration, abuse, or misuse. This warranty extends only to the original consumer purchaser or gift recipient
and is not transferable. Keep the original sales receipt, as proof of purchase is required to make a warranty claim.
This warranty is void if the product is subjected to any voltage and waveform other than as specified on the rating label
(e.g., 120V ~ 60 Hz).
We exclude all claims for special, incidental and consequential damages caused by breach of express or implied
warranty. All liability is limited to the amount of the purchase price. Every implied warranty, including any statutory
warranty or condition of merchantability or fitness for a particular purpose, is disclaimed except to the extent
prohibited by law, in which case such warranty or condition is limited to the duration of this written warranty.
ENGLISH INSTRUCTIONS
This warranty gives you specific legal rights. You may have other legal rights that vary depending on where you
live. Some states or provinces do not allow limitations on implied warranties or special, incidental, or consequential
damages, so the foregoing limitations may not apply to you.
Before returning the product for any repair or service: it must be clean and free from any food particles or other debris;
otherwise, we will return it or impose a $50 cleaning surcharge, at our option.
To make a warranty claim do not return this product to the store: Please go to www.westonsupply.com; or call
1.800.814.4895 in the U.S. and 001.216.901.6801 outside the U.S., Monday – Friday, 8 am – 5 pm Eastern. You are
responsible for all costs associated with shipping us the product freight prepaid. If the product qualifies for a warranty
repair or replacement, we will bear the cost of returning it to you. We are not responsible for shipping damage.
For non-warranty work: call 1.800.814.4895 in the U.S. and 001.216.901.6801 outside the U.S., Monday – Friday,
8 am – 5 pm Eastern, to obtain a Return Merchandise Authorization Number (RMA Number). We will refuse all returns
without an RMA Number. We charge US$35/hour for all diagnostic, service, repair and processing work. We will not
start any service or repair work without prior authorization. You are responsible for all costs associated with shipping
us the product freight prepaid and our returning it to you.
18
840299600 ENv10.indd 18 1/29/19 12:22 PM
Page 19

19
840299600 ENv10.indd 19 1/29/19 12:22 PM
Page 20

PLEASE INSPECT THIS PACKAGE THOROUGHLY FOR MISSING PARTS OR ANY PRODUCT DAMAGE.
IF YOUR PRODUCT CONTAINS SHIPPING DAMAGE, PLEASE CONTACT RETAILER FOR ASSISTANCE.
For all other questions regarding product usage, missing parts, product damage, difculty or warranty activa-
please contact the Weston Brands Customer Service Team:
U.S. Residents Customer Service Line: 1-800-814-4895 (Outside U.S. Call: 001-216-901-6801)
Please DO NOT return this item to the retailer before contacting
Refer to them often and use them to instruct others.
ATTENTION!
tion,
8:00 am to 5:00 pm ET, Monday thru Friday
CustomerService@WestonProducts.com
Weston Brands LLC
261 Yadkin Road
Southern Pines, NC 28387
WestonSupply.com
Weston Brands Customer Service.
SAVE THESE INSTRUCTIONS
model 01/19
36200 840299600
840299600 ENv10.indd 20 1/29/19 12:22 PM
 Loading...