

Page 1
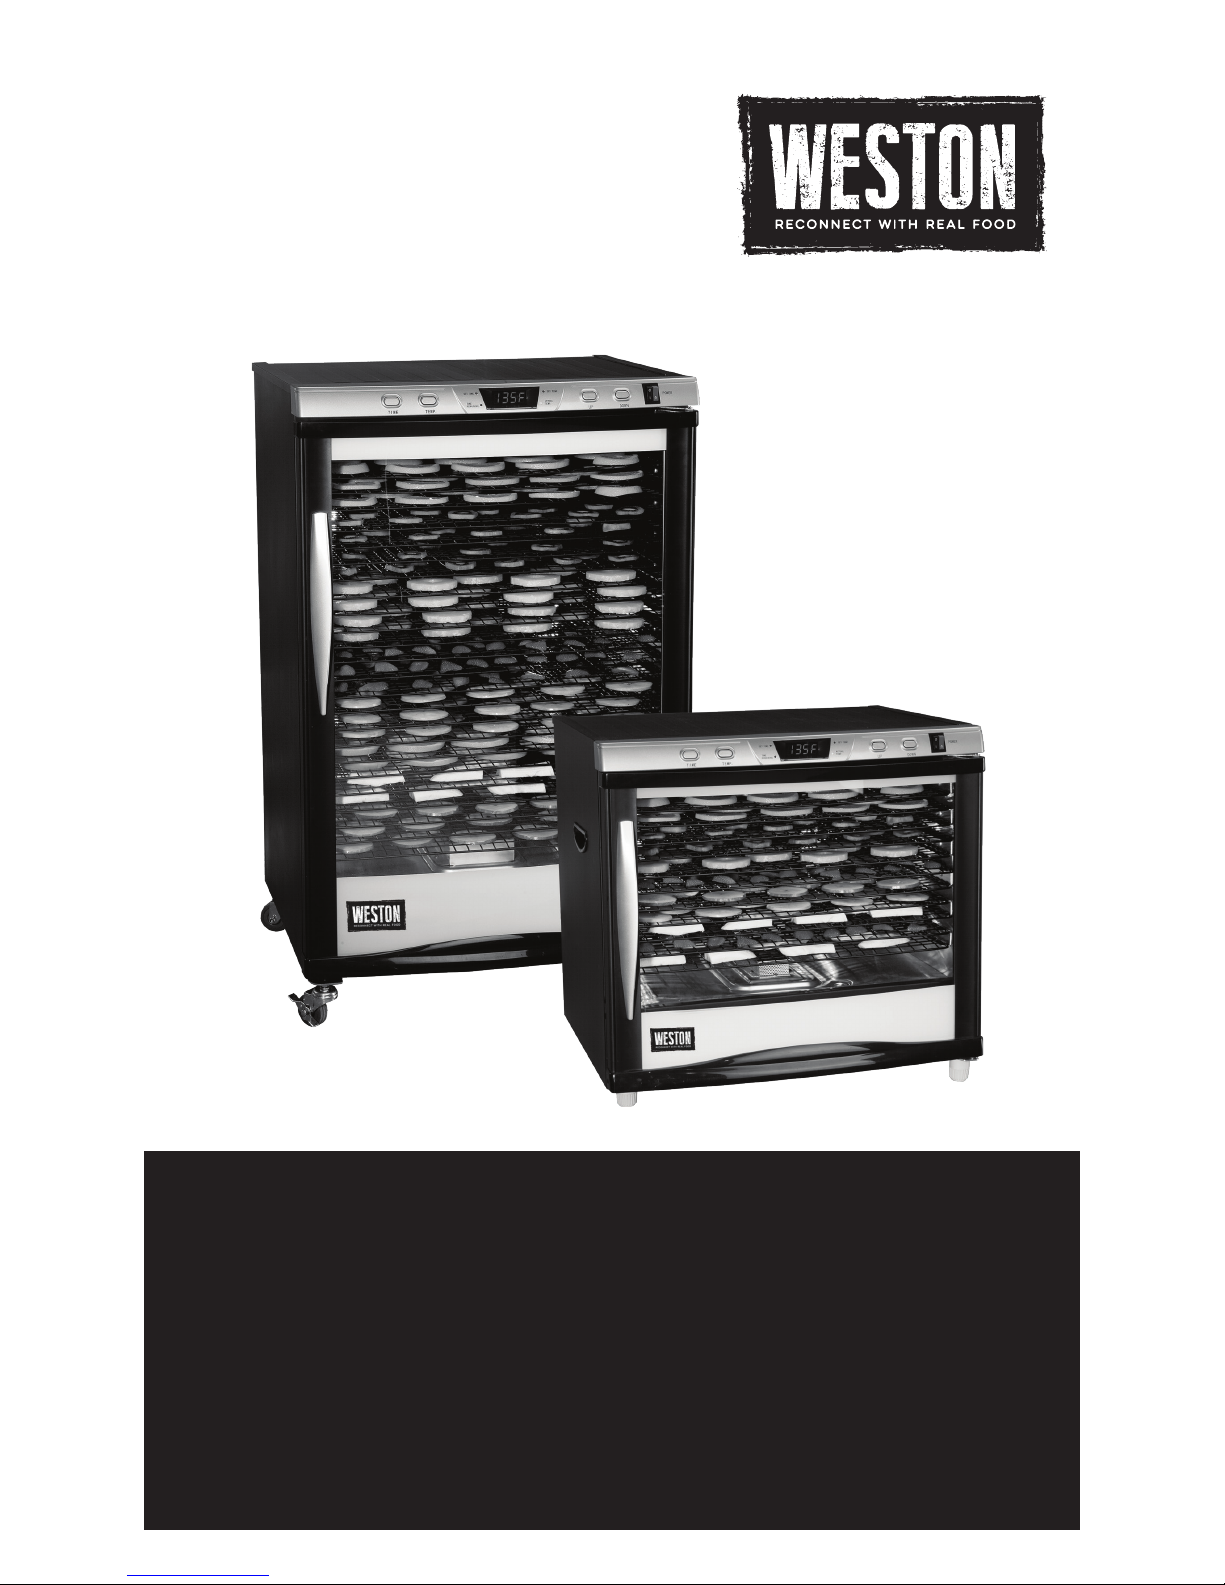
FOOD DEHYDRATORS
PRO-1200 28-0301-W (80 L)
PRO-2400 28-0501-W (160 L)
DUE TO CONSTANT FACTORY IMPROVEMENTS, THE PRODUCT PICTURED MIGHT DIFFER
SLIGHTLY FROM THE PRODUCT IN THIS BOX. 020416
Page 2

TABLE OF CONTENTS / ÍNDICE / TABLE DES MATIÈRES
2
IMPORTANT!
GENERAL SAFETY RULES
GROUNDING INSTRUCTIONS
COMPONENT LIST
ASSEMBLY INSTRUCTIONS
PRE-OPERATING INSTRUCTIONS
SET UP
PROGRAMMING
FUNCTION
POST OPERATION
OPERATING INSTRUCTIONS
CLEANING INSTRUCTIONS
TROUBLESHOOTING
LIGHT BULB REPLACEMENT
DRYING TIPS
MAKING JERKY
STORING JERKY
RECONSTITUTION
SUMMARY
DRYING FLOWERS
FOOD SAFETY
TWO-YEAR LIMITED WESTON WARRANTY
3
4
5
6-7
8
9
9
10
10
11
11
12-13
13
14
15-16
17-18
18
18
19
19
20
22
¡IMPORTANTE !
REGLAS IMPORTANTES DE SEGURIDAD
INSTRUCCIONES PARA HACER TIERRA
LISTA DE COMPONENTES
INSTRUCCIONES DE ENSAMBLADO
INSTRUCCIONES DE PREFUNCIONAMIENTO
INSTALACIÓN
PROGRAMACIÓN
FUNCIÓN
OPERACIÓN POSTERIOR
INSTRUCCIONES DE FUNCIONAMIENTO
INSTRUCCIONES DE LIMPIEZA
SOLUCIÓN DE PROBLEMAS
REEMPLAZO DE LA BOMBILLA
CONSEJOS DE SECADO
PREPARACIÓN DE LA CECINA
ALMACENAMIENTO DE LA CECINA
REHIDRATACIÓN
RESUMEN
SECADO DE FLORES
SEGURIDAD DE LOS ALIMENTOS
DOS AÑOS DE GARANTÍA WESTON LIMITADA
24
25
26
28-29
30
31
31
32
32
33
33
34-35
35
36
37-38
39-40
40
40
41
41
42
44
IMPORTANT!
INSTRUCTIONS DE MISE À LA TERRE
IMPORTANTES RÈGLES DE SÉCURITÉ
DESCRIPTION DE LA PIÈCE
INSTRUCTIONS DE MONTAGE
INSTRUCTIONS AVANT L’UTILISATION
RÉGLAGE
PROGRAMMATION
FONCTION
APRÈS L’UTILISATION
INSTRUCTIONS D’UTILISATION
DIRECTIVES DE NETTOYAGE
DÉPANNAGE
REMPLACEMENT DE L’AMPOULE
CONSEILS DE DÉSHYDRATATION
FAIRE DE LA CHARQUI
ENTREPOSAGE DE LA CHARQUI
RECONSTITUTION
SOMMAIRE
SÉCHER LES FLEURS
SÉCURITÉ ALIMENTAIRE
DEUX ANS DE GARANTIE WESTON LIMITÉE
46
46
47
48-49
50
51
51
52
52
53
53
54-55
55
56
57-58
59-60
60
60
61
61
62
63
Page 3

3
ENGLISH INSTRUCTIONS
This appliance is a Dehydrator, not an oven. Its purpose is to dry,
not cook. Dehydrator operation is not the same as that of an oven.
.
BEFORE dehydrating, heat meat to an internal temperature of 160oF
(71oC) and poultry to 165oF (74oC) in an oven to kill any bacteria that may
be present.
.
Heat the meat or poultry in an OVEN, not the Dehydrator.
.
Ideally, Set Temperature is only the highest temperature reached
during a heating cycle. Set Temperature is not maintained.
.
Depending on a variety of factors including ambient conditions, state
of food being dried and power supply, the Set Temperature may not be
reached.
.
For maximum performance: do not use extension cords; operate the
Dehydrator in area where the temperature is above 70oF (21oC); remove
other appliances from the electrical circuit to which you connect the
Dehydrator; make sure the door is fully closed with no gaps in the seal;
connect the Dehydrator to an electrical circuit protected by a 20-Amp
circuit breaker.
.
DO NOT use the Dehydrator outdoors.
.
Read and fully understand all instructions and warning prior to using the
Dehydrator.
IMPORTANT!
Page 4

ENGLISH INSTRUCTIONS
4
GENERAL SAFETY RULES
READ AND FULLY UNDERSTAND ALL INSTRUCTIONS AND WARNINGS
PRIOR TO USING THIS UNIT. YOUR SAFETY IS MOST IMPORTANT!
FAILURE TO COMPLY WITH PROCEDURES AND SAFE GUARDS MAY
RESULT IN SERIOUS INJURY OR PROPERTY DAMAGE. REMEMBER:
YOUR PERSONAL SAFETY IS YOUR RESPONSIBILITY!
SAVE THESE INSTRUCTIONS
12. DO NOT run the Dehydrator on any ammable
surfaces such as carpeting or wood oors! BE
SAFE and use the Dehydrator on a cinder block or
concrete oor.
13. TO PROTECT AGAINST RISK OF
ELECTRICAL SHOCK: DO NOT SUBMERGE
THE CORD, PLUGS, OR DEHYDRATOR
INTO WATER OR LIQUID. BE SURE THE
DEHYDRATOR IS DISCONNECTED FROM THE
POWER SOURCE BEFORE CLEANING. Wash
all parts by hand and thoroughly dry. Thoroughly
clean all parts that will come in contact with food
before using the appliance. NEVER rinse appliance
Dehydrator with a hose or pouring water, only use
a moist cloth to clean the Dehydrator. DO NOT
use the Dehydrator with wet hands or bare feet.
DO NOT use near water.
14. DO NOT allow water to drip inside of the
Diffuser, damage to the Heating Element may
occur. DO NOT remove the Diffuser from the
Cabinet. Assembly integrity will be compromised
and may void warranty. Follow the Diffuser
cleaning instructions after EACH use.
15. After cleaning, make sure Dehydrator is
completely dry before reconnecting to the power
source – if not; ELECTRICAL SHOCK may result,
and may result in personal injury.
16. Failure to follow cleaning and maintenance
instructions will decrease the life span of your
Dehydrator and may cause serious product
malfunction, injury or property damage.
17. Do not place on or near a hot gas or electric
burner, or in a heated oven. DO NOT allow the
power cord to drape over the Dehydrator or hot
surfaces.
18. BEWARE! Some surfaces of the Dehydrator
may become very HOT during use! Serious
injury may result! DO NOT touch these parts
during operation or until they cool after use.
19. DO NOT attempt to operate the Dehydrator
if the Dehydrator itself is cold. The Dehydrator
temperature should be at least 45oF (7oC) before
beginning.
20. DO NOT use the Dehydrator while under the
inuence of drugs, medications or alcohol.
21. Do not use appliance for other than intended
use.
22. Extreme caution must be used when moving
an appliance or part containing hot oil or other hot
liquids.
1. ALWAYS DISCONNECT the Dehydrator
from the power source before servicing, changing
accessories or cleaning the unit.
2. ALWAYS USE A SEPARATE DEDICATED
ELECTRICAL CIRCUIT to supply power to this
Dehydrator. The circuit should not be less than
#12 wire and MUST be protected with a 20 amp
circuit breaker. If you are unsure of your electrical
system, contact a qualied electrician. Failure to
verify your electrical system may result in re, injury
or property damage! The unit will not heat to the Set
Temperature unless this step is done.
3. NEVER LEAVE THE DEHYDRATOR
UNATTENDED. Be safe, DISCONNECT the
Dehydrator from power source before leaving the
work area. Close supervision is necessary when
any appliance is used near children. This appliance
is NOT to be used by children.
4. Reduce risk of unintentional starting. Make sure
the Power Switch is in the “OFF” position before
attaching to the power source. To disconnect, turn
any control to off, then remove plug from wall outlet.
5. DO NOT USE the Dehydrator if the Power
Cord, Plug or any other parts are damaged. If
the Power Cord or the Dehydrator is damaged,
call Customer Service. DO NOT ATTEMPT TO
REPLACE THE CORD. Be sure to not allow the
Power Cord to drape into your work area. Check
that all parts are operating properly, and perform the
intended functions. Check for alignment of moving
parts or any other conditions that may affect the
operation.
6. NEVER use any accessories or parts from
other manufacturers. Doing so will VOID YOUR
WARRANTY and may cause re, electrical shock
or injury.
7. The Manufacturer declines any responsibility
in the case of improper use of the Dehydrator.
Improper use of the Dehydrator voids the warranty.
8. Electrical repair must be done by your authorized
dealer. Use only factory original parts and
accessories. Modication of the Dehydrator voids
the warranty.
9. Be sure the Dehydrator is on a stable work
surface. Be sure all the Dehydrator Feet are
stable.
Lock the Casters (if applicable) prior to use.
10. DO NOT use outdoors.
11. This Dehydrator contains intake and exhaust
vents on the rear of the unit. Keep all objects
and walls at least 6” (15 cm) from all sides of the
Dehydrator.
Page 5
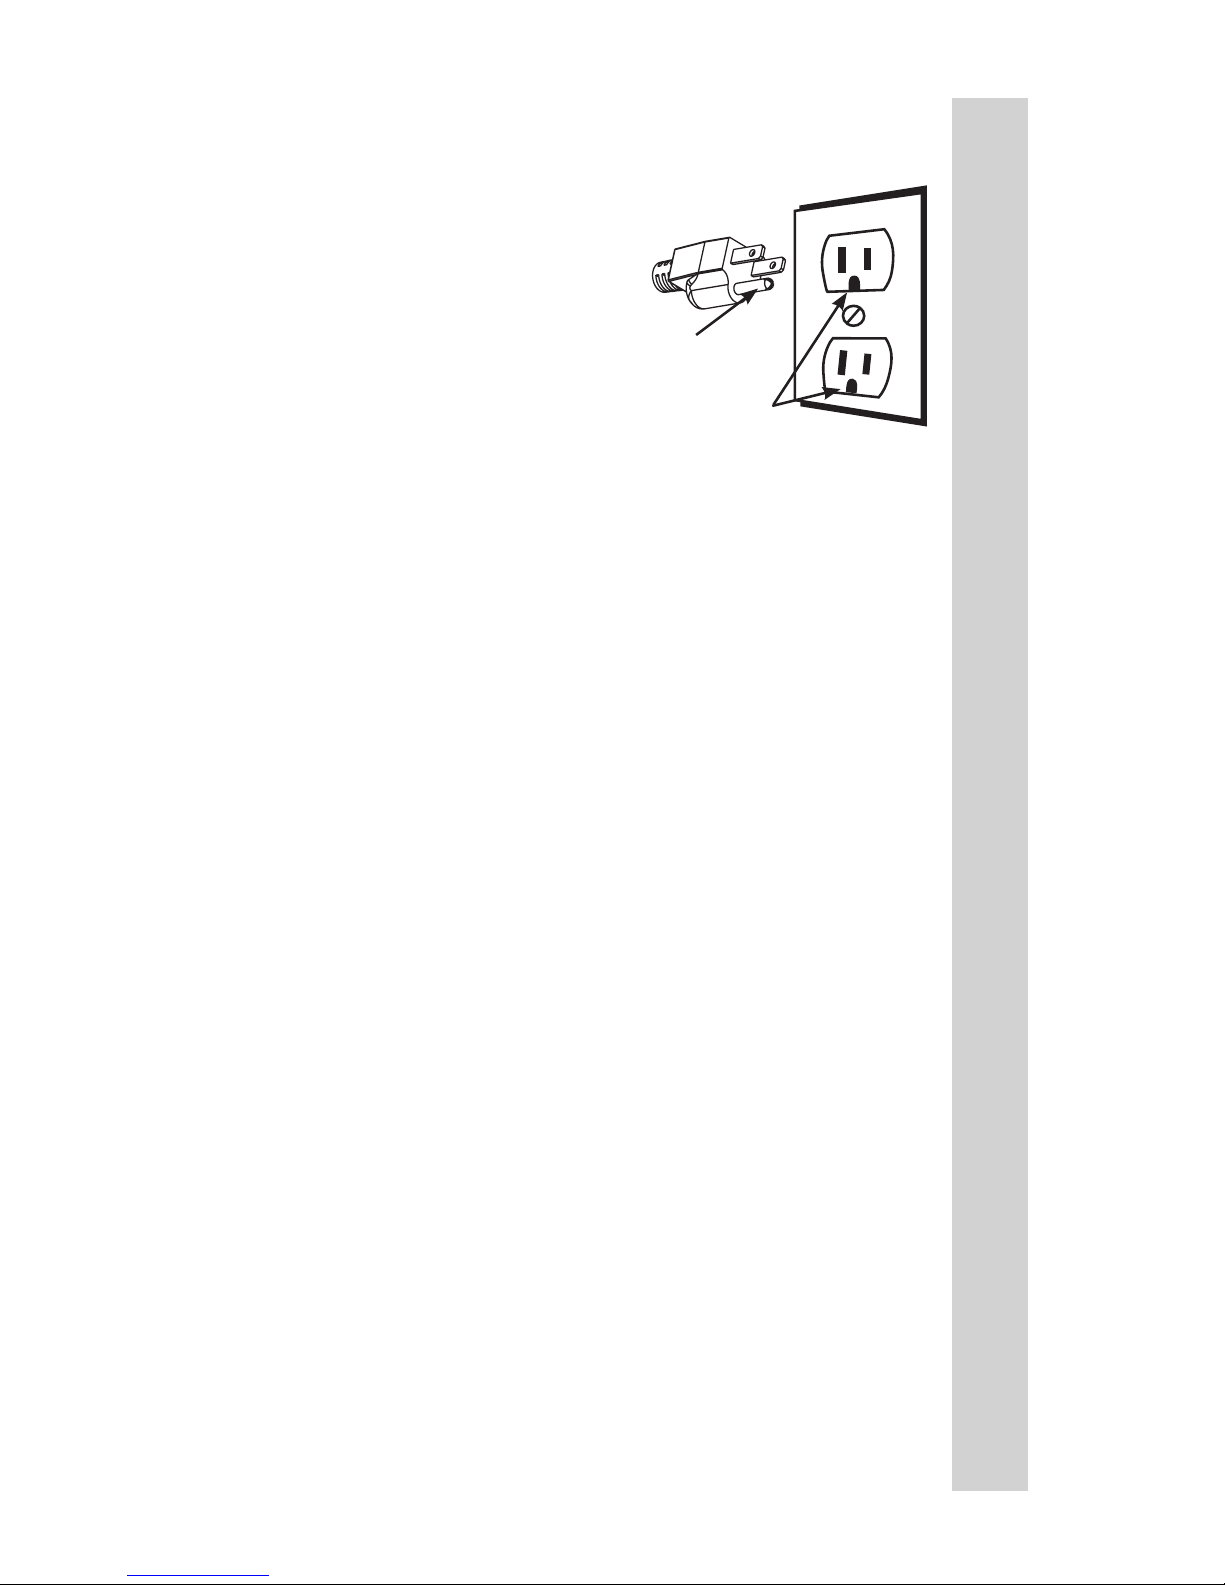
GROUNDING
This appliance must be grounded while in use
to protect the operator from electrical shock.
The appliance is equipped with a 3-conductor
cord and a 3-prong grounding type plug to t
the proper grounding-type receptacle. The
appliance has a plug that looks like Figure A.
5
ENGLISH INSTRUCTIONS
FIGURE A
Circuit
Grounding
Conductor
Grounding
Prong
GROUNDING INSTRUCTIONS
Page 6
ENGLISH INSTRUCTIONS
6
WARNING! Before cleaning, assembling or disassembling the
Dehydrator, make sure the PLUG IS REMOVED FROM THE OUTLET/
POWER SOURCE! ALWAYS unplug the Dehydrator when not in use.
BACK VIEW
Page 7
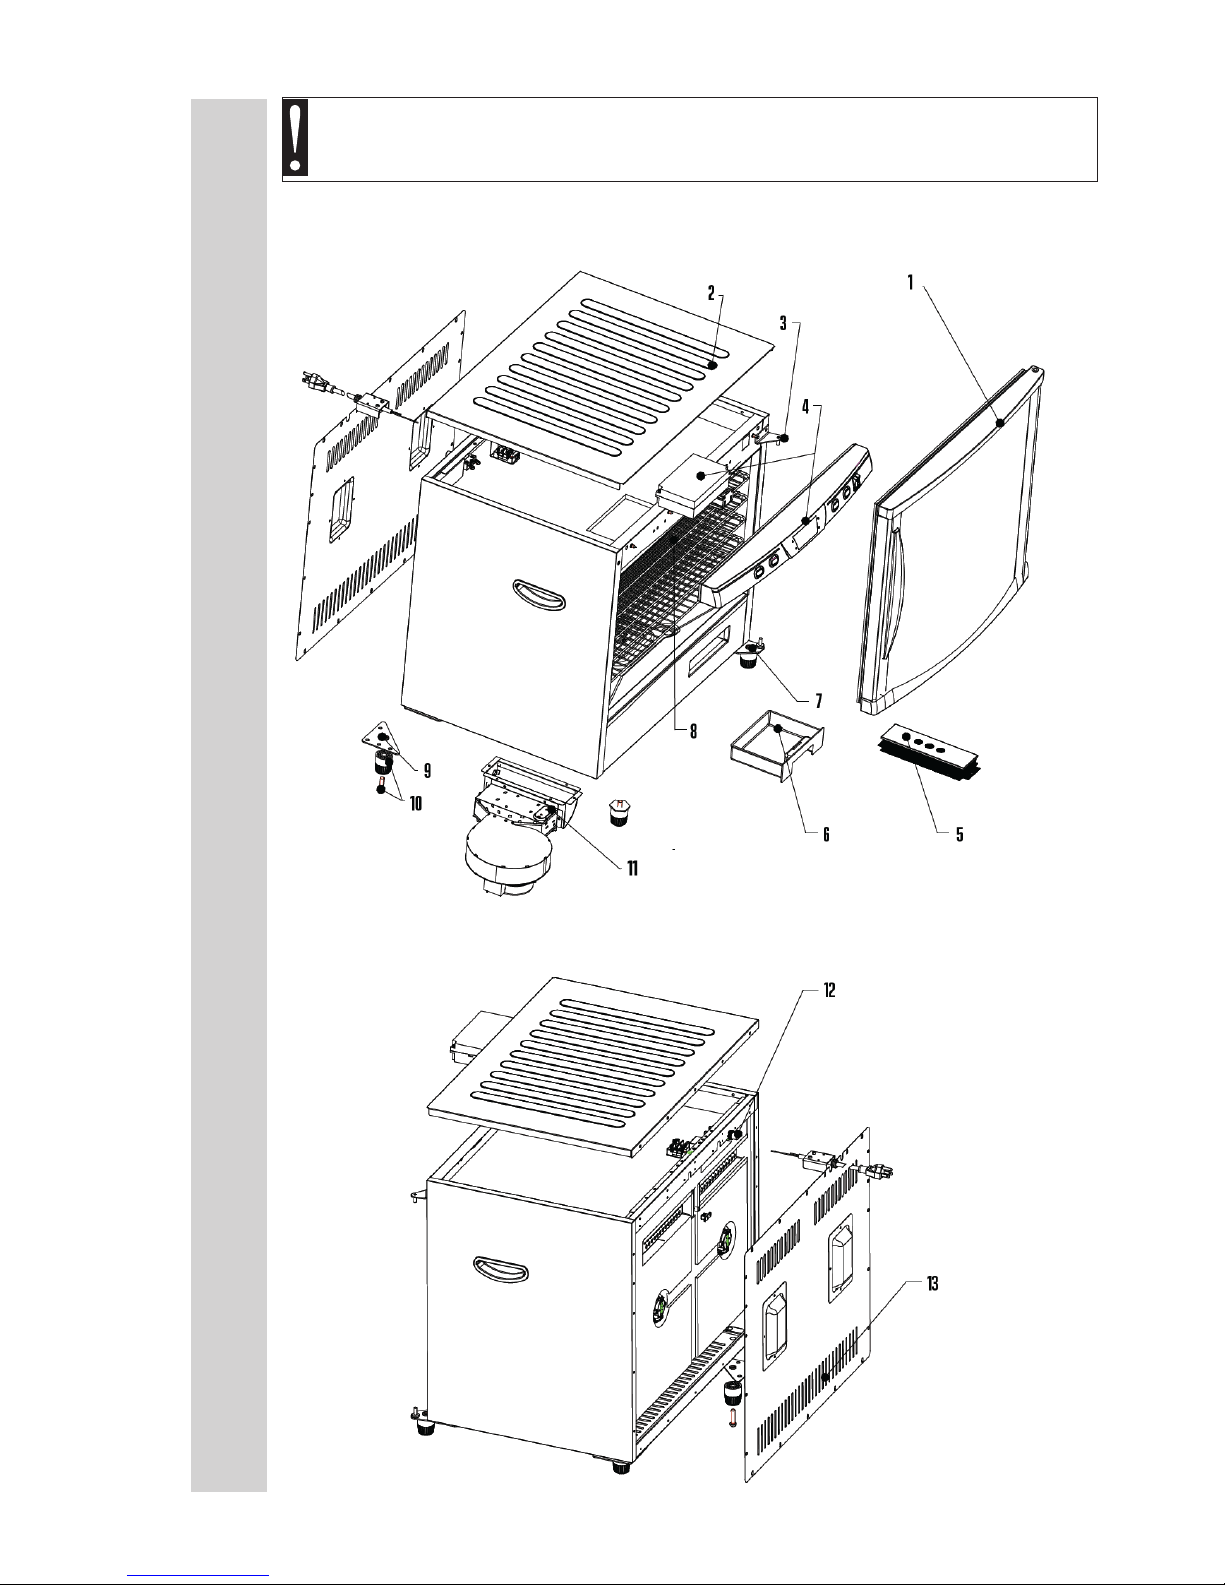
COMPONENT LIST
DIAGRAM # PART DESCRIPTION 28-0301-W 28-0501-W
1 DOOR 28-0404-W 28-0504-W
2 TOP PANEL 28-0506 28-0506
N/A BOTTOM PANEL (NOT SHOWN) 28-0307 28-0307
3 TOP DOOR HINGE 28-0333 28-0333
4
COMPUTER BOARD
& CONTROL PANEL
28-0513 28-0513
5 DIFFUSER 28-0311 28-0331
N/A BACK PANEL DIFFUSER (NOT SHOWN) N/A 28-0330
6 DRIP TRAY 28-0519 28-0519
7 BOTTOM DOOR HINGE 28-0334 28-0334-N
8 NONSTICK RACK - SET OF 12 28-0313
28-0313
(2 SETS INCLUDED)
9 REAR BOTTOM CORNER BRACKET (2) 28-0336 28-0336-N
N/A FRONT FOOT BRACKET (NOT SHOWN) 28-0332 28-0332-N
10
FOOT KIT
(INCLUDES ALL 4 FEET & BOLT)
28-0308 N/A
N/A
CASTER KIT
(INCLUDES ALL 4 CASTERS & NUTS)
N/A 28-0508
11 FAN & HEATING ELEMENT 28-0302 28-0302
12 CIRCUIT BREAKER 28-0379 28-0379
13 BACK PANEL 28-0305 28-0505
N/A SNACK STICK HANGER (NOT SHOWN) 28-0322 28-0322
If any components of this unit are broken, the unit does not operate properly or you
need a replacement instruction manual, visit us on the web at
WestonProducts.com
Or call Weston Brands LLC Toll Free at 1-800-814-4895
Monday thru Friday 8:00am-5:00pm ET. Outside the U.S. call 001-216-901-6801
7
ENGLISH INSTRUCTIONS
Page 8

1. Make sure the Dehydrator is turned off and unplugged.
2. Remove the Racks and any other loose items from the interior and close
the Door.
3. Gently lay the Dehydrator onto its left side (when facing the Door) on a
rug or other similar article to prevent scratching. DO NOT lay the Dehydrator
onto its right side or front to avoid damaging the Door, Control Panel and/or
Circuit Breaker.
4. Insert the Foot Bolts into the holes at the bottom of the Feet until the Bolts
threads protrude out. Thread the Bolts & Feet into the Front Foot Brackets.
5. Tighten the Foot Bolts with a screwdriver.
6. While holding the Door closed, carefully stand the Dehydrator upright
onto the Feet.
1. Follow steps 1-3 above.
2. Screw a Caster Nut (attached to Caster for shipping) onto the threaded
stem of each Caster until it stops.
3. Screw the Swivel Casters into the Rear Bottom Corner Brackets until they
stop. HINT: Hold the Caster frame with one hand and rotate the swivel with
your other hand.
4. Screw the Swivel Casters with Breaks into the Front Foot Brackets until
they stop.
5. Tighten each Caster Nut with a 12-mm (1/2”) open-end wrench. Turn the
Caster Nuts clockwise. You want to tighten them to the Dehydrator, not the
Casters. DO NOT over-tighten.
6. Inspect the gap between the Door and Front Left Foot Bracket to make
sure the stem of the Caster does not contact the bottom of the Door. If there is
contact, loosen the Caster Nut and move the Caster down. Screw the Caster
Nut onto the stem of the Caster, but do not screw it all the way down. Leave
a small gap to shorten the stem that protrudes through the Foot Bracket.
Reinstall the Caster as described above.
7. While holding the Door closed, carefully stand the Dehydrator upright onto
the Casters.
ENGLISH INSTRUCTIONS
8
80 L ASSEMBLY INSTRUCTIONS
160 L ASSEMBLY INSTRUCTIONS
Page 9
9
ENGLISH INSTRUCTIONS
• DO NOT operate the Dehydrator without the Feet / Casters installed.
• Locate the Dehydrator on a clean, level, dry, non-ammable, surface at
least 6” (15 cm) away from any wall. Avoid carpeted surfaces.
• Set the brakes on the two front-mounted Swivel Casters (160-L model) .
1. Make sure the Power and Light
Switches are both set to “OFF.”
2. Plug the Dehydrator into an electrical
outlet. DO NOT use extension cords.
3. Set the Power Switch to “ON.”
4. Fill the Racks with food or other items to be dried.
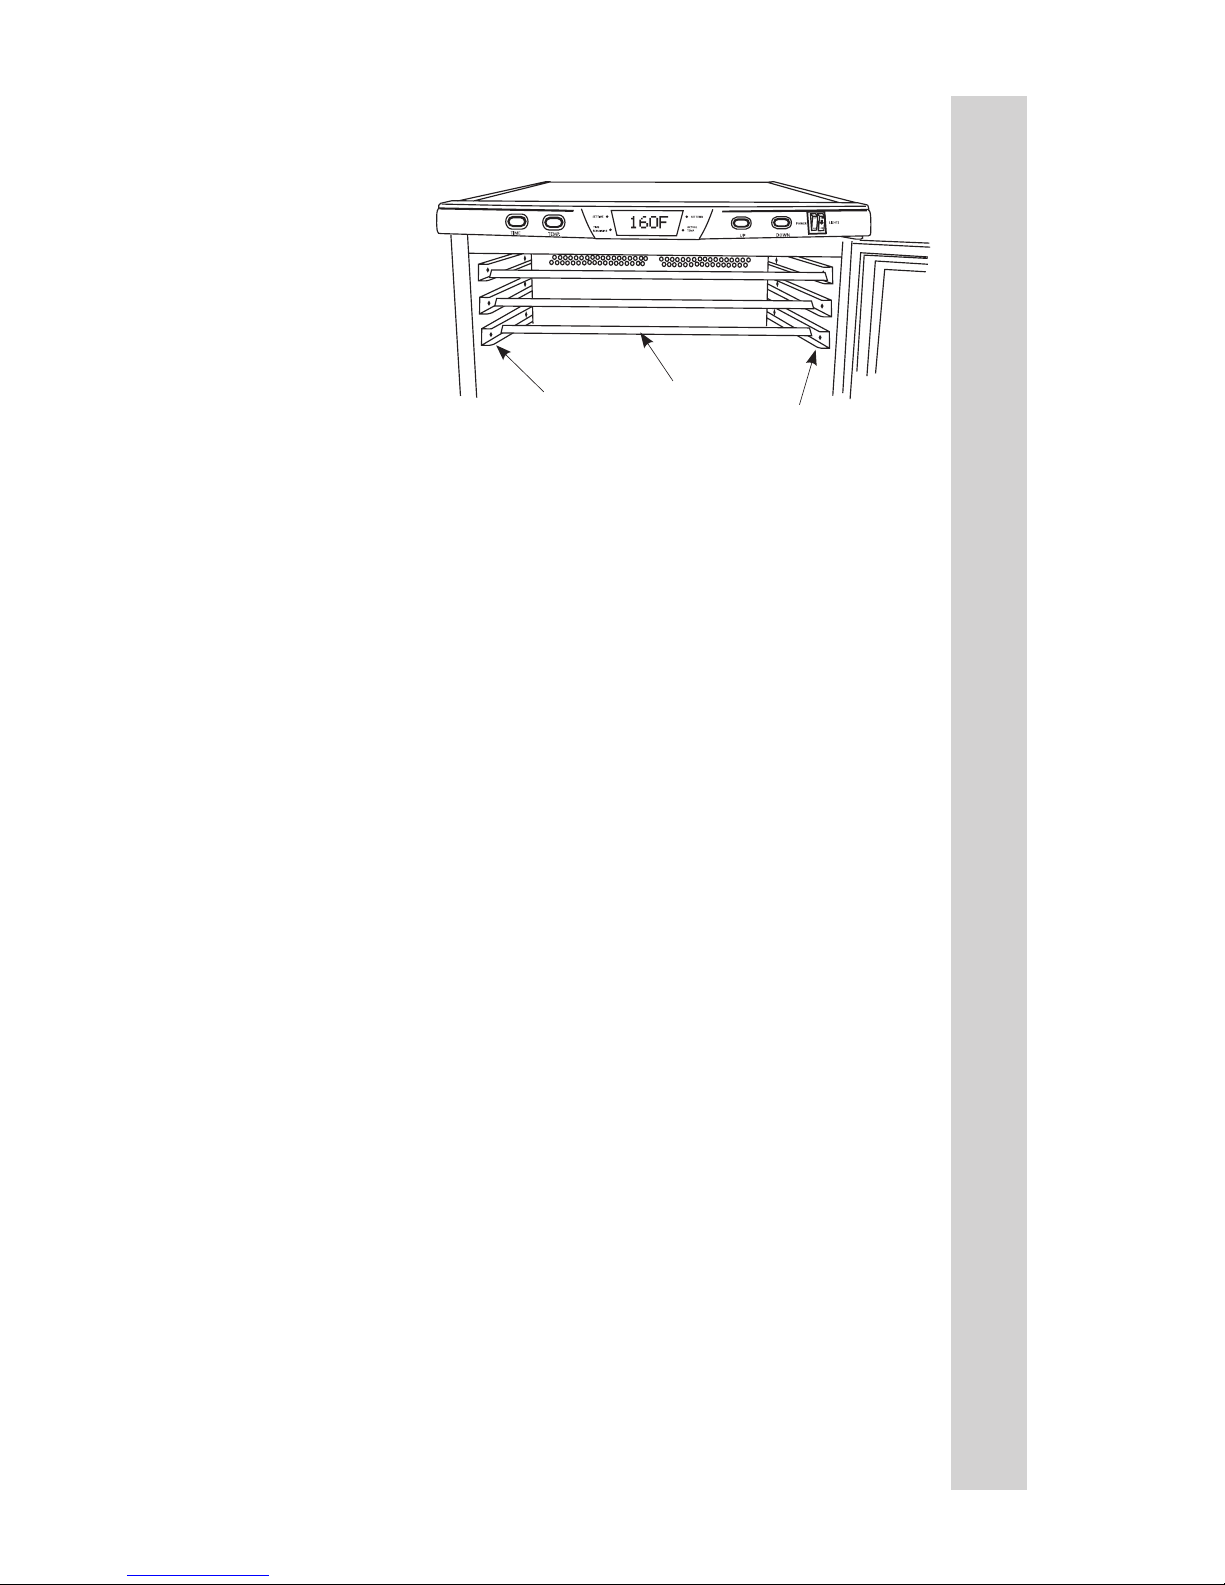
5. Load the Racks in the Dehydrator. Push each Rack in until it stops.
IMPORTANT: There are three notched Racks. Place these Racks (with the
notch to the back) on the top three Rack Supports. The notches prevent the
Racks from touching the Temperature Sensor on the back inside wall near the
top. Any contact between these parts may cause false temperature readings
and/or cycle irregularities.
6. Close the Door, rmly press on the Door to ensure a good seal.
PRE-OPERATING INSTRUCTIONS
SET UP
Page 10
ENGLISH INSTRUCTIONS
10
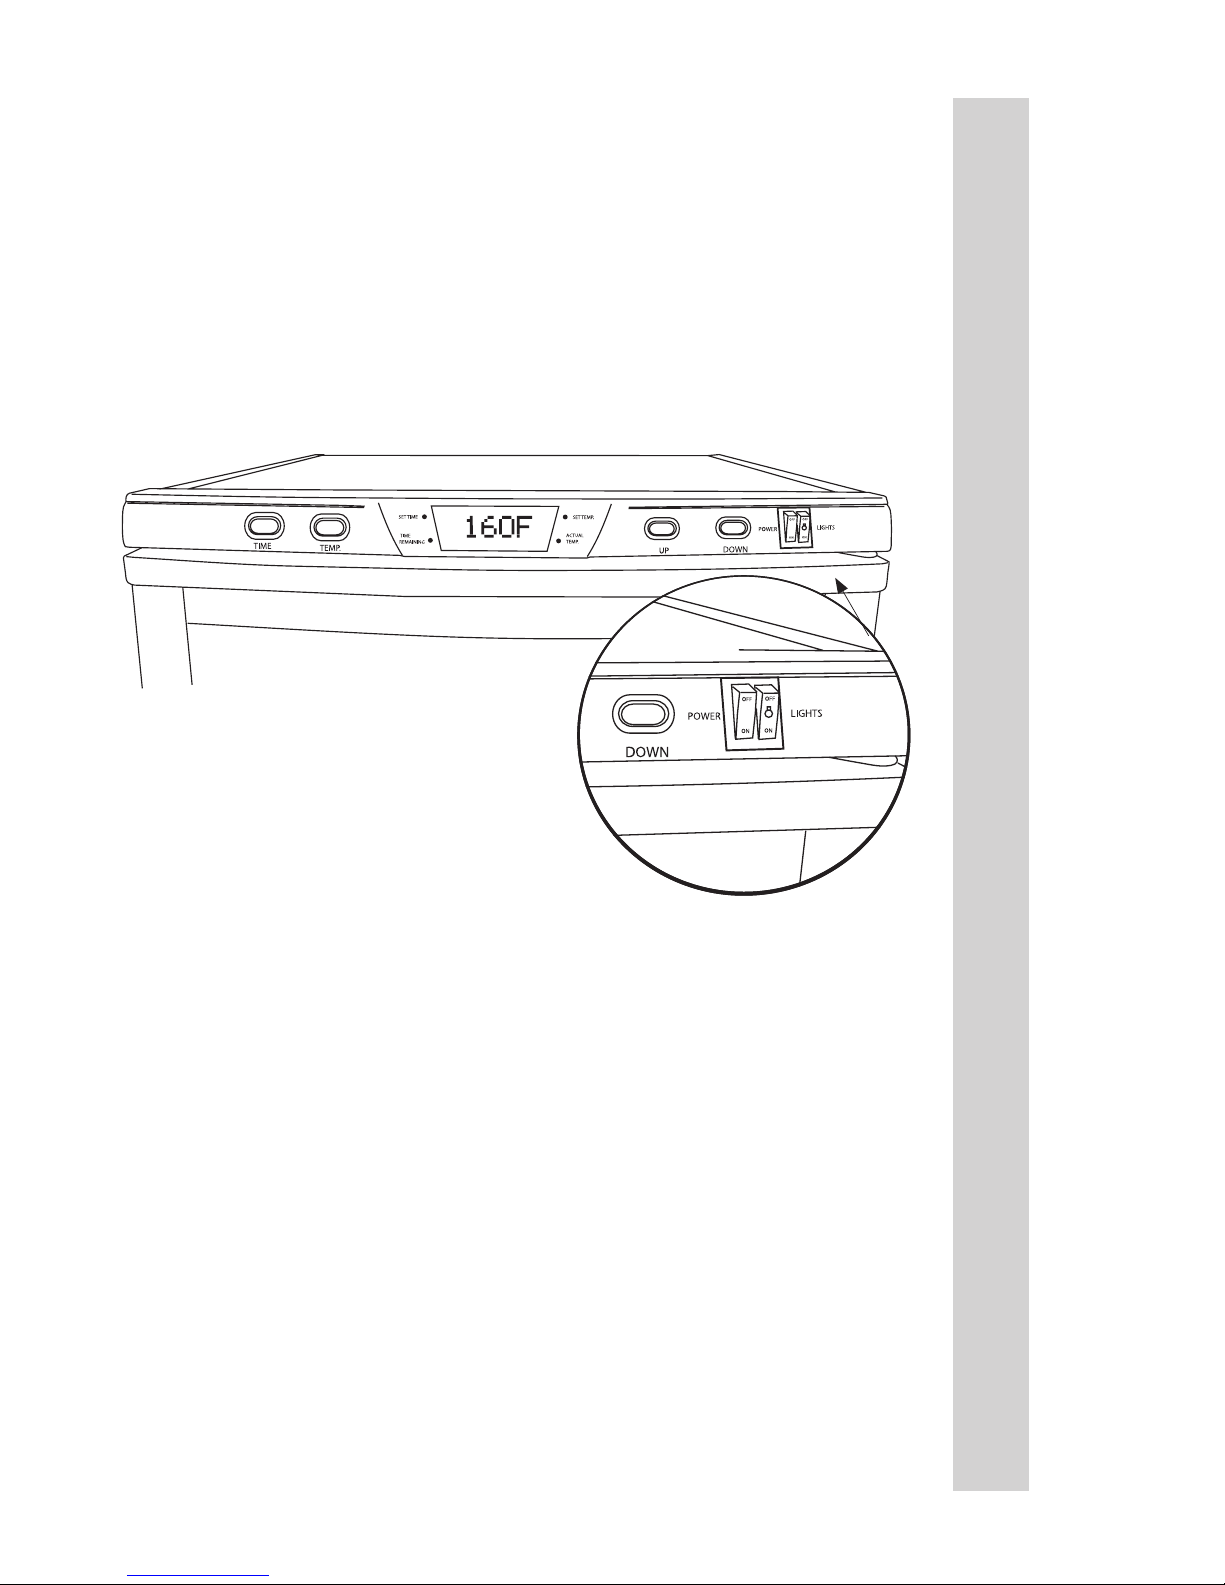
7. TO SET THE TIME: Press the “TIME” Button on the Control Panel one
time. Use the “UP” & “DOWN” Buttons on the right side of the Control Panel to
set the countdown timer hours (23 hour maximum). Press the “TIME” Button
again to switch to minutes. Similarly set the minutes (5 minute increments).
8. TO SET THE TEMPERATURE: Press the “TEMP” Button one time. Use
the “UP” & “DOWN” Buttons to set the temperature (160oF maximum, 50oF
minimum, 5 degree increments).
NOTE: Set Temperature is the maximum temperature the Dehydrator could
reach during operation.
9. You do not need to push any other buttons. The Dehydrator will
automatically start after a brief pause. NOTE: The Dehydrator will start while
you’re programming if you delay. Don’t worry, this is normal. Just continue
programming as instructed above.
10. The Digital Display on the Control Panel will continuously cycle while the
unit is operating. It will alternately display: the preset drying time “SET TIME;”
the remaining drying time “TIME REMAINING;” the preset temperature “SET
TEMP;” and the actual current temperature inside the Dehydrator “ACTUAL
TEMP” (measured by the Temperature Sensor on the back wall near the top).
NOTE: The “SET TEMP” is only the highest temperature reached during a
heating cycle. The “SET TEMP” is NOT maintained.
11. The Dehydrator will emit 8 beeps at startup and when the interior
temperature reaches the preset value.
12. The Dehydrator automatically stops (Fan & Heater) when the countdown
timer reaches 0. Unit power will remain on, however.
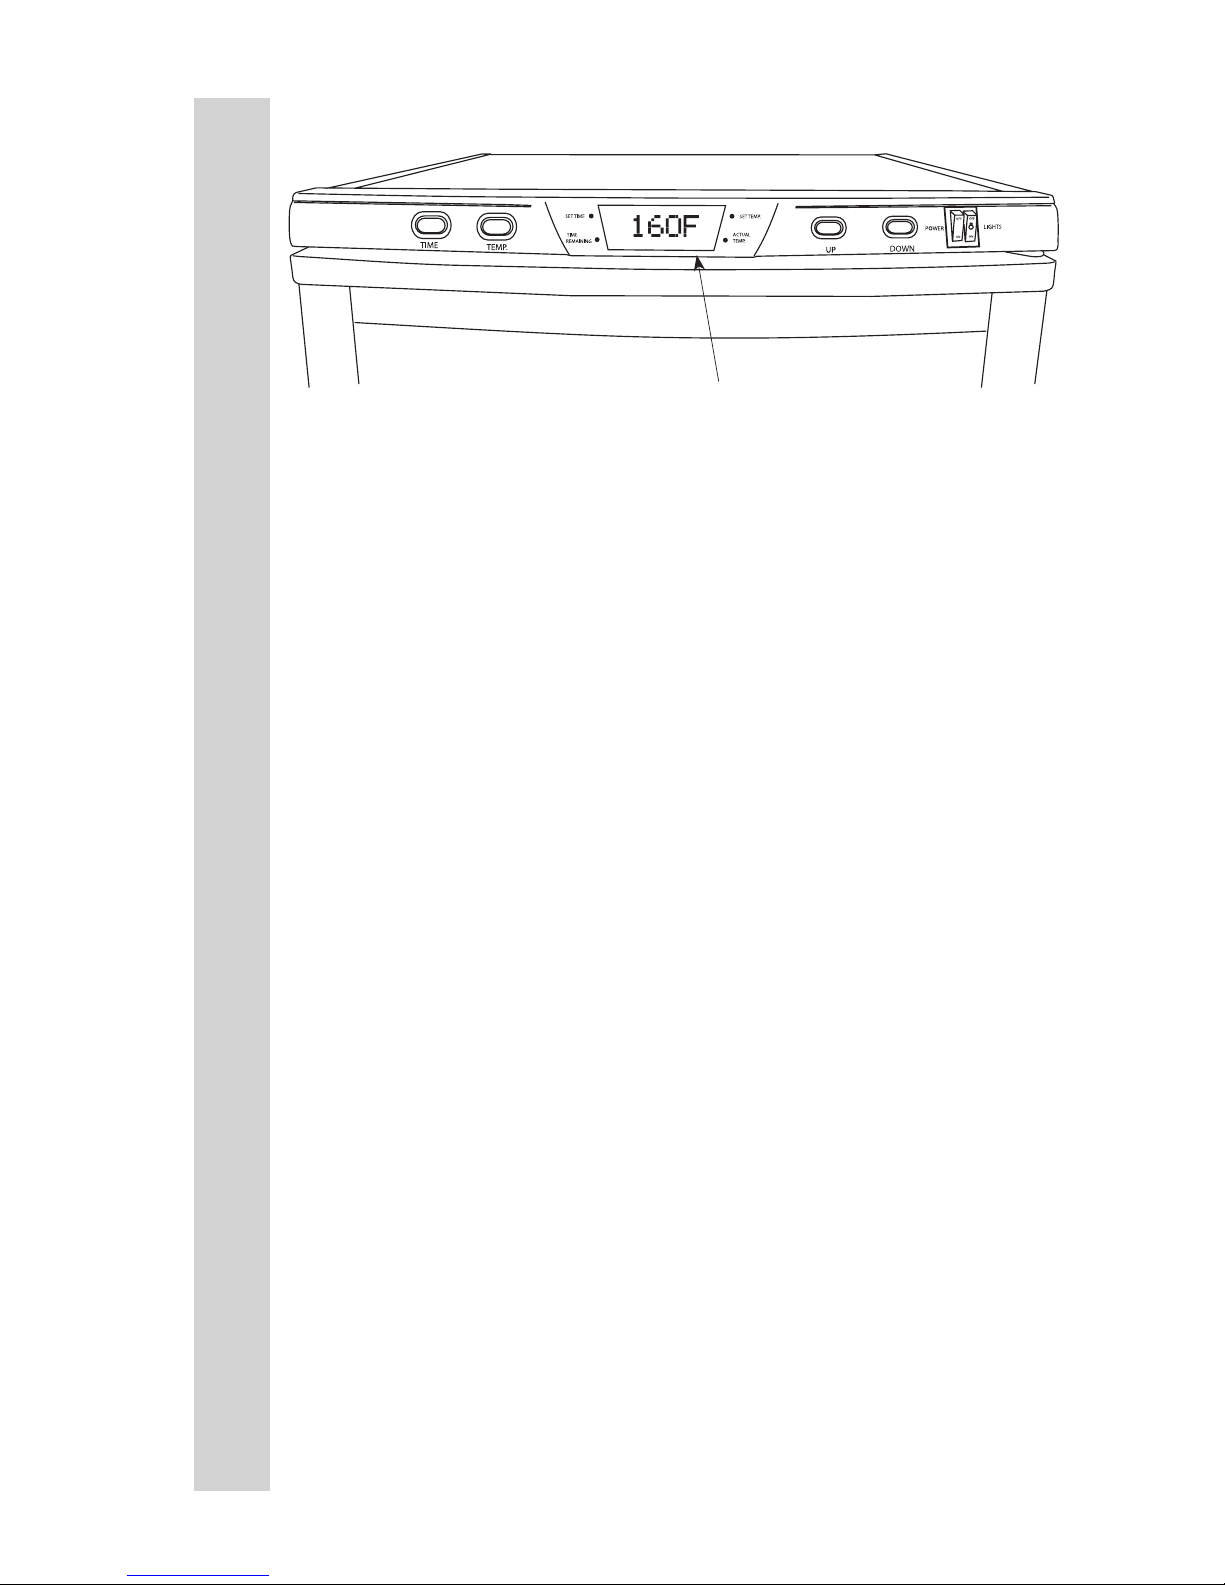
Digital Display
PROGRAMMING
FUNCTION
Page 11

11
ENGLISH INSTRUCTIONS
13. Set the Power Switch to “OFF” when you are done.
14. Unplug the Dehydrator when not in use.
15. Clean the Dehydrator after each use, especially the Diffuser. See the
“CLEANING INSTRUCTIONS” section of this booklet.
• The purpose of this Dehydrator is to dry, not cook. It does not operate in
the same manner as an oven. Its operation and performance should not be
compared to that of an oven.
• The Dehydrator’s “SET TEMP.” is only the highest temperature that
will be reached during a heating cycle. It is the temperature at which
the Heater turns off. The Fan will continue to operate. Heating resumes
when the temperature falls 5 to 10 degrees below the “SET TEMP.”
• The maximum temperature to which you can set the Dehydrator is 160oF
(71oC). The Dehydrator may or may not reach Set Temperature depending on
several factors including: the temperature in the area where the Dehydrator
is operating; whether or not an extension cord is being used; whether or not
the Dehydrator is sharing the electrical circuit with other appliances; food
thickness, temperature and moisture content; the amount and position of
food on the racks.
• For maximum Dehydrator performance: DO NOT use extension cords;
operate the Dehydrator in an area where the temperature is above 70oF
(21oC); remove all other appliances from the electrical circuit to which you
connect the Dehydrator; make sure the door is fully closed with no gaps in
the seal; connect the Dehydrator to an electrical circuit protected by a 20Amp circuit breaker.
POST OPERATION
OPERATING INSTRUCTIONS
Page 12
ENGLISH INSTRUCTIONS
12
• IMPORTANT! Clean the Dehydrator after EACH use. Do not use abrasive
cleansers. The Racks are NOT dishwasher safe.
• WARNING! DO NOT immerse the Dehydrator in water. DO NOT spray the
Dehydrator with water. DO NOT let water drip into the Diffuser.
• DO NOT allow grease to build up inside the Dehydrator, especially on the
Diffuser. Component damage or re may result.
• Turn off and unplug the Dehydrator. Allow the Dehydrator to cool. Clean the
Racks, interior and exterior Cabinet, Diffuser, Door and Drip Tray as described
below.
NON-STICK RACKS
Wash the Racks by hand with a soft brush in warm soapy water. Rinse and
towel dry. Make sure the Racks are completely dry before returning them to
the Dehydrator.
CABINET INTERIOR
Wipe the Cabinet Interior and clean Rack Supports with a moderately damp
cloth and soap if necessary. DO NOT use abrasive cleansers. Wipe off any
residue if soap is used. CAUTION: DO NOT let water drip into the Diffuser.
Electric shock or unit damage may result. If necessary, cover the Diffuser with
a dry towel while cleaning the Cabinet Interior and Rack Supports.
CABINET EXTERIOR
Wipe the Cabinet Exterior with a moderately damp cloth and soap if necessary.
Wipe off any residue if soap is used.
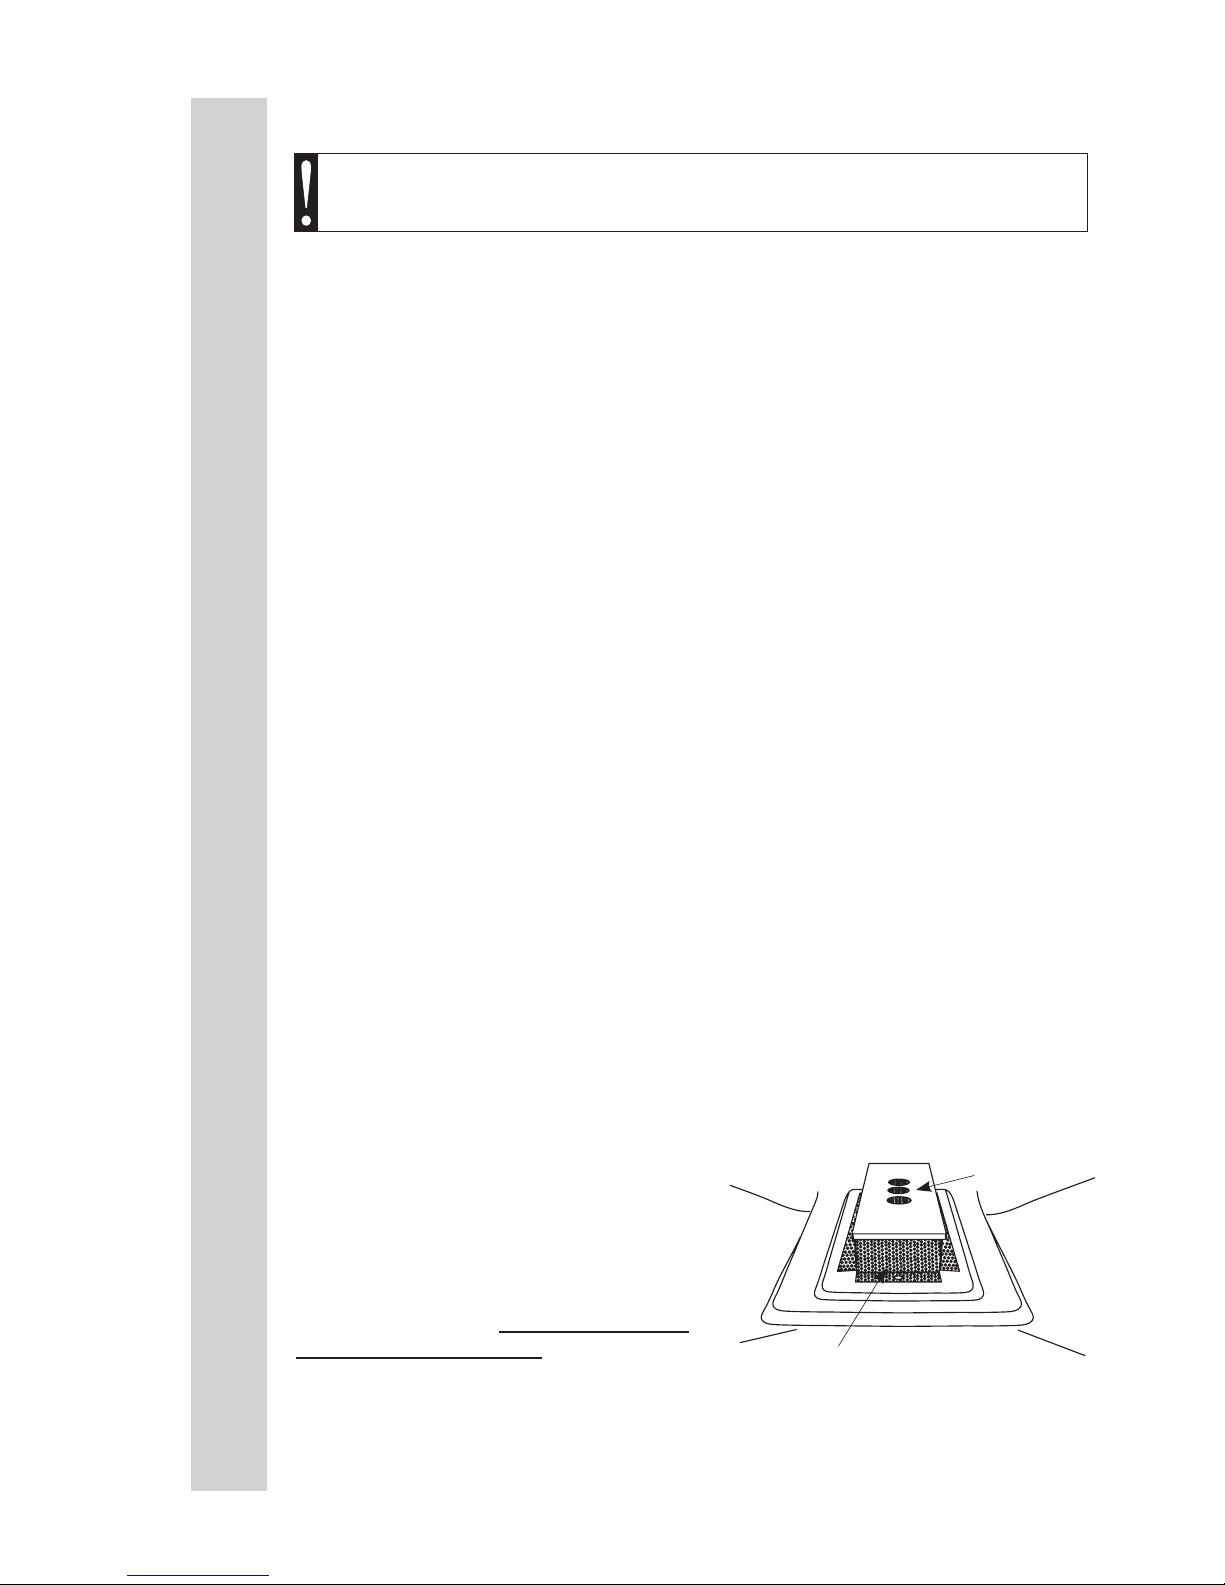
DIFFUSER
Wipe the top and sides of the Diffuser with a
slightly damp cloth and soap if necessary.
DO NOT use abrasive cleansers. Remove
any residue if soap is used.
CAUTION: DO NOT let water drip into
the Diffuser. Electric shock or unit
damage may result.
Inspect the vent holes on the sides and
top of the Diffuser. All the holes must
be clean and fully open. Use a toothpick
or other pointed object to remove any
residue. Be careful not to push residue
into the Diffuser.
WARNING! Before cleaning, assembling or disassembling the
Dehydrator, make sure the Dehydrator is OFF and the PLUG IS
REMOVED FROM THE OUTLET/POWER SOURCE!
Top Vent
Holes
Be sure the
Holes are Open
Diffuser
CLEANING INSTRUCTIONS
Page 13

13
ENGLISH INSTRUCTIONS
CABINET DOOR
Wipe the Door and Seal clean with a moderately damp cloth and soap if
necessary. Wipe off any residue if soap is used. Wipe the glass clean with
a rag or paper towels and glass cleaner.
DRIP TRAY
Empty then wash the Drip Tray in warm soapy water. Rinse and dry the Drip
Tray before re-installing it in the Dehydrator.
The Dehydrator loses power
and will not restart.
• Turn the Dehydrator off and
disconnect the Power Cord from the
electrical outlet. Press the button on
the Circuit Breaker (located on the
back of the Dehydrator near the top)
to reset it.
• Check the household circuit breaker
controlling the electrical outlet to
which you connected the Dehydrator.
Make sure that the breaker is rated
20 Amp and no other appliances are
used at the same time. Reset it, if
necessary.
Uneven or incomplete drying.
• Do not cover the center holes in the Racks.
• Rotate the Racks every 45 to 90 minutes depending on the food being dried.
Move the top Rack to the bottom. Move all other Racks up one shelf. Turn the
Racks around.
• Don’t crowd food items. Space items ½” to 1” (1.3 to 2.5 cm) apart on the
Racks.
• Increase the drying time and temperature.
• Do not block the vents on the bottom of the Dehydrator.
• Keep the Dehydrator at least 6” (15.2 cm) away from any wall.
If the above tips do not resolve the problem you are having with the
Dehydrator, contact Customer Service at the number on the back of this
manual for additional information and further troubleshooting.
Circuit Breaker
Reset Button
TROUBLESHOOTING
Page 14
14
ENGLISH INSTRUCTIONS
1. Turn off the Dehydrator Lights. Turn off and disconnect the Dehydrator from
the power outlet.
2. Let the Dehydrator cool. DO NOT attempt to replace a Light Bulb while the
Dehydrator is hot.
3. Remove all of the Racks.
4. Remove the Back Panel of the Dehydrator.
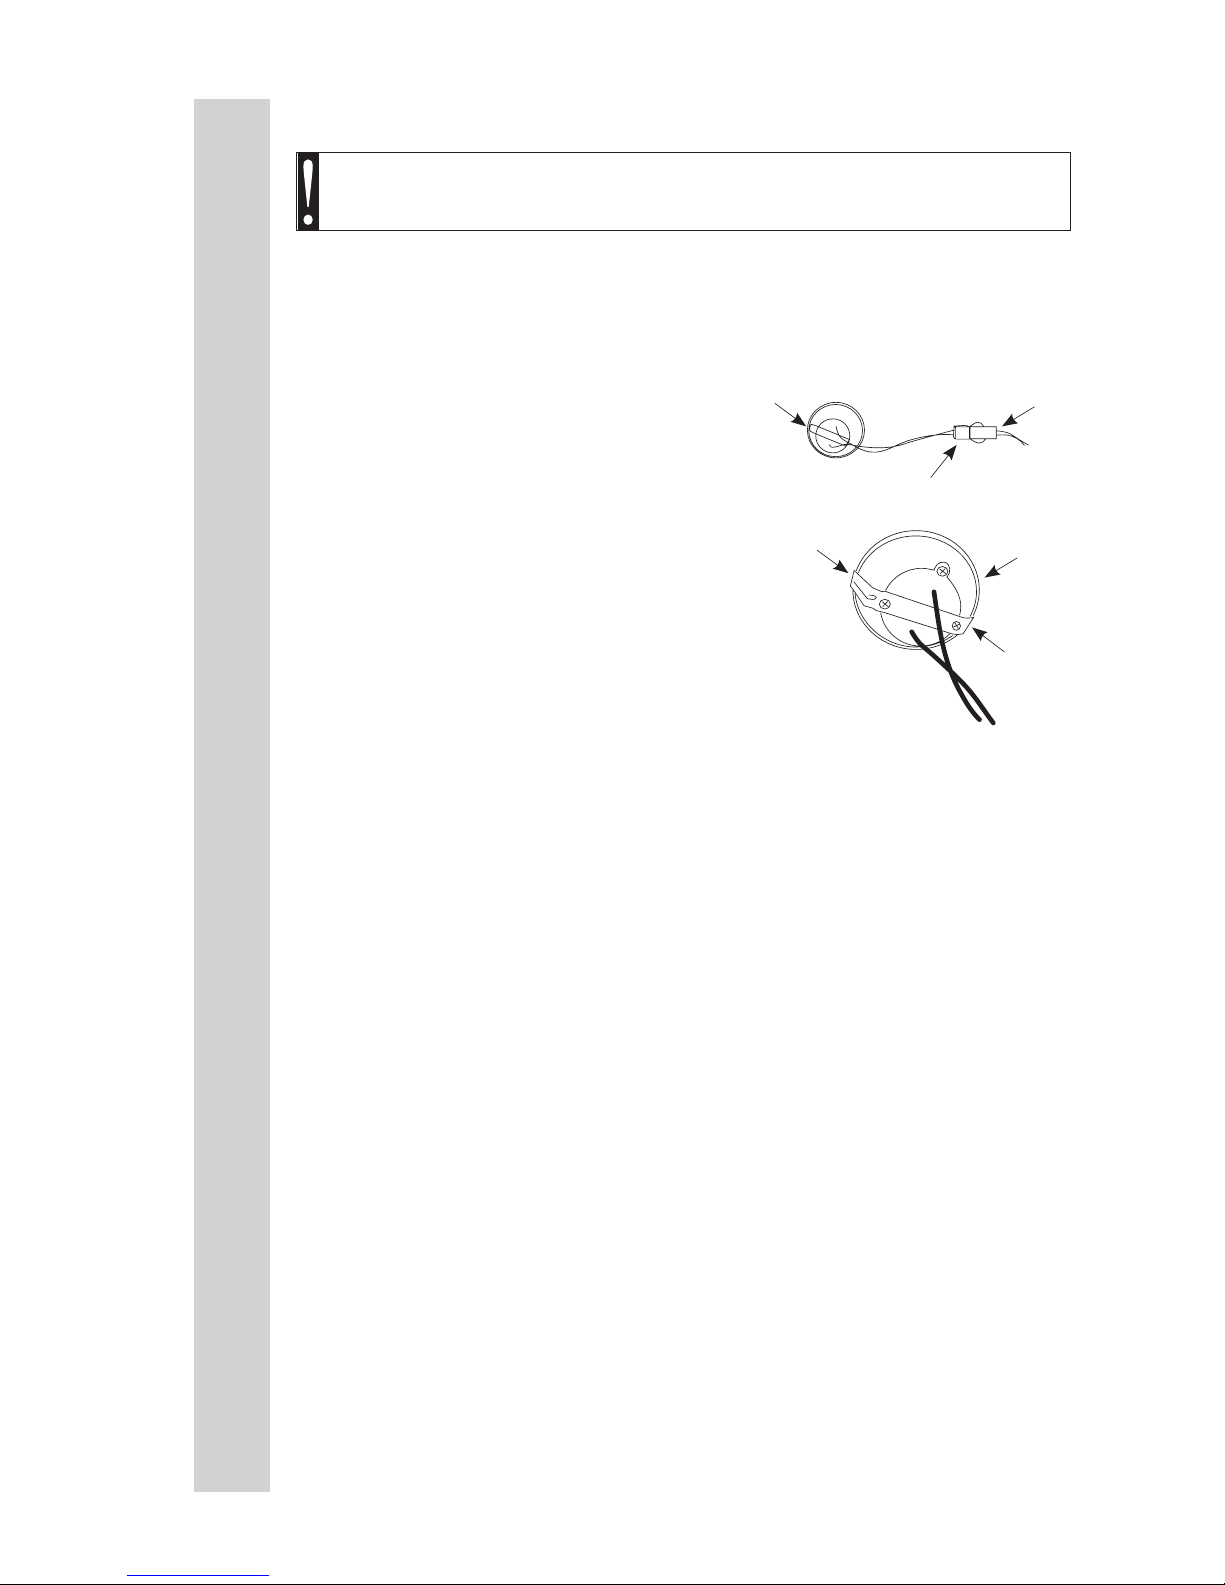
5. Locate the LED Light Fixture that you
wish to replace, and disconnect the wires
from the Light Fixture from the white Wire
Connector on the unit by squeezing together
the two clips on the Wire Connector.
6. Press together the two sides of the Metal
Clip on the Light Fixture to release it from
the body of the Dehydrator and then gently
push the Light Fixture into the Cabinet of the
unit, being sure to have a grip on the wires
connected to the Light Fixture so it does
not drop into the Dehydrator Cabinet. Discard the removed Light Fixture.
7. Insert the replacement Light Fixture into the vacant hole where the old Light
Fixture was by rst feeding the wire connected to the Light Fixture rst.
8. Line up the Light Fixture with the hole and push it back until the Metal Clips
on the back of the Light Fixture lock into place.
9. Re-connect the Wire Connector attached to the Light Fixture with the Wire
Connector the old Light Fixture was connected to by pressing them together until
they lock.
10. Line the Back Panel of the Dehydrator up and re-install the removed screws
to mount the Back Panel.
WARNING! Before cleaning, assembling or disassembling the
Dehydrator, make sure the Dehydrator is OFF and the PLUG IS
REMOVED FROM THE OUTLET/POWER SOURCE!
LED Light
Fixture
Wire
Connector
Wire
Connector
Push
Metal
Clip
Push
Metal
Clip
LED Light
Fixture
LIGHT BULB REPLACEMENT
Page 15
15
ENGLISH INSTRUCTIONS
SAUSAGE OR SNACK
STICKS: Use the Snack
Stick Hangers to hang and
dry sausage links and snack
sticks. After removing all the
Racks from your Dehydrator,
simply drape the links over
the Snack Stick Hangers
and slide them into the top
Rack Supports. Be sure not
to
allow the links to rest on the bottom of the Cabinet or on top of the Diffuser.
GROUND MEATS: Whenever making jerky from ground meats, you
can use a jerky gun or such tool to create perfect strips of jerky as well
as snack sticks.
Snack Stick
Hangers
Rack Supports
Rack Supports
DRYING TIPS
BEEF: Choose Flank, Round or Sirloin Tip cuts, as they are the best beef
cuts for making jerky.
WILD GAME: Venison makes excellent jerky because it does not contain
marbleized fat. Flank or Round Cuts work best. Bear and Elk meat also
make very good jerky.
POULTRY: Whether making chicken or turkey jerky, it is important that
the meat be cooked heated to an internal temperature of 165oF (74oC)
before dehydrating to kill disease-causing bacteria.
FISH: Drying sh into jerky requires a lot of attention. It must be cleaned
and de-boned properly and rinsed thoroughly to ensure that all the blood
is washed away. Steam or bake the sh at 200oF (93oC) until aky before
dehydrating.
Page 16

16
ENGLISH INSTRUCTIONS
As with most methods of cooking, good preparation is essential to success.
Following a few basic guidelines will greatly increase the quality of the
dehydrated product and decrease the time needed to make it.
NOTE: Before dehydrating, heat meat to an internal temperature of 160oF
(71oC) and poultry to 165oF (74oC) to kill any bacteria that may be present.
Heat the meat or poultry in an oven, not the Dehydrator.
• To prevent fruit from darkening, briey soak slices in lemon or pineapple juice
before drying. You also can soak fruit slices in ascorbic acid, which is sold in
most pharmacies and health food stores in powder or tablet form. Prepare a
solution of ascorbic acid according to the manufacturer’s instructions. Soak
fruit slices in the solution for 2 to 3 minutes before dehydrating.
• Water or steam blanch* vegetables before drying to stop enzymatic
action. To water blanch, place vegetables directly into boiling water and
cover. Remove after three minutes. To steam blanch, place vegetables in a
steamer basket and steam for 3 to 5 minutes.
• Maintain a uniform thickness when slicing food items for dehydration. This
will ensure the items dry at the same rate.
• Maximum slice thickness for fruits and vegetables should be 1/4” (0.7 cm)
unless otherwise specied by a recipe.
• Maximum slice thickness for meats should be 3/16” (0.5 cm) unless
otherwise specied by a recipe.
• Lean meat makes better product than fatty meat.
• Marinate meat before heating and dehydrating.
• Food shrinks by half or more during dehydration. A pound of meat, for
example, will yield 1/2 to 1/3 lb (0.15 to 0.2 kg) of jerky. Don’t cut pieces too
small.
• Store dried foods in a closed container in a cool, dark, dry location. The
best storage temperature is between 50oF and 60oF (10o and 16oC). Dried
food should retain its freshness for months when stored this way.
• The actual time needed to dry a food depends on many factors including
the food’s moisture content, fat content, thickness and temperature as well
as ambient humidity and temperature.
• Water droplets may form on the surface of meat and other items while
drying. Occasionally blot the food items to remove the droplets.
*Blanching is not required for all vegetables. Check the recipe or a drying
guide.
DRYING TIPS
Page 17

17
ENGLISH INSTRUCTIONS
Meat should be as lean as possible. Using lean meat will help the meat dry
faster and aid in cleanup by decreasing fat drippings. Ground meat should be
80% to 90% lean. Ground turkey, venison, buffalo and elk are other excellent
choices for Jerky.
Jerky seasonings are available for all tastes, or you can get creative and
make your own. Whenever you make Jerky, you should cure the mixture with
cure (sodium nitrite). The cure is used to help prevent botulism during drying
at low temperatures. Follow the manufacturer’s directions on the cure packet.
Keep raw meats and their juices away from other foods. Marinate meats in the
refrigerator. Do not leave meats unrefrigerated. Prevent cross-contamination
by storing dried jerky away from raw meat. ALWAYS wash hands thoroughly
with soap and water before and after working with meat products. Use clean
equipment and utensils.
Keep meat and poultry refrigerated at 40°F (4.4°C) or slightly below; use or
freeze ground beef and poultry within 2 days; whole red meats, within 3 to 5
days. Defrost frozen meat in the refrigerator, not on the kitchen counter.
Special considerations must be made when using venison or other wild game,
since it can become heavily contaminated during eld dressing. Venison
is often held at temperatures that could potentially allow bacteria to grow,
such as when it is being transported. Refer to the USDA website for further
information on food safety. (www.usda.gov or www.fsis.usda.gov/fact_sheets/
index.asp)
When using a Dehydrator, check the temperature of the Dehydrator with a dial
thermometer before drying jerky. The minimum recommended temperature
for drying meats is 130°F (54°C). Temperatures below 130°F (54°C) are not
recommended.
IMPORTANT: Before placing the meat in a Dehydrator, it is highly
recommended to heat the meat to 160°F (71°C) BEFORE the dehydrating
process. This step assures that any bacteria present will be destroyed by
wet heat. After heating to 160°F (71°C), maintaining a constant Dehydrator
temperature of 130-140°F (54-60°C) during the drying process is important
because:
1.) the process must be fast enough to dry food before it spoils; and
2.) it must remove enough water so that microorganisms are unable to
grow.
MAKING JERKY
Page 18

If you are using a marinade, shake off excess liquid from the meat before
spacing it evenly in single layers, approximately 1/4”-1/2” (0.6-1.5 cm)
apart, on the Dehydrator Racks.
IMPORTANT NOTE: DO NOT place jerky over the center hole of the
Racks. This will impede airow to the center of the Cabinet and could
result in uneven drying.
Dry meat at 145-150°F (62.7-65.6°F) for 4-7 hours. You may need to
blot fat droplets from the surface of the meat occasionally, using a paper
towel. Drying times may vary based on many circumstances including but
not limited to: the relative humidity of the room, the temperature of the
meat at beginning of drying process, the amount of meat in the dehydrator,
leanness of meat, etc. Always allow jerky to cool before taste testing.
18
ENGLISH INSTRUCTIONS
MAKING JERKY
Wrap jerky/snack sticks in aluminum foil and store in a thick plastic food
storage bag, or place jerky/snack sticks in a jar with a tight lid. Avoid
storage in plastic containers or bags without wrapping in aluminum foil or
wax paper rst. Jerky/snack sticks should be stored in a dark, dry, place
between 50-60°F (10-15.6°C). You can store properly dried jerky/snack
sticks at room temperature for 1 to 2 months. To extend the shelf life to
up to 6 months, store jerky/snack sticks in the freezer. Be sure to label
and date all packages.
• While it is not necessary to reconstitute dried foods, it can be done with
ease. Vegetables can be used as a side dish or in recipes very effectively
after being reconstituted in the following way.
• Soak vegetables in cold, unsalted water for 3-7 minutes before cooking. If
planning to soak the food any longer, it should be placed in the refrigerator
while soaking. After soaking, it is best to cook the vegetables in the same
water in which they soaked. Simply bring the water to a boil and cook the
vegetables until tender.
• Generally 1 cup of dried vegetables will result in about 2 cups after
reconstitution. Fruits reconstitute at a ratio of approximately 1:1-1/2 cups.
• Reconstitution time will vary depending on the thickness of the dried
food and the temperature of the water used. Soaking the food in warmer
water will speed up the process, however, it may result in loss of avor.
STORING JERKY
RECONSTITUTION
Page 19

Remember drying food is as much an art as any other form of cooking.
Once familiar with the basics, experiment to create unique dried foods.
Just remember the basics:
• The leaner the meat, the better the jerky
• Do not overlap food products on the drying racks
• Properly pre-treat fruits and vegetables
• Drying times will vary
• Blot excess moisture from surface of foods while drying
• Rotate racks if drying is uneven
• Always follow food safety guidelines for meats, poultry and
sh to make sure the nished product is free of disease-causing
bacteria
SUMMARY
19
ENGLISH INSTRUCTIONS
• The owers should be dry to start with, best if picked after the dew
has dried and before the night damp sets in. Dry the owers as soon as
possible after picking.
• The best condition for drying owers is a dry, warm, dark, clean and well
ventilated area, which makes a dehydrator an ideal setting. Flowers will
retain the best color and condition when dried quickly.
• A low temperature should be used to retain the natural oils.
• Strip off the leaves or if you prefer to keep the foliage. Discard any
brown or damaged leaves.
• Place on the dehydrator Rack in a single layer, avoiding overlapping.
• Drying times will vary considerably depending on the size of the ower
and the amount of foliage. Dry at 100°F (38°C).
DRYING FLOWERS
Page 20

20
ENGLISH INSTRUCTIONS
There are basic rules to follow when handling food.
They are COOK, SEPARATE, CLEAN, and CHILL.
COOK
It’s crucial to cook food to a safe internal temperature to destroy bacteria that is present.
The safety of hamburgers and other foods made with ground meat has been receiving a lot
of attention lately, and with good reason. When meat is ground, the bacteria present on the
surface is mixed throughout the ground mixture. If this ground meat is not cooked to at least
160oF to 165oF (71oC to 74oC), bacteria will not be destroyed and there’s a good chance you
will get sick.
Solid pieces of meat like steaks and chops don’t have dangerous bacteria like E. coli on the
inside, so they can be served more rare. Still, any beef cut should be cooked to an internal
temperature of at least 145oF (63oC) (medium rare). The safe temperature for poultry is 165oF
(75oC) and solid cuts of pork should be cooked to 145oF (63oC).
SEPARATE
Foods that will be eaten uncooked and foods that will be cooked before eating MUST
ALWAYS be separated. Cross-contamination occurs when raw meats or eggs come in
contact with foods that will be eaten uncooked. This is a major source of food poisoning.
Always double-wrap raw meats and place them on the lowest shelf in the refrigerator so
there is no way juices can drip onto fresh produce. Then use the raw meats within 1-2 days
of purchase, or freeze for longer storage. Defrost frozen meats in the refrigerator, not on the
counter.
When grilling or cooking raw meats or sh, make sure to place the cooked meat on a clean
platter. Don’t use the same platter you used to carry the food out to the grill. Wash the utensils
used in grilling after the food is turned for the last time on the grill, as well as spatulas and
spoons used for stir-frying or turning meat as it cooks.
Make sure to wash your hands after handling raw meats or raw eggs. Washing hands with
soap and water, or using a pre-moistened antibacterial towelette is absolutely necessary after
you have touched raw meat or raw eggs. Not washing hands and surfaces while cooking is a
major cause of cross-contamination.
CLEAN
Wash your hands and work surfaces frequently when you are cooking. Washing with soap
and warm water for at least 15 seconds, then dry with a paper towel.
CHILL
Chilling food is very important. The danger zone where bacteria multiply is between 40oF and
140oF (4oC and 6oC). Your refrigerator should be set to 40oF (4oC) or below; your freezer should
be 0oF (-17oC) or below. Simple rule: serve hot foods hot, cold foods cold. Use chang dishes
or hot plates to keep food hot while serving. Use ice water baths to keep cold foods cold. Never
let any food sit at room temperature for more than 2 hours - 1 hour if the ambient temperature
is 90oF (32oC) or above. When packing for a picnic, make sure the foods are already chilled
when they go into the insulated hamper. The hamper won’t chill food - it just keeps food cold
when properly packed with ice. Hot cooked foods should be placed in shallow containers and
immediately refrigerated so they cool rapidly. Make sure to cover foods after they are cool.
NOTE: Special considerations must be made when using venison or other wild game, since it
can become heavily contaminated during eld dressing. Venison is often held at temperatures
that could potentially allow bacteria to grow, such as when it is being transported. Refer to
the USDA Meat and Poultry Department for further questions or information on meat and
food safety.
FOOD SAFETY
Page 21

Page 22

This warranty applies to products purchased and used in the U.S. and Canada,
which have been properly registered within 30 days of the date of original
purchase. This is the only express warranty for this product and is in lieu of
any other warranty or condition. This product is warranted to be free from
defects in material and workmanship for a period of two (2) years from the
date of original purchase. During this period, your exclusive remedy is repair
or replacement of this product or any component found to be defective, at our
option.
To register your product: complete the online form at
www.WestonProducts.com/Warranty.
This warranty does not cover unregistered products, unauthorized repairs or
service to products, products sold “as-is” by retailers, glass, lters, wear from
normal use, use not in conformity with the printed directions, or damage to the
product resulting from accident, alteration, abuse, or misuse. This warranty
extends only to the original consumer purchaser or gift recipient and is not
transferrable. Keep the original sales receipt, as proof of purchase is required
to make a warranty claim.
We exclude all claims for special, incidental and consequential damages
caused by breach of express or implied warranty. All liability is limited to
the amount of the purchase price. Every implied warranty, including any
statutory warranty or condition of merchantability or tness for a particular
purpose, is disclaimed except to the extent prohibited by law, in which case
such warranty or condition is limited to the duration of this written warranty.
This warranty gives you specic legal rights. You may have other legal rights
that vary depending on where you live. Some states or provinces do not
allow limitations on implied warranties or special, incidental, or consequential
damages, so the foregoing limitations may not apply to you.
Before returning the product for any repair or service: it must be clean and free
from any food particles or other debris; otherwise, we will return it or impose a
$50 cleaning surcharge, at our option.
To make a warranty claim: go to www.WestonProducts.com/Contact; or call
1.800.814.4895 in the U.S. and 001.216.901-6801 outside the U.S., Monday –
Friday, 8 am – 5 pm Eastern. You are responsible for all costs associated with
shipping us the product freight prepaid. If the product qualies for a warranty
repair or replacement, we will bear the cost of returning it to you. We are not
responsible for shipping damage.
For non-warranty work: call 1.800.814.4895 in the U.S. and 001.216.901.6801
outside the U.S., Monday – Friday, 8 am – 5 pm Eastern, to obtain a Return
Merchandise Authorization Number (RMA Number). We will refuse all returns
without an RMA Number. We charge US$35/hour for all diagnostic, service,
repair and processing work. We will not start any service or repair work without
prior authorization. You are responsible for all costs associated with shipping
us the product freight prepaid and our returning it to you.
TWO-YEAR LIMITED WESTON WARRANTY
Page 23

DESHIDRATADORES
DE ALIMENTOS
PRO-1200 28-0301-W (80 L)
PRO-2400 28-0501-W (160 L)
DEBIDO A CONSTANTES MEJORAS EN LA FÁBRICA, EL PRODUCTO QUE SE MUESTRA PUEDE
SER LIGERAMENTE DIFERENTE DEL PRODUCTO EN ESTA CAJA. 020416
DESHIDRATADOR DE ALIMENTOS
Page 24

Este electrodoméstico es un deshidratador, no un horno. Tiene
por n secar, no cocinar. La operación de un deshidratador no
es igual a la de un horno.
• ANTES de deshidratar, caliente la carne a una temperatura interna
de 160 oF (71oC) y las aves de corral a 165 oF (74 oC) en un horno para
eliminar cualquier bacteria que pueda estar presente.
•
Caliente la carne o el ave de corral en un HORNO, no en el
deshidratador.
• En teoría, Set temperature (temperatura establecida) es solo la
máxima temperatura alcanzada durante un ciclo de calentamiento.
Set temperature (temperatura establecida) no se mantiene.
• Según una variedad de factores, que incluyen las condiciones
ambientales, el estado de los alimentos que se secan y la fuente de
alimentación, es probable que no se pueda alcanzar la Set temperature
(temperatura establecida).
• Para obtener un máximo rendimiento: no utilice cables de extensión;
opere el deshidratador en una zona donde la temperatura supere
los 70 oF (21 oC); desconecte otros electrodomésticos del circuito
eléctrico donde conecta el deshidratador; asegúrese de que la puerta
esté completamente cerrada y sin espacios en las juntas; conecte
el deshidratador a un circuito eléctrico protegido por un interruptor
automático de 20 amperios.
• NO use el deshidratador en exteriores.
• Lea y comprenda todas las instrucciones y advertencias antes de
usar el deshidratador.
¡IMPORTANTE!
24
INSTRUCCIONES EN ESPAÑOLINSTRUCCIONES EN ESPAÑOL
Page 25

de 6" (15 cm) de todos los lados del deshidratador.
12. NO opere el deshidratador en ninguna supercie
inamable como alfombras o pisos de madera.
MANTÉNGASE SEGURO y use el deshidratador sobre
un bloque de cemento o piso de concreto.
13. PARA PROTEGERSE DE UNA DESCARGA
ELÉCTRICA: No sumerja el cable, los enchufes o
DESHIDRATADOR EN EL AGUA O LÍQUIDO. ANTES
DE LIMPIAR EL DESHIDRATADOR ASEGÚRESE
QUE ESTÉ DESCONECTADO DE LA FUENTE DE
PODER. Lave a mano y seque bien todas las piezas.
Limpie bien todas las piezas que entran en contacto
con los alimentos antes de usar el electrodoméstico.
NUNCA enjuague el aparato deshidratador con una
manguera o echando agua, solo utilice un paño húmedo
para limpiar el deshidratador. NO use el deshidratador
cuando tenga las manos mojadas o esté descalzo. NO
lo use cerca del agua.
14. NO permita que gotee agua dentro del difusor,
pueden producirse daños en el elemento calentador.
NO retire el difusor del gabinete. La integridad del
ensamblado se verá afectada y podría anular la
garantía. Siga las instrucciones de limpieza del difusor
después de CADA uso.
15. Después de limpiar, asegúrese de que el
deshidratador esté completamente seco antes de
volver a conectarlo a la fuente de alimentación –
de lo contrario; pueden producirse DESCARGAS
ELÉCTRICAS y ocasionar lesiones personales.
16. No seguir las instrucciones de limpieza
y mantenimiento disminuirá la vida útil de su
deshidratador ocasionando graves desperfectos en el
funcionamiento del producto, lesiones graves o daños
materiales.
17. No lo coloque sobre o cerca de una hornilla
de gas o eléctrica, o en un horno caliente.. NO
permita que el cable de alimentación cuelgue sobre el
deshidratador o supercies calientes.
18. ATENCIÓN. Algunas supercies del
deshidratador pueden CALENTARSE
excesivamente durante su uso. Esto puede
ocasionar lesiones graves. NO toque estas partes
durante la operación o hasta que se enfríen después
del uso.
19. NO intente operar el deshidratador si el
propio deshidratador está frío. La temperatura del
deshidratador debe estar por lo menos a 45 oF (7 oC)
antes de iniciar.
20. NO utilice el deshidratador bajo la inuencia de
drogas, medicamentos o alcohol.
21. No use el aparato para otro uso que pretende.
22. Debe tener mucho cuidado al mover un aparato o
pieza que contenga aceite u otros líquidos calientes.
1. SIEMPRE DESCONECTE el deshidratador de
la fuente de alimentación antes de dar mantenimiento,
cambiar accesorios o limpiar la unidad.
2. UTILICE SIEMPRE UN CIRCUITO ELÉCTRICO
ESPECÍFICO SEPARADO para suministrar energía
a este deshidratador. El circuito debe tener como
mínimo un cable de calibre n.º 12 y DEBE estar
protegido con un interruptor automático de 20 amperios.
Si no está seguro de su sistema eléctrico, contacte a
un electricista calicado. La falta de revisión de su
sistema eléctrico, podría provocar un incendio, lesiones
o daños materiales. La unidad no se calentará a la Set
temperature (temperatura establecida) a menos que se
realice este paso.
3. NUNCA DEJE EL DESHIDRATADOR SIN
SUPERVISIÓN. Manténgase seguro, DESCONECTE
el deshidratador de la fuente de alimentación antes
de dejar el área de trabajo. Se necesita una estricta
supervisión cuando se use el aparato cerca de los
niños. Este aparato NO es para ser usado por niños.
4. Reduzca el riesgo de arranques no intencionados.
Asegúrese de que el interruptor de Power
(alimentación) esté en la posición “OFF” (apagado)
antes de conectarlo a la fuente de alimentación. Para
desconectar, ajuste todo control a apagado, luego retire
el enchufe del tomacorriente
5. NO USE el deshidratador si el cable de
alimentación, el enchufe o cualquier otra parte está
dañada. Si el cable de alimentación del deshidratador
está dañado, póngase en contacto con el departamento
de Atención al Cliente. NO INTENTE REEMPLAZAR
EL CABLE. Asegúrese de no permitir que el cable de
alimentación cuelgue en su área de trabajo. Verique
que todas las piezas funcionen correctamente y
cumplan sus funciones. Verique la alineación de las
piezas móviles o cualquier otra condición que pueda
afectar el funcionamiento.
6. NUNCA use accesorios o partes de otros fabricantes.
Hacerlo ANULARÁ SU GARANTÍA y puede causar un
incendio, una descarga eléctrica o una lesión.
7. El fabricante no se hace responsable por el uso
inadecuado del deshidratador. El uso inadecuado del
deshidratador anula la garantía.
8. La reparación del sistema eléctrico debe ser realizada
por un distribuidor autorizado. Utilice solo los accesorios
y repuestos de fábrica originales. La modicación del
deshidratador anula la garantía.
9. Asegúrese de que el deshidratador esté en una
supercie estable de trabajo. Asegúrese que todas las
patas del deshidratador estén estables.
Asegure las ruedas (si corresponde) antes de su uso.
10. NO lo utilice al aire libre.
11. Este deshidratador contiene conductos de entrada
y escape en la parte posterior de la unidad. Mantenga
todos los objetos y las paredes a una distancia mínima
25
INSTRUCCIONES EN ESPAÑOLINSTRUCCIONES EN ESPAÑOL
REGLAS IMPORTANTES DE SEGURIDAD
LEA Y ENTIENDA COMPLETAMENTE TODAS LAS INSTRUCCIONES Y
ADVERTENCIAS ANTES DE UTILIZAR ESTA UNIDAD. ¡SU SEGURIDAD
ES LO MÁS IMPORTANTE! NO SEGUIR LOS PROCEDIMIENTOS
Y PRECAUCIONES PUEDE PROVOCAR LESIONES GRAVES Y
DAÑOS MATERIALES. RECUERDE: ¡SU SEGURIDAD PERSONAL ES
RESPONSABILIDAD DE USTED!
¡GUARDE ESTAS INSTRUCCIONES!
Page 26

ATERRIZADO
Este aparato debe estar aterrizado para
proteger al operario de choques eléctricos.
El aparato está equipado con un cable de 3
conductores y una clavija de tierra de tres
patas que entra en un tomacorriente aterrizado
apropiado. El aparato tiene una clavija que se
ve como la gura A.
FIGURA A
Conductor
del circuito
de tierra
Pata de
tierra
INSTRUCCIONES PARA HACER TIERRA
26
INSTRUCCIONES EN ESPAÑOLINSTRUCCIONES EN ESPAÑOL
Page 27

Page 28

28
INSTRUCCIONES EN ESPAÑOLINSTRUCCIONES EN ESPAÑOL
ADVERTENCIA. ¡Antes de limpiar, armar o desarmar el
deshidratador, asegúrese que se haya RETIRADO EL ENCHUFE
DEL TOMACORRIENTE O FUENTE DE ALIMENTACIÓN. SIEMPRE
desconecte el deshidratador cuando no esté en uso.
BACK VIEW
Page 29

29
INSTRUCCIONES EN ESPAÑOLINSTRUCCIONES EN ESPAÑOL
LISTA DE COMPONENTES
Si cualquier componente de esta unidad está roto, si no funciona debidamente, o si necesita un
instructivo de repuesto, visítenos en la web en
WestonProducts.com
O llame a Weston Brands LLC larga distancia sin costo 1-800-814-4895
De lunes a viernes, de 8:00 a.m. a 5:00 p.m. tiempo del ET. Fuera de Estados Unidos llame
al 001-216-901-6801
NÚMERO DE DIAGRAMA DESCRIPCIÓN DE LA PIEZA 28-0301-W 28-0501-W
1 PUERTA 28-0404-W 28-0504-W
2 PANEL SUPERIOR 28-0506 28-0506
N/A PANEL INFERIOR (SIN FOTO) 28-0307 28-0307
3 BISAGRA SUPERIOR DE LA PUERTA 28-0333 28-0333
4
TABLERO DE COMPUTADORA
PRINCIPAL Y PANEL DE CONTROL
28-0513 28-0513
5 DIFUSOR 28-0311 28-0331
N/A DIFUSOR DEL PANEL POSTERIOR N/A 28-0330
6 BANDEJA DE GOTEO 28-0519 28-0519
7 BISAGRA INFERIOR DE LA PUERTA 28-0334 28-0334-N
8
REJILLA ANTIADHERENTE - JUEGO
DE 12
28-0313
28-0313
(2 JUEGOS INCLUIDOS)
9
ESCUADRA PARA ESQUINA INFERIOR
TRASERA (2)
28-0336 28-0336-N
N/A
SOPORTE PARA PATA DELANTERA
(SIN FOTO)
28-0332 28-0332-N
10
JUEGO DE PATA
(INCLUYE 4 PATAS Y PERNO)
28-0308 N/A
N/A
JUEGO DE RUEDA (INCLUYE 4
RUEDAS Y TUERCAS)
N/A 28-0508
11
VENTILADOR Y ELEMENTO
CALENTADOR
28-0302 28-0302
12 INTERRUPTOR AUTOMÁTICO 28-0379 28-0379
13 PANEL POSTERIOR 28-0305 28-0505
N/A
COLGADOR PARA PALITOS DE
BOCADILLOS (SIN FOTO)
28-0322 28-0322-N
Page 30

30
INSTRUCCIONES EN ESPAÑOLINSTRUCCIONES EN ESPAÑOL
Page 31

31
INSTRUCCIONES EN ESPAÑOLINSTRUCCIONES EN ESPAÑOL
Page 32

7. PARA AJUSTAR EL TIEMPO: Presione el botón “TIME” (tiempo) en el
panel de control una vez. Utilice los botones “UP” (subir) y “DOWN” (bajar)
que se encuentran en el lado derecho del panel de control para ajustar las
horas del temporizador regresivo (máximo 23 horas). Presione el botón
“TIME” (tiempo) de nuevo para cambiar a minutos. Del mismo modo ajuste
los minutos (incrementos de 5 minutos).
8. PARA AJUSTAR LA TEMPERATURA: Presione el botón “TEMP”
(temperatura) una vez. Utilice los botones “UP” (subir) y “DOWN” (bajar) para
establecer la temperatura (160 oF máximo, mínimo 50 oF, incrementos de
5 grados).
NOTA: Set Temperature (temperatura establecida) es la temperatura máxima
que el deshidratador podría alcanzar durante el funcionamiento.
9. No es necesario que presione ningún otro botón. El deshidratador
se iniciará automáticamente después de una breve pausa. NOTA: El
deshidratador se encenderá si usted se demora al realizar la programación.
No se preocupe, esto es normal. Solo continúe la programación como se
indica anteriormente.
10. La pantalla digital en el panel de control funcionará continuamente
mientras la unidad está en funcionamiento. Se mostrará alternativamente: el
tiempo de secado preestablecido “TIME SET” (tiempo establecido); el tiempo
de secado restante “TIME REMAINING” (tiempo restante); la temperatura
preestablecida “SET TEMP.” (temperatura establecida); y la temperatura
real actual dentro del deshidratador “TEMP ACTUAL” (temperatura real)
(medida por el sensor de temperatura que se encuentra en la pared trasera,
cerca de la parte superior).
NOTA: “SET TEMP.” (temperatura establecida) es solo la máxima
temperatura alcanzada durante un ciclo de calentamiento. “SET TEMP.”
(temperatura establecida) NO se mantiene.
11. El deshidratador emitirá 8 pitidos al inicio y cuando la temperatura interior
alcance el valor preestablecido.
12. El deshidratador se detiene automáticamente (ventilador y calentador)
cuando el temporizador regresivo llegue a 0. Sin embargo, la alimentación
de la unidad permanecerá encendida.
Pantalla digital
PROGRAMACIÓN
FUNCIÓN
32
INSTRUCCIONES EN ESPAÑOLINSTRUCCIONES EN ESPAÑOL
Page 33

13. Ajuste el interruptor de encendido en “OFF” (apagado) cuando haya
terminado.
14. Desenchufe el deshidratador cuando no esté en uso.
15. Limpie el deshidratador después de cada uso, especialmente el difusor.
Consulte la sección “INSTRUCCIONES DE LIMPIEZA” en este manual.
• El propósito de este deshidratador es secar, no cocinar. No funciona de
la misma manera que un horno. Su funcionamiento y rendimiento no deben
compararse a los de un horno.
• “SET TEMP.” (temperatura establecida) del deshidratador solo es la
temperatura máxima que se alcanza durante un ciclo de calentamiento.
Es la temperatura en la que el calentador se apaga. El ventilador seguirá
funcionando. La calefacción se reanuda cuando la temperatura desciende
de 5 a 10 grados por debajo de la “SET TEMP.” (temperatura establecida).
• La temperatura máxima a la que puede establecer el deshidratador es
160 oF (71 oC). El deshidratador puede o no puede llegar a la Set Temperature
(temperatura establecida) dependiendo de varios factores, incluyendo:
la temperatura en la zona donde el deshidratador está funcionando; si
se está utilizando o no un cable de extensión; si el deshidratador está o
no está compartiendo el circuito eléctrico con otros electrodomésticos; la
consistencia, la temperatura y el contenido de humedad de alimentos; la
cantidad y la posición de los alimentos en las rejillas.
• Para obtener un máximo rendimiento del deshidratador: NO utilice cables
de extensión; opere el deshidratador en un área donde la temperatura esté
por encima de 70 oF (21 oC); desconecte todos los otros electrodomésticos
del circuito eléctrico al que se conecta el deshidratador; asegúrese de que la
puerta esté completamente cerrada y sin espacios en las juntas; conecte el
deshidratador a un circuito eléctrico protegido por un interruptor automático
de 20 amperios.
OPERACIÓN POSTERIOR
INSTRUCCIONES DE FUNCIONAMIENTO
33
INSTRUCCIONES EN ESPAÑOLINSTRUCCIONES EN ESPAÑOL
Page 34

• ¡IMPORTANTE! Limpie el deshidratador después de CADA uso. No
utilice limpiadores abrasivos. Las rejillas NO pueden lavarse en el lavavajillas.
• ¡ADVERTENCIA! NO sumerja el deshidratador en agua. NO rocíe el
deshidratador con agua. NO permita que gotee agua al interior del difusor.
• NO permita que la grasa se acumule en el interior del deshidratador,
especialmente en el difusor. Puede causar daños a los componentes o
provocar un incendio.
• Apague y desenchufe el deshidratador. Deje que el deshidratador se enfríe.
Limpie las rejillas, el interior y exterior del gabinete, el difusor, la puerta y la
bandeja de goteo como se describe a continuación.
REJILLAS ANTIADHERENTE
Lave las rejillas a mano con un cepillo suave en agua tibia y jabón. Enjuague
y seque con una toalla. Asegúrese de que las rejillas estén completamente
secas antes de colocarlas nuevamente en el deshidratador.
INTERIOR DEL GABINETE
Limpie el interior del gabinete y los soportes de las rejillas con un paño
moderadamente húmedo y jabón si es necesario. NO utilice limpiadores abrasivos.
Limpie cualquier residuo si se utiliza jabón. PRECAUCIÓN: NO permita que gotee
agua al interior del difusor. Puede provocar una descarga eléctrica o daños en la
unidad. Si es necesario, cubra el difusor con una toalla seca durante la limpieza
del interior del gabinete y los soportes de las rejillas.
EXTERIOR DEL GABINETE
Limpie el exterior del gabinete con un paño moderadamente húmedo y jabón
si es necesario. Limpie cualquier residuo si se utiliza jabón.
DIFUSOR
Limpie la parte superior y los lados del difusor con un paño ligeramente
húmedo y jabón si es necesario. NO utilice limpiadores abrasivos. Retire
cualquier residuo si se utiliza jabón.
PRECAUCIÓN: NO permita que
gotee agua al interior del difusor.
Puede provocar una descarga
eléctrica o daños en la unidad.
Inspeccione los oricios de ventilación
en los laterales y la parte superior del
difusor. Todos los oricios deben
estar limpios y completamente abiertos.
Utilice un mondadientes u otro objeto
puntiagudo para eliminar cualquier residuo.
Tenga cuidado de no arrojar residuos al interior del difusor.
ADVERTENCIA. Antes de limpiar, ensamblar o desarmar el
deshidratador, asegúrese de que el deshidratador esté APAGADO
y de que se haya RETIRADO EL ENCHUFE DEL TOMACORRIENTE O
DE LA FUENTE DE ALIMENTACIÓN.
Oricios de
ventilación
superiores
Asegúrese de
que los oricios
estén libres
Difusor
INSTRUCCIONES DE LIMPIEZA
34
INSTRUCCIONES EN ESPAÑOLINSTRUCCIONES EN ESPAÑOL
Page 35

PUERTA DEL GABINETE
Limpie la puerta y la junta con un paño moderadamente húmedo y jabón si
es necesario. Limpie cualquier residuo si se utiliza jabón. Limpie el vidrio
con un trapo o toallas de papel y un limpiador de vidrios.
BANDEJA DE GOTEO
Primero vacíe y luego lave la bandeja de goteo con agua tibia y jabón.
Enjuague y seque la bandeja de goteo antes de volver a instalarla en el
deshidratador.
El deshidratador se apaga y
no se reiniciará.
• Apague el deshidratador y
desconecte el cable de alimentación
del tomacorriente. Presione el botón
en el Circuit Breaker (cortacircuitos)
(ubicado en la parte posterior del
deshidratador cerca de la parte
superior) para reiniciarlo.
• Verique el interruptor automático
de la casa que controla el
tomacorriente al que ha conectado
el deshidratador. Asegúrese de que
el interruptor sea de 20 amperios y
que no haya otros electrodomésticos
utilizándose al mismo tiempo.
Reinícielo, si es necesario.
Secado desigual o incompleto.
• No tape los oricios centrales de las rejillas.
• Voltee las rejillas cada 45 a 90 minutos, dependiendo de los alimentos
que se están secando. Mueva la rejilla superior hacia la parte inferior. Suba
todas las otras rejillas un estante. Alterne las rejillas.
• No llene de productos alimenticios. La distancia entre los productos en las
rejillas es de ½" a 1" (1.3 a 2.5 cm).
• Aumente el tiempo de secado y temperatura.
• No obstruya los conductos de ventilación en la parte inferior del
deshidratador.
• Mantenga el deshidratador a una distancia mínima de 6" (15.2 cm) de
cualquier pared.
Si las sugerencias anteriores no resuelven el problema que tiene con el
deshidratador, póngase en contacto con el departamento de Atención
al Cliente al número que aparece en la parte posterior de este manual
para obtener información adicional y otra información sobre solución de
problemas.
Botón Circuit breaker
(cortacicuitos)
y Reset (reinicio)
SOLUCIÓN DE PROBLEMAS
35
INSTRUCCIONES EN ESPAÑOLINSTRUCCIONES EN ESPAÑOL
Page 36

1. Apague las luces del deshidratador. Apague y desconecte el
deshidratador del tomacorriente.
2. Deje enfriar el deshidratador. NO trate de reemplazar una bombilla
mientras el deshidratador está caliente.
3. Retire todas las rejillas.
4. Retire el panel posterior del deshidratador.
5. Busque el accesorio de iluminación
LED que desea reemplazar y desconecte
los cables del accesorio de iluminación
del conector de cable blanco de la unidad,
ajustando los dos clips en el conector de
cable.
6. Presione juntos los dos lados del clip de
metal en el accesorio de iluminación para
liberarlo del cuerpo del deshidratador y
luego empuje cuidadosamente el accesorio
de iluminación en el gabinete de la unidad,
asegurándose de tener un control sobre
los cables conectados al accesorio de
iluminación para que
no se caiga en el gabinete del deshidratador. Deseche el accesorio de
iluminación que se retiró.
7. Inserte el accesorio de iluminación de reemplazo en el oricio vacío
donde se encontraba el accesorio de iluminación anterior, alimentando
primero el cable conectado al accesorio de iluminación.
8. Alinee el accesorio de iluminación con el oricio y presiónelo de nuevo
hasta que los clips de metal de la parte posterior del accesorio de iluminación
encajen en su lugar.
9. Vuelva a conectar el conector de cable sujeto al accesorio de iluminación
con el conector de cable conectado al accesorio de iluminación anterior
presionándolos hasta que encajen.
10. Alinee el panel posterior del deshidratador y vuelva a instalar los tornillos
retirados para montar el panel posterior.
ADVERTENCIA. Antes de limpiar, ensamblar o desarmar el
deshidratador, asegúrese de que el deshidratador esté APAGADO
y de que se haya RETIRADO EL ENCHUFE DEL TOMACORRIENTE
O DE LA FUENTE DE ALIMENTACIÓN.
Accesorio de
iluminación LED
Conector
de cable
Conector
de cable
Clip
de metal
de presión
Clip
de metal
de presión
Accesorio de
iluminación
LED
REEMPLAZO DE LA BOMBILLA
36
INSTRUCCIONES EN ESPAÑOLINSTRUCCIONES EN ESPAÑOL
Page 37

SALCHICHA O PALITOS
DE BOCADILLO: Utilice
el colgador para palitos de
bocadillo para colgar y secar
las salchichas y los palitos
de bocadillo. Después de
retirar todas las rejillas de su
deshidratador, simplemente
cuelgue las salchichas en
los colgadores para palitos
de bocadillo y colóquelas
en los soportes de la rejilla
superior. Asegúrese de no
permitir que las salchichas
se queden en la parte
inferior del gabinete o en la
parte superior del difusor.
Colgadores para
palitos de bocadillo
Soportes
de rejilla
Soportes
de rejilla
CONSEJOS DE SECADO
CARNE DE RES: Elija cortes de la falda, pierna o solomillo, ya que son
los mejores cortes de carne de res para hacer cecina.
CAZA SILVESTRE: La carne de venado es una excelente opción para
hacer cecina, ya que no contiene grasa marmolada. Los cortes de la falda
o pierna funcionan mejor. Las carnes de oso y alce también permiten hacer
cecina de muy buena calidad.
AVES DE CORRAL: Al preparar cecina de pollo o pavo, es importante
que la carne que se va a cocinar se caliente a una temperatura interna de
165 oF (74 oC) antes de la deshidratación para eliminar las bacterias que
causan enfermedades.
PESCADO: El secado del pescado para convertirlo en cecina requiere
de mucho cuidado. Se debe limpiar y quitar las espinas adecuadamente y
enjuagar por completo para asegurar que se limpió toda la sangre. Cueza
al vapor u hornee el pescado a 200 oF (93 oC) hasta que tenga consistencia
de hojaldre antes de deshidratar.
CARNES MOLIDAS: Cuando prepare cecina de carne molida,
puede utilizar una pistola de cecina o dicha herramienta para crear tiras de
carne seca perfectas, así como palitos de bocadillo.
37
INSTRUCCIONES EN ESPAÑOLINSTRUCCIONES EN ESPAÑOL
Page 38

Al igual que con la mayoría de los métodos de cocción, una buena preparación
es fundamental para tener éxito. Siguiendo algunas pautas básicas aumentará en
gran medida la calidad del producto deshidratado y disminuirá el tiempo requerido
para hacerlo.
NOTA: Antes de deshidratar, caliente la carne a una temperatura interna de 160
o
F (71 oC) y las aves de corral a 165 oF (74 oC) en un horno para eliminar cualquier
bacteria que pueda estar presente. Caliente la carne o ave de corral en un horno,
no en el deshidratador.
• Para evitar que la fruta se oscurezca, sumérjala brevemente en rodajas de limón
o jugo de piña antes del secado. También puede remojar trozos de fruta en ácido
ascórbico, el cual se vende en la mayoría de las farmacias y tiendas naturistas en
forma de polvo o tableta. Prepare una solución de ácido ascórbico de acuerdo con
las instrucciones del fabricante. Remoje las rebanadas de fruta en la solución de 2
a 3 minutos antes de la deshidratación.
• Escalde con agua o vapor* las verduras antes del secado para detener la acción
enzimática. Para el escaldado con agua, coloque las verduras directamente en el
agua hirviendo y tape. Sáquelas después de tres minutos. Para el escaldado con
vapor, coloque las verduras en una vaporera y cocine al vapor de 3 a 5 minutos.
• Mantenga un espesor uniforme al rebanar los alimentos que se van a deshidratar.
Esto asegurará que los productos se sequen a la misma velocidad.
• El espesor máximo del corte de frutas y verduras debe ser de 1/4" (0.7 cm) a
menos que se especique lo contrario en una receta.
• El espesor máximo del corte de carnes debe ser de 3/16" (0.5 cm) a menos que
se especique lo contrario en una receta.
• La carne magra es un mejor producto que la carne con grasa.
• Marine la carne antes de calentarla y deshidratarla.
• Los alimentos se reducen a la mitad o más durante la deshidratación. Una libra de
carne, por ejemplo, rendirá 1/2 a 1/3 lb (0.15 a 0.2 kg) de cecina. No corte piezas
demasiado pequeñas.
• Almacene alimentos secos en un recipiente cerrado en un lugar oscuro, fresco y
seco. La mejor temperatura de almacenamiento oscila entre 50 oF y 60 oF (10 o y
16 oC). Los alimentos secos deberían conservar su frescura durante meses cuando
se almacena de esta manera.
• El tiempo que se necesita en realidad para secar un alimento depende de muchos
factores incluyendo el contenido de la humedad, el contenido de grasa, el espesor
y la temperatura del alimento, así como la humedad ambiental y la temperatura.
• Posiblemente se formen gotas de agua en la supercie de la carne y otros
productos mientras se secan. Seque los productos alimenticios ocasionalmente
para remover las gotas.
*No es necesario escaldar todos los vegetales. Revise la receta o una guía de
secado.
CONSEJOS DE SECADO
38
INSTRUCCIONES EN ESPAÑOLINSTRUCCIONES EN ESPAÑOL
Page 39

La carne debe ser lo más delgada posible. El uso de la carne magra le
ayudará a que la carne se seque más rápido y ayudará en la limpieza por la
disminución de los goteos de grasa. La carne molida debe ser de 80% a 90%
magra. Las carnes de pavo, venado, búfalo y alce molidas son otras opciones
excelentes para hacer cecina.
Los condimentos para la cecina están disponibles para todos los gustos, o
puede dejarse llevar por su creatividad y preparar el suyo. Siempre que haga
cecina, debe curar la mezcla con la curación (nitrito de sodio). La curación
se utiliza para ayudar a prevenir el botulismo durante el secado a bajas
temperaturas. Siga las instrucciones del fabricante que se encuentran en el
paquete de curación.
Conserve las carnes crudas y sus jugos alejados de otros alimentos. Deje las
carnes marinadas en el refrigerador. No deje las carnes sin refrigerar. Evite
la contaminación cruzada mediante el almacenamiento de cecina seca lejos
de la carne cruda. SIEMPRE lávese las manos cuidadosamente con agua y
jabón antes y después de trabajar con los productos cárnicos. Use equipos
y utensilios limpios.
Mantenga la carne y aves refrigeradas a una temperatura igual o ligeramente
inferior a 40 °F (4.4 °C); utilice o congele la carne molida y las aves dentro de
2 días; las carnes rojas enteras, de 3 a 5 días. Descongele la carne congelada
en el refrigerador, no en el mostrador de la cocina.
Se deben tomar en cuenta consideraciones especiales cuando se utiliza
la carne de venado o de otro tipo de caza silvestre, ya que puede llegar a
contaminarse durante el sangrado, despellejado y limpieza de la pieza. A
menudo, la carne de venado se mantiene a temperaturas que podrían permitir
que las bacterias se multipliquen, como cuando se está transportando.
Consulte el sitio web del USDA para obtener mayor información sobre la
seguridad alimentaria. (www.usda.gov o www.fsis.usda.gov/fact_sheets/
index.asp)
Al utilizar un deshidratador, verique la temperatura del deshidratador con
un termómetro de aguja antes de secar la cecina. La temperatura mínima
recomendada para el secado de carnes es de 130 °F (54 °C). No se
recomiendan las temperaturas inferiores a 130 °F (54 °C).
IMPORTANTE: Antes de colocar la carne en un deshidratador, se
recomienda rmemente calentar la carne a 160 °F (71 °C) ANTES del
proceso de deshidratación. Este paso asegurará de que el calor húmedo
destruya cualquier bacteria presente. Después de calentar a 160 °F (71 °C),
es importante mantener una temperatura constante del deshidratador de 130
a 140 °F (54 a 60 °C) durante el proceso de secado porque:
1.) el proceso debe ser lo sucientemente rápido para secar el alimento
antes de que se eche a perder; y
2.) debe eliminar suciente agua de manera que los microorganismos
no puedan desarrollarse.
PREPARACIÓN DE LA CECINA
39
INSTRUCCIONES EN ESPAÑOLINSTRUCCIONES EN ESPAÑOL
Page 40

Si está utilizando una marinada, sacuda el exceso de líquido de la carne
antes de dividirlo uniformemente en capas individuales, aproximadamente
1/4" a 1/2" (0.6 a 1.5 cm), en las rejillas del deshidratador.
NOTA IMPORTANTE: NO coloque la cecina sobre el oricio central de
las rejillas. Esto impedirá el ujo de aire al centro del gabinete y puede
ocasionar un secado desigual.
Seque la carne de 145 a 150 °F (62.7 a 65.6 °C) durante 4 a 7 horas.
Es posible que tenga que secar gotitas de grasa de la supercie de la
carne de vez en cuando, con una toalla de papel. Los tiempos de secado
pueden variar en base a muchas circunstancias que incluyen pero no se
limitan a: la humedad relativa del cuarto, la temperatura de la carne al
inicio del proceso, la cantidad de carne en el deshidratador, la cantidad
de grasa en la carne, etc. Siempre permita que la cecina se enfríe antes
de la degustación.
PREPARACIÓN DE LA CECINA
Envuelva la cecina/palitos de bocadillo en hoja de aluminio y almacénela
en una bolsa de plástico grueso para almacenamiento, o coloque la
cecina/palitos de bocadillo en un frasco con una tapa ajustada. Evite
almacenarla en contenedores o bolsas de plástico sin envolverla
previamente en hoja de aluminio o papel encerado. La cecina/palitos de
bocadillo deben almacenarse en un lugar oscuro y seco entre 50 y 60 °F
(10 y 15.6 °C). Puede almacenar cecina/palitos de bocadillo secados de
manera adecuada a temperatura ambiente por 1 a 2 meses. Para ampliar
la vida útil hasta a 6 meses, almacene la cecina/palitos de bocadillo en el
congelador. Asegúrese de etiquetar y fechar todos los paquetes.
• Si bien no es necesario rehidratar los alimentos secos, esto se puede
hacer con facilidad. Las verduras se pueden utilizar como un plato de
acompañamiento o en recetas de manera muy ecaz después de haber
sido rehidratadas de la siguiente manera.
• Remoje las verduras en agua fría sin sal durante 3 a 7 minutos antes de
cocinar. Si tiene previsto remojar los alimentos por más tiempo, se debe
colocar en el refrigerador mientras se remoja. Después de remojar, lo
mejor es cocinar las verduras en la misma agua en la que se remojaron.
Simplemente hierva el agua y cocine las verduras hasta que estén
blandas.
• Por lo general, 1 taza de verduras secas resultará en aproximadamente
2 tazas después de la rehidratación. Las frutas se rehidratan en una
proporción de aproximadamente 1:1-1/2 tazas.
• El tiempo de rehidratación variará dependiendo de la consistencia de los
alimentos secos y la temperatura del agua utilizada. Remojar la comida
en agua más caliente acelerará el proceso; sin embargo, puede resultar
en la pérdida de sabor.
ALMACENAMIENTO DE LA CECINA
REHIDRATACIÓN
40
INSTRUCCIONES EN ESPAÑOLINSTRUCCIONES EN ESPAÑOL
Page 41

Recuerde que secar comida es un arte como cualquier otra forma de
cocinar. Una vez que esté familiarizado con los conceptos básicos,
experimente para crear alimentos secos únicos.
Siempre recuerde los aspectos básicos:
• Cuanto más magra la carne, mejor será la cecina
• No superponga productos alimenticios en las rejillas de secado
• Trate previamente las frutas y verduras adecuadamente
• Los tiempos de secado variarán
• Seque el exceso de humedad de la supercie de los alimentos
mientras se secan
• Alterne las rejillas si el secado es desigual
• Siempre siga las pautas de seguridad alimentaria para carnes,
aves de corral y pescado a n de asegurarse de que el producto
nal esté libre de bacterias que causan enfermedades.
RESUMEN
• Las ores deben estar secas al inicio, es mejor cortarlas después de
que el rocío se haya secado y antes de que la humedad de la noche
se condense. Seque las ores tan pronto como sea posible después de
cortarlas.
• La mejor condición para deshidratar ores es un área seca, caliente,
oscura, limpia y bien ventilada, lo que hace el lugar ideal para el
deshidratador. Las ores conservan el mejor color y condición cuando se
secan rápidamente.
• Se debe usar una temperatura baja para conservar los aceites naturales.
• Quite las hojas o si usted preere conserve el follaje. Deseche cualquier
hoja seca o dañada.
• Coloque en la rejilla del deshidratador en una sola capa, evitando el
traslape.
• Los tiempos de secado variarán considerablemente dependiendo del
tamaño de la or y de la cantidad de follaje. Seque a 100 °F (38 °C).
SECADO DE FLORES
41
INSTRUCCIONES EN ESPAÑOLINSTRUCCIONES EN ESPAÑOL
Page 42

42
INSTRUCCIONES EN ESPAÑOLINSTRUCCIONES EN ESPAÑOL
Hay que seguir ciertas reglas básicas al manejar alimentos.
Las reglas son COCINAR, SEPARAR, LIMPIAR y ENFRIAR.
COCINAR
Es muy importante cocinar los alimentos a una temperatura interna que destruya cualquier
bacteria que esté presente. Últimamente se ha puesto mucha atención en la higiene de
las hamburguesas y otros alimentos elaborados con carne molida y con razón. Cuando se
muele la carne, las bacterias presentes en la supercie se revuelven en toda la mezcla de la
carne molida. Si la carne molida no se cuece a por lo menos 71°C a 74°C (160°F - 165°F),
no se destruyen las bacterias y hay una buena posibilidad de enfermarse.
Las piezas de carne sólida, como los letes y las chuletas, no tienen en su interior bacterias
peligrosas como le E. coli, por lo que pueden servirse menos cocidas. Aun así, cualquier
corte de vacuno debe cocinarse a una temperatura interna de por lo menos 63°C (145°F)
(medio cocido). La temperatura recomendable para las aves es de 75°C (165°F) y los cortes
sólidos de carne de puerco deben cocinarse a 71°C (160°F).
SEPARAR
SIEMPRE DEBE separar los alimentos que se comen crudos y los que se vayan a cocer
antes de comerse. La contaminación cruzada se presenta cuando la carne o los huevos
crudos entran en contacto con alimentos que se van a consumir sin cocimiento. Ésta es una
importante causa de intoxicaciones. Siempre use una doble envoltura para la carne cruda
y colóquela en la repisa más baja del refrigerador, para que no haya manera de que su
jugo gotee en las verduras frescas. Use la carne cruda 1 o 2 días después de comprarla, o
congélela para guardarla más tiempo. Descongele la carne congelada en el refrigerador, no
en el mesón de la cocina.
Cuando ase o cocine carne o pescado crudo, coloque la carne ya cocida en un platón
limpio. No use el mismo platón que usó para llevar la carne al asador. Lave los utensilios
usados en el asador después de haber volteado los alimentos por última vez, así como las
cucharas y espátulas usadas para freír o para voltear la carne al estarla cocinando.
No olvide lavarse las manos después de manejar carne o huevos crudos. Es absolutamente
necesario lavarse las manos con agua y jabón o usar una toallita húmeda antibacteriana
después de tocar carne o huevos crudos. No lavarse las manos o las supercies cuando se
cocina es una causa importante de contaminación cruzada.
LIMPIAR
Lávese las manos y las supercies de trabajo con frecuencia mientras esté cocinando.
Lávese con agua tibia y jabón durante por lo menos 15 segundos; después séquese con
una toalla de papel.
ENFRIAR
Es muy importante enfriar los alimentos. La zona de peligro para la multiplicación de
bacterias está entre los 4 °C y 60 °C (40 °F - 140 °F). El refrigerador debe estar a 4 °C (40
°F) o menos; el congelador debe estar a -17 °C (0 °F) o menos. Regla básica: sirva calientes
los alimentos calientes y sirva fríos los alimentos fríos. Use platos calientes para mantener
caliente la comida a la hora de servirla. Use baños de agua con hielo para mantener fría
la comida fría. Nunca deje ningún alimento a temperatura ambiente por más de 2 horas;
o por más de 1 hora si la temperatura ambiente es de 32 °C (90 °F) o superior. Cuando
empaque para un picnic, asegúrese de que la comida ya esté fría cuando la meta en la
canasta aislada. La canasta no enfría la comida; sólo la mantiene fría si está debidamente
empacada con hielo. Los alimentos cocidos calientes deben colocarse en recipientes bajos
y refrigerarse de inmediato para que se enfríen rápidamente. No olvide cubrir los alimentos
una vez que se enfríen..
NOTA: Debe tener especial consideración al usar venado y otra carne de caza, ya que
puede contaminarse durante la preparación de campo. El venado suele mantenerse a
temperaturas que podrían permitir el crecimiento de bacterias, como cuando se transporta.
Consulte con el Departamento de Carnes y Aves de la USDA si tiene más preguntas o
quiere más información sobre higiene de carne y alimentos.
SEGURIDAD DE LOS ALIMENTOS
Page 43

Page 44

Esta garantía aplica a los productos que se compran y usan en los EE. UU. y
Canadá, y que se registraron adecuadamente dentro de 30 días de la fecha
de compra original. Esta es la única garantía expresa para este producto y
reemplaza cualquier otra garantía o condición. Este producto está garantizado
contra defectos materiales y de fabricación por un período de dos (2) años a
partir de la fecha de compra original. Durante este período, su único recurso es
la reparación o sustitución de este producto o de cualquier componente que se
encuentre defectuoso, a nuestra elección.
Para registrar su producto, complete el formulario en línea en
www.WestonProducts.com/Warranty
Esta garantía no cubre productos no registrados, reparaciones o servicios a
productos no autorizados, productos vendidos “tal cual” por minoristas, vidrio,
ltros, desgaste por uso normal, uso que no sea conforme a las instrucciones
impresas o daño al producto como resultado de un accidente, alteración, abuso
o mal uso. Esta garantía se extiende únicamente al comprador consumidor
original o quien reciba el producto como regalo y no es transferible. Guarde
el recibo de compra original ya que se requiere de un comprobante de compra
para hacer un reclamo de garantía.
Excluimos todo reclamo por daños especiales, incidentales o que resulten
como consecuencia del incumplimiento de la garantía expresa o implícita.
Toda responsabilidad se limita al monto del precio de compra. Toda garantía
implícita, incluyendo cualquier garantía legal o condición de comerciabilidad
o aptitud para un propósito en particular, se niega excepto en la medida
que lo prohíbe la ley, en cuyo caso dicha garantía o condición se limita a la
duración de esta garantía por escrito. Esta garantía le otorga derechos legales
especícos. Puede tener otros derechos legales que varían según donde vive.
Algunos estados o provincias no permiten limitantes en garantías implícitas o
daños especiales, incidentales o consecuentes, por lo tanto, es posible que las
limitaciones mencionadas anteriormente no apliquen para usted.
Antes de devolver el producto para cualquier reparación o servicio: debe estar
limpio y libre de partículas de alimentos u otra suciedad; de otra manera, se le
devolverá o aplicará un cargo de 50 USD por limpieza, a nuestra elección.
Para reclamar una garantía, visite www.WestonProducts.com/Contact o llame
al 1.800.814.4895 en los EE. UU. o al 001.216.901.6801 fuera de los EE. UU.,
de lunes a viernes de 8 a. m. a 5 p. m. hora del este. Usted es responsable de
todos los costos asociados con enviarnos el producto con el ete prepagado.
Si el producto calica para una reparación o un reemplazo bajo garantía,
asumiremos el costo de devolverle el producto. No somos responsables por
los daños resultantes del envío.
Para trabajo fuera de garantía: llame al 1.800.814.4895 dentro de los EE. UU.
o al 001.216.901.6801 fuera de los EE. UU., de lunes a viernes de 8 a. m. a
5 p. m. hora del Este, para obtener un número de autorización de devolución
de mercancía (Return Merchandise Authorization, RMA). Rechazaremos
toda devolución sin número de RMA. Aplicaremos un cargo de 35 USD/hora
por todo trabajo de diagnóstico, servicio, reparación o procesamiento. No
iniciaremos ningún servicio o trabajo de reparación sin autorización previa.
Usted es responsable de todos los costos asociados con enviarnos el producto
con el ete prepagado y con nuestra devolución hacia usted.
DOS AÑOS DE GARANTÍA WESTON LIMITADA
Page 45

PRO-1200 28-0301-W (80 L)
PRO-2400 28-0501-W (160 L)
PARCE QUE NOS PRODUITS BÉNÉFICIENT DE PERFECTIONNEMENTS CONSTANTS
APPORTÉS EN USINE, LES ILLUSTRATIONS PRÉSENTÉES PEUVENT ÊTRE LÉGÈREMENT
DIFFÉRENTES DU PRODUIT REÇU. 020416
DÉSHYDRATEUR MODÉLA A
Page 46

Cet appareil est un déshydrateur,
non un four. Son intention est
de déshydrater, non cuire. Le
fonctionnement du déshydrateur n’est
pas le même que celui d’un four.
. AVANT la déshydratation,
réchauffer la viande à une
température interne de 160 °F (71 °C)
et la volaille à 165 °F (74 °C) dans
un four an de tuer toute bactérie qui
pourrait être présente.
. Chauffer la viande ou la volaille
dans un FOUR, non le déshydrateur.
. Idéalement, la température
programmée n’est que la température
la plus élevée qui est atteinte lors du
cycle de chauffage. La température
programmée n’est pas maintenue.
. Selon divers facteurs, y compris
les conditions ambiantes, l’état des
IMPORTANT!
aliments à déshydrater et l’alimentation
électrique, la température programmée peut
ne pas être atteinte.
. Pour un rendement maximal : ne pas
utiliser des rallonges; faire fonctionner
le déshydrateur dans un endroit où la
température est supérieure à 70 °F
(21 °C); retirer les autres appareils du
circuit électrique auquel est branché le
déshydrateur; s’assurer que la porte
est complètement fermée, sans bris de
l’étanchéité; brancher le déshydrateur à un
circuit électrique protégé par un disjoncteur
de 20 ampères.
. NE PAS utiliser le déshydrateur à
l’extérieur.
. Lire et comprendre parfaitement toutes
les instructions et les avertissements avant
d’utiliser le déshydrateur.
INSTRUCTIONS EN FRANÇAIS
46
MISE À LA TERRE
Cet appareil doit être mis à la terre lorsqu’il est utilisé
an de protéger son utilisateur contre les décharges
électriques. Cet appareil est équipé d’un cordon
d’alimentation polarisé et d’une che à trois lames
permettant de le brancher à une prise de courant mise
à la terre. La che de cet appareil ressemble à celle
illustrée à la gure A.
FIGURE A
Conducteur
de mise à
la terre du
circuit
Broche de
mises à la
terre
INSTRUCTIONS DE MISE À LA TERRE
Page 47

INSTRUCTIONS EN FRANÇAIS
47
IMPORTANTES RÈGLES DE SÉCURITÉ
LIRE ET COMPRENDRE COMPLÈTEMENT TOUTES LES DIRECTIVES
ET LES AVERTISSEMENTS AVANT D’UTILISER CE PRODUIT. LE PLUS
IMPORTANT EST VOTRE SÉCURITÉ! LE DÉFAUT D’OBSERVER LES
PROCÉDURES ET MISES EN GARDE PEUT ENTRAÎNER DES BLESSURES
GRAVES OU DES DOMMAGES MATÉRIELS. N’OUBLIEZ PAS : VOTRE
SÉCURITÉ PERSONNELLE EST VOTRE RESPONSABILITÉ!
CONSERVER CES DIRECTIVES!
d’au moins 6 po (15 cm) libre de tout objet et mur sur
les côtés du déshydrateur.
12. NE PAS faire fonctionner le déshydrateur sur
des surfaces inammables comme un tapis ou des
planchers en bois! ÊTRE SÉCURITAIRE et utiliser le
déshydrateur sur un bloc de cendre ou un plancher
de béton.
13. Ne pas plonger le cordon, la che ou
DESHYDRATEUR EN eau ou de liquide
S’ASSURER QUE LE DÉSHYDRATEUR EST
DÉBRANCHÉ DE LA SOURCE D’ALIMENTATION
AVANT DE LE NETTOYER. Laver toutes les
pièces à la main et les sécher avec soin. Nettoyer
soigneusement toutes les pièces qui seront en
contact avec les aliments avant l’utilisation de
l’appareil. NE JAMAIS rincer le déshydrateur avec
un boyau ou en versant de l’eau; n’utiliser qu’un linge
humide pour nettoyer le déshydrateur. NE PAS utiliser
le déshydrateur avec les mains mouillées ou les pieds
nus. NE PAS utiliser à proximité de l’eau.
14. NE PAS permettre à l’eau de s’inltrer dans le
diffuseur, ce qui pourrait entraîner un dommage
à l’élément chauffant. NE PAS retirer le diffuseur
de l’armoire. L’intégrité de l’assemblage sera
compromise et pourrait annuler la garantie. Suivre les
directives de nettoyage du diffuseur après CHAQUE
utilisation.
15. Après le nettoyage, s’assurer que le déshydrateur
est complètement sec avant de la rebrancher à la
source d’alimentation; sinon, cela peut provoquer
une ÉLECTROCUTION et entraîner des blessures
personnelles.
16. Le défaut de suivre les directives de nettoyage et
d’entretien réduira la durée de vie du déshydrateur
et peut causer des malfonctionnements graves
du produit, des blessures ou des dommages à la
propriété.
17. Ne pas placer sur ou près d'un brûleur à gaz
ou électrique, ou dans un four chauffé. Us le
déshydrateur ou des surfaces chaudes.
18. ATTENTION! Certaines surfaces du déshydrateur
peuvent devenir très CHAUDES lors de l’utilisation!
Ce qui peut entraîner des blessures graves! NE PAS
toucher ces régions lors de l’utilisation jusqu’à ce
qu’elles refroidissent après l’utilisation.
19. NE PAS essayer de faire fonctionner le
déshydrateur si le déshydrateur lui-même est froid. La
température du déshydrateur devrait être au moins
45 °F (7 °C) avant de commencer.
20. NE PAS utiliser le déshydrateur sous l’inuence
de drogues, de médicaments ou d’alcool.
21. Ne pas utiliser l'appareil à d'autres ns que celles
prévues.
22. Une extrême prudence doit être utilisé pour
déplacer un appareil ou une partie contenant de l'huile
chaude ou autres liquides chauds.
1. TOUJOURS DÉBRANCHER le déshydrateur
de la source d’alimentation avant d’en effectuer
l’entretien, de changer les accessoires ou de nettoyer
l’appareil.
2. TOUJOURS UTILISER UN CIRCUIT DISTINCT
EXCLUSIF pour alimenter ce déshydrateur. Le calibre
du l du circuit doit être au moins un l nº 12 et DOIT
être protégé par un disjoncteur de 20 ampères. Si
vous n’êtes pas certain de votre système électrique,
communiquez avec un électricien qualié. Le défaut
de vérier votre système électrique peut provoquer
un incendie, des blessures ou des dommages à la
propriété! L’appareil ne chauffera pas à la température
programmée à moins que cette étape soit effectuée.
3. NE JAMAIS LAISSER LE DÉSHYDRATEUR
SANS SURVEILLANCE. Faire preuve de prudence;
DÉBRANCHER le déshydrateur de la source
d’alimentation avant de quitter le lieu de travail.
Une surveillance étroite est nécessaire lorsque
tout appareil est utilisé à proximité des enfants.
Cet appareil n’est PAS destiné à être utilisé par les
enfants.
4. Réduire le risque de démarrage accidentel.
S’assurer que l’interrupteur d’alimentation est en
position « OFF » (arrêt) avant de connecter la source
d’alimentation. To disconnect, turn any control to off,
then remove plug from wall outlet.
5. NE PAS UTILISER ce déshydrateur si le cordon
d’alimentation, la prise ou tout autre composant
est endommagé. Si le cordon d’alimentation ou
le déshydrateur est endommagé, communiquez
avec le Service à la clientèle. NE PAS TENTER
DE REMPLACER LE CORDON. S’assurer d’éviter
que le cordon d’alimentation encombre l’espace de
travail. Vérier que toutes les pièces fonctionnent
correctement et remplissent les fonctions prévues.
Vérier l’alignement des pièces mobiles et toute autre
condition qui pourrait nuire au fonctionnement normal.
6. NE JAMAIS utiliser des accessoires ou des pièces
provenant d’un autre fabricant. Ceci ANNULERA
LA GARANTIE et pourrait causer un incendie, une
électrocution ou des blessures.
7. Le fabricant décline toute responsabilité dans le
cas d’une utilisation inappropriée du déshydrateur.
L’utilisation inappropriée du déshydrateur annule la
garantie.
8. La réparation électrique doit être effectuée par
un marchand autorisé. N’utiliser que les pièces
et accessoires originaux de la manufacture. La
modication du déshydrateur annule la garantie.
9. S’assurer que le déshydrateur est sur une
surface stable de travail. S’assurer que les pieds du
déshydrateur sont stables.
Verrouiller les roulettes (le cas échéant) avant
l’utilisation.
10. NE PAS l’utiliser à l’extérieur.
11. Ce déshydrateur comprend des entrées et des
sorties d’air à l’arrière de l’unité. Garder une distance
Page 48

AVERTISSEMENT! Avant de nettoyer, d’assembler ou de
démonter le déshydrateur, veiller à LE DÉBRANCHER DE LA PRISE
OU DE LA SOURCE D’ALIMENTATION! TOUJOURS débrancher le
déshydrateur lorsqu’il n’est pas utilisé.
BACK VIEW
INSTRUCTIONS EN FRANÇAIS
48
Page 49

NUMÉRO DE
SCHÉMA
DESCRIPTION DE LA PIÈCE 28-0301-W 28-0501-W
1 PORTE 28-0404-W 28-0504-W
2 PANNEAU SUPÉRIEUR 28-0506 28-0506
N/A PANNEAU INFÉRIEUR 28-0307 28-0307
3
CHARNIÈRE SUPÉRIEURE DE LA
PORTE
28-0333 28-0333
4
CARTE PRINCIPALE DE L’ORDINATEUR
ET PANNEAU DE COMMANDE
28-0513 28-0513
5 DIFFUSEUR 28-0311 28-0331
N/A DIFFUSEUR DU PANNEAU ARRIÈRE N/A 28-0330
6 CUVETTE D’ÉGOUTTAGE 28-0519 28-0519
7 CHARNIÈRE INFÉRIEURE DE LA PORTE 28-0334 28-0334-N
8
GRILLE ANTIADHÉSIVE – ENSEMBLE
DE 12
28-0313
28-0313
(2 ENSEMBLES INCLUS)
9
SUPPORT EN CORNIÈRE INFÉRIEURE
ARRIÈRE (2)
28-0336 28-0336-N
N/A SUPPORT DE PIED AVANT 28-0332 28-0332-N
10
SET DE PIEDS
(AVEC 4 PIEDS ET BOULON)
28-0308 N/A
N/A
SET DE ROULETTE PIVOTANTES (AVEC 4
ROULTETTES ET ÉCROU DE ROULETTE)
N/A 28-0508
11
VENTILATEUR ET
ÉLÉMENT CHAUFFANT
28-0302 28-0302
12 DISJONCTEUR 28-0379 28-0379
13 PANNEAU ARRIÈRE 28-0305 28-0505
N/A
SUPPORT À COLLATIONS EN
BÂTONNET (PAS MONTRÉ)
28-0322 28-0322
INSTRUCTIONS EN FRANÇAIS
49
N’hésitez pas à visiter notre site Web WestonProduct.com/support si un composant est cassé, l’outil
fonctionne mal, ou pour commander un nouveau mode d’emploi.
WestonProducts.com
Veuillez appeler Weston Brands, LLC au numéro sans frais : 1-800-814-4895
Du lundi au vendredi: de 8 h à 17 h ET. En dehors des États-Unis, veuillez
appeler le 001-216-901-6801
DESCRIPTION DE LA PIÈCE
Page 50

1. S’assurer que le déshydrateur est éteint et débranché.
2. Retirer les grilles et tout autre article libre de l’intérieur et fermer la porte.
3. Déposer délicatement le déshydrateur sur son côté gauche (en regardant
la porte) sur un tapis ou autre un article semblable an de prévenir les rayures.
NE PAS déposer le déshydrateur sur son côté droit ou le devant pour éviter
des dommages à la porte, au panneau de contrôle ou au disjoncteur.
4. Insérer les boulons des pieds dans les trous sous les pieds jusqu’à ce
que le letage des boulons en sorte. Enler les boulons et les pieds dans les
supports de pied avant.
5. Serrer les boulons des pieds à l’aide d’un tournevis.
6. En tenant la porte fermée, relever délicatement le déshydrateur en position
verticale sur les pieds.
1. Suivre les étapes 1 à 3 ci-dessus.
2. Visser un écrou de roulette (xé à la roulette pour l’expédition) sur la tige
letée de chaque roulette jusqu’à ce qu’il arrête.
3. Visser les roulettes pivotantes dans les supports à cornière inférieure
arrière jusqu’à ce qu’ils arrêtent. ASTUCE : Tenir le cadre de la roulette d’une
main et tourner le pivot de l’autre.
4. Visser les roulettes pivotantes avec frein dans les supports des pieds
avant jusqu’à ce qu’ils arrêtent.
5. Serrer chaque écrou de roulette à l’aide d’une clé ouverte de 12 mm
(1/2 po). Tourner les écrous de roulette dans le sens horaire. Ils doivent être
serrés sur le déshydrateur, non les roulettes. NE PAS trop serrer.
6. Inspecter l’écart entre la porte et le support du pied gauche avant an
d’assurer que la tige de la roulette n’est pas en contact avec le bas de la porte.
S’il y a contact, desserrer l’écrou de la roulette et déplacer la roulette vers le
bas. Visser l’écrou de la roulette sur la tige de la roulette, mais ne pas le visser
au complet. Laisser un petit écart pour raccourcir la tige qui dépasse dans le
support du pied. Réinstaller la roulette comme indiqué ci-dessus.
7. En tenant la porte fermée, lever soigneusement le déshydrateur en position
verticale sur les roulettes.
INSTRUCTIONS DE MONTAGE 80 L
INSTRUCTIONS DE MONTAGE 160 L
INSTRUCTIONS EN FRANÇAIS
50
Page 51

• NE PAS faire fonctionner le déshydrateur sans avoir installé les pieds/
roulettes.
• Placer le déshydrateur sur une surface propre, de niveau, sèche et non
inammable à au moins 6 po (15 cm) de tout mur. Éviter les surfaces avec
tapis.
• Enclencher les freins sur les deux roulettes pivotantes montées à l’avant
(modèle 160-L).
1. S’assurer que l’alimentation et les
interrupteurs d’éclairage sont à « OFF »
(arrêt).
2. Brancher le déshydrateur dans une
prise électrique. NE PAS utiliser de
rallonges.
3. Régler l’interrupteur d’alimentation à
« ON » (en marche).
4. Remplir les grilles d’aliments ou d’autres articles à déshydrater.
5. Mettre les grilles dans le déshydrateur. Pousser chaque grille jusqu’à ce
qu’elle arrête.
IMPORTANT : Il y a trois grilles avec encoches. Placer ces grilles (avec
les encoches vers l’arrière) sur les trois supports de grille. Les encoches
empêchent les grilles de toucher le capteur de température sur la paroi
arrière, près du haut. Tout contact entre ces pièces peut causer une fausse
lecture de température ou des irrégularités du cycle.
6. Fermer la porte, appuyer fermement sur la porte pour assurer une bonne
étanchéité.
INSTRUCTIONS AVANT L’UTILISATION
RÉGLAGE
INSTRUCTIONS EN FRANÇAIS
51
Page 52

7. POUR PROGRAMMER L’HEURE : Appuyer une fois sur le bouton « TIME »
(heure) sur le panneau de contrôle. Utiliser les boutons « UP » et « DOWN »
(augmenter et diminuer) à droite sur le panneau de contrôle pour programmer
les heures de la minuterie à rebours (23 heures maximum). Appuyer encore
une fois sur le bouton « TIME » (heure) pour passer aux minutes. De la même
façon, programmer les minutes (par incréments de 5 minutes).
8. POUR PROGRAMMER LA TEMPÉRATURE : Appuyer une fois sur le
bouton « TEMP ». Utiliser les boutons « UP » et « DOWN » (augmenter et
diminuer) pour programmer la température (160 °F maximum, 50 °F minimum,
incréments de 5 degrés).
REMARQUE : la température programmée est la température maximale que le
déshydrateur peut atteindre au cours du fonctionnement.
9. Aucun besoin d’appuyer sur d’autres boutons. Le déshydrateur commencera
automatiquement après une courte pause. REMARQUE : le déshydrateur
commencera pendant la programmation si vous tardez. Pas de soucis, c’est
normal. Vous n’avez qu’à continuer la programmation comme susmentionnée.
10. L’afchage numérique sur le panneau de contrôle fera un cycle continu
lorsque l’unité fonctionne. Il afchera en alternance : le temps de déshydratation
programmé « SET TIME »; le temps de déshydratation qu’il reste « TIME
REMAINING »; la température programmée « SET TEMP »; et la température
actuelle réelle dans le déshydrateur « ACTUAL TEMP » (mesurée par le
capteur de la température sur la paroi arrière, vers le haut).
REMARQUE : la « SET TEMP » (température programmée) n’est que la plus
haute température atteinte lors d’un cycle de chauffage. La « SET TEMP »
(température programmée) n’est PAS maintenue.
11. Le déshydrateur émettra 8 bips au départ et lorsque la température
intérieure atteindra la valeur programmée.
12. Le déshydrateur arrête automatiquement (ventilateur et élément chauffant)
lorsque la minuterie à rebours arrive à 0. Cependant, l’alimentation de l’unité
restera sous tension.
Afchage numérique
PROGRAMMATION
FONCTION
INSTRUCTIONS EN FRANÇAIS
52
Page 53

13. Régler l’interrupteur d’alimentation à « OFF » (arrêt) après l’utilisation.
14. Débrancher le déshydrateur lorsqu’il n’est pas utilisé.
15. Nettoyer le déshydrateur après chaque utilisation, surtout le diffuseur.
Voir la rubrique « DIRECTIVES DE NETTOYAGE » de ce livret.
• L’intention de ce déshydrateur est de déshydrater, non cuire. Il ne fonctionne
pas de la même façon qu’un four. Son fonctionnement et son rendement ne
doivent pas être comparés à ceux d’un four.
• La « SET TEMP » (température programmée) du déshydrateur n’est que la
température la plus élevée qui sera atteinte au cours du cycle de chauffage.
C’est la température à laquelle l’élément chauffant s’éteint. Le ventilateur
fonctionnera toujours. Le chauffage recommence lorsque la température
tombe de 5 à 10 degrés sous la « SET TEMP » (température programmée).
• La température maximale à laquelle peut être programmé le déshydrateur est
160 °F (71 °C). Le déshydrateur peut atteindre la température programmée
ou non, en raison de plusieurs facteurs qui comprennent : la température à
l’endroit où fonctionne le déshydrateur; si une rallonge est utilisée ou non; si
le déshydrateur partage un circuit électrique ou non avec d’autres appareils;
l’épaisseur, la température et la teneur en humidité des aliments; la quantité et
la disposition des aliments sur les grilles.
• Pour un rendement maximal du déshydrateur : NE PAS utiliser de rallonges;
faire fonctionner le déshydrateur dans un endroit où la température est
supérieure à 70 °F (21 °C); retirer les autres appareils du circuit électrique
auquel est branché le déshydrateur; s’assurer que la porte est complètement
fermée, sans bris de l’étanchéité; brancher le déshydrateur à un circuit
électrique protégé par un disjoncteur de 20 ampères.
APRÈS L’UTILISATION
INSTRUCTIONS D’UTILISATION
INSTRUCTIONS EN FRANÇAIS
53
Page 54

• IMPORTANT! Nettoyer le déshydrateur après CHAQUE utilisation. Ne
pas utiliser de nettoyants abrasifs. Les grilles NE sont PAS lavables au lavevaisselle.
• AVERTISSEMENT! NE PAS immerger le déshydrateur dans l’eau. NE
PAS pulvériser le déshydrateur avec de l’eau. NE PAS laisser couler de l’eau
dans le diffuseur.
• NE PAS permettre une accumulation de graisse dans le déshydrateur, surtout
sur le diffuseur. Cela pourrait entraîner des dommages des composants ou un
incendie.
• Éteindre et débrancher le déshydrateur. Donner le temps au déshydrateur
de refroidir. Nettoyer les grilles, l’intérieur et l’extérieur de l’armoire,
le diffuseur, la porte et la cuvette d’égouttage, comme il est indiqué
ci-dessous.
GRILLES ANTIADHÉSIVES
Laver les grilles à la main à l’aide d’une brosse douce, dans l’eau chaude et
savonneuse. Rincer et essuyer. S’assurer que les grilles sont complètement
sèches avant de les remettre dans le déshydrateur.
INTÉRIEUR DE L’ARMOIRE
Essuyer l’intérieur de l’armoire et nettoyer les supports des grilles à l’aide d’un
linge modérément humide et du savon, au besoin. NE PAS utiliser de nettoyants
abrasifs. Essuyer tout résidu si le savon est utilisé. MISE EN GARDE : NE PAS
laisser couler de l’eau dans le diffuseur. Cela pourrait entraîner l’électrocution
ou des dommages à l’unité. Au besoin, couvrir le diffuseur d’une serviette
sèche en nettoyant l’intérieur de l’armoire et les supports des grilles.
EXTÉRIEUR DE L’ARMOIRE
Essuyer l’extérieur de l’armoire à l’aide d’un linge modérément humide et du
savon, au besoin. Essuyer tout résidu si le savon est utilisé.
DIFFUSEUR
Essuyer le dessus et les côtés du diffuseur à l’aide d’un linge légèrement
humide et du savon, au besoin. NE PAS utiliser de nettoyants abrasifs.
Retirer tout résidu si le savon est utilisé.
MISE EN GARDE : NE PAS laisser
couler de l’eau dans le diffuseur. Cela
pourrait entraîner l’électrocution ou
des dommages à l’unité.
Inspecter les ouvertures d’aération sur
les côtés et le dessus du diffuseur.
Toutes les ouvertures doivent être
propres et entièrement ouvertes. Utiliser
un cure-dents ou autre autre objet pointu
pour retirer tout résidu. Veiller à ne pas
pousser le résidu dans le diffuseur.
AVERTISSEMENT! Avant de nettoyer, d’assembler ou de
démonter le déshydrateur, s’assurer qu’il est en position OFF (arrêt)
et que LA PRISE EST DÉBRANCHÉE DE LA PRISE DE COURANT/
SOURCE D’ALIMENTATION!
Ouvertures
d’aération
supérieures
S’assurer que
les ouvertures
sont ouvertes
Diffuseur
DIRECTIVES DE NETTOYAGE
INSTRUCTIONS EN FRANÇAIS
54
Page 55

PORTE DE L’ARMOIRE
Essuyer la porte et le joint d’étanchéité à l’aide d’un linge modérément
humide et du savon, au besoin. Essuyer tout résidu si le savon est utilisé.
Bien essuyer la vitre à l’aide d’un chiffon ou de papier essuie-tout et de
lave-vitres.
CUVETTE D’ÉGOUTTAGE
Vider la cuvette d’égouttage et la laver dans de l’eau chaude savonneuse.
Rincer et sécher la cuvette d’égouttage avant de la réinstaller dans le
déshydrateur.
Le déshydrateur perd son
alimentation et ne redémarre
pas.
• Éteindre le déshydrateur et
débrancher le cordon d’alimentation
de la prise de courant électrique.
Appuyer sur le bouton du disjoncteur
(situé à l’arrière du déshydrateur vers
le haut) pour le réinitialiser.
• Vérier le disjoncteur de la maison
qui contrôle la prise de courant
auquel est branché le déshydrateur.
S’assurer que le disjoncteur a une
capacité nominale de 20 ampères et
qu’aucun autre appareil n’est utilisé
en même temps. Le réinitialiser, au
besoin.
Déshydratation inégale ou incomplète.
• Ne pas couvrir les ouvertures du centre des grilles.
• Faire la rotation des grilles toutes les 45 ou 90 minutes, selon la nourriture
à déshydrater. Placer la grille du haut en bas. Monter toutes les autres grilles
d’une étagère. Tourner les grilles.
• Ne pas tasser les aliments. Espacer les articles de 1/2 po à 1 po (1,3 à
2,5 cm) sur les grilles.
• Augmenter le temps et la température de déshydratation.
• Ne pas bloquer les ouvertures d’aération au fond du déshydrateur.
• Garder le déshydrateur à au moins 6 po (15,2 cm) de tout mur.
Si les conseils ci-dessus ne règlent pas votre problème d’utilisation du
déshydrateur, communiquez avec le service à la clientèle au numéro au
verso de ce manuel pour de plus amples informations et autre dépannage.
Bouton de réinitialisation
du disjoncteur
DÉPANNAGE
INSTRUCTIONS EN FRANÇAIS
55
Page 56

1. Éteindre les lumières du déshydrateur. Éteindre et débrancher le
déshydrateur de la prise de courant.
2. Laisser refroidir le déshydrateur.
NE PAS essayer de remplacer une
ampoule lorsque le déshydrateur
est chaud.
3. Retirer toutes les grilles.
4. Retirer le panneau arrière du
déshydrateur.
5. Trouver le luminaire à DEL à remplacer
et débrancher les ls du luminaire du serrels blanc sur l’unité en pinçant ensemble
les deux pinces du serre-ls.
6. Appuyer sur les deux côtés de la pince
en métal sur le luminaire pour le libérer du
corps du déshydrateur, ensuite pousser
doucement le luminaire dans l’armoire de
l’unité, en s’assurant de bien tenir les ls
connectés au luminaire an qu’ils ne
tombent pas dans l’armoire du déshydrateur. Disposer du luminaire retiré.
7. Insérer le luminaire de remplacement dans le trou vide où se trouvait
l’ancien luminaire en passant tout d’abord le l connecté au luminaire.
8. Aligner le luminaire au trou et le pousser jusqu’à ce que les pinces en
métal à l'arrière du luminaire soient xées.
9. Rebrancher le serre-ls xé au luminaire au serre-ls où était xé l’ancien
luminaire en les serrant ensemble jusqu’à ce qu’ils soient xés.
10. Aligner le panneau arrière du Déshydrateur et réinstaller les vis retirées
pour monter le panneau arrière.
AVERTISSEMENT! Avant de nettoyer, d’assembler ou de
démonter le déshydrateur, s’assurer qu’il est en position OFF
(arrêt) et que LA PRISE EST DÉBRANCHÉE DE LA PRISE DE
COURANT/SOURCE D’ALIMENTATION!
Luminaire
à DEL
Serre-ls
Serre-ls
Pince
en métal
à pression
Pince
en métal
à pression
Luminaire
à DEL
REMPLACEMENT DE L’AMPOULE
INSTRUCTIONS EN FRANÇAIS
56
Page 57

SAUCISSES OU
COLLATIONS
EN BÂTONNET :
Utiliser les supports à
collations en bâtonnet
pour accrocher et
déshydrater les chaînons
de saucisses et les
collations en bâtonnet.
Après avoir enlevé les
grilles du déshydrateur,
draper simplement les chaînons sur les supports à collations en bâtonnet
et les faire glisser sur le dessus des supports des grilles. S’assurer de ne
pas laisser les chaînons reposer au fond de l’armoire ou sur le dessus du
diffuseur.
Support à
collations
en bâtonnet
Supports
des grilles
Supports
des grilles
CONSEILS DE DÉSHYDRATATION
BŒUF : Choisir des coupes de bavette, de ronde ou de pointe de surlonge,
puisqu’elles sont les meilleures coupes de bœuf pour faire de la charqui.
GIBIER SAUVAGE : La venaison fait une excellente charqui parce qu’elle ne
contient pas de gras marbré. Les coupes de bavette et de ronde fonctionnent
le mieux. Les viandes d’ours et d’élan font aussi de très bonnes charquis.
VOLAILLE : Lors de la confection de charqui de poulet ou de dinde, il est
important que la viande soit cuite à une température interne de 165 oF (74 oC)
avant la déshydratation an de tuer les bactéries causant des maladies.
POISSON : La déshydratation du poisson pour faire de la charqui nécessite
beaucoup d’attention. Le poisson doit être nettoyé et désossé de façon
appropriée, et bien rincé an d’assurer que tout le sang est éliminé. Étuver le
poisson ou le faire cuire au four à 200 °F (93 °C) jusqu'à ce qu’il s’émiette avant
de le déshydrater.
VIANDES HACHÉES : Lorsque vous faites de la charqui à partir de
viandes hachées, vous pouvez utiliser un pistolet à charqui ou un autre
outil semblable pour créer des languettes parfaites de charqui ainsi que des
collations en bâtonnet.
INSTRUCTIONS EN FRANÇAIS
57
Page 58

Comme la plupart des méthodes de cuisson, une bonne préparation est essentielle
à la réussite. Suivre quelques directives de base augmentera de façon importante
la qualité du produit déshydraté et réduira le temps nécessaire pour le faire.
REMARQUE : Avant de déshydrater, chauffer la viande à une température
interne de 160 °F (71 °C) et la volaille à 165 °F (74 °C) an de tuer toute bactérie
qui pourrait être présente. Chauffer la viande ou la volaille au four, non dans le
déshydrateur.
• An de prévenir le noircissement des fruits, tremper brièvement les tranches dans
du jus de citron ou d’ananas avant la déshydratation. Les fruits peuvent aussi être
trempés dans l’acide ascorbique, qui est vendu dans la plupart des pharmacies
et des magasins d’aliments naturels, soit en poudre ou en capsule. Préparer
une solution d’acide ascorbique selon les instructions du fabricant. Tremper les
tranches de fruit dans la solution pendant 2 à 3 minutes avant la déshydratation.
• Blanchir à l’eau ou à la vapeur* les légumes avant la déshydratation an d’arrêter
l’action enzymatique. Pour blanchir à l’eau, placer les légumes directement dans
l’eau bouillante et couvrir. Retirer après trois minutes. Pour blanchir à la vapeur,
placer les légumes dans un panier cuit-vapeur et étuver pendant 3 à 5 minutes.
• Garder une épaisseur uniforme en tranchant les articles alimentaires pour la
déshydratation. Cela assurera que les articles déshydratent à la même vitesse.
• L’épaisseur maximale des tranches de fruits et de légumes devrait être 1/4 po
(0,7 cm), à moins d’indications contraires dans une recette.
• L’épaisseur maximale des tranches de viande devrait être 3/16 po (0,5 cm) à
moins d’indications contraires dans une recette.
• La viande maigre donne un meilleur produit que la viande grasse.
• Faire mariner la viande avant de la chauffer ou la déshydrater.
• Les aliments rétrécissent de moitié ou plus pendant la déshydratation. Une livre
de viande, par exemple, donnera 1/2 à 1/3 lb (0,15 à 0,2 kg) de charqui. Ne pas
couper les morceaux trop petits.
• Entreposer les aliments déshydratés dans un récipient fermé, dans un endroit
frais, noir et sec. La meilleure température d’entreposage est entre 50 °F et 60 °F
(10 °C et 16 °C). Les aliments déshydratés devraient conserver leur fraîcheur
pendant des mois lorsqu’ils sont entreposés de cette façon.
• Le temps réel nécessaire pour la déshydratation des aliments dépend de
plusieurs facteurs, y compris le teneur en humidité, la teneur en gras, l’épaisseur et
la température des aliments, ainsi que l’humidité et la température ambiantes.
• Des gouttelettes peuvent se former sur la surface de la viande et d’autres articles
lors de la déshydratation. Essuyer les articles alimentaires à l’occasion an de
retirer les gouttelettes.
*Le blanchiment n’est pas nécessaire pour tous les légumes. Consulter la recette
ou le guide de déshydratation.
CONSEILS DE DÉSHYDRATATION
INSTRUCTIONS EN FRANÇAIS
58
Page 59

La viande devrait être aussi maigre que possible. L’utilisation de la viande
maigre aidera à la viande à déshydrater plus rapidement et facilitera le
nettoyage en réduisant l’égouttement de graisse. La viande hachée devrait
être de 80 % à 90 % maigre. La dinde, la venaison, le bufe et l’élan hachés
sont d’autres excellents choix pour la charqui.
Les assaisonnements pour charqui sont offerts pour tous les goûts, ou vous
pouvez être créatif et les faire vous-même. Lors de la confection de la charqui,
le mélange devrait être traité (au nitrate de sodium). Le nitrate de sodium aide
à prévenir le botulisme lors de la déshydratation à de faibles températures.
Suivre les directives du fabricant sur l’emballage de nitrate de sodium.
Garder les viandes crues et leurs jus éloignés d’autres aliments. Mariner les
viandes au réfrigérateur. Ne pas laisser les viandes non réfrigérées. Empêcher
la contamination croisée en entreposant la charqui déshydratée éloignée des
viandes crues. TOUJOURS bien laver les mains avec du savon et de l’eau
avant de travailler avec les produits de viande, et après. Utiliser de l’équipement
et des ustensiles propres.
Garder la viande et la volaille réfrigérées à 40 °F (4,4 °C) ou un peu moins;
utiliser ou congeler la viande hachée ou la volaille dans les 2 jours; les viandes
rouges entières, dans les 3 à 5 jours. Décongeler la viande dans le réfrigérateur,
non sur le comptoir de la cuisine.
On doit porter une attention particulière lors de l’utilisation de la venaison ou
d’autre gibier sauvage, puisqu’elle peut devenir fortement contaminée lors de
l’apprêtage sur le terrain. La venaison est souvent gardée à des températures
qui pourraient permettre la croissance des bactéries, comme lors du transport.
Consulter le site Web du USDA pour de plus amples informations sur la salubrité
des aliments. (www.usda.gov or www.fsis.usda.gov/fact_sheets/index.asp)
Lors de l’utilisation d’un déshydrateur, vérier la température du déshydrateur
à l’aide d’un thermomètre à cadran avant de déshydrater la charqui. La
température minimum recommandée pour la déshydratation des viandes est
130 °F (54 °C). Les températures inférieures à 130 °F (54 °C) ne sont pas
recommandées.
IMPORTANT : Avant de placer la viande dans un déshydrateur, il est fortement
recommandé de chauffer la viande à 160 °F (71 °C) AVANT le processus
de déshydratation. Cette étape assure que toute bactérie sera détruite par
la chaleur humide. Après avoir chauffé à 160 °F (71 °C), le maintien d’une
température constante du déshydrateur de 130 à 140 °F (54 à 60 °C) pendant
le processus de déshydratation est important parce que :
1.) le processus doit être sufsamment rapide pour déshydrater les
aliments avant qu’ils ne soient avariés; et
2.) le processus doit éliminer sufsamment d’eau pour empêcher la
croissance de microorganismes.
FAIRE DE LA CHARQUI
INSTRUCTIONS EN FRANÇAIS
59
Page 60

Si une marinade est utilisée, éliminer l’excès de liquide en secouant la
viande avant de la disposer de façon égale en couches simples, séparée
par environ 1/4 à 1/2 po (0,6 à 1,5 cm) sur les grilles du déshydrateur.
REMARQUE IMPORTANTE : NE PAS placer la charqui sur les trous
au centre des grilles. Cela empêchera la circulation de l’air au centre de
l’armoire et pourrait donner une déshydratation inégale.
Déshydrater la viande à une température de 145 à 150 °F (62,7 à 65,6 °F)
pendant 4 à 7 heures. Il faudra peut-être essuyer les gouttelettes de graisse
à l’occasion sur la surface de la viande, à l’aide d’un papier essuie-tout.
Le temps de déshydratation peut varier selon plusieurs circonstances,
y compris sans toutefois s’y limiter : l’humidité relative de la pièce, la
température de la viande au début du processus de déshydratation, la
quantité de viande dans le déshydrateur, la maigreur de la viande, etc.
Toujours laisser refroidir la charqui avant d’y goûter.
FAIRE DE LA CHARQUI
Envelopper la charqui/les collations en bâtonnet d’un papier d’aluminium
et l’entreposer dans un sac en plastique épais pour aliments, ou placer
la charqui/les collations en bâtonnet dans un bocal avec un couvercle
serré. Éviter l’entreposage dans des récipients ou des sacs en plastique
sans envelopper de papier d’aluminium ou de papier ciré auparavant. La
charqui/les collations en bâtonnet doit être entreposée dans un endroit
noir et sec, entre 50 et 60 °F (10 et 15,6 °C). La charqui/les collations en
bâtonnet peut être entreposée à la température ambiante pendant 1 à
2 mois. Pour prolonger la durée de conservation jusqu’à 6 mois, ranger
la charqui/les collations en bâtonnet dans le congélateur. S’assurer
d’étiqueter les emballages et d’y inscrire la date.
• Bien qu’il ne soit pas nécessaire de reconstituer les aliments
déshydratés, il est facile de le faire. Les légumes peuvent servir comme
plat d’accompagnement ou dans des recettes de façon très efcace
après avoir été reconstitués.
• Tremper les légumes dans l’eau froide, non salée, pendant 3 à
7 minutes avant la cuisson. Si on prévoit tremper les aliments plus
longtemps, ils devraient être placés au réfrigérateur pendant le
trempage. Après le trempage, il est préférable de faire cuire les légumes
dans la même eau. Porter simplement l’eau à ébullition et faire cuire les
légumes jusqu’à ce qu’ils soient tendres.
• De façon générale, 1 tasse de légumes déshydratés donnera environ
2 tasses après la reconstitution. Les fruits sont reconstitués à un rapport
approximatif de 1:1 1/2 tasses.
• Le temps de reconstitution variera selon l’épaisseur des aliments
déshydratés et la température de l’eau utilisée. Tremper les aliments
dans l’eau tiède accélérera le processus, cependant cela pourrait
entraîner une perte de saveur.
ENTREPOSAGE DE LA CHARQUI
RECONSTITUTION
INSTRUCTIONS EN FRANÇAIS
60
Page 61

Ne pas oublier que la déshydratation des aliments est autant un art que
toute autre forme de cuisson. Lorsque les éléments de base sont connus,
l’expérimentation peut créer des aliments déshydratés uniques.
Se souvenir de quelques éléments de base :
• Plus la viande est maigre, meilleure sera la charqui.
• Ne pas faire chevaucher les produits alimentaires sur les grilles
de déshydratation.
• Traiter au préalable les fruits et les légumes de façon appropriée.
• Le temps de déshydratation variera.
• Essuyer l’excès d’humidité de la surface des aliments pendant
la déshydratation.
• Faire la rotation des grilles si la déshydratation n’est pas égale.
• Toujours suivre les directives de salubrité alimentaire pour les
viandes, la volaille et le poisson an d’assurer que le produit nal
est exempt de bactéries qui causent les maladies.
SOMMAIRE
• Les eurs devraient être sèches dès le début; c’est mieux qu’elles soient
cueillies après la disparition de la rosée et avant l’humidité de la soirée.
Sécher les eurs dès que possible après la cueillette.
• La meilleure condition pour sécher les eurs est un endroit sec, chaud,
noir, propre et bien aéré, ce qui fait que le déshydrateur est l’endroit idéal.
Les eurs conserveront la meilleure couleur et le meilleur état lorsqu’elles
sont séchées rapidement.
• On devrait utiliser une basse température pour conserver les huiles
naturelles.
• Retirer les feuilles ou laisser le feuillage, selon la préférence. Supprimer
toute feuille brune ou endommagée.
• Placer sur la grille du déshydrateur, en une seule couche et en évitant
le chevauchement.
• Les temps de séchage varieront selon la taille de la eur et la quantité
de feuillage. Sécher à 100 °F (38 °C).
SÉCHER LES FLEURS
INSTRUCTIONS EN FRANÇAIS
61
Page 62

INSTRUCTIONS EN FRANÇAIS
62
Il y a des règles fondamentales à suivre lors de la manipulation d’aliments.
Elles sont CUIRE, SÉPARER, NETTOYER, et REFROIDIR RAPIDEMENT.
CUIRE
Il est crucial de cuire les aliments à une température interne sûre pour détruire les bactéries qui sont
présentes. La sécurité des hamburgers et autres aliments faits avec de la viande hachée a reçu
dernièrement beaucoup d’attention, et pour une bonne raison. Quand la viande est hachée, les bactéries
présentes sur la surface sont mélangées dans l’ensemble du mélange haché. Si cette viande hachée n’est
pas cuite jusqu’à au moins 160oF à 165oF (71oC à 74oC), les bactéries ne seront pas détruites et il y a une
forte chance que cela vous rendra malade.
Des morceaux solides de viande comme des steaks et côtelettes n’ont pas de bactéries dangereuses
comme E. coli à l’intérieur, donc ils peuvent être servis plus saignants. Quand même, tout morceau de bœuf
doit être cuit à une température interne d’au moins 145oF (63oC) (mi-saignant).La température sûre pour la
volaille est 165oF (75oC) et les morceaux entiers de viande de porc doivent être cuits à 160oF (71oC).
SÉPARER
Les aliments qui seront mangés crus et les aliments qui seront cuits avant d’être mangés DOIVENT
TOUJOURS être séparés. La contamination croisée se produit quand des viandes crues ou des œufs
viennent en contact avec des aliments qui seront mangés crus. Ceci est une source principale d’intoxication
alimentaire. Enveloppez toujours deux fois les viandes crues et placez-les sur l’étagère la plus basse dans
le réfrigérateur de manière qu’aucun jus ne puisse goutter sur les fruits et légumes crus. Puis utilisez
les viandes crues entre 1 et 2 jours après l’achat, ou congelez-les pour les conserver plus longtemps.
Décongelez les viandes congelées dans le réfrigérateur, pas sur le comptoir.
Quand vous grillez ou cuisez des viandes ou des poissons crus, assurez-vous de mettre la viande cuite
sur un plat propre. N’utilisez pas le même plat que vous avez utilisé pour transporter les aliments avant de
les mettre sur la grill. Lavez les ustensiles utilisés pour griller après que les aliments sont tournés pour la
dernière fois sur le grill, aussi bien que les spatules et cuillers utilisées pour faire sauter à feu vif en remuant
ou pour tourner la viande au fur et à mesure qu’elle cuit.
Assurez-vous de bien laver vos mains après avoir manipulé des viandes crues ou des œufs crus. Se laver
les mains avec du savon et de l’eau, ou utiliser une lingette antibactérienne pré-humidiée est absolument
nécessaire après avoir touché de la viande crue ou des œufs crus. Ne pas se laver les mains et les
surfaces pendant la cuisson est une cause majeure de contamination croisée.
NETTOYER
Lavez fréquemment vos mains et les surfaces de travail lorsque vous cuisinez. Lavez avec du savon et de
l’eau chaude pendant au moins 15 seconds, puis séchez avec une serviette en papier.
REFROIDIR RAPIDEMENT
La réfrigération rapide des aliments est très importante. La zone de danger où les bactéries se multiplient
est entre 40oF et 140oF (4oC et 60oC). Votre réfrigérateur doit être réglé à 40oF (4oC) ou en-dessous; votre
congélateur doit être à 0oF (-17oC) ou en-dessous. Une règle simple : servir chaud les aliments chauds,
servir froid les aliments froids. Utilisez des réchauds ou plaques chauffantes pour garder les aliments
chauds pendant le service. Utilisez des bains d’eau glacée pour garder au froid les aliments froids. Ne
jamais laisser des aliments à la température ambiante pendant plus de deux (2) heures - 1 heure si la
température ambiante est 90oF (32oC) ou au-dessus. Lorsque vous emballez les aliments pour un piquenique, assurez-vous que les aliments sont déjà refroidis rapidement lorsqu’ils sont mis dans le panier à
pique-nique isotherme. Le panier à pique-nique ne refroidira pas les aliments – il garde simplement les
aliments froids lorsqu’il est emballé correctement avec de la glace. Les aliments cuits chauds doivent
être placés dans des conteneurs peu profonds et immédiatement réfrigérés pour qu’ils se refroidissent
rapidement. Assurez-vous de bien couvrir les aliments après qu’ils sont froids.
REMARQUE : Des considérations particulières doivent prises lors de l’utilisation de venaison ou d’autre
gibier sauvage, puisqu’ils peuvent devenir très contaminés durant l’opération de dépouille. La venaison est
souvent gardée à des températures qui pourraient potentiellement permettre la croissance de bactéries,
tel que lorsque celle-ci est transportée. Se référer au Département de la viande et de la volaille de l’USDA
(USDA Meat and Poultry Department) pour d’autres questions ou informations sur la sécurité de la viande
et des aliments.
SÉCURITÉ ALIMENTAIRE
Page 63

La présente garantie s’applique aux produits, achetés et utilisés aux États-Unis et au
Canada, qui ont été dûment enregistrés dans un délai de 30 jours à compter de la date
d’achat initiale. La présente garantie est la seule garantie expresse pour ce produit et
remplace toute autre garantie ou condition. Ce produit est garanti contre tout défaut
de matériaux et de fabrication pour une durée deux ans (2) an à compter de la date
d’achat initiale. Au cours de cette période, votre seul recours est la réparation ou le
remplacement de ce produit ou de tout composant s’avérant défectueux, à notre gré.
Pour enregistrer votre produit : remplissez le formulaire en ligne à l’adresse
www.WestonProducts.com/Warranty
La présente garantie ne couvre pas les produits non enregistrés, ni les réparations
ou services après-vente non autorisés, les produits vendus « tels quels » par les
détaillants, le verre, les ltres et l’usure normale d’utilisation, toute utilisation non
conforme aux directives écrites, ni les dommages au produit résultant d’un accident,
d’une modication, d’une utilisation abusive ou incorrecte. La présente garantie est
valable uniquement pour l’acquéreur initial ou le destinataire du cadeau et n’est pas
cessible. Veuillez conserver le reçu de caisse d’origine, puisqu’une preuve d’achat
est requise pour toute réclamation de garantie. La présente garantie devient caduque
si le produit est soumis à une tension ou forme d’onde autre que celle indiquée sur
l’étiquette (par ex., 120 V ~ 60 Hz).
Aucune réclamation en cas de dommages spéciaux, consécutifs ou indirects résultant
du non-respect de toute garantie expresse ou implicite ne sera prise en compte.
Toute responsabilité se limite au montant du prix d’achat. Toute garantie implicite,
notamment toute garantie légale, condition de commercialité ou d’adaptation à une n
particulière, est exclue, sauf dans la mesure où cela est interdit par la loi en vigueur,
auquel cas cette garantie ou condition est limitée à la durée de la présente garantie
écrite. La présente garantie vous confère des droits juridiques spéciques. Vous
pouvez également bénécier d’autres droits juridiques qui varient selon l’endroit
où vous vivez. Certains États ou provinces n’autorisent pas de limitations sur les
garanties implicites ou sur les dommages spéciaux, consécutifs ou indirects, de sorte
que les limitations susmentionnées pourraient ne pas vous concerner.
Avant de retourner le produit pour réparation ou entretien : il doit être propre et exempt
de toute particule de nourriture ou d’autres débris; sans quoi nous serons dans
l’obligation de vous le retourner ou nous vous facturerons des frais de nettoyage de 50
dollars, à notre gré.
Pour procéder à une réclamation de garantie : allez à l’adresse www.
WestonProducts.com/Contact; ou appelez le 1.800.814.4895 pour les États-Unis et le
001.216.801.6801 hors des États-Unis, du lundi au vendredi, de 8 h à 17 h HNE. Tous
les frais liés à l’envoi du produit, frais de transport prépayés inclus, sont à votre charge.
Si le produit remplit les conditions pour une réparation ou un remplacement sous
garantie, les frais de retour seront à notre charge. Nous déclinons toute responsabilité
en cas de dommages dus au transport.
Pour toute réparation sans garantie : appelez le 1.800.814.4895 pour les États-Unis
et le 001.216.901.6801 hors des États-Unis, du lundi au vendredi, de 8 h à 17 h
HNE, pour obtenir un numéro d’autorisation de retour de marchandises (numéro de
RMA). Tout envoi expédié sans numéro de RMA sera refusé. Tout diagnostic, travail
d’entretien, de réparation ou de traitement sera facturé 35 USD/heure. Aucun travail
d’entretien ou de réparation ne sera effectué sans autorisation préalable. Tous les frais
liés à l’envoi du produit, frais de transport prépayés inclus, ainsi que ceux de retour
sont à votre charge.
DEUX ANS DE GARANTIE WESTON LIMITÉE
Page 64

ATTENTION!
PLEASE INSPECT THIS PACKAGE THOROUGHLY FOR MISSING PARTS OR ANY PRODUCT DAMAGE.
IF YOUR PRODUCT CONTAINS SHIPPING DAMAGE, PLEASE CONTACT RETAILER FOR ASSISTANCE.
For all other questions regarding product usage, missing parts, product damage, difculty or warranty activation,
please contact the Weston Brands Customer Service Team:
8:00 am to 5:00 pm ET, Monday thru Friday
CustomerService@WestonProducts.com
U.S. Residents Customer Service Line: 1-800-814-4895 (Outside U.S. Call: 001-216-901-6801)
Weston Brands LLC, Cleveland, Ohio 44149
WestonProducts.com
Please DO NOT return this item to the retailer before contacting
Weston Brands Customer Service.
SAVE THESE INSTRUCTIONS!
Refer to them often and use them to instruct others.
ATTENTION!
VEUILLEZ INSPECTER CET EMBALLAGE AVEC SOIN POUR Y DÉTECTER
TOUTE PIÈCE MANQUANTE OU ENDOMMAGÉE.
SI DES PIÈCES ONT ÉTÉ ENDOMMAGÉES PENDANT LE TRANSPORT, VEUILLEZ
COMMUNIQUER AVEC LE DÉTAILLANT POUR OBTENIR DE L’AIDE.
Pour toutes les autres questions concernant l’utilisation du produit, les pièces manquantes, les problèmes ou
l’activation de la garantie, veuillez communiquer avec l’équipe du service clientèle des produits Weston:
de 8:00 à 17:00 HNE, du lundi au vendredi.
CustomerService@WestonProducts.com
Numéro de téléphone du service clientèle pour les résidents des É.-U. : 1-800-814-4895
Numéro de téléphone à l’extérieur des É.-U. : 001-216-901-6801 Weston Brands LLC,
Weston Brands LLC, Cleveland, Ohio 44149
WestonProducts.com
Veuillez communiquer avec le service clientèle des produits Weston AVANT de retourner cet appareil au détaillant.
CONSERVER CES DIRECTIVES!
Veuillez les consulter fréquemment et les utiliser pour la formation.
¡ATENCIÓN!
Revise completamente el envase y compruebe que no falten partes o que algún producto esté dañado.
si el producto está dañado por el transporte, solicite asistencia al distribuidor.
Para todas aquellas preguntas referentes al uso del producto, partes faltantes, daño del producto, dicultad
o activación de la garantía, comuníquese con el equipo de servicio al cliente de weston Brands:
desde las 8:00 am hasta las 5:00 pm ET, de lunes a viernes
CustomerService@WestonProducts.com
Línea de Servicio al Cliente para Residentes de EE.UU.: 1.800.814.4895 (Fuera de EE.UU., llame al:
001-216-901-6801) Weston Brands LLC, Cleveland, Ohio 44149
WestonProducts.com
NO devuelva este artículo al vendedor minorista antes de comunicarse con Servicio al Cliente de
Weston Brands.
¡GUARDE ESTAS INSTRUCCIONES!
Consulte estas instrucciones y úselas para enseñar sobre el uso de este producto a otras personas.
 Loading...