

Page 1
KITCHEN KIT
16-0401-W
DUE TO CONSTANT FACTORY IMPROVEMENTS, THE PRODUCT PICTURED MIGHT DIFFER
SLIGHTLY FROM THE PRODUCT IN THIS BOX. 090915
Page 2

3
4
5
5-6
7
8
10
11
12
12-13
14
16
18
19
20
20-21
22
23
TABLE OF CONTENTS / ÍNDICE / TABLE DES MATIÈRES
2
GENERAL SAFETY RULES
COMPONENTS
CLEANING INSTRUCTIONS
USAGE INSTRUCTIONS
FOOD SAFETY
WARRANTY
REGLAS IMPORTANTES DE SEGURIDAD
COMPONENTES
INSTRUCCIONES DE LIMPIEZA
INSTRUCCIONES DE USO
SEGURIDAD DE LOS ALIMENTOS
INFORMACIÓN DE GARANTÍA
IMPORTANTES RÈGLES DE SÉCURITÉ
DESCRIPTION DE LA PIÈCE
INSTRUCTIONS DE NETTOYAGE
UTILISATION
SÉCURITÉ ALIMENTAIRE
INFORMATION SUR LA GARANTIE
Page 3

3
ENGLISH INSTRUCTIONS
1. KEEP FINGERS CLEAR of the Blade at all times. NEVER push the product
with your hands in line of the Blade when slicing. ALWAYS use the Food
Pusher.
2. NEVER use ngers to scrape food away from the Blade. SEVERE INJURY
MAY RESULT.
3. NEVER LEAVE THE MANUAL KITCHEN KIT UNATTENDED. Close supervision
is necessary when used near children. The Manual Kitchen Kit is NOT to be used
by children. The Manual Kitchen Kit is NOT a toy.
4. CHECK FOR DAMAGED PARTS. Before using the Manual Kitchen Kit,
check that all parts are operating properly and perform the intended functions.
5. The manufacturer declines any responsibility in the case of improper use of
this unit.
6. NEVER use any accessories or parts from other manufacturers. Doing so will VOID
YOUR WARRANTY and may cause injury.
7. Never ll the Mixing Container with hot liquids and transport. When lling with
hot liquids, always leave the Mixing Container on a stable platform. When lling
the Mixing Container to the maximum capacity, the weight of the ller might be too
much for the Handle to bear. It is always best to hold the Handle and place one
hand under the Mixing Container for support when carrying or pouring.
8. Be sure the Manual Kitchen Kit is stable during use.
9. DO NOT use this Manual Kitchen Kit for frozen foods or anything other than
food stuffs.
10. Remove the Blade after each use to clean. Clean with hot soapy water.
Dry thoroughly. Protective/cut-resistant gloves are recommended whenever
handling the Blades.
11. DO NOT use the Manual Kitchen Kit while under the inuence of drugs or
alcohol.
SAVE THESE INSTRUCTIONS
GENERAL SAFETY RULES
READ AND FULLY UNDERSTAND ALL INSTRUCTIONS AND WARNINGS
PRIOR TO USING THIS UNIT. YOUR SAFETY IS MOST IMPORTANT!
FAILURE TO COMPLY WITH PROCEDURES AND SAFE GUARDS MAY
RESULT IN SERIOUS INJURY OR PROPERTY DAMAGE. REMEMBER:
YOUR PERSONAL SAFETY IS YOUR RESPONSIBILITY!
Page 4
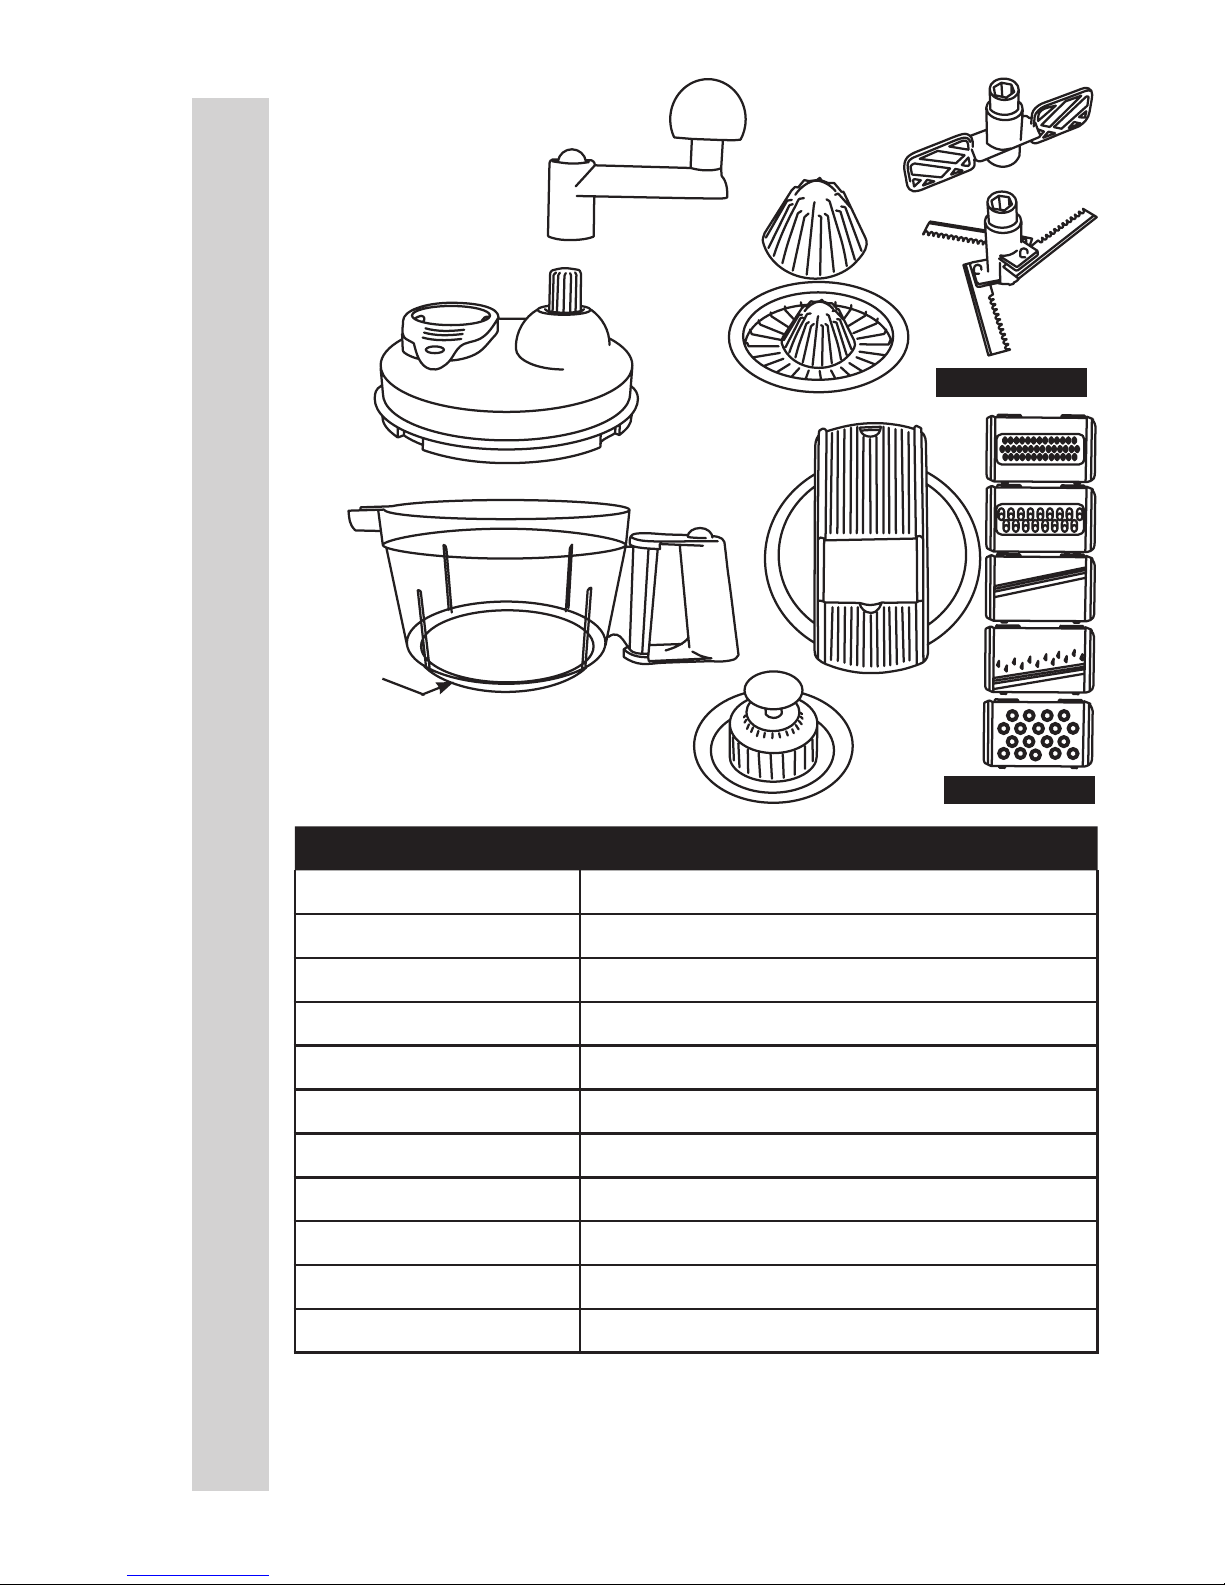
DIAGRAM NUMBER PART DESCRIPTION
1 MIXING CONTAINER
2 REMOVABLE HANDLE
3 MIXING LID
4 MIXING HANDLE
5 BEATER ATTACHMENT
6 3 BLADE CHOPPER
7 JUICER ATTACHMENT, BASE & TOP
8 MANDOLINE BASE WITH 5 BLADES
9 FOOD PUSHER
10 NON-SLIP RUBBER BASE
11 EGG SEPARATER
COMPONENT LIST
If any components of this unit are broken, the unit does not operate properly or you
need a replacement instruction manual, visit us on the web at
WestonProducts.com
Or call Weston Brands LLC Toll Free at 1-800-814-4895
Monday thru Friday 8:00am-5:00pm ET. Outside the U.S. call 001-440-638-3131
4
ENGLISH INSTRUCTIONS
1
2
3
4
5
6
7
8
10
CAUTION SHARP!
9
11
CAUTION SHARP!
Page 5
Page 6
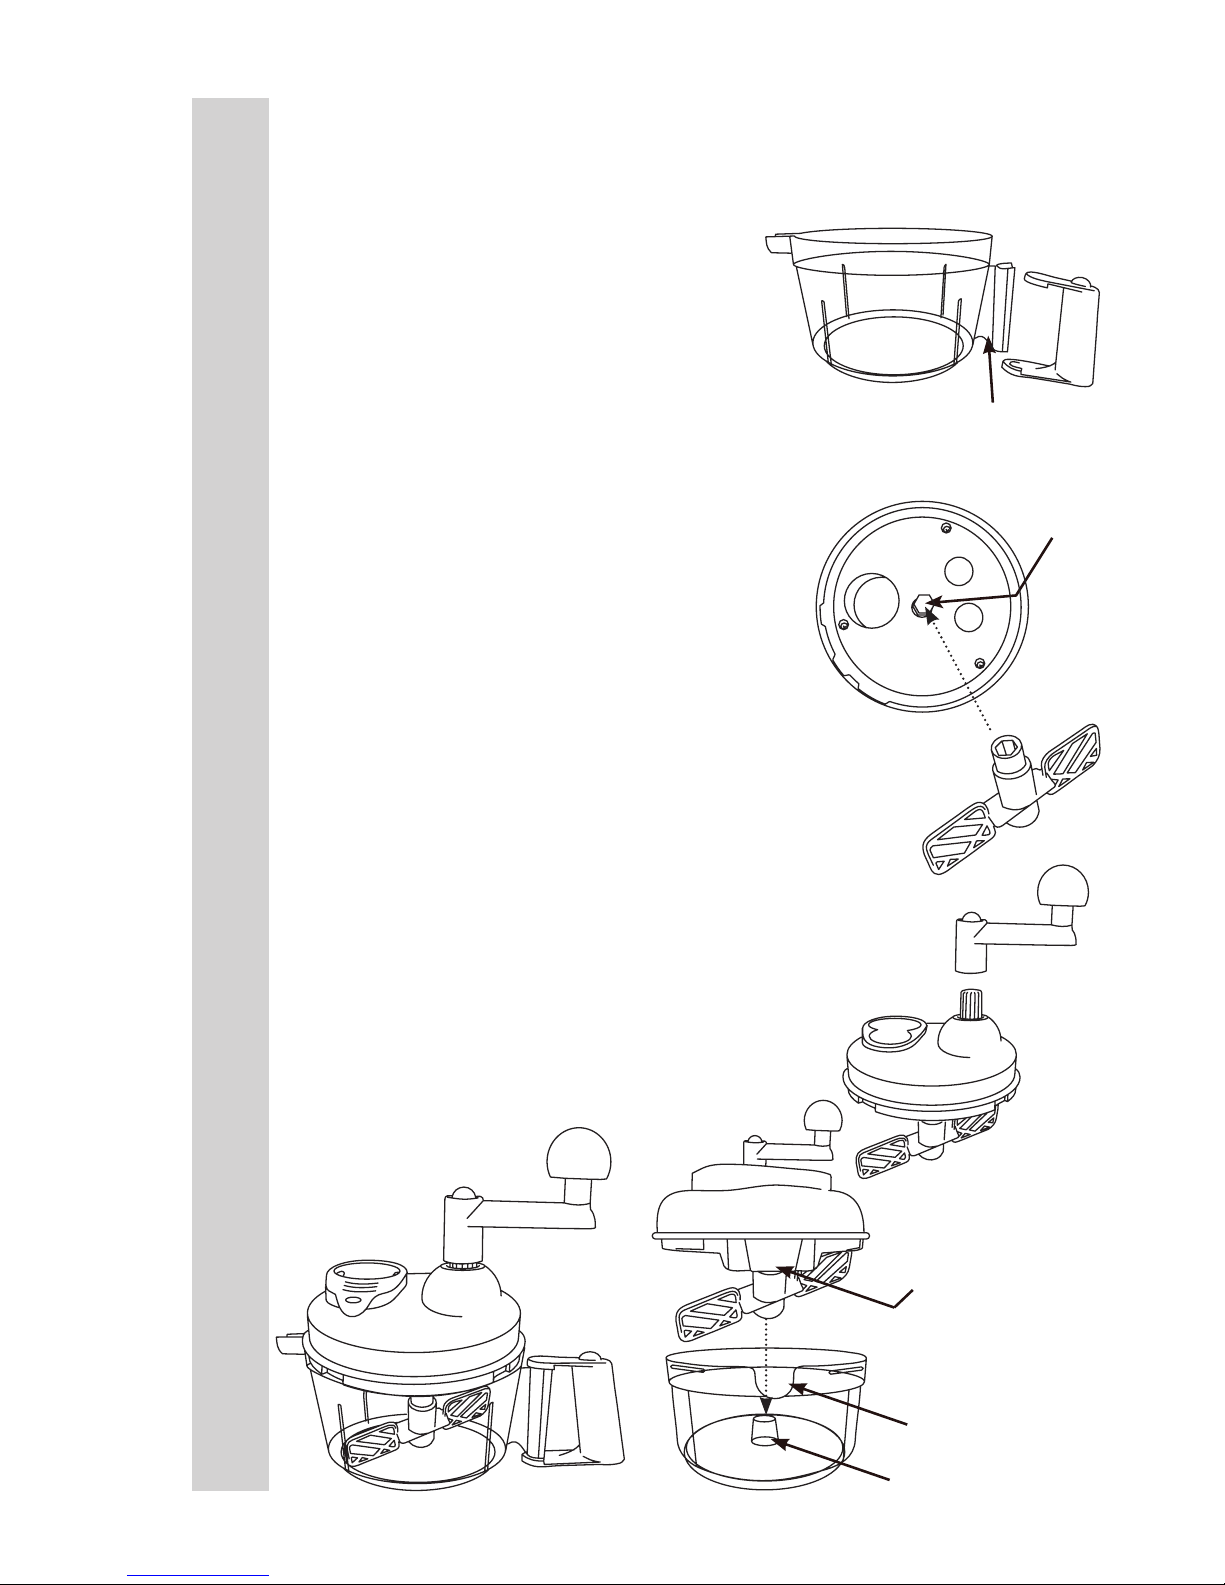
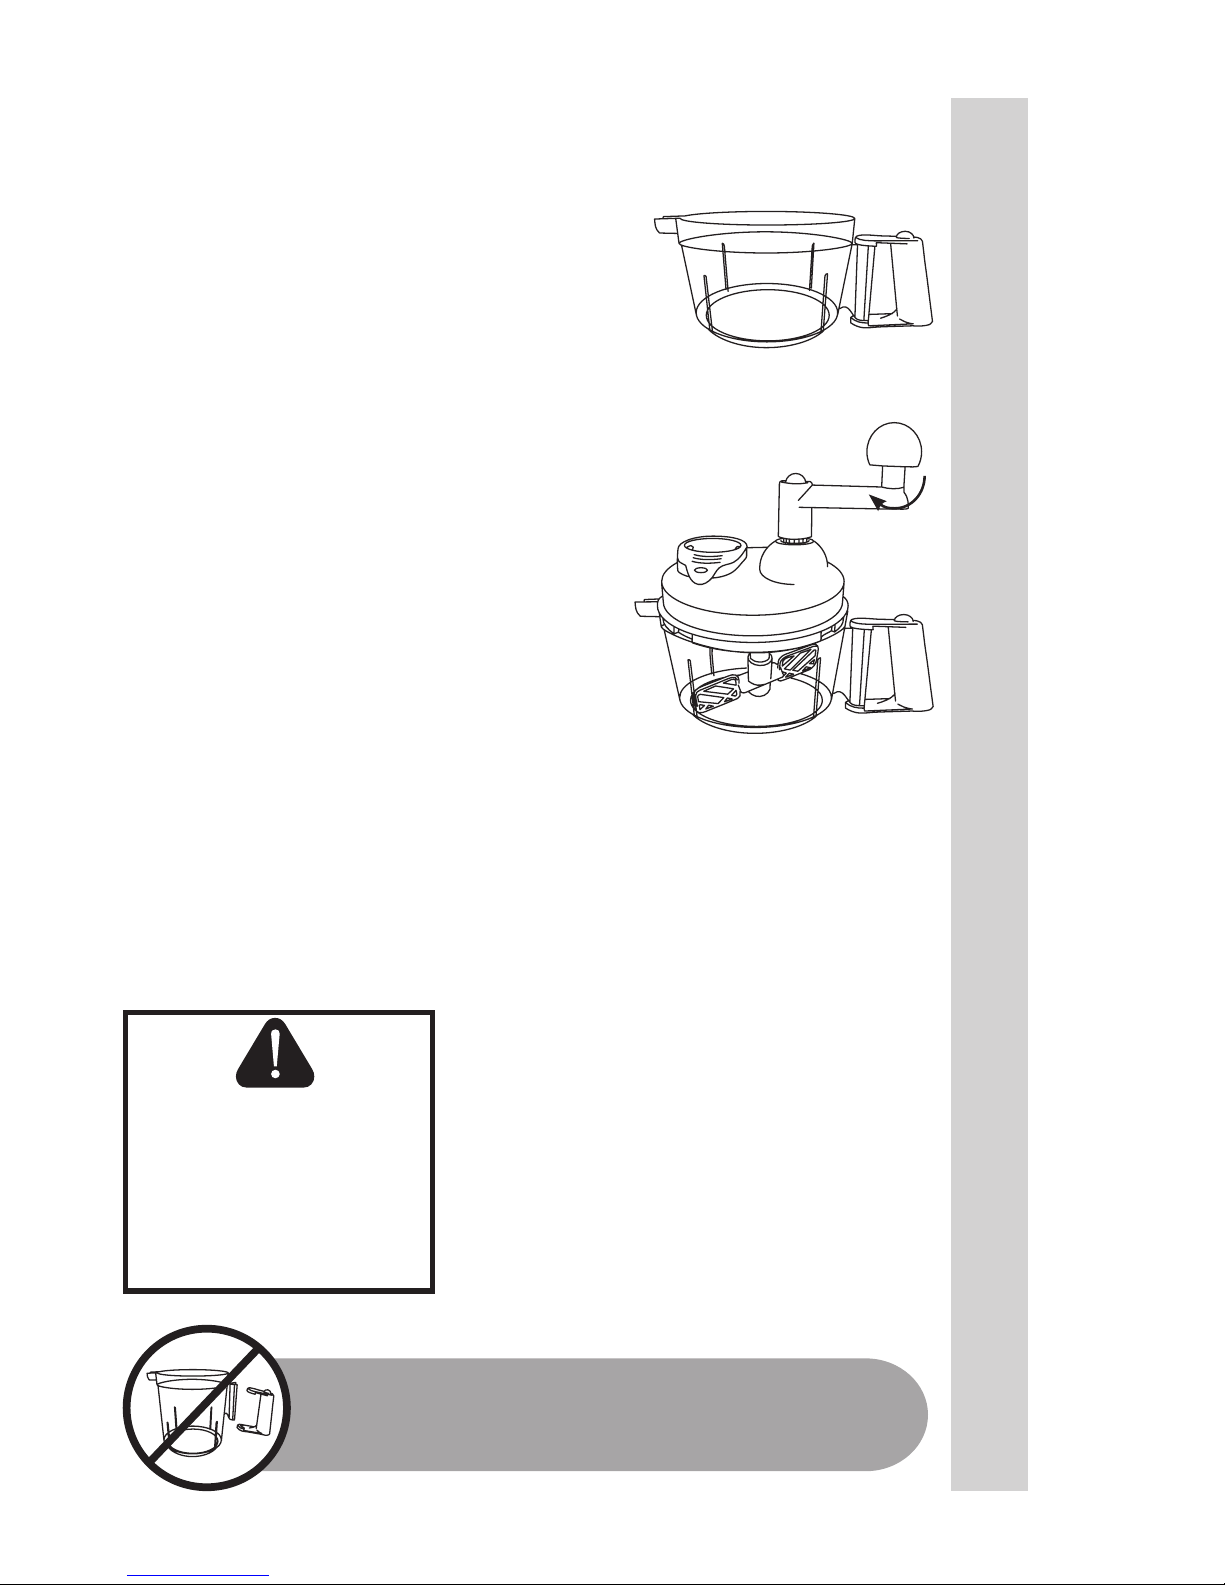
MIXER/CHOPPER ASSEMBLY
1. Attach the Removable Handle to the Mixing
Container. Align the bottom of the Removable
Handle with the “C” shaped handle of the
Mixing Container. Pull up and over on the
Removable Handle to snap the Handle onto
the Mixing Container (FIGURE A). Test to
make certain the Removable Handle is snug
into position on the Mixing Container.
2. Beater Attachment or the 3 Blade
Chopper Attachment: From the underside
of the Mixing Lid, align the slot of the
Beater Attachment or the 3 Blade Chopper
Attachment with the post in the Mixing Lid.
The Attachment should t snugly onto the
post (FIGURE B).
3. Align the grooves in the Mixing Handle
with the splines on the Mixing Lid. Push the
Mixing Handle rmly down (FIGURE C).
4. Line up the spout shield on the Mixing Lid
with the Spout on the Mixing Container, turn
the Mixing Lid slightly to the right to misalign
the spout shield. Place the Mixing Lid on
the Mixing Container and turn the Mixing
Lid clockwise to lock the Mixing Lid onto the
Mixing Container. The Attachment should
be on the Attachment Hub (FIGURE D).
5. The Mixer/Chopper is now ready to use
(FIGURE E).
FIGURE B
Beater
Attachment
Slots for Mixer
& Whisk
Attachments
Underside of
Mixing Lid
FIGURE A
Removable
Handle
Mixing Container
“C” handle
FIGURE C
Splines
Mixing Lid
Mixing Handle
FIGURE D
Attachment Hub
Spout Shield
FIGURE E
Spout
6
ENGLISH INSTRUCTIONS
Page 7
6. Fill the Mixing Container with the desired
food to be mixed. Do not overll the Mixing
Container (6 cup (1.42 L) capacity) (FIGURE
F).
7. Place the Mixing Lid Assembly (with
the attachment of choice) onto the Mixing
Container and turn it clockwise to lock the
Mixing Lid onto the Mixing Container.
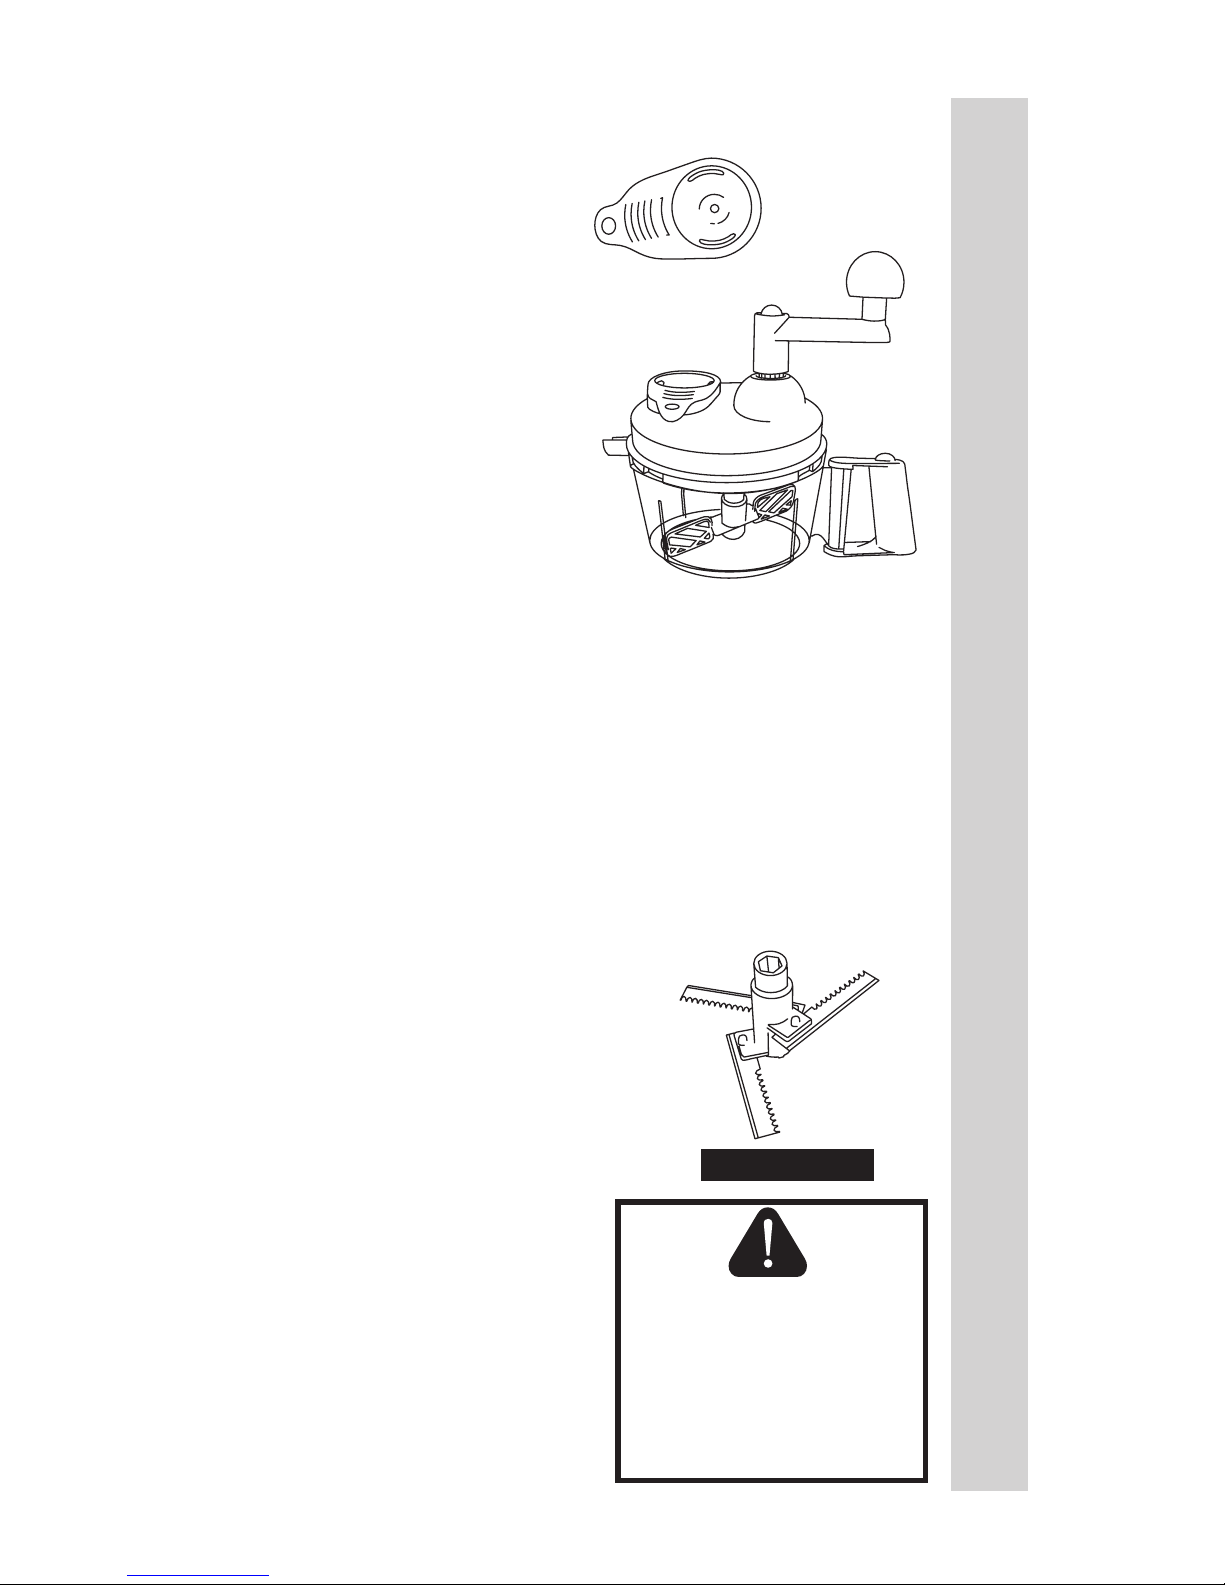
8. Turn the Mixing Handle. The Attachments
will turn and mix/chop the contents of the
Mixing Container (FIGURE G).
9. When mixing is complete, turn the Mixing
Lid counter-clockwise to unlock and remove
the Mixing Lid Assembly. CAUTION! If using
the 3 Blade Attachment the Blades are Very
Sharp!
USING THE MIXER/CHOPPER
FIGURE F
FIGURE G
Mixing Lid
Mixing Handle
Mixing
Container
WARNING
SHARP BLADES!
Protective/cut-resistant
gloves are
recommended whenever
handling the
3 Blade Attachment or
Mandoline Blades!
NOTE: When lling the Mixing Container to the maximum
capacity, the weight of the ller might be too much for the Handle
to bear. It is always best to hold the Handle and place one hand
under the Mixing Container for support when carrying or pouring.
7
ENGLISH INSTRUCTIONS
Page 8

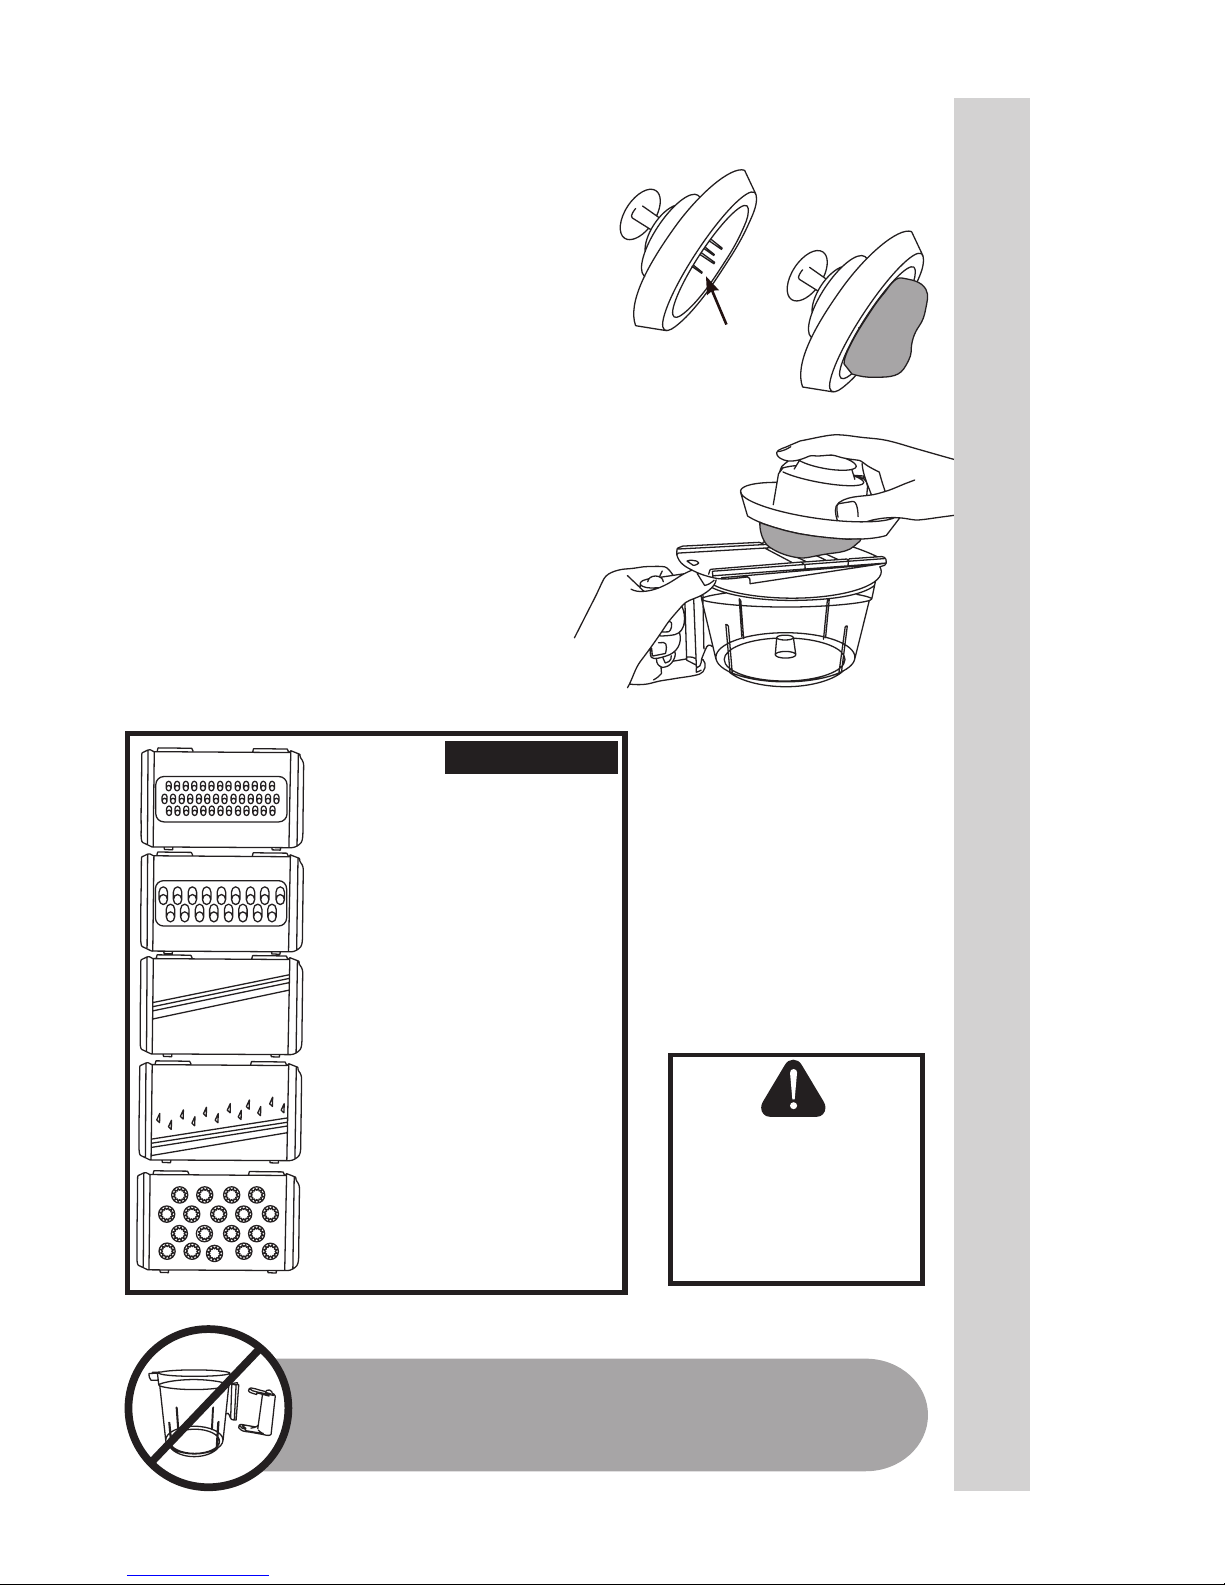
MANDOLINE ASSEMBLY
1. Attach the Removable Handle to the
Mixing Container. Align the bottom of the
Removable Handle with the “C” shaped
handle of the Mixing Container. Pull up and
over on the Removable Handle to snap the
Handle onto the Mixing Container (FIGURE
H). Test to make certain the Removable
Handle is snug into position on the Mixing
Container.
2. Line up the spout shield on the
Mandoline Base with the Spout on the
Mixing Container, turn the Madoline Base
slightly to the right to misalign the spout
shield. Place the Mandoline Base on the
Mixing Container and turn the Madoline
Base clockwise to lock the Mandoline Base
onto the Mixing Container (FIGURE I).
3. Hold a Mandoline Blade by the
plastic portion. Insert the notches of the
Mandoline Blade into the corresponding
notches of the Mandoline Base. Snap the
Mandoline Blade down into the Madoline
Base (FIGURE J).
FIGURE H
Removable
Handle
Mixing Container
“C” handle
FIGURE I
Spout
Shield
Spout
Mandoline
Base
FIGURE J
CAUTION SHARP!
Mandoline
Base
Mandoline
Blade
Mandoline
Blade Notches
8
ENGLISH INSTRUCTIONS
Page 9
WARNING
SHARP BLADES!
Protective/cut-resistant
gloves are
recommended whenever
handling the
3 Blade Attachment or
Mandoline Blades!
USING THE MANDOLINE
4. Stab the food to be sliced onto the spikes
of the Food Pusher (FIGURE K).
ALWAYS use the Food Pusher! NEVER use
your ngers, hands or other objects to push
the food on the Slicer! The Food Pusher is
designed so that it will not touch the Blades
as you slide it up and down the face of the
Slicer.
NOTE: A small at edge may need to be
sliced on the top of the food so there is a
stable area for the Food Pusher to hold on
to.
5. Hold onto the Removable Handle on the
Mixing Container and using the Food Pusher
with the food attached, slide the Food Pusher
downward and forward to slice (FIGURE L).
6. Maintain constant pressure so that the
spikes of the Food Pusher continue to hold
the vegetable/fruit.
FIGURE K
Spikes
Food Pusher
FIGURE L
Fine Shredder Blade
Coarse Shredder Blade
Flat Slicer Blade
Julienne Slicer Blade
Grater Blade
CAUTION SHARP!
NOTE: When lling the Mixing Container to the maximum
capacity, the weight of the ller might be too much for the Handle
to bear. It is always best to hold the Handle and place one hand
under the Mixing Container for support when carrying or pouring.
9
ENGLISH INSTRUCTIONS
Page 10
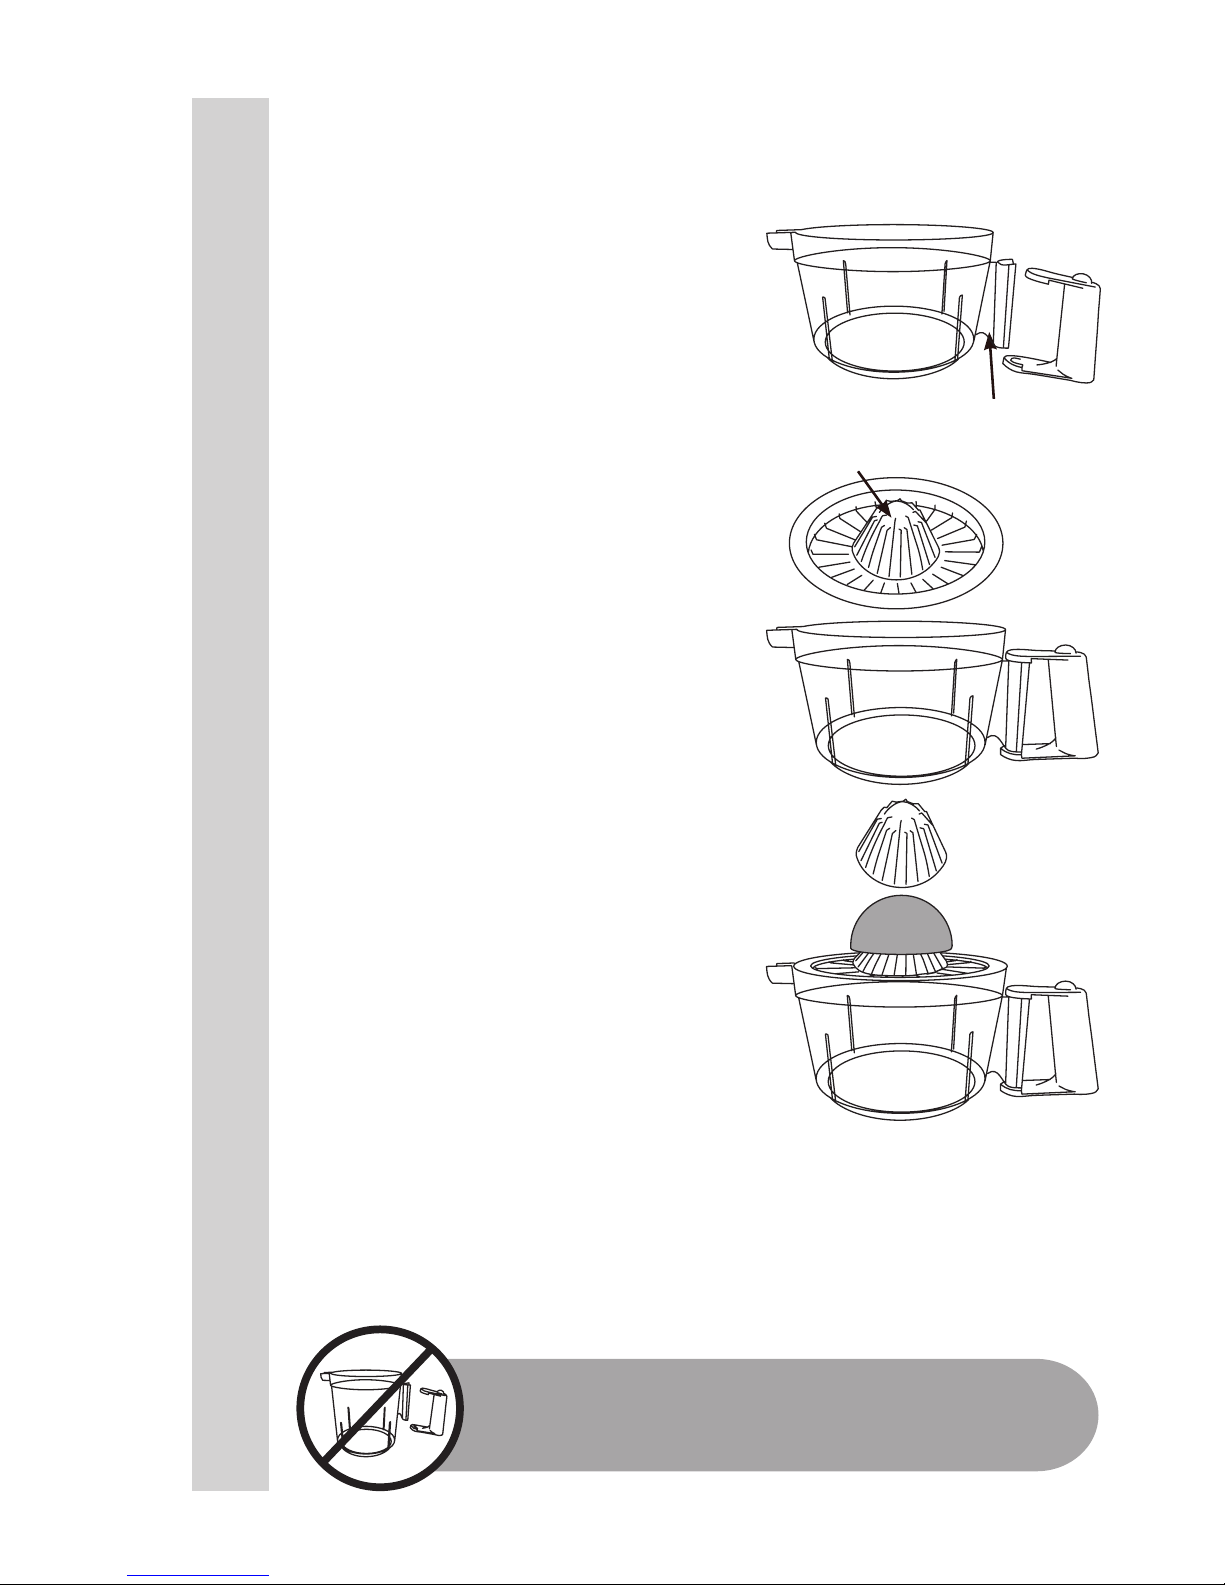
CITRUS JUICER ASSEMBLY
1. Attach the Removable Handle to the
Mixing Container. Align the bottom of the
Removable Handle with the “C” shaped
handle of the Mixing Container. Pull up and
over on the Removable Handle to snap the
Handle onto the Mixing Container (FIGURE
M). Test to make certain the Removable
Handle is snug into position on the Mixing
Container.
2. Place the Juicer Base onto the Mixing
Container. Turn the Juicer Base slightly
clockwise to lock the Juicer Base onto the
Mixing Container (FIGURE N).
FIGURE M
Removable
Handle
Mixing Container
“C” handle
Juicer Base
FIGURE N
USING THE CITRUS JUICER
3. Cut the citrus fruit in halves.
4. Place the fruit onto the hub of the Juicer
Base (FIGURE O).
5. Place the Juicer Top on top of the fruit.
6. Push down on the Juicer Top while
turning from side to side. This will extract
the juice from the fruit.
7. Remove the Juicer Top.
8. Discard the fruit skin.
9. Remove the Juicer Base by turning
it counter-clockwise and lift off of the
Mixing Container.
FIGURE O
Juicer Base
Juicer Top
Juicer Base
Hub
NOTE: When lling the Mixing Container to the maximum
capacity, the weight of the ller might be too much for the Handle
to bear. It is always best to hold the Handle and place one hand
under the Mixing Container for support when carrying or pouring.
10
ENGLISH INSTRUCTIONS
Page 11
EGG SEPARATER ASSEMBLY & USE
1. The Egg Separator rests in the top of the
Mixing Lid Assembly (FIGURE P).
2. Gently crack the egg into the Egg
Separator. The wihites of the egg will sift
through the hole in the unit and into the Mixing
Container. The yolk will be left in the Egg
Separator to discard or save for other uses.
FIGURE P
Egg Separator
Mixing
Lid
Assembly
Mixing Container
CLEANING INSTRUCTIONS
1. Disassemble all parts of the Manual Kitchen Kit. CAUTION! If using the 3
Blade Attachment the Blades are Very Sharp!
2. Cleaning the Manual Kitchen Kit should be done immediately after use to
prevent food from drying on the parts. The Manual Kitchen Kit should be washed
by hand in warm soapy water, rinsed, then dried immediately. Never use harsh
abrasives or pads to clean the Manual Kitchen Kit.
3. The Manual Kitchen Kit can be washed in the top rack of a dishwasher.
Carefully position these pieces where they won’t cut or damage other utensils.
CAUTION: Once the 3 Blade Attachment
or the Mandoline Blades are removed, DO
NOT immerse it in water! Blades should
be washed either in a top rack of the
dishwasher or by holding onto the plastic
portion of the Blade. With a soapy towel,
wipe AWAY from the Blade edges. To
rinse Blade, hold by the Handle and wipe
with a clean, damp towel, or hold under
running water. Dry thoroughly.
4. Store the 3 Blade Attachment inside
the Mixing Container. It is safest to place
the cardboard blade covers back onto the
blades before storage. Return the Manual
Kitchen Kit and all parts to the original box.
Store in a cool, dry area. BE SURE TO
STORE OUT OF REACH OF CHILDREN!
WARNING
SHARP BLADES!
Protective/cut-resistant
gloves are
recommended whenever
handling the
3 Blade Attachment or
Mandoline Blades!
CAUTION SHARP!
11
ENGLISH INSTRUCTIONS
Page 12

This warranty applies to products purchased and used in the U.S. and Canada,
which have been properly registered within 30 days of the date of original
purchase. This is the only express warranty for this product and is in lieu of
any other warranty or condition. This product is warranted to be free from
defects in material and workmanship for a period of one (1) year from the date
of original purchase. During this period, your exclusive remedy is repair or
replacement of this product or any component found to be defective, at our
option.
To register your product: complete the online form at
www.WestonProducts.com/Warranty.
This warranty does not cover unregistered products, unauthorized repairs or
service to products, products sold “as-is” by retailers, glass, lters, wear from
normal use, use not in conformity with the printed directions, or damage to the
product resulting from accident, alteration, abuse, or misuse. This warranty
extends only to the original consumer purchaser or gift recipient and is not
transferrable. Keep the original sales receipt, as proof of purchase is required
to make a warranty claim. This warranty is void if the product is subjected to
any voltage and waveform other than as specied on the rating label (e.g.,
120V ~ 60 Hz).
We exclude all claims for special, incidental and consequential damages
caused by breach of express or implied warranty. All liability is limited to
the amount of the purchase price. Every implied warranty, including any
statutory warranty or condition of merchantability or tness for a particular
purpose, is disclaimed except to the extent prohibited by law, in which case
such warranty or condition is limited to the duration of this written warranty.
This warranty gives you specic legal rights. You may have other legal rights
that vary depending on where you live. Some states or provinces do not
allow limitations on implied warranties or special, incidental, or consequential
damages, so the foregoing limitations may not apply to you.
Before returning the product for any repair or service: it must be clean and free
from any food particles or other debris; otherwise, we will return it or impose a
$50 cleaning surcharge, at our option.
To make a warranty claim: go to www.WestonProducts.com/Contact; or call
1.800.814.4895 in the U.S. and 001.440.638.3131 outside the U.S., Monday –
Friday, 8 am – 5 pm Eastern. You are responsible for all costs associated with
shipping us the product freight prepaid. If the product qualies for a warranty
repair or replacement, we will bear the cost of returning it to you. We are not
responsible for shipping damage.
For non-warranty work: call 1.800.814.4895 in the U.S. and 001.440.638.3131
outside the U.S., Monday – Friday, 8 am – 5 pm Eastern, to obtain a Return
Merchandise Authorization Number (RMA Number). We will refuse all returns
without an RMA Number. We charge US$35/hour for all diagnostic, service,
repair and processing work. We will not start any service or repair work without
prior authorization. You are responsible for all costs associated with shipping
us the product freight prepaid and our returning it to you.
ONE-YEAR LIMITED WESTON WARRANTY
Page 13

COCINA
16-0401-W
DEBIDO A CONSTANTES MEJORAS EN LA FÁBRICA, EL PRODUCTO QUE SE MUESTRA PUEDE
SER LIGERAMENTE DIFERENTE DEL PRODUCTO EN ESTA CAJA. 090915
Page 14

14
INSTRUCCIONES EN ESPAÑOLINSTRUCCIONES EN ESPAÑOL
1. MANTENGA LOS DEDOS ALEJADOS de la cuchilla en todo momento.
NUNCA empuje el producto con las manos en la línea de la cuchilla al rebanar.
SIEMPRE use el empujador de alimentos.
2. NUNCA use los dedos para quitar los alimentos de la cuchilla. PUEDE
SUFRIR LESIONES GRAVES.
3. NUNCA DEJE EL KIT MANUAL DE COCINA SIN VIGILANCIA. Se requiere
estrecha vigilancia cuando se usa cerca de niños. El kit manual de concina NO
debe ser usado por niños. El kit manual de cocina NO es un juguete.
4. VERIFIQUE QUE NO HAYA PIEZAS DAÑADAS. Antes de utilizar el kit
manual de cocina, verique que todas las piezas funcionen correctamente y
realicen las funciones previstas.
5. El fabricante rechaza toda responsabilidad en caso de uso incorrecto de esta
unidad.
6. NUNCA utilice accesorios o piezas de otros fabricantes. Si lo hace, ANULARÁ
LA GARANTÍA y puede sufrir lesiones.
7. Nunca transporte el recipiente para mezclar lleno de líquidos calientes.
Cuando llene el recipiente para mezclar con líquidos calientes, siempre déjelo
sobre una plataforma estable. Cuando llene el recipiente para mezclar hasta la
máxima capacidad, recuerde que es posible que el mango no soporte el peso de
la carga. Siempre es mejor para sostener el mango y colocar una mano debajo
del recipiente para mezclar al transportarlo o al verter el contenido.
8. Asegúrese de que el kit manual de cocina se mantenga estable durante el
uso.
9. NO use este kit manual de cocina con alimentos congelados ni otros objetos
que no sean alimentos.
10. Quite la cuchilla después de cada uso para limpiarla. Límpiela con agua
caliente y jabón. Séquela bien. Se recomienda usar guantes protectores y
resistentes a los cortes de para manipular las cuchillas.
11. NO use el kit manual de cocina mientras esté bajo la inuencia de drogas o
alcohol.
¡GUARDE ESTAS INSTRUCCIONES!
REGLAS IMPORTANTES DE SEGURIDAD
LEA Y ENTIENDA COMPLETAMENTE TODAS LAS INSTRUCCIONES Y
ADVERTENCIAS ANTES DE UTILIZAR ESTA UNIDAD. ¡SU SEGURIDAD
ES LO MÁS IMPORTANTE! NO SEGUIR LOS PROCEDIMIENTOS
Y PRECAUCIONES PUEDE PROVOCAR LESIONES GRAVES Y
DAÑOS MATERIALES. RECUERDE: ¡SU SEGURIDAD PERSONAL ES
RESPONSABILIDAD DE USTED!
Page 15

15
INSTRUCCIONES EN ESPAÑOL
INSTRUCCIONES EN ESPAÑOL
NUMÉRO DE SCHÉMA DESCRIPTION DE LA PIÉCE
1 RECIPIENTE PARA MEZCLAR
2 MANGO EXTRAÍBLE
3 TAPA PARA MEZCLAR
4 MANGO PARA MEZCLAR
5 ACCESORIO BATIDOR
6 3 CUCHILLAS DE LA PICADORA
7 ACCESORIO EXPRIMIDOR DE CÍTRICOS
8 BASE DE MANDOLINA CON 5 CUCHILLAS
9 EMPUJADOR DE ALIMENTOS
10 BASE DE CAUCHO ANTIDESLIZANTE
11 SEPARADOR DE HUEVO
LISTA DE COMPONENTES
Si cualquier componente de esta unidad está roto, si no funciona debidamente, o si necesita
un instructivo de repuesto, visítenos en la Web en
WestonProducts.com
O llame a Weston Brands LLC larga distancia sin costo 1-800-814-4895
De lunes a viernes, de 8:00 am a 5:00 pm tiempo del ET. Fuera de Estados Unidos llame
al 001-440-638-3131
1
2
3
4
5
6
7
8
10
CAUTION SHARP!
9
11
CAUTION SHARP!
Page 16

16
INSTRUCCIONES EN ESPAÑOLINSTRUCCIONES EN ESPAÑOL
MONTAJE DE MEZCLADOR/PICADOR
1. Conecte el Mango extraíble al recipiente
para mezclar. Alinee la parte inferior del
mango extraíble con el mango en forma de
“C” del recipiente para mezclar. Tire hacia
arriba y hacia afuera el mango extraíble para
que el mango calce en el recipiente para
mezclar (FIGURA A). Asegúrese de que el
mango extraíble esté rme en su posición
sobre el recipiente para mezclar.
2. Accesorio batidor o accesorio picador
de tres cuchillas: Desde la parte inferior de
la tapa para mezclar, alinee la ranura del
accesorio batidor o el accesorio picador de
tres cuchillas con el poste de la tapa para
mezclar. El accesorio debe quedar bien
ajustado sobre el poste (FIGURA B).
3. Alinee las ranuras del mango para mezclar
con las estrías de la tapa para mezclar.
Empuje el mango para mezclar rmemente
hacia abajo (FIGURA C).
4. Alinee el protector del pico de la tapa
para mezclar con el pico del recipiente para
mezclar, gire la tapa para mezclar ligeramente
hacia la derecha para desalinear el protector
del pico. Coloque la tapa para mezclar sobre
el recipiente para mezclar y gire la tapa para
mezclar en el sentido de las agujas del reloj
para trabar la tapa para mezclar sobre el
recipiente para mezclar. El accesorio debe
estar sobre el buje para accesorios (FIGURA
D).
5. El mezclador/picador ahora está listo para
ser utilizado (FIGURA E).
FIGURA B
Accesorio batidor
Ranuras para
los accesorios
mezclador y
batidor
Parte inferior de la
tapa para mezclar
FIGURE A
Mango
extraíble
Recipiente para
mezclar
Mango en “C”
FIGURA C
Estrías
Tapas para
mezclar
Mango para mezclar
FIGURA D
Protector del pico
FIGURE E
Page 17

17
INSTRUCCIONES EN ESPAÑOL
INSTRUCCIONES EN ESPAÑOL
1. Llene el recipiente para mezclar con los
alimentos que desea mezclar. No llene
excesivamente el recipiente para mezclar ( 6
tazas [1,42 L] de capacidad) (FIGURA F).
2. Coloque el conjunto de la tapa para mezclar
(con el accesorio elegido) sobre el recipiente
para mezclar y gírela en dirección de las agujas
del reloj para trabar la tapa para mezclar sobre el
recipiente para mezclar.
3. Gire el mango para mezclar. Los accesorios
mezclarán/cortarán el contenido del recipiente
para mezclar (FIGURA G).
4. Cuando la mezcla nalice, gire la tapa para
mezclar en dirección opuesta a las agujas del
reloj para destrabar y quitar el conjunto de la tapa
para mezclar ¡PRECAUCIÓN! Si va a utilizar el
accesorio de tres cuchillas, recuerde que estas
están muy aladas.
USO DEL MEZCLADOR/PICADOR
FIGURA F
FIGURA G
Tapa para
mezclar
Mango para mezclar
Recipiente para
mezclar
NOTA: Cuando llene el recipiente para mezclar hasta la máxima
capacidad, recuerde que es posible que el mango no soporte
el peso de la carga. Siempre es mejor para sostener el mango
y colocar una mano debajo del recipiente para mezclar al
transportarlo o al verter el contenido.
¡ADVERTENCIA!
NAVAJA FILOSA
Se recomienda utilizar
guantes resistentes a los
cortes cuando se usa el
accessorio de tres cuchillas
o cuchillas mandoline.
Page 18

MONTAJE DE LA MANDOLINA
1. Conecte el Mango extraíble al recipiente
para mezclar. Alinee la parte inferior del
mango extraíble con el mango en forma de
“C” del recipiente para mezclar. Tire hacia
arriba y hacia afuera el mango extraíble para
que el mango calce en el recipiente para
mezclar (FIGURA H). Asegúrese de que el
mango extraíble esté rme en su posición
sobre el recipiente para mezclar.
2. Alinee el protector del pico de la base
de la mandolina con el pico del recipiente
para mezclar, gire la base de la mandolina
ligeramente hacia la derecha para desalinear
el protector del pico. Coloque la base de la
mandolina sobre el recipiente para mezclar y
gire la base de la mandolina en el sentido de
las agujas del reloj para trabar la base de la
mandolina sobre el recipiente para mezclar
(FIGURA I).
3. Sostenga una cuchilla de la mandolina por
la parte de plástico. Inserte las muescas de
la cuchilla de la mandolina en las muescas
correspondientes de la base de la mandolina.
Calce la cuchilla de la mandolina en la base
de la mandolina (FIGURA J).
FIGURA H
FIGURA I
Protector
del pico
Spout
Base de la
mandolina
FIGURA J
PRECAUCIÓN SHARP
Base de la
mandolina
Cuchilla de la
mandolina
Muescas de la
cuchilla de la
mandolina
Mango
extraíble
Recipiente para
mezclar
Mango en “C”
18
INSTRUCCIONES EN ESPAÑOLINSTRUCCIONES EN ESPAÑOL
Page 19

USO DE LA MANDOLINA
1. Clave el alimento que va a rebanar en los
picos del empujador de alimentos (FIGURA K).
¡Use SIEMPRE el empujador de alimentos!
¡NUNCA use los dedos, las manos u otros
objetos para empujar los alimentos en el
rebanador! El empujador de alimentos está
diseñado para no tocar las cuchillas mientras
usted lo desliza hacia arriba y abajo contra la
cara del rebanador.
NOTA: Es posible que sea necesario cortar un
pequeño reborde plano en la parte superior del
alimento para que haya un área estable para
asentar el empujador de alimentos.
2. Sostenga el mango extraíble sobre el
recipiente para mezclar y, con el empujador
de alimentos cargado de alimentos, deslice el
empujador de alimentos hacia abajo y hacia
adelante para rebanar (FIGURA L).
3. Mantenga una presión constante para que
los picos del empujador de alimentos sigan
sosteniendo la verdura/fruta.
FIGURA K
Picos
Empujador de
alimentos
FIGURA L
Cuchilla de rallado no
Cuchilla de rallado
grueso
Cuchilla rebanadora
plana
Cuchilla para rebanar
en juliana
Cuchilla ralladora
NOTA: Cuando llene el recipiente para mezclar hasta la máxima
capacidad, recuerde que es posible que el mango no soporte
el peso de la carga. Siempre es mejor para sostener el mango
y colocar una mano debajo del recipiente para mezclar al
transportarlo o al verter el contenido.
PRECAUCIÓN SHARP
¡ADVERTENCIA!
NAVAJA FILOSA
Se recomienda utilizar
guantes resistentes
a los cortes cuando
se usa el accessorio
de tres cuchillas o
cuchillas mandoline.
19
INSTRUCCIONES EN ESPAÑOL
INSTRUCCIONES EN ESPAÑOL
Page 20

20
INSTRUCCIONES EN ESPAÑOLINSTRUCCIONES EN ESPAÑOL
MONTAJE DEL EXPRIMIDOR DE CÍTRICOS
1. Conecte el Mango extraíble al recipiente
para mezclar. Alinee la parte inferior del
mango extraíble con el mango en forma de
“C” del recipiente para mezclar. Tire hacia
arriba y hacia afuera el mango extraíble para
que el mango calce en el recipiente para
mezclar (FIGURA M). Asegúrese de que el
mango extraíble esté rme en su posición
sobre el recipiente para mezclar.
2. Coloque la base del exprimidor sobre el
recipiente para mezclar. Gire la base del
exprimidor ligeramente en el sentido de las
agujas del reloj para bloquear la base del
exprimidor sobre el recipiente para mezclar
(FIGURA N).
FIGURA M
Base del
exprimidor
FIGURA N
USO DEL EXPRIMIDOR DE CÍTRICOS
1. Corte los cítricos en mitades.
2. Coloque la fruta en el buje de la base del
exprimidor (FIGURA O).
3. Coloque la parte superior del exprimidor
sobre la fruta.
4. Empuje hacia abajo la parte superior del
exprimidor y, al mismo tiempo, muévala de
lado a lado. Esto extraerá el jugo de la fruta.
5. Quite la parte superior del exprimidor.
6. Deseche las cáscaras de las frutas.
7. Quite la base del exprimidor; para ello,
gírela en el sentido opuesto al de las agujas
del reloj y extráigala del recipiente para
mezclar.
FIGURA O
Base del
exprimidor
Parte superior
del exprimidor
Buje de la base del
exprimidor
NOTA: Cuando llene el recipiente para mezclar hasta la
máxima capacidad, recuerde que es posible que el mango no
soporte el peso de la carga. Siempre es mejor para sostener
el mango y colocar una mano debajo del recipiente para
mezclar al transportarlo o al verter el contenido.
Mango
extraíble
Recipiente para
mezclar
Mango en “C”
Page 21

21
INSTRUCCIONES EN ESPAÑOL
INSTRUCCIONES EN ESPAÑOL
MONTAJE Y USO DEL SEPARADOR DE HUEVO
1. El separador de huevo se apoya sobre la
parte superior del conjunto de la tapa para
mezclar (FIGURA P).
2. Rompa suavemente el huevo y échelo en
el separador de huevo. La clara del huevo
se ltrará por el agujero de la unidad y caerá
en el recipiente para mezclar. La yema se
quedará en el separador de huevo para que
usted pueda desecharla o guardarla para
otros usos.
FIGURA P
Separador de huevo
Conjunto de la
tapa para
mezclar
Recipiente para
mezclar
INSTRUCCIONES DE LIMPIEZA
1. Desmonte todas las piezas del kit manual de cocina. ¡PRECAUCIÓN! Si va a
utilizar el accesorio de tres cuchillas, recuerde que estas están muy aladas.
2. Debe limpiar el kit manual de cocina inmediatamente después de usarlo para
evitar que los alimentos se sequen en las piezas. Lave el kit manual de cocina
a mano con agua tibia y jabón, enjuáguelo y, luego, séquelo inmediatamente.
Nunca utilice productos abrasivos o esponjas para limpiar el kit manual de cocina.
3. Puede lavar el kit manual de cocina en el estante superior del lavavajillas.
Coloque con cuidado estas piezas donde no corten o dañen otros utensilios.
PRECAUCIÓN: Cuando extraiga el accesorio
de 3 cuchillas o las cuchillas de la mandolina,
¡no los sumerja en agua! Debe lavar las
cuchillas en el estante superior del lavavajillas
o sosteniéndolas por la parte plástica. Con un
paño con jabón, quite los restos de los bordes
de las cuchillas. Para enjuagar las cuchillas,
sosténgalas por el mango y límpielas con un
paño limpio y húmedo o póngalas debajo del
agua del grifo. Séquelas bien.
4. Guarde el accesorio de 3 cuchillas dentro
del recipiente para mezclar. Es más seguro
volver a colocar las cubiertas de cartón en las
cuchillas antes de guardarlas. Vuelva a guardar
el kit manual de cocina y todas las piezas en
la caja original. Guárdelo en un lugar fresco
y seco. ASEGÚRESE DE GUARDARLO
FUERA DEL ALCANCE DE LOS NIÑOS.
PRECAUCIÓN SHARP
¡ADVERTENCIA!
NAVAJA FILOSA
Se recomienda utilizar
guantes resistentes a los
cortes cuando se usa el
accessorio de tres cuchillas
o cuchillas mandoline.
Page 22

Esta garantía aplica a los productos que se compran y usan en los EE. UU. y
Canadá, y que se registraron adecuadamente dentro de 30 días de la fecha
de compra original. Esta es la única garantía expresa para este producto y
reemplaza cualquier otra garantía o condición. Este producto está garantizado
contra defectos materiales y de fabricación por un período de un (1) año a partir
de la fecha de compra original. Durante este período, su único recurso es la
reparación o sustitución de este producto o de cualquier componente que se
encuentre defectuoso, a nuestra elección.
Para registrar su producto, complete el formulario en línea en
www.WestonProducts.com/Warranty
Esta garantía no cubre productos no registrados, reparaciones o servicios a
productos no autorizados, productos vendidos “tal cual” por minoristas, vidrio,
ltros, desgaste por uso normal, uso que no sea conforme a las instrucciones
impresas o daño al producto como resultado de un accidente, alteración, abuso
o mal uso. Esta garantía se extiende únicamente al comprador consumidor
original o quien reciba el producto como regalo y no es transferible. Guarde
el recibo de compra original ya que se requiere de un comprobante de compra
para hacer un reclamo de garantía. Esta garantía es nula si el producto es
sujeto a cualquier voltaje u forma de onda que no sea la que se indica en la
etiqueta de especicaciones (p. ej., 120 V ~ 60 Hz).
Excluimos todo reclamo por daños especiales, incidentales o que resulten
como consecuencia del incumplimiento de la garantía expresa o implícita.
Toda responsabilidad se limita al monto del precio de compra. Toda garantía
implícita, incluyendo cualquier garantía legal o condición de comerciabilidad
o aptitud para un propósito en particular, se niega excepto en la medida
que lo prohíbe la ley, en cuyo caso dicha garantía o condición se limita a la
duración de esta garantía por escrito. Esta garantía le otorga derechos legales
especícos. Puede tener otros derechos legales que varían según donde vive.
Algunos estados o provincias no permiten limitantes en garantías implícitas o
daños especiales, incidentales o consecuentes, por lo tanto, es posible que las
limitaciones mencionadas anteriormente no apliquen para usted.
Antes de devolver el producto para cualquier reparación o servicio: debe estar
limpio y libre de partículas de alimentos u otra suciedad; de otra manera, se le
devolverá o aplicará un cargo de 50 USD por limpieza, a nuestra elección.
Para reclamar una garantía, visite www.WestonProducts.com/Contact o llame
al 1.800.814.4895 en los EE. UU. o al 001.440.638.3131 fuera de los EE. UU.,
de lunes a viernes de 8 a. m. a 5 p. m. hora del este. Usted es responsable de
todos los costos asociados con enviarnos el producto con el ete prepagado.
Si el producto calica para una reparación o un reemplazo bajo garantía,
asumiremos el costo de devolverle el producto. No somos responsables por
los daños resultantes del envío.
Para trabajo fuera de garantía: llame al 1.800.814.4895 dentro de los EE. UU.
o al 001.440.638.3131 fuera de los EE. UU., de lunes a viernes de 8 a. m. a
5 p. m. hora del Este, para obtener un número de autorización de devolución
de mercancía (Return Merchandise Authorization, RMA). Rechazaremos
toda devolución sin número de RMA. Aplicaremos un cargo de 35 USD/hora
por todo trabajo de diagnóstico, servicio, reparación o procesamiento. No
iniciaremos ningún servicio o trabajo de reparación sin autorización previa.
Usted es responsable de todos los costos asociados con enviarnos el producto
con el ete prepagado y con nuestra devolución hacia usted.
UN AÑO DE GARANTÍA WESTON LIMITADA
Page 23

ENSEMBLE DE CUISINE
16-0401-W
PARCE QUE NOS PRODUITS BÉNÈFICIENT DE PERFECTIONNEMENTS CONSTANTS
APPORTÉS EN USINE, LES ILLUSTRATIONS PRÉSENTES PEUVENT ÊTRE LÉGÈREMENT
DIFFÉRENTES DU PRODUIT REÇU. 090915
Page 24

1. TENIR LES DOIGTS ÉLOIGNÉS de la lame en tout temps. Ne JAMAIS
pousser le produit en plaçant les mains dans la ligne de la lame au moment de
trancher. Il faut TOUJOURS utiliser le poussoir.
2. Ne JAMAIS enlever les aliments de la lame avec les doigts. DE GRAVES
BLESSURES POURRAIENT S’ENSUIVRE.
3. NE PAS LAISSER L’ENSEMBLE DE CUISINE MANUEL SANS
SURVEILLANCE. Une surveillance étroite est nécessaire lorsque l’ensemble est
utilisé à proximité des enfants. L’ensemble de cuisine manuel ne doit PAS être
utilisé par les enfants. L’ensemble de cuisine manuel n’est PAS un jouet.
4. VÉRIFIER SI DES PIÈCES SONT ENDOMMAGÉES. Avant d’utiliser
l’ensemble de cuisine manuel, vérier si toutes les pièces fonctionnent
correctement et remplissent les fonctions prévues.
5. Le fabricant décline toute responsabilité en cas d’une utilisation inappropriée de
cet appareil.
6. Ne JAMAIS utiliser d’accessoires ou de pièces provenant d’un autre fabricant.
Ceci ANNULERA LA GARANTIE de l’appareil et pourrait entraîner des blessures.
7. Ne jamais transporter le récipient mélangeur lorsqu’il est rempli de liquides
chauds. Toujours installer le récipient mélangeur sur une surface stable au
moment de le remplir de liquides chauds. Lorsque le récipient mélangeur est
rempli au niveau maximal, le poids de l’aliment peut être trop lourd pour la
poignée. Il est toujours préférable de tenir la poignée et de placer l’autre main
sous le récipient mélangeur an de le soutenir lorsqu’on transporte ou verse le
produit.
8. Assurer la stabilité de l’ensemble de cuisine manuel pendant l’utilisation.
9. NE PAS utiliser l’ensemble de cuisine manuel pour les aliments congelés ou
autre chose que des produits alimentaires.
10. Retirer et nettoyer la lame après chaque utilisation. Nettoyer à l’eau chaude
savonneuse. Sécher soigneusement. Il est conseillé de porter des gants de
protection anticoupures en lors de la manipulation des lames.
11. NE PAS utiliser l’ensemble de cuisine manuel sous l’inuence de drogues ou
d’alcool.
CONSERVER CES DIRECTIVES!
IMPORTANTES RÈGLES DE SÉCURITÉ
LIRE ET COMPRENDRE COMPLÈTEMENT TOUTES LES DIRECTIVES
ET AVERTISSEMENTS AVANT D’UTILISER CE PRODUIT. LE PLUS
IMPORTANT EST VOTRE SÉCURITÉ! LE DÉFAUT D’OBSERVER LES
PROCÉDURES ET MISES EN GARDE PEUT ENTRAINER DES BLESSURES
GRAVES OU DES DOMMAGES MATÉRIELS. N’OUBLIEZ PAS : VOTRE
SÉCURITÉ PERSONNELLE EST VOTRE RESPONSABILITÉ!
INSTRUCTIONS EN FRANÇAIS
24
Page 25

INSTRUCTIONS EN FRANÇAIS
25
NUMÉRO DE SCHÉMA DESCRIPTION DE LA PIÉCE
1 RÉCIPIENT MÉLANGEUR
2 POIGNÉE AMOVIBLE
3 COUVERCLE DU MÉLANGEUR
4 POIGNÉE DU MÉLANGEUR
5 FOUET
6 TROIS COUPERET LAME
7 PRESSE-AGRUMES
8 MANDOLINE COMPRENANT 5 LAMES
9 PUSHER ALIMENTAIRE
10 SOCLE EN CAOUTCHOUC ANTIDÉRAPANT
11 SÉPARATEUR D’ŒUFS
DESCRIPTION DE LA PIÈCE
N’hésitez pas à visiter notre site Web WestonProduct.com/support si un composant est
cassé, l’outil fonctionne mal, ou pour commander un nouveau mode d’emploi.
WestonProducts.com
Veuillez appeler Weston Brands, LLC au numéro sans frais : 1-800-814-4895
Du lundi au vendredi: de 8h00 à 17h00 ET. En dehors des États-Unis, veuillez
appeler le 001-440-638-3131
1
2
3
4
5
6
7
8
10
CAUTION SHARP!
9
11
CAUTION SHARP!
Page 26

ASSEMBLAGE DU MÉLANGEUR/HACHOIR
1. Fixer la poignée amovible au récipient
mélangeur. Aligner le bas de la poignée
amovible sur la poignée en forme de « C » du
récipient mélangeur. Tirer vers le haut et pardessus la poignée amovible pour enclencher
la poignée sur le récipient mélangeur
(FIGURE A). Vérier que la poignée amovible
est bien installée sur le récipient mélangeur.
2. Fouet ou hachoir à trois lames : Depuis la
face inférieure du couvercle du mélangeur,
aligner la rainure du fouet ou du hachoir à trois
lames sur la tige du couvercle. L’accessoire
devrait s’insérer parfaitement dans la tige
(FIGURE B).
3. Aligner les rainures de la poignée du
mélangeur sur les cannelures du couvercle.
Pousser la poignée du mélangeur fermement
vers le bas (FIGURE C).
4. Aligner l’obturateur du bec verseur du
couvercle du mélangeur sur le bec verseur
du récipient mélangeur, tourner le couvercle
légèrement vers la droite pour désaligner
l’obturateur du bec verseur. Placer le
couvercle du mélangeur sur le récipient
mélangeur et tourner le couvercle dans le
sens horaire pour enclencher le couvercle sur
le récipient. L’accessoire devrait être xé à la
prise d’accessoires (FIGURE D).
5. Le mélangeur/hachoir est à présent prêt à
l’emploi (FIGURE E).
FIGURE B
Fouet
Rainures
destinées au
mélangeur
et au fouet
(accessoires)
Face inférieure
du couvercle du
mélangeur
FIGURE A
Poignée
amovible
Récipient mélangeur
Poignée en « C »
FIGURE C
Cannelures
Couvercle
du
mélangeur
Poignée du
mélangeur
FIGURE D
Obturateur du
bec verseur
FIGURE E
INSTRUCTIONS EN FRANÇAIS
26
Page 27

1. Remplir le récipient mélangeur des aliments
que vous voulez mélanger. Ne pas remplir
excessivement le récipient mélangeur (capacité
de 6 tasses ou 1,42 L) (FIGURE F).
2. Placer le couvercle du mélangeur (muni
de l’accessoire de votre choix) sur le récipient
mélangeur et le tourner dans le sens horaire
pour enclencher le couvercle sur le récipient.
3. Tourner la poignée du mélangeur.
L’accessoire choisi tournera et mélangera ou
hachera les aliments contenus dans le récipient
mélangeur (FIGURE G).
4. Lorsque le mélange est terminé, tourner
le couvercle du mélangeur dans le sens
antihoraire pour le libérer et retirer le couvercle
du mélangeur muni de l’accessoire. MISE
EN GARDE! Si vous utilisez le hachoir à trois
lames, ces dernières sont très tranchantes!
UTILISATION DU MÉLANGEUR/HACHOIR
FIGURE F
FIGURE G
Couvercle du
mélangeur
Poignée du
mélangeur
Récipient
mélangeur
REMARQUE : Lorsque le récipient mélangeur est rempli au
niveau maximal, le poids de l’aliment peut être trop lourd
pour la poignée. Il est toujours préférable de tenir la poignée
et de placer l’autre main sous le récipient mélangeur afin de
le soutenir lorsqu’on transporte ou verse le produit.
AVERTISSEMENT
LAMES SHARP!
Gants résistants
aux coupures sont
recommandés lors de la
manipulation de la pièce
jointe des 3 lames ou des
lames Mandoline.
INSTRUCTIONS EN FRANÇAIS
27
Page 28

INSTRUCTIONS EN FRANÇAIS
28
ASSEMBLAGE DE LA MANDOLINE
1. Fixer la poignée amovible au récipient
mélangeur. Aligner le bas de la poignée
amovible sur la poignée en forme de
« C » du récipient mélangeur. Tirer
vers le haut et par-dessus la poignée
amovible pour enclencher la poignée
sur le récipient mélangeur (gure H).
Vérier que la poignée amovible est bien
installée sur le récipient mélangeur.
2. Aligner l’obturateur du bec verseur
de la base de la mandoline sur le bec
verseur du récipient mélangeur, tourner
la base de la mandoline légèrement vers
la droite pour désaligner l’obturateur
du bec verseur. Placer la base de la
mandoline sur le récipient mélangeur et
tourner la base dans le sens horaire pour
enclencher la base de la mandoline sur
le récipient (FIGURE I).
3. Tenir les lames de la mandoline
par l’embout de plastique. Insérer les
encoches de la lame de la mandoline
dans les encoches correspondantes
de la base. Appuyer sur la lame de la
mandoline pour la loger dans la base de
la mandoline (FIGURE J).
FIGURE H
FIGURE I
Obturateur du
bec verseur
Bec
Base de la
mandoline
FIGURE J
ATTENTION SHARP
Base de la
mandoline
Lame de la
mandoline
Encoches de la lame
de mandoline
Poignée
amovible
Récipient mélangeur
Poignée en « C »
Page 29

INSTRUCTIONS EN FRANÇAIS
29
UTILISATION DE LA MANDOLINE
1. Piquer l’aliment à trancher sur les aiguilles du
poussoir (FIGURE K).
Il faut TOUJOURS utiliser le poussoir! Ne
JAMAIS utiliser les doigts, les mains ou d’autres
objets pour faire glisser l’aliment sur la mandoline!
Le poussoir est conçu de manière à ne pas entrer
en contact avec les lames lorsqu’on le fait glisser
d’avant en arrière sur la surface de la mandoline.
REMARQUE : Il peut être nécessaire de couper à
plat un petit morceau de l’aliment an de procurer
au poussoir une zone stable pour agripper
l’aliment.
2. Tenir la poignée amovible du récipient
mélangeur et, à l’aide du poussoir auquel est xé
l’aliment, faire glisser le poussoir vers le bas et
vers l’avant pour effectuer une coupe (FIGURE
L).
3. Maintenir une pression constante an que
les aiguilles du poussoir continuent de retenir le
légume ou le fruit.
FIGURE K
Aiguilles
Poussoir alimentaire
FIGURE L
Lame pour râper
nement
Lame pour râper
grossièrement
Lame de coupe plate
Lame pour juliennes
Râpe
ATTENTION SHARP
REMARQUE : Lorsque le récipient mélangeur est rempli au
niveau maximal, le poids de l’aliment peut être trop lourd
pour la poignée. Il est toujours préférable de tenir la poignée
et de placer l’autre main sous le récipient mélangeur afin de
le soutenir lorsqu’on transporte ou verse le produit.
AVERTISSEMENT
LAMES SHARP!
Gants résistants
aux coupures sont
recommandés lors de la
manipulation de la pièce
jointe des 3 lames ou des
lames Mandoline.
Page 30

ASSEMBLAGE DU PRESSE-AGRUMES
1. Fixer la poignée amovible au récipient
mélangeur. Aligner le bas de la poignée
amovible sur la poignée en forme de « C » du
récipient mélangeur. Tirer vers le haut et pardessus la poignée amovible pour enclencher
la poignée sur le récipient mélangeur
(FIGURE M). Vérier que la poignée
amovible est bien installée sur le récipient
mélangeur.
2. Placer la base du presse-agrumes sur
le récipient mélangeur. Tourner la base
du presse-agrumes légèrement dans le
sens horaire pour enclencher la base sur le
récipient mélangeur (FIGURE N).
FIGURE M
Base du
presse-agrumes
FIGURE N
UTILISATION DU
PRESSE-AGRUMES
1. Couper les agrumes en deux.
2. Placer le fruit sur le moyeu de la base du
presse-agrumes (FIGURE O).
3. Placer le couvercle du presse-agrumes
sur le fruit.
4. Appuyer sur le couvercle du presse-
agrumes en tournant d’un côté à l’autre. Ce
mouvement permet d’extraire le jus du fruit.
5. Retirer le couvercle du presse-agrumes.
6. Jeter la pelure.
7. Tourner la base du presse-agrumes dans
le sens antihoraire pour la retirer du récipient
mélangeur.
FIGURE O
Base du presse-
agrumes
Couvercle du
presse-agrumes
Moyeu de la base du
presse-agrumes
Poignée
amovible
Récipient mélangeur
Poignée en « C »
REMARQUE : Lorsque le récipient mélangeur est rempli au
niveau maximal, le poids de l’aliment peut être trop lourd
pour la poignée. Il est toujours préférable de tenir la poignée
et de placer l’autre main sous le récipient mélangeur afin de
le soutenir lorsqu’on transporte ou verse le produit.
INSTRUCTIONS EN FRANÇAIS
30
Page 31

ASSEMBLAGE ET UTILISATION
DU SÉPARATEUR D’ŒUFS
1. Le séparateur d’œufs repose dans
la partie supérieure du couvercle du
mélangeur (FIGURE P).
2. Casser délicatement l’œuf dans le
séparateur. Le blanc d’œuf passe par
le trou de l’appareil, puis tombe dans
le récipient mélangeur. Le jaune d’œuf
reste dans le séparateur d’œufs, et il peut
être éliminé ou conservé pour d’autres
usages.
FIGURE P
Séparateur d’œufs
Couvercle du
mélangeur
Récipient mélangeur
INSTRUCTIONS DE NETTOYAGE
1. Démonter toutes les pièces de l’ensemble de cuisine manuel. MISE EN
GARDE! Si vous utilisez le hachoir à trois lames, ces dernières sont très
tranchantes!
2. L’ensemble de cuisine manuel doit être nettoyé immédiatement après usage
pour empêcher les aliments de sécher à la surface des pièces. L’ensemble
de cuisine manuel doit être lavé à la main dans de l’eau chaude savonneuse,
puis rincé et séché immédiatement. Ne jamais utiliser de produits abrasifs ni de
tampons à récurer pour nettoyer l’ensemble de
cuisine manuel.
3. L’ensemble de cuisine manuel peut être
nettoyé dans le panier supérieur du lavevaisselle. Placer soigneusement ces pièces de
sorte qu’elles ne coupent ni n’endommagent les
autres ustensiles.
MISE EN GARDE : Après avoir retiré le hachoir
à trois lames ou les lames de la mandoline,
NE PAS les immerger dans l’eau! Les lames
devraient être nettoyées dans le panier supérieur
du lave-vaisselle ou en les tenant par l’embout
de plastique de la lame. À l’aide d’une serviette
imbibée d’eau savonneuse, essuyer en vous
ÉLOIGNANT des bords tranchants. Rincer la
lame en la tenant par le manche et l’essuyer
à l’aide d’une serviette propre et humide ou
en la passant sous l’eau courante. Sécher
soigneusement.
4. Ranger le hachoir à trois lamtes à l’intérieur du
récipient mélangeur. Il est préférable de remettre
les protège-lames cartonnés sur les lames avant
de les ranger. Remettre l’ensemble de cuisine
manuel et toutes ses pièces dans l’emballage
d’origine. Entreposer dans un endroit frais et sec.
PRENDRE SOIN DE RANGER L’APPAREIL
HORS DE PORTÉE DES ENFANTS!
ATTENTION SHARP
AVERTISSEMENT
LAMES SHARP!
Gants résistants
aux coupures sont
recommandés lors de la
manipulation de la pièce
jointe des 3 lames ou des
lames Mandoline.
INSTRUCTIONS EN FRANÇAIS
31
Page 32

La présente garantie s’applique aux produits, achetés et utilisés aux États-Unis et au
Canada, qui ont été dûment enregistrés dans un délai de 30 jours à compter de la date
d’achat initiale. La présente garantie est la seule garantie expresse pour ce produit
et remplace toute autre garantie ou condition. Ce produit est garanti contre tout
défaut de matériaux et de fabrication pour une durée d’un (1) an à compter de la date
d’achat initiale. Au cours de cette période, votre seul recours est la réparation ou le
remplacement de ce produit ou de tout composant s’avérant défectueux, à notre gré.
Pour enregistrer votre produit : remplissez le formulaire en ligne à l’adresse
www.WestonProducts.com/Warranty
La présente garantie ne couvre pas les produits non enregistrés, ni les réparations
ou services après-vente non autorisés, les produits vendus « tels quels » par les
détaillants, le verre, les ltres et l’usure normale d’utilisation, toute utilisation non
conforme aux directives écrites, ni les dommages au produit résultant d’un accident,
d’une modication, d’une utilisation abusive ou incorrecte. La présente garantie est
valable uniquement pour l’acquéreur initial ou le destinataire du cadeau et n’est pas
cessible. Veuillez conserver le ticket de caisse d’origine, puisqu’une preuve d’achat
est requise pour toute réclamation de garantie. La présente garantie devient caduque
si le produit est soumis à une tension ou forme d’onde autre que celle indiquée sur
l’étiquette (par ex., 120 V ~ 60 Hz).
Aucune réclamation en cas de dommages spéciaux, consécutifs ou indirects résultant
du non-respect de toute garantie expresse ou implicite ne sera prise en compte.
Toute responsabilité se limite au montant du prix d’achat. Toute garantie implicite,
notamment toute garantie légale, condition de commercialité ou d’adaptation à une n
particulière, est exclue, sauf dans la mesure où cela est interdit par la loi en vigueur,
auquel cas cette garantie ou condition est limitée à la durée de la présente garantie
écrite. La présente garantie vous confère des droits juridiques spéciques. Vous
pouvez également bénécier d’autres droits juridiques qui varient selon l’endroit
où vous vivez. Certains États ou provinces n’autorisent pas de limitations sur les
garanties implicites ou sur les dommages spéciaux, consécutifs ou indirects, de sorte
que les limitations susmentionnées pourraient ne pas vous concerner.
Avant de retourner le produit pour réparation ou entretien : il doit être propre et exempt
de toute particule de nourriture ou d’autres débris; sans quoi nous serons dans
l’obligation de vous le retourner ou nous vous facturerons des frais de nettoyage de 50
dollars, à notre gré.
Pour procéder à une réclamation de garantie : allez à l’adresse www.
WestonProducts.com/Contact; ou appelez le 1.800.814.4895 pour les États-Unis et le
001.440.638.3131 hors des États-Unis, du lundi au vendredi, de 8 h à 17 h HNE. Tous
les frais liés à l’envoi du produit, frais de transport prépayés inclus, sont à votre charge.
Si le produit remplit les conditions pour une réparation ou un remplacement sous
garantie, les frais de retour seront à notre charge. Nous déclinons toute responsabilité
en cas de dommages dus au transport.
Pour toute réparation sans garantie : appelez le 1.800.814.4895 pour les États-Unis
et le 001.440.638.3131 hors des États-Unis, du lundi au vendredi, de 8 h à 17 h
HNE, pour obtenir un numéro d’autorisation de retour de marchandises (numéro de
RMA). Tout envoi expédié sans numéro de RMA sera refusé. Tout diagnostic, travail
d’entretien, de réparation ou de traitement sera facturé 35 USD/heure. Aucun travail
d’entretien ou de réparation ne sera effectué sans autorisation préalable. Tous les frais
liés à l’envoi du produit, frais de transport prépayés inclus, ainsi que ceux de retour
sont à votre charge.
UN AN DE GARANTIE WESTON LIMITÉE
Page 33

Page 34

Page 35

Page 36

ATTENTION!
PLEASE INSPECT THIS PACKAGE THOROUGHLY FOR MISSING PARTS OR ANY PRODUCT DAMAGE.
IF YOUR PRODUCT CONTAINS SHIPPING DAMAGE, PLEASE CONTACT RETAILER FOR ASSISTANCE.
For all other questions regarding product usage, missing parts, product damage, difculty or warranty activation,
please contact the Weston Brands Customer Service Team:
8:00 am to 5:00 pm ET, Monday thru Friday
CustomerService@WestonProducts.com
U.S. Residents Customer Service Line: 1-800-814-4895 (Outside U.S. Call: 001-440-638-3131)
Weston Brands LLC, Cleveland, Ohio 44149
WestonProducts.com
Please DO NOT return this item to the retailer before contacting
Weston Brands Customer Service.
SAVE THESE INSTRUCTIONS!
Refer to them often and use them to instruct others.
ATTENTION!
VEUILLEZ INSPECTER CET EMBALLAGE AVEC SOIN POUR Y DÉTECTER
TOUTE PIÈCE MANQUANTE OU ENDOMMAGÉE.
SI DES PIÈCES ONT ÉTÉ ENDOMMAGÉES PENDANT LE TRANSPORT, VEUILLEZ
COMMUNIQUER AVEC LE DÉTAILLANT POUR OBTENIR DE L’AIDE.
Pour toutes les autres questions concernant l’utilisation du produit, les pièces manquantes, les problèmes ou
l’activation de la garantie, veuillez communiquer avec l’équipe du service clientèle des produits Weston:
de 8:00 à 17:00 HNE, du lundi au vendredi.
CustomerService@WestonProducts.com
Numéro de téléphone du service clientèle pour les résidents des É.-U. : 1-440-638-3131
Numéro de téléphone à l’extérieur des É.-U. : 001-440-638-3131 Weston Brands LLC,
Weston Brands LLC, Cleveland, Ohio 44149
WestonProducts.com
Veuillez communiquer avec le service clientèle des produits Weston AVANT de retourner cet appareil au détaillant.
CONSERVER CES DIRECTIVES!
Veuillez les consulter fréquemment et les utiliser pour la formation.
¡ATENCIÓN!
Revise completamente el envase y compruebe que no falten partes o que algún producto esté dañado.
si el producto está dañado por el transporte, solicite asistencia al distribuidor.
Para todas aquellas preguntas referentes al uso del producto, partes faltantes, daño del producto, dicultad
o activación de la garantía, comuníquese con el equipo de servicio al cliente de weston Brands:
desde las 8:00 am hasta las 5:00 pm ET, de lunes a viernes
CustomerService@WestonProducts.com
Línea de Servicio al Cliente para Residentes de EE.UU.: 1.800.814.4895 (Fuera de EE.UU., llame al: 001-
1-440-638-3131) Weston Brands LLC, Cleveland, Ohio 44149
WestonProducts.com
NO devuelva este artículo al vendedor minorista antes de comunicarse con Servicio al Cliente de
Weston Brands.
¡GUARDE ESTAS INSTRUCCIONES!
Consulte estas instrucciones y úselas para enseñar sobre el uso de este producto a otras personas.
 Loading...