

Page 1

pro-series
MEAT GRINDER
& SAUSAGE STUFFER
#8 08-0801-W / #12 08-1201-W / #22 08-2201-W / #32 08-3201-W
REV111214
E258759
Page 2

GENERAL SAFETY RULES
COMPONENT LIST
UNPACKING INSTRUCTIONS
GROUNDING INSTRUCTIONS
CLEANING INSTRUCTIONS
GRINDER ASSEMBLY INSTRUCTIONS
GRINDING INSTRUCTIONS
STANDARD STUFFER ASSEMBLY INSTRUCTIONS
HIGH-SPEED STUFFER ASSEMBLY INSTRUCTIONS
STUFFING INSTRUCTIONS
REVERSE FUNCTION
CIRCUIT BREAKER INSTRUCTIONS
SAFETY GUARD INSTRUCTIONS
FOOD SAFETY
SAUSAGE INFORMATION
WARRANTY
4
6
8
8
9
10
11
12
13
14-15
15
16
17
18
19
20
REGLAS IMPORTANTES SEGURIDAD
DESCRIPTION DE LA PIÈCE
INSTRUCCIONES PARA EL DESEMPAQUE
INSTRUCCIONES PARA HACER TIERRA
INSTRUCCIONES DE LIMPIEZA
INSTRUCCIONES DE ENSAMBLE DEL MOLINO
INSTRUCCIONES PARA MOLER
RELLENADOR ESTÁNDAR INSTRUCCIONES DE ENSAMBLADO
ALTA VELOCIDAD DE INSTRUCCIONES DE MONTAJE EMBUTIDORA
INSTRUCCIONES DE RELLENADO
FUNCIÓN DE REVERSA
INSTRUCCIONES PARA EL CORTADOR DE CIRCUITOS
INSTRUCCIONES DE LA GUARDA DE SEGURIDAD
SEGURIDAD DE LOS ALIMENTOS
INFORMACIÓN DE LA SALCHICHA
INFORMACIÓN DE GARANTÍA WESTON
IMPORTANTES RÈGLES DE SÉCURITÉ
DESCRIPTION DE LA PIÈCE
INSTRUCTIONS DE DÉBALLAGE
TABLE OF CONTENTS / ÍNDICE / TABLE DES MATIÈRES
INSTRUCTIONS DE MISE À LA TERRE
INSTRUCTIONS DE NETTOYAGE
INSTRUCTIONS POUR COUPER LA PÂTELE MONTAGE D'UN HACHOIR
INSTRUCTIONS POUR HACHER
INSTRUCTIONS D'ASSEMBLAGE D'UN REMPLISSEUR STANDARD
REMPLISSEUR HAUTE VITESSE INSTRUCTIONS D'ASSEMBLAGE
INSTRUCTIONS DE BOURRAGE
FONCTION DE MARCHE ARRIÈRE
INSTRUCTIONS RELATIVES AU DISJONCTEUR
INSTRUCTIONS RELATIVES AU DISPOSTIF DE SÉCURITÉ
SÉCURITÉ ALIMENTAIRE
INFORMATIONS SUR LES SAUCISSES
INFORMATION SUR LA GARANTIE
23
24
26
26
27
28
29
30
31
32-33
33
34
35
36
37
38
41
42
44
44
45
46
47
48
49
50-51
51
52
53
54
55
56
2
Page 3

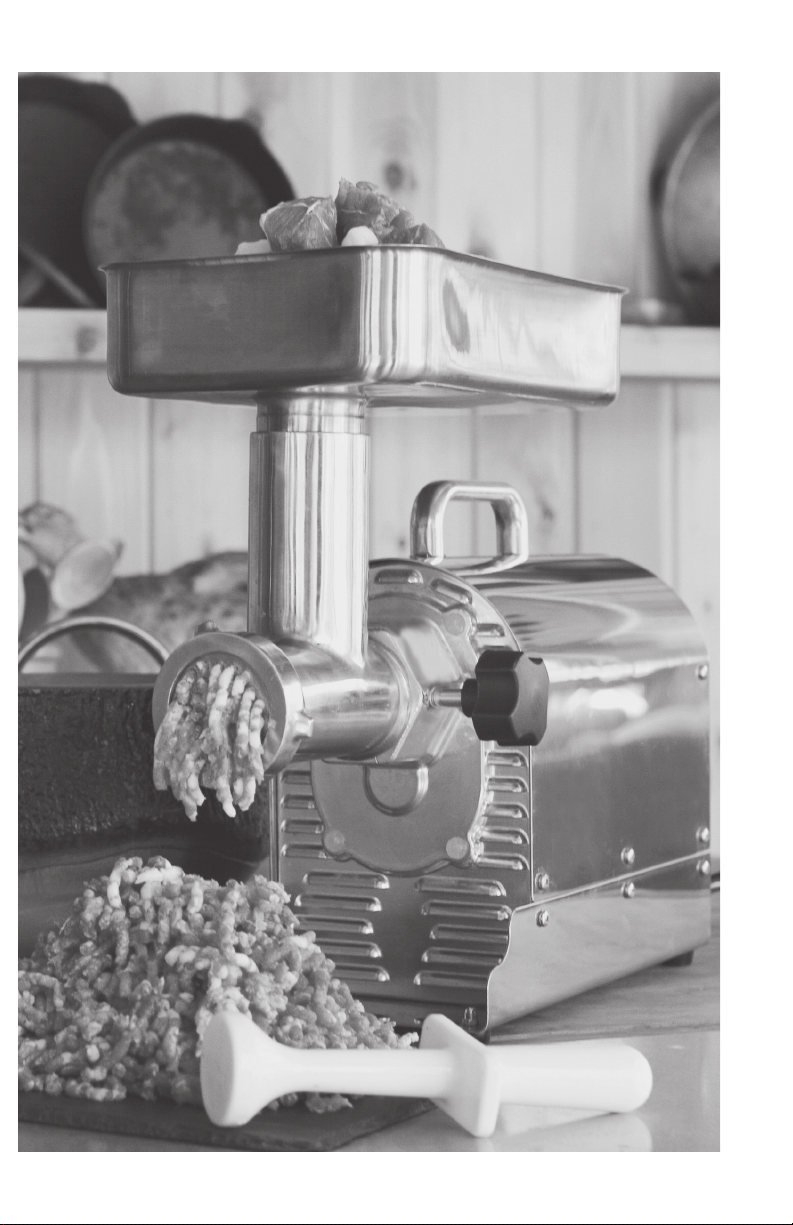
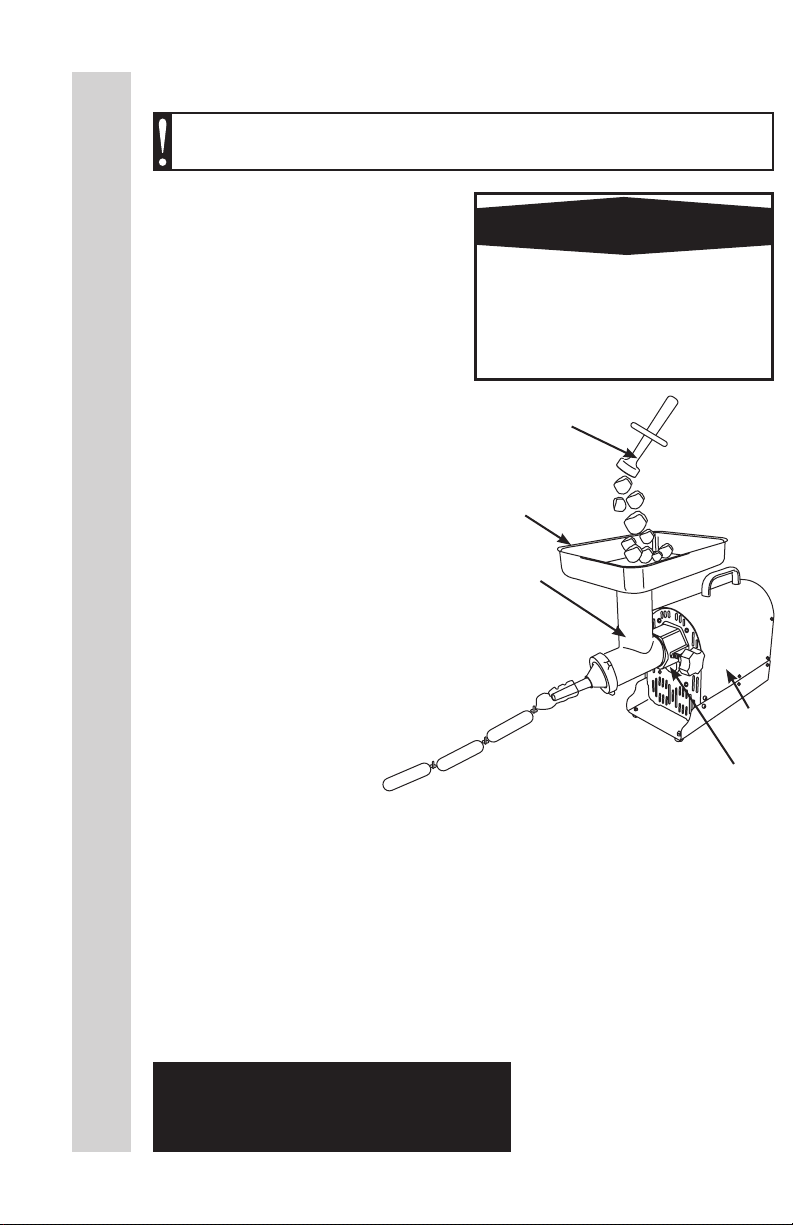
WARNING!
NEVER operate Grinder
without the Tray/Safety Guard
secured in place.
To avoid serious or fatal injury,
NEVER reach into any
Grinder inlet.
ALWAYS use the Stomper to
push meat into the Grinder
Head.
Read & fully understand
all instructions
& warnings prior to use.
ENGLISH INSTRUCTIONS
3
Page 4

GENERAL SAFETY RULES
READ AND FULLY UNDERSTAND ALL INSTRUCTIONS AND WARNINGS
PRIOR TO USING THIS UNIT. YOUR SAFETY IS MOST IMPORTANT!
FAILURE TO COMPLY WITH PROCEDURES AND SAFE GUARDS MAY
RESULT IN SERIOUS INJURY OR PROPERTY DAMAGE. REMEMBER:
1. DO NOT use the Grinder without the Tray/
Safety Guard secured into place.
2. ALWAYS DISCONNECT Grinder from power
source before servicing, changing accessories or
cleaning the unit.
3. Plug the Grinder into a standard 120 Volt, 60
Hz wall outlet. Check if the voltage indicated on the
appliance corresponds to the local voltage before
you connect the appliance.
ENGLISH INSTRUCTIONS
4. DO NOT USE the Grinder if the Power Cord,
Plug or any other parts are damaged. If the Power
Cord or the Grinder is damaged, call Customer
Service. DO NOT ATTEMPT TO REPLACE THE
CORD. Be sure to not allow the Power Cord
to drape into your work area. Check that all parts
are operating properly, and perform the intended
functions. Check for alignment of moving parts or
any other conditions that may affect the operation.
5. NEVER use any accessories or parts from
other manufacturers. Doing so will VOID YOUR
WARRANTY and may cause re, electrical shock or
injury.
6. TO PROTECT AGAINST RISK OF
ELECTRICAL SHOCK: DO NOT SUBMERGE THE
MAIN GRINDER BODY INTO WATER OR LIQUID.
BE SURE THE GRINDER IS DISCONNECTED
FROM THE POWER SOURCE BEFORE
CLEANING. Wash all parts by hand and thoroughly
dry. Thoroughly clean all parts that will come
in contact with food before using the appliance.
NEVER rinse appliance Grinder Motor under tap,
only use a moist cloth to clean the Grinder Motor
Unit.
7. Reduce risk of unintentional starting. Make
sure the Power Switch is in the “OFF” position
before attaching to the power source.
8. KEEP FINGERS CLEAR of the Auger and
Cutting Blades AT ALL TIMES. NEVER REACH
INTO THE GRINDER, doing so may cause serious
injury. ALWAYS USE THE PROVIDED STOMPER,
NEVER FEED FOOD BY HAND.
9. NEVER use ngers to scrape food away from
the Grinding Plate while the Grinder is in operation.
SEVERE INJURY MAY RESULT.
10. NEVER OPERATE THE GRINDER
UNATTENDED. Be safe, DISCONNECT the
Grinder from power source before leaving the work
area. Close supervision is necessary when any
appliance is used near children. This appliance is
NOT to be used by children.
YOUR PERSONAL SAFETY IS YOUR RESPONSIBILITY!
11. Avoid contact with moving parts. Wait until all moving
parts have stopped before you remove any part of the
Grinder.
. TIE BACK loose hair and clothing, and roll up long
sleeves before operating the Grinder. REMOVE ties, rings,
watches, bracelets, or other jewelry before operating the
Grinder.
13. Be sure the Grinder is on a stable work surface. Be
sure all the Grinder Feet are stable.
14. DO NOT attempt to grind bones, nuts or other hard
items. DO NOT let cord come in contact with a hot surface.
DO NOT use on an oven or stove. Check if the voltage
indicated on the appliance corresponds to the local voltage
before you connect the appliance.
15. DO NOT run Grinder without meat in the Head.
Severe damage to the Head and Auger may occur.
16. WEAR EYE PROTECTION. Wear safety glasses.
Everyday eye glasses are not safety glasses. Safety
glasses conform to ANSI Z87.1 requirements. Note:
approved safety glasses have Z87 printed or stamped on
them.
17. DO NOT use outdoors.
18. DO NOT use the Grinder while under the inuence of
drugs, medications or alcohol.
19. DO NOT let the Power Cord hang over edge of work
surface.
20. DO NOT attempt to operate the Grinder if the
Grinder itself is cold. The Grinder temperature should be
at least 45oF (7oC) before beginning.
21. The Gear Housing and the Motor Cover may
become HOT during operation. This is normal. DO NOT
touch these parts during operation or until they cool after
use.
22. WARNING: Busted, splintered bones can get into the
digestive tract of a pet and cause severe damage, even
death by puncturing the walls of the intestines or even
stomach
23. Weston Pro Series Electric Meat Grinders (#22 and
#32) are capable of grinding smaller, softer animal bones
such as rabbit, whole chickens* or chicken quarters, and
other birds, due to both the power and all metal construction
of the units.
24. Avoid grinding large, dense animal bones as they are
very difcult to process (i.e., bones one would nd in large-
game, pigs, or cows).
SAVE THESE INSTRUCTIONS
4
Page 5
Page 6

COMPONENT LIST
DIAGRAM
NUMBER
1 FRONT RING NUT 08-0842 08-1242 08-2242 08-3242
2 4.5 MM GRINDER PLATE 29-0804 29-1204 29-2204 29-3204
3 7 MM GRINDER PLATE 29-0807 29-1207 29-2207 29-3207
4 GRINDING KNIFE 29-0850 29-1250 29-2250 29-3250
5 AUGER PIN 08-0849 08-1249 08-2246 08-3246
6 AUGER 08-0802-U 08-1202 08-2202-N 08-3202-N
7 AUGER BEARING 08-0847 08-0847 08-3047 08-3047
8 STAINLESS STEEL HEAD 08-0809-W 08-1209 08-2209-W 08-3209-W
ENGLISH INSTRUCTIONS
9 RUBBER FEET WITH NUTS (4) 08-2007 08-2007 08-2007 08-2007
10 HEAD LOCKING KNOB 08-2005 08-2005 08-2005 08-2005
11 STAINLESS STEEL TRAY 08-0824-S 08-1224-S 08-2224-S 08-3224-S
12 SAFETY STOMPER 08-0877 08-0877 08-2277-N 08-2277-N
13 FUNNEL 40 MM 08-1040 08-1040 08-1040 08-1040
14 FUNNEL 30 MM 08-1030 08-1030 08-1030 08-1030
15 FUNNEL 20 MM 08-1020 08-1020 08-1020 08-1020
16 FLANGE FOR STUFFING FUNNEL 08-0829 08-1229 08-2229 08-3229
17 FUNNEL 10 MM SS HIGH
18 STAINLESS STEEL STUFFING
19 HIGH SPEED PLASTIC AUGER
20 SAFETY GUARD
PART DESCRIPTION #8
08-0801-W
SPEED
STAR
PATENTED
(WITH 4 SCREWS)
#12
08-1201-W
08-1011 08-1011 08-1011 08-1011
08-0876 08-1276 08-2276 08-3276
08-0812 08-1212 08-2212 08-3212
N/A N/A 08-2223 08-3223
#22
08-2201-W
#32
08-3201-W
If any components of this unit are broken, the unit does not operate properly or you
need a replacement instruction manual, visit us on the web at
WestonProducts.com
Or call Weston Products LLC Toll Free at 1-800-814-4895
Monday thru Friday 8:00am-5:00pm ET. Outside the U.S. call 001-440-638-3131
6
Page 7
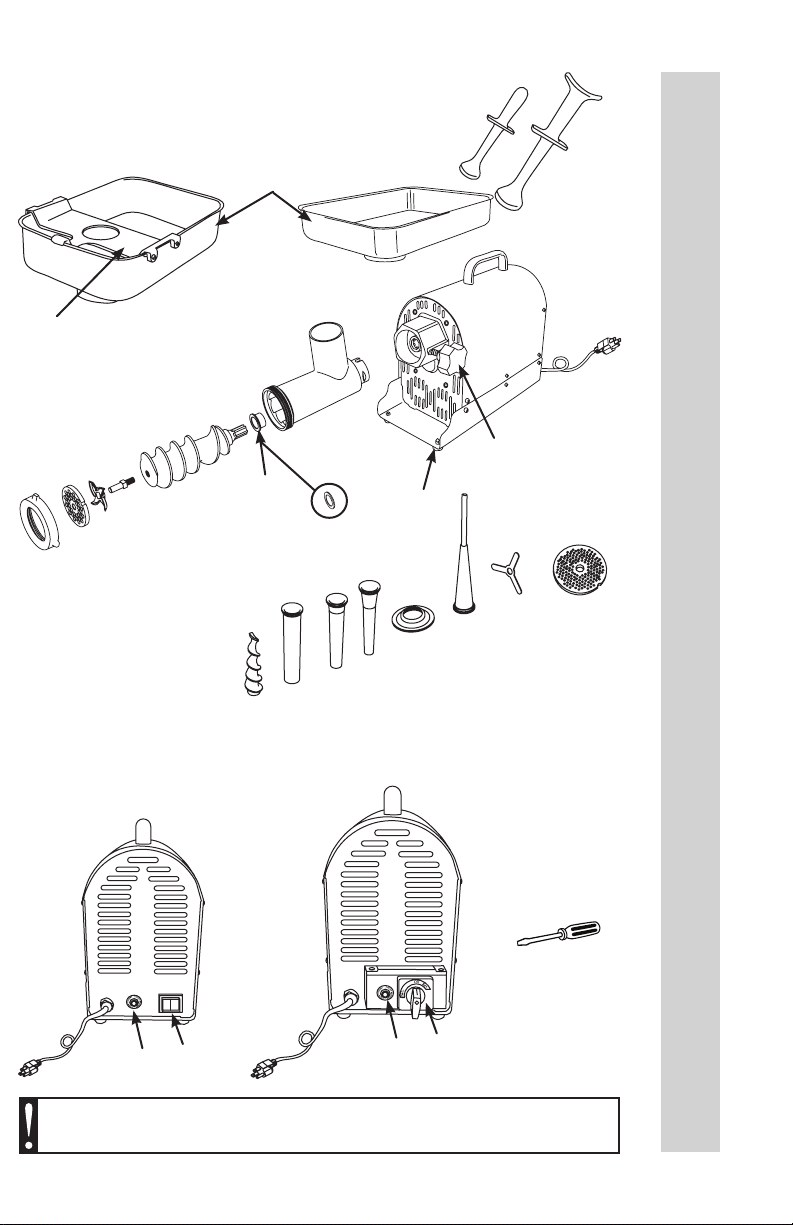
11
#8 & #12
Stomper
12
#22 & #32
Stomper
20
Safety Guard
included with
#22 & #32 Model
Grinders only
3
1
#22 & #32
Tray
#8 & #12
Tray
8
Motor
Cover
Power
Cord
ENGLISH INSTRUCTIONS
10
5
6
4
7
NOTE: #8 & #12
Grinders
have a at washer style
Auger Bearing
14
13
19
15
16
9
18
2
17
#8 & #12
Grinders
Circuit
Breaker
On/Off
Power
Switch
#22 &
#32
Grinders
Circuit
Breaker
On/Off/Reverse
Power
Switch
Flat-head
Screwdriver
included with
#22 & #32
Model Grinders
only for the
Safety Guard
WARNING! Before cleaning, assembling or disassembling
the Grinder, make sure the Grinder Motor is OFF and the PLUG IS
REMOVED FROM THE OUTLET/POWER SOURCE!
7
Page 8
UNPACKING INSTRUCTIONS
. Remove all parts from packaging material and check to be sure there are no
missing parts.
. Retain packaging material for storage of the Grinder and Grinder parts when
not in use.
GROUNDING INSTRUCTIONS
GROUNDING
This appliance must be grounded while in use
to protect the operator from electrical shock.
The appliance is equipped with a 3-conductor
ENGLISH INSTRUCTIONS
cord and a 3-prong grounding type plug to t
the proper grounding-type receptacle. The
appliance has a plug that looks like Figure
A. An adapter, Figure B, should be used
for connecting Figure A plugs to two-prong
receptacles. The grounding tab which extends
from the adapter must be connected to a
permanent ground such as a properly grounded
outlet box as shown in Figure C using a metal
screw.
Grounding
Prong
Circuit
Grounding
Conductor
FIGURE A
FIG RE B
EXTENSION CORDS
Use only 3-wire extension cords which have
3-prong grounding-type plugs and a 3-pole
cord connector that accepts the plug from the
appliance. Use only extension cords having
an electrical rating not less than the rating of
the appliance. Do not use damaged extension
cords. Examine extension cord before using and
replace if damaged. Do not abuse extension
cord and do not yank on any cord to disconnect.
Keep cord away from heat and sharp edges.
8
Metal
Grounding
Screw
Cover of
Grounded
Outlet Box
Grounding
Means
AA2220
FIGURE C
Page 9
CLEANING INSTRUCTIONS
WARNING! Before cleaning, assembling or disassembling the
Grinder, make sure the Grinder Motor is OFF and the PLUG IS REMOVED
FROM THE OUTLET/POWER SOURCE!
1. Remove the Head Assembly from the Grinder Motor.
2. Disassemble the Head Assembly.
3. Remove the Safety Guard from the Tray, as instructed in the “Safety Guard
Instructions”. Safety Guards only come with #22 and #32 Model Grinders.
4. Wash all parts that have come in contact with meat in hot soapy water. BE
SURE TO CLEAN IMMEDIATELY AFTER USE. DO NOT IMMERSE THE
MOTOR IN WATER OR OTHER LIQUIDS!
5. Rinse the Grinder parts with clean hot water, then dry them IMMEDIATELY.
6. Fully lubricate the Head, Plates and the Knife with a food grade silicone
spray before and after each use.
7. Clean the Motor Cover and Gear Housing with a damp towel and wipe dry. DO
NOT IMMERSE THE MOTOR IN WATER OR OTHER LIQUIDS!
IMPORTANT: Any metal parts should be coated with a food safe silicone spray
to prevent rusting. If not properly protected, these parts can begin to rust very
quickly. DO NOT use rusted parts. Ordering information can be found on the
last page of this instruction manual.
8. Make sure the grinder and all components are completely dry before assembling
or storing.
ENGLISH INSTRUCTIONS
WARNING!
NEVER operate Grinder without the
Tray/Safety Guard secured in place.
To avoid serious or fatal injury, NEVER reach
ALWAYS use the Stomper to push meat
Read & fully understand all instructions
into any Grinder inlet.
into the Grinder Head.
& warnings prior to use.
9
Page 10
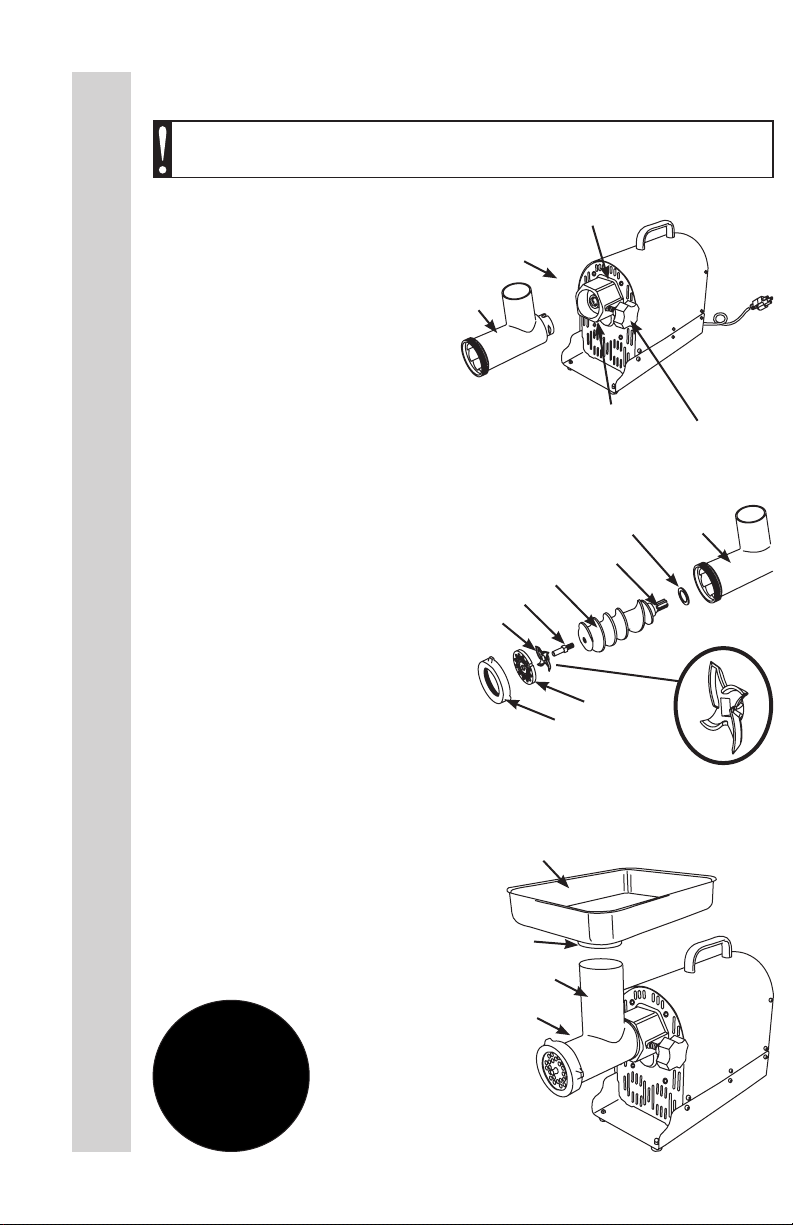
GRINDER ASSEMBLY INSTRUCTIONS
WARNING! Before cleaning, assembling or disassembling the
Grinder, make sure the Grinder Motor is OFF and the PLUG IS REMOVED
FROM THE OUTLET/POWER SOURCE!
1. Insert the Head into the Gear
Housing with the Feed Chute facing
straight up. You will need to line up
the slot in the Head with the Pin inside
the Gear Housing. Be sure the Head
is seated fully into the Gear Housing
(Figure 1).
2. Tighten the Head Locking Knob to
lock the Head into place.
3. Insert the Auger, with the Auger
ENGLISH INSTRUCTIONS
Bearing attached, into the Head
(Figure 2). Align the Auger Splines
with the Drive Shaft of the Grinder.
NOTE: Periodically inspect the Auger
Bearing for wear. If the Auger Bearing
has excessive wear, replace it to
prevent head damage.
4. Place the Knife onto the square
part of the Auger Pin (Figure 2). Be
sure the blades of the Knife are facing
outward.
5. Place one of the Grinder Plates
onto the Auger Pin; align the notch in
the Grinder Plate with the Pin in the
Grinder Head.
6. Install the Front Ring Nut. DO NOT
OVERTIGHTEN. Turn the Front Ring
Nut until it makes contact with the
Grinder Plate, then make 1/4 turn
more to tighten into place.
7. Insert the neck of the Tray into the
Feed Chute (FIGURE 3).
Head
Feed
Chute
Auger Pin
Knife
Slot in Head
Auger Splines
Auger
Grinder Plate
Front Ring
Nut
Tray
Gear
Housing
Head Locking
Knob
FIGURE 2
Auger Bearing
NOTE! Be sure the blades
of the Knife are facing out.
Head
FIGURE 1
8. NEVER operate Grinder without the
Tray secured in place (FIGURE 3).
REFER TO “GRINDING
INSTRUCTIONS”
WARNING!
See Safety
Guard
Instructions
Prior
Operation!
10
Neck
Head
Feed
Chute
FIGURE 3
Page 11
GRINDING INSTRUCTIONS
WARNING! Before cleaning, assembling or disassembling the
Grinder, make sure the Grinder Motor is OFF and the PLUG IS REMOVED
FROM THE OUTLET/POWER SOURCE!
1. Follow the “Grinder Assembly
Instructions” to fully assemble the
Grinder including the Tray.
NOTE: It is best to grind the meat using
the coarse, 7 mm Grinding Plate rst.
If a ner grind of meat is desired, run
the coarse ground meat through the
Grinder a second time using the ne,
4.5 mm Grinding Plate.
WARNING!
NEVER operate Grinder without the
Tray/Safety Guard secured in place.
To avoid serious or fatal injury, NEVER reach
into any Grinder inlet.
ALWAYS use the Stomper to push meat
into the Grinder Head.
Read & fully understand all instructions
& warnings prior to use.
2. Trim the meat of all cords, tendons,
bones, shot, etc.
3. For best results, be sure that all
meat has been chilled to between 32-
34oF (0-1oC) before grinding. DO NOT
ALLOW MEAT TO SIT OUT AT ROOM
TEMPERATURE LONGER THAN
ABSOLUTELY NEEDED. Closely
follow the “Food Safety” instructions as
outlined by the USDA.
4. Cut meat into sizes small enough to
t into the Feed Chute. Approximately
1” (2.5 cm) cubes.
5. Place cubed meat to be ground into
the Tray. Do not overll the Tray, place
just enough meat to leave the Feed
Chute area open.
6. Place a dish or bowl to collect the
ground meat at the end of the Grinder
Head (Figure 4).
7. Make sure the Grinder is in the
“OFF” position. Attach the Grinder to
the power supply.
8. Switch the Grinder to the forward
“FWD” position. Carefully start feeding
cubes of meat into the Feed Chute.
ONLY USE THE STOMPER TO
PUSH MEAT INTO THE HEAD, DO
NOT USE YOUR FINGERS OR ANY
OTHER OBJECT.
CAUTION! It is important to follow the
“Food Safety” guidelines outlined in this
manual. For the most up to date
instruction visit the USDA website.
Stomper
Feed
Chute
Tray
Grinder
Head
Bowl for
ground meat
FIGURE 4
Gear
Housing
Motor
Cover
HOT
The Gear Housing and the Motor Cover
may become HOT during operation. This is
normal. DO NOT touch these parts during
operation or until they cool after use.
DO NOT T OUCH!
ENGLISH INSTRUCTIONS
11
Page 12
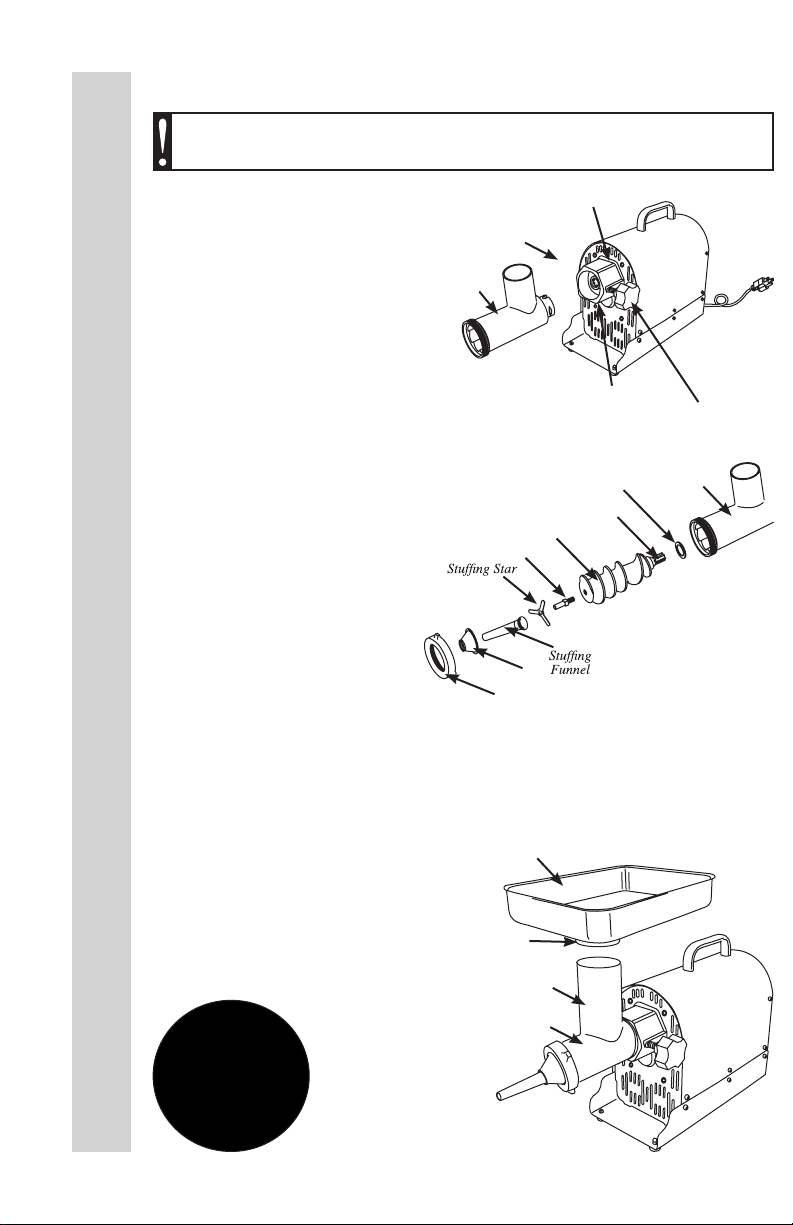
STANDARD STUFFER ASSEMBLY INSTRUCTIONS
WARNING! Before cleaning, assembling or disassembling the
Grinder, make sure the Grinder Motor is OFF and the PLUG IS REMOVED
FROM THE OUTLET/POWER SOURCE!
1. Insert the Head into the Gear
Housing with the feed chute of the
Head facing straight up. You will need
to line up the slot in the Head with the
Pin inside the Gear Housing. Be sure
the Head is seated fully into the Gear
Housing. (FIGURE 5)
2. Tighten the Head Locking Knob to
lock the Head into place.
3. Insert the Auger, with the Auger
ENGLISH INSTRUCTIONS
Bearing attached, into the Head
(FIGURE 6). Align the Auger Splines
with the Drive Shaft of the Grinder.
NOTE: Periodically inspect the
Auger Bearing for wear. If the Auger
Bearing has excessive wear, replace
it to prevent head damage.
4. Slide the Stufng Star over the
round portion of the Auger Pin.
5. Slide one of the Stufng
Funnels through the Flange and
place it through the Front Ring
Nut.
6. Install the Front Ring Nut, DO NOT
OVERTIGHTEN. Turn the Front Ring
Nut until it makes contact with the
Flange, then make 1/4 turn more to
tighten into place.
Head
Front Ring
Feed
Chute
Auger
Auger Pin
Flange
Nut
Slot in Head
Gear
Housing
Auger Bearing
Auger Splines
FIGURE 5
Head Locking
Knob
FIGURE 6
Head
7. Insert the neck of the Tray into the
Feed Chute (FIGURE 7).
8. NEVER operate Grinder without
the Tray secured in place (FIGURE 7).
REFER TO “STUFFING
INSTRUCTIONS”
WARNING!
See Safety
Guard
Instructions
Prior
Operation!
12
Neck
Tray
Feed
Chute
Head
FIGURE 7
Page 13
WARNING! Before cleaning, assembling or disassembling the
Grinder, make sure the Grinder Motor is OFF and the PLUG IS REMOVED
FROM THE OUTLET/POWER SOURCE!
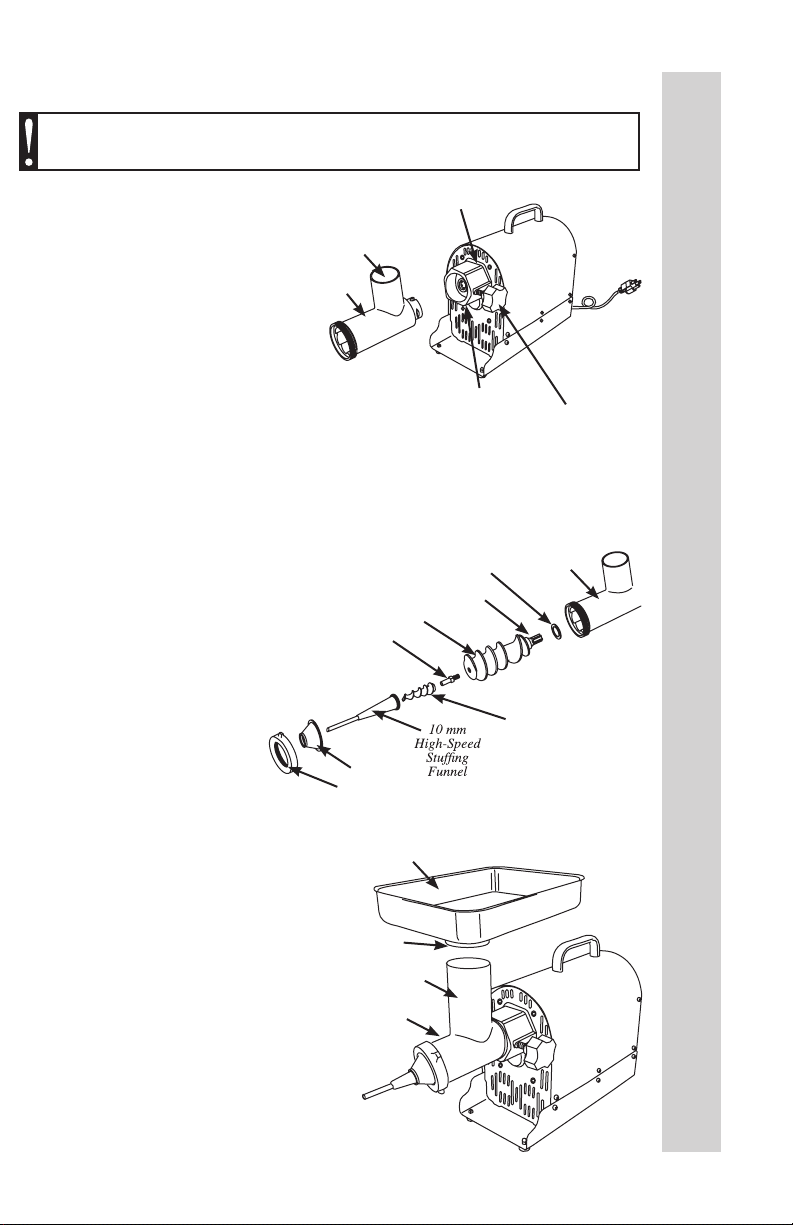
NOTE: The High Speed Stufng System
is designed for use with the 10 mm Funnel
ONLY. DO NOT attempt to use the High-
Speed Plastic Auger with any other Funnels.
SERIOUS DAMAGE to the Grinder Head
and other components may occur. Follow
the “Standard Stuffer Assembly Instructions”
located in this manual, when using the 20,
30, or 40 mm Funnels.
Head
Feed
Chute
Slot in Head
1. Insert the Head into the Gear
Housing with the feed chute of the
Head facing straight up. You will need
to line up the slot in the Head with the
Pin inside the Gear Housing. Be sure
Gear
Housing
Head Locking
Knob
the Head is seated fully into the Gear
Housing (FIGURE 8).
2. Tighten the Head Locking Knob to
lock the Head into place.
3. Insert the Auger, with the Auger
Bearing attached, into the Head
(FIGURE 9). Align the Auger Splines
with the Drive Shaft of the Grinder.
NOTE: Periodically inspect the
Auger Bearing
Auger Splines
Auger
Auger Pin
Head
Auger Bearing for wear. If the Auger
Bearing has excessive wear, replace
it to prevent head damage.
High-Speed
4. Slide the High Speed
Plastic Auger
Plastic Auger onto the Auger
Pin making sure the square
part of the Plastic Auger fully
seats on to the square portion
of the Auger Pin.
5. Slide the 10 mm Stufng Funnel
Flange
Front Ring
Nut
FIGURE 10
Tray
through the through the Flange and
place it through the Front Ring Nut.
FIGURE 8
ENGLISH INSTRUCTIONS
FIGURE 9
6. Install the Front Ring Nut, DO NOT
OVERTIGHTEN. Turn the Front Ring
Nut until it makes contact with the
Flange, then make 1/4 turn more to
tighten into place.
7. Insert the neck of the Tray into the
Feed Chute (FIGURE 10).
8. NEVER operate Grinder without the
Tray secured in place (FIGURE 10).
REFER TO “STUFFING
INSTRUCTIONS”
Neck
Head
Feed
Chute
13
Page 14
STUFFING INSTRUCTIONS
WARNING! Before cleaning, assembling or disassembling the
Grinder, make sure the Grinder Motor is OFF and the PLUG IS REMOVED
FROM THE OUTLET/POWER SOURCE!
1. After grinding the meat following the
“Grinding Instructions”, mix the ground
meat with the sausage seasonings.
2. Follow the “Stuffer Assembly
Instructions” or the “High-Speed Stuffer
Assembly Instructions” to fully assemble
the Grinder as a Stuffer including the
Tray.
NOTE: While one person can stuff
sausage with this Grinder, it
ENGLISH INSTRUCTIONS
is recommended that two people
perform this operation. For best results
when using the High-Speed Stainless
Steel 10 mm Stufng Funnel do not
grind the meat through the 4.5 mm
Grinding Plate.
WARNING!
NEVER operate Grinder without the
Tray/Safety Guard secured in place.
To avoid serious or fatal injury, NEVER reach
into any Grinder inlet.
ALWAYS use the Stomper to push meat
into the Grinder Head.
Read & fully understand all instructions
& warnings prior to use.
Stomper
Tray
FIGURE 11
3. Place seasoned ground meat into the
Tray. Do not overll the Tray, place just
enough meat to leave the Feed Chute
area open.
4. Slide a sausage casing over the
Stufng Funnel. See the “Sausage
Information / Casing” section of
this manual for more
information.
5. Slide 4”-6” (10-15 cm)
of casing from the end of
the Stufng Funnel and
tie a knot in the end of the casing. If you are using large diameter brous
casing, hold the closed end of the casing tightly against the end of the
Stufng Funnel (FIGURE 11).
6. Make sure the Grinder is in the “OFF” position. Attach the Grinder to the power
supply.
7. Switch the Grinder to the forward “FWD” position. Carefully start feeding
ground meat into the Feed Chute. ONLY USE THE STOMPER TO PUSH
MEAT INTO THE HEAD, DO NOT USE YOUR FINGERS OR ANY OTHER
OBJECT.
CAUTION! It is important to follow the
“Food Safety” guidelines outlined in this
manual. For the most up to date
instruction visit the USDA website.
Feed
Chute
Motor
Cover
Gear
Housing
14
Page 15
8. Hold the casing in place with one hand while feeding the sausage mixture
through the Grinder. As the meat lls the casing, gently lay it on a clean, dry
surface. NOTE: When using natural casings, use a wet surface.
9. Do not ll the last 3”-4” (7.5-10 cm) of casing. After the entire length of
casing has been stuffed, twist the open end to close, then tie off the ends of the
casing tightly to close. Twist into links.
10. Whenever stufng sausage, ll the casing slowly to avoid air pockets. If air
pockets do appear in the sausage use a pin to prick the bubbles. The small holes
will seal naturally.
REVERSE FUNCTION
(Only applicable on#22 & #32 Grinders)
. Allow the Grinder Motor to come to a
COMPLETE STOP before engaging into
reverse “REV” (FIGURE 12).
. Allow the Grinder Motor to come to a
COMPLETE STOP before engaging in forward
“FWD” after using the reverse function.
. NEVER operate the Grinder in reverse for
more than 5 seconds at a time.
WARNING!
FIGURE 12
On/Off/Reverse
Power
Switch
ENGLISH INSTRUCTIONS
NEVER operate Grinder without the
Tray/Safety Guard secured in place.
To avoid serious or fatal injury, NEVER reach
into any Grinder inlet.
ALWAYS use the Stomper to push meat
into the Grinder Head.
Read & fully understand all instructions
& warnings prior to use.
15
Page 16

CIRCUIT BREAKER INSTRUCTIONS
This Grinder is equipped with a Circuit
Breaker as a safety precaution. If the Grinder
stops running follow these steps to remedy:
1. Turn the Grinder to the “Off” position.
2. Check the Grinder to see if there is a jam in
the Grinder Head. If there is, the jam needs
to be cleared of the obstruction as outlined in
“Grinding Tips”.
2. Press the Circuit Breaker Reset Button
(FIGURE 13).
3. Turn the Grinder back on and resume
grinding.
4. If the Grinder still does not turn on, check that the electrical wall outlet is
properly working. Plug in another appliance to see if that appliance works from
the wall outlet. Check that the household circuit breaker has not been tripped. If
INSTRUCCIONES EN ESPAÑOLINSTRUCCIONES EN ESPAÑOL
none of the above steps remedy the situation, or if the Circuit Breaker repeatedly
shuts off the Grinder contact a customer service for further assistance.
WARNING! DO NOT continue to use the Grinder if the Circuit Breaker trips
repeatedly. Continued use may cause permanent damage to the Grinder and
will void the warranty.
PLEASE NOTE: This Grinder features an all hardened steel gear
transmission. This causes the Grinder to operate at a higher volume and
temperature than other Grinders. This is normal and will not affect the
Grinder’s performance.
FIGURE 13
Circuit Breaker
Reset Button
GRINDING TIPS
.
DO NOT over-tighten the Front Ring Nut. It should be rmly tight.
.
Make sure the Grinding Knife blades lay at on the Grinder Plate.
.
DO NOT operate the Grinder without meat in the Head. Running the
Grinder while dry could damage the Head and Auger.
.
ALWAYS lubricate the Head, Grinding Plate and Grinding Knife with a food-
grade silicone spray after cleaning.
.
If the Grinder Plate becomes jammed/clogged during operation, follow these
steps to restore normal output.
.
Turn the Grinder “OFF” and disconnect the Power Cord from the electrical outlet.
.
Remove the Front Ring Nut and Grinding Plate.
.
Thoroughly clean the Grinding Plate. Make sure all of the holes are clear.
.
Re-install the Grinding Plate and Front Ring Nut.
.
Re-connect the Grinder to the electrical outlet.
Continue with grinding.
.
Repeat as necessary.
16
Page 17
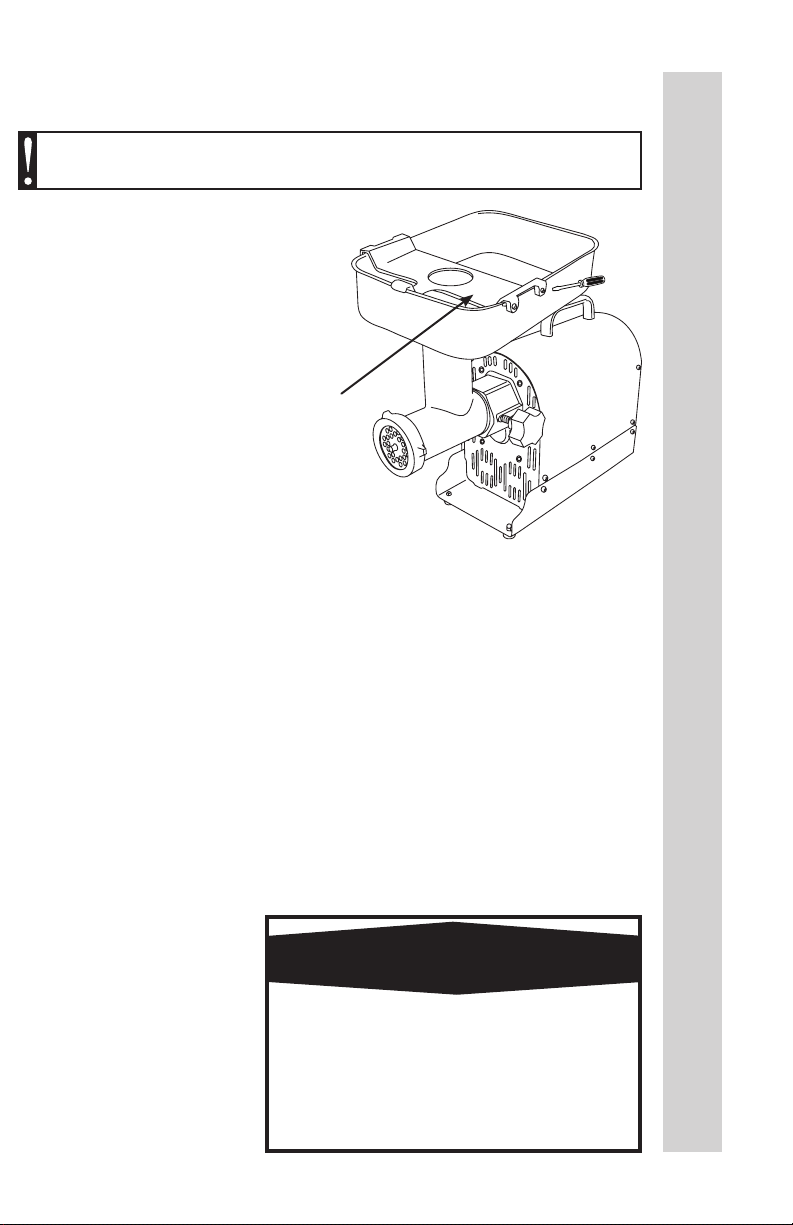
SAFETY GUARD INSTRUCTIONS
(Only applicable on#22 & #32 Grinders)
WARNING! Before cleaning, assembling or disassembling the
Grinder, make sure the Grinder Motor is OFF and the PLUG IS REMOVED
FROM THE OUTLET/POWER SOURCE!
The #22 and #32 Grinders are
equipped with a Safety Guard. This
Safety Guard is here to prevent
injury to the user. The only reason
that the Safety Guard should be
removed is for cleaning purposes,
then it should be IMMEDIATELY
REPLACED.
To remove the Safety Guard, use
the provided Flat-head Screwdriver
to loosen all four of the screws that
hold the Safety Guard to the Tray
(FIGURE 14). There is no need to
completely remove the screws from
the Safety Guard, as they can be
easily lost.
Remove the Safety Guard, clean
as instructed in the “Cleaning
Instructions” then IMMEDIATELY
REPLACE the Safety Guard onto
the Tray.
Safety
Guard
FIGURE 14
INSTRUCCIONES EN ESPAÑOL
INSTRUCCIONES EN ESPAÑOL
WARNING!
NEVER operate Grinder without the
Tray/Safety Guard secured in place.
To avoid serious or fatal injury, NEVER reach
into any Grinder inlet.
ALWAYS use the Stomper to push meat
into the Grinder Head.
Read & fully understand all instructions
& warnings prior to use.
17
Page 18

There are basic rules to follow when handling food.
FOOD SAFETY
They are COOK, SEPARATE, CLEAN, and CHILL.
COOK
It’s crucial to cook food to a safe internal temperature to destroy bacteria that is present.
The safety of hamburgers and other foods made with ground meat has been receiving a lot
of attention lately, and with good reason. When meat is ground, the bacteria present on the
surface is mixed throughout the ground mixture. If this ground meat is not cooked to at least
160oF to 165oF (71oC to 74oC), bacteria will not be destroyed and there’s a good chance you
will get sick.
Solid pieces of meat like steaks and chops don’t have dangerous bacteria like E. coli on the
inside, so they can be served more rare. Still, any beef cut should be cooked to an internal
temperature of at least 145oF (63oC) (medium rare). The safe temperature for poultry is 180oF
(82oC) and solid cuts of pork should be cooked to 160oF (71oC). Eggs should be thoroughly
cooked too. If you are making a meringue or other recipe that uses uncooked eggs, buy
specially pasteurized eggs or use prepared meringue powder.
SEPARATE
Foods that will be eaten uncooked and foods that will be cooked before eating MUST
ALWAYS be separated. Cross-contamination occurs when raw meats or eggs come in
INSTRUCCIONES EN ESPAÑOLINSTRUCCIONES EN ESPAÑOL
contact with foods that will be eaten uncooked. This is a major source of food poisoning.
Always double-wrap raw meats and place them on the lowest shelf in the refrigerator so
there is no way juices can drip onto fresh produce. Then use the raw meats within 1-2 days
of purchase, or freeze for longer storage. Defrost frozen meats in the refrigerator, not on the
counter.
When grilling or cooking raw meats or sh, make sure to place the cooked meat on a clean
platter. Don’t use the same platter you used to carry the food out to the grill. Wash the utensils
used in grilling after the food is turned for the last time on the grill, as well as spatulas and
spoons used for stir-frying or turning meat as it cooks.
Make sure to wash your hands after handling raw meats or raw eggs. Washing hands with
soap and water, or using a pre-moistened antibacterial towelette is absolutely necessary after
you have touched raw meat or raw eggs. Not washing hands and surfaces while cooking is a
major cause of cross-contamination.
CLEAN
Wash your hands and work surfaces frequently when you are cooking. Washing with soap
and warm water for at least 15 seconds, then dry with a paper towel.
CHILL
Chilling food is very important. The danger zone where bacteria multiply is between 40oF and
140oF (4oC and 6oC). Your refrigerator should be set to 40oF (4oC) or below; your freezer should
be 0oF (-17oC) or below. Simple rule: serve hot foods hot, cold foods cold. Use chang dishes
or hot plates to keep food hot while serving. Use ice water baths to keep cold foods cold. Never
let any food sit at room temperature for more than 2 hours - 1 hour if the ambient temperature
is 90oF (32oC) or above. When packing for a picnic, make sure the foods are already chilled
when they go into the insulated hamper. The hamper won’t chill food - it just keeps food cold
when properly packed with ice. Hot cooked foods should be placed in shallow containers and
immediately refrigerated so they cool rapidly. Make sure to cover foods after they are cool.
NOTE: Special considerations must be made when using venison or other wild game, since it
can become heavily contaminated during eld dressing. Venison is often held at temperatures
that could potentially allow bacteria to grow, such as when it is being transported. Refer to
the USDA Meat and Poultry Department for further questions or information on meat and
food safety.
18
Page 19

SAUSAGE INFORMATION
MEAT SELECTION FOR SAUSAGE MAKING
Sausage making has evolved over many years and generations, and as a result there are countless
types of sausage you can make using the basic ingredients of meat, fat and a few carefully blended
spices. Following are a few simple guidelines that will help you make the best tasting sausage
possible.
Any type of meat can be used for making sausage: pork, beef, bison, moose and caribou, even
antelope make great sausage. It is important when preparing venison or other red game meats to
trim all the fat from the meat, as red game tallow will turn rancid in as few as ve days. Replace the
fat with either pork or beef fat, depending on the type of product you are making, at a ratio of 1 pound
(0.5 kg) of fat for every 4 pounds (1.8 kg) of game meat.
The fat content of your sausage will affect the taste, texture, cooking characteristics and shelf life of
your product. Most commercially made sausage has a fat content of about 20%. Using less than 12%
fat will result in a very dry tasting sausage, while using more than 20% may result in a sticky avorless
sausage that will be difcult to cook.
CURING
It is important to properly cure meats to preserve meat and poultry, and to destroy undesirable
microorganisms on the meat surfaces that cause spoilage and food born illnesses. There are
many steps that help in this process, including smoking, cooking, drying, chilling and the addition
of cure ingredients. The oldest means of accomplishing this is by introducing salt into the meat. The
resistance of bacteria to salt varies widely among different types of bacteria. The growth of some
bacteria is inhibited by salt concentrations as low as 3%, e.g., Salmonella, whereas other types are
able to survive in much higher salt concentrations, e.g., Staphylococcus. Fortunately, the growth of
many undesirable organisms normally found in cured meat and poultry products is inhibited at low
concentrations of salt.
Modern curing is based on Nitrates and is very scientic. The best way to ensure proper curing is to
purchase one of the many commercially available curing agents from either a grocery store or your
local butcher. A very common cure is Prague Powder, which is available in two types (#1 and #2).
CASING
There are many different types of casings available, the right choice depends on personal preference
as well as the type of sausage you wish to make. For most sausages, your choices are natural or
collagen. Don’t let the names fool you; collagen casings are not a synthetic product . They are made
from beef skin and other tissues. Collagen casings are uniform in size and texture and require almost
no preparation. “Natural” casings are the intestines of lamb, sheep, hogs or beef. They are less
uniform in size and require substantial preparation. For those reasons, more than 75% of commercially
made sausage in the U.S. is made with collagen casing. There are also brous non-edible casings
that are used for some varieties of smoked sausages and bolognas.
INSTRUCCIONES EN ESPAÑOL
INSTRUCCIONES EN ESPAÑOL
TYPES OF SAUSAGE
Most sausages fall into one of four categories: Fresh, Smoked, Cooked or Dried. All sausages, except
dried, require refrigerated storage. There is also a sub-category of uncooked smoked sausages.
Among the fresh and uncooked smoked sausages, you will nd such avors as kielbasa or Polish
sausage, Italian sausage, breakfast sausage and many others. Both fresh and uncooked smoked
sausages require cooking before eating and also require refrigerated storage.
Smoked and cooked sausages include salami, bologna, the ever-popular hot dogs and many others.
Proper smoking requires a smokehouse or smoker. These can be simple home-built structures made
from metal drums or even old refrigerators or they can be elaborate manufactured units. Most smoked
sausages are warmed before serving. Many people think that a smoked sausage will last much
longer without spoilage, but this is not true. Smoked sausages should be treated the same as fresh
sausage in terms of storage.
Dried sausages require the longest processing time, as they are air dried over a long period of time.
Some types of dry sausages are pepperoni, prosciutto and a variety of ham products, just to name a
few. The conditions under which the meat is dried are very exacting; temperature, time and humidity
must all be carefully monitored for a safe and delicious product.
STORAGE
It is important to remember that sausage will lose its avor the longer that it is stored. It is recommended
that you only make as much sausage as you will need for 4-6 weeks. Even frozen sausage will begin
to lose avor noticeably after 6 weeks. Frozen sausage should be thawed slowly in the refrigerator
before cooking or serving. Quick thawing of the product will degrade the taste as well.
19
Page 20

WESTON WARRANTY INFORMATION
Weston Products LLC warrants to the ORIGINAL RETAIL PURCHASER of this product that if operated in accordance
with the printed instruction accompanying it, then for a period of 1 year from the date of purchase, the product shall be free
The Warranty Card, along with a copy of the original receipt, must be received by Weston Products LLC within 30
days from purchase date for the warranty to apply. Failure to send the completely lled out Warranty Card, along with a
The product must be delivered to or shipped freight prepaid to Weston Products LLC for warranty services, in either
its original packaging or similar packaging affording an equal degree of protection. Damage due to shipping is not the
responsibility of the company. Weston Products LLC charges a $35.00 per hour bench charge. NOTE: No repairs will
be started without the authorization of the customer. The return shipping cost to the customer will be added to the repair
Prior to returning the product for Warranty Repair, the product must be thoroughly cleaned and free from any food
particles or other debris. Failure of the purchaser to comply with this standard will result in the unit being returned without
Weston Products LLC will repair (or at its discretion, replace) the product free of charge, if in the judgment of the
New or rebuilt replacements for factory defective parts will be supplied for one (1) year from the date of purchase.
For non-warranty repairs, contact Weston Products LLC’s Customer Service at 1-800-814-4895 M-F 8am-5pm ET
(outside of the United States 001-440-638-3131) to obtain a Return Merchandise Authorization Number (RMA Number).
Weston Products LLC will refuse all returns that do not contain this number. DO NOT RETURN THE UNIT WITHOUT
LIMITATIONS: The warranty is void if the product is used for any purpose other than that for which it is designed.
The product must not have been previously altered, repaired, or serviced by anyone else other than Weston Products
LLC. If applicable, the serial number must not have been altered or removed. The product must not have been subjected
to accident in transit or while in the customer’s possession, misused, abused, or operated contrary to the instructions
contained in the instruction manual. This includes failure caused by neglect of reasonable and necessary maintenance,
improper line voltage and acts of nature. This warranty is not transferable and applies only to U.S. and Canadian sales.
Except to the extent prohibited by applicable law, no other warranties whether expressed or implied, including
warranty merchantability and tness for a particular purpose, shall apply to this product. Under no circumstances shall
Products LLC neither assumes nor authorizes any representative or other person to assume for it any obligation or liability
other than such as is expressly set forth herein. Any applicable implied warranties are also limited to the one (1) year
This warranty covers only the product and its specic parts, not the food or other products processed in it. Weston is
not responsible for missing or damaged parts on discounted/clearance, resale or nal sale items where the seller may not
SAVE THIS WARRANTY INFORMATION FOR YOUR RECORDS!
from defects in material and workmanship.
copy of the original receipt, will void the warranty.
invoice.
repair. In some cases, a $50 cleaning surcharge may apply.
company, it has been proven to be defective as to seller’s labor and material, within the warranty period.
Replacement parts are warranted for the remainder of the original warranty period.
PROPER AUTHORIZATION FROM WESTON PRODUCTS LLC.
Weston Products LLC be liable for consequential damages sustained in connection with said product and Weston
period of the limited warranty.
CUT ALONG THE DOTTED LINE AND SEND THE WARRANTY CARD ALONG WITH A COPY OF YOUR
be able to guarantee full functionality or completeness of the unit.
ORIGINAL PURCHASE RECEIPT TO:
Weston Products LLC / WARRANTY
20365 Progress Drive, Strongsville, OH 44149 USA
SEND THIS CARD ALONG WITH A COPY OF YOUR ORIGINAL PURCHASE RECEIPT TO:
WESTON WARRANTY CARD
WESTON PRODUCTS LLC / WARRANTY, 20365 PROGRESS DRIVE, STRONGSVILLE, OH 44149 USA
Customer Name:
Address:
City/State/Zip/Country:
Telephone Number:
E-Mail Address:
Original Date of Purchase:
Product Model #:
Serial # (if applicable):
I have read the warranty information. Initial here:
Copy of Receipt
Included
Page 21

MOLINO ELÉCTRICO
PARA CARNE Y RELLENADOR DE SALCHICHAS
#8 08-0801-W / #12 08-1201-W / #22 08-2201-W / #32 08-3201-W
Molino eléctrico
de grado
comercial para
E258759
carne
Debido a constantes mejoras en la fábrica,
el producto que se muestra puede ser
ligeramente diferente del producto en
esta caja.
REV111214
Equipo de preparación
de alimentos con
potencia comercial
Page 22

¡ADVERTENCIA!
NUNCA opere el molino
sin la bandeja/guarda de
seguridad ja en su lugar.
Para evitar lesiones serias o
fatales,
NUNCA ingrese a ninguna
entrada en el molino.
Utilice SIEMPRE el pisón para
empujar los alimentos dentro del
cabezal del molino.
Lea y entienda por completo
todas las instrucciones
y advertencias antes de usarlo.
Page 23

REGLAS IMPORTANTES DE SEGURIDAD
LEA Y ENTIENDA COMPLETAMENTE TODAS LAS INSTRUCCIONES Y
ADVERTENCIAS ANTES DE UTILIZAR ESTA UNIDAD. ¡SU SEGURIDAD
ES LO MÁS IMPORTANTE! NO SEGUIR LOS PROCEDIMIENTOS
Y PRECAUCIONES PUEDE PROVOCAR LESIONES GRAVES Y
DAÑOS MATERIALES. RECUERDE: ¡SU SEGURIDAD PERSONAL ES
1. NO use el molino sin la bandeja/guarda de
seguridad asegurada en su lugar.
2. SIEMPRE DESCONECTE el molino de la
fuente de corriente antes de darle mantenimiento,
cambiarle accesorios o limpiarla.
3. Conecte el molino en un tomacorriente
estándar de 120 volts y 60 Hz. Revise si el voltaje
indicado en el aparato corresponde al voltaje de
su localidad antes de conectarlo.
4. NO USE el molino si el cable de
corriente, la clavija, o cualquier otra parte
estuvieran dañadas. Si el cable de corriente
o el molino está dañado, llame al servicio al
cliente. NO TRATE DE REEMPLAZAR EL
CABLE. Asegúrese de no permitir que el cable
de corrientese encuentre dentro de su área
de trabajo. Revise que todas las partes estén
funcionando debidamente y realicen las funciones
deseadas. Revise la alineación de las partes
móviles, o cualquier otra situación que afecte el
funcionamiento.
5. NUNCA use ningún accesorio o partes
de otros fabricantes. Hacerlo INVALIDA LA
GARANTÍA y puede causar incendios, choques
eléctricos y lesiones.
6. PARA PROTEGERSE DE CHOQUES
ELÉCTRICOS: NO SUMERJA LA EL CUERPO
PRINCIPAL DEL MOLINO EN AGUA U OTRO
LÍQUIDO. ASEGÚRESE DE QUE EL MOLINO
ESTÉ DESCONECTADO DE LA FUENTE DE
CORRIENTE ANTES DE LIMPIARLO. Lave a
mano todas las partes y séquelas bien. Limpie
cuidadosamente todas las partes que entren
en contacto con los alimentos antes de usar el
electrodoméstico. NUNCA enjuague el motor del
molino bajo la llave, utilice sólo un paño húmedo
para limpiar la unidad del motor del molino.
7. Reduzca el riesgo de encendido involuntario.
Asegúrese de que el interruptor de corriente
está en la posición “OFF” (apagado) antes de
conectar al tomacorriente.
8. MANTENGA LOS DEDOS LEJOS del
tornillo sinfín y de las navajas de corte EN
TODO MOMENTO. NUNCA META LAS MANOS
AL MOLINO, hacerlo puede causar lesiones
graves. SIEMPRE UTILICE EL PISÓN DE
ALIMENTOS, NUNCA PASE LOS ALIMENTOS
A MANO.
9. NUNCA utilice los dedos para raspar
alimentos de la cuchilla mientras el molino está
en funcionamiento. PUEDEN PRODUCIRSE
LESIONES GRAVES.
10. NUNCA TENGA FUNCIONANDO EL
MOLINO SIN VIGILANCIA. Sea prudente,
DESCONECTE el molino de la fuente de
corriente antes de dejar el área de trabajo. Es
necesaria la supervisión cercana cuando se use
cualquier aparato cerca de niños. Este aparato
RESPONSABILIDAD DE USTED!
NO DEBE ser usado por niños.
11. Evite el contacto con partes en movimiento.
Espere hasta que todas las partes móviles se
hayan detenido antes de remover cualquier parte
del molino.
12. RECÓJASE el pelo suelto y la ropa y
enróllese las mangas antes de manejar el
molino. QUÍTESE la corbata, anillos, relojes,
brazaletes y demás joyería antes de manejar el
molino.
13. Revise que el molino esté en una supercie
de trabajo estable. Revise que estén estables
las patas del molino.
14. NO intente moler huesos, nueces u otros
artículos duros. NO deje que el cable haga
contacto con supercies calientes. NO lo use
encima de un horno o estufa. Revise si el voltaje
indicado en el aparato corresponde al voltaje de
su localidad antes de conectarlo.
15. NO opere el molino sin carne en el cabezal.
Pueden ocurrir daños severos en el cabezal y en
el tornillo sinfín.
16. USE PROTECCIÓN EN LOS OJOS. Utilice
gafas de seguridad. Los anteojos ópticos no son
protección de seguridad. Las gafas de seguridad
cumplen con los requerimientos de la norma
ANSI Z87.1. Nota: Las gafas de seguridad
aprobadas tienen impresa o estampada la clave
Z87.
17. NO la use en exteriores.
18. NO use el molino mientras esté bajo los
efectos de drogas, medicamentos o alcohol.
19. NO DEJE que el cable de corriente cuelgue
por el borde de la supercie de trabajo.
20. NO intente operar el molino si el molino
está frío. La temperatura del molino debe ser
de al menos 45oF (7oC) antes de comenzar.
21. El gabinete de engranes y la tapa del
motor pueden CALENTARSE durante la
operación. Esto es normal. NO toque estas
partes durante la operación, o hasta que se
enfríen después del uso.
22. ¡ADVERTENCIA! Los huesos rotos y
astillados pueden ingresar al tracto digestivo de
las mascotas y causar daños severos, incluso la
muerte, debido a la perforación de los intestinos
o incluso del estómago.
23. Los molinos eléctricos para carne de la Serie
Pro de Weston (#22 y #32) son capaces de
moler huesos más pequeños y más suaves de
animales tales como el conejo, pollos enteros*
o cuartos de pollo y otras aves, debido a la
potencia y a la construcción metálica de las
unidades.
24. Evite moler huesos animales grandes y
densos ya que son muy difíciles de procesar (por
ejemplo, huesos como los que se encuentran en
animales de caza, cerdos o reses).
INSTRUCCIONES EN ESPAÑOL
¡GUARDE ESTAS INSTRUCCIONES!
23
Page 24

DESCRIPTION DE LA PIÈCE
NÚMERO DE
DIAGRAMA
1 TUERCA DEL ANILLO FRONTAL 08-0842 08-1242 08-2242 08-3242
2 PLACA DEL MOLINO DE 4.5 MM29-0804 29-1204 29-2204 29-3204
3 PLACA DEL MOLINO DE 7 MM 29-0807 29-1207 29-2207 29-3207
4 NAVAJA DEL MOLINO 29-0850 29-1250 29-2250 29-3250
5 PERNO DEL TORNILLO SINFÍN 08-0849 08-1249 08-2246 08-3246
6 TORNILLO SINFÍN 08-0802-U 08-1202 08-2202-N 08-3202-N
7 COJINETE DEL TORNILLO
8 CABEZAL DE ACERO
9 PATA DE CAUCHO CON TUERCAS
INSTRUCCIONES EN ESPAÑOL
10 PERILLA DE BLOQUEO DEL
11 BANDEJA DE ACERO
12 PISÓN DE SEGURIDAD 08-0877 08-0877 08-2277-N 08-2277-N
13 EMBUDO 40 MM 08-1040 08-1040 08-1040 08-1040
14 EMBUDO 30 MM 08-1030 08-1030 08-1030 08-1030
15 EMBUDO 20 MM 08-1020 08-1020 08-1020 08-1020
16 BRIDA PARA EL EMBUDO DE
17 EMBUDO DE 10 MM DE ACERO
18 ESTRELLA DE RELLENADO DE
19 TORNILLO SINFÍN PLÁSTICO
20 GUARDA DE SEGURIDAD (CON 4
N’hésitez pas à visiter notre site Web WestonProduct.com/support si un composant est cassé, l’outil
Veuillez appeler Weston Products, LLC au numéro sans frais : 1-800-814-4895
DESCRIPCIÓN DE LA PIEZA #8
08-0801-W
#12
08-1201-W
#22
08-2201-W
08-0847 08-0847 08-3047 08-3047
SINFÍN
08-0809-W 08-1209 08-2209-W 08-3209-W
INOXIDABLE
08-2007 08-2007 08-2007 08-2007
(4)
08-2005 08-2005 08-2005 08-2005
CABEZAL
08-0824-S 08-1224-S 08-2224-S 08-3224-S
INOXIDABLE
08-0829 08-1229 08-2229 08-3229
RELLENADO
08-1011 08-1011 08-1011 08-1011
INOXIDABLE DE ALTA
VELOCIDAD
08-0876 08-1276 08-2276 08-3276
ACERO INOXIDABLE
08-0812 08-1212 08-2212 08-3212
DE ALTA
VELOCIDAD PATENTADO
N/A N/A 08-2223 08-3223
TORNILLOS)
fonctionne mal, ou pour commander un nouveau mode d’emploi.
WestonProducts.com
Du lundi au vendredi: de 8h00 à 17h00 ET. En dehors des États-Unis, veuillez
appeler le 001-440-638-3131
#32
08-3201-W
24
Page 25

11
#8 & #12
Pisón
12
#22 & #32
Pisón
20
Guarda de seguridad
incluida con
molinos Modelos #22 Y
#32 únicamente
5
4
3
1
Los molinos
#8 & #12
#22 & #32
Charola
#8 & #12
Charola
8
6
7
NOTA: Los molinos #8 & #12
tienen un cojinete del
tornillo sin n de tipo arandela
plana
14
13
19
Los
molinos
#22 & #32
15
16
Cubierta del
motor
Cable de
corriente
10
INSTRUCCIONES EN ESPAÑOL
9
18
17
2
Destornillador
plano
incluido con
molinos Modelos
#22 y #32
Encendido/
Apagado
Interruptor
Cortador
de
circuitos
¡ADVERTENCIA! ¡Antes de limpiar, ensamblar o desarmar el molino,
cerciórese de que el motor del molino esté APAGADO y que LA CLAVIJA
ESTÉ RETIRADA DEL TOMACORRIENTE O FUENTE DE ENERGÍA!
de encen-
dido y
apagado
Cortador de
circuitos
Encendido/
Apagado/Reversa
Interruptor
de encendido y
apagado
únicamente para
la guarda de
seguridad
25
Page 26

INSTRUCCIONES PARA EL DESEMPAQUE
. Retire todas las partes del material de empaque y verique que no falte
ninguna.
. Conserve el material de empaque para almacenar el molino y las partes del
molino cuando no esté en uso.
INSTRUCCIONES PARA HACER TIERRA
ATERRIZADO
Este aparato debe estar aterrizado para proteger
al operario de choques eléctricos. El aparato
está equipado con un cable de 3 conductores
y una clavija de tierra de tres patas que entra
en un tomacorriente aterrizado apropiado. El
INSTRUCCIONES EN ESPAÑOL
aparato tiene una clavija que se ve como la
gura A. Debe usarse un adaptador, gura
B, para conectar la clavija de la gura A en
tomacorrientes de dos patas. La pestaña de
tierra que sale del adaptador debe conectarse
a una tierra permanente, por ejemplo, una caja
de conexiones debidamente aterrizada, como la
que se muestra en la gura C, usando un tornillo
de metal. NO modique la clavija de ninguna
manera.
CABLES DE EXTENSIÓN
Use solamente cables de extensión de 3
alambres que tengan clavijas de tierra de 3
patas y un conector de 3 polos que acepte
la clavija del aparato. Use solamente cables
de extensión que tengan una calibración
eléctrica no menor que la calibración del
aparato. NO USE cables de extensión dañados.
Examine el cable de extensión antes de
usarlo y reemplácelo si está dañado. NO
maltrate el cable de extensión y no lo jale para
desconectarlo. Mantenga el cable alejado del
calor y de bordes losos. NO permita que el
cable cuelgue por el borde del área de trabajo.
Pata de
tierra
Conductor
del circuito
de tierra
Tornillo
metálico de
tierra
Cubierta de
la caja de
conexiones
de tierra
Medios de
aterrizaje
AA2220
FIGURA A
FIGURA B
FIGURA C
26
Page 27

INSTRUCCIONES DE LIMPIEZA
¡ADVERTENCIA! ¡Antes de limpiar, ensamblar o desarmar el molino,
cerciórese de que el motor del molino esté APAGADO y que LA CLAVIJA
ESTÉ RETIRADA DEL TOMACORRIENTE O FUENTE DE ENERGÍA!
1. Retire el cabezal del motor del molino.
2. Desarme el conjunto del cabezal.
3. Retire la guarda de seguridad de la bandeja, como se indica en las
“Instrucciones de la guarda de seguridad”. Las guardas de seguridad sólo
vienen con los molinos Modelo #22 y #32.
4. Lave con agua jabonosa caliente todas las partes que entren en contacto
con la carne. PROCURE LIMPIAR LAS PARTES INMEDIATAMENTE
DESPUÉS DE USARLAS. ¡NO SUMERJA EL MOTOR EN AGUA NI EN
NINGÚN OTRO LÍQUIDO!
5. Enjuague las partes del molino con agua caliente limpia y séquelas
INMEDIATAMENTE.
6. Lubrique completamente el cabezal, las placas y la navaja con un
atomizador de silicona para uso con alimentos antes y después de cada uso.
7. Limpie la cubierta del motor y el gabinete de engranajes con una toalla
húmeda y séquelos. ¡NO SUMERJA EL MOTOR EN AGUA NI EN NINGÚN
OTRO LÍQUIDO!
IMPORTANTE: Cualquier parte mecánica debe recubrirse con un atomizador
de silicona para uso con alimentos para evitar la oxidación; si no se protegen
de forma adecuada, estas partes comenzarán a oxidarse de forma muy
rápida. No use partes oxidadas. Puede encontrarse información para
pedidos en la última página de este manual de instrucciones.
INSTRUCCIONES EN ESPAÑOL
8. Hacer agria el molino y todos los componentes son completamente seco llame
antes de montar el oro almacenamiento.
¡ADVERTENCIA!
WARNING!
NUNCA opere el molino sin la
bandeja/guarda de seguridad ja en su lugar.
Para evitar lesiones graves o fatales, nunca meta las
manos en ninguna abertura del molino.
SIEMPRE utilice el pisón para empujar la carne
en el cabezal del molino.
Lea y entienda completamente todas las
instrucciones
y advertencias antes de usarlo.
27
Page 28

INSTRUCCIONES DE ENSAMBLE DEL MOLINO
¡ADVERTENCIA! ¡Antes de limpiar, ensamblar o desarmar el molino,
cerciórese de que el motor del molino esté APAGADO y que LA CLAVIJA
ESTÉ RETIRADA DEL TOMACORRIENTE O FUENTE DE ENERGÍA!
1. Inserte el cabezal en el gabinete de
engranajes con la tolva de alimentación
hacia arriba. Necesitará alinear la
ranura en el cabezal con el pasador
dentro del gabinete de engranajes.
Asegúrese de que el cabezal esté
totalmente asentada dentro del gabinete
de engranajes (FIGURA 1).
2. Apriete la perilla de bloqueo del
cabezal para jar el cabezal en su lugar.
3. Inserte el tornillo sinfín, con el cojinete
del tornillo sinfín colocado, dentro del
cabezal (FIGURA 2). Alinee las tiras del
tornillo sinfín con el eje de transmisión
del molino.
INSTRUCCIONES EN ESPAÑOL
NOTA: Inspeccione de forma periódica
el cojinete del tornillo sinfín en busca de
desgaste. Si el cojinete del tornillo sinfín
está desgastado de forma excesiva,
reemplácelo inmediatamente o pueden
presentarse daños en el cabezal.
4. Coloque el cuchillo en el extremo
cuadrado del perno del tornillo sinfín
(FIGURA 2). Asegúrese de que las
navajas de la cuchilla miran hacia
afuera.
5. Coloque una de las placas del molino
sobre el pasador del tornillo sinfín;
alinee la muesca en la placa del molino
con el pasador en el cabezal del molino.
6. Instale la tuerca del anillo frontal, NO
APRIETE DEMASIADO. Gire la tuerca
del anillo frontal hasta que haga contacto
con la placa del molino, gire otro 1/4 de
vuelta para apretarla en su lugar.
7. Inserte el cuello de la bandeja en la
tolva de alimentación (FIGURA 3).
8. NUNCA opere el molino sin haber
asegurado la bandeja en su lugar
(Figura 3).
REMÍTASE A LAS “INSTRUCCIONES
DE MOLIDO”
¡ADVERTENCIA!
¡Ver las instrucciones
de la guarda
de seguridad
antes de la
operación!
Tolva de
alimentación
Gabinete
del
Tornillo sinfín
Pasador del
tornillo sinfín
Cuchillo
Tuerca de aro
Charola
Cuello
Tolva de
alimentación
Cabezal
Ranura en el
cabezal
tornillo sinfín
frontal
engranaje del
cabezal
Cojinete del
tornillo sinfín
Tiras del
Placa del
molino
NOTA: Asegúrese de que
las navajas de la cuchilla
miran hacia afuera.
Perilla para
trabar el cabezal
Cabezal
FIGURA 1
FIGURA 2
FIGURA 3
28
Page 29

INSTRUCCIONES PARA MOLER
¡ADVERTENCIA! ¡Antes de limpiar, ensamblar o desarmar el molino,
cerciórese de que el motor del molino esté APAGADO y que LA CLAVIJA
ESTÉ RETIRADA DEL TOMACORRIENTE O FUENTE DE ENERGÍA!
1. Siga las “Instrucciones de
ensamble del molino” para
ensamblar completamente el molino
incluida la charola.
NOTA: Es mejor moler la carne
utilizando primero la placa del molino
gruesa de 7 mm. Si se desea un
molido más no de la carne, pase
la carne molida gruesa a través del
molino una segunda vez utilizando la
placa de molino no de 4.5 mm.
2. Recorte de todos los cordones,
tendones, huesos, etc. de la carne.
3.
Para mejores resultados, asegúrese
de que toda la carne se haya enfriado
a una temperatura de 32-34oF (0-1oC)
antes de molerla. No permita que la
carne esté a temperatura ambiente por
más tiempo del que sea absolutamente
necesario. Siga cuidadosamente las
instrucciones de “Seguridad alimenticia”
impartidas por la USDA.
4. Corte la carne en pedazos
lo sucientemente pequeños
como para que quepan en la
tolva de alimentación. Cubos de
aproximadamente 1” (2.5 cm).
¡ADVERTENCIA!
WARNING!
NUNCA opere el molino sin la
bandeja/guarda de seguridad ja en su lugar.
Para evitar lesiones graves o fatales, nunca meta las
manos en ninguna abertura del molino.
SIEMPRE utilice el pisón para empujar la carne
en el cabezal del molino.
Lea y entienda completamente todas las
Charola
Tolva de
alimentación
Cabezal
del molino
instrucciones
y advertencias antes de usarlo.
Pisón
INSTRUCCIONES EN ESPAÑOL
FIGURA 4
5. Coloque los cubos de carne
que se van a moler en la charola.
No llene demasiado la charola,
coloque solo suciente carne para
dejar abierta el área de la tolva de
alimentación.
6. Coloque un plato o un cuenco
para recolectar la carne molida en
el extremo del cabezal del molino
(FIGURA 4).
ADVERTENCIA Es importante seguir
los lineamientos de "Seguridad en
alimentos" establecidos en este manual.
Visite el sitio Web de USDA para ver las
instrucciones actualizadas.
Cubierta del
Cuenco para
la carne
molida
¡CALIENTE
HOT
DO NOT T OUCH!
El gabinete de engranes y la tapa del motor
pueden CALENTARSE durante la operación.
Esto es normal. NO toque estas partes durante la
operación, o hasta que se enfríen después del uso.
NO LO TOQUE!
motor
Gabinete de
engranajes
29
Page 30

RELLENADOR ESTÁNDAR INSTRUCCIONES DE ENSAMBLADO
¡ADVERTENCIA! ¡Antes de limpiar, ensamblar o desarmar el molino,
cerciórese de que el motor del molino esté APAGADO y que LA CLAVIJA
ESTÉ RETIRADA DEL TOMACORRIENTE O FUENTE DE ENERGÍA!
1. Inserte el cabezal en el gabinete
de engranajes con la tolva de
alimentación del cabezal hacia
arriba. Necesitará alinear la ranura
en el cabezal con el pasador
dentro del gabinete de engranajes.
Asegúrese de que el cabezal esté
totalmente asentada dentro del
gabinete de engranajes (FIGURA
5).
2. Apriete la perilla de bloqueo del cabezal
para jar el cabezal en su lugar.
3. Inserte el tornillo sinfín, con el cojinete del
INSTRUCCIONES EN ESPAÑOL
tornillo sinfín colocado, dentro del cabezal
(FIGURA 6). Alinee las tiras del tornillo
sinfín con el eje de transmisión del molino.
NOTA: Inspeccione de forma
periódica el cojinete del tornillo
sinfín en busca de desgaste. Si
el cojinete del tornillo sinfín está
desgastado de forma excesiva,
reemplácelo inmediatamente o
pueden presentarse daños en
el cabezal.
4. Coloque la estrella de
rellenado en el extremo
redondo del perno del taladro.
5. Deslice uno de los embudos
de rellenado a través de la brida y para
hacerlo a través de la tuerca de anillo
frontal.
6. Instale la tuerca del anillo frontal, NO
APRIETE DEMASIADO. Gire la tuerca
del anillo frontal hasta que haga contacto
con la brida, gire otro 1/4 de vuelta para
apretarla en su lugar.
Tolva de
alimentación
Pasador del
tornillo sin n
Estrella para
rellenar
Tuerca de aro
frontal
Ranura en el
cabezal
Cabezal
Tiras del torni-
llo sinfín
Taladro
Brida
Charola
Cuello
Tolva de
alimentación
Cabezal
Engranaje del
cabezal
Cojinete del
tornillo sinfín
Embudo para
rellenar
Perilla para
trabar el
cabezal
Cabezal
FIGURA 5
FIGURA 6
FIGURA 7
30
7. Inserte el cuello de la bandeja en la
tolva de alimentación (Figura 7).
8. NUNCA opere el molino sin haber
asegurado la bandeja en su lugar (Figura
7).
REMÍTASE A LAS “INSTRUCCIONES E
RELLENADO”
Page 31

ALTA VELOCIDAD DE INSTRUCCIONES DE MONTAJE EMBUTIDORA
WARNING! Before cleaning, assembling or disassembling the
Grinder, make sure the Grinder Motor is OFF and the PLUG IS REMOVED
FROM THE OUTLET/POWER SOURCE!
Cabezal
Brida
Taladro
Charola
Ranura en el
cabezal
Gabinete de
engranajes
Cojinete del
tornillo sinn
Tiras del
tornillo
sinfín
Embudo para
rellenar de
alta velocidad,
10 mm
FIGURA 8
Perilla para trabar
el cabezal
FIGURA 9
Cabezal
Taladro de
plástico de alta
velocidad
FIGURA 10
NOTA: El sistema de rellenado de alta
velocidad está diseñado para utilizarlo
ÚNICAMENTE con el embudo de
10 mm. NO trate de utilizar el tornillo
sinfín plástico de alta velocidad con
ningún otro embudo. Pueden ocurrir
DAÑOS GRAVES en el cabezal del
molino y otros componentes. Siga las
“Instrucciones estándar de ensamblaje
del rellenador” que se encuentran en
este manual cuando utilice los embudos
de 20, 30, o 40 mm.
1. Inserte el cabezal dentro del
gabinete de engranajes con la tolva
de alimentación del cabezal hacia
arriba. Necesitará alinear la ranura en
el cabezal con el pasador dentro del
gabinete de engranajes. Asegúrese
de que el cabezal esté completamente
asentado dentro del gabinete de
engranajes (FIGURA 8).
2. Apriete la perilla de bloqueo del
cabezal para bloquear el cabezal en su
lugar.
3. Inserte el tornillo sinfín, con el cojinete
del tornillo sinfín instalado,
dentro del cabezal (FIGURA
9). Alinee las tiras del
tornillo sinfín con el eje de
transmisión del molino.
NOTA: Inspeccione de forma
periódica el cojinete del
tornillo sinfín en busca de desgaste.
Si el cojinete del tornillo sinfín está
desgastado de forma excesiva,
reemplácelo inmediatamente o pueden
presentarse daños en el cabezal.
Tolva de
alimentación
Pasador
del tornillo
sin n
Tuerca de aro
frontal
INSTRUCCIONES EN ESPAÑOL
4. Deslice el tornillo sinfín plástico de
alta velocidad sobre el pasador del
tornillo sinfín asegurándose de que la
parte cuadrada del tornillo sinfín plástico
se asiente completamente sobre la
porción cuadrada del pasador del
tornillo sinfín.
5. Deslice el embudo de rellenado de
10 mm a través de la brida y páselo a
través de la tuerca del anillo frontal.
Cuello
Tolva de
alimentación
Cabezal
31
Page 32

INSTRUCCIONES DE RELLENADO
¡ADVERTENCIA! ¡Antes de limpiar, ensamblar o desarmar el molino,
cerciórese de que el motor del molino esté APAGADO y que LA CLAVIJA
ESTÉ RETIRADA DEL TOMACORRIENTE O FUENTE DE ENERGÍA!
1.
Después de moler la carne siguiendo
las "Instrucciones de molido", mezcle la
carne molida con los condimentos para
salchichas.
2. Siga las “Instrucciones de
ensamblado del rellenador” o las
“Instrucciones de ensamblado del
rellenador de alta velocidad” para
ensamblar completamente el molino
como rellenador, incluida la charola.
NOTA: Aunque una sola persona
puede rellenar salchichas con este
molino,
se recomienda que dos personas
INSTRUCCIONES EN ESPAÑOL
lleven a cabo esta operación. Para
mejores resultados cuando utilice
el embudo de rellenado de acero
inoxidable de alta velocidad de 10
mm, no muela la carne a través de la
placa de molido de 4.5 mm.
3. Coloque la carne molida y
sazonada en la charola.
No llene demasiado la charola,
coloque solo suciente carne para
dejar abierta el área de la
tolva de alimentación.
4. Deslice una punta para
salchichas sobre el
embudo de rellenado.
Ver la sección de
“Información de
salchichas / fundas” de
este manual para más información.
¡ADVERTENCIA!
WARNING!
NUNCA opere el molino sin la
bandeja/guarda de seguridad ja en su lugar.
Para evitar lesiones graves o fatales, nunca meta las
manos en ninguna abertura del molino.
SIEMPRE utilice el pisón para empujar la carne
en el cabezal del molino.
Lea y entienda completamente todas las
Charola
Tolva de
alimentación
instrucciones
y advertencias antes de usarlo.
Pisón
FIGURA 11
Cubierta
del
motor
Gabinete de
engranajes
32
5. Deslice entre 4” y 6” (10-15 cm) de funda desde el extremo del embudo de
rellenado y haga un nudo en el extremo de la funda. Si está utilizando una
funda brosa de gran diámetro, mantenga el extremo cerrado de la funda
rmemente contra el extremo del embudo de rellenado (FIGURA 11).
6. Asegúrese de que el molino se encuentra en la posición “OFF” (apagado).
Conecte el molino al suministro de corriente.
ADVERTENCIA Es importante seguir
los lineamientos de "Seguridad en
alimentos" establecidos en este manual.
Visite el sitio Web de USDA para ver las
instrucciones actualizadas.
Page 33

7. Lleve el molino a la posición “FWD” (adelante). Con cuidado, comience a
introducir cubos de carne en la tolva de alimentación. UTILICE ÚNICAMENTE
EL PISÓN PARA EMPUJAR LA COMIDA DENTRO DEL CABEZAL, NO
UTILICE SUS DEDOS NI NINGÚN OTRO OBJETO.
8. Sostenga la funda en su lugar con una mano mientras alimenta la mezcla
de salchichas a través del molino. A medida que la carne llena la funda,
colóquela suavemente sobre una supercie limpia y seca. NOTA: Cuando
utilice fundas naturales, utilice una supercie húmeda.
9. No rellene las últimas 3” - 4” (7.5-10 cm) de la funda. Después de rellenar
toda la longitud de la funda, gire el extremo abierto para cerrarlo, luego amarre
rmemente los extremos de la funda para cerrarlos. Haga giros para formar
eslabones.
10. Siempre que rellene salchichas, rellene lentamente la funda para evitar
bolsas de aire. Si aparecen bolsas de aire en la salchicha, utilice un aller
para perforar las burbujas. Los pequeños agujeros se cerrarán de forma
natural.
FUNCIÓN DE REVERSA
(Sólo es aplicable para #22 y #32)
. Permita que el motor del molino SE
DETENGA COMPLETAMENTE antes de
ponerlo en reversa (“REV”) (FIGURA 12).
. Permita que el motor del molino SE
DETENGA COMPLETAMENTE antes de
ponerlo en “FWD” (adelante) después de
utilizar la función de reversa.
. Nunca opere el molino en reversa durante
más de 5 segundos seguidos.
¡ADVERTENCIA!
WARNING!
NUNCA opere el molino sin la
bandeja/guarda de seguridad ja en su lugar.
Para evitar lesiones graves o fatales, nunca meta las
manos en ninguna abertura del molino.
SIEMPRE utilice el pisón para empujar la carne
en el cabezal del molino.
Lea y entienda completamente todas las
instrucciones
y advertencias antes de usarlo.
FIGURA 12
Encendido/Apagado/
Reversa
Interruptor
de encendido y
apagado
INSTRUCCIONES EN ESPAÑOL
33
Page 34

INSTRUCCIONES PARA EL CORTADOR DE CIRCUITOS
Este molino está equipado con un cortador
de circuitos como medida de precaución.
Si el molino deja de funcionar, siga estos
pasos para solucionarlo:
1. Ponga el molino en la posición “Off”
(apagado).
2. Revise el molino para ver si hay una
obstrucción en el cabezal del molino. Si
la hay, es necesario retirar la obstrucción
como se describe en los “Consejos para el
molido”.
2. Presione el botón de reinicio del cortador
de circuitos (FIGURA 13).
3. Vuelva a encender el molino y continúe
moliendo.
4. Si el molino aún no gira, verique que
el tomacorriente esté funcionando de
forma adecuada. Con este otro electrodoméstico para ver si funciona en ese
tomacorriente. Verique que no se haya disparado el cortador de circuitos
de la casa. Si ninguno de los anteriores pasos soluciona la situación, o si
INSTRUCCIONES EN ESPAÑOL
el cortador de circuitos apaga el molino de manera repetida, póngase en
contacto con servicio al cliente para mayor asistencia.
¡ADVERTENCIA! NO continúe utilizando el molino si el cortador de circuitos
se dispara de forma repetida. Seguir utilizándolo puede causar daños
permanentes al molino y anula la garantía.
POR FAVOR TOME NOTA: Este molino tiene todos los engranajes
de la transmisión en acero endurecido. Esto hace que el molino funcione
a un volumen y temperatura mayor de otros molinos. Esto es normal y no
afecta el desempeño del molino.
Botón de
restablecimiento del
cortador de circuitos
FIGURA 13
34
CONSEJOS PARA EL MOLIDO
. NO apriete demasiado la tuerca del anillo frontal. Debe estar rmemente
apretada
. Asegúrese de que las navajas de la cuchilla de molido están planas sobre la
placa del molino.
. NO opere el molino sin carne en el cabezal. Hacer funcionar el molino en
seco podría dañar el cabezal y el tornillo sinfín.
. SIEMPRE lubrique el cabezal, la placa de molido y la cuchilla de molido con
un atomizador de silicona para alimentos después de limpiarlos.
. Si la placa del molino se atasca durante la operación, siga estos pasos para
restablecer el desempeño normal.
. Apague el molino y desconecte el cable de corriente del tomacorriente.
. Remueva la tuerca del anillo frontal y la placa de molido.
. Limpie muy bien la placa de molido. Asegúrese de que todos los agujeros
estén limpios.
. Vuelva a instalar la placa de molido y la tuerca el anillo frontal.
. Vuelva a conectar el molino al tomacorriente.
. Continúe mordiendo.
. Repita si es necesario.
Page 35

INSTRUCCIONES DE LA GUARDA DE SEGURIDAD
(Sólo es aplicable para #22 y #32)
¡ADVERTENCIA! ¡Antes de limpiar, ensamblar o desarmar el molino,
cerciórese de que el motor del molino esté APAGADO y que LA CLAVIJA
ESTÉ RETIRADA DEL TOMACORRIENTE O FUENTE DE ENERGÍA!
Los molinos #22 y #32 están
equipados con una guarda de
seguridad. Esta guarda de
seguridad está diseñada para
evitar lesiones al usuario. La
única razón por la cual debe
removerse la guarda de seguridad
es para propósitos de limpieza, y
DEBE VOLVERSE A COLOCAR
INMEDIATAMENTE.
Para remover la guarda de
seguridad, utilice el destornillador
de pala que se suministra para
aojar los cuatro tornillos que
sostienen la guarda de seguridad
a la charola (FIGURA 14). No es
necesario remover completamente
los tornillos de la guarda de
seguridad, ya que pueden
perderse con facilidad.
Remueva la guarda de seguridad,
limpie según lo que se indica en
las “Instrucciones de limpieza”
y VUELVA A COLOCAR
INMEDIATAMENTE la guarda de
seguridad sobre la charola.
Guarda de
seguridad
FIGURA 14
INSTRUCCIONES EN ESPAÑOL
¡ADVERTENCIA!
WARNING!
NUNCA opere el molino sin la
bandeja/guarda de seguridad ja en su lugar.
Para evitar lesiones graves o fatales, nunca meta las
manos en ninguna abertura del molino.
SIEMPRE utilice el pisón para empujar la carne
en el cabezal del molino.
Lea y entienda completamente todas las
instrucciones
y advertencias antes de usarlo.
35
Page 36

SEGURIDAD DE LOS ALIMENTOS
Hay que seguir ciertas reglas básicas al manejar alimentos.
Las reglas son COCINAR, SEPARAR, LIMPIAR y ENFRIAR.
COCINAR
Es muy importante cocinar los alimentos a una temperatura interna que destruya cualquier
bacteria que esté presente. Últimamente se ha puesto mucha atención en la higiene de
las hamburguesas y otros alimentos elaborados con carne molida y con razón. Cuando se
muele la carne, las bacterias presentes en la supercie se revuelven en toda la mezcla de
la carne molida. Si la carne molida no se cuece a por lo menos 71 °C a 74 °C (160 °F - 165
°F), no se destruyen las bacterias y hay una buena posibilidad de enfermarse.
Las piezas de carne sólida, como los letes y las chuletas, no tienen en su interior bacterias
peligrosas como le E. coli, por lo que pueden servirse menos cocidas. Aun así, cualquier
corte de vacuno debe cocinarse a una temperatura interna de por lo menos 63 °C (145
°F) (medio cocido). La temperatura recomendable para las aves es de 82 °C (180 °F) y los
cortes sólidos de carne de puerco deben cocinarse a 63 °C (145 °F). Los huevos también
deben consumirse bien cocidos. Si usted va a preparar merengue u otra receta que lleve
huevos crudos, compre huevos pasteurizados o use polvo preparado de merengue.
SEPARAR
SIEMPRE DEBE separar los alimentos que se comen crudos y los que se vayan a cocer
INSTRUCCIONES EN ESPAÑOL
antes de comerse. La contaminación cruzada se presenta cuando la carne o los huevos
crudos entran en contacto con alimentos que se van a consumir sin cocimiento. Ésta es una
importante causa de intoxicaciones. Siempre use una doble envoltura para la carne cruda
y colóquela en la repisa más baja del refrigerador, para que no haya manera de que su
jugo gotee en las verduras frescas. Use la carne cruda 1 o 2 días después de comprarla, o
congélela para guardarla más tiempo. Descongele la carne congelada en el refrigerador, no
en el mesón de la cocina.
Cuando ase o cocine carne o pescado crudo, coloque la carne ya cocida en un platón
limpio. No use el mismo platón que usó para llevar la carne al asador. Lave los utensilios
usados en el asador después de haber volteado los alimentos por última vez, así como las
cucharas y espátulas usadas para freír o para voltear la carne al estarla cocinando.
No olvide lavarse las manos después de manejar carne o huevos crudos. Es absolutamente
necesario lavarse las manos con agua y jabón o usar una toallita húmeda antibacteriana
después de tocar carne o huevos crudos. No lavarse las manos o las supercies cuando se
cocina es una causa importante de contaminación cruzada.
LIMPIAR
Lávese las manos y las supercies de trabajo con frecuencia mientras esté cocinando.
Lávese con agua tibia y jabón durante por lo menos 15 segundos; después séquese con
una toalla de papel.
36
ENFRIAR
Es muy importante enfriar los alimentos. La zona de peligro para la multiplicación de
bacterias está entre los 4 °C y 60 °C (40 °F - 140 °F). El refrigerador debe estar a 4 °C (40
°F) o menos; el congelador debe estar a -17 °C (0 °F) o menos. Regla básica: sirva calientes
los alimentos calientes y sirva fríos los alimentos fríos. Use platos calientes para mantener
caliente la comida a la hora de servirla. Use baños de agua con hielo para mantener fría
la comida fría. Nunca deje ningún alimento a temperatura ambiente por más de 2 horas;
o por más de 1 hora si la temperatura ambiente es de 32 °C (90 °F) o superior. Cuando
empaque para un picnic, asegúrese de que la comida ya esté fría cuando la meta en la
canasta aislada. La canasta no enfría la comida; sólo la mantiene fría si está debidamente
empacada con hielo. Los alimentos cocidos calientes deben colocarse en recipientes bajos
y refrigerarse de inmediato para que se enfríen rápidamente. No olvide cubrir los alimentos
una vez que se enfríen..
NOTA: Debe tener especial consideración al usar venado y otra carne de caza, ya que
puede contaminarse durante la preparación de campo. El venado suele mantenerse a
temperaturas que podrían permitir el crecimiento de bacterias, como cuando se transporta.
Consulte con el Departamento de Carnes y Aves de la USDA si tiene más preguntas o
quiere más información sobre higiene de carne y alimentos.
Page 37

INFORMACIÓN DE LA SALCHICHA
SELECCIÓN DE CARNE PARA HACER SALCHICHAS
La elaboración de salchichas ha evolucionado a lo largo de muchos años y generaciones, y como resultado,
hay un sinnúmero de tipos de salchichas que puede hacer usando los ingredientes básicos como carne,
grasa y algunas especias cuidadosamente combinadas. A continuación se presentan algunos lineamientos
sencillos que le ayudarán a elaborar salchichas con el mejor sabor posible.
Se puede utilizar cualquier tipo de carne para elaborar embutidos: carne de cerdo, de res, de bisontes, de
alces y de caribúes, incluso con la de antílope se hacen excelentes salchichas. En la preparación de la carne
de venado o de otras carnes rojas de caza es importante quitar toda la grasa de la carne, ya que el sebo de
la carne roja de caza se vuelve rancio en tan sólo cinco días. Reemplace la grasa, con grasa de cerdo o de
vaca, dependiendo del tipo de producto que esté elaborando, en una proporción de 0.5 kg (1 lb) de grasa por
cada 1.8 kg (4 lb) de carne de caza.
El contenido de grasa de la salchicha afectará el sabor, la textura, las características de cocción y la vida
útil de su producto. La mayoría de las salchichas comerciales tienen un contenido de grasa de alrededor del
20%. El uso de menos de 12% de grasa dará lugar a una salchicha muy seca a la degustación, mientras que
con más del 20% puede dar como resultado una salchicha sin sabor y pegajosa que será difícil de cocinar.
CURADO
Es importante curar adecuadamente las carnes para conservarlas, y destruir los microorganismos
indeseables en las supercies de la carne que causan su descomposición así como enfermedades derivadas
de ésta. Hay muchas medidas que son de ayuda en este proceso, como el ahumado, la cocción, el secado,
la refrigeración, y la adición de ingredientes para curado. Los medios más antiguos para lograr esto eran
mediante la introducción de la sal en la carne. La resistencia de las bacterias a la sal varía ampliamente entre
los diferentes tipos de bacterias. El crecimiento de algunas bacterias se inhibe por concentraciones de sal
tan bajas como el 3% en por ejemplo la Salmonela, mientras que otros tipos son capaces de sobrevivir en
concentraciones mucho más altas de sal, por ejemplo el estalococo. Afortunadamente, el crecimiento de
muchos organismos no deseados que normalmente se encuentran en los productos de carne y de aves de
corral curadas se inhibe a concentraciones bajas de sal.
El curado moderno se basa en nitratos y es muy cientíco. La mejor manera de asegurar un curado apropiado
es comprar uno de los muchos agentes de curado disponibles en el mercado, ya sea en un supermercado
o con su carnicero local. Una forma de curdo muy común es el Polvo de Praga, que está disponible en dos
tipos (#1 y #2).
FORRO
Existen muchos tipos diferentes de forros disponibles, la elección correcta depende de su la preferencia
personal, así como del tipo de salchicha que desea elaborar. Para la mayoría de las salchichas, sus opciones
son naturales o de colágeno. No deje que los nombres le engañen; los forros de colágeno no son un producto
sintético. Están hechos de piel de res y otros tejidos. Los forros de colágeno son uniformes en tamaño y
textura y casi no requieren preparación. Los forros “naturales” son los intestinos de cordero, de ovejas, de
cerdos o de res. Son menos uniformes en tamaño y requieren una preparación considerable. Por estas
razones, más del 75% de las salchichas de fabricación comercial en los EE.UU. se hace con forro de
colágeno. También hay forros brosos no comestibles que se utilizan para algunas variedades de salchichas
y mortadelas ahumadas.
INSTRUCCIONES EN ESPAÑOL
TIPOS DE SALCHICHAS
La mayoría de las salchichas caen dentro de una de cuatro categorías: Frescas, ahumadas, cocidas o secas.
Todas las salchichas, excepto las secas, requieren ser refrigeradas para su almacenamiento. También hay
una subcategoría de salchichas ahumadas crudas.
Entre las salchichas ahumadas frescas y las crudas, encontrará sabores como kielbasa o salchicha polaca,
salchicha italiana, salchichas para desayuno y muchos otros. Las salchichas ahumadas frescas y crudas
requieren cocción antes de comerse y también requieren de almacenamiento refrigerado.
Las salchichas ahumadas y las cocidas incluyen al salami, a la mortadela, a los siempre populares perros
calientes y a muchas otras. El ahumado adecuado requiere un ahumadero o un ahumador. Estas pueden ser
estructuras simples de fabricación casera hechas de bidones metálicos o incluso con refrigeradores viejos o
pueden ser complejas unidades prefabricadas. La mayoría de las salchichas ahumadas se calientan antes
de servir. Muchas personas piensan que una salchicha ahumada va a durar mucho más tiempo sin echarse
a perder, pero esto no es cierto. Las salchichas ahumadas deben ser tratadas de la misma manera que las
salchichas frescas en cuanto al almacenamiento.
Las salchichas secas requieren un tiempo de procesamiento más largo, ya que se secan al aire durante un
largo período de tiempo. Algunos tipos de salchichas secas son el pepperoni, el jamón y una variedad de
productos de jamón, por nombrar sólo unos pocos. Las condiciones en las que se seca la carne son muy
exigentes; la temperatura, el tiempo y la humedad deben ser monitoreados cuidadosamente para obtener un
producto seguro y delicioso.
ALMACENAMIENTO
Es importante recordar que la salchicha perderá su sabor mientras más tiempo permanezca almacenada.
Se recomienda que sólo elabore las salchichas que necesite para un período de 4-6 semanas. Incluso las
salchichas congeladas empezarán a perder sabor notablemente después de 6 semanas. Las salchichas
congeladas deben descongelarse lentamente en el refrigerador antes de cocinarse o servirse. El
descongelamiento rápido del producto también degradará el sabor.
37
Page 38

INFORMACIÓN DE GARANTÍA WESTON
¡GUARDE ESTA INFORMACIÓN DE GARANTÍA PARA SUS REGISTROS!
Weston Products LLC garantiza al COMPRADOR AL DETALLE ORIGINAL de este producto que si funciona en cumplimiento
con las instrucciones impresas adjuntas, entonces por un período de 1 año desde la fecha de compra, el producto se
La Tarjeta de Garantía, junto con una copia del recibo original debe ser recibida por Weston Products LLC dentro de 30 días
desde la fecha de compra para hacer efectiva la garantía. Si no se envía la Tarjeta de Garantía completamente llena, junto
El producto debe ser enviado o despachado mediante ete prepagado a Weston Products LLC para efectuar los servicios
establecidos en la garantía, en su envase original o en un envase similar que garantice igual grado de protección. El daño
producto del despacho no es responsabilidad de la compañía. Weston Products LLC cobra $35.00 por concepto de mesón
por hora. NOTA: Las reparaciones no se iniciarán sin la autorización del cliente. El costo por despacho de devolución al
Antes de devolver el producto para la Reparación según la Garantía, el producto debe estar completamente limpio y libre de
partículas de alimentos u otros fragmentos. El incumplimiento del comprador respecto de esta norma resultará en el envío de
la unidad sin reparación. En algunos casos, podría aplicar un sobrecargo de $50 por concepto de limpieza.
Weston Products LLC reparará (o a su decisión, cambiará) el producto sin cobro, si a juicio de la compañía, se ha demostrado
que está defectuoso respecto de la mano de obra y material del vendedor, dentro del período de garantía.
Los cambios de productos nuevos o reacondicionados por partes defectuosas de fábrica serán suministrados por un (1) año
desde la fecha de compra. Las partes cambiadas están garantizadas por el resto del período original de garantía.
Para las reparaciones que no estén cubiertas en la garantía, comuníquese con Servicio al Cliente de Weston Products LLC
al 1-800-814-4895 de lunes a viernes, desde las 8 a.m. hasta las 5pm ET (Desde fuera de los Estados Unidos comuníquese
al 001-440-638-3131) para solicitar un Número de Autorización de Devolución de la Mercadería (Número RMA). Weston
Products LLC rechazará todo envío que no contenga este número. NO DEVUELVA LA UNIDAD SIN LA AUTORIZACIÓN DE
LIMITACIONES: La garantía queda invalidada si el producto se utiliza para algún objetivo que no sea aquél para el cual
está diseñado. El producto no debe haber sido previamente alterado, reparado, ni tampoco se le debe haber hecho servicio
técnico por cualquier otra persona que no sea de Weston Products LLC. Si corresponde, no se debe alterar o eliminar el
número de serie. El producto no debe estar sujeto a accidentes durante el transporte o estando en posesión del cliente, no
debe ser mal usado, mal tratado, u operado en forma contraria a las instrucciones de este manual. Esto incluye toda falla
causada por negligencia de mantención razonable o necesaria, voltaje de línea inadecuado o actos de la naturaleza. Esta
Salvo en la medida en que lo prohíba la ley correspondiente, ninguna otra garantía expresa o implícita, incluyendo
comerciabilidad o aptitud de la garantía para un objetivo en particular, aplicará a este producto. Bajo ninguna circunstancia
Weston Products LLC será responsable de daños emergentes sostenidos en conexión con dicho producto y Weston Products
LLC no asume ni autoriza a ningún representante u otra persona a asumir por él ninguna obligación o responsabilidad que no
sea aquella expresamente establecida en esta tarjeta de garantía. Toda garantía correspondiente implícita también se limita a
Esta garantía cubre sólo el producto y sus partes especícas, no cubre los alimentos u otros productos procesados en
él. Weston no se hace responsable por partes faltantes o dañadas en productos con descuento/en oferta, reventa, o en
promoción nal, sobre los cuales el vendedor puede no ser capaz de garantizar una funcionalidad completa, o la integridad de
CORTE POR LA LÍNEA PUNTEADA Y ENVÍE LA TARJETA DE GARANTÍA JUNTO CON UNA COPIA DE SU RECIBO DE
considerará libre de defectos respecto del material y mano de obra.
con una copia del recibo original, anulará la garantía.
cliente se agregará a la factura por reparación.
WESTON PRODUCTS LLC.
garantía es intransferible y sólo se aplica a ventas realizadas en Estados Unidos y Canadá.
un período de un (1) año de la garantía limitada.
Weston Products LLC / WARRANTY
20365 Progress Drive, Strongsville, OH 44149 USA
la unidad.
COMPRA ORIGINAL A
ENVÍE ESTA TARJETA JUNTO CON UNA COPIA DE SU RECIBO DE COMPRA ORIGINAL A: WESTON
TARJETA DE GARANTÍA WESTON
PRODUCTS LLC/WARRANTY, 20365 PROGRESS DRIVE. STRONGSVILLE, OH 44149 USA
Nombre del Cliente:
Dirección:
Ciudad/Estado/Código Zip/País:
Número Telefónico:
Dirección de Correo Electrónico:
Fecha de Compra Original:
Modelo del Producto #:
# de Serie (Si corresponde):
Copia del recibo
incluido
Page 39

HACHOIR DE VIANDE ÉLECTRIQUE
ET REMPLISSEUR DE SAUCISSE
PRO-SERIES
#8 08-0801-W / #12 08-1201-W / #22 08-2201-W / #32 08-3201-W
REV111214
Électrique et
remplisseur de
E258759
Motorisé Commercial
Homologué Pour
Préparation de Produits
Aalimentaires
saucisse
Page 40

AVERTISSEMENT!
NE JAMAIS utiliser le hachoir
sans le dispositif de sécurité/
plateau
en place.
Pour éviter les blessures
graves, voire mortelles,
NE JAMAIS METTRE LES MAINS
dans l'entrée du hachoir.
TOUJOURS utiliser le poussoir
d'aliments pour pousser la
viande dans la tête du hachoir.
Lire et bien comprendre
toutes les instructions
ainsi que les messages
d'avertissement avant l'utiliser
l'appareil.
Page 41

IMPORTANTES RÈGLES DE SÉCURITÉ
LIRE ET COMPRENDRE COMPLÈTEMENT TOUTES LES DIRECTIVES
ET AVERTISSEMENTS AVANT D’UTILISER CE PRODUIT. LE PLUS
IMPORTANT EST VOTRE SÉCURITÉ! LE DÉFAUT D’OBSERVER LES
PROCÉDURES ET MISES EN GARDE PEUT ENTRAINER DES BLESSURES
GRAVES OU DES DOMMAGES MATÉRIELS. N’OUBLIEZ PAS : VOTRE
SÉCURITÉ PERSONNELLE EST VOTRE RESPONSABILITÉ!
1. NE PAS utiliser le hachoir sans le dispositif
de protection/plateau.
2. TOUJOURS DÉBRANCHER le hachoir de
la source d'alimentation avant de procéder à des
opérations de réparation/entretien, au changement
d'accessoires ou nettoyage de l'unité.
3. Brancher le hachoir dans une prise murale
standard de 120 V, 60 Hz. Vérier que la tension
indiquée sur l'appareil correspond à la tension
locale avant de connecter l'appareil.
4. NE PAS UTILISER le hachoir si le cordon
d'alimentation, la che ou toute autre pièce
de l'appareil sont endommagés. Si le cordon
d'alimentation ou le hachoir sont endommagés,
appeler le service clientèle. NE PAS REMPLACER
LE CORDON. S'assurer que le cordon
d'alimentation ne se trouve pas sur la surface de
travail. Vérier que toutes les pièces fonctionnent
correctement et comme prévu. Vérier l'alignement
des pièces mobiles ou tout autre facteur qui
pourrait avoir une incidence sur le fonctionnement.
5. NE JAMAIS utiliser des accessoires ou des
pièces d'autres fabricants. Si vous utilisez des
pièces d'autres fabricants, la GARANTIE SERA
ANNULÉE et il y a risque d'électrocution ou de
blessure.
6. POUR VOUS PROTÉGER CONTRE TOUT
RISQUE DE CHOCS ÉLECTRIQUES: NE PAS
IMMERGER LE CORPS PRINCIPAL DU HACHOIR
DANS DE L'EAU OU DU LIQUIDE. S'ASSURER
QUE LE HACHOIREST DÉBRANCHÉE DE
LA SOURCE D'ALIMENTATION AVANT DE
PROCÉDER AU NETTOYAGE. Laver toutes
les pièces à la main et bien les sécher ensuite.
Nettoyer soigneusement toutes les pièces qui
entrent en contact avec les aliments avant d'utiliser
l'appareil. NE JAMAIS rincer le moteur du
hachoir de l'appareil sous l'eau courante. Toujours
utiliser un chiffon humide pour nettoyer le moteur
du hachoir.
7. Réduire le risque d'un démarrage accidentel.
S'assurer que l'interrupteur de mise en marche/
arrêt est en position d'arrêt (OFF) avant d'effectuer
la connexion à l'alimentation.
8. TOUJOURS TENIR LES DOIGTS À
L'ÉCART de la vis sans n et des couteaux
tranchants. NE JAMAIS METTRE LES MAINS
DANS LE HACHOIR. Il y a risque de graves
blessures. TOUJOURS UTILISER LE POUSSOIR
D'ALIMENTS FOURNI. NE JAMAIS POUSSER
LES ALIMENTS AVEC LES MAINS.
9. NE JAMAIS utiliser les doigts pour enlever la
nourriture de la plaque de hachage alors que le
hachoir est toujours en marche. VOUS RISQUEZ
DE VOUS BLESSER SÉRIEUSEMENT.
10. NE JAMAIS LAISSER LE HACHOIR SANS
SURVEILLANCE. Par précaution, DÉBRANCHER
le hachoir de la source d'alimentation avant de
quitter la zone de travail. Toujours superviser les
appareils en présence d'enfants. Cet appareil NE
DOIT PAS être utilisé par des enfants.
11. Éviter tout contact avec les pièces en
mouvement. Attendre que toutes les pièces
mobiles soient immobilisées avant de retirer des
pièces du hachoir.
12. ATTACHER les cheveux et les vêtements et
retrousser les manches longues avant de mettre
l'appareil en marche et d'utiliser le hachoir.
RETIRER les cravates, bagues, montres, bracelets
ou autres bijoux avant de faire fonctionner le
hachoir.
13. S'assurer que le hachoir est posé sur une
surface de travail stable. S'assurer que les pieds
du hachoir sont stables.
14. NE PAS broyer d'os, de noix ou d'autres objets
durs. NE PAS laisser le cordon entrer en contact
avec une surface chaude. NE PAS utiliser sur une
cuisinière ou dans un four. Vérier que la tension
indiquée sur l'appareil correspond à la tension
locale avant de connecter l'appareil.
15. NE PAS faire fonctionner le hachoir sans
viande dans la tête. La tête et la vis sans n
risquent de subir de sérieux dommages.
16. PORTER UNE PROTECTION POUR LES
YEUX. Porter des lunettes de sécurité. Les lunettes
de vue ne sont pas des lunettes de sécurité. Les
lunettes de sécurité doivent être conformes aux
exigences de la norme ANSI Z87.1. Remarque:
Les lunettes de sécurité agréées ont la marque Z87
imprimée ou gravée dessus.
17. NE PAS utiliser à l'extérieur.
18. NE PAS utiliser le hachoir sous l'effet d'alcool
et de drogue.
19. NE PAS laisser le cordon d'alimentation
pendre du bord de la surface de travail.
20. NE PAS utilise le hachoir si l'appareil est
froid. La température du hachoir doit être d'au
moins de 7 ºC avant de commencer.
21. Le carter d'engrenage et le couvercle
du moteur peuvent devenir chauds pendant
le fonctionnement. Cette condition n'est pas
anormale. NE PAS toucher ces pièces pendant
le fonctionnement et attendre qu'elles aient refroidi
après utilisation.
22. AVERTISSEMENT: Des os éclatés peuvent
entrer dans le tube digestif d'un animal et entraîner
de graves dommages, voire la mort en perforant les
parois intestinales ou même l'estomac
23. Les hachoirs électriques pour viandes de
Weston Pro Series (nº 22 et nº 32) peuvent hacher
des os d'animaux plus petits et plus souples
comme ceux du lapin, des poulets entières* ou des
morceaux de poulet et d'autres oiseaux, grâce à la
puissance et la fabrication métallique des unités.
24. Ne pas hacher des animaux de grande taille
dans la mesure où ils sont difciles à traiter (par
exemple, des os de gibier, de porcs ou des vaches).
INSTRUCTIONS EN FRANÇAIS
CONSERVER CES DIRECTIVES!
41
Page 42

DESCRIPTION DE LA PIÈCE
DIAGRAM
NUMBER
1 ÉCROU ANNULAIRE AVANT 08-0842 08-1242 08-2242 08-3242
2 PLAQUE DE HACHAGE 4,5 MM 29-0804 29-1204 29-2204 29-3204
3 PLAQUE DE HACHAGE 7 MM 29-0807 29-1207 29-2207 29-3207
4 COUTEAU DE BROYAGE 29-0850 29-1250 29-2250 29-3250
5 GOUPILLE DE VIS SANS FIN 08-0849 08-1249 08-2246 08-3246
6 VIS SANS FIN 08-0802-U 08-1202 08-2202-N 08-3202-N
7 ROULEMENT DE VIS SANS FIN 08-0847 08-0847 08-3047 08-3047
8 EN ACIER INOXYDABLE 08-0809-W 08-1209 08-2209-W 08-3209-W
9 PIEDS EN CAOUTCHOUC AVEC
10 BOUTON DE VERROUILLAGE DE
INSTRUCTIONS EN FRANÇAIS
11 PLATEAU EN ACIER
12 POUSSOIR DE SÉCURITÉ 08-0877 08-0877 08-2277-N 08-2277-N
13 ENTONNOIR 40 MM 08-1040 08-1040 08-1040 08-1040
14 ENTONNOIR 30 MM 08-1030 08-1030 08-1030 08-1030
15 ENTONNOIR 20 MM 08-1020 08-1020 08-1020 08-1020
16 SUPPORT POUR ENTONNOIR DE
17 ENTONNOIR 10 MM EN ACIER
18 ÉTOILE DE BOURRAGE EN ACIER
19 VIS SANS FIN EN PLASTIQUE À
20 DISPOSITIF DE SÉCURITÉ (AVEC
N’hésitez pas à visiter notre site Web WestonProduct.com/support si un composant est cassé, l’outil
Veuillez appeler Weston Products, LLC au numéro sans frais : 1-800-814-4895
PART DESCRIPTION #8
08-0801-W
#12
08-1201-W
#22
08-2201-W
08-2007 08-2007 08-2007 08-2007
ÉCROUS (4)
08-2005 08-2005 08-2005 08-2005
LA TÊTE
08-0824-S 08-1224-S 08-2224-S 08-3224-S
INOXYDABLE
08-0829 08-1229 08-2229 08-3229
BOURRAGE
08-1011 08-1011 08-1011 08-1011
INOXYDABLE À VITESSE ÉLEVÉE
08-0876 08-1276 08-2276 08-3276
INOXYDABLE
08-0812 08-1212 08-2212 08-3212
VITESSE ÉLEVÉE BREVETÉE
N/A N/A 08-2223 08-3223
4 VIS)
fonctionne mal, ou pour commander un nouveau mode d’emploi.
WestonProducts.com
Du lundi au vendredi: de 8h00 à 17h00 ET. En dehors des États-Unis, veuillez
appeler le 001-440-638-3131
#32
08-3201-W
42
Page 43

11
Nº 8 et nº 12
Poussoir
12
Nº 22 et nº 32
Poussoir
20
Dispositif de
sécurité
inclus avec
Hachoirs modèles
nº 22 et nº 32
uniquement
3
1
Hachoirs
nº 8 et
nº 12
Nº 22 et nº 32
Plateau
Nº 8 et nº 12
Plateau
Couvercle
moteur
Cordon
d'alimentation
8
10
5
6
4
7
REMARQUE: Hachoirs nº 8 et nº 12
dispose d'une rondelle de style plate
Roulement de vis sans n
9
INSTRUCTIONS EN FRANÇAIS
18
17
16
15
14
13
19
Hachoirs
nº 22 et
nº 32
Tournevis
à tête plate
inclus avec
les modèles de
hachoir nº 22 et
nº 32 uniquement
pour le dispositif
de sécurité
Disjoncteur
Commutateur
de marche/arrêt
arrêt
Disjoncteur
AVERTISSEMENT! Avant de procéder au nettoyage, au montage ou
au démontage de l'appareil, s'assurer que l'appareil est HORS TENSION
et que la FICHE A ÉTÉ RETIRÉE DE LA PRISE/SOURCE D'ALIMENTATION!
de marche/arrêt
et marche arrière
Commutateur
43
Page 44

INSTRUCTIONS DE DÉBALLAGE
. Retirez toutes les pièces de matériaux d'emballage et vérier pour être sûr
qu'il n'y a pas de pièces manquantes.
. Conservez les matériaux d'emballage pour le stockage des pièces Grinder
Grinder lorsqu'il ne sert pas.
INSTRUCTIONS DE MISE À LA TERRE
MISE À LA TERRE
Cet appareil doit être mis à la terre lorsqu’il est utilisé
an de protéger son utilisateur contre les décharges
électriques. Cet appareil est équipé d’un cordon
d’alimentation polarisé et d’une che à trois lames
permettant de le brancher à une prise de courant mise
à la terre. La che de cet appareil ressemble à celle
illustrée à la gure A. Un adaptateur, illustré à la gure
B, doit être utilisé pour brancher la che polarisée
INSTRUCTIONS EN FRANÇAIS
dans une prise de courant à deux trous. La patte de
mise à la masse qui dépasse de l’adaptateur doit être
branchée à une masse permanente, comme une prise
de courant correctement mise à la terre, à l’aide d’une
vis en métal, comme il est illustré à la gure C.
RALLONGES
Utiliser uniquement des rallonges polarisées
qui comportent des ches à trois lames et des
connecteurs de rallonges à trois lames pouvant
accepter la che polarisée de cet appareil. Utiliser
uniquement des rallonges ayant une classication
électrique égale ou supérieure à celle de l’appareil.
NE PAS utiliser de rallonges endommagées.
Vérier l’état de la rallonge avant de l’utiliser et la
remplacer si elle est endommagée. NE PAS faire
une utilisation abusive de la rallonge et ne pas la
débrancher en tirant sur le cordon. Garder le cordon
d’alimentation à bonne distance de la chaleur et des
rebords tranchants.
Conducteur
de mise à
la terre du
circuit
Broche de
mises à la
terre
Vis de mises
à la terre en
métal
Plaque de
la prise de
courant avec
mise à la
terre
Patte de
mise à la
terre
AA2220
FIGURE A
FIGURE B
FIGURE C
44
Page 45

INSTRUCTIONS DE NETTOYAGE
AVERTISSEMENT! Avant de procéder au nettoyage, au montage ou
au démontage de l'appareil, s'assurer que l'appareil est HORS TENSION
et que la FICHE A ÉTÉ RETIRÉE DE LA PRISE/SOURCE D'ALIMENTATION!
1. Retirer l'ensemble tête du moteur du hachoir.
2. Démonter l'ensemble de tête.
3. Retirer le dispositif de sécurité du plateau, tel que stipulé dans la section
Instructions relatives au dispositif de sécurité. Le dispositif de sécurité est
uniquement disponible avec les hachoirs, modèles nº22 et nº32.
4. Laver toutes les pièces qui entrent en contact avec la viande dans de l'eau
chaude et savonneuse. TOUJOURS NETTOYER IMMÉDIATEMENT APRÈS
EMPLOI. NE JAMAIS IMMERGER LE MOTEUR DANS L'EAU OU TOUT
AUTRE LIQUIDE.
5. Rincer les pièces du hachoir avec de l'eau claire et chaude et les sécher
IMMEDIATELEMENT.
6. Lubrier entièrement la tête, les plaques et le couteau avec un vaporisateur
de silicone de qualité alimentaire avant et après chaque utilisation.
7. Nettoyer le couvercle du moteur ainsi que le boîtier d'engrenage avec
un chiffon humide et bien essuyer ensuite. NE JAMAIS IMMERGER LE
MOTEUR DANS L'EAU OU TOUT AUTRE LIQUIDE.
IMPORTANT: Toutes les pièces métalliques doivent être vaporisées de
silicone qualité alimentaire en prévention de la rouille; si ces pièces ne sont
pas protégées correctement, elles vont très rapidement commencer à rouiller.
NE PAS utiliser de pièces rouillées. Des informations sur les commandes
sont disponibles à la dernière page de ce manuel d'instructions.
8. Assurez-vous que le broyeur et tous les composants sont secs avant de
monter complètement ou de le ranger.
AVERTISSEMENT!
WARNING!
NE JAMAIS utiliser le hachoir sans
le plateau/dispositif de sécurité installés.
Pour éviter les blessures graves voire mortelles, NE
JAMAIS mettre les mains dans l'entrée des hachoirs.
TOUJOURS utiliser le poussoir pour pousser la
Lire et bien comprendre les instructions
ainsi que les messages d'avertissement avant
viande
dans la tête du hachoir.
l'utiliser l'appareil.
INSTRUCTIONS EN FRANÇAIS
45
Page 46

INSTRUCTIONS POUR LE MONTAGE D'UN HACHOIR
AVERTISSEMENT! Avant de procéder au nettoyage, au montage ou
au démontage de l'appareil, s'assurer que l'appareil est HORS TENSION
et que la FICHE A ÉTÉ RETIRÉE DE LA PRISE/SOURCE D'ALIMENTATION!
Fente dans
1. Insérer la tête dans le boîtier
d'engrenage avec la chute des aliments
faisant face toute droite. Il faut aligner
la fente de la tête avec la goupille à
l'intérieur du boîtier d'engrenages.
S'assurer que la tête est correctement
logée dans le boîtier d'engrenages
(FIGURE 1).
Chute
des aliments
Tête
la tête
FIGURE 1
2. Serrer le bouton de verrouillage de la
têtepour bloquer la tête.
3. Insérer la vis sans n, avec le
roulement de la vis sans n xé
sur la tête (FIGURE 2). Aligner les
INSTRUCTIONS EN FRANÇAIS
cannelures de la vis sans n à l'arbre
d'entraînement du hachoir.
REMARQUE: Inspecter régulièrement
le roulement de la vis sans n pour
détecter toute trace d'usure. Si
le roulement de la vis sans n est
particulièrement usé, le remplacer
Goupille de
vis sans n
Couteau
immédiatement pour ne pas
endommager la tête.
4. Placer le couteau sur la partie carrée
de la goupille de la vis sans n (FIGURE
2). S'assurer que les lames du
couteausont dirigées avec l'extérieur.
5. Placer l'une des plaques de hachage
sur la vis sans n; aligner l'encoche de
la plaque de hachage à la goupille de la
tête du hachoir.
6. Installer l'écrou annulaire avant. NE
PAS SERRER AVEC EXCÈS. Tourner
l'écrou annulaire avant jusqu'à ce qu'il
entre en contact avec la plaque de
hachage, et faire un autre 1/4 de tour
pour bloquer.
des aliments
7. Insérer le col du plateau dans la chute
d’aliments (FIGURE 3).
Vis sans n
Écrou annulaire
Plateau
Cou
Chute
Tête
Boîtier
d'engrenage
Roulement de
vis sans n
Cannelures de
la vis sans n
Plaque de
hachage
avant
REMARQUE: S'assurer
que les lames du couteau
sont dirigées vers l'extérieur.
Bouton de
verrouillage
de la tête
FIGURE 2
Tête
FIGURE 3
46
8. NE JAMAIS utiliser le hachoir sans le
plateau bien xé (FIGURE 3).
VOIR LA SECTION INSTRUCTIONS
POUR HACHER LA VIANDE
Page 47

INSTRUCTIONS POUR HACHER
AVERTISSEMENT! Avant de procéder au nettoyage, au montage ou
au démontage de l'appareil, s'assurer que l'appareil est HORS TENSION
et que la FICHE A ÉTÉ RETIRÉE DE LA PRISE/SOURCE D'ALIMENTATION!
1. Procéder selon les Instructions de
montage du hachoir pour assembler le
hachoir y compris le plateau.
REMARQUE: Il est recommandé de
commencer par hacher la viande en
morceaux grossiers avec la plaque
de hachage de 7 mm. Pour hacher la
viande plus nement, passer la viande
par le hachoir une deuxième fois avec la
plaque de hachage de 4,5 mm.
2. Enlever tous les cordons, tendons, os,
etc. de la viande.
3. Pour obtenir de meilleurs résultats,
s'assurer que la viande a été refroidie
à 0-1 ºC) avant d'être hachée. NE
JAMAIS LAISSER DE LA VIANDE
PLUS LONGTEMPS QUE REQUIS
À UNE TEMPÉRATURE AMBIANTE.
Toujours suivre les instructions de la
section Salubrité des aliments telles que
stipulées par l'USDA.
4. Couper la viande en morceaux
sufsamment petits pour pouvoir
passer par la chute d'aliments. En
cubes de 2,5 cm environ.
5. Placer la viande en cube prête
à être hachée sur le plateau. Ne
pas surcharger le plateau, placer
une quantité sufsante de viande
de manière à ce que la zone de la
chute d'aliments soit libre.
6. Placer un plat ou un bol pour récupérer
la viande hachée lorsqu'elle tombe de la
tête du hachoir (FIGURE 4).
7. S'assurer que le hachoir est en position
d'arrêt (OFF). Raccorder le hachoir à la
source d'alimentation.
8. Mettre le hachoir en positon
d'avancement (FWD). Placer
soigneusement des cubes de viande
dans la chute d'aliments. POUR
POUSSER LA VIANDE DANS LA TÊTE,
UTILISER UNIQUEMENT LE POUSSOIR
D'ALIMENTS. NE PAS UTILISER LES
DOIGTS OU UN AUTRE OBJET.
ATTENTION! Il est important de respecter
toutes les consignes de sécurité concernant
les aliments qui sont stipuléesdans le manuel.
Consultez les instructions mises à jour sur le site
Internet de l'USDA.
AVERTISSEMENT!
WARNING!
NE JAMAIS utiliser le hachoir sans
le plateau/dispositif de sécurité installés.
Pour éviter les blessures graves voire mortelles, NE
JAMAIS mettre les mains dans l'entrée des hachoirs.
TOUJOURS utiliser le poussoir pour pousser la viande
ainsi que les messages d'avertissement avant l'utiliser
Plateau
Chute
des aliments
Tête
Le carter d'engrenage et le couvercle du
moteur peuvent devenir chauds pendant le
fonctionnement. Cette condition n'est pas
anormale. NE PAS toucher ces pièces pendant
le fonctionnement et attendre qu'elles aient
refroidi après utilisation.
dans la tête du hachoir.
Lire et bien comprendre les instructions
l'appareil.
Poussoir
Couvercle
Bol pour
viande hachée
CHAUD
HOT
NE PAS TOUCHER!
DO NOT T OUCH!
Boîtier
d'engrenage
INSTRUCTIONS EN FRANÇAIS
FIGURE 4
moteur
47
Page 48

INSTRUCTIONS D'ASSEMBLAGE D'UN REMPLISSEUR STANDARD
AVERTISSEMENT! Avant de procéder au nettoyage, au montage ou
au démontage de l'appareil, s'assurer que l'appareil est HORS TENSION
et que la FICHE A ÉTÉ RETIRÉE DE LA PRISE/SOURCE D'ALIMENTATION!
1. Insérer la tête dans le boîtier
d'engrenage avec la chute d'aliment
de la tête faisant face toute droite. Il
faut aligner la fente de la tête avec
Chute
des aliments
la goupille à l'intérieur du boîtier
d'engrenages. S'assurer que la tête
est correctement logée dans le boîtier
Tête
d'engrenages (FIGURE 5).
2. Serrer le bouton de verrouillage de
la têtepour bloquer la tête.
3. Insérer la vis sans n, avec le
roulement de la vis sans n xé
sur la tête (FIGURE 6). Aligner les
cannelures de la vis sans n à l'arbre
d'entraînement du hachoir.
REMARQUE: Inspecter
INSTRUCTIONS EN FRANÇAIS
régulièrement le roulement de la vis
sans n pour détecter toute trace
d'usure. Si le roulement de la vis
sans n est particulièrement usé, le
remplacer immédiatement pour ne
pas endommager la tête.
Goupille de
4. Déplacer l'étoile de bourrage
sur la partie ronde de la
goupille de la vis sans n.
Barre de
bourrage
vis sans n
5. Déplacer l'un des entonnoirs
de bourragepar la bride puis
par l'écrou annulaire avant.
6. Installer l'écrou annulaire avant.
NE PAS SERRER AVEC EXCÈS.
Écrou annulaire
Tourner l'écrou annulaire avant
jusqu'à ce qu'il entre en contact avec
le support, et faire un autre 1/4 de
tour pour bloquer.
7. Insérer le col du plateau dans la
chute d’aliments (FIGURE 7).
8. NE JAMAIS utiliser le hachoir sans
le plateau bien xé (FIGURE 7).
des aliments
Vis sans n
Support
avant
Plateau
Cou
Chute
Fente dans
la tête
Boîtier
d'engrenage
Roulement de
vis sans n
Cannelures de
la vis sans n
Entonnoir
pour farce
FIGURE 5
Bouton de
verrouillage de
la tête
FIGURE 6
Tête
FIGURE 7
48
VOIR LA SECTION INSTRUCTIONS
POUR LE BOURRAGE
Tête
Page 49

AVERTISSEMENT! Avant de procéder au nettoyage, au montage ou
au démontage de l'appareil, s'assurer que l'appareil est HORS TENSION
et que la FICHE A ÉTÉ RETIRÉE DE LA PRISE/SOURCE D'ALIMENTATION!
REMARQUE: Le système de bourrage à
vitesse élevée a été conçu pour être utilisé
avec l'entonnoir de 10 mm UNIQUEMENT.
NE PAS utiliser la vis sans n en plastique
à vitesse élevée avec d'autres entonnoirs.
La tête du hachoir et les autres composants
subiront de sérieux dommages. Respecter
les Instructions de montage du remplisseur
standard stipulées dans ce manuel, avec
des entonnoirs de 20, 30, ou 40 mm.
Chute
des aliments
Tête
Fente dans
la tête
1. Insérer la tête dans le boîtier
d'engrenage avec la chute d'aliments
de la tête faisant face toute droite. Il
faut aligner la fente de la tête à la
goupille dans le boîtier d'engrenage.
S'assurer que la tête est correctement
logée dans le boîtier d'engrenages
Boîtier
d'engrenage
Bouton de
verrouillage
de la tête
(FIGURE 8).
2. Serrer le bouton de verrouillage de la
tête pour bloquer la tête.
3. Insérer la vis sans n, avec le
roulement de la vis sans n xé,
dans la tête (FIGURE 9). Aligner les
cannelures de la vis sans n à l'arbre
d'entraînement du hachoir.
Vis sans n
Goupille de
vis sans n
Roulement de
vis sans n
Cannelures de
la vis sans n
Tête
REMARQUE: Inspecter régulièrement
le r
oulement de la vis sans n pour
détecter toute trace d'usure. Si le
roulement de la vis sans n
est particulièrement usé, le
remplacer immédiatement pour
ne pas endommager la tête.
4. Déplacer la vis sans n en
plastique haute vitesse sur la
goupille de la vis sans n en
Support
Écrou
annulaire
avant
Entonnoir de
bourrage à
vitesse élevée
10 mm
Vis sans n
en plastique
haute vitesse
veillant à ce que la section carrée de la
vis sans n en plastique soit bien logée
sur la section carrée de la goupille de
Plateau
la vis sans n.
5. Passer l'entonnoir de bourrage de
10 mm par le support et par l'écrou
annulaire avant.
6. Installer l'écrou annulaire
avant mais NE PAS LE SERRER
EXCESSIVEMENT. Tourner l'écrou
annulaire avant jusqu'à ce qu'il entre
Cou
Chute
des aliments
Tête
en contact avec le support, et faire un
autre 1/4 de tour pour bloquer.
7. Insérer le col du plateau dans la
chute d’aliments (FIGURE 10).
8. NE JAMAIS utiliser le hachoir sans
le plateau bien xé (FIGURE 10).
VOIR LA SECTION INSTRUCTIONS
POUR LE BOURRAGE
FIGURE 8
FIGURE 9
FIGURE 10
INSTRUCTIONS EN FRANÇAIS
49
Page 50

INSTRUCTIONS DE BOURRAGE
AVERTISSEMENT! Avant de procéder au nettoyage, au montage ou
au démontage de l'appareil, s'assurer que l'appareil est HORS TENSION
et que la FICHE A ÉTÉ RETIRÉE DE LA PRISE/SOURCE D'ALIMENTATION!
1. Après avoir haché la viande en suivant les Instructions pour hacher la
viande, mélanger la viande hachée avec les assaisonnements de saucisses.
2. Respecter les Instructions de montage du remplisseur ou Instructions
de montage du remplisseur haute vitesse pour assembler correctement le
hachoir comme un remplisseur, y compris le plateau.
REMARQUE: Bien qu'une seule
personne sufse pour faire des
saucisses avec ce hachoir, il est
recommandé que deux personnes
effectuent cette opération. Pour de
meilleurs résultats avec l'entonnoir de
bourrage 10 mm en acier inoxydable
haute vitesse, ne pas hacher la viande
avec la plaque de hachage de 4,5
INSTRUCTIONS EN FRANÇAIS
mm.
3. Placer la viande hachée
assaisonnée sur le plateau. Ne pas
surcharger le plateau. Placer une
quantité sufsante de viande et ne pas
obstruer la zone de la chue d'aliments.
4. Placer une enveloppe de saucisse
par-dessus l'entonnoir de bourrage.
Pour de plus amples informations,
voir la section Information relative aux
saucisses/enveloppes
dans ce manuel.
5. Déplacer entre 10 à
15 cm de l'enveloppe
de l'extrémité de
l'entonnoir de bourrage et faire un nœud à l'extrémité de l'enveloppe. Avec
une enveloppe plus breuse à grand diamètre, tenir l'extrémité fermée
de l'enveloppe bien serrée contre l'extrémité de l'entonnoir de bourrage
(FIGURE 11).
Plateau
Chute
des aliments
Poussoir
FIGURE 11
Couvercle
moteur
Boîtier
d'engrenage
50
6. S'assurer que le hachoir est en position d'arrêt (OFF). Raccorder le
hachoir à la source d'alimentation.
Page 51

7. Mettre le hachoir en positon d'avancement (FWD). Placer soigneusement
la viande dans la chute d'aliments. POUR POUSSER LA VIANDE DANS
LA TÊTE, UTILISER UNIQUEMENT LE POUSSOIR D'ALIMENTS. NE PAS
UTILISER LES DOIGTS OU UN AUTRE OBJET.
8. Tenir l’enveloppe en place d’une main tout en alimentant le mélange
de saucisses dans le hachoir. À mesure que la farce remplit l’enveloppe,
l’étaler sur une surface propre et sèche. REMARQUE: Lors de l’utilisation
d’enveloppe naturelle, humidier la surface.
9. Ne pas remplir les derniers 7,5 à 10 cm de l’enveloppe. Après avoir bourré
toute la longueur de l’enveloppe, entortiller l’extrémité ouverte pour la fermer
puis nouer les extrémités de l’enveloppe en serrant bien. Entortiller en
chapelet.
10. Pour bourrer de la saucisse, remplir lentement l’enveloppe an d’éviter
les poches d’air. Si des poches d’air se forment dans la saucisse, perce les
bulles avec une épingle. Les petits trous vont se sceller naturellement.
FONCTION DE MARCHE ARRIÈRE
(Seulement applicable pour modèles nº 22 et nº 32)
. Attendre que le moteur du hachoir est
atteint un ARRÊT COMPLET avant de passer
à la marche arrière (soit REV) (Figure 12).
. Attendre que le moteur du hachoir est
atteint un ARRÊT COMPLET avant de passer
à la fonction d'avance (soit FWD) après avoir
utilisé la marche arrière.
FIGURE 12
INSTRUCTIONS EN FRANÇAIS
. NE JAMAIS utiliser le hachoir en marche
arrière pendant plus de 5 secondes à la fois.
AVERTISSEMENT!
WARNING!
NE JAMAIS utiliser le hachoir sans
le plateau/dispositif de sécurité installés.
Pour éviter les blessures graves voire mortelles, NE
JAMAIS mettre les mains dans l'entrée des hachoirs.
TOUJOURS utiliser le poussoir pour pousser la viande
ainsi que les messages d'avertissement avant l'utiliser
dans la tête du hachoir.
Lire et bien comprendre les instructions
l'appareil.
Marche/Arrêt/
Arrière
Bouton
Marche/Arrêt
51
Page 52

INSTRUCTIONS RELATIVES AU DISJONCTEUR
Par mesure de sécurité, ce hachoir est
équipé d'un disjoncteur. Si le hachoir
cesse de fonctionner, procéder comme suit
pour remédier au problème.
1. Mettre le hachoir en position d'Arrêt
(OFF).
2. Inspecter le hachoir an de déterminer
s'il y a un bourrage coincé dans la tête. Si
c'est le cas, il faut éliminer l'obstruction
selon les instructions de la section Conseils
pour hacher la viande.
3. Appuyer sur le bouton de remise à zéro
du disjoncteur (FIGURE 13).
4. Remettre le hachoir en marche et
reprendre l'opération.
5. Si le hachoir ne fonctionne toujours pas, s'assurer que la prise électrique
murale fonctionne correctement.. Brancher un autre appareil pour déterminer
si la prise murale fonctionne. S'assurer que le disjoncteur de la maison n'a
pas été déclenché. Si aucune des étapes susmentionnées ne parviennent à
INSTRUCTIONS EN FRANÇAIS
solution le problème ou si le disjoncteurcontinue d'éteindre brusquement le
hachoir, contacter un représentant du service clientèle.
AVERTISSEMENT! CESSER d'utiliser le hachoir si le disjoncteur est
déclenché plusieurs fois. L'utilisation continue peut endommager le hachoir
de manière permanente et annuler la garantie.
REMARQUE IMPORTANTE: Ce hachoir dispose d'une transmission par
engrenage entièrement en acier trempé. En conséquence, le hachoir fonctionne
à des vitesses et des températures supérieures aux autres hachoirs. Ce
phénomène est normal et n'a aucune incidence sur la performance du hachoir.
Disjoncteur
Bouton de remise
FIGURE 13
à zéro
52
CONSEILS POUR HACHER LA VIANDE
. NE PAS serrer excessivement l'écrou annulaire avant. Il doit simplement
être serré fermement.
. S'assurer que les lames du couteau de hachage sont bien à plat sur la
plaque de hachage.
. NE PAS mettre le hachoir en marche sans viande dans la tête. Si le hachoir
est utilisé à sec, la tête et la vis sans n subiront des dommages.
. TOUJOURS lubrier la tête, la plaque de hachage et le couteau de hachage
avec un vaporisateur de silicone alimentaire après le nettoyage.
. Si la plaque de hachage se coince/bouche pendant le fonctionnement,
procéder comme suit pour reprendre normalement l'opération.
. Mettre le hachoirà l'arrêt (OFF) et débrancher le cordon d'alimentation
de la prise d'alimentation.
. Retirer l'écrou annulaire avant ainsi que la plaque de hachage.
. Nettoyer soigneusement la plaque de hachage. S'assurer que les trous
ne sont pas obstrués.
. Ré-installer la plaque de hachage et l'écrou annulaire avant.
. Rebrancher le hachoir dans la prise électrique.
. Poursuivre l'opération.
. Répéter au besoin.
Page 53

INSTRUCTIONS RELATIVES AU DISPOSTIF DE SÉCURITÉ
(Seulement applicable pour modèles nº 22 et nº 32)
AVERTISSEMENT! Avant de procéder au nettoyage, au montage ou
au démontage de l'appareil, s'assurer que l'appareil est HORS TENSION
et que la FICHE A ÉTÉ RETIRÉE DE LA PRISE/SOURCE D'ALIMENTATION!
Les hachoirs, modèles nº 22 et
nº 32 sont équipés d'un dispositif
de sécurité. Ce dispositif de
sécurité a pour fonction de
protéger l'utilisateur contre
des blessures éventuelles. Le
dispositif de sécurité ne doit
être enlevé qu'à des ns de
nettoyage et il doit toujours être
IMMÉDIATEMENT REPLACÉ.
Pour retirer le dispositif de
sécurité, utiliser le tournevis à
tête plate (fourni) et desserrer les
quatre vis qui xent le dispositif de
sécurité au plateau (Figure 14). Il
est inutile de retirer complètement
les vis du dispositif de sécurité
qui peuvent en outre se perdre
facilement.
Retirer le dispositif de sécurité,
le nettoyer selon les Instructions
de nettoyage et REPLACER
IMMÉDIATEMENT. Le dispositif
de sécurité sur le plateau.
du dispositif de
FIGURE 14
Dispositif
INSTRUCTIONS EN FRANÇAIS
AVERTISSEMENT!
WARNING!
NE JAMAIS utiliser le hachoir sans
le plateau/dispositif de sécurité installés.
Pour éviter les blessures graves voire mortelles,
NE JAMAIS mettre les mains dans l'entrée des
TOUJOURS utiliser le poussoir pour pousser la
Lire et bien comprendre les instructions
ainsi que les messages d'avertissement avant
hachoirs.
viande
dans la tête du hachoir.
l'utiliser l'appareil.
53
Page 54

SÉCURITÉ ALIMENTAIRE
Il y a des règles fondamentales à suivre lors de la manipulation d’aliments.
Elles sont CUIRE, SÉPARER, NETTOYER, et REFROIDIR RAPIDEMENT.
CUIRE
Il est crucial de cuire les aliments à une température interne sûre pour détruire les bactéries qui sont
présentes. La sécurité des hamburgers et autres aliments faits avec de la viande hachée a reçu
dernièrement beaucoup d’attention, et pour une bonne raison. Quand la viande est hachée, les bactéries
présentes sur la surface sont mélangées dans l’ensemble du mélange haché. Si cette viande hachée n’est
pas cuite jusqu’à au moins 71oC à 74oC (160oF à 165oF), les bactéries ne seront pas détruites et il y a
une forte chance que cela vous rendra malade.
Des morceaux solides de viande comme des steaks et côtelettes n’ont pas de bactéries dangereuses
comme E. coli à l’intérieur, donc ils peuvent être servis plus saignants. Quand même, tout morceau de
bœuf doit être cuit à une température interne d’au moins 63oC (145oF) (mi-saignant).La température
sûre pour la volaille est 82oC (180oF) et les morceaux de viande entier de porc doivent être cuits à 63oC
(145oF). Les œufs doivent être bien cuits aussi. Si vous faites une meringue ou autre recette qui utilise
des œufs non cuits, achetez des œufs spécialement pasteurises ou utilisez de la poudre pour meringue
préparée.
SÉPARER
Les aliments qui seront mangés crus et les aliments qui seront cuits avant d’être mangés DOIVENT
INSTRUCTIONS EN FRANÇAIS
TOUJOURS être séparés. La contamination croisée se produit quand des viandes crues ou des œufs
viennent en contact avec des aliments qui seront mangés crus. Ceci est une source principale d’intoxication
alimentaire. Enveloppez toujours deux fois les viandes crues et placez-les sur l’étagère la plus basse dans
le réfrigérateur de manière qu’aucun jus ne puisse goutter sur les fruits et légumes crus. Puis utilisez
les viandes crues entre 1 et 2 jours après l’achat, ou congelez-les pour les conserver plus longtemps.
Décongelez les viandes congelées dans le réfrigérateur, pas sur le comptoir.
Quand vous grillez ou cuisez des viandes ou des poissons crus, assurez-vous de mettre la viande cuite
sur un plat propre. N’utilisez pas le même plat que vous avez utilisé pour transporter les aliments avant de
les mettre sur le grill. Lavez les ustensiles utilisés pour griller après que les aliments sont tournés pour la
dernière fois sur le grill, aussi bien que les spatules et cuillers utilisées pour faire sauter à feu vif en remuant
ou pour tourner la viande au fur et à mesure qu’elle cuit.
Assurez-vous de bien laver vos mains après avoir manipulé des viandes crues ou des œufs crus. Se laver
les mains avec du savon et de l’eau, ou utiliser une lingette antibactérienne pré-humidiée est absolument
nécessaire après avoir touché de la viande crue ou des œufs crus. Ne pas se laver les mains et les
surfaces pendant la cuisine est une cause majeure de contamination croisée.
NETTOYER
Lavez fréquemment vos mains et les surfaces de travail lorsque vous cuisinez. Lavez avec du savon et de
l’eau chaude pendant au moins 15 seconds, puis séchez avec une serviette en papier.
54
REFROIDIR RAPIDEMENT
La réfrigération rapide des aliments est très importante. La zone de danger où les bactéries se multiplient
est entre 4oC et 60oC (40oF et 140oF). Votre réfrigérateur doit être réglé à 4oC (40oF) ou en-dessous;
votre congélateur doit être à -17oC (0oF) ou en-dessous. Une règle simple : servir chaud les aliments
chauds, servir froid les aliments froids. Utilisez des réchauds ou plaques chauffantes pour garder les
aliments chauds pendant le service. Utilisez des bains d’eau glacée pour garder au froid les aliments
froids. Ne jamais laisser des aliments à la température ambiante pendant plus de deux (2) heures - 1 heure
si la température ambiante est 32oC (90oF) ou au-dessus. Lorsque vous emballez les aliments pour un
pique-nique, assurez-vous que les aliments sont déjà refroidis rapidement lorsqu’ils sont mis dans le panier
à pique-nique isotherme. Le panier à pique-nique ne refroidira pas les aliments – il garde simplement les
aliments froids lorsqu’il est emballé correctement avec de la glace. Les aliments cuits chauds doivent
être placés dans des conteneurs peu profonds et immédiatement réfrigérés pour qu’ils se refroidissent
rapidement. Assurez-vous de bien couvrir les aliments après qu’ils sont froids.
REMARQUE : Des considérations particulières doivent prises lors de l’utilisation de venaison ou d’autre
gibier sauvage, puisqu’ils peuvent devenir très contaminés durant l’opération de dépouille. La venaison est
souvent gardée à des températures qui pourraient potentiellement permettre la croissance de bactéries,
tel que lorsque celle-ci est transportée. Se référer au Département de la viande et de la volaille de l’USDA
(USDA Meat and Poultry Department) pour d’autres questions ou informations sur la sécurité de la viande
et des aliments.
Page 55

CHOIX DE VIANDE POUR LA FABRICATION DE SAUCISSE
La fabrication de saucisse s’est développée au cours des nombreuses années et générations, et il en résulte
qu’un nombre incalculable de type de saucisses peuvent être fabriquées en utilisant les ingrédients de base de
la viande, matière grasse et quelques épices soigneusement mélangées. Ci-dessous, vous trouverez quelques
indications simples qui vous aideront à faire des saucisses avec le meilleur goût possible.
Tout type de viande peut être utilisé pour faire des saucisses : porc, bœuf, bison, orignal et caribou, même
l’antilope font de la très bonne saucisse. Il est important lors de la préparation de venaison ou d’autres viandes
de gibier rouges d’enlever la matière grasse de la viande, car le suif de gibier rouge rancira en aussi peu que
cinq jours. Remplacez la matière grasse avec soit de la graisse de porc ou de bœuf, suivant le type de produit
que vous faites, à un taux de 0,5 kg (1 livre) de graisse pour chaque 1,8 g (4 livres) de viande de gibier.
La teneur en matière grasse de vos saucisses affectera le goût, la texture, les caractéristiques de cuisson et la
durée de conservation de votre produit. La plupart des saucisses fabriquées commercialement ont une teneur
en matière grasse d’environ 20%. En utilisant moins de 12% de matière grasse, vous obtiendrez des saucisses
avec un goût très sec, alors que si vous utilisez plus de 20%, cela peut résulter en des saucisses collantes et
sans goût qui seront très difciles à cuire.
SAUMURAGE
Il est important de saumurer correctement les viandes pour conserver la viande et la volaille, et pour détruire
les microorganismes indésirables sur les surfaces de la viande qui causent la détérioration et des maladies
d’origine alimentaire. Il y a de nombreuses étapes qui aident à ce processus, y compris la fumaison, la cuisson,
le séchage, le refroidissement rapide et l’addition d’ingrédients de saumure. Le plus ancien moyen d’accomplir
cela est en introduisant le sel dans la viande. La résistance des bactéries au sel varie beaucoup parmi les
différents types de bactéries. Le développement de certaines bactéries est inhibé par des concentrations en
sel aussi basses que 3%, par exemple. Salmonella, alors que d’autres types peuvent survivre dans de plus
hautes concentrations en sel, par exemple, Staphylococcus. Heureusement, le développement de nombreux
microorganismes indésirables normalement trouvés dans les viandes et produits de volaille saumurées est
inhibé à des basses concentrations de sel.
Le saumurage moderne est basé sur les Nitrates et est très scientique. La meilleure façon d’assurer le
saumurage correct est de faire l’achat d’un des nombreux agents de saumure disponible commercialement
dans une épicerie ou chez votre boucherie locale. Une saumure très courante est la Poudre de Prague, laquelle
est disponible en deux types (No.1 et No.2).
BOYAUX
Il y a de nombreux types de boyaux différents disponibles, le bon choix dépend de la préférence personnelle
aussi bien que le type de saucisse que vous désirez faire. Pour la plupart des saucisses, vos choix sont
“naturel” ou “collagène”. Ne laissez pas les noms vous tromper; les boyaux en collagène ne sont pas un produit
synthétique. Ils sont fabriqués à partir de peau de bœuf et d’autres tissus. Les boyaux en collagène sont
uniformes en taille et en texture et ne nécessitent presque aucune préparation. Les boyaux “Naturels” sont les
intestins d’agneau, de mouton, porc ou bœuf. Ils sont moins uniformes en taille et nécessitent une préparation
considérable. Pour ces raisons, plus de 75% des saucisses fabriquées commercialement aux États-Unis sont
faites avec des boyaux en collagène. Il y a aussi des boyaux breux non comestibles qui sont utilisés pour
quelques variétés de saucisses fumées et saucissons de Bologne.
TYPES DE SAUCISSE
La plupart des saucisses se situent dans une des quatre catégories : Fraîche, Fumée, Cuite ou Sèche. Toutes
les saucisses, sauf les sèches, exigent l’entreposage frigorique. Il y a aussi une sous-catégorie de saucisses
fumées non cuites.
Parmi les saucisses fraîches et fumées non cuites, vous trouverez des arômes tels que la kielbasa ou saucisse
polonaise, saucisse italienne, saucisse petit déjeuner et beaucoup d’autres. Les saucisses fraîches aussi
bien que les saucisses fumées non cuites doivent être cuites avant de les manger et elles nécessitent aussi
l’entreposage frigorique.
Les saucisses fumées et cuites comprennent le salami, le saucisson de Bologne, les toujours aussi populaires
hot-dogs et de nombreux autres. La fumaison correcte nécessite un fumoir or appareil pour fumer les aliments.
Ceux-ci peuvent être simplement des structures faites maison à partir de bidons métalliques ou même d’anciens
réfrigérateurs ou ils peuvent être des appareils fabriqués complexes. La plupart des saucisses fumées sont
réchauffées avant de servir. Un grand nombre de personnes pensent qu’une saucisse fumée durera plus
longtemps sans altération, mais cela n’est pas vrai. Les saucisses fumées doivent être traitées de la même
manière que les saucisses fraîches en termes d’entreposage.
Les saucisses sèches exigent le temps de transformation le plus long, puisqu’elles sont séchées à l’air pendant
une longue période de temps. Certains types de saucisses sèches sont le pepperoni, le prosciutto et une variété
de produits à jambon, juste pour en nommer quelques uns. Les conditions sous lesquelles la viande est séchée
sont très exigeantes; la température, la durée et l’humidité doivent toutes être soigneusement surveillées pour
avoir un produit sûr et délicieux.
ENTREPOSAGE
Il est important de se rappeler que la saucisse perdra sa saveur le plus longtemps qu’elle est entreposée. Il est
recommandé que vous fassiez autant de saucisses que vous aurez besoin pour 4 à 6 semaines. Même les
saucisses congelées commenceront à perdre nettement la saveur après 6 semaines. La saucisse congelée
doit être dégelée lentement dans le réfrigérateur avant de la cuire ou de la servir. La décongélation rapide du
produit dégradera aussi bien le goût.
INSTRUCTIONS EN FRANÇAIS
55
Page 56

Page 57

INFORMATION SUR LA GARANTIE
CONSERVEZ CETTE INFORMATION SUR LA GARANTIE POUR VOS DOSSIERS!
Weston Products LLC garantit à l’ACHETEUR AU DÉTAIL D’ORIGINE de ce produit contre tout défaut en
matériau et en main-d’œuvre pendant un (1) an a partir de la date d’achat à condition qu’il soit utilisé conformément
La Carte de Garantie, avec une copie du reçu original, doivent être reçus par Weston Products LLC dans les
trente (30) jours à partir de la date d’achat pour que la garantie puisse s’appliquer. Le manque d’envoyer la Carte de
Le produit doit être livré à ou expédié franco de port à Weston Products LLC pour les services de garantie, soit
dans son emballage d’origine ou un emballage similaire offrant un degré de protection équivalent. Les dommages
causés par l’expédition ne sont pas la responsabilité de la société. Weston Products LLC charge 35,00 $ par heure
pour frais de service. REMARQUE : Aucune réparation ne sera commencée sans l’autorisation du client. Les frais
Avant de renvoyer le produit pour une réparation sous garantie, bien nettoyer le produit pour qu’il soit exempt de
toute particule alimentaire ou autres débris. Si l’acheteur ne respecte pas cette consigne, le produit lui sera renvoyé
Weston Products LLC réparera (ou à sa discrétion, remplacera) le produit sans frais, si à l’opinion de la société, il
Des remplacements neufs ou remis en état pour les pièces d’usine défectueuses seront fournis pendant un (1)
an à partir de la date d’achat. Les pièces de remplacement sont garanties pour le reste de la période de garantie
Pour les réparations non garanties, veuillez contacter le Service à la clientèle de Weston Products LLC au numéro
sans frais 1-800-814-4895, du lundi au vendredi, de 8h00 à 17h00 ET (en dehors des États-Unis : 001-440-638-
3131) pour obtenir une Autorisation de retour d’article (Numéro RMA). Weston Products LLC refusera tous les
retours qui ne contiennent pas ce numéro. NE PAS RENVOYER CET APPAREIL SANS L’AUTORISATION
LIMITATIONS : La garantie est annulée si le produit est utilisé pour toute raison autre que pour laquelle il est
conçu. Le produit ne doit pas avoir été antérieurement modié, réparé, ou entretenu par quelqu’un autre que
Weston Products LLC. Le cas échéant, le numéro de série ne doit pas être modié ou enlevé. Le produit ne doit
pas avoir été soumis à un accident en transit ou pendant qu’il est en la possession du client, mal utilisé, mal traité,
ou utilisé contrairement aux directives contenues dans le manuel d’utilisation. Ceci comprend la défaillance causée
par la négligence d’un entretien raisonnable et nécessaire, une tension de secteur incorrecte et des catastrophes
naturelles. Cette garantie n’est pas transférable et s’applique seulement aux ventes américaines et canadiennes.
À l’exception des cas où la loi en vigueur l’interdit, aucune autre garantie, expresse ou implicite, y compris les
garanties relatives au caractère adéquat pour la commercialisation ou un usage particulier, ne s’appliquera à ce
produit. Weston Products LLC ne sera en aucun cas responsable des dommages indirects liés au dit produit
et Weston Products LLC n’a aucune obligation ni responsabilité autre que celles expressément établies dans la
présente, et n’autorise aucun représentant ou autre personne à les assumer pour lui. Toutes garanties implicites
Cette garantie couvre seulement le produit et ses pièces spéciques, pas les aliments ou autres produits traités
dans celui-ci. Weston n’est pas responsable des pièces manquantes ou endommagées pour les articles réduits/
en solde ou les articles naux de vente où le vendeur peut ne pas être en mesure de garantir l’ensemble de la
DÉCOUPEZ LE LONG DE LA LIGNE POINTILLÉE ET ENVOYEZ CETTE CARTE DE GARANTIE AVEC UNE
Garantie complètement remplie avec une copie du reçu original annulera la garantie.
sans avoir été réparé. Dans certains, la somme de 50 dollars sera facturée pour le nettoyage.
a été prouvé être défectueux en matériau et en main d’œuvre dans la période de garantie.
applicables sont aussi limitées à la période d’un (1) an de la garantie limitée.
aux directives imprimées qui y sont jointes.
d’expédition de retour seront ajoutés à la facture de réparation.
originale.
CORRECTE DE Weston Products LLC.
fonctionnalité ou l’intégralité de l’unité.
COPIE DE VOTRE REÇU D’ACHAT ORIGINAL À :
Weston Products LLC / WARRANTY
20365 Progress Drive, Strongsville, OH 44149 USA
ENVOYEZ CETTE CARTE DE GARANTIE AVEC UNE COPIE DE VOTRE REÇU D’ACHAT ORIGINAL À:
CARTE DE GARANTIE
WESTON PRODUCTS LLC / WARRANTY, 20365 PROGRESS DRIVE, STRONGSVILLE, OH 44149 USA
Nom du Client:
Adresse:
Province/Code postal/Région:
Numéro de téléphone:
Adresse de courrier électronique:
Date d’achat d’origine:
No de modèle du produit:
No de série (s’il y a lieu):
J’ai lu les informations relatives à la garantie. Initiales ici:
Copie du reçu incluse
Page 58

Page 59

Page 60

PLEASE INSPECT THIS PACKAGE THOROUGHLY FOR MISSING PARTS OR ANY PRODUCT DAMAGE.
IF YOUR PRODUCT CONTAINS SHIPPING DAMAGE, PLEASE CONTACT RETAILER FOR ASSISTANCE.
For all other questions regarding product usage, missing parts, product damage, difculty or warranty activation,
U.S. Residents Customer Service Line: 1-800-814-4895 (Outside U.S. Call: 001-440-638-3131)
please contact the Weston Products Customer Service Team:
Weston Products LLC, 20365 Progress Drive, Strongsville, Ohio 44149
Please DO NOT return this item to the retailer before contacting
SAVE THESE INSTRUCTIONS!
Refer to them often and use them to instruct others.
ATTENTION!
8:00 am to 5:00 pm ET, Monday thru Friday
CustomerService@WestonProducts.com
WestonProducts.com
Weston Products Customer Service.
VEUILLEZ INSPECTER CET EMBALLAGE AVEC SOIN POUR Y DÉTECTER
SI DES PIÈCES ONT ÉTÉ ENDOMMAGÉES PENDANT LE TRANSPORT, VEUILLEZ
Pour toutes les autres questions concernant l’utilisation du produit, les pièces manquantes, les problèmes ou
l’activation de la garantie, veuillez communiquer avec l’équipe du service clientèle des produits Weston:
Numéro de téléphone du service clientèle pour les résidents des É.-U. : 1-440-638-3131
Numéro de téléphone à l’extérieur des É.-U. : 001-440-638-3131 Weston Products LLC,
Veuillez communiquer avec le service clientèle des produits Weston AVANT de retourner cet appareil au détaillant.
Revise completamente el envase y compruebe que no falten partes o que algún producto esté dañado.
Para todas aquellas preguntas referentes al uso del producto, partes faltantes, daño del producto, dicultad
o activación de la garantía, comuníquese con el equipo de servicio al cliente de weston products:
Línea de Servicio al Cliente para Residentes de EE.UU.: 1.800.814.4895 (Fuera de EE.UU., llame al: 001-
NO devuelva este artículo al vendedor minorista antes de comunicarse con Servicio al Cliente de Weston
si el producto está dañado por el transporte, solicite asistencia al distribuidor.
1-440-638-3131) Weston Products LLC, 20365 Progress Drive, Strongsville, Ohio 44149
TOUTE PIÈCE MANQUANTE OU ENDOMMAGÉE.
COMMUNIQUER AVEC LE DÉTAILLANT POUR OBTENIR DE L’AIDE.
20365 Progress Drive, Strongsville, Ohio 44149
CONSERVER CES DIRECTIVES!
Veuillez les consulter fréquemment et les utiliser pour la formation.
desde las 8:00 am hasta las 5:00 pm ET, de lunes a viernes
ATTENTION!
de 8:00 à 17:00 HNE, du lundi au vendredi.
CustomerService@WestonProducts.com
WestonProducts.com
¡ATENCIÓN!
CustomerService@WestonProducts.com
WestonProducts.com
Products.
Consulte estas instrucciones y úselas para enseñar sobre el uso de este producto a otras personas.
¡GUARDE ESTAS INSTRUCCIONES!
 Loading...