

Page 1
APPLE AND FRUIT
CRUSHER
05-0201
DUE TO CONSTANT FACTORY IMPROVEMENTS, THE PRODUCT PICTURED MIGHT DIFFER
SLIGHTLY FROM THE PRODUCT IN THIS BOX. 061015
APPLE & FRUIT CRUSHER SHOWN WITH
FRUIT & WINE PRESS
MODEL NO. 05-0101, SOLD SEPARATELY
Page 2

TABLE OF CONTENTS / TABLA DE CONTENIDO / TABLE DES MATIÈRES
2
GENERAL SAFETY RULES
COMPONENT LIST
ASSEMBLY FOR TABLE MOUNTING
ASSEMBLY FOR WALL MOUNTING
HANDLE MOUNTING ASSEMBLY
USING THE APPLE CRUSHER
CLEANING INSTRUCTIONS
WARRANTY INFORMATION
IMPORTANTES RÈGLES DE SÉCURITÉ
DESCRIPTION DE LA PIÈCE
ASSEMBLAGE POUR INSTALLATION SUR TABLE
ASSEMBLAGE POUR INSTALLATION MURALE
DIRECTIVES D’INSTALLATION DU MANCHE
UTILISATION DU FOULOIR À POMMES ET À FRUITS
DIRECTIVES DE NETTOYAGE
INFORMACIÓN DE GARANTÍA WESTON
3
5
6-7
8-9
10
11
11
12
15
16-17
18-19
20-21
22
23
23
27
Page 3

3
ENGLISH INSTRUCTIONS
1. To avoid personal injury, NEVER reach into the Chute or Main Body. Keep
ngers and hands away from the Drum and Crushing Blades at all times.
2. NEVER use your ngers to clear a jam, clean the Drum or remove crushed
fruit from the Chute. Use the Wooden Fruit Scraper.
3. DO NOT crush nuts, fruits with pits or large seeds, or other hard items in the
Crusher.
4. Tie back loose hair and clothing, roll up long sleeves and remove ties and
jewelry including rings, bracelets and watches before operating the Crusher.
5. DO NOT use the Crusher while under the inuence of drugs, medications, or
alcohol.
6. Make sure the Crusher is properly mounted on a sturdy, stable structure
before use.
7. The Apple & Fruit Crusher is not a toy. KEEP CHILDREN AWAY. NEVER
leave the Crusher unattended.
8. The manufacturer declines responsibility for the outcome of any improper use
of this product.
9. Thoroughly wash the Crusher before and after each use. See the “Cleaning
Instructions” section of this manual. The Apple & Fruit Crusher is not dishwasher
safe.
10. The Fruit & Apple Crusher is for household use only. Commercial use of this
product will void the warranty.
SAVE THESE INSTRUCTIONS
GENERAL SAFETY RULES
READ AND FULLY UNDERSTAND ALL INSTRUCTIONS AND WARNINGS
PRIOR TO USING THIS UNIT. YOUR SAFETY IS MOST IMPORTANT!
FAILURE TO COMPLY WITH PROCEDURES AND SAFE GUARDS MAY
RESULT IN SERIOUS INJURY OR PROPERTY DAMAGE. REMEMBER:
YOUR PERSONAL SAFETY IS YOUR RESPONSIBILITY!
Page 4

ENGLISH INSTRUCTIONS
4
TOOLS YOU WILL NEED:
10mm Wrench
7
3
5
4
6
8 9 10 11 12
Top View
2
Stainless
Steel
Back
Plate
Front
Side
Feet
2
Handle
Set Screw
Hole
Feet
13
Shaft Set
Screw
Hole
Set
Screw
located in
Handle
LEFT SIDE
RIGHT SIDE
1
14
14
15
Page 5

5
ENGLISH INSTRUCTIONS
COMPONENT LIST
DIAGRAM NUMBER PART DESCRIPTION PART NUMBER
1 STAINLESS STEEL BACK PLATE 05-0219
2 WOOD DRUM W/SS CRUSHING BLADES
& SHAFT
05-0212
3 MOUNTING BOARD 05-0202
4 CHUTE 05-0206
5 HANDLE 05-0213
6 C-CLAMP (2) 05-0214
7 4 MM ALLEN WRENCH 05-0205
8 WING NUT (4) N/A
9 FLAT WASHER M6 (4) N/A
10 HEX FLANGE NUT M6 (4) N/A
11 CARRIAGE BOLT M6 (4) N/A
12 MACHINE SCREW (4) N/A
13 WOODEN FRUIT SCRAPER 05-0203
14 LEFT AND RIGHT SIDE BODY 05-0217
15 FRONT SIDE 05-0218
If any components of this unit are broken, the unit does not operate properly or you
need a replacement instruction manual, visit us on the web at
WestonProducts.com
Or call Weston Brands LLC Toll Free at 1-800-814-4895
Monday thru Friday 8:00am-5:00pm ET. Outside the U.S. call 001-440-638-3131
Page 6
6
ENGLISH INSTRUCTIONS
Back Side
Foot
FIGURE 1
FIGURE 2
Mounting
Board
Stepped hole
in the
Mounting
Board
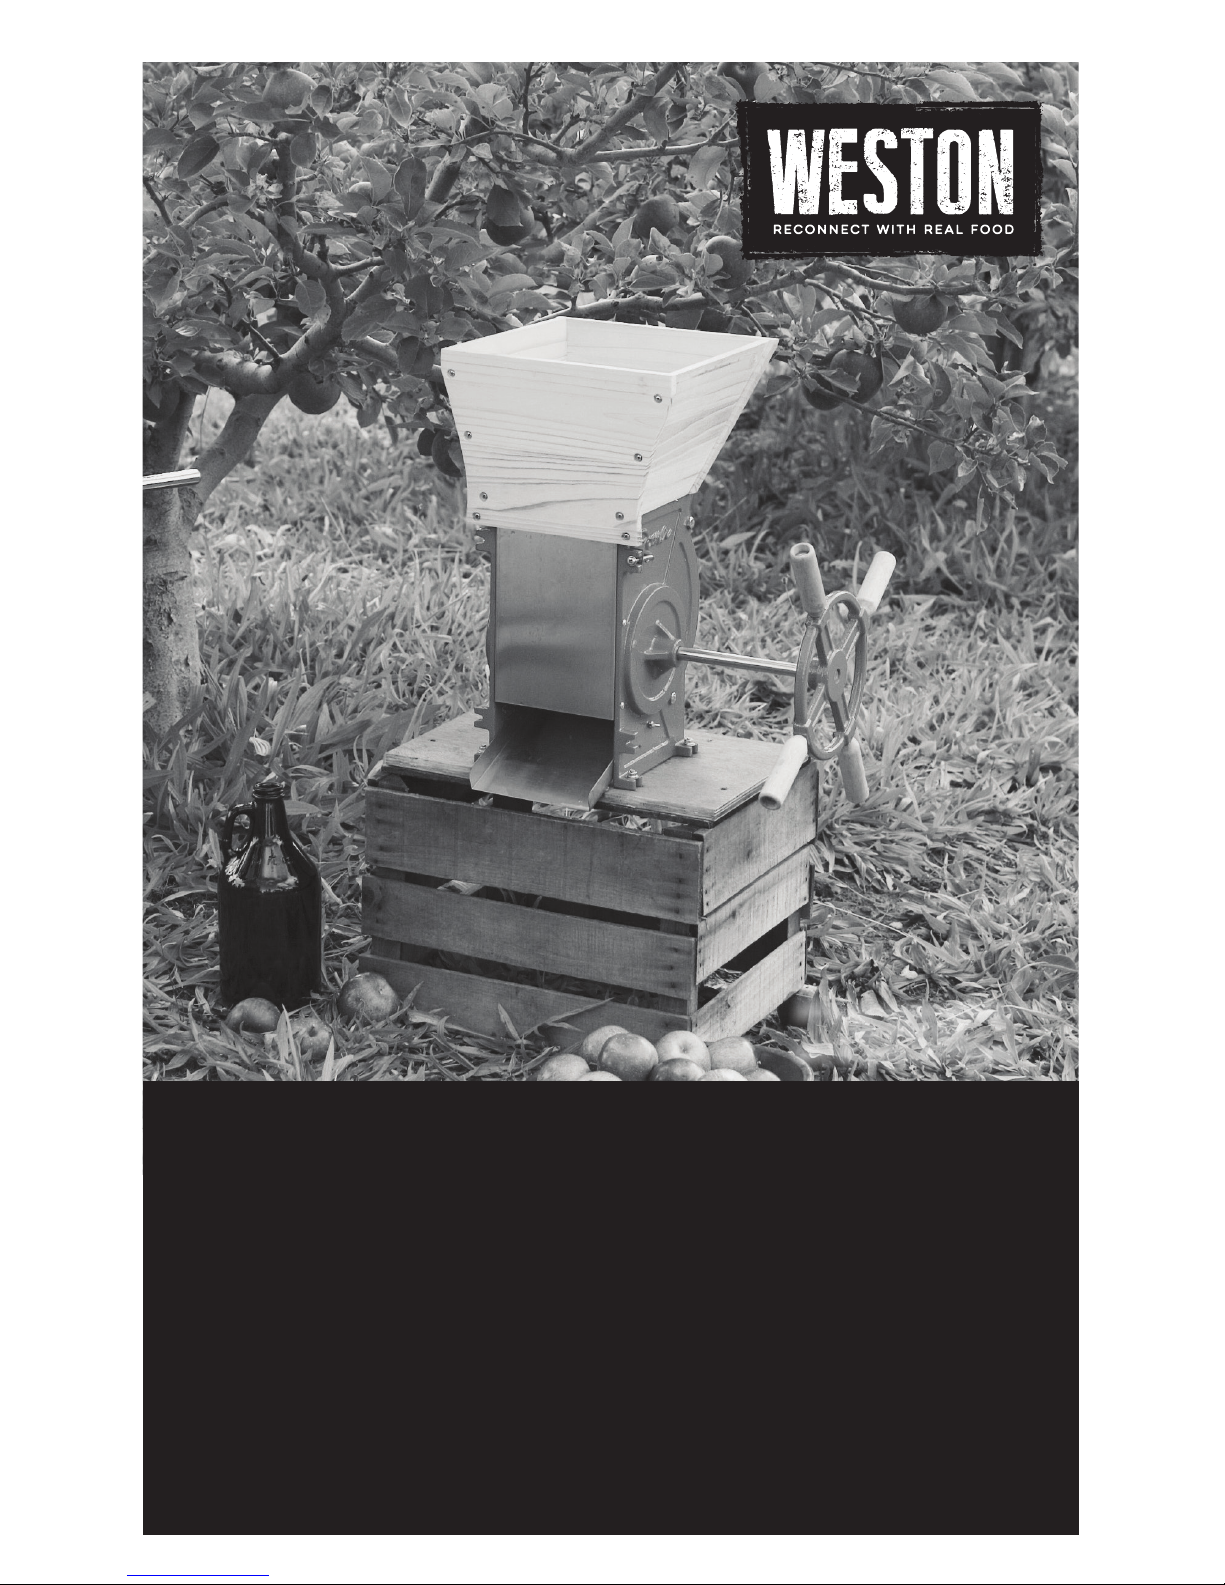
ASSEMBLY FOR TABLE MOUNTING
The Apple & Fruit Crusher can be
used on a Table Top or Mounted to
a wall.
The Apple & Fruit Crusher comes
pre-assembled to the Mounting
Board.
TOOLS YOU WILL NEED:
10mm Wrench or an
Adjustable Wrench
Note: The Apple & Fruit Crusher
comes with the Mounting Board
attached for use on a table top.
Begin at Step 5 to complete the
assembly.
1. Set the Apple & Fruit Crusher on
its back side on a at, level surface
with the feet facing toward you.
2. Align holes A, B, C & D on the
Mounting Board with Feet A, B, C,
& D (FIGURES 1 & 2). The side of
the Mounting Board with the stepped
holes should face toward you.
3. Secure the Mounting Board to
the Feet with the Carriage Bolts,
Flat Washers and Hex Flange Nuts
(FIGURE 3). Use a 10-mm wrench
or adjustable wrench to tighten the
Hex Flange Nuts.
4. Stand the Apple & Fruit Crusher
upright on the Mounting Board.
FIGURE 3
Page 7
7
ENGLISH INSTRUCTIONS
Hole 1
FIGURE 5
FIGURE 4
Hole 1
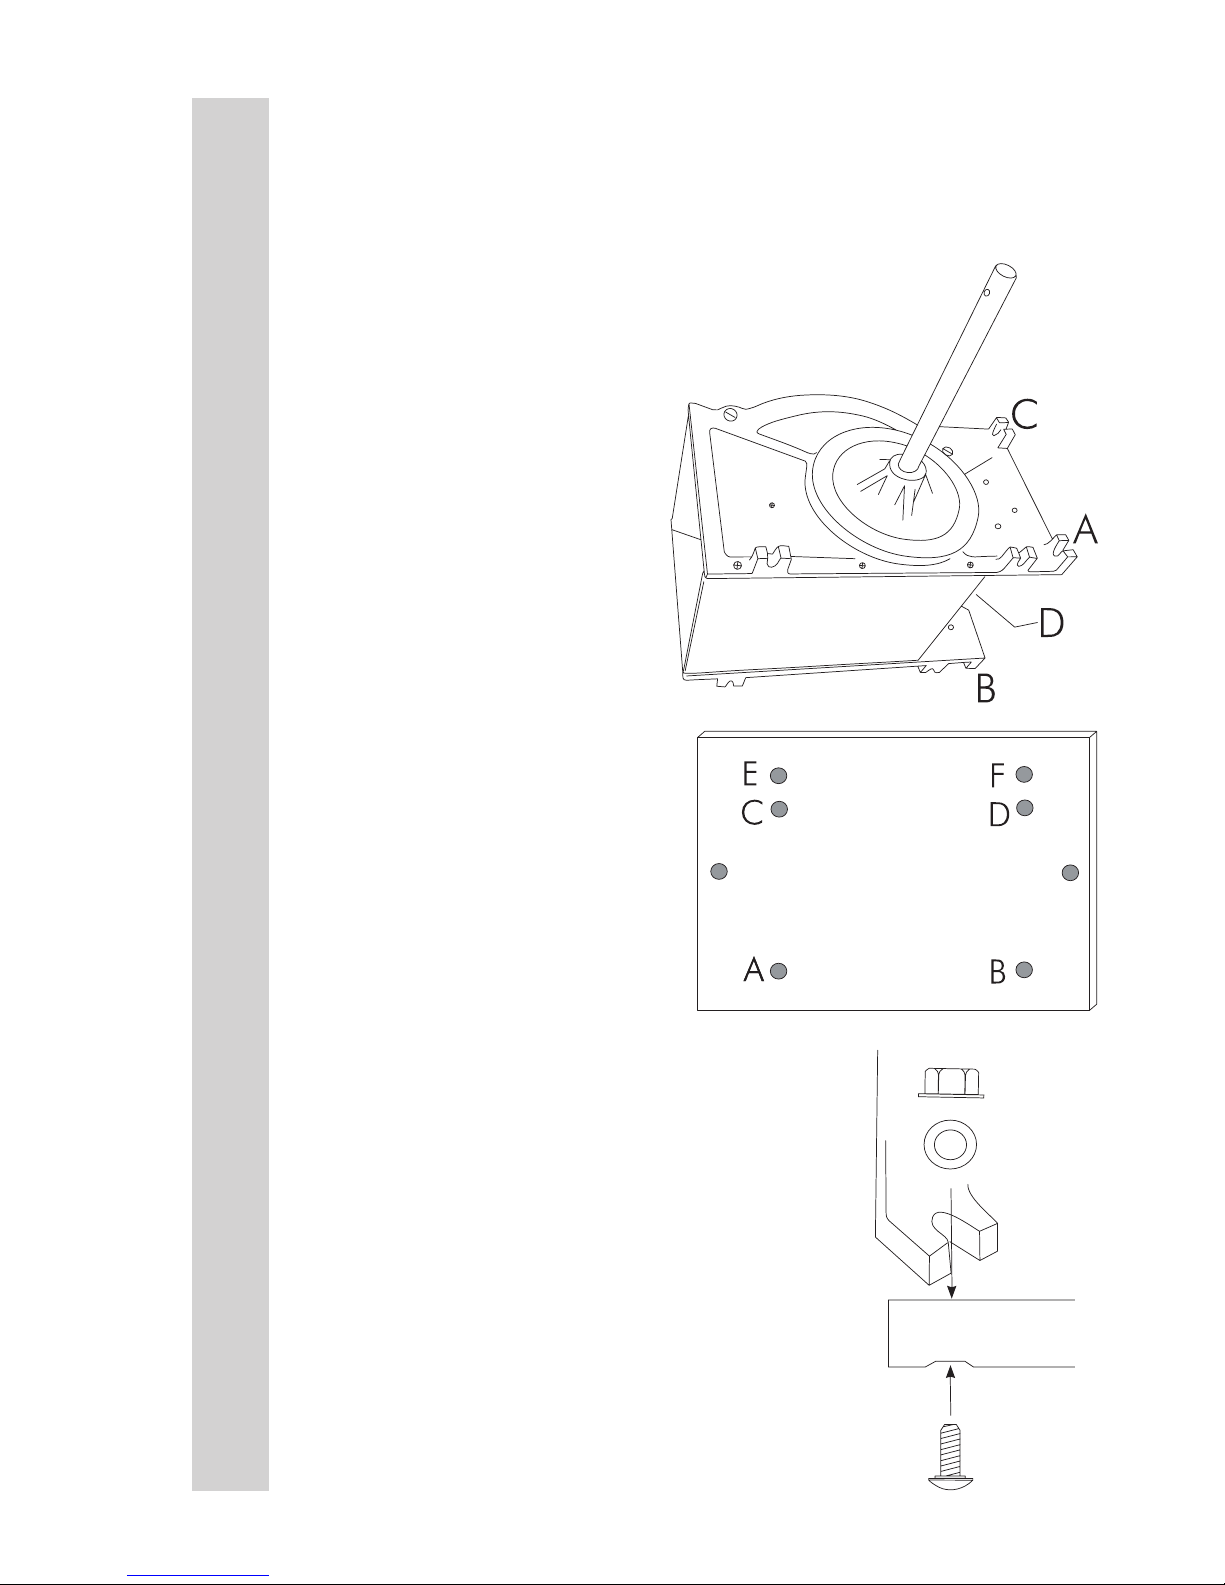
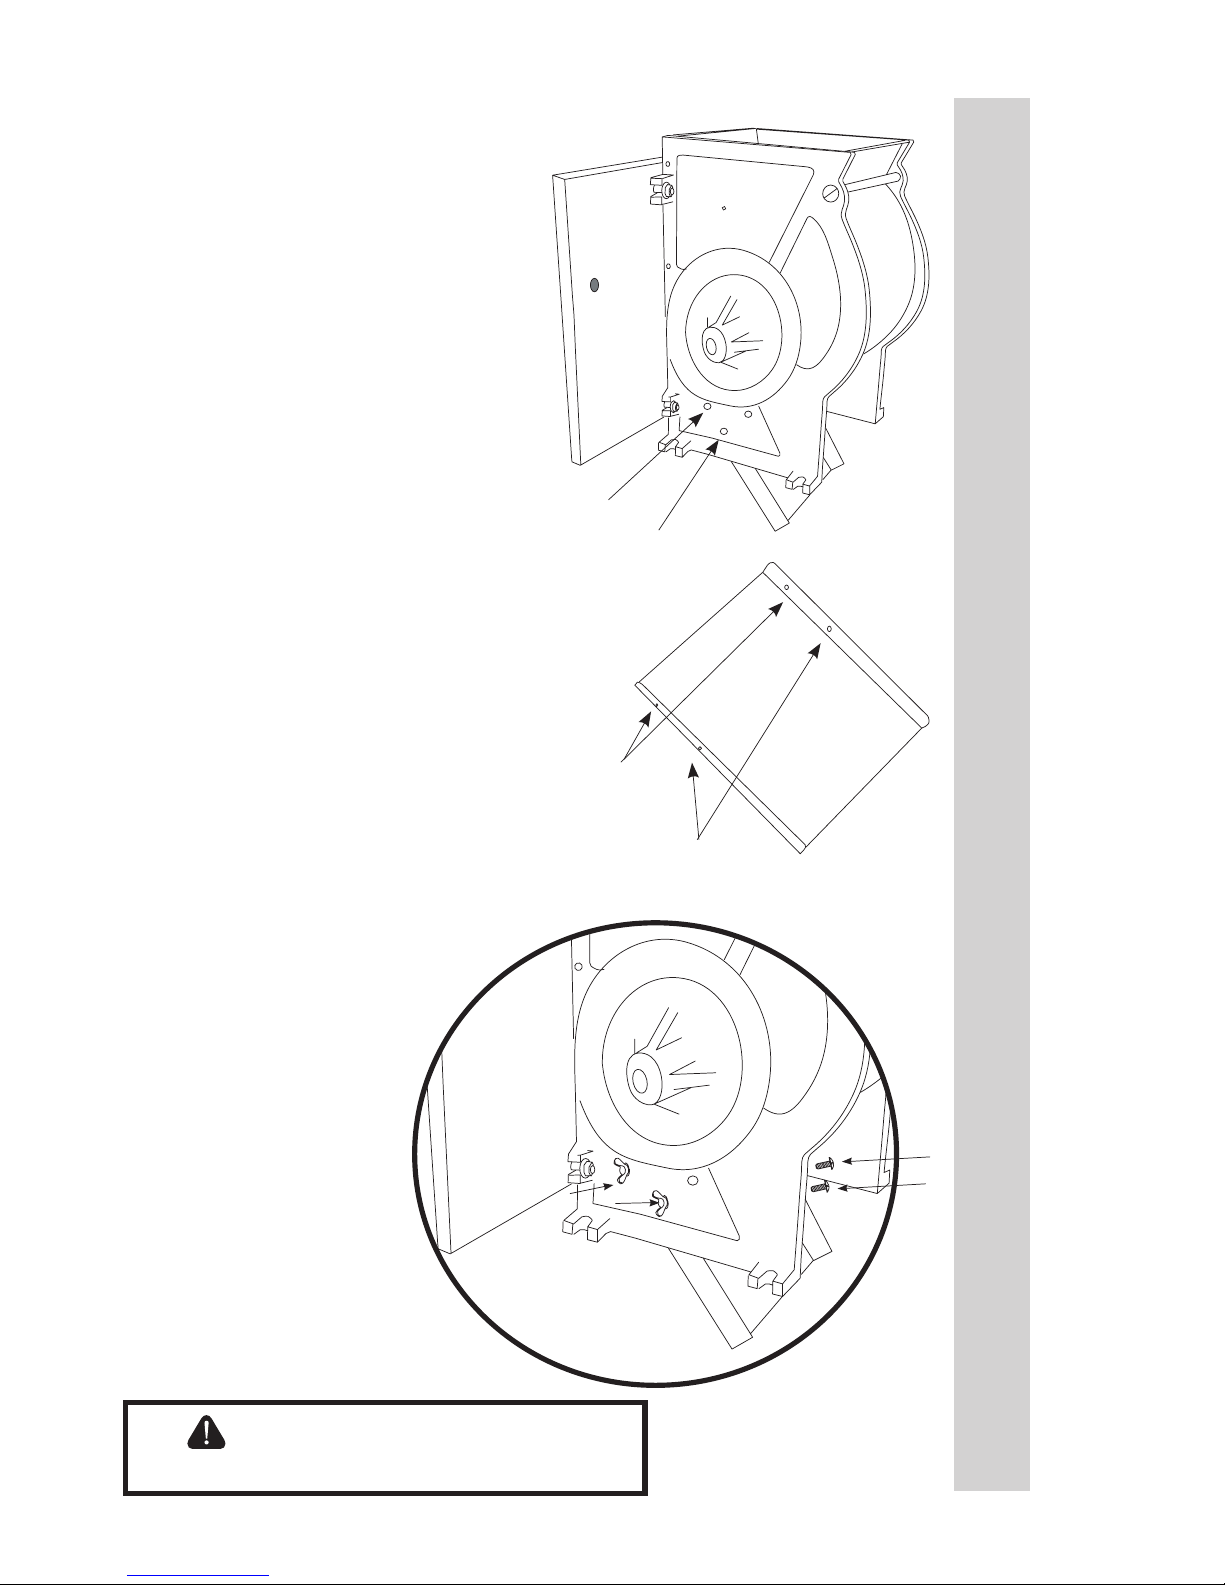
5. Slide the Chute up into the Apple
Crusher Body. FIGURES 4 & 5
6. Line up Hole 1 of the Chute to Hole 1
of the Apple Crusher. Secure the Chute
to the Apple Crusher Main Body using a
Machine Screw and Wing Nut. Repeat
on the other side of the Chute. Tighten
both Wing Nuts by hand. FIGURE 6
7. When table-mounting the Crusher,
make sure the Handle can freely rotate.
A table corner is an ideal location.
8. Secure the Crusher to the table with
the two C-Clamps. FIGURE 7
FIGURE 6
FIGURE 7
Page 8
8
ENGLISH INSTRUCTIONS
FIGURE 8
YOU WILL NEED:
10mm Wrench or
an Adjustable Wrench
Two 3/8” Bolts and Washers
Wall Anchors
NOTICE: These instructions
only are for assembling the
Apple & Fruit Crusher for wall
mounting. It is the user’s
responsibility to properly
mount the Crusher.
WARNING! The Apple &
Fruit Crusher is very heavy.
Make sure the wall is solid
and stable before mounting
the Crusher to it. Failure to
properly mount the Crusher
may result in serious personal
injury!
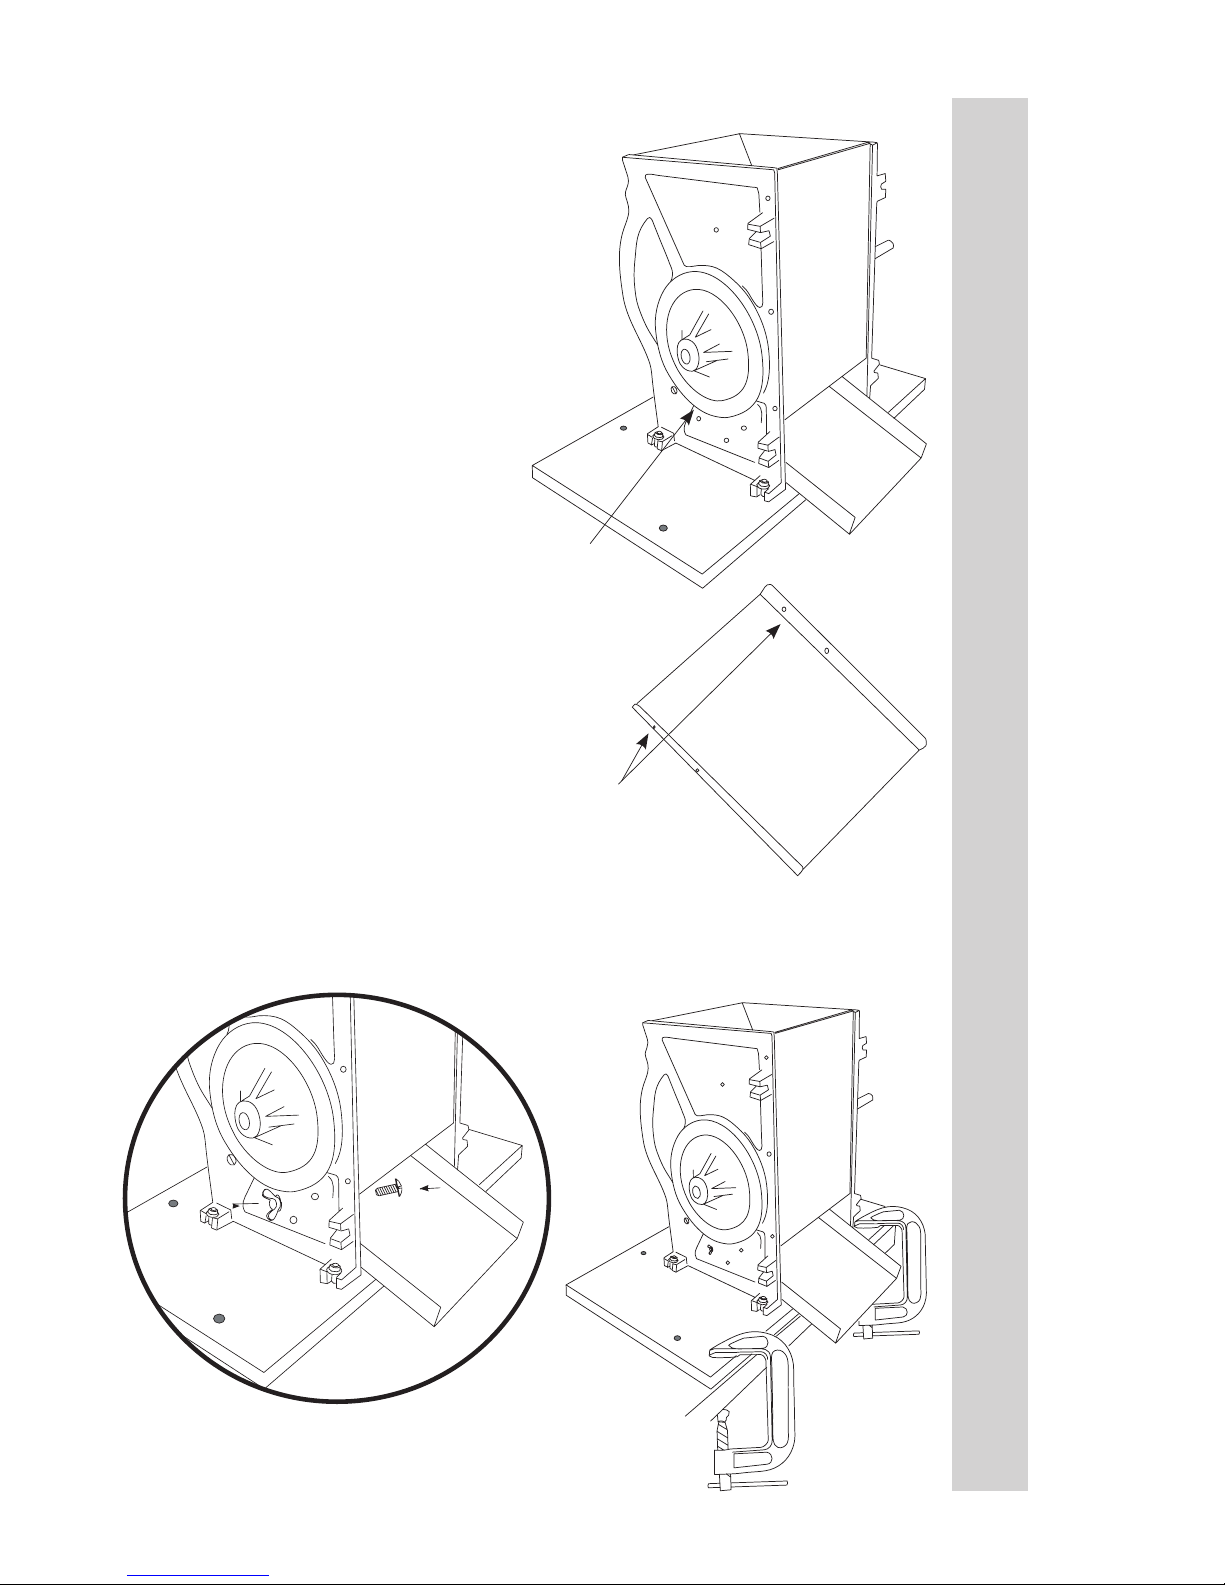
1. Stand the Apple Crusher
Main Body upright on a at,
level surface with the Back
Side facing toward you.
2. Align holes A, B, E & F on
the Mounting Board with Feet
A, B, E, & F (FIGURES 8 &
9). The side of the Mounting
Board with the stepped holes
should face toward you.
3. Secure the Mounting Board
to the Feet with the Carriage
Bolts, Flat Washers and Hex
Flange Nuts (FIGURE 10).
Use a 10-mm wrench or an
adjustable wrench to tighten
the Hex Flange Nuts.
FIGURE 10
FIGURE 9
Back Side
Foot
Mounting
Board
Stepped hole
in the
Mounting
Board
CAUTION!
To avoid personal injury, DO
NOT touch the stainless steel
Blades on the Wooden Drum.
ASSEMBLY FOR WALL MOUNTING
Page 9
4. When wall-mounting the Crusher,
make sure the Handle can freely rotate.
An outside corner is an ideal location.
5. Mount the Apple Crusher to a solid
wall.
6. Slide the Chute up into the Apple
Crusher Body. FIGURES 11 &12
7. Line up Holes 1 & 2 of the Chute
to Holes 1 & 2 of the Apple Crusher.
Secure the Chute to the Apple Crusher
Main Body using Machine Screws and
Wing Nuts. Repeat on the other side
of the Chute. Tighten the Wing Nuts
by hand. FIGURE 13
Continue to Handle
Mounting Instructions
Hole 1
Hole 2
FIGURE 12
FIGURE 11
FIGURE 13
Hole 1
Hole 2
CAUTION!
To avoid personal injury, DO
NOT touch the stainless steel
Blades on the Wooden Drum.
9
ENGLISH INSTRUCTIONS
Page 10

NOTE: The Apple & Fruit Crusher comes with the Handle already
mounted. Follow these instructions if the Handle should ever come
loose or to reinstall it after cleaning.
1. Loosen the Set Screw on the Handle with the provided Allen Wrench.
Note: It is not necessary to completely remove the Set Screw from the
Handle.
2. Slide the Handle onto the Shaft. Align the Handle Set Screw Hole
with the Shaft Set Screw Hole. FIGURE 14
3. Using the Allen Wrench, tighten the Set Screw to the Shaft. NOTE:
If the Handle slips on the Shaft while turning, the Set Screw is not
correctly aligned or tightened. Repeat steps 1-3 until the Handle is
secure.
FIGURE 14
Shaft
Set Screw
CAUTION!
To avoid personal injury, DO
NOT touch the stainless steel
Blades on the Wooden Drum.
10
ENGLISH INSTRUCTIONS
HANDLE MOUNTING INSTRUCTIONS
Page 11

11
ENGLISH INSTRUCTIONS
.
The easiest way to clean the Apple & Fruit Crusher is to spray it with a garden
hose. Slowly turn the Handle while spraying the Drum to help remove any
leftover fruit. You also may clean the outside of the Crusher using a sponge and
soap and water or by wiping it with a cloth. Immediately dry the outside of the
Crusher including the Mounting Board and Handle. Allow the Drum and inside
of the Crusher to air-dry.
1. Cut apples or other large fruit into quarters.
2. Place apples/fruit in the top of the crusher.
3. Place a container below the apple chute to catch the crushed apples/fruit.
4. Slowly turn the Handle clockwise and watch the crushed apples/fruit fall into
the container.
5. Turn the Handle back and forth to dislodge any apples/fruits that become stuck.
You also can use the Wooden Fruit Scraper for this purpose. DO NOT turn the
Handle while dislodging stuck fruit with the Scraper. NEVER use your ngers!
6. Use the Wooden Fruit Scraper to remove the crushed fruit from the Chute.
USING THE APPLE CRUSHER
CLEANING INSTRUCTIONS
Page 12

Weston Brands LLC warrants to the ORIGINAL RETAIL PURCHASER of this product that if operated in accordance
with the printed instruction accompanying it, then for a period of 2 years from the date of purchase, the product shall be
free from defects in material and workmanship.
The Warranty Card, along with a copy of the original receipt, must be received by Weston Brands LLC within 30 days
from purchase date for the warranty to apply. Failure to send the completely lled out Warranty Card, along with a copy of
the original receipt, will void the warranty.
The product must be delivered to or shipped freight prepaid to Weston Brands LLC for warranty services, in either
its original packaging or similar packaging affording an equal degree of protection. Damage due to shipping is not the
responsibility of the company. Weston Brands LLC charges a $35.00 per hour bench charge. NOTE: No repairs will
be started without the authorization of the customer. The return shipping cost to the customer will be added to the repair
invoice.
Prior to returning the product for Warranty Repair, the product must be thoroughly cleaned and free from any food
particles or other debris. Failure of the purchaser to comply with this standard will result in the unit being returned without
repair. In some cases, a $50 cleaning surcharge may apply.
Weston Brands LLC will repair (or at its discretion, replace) the product free of charge, if in the judgment of the
company, it has been proven to be defective as to seller’s labor and material, within the warranty period.
New or rebuilt replacements for factory defective parts will be supplied for two (2) year from the date of purchase.
Replacement parts are warranted for the remainder of the original warranty period.
For non-warranty repairs, contact Weston Brands LLC’s Customer Service at 1-800-814-4895 M-F 8am-5pm ET
(outside of the United States 001-440-638-3131) to obtain a Return Merchandise Authorization Number (RMA Number).
Weston Brands LLC will refuse all returns that do not contain this number. DO NOT RETURN THE UNIT WITHOUT
PROPER AUTHORIZATION FROM WESTON BRANDS LLC.
LIMITATIONS: The warranty is void if the product is used for any purpose other than that for which it is designed.
The product must not have been previously altered, repaired, or serviced by anyone else other than Weston Brands
LLC. If applicable, the serial number must not have been altered or removed. The product must not have been subjected
to accident in transit or while in the customer’s possession, misused, abused, or operated contrary to the instructions
contained in the instruction manual. This includes failure caused by neglect of reasonable and necessary maintenance,
improper line voltage and acts of nature. This warranty is not transferable and applies only to U.S. and Canadian sales.
Except to the extent prohibited by applicable law, no other warranties whether expressed or implied, including
warranty merchantability and tness for a particular purpose, shall apply to this product. Under no circumstances shall
Weston Brands LLC be liable for consequential damages sustained in connection with said product and Weston Brands
LLC neither assumes nor authorizes any representative or other person to assume for it any obligation or liability other than
such as is expressly set forth herein. Any applicable implied warranties are also limited to the two (2) year period of the
limited warranty.
This warranty covers only the product and its specic parts, not the food or other products processed in it. Weston is
not responsible for missing or damaged parts on discounted/clearance, resale or nal sale items where the seller may not
be able to guarantee full functionality or completeness of the unit.
CUT ALONG THE DOTTED LINE AND SEND THE WARRANTY CARD ALONG WITH A COPY OF YOUR
ORIGINAL PURCHASE RECEIPT TO:
Weston Brands LLC / WARRANTY
20365 Progress Drive, Strongsville, OH 44149 USA
Customer Name:
Address:
City/State/Zip/Country:
Telephone Number:
E-Mail Address:
Original Date of Purchase:
Product Model #:
Serial # (if applicable):
I have read the warranty information. Initial here:
WESTON WARRANTY INFORMATION
SAVE THIS WARRANTY INFORMATION FOR YOUR RECORDS!
WESTON WARRANTY CARD
SEND THIS CARD ALONG WITH A COPY OF YOUR ORIGINAL PURCHASE RECEIPT TO:
WESTON BRANDS LLC / WARRANTY, 20365 PROGRESS DRIVE, STRONGSVILLE, OH 44149 USA
Copy of Receipt
Included
Page 13

FOULOIR À POMME ET À
FRUITS
05-0201
PARCE QUE NOS PRODUITS BÉNÈFICIENT DE PERFECTIONNEMENTS CONSTANTS
APPORTÉS EN USINE, LES ILLUSTRATIONS PRÉSENTES PEUVENT ÊTRE LÉGÈREMENT
DIFFÉRENTES DU PRODUIT REÇU. 060815
*FOULOIR À VIN ET À FRUITS, MODÈLE
Nº 05-0101 VENDU SÉPARÉMENT
Page 14

Page 15

1. An d’éviter les blessures corporelles, ne JAMAIS insérer les doigts ou les
mains dans la goulotte ou la partie principale du fouloir. Tenir les doigts et les
mains éloignés du baril et des lames de broyage en tout temps.
2. Ne JAMAIS utiliser les doigts pour dégager une obstruction, nettoyer le
baril ou retirer des fruits broyés de la goulotte. Toujours utiliser le grattoir en
bois.
3. NE PAS broyer de noix, de fruits avec noyaux ou de grosses graines, ou
d’autres objets durs dans le fouloir.
4. Attacher les cheveux, ainsi que les vêtements amples, et remonter les
manches longues avant d’utiliser le fouloir. Retirer les cravates, bagues,
montres, bracelets et autres bijoux avant d’utiliser le fouloir et retirer les
cravates et bijoux, y compris les bagues, les bracelets et les montres, avant
d’utiliser le fouloir.
5. NE PAS utiliser le fouloir sous l’inuence de drogues, de médicaments ou
d’alcool.
6. Avant l’utilisation, s’assurer que le fouloir est correctement installé, sur une
surface solide et stable.
7. Le fouloir à pommes et à fruits n’est pas un jouet. GARDER LES
ENFANTS À L’ÉCART. Ne JAMAIS laisser le fouloir sans surveillance.
8. Le fabricant décline toute responsabilité en cas d’une utilisation
inappropriée de ce produit.
9. Bien laver le fouloir avant et après chaque utilisation. Voir la rubrique
« Directives de nettoyage » du présent livret. Le fouloir à pommes et à fruits
ne va pas au lave-vaisselle.
10. Le fouloir à pommes et à fruits est destiné uniquement à un usage
domestique. L’utilisation commerciale de ce produit annulera la garantie.
IMPORTANTES RÈGLES DE SÉCURITÉ
INSTRUCTIONS EN FRANÇAIS
15
LIRE ET COMPRENDRE COMPLÈTEMENT TOUTES LES DIRECTIVES
ET AVERTISSEMENTS AVANT D’UTILISER CE PRODUIT. LE PLUS
IMPORTANT EST VOTRE SÉCURITÉ! LE DÉFAUT D’OBSERVER LES
PROCÉDURES ET MISES EN GARDE PEUT ENTRAINER DES BLESSURES
GRAVES OU DES DOMMAGES MATÉRIELS. N’OUBLIEZ PAS : VOTRE
SÉCURITÉ PERSONNELLE EST VOTRE RESPONSABILITÉ!
CONSERVER CES DIRECTIVES!
Page 16

OUTILS DONT VOUS
AUREZ BESOIN :
Clé de 10 mm
7
3
5
1
4
6
8 9 10 11 12
Vue du
dessus
2
Arrière
Avant
Pieds
2
Trou pour
vis de
réglage de
manche
Pieds
13
Trou pour
vis de
réglage
d’arbre
Vis de
réglage
située dans le
manche
INSTRUCTIONS EN FRANÇAIS
16
CÔTÉ
GAUCHE
14
14
CÔTÉ DROIT
15
16
Page 17

NUMÉRO DE SCHÉMA DESCRIPTION DE LA PIÈCE NUMÉRO DE LA PIÈCE
1 PLAQUE EN ACIER INOXYDABLE
DE RETOUR
05-0219
2 BARIL EN BOIS AVEC LAMES DE BROYAGE
ET ARBRE EN ACIER INOXYDABLE
05-0212
3 PANNEAU DE MONTAGE 05-0202
4 GOULOTTE 05-0206
5 MANCHE 05-0213
6 SERRE EN C (2) 05-0214
7 CLÉ ALLEN DE 4 MM 05-0205
8 ÉCROU À OREILLES (4) S.O.
9 RONDELLE PLATE M6 (4) S.O.
10 ÉCROU HEXAGONAL À EMBASE M6 (4) S.O.
11 BOULON ORDINAIRE M6 (4) S.O.
12 VIS À MÉTAL (4) S.O.
13 GRATTOIR EN BOIS 05-0203
14 CÔTÉ DROIT 05-0217
15 CÔTÉ GAUCHE 05-0218
DESCRIPTION DE LA PIÈCE
INSTRUCTIONS EN FRANÇAIS
17
N’hésitez pas à visiter notre site Web WestonProduct.com/support si un composant est cassé, l’outil
fonctionne mal, ou pour commander un nouveau mode d’emploi.
WestonProducts.com
Veuillez appeler Weston Brands, LLC au numéro sans frais : 1-800-814-4895
Du lundi au vendredi: de 8h00 à 17h00 ET. En dehors des États-Unis, veuillez
appeler le 001-440-638-3131
Page 18

Arrière
Pied
FIGURE 1
FIGURE 2
Panneau de
montage
Trou étagé dans
le panneau de
montage
ASSEMBLAGE POUR INSTALLATION SUR TABLE
Le fouloir à pommes et à fruits peut
être installé sur table ou au mur.
Le fouloir à pommes et à fruits
est préalablement assemblé au
panneau de montage.
OUTILS DONT VOUS
AUREZ BESOIN :
Clé de 10 mm ou une clé réglable
Remarque : Le fouloir à pommes
et à fruits est vendu assemblé
au panneau de montage pour
utilisation sur table. Commencer
à l’étape 5 pour terminer
l’assemblage.
1. Placer le fouloir à pommes et à
fruits sur le dos, sur une surface
plane et de niveau, avec les pieds
qui vous font face.
2. Aligner les trous A, B, C et D du
panneau de montage aux pieds A,
B, C et D (FIGURES 1 ET 2). Le
côté du panneau de montage avec
trous étagés devrait vous faire
face.
3. Fixer le panneau de montage
aux pieds à l’aide des boulons
ordinaires, des rondelles plates et
des écrous hexagonaux à embase
(FIGURE 3). Utiliser une clé de
10 mm ou une clé réglable pour
serrer les écrous hexagonaux à
embase.
4. Placer le fouloir à pommes et
à fruits debout sur le panneau de
montage.
FIGURE 3
INSTRUCTIONS EN FRANÇAIS
18
Page 19

Trou 1
FIGURE 5
FIGURE 4
Trou 1
5. Faire glisser la goulotte vers le haut,
dans le corps du fouloir à pommes et à
fruits (FIGURES 4 ET 5).
6. Aligner le trou 1 de la goulotte au
trou 1 du fouloir à pommes et à fruits.
Fixer la goulotte au corps principal
du fouloir à pommes et à fruits à
l’aide d’une vis à métal et d’un écrou
à oreilles. Répéter l’opération pour
l’autre côté de la goulotte. Serrer
les deux écrous à oreilles à la main
(FIGURE 6).
7. Lors de l’installation du fouloir sur
table, s’assurer que le manche peut
tourner librement. Un coin de table est
l’emplacement idéal.
8. Fixer le fouloir à la table à l’aide de
deux serres en C (FIGURE 7).
FIGURE 6
FIGURE 7
INSTRUCTIONS EN FRANÇAIS
19
Page 20

FIGURE 8
CE DONT VOUS AUREZ
BESOIN :
Clé de 10 mm ou une clé
réglable deux boulons de
3/8 po et rondelles ancrages
muraux
AVIS : Ces directives sont
uniquement destinées à
l’assemblage du fouloir
à pommes et à fruits
pour installation murale.
L’utilisateur a la responsabilité
d’installer correctement le
fouloir.
AVERTISSEMENT! : Le
fouloir à pommes et à fruits
est très lourd. S’assurer que
le mur est solide et stable
avant d’y installer le fouloir
à pommes et à fruits. Ne
pas installer correctement le
fouloir à pommes et à fruits
peut engendrer des blessures
corporelles graves!
1. Placer la partie principale
du fouloir à pommes et à fruits
debout sur une surface plane
et de niveau, avec l’arrière
face à vous.
2. Aligner les trous A, B, E et
F du panneau de montage
aux pieds A, B, E et F
(FIGURES 8 ET 9). Le côté
du panneau de montage avec
trous étagés devrait vous faire
face.
3. Fixer le panneau de
montage aux pieds à l’aide
des boulons ordinaires,
des rondelles plates et des
écrous hexagonaux à embase
(FIGURE 10). Utiliser une clé
de 10 mm ou une clé réglable
pour serrer les écrous
hexagonaux à embase.
FIGURE 10
FIGURE 9
Arrière
Pied
Panneau de
montage
Trou étagé
dans le
panneau de
montage
ASSEMBLAGE POUR INSTALLATION MURALE
INSTRUCTIONS EN FRANÇAIS
20
Page 21

4. Lors de l’installation murale du
fouloir, s’assurer que le manche peut
tourner librement. Un coin extérieur est
l’emplacement idéal.
5. Installer le fouloir à pommes et à fruits
sur un mur solide.
6. Faire glisser la goulotte vers le haut,
dans le corps du fouloir à pommes et à
fruits (FIGURES 11 ET 12).
7. Aligner les trous 1 et 2 de la goulotte
aux trous 1 et 2 du fouloir à pommes
et à fruits. Fixer la goulotte à la partie
principale du fouloir à pommes et à fruits
à l’aide de vis à métal et d’écrous à
oreilles. Répéter l’opération pour l’autre
côté de la goulotte. Serrer les écrous à
oreilles à la main (FIGURE 13).
Passer aux directives d’installation du
manche.
Trou 1
Trou 2
FIGURE 12
FIGURE 11
FIGURE 13
Trou 1
Trou 2
INSTRUCTIONS EN FRANÇAIS
21
Page 22

REMARQUE : Le fouloir à pommes et à fruits est vendu avec le manche
déjà installé. Suivre ces directives si le manche se desserre ou doit être
réinstallé après avoir été nettoyé.
1. Desserrer la vis de réglage du manche à l’aide de la clé Allen fournie.
Remarque : Il n’est pas nécessaire de retirer complètement la vis de
réglage du manche.
2. Glisser le manche sur l’arbre. Aligner le trou de la vis de réglage du
manche avec le trou de la vis de réglage de l’arbre (FIGURE 14).
3. À l’aide de la clé Allen, serrer la vis de réglage sur l’arbre. REMARQUE :
Si le manche glisse sur l’arbre pendant qu’il tourne, la vis de réglage n’est
pas correctement alignée ou pas assez serrée. Répéter les étapes 1 à 3
jusqu’à ce que le manche soit correctement xé.
FIGURE 14
Arbre
Vis de réglage
MISE EN GARDE!
Pour éviter les blessures corporelles,
NE PAS toucher les lames en acier
inoxydable du baril de bois.
DIRECTIVES D’INSTALLATION DU MANCHE
INSTRUCTIONS EN FRANÇAIS
22
Page 23

.
Le moyen le plus facile de nettoyer le fouloir à pommes et à fruits est de
l’arroser à l’aide d’un boyau d’arrosage. Tourner lentement le manche tout en
arrosant le baril pour éliminer tout reste de fruits. Il est également possible de
nettoyer l’extérieur du fouloir à l’aide d’une éponge et d’eau savonneuse, ou
en l’essuyant avec un linge. Sécher immédiatement l’extérieur du fouloir, y
compris le panneau de montage et le manche. Laisser le baril et l’intérieur
du fouloir sécher à l’air.
1. Couper les pommes ou les autres gros fruits en quartiers.
2. Déposer les pommes/fruits dans le fouloir, par le dessus.
3. Placer un contenant sous la goulotte pour recueillir les pommes/fruits broyés.
4. Tourner lentement le manche dans le sens horaire et surveiller les pommes/
fruits broyés tomber dans le contenant.
5. Tourner le manche dans les deux sens pour déloger tout morceau de pomme/
fruit coincé. Le grattoir en bois peut aussi être utilisé à cette n. NE PAS tourner
le manche et décoincer des morceaux de fruits à l’aide du grattoir au même
temps. Ne JAMAIS utiliser les doigts!
6. Utiliser le grattoir en bois pour déloger les fruits broyés de la goulotte.
UTILISATION DU FOULOIR À POMMES ET À FRUITS
DIRECTIVES DE NETTOYAGE
INSTRUCTIONS EN FRANÇAIS
23
Page 24

Page 25

Page 26

Page 27

Weston Brands LLC garantit à l’ACHETEUR AU DÉTAIL D’ORIGINE de ce produit contre tout défaut en matériau
et en main-d’œuvre pendant un (2) ans a partir de la date d’achat à condition qu’il soit utilisé conformément aux
directives imprimées qui y sont jointes.
La Carte de Garantie, avec une copie du reçu original, doivent être reçus par Weston Brands LLC dans les trente
(30) jours à partir de la date d’achat pour que la garantie puisse s’appliquer. Le manque d’envoyer la Carte de
Garantie complètement remplie avec une copie du reçu original annulera la garantie.
Le produit doit être livré à ou expédié franco de port à Weston Brands LLC pour les services de garantie, soit dans
son emballage d’origine ou un emballage similaire offrant un degré de protection équivalent. Les dommages causés
par l’expédition ne sont pas la responsabilité de la société. Weston Brands LLC charge 35,00 $ par heure pour frais
de service. REMARQUE : Aucune réparation ne sera commencée sans l’autorisation du client. Les frais d’expédition
de retour seront ajoutés à la facture de réparation.
Avant de renvoyer le produit pour une réparation sous garantie, bien nettoyer le produit pour qu’il soit exempt de
toute particule alimentaire ou autres débris. Si l’acheteur ne respecte pas cette consigne, le produit lui sera renvoyé
sans avoir été réparé. Dans certains, la somme de 50 dollars sera facturée pour le nettoyage.
Weston Brands LLC réparera (ou à sa discrétion, remplacera) le produit sans frais, si à l’opinion de la société, il a
été prouvé être défectueux en matériau et en main d’œuvre dans la période de garantie.
Des remplacements neufs ou remis en état pour les pièces d’usine défectueuses seront fournis pendant de (2)
ans à partir de la date d’achat. Les pièces de remplacement sont garanties pour le reste de la période de garantie
originale.
Pour les réparations non garanties, veuillez contacter le Service à la clientèle de Weston Brands LLC au numéro
sans frais 1-800-814-4895, du lundi au vendredi, de 8h00 à 17h00 ET (en dehors des États-Unis : 001-440-638-
3131) pour obtenir une Autorisation de retour d’article (Numéro RMA). Weston Brands LLC refusera tous les retours
qui ne contiennent pas ce numéro. NE PAS RENVOYER CET APPAREIL SANS L’AUTORISATION CORRECTE
DE Weston Brands LLC.
LIMITATIONS : La garantie est annulée si le produit est utilisé pour toute raison autre que pour laquelle il est
conçu. Le produit ne doit pas avoir été antérieurement modié, réparé, ou entretenu par quelqu’un autre que
Weston Brands LLC. Le cas échéant, le numéro de série ne doit pas être modié ou enlevé. Le produit ne doit pas
avoir été soumis à un accident en transit ou pendant qu’il est en la possession du client, mal utilisé, mal traité, ou
utilisé contrairement aux directives contenues dans le manuel d’utilisation. Ceci comprend la défaillance causée
par la négligence d’un entretien raisonnable et nécessaire, une tension de secteur incorrecte et des catastrophes
naturelles. Cette garantie n’est pas transférable et s’applique seulement aux ventes américaines et canadiennes.
À l’exception des cas où la loi en vigueur l’interdit, aucune autre garantie, expresse ou implicite, y compris les
garanties relatives au caractère adéquat pour la commercialisation ou un usage particulier, ne s’appliquera à ce
produit. Weston Brands LLC ne sera en aucun cas responsable des dommages indirects liés au dit produit et
Weston Brands LLC n’a aucune obligation ni responsabilité autre que celles expressément établies dans la présente,
et n’autorise aucun représentant ou autre personne à les assumer pour lui. Toutes garanties implicites applicables
sont aussi limitées à la période de (2) ans de la garantie limitée.
Cette garantie couvre seulement le produit et ses pièces spéciques, pas les aliments ou autres produits traités
dans celui-ci. Weston n’est pas responsable des pièces manquantes ou endommagées pour les articles réduits/
en solde ou les articles naux de vente où le vendeur peut ne pas être en mesure de garantir l’ensemble de la
fonctionnalité ou l’intégralité de l’unité.
DÉCOUPEZ LE LONG DE LA LIGNE POINTILLÉE ET ENVOYEZ CETTE CARTE DE GARANTIE AVEC UNE
COPIE DE VOTRE REÇU D’ACHAT ORIGINAL À :
Weston Brands LLC / WARRANTY
20365 Progress Drive, Strongsville, OH 44149 USA
INFORMATION SUR LA GARANTIE
CONSERVEZ CETTE INFORMATION SUR LA GARANTIE POUR VOS DOSSIERS!
Nom du Client:
Adresse:
Province/Code postal/Région:
Numéro de téléphone:
Adresse de courrier électronique:
Date d’achat d’origine:
No de modèle du produit:
No de série (s’il y a lieu):
J’ai lu les informations relatives à la garantie. Initiales ici:
CARTE DE GARANTIE
ENVOYEZ CETTE CARTE DE GARANTIE AVEC UNE COPIE DE VOTRE REÇU D’ACHAT ORIGINAL À:
WESTON BRANDS LLC / WARRANTY, 20365 PROGRESS DRIVE, STRONGSVILLE, OH 44149 USA
Copie du reçu incluse
Page 28

ATTENTION!
PLEASE INSPECT THIS PACKAGE THOROUGHLY FOR MISSING PARTS OR ANY PRODUCT DAMAGE.
IF YOUR PRODUCT CONTAINS SHIPPING DAMAGE, PLEASE CONTACT RETAILER FOR ASSISTANCE.
For all other questions regarding product usage, missing parts, product damage, difculty or warranty activation,
please contact the Weston Brands Customer Service Team:
8:00 am to 5:00 pm ET, Monday thru Friday
CustomerService@WestonProducts.com
U.S. Residents Customer Service Line: 1-800-814-4895 (Outside U.S. Call: 001-440-638-3131)
Weston Brands LLC, Cleveland, Ohio 44149
WestonProducts.com
Please DO NOT return this item to the retailer before contacting
Weston Brands Customer Service.
SAVE THESE INSTRUCTIONS!
Refer to them often and use them to instruct others.
ATTENTION!
VEUILLEZ INSPECTER CET EMBALLAGE AVEC SOIN POUR Y DÉTECTER
TOUTE PIÈCE MANQUANTE OU ENDOMMAGÉE.
SI DES PIÈCES ONT ÉTÉ ENDOMMAGÉES PENDANT LE TRANSPORT, VEUILLEZ
COMMUNIQUER AVEC LE DÉTAILLANT POUR OBTENIR DE L’AIDE.
Pour toutes les autres questions concernant l’utilisation du produit, les pièces manquantes, les problèmes ou
l’activation de la garantie, veuillez communiquer avec l’équipe du service clientèle des produits Weston:
de 8:00 à 17:00 HNE, du lundi au vendredi.
CustomerService@WestonProducts.com
Numéro de téléphone du service clientèle pour les résidents des É.-U. : 1-440-638-3131
Numéro de téléphone à l’extérieur des É.-U. : 001-440-638-3131 Weston Brands LLC,
Weston Brands LLC, Cleveland, Ohio 44149
WestonProducts.com
Veuillez communiquer avec le service clientèle des produits Weston AVANT de retourner cet appareil au détaillant.
CONSERVER CES DIRECTIVES!
Veuillez les consulter fréquemment et les utiliser pour la formation.
 Loading...