

Page 1
FRUIT AND WINE
PRESS
05-0101
DUE TO CONSTANT FACTORY IMPROVEMENTS, THE PRODUCT PICTURED MIGHT DIFFER
SLIGHTLY FROM THE PRODUCT IN THIS BOX. 092315
Page 2

TABLE OF CONTENTS / ÍNDICE / TABLE DES MATIÈRES
2
COMPONENT LIST
ASSEMBLY INSTRUCTIONS
OPERATING INSTRUCTIONS
CLEANING INSTRUCTIONS
WARRANTY
LISTA DE COMPONENTES
INSTRUCCIONES DE ENSAMBLADO
INSTRUCCIONES DE FUNCIONAMIENTO
INSTRUCCIONES DE LIMPIEZA
INFORMACIÓN DE GARANTÍA WESTON
LISTE DES PIÈCES
INSTRUCTIONS DE MONTAGE
INSTRUCTION D’UTILISATION
DIRECTIVES DE NETTOYAGE
INFORMATION SUR LA GARANTIE
5
6
7
8
10
13
14
15
16
18
21
22
23
24
26
Page 3
Page 4

ENGLISH INSTRUCTIONS
4
1
2
3
4
9
10
11
12
18
5
6
7
13
16
8
19
20
Underside of Base
21
2216
17
14
15
Page 5

5
ENGLISH INSTRUCTIONS
COMPONENT LIST
DIAGRAM NUMBER PART DESCRIPTION PART NUMBER
1* RATCHET INSERT (2) 05-0102
2* SMALL RETAINING CLIP 05-0113
3* WASHER 05-0116
4* UPPER RATCHET PLATE 05-0105
5* THREADED INNER COLLAR (CROWN) 05-0110
6* LOWER RATCHET PLATE 05-0111
7* THREADED SHAFT 05-0104
8 BASKET (HALF CAGE (2)) 05-0107
9* LEVER PIN 05-0112
10* LEVER MECHANISM 05-0115
11 LEVER HANDLE 05-0103
12* LARGE RETAINING CLIP 05-0114
13 BASKET LOCKING PIN (4) 05-0106
14 WOOD PRESSING BLOCK (10) 05-0108
15 WOOD PLATE (SEMI-DISC (2)) 05-0109
16 BASE 05-0119
17 LOWER RETAINING NUT 05-0117
18* COTTER PIN 05-0118
19 TOP SHAFT WASHER 05-0121
20 BOTTOM SHAFT WASHER 05-0120
21 4MM ALLEN WRENCH 05-0205
22 SET SCREW 05-0124
* THESE ITEMS ALL COME PRE-ASSEMBLED FROM THE FACTORY.
If any components of this unit are broken, the unit does not operate properly or you
need a replacement instruction manual, visit us on the web at
WestonProducts.com
Or call Weston Brands LLC Toll Free at 1-800-814-4895
Monday thru Friday 8:00am-5:00pm ET. Outside the U.S. call 001-440-638-3131
Page 6
6
ENGLISH INSTRUCTIONS
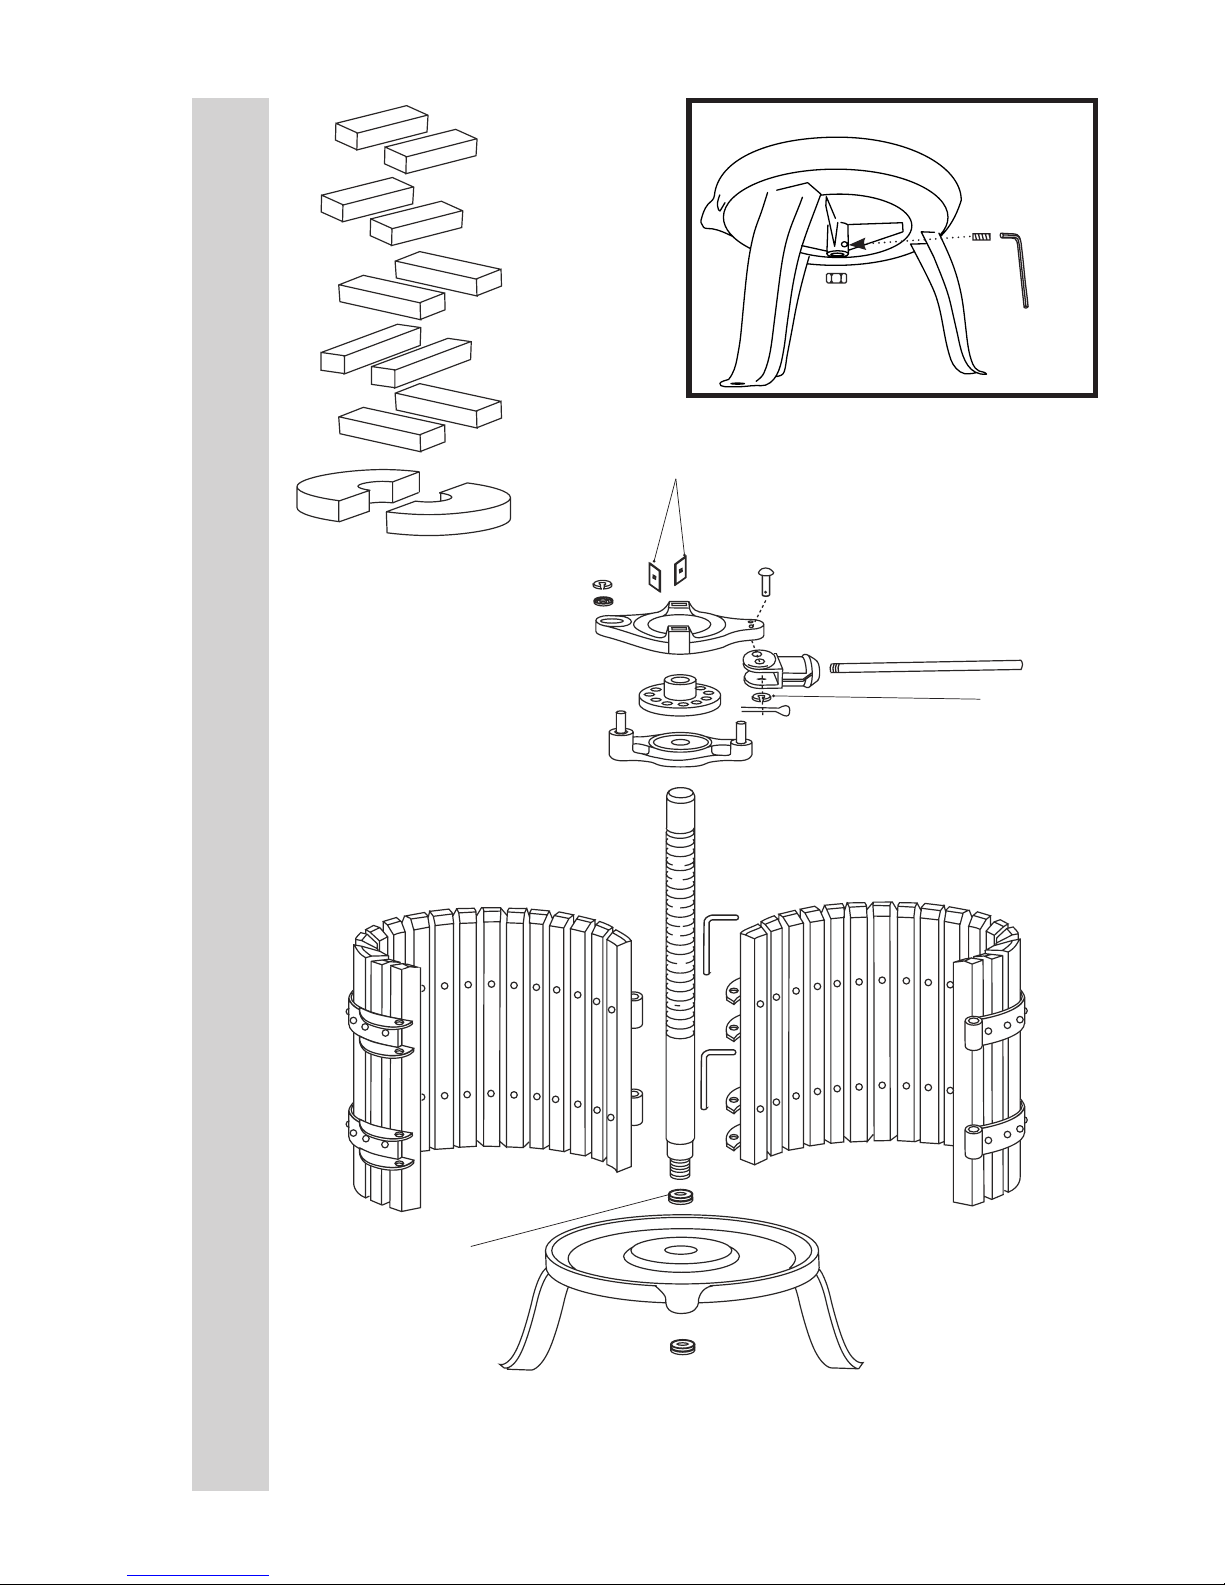
ASSEMBLY INSTRUCTIONS
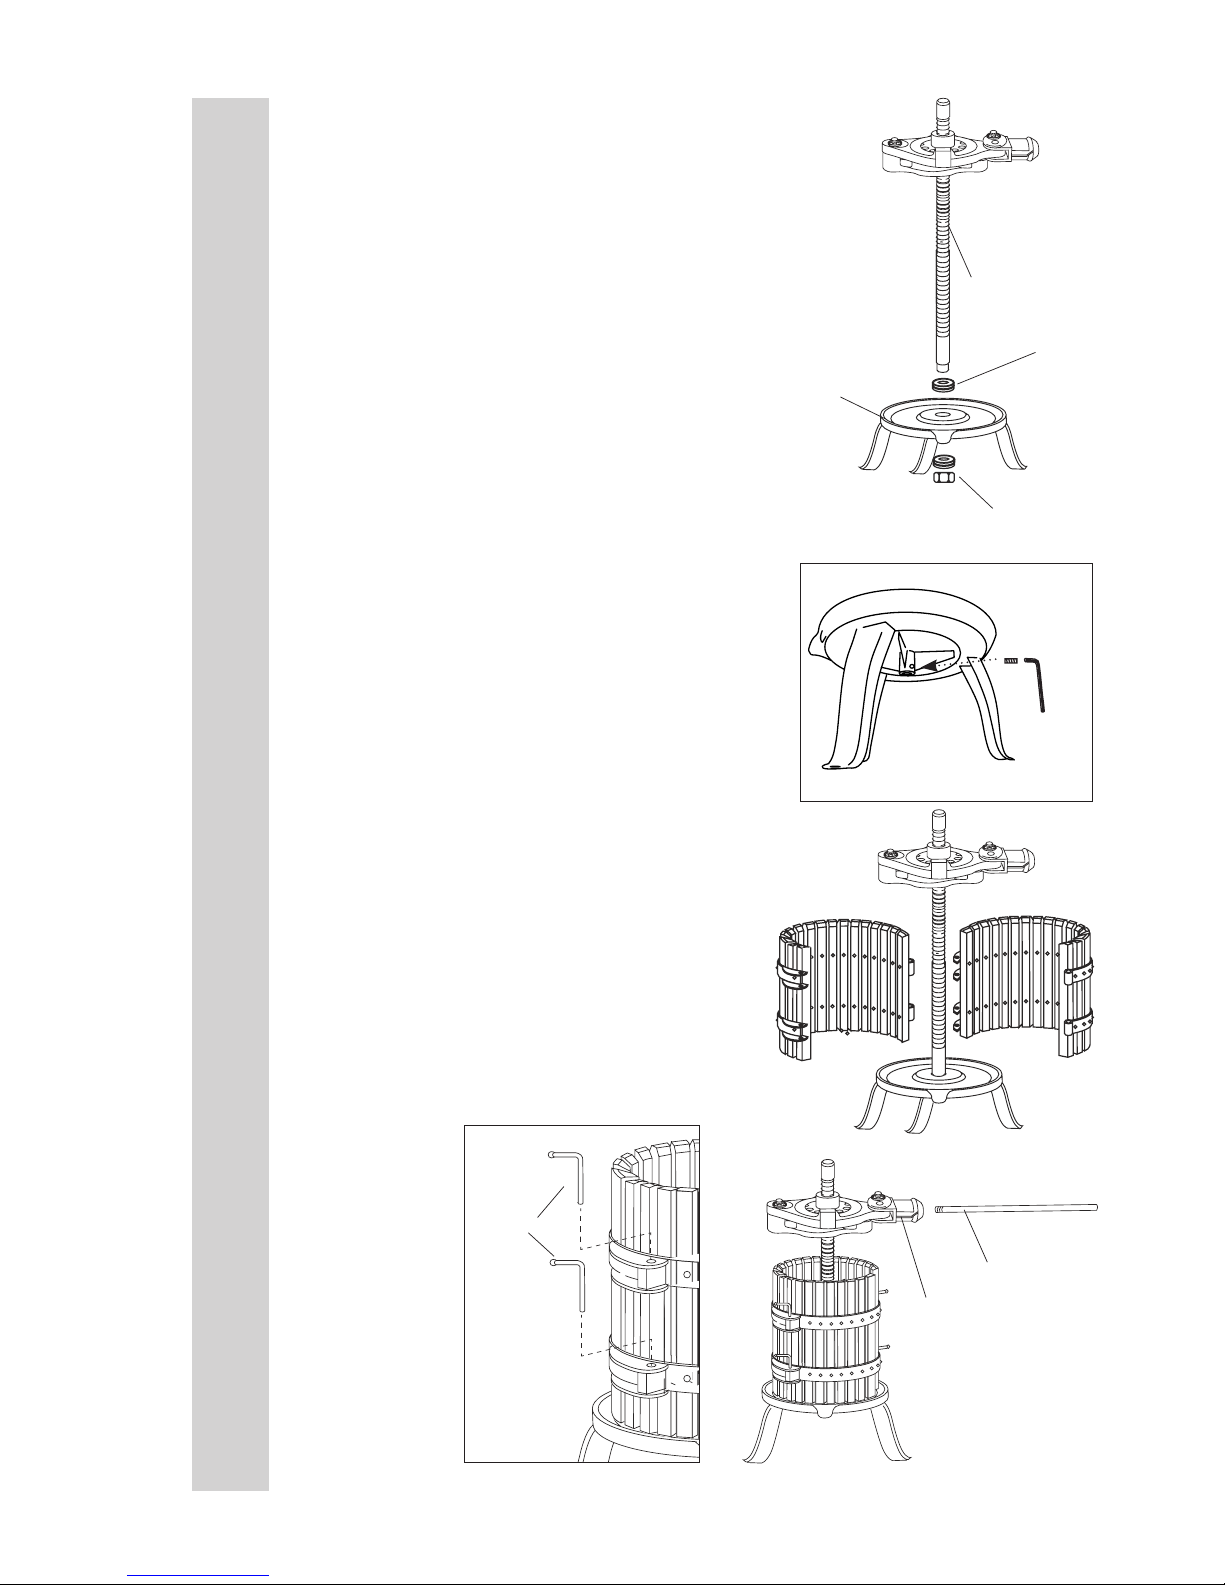
1. Thoroughly clean the Fruit & Wine Press
before assembling and using it for the
rst time to remove any residue that may
have accumulated during manufacturing
and shipping. Refer to the “CLEANING
INSTRUCTIONS” section of this manual.
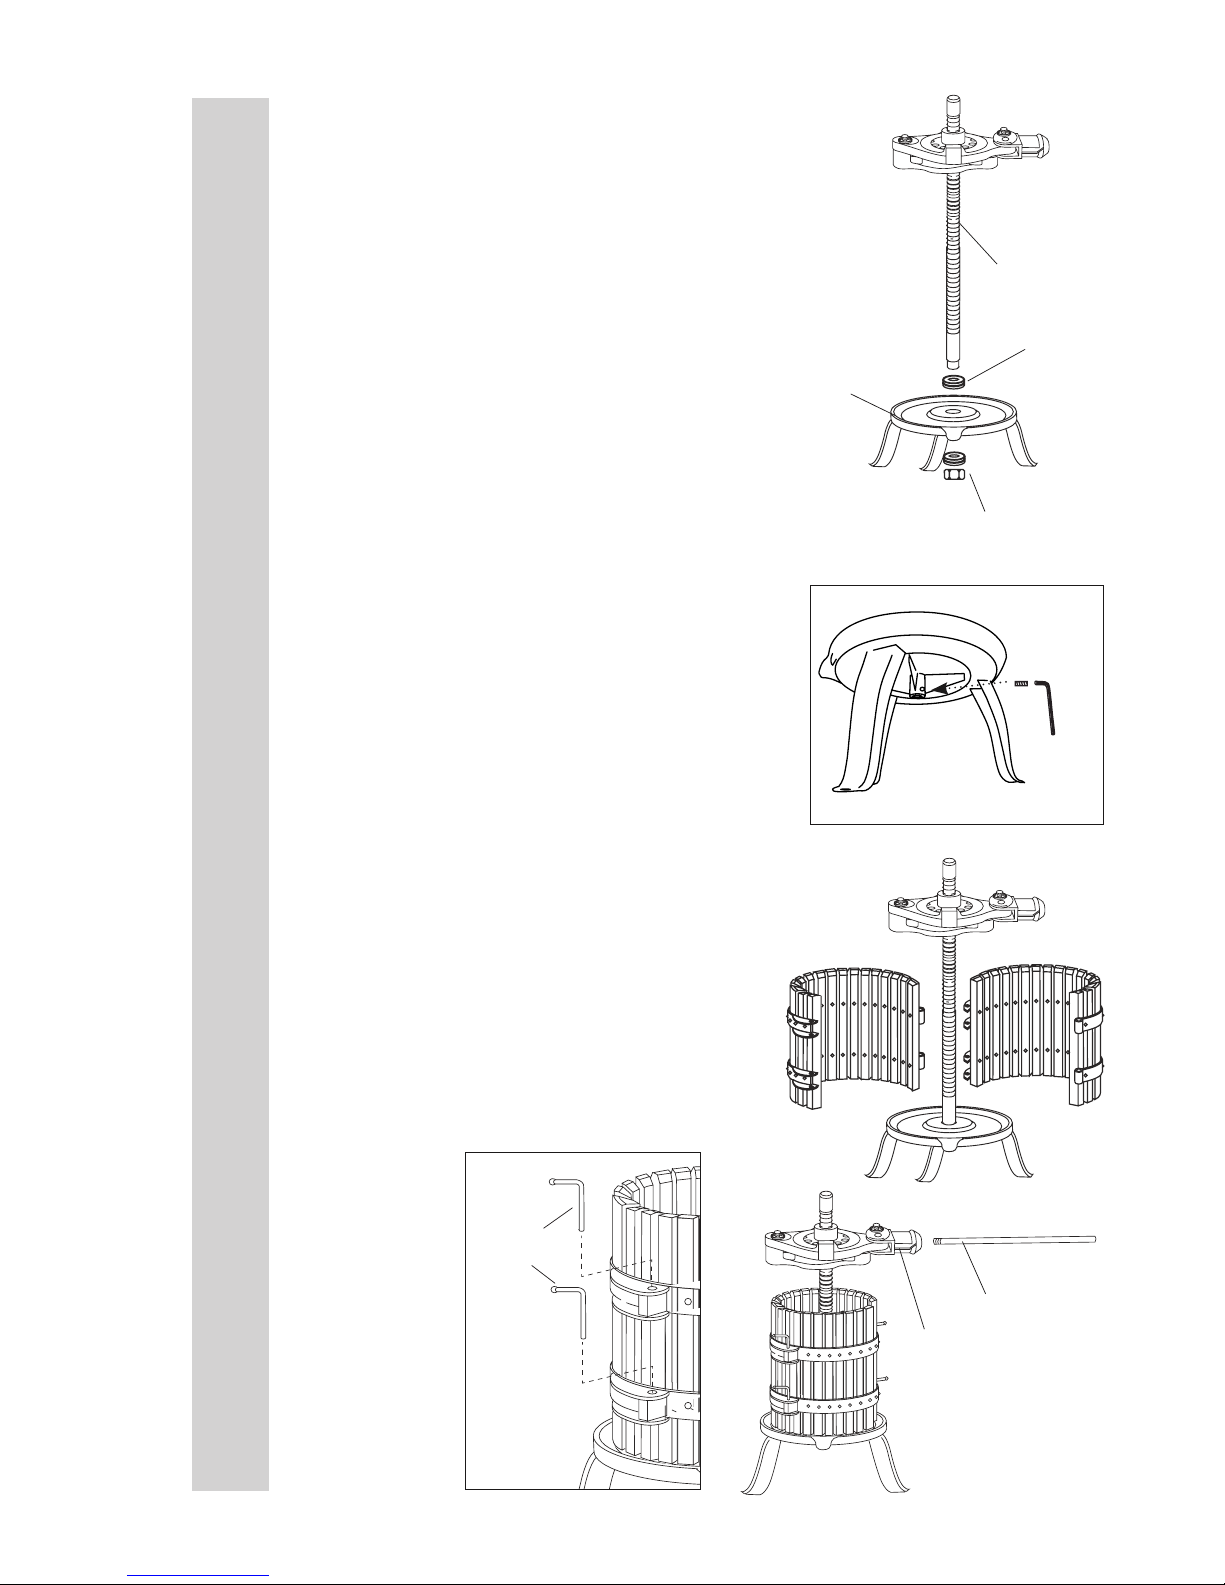
2. Remove the Lower Retaining Nut and the
Bottom Shaft Washer from the Threaded
Shaft.
3. Start the Set Screw into the hole on the
underside of the Base (FIGURE 2) do not
tighten all the way.
4. Insert the Threaded Shaft through the Top
Shaft Washer then through the opening in
the center of the Base (FIGURE 1).
5. Tighten the Set Screw until snug using the
provided Allen Wrench (FIGURE 2).
6. Secure the Threaded Shaft to the Base
with the Bottom Shaft Washer and the Lower
Retaining Nut (FIGURE 1).
7. Place each Basket Half Cage on the Base
forming a circle around the Threaded Shaft
and couple the hinges (FIGURE 3).
8. Secure the Basket together by inserting a
Basket Locking Pin into each hinge (FIGURE
4).
9. Insert the threaded end of the Lever
Handle into the Lever Mechanism (FIGURE
5).
Base
Threaded
Shaft
Basket
Locking
Pins
FIGURE 4
FIGURE 2
Base
Set Screw
Allen
Wrench
FIGURE 1
FIGURE 3
Lower Retaining Nut &
Bottom Shaft Washer
Top Shaft Washer
FIGURE 5
Lever
Handle
Lever
Mechanism
Page 7
7
ENGLISH INSTRUCTIONS
Ratchet
Inserts
FIGURE 8
FIGURE 9
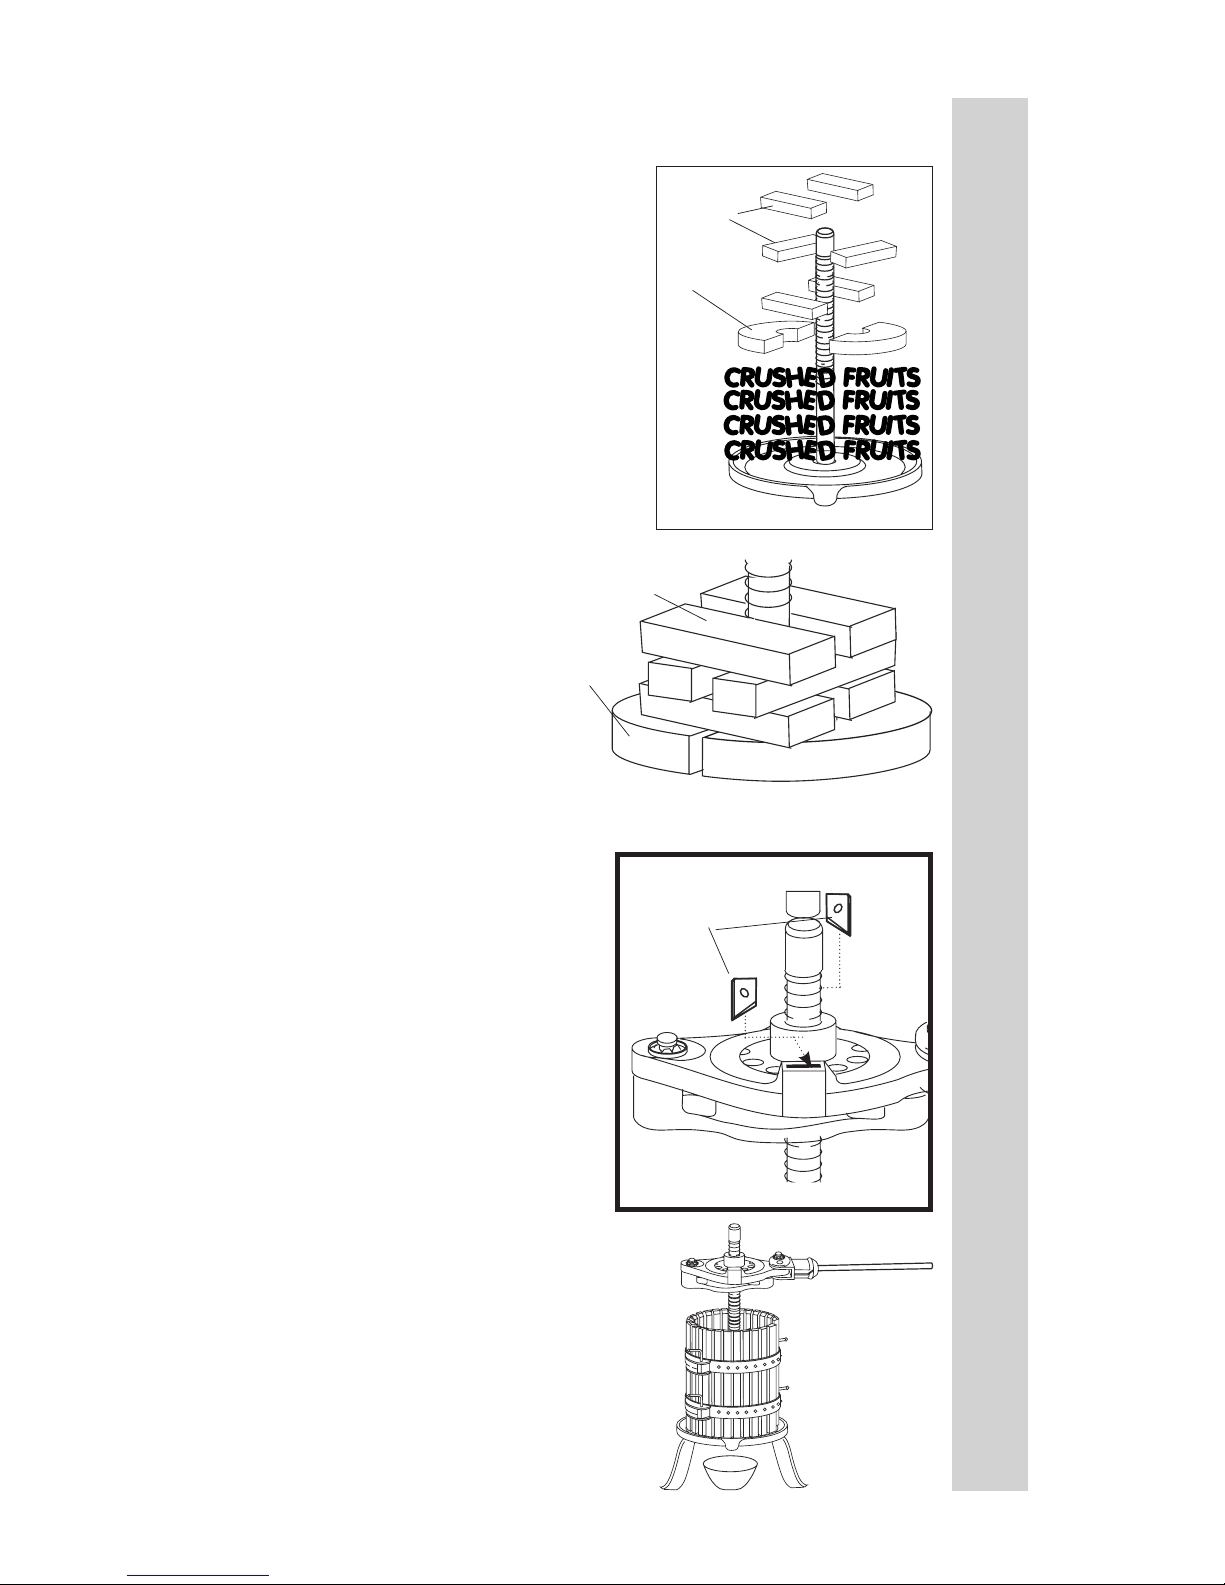
1. Fill the Basket with fruit to 1” (2.5cm)
from the top. For best results, crush fruit
before pressing.
2. Place the Wood Plates on top of the fruit
(FIGURE 6).
3. Place two Wood Pressing Blocks on top
of the Wood Plates. Position the Blocks
perpendicular to the gap between the
Plates and as close as possible to the
Threaded Shaft.
4. Continue adding sets of Blocks (each
set placed perpendicular to the previous
set) until the Blocks are higher than the
Basket (FIGURE 7).
5. Lower the Ratchet Assembly until
the Lower Ratchet Plate contacts the
Blocks. Rotate the Ratchet Assembly
clockwise to lower it and counter clockwise
to raise it (when viewed from the top).
6. Position the Ratchet Assembly so the
Lever Mechanism is to your right. Place
a Ratchet Insert into the slot in the Upper
Ratchet Plate that is closest to you. The
pointed end of the Ratchet Insert should
be down and to the left (FIGURE 8).
7. Rotate the Ratchet Assembly until the
Lever Mechanism is to your left. Place
another Ratchet Insert into the remaining
slot with the pointed end down and to the
left.
8. Place a container under the Spout to
collect juice as it drains from the Base
(FIGURE 9).
9. Crank the Lever Handle to press the
fruit.
10. Continue cranking until the Ratchet
Assembly encounters excessive
resistance. If the Lever Handle contacts
the top of the Basket while pressing you
will need to raise the Ratchet Assembly
and add more Wood Pressing Blocks.
11. To release the Ratchet Assembly,
reverse the Ratchet Inserts in the slots
(i.e. the pointed ends should be down and
to the right), then crank the Lever Handle.
Wood Plates
Wood
Pressing
Blocks
FIGURE 6
Base
FIGURE 7
Wood
Plates
Wood
Pressing
Blocks
OPERATING INSTRUCTIONS
Page 8

8
ENGLISH INSTRUCTIONS
1. Unscrew and remove the Lever Handle from the Lever Mechanism.
2. Remove the Ratchet Assembly from the Threaded Shaft.
3. Remove the Wood Pressing Blocks and Plates from the Basket.
4. Remove the Basket Locking Pins from the Hinges.
5. Remove the Basket Half Cages from the Base.
6. Wash all loose parts in warm soapy water. Wash the assembled Base and
Threaded Shaft with a sponge and warm soapy water.
7. Rinse all parts with clean water. Immediately dry all parts.
8. Coat all metal parts with a food-grade silicone spray.
9. Reassemble the Basket Half Cages on the Base. Reinsert the Basket Locking
Pins.
10. Place the Plates, Wood Pressing Blocks and Lever Handle in the Basket.
11. Place the Ratchet Inserts in slots.
12. Store the Fruit & Wine Press in a cool, dry location.
CLEANING INSTRUCTIONS
Page 9
Page 10

This warranty applies to products purchased and used in the U.S. and Canada,
which have been properly registered within 30 days of the date of original
purchase. This is the only express warranty for this product and is in lieu of
any other warranty or condition. This product is warranted to be free from
defects in material and workmanship for a period of one (1) year from the date
of original purchase. During this period, your exclusive remedy is repair or
replacement of this product or any component found to be defective, at our
option.
To register your product: complete the online form at
www.WestonProducts.com/Warranty.
This warranty does not cover unregistered products, unauthorized repairs or
service to products, products sold “as-is” by retailers, glass, lters, wear from
normal use, use not in conformity with the printed directions, or damage to the
product resulting from accident, alteration, abuse, or misuse. This warranty
extends only to the original consumer purchaser or gift recipient and is not
transferrable. Keep the original sales receipt, as proof of purchase is required
to make a warranty claim. This warranty is void if the product is subjected to
any voltage and waveform other than as specied on the rating label (e.g.,
120V ~ 60 Hz).
We exclude all claims for special, incidental and consequential damages
caused by breach of express or implied warranty. All liability is limited to
the amount of the purchase price. Every implied warranty, including any
statutory warranty or condition of merchantability or tness for a particular
purpose, is disclaimed except to the extent prohibited by law, in which case
such warranty or condition is limited to the duration of this written warranty.
This warranty gives you specic legal rights. You may have other legal rights
that vary depending on where you live. Some states or provinces do not
allow limitations on implied warranties or special, incidental, or consequential
damages, so the foregoing limitations may not apply to you.
Before returning the product for any repair or service: it must be clean and free
from any food particles or other debris; otherwise, we will return it or impose a
$50 cleaning surcharge, at our option.
To make a warranty claim: go to www.WestonProducts.com/Contact; or call
1.800.814.4895 in the U.S. and 001.440.638.3131 outside the U.S., Monday –
Friday, 8 am – 5 pm Eastern. You are responsible for all costs associated with
shipping us the product freight prepaid. If the product qualies for a warranty
repair or replacement, we will bear the cost of returning it to you. We are not
responsible for shipping damage.
For non-warranty work: call 1.800.814.4895 in the U.S. and 001.440.638.3131
outside the U.S., Monday – Friday, 8 am – 5 pm Eastern, to obtain a Return
Merchandise Authorization Number (RMA Number). We will refuse all returns
without an RMA Number. We charge US$35/hour for all diagnostic, service,
repair and processing work. We will not start any service or repair work without
prior authorization. You are responsible for all costs associated with shipping
us the product freight prepaid and our returning it to you.
ONE-YEAR LIMITED WESTON WARRANTY
Page 11

PRENSA PARA
FRUTAS Y VINO
05-0101
DEBIDO A CONSTANTES MEJORAS EN LA FÁBRICA, EL PRODUCTO QUE SE MUESTRA PUEDE
SER LIGERAMENTE DIFERENTE DEL PRODUCTO EN ESTA CAJA. 092315
Page 12
12
INSTRUCCIONES EN ESPAÑOLINSTRUCCIONES EN ESPAÑOL
1
2
3
4
9
10
11
12
18
5
6
7
13
16
8
19
20
Parte inferior de la base
21
2216
17
14
15
Page 13

13
INSTRUCCIONES EN ESPAÑOL
INSTRUCCIONES EN ESPAÑOL
LISTA DE COMPONENTES
NÚMERO DE DIAGRAMA DESCRIPCIÓN DE LA PIEZA NÚMERO DE PIEZA
1* INSERTO PARA TRINQUETE (2) 05-0102
2* ABRAZADERA DE RETENCIÓN PEQUEÑA 05-0113
3* ARANDELA 05-0116
4* PLACA DE TRINQUETE SUPERIOR 05-0105
5* COLLARÍN INTERIOR CON ROSCA
(CORONA)
05-0110
6* PLACA DE TRINQUETE INFERIOR 05-0111
7* EJE CON ROSCA 05-0104
8 CESTA (MEDIA CESTA (2)) 05-0107
9* PERNO DE PALANCA 05-0112
10* MECANISMO DE PALANCA 05-0115
11 MANIVELA DE LA PALANCA 05-0103
12* ABRAZADERA DE RETENCIÓN GRANDE 05-0114
13 CHAVETA DE SEGURIDAD DE LA CESTA (4) 05-0106
14 BLOQUE DE MADERA PARA PRENSA (10) 05-0108
15 PLATO DE MADERA (SEMI DISCO (2)) 05-0109
16 BASE 05-0119
17 TUERCA DE RETENCIÓN INFERIOR 05-0117
18* CLAVIJA 05-0118
19 ARANDELA DEL EJE SUPERIOR 05-0121
20 ARANDELA DEL EJE INFERIOR 05-0120
21 LLAVE ALLEN DE 4 MM 05-0205
22 TORNILLO FIJADOR 05-0124
*TODOS ESTOS ELEMENTOS VIENEN PREENSAMBLADOS DE FÁBRICA.
Si cualquier componente de esta unidad está roto, si no funciona debidamente, o si necesita
un instructivo de repuesto, visítenos en la Web en
WestonProducts.com
O llame a Weston Brands LLC larga distancia sin costo 1-800-814-4895
De lunes a viernes, de 8:00 am a 5:00 pm tiempo del ET. Fuera de Estados Unidos llame
al 001-440-638-3131
Page 14
14
INSTRUCCIONES EN ESPAÑOLINSTRUCCIONES EN ESPAÑOL
1. Limpie cuidadosamente la Prensa para
frutas y vino antes de ensamblarla y usarla
por primera vez para eliminar cualquier
residuo que pueda haberse acumulado
durante la fabricación y el envío. Consulte
la sección de “INSTRUCCIONES DE
LIMPIEZA” de este manual.
2. Retire la tuerca de retención inferior y la
arandela del eje inferior del eje con rosca.
3. Coloque el tornillo jador en el oricio de
la parte inferior de la base (FIGURA 2) y no
lo ajuste por completo.
4. Inserte el eje con rosca en la arandela del
eje superior y luego a través de la abertura
en el centro de la base (FIGURA 1).
5. Ajuste el tornillo jador hasta el nal
utilizando la llave Allen que se incluye
(FIGURA 2).
6. Asegure el eje con rosca a la base con
la arandela del eje inferior y la tuerca de
retención inferior (FIGURA 1).
7. Coloque cada una de las mitades de la
cesta sobre la base de modo que formen un
círculo alrededor del eje con rosca y acople
las bisagras (FIGURA 3).
8. Asegure la cesta insertando un chaveta
de seguridad para la cesta en cada bisagra
(FIGURA 4).
9. Inserte el extremo con rosca de la
manivela de la palanca en el mecanismo de
palanca (FIGURA 5).
INSTRUCCIONES DE ENSAMBLADO
Base
Eje con
rosca
FIGURA 2
Base
Tornillo
jador
Llave Allen
FIGURA 1
FIGURA 3
Tuerca de retención inferior y
arandela del eje inferior
Arandela del
eje superior
FIGURA 5
Manivela de
la palanca
Mecanismo
de palanca
Chavetas
de
seguridad
para la
cesta
FIGURA 4
Page 15

15
INSTRUCCIONES EN ESPAÑOL
INSTRUCCIONES EN ESPAÑOL
INSTRUCCIONES DE FUNCIONAMIENTO
Insertos para
trinquete
FIGURA 8
FIGURA 9
1. Llene la cesta con fruta hasta 1 pulg.
(2,5 cm) del tope. Para obtener mejores
resultados, aplaste la fruta antes de
prensarla.
2. Coloque los platos de madera sobre la
fruta (FIGURA 6).
3. Coloque dos bloques de madera para
prensa sobre los platos de madera. Ubique
los bloques de manera perpendicular al
espacio entre los platos y tan cerca como
sea posible del eje con rosca.
4. Continúe agregando conjuntos de
bloques (cada conjunto colocado de
manera perpendicular al conjunto anterior)
hasta que los bloques estén más altos que
la cesta (FIGURA 7).
5. Baje el ensamblado del trinquete
hasta que la placa de trinquete inferior
haga contacto con los bloques.Gire el
ensamblado del trinquete en el sentido de
las agujas del reloj para bajarlo y en sentido
contrario para levantarlo (visto desde
arriba).
6. Coloque el ensamblado del trinquete de
modo que el mecanismo de palanca se
encuentre a su derecha. Coloque un inserto
para trinquete en la ranura de la placa de
trinquete superior que se encuentre más
cerca de usted. El extremo con punta del
inserto para trinquete debe estar hacia
abajo y a la izquierda (FIGURA 8).
7. Gire el ensamblado del trinquete hasta
que el mecanismo de palanca se encuentre
a su izquierda. Coloque otro inserto
para trinquete en la ranura restante con
el extremo con punta hacia abajo y a la
izquierda.
8. Coloque un recipiente debajo del pico
para recoger el jugo a medida que se ltre
desde la base (FIGURA 9).
9. Gire la manivela de la palanca para
prensar la fruta.
10. Continúe girando hasta que el
ensamblado del trinquete encuentre una
resistencia excesiva. Si la manivela de la
palanca hace contacto con la parte superior
de la cesta cuando presiona tendrá que
levantar el ensamblado del trinquete y
agregar más bloques de madera para
prensa.
11. Para retirar el ensamblado del trinquete,
invierta los insertos para trinquete en
las ranuras (es decir que los extremos
con punta deben estar hacia abajo y a la
derecha), y luego gire la manivela de la
palanca.
Platos de
madera
Bloques
de madera
para
prensa
FIGURA 6
Base
FIGURA 7
Platos de
madera
Bloques de
madera para
prensa
FRUTAS APLASTADAS
FRUTAS APLASTADAS
FRUTAS APLASTADAS
FRUTAS APLASTADAS
Page 16

16
INSTRUCCIONES EN ESPAÑOLINSTRUCCIONES EN ESPAÑOL
1. Destornille y retire la manivela de la palanca del mecanismo de palanca.
2. Retire el ensamblado del trinquete del eje con rosca.
3. Retire los bloques de madera para prensa y los platos de la cesta.
4. Retire los chavetas de seguridad de la cesta de las bisagras.
5. Retire las mitades de la cesta de la base.
6. Lave todas las piezas con agua tibia y jabón. Lave la base ensamblada y el
eje con rosca con una esponja, agua tibia y jabón.
7. Enjuague todas las piezas con agua limpia. Seque todas las piezas
inmediatamente.
8. Cubra todas las piezas de metal con silicona en aerosol apta para uso
alimentario.
9. Vuelva a ensamblar las mitades de la cesta sobre la base. Vuelva a
insertar las chavetas de seguridad de la cesta.
10. Coloque los Platos, los bloques de madera para prensa y la manivela de
la palanca en la cesta.
11. Coloque los insertos para trinquete en las ranuras.
12. Guarde la prensa para frutas y vino en un lugar fresco y seco.
INSTRUCCIONES DE LIMPIEZA
Page 17

Page 18

Esta garantía aplica a los productos que se compran y usan en los EE. UU. y
Canadá, y que se registraron adecuadamente dentro de 30 días de la fecha
de compra original. Esta es la única garantía expresa para este producto y
reemplaza cualquier otra garantía o condición. Este producto está garantizado
contra defectos materiales y de fabricación por un período de un (1) año a partir
de la fecha de compra original. Durante este período, su único recurso es la
reparación o sustitución de este producto o de cualquier componente que se
encuentre defectuoso, a nuestra elección.
Para registrar su producto, complete el formulario en línea en
www.WestonProducts.com/Warranty
Esta garantía no cubre productos no registrados, reparaciones o servicios a
productos no autorizados, productos vendidos “tal cual” por minoristas, vidrio,
ltros, desgaste por uso normal, uso que no sea conforme a las instrucciones
impresas o daño al producto como resultado de un accidente, alteración, abuso
o mal uso. Esta garantía se extiende únicamente al comprador consumidor
original o quien reciba el producto como regalo y no es transferible. Guarde
el recibo de compra original ya que se requiere de un comprobante de compra
para hacer un reclamo de garantía. Esta garantía es nula si el producto es
sujeto a cualquier voltaje u forma de onda que no sea la que se indica en la
etiqueta de especicaciones (p. ej., 120 V ~ 60 Hz).
Excluimos todo reclamo por daños especiales, incidentales o que resulten
como consecuencia del incumplimiento de la garantía expresa o implícita.
Toda responsabilidad se limita al monto del precio de compra. Toda garantía
implícita, incluyendo cualquier garantía legal o condición de comerciabilidad
o aptitud para un propósito en particular, se niega excepto en la medida
que lo prohíbe la ley, en cuyo caso dicha garantía o condición se limita a la
duración de esta garantía por escrito. Esta garantía le otorga derechos legales
especícos. Puede tener otros derechos legales que varían según donde vive.
Algunos estados o provincias no permiten limitantes en garantías implícitas o
daños especiales, incidentales o consecuentes, por lo tanto, es posible que las
limitaciones mencionadas anteriormente no apliquen para usted.
Antes de devolver el producto para cualquier reparación o servicio: debe estar
limpio y libre de partículas de alimentos u otra suciedad; de otra manera, se le
devolverá o aplicará un cargo de 50 USD por limpieza, a nuestra elección.
Para reclamar una garantía, visite www.WestonProducts.com/Contact o llame
al 1.800.814.4895 en los EE. UU. o al 001.440.638.3131 fuera de los EE. UU.,
de lunes a viernes de 8 a. m. a 5 p. m. hora del este. Usted es responsable de
todos los costos asociados con enviarnos el producto con el ete prepagado.
Si el producto calica para una reparación o un reemplazo bajo garantía,
asumiremos el costo de devolverle el producto. No somos responsables por
los daños resultantes del envío.
Para trabajo fuera de garantía: llame al 1.800.814.4895 dentro de los EE. UU.
o al 001.440.638.3131 fuera de los EE. UU., de lunes a viernes de 8 a. m. a
5 p. m. hora del Este, para obtener un número de autorización de devolución
de mercancía (Return Merchandise Authorization, RMA). Rechazaremos
toda devolución sin número de RMA. Aplicaremos un cargo de 35 USD/hora
por todo trabajo de diagnóstico, servicio, reparación o procesamiento. No
iniciaremos ningún servicio o trabajo de reparación sin autorización previa.
Usted es responsable de todos los costos asociados con enviarnos el producto
con el ete prepagado y con nuestra devolución hacia usted.
UN AÑO DE GARANTÍA WESTON LIMITADA
Page 19

PRESSOIR À VIN ET
A FRUITS
05-0101
PARCE QUE NOS PRODUITS BÉNÈFICIENT DE PERFECTIONNEMENTS CONSTANTS
APPORTÉS EN USINE, LES ILLUSTRATIONS PRÉSENTES PEUVENT ÊTRE LÉGÈREMENT
DIFFÉRENTES DU PRODUIT REÇU. 092315
Page 20

INSTRUCTIONS EN FRANÇAIS
20
1
2
3
4
9
10
11
12
18
5
6
7
13
16
8
19
20
Dessous de la base
21
2216
17
14
15
Page 21

INSTRUCTIONS EN FRANÇAIS
21
LISTE DES PIÈCES
NUMÉRO DE SCHÉMA DESCRIPTION DE LA PIÉCE NUMÉRO DE LA PIÉCE
1* GARNITURES DE ROCHET (2) 05-0102
2* PETITE PINCE DE FIXATION 05-0113
3* RONDELLE 05-0116
4* PLAQUE CRANTÉE DE LA PARTIE
SUPÉRIEURE
05-0105
5* COLLET INTÉRIEUR FILETÉ (COURONNE) 05-0110
6* PLAQUE CRANTÉE DE LA PARTIE
INFÉRIEURE
05-0111
7* TIGE FILETÉE 05-0104
8 CAGES (2) DE DEMI-PANIER 05-0107
9* AXE DE LA MANIVELLE 05-0112
10* MÉCANISME DE LA MANIVELLE 05-0115
11 MANIVELLE 05-0103
12* GRANDE PINCE DE FIXATION 05-0114
13 TIGES DE BLOCAGE DU PANIER (4) 05-0106
14 BLOCS DE PRESSAGE EN BOIS (10) 05-0108
15 PLAQUE DE BOIS (DEMI-DISQUE (2)) 05-0109
16 SOCLE 05-0119
17 ÉCROU DE RETENUE DE LA PARTIE
INFÉRIEURE
05-0117
18* GOUPILLE FENDUE 05-0118
19 RONDELLE DE LA TIGE DE LA PARTIE
SUPÉRIEURE
05-0121
20 RONDELLE DE LA TIGE DE LA PARTIE
INFÉRIEURE
05-0120
21 CLÉ ALLEN 4 MM 05-0205
22 VIS DE RÉGLAGE 05-0124
* CES PIÈCES SONT TOUTES PRÉALABLEMENT ASSEMBLÉES EN USINE.
N’hésitez pas à visiter notre site Web WestonProduct.com/support si un composant est
cassé, l’outil fonctionne mal, ou pour commander un nouveau mode d’emploi.
WestonProducts.com
Veuillez appeler Weston Brands, LLC au numéro sans frais : 1-800-814-4895
Du lundi au vendredi: de 8h00 à 17h00 ET. En dehors des États-Unis, veuillez
appeler le 001-440-638-3131
Page 22

INSTRUCTIONS EN FRANÇAIS
22
INSTRUCTIONS DE MONTAGE
1. Avant l’assemblage, nettoyer complètement
le pressoir à vin et à fruits et avant de l’utiliser
pour la première fois, enlever tout résidu qui
a pu s’accumuler pendant la fabrication et
l’expédition. Voir la rubrique « INSTRUCTIONS
DE NETTOYAGE » du présent livret.
2. Retirer l’écrou de retenue de la partie
inférieure et la rondelle de la tige de la partie
inférieure de la tige letée.
3. Commencer à visser la vis de réglage dans le
trou sur la face cachée de la base (FIGURE 2)
sans serrer complètement.
4. Insérer la tige letée dans la rondelle de la
tige de la partie supérieure puis par l’ouverture
dans le centre de la base (FIGURE 1).
5. Serrer la vis de réglage jusqu’à ce qu’elle
soit bien ajustée à l’aide de la clé Allen fournie
(FIGURE 2).
6. Serrer la tige letée à la base avec la
rondelle de la tige de la partie inférieure et
l’écrou de retenue de la partie inférieure
(FIGURE 1).
7. Placer chaque cage de demi-panier sur la
base formant un cercle autour de la tige letée
et assembler les charnières (FIGURE 3).
8. Fixer le panier en insérant une tige de
blocage du panier dans chaque charnière
(FIGURE 4).
9. Insérer l’extrémité letée dans la manivelle du
mécanisme de la manivelle (FIGURE 5).
Socle
Tige letée
Tiges de
blocage
du panier
FIGURE 4
FIGURE 2
Socle
Vis de
réglage
Clé Allen
FIGURE 1
FIGURE 3
Écrou de retenue de la partie inférieure et
rondelle de la tige de la partie inférieure
Rondelle de la
tige de la partie
supérieure
FIGURE 5
Manivelle
Mécanisme
de la
manivelle
Page 23

INSTRUCTIONS EN FRANÇAIS
23
Garnitures
de rochets
FIGURE 8
FIGURE 9
1. Remplir le panier de fruits jusqu’à 1 po
(2,5 cm) du bord. Pour de meilleurs résultats,
écraser les fruits avant de les presser.
2. Poser les plaques de bois sur le dessus
des fruits (FIGURE 6).
3. Poser deux blocs de pressage en bois
sur le dessus des plaques de bois. Placer
les blocs perpendiculaires à l’écart entre les
plaques et aussi près que possible de la tige
letée.
4. Continuer à ajouter des ensembles
de blocs (chaque ensemble placé
perpendiculairement à l’ensemble précédent)
jusqu’à ce que les blocs soient plus élevés
que le panier (FIGURE 7).
5. Abaisser l’assemblage de rochets jusqu’à
ce que la plaque crantée de la partie
inférieure atteigne les blocs. Faire tourner
l’assemblage de rochets dans le sens horaire
pour l’abaisser et dans le sens antihoraire
pour le monter (en regardant depuis le
dessus).
6. Positionner l’assemblage de rochets an
que le mécanisme de la manivelle soit à
votre droite. Placer une garniture de rochet
dans la fente de la plaque crantée de la
partie supérieure qui est la plus proche de
vous. L’extrémité pointue de la garniture
de rochet devrait être vers le bas et vers la
gauche (FIGURE 8).
7. Faire tourner l’assemblage de rochets
jusqu’à ce que le mécanisme de la manivelle
soit à votre gauche. Placer une autre
garniture de rochet dans la fente restante
avec l’extrémité pointue vers le bas et vers la
gauche.
8. Placer un récipient sous le bec verseur
pour recueillir le jus qui s’écoule de la base
(FIGURE 9).
9. Tourner la manivelle pour presser les
fruits.
10. Continuer à tourner la manivelle jusqu’à
ce que l’assemblage de rochets rencontre
une grande résistance. Si la manivelle
touche le haut du panier pendant le pressage
vous devrez remonter l’assemblage de
rochets et ajouter plus de blocs de pressage
en bois.
11. Pour démonter l’assemblage de rochets,
renverser les garnitures de rochets dans
les fentes (c’est-à-dire que les extrémités
pointues devraient être vers le bas et vers la
droite), puis tourner la manivelle.
INSTRUCTION D’UTILISATION
Plaques
de bois
Blocs de
pressage
en bois
FIGURE 6
Socle
FIGURE 7
Plaques
de bois
Blocs de
pressage
en bois
FRUITS ÉCRASÉS
FRUITS ÉCRASÉS
FRUITS ÉCRASÉS
FRUITS ÉCRASÉS
Page 24

INSTRUCTIONS EN FRANÇAIS
24
1. Dévisser et retirer la manivelle du mécanisme de la manivelle.
2. Retirer l’assemblage de rochets de la tige letée.
3. Retirer les blocs de pressage en bois et les plaques du panier.
4. Retirer les tiges de blocage du panier des charnières.
5. Retirer les cages de demi-panier de la base
6. Laver soigneusement dans de l’eau tiède savonneuse. Laver la base
assemblée et la tige letée avec une éponge et une eau savonneuse tiède.
7. Rincer toutes les pièces dans de l’eau chaude propre. Faire sécher
immédiatement toutes les pièces.
8. Enduire tous les composants métalliques d’un silicone de qualité
alimentaire en vaporisateur an d’empêcher la corrosion.
9. Remonter les cages de demi-panier sur le socle. Réinstaller les tiges de
du panier.
10. Placer les plaques, les blocs de pressage en bois et la manivelle dans le
panier.
11. Placer les garnitures de rochets dans les fentes.
12. Ranger le pressoir à vin et à fruits dans un endroit frais et sec.
INSTRUCTIONS DE NETTOYAGE
Page 25

Page 26

La présente garantie s’applique aux produits, achetés et utilisés aux États-Unis et au
Canada, qui ont été dûment enregistrés dans un délai de 30 jours à compter de la date
d’achat initiale. La présente garantie est la seule garantie expresse pour ce produit
et remplace toute autre garantie ou condition. Ce produit est garanti contre tout
défaut de matériaux et de fabrication pour une durée d’un (1) an à compter de la date
d’achat initiale. Au cours de cette période, votre seul recours est la réparation ou le
remplacement de ce produit ou de tout composant s’avérant défectueux, à notre gré.
Pour enregistrer votre produit : remplissez le formulaire en ligne à l’adresse
www.WestonProducts.com/Warranty
La présente garantie ne couvre pas les produits non enregistrés, ni les réparations
ou services après-vente non autorisés, les produits vendus « tels quels » par les
détaillants, le verre, les ltres et l’usure normale d’utilisation, toute utilisation non
conforme aux directives écrites, ni les dommages au produit résultant d’un accident,
d’une modication, d’une utilisation abusive ou incorrecte. La présente garantie est
valable uniquement pour l’acquéreur initial ou le destinataire du cadeau et n’est pas
cessible. Veuillez conserver le ticket de caisse d’origine, puisqu’une preuve d’achat
est requise pour toute réclamation de garantie. La présente garantie devient caduque
si le produit est soumis à une tension ou forme d’onde autre que celle indiquée sur
l’étiquette (par ex., 120 V ~ 60 Hz).
Aucune réclamation en cas de dommages spéciaux, consécutifs ou indirects résultant
du non-respect de toute garantie expresse ou implicite ne sera prise en compte.
Toute responsabilité se limite au montant du prix d’achat. Toute garantie implicite,
notamment toute garantie légale, condition de commercialité ou d’adaptation à une n
particulière, est exclue, sauf dans la mesure où cela est interdit par la loi en vigueur,
auquel cas cette garantie ou condition est limitée à la durée de la présente garantie
écrite. La présente garantie vous confère des droits juridiques spéciques. Vous
pouvez également bénécier d’autres droits juridiques qui varient selon l’endroit
où vous vivez. Certains États ou provinces n’autorisent pas de limitations sur les
garanties implicites ou sur les dommages spéciaux, consécutifs ou indirects, de sorte
que les limitations susmentionnées pourraient ne pas vous concerner.
Avant de retourner le produit pour réparation ou entretien : il doit être propre et exempt
de toute particule de nourriture ou d’autres débris; sans quoi nous serons dans
l’obligation de vous le retourner ou nous vous facturerons des frais de nettoyage de 50
dollars, à notre gré.
Pour procéder à une réclamation de garantie : allez à l’adresse www.
WestonProducts.com/Contact; ou appelez le 1.800.814.4895 pour les États-Unis et le
001.440.638.3131 hors des États-Unis, du lundi au vendredi, de 8 h à 17 h HNE. Tous
les frais liés à l’envoi du produit, frais de transport prépayés inclus, sont à votre charge.
Si le produit remplit les conditions pour une réparation ou un remplacement sous
garantie, les frais de retour seront à notre charge. Nous déclinons toute responsabilité
en cas de dommages dus au transport.
Pour toute réparation sans garantie : appelez le 1.800.814.4895 pour les États-Unis
et le 001.440.638.3131 hors des États-Unis, du lundi au vendredi, de 8 h à 17 h
HNE, pour obtenir un numéro d’autorisation de retour de marchandises (numéro de
RMA). Tout envoi expédié sans numéro de RMA sera refusé. Tout diagnostic, travail
d’entretien, de réparation ou de traitement sera facturé 35 USD/heure. Aucun travail
d’entretien ou de réparation ne sera effectué sans autorisation préalable. Tous les frais
liés à l’envoi du produit, frais de transport prépayés inclus, ainsi que ceux de retour
sont à votre charge.
UN AN DE GARANTIE WESTON LIMITÉE
Page 27

Page 28

ATTENTION!
PLEASE INSPECT THIS PACKAGE THOROUGHLY FOR MISSING PARTS OR ANY PRODUCT DAMAGE.
IF YOUR PRODUCT CONTAINS SHIPPING DAMAGE, PLEASE CONTACT RETAILER FOR ASSISTANCE.
For all other questions regarding product usage, missing parts, product damage, difculty or warranty activation,
please contact the Weston Brands Customer Service Team:
8:00 am to 5:00 pm ET, Monday thru Friday
CustomerService@WestonProducts.com
U.S. Residents Customer Service Line: 1-800-814-4895 (Outside U.S. Call: 001-440-638-3131)
Weston Brands LLC, Cleveland, Ohio 44149
WestonProducts.com
Please DO NOT return this item to the retailer before contacting
Weston Brands Customer Service.
SAVE THESE INSTRUCTIONS!
Refer to them often and use them to instruct others.
ATTENTION!
VEUILLEZ INSPECTER CET EMBALLAGE AVEC SOIN POUR Y DÉTECTER
TOUTE PIÈCE MANQUANTE OU ENDOMMAGÉE.
SI DES PIÈCES ONT ÉTÉ ENDOMMAGÉES PENDANT LE TRANSPORT, VEUILLEZ
COMMUNIQUER AVEC LE DÉTAILLANT POUR OBTENIR DE L’AIDE.
Pour toutes les autres questions concernant l’utilisation du produit, les pièces manquantes, les problèmes ou
l’activation de la garantie, veuillez communiquer avec l’équipe du service clientèle des produits Weston:
de 8:00 à 17:00 HNE, du lundi au vendredi.
CustomerService@WestonProducts.com
Numéro de téléphone du service clientèle pour les résidents des É.-U. : 1-440-638-3131
Numéro de téléphone à l’extérieur des É.-U. : 001-440-638-3131 Weston Brands LLC,
Weston Brands LLC, Cleveland, Ohio 44149
WestonProducts.com
Veuillez communiquer avec le service clientèle des produits Weston AVANT de retourner cet appareil au détaillant.
CONSERVER CES DIRECTIVES!
Veuillez les consulter fréquemment et les utiliser pour la formation.
¡ATENCIÓN!
Revise completamente el envase y compruebe que no falten partes o que algún producto esté dañado.
si el producto está dañado por el transporte, solicite asistencia al distribuidor.
Para todas aquellas preguntas referentes al uso del producto, partes faltantes, daño del producto, dicultad
o activación de la garantía, comuníquese con el equipo de servicio al cliente de weston Brands:
desde las 8:00 am hasta las 5:00 pm ET, de lunes a viernes
CustomerService@WestonProducts.com
Línea de Servicio al Cliente para Residentes de EE.UU.: 1.800.814.4895 (Fuera de EE.UU., llame al: 001-
1-440-638-3131) Weston Brands LLC, Cleveland, Ohio 44149
WestonProducts.com
NO devuelva este artículo al vendedor minorista antes de comunicarse con Servicio al Cliente de
Weston Brands.
¡GUARDE ESTAS INSTRUCCIONES!
Consulte estas instrucciones y úselas para enseñar sobre el uso de este producto a otras personas.
 Loading...