

Page 1
ROASTER OVENS
18 QT BLACK: 03-4000-W
22 QT STAINLESS STEEL: 03-4100-W
DUE TO CONSTANT FACTORY IMPROVEMENTS, THE PRODUCT PICTURED MIGHT DIFFER
SLIGHTLY FROM THE PRODUCT IN THIS BOX. 062716
Page 2

TABLE OF CONTENTS / ÍNDICE / TABLE DES MATIÈRES
2
GENERAL SAFETY RULES
COMPONENT LIST
USING YOUR ROASTER
TIPS
ROASTING MEATS
ROASTING CHART
BAKING, STEAMING, WARMING, COOKING
CLEANING
WARRANTY
REGLAS IMPORTANTES DE SEGURIDAD
LISTA DE COMPONENTES
CÓMO SE USA EL HORNO ASADOR
CONSEJOS
CÓMO ASAR CARNES ROJAS Y DE AVE
TABLA DE ASADO
HORNEAR , COCER AL VAPOR , CALENTAMIENTO , COCCIÓN
LIMPIEZA
GARANTÍA
IMPORTANTES RÈGLES DE SÉCURITÉ
PIÈCES
MODE D’EMPLOI
CONSEILS
RÔTISSAGE DE VIANDES ET VOLAILLES
TABLEAU DE RÔTISSAGE
LA CUISSON, LA VAPEUR, LE RÉCHAUFFEMENT , LA CUISINE
NETTOYAGE
GARANTIE
3
4
5
6
7
8
9
10
11
13
14
15
16
17
18
19
20
21
23
24
25
26
27
28
29
30
31
Page 3

CLEANING INSTRUCTIONS
3
ENGLISH INSTRUCTIONS
1. Read all instructions.
2. This appliance is not intended for
use by persons (including children) with
reduced physical, sensory, or mental
capabilities, or lack of experience and
knowledge, unless they are closely
supervised and instructed concerning
use of the appliance by a person
responsible for their safety.
3. Close supervision is necessary
when any appliance is used by or near
children. Children should be supervised
to ensure that they do not play with the
appliance.
4. Do not touch hot surfaces. Use
handles or knobs.
5. Use oven mitts to remove the roasting
pan or rack from the roaster oven, or to
remove a baking pan or cooked food
from the roasting pan.
6. To protect against electrical shock do
not immerse roaster base, cord, or plug
in water or other liquid.
7. Unplug from outlet when not in use
and before cleaning. Allow to cool
before putting on or taking off parts and
before cleaning.
8. Do not operate any appliance with a
damaged supply cord or plug, or after
the appliance malfunctions or has been
dropped or damaged in any manner.
Supply cord replacement and repairs
must be conducted by the manufacturer,
its service agent, or similarly qualied
persons in order to avoid a hazard.
Call the provided customer service
number for information on examination,
repair, or adjustment.
9. The use of accessory attachments
not recommended by the appliance
manufacturer may cause injuries.
10. Do not use outdoors.
11. Do not let cord hang over edge of
table or counter, or touch hot surfaces,
including the stove.
GENERAL SAFETY RULES
READ AND FULLY UNDERSTAND ALL INSTRUCTIONS AND WARNINGS
PRIOR TO USING THIS UNIT. YOUR SAFETY IS MOST IMPORTANT!
FAILURE TO COMPLY WITH PROCEDURES AND SAFE GUARDS MAY
RESULT IN SERIOUS INJURY OR PROPERTY DAMAGE. REMEMBER:
YOUR PERSONAL SAFETY IS YOUR RESPONSIBILITY!
SAVE THESE INSTRUCTIONS
12. To disconnect, turn any control to MIN
and then remove plug from wall outlet.
13. Do not place on or near a hot gas or
electric burner, or in a heated oven.
14. Extreme caution must be used when
moving an appliance containing hot oil or
other hot liquids.
15. Steam escaping from under lid is hot
and can burn.
16. Do not use without the roasting pan
specically designed for this model.
17. Do not use appliance to melt wax or
any other nonfood use.
18. Do not allow ammable materials such
as curtains, draperies, walls, cabinets,
backsplashes, and the like to touch any
part of the roaster oven while it is in
operation.
19. Do not use appliance for other than
intended use.
Page 4
ENGLISH INSTRUCTIONS
4
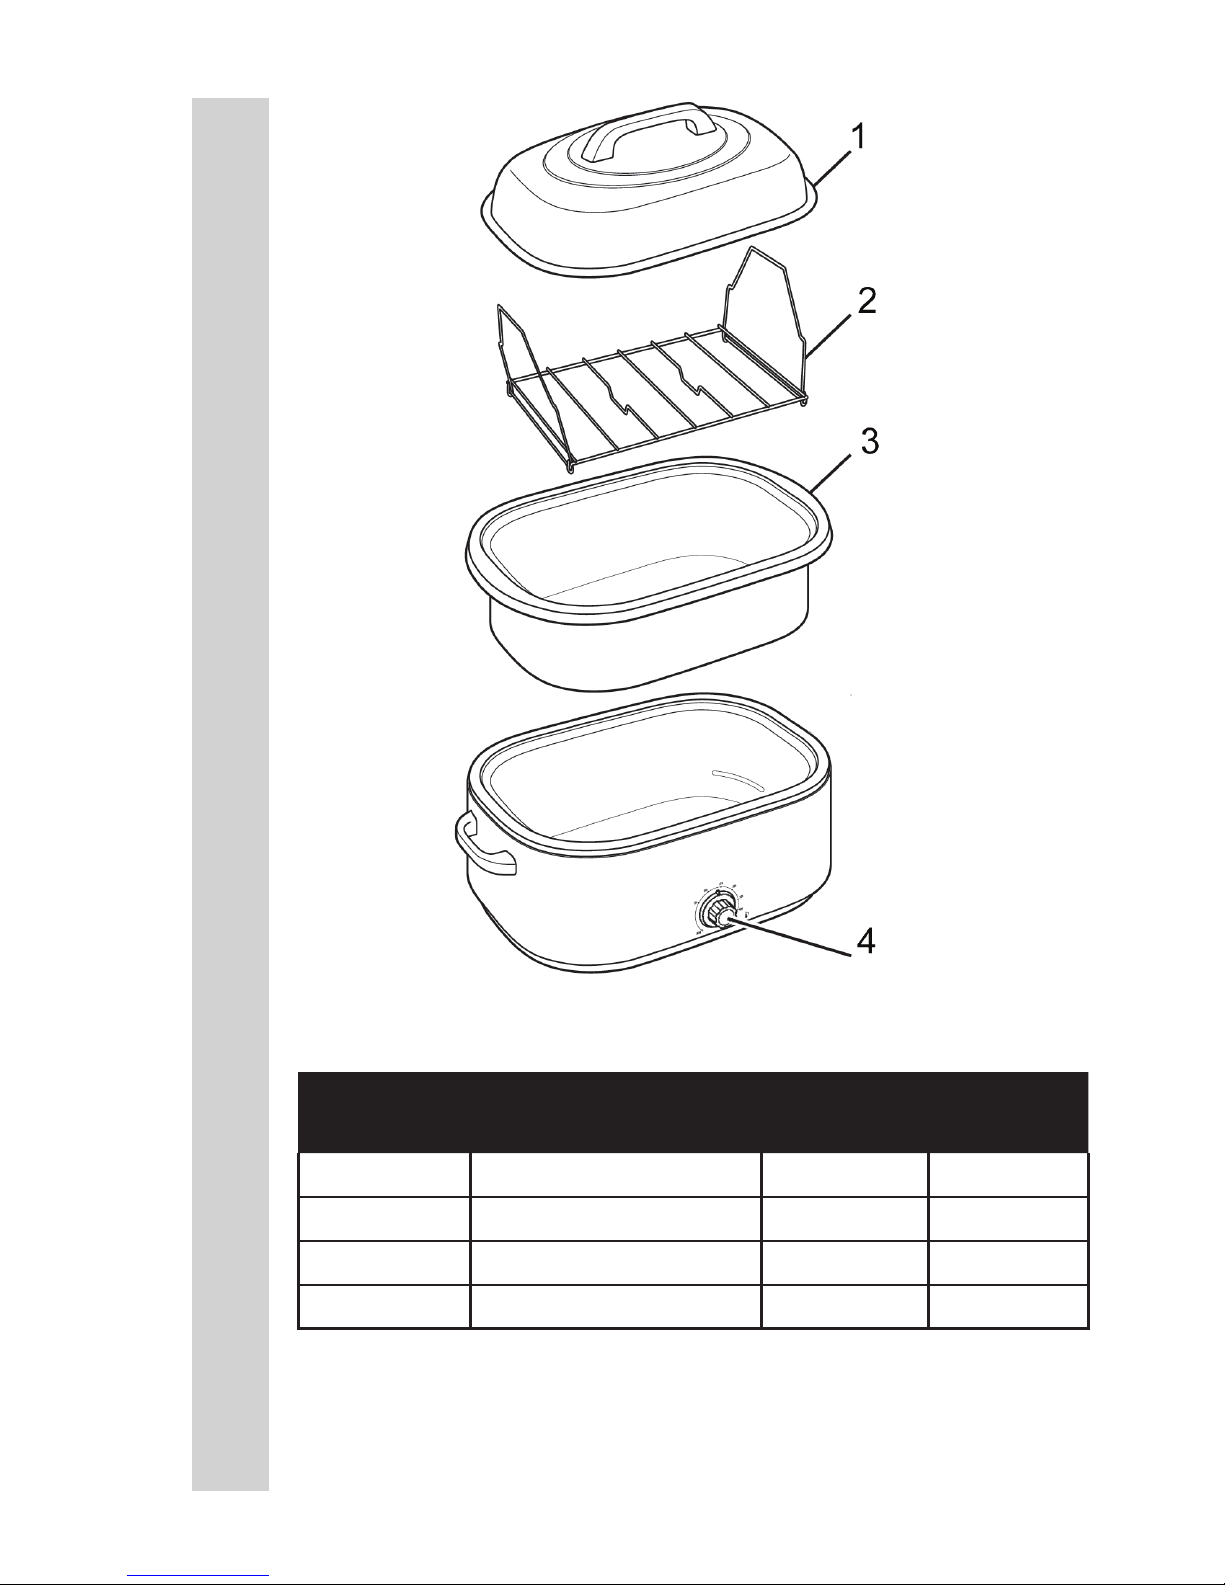
COMPONENT LIST
DIAGRAM NUMBER PART DESCRIPTION PART NUMBER
(18 QT)
PART NUMBER
(22 QT)
1 LID 03-4003 03-4003
2 RACK 03-4002 03-4002
3 ROASTING PAN 03-4001 03-4101
4 CONTROL KNOB 03-4004 03-4004
If any components of this unit are broken, the unit does not operate properly or you
need a replacement instruction manual, visit us on the web at
WestonProducts.com
Or call Weston Brands LLC Toll Free at 1-800-814-4895
Monday thru Friday 8:00am-5:00pm ET. Outside the U.S. call 001-216-901-6801
Page 5
5
ENGLISH INSTRUCTIONS
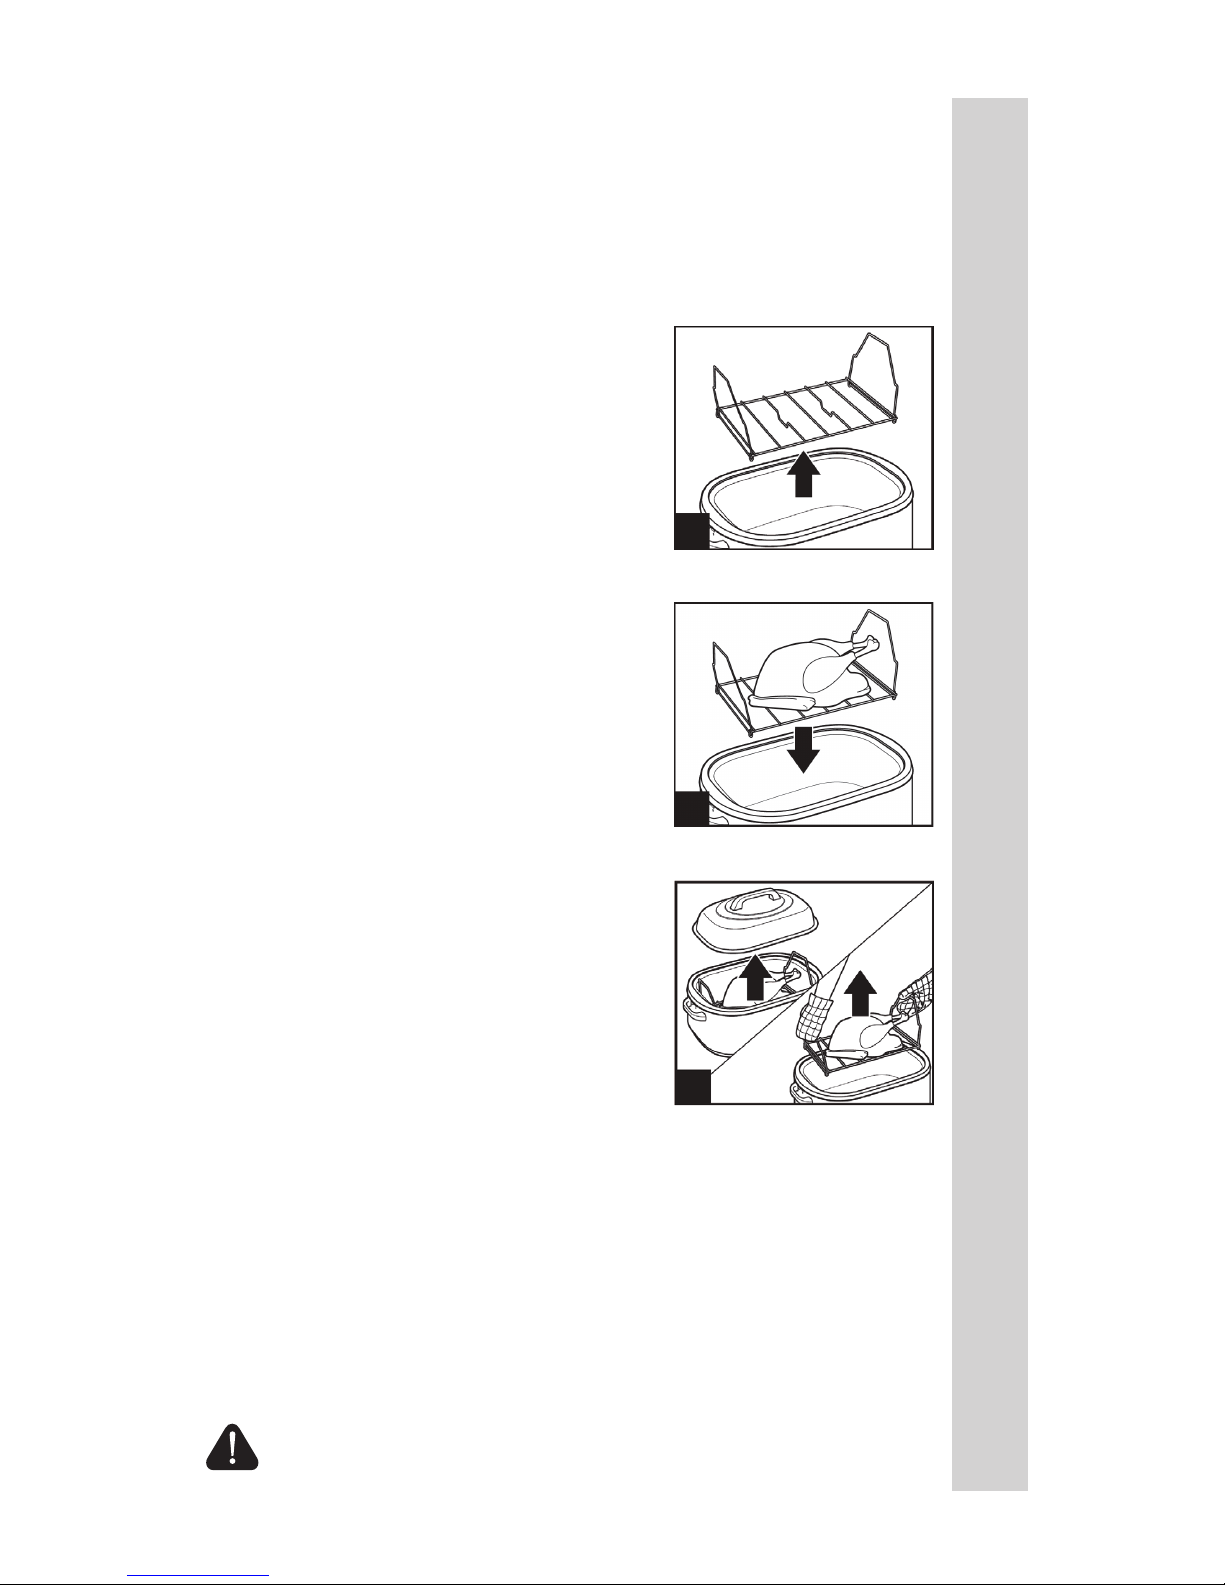
USING YOUR ROASTER OVEN
1. Make sure temperature control is turned to MIN.
Plug cord into outlet.
2. Remove rack. Leave roasting pan in roaster
oven. FIGURE 1
3. Set temperature control to desired setting and
let preheat 15 minutes with lid on.
4. Place food to be cooked in a pan on the rack
(or directly in the roasting pan). Then place rack in
oven and replace the lid. FIGURE 2
5. When nished cooking, remove lid. Wearing
oven mitts, remove food by using the rack.
FIGURE 3
6. Turn temperature control to MIN and unplug.
NOTE: The roasting pan should always be
placed in the roaster base when cooking.
WARNING: Burn Hazard. Escaping steam may cause burns.
Use hot mitts to protect hands when removing roasting pan,
rack, baking pan, or cooked food.
1
2
3
BEFORE FIRST USE: Wash insert pan, rack, and lid in hot, soapy water.
Rinse and dry. During the rst use of the roaster oven, some smoke and odor
may be noticed. The smoke and odor should not occur after this rst heating
of the oven.
Page 6

ENGLISH INSTRUCTIONS
6
TIPS FOR USING YOUR ROASTER OVEN
• Before baking or roasting in the roaster oven, make sure the pan or dish
you plan to use will t by placing it in the roasting pan. Most heat-resistant
glass casserole dishes t in the roaster oven.
• The roasting pan must always be used when cooking in the roaster oven.
If cooking large quantities of soups or stews, the roasting pan may be used
as the cooking pan in the roaster base. It may also be used as a large
roasting pan in the roaster base.
• Do not use the roasting pan as a baking pan or casserole dish for cakes,
breads, or casseroles. A separate pan must be placed in the roasting pan
when cooking these foods.
• Baking pans and casserole dishes should be placed on the rack for best
heat circulation. If necessary, the rack can be removed to t a large roast-
ing pan or two casseroles in roaster oven.
• Foil oven roasting bags can be used in the roaster oven. We do not
recommend using plastic oven roasting bags in the roaster oven.
• Do not remove the lid of the roaster oven unless necessary. Removing
the lid allows heat to escape and affects the temperature of the roaster
oven.
• Unless otherwise instructed, preheat roaster oven for 15 minutes to the
temperature stated in recipes.
• If a recipe calls for the use of a baking pan or dish, take the rack out of
the roaster oven. Preheat oven to desired temperature. Then place pan on
the rack and then place both into the roaster oven. Bake as instructed in
recipe. The rack makes it easier to place or remove pans or dishes in the
hot roaster oven. Following are pan sizes which will t in the roaster ovens:
• One 9- x 13-inch (23 x 33 cm) baking
or 10- x 14-inch (25 x 36 cm) roasting pan
• Two 9- x 5-inch (23 x 13 cm)
or 8- x 4-inch (20 x 10 cm) loaf pans
• One tube or bundt pan
Page 7

7
ENGLISH INSTRUCTIONS
ROASTING MEATS AND POULTRY
• We recommend the use of a meat thermometer to ensure perfectly
cooked roasts and poultry every time. If using a meat thermometer,
the meat or poultry should be removed from the roaster oven when the
thermometer reading is 5 to 10 degrees below the desired temperature.
The internal temperature will continue to rise after the meat has been
removed from the roaster oven.
• Most hams sold today are labeled as “Cook Before Eating” or “Fully
Cooked.” Ham labeled “Cook Before Eating” has been smoked or cured
but NOT cooked. This ham must be thoroughly cooked to an internal
temperature of 155º to 160°F (68º to 71ºC). The “Fully Cooked” hams have
been smoked or cured and already cooked. The ham does not require
further cooking, but heating to 140°F (60ºC) improves the avor.
• The roaster oven cooks turkeys in less time than conventional ovens. A
25- to 28-pound (11.3–12.7 kg) unstuffed turkey will cook in approximately
3 1/2 to 4 hours. A turkey cooked in the roaster oven is moist and juicy, but
is lighter brown than a conventional oven roasted turkey.
• The Roasting Chart lists cooking times for tender cuts of meat that
are usually dry-roasted. These roasts are from the rib or sirloin area. To
tenderize cuts from the leg (ham) or shoulder/chuck area, cook in liquid for
a longer period of time.
• Times indicated are approximate and should be used only as a general
guideline. Individual cuts of meat and personal preference may dictate
longer or shorter roasting times.
• Food must be hot enough to prevent bacterial growth.
Visit foodsafety.gov for more information.
Page 8
ENGLISH INSTRUCTIONS
8
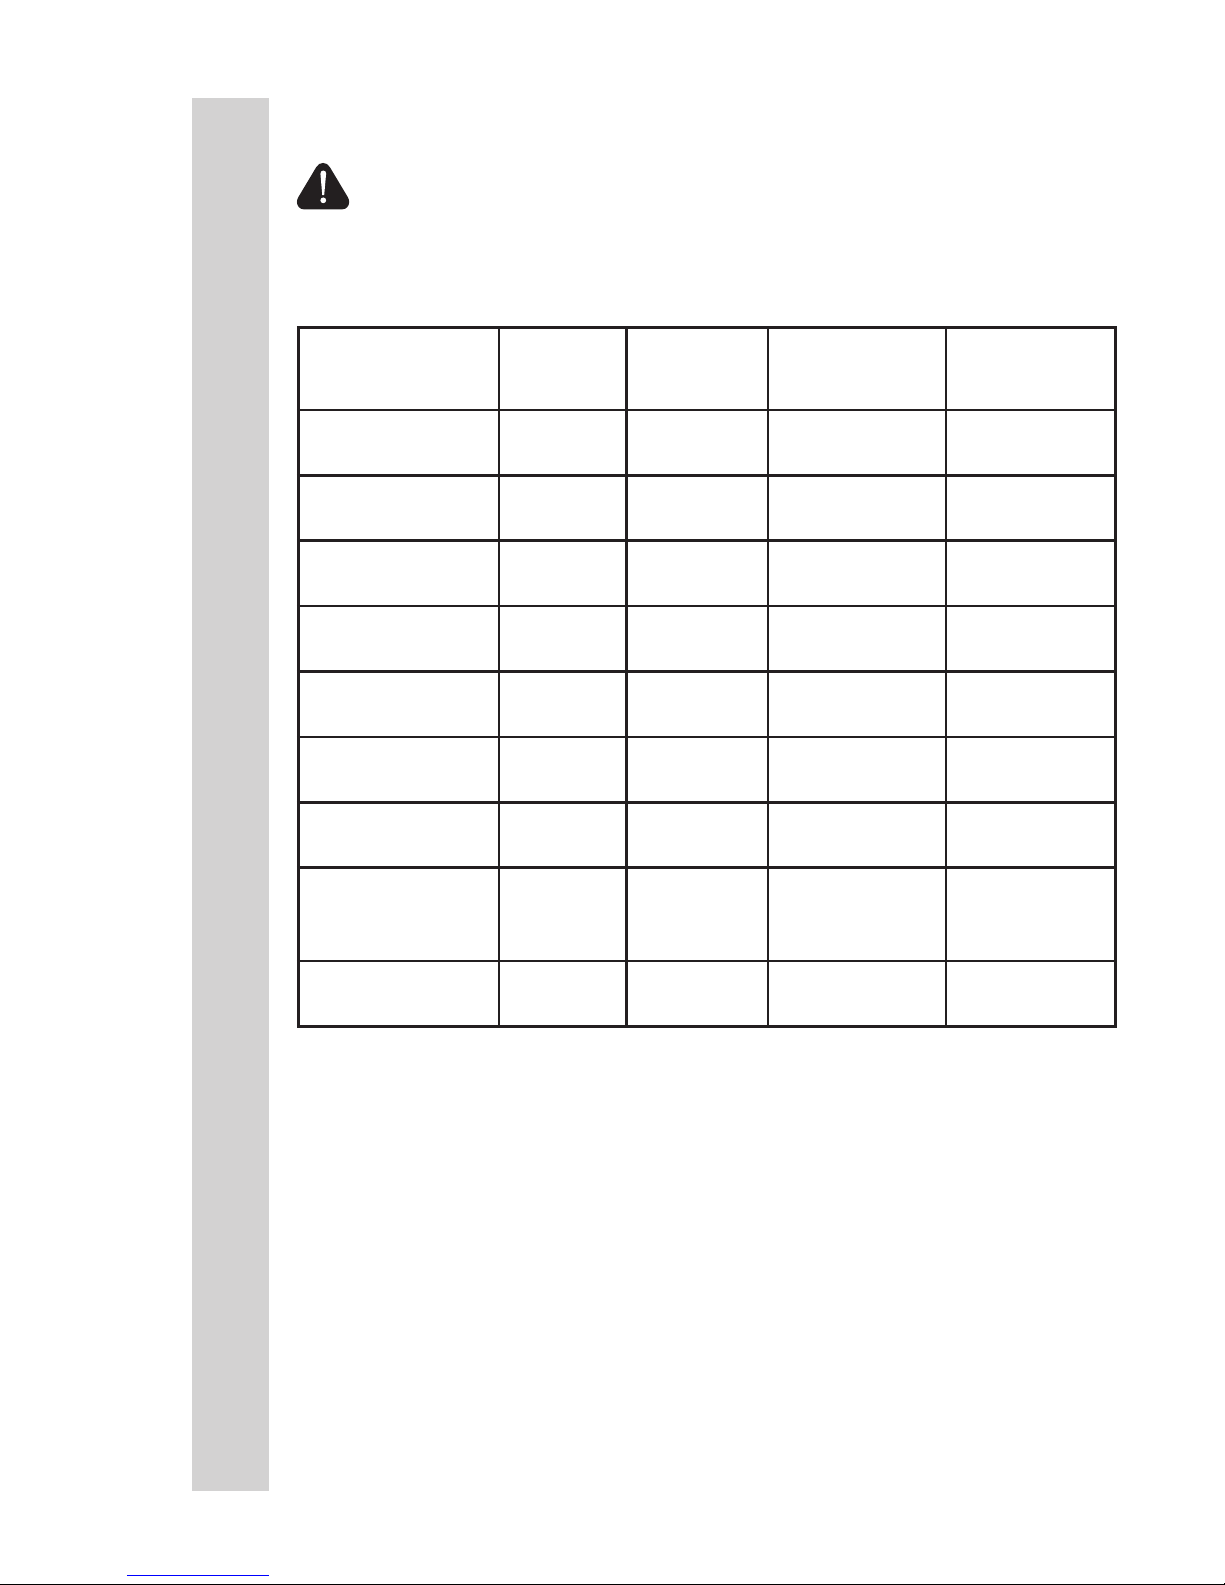
FOOD
WT. LBS
WT. KGS
MEAT
THERM
COOK TIME
(18 QT/325ºF)
18 L/160ºC)
COOK TIME
(22 QT/325ºF)
22 L/160ºC)
Whole Turkey 14-18
6.4-8.2
180ºF/82ºC 2-3 hours 2-3 hours
Whole Turkey 19-24
8.6-10.9
180ºF/82ºC N/A 2-3 hours
Whole Turkey 25-28
11.3-12.7
180ºF/82ºC N/A 3 ½ - 4 hours
Turkey Breast 5-7
2.3-3.2
180ºF/82ºC 1 ½ hours 1 ½ hours
Roasting
Chicken
6-8
2.7-3.6
180ºF/82ºC 1 - 1 ½ hours 1 - 1 ½ hours
Beef Roast 5-7
2.3-3.2
160ºF/71ºC
(medium)
2 ½ hours 2 ½ hours
Fresh Pork Roast 5-7
2.3-3.2
160ºF/71ºC
(medium)
2 hours 2 hours
Picnic Shoulder
Ham
(Fully Cooked)
7-10
3.2-4.5
140ºF/60ºC 2-3 hours 2-3 hours
Whole Ham
(Fully Cooked)
15-18
6.8-8.2
140ºF/60ºC 2-3 hours 2-3 hours
ROASTING CHART
NOTE: Roasting chart is for reference only. Follow package directions or USDA
recommendations. Visit www.foodsafety.gov for more information on safe
internal cooking temperatures.
Page 9
ENGLISH INSTRUCTIONS
9
BAKING
The roaster oven can bake your favorite cakes, pies, breads, or casseroles
like a conventional oven. Pans and dishes should be placed on the rack for
best heat circulation. Using the rack is also recommended for convenience
in removing hot dishes and pans from the roaster oven. Do not remove the
lid of the roaster oven unless necessary. Removing the lid allows heat to
escape and affects the temperature of the roaster oven.
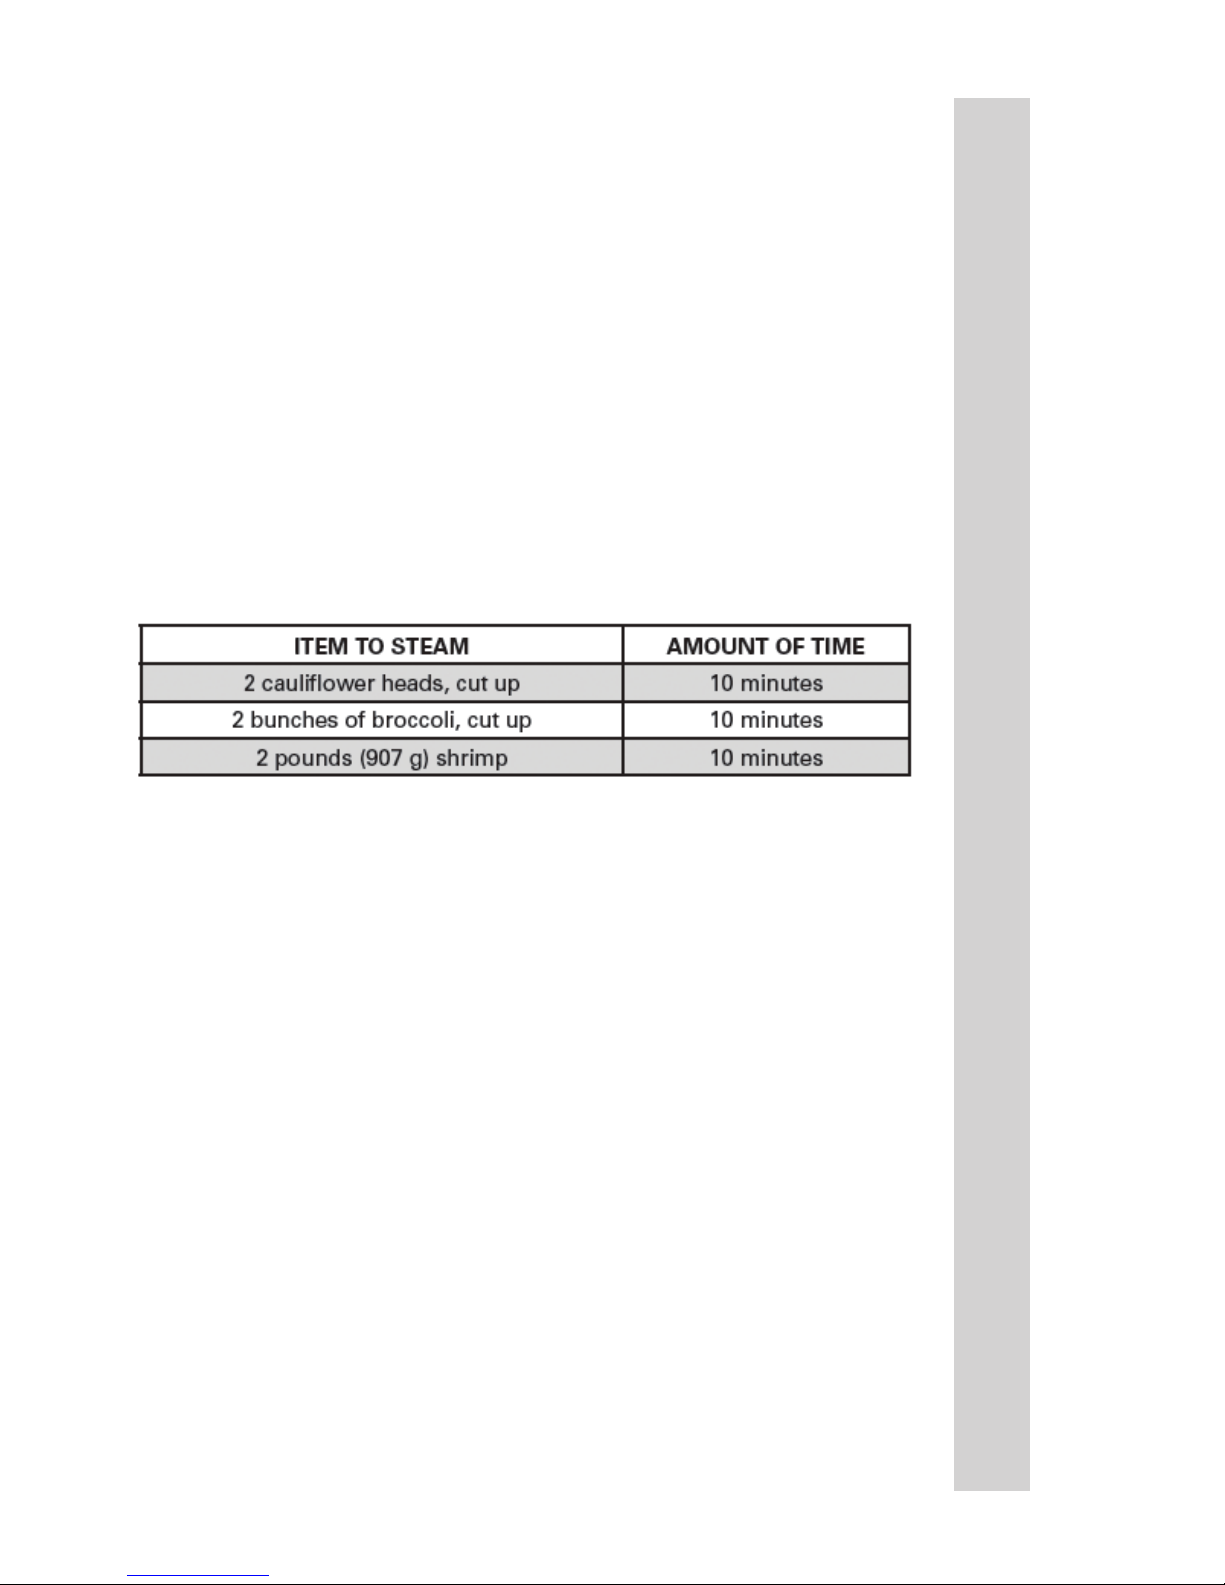
STEAMING
Preheat roaster oven to 450ºF (232ºC). To steam in the roaster oven, you
will need a metal colander. Place rack in the roasting pan. Place roasting
pan in roaster oven. Pour 1 quart (946 ml) boiling water into the roasting
pan. Place food to be steamed in the colander and place colander in
roasting pan. Cover and steam according to the chart times or until desired
doneness.
WARMING ROLLS & BISCUITS
Preheat roaster over to 250ºF (121ºC). You will need two small ovenproof
containers to hold water. Emptied and washed food cans are perfect. Fill
the cans two-thirds full with hot water and place in opposite corners of the
roasting pan.
Stack rolls, biscuits, or pancakes in roasting pan. Do not let them touch sides
of pan. Cover and keep warm up to 1 hour.
QUANTITY COOKING
The roasting pan may be used as a large cooking utensil when cooking or
heating large quantities. It may be used to simmer sauces, soups, or stews,
or simply to heat or warm large quantities. When cooking or heating soups
or stews in the roaster oven, stir occasionally for quicker, even heating.
For example, set the temperature control at 400°F (204ºC) and the roaster
oven will warm vegetable beef soup from refrigerated temperature to serving
temperature in about 2 hours. To cook soups, stews, or sauces, set the
temperature control on 225°F (107ºC) and allow 4 to 8 hours to simmer,
depending on recipe.
Page 10
ENGLISH INSTRUCTIONS
10
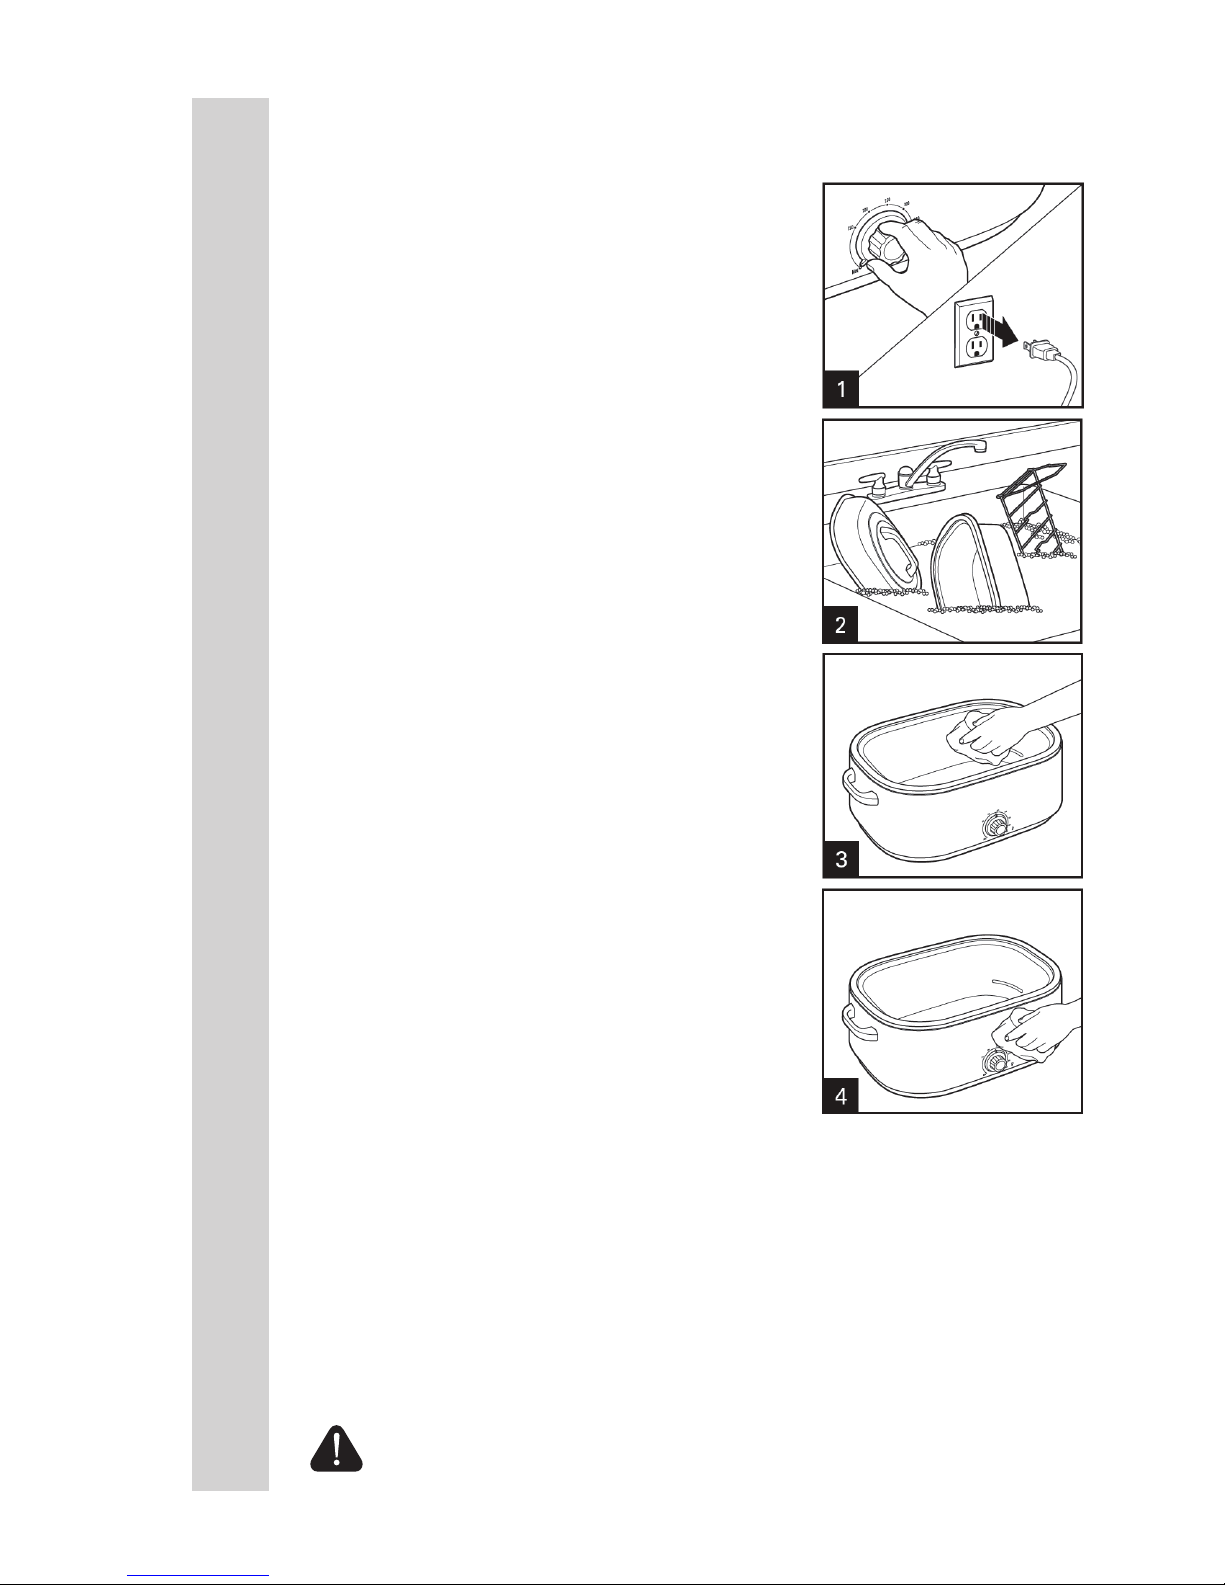
CLEANING
1. Turn temperature control to MIN. Unplug and let
cool completely.
2. Wash cover, rack & roasting pan in hot, soapy
water. To remove burned-on food, let soak; then
scrub with a nylon scouring pad. Rinse in hot
water; then dry.
3. Wipe the inside of the roaster base with a damp
cloth.
4. Wipe the outside of the roaster oven with a
damp, soapy cloth; then dry. NOTE: The lid may
discolor from the cooking process. It is a natural
occurrence and does not affect performance.
WARNING: Electrical Shock Hazard. Disconnect power before cleaning.
Do not immerse cord, plug, or base in any liquid. Failure to follow these
instructions can result in death or electrical shock.
Page 11

This warranty applies to products purchased and used in the U.S. and Canada,
which have been properly registered within 30 days of the date of original
purchase. This is the only express warranty for this product and is in lieu of
any other warranty or condition. This product is warranted to be free from
defects in material and workmanship for a period of one (1) year from the date
of original purchase. During this period, your exclusive remedy is repair or
replacement of this product or any component found to be defective, at our
option.
To register your product: complete the online form at
www.WestonProducts.com/Warranty.
This warranty does not cover unregistered products, unauthorized repairs or
service to products, products sold “as-is” by retailers, glass, lters, wear from
normal use, use not in conformity with the printed directions, or damage to the
product resulting from accident, alteration, abuse, or misuse. This warranty
extends only to the original consumer purchaser or gift recipient and is not
transferrable. Keep the original sales receipt, as proof of purchase is required
to make a warranty claim.
We exclude all claims for special, incidental and consequential damages
caused by breach of express or implied warranty. All liability is limited to
the amount of the purchase price. Every implied warranty, including any
statutory warranty or condition of merchantability or tness for a particular
purpose, is disclaimed except to the extent prohibited by law, in which case
such warranty or condition is limited to the duration of this written warranty.
This warranty gives you specic legal rights. You may have other legal rights
that vary depending on where you live. Some states or provinces do not
allow limitations on implied warranties or special, incidental, or consequential
damages, so the foregoing limitations may not apply to you.
Before returning the product for any repair or service: it must be clean and free
from any food particles or other debris; otherwise, we will return it or impose a
$50 cleaning surcharge, at our option.
To make a warranty claim: go to www.WestonProducts.com/Contact; or call
1.800.814.4895 in the U.S. and 001.216.901-6801 outside the U.S., Monday –
Friday, 8 am – 5 pm Eastern. You are responsible for all costs associated with
shipping us the product freight prepaid. If the product qualies for a warranty
repair or replacement, we will bear the cost of returning it to you. We are not
responsible for shipping damage.
For non-warranty work: call 1.800.814.4895 in the U.S. and 001.216.901.6801
outside the U.S., Monday – Friday, 8 am – 5 pm Eastern, to obtain a Return
Merchandise Authorization Number (RMA Number). We will refuse all returns
without an RMA Number. We charge US$35/hour for all diagnostic, service,
repair and processing work. We will not start any service or repair work without
prior authorization. You are responsible for all costs associated with shipping
us the product freight prepaid and our returning it to you.
ONE-YEAR LIMITED WESTON WARRANTY
Page 12

HORNO ASADOR
18 CUARTO NEGRO: 03-4000-W
22 CUARTO EN ACERO INOXIDABLE: 03-4100-W
DEBIDO A CONSTANTES MEJORAS EN LA FÁBRICA, EL PRODUCTO QUE SE MUESTRA
PUEDE SER LIGERAMENTE DIFERENTE DEL PRODUCTO EN ESTA CAJA. 062616
Page 13

REGLAS IMPORTANTES DE SEGURIDAD
LEA Y ENTIENDA COMPLETAMENTE TODAS LAS INSTRUCCIONES Y
ADVERTENCIAS ANTES DE UTILIZAR ESTA UNIDAD. ¡SU SEGURIDAD
ES LO MÁS IMPORTANTE! NO SEGUIR LOS PROCEDIMIENTOS
Y PRECAUCIONES PUEDE PROVOCAR LESIONES GRAVES Y
DAÑOS MATERIALES. RECUERDE: ¡SU SEGURIDAD PERSONAL ES
RESPONSABILIDAD DE USTED!
¡GUARDE ESTAS INSTRUCCIONES!
1. Lea todas las instrucciones.
2. Este aparato no se destina para
utilizarse por personas (incluyendo
niños) cuyas capacidades físicas,
sensoriales o mentales sean diferentes
o estén reducidas, o carezcan de
experiencia o conocimiento, a menos
que dichas personas reciban una
supervisión o capacitación para el
funcionamiento del aparato por una
persona responsable de su seguridad.
3. Se requiere de una estrecha
supervisión cuando el aparato se
use cerca de niños. Los niños deben
supervisarse para asegurar que ellos no
empleen los aparatos como juguete.
4. Verique que el voltaje de su
instalación corresponda con el del
producto.
5. No toque supercies calientes. Use
las manijas o las perillas.
6. Use guantes de cocina para sacar
la asadera de inserción o la rejilla del
horno asador; o para sacar una asadera
o alimentos cocidos de la asadera de
inserción.
7. Para protegerse contra el riesgo de
choque eléctrico, no sumerja la base del
asador, el cordón ni el enchufe en agua
ni en ningún otro líquido.
8. Desenchúfelo del tomacorriente
cuando no lo esté usando y antes de la
limpieza. Deje que se enfríe antes de
colocar o sacar alguna pieza, y antes de
limpiarlo.
9. No opere ningún aparato con cables
o enchufe dañados o después de que el
aparato funcione mal o se caiga o dañe
de cualquier manera. El reemplazo del
cable de suministro y las reparaciones
deben ser efectuadas por el fabricante,
su agente de servicio, o personas
igualmente calicadas para poder evitar
un peligro. Llame al número de servicio
al cliente proporcionado para información
sobre examinación, reparación o ajuste.
10. El uso de accesorios no
recomendados por el fabricante del
aparato puede causar lesiones.
11. No lo use al aire libre.
12. No deje que el cordón cuelgue sobre
el borde de una mesa o de un mostrador,
o que toque alguna supercie caliente,
incluyendo la supercie de una cocina.
13. Para desconectar, coloque el control
en la posición MIN y luego saque el
enchufe del tomacorriente.
SALVAGUARDIAS IMPORTANTES
14. No coloque el aparato sobre o cerca
de una fuente de gas caliente o de un
quemador eléctrico, ni dentro de un horno
caliente.
15. Es importante tener extremo
cuidado cuando se mueva un aparato
electrodoméstico que contenga aceite
caliente u otros líquidos calientes.
16. El vapor que se escapa por debajo
de la tapa es caliente y puede causar
quemaduras.
17. No lo use sin la asadera de inserción
especialmente diseñada para este
modelo.
18. No use el aparato para derretir cera
ni para cualquier otra aplicación no
relacionada con alimentos.
19. No permita que materiales inamables
como cortinas, colgaduras, paredes,
armarios, placas posteriores y otras
supercies toquen ninguna parte del
horno asador mientras esté funcionando.
20. No use el aparato electrodoméstico
para ningún otro n que no sea el
indicado.
13
INSTRUCCIONES EN ESPAÑOL
Page 14

NÚMERO DE
DIAGRAMA
DESCRIPCIÓN DE LA PIEZA NÚMERO DE PIEZA
(18 CUARTO)
NÚMERO DE PIEZA
(22 CUARTO)
1 TAPA 03-4003 03-4003
2 REJILLA 03-4002 03-4002
3 ASADERA DE INSERCIÓN 03-4001 03-4101
4 PERILLA DE CONTROL DE
TEMPERATURA
03-4004 03-4004
LISTA DE COMPONENTES
Si cualquier componente de esta unidad está roto, si no funciona debidamente, o si necesita
un instructivo de repuesto, visítenos en la Web en
WestonProducts.com
O llame a Weston Brands LLC larga distancia sin costo 1-800-814-4895
De lunes a viernes, de 8:00 am a 5:00 pm tiempo del ET. Fuera de Estados Unidos llame
al 001-216-901-6801
14
INSTRUCCIONES EN ESPAÑOL
Page 15

15
INSTRUCCIONES EN ESPAÑOL
CÓMO SE USA EL HORNO ASADOR
1. Asegúrese de que la perilla de control de
temperatura se encuentre en MIN. Enchufe en el
tomacorriente.
2. Saque la rejilla. Deje la asadera de inserción en
el horno asador. FIGURA 1
3. Congure la perilla de control de temperatura
en la temperatura deseada y precaliente por 15
minutos con la tapa colocada.
4. Coloque la comida que se cocinará en una
asadera sobre la rejilla (o directamente en la
asadera de inserción). Luego coloque la rejilla en
el horno y vuelva a tapar. FIGURA 2
5. Utilice guantes de cocina para quitar la tapa y
los alimentos cuando haya nalizado la cocción.
FIGURA 3
6. Gire la perilla de control de temperatura a MIN y
desenchufe.
NOTA: La asadera de inserción siempre debe
estar colocada en la base del asador cuando se
esté cocinando.
PRECAUCIÓN Peligro de Quemaduras.
El vapor que escapa puede provocar quemaduras. Utilice
guantes de cocina para proteger sus manos cuando retire la
asadera de inserción, la rejilla, la asadera común o alimentos
cocidos.
1
2
3
ANTES DEL PRIMER USO: Lave la asadera de inserción, la rejilla y la tapa
en agua caliente jabonosa. Enjuague y seque. Durante el primer uso del horno asador, es posible que se observe un poco de humo y olor. El humo y el
olor no deberán ocurrir después de la primera vez que se caliente el horno.
Page 16

16
INSTRUCCIONES EN ESPAÑOL
CONSEJOS PARA UTILIZAR SU HORNO ASADOR
• Antes de hornear o de asar en el horno asador, coloque la asadera o cacerola que tenga planeado usar en la asadera de inserción para asegurarse
de que encaje debidamente.
• La asadera de inserción siempre debe usarse cuando se cocine con el
horno asador. Si va a cocinar grandes cantidades de sopas, estofados
o guisos, la asadera de inserción puede utilizarse como la asadera de
cocción en la base.
• Las asaderas comunes y cacerolas deben colocarse sobre la rejilla para
permitir que el calor circule mejor. Si es necesario, se puede sacar la rejilla
para adaptar una asadera más grande o dos cacerolas en el horno asador.
• Se pueden usar bolsas de aluminio para asar en el horno asador. No
recomendamos el uso de bolsas de plástico para asar en el horno asador.
• No quite la tapa del horno asador a menos que sea necesario. Si se
quita la tapa, se permite que el calor escape, afectando la temperatura del
horno asador.
• A menos que se haya indicado lo contrario, precaliente el horno asador
durante 15 minutos a la temperatura indicada en la receta.
• Si la receta indica que se debe usar una asadera o fuente, saque la rejilla
del horno. Precaliente el horno a la temperatura deseada. Luego coloque
la asadera sobre la rejilla y luego coloque ambos en el horno asador.
Hornee según las instrucciones de la receta. La rejilla hace que sea más
fácil colocar o sacar las asaderas o las fuentes del horno asador caliente.A
continuación indicamos los tamaños de asaderas que
encajarán en el horno asador:
• Una asadera de 9 x 13 pulgadas (23 x 33 cm)
o una fuente de horno de 10 x 14 pulgadas (26 x 35 cm)
• Dos moldes para pan de 9 x 5 pulgadas (23 x 13 cm)
u 8 x 4 pulgadas (20 x 10 cm)
• Una tortera con tubo o para Bundt
Page 17

17
INSTRUCCIONES EN ESPAÑOL
• Recomendamos el uso de un termómetro para carne para que las carnes
rojas y de ave siempre estén perfectamente cocidas. Si usa un termómetro
para carne, se deberá sacar las carnes rojas o de ave del horno asador
cuando el termómetro haya alcanzado una temperatura de 5 a 10 grados
inferior a la temperatura deseada. La temperatura interna continuará
aumentando después de haber sacado la carne del horno asador.
• La mayoría de los jamones que se venden en la actualidad, tienen una
etiqueta que dice “Cocinar antes de Comer” o “Totalmente cocido”. El
jamón con una etiqueta de “Cocinar antes de Comer” ha sido ahumado
o curado pero NO cocido. Ese jamón se debe cocinar bien a una
temperatura interna de entre 155º y 160°F (68º–71ºC). Los jamones
“Totalmente cocidos” han sido ahumados o curados y también cocidos.
El jamón no requiere más cocción, pero si se calienta a 140°F (60ºF), eso
mejorará su sabor.
• El horno asador cocina los pavos en menos tiempo que los hornos
convencionales. Un pavo sin rellenar de 14 a 18 libras (6.4–8.2 kg) se
cocinará en aproximadamente 2 1/2 horas. Un pavo cocido en el horno
asador queda húmedo, jugoso y ligeramente dorado. Si desea un pavo
con una piel dorada más oscura, tenga a bien utilizar la salsa para dorar el
pavo de la sección “Recetas para asado”.
• La Tabla de Asado indica los tiempos de cocción para cortes tiernos de
carne que generalmente se asan en seco. Estos cortes son de la zona de
las costillas o del lomo. Para suavizar los cortes de la nalga (jamón) o de
la paleta o corte delantero, se deberán cocinar en líquido por un período
más largo de tiempo.
• Los tiempos indicados son aproximados y se deben usar solamente
como guía general. Los cortes individuales de carne y las preferencias
personales dictarán tiempos de asado más largos o más cortos.
• Es importante que la comida esté lo sucientemente caliente para
evitar el crecimiento de bacteria. Para más información, visite
foodsafety.gov.
Page 18

18
INSTRUCCIONES EN ESPAÑOL
ALIMENTO
PESO
KGS
CARNE
TERM.
TIEMPO DE
COCCIÓN
(18 QT./325°F)
(18 L/160ºC)
TIEMPO DE
COCCIÓN
(22 QT./325°F)
(22 L/160ºC)
Pavo entero 14-18
6.4-8.2
180ºF/82ºC 2-3 horas 2-3 horas
Pavo entero 19-24
8.6-10.9
180ºF/82ºC N/A 2-3 horas
Pavo entero 25-28
11.3-12.7
180ºF/82ºC N/A 3 ½ - 4 horas
Pechuga de
pavo
5-7
2.3-3.2
180ºF/82ºC 1 ½ horas 1 ½ horas
Pavo asado al
horno
6-8
2.7-3.6
180ºF/82ºC 1 - 1 ½ horas 1 - 1 ½ horas
Carne al horno 5-7
2.3-3.2
160ºF/71ºC
(medium)
2 ½ horas 2 ½ horas
Cerdo fresco al
horno
5-7
2.3-3.2
160ºF/71ºC
(medium)
2 horas 2 horas
Jamón de paleta
para picnic
(completamente
cocinado)
7-10
3.2-4.5
140ºF/60ºC 2-3 horas 2-3 horas
Jamón entero
(completamente
cocinado)
15-18
6.8-8.2
140ºF/60ºC 2-3 horas 2-3 horas
TABLA DE ASADO
NOTA: El tabla de asado es para la referencia sólo. Siga paquete las
direcciones o las recomendaciones de USDA. Visite www.foodsafety.gov
para más información sobre temperaturas internas seguras para cocinar.
Page 19

19
INSTRUCCIONES EN ESPAÑOL
PARA HORNEAR
El horno asador puede hornear sus pasteles, pais, panes o guisados
favoritos como un horno convencional. Las asaderas y las fuentes se
deben colocar sobre la rejilla para hacer circular mejor el calor. También
se recomienda el uso de la rejilla por conveniencia para sacar las fuentes y
las asaderas calientes del horno asador. No quite la tapa del horno asador
a menos que sea necesario. Si se quite la tapa, se permite que el calor
escape, afectando la temperatura del horno asador.
PARA COCINAR AL VAPOR
Caliente el horno asador a 450°F (230ºC). Para cocinar al vapor en el horno
asador, se necesitará un colador de acero inoxidable. Coloque la rejilla
en la asadera de inserción. Coloque la asadera de inserción en el horno
asador. Vierta 1 cuarto de galón (0.95 L) de agua hirviendo en la asadera
de inserción. Coloque la comida que desee cocinar al vapor en el colador
y coloque el colador en la asadera de inserción. Cubra y cocine al vapor
según los tiempos que se indican a continuación o hasta que se haya
obtenido la cocción deseada.
PARA CALENTAR PANECILLOS, ETC.
Precaliente el horno asador a 250°F (121ºC). Necesitará dos envases
refractarios pequeños para el agua. Latas de comida vaciadas y lavadas
son una perfecta solución. Llene dos tercios de las latas con agua caliente y
colóquelas en esquinas opuestas de la asadera de inserción.
Coloque los panecillos o panqueques apilados en el horno de inserción. No
deje que toquen los costados de la asadera. Cubra y manténgalos calientes
hasta por 1 hora.
PARA COCINAR EN CANTIDADES
La asadera de inserción se puede usar como utensilio grande de cocción
cuando se cocinen o se calienten cantidades grandes. Se puede usar para
hervir salsas, sopas o guisados a fuego lento, o simplemente para calentar o
entibiar cantidades grandes. Cuando cocine o caliente sopas o guisados en
el horno asador, revuelva ocasionalmente para que se calienten en forma
más uniforme y más rápida.
Por ejemplo, gradúe la temperatura a 400ºF (204ºC) y el horno asador
calentará sopa de carne con vegetales desde la temperatura de
refrigeración a la temperatura para servirla en unas 2 horas. Para cocinar
sopas, guisados o salsas, gradúe la temperatura a 225ºF (107ºC) y deje
calentar a fuego lento entre 4 y 8 horas, según la receta.
Page 20

20
INSTRUCCIONES EN ESPAÑOL
LIMPIEZA Y CUIDADO
1.Gire la perilla de control de temperatura a MIN.
Desenchufe y deje enfriar.
2. Limpie la tapa, la rejilla y la asadera de
inserción en agua caliente y jabonosa. Para
eliminar la comida quemada que se haya pegado,
deje en remojo, y luego frote con una esponjilla de
nilón. Enjuague en agua caliente y luego seque.
3. Lave el interior de la base del asador con un
paño húmedo.
4. Limpie el exterior del horno asador con un paño
húmedo y jabonoso y luego deje que se seque.
NOTA: Podría ocurrir decoloración de la tapa si se
lava en el lavavajillas.
ADVERTENCIA Peligro de Descarga Eléctrica. Desconecte el suministro
eléctrico antes de limpiar. No sumerja el cable, el enchufe o la base en
ningún líquido. No seguir estas instrucciones podría resultar en la muerte o
choque eléctrico.
Page 21

Esta garantía aplica a los productos que se compran y usan en los EE. UU. y
Canadá, y que se registraron adecuadamente dentro de 30 días de la fecha
de compra original. Esta es la única garantía expresa para este producto y
reemplaza cualquier otra garantía o condición. Este producto está garantizado
contra defectos materiales y de fabricación por un período de un (1) año a partir
de la fecha de compra original. Durante este período, su único recurso es la
reparación o sustitución de este producto o de cualquier componente que se
encuentre defectuoso, a nuestra elección.
Para registrar su producto, complete el formulario en línea en
www.WestonProducts.com/Warranty
Esta garantía no cubre productos no registrados, reparaciones o servicios a
productos no autorizados, productos vendidos “tal cual” por minoristas, vidrio,
ltros, desgaste por uso normal, uso que no sea conforme a las instrucciones
impresas o daño al producto como resultado de un accidente, alteración, abuso
o mal uso. Esta garantía se extiende únicamente al comprador consumidor
original o quien reciba el producto como regalo y no es transferible. Guarde
el recibo de compra original ya que se requiere de un comprobante de compra
para hacer un reclamo de garantía.
Excluimos todo reclamo por daños especiales, incidentales o que resulten
como consecuencia del incumplimiento de la garantía expresa o implícita.
Toda responsabilidad se limita al monto del precio de compra. Toda garantía
implícita, incluyendo cualquier garantía legal o condición de comerciabilidad
o aptitud para un propósito en particular, se niega excepto en la medida
que lo prohíbe la ley, en cuyo caso dicha garantía o condición se limita a la
duración de esta garantía por escrito. Esta garantía le otorga derechos legales
especícos. Puede tener otros derechos legales que varían según donde vive.
Algunos estados o provincias no permiten limitantes en garantías implícitas o
daños especiales, incidentales o consecuentes, por lo tanto, es posible que las
limitaciones mencionadas anteriormente no apliquen para usted.
Antes de devolver el producto para cualquier reparación o servicio: debe estar
limpio y libre de partículas de alimentos u otra suciedad; de otra manera, se le
devolverá o aplicará un cargo de 50 USD por limpieza, a nuestra elección.
Para reclamar una garantía, visite www.WestonProducts.com/Contact o llame
al 1.800.814.4895 en los EE. UU. o al 001.216.901.6801 fuera de los EE. UU.,
de lunes a viernes de 8 a. m. a 5 p. m. hora del este. Usted es responsable de
todos los costos asociados con enviarnos el producto con el ete prepagado.
Si el producto calica para una reparación o un reemplazo bajo garantía,
asumiremos el costo de devolverle el producto. No somos responsables por
los daños resultantes del envío.
Para trabajo fuera de garantía: llame al 1.800.814.4895 dentro de los EE. UU.
o al 001.216.901.6801 fuera de los EE. UU., de lunes a viernes de 8 a. m. a
5 p. m. hora del Este, para obtener un número de autorización de devolución
de mercancía (Return Merchandise Authorization, RMA). Rechazaremos
toda devolución sin número de RMA. Aplicaremos un cargo de 35 USD/hora
por todo trabajo de diagnóstico, servicio, reparación o procesamiento. No
iniciaremos ningún servicio o trabajo de reparación sin autorización previa.
Usted es responsable de todos los costos asociados con enviarnos el producto
con el ete prepagado y con nuestra devolución hacia usted.
UN AÑO DE GARANTÍA WESTON LIMITADA
Page 22

RÔTISSOIRE
18 PINTES NOIR 03-4000-W
22 PINTES EN ACIER INOXYDABLE: 03-4100-W
PARCE QUE NOS PRODUITS BÉNÈFICIENT DE PERFECTIONNEMENTS CONSTANTS APPORTÉS
EN USINE, LES ILLUSTRATIONS PRÉSENTES PEUVENT ÊTRE LÉGÈREMENT DIFFÉRENTES DU
PRODUIT REÇU. 062716
Page 23

IMPORTANTES RÈGLES DE SÉCURITÉ
LIRE ET COMPRENDRE COMPLÈTEMENT TOUTES LES DIRECTIVES
ET AVERTISSEMENTS AVANT D’UTILISER CE PRODUIT. LE PLUS
IMPORTANT EST VOTRE SÉCURITÉ! LE DÉFAUT D’OBSERVER LES
PROCÉDURES ET MISES EN GARDE PEUT ENTRAINER DES BLESSURES
GRAVES OU DES DOMMAGES MATÉRIELS. N’OUBLIEZ PAS : VOTRE
SÉCURITÉ PERSONNELLE EST VOTRE RESPONSABILITÉ!
CONSERVER CES DIRECTIVES!
1.Lire toutes les instructions.
2.Cet appareil n’est pas destiné à être
utilisé par des personnes (y compris les
enfants) dont les capacités physiques,
sensorielles ou mentales sont
réduites, ou manquant d’expérience
et de connaissance, sauf si elles sont
étroitement surveillées et instruites
sur l’utilisation de l’appareil par une
personne responsable de leur sécurité.
3.Une surveillance étroite est requise
pour tout appareil utilisé par ou près des
enfants. Surveiller que les enfants ne
jouent pas avec l’appareil.
4.Ne pas toucher les surfaces chaudes.
Utiliser les poignées ou boutons.
5.Utiliser des gants de cuisine pour
retirer le plat amovible ou la grille de
la rôtissoire ; ou pour sortir un moule
à gâteau ou des aliments cuits du plat
amovible.
6.Pour protéger contre le risque de choc
électrique, ne pas immerger la base de
la rôtissoire, le cordon ou la che dans
l’eau ou autre liquide.
7.Débrancher l’appareil de la prise de
courant électrique lorsqu’il n’est pas
utilisé et avant un nettoyage. Le laisser
refroidir avant d’y placer ou d’y enlever
des pièces et avant un nettoyage.
8.Ne pas faire fonctionner un appareil
électroménager avec un cordon ou
une che endommagée, ou lorsque
l’appareil ne fonctionne pas bien ou
a été échappé ou endommagé d’une
manière quelconque. Le remplacement
et la réparation du cordon d’alimentation
doivent être faits par le fabricant, son
agent de service ou toute personne
qualiée de façon à éviter tout danger.
Appeler le numéro de service à la
clientèle fourni pour des renseignements
concernant l’examen, la réparation ou
l’ajustement.
9.L’utilisation d’accessoires non
recommandés par le fabricant de l’appareil
ménager peut causer des blessures.
10.Ne pas utiliser à l’extérieur.
11.Ne pas laisser le cordon pendre du
bord d’une table ou d’un comptoir, ni
toucher des surfaces chaudes, y compris
la cuisinière.
12.Pour déconnecter, tourner la
commande de température sur MIN, puis
débrancher la che de la prise murale.
13.Ne pas placer l’appareil sur ou près
d’un brûleur à gaz chaud, ou d’un élément
électrique, ou dans un four chauffé.
14.Une grande précaution doit être
prise lors de l’utilisation d’un appareil
électroménager contenant de l’huile
chaude ou autres liquides chauds.
15.La vapeur s’échappant de dessous le
couvercle est chaude et peut causer des
brûlures.
16.Ne pas utiliser sans le plat amovible
conçu spécialement pour ce modèle.
17.Ne pas utiliser cet appareil pour faire
fondre de la cire ou pour tout autre usage
non alimentaire.
18.Veiller à ce que les matériaux
inammables tels que les rideaux,
tentures, murs, armoires, dosserets, etc.
ne touchent aucune partie de la rôtissoire
durant son utilisation.
19.Ne pas utiliser l’appareil
électroménager à une n autre que
l’utilisation prévue.
INSTRUCTIONS EN FRANÇAIS
23
Page 24

INSTRUCTIONS EN FRANÇAIS
24
NUMÉRO DE
SCHÉMA
DESCRIPTION DE LA PIÉCE NUMÉRO DE LA
PIÉCE
(18 PINTES)
NUMÉRO DE LA
PIÉCE
(22 PINTES)
1 COUVERCLE 03-4003 03-4003
2 GRILLE 03-4002 03-4002
3 PLAT AMOVIBLE 03-4001 03-4101
4 COMMANDE DE TEMPÉRATURE 03-4004 03-4004
PIÈCES
N’hésitez pas à visiter notre site Web WestonProduct.com/support si un composant est
cassé, l’outil fonctionne mal, ou pour commander un nouveau mode d’emploi.
WestonProducts.com
Veuillez appeler Weston Brands, LLC au numéro sans frais : 1-800-814-4895
Du lundi au vendredi: de 8h00 à 17h00 ET. En dehors des États-Unis, veuillez
appeler le 001-216-901-6801
Page 25

INSTRUCTIONS EN FRANÇAIS
25
MODE D’EMPLOI
1.S’assurer que la commande de température est
tournée sur MIN. Brancher la che dans une prise
de courant.
2.Enlever la grille. Laisser le plat amovible dans la
rôtissoire. FIGURE 1
3.Tourner la commande de température à la
température désirée, mettre le couvercle et laisser
préchauffer pendant 15 minutes.
4.Placer la nourriture à faire cuire dans une
grille (ou directement dans le plat amovible).
Placer dans la rôtissoire et remettre en place le
couvercle. FIGURE 2
5.Mettre des gants de cuisine pour enlever le
couvercle et retirer les aliments à la n de la
cuisson. FIGURE 3
6.Tourner la commande de température sur MIN
puis débrancher.
REMARQUE : Le plat amovible doit toujours être
placé dans la base lors de la cuisson.
MISE EN GARDE Risque de brûlures. La vapeur qui
s’échappe peut causer des brûlures. Utiliser des gants de
cuisine pour vous protéger les mains quand vous enlevez le
plat amovible, la grille, les bacs ou des aliments cuits.
1
2
3
AVANT L’UTILISATION INITIALE : Laver le plat amovible, la grille et le cou-
vercle dans l’eau chaude savonneuse. Rincer et sécher. Lors de l’utilisation
initiale de la rôtissoire, on remarquera peut-être de la fumée et une odeur.
On ne devrait pas percevoir de fumée ou d’odeur après le premier chauffage
de la rôtissoire.
Page 26

INSTRUCTIONS EN FRANÇAIS
26
CONSEILS À PROPOS DE LA RÔTISSOIRE
• Avant de faire cuire ou de rôtir dans la rôtissoire, s’assurer que le plat que
vous prévoyez d’utiliser conviendra en le plaçant dans le plat amovible. La
plupart des plats en verre réfractaire conviennent à la rôtissoire.
• Le plat amovible doit toujours être utilisé lors de la cuisson dans la
rôtissoire. Si l’on prépare de grandes quantités de soupes, de ragoûts ou
casseroles, le plat amovible peut être utilisé comme plat de cuisson dans
la base de la rôtissoire.
• Les plats pour la cuisson doivent être placés sur la grille pour une circulation maximale de la chaleur. Si nécessaire, la grille peut être retirée pour
accommoder un grand plat ou deux plats dans la rôtissoire.
• Les sacs de rôtissage au four en papier d’aluminium peuvent être utilisés
dans la rôtissoire. Nous ne recommandons pas d’utiliser des sacs plastique de rôtissage au four dans la rôtissoire.
• Ne pas enlever le couvercle de la rôtissoire inutilement. Enlever le couvercle laisse la chaleur s’échapper et affecte la température de la rôtissoire.
• À moins d’indication contraire, préchauffer la rôtissoire 15 minutes à la
température demandée dans la recette.
• Si la recette nécessite l’utilisation d’une casserole ou d’un moule, enlever
la grille de la rôtissoire. Préchauffer à la température désirée. Mettre la
casserole ou le moule sur la grille, puis mettre les deux ensemble dans
la rôtissoire. Cuire selon les instructions de la recette. La grille permet de
mettre et de retirer plus facilement la casserole ou le moule dans la rôtissoire chaude. Les plats de tailles suivantes conviennent à la rôtissoire :
• Un plat de cuisson de 9 x 13 po (23 x 33 cm)
ou une plaque à rôtir de 10 x 14 po (26 x 35 cm)
• Deux moules à pain de 9 x 5 po (23 x 13 cm)
ou 8 x 4 po (20 x 10 cm)
• Un moule long ou en cheminée
Page 27

INSTRUCTIONS EN FRANÇAIS
27
RÔTISSAGE DE VIANDES ET VOLAILLES
• Nous recommandons l’utilisation d’un thermomètre à viande pour assurer
une cuisson parfaite des rôtis et de la volaille à chaque fois. Si on utilise
un thermomètre à viande, la viande ou la volaille doit être retirée de la
rôtissoire lorsque la température indiquée par le thermomètre est de 5º
à 10° en-dessous de la température désirée. La température interne
continuera de s’élever une fois la viande retirée de la rôtissoire.
• La plupart des jambons vendus de nos jours sont étiquetés « Faire cuire
avant de manger » ou « Entièrement cuit ». Le jambon étiqueté « Faire
cuire avant de manger » a été fumé ou salaisonné, mais n’a PAS été cuit.
On doit faire cuire ce jambon entièrement jusqu’à une température interne
de155º à 160°F (68º–71ºC). Le jambon « Entièrement cuit » a été fumé ou
salaisonné et cuit. Il n’est pas nécessaire de faire cuire ce jambon, mais
porter sa température à 140°F (60ºC) améliorera sa saveur.
• La rôtissoire cuit les dindes en moins de temps que les fours
conventionnels. Une dinde non farcie de 14 à 18 livres (6,4 à 8,2 kg) cuira
en environ 2 1/2 heures. Une dinde cuite dans une rôtissoire est humide et
juteuse et légèrement dorée. Si l’on désire une peau plus dorée, utiliser la
sauce à brunir pour dinde du chapitre « Recettes de rôtissage ».
• Le Tableau de rôtissage donne les durées de cuisson pour les pièces
de viande tendres habituellement rôties à sec. Ces rôtis proviennent des
côtes ou de la surlonge. Pour attendrir les pièces provenant de la cuisse
(jambon) ou de l’épaule/bas de palette, faire cuire dans le liquide pendant
une période plus longue.
• Les durées indiquées sont approximatives et ne doivent servir qu’à titre
indicatif. Les pièces de viande individuelles et les préférences personnelles
peuvent nécessiter des durées de rôtissage plus longues ou plus courtes.
• Le mets doit être assez chaud pour empêcher la croissance de
bactéries. Visiter les différents sites gouvernementaux pour plus
d’information.
Page 28

INSTRUCTIONS EN FRANÇAIS
28
ALIMENT
PDS
KGS
TEMP
VIANDE
TEMPS DE
CUISSION
(18 QT,/325 °F)
(18 L/160 ºC)
TEMPS DE
CUISSON
(22 QT,/325 °F)
(22 L/160 ºC)
Dinde entière 14-18
6,4-8,2
180ºF/82ºC 2 à 3 heures 2 à 3 heures
Dinde entière 19-24
8,6-10,9
180ºF/82ºC N/A 2 à 3 heures
Dinde entière 25-28
11,3-12,7
180ºF/82ºC N/A 3 ½ à 4 heu-
res
Blanc de dinde 5-7
2,3-3,2
180ºF/82ºC 1 ½ heures 1 ½ heures
Poulet à rôtir 6-8
2,7-3,6
180ºF/82ºC 1 à 1 ½ heures 1 à 1 ½ heu-
res
Rôti de boeuf 5-7
2,3-3,2
160ºF/71ºC
(med.)
2 ½ heures 2 ½ heures
Rôti de porc frais 5-7
2,3-3,2
160ºF/71ºC
(med.)
2 heures 2 heures
Jambon pour
pique-nique
(entièrement
cuit)
7-10
3,2-4,5
140ºF/60ºC 2 à 3 heures 2 à 3 heures
Jambon entier
(entièrement
cuit)
15-18
6,8-8,2
140ºF/60ºC 2 à 3 heures 2 à 3 heures
TABLEAU DE RÔTISSAGE
NOTE: Le tableau de rôtissage est pour la référence seulement. Suivre
les directions de packet ou les recommandations de USDA. Visiter les
différents sites gouvernementaux pour plus d’information à propos des
températures internes de cuisson.
Page 29

INSTRUCTIONS EN FRANÇAIS
29
CUISSON AU FOUR
La rôtissoire peut cuire vos gâteaux, tartes, pains ou mets en sauce favoris
comme un four conventionnel. Les plats doivent être placés sur la grille
pour la meilleure circulation de la chaleur. L’utilisation de la grille est aussi
recommandée pour la commodité de sortir les plats chauds de la rôtissoire.
Ne pas ôter le couvercle de la rôtissoire inutilement. Ôter le couvercle laisse
la chaleur s’échapper et affecte la température de la rôtissoire.
ÉTUVAGE
Préchauffer la rôtissoire à 450 ºF (232 ºC). Pour cuire à la vapeur dans la
rôtissoire, il vous faudra une passoire en acier inoxydable. Placer la grille
dans le plat amovible. Placer le plat amovible dans la rôtissoire. Verser une
pinte (0,95 L) d’eau bouillante dans le plat amovible. Placer les aliments
à faire cuire à la vapeur dans la passoire et placer la passoire dans le plat
amovible. Couvrir et cuire à la vapeur pendent les durées ci-dessous ou
jusqu’au degré de cuisson désiré.
RÉCHAUFFAGE DE PETITS PAINS, BISCUITS, ETC.
Préchauffer la rôtissoire à 250 ºF (121 ºC). Vous aurez besoin de deux petits
contenants allant au four pour contenir l’eau. Les boîtes de conserve vides
et lavées conviennent parfaitement. Remplir les boîtes aux deux tiers d’eau
chaude et les placer dans les coins opposés du plat amovible.
Empiler les petits pains, biscuits ou crêpes dans le plat amovible. Ne pas
les laisser toucher les côtés du plat. Couvrir et garder au chaud pendant 1
heure.
CUISSON EN QUANTITÉ
La plat amovible peut servir pour la cuisson ou le réchauffage de grandes
quantités. Il peut servir pour faire mijoter les sauces, soupes ou ragoûts, ou
simplement pour faire chauffer ou réchauffer de grandes quantités. Lors de
la cuisson ou de réchauffage de soupes ou de ragoûts dans la rôtissoire,
remuer occasionnellement pour un réchauffage plus rapide et uniforme.
Par exemple, régler la commande de température sur 400 ºF (204 ºC) et la
rôtissoire réchauffera une soupe aux légumes et au boeuf d’une température
réfrigérée à une température de service en environ 2 heures. Pour faire cuire
des soupes, ragoûts ou sauces, régler la commande de température sur 225
ºF (107 ºC) et prévoir 4 à 8 heures de mijotage selon la recette.
Page 30

INSTRUCTIONS EN FRANÇAIS
30
NETTOYAGE ET ENTRETIEN
1.Tourner la commande de température sur MIN.
Débrancher et laisser refroidir.
2.Laver le couvercle, la grille et le plat amovible
dans de l’eau chaude savonneuse. Pour enlever
les aliments brûlés sur la surface, faire tremper,
puis frotter avec un tampon de récurage en nylon.
Rincer à l’eau chaude, puis sécher.
3.Essuyer l’intérieur de la base de la rôtissoire
avec un linge humide.
4.Essuyer l’extérieur de la rôtissoire avec un linge
humide savonneux, puis sécher.
NOTE: La décoloration du couvercle peut se
produire si lavé dans le lave-vaisselle.
AVERTISSEMENT Risque de choc électrique.
Débrancher le courant avant de nettoyer. Ne plonger jamais le cordon, la
prise ou la base dans un liquide. Si vous ne suivez pas ces instructions,
vous pouvez occasionner des secousses électriques et même la mort.
Page 31

La présente garantie s’applique aux produits, achetés et utilisés aux États-Unis et au
Canada, qui ont été dûment enregistrés dans un délai de 30 jours à compter de la date
d’achat initiale. La présente garantie est la seule garantie expresse pour ce produit et
remplace toute autre garantie ou condition. Ce produit est garanti contre tout défaut
de matériaux et de fabrication pour une durée une an (1) an à compter de la date
d’achat initiale. Au cours de cette période, votre seul recours est la réparation ou le
remplacement de ce produit ou de tout composant s’avérant défectueux, à notre gré.
Pour enregistrer votre produit : remplissez le formulaire en ligne à l’adresse
www.WestonProducts.com/Warranty
La présente garantie ne couvre pas les produits non enregistrés, ni les réparations
ou services après-vente non autorisés, les produits vendus « tels quels » par les
détaillants, le verre, les ltres et l’usure normale d’utilisation, toute utilisation non
conforme aux directives écrites, ni les dommages au produit résultant d’un accident,
d’une modication, d’une utilisation abusive ou incorrecte. La présente garantie est
valable uniquement pour l’acquéreur initial ou le destinataire du cadeau et n’est pas
cessible. Veuillez conserver le reçu de caisse d’origine, puisqu’une preuve d’achat
est requise pour toute réclamation de garantie. La présente garantie devient caduque
si le produit est soumis à une tension ou forme d’onde autre que celle indiquée sur
l’étiquette (par ex., 120 V ~ 60 Hz).
Aucune réclamation en cas de dommages spéciaux, consécutifs ou indirects résultant
du non-respect de toute garantie expresse ou implicite ne sera prise en compte.
Toute responsabilité se limite au montant du prix d’achat. Toute garantie implicite,
notamment toute garantie légale, condition de commercialité ou d’adaptation à une n
particulière, est exclue, sauf dans la mesure où cela est interdit par la loi en vigueur,
auquel cas cette garantie ou condition est limitée à la durée de la présente garantie
écrite. La présente garantie vous confère des droits juridiques spéciques. Vous
pouvez également bénécier d’autres droits juridiques qui varient selon l’endroit
où vous vivez. Certains États ou provinces n’autorisent pas de limitations sur les
garanties implicites ou sur les dommages spéciaux, consécutifs ou indirects, de sorte
que les limitations susmentionnées pourraient ne pas vous concerner.
Avant de retourner le produit pour réparation ou entretien : il doit être propre et exempt
de toute particule de nourriture ou d’autres débris; sans quoi nous serons dans
l’obligation de vous le retourner ou nous vous facturerons des frais de nettoyage de 50
dollars, à notre gré.
Pour procéder à une réclamation de garantie : allez à l’adresse www.
WestonProducts.com/Contact; ou appelez le 1.800.814.4895 pour les États-Unis et le
001.216.901.6801 hors des États-Unis, du lundi au vendredi, de 8 h à 17 h HNE. Tous
les frais liés à l’envoi du produit, frais de transport prépayés inclus, sont à votre charge.
Si le produit remplit les conditions pour une réparation ou un remplacement sous
garantie, les frais de retour seront à notre charge. Nous déclinons toute responsabilité
en cas de dommages dus au transport.
Pour toute réparation sans garantie : appelez le 1.800.814.4895 pour les États-Unis
et le 001.216.901.6801 hors des États-Unis, du lundi au vendredi, de 8 h à 17 h
HNE, pour obtenir un numéro d’autorisation de retour de marchandises (numéro de
RMA). Tout envoi expédié sans numéro de RMA sera refusé. Tout diagnostic, travail
d’entretien, de réparation ou de traitement sera facturé 35 USD/heure. Aucun travail
d’entretien ou de réparation ne sera effectué sans autorisation préalable. Tous les frais
liés à l’envoi du produit, frais de transport prépayés inclus, ainsi que ceux de retour
sont à votre charge.
UNE AN DE GARANTIE WESTON LIMITÉE
Page 32

ATTENTION!
PLEASE INSPECT THIS PACKAGE THOROUGHLY FOR MISSING PARTS OR ANY PRODUCT DAMAGE.
IF YOUR PRODUCT CONTAINS SHIPPING DAMAGE, PLEASE CONTACT RETAILER FOR ASSISTANCE.
For all other questions regarding product usage, missing parts, product damage, difculty or warranty activation,
please contact the Weston Brands Customer Service Team:
8:00 am to 5:00 pm ET, Monday thru Friday
CustomerService@WestonProducts.com
U.S. Residents Customer Service Line: 1-800-814-4895 (Outside U.S. Call: 001-216-901-6801
Weston Brands LLC, Cleveland, Ohio
WestonProducts.com
Please DO NOT return this item to the retailer before contacting
Weston Brands Customer Service.
SAVE THESE INSTRUCTIONS!
Refer to them often and use them to instruct others.
ATTENTION!
VEUILLEZ INSPECTER CET EMBALLAGE AVEC SOIN POUR Y DÉTECTER
TOUTE PIÈCE MANQUANTE OU ENDOMMAGÉE.
SI DES PIÈCES ONT ÉTÉ ENDOMMAGÉES PENDANT LE TRANSPORT, VEUILLEZ
COMMUNIQUER AVEC LE DÉTAILLANT POUR OBTENIR DE L’AIDE.
Pour toutes les autres questions concernant l’utilisation du produit, les pièces manquantes, les problèmes ou
l’activation de la garantie, veuillez communiquer avec l’équipe du service clientèle des produits Weston:
de 8:00 à 17:00 HNE, du lundi au vendredi.
CustomerService@WestonProducts.com
Numéro de téléphone du service clientèle pour les résidents des É.-U. : 1-800-814-4895
Numéro de téléphone à l’extérieur des É.-U. : 001-216-901-6801
Weston Brands LLC, Cleveland, Ohio
WestonProducts.com
Veuillez communiquer avec le service clientèle des produits Weston AVANT de retourner cet appareil au détaillant.
CONSERVER CES DIRECTIVES!
Veuillez les consulter fréquemment et les utiliser pour la formation.
¡ATENCIÓN!
Revise completamente el envase y compruebe que no falten partes o que algún producto esté dañado.
si el producto está dañado por el transporte, solicite asistencia al distribuidor.
Para todas aquellas preguntas referentes al uso del producto, partes faltantes, daño del producto, dicultad
o activación de la garantía, comuníquese con el equipo de servicio al cliente de weston Brands:
desde las 8:00 am hasta las 5:00 pm ET, de lunes a viernes
CustomerService@WestonProducts.com
Línea de Servicio al Cliente para Residentes de EE.UU.: 1.800.814.4895 (Fuera de EE.UU., llame al: 001-
216-901-6801) Weston Brands LLC, Cleveland, Ohio
WestonProducts.com
NO devuelva este artículo al vendedor minorista antes de comunicarse con Servicio al Cliente de
Weston Brands.
¡GUARDE ESTAS INSTRUCCIONES!
Consulte estas instrucciones y úselas para enseñar sobre el uso de este producto a otras personas.
 Loading...