

Page 1
OWNER’S MANUAL
MODEL WST5001ZE
IRON FULLY FEATURED
Page 2

IMPORTANT SAFEGUARDS
When using your flat iron, basic safety precautions should always be
followed including the following:
1. Read all instructions.
2. Use iron only for its intended use.
3. To protect against a risk of electric shock, do not immerse the iron
in water or other liquids.
4. The iron should always be turned to off before plugging or
unplugging from outlet. Never yank cord to disconnect from
outlet; instead, grasp plug and pull to disconnect.
5. Do not allow cord to touch hot surfaces. Let iron cool completely
before putting away. Loop cord loosely around iron when storing.
6. Always disconnect iron from electrical outlet when filling with water
or emptying and when not in use.
7. Do not operate iron with a damaged cord or if the iron has been
dropped or damaged. To avoid the risk of electric shock, do not
disassemble the iron. Incorrect reassembly can cause a risk of electric shock when the iron is used. Contact Consumer Service for
examination and repair.
8. Close supervision is necessary for any appliance being used by or
near children. Do not leave iron unattended while connected or on
an ironing board.
9. Burns can occur from touching hot metal parts, hot water, or
steam. Use caution when you turn a steam iron upside down--there may be hot water in the reservoir.
SPECIAL INSTRUCTIONS
1. To avoid a circuit overload, do not operate another high wattage
appliance on the same circuit.
2. If an extension cord is absolutely necessary, a 15-ampere cord
should be used. Cords rated for less amperage may overheat.
Care should be taken to arrange the cord so that it cannot be
pulled or tripped over.
SAVE THESE INSTRUCTIONS
For Household Use Only
2
Page 3

3
ADDITIONAL IMPORTANT
SAFEGUARDS
CAUTION HOT SURFACES: This appliance generates heat and escaping steam during use. Proper precautions must be taken to prevent
the risk of burns, fires or other damage to persons or property.
1. All users of this appliance must read and understand this Owner’s Manual
before operating or cleaning this appliance.
2. The cord to this appliance should be plugged into a 120V AC electrical
outlet only.
3. If this appliance begins to malfunction during use, immediately unplug the
cord. Do not use or attempt to repair the malfunctioning appliance.
4. Do not leave this appliance unattended during use.
POLARIZED PLUG
This appliance has a polarized plug (one blade is wider than the other).
To reduce the risk of electric shock, this plug is intended to fit into a
polarized outlet only one way. If the plug does not fit fully in the outlet,
reverse the plug. If it still does not fit, contact a qualified electrician. Do
not attempt to modify the plug in any way.
ELECTRIC POWER
If the electrical circuit is overloaded with other appliances, your appliance may not operate properly. It should be operated on a separate
electrical circuit from other appliances.
Page 4
GETTING TO KNOW YOUR
WESTINGHOUSE WST5001ZE
IRON - FULLY FEATURED
PRODUCT MAY VARY SLIGHTLY FROM ILLUSTRATION.
13
2
14
5
6
7
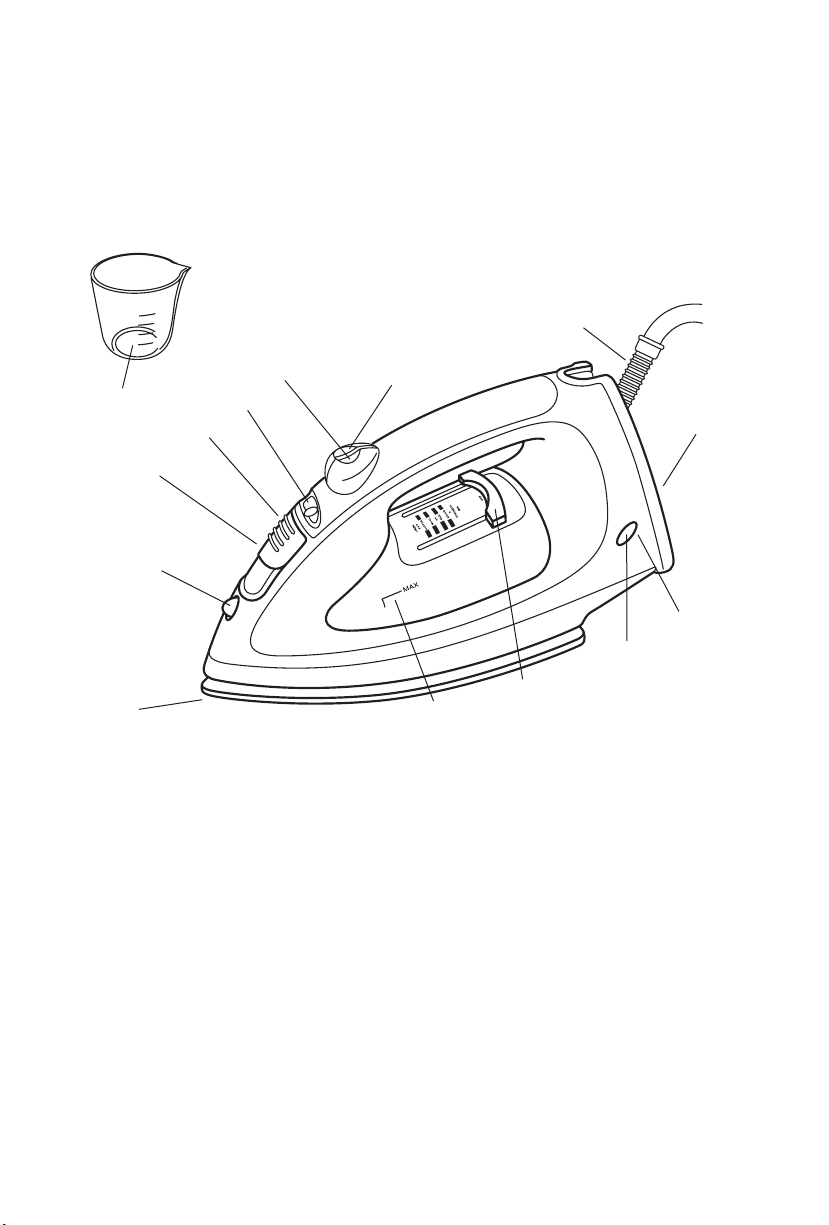
1. Burst of Steam Button
2. Spray Button
3. Variable Steam
4. Water Fill Cover
5. Water Fill Opening
(not shown)
6. Spray Nozzle
7. Stainless Steel Soleplate
3
4
1
12
11
10
9
8
FIGURE 1
8. Maximum Water Level
9. Temperature Control
10. Green Auto Shut-Off Light
11. Red Power On/Heating Light
12. Iron Base
13. Pivot Cord
14. Filler Cup (P/N 50317)
4
Page 5
GETTING TO KNOW YOUR
WESTINGHOUSE WST5001ZE
IRON - FULLY FEATURED
(Cont.)
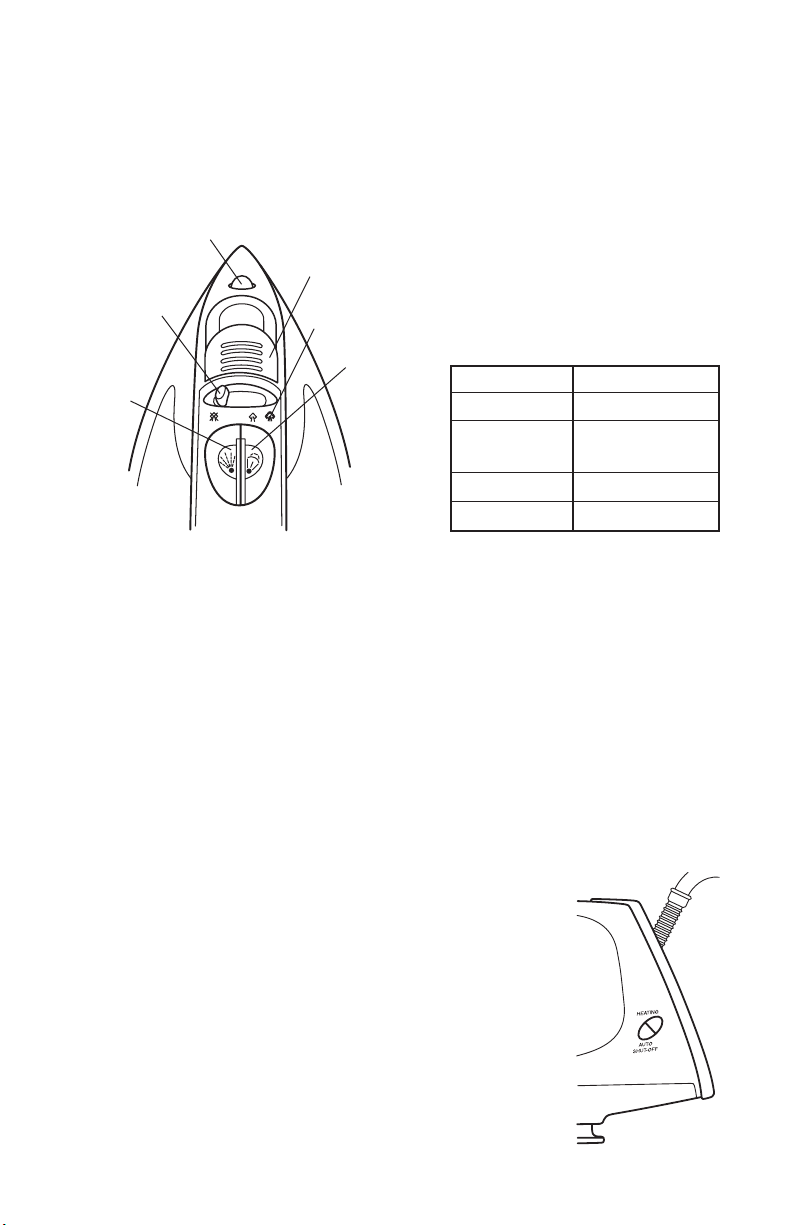
FIGURE 2
Spray Nozzle
Water
Fill
Cover
Max Steam
Burst
of Steam
Button
No Steam
Spray
Button
Fabric Temperature
Synthetic Low
Nylon/Silk/ Medium
Polyester
Wool/Cotton Medium High
Linen High
FIGURE 3
For best results, check garment labels for the temperature and steam
setting recommended by the fabric manufacturer, or consult the
enclosed garment care tips pamphlet for additional information. To
prevent damaging garments from too hot of an iron; it is best to first
iron garments that require a low temperature. If you should need to
switch from a high setting to a lower temperature, for example Cotton
to Nylon, allow the iron to cool down for about 5 minutes to reach the
lower temperature.
Tips: If you are unsure of a garment’s fabric content, start on a low
setting and test the iron on an area of the garment that does not show,
such as a seam. Gradually increase the heat setting until wrinkles
remove without damaging the fabric. To freshen up
garments made of velvet, felt, suede or velour, hold
the steaming iron horizontally 2 inches above the
fabric for a gentle steaming. Make sure the iron
does not come in contact with the fabric. To prevent shine, iron dark garments or those made of
silk, acetate or rayon inside out.
FIGURE 4
5
Page 6

GETTING TO KNOW YOUR
WESTINGHOUSE WST5001ZE
IRON - FULLY FEATURED
(Cont.)
PATENTED AUTOMATIC SAFETY SHUT-OFF
This iron has two kinds of safety shut-off mechanisms. One is a patented, touch-sensitive “brain” in the handle which turns the iron on or off
when it is in the horizontal position. The other is a timer that automatically shuts the iron off if it is left resting in the upright vertical position
for more than 15 minutes.
Horizontal Position: When the iron is plugged in and resting in the
horizontal position, it will remain on as long as your hand is making
contact with the handle. Once you take your hand off the handle, the
iron automatically turns itself off. The green Auto Shut-Off Light and red
Power On/Heating Light will both turn off. For example, if you are ironing and leave the iron with the Stainless Steel Soleplate down on the
ironing board to answer the phone, the iron will automatically begin to
de-energize. Although de-energized and starting to cool, the iron still
remains hot. Use caution to prevent burning or scorching when leaving
the iron with the soleplate in the down position. The iron will turn back
on as soon as you grip the handle and resume ironing. Important: To
return the iron to the desired temperature, allow it to rest in the upright
position until the red Power On/Heating Light goes off.
Vertical Position: When the iron is plugged in and resting on its heel,
it will remain on for 15 minutes, allowing ample time to reposition garments during the ironing process. If the iron is left resting for more than
15 minutes, it will automatically shut-off. To begin ironing again after
the timer has shut off the iron, pick it up by the handle. The green and
red lights will come on. Move the Temperature Control to desired setting and return it to its upright position. When the temperature setting
has been reached, the red Power On/Heating Light will go out and you
are ready to iron.
POWER ON/HEATING
When the iron is heating up or the temperature setting has been adjusted, the red Power On/Heating Light will come on. When the temperature setting has been reached, the red Power On/Heating Light will go
off.
6
Page 7

7
GETTING TO KNOW YOUR
WESTINGHOUSE WST5001ZE
IRON - FULLY FEATURED
(Cont.)
AUTO OFF/ON
When the iron is on, the green Auto Shut-Off Light will come on. When
the iron is off, the green Auto Shut-Off Light will go off.
FIGURE 5
FIGURE 6
BEFORE USING FOR THE FIRST TIME
1. Remove any protective coverings from the Stainless Steel Soleplate
and the body of the iron.
2. Unwind and straighten the power cord.
3. Flush the Stainless Steel Soleplate steam vents to ensure that no
stain is transferred onto the fabric from residue possibly left in the
vents from the manufacturing process. To do that, see Flushing.
NOTE: When the iron is plugged in for use, the iron must first be
placed in the horizontal position with your hand making contact with
the handle (see Figure 5). The iron can then be placed in the vertical
position (see Figure 6) and the desired temperature selected. If the iron
is not first placed in the horizontal position, the iron will not heat-up.
This is an additional safety feature.
Page 8

OPERATING INSTRUCTIONS
USING AS A DRY IRON
The iron can be used on the dry setting with or without water in the
Water Tank. However, it is best to avoid having the Water Tank too full
of water while dry ironing.
1. Position the Temperature Control to the OFF position
(see Figure 7).
2. Move the Variable Steam to the no steam position (see Figure 2).
3. Stand the iron, on its heel, in an upright position on a heat resistant
surface. Plug into a 120 V ~ 60 Hz outlet.
4. Move the Temperature Control to the desired setting.
5. Tilt the iron to the horizontal position (see Figure 5) to turn the iron
on. It may then be returned to the vertical position (see Figure 6) to
preheat the iron.
6. When the red Power On/Heating Light goes off, the iron has
reached the desired temperature. The light will continue to turn off
and on during use to maintain the proper temperature.
7. When finished using, move the Temperature Control to the OFF
position and unplug. Allow the iron to cool before cleaning the
exterior or storing.
CAUTION: IF THE IRON IS HOT, DO NOT FILL WITH WATER.
OFF Position
FIGURE 7
8
Page 9

9
OPERATING INSTRUCTIONS
(Cont.)
FILLING THE WATER TANK
Fill the water tank with tap water or distilled water. Do not use chemically descaled water or any other liquids.
1. Unplug and allow the iron to cool before filling.
2. Move the Variable Steam to no steam setting.
3. Slide the Water Fill Cover away from
the iron handle to open.
4. Fill water through the Water Tank
Opening (see FIGURE 8).
5. Fill to the MAX level as marked on the
Water Tank (see FIGURE 1).
6. Slide the Water Fill Cover toward the
iron handle.
USING AS A STEAM IRON
See Before Using For The First Time.
1. Position the Temperature Control to the OFF position (see Figure 7).
2. Unplug the iron from the outlet.
3. Fill the Water Tank with water; see FILLING THE WATER TANK.
4. Stand the iron on its heel in an upright position on a heat resistant
surface. Plug into a 120 V ~ 60 Hz outlet.
5. Turn the Temperature Control to the wool setting or higher. Do not
use the steam function with the Temperature Control selected below
the wool setting.
6. Tilt the iron to the horizontal position (see Figure 5) to turn the iron
on. It may then be returned to the vertical position (see Figure 6) to
preheat the iron.
7. Allow approximately 45 seconds for the iron to reach the desired
temperature. The red Power On/Heating Light will turn off. The light
will continue to turn off and on during use to maintain the proper
temperature.
8. Move the Variable Steam for more steam.
9. When finished, turn the Temperature Control to the OFF position,
turn Variable Steam to the no steam position and unplug iron. Allow
iron to cool before cleaning the exterior of the iron for storing.
CAUTION: AVOID COMING IN CONTACT WITH ESCAPING STEAM.
FIGURE 8
Page 10

OPERATING INSTRUCTIONS
(Cont.)
BURST OF STEAM
For a penetrating burst of steam to iron faster
and to smooth difficult wrinkles, firmly press
the Burst of Steam Button (see FIGURE 9). The
red Power On/Heating Light must be on for
best results. Do not press the Burst of Steam
Button more than three times successively.
Pause for at least 5 seconds to let the iron reheat for additional steam.
For maximum steaming, keep the Water Tank at least half full.
FIGURE 9
SPRAY
For a mist of water to moisten the dry and
difficult fabrics such as linen, cotton or
wool, or to handle stubborn wrinkles, aim
the Spray Nozzle and press the Spray
Button (see FIGURE 10). The spray function
is also handy to moisten creases accidentally ironed into the fabric. The spray function can be used on any setting
and does not affect the ironing temperature.
NOTE: You may have to pump the Spray Button several times the first
time you use the iron each session to start the spraying action.
FIGURE 10
USING THE VERTICAL STEAM FUNCTION
The vertical steam feature allows you to eliminate wrinkles from drapes
without having to take them off the rod or to freshen the appearance of
clothing on the hanger.
1. Unplug the iron from the outlet.
2. Position the Temperature Control to the
OFF position.
3. Fill the water tank with water, see FILLING
THE WATER TANK.
4. Stand the iron on its heel in an upright position on a heat-resistant surface. Plug into
120 V ~ 60 Hz outlet.
FIGURE 11
10
Page 11

11
OPERATING INSTRUCTIONS
(Cont.)
USING THE VERTICAL STEAM FUNCTION (Cont.)
5. Move the Temperature Control and Variable Steam to desired
setting.
6. Allow approximately 45 seconds for the iron to reach the desired
temperature. The red Power On/Heating Light will turn off.
7. Hold the iron 7-15 inches away from the garment and press the
burst of steam button once.
8. Wait a few seconds before pressing the Burst of Steam Button
again. The red Power On/Heating Light will cycle on and then off
during this process. Do not press the burst of steam button more
than three times successively when the red Power On/Heating Light
is ON. For best results, keep Water Tank at least half full.
9. When finished, move Temperature Control to the OFF position and
Variable Steam to no steam position and unplug the iron. Allow
iron to cool before cleaning the exterior of the iron for storing.
CAUTION: AVOID COMING IN CONTACT WITH ESCAPING STEAM.
EMPTYING THE WATER TANK
The Water Tank should be emptied after each use.
1. When finished, move Temperature Control to the OFF position and
turn the Variable Steam to no steam position and unplug the iron
from the electrical outlet.
2. Hold the Iron upside down and gently shake it to remove the
remaining water in the tank.
3. Press the Burst of Steam and Spray Buttons to release any
remaining water.
FLUSHING
Flushing the iron is advised after every 5 uses or more regularly to
prevent harmful mineral build-up that can clog the iron and prevent it
from heating and steaming properly.
1. Fill the Water Tank half full; see FILLING THE WATER TANK.
2. Stand the iron on its heel in an upright position on an iron-safe,
heat resistant surface. Plug into a 120 V ~ 60 Hz outlet.
3. Move the Temperature Control to the maximum setting.
Page 12

OPERATING INSTRUCTIONS
(Cont.)
FLUSHING (Cont.)
4. The red Power On/Heating Light will turn off when the iron has
reached the desired setting.
5. Wait for one more cycle, the red Power On/Heating Light will cycle
on and back off again.
6. Move the Temperature Control to the OFF position.
7. Unplug cord from outlet.
8. Steam and hot water will flow through the vents on the Stainless
Steel Soleplate, washing away the scales and minerals that have
built-up in the iron.
9. Gently move the iron back and forth until the Water Tank is empty.
10. Press the Variable Steam Button and turn the Variable Steam to the
no steam position.
USER MAINTENANCE INSTRUCTIONS
This appliance requires little maintenance. It contains no user serviceable parts. Do not try to repair it yourself. Refer it to a qualified appliance repair technician if servicing is needed.
CARE AND CLEANING
CAUTION: Unplug the iron from the electrical outlet and allow to cool
before cleaning the exterior of the iron and storing. Never immerse the
iron in water.
NOTE: Do not put any chemical cleaning agents or solvents in the
water tank.
To protect the Stainless Steel Soleplate from scratching, avoid ironing
over snaps, zippers, metal buttons, etc. Also, do not place the iron on
metal surfaces.
If starch or other residues cling to the Stainless Steel Soleplate, use a
hot iron cleaner according to directions. Hot iron cleaner is available at
mass merchandise, discount or hardware stores.
STORAGE
Remove the cord from the outlet by grasping the plug rather than
pulling the cord. Empty the Water Tank after each use, see EMPTYING
THE WATER TANK. Allow the iron to COOL COMPLETELY before
putting away. To protect the Stainless Steel Soleplate, place the iron in
an upright position on its heel. Wrap cord around iron base.
12
Page 13

NOTES
13
Page 14

LIMITED ONE YEAR PRODUCT WARRANTY
Warranty: This product is warranted to be free from defects in materials and
workmanship for a period of one (1) year from the original purchase date. This
product warranty covers only the original consumer purchaser of the product.
Warranty Coverage: This warranty is void if the product has been damaged by
accident in shipment, unreasonable use, misuse, neglect, improper service, commercial use, repairs by unauthorized personnel, normal wear and tear, improper
assembly, installation or maintenance abuse or other causes not arising out of
defects in materials or workmanship. This warranty is effective only if the product is
purchased and operated in the USA or Canada, and does not extend to any units
which have been used in violation of written instructions furnished with the product
or to units which have been altered or modified or to damage to products or parts
thereof which have had the serial number removed, altered, defaced or rendered
illegible.
Implied Warranties: ANY WARRANTIES IMPLIED WHICH THE PURCHASER MAY
HAVE ARE LIMITED IN DURATION TO ONE (1) YEAR FROM THE DATE OF PURCHASE. Some states and provinces do not allow limitations on how long an implied
warranty lasts, so the above limitation may not apply to you.
Warranty Performance: During the above one-year warranty period, a product
with a defect will be either repaired or replaced with a comparable model when the
product is returned to Zellers. The repaired or replacement product will be in warranty for the balance of the one-year warranty period and an additional one-month
period. No charge will be made for such repair or replacement within the warranty
period.
Important Notice: If any parts are missing or defective, return this product to the
place of purchase.
Any questions or comments can be directed to the Consumer Relations Department.
Please write to or call:
Consumer Relations Dept.
P.O. Box 6916
Columbia, MO 65205-6916
1(800) 233-9054
Limitation of Remedies: No representative or person is authorized to assume for
us any other liability in connection with the sale of our products. There shall be no
claims for defects or failure of performance or product failure under any theory of
tort, contract or commercial law including, but not limited to negligence, gross negligence, strict liability, breach of warranty, and breach of contract. Repair, replacement or refund shall be the sole remedy of the purchaser under this warranty. Some
states and provinces do not allow the exclusion or limitation of incidental or consequential damages, so the above limitation or exclusion may not apply to you.
Legal Rights: This warranty gives you specific legal rights, and you may also have
other rights which vary from state to state/province.
WESTINGHOUSE™, and “YOU CAN BE SURE...IF IT’S WESTINGHOUSE™”
are trademarks of WESTINGHOUSE ELECTRIC CORPORATION and used under
license by Salton, Inc. In no event shall Salton be liable for any incidental
or consequential damages, losses or expenses.
Made in China
“© 2003 P/N 61268
All Rights Reserved” Printed in China
 Loading...