

Page 1

DIGITAL
CONVECTION
OVEN
MODEL WST3019ZE
OWNER’S MANUAL
Page 2

IMPORTANT SAFEGUARDS
When using electrical appliances, basic safety precautions should always be
followed including the following:
1. Read all instructions.
2. Do not touch hot surfaces. Use handles or knobs.
3. To protect against electrical shock do not immerse cord, plugs, or appliance in water or other liquid.
4. Close supervision is necessary when any appliance is used by or near
children.
5. Unplug from outlet when not in use and before cleaning. Allow to cool
before putting on or taking off parts.
6. Do not operate any appliance with a damaged cord or plug or after the
appliance malfunctions or has been damaged in any manner. Contact
Consumer Service for examination, repair or adjustment.
7. The use of accessory attachments not recommended by the appliance
manufacturer may cause injuries.
8. Do not use outdoors.
9. Do not let cord hang over edge of table or counter, or touch hot surfaces.
10. Do not place on or near a hot gas or electric burner, or in a heated oven.
11. Extreme caution must be used when moving an appliance containing hot
oil or other hot liquids.
12. To disconnect, turn any control to “off”, then remove plug from wall outlet.
13. Do not use appliance for other than intended use.
14. Oversize foods or metal utensils must not be inserted in a Digital
Convection Oven as they may create a fire or risk of electric shock.
15. A fire may occur if the Digital Convection Oven is covered or touching
flammable material, including curtains, draperies, walls, and the like, when
in operation. Do not store any item on top of the appliance when in
operation.
16. Do not clean with metal scouring pads. Pieces can break off the pad and
touch electrical parts involving a risk of electric shock.
17. Extreme caution should be exercised when using containers constructed of
other than metal or glass.
18. Do not store any materials, other than manufacturers recommended accessories, in this oven when not in use.
19. Do not place any of the following materials in the oven: paper, cardboard,
plastic, and the like.
20. Do not cover crumb tray or any part of the oven with metal foil. This will
cause overheating of the oven.
21. Press STOP button to turn “off” the power.
SAVE THESE INSTRUCTIONS
For Household Use Only
2
Page 3

ADDITIONAL IMPORTANT
SAFEGUARDS
CAUTION HOT SURFACES: This appliance generates heat and escaping steam
during use. Proper precautions must be taken to prevent the risk of burns, fires,
or other injury to persons or damage to property.
1. A person who has not read and understood all operating and safety
instructions is not qualified to operate this appliance. All users of this appliance must read and understand this Owner’s Manual before operating or
cleaning this appliance.
2. Unplug from outlet when not in use and before cleaning. To
avoid electric shock, never immerse or rinse this appliance in
water or any other liquid.
3. If this appliance falls or accidentally becomes immersed in water, unplug it
from the wall outlet immediately. Do not reach into the water!
4. When using this appliance, provide adequate air space above and on all
sides for air circulation. Do not operate this appliance while it is touching
or near curtains, wall coverings, clothing, dishtowels or other flammable
materials.
5. To reduce the risk of fire, do not leave this appliance unattended during
use.
6. If this appliance begins to malfunction during use, immediately unplug the
cord. Do not use or attempt to repair a malfunctioning appliance!
7. The cord to this appliance should only be plugged into a 120V AC electrical wall outlet.
8. Do not use this appliance in an unstable position.
3
Page 4

POLARIZED PLUG
This appliance has a polarized plug (one blade is wider than the other).
To reduce the risk of electric shock, this plug is intended to fit into a
polarized outlet only one way. If the plug does not fit fully in the outlet,
reverse the plug. If it still does not fit, contact a qualified electrician. Do
not attempt to modify the plug in any way.
SHORT CORD INSTRUCTIONS
A short power-supply cord is provided to reduce the risk resulting from
becoming entangled in or tripping over a longer cord.
Longer detachable power-supply cords or extension cords are available
and may be used if care is exercised in their use.
If a longer detachable power-supply cord or extension cord is used, (1)
the marked electrical rating of the cord set or extension cord should be
at least as great as the electrical rating of the appliance, and (2) the
cord should be arranged so that it will not drape over the countertop or
tabletop where it can be pulled on by children or tripped over
unintentionally.
ELECTRIC POWER
If the electrical circuit is overloaded with other appliances, your appliance may not operate properly. It should be operated on a separate
electrical circuit from other appliances.
PLASTICIZER WARNING
CAUTION: To prevent Plasticizers from migrating from the finish of the
countertop or tabletop or other furniture, place NON-PLASTIC coast-
ers or placemats between the appliance and the finish of the countertop
or tabletop.
Failure to do so may cause the finish to darken, permanent
blemishes may occur or stains can appear.
4
Page 5
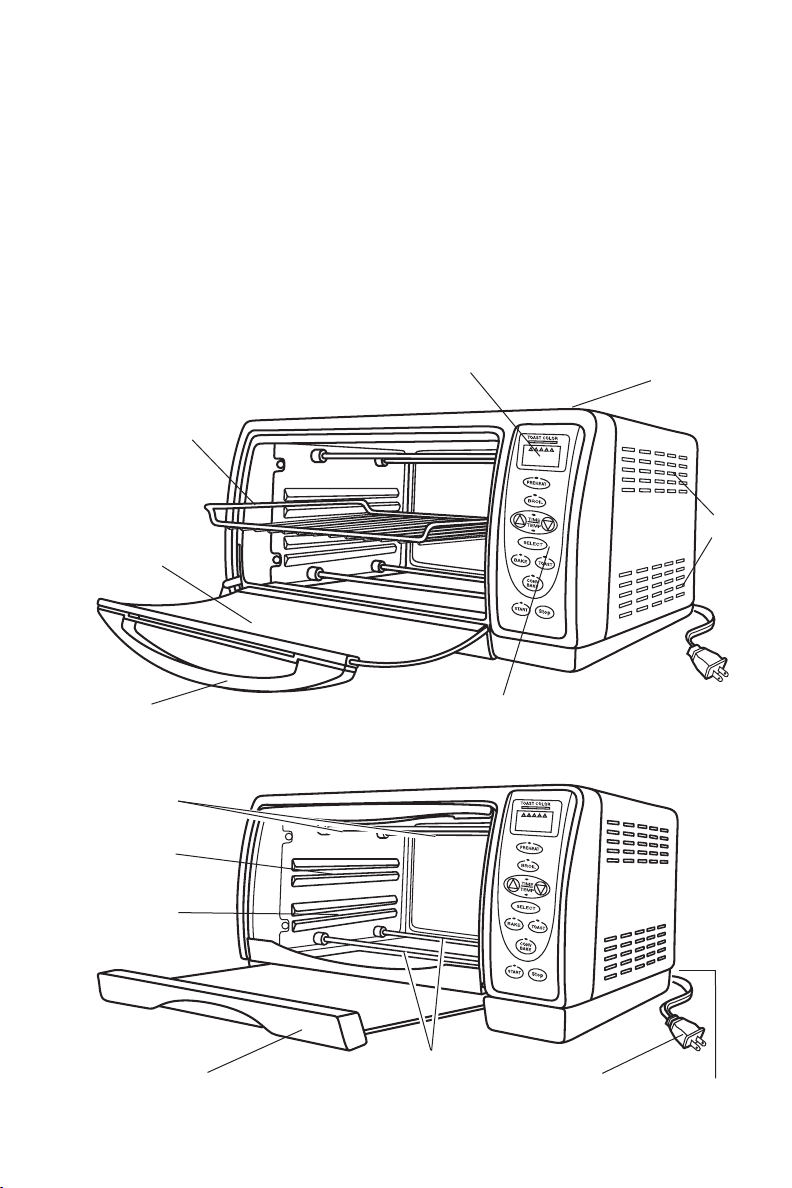
GETTING TO KNOW YOUR
WESTINGHOUSE WST3019ZE
DIGITAL CONVECTION OVEN
Your Westinghouse 6 Slice Digital Convection Oven offers 5 Functions:
PREHEAT, BROIL, TOAST, BAKE, and CONVECTION BAKE. The large
LCD Display and electronic touch pad controls make operation simple.
Its brushed stainless steel housing accented in elegant black and beautiful curved Glass Door make it a handsome addition to any kitchen.
PRODUCT MAY VARY SLIGHTLY FROM ILLUSTRATION
Removable
Wire Rack
(P/N 21612)
Glass
Oven
Door
Door
Handle
Upper Heating
Elements
Upper Shelf
Position
Lower Shelf
Position
LCD Display
Control Panel
Digital Convection
Oven Body
Vents
Crumb Tray
(P/N 21613)
Lower
Heating
Elements
5
Power Cord with
Polarized Plug
Cord Wrap
(not shown)
Page 6

BEFORE USING FOR THE FIRST TIME
CAUTION: To protect against electric shock, do not immerse the Digital
Convection Oven or allow cord to come into contact with water or other
liquids.
1. Carefully unpack the oven and accessories removing all packaging materials. Remove any labels from the outer surfaces.
2. Use a clean damp cloth to wipe the inside and outside surfaces of the
oven. Wash all accessories in warm soapy water, rinse and dry thoroughly.
Do not use abrasive cleaners.
3. To ensure that the oven is free from oils used in manufacturing, select the
BAKE Function and set the TEMPERATURE to 450°F, set the TIME to 30
minutes and press the START Button. At the end of the bake time the
Digital Convection Oven is ready for use.
HINTS FOR BEST RESULTS
1. To prevent heat loss, avoid opening the door excessively.
2. To speed up browning, brush lean cuts of meat, chicken and fish with oil,
margarine or melted butter.
3. If the START Button is not pressed, the Display will revert to: (— — —).
CAUTION: Appliance surfaces are hot during and after use.
CAUTION: Always wear protective, insulated oven mitts on hands
when touching hot Oven or hot dishes and food or when inserting
or removing Wire Rack, baking dish and food.
COOKING CONTAINERS
1. The Baking Tray included with the Digital Convection Oven is suitable for
items such as cookies, rolls, biscuits, nachos and pork chops.
2. A variety of standard baking dishes, such as a 8” round or square cake
pan, a 6-cup muffin pan, and 1 & 2 quart round, square, or rectangular
casserole dishes may be used for other foods.
3. Choose bakeware made of metal, or glass/ceramic without lids.
4. Dark or dull pans absorb heat faster; foods will bake more rapidly and
crust will brown more easily than in shiny bake pans.
5. Check package directions and/or with the ovenware manufacturer to
determine if the container is suitable for use in a Digital Convection Oven.
6. Do not use oven roasting bags in this Oven, as they may come in contact
with the heating elements.
CAUTION: Allow at least 1” air space between the top of the container and the upper heating elements. Never use glass lids on
glass or metal bakeware. If a lid is necessary, cover tightly with
heavy-duty aluminum foil.
PLEASE NOTE: Ovenware manufacturers do not recommend using
see-through glass baking containers or lids in this Oven. Glassceramic baking containers (that are not see-through) may be used.
Do not use oven roasting bags in this Oven, as they may come in
contact with the Heating Elements.
6
Page 7
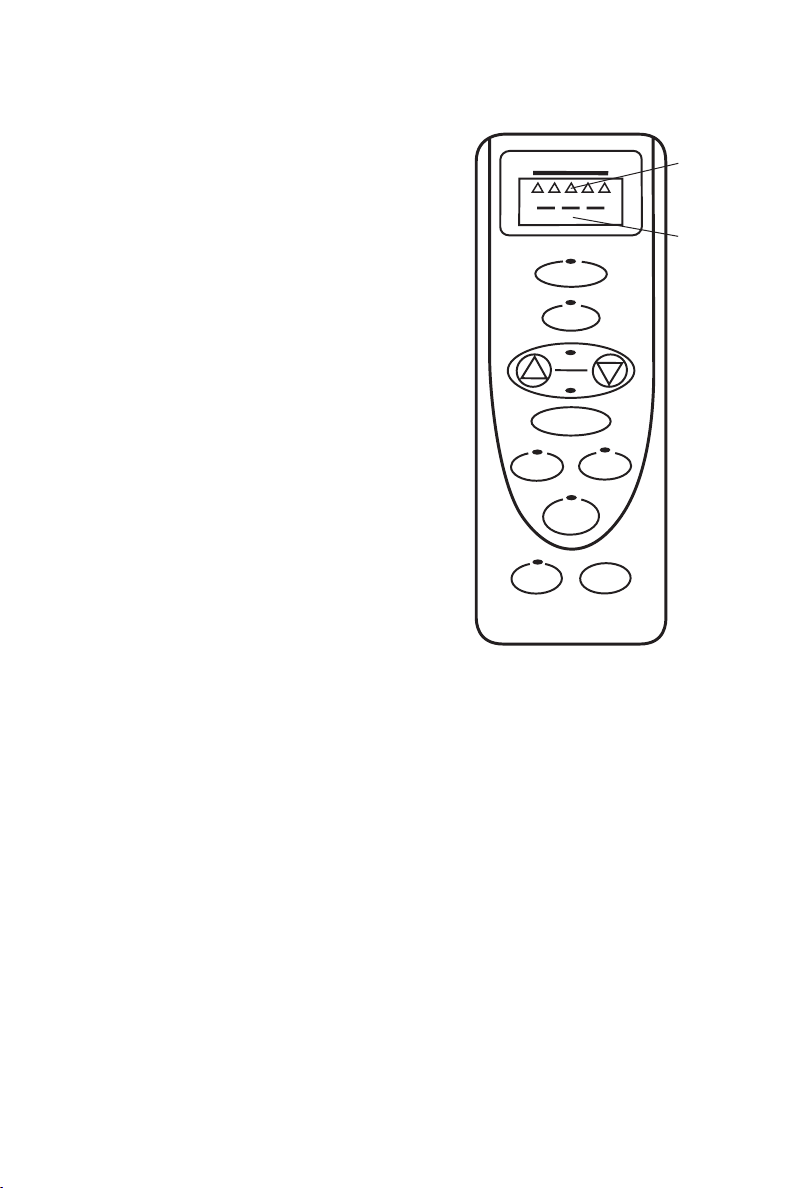
OPERATING INSTRUCTIONS
CONTROL PANEL
1. Toast Color: Browning Selector
consists of series of 5 points that
TOAST COLOR
represent Toast Color, progressively
darker each step.
2. Digital Display: Shows set
TIME/TEMPERATURE or (— — —).
3. PREHEAT Button: Fixed temperature setting at 200ºF, default time:
30 minutes (0:30). Maximum Time:
1 hour.
PREHEAT
BROIL
TIME
TEMP
4. BROIL Button: Fixed temperature
BAKE
SELECT
CONV
BAKE
TOAST
setting at 450ºF, default time: 30
minutes (0:30). Maximum Time: 2
hours.
5. BAKE Button: Default temperature
setting at 350ºF, default time: 30
minutes (0:30). Maximum Time: 2
hours.
START
Stop
6. TOAST Button: Fixed temperature
setting at 450ºF, default setting:
light toast.
7. CONVECTION BAKE Button: Default setting at 350ºF, 30 minutes (0:30). Maximum Time: 2 hours.
8. SELECT Button: Toggles between TIME and TEMPERATURE.
9. TIME/TEMPERATURE Button: Press UP or DOWN Arrows to
adjust TIME and TEMPERATURE for some Functions and Toast
Color selection when toasting.
(Hint: Holding the UP or DOWN Arrows down in place will
either fast forward or fast reverse the time and
temperature.)
10. START Button: Press this Button to begin all Functions. If this
Button is not pressed, the Display will revert to: (— — —).
11. STOP Button: Press this Button to turn OFF the power. The beeper
will sound once, the Display will revert to: (— — —), and all
Indicator Lights will turn OFF.
NOTE: Each time you press PREHEAT, BROIL,
TIME/TEMPERATURE, BAKE, CONVECTION BAKE, TOAST,
START or STOP Buttons, a red Indicator Light will illuminate and/or
you will hear a beep. This lets you know your selection has been made.
Toast
Color
Points
Digital
Display
7
Page 8

OPERATING INSTRUCTIONS
(Cont.)
SHELF AND RACK POSITIONS
Depending on the size of your food or the
height of your baking pan, you may wish to
adjust the height and position of the Wire
Rack. There are 2 Shelf Positions that the
Wire Rack or inverted Wire Rack fits into.
Slide the Wire Rack into the Oven making
sure that it is level and properly positioned.
You may use the Wire Rack in the normal
position or invert it.
1. When using the BROIL Function, your food should be 1- 2 inches
from the top element.
2. When baking, the shelf position used will depend on the size of the
food being prepared. It is important to place your food as close to
the center as possible to ensure even cooking.
Wire Rack
Inverted Wire Rack
PREHEAT FUNCTION
Use the PREHEAT Function at 200ºF, for 5 minutes to a maximum time
of 1 hour. The temperature cannot be adjusted.
1. Plug the Digital Convection Oven into a 120V AC outlet.
2. Press the PREHEAT Button. The red Indicator Light next to the
PREHEAT Button will illuminate.
3. The TIME Light will also illuminate and the default TIME 0:30 minutes will appear on the Display. To change the TIME, press the UP
or DOWN Arrow and it will change in 5 minute increments. You
may set the Oven to PREHEAT for 5 minutes to a maximum of 1
hour.
NOTE: If you press the SELECT Button, the TEMPERATURE Light will illuminate and the preset temperature of 200°F will appear in the Display.
The temperature cannot be adjusted. Press the SELECT Button
again.
4. Open the Door and center food on the Wire Rack. Close the Door.
5. Press the START Button to begin warming. The Display will show the
last selection, TIME or TEMPERATURE. If TEMPERATURE was selected last, it will remain on the Display for approximately 30 seconds;
then it will display the TIME as it counts down. At the end of the
pre-set time, the Oven will sound 5 beeps and turn itself OFF.
8
Page 9

OPERATING INSTRUCTIONS
(Cont.)
PREHEAT FUNCTION (Cont.)
6. You may turn the Oven OFF and cancel warming at any time by
pressing the red STOP Button.
7. Wear protective oven mitts to remove food from Digital Convection
Oven.
8. Unplug and allow to cool before cleaning.
HINTS FOR PREHEAT
1. Use for short periods of time after food is cooked.
BROIL FUNCTION
The BROIL Function may be used to broil your favorite foods according
to package or recipe instructions.
1. When broiling, always use Baking/Broiling Tray with the Broiling
Insert. This allows juices and fat to drip into the Baking/Broiling
Tray and decreases splattering while broiling.
Broiling Insert (P/N 21610)
Baking/Broiling Tray (P/N 21611)
Place the Broiling Insert into the
Baking/Broiling Tray
Use the upper
shelf position
when possible
Place food 1-2 inches
from the top element.
2. Use the upper shelf position when possible. Food should be placed
1 - 2 inches from the top element. Use the Wire Rack in either the
normal or the inverted position depending on the thickness of your
food.
CAUTION: NEVER LEAVE DIGITAL CONVECTION OVEN
UNATTENDED WHEN BROILING.
9
Page 10

OPERATING INSTRUCTIONS
(Cont.)
BROIL FUNCTION (Cont.)
3. Plug the Digital Convection Oven into a 120V AC outlet.
4. Open the Door and center Baking/Broiling Tray and Broiling Insert
with food on the Wire Rack. Close the Door.
5. Press the BROIL Button. The red Indicator Light next to the BROIL
Button will illuminate.
6. The TIME Light will illuminate and the default TIME 0:30 minutes
will appear on the Display. To change the TIME, press the UP or
DOWN Arrow and it will change in 5 minute increments. You may
set the Oven to BROIL for 5 minutes to a maximum of 2 hours.
NOTE: If you press the SELECT Button, the TEMPERATURE Light will illuminate and the preset temperature of 450°F will appear in the Display.
The temperature cannot be adjusted.
7. Press the START Button to begin broiling. The Display will show the
last selection, TIME or TEMPERATURE. If TEMPERATURE was selected last, it will remain on the Display for approximately 30 seconds;
then it will display the TIME as it counts down. Turn food halfway
through cooking time. At the end of the pre-set time, the Oven will
sound 5 beeps and turn itself OFF.
8. You may turn the Oven Broiler OFF and cancel cooking at any
time by pressing the red STOP Button.
9. Wear protective oven mitts to remove food from Digital Convection
Oven.
10. Unplug and allow to cool before cleaning.
HINTS FOR BROIL
1. Do not place aluminum foil on top of Broiling Insert. Doing this
traps grease and can cause a fire.
2. When broiling, trim excess fats from meat and score edges to
reduce curling, splattering and smoking.
3. Always thaw meat before broiling.
4. The Oven is preset to the highest temperature when broiling.
10
Page 11

OPERATING INSTRUCTIONS
(Cont.)
BROIL INSTRUCTIONS
1. Position Broiling Insert in Baking/Broiling Tray. Place food on top of
Insert.
2. Season food before or after cooking.
3. Broil until done, turning halfway through cooking time.
BROIL CHART
Weight/ Broil Time Internal
Food Thickness (Minutes) Temp. (ºF)
Beef
Porterhouse/Sirloin 1 inch 0:15 - 0:25 145 - 170
Rib Eye 1 inch 0:15 - 0:25 145 - 170
Hamburger 4 ounces 0:15 - 0:20 160
Pork
Chops
Poultry
Chicken pieces 0:25 - 0:35 180
Fish
Fillets
Steak 1 inch 0:20 - 0:30
1
⁄2inch 0:10 - 0:20 160 - 170
1
⁄2inch 0:10 - 0:15
USDA COOKING GUIDELINES
NOTE: The United States Department of Agriculture recommends that meat and poultry be cooked to the following
internal temperatures to be sure any harmful bacteria has
been killed. Ground turkey and chicken should be cooked to
an internal temperature of 165ºF and ground beef, veal,
lamb and pork be cooked to an internal temperature 160ºF.
Chicken and turkey should be cooked to an internal temperature of 170ºF for white meat and 180ºF for dark meat. Goose
and duck should be cooked to an internal temperature of
180ºF. Fresh beef, veal and lamb, etc., should be cooked to
an internal temperature of at least 145ºF. Fresh pork should
be cooked to an internal temperature of at least 160ºF. When
re-heating meat and poultry products, they should also be
cooked to an internal temperature of 165ºF.
11
Page 12

OPERATING INSTRUCTIONS
(Cont.)
BAKE / CONVECTION BAKE FUNCTION
The BAKE Function may be used to bake cakes, cookies, pies, biscuits
or your favorite recipe according to package or recipe instructions.
The CONVECTION BAKE Function circulates heated air throughout the
oven cavity to maintain uniform temperature around the food. This constant, gentle air flow promotes browning and seals in juices when cooking meats and poultry.
1. Plug the Digital Convection Oven into a 120V AC outlet.
2. Position the Wire Rack in the correct shelf position for the baking
dish.
3. Press either the BAKE or CONVECTION BAKE Button. The red
Indicator Light next to the BAKE or CONVECTION BAKE Button will
illuminate.
4. The TIME Light will also illuminate and the default TIME 0:30 minutes will appear on the Display. To change the TIME, press the UP
or DOWN Arrow and it will change in 5 minute increments. You
may set the Oven to BAKE or CONVECTION BAKE for 5 minutes to
a maximum of 2 hours.
5. Press the SELECT Button. The TEMPERATURE Light will illuminate
and the preset temperature of 350°F will appear in the Display. To
change the temperature, press the UP or DOWN Arrow. The temperature will change in 25°F increments. To change the temperature more quickly, hold the ARROW down. You may set the Oven
to BAKE or CONVECTION BAKE from 100°F to a maximum of
450°F.
6. Press the START Button to begin preheating the Oven for 10 minutes if called for on the package or recipe. The Display will show
the last selection, TIME or TEMPERATURE. If TEMPERATURE was
selected last, it will remain on the Display for approximately 30 seconds; then it will display the TIME as it counts down. At the end of
the pre-set time, the Oven will sound 5 beeps and turn itself OFF.
12
Page 13

OPERATING INSTRUCTIONS
(Cont.)
BAKE / CONVECTION BAKE FUNCTION
The BAKE Function may be used to bake cakes, cookies, pies, biscuits
or your favorite recipe according to package or recipe instructions.
The CONVECTION BAKE Function circulates heated air throughout the
oven cavity to maintain uniform temperature around the food. This constant, gentle air flow promotes browning and seals in juices when cooking meats and poultry.
1. Plug the Digital Convection Oven into a 120V AC outlet.
2. Position the Wire Rack in the correct shelf position for the baking
dish.
3. Press either the BAKE or CONVECTION BAKE Button. The red
Indicator Light next to the BAKE or CONVECTION BAKE Button will
illuminate.
4. The TIME Light will also illuminate and the default TIME 0:30 minutes will appear on the Display. To change the TIME, press the UP
or DOWN Arrow and it will change in 5 minute increments. You
may set the Oven to BAKE or CONVECTION BAKE for 5 minutes to
a maximum of 2 hours.
5. Press the SELECT Button. The TEMPERATURE Light will illuminate
and the preset temperature of 350°F will appear in the Display. To
change the temperature, press the UP or DOWN Arrow. The temperature will change in 25°F increments. To change the temperature more quickly, hold the ARROW down. You may set the Oven
to BAKE or CONVECTION BAKE from 100°F to a maximum of
450°F.
6. Press the START Button to begin preheating the Oven for 10 minutes if called for on the package or recipe. The Display will show
the last selection, TIME or TEMPERATURE. If TEMPERATURE was
selected last, it will remain on the Display for approximately 30 seconds; then it will display the TIME as it counts down. At the end of
the pre-set time, the Oven will sound 5 beeps and turn itself OFF.
12
Page 14

OPERATING INSTRUCTIONS
(Cont.)
BAKE / CONVECTION BAKE FUNCTION (Cont.)
7. Open the Door and center food on the Wire Rack. Close the Door.
8. You may turn the Oven OFF and cancel cooking at any time by
pressing the red STOP Button.
9. Wear protective oven mitts to remove food from Digital Convection
Oven.
10. Unplug and allow to cool before cleaning.
HINTS FOR BAKE / CONVECTION BAKE
1. When baking, the shelf position used will depend on the size of the
food being prepared. It is important to place your food as close to
the center of the Oven as possible to ensure even cooking.
2. Dark or dull pans absorb heat faster; foods will bake more rapidly
and crust will brown more easily than in shiny bake pans.
3. Shallow baking containers are best when using the Convection
Bake because they allow maximum air flow.
4. Choose bakeware made of metal, ovenproof glass, and ceramic.
5. Check package directions to determine if the container is suitable
for use in a regular oven.
CAUTION: Allow at least 1” air space between the top of the
container and the upper heating elements. Never use glass
lids on glass or metal bakeware. If a lid is necessary, cover
tightly with aluminum foil.
13
Page 15

OPERATING INSTRUCTIONS
(Cont.)
CONVECTION BAKE INSTRUCTIONS
1. Preheat Oven. Place meat (fat side up) or food to be cooked into a
bake pan.
2. Season meat before or after cooking.
3. Insert meat thermometer into the thickest part of meat, not touching
bone or fat.
4. Do not add water. Do not cover.
5. Roast to 5 - 10 degrees below desired doneness. (Internal
temperature).
6. Allow meat to stand 15 - 20 minutes before serving. The temperature will continue to rise while standing.
CONVECTION BAKE CHART
Oven Convection Internal
Food Weight Temp. (ºF) Bake Time Temp. (ºF)
Beef
Eye of Round, Rib Eye 2 - 5 lbs. 325 1:45 - 2:00 145 - 170
Top Round Roast 2 - 3 lbs. 375 1:45 - 2:15 145 - 170
Pork
Loin (boneless) 2 - 3 lbs. 325 1:15 - 1:30 160 - 170
Center Cut
Pork Loin Filet 2 lbs. 325 1:15 - 1:30 160 - 170
Ham (smoked) 5 lbs. 325 1:45 - 2:15 140
Poultry
Chicken (whole) 3 - 4 lbs. 350 1:15 - 1:30 180
Cornish Hen 1 to 1
1
⁄2lbs. 350 1:00 - 1:25 180
14
Page 16

OPERATING INSTRUCTIONS
(Cont.)
TOAST FUNCTION
The TOAST Function may be used to toast up to 6 slices of bread,
English muffin halves, frozen waffles and more!
CAUTION: NEVER LEAVE DIGITAL CONVECTION OVEN
UNATTENDED WHEN TOASTING.
1. Plug the Digital Convection Oven into a 120V AC outlet.
2. Make sure the Crumb Tray is firmly inserted in the bottom of the
Oven.
3. Remove all protective wrappings from food before placing in
Digital Convection Oven. Follow toaster food directions. Place the
food directly onto the Wire Rack, in the center of your Oven.
4. Press the TOAST Button. The red Indicator Light next to the TOAST
Button will illuminate.
5. At the top of the Control Panel, you will see “TOAST COLOR” and
underneath the Browning Selector series of 5 points — starting at
the left, the points indicate TOAST progressively darker each step.
6. Press the UP or DOWN Arrow to position point for either darker or
lighter TOAST settings.
NOTE: For your first toasting, it is best to position the Browning
Selector in the middle for medium toasting, then adjust each subsequent toasting to your preference.
NOTE: Use extra caution when using this Digital
Convection Oven for toasting pastry items with runny-type
frosting or open fillings.
7. Open the Door and center food on the Wire Rack. Close the Door.
8. Press the START Button to begin toasting. For the first 30 seconds,
450°F will appear on the Display. Depending on the browning
selection, the TIME will count down from 2:30 (1st position), 3:30
(2nd position), 4:30 (3rd position), 5:30 (4th position) and 6:30
(5th position). At the end of the pre-set time, the Oven will sound 5
beeps and turn itself OFF.
15
Page 17

OPERATING INSTRUCTIONS
(Cont.)
TOAST FUNCTION (Cont.)
9. Watch toast until desired color is achieved. You may turn the Oven
OFF and cancel cooking at any time by pressing the red STOP
Button.
10. Wear protective oven mitts to remove food from Digital Convection
Oven.
11. Unplug and allow to cool before cleaning.
HINTS FOR TOAST
1. Frozen and heavy bread require a longer time setting (e.g. bagels
and English muffins.)
2. When toasting more than one slice of bread, use slices of similar
size, thickness and freshness.
3. Stale bread, thin bread or sweet bread products, such as tea cakes
and fruit loaf, brown much more quickly than ordinary bread, so
they should be toasted for less time.
4. Different breads require different toasting times. Check your food
by looking through the Glass Door. If you are satisfied that the
food is toasted satisfactorily, press the STOP Button to turn the
Oven OFF. Open the Oven Door to check the toasted food’s color.
If more toasting time is needed, close the Oven Door, press TOAST
Button and then the START Button.
5. For best results, clean Crumb Tray frequently.
16
Page 18

USER MAINTENANCE INSTRUCTIONS
This appliance requires little maintenance. It contains no user serviceable parts. Do not try to repair it yourself. Contact a qualified appliance
repair technician if the product requires servicing.
CARE AND CLEANING
1. Always unplug and allow to cool completely before cleaning or
moving.
2. Clean the Bake/Broil Pan, Broiling Insert, Wire Rack and Crumb
Tray after each use. The Crumb Tray must be in position before
using.
3. Clean the interior of the Digital Convection Oven and all removable parts with a mild non-abrasive cleaner and a plastic scouring
pad after each use. Rinse and dry thoroughly. Do not rub too hard
as the interior surface of the oven can be scratched.
4. Clean the Glass Oven Door and Digital Convection Oven exterior
with glass cleaner or mild detergent and a damp cloth or plastic
scouring pad. Do not use an abrasive cleaner or pad as they might
scratch the finish.
5. Rinse and dry thoroughly with a clean cloth. Allow to dry before
closing Glass Door.
STORAGE
Unplug unit, allow to cool, and clean before storing. Store Digital
Convection Oven in its box in a clean, dry place. Never store appliance
while it is hot or still plugged in. Never wrap cord tightly around the
appliance, use the Cord Storage area on the bottom of the back of the
Oven. Do not put any stress on the cord where it enters the unit, as it
could cause the cord to fray and break.
17
Page 19

RECIPES
BREAKFAST CASSEROLE
1 tablespoon tarragon, chopped
1
⁄2lb. sausage, cooked
3 slices bread, cubed
3
⁄4cup eggs substitute
3
⁄4cup cheddar cheese, shredded
1 cup milk
1
⁄4teaspoon salt
1 teaspoon prepared mustard
1
⁄8teaspoon cayenne pepper
Preheat Oven on BAKE to 425ºF. Place sausage, tarragon and bread
cubes into a greased 8 x 8-inch baking pan. Beat eggs, cheese, milk,
salt, mustard and pepper together. Pour over the bread mixture. Bake
for 20 minutes or until done.
TOMATOES WITH FRESH HERBS
8 tomato slices, 1⁄2-inch thick
2 slices bread, crumbled
2 tablespoons grated Parmesan cheese
1 tablespoon chopped fresh oregano
1 tablespoon chopped fresh basil
2 cloves garlic, minced
1
⁄8teaspoon salt
1
⁄8teaspoon pepper
Place the Broiling Insert into the Baking/Broiling Tray. Arrange tomato
slices on Broiling Insert. BROIL for 3-4 minutes. Mix remaining ingredients. Turn tomato slices over and spoon mixture on top.
BROIL for 3-4 minutes or until topping is lightly browned.
Makes 4 servings
18
Page 20

RECIPES
ACCORDION POTATOES
4 medium baking potatoes
1 medium onion, sliced and cut in half
1
⁄4cup margarine or butter
1
⁄8teaspoon salt
1
⁄8teaspoon pepper
1
⁄8teaspoon paprika
Preheat oven on BAKE to 350°F. Wash and scrub potatoes. Make deep
slashes at half inch intervals across the length of each potato, being
careful not to cut through the bottom. Place a slice of onion and a
small pat of margarine in each slot. Season with salt, pepper and
paprika.
Tightly wrap each potato in aluminum foil. BAKE 1 hour and 15 minutes or until done.
Makes 4 servings
SALMON STEAKS WITH FRESH DILL
4 salmon steaks
1 tablespoon olive oil
1
⁄2teaspoon salt
1 teaspoon fresh dill weed
1 lemon sliced
Place the Broiling Insert into the Baking/Broiling Tray. Place salmon
steaks onto Broiling Insert. Brush top with oil, sprinkle with salt and dill
weed.
Top with lemon wedges. BROIL 20 - 30 minutes, or until done.
Makes 4 servings
19
Page 21

RECIPES
MEXICAN CHICKEN
4 chicken breast halves, boneless-skinless
1 cup salsa
1 (8-ounce) can stewed tomatoes
1
⁄8teaspoon salt
1
⁄8teaspoon pepper
Preheat oven on BAKE to 350°F. Cut chicken into cubes and mix with
remaining ingredients. Place into 8x8-inch pan.
Cover with foil and BAKE 1 hour or until done. Serve with potatoes or
rice.
Makes 4 servings
CURRY BEEF AND WILD RICE
2 cups beef broth
1
⁄2cup onion, chopped
2 teaspoons curry powder
1 cup wild rice, uncooked
salt and pepper to taste
1
⁄2lb. raw ground turkey or lean beef
Preheat Oven on BAKE to 350ºF. Mix together broth, onion, curry powder, rice, salt and pepper in a greased 8 x 8-inch baking pan.
Crumble meat on top of rice mixture and BAKE 1 hour or until done.
Makes 4 servings
20
Page 22

RECIPES
PORK CANTONESE CASSEROLE
4 pork chops
1 cup celery, chopped
1 cup green pepper, chopped
1 cup onion, chopped
1
⁄4cup soy sauce
1
⁄2tablespoons vinegar
1
1 tablespoon Worcestershire sauce
2 tablespoons Teriyaki sauce
3 tablespoons brown sugar
2 tablespoons flour
Preheat Oven on BAKE to 350ºF. Place pork and vegetables in a
greased 2 quart container. Mix together remaining ingredients and
pour over meat and vegetables.
BAKE 45 minutes or until done.
APPLE TORTE WITH BLUEBERRIES
2 eggs
1
⁄2cups sugar
1
1
⁄2cup flour
1
⁄2teaspoons baking powder
2
1
⁄4teaspoon salt
1 cup chopped nuts
4 cups chopped apples
2 teaspoons vanilla
1 pint blueberries
Preheat oven on BAKE to 350°F. Beat together egg and sugar until thoroughly blended and smooth. Sift together dry ingredients; mix into the
egg-sugar mixture. Stir in nuts, apples and vanilla. Pour into greased
8x8-inch baking pan.
BAKE 45-50 minutes or until done. Serve warm or cold with whipped
cream or ice cream. Top with blueberries.
Makes 6-8 servings
21
Page 23

LIMITED ONE YEAR PRODUCT WARRANTY
Warranty: This product is warranted to be free from defects in materials and
workmanship for a period of one (1) year from the original purchase date. This
product warranty covers only the original consumer purchaser of the product.
Warranty Coverage: This warranty is void if the product has been damaged by
accident in shipment, unreasonable use, misuse, neglect, improper service, commercial use, repairs by unauthorized personnel, normal wear and tear, improper
assembly, installation or maintenance abuse or other causes not arising out of
defects in materials or workmanship. This warranty is effective only if the product is
purchased and operated in the USA or Canada, and does not extend to any units
which have been used in violation of written instructions furnished with the product
or to units which have been altered or modified or to damage to products or parts
thereof which have had the serial number removed, altered, defaced or rendered
illegible.
Implied Warranties: ANY WARRANTIES IMPLIED WHICH THE PURCHASER MAY
HAVE ARE LIMITED IN DURATION TO ONE (1) YEAR FROM THE DATE OF PURCHASE. Some states and provinces do not allow limitations on how long an implied
warranty lasts, so the above limitation may not apply to you.
Warranty Performance: During the above one-year warranty period, a product
with a defect will be either repaired or replaced with a comparable model when the
product is returned to Zellers. The repaired or replacement product will be in warranty for the balance of the one-year warranty period and an additional one-month
period. No charge will be made for such repair or replacement within the warranty
period.
Important Notice: If any parts are missing or defective, return this product to the
place of purchase.
Any questions or comments can be directed to the Consumer Relations Department.
Please write to or call:
Consumer Relations Dept.
P.O. Box 6916
Columbia, MO 65205-6916
1(800) 233-9054
Limitation of Remedies: No representative or person is authorized to assume for
us any other liability in connection with the sale of our products. There shall be no
claims for defects or failure of performance or product failure under any theory of
tort, contract or commercial law including, but not limited to negligence, gross negligence, strict liability, breach of warranty, and breach of contract. Repair, replacement or refund shall be the sole remedy of the purchaser under this warranty. Some
states and provinces do not allow the exclusion or limitation of incidental or consequential damages, so the above limitation or exclusion may not apply to you.
Legal Rights: This warranty gives you specific legal rights, and you may also have
other rights which vary from state to state/province.
WESTINGHOUSE™, and “YOU CAN BE SURE...IF IT’S WESTINGHOUSE™”
are trademarks of WESTINGHOUSE ELECTRIC CORPORATION and used under
license by Salton, Inc. In no event shall Salton be liable for any incidental
or consequential damages, losses or expenses.
Made in China
“© 2003 P/N 61279
All Rights Reserved” Printed in China
 Loading...