

Page 1
MA7200 PLUS INVERTER
SERIES
PID Quick Start Manual
For Fan and Pump Applications
1 to 2 HP
Models- MA7200-2001/2-N1 (230V)
&
MA7200-4001/2-N1 (460V)
speed
time
Rev. 1.3 - May 27th 2008
Page 2

MA7200 PLUS Inverter 1 to 2 HP PID Fan and Pump Quick Start Manual
__________________________________________________________________
PID Quick Start Guide for Fan and Pump Applications
PID is a control method that can be used for the purpose of automatically regulating flow or
pressure in fan and pump applications. Following steps 1 through 13 listed below in this guide will
simplify the start up of the MA7200 PLUS Inverter series for fan and pump applications using PID
control. Some of the steps are specific to pump applications only and will be so noted. The guide is
not intended to replace the MA7200 PLUS Installation and Operation Manual, and the user is urged
review this manual.
The PID method of control covered by this guide will consist basically of a set-point (operating point,
e.g. flow, pressure etc.) entered through the keypad and an analog transducer feedback signal (0 –
10 VDC or 4 - 20 mA). These two signals are then compared, and through PID processing, correct for
any load or environmental changes to maintain the set-point. Only the (P) proportional and (I)
integral parameters will be set and adjusted through the keypad to optimize performance. The
parameter (D) derivative will not be discussed or used in this guide as the factory setting is usually
sufficient for fan and pump applications. Actual values will be used to provide a realistic example of
setting up PID control.
Although the inverter can be controlled via serial communication, it is beyond the scope of this guide
and the user is referred to the MA7200 PLUS Installation and Operating Manual for further
information on this subject.
Step 1 – Before starting the inverter –Safety First!
Step 2 – Apply power to the drive.
Step 3 – Set drive to run mode.
Step 4 – Check fan or pump motor operation.
Step 5 – Making external digital input / output and analog feedback control wiring connections.
Step 6 – Select stop / start method of control.
Step 7 – Setting minimum speed in pump applications. (Pump applications only)
Step 8 – Select PID control and feedback input
Step 9 – Select engineering units.
Step 10 – Setting PID parameters
Step 11 – Setting acceleration and deceleration. (Note 1)
Step 12 – Setting PID sleep functions. (Pump applications only)
Step 13 – Testing the system.
Note 1 – The acceleration and deceleration parameters are not specific to PID control but are
included as part of the PID set-up.
SAFETY FIRST!
Step 1 - Before Starting the Inverter
• Referring to the MA7200 PLUS Instruction Manual, please review and verify that the correct
inverter size for the motor was received free of damage. To ensure personnel safety and to avoid
equipment damage, follow the precautions and the installation procedures for mounting, wiring,
and operating environment.
CAUTION - To avoid damage to the inverter when removing the inverter cover
and/or LCD Operator, refer to Appendix B for the proper procedure.
• In accordance with applicable codes make electrical connection s to the motor and input power
terminals. (Refer to the block diagram, Fig. 4). No other external connections should be made at
this time, as the initial control will be from the keypad.
________________________________________________________________
TECO – Westinghouse Motor Company
2
Page 3
MA7200 PLUS Inverter 1 to 2 HP PID Fan and Pump Quick Start Manual
__________________________________________________________________
Step 2 - Apply Power to the Drive
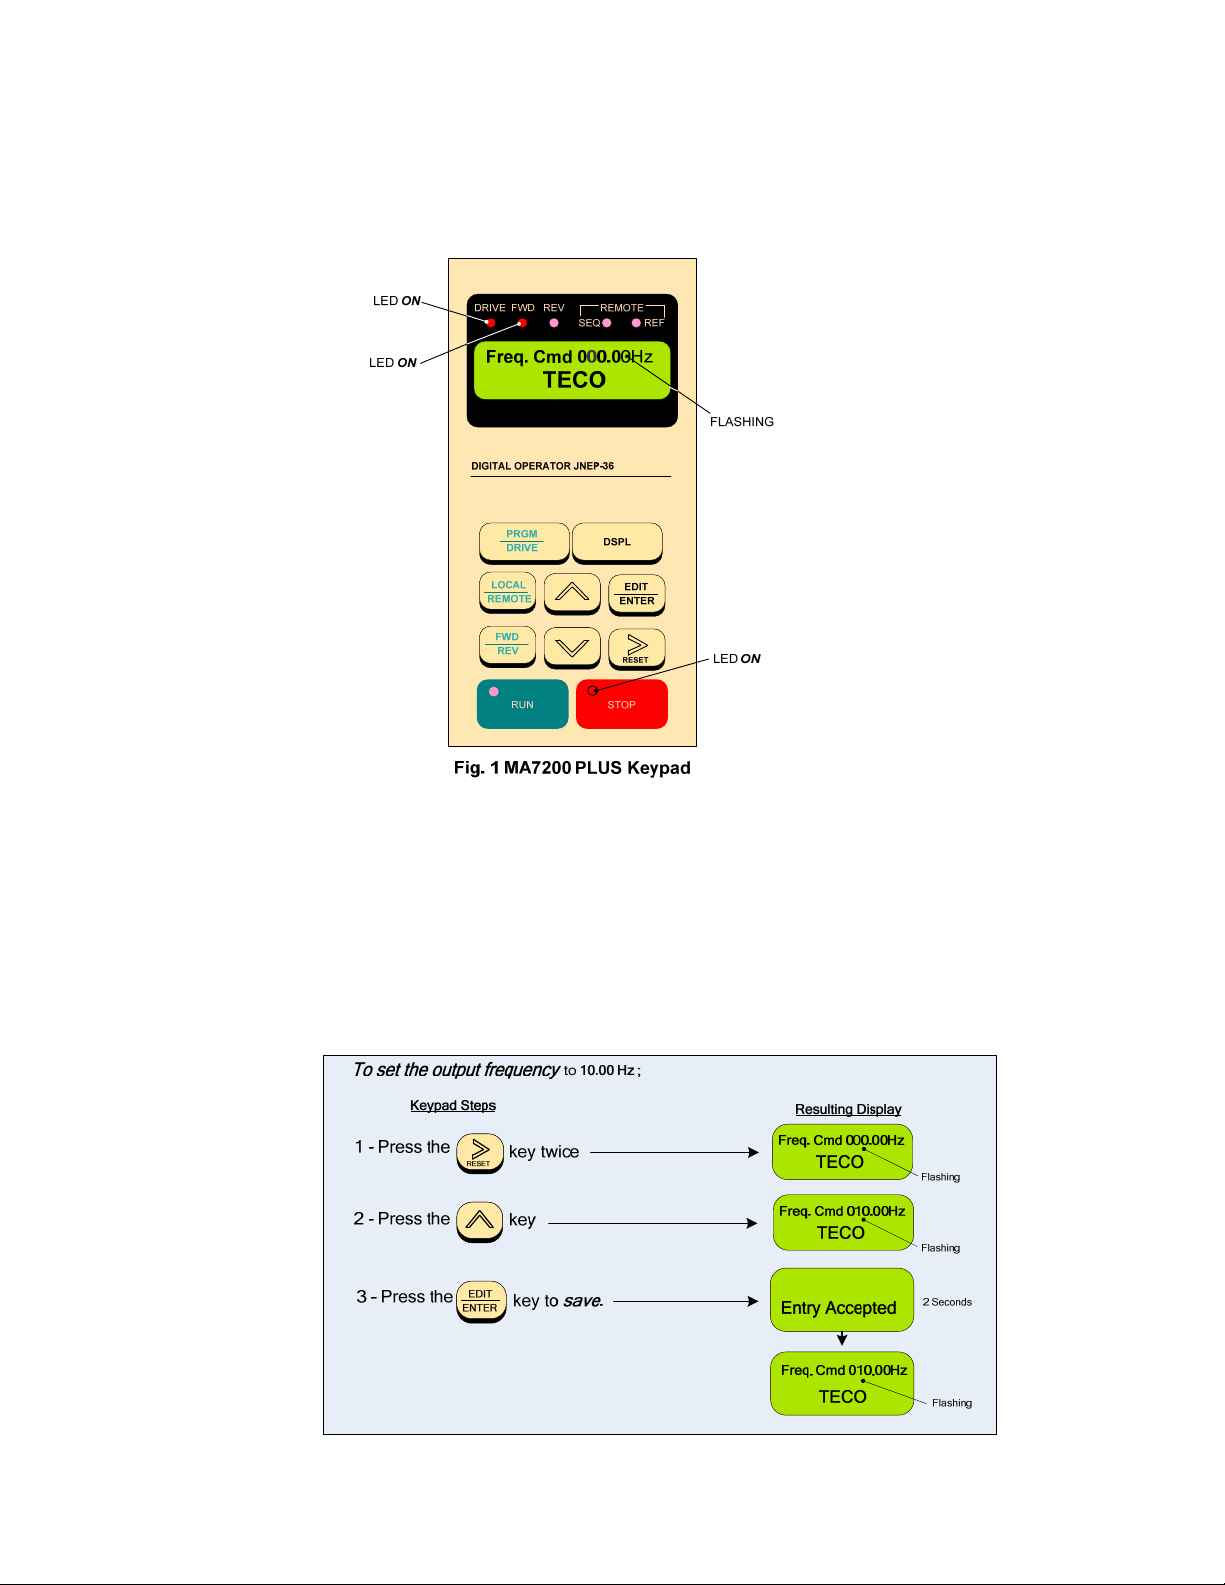
• Apply AC power to the Inverter and observe the LCD Display Line 1; it should read
“Freq. Cmd 000.00Hz”. Line 2 should read “TECO”. The red LED on the STOP key should be on.
The DRIVE and FWD LED’s should be on. (See Fig. 1 below)
Step 3
• If the red DRIVE LED is not on with AC power up, press the PGRM / DRIVE key until the red
Drive LED is on. The Inverter is now in the RUN mode.
- Set Drive to Run Mode
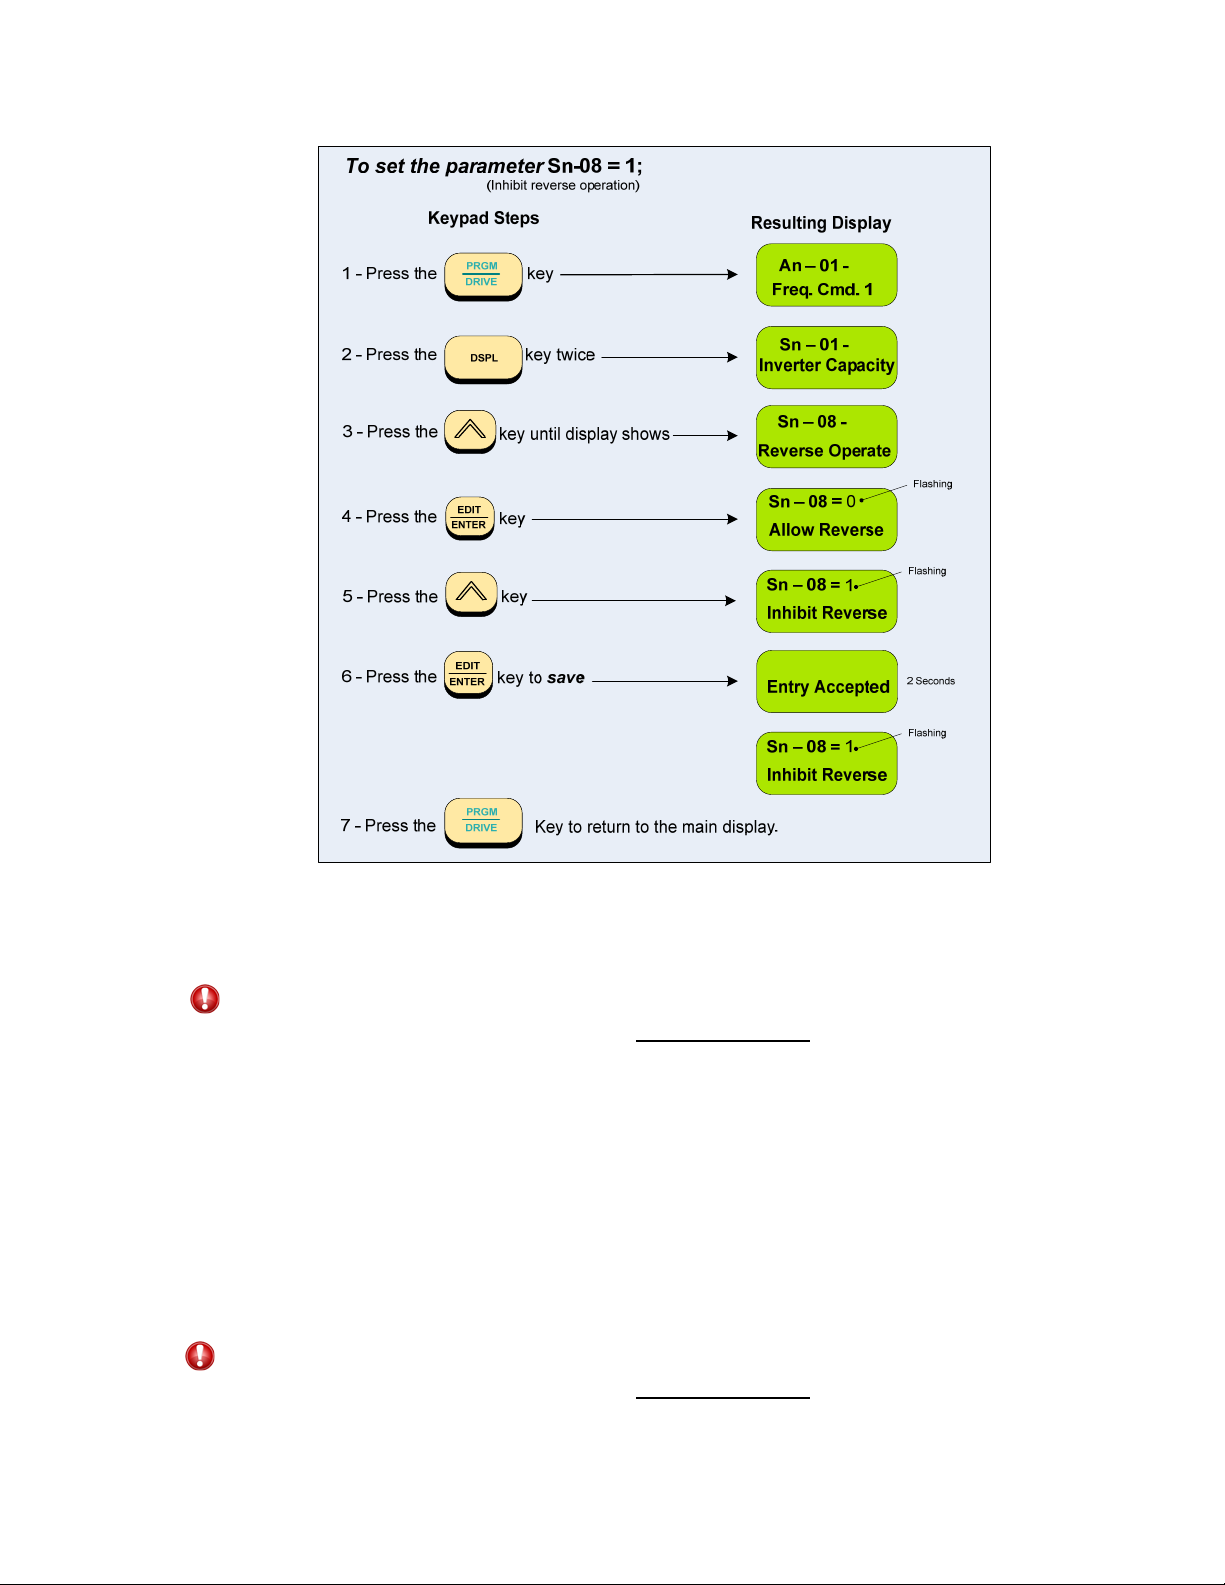
Step 4 - Check Fan or Pump Motor Operation
• Enter 10.00Hz for the frequency reference and set parameter Sn-08 = 1 to disable Reverse
Direction Operation. Note: The output from the inverter is displayed in Hz as factory default. If
desired, the output may be displayed in other units such as (%) of full speed, P SI etc. (see
Step 9)
________________________________________________________________
TECO – Westinghouse Motor Company
3
Page 4
MA7200 PLUS Inverter 1 to 2 HP PID Fan and Pump Quick Start Manual
__________________________________________________________________
• Press the RUN key, and check the fan or pump direction of rotation. If the direction is not correct,
press the STOP key and wait until the fan or pump has come to a complete STOP. Next, power
down the inverter.
Danger
After the power has been turned OFF, wait at least 5 minutes until the charge
indicator extinguishes completely before touching any wiring, circuit boards or
components.
• Reverse any two of the fan or pump motor connections at the inverter ( U(T1),V(T2), or W(T3) ).
Next, following STEP 2, power-up the inverter; the motor direction should now be correct.
Step 5 – Making External Digital Input/Output and Analog Feedback
Control wiring Connections
• Before removing any covers or making any external control connections, power down the
inverter.
Danger
After the power has been turned OFF, wait at least 5 minutes until the charge
indicator extinguishes completely before touching any wiring, circuit boards, or
components.
________________________________________________________________
TECO – Westinghouse Motor Company
4
Page 5
MA7200 PLUS Inverter 1 to 2 HP PID Fan and Pump Quick Start Manual
__________________________________________________________________
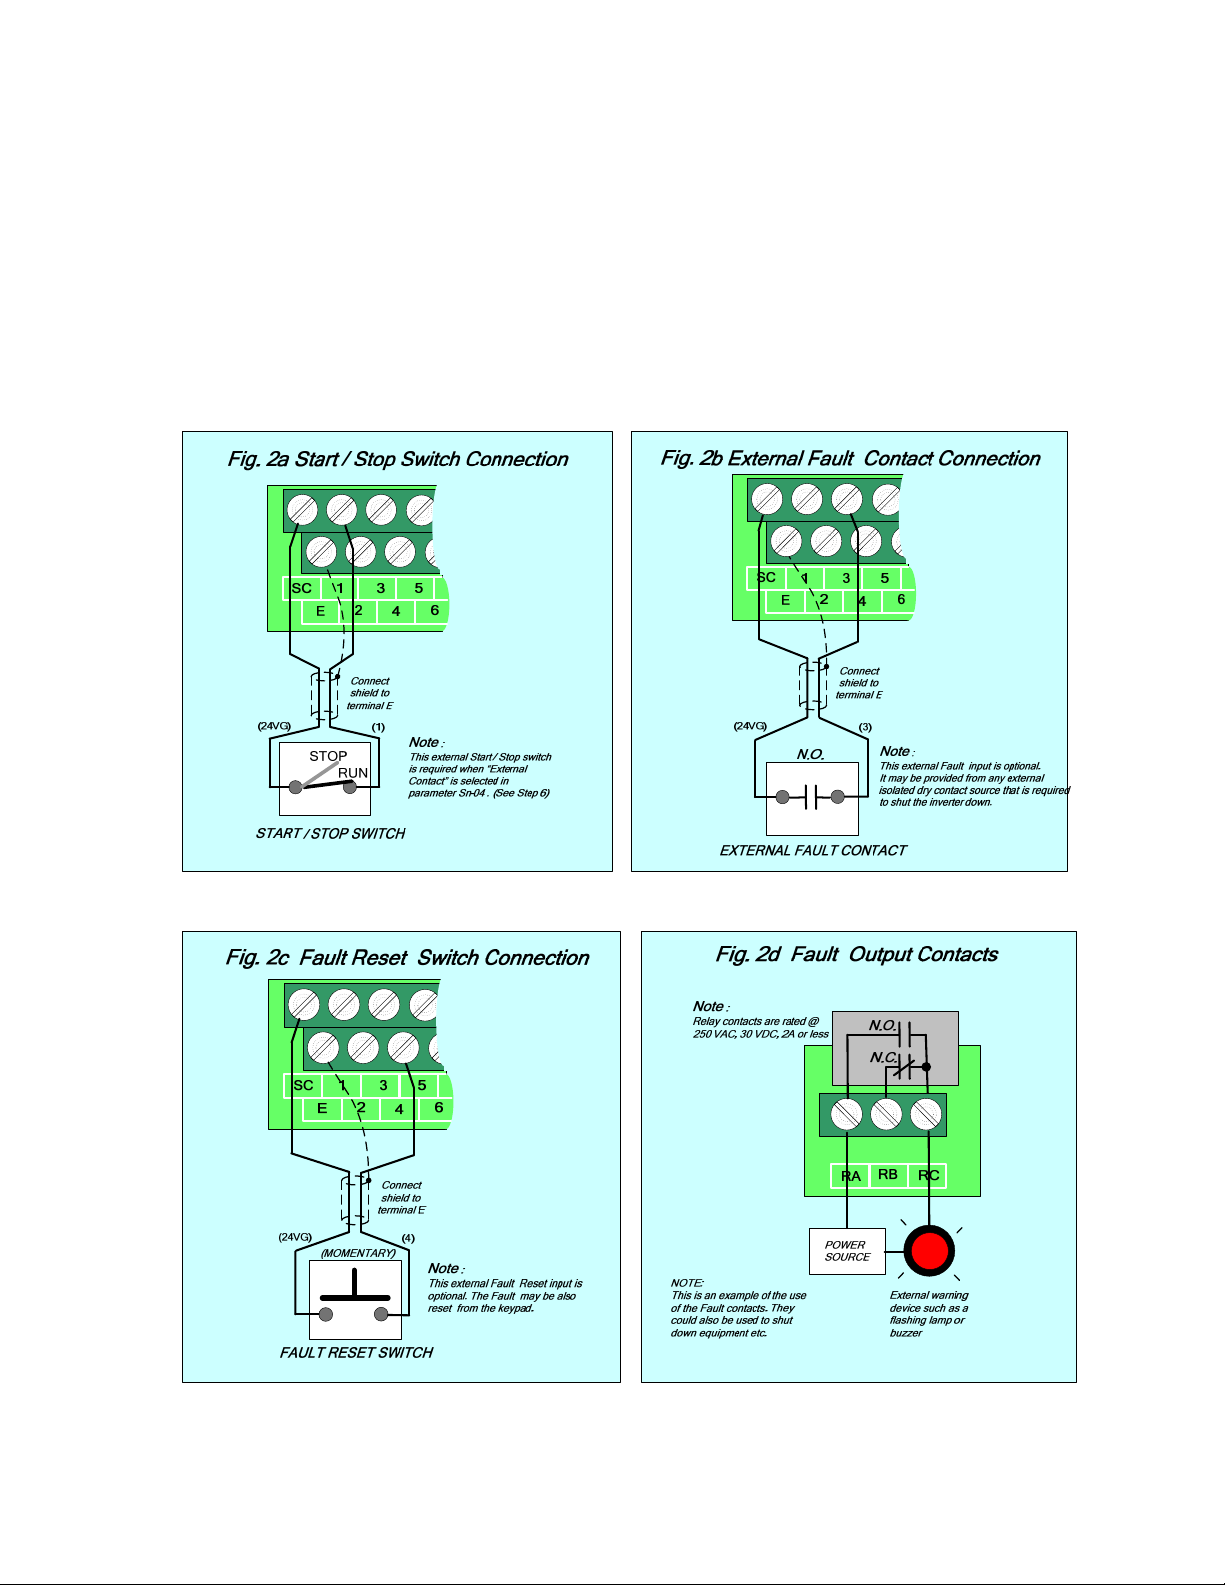
• In this step the external wiring connections will be made for the various control functions. To do
this, the method of control and feedback used in your particular application must be determined.
In the following pages are wiring examples for (digital input) Start / Stop, and (analog)
Feedback. Also included are E-Stop, (digital output) Restart, and Fault indication connections.
DIGITAL INPUT / OUTPUT terminal connections
Fig’s 2a, 2b, and 2c below show the terminal connections for input control functions. The
connections shown are typical and the user is referred to the MA7200 PLUS Manual if
additional information is required. Fig.2d shows an example for the use of the Fault Output
Relay.
________________________________________________________________
TECO – Westinghouse Motor Company
5
Page 6
MA7200 PLUS Inverter 1 to 2 HP PID Fan and Pump Quick Start Manual
__________________________________________________________________
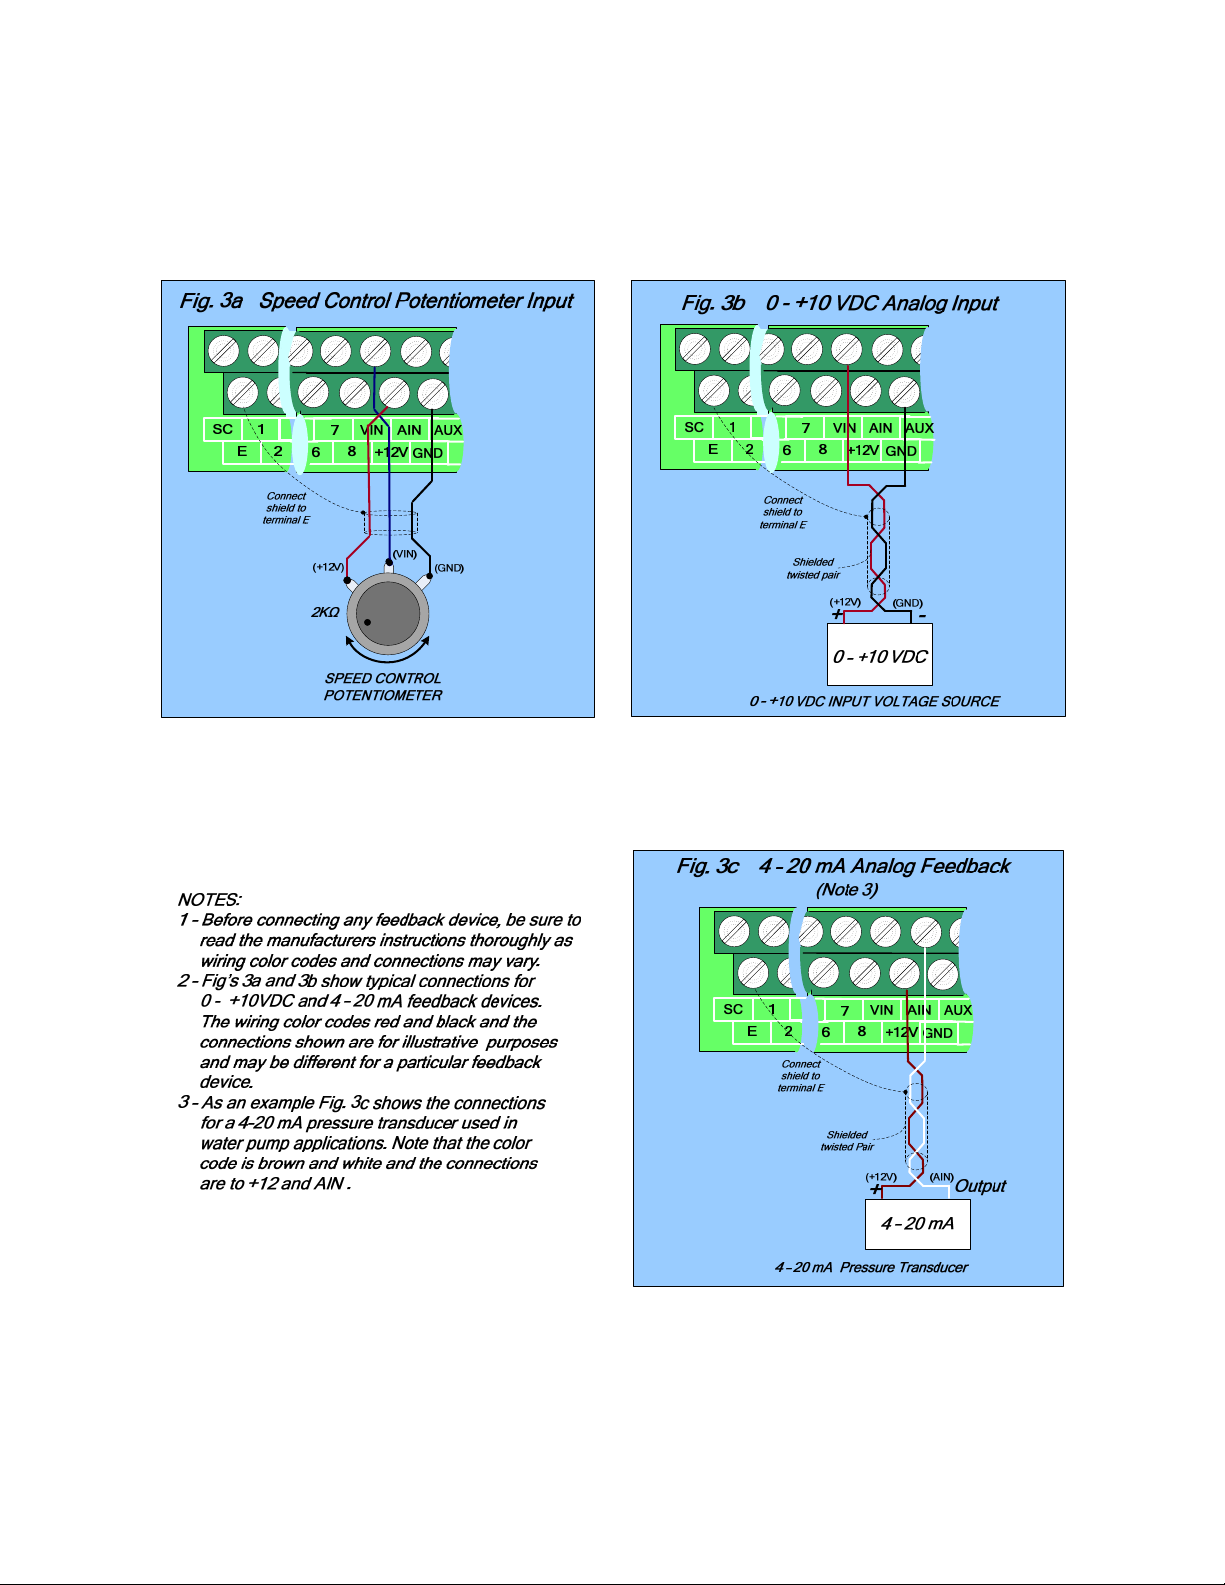
ANALOG FEEDBACK terminal connections
Fig’s 3a,3b, and 3c, show the analog feedback schemes for 0-10VDC or 4-20mA devices to
control flow, level, pressure etc.
• After all of the external wiring has been completed and secure, replace all covers and
power up the inverter.
________________________________________________________________
TECO – Westinghouse Motor Company
6
Page 7
MA7200 PLUS Inverter 1 to 2 HP PID Fan and Pump Quick Start Manual
__________________________________________________________________
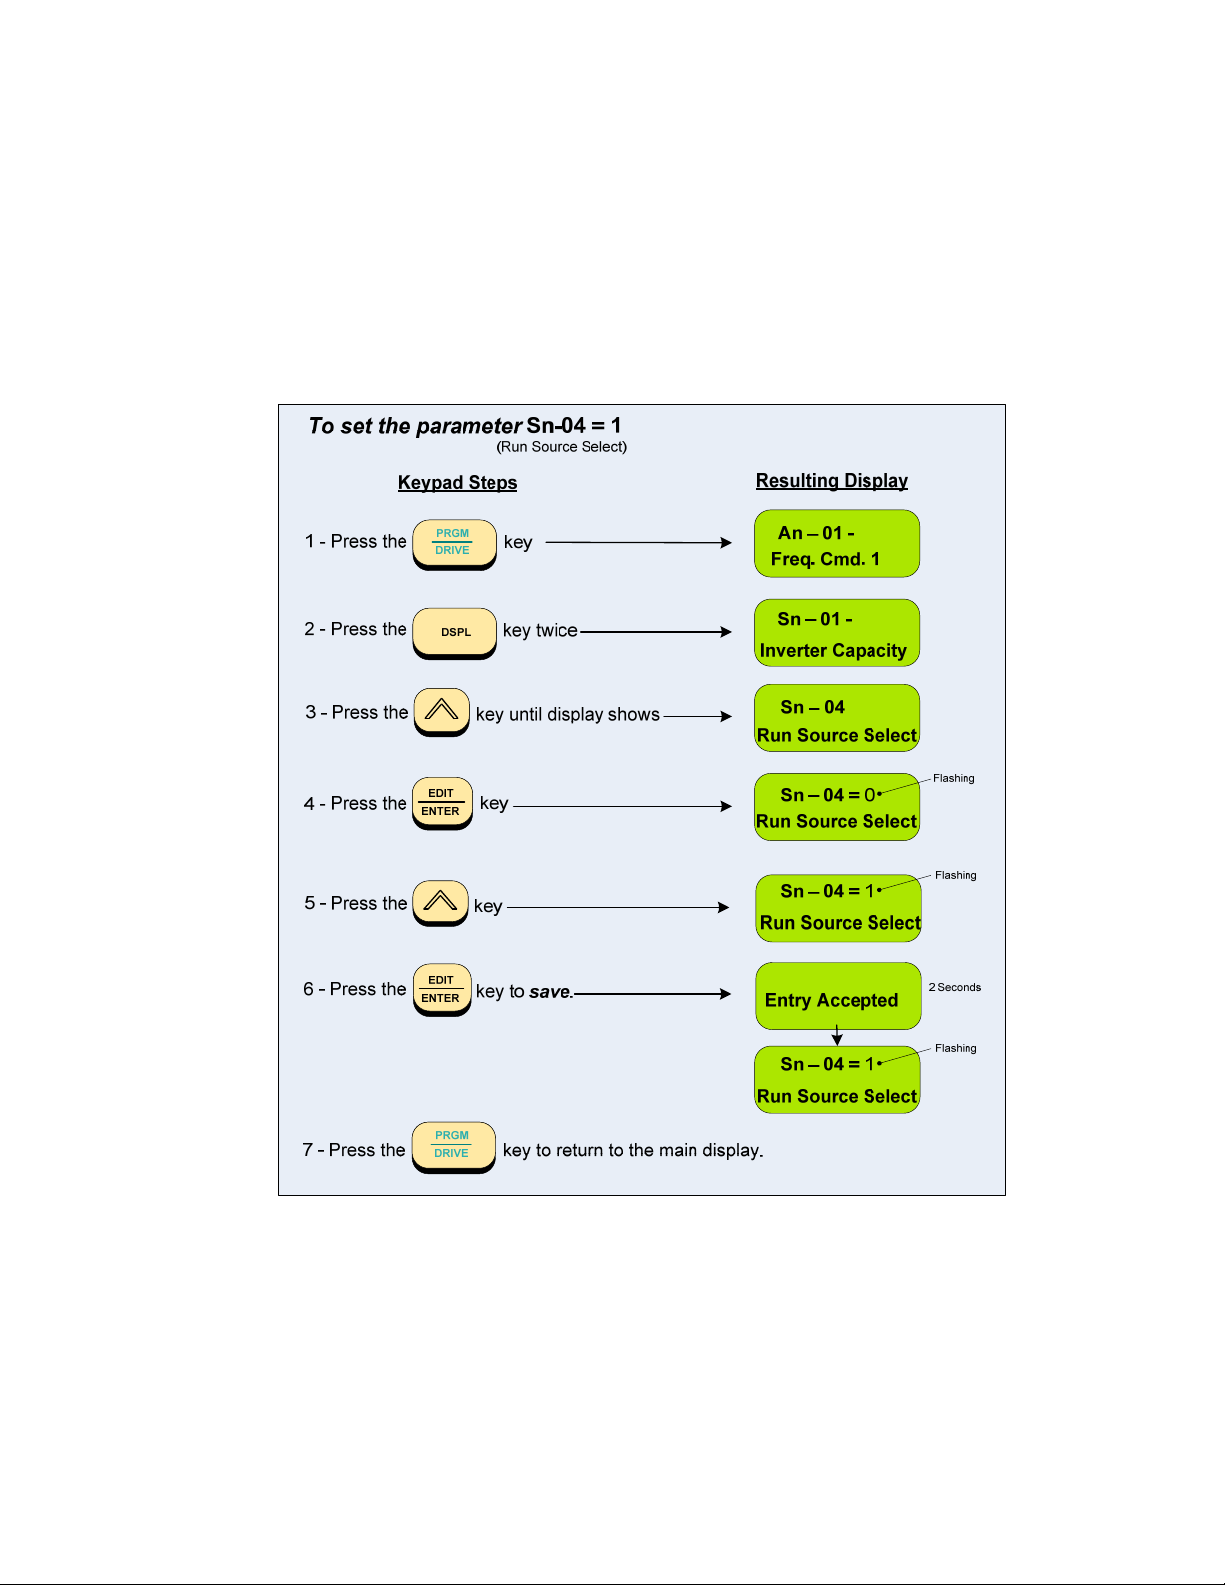
Step 6
• Before selecting this parameter, ensure the inverter is in the STOP mode.
• The set-point is selected by the keypad (Sn-05=0), and the start / stop method can be from the
• The parameter (Sn – 04) is set to = 0 (keypad), as factory default. If external contact is desired,
– Select Start / Stop Method of Control (Sn-04)
keypad or external contact (see Fig. 2a). NOTE: The set-point can also be set from an external
source but commonly it is set from the keypad.
follow the navigation procedure below to set (Sn-04 = 1).
________________________________________________________________
TECO – Westinghouse Motor Company
7
Page 8
MA7200 PLUS Inverter 1 to 2 HP PID Fan and Pump Quick Start Manual
__________________________________________________________________
Step 7 – Setting Minimum Speed in Pump Applications
(NOTE: In the case of a fan application skip this step and go to Step 8)
• In the case of pump applications it is normally required to limit the minimum speed that the
pump will operate regardless of the input speed command. The pump minimum speed is
usually specified either by the pump manufacturer or the application. Once this value has
been established, the minimum output frequency of the inverter and thus the minimum
motor (pump) speed can be set by parameter Cn-19. This parameter sets the minimum
inverter frequency output, and thus a minimum motor (pump) speed to a percentage of the
maximum output command frequency.
• The following is an example of setting the minimum motor (pump) speed to 1800 RPM,
which is 50% of the maximum pump speed, 3600 RPM.
To set parameter Cn-19 = 050%
(Minimum pump speed )
Keypad Steps
1 - Press the
2 - Press the
3 - Press the
4 - Press the
5 - Press the
PRGM
DRIVE
DSPL
key
key 3 times
key until the display shows
EDIT
key
ENTER
key twice; then the
RESET
Resulting Display
key 5 times
An – 01 -
Freq. Cmd. 1
Cn-01
Input Voltage
Cn-19
Freq Cmd Low Bound
Flashing
Cn-19 = 000%
Freq Cmd Low Bound
Flashing
Cn-19 = 050%
Freq Cmd Low Bound
6 - Press the
EDIT
ENTER
key to save.
Entry Accepted
2 Seconds
Flashing
Cn-19 = 050%
Freq Cmd Low Bound
7 - Press the
PRGM
DRIVE
key to return to the main display.
________________________________________________________________
TECO – Westinghouse Motor Company
8
Page 9

MA7200 PLUS Inverter 1 to 2 HP PID Fan and Pump Quick Start Manual
__________________________________________________________________
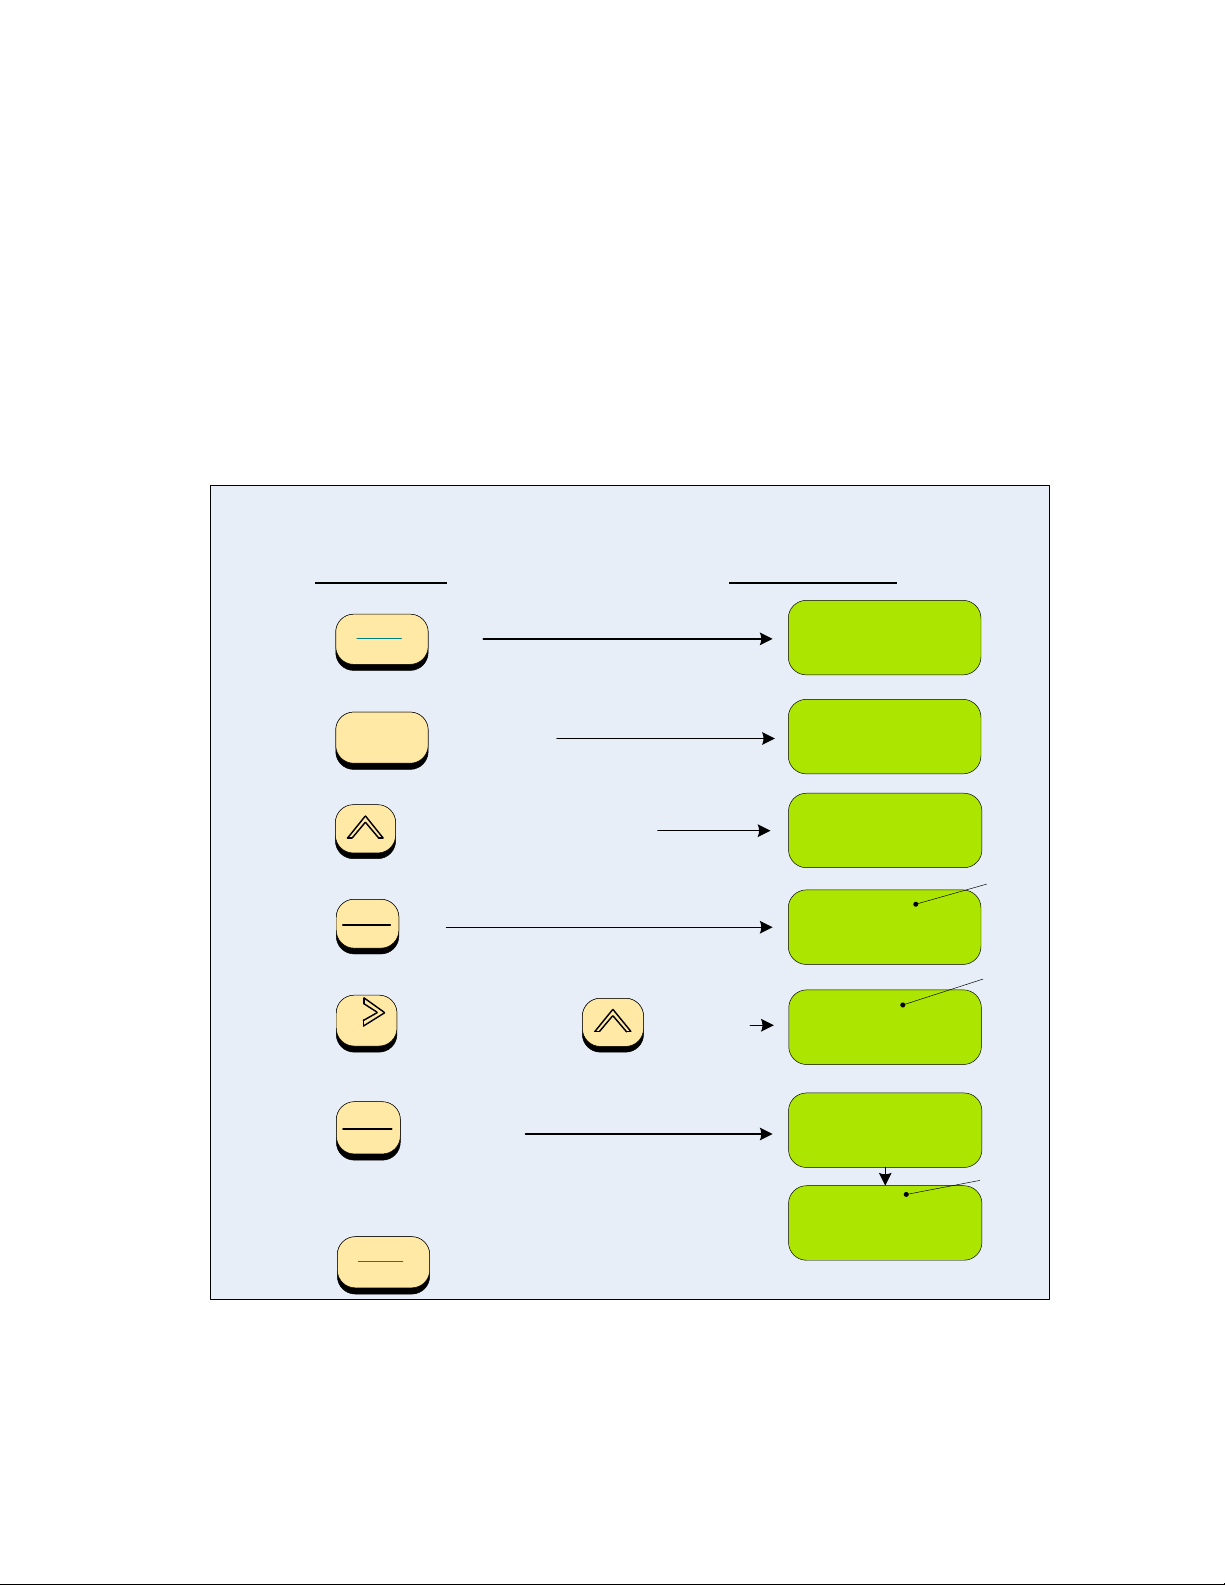
Step 8
or 0 – 10 Vdc]
• Before selecting the parameter(s), ensure the inverter is in the STOP mode.
• To activate PID control parameter (Sn-64) must be set to =1.
• The Feedback Input parameter (Sn –24) is set to = 1 (AIN, 4-20 mA), as factory default. To
• To set the parameter(s), follow the navigation procedure as shown next.
– Select PID control (Sn-64), and Feedback input (Sn – 24) [4 – 20 mA
select (VIN, 0-10 Vdc), (Sn-24) must be set to 0. (See Figs. 3a, 3b and 3c for feedback
connections)
(Turn on PID control)
1 - Press the
2 - Press the
3 - Press the
key until display shows
4 - Press the key
5 - Press the
6 - Press the
key
key to .
key
key twice
Flashing
0
Flashing
1
2 Seconds
Flashing
1
7 - Press the
key to return to the main display.
________________________________________________________________
TECO – Westinghouse Motor Company
9
Page 10

MA7200 PLUS Inverter 1 to 2 HP PID Fan and Pump Quick Start Manual
__________________________________________________________________
To set the parameter Sn-24 = 0
(VIN, 0 – 10 VDC)
Keypad Steps
1 - Press the
2 - Press the
3 - Press the
4 - Press the key
5 - Press the
6 - Press th e
PRGM
DRIVE
DSPL
key until display shows
EDIT
ENTER
key
EDIT
key to save.
ENTER
key
key twice
Resulting Display
An – 01 -
Freq. Cmd. 1
Sn – 01 -
Inverter Capacity
Sn – 24
External Input
Flashing
Sn – 24 = 1
CMD. AIN
Flashing
Sn – 24 = 0
CMD. VIN
2 Seconds
Entry Accepted
Flashing
Sn – 24 = 0
CMD. VIN
7 - Press the
PRGM
DRIVE
key to return to the main display.
Step 9 – Select Feedback Engineering Units (P1-01) and Scaling (P1-02)
• Initially the display will read output frequency in (Hz) as the factory default and is set by
parameter (Cn-28=0). If (Cn-28) is changed to (=1), then the display will read out in (%). The
setting of (Cn-28) is only valid if (P1-01=0), which is the factory default. Other engineering units
may be selected by parameter setting (P1-01) as described on the following page.
• In this step, the feedback engineering units that the system is controlling such as CPM in fan
applications or PSI in the case of pumps can be selected by parameter (P1-01). (See Appendix
A for additional selections). The maximum value that the engineering units will be in any given
application is set by parameter (P1-02). These selections will now be displayed on the digital
operator.
Example: A pump application that has a feeedback transducer with a maximum value of
200 PSI i.e 200 PSI = 20mA or 10 Vdc, can be set as shown next.
________________________________________________________________
TECO – Westinghouse Motor Company
10
Page 11

MA7200 PLUS Inverter 1 to 2 HP PID Fan and Pump Quick Start Manual
__________________________________________________________________
(Engineering Units)
1 - Press the
2 - Press the
3 - Press the
key
key 4 times
key
4 - Press the key twice
5 - Press the
key to .
Note: Once P1-01 is set to a non-zero value, then Cn-28 is no longer valid.
Flashing
0
Flashing
2
2 Seconds
Flashing
2
________________________________________________________________
TECO – Westinghouse Motor Company
11
Page 12

MA7200 PLUS Inverter 1 to 2 HP PID Fan and Pump Quick Start Manual
__________________________________________________________________
(Maximum value of Engineering Units)
1 - Press the
2 - Press the
3 - Press the key
4 - Press the
6 - Press the
key
key
key 5 - Press the
key; then the key twice
key
Flashing
0
Flashing
1
Flashing
0
Flashing
2
7 - Press the
8 - Press the
key to .
2
key to return to the main display.
2 Seconds
Flashing
________________________________________________________________
TECO – Westinghouse Motor Company
12
Page 13

MA7200 PLUS Inverter 1 to 2 HP PID Fan and Pump Quick Start Manual
__________________________________________________________________
Step 10 – Setting PID Parameters; Proportional Gain (Bn-17) and
Integral Time (Bn-18)
• After all external connections have been made and the protective covers have been
replaced, power up the inverter but do not run at this point.
• Parameters Bn-17 = 1.0 (Proportional Gain) and Bn-18 = 10.0s (Integral Time) are factory
set to the values shown. However, a good starting point for these values is setting the
Proportional Gain Bn-17 = 2.0
and the Integral Time Bn-18 = 5.0s. To change these
parameters, follow the keypad navigation procedure below.
To set parameter Bn-17 = 02.0
(Proportional Gain )
Keypad Steps
1 - Press the
2 - Press the
3 - Press the
4 - Press the
5 - Press th e
PRGM
DRIVE
DSPL
key
key
key until the display shows
EDIT
key
ENTER
key twice; then the
RESET
key
Resulting Display
An – 01 -
Freq. Cmd. 1
Bn-01
Acc. Time 1
Bn-17
PID P_ Gain
Flashing
Bn-17 = 01.00
PID P_ Gain
Flashing
Bn-17 = 02.00
PID P_ Gain
6 - Press the
EDIT
ENTER
key to save.
Next set Bn-18 = 005.00
Entry Accepted
Cn-19 = 050%
Freq Cmd Low Bound
2 Seconds
Flashing
________________________________________________________________
TECO – Westinghouse Motor Company
13
Page 14

MA7200 PLUS Inverter 1 to 2 HP PID Fan and Pump Quick Start Manual
__________________________________________________________________
To set parameter Bn-18 = 005.00
(Integral Time )
Keypad Steps
1 - Press the
2 - Press the
3 - Press the
4 - Press the
6 - Press the
key
EDIT
key
ENTER
key twice; then the
RESET
key ; then the
RESET
EDIT
key to save.
ENTER
key
key 5 times
Resulting Display
Bn-18
PID I_ Time
Flashing
Bn-18 = 010.00 s
PID I_ Time
Flashing
Bn-18 = 000.00 s
PID I_ Time
Flashing
Bn-18 = 005.00 s
PID I_ Time
2 Seconds
Entry Accepted
7 - Press the
PRGM
DRIVE
Word About PID Control-
Flashing
Bn-18 = 005.00 s
PID I_ Time
key to return to the main display.
________________________________________________________________
TECO – Westinghouse Motor Company
14
Page 15

MA7200 PLUS Inverter 1 to 2 HP PID Fan and Pump Quick Start Manual
__________________________________________________________________
Step 11 – S
times
etting parameters acceleration (Bn-01) and deceleration (Bn-02)
• Acceleration and Deceleration times as well as the PID control [(P) Proportional Gain
and/or the (I) Integral Time (see STEP 11) directly control the system dynamic response.
The longer the acceleration and deceleration time, the slower the system response, and the
shorter time, the faster the response. An excessive amount of time can result in sluggish
system performance while too short of a time may result in system instability.
The starting values suggested by this guide normally result in good system performance for
the majority of fan and pump applications. If the values need to be adjusted, caution
should be exercised, and the changes should be in small increments to avoid system
instability.
• Parameters Bn-01 (Acceleration) and Bn-02 (Deceleration) are both set at the factory for
10.0 seconds. For fan and pump applications, the recommended starting values are 30
seconds. To change these parameters, follow the keypad navigation procedure as shown
next.
To set parameter Bn-01 = 30.0 s
(Acceleration Time )
Keypad Steps
1 - Press the
2 - Press the
3 - Press the
4 - Press the
5 - Press the
PRGM
DRIVE
DSPL
EDIT
ENTER
RESET
EDIT
ENTER
key
key
key
key 3 times; then the
key to save.
Resulting Display
Key twice
An – 01 -
Freq. Cmd. 1
Bn-01
Acc. Time 1
Flashing
Bn-01 = 0010.0
Acc. Time 1
Flashing
Bn-01 = 0030.0
Acc. Time 1
2 Seconds
Entry Accepted
Flashing
Next set Bn-02 = 0030.0
Bn-01 = 0030.0
Acc. Time 1
________________________________________________________________
TECO – Westinghouse Motor Company
15
Page 16

MA7200 PLUS Inverter 1 to 2 HP PID Fan and Pump Quick Start Manual
__________________________________________________________________
To set parameter Bn-02 =30.0
(deceleration Time )
Keypad Steps
1 - Press the
2 - Press the
3 - Press the
4 - Press the
5 - Press the
key
EDIT
key
ENTER
key 3 times; then the
RESET
EDIT
key to save.
ENTER
PRGM
DRIVE
key to return to the main display.
key twice
Resulting Display
Bn-02
Dec. Time 1
Flashing
Bn-02 = 0010.0 s
Dec. Time 1
Flashing
Bn-02 = 0030.0 s
Dec. Time 1
2 Seconds
Entry Accepted
Flashing
Bn-02 = 0030.0 s
Dec. Time 1
Step 12 – Setting PID Sleep Function parameters (P1-04), (P2-01),
(P2-02), (P2-03) and (P2-04).
(NOTE: In the case of a Fan application skip this step and go to Step13)
• The PID Sleep function is turned on by parameter (P1-04) when set to (=1). This allows the
system to turn off the PID and thus the inverter output so that the pump does not run when
the system level (PSI) is above the set-point. This sleep start level is set by parameter (P2-
01) in a range from 0 – 100% of the maximum inverter output. When the system level drops
below a value (the units are selected by Step 8) set by parameter (P2-03), the sleep
wakeup level, the output of the inverter will turn on. Parameters (P2-02) and (P2-04)
provide delay times in seconds for sleep start level and sleep wakeup level respectively.
Fig. 4 will serve to illustrate this.
________________________________________________________________
TECO – Westinghouse Motor Company
16
Page 17

MA7200 PLUS Inverter 1 to 2 HP PID Fan and Pump Quick Start Manual
__________________________________________________________________
• To further cover the PID Sleep function, the following is an example of the various
parameter settings that could be used. In this example the system will have the following
specifications:
- Max. Pump Motor Speed : 3600 RPM.
- Set Point: 150 PSI.
- Feedback Transducer Range: 0 – 200 PSI.
- Pump System Sleep Level: 2160RPM or 60% of max. speed set by
(P21-01=060.00). Sleep Level Delay Time: 10 sec. set by (P2-02=010.0 ).
- Pump System Wakeup Level: 100 PSI set by (P2-03=0100). Wakeup Time: 5 sec.
• Referring to Step 9, set the engineering units to PSI (P1-01=02) and then the range to 200
(P1-02=0200).
• On the following pages the keypad navigation sequence is shown in setting the PID
parameters.
NOTE: The inverter must be in the Stop mode in order to turn on the sleep function.
set by (P2-04=005.0).
________________________________________________________________
TECO – Westinghouse Motor Company
17
Page 18

MA7200 PLUS Inverter 1 to 2 HP PID Fan and Pump Quick Start Manual
__________________________________________________________________
Set parameter P1-04 = 1
(Turn on sleep function)
Keypad Steps
Resulting Display
1 - Press the
2 - Press the
3 - Press the
4 - Press the
5 - Press the
PRGM
DRIVE
DSPL
EDIT
ENTER
EDIT
ENTER
key
key 4 times
key
key
key to save.
Next set P2-01 = 60%
An – 01 -
Freq. Cmd. 1
P1-04
PID Sleep Function
P1-04 = 0
PID Sleep Invalid
P1-04 = 1
PID Sleep Valid
Entry Accepted
P1-04 = 1
PID Sleep Valid
Flashing
Flashing
2 Seconds
Flashing
________________________________________________________________
TECO – Westinghouse Motor Company
18
Page 19

MA7200 PLUS Inverter 1 to 2 HP PID Fan and Pump Quick Start Manual
__________________________________________________________________
(Sleep Start Level Delay Time)
1 - Press the
2 - Press the
3 - Press the
4 - Press the
5 - Press the
key twice; then the
key
key twice; then the
key ; then the
key to .
key
key
key
Flashing
0
Flashing
1
Flashing
0
2 Seconds
Flashing
0
________________________________________________________________
TECO – Westinghouse Motor Company
19
Page 20

MA7200 PLUS Inverter 1 to 2 HP PID Fan and Pump Quick Start Manual
__________________________________________________________________
(Sleep wakeup Level)
1 - Press the
2 - Press the
3 - Press the
4 - Press the
key twice; then the
key
key twice; then the
key to .
key
key
Flashing
0
Flashing
1
2 Seconds
Flashing
1
________________________________________________________________
TECO – Westinghouse Motor Company
20
Page 21

MA7200 PLUS Inverter 1 to 2 HP PID Fan and Pump Quick Start Manual
__________________________________________________________________
Step 13
NOTE: Parameters Bn-17 and Bn-18 may be changed through the keypad while the
system is operating.
– Testing The System
• The system can now be tested for performance. To do this, set the set-point through the
keypad and run the drive at some low level and check that the motor is operating properly
and that the feedback signal level and polarity are correct.
• Check the system for dynamic operation and make any adjustments necessary for optimum
performance. This may require making adjustments to parameters Bn-17 proportional
gain and Bn-18 Integral Time. (Refer to Step 10)
A word of CAUTION ! - the parameter changes should be made in small increments
and the results checked to avoid highly unstable and possibly damaging
conditions.
• This should complete the installation.
MA7200 PLUS BLOCK DIAGRAM
Fig. 5 is an overall basic electrical connection diagram for the MA7200 PLUS. It is used in
conjunction with the other sections of this guide to give the user the ability to successfully start up
a fan or pump application. More detailed information is available in the MA7200 PLUS Manual to
which the user is referred, if further information is required.
________________________________________________________________
TECO – Westinghouse Motor Company
21
Page 22

MA7200 PLUS Inverter 1 to 2 HP PID Fan and Pump Quick Start Manual
__________________________________________________________________
________________________________________________________________
TECO – Westinghouse Motor Company
22
Page 23

MA7200 PLUS Inverter 1 to 2 HP PID Fan and Pump Quick Start Manual
__________________________________________________________________
Appendix A-
Engineering Units Selected by P1-01=
Setting Unit Description
0
1 % %
2 PSI PSI
3 GPH gallon / hour
4 GPM gallon / minute
5 InW Inch water
6 FPM feet / minute
7 CFM feet3 / minute
8 In inch
9 Ft feet
10 HP HP
11 °F °F
12 m/s meter / second
----
Setting Unit Description
13 MPM meter / minute
14 CMM meter3 / minute
15 W W
16 kW kW
17 °C °C
18 m meter
19 A A
20 RPM RPM
21 SPM stroke/minute
22 /s unit / s
23 /m unit / m
24 /h unit / h
25 none
Appendix B Removing the LCD Digital Operator and Inverter Cover(s)
Remove the (2) screws
LCD Operator
Gently Lift the
RJ11 connector
LCD Operator and remove the
connecting cable (RJ11) by
unplugging it from the back of
the LCD Operator.
Connecting cable
Gently remove the
cover(s).
________________________________________________________________
TECO – Westinghouse Motor Company
23
Page 24

 Loading...