

Page 1
Page 2

Page 3
TABLE O F CONTE NTS
1
2
3
4
5
6
7
I M P O R T A N T
INFORMATION
HOW TO INSTALL
THE STAND
PREFACE
SAFETY
PRECAUTIONS
CONTENTS
FRONT/BACK
CONNECTIONS
OF LCD TV
TV INSTALLA TI ON
Power Cord Connection
Antenna Connection
AV Connection
YPbPr(component) Connection
VGA(PC) Connection
Service Port Function
HDMI Connection
2
4
5
5
7
8
9
9
10
10
11
11
12
English
8
9
10
11
REMOTE CONTROL
MENU OPERATION
TROUBLESHOOTING
SPECIFICATIO NS
Remote control instructions in TV mode
Remote control setup
SETUP WIZARD
Operating the Menu
PICTURE Menu
AUDIO Menu
TIME Menu
SETUP Menu
LOCK Menu
CHANNEL Menu
13
14
15
17
18
19
19
20
22
24
26
27
1
Page 4
IM PORTANT INFO RMATION
English
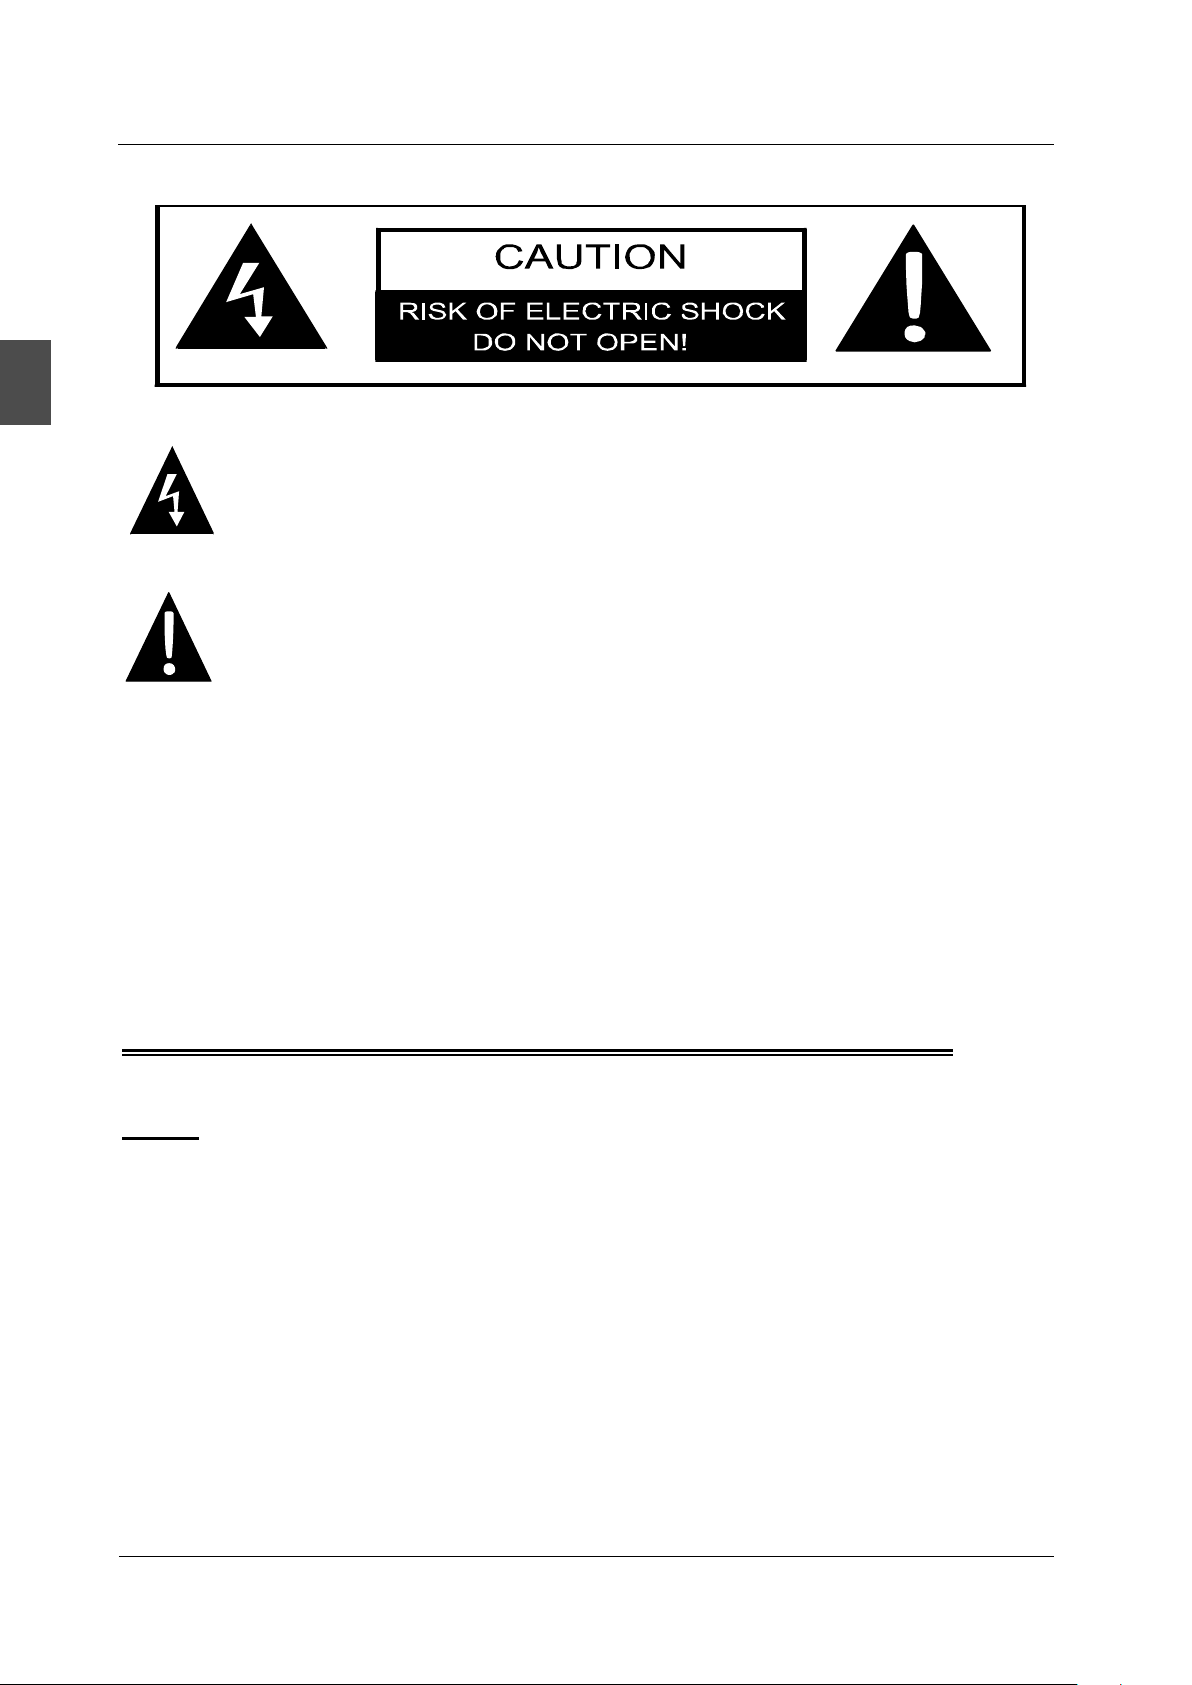
The lightning flash with arrowhead symbol, within an equilateral triangle, is intended to
alert the user to the presence of un-insulated dangerous voltage within the products
enclosure that may be of sufficient magnitude to constitute a risk of electric to persons.
The exclamation point within an equilateral triangle is interded to aler the user to the
presence of important operating and maintenance (servicing) instruction the literature
accompanying the appliance.
CAUTION: USE OF ANY CONTROLS, ADJUSTMENTS, OR PROCEDURES OTHER THAN
THOSE SPECIFIED HEREIN MAY RESULT IN HAZARDOUS RADIATION EXPOSURE.
CAUTION: These servicing instructions are for use by qualified service personnel only. To reduce
the risk of electric shock, do not perform any servicing other than that contained in the operating
instructions unless you are qualified to do so.
Refer to service manual for servicing instructions.
Important Safety Instructions
Note:
1.Read these instructions.
2.Keep these instructions.
3.Heed all warnings.
4.Follow all instructions.
5.Do not use near water.
6.Clean only with dry cloth.
7.Do not block any ventilation openings. Install in accordance with the manufacturer's instructions.
8.Do not install near any heat sources such as radiators, heat registers, stoves, or other apparatus
(including amplifiers) that produce heat.
9.Do not defeat the safety purpose of the polarized or grounding-type plug. A polarized plug has
two blades with one wider than the other. A grounding type plug has two blades and a third
grounding prong. The wide blade or the third prong are provided for your safety. If the provided
plug does not fit into your outlet, consult an electrician for replacement of the obsolete outlet.
2
Page 5
IM PORTANT INFO RMATION
10.Pr otect t he powe r cord fr om bein g walke d on or pin ched particu larly at plugs, conve nience receptacles, and th e point
where t hey exi t from th e appar atus.
11.Only u se atta chmen ts / acce ssori es spec ified b y the man ufact urer.
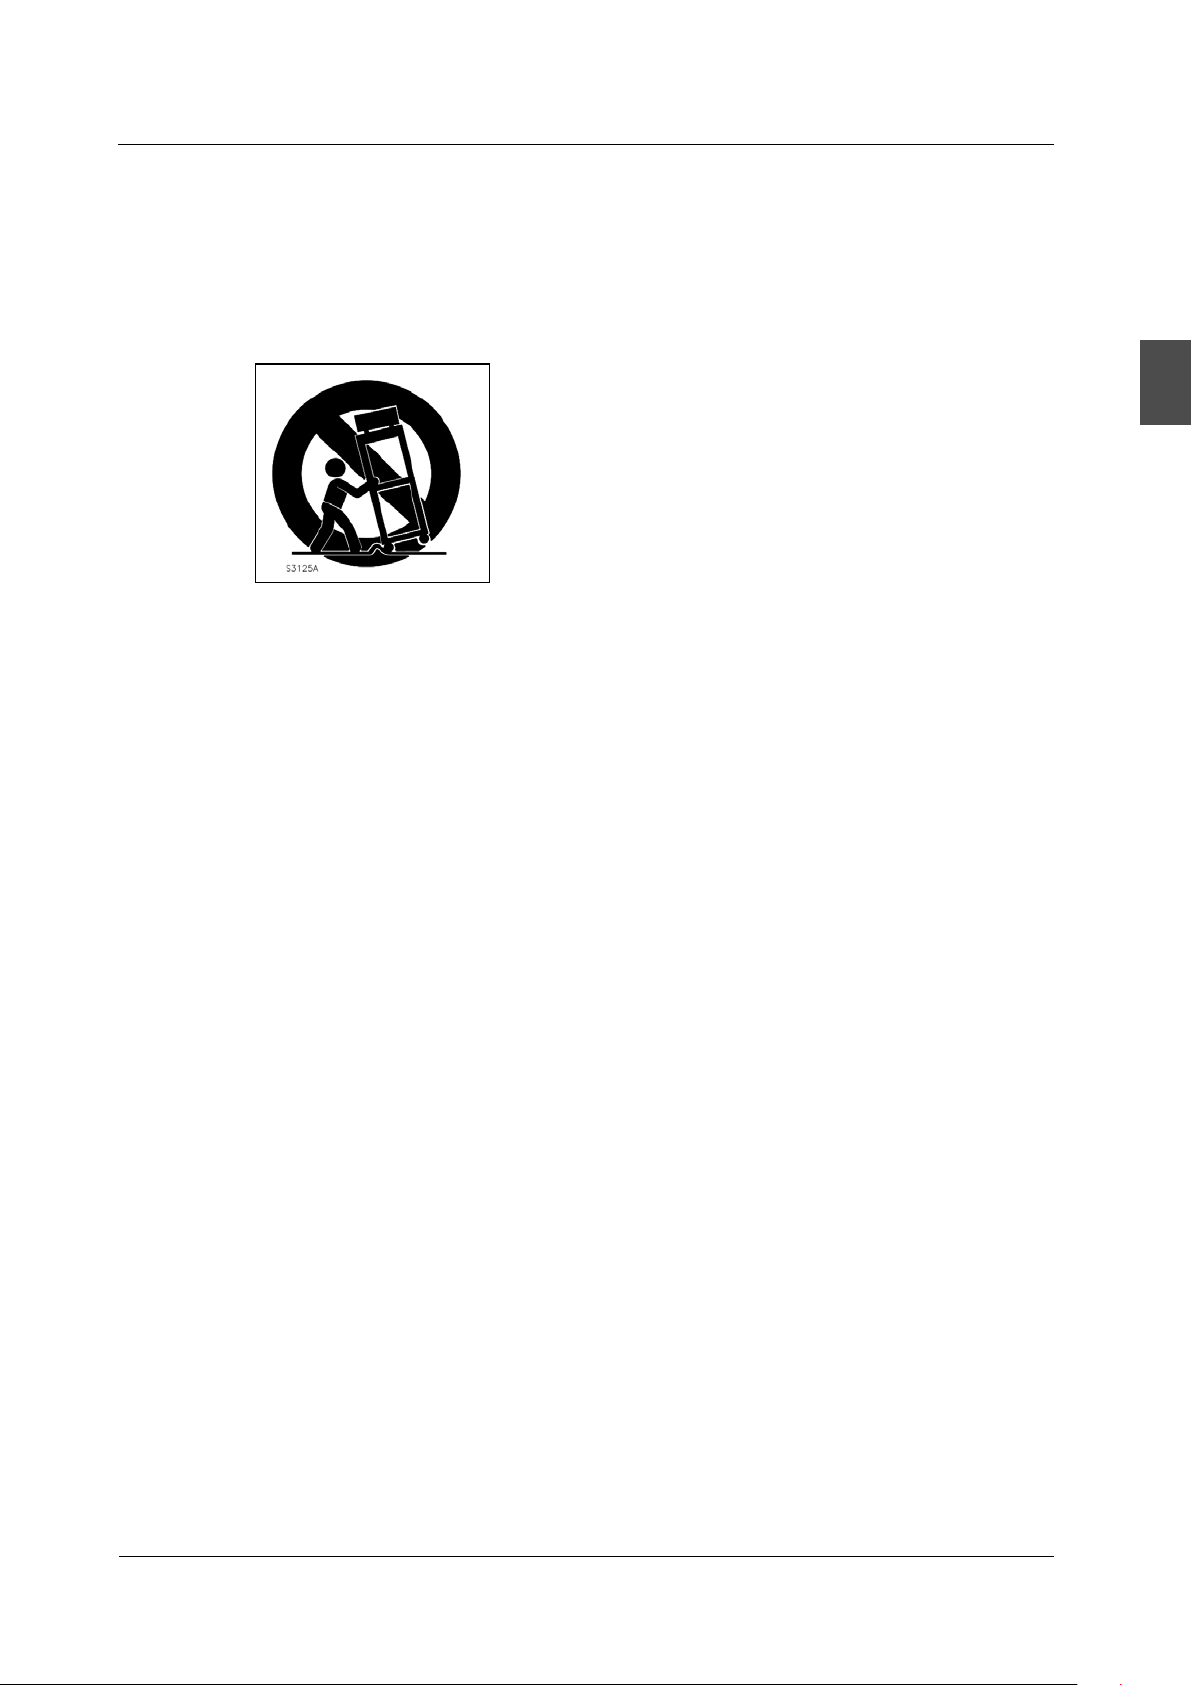
12.Use only with the cart, stan d, trip od, bra cket, o r table s pecif ied by th e manuf actur er, or sol d with th e appar atus.
When a ca rt is use d, use ca ution w hen mov ing the c art / app aratu s combi natio n to avoi d injur y from ti p-ove r.
13.Unplug this apparatus during lightning storms or when unused for long periods of time.
14.Refer all servicing to qualified service personnel. Servicing is required when the apparatus has been damaged in any
way, suc h as powe r-sup ply cor d or plug i s damag ed, liq uid has b een spi lled or o bject s have fa llen in to the ap parat us,
the app aratu s has bee n expos ed to rai n or mois ture, d oes not o perat e norma lly, or ha s been dr opped .
15.App aratu s shall not be exposed to dripping or splashing and that no objects filled with liquids, suchas vases, shall be
place d on the ap parat us.
16.WARNI NG:To red uce the r isk of fi re or ele ctric s hock, d o not exp ose thi s appar atus to r ain or mo istur e.
17.Ma ins plug or appliance coupler is used as the disconnect device, shall be readily operable.
18.Th e apparatus sh all be connected to a MAI NS sock et outl et with a p rotec tive ea rthin g conne ction .
English
3
Page 6
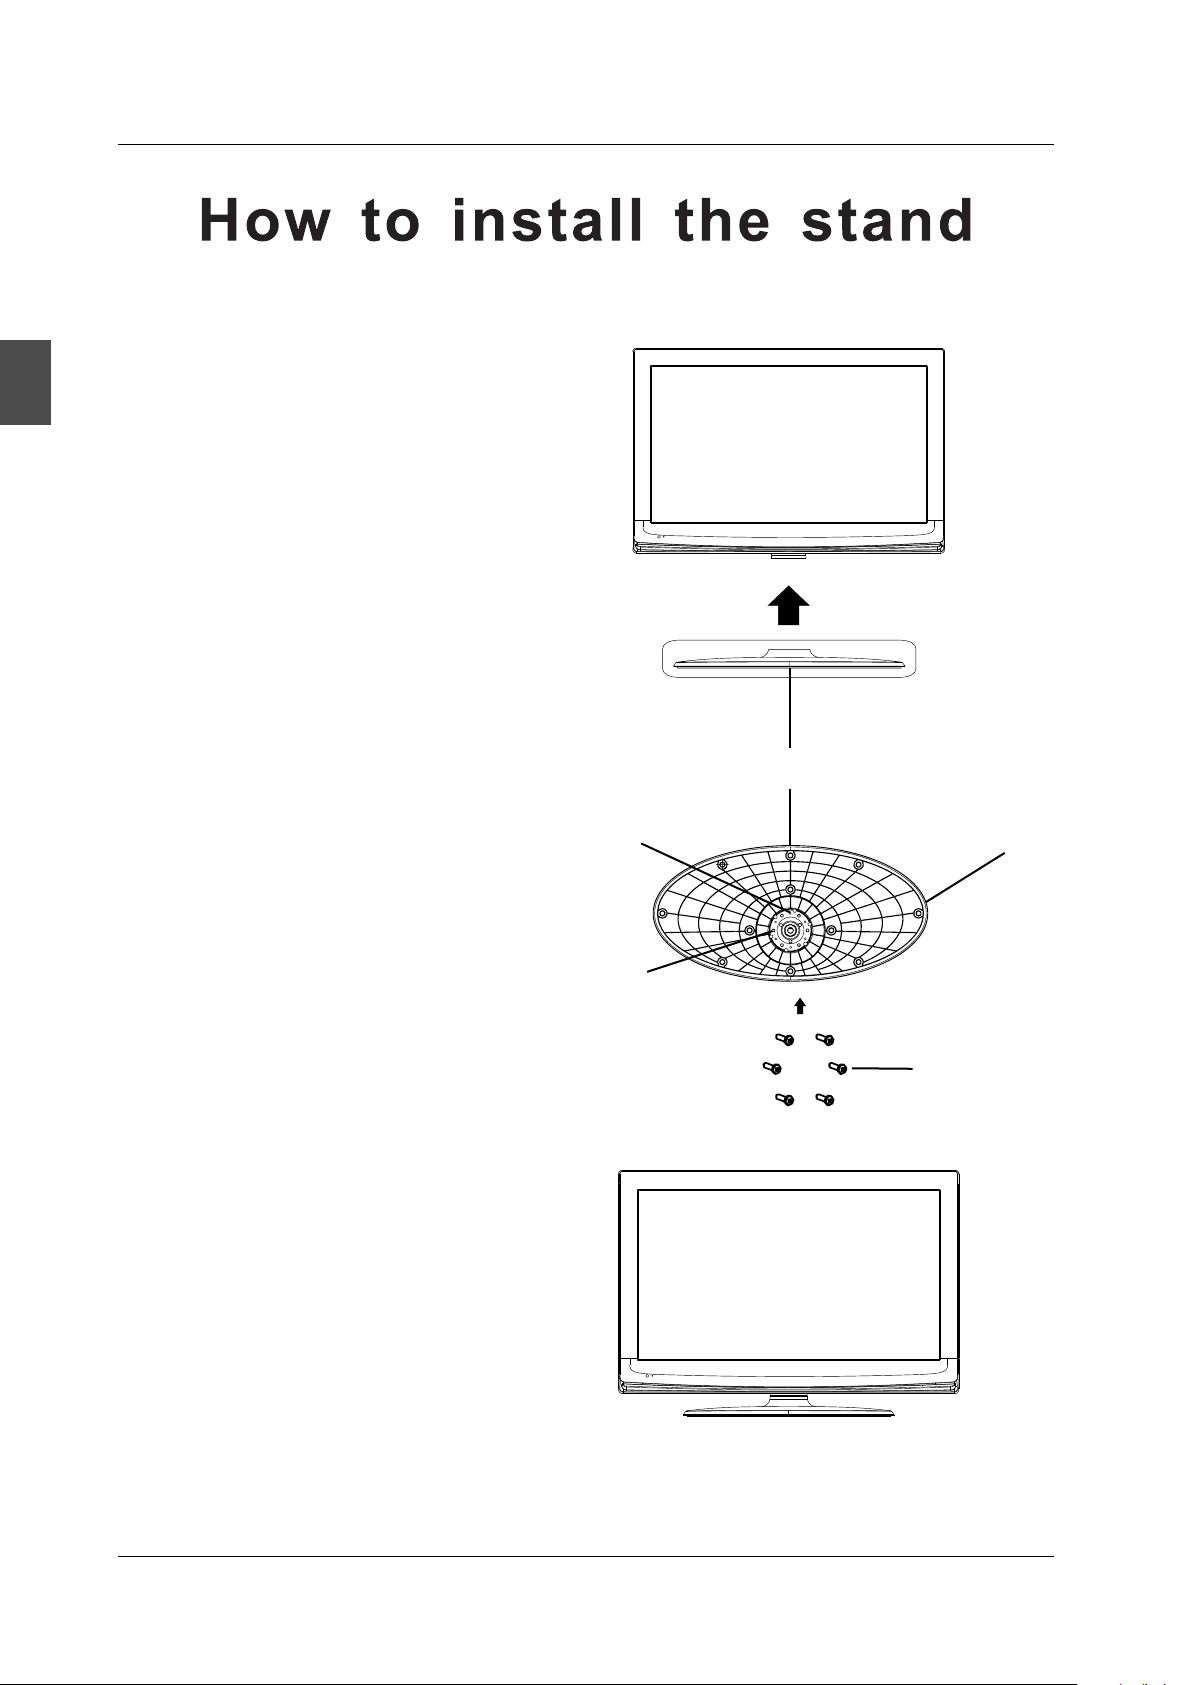
HOW TO I NSTALL THE S TAN D
English
1. Attach the base cover to the fixed-ring base ;
image 1
2. Screw the base cover to fixed-ring base;
image 2
image 3
Limit
Screw holes
Front
Base cover
Screws
4
Page 7
3. PREFACE
PR EFACE
Thank you for buying this Please read this manual thoroughly before operating the TV.
TV!
Make sure the TV was not damaged in transit. Should the TV be damaged, do not install it and
contact your dealer. Check that you have all the accessories according to the model.
4. SAFETY PRECAUTIONS
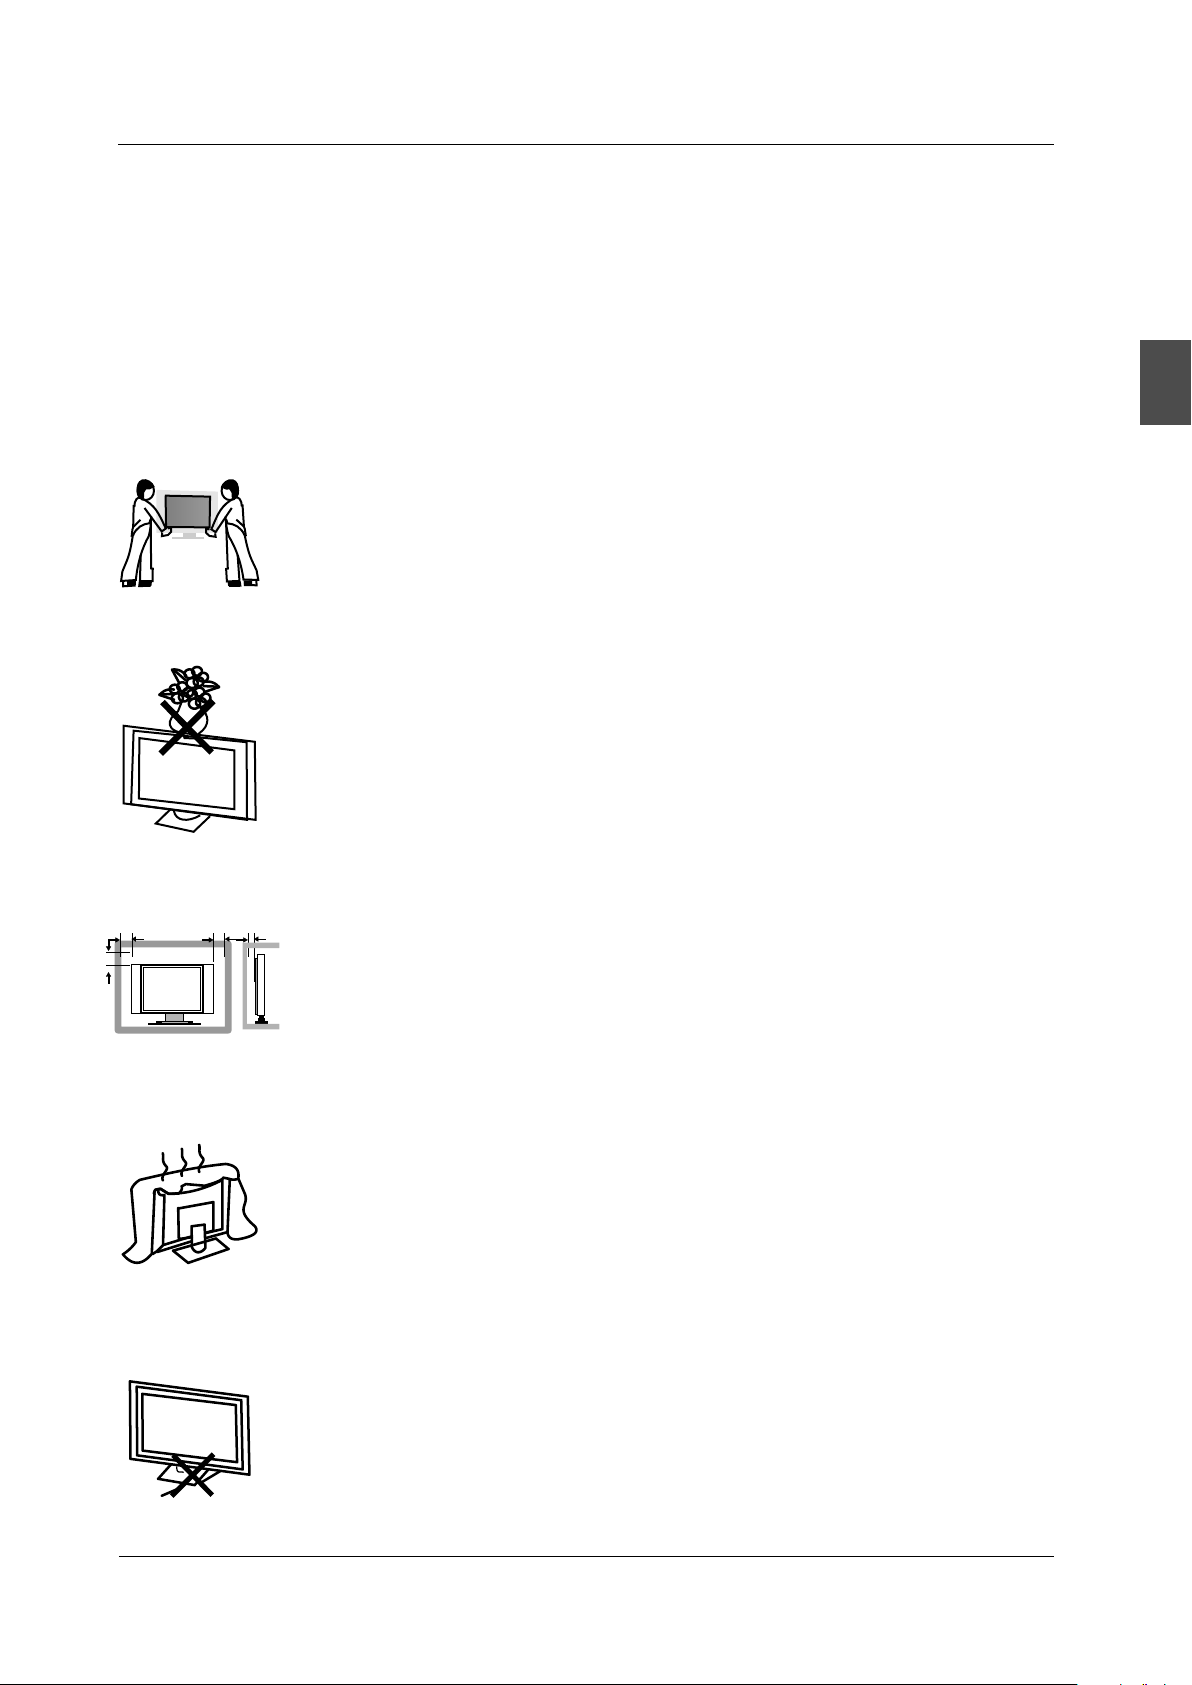
Put the TV on a stable surface.
Do not place any material on the TV.
English
Min imum dis tance s
10c m
20c m
10c m 5cm
Do not use the TV with fixtures other than those provide d or
suggested by the manufacturer.
Do not block or cover the ventilation openings on the TV.
If you have a wall mount, check that it is steady.
Power cord and cables must be properly routed and protec te d to p re ve nt
people from stepping on them and causing the TV to fall.
5
Page 8
SA FETY PREC AUTIO NS
English
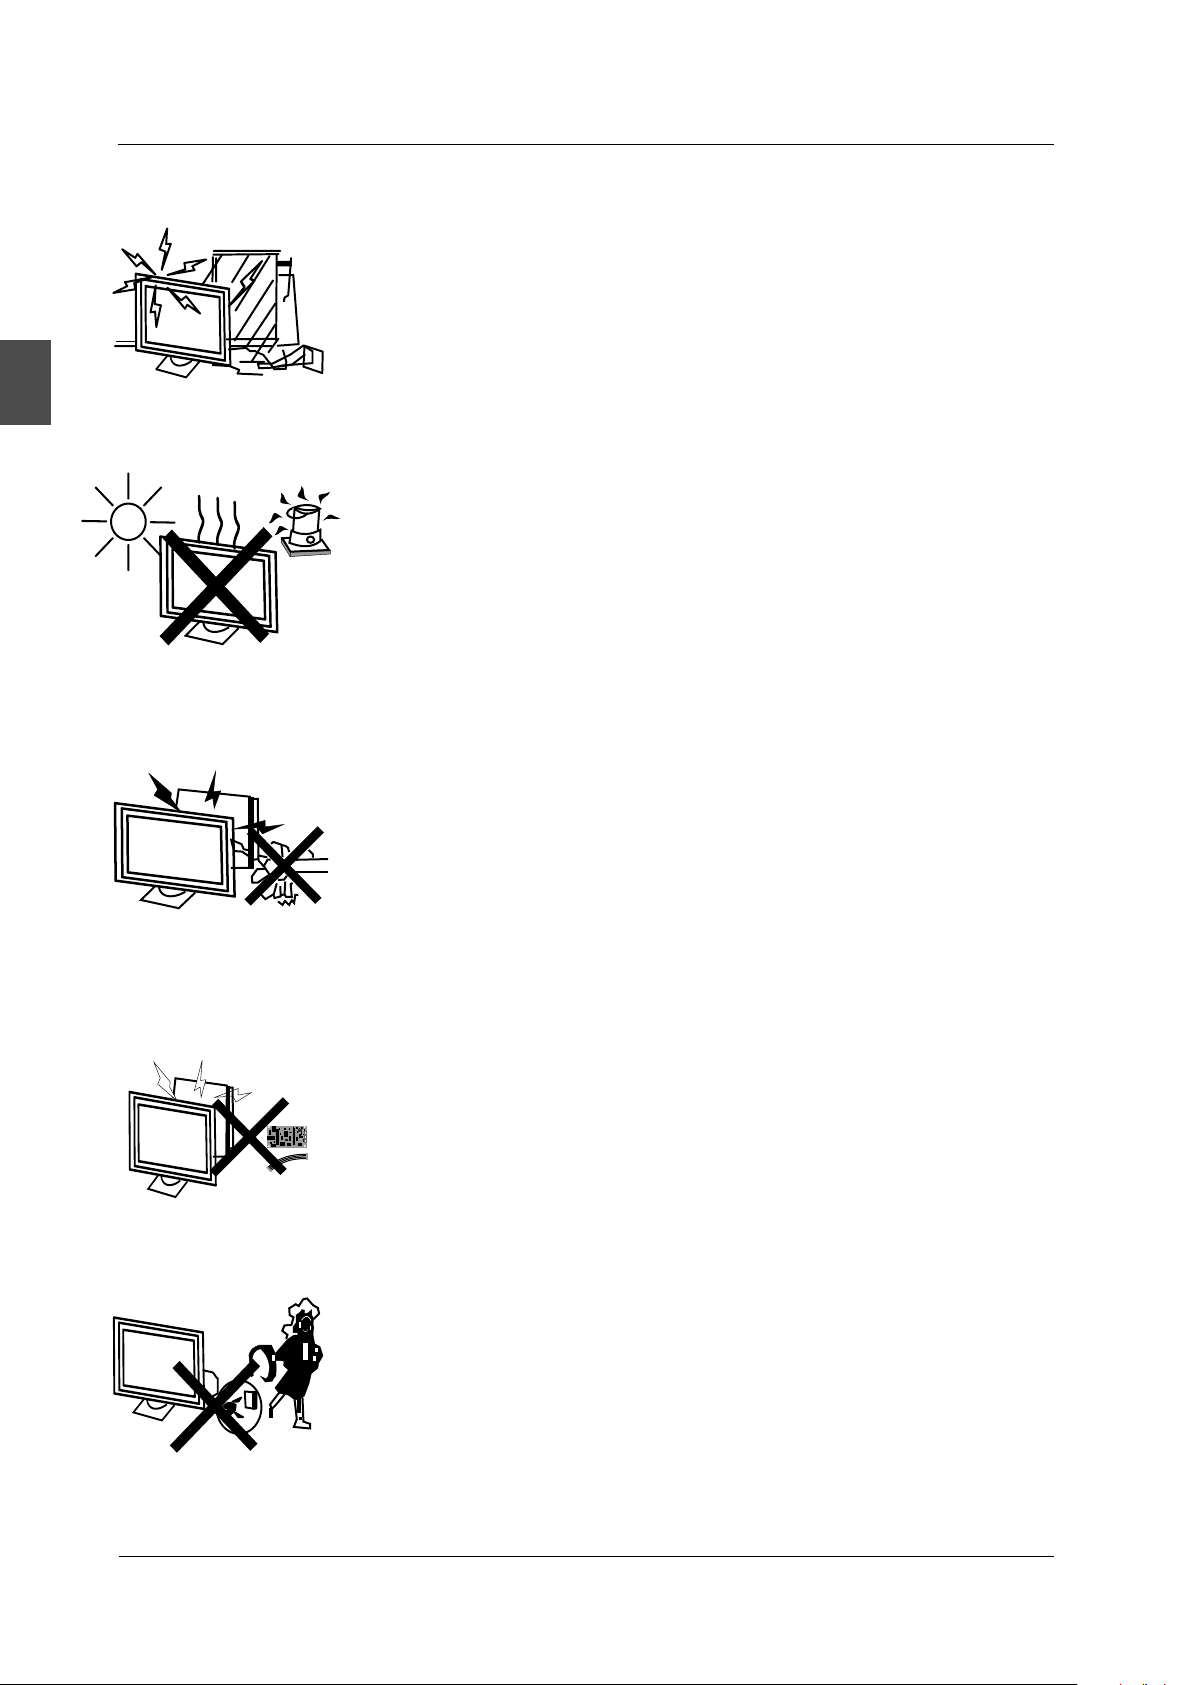
Keep the TV dry and away from humidity.
Keep the TV away from heat sources.
Unplug the TV before cleaning it. Do not use solvent or liquid to clean
the TV.
Only clean the TV with a soft and dry cloth.
In case of troubleshooting, do not use spare parts other than those
suggested by the manufacturer. Using inad eq ua te s pa re p ar ts c an
lead to electric shocks, short-circuits, fire or other inc id en ts .
Unplug the TV during lightning storms or when unused for long periods
of time.
6
Page 9
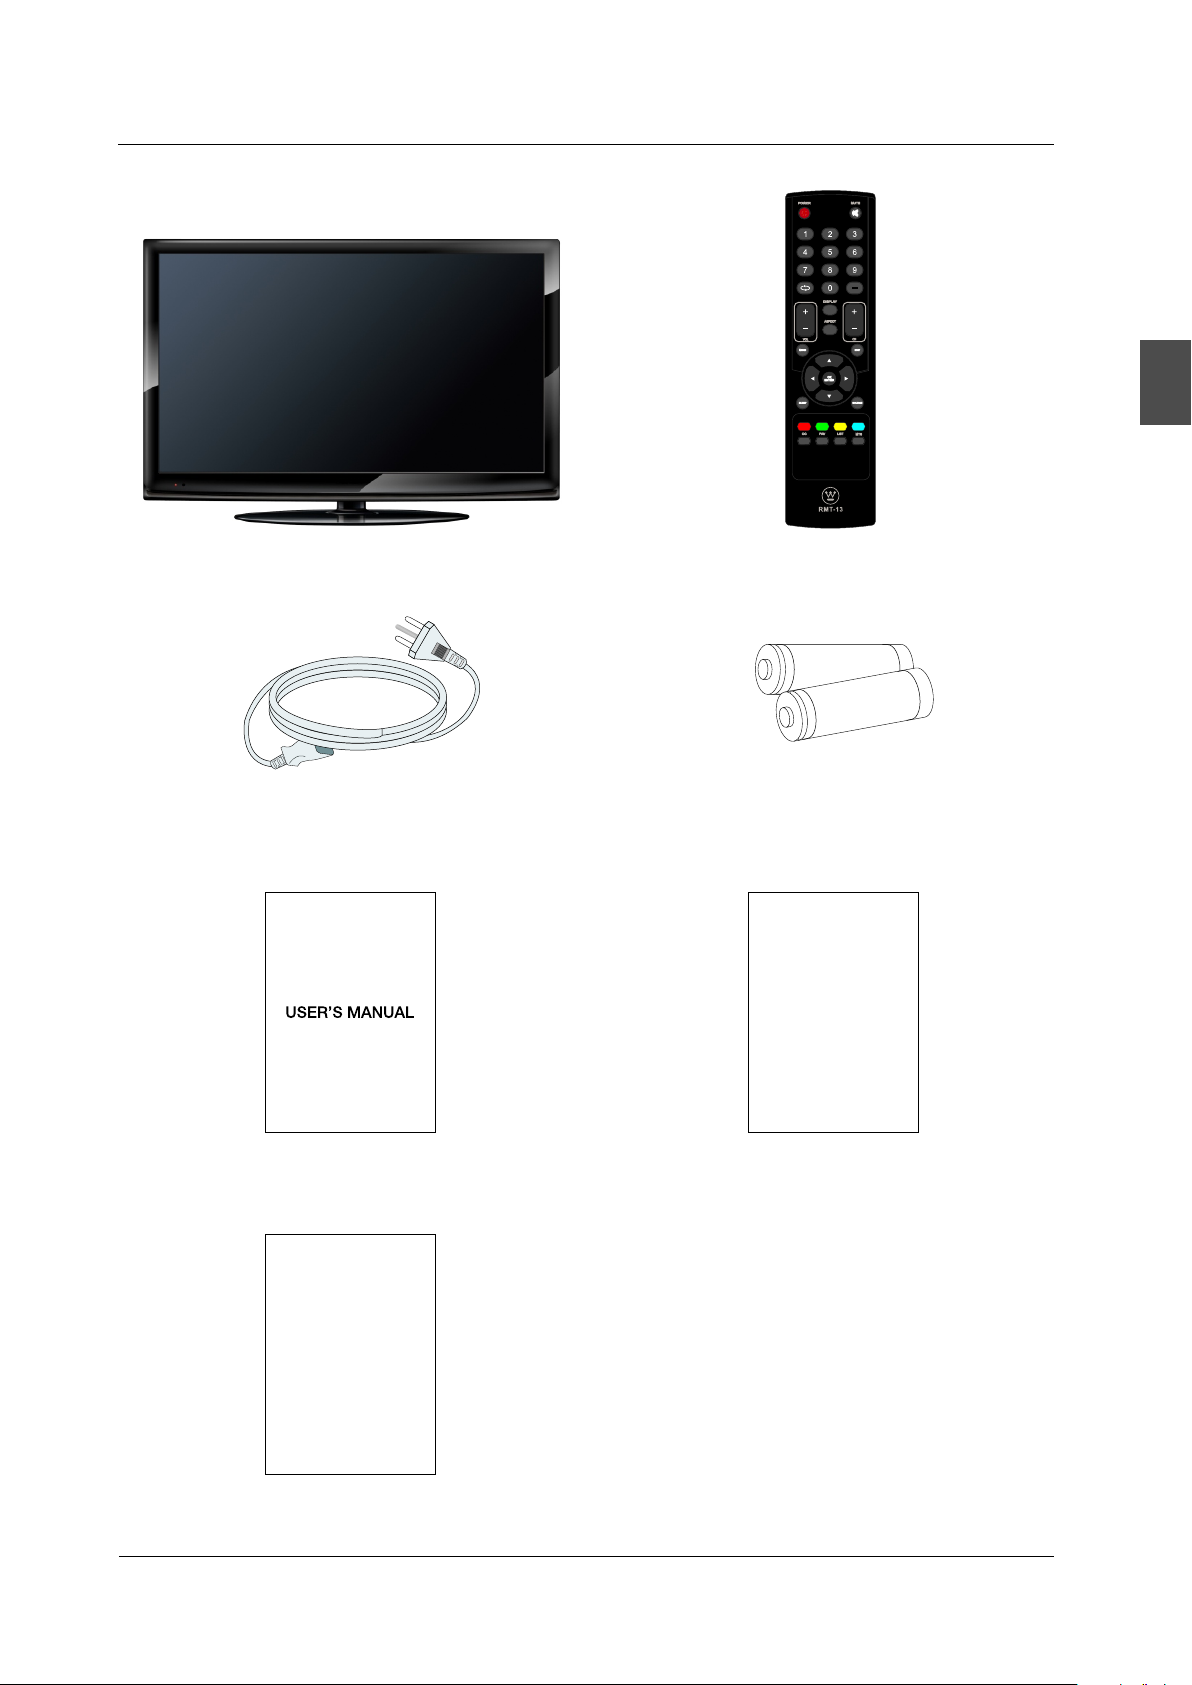
5. CONTENTS
CO NTENT S
English
LCD TV SET
Power Cable
Remote Control
1.5V
V
.5
1
AAA Batteries
Qui ck Co nne ct Gui de
USER'S MANUAL
War ranty C ard
Warranty Card
Quick Connect Guide
7
Page 10
FR ONT/B ACK CON NECTI ONS OF LCD TV
6. FRONT/BACK CONNECTIONS OF LCD TV
Front View
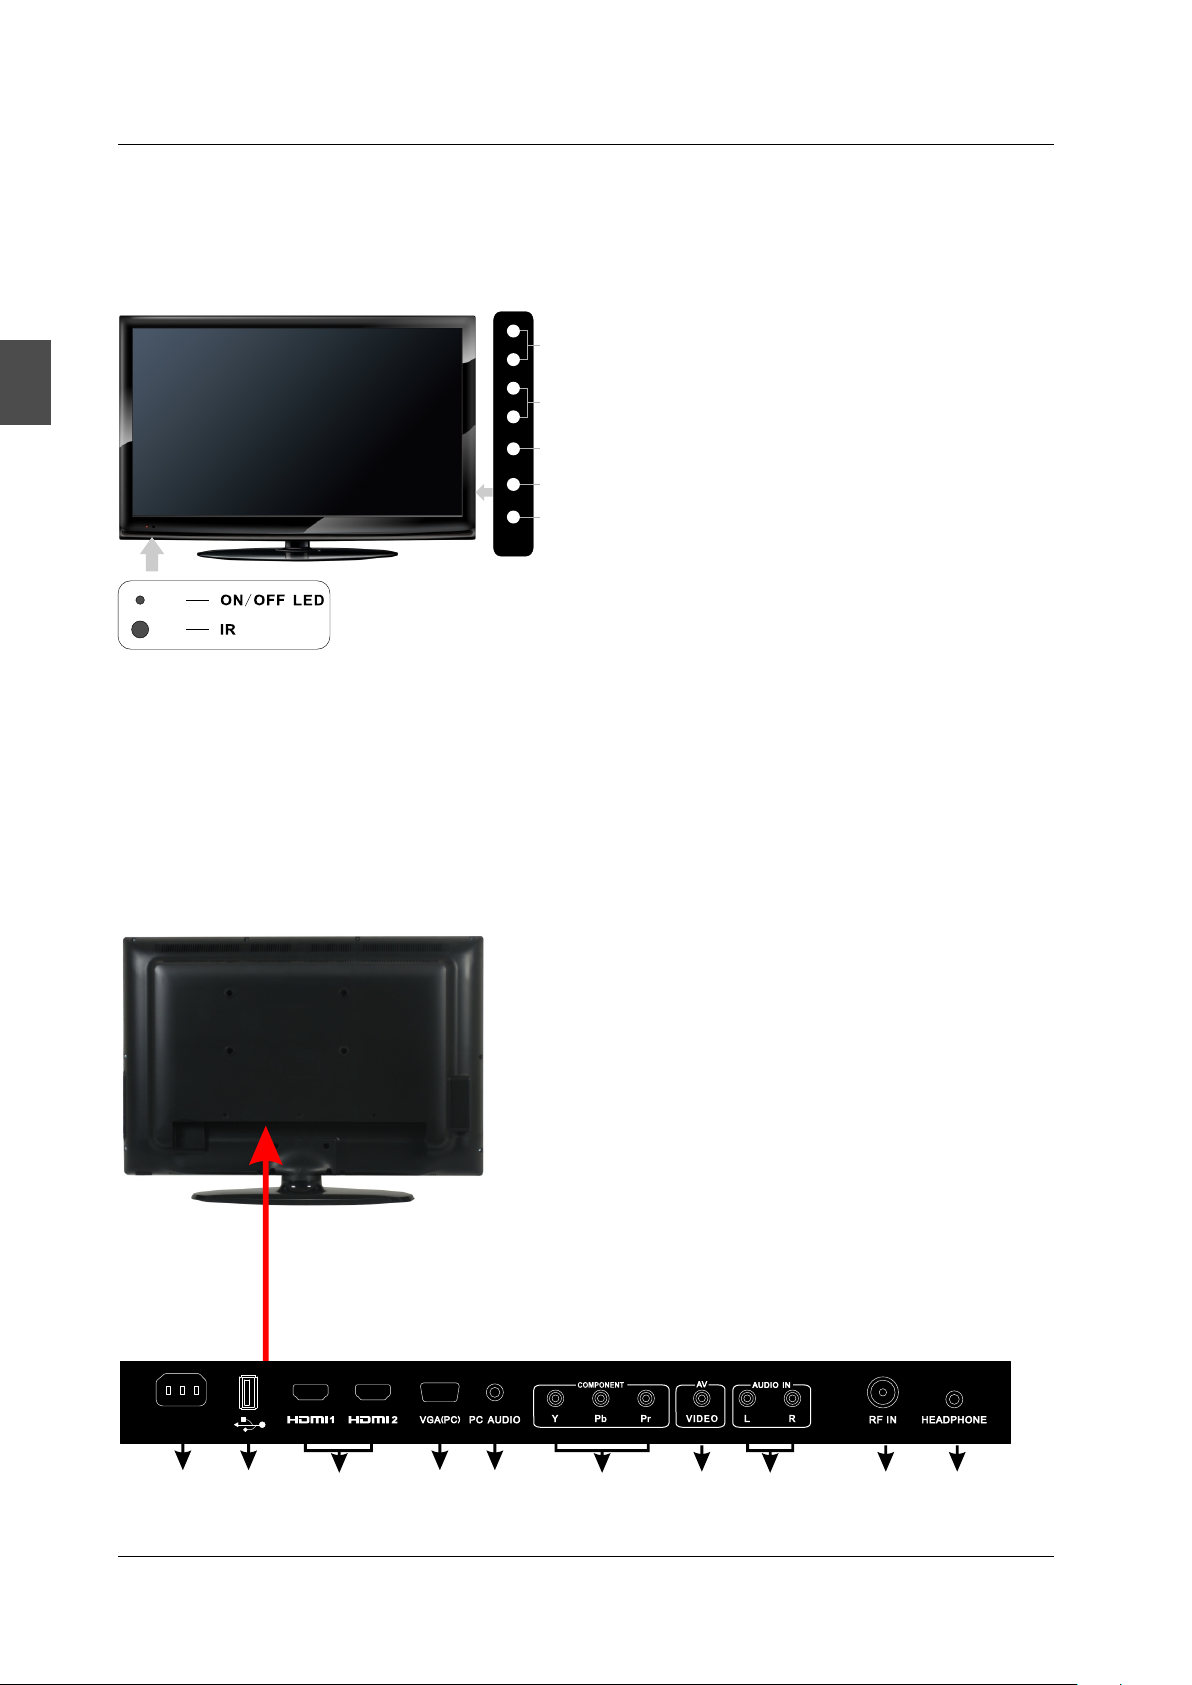
1. Press“POWER” button to turn the TV on or off.
2. Press“SOURCE”to select the input source.
English
6
7
VOL+VOL+
VOL-VOL-
MENUMENU
SOURCESOURCE
POWE RPOWE R
3. Press “MENU”to bring up the main menu on
5
the screen.
4. Press“CH+”or “CH-”to scan through channels.
CH+CH+
4
5. Press“VOL+”or “VOL-”to increase or decrease
CH-CH-
the volume.
3
6. POWER INDICATOR: red in standby mode.
2
red or green when your TV is switched on.
Shows
7. REMOTE SENSOR: infrared sensor for the
1
Shows
remote control.
Back View and Control Connections
1.AC IN: Main power input.
2.USB Service: USB port for Factory Use Only.
3.HDMI1 / HDMI2: Connect to the HDMI output jack
of a DVD player.
4.VGA (PC): Connect to the VGA RGB output jack
of a PC.
5.PC AUDIO: Connect to the Audio output jack of a PC.
6.COMPONENT: Connect to the YPbPr output jack
of a DVD or VCR player.
7. AV: Connect to the Video output jack of a DVD or
VCR player.
8.AUDIO IN: Connect to the Audio output jack of a
DVD or VCR player.
9.RF IN: Connect to an antenna or cable source.
10.HEADPHONE: Connect to a headphone.
AC IN
1
8
2
3
5
4
6
7
8
9
10
Page 11
7. TV INSTALL TION A
TV I NSTALL TI ON A
Power Cord Connection
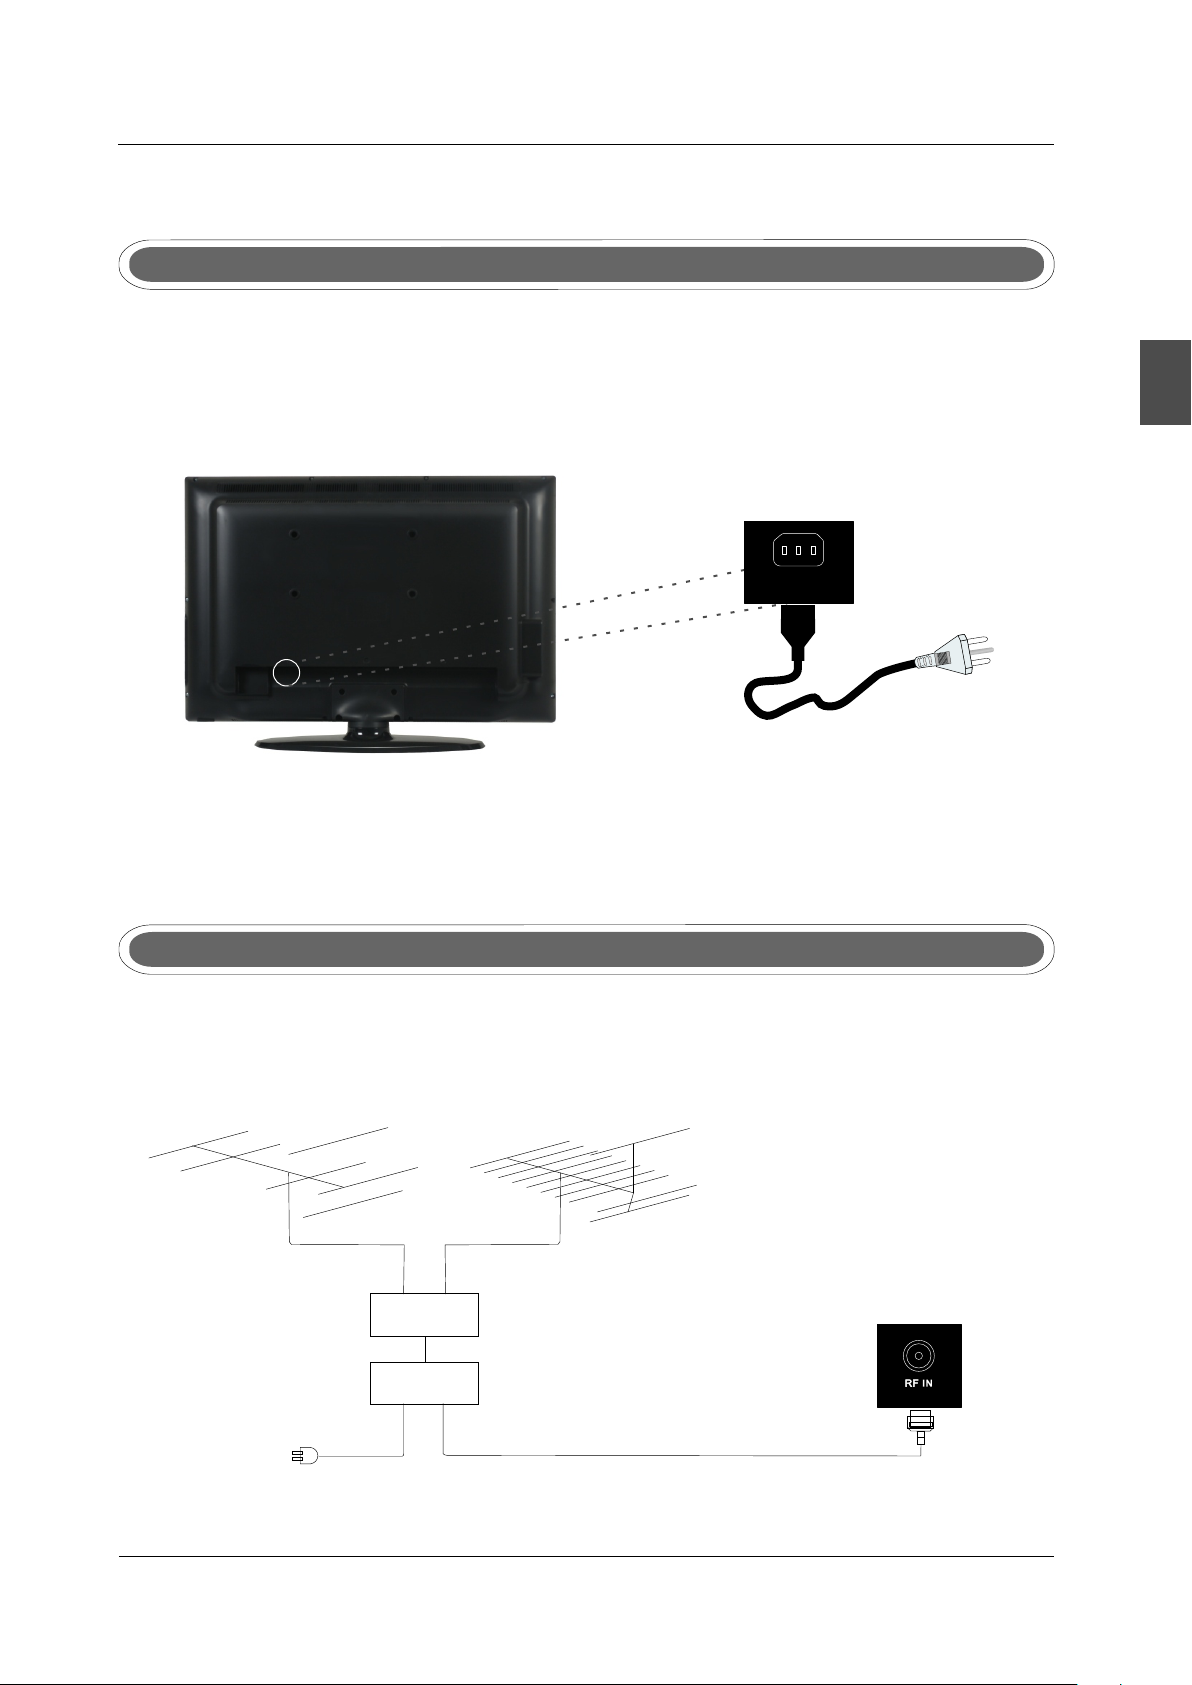
- Connect the power cord correctly as shown.
- Pre ss the PO WER sw itc h o f your L CD TV to sw itc h o n the LCD TV. Th e p owe r i ndi cator
on th e f ron t p ane l l igh ts up in re d o r gree n.
AC IN
English
Antenna Connection
To ensure good picture and sound, TV antenna system needs to be installed. The antenna system as
shown can be sourced from TV equipment shops, which will provide service for correct installation
and connection. After installation, insert the 75-ohm antenna plug into the antenna jack as shown.
VHF ANT ENNA UHF ANTENNA
OUTDO OR
ANTEN NA
AMPLI FIER
INDOO R
ANTEN NA
AMPLI FIER
75 OHM
ANTEN NA
POWER P LUG OF
ANTEN NA
AMPLI FIER
PLUG
9
Page 12
TV I NSTALL TI ON A
AV Connection
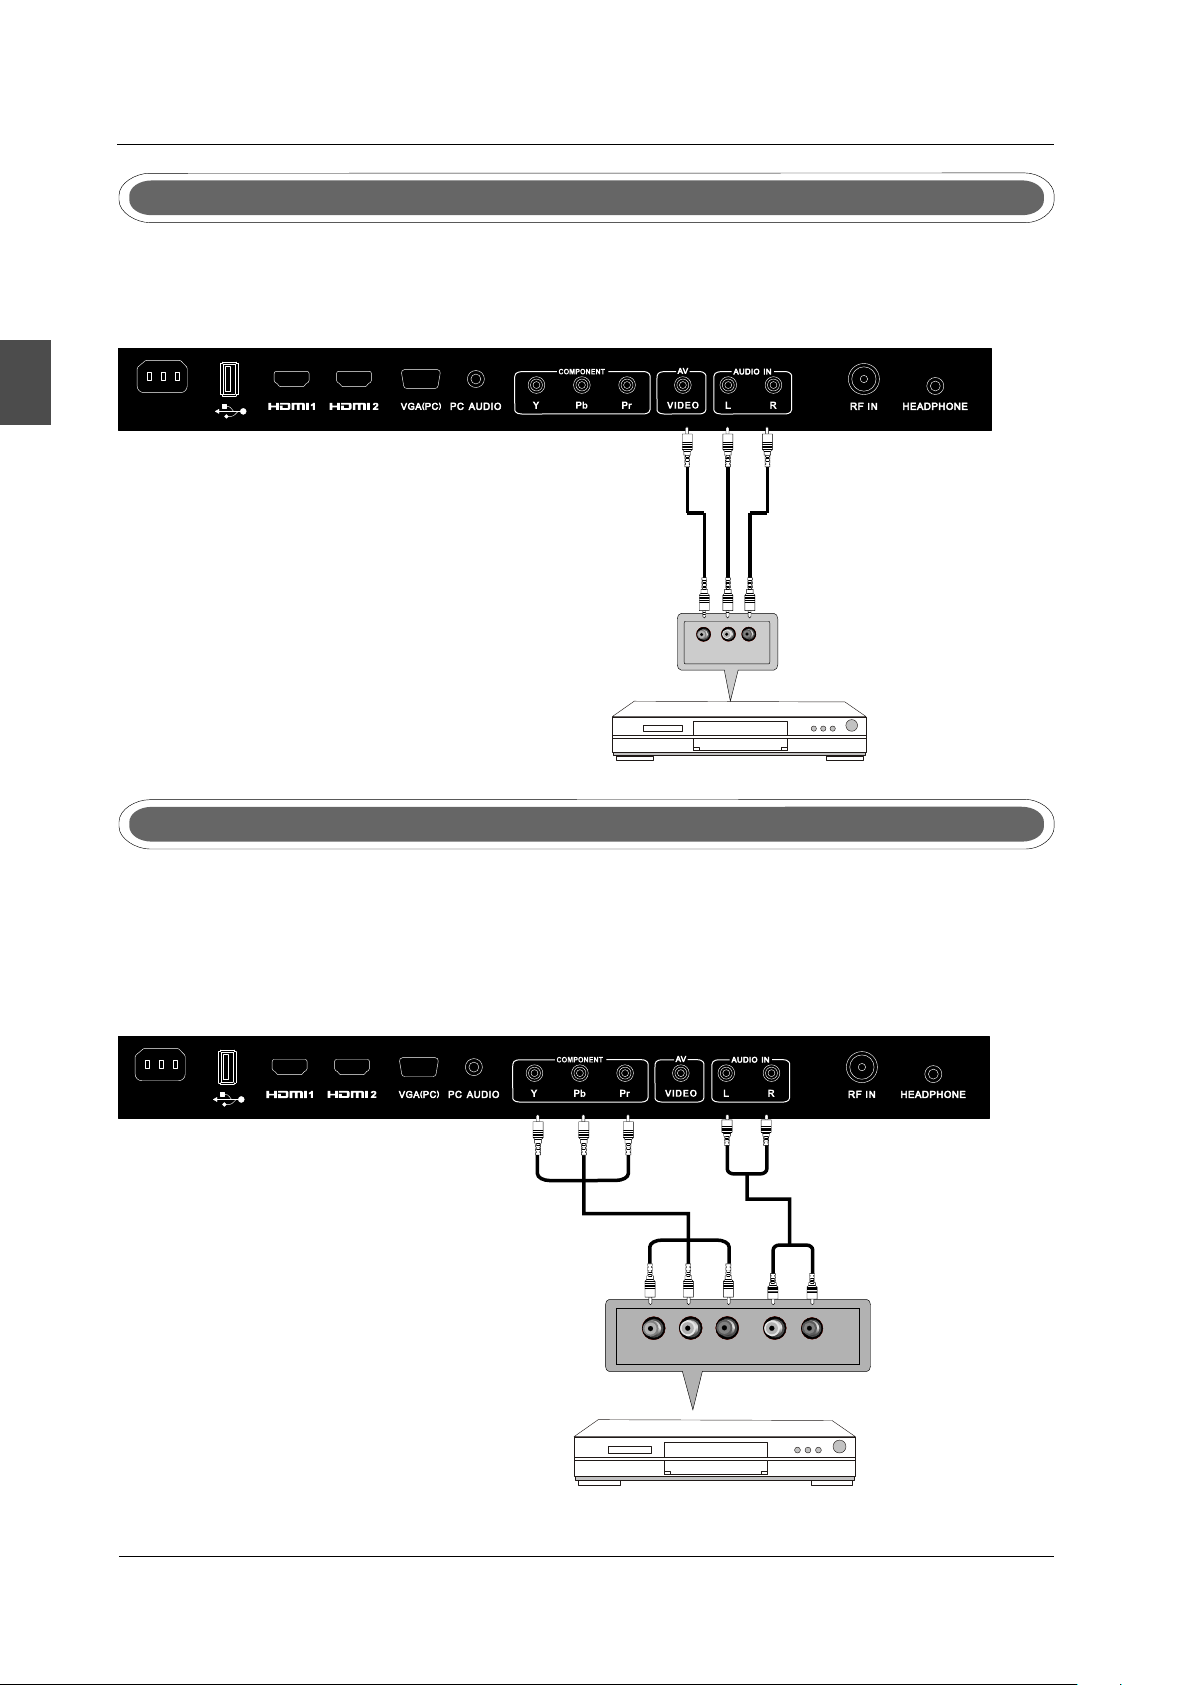
Connect the VIDEO and AUDIO output jack of the DVD or VCR to the VIDEO jacks on the set using
the RCA cable. Match the jack colors: Video is yellow, Audio left is white, and Audio right is red.
Select the AV input source using the SOURCE button on the remote control.
English
AC IN
TV Back
Video C able
VIDEO VIDEO R R LL
DVD or VC R Back
DVD or VC R
YPbPr Connection(Component)(Component)
Connect the YPbPr output of the DVD or VCR to the YPbPr input on the set. The p ic tu re q ua li ty is
improved; compared to connecting a regular V CR t o th e vi de o in pu t. C on ne ct the Audio output of
the DVD or VCR to the Audio input jacks on the set using the RC A cab le .
Match the jacks colors :Y is green,Pb is blue,Pr is red,Audi o le ft i s wh it e an d Au di o ri gh t in r ed.
Select component input source using the SOURCE b ut to n on t he r em ot e co nt ro l.
AC IN
TV Back
AUDIO c able
YPbPr c able
10
Pb
Y
DVD or VC R
Pr L
DVD or VC R Back
R
Page 13
TV I NSTALL TI ON A
VGA(PC) Connection
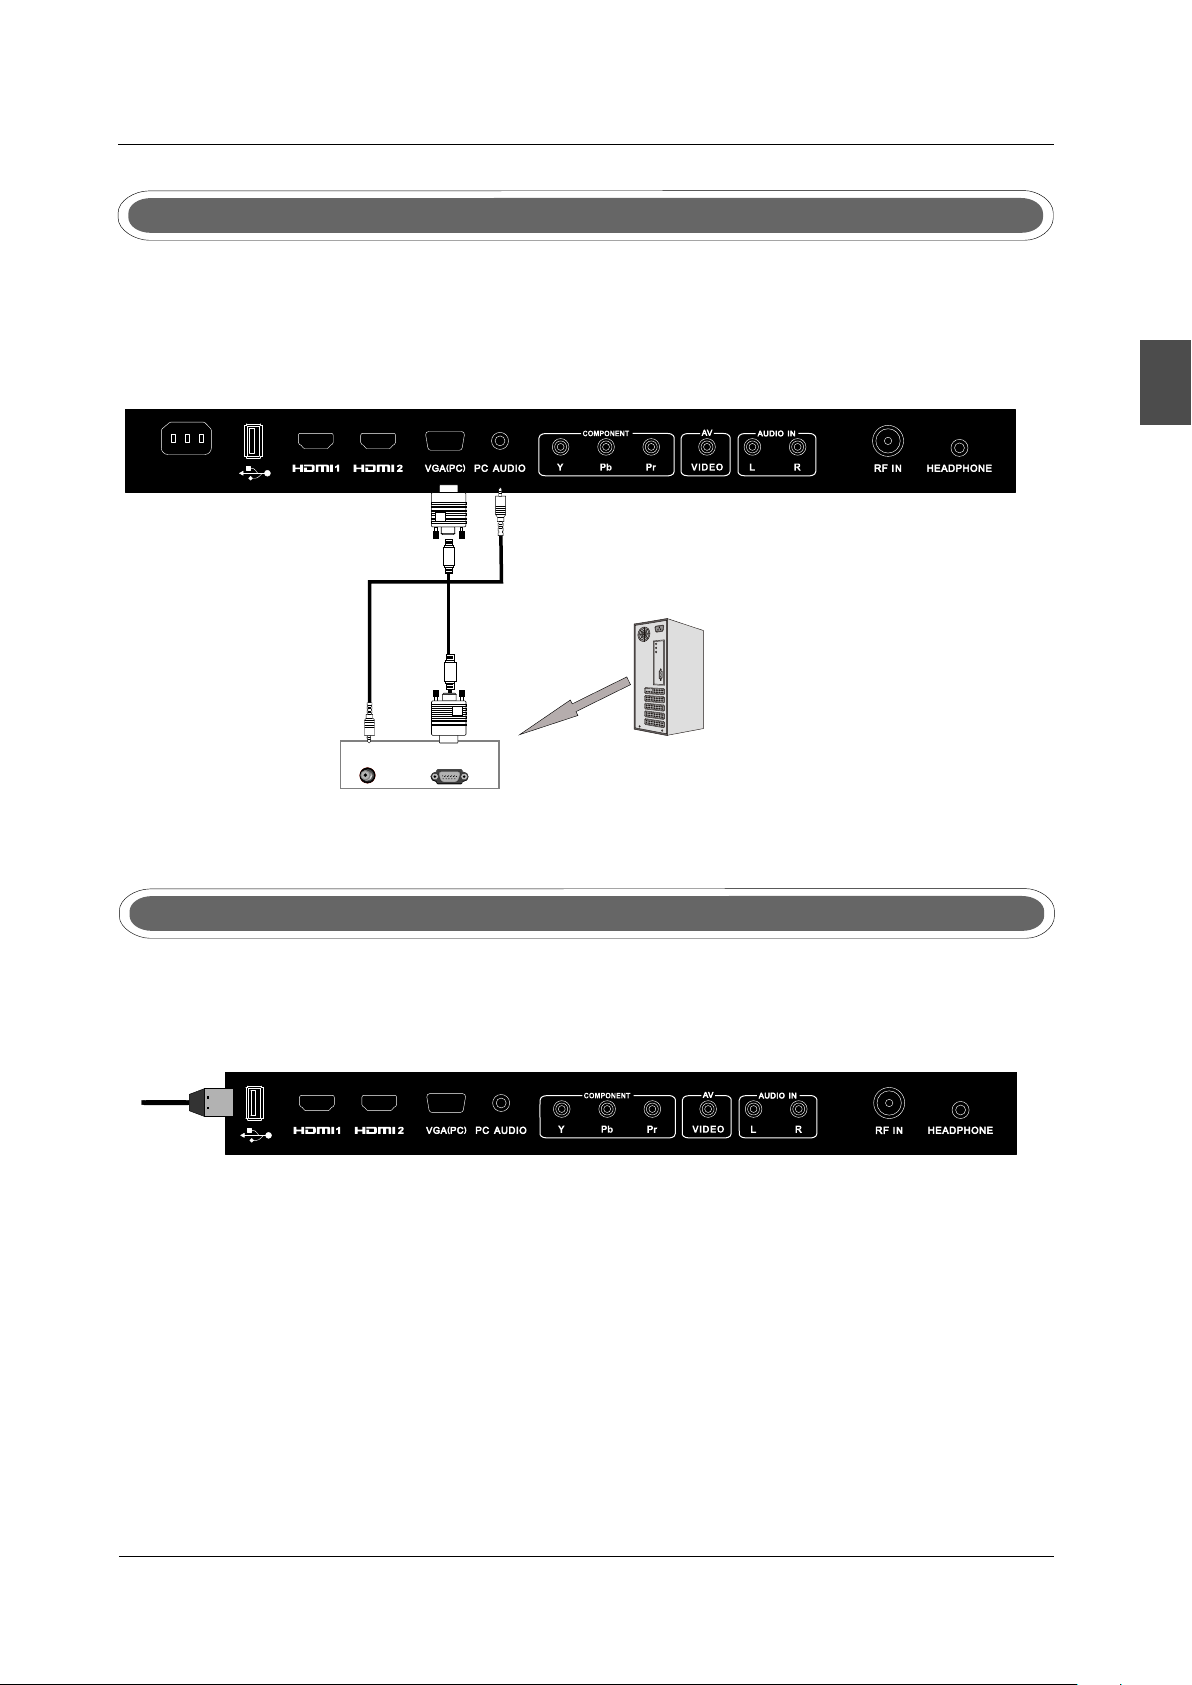
Conne ct the RGB o utput of the PC t o the jack on the set. Conne ct th e AUDIO output o fVGA(P C)
The PC to the PC AUDIO jack on the set. Sele ct th e RGB i nput source wit h usi ng SO URCE butto n
on the remot e con trol.
AC IN
TV Back
English
Audio Cable
AUD IO RGB -PC OUT PUT
Service Port Function
Service port: (For factory uses only.)
VGA Cable
TV Back
USB Cable
11
Page 14
TV I NSTALL TI ON A
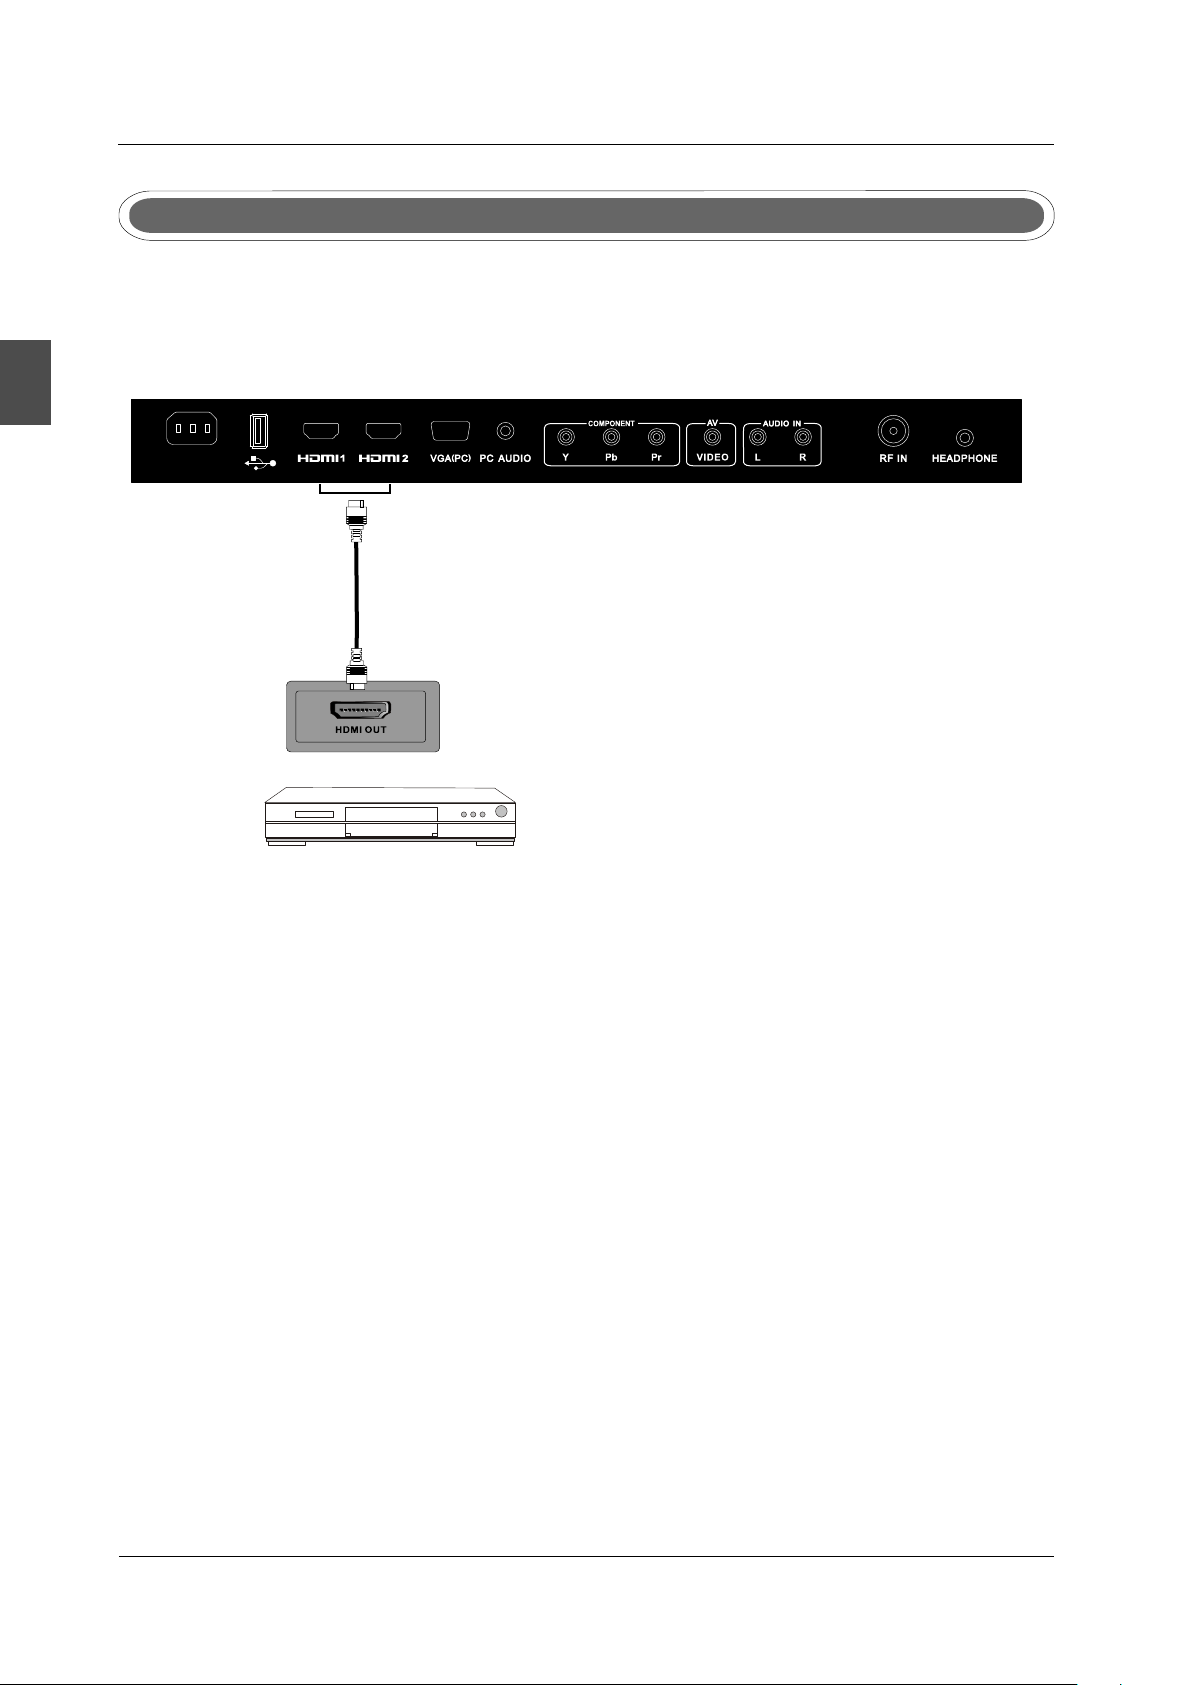
HDMI Connection
HDMI plug which replaces the HDMI connection allows transfer of all audio/video/control
English
signals through one cable only. These signals are transferred in digital.
AC IN
TV Back
HDMI Ca ble
DVD Back
12
Page 15
8 REMOTE CONTROL.
REMOTE CO NTROL
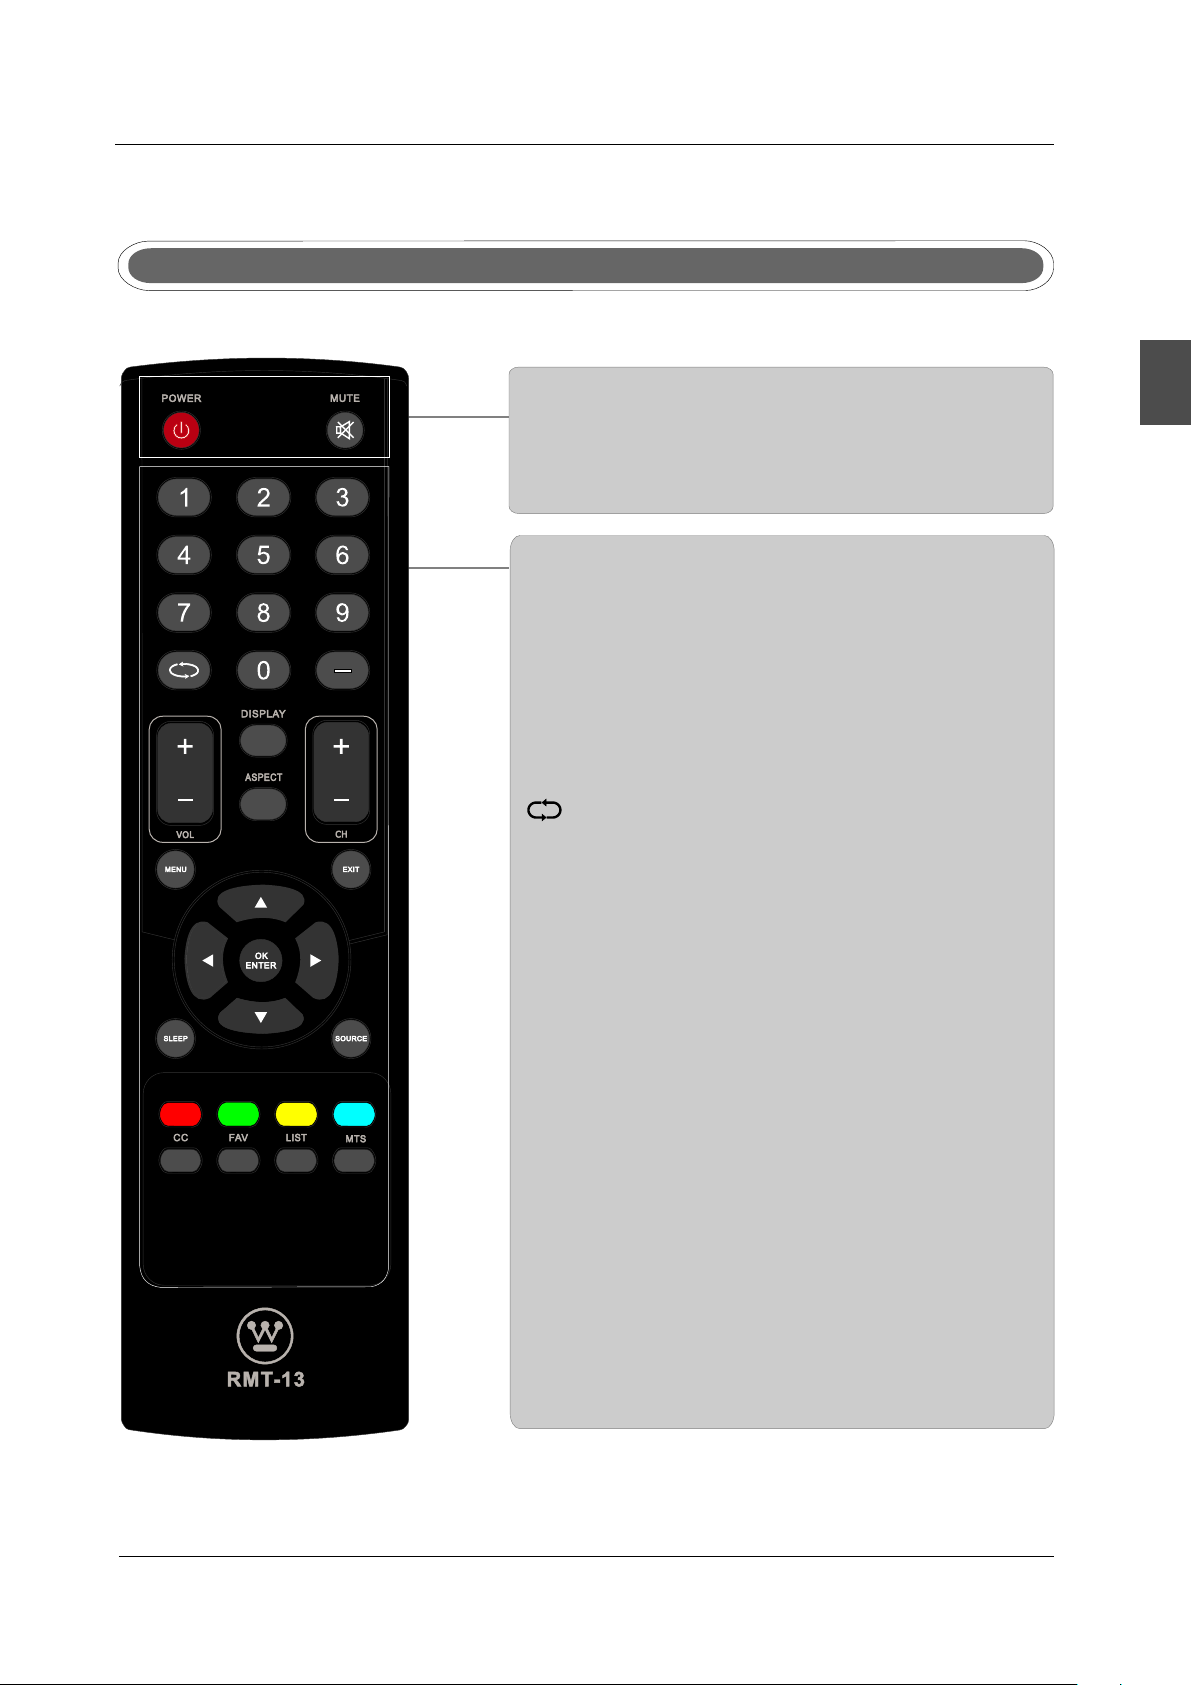
Remote control instructions in TV mode
POWER
Turn the LC D TV ON or OFF.
MUTE
Press to m ut e th e sound. Press again or press VOL+ to
un-mut e th e TV.
NUMBER BUTTONS
Press 0-9 to directly change the TV channel.
SOURCE
Press SOURCE to display the OSD input source,
press ▲▼to select an input source and then press
OK to confirm.
,
-
Press this button to enter a program number for
multiple program channel such as 2-1,etc.
English
Return to the previous channel viewed.
DISPLAY
Press to disp lay the source an d channel's i nformation.
MENU
Brings up the m ain TV menu t o the screen.
EXIT
Exit the main TV menu to the s creen.
ASPECT
Press to select Aspect Ratio.
THUMBSTICK( ▲/ ▼/◄ / ►/ OK )
Allows you to n avigate the on- screen menu s and adjust the
system sett ings to your pref erence.
VOL+/VOL-
Press to increase / decrease the sound level.
CH+/CH-
Press to scan through channels.
CC
Press to display the closed caption.
LIST
Press to display the TV program list.
FAV
Press to display the TV favourite progr am l is t.
MTS
Press to adjust between available audio channel.
13
Page 16
REMOTE CO NTROL
Remote control setup
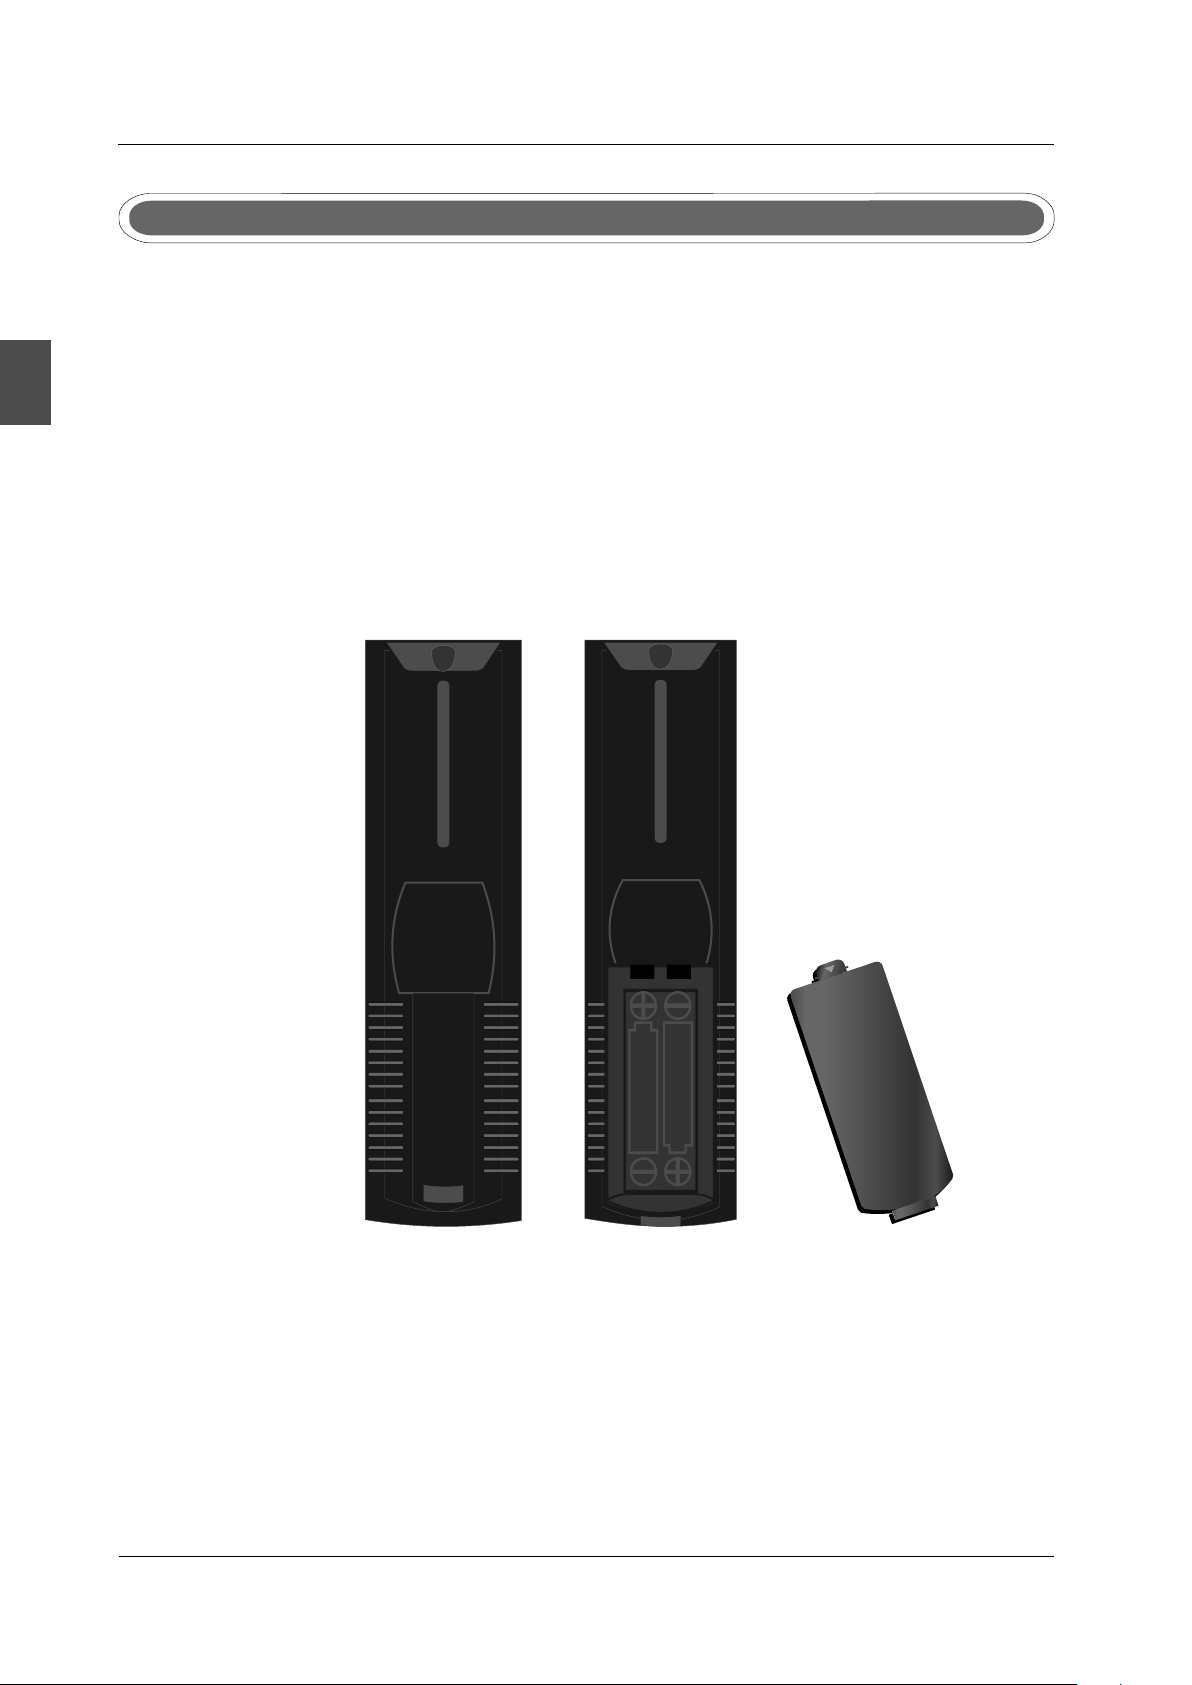
1. Open the cover.
2. Uses AAA size batteries.When inserting the batteries, make sure correct polarities “+”and “-”
English
marks
3. Replace the battery cover.
To prevent battery leakage which may result in bodily injury or damage to the remote:
1. Install all batteries correctly, and as marked on the remote control.
2. Do not mix batteries:(OLD and NEW or CARBON and ALKALINE, etc)
on the batteries line up correctly with compartment markings .
Remove batteries when the remote is not used for a long period of time.
.
14
Page 17
9.Menu Operation
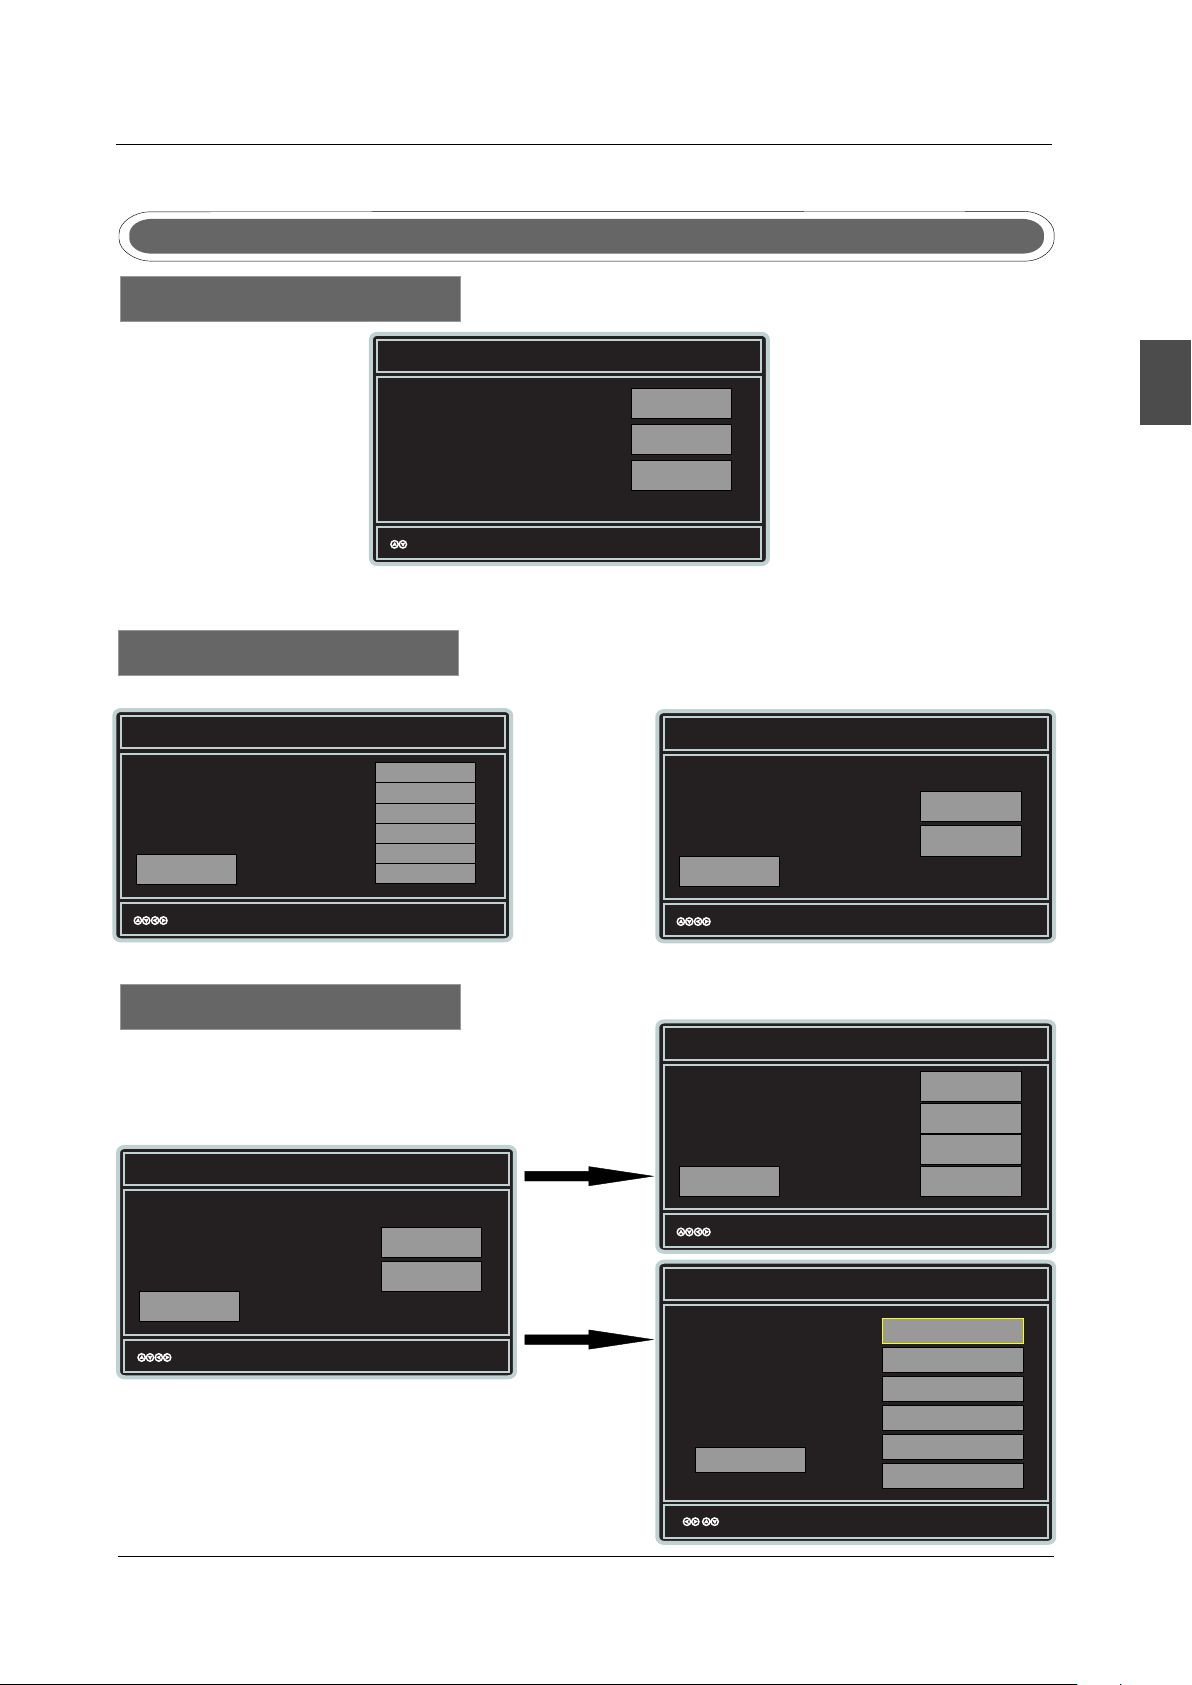
Select Language
Select Lang uage
ME NU OPER ATI ON
SETUP WIZARD
English
Time zone
Time Zone
Use The Up a nd Do wn ar rows
and pres s Sel ect o n your
Tim e Zon e.
Go Back
:Select
Follow t his g uid e to help you s et
up your TV U se Th e Up an d Down
arrows o n you r rem ote contr ol
and sele ct th e Lan guage you
want to us e for m enu s and
messag e scr een s.
:Select
Haw ail(U TC-10 )
Ala skal( UTC-9 )
Pac ific( UTC-8 )
Mou ntain (UTC- 7)
Cen tral( UTC-6 )
Eas tern( UTC-5 )
Ent er:Co nfirm
English
French
Spanish
Ent er:Co nfirm
Power Up Mode
Choose t his s ett ing for opt ima l
perfor man ce un der every d ay
use.
Go Back
:Select
Home Us e
Retal l Use
Ent er:Co nfirm
Setup Wizard
Setup Wiz ard
Please f oll ow th e Setup
Wiz ard t o sca n and store
channe ls. You c an pe rfo rm
the scan l ate r if yo u choose
to skip.
Go Back
:Select
ENTER
Skip
Ent er:Co nfirm
Enter
Skip
Channel Sca n
Please c hoo se wh at type of
device t o set u p? If y ou want
to set up a DV D, G ame
Consol e or Co mpu ter pleas e
choose o the r and s elect wha t
connec tio n you a re using.
Go Back
:Select
Source List
Go Back
:Select
Anten na
Cable
Satel lit e
Other
Ent er:Co nfirm
TV
AV
Component
HDMI1
HDMI2
VGA
Ent er:Co nfirm
15
Page 18
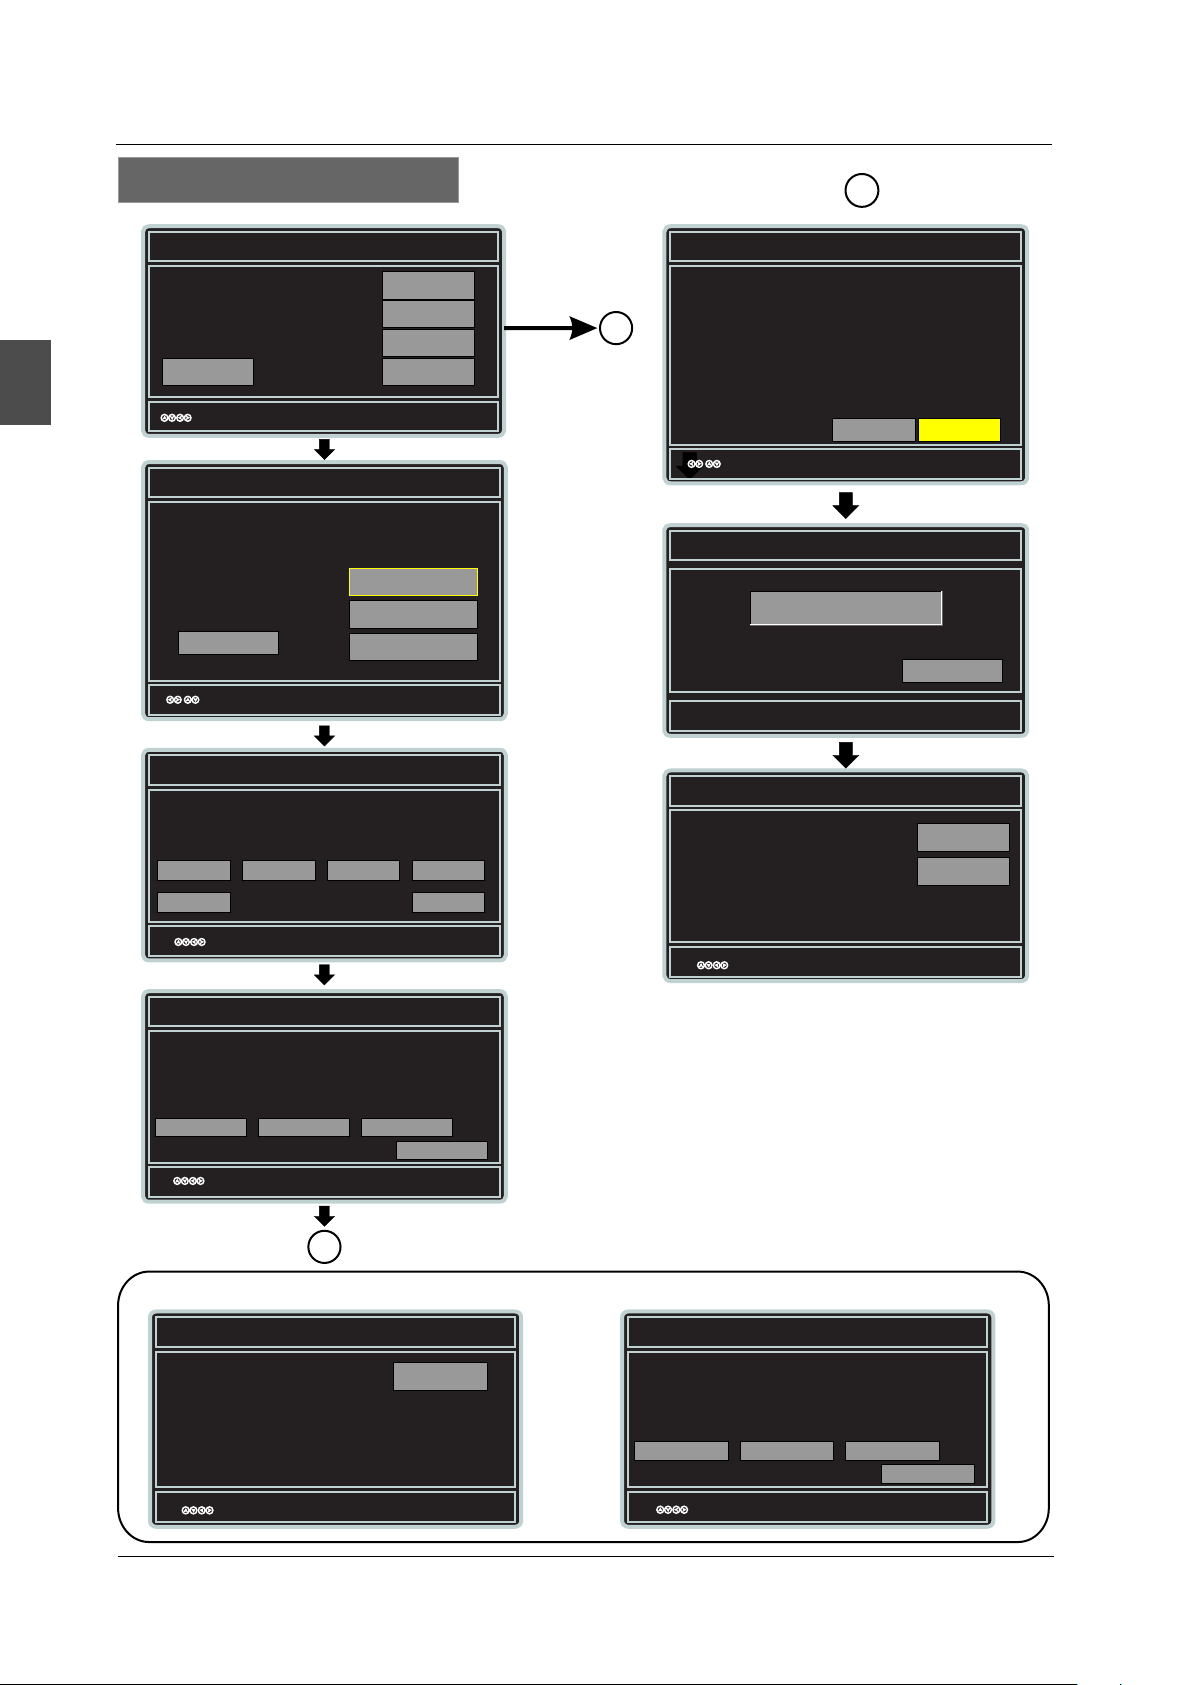
ME NU OPER ATI ON
Channel Scan
Channel Scan
Ple ase cho ose wha t type of
dev ice to se t up? If yo u want
to se t up a DVD, G ame
Con sole or C omput er plea se
English
cho ose oth er and se lect wh at
con necti on you ar e using .
Go Back
:Select
Antenna
Cable
Satellite
Other
Ent er:Co nfirm
Anten a
A
Cable
Obtain Tuner Ac tivat ion Cod e
Serial Number: XXXXXXXXXXX XX
An Ac tivat ion Cod e is nece ssary t o prope rly sca n and acc ess
you r Cable c hanne ls.
Thi s Activ ation C ode is av ailab le at no ch arge an d can be
obt ained u sing th e above S erial N umber i n eithe r of the
fol lowin g ways:
>Voi cemai l-Cal l 1-800 -701- 0680 - fo llow vo ice ins truct ion.
>On line - Go t o www.w ed.co m/sup port an d selec t Cable
Cle ar Qam Tu ner Ac tiv atio n.
:Select
A
Go Back
Next
Ent er:Co nfirm
Cable/Satellite Select
Are you using a
Cable/Sat ell ite B ox to
Connect to yo ur TV ?
Enter Activation Code
Yes
Go Back
No
Exit Setup
Enter Activ ati on Co de us ing R emo te Co ntrolEnter Activ ati on Co de us ing R emo te Co ntrol
- --- -- - - - -
Go Back
:Select
Ent er:Co nfirm
0~9:Key in password
Ent er:Co nfirm
Cable/Satellite Box Input
Wha t conne ction a re you us ing? Fo r Optim al Vide o
Qua lity We R ecom mend HD MI or com ponen t.(Re fer
to Qu ick Con nect Gu ide or Us er Manu al to hel p
you d eterm ine wha t conne ction y ou are us ing.)
HDMI1
Skip
:Select
HDMI2
Com ponen t
Coaxial
Go Back
Ent er:Co nfirm
RF Wa rning
Not e: We don ’t rec ommen d RF as you r conne ction b ecaus e
it wi ll prov ide ver y poor vi deo sig nal to yo ur TV and v ideo
qua lity wi ll look v ery poo r. Go back a nd use a di ffere nt
con necti on for op timal c ond t ion. If y ou don’ t have a
Cab le Box th at prov ide Hig h Defin ition q ualit y signa ls we
rec ommen d you cal l your ca ble pro vider a sk for an u pgrad e
Exit Setup Proceed S kip
:Select
i
Go Back
Ent er:Co nfirm
A
Error message
No TV Chann els Fou nd
The S etup Wi zar d did no t fin d
any c hanne ls. Che ck your
ant enna or c able
con necti ons. You m ay hav e
sel ected a n impro per RF
Inp ut Sour ce. Che ck your
set up and tr y again .
:Select
Repeat
Ent er:Co nfirm
Scan Stoped
You ha ve sto pped th e
cha nnel sc an befo re it cou ld
com plete . Do you wi sh to
adj ust you r RF inpu t Sourc e
and r epeat t he scan , or watc h
TV wi th the ch annel s that
hav e been fo und?
:Select
Repeat
Wat ch TV
Ent er:Co nfirm
No Cable Chann els Fou nd
n
Not e: Chan nel 3 can ’t be fou d. Pl ease c heck if t he RF cab le is
plu gged in , and che ck the se tting s of the Ca ble Box ! Press t he
Pro ceed ag ain to re -scan .
Exit Setup P roc eed Skip
:Select
Go Back
Ent er:Co nfirm
16
Page 19
ME NU OPER ATI ON
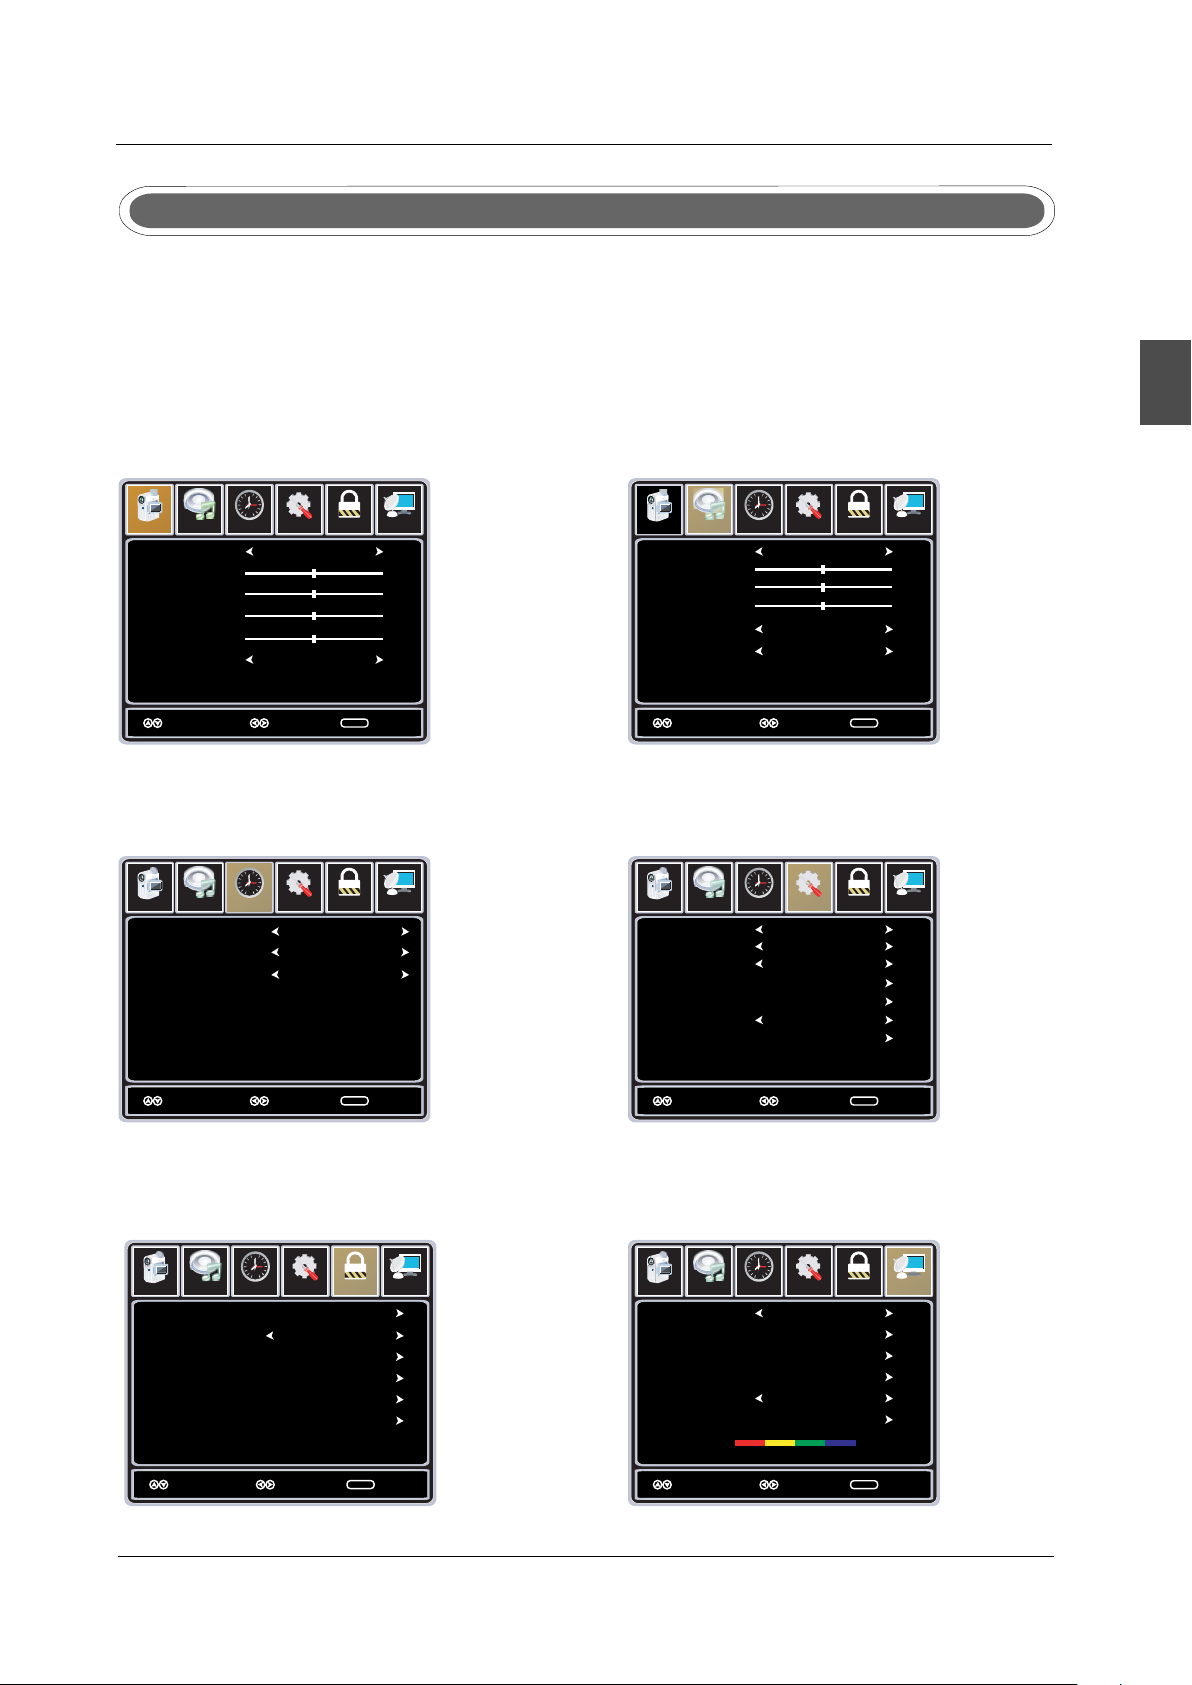
Operating the MenuOperating the Menu
1.Press the POWER button to turn the LCD TV on.
2.Press the MENU button on the remote control, the on-screen menu will appear on the screen.
3.Use the LEFT and RIGHT buttons to select your main menu option.
PICTURE MENU:
Allows you to make adjustments to your picture
settings.(select TV source for example)
12
6
Setup
Standard
Normal
Lock
Chann el
MENU
Picture Audio
Picture Mode
Contrast
Brightness
Color
Sharpness
Color Temp.
Select Move Exit
e
Tim
TIME MENU:
Allows you to set up a variety of timer options.
AUDIO MENU:
Allows you to customize the audio options
and effects.(select TV source for example)
12
6
Setup
Picture
Audio
Sound Mode
Bass
Treble
Balance
Surround
Audio Language
Select Move Exit
e Chann el
Tim
Lock
Standrad
Off
English
MENU
SETUP MENU:
Allows you to set up a variety of setup options.
(Select TV source for example) (Select TV source for example)
12
6
Setup
Picture
Audio
Time
Sleep
Time Zone
Daylight Saving Time
Clock 2010/07/10 11:50
Lock Channel
Off
Pacific
Off
Picture
Menu Language
Zoom Mode
Noise Reduction
PC Setup
Close Caption
DLC
Restore Default
12
6
Audio
Setup
Time Channel
Engli sh
Norma l
Off
k
Lock
On
English
Select Move Exit
MENU
LOCK MENU:
Allows you to set up a variety of lock options.
(Select TV source for example)
12
6
Setup
Picture Audio
Change Password
System Lock
US
Canada
RRT Setting
Reset RRT
Select Move Exit
Time
Lock
Channel
On
MENU
Select Move Exit
MENU
CHANNEL MENU:
Allows you to search channels and set up a variety
of channel options.
Picture Audio
Air/Cable
Auto Scan
Favorite
Show/Hide
Channel No.
Channel Label
DTV Signal
Select Move Exit
(Select TV source for example)
12
6
Setup
Air
11-1
50-3
MBC DTV
Lock
Channel
Goo d
MENU
Time
17
Page 20
ME NU OPER ATI ON
4.Use the UP/DOWN buttons to select an option of the sub-menu, and press the RIGHT button.
While in adjustment mode, use the LEFT/RIGHT button to change the value of the item.
5.Press the MENU button to exit the menu.
English
Note:
Only when you input the suitable signal, the relevant items can be activated.
1.Press the POWER button to turn the LCD TV on.
2.Press the MENU button on the remote control, the on-screen menu will appear on the screen.
3.Use the LEFT and RIGHT buttons to select your main menu option.
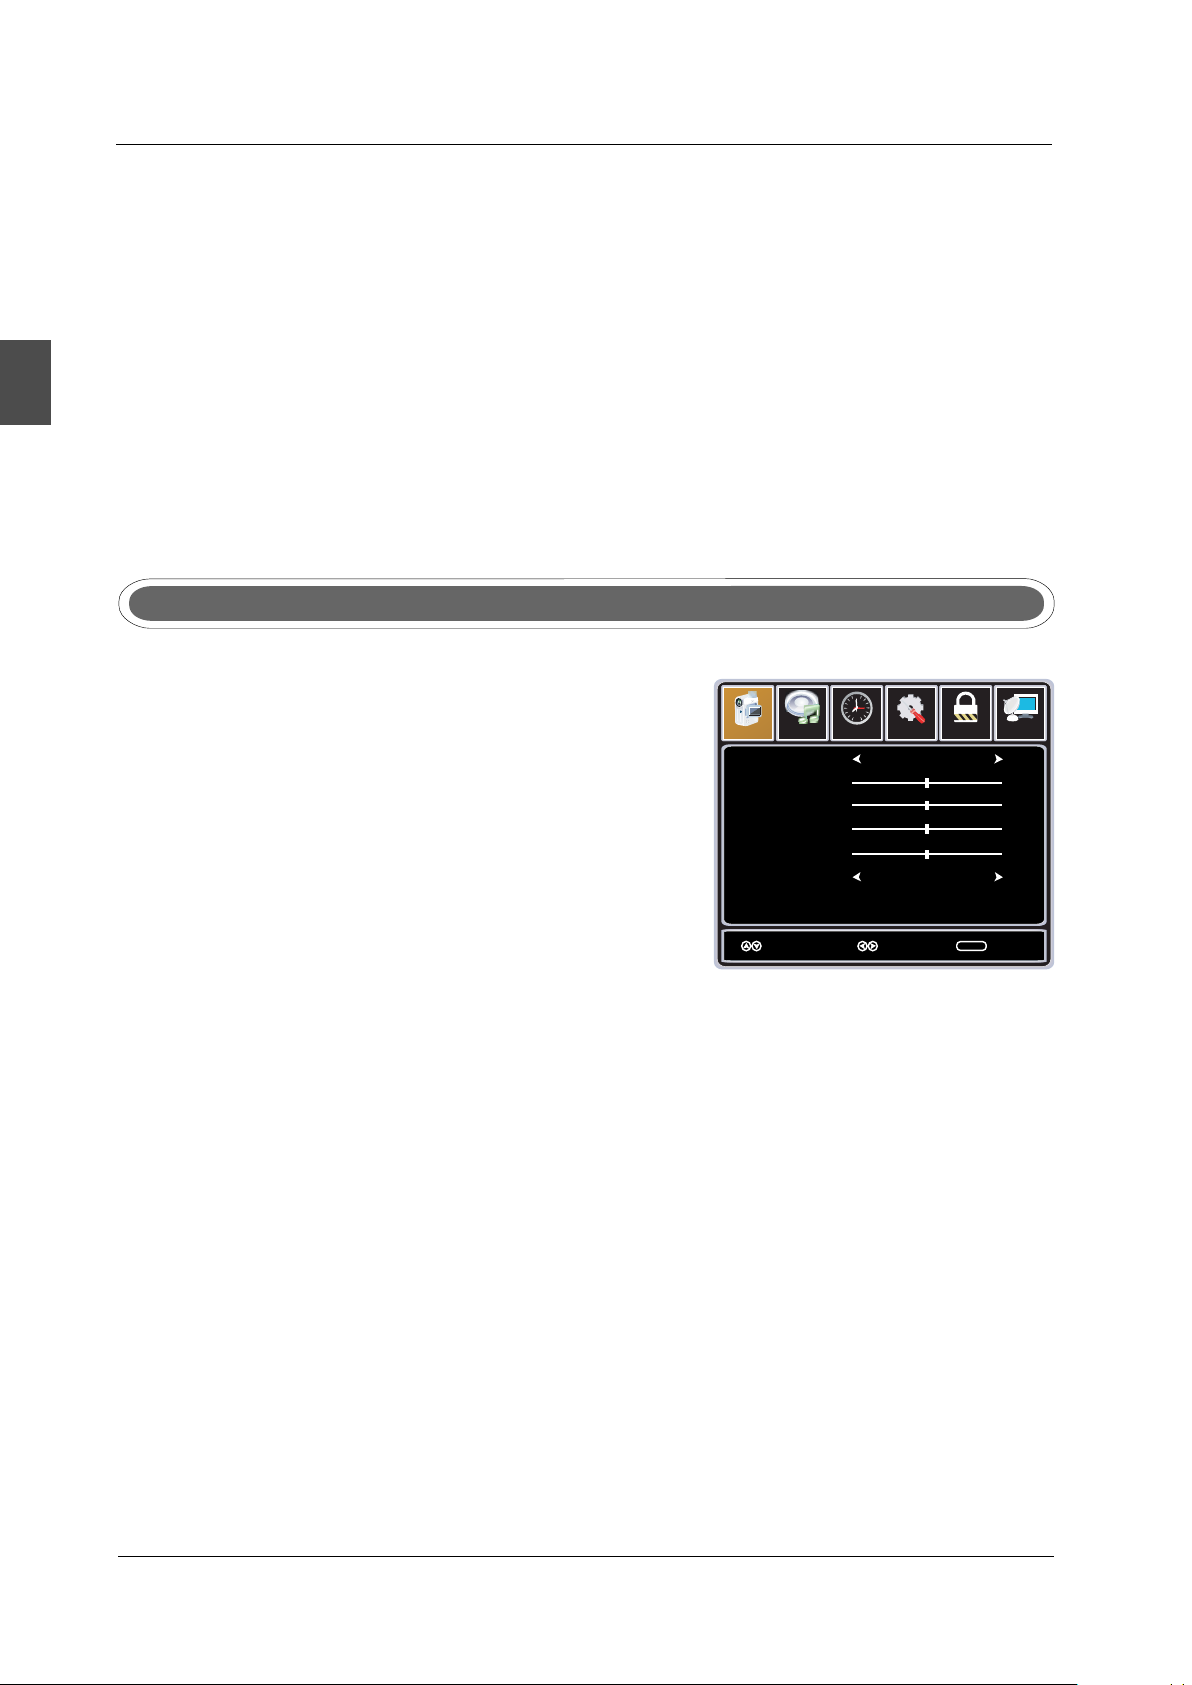
PICTURE MenuPICTURE Menu
Select TV source for example.
1. Press the MENU button on the remote control to display
the Main menu, and use the LEFT and RIGHT
buttons to select the PICTURE.
2. Use the UP and DOWN buttons to highlight an individual
PICTURE option, use the LEFT and RIGHT buttons to change
the setting, and press the MENU to exit the menu.
Picture Audio
Picture Mode
Contrast
Brightness
Color
Sharpness
Color Temp.
12
6
Setup
Standard
Normal
Lock
Chann el
e
Tim
Select Move Exit
The PICTURE menu includes the following options :
Picture Mode
Cycles among picture display modes: Standard, Dynamic, Movie, User.
Contrast
Controls the difference between the brightest and darkest regions of the picture.
Brightness
Controls the overall brightness of the picture
Color
Control the color.
Sharpness
Increase this setting to see crisp edges in the picture; decrease it for soft edges .
Color Temp.
Cycles among color temp: Standard, Fill, Overscan.
MENU
18
Page 21
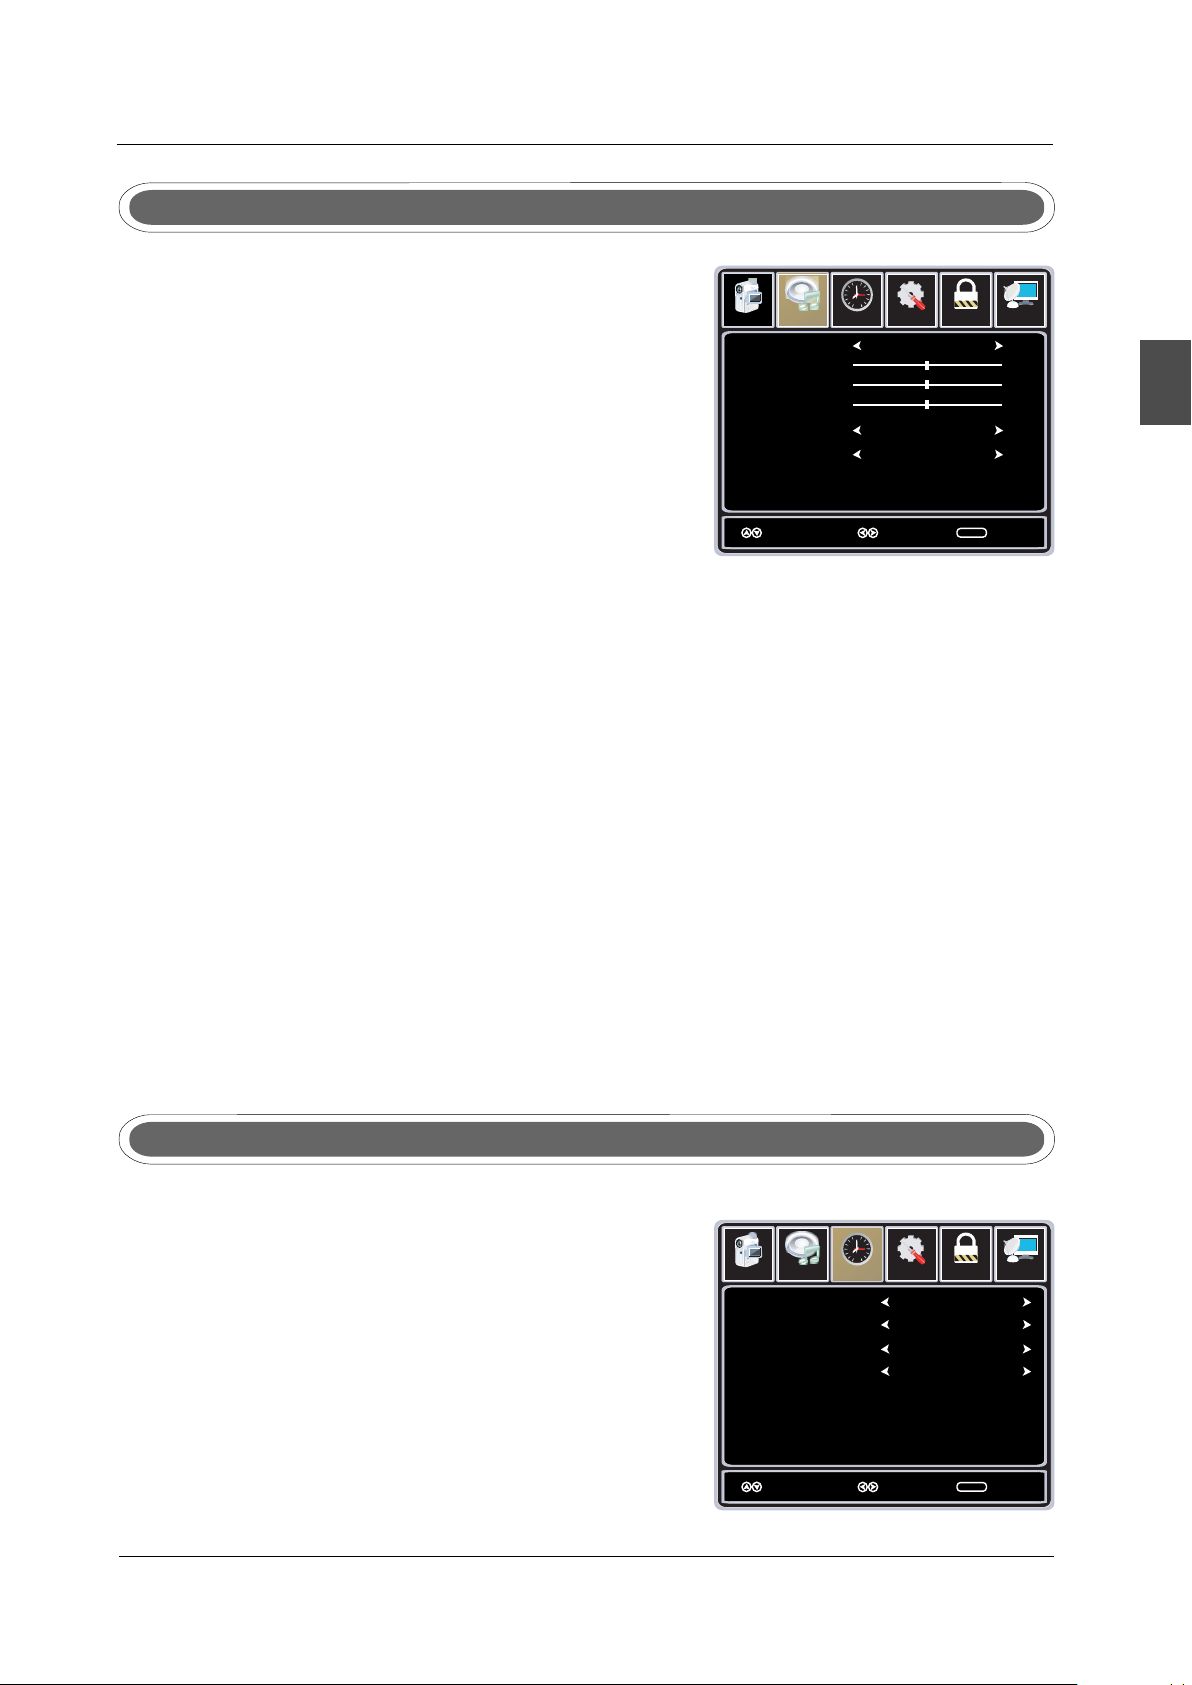
AUDIO MenuAUDIO Menu
ME NU OPER ATI ON
Select TV source for example.
Picture
1. Press the MENU button on the remote control to display
the Main menu, and use the LEFT and RIGHT buttons to
select the AUDIO.
2. Use the UP and DOWN buttons to highlight an individual
AUDIO option, use the LEFT and RIGHT buttons to change
Audio
Sound Mode
Bass
Treble
Balance
Surround
Audio Language
the setting, and press the MENU to exit the menu.
Select Move Exit
The AUDIO menu includes the following options :
Sound Mode
Allows you to select among: Standard, Music, Movie, Personal, User and Sports.
Bass
Controls the relative intensity of lower pitched sounds.
Treble
Controls the relative intensity of higher pitched sounds
Balance
To adjust the balance of the left and right sound track, or turn off the volume of the
left and right sound track.
Surround
Use the LEFT and RIGHT buttons to select on or off.
Audio Language
Allows you to select audio languages among: English, French and Spanish.
12
6
Setup
e Chann el
Tim
Lock
Standrad
Of f
English
MENU
English
TIME MenuTIME Menu
Select TV source for example.
1. Press the MENU button on the remote control to display
the Main menu, and use the UP and DOWN buttons to select
the TIME.
2. Use the UP and DOWN buttons to highlight an individual
TIME option, use the LEFT and RIGHT buttons to change
the setting, and press the MENU button to exit.
12
6
Picture
Audio
Sleep
Time Zone
Daylight Saving Time
Clock
Select Move Exit
Time
Setup
2010/07/10 11:50
Lock Channel
Off
Pacific
Off
MENU
19
Page 22
ME NU OPER ATI ON
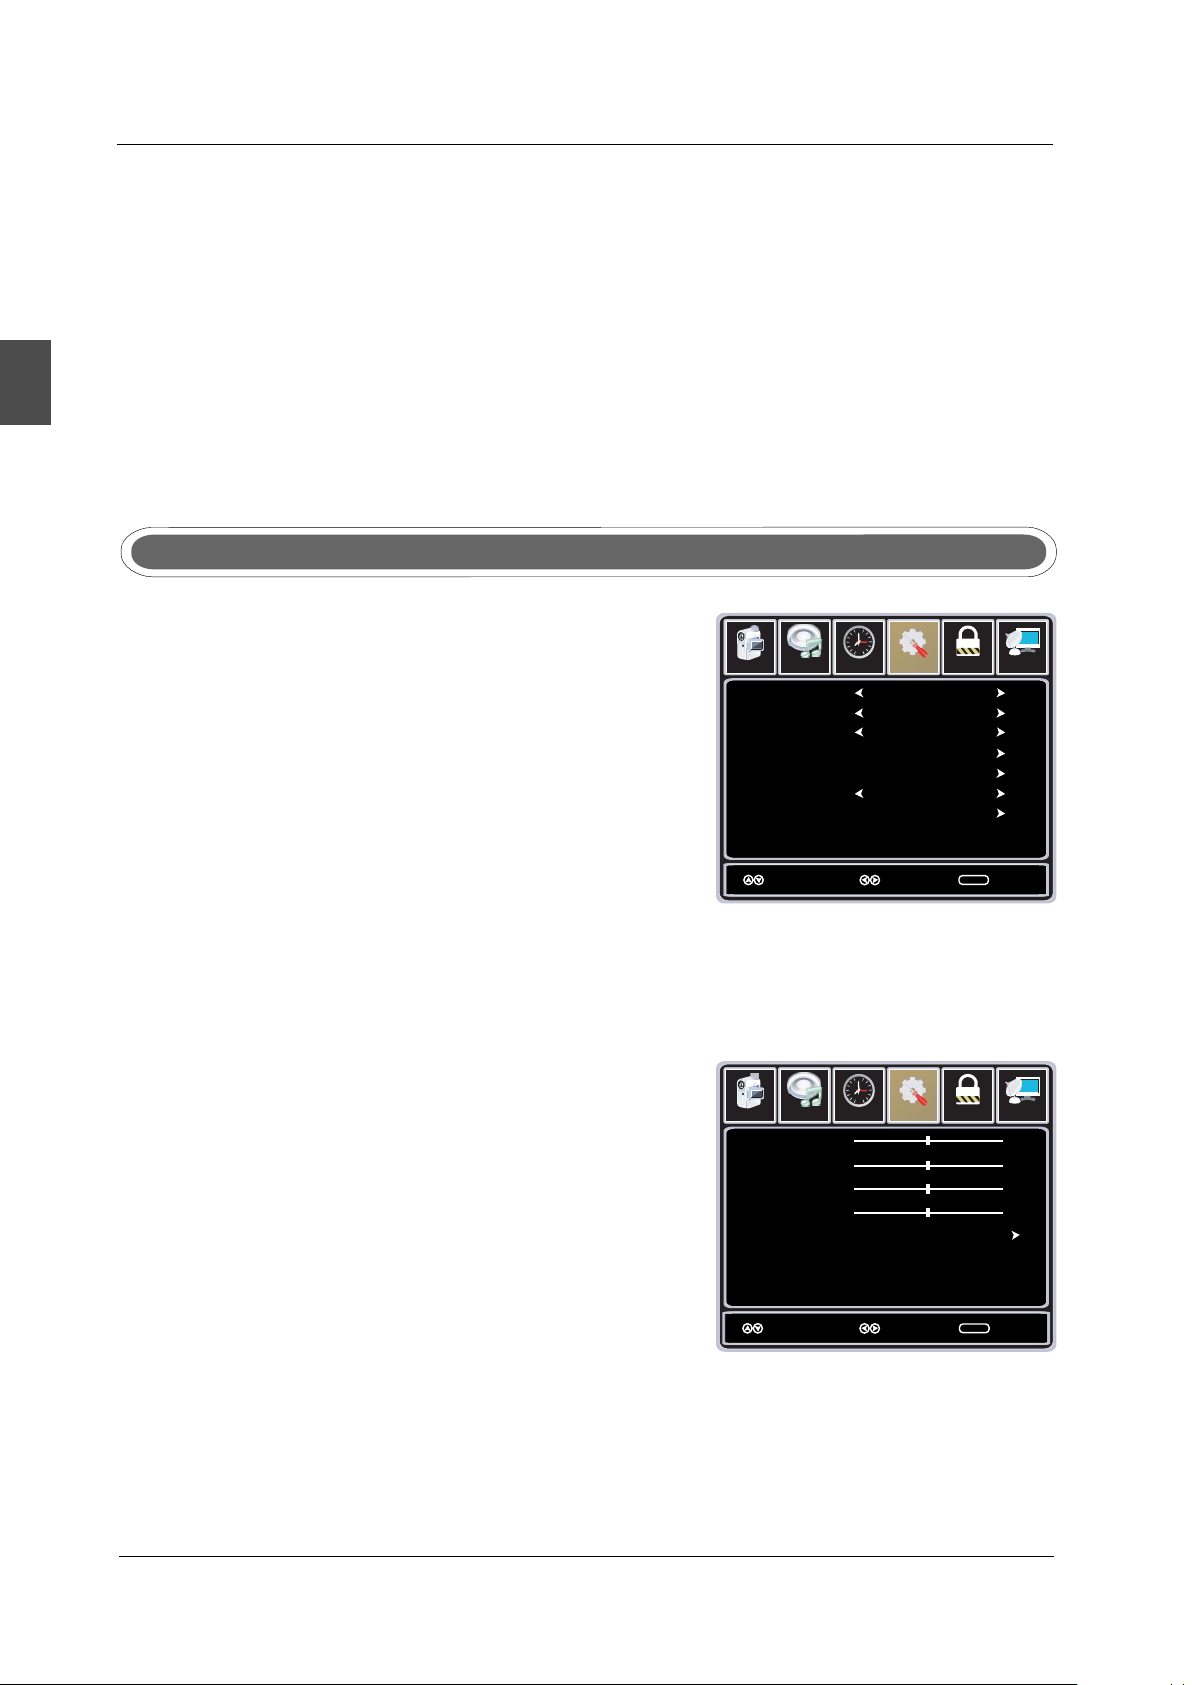
The TIMER menu includes the following options :
Sleep Timer
Allows you to set up the sleep timer among: 5min, 10min, 15min, 30min, 45min, 60min, 90min,
120min, 180min, 240min and off.
Time Zone
English
Allows you to set up the sleep timer among: Pacific, Alaska, Atlantic, Hawaii, Eastern, Central and
Mountain.
Daylight Saving Time
Allows you to turn on or off the daylight saving time.
Clock
Display the current time.
SETUP MenuSETUP Menu
Select TV source for example.
1. Press the MENU button on the remote control to display
the Main menu, and use the LEFT or RIGHT
button to select the SETUP.
2. Use the UP and DOWN buttons to highlight an individual
SETUP option, use the LEFT and RIGHT
buttons to change the setting, and press the MENU button
Picture
Menu Language
Zoom Mode
Noise Reduction
PC Setup
Close Caption
DLC
Restore Default
to exit.
Select Move Exit
The SETUP menu includes the following options:
Menu Language
Allows you to select menu language among: English, Français and Español.
Transparency
Allows you turn on or off the transparency function.
Zoom Mode
Allows you to select the zoom mode among: Normal,
Cinema, Wide and Zoom.
Noise Reduction
Allows you to select the noise reduction mode among:
Strong, Off, Weak, Middle.
Picture Audio
H-POS
V-POS
Clock
Phase
Auto
PC Setup (In VGA Mode only)
Input PC signal first, then press SOURCE button to select
VGA mode, press RIGHT button to confirm.
Select Move Exit
12
6
Audio
Setup
Time Channel
En glis h
Norma l
Off
12
6
Set up
e
Tim
On
Lock
Loc k
k
MENU
Cha nnel
MENU
20
H-Position Allow you to use LEFT and RIGHT button to adjust the H Position.
V-Position Allow you to use LEFT and RIGHT button to adjust the V Position.
Clock Allow you to prolong the image.
Phase Allow you to adjust the definition.
Auto Select “Auto”and press RIGHT, the unit will automatically adjust all items
to achieve a best effect.
Page 23
ME NU OPER ATI ON
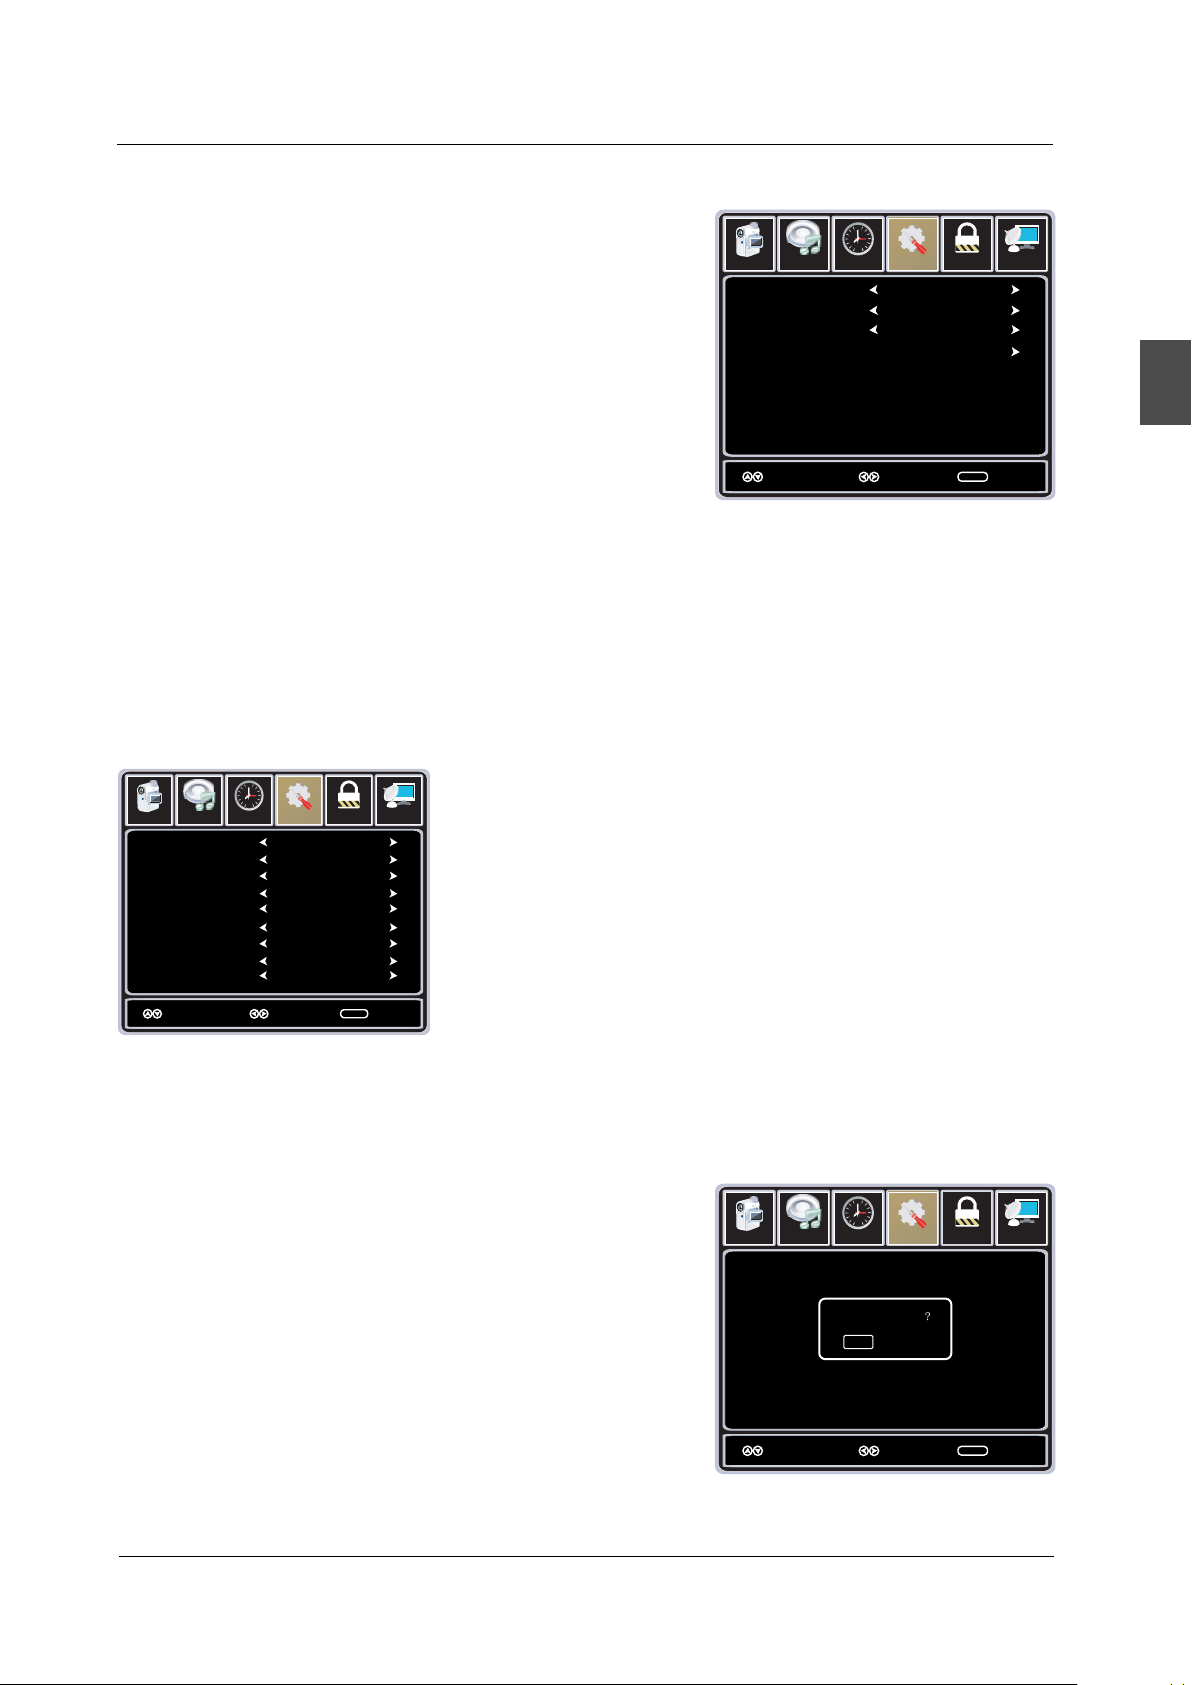
Close Caption
Use Down button to highlight the Close Caption item, then
press RIGHT button to enter into the following menu.
CC Mode
Pic ture
Audio
CC Mo de
Selection
Basic
Advanced Selection
Option
12
6
Time Ch annel
Allows you to select the CC Mode among: On, Off
and CC on Mute.
Basic Selection
Allows you to select the basic selection among:
Move
Select
CC1, CC2,CC3, CC4, Text1, Text2, Text3 and Text4.
Advanced Selection
Allows you to select the advanced selection among:
Service1, Service2, Service3, Service4, Service 5 and, Service 6.
Option
Use Down button to highlight the “Option”item, then press RIGHT button to enter into the
following menu.
12
6
Setu p
Pict ure
Audio
Mod e
Fon t S tyle
Fon t Si ze
Fon t Ed ge S tyle
Fon t E dge Col or
FG Co lor
BG Co lor
FG Op acity
BG Opacit y
Time C hanne l
Lock
Custo m
Defau lt
Defau lt
Defau lt
Defau lt
Defau lt
Defau lt
Defau lt
Defau lt
Setu p
Service 1
On
CC 1
Loc k
MENU
English
Exit
MENU
Move
Select
Exit
Use UP and DOWN buttons to highlight the desired item, and use LEFT and RIGHT buttons
to select.
DLC
Dynamic luminance control ON or OFF .
Pictu re Audio
12
6
Setu p
e
miT
Restore Default
Restores all settings to factory settings.
Ar e y ou su re
No
Yes
Move
Select
MENU
Chan nel
kcoL
Exit
21
Page 24
ME NU OPER ATI ON
Select TV source for example.
LOCK MenuLOCK Menu
English
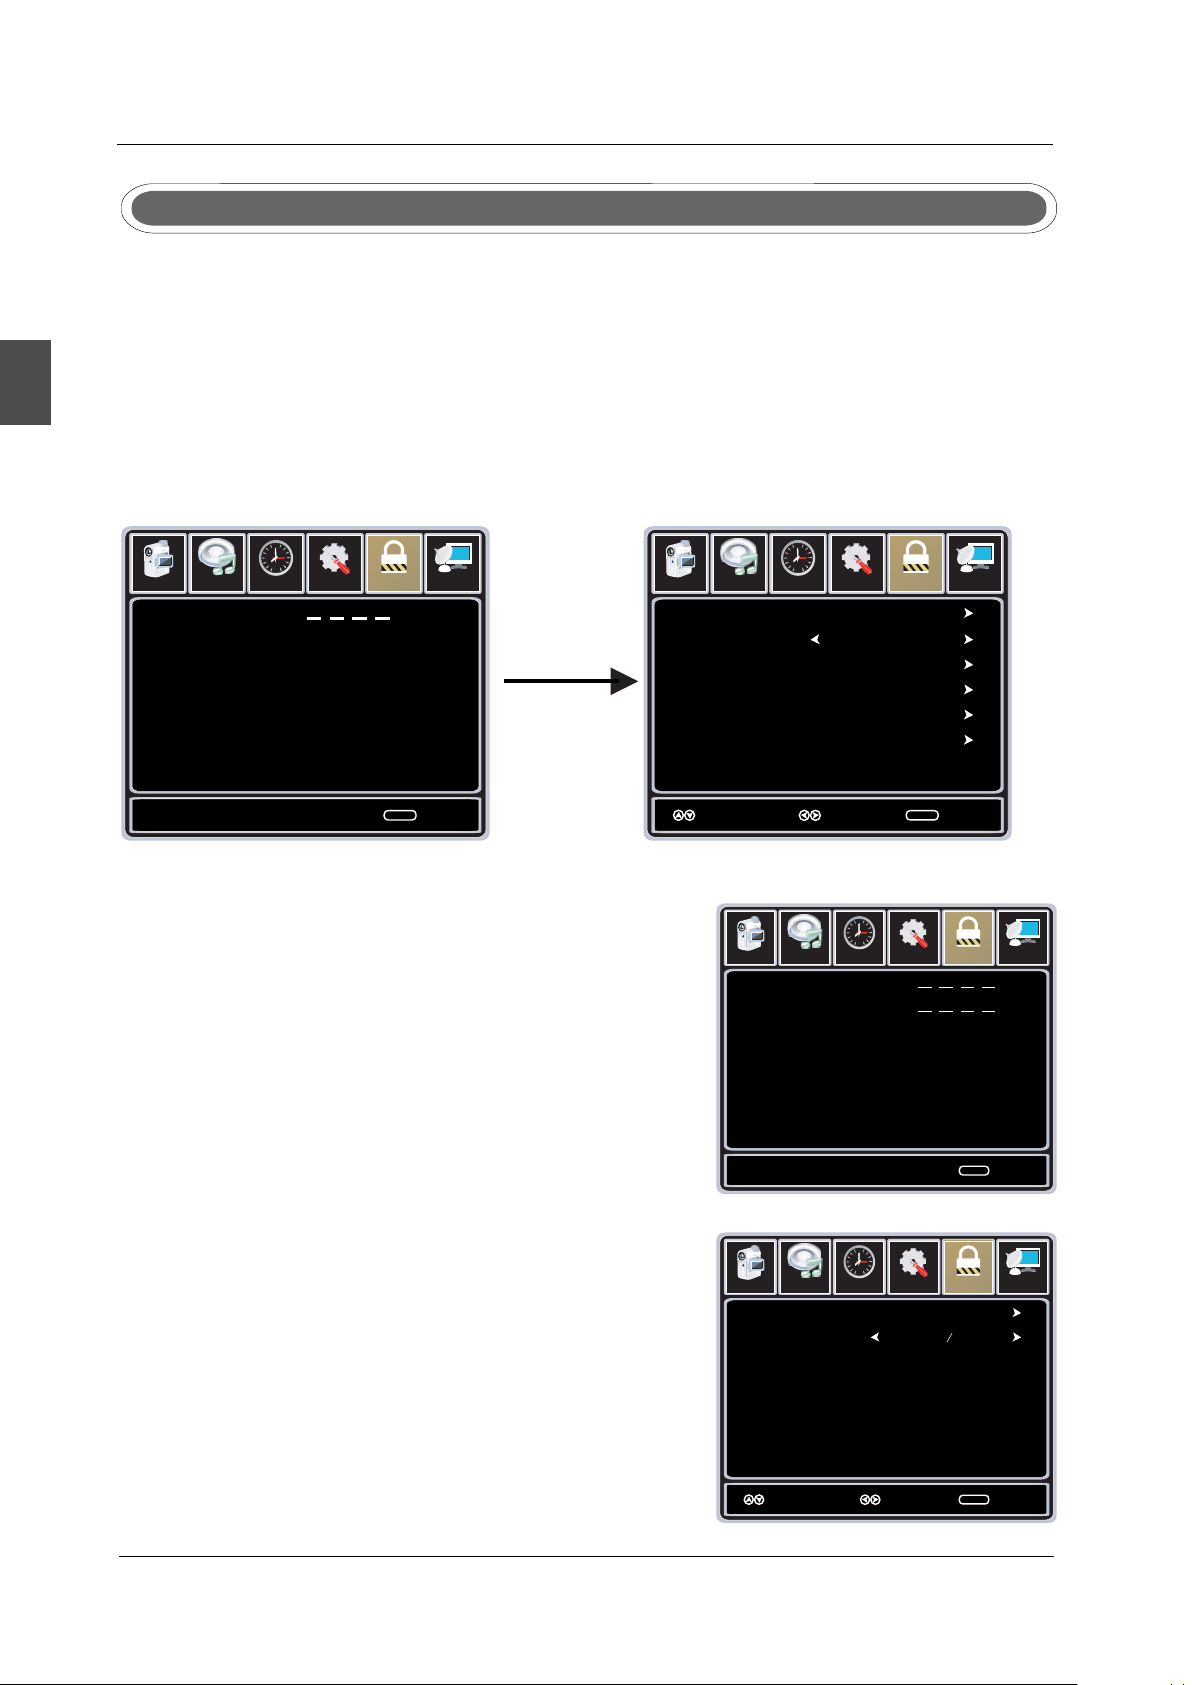
1. Press the MENU button on the remote control to display the Main menu, and use the LEFT and
RIGHT buttons to select the LOCK
2. Use the DOWN button to highlight the “Enter Password”item, use the numeric keys to input
4-digital password, then the screen will display the junior menu. After settings, press menu button
to exit.
NOTE: The factory password is 0000.
12
6
Picture Audio
Enter Password
Time
Setup
Lock
Channel
input
4-digital password
0~9
MEN U
Exi t
The LOCK menu includes the following options :
Change Password
Use DOWN button to select the “Change Password” item,
Picture Audio
Change Password
System Lock
US
Canada
RRT Setting
Reset RRT
Select Move Exit
12
6
Time
Picturei Audio
Enter New Password
Confirm Password
Setup
Time
Lock
Channel
On
MEN U
12
6
Setup
Lock
Channel
then press RIGHT button to enter into the following menu.
Input the new 4-digital password and input it again to
confirm.
System Lock
Allows you to turn on or off the system lock.
If you turn off the system lock, then the following items
(US, Canada, RRT Setting and Reset RRT) will unable to
use.
US
Use Down button to highlight the “US”item, then press
RIGHT button to enter into the following menu.
22
0~9
12
6
Setu p
e
Pic ture Audio
TV
MPAA
Mov e Exi t
Tim
N A
Selec t
Loc k
MENU
MENU
Exit
Cha nnel
Page 25
ME NU OPER ATI ON
TV
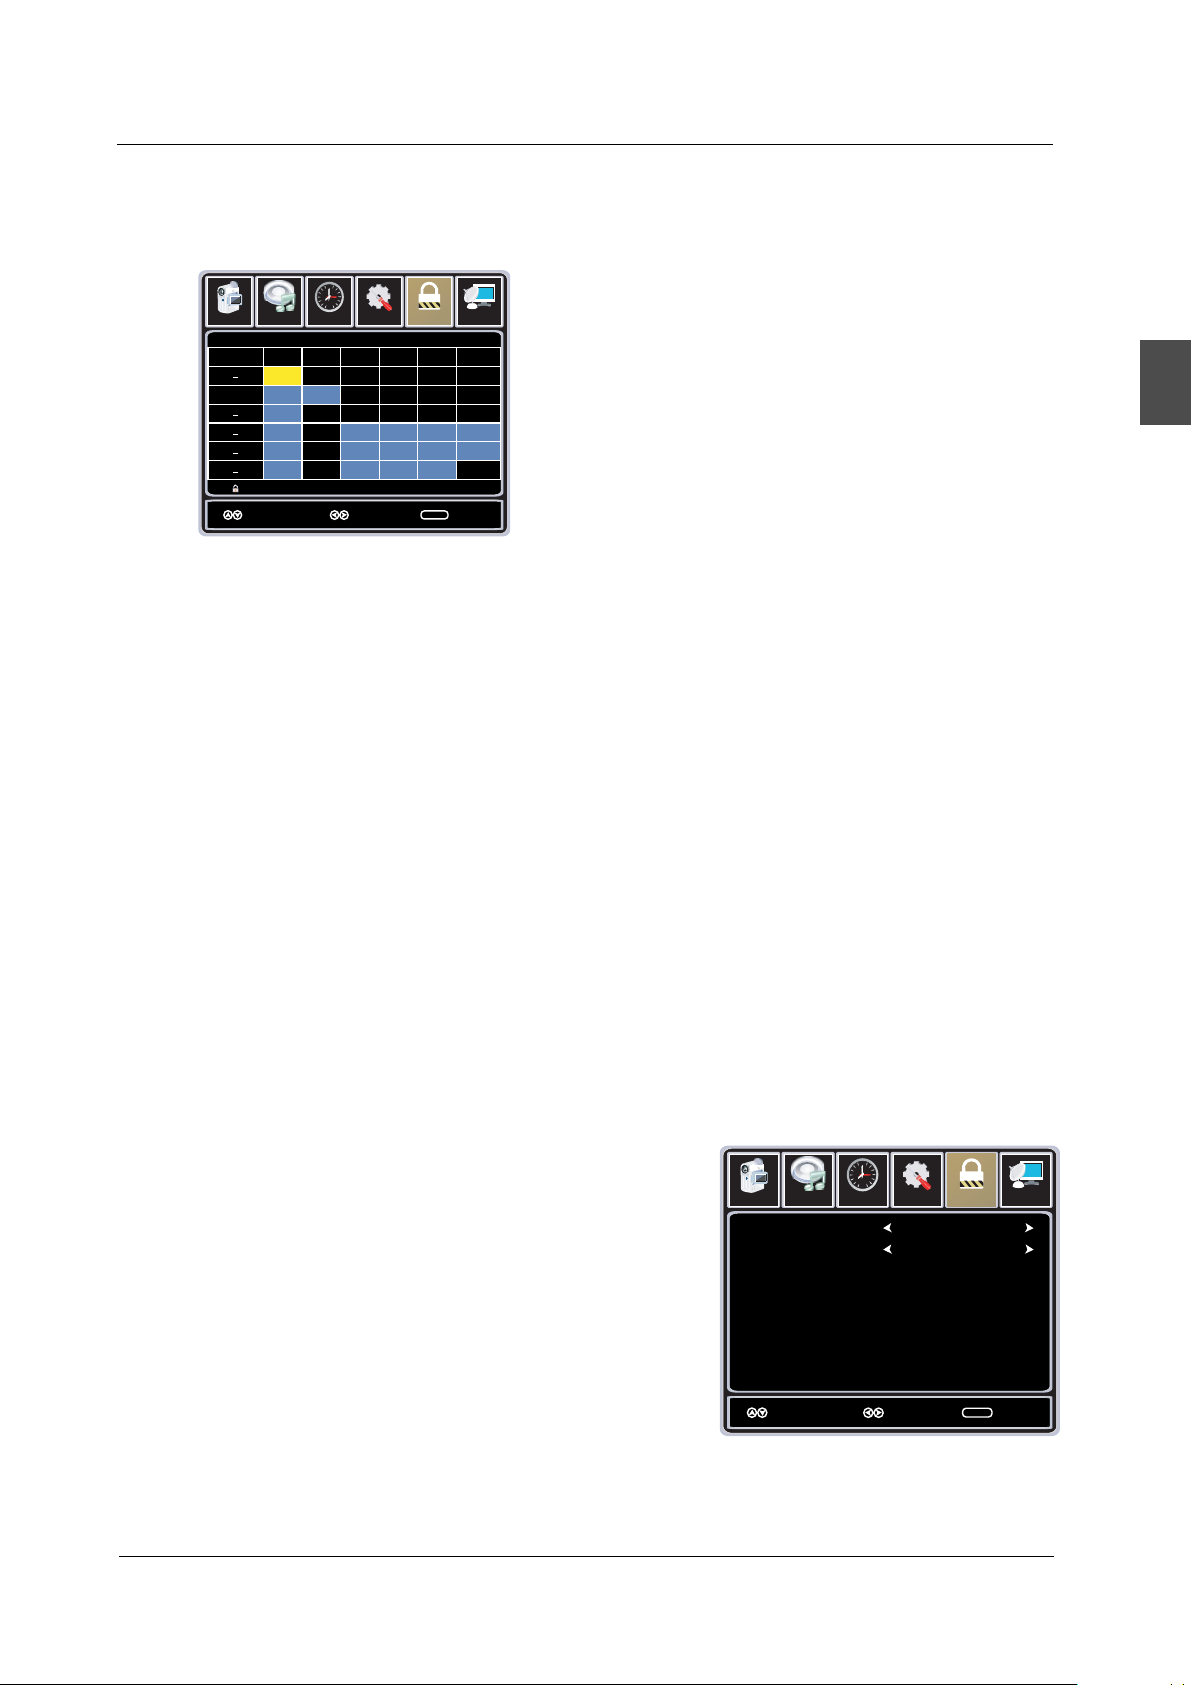
Use Down button to highlight the “TV”item, then press RIGHT button to enter into the following menu.
12
6
Setu p
Pictur e Audio
ALL FV V S L D
TV Y
TV Y7
TV G
TV PG
TV 14
TV MA
Bloc k
Select
e
Tim
TV RATI NG
Press OK to Lock or Unlock
Move Exit
Use UP and DOWN buttons to select the desired rating and press RIGHT button to block or unblock rating.
MPAA
The Movie rating (MPAA) is used for original movies rated by the Motion Picture Association of America
Lock
Chann el
MENU
English
(MPAA) as broadcasted on cable TV and not edited for television.
Use UP or DOWN button to select N/A, G, PG, PG-13, R, NC-17 or X.
RATING DESCRIPTION
G General Audiences. Movie is appropriate for all ages.
PG Parental Guidance Suggested. May contain material not suited for
younger viewers.
PG-13 Contains content that may not be appropriate for viewers under the
age of 13.
R Restricted. Contains adult content, no one under 17 admitted without
parent.
NC-17 No one 17 and under admitted.
X Adults only.
Canada
Use Down button to highlight the “Canada” item, then press
RIGHT button to enter into the following menu.
Canada Eng
Use LEFT and RIGHT buttons to select among: E,
C, C8+, G, PG, 14+ and 18+
Canada Fre
Use LEFT and RIGHT buttons to select among: E,
G, 8ans+,13ans+, 16ans+ and 18ans+
RRT Setting
Rating Region Table seting.
Reset RRT
Allows you to reset the RRT setting.
Pic ture Audio
Ca nada English
French
Ca nada
Select
12
6
Set up
e
Tim
Move Exit
Cha nnel
Loc k
E
E
MENU
23
Page 26
ME NU OPER ATI ON
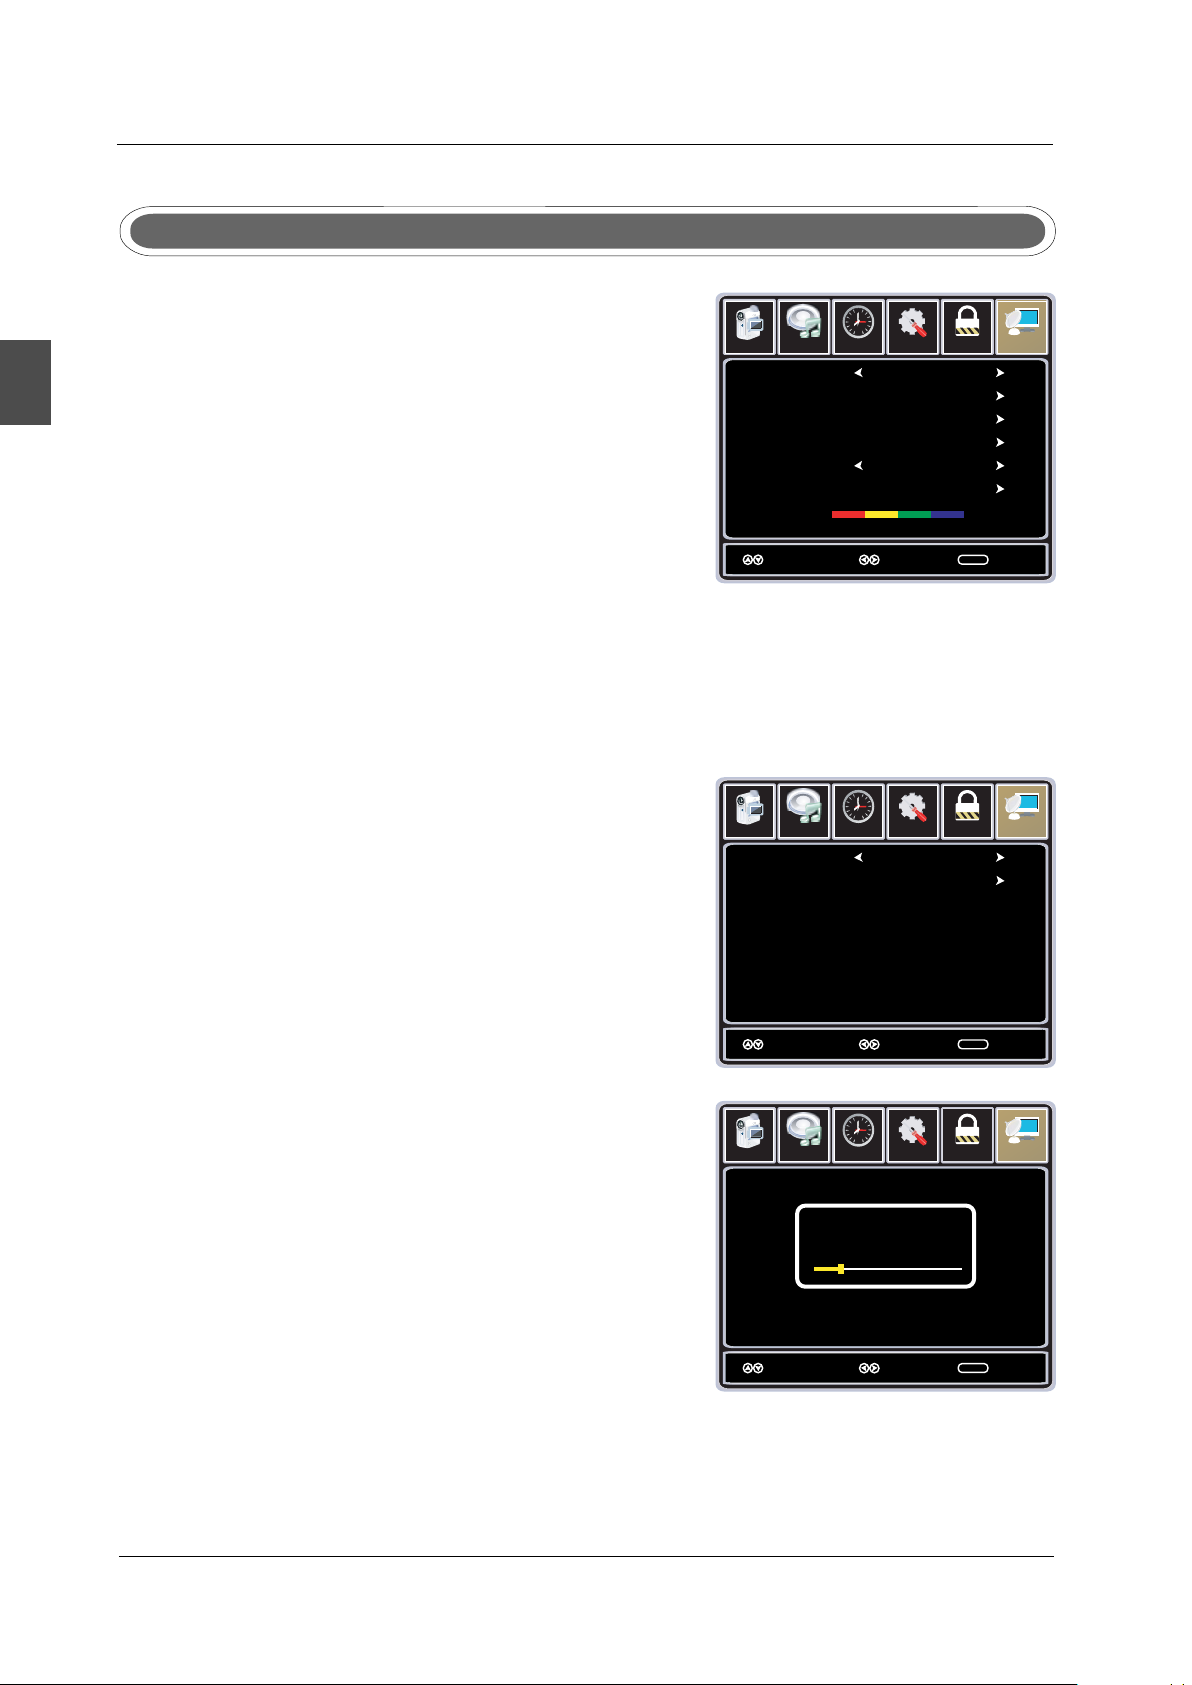
CHANNEL MenuCHANNEL Menu
Select TV source.
English
1. Press the MENU button on the remote control to display
the Main menu, and use the LEFT and RIGHT buttons to
select the CHANNEL.
2. Use the UP and DOWN buttons to highlight an individual
CHANNEL option, use the LEFT and RIGHT buttons to
change the setting, and press the MENU button to exit.
Picture Audio
Air/Cable
Auto Scan
Favorite
Show/Hide
Channel No.
Channel Label
TV Signal
Select Move Exit
Time
12
6
Setup
Lock
Channel
Air
50-3
KOCE-Lb
Go od
MENU
The CHANNEL menu includes the following options :
Air/Cable
Allows you to select antenna between Air and Cable.
12
6
Time
Setup
Auto
Lock
Channel
Use Down button to highlight the “Auto Scan” item, then
press RIGHT button to enter into the following menu.
Picture Audio
Cable System
Start to Scan
Select Move Exit
If you select “Air”as input signal in Antenna item, you can
press RIGHT button to search the channels automatically.
The receivable channels will be stored automatically.
Picture Audio
RF CH:
Found :
12
6
Setup
When searching channels, press MENU to stop.
If you select “Cable”as input signal in Antenna item, allows
you to select Cable System among: Auto, STD, IRC and HRC.
Select
Move Exit
Use DOWN button to highlight the “Start to Scan”, then press
RIGHT button to search the channels automatically.The receivable channels will be stored
automatically. When searching channels, press MENU to stop.
24
MENU
Channel
LockTime
7
4
MENU
Page 27
ME NU OPER ATI ON
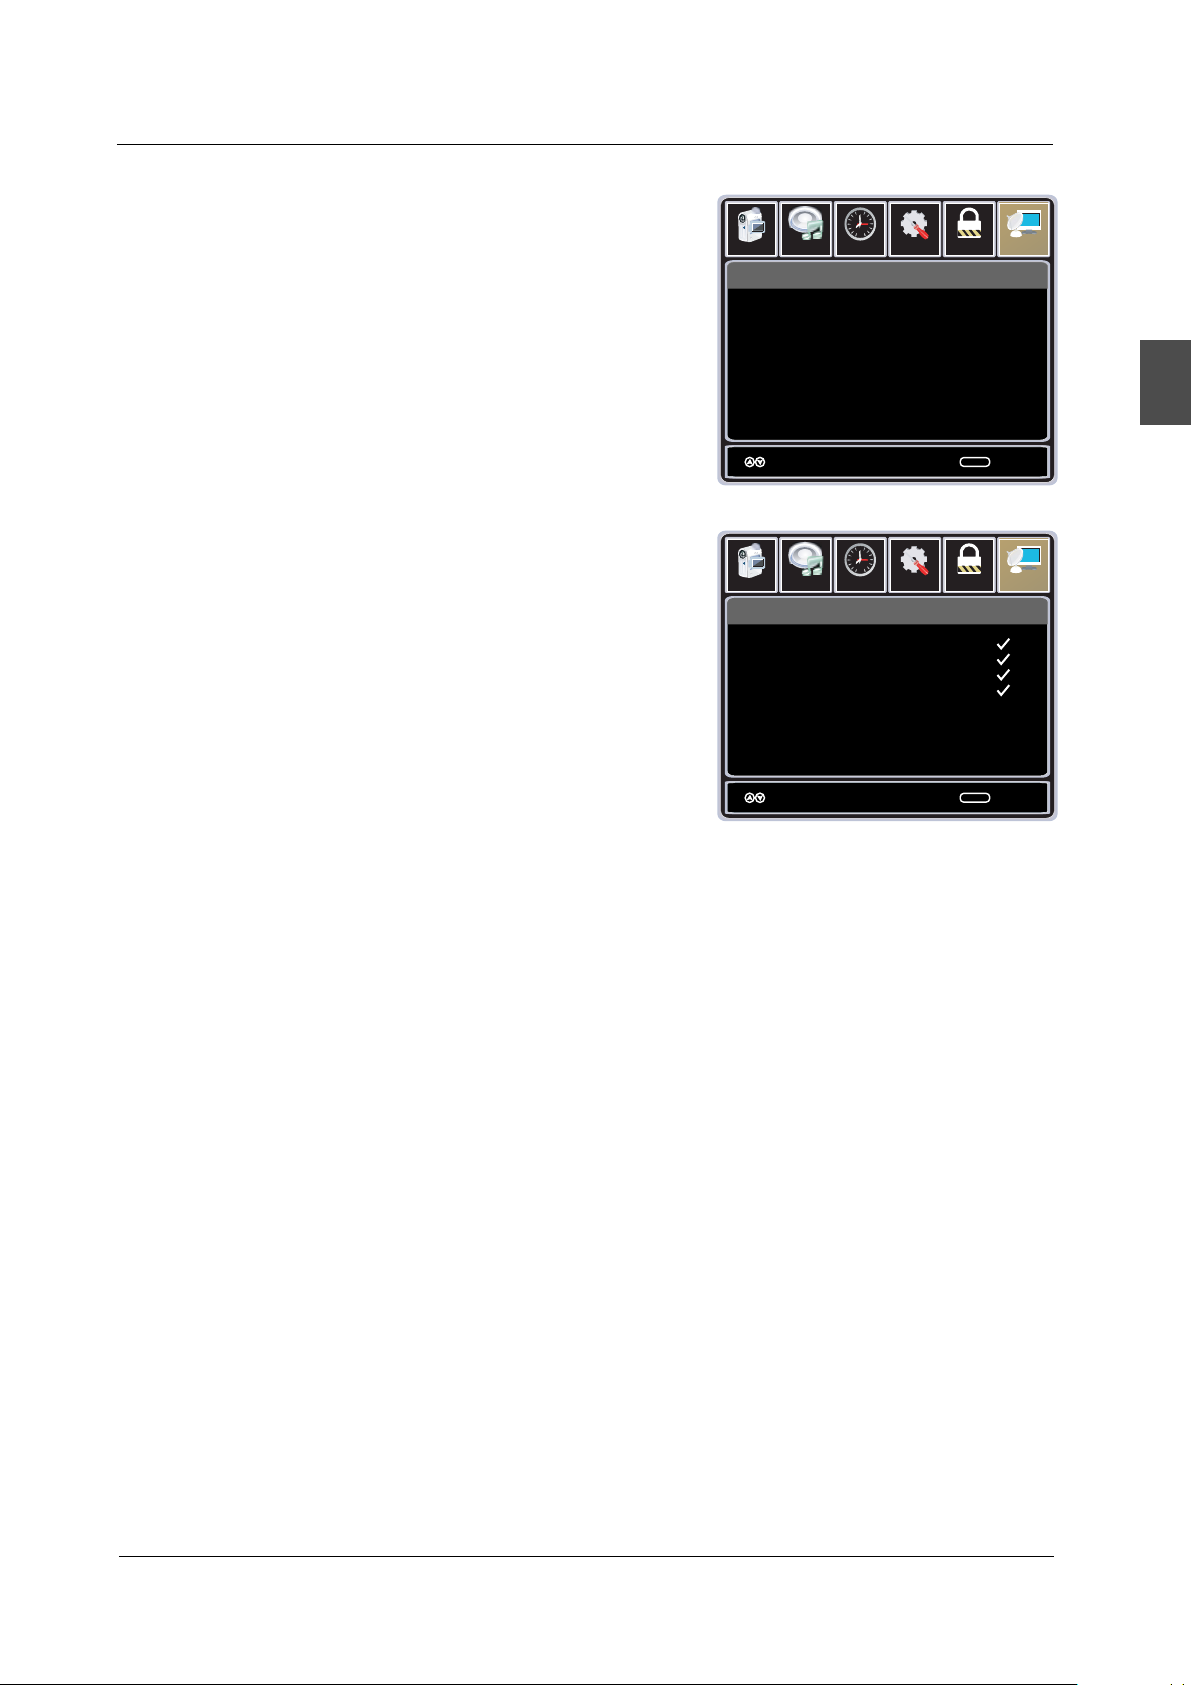
Favorite
Allows you to add these channels which you desired as the
favorite channels.
Use UP or DOWN button to highlight the “Favorite”item,
then press RIGHT button to enter into the following menu.
Use UP and DOWN button to highlight the desired item,
then press OK button to add or remove the highlighted
channel as favorite.
Show / Hide
Allows you to show or hide the channels.
Use UP or DOWN button to highlight the “Show / Hide” item,
then press RIGHT button to enter into the following menu.
Use UP and DOWN button to highlight the desired item,
then press OK button to show or hide the highlighted
channel.
12
6
Picture Audio
Channel
4-0
8-0
11-0
14-0
Select Exit
Pic ture Audio
Channel
4-0
8-0
11-0
14-0
Channel Name
Press ‘OK’ change
Channel Name
Time
MBC DTV
12
6
e
Tim
MBC DTV
Setup
Setup
Lock
Lock
Channel
Favorite
English
MENU
Channel
Show
Channel No.
Display the number of current channel.
Channel Label
Display the lable of current channel.
TV Signal
Display the quality of current TV signal.
Select Exi t
Press ‘OK’ change
MENU
25
Page 28
TR OUBLE SHOOT ING
10. Troubleshooting
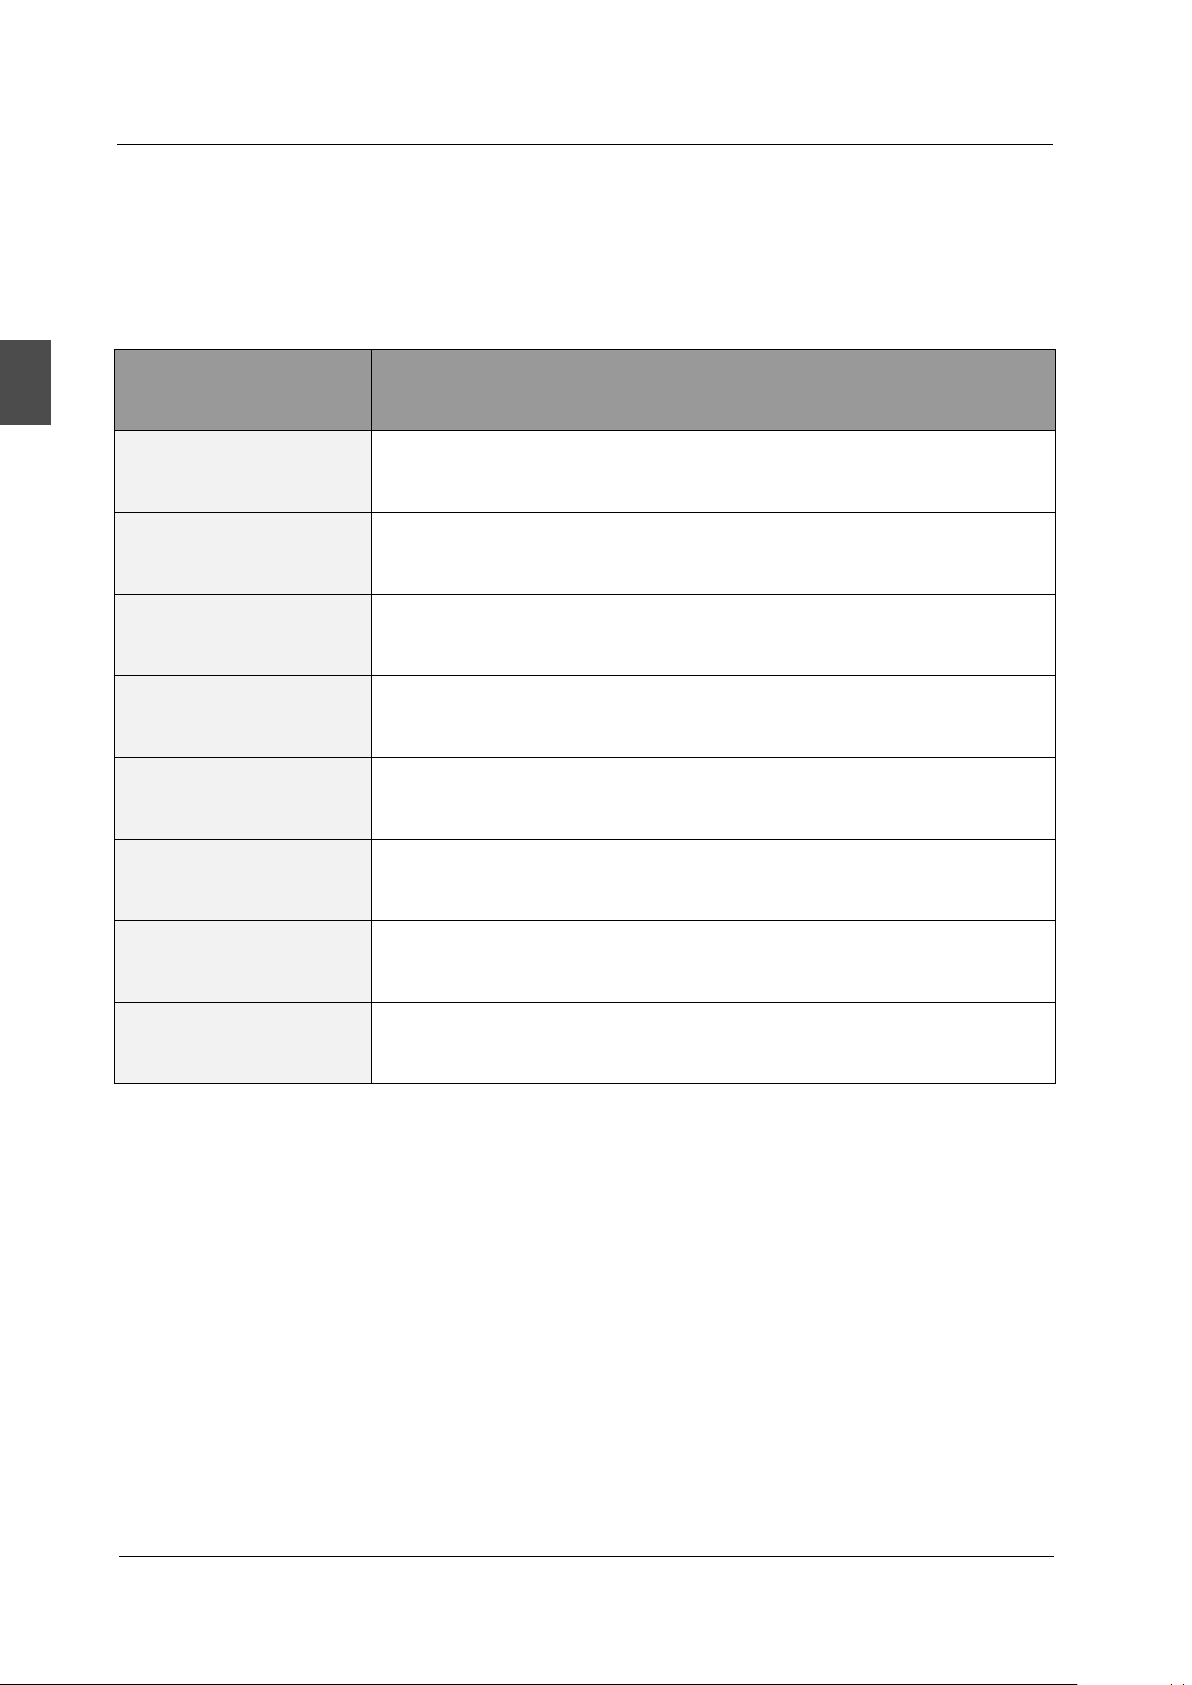
Please check if you can solve problems by troubleshoot in g yo ur se lf .
English
Troubleshooting
No signal
No color shades
Stain on the
screen
Double or multiple
display image
Snow on the screen
The remote control
does not work
"Zip" made noise on
TV cover
Control
Please check that all cables are correctly plugged i n.
Adjust the contrast, the color and the brightness.
May be the result from a lighting signal from car, motor, neon lig ht
and other electrical devices or appliances .
May be the result of an electrical wave disturb from other TV,
Computer and Game machine or Radio.
The cables of the antenna are not correctly plugged in.
Please check the batteries order and alignment. Chec k th at t he I R
of the remote control is not hidden by something.
Even if the display image is correct, the noise may come from an
unsteady fixation of the panel.
26
No sound
Make sure that you have not press the MUTE button of the panel
or of the remote control.
Page 29
SP ECIFI CATIONS
11. SPECIFICATIONS
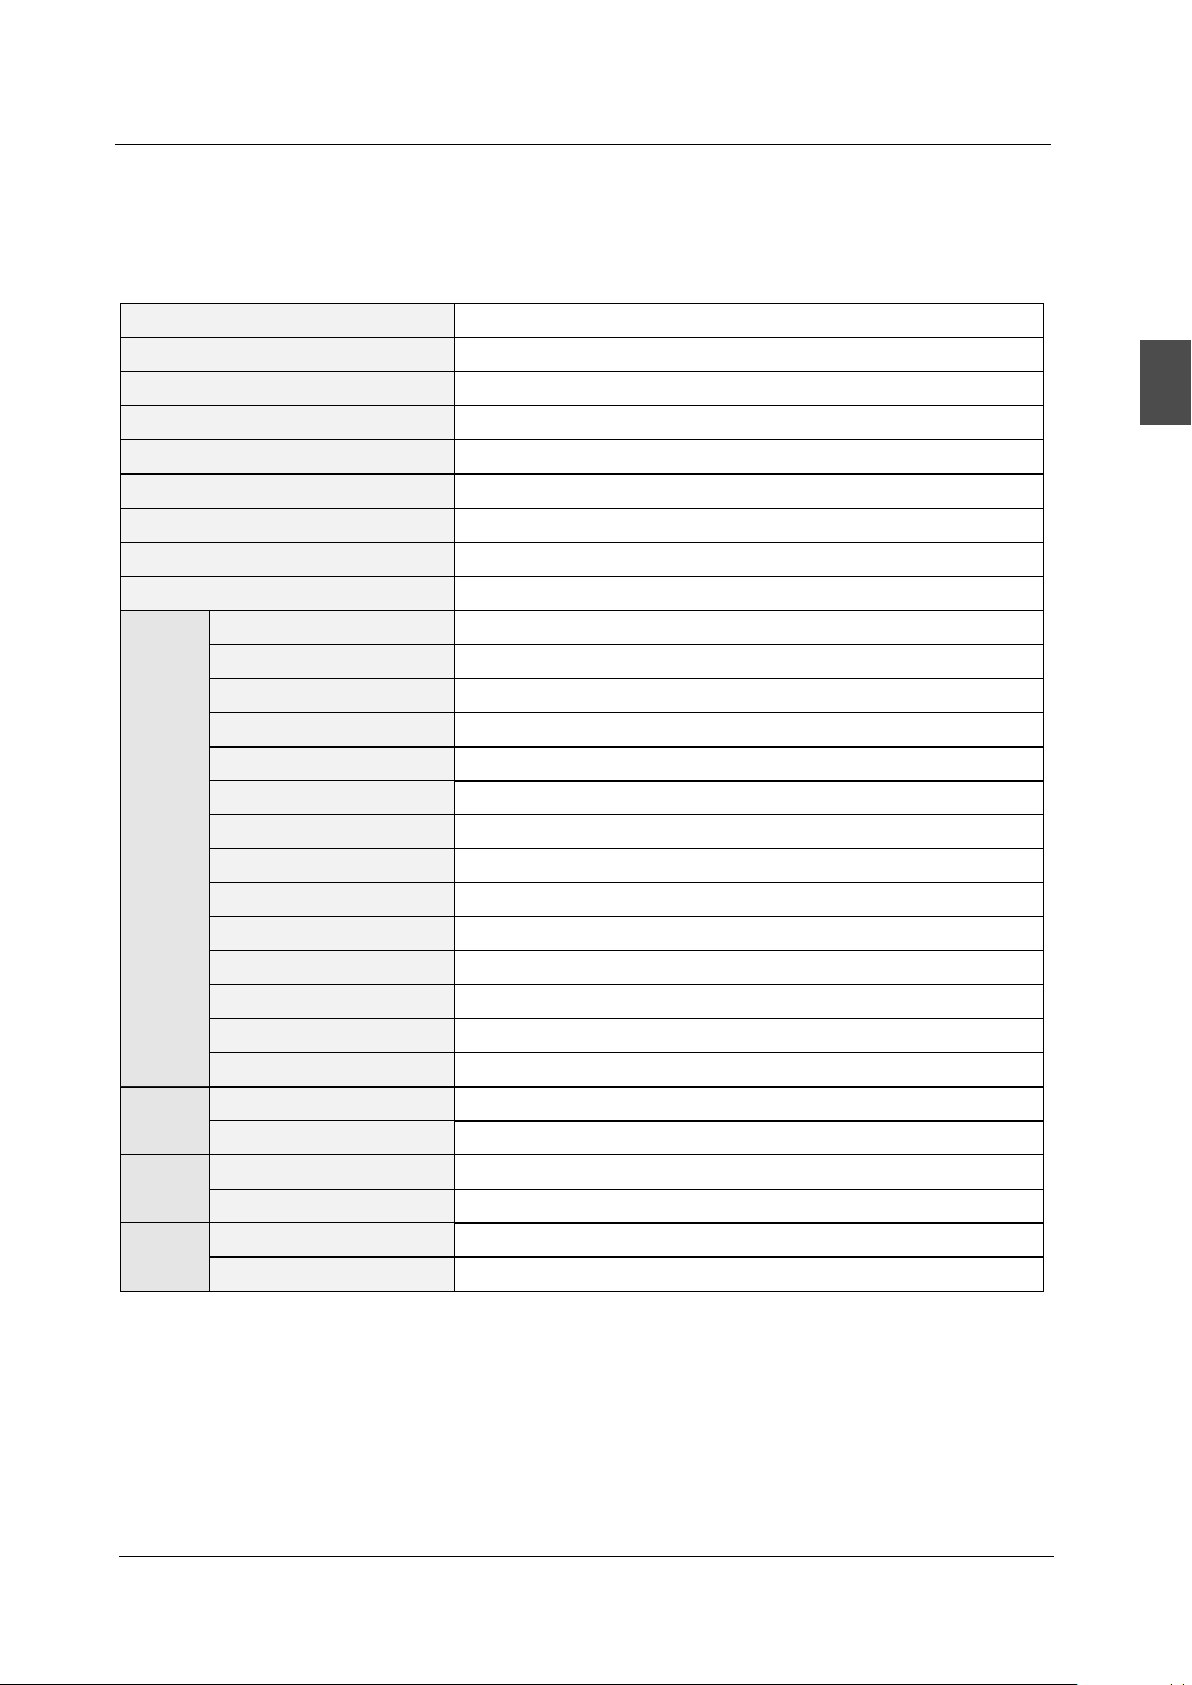
This manua l is only for your refere nce , any c han ge to t he de sig n and spec ificatio n wil l not be
advis ed.
Power Consumption
Audio Output Power
SUPPORT
DVD
Dimensions
Weight
Screen Size
Display Type
Resolution(Pixel)
Aspect Ratio
Power Supply
TV System
Video Input Format
ANTENNA
AV-IN
YPbPr - IN
HDMI - IN
VGA(PC) - IN
VGA(PC) AUDIO - IN
SCART - IN
SCART - OUT
HEADPHONE - OUT
S-VIDEO - IN
COAXIAL - OUT
COMMON INTERFACE
USB
IPOD
Disc Physical Format
DVD Video Output Format
Inc Stand (LxWxHmm)
Exc Sand (LxWxHmm)
Net (Kgs)
Gross (Kgs)
31.5 Inch
English
TFT LCD
1366 X 768
16:9
AC110-240V 50/60Hz
140W
ATSC/NTSC
PAL/NTSC
L / R 2X8W
YES
YES
YES
YES
YES
YES
--
--
YES
--
--
--
Service Port Only
--
--
--
782x232x555mm
782x109x502mm
9. 3
12
27
Page 30

 Loading...