

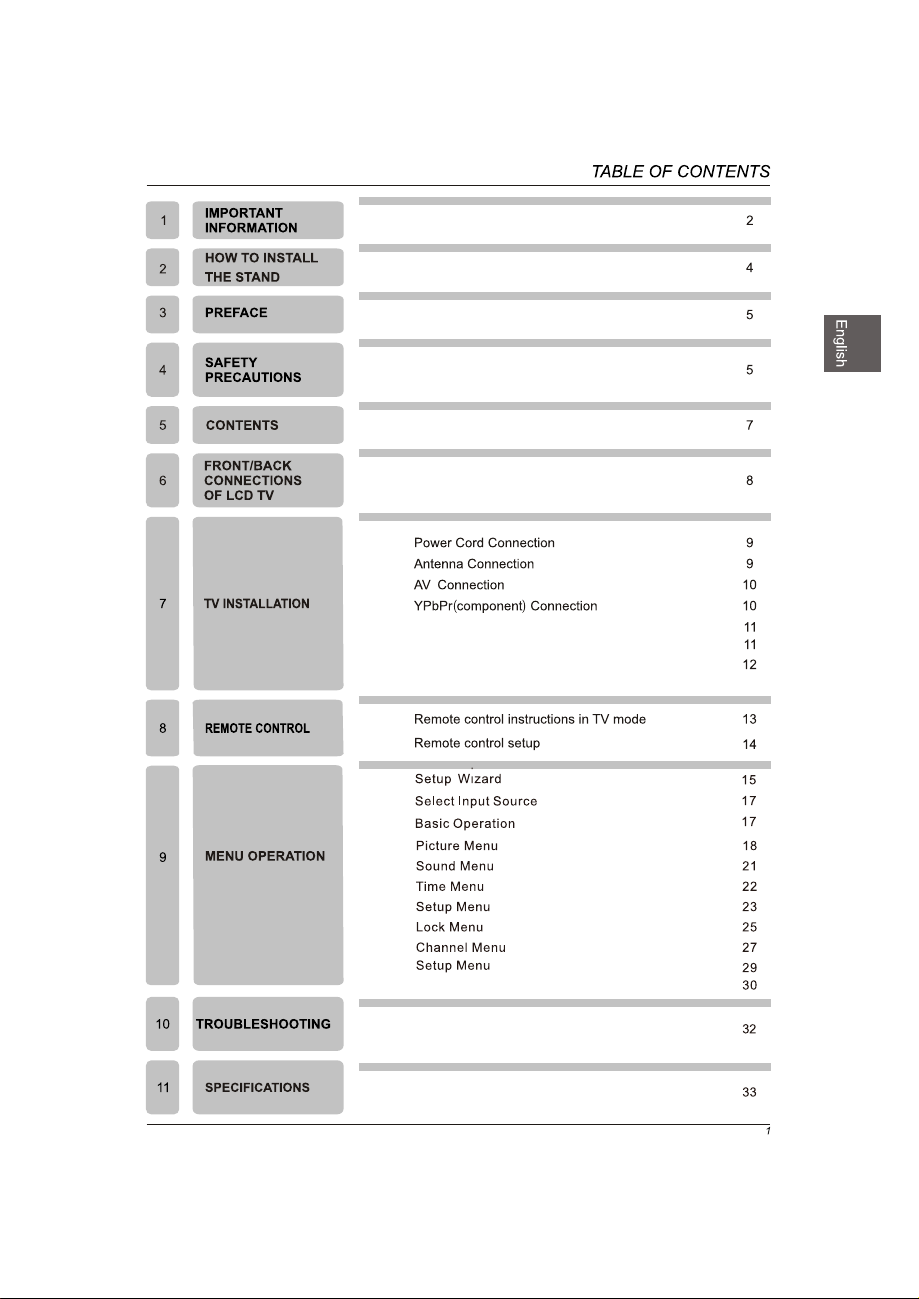
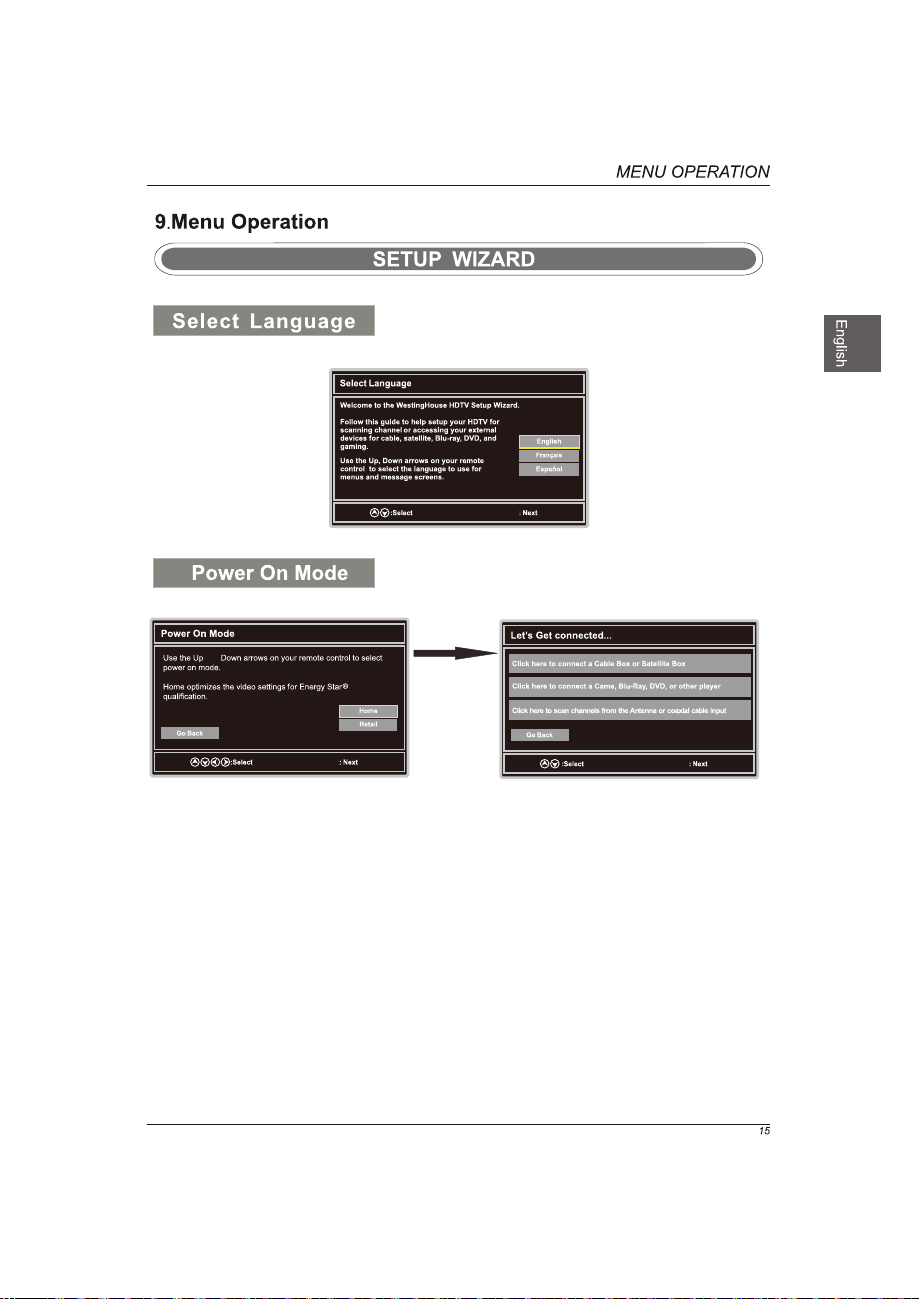
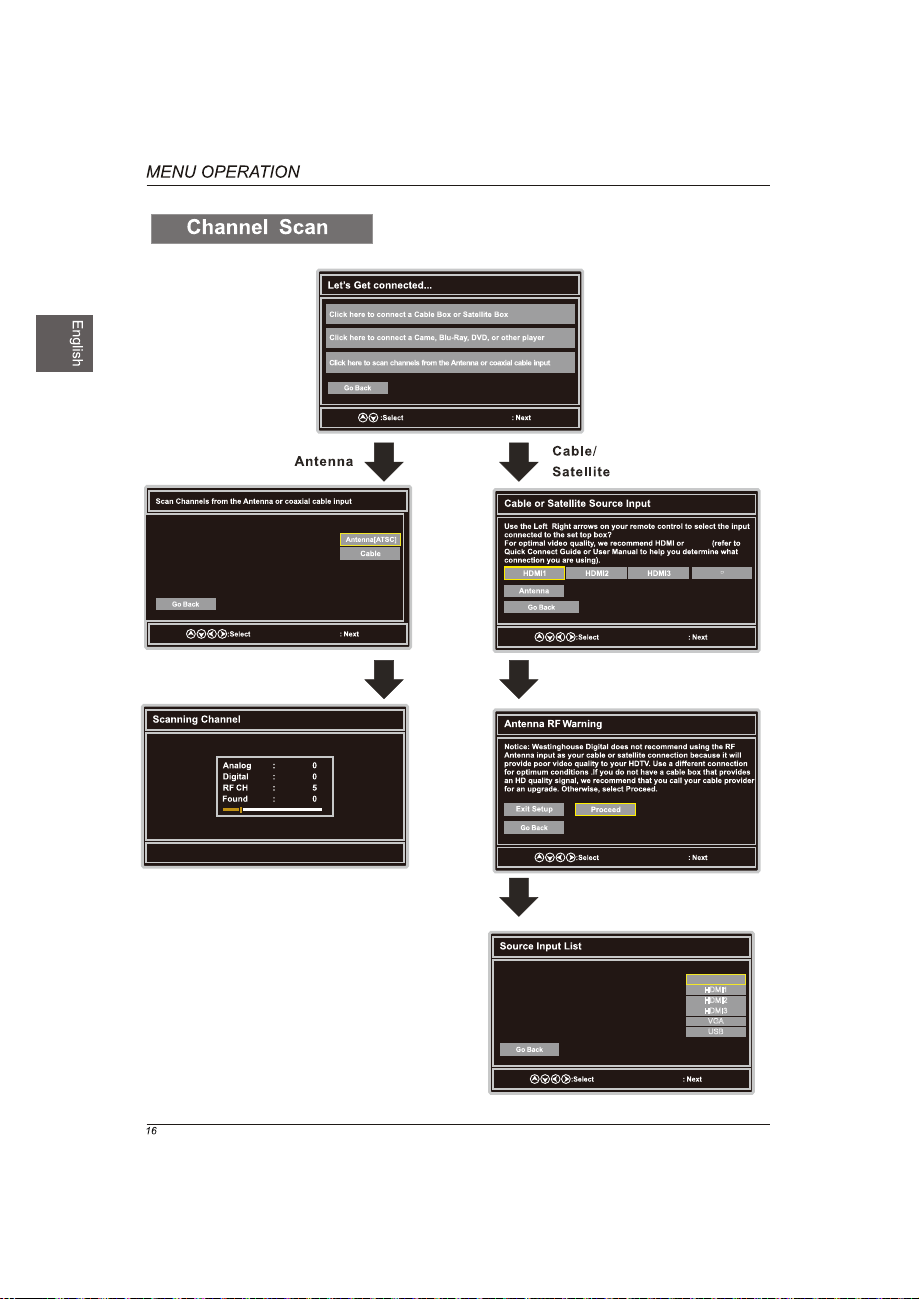
Page 1
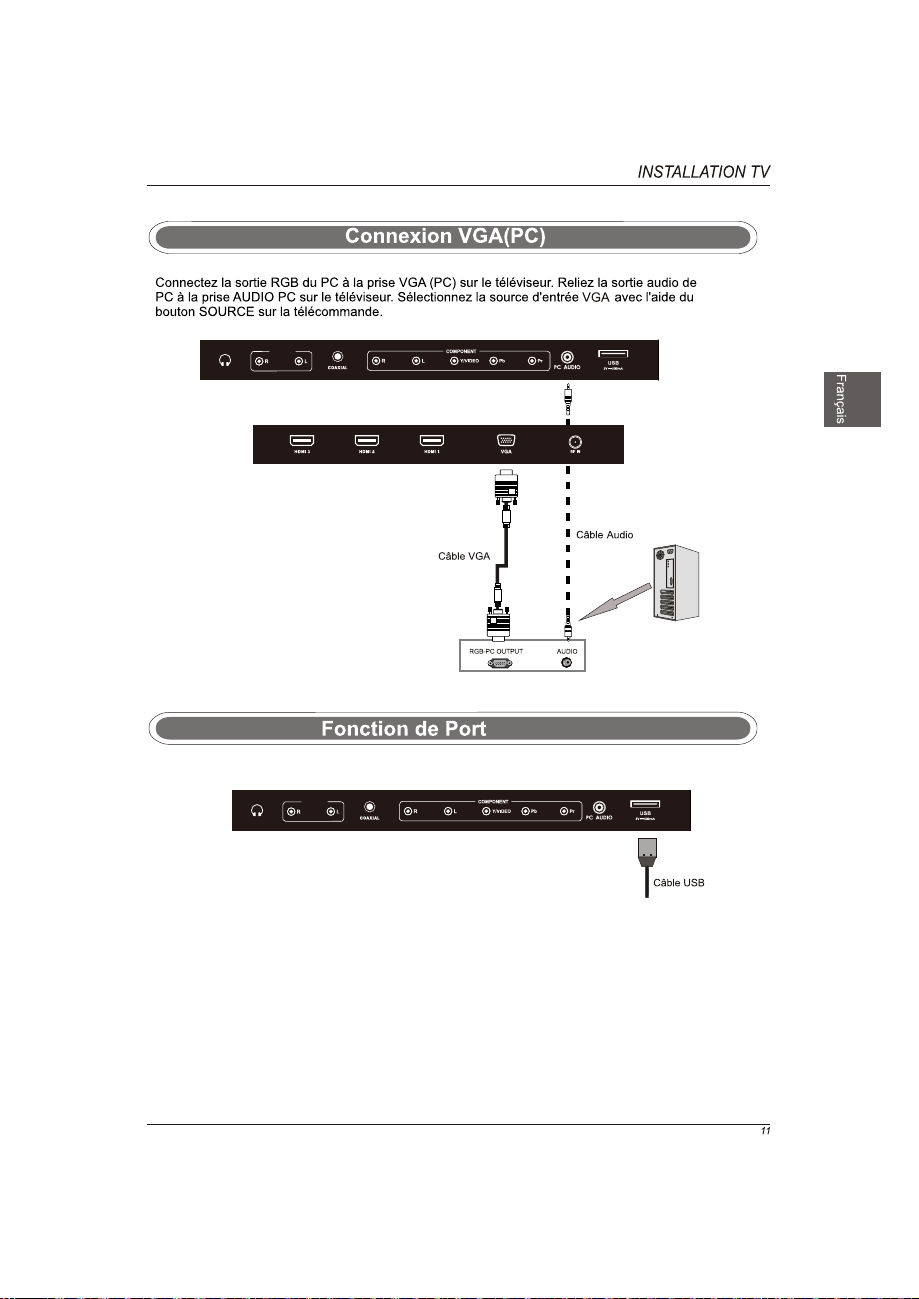
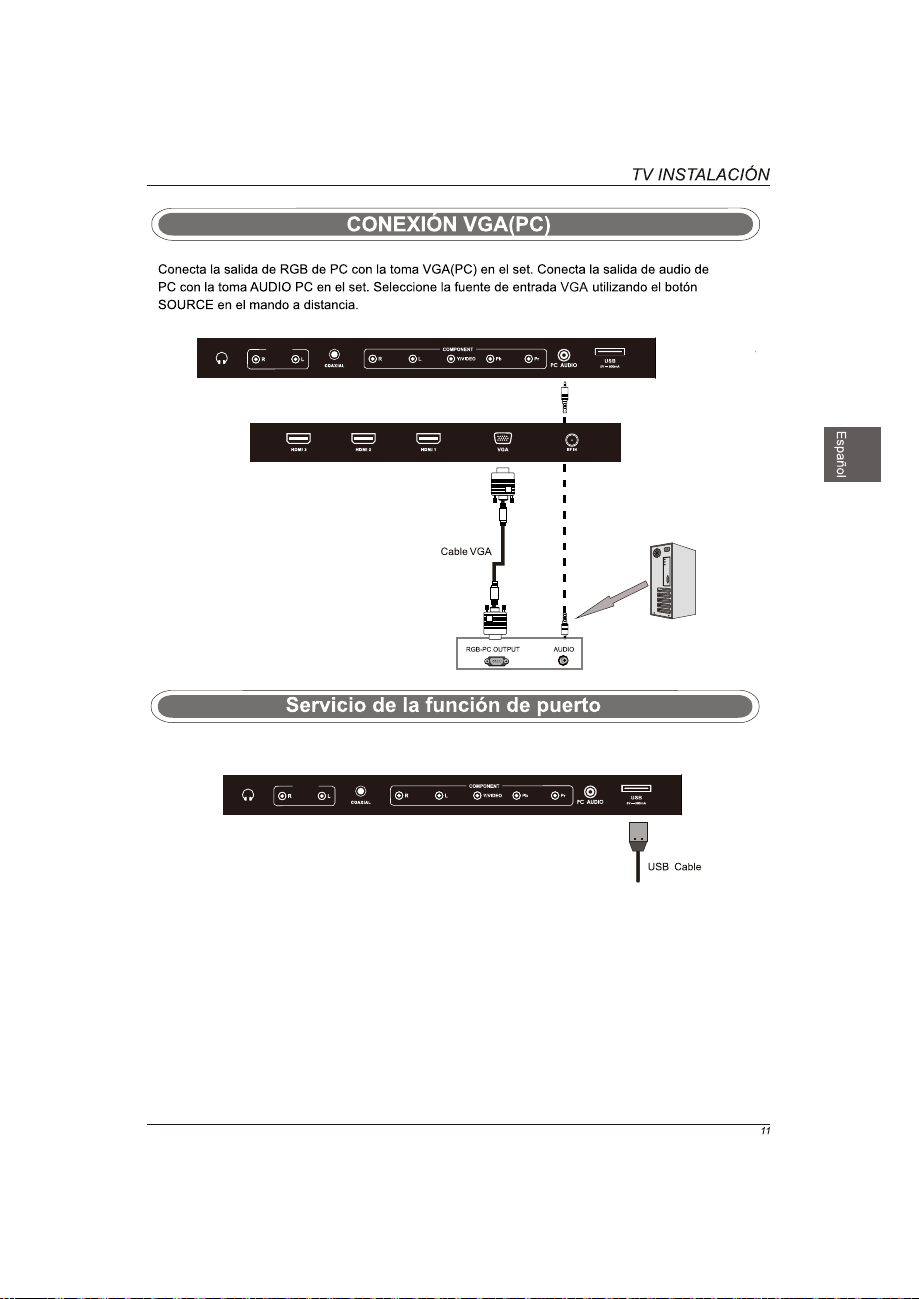
VGA(PC)Connection
USB Port Function
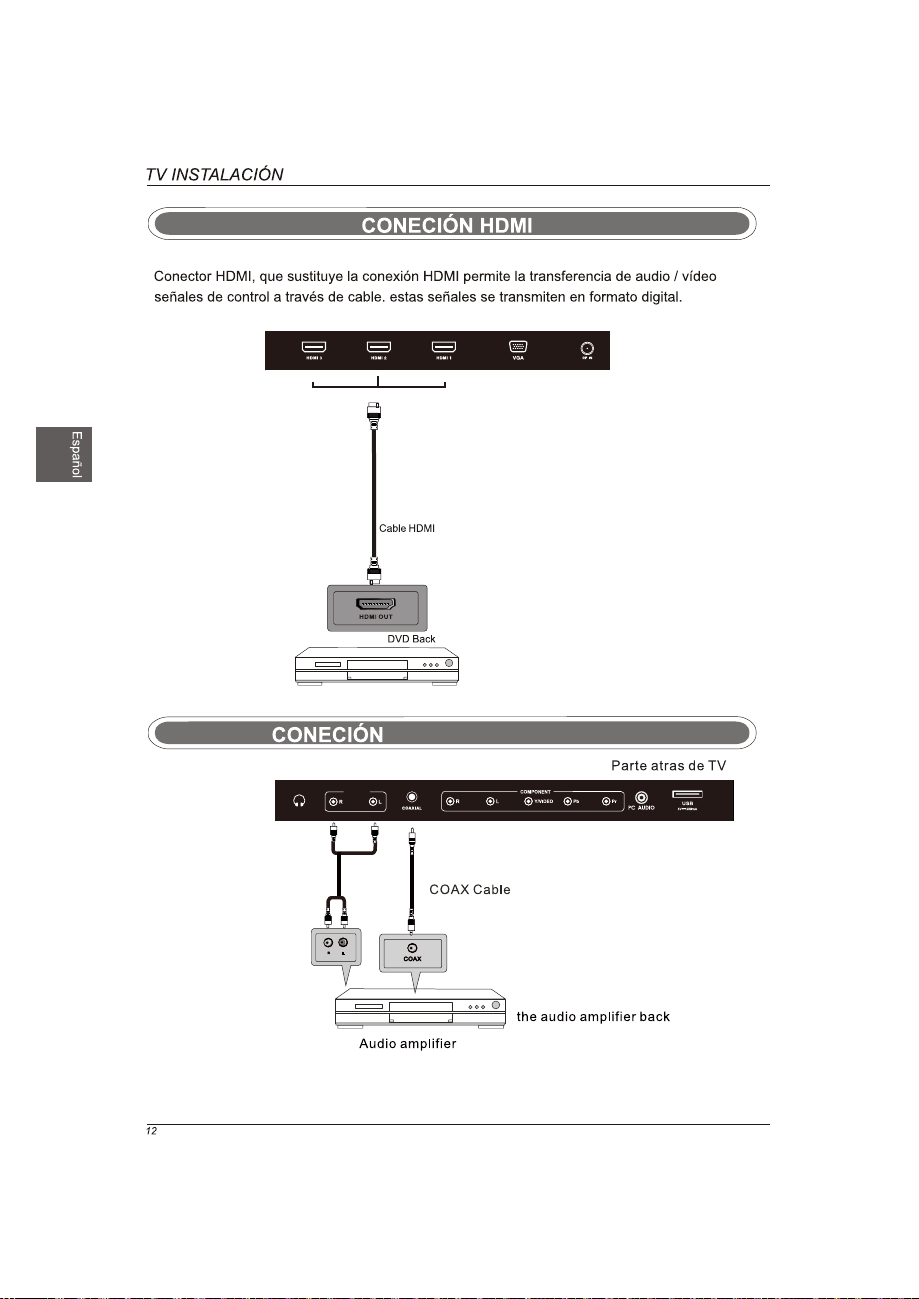
HDMI&Coaxial&Auido out Connection
USB Menu
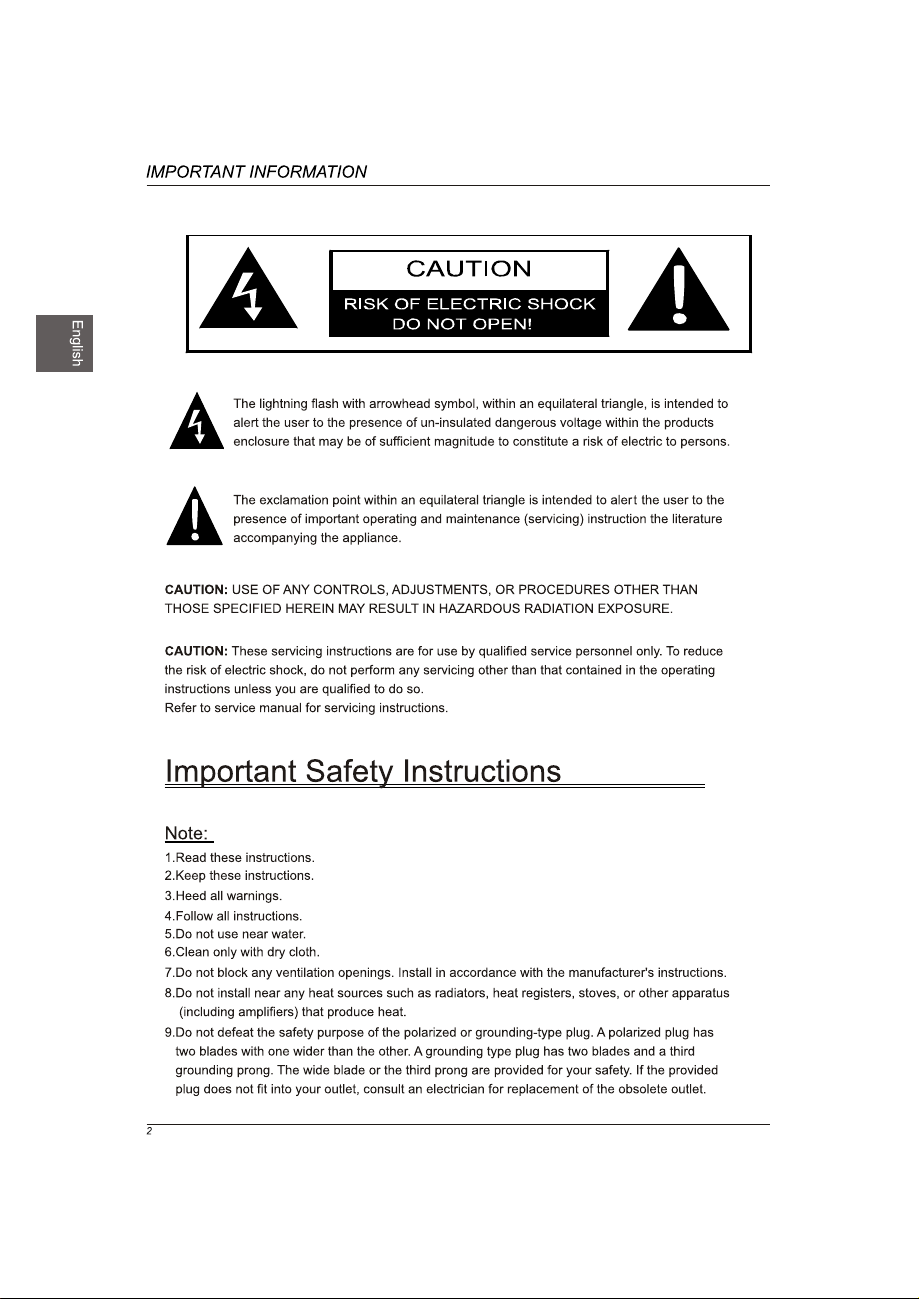
Page 2
Page 3
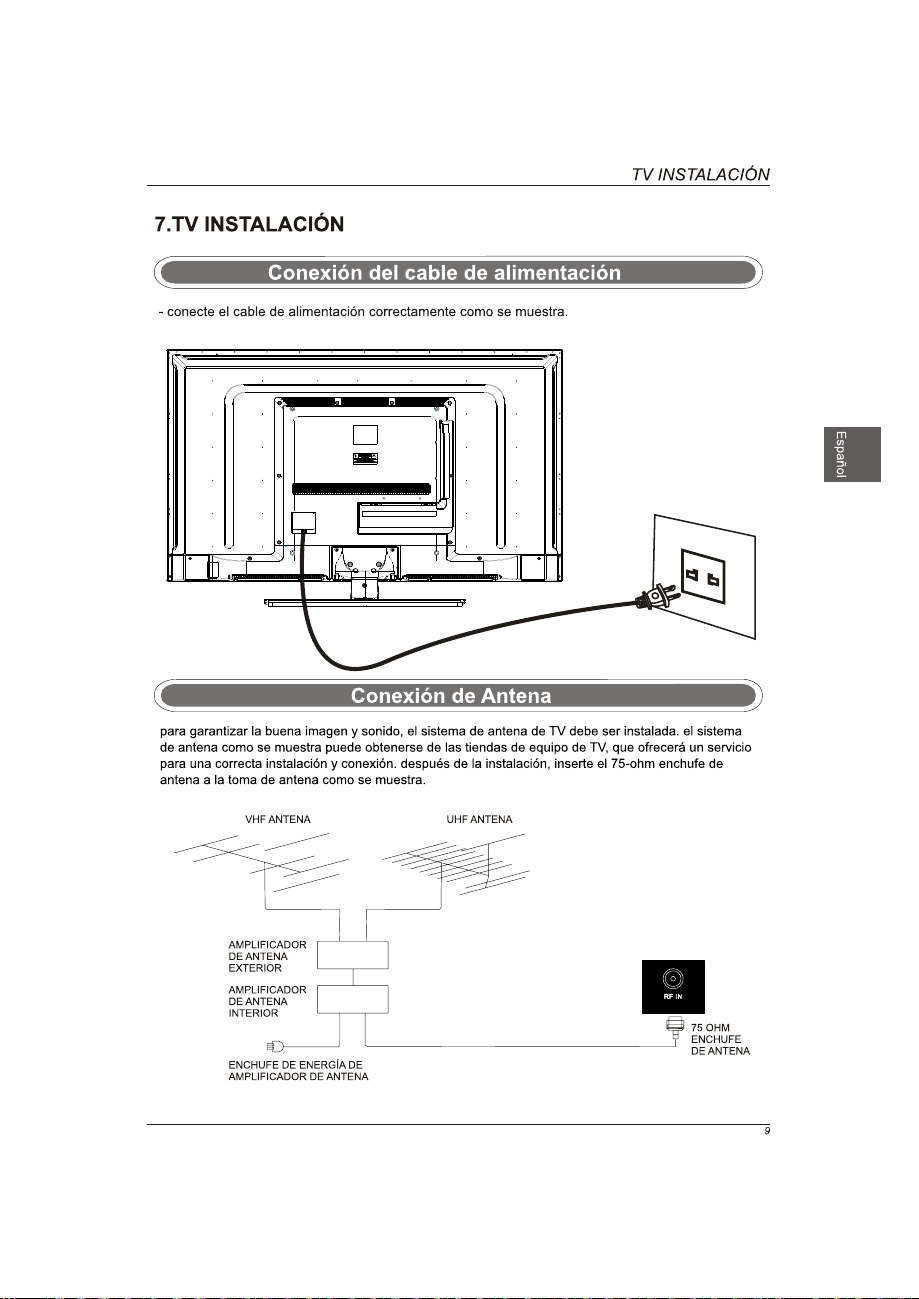
0.5
75
Page 4
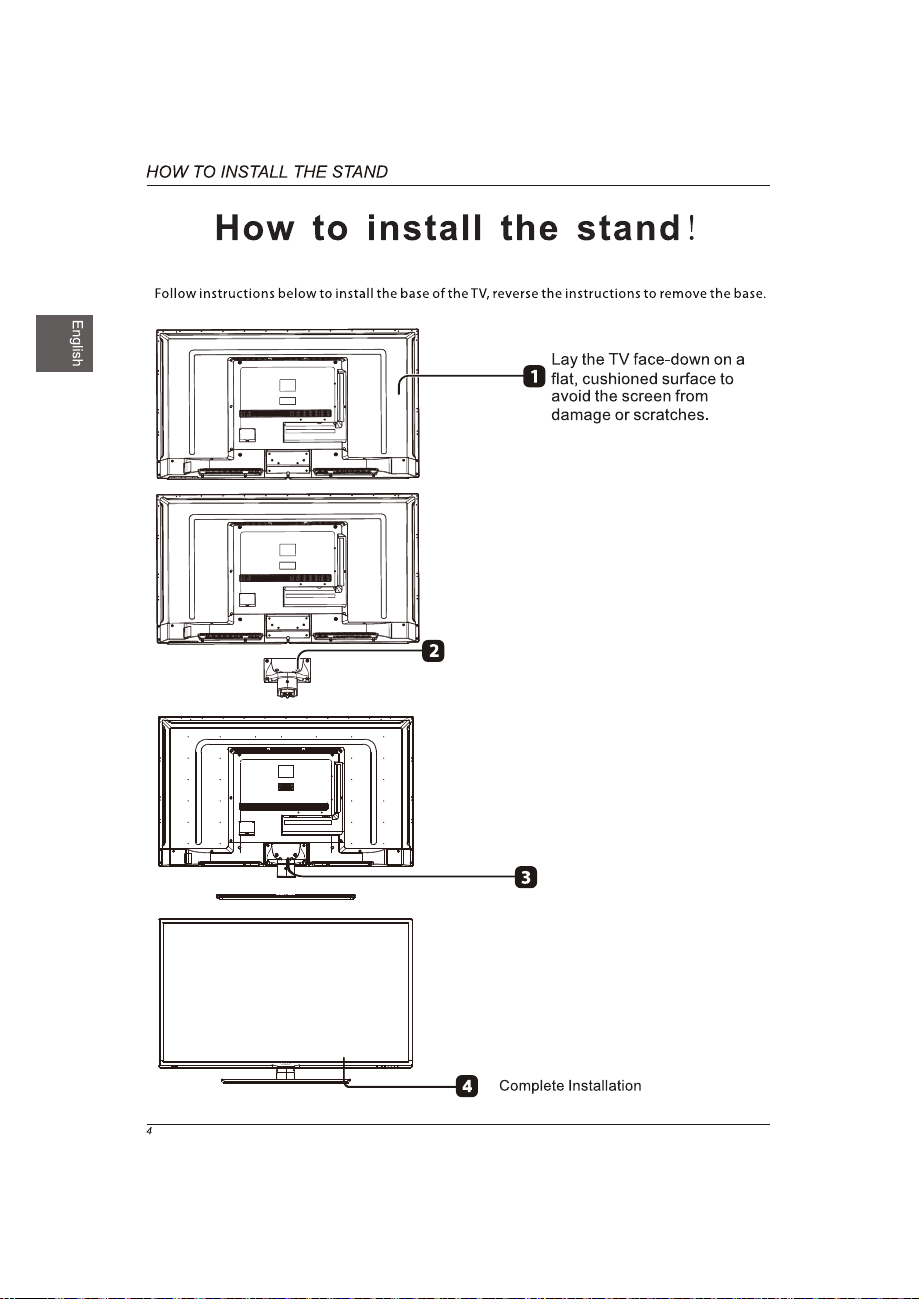
Fix the stand support to the TV
using 6 pcs screws.
Fix the base stand to the TV using
6 pcs screws.
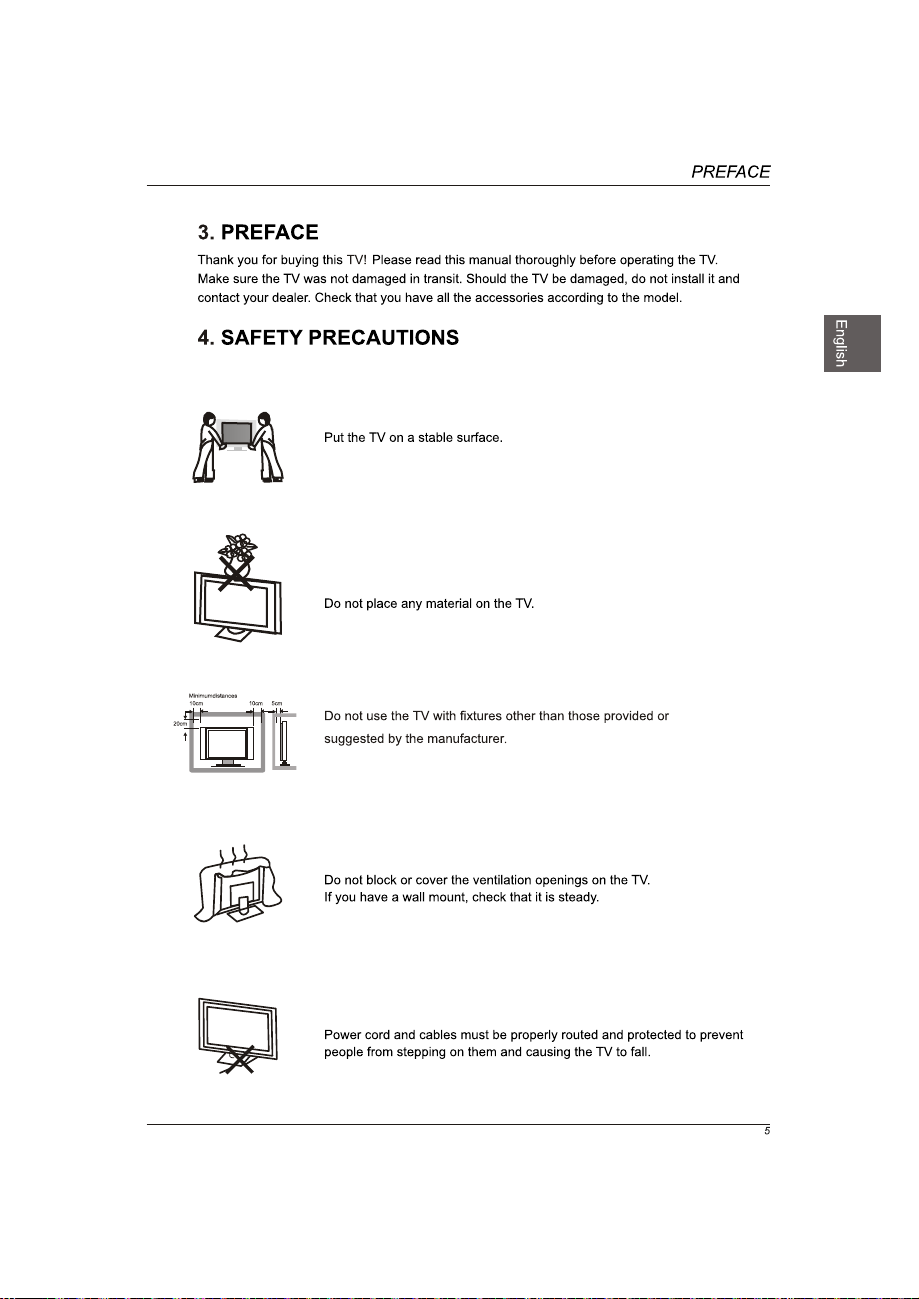
Page 5
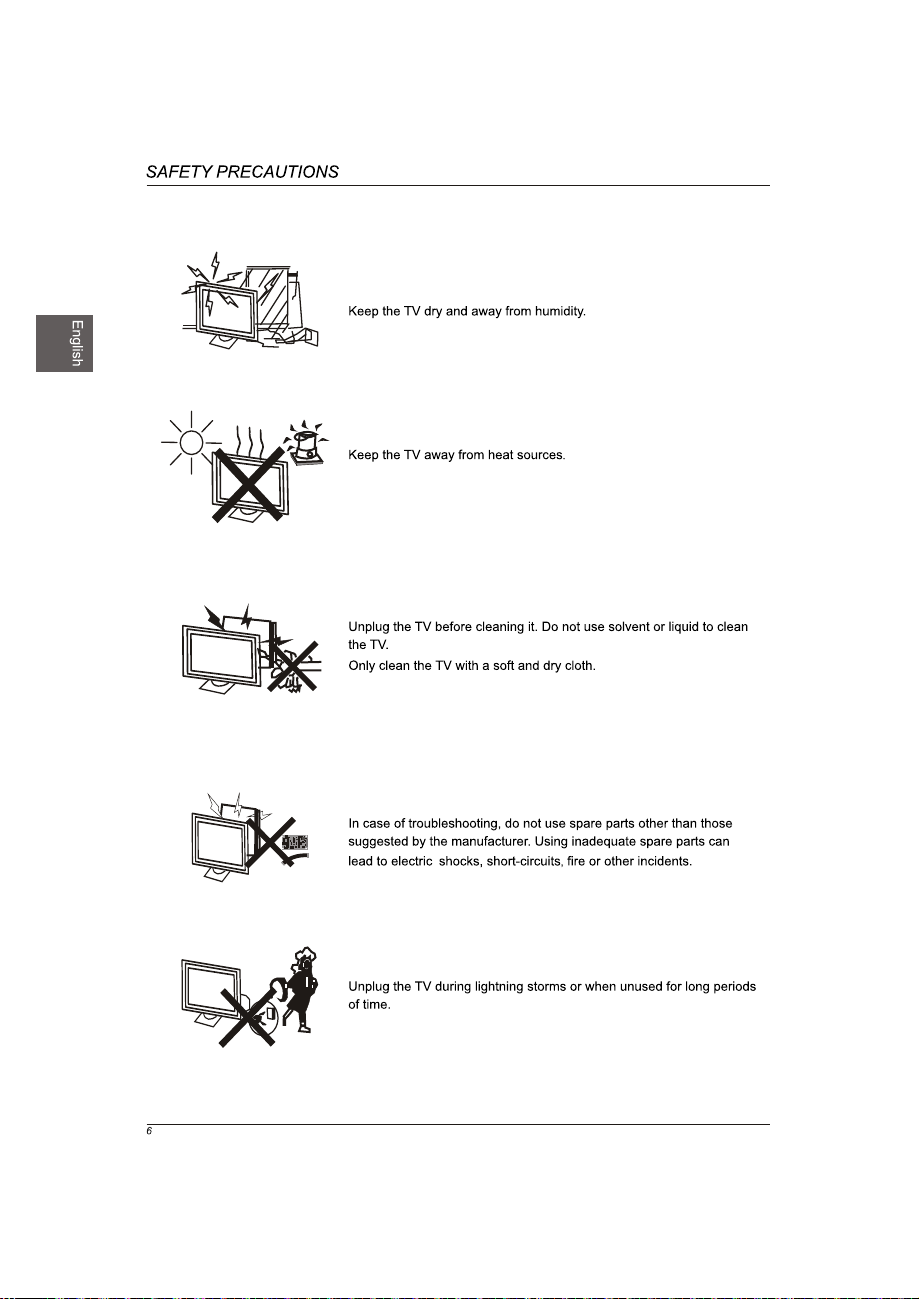
Page 6
Page 7

Page 8
AUDIO OUT
blue
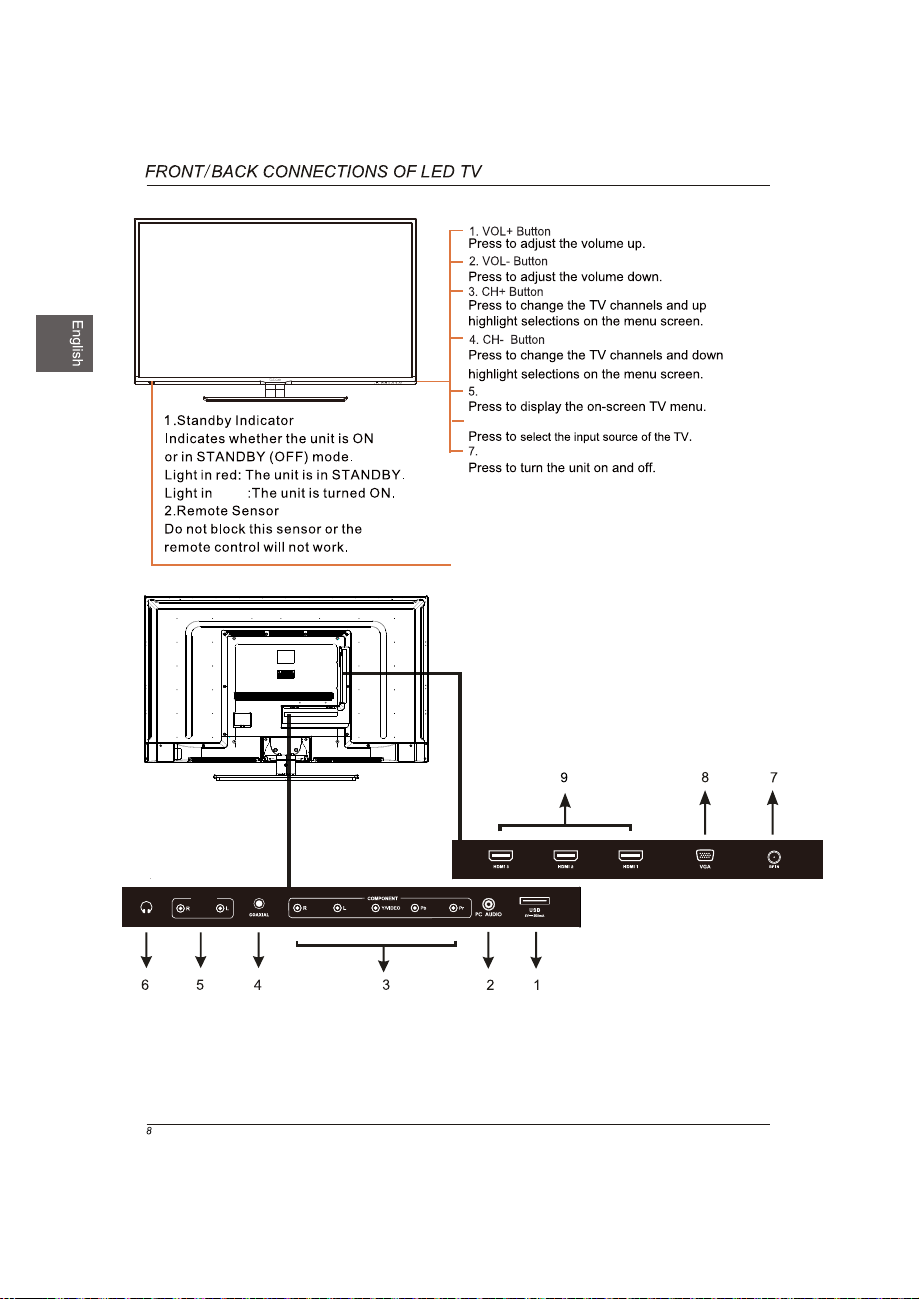
MENU Button
6.INPUT Button
POWER Button
1.USB
2.PC AUDIO IN Jack
3.COMPONENT/VIDEO IN
and AUDIO IN Jack
4.Coax OUT Jack
5.AUDIO OUT Jack
6.Headphone Jack
7.TV ANTENNA Terminal
8.VGA IN Jack
9.HDMI IN Jack
Page 9
Page 10
AUDIO OUT
Audio left is white,and Audio right is red.
Audio left is white,and Audio right is red.
AUDIO OUT
Page 11

AUDIO OUT
AUDIO OUT
PC Audio Cable
USB
Page 12
COAXIAL and AUDIO OUT
AUDIO OUT
Page 13
Turn the LED TV on or off.
Pre ss once t o disab le the au dio a nd pres s again t o
ena ble the a udio.
P.MODE
S.MODE
Pre ss to adj ust bet ween av ailab le audi o chann el.
SLEEP
SOURCE
NFO
I
Pre ss to set t he clos ed capt ion.
V-CHIP
CH.LIST
ASPECT
All ows you t o navig ate the o n-scr een m enus and ad just th e
syste m setti ngs to yo ur prefer ence.
FAV
Press to diaplay the favourite program list.
ADD/ERASE
FAV+ FAV-
Press these two keys to switch to your favourite programs.
S
OK
Displays
Switch to V-CHIP input.
Pre ss to dis play th e TV progr am list .
OK
Dis pla
Exi t the mai n TV me nu.
ys th e
mai n TV me nu.
Add/Erase channel to favourite program list.
Page 14
Page 15
OK
and
OK
OK
OK
Page 16
OK
Use the Up and Down arrows on your remote
control to select the channel scan type.
s
OK
OK
Menu:Quit
/
YPbPr
YPbPr
OK
OK
YPbPr/AV
HDMI1
HDMI2
HDMI3
VGA
USB
OK
Page 17

INPUT SOURCE
YPbPr/AV
HDMI1
HDMI2
HDMI3
VGA
USB
Select Input Source
OK
Basic Operation
Lock
OK
Page 18
Neutral
Lock
Color Temp
Press button to select Color Temp. ,then press button to adjust.
Available color Temp. mode:Warm,Cool,Neutral.
Page 19
OK
Lock
OK
Neutral
Off,Weak,Medium,Strong.
OK
Lock Lock
Color Red
Hue
OK
Saturation
Brightness
Reset
Lock
Custom
Page 20
OK
the option you want press
OK
Lock Lock
OK
Page 21
AUDIO Menu
Sound Mode
Sound Mode
MTS
Sound Mode
Bass
Treble
Balance
MTS
Digital Audio Ouput
Surround Mode
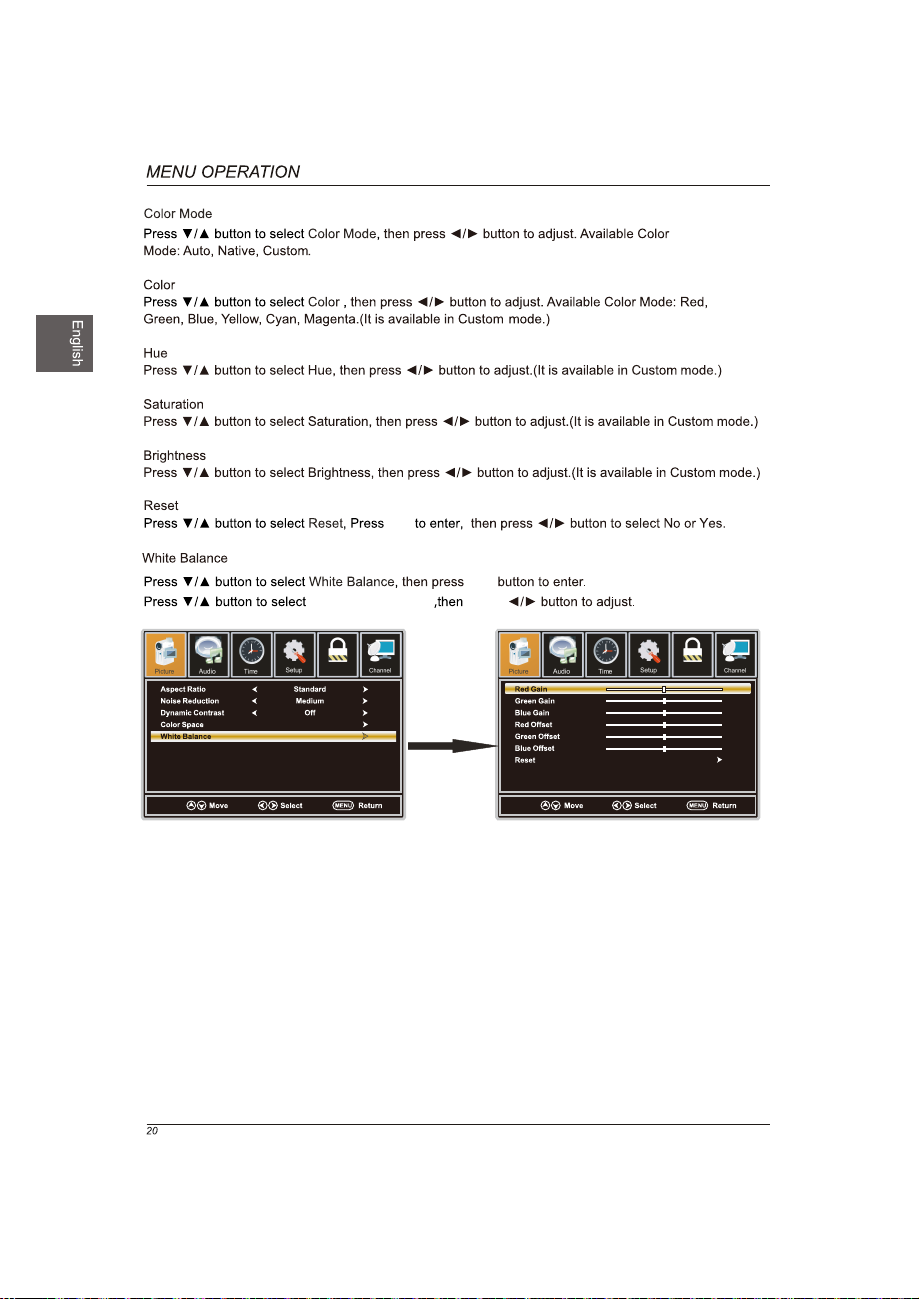
AVL
Audio
MTS
Sound Mode
Standard
Stereo
PCM
Off
On
Lock
Audio menu.
Surround Mode
Surround Mode
On or Off
Page 22
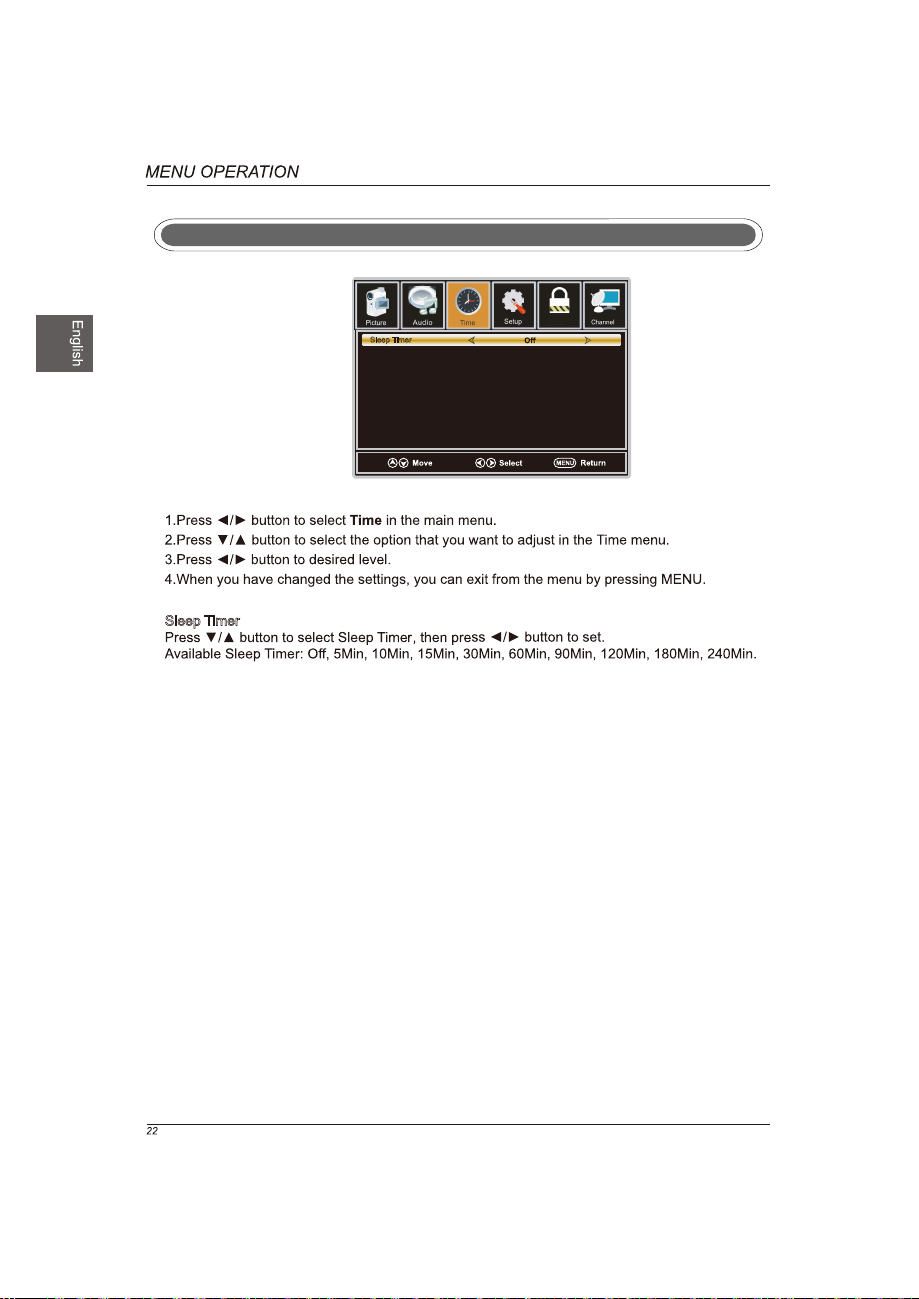
TIME Menu
Sleep Timer
Sleep Timer
Lock
Page 23
Lock
Lock
OK
OK
Advance Selection
Option
Service1
Page 24

Advance Selection
Press button to select Advance Selection,then press button to select Service1,Service2
Service3,Service4,Service5,Service6.
Option
Press button to select Option,then press button enter submenu.
OK
Lock
Lock
OK
OK
Lock
OK
(0000)
Lock
Enter Password
Press “OK” to confirm
Page 25

Lock
Change Password
Lock
On
OK
Block Unrated Off
a sub menu will
8899
Lock
Block Unrated Off
OK
Lock
Lock
Page 26
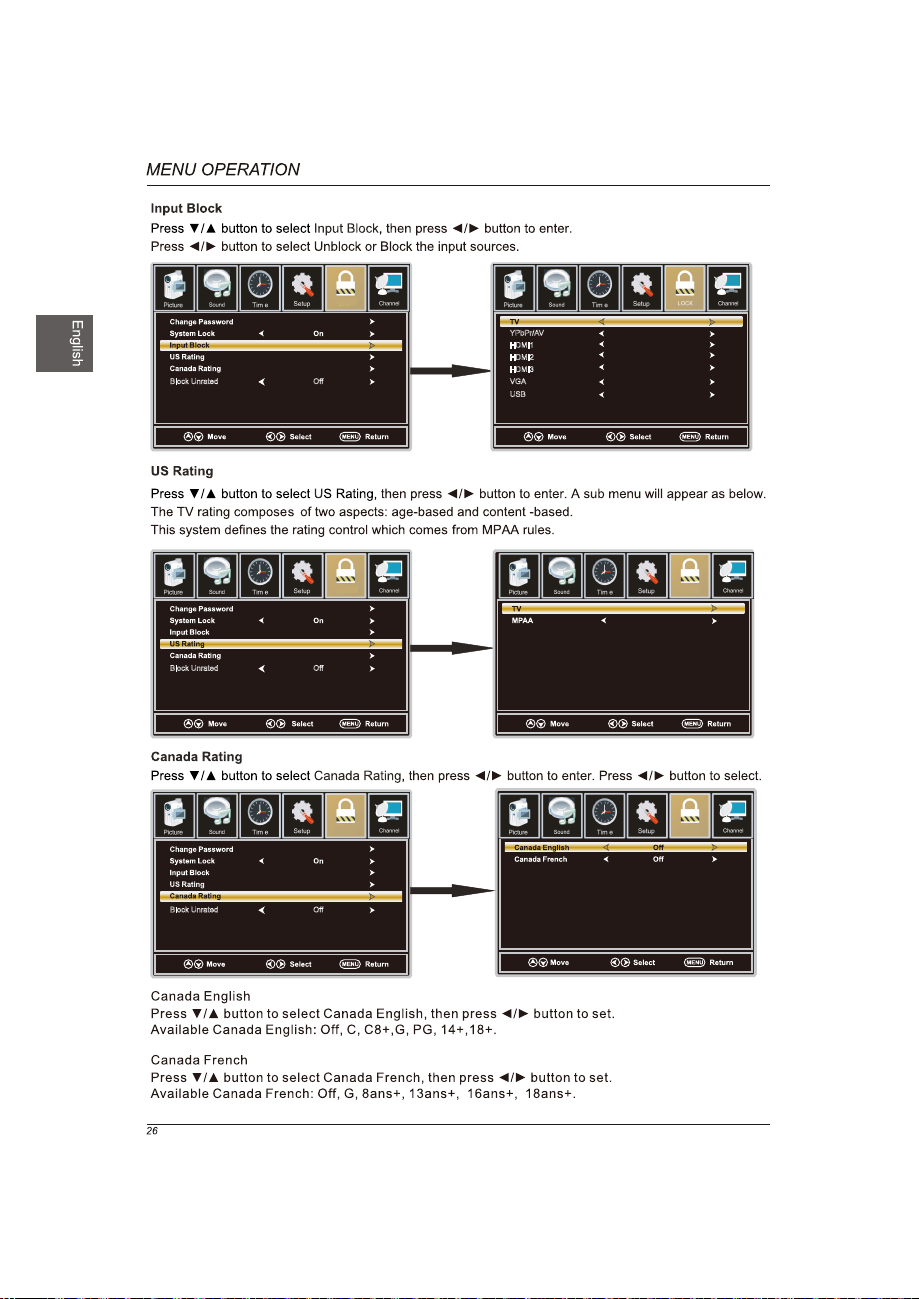
Block Unrated Off
Block Unrated Off
Lock
YPbPr/AV
OK
Lock Lock
HDMI1
HDMI2
HDMI3
VGA
USB
OK
Unlock
Unlock
Unlock
Unlock
Unlock
Unlock
Unlock
N/A
OK
LockLock
Block Unrated Off
Page 27
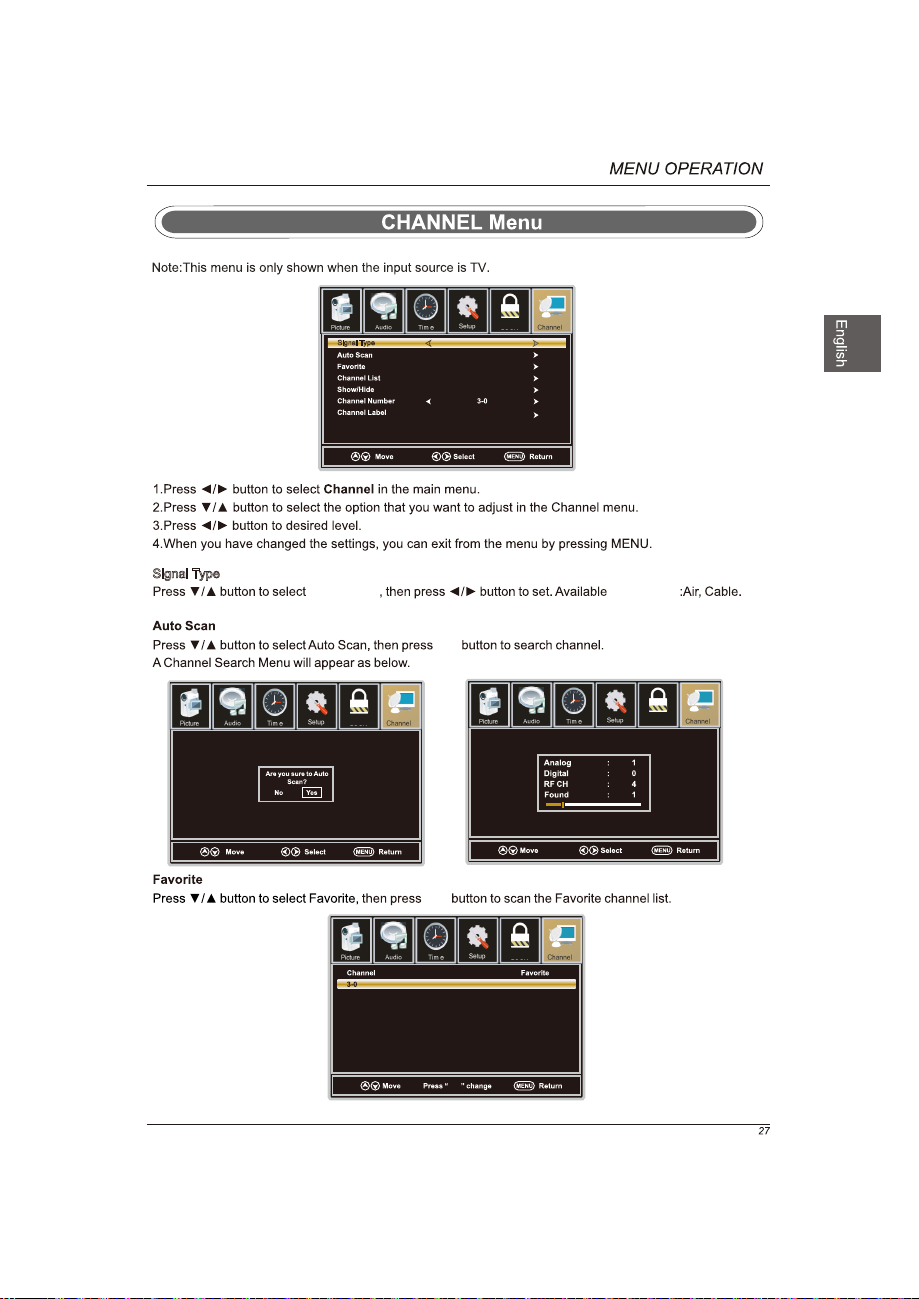
Signal Type
Lock
Air
Signal Type
Signal Type Signal Type
OK
Lock
Lock
OK
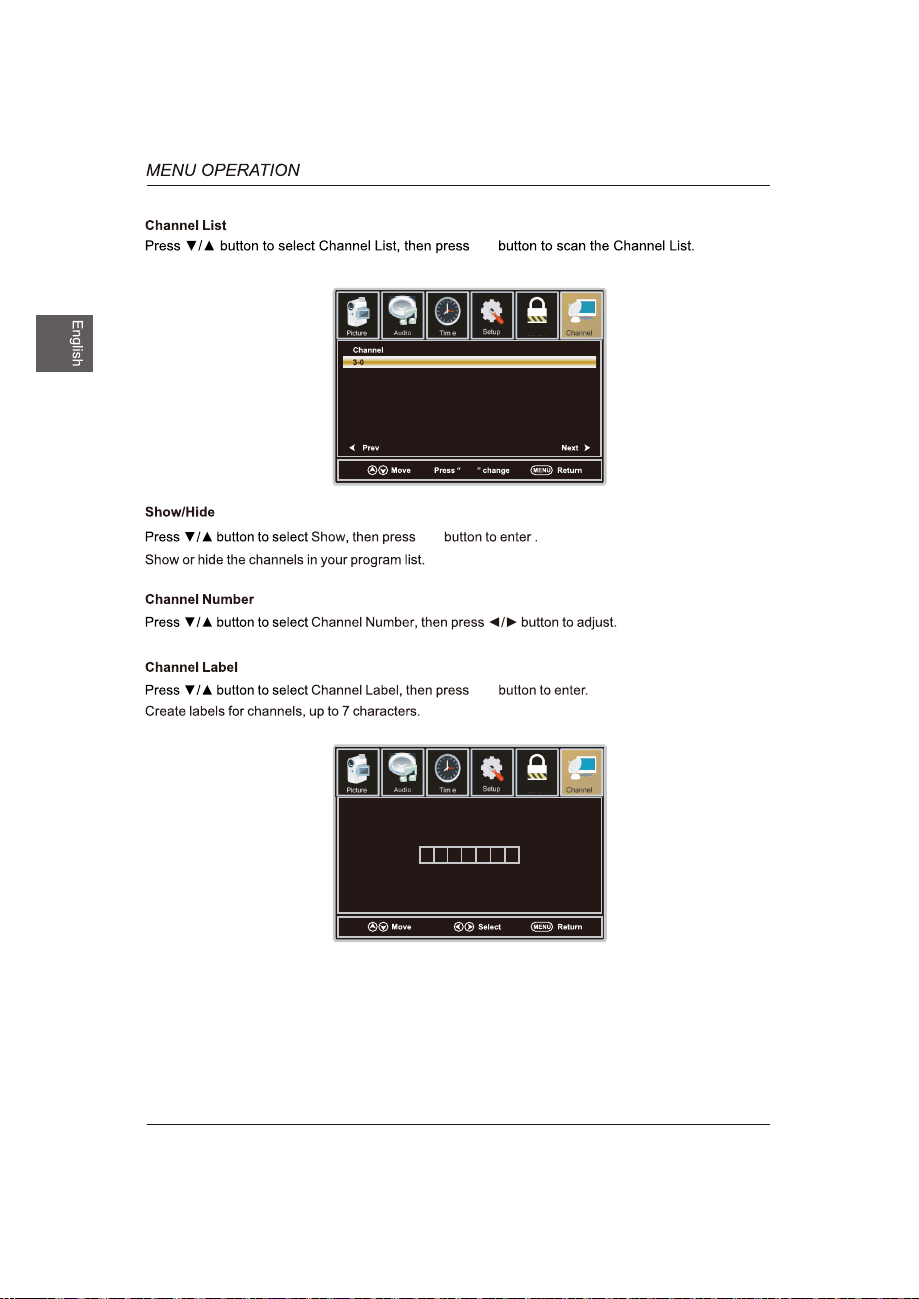
Channel Name
OK
Lock
Page 28
OK
OK
Channel Name
Lock
OK
OK
Lock
28
Page 29
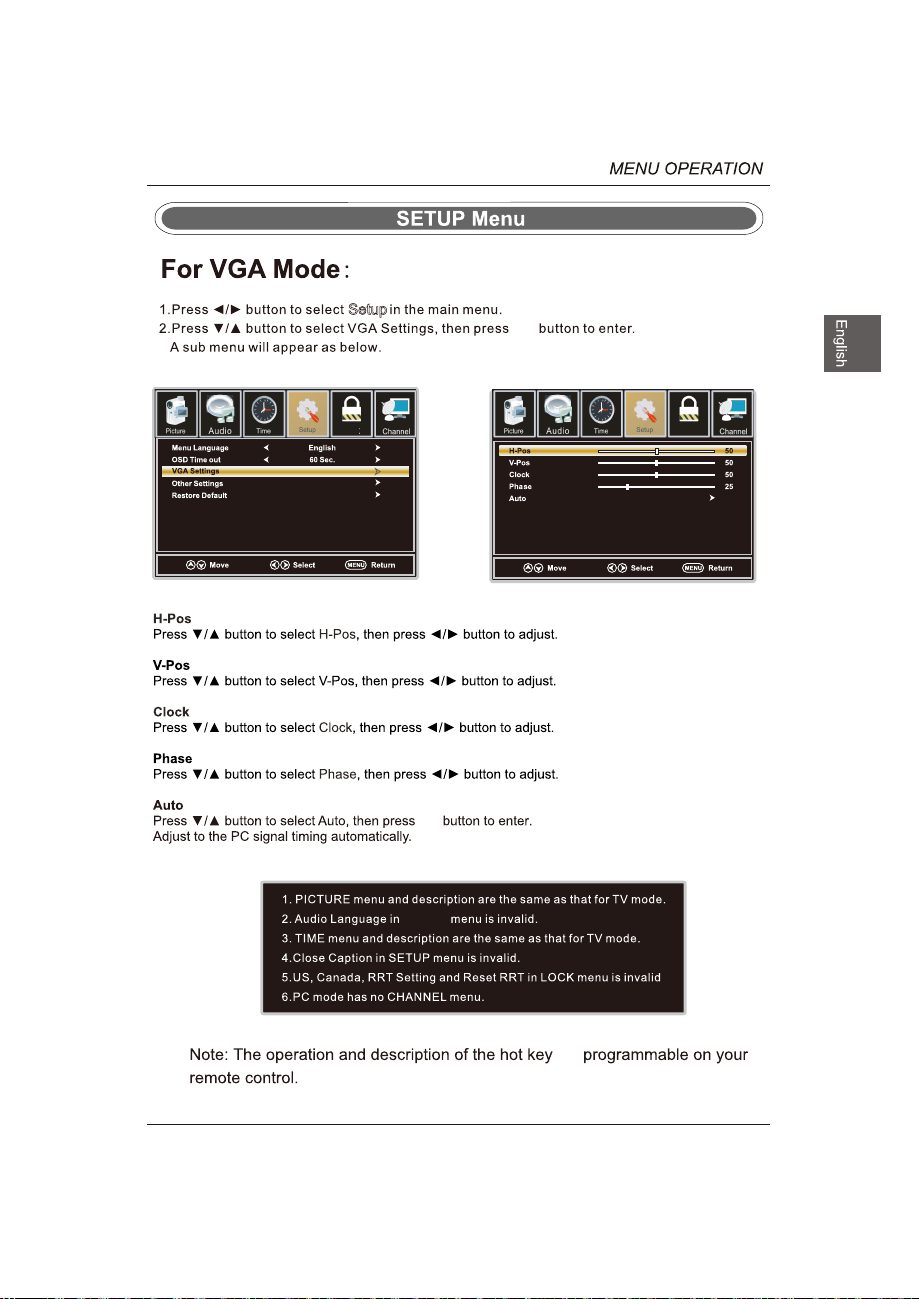
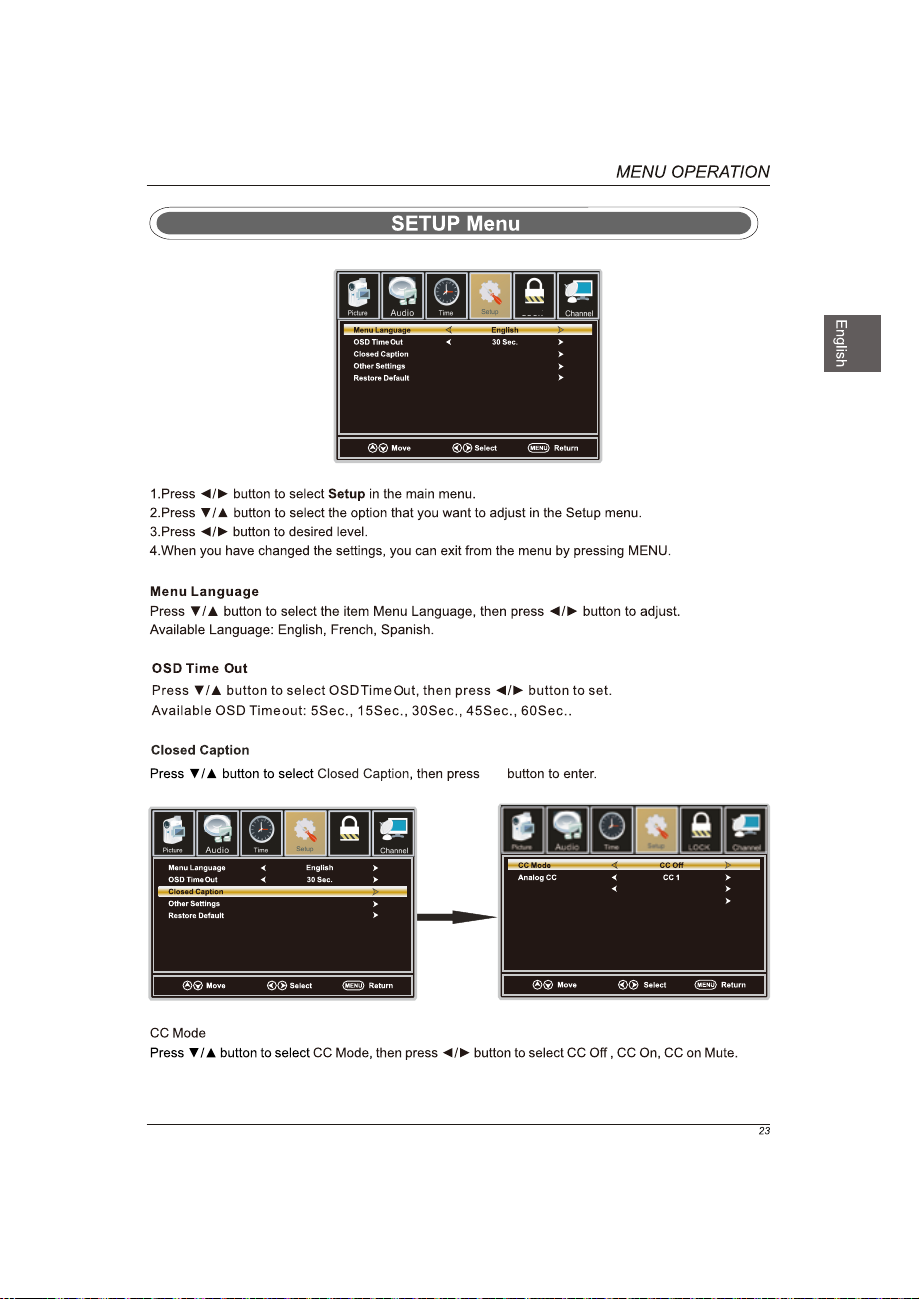
Setup
OK
Lock
Lock
OK
AUDIO
are
29
Page 30
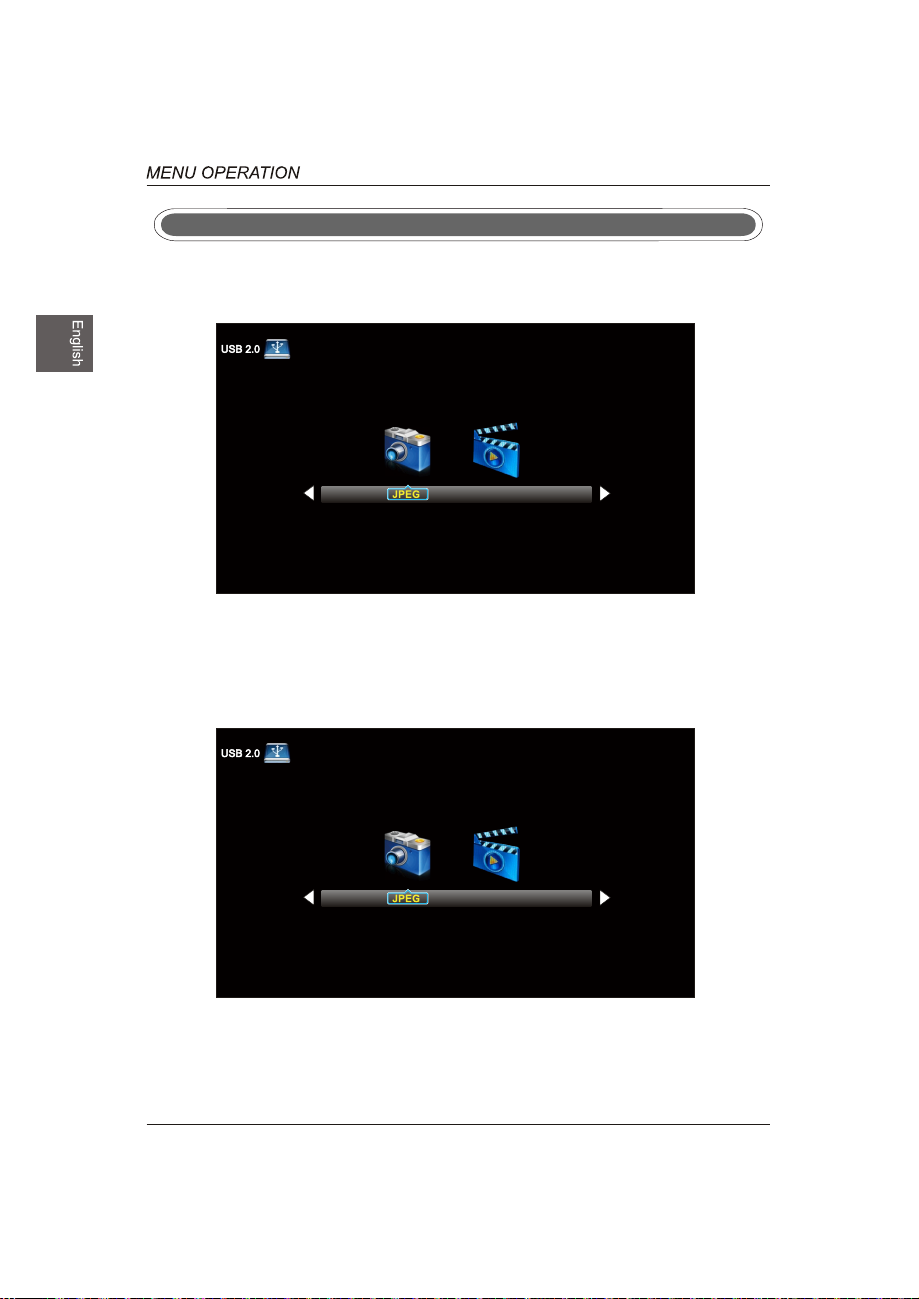
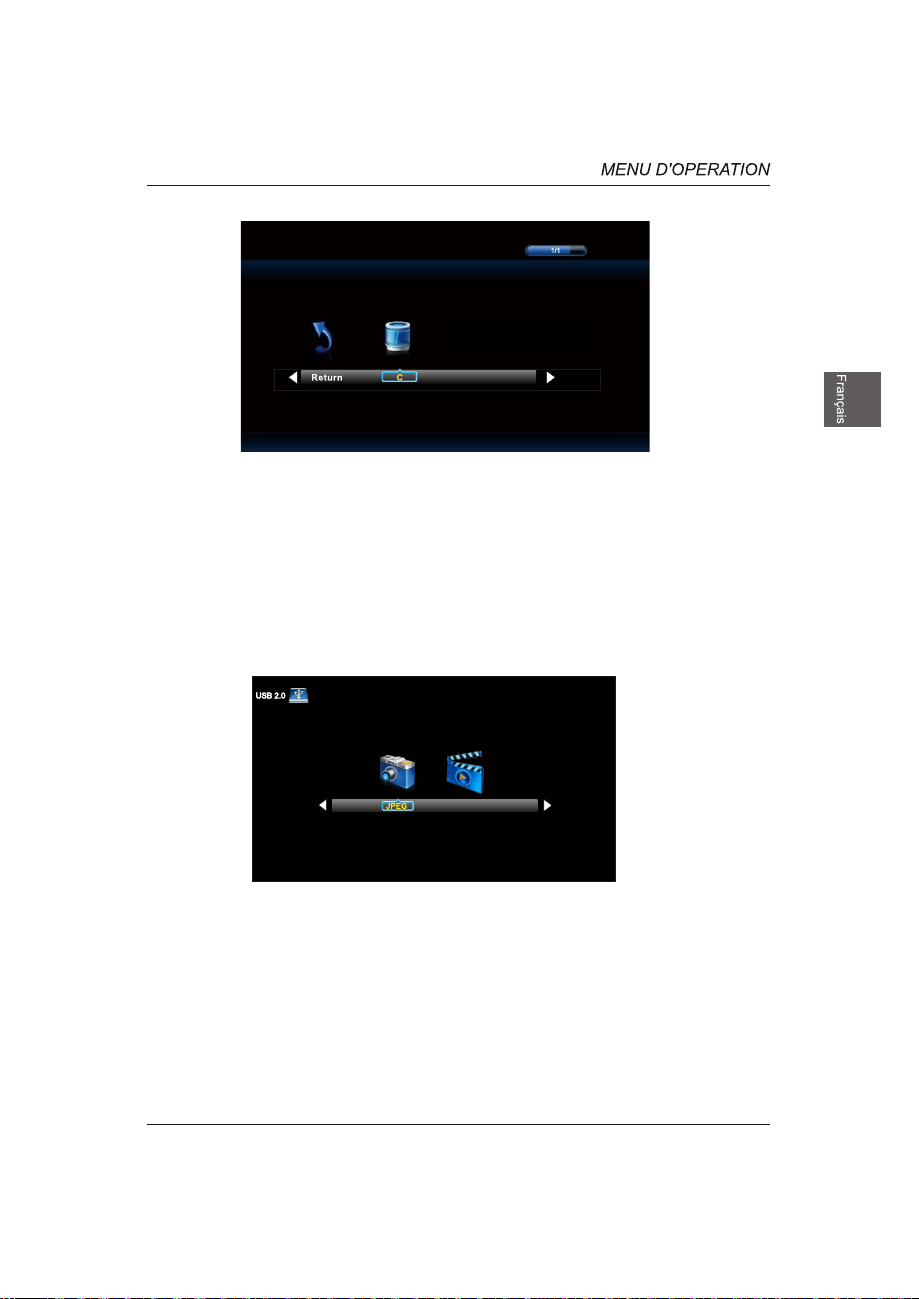
USB Menu
Note:Before operating Media menu,Plug in USB device,then press SOURCE button to set the Input
Source to USB.
Press / button to select USB in the Source menu,then press OK button to enter.
M-JPEG
Press ◄ / ► button to select the option you want to adjust in the main Media menu,then press
OK button to enter.
JPEG Menu
Press ◄ / ► button to select JPEG in the main menu,then press OK button to enter.
Press Exit button to return back to the previous menu.
M-JPEG
Press ◄ / ► button to select drive disk you want to watch,then press OK button to enter.
Press ◄ / ► button to select Return option to go back to the previous menu.
30
Page 31

Press ◄ / ► button to select the file you want to watch in the file selecting menu,then press OK
button to display picture.
When highlighting the option you select,the file information will appear on the right and Picture will be
previewed in the center.
M-JPEG Menu
Press ◄ / ► button to select M-JPEG in the main menu,then press OK button to enter.
Press EXIT button to return back to the previous menu.
M-JPEG
Press ◄ / ► button to select drive disk you want to watch,then press OK button to enter.
Press ◄ / ► button to select Return option to go back to the previous menu.
When highlighting the option you select,the file information will appear on the right and Movie will be
previewed in the center.
Press OK button to play the selected movie.
Press display button to show select menu in the bottom.
Press ◄ / ► button to select menu in the bottom you want to run,then press OK button to operate.
31
Page 32

32
Page 33

AUDIO - OUT
47.6
LED
1920x1080
120 W
ATSC/NTSC
8
JPEG, M-JPEG
1097 x 711 x 257 mm
1097 x 644 x 90 mm
13
19.5
33
Page 34

Menu de USB
USB
& Coaxial & Sortie Audio
Page 35

Page 36

0.5
75
Page 37

Couchez le téléviseur face vers le bas
sur une surface plate et coussinée
pour éviter de l’endommager ou de
rayer l’écran.
Fixez le socle au téléviseur à l’aide des
6 vis fournies.
Fixez le socle de base au téléviseur à
l’aide des 6 vis fournies.
Terminer l’installation.
Page 38
Page 39

Page 40

Page 41

1.CAPTEUR DE TELECOMMANDE:
capteur infrarouge pour la
télécommande.
2.INDICATEUR DE PUISSANCE:
Bleu lorsque que le téléviseur
est allumé. Rouge lorsque le
téléviseur est éteint.
Appuyer sur le bouton «VOL +» ou «VOL -» pour augmenter
ou diminuer le volume de son.
Appuyer sur le bouton «VOL +» ou «VOL -» pour augmenter
ou diminuer le volume de son.
Appuyer sur le bouton «CH +" ou «CH-» pour naviguer
sur les canaux.
Appuyer sur le bouton «CH +" ou «CH-» pour naviguer
sur les canaux.
Appuyer sur le bouton «MENU» pour faire apparaître le
menu principal sur l'écran.
INPUT Button
Appuyer sur le bo
d'entrée.
Power Button
Appuyer sur le bouton «POWER» pour mettre le téléviseur
sous ou hors tension.
1.USB: USB Port .
2.AUDIO PC: Connecter le jack de sortie Audio du PC.
3.COMPONENT: Connecter la sortie Vidéo et Audio.
4.Sortie COAXIAL: Connecter le récepteur COAXIAL.
5.écouteurs Audio: La Composante/AV partage avec sortie
audio (D/G).
6.Casque: Connecter un casque stéréo pour une écoute privée.
7.RF IN: brancher l'antenne.
8.VGA (PC): Connecter le jack de sortie PC-RGB du PC
9.HDMI1/HDMI2/HDMI3: Brancher le jack de sortie HDMI du DVD.
uton «SOURCE» pour sélectionner la source
AUDIO OUT
Page 42

Page 43

AUDIO OUT
AUDIO OUT
Page 44
AUDIO OUT
USB
AUDIO OUT
Page 45

& Sortie AUDIO
AUDIO OUT
Câble coaxialCâble Sortie AUDIO
Amplificateur audio
Arrière de TV
l'amplificateur de retour audio
Page 46

POWER Allumer le téléviseur LED.
MUTE Appuyer une fois sur ce bouton pour fermer le son et
appuyer à nouveau
BOUTONS NUMERIQUES : Appuyer sur les boutons 0-9 pour
-
Appuyer sur ce bouton pour entrer un numéro multiple de
canal tel que 2
Retour à la chaîne précédemment affichée.
P.MODE Sélectionner le mode d'image.
S.MODE Sélectionner le mode de son.
MTS Appuyer sur ce bouton pour régler entre les canaux audio disponibles.
SLEEP Régler la minuterie d'arrêt.
SOURCE
d'entrée OSD, appuyer sur ▲ ▼ pour sélectionn
source d'entrée, puis appuyer sur OK pour la confirmer.
CH+/CH-
VOL+/VOL-
INFO Afficher la source et l'information du canal.
CC Appuyer sur ce bouton pour régler le sous-titrage.
V-CHIP Mise en place d'un contrôle parental.
CH.LIST
programmes TV
ASPECT Appuyer sur ce bouton pour sélectionner Aspect Ratio.
BOUTONS (▲/▼/◄/►/ OK)
Permet de naviguer dans les menus sur l'écran et ajuster les
paramètres du système selon vos préférences.
MENU Afficher le menu principal du téléviseur
EXIT Quitter le menu principal du téléviseur.
AV
F
ADD/ERASE
F
AV+/FAV-
changer directement la chaîne de télévision.
, etc.
-1
Appuyer sur le bouton SOURCE pour
Appuyer sur ce bouton pour naviguer sur les canaux.
Appuyer sur ce bouton pour augme
le niveau sonore.
Appuyer sur ce bouton pour
Ajouter / Effacer le canal dans la liste favorite de
programmes.
Canal préféré + canal préféré -.
sur ce bouton pour ouvrir le son.
afficher la source
nter / diminuer
.
afficher la liste des
.
er une
Page 47

Page 48

Sélection de la lauguage d’ affichage
Voici l’assistant d’installation HDTV de Westinghouse .
Veuillez suivre ce guide d’installation afin de
lancêtre le balayage automatique des canaux ou
pour repérer vos autres appareils, tels que
décodeur , récepteur satellite , lecteur Blu-Ray,
lecteur DVD et consoles de jeux .
Utilitsez les flèches de la télécommande pour
sélectionner la langue d’affichage des menus et
des messages .
:sélectionner Ttouche Enter: Suivant
Anglais
Mode en fonction
Utilisez les flèches Haut ,Bas de la télécommande afin de
sélectionner le mode en foncition .
Le mode Domicile optimise les paramètres
vidéo pour une utilisation quotidienne au
domicile .
Précédent
:sélectionner Ttouche Enter: Suivant
Domicile
Magasin
OK
Connexions
Cliquez ici pour raccorder un décodeur ou un récepteur satellite
Cliquez ici pour raccorder une console de jeux , un lecteur Blu-Ray,
un lecteur DVD , ou autre lecteur
Cliquez ici afin de lancer le balayage automatique des canaux avec
un raccordement par antenne ou par câble coaxial
Précédent
:sélectionner Ttouche Enter: Suivant
Page 49

Connexions
Cliquez ici pour raccorder un décodeur ou un récepteur satellite
Cliquez ici pour raccorder une console de jeux , un lecteur Blu-Ray,
un lecteur DVD , ou autre lecteur
Cliquez ici afin de lancer le balayage automatique des canaux avec
un raccordement par antenne ou par câble coaxial
Précédent
:sélectionner Ttouche Enter: Suivant
Balayage des canaux
Utilisez les flèches Haut ,Bas de la télécommande
afin de sélectionner le type de balayage des
canaux .
Précédent
:sélectionner Ttouche Enter: Suivant
Balayage des canaux
Canal RF
Trouvé
Antenne[ATSC]
Menu:Quitter
câble
Entrée décodeur ou récepteur satellite
Utilisez lès flèches de la télécommande afin de sélectionner
l’entrée raccordee au décodeur ou au récepteur .
pour une qualité vidéo oprimale ,mousse recommandons d’utiliser
HDMI ou YPbPr(veuillez consulter le guide d’installation ou
d’utlisation afin de vous aider à déterminer laquella de ces deux
connexions vous utilisez).
Antenne
Précédent
:sélectionner Ttouche Enter: Suivant
YPbPr/AV
Mise en garde: Antenne RF
Remarque:Westinghouse Digital ne recommande pas l’utilisation
de l’entrée antenne RF pour la connexion de votre décodeur ou
récepteur satellite , car elle offre une qualité d’image moindre à
qualité d’image optimale .sî vous ne possédez pas de décodeur qui
offre un signal haute définition de qualité ,nous vous
recommandons de contacter votre CABLODIFFUSEUR afin d’en
obtenir un .autrement ,sélectionnez continuer .
Quitter installati... Continuer
Précédent
:sélectionner Ttouche Enter: Suivant
Liste de source d’entrée
YPbPr/AV
HDMI1
HDMI2
HDMI3
Précédent
:sélectionner Ttouche Enter: Suivant
VGA
USB
Page 50

ENTRÉE SOURCE
YPbPr/AV
HDMI1
HDMI2
HDMI3
VGA
USB
OK
OK
Lock
Prog.VerroOptionHeureAudioImage
Page 51

Mode d’image
Lumière
Contraste
Saturation
Finesse
Temp. couleur
Advanced Settings
Neutral
Lock
Prog.VerroOptionHeureAudioImage
Déplacer
Sélectionner
Couleur Temp
Return
Page 52

OK
Mode d’image
Lumière
Contraste
Saturation
Finesse
Temp. couleur
Advanced Settings
Déplacer
Neutral
Sélectionner
OK
Aspect Ratio Standard
Reduction de Ruido
Dynamic Contrast
Color Space
White Balance
Moyen
Arret
Lock
Prog.VerroOptionHeureAudioImage
OK
Return
Lock
Prog.VerroOptionHeureAudioImage
OK
Aspect Ratio Standard
Reduction de Ruido
Dynamic Contrast
Color Space
White Balance
Déplacer
Color Mode Personnalisé
Color
Teinte
Saturation
Brillance
réinitialiser
Moyen
Arret
Sélectionner
Rouge
Lock
Prog.VerroOptionHeureAudioImage
Return
Lock
Prog.VerroOptionHeureAudioImage
Déplacer
Sélectionner
Return
Déplacer
Sélectionner
Return
Page 53

OK
OK
Aspect Ratio Standard
Reduction de Ruido
Dynamic Contrast
Color Space
White Balance
Déplacer
Moyen
Arret
Sélectionner
Lock
Prog.VerroOptionHeureAudioImage
OK
Return
Red Gain
Green Gain
Blue Gain
Red Offset
Green Offset
Blue Offset
Réinitialiser
Déplacer
Sélectionner
Lock
Prog.VerroOptionHeureAudioImage
Return
Page 54

Mode Sain Standard
Basses
Aigus
Balance
MTS
Output Digital Audio
Mode Surround
AVL
Déplacer
Stereo
PCM
Marche
Marche
Sélectionner
Prog.VerroOptionHeureAudioImage
Return
Mode Son
MTS
Mode Surround
Mode Son
Mode Son
MTS
Mode Surround
Page 55

Timer de Veille Arret
Prog.VerroOptionHeureAudioImage
Déplacer
Sélectionner
Return
Page 56

Langue Menu Français
OSD Time Out
Sous-titrage
Autres Paramètre
Rétablir
60 Sec.
Prog.VerroOptionHeureAudioImage
Langue Menu Français
OSD Time Out
Sous-titrage
Autres Paramètre
Rétablir
Déplacer
60 Sec.
Sélectionner
Return
Déplacer
Sélectionner
Return
OK
Prog.VerroOptionHeureAudioImage
Image Audio Temps Réglage Serrure Canal
Sonore Seulement Désactivé
OK
Déplacez Retour
Select
Page 57

OK
Langue Menu Français
OSD Time Out
Sous-titrage
Autres Paramètre
Rétablir
Déplacer
60 Sec.
Sélectionner
OK
Langue Menu Français
OSD Time Out
Sous-titrage
Autres Paramètre
Rétablir
Déplacer
60 Sec.
Sélectionner
Return
Return
Prog.VerroOptionHeureAudioImage
Son seul Arrel
Prog.VerroOptionHeureAudioImage
OK
Déplacer
Sélectionner
Return
(0000)
Prog.VerroOptionHeureAudioImage
OK
Enter le Code
Appuyez sur ‘OK’ pour confirmer
Déplacer
Sélectionner
Prog.VerroOptionHeureAudioImage
Return
Page 58

Entrer l’ancien code _ _ _ _
Prog.VerroOptionHeureAudioImage
Changer le Code
OK
Verrouillage
Loc d’entrée
Catégorie USA
Catégorie Canada
Non Classé
Marche
Arret
Prog.VerroOptionHeureAudioImage
OK
Entrer l’ancien code _ _ _ _
0-9
Return
Déplacer
Sélectionner
Return
8899
Prog.VerroOptionHeureAudioImage
0-9
Return
Changer le Code
Verrouillage
Loc d’entrée
Catégorie USA
Catégorie Canada
Non Classé
Image Audio
Nouveau code
Confirme le code
Marche
Arret
_ _ _ _
_ _ _ _
0-9
Prog.VerroOptionHeureAudioImage
Prog.VerroOptionHeureAudioImage
Return
Déplacer
Sélectionner
Return
Page 59

Changer le Code
Verrouillage
Loc d’entrée
Catégorie USA
Catégorie Canada
Non Classé
Marche
Arret
Prog.VerroOptionHeureAudioImage
OK
TV UnLock
YPbPr/AV
HDMI1
HDMI2
HDMI3
VGA
USB
UnLock
UnLock
UnLock
UnLock
UnLock
UnLock
Prog.VerroOptionHeureAudioImage
Déplacer
Changer le Code
Verrouillage
Loc d’entrée
Catégorie USA
Catégorie Canada
Non Classé
Déplacer
Changer le Code
Verrouillage
Loc d’entrée
Catégorie USA
Catégorie Canada
Non Classé
Déplacer
Sélectionner
Marche
Arret
Sélectionner
Marche
Arret
Sélectionner
Return
Return
Return
Déplacer
Prog.VerroOptionHeureAudioImage
TV
OK
TV N/A
Déplacer
Prog.VerroOptionHeureAudioImage
Anglais Canadien
OK
Francais Canadien
Déplacer
Sélectionner
Sélectionner
Sélectionner
Arret
Arret
Return
Prog.VerroOptionHeureAudioImage
Return
Prog.VerroOptionHeureAudioImage
Return
Page 60

Image
Type de signal
Balayage Automatique
Favoris
Liste Canaux
Montrer/Cacher
numéro de poste
nom du canal
Option
HeureAudio
Air
Arret
14-1
ATSC-1
Verro
Prog.
Type de signal
OK
Image
Déplacer
Option
HeureAudio
Etes vous sur to Auto Scan?
Non Oui
Sélectionner
Déplacer
Type de signal
Prog.
Verro
Return
Image
Prog.
3-0
6-0
11-0
14-1
14-2
14-3
Sélectionner
Return
vous voulez ajuster dans le menu Cha
Type de signal
Image
Déplacer
Option
HeureAudio
Canaux Name Favoris
ATSC-1
ATSC-2
ATSC-1
Verro
HeureAudio
Analog
Digital
Canal RF
Trouvé
Prog.
Option
: 0
: 0
: 3
: 0
Sélectionner
Verro
Prog.
Return
OK
Déplacer
Press “OK” change
Return
Page 61

OK
OK
Image
Prog.
3-0
6-0
11-0
14-1
14-2
14-3
Image
Option
HeureAudio
Canaux Name Favoris
ATSC-1
ATSC-2
ATSC-1
Déplacer
Press “OK” change
Option
HeureAudio
A T S C - 2
Déplacer
Sélectionner
Verro
Verro
Prog.
Return
OK
Prog.
Return
28
Page 62

OK
Langue Menu Français
OSD Time Out
Sous-titrage
Autres Paramètre
Rétablir
Déplacer
60 Sec.
Sélectionner
Return
Prog.VerroOptionHeureAudioImage
H-Pos
V-Pos
Horloge
Phase
Automatique
Déplacez
Prog.VerroOptionHeureAudioImage
OK
sont
29
Page 63

MENU USB
Remarque: Avant d'utiliser le menu Media, Branchez un périphérique USB, puis appuyez sur le bouton
SOURCE pour mettre la source d'entrée aux USB.
Appuyez sur pour sélectionner USB dans le menu Source, puis appuyez sur la touche
OK pour ente.
Appuyez sur ◄ / ► pour sélectionner l'option que vous souhaitez régler dans le menu Média
principal, puis appuyez sur le bouton pour entrer OK.
/ r.
M-JPEG
JPEG Menu
Appuyez sur ◄ / ► pour sélectionner JPEG dans le menu principal, puis appuyez sur le bouton
pour entrer OK.
Appuyez sur le bouton de sortie pour revenir au menu précédent.
M-JPEG
Appuyez sur ◄ / ► pour sélectionner le disque d'entraînement que vous voulez regarder, puis
appuyez sur le bouton pour entrer OK.
Appuyez sur ◄ / ► pour sélectionner l'option de retour à revenir au menu précédent.
30
Page 64
Appuyez sur ◄ / ► pour sélectionner le fichier que vous voulez regarder dans le menu de sélection de
fichier, puis appuyez sur le bouton pour afficher l'image OK.
Quand soulignant l'option que vous choisissez, les informations du fichier apparaît sur la droite et l'image
sera prévu dans le centre.
M-JPEG Menu
Appuyez sur ◄ / ► pour sélectionner M-JPEG dans le menu principal, puis appuyez sur le bouton pour
entrer OK.
Appuyez sur le bouton EXIT pour revenir au menu précédent.
M-JPEG
Appuyez sur ◄ / ► pour sélectionner le disque d'entraînement que vous voulez regarder, puis appuyez
sur le bouton pour entrer OK.
Appuyez sur ◄ / ► pour sélectionner l'option de retour à revenir au menu précédent.
Quand soulignant l'option que vous choisissez, les informations du fichier apparaît sur la droite et le film
sera présenté en avant au centre.
Appuyez sur le bouton OK pour lire le film sélectionné.
Appuyez sur le bouton d'affichage pour afficher le menu de sélection dans le fond.
Appuyez sur ◄ / ► pour sélectionner le menu dans le fond que vous voulez exécuter, puis appuyez sur
la touche OK pour fonctionner.
r.
31
Page 65

32
Page 66

AUDIO - OUT
47.6
1920x1080
120 W
PAL/NTSC
8
JPEG,M-JPEG
1097 x 711 x 257 mm
1097 x 644 x 90 mm
13
19.5
33
Page 67

TABLA DE CONTENIDOS
&Coaxial&Salida Audio
Menú de USB
Page 68

Page 69

0.5
75
Page 70

Coloque el televisor boca abajo sobre una
superficie lisa y acolchonada para evitar
que se dañe o raye.
Fije el soporte al televisor
utilizando los 6 tornillos proporcionados.
Fije el soporte de la base al
televisor con los
6 tornillos proporcionados.
Page 71

Page 72

Page 73

Page 74

E
1.SENSOR REMOTO Sensor infrarojo
para el controlo remoto.
2. INDICADOR DE PODER , Azul cuando
el TV esta encendido,
rojo cuando el TV esta apagado.
Presiona VOL+ ou VO
volumen de voz.
Presiona VOL+ ou VO
volumen de voz.
L – para aumentar o diminuir a
L – para aumentar o diminuir a
Presiona CH+ ou CH – para
escanear los canales.
Presiona CH+ ou CH – para
escanear los canales.
Presiona MENU para mostrar el menú
principal en la pantalla.
6.INPUT Button
Presiona SOURCE para selecionar el fuente de entrada.
Power Button
Presiona POWER bóton para encender o apagar el TV
1.SERVICIO DE USB Solamente para utilización de fàbrica.
2.PC AUDIO Conecta el enchufe de salida audio de PC.
3.COMPONENT
/Conecta con YPBPR y salida de audio.
4.COAXIAL Out Conecta con el receptor de COAXIAL .
AV Conecta el video y Salida de audio.
5.Salida Audio:El componente/AV se comparte con
salida de Audio (L/R).
6.Auricular Conecta una línea auricular para escucha privada.
7.RF IN Conecta con la antena.
8.PC VGA Conecta el enchufe de salida audio de PC.
9.HDMI1 HDMI2 HDMI3 Conecta el enchufe de salida HDMI .
:Conecta el video y Salida de audio.
AUDIO OUT
Page 75
Page 76

AUDIO OUT
AUDIO OUT
Page 77
AUDIO OUT
Cable PC Audio
AUDIO OUT
Page 78
Cable Salida AUDIO
COAXIAL & Salida AUDIO
AUDIO OUT
Page 79

Power(Poder) --- Enciende o apaga la presentación.
MUTE Apreta para apagar la voz temporalmente, apreta por
otra vez para resumi
NUMBER BUTTONS Presiona 0-9 bóton directamente para
cambiar el canal.
Presiona el bóton para entrar un número de canal como 2-1,etc.
-
Volta al canal que visto anteriormente.
P.MODE Selecciona el modo de foto.
S.MODE Selecciona el modo de voz.
presiona para ajustar entre canales disponibles de audio.
MTS
SLEEP Afija el tiempo de dormiento.
SOURCE
Presiona SOUCE para mostrar el fuente de entrada de
OSD, Presiona▲ ▼ para seleccionar un fuente de
entrada, y presiona OK para confirmar.
CH+ / CH-
Presiona para escanear los canales.
Vol+ / VOL-
volumen de voz.
V-CHIP
Presiona el bóton para aumentar o diminuir el
INFO Mostra el fuente y información de canal.
CC presiona para cerrar el título.
Para fijar el controlo parental
CH. LIST Presiona para mostrar la lista de programa de TV
ASPECT Presiona para seleccionar el ratio de aspecto.
THUMBSTICK ▲/▼/ / /OK
Para navegar los menus y ajustar las configuraciones de sistema
según su reqisito.
MENU Mostra el menú principal de TV.
EXIT Para salir de menú principal.
FAV
ADD/ERASE Adicionar/Cancelar canal de la lista de programas
FAV+/FAV-
favoritos.
Canal favorite+/canal favorite
r.
Page 80

Page 81

Seleccione idioma
Bienvenido al asistente de configuración del televisor de alta
definición Westinghouse .
Siga esta guía para obtener ayuda en la
configuración de su televisor de alta
definición (High definitivo televisión ,HDTV )
lpara explorar canelas o teñer acceso a sus
dispositivos externos para cable satélite ,
Blu-ray ,DVD y juegos .
Utilice las flechas del control remoto para
selecocinar él idioma que desea usar para los
menus y las pantallas de mensajes.
:Seleccionar Intro:Siguiente
Ingles
Modo de encendido
Utilice las flechas Arriba,Abajo del control remoto para
seleccionar modo de encendido.
Hogar optimiza la configuración de Video
para el uso diario ei hogar.
Regresar
:Seleccionar Intro:Siguiente
Hogar
Sala de exhibición
Conectemonos...
Haga clica aquí para conectar uña caja de televisión por cable o por
satélite .
Haga clica aquí para conectar uña consola de juego ,blu-ray,DVD o
cualquier otro reproductor .
Haga clica aquí para buscar canelas de uña antena o de uña enterada
de cable coaxial.
Regresar
Intro:Siguiente :Seleccionar
Page 82

Exploración de canelas
Utilice las finchas arriba ,abajo del control
remoto para seleccionar el tipo de busqueda
Regresar
:Seleccionar
Andana [ATSC]
Intro:Siguiente
Cable
Exploración de canelas
Utilice las finchas arriba ,abajo del control
remoto para seleccionar el tipo de busqueda
Regresar
:Seleccionar
Exploración de canelas
Canelas RF
Encobrado
Intro:Siguiente
Menú:Salir
Andana [ATSC]
Cable
Fuente de entrada de televisión personnalisé cable o per satélite
Utilice las flechas izquierda ,derecha del control remoto para
seleccionar la entrada conectada al televisor .
para obtener uña calidad de vidéo optima ,recomendamos HDMI o
YPbPr (consulte la guía de conexión lrápida o el manual de usuario
para ayudarle adeterminar qué conexión usted está asando ).
Antena
Regresar
:Seleccionar
YPbPr/AV
Intro:Siguiente
advertencia de antena de RF
aviso:Westinghouse Digital no recomienda el uso de una entrada
de antena de RF como su conexión de televisión por cable o por
satélite ,ya que ofrece uña calidad de vidéo deficiente para su
HDTV .Utilice uña conexión deferente para obtener condiciones
optimas.si usted no tiene uña caja de calidad de alta definición ,le
recomendamos que llame asu proveedor de televisión por cable
para uña actualización. de lo contrario ,seleccione continuar .
salar de configu... Continuar
Regresar
:Seleccionar
Intro:Siguiente
Fuente lista de entradas
YPbPr/AV
HDMI1
HDMI2
HDMI3
Regresar
:Seleccionar
Intro:Siguiente
VGA
USB
Page 83

ENTRADA FUENTE
YPbPr/AV
HDMI1
HDMI2
HDMI3
VGA
USB
OK
OK
Lock
HeureAudioImage
CanalesBioqueoOpcionesHoraAudioImagen
Page 84

Modo del cuadro
Brillo
Contraste
Color
Enfoque
Temp.Color
Advanced Settings
Neutral
OptionHeureAudioImage
Lock
CanalesBioqueoOpcionesHoraAudioImagen
Enfoque
Advanced Settings
Mover
Enfoque
Color Temp
Advanced Settings,
Seleccionar
Salir
Page 85

Modo del cuadro
Brillo
Contraste
Color
Enfoque
Temp.Color
Advanced Settings
Neutral
OK
Lock
OptionHeureAudioImage
Lock
CanalesBioqueoOpcionesHoraAudioImagen
OK
Aspect Ratio Fill
Abaisser bruit
Dynamic Contrast
HDMI Mode
Color Space
White Balance
Apagado
Medio
Video
CanalesBioqueoOpcionesHoraAudioImagen
Mover
Aspect Ratio Fill
Abaisser bruit
Dynamic Contrast
HDMI Mode
Color Space
White Balance
Mover
Seleccionar
Seleccionar
Medio
Apagado
Video
Salir
Mover
Seleccionar
Salir
OK
Lock
CanalesBioqueoOpcionesHoraAudioImagen
OK
Salir
Color Mode Personalizado
Color
Matiz
Saturación
Brillo
Restaurar
Mover
Rojo
Seleccionar
Lock
CanalesBioqueoOpcionesHoraAudioImagen
Salir
Page 86
Aspect Ratio Fill
Abaisser bruit
Dynamic Contrast
HDMI Mode
Color Space
White Balance
Apagado
Medio
Video
OK
OK
Lock
CanalesBioqueoOpcionesHoraAudioImagen
OK
Red Gain
Green Gain
Blue Gain
Red Offset
Green Offset
Blue Offset
Restaurar
Lock
CanalesBioqueoOpcionesHoraAudioImagen
Mover
Seleccionar
Salir
Mover
Seleccionar
Salir
Page 87

Mode sono Estándar
Bajos
Agudos
Balance
MTS
Output de audio Digital
Modo de Surround
AVL
Estéreo
PCM
Encendido
Encendido
CanalesBioqueoOpcionesHoraAudioImagen
Mode de Sonido
Mode de Sonido
MTS
Mode de Surround
MTS
Mover
Mode de Sonido
Mode de Surround
Seleccionar
Salir
Page 88

Relojde Dormir Apagado
CanalesBioqueoOpcionesHoraAudioImagen
Mover
Seleccionar
Salir
Page 89

Prog.
Menù lenguaje Español
OSD Time Out
Cierre de Titulos
Otras Escenas
Restablecer
30 seg-
CanalesBioqueoOpcionesHoraAudioImagen
Prog.
Menù lenguaje Español
OSD Time Out
Cierre de Titulos
Otras Escenas
Restablecer
Mover
Return
30 seg-
Seleccionar
Return
Mover
Seleccionar
Salir
OK
CanalesBioqueoOpcionesHoraAudioImagen
OK
Salir
Modo CC CC Apagado
analógica
selección avanzada
opción
Mover
Service1
Seleccionar
CanalesBioqueoOpcionesHoraAudioImagen
CC1
Salir
Page 90

OK
Prog.
Menù lenguaje Español
OSD Time Out
Cierre de Titulos
Otras Escenas
Restablecer
Mover
Return
(0000)
Prog.
Menù lenguaje Español
OSD Time Out
Cierre de Titulos
Otras Escenas
Restablecer
Mover
Return
30 seg-
Seleccionar
30 seg-
Seleccionar
CanalesBioqueoOpcionesHoraAudioImagen
Solo Audio Apagado
CanalesBioqueoOpcionesHoraAudioImagen
OK
Salir
Mover
Seleccionar
Salir
OK
CanalesBioqueoOpcionesHoraAudioImagen
OK
Salir
Entra contraseña
Pulse ‘OK’ para confirmar
Mover
Seleccionar
CanalesBioqueoOpcionesHoraAudioImagen
Salir
Page 91

Entra Contraseña _ _ _ _
CanalesBioqueoOpcionesHoraAudioImagen
Cambiar contraseña
OK
Sist. de Bloqueo
Loque de la entrada
Evaluacion de EE.UU.
Evaluación de Canadá
No Clasificada
Encendido
Apagado
CanalesBioqueoOpcionesHoraAudioImagen
0-9
Entra Contraseña _ _ _ _
0-9
Salir
CanalesBioqueoOpcionesHoraAudioImagen
Salir
Cambiar contraseña
Sist. de Bloqueo
Loque de la entrada
Evaluacion de EE.UU.
Evaluación de Canadá
No Clasificada
8899
Encendido
Contraseña Nueva
Contraseña Confirm
Apagado
Mover
Seleccionar
Salir
OK
_ _ _ _
_ _ _ _
0-9
CanalesBioqueoOpcionesHoraAudioImagen
CanalesBioqueoOpcionesHoraAudioImagen
Salir
Mover
Seleccionar
Salir
Page 92

Cambiar contraseña
Sist. de Bloqueo
Loque de la entrada
Evaluacion de EE.UU.
Evaluación de Canadá
No Clasificada
Encendido
Apagado
CanalesBioqueoOpcionesHoraAudioImagen
OK
TV UnLock
YPbPr/AV
HDMI1
HDMI2
HDMI3
VGA
USB
UnLock
UnLock
UnLock
UnLock
UnLock
UnLock
CanalesBioqueoOpcionesHoraAudioImagen
Mover
Cambiar contraseña
Sist. de Bloqueo
Loque de la entrada
Evaluacion de EE.UU.
Evaluación de Canadá
No Clasificada
Mover
Cambiar contraseña
Sist. de Bloqueo
Loque de la entrada
Evaluacion de EE.UU.
Evaluación de Canadá
No Clasificada
Mover
Seleccionar
Encendido
Seleccionar
Encendido
Seleccionar
Apagado
Apagado
Salir
CanalesBioqueoOpcionesHoraAudioImagen
OK
Salir
CanalesBioqueoOpcionesHoraAudioImagen
OK
Salir
Mover
TV
MPAA
Mover
Inglés canadiense
Francés canadiense
Mover
Seleccionar
Seleccionar
Seleccionar
N/A
Apagado
Apagado
Salir
CanalesBioqueoOpcionesHoraAudioImagen
Salir
CanalesBioqueoOpcionesHoraAudioImagen
Salir
Page 93
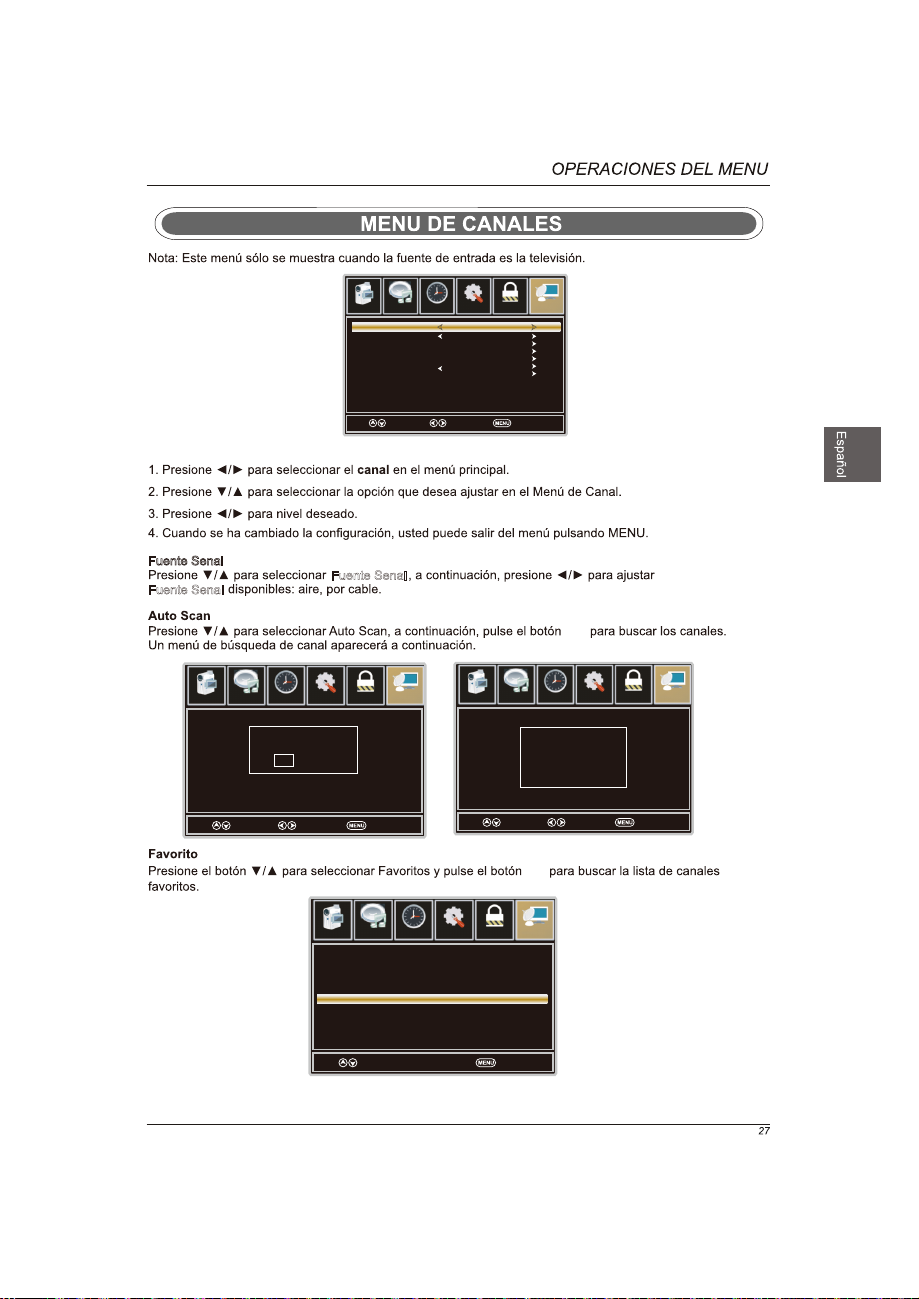
fuente señal
Busqueda auto
Favoritos
Lista Canelas
Mostr/Ocult
Numero Del Cauce
Sigila de Canelas
Aire
Apagado
14-1
ATSC-1
CanalesBioqueoOpcionesHoraAudioImagen
Fuente Senal
Fuente Senal
es usted seguro to Auto Sca...?
No Si
Mover
Seleccionar
Canales
3-0
6-0
11-0
14-1
14-2
14-3
Mover
Fuente Senal
CanalesBioqueoOpcionesHoraAudioImagen
Salir
Canales Name Favoritos
ATSC-1
ATSC-2
ATSC-1
Seleccionar
Mover
Salir
OK
CanalesBioqueoOpcionesHoraAudioImagen
OK
Analog
Digital
Canales RF
Encontrado
Seleccionar
: 0
: 0
: 3
: 0
CanalesBioqueoOpcionesHoraAudioImagen
Salir
Mover
Press “OK” change
Salir
Page 94

Canales
3-0
6-0
11-0
14-1
14-2
14-3
Canales Name Favoritos
ATSC-1
ATSC-2
ATSC-1
Press “OK” change
Mover
OK
CanalesBioqueoOpcionesHoraAudioImagen
Salir
OK
OK
CanalesBioqueoOpcionesHoraAudioImagen
A T S C - 2
Mover
Seleccionar
Salir
28
Page 95

Image
Audio Tiempo Ajuste Cerradura Canal
Idioma
OSD Timeout
Config. de VGA
Otras Escenas
Restablecer
Espanol
30Seg.
Image
Audio Tiempo Ajuste Cerradura Canal
H-Po s
V-Pos
ReIoj
Rase
Automatico
OK
Mover Select Volve r
Mover Selec t Volver
OK
AUDIO
son
29
Page 96

MENÚ de USB
Nota: Antes de utilizar el menú Media, Conecte el dispositivo USB y pulse el botón SOURCE para ajustar
la fuente de entrada a los USB de comunicación.
Pulse ◄ / ► para seleccionar los USB de comunicación en el menú Fuente, a continuación, pulser
OK para entrar.
M-JPEG
Pulse ◄ / ► para seleccionar la opción que desea ajustar en el menú principal de Media, a continuación,
pulse OK para entrar.
JPEG Menú
Pulse ◄ / ► para seleccionar JPEG en el menú principal, luego pulse OK para entrar.
Presione el botón EXIT para volver al menú anterior.
M-JPEG
Pulse ◄ / ► para seleccionar el disco duro que desea ver y pulse OK para entrar.
Pulse ◄ / ► para seleccionar la opción de regreso para volver al menú anterior.
30
Page 97

Pulse ◄ / ► para seleccionar el archivo que desea ver en el menú de selección de archivo, a continuación,
pulse el botón OK para mostrar la imagen.
Al resaltar la opción que seleccione, aparecerá la información de la foto a la derecha y la imagen será visto
de antemano en el centro.
M-JPEG Menú
Pulse ◄ / ► para seleccionar M-JPEG en el menú principal, luego pulse OK para entrar.
Pulse el botón EXIT para volver al menú anterior.
M-JPEG
Pulse ◄ / ► para seleccionar el disco duro que desea ver y pulse OK para entrar.
Pulse ◄ / ► para seleccionar la opción de regreso para volver al menú anterior.
Al resaltar la opción que seleccione, aparecerá la información de la foto de la derecha y de la película
será visto de antemano
en el centro.
Pulse OK para reproducir la película seleccionada.
Pulse de pantalla para mostrar el menú de selección en la parte inferior.
Pulse ◄ / ► para seleccionar el menú en la parte inferior que desea ejecutar y pulse el botón
OK para operar.
31
Page 98

32
Page 99

/Salida
Audio - salida
47.6
1920x1080
120 W
PAL/NTSC
8
JPEG, M-JPEG
1097 x 711 x 257 mm
1097 x 644 x 90 mm
13
19.5
33
 Loading...