

Page 1

USER’S MANUAL
MANUEL DE L’UTILISATEUR
MANUAL DEL USUARIO
CW50T9XW
Page 2

CONTENTS
English
SAFETY
1
PRECAUTION
IMPORTANT
SAFETY
2
INSTRUCTION
ACCESSORIES
3
GETTING
4
STARTE D
CONTROL
5
REFERENCE
GUIDE
CONNEC TIONS
6
Remote Con trol
Front View
Back View
Side View
Antenna Co nnection
AV Connection
Y Pb Pr Connection
HDMI Conne ction
VGA Connect ion
Headphon e Connection
Power Cord C onnection
Coax(SPD IF) Connection
1
2
3
3
4
5
5
6
7
7
8
8
9
9
9
10
WALL MOUNT
7
INSTAL LATION
INITIAL SETUP
8
TV SETUP
9
Putting The Unit On A Proper Place
Turning The U nit On For The First Time
Source sel ection
Main menu
Picture Me nu
Sound Menu
Channel Me nu
Parental C ontrol
Setup Menu
Other Menu
11
12
12
14
14
16
20
22
25
29
31
Page 3

CONTENTS
10
11
12
DI S P LAY
MO D E
SP E C IFICA T I O N
TR O U BLESH O O TING
GU I D E
PC Formats
Video Formats
TV Symptom
32
33
34
35
SAFETY CLASS :This is an IEC safety class I product
and it must be grounded for safety.
Page 4
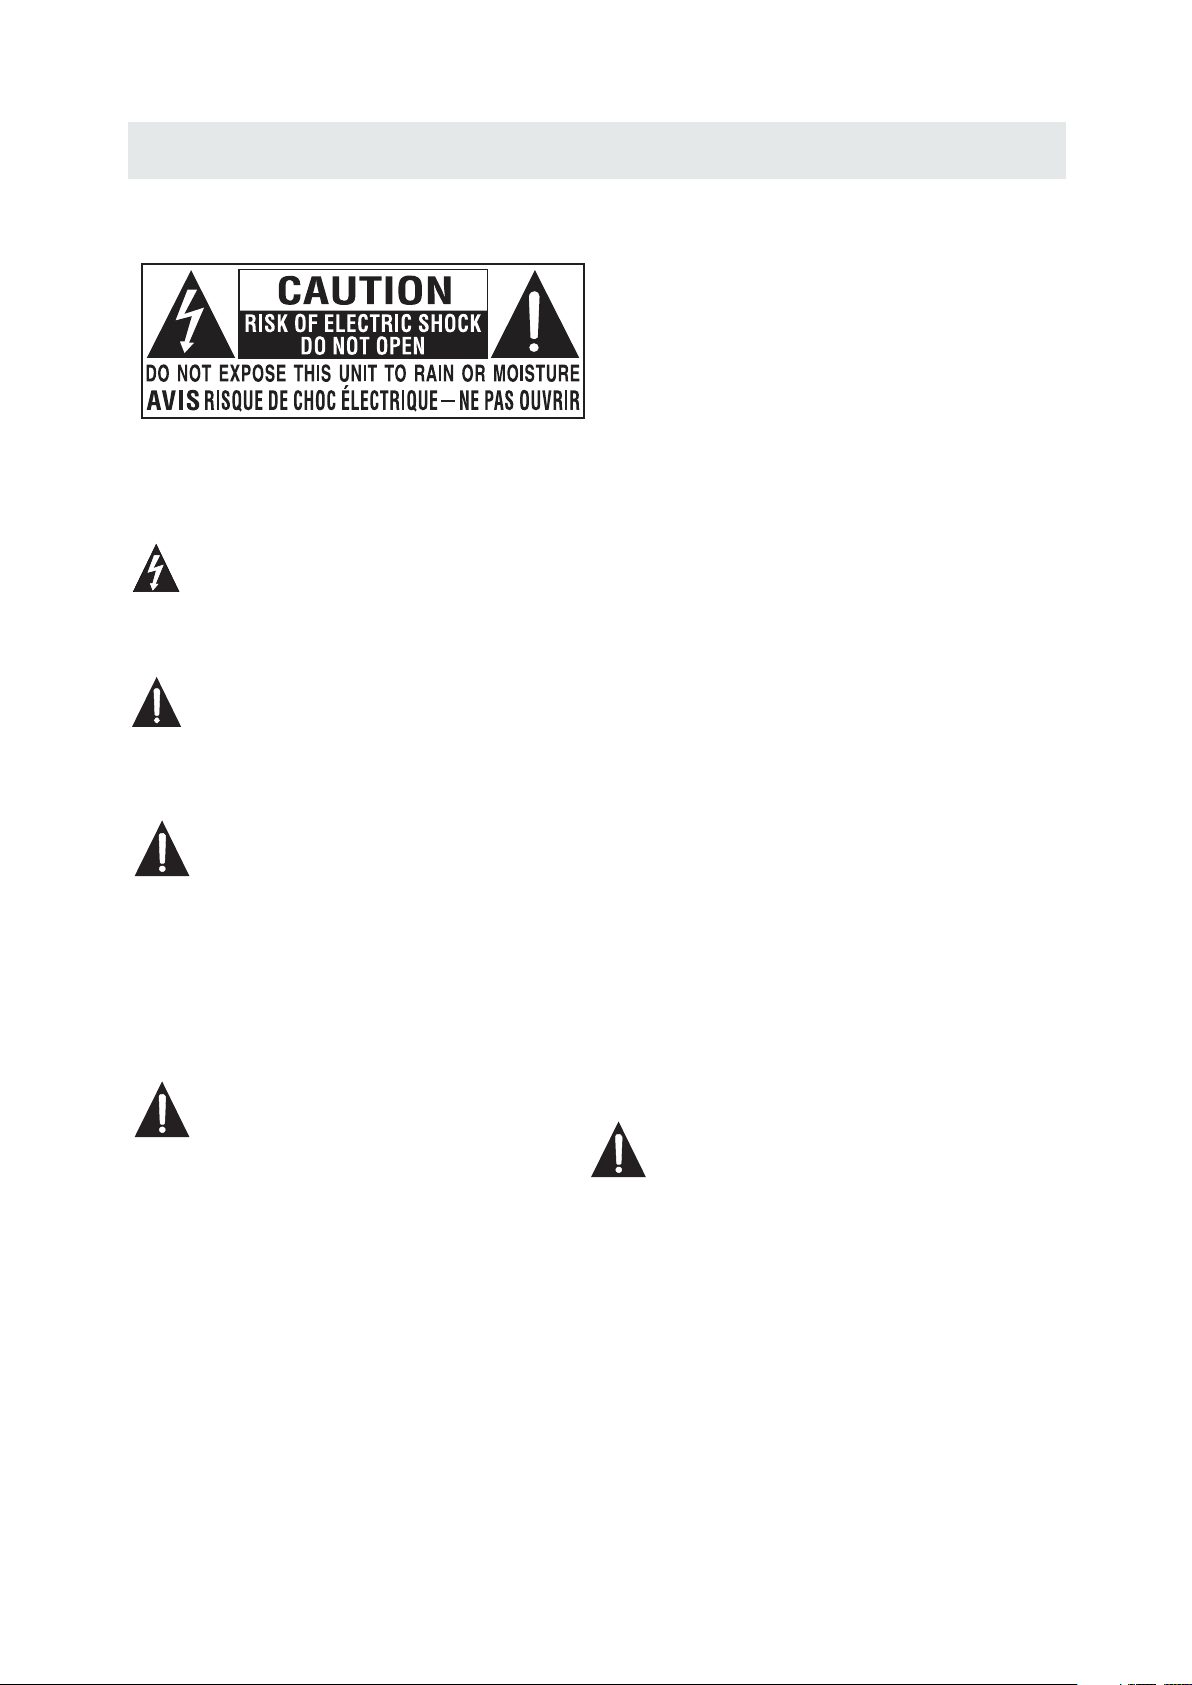
SAFETY PRECAUTION
CAUTI ON MA RKI NG WAS LOCA TED A T THE REAR
*
OF THE AP PAR ATU S.
WARNING: TO REDUCE THE RISK OF ELECTRIC
SHOCK,DO NOT REMOVE COVER(OR BACK)
NO USER SERVICEABLE PARTS INSIDE.
REFER SERVICING TO QUALIFIED SERVICE
PERSONNEL.
The lightning flash with arrowhead symbol,
within an equilateral triangle,is intended to
alert the user to the presence of uninsulated
“dangerous voltage”within the product's enclosure
that may beof sufficient magnitude to constitute a
risk of electric shock to persons.
The exclamation point within an equilateral
Triangle is intended to alert the user to
The presence of important operating and
maintenance (servicing) instructions in the literature
accompanying the appliance.
CAUTI ON
•
DANGE R OF EX PLO SION IF BATTER Y IS
INCORREC TLY R EPLACED . REP LAC E ONLY
WITH THE SAM E OR EQ UIVALENT TYP E.
•
USE OF CONTR OLS O R ADJUSTMENT S OR
PERFORMA NCE O F PROCEDURES O THE R
THAN THOSE S PEC IFIED MAY RESU LT IN
HAZAR DOU S RAD IATION EXPOS URE .
WARNIN G:
TO REDUCE TH E RIS K OF FIRE OR ELECT RIC
•
SHOCK , DO NO T EXP OSE THIS APPLI ANC E TO
RAIN OR MOIS TUR E.
TO REVENT FI RE OR S HOCK HAZARD, D O NOT
•
EXPOSE THI S UNI T TO RAIN OR MOIST URE . DO
NOT PLACE OB JEC TS FILLED WITH L IQU IDS ON
OR NEAR THIS U NIT .
•
SHOUL D ANY T ROU BLE OCCUR , DIS CON NECT
THE AC POWER C ORD A ND REFER SERVI CIN G
TO A QUALIFI ED TE CHNICIAN.
PL ACEM ENT INF ORMATION
•
Do not us e thi s uni t in places t hat a re ex tremely
hot, cold, d ust y or humid.
•
Do not re str ict t he airflow of th is un it by placing it
somew her e wit h poor airf low , by co vering it w ith
a cloth , by pl aci ng it on bedd ing o r car peting.
SA FETY INFORM ATIO N
•
When co nne cti ng or disco nne cti ng the AC pow er
cord, grip t he pl ug and not the cor d its elf. Pulling
the cord may d ama ge it and cre ate a h aza rd.
•
When yo uar e not g oing to use t he un it fo r a long
perio d of ti me, d isconne ct th e AC po wer cord.
RATING PL ATE LOC ATION
The rating p lat e is locate d on th e rea r of the unit.
FCC STATEME NTS
NOTE: This u nit h as been tested a nd fo und to comply
with th e lim its f or a Class B digit al de vice, pursua nt
to Part 15 of th e FCC R ules. These li mit s are designed
to provide r eas onable pr ote cti on agains t har mfu l
inter fer enc e in a reside nti al in stallat ion .
This un it ge ner ates, use s and c an ra diate rad io
frequ enc y ene rgy and, if n ot in sta lled and us ed in
accor dan ce wi th the inst ruc tio ns, may cause ha rmf ul
inter fer enc e to radio co mmu nic ation. Ho wev er, t here
is no gua ran tee t hat inter fer enc e will not oc cur i n a
parti cul ar in stallat ion . If th is unit does cau se ha rmful
inter fer enc e to radio or tele vis ion recep tio n, wh ich
can be de ter min ed by turni ng th e uni t off and on, the
user is e nco ura ged to try to corr ect t he interfere nce
by one or m ore o f the f ollowin g mea sur es:
- Reori ent o r rel ocate the r ece ivi ng antenn a.
- Increase t he se paration bet wee n the unit an d
recei ver .
-Conn ect t he un it into an ou tle t on a ci rcuit differ ent
from that to w hic h the receiver i s con nected.
- Consu lt th e dea ler or an exp eri enc ed radio/ TV
techn ici an fo r help.
WARNING :
Chang es or mo dificat ions t o this
unit no t expr essly app rove d by the part y resp onsible
for com plia nce could v oid th e user auth orit y
to oper ate th e unit.
1
Page 5

IMPORTANT SAFETY INSTRUCTIONS
1)Read t hes e ins tructio ns.
2)Keep t hes e ins tructio ns.
3)Heed a ll wa rni ngs.
4)Foll ow al l ins tructio ns.
5)Do not u se th is ap paratus n ear w ate r.
6)Clea n onl y wit h a dry cloth .
7)Do not b loc k any v entilat ion o pen ings.
Install in a cco rdance wi th th e
manuf act ure r's instr uct ion s.
8)Do not i nst all n ear any hea t sou rce s such
as radi ato rs, h eat regis ter s, st oves, or
other a ppa rat us (Inclu din g amp lifiers ) tha t
produ ce he at.
9)Do not d efe ct th e safety pu rpo se of t he
polar ize d or gr ounding -ty pe pl ug.
A polar ize d plu g has two bla des w ith o ne
wider than t he ot her.
A groun din gty pe plug has t wo bl ade s
and a thi rd gr oun ding pron g.
The wid e bla de or t he third pr ong i s
provi ded f or yo ur safety .
If the provi ded p lug does no t fit i nto y our
wall ou tle t, co nsult an el ect ric ian for
repla cem ent o f the obsol ete o utl et.
10)Pro tec t the p ower cord f rom b ein g walked on
or pinched p art icularl y at pl ugs , conveni enc e
receptac les , and the poi nt wh ere t hey exit
from the app ara tus.
11)Onl y use a tta chments / a cce sso ries spec ifi ed
by the manuf act urer.
12)Use o nly w ith t he cart, st and ,
tripod, br ack et, or tabl e
specifie d by th e manufac tur er,
or sold with t he ap paratus .
When a cart is u sed , use cauti on wh en
moving the c art / a pparatu s com bin ation to
avoid inju ry fr om tip-ov er.
13)Unp lug t his a pparatu s dur ing l ightnin g
Storms or wh en un used for lo ng pe rio ds of
time.
14)Ref er al l ser vicing to q ual ifi ed servic e
personne l. Se rvicing i s req uir ed when the
apparatu sha s been dama ged i n any w ay,
such as the po wer c ord or plug i s dam age d,
liquid has b een s pilled or o bje cts h ave falle n
into the app ara tus, the ap par atu s has been
exposed to r ain o r moistur e, do es no t operate
normally , or ha s been drop ped .
15)To pr eve nt el ectric sh ock , ens ure the gro und ing
pin on the AC co rd po wer plug is s ecu rel y
connecte d.
2
Page 6

ACCESSORIES
Pl ease check an d ident ify the sup plie d acces sori es.
Remote con tro l ... .......... ... ... .......... ... ... .......... ... ... ... .......... ... ... .......... ... ... .......... ... ... .......... ..
Remot e con trol
x 1
Batte ry( AAA )
Warra nty C ard
Instr uct ion M anual
..... .... .... .... ... .... .... .... ... .... .... .... ... .... .... .... ... .... .... .... ....... .... .... ....... .... .... . ..... ....
..... .... .... .... ... .... .... .... ... .... .... .... ... .... .... .... ....... .... .... ....... .... .... ....... .... .... .....
..... .... .... .... ... .... .... .... ... .... .... .... ... .... .... .... ... .... .... .... ....... .... .... ....... .... ....
Base sta nd and 6 sc rews
Screw dr iver
..... .... .... .... ... .... .... .... ... .... .... .... ... .... .... .... ....... .... .... ....... .... .... ....... .... .... .... .
..... .... .... .... ... .... .... .... ... .... .... .... ... .... .... .... ... .... .... .... ....... .... ...
x 2
x 1
x 1
x 1
x 1
GETTING STARTED
Installing Batteries to the Remote Control
Pleas e inse rt two AAA batt erie s into the re mote c ontrol. Make su re that you match t he (+) a nd (-) symb ols on
the bat teri es with the ( +) and ( -) symbol s insi de the battery co mpartment. Aft erwa rds, re-a ttac h the batte ry
cover.
Pleas e note :
Only u se AAA batter ies.
Do not m ix new and ol d batt eries. This ma y resu lt in crack ing or l eakage th at may p ose a fire risk or
lead to p erso nal injur y.
Inse rting the b atte ries inco rrec tly may also resu lt in cr acking or l eaka ge that may p ose a fi re risk or
lead to p erso nal injur y.
Disp ose the bat teri es in accordanc e with local laws a nd reg ulation s.
Keep t he batter ies aw ay from chi ldre n and pe ts.
If the r emote con trol i s not used fo r a long t ime, remove the b atteries.
Keep t he remote c ontr ol away fro m mois ture, sunligh t, and h igh tempe ratu res.
WARNI NG :
Do not dispo se ba tteries i n a fir e. Batter ies m ay explode or le ak.
Batterie s sha ll not be exp ose d to excess ive h eat such as s uns hin e, fire or th e lik e.
3
Page 7
CONTROL REFERENCE GUIDE
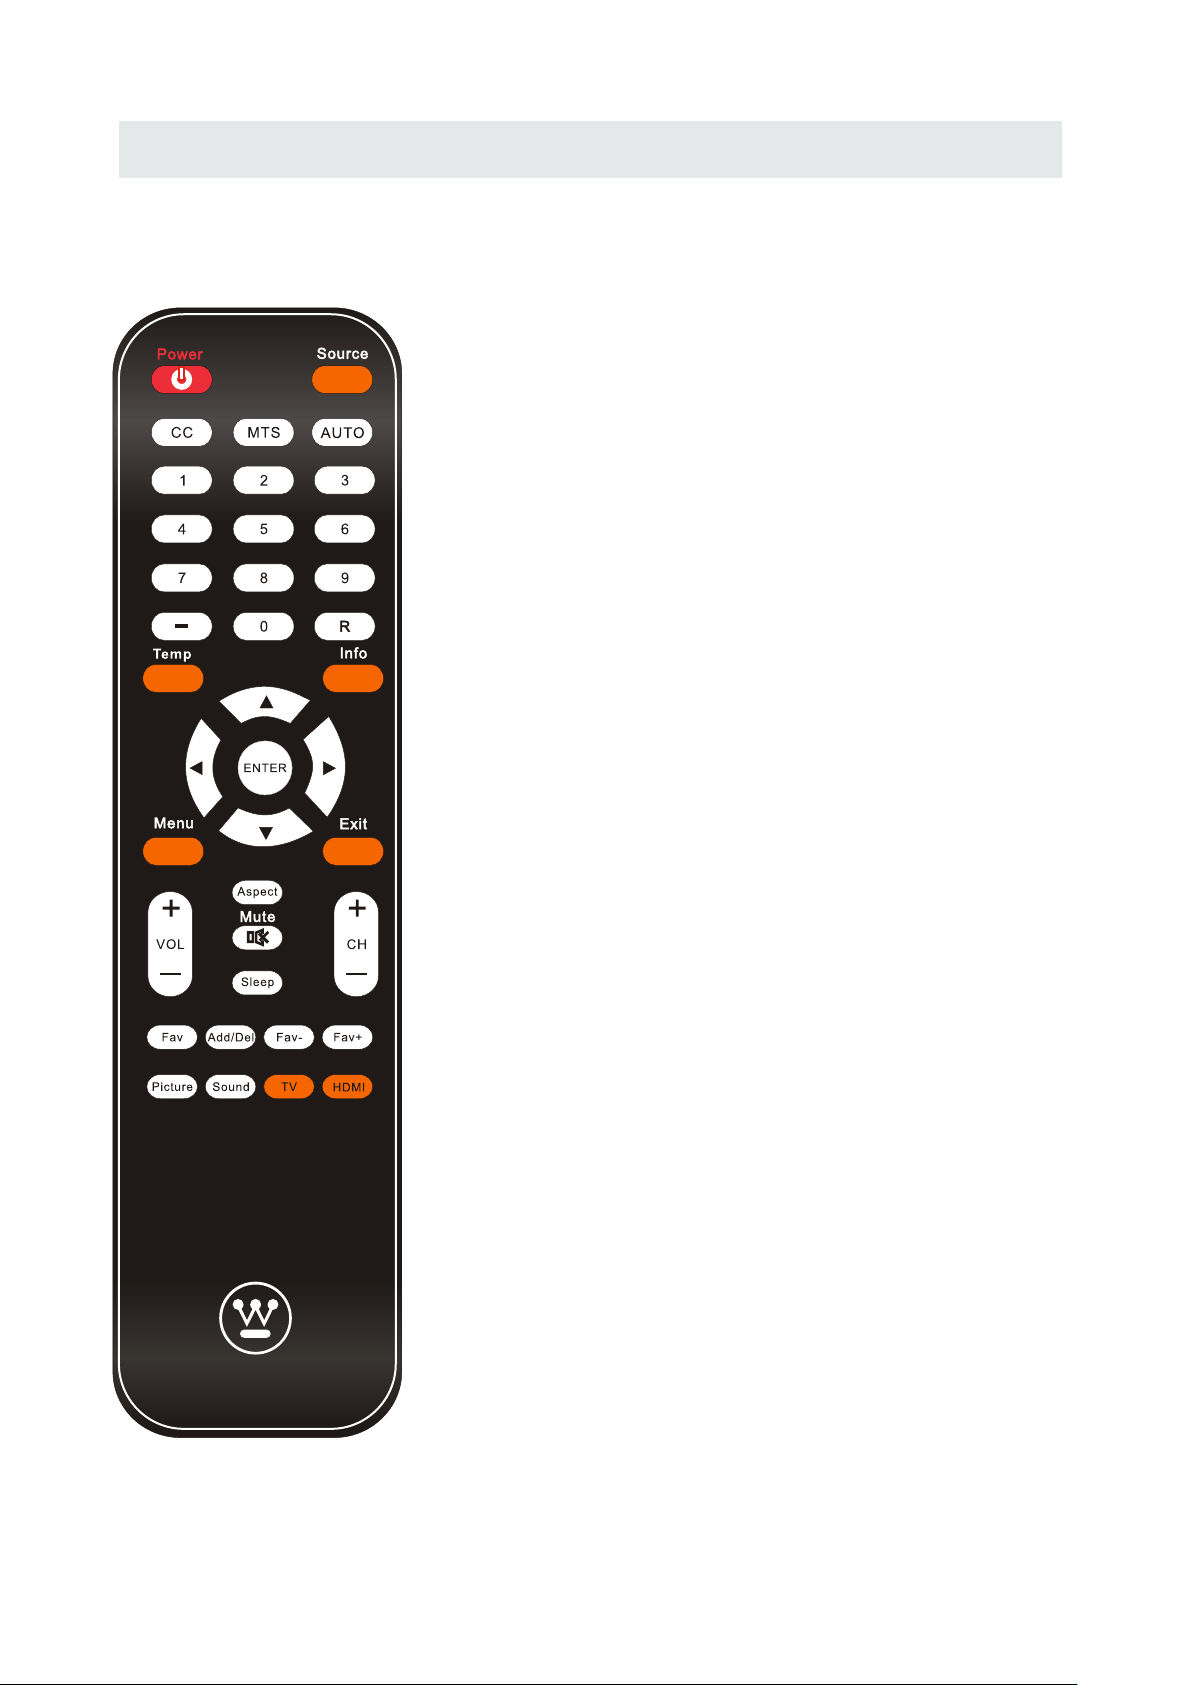
REMOTE CONTROL
1.POW ER Turn s the TV on or o ff.
2.SOU RCE Pr ess this bu tton t o cycle thr ough t he INPUT sourc e.
3.CC Cy cles b etween di ffe rent closed cap tion ing modes .
4.MTS S elec ts stereo , mono , or second a udio p rogramming.
5.AUTO Pre ss this but ton to a utoadjust the s cree n size on PC mo de.
6.NUM BER BU TTONS (0 -9) Pr ess 0-9 to select a TV cha nnel dire ctly
when yo u are wa tching TV. The cha nnel w ill chang e afte r 2 seconds .
7.(-) I nser ts the dash f or sel ecting di gita l channels dire ctly.
8.R Ret urns t o the previ ous ch annel.
9. Temp This bu tton i s for selec t for th e color tem pera ture.
10. INF O Show s the displ ay inf o.
11.▲/ ▼/◄/ ►/ENTER Thes e directional b utto ns allow yo u to mov e
aroun d in the TV's menu. Pres s the ENTER butto n when y ou want to se lect
a parti cula r option.
12.ME NU Bri ngs up the ma in TV m enu on the screen .
13.EX IT Ex it the main TV men u on the s creen.
14.VO L(+) /VOL(-) P ress t he VOL button s to inc rease or de crea se the
sound l evel .
15.AS PECT Press thi s butt on to change the pi ctur e's cropp ing me thod.
16.MU TE Turn s the sound o ff fr om the TV. To un-mute e ithe r press
VOL(+ ) or pre ss the MUTE b utto n again
17.SL EEP Turns the TV off in a s peci fic set of ti me dep endent on your
selec tion .
18.FAVORIT E Gives you y our li st of favor ite ch annels.
19.AD D/DE L Adds or Delete s curr ent chann el fro m the favor ite li st.
20.FAV(-) Pr ess this bu tton t o change to the pre viou s favorit e chan nel.
21.FAV(+) Pr ess this bu tton t o change to the nex t favorite chan nel.
22.PI CTUR E Selects v ario us preset p ictu re settings.
23.SO UND - Se lects var ious p reset sou nd set tings.
24.TV This b utton sel ect th e source TV.
25.HD MI Th is button s elec t the source from H DMI1 t o HDMI3.
4
Page 8
CONTROL REFERENCE GUIDE
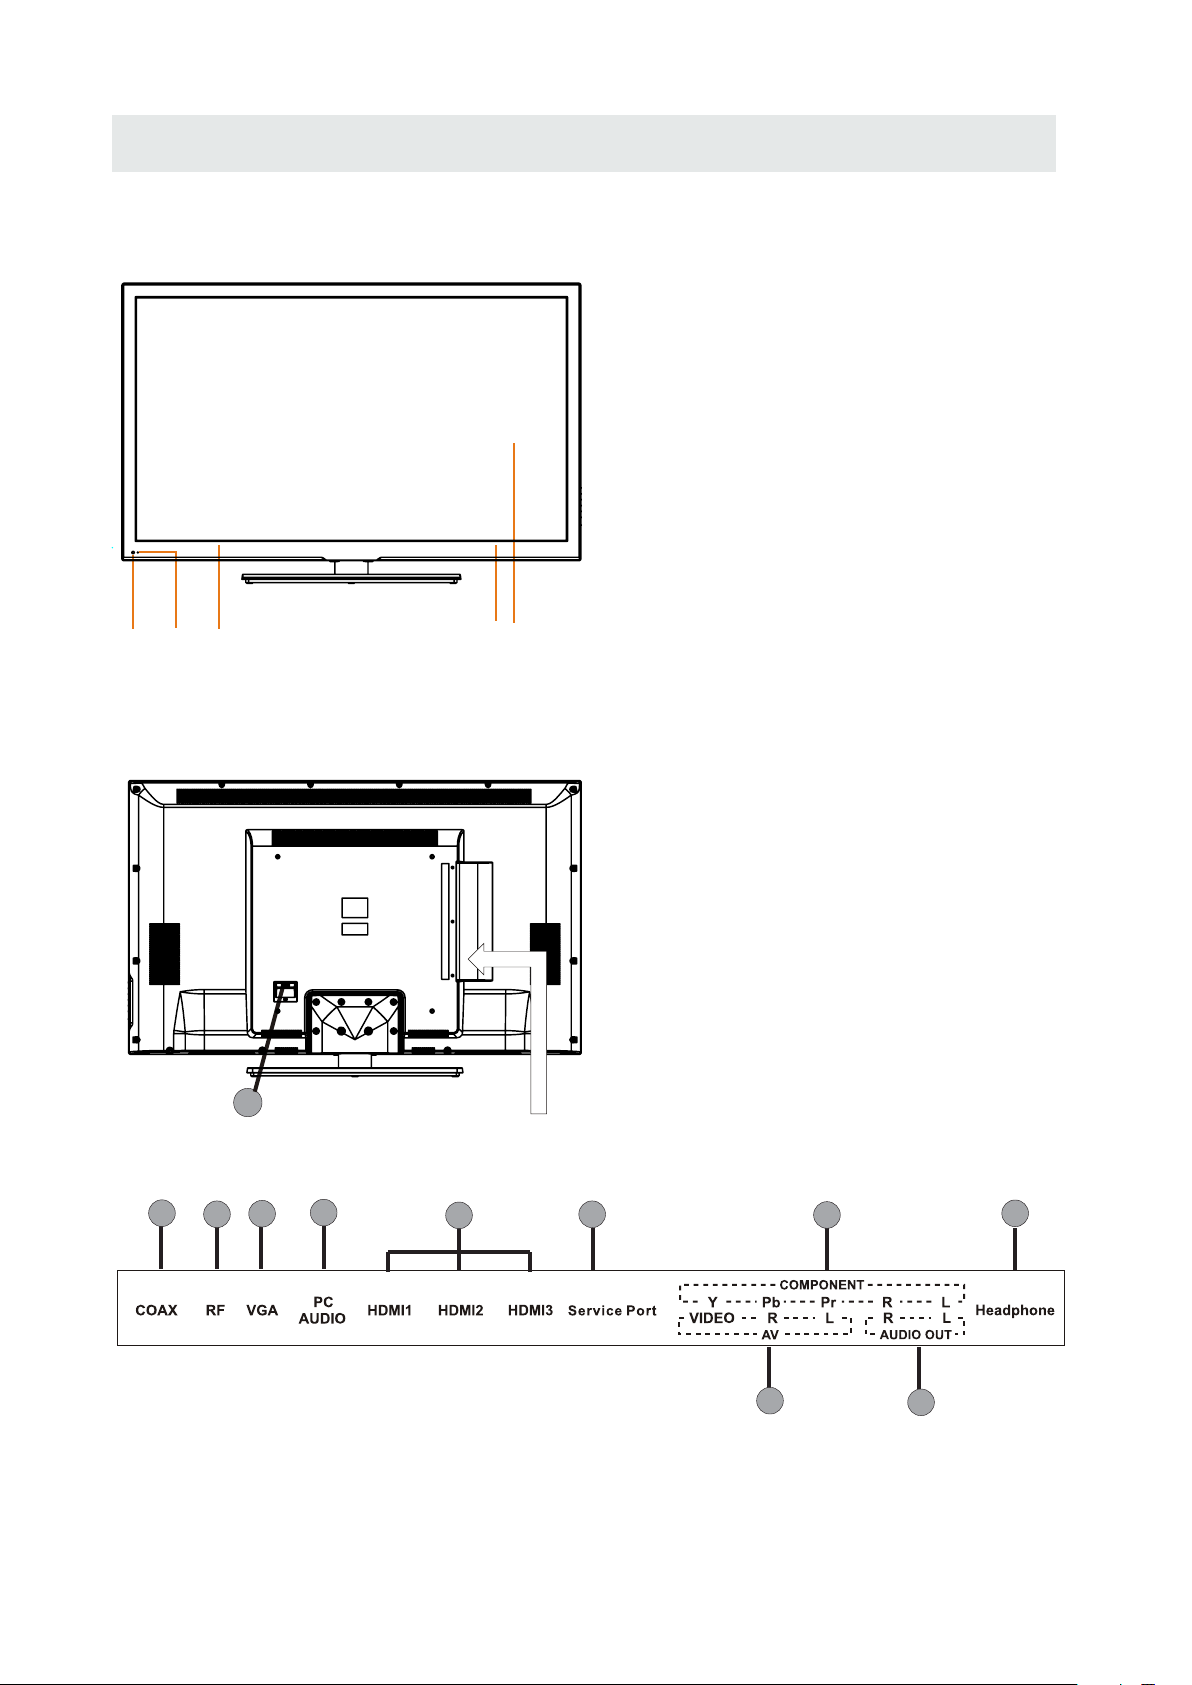
FRONT VIEW
1.Color Screen
2.Remote Sensor
Do not block this sensor or the
remote control will not work.
3.Standby Indicator
Indicates whether the unit is ON
or in STANDBY (OFF) mode.
Light in red: The unit is in STANDBY.
Light in blue:The unit is turned ON.
4. Speakers
2
3
BACK VIEW
1
2
4
3
5
44
1
1.Power cord
2.Coax OUT Jack
3.TV ANTENNA Term inal
4.VGA IN Jack
5.PC AUDIO IN Jack
6.HDMI IN Jack
7.Service Port
8.COMPONENT IN Jack
9.AV (VI DEO/ AUDIO R/L) IN
10.AUDIO OUT Jack
(Audio out- This connection i s for sending out
analog audio sig nal to the 2nd equipment .Red
is for Right Chann el, white is for Left Channel.)
11.Headphone Jack
6
7
8
11
9
5
10
Page 9
CONTROL REFERENCE GUIDE
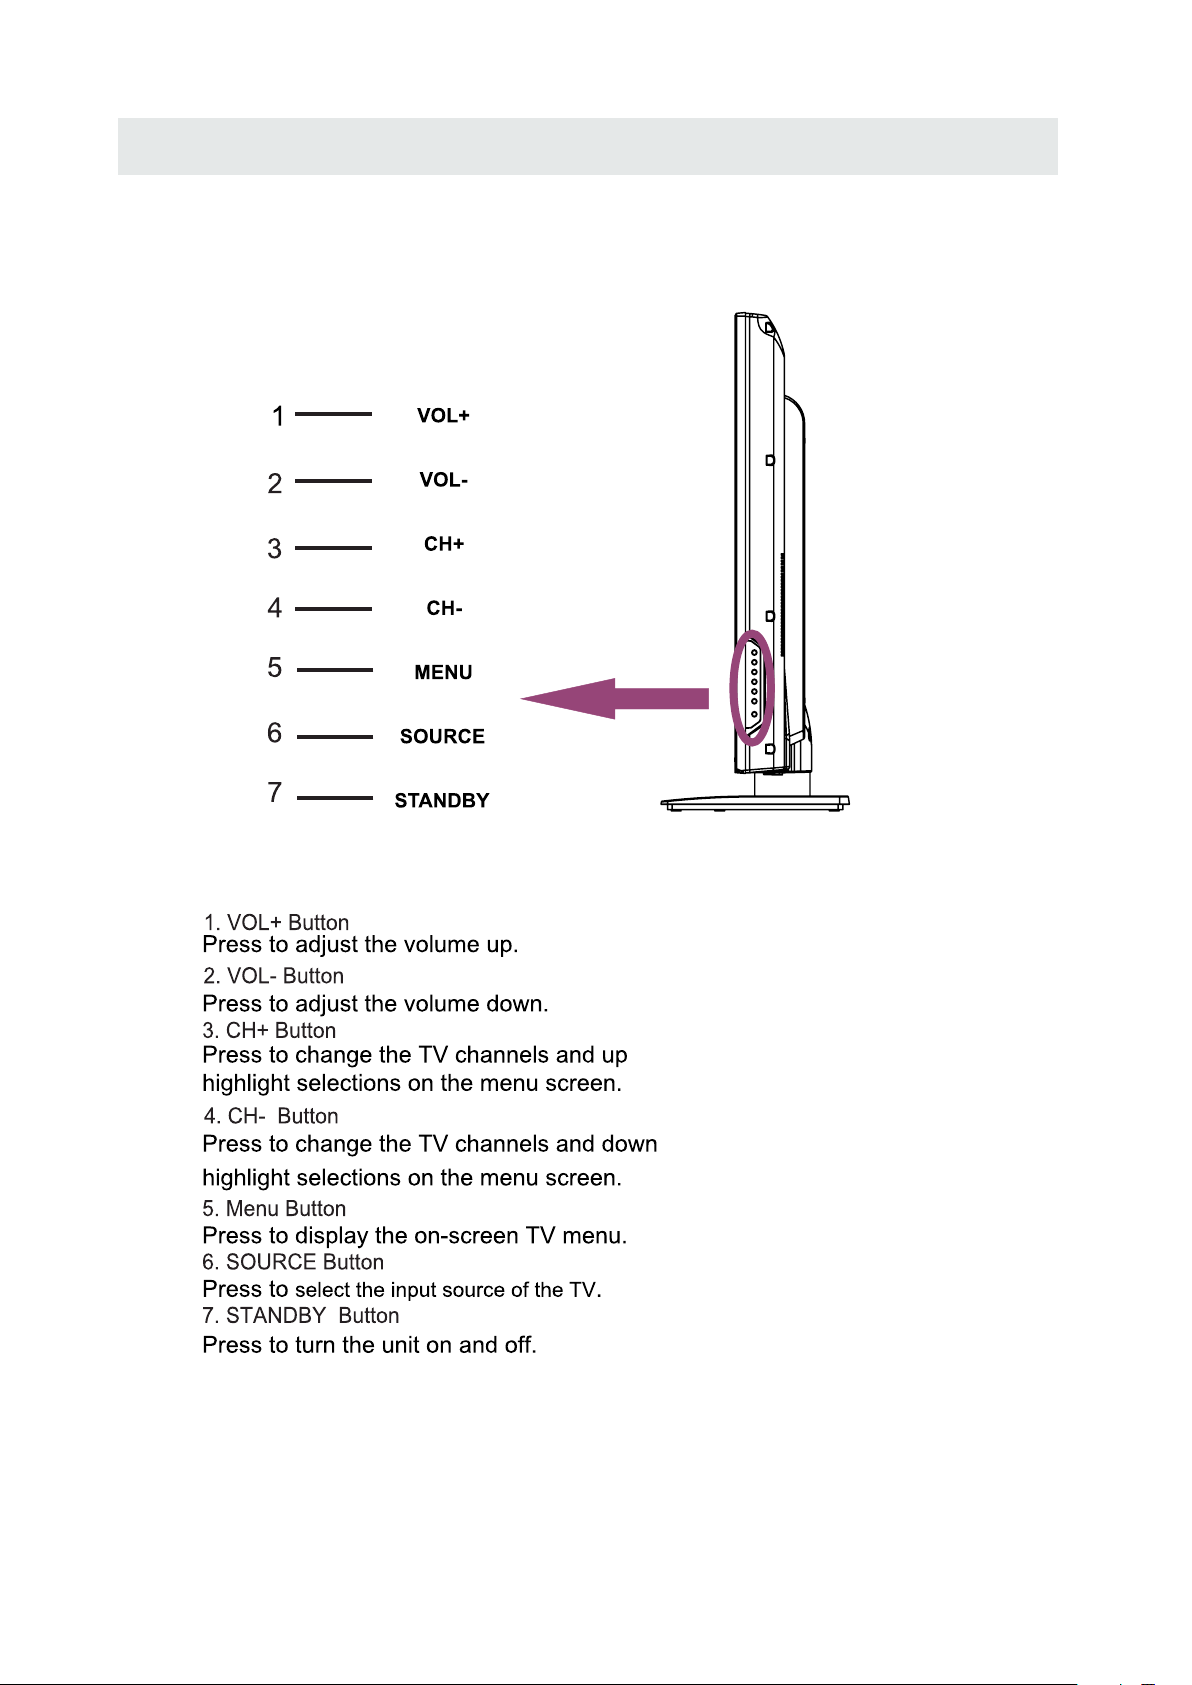
SIDE VIEW
6
Page 10
CONNECTIONS
CONNECTING A TV ANTE NNA / CABL E / S A TELLITE
To vie w telev ision cha nnels co rrect ly, a signa l must
be received from on e of the foll owing so urces :
- An indoor or outdoor aer ial ante nna
- A ca ble sys tem
- A sa telli te syst em
NOTE
Fo r recei ving ove r-the- air TV broa dcast s, we
recomm end that you use an exter nal fixed ante nna.
Sh ould yo u requ ire th e use of a temporar y antenn a,
pl ease ens ure that you purchase an antenna with
su ffici ent ability to rec eive in wea k signal areas.
On ly when y ou are i n close proxi mity to a t ransmitter
wi ll a temp orary anten na reproduce a sig nal as
st rong ly as a fixe d antenn a.
CONNECT ING AN A/V DE VICE
To con nect to other equip ment suc h as a VCR, camc orde r, sate llite sy stem or cab le, etc .
Sa tel lite, cabl e or TV an tenn a
ca ble to T V ANTENNA
termi nal (cable no t inclu ded)
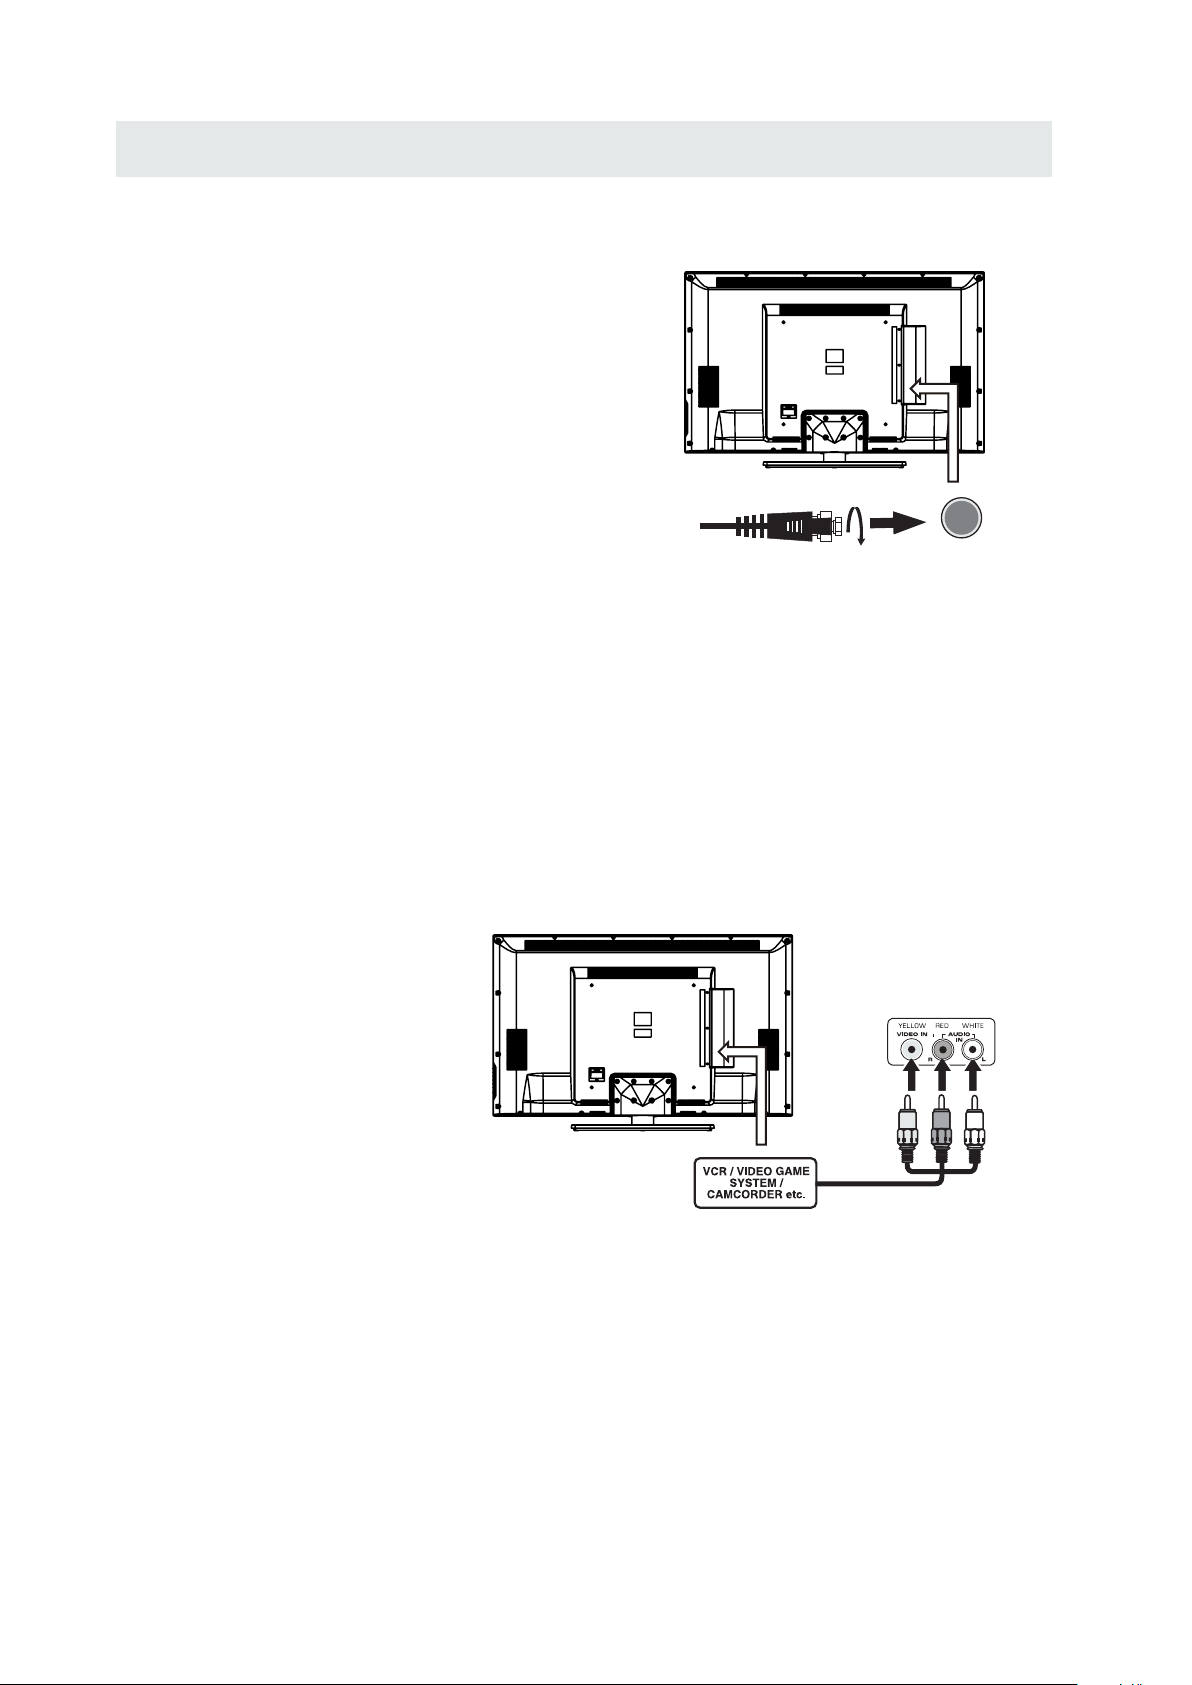
CONNECT ING DEVI CES WITH A COMPOSI TE (YELLOW RCA -T YPE)
VI DEO OUTP UT
To con nect A/V d evice s such as a VCR, vi deo game s yste m or camco rder.
Co nnect ing to a VC R / Video Game Syste m / Camcorder
Co nnect th e AUDIO / VI DEO cabl e (not inclu ded) as sho wn.
Ma ke su re you c onnect t he cabl e from th e other e quipme nt ( and ) to this un it
AUDIO VI DEO OUT
(AV in)
NOTE
Pl ease refer to t he user m anual
fo r the oth er equip ment fo r
mo re info rmatio n.
To AU DIO / VID EO
OU T jac ks
To AUDIO / VID EO
IN j ac ks
7
Page 11
CONNECTIONS
CONNE CTI NG A HIGH -DE FINI TIO N (HD) SOU RCE US ING CONN ECTI ON
High- Definit ion (H D) Devices wi th com pone nt vid eo outp ut mus t be connected to the Y input .
Conne ct the co mpon ent vi deo cable and au dio cable (no t incl uded) as show n.
Ma ke sure you con nect t he co mpon ent vi deo ca ble an d audio cab le from the o ther e quip ment
(COMPONENT OUT and AUDIO OUT)to the unit COMPONENT IN.
COMPONENT
PbPr
NOT E
When conn ectin g a DVD play er to the television,
the pictu re res olution is solely depen dent upo n
the reso lutio n suppor ted by the DVD player attache d.
DVD playe r resol utions vary from 480i to 1080p.
and this televis ion can sup port DVD pla yers up to
a maximum resolu tion of 1080p.
* May require a subscription
COMPONENT IN
fo r receiv ing HD chann els,
ch eck with your cable /sate llite
se r vi ce provi der for deta ils.
To COMPONENT
VIDEO IN jacks
To CO MPON ENT
VI DEO OUT jac ks
To COMPONENT AUDIO
OU T jacks
To COMPONENT
AU DIO I N jacks
CONNE CTIN G A HIGH -DEF INIT ION (HD ) SOUR CE USING HDMI CO NNE CTIO N
HDMI (Hi gh Defi nit ion Mul time dia In terfa ce) suppor t s both vid eo and audio on a sin gle dig ital conne ctio n
fo r use wi th DV D players, DT V, set- top box es and o ther digi tal AV de vice s. HD MI was d evel oped to provid e
the tech nol ogie s of High Ba ndwidth Di gita l Cont ent Prote ctio n (HDC P) as well as D igit al Visu al Interfac e
(D VI) in one sp ecif icat ion. H DCP is used t o pro tec t digi tal conte nt tra nsmitte d and recei ved b y
DVI-c ompl iant or HDMIc ompl ian t displ ays.
HDMI has th e capa bili ty to sup port sta ndard, enhanc ed or high -de fini tion vi deo plus stan dard to
multi -cha nnel surro und -sou nd audi o. HDM I featu res in clud e unco mpresse d digi tal vid eo, a ba ndwidth of
up to 2.2 gigabyt es per sec ond (w ith HDTV sig nals ), one con nec tor (inste ad of severa l cables and
conne cto r s), and commu nica tio n betwe en the AV so urc e and AV dev ices su ch as DTVs.
Co nnect the H DMI ca ble (n ot inc luded) as
sh own :
Ma ke sure you con nect t he cab le from the
so urc e equip ment ( ) to this unit
( ).
HD MI IN
HDMI CABLE
(NOT INC LUDE D)
HD MI OUT
To HDMI
IN jack
To HDMI
ja ckOUT
8
Page 12
CONNECTIONS
CONNE CTIN G A
Co nne ct the 15- pin D-S UB PC/VGA co nnec tor
from you r computer to the 15-p in D-SU B PC/VGA
in put on th is unit us ing a mon ito r cable an d an
au dio ca ble (no t inclu ded) as sh own .
Ma ke sure you con nect t he cab le from th e c omp ute r
( an d ) to this unit
VGA
( and ).
VGA AUDIO - PC IN
AUDIO - P C OUT
PC
TO AUDIO OUT jacks
TO PC Connector
NOT E
• Inser t the powe r plug fully into the socket outlet
( ,
If the power plug is loose it could generate heat and
cause fire
•
Ensure tha t the p owe r plug is eas ily a cce ssible.
•
Ensure the e art h pin o n the power p lug i s sec urely
connected to preven t elec tri cal sh ock .
•
Do not touch t he power pl ug wit h a wet hand
( .)
This may cause electrica l shock
•
Do not use any power cord other than that provided
with this TV This may cause fire or electrical shock
•
Do not damage the power cord
( ).
A damag ed cord may caus e fire or electr ical shock
• Do not move the TV with the cord plugged in the
socket outlet.
• Do not place a heavy objec t on the cord or place
the cord near a high-temp erature object.
• Do not twist the cord, bend it excessively, or stre tch it.
• Do not pull on the cord. Hold onto the power plug bod y when disconnecting c ord.
• Do not use a damaged power plug or socket outle t.
.)
. ( .)
.
.
.
9
Page 13

CONNECTIONS
Connection to a Home Theater Audio System
For BEST audio performa nce
Connecting to a Ho me The ater Sy stem
Dolby Digital ca n deliver optimal 2 channel
stereo or surrou nd sound with five discrete
full range chann els plus a sixth channel for
a subwoofer.
Enjoy optimal so und reproduction from your
system with a Dolb y Digit al amplifier that
incorporates a d igital coaxial input. Conne ct
an optional digi tal cable directly to the
television’s Coax au dio out put to listen
through all inpu ts except VGA.
(The VGA does not supp ort dig ital audio)
SPD IF OUT
Coax
How To Set up Digital Output
Press the MENU but ton on th e remote control
Press the right ► ar row but ton to select SOUND
and Press ENTER to e nter th e submenu.
Press the down ▼ arr ow butt on to highlight
Digital Audio Out put and press ◄► to
change setting f rom PCM , Raw or Off.
10
Page 14

WALL MOUNT INSTALLATION
INSTALLING REMOV ING THE BASE STAND
WARNING/: The LCD Dis pla y is very f ragi le and m ust be p rotecte d at all t imes when r emov ing th e base
.
Stand
Be sure that no hard or sharp object or anything that could scra tch or damage the LCD displ ay comes into
contact with it Do NOT exert pressure on the front of the unit at any time because the screen could crack
. .
1 Disconnect all cab les or cords connected to the unit
. .
2 Lay the unit down on a f lat surface with the back side facing up Plea se make sure to plac e a sof t
cushioned material such as a pillow or thick piece of foam beneath the screen
3 To remove the base stand loosen screws off the holes then pull downwards to release
. ,
the ba se stand
. .
.
,
MO UNT ING ON THE WALL
This unit is VESA-com pliant, and is designed to be wall-mounted with a VESA-compliant 16”x 16 ”
(400mm x 400mm) mounting kit desig ned for fl at-panel TVs ( not supplied). Mount this unit according to
the instructions included in the mounting kit.
Length of screw sh ould not exceed 14 mm.
NOTE
Remo ve the ba se sta nd befo re mou ntin g the unit on th e wall.
16”
16”
M6
11
Page 15

INITIAL SETUP
PUT TING THE UNIT ON A PROPER PLACE
Wh en you tur n on your television set fo r
th e first ti m e, be sure to plac e it on a soli d
st able surfac e.
To avo id dange r, do not e xpose th e T V
to water, or a heat s o urce
(e .g. lamp, ca ndle, rad iator ).
Do not obstruc t the ventil ation gri d
at t he rear a nd be sure to leave suffic ient
ga ps aroun d the unit.
TUR NING THE UNIT ON FOR THE FIRST TIM E
Af ter you have initially conn ected your TV
antenna or cab l e,
tu rn the televisi on ON.
Foll ow t his gui de t o he lp yo u se t up y our TV. Use t he U p and
A guide will displa y to help you set up your TV.
Down a rr ows on yo ur r em ote c on tr ol and se le ct the La ng uage
you wa nt t o us e for m en us a nd me ss ag e scree ns .
Select Languag e
Follow this guid e to help you set up your TV.
Use the Up and Down ar rows on your remote
control and sele ct the La nguage you want to
use for menus and me ssage s creens.
Use the left or righ t key to se lect on you
time zone.
Use the up/down ke y arrows on you remote
control to selec t
power on mode.
Home optimizes t he vide o setting for
ENERGY STAR®
qualificatio n.
Engl ish Enter
Fren ch Ent er
Span ish Ent er
Time Zone
Use th e le ft o r rig ht k ey t o sel ec t on y ou time z on e.
Tim e Zon e Atlantic
Next
Power On Mode
Use th e up /d own k ey a rr ows o n yo u re mote co nt rol to se le ct
powe r on m ode.
Home o pt imize s th e vi deo s et ti ng for EN ER GY STAR ®
qual if icati on .
Reta il o ptimi ze s th e vid eo s et ting fo r us e on a reta il
show ro om floo r or d em o env ir on ment
Retail optimiz es the vi deo setting for use on
a retail
showroom floor o r demo environment
Home
Reta il
12
Page 16

INITIAL SETUP
What Connectio n are you u sing? For optimal vide o quality
We Recommend HDMI or Componen t Input.
Let’s Get Connected
Cabl e Box o r Sat ellite Box
Game , Blu -Ra y, DV D, or o ther playe r
Ante nna o r coa xial cable i npu t
Back
Cable or Satelli te Box In put
What C on necti on a re y ou us in g? F or opti ma l video q ua lity
We Re com me nd H DMI or Co mp onent I np ut. (Re fe r to
Quic k Co nnect o r Us er M anu al H el p)
Sour ce Se lec t TV
Skip
Next
Back
Press left or righ t butto n to selece the Source and d own button to select
Next, press ENTE R butto n to start scan the progra mme.
It will take a few mun ites.
Let’s Get Connected
Cabl e Box o r Sat ellite Box
Game , Blu -Ra y, DV D, or o ther playe r
Ante nna o r coa xial cable i npu t
Back
SOURCE LIST
TV
AV
YPbP r
HDMI 1
HDMI 2
HDMI 3
PC
Please Wait ...
Page 1 /2
:Sel ect
:Pag e
When you connect t he Play er, you can select this fun ction to select the Input Sourc e.
Let’s Get Connected
Cabl e Box o r Sat ellite Box
Game , Blu -Ra y, DV D, or o ther playe r
Ante nna o r coa xial cable i npu t
Back
When you connect t he Anten na, you can
choose this func tion an d select the channel
scan type.
After that , you can choose A ntenna[ATS C]
Please confirm y our antenna type is Air or Cable.
Wrong setting of Signal Type maybe cau se
finding no chann el.
and then it will sea rch analog channels first,
then digital cha nnels.
13
Page 17

INITIAL SETUP
1. Press the button on the remo te control.
2.
Us e or button to selec t the opti onsthe
(TV,AV,YPbP r, HDMI 1,HDMI2 ,HDM I3,PC)
and select any of them usin g t he button o r
the button.
ENT ER
(T he scre en will ch ange to y our desi red s ).
Note:
Be fore watchin g please make sure al l necessary
cables and devices are conn ected.
Main MENU
ource
Press MENU to disp lay the m ain menu or return to the pr evious menu or close the main men u.
Press ◄/► to high light the desired menu ico n, and press ENTER to select.
If no button s are pressed, the menu will close automatically after about 10 secon ds.
Main Menu Description
Picture Menu
Adjust you r picture settings.
The operat ions are slightly different among
different source.
Sound Menu
Adjust the s ound settings.
14
Page 18

TV SETUP
Ente r
Channel Menu
Customiz e your channel settings.
Parental Control Menu
Keyp ad L ock
Sour ce L ock
Set progra m rating control and input source
keypad loc k function.
Setup Menu
Select clo sed caption options, language
and time.
Ente r
Other Menu
Set the OSD bl ue background, whether auto
power off if no signal or no operation, clear
all user set tings, etc.
15
Page 19

TV SETUP
Picture Menu
Press ▲/▼ to highlight one of the followin g options, then press ENTER or ► to enter next
submenu to a djust it. Press EXIT to clear on-screen menu or MENU back to the previo us
menu.
Picture Settings
Adjust the p icture quality including brightne ss, contrast, color, tint, sharpness.
Screen Size
Press ◄/► to select the display aspect rat io till the picture is fit onto th e screen.
The operat ions are different according to different input source.
PC Settings
The item is av ailable only for PC DB15 input mode.
Color Temperature
Press ◄/► to select the color temperatur e that you feel comfortable.
Cool Gives whit e colors a blue tint.
Normal
Warm
Gives whit e colors a neutral tint.
Gives whit e colors a red tint.
Advanced Picture Settings
The Item is some special picture feature .
16
Page 20

TV SETUP
Picture Settings
When Pictu re Mode is set to User, the following setting can be manually adjusted.
Press PMOD E shortcut button on the remot e control to select picture mo de directly.
Picture Mo de
Highligh t the item and Press ◄/► to select S tandard/ Movie/ User/ Dyna mic.
Standard Produces a highly defined ima ge in a normally lit room.
Movie Produces a highly defined image in g entle lit room.
User Select to customize picture setting.
Dynamic Produces a highly defined image in a bright lit room.
Highligh t the item and press ►, and a process bar appears, then press ◄/► to adjust the value.
Tint is available when analog TV or NTSC-system AV.
Press MENU to back the Picture Settings me nu.
Brightne ss
Adjust dar kness of black sections in the p icture.
Contrast
Adjust the w hite level of the picture.
Color
Adjust the c olor intensity of the pictur e.
Tint
Adjust the h ue( Red, Green, Blue) of the pic ture.
Sharpnes s
Object edg es are enhanced for picture detail.
17
Page 21

TV SETUP
PC Settings
PC Setting s Menu is aviliable only in PC DB15 mode.
Press ▲/▼ to highlight one of the followin g options, then press ENTER to select it.
Auto Adjust
Automati cally adjust Clock, Phase, H-Position and V-position settings.
Horizont al Position
Shift the screen slightly to left or right .
Vertical Po sition
Shift the screen slightly up or down.
Clock
Adjust the D B 15 Picture signal sampling clock rate.
Phase
Adjust the D B 15 Picture signal sampling phase. It maybe affect the definitio n. Wrong value
maybe resu lt the interference.
Reset
Reset the pa rameters of current menu to de fault value.
18
Page 22

TV SETUP
Advanced Picture Settings
Press ▲/▼ to highlight the item and press EN TER or ► to display the submenu as f ollowing.
Dynamic Co ntrast Off/ On
The system w ill adjust the luminance curve by analyzing the picture content dyn amically.
Film Mode Off/ On
For the 2:2 or :2 format signal of cinema, ena ble special pixel process to reduce the flick of
moving are a.
Noise Redu ction Off/ Low/ Medium/ Hi gh
You can clear up ana log TV signal by reducing the dot noise . This feature is not available at
PC source.
MPEG Noise R eduction Off/ Low/ Mediu m/ High
Similar wi th the Noise Reduction, you can set to reduce the block noise.
19
Page 23

TV SETUP
Sound Menu
Sound Settings
Set the soun d mode, and Bass/ Treble/ Balance.
Surround Mode
Set to enjoy t he virtual surround sound. Press ENTER to set or cancel.
AVL
Auto Volume L evel. Press ENTER to set or canc el. When AVL is set on, it will limit the sound
being hear d when sudden changes in volume occur dur ing commercial breaks or channel
changes.
Usually be e nabled at night.
Analog Sound
Available at analog TV channels, SAP/ Stereo/ Mono
Set the pref erred sound track of analog channels. Stereo and SAP ecist on some ch annels.
Generall y SAP is a second language sound or help the people with hearing impair.
Digital Sound
Available at digital TV channels, English/ French/ Spanish
Set the pref erred sound track of digital c hannels, French and Spanish exist on so me channels.
Digital Audio Output PCM/ Raw/ Off
Set the audi o output type of coax or optical t erminal. Raw means output the origina l format of
audio stre am. PCM can be matched with most AV amplifiers.
Equalizer Settings
Adjust the c urve of 7 bands equalizer.
20
Page 24

TV SETUP
Sound Settings
Sound Mode Standard/ Soft/ User/ Dynamic
Only in User m ode, the following items can be adjusted.
Bass
Adjust the l ow frequency band response.
Treble
Adjust the h igh frequency band response.
Balance
Adjust the l evel of sound coming from the left or right speaker.
Adjust the B ass/ Treble/ Balance
1.Set sound m ode to User.
2.Highlig ht the item and press ► to display the submenu, the press ◄/► to adj ust the value.
21
Page 25

TV SETUP
Equalizer Settings
Mode Off / Rock/ Pop/ Jazz/ User( only in U ser mode, the following can be manually a djusted.)
Adjust Equalizer Settings
Based on you r favorites about which frequency band need to be adjusted, make smal l
adjustme nt with certain frequency band at a time. Suggest NOT making too larg e changes.
1.Set mode to U ser.
2.Press ▼ to select the first( 100Hz) item, then press ◄/► to select the band to be turned.
3.Press ▲/▼ to adjust the value.
Channel Menu
Ente r
Note: The menu is available only at TV source.
22
Page 26

TV SETUP
Channel List
You can view all the c hannels and choose one quickly.
“ABC”: Lab el of the Channel.
Press ▲/▼ to highlight a channel and press E NTER to view it.
Favorite L ist
All of you fav orite channels are listed in this menu, and you can choose them quickly.
Channel Se tting
Set the favo rite channels, skipped channels, label of channels.
Signal Type
Set to Air or Cab le according to your antenna source.
23
Page 27

TV SETUP
Auto Channel Search
Highligh t and press ENTER to start the auto searching.
It will sear ch analog channels first, then digital channels.
Before exe cute auto channel search, please confirm your antenna type is Air or Cab le.
Wrong setting of Signal Type maybe cause finding no chann el.
Channel Settings
Skip
Set the chan nel to be skipped when using
CH+/CH- to v iew channels.
Favorite
Set the chan nel to your favorite list.
Label
Rename lab el of the channel.
Change the s ettings
Skip & Favor ite
1.Press ▲/▼ to select the channel you want to s et.
2.Press ◄/► to highlight correspondin g item, and press ENTER to set or ca ncel.
Label
1. Press ▲/▼ to select the channel and ENTER t o enter the edit state.
2. Press ▲/▼ to select the character, press ◄/►to move the cursor. Total sev en letters.
24
Page 28

TV SETUP
Parental Control
Keyp ad L ock
Sour ce L ock
Note: Th e default user password is "0000", and if f orget what you set, try"1470 ".
Lock Paren tal Control
The follow ing items are only available if the password input is correct.
V-CHIP Incl ude below settings:
US V-Chip
Rating sys tem used at USA.
Canada V-Ch ip
Rating sys tem used at Canada.
Block UnRa ted Show
Control wh ether lock the program that have not any valid rating flag.
Downloadable Rating
Control th e RRT5 setting which are valid only at so me digital cable channels.
Clear Downloadable Data
Select to cl ear the previous downloadable ratin g data.
Change Pas sword
Enter a 4-di gital number you want to set.
Keypad Loc k
Select to Lo ck or unlock the keypad.
Source Loc k
Select the S ource Lock or unlock.
25
Page 29

TV SETUP
US V-CHIP
For the Unit ed States, the rating settin g basically include the following opt ions:
Movie Rati ng, TV Rating.
Moive Rati ng
This syste m defines the rating control w hich come from MPAA rules
Rating Define
G General audience. All ages admitted.
PG Parental guidance suggested . Some material may not be suitable for c hild ren.
PG-13 Parents strongly cautioned. Some material may be inappropriate for children
under 13.
R Restricted. Children under 17 require accompanying parent or adult guardian.
NC-17 No one 17 and under admitted
X Adult audience only.
26
Page 30

TV SETUP
TV Rating
The TV rating compose of two aspects: age-based a nd content-based.
Content Define
FV Fantasy violence
D Suggestive dialogue
L
S Sexual situations
V Violence
Age Define
TV-Y General audience
TV-Y7 Parental guidance suggested
TV-G Parents strongly cautioned
TV-PG Retricted
TV-14 No one 17 and under admitted
TV-MA Adult a udience only
Note: The content ratings will increase dependin g on the level of the age-based rating . For
example, a p rogram with a TV-PG V(violence) rati ng may contain moderate violence, while a
TV-14 V(violence)rating may contain intense violence. So l ocking a higher lev el option will
automati cally cause locking the option that has more sensitive level.
Strong lan guage
27
Page 31

TV SETUP
Canada V-CH IP
For Canada , the rating setting include the
followin g options: English rating, French Rating.
English Rating
These rati ngs are for programs which are using
English ra ting system.
Rating Defined as
C Children
C8+ Children 8 years and older
G General programming
PG Parental guidance
14+ View ers 14 and older
18+ Adult programming
French Rat ing
These rati ngs are for programs which are using
French rat ing system.
Rating Defined as
G General
8 ans+ Not recommended for younger children
13 ans+ Not re commended for children under
age 13
16 ans+ Not re commended for ages under 16
18 ans+ Th is program is restricted to adults
28
Page 32

TV SETUP
Change Pas sword
At first you should enter the correct old pa ssword then enter new password twice.
If you lost your password, try to enter "147 0".
Setup Menu
Closed Cap tion(CC)
Caption Display
Display or h ide the CC .
Analog Cap tion Type
Select fro m closed-caption modes for analog
programs .
Digital Ca ption Type
Applies on ly to digital channels with closed
Menu Language
Set the menu l anguage. English/French/Spanish.
Clock
Set the Time Zo ne/ Auto Clock/ Setup Time/
Day of week/ D aylight Saving Time.
caption.
Digital CC Preset Default/Custom
If set to Custom, Digital CC Style is availa ble.
29
Page 33

TV SETUP
Digital CC Style
This menu is v alid only for digital closed caption of digital channels.
DIGITAL CC STYLE
CC Siz e
CC Fon t
CC Opa ci ty
Text Col or
CC Bac kg round O pa ci ty
CC Bac kg round C ol or
CLOS ED C AP TI ON
MENU
:Ret ur n :Mov e
:On/ Of f
CC Size Smal l/Standard/Large/Default
CC Font Styl e0~7,Default
CC Opacity D efault/Solid/Flashing/Translucent/Transparent/ Default.
Defa ul t
Defa ul t
Defa ul t
Defa ul t
Defa ul t
Defa ul t
Text Color Bla ck/White/Red/Green/B lue/Yellow/Magenta/Cyan/Default.
CC Backgro und Opacity Solid/Flashing/Translucent/Transparent/Default.
CC Backgro und Color Black/White/Re d/Green/Blue/Yellow/Magenta/Cya n/Default.
Clock
Time Zon e Hawaii/Alaska/Pacific/Centra/
Mountain /Eastern/Samoa/Newfounland/Altantic
Set the time zone.
Auto Clock
If set it to ON , the TV will sync the local clock
accordin g to the DTV broadcasting time
automati cally. Otherwise you can set the time
manually.
Setup Ti me
Set Auto Cloc k to Off, then you can set the time manually .
Note: In the case of loss of power, the clock set ting will be lost
Day of Week
The TV will calculate current day of week accordi ng to the time.
Daylight S aving Time
When Auto Clo ck set to ON, this item is availab le to enable daylight saving option or no t.
30
Page 34

TV SETUP
Ohters Menu
Ente r
Blue Back
Set the scre en background color blue or not when no val id signal input. When analog TV
input and ha s no signal, snow noise will display if thi s option is cleared.
No Signal Power Off
If it is set,TV will automatically enter s tandby after 10 minutes with out signal input.
No Operati on Power Off
If it is set, TV will automatically enter standby after 3 hours without any opera tion.
All Reset
When you hig hlight the item, the system wi ll note you that"Attention! If [AlI Reset] was
executed ,TV system is reset" , and if you ar e sure to reset, press ENTER to reset .
Audio Only
When you hig hlight the item, the system wi ll note you that "Attention! Hold on power key 3
second to re store video", and if you are sure not need to view (backlight is turned off),
press ENTE R to confirm. As the attention, i f you want to wake up the video, please hold on
the power bu tton for 3 seconds.
31
Page 35

PC FORMATS
o ut n
Res l io
Sc ning F eq enan r u cy
DISPLAY MODE
H i o aor z nt l
(KHz)
i a
Vert c l
an i g Fr qu ncy
Sc n n e e
(Hz)
Format
X
640 480
X
00 6
8 0
00 6 0
024 681 7
13
60 76
008
X
X
X
1920 x 1080
8
31. 5
7. 74
66.6
NOTE:
This product doe s not sup port the display mode no t listed above.
In order to achiev e the bes t display effect, please sel ect the a bove-listed
6 display modes in put signal.
Because of the difference of di splay drivers output s ignal
(especially no n-sta ndard signal output) , the display image may ap pear little
disturbance wh ich can be adjusted on the PC menu.
To prolong this unit 's serv ice life, please set you r computer to power mana gemen t mode.
32
Page 36

VIDEO FORMATS
SUPPORTED COMPONENT / HDMI INPUT MODE
DISPLAY MODE
e iR so
lut
on
X
720 480
X
720 480
1280 720
1280 720
1920 1080
1920 1080
1920 1080
1920 1080
1920 1080
X
X
X
X
X
X
X
Horizontal
Scanning Frequency
31. 47
15. 734
37. 5
45
31. 25
33. 75
27
56. 25
67. 50
Vertical
Scanning Frequency
(Hz)
59. 94
59. 94
50
60
50
60
24
50
60
Format
480 i
480 p
720 p
720 p
1080 i
1080 i
1080 p
1080 p
1080 p
NOTE:
The above listed f ormats are also related to the AV devices y ou are ab out to connect.
Before you conne ct this u nit with others please r ead all instructions carefu lly and
make sure all nece ssary c ables are connected.
.
This unit may be inc ompat ible with some other for mats which are not meet the
above conditio ns.
33
Page 37

SPECIFICATION
Panel
Systems
Input /
Output
Jacks
Model Description
Panel Type LCD Panel
Diagonal Size
Screen Format 16 9:
Resolution 1920 x1080
Brightness
Contrast
View Angle
Response Time
Maximum Color
Refresh Rate
Color System
Sound System
Audio System
Sound Output
RF Input 75 ohm external terminal
HDMI Input
PC RGB Input-
Composite Video Input
Component Y Pb Pr Input/
Sound Input
50 inches
350 nit
4000: 1
178(H )/17 8(V)
8 ms
16.7M colors
60Hz
ATSC/QAM/NTSC
M
MTS
L/R Speaker:10 W+ 10W
Video 480i 480p 720p 1080i, 1080p.: , , ,
Audio Two channel linear PCM 32 44 1 and 48kHz 16 20 and 24 bits: , . , ,
D sub 15pinG 0 7Vp p 75ohms: . - ,
B 0 7Vp p 75ohms: . - ,
R 0 7Vp p 75ohms: . - ,
1.0 Vp- p, 75 ohms RCA
RCA
Y:1. 0 Vp-p, 75ohm s, 0.3V negative sy nc
Pb:0 .7Vp-p, 75 ohms
Pr : 0.7Vp- p, 75o hms
Component AUDIO: For Component A udio input
AV AUDIO: For CVBS Audio input
PC AUDIO: For PC RGB Audio input
500mV rms, Impedance: 20k ohms
50”LCD TV
Power
Power Requirement
Power consumption
100-240V~ 50/60Hz
200W
This manual is only for your reference.
Specifications are subject to update without prior notice.
34
Page 38

TROUBLESHOOTING GUIDE
SYMPTOM CAUSE AND REMEDY( )
TV
Picture
Bad
multiple
distortion,blurry)
No sound.
Black
picture.
and
(snow,
images
White
• Check the location of the antenna and adjust it if necessary.
• Make sure the antenna cable is firmly connected.
• Make sure all input cables are firmly connected.
• Increase the volume.
• Check
Remote Control.
• Check the PICTURE setting within the PICTURE menu.
• Check to make sure the program you are watching is broadcast
in Color and not Black & White.
whether the mute function has been activated on the
No picture or sound.
Coloredp atches of
picture.
Panel function key does
not respond correctly.
The display monitor's
panel goes hot.
Unusual dots
• Make sure the unit is plugged in and turned on.
• Make sure that the ATV mode is selected.
• Try a new channel to check for possible station trouble.
• Make sure the antenna is connected properly.
• Increase the volume.
•
Make sure the antenna or audio/video source device is
working properly.
• Make sure all cables are firmly connected.
• Check for local interference.
• Make sure there are no unshielded electrical devices nearby
that are causing interference.
• Turn the TV off for 30 minutes, then try it again.
• Under the influence of electrostatic phenomenon, the product
may malfunction and require usertopowerreset.
• Unplug and re-plug the AC power cord.
• LCD TV takes inside lighten phosphor. It may increase the
temperature of the screen in some occasions. It's not a defect.
• Black dots and Bright points may appear on the LCD screen.
This is a structural property of the LCD panel and is not a defect.
Stripes on screen
The top of the monitor
gets hot .
Unable to select a
certain channel.
Disorder display
at power on.
• Adjust the impulse phase may decrease stripes. RGB in( )
• It may occur during long-time working. It's not a defect.
The channel may be skipped. Choose this channel by
•
directly selecting the buttons from the remote control.
••This may be caused because of a very short interval
between POWER OFF and ON.
Unplug the power and restart.
35
Page 39

S/N:
www.westinghousedigital.com
Westinghouse Digital, LLC
Orange, CA
SE-UM-5001-1201
 Loading...