

Page 1

Westinghouse Canada
Switchgear and Control Division
Instruction Leaflet
30-470 (E)
Page 1
October, 1979
Supersedes issue dated October, 1975
Instruction Leaflet 30-470 (E) Pages 1-12
Automatic
Transfer
Switches
Index
Warranty ......................................... 2
Westinghouse Offices ..................... 3
General Description ......................... 4
Component Identification ................. 5
LRO Description ..............................5
RO Description ................................ 6
PRO Description ............................. 6
Application Information .................... 7
Automatic Control ........................... 7
Replacing Parts ............................ 11
Trouble Shooting Guide ................. 12
Recommended Maintenance ......... 12
Operation and
Maintenance
Manual
Page 2

Instruction Leaflet
30-470 (E)
Page 2
Warranty
The Company warrants the apparatus to be supplied hereunder to
be of the kind designated or specified. The Company shall repair or
replace any defective part or parts, f.o.b. the Companys factory,
repair shop or warehouse, which prove to be defective under
normal and proper use within one year from the date of shipment,
provided that the Purchaser gives the Company immediate written
notice of any such defect or defects. In no event (including, but not
limited to the negligence of the Company, its employees or agents)
shall the Company be liable for special or consequential damages
or damages for loss of use and on expiration of the Warranty
period, any liability of the Company shall terminate. This constitutes
the only warranty of the Company and no other warranty or condition,
statutory or otherwise, shall be implied.
Important
Check equipment for shipping damage immediately on
receipt. In case of fire damage call the carriers concerned at
once for inspection, and request an inspection report. Do not
write to us first notify the carrier instead. If this
precaution is not taken we cannot assist you in recovering
the amount of the claim against the carrier.
Page 3

Instruction Leaflet
30-470 (E)
Page 3
For Supply
Westinghouse industrial products, and a complete line of electrical construction products, are
distributed across Canada by WESCO (Westinghouse Sales & Distribution Company). For product
application, delivery or pricing information call the WESCO office near you.
WESCO Sales Offices
Abbotsford 859-3111 34446 South Fraser Way Red Deer 343-2113 1-7743 50th Avenue
Calgary 253-7561 810-59th Avenue S.E. Regina 525-5841 1625-8th Avenue
Calgary 253-7561 1316-11th Avenue S.W. Rimouski 724-9224 46, rue St-Germain est
Chicoutimi 549-0368 1533,boulevard Talbot St. Johns 726-9073 95 Oleary Avenue
Corner Brook 639-9771 46 Raymond Heights Sarnia 336-0722 1127 North McGregor Rd.
Edmonton 452-7920 14760-116th Avenue Saskatoon 242-1296 509-44th Street East
Edmonton 478-7757 13475 Fort Road Sept-Iles 962-6552 253, avenue Joliette
Edmonton 465-0311 7549-72A Street Sudbury 673-8413 97 St. George Street
Halifax 454-5851 3377 Kempt Road Surrey 588-6501 13514-106th Avenue
Hamilton 528-8811 1910 Barton Street East Thunder Bay 622-0638 700 Norah Crescent
Kamloops 374-2112 705 Notre Dame Drive Toronto 445-0550 840 York Mills Rd. Don Mills
Kelowna 860-3918 1936 Kent Road Trail 368-6474 860 Eldorado Street
Kitchener 893-6630 10 Goodrich Drive Vancouver 682-5533 1000 Beach Avenue
Moncton 854-8600 400 Edinburgh Drive Victoria 382-7265 481 Cecelia Road
Montreal 631-9471 2125, 23e avenue Lachine Windsor 966-2300 59 Eugenie Street East
Ottawa 733-2500 1800 Bank Street Winnipeg 772-9401 1460 Ellice Avenue
Prince George 562-3306 2223 Nicholson Street N.
Quebec 656-1025 2385, rue Watt Ste-Foy
Westinghouse products for electrical utilities are available through the listed Utility Sales offices.
Call the office nearest you.
For Service
Utility Sales Offices
Calgary 265-1204 807-324 8th Avenue S.W. Montreal 812-2566 2723-1, Complexe Dejardins
Edmonton 428-7540 303-10506 Jasper Avenue Toronto 595-9551 1012-790 Bay Street
Fredericton 454-6952 460-440 King Street Vancouver 689-4243 2699 Harbour Centre
Halifax 422-2221 720 Barrington Street Tower Winnipeg 475-9080 1146 Waverley St., Bldg. D
Westinghouse Apparatus Service Centres provide after-sales service, installation and start-up
supervision, also testing and inspection, systems verification, field repairs, alignment and balancing,
rewind of all types of motors and generators, modification and rebuilding for all makes of electrical
and mechanical equipment. Call the centre nearest you for service at all hours.
Apparatus Service Centres
Calgary 273-0991 1857 Centre Avenue S.E. St. Catharines 682-8336 234 Welland Avenue
Dartmouth 469-8400 71 Wright Avenue Burnside St. Catherines 688-2263 5 Seapark Dr.(Marine Serv)
Edmonton 465-7541 8011 Davies Road St. Johns 722-7282 89 OLeary Avenue
Fort McMurray 743-8123 8204 Fraser Avenue Sarnia 337-3285 348 Queen Street South
Hamilton 545-1151 717 Woodward Avenue Saskatoon 653-4313 800-47th Street East
Kingston 389-8565 639B Justus Drive Sept-Iles 962-9803 180, rue Maltais
Kitchener 893-7420 350 Manitou Drive Sudbury 522-3210 1360 Kelly Lake Road
London 453-0470 1921 Huron Street East Swastika 642-3252 Westinghouse Avenue
Medicine Hat 526-0759 1248 Brier Parkway N.W. Sydney 562-2242 RR2 Marion Bridge
Moncton 382-4457 80 Entreprise Street Thunder Bay 577-4267 635 Mountain Avenue
Montreal 748-8811 180, rue Authier St-Laurent Toronto 255-8551 55 Goldthorne Ave.
Nanaimo 758-9171 2311 McCullough Road Vancouver 278-9841 1330 Vulcan Way
Prince George 562-5571 2235 Nicholson Street N. Windsor 944-0121 4080 E.C. Row Unit 22, RR1
Quebec 656-1026 2385, rue Watt, Ste-Foy Winnipeg 775-8643 1460 Ellice Avenue
Regina 352-5606 545 Dewdney Avenue East
Page 4
Instruction Leaflet
30-470 (E)
Page 4
General Description
CSA Standard C22.2 No. 178-1978 defines an automatic transfer
switch as, self acting equipment for transferring one or more load
conductor connections from one power source to another.
Transfer switch type A means an automatic transfer switch that
does not employ integral overcurrent devices. Transfer switch, type B
means an automatic switch that (does) employ integral overcurrent
protection. Westinghouse Robonic automatic transfer switches are
available in both types. Robonics in type A are equipped with special
instantaneous magnetic only breakers. The trip settings of these
special breakers are set (and fixed) at higher than standard values so
that they will trip only if the upstream circuit protective device trips.
Incorporating these special magnetic only breakers, a type A Robonic
operates in exactly the same way as a transfer switch not having this
feature. In the event that both devices trip, (the upstream protective
device and the magnetic only breaker in the Robonic) the Robonics
control circuitry will automatically initiate transfer to the alternate
source. The transfer operation will reset the tripped magnetic only
breaker.
Mechanical Component Identification
Type LRO
Information on interrupting, closing and withstand ratings, and
recommendations for maximum upstream protective devices for type
A Robonics, are given in tables 1, 2 and 3, on page 7.
Type B Robonics are equipped with standard thermal-magnetic
breakers which will provide the required overload and short circuit
protection. Type B Robonics can also be built using Seltronic or SCB
breakers which could include ground fault tripping as well as overload
and short circuit. For application information or assistance with type B
Robonics, refer to Westinghouse.
The Robonic provides automatic transfer of an electrical load to a
standby power supply in the event of drop or loss of voltage of any or
all phases of the normal power supply. Upon the restoration of the
normal supply, the electrical load is automatically retransferred to the
normal power supply.
The transfer motor utilizes the power from the source to which the
electrical load is being transferred. The mechanism provides a positive
mechanical interlock to prevent both breakers being closed at the
same time. The mechanism is also designed to leave both breakers trip
free in the closed position, permitting incorporation of thermal and
short-circuit protection in either or both breakers. In the higher
ampacity models, type RO and PRO, an alarm switch contact is
supplied. This contact is connected in the transfer motor circuit to lock
the motor circuit out of operation when the breaker(s) trip on an
overload or short-circuit condition. Then the breaker has to be
manually reset. Instructions for the reset procedure are located on the
front of the operating mechanism.
Most of the control components are plug-in units which are easily
replaced.
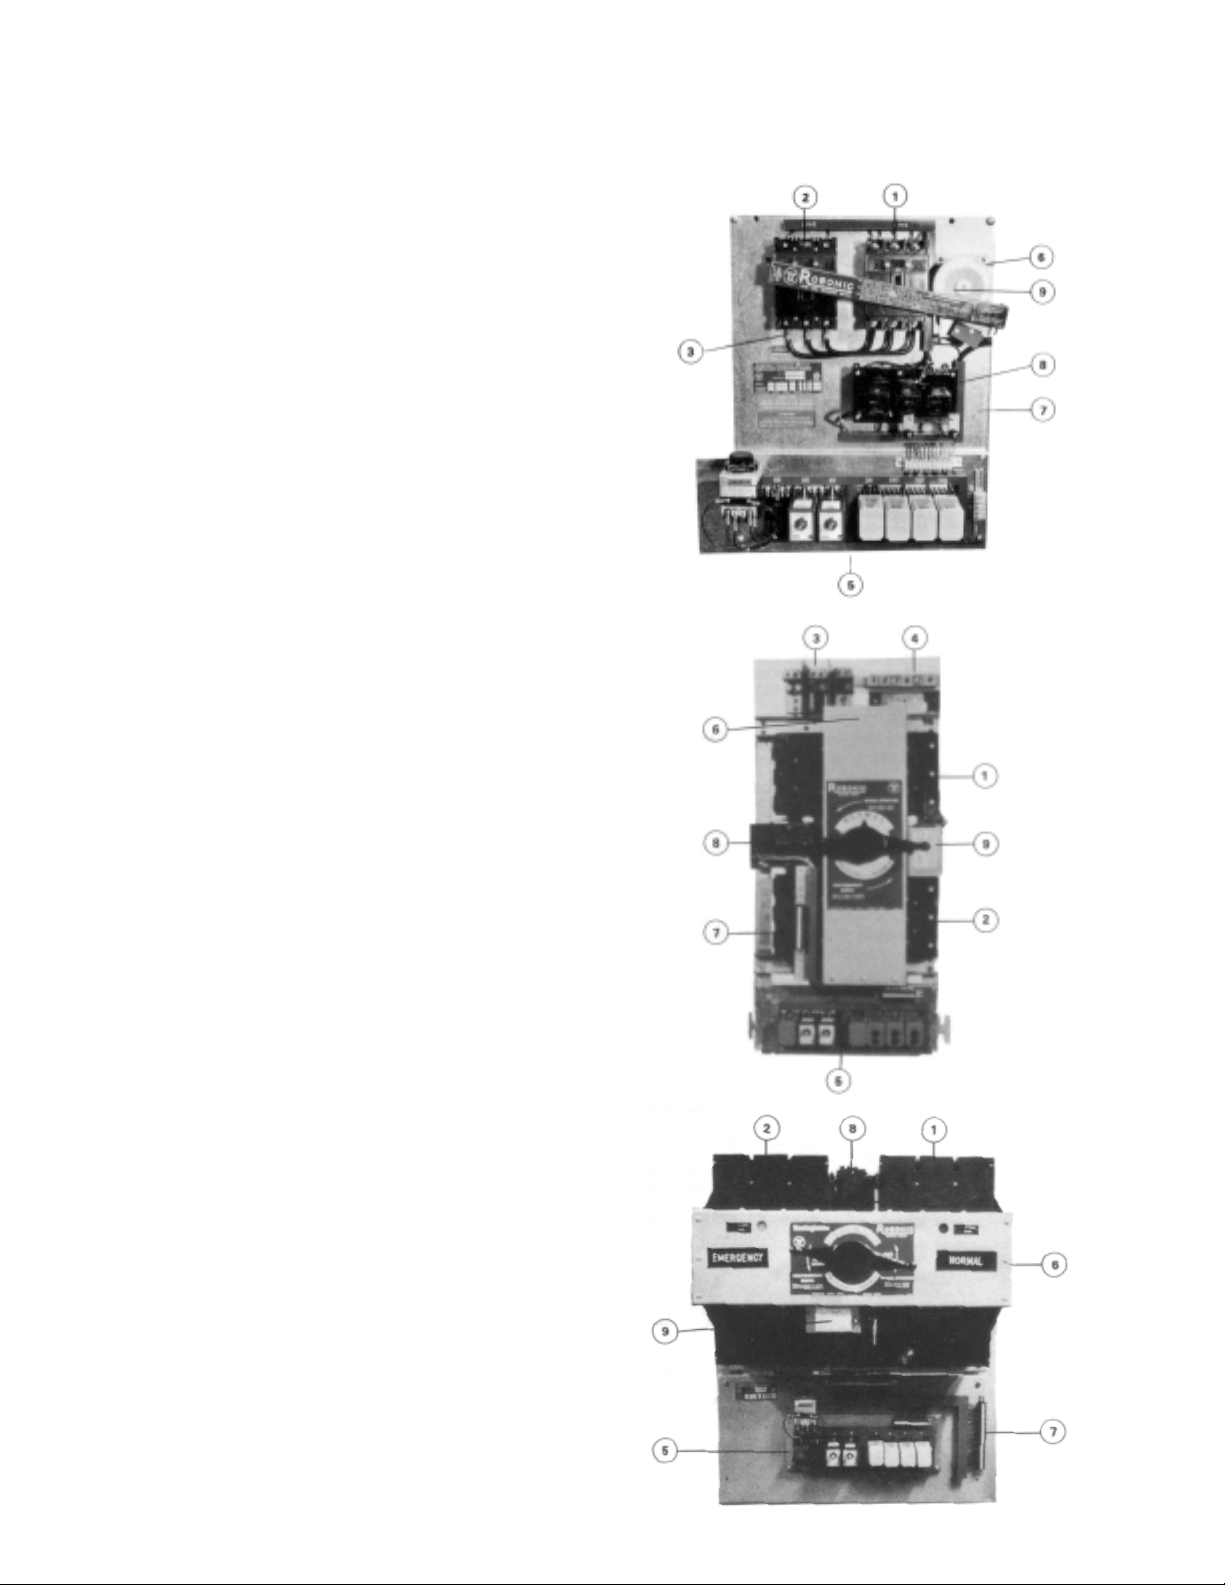
Type RO
1. Normal Source Connections
2. Emergency Source Connection
3. Load Connections
4. Neutral Connections
5. Control Panel
6. Transfer Mechanism
7. Customer Connections
8. Control & Sensing Transformers
9. Transfer Motor
Type PRO
Page 5

Automated Control Component Identification
Instruction Leaflet
30-470 (E)
Page 5
1. NE ON Delay Relay Assuring emergency source will remain
2. ES OFF Delay Relay Overriding momentary dips or outages
3. EC ON Delay Relay Running standby unloaded to cool
4. EN ON Delay Relay Assuring normal source will remain
5. CR Control relay Voltage and frequency sensitive
6. VS Voltage sensing relays Sensing normal source
7. Terminal block connection
Type LRO Robonic Automatic Transfer Switch
Rated 30 amperes through 100 amperes at 600 volts Ac maximum 50
or 60 Hertz.
The mechanism is a lever operated device controlled by a 120 volt
unidirectional motor.
The transfer motor drives a nylon cam which in turn operates a steel
lever by sliding a pin along a slot in the back of the lever. The lever, in
turn, operates the two breaker handles. The distance travelled is
determined by two projections on the cam. These projections operate
two micro switches (NLS, ELS) which in turn disconnect the power to
the transfer motor causing a brake to operate.
The type LRO has three operating positions. They are the normal
breaker closed and the emergency breaker open, the emergency
breaker closed and the normal breaker open or both the normal and
emergency breakers open but never both normal and emergency
breakers closed.
The type LRO can also be easily manually operated. Open the lever
cover, remove the slide pin and place it in the hole supplied in the lever
cover and close the cover. Then the lever can be manually operated
for what ever position desired without interference by the automatic
control. For automatic control again, simply align the lever slot with the
hole in the operating cam and replace the slide pin.
Emergency Normal
Pivot Post
Operating Arm
Slide
Pin
Cam
Projection To
Operate Limit
Switches
The various automatic control components are described under the
section titled Automatic Control.
Page 6

Instruction Leaflet
30-470 (E)
Page 6
Type RO Robonic Automatic Transfer Switch
A complete line rated from 150 amperes through 1000 amperes at 600
volts Ac or at 250 volts Dc.
The transfer mechanism consists of the transfer motor, a gear train
and two breaker operating cams.
Scribe LineScribe Line
Spur Gear Meshing Relationship
(
bottom view of top cover)
The transfer motor drives the centre gear which in turn operates the
two secondary gears. There is a projection in the secondary gears
which slides in a groove in the operating cams moving the cams from
side to side. The breaker handles are set inside two outer guides of
the cam and are also moved from side to side. There are two micro
switches (NLS, ELS) inside the breakers which are operated by the
breakers main contacts to disconnect the transfer motor power
supply and allow the brake to operate.
The type RO transfer switch has three operating positions, the
normal breaker closed and the emergency breaker open, the emergency breaker closed and the normal breaker open or both the normal
and the emergency breakers open but never both the normal and
emergency breakers closed at the same time.
Type PRO Robonic Automatic Transfer Switch
Rated 1200 amperes through 3000 amperes at 600 volts Ac or 250
volts Dc.
The transfer mechanism consists of a transfer motor, a gear train and
two breaker operating cams.
Scribe Line
Spur Gear Meshing Relationship
(
bottom view of top cover)
The transfer motor drives a centre gear which in turn drives two inner
secondary gears. These two inner gears then drive larger, outer
secondary gears. There are projections from these outer secondary
gears which slide in a groove at the back of each operating cams
moving the cam up and down. The breaker handles are set inside two
outer guides on the cams, moving up and down with the cams. There
are two micro switches (NLS, ELS) inside the breakers which are
operated by the breakers main contacts to disconnect the transfer
motor power supply and allow the brake to operate.
The type PRO transfer switch has three operating positions, the
normal breaker closed and the emergency breaker open, the emergency breaker closed and the normal breaker open or both the normal
and emergency breakers closed at the same time.
Scribe Line
The type RO Robonic Transfer Switch is also easy to operate
manually. Simply remove the transfer motor link and turn the black
handle on the front of the transfer mechanism in a counter clockwise
direction until you hear the breakers operated and the indicator is in
the desired position. There will be no interference from the automatic
control. For automatic control again, replace the transfer motor link and
the Robonic transfer switch will seek the power available.
The various control components are described under the section titled
Automatic Control.
The type PRO Robonic Automatic Transfer Switch is also easy to
operate manually. Simply remove the transfer motor link and turn the
black handle on the front of the transfer mechanism in a counterclockwise
direction until you hear the breakers operated and the colour indicator
shows the desired position. For automatic control again, replace the
transfer motor link and the Robonic Transfer switch will seek the
power available.
The various control components are described under the section titled
Automatic Control.
Page 7

Instruction Leaflet
30-470 (E)
Page 7
Table 1 Interrupting, Closing and Withstand Rating
Robonic Type A
Robonic
Continuous
Rating 600 Vac 480 Vac 120,208,240 Vac
30 to 100 amps 14,000 14,000 18,000
150 to 1000 amps 22,000 30,000 42,000
1200 to 3000 amps 100,000 100,000 125,000
rms symmetrical amperes
Since type A Robonics employ magnetic only breakers, their interrupting,
closing, and withstand ratings are the same value. Under fault
conditions, with its normal breaker closed, a Robonic is required to
withstand the energy let through of the normal service protective
device while the fault is being cleared. At the same time, should the
normal voltage fall below the voltage sensing relays selected value,
and if the alternate source were available, the Robonic could transfer
before the normal service protective device cleared the fault.
This would require that the Robonic be capable of interrupting the
protective devices let through current. In addition, the Robonic could
be required to close in on a fault. Thus can be seen the need for
Robonics to have, interrupting, closing and withstand ratings.
The interrupting, closing and withstand ratings shown in Table 1 are
those for standard type A Robonics. For higher values, consideration
can be given to use of Robonics built with Mark 75, Tri-Pac or SCB
breakers.
Table 2 Maximum Upstream Circuit Protective Devices for
Type A Robonics, All Classes of Loads
Standard Robonic Maximum Upstream Maximum Upstream Fuse Rating
Continuous Breaker Frame Size
Rating (amperes) Class J or L Class K5 or R
30, 70, 100 EHB, FB, FB-P 100 100
150, 225 CA, JA, KA 225 225
400 DA, LB, LA-P 400 400
600 LA600 600 600
800 MA, MC, NB-P 800 800
1000, 1200 NB, NC 1200 ....
1400, 2000 PB, PB-P, PCC 2000 ....
Table 3 Maximum Upstream Circuit Protective Device for
Type A Robonics, 90% or Larger Motor Load
Standard Robonic Maximum Upstream Maximum Upstream Fuse Rating
Continuous Breaker Frame Size
Rating (amperes) Class J or L Class K5 or R
30, 70, 100 EHB,FB,HFB,FB-P 300 100
150, 225 CA,JA,KA,HKA,LA 400 225
400 LA,HCA,LA-P,LB,MA 600 400
600 MA,HMA,MC,HMC 1200 600
800 MA,HMA,NB,HNB, 1200
1000 NB,HNB,NC,HNC,PB-P 1200
1200 NB,HNB,NC,HNC,PB-P 1200
1400, 2000 PB,PB-P,PC 2000
LA-P,c/w 400 LAP10
HLA,LB,HLB,MA,NB
LA-P,NB-P c/w 1000
NB14 MC,NC
HMA,NB,HNB,NB-P
MC,HMC,NC,HNC
NB,NC,HNC,NB-P
NB-P
MC,HMC,NC,HNC
....
....
....
....
Automatic Control
Voltage Sensing Relays
Ratings 1.0 volt-ampere power consumption
Input Coil Voltage 120 volts at 50/60 hertz
Contact Rating 3.0 amperes resistive at 120 volts
Duty continuous
Operating Temperature Ratings -10°C to +55°C
Description
The device VS is an octual plug-in unit complete with solid-state
sensing and a DPDT relay enclosed in a dust-tight, yellow capsule.
The receptacles and plugs are designed to ensure a tight fit to reduce
the possibility of coming loose through vibrations.
The solid state sensing of the fixed model has been factory set for
pickup and dropout values of 104 volts Ac and 84 volts Ac respectively.
The adjustable model voltage sensor has a variable range of pickup,
92 volts to 140 volts Ac and dropout, 90 volts to 138 volts Ac with a
close differential of 2 volts.
The contacts being two pole double throw allows one set to be
incorporated in the control scheme and an additional set for external
connections if required.
Application
When used on the Robonic Automatic Transfer Switch as an undervoltage sensing device, they have been designated as devices VS.
The standard Robonic Transfer Switch comes with one fixed voltage
sensor, VS1, for single phase application and three fixed voltage
sensors, VS1, VS2 and VS3, for three phase applications, all of
which monitor the normal power source only.
The single phase voltage sensor is connected to the normal control
transformer, NT, to monitor the normal source.
The three phase voltage sensors are connected to three smaller
transformers, VST, which are connected in a delta-Wye configuration
for use on all voltages, including 120/208 volts, none of which use the
system neutral.
Page 8

Instruction Leaflet
30-470 (E)
Page 8
Automatic Control (Continued
When adjustable type voltage sensors have been ordered, they are
factory set to dropout at 90 volts and pickup at 108 volts Ac. For
adjustment to other settings, first set the drop value and adjust the
pickup to desired setting. This is done by using a variable power
supply for the coil, pins 2 and 7, and using an ohm meter on the
contacts to determine when the relay has picked-up.
Additional relays are available for over voltage monitoring, emergency
source monitoring, and 125 volt Dc applications.
Note: The pickup and dropout settings do vary with temperature
variations at a rate of 0.1% per degree C from a nominal operating
temperature of 25°C.
On Delay Time Delay Relays
Ratings 6 Watts Power Consumption
Input coil Voltage 120 Volts
Contact Rating 3 amperes at 220 volts Ac 50/60 Hertz
Operating Temperature Rating -10°C to +50°C
Time Ratings Various available
)
should the source fail again prior to completing the timing cycle, the
relay will reset to time again. If the normal power source should
remain restored longer than the timing cycle the EN will open its
normally closed contact in the control relay, CR, initiating re-transfer.
When used as an NE device, it is incorporated into the control scheme
to delay the transfer to the emergency position until the normal source
has failed longer than the time setting. This allows the standby source
time to stabilize prior to transfer. When the time cycle is complete, it
closes its contact in the control relay, CR, initiating transfer.
When used as an EC device, it is incorporated in the control scheme to
delay the stopping of the standby source after re-transfer. The
standby will run unloaded to cool off for the set timing cycle. When the
cycle is complete, it closes its contact in the engine start relay, ES,
which in turn stops the standby unit. If the normal power should fail
again prior to completing the timing cycle, the transfer switch will
transfer again instantly.
When used as a DT device, it is incorporated in the control scheme to
stop the transfer switch with both breakers open. This is to allow
residual load voltage to decay prior to closing on another supply
which could be out of phase. When the timing cycle is complete, the
relay re-initiates transfer to the available source.
OFF Delay Time Delay Relays
Pneumatic Type
Ratings 8 Watts Power Consumption
Input Coil Voltage 120 volts 50/60 Hertz
Contact Rating 10 amperes resistive at 120 volts Ac
Time Ranges Various available
Operating Temperature Range -30r°C to +75°C
Description
This time delay relay is an octual plug-in, synchronous motor type. It is
complete with clutch and mechanical load switch giving one instantaneously operated normally open contact and a timed single pole double
throw contact in a dust-tight grey capsule. The mechanism is
constructed to operate for the time set on the indicating dial and then
disconnect itself when the timing cycle is complete. A red pilot light on
the face plate indicates that the relay is timing to operate its contacts.
When de-energized, the relay requires a reset time of at least 0.5
seconds. Time delay begins immediately upon energizing the coil.
When the timing cycle is complete, a mechanical latch holds the
contacts in position and the coil is de-energized.
Application
The time delay relay is used on the Robonic Automatic Transfer
Switch for four functions. They are designated as EN, NE, EC and DT.
It may also be used for additional timing functions if required.
When used as an EN device, it is incorporated into the control scheme
to delay the operation of the transfer switch to the normal position,
and prevent the transfer on momentary return of the normal power
source. Upon restoration of the normal source it begins timing and
Description
This is a panel mount relay containing a coil, an adjustable sealed
pneumatic timing head and snap action switch assembly. The relay will
pick up instantaneously when the voltage is applied to the coil and it
will remain in this position as long as the coil is energized. Time delay
begins immediately upon de-energization and at the end of the timing
cycle, the switch returns to its de-energized position. Reenergizing
the coil during the timing cycle will reset the relay to time a complete
cycle again.
Page 9

Instruction Leaflet
30-470 (E)
Page 9
Solid State Type
Ratings 1.2 watts power consumption
Input Coil Voltage 120 volts at 50/60 Hertz
Contact Rating 10 amperes resistive at 120 volts
Time Range 2 to 3 seconds nonadjustable
Operating Temperature Range -10°C to +55°C
Description
This is an octal plug-in relay containing solid-state control, a Dc coil
and a one pole single throw set of contacts complete in a dust-tight
yellow capsule. The relay will pick up instantaneously when voltage is
applied to the coil and remains in this position as long as the coil is
energized. Timing begins immediately upon de-energization and at the
end of the timing cycle, the contacts will return to their original
position. If the power should return prior to the completion of the timing
cycle, the relay will reset for another complete timing cycle.
Control Relay (CR
)
Ratings 1.2 volt amperes power consumption
Input Coil Voltage 120 volts 60 hertz and 50 hertz
Contact Rating 10 amperes resistive
Operating Temperatures -10°C to +55°C
Settings 50 hertz fixed sensing or 60 hertz fixed sensing
Chart A
CONTROL RELAY CHARACTERISTICS
pickup only
Tolerance Levels
Percent Frequency
Percent Voltage
Description
This device CR is an octal plug-in unit complete with solid-state
sensing, single pole, double throw set of contacts, two sets of single
pole single throw contacts and a Dc coil enclosed in a dust-tight
yellow capsule. The receptacles and plugs are designed to ensure a
tight fit to reduce the possibility of coming loose through vibrations.
The solid-state sensing of both the 50 and 60 hertz relays is set for
pickup values as indicated on the above chart.
Application
When used on the Robonic Automatic Transfer Switch as an engine
starting relay, this relay has been designated as a device E.S. The
relay is incorporated in the control scheme to delay the start-up of the
engine-generator set until normal supply voltage has been interrupted
for a longer time than the timing period. If normal supply voltage has
not returned by the end of the delay period, the relay contacts cause
the engine-generator set to start and when the emergency supply
voltage and frequency has reached the pickup value of the control
relay, the relay will energize and initiate the operation of the transfer
switch to the emergency position.
Application
The control relay, CR, is incorporated into the control scheme to
prevent the transfer of the load to the standby power source until the
source has reached an acceptable level of voltage and frequency. In
doing so, there will be little chance of damage due to low voltages or
low frequencies. If the standby power source can only produce
voltage an insufficient frequency or frequency and insufficient voltage
the Robonic Automatic Transfer Switch will not transfer to the
standby power.
When the standby power source is supplying sufficient voltage and
frequency, this relay will operate its contacts and initiate transfer.
Upon restoration of the normal supply, device EN will open its contact
in the control relay circuit causing the relay to de-energize initiating
operation of the transfer switch to the normal position.
Page 10

Instruction Leaflet
30-470 (E)
Page 10
Plant Exerciser (as used in Robonic Transfer Switches)
Ratings Input voltage 120 volts
Contact rating 20 amps at 120 volts resistive S.P.D.T.
Description
Dial A is divided into a 24 hour day and night scale, and has tabs
around the periphery which may be adjusted to operate the micro
switch within intervals each 24 hours. Each tab represents a 15
minute interval. Dial B has 7 spokes and advances one position for
each revolution of Dial A. Each spoke has provision to add a pin to
operate the micro switch. These pins represent days of the week and
their function is to prevent operation of the micro switches on
selected days.
The micro switch has one normally open and one normally closed
contact.
Application in Robonic Transfer Switches
The Plant Exerciser is a Program Time Switch which functions to start
and stop the engine-generator set and transfer switch automatically at
pre-selected intervals or times. It consists of a synchronous electric
motor and a gear assembly to rotate a dial 360° each day for a week
(168 hours). On the periphery of the dial there are levers or tabs
which can be set to operate a mechanical load switch as the dial
rotates. These levers can be selected to operate the switch at
specific times of the day daily or specific days of the week. The cycle
repeats weekly. The Plant Exerciser may be used in two different
ways as an accessory for transfer switches.
1. It may be used to simulate an interruption in the normal source of
supply at selected intervals, at least once per week, causing the
transfer switch components to function, including start-up of the
engine-generator set and transfer of load to the generator supply.
At the end of the interval it will initiate the transfer back to normal
supply and shut down the engine-generator.
or
2. It may be used to start an engine-generator set at selected intervals,
at least once per week, but without causing the transfer switch to
operate and transfer the load to the generator supply. At the end of
the interval it will cause the engine-generator to shut down.
Instructions To operate the engine for an interval once
each week, with or without operation of the transfer switch.
1. Extend the tabs of Dial A outwards, except those representing the time
of day for the running of the engine or operation of the transfer switch.
2. Determine the day of the week for this testing. Install the six brass
pins (called skip pins) in the spokes of Dial B representing the other
six days of the week.
3. Turn Dial A counterclockwise until the special tab at 12:00 midnight
advances Dial B. Turn Dial B until the present day of the week is
opposite the copper arrow. Turn Dial A counterclockwise until the
correct time of day (or night) is opposite the arrow on the name plate.
4. If the interval of running the engine is desired more than one day
per week but at the same time of day, remove the skip pin from the
appropriate spoke of Dial B.
Caution
DO NOT insert skip pins in any spoke when that spoke is pointing
toward the copper arrow.
Page 11

Instruction Leaflet
30-470 (E)
Page 11
Replacing Parts
The Robonic Automatic Transfer Switch has been designed to have all
components accessible and readily removable from the front of the
panels. The Robonic Transfer Switch is divided into two basic
sections. The upper section consists of the main contacts and
transfer mechanism, the lower section consists of all the automatic
control devices.
Caution
When replacing any parts of the mechanism, control transformers or
breakers, isolate the Robonic Transfer Switch from any possible
source of power.
To remove the transfer mechanism of the LRO transfer switch, first
open the cover and remove the slide pin from the operating cam, then
remove the centre bolt, the mechanism will lift straight off. The
breakers and transfer motor bracket are held by four screws for ease
of removal and replacement. When replacing the mechanism, first set
it on the Robonic with the breaker handles in the holes provided and
then fasten the centre bolt reasonably tight with the mechanism fully
movable with an equivalent swing distance up and down.
To remove the transfer mechanism of the RO transfer switch, remove
the four bolts holding it, taking note of which holes the bolts were in,
then lift the mechanism straight off. The breakers are held by two
bolts at one end and the bus connectors on the other end. The
transfer motor is mounted to the transfer mechanism cover and centre
drive gear. When replacing any part of the transfer mechanism, be
sure that the scribe lines of the gears are in a straight row (example
shown below).
When replacing the mechanism move it about until the breaker toggles
fit between the mechanism fingers and then fasten the bolts tightly. To
test for proper operation first operate manually and then connect 120
volt, 60 hertz supply to motor leads and observe operation for free
movement and proper breaker operation.
The PRO transfer switch mechanism is similar to the RO with the
exception that the PRO mechanism has five gears and is mounted
horizontally. The breakers are fastened to the panel by six bolts.
All Robonic transfer switch breakers and mechanisms have allowed
some adjustments for mounting to assure proper operation without
slipping or binding. Be sure all hardware is tightened sufficiently
before reenergizing any transfer switch.
To replace any of the octal plug-in relays, pull old units straight out and
insert the replacement unit. Some of the timing relays have white clips
on the top and bottom to be released first. Due to the tight fit of the
receptacle and pins, you may have to move the relay about a little to
pull it out. DO NOT INTERCHANGE ANY RELAY WITH ANY OTHERS.
To prevent operation of the transfer switch while replacing mechanism
or components, disconnect all source of power.
Parts List
Part Name Style No.
Parts Common to all Robonics
Control Relay 3155A21H01
Voltage Sensor Fixed 3152A50H01
Voltage Sensor Adjustable 3152A50H02
Timer On Delay 5180 sec. 688A887H03
Timer On Delay 20 s10 m 688A887H04
Timer On Delay 130 m 688A887H05
Timer Off Delay 1300 sec. 688A886H11
Timer Off Delay 2.5 s fixed 3152A51H01
Instantaneous Relay 3152A52H01
Socket Potter & Brumfield 3152A52H02
Socket Omron 688A887H01
Plant Exerciser 688A888H01
Battery Charger 12V 1259C26G01
Battery Charger 24V 1259C26G03
4 Position s/s fixed 3151A90H01
4 Position s/s keyed 3151A90H02
Terminal Block 300V 688A133H01
125V Control Transformer 600V 573B414H01
125VA Control Transformer 480/416V 573B414H02
125VA Control Transformer 240/208V 573B414H03
Sensing Transformer 600V 573G414H04
Sensing Transformer 480V 573B414H05
Sensing Transformer 416V 573B414H06
Sensing Transformer 208V 573B414H07
For Type LRO Robonics
Mechanism 833C222G02
Motor Assembly 833C223G01
Motor 688A732H02
Operating Cam 688A548G01
Slide Pin 688A731H01
Limit Switches 688A747H01
For Type RO Robonics
Mechanism 150 to 400A 833C226G01
Mechanism 600 to 1000A 833C226G01
Motor 688A749H01
Solenoid 688A740H01
Brake Shoe Assembly 688A738G01
Operating Cam 572B774H01
Auxiliary & Limit Switch 688A747H01
SCRIBE LINE
For Type PRO Robonic
Mechanism 688A109G01
Motor 688A749H02
Solenoid 688A740H01
Auxiliary & Limit Switch 688A747H01
300VA Control Transformer 600V/480V 554B408H04
Page 12

Instruction Leaflet
30-470 (E)
Page 12
Trouble Shooting Guide
Symptoms
refusal to re-transfer to normal
source upon restoration
will not transfer to emergency
source upon failure of normal
source
transfer without a power
failure in the normal source
no time delay when there
should be
Possible Causes
a voltage sensing relay did not
energize
emergency to normal time delay
relay has failed
a loose control connection
engine-generator did not start
generator not producing
enough voltage at a high
enough frequency (device CR
is voltage and frequency
sensitive)
a loose control connection
CR device has failed
normal to emergency time delay
relay, if supplied, has failed
if voltage sensing relays
supplied in emergency, there
may be a failure of one
a voltage sensing relay has
failed
emergency to normal time delay
relay has failed
that particular time delay relay
has failed
Recommended Maintenance
1. DO NOT perform dielectric tests on the equipment with the control
components in the circuit.
2. DO NOT use loctite.
3. Check lubricant in high speed bearings of the motor and the low
speed bearings of the gear box. For lubrication use Dow Corning
Silicon DC44 or equivalent on the high speed bearings and Aero
Shell No. 6 grease or equivalent in gear box after 5000 operations.
4. Check if control components are tight in sockets.
5. Periodically inspect all terminals (load, line and control) for tightness.
Retighten all bolts, nuts and accessible hardware. Clean or replace
any contact surfaces which are dirty, corroded or pitted.
6. Robonics should be in clean, dry and moderately warm locations. If
signs of moisture are present, dry and clean transfer switch. If
there is corrosion try to clean off, if cleaning is unsuitable replace
the corroded parts. Should dust and/or debris gather on the
transfer switch, brush, vacuum or wipe clean. DO NOT blow dirt
into breaker or terminals.
7. Test the transfer switch operation. While the Robonic is exercising,
check for freedom of movement, hidden dirt or corrosion and any
excessive wear on the mechanical operating parts. Clean, lubricate
or replace parts where necessary.
8. Check all adjustable control components (time delay and voltage
sensing relays) for correct settings.
9. If the type RO mechanism is removed be sure that the scribe lines
on the gears are in line. When reassembling the drive mechanisms
be sure that they are fastened to the correct holes in the frame and
that the breaker handles are between the cam fingers (one breaker
has to be on and the other off).
engine-generator starts when
the normal source has not
failed
normal source has failed and
the transfer switch cycles
without stopping in emergency
if the power is not available on
the load terminals with either
the normal or emergency
sources available and the
transfer switch will not operate
the engine start time delay relay
has failed
a plant exerciser has been built
into the system
a voltage sensing relay has
failed
the operating cam in the
mechanism has either broken
or come out of the breaker
handle
ELS has failed to operate
the breaker may be complete
with trip units and if there has
been a fault on the system, the
motor circuit has been opened
by either EAS and NAS.
Correct and manually reset the
breakers in the transfer switch
Type LRO Robonics
CAUTION
DO NOT overtighten the pivot screw inside the operating arm. This
screw was correctly adjusted at the factory to provide low friction
movement of the operating arm without excessive play.
DO NOT overtighten the set screw holding the operating cam on the
motor shaft.
 Loading...