

Page 1
®
WD TV
WD TV
HD Media Player
User Manual
Live
®
Live Plus
Page 2

Table of Contents
1 Important User Information . . . . . . . . . . . . . . . . . . . . 1
Important Safety Instructions . . . . . . . . . . . . . . . . . . . . . . . . . . . . . . 1
WD Service and Support . . . . . . . . . . . . . . . . . . . . . . . . . . . . . . . . .2
Recording your WD Product Information . . . . . . . . . . . . . . . . . . . . . 3
Registering your WD Product . . . . . . . . . . . . . . . . . . . . . . . . . . . . . 3
Accessories . . . . . . . . . . . . . . . . . . . . . . . . . . . . . . . . . . . . . . . . . . 5
2 Product Overview . . . . . . . . . . . . . . . . . . . . . . . . . . . . 6
3 Features and Functions . . . . . . . . . . . . . . . . . . . . . . . 8
Features. . . . . . . . . . . . . . . . . . . . . . . . . . . . . . . . . . . . . . . . . . . . . . 8
Connections . . . . . . . . . . . . . . . . . . . . . . . . . . . . . . . . . . . . . . . . . 9
LED Indicators . . . . . . . . . . . . . . . . . . . . . . . . . . . . . . . . . . . . . . . . 10
Remote Control . . . . . . . . . . . . . . . . . . . . . . . . . . . . . . . . . . . . . . . 11
4 Getting Started . . . . . . . . . . . . . . . . . . . . . . . . . . . . . 12
Package Contents . . . . . . . . . . . . . . . . . . . . . . . . . . . . . . . . . . . . 12
Installation Requirements . . . . . . . . . . . . . . . . . . . . . . . . . . . . . . . 12
Installation Procedure. . . . . . . . . . . . . . . . . . . . . . . . . . . . . . . . . . . 12
5 Operating the Media Player . . . . . . . . . . . . . . . . . . . 25
Using the Remote Control . . . . . . . . . . . . . . . . . . . . . . . . . . . . . . . 25
Using the WD TV HD Media Player Menu. . . . . . . . . . . . . . . . . . . . 26
Media Library Compilation . . . . . . . . . . . . . . . . . . . . . . . . . . . . . . . 27
Locating Your Contents on the Drive . . . . . . . . . . . . . . . . . . . . . . . 30
6 Watching Video . . . . . . . . . . . . . . . . . . . . . . . . . . . . . 34
Video Playback . . . . . . . . . . . . . . . . . . . . . . . . . . . . . . . . . . . . . . . 34
Video Playback Controls . . . . . . . . . . . . . . . . . . . . . . . . . . . . . . . . 36
Video Playback Options . . . . . . . . . . . . . . . . . . . . . . . . . . . . . . . . . 36
DVD Navigation . . . . . . . . . . . . . . . . . . . . . . . . . . . . . . . . . . . . . . . 41
7 Playing Music . . . . . . . . . . . . . . . . . . . . . . . . . . . . . . 44
Music Playback . . . . . . . . . . . . . . . . . . . . . . . . . . . . . . . . . . . . . . . 44
Music Playback Controls . . . . . . . . . . . . . . . . . . . . . . . . . . . . . . . . 46
TABLE OF CONTENTS – i
Page 3

Music Playback Options. . . . . . . . . . . . . . . . . . . . . . . . . . . . . . . . . 46
8 Viewing Photos . . . . . . . . . . . . . . . . . . . . . . . . . . . . . 48
Photo Display. . . . . . . . . . . . . . . . . . . . . . . . . . . . . . . . . . . . . . . . . 48
Digital Camera Support . . . . . . . . . . . . . . . . . . . . . . . . . . . . . . . . . 49
Photo Display Options . . . . . . . . . . . . . . . . . . . . . . . . . . . . . . . . . . 50
Photo Slideshow . . . . . . . . . . . . . . . . . . . . . . . . . . . . . . . . . . . . . . 52
9 Network Setup. . . . . . . . . . . . . . . . . . . . . . . . . . . . . . 56
Ethernet Network (Wired) Setup . . . . . . . . . . . . . . . . . . . . . . . . . . . 56
Wireless Network Setup. . . . . . . . . . . . . . . . . . . . . . . . . . . . . . . . . 59
Checking the Network Connection. . . . . . . . . . . . . . . . . . . . . . . . . 62
10 Network Services . . . . . . . . . . . . . . . . . . . . . . . . . . . 64
Accessing Media Content from the Network . . . . . . . . . . . . . . . . . 64
Transferring Files . . . . . . . . . . . . . . . . . . . . . . . . . . . . . . . . . . . . . . 67
11 Internet Services . . . . . . . . . . . . . . . . . . . . . . . . . . . . 72
Live365 . . . . . . . . . . . . . . . . . . . . . . . . . . . . . . . . . . . . . . . . . . . . . 72
Pandora. . . . . . . . . . . . . . . . . . . . . . . . . . . . . . . . . . . . . . . . . . . . . 89
Flickr . . . . . . . . . . . . . . . . . . . . . . . . . . . . . . . . . . . . . . . . . . . . . . 102
YouTube . . . . . . . . . . . . . . . . . . . . . . . . . . . . . . . . . . . . . . . . . . . 110
Mediafly . . . . . . . . . . . . . . . . . . . . . . . . . . . . . . . . . . . . . . . . . . . . 128
Netflix (for WD Live Plus only) . . . . . . . . . . . . . . . . . . . . . . . . . . . . 135
12 Settings and Advanced Features. . . . . . . . . . . . . . 136
Settings Navigation Buttons . . . . . . . . . . . . . . . . . . . . . . . . . . . . 136
File Management . . . . . . . . . . . . . . . . . . . . . . . . . . . . . . . . . . . . .137
Audio/Video . . . . . . . . . . . . . . . . . . . . . . . . . . . . . . . . . . . . . . . . 144
Music . . . . . . . . . . . . . . . . . . . . . . . . . . . . . . . . . . . . . . . . . . . . . 149
Video . . . . . . . . . . . . . . . . . . . . . . . . . . . . . . . . . . . . . . . . . . . . . 151
Photo . . . . . . . . . . . . . . . . . . . . . . . . . . . . . . . . . . . . . . . . . . . . . 154
System . . . . . . . . . . . . . . . . . . . . . . . . . . . . . . . . . . . . . . . . . . . . 157
Network . . . . . . . . . . . . . . . . . . . . . . . . . . . . . . . . . . . . . . . . . . .163
Media Library . . . . . . . . . . . . . . . . . . . . . . . . . . . . . . . . . . . . . . . 165
13 System Maintenance . . . . . . . . . . . . . . . . . . . . . . . 168
System Firmware Upgrade . . . . . . . . . . . . . . . . . . . . . . . . . . . . . 168
Troubleshooting . . . . . . . . . . . . . . . . . . . . . . . . . . . . . . . . . . . . .171
TABLE OF CONTENTS – ii
Page 4

Common Error Messages . . . . . . . . . . . . . . . . . . . . . . . . . . . . . . 174
FAQs . . . . . . . . . . . . . . . . . . . . . . . . . . . . . . . . . . . . . . . . . . . . . . 175
14 Appendix . . . . . . . . . . . . . . . . . . . . . . . . . . . . . . . . . 176
Supported Formats . . . . . . . . . . . . . . . . . . . . . . . . . . . . . . . . . . . 176
Regulatory Compliance . . . . . . . . . . . . . . . . . . . . . . . . . . . . . . . . 180
Warranty Information . . . . . . . . . . . . . . . . . . . . . . . . . . . . . . . . . .182
GNU General Public License (“GPL”) . . . . . . . . . . . . . . . . . . . . . . 183
TABLE OF CONTENTS – iii
Page 5

1
WD TV Live/WD TV Live Plus HD Media Player
User Manual
Important User Information
Important Safety Instructions
This device is designed and manufactured to assure personal safety. Improper use
can result in electric shock or fire hazard. The safeguards incorporated into this unit
will protect you if you observe the following procedures for installation, use, and
servicing.
Read these instructions.
Keep these instructions.
Heed all warnings.
Follow all instructions.
Do not use this apparatus near water.
Clean only with dry cloth.
Do not block any ventilation openings. Install in accordance with the
manufacturer’s instructions.
Do not install near any heat sources such as radiators, heat registers, stoves, or
other apparatus (including amplifiers) that produce heat.
Do not defeat the safety purpose of the polarized or grounding-type plug. A
polarized plug has two blades with one wider than the other. A grounding type
plug has two blades and a third grounding prong. The wide blade or the third
prong are provided for your safety. If the provided plug does not fit into your
outlet, consult an electrician for replacement of the obsolete outlet.
Protect the power cord from being walked on or pinched particularly at plugs,
convenience receptacles, and the point where they exit from the apparatus.
Only use attachments/accessories specified by the manufacturer.
Unplug this apparatus during lightning storms or when unused for long periods
of time.
Refer all servicing to qualified service personnel. Servicing is required when the
apparatus has been damaged in any way, such as power-supply cord or plug is
damaged, liquid has been spilled or objects have fallen into the apparatus, the
apparatus has been exposed to rain or moisture, does not operate normally, or
has been dropped.
Carefully read and follow the Quick Install Guide and User Manual.
Do not operate this device outside the temperature range of 5°C–35°C
(41°F–95°F).
Do not drop or shake the device.
Do not move the device when it is powered on.
Power supply cords should be routed so that they are not likely to be walked on
or pinched by items placed upon them or against them.
Do not overload wall outlets.
For additional safety information, refer to www.wdc.com.
IMPORTANT USER INFORMATION – 1
Page 6

WD TV Live/WD TV Live Plus HD Media Player
User Manual
WD Service and Support
Should you encounter any problem, please give us an opportunity to address it
before returning this product. Most technical support questions can be answered
through our knowledge base or e-mail support service at support.wdc.com. If the
answer is not available or, if you prefer, please contact WD at the best telephone
number shown below.
Your product includes 30 days of free telephone support during the warranty period.
This 30-day period starts on the date of your first telephone contact with WD
technical support. E-mail support is free for the entire warranty period and our
extensive knowledge base is available 24/7. To help us keep you informed of new
features and services, remember to register your product online at
register.wdc.com.
Accessing Online Support
Visit our product support website at support.wdc.com and choose from these
topics:
Downloads - Download drivers, software, and updates for your WD product.
Registration - Register your WD product to get the latest updates and special
offers.
Warranty & RMA Services - Get Warranty, Product Replacement (RMA), RMA
Status, and Data Recovery Information.
Knowledge Base - Search by keyword, phrase, or answer ID.
Installation - Get online installation help for your WD product or software.
Contacting WD Technical Support
When contacting WD for support, have your WD product serial number, system
hardware, and system software versions available.
North America Asia Pacific
English 800.ASK.4WDC Australia 1 800 42 9861
(800.275.4932) China 800 820 6682/+65 62430496
Spanish 800.832.4778 Hong Kong +800 6008 6008
India 1 800 11 9393 (MNTL)/1 800 200 5789 (Reliance)
Europe (toll
free)*
Europe
Middle East
Africa
* Toll free number available in the following countries: Austria, Belgium, Denmark, France, Germany, Ireland, Italy,
Netherlands, Norway, Spain, Sweden, Switzerland, United Kingdom.
00800 ASK4 WDEU Indonesia +803 852 9439
(00800 27549338) Japan 00 531 650442
Korea 02 719-3240
+31 880062100 Malaysia +800 6008 6008/1 800 88 1908/+65 62430496
+31 880062100 Philippines 1 800 1441 0159
+31 880062100 Singapore +800 6008 6008/+800 608 6008/+65 62430496
Taiwan +800 6008 6008/+65 62430496
011 26384700 (Pilot Line)
IMPORTANT USER INFORMATION – 2
Page 7
WD TV Live/WD TV Live Plus HD Media Player
User Manual
Recording your WD Product Information
In the following table, write the serial and model numbers of your new WD product.
You can find this information on the label on the bottom of the device. You should
also note the date of purchase. This information may be required when requesting
technical support.
Serial Number:
MAC Address:
Model Number:
Purchase Date:
System and Software Notes:
Registering your WD Product
Your WD product includes 30 days of free technical support during the applicable
warranty period for your product. The 30-day period commences on the date of
your first telephone contact with WD technical support. Register your WD product
online at register.wdc.com.
If your media player has an active network connnection, you can register directly
from the unit.
To register your WD product using the System Setting menu:
1. Make sure your media player has an active network connection.
Go to “Network Setup” on page 56 for instructions on how to set up a network
connection.
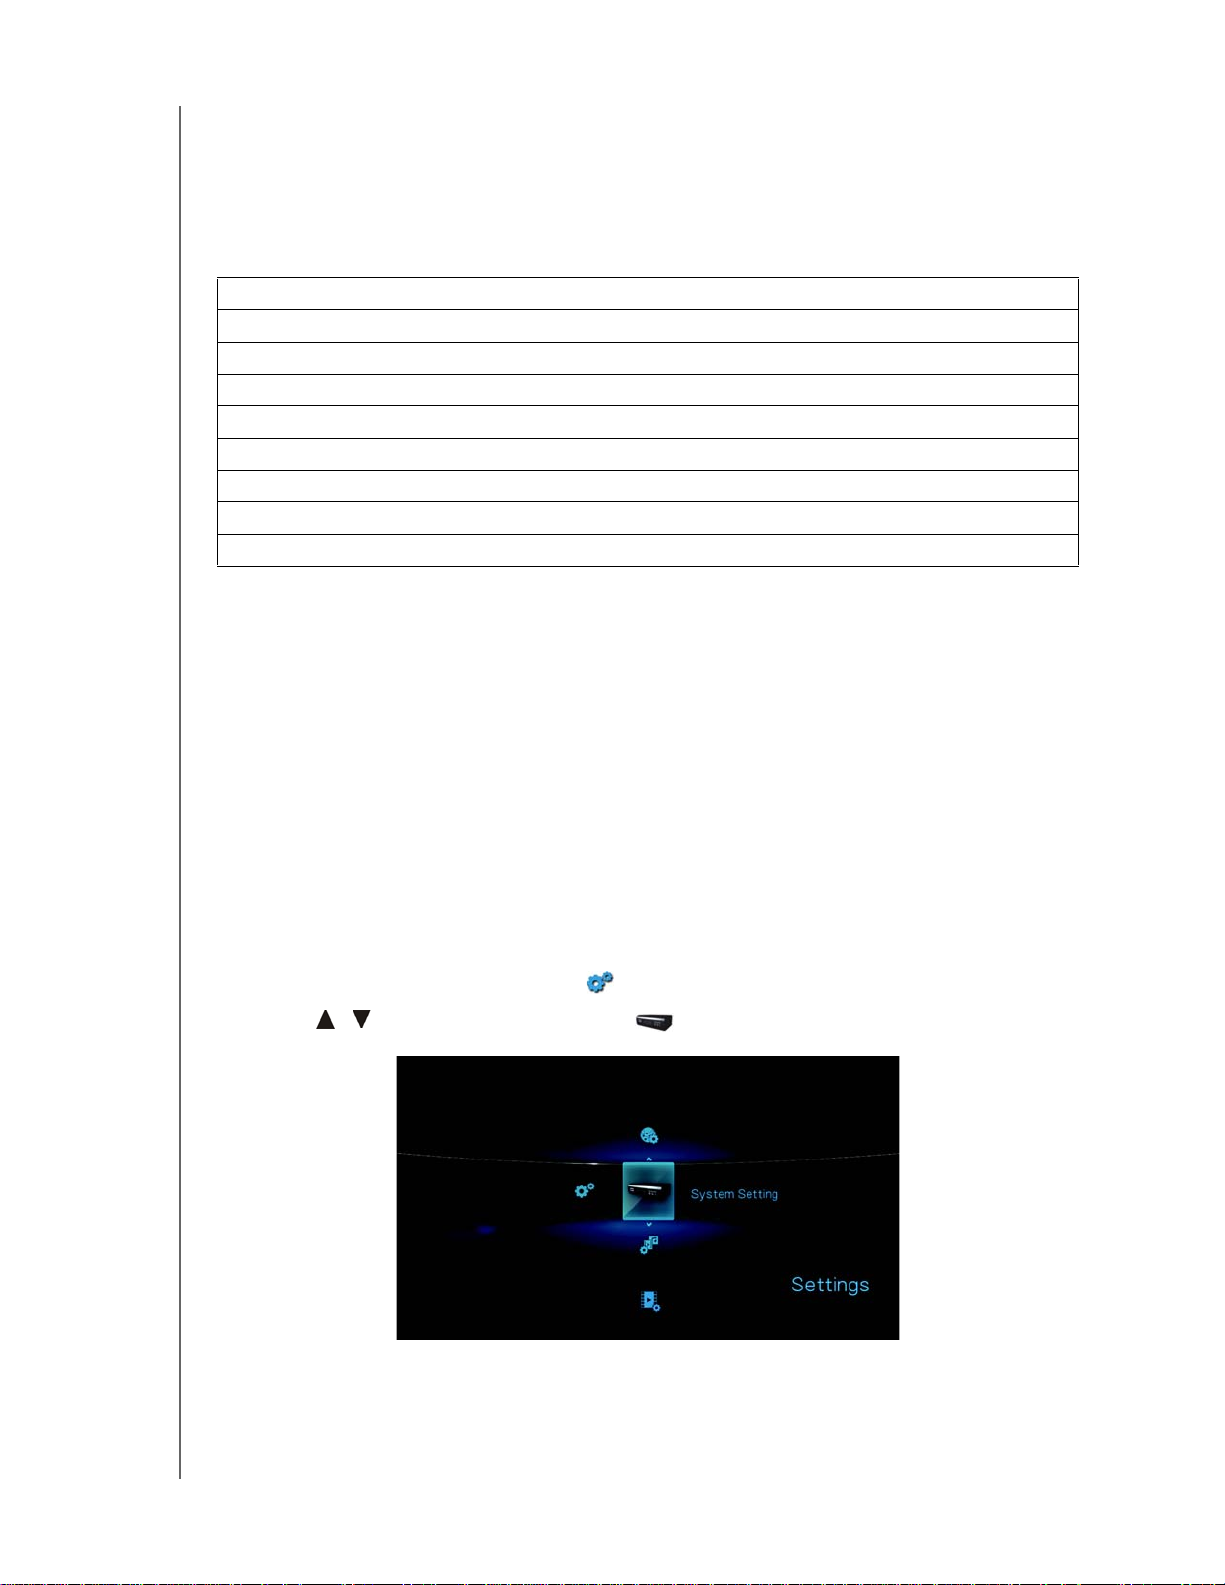
2. Navigate to the Home | Settings menu bar.
3. Press / to select System Setting , then press ENTER.
IMPORTANT USER INFORMATION – 3
Page 8
WD TV Live/WD TV Live Plus HD Media Player
User Manual
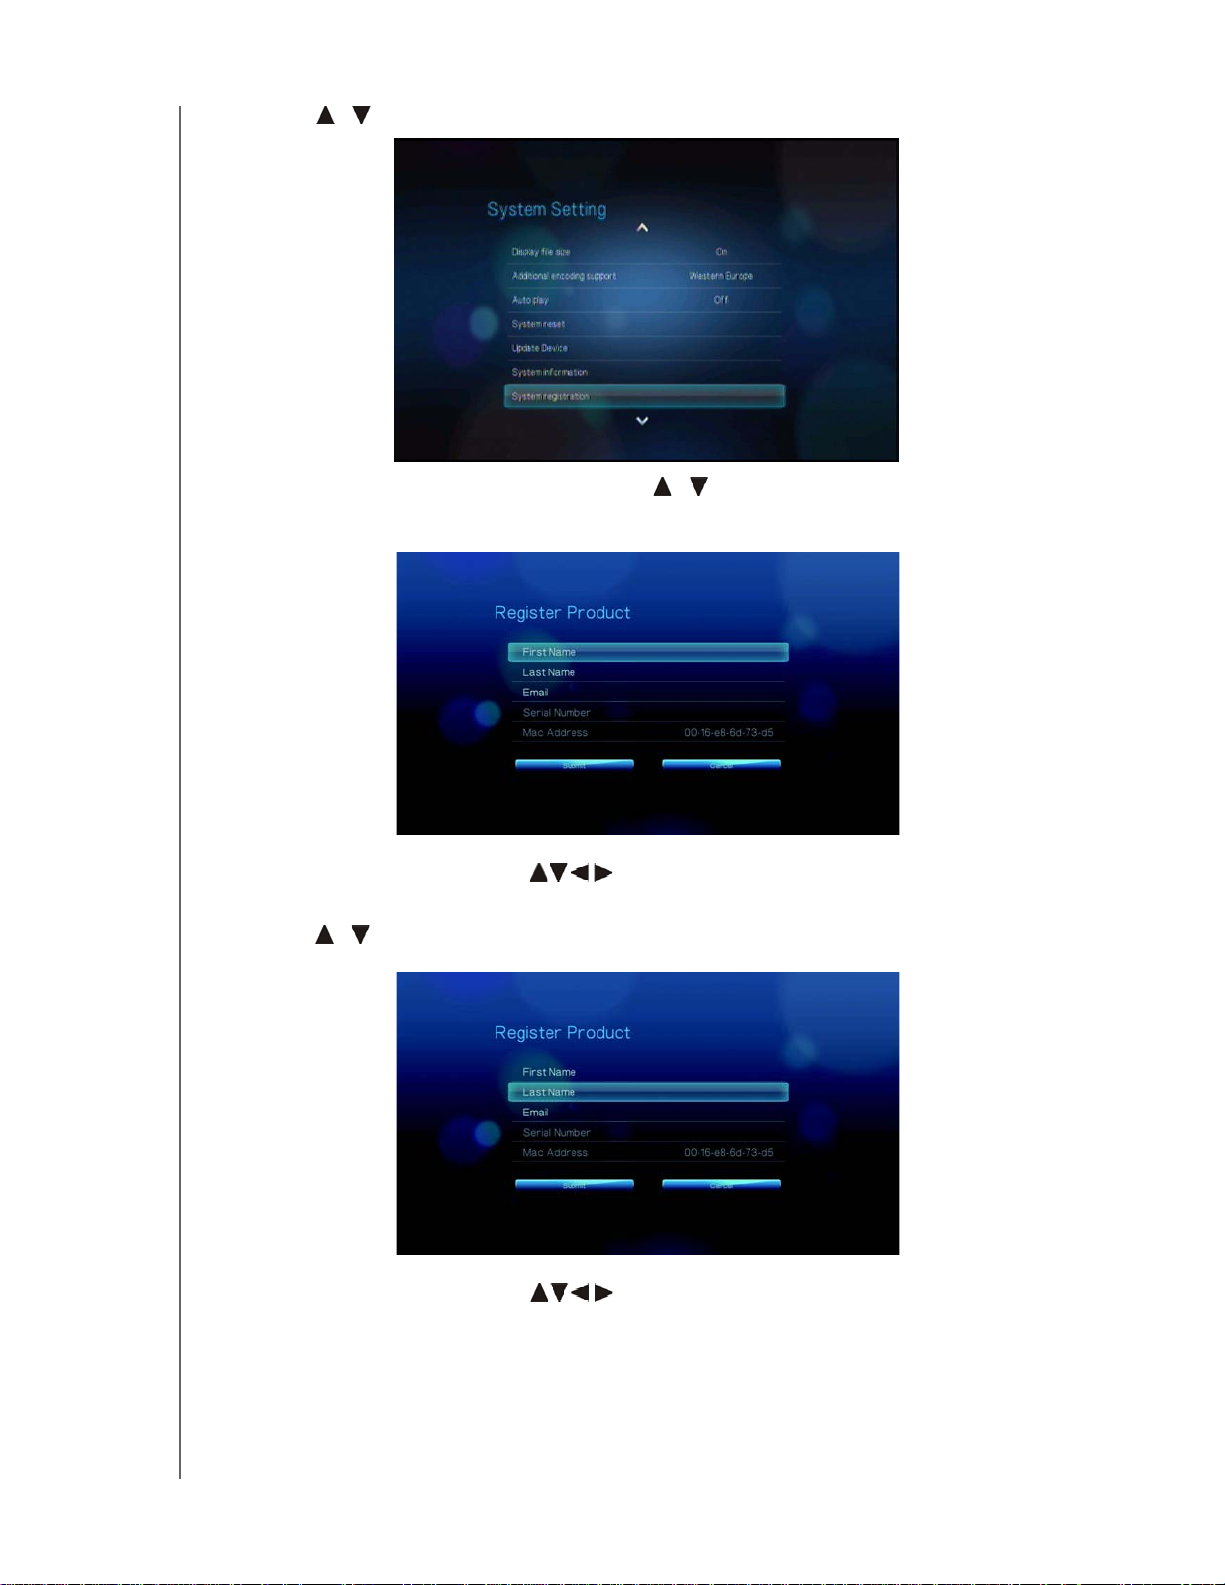
4. Press / to select System registration, then press ENTER.
5. On the Register Product screen, press / to select First Name, then press
ENTER.
6. Use the navigation buttons to type in your first name using the on-screen
keyboard. Select Submit, then press ENTER.
7. Press / to select Last Name, then press ENTER.
8. Use the navigation buttons
to type in your last name using the on-screen
keyboard. Select Submit, then press ENTER.
IMPORTANT USER INFORMATION – 4
Page 9
WD TV Live/WD TV Live Plus HD Media Player
User Manual
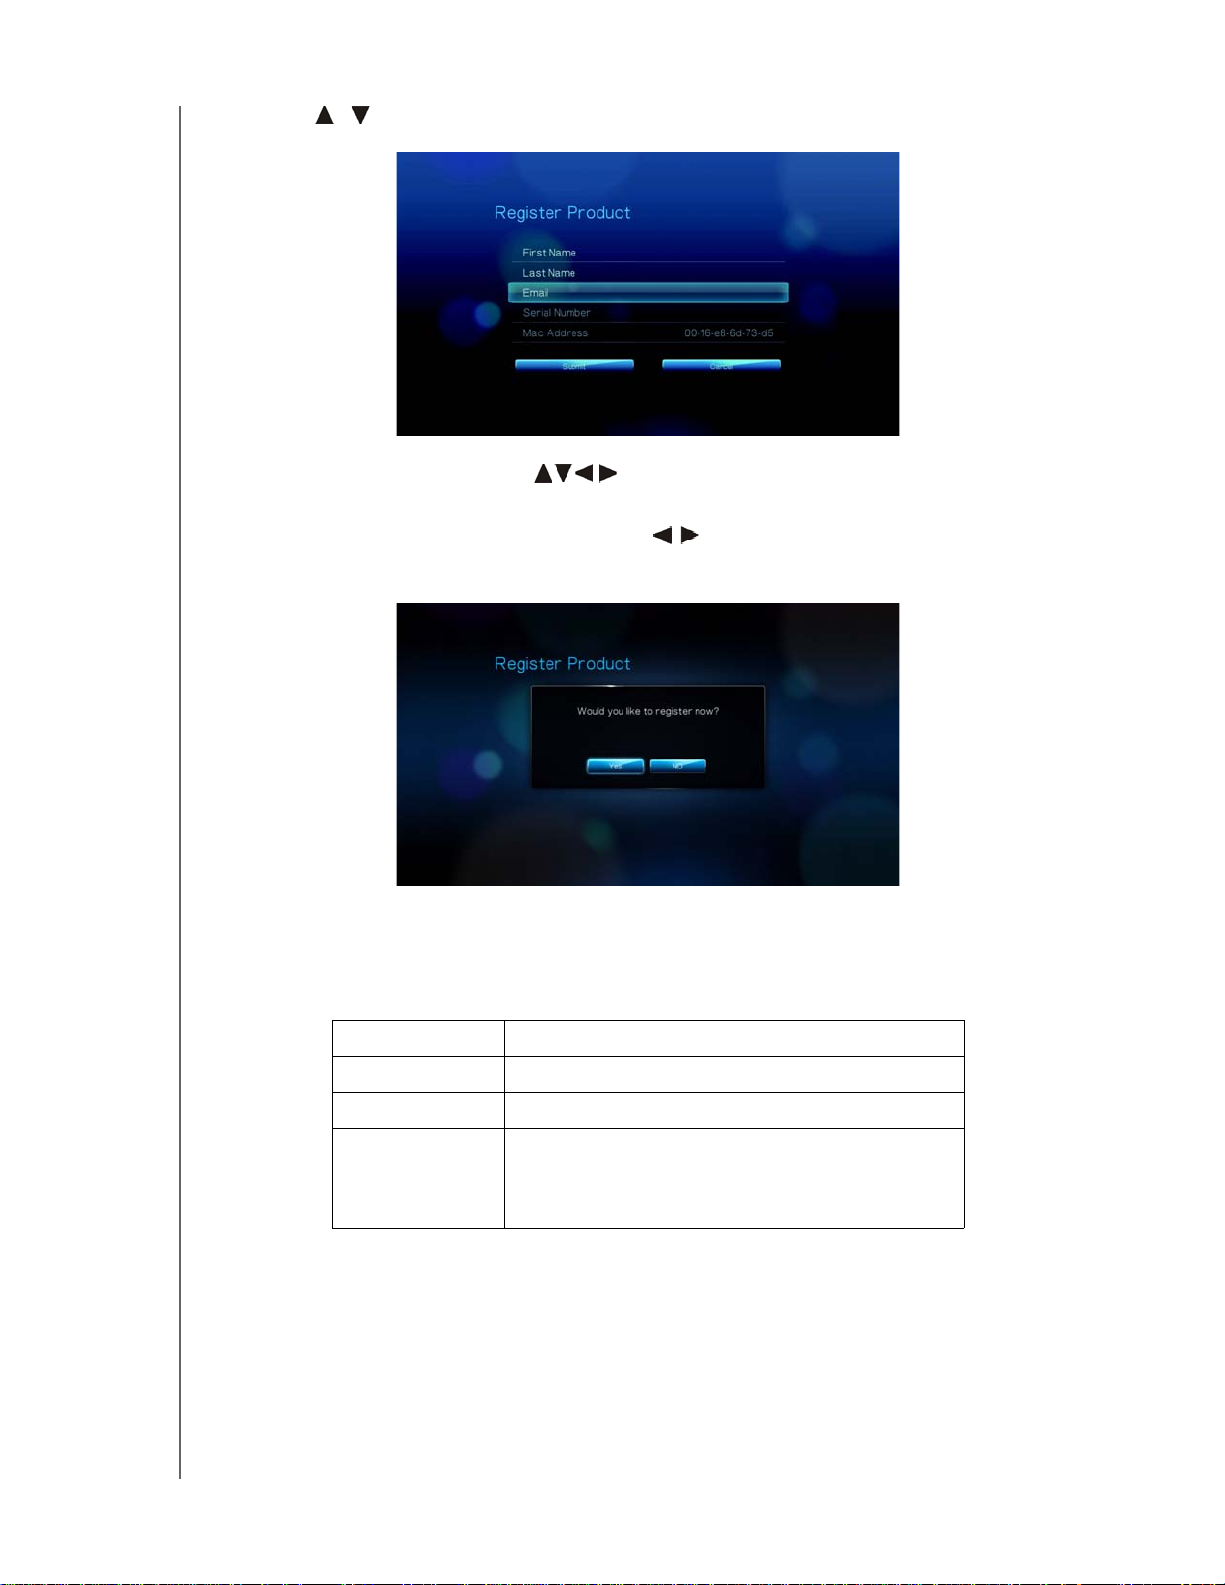
9. Press / to select Email, then press ENTER.
10.Use the navigation buttons to type in your email address using the onscreen keyboard. Select Submit, then press ENTER.
11.On the Register Product screen, press to select OK, and then press
ENTER.
Accessories
For information on optional accessories for this product, visit:
US www.shopwd.com or www.wdstore.com
Canada www.shopwd.ca or www.wdstore.ca
Europe www.shopwd.eu or www.wdstore.eu
All others Contact WD Technical Support in your region. For a
list of Technical Support contacts, visit
support.wdc.com and see Knowledge Base
Answer ID 1048.
IMPORTANT USER INFORMATION – 5
Page 10

2
WD TV Live/WD TV Live Plus HD Media Player
User Manual
Product Overview
Thank you for purchasing a WD TV Live or WD TV Live Plus HD Media Player. This
user manual provides step-by-step instructions for installing and using your new
media player. For the latest WD product information and news, visit our website at
www.westerndigital.com.
Full-HD video playback and navigation - up to 1080p – This is the real thing;
Full-HD 1080p playback. Sit back and enjoy the spectacular picture quality of
brilliant high definition video and the crystal clear sound of digital audio. Use the
included remote control to make your entertainment choices using our crisp,
animated navigation menus.
Enjoy new releases, classics, and TV episodes instantly – Don’t wait for the
mailman to deliver your movies and don’t settle for streaming to your small computer
screen. Access your Netflix unlimited membership and instantly watch TV episodes
and movies on your big screen.*
*WD TV Live Plus HD media player only. Netflix unlimited membership required. US only.
See your personal media and Internet content on your HD TV – Experience
your movies, music, and photos as big as life on your TV in Full-HD. Stream
YouTube, Flickr, Pandora, daily video podcasts from CNN, NBC, MTV, ESPN, and
other online content.*
*Availability varies by country. Pandora available in US only. These streaming services may be changed,
terminated or interrupted at any time.
Play almost any type of media file – The media players support a wide variety of
the most popular file formats. No need to spend time transcoding.
Access media anywhere on your home network – The Ethernet port lets you
connect this media player to your home network so you can access and stream
video, view photos, and play music from any Mac, PC, and network drive in your
house.
Turn your USB drive into an HD media player – Play content from most popular
USB drives, and digital cameras, camcorders, and portable media players that can
be recognized as mass storage devices. Optimized for My Passport™ portable hard
drives.
WiFi ready – Supports wireless network connection to your home network with an
optional USB wireless adapter.
Play media seamlessly from multiple USB drives – Two USB ports on the player
let you connect multiple USB storage devices and access them simultaneously. Our
media library feature collects the content on all the drives into one list sorted by
media type. There’s no limit to the size of your media collection; just add more USB
drives for more space.
®
Control your media from your computer – This media player is Windows
7
compatible, so you can use the “Play To” feature to easily stream your Windows 7
computer’s files to your TV through your media player.*
*For more information on Play To, go to
http://windows.microsoft.com/en-us/windows7/products/features/play-to.
PRODUCT OVERVIEW – 6
Page 11

WD TV Live/WD TV Live Plus HD Media Player
User Manual
Transfer files easily – Copy, move, or delete files stored on a USB drive, a network
drive, your camcorder, or a camera to the attached USB drive using the on-screen
menus.
Show photos and movies directly from your digital camera or video camera
– Works with digital cameras, digital video cameras, in fact, any digital imaging
device that supports Picture Transfer Protocol.
Advanced navigation options
Thumbnail, list, and preview modes – Browse your content by file name or by
thumbnails of photos, album covers, video preview, and movie cover art.
Media Library – This unique feature lets you view all your media by media type
in one menu regardless of its location in folders or drives. You can view your
content by categories such as genre, album, artist and date.
Search – Search by genre, title, artist, filename and partial filename.
Photo viewing
Create custom slide shows with a variety of transitions and background
music
Zoom and pan
Search by filename, partial filename, most recently viewed and date
Movie viewing
Fast forward, rewind, pause, zoom, and pan
View subtitles
Search by filename, partial filename, most recently viewed and date
Music playback
Fast forward, rewind, pause, shuffle, repeat
Search by filename, partial filename, most recently viewed and date.
File Management
Copy files between USB drives and transfer files between a USB drive
connected to the media player and your computer.
HDMI 1.3, composite video and component video output - The HDMI port lets
you connect to the highest quality HDTV or home theater. Additional composite
(RCA), and component outputs ensure compatibility with virtually all television sets.
SPDIF digital output – The optical audio output sends digital signals to your AV
receiver for the best surroundsound experience.
Ultra-compact design - Fits easily into your entertainment center.
PRODUCT OVERVIEW – 7
Page 12

3
WD TV Live/WD TV Live Plus HD Media Player
Features and Functions
Features
Audio/Video Interface
HDMI 1.3 interface for digital audio and high-definition video
Component video interface (YPbPr, green/blue/red) for analog video connection
Composite interface (RCA, yellow/white/red) for analog AV connection
Toslink (optical) audio for high-fidelity digital audio
Auto source function enables the HD media player to detect and switch to a new
interface connection. For example, the media player automatically switches to
HD mode when it is connected through an HDMI cable.
Video output resolution includes 480i, 576i, 480p, 576p, 720i, 720p, 1080i,
1080p
Stereo or multi-channel digital surround audio output (digital surround sound is
only available when using the Toslink S/PDIF interface).
Wired or wireless Internet connection for access to online media content.
User Manual
Multiformat Content Playback
Multiformat is a file type that groups other files of the same digital content but may
be encoded in different digital formats. For example, a single video file may actually
include a few components such as video, audio, and photo grouped together.
The media player is capable of playing several different types of multiformat files. For
a detailed list of supported formats, refer to “Supported Formats” on page 176. )
Audio
codec
MP3 AIFF MPEG 1 AVI GIF SRT PLS
MP2 MPEG 2 VOB/ISO BMP SUB WPL
WAV/
PCM/
LPCM
Dolby
Digital**
FLAC Xvid MKV PNG ASS
WMA MOV
Audio
container
MKA MPEG 4
OGG VC-1 DVR-MS TIF/
Video
codec
(ASP, AVC
HD/H.264)
Video
container
WMV9 JPEG SMI M3U
Photo Subtitle* Playlist
SSA
TIFF***
AAC DAT (VCD/
SVCD
DTS**** tp, ts, m2t/
m2ts
Vorbis
*To convert subtitle files encoded in a different format, open the file with Notepad and do a Save As with the
following parameters: File Type—All Files and Encoding—UTF-8.
FEATURES AND FUNCTIONS – 8
Page 13
WD TV Live/WD TV Live Plus HD Media Player
**2-channel only. 2+channel signal is sent via digital pass through to a receiver. Manufactured under license from
Dolby Laboratories. “Dolby” and the double-D symbol are trademarks of Dolby Laboratories.
***Single layer only.
****Manufactured under license under U.S. Patent #’s: 5,451,942; 5,956,674; 5,974,380; 5,978,762; 6,487,535
& other U.S. and worldwide patents issued & pending. DTS is a registered trademark & the DTS logos and
Symbol are trademarks of DTS, Inc.
User Manual
Plug-n-Play USB 2.0 Support*
USB storage device with a USB connector
Portable media players with USB connector
Digital cameras/camcorders with USB connector
*For a list of tested, compatible USB devices, see Article #2581 in our knowledge base at support.wdc.com.
USB Storage File System Support
NTFS
FAT/FAT32
HFS+
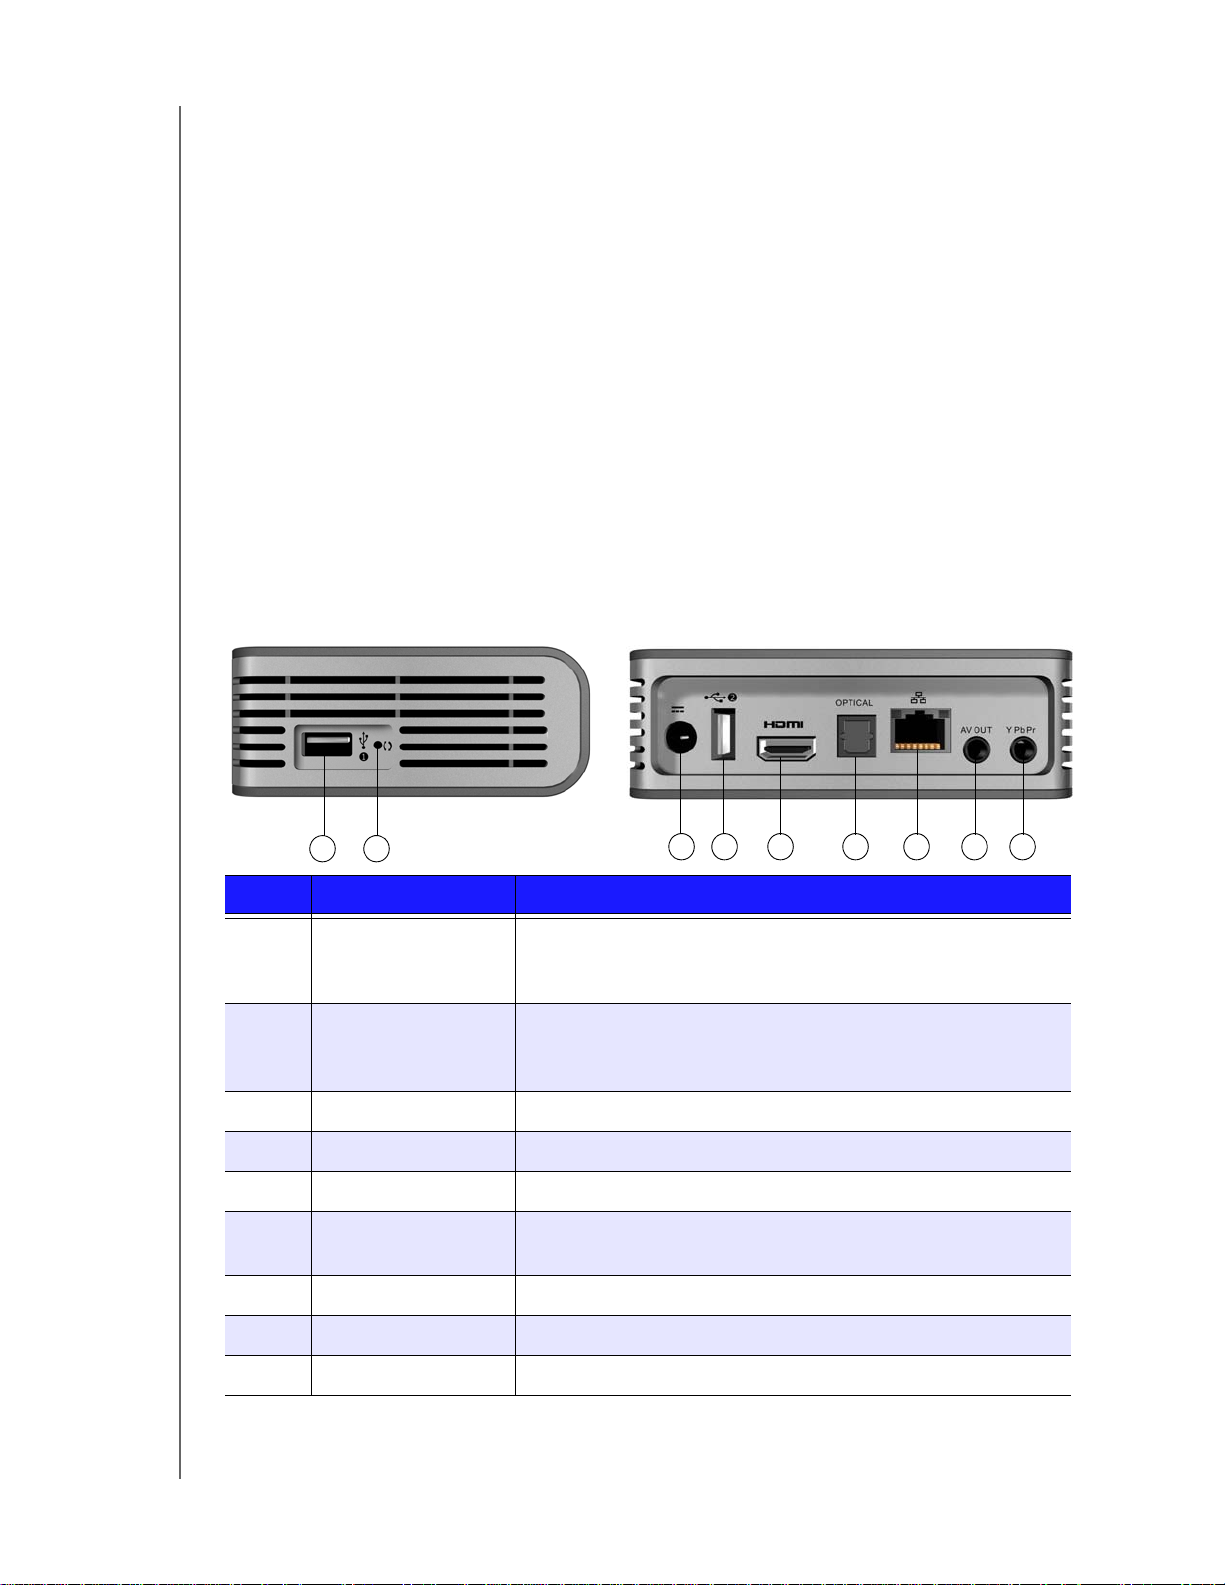
Connections
1 2
3 4 5 6 7 8 9
Item Component Description
1 USB port 1 Supports connection of removable storage devices, portable
media players, digital cameras with USB connectors, and
USB wireless adapters.
2 Reset switch Press for one second to reset to factory default. Press and
hold 10 seconds to toggle between NTSC and PAL. (using a
fine-tipped stylus or the unfolded end of a paperclip).
3 Power jack Connects the power cable
4 USB port 2 The same function as USB port 1
5 HDMI port Connects to your TV’s HDMI port (HDMI cable sold separately)
6 Toslink (optical)
Connects to your AV receiver (Toslink cable sold separately)
audio port
7 Ethernet port Supports LAN connection for wired Internet access.
8 Composite jack Connect to your TV’s analog video and audio jacks
9 Component jack Connect to your TV’s component (YPbPr) terminals.
Note: The WD TV HD Media Player does not support USB hubs.
FEATURES AND FUNCTIONS – 9
Page 14
WD TV Live/WD TV Live Plus HD Media Player
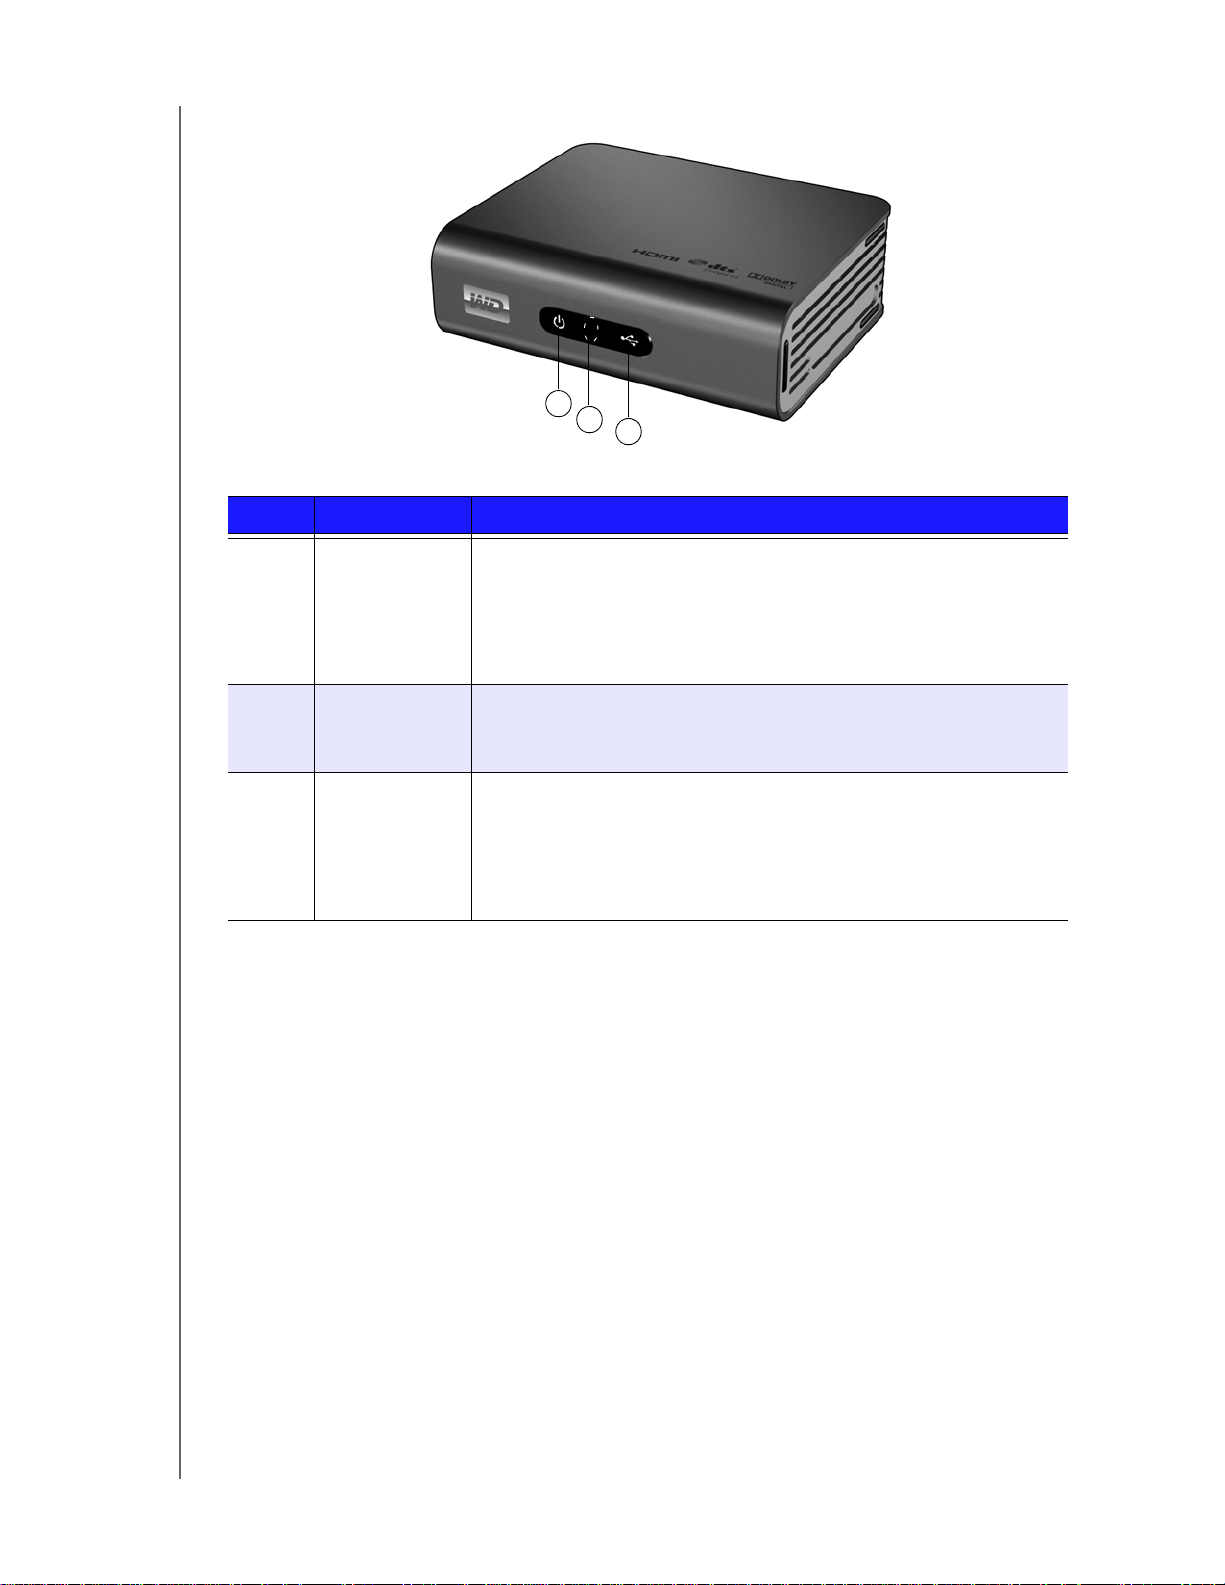
LED Indicators
1
2
3
Item Component Description
1 Power LED • On—The power cable is connected and the power is on.
• Off—The media player is in standby mode or the power cable is
disconnected.
• Blinking—A system diagnostic failure has occurred.
See “Troubleshooting” on page 171.
User Manual
2 Infrared
receiver
• Receives signals from the remote control. Point the tip of the
remote control to the infrared receiver and ensure that the path
between the two is unobstructed.
3 Status LED • On—A USB device is being accessed and the media player is in
idle mode.
• Off—No USB device is connected.
• Blinking—Scans for media from the USB storage.
See “Media Library” on page 165 for more information.
FEATURES AND FUNCTIONS – 10
Page 15
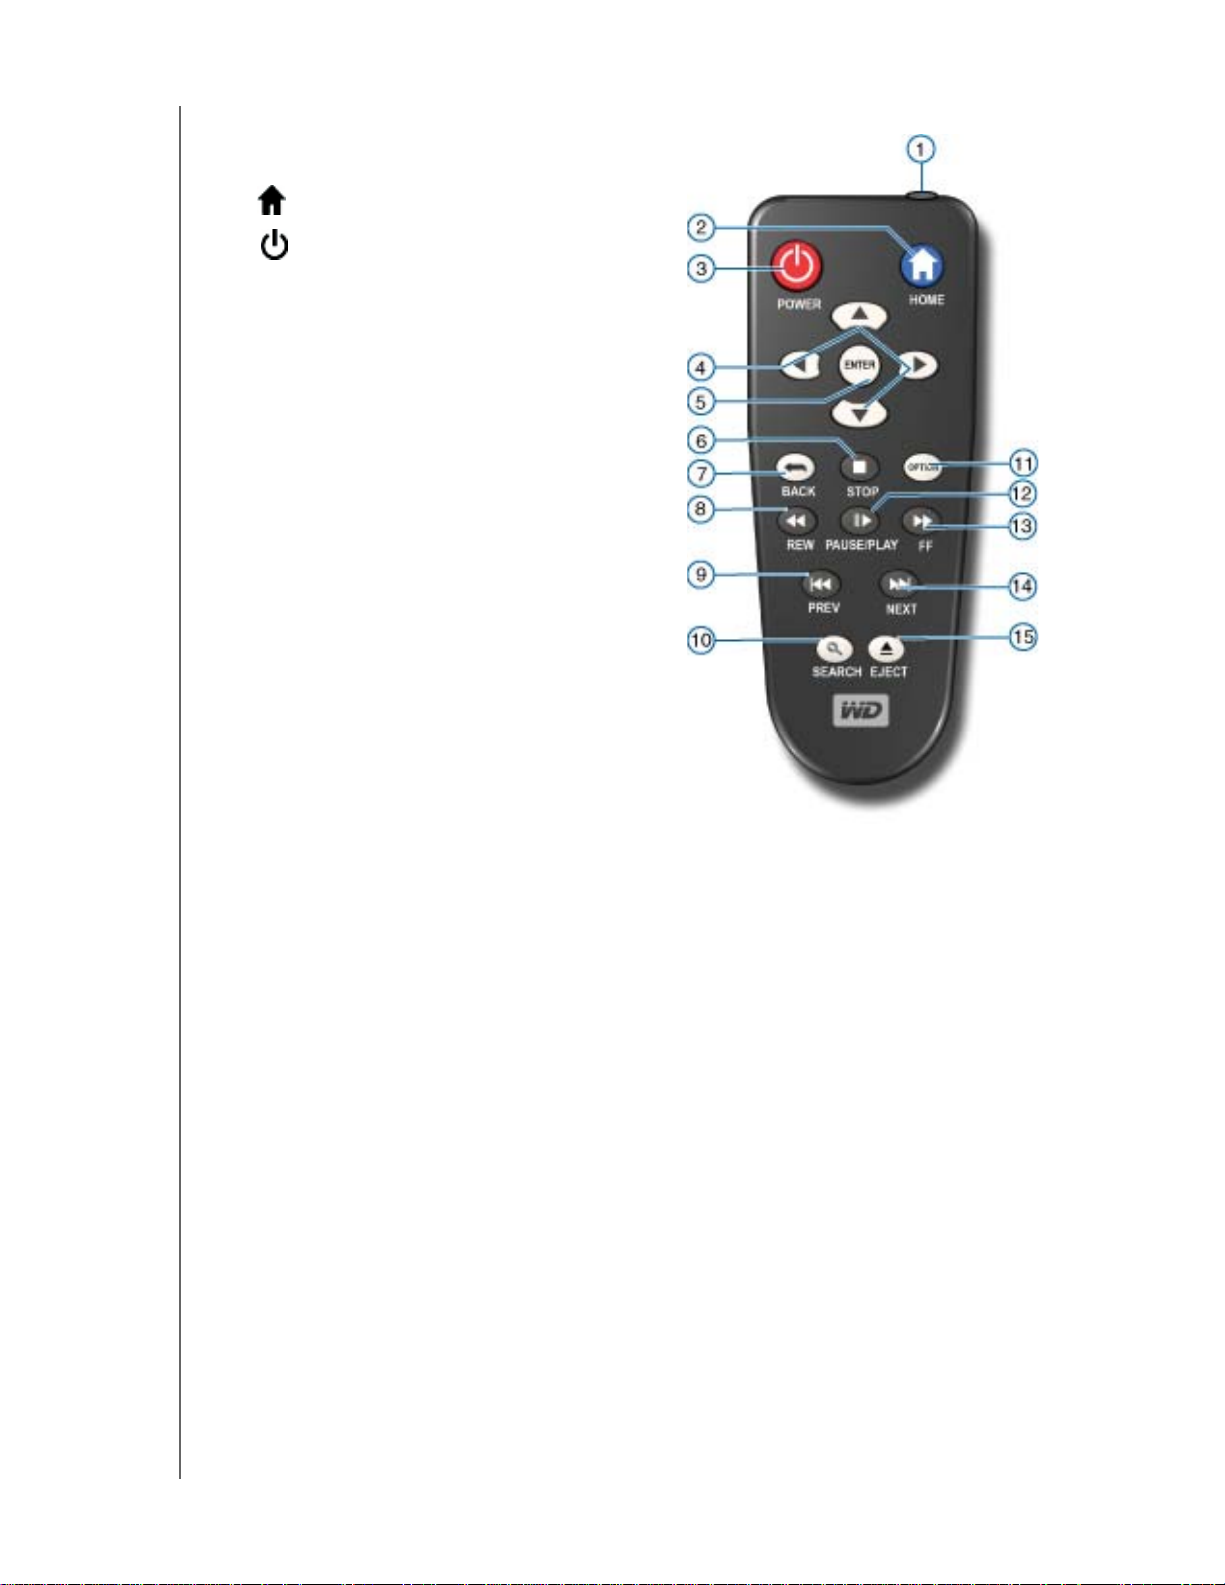
Remote Control
1. Infrared transmitter
2. HOME
3. POWER
4. Navigation buttons
5. ENTER (turns Info bar ON or OFF)
6. STOP
7. BACK
8. REV (rewind)
9. PREV (previous track/page up)
10. SEARCH
11. OPTION
12. PAUSE/PLAY
13. FF (fast forward)
WD TV Live/WD TV Live Plus HD Media Player
User Manual
14. NEXT (next track/page down)
15. EJECT (safe removal of attached
storage)
Note: For additional information, see “Using the Remote
Control” on page 25.
FEATURES AND FUNCTIONS – 11
Page 16
4
Getting Started
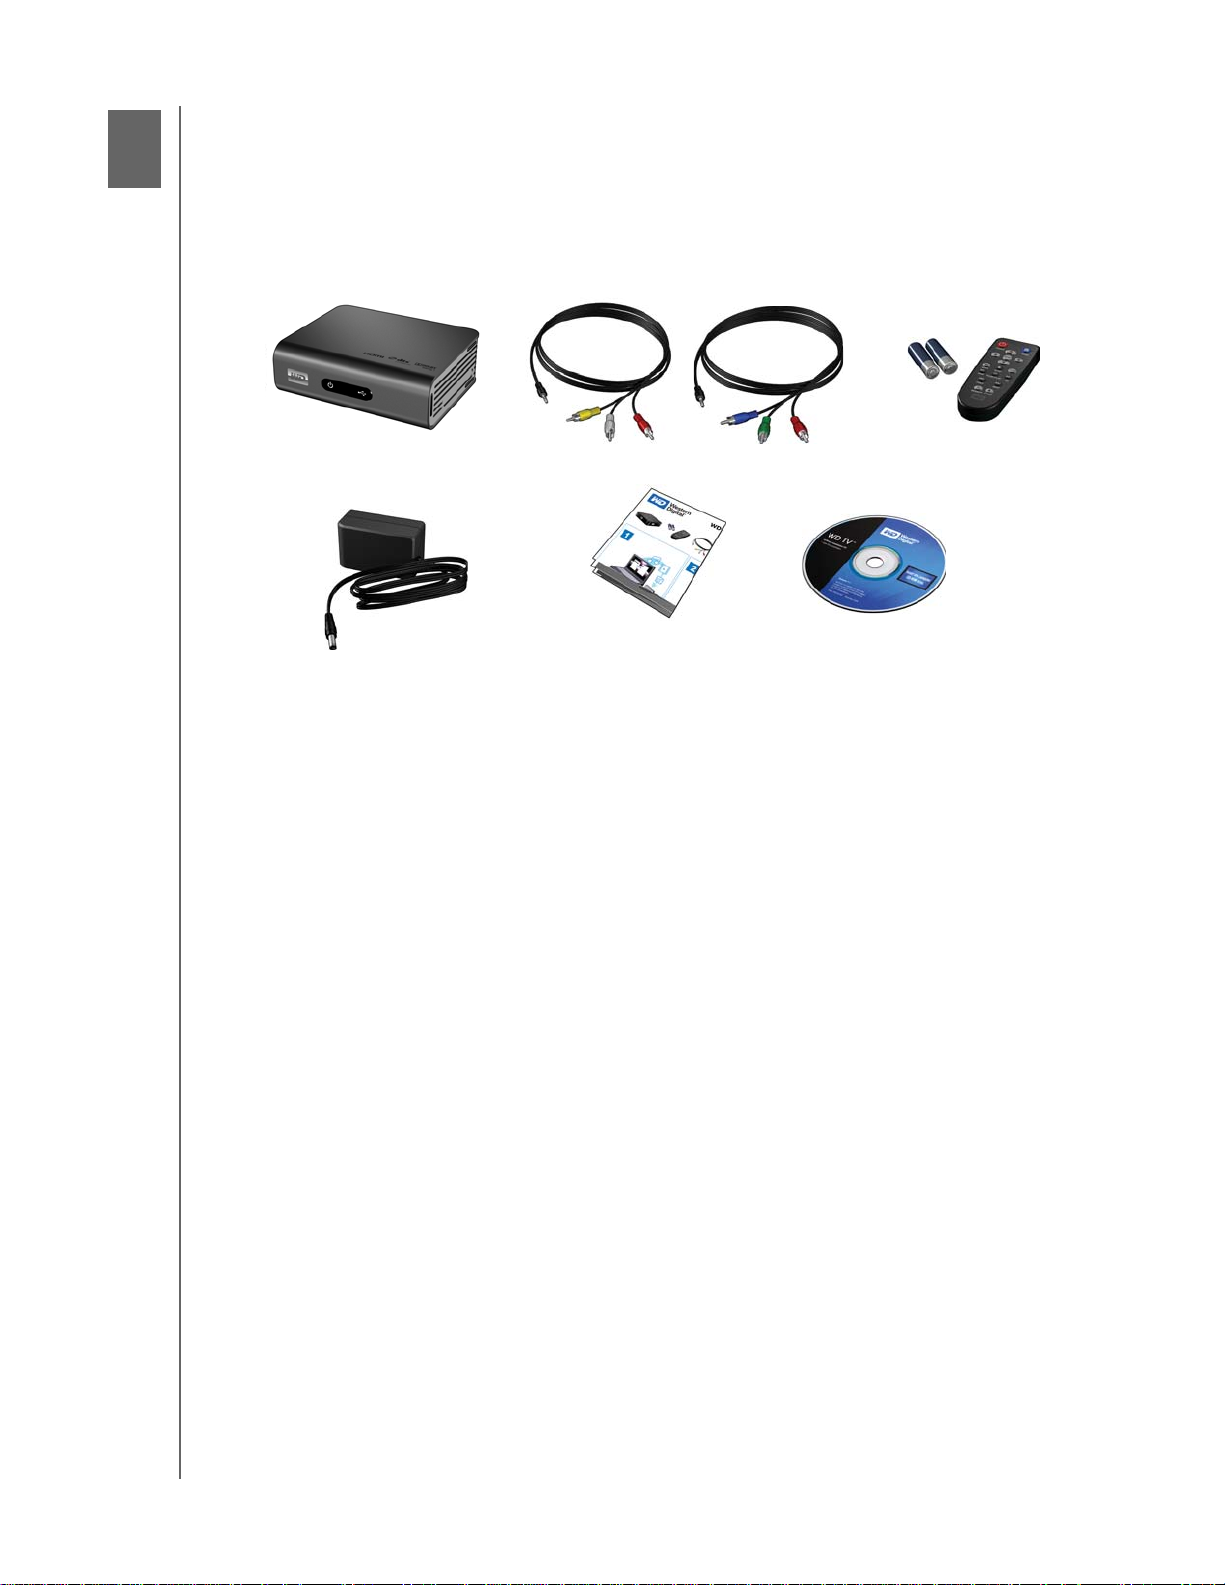
Package Contents
WD TV Live/WD TV Live Plus HD Media Player
User Manual
WD TV Live/Live Plus HD Media Player
AC power adapter
Composite AV cables
Quick Install Guide
Component (YPbPr) cables
Documentation and
software CD
Remote control and
Two AAA batteries
Installation Requirements
Standard or HD TV with a composite (standard A/V), component (YPbPr), HDMI,
or S/PDIF input
USB storage device with a USB 2.0 connector
Valid wired or wireless network connection
Media Library support requirement* —1% of total storage capacity
Optional: TV, stereo, or AV receiver with an optical digital (Toslink) or stereo audio
input jack (audio playback only); Ethernet cable
*Can be turned off in Settings Menu if not needed.
Installation Procedure
The media player installation procedure is outlined below:
1. Transfer content from your computer to the USB storage media.
2. Connect the media player to your TV or entertainment unit through the desired
interface option.
3. Connect the power cable.
4. Insert the batteries into the remote control.
5. Connect the USB device containing your media content or establish a wired or
wireless network connection.
GETTING STARTED – 12
Page 17
WD TV Live/WD TV Live Plus HD Media Player
User Manual
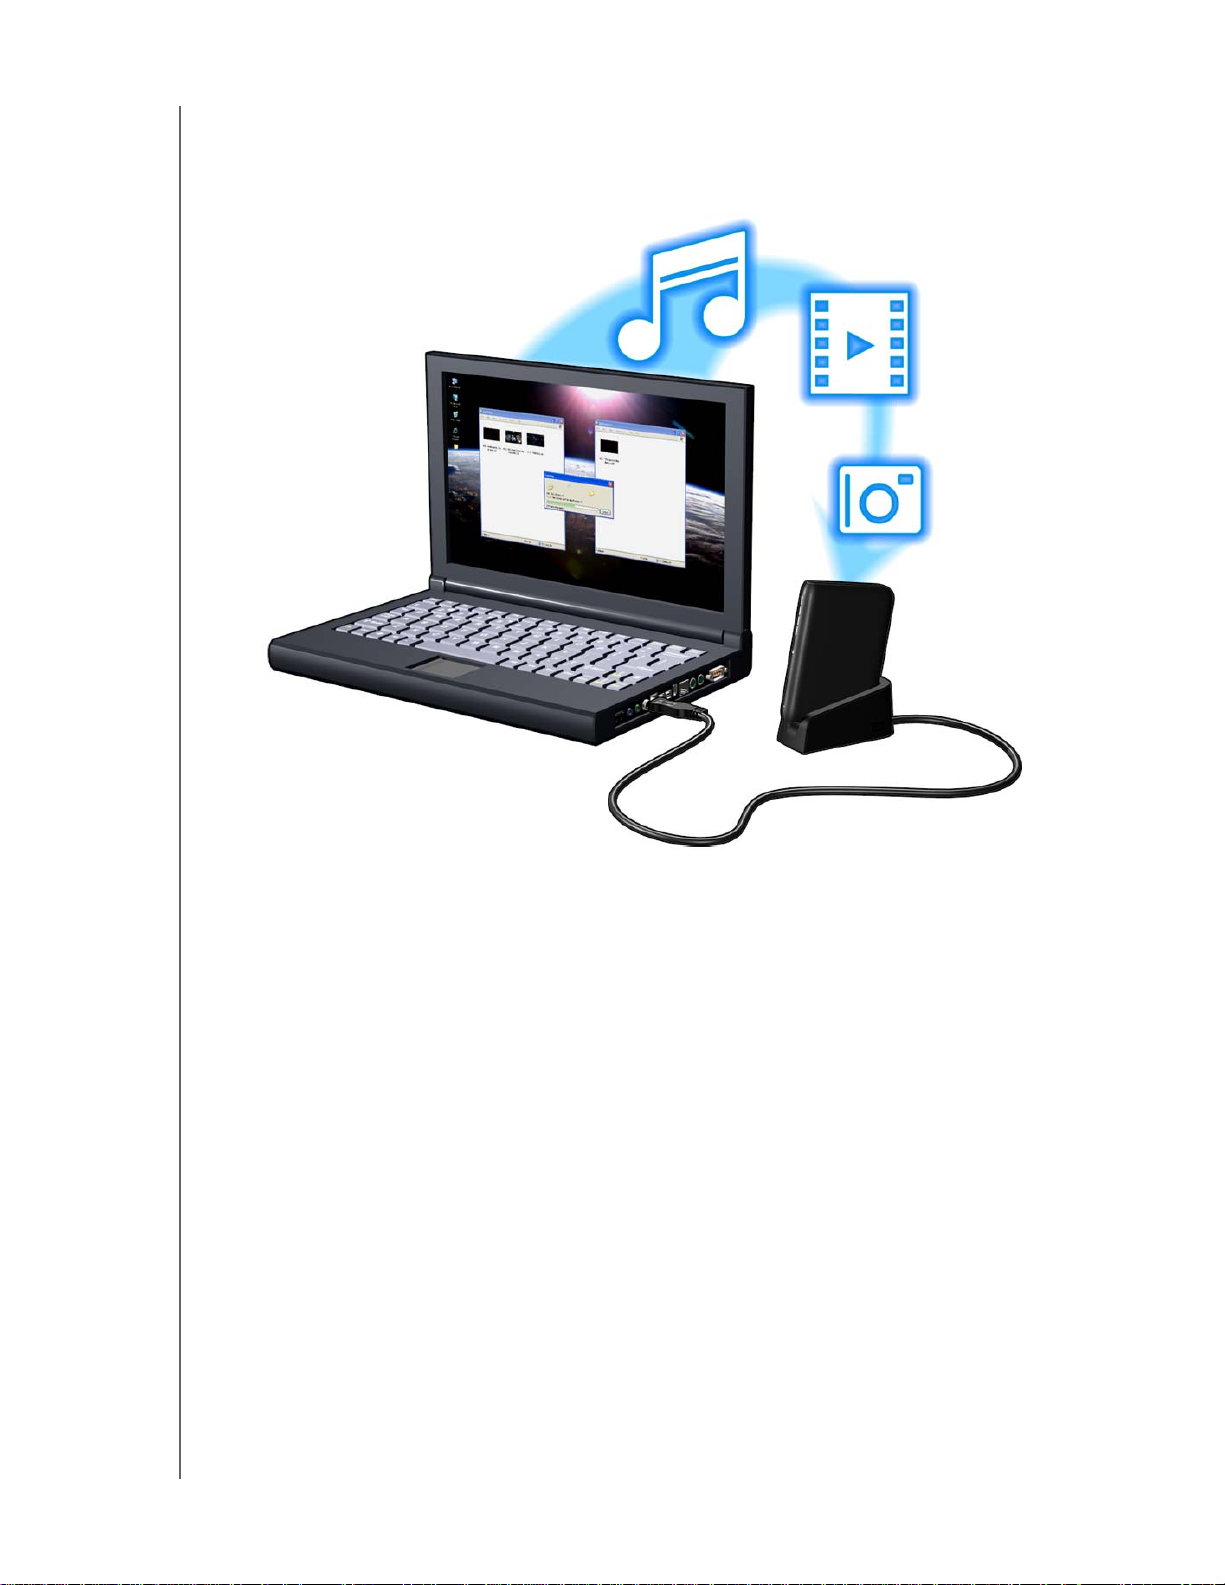
Step 1 - Loading Content onto your USB Drive
Transfer your favorite content from your computer to your external USB drive, such
as My Passport™ or My Book® (external USB drives and stand not included).
GETTING STARTED – 13
Page 18
WD TV Live/WD TV Live Plus HD Media Player
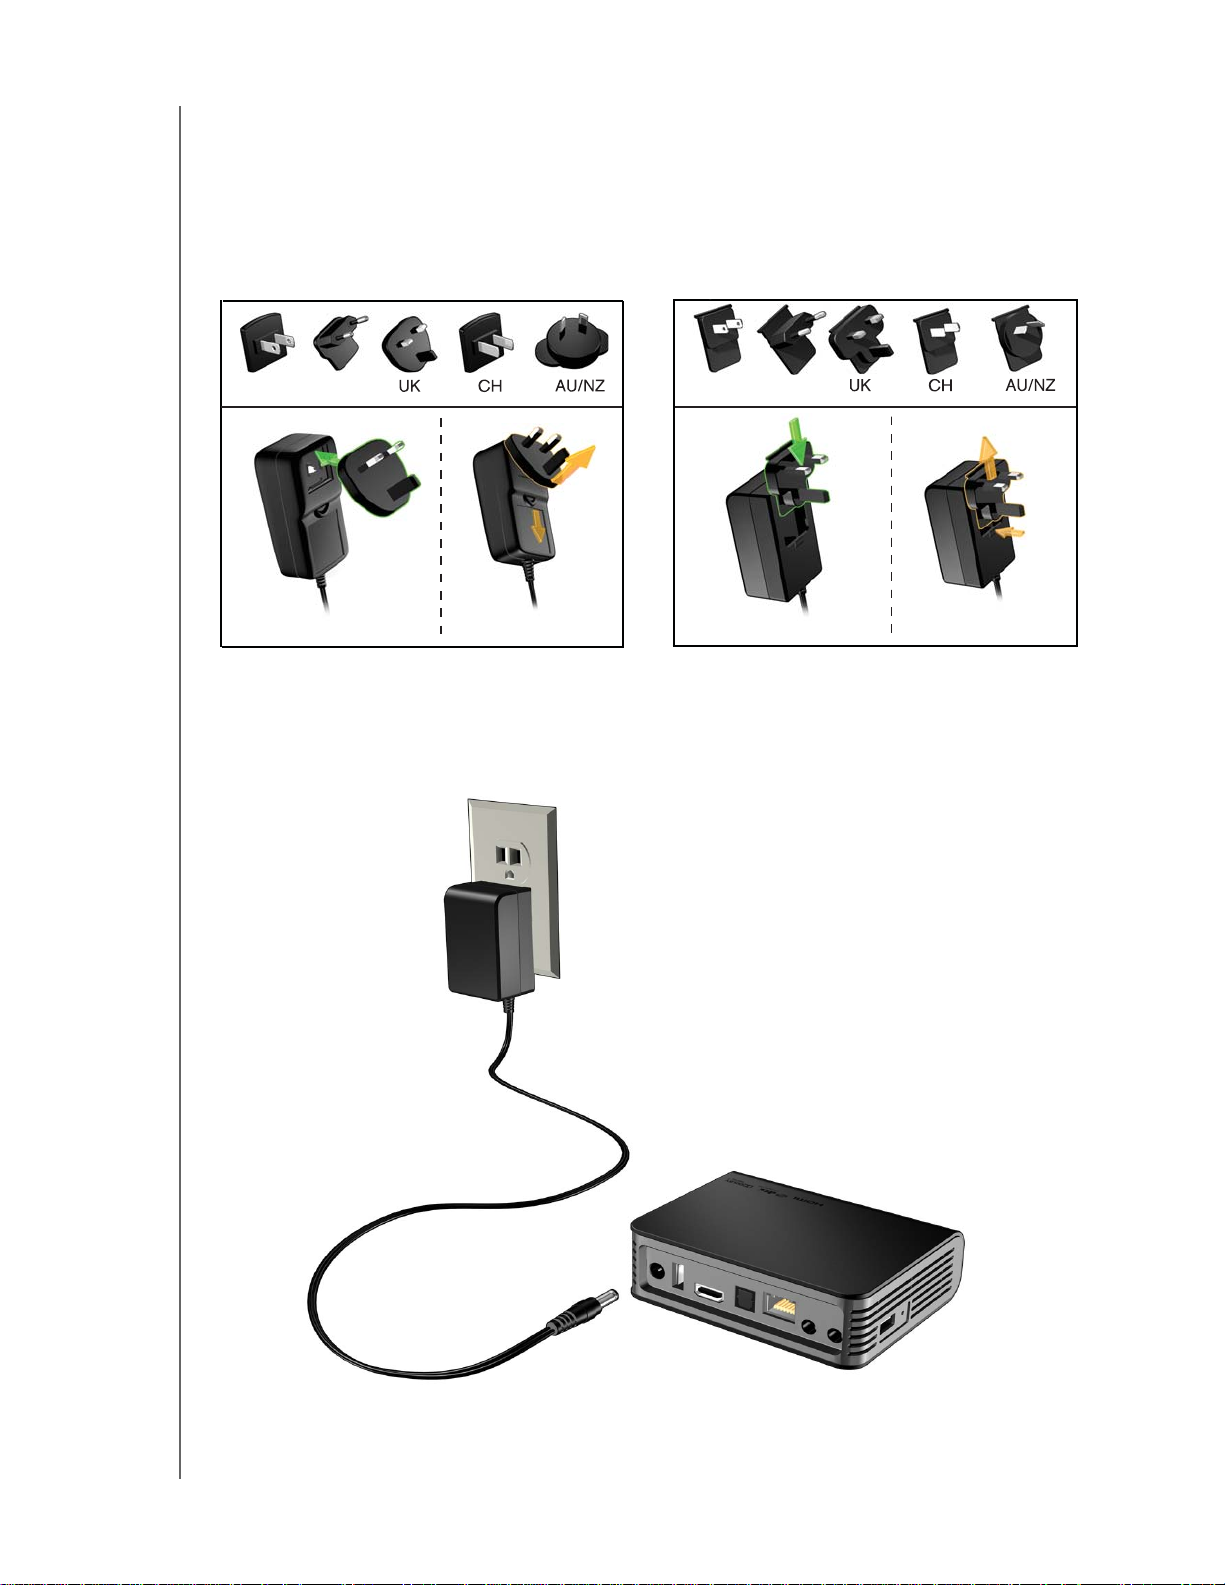
Step 2 - Connecting the Power Cable
1. Connect the power clip to the power cable plug.
The AC power adapter will vary, depending on your location. Some locations do
not require a power plug clip. Units sold in those locations will have a fixed power
plug. Refer to the illustration below.
User Manual
US/JA/TW
EU/KO
Installing InstallingRemoving Removing
US/JA/TW
EU/KO
2. Connect the power cable to the media player’s DC connector, and then plug the
opposite end into an AC power outlet. The media player powers up
automatically.
Wait a few seconds for your TV to detect the media player. If it is not detected,
you may need to change the input source on your TV to HDMI or composite,
GETTING STARTED – 14
Page 19
WD TV Live/WD TV Live Plus HD Media Player
User Manual
depending on your connection. Check the user documentation of your TV for
more information.
Once the media player is detected, the splash screen displays to indicate system
bootup, then the home screen of the user interface opens.
For more information, see “Using the WD TV HD Media Player Menu” on page
26.
Step 3 - Connecting the Media Player
The following figures illustrate the cable connections supported by the media player.
The standard connection uses the included composite-to-mini AV cables.
Note: HDMI and Toslink (optical) cables are sold separately.
Important: Configure the media player’s Audio/Video settings depending
on the type of connection you choose. See “Audio/Video” on page 144 for
more information on these settings.
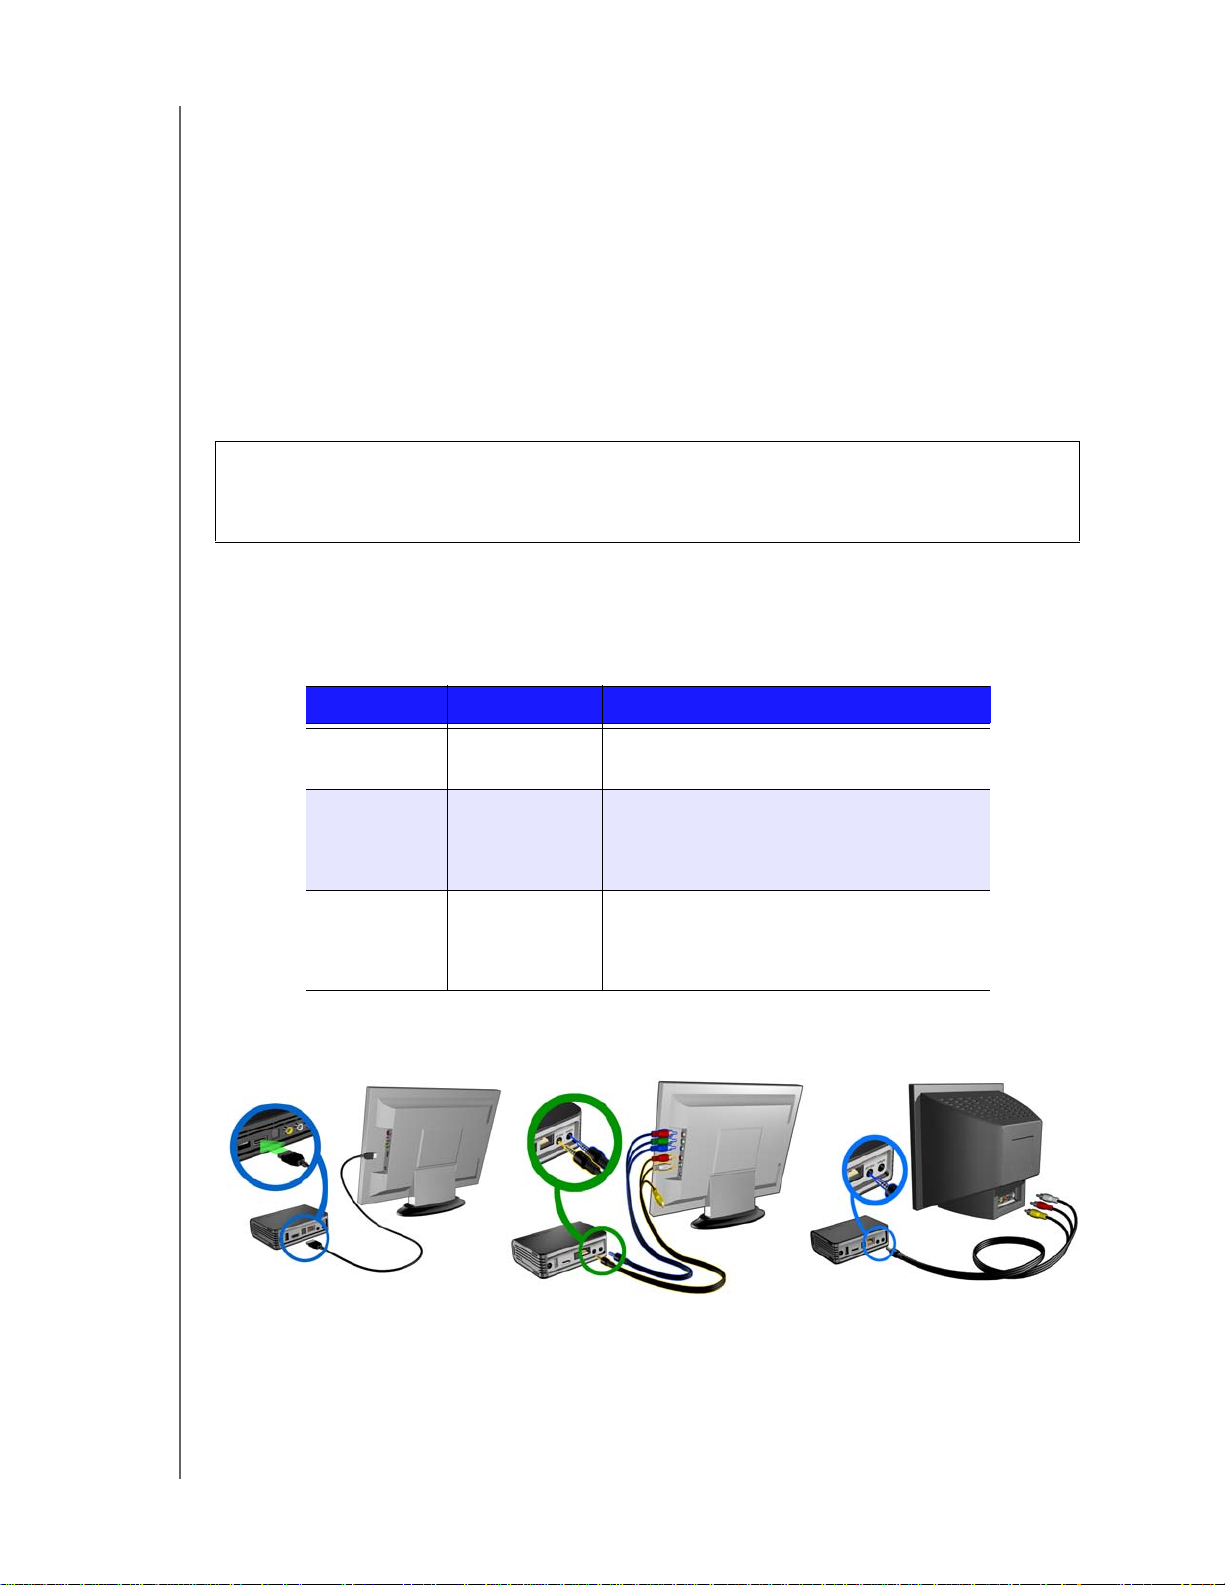
Choosing the Best Connection
The quality of the picture produced by your TV depends on the quality of your TV
and its connection to the media player.
Connection Quality Connectors
HDMI Best
(up to 1080p)
Component Better
(up to 1080i)
Composite Good
(480i/576i)
Component (High Definition)HDMI (High Definition)
Specialized, high-definition connector
• Green = Y
• Blue = Pb
• Red = Pr
• Yellow = video
• Red = right audio
• White = left audio
Composite (Standard Definition)
GETTING STARTED – 15
Page 20

WD TV Live/WD TV Live Plus HD Media Player
User Manual
HDMI Video and Audio (High Definition)
HDMI combines high-definition video, multi-channel audio, and inter-component
control in a single digital cable. This interface provides video quality resolution of up
to 1080p.
To connect your media player using an HDMI cable:
1. Plug an HDMI cable into the HDMI connector on the media player.
2. Plug the opposite end into the HDMI port on your TV or audio/video system (if
available).
As an option, for higher quality multi-channel audio:
3. Plug a Toslink (optical) cable into the S/PDIF (optical digital) connector on the
media player.
4. Plug the opposite end into the optical digital port on your receiver or home
theater system.
Note: HDMI and Toslink cables are sold separately.
5. Select the appropriate TV input source.
GETTING STARTED – 16
Page 21
WD TV Live/WD TV Live Plus HD Media Player
User Manual
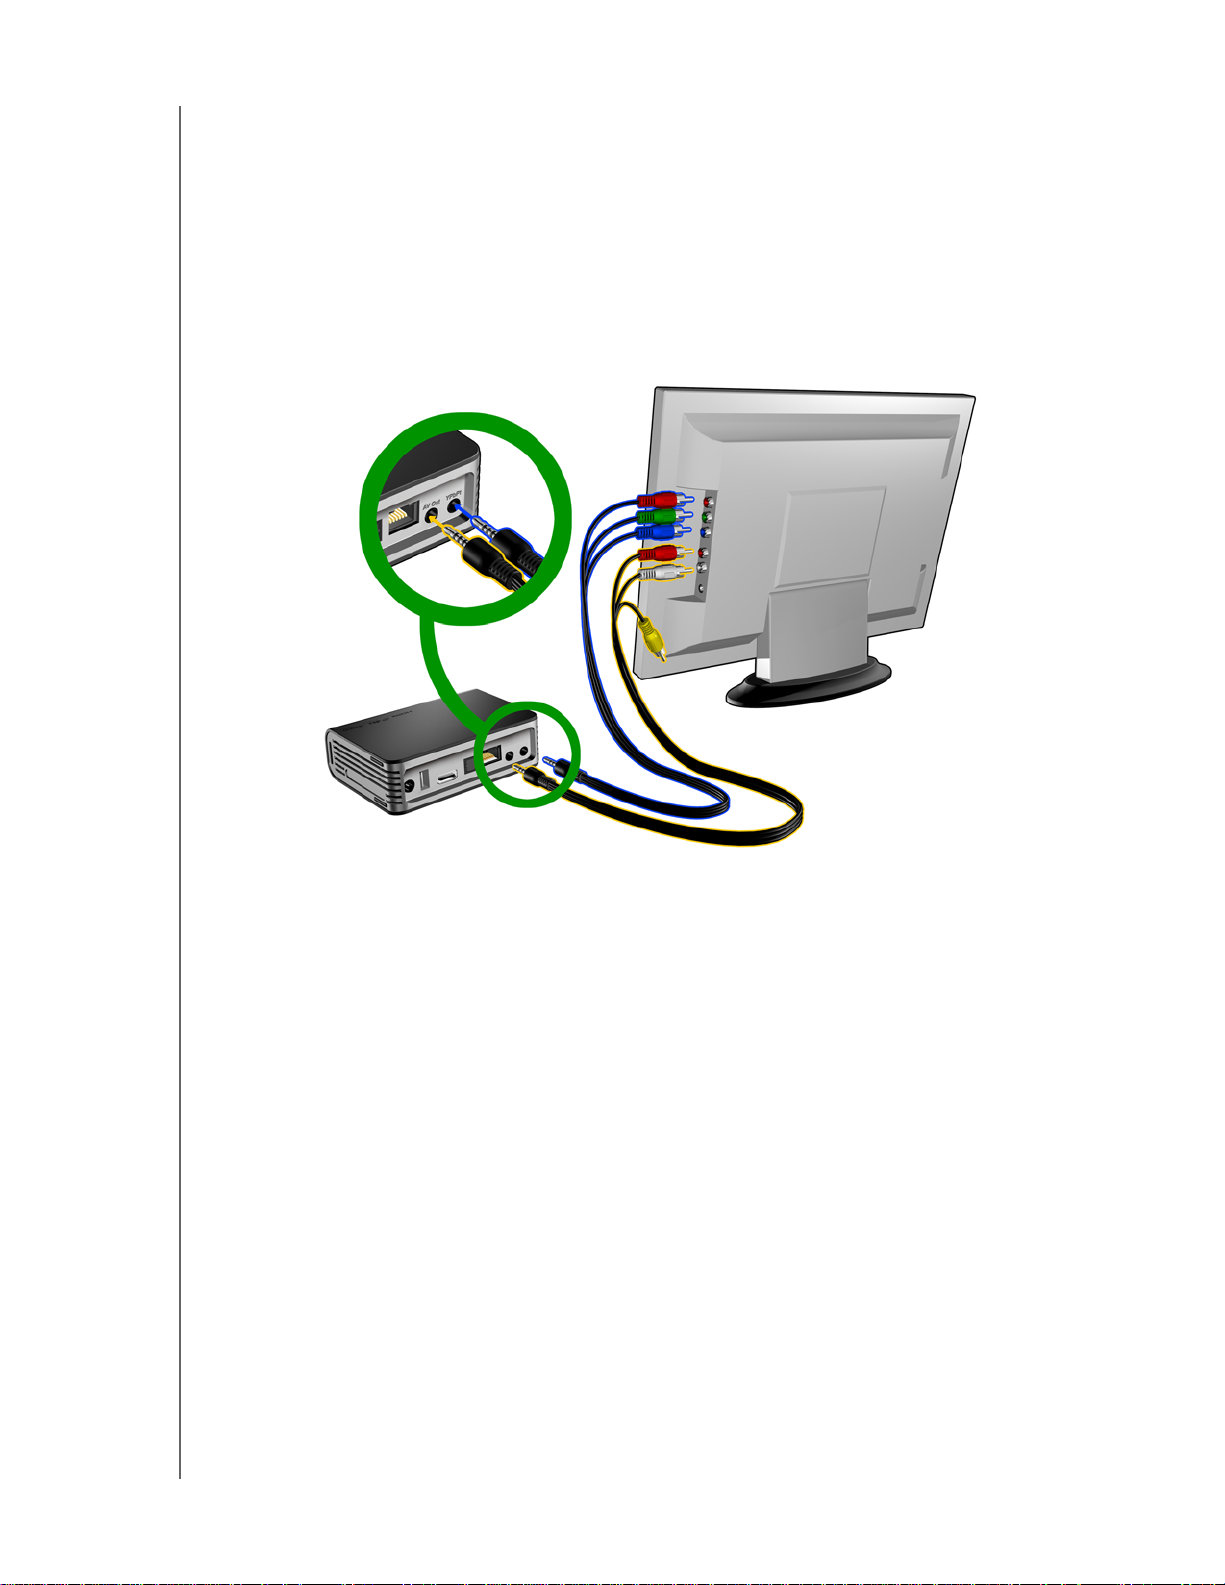
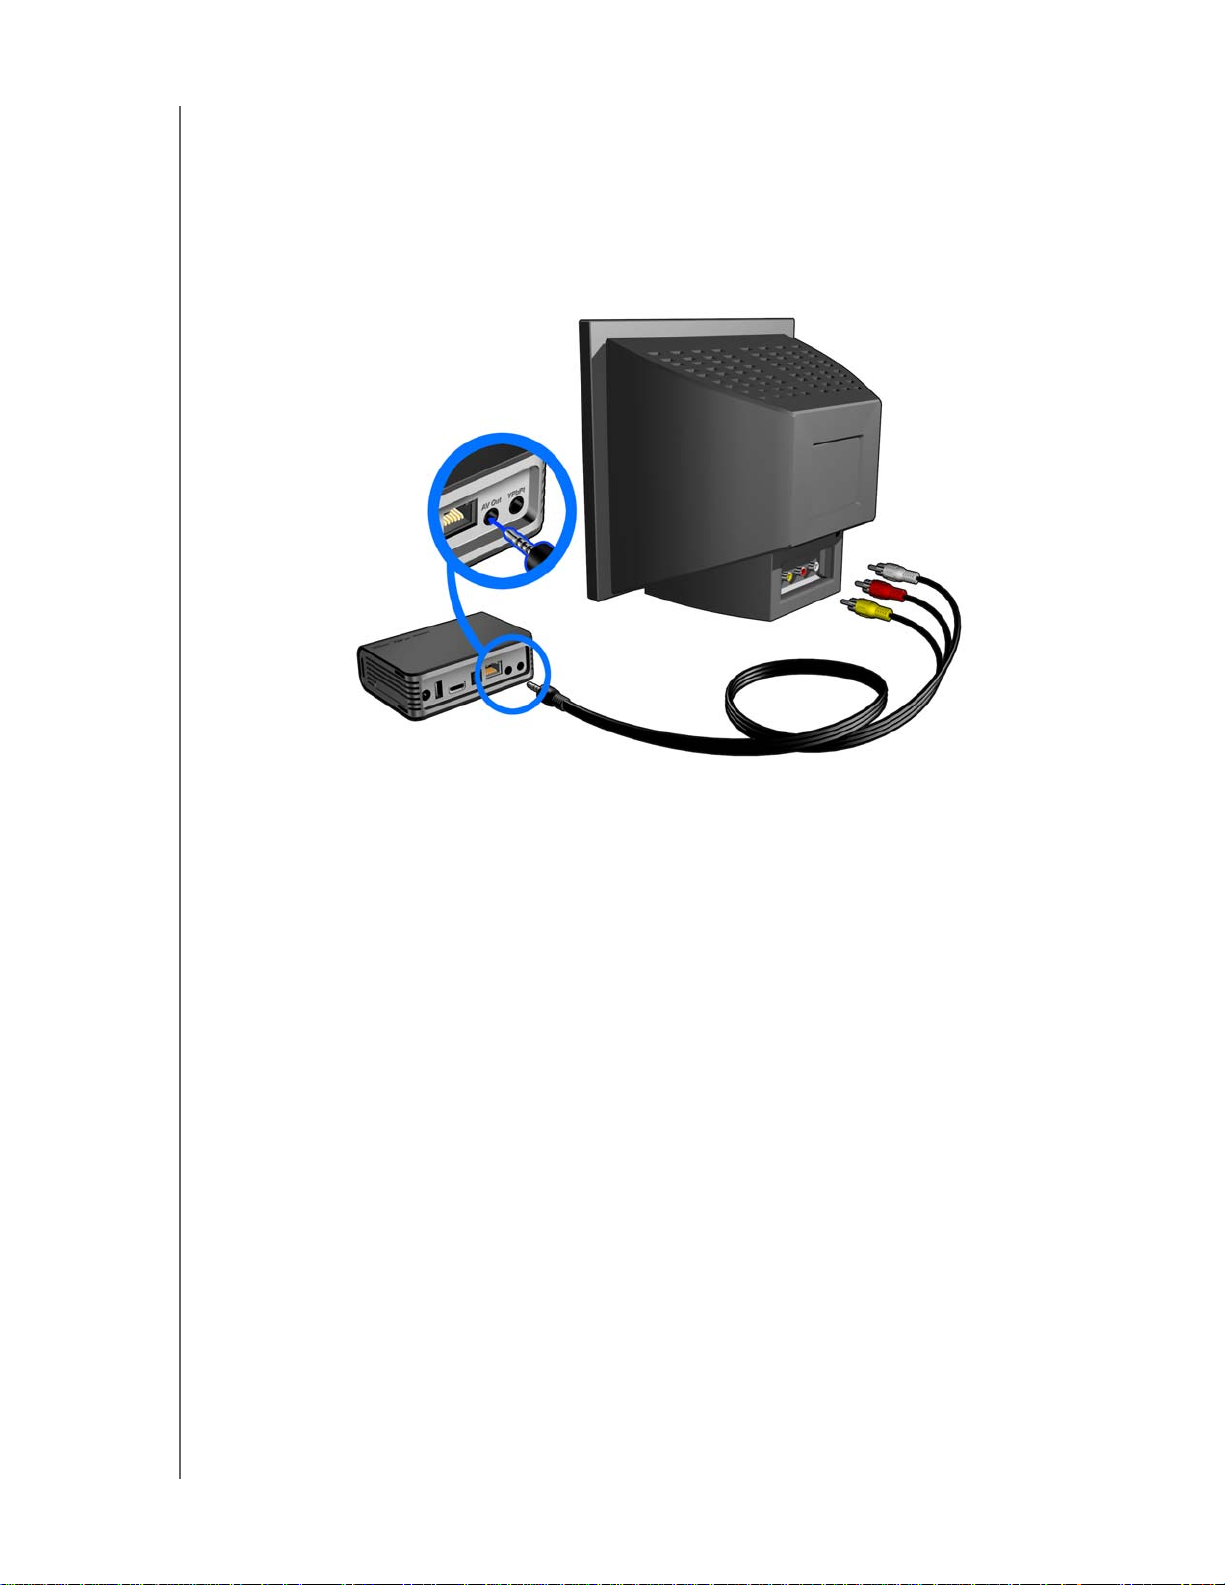
Component Video and Audio (High Definition)
The component connection only provides video signals. You will also need to
connect the composite audio cables to provide sound. This interface provides video
quality resolution of up to 1080i.
To connect your media player using a component-to-mini cable:
1. Plug mini cable into the component connector on the media player.
2. Plug the opposite ends into the component ports on your TV or audio/video
system (if available), red to red, green to green, and blue to blue.
3. For audio, plug the composite-to-mini connector into the composite port on the
media player.
4. Plug the audio connectors on the opposite end of the cable into the composite
audio input ports on your TV, red to red and white to white.
Wait a few seconds for your TV to detect the media player. If the media player is
not detected, you may need to change the input source on your TV to component or composite, depending on your connection. Check the user documentation of your TV for more information.
Once the media player is detected, the splash screen displays to indicate system
bootup, then the home screen of the user interface opens.
GETTING STARTED – 17
Page 22
WD TV Live/WD TV Live Plus HD Media Player
User Manual
Composite AV Connection (Standard Definition)
To use a composite connection:
1. Plug the mini-connector into the composite port on the media player.
2. Plug the opposite ends into the composite input ports on your TV, yellow to
yellow, red to red, and white to white.
3. Select the appropriate TV input source.
Wait a few seconds for your TV to detect the media player. If the media player is
not detected, you may need to change the input source on your TV to component or composite, depending on your connection. Check the user documentation of your TV for more information.
Once the media player is detected, the splash screen displays to indicate system
bootup, then the home screen of the user interface opens.
GETTING STARTED – 18
Page 23
WD TV Live/WD TV Live Plus HD Media Player
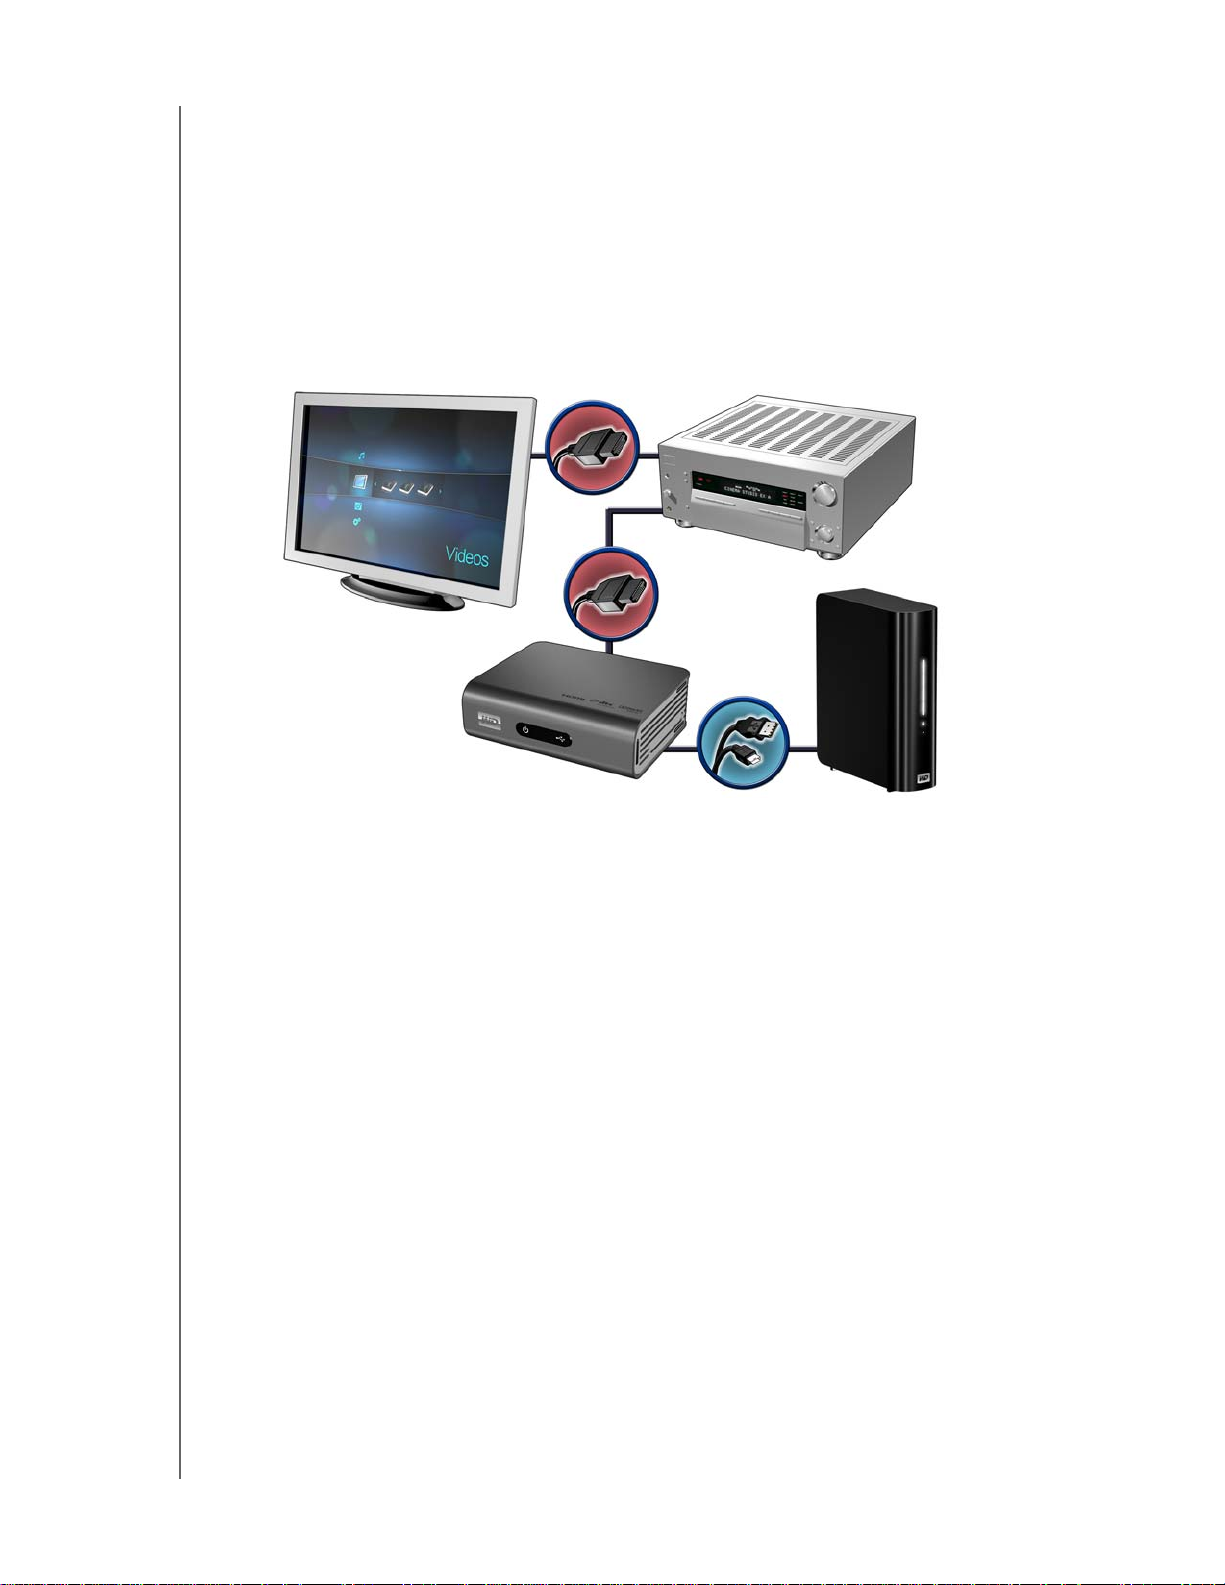
Home Theater (High Definition)
To connect a home theater system:
1. Plug an HDMI cable into the HDMI connector on the media player.
2. Plug the opposite end into the HDMI In port on your A/V receiver.
3. Plug an HDMI cable into the HDMI Out port on your A/V receiver.
4. Plug the opposite end into the HDMI port on your TV (if available).
5. Select the appropriate TV input source.
User Manual
Note: HDMI cable sold separately.
My Book external drive
(sold separately)
GETTING STARTED – 19
Page 24
WD TV Live/WD TV Live Plus HD Media Player
User Manual
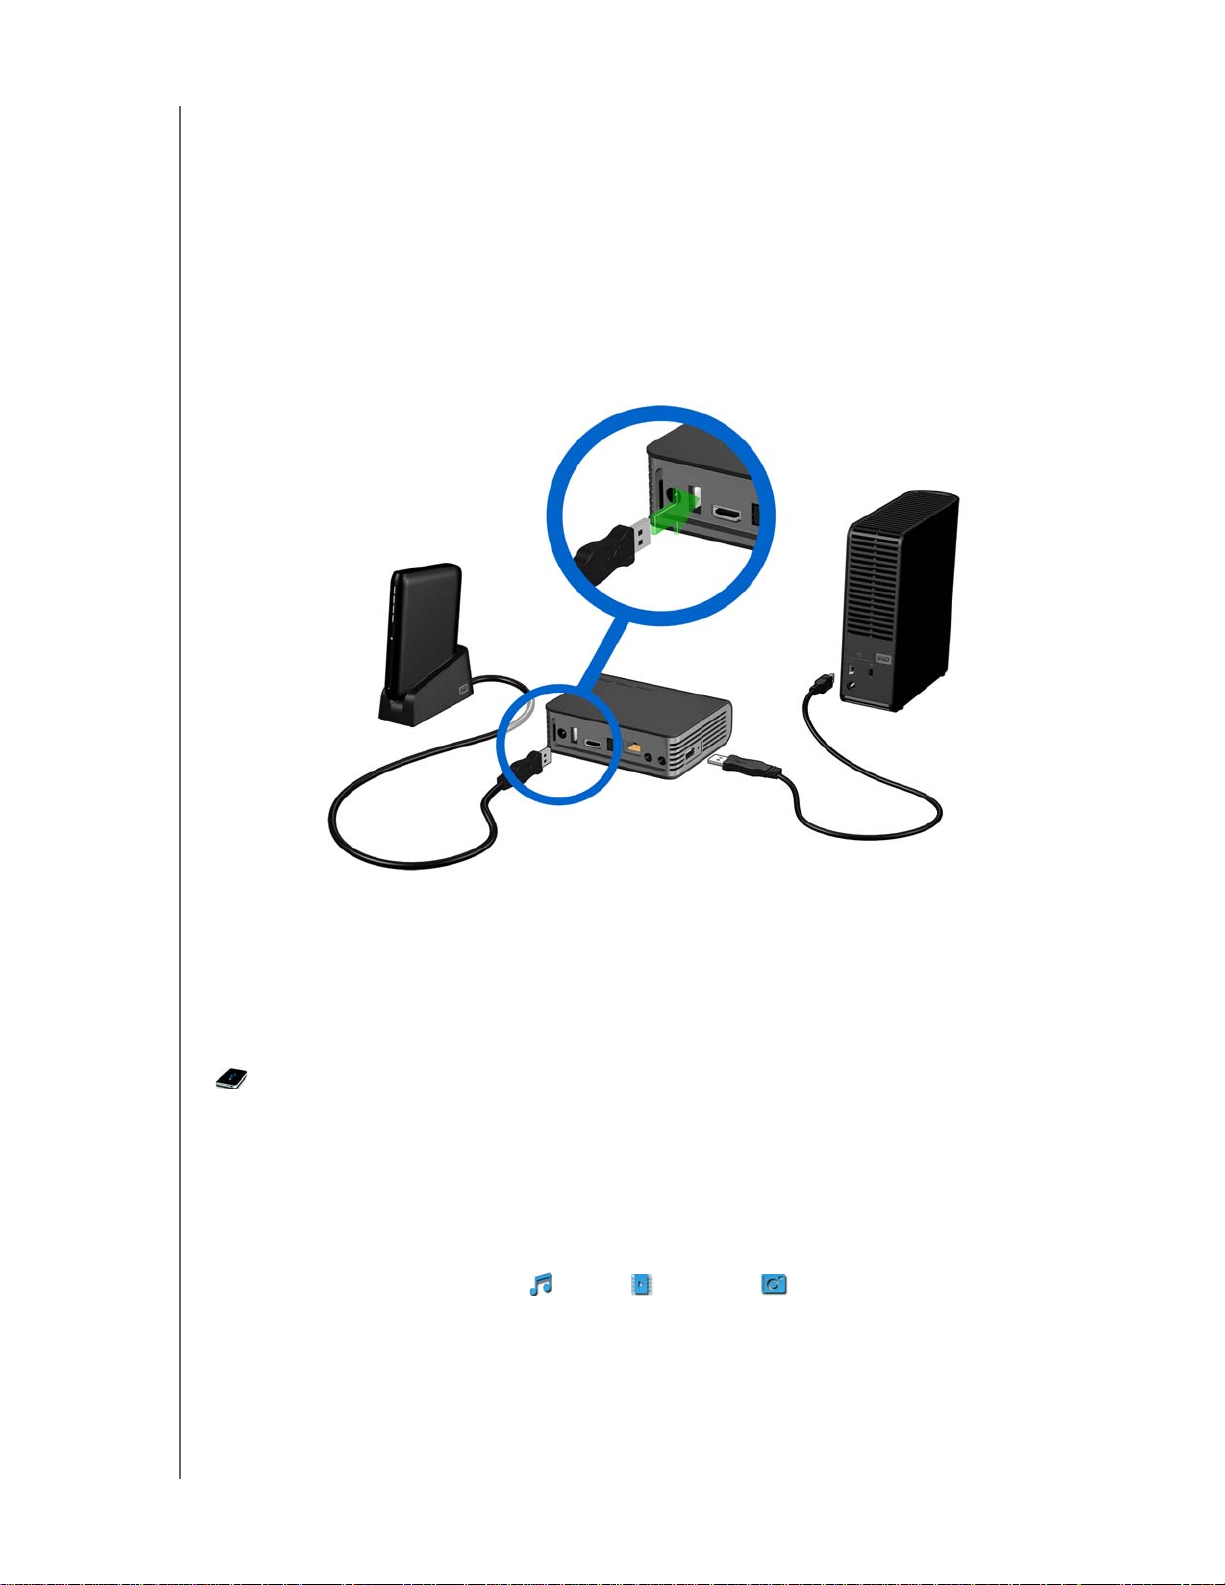
Step 4 - Connecting a USB Device
The media player has two USB ports that support playback from WD USB external
drives.*
* For a list of supported WD external drives, see article #2581 in or knowledge base at sup-
port.wdc.com.
To connect the USB device:
1. Connect the USB device to either of the media player’s USB ports.
My Passport portable drive
and stand (sold separately)
My Book external drive
(sold separately)
2. Wait for a few moments while the media player scans the USB device for media
files. (Scanning is enabled by default. If you want to turn off automatic scanning,
go to “Media Library Compilation” on page 27.)
This may take several minutes, depending on the storage capacity of the USB
device and the number of available media files. When the USB device is detected,
the status LED turns on and the Home screen displays the new USB directory icon
. If the media player does not detect any storage devices, “No storage present”
appears on the screen. You can still navigate within the folders, but the folders will be
empty.
To unlock a locked WD USB device:
A USB device must be unlocked for the media player to access its contents.
1. Navigate to the Home screen, and select the icon for the media content you wish
to access. It can be Music , Video , or Photo .
GETTING STARTED – 20
Page 25

WD TV Live/WD TV Live Plus HD Media Player
User Manual
2. In the Unlock your WD Drive screen, press / to select OK, then press
ENTER.
3. Use the navigation buttons to type in the USB drive access password in
the on-screen keyboard. Select Submit, then press ENTER.
If a wrong password is entered, the following screen displays.
Press
/ to select OK, press ENTER, then type in the correct password.
GETTING STARTED – 21
Page 26
WD TV Live/WD TV Live Plus HD Media Player
User Manual
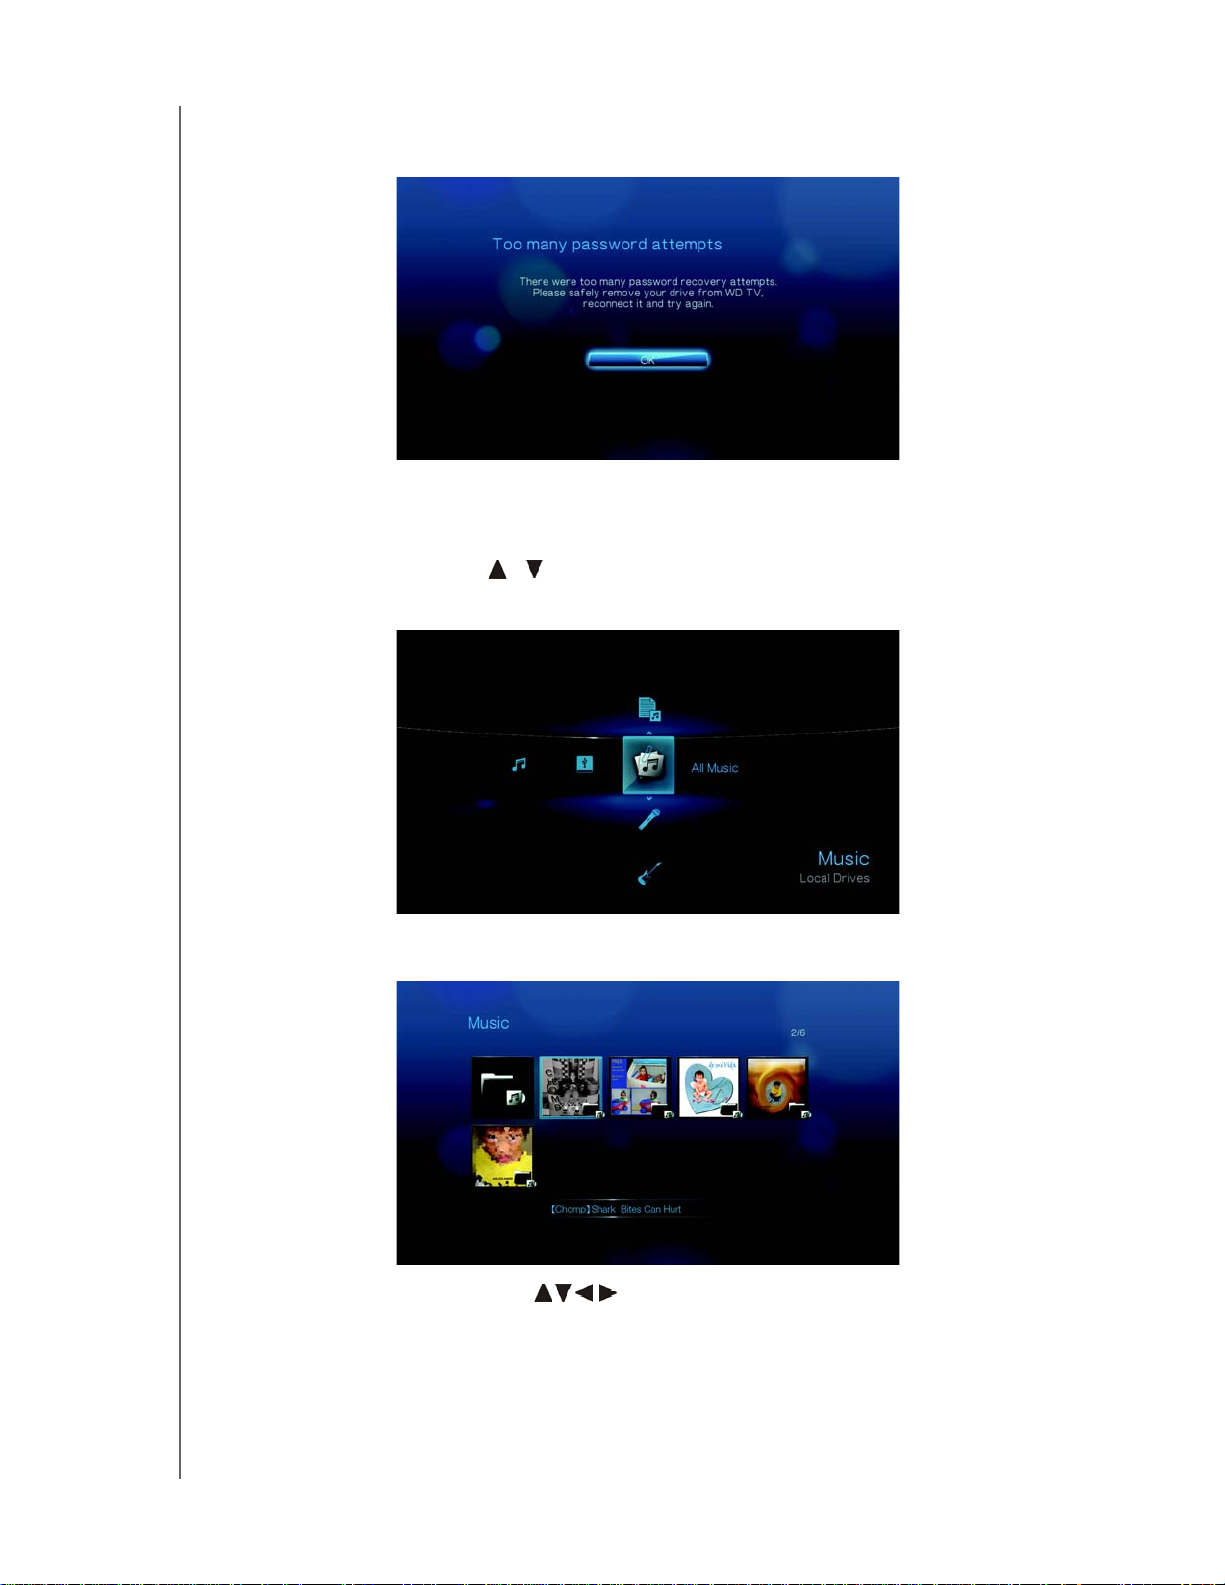
If you enter the wrong password five consecutive times, the USB drive is placed
in a hold state and the following message appears.
Press ENTER to close the error message. Disconnect the USB drive. Power
cycle and reconnect the USB drive and type in the correct access password.
4. Once the USB drive has been unlocked, the menu bar for the selected media
type will appear. Press / to choose a filter option for displaying supported
media contents, then press ENTER.
Supported content for the selected media type will be displayed.
5. Use the navigation buttons
to select the content you wish to access,
then press ENTER to start media playback.
GETTING STARTED – 22
Page 27
WD TV Live/WD TV Live Plus HD Media Player
User Manual
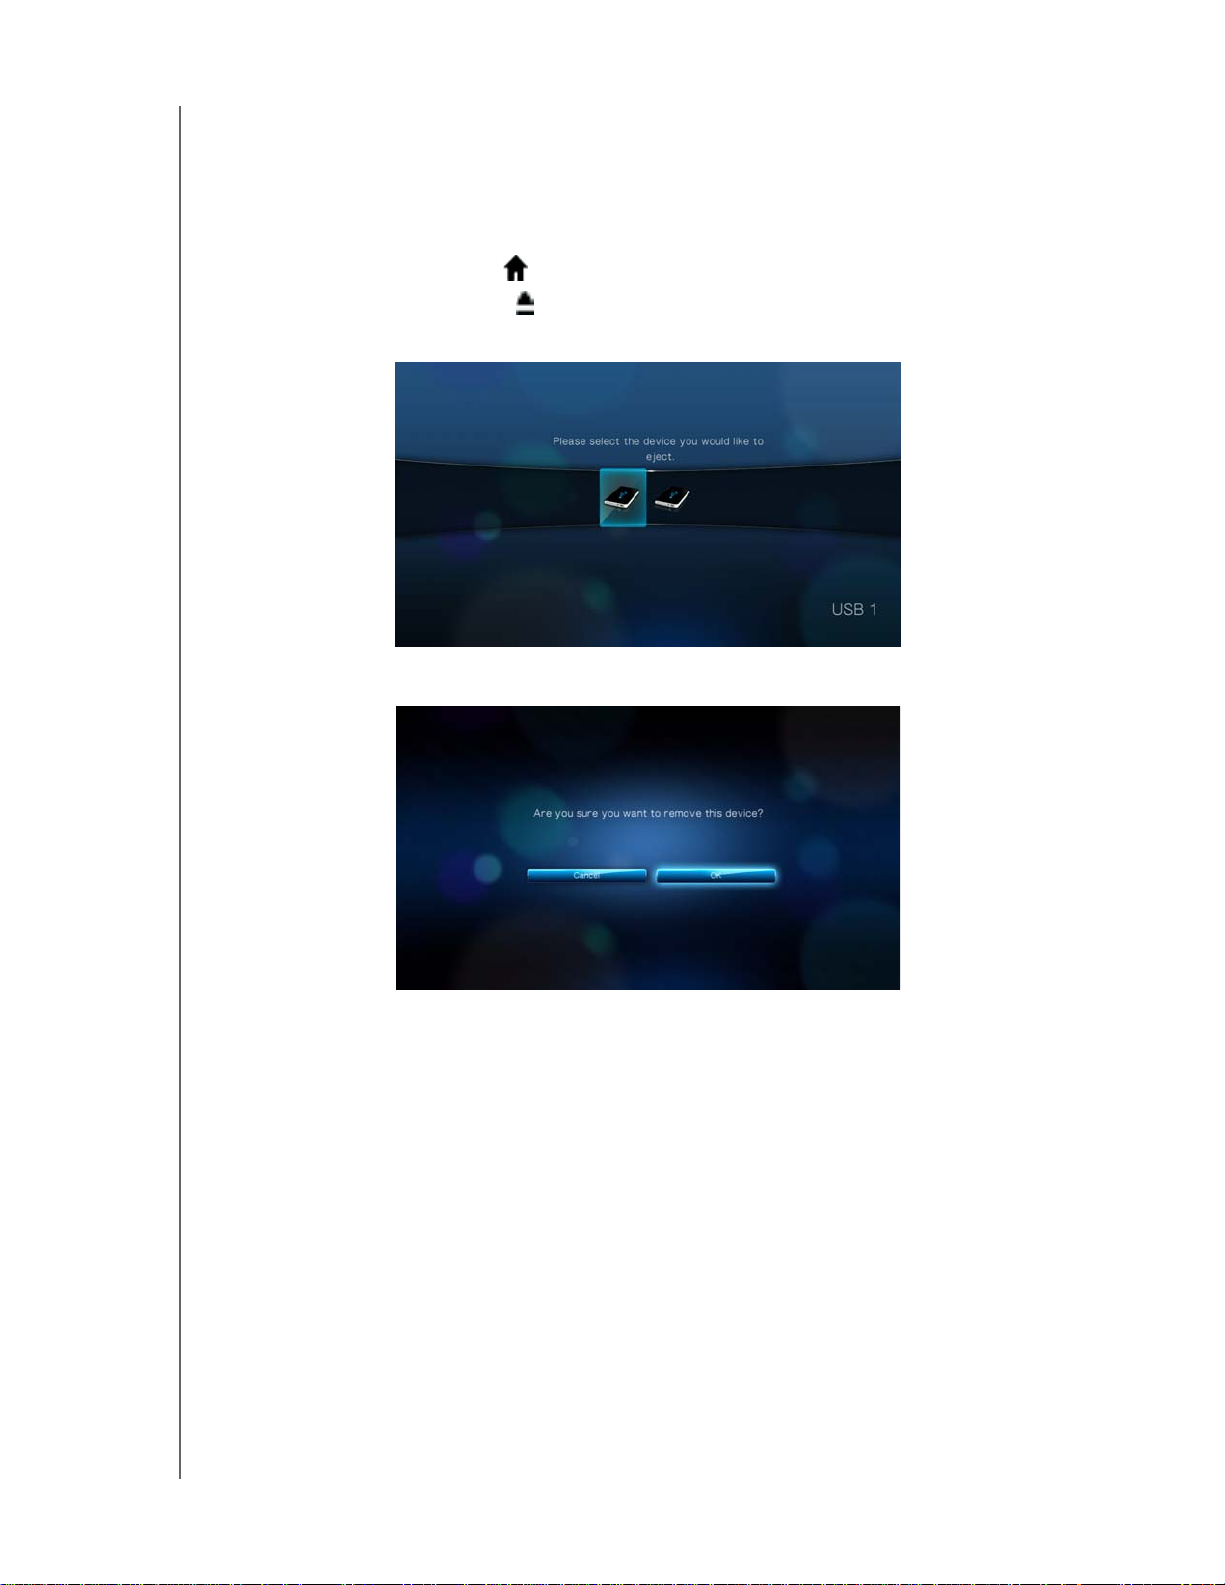
Removing a USB Device
To prevent data loss, it is highly recommended that you first press the EJECT button
on the remote control before removing a USB device.
To remove a USB device:
1. Press the HOME button .
2. Press the EJECT button
3. Select the USB device you want to remove.
4. Select OK, then press Enter.
5. Disconnect the USB device from the media player.
GETTING STARTED – 23
Page 28
WD TV Live/WD TV Live Plus HD Media Player
User Manual
Step 5 - Connecting to your Network
The media player can be connected to your home network to access the Internet
and network storage using a wired or wireless network connection. A network
connection provides access to locally stored and online media content.
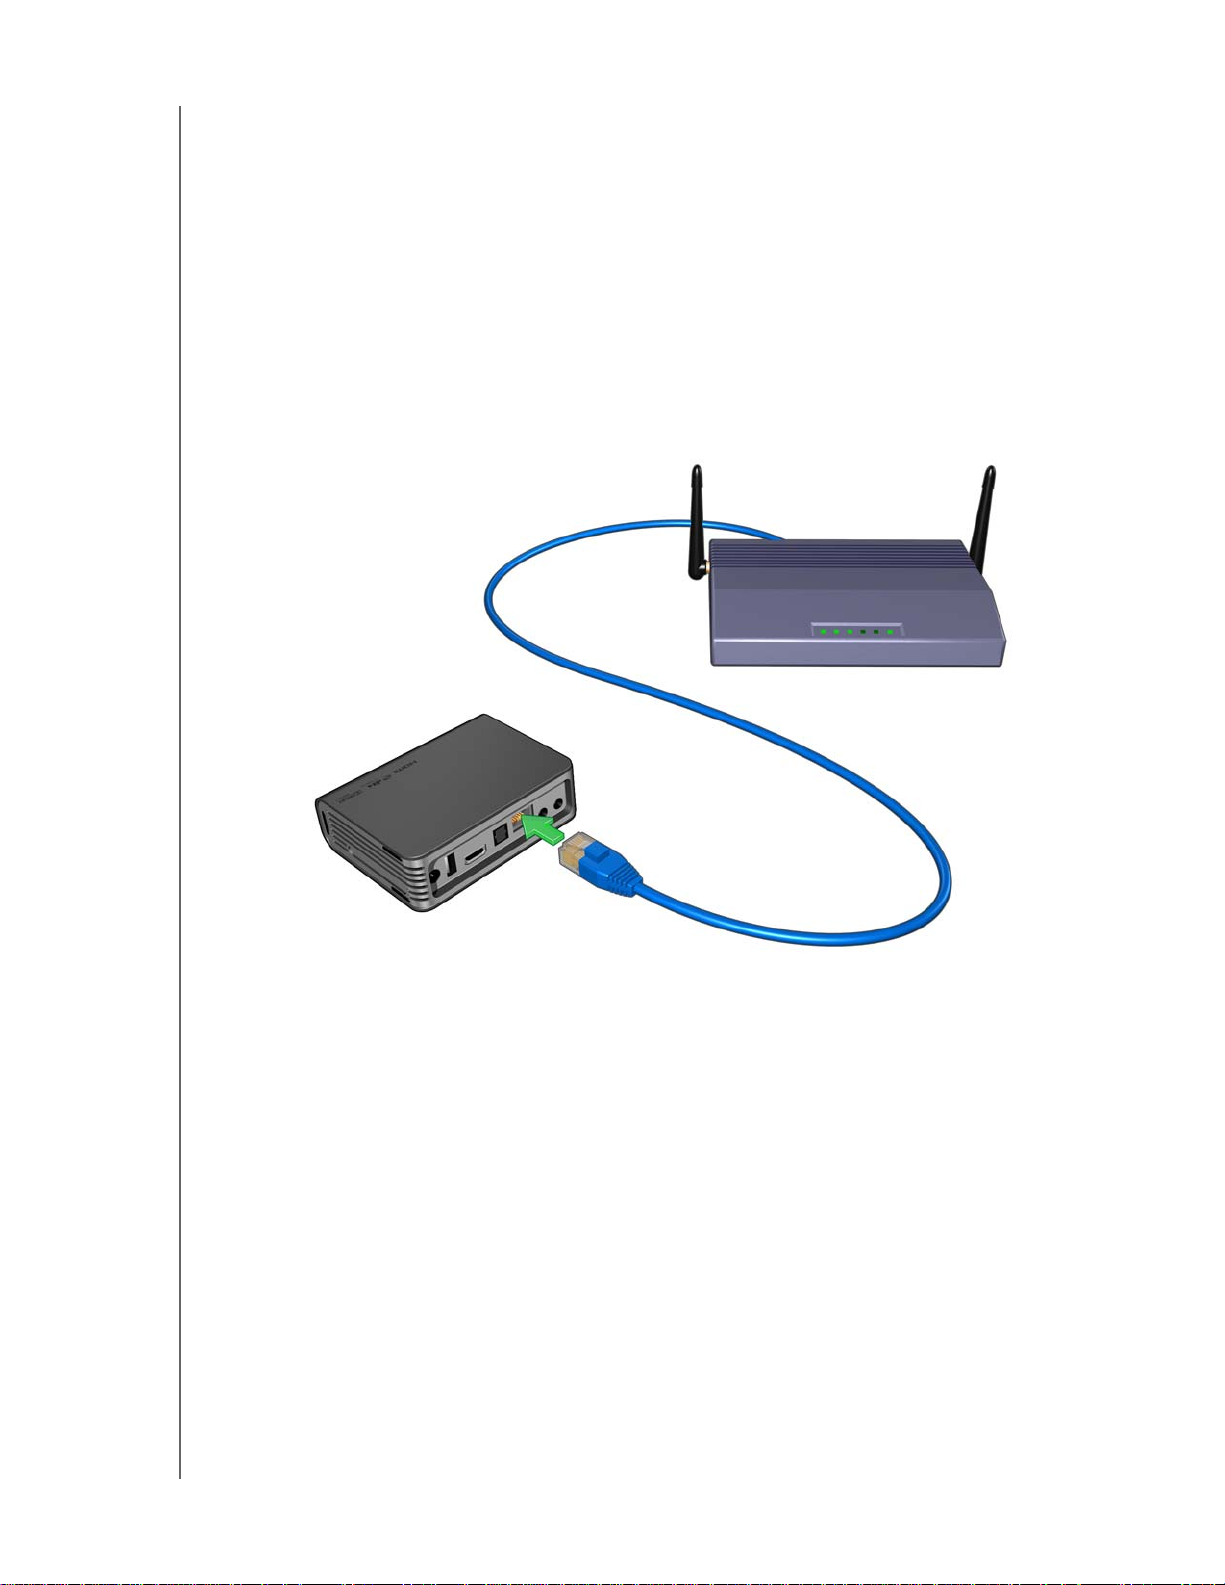
Wired Network Connection
To connect to a home network using an Ethernet cable:
1. Plug an Ethernet cable (sold separately) into the Ethernet connector on the
media player.
2. Plug the opposite end of the Ethernet cable directly into a LAN port on a router or
network switch.
For detailed instructions on wireless and wired network connections and
configuration, see “Network Setup” on page 56.
Accessing Media Content from the Network
See “Network Services” on page 64.
Accessing Online Media Content
See “Internet Services” on page 72.
GETTING STARTED – 24
Page 29

5
WD TV Live/WD TV Live Plus HD Media Player
User Manual
Operating the Media Player
Using the Remote Control
The media player remote control lets you navigate the Home screen, browse for
media files, enable playback options, and customize the system settings. The
infrared sensor detects infrared signals from the remote.
Important: Make sure there are no obstructions between the remote control and
the infrared sensor on the media player.
Button Function
HOME
POWER
Navigation buttons Navigate through Home options, menu screens, media libraries, on-screen
ENTER
STOP
BACK
REV (rewind)
PREV
(previous track)
SEARCH
(current folder)
Home screen which displays Music/Photo/Video/Setup.
Standby mode.
keyboard, and toolbars.
• Displays the media directories and Settings screens.
• Turns information bar ON or OFF.
• Begins playback of the selected media file.
• Enables the currently selected setting in a Settings option screen.
Discontinues playback.
Goes back to the previous screen.
Scans backward during audio/video playback. Supports the following
speeds: 2×, 4×, 8×, 16×.
• Press once to jump to the start of the audio/video file.
• Press twice to jump to the previous audio/video/image file.
• Press to page up
• During Video REV mode, press to skip back 10 minutes.
Locates a media file in the current folder. This function is only available
when the Media Library setting is enabled. Does not search subfolder.
OPTION
PAUSE /PLAY
FF
(fast forward)
NEXT
(next track)
EJECT
During playback, displays the toolbar for additional playback options. From
an online media content screen, press to display more service options.
Toggles between pause and playback.
Scans forward through the audio/video playback. Supports the
following speeds: 2×, 4×, 8×, 16×.
• Skips to the next audio, video, or image file.
• Press to page down.
• During Video FF mode, press to skip forward 10 minutes.
Switches to safe mode so you can safely remove a USB device.
OPERATING THE MEDIA PLAYER – 25
Page 30
WD TV Live/WD TV Live Plus HD Media Player
User Manual
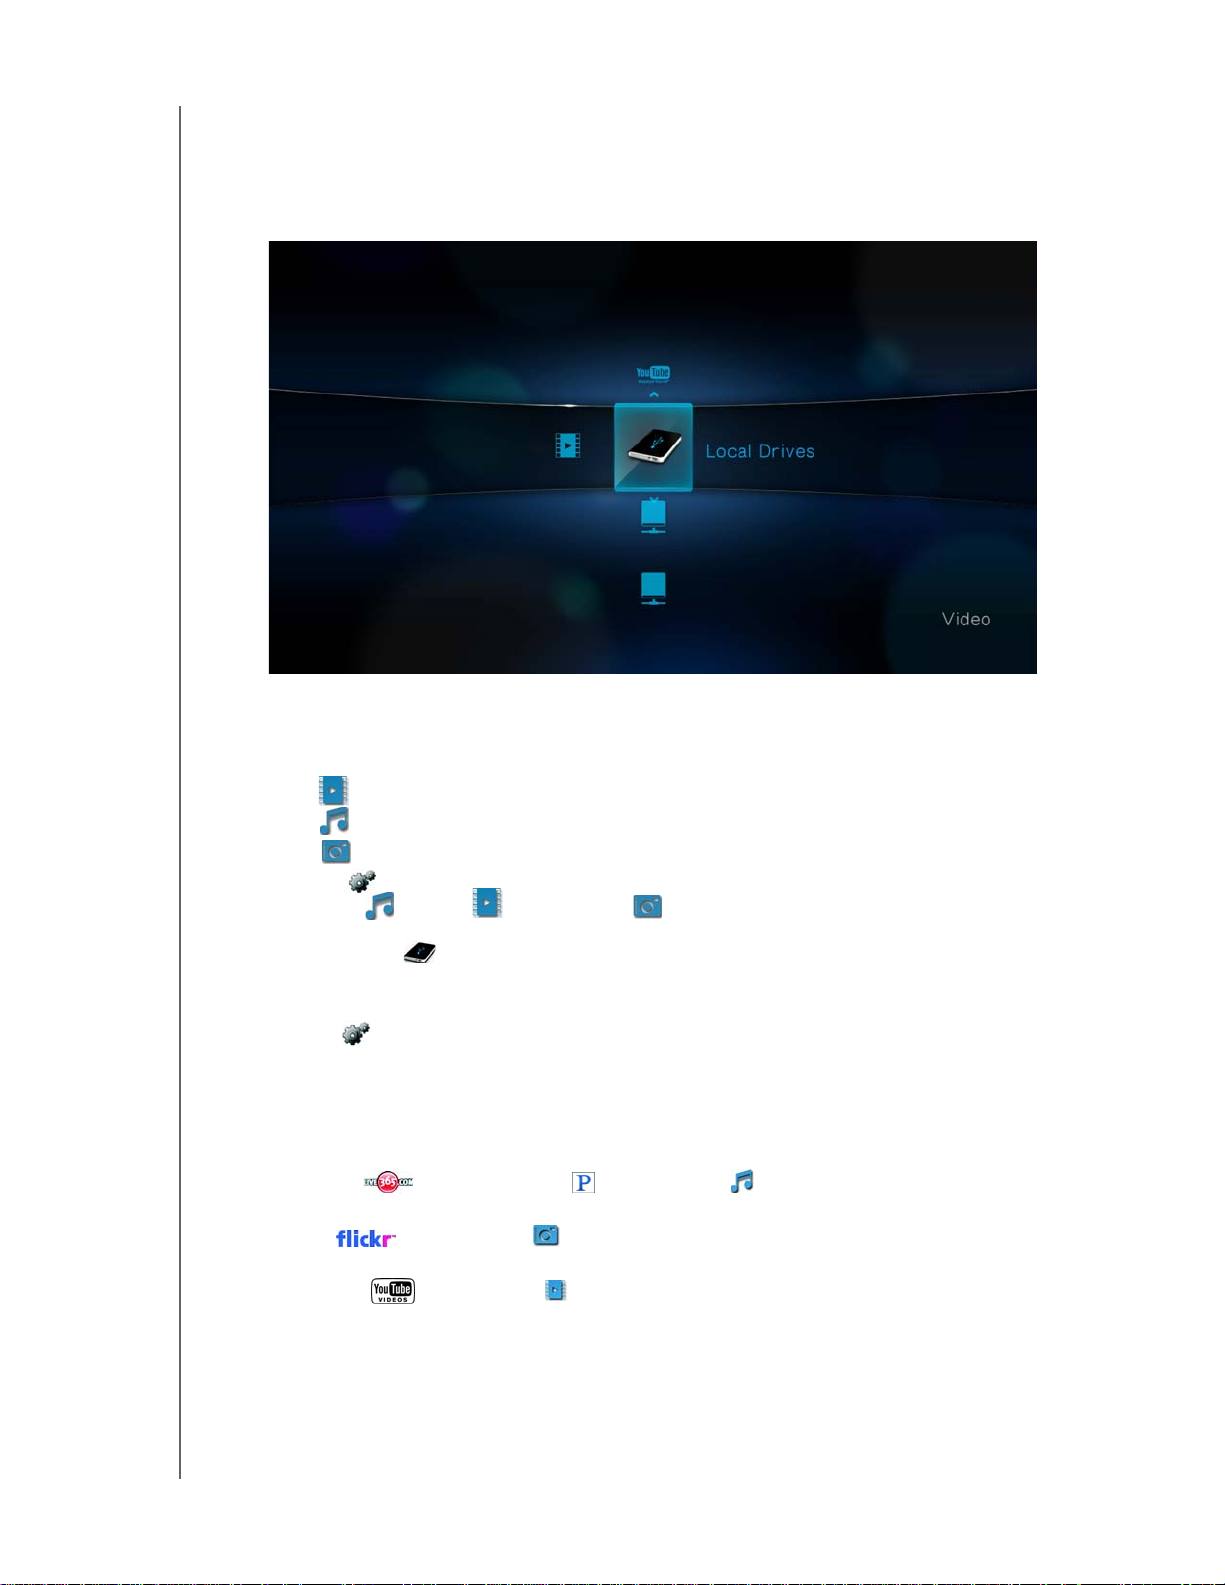
Using the WD TV HD Media Player Menu
The Home screen menu is displayed when you press HOME on the remote control.
The icons on this screen let you browse your media library and configure the media
player’s settings.
Home Screen Options
The four main Home options (icons) are:
Video
Music
Photo
Settings
The Music , Video , and Photo icons represent folders for the different
media types. Media contents will be displayed either as file/file folders in a USB
drive directory or as a media library compilation list based on metadata
information. For example, music files can be categorized based on their genre or
the artist’s name.
Settings lets you customize the way you use the media player and set
preferences for media playback. For more information, see “Settings and
Advanced Features” on page 136.
When there is a network connection, links to the following Internet services are also
displayed.
Live365™ and Pandora® in the Music menu bar – See “Internet
Services” on page 72 for more information on this Internet radio services.
Flickr™ in the Photo menu bar – See “Flickr” on page 102 for more
information on this image hosting site.
YouTube™ in the Video menu bar – See “YouTube” on page 110 for more
information on this video hosting and sharing site.
OPERATING THE MEDIA PLAYER – 26
Page 31

WD TV Live/WD TV Live Plus HD Media Player
Home Screen Navigation
Use the following keys to navigate through the menu screens.
Button Function
User Manual
Up/Down arrows
Left/Right arrows
ENTER
Select a media type (photos, video, or music) or settings
Select one of the option icons in an Internet service’s submenu bar
Move within a category
Launches your selection
Media Library Compilation
Media Library Compilation refers to the process of scanning and consolidating the
media contents of a USB drive into one comprehensive database so that you can
easily browse and locate media files based on certain metadata information
(e.g., video files are categorized based on title or release date).
Media Library Compilation Exemptions
The following conditions will prevent the media library compilation process.
The USB device has read-only protection.
There is not enough hard disk space on the USB device.
To turn off Media Library Compilation (default is On):
1. Navigate to Home | Settings | System .
2. Select Media Library Compilation, and then press ENTER.
OPERATING THE MEDIA PLAYER – 27
Page 32

3. Select OFF, then press ENTER.
WD TV Live/WD TV Live Plus HD Media Player
User Manual
OPERATING THE MEDIA PLAYER – 28
Page 33

WD TV Live/WD TV Live Plus HD Media Player
User Manual
Supported Categories for Media Library Compilation Categories
Once the media library compilation process is completed, all available media files are
organized under their respective media type directory. By default, media contents
are displayed as thumbnails (music album/movie poster art, image thumbnail). The
content categories are listed in the following table.
Media Type Icon Category Description
Music
Video
All Music Displays a list of all audio files arranged in alphabetical
order.
Artist Content is categorized based on the artist name.
Genre Content is categorized based on their genre.
Album Content is categorized based on their album names.
Date Content is organized by Date Modified.
Folders Contents are displayed in audio file folders.
Recent Displays a list of audio folders/files that have been
accessed recently.
Playlist Displays a list of music playlists.
All Video Displays a list of all video files arranged in alphabetical
order.
Date Content is organized by Date Modified.
Photo
Folders Contents are displayed in video file folders.
Recent Displays a list of video folders/files that have been
played recently.
Playlist Displays a list of video playlists.
All Pictures Displays a list of all images files arranged in
alphabetical order.
Date Content is organized by Date Modified.
Folders Contents are displayed in image file folders.
Recent Displays a list of image folders/files that have been
accessed recently.
OPERATING THE MEDIA PLAYER – 29
Page 34

WD TV Live/WD TV Live Plus HD Media Player
User Manual
Locating Your Contents on the Drive
There are two ways of locating a particular media file depending on whether or not
the media library compilation function is enabled.
Manual Search
You can manually search for a media file by navigating to the specific media section
and browsing through the available file folders. This method is recommended if there
are only a limited number of files to search through. Otherwise, it is better to enable
the media library compilation and use the built-in Search function.
Use the navigation buttons to move around a particular folder; press to move
between folders.
Thumbnail support for media files
Your media player supports thumbnails in two ways - embedded or user generated
(some file formats do not support thumbnails).
Supported embedded formats with thumbnail:
Music - MP3 and WMA
Photo - JPEG (from EXIF or WDTV will auto generate thumbnails)
Video - MP4
To generate a thumbnail to a file:
1. Select a JPEG file that you want to display as a thumbnail of the music or video
file.
2. Save the file in the same location as the file it will represent.
Folder Thumbnails view functions (defaults)
Music:
Display folder.JPG (the image file must be named “folder.JPG” or thumbnail will
not function)
If no folder .JPG file is found, display the first album art image (.MP3 with
embedded .JPG)
If no album art is available, display the first .JPG in the folder
OPERATING THE MEDIA PLAYER – 30
Page 35

WD TV Live/WD TV Live Plus HD Media Player
Photo:
Display folder.JPG
If no folder.JPG file is found, display the first photo in the folder
Video:
Display folder.JPG
If no folder.JPG file is found, display the first cover art (.MP4 with embedded
.JPG)
If no cover art is available, display the first photo in the same folder as the video
to be played
File Thumbnail view functions (defaults)
Music:
Display album art (.MP3 file with embedded .JPG)
If no album art is available, display the image file with the same name as the
audio file to be played. (for example, song.wav will be associated with
song.JPG)
Photo:
Display thumbnail
User Manual
Video:
Display .MP4 with embedded .JPG
Display image file associated with the video file to be played (for example
video.mkv will be associated with video.JPG)
Search Function
You must first enable the Media Library Compilation feature before using the Search
function. Go to “Media Library Compilation” on page 27 for instructions.
To perform a media search:
1. If you want to search for all types of media matching the search parameters, go
to the Home screen.
If you want to search for particular type of media, for example video files only, go
to the main browser screen of that media type.
2. Press on the remote control.
OPERATING THE MEDIA PLAYER – 31
Page 36

WD TV Live/WD TV Live Plus HD Media Player
User Manual
3. Define the search parameters. Select the Starts with or Contains field, then
press ENTER.
Starts with – All files with filenames that begin with the characters entered in
this field will be included in the search results. For example, inputting ‘glo’ will
result to a search results like this:
Global party.mpeg
Glow of the Field.jpg
Gloss.mp3
Contains – All files with filenames that includes the characters entered in this
field will be listed in the search results. For example, inputting ‘un’ will result to
a search results like this:
Land of the Rising Sun.mpeg
shunt_1a.jpg
Unite.mp3
4. On the on-screen keyboard:
Use the navigation buttons to select a character, then press ENTER to input
it in the search bar.
Select or , then press ENTER to input characters in different case.
Select , then press ENTER to display the symbol keyboard for inputting
special characters.
If you want to erase the last character, select then press ENTER.
OPERATING THE MEDIA PLAYER – 32
Page 37

WD TV Live/WD TV Live Plus HD Media Player
User Manual
5. Once you defined the search parameters, select Search on the bottom of the
on-screen keyboard, then press ENTER.
6. If there are no media files matching the search parameters, the following
message appears.
Press ENTER to display the on-screen keyboard again and redefine the search
parameters.
If media files matching the search parameters you set are found, they will be
listed as shown below.
Use the navigation buttons to select the media file you are looking for, and then
press ENTER or to initiate playback.
OPERATING THE MEDIA PLAYER – 33
Page 38

6
WD TV Live/WD TV Live Plus HD Media Player
Watching Video
You can watch videos on your TV using the media player.
Supported Video Formats
The following video file formats are supported.
AVI (Xvid, AVC, MPEG1/2/4)
MPG/MPEG
VOB/ISO
MKV (h.264, x.264, AVC, MPEG1/2/4)
TS/TP/M2T (MPEG1/2/4, AVC, VC-1)
MP4/MOV (MPEG4, h.264)
M2TS
WMV9 (VC-1)
Video Playback
User Manual
To play back video:
1. Browse to the Video category.
2. Highlight All Video , then press ENTER.
-ORIf Media Library is enabled, you can choose to navigate using a filter option (All
Video, Date, Folders, Recent, or Playlist) by selecting the Video icon and then
using the left and right arrow buttons on the remote control to scroll through the
options listed.
WATCHING VIDEO – 34
Page 39

WD TV Live/WD TV Live Plus HD Media Player
The screen will display available video files and video folders. The display will
either be in thumbnail (default), list mode, or video preview, depending on your
Browser Display setting (see “Video” on page 151 for more information on
Browser Display settings).
3. Locate the video file you want to play.
To begin playback of a single video file, highlight the file, and then press
ENTER.
To begin playback of a video playlist, highlight the playlist name, then press
PAUSE /PLAY.
To begin playback of all video files in a folder, highlight a video in that folder,
then press PAU SE/P LAY.
If you try to open a video file that has been partially played before, you are
prompted to choose whether to play the file from the beginning or resume playback from the last playback position. Select OK to resume playback or Cancel
to start playback from the beginning.
User Manual
WATCHING VIDEO – 35
Page 40

WD TV Live/WD TV Live Plus HD Media Player
Video Playback Controls
Use these buttons on the remote control to control video playback:
Button Function
User Manual
STOP
PAUSE /PL AY
1. Press FF (fast forward) or REV
(reverse) to scan video (press
repeatedly to select the scan speed)
2. Press PAUSE/PLAY to resume
playback on the selected position
NEXT
PREV
Up arrow
Down arrow
Discontinues video playback
Pauses or resumes video playback
Scans the video playback forward or backward
The media player supports the following scan speeds:
2x, 4x, 8x, 16x
• Plays the next video file in the video folder/playlist
• Press during Fast Forward to skip forward 10
minutes.
•Press
• Plays the previous video file in the video folder/
• Press during Fast Reverse to skip back 10 minutes.
• Press
• Move subtitles up on the screen.
• Move subtitles down on the screen.
NEXT to skip to the next chapter (if the
video file supports chapters).
playlist
PREV to skip to the previous chapter (if the
video file supports chapters).
Left arrow
Right arrow
• Reduce subtitle display speed.
• Increase subtitle display speed.
Video Playback Options
The Video toolbar has several command icons to customize the way you watch your
videos.
To display the Video toolbar, press OPTION.
To hide the toolbar, press BACK or OPTION again.
WATCHING VIDEO – 36
Page 41

WD TV Live/WD TV Live Plus HD Media Player
User Manual
Displaying the Video Information Panel
Use this option to display the Video Information Panel on the bottom of the screen.
This panel shows the following information about the current video:
The icon for the current repeat mode is displayed, if
Pending screenshot with new
Video Information Panel
Video playback progress bar
Elapsed and total
playback times
Video filename
To view the Video Information Panel:
1. During video playback, press the OPTION key. The Options bar appears on the
top of the screen.
2. Highlight the information icon , then press ENTER. The Video Information
Panel appears on the bottom of the screen.
-ORPress OPTION or BACK to hide the Video Information Panel.
WATCHING VIDEO – 37
Page 42

WD TV Live/WD TV Live Plus HD Media Player
User Manual
Audio Channel Selection
Use this option to select the audio language used in the video playback. This option
is only available if the current video has more than one audio track. Make sure the
audio tracks are located in the same folder as the current video.
To select the audio channel:
1. Press OPTION. The Options bar opens.
2. Highlight , then press ENTER repeatedly until the audio channel you want is
displayed.
-ORHighlight Audio Off to turn off the sound.
Chapter Selection
If you are viewing a multichapter video file, you can select which chapter to play.
To select the video chapter:
1. Press OPTION. The Options bar opens.
2. Highlight , then press ENTER repeatedly until the preferred video chapter is
displayed.
WATCHING VIDEO – 38
Page 43

WD TV Live/WD TV Live Plus HD Media Player
User Manual
DTS Audio
This media player supports DTS audio. Simply select a video file with DTS audio
encoding and select it for playback.
Selecting Subtitles
Use this option to view subtitles during video playback. Make sure the subtitle files
are located in the same folder as the current video, and that it has the same filename
as the video file.
Subtitle files (specific types that are supported) need to have the exact same file name as the media they are
playing (the extensions will be different) and need to be located in the same folder as the video file.
To view subtitles:
1. During video playback, press OPTION. The Options toolbar appears at the top
of the screen.
2. Highlight , then press ENTER repeatedly to cycle through the available
subtitles.
-ORSelect Subtitle Off to disable subtitles.
Note: During playback, press the left/right arrows on the remote control to increase or decrease the speed at
which the subltitles display, and press the up/down buttons to move the subtitles up or down on the screen.
WATCHING VIDEO – 39
Page 44

WD TV Live/WD TV Live Plus HD Media Player
User Manual
Selecting Video Zoom Options
Use these options to change the viewing scale of the video playback screen.
To change the viewing scale:
1. During video playback, press OPTION. The Options bar appears on the top of
the screen.
2. Highlight to zoom in or to zoom out, then press ENTER repeatedly to cycle
through the available zoom options.
-ORPress OPTION or BACK to revert to the default viewing scale.
Video Pan Mode
Use this option to pan the video display.
To pan the video display:
1. Press OPTION. The Options bar opens.
2. Select , then press ENTER.
3. Use the navigation buttons to pan the display.
Alternatively, press OPTION or to revert to the default display position.
WATCHING VIDEO – 40
Page 45

WD TV Live/WD TV Live Plus HD Media Player
User Manual
Using Video Repeat
Use this option to repeat the video currently playing.
To set the video repeat mode:
1. During video playback, press OPTION. The Options bar appears on the top of
the screen.
2. Highlight the repeat icon , then press ENTER repeatedly until the repeat mode
icon you want is displayed. Options include:
Normal – The video file will only be repeated once. When playback is
completed, the previous browser screen is displayed.
Repeat One – The current video is played repeatedly until you press
STOP or BACK.
Repeat All – All the files in the current video folder/playlist is played in
sequence, and repeatedly, until you press STOP or BACK.
DVD Navigation
In most cases, when the contents of an entire DVD have been successfully saved
and stored on an attached USB hard drive or a networked hard drive connected to
the media player, you will experience the same DVD menu navigation functionality
using the buttons on the media player remote as you would using a DVD remote for
a DVD player connected to a television.
Note: Video files such as AVI, MP4, MKV, and MT2S are "single track" video files that do not provide DVD
navigation features.
Did you know?
For DVD navigation to work, the VOB files must be placed in a folder named
VIDEO_TS.
WATCHING VIDEO – 41
Page 46

WD TV Live/WD TV Live Plus HD Media Player
User Manual
Video Playback Controls
Use these buttons on the remote control to control DVD navigation video playback:
Button Function
STOP
PAUSE /PL AY
1. Press FF (fast forward) or REV
(reverse) to scan video (press
repeatedly to select the scan speed)
2. Press PAUSE/PLAY to resume
playback on the selected position
NEXT
PREV
Up arrow
Down arrow
Discontinues video playback
Pauses or resumes video playback
Scans the video playback forward or backward
The media player supports the following scan speeds:
2x, 4x, 8x, 16x
• Press during Fast Forward to skip forward 10
minutes.
•Press
• Press during Fast Reverse to skip back 10 minutes.
• Press
• At the main menu, move between selections such
• Move subtitles up on the screen during video
• At the main menu, move between selections such
• Move subtitles down on the screen during video
NEXT to skip to the next chapter.
PREV to skip to the previous chapter.
as Play Movie, Scene Selection, Set Up, Special
Features, etc.
playback.
as Play Movie, Scene Selection, Set Up, Special
Features, etc.
playback.
Left arrow
Right arrow
• At the main menu, move between selections such
as Play Movie, Scene Selection, Set Up, Special
Features, etc.
• Reduce subtitle display speed during video
playback.
• At the main menu, move between selections such
as Play Movie, Scene Selection, Set Up, Special
Features, etc.
• Increase subtitle display speed during video
playback.
WATCHING VIDEO – 42
Page 47

WD TV Live/WD TV Live Plus HD Media Player
Video Playback Options
The DVD navigation video toolbar has three command icons.
To display the video toolbar, press OPTION.
To hide the toolbar, press BACK or OPTION again.
Main Menu Selection
To show the main menu in DVD navigation mode:
1. Press OPTION. The Options bar opens.
2. Highlight , then press ENTER. The main menu displays.
Audio Channel Selection
See “Audio Channel Selection” on page 38.
Selecting Subtitles
User Manual
See “Selecting Subtitles” on page 39.
WATCHING VIDEO – 43
Page 48

7
WD TV Live/WD TV Live Plus HD Media Player
User Manual
Playing Music
You can copy your music library to a USB device and listen to it from your
entertainment unit using the media player. The following audio file and audio codec
formats are supported.
MP3
WAV/PCM/LPCM
WMA
AAC
FLAC
MKA
AIF/AIFF
OGG
Dolby Digital
DTS
Music Playback
1. Press HOME, then highlight the Music bar. The music bar is displayed.
2. Highlight All Music , then press ENTER.
-ORIf Media Library is enabled, you can navigate using a filter option (All Music, Artist,
Genre, Album, Date, Folders, Recent, or Playlist) by selecting the Music icon and
then using the left and right arrow buttons on the remote control to scroll through
the options listed.
The screen will display available audio files and audio folders. The display will
either be in thumbnail (showing the music album art, when available) or in list
PLAYING MUSIC – 44
Page 49

WD TV Live/WD TV Live Plus HD Media Player
mode depending on your Browser Display setting. Only audio files supported by
the media player are displayed.
3. Locate the audio file you want to play.
To begin playback of a single audio file, highlight the file, and then press
ENTER.
To begin playback of a music playlist, highlight the playlist name, and then
press PAUSE/PLAY.
To begin playback of all audio files in a folder, highlight an audio file in that
folder, and then press PAUS E/PL AY.
The music playback screen displays the following information about the currently
played audio file:
Current repeat mode (if enabled)
Album art (if available)
Audio playback progress bar
Elapsed time and total playback time
User Manual
Album name
Artist
Genre
Next song
Audio filename
PLAYING MUSIC – 45
Page 50

WD TV Live/WD TV Live Plus HD Media Player
Music Playback Controls
Use these buttons on the remote control to control music playback:
Button Function
STOP Stop audio playback
PAUSE/PLAY Pause or resume audio playback
User Manual
1. Press FF (fast forward) or REV (rewind) to
scan the audio file (press repeatedly to
select the scan speed).
2. Press PLAY to resume playback on the
selected position.
Press PREV (previous track) once. Start playback from the beginning
Press NEXT Play the next audio track in the music folder/
Press PREV (previous track) twice. Play the previous audio track in the music folder/
Scan the audio playback forward or backward
The media player supports the following scan
speeds: 2×, 4×, 8×, 16×
playlist
playlist
Music Playback Options
The two command icons on the Music toolbar let you set music repeat and shuffle
modes.
To display the music toolbar, press OPTION.
To hide the toolbar, press BACK or OPTION again.
To set the music repeat mode:
1. During music playback, press OPTION. The music toolbar opens at the top of
the screen.
PLAYING MUSIC – 46
Page 51

WD TV Live/WD TV Live Plus HD Media Player
User Manual
2. Highlight , then press ENTER repeatedly until the repeat icon you want is
displayed. Options include:
Normal – The audio track will only be played once. When playback is
completed, the previous browser screen is displayed.
Repeat One – The current audio track is played repeatedly until you press
STOP or BACK.
Repeat All – All the audio files in the current music folder/playlist is played
in sequence and repeatedly until you press STOP or BACK.
The icon for the enabled repeat mode will appear below the playback progress
bar.
Music Shuffle Mode
Use this option to set the audio tracks in the current music folder/playlist to play in
random order.
To enable music shuffle mode:
1. During music playback, press OPTION. The music toolbar opens at the top of
the screen.
2. Press ENTER repeatedly until the shuffle icon is displayed.
Playing music from your iPod
®
Apple® uses a proprietary naming scheme and because of this the media player is
unable to display the original names for the folders and files as they are in your iPod.
The media player instead reassigns new names for the folders and files, but only
while in use with the media player. The original file information is preserved in your
iPod. You can view the original file information when you play a file where the screen
will display the metadata.
Note: The media player does not support playback of protected premium content such as movies or music from
the iTunes
®
Store, Cinema Now, Movielink®, Amazon Unbox™, and Vongo®.
To use your iPod with the media player, simply plug your iPod in to the USB port and
navigate through the interface menu.
Note: The media player only supports USB mass storage mode. iPod Touch is not a USB mass storage device
and is therefore not supported.
PLAYING MUSIC – 47
Page 52

8
WD TV Live/WD TV Live Plus HD Media Player
User Manual
Viewing Photos
With the media player you can view your digital photo album in the comfort of your
living room. It’s perfect for sharing fun times with your friends and family. The
following image file formats are supported:
GIF (Animated GIFs are not supported)
BMP (non-compressed)
JPEG (grayscale, RGB, YCbCy) (does not support CMYK or YCCK)
TIF/TIFF (RGB) (does not support CMYK, YMC, YMCK, or KCMY)
PNG (Non-alpha channel only)
Photo Display
1. Press HOME, then select the Photo bar. The photo bar is displayed. .
2. Select the All Photo icon , then press ENTER.
-ORIf Media Library is enabled, you can choose to navigate using a filter (All Pictures,
Date, Folders, and Recent) by selecting the Photo icon and then using the left
and right arrow buttons on the remote control to scroll through the options listed.
The screen will display thumbnails of available picture files and photo folders.
Only image files supported by the media player are displayed.
VIEWING PHOTOS – 48
Page 53

WD TV Live/WD TV Live Plus HD Media Player
User Manual
3. Locate the picture file you want to view.
To open a single picture file for viewing, select the file, and then press ENTER.
To view the next picture file in the photo folder, press NEXT (track).
To view the previous picture file in the photo folder, press PRE (previous).
You can also view a slideshow using all picture files in a photo folder. See “Photo
Slideshow” on page 52 for instructions.
Digital Camera Support
You can attach your digital camera to the media player via a USB port and view the
supported images files stored in the camera’s memory card.
To view images from a digital camera:
1. Attach your digital camera to the media player via the USB port.
The media player considers the camera’s memory card as a read-only device
and displays the following message.
2. Press ENTER to close the message.
3. Navigate to the Home | Photo bar.
4. The digital camera is considered a USB device. Use the navigation buttons to
select , then press ENTER.
VIEWING PHOTOS – 49
Page 54

WD TV Live/WD TV Live Plus HD Media Player
The screen will display thumbnails of available picture files and photo folders.
Only image files supported by the media player are displayed.
Proceed to step 3 of the next section for instructions on how to view image files.
Photo Display Options
User Manual
The Picture toolbar has several command icons to customize the way you view your
pictures.
1. To display the Picture toolbar, press OPTION.
2. To hide the toolbar, press BACK or OPTION again.
Panning Around the Picture
Use this to pan the picture display horizontally or vertically.
To pan the image display:
1. During photo viewing, press OPTION. The Picture toolbar opens at the top of
the screen.
2. Select the pan icon , then press ENTER.
3. Use the remote control navigation buttons (Left, Right, Up, Down) to pan the
display.
-ORPress OPTION or BACK to revert to the default display position.
VIEWING PHOTOS – 50
Page 55

WD TV Live/WD TV Live Plus HD Media Player
User Manual
Rotating the Picture
Use these options to rotate the image clockwise or counterclockwise. These
settings do not affect the original file’s orientation.
To rotate the picture:
1. During photo viewing, press OPTION. The Picture toolbar opens at the top of
the screen.
2. Highlight a picture rotate icon or to choose the direction of image rotation,
then press ENTER repeatedly until the rotation you want is set.
-ORPress OPTION or BACK to revert to the default viewing orientation.
Using Photo Zoom
Use these options to change the viewing scale of the image display.
To change the viewing scale:
1. During photo viewing, press OPTION. The Picture toolbar opens at the top of
the screen.
2. Select the zoom in icon to zoom in or to zoom out, then press ENTER
repeatedly until the scale you want is shown.
-ORPress OPTION or BACK to revert to the default viewing scale.
Displaying the Picture Information Panel
Use this option to display the Picture Information Panel on the bottom of the screen.
This panel shows the following information about the current picture:
Image filename
Image resolution and file size
Image’s sequence number and the total number of image files in the current
photo folder
To view the Picture Information Panel:
1. During photo viewing, press OPTION. The Picture toolbar opens at the top of
the screen.
VIEWING PHOTOS – 51
Page 56

WD TV Live/WD TV Live Plus HD Media Player
User Manual
2. Select the Picture Info icon , then press ENTER.
-ORPress OPTION or BACK to hide the Picture Information Panel.
Photo Slideshow
The media player allows you to create a slideshow using the contents of a photo
folder.
To start a slideshow:
1. Locate the photo folder containing the image files you want in the slideshow.
(See “Photo Display” on page 48.)
2. Select the photo folder, then press PAUS E/P LAY to start the slideshow.
To listen to background music with a slideshow:
1. Navigate to the music folder containing the audio file/playlist you want to
accompany the slideshow. (See “Music Playback” on page 44.)
2. Select the audio file/playlist, and then press PLAY.
If you selected a single audio file, you may want to enable it to play repeatedly
so it doesn’t stop before the slideshow is done.
If you selected a music playlist, you can choose to enable the repeat or shuffle
mode.
VIEWING PHOTOS – 52
Page 57

WD TV Live/WD TV Live Plus HD Media Player
User Manual
3. Press HOME, and then start the slideshow (as described above).
Displaying the Slideshow Information Panel
You can display the Slideshow Information Panel on the bottom of the screen. This
panel shows the following information:
Slideshow progress bar
Also shown (if used) is the filename of
the music background
Filename, image resolution,
and file size of current image
Repeat and/or shuffle
icons (if enabled)
Current image’s sequence
number and total number of
image files in the folder
VIEWING PHOTOS – 53
Page 58

WD TV Live/WD TV Live Plus HD Media Player
User Manual
To view the Slideshow Information Panel:
1. During a slideshow, press OPTION. The Slideshow toolbar opens at the top of
the screen.
2. Select the Slideshow Info icon , then press ENTER.
-OR-
1. Press OPTION or BACK to hide the Slideshow Information Panel.
Slideshow Playback Controls
Use these buttons on the remote control to control slideshow playback:
Button Function
STOP
PAUSE /PL AY
STOP
NEXT
PREV
Discontinue the slideshow
Pause or resume the slideshow
Stop the music background
Display the next picture file in the slideshow
Play the previous picture file in the slideshow
Slideshow Options
The Slideshow toolbar has the same command icons as the Picture toolbar, with the
addition of icons for slideshow repeat and shuffle modes.
Configuring the slideshow settings is discussed in the “Settings and Advanced
Features” on page 136. These settings include the slideshow’s default repeat/shuffle
modes, transition effect, and interval time.
VIEWING PHOTOS – 54
Page 59

WD TV Live/WD TV Live Plus HD Media Player
User Manual
Repeating and/or shuffling a Slideshow
Use this option to set the slideshow to play in a loop sequence.
To set the slideshow repeat mode:
1. During a slideshow, press OPTION. The pictures toolbar opens at the top of the
screen.
2. Select , then press ENTER repeatedly until the repeat mode you want is
displayed. Options include:
Normal – The slideshow is played once. When the last image is
displayed, the previous browser screen is displayed.
Repeat – The slideshow is played repeatedly until you press Stop or
Back.
Shuffle – The slideshow is played in random order until you press Stop.
Repeat and Shuffle – The slideshow is played continuously in
random order.
VIEWING PHOTOS – 55
Page 60

9
WD TV Live/WD TV Live Plus HD Media Player
User Manual
Network Setup
The media player can be connected to the local area network using a wired or
wireless network connection for access to streaming video and online and offline
media content.
Ethernet Network (Wired) Setup
1. Plug an Ethernet cable into the Ethernet connector on the media player.
2. Plug the opposite end of the Ethernet cable directly into a LAN port on a router or
network switch.
3. Navigate to the Home | Settings menu bar.
4. Press / to select Network Setting , then press ENTER.
NETWORK SETUP – 56
Page 61

WD TV Live/WD TV Live Plus HD Media Player
5. Press / to select Network setup, then press ENTER.
6. Select a setup configuration option, then press ENTER.
Select Automatic to have the device attempt to detect your network connection
automatically, then go to step 11.
Select Manual to manually set your network connection, then proceed to step 7.
User Manual
7. Once the network is detected, the following screen appears. Press / to
select IP address, then press ENTER.
NETWORK SETUP – 57
Page 62

WD TV Live/WD TV Live Plus HD Media Player
User Manual
8. Press to key in your IP address using the on-screen keyboard. Select
Submit, then press ENTER.
9. Repeat the step above to key in values for the subnet mask, gateway, and DNS
settings.
10.After entering all the configuration settings, select Finish, then press ENTER.
11.Once the network is detected, the following screen appears. Press ENTER to
display the Home screen.
After establishing a network connection, you can:
Use the different Internet services integrated into your media player to access
streaming media. Go to the next chapter for more information on these
services.
Transfer files between the media player and your computer (PC or Mac).
Procedures for copying and moving files between the media player and your
computer are described in “File Management” on page 137.
NETWORK SETUP – 58
Page 63

WD TV Live/WD TV Live Plus HD Media Player
User Manual
Wireless Network Setup
Note: For a list of tested, compatible USB devices, see Article #3805 in our knowledge base at
support.wdc.com.
1. Connect a USB wireless adapter (sold separately) to the USB port on your media
player.
2. Navigate to the Home | Settings menu bar.
3. Press / to select Network Setting , then press ENTER.
4. Press / to select Network setup, then press ENTER.
NETWORK SETUP – 59
Page 64

WD TV Live/WD TV Live Plus HD Media Player
User Manual
5. Use the navigation buttons to select Wireless, then press ENTER.
6. Use the navigation buttons to select an SSID input option, then press
ENTER.
If you choose Auto search, the unit will search for available access points in
your area. Proceed to step 7.
Choose Manually input SSID to input the SSID manually, then proceed to step
8.
7. Press / to select the access point you want to connect to, then press
ENTER. Proceed to step 10 to continue Auto search.
NETWORK SETUP – 60
Page 65

WD TV Live/WD TV Live Plus HD Media Player
User Manual
8. Use the navigation buttons to type in the SSID for the access point you
want to connect to, select Submit, then press ENTER.
9. Press
/ to select a security protocol, then press , then press ENTER.
10.Use the navigation buttons to key in the passcode for the access point,
select Submit, then press ENTER.
NETWORK SETUP – 61
Page 66

WD TV Live/WD TV Live Plus HD Media Player
User Manual
11.Use the navigation buttons to select Automatic (obtains IP address
automatically from the router) or Manual (input static IP address manually), then
press ENTER. If you selected Manual, follow steps 7-10 under “Ethernet
Network (Wired) Setup” on page 56. When finished, proceed to step 12 below.
12.Once the network is successfully set up, the following screen appears. Press
ENTER to display the Home screen.
After establishing a network connection, you can:
Use the Internet services integrated into your media player to access
streaming media. Go to the next chapter for more information on these
services.
Transfer files between the media player and your computer (PC or Mac).
Procedures for copying and moving files between the media player and your
computer is described in “File Management” on page 137.
Checking the Network Connection
If you experience network problems, check the network connection to determine the
cause of the problem.
To check the network connection:
1. Navigate to the Home | Settings menu bar.
2. Press
/ to select Network Setting , then press ENTER.
NETWORK SETUP – 62
Page 67

WD TV Live/WD TV Live Plus HD Media Player
3. Press / to select Check connection, then press ENTER.
The unit will automatically check the network connection. Once the check is
completed, the results display. A blue check mark on these items indicate that
there is no problem with your network settings. If a problem is indicated, check
your router settings and manual for a solution.
User Manual
A red cross mark on the result items indicate a problem with the network settings. It can either be the IP address or the DNS server address. If the problem
persists, you may want to check with your Internet service provider to make sure
that the problem is not on their end.
NETWORK SETUP – 63
Page 68

10
WD TV Live/WD TV Live Plus HD Media Player
User Manual
Network Services
Accessing Media Content from the Network
Once the media player has an active network connection, you can access media
content from a NAS device or shared computer located on the same network as
your media player.
To access media content from a network share:
1. Navigate to the Home screen, and select the icon for media content you wish to
access. It can be Music , Video , or Photo .
2. Press / to select Network Shares , then press ENTER.
3. Press / to select the network resource where the media content you wish to
access is located, then press ENTER.
NETWORK SERVICES – 64
Page 69

WD TV Live/WD TV Live Plus HD Media Player
User Manual
4. Type in your user name and password to access the network resource. For
further information regarding password setup, refer to your NAS device
documentation.
5. Press
to select OK, then press ENTER.
Supported content for the selected media type displays.
6. Select the content you wish to access, then press ENTER to start media
playback.
To access media content from a media server:
1. Navigate to the Home screen, and select the icon for media content you wish to
access. It can be Music , Video , or Photo .
2. Press / to select Media Servers , then press ENTER.
NETWORK SERVICES – 65
Page 70

WD TV Live/WD TV Live Plus HD Media Player
User Manual
3. Press / to select the network resource where the media content you wish to
access is located, then press ENTER.
4. Type in your user name and password to access the network resource. For
further information regarding password setup, refer to your NAS device
documentation.
5. Press to select OK, then press ENTER.
Supported content for the selected media type displays.
6. Select the content you wish to access, then press ENTER to start media
playback.
NETWORK SERVICES – 66
Page 71

WD TV Live/WD TV Live Plus HD Media Player
User Manual
Transferring Files
If the media player has an active network connection, any USB drive connected to it
can serve as a network drive. This allows you to transfer files between your media
player and your computer. This feature is applicable to a PC running the
Windows® XP, Windows Vista®, or Windows 7 operating systems, as well to a
Macintosh® computer running Mac® OS X® Leopard® or Snow Leopard®.
Enabling File Sharing on the Network Share (Samba Server)
1. Navigate to the Home | Settings menu bar.
2. Press / to select Network Setting , then press ENTER.
3. Press / to select Share WD TV on your network and make sure the option
is set to On.
NETWORK SERVICES – 67
Page 72

WD TV Live/WD TV Live Plus HD Media Player
User Manual
4. Note the name indicated in the Device name field. This will help you identify your
media player on the network.
Moving Files Between the Media Player and a Windows XP Computer
1. Connect the USB hard drive you need for the file transfer to your media player.
2. Ensure that your computer is on the same network as your media player and that
the file sharing option is enabled. Refer to Windows Help for instructions on how
to enable file sharing on your computer.
3. Check that the WD Discovery Tool that is bundled on the enclosed CD is installed
on your computer. You need this tool to locate the media player over the
network.
4. Run WD Discovery on your computer. Your media player is automatically
displayed on-screen.
NETWORK SERVICES – 68
Page 73

WD TV Live/WD TV Live Plus HD Media Player
User Manual
5. Click Browse Network Share. The USB drive connected to your media player
will be displayed.
6. Click the USB drive you need for the file transfer. The USB drive contents display
in a Windows Explorer window.
7. Locate the file(s) you intend to transfer and do a Copy/Paste, Cut/Paste, or Drag/
Drop operation.
Moving Files Between the Media Player and a Windows Vista / Windows 7 Computer
1. Connect the USB hard drive you need for the file transfer to your media player.
2. Ensure that your computer is on the same network as your media player and that
the file sharing option is enabled. Refer to Windows Help for instructions on how
to enable file sharing on your computer.
NETWORK SERVICES – 69
Page 74

WD TV Live/WD TV Live Plus HD Media Player
User Manual
3. Open a Windows Explorer window, then click Network. Your media player is
listed on the network resources list.
4. Click the device corresponding to your media player.
5. Click the USB drive you need for the file transfer to display its contents.
6. Locate the file(s) you intend to transfer and do a Copy/Paste, Cut/Paste, or Drag/
Drop operation.
NETWORK SERVICES – 70
Page 75

WD TV Live/WD TV Live Plus HD Media Player
User Manual
Moving Files Between the Media Player and a Mac Computer
1. Connect the USB hard drive you need for the file transfer to your media player.
2. Ensure that your computer is on the same network as your media player and that
the file sharing option is enabled. Refer to Apple Help for instructions on how to
enable file sharing on your computer.
3. Open a Finder window.
4. On the Finder side bar, click Shared. Your media player is listed on the shared
resources list.
5. Click the device corresponding to your media player.
The USB drive connected to your media player displays.
6. Click the USB drive you need for the file transfer to display its contents.
7. Locate the file(s) you intend to transfer and do a Copy/Paste, Cut/Paste, or Drag/
Drop operation.
NETWORK SERVICES – 71
Page 76

11
WD TV Live/WD TV Live Plus HD Media Player
User Manual
Internet Services
Important: A broadband Internet connection (e.g., DSL or cable) is required to use
Internet services. Availability varies by country. These services may be changed,
terminated or interrupted at any time.
After connecting to a network, you can use the media player to access media
content from the following Internet services:
Internet radio – Live365 and Pandora
Online image and video hosting – Flickr
Online video sharing – YouTube
Online viewing or listening to podcasts – Mediafly
Online movie viewing – Netflix (WD TV Live Plus only)
The above services are fully integrated with their web-based counterparts when
accessed via the media player. If you are a registered user of any of these services,
everything you create, rate, or bookmark when using the media player shows up on
your account the next time you sign in to that service from your computer or mobile
computing device.
Live365
Use Live365 to create your own online radio station or listen to other Live365
broadcasters’ online stations. Music selections are compiled based on user ratings.
Some small AM and FM stations also utilize Live365 to stream audio over the
Internet.
To access Live365:
1. Navigate to the Home | Music menu bar and select Live365 , then press
ENTER.
INTERNET SERVICES – 72
Page 77

WD TV Live/WD TV Live Plus HD Media Player
User Manual
Signing in to Live365
You can start listening to free Live365 stations as an unregistered user, but to enjoy
more features like access to recommended stations, saving stations to favorites,
securing track information, setting station preferences, and many others, you need
to sign up for a Live365 account.
To sign in to Live365:
1. Navigate to the Home | Music menu bar.
2. Press
/ to select Live365 , then press ENTER.
3. On the Live365 main screen, press
/ to select Sign In/Sign Out, then press
ENTER.
4. Press ENTER to create your new Live365 account.
INTERNET SERVICES – 73
Page 78

WD TV Live/WD TV Live Plus HD Media Player
User Manual
5. Use the navigation buttons to key in your Live365 user name on the onscreen keyboard. Select Submit, then press ENTER.
6. Use the navigation buttons to key in your Live365 account password on
the on-screen keyboard. Select Submit, then press ENTER.
7. Press / to select a save option.
Options include:
No – Your account details are not saved. You need to repeat the initial sign-in
process every time you use the media player to access the Live365 service.
Save username only – Your user name is saved, but you will be prompted to
type in your password every time you use the media player to access the
Live365 service.
Yes – Both your user name and password are saved. You are automatically
logged in to your account every time you select Live365 from the Music
menu bar.
INTERNET SERVICES – 74
Page 79

WD TV Live/WD TV Live Plus HD Media Player
User Manual
8. Press ENTER to complete the sign-in process. Once you have successfully
signed in, the Live365 Home screen appears.
From this screen you can browse for new stations, access previous stations
you’ve listened to, and define profile preferences for your Live365 account.
For more information on the features, options, and limitations of using Live365, go to
http://www.live365.com/index.live.
INTERNET SERVICES – 75
Page 80

WD TV Live/WD TV Live Plus HD Media Player
User Manual
Listening to a Live365 Station
New Live365 users can browse for a radio stations.
You can access the last station you’ve listened to if you’ve already accessed
Live365 from the media player.
Registered Live365 users can access My Preset List and listen to favorite
stations.
Live365 VIP members can listen to premium radio stations.
To browse for a radio station:
1. On the Live365 main screen, press / to select Stations, then press ENTER.
2. Press
/ to select a station category, then press ENTER.
Options include:
Free Stations – Free Internet radio.
VIP Stations – Premium, uninterrupted Internet radio for registered and
paying Live365 users. You must sign in to your Live365 account and be a
valid VIP member before you can access this category. Go to page 78 for
more information.
Recommendations - Free Internet radio recommended by your other Live365
users. You must be signed in to access these stations.
Search – Search for a Live365 station. Go to page 80 for more information.
INTERNET SERVICES – 76
Page 81

WD TV Live/WD TV Live Plus HD Media Player
3. Press / to select the station you want to listen to.
4. Press or ENTER to start listening to the selected radio station.
To access the last station listened to:
1. On the Live365 main screen, press / to select Last Stations. .
User Manual
2. Press or ENTER to start listening to the selected radio station.
To listen to a favorite station:
1. On the Live365 main screen, press
/ to select My Presets, then press
ENTER.
INTERNET SERVICES – 77
Page 82

WD TV Live/WD TV Live Plus HD Media Player
User Manual
2. Press / to select a station from your preset list.
3. Press or ENTER to start listening to the selected radio station.
To listen to a VIP station:
1. On the Live365 main screen, press / to select Stations, then press ENTER.
2. Press / to select VIP Stations, then press ENTER.
INTERNET SERVICES – 78
Page 83

WD TV Live/WD TV Live Plus HD Media Player
3. Press / to select a music genre, then press ENTER.
4. Press / to select a music sub-genre, then press ENTER.
User Manual
5. Press / to select the station you want to listen to.
6. Press or ENTER to start listening to the selected radio station.
INTERNET SERVICES – 79
Page 84

WD TV Live/WD TV Live Plus HD Media Player
User Manual
Searching for a Live365 station
Perform a station search based on the following criteria:
Artist name
Track or CD title
Station information
Music genre
Station location
Audio quality.
You can limit your search based on whether a station has been rated by Live365
editors or if it is a professional, independent, or official station.
To search for a Live 365 station:
1. On the Live365 home screen, press OPTION to view the Live365 toolbar.
2. Press / to select Search , then press ENTER.
3. On the on-screen keyboard, use the navigation buttons to key in a
search keyword, then press ENTER.
INTERNET SERVICES – 80
Page 85

WD TV Live/WD TV Live Plus HD Media Player
4. Press / to select a station from the search result.
5. Press or ENTER to start listening to the selected radio station.
Displaying the Currently Playing Station
1. On the Live365 main screen, press OPTION to view the Live365 toolbar.
User Manual
2. Press
/ to select Now Playing , then press ENTER.
INTERNET SERVICES – 81
Page 86

WD TV Live/WD TV Live Plus HD Media Player
User Manual
Adding a Station to Your Preset List
If you like a particular station, you can add it to your preset list for easier access in
the future.
To add a station to your preset list from the station list:
1. Go to the station list showing the station logo for the station you want to add.
2. Press / to select the station you want to add.
3. Press enable the Add to My Preset function, then press ENTER.
4. A confirmation screen appears. Press ENTER to confirm the new preset station
and return to the Now Playing screen.
INTERNET SERVICES – 82
Page 87

WD TV Live/WD TV Live Plus HD Media Player
User Manual
To add a station to your preset list from the Now Playing screen:
1. Tune in to the station you want to add.
2. Press / to select , then press ENTER.
3. A confirmation screen appears. Press ENTER to confirm the new preset station
and return to the Now Playing screen.
Removing a Station from Your Preset List
You can remove stations you no longer want from your preset list.
To remove a station from your preset list:
1. Sign in to your Live365 account. Go to “To sign in to Live365:” on page 73 for
instructions.
2. From the Live365 home screen, press / to select My Presets, then press
ENTER.
3. Press
/ to select the station you want to remove.
INTERNET SERVICES – 83
Page 88

WD TV Live/WD TV Live Plus HD Media Player
User Manual
4. Press to enable the Remove Station function, then press ENTER.
5. A confirmation prompt will appear. Press ENTER to go back the Now Playing
screen.
Providing Song Feedback
Music selections in Live365 are compiled based on their user ratings. You can
participate in the selection process by giving a song the “thumbs up” or “thumbs
down” vote.
To provide song feedback:
1. While the song is playing, press
feedback, for a negative one. Press ENTER.
2. A feedback confirmation screen appears. Press ENTER to go back the the Now
Playing screen.
/ to select a feedback icon– for a positive
INTERNET SERVICES – 84
Page 89

WD TV Live/WD TV Live Plus HD Media Player
User Manual
Getting Track Information
You can send the track information of the currently playing song to your email
account for later reference.
To secure track information:
1. While the song is playing, press / to select , then press ENTER.
2. A confirmation screen appears. Press ENTER to return to the Now Playing
screen.
The track information will be sent to the email address you used to sign up for
your Live365 account.
INTERNET SERVICES – 85
Page 90

WD TV Live/WD TV Live Plus HD Media Player
User Manual
Live365 Preferences
When browsing or searching for radio stations, you can:
Specify that only radio stations of a specific audio quality display.
Choose to sort radio stations alphabetically or by popularity (based on user
recomendations).
To specify the audio quality of accessible stations:
1. On the Live365 main screen, press / to select Preferences, then press
ENTER.
2. Press / to select Audio, then press ENTER.
3. Press
/ to select an audio quality option, then press ENTER.
INTERNET SERVICES – 86
Page 91

WD TV Live/WD TV Live Plus HD Media Player
User Manual
To set how radio stations are sorted:
1. On the Live365 main screen, press / to select Preferences, then press
ENTER.
2. Press / to select Sort Option, then press ENTER.
3. Press / to select a sort option, then press ENTER.
INTERNET SERVICES – 87
Page 92

WD TV Live/WD TV Live Plus HD Media Player
User Manual
Signing out from Live365
Sign out of Live365 after a listening session to ensure that nobody can make
changes to your Live365 settings and stations without your permission.
To sign out from Live365:
1. On the Live365 main screen, press / to select Sign In/Sign Out, then press
ENTER.
Tip: You can also press Option to show the toolbar, press / to select , then
press Enter.
2. Press / to select OK on the confirmation prompt, then press ENTER.
INTERNET SERVICES – 88
Page 93

WD TV Live/WD TV Live Plus HD Media Player
User Manual
Pandora
Pandora is an automated music recommendation and Internet radio service. With
Pandora, you can input a song title or artist name and the service responds by
playing selections that are musically similar. You can provide feedback (approved/not
approved) on individual songs, which Pandora takes into account for future
selections.
Conditions for Using Pandora
The following conditions must be satisfied before you can use the Pandora service.
You must have a Pandora account. Go to www.pandora.com to create your
account. Once you have registered, note your activation code. You will need this
code to sign in to Pandora from your media player.
At present, Pandora is only available for users located in the United States. You
must have a US-based network connection.
To set the system language to English:
1. Navigate to Home | Settings menu bar.
2. Press
3. Press
/ to select System , then press ENTER.
/ to select Language, then press ENTER.
4. Press / to select English, then press ENTER.
INTERNET SERVICES – 89
Page 94

WD TV Live/WD TV Live Plus HD Media Player
User Manual
Signing in to Pandora for the first time
1. Connect your media player to the network.
2. Navigate to Home | Music Pandora | Add account, then press ENTER.
3. If you already have a Pandora account, choose I have a Pandora account,
then press ENTER to create your new Pandora account. Proceed to step 6.
4. If you do not have a Pandora account, select I am new to Pandora, then press
ENTER.
INTERNET SERVICES – 90
Page 95

WD TV Live/WD TV Live Plus HD Media Player
User Manual
5. Write down the activation code and follow the onscreen instructions. When
finished, choose Continue, then press ENTER.
6. Use the navigation buttons to type in your Pandora user name using the
on-screen keyboard, then press ENTER.
7. Use the navigation buttons to type in your Pandora account password
using the on-screen keyboard, then press ENTER.
INTERNET SERVICES – 91
Page 96

8. Press / to select a save option.
Options include:
No – Your account details will not be saved. You need to repeat the initial
sign-in process every time you access the Pandora service using the media
player.
Save username only – Your user name is saved, but you will be prompted
to type in your password every time you access the Pandora service using
the media player.
Yes – Both your user name and password are saved. You are automatically
logged in to your account every time you select Pandora from the Music
menu bar.
WD TV Live/WD TV Live Plus HD Media Player
User Manual
9. Press ENTER to complete the sign-in process.
INTERNET SERVICES – 92
Page 97

WD TV Live/WD TV Live Plus HD Media Player
User Manual
Once you have successfully signed in to Pandora, the Stations screen appears.
From this screen you can create new stations, start listening to previously created stations and Quickmix playlist, and define profile preferences for your
account.
For more information on the features, options, and limitations of using Pandora,
go to http://blog.pandora.com/faq/#839.
Pandora Stations
A Pandora station is a personalized stream of music, based on one or more artist
names or song titles of your choice. Once you’ve signed in to Pandora from your
media player, you can easily access your stations from the Music menu bar.
Pandora stations reminders
You can have up to 100 stations at any one time, plus one QuickMix. Once you
reach this maximum number of stations you have to delete a station before you
can add another one.
Pandora does not allow immediate or "on demand" playback of a specific song.
A Pandora station cannot play more than four songs by an artist in a three-hour
period.
After eight hours of play, Pandora prompts you to see if you’re still listening.
Streaming stops until you respond.
The music selection streamed into your Pandora station contains a mix of songs
or artists that were compiled based on:
the initial station “seed’ used in creating that station. Go to the next section
for instructions on how to create a new Pandora station.
the track feedback (thumbs up / thumbs down) you provide. Go to page 97
for more information.
the number of skips assigned to a track. Go to page 98 for more information.
You cannot rewind or immediately replay the songs played on your Pandora
station.
INTERNET SERVICES – 93
Page 98

WD TV Live/WD TV Live Plus HD Media Player
User Manual
To create a Pandora station:
1. Press / to select Create a new station in the Stations screen.
2. Use the navigation buttons to type the name of an artist or song title
using the on-screen keyboard. Select Submit, then press ENTER.
3. Press / to select a listing from the search results, then press ENTER.
The listing you selected will serve as the station ‘seed’ for Pandora to compile
and stream music similar to your station.
INTERNET SERVICES – 94
Page 99

WD TV Live/WD TV Live Plus HD Media Player
User Manual
To listen to a Pandora station:
1. On the Stations screen, press / to select the name of the station you want
to listen to.
2. Press or ENTER to start listening to the selected Pandora station.
To tune in to another station:
1. Press Option in the Now Playing screen.
2. Press / to select Stations , then press ENTER.
3. Press
/ to select the name of the station you want to switch to.
4. Press to start listening to the selected station.
To rename a Pandora station:
1. Tune in to the station you want to rename, then press OPTION.
INTERNET SERVICES – 95
Page 100

WD TV Live/WD TV Live Plus HD Media Player
User Manual
2. Press / to select Rename Station , then press ENTER.
3. Use the navigation buttons to key in a new station name using the onscreen keyboard. Select Submit, then press ENTER.
To delete a Pandora station:
1. Tune in to the station you want to delete, then press OPTION.
2. Press / to select Delete Station , then press ENTER.
INTERNET SERVICES – 96
 Loading...