

Page 1

DIMMER &
AC ADAPTER
QUICK START GUIDE
Page 2
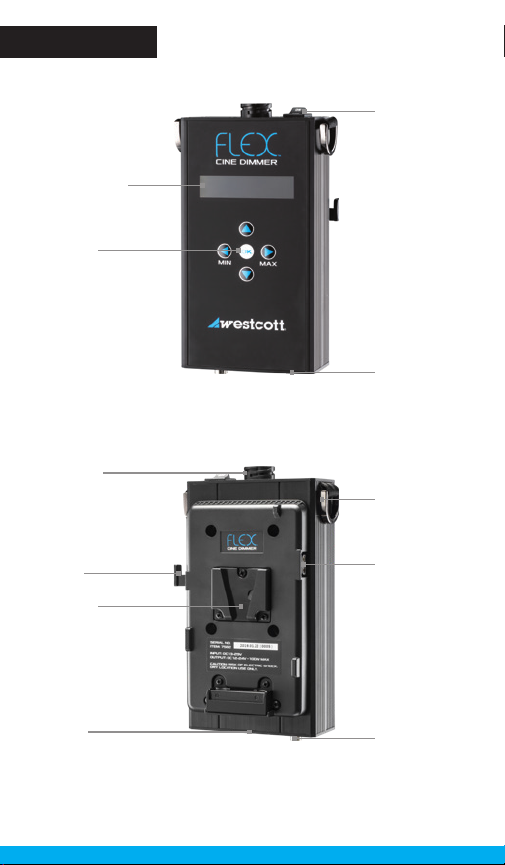
Overview
LCD Display
Controls
TE-9 Pin
Connector (Male)
Power
Switch
USB-C Port
(Data Only)
D-Ring
V-Mount Release
Button
V-Mount
1/4"-20
Mounting
Thread
D-Tap (Power
Input Only)
AC Adapter
Barrel Plug
Page 3

Introduction
This guide covers setup, controls , and basic
operation. Visit fjwestcott .com/7582 and
scroll to th e Support section for the complete
manual and video instruction guide.
Warning
• Use only with the AC Adapter an d Power Cord included, AC
Adapter for Flex Cine Wireless DMX Dimmer (#7581), or
compatible 14 .4V to 26V V-Mount batteries
• Do not connec t a V-Mount power source to the Flex Cine Dimmer
when connected to an AC power source. The AC connection will
not charge the battery.
• Keep away from fire and water
• Do not submerge in water
• Do not overtighten connections
• Do not overtighten mounting threads
• Do not at tempt to open or modify dimmer casin g
• Do not short AC adapter terminals
• Do not alter or change V-Mount plate or pins
Flex Mat Compatibility
Flex Cine Mats require a Flex Cine Dimmer a nd power source for
operation.
Flex Mats Compatible with Flex Cine Dimmer
• 1' x 1' Daylight and Bi-Color Flex Cine and Legacy Mats
• 1' x 2' Daylight and Bi-Color Flex Cine and Legacy Mats
Flex Cine Mats la rger than 1' x 2 ' and Flex Cine RG BW Mats require
a Flex Cine Wireless DMX Dimmer (#7580) and compatible powe r
source. They will not operate with the Flex Cine Dimme r.
Page 4

Power
Flex Cine Dimmer Compatible Power Options
• AC Adapter and Power Cord for Flex Cine D immer (included)
• AC Adapter for Flex Cine Wireless DMX Dimm er (#7581)
• 26V V-M ount Lithium-Ion B atter y (#7583)
• 14.4/14.8 V-Mount Lithium-Ion Batteries
Flex 1' x 2 ' mats will only operate up to 80% output and have
reduced run-times with 14.4/14.8V batteries.
Do not connect a V-Mount power source to the Flex Cine Dimmer
when connected to an AC power source. The AC connection will
not charge the battery.
Connecting AC Adapter Power Source
1. Ensure the dimmer is turned OFF.
2. Insert the 16' power cable into the AC power adapter.
3. Locate the threade d female barrel plug receptacle on the bottom of
the Cine Dimme r and insert th e male barrel plug located at the end
of the AC power adapter cable.
4. Once inserted, slide the coupling ring towards the dim mer and
rotate the coupling ring clockwise to secure the cable.
Disconnecting AC Adapter Power Source
1. Ensure the dimmer is turned OFF.
2. While holding the dimmer, grasp the coupling ring on the AC power
adapter cable, rotate th e ring counterclockwise two full turns, and
gently remove the barrel plug from the dimmer.
Connecting V-Mount Power Source
1. Ensure the dimmer is turned OFF.
2. Press the V-Mount power source against the back of the dimmer
and slide it towards the bottom of the dimmer until it clicks into the
locked position.
Disconnecting V-Mount Power Source
1. Ensure the dimmer is turned OFF.
2. Push the V-Mount release button inwards and slide the power
source towards the top of the dim mer until it releases.
Page 5

Connecting a Flex Mat
Connecting a Flex Cine LED Mat
1. Ensure the dimmer is turned OFF.
2. Plug the Flex Cine mat’s TE-9 Pin conn ector into the TE-9
Pin receiver located on the top of the Flex Cine Dimmer.
Proper connection may require the connector to be rotated until
the pins align and it easily inserts into the dimm er’s receiver.
3. Once connected , rotate th e coupling ring 3/4 clockwise on the
cable connector to secure.
4. Connect the dimmer to a compatible power source. See th e Power
section in this guide for compatibilit y and connecting details.
Connecting a Flex LED Legacy Mat
Original Flex mat owners can operate their original Flex 1' x 1' and
1' x 2' m ats with the Cine Dimmer when paired with a Legacy Adapter
(sold separately). Legacy Adapters are mat specific. D o not attempt to
use the same legacy adapte r for various Flex mat styles.
1. Ensure the dimmer is turned OFF.
2. Connect the adapter’s TE-9 Pin connec tor into the TE-9 Pin receiver
on the dimmer, rotate the coupling ring 3/4 clockwise on the c able
connector to secure.
3. Connec t the Flex mat connector to th e adapter.
4. Rotate the connector’s coupling ring clockwise to secure the
connection.
5. Connec t the dimmer to a compatible power so urce. See the Powe r
section in this guide for compatibilit y and connecting details.
Disconnecting a Flex Cine LED Mat
1. Ensure the dimmer is turned OFF.
2. Grasp the TE-9 Pin co upling ring an d rotate counterclockwise
3/4 tu rn.
3. Gently pull the cable connector straight out and away from the
dimmer.
Disconnecting a Flex LED Legacy Mat
1. Ensure the dimmer is turned OFF.
2. Rotate the adapter ’s TE-9 Pin coupling ring that’s attached to the
dimmer counterclockwise 3/4 turn.
3. Gently pull the adapter straight out and away from the dimmer.
4. Disconnect the mat from the adapter.
Never fo rce en try or removal of the c onne ctor s.
Never ove rtighten coupl ing ri ngs.
Page 6

Basic Operation
For the most up-to-date dimmer control operation, please visit
fjwestcott .com/7582 and scroll to the Support section for the
complete manual and video instruction guide.
1. After conne cting a compatible Flex mat and power source to the
dimme r, locate the ON|OFF Power Switch loc ated on th e top of the
dimme r. Turn the switch to the ON position.
2. The dimmer screen will first indicate the connected V-Mount power
source type (when applicable), then the dimmer controls will appear
for the connected Flex mat.
3. Once the mat control screen is visible, the controls are as follows:
Flex Daylight 1' x 1' and 1' x 2' Mat Cont rols
• Use ◄ (Min) and ► (Max) to control light intensit y (0-10 0%, ±1%
increments)
• The ▲ (U p), ▼ (Down), and OK buttons are disabled during daylight
control mode
Flex Bi-Color 1' x 1 ' and 1' x 2' Mat Controls
• Use ▲ (Up) and ▼ (Down) to move the → (Selection Arrow)
between BRT (B rightness) and CC T (Correlated Color Temperature).
• Once the desired control option has the → (Selection Arrow) located
next to it on the dimmer scre en, use ◄ (Min) and ► (Max) to adjust
the Brightness (0-10 0%, ±1% increments) or CC T (280 0- 600 0K,
±10K increments).
Flex Bi-Color Presets
The dimmer can store 4 user-defined presets for bi-color mats.
1. To access Preset Mode, press and hold OK.
2. Use ◄ (Min) and ► (Max) to selec t the desired pre set.
3. To adjust the selected preset, use ▲ (Up) and ▼ (Down) buttons to
display and move the → (Selection Arrow) between B RT and CCT.
4. Then, use ◄ (Min) and ► (Max) to adjust the Brightness (00 -100%,
±1% increments) or CCT (2800- 600 0K, ±10K increme nts).
5. Quickly press OK to save the desired settings to the selec ted preset.
6. Use ◄ (Min) and ► (Max) to select an additional preset to adjust or
to exit Preset Mode, press and hold OK.
Quick presse s of the ◄ (Min) and ► (M ax) buttons allow for slower
adjustments , while holding down the buttons allow for more rapid
changes.
Page 7
Remote Operation
The Flex Cine Dimmer can be controlled via the dedicated Westcott
Flex Cine mobile app.
Mobile apps, like Luminair, that provide DMX over Artnet protocol,
are not compatible with the Cine Dimmer for remote operation.
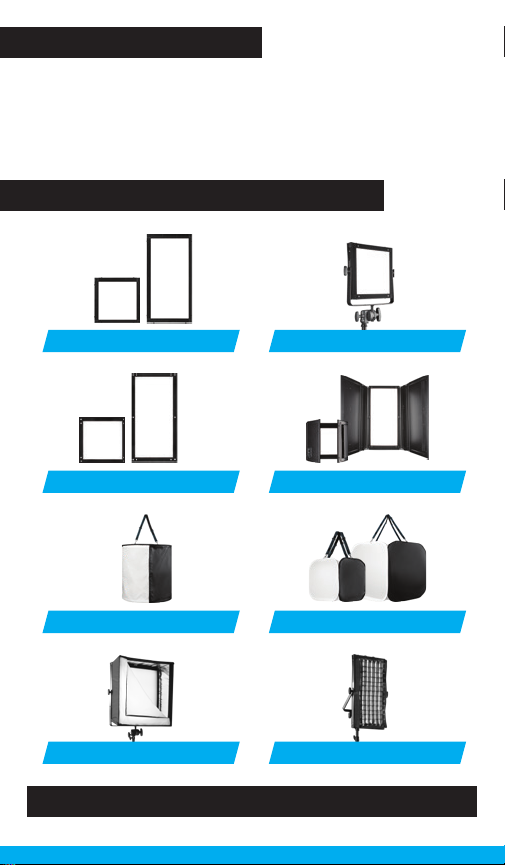
Flex Cine Mounts & Modifiers
YokesScrim Jim® Cine Frames
Hard Diusion Panels Barndoors
Drum Softbox China Cubes
Portable Softboxes Egg Crate Grids
Learn more at FJWESTCOTT.COM/FLEX
Page 8

Warranty
Westcott’s warranty obligations for this product are limited to the following
terms.
The F.J. Westcott Co. (“Westcott”) warrants this Westcott branded product
against defects in materials and workmanship under normal use for a
period of ONE (1) YEAR from the date of retail purchase from Westcott
or an authorized retailer by the original end-user purchaser (“Warranty
Period”). If a defect arises and a valid claim is received within the Warranty
Period, at its option and to the extent permitted by law, Westcott will either
(1) repair the defect at no charge, using new or refurbished replacement
parts, or (2) exchange the product with a product that is new or which
has been manufactured from new or serviceable used parts and is at least
functionally equivalent to the original product. This Limited Warranty
applies only to products manufactured by or for Westcott that can be
identified by the Westcott trademark, trade name, or logo affixed to them.
This warranty does not apply to: (a) damage caused by accident, abuse,
misuse, flood, fire, earthquake, mold, or other external causes; (b) damage
caused by operating the product outside the permitted or intended uses
described by Westcott; (c) a product or part that has been modified to
alter functionality or capability without the written permission of Westcott;
or (d) cosmetic damage, including but not limited to scratches, dents and
broken plastic.
Disclaimer: By purchasing, borrowing and/or using this product for any
event, both public or private, you, the customer, accepts all responsibility
and releases Westcott, and its associates, of any and all liability in the event
of manufacturer’s defect, malfunction or misuse of the product which may
lead to further injuries or complications unforeseen by the user. Westcott
is not responsible for any potential or incurred damage caused by failure
to properly mount, hang, or store the product, which includes, but is not
limited to damage to cameras, electronics, electrical equipment, buildings,
building materials, personal injury, death, or disability, fire damage, or any
and all other damage not mentioned previously.
Please contact Westcott’s Repair Department for a Return Authorization
Number “RMA” prior to requesting warranty service. This RMA must be
clearly written on the outside of the box to the left of the shipping label.
Items sent in without pre-authorization or that do not fall under the limited
warranty will be returned at the expense of the sender.
Repair Department: 800-886-1689 / 419-243-7311 (International)
Email: [email protected]
Shipping: F.J. Westcott Co, 1425-B Holland Rd. Maumee, OH 43537
Register your new gear online at FJWESTCOTT.COM/REGISTER
Visit FJWESTCOTT.COM for videos, pro tips, inspiration, and more!
Westcott products are made to the company’s traditionally high standards of quality and
comply with all applicable government safety regulations and requirements. In an eort to
provide the best quality products possible, we periodically make product modifications.
Actual products may not be identical to items pictured. Made in Korea. ©F.J. Westcott Co.
All rights reserved. KO0219
 Loading...