

Page 1
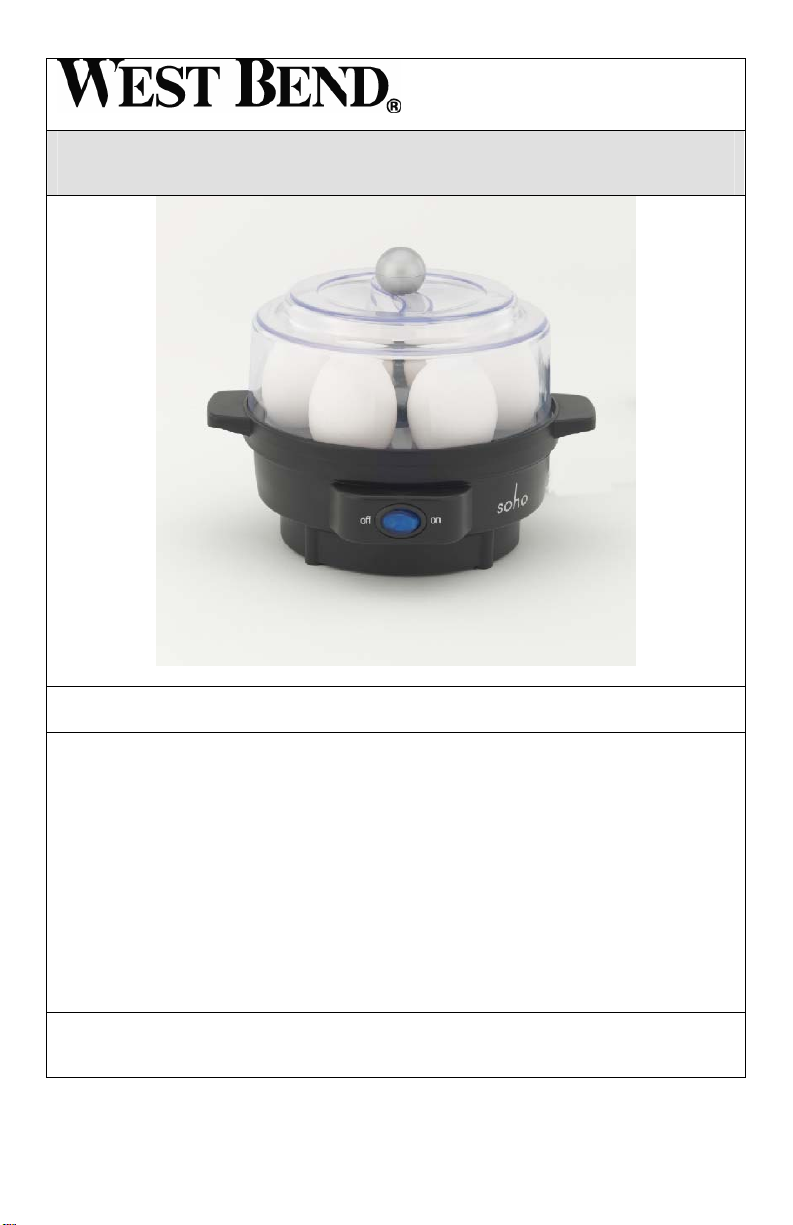
SOHO® EGG COOKER
Instruction Manual
Register this and other Focus Electrics products through our website:
www.focuselectrics.com
Important Safeguards................................................................................................ 2
Heat Precautions....................................................................................................... 2
Electricity Precautions............................................................................................... 3
Using Your Egg Cooker............................................................................................. 4
Cleaning Your Egg Cooker........................................................................................ 6
Recipes..................................................................................................................... 7
Warranty.................................................................................................................... 8
SAVE THIS INSTRUCTION MANUAL FOR FUTURE REFERENCE
© 2008 West Bend
®
, a Brand of Focus Electrics, LLC.
www.focuselectrics.com
Page 2
To prevent personal injury or property damage, read and follow all instructions
and warnings.
When using electrical appliances, basic safety precautions should always be
followed including the following:
• Read all instructions, including these important safeguards and the care and use
• Do not use appliance for other than intended use.
• Do not place on or near a hot gas or electric burner, in a heated oven,
• Close supervision is necessary when this appliance is used by or near children.
• The use of accessory attachments not recommended by Focus Electrics may
• Do not operate when the appliance is not working properly or when it has been
• Do not attempt to repair this appliance yourself.
• For household use only.
IMPORTANT SAFEGUARDS
instructions in this manual.
refrigerator or freezer.
cause fire, electric shock, or injury to persons.
damaged in any manner. For service information see warranty page.
To prevent burns, personal injury or property damage, read and follow all
instructions and warnings.
HEAT PRECAUTIONS
• Do not touch hot surfaces. Use handles and knobs where provided. Use hot
pads or oven mitts when handling hot surfaces.
• Do not move an appliance containing hot water or other hot liquids.
2
Page 3

To prevent electrical shock, personal injury or property damage, read and
follow all instructions and warnings.
ELECTRICITY PRECAUTIONS
• To protect against electric shock, do not immerse cord, plugs, or other electric
parts in water or other liquids.
• Do not operate any appliance with a damaged cord or plug.
• Do not use this appliance outdoors.
• Always unplug the appliance from outlet before cleaning. Allow to cool before
putting on or taking off parts and before cleaning.
• A short power-supply cord is provided to reduce risks resulting from becoming
entangled in or tripping over a longer cord.
• Longer, detachable power-supply cords or extension cords are available and
may be used if care is exercised in their use. While use of an extension cord is
not recommended, if you must use one, the marked electrical rating of the
detachable power-supply cord or extension cord should be at least as great as
the electrical rating of the appliance. If the appliance is of the grounded type,
the extension cord should be a grounding-type 3-wire cord. The cord should be
arranged so that it will not hang over the counter top or tabletop where it can be
pulled by children or tripped over.
• This appliance has a polarized plug (one blade is wider than the other). To
reduce the risk of electric shock, this plug is intended to fit into a polarized outlet
only one way. If the plug does not fit fully into the outlet, reverse the plug. If it
still does not fit, contact a qualified electrician. Do not attempt to modify the plug
in any way.
• Do not use an outlet or extension cord if the plug fits loosely or if the outlet or
extension cord feels hot.
• Keep the cord away from hot parts of the appliance and hot surfaces during
operation.
SAVE THESE INSTRUCTIONS
3
Page 4
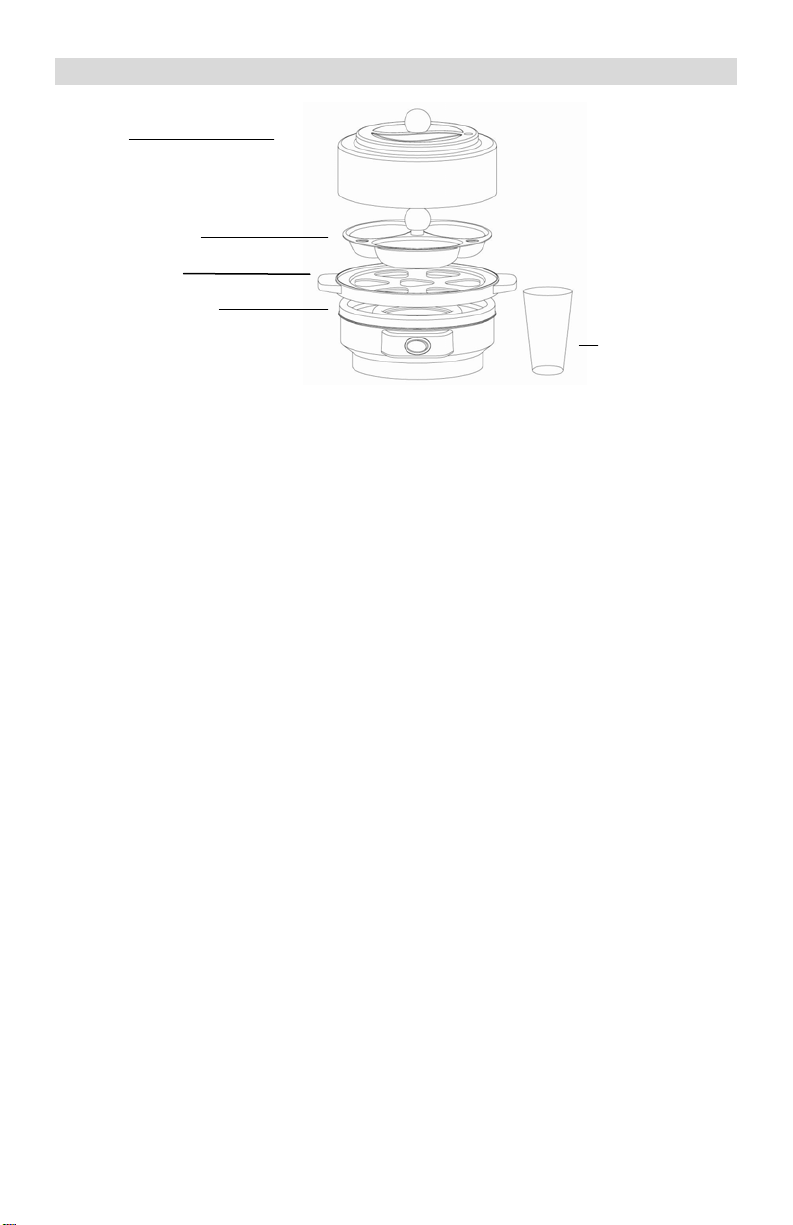
Cover
Poaching Pan
Cooking Rack
Egg Cooker Base
USING YOUR EGG COOKER
Measuring
Cup
Before using your Egg Cooker, clean the entire unit according to the cleaning
instructions. Wash all loose parts in warm, soapy water, rinse thoroughly and
dry. Do not immerse egg cooker base in water.
You can poach up to 3 eggs or hard-cook or soft-cook up to 7 eggs. Cooking times
will vary depending on the size of the egg. To get the best results, use the
measuring cup included with the egg cooker which has water level markings to use
as a guide. These amounts are approximate and can be varied to suit individual
preferences. Use less water for softer cooked eggs and more water for harder
cooked eggs.
TO POACH EGGS:
1. Place the egg cooker base on a dry, level surface. Use the medium cooked
water level markings on the measuring cup to determine the amount of water for
the number of eggs being cooked. Example: For 1 poached egg fill water to the
7 mark on the measuring cup; for 2 poached eggs, fill water to the 6 mark; for 3
poached eggs, fill water to the 5 mark. Note: The more eggs you are poaching
the more water you should use.
2. With the switch set to “OFF,” pour the recommended amount of cold water into
the electric base. Place the cooking rack into the base.
3. Lightly butter or oil the poaching cups to be used. Place the poaching pan on
top of the cooking rack in the egg cooker base. ALWAYS PLACE THE
POACHING PAN ON THE COOKING RACK. Be sure to position the poaching
pan onto the cooking rack so that it is level. Break one egg into each cup.
4. Place the cover on the egg cooker base and plug the appliance into a 120- volt,
AC electrical outlet. Turn the switch to “ON.” The “ON” light will glow, indicating
the cooking process has begun. Note: Do NOT remove the cover from the base
while the eggs are cooking. An audible alert will sound when the eggs are
ready, after approximately 5 to 8 minutes. Turn the switch to “OFF.” Unplug
cord from electrical outlet. Use hot pads or oven mitts to remove the cover and
poaching pan. Slide the eggs out of the cups with a smooth-edged utensil.
Serve immediately to prevent overcooking.
4
Page 5

5. Allow the egg cooker to cool completely before discarding any remaining water
from the egg cooker base and before cleaning.
TO SOFT-COOK EGGS:
1. Place the egg cooker on a dry, level surface. Use the soft cooked water level
markings on the measuring cup to determine the amount of water for the
number of eggs being cooked. Example: If soft cooking 7 eggs, fill the
measuring cup to the 7 mark.
2. With the switch set to “OFF,” pour the recommended amount of cold water into
the egg cooker base. The recommended amount of water will provide eggs with
soft yolks and cooked egg whites.
3. Place the cooking rack onto the egg cooker base. Place the eggs in the cooking
rack.
4. Place the cover onto the egg cooker base and plug the appliance into a 120 volt,
AC electrical outlet. Turn the switch to “ON.” The “ON” light will glow, indicating
the cooking process has begun. Note: Do NOT remove the cover from the egg
cooker base while the eggs are cooking. An audible alert will sound when the
eggs are ready, after approximately 6 to 8 minutes. Turn the switch to “OFF.”
Unplug the cord from the electrical outlet. Use hot pads or oven mitts to remove
the cover and cooking rack. Serve immediately to prevent over cooking. Eggs
may be rinsed briefly with cold water while still in the cooking rack for easy
handling.
5. Allow the egg cooker to cool completely before discarding any remaining water
from the base and before cleaning.
TO MEDIUM-COOK EGGS:
1. Place the egg cooker on a dry, level surface. Use the medium cooked water
level markings on the measuring cup to determine the amount of water for the
number of eggs being cooked. Example: If medium cooking 7 eggs fill the
measuring cup to the 7 mark.
2. With the switch set to “OFF,” pour the recommended amount of cold water into
the egg cooker base. The recommended amount of water will provide eggs with
medium yolks and cooked egg whites.
3. Place the cooking rack onto the egg cooker base. Place the eggs in the cooking
rack.
4. Place the cover onto the egg cooker base and plug appliance into a 120 volt, AC
electrical outlet. Turn the switch to “ON.” The “ON” light will glow indicating the
cooking process has begun. Note: Do NOT remove the cover from the base
while the eggs are cooking. An audible alert will sound when the eggs are
ready, after approximately 8 to 10 minutes. Turn the switch to “OFF.” Unplug
the cord from the electrical outlet. Use hot pads or oven mitts to remove the
cover and cooking rack. Serve immediately to prevent over cooking. Eggs may
be rinsed briefly with cold water while still in the cooking rack for easy handling.
5. Allow the egg cooker to cool completely before discarding any remaining water
from the egg cooker base and before cleaning.
5
Page 6

TO HARD-COOK EGGS:
1. Place the egg cooker on a dry, level surface. Use the hard cooked water level
markings on the measuring cup to determine the amount of water for the
number of eggs being cooked. Example: If hard cooking 7 eggs, fill the
measuring cup to the 7 mark on the hard cooked-side of the measuring cup.
2. With the switch set to “OFF,” pour the recommended amount of cold water into
the egg cooker base. Note: When cooking more eggs, less water is used.
3. Place the cooking rack onto the egg cooker base. Place the eggs in the cooking
rack.
4. Place the cover onto the egg cooker base. Plug the appliance into a 120 volt,
AC electrical outlet. Turn the switch to “ON”. The “ON” light will glow indicating
the cooking process has begun. Note: Do NOT remove the cover from the base
while the eggs are cooking. An audible alert will sound when the eggs are
ready, after approximately 15 to 19 minutes. Turn the switch to “OFF.” Unplug
the cord from the electrical outlet. Use hot pads or oven mitts to remove the
cover and cooking rack. Eggs may be rinsed briefly with cold water while still in
the cooking rack for easy handling. For easy peeling, crack the shell all over by
tapping on a hard surface. Hard-cooked eggs may be refrigerated for up to 4
weeks.
5. Allow the egg cooker to cool completely before discarding any remaining water
from the egg cooker base and before cleaning.
• A small amount of smoke and/or odor may occur upon heating due to the release
of manufacturing oils – this is normal.
• Some minor expansion/contraction sounds may occur during heating and cooling
– this is normal.
CLEANING YOUR EGG COOKER
To ensure optimal performance clean your egg cooker after each use. Wash the
cover, poaching pan, cooking rack, and measuring cup in warm, soapy water, rinse
and dry thoroughly. The cover, poaching pan and cooking rack may be cleaned in
an automatic dishwasher, top rack only, however the underside of the poaching pan
will discolor which is normal and does not affect its use in cooking eggs. DO NOT
CLEAN THE MEASURING CUP IN AN AUTOMATIC DISHWASHER, AS DAMAGE
WILL OCCUR.
Wipe the egg cooker base with a damp cloth and dry.
Place the cooking rack, poaching pan, measuring cup, and cord inside the egg
cooker for compact storage.
6
Page 7

RECIPES
Deviled Eggs
8 hard-cooked eggs, shelled and halved
1 tbsp. lemon juice or vinegar
1 tsp. prepared mustard
1 tsp. Worcestershire sauce
½ tsp. salt
2 dashes hot pepper sauce
3 to 4 tbsp. mayonnaise or salad dressing
1. Remove the yolks from the eggs and mash. In a small mixing bowl, combine
the remaining ingredients and mix well.
2. Refill the egg whites with the egg yolk mixture. Sprinkle with paprika if desired.
Makes 16 deviled eggs.
Deviled Egg Variations: Follow the Deviled Egg recipe adding any of the
ingredients listed below to the yolk mixture.
Ham: ¼ cup finely chopped cooked ham
Bacon: ¼ cup crumbled cooked bacon, about 2 slices
Dried Beef: ¼ cup finely chopped dried beef and 1 tbsp. sweet pickle relish
Seafood: ¼ cup finely chopped cooked or canned shrimp, smoked fish, flaked tuna,
salmon or crabmeat and a dash of curry powder
Cheese: ¼ cup shredded cheddar cheese
Olive: ¼ chopped green or ripe olives
OBrien: 2 tbsp. finely chopped green pepper, 1 tsp. finely chopped pimento and ½
tsp. instant minced onion
Eggs Benedict
4 eggs
2 English muffins split, toasted and buttered
4- ¼-inch slices bacon, grilled
1 Easy Hollandaise Sauce, recipe below
1. Poach the eggs in the egg cooker according to the directions.
2. Place one slice of bacon on each muffin half and top with a poached egg.
Spoon 2 tbsp. Hollandaise Sauce over each egg. Garnish with chopped parsley
if desired. Makes 4 servings.
Easy Hollandaise Sauce
¼ cup butter or margarine
2 egg yolks
¼ tsp. salt
1 tbsp. lemon juice
2 tbsp. cream or evaporated milk
1. In a 1-quart saucepan, melt the butter over low heat.
2. In a small mixing bowl, combine the egg yolks, salt, lemon juice and cream. Mix
well. Add the egg mixture to the saucepan, stirring constantly until the mixture is
smooth and has the consistency of light cream.
7
Page 8

PRODUCT WARRANTY
Appliance 1 Year Limited Warranty
Focus Electrics, LLC (“Focus Electrics”) warrants this appliance from failures in the material
and workmanship for one (1) year from the date of original purchase with proof of purchase,
provided the appliance is operated and maintained in conformity with the provided Instruction
Manual. Any failed part of the appliance will be repaired or replaced without charge at Focus
Electrics’ discretion. This warranty applies to indoor household use only.
This warranty does not cover any damage, including discoloration, to any non-stick surface of
the appliance. This warranty is null and void, as determined solely by Focus Electrics if the
appliance is damaged through accident, misuse, abuse, negligence, scratching, or if the
appliance is altered in any way.
THIS WARRANTY IS IN LIEU OF ALL IMPLIED WARRANTIES, INCLUDING WARRANTIES
OF MERCHANTABILITY, FITNESS FOR A PARTICULAR PURPOSE, PERFORMANCE, OR
OTHERWISE, WHICH ARE HEREBY EXCLUDED. IN NO EVENT SHALL FOCUS
ELECTRICS BE LIABLE FOR ANY DAMAGES, WHETHER DIRECT, INDIRECT,
INCIDENTAL, FORSEEABLE, CONSEQUENTIAL, OR SPECIAL, ARISING OUT OF OR IN
CONNECTION WITH THIS APPLIANCE.
If you think the appliance has failed or requires service within its warranty period, please
contact the Focus Electrics Customer Service Department at (866) 290 –1851 or e-mail us at
service@focuselectrics.com
original purchase date will be required for all warranty claims. Hand-written receipts are not
accepted. Focus Electrics is not responsible for returns lost in transit.
. Return shipping fees are non-refundable. A receipt proving
Valid only in USA and Canada
REPLACEMENT PARTS
Replacement parts, if available, may be ordered directly from Focus Electrics online at
www.focuselectrics.com
address listed above, or by writing to us at:
Focus Electrics, LLC
Attn: Customer Service
P. O. Box 2780
West Bend, WI 53095
Be sure to include the catalog/model number of your appliance (located on the bottom/back of
the unit) and a description and quantity of the part you wish to order. Along with this include
your name, mailing address, Visa/MasterCard number, expiration date and the name as it
appears on the card. Checks can be made payable to Focus Electrics, LLC. Call Customer
Service to obtain purchase amount. Your state’s sales tax and a shipping/processing fee will
be added to your total charge. Please allow two (2) weeks for delivery.
This manual contains important and helpful information regarding the safe use and care of your
new Focus Electrics product. For future reference, attach dated sales receipt for warranty proof
of purchase and record the following information:
Date purchased or received as gift: _______________________________________________
Where purchased and price, if known: _____________________________________________
Item number and Date Code (shown bottom/back of product):_____________________________
, or you may call or e-mail the service department at the number/e-mail
L5715 03/08 West Bend
®
, a Brand of Focus Electrics, LLC. Printed in China
8
Page 9

APPAREIL DE CUISSON DES OEUFS
Mode d’emploi
Enregistrez ce produit et d’autres produits Focus Electrics sur notre site Web:
www.focuselectrics.com
Précautions importantes............................................................................................ 2
Précautions de sécurité à haute température............................................................ 2
Précautions de sécurité relatives à l’électricité.......................................................... 3
Utilisation de votre appareil de cuisson des oeufs .................................................... 4
Nettoyage de votre appareil de cuisson des oeufs.................................................... 6
Recettes.................................................................................................................... 7
Garantie .................................................................................................................... 8
CONSERVEZ CE MANUEL D’INSTRUCTIONS POUR RÉFÉRENCE FUTURE
© 2008 West Bend®, une Marque de Focus Electrics, LLC.
www.focuselectrics.com
Page 10

PRECAUTIONS IMPORTANTES
Pour empêcher toute blessure physique ou tout dommage matériel, lisez et
suivez toutes les consignes et mises en garde.
Lorsque vous utilisez des appareils électriques, les précautions de sécurité
élémentaires devraient toujours être respectées, notamment les précautions cidessous:
• Lisez toutes les instructions, notamment les présentes précautions importantes,
ainsi que les consignes pour l’entretien de ce manuel.
• N’utilisez pas l’appareil pour un autre usage que celui pour lequel il a été conçu.
• Ne placez pas cet appareil sur ou à proximité d’une gazinière ou d’ un réchaud
électrique, à l’intérieur d’un four chaud, au réfrigérateur ni au congélateur.
• Une surveillance étroite est nécessaire lorsque vous cet appareil est utilisé par
ou à proximité d’enfants.
• L’utilisation d’accessoires non recommandés par Focus Electrics risque de
causer un incendie, une électrocution ou des blessures.
• N’utilisez pas l’appareil s’il ne fonctionne pas correctement ou s’il a été détérioré
de quelque manière que ce soit. Pour tout renseignement concernant les
réparations, voir la page de garantie.
• N’essayez pas de réparer cet appareil vous-même.
• Pour une utilisation domestique uniquement.
Pour empêcher toute brûlure, toute blessure physique ou tout dommage
matériel, lisez et suivez toutes les consignes et mises en garde.
PRECAUTIONS DE SECURITE A HAUTE TEMPERATURE
• Ne touchez pas les surfaces à haute température. Utilisez les poignées
rectangulaires et rondes lorsque celles-ci sont fournies. Utilisez des maniques
ou des gants de cuisine lorsque vous manipulez des surfaces à haute
température.
• Ne déplacez pas un appareil électrique contenant de l’eau ou d’autres liquides à
haute température.
2
Page 11

Pour empêcher tout choc électrique, toute blessure physique ou tout
dommage matériel, lisez et suivez toutes les consignes et mises en garde.
PRECAUTIONS DE SECURITE RELATIVES A L’ELECTRICITE
• Pour vous protéger contre tout choc électrique, n’immergez pas le cordon, les
fiches ni aucune autre pièce électrique dans l’eau ni dans tout autre liquide.
• N’utilisez aucun appareil électrique dont le cordon ou la fiche est en mauvais
état.
• N’utilisez pas cet appareil en extérieur.
• Débranchez toujours l’appareil de la prise secteur avant de procéder au
nettoyage. Laissez l’appareil refroidir avant de mettre en place ou de retirer des
pièces ainsi qu’avant de procéder au nettoyage.
• Le cordon d’alimentation fourni est court pour réduire les risques qu’une
personne se prenne les pieds ou trébuche sur un cordon plus long.
• Des cordons d’alimentations plus longs détachables ou des cordons de rallonge
sont disponibles et peuvent être utilisés à condition de faire preuve de prudence
lors de leur utilisation. Bien que l’utilisation d’un cordon de rallonge ne soit pas
recommandée, si vous devez en utiliser un, la puissance nominale indiquée
pour le cordon d’alimentation détachable ou pour le cordon de rallonge devrait
être au moins aussi importante que la puissance nominale de l’appareil. Si
l’appareil est de type raccordé à la terre, le cordon de rallonge devrait être relié
à la terre et composé de trois fils. Le cordon devrait être disposé de manière à
ne pas pendre depuis le plan de travail d’où il risque d’être tiré par des enfants
ou d’où quelqu’un pourrait s’y prendre les pieds..
• Cet appareil est pourvu d’une fiche polarisée (une lame est plus large que
l’autre). Pour réduire le risque d’électrocution, cette fiche est conçue pour
s’encastrer dans une prise secteur polarisée dans un sens uniquement. Si la
fiche ne s’insère pas complètement dans la prise secteur, retournez la fiche. Si
elle ne s’encastre toujours pas, contactez un électricien qualifié. Ne tentez pas
de modifier la fiche de quelque manière que ce soit.
• N’utilisez pas une prise secteur ou un cordon de rallonge si la fiche s’y adapte
avec un jeu ou si cette prise secteur ou ce cordon de rallonge vous semblent
chauds.
• Maintenez le cordon à l’écart des pièces de l’appareil et des surfaces à haute
température pendant l’utilisation.
CONSERVEZ CES CONSIGNES
3
Page 12

UTILISATION DE VOTRE APPAREIL DE CUISSON DES OEUFS
Couvercle
Plat à pocher
Grille de cuisson
Base électrique
Avant d’utiliser votre appareil de cuisson des oeufs, nettoyez totalement l’appareil
conformément aux instructions de nettoyage. Lavez toutes les pièces détachables
à l’eau tiède savonneuse, rincez-les soigneusement puis séchez-les. N’immergez
pas la base chauffante dans l’eau.
Vous pouvez pocher jusqu’à 3 oeufs ou cuire jusqu’à 7 oeufs durs/mollets. Les durées de
cuisson seront variables en fonction de la taille de l’oeuf. Pour obtenir les meilleurs
résultats, utilisez la mesure fournie avec l’appareil de cuisson des oeufs ; celle-ci est
pourvue de marques de mesure indiquant le niveau d’eau à utiliser comme référence.
Ces quantités sont approximatives et peuvent être modifiées pour s’adapter aux
préférences individuelles. Veuillez utiliser moins d’eau pour des oeufs mollets et
davantage d’eau pour des oeufs durs.
POUR POCHER DES OEUFS
1. Veuillez placer la base de l’appareil de cuisson des oeufs sur une surface sèche et
plane. Utilisez les marques de niveau d’eau de la mesure correspondant aux oeufs
mollets afin de déterminer la quantité d’eau correspondant au nombre d’oeufs à
cuire. Exemple : Pour 1 oeuf poché, veuillez remplir la mesure d’eau jusqu’à la
marque 7, pour 2 oeufs pochés, remplissez d’eau jusqu’à la marque 6, pour 3 oeufs
pochés, remplissez d’eau jusqu’à la marque 5. Remarque : Plus vous pochez
d’oeufs, plus vous devriez utiliser d’eau.
2. En positionnant l’interrupteur sur « OFF », versez la quantité recommandée d’eau
froide dans la base de l’appareil de cuisson des oeufs. Placez la grille de cuisson à
l’intérieur de la base.
3. Beurrez ou huilez légèrement les coupelles à pocher que vous allez utiliser. Placez
le plat à pocher au-dessus de la grille de cuisson à l’intérieur de la base de l’appareil.
PLACEZ TOUJOURS LE PLAT A POCHER SUR LA GRILLE DE CUISSON.
Assurez-vous de positionner le plat à pocher sur la grille de cuisson de sorte que
celle-ci repose à plat. Cassez un oeuf dans chaque coupelle.
4. Placez le couvercle sur la base de l’appareil de cuisson des oeufs.
Puis branchez-le à une prise secteur de 120 volts AC. Positionnez l’interrupteur sur
« ON ». Le voyant ON s’allume, indiquant que le processus de cuisson a commencé.
Mesure
4 5
Page 13

Remarque : Ne retirez PAS le couvercle de la base pendant la cuisson des oeufs.
Une alarme audible est émise lorsque les oeufs sont prêts, au bout d’environ 6 à 8
minutes. Positionnez l’interrupteur sur « OFF ». Débranchez la fiche de la prise
secteur. Utilisez des maniques/gants de cuisine pour retirer le couvercle et le plat à
pocher. Faites glisser les oeufs à l’extérieur des coupelles à l’aide d’un ustensile à
bout arrondi. Servez immédiatement afin d’éviter toute cuisson excessive.
5. Laissez l’appareil de cuisson des oeufs refroidir complètement avant de jeter l’eau
restant à l’intérieur de la base et avant de nettoyer l’appareil.
POUR CUIRE DES OEUFS MOLLETS
1. Veuillez placer l’appareil de cuisson des oeufs sur une surface sèche et plane.
Utilisez les marques de niveau d’eau de la mesure correspondant aux oeufs mollets
afin de déterminer la quantité d’eau correspondant au nombre d’oeufs à cuire.
Exemple : Si vous cuisez 7 oeufs mollets, remplissez la mesure jusqu’à la marque 7.
2. En positionnant l’interrupteur sur « OFF », versez la quantité d’eau froide
recommandée à l’intérieur de la base de l’appareil de cuisson des oeufs. L’utilisation
de la quantité d’eau recommandée produira des oeufs avec des jaunes mous et des
blancs cuits.
3. Placez la grille de cuisson sur la base. Mettez les oufs dans la grille.
4. Placez le couvercle sur la base de l’appareil de cuisson des oeufs. Puis branchez
l’appareil à une prise secteur de 120 volts AC. Positionnez l’interrupteur sur « ON ».
Le voyant « ON » s’allume, indiquant que le processus de cuisson a commencé.
Remarque : Ne retirez PAS le couvercle de la base pendant la cuisson des oeufs.
Une alarme audible est émise lorsque les oeufs sont prêts, au bout d’environ 6 à 8
minutes. Positionnez l’interrupteur sur « OFF ». Débranchez la fiche de la prise
secteur. Utilisez des maniques/gants de cuisine pour retirer le couvercle et la grille
de cuisson. Servez immédiatement afin d’éviter toute cuisson excessive. Vous
pouvez rincer rapidement les oeufs à l’eau froide pendant qu’ils sont dans la grille de
cuisson pour faciliter leur manipulation.
5. Laissez l’appareil de cuisson des oeufs refroidir complètement avant de jeter l’eau
restant à l’intérieur de la base et avant de nettoyer l’appareil.
POUR CUIRE DES OUFS MOLLETS
1. Veuillez placer l’appareil de cuisson des oeufs sur une surface sèche et plane.
Utilisez les marques « medium cooked » sur la tasse graduée afin de déterminer la
quantité d'eau nécessaire pour le nombre d'oufs à cuire.. Exemple : Si vous cuisez 7
oeufs mollets, remplissez la mesure jusqu’à la marque 7.
2. En positionnant l’interrupteur sur « OFF », versez la quantité d’eau froide
recommandée à l’intérieur de la base de l’appareil de cuisson des oeufs. Utilice las
marcas de nivel de agua para huevos semiduros en la taza de medición para
determinar la cantidad de agua para el número de huevos que se están cocinando.
3. Placez la grille de cuisson sur la base. Mettez les oufs dans la grille.
4. Placez le couvercle sur la base de l’appareil de cuisson des oeufs. Puis branchez
l’appareil à une prise secteur de 120 volts AC. Positionnez l’interrupteur sur « ON ».
Le voyant « ON » s’allume, indiquant que le processus de cuisson a commencé.
Remarque : Ne retirez PAS le couvercle de la base pendant la cuisson des oeufs.
Une alarme audible est émise lorsque les oeufs sont prêts, au bout d’environ 8 à 10
minutes. Positionnez l’interrupteur sur « OFF ». Débranchez la fiche de la prise
secteur. Utilisez des maniques/gants de cuisine pour retirer le couvercle et la grille
de cuisson. Servez immédiatement afin d’éviter toute cuisson excessive. Vous
pouvez rincer rapidement les oeufs à l’eau froide pendant qu’ils sont dans la grille de
cuisson pour faciliter leur manipulation.
Page 14

5. Laissez l’appareil de cuisson des oeufs refroidir complètement avant de jeter l’eau
restant à l’intérieur de la base et avant de nettoyer l’appareil.
POUR CUIRE DES OEUFS DURS
1. Veuillez placer l’appareil de cuisson des oeufs sur une surface sèche et plane.
Utilisez les marques de niveau d’eau de la mesure correspondant aux oeufs durs
afin de déterminer la quantité d’eau correspondant au nombre d’oeufs à cuire.
Exemple : Si vous cuisez 7 oeufs durs, remplissez la mesure jusqu’à la marque 7 du
côté de la mesure correspondant aux oeufs durs.
2. En positionnant l’interrupteur sur « OFF », versez la quantité d’eau froide
recommandée dans la base de l’appareil de cuisson des oeufs. Remarque : Lorsque
vous cuisez plus d’oeufs, vous utilisez moins d’eau.
3. Placez la grille de cuisson sur la base. Mettez les oufs dans la grille.
4. Placez le couvercle sur la base de l’appareil de cuisson des oeufs. Puis branchez
l’appareil à une prise secteur de 120 volts AC. Positionnez l’interrupteur sur « ON ».
Le voyant « ON » s’allume, indiquant que le processus de cuisson a commencé.
Remarque : Ne retirez PAS le couvercle de la base tandis que les oeufs sont en
train de cuire. Une alarme audible est émise lorsque les oeufs sont prêts, au bout
d’environ 15 à 19 minutes. Positionnez l’interrupteur sur « OFF ». Débranchez la
fiche de la prise secteur. Utilisez des maniques/gants de cuisine pour retirer le
couvercle et la grille de cuisson. Vous pouvez rincer rapidement les oeufs à l’eau
froide pendant qu’ils sont dans la grille de cuisson pour faciliter leur manipulation.
Pour retirer la coque facilement, fissurez la coque partout en la tapotant contre une
surface dure. Les oeufs durs se conservent au réfrigérateur pendant une durée
maximale de 4 semaines.
5. Laissez l’appareil de cuisson des oeufs refroidir complètement avant de jeter l’eau
restant à l’intérieur de la base et avant de le nettoyer.
• Il est possible qu’un peu de fumée et une légère odeur se dégagent pendant la
cuisson en raison de la diffusion des huiles de fabrication : c’est tout à fait normal.
• De petits bruits d’expansion/contraction peuvent être produits pendant la cuisson et
le refroidissement : c’est tout à fait normal.
NETTOYAGE DE VOTRE APPAREIL DE CUISSON DES OEUFS
Pour garantir une performance optimale de votre appareil de cuisson des oeufs après
chaque utilisation. Lavez le couvercle, le plat à pocher, la grille de cuisson et la mesure à
l’eau savonneuse chaude, rincez puis séchez. Le couvercle, le plat à pocher et la grille de
cuisson sont lavables au lave-vaisselle automatique, sur la grille supérieure de celui-ci
uniquement ; toutefois le dessous du plat à pocher se décolorera : ce phénomène est
normal et n’influence pas l’utilisation du plat pour la cuisson des oeufs. NE NETTOYEZ
PAS LA MESURE AU LAVE-VAISSELLE AUTOMATIQUE ; CELA LA DETERIORERAIT.
Essuyez la base de l’appareil de cuisson des oeufs à l’aide d’un chiffon humide puis
séchez-la.
Placez la grille de cuisson, le plat à pocher, la mesure et le cordon d’alimentation à
l’intérieur de l’appareil de cuisson des oeufs pour un rangement moins encombrant.
6
Page 15

RECETTES
Oeufs à la diable
8 oeufs durs, sans coques et coupés en deux
1 cuiller à soupe de jus de citron ou de vinaigre
1 cuiller à café de moutarde préparée
1 cuiller à café de sauce Worcestershire
½ cuiller à café de sel
2 gouttes de sauce au piment fort
3 à 4 cuillers à soupe de mayonnaise ou de vinaigrette
1. Retirez les jaunes des oeufs et écrasez-les. Dans un petit saladier, incorporez les
ingrédients restants et mélangez bien.
2. Remplissez à nouveau les blancs d’oeufs avec le mélange de jaunes. Saupoudrez
de paprika si vous le souhaitez. Convient pour 16 parts d’oeufs à la diable diable.
Variations pour les oeufs à la diable Suivez la recette des oeufs à la diable en ajoutant
l’un des ingrédients ci-dessous au mélange de jaunes.
Jambon : ¼ de mesure de jambon fumé finement haché
Lard : ¼ de mesure de lard fumé pané, environ 2 tranches
Boeuf séché : ¼ de mesure de boeuf séché finement haché et 1 cuiller à soupe de
marinade douce.
Fruits de mer : ¼ de mesure de crevettes cuites ou en conserve, de poisson fumé, de
miettes de thon, de saumon, de chair de crabe finement haché et une pincée de poudre
de curry
Fromage : ¼ de mesure de cheddar râpé
Olive : ¼ d’olive verte ou noire hachée
OBrien : 2 cuillers à soupe. Poivron vert finement haché, 1 cuiller à café de piment
finement haché et ½ cuiller à café d’oignon haché en poudre.
Oeufs Bénédicte
4 oeufs
2 muffins anglais, coupés en deux, toastés et beurrés
4 tranches de bacon de ¼ de pouce, grillées
1 sauce hollandaise facile, voir recette ci-dessous
1. Pochez les oeufs dans l’appareil de cuisson des oeufs en vous conformant aux
instructions.
2. Placez une tranche de bacon sur chaque demi-muffin puis recouvrez avec un oeuf
poché. Versez 2 cuillers à soupe. de sauce hollandaise sur chaque oeuf. Garnissez
de persil haché si vous le souhaitez. Convient pour 4 parts.
Sauce hollandaise facile
¼ de mesure de beurre ou de margarine
2 jaunes d’oeufs
¼ de cuiller à café de sel
1 cuiller à soupe de jus de citron
2 cuillers à soupe de crème ou de lait condensé
1. Dans une casserole d’un quart, faire fondre le beurre à feu doux.
2. Dans un petit saladier, mélanger les jaunes d’oeufs, le sel, le jus de citron et la
crème. Mélangez bien. Ajoutez le mélange d’oeufs dans la casserole, en
mélangeant constamment jusqu’à ce que le mélange soit homogène et ait la
consistance d’une crème légère.
7
Page 16

GARANTIE DU PRODUIT
Garantie limitée d’1 an de l’appareil
Focus Electrics, LLC garantit cet appareil contre tout défaut de pièce et de main d’œuvre
pendant un (1) an à compter d el date d’achat d’origine avec un justificatif d’achat à condition
que l’appareil soit utilisé et entretenu conformément avec le Mode d’emploi de Focus Electrics.
Toute pièce défectueuse de l’appareil sera réparée ou remplacée sans frais à la discrétion de
Focus Electrics. Cette garantie s’applique en cas d’utilisation domestique en intérieur
uniquement.
La présente garantie ne couvre aucun dommage, notamment la décoloration, de toute surface
antiadhésive de l’appareil. Cette garantie est nulle et non avenue, tel que déterminé
uniquement par Focus Electrics si l’appareil est détérioré à la suite d’un accident, d’une
mauvaise utilisation, d’une utilisation abusive, d’une négligence, d’une rayure ou si l’appareil
est modifié de toute manière.
LA PRÉSENTE GARANTIE ANNULE ET REMPLACE TOUTE GARANTIE INDUITE,
NOTAMMENT LES GARANTIES DE COMMERCIALISATION, D’ADAPTATION À UN USAGE
PARTICULIER, DE PERFORMANCE, OU AUTRE QUI SONT ICI EXCLUES. EN AUCUN CAS
FOCUS ELECTRICS. NE POURRA ÊTRE TENUE POUR RESPONSABLE DE TOUT
DOMMAGE, QUE CELUI-CI SOIT DIRECT, INDIRECT, INDUIT, PRÉVISIBLE, SECONDAIRE
OU PARTICULIER, RÉSULTANT DE L’UTILISATION DE OU EN RELATION AVEC CET
APPAREIL.
Si vous pensez que cet appareil est défectueux ou nécessite des réparations pendant la durée
de sa garantie, veuillez contacter le Service clientèle de Focus Electrics au (866) 290-1851 ou
nous envoyer un e-mail à service@focuselectrics.com
pas remboursables. Une facture justifiant la date d’achat d’origine sera nécessaire pour toute
demande dans le cadre de la garantie. Les factures manuscrites ne sont pas acceptées. Focus
Electrics n’est pas responsable pour les retours perdus pendant le transport.
Valide uniquement aux USA et au Canada
. Les frais de transport de retour ne sont
PIECES DE RECHANGE
Les pièces de rechange, lorsque celles-ci sont disponibles, peuvent être commandées directement
auprès de Focus Electrics en ligne sur www.focuselectrics.com. Ou vous pouvez téléphoner ou
adresser un e-mail au service des réparations au numéro/à l’adresse e-mail ci-dessus, ou en nous
écrivant à :
Focus Electrics, LLC
Attn: Customer Service
P. O. Box 2780
West Bend, WI 53095
Assurez-vous d’indiquer le numéro de catalogue/modèle de votre appareil (situé au bas/dos de
l’appareil) et une description ainsi qu’une quantité pour la pièce que vous souhaitez commander.
Joignez à ces informations votre nom, votre adresse postale, votre numéro de carte Visa/MasterCard,
la date d’expiration et le nom du titulaire tel qu’il apparaît sur la carte. Les chèques peuvent être
libellés à l’ordre de Focus Electrics, LLC. Appelez le Service clientèle pour obtenir le montant de
l’achat. La taxe commerciale de votre état et des frais de transport/traitement seront ajoutés à votre
facturation totale. Veuillez autoriser deux (2) semaines pour la livraison.
Ce manuel contient des infor mations importantes et utiles concernant l’utilisation et l’entretien sans
danger de votre nouveau produit Focus Electrics. Pour une consultation ultérieure, fixez le ticket de
caisse daté pour avoir un justificatif d’achat pour la garantie et indiquez les informations ci-dessous:
Date d’achat ou de réception en cadeau : _____________________________________________
Lieu d’achat et prix, si connu : ______________________________________________________
Numéro de l’article et Code de date (indiqué au bas/dos du produit) : _______________________
L5715 03/08 West Bend
®
, une Marque de Focus Electrics, LLC. Imprimé en Chine
8
Page 17

HERVIDOR DE HUEVOS AUTOMÁTICO
Manual de instrucciones
Registre éste y otros productos de Focus Electrics en nuestro sitio:
www.focuselectrics.com en Internet
Precauciones importantes......................................................................................... 2
Precauciones relativas al calor.................................................................................. 2
Precauciones eléctricas ............................................................................................ 3
Utilización de Su Hervidor de Huevos....................................................................... 4
Limpieza de Su Hervidor de Huevos......................................................................... 6
Recetas..................................................................................................................... 7
Garantía.................................................................................................................... 8
CONSERVE ESTE MANUAL DE INSTRUCCIONES COMO REFERENCIA PARA
EL FUTURO
®
© 2008 West Bend
, una Marca de Focus Electrics, LLC.
www.focuselectrics.com
Page 18

PRECAUCIONES IMPORTANTES
Para evitar lesiones personales o daños materiales, lea y acate todas las
instrucciones y advertencias.
Al utilizarse artefactos electrodomésticos, siempre deben acatarse las precauciones
básicas de seguridad incluyendo las siguientes:
• Lea todas las instrucciones, incluyendo estas precauciones importantes, así
como las instrucciones de uso y cuidado en este manual.
• No utilice el aparato para usos distintos del indicado.
• No lo coloque sobre o cerca de un calentador eléctrico o a gas caliente, en un
horno caliente, refrigerador o congelador.
• Se requiere de supervisión adulta cuando cualquier artefacto electrodoméstico
sea usado por o cerca de niños.
• El uso de accesorios no recomendados por Focus Electrics puede causar
incendios, descargas eléctricas o lesiones personales.
• No opere el electrodoméstico cuando no funcione correctamente o haya sido
dañado de algún modo. Para información relativa al servicio de reparaciones
vea la página de garantías.
• No trate de reparar este artefacto electrodoméstico usted mismo.
• Sólo para uso doméstico.
Para evitar quemaduras, lesiones personales o daños materiales, lea y acate
todas las instrucciones y advertencias.
PRECAUCIONES RELATIVAS AL CALOR
• No toque las superficies calientes. Use las asas o perillas donde estén
provistas. Use almohadillas térmicas o guantes para horno al manipular
superficies calientes.
• No mueva el artefacto electrodoméstico de un sitio al otro cuando contenga
agua caliente u otros líquidos calientes.
2
Page 19

Para evitar descargas eléctricas, lesiones personales o daños materiales, lea y
acate todas las instrucciones y advertencias.
PRECAUCIONES ELÉCTRICAS
• Para protegerse contra descargas eléctricas no sumerja el cable, enchufes, u
otras partes eléctricas en agua u otros líquidos.
• No opere aparato electrodoméstico alguno con el cordón eléctrico o el e nchufe
dañado.
• No use este electrodoméstico al aire libre.
• Siempre desenchufe el artefacto del tomacorriente antes de limpiarlo. Permita
que se enfríe antes de colocarle o quitarle partes o antes de limpiarlo
• Se suministra un cordón eléctrico corto para reducir los riesgos que resultan de
enredarse o tropezarse con un cordón eléctrico más largo.
• Hay disponibles cordones de alimentación eléctrica desmontables más largos o
extensiones eléctricas y pueden ser utilizados si se ejerce cuidado al usarlos.
Mientras el uso de una extensión eléctrica no es recomendado, si usted debe
usar una, la capacidad eléctrica nominal marcada en el cordón desmontable de
alimentación eléctrica o la extensión eléctrica deberá ser al menos la mis m a
que la capacidad eléctrica nominal del artefacto electrodoméstico. Si el
artefacto electrodoméstico es del tipo conectado a tierra, la extensión eléctrica
deberá ser un cordón eléctrico de 3 hilos con conexión a tierra. El cordón
eléctrico debería ser extendido de tal manera que no pase sobre encimeras o
mesas donde pueda ser tirado por niños o tropezarse con el mismo.
• Este artefacto tiene un enchufe polarizado (una clavija es más ancha que la
otra). Para reducir el riesgo de descarga eléctrica, este enchufe está diseñado
para encajar de una sola manera en un tomacorriente polarizado. Invierta el
enchufe si éste no encaja completamente en el tomacorriente o en el cable de
extensión. Si todavía no encaja, póngase en contacto con un electricista
calificado. No trate de modificar el enchufe de manera alguna.
• No use un tomacorriente o cable de extensión en el cual el enchufe calza
flojamente, o si el tomacorriente o el cable de extensión se calientan.
• Mantenga el cordón eléctrico alejado de las partes calientes del artefacto
electrodoméstico mientras éste esté operándose.
CONSERVE ESTAS INSTRUCCIONES
3 4
Page 20

COMO USAR SU HERVIDOR DE HUEVOS
Tapa
Cacerola de escalfar
Bandeja para los huevos
Base eléctrica
Antes de usar su hervidor de huevos, limpie la unidad entera según las
instrucciones de limpieza. Lave todas las partes sueltas en agua jabonosa,
enjuáguelas a fondo y séquelas. No sumerja la base de calentamiento en agua.
Usted puede escalfar hasta 3 huevos o cocer hasta 7 huevos pasados por agua o duros.
Los tiempos de cocción variarán según el tamaño del huevo. Para conseguir los mejores
resultados, use la jarra graduada incluida con el hervidor de huevos que tiene marcas de
nivel de agua para usar como guía. Estas cantidades son aproximadas y pueden ser
variadas para satisfacer las preferencias de cada uno. Use menos agua para huevos
cocidos menos duros y más agua para huevos cocidos más duros.
PARA ESCALFAR HUEVOS:
1. Coloque la base del hervidor de huevos sobre una superficie horizontal seca. Use
las marcas de nivel de agua para huevos pasados por agua ("soft cooked") en la
jarra graduada para determinar la cantidad del agua para el número de huevos a
cocer. Por ejemplo: Para 1 huevo escalfado llene el agua a la marca 7 en la jarra
graduada; para 2 huevos escalfados, llene de agua hasta la marca 6, ; para 3
huevos escalfados, llene de agua hasta la marca 5. Nota: Mientras más huevos
escalfe, más agua deberá usar.
2. Con el interruptor en la posición “OFF” (apagado), vierta la cantidad recomendada
de agua fría en la base del hervidor de huevos. Coloque en la base la bandeja para
los huevos.
3. Agregue una leve cantidad de mantequilla o aceite a las tazas de escalfado a
usarse. Coloque la cacerola de escalfar encima de la bandeja de cocción en la base
del hervidor de huevos. SIEMPRE COLOQUE LA CACEROLA DE ESCALFAR
SOBRE LA BANDEJA DE COCCIÓN. Asegúrese de que la cacerola de escalfar
quede bien nivelada sobre la bandeja de cocción. Casque un huevo en cada taza.
4. Coloque la tapa sobre la base del hervidor de huevos. Luego enchufe la unidad sólo
en un tomacorriente eléctrico de 120 voltios de CA. Gire el interruptor a “ON”
(encendido). La luz de encendido se prenderá indicando que el proceso de cocción
ha comenzado.
Jarra
graduada
Page 21

Nota: NO quite la tapa de la base mientras los huevos se estén cociendo. Una
alarma audible sonará cuando los huevos están listos, aproximadamente unos 6 a 8
minutos. Gire el interruptor a la posición “OFF” (apagado). Desenchufe el cordón
eléctrico del tomacorriente. Use almohadillas/guantes para hornos para quitar la
tapa y la cacerola de escalfar. Deslice los huevos de las tazas usando algún
utensilio con bordes lisos. Sirva inmediatamente para prevenir que los huevos se
sobrecuezan.
5. Permita que el hervidor de huevos se enfríe completamente antes de desechar
cualquier agua restante de la base y antes de limpiar.
PARA PREPARAR HUEVOS PASADOS POR AGUA:
1. Coloque el hervidor de huevos sobre una superficie seca horizontal. Use las marcas
de nivel de agua para huevos pasados por agua ("soft cooked") en la jarra graduada
para determinar la cantidad del agua para el número de huevos a cocer. Ejemplo: Si
va a cocer 7 huevos pasados por agua, llene la jarra graduada a la marca 7.
2. Con el interruptor en la posición “OFF” (apagado), vierta la cantidad recomendada
de agua fría en la base del hervidor de huevos. La cantidad recomendada de agua
proveerá huevos con la yema blanda y la clara de huevo bien cocida.
3. Coloque la bandeja de cocción sobre la base. Coloque los huevos en la rejilla de
cocción.
4. Coloque la tapa sobre la base del hervidor de huevos. Enchufe la unidad en un
tomacorriente eléctrico de 120 voltios de C.A. solamente.
(encendido). La luz de encendido se prenderá indicando que el proceso de cocción
ha comenzado. . Nota: NO quite la tapa de la base mientras los huevos se estén
cociendo. Una alarma audible sonará cuando los huevos estén listos,
aproximadamente unos 6 a 8 minutos. Gire el interruptor a la posición “OFF”
(apagado). Desenchufe el cordón eléctrico del tomacorriente. Use
almohadillas/guantes de cocina calientes para quitar la tapa y la bandeja de cocción.
Sirva inmediatamente para prevenir que los huevos se sobrecuezan. Mientras están
en la bandeja, los huevos pueden enjuagarse brevemente con agua fría para facilitar
su manipulación.
5. Permita que el hervidor de huevos se enfríe completamente antes de desechar
cualquier agua restante de la base y antes de limpiar.
PARA PREPARAR A HUEVOS SEMIDUROS:
1. Coloque el hervidor de huevos sobre una superficie seca horizontal. Use las marcas
de nivel de agua para huevos pasados por agua ("soft cooked") en la jarra graduada
para determinar la cantidad del agua para el número de huevos a cocer. Ejemplo: Si
va a cocer 7 huevos pasados por agua, llene la jarra graduada a la marca 7.
2. Con el interruptor en la posición “OFF” (apagado), vierta la cantidad recomendada
de agua fría en la base del hervidor de huevos. La cantidad recomendada de agua
proveerá huevos con la yema blanda y la clara de huevo bien cocida.
3. Coloque la bandeja de cocción sobre la base. Coloque los huevos en la rejilla de
cocción.
4. Coloque la tapa sobre la base del hervidor de huevos. Enchufe la unidad en un
tomacorriente eléctrico de 120 voltios de C.A. solamente.
(encendido). La luz de encendido se prenderá indicando que el proceso de cocción
ha comenzado. Nota: NO quite la tapa de la base mientras los huevos se estén
cociendo. Una alarma audible sonará cuando los huevos estén listos,
aproximadamente unos 8 a 10 minutos. Gire el interruptor a la posición “OFF”
(apagado). Desenchufe el cordón eléctrico del tomacorriente. Use
almohadillas/guantes de cocina calientes para quitar la tapa y la bandeja de cocción.
Sirva inmediatamente para prevenir que los huevos se sobrecuezan. Mientras están
en la bandeja, los huevos pueden enjuagarse brevemente con agua fría para facilitar
su manipulación.
5
Gire el interruptor a “ON”
Gire el interruptor a “ON”
Page 22

5. Permita que el hervidor de huevos se enfríe completamente antes de desechar
cualquier agua restante de la base y antes de limpiar.
PARA PREPARAR HUEVOS DUROS:
1. Coloque el hervidor de huevos sobre una superficie seca horizontal. Use las
marcas de nivel de agua para huevos duros ("hard cooked") en la jarra graduada
para determinar la cantidad del agua para el número de huevos a cocer. Ejemplo: Si
va a cocer 7 huevos duros, llene la jarra graduada a la marca 7 del lado de los
huevos duros.
2. Con el interruptor en la posición “OFF” (apagado), vierta la cantidad recomendada
de agua fría en la base del hervidor de huevos. Nota: Al cocinar más huevos,
menos agua se usa.
3. Coloque la bandeja de cocción sobre la base. Coloque los huevos en la rejilla de
cocción.
4. Coloque la tapa sobre la base del hervidor de huevos. Enchufe la unidad en un
tomacorriente eléctrico de 120 voltios de C.A. solamente.
(encendido). La luz de encendido se prenderá indicando que el proceso de cocción
ha comenzado. Nota: NO quite la tapa de la base mientras los huevos se estén
cociendo. Una alarma audible sonará cuando los huevos estén listos,
aproximadamente unos 15 a 19 minutos. Gire el interruptor a la posición “OFF”
(apagado). Desenchufe el cordón eléctrico del tomacorriente. Use
almohadillas/guantes de cocina calientes para quitar la tapa y la bandeja de cocción.
Los huevos pueden enjuagarse brevemente con agua fría mientras están en la
bandeja para facilitar su manipulación. Para pelar los huevos con facilidad, rompa la
cáscara por todas partes dándole toquecitos sobre una superficie dura. Los huevos
duros pueden ser refrigerados hasta durante 4 semanas.
5. Permita que el hervidor de huevos se enfríe completamente antes de desechar
cualquier agua restante de la base y antes de limpiar.
• Al calentar el artefacto podrá emitirse una pequeña cantidad de humo y/o un leve olor
a causa de la emanación de los aceites usados en la fabricación de éste - esto es
normal.
• Durante el calentamiento y enfriamiento pudieran ocurrir algunos ruidos menores de
expansión y contracción - esto es normal.
Gire el interruptor a “ON”
LIMPIEZA DE SU HERVIDOR DE HUEVOS
Para asegurar el desempeño óptimo de su hervidor de huevos después de cada uso:
lave la tapa, la cacerola de escalfar, la bandeja de cocción y la jarra graduada en agua
jabonosa caliente, enjuague y seque. La tapa, la cacerola de escalfar y la bandeja de
cocción pueden ser limpiadas en un lavavajillas automático, pero solamente en el
anaquel superior; sin embargo, la parte inferior de la cacerola de escalfar se descolorará,
lo cual es normal y no afecta su uso para cocer huevos. NO LIMPIE LA JARRA
GRADUADA EN UN LAVAVAJILLAS AUTOMATICO, PUES SE DAÑARÁ.
Limpie la base del hervidor de huevos con un trapo húmedo y séquela.
Coloque la bandeja de cocción, la cacerola de escalfar, la jarra graduada y el cordón
eléctrico dentro del hervidor de huevos para almacenarlos de manera compacta.
6
Page 23

RECETAS
Huevos rellenos
8 huevos duros, descascarados y cortados por la mitad
1 cucharadita de jugo de limón o vinagre
1 cucharadita de mostaza preparada
1 cucharadita de salsa inglesa
½ cucharadita de sal
2 pizcas de salsa de pimienta picante
3 a 4 cucharaditas de mayonesa o aliño para ensalada
1. Quite las yemas de los huevos y haga un puré con ellas. En un pequeño tazón de
mezcla, combine los ingredientes restantes y mézclelos bien.
2. Rellene los claros de huevo con mezcla de las yemas. Si lo desea, rocie pimentón
dulce. Se preparan 16 huevos rellenos.
Variaciones del huevo relleno: Siga la receta del huevo relleno y a la mezcla de yema
de huevo agregue cualquiera de los ingredientes abajo listados.
Jamón: ¼ de taza de jamón cocido finamente picado
Tocino: ¼ de taza de tocino cocido desmenuzado, aproximadamente 2 lonjas
Carne seca: ¼ de taza de carne seca finamente picada y 1 cucharadita de salsa
encurtida dulce
Mariscos: ¼ de taza de camarón cocido o enlatado, pescado ahumado, atún
desmenuzado, salmón o carne de cangrejo finamente picados y una pizca de curry en
polvo
Queso: ¼ de taza de queso Cheddar rallado
Aceituna: ¼ aceitunas verdes o maduras picadas
OBrien: 2 cucharaditas de pimienta verde finamente picada, 1 cucharadita pimiento
finamente picado y ½ cucharadita de cebolla picada seca
Huevos Benedict
4 huevos
2 molletes ingleses, rebanados, tostados y untados con mantequilla
4- lonjas de tocino de ¼ de pulgada, asadas a la parrilla
1 Salsa Holandesa fácil de preparar, según la receta más abajo
1. Escalfe los huevos en el hervidor de huevos según las direcciones pertinentes.
2. Coloque una lonja de tocino en cada mitad de mollete y cúbrala con un huevo
escalfado. Vierta 2 cucharaditas de salsa holandesa sobre cada huevo. Adorne
con perejil picado si lo desea. Prepara 4 porciones.
Salsa holandesa fácil de preparar
¼ de taza de mantequilla o margarina
2 yemas de huevo
¼ cucharadita de sal
1 cucharadita de jugo de limón
2 cucharaditas de crema o leche evaporada
1. En una cacerola de 1 cuarto de galón, derrita la mantequilla a fuego bajo.
2. En un pequeño tazón de mezcla, combine las yemas de huevo, la sal, el jugo de
limón y la crema. Mezcle bien. Añada la mezcla de huevo a la cacerola,
removiéndola constantemente hasta que la mezcla quede homogénea y tenga la
consistencia de crema ligera.
7
Page 24

GARANTÍA DEL PRODUCTO
Garantía limitada de 1 año del artefacto electrodoméstico
Focus Electrics, LLC (“Focus Electrics”) garantiza que este aparato no presentará fallas de
material ni fabricación durante un (1) año a partir de la fecha original de compra con prueba de
dicha compra, siempre y cuando el aparato sea operado y mantenido tal como se indica en el
manual de instrucciones provisto. Toda pieza del aparato que presente fallas será reparada o
reemplazada sin costo alguno a criterio de Focus Electrics. Esta garantía rige solamente para
el uso domestico dentro de la casa.
Esta garantía no cubre ningún daño, incluyendo la decoloración, de superficie antiadherente
alguna del aparato electrodoméstico. Esta garantía es nula y sin valor, según lo determine
exclusivamente Focus Electrics si el artefacto electrodoméstico es dañado a causa de
accidente, mal uso, abuso, negligencia, rayaduras, o si el artefacto electrodoméstico es
cambiado de algún modo.
ESTA GARANTÍA REEMPLAZA A TODAS LAS DEMÁS GARANTÍAS IMPLÍCITAS,
INCLUYENDO AQUÉLLAS DE COMERCIABILIDAD, IDONEIDAD PARA UN FIN O USO EN
PARTICULAR, DESEMPEÑO, U OTROS TIPOS, LAS CUALES QUEDAN EXCLUIDAS
MEDIANTE EL PRESENTE DOCUMENTO. FOCUS ELECTRICS RECHAZA TODA
RESPONSABILIDAD POR DAÑOS, YA SEAN DIRECTOS, INDIRECTOS, INCIDENTALES,
PREVISIBLES, CONSECUENTES O ESPECIALES QUE SURJAN DE ESTE APARATO
ELECTRODOMÉSTICO O GUARDEN RELACIÓN CON EL MISMO.
Si piensa que el artefacto electrodoméstico se ha dañado o requiere de servicio dentro de su
período de garantía, por favor póngase en contacto con el Departamento de Atención al
Cliente de Focus Electrics por el (866) 290-1851 o contáctenos por correo electrónico a la
service@focuselectrics.com
reclamaciones de garantía, se requerirá un recibo que demuestra la fecha de compra original.
Los recibos escritos a mano no son aceptados. Focus Electrics no se hace responsable de las
devoluciones perdidas en tránsito.
. Los gastos de devolución no son reembolsables. Para todas las
Válido sólo en EE.UU. y Canadá
REPUESTOS
Las partes de repuestos, si están disponibles, pueden pedirse directamente en línea a Focus
Electrics en www.focuselectrics.com
departamento de servicio al número telefónico o dirección de correo electrónico arriba
indicados, o escribiéndonos a:
Focus Electrics, LLC
Attn: Customer Service
P. O. Box 2780
West Bend, WI 53095
Cerciórese de incluir el número de catálogo/modelo del aparato electrodoméstico (situado en la
parte inferior/posterior de la unidad) así como la descripción y la cantidad de repuestos que
necesita. Junto con esta información, incluya su nombre, dirección postal, número de tarjeta
de crédito Visa o MasterCard, la fecha de vencimiento y el nombre tal como aparece en la
tarjeta. Los cheques pueden ser pagaderos a Focus Electrics, LLC. Llame al Departamento
de Atención al Cliente para obtener el monto de la compra. Se sumará al total el impuesto de
venta estatal que corresponda, más un cargo por despacho y procesamiento. La entrega tarda
dos (2) semanas.
Este manual contiene información importante y útil sobre el uso seguro y el cuidado de su nuevo producto
Focus Electrics. Para su propia referencia, archive aquí el recibo fechado que sirve de comprobante de
compra para la garantía, y anote la siguiente información:
Fecha en que compró o recibió la unidad como regalo: __________________________________________
Dónde se efectuó la compra y el precio, si lo sabe: _____________________________________________
Número y código de fecha del producto (aparece en la parte inferior/posterior de la unidad): _____________
L5715 03/08 West Bend®, una Marca de Focus Electrics, LLC. Impreso en China
, o puede llamar o enviar un correo electrónico al
8
 Loading...