

Page 1
®
%
COFFEEMAKER
Model No. 57000 - 59000 Model No. 57630M - 58602M
Register this and other West Bend products through
our website:
TO PREVENT PERSONAL INJURY OR PROPERTY DAMAGE,
READ AND FOLLOW THE INSTRUCTIONS AND WARNINGS
IN THIS CARE AND USE INSTRUCTION MANUAL.
www.westbend.com
Care and Use Instructions
L-5395 04-00
IMPORTANT SAFEGUARDS
Use electricity safely and wisely. Observe safety precautions when using
your coffeemaker including the following:
Read all instructions before using.
•
Always attach plug to coffeemaker first, then plug cord into wall outlet.
•
To disconnect, remove plug from wall outlet. Let coffeemaker cool before
removing cord.
Do not leave coffeemaker plugged in when not in use.
•
Do not let cord touch hot surfaces or hang over the edge of a counter, table
•
or other surface area.
Coffeemaker should always be unplugged and allowed to cool before
•
cleaning.
Make sure cover, basket, stem and cord are properly attached before cof-
•
feemaker is plugged in. (See instructions.) No part of the coffeemaker
should be removed during the brewing cycle. Scalding may occur.
Your coffeemaker, its cord and plugs, should not be immersed in liquids,
•
placed near a hot electric or gas burner, or in a heated oven.
Coffeemaker should not be used outdoors.
•
Do not touch hot coffeemaker. Use handles or knob.
•
Supervise closely when coffeemaker is used by or near children.
•
Use your coffeemaker only for the uses described in this booklet. Do not
•
use attachments with your coffeemaker unless recommended by The West
Bend Company.
Do not use your coffeemaker if it or its cord are damaged or not working
•
properly. Return it to The West Bend Company for examination and/or
repair.
SAVE THESE INSTRUCTIONS
Your party perk needs no special care other than cleaning. If servicing becomes necessary, please
return your coffeemaker to The West Bend Company. See warranty section in this leaflet for service
details. Do not attempt to repair it yourself.
WARNING: To prevent personal injury or property damage caused by fire, always unplug this and
other appliances when not in use.
WARNING: This appliance may contain substances known to the State of California to cause cancer, birth defects or other reproductive harm.
For ho u se ho l d u se on l y.
Electric Cord Statement
CAUTION: Your coffeemaker has a short cord as a safety precaution to prevent personal injury or
property damage resulting from pulling, tripping or becoming entangled with the cord. Do not
allow children to be near or use this coffeemaker without adult supervision. If you must use a
longer cordset or an extension cord when using this coffeemaker, the cord must be arranged so it
will not drape or hang over the edge of a countertop, tabletop or surface area where it can be pulled
on by children or tripped over. To prevent electric shock, personal injury or fire, the electrical rating of the extension cord you use must be the same or more than the wattage of the coffeemaker
(wattage is stamped on underside of base).
BEFORE USING THE FIRST TIME:
•
Before using the coffeemaker for the first time, clean it thoroughly. Refer to General Cleaning
Instructions, Steps 1-4 in this leaflet.
CAUTION: To prevent personal injury or electric shock, do not immerse coffeemaker, its cord or
plugs in water or other liquid.
Your coffeemaker is now ready to use.
INSTRUCTIONS FOR MAKING COFFEE:
•
1. With basket and stem removed, fill coffeemaker with
COLD water to desired level, using the cup markings on
inside of coffeemaker as guide. Do not make less than 12
or more than maximum capacity of coffeemaker at one
time.
2. Place stem into heating unit in bottom of coffeemaker,
then put basket on stem. Spread the recommended
amount of ground coffee evenly into the basket. See
chart. Use regular electric perk grind coffee or coffee
ground for all coffeemakers for best results. Do not use
drip or finely ground coffee as flooding of the basket can
occur.
SPECIAL NOTE ON GRINDING COFFEE BEANS:
•
If grinding your own coffee beans, grind to medium
coarseness for best results. DO NOT grind too fine (powder-like) as this can cause basket to flood.
Use standard measuring cups to measure coffee. Do not allow ground coffee to fall into stem. The
amount of coffee recommended will produce mild coffee which most people prefer. The amount of
coffee used can be adjusted to suit your preference.
Water Level Amount of Ground Coffee Water Level Amount of Groud Coffee
42 Cups 2
36 Cups 2 Cups 22 Cups 1
30 Cups 1
28 Cups 1
As a guide, there are about 5 cups of ground coffee to a pound (16 oz.).
Special Notes: The water level markings represent about 5
made. This amount of water will ensure a standard 5-ounce cup of brewed coffee as some water is
absorbed by the grounds and some is lost in steam.
The basket does not have a perforated cover as the coffeemaker cover is designed to spread water
evenly over the coffee grounds. In addition, the bottom of the basket is designed with a built-in filter, therefore a paper filter is not needed. If you prefer, a paper filter can be used; just be sure it fits
into the bottom of the basket.
3. Turn cover in place on coffeemaker. To reduce coffee spills, especially if coffeemaker is tipped over,
make sure cover has been turned clockwise until it is completely secured in the handle slots. (Note
the arrows on the cover for correct turning.) The cover temporarily reduces coffee spillage if coffeemaker is tipped over, so care should be used when moving coffeemaker.
4. Place coffeemaker on a dry, level surface. Attach cord to coffeemaker and plug into a 120 volt AC
electrical outlet ONLY.
1
/
2
Cups 24 Cups 1
3
/
4
Cups 18 Cups 1
2
/
3
Cups 12 Cups 1 Cup
1
/
2
ounces for each cup of coffee being
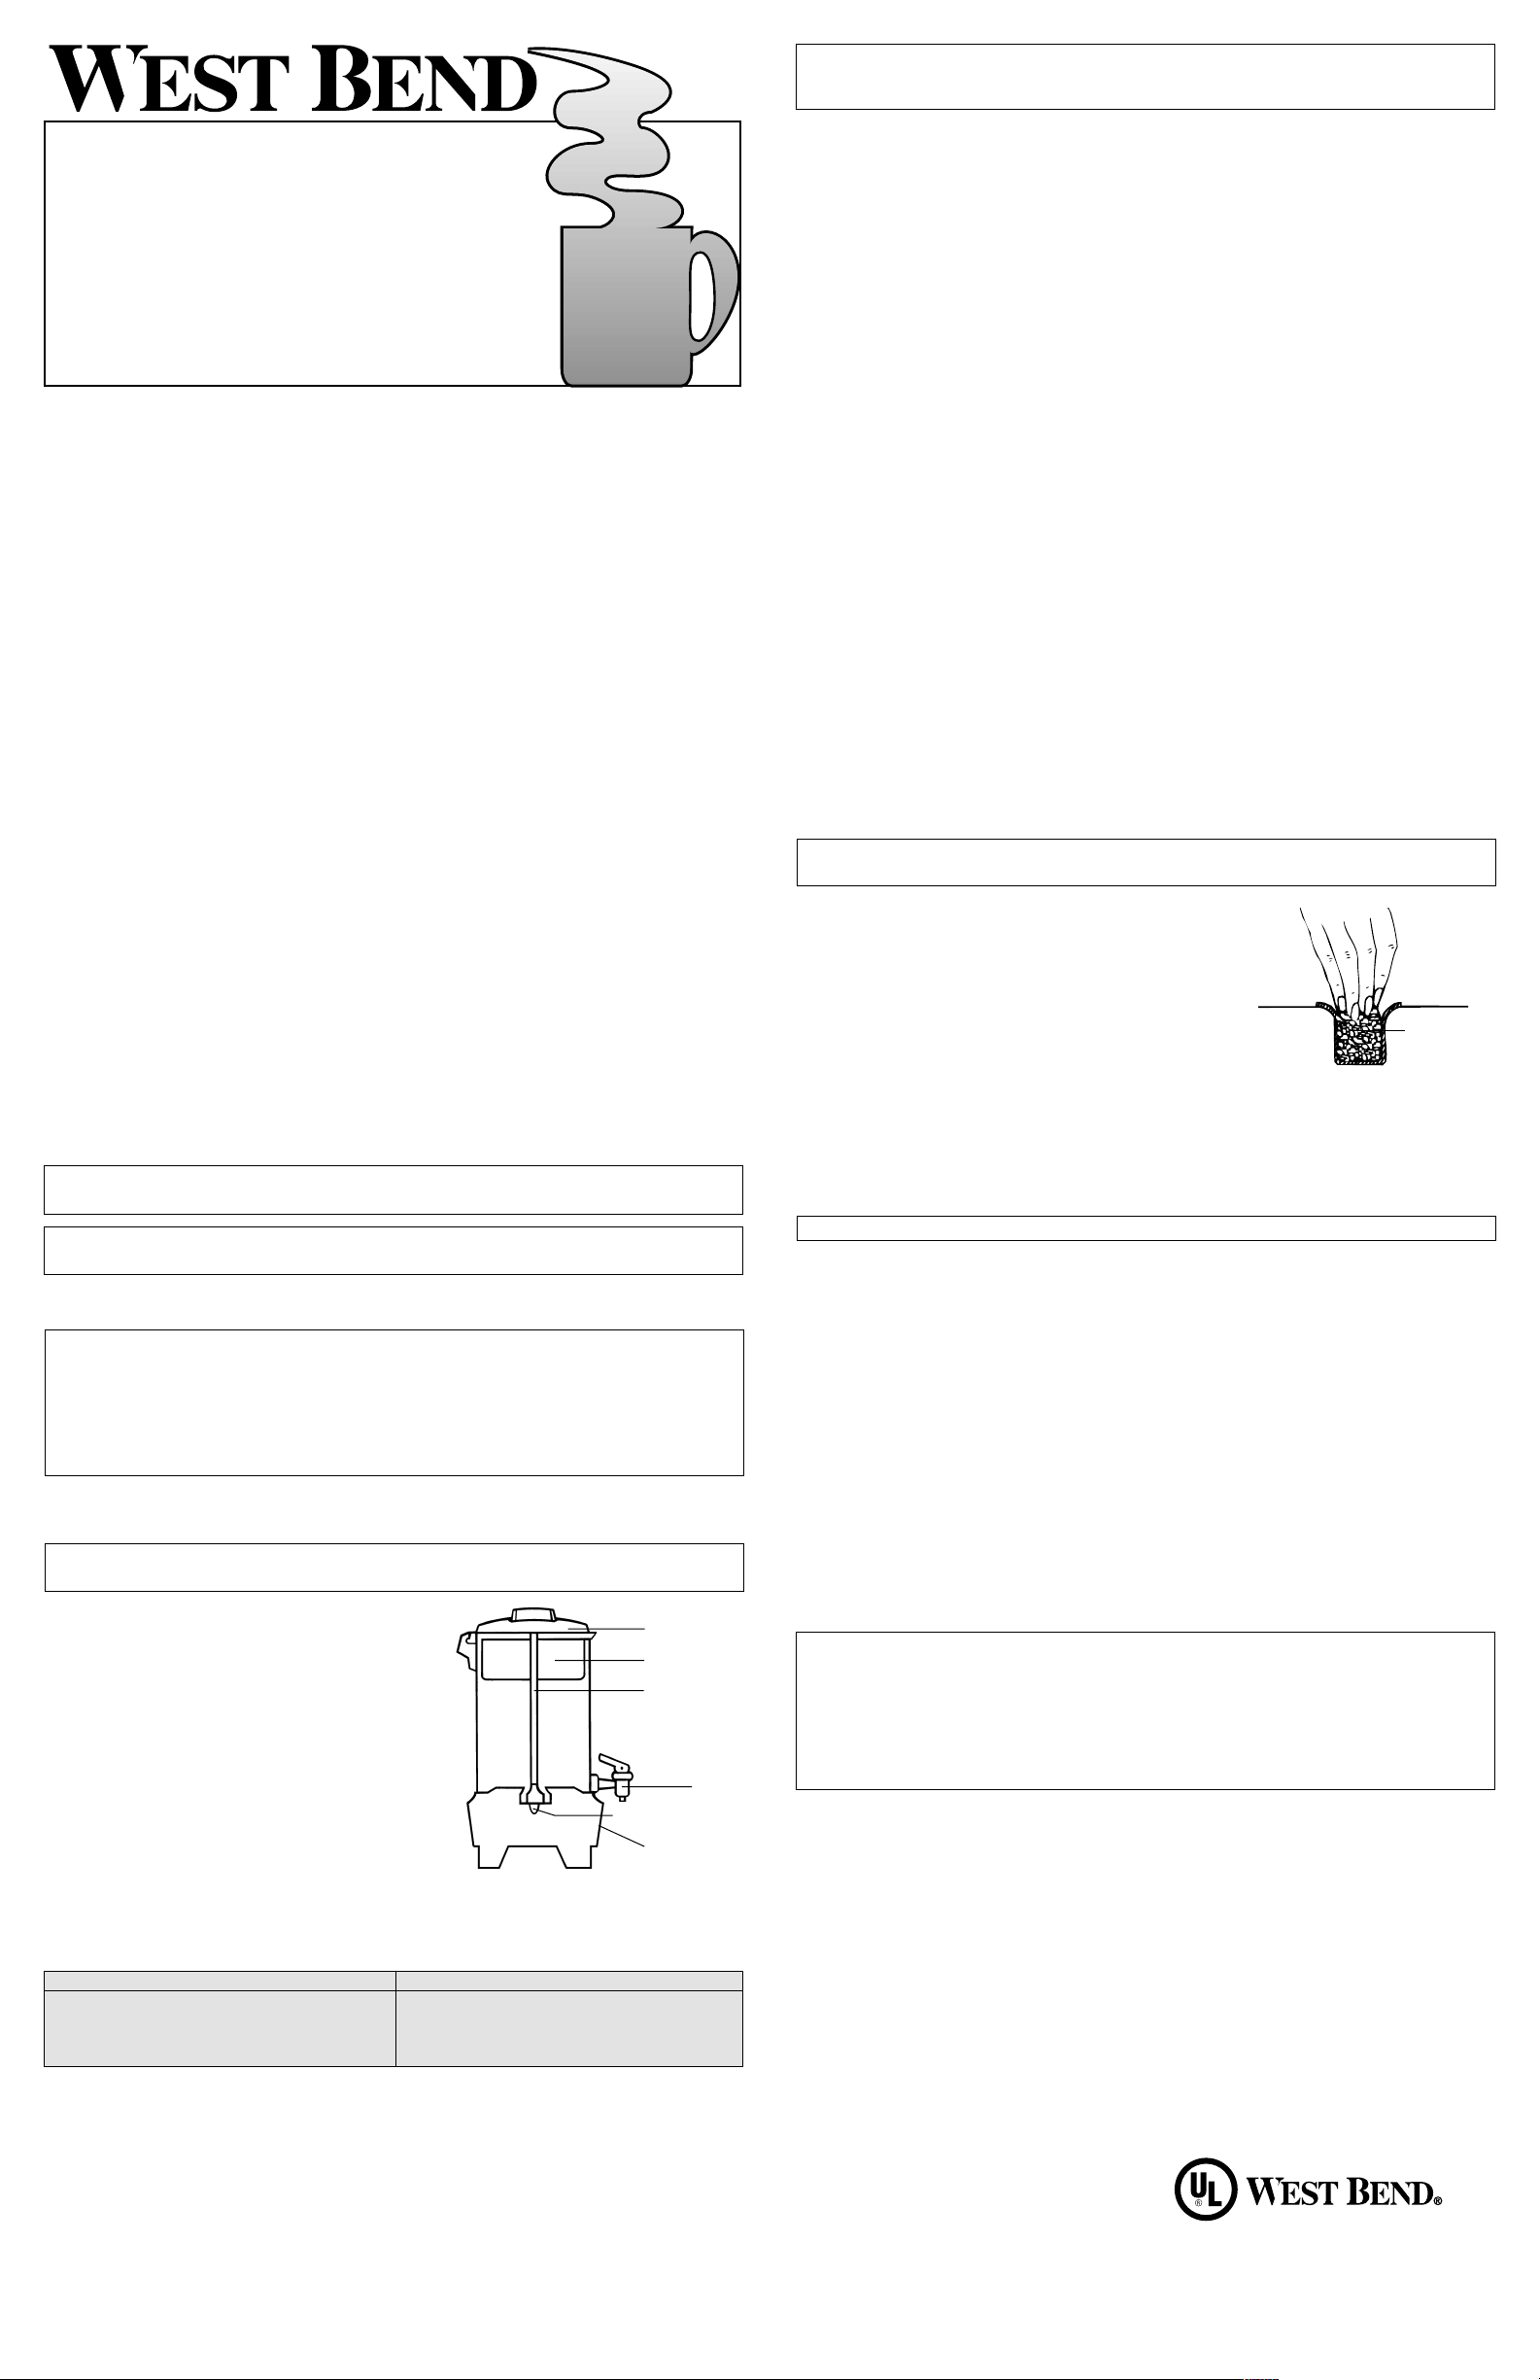
Cover
Coffee Basket
Stem
Fa u c et
Heat ing Unit Well
Serving Light
1
/
2
Cups
1
/
2
Cups
1
/
4
Cups
CAUTION: To prevent personal injury or property damage, inspect cordset for damage or wear
before each use. Do not use your product if it or its cord have been damaged or if it is not working
properly.
5. Coffeemaker stops perking automatically. (Each cup of coffee requires about 1 minute brewing
time.) Serving light will glow when coffee is ready. Before serving, use a hot pad to remove cover,
then carefully remove stem and basket from coffeemaker as coffee and grounds are HOT. If
not removed, bitter oils from the coffee grounds will drip into coffee. Replace the cover making
sure it is completely secured into the handle slots.
6. Coffee will remain at serving temperature as long as coffeemaker is connected to outlet. (If you
have an insulated coffeemaker, the sealed-air insulation will keep coffee hot for up to two hours
without electricity.) To serve, place cup and saucer under faucet and press down on handle. If a
continuous flow is desired to fill a carafe, lift handle straight up until it locks into open position.
When approximately one cup of coffee remains in coffeemaker, disconnect from outlet.
TO MAKE MORE COFFEE:
•
If another pot of coffee is desired right away, partially fill coffeemaker with cold water to reset the
thermostat. Pour out water, refill with cold water and repeat above steps.
TO REHEAT COLD COFFEE:
•
There must be at least 3 cups of coffee in the coffeemaker for reheating. Replace clean stem and
basket (without grounds) so the coffee will heat more evenly, preventing harsh flavors. Secure cover
and plug in. Reheated coffee never tastes as good as fresh perked, so try to brew only the amount
you plan to serve.
TO HEAT WATER FOR INSTANT BEVERAGES:
•
Plain water may be heated in your coffeemaker for use with instant beverages. Simply fill the clean
coffeemaker with cold water to the desired cup level, then place the stem and empty coffee basket
in place as for making coffee. Using the stem and empty basket will heat the water more uniformly.
Secure cover in place and plug coffeemaker in. Heat water until perking stops and serving light
comes on. Unplug coffeemaker when less than 1 cup remains.
Other than making coffee or heating water, no other liquid should be heated in coffeemaker as damage to heating unit can occur.
When coffeemaker is used to heat water only, the metal inside will discolor which is normal and
does not affect performance or the water heated in the coffeemaker. Refer to “Special Cleaning
Instructions” in this leaflet for removing discoloration as well as mineral deposits which form
inside the coffeemaker when heating water. If these deposits are not removed, pitting of the metal
inside may occur and result in damage to coffeemaker. Refer to the care and cleaning instructions
as follows:
CLEANING INSTRUCTIONS — After Each Use
•
Improper cleaning of the coffeemaker, especially the heating unit well, will affect performance of the coffeemaker, resulting in weak, lukewarm coffee and may even cause the coffeemaker to stop perking. To keep your coffeemaker working properly, it is important to follow the cleaning instructions below:
1. Unplug coffeemaker and allow to cool before cleaning.
CAUTION: To prevent personal injury or electric shock, do not immerse coffeemaker, its cord or
plugs in water or other liquid.
2. Clean basket, stem and cover in hot soapy water with a dishcloth, rinse and dry. Coffee stains on underside of cover or
stem may be removed by scouring with a damp cloth and a
non-abrasive cleanser such as Bon Amior Soft Scrub.
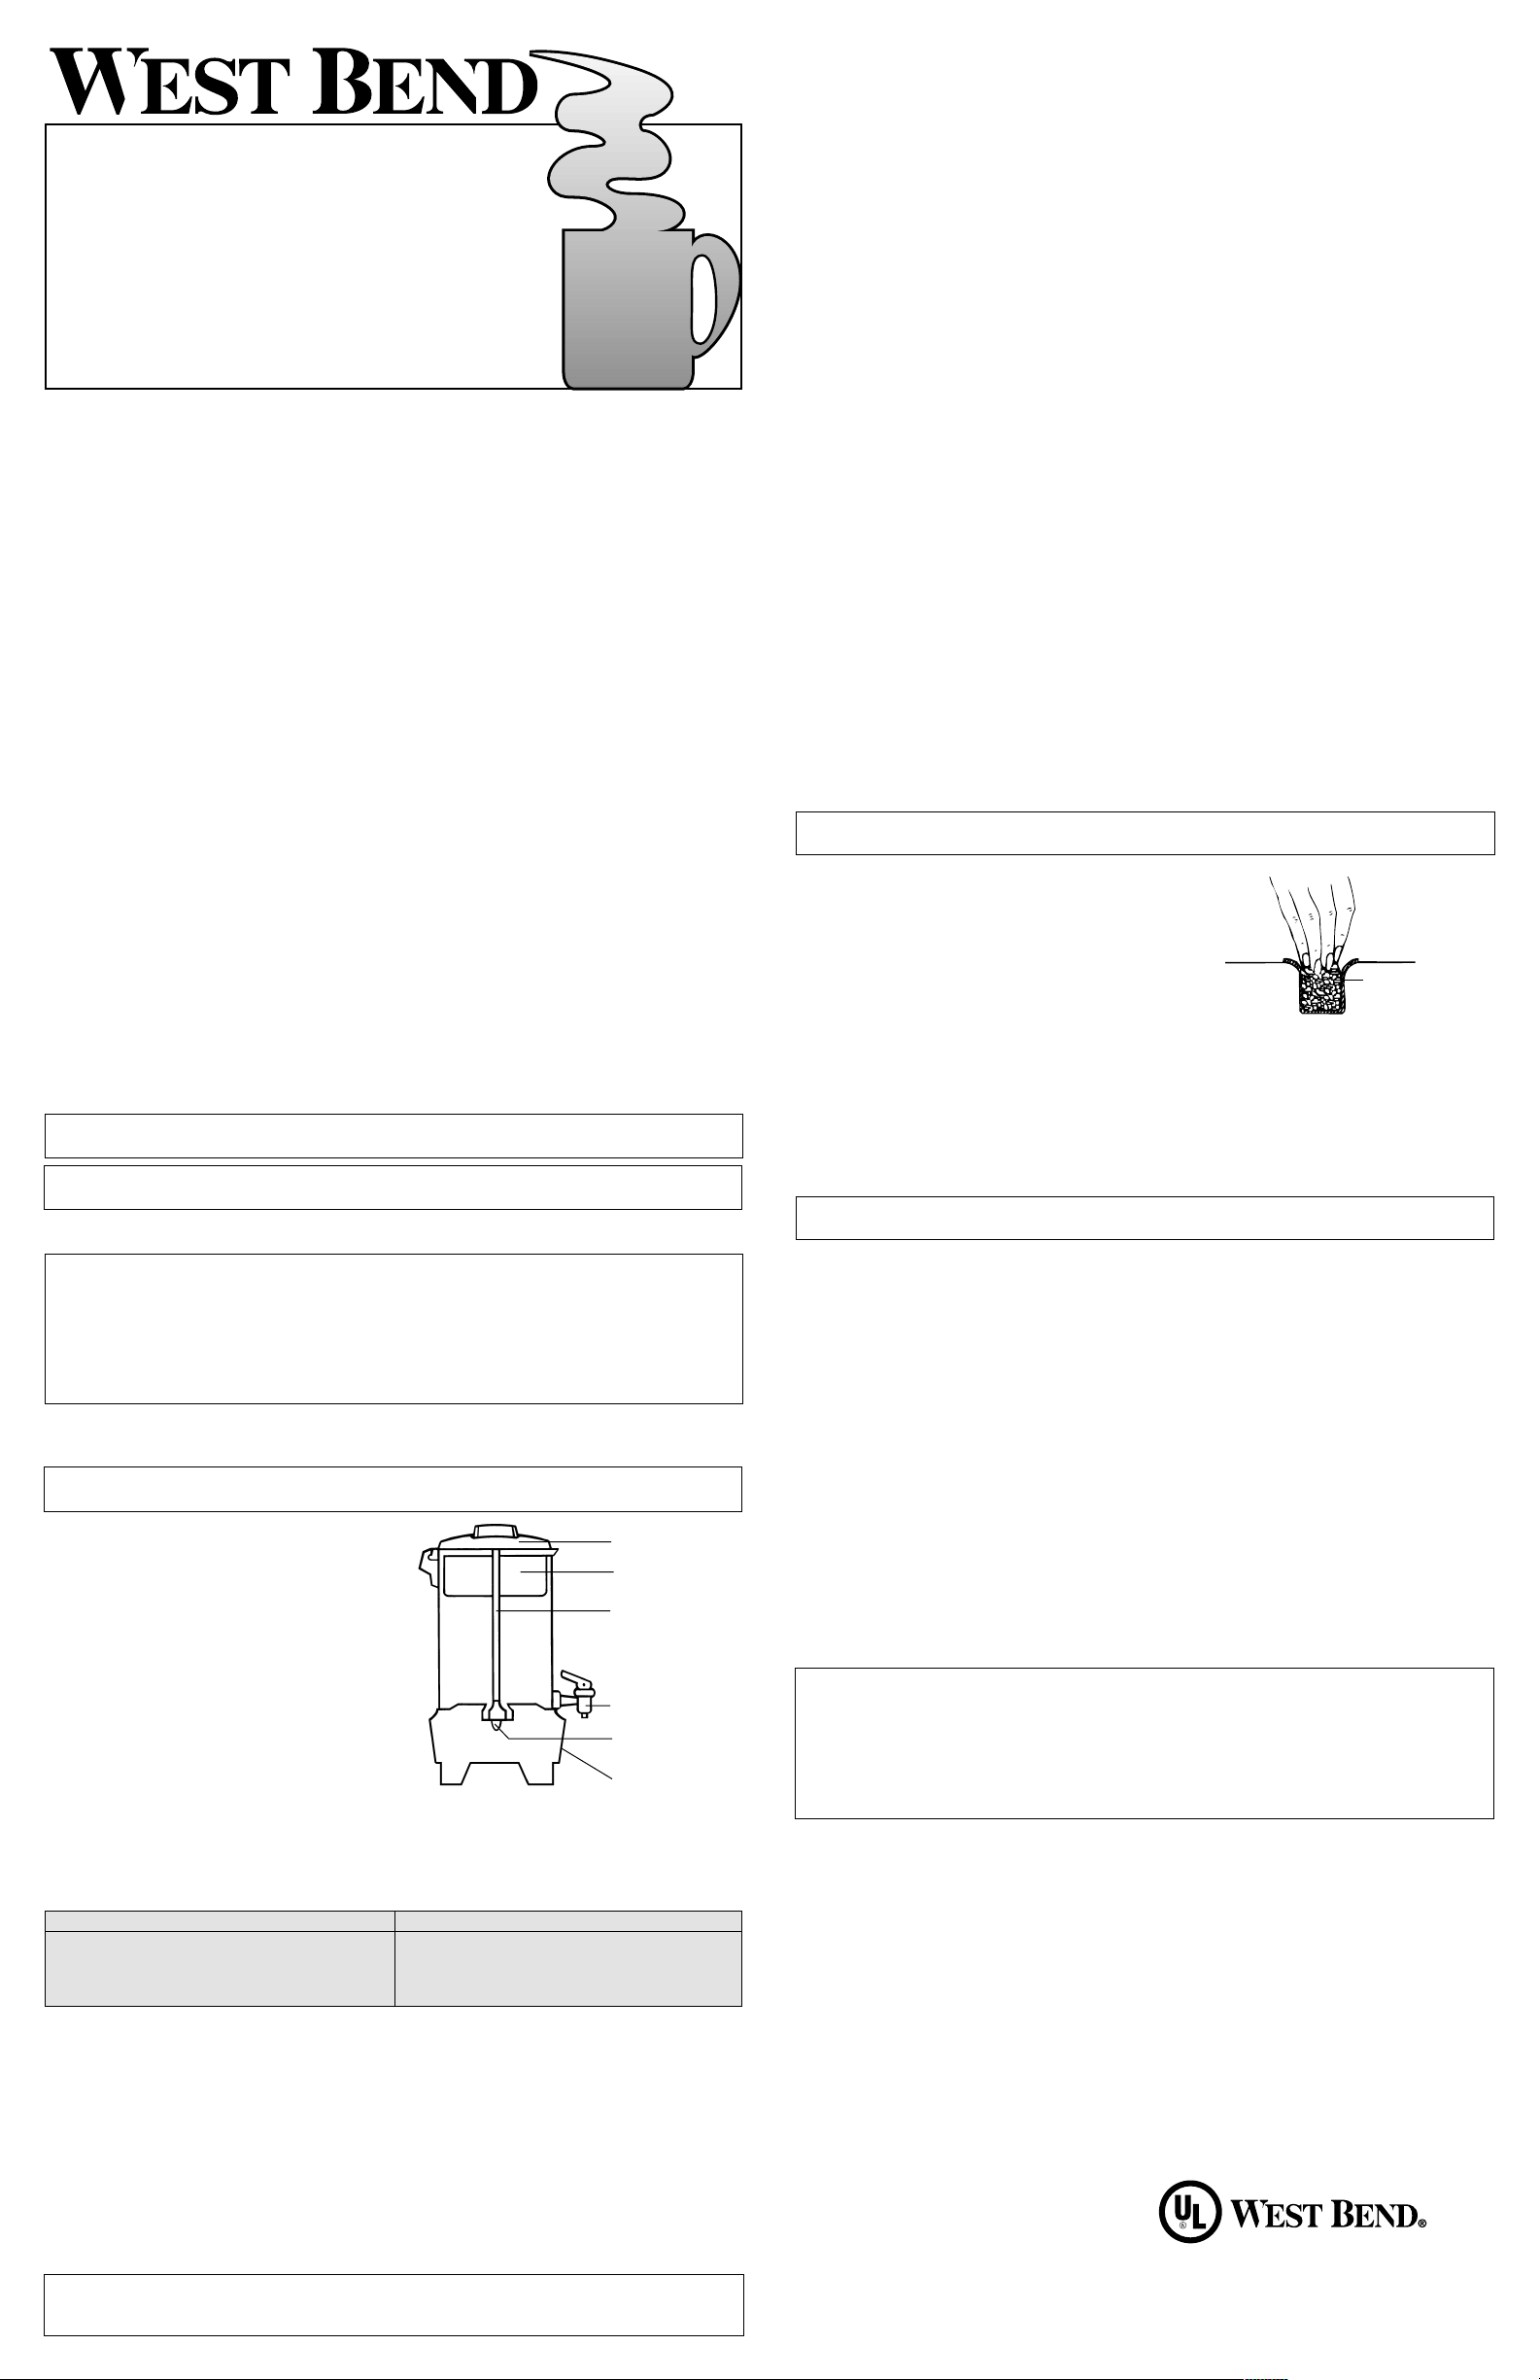
3. Clean inside of coffeemaker by filling with hot water until
about one-third full. Add a small amount of liquid dishwashing detergent and wash with a dishcloth or sponge. Then clean
the heating unit well (where stem fits) with a scouring pad,
such as Scotch Briteor Brillo, to remove coffee residue.
Twist pad inside heating unit well to clean thoroughly.
IMPORTANT: If heating unit well is not kept clean, coffeemaker will not perform properly. See diagram.
4. After cleaning inside of coffeemaker, drain and rinse inside. Clean faucet by letting clear water run
through it into sink, while moving faucet handle up and down. Drain water from inside of coffee make r a nd dry.
5. Clean outside of coffeemaker with a damp cloth and dry with a soft cloth. Do not use abrasive
metal scouring pads or cleansers on outside of coffeemaker as scratching will occur.
DO NOT WASH COFFEEMAKER PARTS IN AN AUTOMATIC DISHWASHER.
SPECIAL CLEANING INSTRUCTIONS
•
To Remove Mineral Deposits
If coffeemaker is used daily, a special cleaning every 2 weeks OR every week if used for heating
water, is necessary. Fill coffeemaker with 1 quart each of water and white distilled vinegar. (If a
white mineral buildup has formed on inside of coffeemaker, use an additional 2 cups of vinegar.)
Place stem and empty coffee basket in place, secure cover onto coffeemaker and plug in. Allow coffeemaker to complete perking cycle, then let stand for 10 to 15 minutes. Unplug and drain coffeemaker. Allow to cool and follow general cleaning instructions.
To Remove Discoloration
Inside of coffeemaker can discolor when used for heating water which is normal. To
remove/lighten discoloration, fill coffeemaker with water to the level of discoloration (at least to
the 12 cup level, but not past maximum cup level). Place stem and empty basket in place. For
every 12 cups of water added to coffeemaker, add 2 teaspoons cream of tartar to basket. Secure
cover onto coffeemaker, plug cord into outlet and allow coffeemaker to complete perk cycle.
Then let stand for 15 to 20 minutes or until discoloration is lightened. Unplug cord and drain coffeemaker. Allow to cool and follow general cleaning instructions.
Do not use baking soda to clean coffeemaker as it will discolor inside metal.
After frequent use, coffee residue may collect inside faucet. To clean, unscrew top half of faucet.
Move a small brush up and down through faucet, then insert brush through opening inside coffeemaker to clean faucet connection. Rinse and replace top half of faucet.
This booklet contains important and helpful information on your new product. Please file it for handy
reference to instructions for proper use and care, warranty and service information:
For your personal reference, attach dated sales receipt for warranty proof of purchase and record the following information:
Date purchased or received as a gift: __________________________________
Where purchased and price, if known: ________________________________
Clean Heating
Uni t Wel l
With
Scouring Pad
REPLACEMENT PARTS
Replacement parts for the Coffeemaker may be obtained directly from the company’s Customer
Service Department. Write or call to the address below.
Be sure to include the model number of your Coffeemaker, a description of the part you want and the
quantity. Along with this information please include your name, mailing address and your Visa,
MasterCard or Discover credit card number for the billing of the part(s) to you. Your state’s sales tax
and a handling fee will be added to your total charge. Or, to send a check or money order, call (262)
334-6949 to obtain purchase amount. Please allow 2 weeks for delivery.
90 DAY WARRANTY
Your West Bend Warranty covers failures in the materials and workmanship of this Coffeemaker for
90 days from the date of original purchase. Any failed part of the Coffeemaker will be repaired or
replaced without charge.
This warranty gives you specific legal rights and you may also have other rights which vary from state
to state. This warranty does not cover alleged damage caused by misuse, abuse, accidents or alterations to the Coffeemaker.
If you think the Coffeemaker has failed or requires service, please carefully package and return the
Coffeemaker prepaid and insured with a description of the difficulty to:
The West Bend Company
Attn: Customer Service Department
400 W. Washington Street
West Bend, WI 53095-2582
(262) 334-6949
Please ensure that you enclose the sales slip or proof of date of purchase in order to assure warranty
coverage.
L-5395 04-00 ©The West Bend Company Printed in U.S.A.
NOT VALID IN MEXICO
Page 2
®
/
CAFETERA
Modelos No. 57000 - 59000 Modelos No. 57630M - 58602M
PARA IMPEDIR LESIONES PERSONALES O
DAÑOS A LA PROPIEDAD, LEA Y SIGA LAS
INSTRUCCIONES Y ADVERTENCIAS DE ESTE
MANUAL DE INSTRUCCIONES DE CUIDADO Y USO.
Instrucciones de cuidado y uso
L-5395 04-00
PRECAUCIONES IMPORTANTES
Use la electricidad en forma segura e inteligente. Siga las precauciones de
seguridad cuando use su cafetera, incluidas las siguientes:
Lea todas las instrucciones antes de usar.
•
Siempre coloque el cable de alimentación en la cafetera primero, luego
•
enchúfelo en el tomacorriente. Para desconectarlo, desenchufe el cable del
tomacorriente. Deje que se enfríe la cafetera antes de retirar el cable.
No deje la cafetera enchufada cuando no esté en uso.
•
No permita que el cable toque superficies calientes ni que cuelgue por el
•
borde de un mostrador, mesa u otra superficie.
La cafetera debe desenchufarse y dejarse enfriar siempre antes de hacerle
•
la limpieza.
Asegúrese de que la tapa, la cesta, el vástago y el cable estén debidamente
•
colocados antes de enchufar la cafetera. (Consulte las instrucciones.) No
debe quitarse ningún componente de la cafetera durante el ciclo de
preparación. Pueden ocasionarse quemaduras por líquido caliente.
No debe sumergirse la cafetera, su cable ni enchufes en líquidos, colocarse
•
cerca de un quemador de gas o eléctrico caliente, ni colocarse en un horno
caliente.
La cafetera no debe usarse en exteriores.
•
No toque la cafetera cuando esté caliente. Use las asas o perilla.
•
Supervise de cerca cuando haya niños usando la cafetera.
•
Use la cafetera sólo para las tareas descritas en este folleto. No use aditamen-
•
tos con su cafetera a menos que los recomiende The West Bend Company.
No use la cafetera si ella o su cable han sido dañados o si no está funcio-
•
nando correctamente. Devuelva la cafetera a The West Bend Company
para su examen y/o reparación.
GUARDE ESTAS INSTRUCCIONES
Su cafetera para fiestas no necesita cuidado especial aparte de la limpieza. Si se hace necesario darle
servicio, envíe su cafetera a The West Bend Company. Para ver los detalles de servicio, consulte la sección Garantía en este folleto. No intente hacer las reparaciones usted mismo.
ADVERTENCIA: Para impedir lesiones personales o daños a la propiedad causados por un incendio, desenchufe este y cualquier otro aparato cuando no se usa.
ADVERTENCIA: Este aparato puede contener sustancias que el Estado de California conoce
como causantes de cáncer defectos congénitos u otros trastornos reproductivos.
Para uso doméstico solamente.
Declaración referente al cable eléctrico
PRECAUCIÓN: Su cafetera tiene un cable corto como medida de precaución para impedir lesiones
personales o daños a la propiedad que resulten de jalar, tropezarse o enredarse en el cable. No permita niños en la cercanía ni que operen esta cafetera sin la supervisión cercana de un adulto. Si tiene
que usar un juego de cable o cable de extensión cuando use esta cafetera, el cable debe ser colocado
de manera que no sobresalga o cuelgue fuera del borde de la mesa, el mostrador u otra área de donde
pueda ser jalado por niños o causar tropiezos. Para impedir un choque eléctrico, lesiones personales
o fuego, el grado eléctrico del cable de extensión que use debe ser el mismo o superior al número de
vatios de la cafetera (el número de vatios está estampado debajo de la cafetera).
ANTES DE USAR POR PRIMERA VEZ:
•
Antes de usar la cafetera por primera vez, límpiela totalmente. Consulte las instrucciones generales
de limpieza, pasos 1-4 de este folleto.
PRECAUCIÓN:Para impedir lesiones físicas o choques eléctricos, no sumerja la base de la cafetera,
el cable eléctrico ni el enchufe en agua ni otros líquidos.
Su cafetera ahora está lista para usarse.
INSTRUCCIONES PARA PREPARAR CAFE:
•
1. Habiendo retirado la cesta y el vástago, llene la
cafetera con agua FRÍA hasta el nivel deseado,
usando las marcas de las tazas en el interior de la
cafetera como guía. No prepare menos de 12 o más
de la capacidad máxima de la cafetera de una vez.
2. Coloque el vástago en la unidad calentadora de la
parte inferior de la cafetera, luego coloque la cesta
sobre el vástago. Extienda la cantidad recomendada de café molido en forma pareja dentro de la
cesta. Consulte la tabla. Use café molido regular
para cafetera eléctrica o para todo tipo de cafeteras
para obtener óptimos resultados. No use café moli-
do fino ni para cafeteras por goteo (drip) porque
puede desbordarse la cesta.
NOTA ESPECIAL SOBRE LA MOLIENDA DE GRANOS DE CAFÉ:
•
Si usted muele su propio café, muélalo con un grosor mediano para obtener óptimos resultados. NO
lo muela demasiado fino (como polvo) porque esto puede hacer que se desborde la cesta.
Use tazas medidoras estándar para medir el café. No permita que el café molido caiga dentro del
vástago. La cantidad de café recomendada produce café suave, el cual prefiere la mayoría de la gente.
La cantidad de café puede ajustarse según lo prefiera.
Nivel del agua Cantidad de café molido Nivel del agua Cantidad de café molido
6,85 l (42 tazas) 59,25 g (2
5,87 l (36 tazas) 47,4 g (2 tazas) 3,59l (22 tazas) 35,55 g (1
4,89 l (30 tazas) 41,48 g (1
4,56 l (28 tazas) 39,5 g (1
A modo de guía, hay aproximadamente 118,5 g (5 tazas) de café molido por libra (16 oz.)
Notas especiales: Las marcas del nivel del agua representan 163 ml (5
que se prepare. Esta cantidad de agua asegurará una taza estándar de 148 ml (5 onzas) de café
porque se absorbe un poco agua en el café molido y se evapora otro tanto.
La cesta no tiene una tapa perforada porque la tapa de la cafetera está diseñada para distribuir el
agua en forma pareja encima del café molido. Además, el fondo de la cesta está diseñado con un filtro incorporado, por lo tanto no se necesita un filtro de papel. Si prefiere, puede utilizarse un filtro
de papel; pero confirme que encaje bien en el fondo de la cesta.
3. Gire la tapa en su sitio en la cafetera. Para reducir los derrames de café, especialmente si la cafetera
se vuelca, asegúrese de que la tapa se haya girado hacia la derecha hasta quedar totalmente fija en las
ranuras del asa. (Observe las flechas de la tapa para girarla correctamente.) La tapa reduce temporalmente el derrame de café si se vuelca la cafetera, así es que debe tenerse cuidado de usarla cuando se traslade la unidad.
4. Coloque la cafetera sobre una superficie seca y nivelada. Instale el cable de alimentación en la
cafetera y enchúfelo en un tomacorriente de 120 voltios de CA SOLAMENTE.
PRECAUCIÓN: Para impedir lesiones físicas o daños a la propiedad, inspecciones los cables en
busca de daños o desgaste antes del uso. No use el producto si éste o el cable se han dañado o si no
funcionan correctamente.
1
/
2
tazas) 3,911 (24 tazas) 35,55 g (1
3
/
4
tazas) 2,93l (18 tazas) 29,63 g (1
2
/
3
tazas) 1,96l (12 tazas) 23,7 g (1 taza)
1
/
2
onzas) por cada taza de café
Ta p a
Cesta del café
Vástago
Grifo
Receptáculo de la
unidad calentadora
Luz de servicio
1
/
2
tazas)
1
/
2
tazas)
1
/
4
tazas)
5. La cafetera deja de funcionar automáticamente. (Cada taza de café requiere alrededor de 1 minuto
de tiempo de preparación.) La luz de servicio destellará cuando el café esté listo. Antes de servir, use
un tomaolla para quitar la tapa, luego retire con cuidado el vástago y la cesta de la cafetera porque el
café y el molido están CALIENTES. Si no se quitan, gotearán aceites amargos del café molido dentro de la cafetera. Vuelva a colocar la tapa asegurándose de que esté totalmente fija en las ranuras del
asa.
6. El café mantendrá su temperatura de servicio tan pronto la cafetera se conecte al tomacorriente. (Si
tiene una cafetera aislada, el aislamiento de aire sellado mantendrá el café caliente hasta dos horas
sin electricidad.) Para servir, coloque la taza y el platillo bajo el grifo y presione la palanca. Si se desea
un flujo continuo para llenar una jarra, levante la palanca derecho hacia arriba hasta que quede fija
en la posición abierta. Cuando quede aproximadamente una taza en la cafetera, desconéctela del
tomacorriente.
PARA PREPARAR MÁS CAFÉ:
•
Si se desea otra taza de café inmediatamente, llene la unidad con agua fría para reajustar el termostato. Vierta el agua y vuelva a llenar con agua fría; y repita los pasos anteriores.
PARA RECALENTAR CAFÉ FRÍO:
•
Debe haber por lo menos 3 tazas de café en la cafetera para recalentarlo. Vuelva a colocar el vástago
y la cesta limpios (sin café molido) para que el café se caliente en forma pareja, evitando sabores
fuertes. Asegure la tapa y enchúfela. El café recalentado nunca sabe tan bien como el café recién
preparado, así es que trate de preparar sólo la cantidad que va a servir.
PARA CALENTAR AGUA PARA BEBIDAS INSTANTÁNEAS:
•
Puede calentarse agua sola en la cafetera para usar con bebidas instantáneas. Basta con llenar la
cafetera limpia con agua fría hasta el nivel deseado de tazas, luego colocar el vástago y la cesta de café
vacía en su sitio como para preparar café. Usando el vástago y la cesta vacía el agua se calentará más
uniformemente. Asegure la tapa en su sitio y enchufe la cafetera. Caliente el agua hasta que la unidad
deje de funcionar y se encienda la luz de servicio. Desenchufe la cafetera cuando quede menos de 1
taza.
Aparte de preparar café o calentar agua, no debe calentarse ningún otro líquido en la cafetera porque
puede dañarse la unidad calentadora.
Cuando se usa la cafetera para calentar agua solamente, el metal del interior se decolorará, lo cual es
normal y no afecta el rendimiento ni el agua calentada en la cafetera. Consulte las “Instrucciones
especiales de limpieza” contenidas en este folleto para eliminar la decoloración así como los depósitos minerales que se forman dentro de la cafetera al calentar agua. Si no se eliminan estos depósitos,
puede horadarse el metal interior y producir daños a la cafetera. Consulte las instrucciones de cuidado y limpieza como se indica:
INSTRUCCIONES DE LIMPIEZA – Después de cada uso
•
La limpieza indebida de la cafetera, especialmente el receptáculo de la unidad calentadora, afectará el rendimiento de la cafetera, produciendo café desabrido y tibio, e incluso puede hacer
que la cafetera deje de funcionar. Para mantener su cafetera funcionando correctamente, es
importante seguir las instrucciones de limpieza a continuación:
1. Desenchufe la cafetera y déjela enfriar antes de limpiarla.
PRECAUCIÓN:Para impedir lesiones físicas o choques eléctricos, no sumerja la base de la cafetera,
el cable eléctrico ni el enchufe en agua ni otros líquidos.
2.Limpie la cesta, el vástago y la tapa en agua jabonosa
caliente con un paño para lavar platos, enjuague y seque. Las
manchas de café en la parte inferior de la tapa o vástago
pueden eliminarse fregando con un paño húmedo y un
limpiador no abrasivo como Bon Ami o Soft Scrub.
3. Limpie el interior de la cafetera llenándola con agua caliente
hasta que quede aproximadamente un tercio llena. Agregue
una pequeña cantidad de detergente líquido para lavar
platos y lave con un paño o esponja para lavar platos. Luego
limpie el receptáculo de la unidad calentadora (donde se
coloca el vástago) con una esponja abrasiva, como Scotch Brite; o Brillo; para eliminar el
residuo de café. Gire la esponja dentro del receptáculo para limpiarlo bien. IMPORTANTE:
Si no se mantiene limpio el receptáculo de la unidad calentadora, la cafetera no funcionará
bien. Consulte el diagrama.
4. Después de limpiar la cafetera por dentro, escurra el agua y enjuague el interior. Limpie el grifo
dejando correr el agua a través de él hasta el fregadero, moviendo la palanca del grifo hacia arriba y
hacia abajo. Escurra el agua del interior de la cafetera y séquela.
5. Limpie el exterior de la cafetera con un paño húmedo y séquelo con un paño suave. No use esponjas
ni limpiadores abrasivos en el exterior de la cafetera porque se rayará.
NO LAVE LAS PIEZAS DE LA CAFETERA EN UNA LAVADORA DE VAJILLA
AUTOMÁTICA.
INSTRUCCIONES ESPECIALES DE LIMPIEZA
•
Para eliminar depósitos minerales
Si la cafetera se usa a diario, es necesario limpiarla especialmente cada 2 semanas O BIEN todas las
semanas si se usa para calentar agua. Llene la cafetera con 0,95 l (1 cuarto) de agua y otro de vinagre
destilado. (Si se ha formado una acumulación de mineral blanco en el interior de la cafetera, use 473
ml [2 tazas] adicionales de vinagre.) Coloque el vástago y la cesta de café vacía en su sitio, asegure la
tapa en la cafetera y enchúfela. Deje que la cafetera lleve a cabo su ciclo, luego déjela estar 10 a 15
minutos. Desenchufe la unidad y escurra la solución de la cafetera. Deje que se enfríe y siga las
instrucciones generales de limpieza.
Para eliminar la decoloración
El interior de la cafetera puede decolorarse al utilizarse para calentar agua, lo cual es normal. Para
eliminar o disimular la decoloración, llene la cafetera con agua al nivel de decoloración (por lo menos
hasta el nivel de 12 tazas, pero no más allá del nivel máximo de tazas). Coloque el vástago y la cesta
vacía en su sitio. Por cada 1,96 l (12 tazas) de agua que se coloquen en la cafetera, añada 2 cucharaditas de cremor tártaro a la cesta. Asegure la tapa en la cafetera, enchufe el cable de alimentación y
deje que la unidad lleve a cabo su ciclo. Déjela estar 15 a 20 minutos o hasta que la decoloración se
borre lo más posible. Desenchufe el cable de alimentación y vierta el contenido de la cafetera. Deje
que se enfríe y siga las instrucciones generales de limpieza.
No use bicarbonato de sosa para limpiar la cafetera porque decolorará el metal interior.
Después del uso frecuente, puede acumularse residuo de café dentro del grifo. Para limpiarlo,
destornille la mitad superior del grifo. Mueva un pequeño cepillo hacia arriba y hacia abajo a través
del grifo, luego inserte el cepillo por la abertura dentro de la cafetera para limpiar la conexión al grifo.
Enjuague y vuelva a colocar la mitad superior del grifo.
Este folleto contiene información importante y útil sobre su nuevo producto. Consérvelo para usarlo
como referencia práctica en cuanto a instrucciones sobre el uso y cuidado correctos, además de información de garantía y servicio.
Para su referencia personal, incluya el recibo de venta con la fecha como evidencia de compra para fines
de garantía y anote la información siguiente:
Fecha de la compra o regalo: ________________________________________
Dónde se compró y el precio, si se sabe: ________________________________
Limpie bien el recep-
táculo de la unidad
calentadora con una
esponja abrasiva
PIEZAS DE REPUESTO
Las piezas de repuesto para la cafetera pueden obtenerse directamente del Departamento de
Servicio al Cliente de la compañía. Escriba o llame a:
Recuerde incluir el número de modelo de su cafetera, una descripción de la pieza que desea y la cantidad. Junto con esta información, sírvase incluir su nombre, dirección postal y su número de tarjeta
de crédito Visa, MasterCard o Discover para fines de facturación. Se sumará al total el impuesto de
venta estatal y un cargo de procesamiento. O bien, para enviar un cheque u orden de pago, llame al
(262) 334-6949 para obtener el total de su compra. La entrega se efectúa dentro de 2 semanas.
GARANTÍA DE 90 DÍAS
Su garantía West Bend cubre fallas de materiales y fabricación de esta cafetera durante 90 días
desde la fecha de compra original. Se reparará o reemplazará toda pieza fallada de la cafetera sin
cargo alguno.
Esta garantía le otorga derechos legales específicos y usted puede tener también otros derechos que
varían de un estado a otro. Esta garantía no cubre daños supuestos por uso indebido, abuso, accidentes o alteraciones a la cafetera.
Si considera que su cafetera ha fallado o requiere servicio, sírvase empacarla cuidadosamente y
devolverla con porte prepagado y seguro, incluyendo una descripción de la dificultad a:
The West Bend Company
Attn: Customer Service Department
400 W. Washington Street
West Bend, WI 53095-2582
(262) 334-6949
Recuerde incluir el recibo o comprobante con la fecha de la compra a fin de asegurar la cobertura de
la garantía.
L-5395 04-00 ©The West Bend Company Impreso en los EE.UU.
NO ES VALIDA EN MEXICO
 Loading...