

Page 1
WEST BEND
C O F F E E M A K E R
Model No. 54129
9 Cup Automatic Coffeemaker
Register this and other West Bend products thro ugh our website: www.westbend.com
To prevent personal injury or property damage, read a nd follow the instructions and warnings in
this care and use i nstructional manual.
Care and Use Instructions
L-5218
IMPORTANT SAFEGUA RDS
Use electricity safely and wisely. Observe safety precautions when using your coffeemaker including the
following:
• Read all instr uctions before using.
• Always attach plug to coffeemaker first, then pl ug cord into wall outlet. To disconnect remove plug
from wall outlet. Let coffeemaker cool before removing cord.
• Do not leave coffeemak er plugged in when not in use.
• Do not let cord touch ho t surfaces or hang over the edge of a counter, table or other surface area .
• Coffeemaker should always be unplugged and allo wed to cool before cleaning.
• Make sure cover, basket, stem a nd cord are properly attached before coffeemaker is pl ugged in.
(See instructions.) No p art of the coffeemaker should be remo ved during the brewing cycle.
Scalding may occur.
• Your coffeemaker, its cord and plugs should not be immersed in liquids, placed near a hot elect ric or
gas burner, or in a heated oven.
• Coffeemaker should not be used outdoors.
• Do not touc h hot coffeema ker. Use hand les or knob.
• Supervise closely when coffeemaker is used by or near children.
• Use your coffeemaker only for the use s described in this booklet. Do not use attachments with your
coffeemaker unless recommended by T he West Bend Company.
• Do not use your coffeemaker if it or it s cord are damaged or not working properly. Return it to The
West Be nd Compa ny for exa mination a nd/or rep air.
SAVE THESE INSTRUCTIONS
Your coffeemaker needs no special care other than cleaning.
WARNING: To prevent personal injury or property damage caused by fire, always unplug t his and other
appliances when not in use.
For household use only.
1
Page 2
Electric Cord Statement
CAUTION: Yo ur coffeemaker has a short cord as a safety precaution to prevent personal injury or property
damage resulting from pulling, tripping or becoming entangled with the cord. Do not allow children to be
near or use this coffeemaker without adult supervision. If you must use a longer cordset or an e xtension
cord when using this coffeemaker, t he cord must be arranged so it will not drape or hang over the edge of a
countertop, tabletop or surface area where it can be pulled on by children or tri pped over. To prevent
electric shock, perso nal injury or fire, the electrical r ating of the extension cord you use must be the same
or more than the wattage of the co ffeemaker (wattage is stamped on underside of ba se).
BEFORE USING THE FIRST TIME: Before using the co ffeemaker for the first time, clean it
thoroughly. Refer to General Cleaning Instructions, Steps 1-4 in this leaflet.
CAUTION: To preven t personal injury or property damage caused by fire, always unplug t his and other
appliances when not in use.
Your coffeemaker is now ready to use.
INSTRUCTIONS FOR MAKING COFFEE
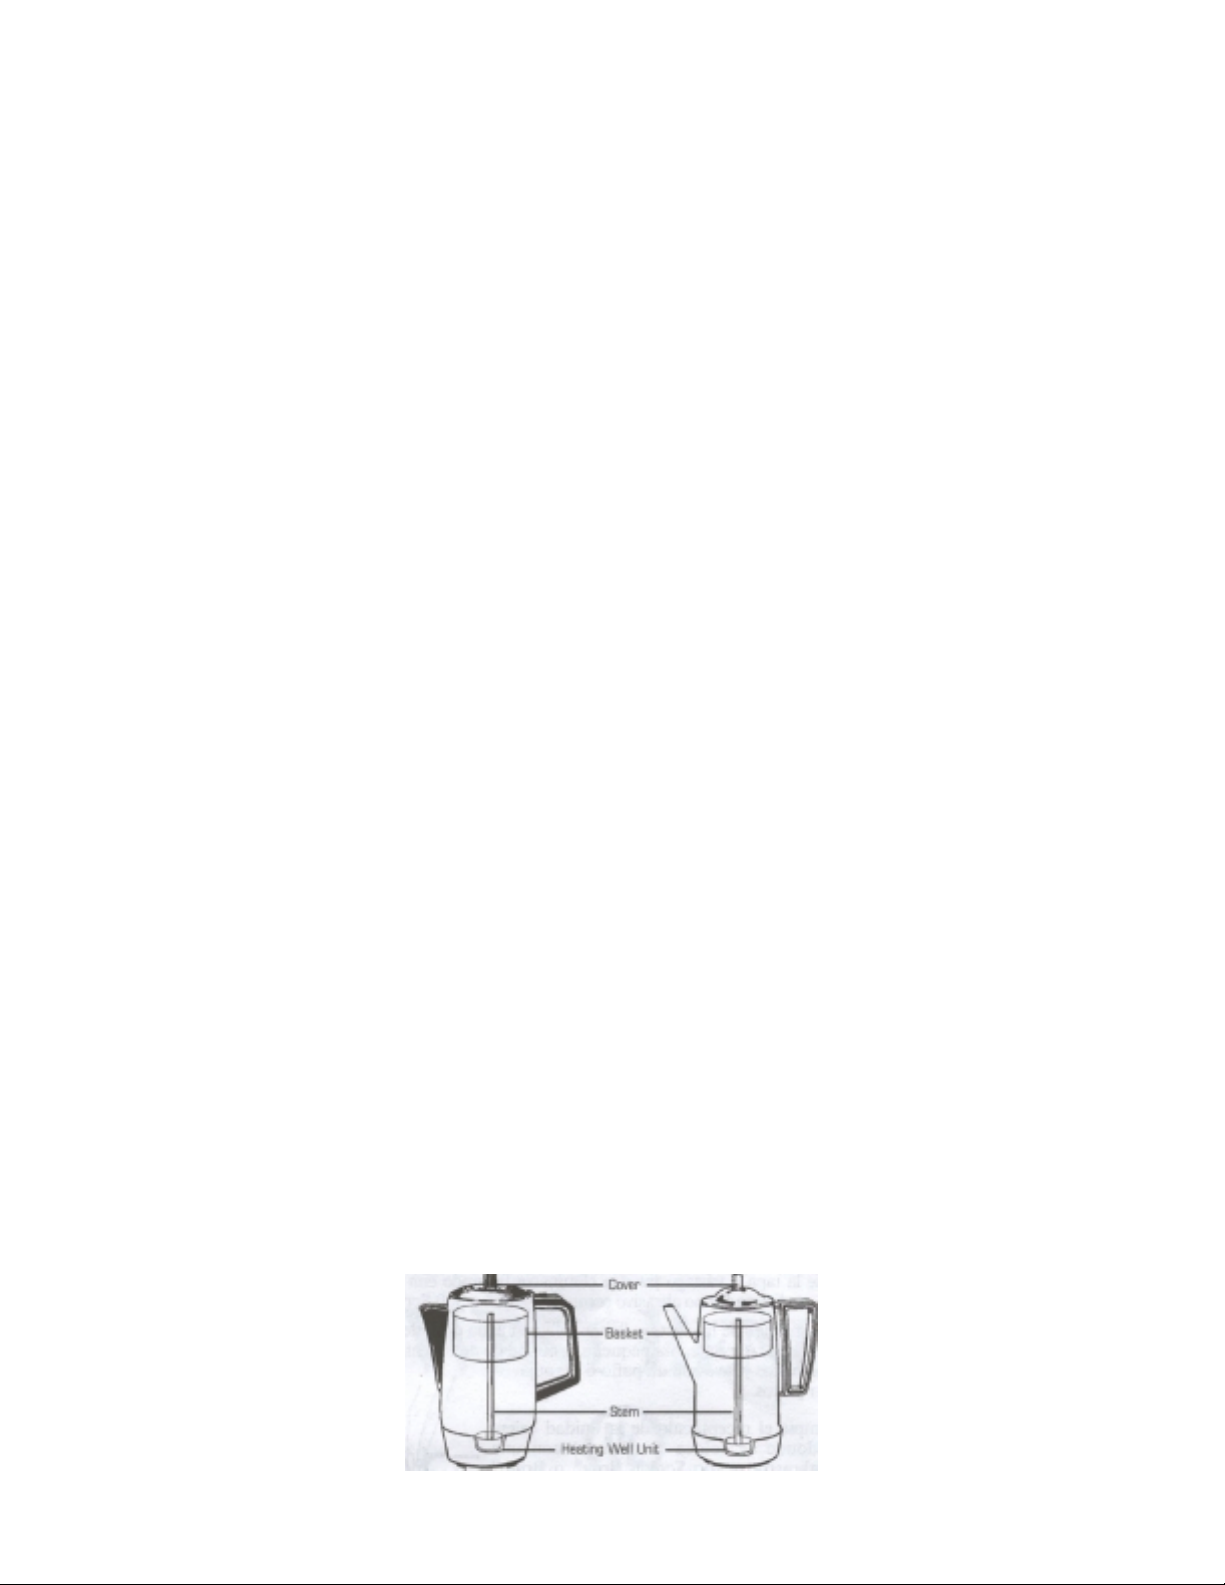
1. With basket and stem removed, fill coffeemaker with COLD water to desired level, using the cup
markings on inside of coffeemaker as guide. Do no t make less than (4 or 5 cups) or more than
maximum (8 or 9 cups) amount of coffee a t one time.
2. Place stem into heating unit in bottom of coffeemaker, then put basket on stem. Add electric perk or
regular grind coffee ground for all coffee makers into basket using 1 level tablespoon per cup for mild
strength and 1 slightly rounded tablespoon per cup for strong strength. Do not use drip or finely
ground coffee as flooding of the basket can occur.
SPECIAL NOTE ON GRINDING COFFEE BEANS:
If grindi ng your own co ffee beans, gr ind to mediu m coarsenes s for best resu lts. DO NOT grind too fine
(powder-like) as this can cause basket to flood.
Be careful not to let ground coffee fall into stem. Spr ead coffee evenly into basket. The a mount of coffee
can be adjusted to suit your pr eference.
• SPECIAL NOTES: The basket does not have a per forated cover as the coffeemaker co ver is
designed to spread water e venly over the coffee grounds. In additio n, the bottom of the basket is
designed with a built-in filter, therefore a paper filter is not needed. If you prefer to double filter your
coffee, a paper filter ca n be used, just be sure it fits into t he bottom of the basket. The water level
markings represent 5-1/2 ounces for each cup of co ffee. This amount of water will ensure a standard 5ounce cup of brewed coffee as some water is absorbed by the grounds and some is lost in steam.
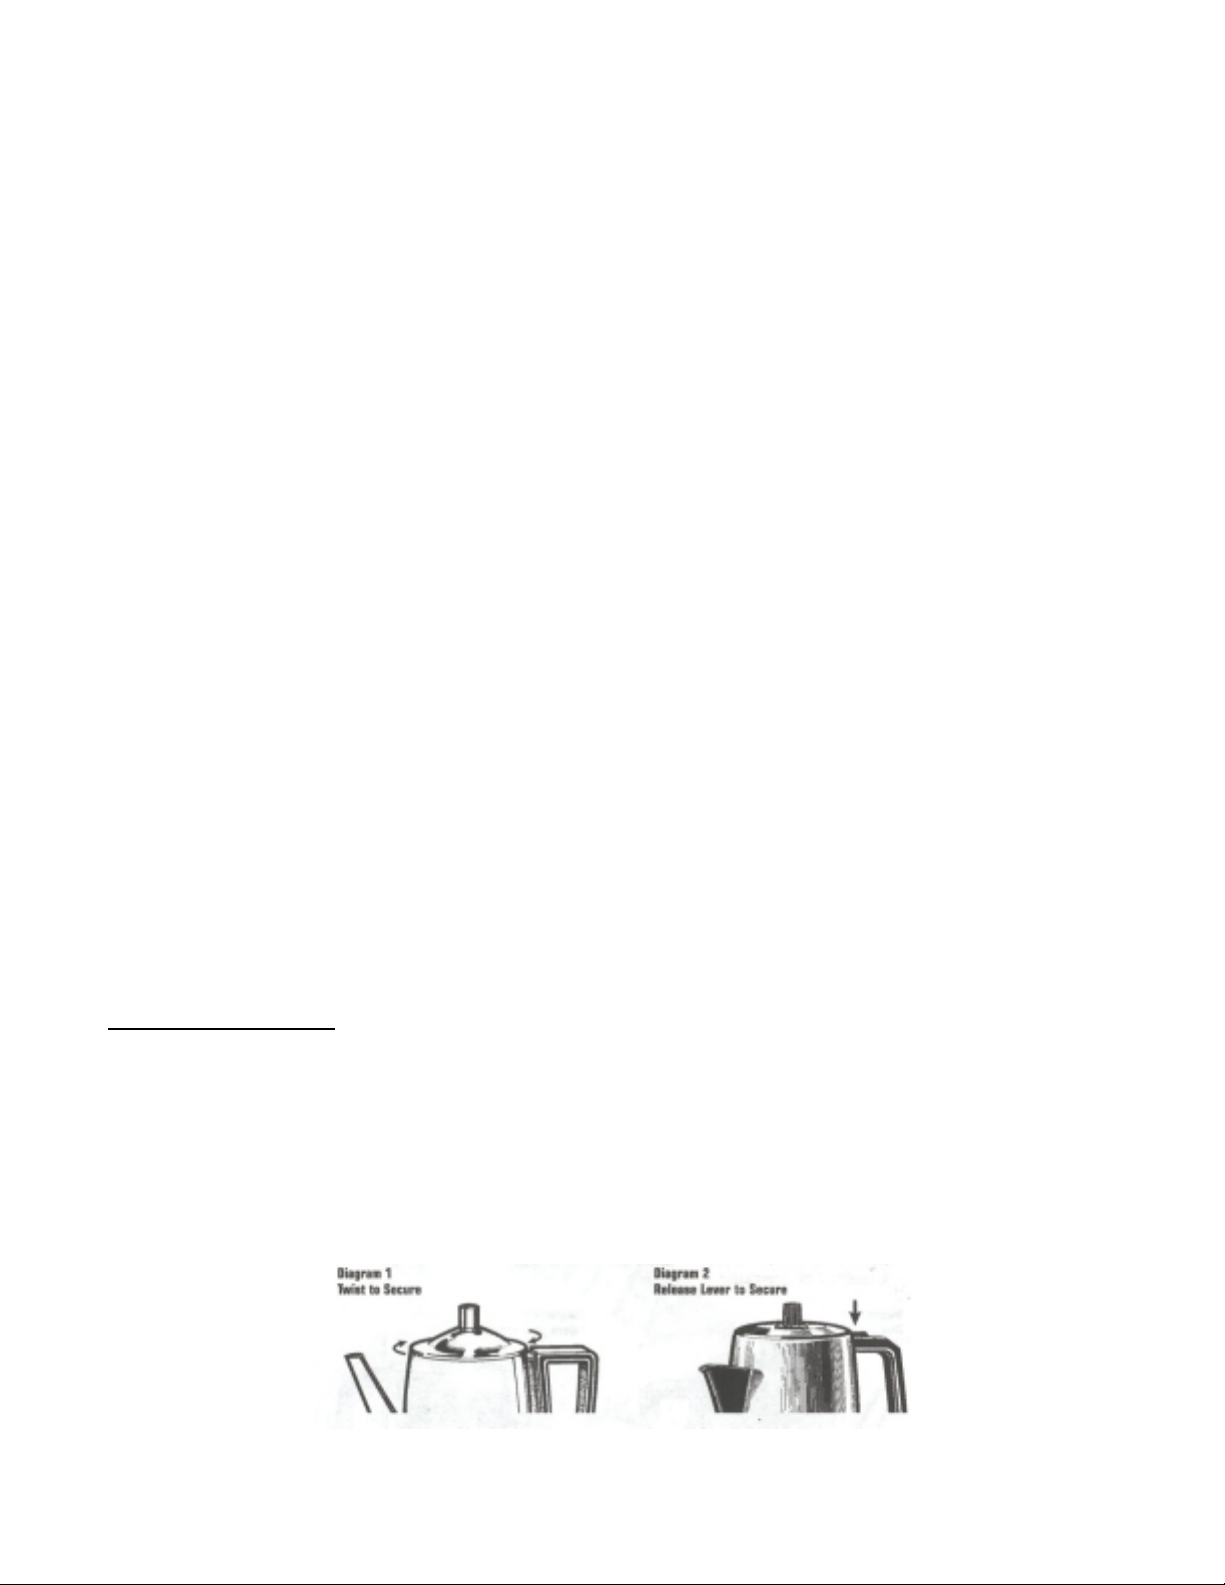
3. Secure cover on coffee maker. Your coffeemaker will fea ture a lever-secured cover. For t he leversecured cover, position cover into opening of co ffeemaker while pressing lever down on top of handle.
Release lever to secure cover in place. See Diagram.
2
Page 3

To minimize coffee spill s, especially if coffeemaker is tipped over, make sure cover is secured onto
coffeemaker. Care should still be used when moving coffemaker as cover te mporarily reduces spillage
if coffeemaker is tipped over .
4. Place coffeemaker on a dry, level surface. Attach cord to coffeemaker and plug into a 120 volt AC
electrical outle t ONLY.
CAUTION: To preven t personal injury or property damage, inspect cordset for da mage or wear before
each use. Do not use your product if it or its cord has been damaged or if it is not working properly.
Coffee stops perking automatically when coffee is ready. Allow approximately 1-1/2 minutes brewing
time for each cup prepared. Before serving, remove cover and lift out basket and stem assembly using a
hot pad. (Depress lever on handle to rele ase cover.) If basket and stem are not removed, bitter oils from
the coffee grounds will drip into the coffee. Replace cover, making sure it is secured onto coffee maker.
See step 3.
5. Coffee will remain at serving temperature as long as coffeemaker is connected to outlet. When
approximately one cup remains, unplug cord from electric outlet and allow coffeemaker to cool before
cleaning.
TO MAKE MORE COFFEE:
If another pot of coffee is d esired right away, clean all parts and fill coffeemaker with COLD water to reset
the thermostat. Pour o ut water, then refill COL D water to the desired level and rep eat the steps above for
making coffee.
TO REHEAT COFFEE:
Reheated coffee never tastes as good as fresh perked, so try to brew only the amount you plan to serve. If
coffee is reheated in coffee maker, there must be at least 3 cups in co ffeemaker. Place stem and empty
basket in place and secure co ver onto coffeemaker. (Using the ste m and coffee basket will heat the coffee
faster and more uniformly.) Plug co ffeemaker in and allow it to comple te the perking cycle. Remove
basket and stem assembly. Unplug coffeemaker when 1 cup remains.
TO HEAT WATER FOR INSTANT BEVERAGES:
Plain water may be heated in your coffeemaker for use with instant beverages. Simply fill the clean
coffeemaker with cold water to the desired cup level. Place clean stem and empty coffee basket in place as
for making coffee. (Using stem and empty basket will heat the water more uniformly.) Secure cover in
place and plug coffeemaker in. Allow it to complete perking cycle. Remove basket and stem assembly.
Unplug coffeemaker when 1 cup remai ns.
Other than making coffee or heating water, no other liquid should be heated in cof feemaker as damage to
heating unit can occur.
When coffeemaker is used to heat water only, the metal inside will discolor which is normal and does not
affect performance or the water heated in the coffeemaker. Refer to “Special Cleaning Instruct ions” in this
leaflet for removing discoloration as well as mineral deposits which form inside the coffeemaker when
heating water. If these deposits are not removed, pitting of the meal inside may occur and result in damage
to coffeemaker. Refer to care and cleaning instructions as follows:
GENERAL CLEANING INSTRUCTIONS – After Each Use
Improper cleaning of t he coffeemaker, especially t he heating unit well, will affe ct performance of the
coffeemaker, resulting in weak, lukewar m coffee and may even cause the coffee maker to stop perking.
To keep your coffeemaker working properly, it is important to follow the cleaning instructions below:
1. Unplug coffeemaker and allo w to cool before cleaning.
CAUTION: To preven t personal injury or electrical shock, do not immerse co ffeemaker, its cord or plugs in
water or other liquid
2. Clean basket, stem and cover in hot soapy water with a dishcloth, rinse and dry. Coffee stains on
underside of cover or stem may be removed by scouri ng with a damp cloth and a non-abrasive
3
Page 4

cleanser such as Bon Ami or Soft Scrub.
3. Clean inside of coffeemaker by filling with hot water to 5-cup level. Add a small amount of liquid
dishwashing detergent and wash with a dishcloth or sponge.
Then clean the heating unit well (where stem fits) with
a scouring pad, such as Scotch Brite or Brillo ,
to remove coffee residue. T wist pad inside heating
unit well to clean thoroughly. IMPORTANT: If heating
unit well is not kept clea n, coffeemaker will not perfor m
properly. See diagram.
After cleaning inside of coffeemaker, dr ain, rinse and dry. Whip outside of co ffeemaker with a damp soapy
cloth and dry. Do not use abrasive meta l scouring pads or cleansers on outside of coffeemaker as
scratching will occur.
DO NOT WASH COFF EEMAKER PARTS IN AN AUTOMATIC DISH WASHER.
SPECIAL CLEANING INSTRUCTIONS
• To Remove Mineral Deposit
If coffeemaker is used daily, a special cleaning every 2 weeks OR every week if used for heating water, is
necessary. Fill coffeemaker to the 5-cup level with white distilled vinegar . Then fill to the maximum cup
level with cold water. P lace stem and empty coffee basket in place, secure cover and plug coffeemak er in.
Allow coffeemaker to complete perki ng cycle, then let stand for 15 to 20 minutes. Unplug and d rain
coffeemaker. Allow to cool before cleaning, follow general cleaning instructions in this leaflet.
To Remove Discoloration
Inside of coffeemaker can discolor when used for heating water which is normal. To remove/lighten
discoloration, fill coffeemaker with cold water to the maximum cup level. Place stem and empty basket in
place and add 1 teaspoon cream of tarter to basket. Secure co ver onto coffeemaker, plug cord into outlet
and allow coffeemaker to complete per k cycle. Then let stand for 15 to 20 minutes or until discoloration is
lightened. Unplug cord and drain coffeemaker. Allow to cool and follow general cleaning instructions.
Do not use baking soda to clean coff eemaker as it will di scolor inside metal.
REPLACEMENT PARTS
Replacement parts for t he Coffeemaker may be obtained direc tly from the company’s Custo mer Service
Department. Write or call:
The West B end Comp any
Attn: Housewares Customer Service
P.O. Box 2780
West Bend, WI 53095-2780
(262) 334-6949
Be sure to include the model number of your Coffeemaker, a description of the part you want and the
quantit y. Along with t his informat ion please i nclude your na me, mailin g address and yo ur Visa,
MasterCard or Discover credit card number for the billings of the part(s) to you. Your state’s sales tax and
a shipping/handling fee will be added to your total charge. Or, to send a check or money order, call (262)
334-6949 during the hours of 8 AM to 4 PM central time to ob tain purchase amount. Please allow 2 weeks
for delivery.
4
Page 5

WEST BEND
90 DAY WARRANTY
Your We st Bend Warranty covers failures in the materi als and workmanship of the Coffeemaker
for 90 days from the date of original purchase. Any failed part of the Coffeemaker will be repaired
or replaced without charge.
This warr anty gives yo u specific lega l rights and yo u may also have other rights wh ich vary fro m
state to state. This warr anty does not cover alleged damage caus ed by misuse, abuse, accidents o r
alterations to the coffeemaker.
If you think the coffeemaker has failed, please carefully package and return t he coffeemaker prepaid
and insured with a description of the difficulty to:
The West B end Comp any
Attn: Housewares Customer Service
1100 Schmidt Road
West Bend, WI 53090-1961
(262) 334-6949
Please ensure that you enclose the sales slip or proof of date of purchase in order to assure warranty
coverage.
IMPORTANT INFORMATION
Please file this booklet for reference to instructions for proper use and care, warranty and service information. For your records,,
attach dated sales receipt for warranty purposes and complete the following information:
Date Purchased or received as a gift: ____________________________________________________________________
Where purchased and price if know: ____________________________________________________________________
Date of Manufacture (on back of bread maker): ______________________ Cat. Number __________________________
L5218
5
 Loading...