

Page 1
Instruction Manual
Register this and other Focus Electrics products through our website:
www.focuselectrics.com
Important Safeguards............................................................................................... 2
Operating Precautions.............................................................................................. 3
Getting To Know Your Breadmaker ......................................................................... 3
Know Your Ingredients............................................................................................. 6
Basic Steps in Making Bread ................................................................................... 9
Cleaning Your Breadmaker .................................................................................... 10
Troubleshooting ..................................................................................................... 11
Recipes .................................................................................................................. 14
Warranty................................................................................................................. 19
SAVE THIS INSTRUCTION MANUAL FOR FUTURE REFERENCE
© 2008 West Bend®, a Brand of Focus Electrics, LLC.
www.focuselectrics.com
Page 2

IMPORTANT SAFEGUARDS
To prevent personal injury or property damage, read and follow all instructions
and warnings.
When using electrical appliances, basic safety precautions should always be
followed including the following:
• Read all instructions, including these important safeguards and the care and use
instructions in this manual.
• Do not touch hot surfaces. Use handle or knobs.
• To protect against electric shock do not immerse cord, plugs, or other electric
parts in water or other liquids.
• Close supervision is necessary when this appliance is used by or near children.
• Unplug the appliance from outlet when not in use and before cleaning. Allow to
cool before putting on or taking off parts.
• Do not operate any appliance with a damaged cord or plug or after the appliance
malfunctions or if the appliance is dropped or damaged in any manner. If you
experience any problems with your appliance, unplug it immediately from the
electrical outlet. For service information see warranty page.
• The use of accessory attachments not recommended by Focus Electrics may
cause fire, electric shock, or injury to persons.
• Do not use this appliance outdoors.
• Do not let cord hang over the edge of a table or counter, or touch hot surfaces.
• Do not place on or near a hot gas or electric burner, or in a heated oven.
• Extreme caution must be used when moving an appliance containing hot oil or
other hot liquids.
• To disconnect, turn any control to “OFF,” then remove plug from wall outlet.
• Do not use appliance for other than intended use.
• Avoid contacting moving parts.
• Do not let cord contact hot surface, including the stove.
• This appliance has a polarized plug (one blade is wider than the other). To
reduce the risk of electric shock, this plug is intended to fit into a polarized outlet
only one way. If the plug does not fit fully into the outlet, reverse the plug. If it
still does not fit, contact a qualified electrician. Do not attempt to modify the plug
in any way.
• For household use only.
2
Page 3
To prevent personal injury or property damage, read and follow all instructions
and warnings.
OPERATING PRECAUTIONS
• Set breadpan on hot pad, trivet or other heat protective surface. Do not set hot
breadpan directly on the counter, table or other surface.
• Do not put hand inside oven chamber after bread pan is removed. Heating unit
will still be hot.
• Do not use your breadmaker with a converter or transformer. This will destroy
the electronic controls.
• Do not attempt to repair this appliance yourself.
• A short power-supply cord is provided to reduce risks resulting from becoming
entangled in or tripping over a longer cord.
• Longer, detachable power-supply cords or extension cords are available and
may be used if care is exercised in their use. While use of an extension cord is
not recommended, if you must use one, the marked electrical rating of the
detachable power-supply cord or extension cord should be at least as great as
the electrical rating of the appliance. If the appliance is of the grounded type, the
extension cord should be a grounding-type 3-wire cord. The cord should be
arranged so that it will not hang over the counter top or tabletop where it can be
pulled by children or tripped over.
SAVE THESE INSTRUCTIONS
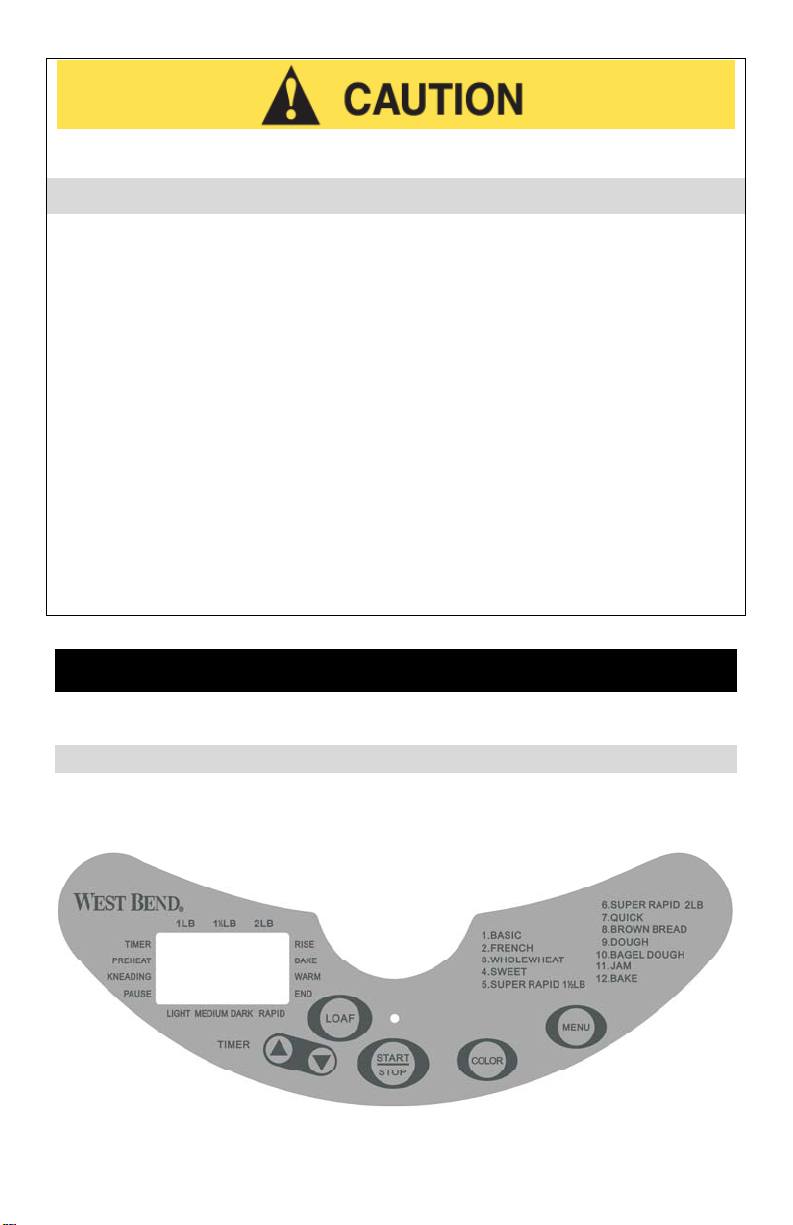
GETTING TO KNOW YOUR BREADMAKER
The control panel on your bread maker was designed to be very easy to use. Please
review the following features to better understand the control panel.
3
Page 4

CONTROL PANEL and FUNCTIONS
LCD DISPLAY: The display indicates when the appliance is ready for use. When
the unit is first plugged in the default program is displayed. “1 3:25” appears on the
display. The “1”specifies which program is selected (1-12 programs) and the “3:25”
is the length of the program in hour:minutes. The position of the marking at the top
of the display indicates the weight of the loaf selected (1, 1-1/2 or 2lb) with 2lb as the
default. The position of the marking at the bottom of the display indicates the degree
of browning that is selected (light, medium, dark or rapid) with medium as the
default. As the program proceeds the digits of the time displayed will decrease
progressively indicating remaining time. During operation the status of the program
is indicated in the display with a mark at the active program mode; “Timer,”
“Preheating,” “Kneading,” “Pause,” “Rising,” “Baking,” “Keep Warm,” and program
“End.”
“START/STOP” Button
cancel a program. Pressing the button when the bread maker is idle will start the
program. Pressing the button when the bread maker is active will pause the
program. Pressing the button while the program is paused will resume the program.
When the bread maker is active or paused, pressing and holding the button until a
short alert is heard will cancel the program. A short alert is heard with each press of
the “START/STOP” button. You must set all your desired program settings before
starting the program. The program cannot be changed while the bread maker is
active.
UP and DOWN “TIMER” Buttons
program end time. Only the following programs can be used with the delay timer: (1)
“BASIC,” (2) “FRENH,” (3) “WHOLEWHEAT,” (4) “SWEET,” (8) “DARK,” (9)
“DOUGH” and (10) “BAGEL DOUGH.” The (5) “SUPER RAPID 1.5lb,” (6) “SUPER
RAPID 2lb,” (7) “QUICK,” (11) “JAM” and (12) “BAKE” programs can not be started
with the delay timer. The delay hours and minutes will be added to the
preprogrammed times for the specific program. The time indicated in the display is
the time until the end of the cycle. The maximum time delay is 12 hours and 58
minutes per program.
Example: It is 8:30 p.m. and you would like the bread ready for the next morning at
7:00 a.m. Determine the time difference, 7:00 a.m. is 10 hours and 30 minutes
ahead of 8:30 p.m. Press the “TIMER” up or down button until 10:30 appears in the
display.
NEVER use the time delay function when using perishable ingredients such as milk,
eggs, fruit, yogurt, etc.!
: The “START/STOP” button is used to start, stop, pause or
: The “TIMER” buttons are used to set a delayed
4
Page 5

“COLOR” Button
button; light, medium, dark color or rapid function.
“LOAF” Button: The “LOAF” button adjusts the various programs for the selected
loaf size; 1lb, 1½lb or 2lb.
“MENU” Button: Use the “MENU” button to select the desired program. In general,
use the following suggested programs for the following specialties.
MENU SELECTIONS
Menu 1: “BASIC” for white, rye, potato, egg, garlic and similar breads. The “BASIC”
setting can be used for almost any bread recipe containing mostly bread flour.
Menu 2: “FRENCH” for the preparation of particularly light white and Italian breads.
Menu 3: “WHOLEWHEAT” for breads containing 50% or more whole wheat, cracked
wheat, buttermilk wheat and like breads.
Menu 4: “SWEET BREAD” for preparing breads with raisins, cinnamon, apricots and
similar breads.
Menu 5: “SUPER RAPID 1½ lb.” for preparing 1½ lb. loaves in an hour.
Menu 6: “SUPER RAPID 2 lb.” for preparing 2 lb. loaves in an hour.
Menu 7: “QUICK” for quick breads that do not use yeast and require only mixing
and baking.
Menu 8: “BROWN BREAD” for preparing dark bread, pumpernickel or similar
breads.
Menu 9: “DOUGH” for the preparation of dough with no baking.
Menu 10: “BAGEL DOUGH” for the preparation of bagel dough.
Menu 11: “JAM” to cook marmalades and jams.
Menu 12: “BAKE” to bake and/or brown bread or cakes.
: The desired browning level or the rapid function is set with this
5
Page 6

ALERTS, SOUNDS and OTHER GENERAL FUNCTIONS
Alert: The alert sounds;
• At the pressing of any button that allows function selection. If the button doesn’t
beep, that function choice is not available.
• During the second kneading cycle of the “BASIC”, WHOLEWHEAT”, “SWEET”
and “BROWN BREAD” programs to signal that the cereals, fruit, nuts or other
ingredients can be added.
• When the end of the program is reached.
• During the warming phase at the end of the baking procedure the alert sounds
several times.
Power Interruption
: If there is a brief power interruption of less than five minutes,
the program position is stored in memory and the machine will resume when the
power is restored.
Over-temp Error: If trying to prepare consecutive batches, an “E01” will appear in
the display when pressing start and the alert will sound if the appliance temperature
is too high. Press and hold the “START/STOP” button untl the “E01” message clears
and the basic setting appears on the display. Remove the bread pan, leave the
cover open, and allow the appliance to cool for 15-20 minutes. Only the “BAKE”
program can be started immediately after clearing the “E01” message even if the
appliance is still hot.
KNOW YOUR INGREDIENTS AND MEASURE ACCURATELY
Although bread making seems very basic, it is a science and the proportions of
ingredients are critical. The most important step in using your bread maker is to
measure the ingredients precisely and accurately. Read the following information to
better understand the importance each ingredient plays in the bread making process.
Always make sure the ingredients are fresh.
Measure the liquid ingredients in see-through measuring cups with
accurate markings. Place the cup on a flat surface and measure at “Eye Level,” not
at an angle. All measurements must be accurate. Always use liquids between 8090°F (27-32°C) to assure optimal yeast activity.
Spoon the dry ingredients into the appropriate measuring cups or
spoons, and then level off with table knife. All ingredients measured in measuring
spoons and cups must be level, not rounded or heaping.
Never scoop measuring cups into dry ingredients. This will compress the
ingredients into the cup and cause the dough to be dry which will result in a short
loaf of bread.
6
Page 7

BREAD FLOUR should be used in your bread maker. It contains more glutenforming proteins than all-purpose flour and will provide well-formed loaves with good
structure. Several different brands of bread flour are available.
WHOLE WHEAT FLOUR can be used in your bread maker using the
“WHOLEWHEAT” bread setting. Whole wheat flour contains the entire wheat kernel,
including the bran and germ. Therefore, breads made with 100 percent or a high
percentage of whole wheat flour will be lower in height and heavier in texture than
bread made with bread flour. The “WHOLEWHEAT” setting on your bread maker is
programmed to better develop the structure of wheat breads for optimum results.
RYE FLOUR can be used in combination with bread flour in the preparation of rye or
pumpernickel bread. However, it cannot be used alone as it does not contain
enough protein to develop adequate gluten for structure.
SUGAR and OTHER SWEETENERS provide food for the yeast, add height and
flavor to the bread and give the crust a golden color. Types of sweeteners that can
be used include sugar, brown sugar, honey, molasses, maple syrup, corn syrup and
fruits, dried or fresh. Do not use artificial sweeteners as a substitute for sugars and
other natural sweeteners; the yeast will not react properly and poor results will be
attained.
MILK enhances flavor and increases the nutritional value of bread. Any type of milk
dry, whole, 2%, 1%, skim, buttermilk or canned evaporated milk can be used in
making bread. Refrigerated milk may be warmed to 80-90°F (27-32°C) however do
not overheat (above 100°F, 38°C) as this could affect the yeast activity. Do not use
regular milk when using the “Time Delay” function. Use dry milk and water as a
substitute.
WATER used in combination with dry milk can be substituted for regular milk and
must be used when using the “Time Delay” function as regular milk can spoil when
left at room temperature for several hours. Use lukewarm water, about 80-90°F (2732°C). Do not use water above 100°F (38°C) as this could affect the yeast.
BUTTER, MARGARINE, SHORTENING and OILS serve several purposes in bread
making as they tenderize the bread, add flavor and richness. Butter and margarine
are interchangeable in recipes. Butter and margarine can be used right from the
refrigerator. Cut cold butter or margarine into smaller pieces for faster blending
during the knead cycle. Low-fat or fat-free bread can be made by substituting equal
amounts of unsweetened applesauce or plain yogurt for the amount of fat
recommended in the recipe. Using less fat will affect the height, tenderness and
texture of the bread, which is normal.
7
Page 8

EGGS add color, richness and leavening to bread. Use only large eggs. No
premixing is needed. Egg substitutes can be used in place of fresh eggs. One egg
equals ¼ cup of egg substitute. To reduce cholesterol, you can substitute two (2)
egg whites for a large egg in the recipes without affecting the end result. Watch the
dough during the knead cycle as some minor adjustment may be needed to get the
dough to the right consistency.
SALT has several functions in making bread. It controls yeast growth while
strengthening the gluten structure to make the dough more elastic and also adds
flavor. Use ordinary table salt in your bread maker. Using too little or eliminating the
salt will cause the dough to over rise. Using too much can prevent the dough from
rising as high as it should. “Light” salt can be used as a substitute for ordinary table
salt, providing it contains both potassium chloride and sodium. Use the same
amount as recommended for table salt. When adding salt to the bread pan, add to
one corner to keep it away from the yeast, especially when using time delay as the
salt can affect the yeast activity.
YEAST is a living organism, which through fermentation, feeds on carbohydrates in
flour and sugar to produce carbon dioxide gas that makes the bread rise. Active dry,
fast rising or bread machine yeast can be used in your bread maker. Use only the
amount stated in the recipes. Using a little more can cause the dough to over rise
and bake into the top of the bread maker. Fast rising yeast and bread machine
yeast are virtually the same and interchangeable with one another. Do not use
compressed yeast as poor results may be obtained. A ¼-ounce envelope of yeast
contains 2¼ teaspoons. Yeast can also be purchased in bulk so you can measure
the exact amount needed. Once opened, keep refrigerated. Always make sure
yeast is fresh and has not passed the “Use By” date.
SPECIAL NOTE ON CINNAMON AND GARLIC: Adding too much cinnamon or
garlic can affect the texture and size of the loaf obtained. Cinnamon can break down
the structure of the dough, affecting height and texture. Too much garlic can inhibit
the yeast activity. Use only the amount of cinnamon and garlic recommended in the
recipe.
8
Page 9

BASIC STEPS IN MAKING BREAD
Always clean your new appliance thoroughly before using. Refer to “Cleaning
Your Breadmaker” section.
1. Insert the bread pan; place the non-stick coated bread pan exactly in the middle
of the base inside the baking space. When the bread pan is pressed lightly in
the center the fixing device locks into place. To remove the bread pan, pull with
medium force on the bread pan carrying handle. CAUTION: The handle is hot
after baking. Use oven mitts or hot pads when removing a hot bread pan.
2. Position the knead bar on to the shaft in the bottom of the bread pan, matching
the hub shape with the shaft shape. You may need to twist the bar slightly for
the knead bar to drop in place. Make sure the knead bar is pushed down on the
shaft all the way.
3. Add ingredients to the bread pan in the order listed in the recipe; liquids first,
then the butter or margarine, next the dry ingredients and finally the yeast. For
best results level the dry ingredients before adding the yeast.
4. Plug the bread maker cord into a 120 volt, AC electrical outlet ONLY.
5. Use the “MENU” button to select the desired program menu.
6. Use the “COLOR” button to select the desired degree of browning.
7. Use the “LOAF” button to select the desired loaf size.
8. If desired, use the “TIMER” up or down arrows to set the elapsed time for when
the program is to be completed.
9. Press the “START/STOP” button to begin the program. The start indicator will
illuminate. After the bread maker has been turned on, the programmed setting
cannot be changed without canceling the program. To change the setting, hold
the “START/STOP” button down until the alert sounds and the green “operation”
light goes out. Then program the control as desired and turn back on.
10. When the bread is done, an alert will sound and the start indicator will flash.
Turn the bread maker off by holding the “START/STOP” button down until the
alert sounds and the start indicator light goes out. Unplug the cord from the
electrical outlet. If the bread maker is not turned off after the cycle is complete,
the bread maker will automatically go into a one hour “Keep Warm” mode. If the
machine is not turned off after the end of the “Keep Warm” period, the machine
will turn itself off and the start indicator will go out.
11. Remove the bread pan. CAUTION: The handle is hot after baking. Use oven
mitts or hot pads when removing a hot bread pan.
9
Page 10

12. Invert the bread pan and shake gently until the loaf falls out. Place the bread on
a rack to cool 15 to 20 minutes. The knead bar will normally stay in the bread
pan when the bread is removed, but may on occasion slide out in the bread. If
the knead bar is inside the loaf, remove before slicing. If making another loaf of
bread right away, be sure the machine is turned off and allowed to cool 15 to 20
minutes with the cover open.
High Altitude Adjustment: Reduced air pressure at high altitudes causes yeast
gases to expand more rapidly and the dough to rise more quickly. The dough can
rise so much that when it begins to bake, it will collapse due to overstretching of the
gluten structure. To slow the rising of the dough, reduce the amount of yeast by ¼
teaspoon at a time until you find the right amount. You can also reduce the amount
of liquid by a teaspoon or two. Some experimentation will be needed when using
your bread maker at high altitudes.
CLEANING YOUR BREADMAKER
1. Unplug the cord from the electrical outlet and allow the appliance to cool
completely before cleaning.
2. Immediately after the bread is removed from the bread pan, fill the bread pan
half full with warm water and a small amount of dish soap. Allow the bread pan
to soak for 5 to 20 minutes or until the knead bar can be lifted off of the shaft.
You may need to twist the knead bar slightly to loosen. The knead bar may
need to soak in water before it can be removed. If the knead bar is difficult to
remove after soaking, secure the cross bar on the underside of the bread pan
while twisting the knead bar to loosen. Wash the inside of the bread pan and
knead bar with a soft cloth, rinse and dry. Use a mild detergent. Never use
chemical cleaning agents, oven cleaners, abrasive scouring pads, or cleansers
on the bread pan or knead bar as damage to the coating or finish can occur.
Replace the knead bar on the shaft.
3. Never immerse the bread pan in water or wash in an automatic
dishwasher as damage to the bearing that turns the knead bar
can occur. Wipe the inside of the oven chamber and the outside
surfaces of the bread maker with a damp cloth if necessary.
Never dip the appliance in water or fill the baking compartment with water! For
easy cleaning, the lid can be removed by positioning it vertically and pulling it
out.
NOTE: The coating on the inside of bread pan may change color over time, this is
normal and does not affect the bread.
10
Page 11

TROUBLESHOOTING GUIDE
Review the following Problems, Possible Causes and Solutions below.
LOAF SIZE & SHAPE
Short loaves
• Wheat breads will be shorter than white breads due to less gluten forming
protein in whole-wheat flour.
• Not enough liquid - Increase liquid by 1-2 teaspoons.
• Sugar omitted or not enough added - Assemble ingredients as listed in recipe.
• Wrong type of flour used - Do not use all-purpose flour.
• Not enough yeast used or too old - Measure amount recommended and check
freshness date on package.
• Wrong type of yeast used - Use fast rising or bread machine yeast. Do not use
compressed yeast.
Flat loves, no rising
• Yeast omitted - Assemble ingredients as listed in recipe.
• Yeast too old - Check expiration date.
• Liquid too hot - Use lukewarm liquids 80-90°F (27-32°C).
• Too much salt added - Use amount recommended in recipe.
• Sugar or other sweetener omitted - Assemble ingredients as listed in recipe.
Top and sides cave in
• Too much liquid – Reduce liquid by 1-2 teaspoons.
• Too much yeast – Use recommended amount.
Gnarly or knotted top, not smooth
• Not enough liquid – Increase liquid by 1-2 teaspoons.
• Too much flour – Measure flour accurately, leveling off measuring cup.
Loaves uneven, shorter on one end
• Dough too dry preventing even rise in bread pan – Increase liquid by 1-2
teaspoons.
Collapsed while baking
• May be caused from baking in high altitude – Make adjustment for high altitude
baking by reducing yeast by ¼ teaspoon and reducing liquid by 1-2 teaspoons.
11
Page 12

BREAD TEXTURE
Heavy, dense texture
• Too much flour – Measure accurately, leveling off measuring cup.
• Not enough yeast – Add recommended amount of yeast.
• Not enough sugar – Add recommended amount of sugar.
Open, coarse, or holey texture
• Salt omitted – Assemble ingredients as listed in recipe.
• Too much yeast – Add recommended amount of yeast.
• Too much liquid – Reduce liquid by 1-2 teaspoons.
Bread doesn’t slice well, very sticky
• Sliced while too hot – Allow bread to cool on rack at least 15-20 minutes before
slicing to release steam.
• Not using proper knife – Use a good bread knife or electric knife.
Center of loaf raw, not baked through
• Too much liquid – Reduce liquid by 1-2 teaspoons.
• Power outage during operation – If the power goes out during operation for
longer than 5 minutes, the bread maker will remain off when the power is
restored. Remove the unbaked loaf from the bread pan and start over with fresh
ingredients.
• Forgot to put knead bar in bread pan – Always make sure the knead bar is on
the shaft in bottom of the bread pan before adding ingredients.
CRUST and COLOR THICKNESS
Dark crust color/too thick
• Too much sugar – Reduce sugar by half.
Loaf of bread is burned
• Bread maker is malfunctioning – See Warranty page for service information.
Crust too light
• Not enough sugar or fat – Increase sugar or fat by half the amount
recommended.
12
Page 13

BREAD PAN PROBLEMS
Knead bar cannot be removed
• Add warm water to the bread pan and allow the knead bar to soak before trying
to remove. Follow the cleaning instructions. You may need to twist the knead
bar slightly after soaking to loosen. Do not immerse the bread pan in water.
Bread sticks to bread pan/difficult to shake out
• Can happen over prolonged use – Wipe the inside of the bread pan, from the
ribs down with vegetable oil or solid shortening. Or add 1 tsp. vegetable oil to
the liquid in the bread pan before adding dry ingredients. Do not use vegetable
spray as sticking can worsen. Or, let bread sit in bread pan for 10 minutes
before shaking out. Replacement bread pan may be ordered. See Warranty
section.
MACHINE MECHANICS
Ingredients not mixed
• Did not start machine – After programming the control panel, press the
“START/STOP” button to turn on.
• Forgot to put knead bar in bread pan – Always make sure the knead bar is on
the shaft in the bottom of the bread pan before adding ingredients.
Burning odor noted during operation
• Ingredients spilled inside oven – Be careful not to spill ingredients when adding
to the bread pan as they will burn on the heating unit and cause smoke.
• Bread pan leaks – Replacement bread pan may be ordered. See Warranty
section.
• Exceeding capacity of bread pan – Do not use more ingredients than
recommended in recipe and always measure accurately.
Machine unplugged by mistake or power lost during use for longer than 5
minutes. How can I save the bread?
• If machine is in knead cycle, reprogram to the same bread setting and turn the
machine back on.
• If machine is in rise or bake cycle, preheat conventional oven to 350°F (177°C).
Carefully remove the bread pan from the machine and bake on rack in center of
oven for 20-25 minutes or until golden brown.
Alert sounds, display shows “E01” and machine cannot be turned on.
• Bread maker too hot to make consecutive loaves – Unplug the cord from the
outlet and allow to cool with the bread pan removed and cover open for 15-20
minutes. Plug the cord back in the outlet, add bread pan and start machine.
• Bread maker is malfunctioning – See Warranty section for service information.
13
Page 14

RECIPES
Pre-packaged bread mixes can be used in your bread maker. Simply follow the
instructions given for the specific bread mix. Unless otherwise stated for the bread
mix, use the 1½ lb. setting for loaf size. Follow standard practices; liquid ingredients
into the bread pan first, then dry ingredients with the yeast, if required going in last.
Following are some scratch bread recipes to get you started. There are many recipe
books containing bread recipes and many more recipes can be found on the
Internet. You may also visit our web site at www.focuselectrics.com to find additional
recipes and helpful information to make your bread making a pleasurable and
rewarding experience.
BASIC
Old Fashioned White Bread
Made with milk for a tender crust and fine texture. Bread just like Grandma used to
make that you can make, too!
1½ Pound Loaf INGREDIENTS 2 Pound Loaf
11 oz. (1¼ cups + 2
Tbsp.)
2 Tbsp. BUTTER or MARGARINE 2 Tbsp.
3 ⅓ Cups BREAD FLOUR 4 Cups
1½ Tbsp. SUGAR 2 Tbsp.
1¼ Tsp. SALT 1½ Tsp.
2 Tsp. ACTIVE DRY YEAST 2¼ Tsp.
-or- -or- -or-
1½ Tsp. BREAD MACHINE/FAST RISE
MILK 13 oz. (1½ cups + 2
Tbsp.)
2 Tsp.
YEAST
14
Page 15

FRENCH
French Bread
Crusty on the outside, chewy on the inside. Just the way it should be!
1½ Pound Loaf INGREDIENTS 2 Pound Loaf
10½ oz. (1¼ cups + 1
Tbsp.)
1 Tbsp. BUTTER or MARGARINE 1½ Tbsp.
3 ⅓ Cups BREAD FLOUR 4¼ Cups
1½ Tsp. SUGAR 2 Tsp.
1¼ Tsp. SALT 1½ Tsp.
2 Tsp. ACTIVE DRY YEAST 2¼ Tsp.
-or- -or- -or-
1½ Tsp. BREAD MACHINE/FAST RISE
WATER, 80° F 12½ oz. (1½ cups +
1 Tbsp.)
2 Tsp.
YEAST
WHOLEWHEAT
100% Whole Wheat Bread
A dense bread, packed with fiber since all whole-wheat flour is used. A longer
kneading cycle at the “WHEAT” setting will provide great results. If the bread
collapses during the baking period, add 1 or 1½ tablespoons vital wheat gluten to the
recipe for respective loaf size to prevent this from happening. Vital wheat gluten can
be found at most health food stores.
1½ Pound Loaf INGREDIENTS 2 Pound Loaf
9 oz. (1 cup + 2 Tbsp.) WATER, 80° F 11½ oz. (1¼ cups +
3 Tbsp.)
1 EGG, large 1
1 Tbsp. MOLASSES 1½ Tbsp.
1 Tbsp. HONEY 1½ Tbsp.
2 Tbsp. BUTTER or MARGARINE 2 Tbsp.
3 ⅓ Cups WHOLE WHEAT FLOUR 4¼ Cups
2 Tbsp. DRY MILK 2 Tbsp.
1¼ Tsp. SALT 1½ Tsp
2 Tsp. ACTIVE DRY YEAST 2¼ Tsp.
-or- -or- -or-
1½ Tsp. BREAD MACHINE/FAST RISE
YEAST
2 Tsp.
15
Page 16

SWEET
Raisin Bread
What better bread to wake up to in the morning! Warm from the bread maker or
toasted, a great way to start the day.
1½ Pound Loaf INGREDIENTS 2 Pound Loaf
10½ oz. (1¼ cup + 1
Tbsp.)
2 Tbsp. BUTTER or MARGARINE 2 Tbsp.
3 ⅓ Cups BREAD FLOUR 4 Cups
2 Tbsp. DRY MILK 2 Tbsp.
2 Tbsp. SUGAR 2½ Tbsp.
1½ Tsp. SALT 1¾ Tsp.
1 Tsp. GROUND CINNAMON 1¼ Tsp.
2 Tsp. ACTIVE DRY YEAST 2¼ Tsp.
-or- -or- -or-
1½ Tsp. BREAD MACHINE/FAST RISE
¾ Cup RAISINS 1 Cup
¼ Cup CHOPPED NUTS (optional) ⅓ Cup
WATER, 80° F 12½ oz. (1½ cups +
1 Tbsp.)
2 Tsp.
YEAST
SUPER RAPID 1.5 lb. and SUPER RAPID 2 lb.
Use your recipe of choice and add 1 teaspoon yeast for those recipes using yeast.
QUICK
Nut Bread
This is the master recipe of which variations can be created as provided below.
Always make sure to grease the inside of the bread pan and knead bars with
shortening before adding ingredients and allow the bread to cool in the bread pan on
a rack for at least 15 minutes to ensure a good release.
1½ Pound Loaf INGREDIENTS
4 Tbsp. VEGETABLE OIL
6 oz. (¾ cup) MILK
2 EGGS, large
2½ Cups ALL PURPOSE FLOUR
1 Cup SUGAR
2½ Tsp. BAKING POWDER
½ Tsp. BAKING SODA
1 Tsp. SALT
½ Cup CHOPPED NUTS
16
Page 17

NUT BREAD FLAVOR VARIATIONS
Banana Nut: Replace vegetable oil with ½ cup softened butter or margarine, cut
into small pieces for thorough blending; reduce milk to 2 tablespoons; add 1⅓ cups
mashed ripe banana (about 2 medium).
Cherry Pecan: Reduce milk to ½ cup; use chopped pecans for chopped nuts; add ½
cup chopped maraschino cherries, well drained.
Cranberry Nut: Reduce milk to ½ cup and add 1 cup coarsely chopped cranberries.
Date: Omit chopped nuts and add ¾ cup chopped dates and ½ teaspoon ground
nutmeg.
BROWN
CLASSIC RYE BREAD
A light, but hearty rye that can be prepared with or without caraway seed depending
on your pleasure.
1½ Pound Loaf INGREDIENTS 2 Pound Loaf
10 oz. (1¼ cups + 1
Tbsp.)
1 Tbsp. BUTTER or MARGARINE 1 Tbsp.
2⅓ Cups BREAD FLOUR 3 Cups
1 Cup MEDIUM RYE FLOUR 1¼ Cups
2 Tbsp. DRY MILK 2 Tbsp.
1½ Tbsp. SUGAR 1½ Tbsp.
1¼ Tsp. SALT 1½ Tsp
2 Tsp. CARAWAY SEED, optional 2 Tsp.
2 Tsp. ACTIVE DRY YEAST 2¼ Tsp.
-or- -or- -or-
1½ Tsp. BREAD MACHINE/FAST RISE
WATER, 80° F 12 oz. (1½ cups)
2 Tsp.
YEAST
17
Page 18

DOUGH
Basic Dinner Rolls/Bread Sticks
Make this basic dough and shape into your favorite dinner rolls, such as cloverleaf,
crescent and parker or even bread sticks for fun! Makes between 2 and 3 dozen
rolls depending on shape made. Freeze any leftover rolls for another time.
1½ Pound Loaf INGREDIENTS
7½ oz. (¾ cup + 1 Tbsp.) WATER, 80° F
3 Tbsp. BUTTER or MARGARINE
3 Cups BREAD FLOUR
3½ Tbsp. SUGAR
2 Tbsp. DRY MILK
1 Tsp. SALT
2 Tsp. ACTIVE DRY YEAST
-or- -or1½ Tsp. BREAD MACHINE/FAST RISE YEAST
SOFTENED BUTTER or SLIGHTLY BEATEN
EGG WHITE
BAGEL DOUGH
Basic Bagel
1½ Pound Loaf INGREDIENTS
8 oz. (1 cup) WATER, 80° F
3 Cups BREAD FLOUR
2 Tbsp. SUGAR
1½ Tsp. SALT
1½ Tbsp., cut into 6 pieces BUTTER or MARGARINE
2 Tsp. ACTIVE DRY YEAST
-or- -or1½ Tsp. BREAD MACHINE/FAST RISE YEAST
3 Quarts WATER
1 Tbsp. SUGAR
POPPY or SESAME SEEDS (for garnish)
BREADMAKER STRAWBERRY JAM
INGREDIENTS
1 CUP GRANULATED SUGAR
1 TBSP POWDERED LOW SUGAR FRUIT PECTIN
1½ CUPS FRESH STRAWBERRIES, washed, sliced and hulled
18
Page 19

PRODUCT WARRANTY
Appliance 1 Year Limited Warranty
Focus Electrics, LLC (“Focus Electrics”) warrants this appliance from failures in the material
and workmanship for one (1) year from the date of original purchase with proof of purchase,
provided the appliance is operated and maintained in conformity with the provided Instruction
Manual. Any failed part of the appliance will be repaired or replaced without charge at Focus
Electrics’ discretion. This warranty applies to indoor household use only.
This warranty does not cover any damage, including discoloration, to any non-stick surface of
the appliance. This warranty is null and void, as determined solely by Focus Electrics if the
appliance is damaged through accident, misuse, abuse, negligence, scratching, or if the
appliance is altered in any way.
THIS WARRANTY IS IN LIEU OF ALL IMPLIED WARRANTIES, INCLUDING WARRANTIES
OF MERCHANTABILITY, FITNESS FOR A PARTICULAR PURPOSE, PERFORMANCE, OR
OTHERWISE, WHICH ARE HEREBY EXCLUDED. IN NO EVENT SHALL FOCUS
ELECTRICS BE LIABLE FOR ANY DAMAGES, WHETHER DIRECT, INDIRECT,
INCIDENTAL, FORSEEABLE, CONSEQUENTIAL, OR SPECIAL, ARISING OUT OF OR IN
CONNECTION WITH THIS APPLIANCE.
If you think the appliance has failed or requires service within its warranty period, please
contact the Focus Electrics Customer Service Department at (866) 290-1851, or e-mail us at
service@focuselectrics.com
warranty claims, hand written receipts are not accepted. You may also be required to return
the appliance for inspection and evaluation. Return shipping costs are not refundable. Focus
Electrics is not responsible for returns lost in transit.
. A receipt proving the original purchase date will be required for all
Valid only in USA and Canada
REPLACEMENT PARTS
Replacement parts, if available, may be ordered directly from Focus Electrics, LLC several
ways. Order online at www.focuselectrics.com
phone by calling (866)290-1851, or by writing to:
Focus Electrics, LLC
Attn: Customer Service
P. O. Box 2780
West Bend, WI 53095
To order with a check or money order, please first contact Customer Service for an order total.
Mail your payment along with a letter stating the model or catalog number of your appliance,
which can be found on the bottom or back of the unit, a description of the part or parts you are
ordering, and the quantity you would like. Your check should be made payable to Focus
Electrics, LLC.
Your state/province’s sales tax and a shipping fee will be added to your total charge. Please
allow two weeks for processing and delivery.
This manual contains important and helpful information regarding the safe use and care of your
new Focus Electrics product. For future reference, attach dated sales receipt for warranty proof
of purchase and record the following information:
Date purchased or received as gift: _______________________________________________
Where purchased and price, if known: _____________________________________________
Item number and Date Code (shown bottom/back of product):___________________________
, e-mail service@focuselectrics.com, over the
L5762 07/08 West Bend®, a Brand of Focus Electrics, LLC. Printed in China
19
Page 20

Page 21

Mode d’emploi
Enregistrez ce produit et d’autres produits Focus Electrics sur notre site Web:
www.focuselectrics.com
Précautions Importantes .......................................................................................... 2
Précautions D’Utilisation ..........................................................................................3
Mieux Connaître Votre Machine à Pain.................................................................... 3
Connaître Les Ingrédients ........................................................................................ 6
Étapes Élémentaires de la Préparation du Pain....................................................... 9
Nettoyage de Votre Machine à Pain....................................................................... 10
Résolution des Problèmes ..................................................................................... 11
Recettes................................................................................................................. 14
Garantie .................................................................................................................19
CONSERVEZ CE MANUEL D’INSTRUCTIONS POUR RÉFÉRENCE FUTURE
© 2008 West Bend
®
, une Marque de Focus Electrics, LLC.
www.focuselectrics.com
Page 22

PRECAUTIONS IMPORTANTES
Pour empêcher toute blessure physique ou tout dommage matériel, lisez et
suivez toutes les consignes et mises en garde.
Lorsque vous utilisez des appareils électriques, les précautions de sécurité
élémentaires devraient toujours être respectées, notamment :
• Lisez toutes les instructions, notamment les présentes précautions importantes,
ainsi que les consignes pour l’entretien de ce manuel.
• Ne touchez pas les surfaces chaudes. Utilisez des poignées rectangulaires ou
rondes.
• Pour vous protéger contre tout choc électrique, n’immergez pas le cordon, les
fiches ni aucune autre pièce électrique dans l’eau ni dans tout autre liquide.
• Une surveillance étroite est nécessaire lorsque vous cet appareil est utilisé par
ou à proximité d’enfants.
• Débranchez l’appareil de la prise électrique lorsqu’il n’est pas utilisé et avant de
le nettoyer. Laissez l’appareil refroidir avant la mise en place ou le retrait de
pièces et avant tout nettoyage.
• N’utilisez pas cet appareil avec un cordon abîmé ou une fiche détériorée, si
l’appareil a connu un disfonctionnement ou si l’appareil est tombé ou a été
détérioré de quelque manière que ce soit. Si vous rencontrer un problème quel
qu’il soit avec votre appareil, débranchez-le immédiatement de la prise secteur.
Pour des informations sur les réparations, voir la page de garantie.
• L’utilisation d’accessoires non recommandés par Focus Electrics risque de
causer un incendie, une électrocution ou des blessures.
• N’utilisez pas cet appareil à l’extérieur.
• Ne laissez pas pendre le cordon du bord du plan de travail ou de la table et
assurez-vous qu'il ne touche pas de surface chaude.
• Ne le placez pas sur ou près d’un brûleur à gaz ou électrique chaud ou dans un
four chauffé.
• Soyez extrêmement prudent lorsque vous déplacez un appareil contenant de
l’huile chaude ou tout autre liquide chaud.
• Pour débrancher l’appareil, tournez toute commande sur « OFF » puis retirez la
fiche de la prise murale.
• N’utilisez pas l’appareil pour une autre utilisation que l’utilisation indiquée.
• Évitez tout contact avec les pièces mobiles.
• Ne laissez pas le cordon électrique entrer en contact avec une surface à haute
températue, y compris la gazinière.
• Cet appareil est pourvu d’une fiche polarisée (une lame est plus large que
l’autre). Pour réduire le risque d’électrocution, cette fiche est conçue pour
s’encastrer dans une prise secteur polarisée dans un sens uniquement. Si la
fiche ne s’insère pas complètement dans la prise secteur, retournez la fiche. Si
elle ne s’encastre toujours pas, contactez un électricien qualifié. Ne tentez pas
de modifier la fiche de quelque manière que ce soit.
• Pour une utilisation domestique uniquement.
2
Page 23

Pour empêcher toute blessure physique ou tout dommage matériel, lisez et
suivez toutes les consignes et mises en garde.
PRECAUTIONS D’UTILISATION
• Placez le plat à pain sur la grille à pain, une grille ou toute autre surface
résistante à la chaleur. Ne posez pas le plat à pain à haute température
directement sur le plan de travail, la table ou toute autre surface.
• Ne placez pas la main à l’intérieur du compartiment du four une fois que le pain
a été retiré. L’élément de chauffage sera toujours chaud.
• N’utilisez pas votre machine à pain avec un convertisseur ou un transformateur.
Ceci détruirait les commandes électroniques.
• N’essayez pas de réparer cet appareil vous-même.
• Le cordon d’alimentation fourni est court pour réduire les risques qu’une
personne se prenne les pieds ou trébuche sur un cordon plus long.
• Des cordons d’alimentations plus longs détachables ou des cordons de rallonge
sont disponibles et peuvent être utilisés à condition de faire preuve de prudence
lors de leur utilisation. Bien que l’utilisation d’un cordon de rallonge ne soit pas
recommandée, si vous devez en utiliser un, la puissance nominale indiquée
pour le cordon d’alimentation détachable ou pour le cordon de rallonge devrait
être au moins aussi importante que la puissance nominale de l’appareil. Si
l’appareil est de type raccordé à la terre, le cordon de rallonge devrait être relié
à la terre et composé de trois fils. Le cordon devrait être disposé de manière à
ne pas pendre depuis le plan de travail d’où il risque d’être tiré par des enfants
ou d’où quelqu’un pourrait s’y prendre les pieds.
CONSERVEZ CES CONSIGNES
MIEUX CONNAITRE VOTRE MACHINE A PAIN
Le panneau de commande de votre machine à pain a été conçu pour être très facile
à utiliser. Veuillez examiner les fonctionnalités suivantes pour mieux comprendre le
panneau de commande.
3
Page 24

PANNEAU DE COMMANDE et FONCTIONS
ÉCRAN LCD : L’écran indique quand l’appareil est prêt à être utilisé. Lorsque
l’appareil est branché pour la première fois, le programme par défaut est en place.
« 1 3:25 » s’affiche sur l’écran. Le « 1 » indique quel programme est sélectionné (112 programmes) et le « 3:25 » est la durée du programme en h : minutes. La
position de la marque en haut de l’écran indique le poids du pain sélectionné (1, 11/2 ou 2 livres), 2 livres étant la sélection par défaut. La position de la marque au
bas de l’écran indique le degré de cuisson sélectionné (légère, moyenne, noir ou
rapide) avec moyenne par défaut. Au fur et à mesure du déroulement du
programme, les chiffres du temps affiché diminuent progressivement, indiquant le
temps restant. Pendant le fonctionnement l’état du programme est indiqué sur
l’écran par une marque au niveau du mode de programme actif : minuterie,
préchauffage, pétrissage, pause, levée, cuisson, maintien au chaud et fin du
programme.
Bouton « START/STOP » (MARCHE/ARRÊT)
(MARCHE/ARRÊT) est utilisé pour mettre en marche, arrêter ou mettre en pause un
programme. L’appui sur ce bouton lorsque la machine à pain est au repos lance le
programme. L’appui sur ce bouton lorsque la machine à pain est active marque une
pause dans le programme. L’appui sur ce bouton pendant la pause du programme
relance le programme. Lorsque la machine à pain est active ou en pause, le
maintien enfoncé de ce bouton jusqu’à l’émission d’une brève sonnerie annule le
programme. Une brève sonnerie est émise à chaque appui sur le Bouton
« START/STOP » (MARCHE/ARRÊT). Vous devez effectuer tous les paramétrages
de programmes que vous souhaitez avant de commencer le programme. Le
programme ne peut pas être modifié une fois que la machine à pain est active.
Boutons HAUT et BAS de la « TIMER » (MINUTERIE)
Minuterie sont utilisés pour paramétrer une heure de fin de programme à départ
différé. Seuls les programmes suivants peuvent être utilisés avec la minuterie de
départ différé : (1) « BASIC » (Elémentaire), (2) « FRENCH » (Baguette), (3)
« WHOLEWHEAT » (Pain complet), (4) « SWEET » (Doux), (8) « DARK » (Noir), (9)
« DOUGH » (Pâte) et (10) « BAGEL DOUGH » (Pâte à bagels). Les programmes (5)
« SUPER RAPID 1½lb. » (Super rapide 1,5 livres), (6) « SUPER RAPID 2 lb. »
(Super rapide 2 livres), (7) « QUICK » (Rapide), (11) « JAM » (Confiture) et (12)
« BAKE » (Cuisson) uniquement ne peuvent pas être lancés avec la minuterie de
départ différé. Les heures et les minutes du délai seront ajoutées aux durées
préprogrammées pour le programme spécifique.. Le temps indiqué sur l’écran est le
temps jusqu’à la fin du cycle (pas l’heure de départ du cycle). Le retard maximum est
de 12 heures et 58 minutes par programme.
Exemple: Il est 20 h 30 et vous voulez que le pain soit prêt le lendemain à 7 h.
Calculez la différence: il faut ajouter 10 heures et 30 minutes pour aller de 20 h 30 à
7 h. Appuyez sur le bouton Haut ou Bas de la MINUTERIE jusqu’à ce que 10:30
s’affiche sur l’écran.
N’utilisez JAMAIS la fonction de départ différé lorsque vous utilisez des ingrédients
périssables comme du lait, des œufs, des fruits, du yaourt, etc. !
: Le Bouton « START/STOP »
: Les boutons de la
4
Page 25

Bouton « COLOR » (COULEUR)
rapide se paramètrent avec ce bouton : couleur Légère, moyenne, noir ou fonction
Rapide.
Bouton « LOAF » (PAIN)
rapport à la taille du pain sélectionné : 1 livre, 1½ livres ou 2 livres.
Bouton « MENU » : Utilisez le bouton du menu pour sélectionner le programme
souhaité. En général, utilisez les programmes suggérés suivants pour les spécialités
suivantes.
SELECTIONS DU MENU
Menu 1 : « BASIC » (ELEMENTAIRE) pour les pains blancs, de seigle, aux
pommes de terre, aux œufs, à l’ail et les pains similaires. Le paramétrage
Elémentaire peut être utilisé pour presque n’importe quelle recette de pain contenant
principalement de la farine à pain.
Menu 2 : « FRENCH » (BAGUETTE) pour la préparation des pains particulièrement
blancs et des pains italiens.
Menu 3 : « WHOLEWHEAT » ( PAIN COMPLET) pour les pains contenant 50% ou
plus de blé complet, de blé craqué, de blé au babeurre et les pains semblables.
Menu 4 : « SWEET BREAD » (PAIN DOUX) pour la préparation de pains sucrés
avec des raisins, de la cannelle, de l’abricot et les pains similaires.
Menu 5: « SUPER RAPID » (SUPER RAPIDE) 1½ livres pour la production de
pains de jusqu’à 1½ livres en une heure.
Menu 6 : « SUPER RAPID » (SUPER RAPIDE) 2 livres pour la production de pains
jusqu’à 2 livres en une heure.
Menu 7 : « QUICK » (RAPIDE) pour des pains rapides qui n’utilisent pas de levure
et nécessitent uniquement de pétrir et de cuire.
Menu 8 : « BROWN BREAD » (PAIN NOIR) pour préparer du pain foncé, du pain
de seigle et des pains similaires.
Menu 9 : « DOUGH » (PÂTE) pour la préparation de la pâte (pas de cuisson).
Menu 10 : « BAGEL DOUGH » (PÂTE A BAGELS) pour la préparation de la pâte à
bagels.
Menu 11 : « JAM » (CONFITURE) pour cuire les marmelades et les confitures.
Menu 12 : « BAKE » (CUISSON) pour simplement cuire et/ou faire brunir du pain ou
des gâteaux
: Le bouton de Taille ajuste les divers programmes par
: Le niveau de cuisson souhaité ou la fonction
5
Page 26

ALARME, SONS FONCTIONS GENERALES
Alarme : Une sonnerie est émise ;
• Lorsque vous appuyez sur un bouton de sélection d’une fonction : s’il ne se
produit aucun son, cela veut dire que ce choix de fonction n’est pas disponible.
• Pendant le second cycle de pétrissage des programmes « BASIC »
(Elémentaire), « WHOLEWHEAT » (Pain complet), « SWEET » (Doux) et
« BROWN BREAD » (Noir) pour indiquer que les céréales, les fruits, les noix ou
les autres ingrédients peuvent être ajoutés.
• Lorsque vous avez atteint la fin du programme.
• Pendant la phase de mise en garde à la fin de la procédure de cuisson, la
sonnerie est émise plusieurs fois.
Coupure de courant : Si le courant est interrompu pendant moins de cinq minutes,
la position du programme reste en mémoire et la machine continue normalement
dès que l'alimentation électrique est rétablie.
Erreur de sur-température : Si vous essayez de faire une série de préparations,
« E01 » s’affiche et une alarme sonore se fait entendre lorsque vous appuyez sur le
bouton de mise en route si la température de l’appareil est trop élevée. Maintenez
enfoncé le bouton « START/STOP » jusqu'à ce que le message « E01 » disparaisse
et que les réglages de base s’affichent à l'écran. Retirez le moule à pain, laissez le
couvercle ouvert et attendez 15 à 20 minutes pour que l’appareil se refroidisse. La
cuisson (BAKE) est la seule option possible immédiatement après avoir effacé le
message « E01 » quand l’appareil est encore chaud.
CONNAITRE LES INGREDIENTS ET MESURER AVEC PRECISION
Bien que la préparation du pain semble très simple, c’est une science et les
proportions des ingrédients sont essentielles. L’étape la plus importante de
l’utilisation de votre machine à pain est la mesure des ingrédients avec précision.
Lisez les informations suivantes pour mieux comprendre l’importance du rôle de
chaque ingrédient dans le processus de préparation du pain. Vérifiez toujours que
les ingrédients sont frais.
Mesurez les ingrédients liquides dans des ustensiles de mesure
translucides gradués avec précision. Placez le récipient sur une surface plane et
mesurez au “Niveau de l’œil”, pas suivant un angle. Toutes les mesures doivent être
précises. Utilisez toujours des liquides entre 27-32°C (80-90°F) pour assurer
l’activité optimale de la levure.
Versez à la cuiller les ingrédients secs dans les ustensiles de mesure
adaptés puis arasez avec un couteau de cuisine. Tous les ingrédients mesurés dans
les ustensiles de mesure doivent être arasés, pas arrondis ni bombés.
Ne plongez jamais les ustensiles de mesure dans les ingrédients secs.
Ceci comprimerait les ingrédients dans l’ustensile et provoquerait la sécheresse de
la pâte, avec pour conséquence un petit pain.
6
Page 27

De la FARINE A PAIN devrait être utilisée dans votre machine à pain. Elle contient
davantage de protéines formant du gluten que les farines multi-usages et donne des
pains biens formés avec une bonne structure. Plusieurs marques différentes de
farines à pain sont disponibles.
De la FARINE A PAIN COMPLET peut être utilisée dans votre machine à pain avec
le réglage Pain complet. La farine à pain complet contient la totalité du grain de blé,
y compris le son et le germe, les pains fabriqués avec 100% ou un pourcentage
élevé de farine de blé complet sont donc plus bas en taille et plus lourds en texture
que les pains préparés avec de la farine à pain. Le paramétrage Pain complet de
votre machine à pain est programmé pour mieux développer la structure des pains
de blé pour un résultat optimal.
De la FARINE DE SEIGLE peut être utilisée en association avec de la farine à pain
pour la préparation de pain de seigle ou de pain noir. Toutefois, elle ne peut pas être
utilisée seule car elle ne contient pas suffisamment de protéines pour développer un
gluten adapté à la structure.
Le SUCRE et les AUTRES EDULCORANTS alimentent la levure, apportent de la
hauteur et de la saveur au pain et donnent à la croûte une couleur dorée. Les types
d’édulcorants qui peuvent être utilisés incluent le sucre, le sucre brun, le miel, les
mélasses, le sirop d’érable, le sirop de maïs et les fruits (secs ou frais). N’utilisez pas
d’édulcorants artificiels comme substitut pour le sucre et les autres édulcorants
naturels car la levure ne réagirait pas correctement et vous obtiendriez un résultat
médiocre.
Le LAIT optimise le goût et augmente la valeur nutritionnelle du pain. Vous pouvez
utilisez n’importe que type de lait pour la préparation du pain : en poudre, entier, à 1
ou 2%, écrémé, babeurre ou du lait concentré. Le lait réfrigéré peut être réchauffé à
27-32°C (80-90°F) toutefois sans le surchauffer (au-dessus de 100°F) car cela
risquerait d’avoir une influence négative sur l’activité de la levure. N’utilisez pas de
lait ordinaire lorsque vous utilisez la fonction Départ différé. Utilisez du lait en
poudre et de l’eau comme produit de remplacement.
De l’EAU utilisée en association avec du lait condensé peut être utilisée à la place
du lait ordinaire et doit être utilisée lorsque vous utilisez la fonction de Départ différé
car le lait ordinaire risque de tourner si vous le laissez à température ambiante
pendant plusieurs heures. Utilisez de l’eau tiède, environ 27-32°C (80-90°F).
N’utilisez pas d’eau à plus de 100°F car cela pourrait avoir un effet négatif sur la
levure.
Le BEURRE, la MARGARINE, l’HUILE VEGETALE et les HUILES servent
plusieurs objectifs dans la préparation du pain en le rendant plus tendre, tout en
apportant de la saveur et de la richesse. Le beurre et la margarine sont
interchangeables dans les recettes. Le beurre et la margarine peuvent être utilisés
directement après leur sortie du réfrigérateur mais coupez le beurre froid ou la
margarine froide en petits morceaux pour accélérer le mélange pendant le cycle de
pétrissage. Les pains à faible teneur en matières grasses ou sans matières grasses
peuvent être préparés en substituant des quantités équivalentes de sauce à la
pomme sans sucre ou de yaourt nature à la quantité de matière grasse
recommandée dans la recette. L’utilisation de moins de matière grasse aura une
influence sur la hauteur, le moelleux et la texture du pain, ce qui est normal.
7
Page 28

Les ŒUFS apportent de la couleur, de la richesse et du levant au pain. Utilisez de
gros œufs. Aucun prémélange n’est nécessaire. Des substituts d’œufs peuvent être
utilisés à la place des œufs frais. Un œuf correspond à ¼ tasse de substitut d’œuf.
Pour réduire le cholestérol, vous pouvez substituer deux (2) blancs d’œuf à un gros
œuf dans les recettes sans affecter le résultat final. Observez la pâte pendant le
cycle de pétrissage car des ajustements mineurs pourraient être nécessaires pour
obtenir la bonne consistance de pâte.
Le SEL a plusieurs fonctions dans la préparation du pain. Il contrôle la croissance de
la levure tout en renforçant la structure du gluten pour rendre la pâte plus élastique
et ajoute de la saveur. Utilisez du sel de table ordinaire dans votre machine à pain.
L’utilisation de trop peu de sel ou l’élimination du sel provoquera un gonflement
excessif de la pâte. L’utilisation de trop de sel peut empêcher la pâte de lever aussi
haut qu’elle le devrait. Du sel “Léger” peut être utilisé comme substitut au sel de
table ordinaire, à condition que celui-ci contienne à la fois du chlorure de potassium
et du sodium. Utilisez la même quantité que celle recommandée pour le sel de table.
Lorsque vous ajoutez du sel dans le plat, ajoutez-le dans un coi pour le maintenir à
l’écart de la levure, en particulier lorsque vous utilisez le Départ différé car le sel peut
affecter l’activité de la levure.
La LEVURE est un organisme vivant, qui par fermentation se nourrit des glucides
présents dans la farine et le sel pour produire du dioxyde de carbone qui fait lever le
pain. Vous pouvez utiliser de la levure sèche active, de la levure à action rapide ou
de la levure pour machine à pain. Utilisez uniquement la quantité indiquée dans les
recettes. L’utilisation d’un peu plus de levure peut provoquer un gonflement excessif
de la pâte et une cuisson jusqu’en haut de la machine à pain. La levure à action
rapide et la levure pour machine à pain sont pratiquement les mêmes et sont
interchangeables. N’utilisez pas de levures comprimées car vous risqueriez d’obtenir
un résultat médiocre. Une enveloppe de ¼ d’once de levure contient 2¼ cuillers à
café. La levure s’achète également en vrac de sorte que vous puissiez mesurer la
quantité exacte dont vous avez besoin. Une fois ouverte, conservez-la au
réfrigérateur. Assurez-vous toujours que la levure est fraîche et que la date limite de
consommation n’est pas dépassée.
REMARQUE SUR LA CANNELLE ET L’AIL : Le fait d’ajouter trop de cannelle ou
d’ail peut affecter la texture et la taille du pain obtenu. La cannelle peut briser la
structure de la pâte, affectant ainsi sa hauteur et sa texture. Trop d’ail risque
d’inhiber l’activité de la levure. Utilisez uniquement la quantité de cannelle et d’ail
recommandée dans la recette.
8
Page 29

ETAPES ELEMENTAIRES DE LA PREPARATION DU PAIN
Nettoyez toujours votre appareil neuf avec soin avant de l’utiliser. Consultez la
section « Nettoyage de Votre Machine à Pain ».
1. Placez le moule à pain anti-adhésif dans l’appareil, exactement au centre du
socle, dans l’espace de cuisson. Appuyez légèrement sur le moule à pain et le
système de verrouillage s’enclenchera si le moule est bien centré. Pour retirer le
moule à pain, tirez-le par ses poignées en exerçant une force moyenne.
ATTENTION : La poignée est très chaude après la cuisson. Utilisez des
maniques ou des gants de cuisine lorsque vous retirez un moule à pain chaud.
2. Positionnez la barre de pétrissage sur l’axe en bas du plat, en faisant
correspondre la forme de moyeux avec la forme d’axe. Il est possible que vous
deviez tordre légèrement la barre pour qu’elle tombe en place. Assurez-vous
que la barre de pétrissage est enfoncée sur l’axe jusqu’au fond.
3. Ajoutez les ingrédients dans le plat selon l’ordre indiqué dans la recette ; les
liquides en premier, ensuite le beurre ou la margarine, ensuite les ingrédients
secs et enfin la levure. Pour de meilleurs résultats mettez à niveau les
ingrédients secs avant d’ajouter la levure.
4. Branchez le cordon de la machine à pain sur une prise secteur 120 volts AC
UNIQUEMENT.
5. Utilisez le bouton « MENU » pour sélectionner le menu de programme souhaité.
6. Utilisez le bouton « COLOR » (COULEUR) pour sélectionner le degré de
cuisson souhaité.
7. Utilisez le bouton « LOAF » (PAIN) pour sélectionner la taille de pain souhaitée.
8. Si vous le souhaitez, utilisez les flèches Haut et Bas de la « TIMER »
(MINUTERIE) pour définir le temps écoulé lorsque le programme doit s’arrêter.
9. Appuyez sur le bouton « START/STOP » (MARCHE/ARRÊT) pour commencer
le programme. Le voyant de démarrage s’allume. Une fois la machine à pain
mise en route, il est impossible de modifier le programme choisi sans annuler
tout le programme. Pour modifier le paramétrage, maintenez le bouton
« START/STOP » (MARCHE/ARRÊT) enfoncé jusqu’à ce que la sonnerie
d’alerte se déclenche et que la lumière verte indiquant le “fonctionnement”
s’éteigne. Ensuite, effectuez la programmation souhaitée et remettez la machine
en marche.
10. Lorsque le pain est prêt une sonnerie d’alerte se déclenche et le voyant de
démarrage clignote. Mettez la machine à pain hors tension en maintenant le
bouton « START/STOP » (MARCHE/ARRÊT) enfoncé jusqu’à ce que l’alerte se
déclenche et que le voyant de démarrage s’éteigne. Débranchez le cordon de la
prise secteur. Si l machine à pain n’est pas mise hors tension à la fin du cycle,
elle passe automatiquement en mode de “maintien au chaud” pendant une
heure. Si la machine n’est pas mise hors tension à la fin de la période de
“maintien au chaud”, elle se met hors tension automatiquement et le voyant de
démarrage s’éteint.
11. Retirez le plat à pain. ATTENTION : La poignée est très chaude après la
cuisson. Utilisez des maniques ou des gants de cuisine lorsque vous retirez un
moule à pain chaud.
9
Page 30

12. Renversez le plat à pain et secouez doucement jusqu’à ce que le pain tombe.
Placez-le sur une grille pour qu’il refroidisse 15 à 20 minutes. La barre de
pétrissage restera normalement dans le plat lorsque vous retirerez le pain, mais
il est possible qu’à l’occasion elle glisse dans le pain. Si la barre est à l’intérieur
du pain, retirez-la avant de trancher le pain. Si vous faites un autre pain
directement, assurez-vous que la machine est éteinte et repose pendant 15 à
20 minutes avec le couvercle ouvert.
Réglage en Haute Altitude : La réduction de la pression atmosphérique en haute
altitude peut provoquer l’expansion plus rapide des gaz de la levure et une levée
plus rapide de la pâte. La pâte peut lever tellement que quand la cuisson commence
elle s’effondre en raison d’une extension excessive de la structure du gluten. Pour
ralentir la levée de la pâte, réduisez la quantité de levure de ¼ de cuiller à café à la
fois jusqu’à ce que vous trouviez la bonne quantité. Vous pouvez également réduire
la quantité de liquide d’une cuiller à café ou deux. Une certaine expérimentation sera
nécessaire si vous utilisez votre machine à pain en altitude.
NETTOYAGE DE VOTRE MACHINE A PAIN
1. Débranchez le cordon de la prise secteur et laissez l’appareil refroidir
complètement avant de le nettoyer.
2. Immédiatement après avoir retiré le pain du plat, remplissez le plat jusqu’à la
moitié avec de l’eau chaude et une petite quantité de liquide vaisselle. Laissez
le plat tremper pendant 5 à 20 minutes ou jusqu’à ce que la barre de pétrissage
puisse être retirée de l’axe. Il est possible que vous deviez tordre légèrement la
barre pour la dégager. Il est possible que la barre de pétrissage ait besoin de
tremper dans l’eau avant de pouvoir être retirée. Si la barre de pétrissage est
difficile à retirer après avoir trempé, fixez la barre transversale au-dessous du
plat tout en faisant pivoter la barre de pétrissage pour la dégager. Lavez
l’intérieur du plat et la barre de pétrissage avec un chiffon doux, rincez et
séchez. Utilisez un détergent de puissance moyenne. N’utilisez jamais d’agents
nettoyants chimiques, de nettoyants pour four, de tampons à
récurer abrasifs ou de détergents sur le plat à pain ou la barre de
pétrissage car cela risquerait de détériorer le revêtement ou la
finition. Replacez la barre de pétrissage sur l’axe.
3. N’immergez jamais le plat à pain dans l’eau ou ne le lavez jamais
au lave-vaisselle car l’axe qui fait tourner la barre de pétrissage pourrait être
endommagé. Essuyez l’intérieur du compartiment du four et les surfaces
externes de la machine à pain avec un chiffon humide si nécessaire. Ne
trempez jamais la machine dans l’eau ou ne remplissez jamais le compartiment
de cuisson d’eau ! Pour faciliter le nettoyage, le couvercle peut être retiré en le
positionnant verticalement avant de le tirer.
REMARQUE : Le revêtement à l’intérieur du plat à pain peut changer de couleur au
fil du temps ; ceci est normal et n’affecte pas le pain.
10
Page 31

GUIDE POUR LA RESOLUTION DES PROBLEMES
Examinez les Problèmes, les Causes Potentielles et les Solutions Ci-Dessous.
TAILLE ET FORME DU PAIN
Petits pains
• Les pains à la farine de blé complet seront plus petits que les pains blancs
parce que cette farine contient moins de protéines de formation de gluten.
• Pas suffisamment de liquide – augmentez la quantité de liquide de 1-2 cuillers à
café.
• Sucre omis ou pas suffisamment de sucre ajouté – Assemblez les ingrédients
comme indiqué dans la recette.
• Mauvais type de farine utilisé – N’utilisez pas de farine multi-usages.
• Pas suffisamment de levure utilisée ou levure trop ancienne – Mesurez la
quantité recommandée et vérifiez la date de fraîcheur sur l’emballage.
• Mauvais type de levure utilisé – Utilisez de la levure à levée rapide ou de la
levure pour machine à pain. N’utilisez pas de levure pressée.
Pains plat, qui ne lèvent pas
• Pas de levure – Assemblez les ingrédients comme indiqué dans la recette.
• Levure trop ancienne – Vérifiez la date d’expiration.
• Liquide trop chaud – Utilisez des liquides tièdes à 27-32°C (80-90°F).
• Trop de sel ajouté – Employez la quantité indiquée par la recette.
• Le sucre ou un autre édulcorant est absent – Assemblez les ingrédients comme
indiqué dans la recette.
Le haut et les côtés tombent vers l’intérieur
• Trop de liquide – Réduisez la quantité de liquide de 1-2 cuillers à café.
• Trop de levure – Utilisez la quantité recommandée.
Dessus noueux et ratatiné, pas homogène
• Pas suffisamment de liquide – augmentez la quantité de liquide de 1-2 cuillers à
café.
• Trop de farine – Mesurez la farine avec précision, en arasant la tasse de
mesure.
Pain inégal, plus petit d’un côté
• Pâte trop sèche empêchant une levée homogène dans le plat – augmentez la
quantité de liquide de 1-2 cuillers à café.
Effondrement pendant la cuisson
• Peut être provoqué par une cuisson en altitude – Effectuez les ajustements pour
la cuisson en altitude en réduisant la quantité de levure de ¼ de cuiller à café et
en réduisant la quantité de liquide de 1-2 cuillers à café.
11
Page 32

TEXTURE DU PAIN
Texture lourde, dense
• Trop de farine – Mesurez précisément, en arasant la tasse de mesure.
• Pas suffisamment de levure – Ajoutez la quantité de levure recommandée.
• Pas suffisamment de sucre – Ajoutez la quantité recommandée de sucre.
Texture ouverte, grossière, trouée
• Pas de sel – Assemblez les ingrédients comme indiqué dans la recette.
• Trop de levure – Ajoutez la quantité de levure recommandée.
• Trop de liquide – Réduisez la quantité de liquide de 1-2 cuillers à café.
Le pain ne se tranche pas bien, très collant
• Tranché quand il était trop chaud – Laissez le pain refroidir sur la grille au moins
15-20 minutes avant de la trancher pour que la vapeur s’évacue.
• Vous n’utilisez pas un couteau adapté. – Utilisez un bon couteau à pain ou un
couteau électrique.
Centre du pain cru, pas complètement cuit
• Trop de liquide – Réduisez la quantité de liquide de 1-2 cuillers à café.
• Coupure de courant pendant le fonctionnement – Si l’alimentation électrique est
coupée pendant plus de 5 minutes, la machine à pain restera éteinte même si le
courant est rétabli. Retirez le pain non cuit du moule à pain et recommencez
avec des ingrédients frais
• Barre de pétrissage non placée dans le plat –vérifiez toujours que la barre de
pétrissage est sur l’axe au bas du plat avant d’ajouter les ingrédients.
EPAISSEUR DE LA CROÛTE et COULEUR
Couleur de croûte noir/croûte trop épaisse
• Trop de sucre – Réduisez la quantité de sucre de moitié.
Le pain est brûlé
• La machine à pian fonctionne anormalement – Voir la page de Garantie pour
des informations sur les réparations.
Croûte trop claire
• Pas suffisamment de sucre ou de matière grasse – Augmentez la quantité de
sucre ou de matière grasse de la moitié de la quantité recommandée.
12
Page 33

PROBLÈMES AVEC LE MOULE À PAIN
La barre de pétrissage ne peut pas être retirée
• Ajoutez de l’eau tiède au moule à pain et laissez tremper la barre à pétrir avant
d'essayer de la retirer. Suivez les consignes de nettoyage. Il est possible que
vous deviez tordre légèrement la barre après l’avoir fait tremper pour la
dégager. Ne plongez pas le plat à pain dans l’eau.
Le pain colle au plat/est difficile à démouler
• Peut se produire en cas d’utilisation prolongée – essuyez l’intérieur du plat à
pain, des extrémités vers le bas avec de l’huile végétale, de la graisse végétale
solide, ou ajoutez 1 cuiller à café d’huile végétale au liquide dans le plat avant
d’ajouter les ingrédients secs. N’utilisez pas de graisse végétale en aérosol car
cela risque d’empirer le phénomène. Ou, laissez le pain reposer dans le plat
pendant 10 minutes avant de la démouler. Vous pouvez commander un plat de
rechange. Voir la section « Garantie ».
MECANIQUE DE LA MACHINE
Ingrédients non mélangés
• La machine n’a pas été mise en marche – Après avoir programmé le panneau
de commande, appuyez sur le bouton « START/STOP » (MARCHE/ARRÊT)
pour mettre la machine en marche.
• Vous avez oublié de placer la barre de pétrissage dans le plat – Vérifiez
toujours que la barre est sur l’axe au fond du plat avant d’ajouter les ingrédients.
Odeur de brûlé remarquée pendant le fonctionnement
• Ingrédients renversés à l’intérieur du four – Veillez à ne pas renverser
d’ingrédients lorsque vous les ajoutez dans le plat, car ceux-ci vont brûleur sur
l’unité de chauffage et produire de la fumée.
• Le plat fuit – Vous pouvez commander un plat de rechange. Voir la section
« Garantie ».
• Dépassement de la capacité du plat à pain – N’utilisez pas plus d’ingrédients
que recommandé dans la recette et mesurez toujours avec précision.
En cours d’utilisation, la machine est débranchée par erreur ou il y a une
panne de courant pendant plus de 5 minutes. Comment faire pour ne pas
perdre le pain?
• Si la machine est en cours de cycle de pétrissage, reprogrammez les mêmes
paramètres pour le pain et remettez la machine en marche.
• Si la machine est dans le cycle de levée ou de cuisson, préchauffez un four
traditionnel à 177°C (350°F). Retirez prudemment le plat de la machine et faites
cuire le pain sur la grille au centre du four pendant 20-25 ou jusqu’à ce qu’il soit
doré.
L’alerte est émise, l’écran affiche E01 et la machine ne peut pas être mise en
marche.
• La machine à pain est trop chaude pour faire deux pains à la suite –
Débranchez le cordon de la prise secteur et laissez-la refroidir avec le plat à
l’extérieur et le couvercle ouvert pendant 15-20 minutes. Branchez à nouveau le
cordon sur la prise secteur, ajoutez le plat et mettez la machine en marche.
• La machine à pain ne fonctionne pas correctement – Voir la section
« Garantie » pour des informations sur les réparations.
13
Page 34

RECETTES
Vous pouvez utiliser des mélanges pour pâte à pain pré-emballés dans votre
machine à pain. Suivez simplement les instructions fournies pour le mélange de pain
spécifique. Sauf mention contraire pour le mélange de pain, utilisez le paramétrage
1½ livres pour la taille du pain. Suivez la pratique standard ; les ingrédients liquides
dans le plat à pain en premier, puis les ingrédients secs avec la levure (si
nécessaire) en dernier.
Vous trouverez ci-dessous des recettes de pains simples pour démarrer. Il existe de
nombreux livres de recettes contenant des recettes de pains et vous pourrez trouver
de nombreuses autres recettes sur Internet. Vous pouvez également consulter notre
site Internet sur www.focuselectrics.com pour trouver des recettes supplémentaires
et des informations utiles pour faire de votre préparation du pain une expérience
agréable et enrichissante.
ELÉMENTAIRE
Pain Blanc Traditionnel
Préparé avec du lait pour une croûte tendre et une texture fine. Du juste comme le
faisait Grand-mère, et que vous savez que vous pouvez faire aussi !
Pain de 1½ Livres INGREDIENTS Pain de 2 Livres
11 oz. (1¼ tasses + 2
cuillers à soupe)
2 cuillers à soupe BEURRE ou MARGARINE 2 cuillers à soupe
3 ⅓ tasses FARINE A PAIN 4 tasses
1½ cuillers à soupe SUCRE 2 cuillers à soupe
1¼ cuillers à café SEL 1½ cuillers à café
2 cuillers à café LEVURE SECHE ACTIVE 2¼ cuillers à café
-ou- -ou- -ou-
1½ cuillers à café
LEVURE A MACHINE A
PAIN/LEVEE RAPIDE
LAIT
13 oz. (1½ tasses +
2 cuillers à soupe)
2 cuillers à café
14
Page 35

BAGUETTE
Baguette
Croustillante à l’extérieur, moelleuse à l’intérieure. Juste comme elle devrait être !
Pain de 1½ Livres INGREDIENTS Pain de 2 Livres
10½ oz. (1¼ tasses +
1 cuiller à soupe.)
1 cuiller à soupe. BEURRE ou MARGARINE 1½ cuillers à soupe.
3 ⅓ tasses FARINE A PAIN 4¼ tasses
1½ cuillers à café SUCRE 2 cuillers à café
1¼ cuillers à café SEL 1½ cuillers à café
2 cuillers à café LEVURE SECHE ACTIVE 2¼ cuillers à café
-ou- -or- -ou-
1½ cuillers à café
EAU, 80° F
LEVURE A MACHINE A
PAIN/LEVEE RAPIDE
12½ oz. (1½ tasses
+ 1 cuiller à soupe.)
2 cuillers à café
PAIN COMPLET
Pain Complet à 100%
Un pain dense, plein de fibres dans la mesure où on utilise de la farine de blé
complet. Un cycle de pétrissage plus long au paramètre blé fournira de très bons
résultats. Si le pain s’effondre pendant la cuisson, ajoutez 1 ou 1½ cuillers à soupe
de gluten de blé vital à la recette pour les tailles de pain respectives pour empêcher
cela. Le gluten de blé vital est commercialisé dans la plupart des magasins
d’alimentation diététique.
Pain de 1½ Livres INGREDIENTS Pain de 2 Livres
9 oz. (1 tasse + 2
cuillers à soupe)
1 ŒUF, gros 1
1 cuiller à soupe MELASSES 1½ cuillers à soupe
1 cuiller à soupe MIEL 1½ cuillers à soupe
2 cuillers à soupe BEURRE ou MARGARINE 2 cuillers à soupe
3 ⅓ tasses FARINE DE BLE COMPLET 4¼ tasses
2 cuillers à soupe LAIT CONDENSE 2 cuillers à soupe
1¼ cuillers à café SEL 1½ cuillers à café
2 cuillers à café LEVURE SECHE ACTIVE 2¼ cuillers à café
-ou- -ou- -ou-
1½ cuillers à café
EAU, 80° F
LEVURE A MACHINE A
PAIN/LEVEE RAPIDE
11½ oz. (1¼ tasses
+ 3 cuillers à soupe)
2 cuillers à café
15
Page 36

PAINS DOUX
Pain aux raisins
Quel pain pourrait être meilleur pour vous réveiller le matin ! Sorti tout chaud de la
machine à pain ou toasté, une excellente façon de démarrer la journée.
Pain de 1½ Livres INGREDIENTS Pain de 2 Livres
10½ oz. (1¼ tasse + 1
cuiller à soupe)
2 cuillers à soupe BEURRE ou MARGARINE 2 cuillers à soupe
3 ⅓ tasses FARINE A PAIN 4 tasses
2 cuillers à soupe LAIT CONDENSE 2 cuillers à soupe
2 cuillers à soupe SUCRE 2½ cuillers à soupe
1½ cuillers à café SEL 1¾ cuillers à café
1 cuiller à café CANNELLE MOULUE 1¼ cuillers à café
2 cuillers à café LEVURE SECHE ACTIVE 2¼ cuillers à café
-ou- -ou- -ou-
1½ cuillers à café
¾ tasse RAISINS 1 tasse
¼ tasse NOIX tranchées (facultatif) ⅓ tasse
EAU, 80° F
LEVURE A MACHINE A
PAIN/LEVEE RAPIDE
12½ oz. (1½ tasses
+ 1 cuiller à soupe)
2 cuillers à café
SUPER RAPIDE 1,5 Livres et SUPER RAPIDE 2 Livres
Utilisez la recette de votre choix et ajoutez une cuiller à café de levure pour les
recettes utilisant de la levure.
RAPIDE
Pain Aux Noix
Voici la recette de base à partir de laquelle vous pouvez créer des variantes.
Assurez-vous toujours de graisser l’intérieur du plat et les barres de pétrissage avec
de la graisse végétale avant d’ajouter les ingrédients et laissez le pain refroidir dans
le plat ou sur la grille pendant au moins 15 minutes pour assurer un bon démoulage.
Pain de 1½ Livres INGREDIENTS
4 cuillers à soupe HUILE VEGETALE
6 oz. (¾ tasse) LAIT
2 ŒUFS, gros
2½ tasses FARINE MULTI-USAGES
1 tasse SUCRE
2½ cuillers à café LEVURE CHIMIQUE
½ cuiller à café BICARBONATE DE SOUDE
1 cuiller à café SEL
½ tasse NOIX TRANCHEES
16
Page 37

VARIANTES DE SAVEURS POUR LE PAIN AUX NOIX
Noix et bananes : Remplacez l’huile végétale par ½ tasse de beurre ramolli ou de
margarine, découpé en petits morceaux pour un mélange parfait ; réduisez le lait à 2
cuillers à soupe ; ajoutez 1⅓ tasses de banane mure écrasée (environ 2 moyennes).
Cerises et pécan : Réduisez le lait à ½ tasse; utilisez des noix de pécan tranchées
à la place des noix tranchées ; ajoutez ½ tasse de cerises maraschino tranchées,
bien égouttées.
Airelles et noix : Réduisez le lait à ½ tasse et ajoutez 1 tasse d’airelles
grossièrement tranchées.
Dattes : Ne mettez pas de noix tranchées et ajoutez ¾ tasse de dattes tranchées et
½ cuiller à café de noix de muscade moulue.
NOIR
Pain De Seigle Classique
Un pain de seigle léger mais chaleureux qui peut être préparé avec ou sans graines
de carvi, en fonction de vos goûts.
Pain de 1½ ivres INGREDIENTS Pain de 2 ivres
10 oz. (1¼ tasses + 1
cuiller à soupe)
1 cuiller à soupe BEURRE ou MARGARINE 1 cuiller à soupe
2⅓ tasses FARINE A PAIN 3 tasses
1 tasse FARINE DE SEIGLE MOYENNE 1¼ tasses
2 cuillers à soupe LAIT CONDENSE 2 cuillers à soupe
1½ cuillers à soupe SUCRE 1½ cuillers à soupe
1¼ cuillers à café SEL 1½ cuiller à café
2 cuillers à café GRAINES DE CARVI, facultatif 2 cuillers à café
2 cuillers à café LEVURE SECHE ACTIVE 2¼ cuillers à café
-ou- -ou- -ou-
1½ cuillers à café
EAU, 80° F 12 oz. (1½ tasses)
LEVURE A MACHINE A
PAIN/LEVEE RAPIDE
2 cuillers à café
17
Page 38

PÂTE
Petits Pains Rond Classiques/Petites Baguettes
Préparez cette pâte élémentaire et donnez-lui la forme de vos petits pains préférés ;
petit pain en trèfle, petit pain en croissant et petit pain fin ou même baguettes pour le
plaisir ! Cette recette permet de préparer entre 2 et 3 douzaines de petits pains en
fonction de la forme. Congelez les restes de petits pains pour une prochaine fois.
Pain de 1½ Livres INGREDIENTS
7½ oz. (¾ tasse + 1 cuiller à
soupe)
3 cuillers à soupe BEURRE ou MARGARINE
3 tasses FARINE A PAIN
3½ cuillers à soupe SUCRE
2 cuillers à soupe LAIT CONDENSE
1 cuiller à café SEL
2 cuillers à café LEVURE SECHE ACTIVE
-ou- -ou1½ cuillers à café LEVURE A MACHINE A PAIN/LEVEE RAPIDE
Bagels Élémentaires
BEURRE RAMOLLI OU BLANC D’ŒUF
PÂTE A BAGELS
EAU, 80° F
LEGEREMENT BATTU
Pain de 1½ Livres INGREDIENTS
8 oz. (1 tasse) EAU, 80° F
3 tasses FARINE A PAIN
2 cuillers à soupe SUCRE
1½ cuillers à café SEL
1½ cuillers à soupe,
découpé en 6 morceaux
BEURRE ou MARGARINE
2 cuillers à café LEVURE SECHE ACTIVE
-ou- -ou-
1½ cuillers à café
LEVURE A MACHINE A PAIN/LEVEE
RAPIDE
3 quarts EAU
1 cuiller à soupe SUCRE
GRAINES DE PAVOT OU DE SESAME
(pour la décoration)
1 CUILLER A SOUPE DE PECTINE DE FRUIT A FAIBLE TENEUR EN
1½ TASSES DE FRAISES FRAICHES, lavées, tranchées et décortiquées
CONFITURE DE FRAISE DE BOULANGER
INGREDIENTS
1 TASSE DE SUCRE EN POUDRE
SUCRE
18
Page 39

GARANTIE DU PRODUIT
Garantie limitée d’1 an de l’appareil
Focus Electrics, LLC garantit cet appareil contre tout défaut de pièce et de main d’œuvre
pendant un (1) an à compter d el date d’achat d’origine avec un justificatif d’achat à condition
que l’appareil soit utilisé et entretenu conformément avec le Mode d’emploi de Focus Electrics.
Toute pièce défectueuse de l’appareil sera réparée ou remplacée sans frais à la discrétion de
Focus Electrics. Cette garantie s’applique en cas d’utilisation domestique en intérieur
uniquement.
La présente garantie ne couvre aucun dommage, notamment la décoloration, de toute surface
antiadhésive de l’appareil. Cette garantie est nulle et non avenue, tel que déterminé
uniquement par Focus Electrics si l’appareil est détérioré à la suite d’un accident, d’une
mauvaise utilisation, d’une utilisation abusive, d’une négligence, d’une rayure ou si l’appareil
est modifié de toute manière.
LA PRÉSENTE GARANTIE ANNULE ET REMPLACE TOUTE GARANTIE INDUITE,
NOTAMMENT LES GARANTIES DE COMMERCIALISATION, D’ADAPTATION À UN USAGE
PARTICULIER, DE PERFORMANCE, OU AUTRE QUI SONT ICI EXCLUES. EN AUCUN CAS
FOCUS ELECTRICS. NE POURRA ÊTRE TENUE POUR RESPONSABLE DE TOUT
DOMMAGE, QUE CELUI-CI SOIT DIRECT, INDIRECT, INDUIT, PRÉVISIBLE, SECONDAIRE
OU PARTICULIER, RÉSULTANT DE L’UTILISATION DE OU EN RELATION AVEC CET
APPAREIL.
Si vous pensez que cet appareil est défectueux ou nécessite des réparations pendant la durée
de sa garantie, veuillez contacter le Service clientèle de Focus Electrics au (866) 290-1851 ou
nous envoyer un e-mail à service@focuselectrics.com
d’origine sera nécessaire pour toute demande dans le cadre de la garantie, les factures
manuscrites ne sont pas acceptées. Il possible que l’on vous demande de renvoyer l’appareil
pour inspection et évaluation. Les frais de transport de retour ne sont pas remboursables.
Focus Electrics n’est pas responsable pour les retours perdus pendant le transport.
Valide uniquement aux USA et au Canada
. Une facture justifiant la date d’achat
PIECES DE RECHANGE
Les pièces de rechange, si elles sont disponibles, peuvent être commandées directement chez
Focus Electrics, LLC de plusieurs façons. Commandez en ligne à www.focuselectrics.com
courriel à service@focuselectrics.com
, par téléphone au (866)290-1851, ou en écrivant à :
Focus Electrics, LLC
Attn: Customer Service
P. O. Box 2780
West Bend, WI 53095
Pour les commandes payées par chèque ou mandat, veuillez d'abord prendre contact avec le
service à la clientèle pour obtenir le montant total de la commande. Envoyez votre paiement
avec une lettre indiquant le modèle ou le numéro de catalogue de votre appareil (ce numéro
est situé au-dessous ou au dos de l’appareil) et fournissez une description de la pièce ou des
pièces ainsi que la quantité que vous souhaitez commander. Les chèques sont à écrire à
l'ordre de Focus Electrics, LLC. Les taxes sur les ventes de votre état ou province et des frais
d’expédition seront ajoutés à votre prix
traitement et la livraison
Ce manuel contient des informations importantes et utiles concernant l’utilisation et l’entretien sans
danger de votre nouveau produit Focus Electrics. Pour une consultation ultérieure, fixez le ticket de
caisse daté pour avoir un justificatif d’achat pour la garantie et indiquez les informations ci-dessous:
Date d’achat ou de réception en cadeau : _____________________________________________
Lieu d’achat et prix, si connu : ______________________________________________________
Numéro de l’article et Code de date (indiqué au bas/dos du produit) : _______________________
total. Il faut compter environ deux semaines pour le
, par
L5762 07/08 West Bend®, une Marque de Focus Electrics, LLC. Imprimé en Chine
19
Page 40

Page 41
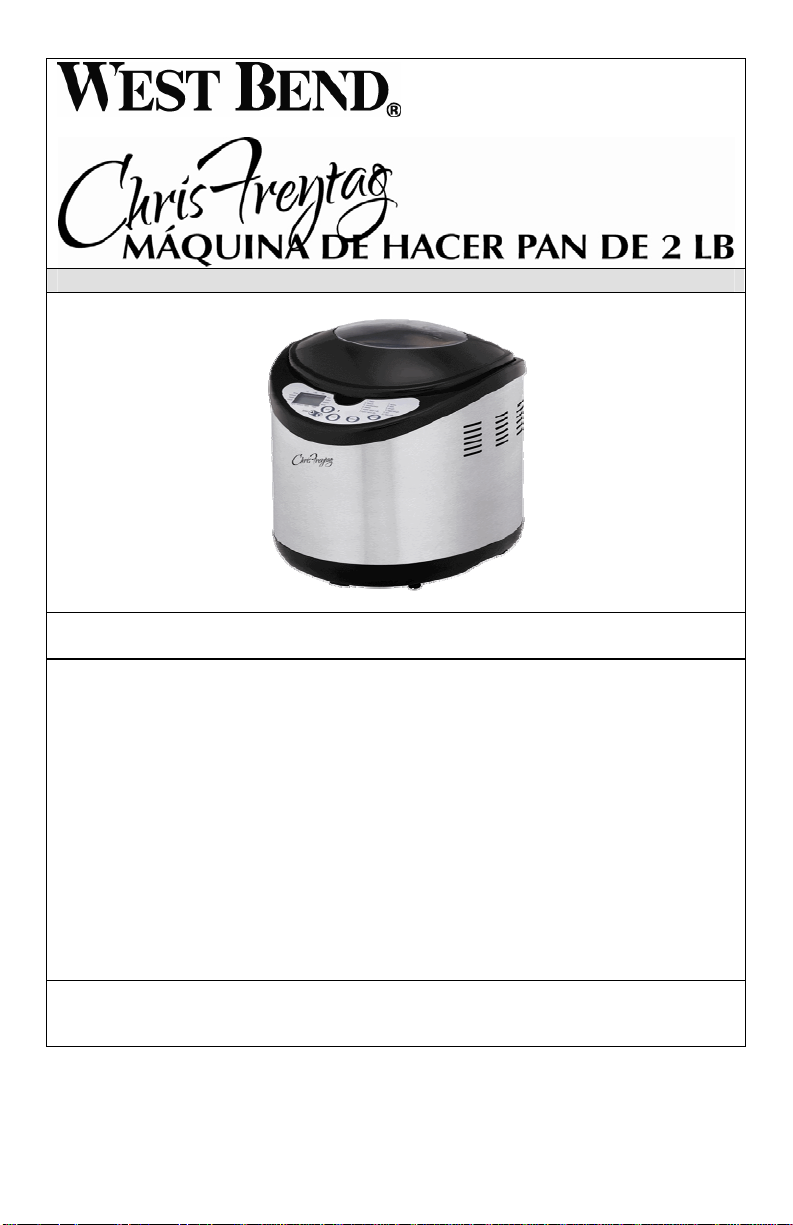
Manual de instrucciones
Registre éste y otros productos de Focus Electrics en nuestro sitio:
www.focuselectrics.com en Internet
Precauciones Importantes........................................................................................ 2
Precauciones de Funcionamiento ............................................................................ 3
Conozca su Máquina de Hacer Pan......................................................................... 3
Conozca Sus Ingredientes ....................................................................................... 6
Pasos Básicos Para la Preparación de Pan............................................................. 9
La Limpieza de su Máquina de Hacer Pan............................................................. 10
Resolución de Problemas ......................................................................................11
Recetas.................................................................................................................. 14
Garantía ................................................................................................................. 19
CONSERVE ESTAS INSTRUCCIONES COMO REFERENCIA PARA EL FUTURO
© 2008 West Bend®, una Marca de Focus Electrics, LLC.
www.focuselectrics.com
Page 42

PRECAUCIONES IMPORTANTES
Para evitar lesiones personales o daños materiales, lea y acate todas las
instrucciones y advertencias.
Al utilizarse artefactos electrodomésticos, siempre deben acatarse las precauciones
básicas de seguridad incluyendo las siguientes:
• Lea todas las instrucciones, incluso estas precauciones importantes, así como
las instrucciones de uso y cuidado en este manual.
• No toque las superficies calientes. Use las agarraderas o las perillas.
• Para protegerse contra descargas eléctricas no sumerja el cable, enchufes, u
otras partes eléctricas en agua u otros líquidos.
• Se requiere de supervisión adulta cuando cualquier artefacto electrodoméstico
sea usado por o cerca de niños.
• Desenchufe el aparato del tomacorriente cuando no esté en uso y antes de
limpiarlo. Deje que se enfrie antes de poner o quitar alguna parte, y antes de
limpiar.
• No haga funcionar este artefacto electrodoméstico con el cordón eléctrico o el
enchufe dañado, después que el artefacto llegase a funcionar mal, o si el
artefacto se ha dejado caer o se ha dañado de alguna manera.Si usted
experimenta algún problema con su máquina, desenchúfela inmediatamente del
tomacorriente. Para información relativa al servicio de reparaciones vea la
página de garantías.
• El uso de accesorios no recomendados por Focus Electrics puede causar
incendios, descargas eléctricas o lesiones personales.
• No use este aparato a la intemperie.
• No permita que el cordón eléctrico cuelgue del borde de un mostrador, mesa u
otra superficie, o que toque superficies calientes.
• No la coloque en o cerca de un quemador caliente de gas o eléctrico o en un
horno caliente.
• Se debe tener extrema precaución al mover un artefacto electrodoméstico que
contenga aceite caliente u otros líquidos calientes.
• Para desconectar, coloque cualquier control en la posición "OFF" (apagado), y
luego desenchufe del tomacorriente.
• No utilice el aparato para usos distintos del indicado.
• Evite contato con piezas en movimiento.
• No permita que el cordón haga contacto con la superficie caliente de la estufa.
• Este artefacto tiene un enchufe polarizado (una clavija es más ancha que la
otra). Para reducir el riesgo de descarga eléctrica, este enchufe está diseñado
para encajar de una sola manera en un tomacorriente polarizado. Invierta el
enchufe si éste no encaja completamente en el tomacorriente o en el cable de
extensión. Si todavía no encaja, póngase en contacto con un electricista
calificado. No trate de modificar el enchufe de manera alguna.
• Sólo para uso doméstico.
2
Page 43
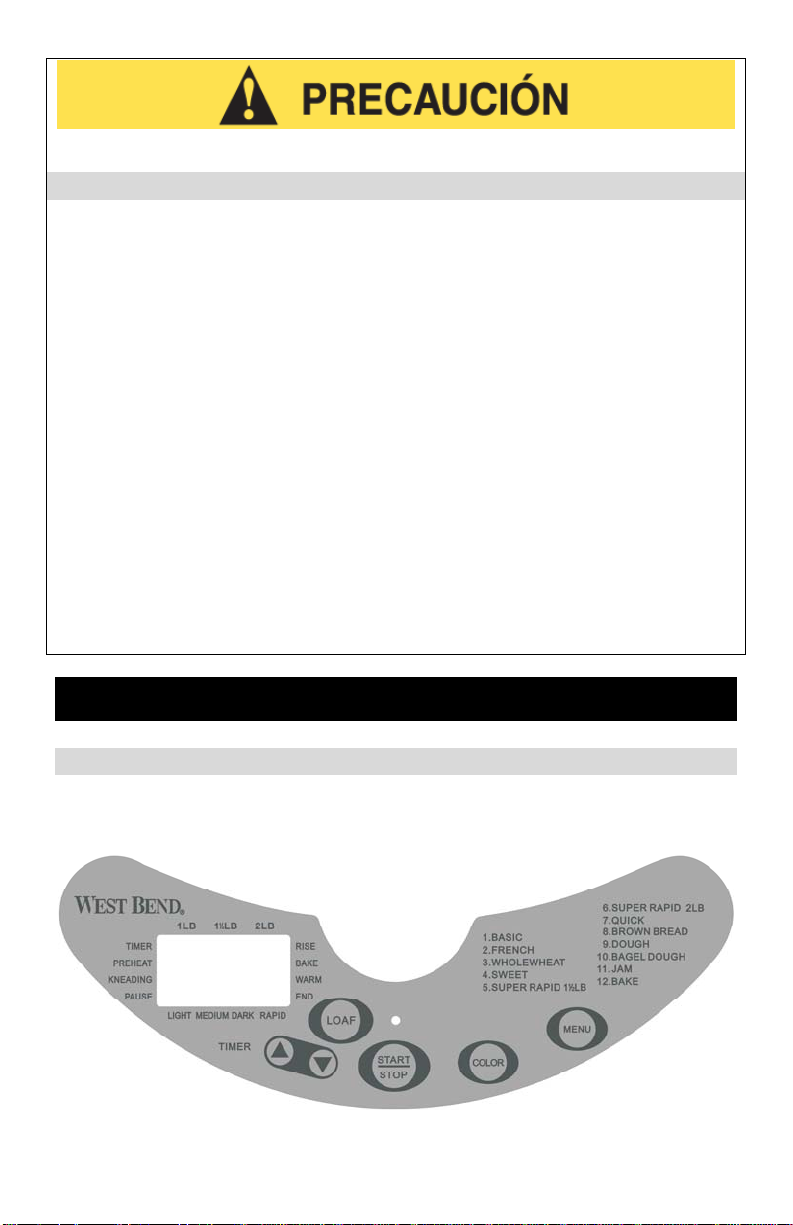
Para evitar lesiones personales o daños materiales, lea y acate todas las
instrucciones y advertencias.
PRECAUCIONES DE FUNCIONAMIENTO
• Coloque la máquina de hacer pan sobre una almohadilla térmica, trébedes u
otra superficie protectora contra el calor. Cuando la máquina de hacer pan esté
caliente, no la coloque directamente sobre la encimera, mesa o cualquier otra
superficie.
• No ponga la mano dentro de la cámara del horno después de haber retirado el
molde de pan. La unidad calefactora todavía estará caliente.
• No use su hacedor de pan con un convertidor o transformador. Éste destruirá
los controles electrónicos.
• No trate de reparar este artefacto electrodoméstico usted mismo.
• Se suministra un cordón eléctrico corto para reducir los riesgos que resultan de
enredarse o tropezarse con un cordón eléctrico más largo.
• Hay disponibles cordones de alimentación eléctrica desmontables más largos o
extensiones eléctricas y pueden ser utilizados si se ejerce cuidado al usarlos.
Mientras el uso de una extensión eléctrica no es recomendado, si usted debe
usar una, la capacidad eléctrica nominal marcada en el cordón desmontable de
alimentación eléctrica o la extensión eléctrica deberá ser al menos la misma
que la capacidad eléctrica nominal del artefacto electrodoméstico. Si el
artefacto electrodoméstico es del tipo conectado a tierra, la extensión eléctrica
deberá ser un cordón eléctrico de 3 hilos con conexión a tierra. El cordón
eléctrico debería ser extendido de tal manera que no pase sobre encimeras o
mesas donde pueda ser tirado por niños o tropezarse con el mismo.
CONSERVE ESTAS INSTRUCCIONES
CONOZCA A SU MÁQUINA DE HACER PAN
El panel de controles en su máquina de hacer pan fue diseñado para que sea muy
fácil de usar. Por favor examine las siguientes características del panel de controles
para entenderlo mejor.
3
Page 44

PANEL DE CONTROL Y LAS FUNCIONES
Pantalla LCD: La pantalla indica cuando el artefacto está listo para usarse.
Cuando la unidad se enchufa por primera vez, se inicia el programa preestablecido.
“1 3:25” aparece en la pantalla. "El 1" especifica qué programa es seleccionado (112 programas) y el "3:25" indica lo largo del programa en horas: minutos. La
posición de la marca en la parte superior de la pantalla indica el peso de la barra de
pan seleccionada (1, 1-1/2 o 2 libras) con 2 libras como valor preestablecido. La
posición de la marca en la parte inferior de la pantalla indica el grado de tostado
seleccionado (“light” (claro),”medium” (medio), “dark” (oscuro) o “rapid” (rápido)) con
medio como valor preestablecido. A medida que programa avanza, los dígitos del
tiempo mostrados disminuirán progresivamente indicando el tiempo remanente.
Durante la operación el estado del programa es indicado en la pantalla con una
marca en el modo del programa que está activo; “timer” (temporizador), “preheating”
(precalentado), “kneading” (amasado), “pause” (pausa), “rising” (subida), “baking”
(horneado), “keeping warm” (mantenimiento en caliente) y “program end”
(finalización del programa).
Botón “START/STOP” (encendido/parada)
apagado) es usado para iniciar, parar o hacer una pausa en un programa. El pulsar
el botón cuando la máquina de hacer pan no está activa comenzará el programa. El
pulsar el botón cuando la máquina de hacer pan está activa hará una pausa en el
programa. El pulsar el botón mientras el programa está en pausa reanudará el
programa. Cuando la máquina de hacer pan está activa o en pausa, el presionar y
mantener presionado el botón hasta oír un bip corto cancelará el programa. Se
escucha un bip corto con cada pulsación del botón “START/STOP” (encendido y
apagado). Debe fijar todos los ajustes deseados del programa antes de comenzar
el programa. El programa no puede cambiarse mientras la máquina de hacer pan
esté activa.
Botones UP (arriba) y DOWN (abajo) del “TIMER” (temporizador)
del temporizador son usados para fijar un tiempo retrasado de finalización del
programa. Sólo los siguientes programas pueden ser usados con el temporizador
de retraso: (1) “BASIC” (básico), (2) “FRENCH” (francés), (3) “WHOLEWHEAT”
(trigo entero), (4) “SWEET” (dulce), (8) “DARK” (negro), (9) “DOUGH” (masa) y (10)
“BAGEL DOUGH” (masa bagel). Los programas (5) “SUPER RAPID” (súper rápido)
1,5 libras, (6) “SUPER RAPID” (súper rápidó) 2 libras, (7) “QUICK” (rápido), (11)
“JAM” (mermelada) y (12) “BAKE” only (sólo horneado) no pueden iniciarse con el
temporizador de retardo. Las horas y minutos de retardo serán añadidos a las horas
preprogramadas para el programa específico. La hora indicada en la pantalla es la
hora al final del ciclo (no la hora al principio del ciclo). El retardo máximo es de 12
horas y 58 minutos por programa.
Ejemplo: son las 8:30 p.m. y le gustaría tener el pan listo para la mañana siguiente a
las 7:00 a.m. Determine la diferencia de tiempo: las 7:00 a.m. está 10 horas y 30
minutos por delante de las 8:30 p.m. Pulse el “TIMER” (temporizador) hacia arriba
(Up) o abajo (Down) hasta que 10:30 aparece en la pantalla.
¡NUNCA use la función de retardo usando ingredientes perecederos como la leche,
huevos, fruta, yogur, etc.!
El botón “START/STOP” (encendido y
: Los botones
4
Page 45

Botón “COLOR”
este botón; color “Light” (claro), “Médium” (medio), “Dark” (oscuro) o “Rapid
Function” (función rápida).
Botón “LOAF” (barra de pan)
para el tamaño de barra de pan seleccionado, 1lb, 1½lb o 2lb.
Botón “MENU” (menú): Use el botón de menú para seleccionar el programa
deseado. En general, use los programas sugeridos a continuación para las
especialidades siguientes.
SELECCIONES DE MENÚ
Menú 1: “BASIC” (básico) para panes blancos, de centeno, de papa, de huevo, de
ajo y similares. El ajuste “BASIC” (básico) puede ser usado para casi cualquier
receta de pan que contenga principalmente harina de pan.
Menú 2: “FRENCH” (francés) para la preparación de panes blancos e italianos
particularmente claros.
Menú 3: “WHOLEWHEAT” (trigo entero) para los panes que contienen 50 % o más
de trigo entero, trigo rajado, trigo de suero y similares.
Menú 4: “SWEET BREAD” (pan dulce) para preparar panes dulces con pasas,
canela, albaricoque y similares.
Menú 5: “SUPER RAPID” (súper rápido) 1½ libras para la producción de panes de
hasta 1½ libra en una hora.
Menú 6: “SUPER RAPID” (súper rápido) 2 libras para la producción de panes de
hasta 2 libras en una hora.
Menú 7: “QUICK” (rápido) para panes rápidos que no usan levadura y requieren
sólo mezclar y hornear.
Menú 8: “BROWN BREAD” (pan negro) para preparar pan oscuro, pan integral de
centeno y otros por el estilo.
Menú 9: “DOUGH” (masa) para la preparación de masa (sin hornear).
Menú 10: “BAGEL DOUGH” (masa de bagel) para la preparación de masa de
bagel.
Menú 11: “JAM” (mermelada) para cocinar mermeladas.
Menú 12: “BAKE” (hornear) para simplemente hornear y/o dorar panes o pasteles.
: El nivel tostado de deseado o la función rápida son ajustados con
: El botón SIZE (tamaño) ajusta los varios programas
5
Page 46

ALARMAS, SONIDOS FUNCIONES GENERALES
Alarmas: El avisador suena:
• Al pulsar cualquier botón que permita la selección de funciones. Si el botón no
emite una señal sonora, dicha opción de función no está disponible.
• Durante el segundo ciclo de amasado de los programas “BASIC” (básico),
“WHOLEWHEAT” (trigo entero), “SWEET” (dulce) y “BROWN BREAD” (pan
negro) para señalar que los cereales, frutas, nueces u otros ingredientes
pueden ser añadidos.
• Al llegar al final del programa.
• Durante la fase de advertencia al final del procedimiento de horneado, el
avisador suena varias veces.
Interrupción del Suministro Eléctrico: Si hay una breve interrupción de la energía
eléctrica de menos de cinco minutos, la posición en el programa es almacenada en
la memoria y la máquina continuará cuando la energía eléctrica sea restaurada.
Error de Exceso de Temperatura: Si se está tratando de preparar hornadas
consecutivas, un "E01" parecerá en la pantalla al presionar inicio y la alarma sonará
si la temperatura del artefacto electrodoméstico es demasiado alta. Pulse y
mantenga presionado el botón "START/STOP" (iniciar/parar) hasta que el mensaje
“E01” se despeje y el ajuste básico aparezca en la pantalla. Retire el molde para
pan, deje abierta la tapa y permita que el artefacto electrodoméstico se enfríe
durante 15-20 minutos. Sólo el programa "BAKE" (hornear) puede ser iniciado
inmediatamente después de limpiar el mensaje “E01”, incluso si el artefacto
electrodoméstico está aún caliente.
CONOZCA LOS INGREDIENTES Y MÍDALOS CON EXACTITUD
Aunque la preparación de pan parezca sumamente básica, esto es una ciencia y las
proporciones de los ingredientes son críticas. El paso más importante al utilizar la
máquina de hacer pan es el medir los ingredientes exacta y precisamente. Lea la
información siguiente para entender mejor la importancia que cada ingrediente juega
en el proceso de preparación del pan. Siempre asegúrese de que los ingredientes
sean frescos.
Siempre mida los ingredientes líquidos en tazas de medición
transparentes con marcas graduadas. Coloque la taza sobre una superficie plana y
mida a “nivel de ojo’, no a un ángulo. Todas las medidas deben ser exactas.
Siempre use líquidos a una temperatura entre 27-32°C (80-90°F) para asegurar la
actividad óptima de la levadura.
Siempre trasiegue los ingredientes secos a tazas de medición o
cucharas marcadas, y luego nivele con un cuchillo de mesa. Todos los ingredientes
medidos en las cucharas y tazas de medición deben quedar a ras del nivel de las
mismas, nunca abultadas o colmadas.
Nunca meta las tazas de medición dentro de los ingredientes secos.
Este comprimirá los ingredientes en la taza y hará que la masa quede seca, lo cual
resultará en una barra de pan corta.
6
Page 47

Deberá usarse HARINA DE PAN en s
proteínas formadoras de gluten que la harina de uso múltiple y proveerá panes bien
formados con una buena estructura. Hay disponibles varias marcas diferentes de
harina de pan.
LA HARINA INTEGRAL puede ser usada en combinación con la harina de pan con
el Bread Sel ect (selector de pan) ajustado a la posición “WHOLEWHEAT” (trigo).
La harina de trigo integral contiene grano de trigo entero, incluso el salvado y el
germen; por lo tanto, los panes hechos con el 100 por ciento o un alto porcentaje de
harina de trigo integral serán más chicos en altura y más pesados en textura que los
panes hechos con harina de pan. El ajuste de trigo entero “WHOLEWHEAT” en su
máquina de hacer pan está programado para desarrollar mejor la estructura de los
panes de trigo y obtener resultados óptimos.
LA HARINA DE CENTENO puede ser usada en combinación con la harina de pan
para preparar pan de centeno. Sin embargo, no puede ser usado solo cuando ya
que no contiene suficiente proteína para desarrollar el gluten adecuado para la
estructura.
EL AZÚCAR Y OTROS DULCIFICANTES proporcionan alimento para la levadura,
le añaden altura y sabor al pan y le dan a la corteza un color dorado Entre los tipos
de dulcificantes que pueden ser usados se incluyen el azúcar, azúcar moreno, miel,
melaza, azúcar de arce, jarabe de maíz y frutas (secas o frescas). No use
dulcificantes artificiales como sustitutos de los azúcares y demás dulcificantes
naturales ya que la levadura no reaccionará correctamente y se obtendrán pobres
resultados.
La LECHE realza el sabor y aumenta el valor nutritivo del pan. Cualquier tipo de
leche (en polvo, entera, de 2%, de 1%, descremada, suero o leche evaporada
enlatada) pueden ser usada en la preparación del pan. La leche refrigerada puede
calentarse a 80-90°F; sin embargo, no la caliente de más (por encima de 100°F) ya
que podría afectar la actividad de la levadura. No use leche regular al usar la
función Time Delay (retardo). Utilice leche en polvo y agua como un sustituto.
El AGUA usada en combinación con la leche en polvo puede ser sustituir a la leche
regular y debe ser usada al utilizar la función “TIME DELAY” (retardo) ya que la
leche regular puede agriarse si se deja a la temperatura ambiente durante varias
horas. Use agua tibia, alrededor de 27-32°C (80-90°F). No use agua por encima de
100°F ya que esto podría afectar la levadura.
La MANTEQUILLA, MARGARINA, MANTECA Y ACEITES cumplen varios
objetivos en la preparación de pan ya que estos lo ablandan y le añaden sabor y
riqueza. La mantequilla y la margarina son intercambiables en las recetas. La
mantequilla y la margarina pueden ser usadas directamente del refrigerador, pero
corte la mantequilla o margarina fría en pedazos más pequeños para una mezcla
más rápida durante el ciclo de amasado. Se puede preparar pan de pocas calorías
o sin grasas substituyendo cantidades iguales de compota de manzanas no
endulzada o yogur regular por la cantidad de grasa recomendada en la receta. La
utilización de menos grasa afectará la altura, la ternura y la textura del pan, lo cual
es normal.
u máquina de hacer pan. Esta contiene más
7
Page 48

Los HUEVOS añaden color y riqueza al pan y lo ayudan a leudar. Use huevos
grandes. No es necesario premezclarlos. Los sustitutos de huevo pueden ser
usados en lugar de huevos frescos. Un huevo es igual a ¼ taza de sustituto de
huevo. Para r
g
rande por dos (2) claras de huevo sin afectar el resultado final. Observe la masa
durante el ciclo de amasado ya que algún ajuste menor podría requerirse para hacer
que la masa tenga la consistencia correcta.
La SAL tiene varias funciones en la preparación del pan. Controla el crecimiento de
la levadura a la vez que refuerza la estructura del gluten para hacer que la masa sea
más elástica y le añade sabor. Use la sal de mesa ordinaria en su máquina de
hacer pan. La utilización de demasiado poca sal, o su eliminación, causará que la
masa suba demasiado. Utilizar demasiado pu
q
ue debería hacerlo. La sal "ligera" puede ser usada como sustituta de la sal de
mesa ordinaria, siempre y cuando contenga tanto cloruro de potasio como de sodio.
Use la misma cantidad recomendada para la sal de mesa. Al añadir la sal al molde,
añádala en una esquina para mantenerla alejada de la levadura, sobre todo al usar
el retardo ya
La LEVADURA es un organismo vivo que por medio de la fermentación se alimenta
de hidratos de carbono en la harina y el azúcar para producir el gas dióxido de
carbono que hace que el pan suba. En su máquina de hacer pan se puede utilizar
levadura activa seca de subida rápida o de máquina de hacer pan. Use sólo la
cantidad indicada en las recetas. La utilización de un poco más puede causar que
la masa suba de más y se hornee en la parte superior de la máquina de hacer pan.
La levadura
p
rácticamente lo mismo e intercambiables la una con la otra. No use levadura
comprimida ya que se obtendrán pobres resultados. Un sobre de una ¼ onza
levadura contiene 2¼ cucharaditas. La levadura también puede ser comprada
tarros de manera que usted puede medir la cantidad exacta necesaria. Una vez
abierto, manténgalo refrigerado. Siempre asegúrese de que la levadura sea fresca
y no haya sobrepasado su fecha de vencimiento.
N
OTA ESPECIAL SOBRE LA CANELA Y EL AJO: El agregar demasiada canela o
ajo puede afectar la textura y el tamaño del pan. La canela puede degradar la
estructura de la masa, afectando la altura y la textura. Demasiado ajo puede inhibir
la actividad de levadura. Use sólo las cantidades de canela y ajo recomendadas en
la receta.
educir el colesterol, en la receta usted puede sustituir un huevo
ede impedir que la masa suba al nivel
que la sal puede afectar la actividad de misma.
de subida rápida y la levadura de máquina de hacer pan son
de
en
8
Page 49

PASOS BÁSICOS PARA LA PREPARACIÓN DE PAN
Antes de usarlo, siempre limpie a fondo su artefacto electrodoméstico nuevo.
Consulte la sección “Limpieza de su Máquina de Hacer Pan”.
1. Inserte el molde para pan; coloque el molde para pan recubierto con
antiadherente exactamente en el medio de la base dentro del espacio de
horneado. Cuando el molde para pan es presionado ligeramente en el centro, el
dispositivo de fijación queda enganchado. Para retirar el molde para pan, tire
con fuerza media del asa del molde para pan. PRECAUCIÓN: El asa está
caliente después de hornear. Utilice guantes de cocina o almohadillas térmicas
al sacar un molde para pan caliente.
2. Coloque la barra de amasar sobre el eje en el fondo del molde, emparejando la
forma del cubo con la forma del eje. Puede que necesite tener que torcer la
barra ligeramente para que ésta caiga en sitio. Asegúrese de que la barra de
amasar se empuje a lo largo del eje hasta abajo de todo.
3. Añada los ingredientes al molde en el orden listado en la receta: los líquidos
primero, luego la mantequilla o margarina, después los ingredientes secos y
finalmente la levadura. Para los mejores resultados n
secos antes de añadir la levadura.
4. Enchufe el cordón eléctrico de la máquina de hacer pan SOLAMENTE a un
tomacorriente de corriente alterna de 120 voltios.
5. Use el botón “MENU” (menú) para seleccionar el menú de programa deseado.
6. Use el botón “COLOR” para seleccionar el grado de tostado deseado.
7. Use el botón de “LOAF” (barra de pan) para seleccionar el tamaño deseado de
la barra de pan.
8. Si lo desea, use las flechas hacia arriba o abajo del temporizador “TIMER” para
ajustar el tiempo que tiene que pasar para cuando se desee que el programa
deba ser completado.
9. Pulse el botón de “START/STOP” (encendido y apagado) para iniciar el
programa. El indicador de inicio se iluminará.
Una vez que la máquina de
hacer pan ha sido encendida, el ajuste programado no puede ser cambiado sin
anular el programa. Para cambiar el ajuste, presione el botón “START/STOP”
(encendido y apagado) hasta que la alarma suene y la luz verde de "operación"
se apague. Entonces programe el control según lo desee y vuelva a encender
el artefacto.
10. Cuand
o el pan está listo, sonará una alarma y el indicador de inicio destellará.
Apague la máquina de hacer pan presionando el botón “START/STOP”
(encendido y apagado) hasta que suene la alarma y la luz roja “conservar
caliente " se apague. Desenchufe el cordón eléctrico del tomacorriente. Si la
máquina de hacer pan no es apagada después de completarse el ciclo, la
misma entrará automáticamente en una modalidad de “mantenimiento en
caliente” de una hora de duración. Si la máquina no es apagada después del
final del periodo de “mantenimiento en caliente”, la máquina y el indicador de
inicio se apagarán solos.
11. Retire el molde de pan. PRECAUCIÓN: El asa está caliente después de
hornear. Utilice guantes de cocina o almohadillas térmicas al sacar un molde
para pan caliente.
ivele los ingredientes
9
Page 50

12. Invierta a el pan.
el molde de pan y agítelo suavemente hasta que caig
elo durante os Colóqu sobre una rejilla un 15 a 20 minutos para que se enfríe.
La barra de amasar normalmente se quedará en el molde al sacar el pan, pero
de vez en cuando puede deslizarse dentro el pan. Si la barr
pan, sáquela antes de rebanar el pan. Si se va a preparar otro pan e
asegúrese de la que máquina se apague y permita enfriarse durante 15
minutos con la tapa abierta.
Ajuste para altitudes altas: La reducida presión atmosférica a altas altitudes hac
que los gases de la levadura se expandan más velozmente y que la masa suba
a está dentro del
n seguida,
a 20
e
más
rápidamente. La masa puede subir tanto que cuando comience a hornearse sufra
un colapso debido al estiramiento excesiv
o de la estructura de gluten. Para reducir
la subida de la masa, reduzca la cantidad de levadura en ¼ de cucharilla a la vez
hasta que dé con la cantidad correcta. También puede reducir la cantidad de líquido
en una cucharilla o dos. Alguna experimentación será necesaria al usar su máquina
de hacer pan a altas altitudes.
LA LIMPIEZA DE SU MÁQUINA DE HACER PAN
1. Desenchufe el cordón eléctrico del tomacorriente y permita que se enfríe
completamente antes de limpiarla.
2. Después de sacar el pan del molde, llene éste hasta la mitad con agua caliente
y una pequeña cantidad de jabón para platos. Permita que el molde quede e
remojo durante 5 a 20 minutos o hasta que la barra de amasar pueda se
levantada del eje. Puede ser que necesite torcer la barra ligerame
aflojarla. La barra de amasar debe remojarse en agua antes de que pueda ser
sacada. Si se dificulta sacar la barra de amasar después del remojo, asegure la
barra transversal en la cara inferior del molde a la vez que tuerce la barra de
amasar para aflojarla. Con un paño suave lave la parte interna del molde y la
barra de amasar, enjuague y seque. Use un detergente suave. No use
ninguna esponja metáli
ca o productos de limpieza abrasivos en el molde de pan
o la barra de amasar pues puede dañar el recubrimiento o
acabado. Vuelva a colocar la barra de amasar sobre el eje.
3. No sumerja el molde de pan en agua ni lo lave en un lavavajillas
automático ya que se puede dañar el cojinete que gira la barra
de amasar. Limpie dentro de la cámara de hornear y las
superficies externas de la máquina de hacer pan con una tela húmeda si fuese
necesario. ¡Nunca sumerja el artefacto electrodoméstico en agua o llene el
compartimiento de horneado de agua! Para una limpieza fácil, puede quitarse
la tapa colocándola en posición vertical y sacándola.
NOTA: El recubrimiento interno del molde de pan puede cambiar de color con el
tiempo, lo cual es normal y no afecta al pan.
n
r
nte para
10
Page 51

GUÍA DE SOLUCIÓN DE PROBLEMAS
Analice los Siguientes Problemas, Sus Causas Posibles y Soluciones.
TAMAÑO Y FORMA DEL PAN
Panes cortos.
Los panes de trigo serán más• cortos que los panes blancos debido a una menor
cantidad de la proteína que forma el gluten en la harina integral.
• No hay suficiente líquido - Aumente el líquido en 1-2 cucharillas.
• Se omitió el azúcar o no se agregó suficiente - Reúna los ingredientes tal como
se indican en la receta.
• El tipo de harina usada no es la correcta - No use harina de uso general.
• No se usó suficiente levadura o está demasiado vieja. Mida la cantidad de
recomendada y revise la fecha de frescura de caducidad en el paquete.
• Se uso el tipo incorrecto de
levadura. Utilice levadura de subida rápida o para
máquina de hacer pan. No use levadura comprimida.
Panes planos, no hay subida.
• Se omitió la levadura - Reúna los ingredientes tal como se indican en la receta.
• rifique la fecha de vencimiento.
La levadura es demasiado vieja – Ve
• El líquido está demasiado caliente - Use líquidos tibios 27-32°C (80-90°F).
• Se añadió demasiada sal – Utilice la cantidad recomendada en la receta.
• Se omitió el azúcar u otro dulcificante - Reúna los ingredientes tal como se
indican en la receta.
La parte superior y los laterales se hunden.
• Demasiado líquido - Reduzca el líquido en 1-2 cucharillas.
• Demasiada levadura – Usa la cantidad recomendada.
Parte superior nudosa, no lisa.
• No hay suficiente líquido – Auméntelo en 1-2 cucharaditas.
• Demasiad harina – Mida la harina con precisión, nivelando la taza
Panes desiguales, más cortos en un extremo.
• La masa está demasiado seca previendo el crecimiento parejo en el molde -
Incremente la cantidad de líquido en 1 a 2 cucharaditas.
C
olapsó mientras se horneaba.
• Puede ser causado por hornear a altas altitudes - Haga el ajuste para hornear a
alto altitud, reduciendo la levadura en ¼ cucharadita y el líquido en 1-2
cucharaditas.
de medición.
11
Page 52

TEXTURA DEL PAN
Tex
tura pesada y densa.
Demasiada harina – Mida la harina con precisión, nivelando la taza de
•
medición.
• No hay sufic
• No hay suficiente azúcar - Añada la cantidad recomendada de azúcar.
iente levadura - Añada la cantidad recomendada de levadura.
Textura abierta, gruesa y llena de agujeros.
• Se omitió la sal - Reúna los ingredientes tal como se indican en la receta.
• ñada la cantidad recomendada de levadura.
Demasiada levadura - A
• Demasiado líquido - Reduzca el líquido en 1-2 cucharaditas.
El pan no se corta bien, está muy pegajoso.
• Rebanado mientras estaba caliente – Permita que el pa
n se enfríe en la rejilla
por lo menos 15-20 minutos antes de cortarlo para que libere el vapor.
• No está usando el cuchillo a
propiado. – Use un buen cuchillo de pan o un
cuchillo eléctrico.
El centro del pan está crudo, no se horneó
Demasiado líquido - Reduzca el líquido en 1-2 cucharaditas.
•
Corte de suministro eléctrico – Si la energía eléctrica llegase a cortarse durante
•
la operación durante un lapso mayor de 5 minutos, la máquina de hacer pan
permanecerá apagad
a cuando la energía eléctrica sea restaurada. Retire la
barra de pan no cocida del molde para pan y comience de nuevo con
ingredientes frescos.
• Se olvidó de colocar la barra de amasar en el molde - Antes
ingredientes, asegúrese siempre de que la barra de amasar
de añadir
esté en el eje en el
fondo del molde.
GROSOR Y COLOR DE LA CORTEZA
orteza demasiada gruesa con color oscuro.
C
• Demasiado azúcar - Reduzca el azúcar a la m
itad.
El pan está quemado.
La máquina de hacer pan está funcionando mal – Vea la página de Garantía
•
para la información de servicio
.
Corteza demasiado clara.
• No hay suficiente azúcar - Aumente el azúcar o la grasa en una mitad m
recomendado.
ás de lo
12
Page 53

PROBLE RA PAN
No puede quitarse la barr
• Añada agua tibia al molde para pan y permita que la barra de amasar q
remojo antes de tratar de sacarlo. Siga las instrucciones de limpieza. P
MAS DEL MOLDE PA
a de amasar.
uede en
ara
aflojarla, puede que tenga que torcer la barra ligeramente después de
remojarla. No sumerja el molde de pan en agua.
lE• pan se pega al molde / difícil de vaciarlo sacudiendo.
Puede ocurrir con el uso prolongado – Unte aceite ve
dentro del molde de pan, de las costillas para abajo, o añada 1 cucharada
getal o manteca sólida
de
aceite vegetal al líquido en el molde antes de añadir los ingredientes secos. No
use spray vegetal ya que la pegajosidad puede empeorarse. O, deje
reposar en el molde durante 10 minutos antes de vaciarlo sacu
pedirse un molde de reemplazo. Vea la sección de Garantía.
MECÁNICA DE LA M
ÁQUINA
al pan
diendo. Puede
Ingredientes no se mezclan.
• La máquina no arrancó – Después de programar el panel de instrument os
,
pulse el botón “START/STOP” (encendido y apagado) para encender el
artefacto.
•
Se olvidó de colocar la barra de amasar en el molde - Antes de añadir
ingredientes, asegúrese siempre de que la
barra de amasar esté en el eje en el
fondo del molde.
Se notó olor a quemado durante la operación.
• Los ingredientes se derramaron dentro del horno – Procure no derramar
ingredientes al agregarlos al molde ya que se quemarán en la unidad
calentadora y formarán humo.
• Escapes del molde – Puede pedirse un molde de reemplazo. Vea la se
cción de
Garantía.
• Se está excediendo la capacidad del molde del pan – No use más ingredientes
de los recomendados e ie
n la receta y s mpre mida con exactitud.
• La máquina fue un corte de
energía eléctrica Cómo puedo
desenchufada por equivocación o hubo
de más de 5 minutos durante el uso. ¿
salvar el pan?
• Si la máquina está en el ciclo de amasado, vuelva a
programar al mismo ajuste
de pan y vuelva a encender la máquina.
• Si la máquina está e
n el ciclo de subida u horneado, precaliente el horno
convencional a 177°C (350°F). Con cuidado saque el molde de la máquina y
hornee en la rejilla en el centro del horno durante 20-25 minutos o hasta que
tome un color oro marrón.
La alarma suena, la pantalla muestra E01 y la máquina no puede ser
encendida.
• Máquina de hacer pan está
demasiado caliente para hacer barras de pan de
manera consecutiva – Desenchufe el cordón eléctrico del tomacorriente y
permita que se enfríe durante 15-20 minutos con el molde quitado y la tapa
abierta. Enchufe el cordón eléctrico de nuevo en el tomacorriente, coloque el
molde en su sitio y encienda la máquina.
• La máquina de hacer pan está funcionando mal – Vea la página de Garantía
para la información de servicio.
13
Page 54

RECETAS
La mezclas de pan preempacadas pueden usarse en su máquina de hacer pan.
s
Simplemente siga las instrucciones dadas para la mezcla de pan específica. A
menos que se indique lo contrario para la mezcla de pan, use el ajuste de 1½ libr
para el tamaño de la barra de pan. Siga prácticas estándares; primero agr
gredientes líquidos en el molde para pan, luego los
in
levadura (de ser requerida) de último. Las siguientes son alg
sencillas para que pueda comenzar. Hay muchos libros de receta que contien
recetas de pan y muchas recetas más pueden ser encontradas en el Internet. Uste
también puede visitar nuestro sitio Web en www.focuselectrics.com para encontrar
recetas adicionales e información útil para que la preparación de pan le sea u
experiencia agradable y provechosa.
ingredientes secos con la
unas recetas de pan
BÁSICO (“BASIC”)
Pan Blanco Tradicional
Hecho con leche para una corteza tierna y una textura fina. ¡Ahora usted también
puede hacer el pan jus
Barra de 1½ Libra INGREDIENTE
11 onz. (1¼ tazas + 2
cucharadas)
2 cucharadas MANTEQUILLA O MARGARINA 2 cucharadas
3 ⅓ tazas HARINA DE PAN 4 tazas
1½ cucharadas AZÚCAR 2 cucharadas
1¼ cucharadita SAL 1½ cucharadita
2 cucharaditas LEVADURA SECA ACTIVA 2¼ cucharaditas
-o- -o- -o-
1½ cucharaditas
to como la abuela solía hacerlo!
S Barra de 2 Libras
LECHE
LEVADURA RÁPIDA / DE
MÁQUINA DE HACER PAN
13 onz. (1½ ta
2 cucharad
2 cucharaditas
as
egue los
en
d
na
zas +
as)
14
Page 55

FRAN CH”)
CÉS (“FREN
Pan Francés
Crujiente por fuera, masticable por dentro. ¡Justo como debería ser!
Barra de pan de 1½
Libra
10½ onz. (1¼ tazas +
1 cucharada)
1 cucharada MANTEQUILLA O MARGARINA 1½ cucharada
3 ⅓ tazas HARINA DE PAN 4¼ tazas
1½ cucharaditas AZÚCAR 2 cucharaditas
1¼ cucharadita. SAL 1½ cucharaditas
2 cucharaditas LEVADURA SECA ACTIVA 2¼ cucharaditas
-o- -o- -o-
1½ cucharaditas
INGREDIENTES Barra de 2 Libras
AGUA, 80° F
LEVADURA RÁPIDA / D
MÁQUINA DE HACER PAN
E
12½ onz. (1½ tazas
+ 1 cucharada)
2 cucharaditas
TRIGO ENTERO (“WHOLEWHEAT”)
100 % Integral
Pan
, lleno la fibra ya que se u de trigo integr n un
ciclo más largo ado proporcionará resultados f ulosos. Si el
colapsase dur orneado, añada 1 o aradas de
trigo vital a la re de barra de va para impedir
esto suceda. El ede e mayor parte de
tiendas de alimentos nat s.
Barra de pan de
Libra
9 onz. (1 taza + 2
cucharadas)
1 HUEVO, grande 1
1 cucharada MELAZA 1½ cucharadas
1 cucharada MIEL 1½ cucharadas
2 cucharadas MANTEQUILLA O MARGARINA 2 cucharadas
3 ⅓ tazas HARINA DE TRIGO INTEGRAL 4¼ tazas
2 cucharadas LECHE EN POLVO 2 cucharadas
1¼ cucharadita. SAL 1½ cucharaditas
2 cucharaditas LEVADURA SECA ACTIVA 2¼ cucharaditas
-o- -o- -o-
1½ cucharaditas
de amas ab pan
ante el período de h 1½ cuch gluten de
ceta para el tamaño pan respecti que
gluten de trigo vital pu ncontrarse en la las
urale
1½
LEVADURA RÁPIDA / DE
MÁQUINA DE HACER PAN
sa harinaUn pan denso al. Un ajuste co
INGREDIENTES Barra de 2 Libras
AGUA, 80° F
11½ onz. (1¼ tazas
+ 3 cucharadas)
2 cucharaditas
15
Page 56

DULCE (“SWEET”)
acer pan o tostado, un gran modo de comenzar el día. h
Barra de pan de 1½
Libra
10½ onz. (1¼ tazas +
1 cucharada)
2 cucharadas MANTE ARINA QUILLA O MARG 2 cucharadas
3 ⅓ tazas HARINA DE PAN 4 tazas
2 cucharadas LECHE OLVO EN P 2 cucharadas
2 cucharadas AZÚCAR 2½ cucharadas
1½ cuchar asadit SAL 1¾ cuch itas arad
1 cuchara 1¼ cuch itas ditas CANELA MOLIDA arad
2 cucharaditas LEVADURA SECA ACTIVA 2¼ cucharaditas
-o- -o- -o1½ cucharaditas
¾ taza PASAS 1 taza
¼ taza taza NUECES PICA ⅓DAS (opcionales)
Pan de Pasa
a máquina de ¡Qué mejor pan con el que despertar por la mañana! Caliente de l
INGREDIENTES Barra de 2 Libras
AGUA, 80° F
LEVADURA RÁPIDA / DE
MÁQUINA DE HACER PAN
12½ onz. (1½ tazas
2 cucharaditas
+ 1 cucharada)
SÚPER RÁPIDO 1.5 Libras y SÚPER RÁPIDO 2 Libras
Use su receta preferida y añada 1 cucharadita de levadura para aquellas recetas
que usan levadura.
RÁPIDO (“QUICK”)
Pan de Nuez
É partir de en crear vari
sta es la receta maestra a la cual se pued aciones según lo
indicado a continua
barras de am
n se enfríe en el mold
una buena lib
Barra de INGREDIEN ES
4 cucharadas ACEITE VEGETAL
6 onz. (¾ taza) LECHE
2 HUEVOS, grandes
2½ tazas HARINA DE USO GENERAL
1 taza AZÚCAR
2½ cucharaditas LEVADURA EN POLVO
½ cucharadita BICARBONATO DE SOSA
1 cucharadita SAL
½ taza
ción. Siempre as grasar el int
asar con manteca ante s ingredien el
e sobre la enos 15 m
eración.
1½ libra T
egúrese de en
s de añadir lo
NUECES PICADAS
16
erior del molde y las
tes y permitir que
tos para asegurarpa rejilla durante al m inu
Page 57

VARIACIONE N DE NUEZ
S DE SABOR DEL PA
Nuez con Banana: Sustituya l por ½ taza de mantequilla o
margarina ablandada, cortada en pequeños pedazos para poderlos mezclar bien;
reduzca la leche a 2 cucharadas; añada 1⅓ tazas de banano maduro triturado
aproximadamente 2 medianos). (
P eduzca la l e pacanas
acanas y cerezas: R eche a ½ taza; us picadas en vez de
nueces picadas; añada
Nueces y arán
gruesamente p
Dátiles: Omita das y añada ¾ ta átiles picados
cucharadita de
danos: Reduz ue nos
icados.
las nueces pica za de d y ½
nuez moscada molida.
½ taza de cerezas de marrasquino picad
el aceite vegeta
as, bien drenadas.
1 taza de arándaca la leche a ½ taza y añade q
NEGRO (“BROWN”)
P
an de Centeno Cilásico
Un pan pero abundante que puede prepar se, a su
si
10 onz. (1¼ tazas + 1
cucharada)
1 cucharada MA INA 1 cucharada NTEQUILLA O MARGAR
2⅓ tazas HARINA DE PAN 3 tazas
1 taza HARIN MEDIA 1¼ tazas A DE CENTENO
2 cucharadas LECHE EN PO 2 cucharadas LVO
1½ cucharadas AZÚCAR 1½ cucharadas
1¼ cucharadita SAL 1½ cucharadita
2 cucharaditas
2 cucharaditas LEVADURA SECA ACTIVA 2¼ cucharaditas
-o- -o- -o1
de centeno liviano, ar gusto, con o
n semilla de alcaravea.
Barra de
pan de 1½
Libra
INGREDIENTES Barra de 2 Libra
AGUA, 80° F 12 onz. (1½ tazas)
SEMILLA DE ALCARAVEA,
opcional
LEVADURA RÁPID
MÁQUINA DE HA
A / DE
CER PAN
2 cucharaditas
2 cuc
haraditas ½ cucharaditas
s
17
Page 58

MASA (“DOUGH”)
Palillos de Pan/Bolillos Básicos
¡Prepare esta masa básica y déles forma de bolillos, como de hoja de trébol, media
luna y parker o hasta palillos de pan por diversión! Prepara entre 2 y 3 docenas de
bolillos según la forma de estos. Congele cualquier bolillo sobrante para otro
omento. m
Barra de 1½ Libra INGREDIENTES
7½ onz. (¾ taza + 1
cucharada.)
AGUA, 80° F
3 cucharadas MANTEQUILLA O MARGARINA
3 tazas HARINA DE PAN
3½ cucharadas AZÚCAR
2 cucharadas LECHE EN POLVO
1 cucharadita SAL
2 cucharaditas LEVADURA SECA ACTIVA
-o- -o-
1½ cucharaditas
LEVADURA RÁP
MAN A ABLANDADA o CLARA DE
TEQUILL
HUEVO LIGERA
IDA / DE MÁQUINA DE
ER PAN
HAC
MENTE BATIDA
MASA DE BAGEL (“BAGEL DOUGH”)
Bagel Básico
Barra de pan de 1½ ING S
Libra REDIENTE
8 onz. (1 taza) AGUA, 80° F
3 tazas HARINA DE PAN
2 cucharadas AZÚCAR
1½ cucharaditas SAL
1½ cucharadas, cortadas Aen
6 pedazos
MANTEQUILLA O M
RGARINA
2 cucharaditas DURA SECA LEVA ACTIVA
-o- -o-
1½ cucharaditas
LEVADURA RÁPIDA / DE
MÁQUINA DE HACER
PAN
3 cuartos de galón A AGU
1 cucharada AZÚCAR
SEMILLAS DE AMAPO
guarnic
LA O
SÉSAMO (como
ión)
MERMELADA DE FRESA DE MÁQUINA DE HACER PAN
INGREDIENTES
1 TAZA DE AZÚCAR GRANULADO
1 CUCHARADA DE PECTINA DE FRUTA PULVERIZADA CON BAJO
CONTENIDO DE AZÚCAR
1½ TAZAS DE FRESAS FRESCAS, lavadas, cortadas y descascaradas
18
Page 59

GAR TO
ANTÍA DEL PRODUC
Garant
ía limitada de 1 año del artefacto
Focus Electrics, LLC (“Focus Electrics”) garantiza que este aparato no presentará fallas de
material ni fabricación durante un (1) año a partir de la fecha original de compra con prueba de
dicha compra, siempre y cuando el aparato sea operado y mantenido tal como se indica en el
manual de instrucciones provisto. Toda pieza del aparato que presente fallas será reparada o
reemplazada sin costo alguno a criterio de Focus El
omestico dentro de la c
el uso d asa.
sta garantía no cubre ni ación, de superfi
E ngún daño, incluyendo la decolor cie antiadherente
alguna del aparato electrodoméstico. Esta garantía es nul ún lo determine
exclusivamente Focus Electrics si el artefacto e
accidente, mal uso, abuso, negligencia, rayadura
cambiado de algún modo.
STA GARANTÍA REEMPLAZA S GARANTÍAS IMPLÍCI
E A TODAS LAS DEMÁ TAS,
I UÉLLAS DE COMERCIABILIDAD, I IN O USO EN
ARTICULAR, DE
P SEMPEÑO, U OTROS TIPOS, DAS
M CUMENTO. FOC A
RESPONSABILI POR DAÑOS, YA SEAN DIRECTOS, INDI TOS, INCIDENTALES,
PREVISIBLES, CO S O ESP
LECTRODOMÉSTIC
E O O GUARDEN RELACI
Si piensa que el artefacto electrodomésti
DAD REC
NSECUENTE
ECIALES QUE SURJAN DE ESTE APARATO
co se ha dañado o requiere de servicio dentro de su
período de garantía, por favor póngase en cont
liente de Focus Electrics por el (866) 290-185
rvice@focuselectric
se s.com
que demuestra la fech son aceptados.
También puede requerirse que usted d para su inspección y evaluación
astos de devolución no son reembolsables.Focus Electrics no se hace responsable de las
g
ev
d oluciones perdidas en tránsito.
. Para todas las reclamaciones de garantía, se
a de compra original, los recibos escritos a mano no
evuelva el aparato
do sólo en EE.UU. y
Váli Canadá
REPUESTOS
L bles, pueden ser pedid cus Electrics, LLC
d Ordene en línea a través de ww ctrics.com
el ics.comectrónico a service@focuselectr
e
scribiendo a:
F
ocus Electrics, LLC
At e
tn: Customer Servic
ectrics. Esta garantía rige solamente para
a y sin valor, seg
lectrodoméstico es dañado a causa de
s, o si el artefacto electrodoméstico es
DONEID RA UN FNCLUYENDO AQ
AD PA
LAS CUALES QUEDAN EXCLUI
US ELECTRICS RECHAZA TODEDIANTE EL PRESENTE DO
ÓN CON EL MISMO.
acto con el Departamento de Atención al
1 o contáctenos por correo electrónico a la C
requerirá un recibo
. Los
os d a Foos repuestos, de estar disponi irectamente
, por teléfono lla al (866) 290-1851, o
mando
w lee varias maneras. .focuse
, por correo
P. O. Box 2780
West Bend, WI 53095
ara colocar un pedido
P con pago mediante cheque o giro po ase en contacto primero
n Atención al Cliente
co para que le indiquen el total de la o su pago junto con una
ca modelo o catálogo de su e puede ubicarlo en la
ar na descripción de la parte o partes que usted solicita
p te inferior o posterior de la unidad, u , y
la cantidad que desea. Su cheque deberá ser hecho a nom Electrics, LLC.
l impues
E to sobre las ventas de su estado y un recargo por gastos de envío serán añadidos al
precio tota ga.
ste manual contiene información importante y útil sobre el uso seguro y el cuidado de su nuevo producto
E
Focus Electrics. Para su propia referenci o fechado que sirve de comprobante de a, archive aquí el recib
compra para la garantía, y anote la siguiente información:
Fecha e _____ n que compró o recibió la unidad como regalo: _____________________________________
Dónde s _____ e efectuó la compra y el precio, si lo sabe: ________________________________________
Número y código de fecha del produ rior de la unidad): _____________ cto (aparece en la parte inferior/poste
l. Por favor permita un plazo de dos semanas para el procesamiento y entre
stal, póng
den. Envr íe
aparato, qurta que indique el número de
bre de Focus
19
L5762 07/08 West Bend®, una Marca de Focus Electrics, LLC. Impreso en China
Page 60

 Loading...