

Page 1
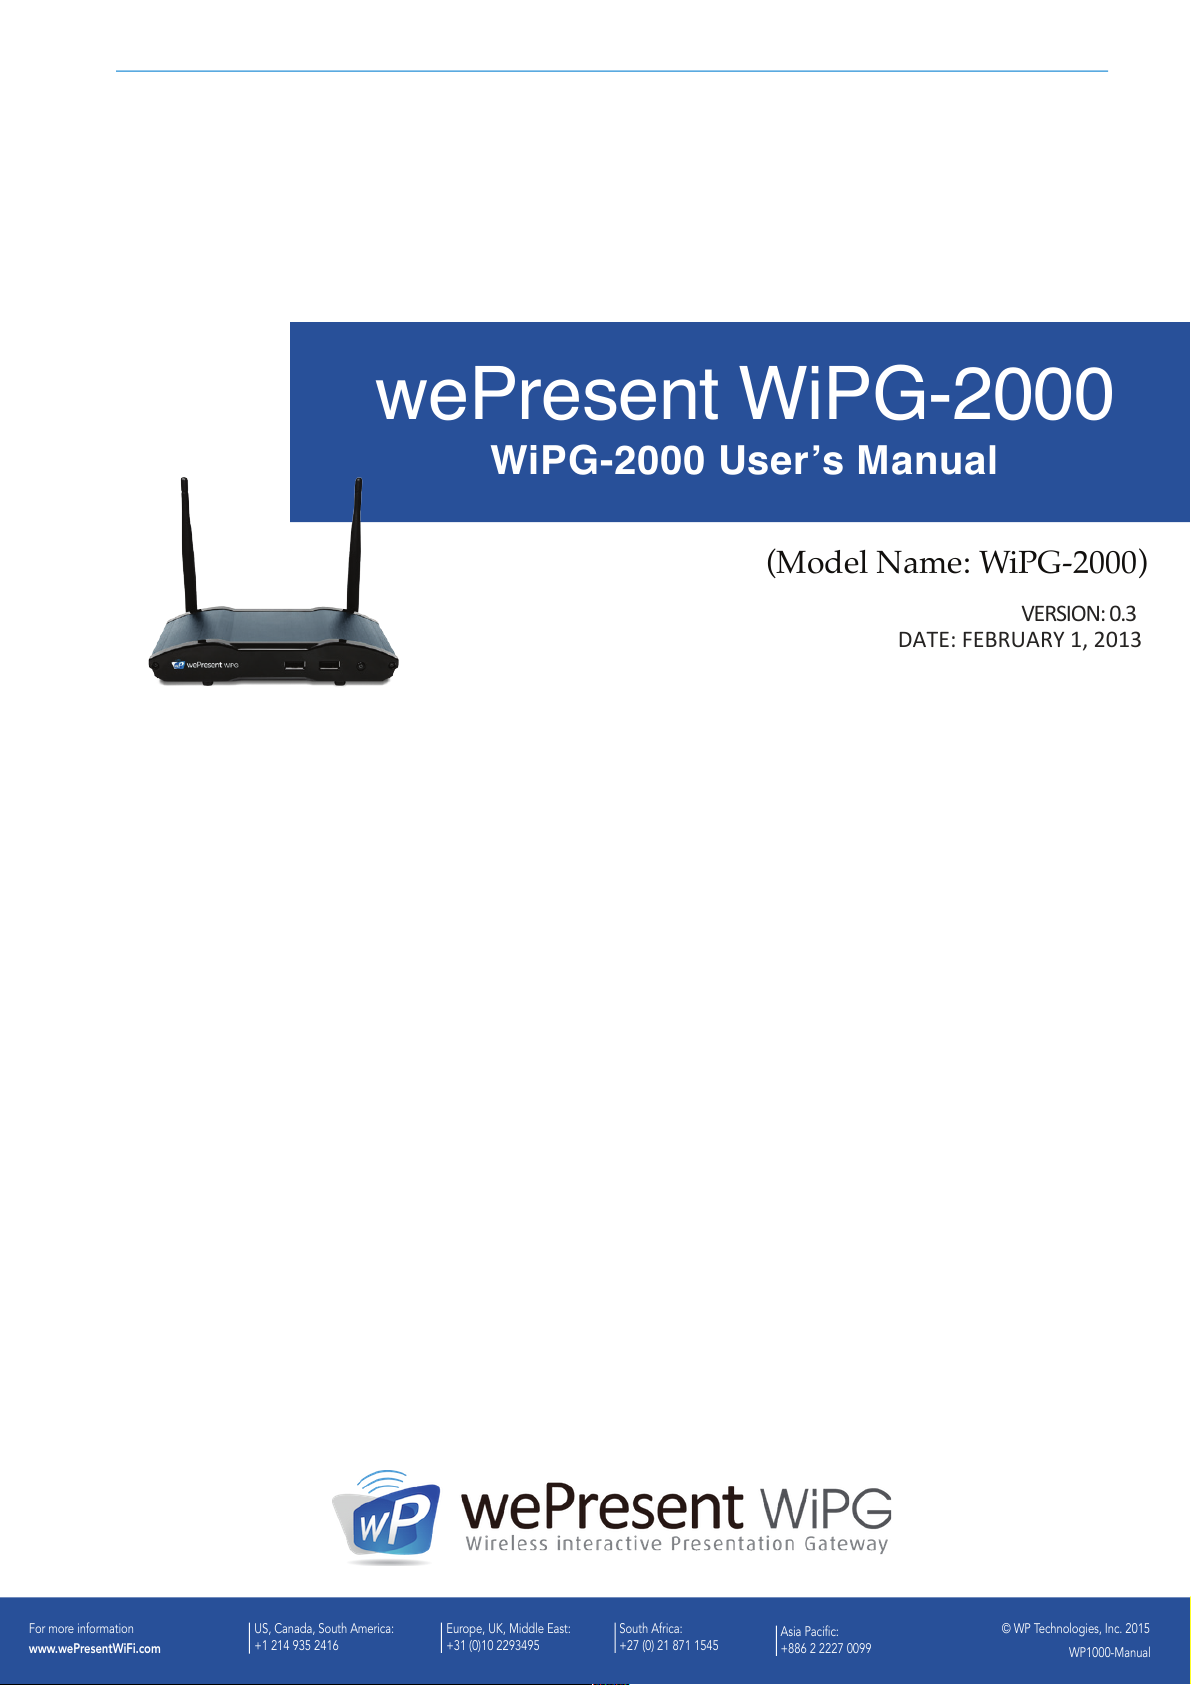
wePresent WiPG-2000
WiPG-2000 User’s Manual
(Model Name: WiPG-2000)
VERSION: 0.3
DATE: FEBRUARY 1, 2013
P)0$.) 0/$1' <)0. &+1)'$
!! ! "!#$ %#&#'() *+*", - .
-H1&$D&21<123
4AA;$6$666=$??88
US, Canada, South America:
+1 214 935 2416
South Africa:
+27 (0) 21 871 1545
© WP Technologies, Inc. 2015
WP1000-Manual
Europe, UK, Middle East:
+31 (0)10 2293495
For more information
www.wePresentWiFi.com
Asia Pacific:
+886 2 2227 0099
Page 2

2
Table of Contents
1 OVERVIEW ............................................................................................................................... 6
2 PACKAGE CONTENTS ................................................................................................................... 9
3 USB TOKEN CONTENTS............................................................................................................... 9
4 PHYSICAL DETAILS .................................................................................................................... 10
5 WHAT YOU MIGHT NEED .......................................................................................................... 11
6 QUICK INSTALLATION ................................................................................................................ 12
7 WIPG-2000 STAR T/STAN DBY PAGE ............................................................................................ 13
7.1 QUICK GUIDE / USER-LIST ......................................................................................................... 13
7.2 FEATURE ICONS ....................................................................................................................... 13
7.3 REMOTE TOUCH CONTROL (UMT) .............................................................................................. 15
7.4 CONFERENCE CONTROL MODE ................................................................................................... 15
7.5 SPLIT SCREEN MODE ................................................................................................................. 16
7.6 DIRECT DRAW ......................................................................................................................... 16
7.7 PEN MENU FUNCTION UNDER PROJECTING MODE. ....................................................................... 17
7.8 USB PLAYER FUNCTION ............................................................................................................ 18
8 DOWIFI FOR WINDOWS ........................................................................................................... 19
8.1 INSTALL THE APPLICATION .......................................................................................................... 19
8.2 START THE APPLICATION ............................................................................................................ 21
8.3 RECENT CONNECTION ............................................................................................................... 21
8.4 CONNECT TO RECEIVER DEVICE ................................................................................................... 22
8.5 LOGIN .................................................................................................................................... 23
8.6 CHANGE TO ANOTHER WIFI NETWORK ........................................................................................ 23
8.7 MAIN USER INTERFACE ............................................................................................................. 24
8.8 SCREEN PROJECTION ................................................................................................................ 24
8.9 CONNECTED RECEIVER LIST ........................................................................................................ 25
8.10 VIDEO STREAMING ................................................................................................................... 25
8.11 MENU ................................................................................................................................... 27
8.11.1 LAUNCH SIDEPAD .................................................................................................................... 27
8.11.2 LAUNCH WEBSLIDES ................................................................................................................ 28
8.11.3 REMOTE CONTROL ................................................................................................................... 30
8.11.4 PROJECTION SOURCE ................................................................................................................ 30
8.11.5 ADVANCED PROJECTION OPTION ................................................................................................ 31
8.11.5.1 ADVANCED SCREEN CAPTURE ..................................................................................................... 31
8.11.5.2 PROJECTION ASPECT RATIO ........................................................................................................ 32
8.11.5.3 SELECT PROJECTION MODE ........................................................................................................ 32
8.11.5.4 RESOLUTION SETTINGS ............................................................................................................. 33
8.11.5.5 PROJECTION QUALITY ............................................................................................................... 33
Page 3

3
8.11.5.6 SCREEN ENCODING FORMAT ...................................................................................................... 33
8.11.6 OTHERS ................................................................................................................................. 34
8.11.6.1 AUTO POWER MANAGER .......................................................................................................... 34
8.11.6.2 MAKE USB PNS TOKEN ............................................................................................................ 35
8.11.6.3 COPY APPLICATION TO DESKTOP .................................................................................................. 35
8.11.6.4 HOT KEY ................................................................................................................................ 36
8.11.7 DISCONNECT ........................................................................................................................... 36
8.11.8 ABOUT .................................................................................................................................. 36
8.11.9 EXIT ...................................................................................................................................... 36
9 DOWIFI FOR MAC ................................................................................................................... 37
9.1 INSTALL THE APPLICATION .......................................................................................................... 37
9.2 START THE APPLICATION ............................................................................................................ 38
9.3 RECENT CONNECTION ............................................................................................................... 38
9.4 LOGIN .................................................................................................................................... 39
9.5 CHANGE TO ANOTHER WIFI NETWORK ........................................................................................ 40
9.6 MAIN USER INTERFACE ............................................................................................................. 41
9.7 SCREEN PROJECTION ................................................................................................................ 41
9.8 CONNECTED RECEIVER LIST ........................................................................................................ 42
9.9 VIDEO STREAMING ................................................................................................................... 42
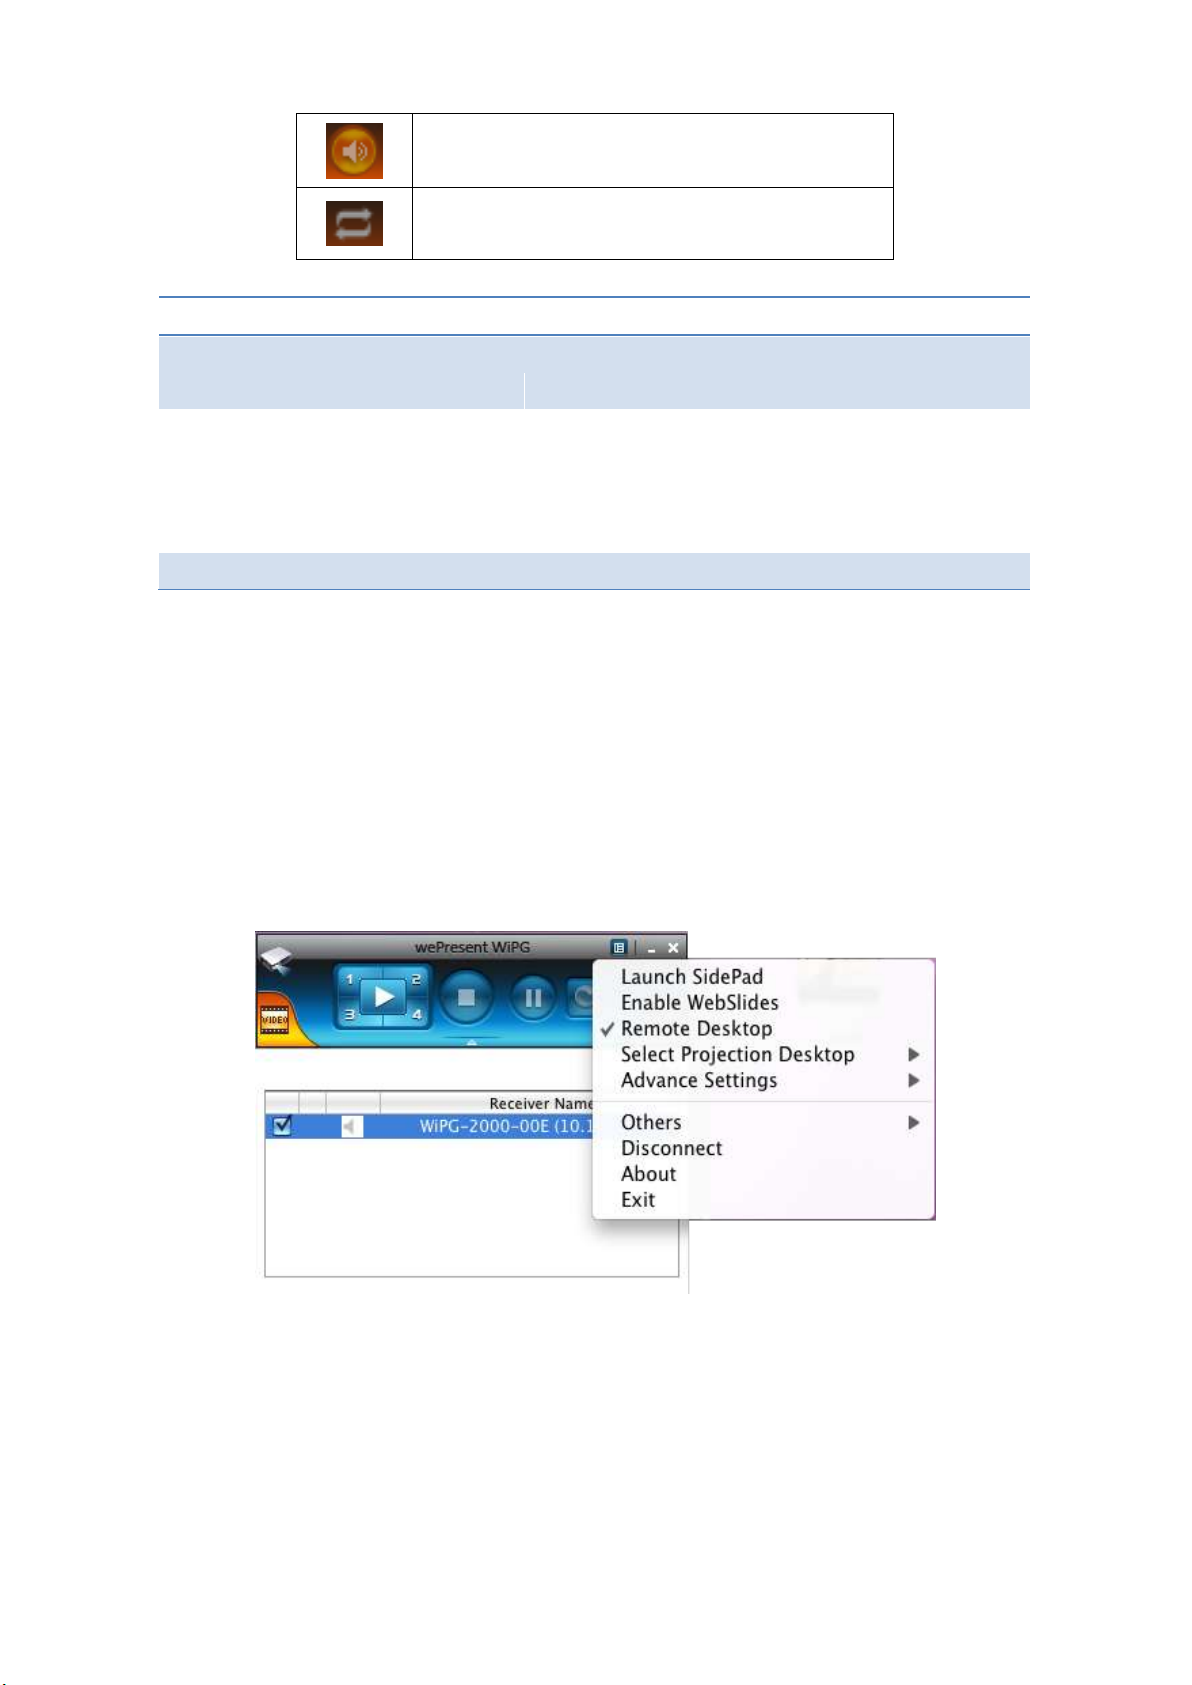
9.10 MENU ................................................................................................................................... 43
9.10.1 LAUNCH SIDEPAD .................................................................................................................... 43
9.10.2 LAUNCH WEBSLIDES ................................................................................................................ 45
9.10.3 REMOTE DESKTOP.................................................................................................................... 47
9.10.4 SELECT PROJECTION DESKTOP .................................................................................................... 47
9.10.5 ADVANCED SETTINGS ................................................................................................................ 47
9.10.5.1 PROJECTION ASPECT RATIO ........................................................................................................ 47
9.10.5.2 SELECT PROJECTION MODE ........................................................................................................ 48
9.10.5.3 RESOLUTION SETTINGS ............................................................................................................. 48
9.10.5.4 PROJECTION QUALITY ............................................................................................................... 48
9.10.5.5 SCREEN ENCODING FORMAT ...................................................................................................... 49
9.10.6 OTHERS ................................................................................................................................. 49
9.10.6.1 MAKE USB PNS TOKEN ............................................................................................................ 49
9.10.6.2 HOT KEY ................................................................................................................................ 50
9.10.7 DISCONNECT ........................................................................................................................... 50
9.10.8 ABOUT .................................................................................................................................. 50
9.10.9 EXIT ...................................................................................................................................... 50
10 WEB MANAGEMENT ................................................................................................................ 51
10.1 HOME PAGE ........................................................................................................................... 51
10.2 DOWNLOAD............................................................................................................................ 51
Page 4

4
10.3 CONFERENCE CONTROL ............................................................................................................. 52
10.4 ADMIN .................................................................................................................................. 53
10.5 SYSTEM STATUS ....................................................................................................................... 54
10.6 DEVICE SETUP ......................................................................................................................... 55
10.7 NETWORK SETUP ..................................................................................................................... 56
10.8 WIFI SETUP ............................................................................................................................ 58
10.9 SNMP SETUP ......................................................................................................................... 60
10.10 OSD SETUP ............................................................................................................................ 61
10.11 WEBSLIDES SETUP ................................................................................................................... 62
10.12 CHANGE PASSWORDS ............................................................................................................... 63
10.13 RESET TO DEFAULT ................................................................................................................... 64
10.14 FIRMWARE UPGRADE ............................................................................................................... 64
10.15 REBOOT SYSTEM ...................................................................................................................... 65
10.16 LOGOUT ................................................................................................................................. 66
10.17 WEBSLIDES ............................................................................................................................ 67
11 USB PLAYER ........................................................................................................................... 68
11.1 PHOTO VIEWER ....................................................................................................................... 69
11.2 VIDEO PLAYER ......................................................................................................................... 69
11.3 MUSIC PLAYER ........................................................................................................................ 70
11.4 OFFICE VIEWER ....................................................................................................................... 71
11.5 SETUP ................................................................................................................................... 72
Page 5

5
Safety
1. Compliance IC
Canada, Industry Canada (IC) Notices
This Class B digital apparatus complies with Canadian ICES-003 and RSS-210.
Operation is subject to the following two conditions: (1) this device may not cause
interference, and (2) this device must accept any interference, including
interference that may cause undesired operation of the device.
Radio Frequency (RF) Exposure Information
The radiated output power of the AWIND Wireless Device is below the Industry
Canada (IC) radio frequency exposure limits. The AWIND Wireless Device should be
used in such a manner such that the potential for human contact during normal
operation is minimized.
WiPG-1500 IC No.: 11600A-WIPG1500S
Antenna Information and Compliance:
This radio transmitter (IC:11600A-WIPG1500S, or WiPG-1500 if Category II)
has been approved by Industry Canada to operate with the antenna types listed
below with the maximum permissible gain and required antenna impedance for
each antenna type indicated. Antenna types not included in this list, having a gain
greater than the maximum gain indicated for that type, are strictly prohibited for
use with this device.
Antenna Part Number:AN2400-5791RS, Antenna Type (Dipole), Gain 2.55dBi,
Impedance 50 ohms[Main]
Antenna Part Number:AN2400-5791RS, Antenna Type (Dipole), Gain 2.55dBi,
Impedance 50 ohms[Aux]
Caution: Exposure to Radio Frequency Radiation
To comply with RSS 102 RF exposure compliance requirements, a separation
distance of at least 20 cm must be maintained between the antenna of this device
and all persons.
Page 6
6
1 Overview
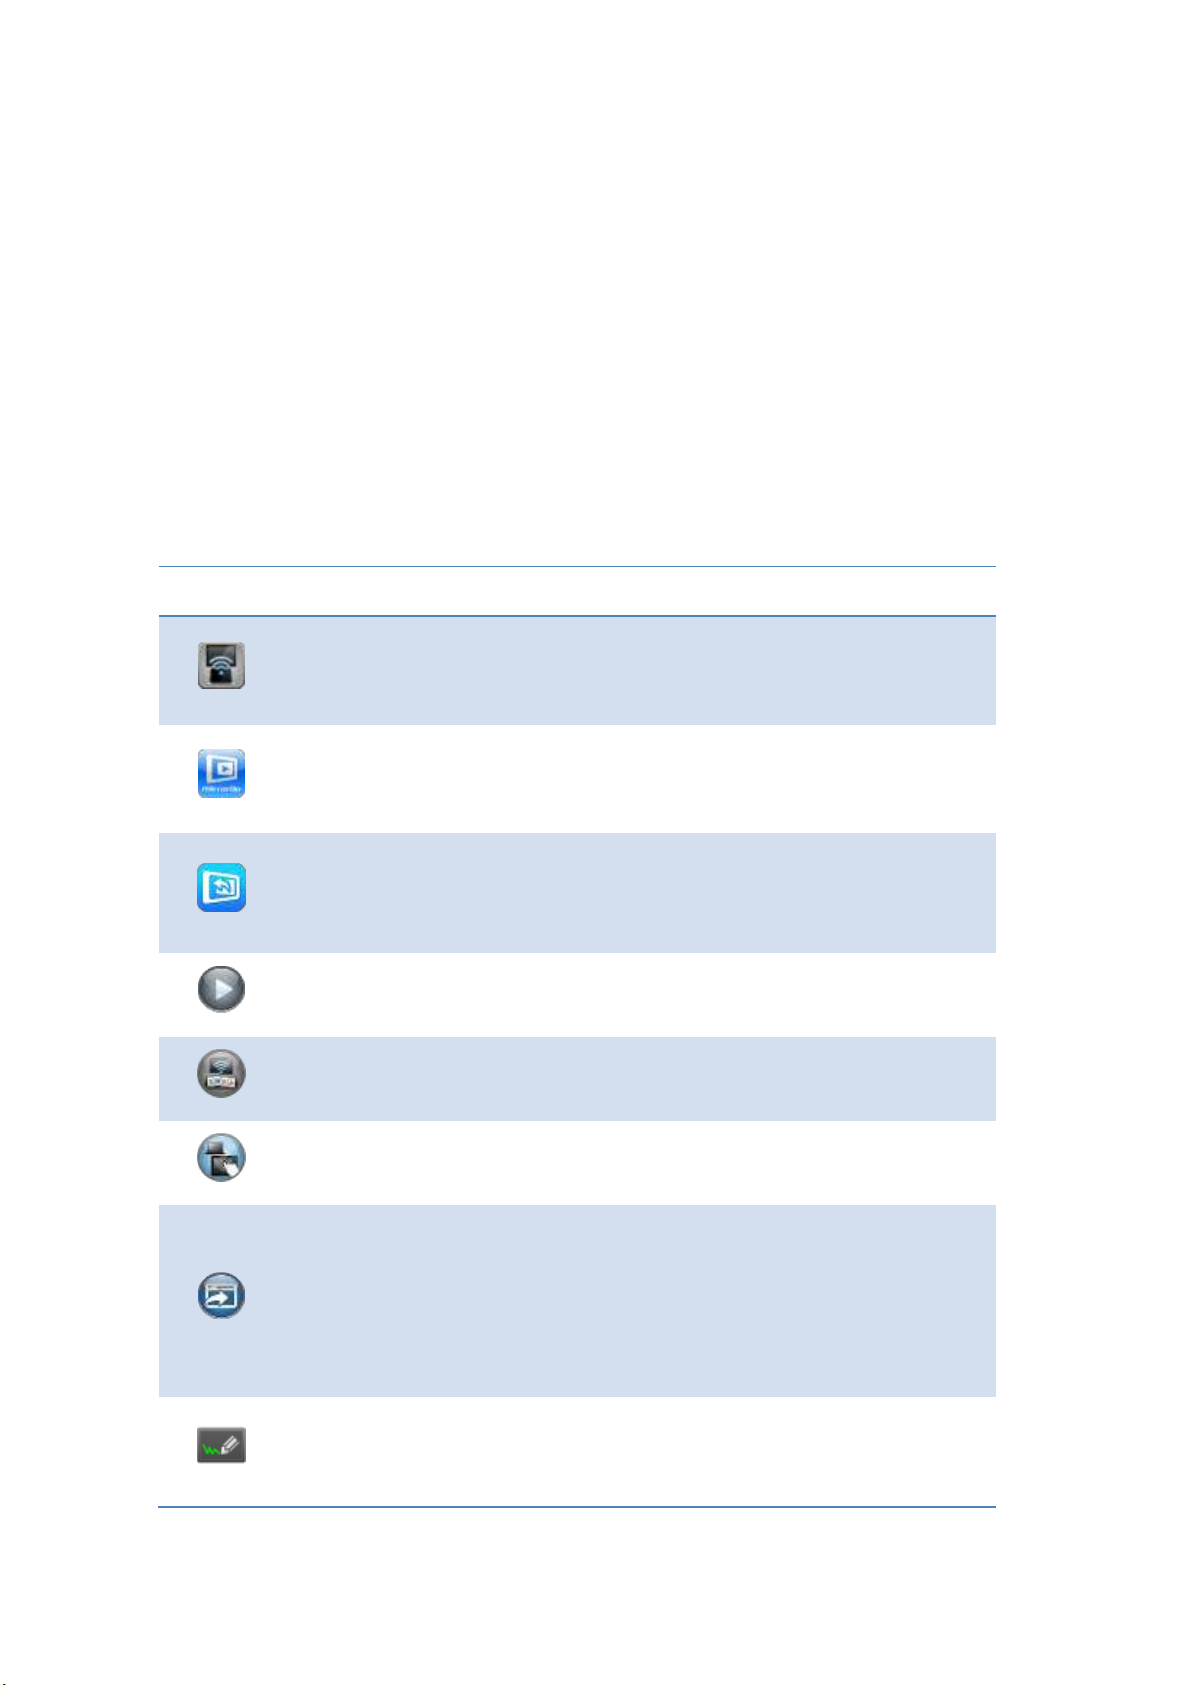
WiPG-2000 is a spectacular wireless presentation device which connects
multi-platform devices (Windows/Mac/Pad/Smartphone/AirPad) for engaging
interactive presentations by supporting finger-touch technology, virtual whiteboard
and Win 7/8 HID compatible remote devices.
WiPG-2000 Highlight Features:
Icon
Feature
Description
DoWiFi
Wireless presentation for Windows and Mac
Win: XP/Vista/7/8,
Mac: 10.7/10.8/10.9
MirrorOp for Galaxy
MirrorOp sender for Samsung Galaxy series devices
Support. Users can project any contents from their
Samsung Galaxy devices.
MirrorOp Presenter
High quality presentation and annotation via
iPhone/iPad or Android devices (Word, Excel, PPT, PDF ,
Photo , Browser, Live Camera, Screenshot)
Video Streaming
Network Video/Music streaming for Windows and Mac.
WiFi-Doc
High quality presentation via iPhone/iPad or Android
devices (Word, Excel, PPT, PDF , Photo , Screenshot)
SidePad
Control the projecting screen on PC or Mac via
iPhone/iPad or Android devices
WebSlides
Broadcast slides to your devices with WiFi and web
browser
Audience can save the projecting slides for taking
notes
Webslides can be secured by password.
Direct Draw
Make free drawing on virtual
whiteboard/blackboard without any computer
connected
Page 7
7
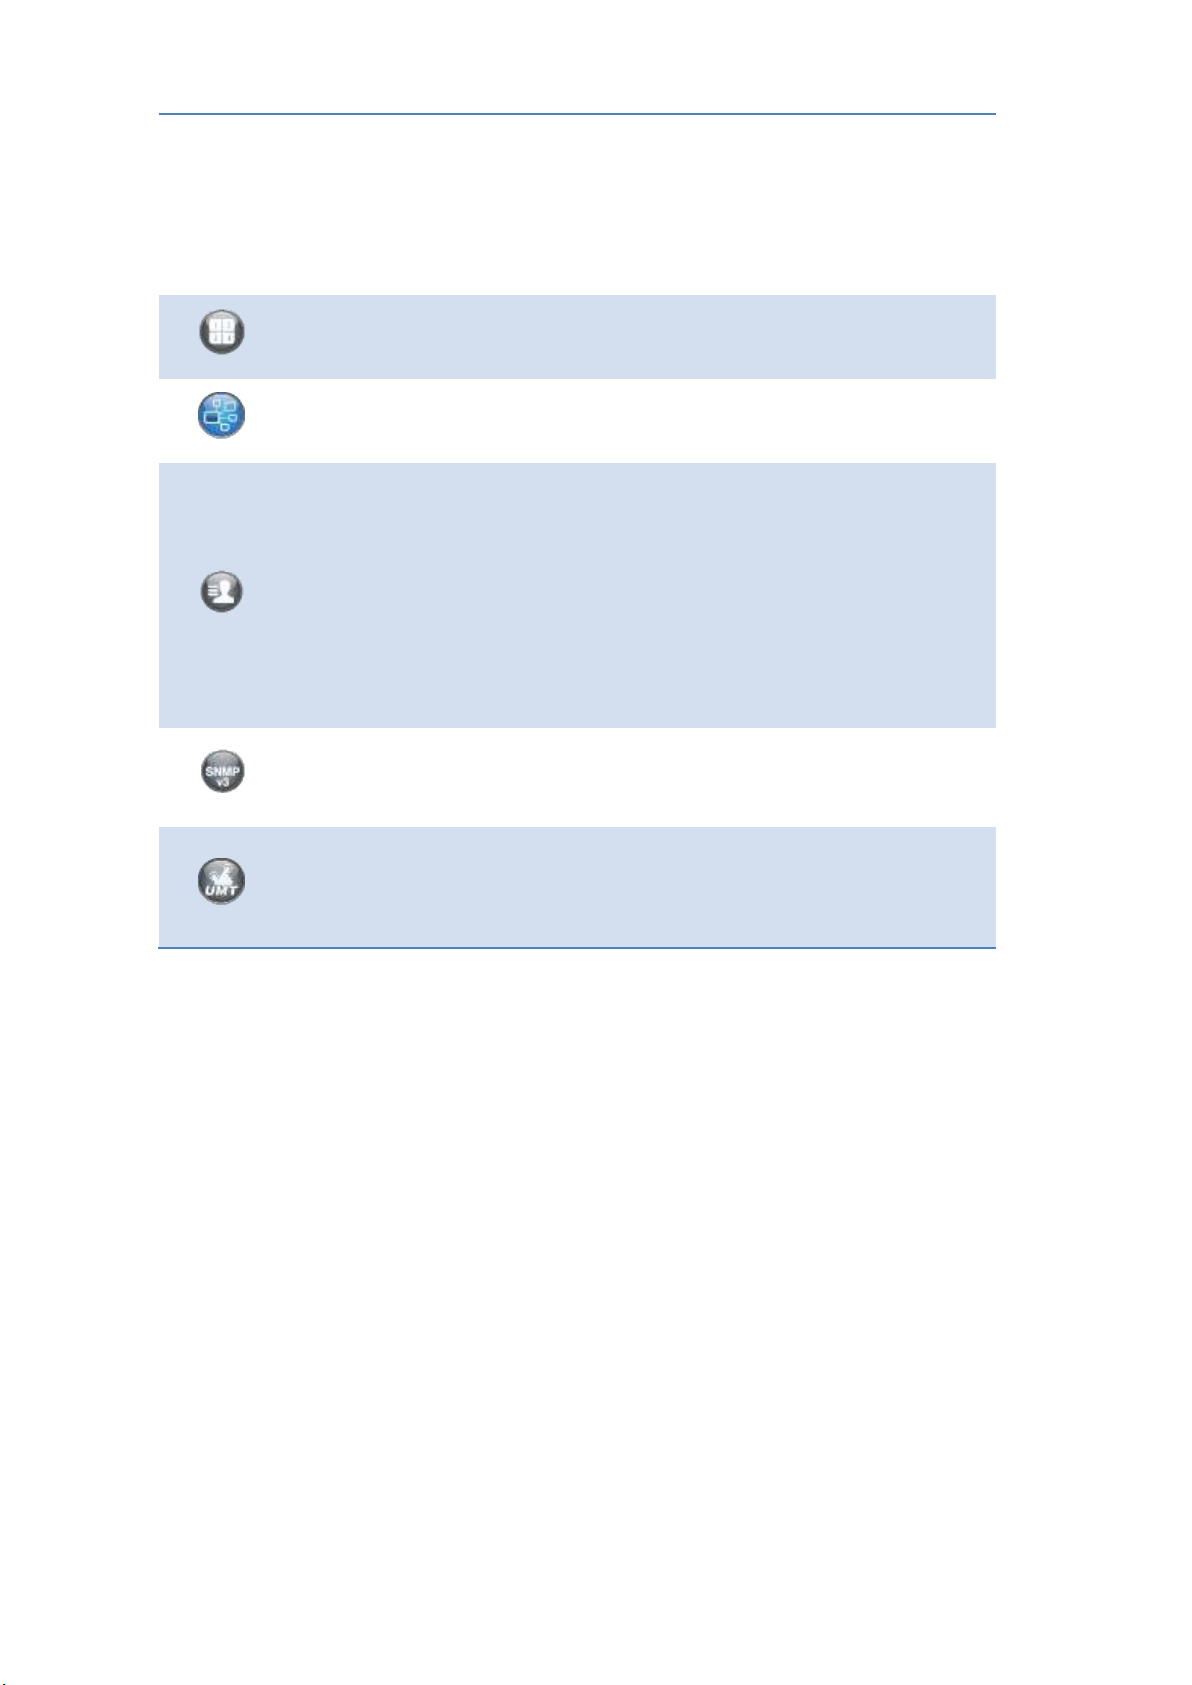
Make annotation on any projecting content. It
allows you to annotate on the screen during the
presentation
Annotating, writing and drawing can be done using
touch screen, AirPad or any other USB HID device
4-to-1 projection
Project four PC/Mac screens or WiFi-Doc content to one
projector/display at once.
One to Many Projection
Project the screen to up to four receiver devices at the
same time.
Conference Control /
OSD User-List
Control projection from WiPG's web page, or use
mouse/keyboard to select a PC from the standby screen.
Conference control function can be secured by
password
Moderator can control who is projecting.
Moderator can compare 4 screens side by side.
SNMP V3
Manage WiPG devices across the corporate network
through enhanced SNMP V3 protocol
UMT
Driverless remote touch control through network.
(Support standard Win 7/8 compatible USB HID touch
device)
Key Features
High performance screen/audio projection for Windows/Mac (Windows 7/8
and Mac 10.7/10.8/10.9)
Remote desktop control from AirPad, Touch Screen or Mouse/Keyboard for
Windows/Mac
Plug&Show: launching the projection application from a USB Token without
installation. Extra USB tokens with the PlugandShow function can be easily
created in the wePresent software.
High performance 4-to-1 Quadrant Screen Projection
Support up to 64 concurrent login users
Conference Control: Mediator function through the device web page or
standby screen
Support Wireless Multi-touch control (Win7/8 standard HID compatible device)
Support drawing feature for projecting sender screen, or drawing on
Page 8

8
whiteboard without PC
Changeable Customized Image of full size Splash/standby screen.
- Replace entire start screen with background image. SNMP V3:
manage/configure multiple WiPGs through SNMP V3 protocol
- Firmware upgrade via FTP
- Enhance the remote SNMP manageability to higher security level
Wi-Fi Enterprise encryption support
Support MSI installer for Windows software deployment and execute
application from command line
Extended desktop support for both Windows and Mac
Security design: Session Login Code, WEP/WPA/WPA-Enterprise WiFi Security,
and GateKeeper
HDMI and VGA dual video interfaces
WiFi AP, Station and AP-Client mode: Make WiPG-2000 a part of your wired
or wireless network. Allowing internet access to all connected users and
presentation from network computers.
WiFi 802.1b/g/n
Page 9

9
2 Package Contents
wePresent WiPG-2000 Box
wePresent WiPG-2000 USB Token
AirPad device
Power Adapter (DC +5V, 2.6A)
2 WiFi Antenna
Quick Installation Guide
Wall Mount Kit
Warranty Card
3 USB Token Contents
Windows Installer (WiPG-2000 Windows Installer)
MAC Installer (WiPG-2000 Mac Installer)
VAC Driver (For Windows XP Audio Projection)
VDD Driver (For Windows XP/Vista Virtual Extended Screen)
User Manual
wePresent WiPG Execution File
SVS Driver (For Mac Extended Screen)
Utility
PtG Converter (For MobiShow PtG function)
SNMP Manager (For SNMP Management)
Page 10
10
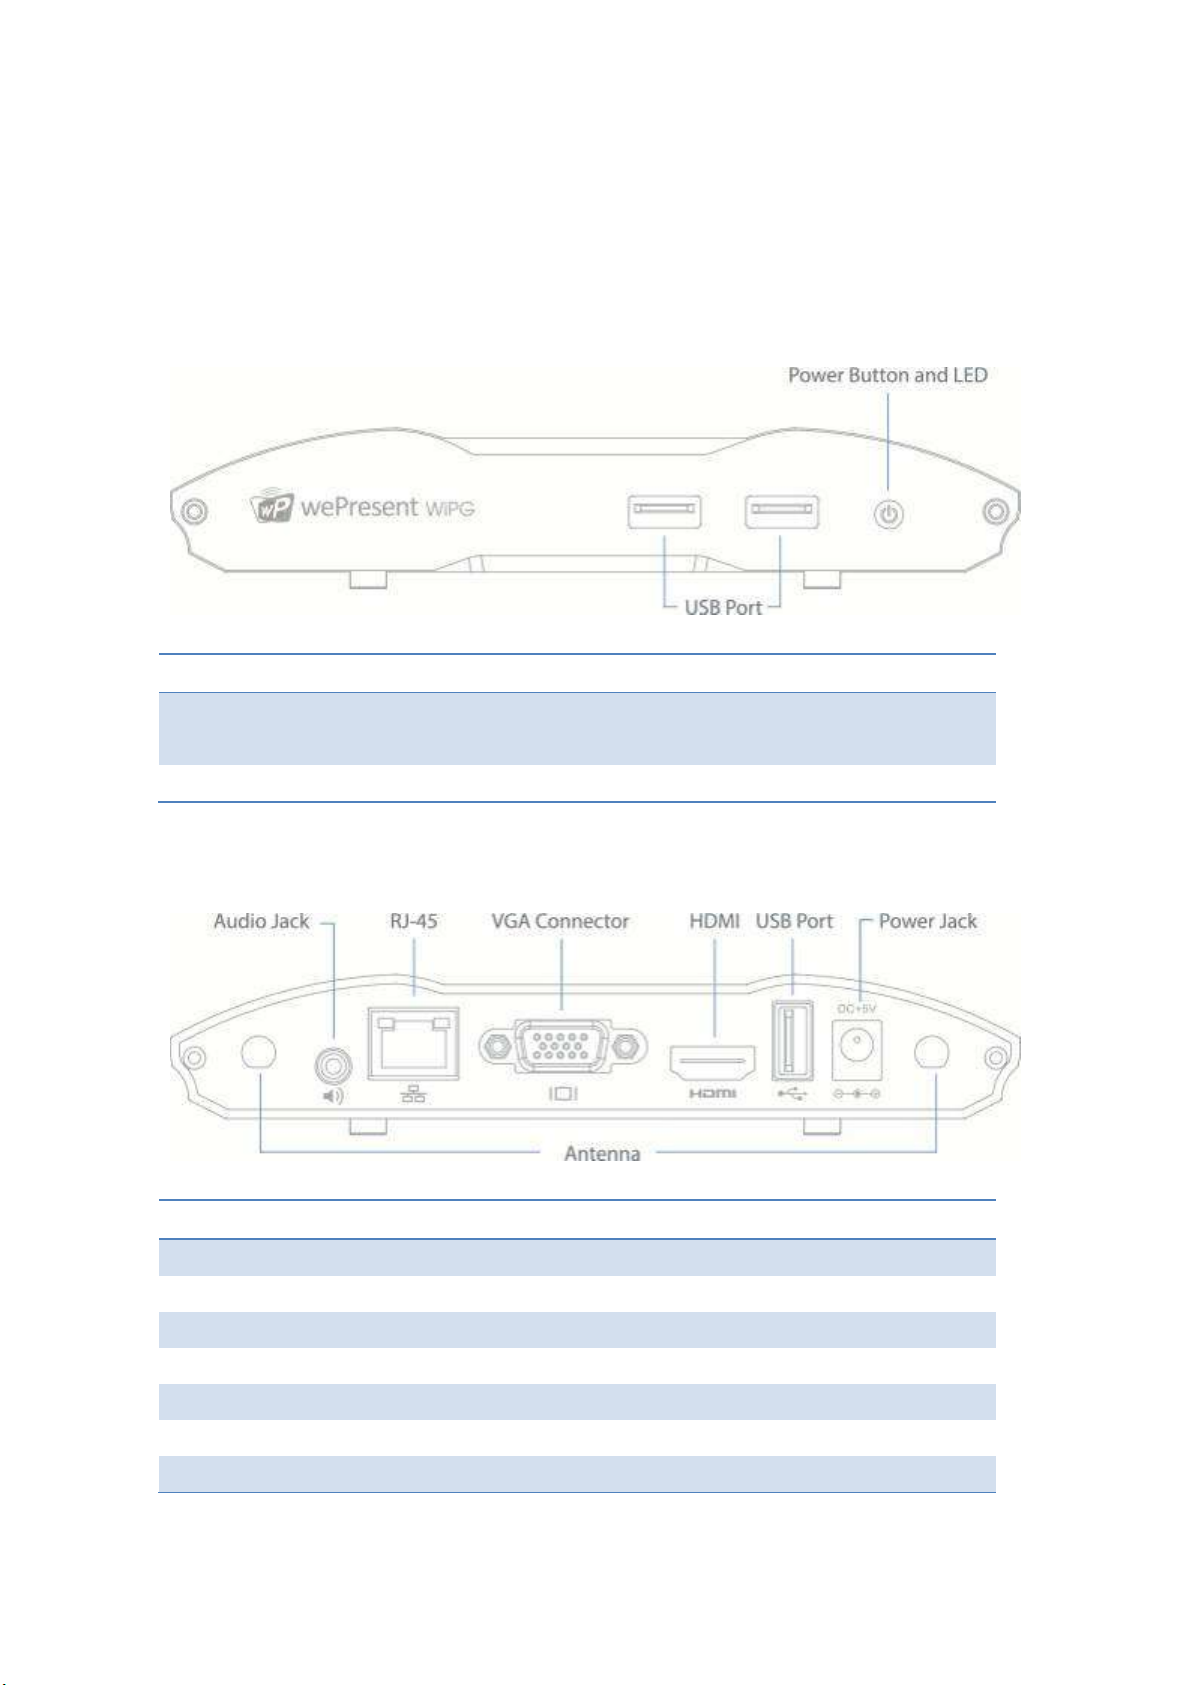
4 Physical Details
Front Panel
Description
Power Button and LED
Power on/off button.
LED Indicator: System Loading(Red), Ready(Blue)
USB Port (Front)
2 USB ports for USB mouse and keyboard
Rear Panel
Description
Antenna
WiFi Antenna
USB Port (Rear)
USB port for USB Thumb drive or Touch Device
RJ-45
10/100/1000M RJ-45 port
VGA Connector
VGA connector
HDMI
HDMI Connector
Audio Jack
Audio Jack (3.5mm)
Power Jack
Power Jack (5V/2.5A)
The USB port can support up to 5V/0.5A touch device and USB drive.
Page 11
11
Bottom Side
Description
Screw Hole
Screw Hole for Wall Mount Kit
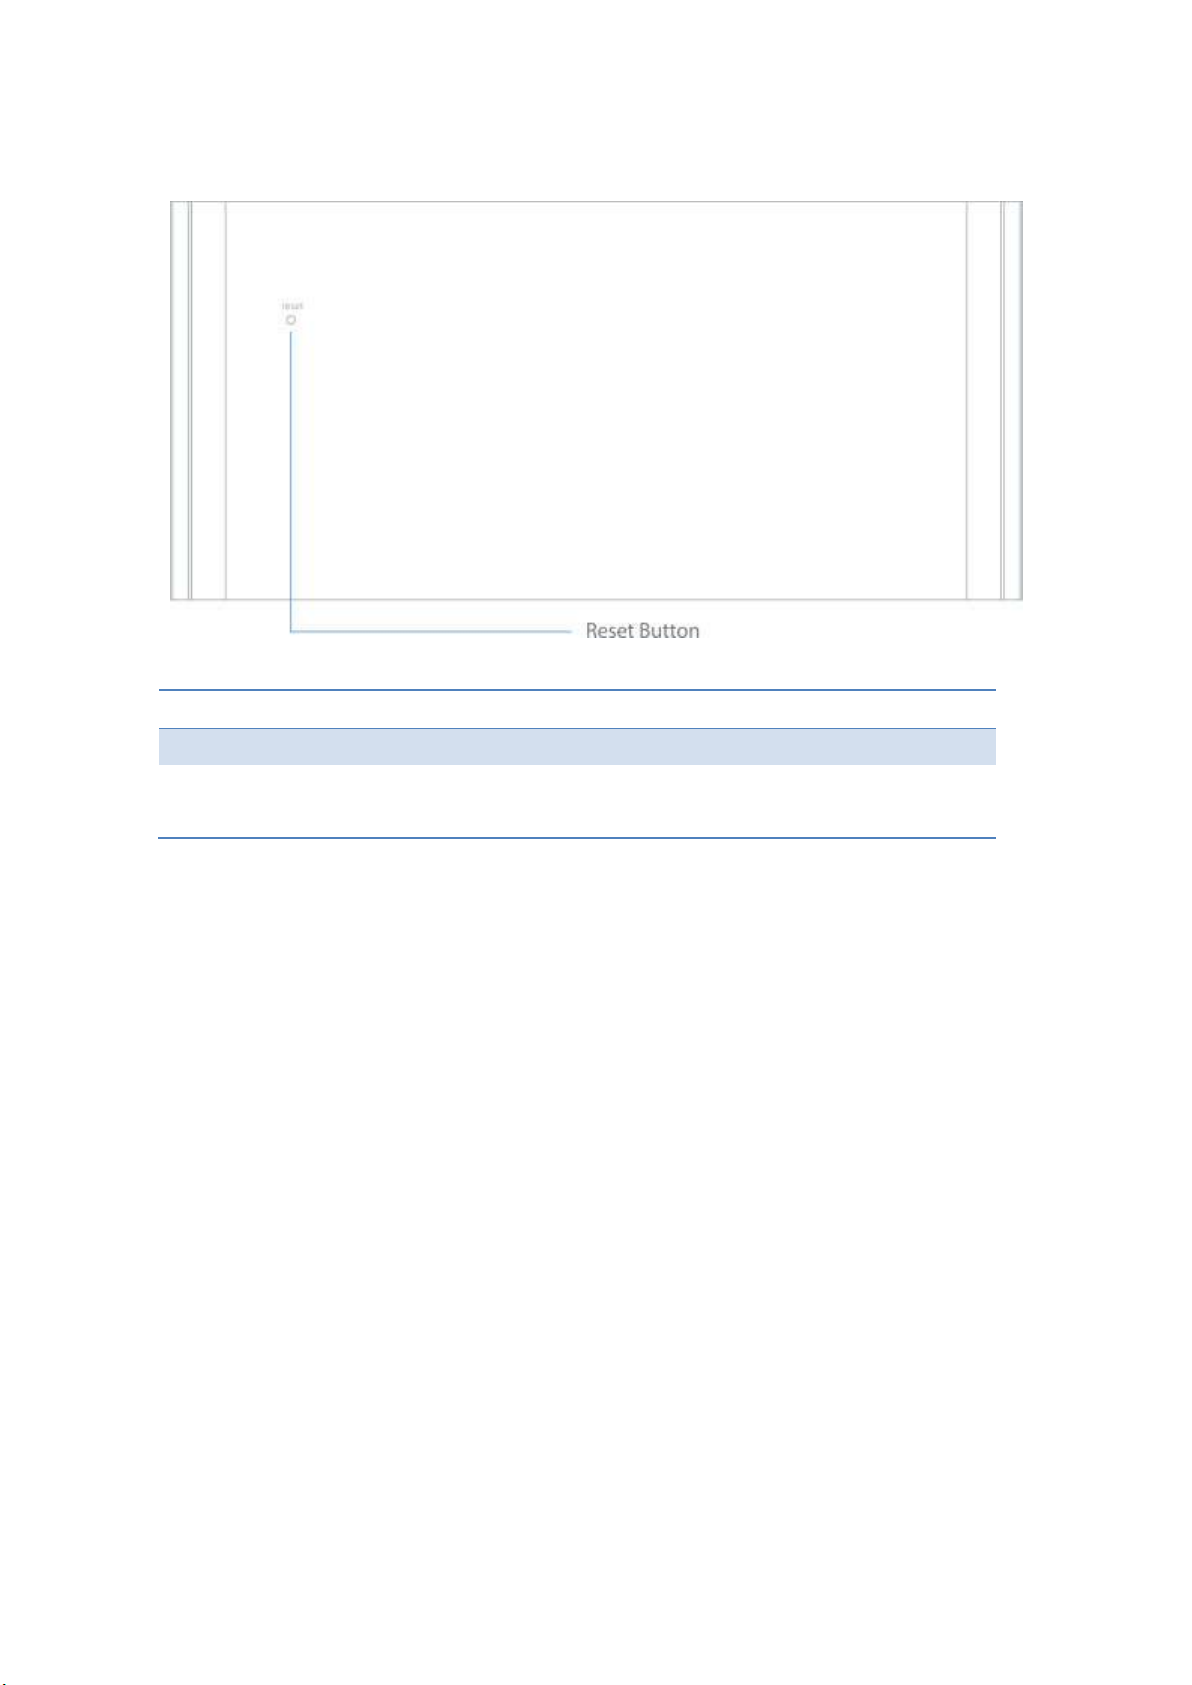
Reset Button
Press reset button and power on the device to execute
Hardware Reset.
5 What You Might Need
Projector/display with VGA/HDMI interface
Windows or Mac PC/Laptop
Apple iPhone, iPad or iPod-touch device
Android Phone or Tablet device
Speaker (Optional, for audio projection feature)
USB Mouse and Keyboard (Optional, for remote desktop feature)
USB HID Touch Screen/IWB Device (Optional, for UMT feature)
Page 12
12
6 Quick Installation
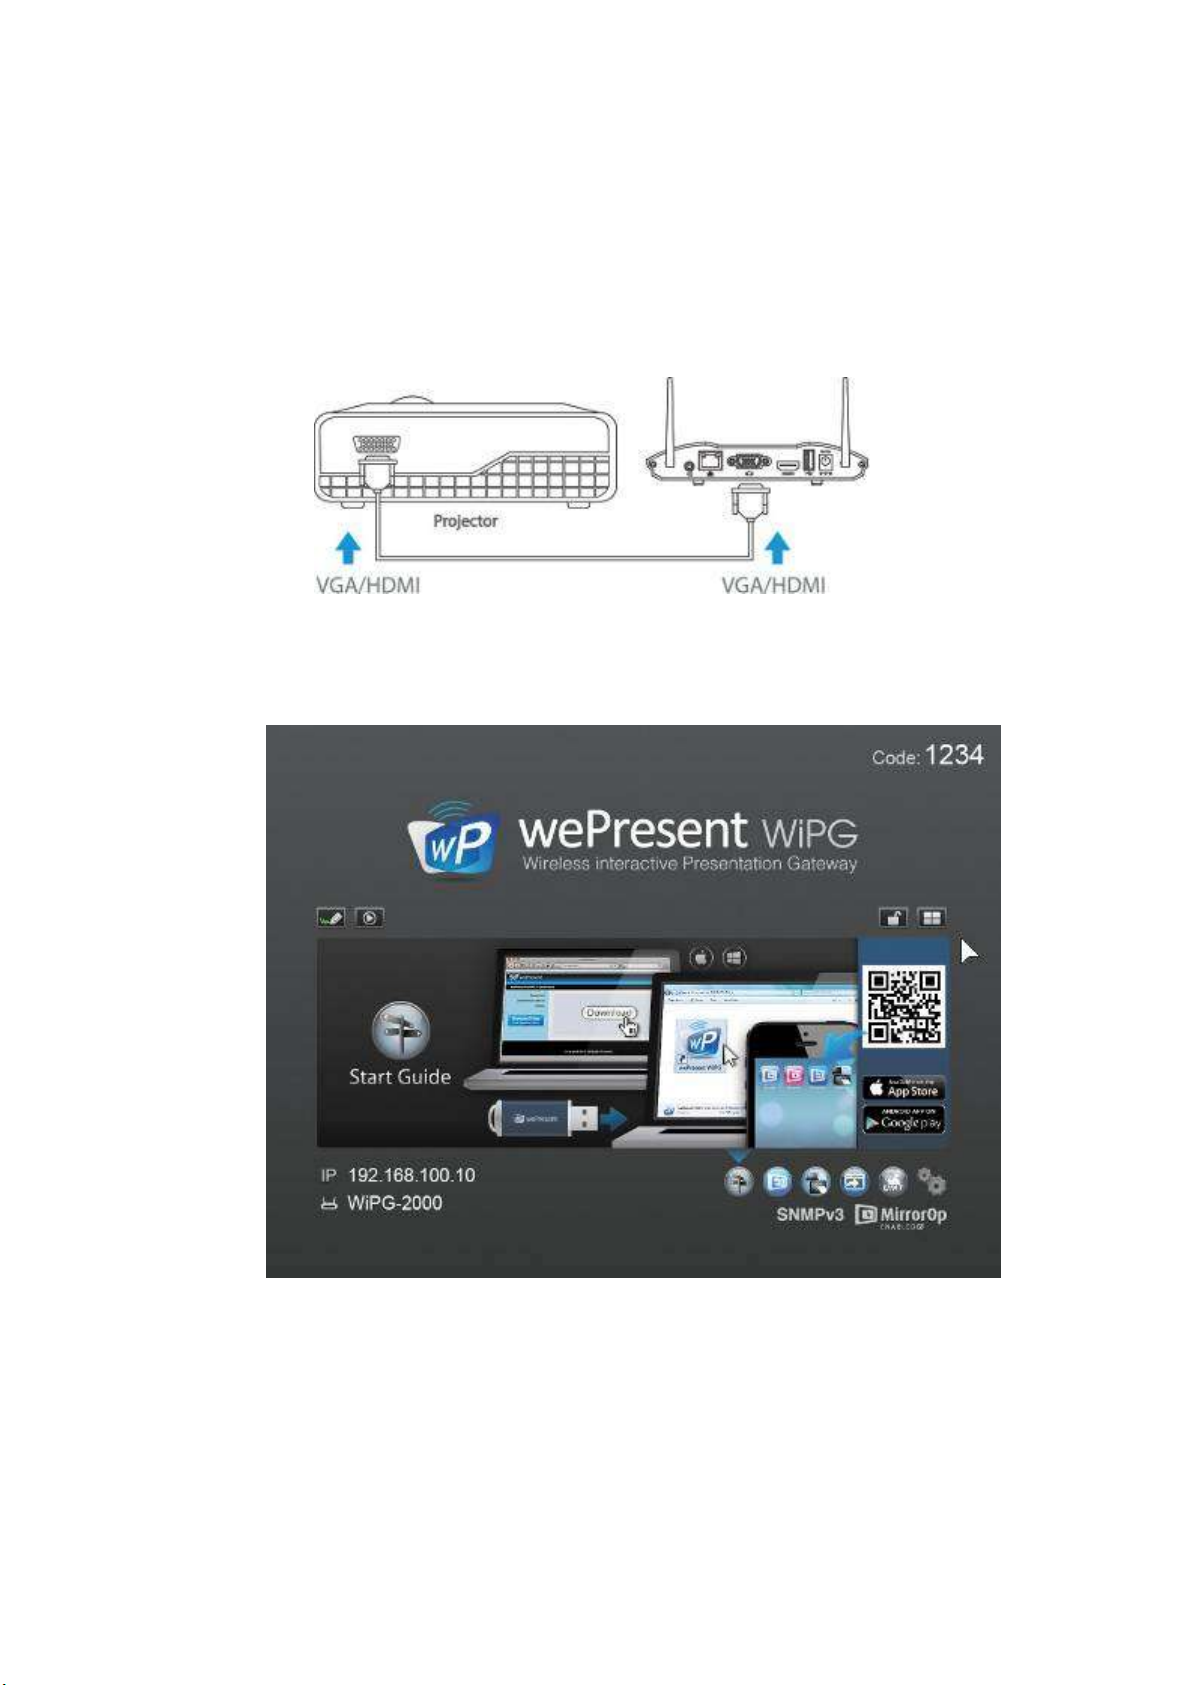
1) Connect wePresent WiPG-2000 device to Projector/display through VGA/HDMI
port and turn on projector/display power.
2) Connect the power adaptor to WiPG-2000 device and press the power button to
turn on WiPG-2000 device. System will be ready when the LED light turns to blue.
It will show the default standby screen as below when system is ready.
3) Insert the speaker cable to WiPG-2000 audio jack for audio output
4) Insert the USB mouse or keyboard/AirPad or USB touch device to WiPG-2000
front/rear USB port for On-Screen Display (OSD) control. (Optional)
Page 13
13
7 WiPG-2000 Start/Standby Page
7.1 Quick Guide / User-List
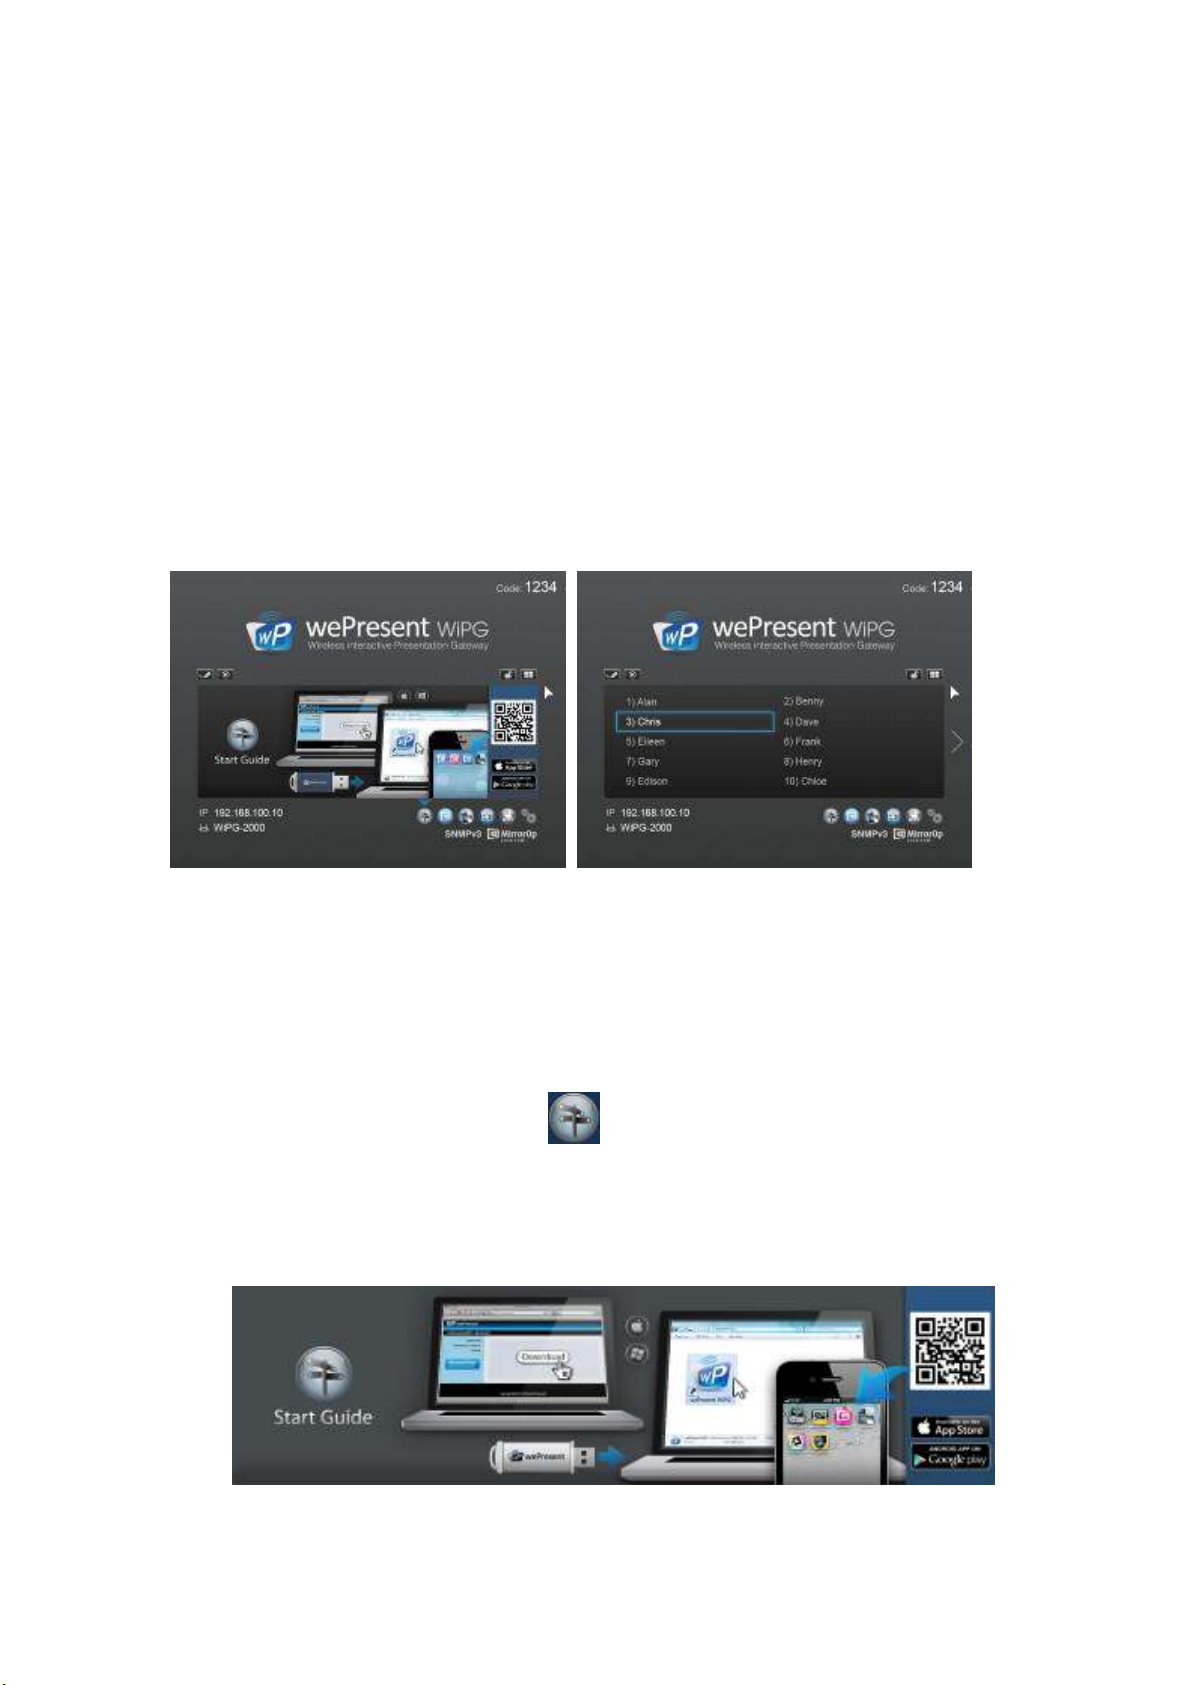
The device will show the quick guide on the screen when there is no user connected.
When there is any new user connected to WiPG-2000, the user name will be show on
the user-list area. WiPG-2000 allows multiple user connection. See below image for
detail.
7.2 Feature Icons
1) You can also click on the feature Icons on the right hand bottom to view the Quick
Guide for each highlight feature.
(1)Quick Guide: Click on Quick icon , it describes that WiPG-2000 can support
Windows, Mac and Mobile devices. If your Smartphone has QR code scan App, you
can scan the QR code image on the screen with your Smartphone which will lead
you to the corresponding place to download all the available Apps.
Page 14
14
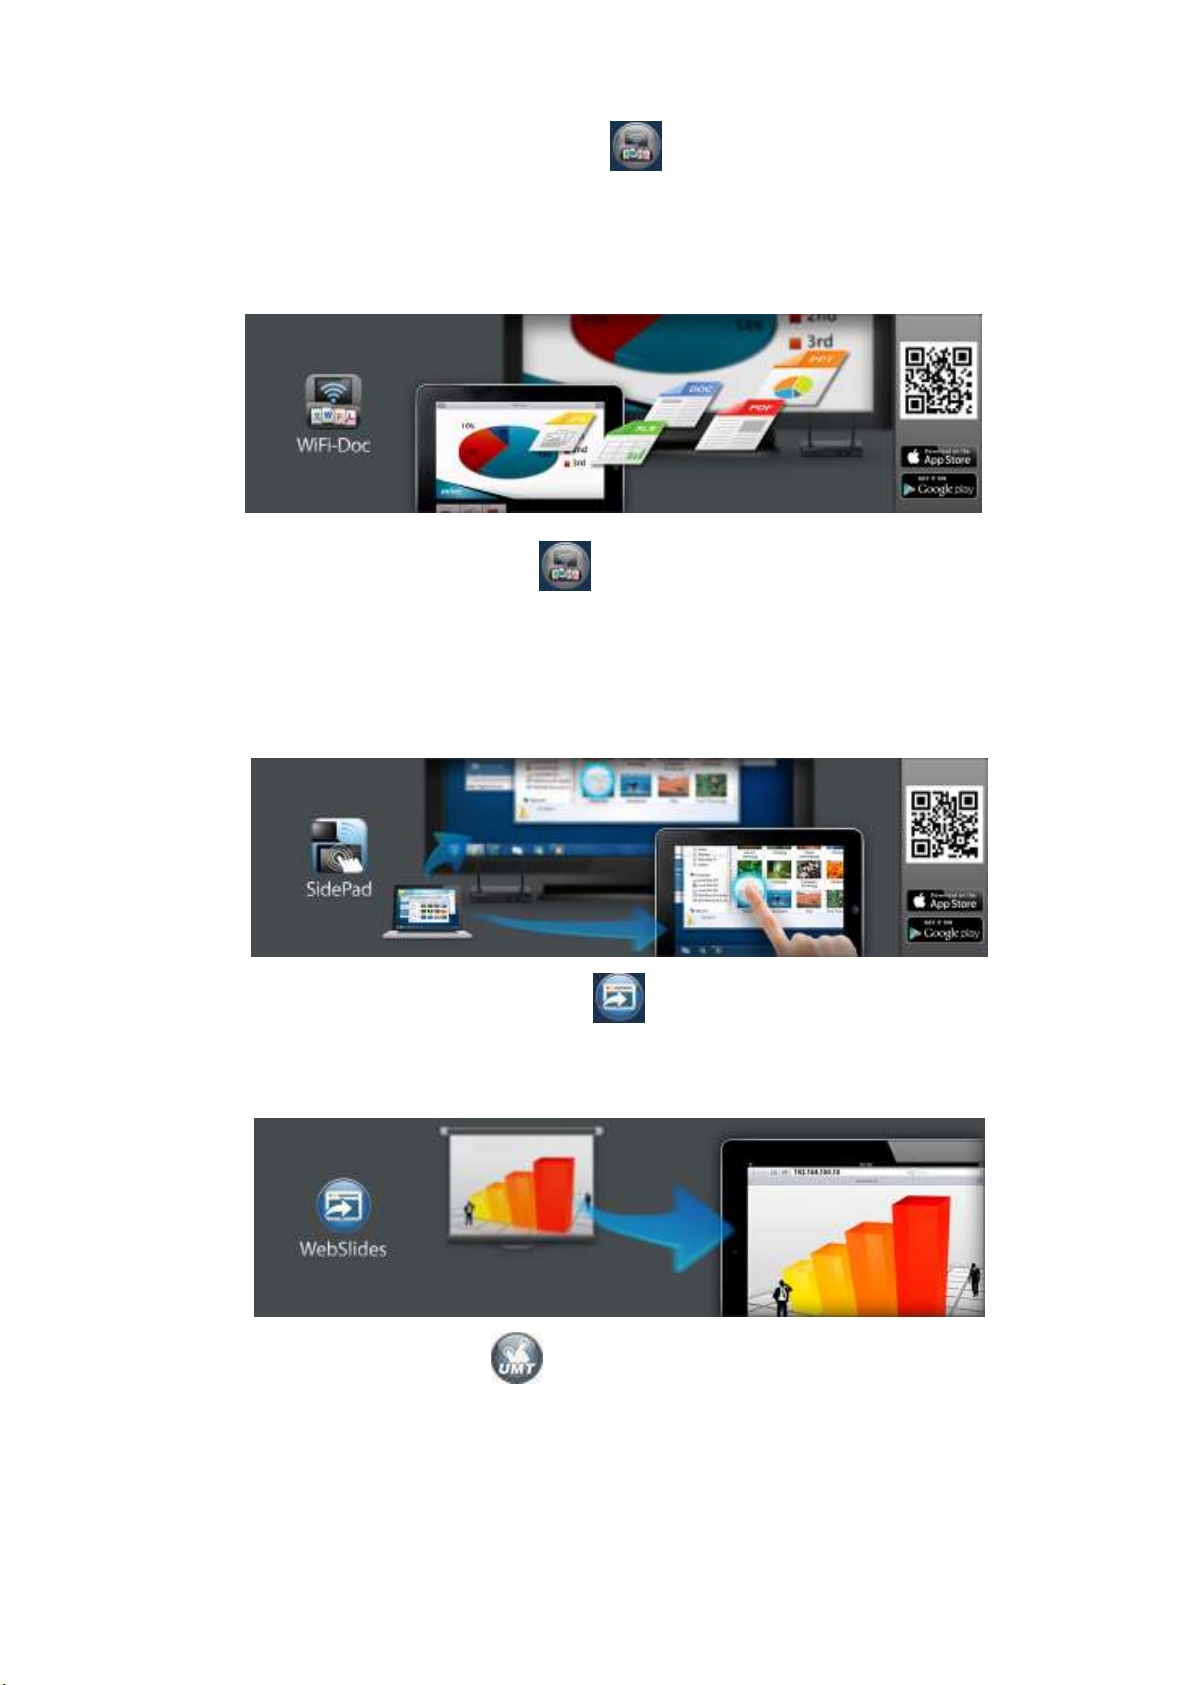
(2)WiFi-Doc(TBD): Click on WiFi-Doc icon , it describes the wireless
presentation for Mobile using WiFi-Doc. If your Smartphone has QR code scan App,
you can scan the QR code image on the screen with your Smartphone which will
lead you to the corresponding place to download all the available Apps.
(3)SidePad: Click on SidePad icon , it describes WiPG-2000 support SidePad
feature which allow users control the projecting screen on PC or Mac via
iPhone/iPad or Android devices. If your Smartphone has QR code scan App, you
can scan the QR code image on the screen with your Smartphone which will lead
you to the corresponding place to download all the available Apps.
(4) WebSlides: Click on WebSlides icon . It describes WiPG-2000 support
WebSlides feature which can broadcast slides to audience’s web browser through
network.
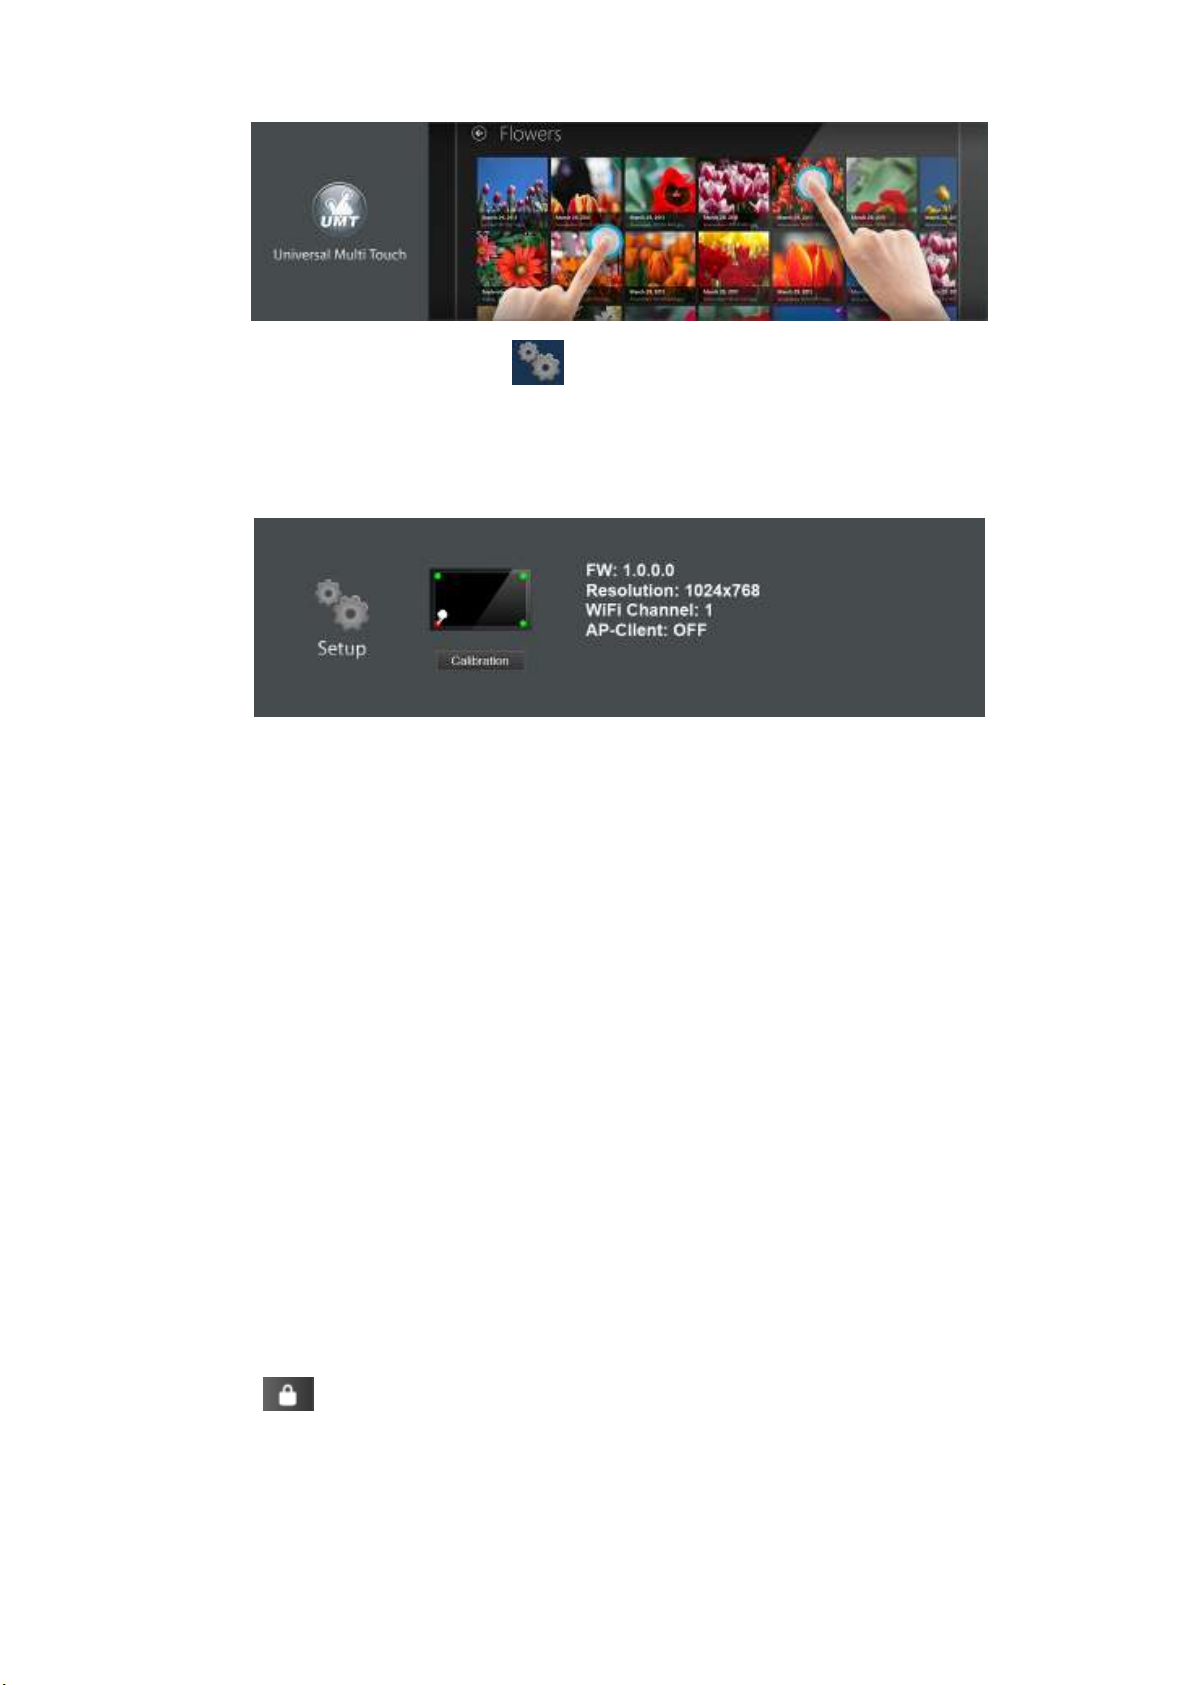
(5)UMT: Click on UMT icon . It describes WiPG-2000’s UMT(Universal
Multi-Touch) feature which can support standard touch device without installing
driver.
Page 15
15
(6) Setup: click on Setup icon , you can find the Firmware (FW) version,
resolution, WiFi channel and AP-client status information on the screen.
Meanwhile, you can also click on the “Calibration” function to calibrate the
projecting screen to an optimization mode.
7.3 Remote Touch Control (UMT)
WiPG-2000 can support standard Win7/8 compatible HID touch device. By
connecting the HID touch screen/IWB device, users can control the standby screen,
direct draw and the projecting screen remotely from the Touch Screen/IWB device.
Note:
1. The UMT can only support standard USB HID touch device, it can’t support the
touch device required installing additional driver.
2. It will process the touch event and send the mouse event to sender when the
sender is Windows XP, 7 and Mac.
3. The USB port on WiPG-2000 can supply up to 5V/0.5A power, the additional
power supply is required if the attached HID device required more power.
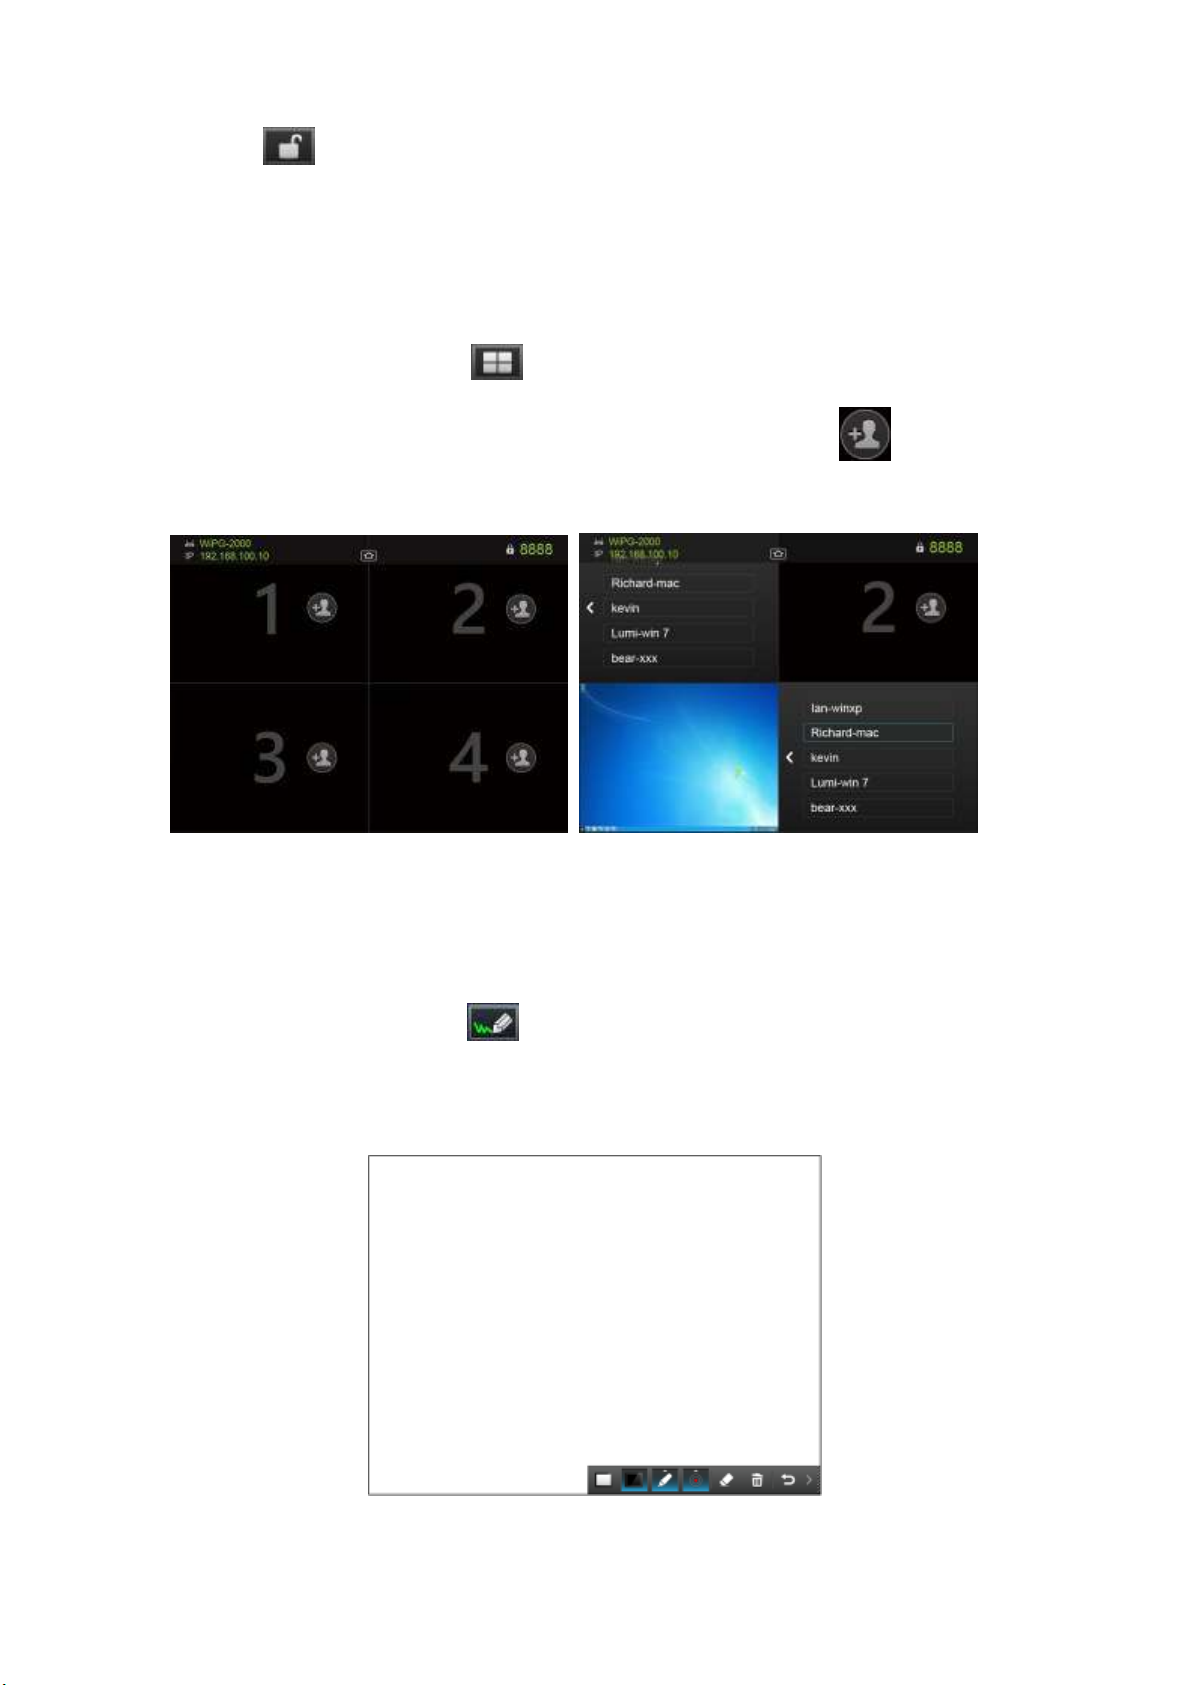
7.4 Conference Control Mode
1) Click to enable conference control mode and the sender will be blocked
when they try to overtake the screen from the sender application. The moderator
can only manage the projecting sender through web conference control page or the
OSD PC-List.
Page 16
16
2) Click to disable conference control mode, the sender can overtake the
screen freely by pressing the button on the sender application
7.5 Split Screen mode
1) Click on the “Split Screen” button on the start page to enter “Split Screen”
page. You can see the connected sender list and press the “add” icon to
choose them to the selected quadrant area.
7.6 Direct Draw
1) Click on the “direct draw” button on the start page to enter “direct draw”
function page. You can make the free drawing on device screen through Mouse,
AirPad, Touch Screen or IWB device.
Page 17
17
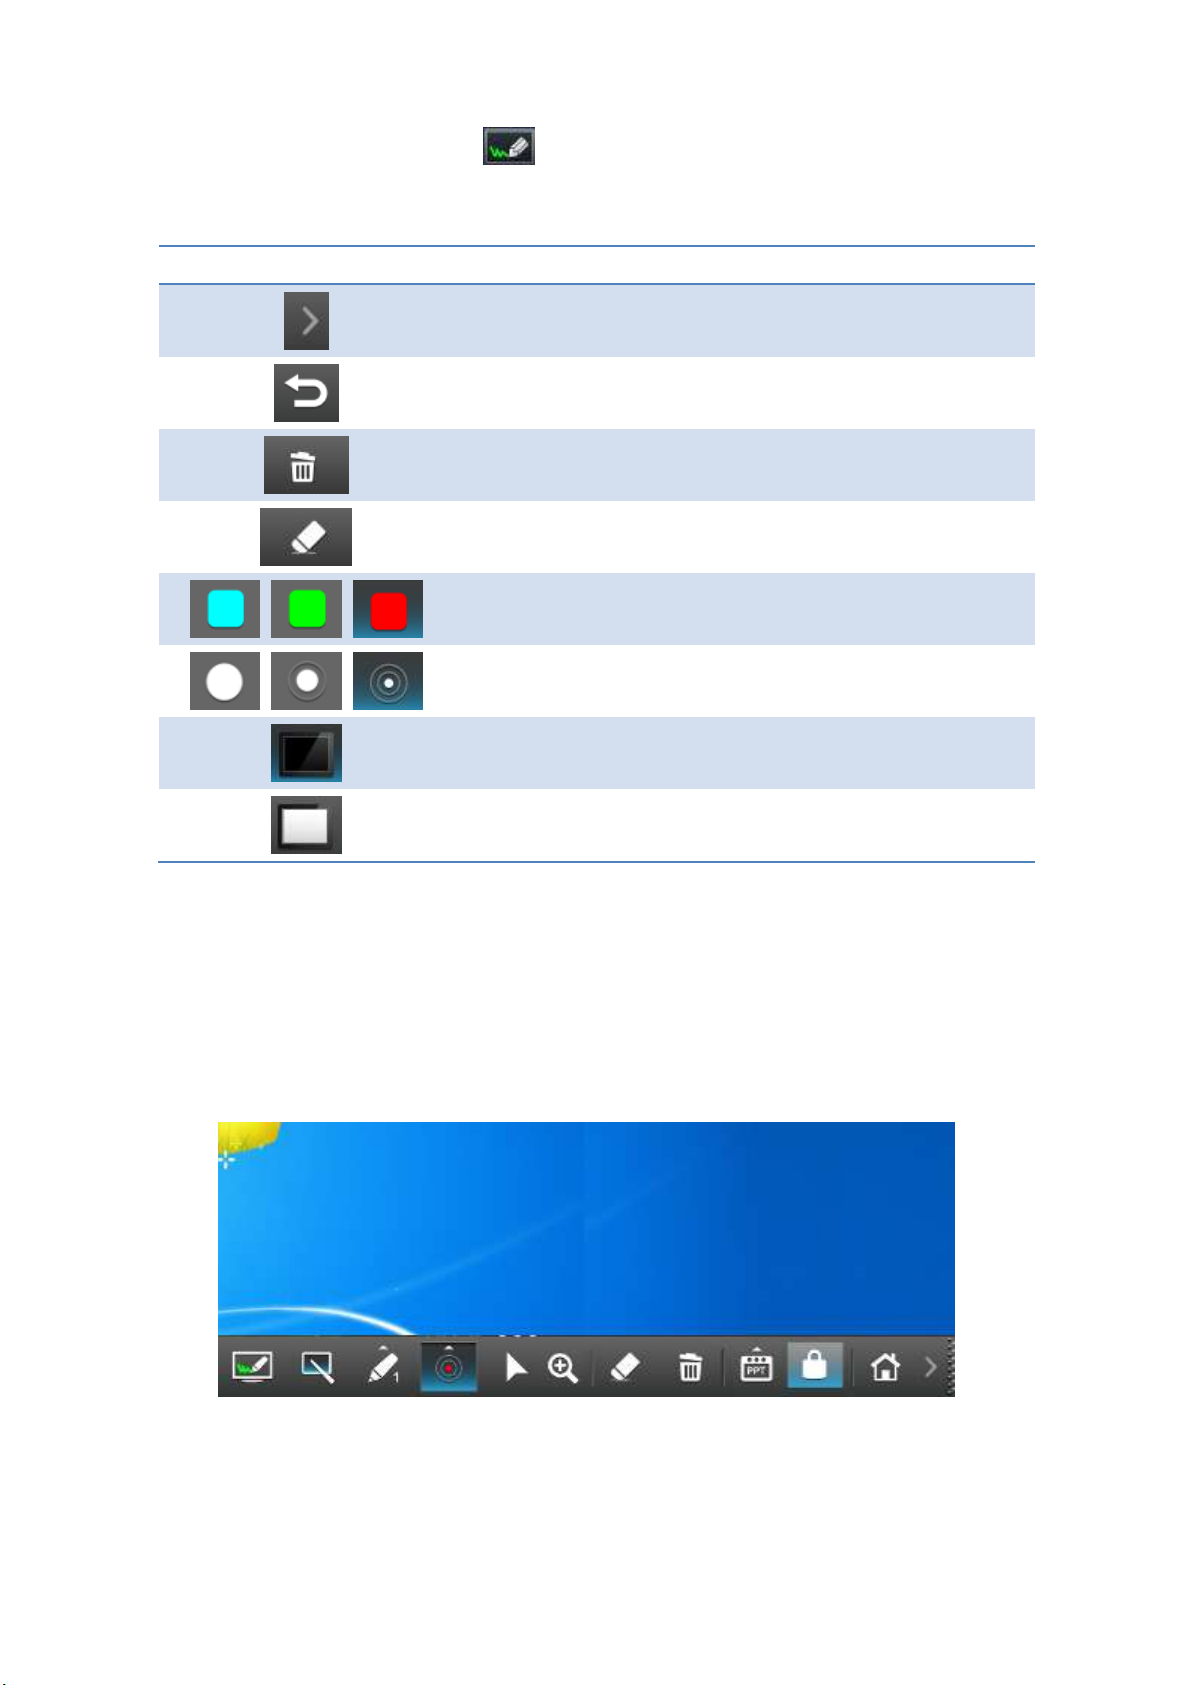
Click on the “direct draw” icon, the menu will pop up as below image.
Pen Menu Function
Button
Description
Open/Minimize all Pen menu bar.
Home, Go back to wePresent home standby screen.
Clear all of the drawing/writing on the screen.
Erase part of drawing/writing.
Select the pen color. (Red, Green, Blue)
Select the size of the pen. (Small, Medium, Big)
Click to use the blackboard. (All the drawing/writing will be
cleared when changes to different mode)
Click to use the whiteboard. (All the drawing/writing will be
cleared when changes to different mode)
7.7 Pen Menu Function Under Projecting Mode.
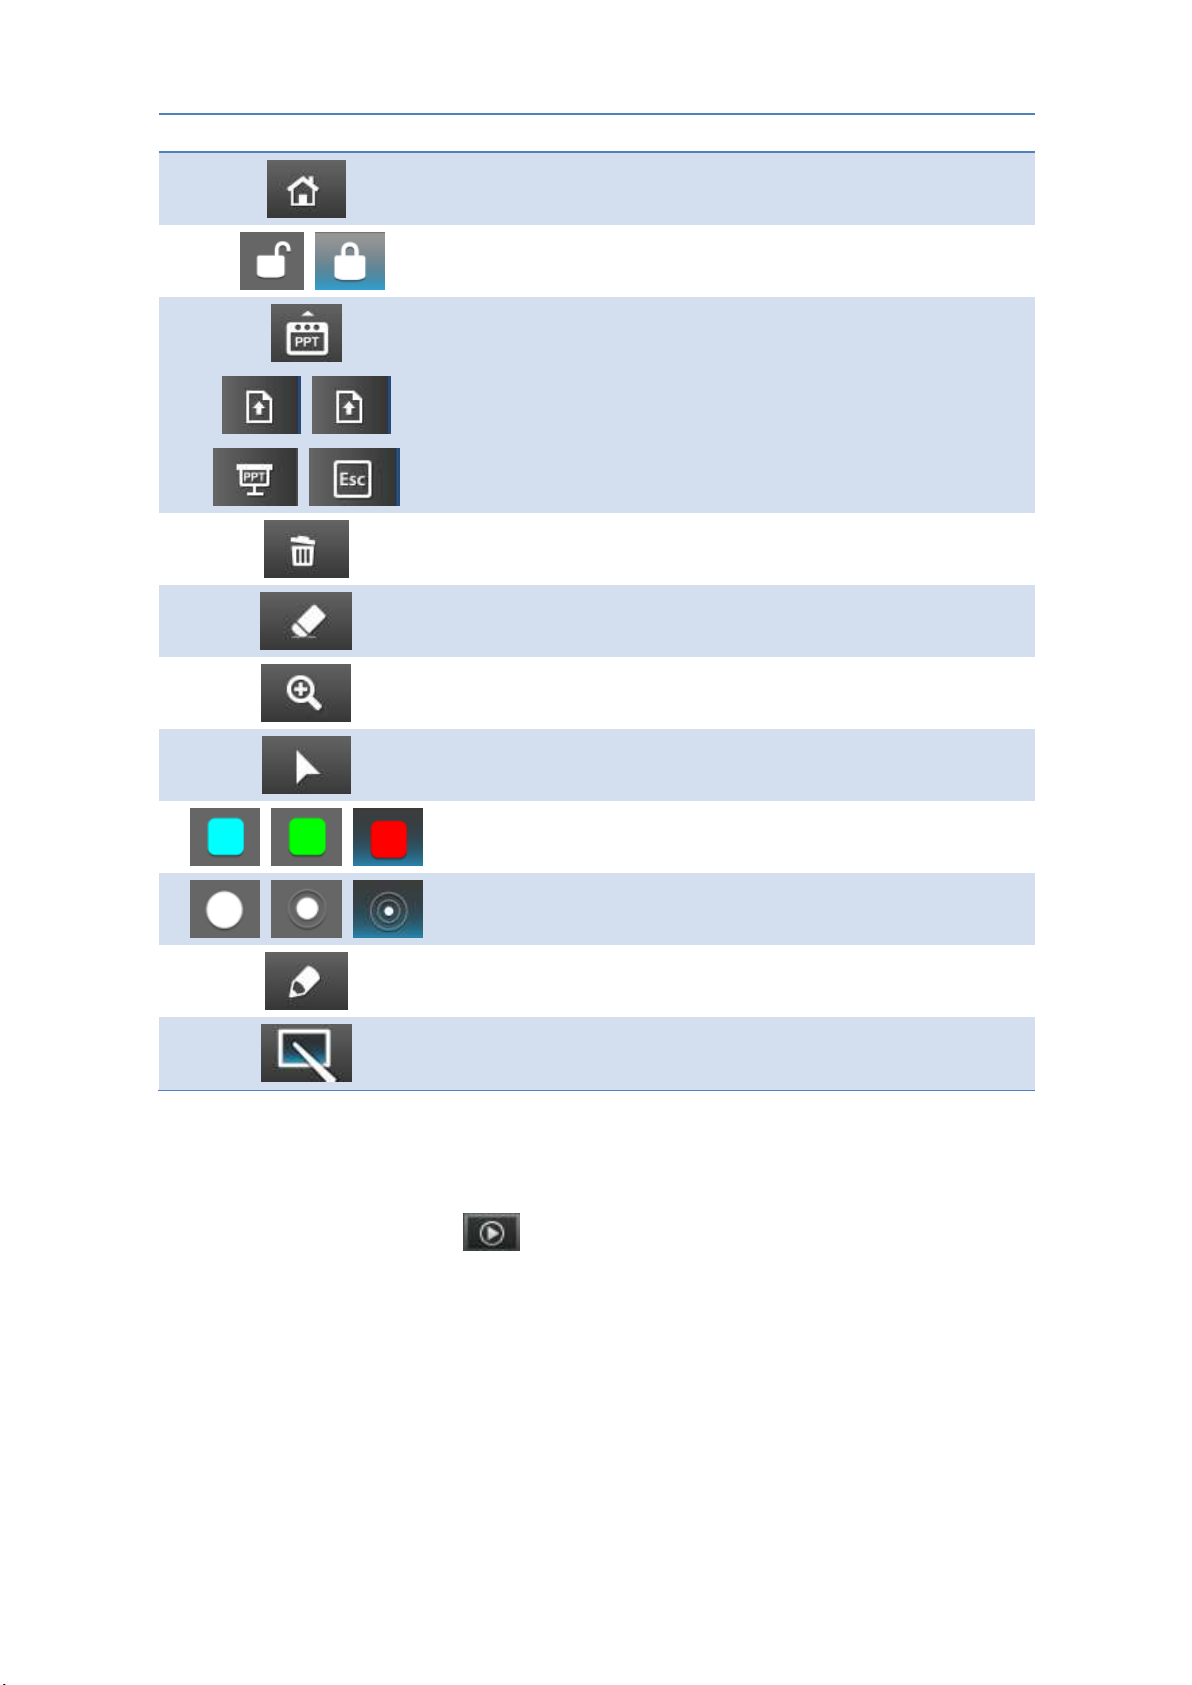
1) When users are projecting through Windows, Mac, Android and iOS application,
any Win7/8 standard HID compatible device (i.e AirPad/Mouse/IWB/Touch Screen)
can be used for Pen feature. Users can do free drawings/writings and annotation
on the projecting screen.
Page 18
18
Item
Description
Home, Go back to wePresent home standby screen.
Enable/Disable the conference control mode.
The tool for PowerPoint presentation.
PageUp/PageDn, this button to go to previous/next page.
SlideShow, When the user is projecting a PPT file, press this
button to enable Slide Show function.
ESC, When the user is projecting a PPT file, press this button
to quit Slide Show mode.
Clear all of the drawing/writing on the screen.
Erase part of drawing/writing.
Enable the magnifier function.
Change to Mouse mode for remote control function.
Select the color and size for Pen mode. (Red, Green, Blue)
Select the size of the pen. (Small, Medium, Big)
Change to Pen mode for drawing/writing function.
Change to Pointer Mode.
7.8 USB Player function
1) Click on the “USB Player” button on the start page to enter “USB Player”
function. You can playback the Photo/Music/Video/Office files from the attached
USB drive. Details please see the USB Player section.
Page 19
19
8 DoWiFi for Windows
(Do Not Support Windows Phone, Windows RT)
8.1 Install the application
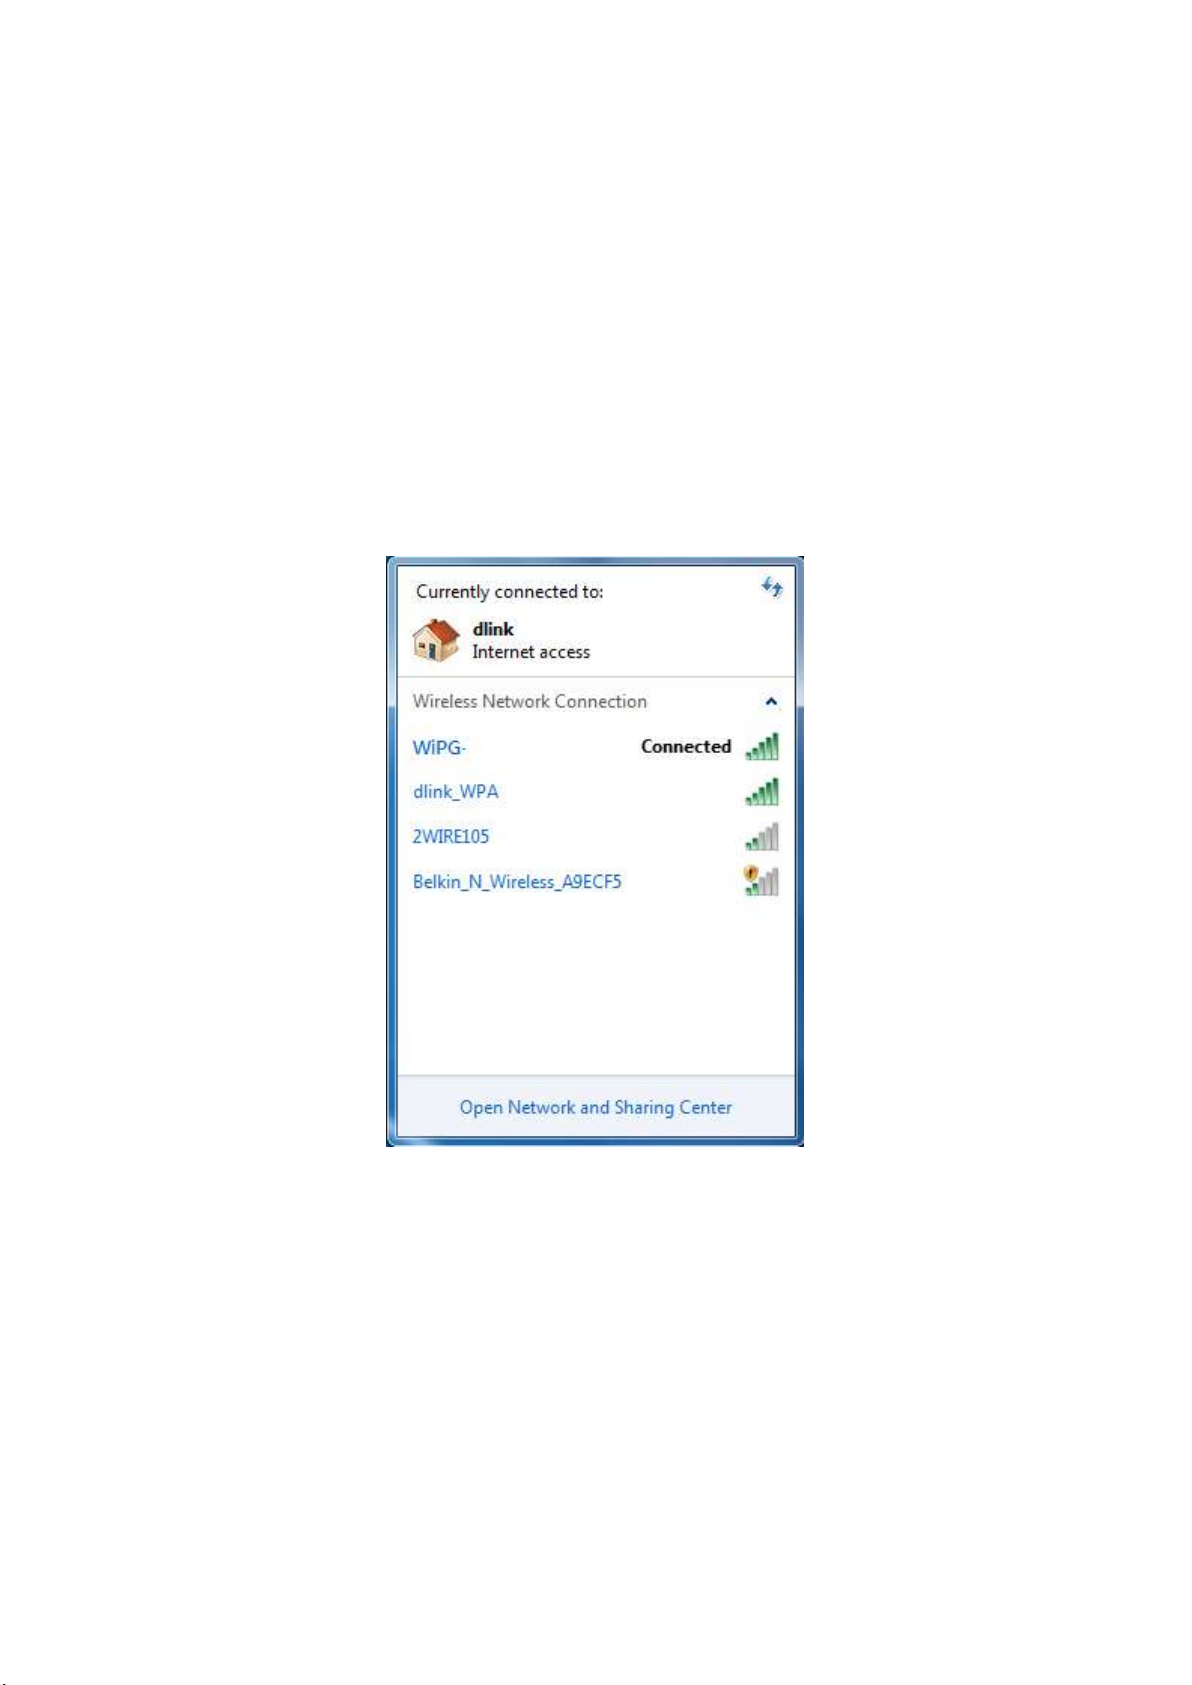
1) Make sure your PC WiFi is enabled already, and connect your PC to wePresent
WiPG-2000 box through WiFi. You can find the WiFi name of your WiPG box
information on the start/standby page.
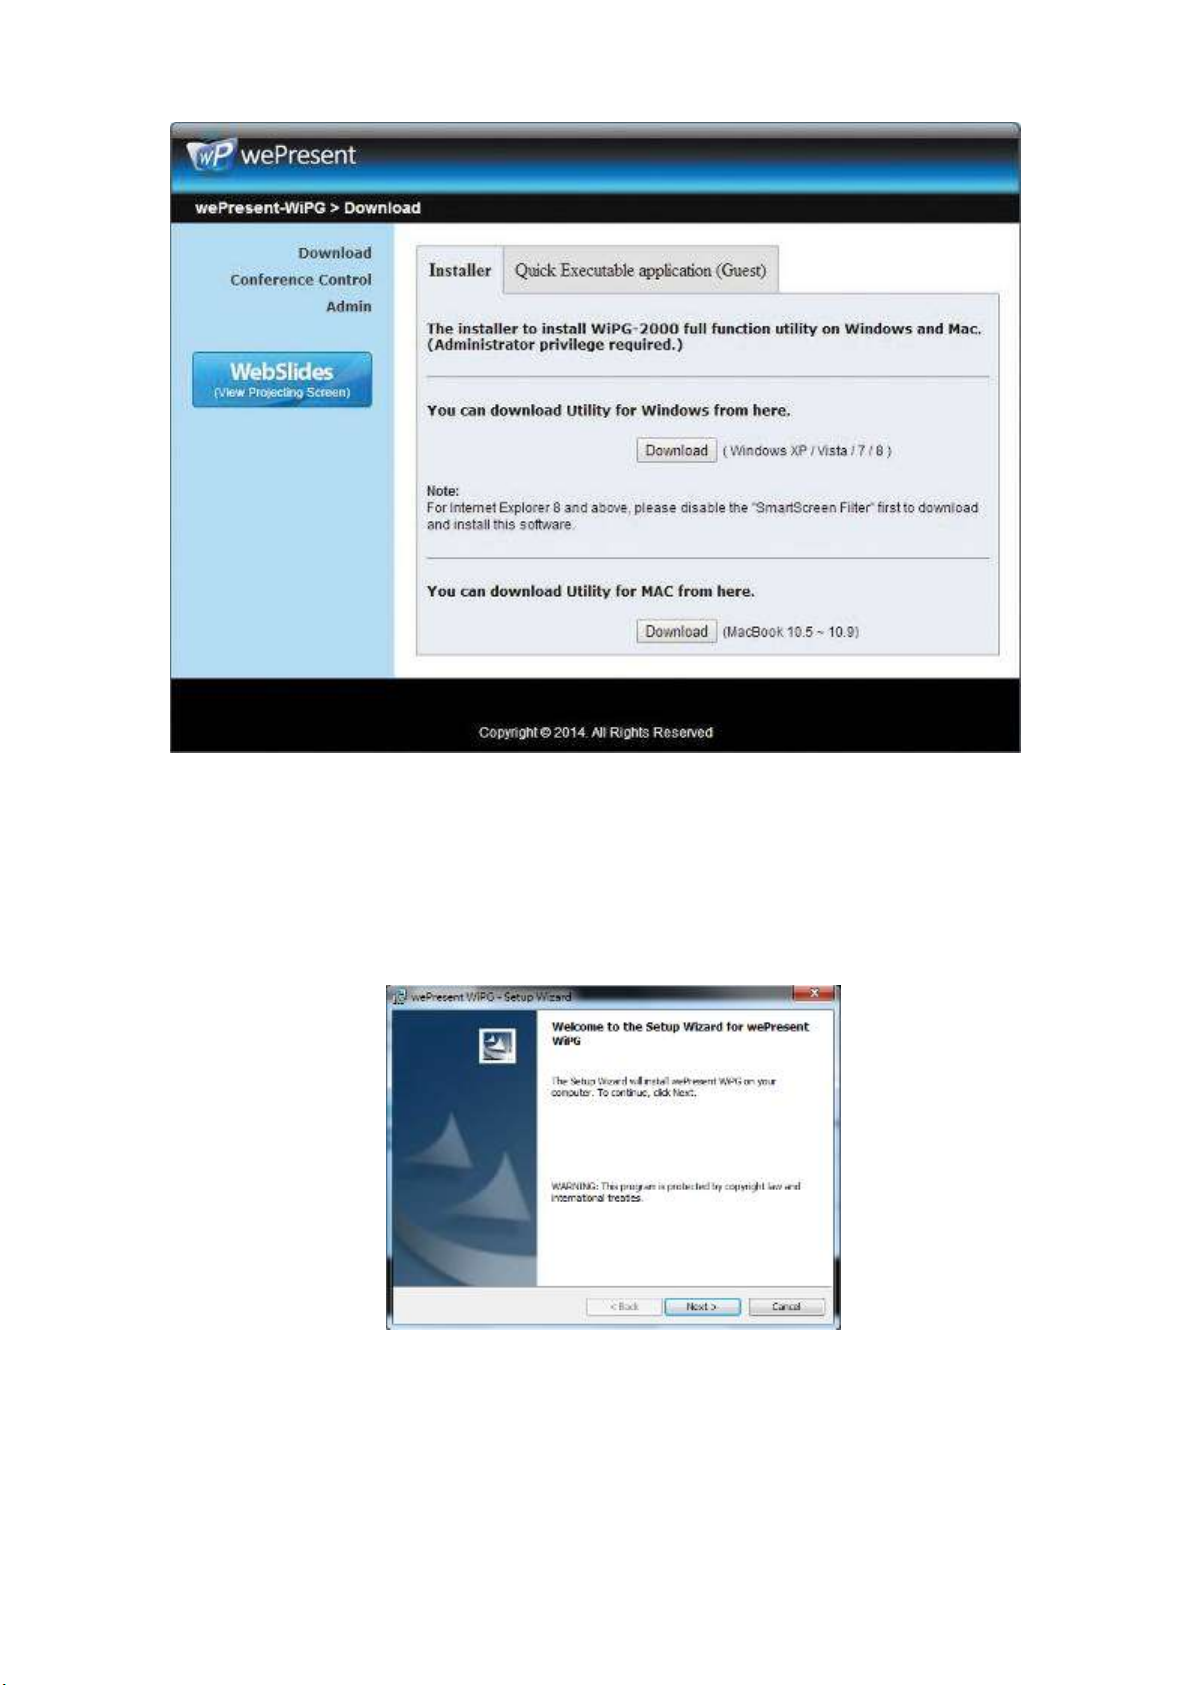
2) Launch your browser and enter the Device Host Name (SSID) or IP address in the
browser. You can find the IP address and Host Name (SSID) on the
projector/display screen. (Default Host Name (SSID) is WiPG-2000-xxx, Default IP
is 192.168.100.10)
3) Download the wePresent software for “XP/Vista/Windows 7 / 8” and install on your
PC. (Ps. You can also launch the application from USB token directly.)
Page 20
20
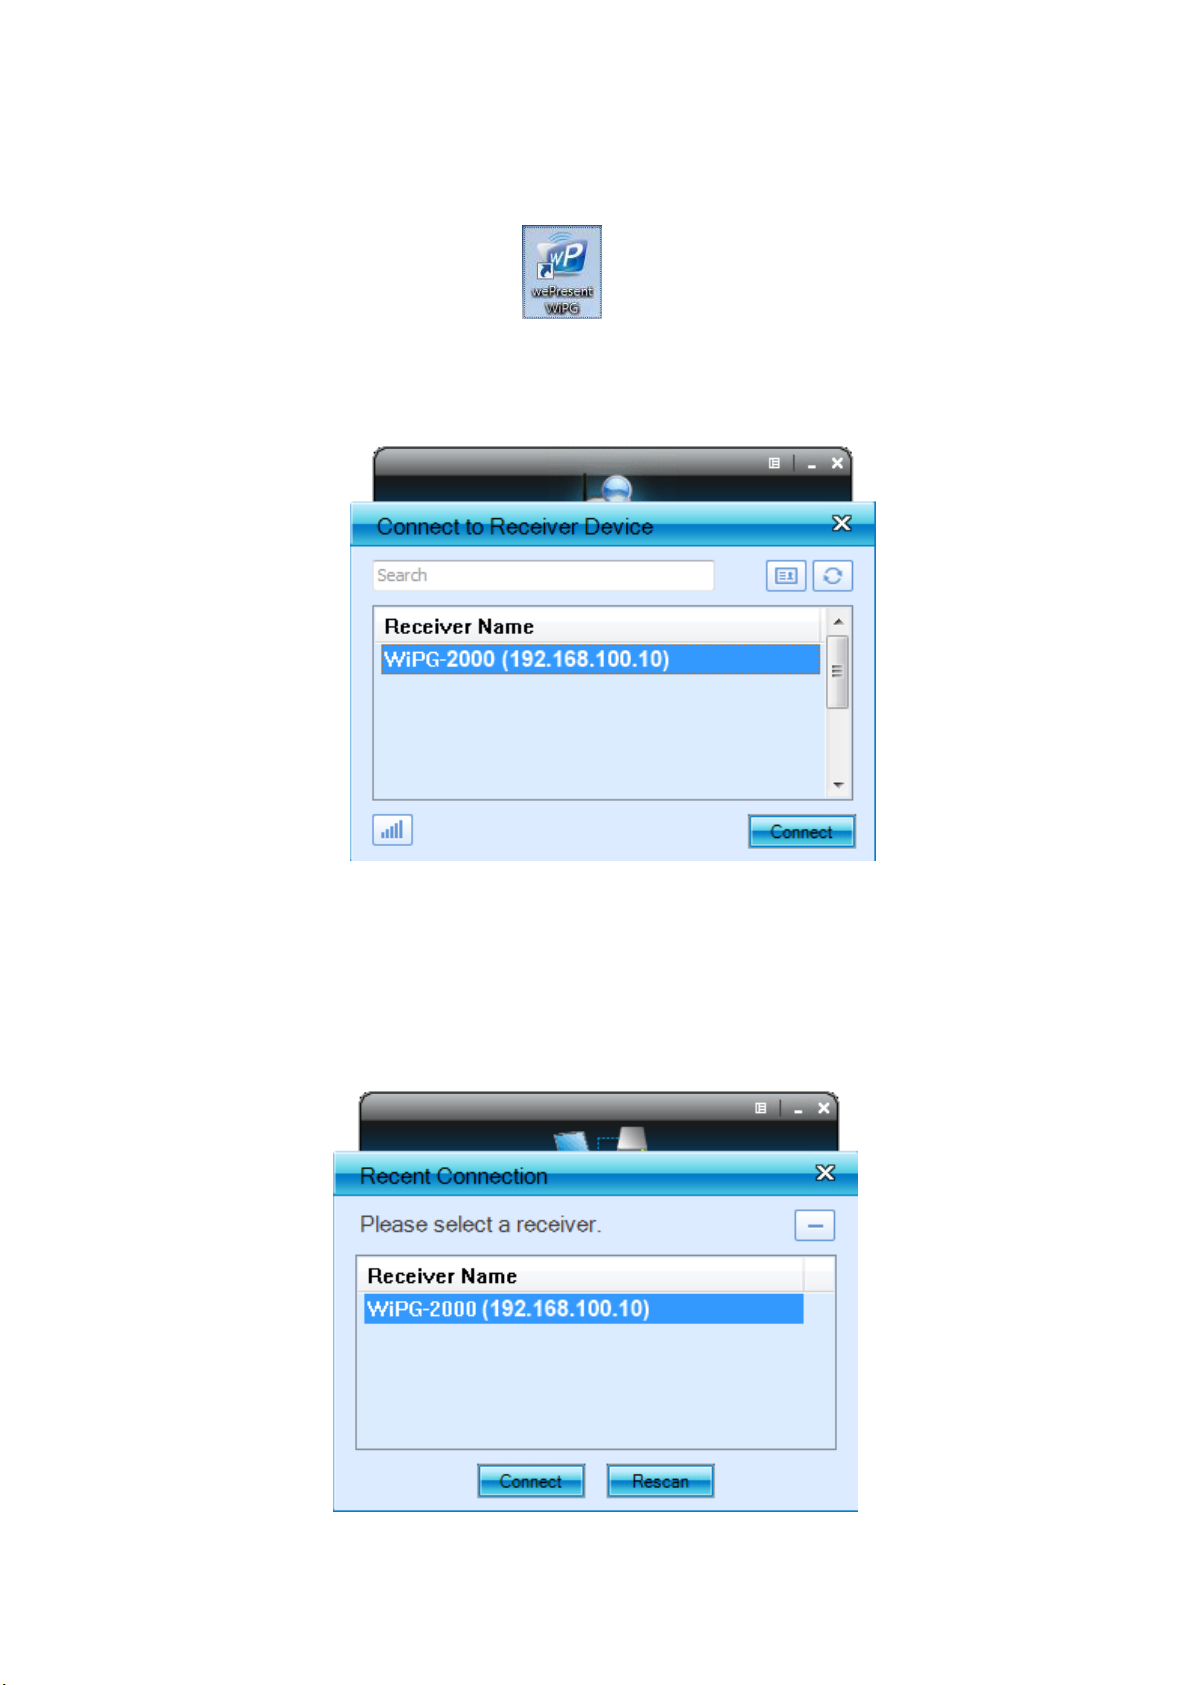
4) When the download is completed, follow the wePresent WiPG Setup wizard to
execute the software.
(Make sure your WiFi have connected to WiPG-2000-xxx and your PC’s personal
firewall allows wePresent WiPG-2000 software to pass through.)
Page 21
21
8.2 Start the application
1) Click wePresent WiPG-2000 icon on desktop to execute the application, or
launch the application from USB token directly. (You can find the wePresent
WiPG-2000.exe under wePresent WiPG folder).
2) It will start to search wePresent WiPG-2000 receiver automatically.
8.3 Recent Connection
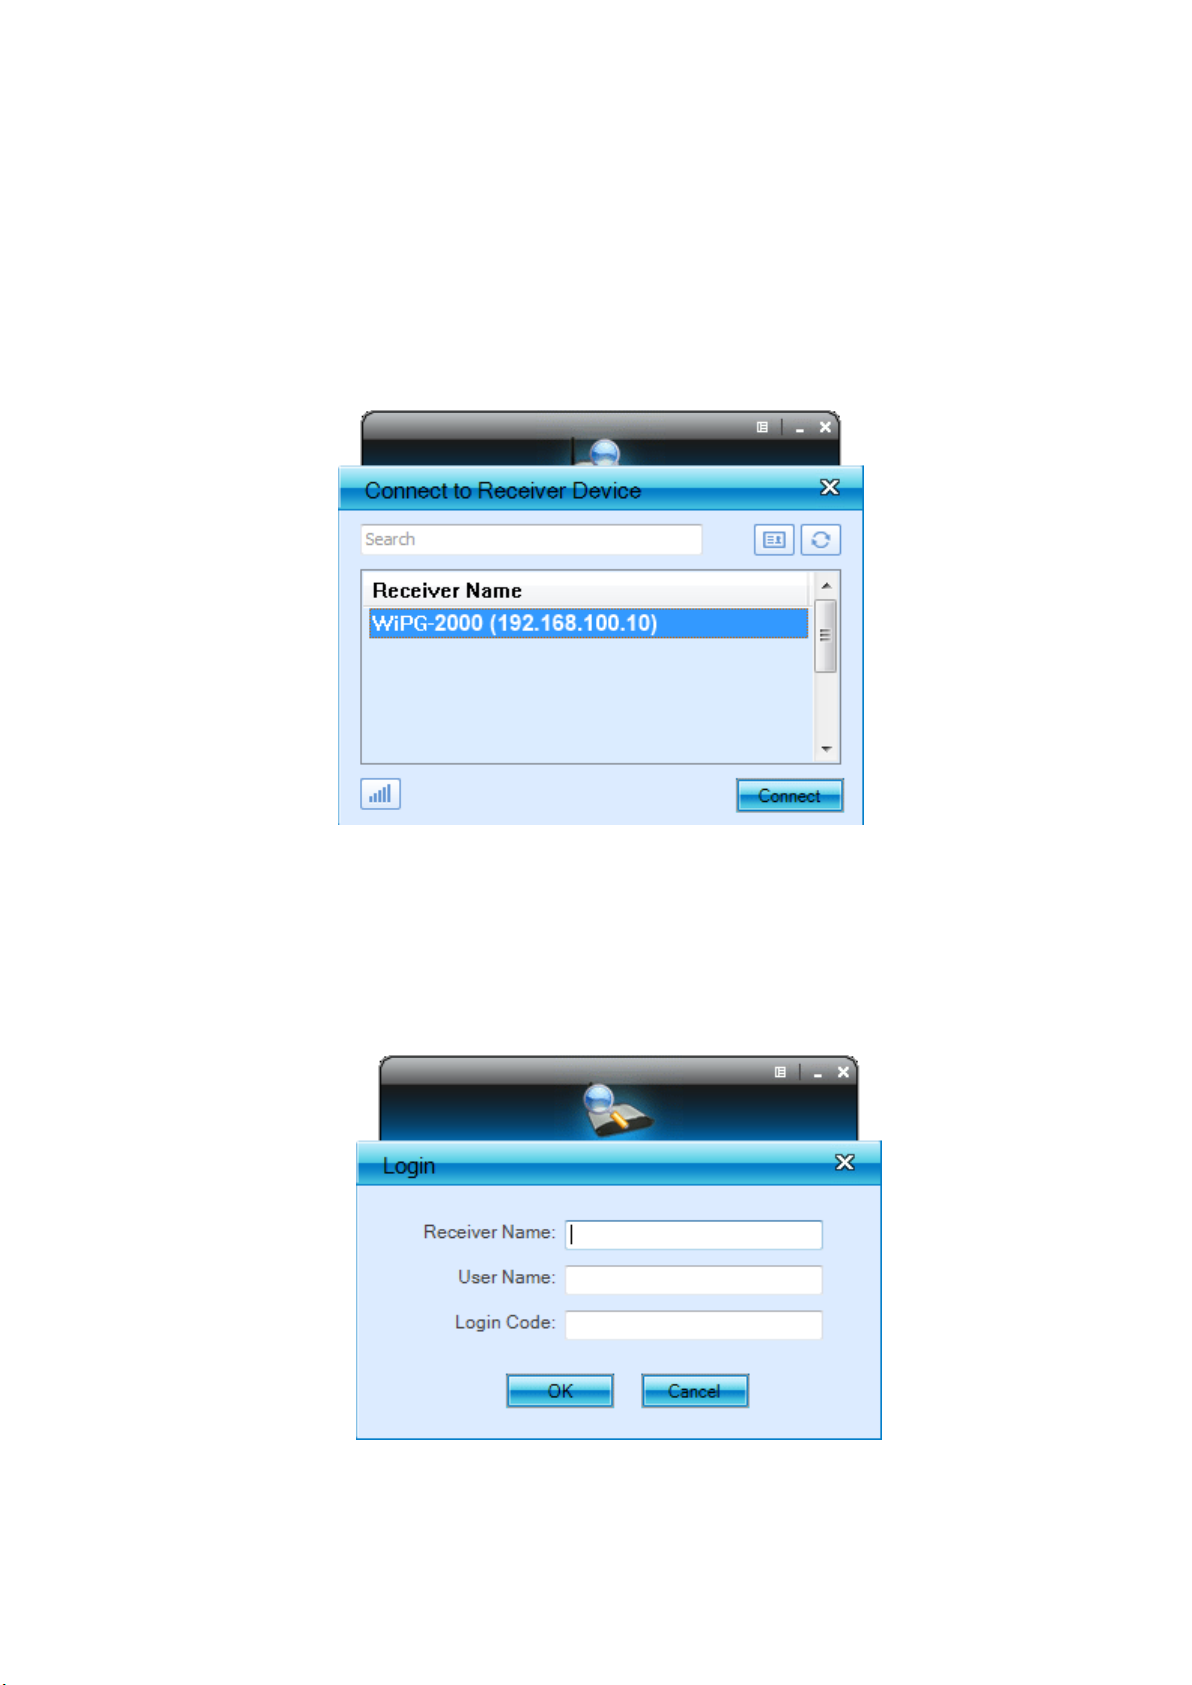
1) WiPG-2000 will memorize the successful connection profiles and open the recent
connect dialog, you can select one of the profile and press the “Connect” button to
connect this WiPG-2000 directly.
Page 22
22
2) If you want to connect to another WiPG-2000 receiver, please press the “Rescan”
button.
8.4 Connect to Receiver Device
1) WiPG-2000 application will search and list the WiPG-2000 receiver Device. You can
select the target receiver device and press “Connect” button to connect the
selected receiver device.
2) You can press the “Refresh” button to search again.
3) If you can’t find the target receiver device from the list, you can press the “Manual”
button to enter the receiver IP address manually and connect.
4) If you want to change to another WiFi network, you can press the “WiFi” button to
list the available WiFi network.
Page 23
23
8.5 Login
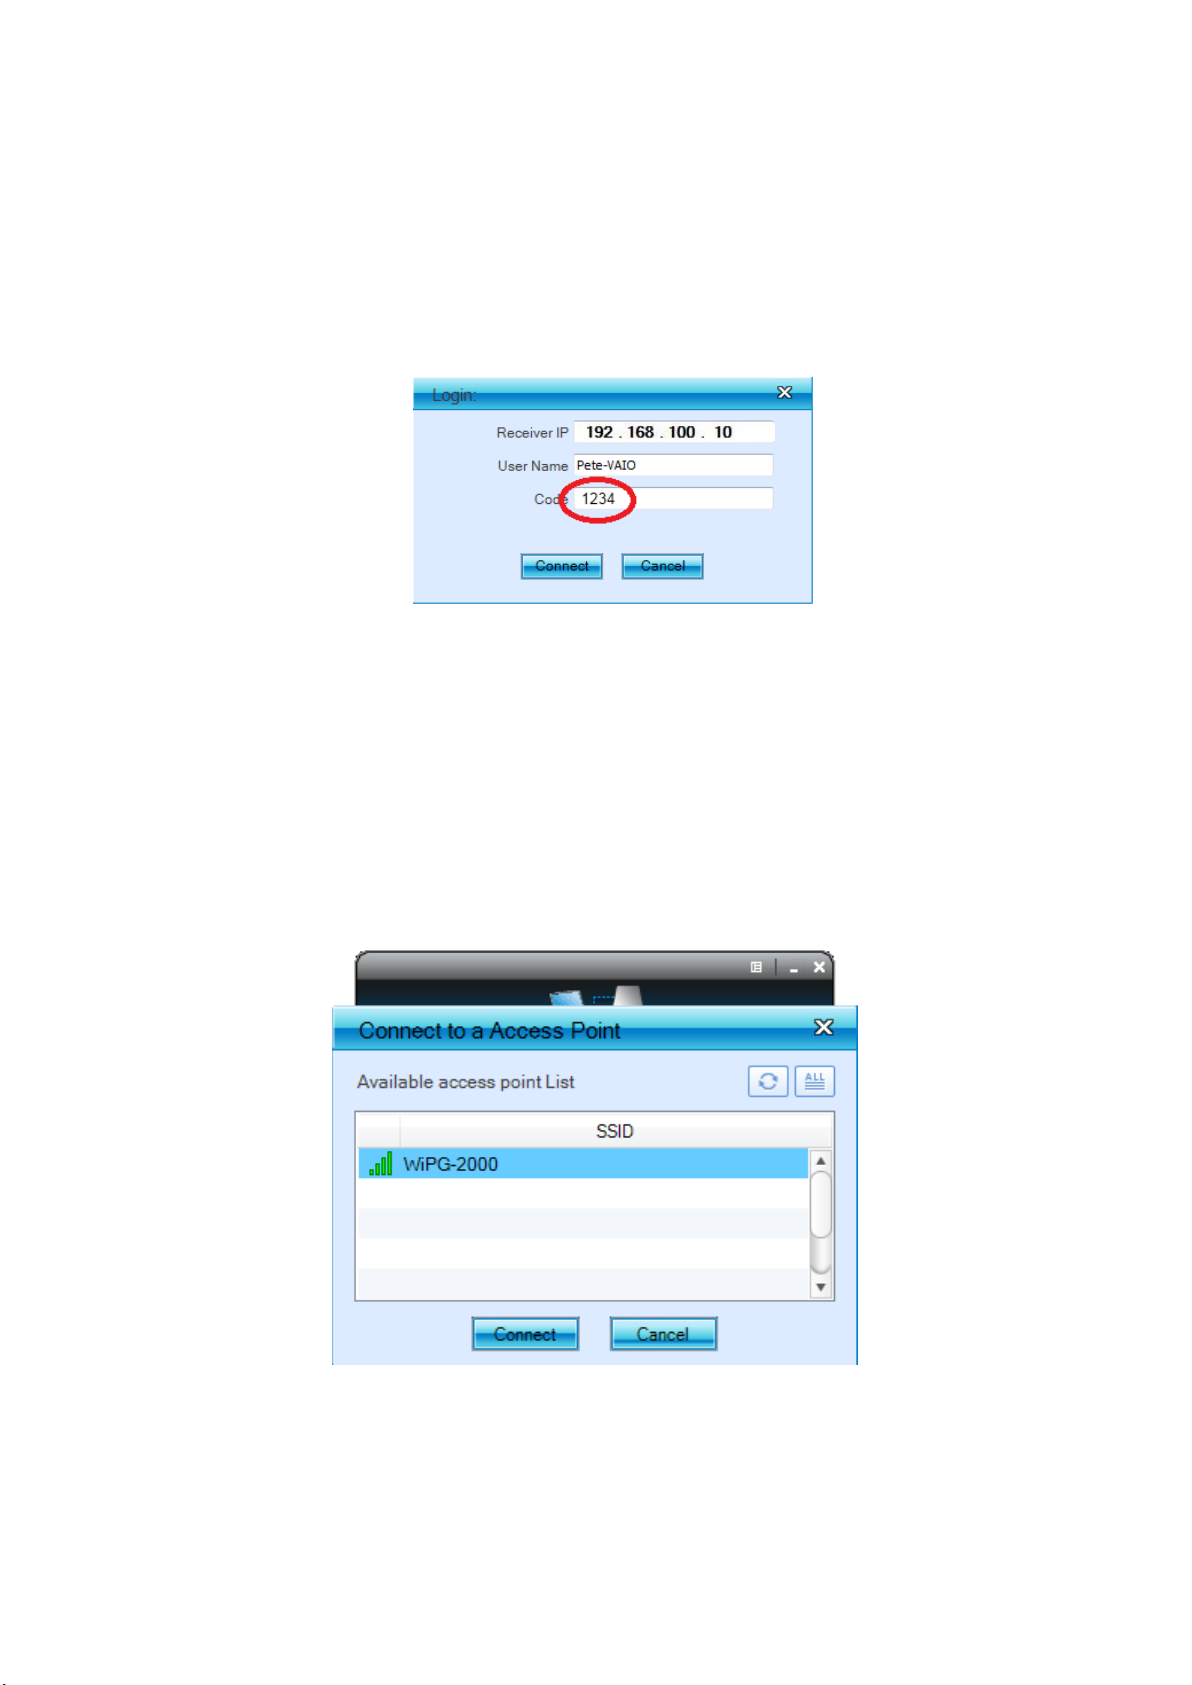
1) When connecting to a “Code” protection enabled WiPG-2000 receiver, you have to
enter the “Code” and press the “Connect” button to login the receiver.
(You can find the CODE from the OSD standby screen or right-upper corner of start
screen)
(Enter the code into the circled area)
2) If you want to connect to another receiver or cancel the login, please press the
“Cancel” button.
8.6 Change to another WiFi Network
1) If you press the “WiFi” icon, WiPG-2000 application will search the available WiFi
Network and list the WiPG-2000 WiFi Device. You can select a network and press
the “Connect” button to connect the selected WiFi Device.
2) You can press the “Refresh” button to search again or press the “All” button to list
all available WiFi Network name.
3) If you don’t like to change the WiFi Network and want to keep the connection to
current network, you can press the “Cancel” button.
Page 24
24
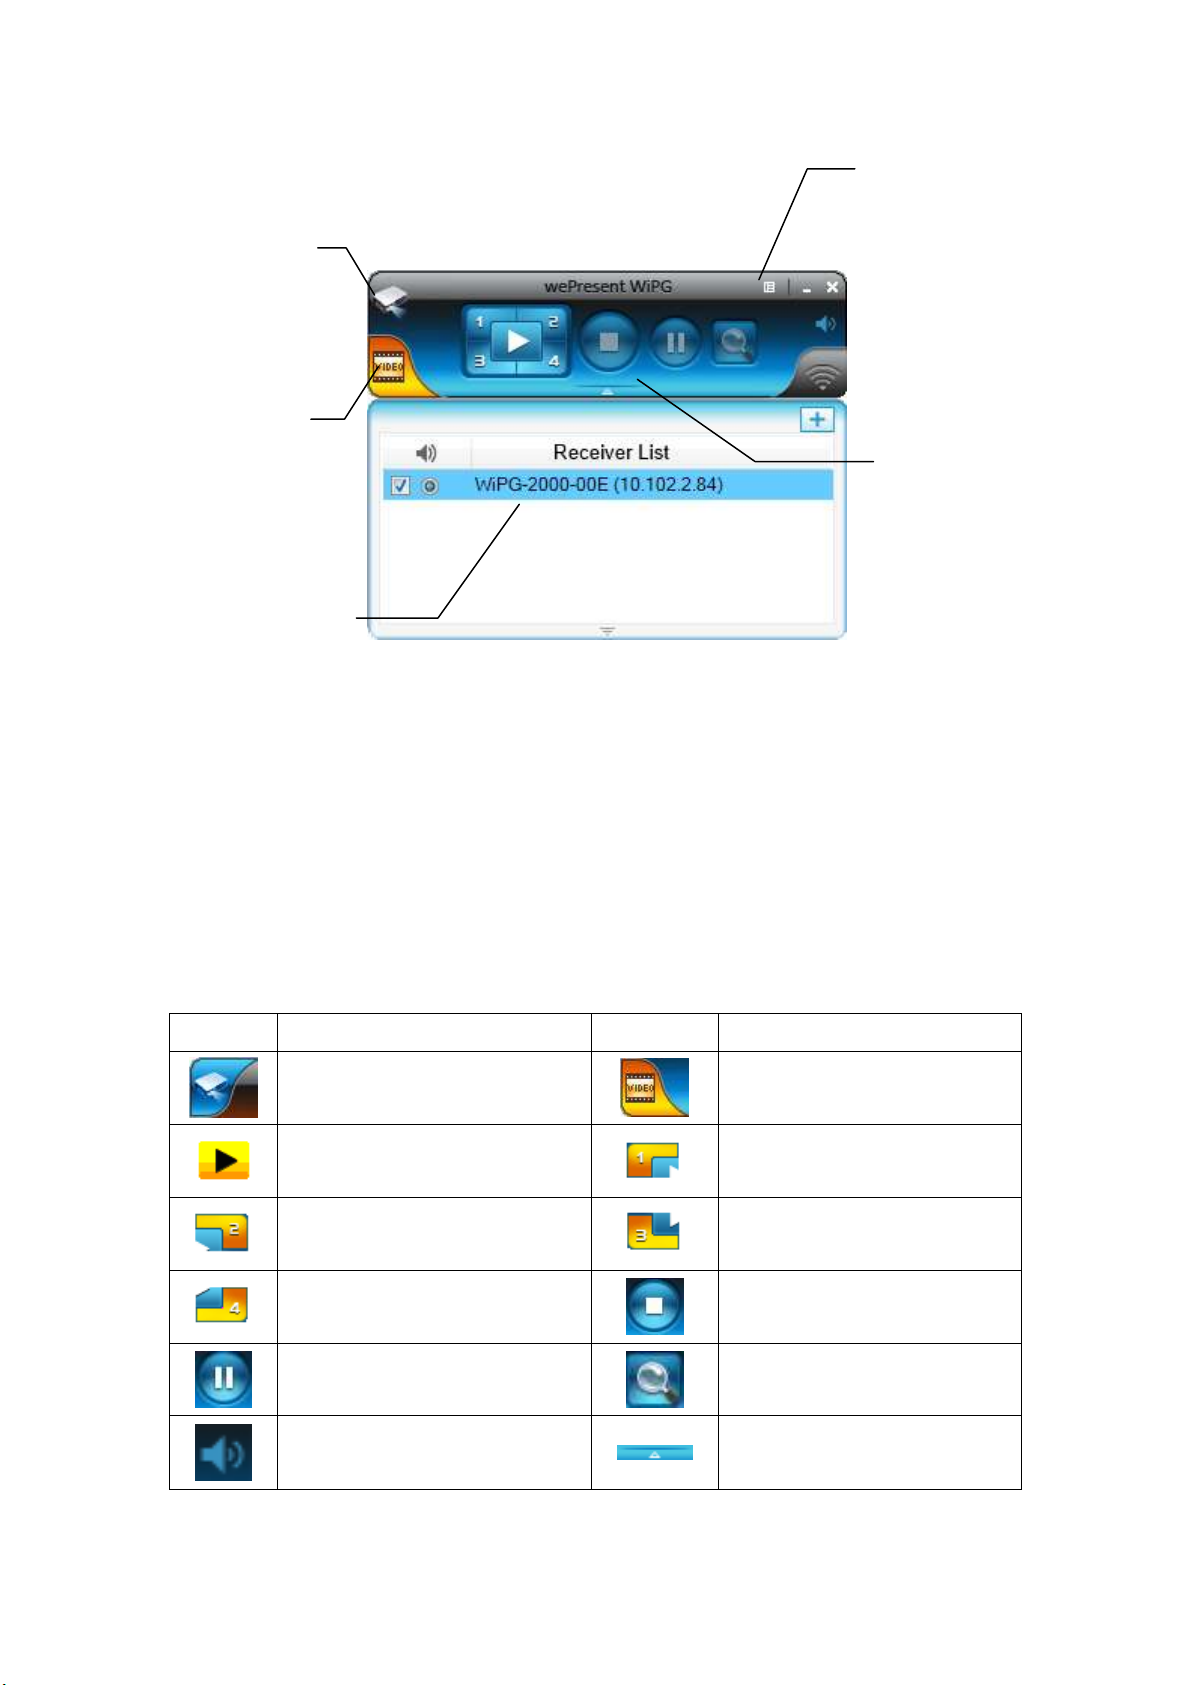
8.7 Main User Interface
8.8 Screen Projection
1) Click the “Play” button for full or “1,2,3,4” for split screen projection, you can
project the main screen on to the display immediately. Click the “Pause” button,
you can freeze you projection screen, and click the “Stop” button to stop projecting
your screen.
Button
Description
Button
Description
Presentation Function Tab
Video Function Tab
Full Screen projection (Support
audio projection)
Project to Split #1 (Support
audio projection)
Project to Split #2 (No audio
projection)
Project to Split #3(No audio
projection)
Project to Split #4(No audio
projection)
Stop projecting
Pause projecting
Magnifier function
Mute/Unmute for screen
projection
Open/Hide Connected Receiver
List
Control Area for
Screen Projection
Feature
Menu Area
Video
function
Presentation
function tab
Connected
Receiver list Area
Page 25
25
Note:
1. Audio Function:
For Windows XP system, if you can’t hear the audio, please installs the Audio
driver (“VAC.exe”, Virtual Audio Control Driver) on your computer first, you can
find the software from USB Token.
(Windows Vista, Win7 and Win8 is not necessary to install VAC driver)
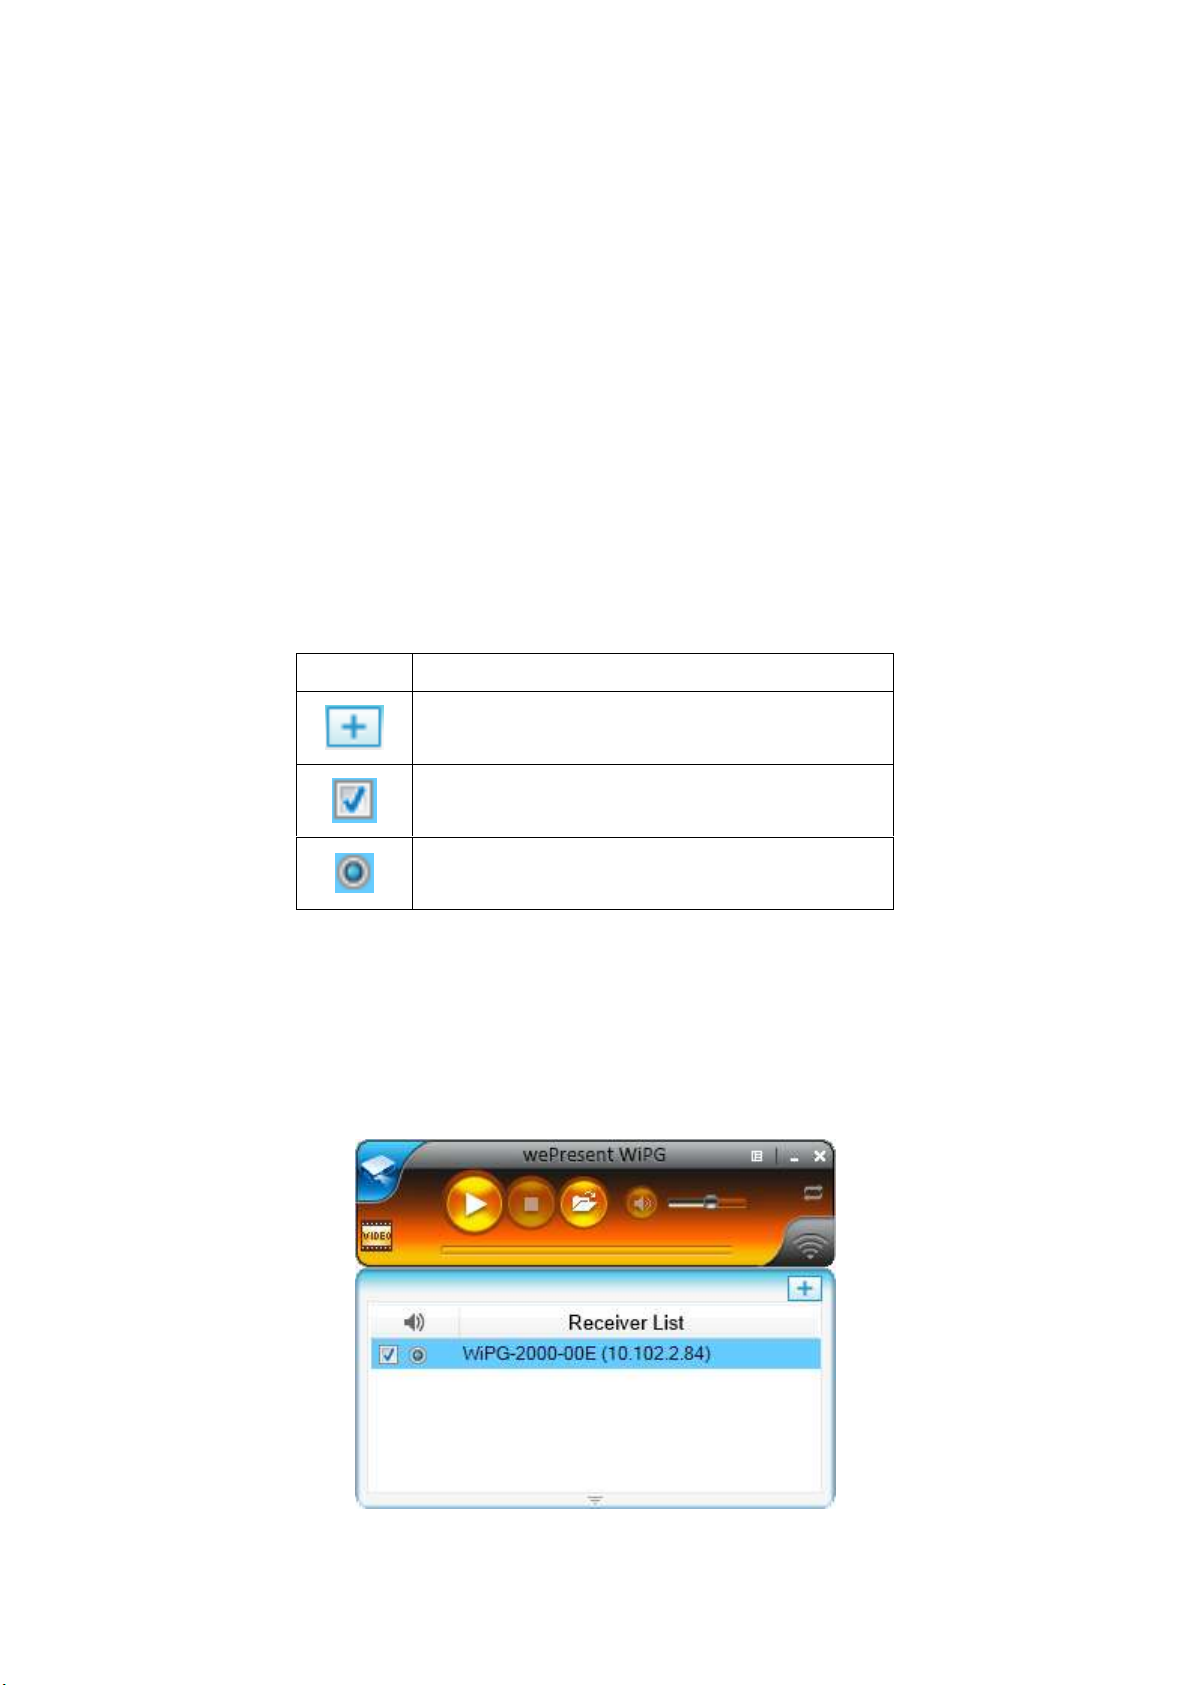
8.9 Connected Receiver list
Press on the “arrow” button to expand the connected receiver list, and press the “add”
button to add another receiver. During standby status, you can press the “check”
button to select the multiple receivers (up to 4) to mirror your screen, and press
“radio” button to select one of the receiver to send the audio.
Button
Description
Add another receiver
Select the receiver to project your screen and
stream the video. (up to 4)
Select the receiver to send audio
(One of them)
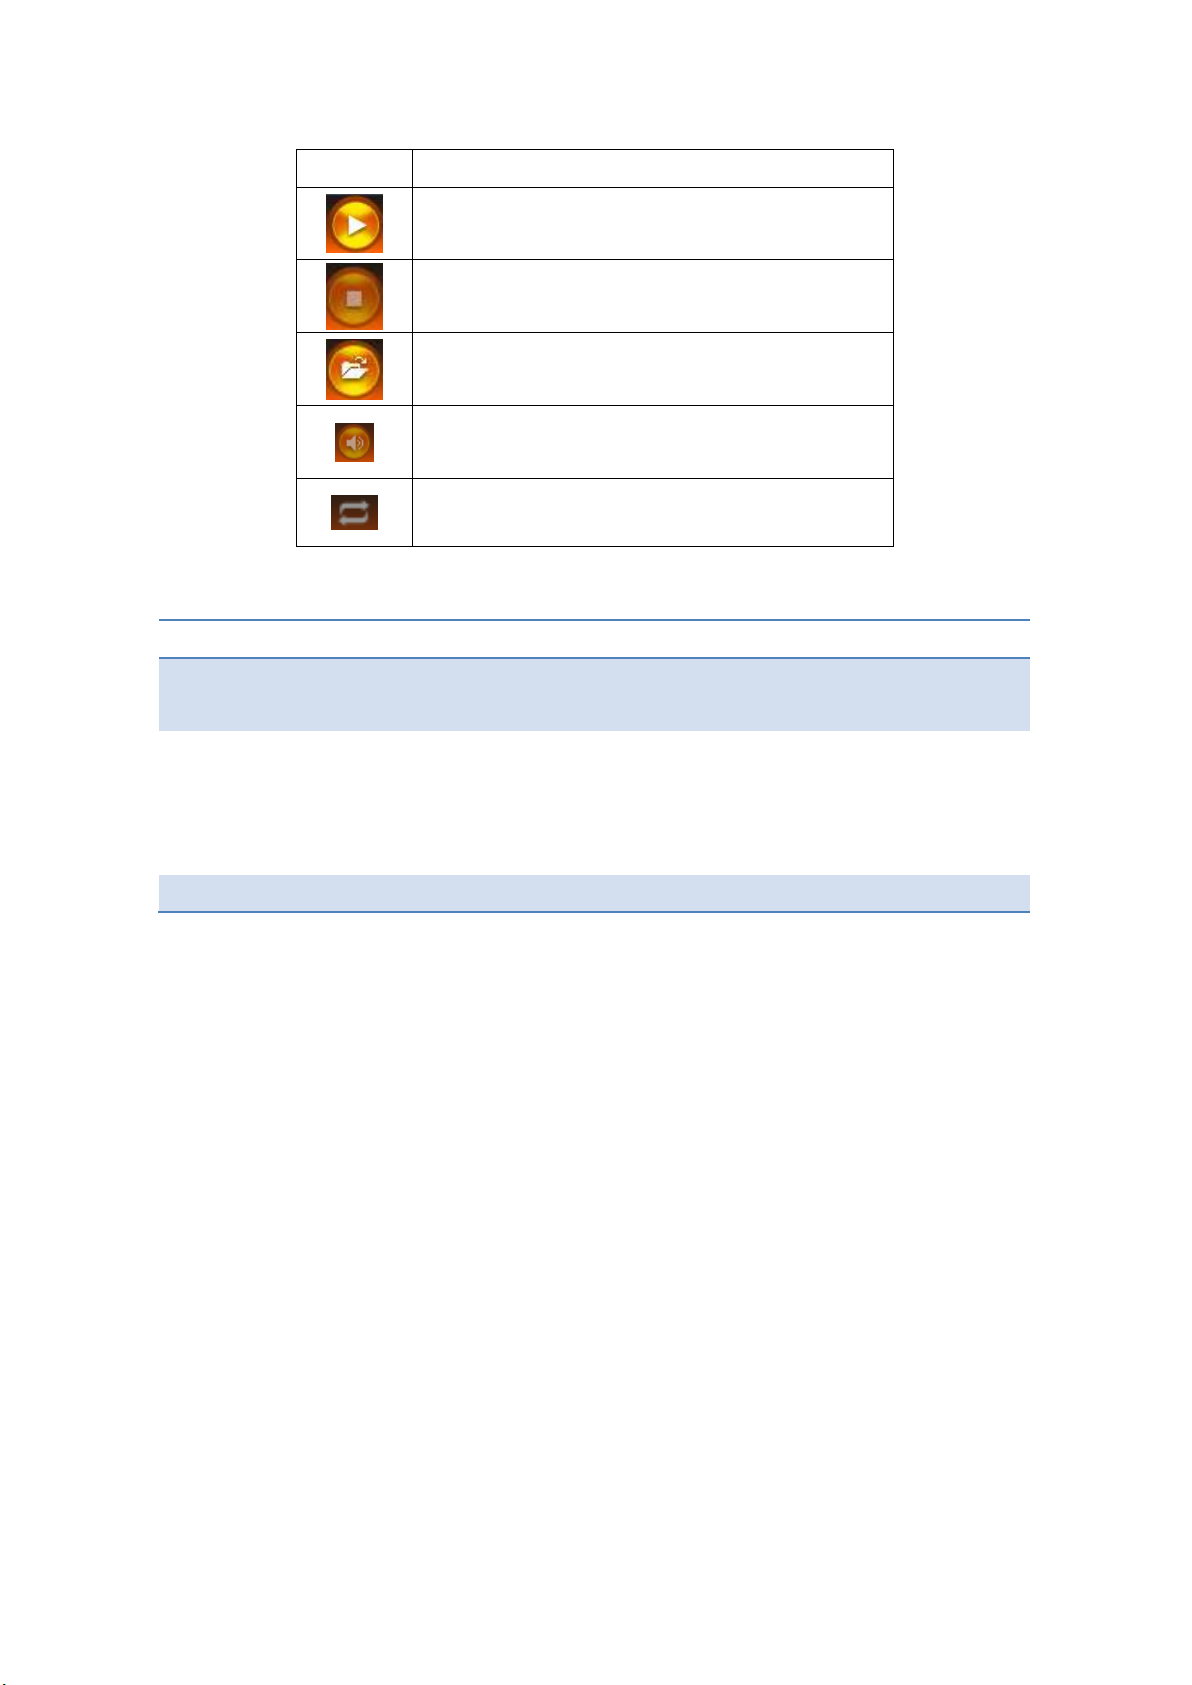
8.10 Video Streaming
Click the “Open File” button to select the video/music files for the streaming. Click the
“Pause” or “Stop” button, you can pause or stop the streaming, and click the “Volume”
button to mute, adjust the volume level.
Page 26
26
Button
Description
Play the video/Music
Stop the Video/Music
Open the Video/Music File
Mute/Unmute
Repeat On/Off
Note:
Item
Valu e
Supported File Format
MPEG-1 / MPEG-2 / MPEG-2 TS / MPEG-4 / MWV9 / MOV /
Motion JPEG / MKV / ASF / DVR-M5
Supported Video Codec
MPEG-1 / MPEG-2 / MPEG-2 TS / MPEG-4* / WMV9** /
QuickTime / Motion JPEG
* Microsoft MPEG-4 v1-3 is not supported.
** Only WMV3/WVC1 is supported.
Supported Audio Codec
LPCM / AAC / MP3 / WMA
* All formats support up to 1920x1080, 30fps, and 20Mbps.
* These file formats might include video and audio codecs which are not supported.
Page 27
27
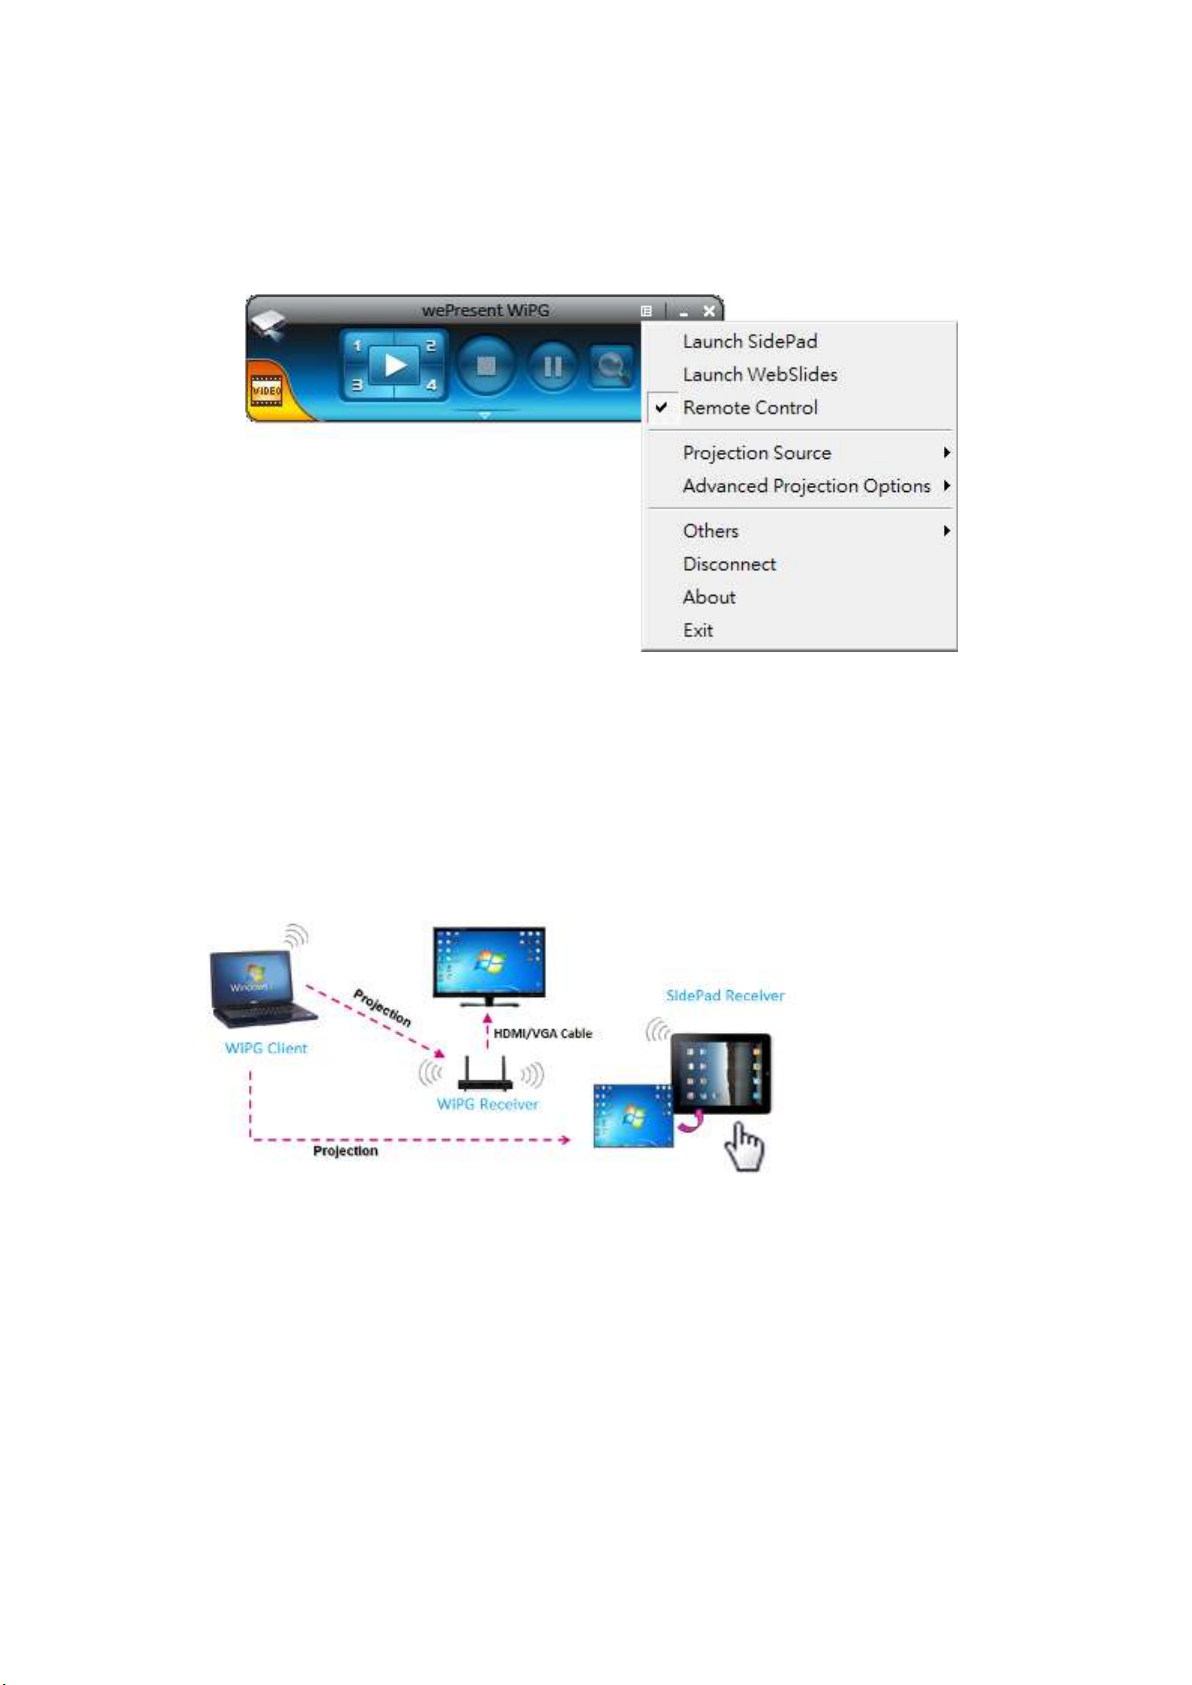
8.11 Menu
1) Press “Menu” button from the main UI, you will find the menu to enable the
additional feature or to change the application options.
8.11.1 Launch SidePad
Introduction: SidePad is an application to allow the user to connect
Pad/Smartphone (Android and iOS), PC, and display/projector via WiPG-2000
device. User can then control the projecting PC via Pad/Smartphone. Please refer to
the below image for more information.
1) SidePad Control for Android/iOS device.
Android: Download “‘SidePad Receiver” from Google Play Store
iOS: Download “‘SidePad Receiver” from Apple Store.
Connect your Android device to WiPG-2000 device through WiFi and Launch
“‘SidePad Receiver”
Page 28
28
Click on “Launch SidePad” from the menu. In seconds, you shall see the PC
desktop shown on the iOS/Andriod Device. Now you can control the
projecting PC from your iOS/Android device.
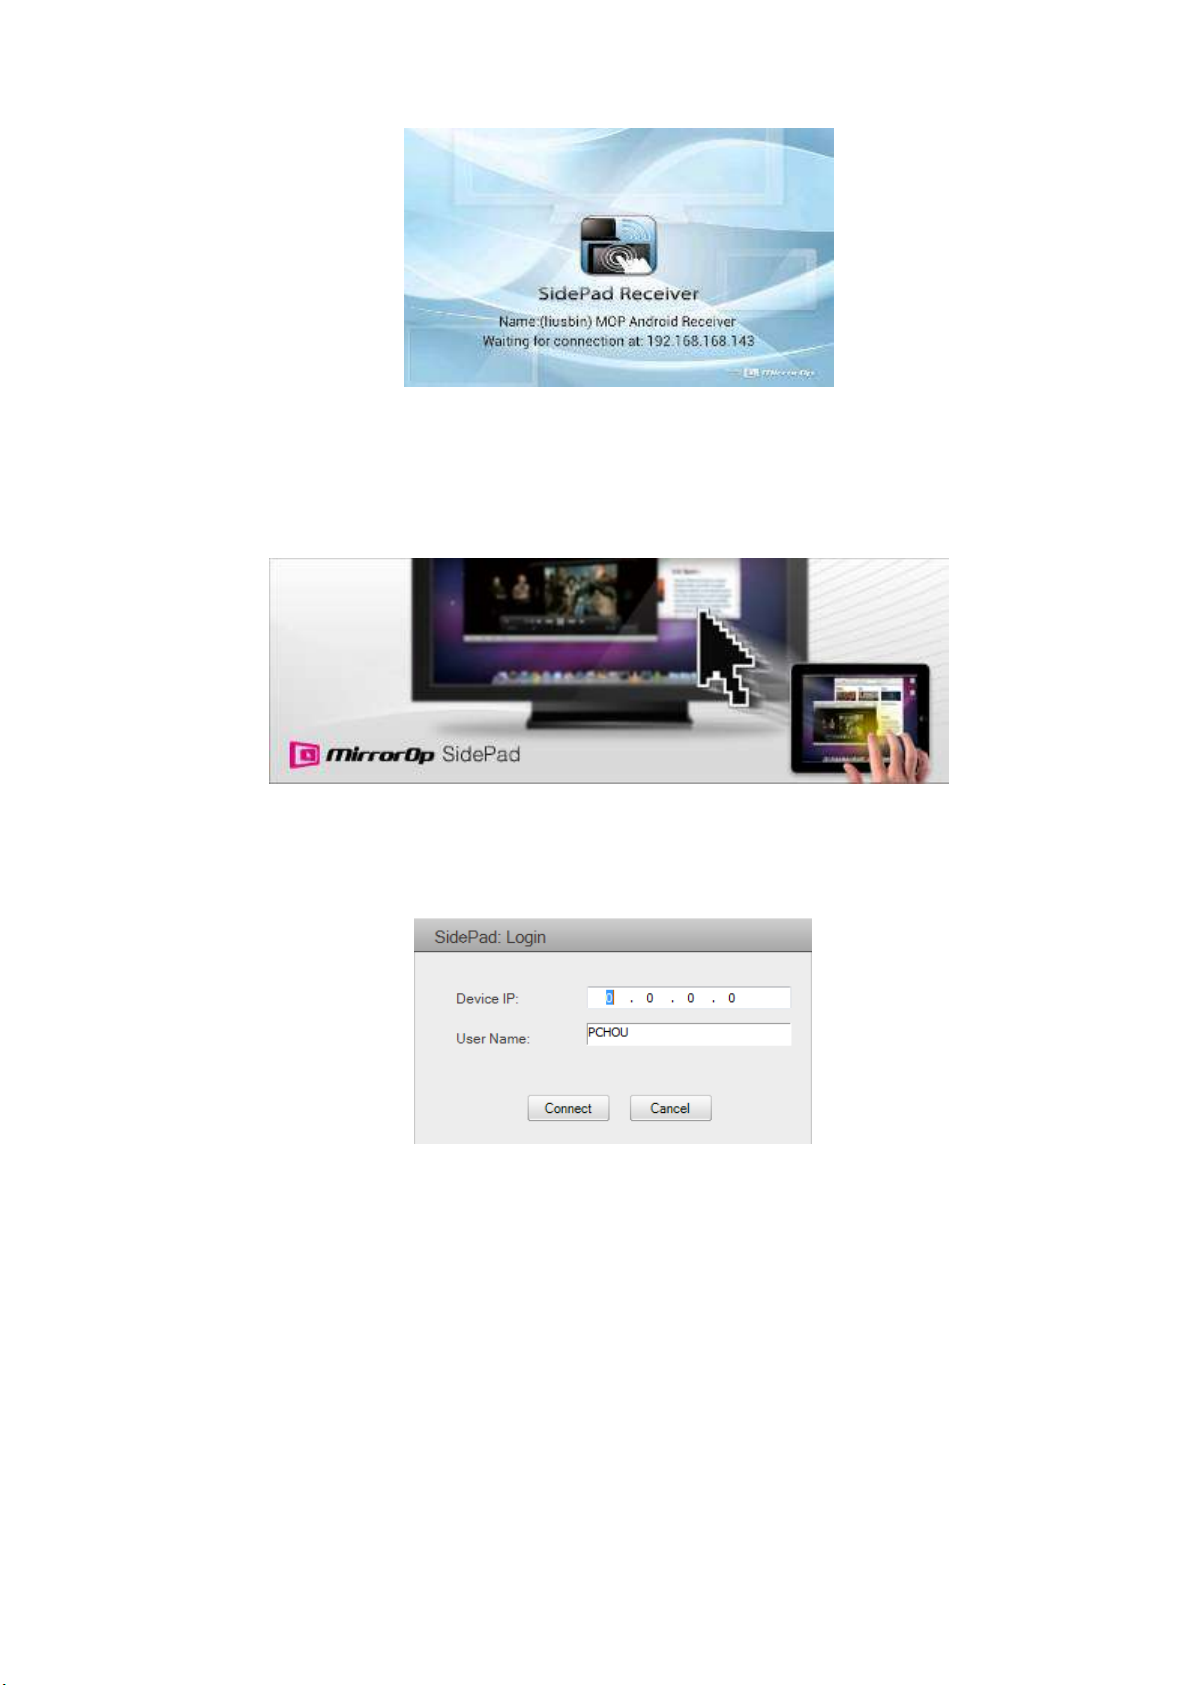
2) If there is no Smartphone/Pad device detected after clicking on “Launch SidePad”
the below image will show up.
8.11.2 Launch WebSlides
1) Introduction: Webslides is an application to allow the user/presenter to broadcast
the projecting screen/slides to allow multiple login users to receive the slides
during a presentation and save the slides for note taking later.
Page 29
29
2) Presenter: Make sure your PC/Mac is connected to WiPG-2000 box and click on
“Launch Webslides”, when the function is on, the item will be checked on the main
menu.
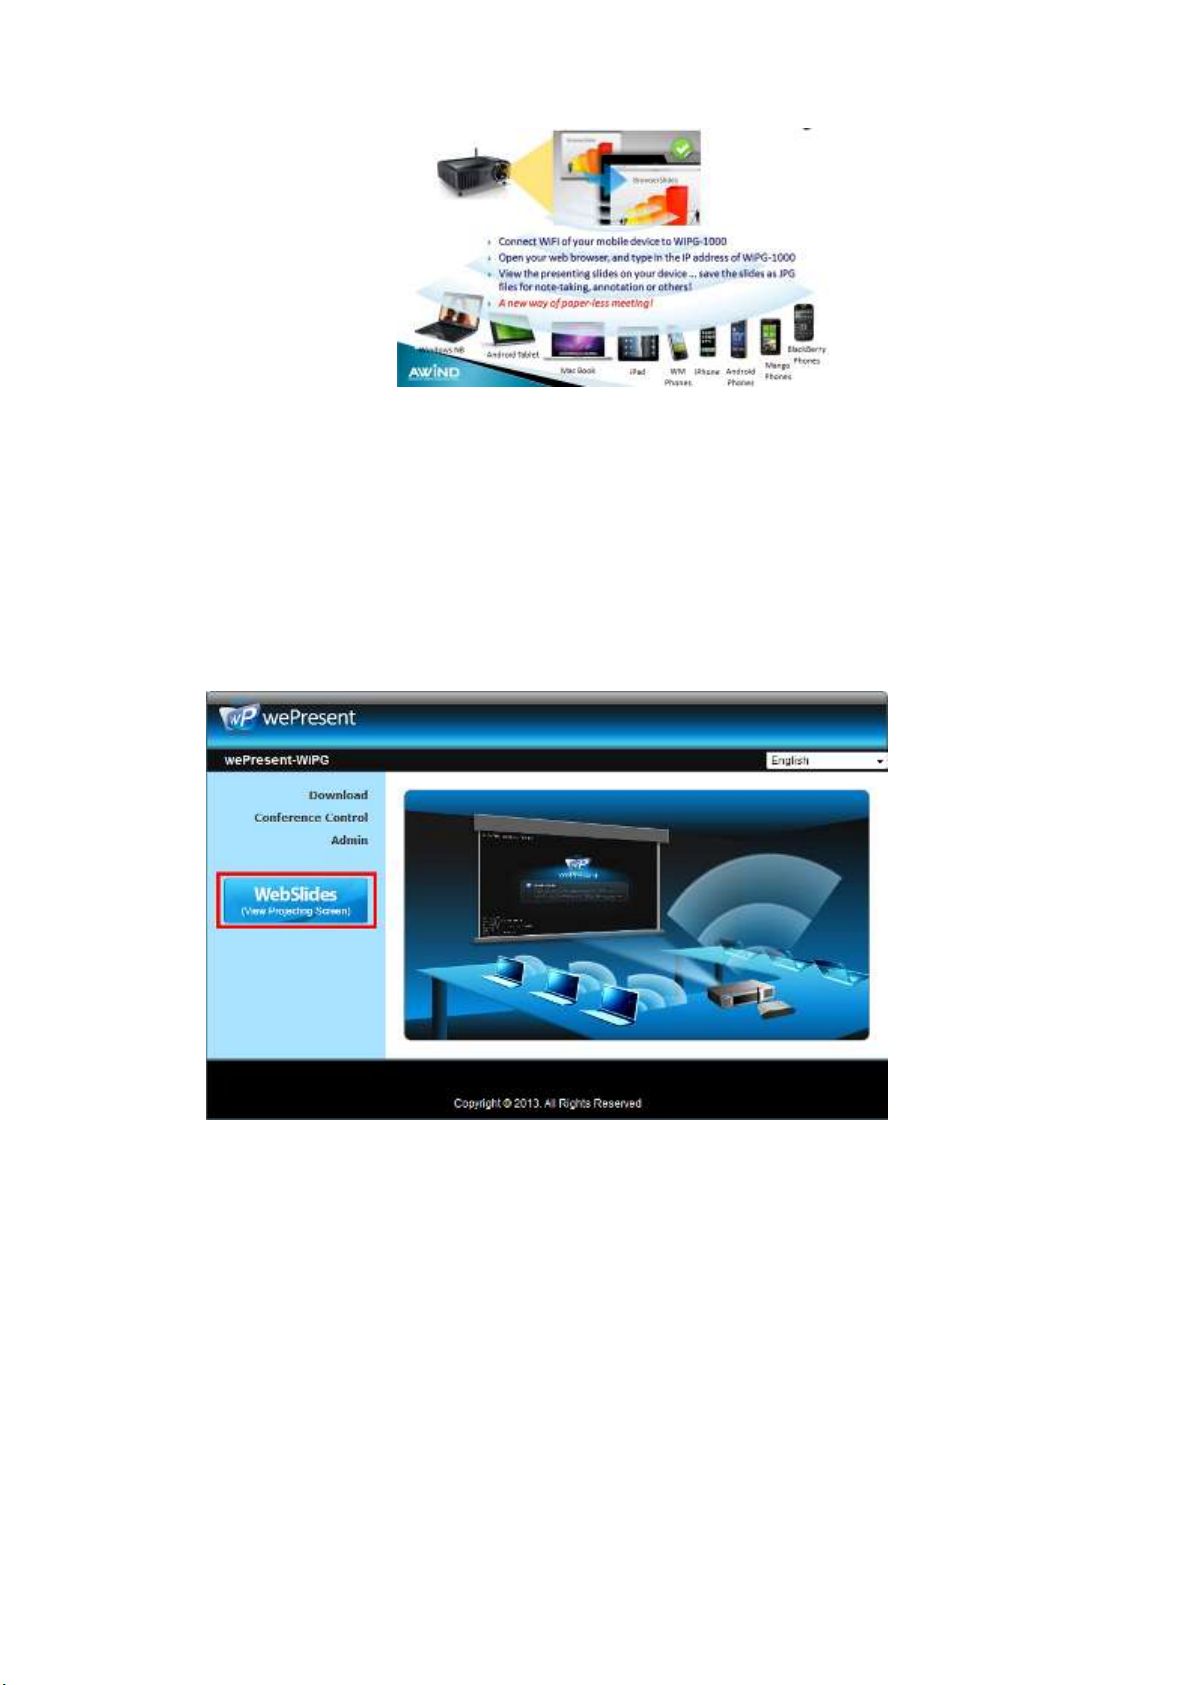
3) Audience: Users need to connect to WiPG-2000 WiFi Network as the presenter and
then launch their browser and enter WiPG-2000 IP address (The information can be
found on the projecting screen) on the URL of browser. Once the users are
connected, they will see the below image on their devices. Click on “Websildes”
button. See below:
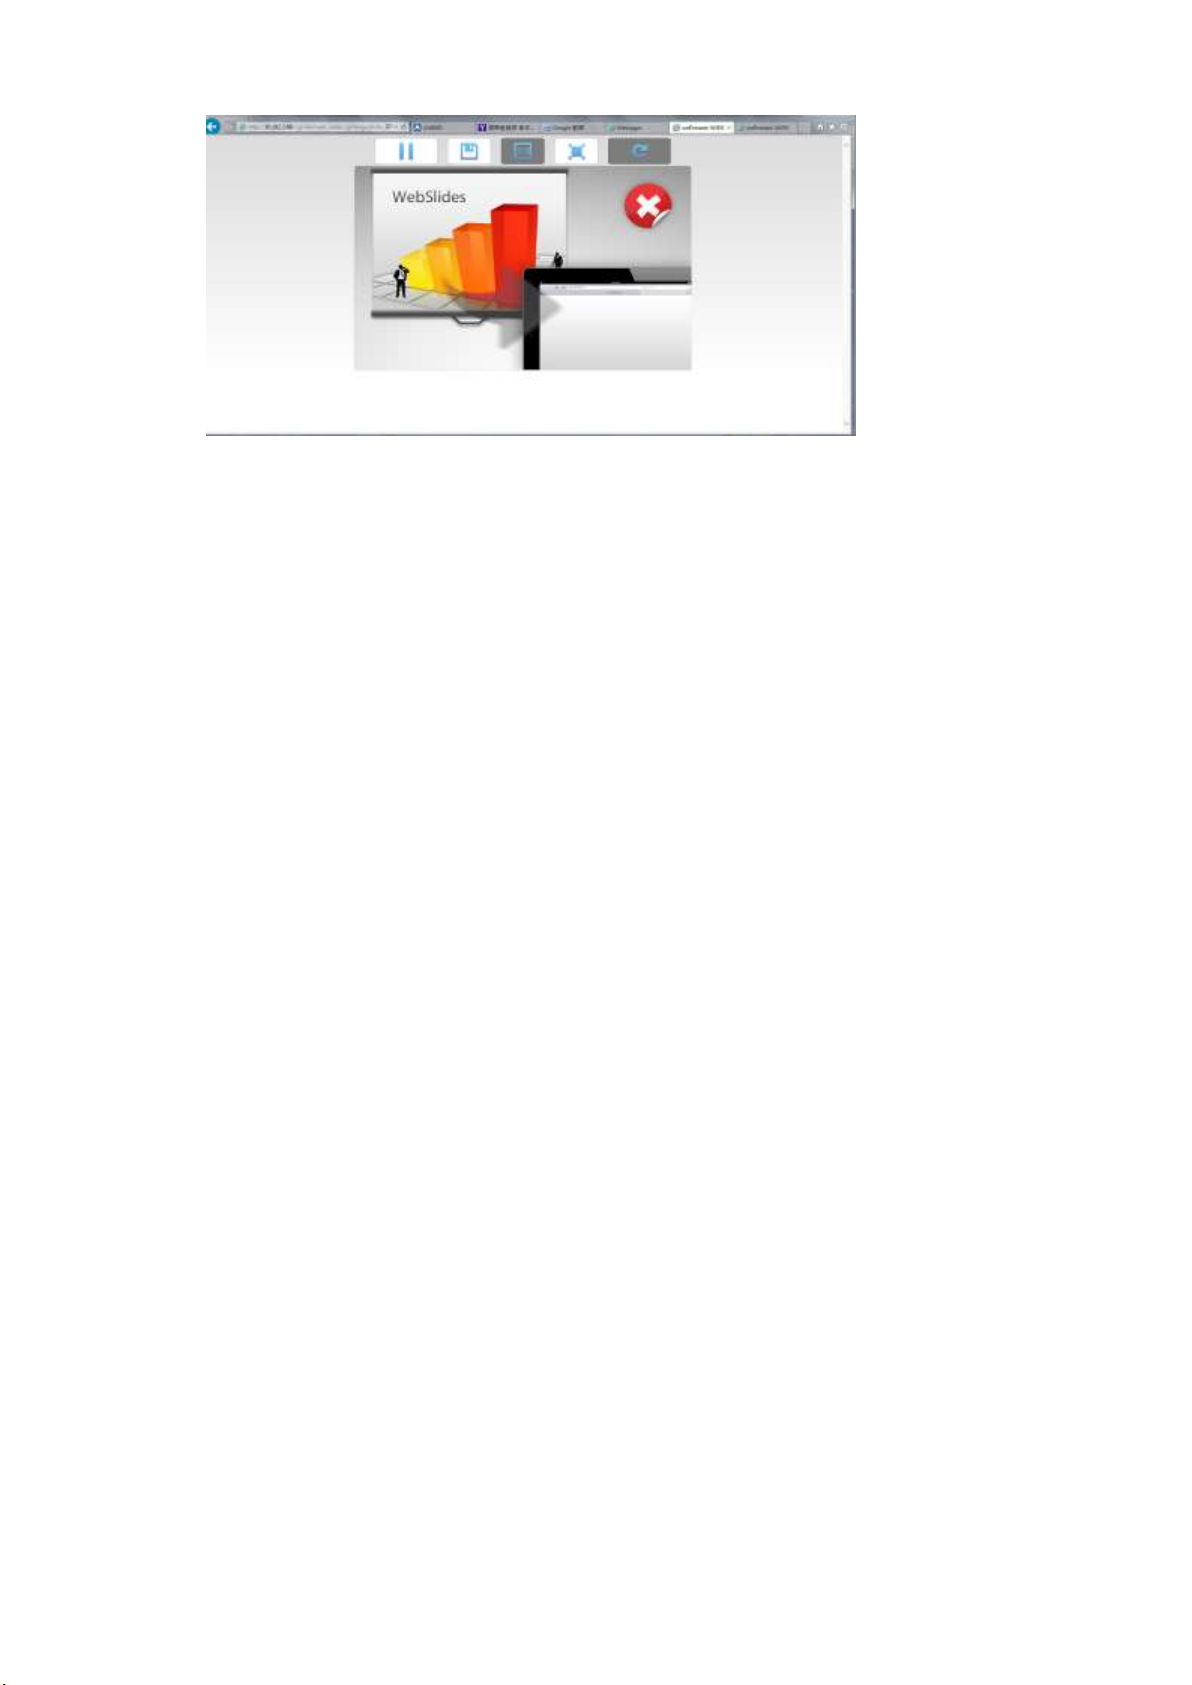
4) Start to receive the presenter’s slides (Auto refresh every 30 sec). The below image
can be seen on the audience’s browser.
Page 30
30
Users can put the mouse/finger on each button to get the “tip window” for the
function of each button.
Note:
The WiPG-2000 logged-in user is not identical to WebSlides user, and they both
consume the wireless bandwidth for device connection. If there are more than 10
users logged into WiPG-2000, it is recommended to connect WiPG-2000 to company
network through Ethernet or bridge WiPG-2000 to a router due to wireless bandwidth
concern. User should connect WiPG-2000 via company network or router in order to
secure the projection performance. The WebSlides user number should not exceed the
recommended number on the web management page to prevent the connection
failure or low projection performance.
PS. Wireless Projection function and Conference Control function can support up to 64
users.
8.11.3 Remote Control
1) Click on “Remote Control”, you can allow or block the remote
mouse/keyboard/touch control from WiPG-2000 receiver.
8.11.4 Projection Source
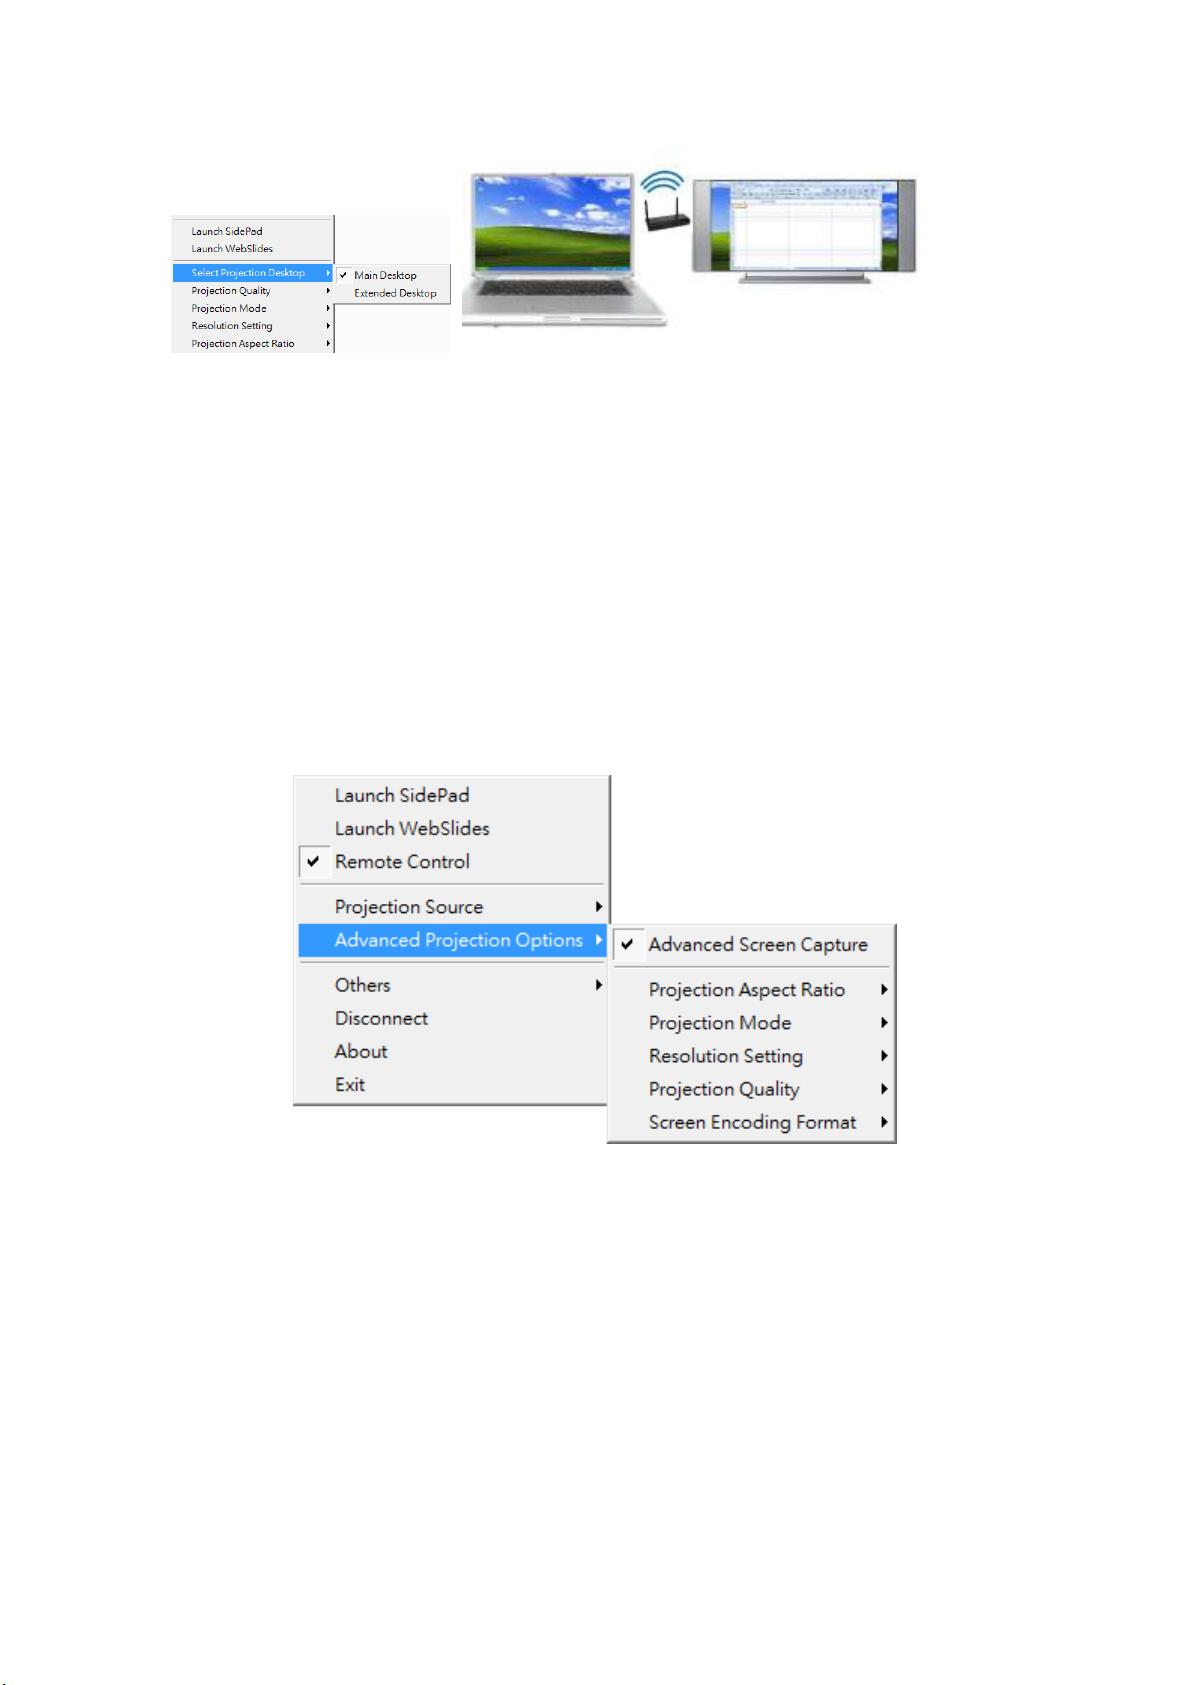
1) Click on “Select Projection Desktop”, you can select to project the main screen or
the extended screen.
Page 31
31
Note:
1. For Windows XP system, you need to install “VDD.exe” driver first, you can
find it from USB token.
2. For Windows 7/Vista Starter edition, it can’t support extended screen.
3. For some Win7/Win8 laptop/tablet, the extended screen feature is not supported
if the display card can’t support the extended screen function. This typically can
be verified by checking whether it can enable the extended screen through
physical VGA cable, if yes, then it should work with wePresent software.
8.11.5 Advanced Projection Option
8.11.5.1 Advanced Screen Capture
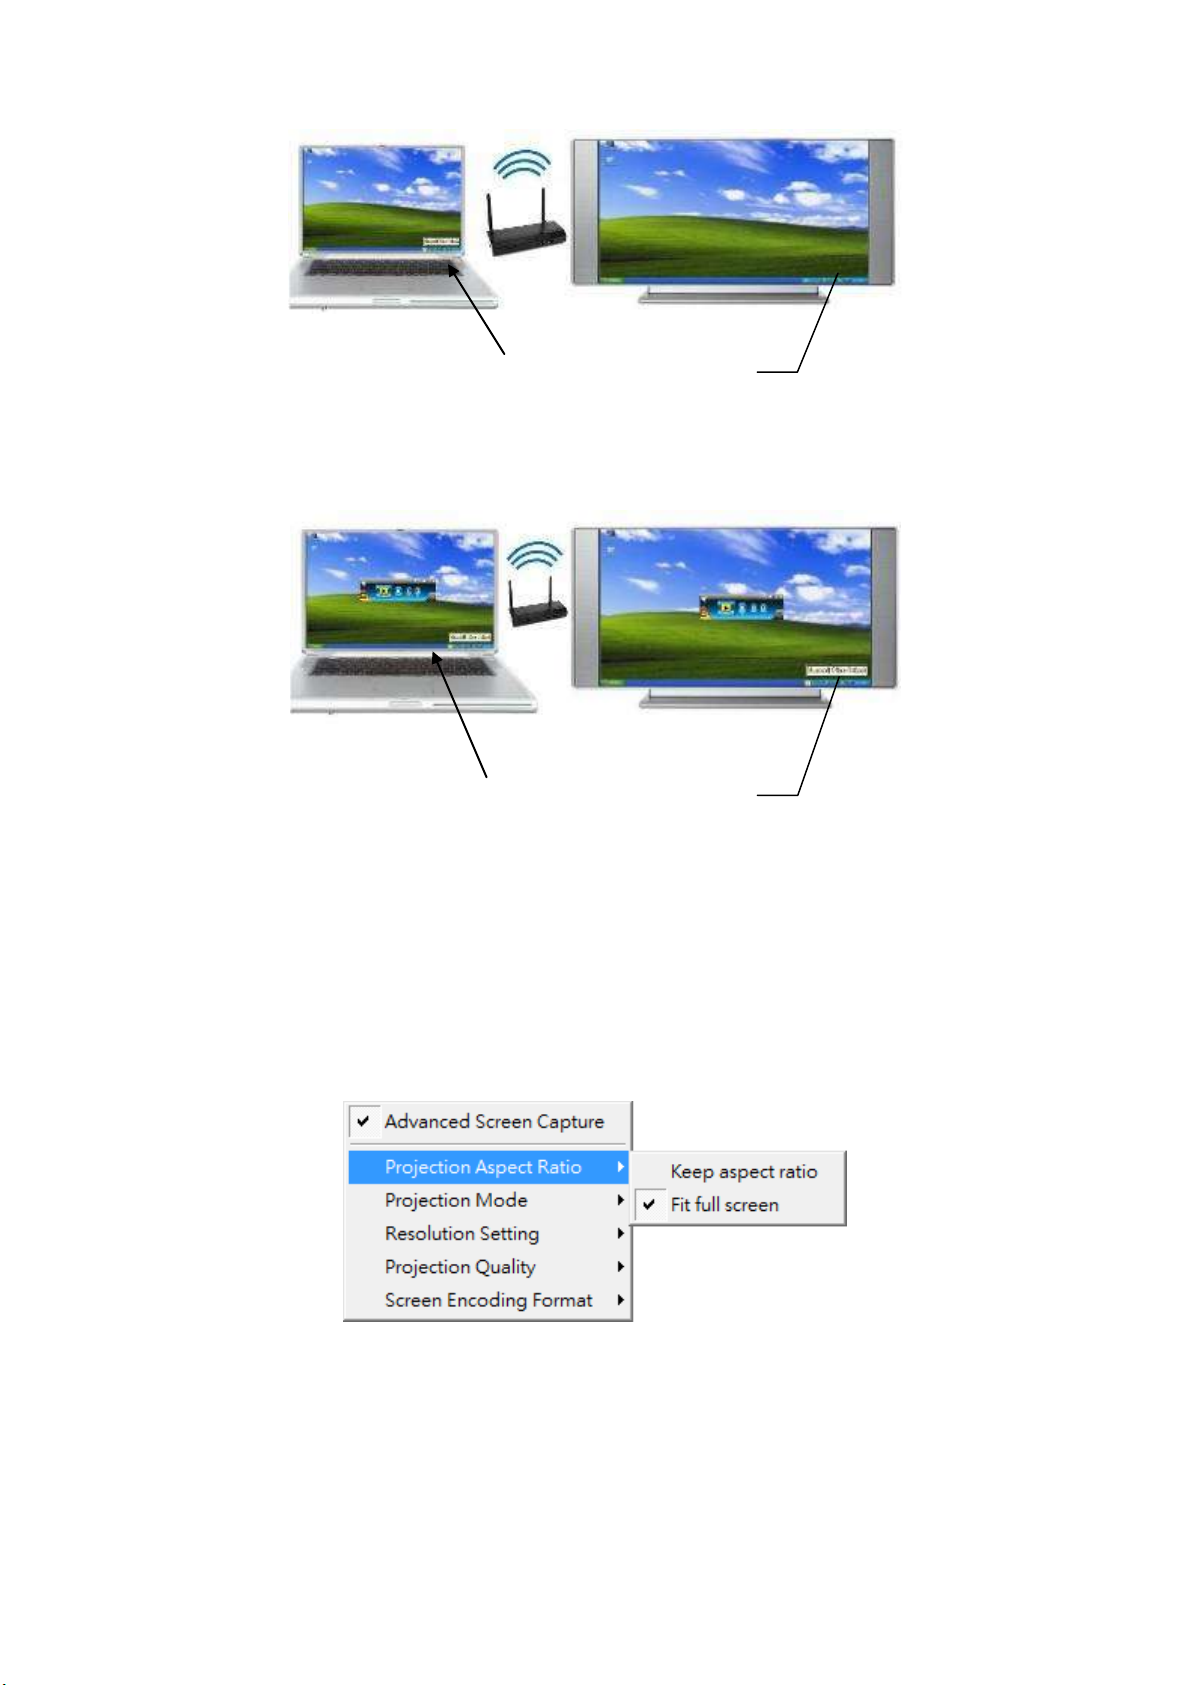
1) Click on “Advanced Screen Capture”, you will be able to see tip windows and other
layered windows (include the main UI) on the connected display.
However, the mouse cursor may blink from time to time when you are projecting
your PC screen!
Disable “Advanced Screen Capture”.
Page 32
32
Enable “Advanced Screen Capture”.
8.11.5.2 Projection Aspect Ratio
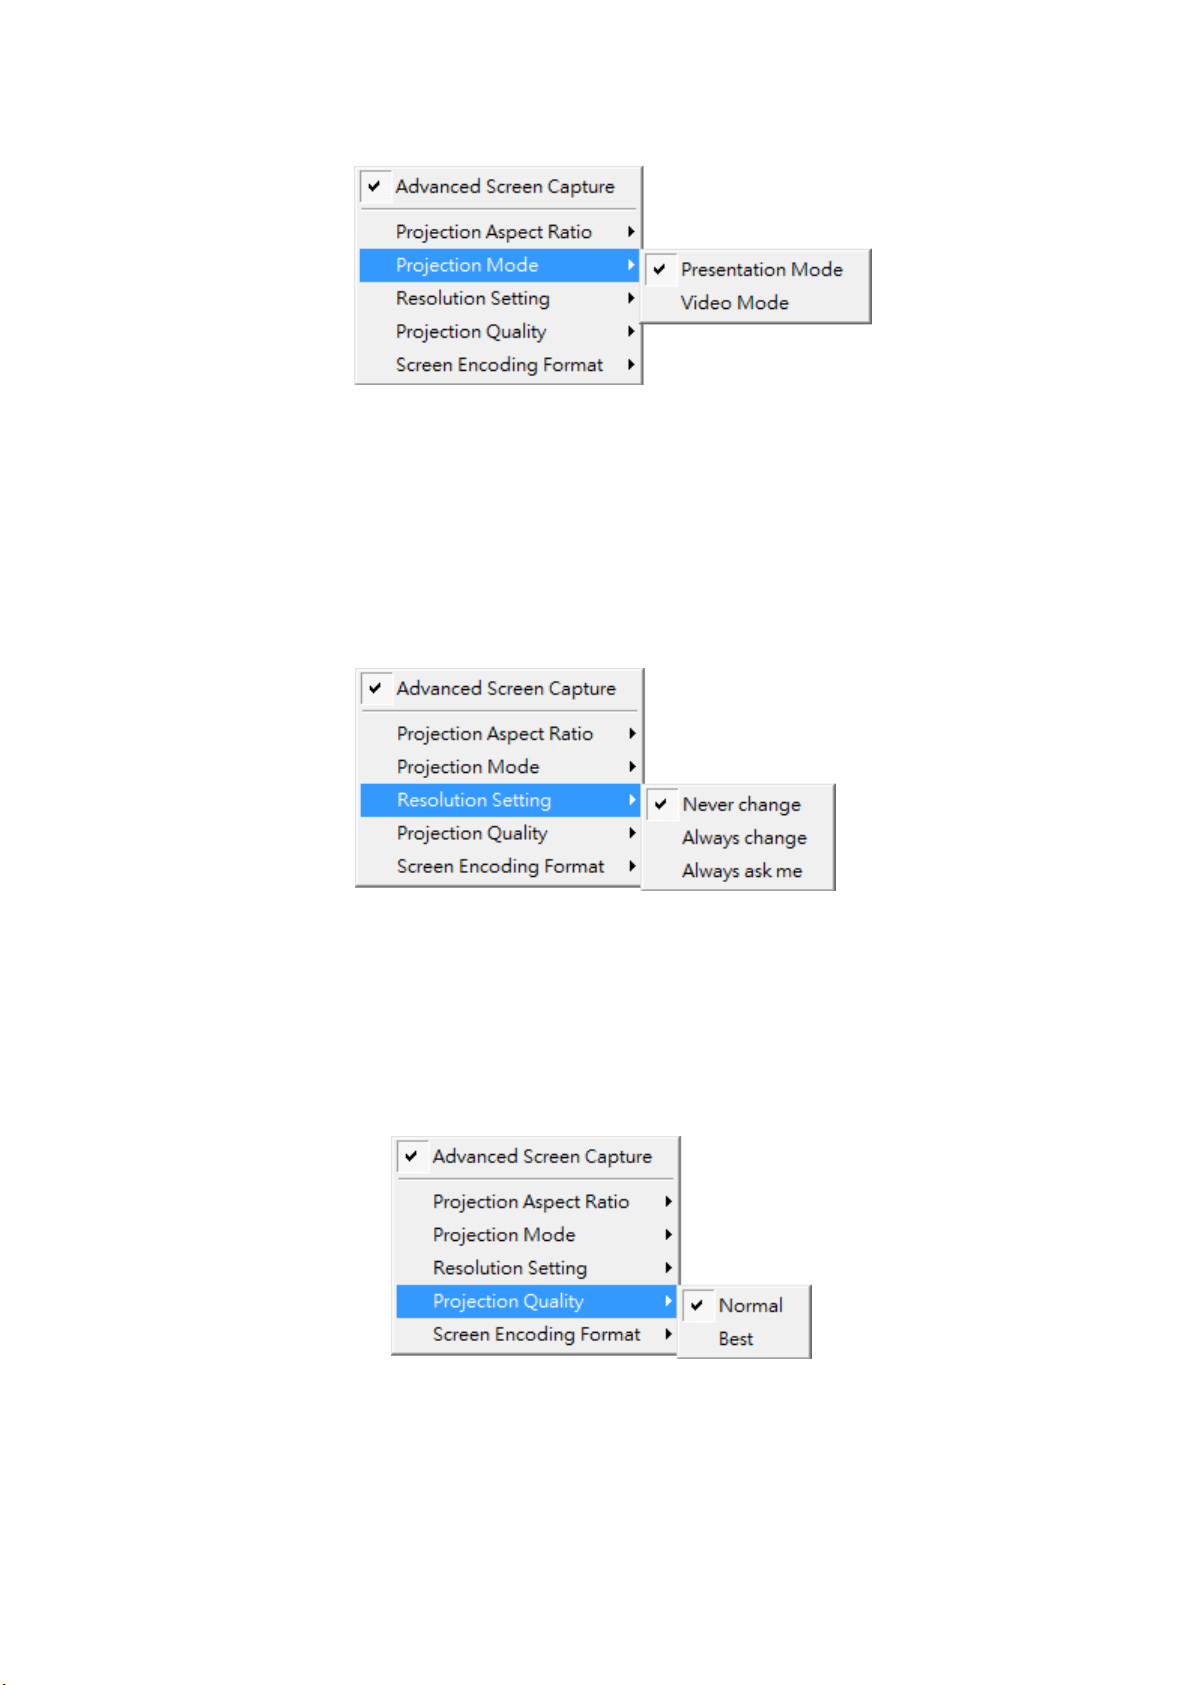
1) Click on “Projection Aspect Ratio”, choose “Keep aspect ratio” to keep the original
aspect ratio if the desktop resolution is different from WiPG-2000 output resolution,
or choose “Fit full screen” to project the screen to full screen.
8.11.5.3 Select Projection Mode
1) Click on “Select Projection Mode”, choose the Presentation mode for shortest
latency or the Video mode for auto-latency control to have better video
Tip window is shown in
projection screen.
Tip window is not shown in
projection screen.
Page 33
33
performance.
8.11.5.4 Resolution Settings
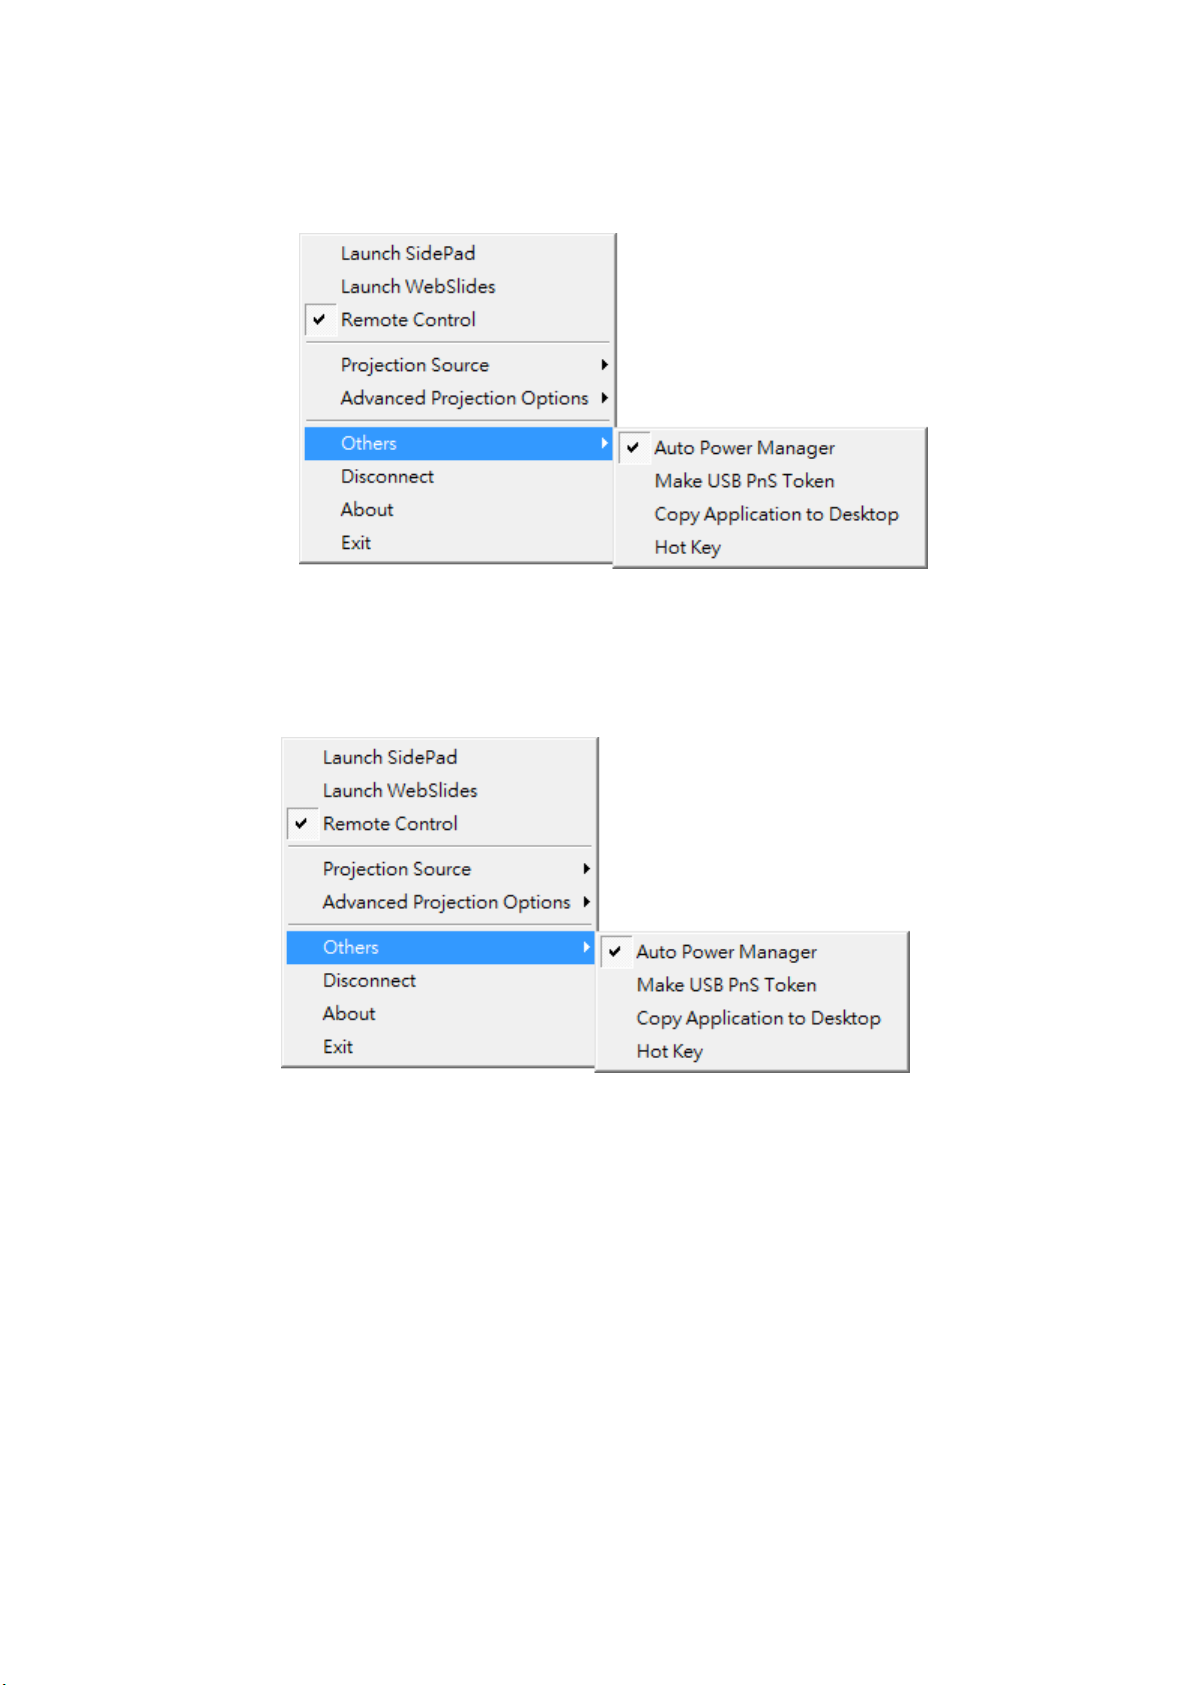
1) Click on “Resolution Setting”, choose “Never Change” to keep original desktop
resolution, “Always Change” to change resolution automatically according to
application’s recommendation, or “Always ask me” to prompt a resolution change
message to user.
8.11.5.5 Projection Quality
1) Click on “Projection Quality”, choose “Normal” for faster projection speed with
lower screen image quality, and “Best” for clear screen image quality but slower
projection speed.
8.11.5.6 Screen Encoding Format
1) Click on “Screen Encoding Format”, choose “JPG” for better image quality but
Page 34
34
bigger network bandwidth required, and “H264” for smaller data size with
reasonable image quality, and “Auto” that the application will select the encoding
type automatically according to the receiver’s and sender’s setting and status.
8.11.6 Others
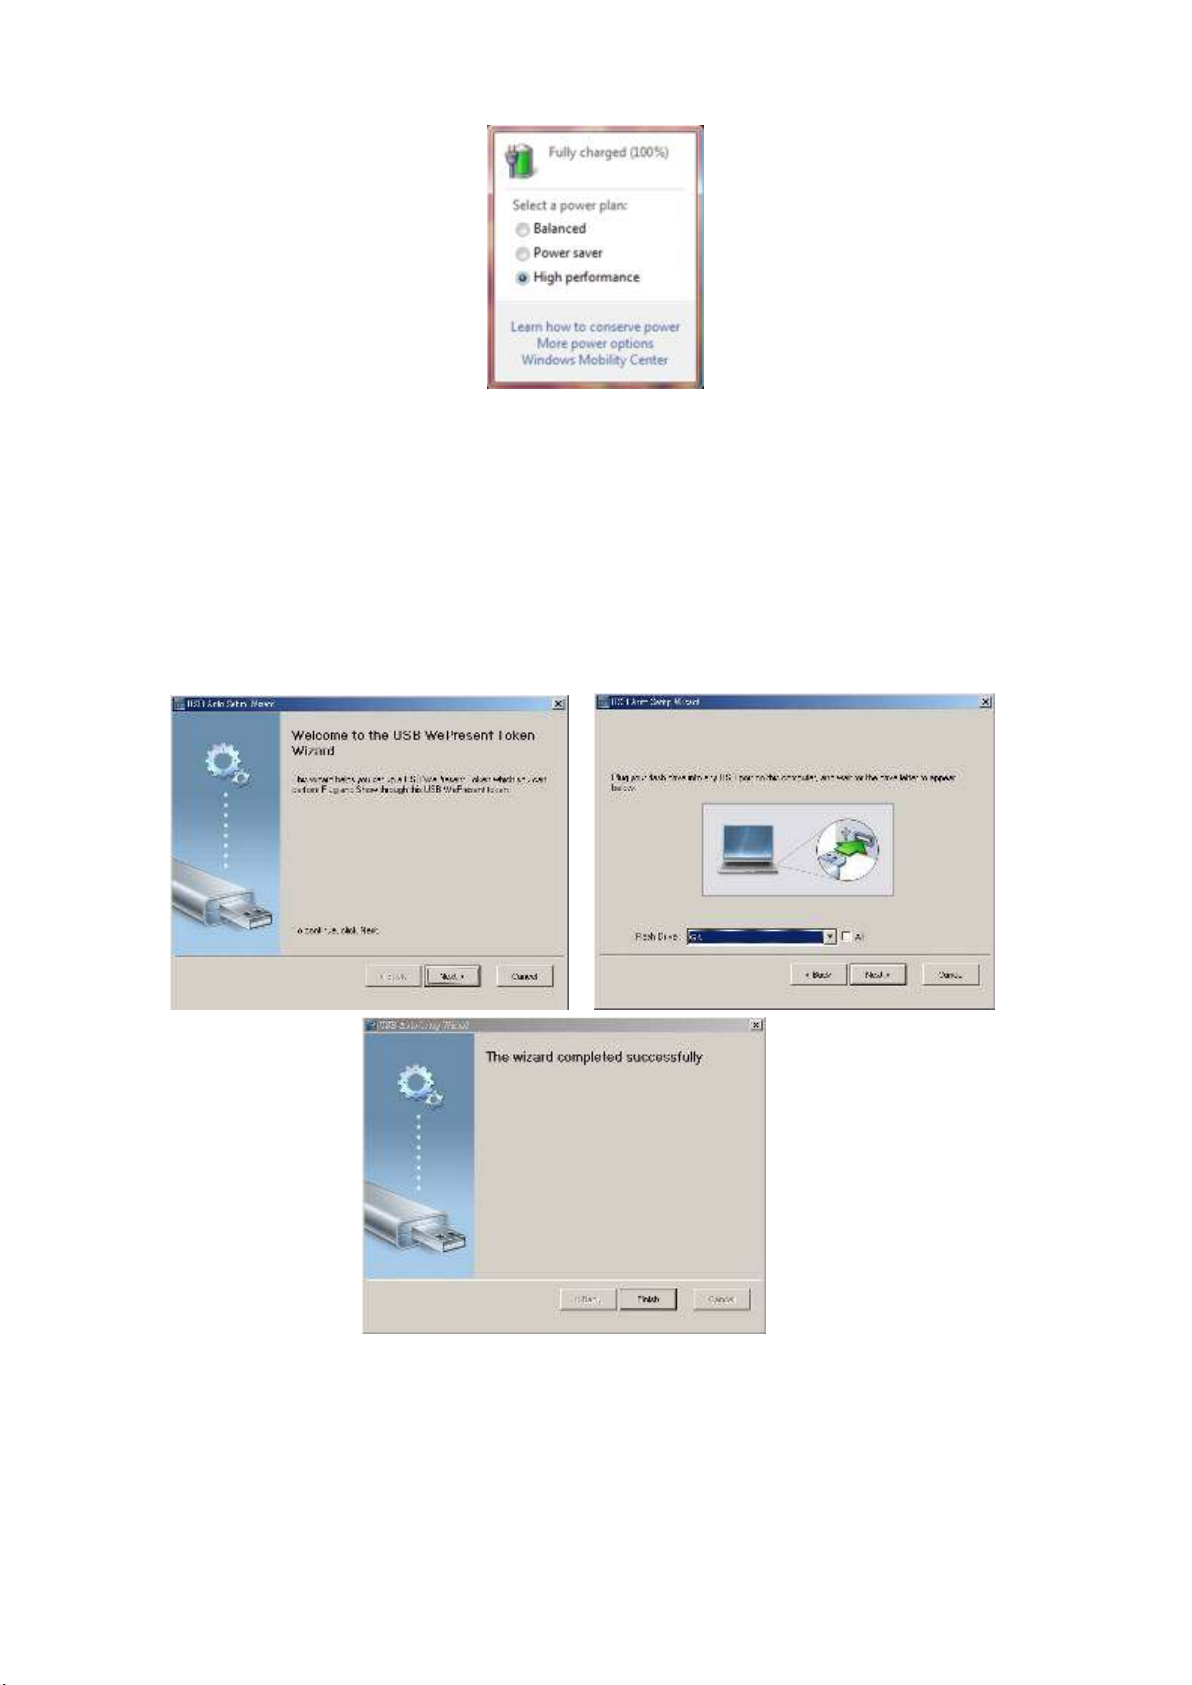
8.11.6.1 Auto Power Manager
1) To make the highest projection performance, application will turn the PC’s windows
power scheme from current settings to “highest performance”, however, you can
click on “Auto Power Manage” to enable or disable this function and restore you
power scheme immediately.
Page 35
35
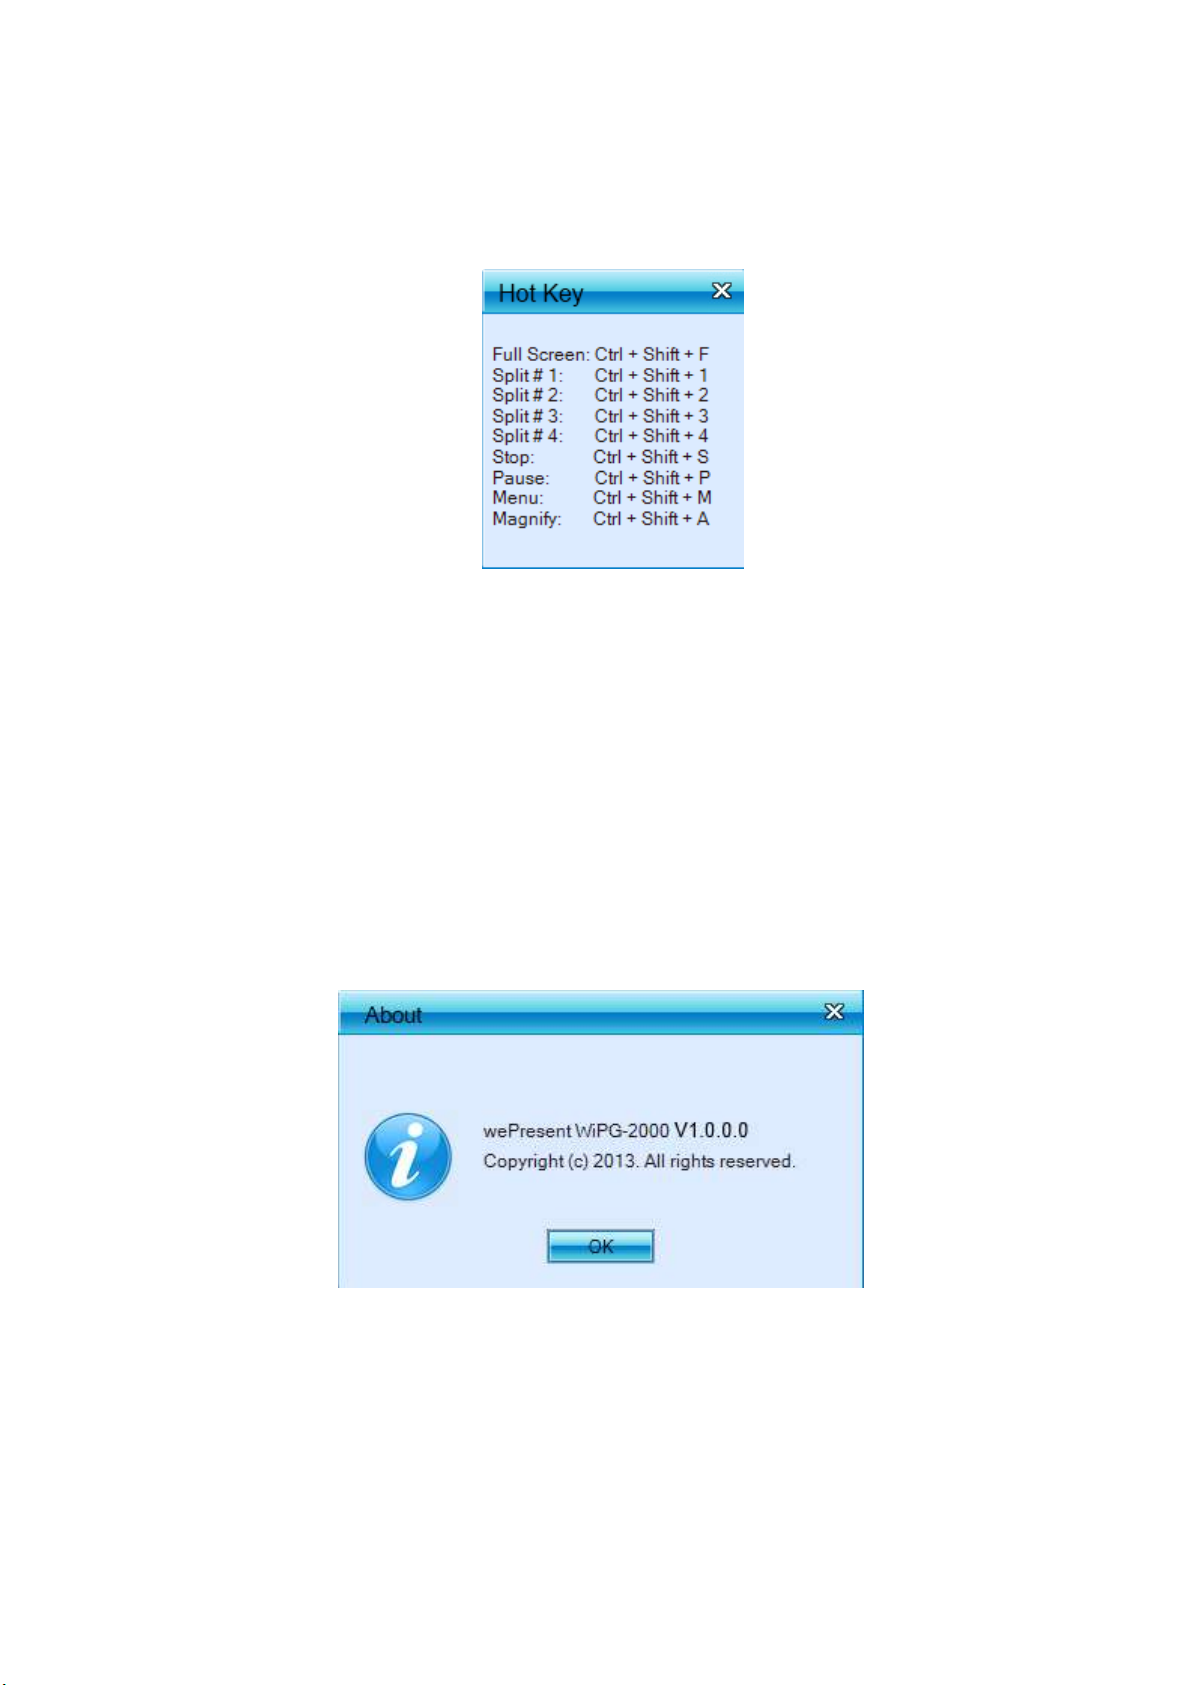
8.11.6.2 Make USB PnS Token
1) Click “Make USB PnS Token” to make a USB wePresent WiPG-2000 Token, you can
insert a USB and follows the wizard to make the Token. After completion, you can
plug the USB to any PC to do the projection without installing the wePresent WiPG
software onto every PC.
8.11.6.3 Copy Application to desktop
1) Click on “Copy Application to desktop”, it will copy the application to your desktop
immediately.
Page 36
36
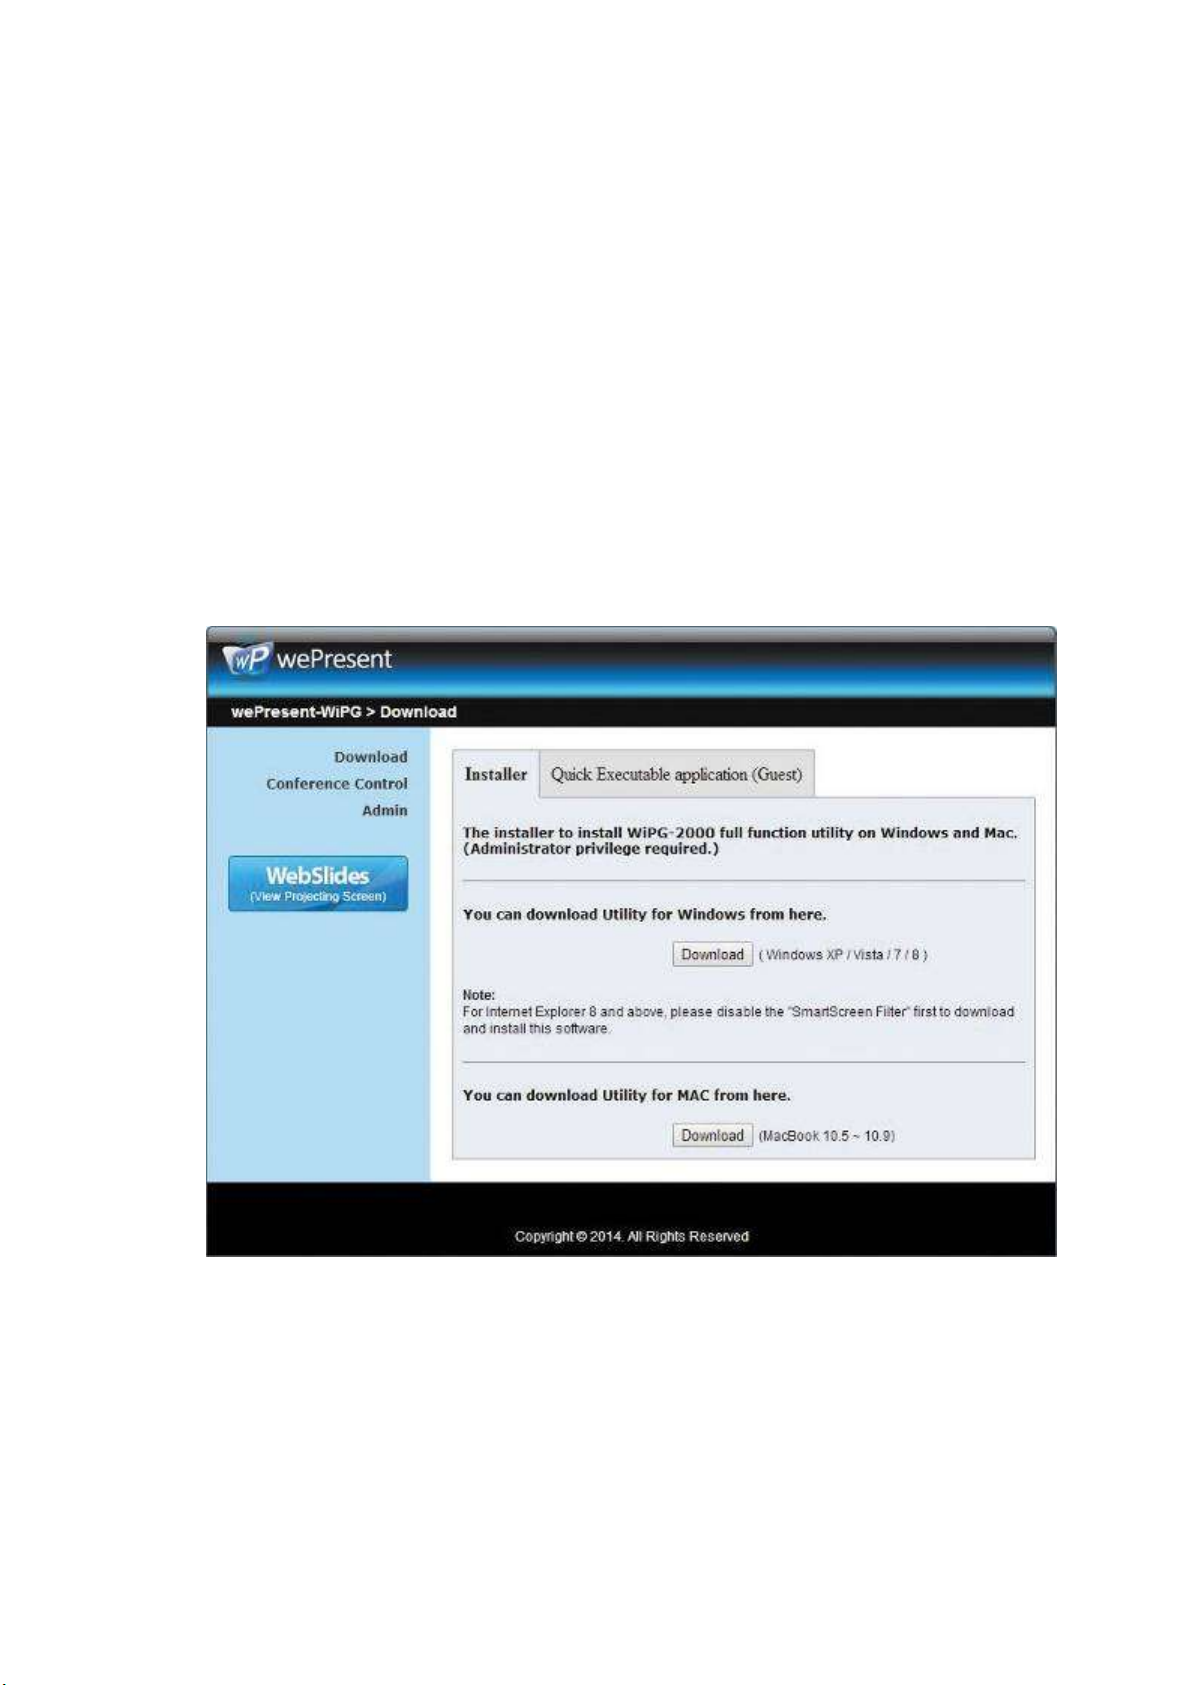
8.11.6.4 Hot Key
1) Click on “Hot Key” to display the available Hot Key definition.
8.11.7 Disconnect
1) Click on “Disconnect” to disconnect from current connected receivers.
8.11.8 About
1) Click on “About” to show system information. It includes product model name,
Application version.
8.11.9 Exit
1) Click on “Exit” to exit this application. It will stop current playing status and shut
down the application immediately.
Page 37
37
9 DoWiFi for Mac
9.1 Install the application
1) Make sure your PC WiFi is enabled and connect your PC to wePresent WiPG-2000
box through WiFi.
2) Launch your browser and enter the IP address on browser. You can find the IP
address and Host Name (SSID) on the projector/display screen. (Default IP is
192.168.100.10)
3) Download the wePresent software for “Mac” and install on your PC.
4) When the download is completed, follow the wePresent WiPG Setup wizard to
execute the software.
Page 38
38
9.2 Start the application
1) Click on wePresent WiPG-2000 icon from Application folder to execute the
application.
2) It will start to search wePresent WiPG-2000 receiver automatically.
9.3 Recent Connection
1) WiPG-2000 will memorize the successful connection profiles and open the recent
connect dialog, you can select one of the profile and press the “Connect” button to
connect this WiPG-2000 directly.
2) If you want to connect
to another WiPG-2000 receiver, please press the “Rescan” button.
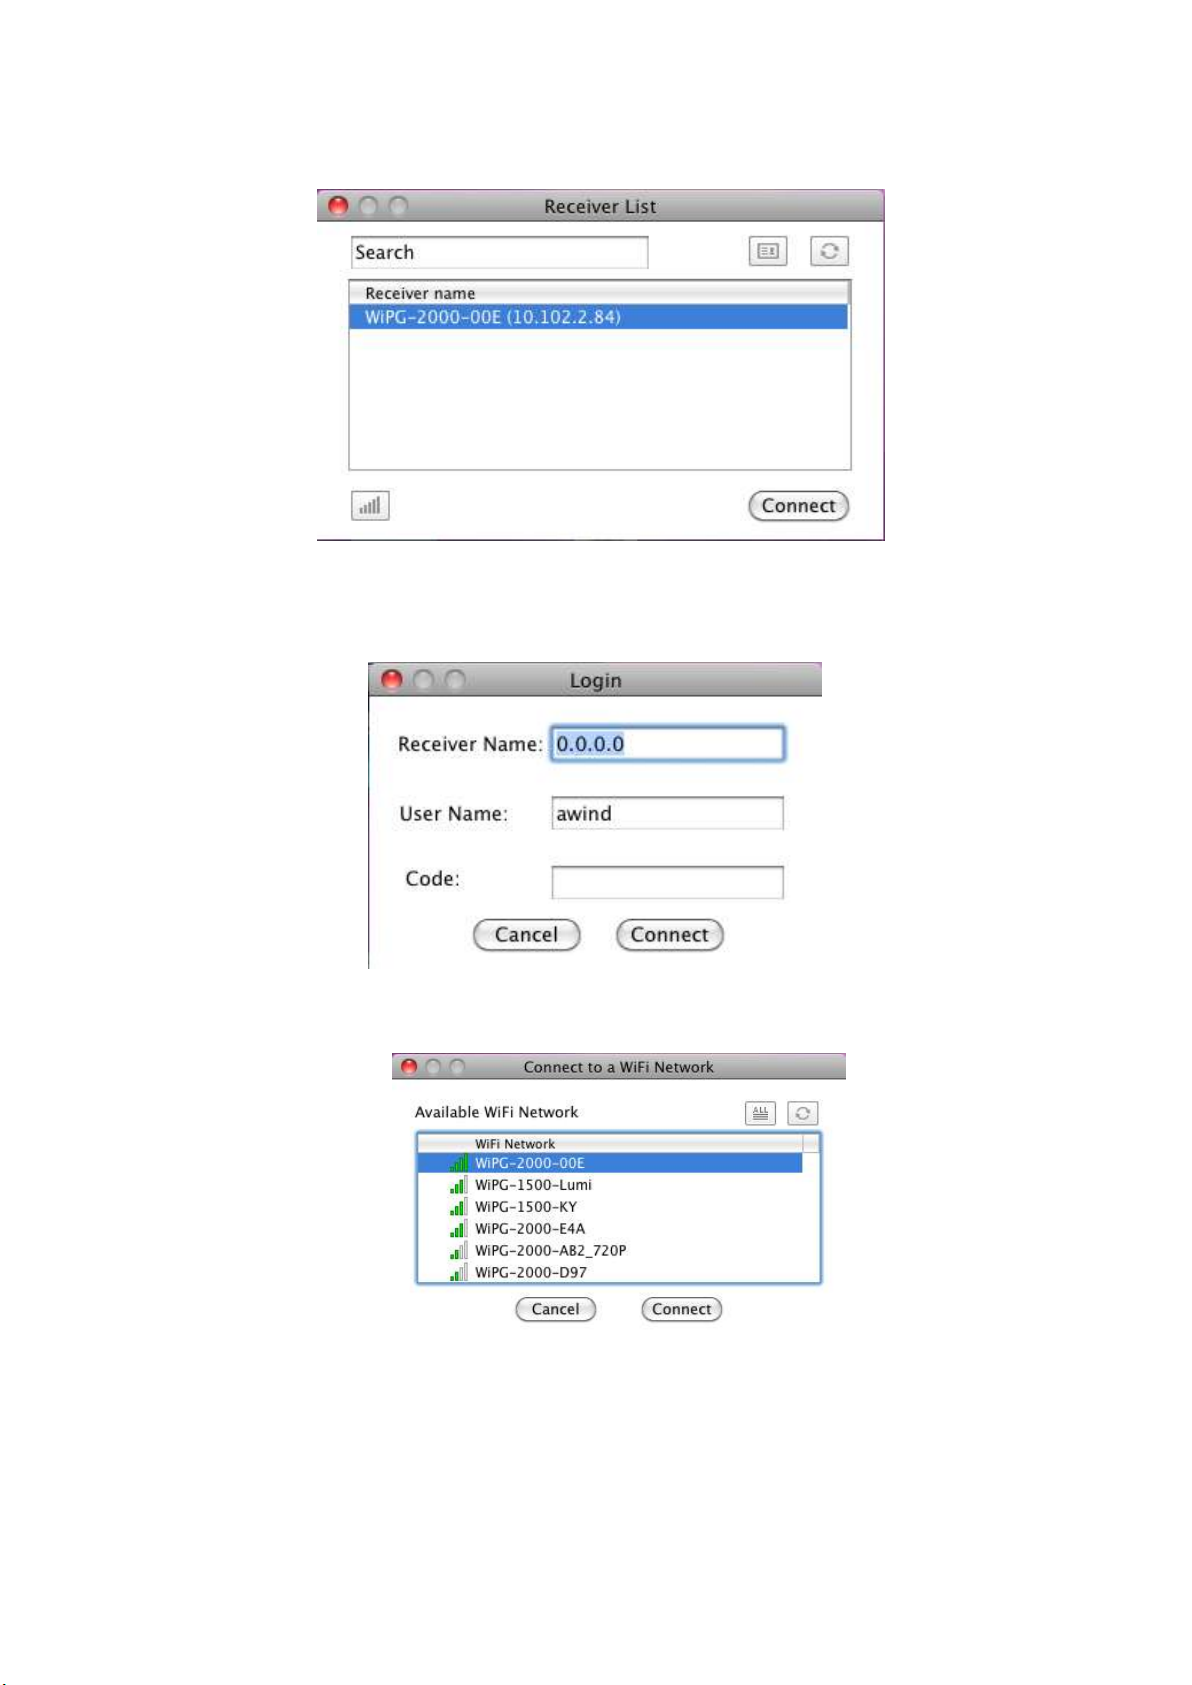
3) WiPG-2000 application will search and list the WiPG-2000 receiver Device. You can
Page 39
39
select the target receiver device and press “Connect” button to connect the
selected receiver device.
4) You can press the “Refresh” button to search again.
5) If you can’t find the target receiver device from the list, you can press the “Manual”
button to enter the receiver IP address manually and connect.
6) If you want to change to another WiFi network, you can press the “WiFi” button to
list the available WiFi network.
9.4 Login
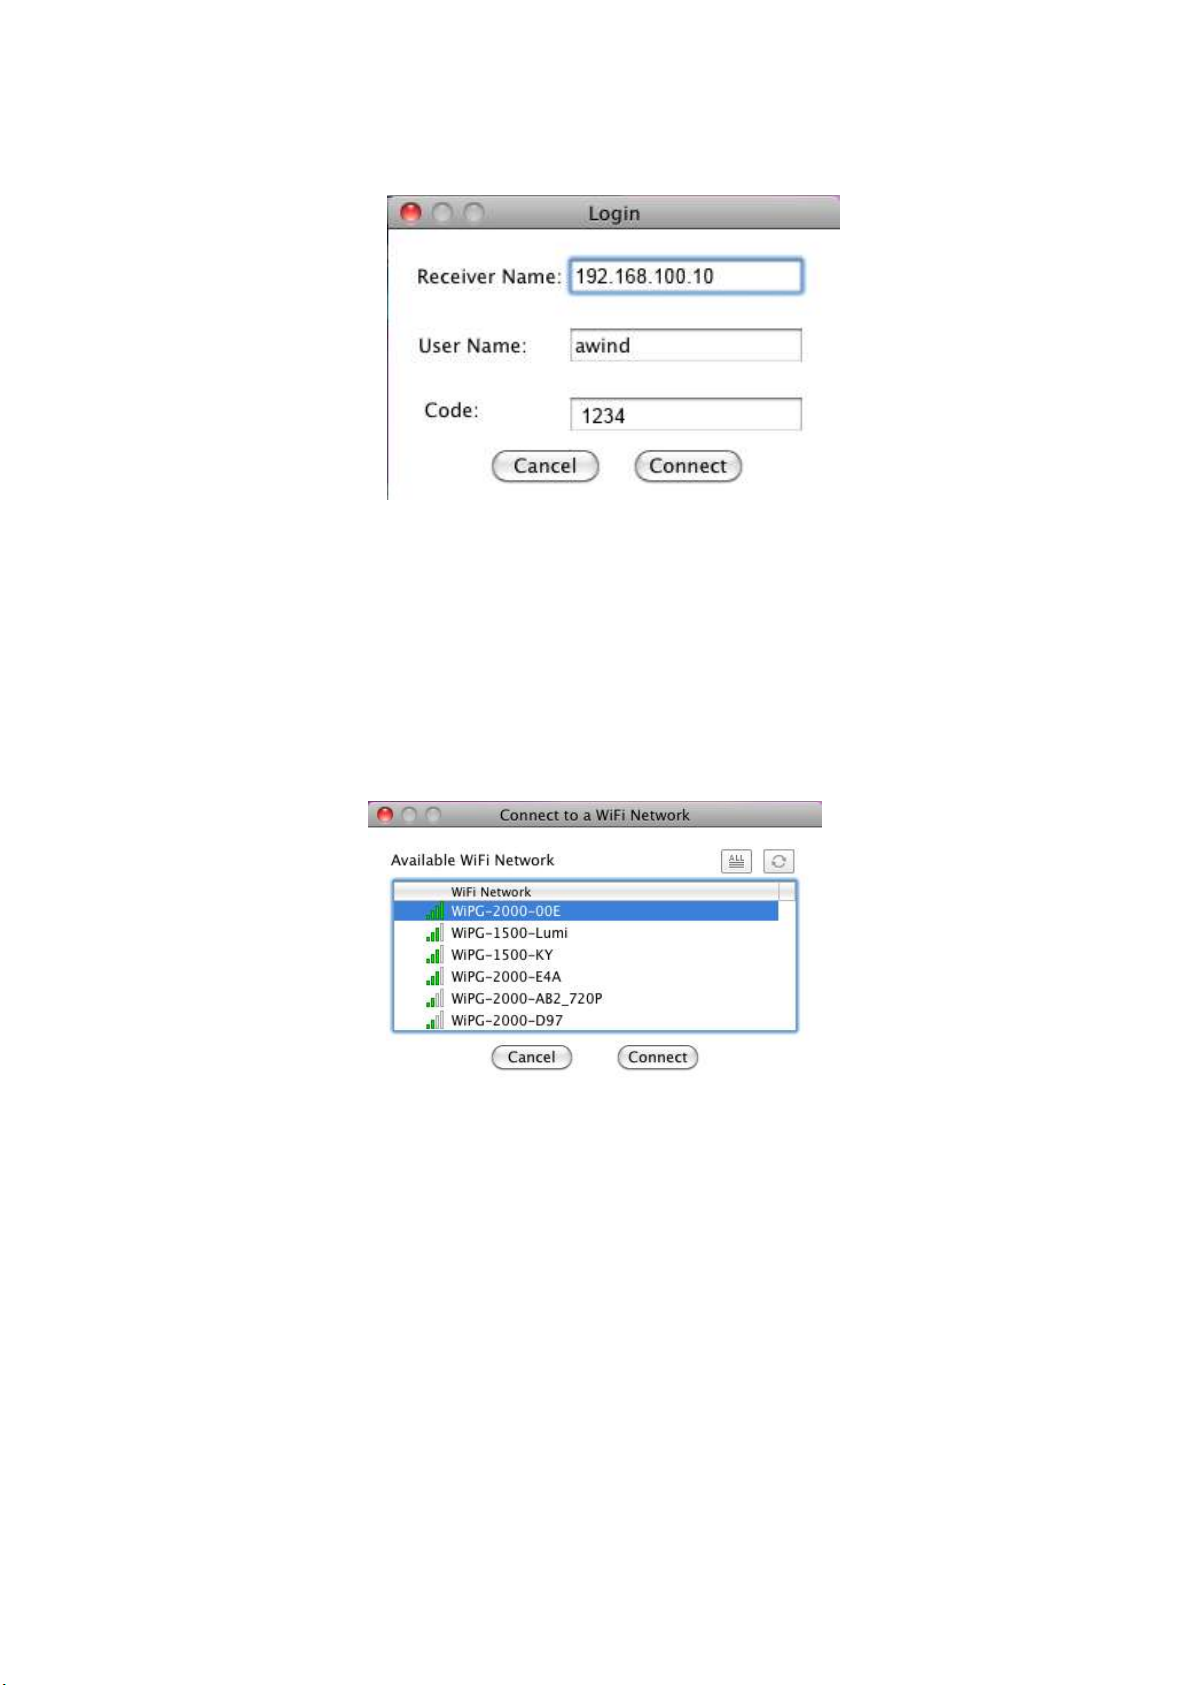
1) When connecting to a “Code” protection enabled WiPG-2000 receiver, you have to
enter the “Code” and press the “Connect” button to login the receiver.
Page 40
40
(You can find the CODE from the OSD standby screen or right-upper corner of start
screen)
2) If you want to connect to another receiver or cancel the login, please press the
“Cancel” button.
9.5 Change to another WiFi Network
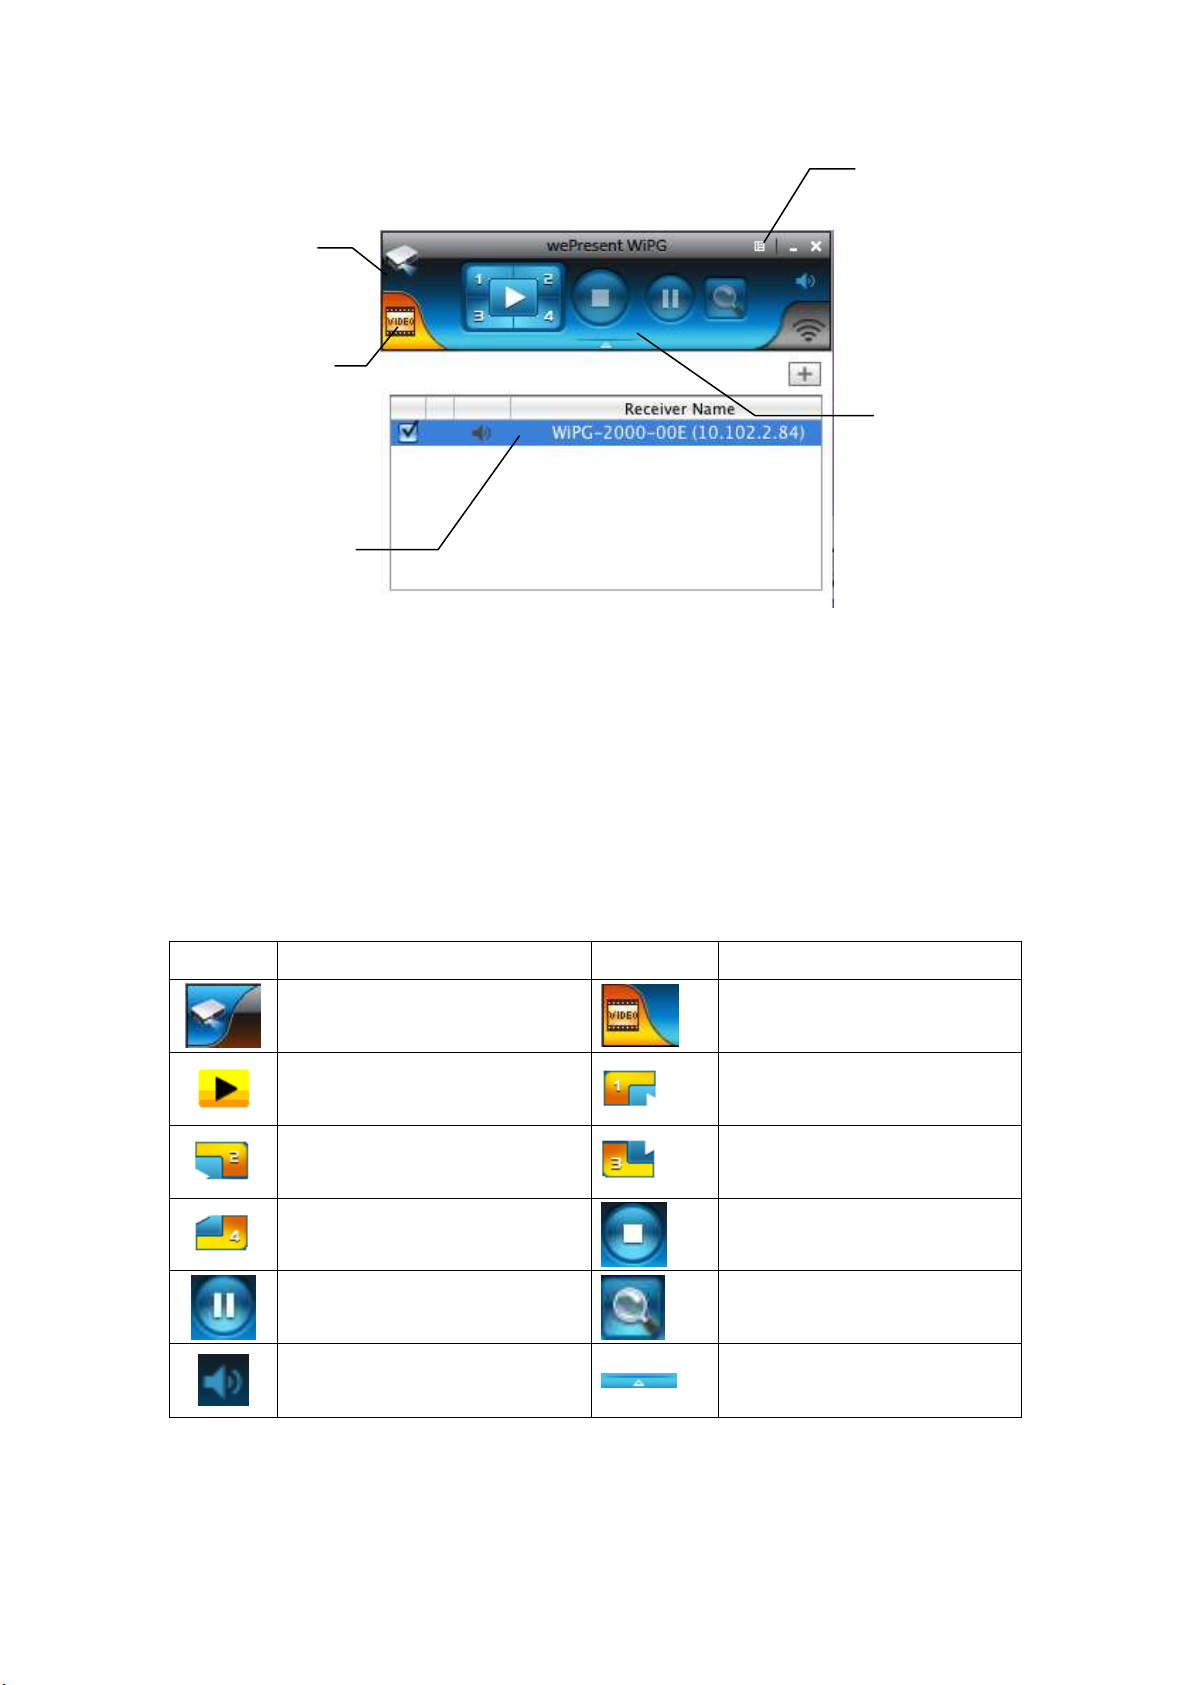
1) If you press the “WiFi” icon, WiPG-2000 application will search the available WiFi
Network and list the WiPG-2000 WiFi Device. You can select a network and press
the “Connect” button to connect the selected WiFi Device.
2) You can press the “Refresh” button to search again or press the “All” button to list
all available WiFi Network name.
3) If you don’t like to change the WiFi Network and want to keep the connection to
current network, you can press the “Cancel” button.
Page 41
41
9.6 Main User Interface
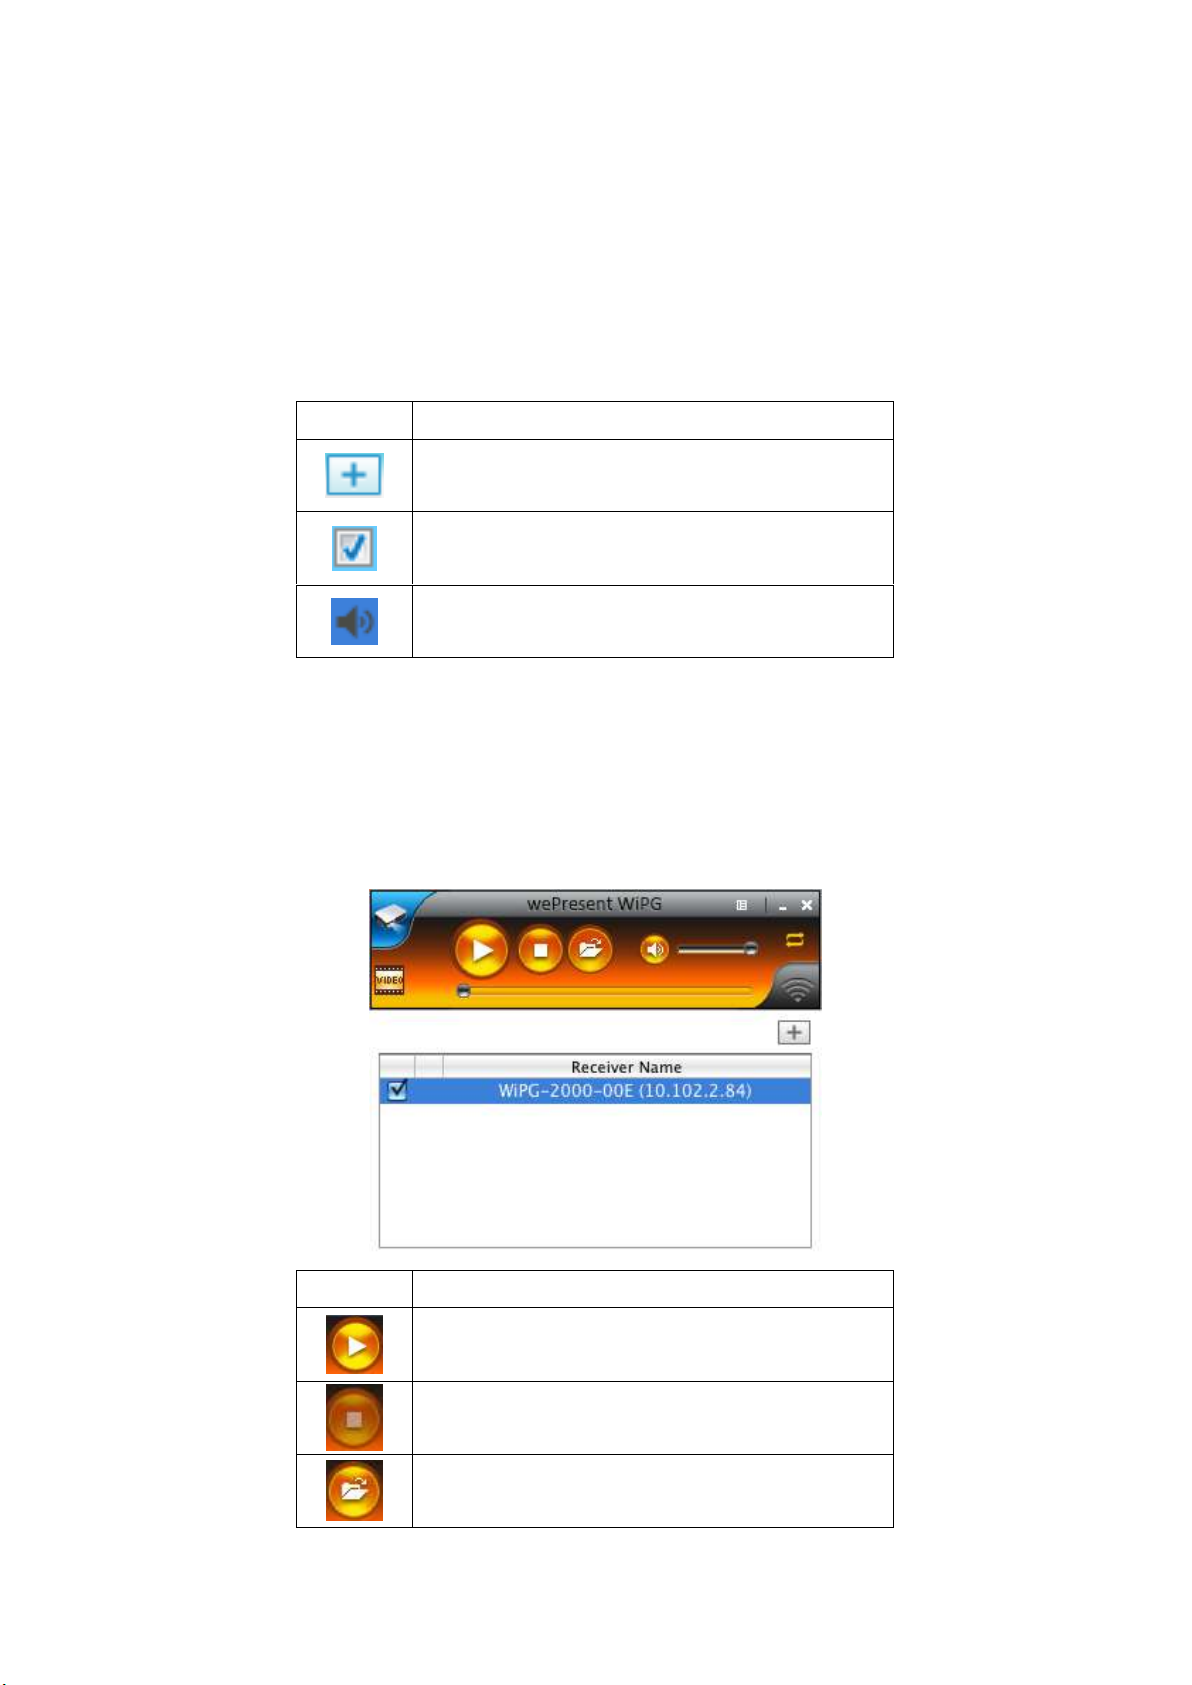
9.7 Screen Projection
1) Click the “Play” button for full or “1,2,3,4” for split screen projection, you can
project the main screen on to the display immediately. Click the “Pause” button,
you can freeze you projection screen, and click the “Stop” button to stop projecting
your screen.
Button
Description
Button
Description
Presentation Function Tab
Video Function Tab
Full Screen projection (Support
audio projection)
Project to Split #1 (Support
audio projection)
Project to Split #2 (No audio
projection)
Project to Split #3(No audio
projection)
Project to Split #4(No audio
projection)
Stop projecting
Pause projecting
Magnifier function
Mute/Unmute for screen
projection
Open/Hide Connected Receiver
List
Note: For audio feature, please install the SoundFlower on your computer first, you
can find the software from USB Token.
Control Area for
Screen Projection
Feature
Menu Area
Video function tab
Presentation
function
Connected
Receiver list Area
Page 42
42
9.8 Connected Receiver list
Press on the “arrow” button to expand the connected receiver list, and press the “add”
button to add another receiver. During standby status, you can press the “check”
button to select the multiple receivers (up to 4) to mirror your screen, and press
“radio” button to select one of the receiver to send the audio.
Button
Description
Add another receiver.
Select the receiver to project your screen and
stream the video. (up to 4)
Select the receiver to send audio.
(One of them)
9.9 Video Streaming
Click the “Open File” button to select the video/music files for the streaming. Click the
“Pause” or “Stop” button, you can pause or stop the streaming, and click the “Volume”
button to mute, adjust the volume level.
Button
Description
Play the video/Music.
Stop the Video/Music.
Open the Video/Music File.
Page 43
43
Mute/Unmute
Repeat On/Off
Note:
Item
Val ue
Supported File Format
MPEG-1 / MPEG-2 / MPEG-2 TS / MPEG-4 / MWV9 /
MOV / Motion JPEG / MKV / ASF / DVR-M5
Supported Video Codec
MPEG-1 / MPEG-2 / MPEG-2 TS / MPEG-4* /
WMV9** / QuickTime / Motion JPEG
* Microsoft MPEG-4 v1-3 is not supported.
** Only WMV3/WVC1 is supported.
Supported Audio Codec
LPCM / AAC / MP3 / WMA
* All formats support up to 1920x1080, 30fps, and 20Mbps.
* These file formats might include video and audio codecs which are not supported.
9.10 Menu
1) Press “Menu” button from the main UI, you will find the menu to enable the
additional feature or to change the application options.
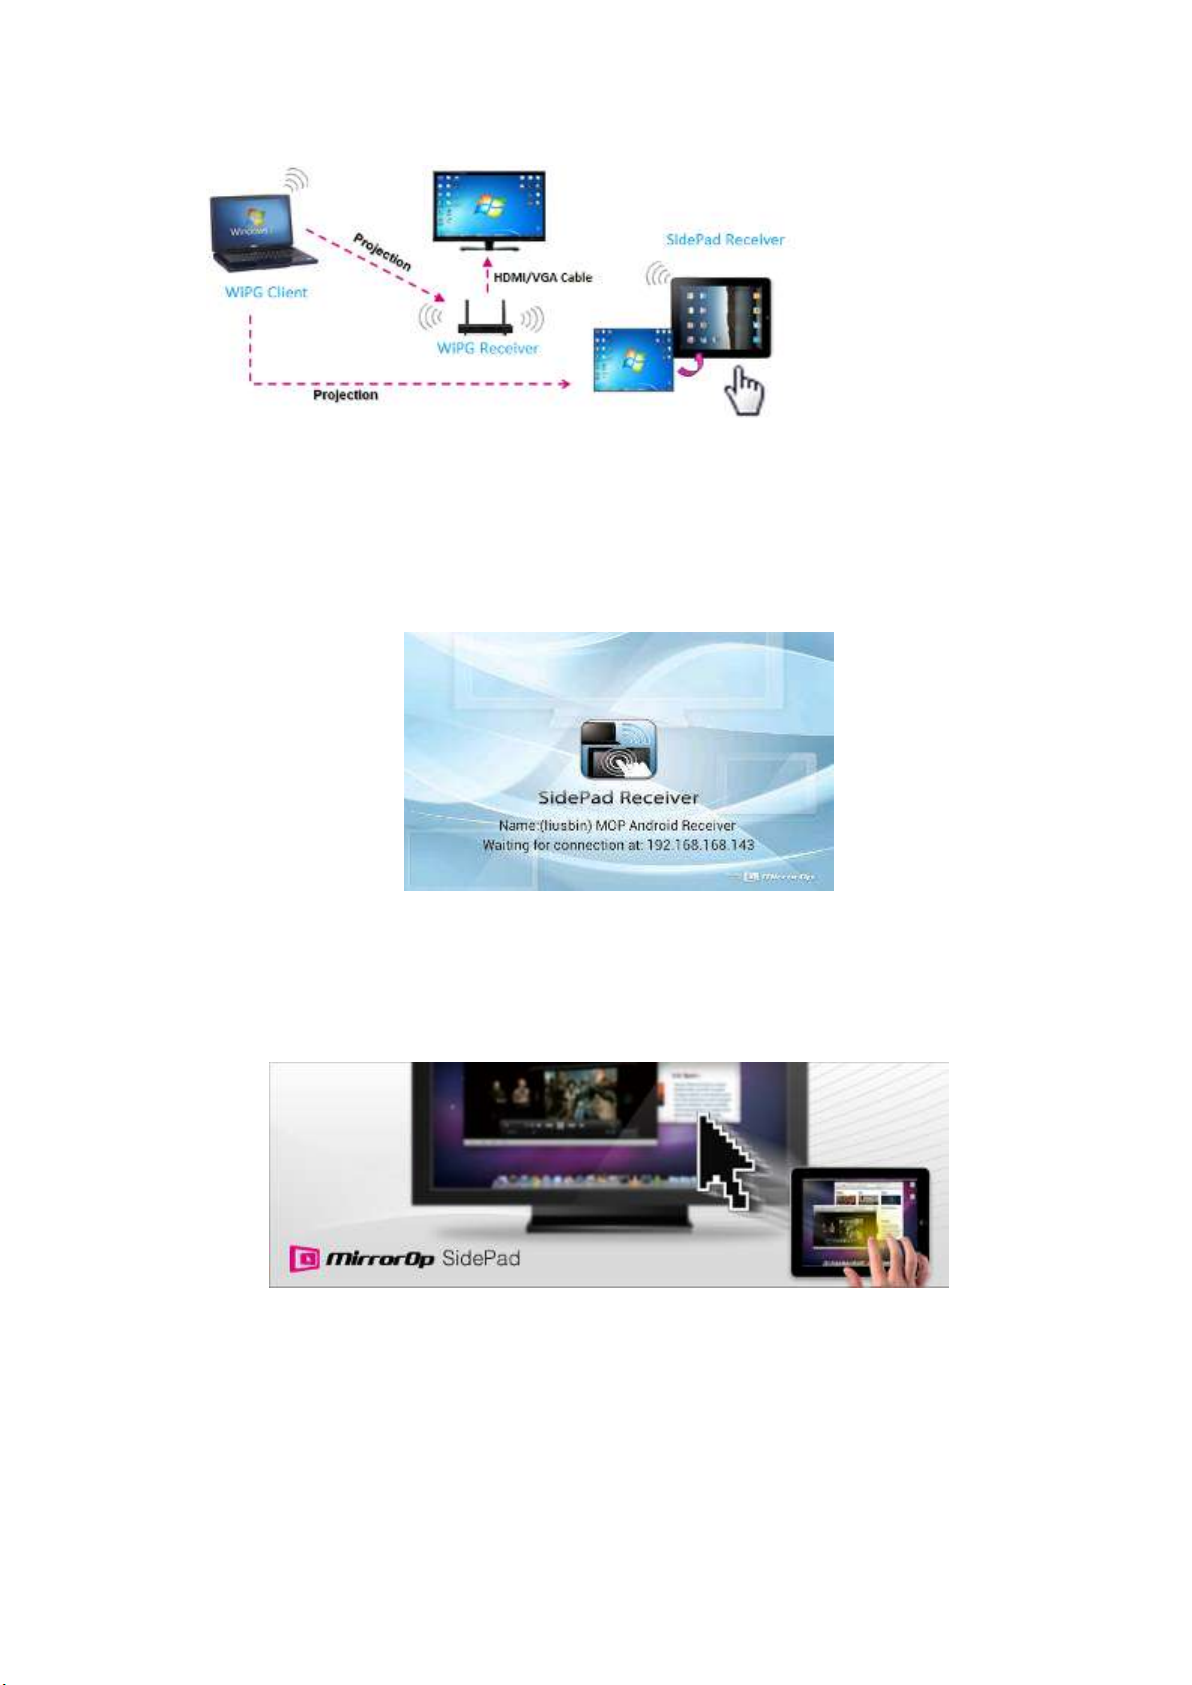
9.10.1 Launch SidePad
1) Introduction: SidePad is an application to allow the user to connect
Pad/Smartphone (Android and iOS), PC, and display/projector via WiPG-2000
device. User can then control the projecting PC via Pad/Smartphone. Please refer
Page 44
44
to the below image for more information.
2) SidePad Control for Android/iOS device.
Android: Download “‘SidePad Receiver” from Google Play Store
iOS: Download “‘SidePad Receiver” from Apple Store.
Connect your Android device to WiPG-2000 device through WiFi and Launch
“‘SidePad Receiver”
Click on “Launch SidePad” from the menu. In seconds, you shall see the PC
desktop shown on the iOS/Andriod Device. Now you can control the
projecting PC from your iOS/Android device.
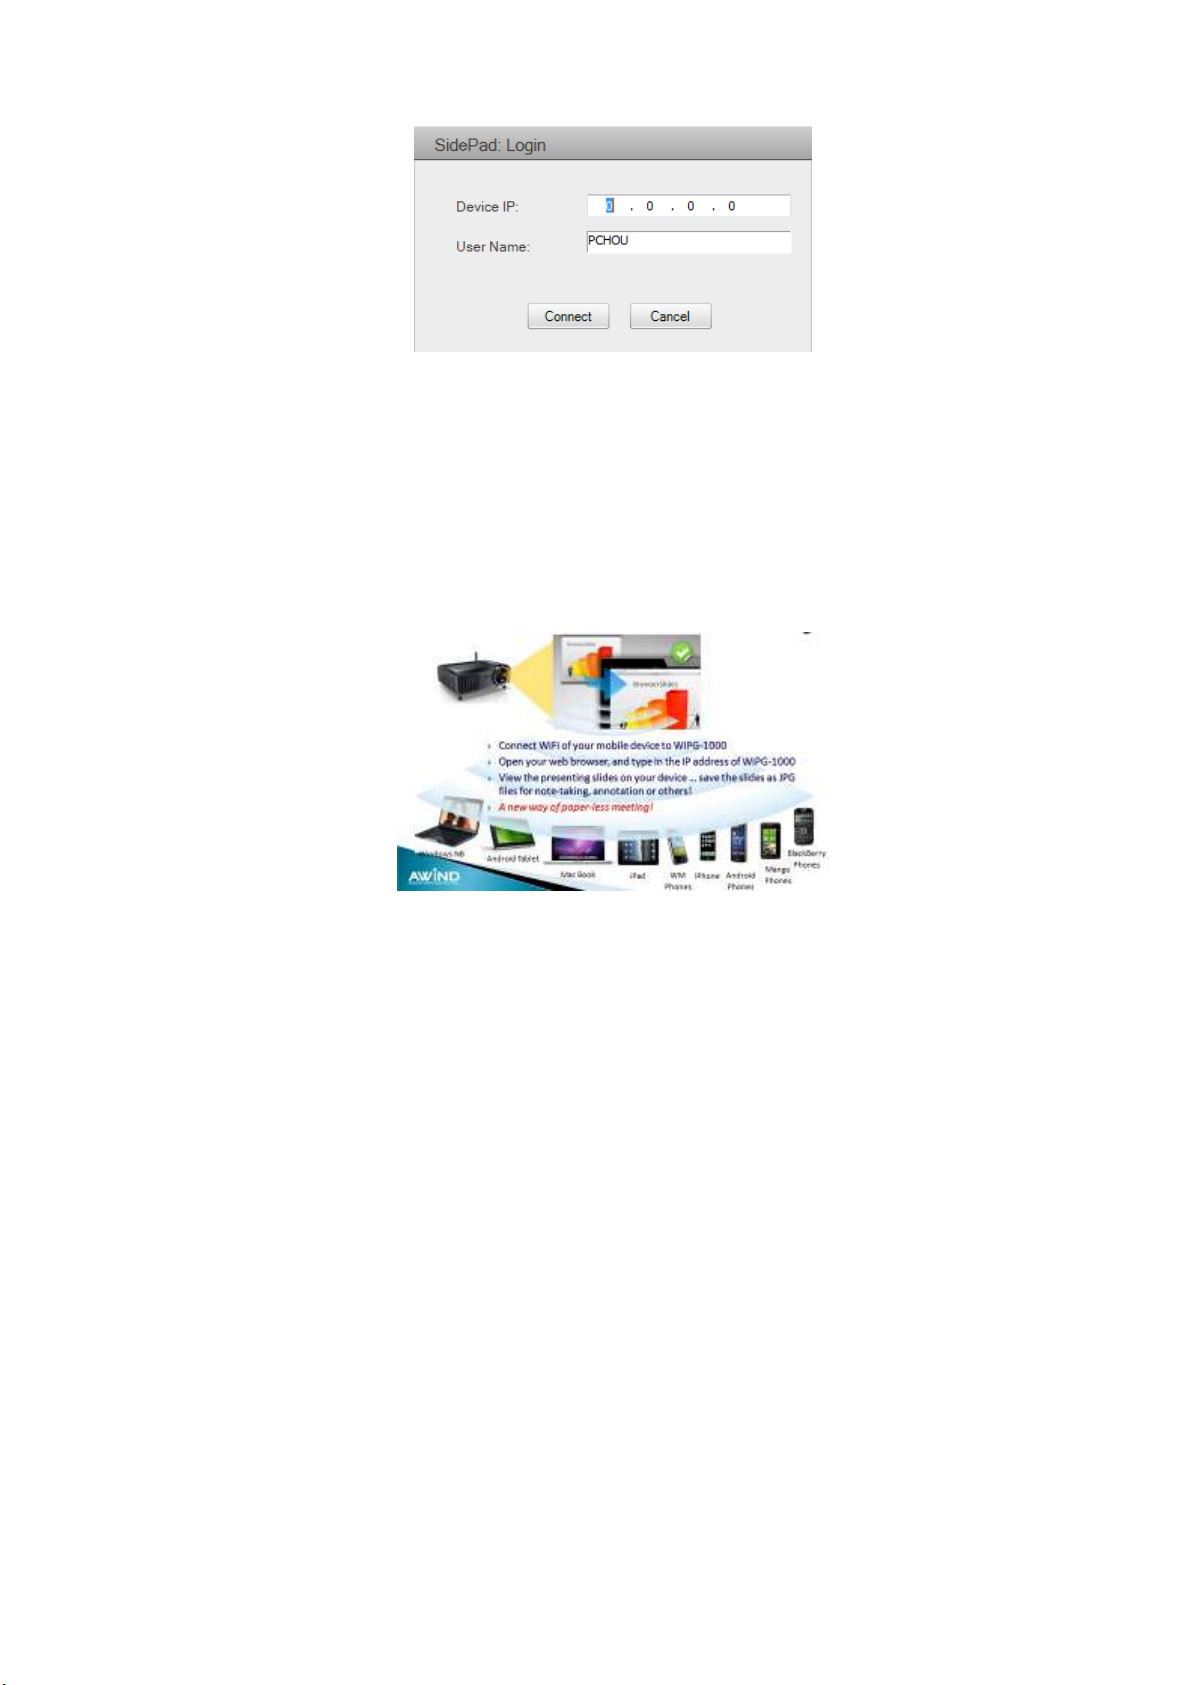
3) If there is no Smartphone/Pad device detected after clicking on “Launch SidePad”
the below image will show up.
Page 45
45
9.10.2 Launch WebSlides
1) Introduction: Webslides is an application to allow the user/presenter to broadcast
the projecting screen/slides to allow multiple login users to receive the slides
during a presentation and save the slides for note taking later.
2) Presenter: Make sure your PC/Mac is connected to WiPG-2000 box and click on
“Launch Webslides”, when the function is on, the item will be checked on the main
menu.
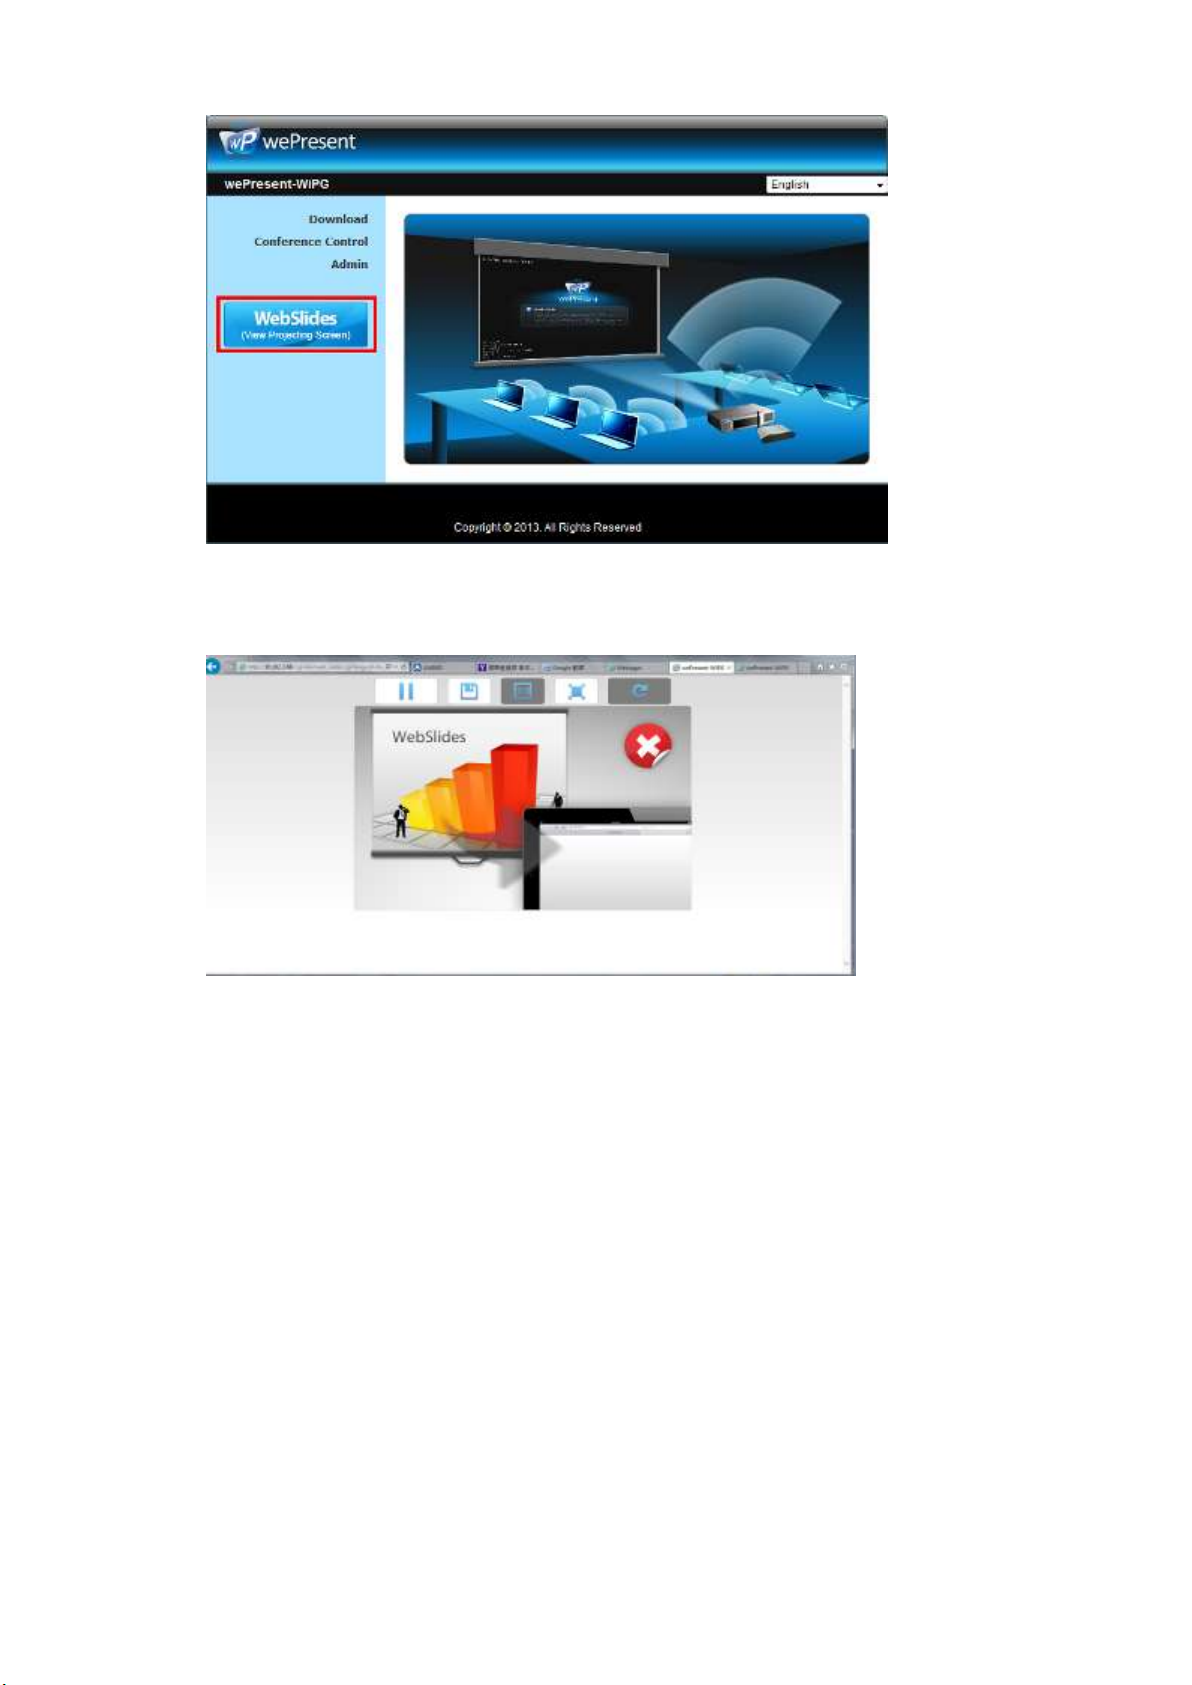
3) Audience: Users need to connect to WiPG-2000 WiFi Network as the presenter and
then launch their browser and enter WiPG-2000 IP address (The information can be
found on the projecting screen) on the URL of browser. Once the users are
connected, they will see the below image on their devices. Click on “Websildes”
button. See below:
Page 46
46
4) Start to receive the presenter’s slides (Auto refresh every 30 sec). The below image
can be seen on the audience’s browser.
Users can put the mouse/finger on each button to get the “tip window” for the
function of each button.
Note:
The WiPG-2000 logged-in user is not identical to WebSlides user, and they both
consume the wireless bandwidth for device connection. If there are more than 10
users logged into WiPG-2000, it is recommended to connect WiPG-2000 to company
network through Ethernet or bridge WiPG-2000 to a router due to wireless bandwidth
concern. User should connect WiPG-2000 via company network or router in order to
secure the projection performance. The WebSlides user number should not exceed the
recommended number on the web management page to prevent the connection
failure or low projection performance.
PS. Wireless Projection function and Conference Control function can support up to 64
users.
Page 47
47
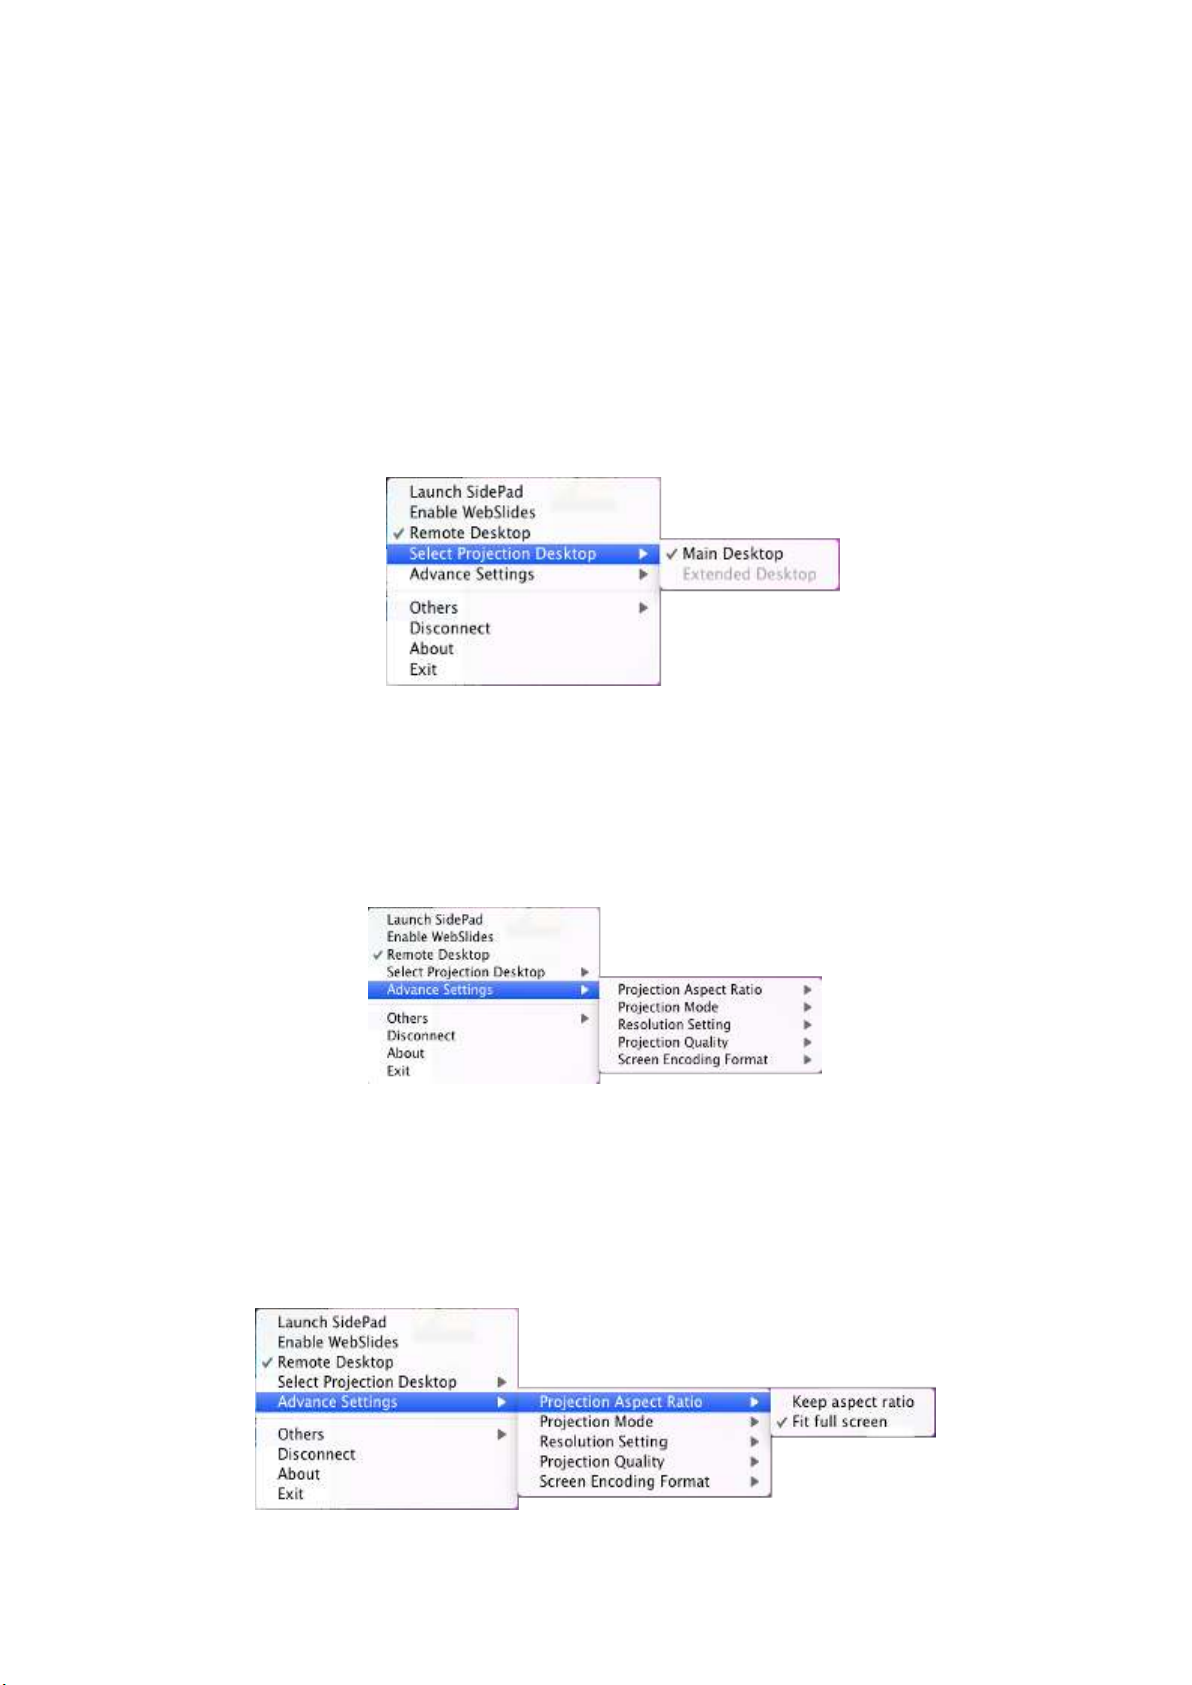
9.10.3 Remote Desktop
1) Click on “Remote Desktop”, you can allow or block the remote
mouse/keyboard/touch control from WiPG-2000 receiver.
9.10.4 Select Projection Desktop
1) Click on “Select Projection Desktop”, you can select to project the main screen or
the extended screen.
Note: It can only support Mac 10.7 and 10.8. To use the extended screen, you
have to install the SVS extended screen driver which can be found from the USB
Token.
9.10.5 Advanced Settings
9.10.5.1 Projection Aspect Ratio
1) Click on “Projection Aspect Ratio”, choose “Keep aspect ratio” to keep the original
aspect ratio if the desktop resolution is different from WiPG-2000 output resolution,
or choose “Fit full screen” to project the screen to full screen.
Page 48
48
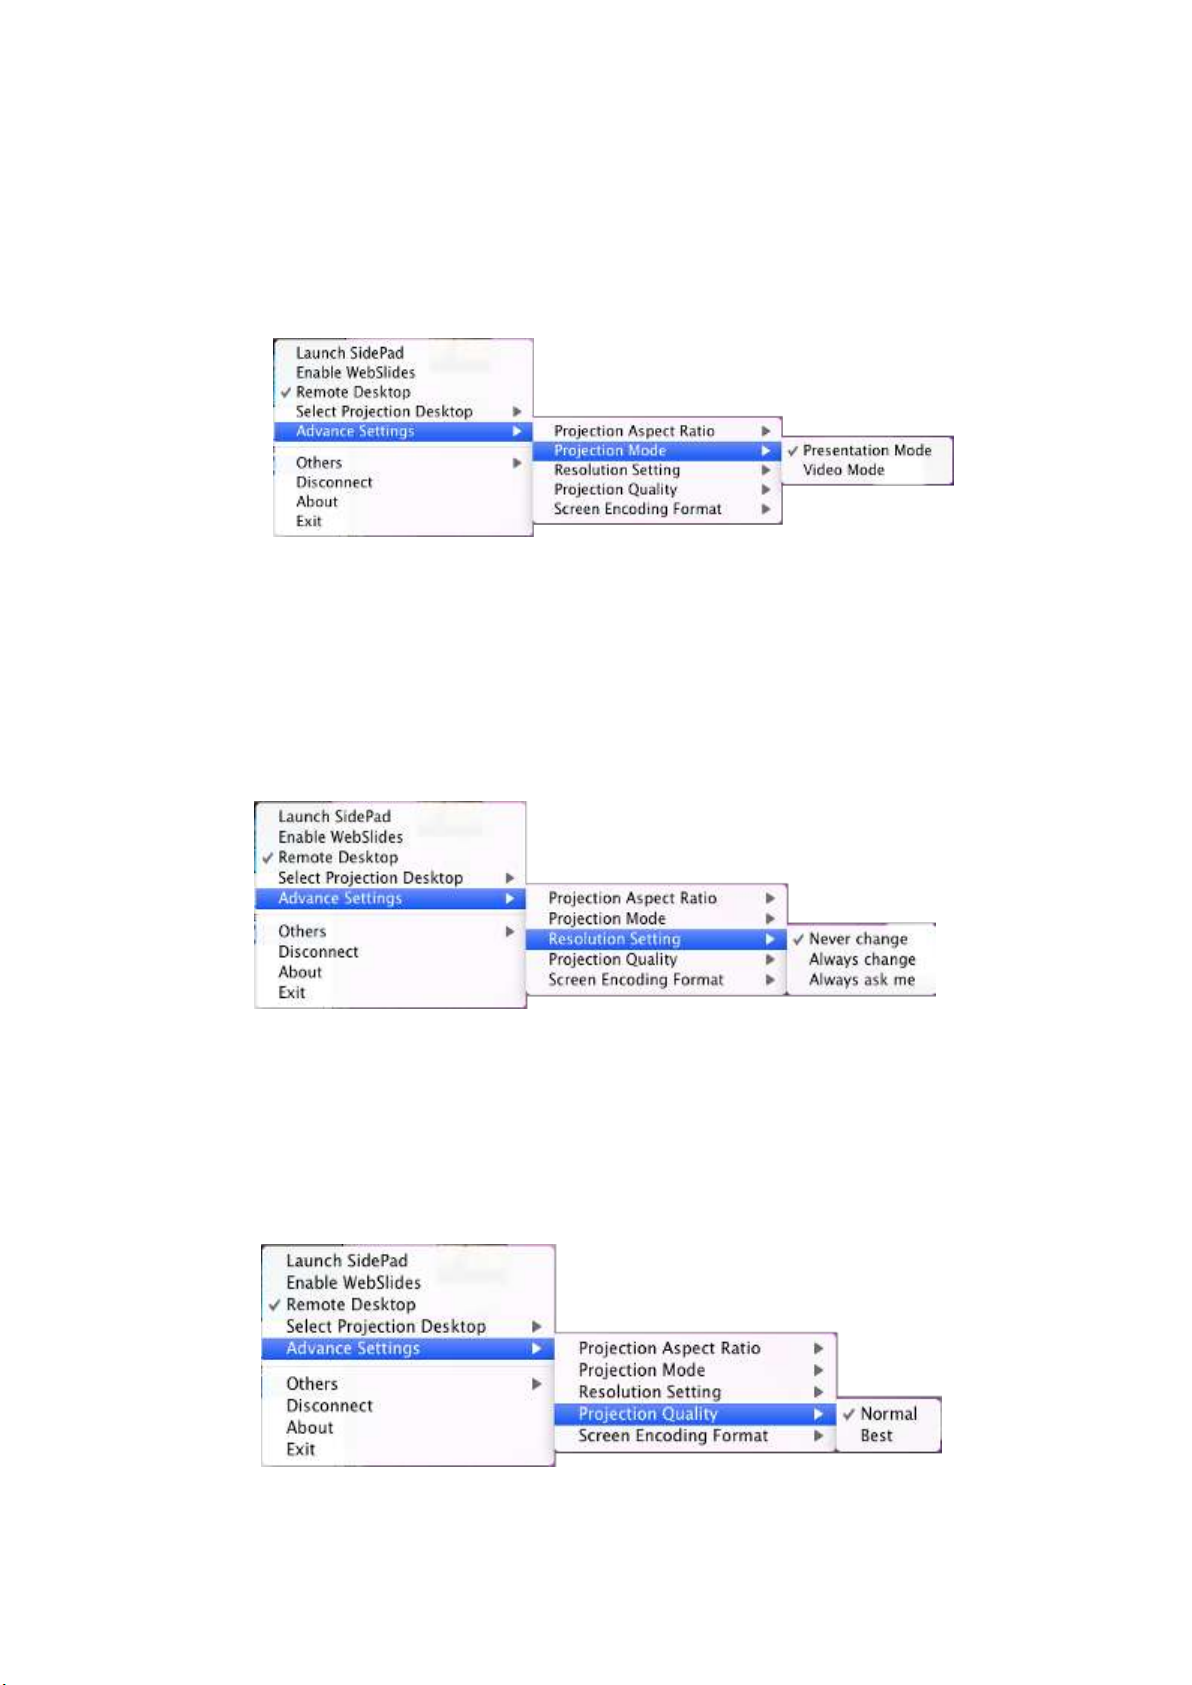
9.10.5.2 Select Projection Mode
1) Click on “Select Projection Mode”, choose the Presentation mode for shortest
latency or the Video mode for auto-latency control to have better video
performance.
9.10.5.3 Resolution Settings
1) Click on “Resolution Setting”, choose “Never Change” to keep original desktop
resolution, “Always Change” to change resolution automatically according to
application’s recommendation, or “Always ask me” to prompt a resolution change
message to user.
9.10.5.4 Projection Quality
1) Click on “Projection Quality”, choose “Normal” for faster projection speed with
lower screen image quality, and “Best” for clear screen image quality but slower
projection speed.
Page 49
49
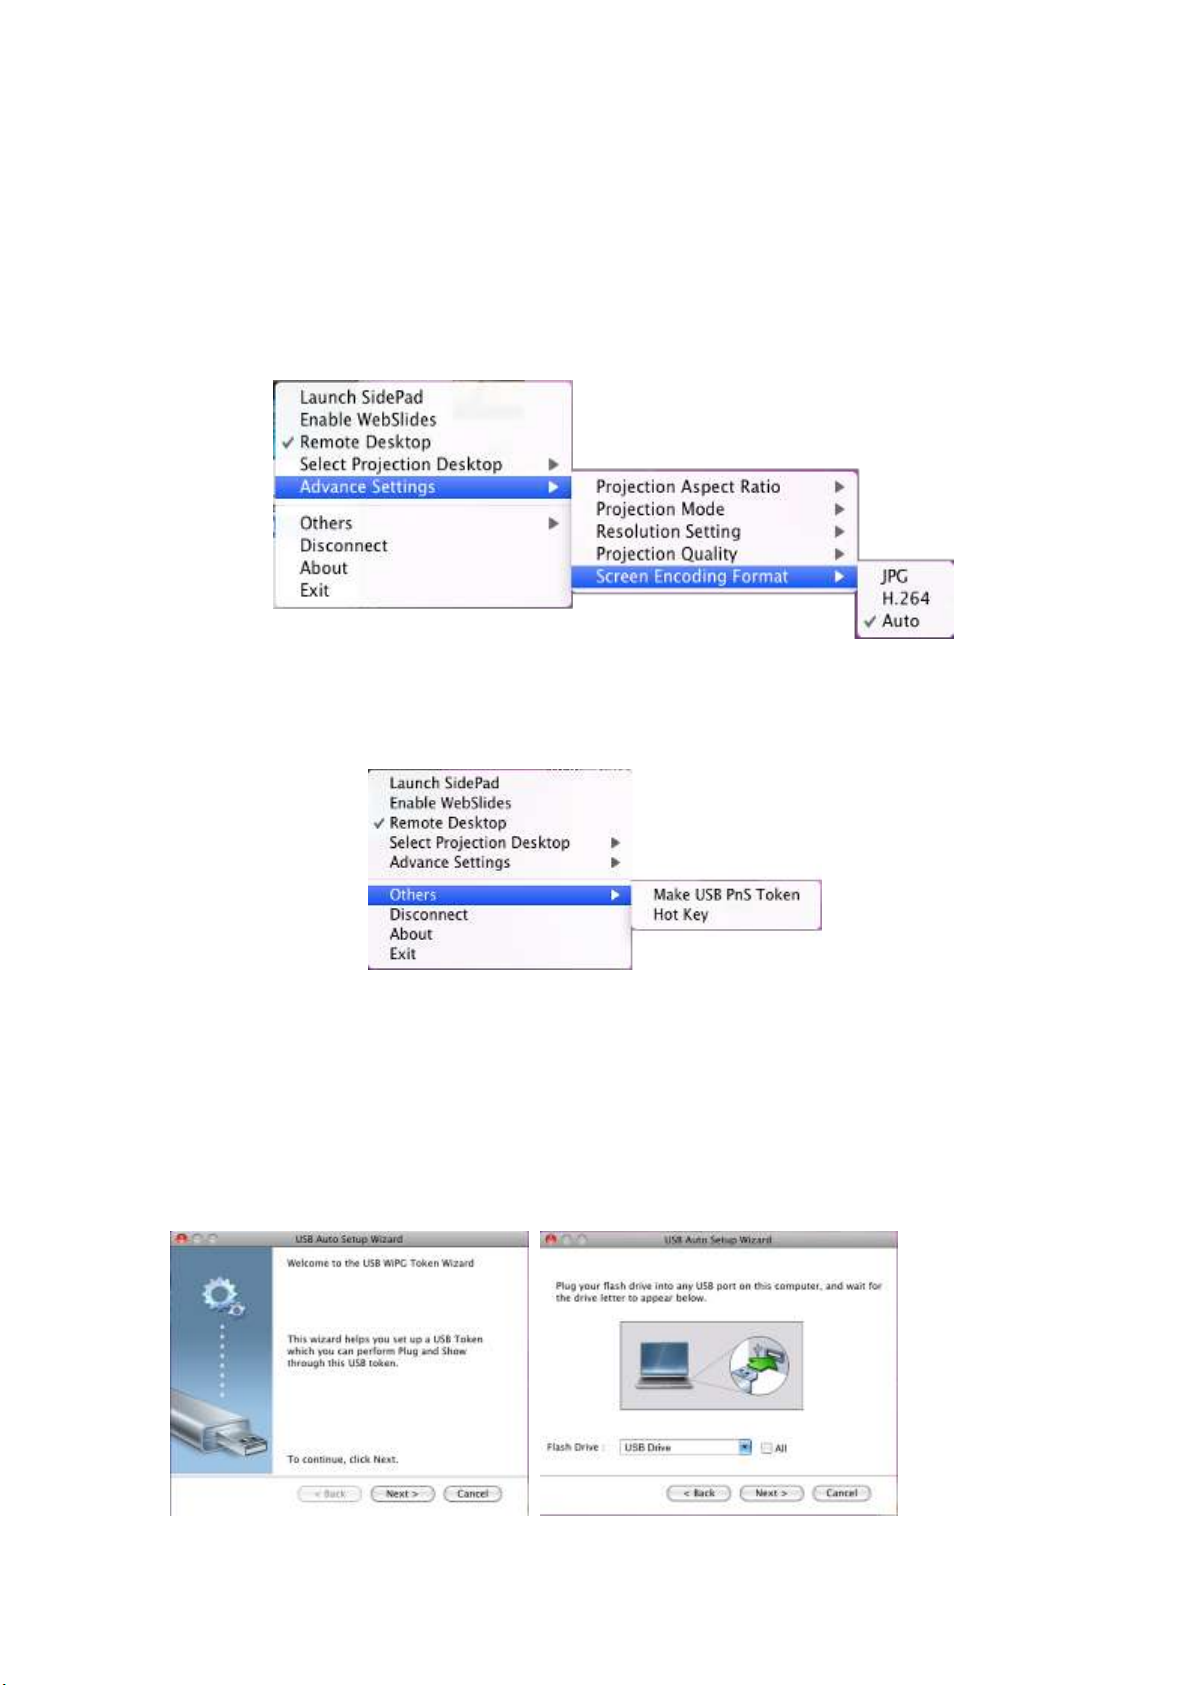
9.10.5.5 Screen Encoding Format
1) Click on “Screen Encoding Format”, choose “JPG” for better image quality but
bigger network bandwidth required, and “H264” for smaller data size with
reasonable image quality, and “Auto” that the application will select the encoding
type automatically according to the receiver’s and sender’s setting and status.
9.10.6 Others
9.10.6.1 Make USB PnS Token
1) Click “Make USB PnS Token” to make a USB wePresent WiPG-2000 Token, you can
insert a USB and follows the wizard to make the Token. After completion, you can
plug the USB to any PC to do the projection without installing the wePresent WiPG
software onto every PC.
Page 50
50
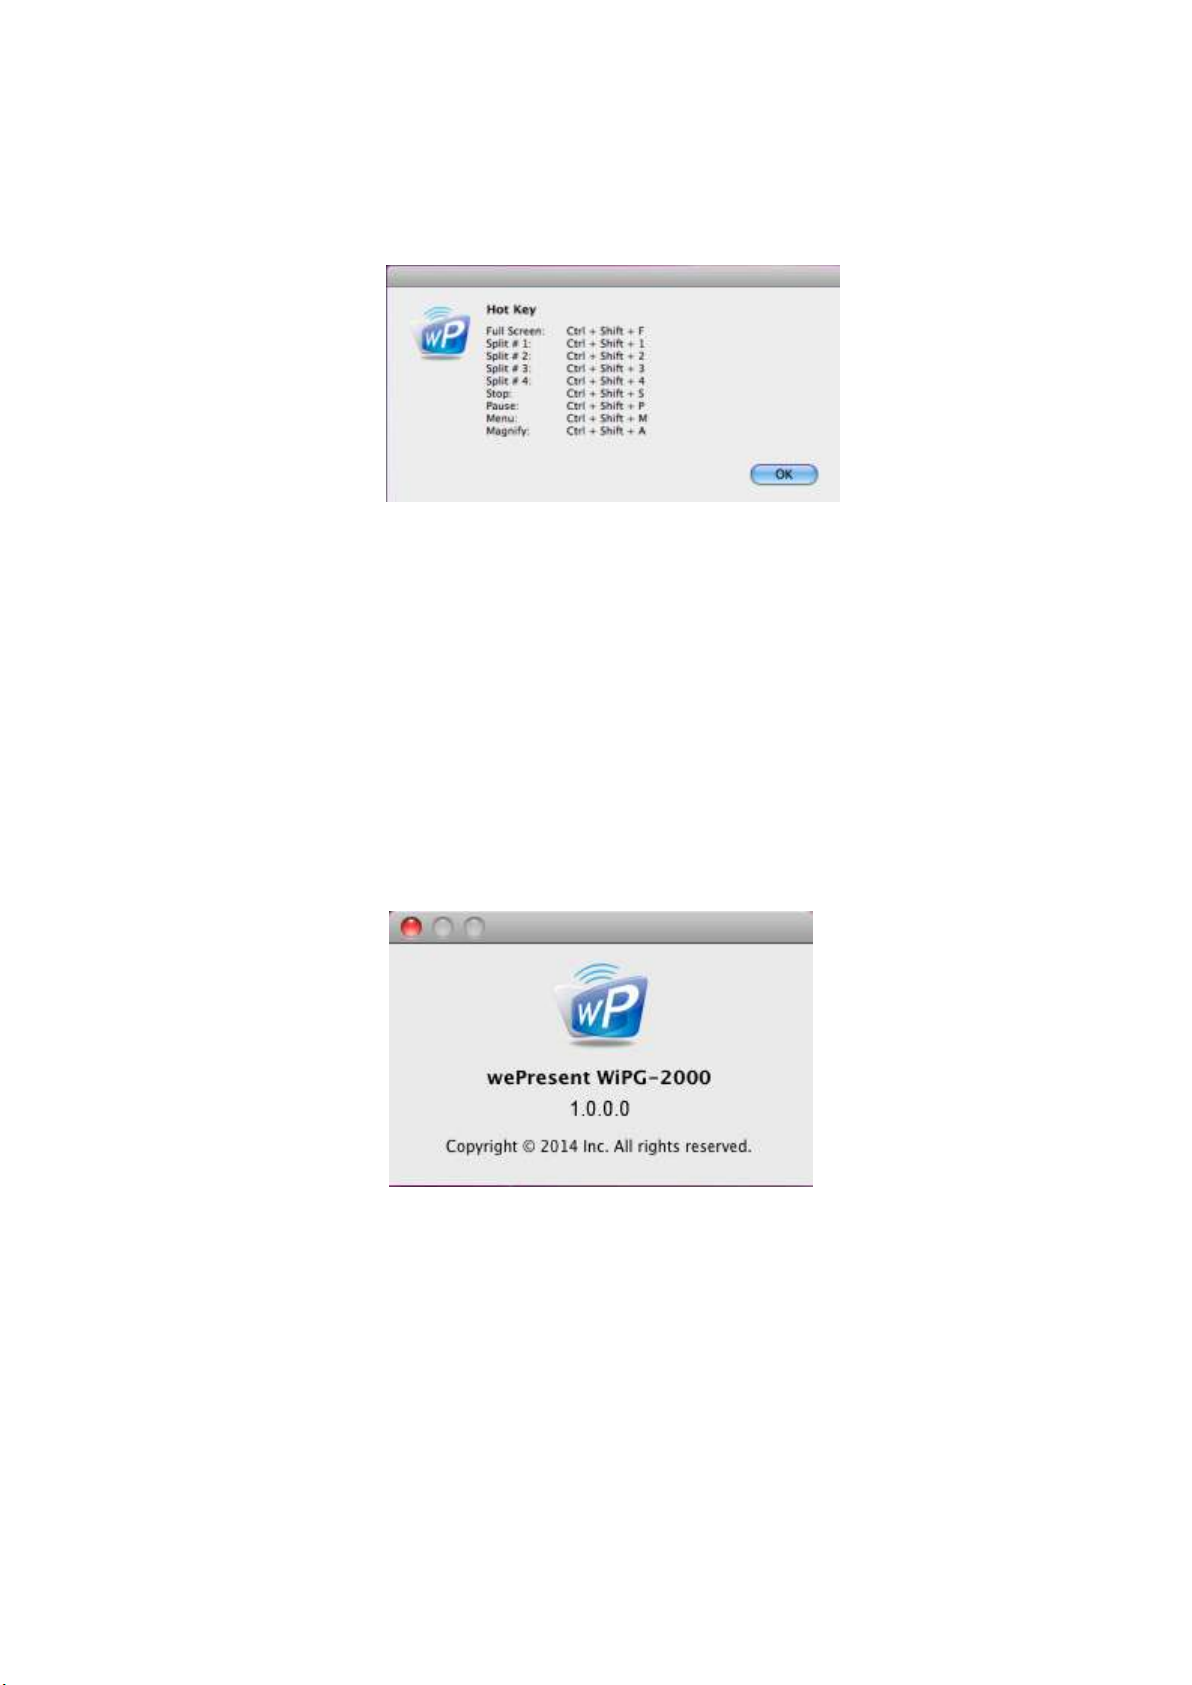
9.10.6.2 Hot Key
1) Click on “Hot Key” to display the available Hot Key definition.
9.10.7 Disconnect
1) Click on “Disconnect” to disconnect from current connected receivers.
9.10.8 About
1) Click on “About” to show system information. It includes product model name,
Application version.
9.10.9 Exit
1) Click on “Exit” to exit this application. It will stop current playing status and shut
down the application immediately.
Page 51
51
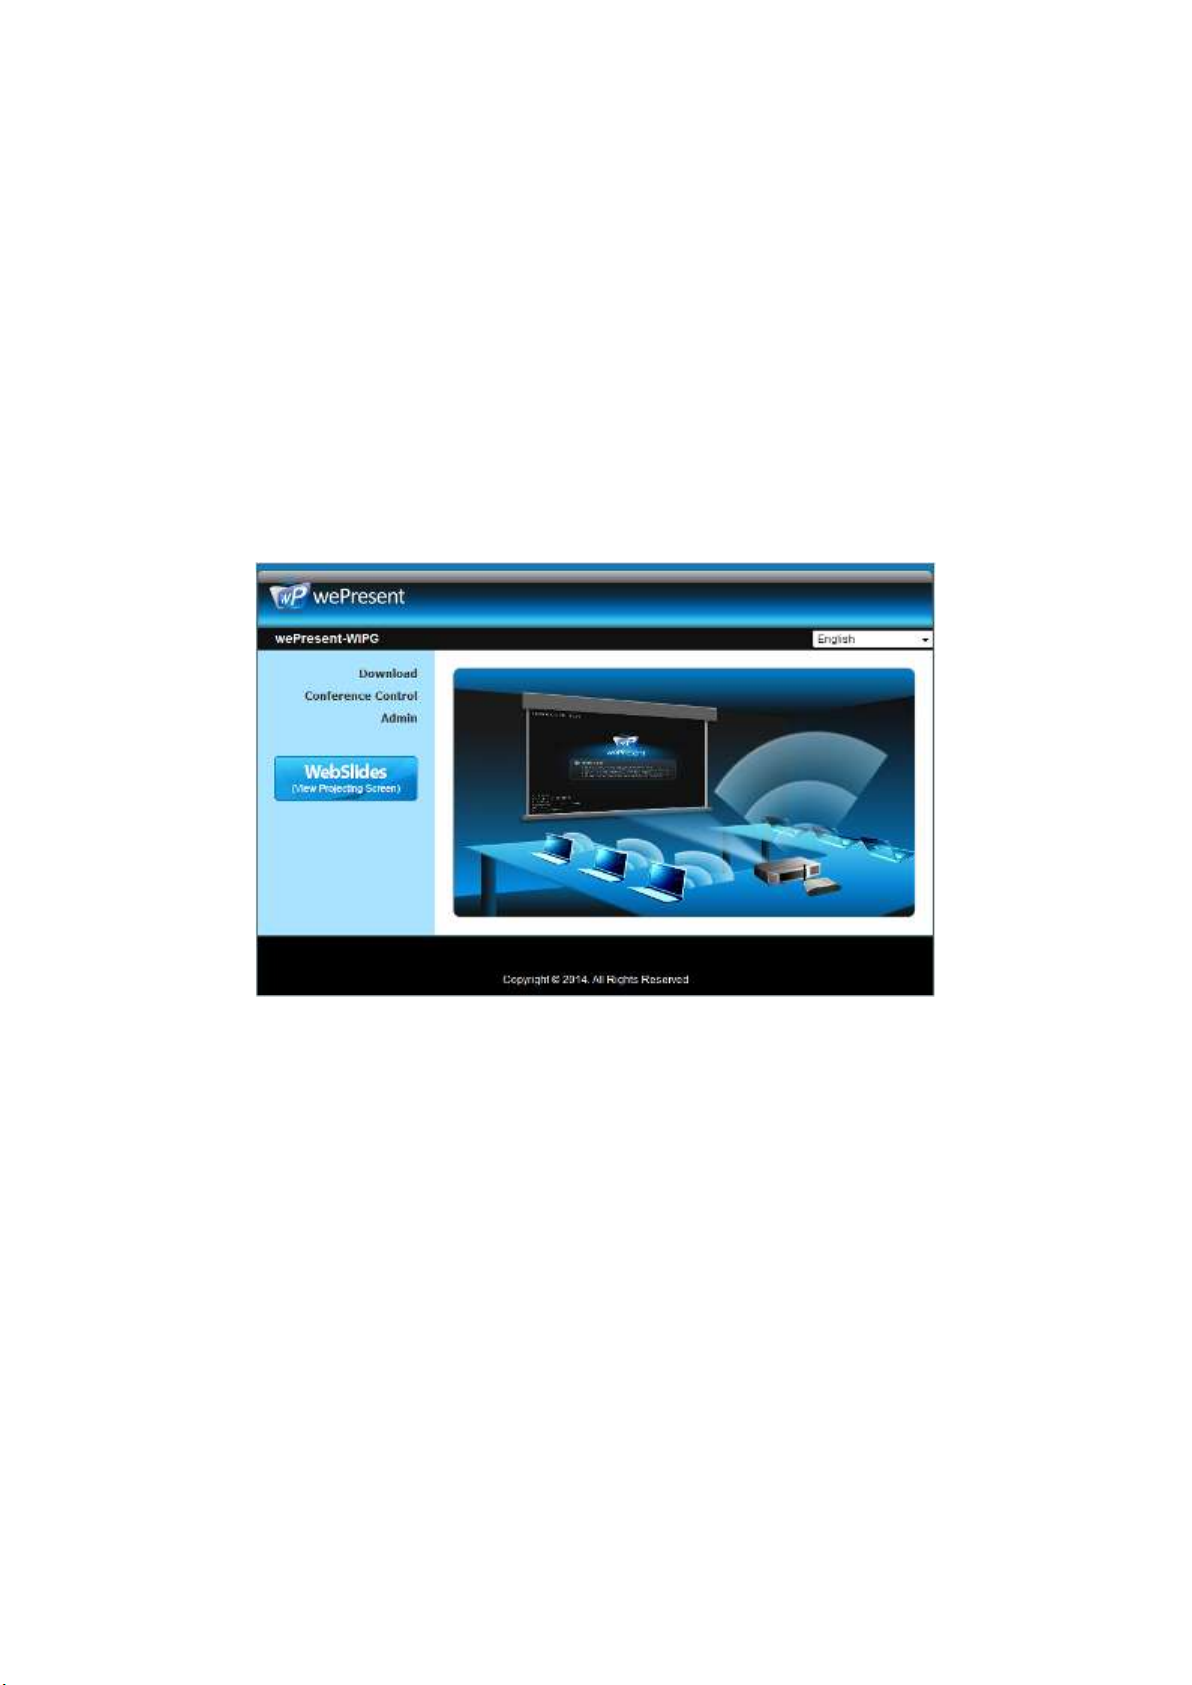
10 Web Management
10.1 Home Page
1) Make sure your PC connect to wePresent WiPG-2000 box successfully.
2) Enter the receiver IP address on your browser; you can find the IP address on the
projector/display screen. (Default IP is 192.168.100.10).
3) Your browser will lead you to the below page.
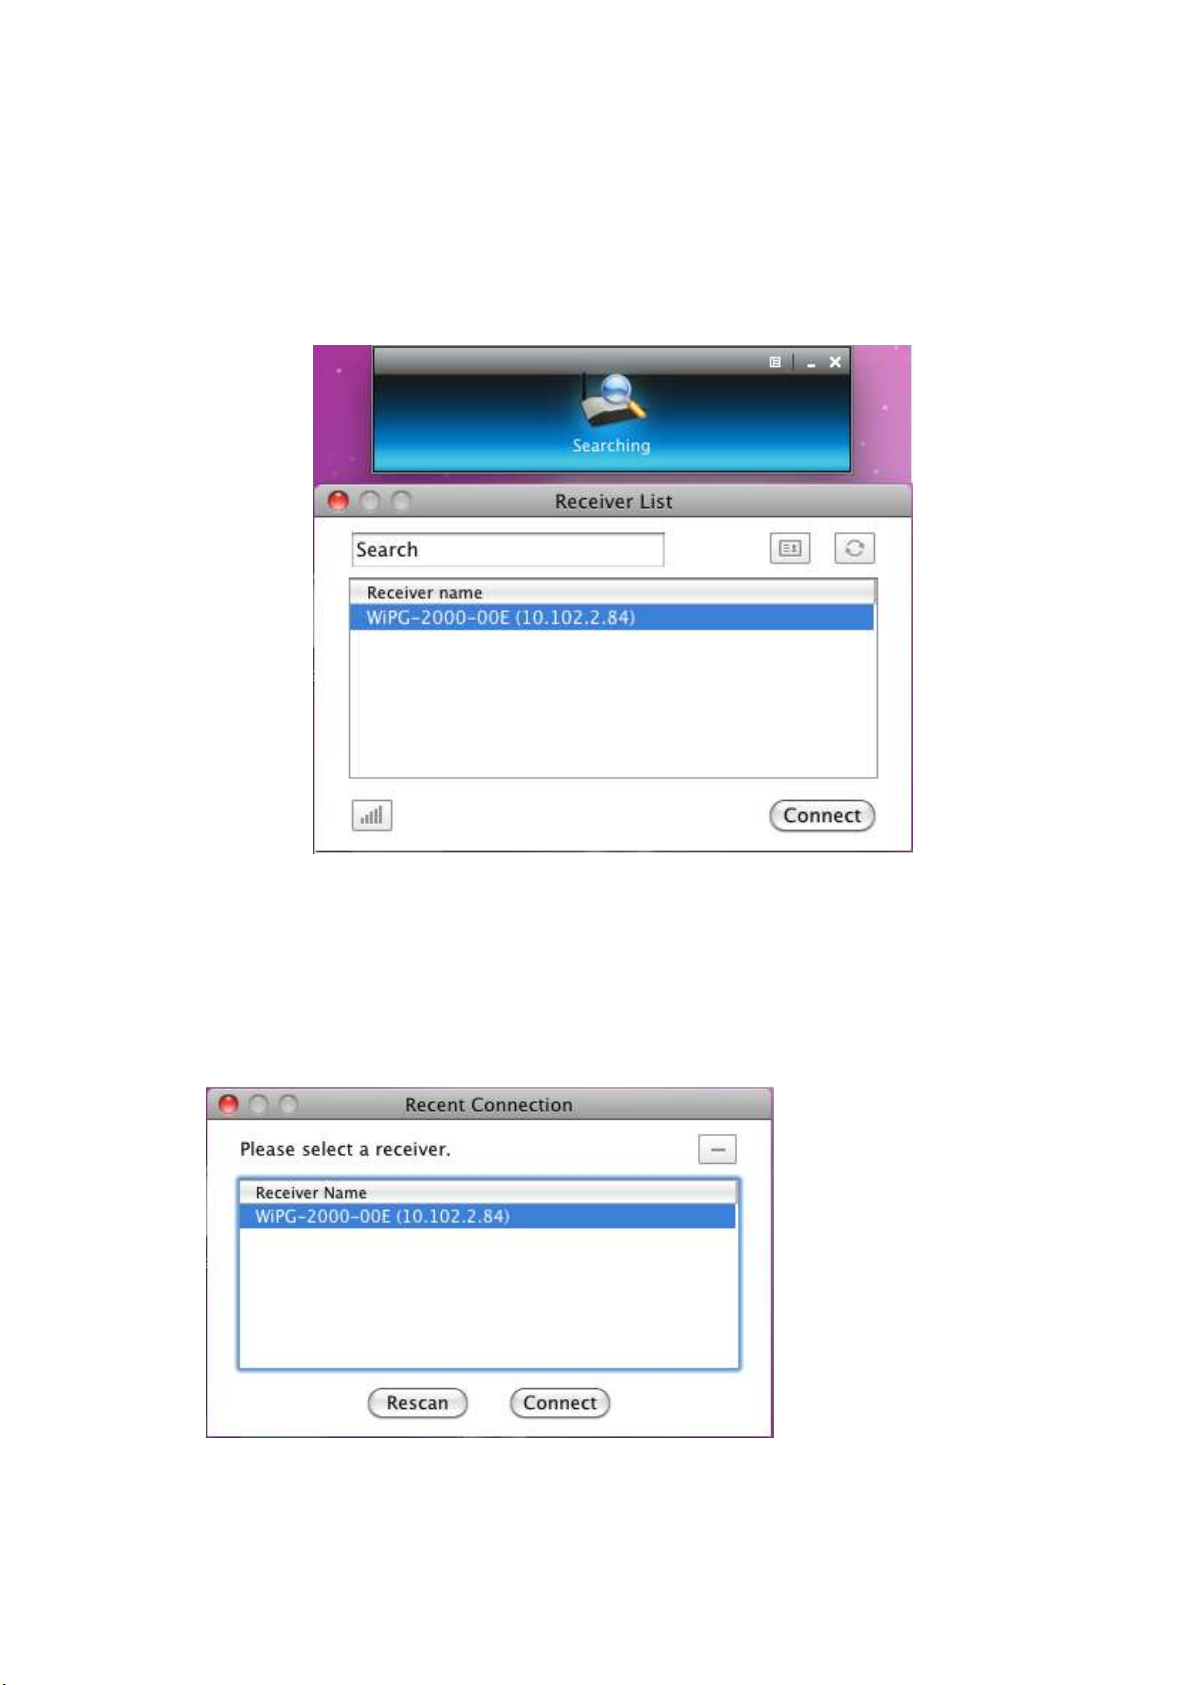
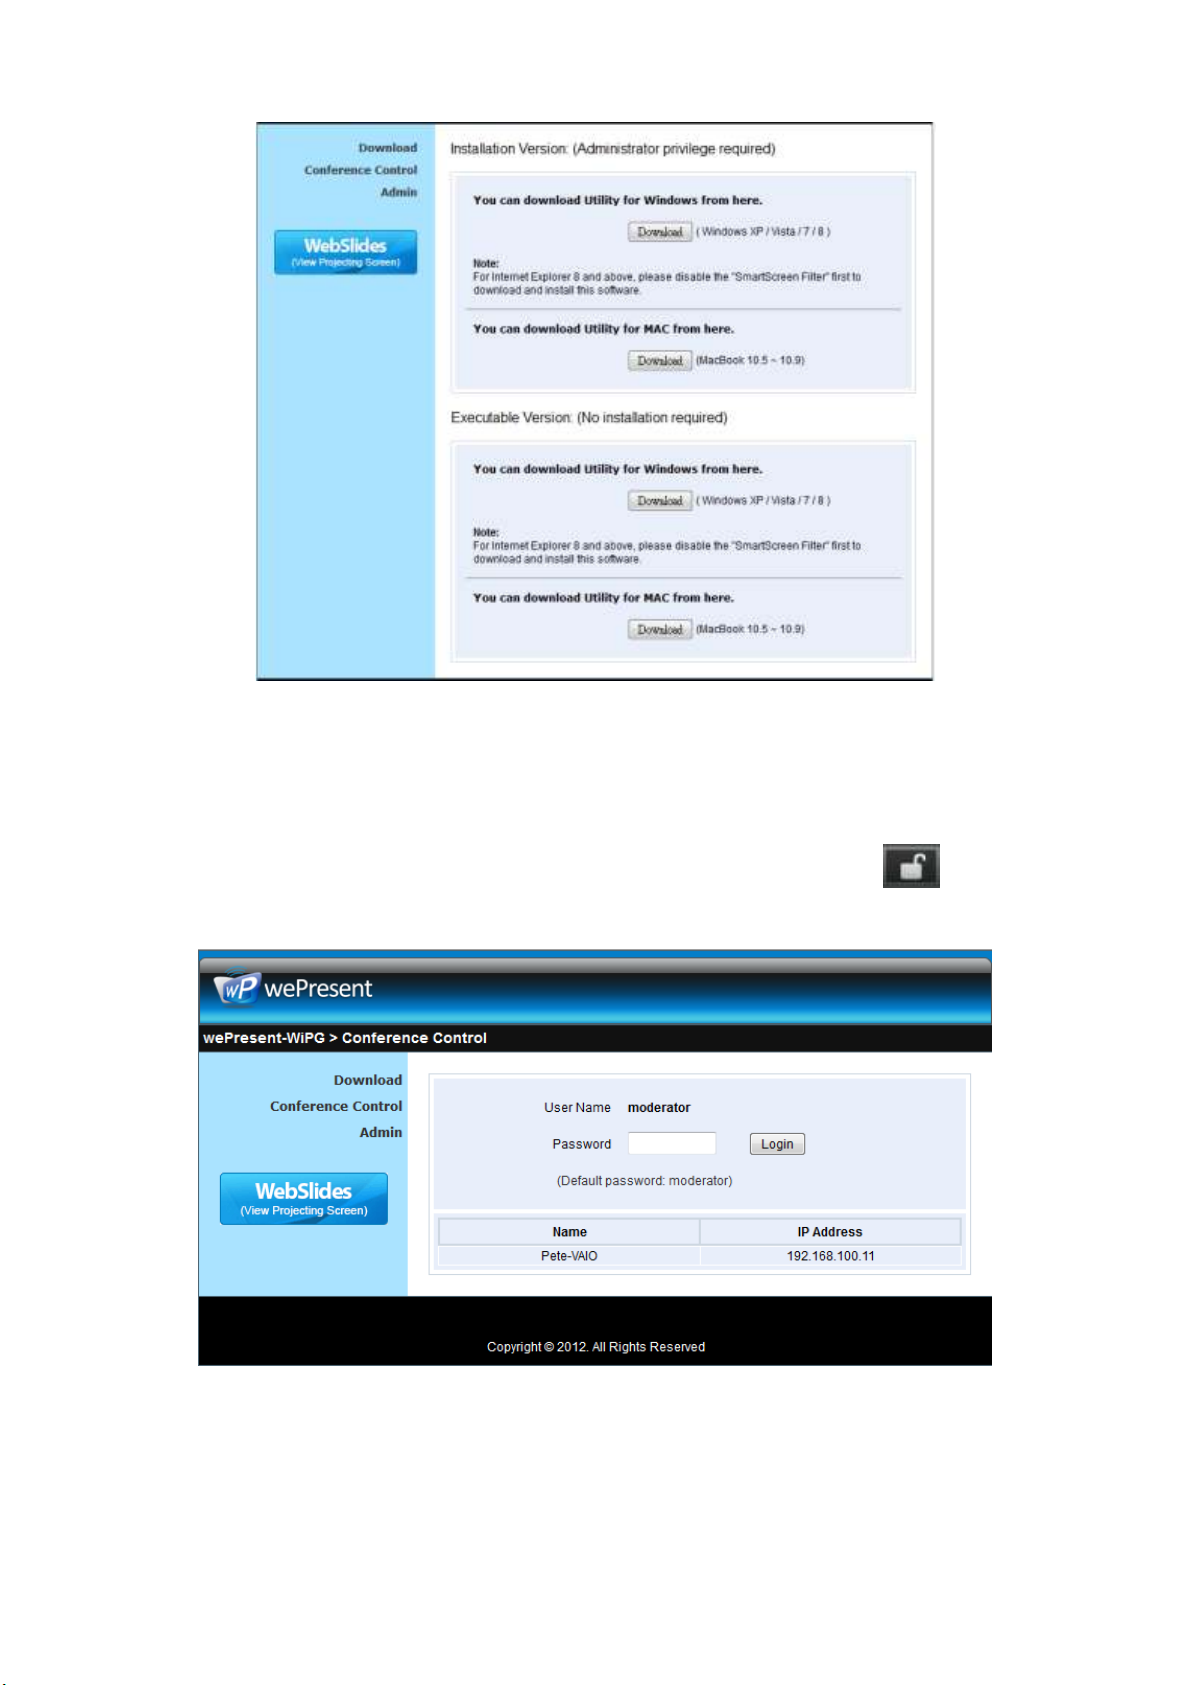
10.2 Download
1) Select “Download” function.
2) Please select the “Win 8 / 7 / Windows Vista / XP” or “Mac Utility” and execute the
installation program.
Note: Please disable the “Smart Screen Filter” on IE browser; otherwise you
might not able to download the file.
Page 52
52
10.3 Conference Control
1) Select “Conference Control” function, you can find the current connected user list
on this page. Please make sure the lock on the start page is disabled.
2) Enter password and then press [Login]. (default password: moderator)
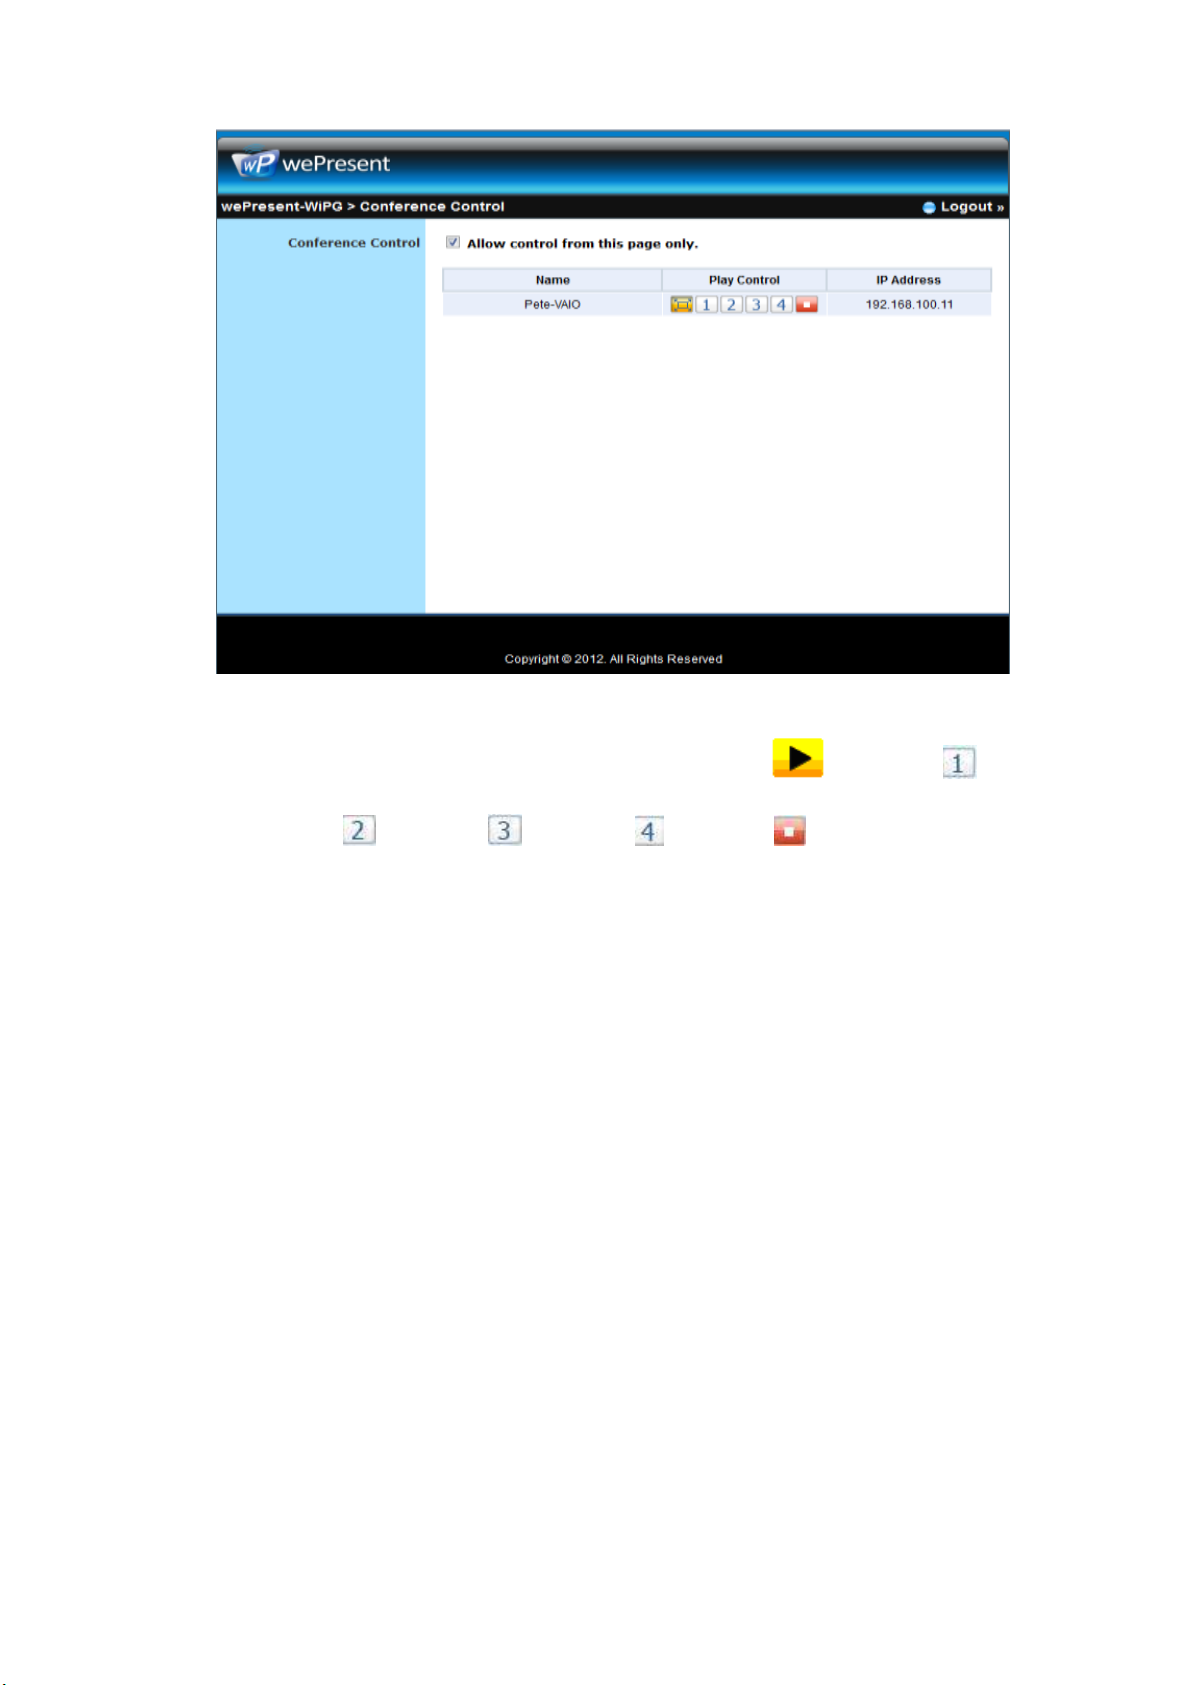
3) After login, you can see a User List on the screen which indicates all of the users
connected to wePresent WiPG-2000 box.
4) The default setting is “allow control from this page only”. When this function is
checked, the moderator can control all the login users’ projection.
Page 53
53
5) There are three columns, “Computer Name”, “Play Control” and “IP Address”.
a. Play Control: There are six buttons, including Play(Full) , Screen #1 ,
Screen#2 ,Screen #3 , Screen#4 and Stop .
b. Moderator can click on the “play” button to allow the projecting.
c. Moderator can assign which user to project on which screen by clicking on the
screen numbers.
d. Moderator can “stop” the projecting anytime.
6) Uncheck the “Allow Control from this page only”, it will disable the centralized
control and user can project the screen to WiPG-2000 freely.
7) Moderator can log out from the conference control mode by clicking on the” log
out” on the upper right corner.
10.4 Admin
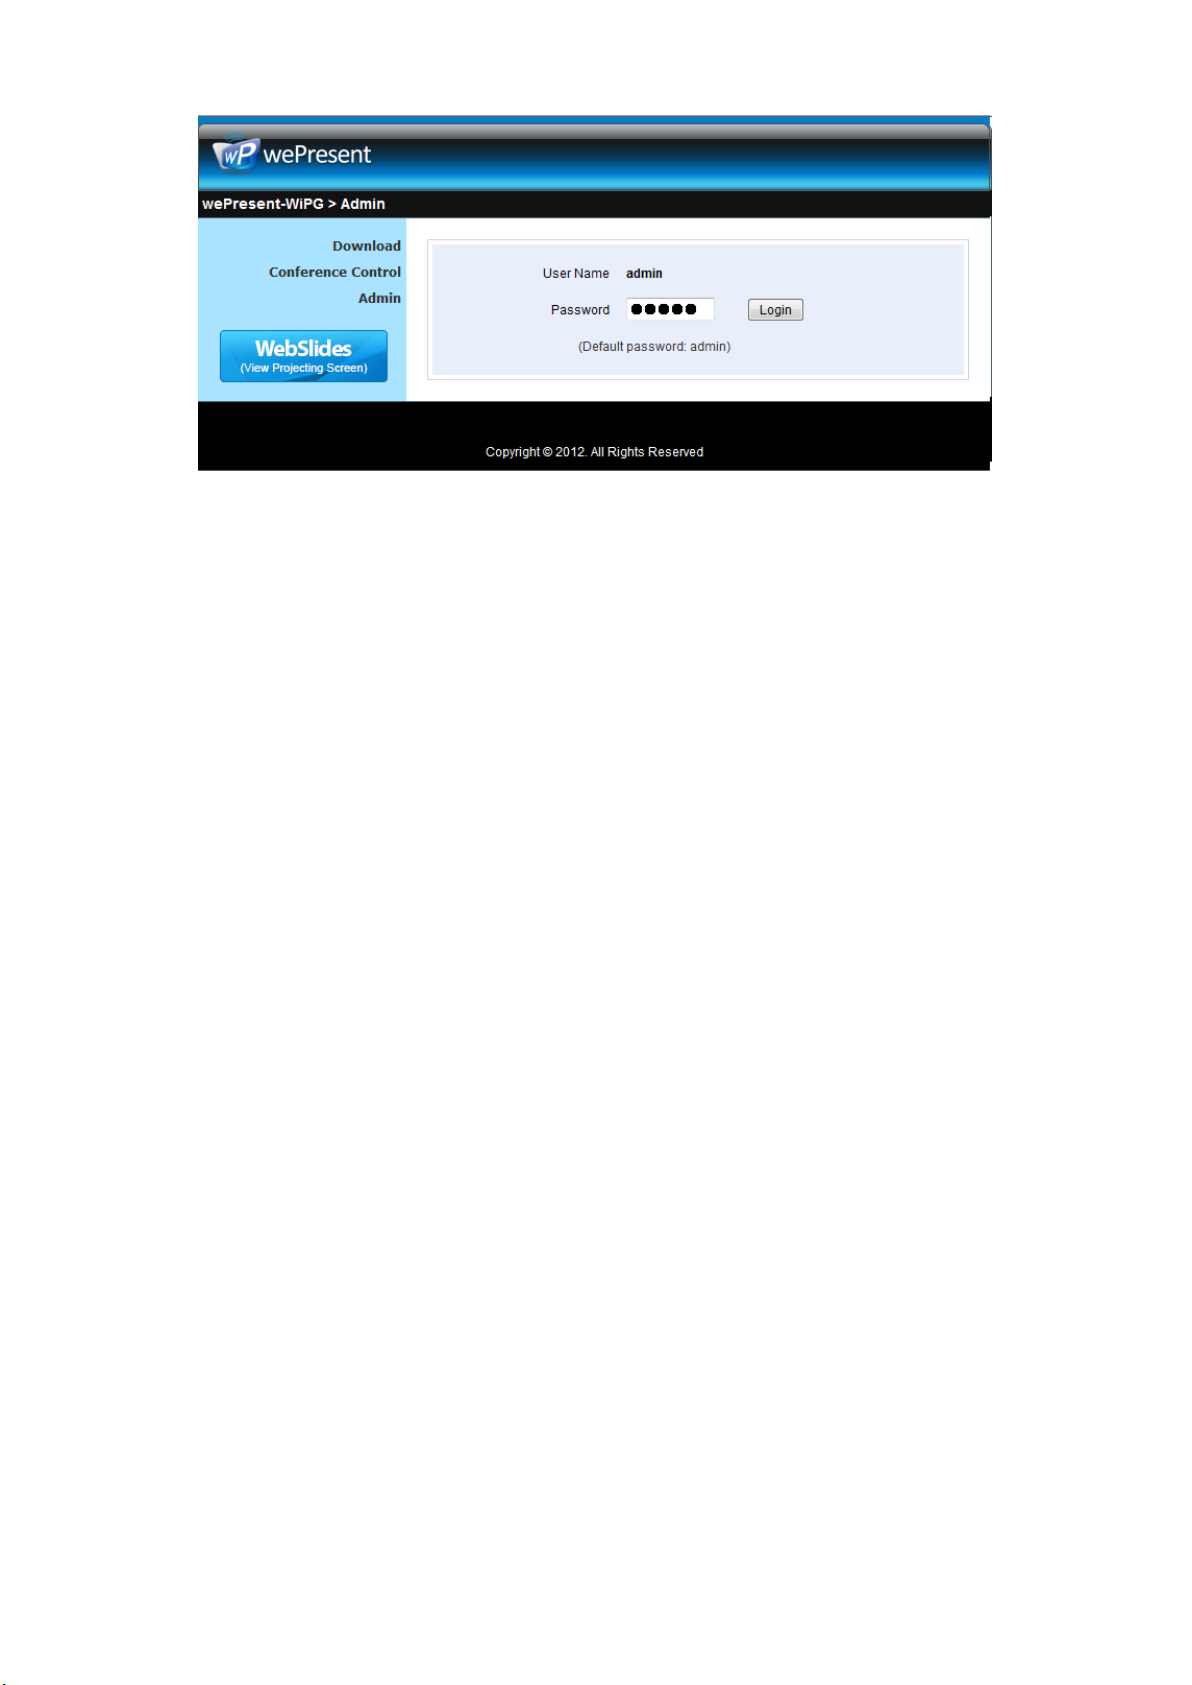
1) Click on “Admin” and then enter the password to login web admin page. (Default
Password: admin)
Page 54
54
10.5 System Status
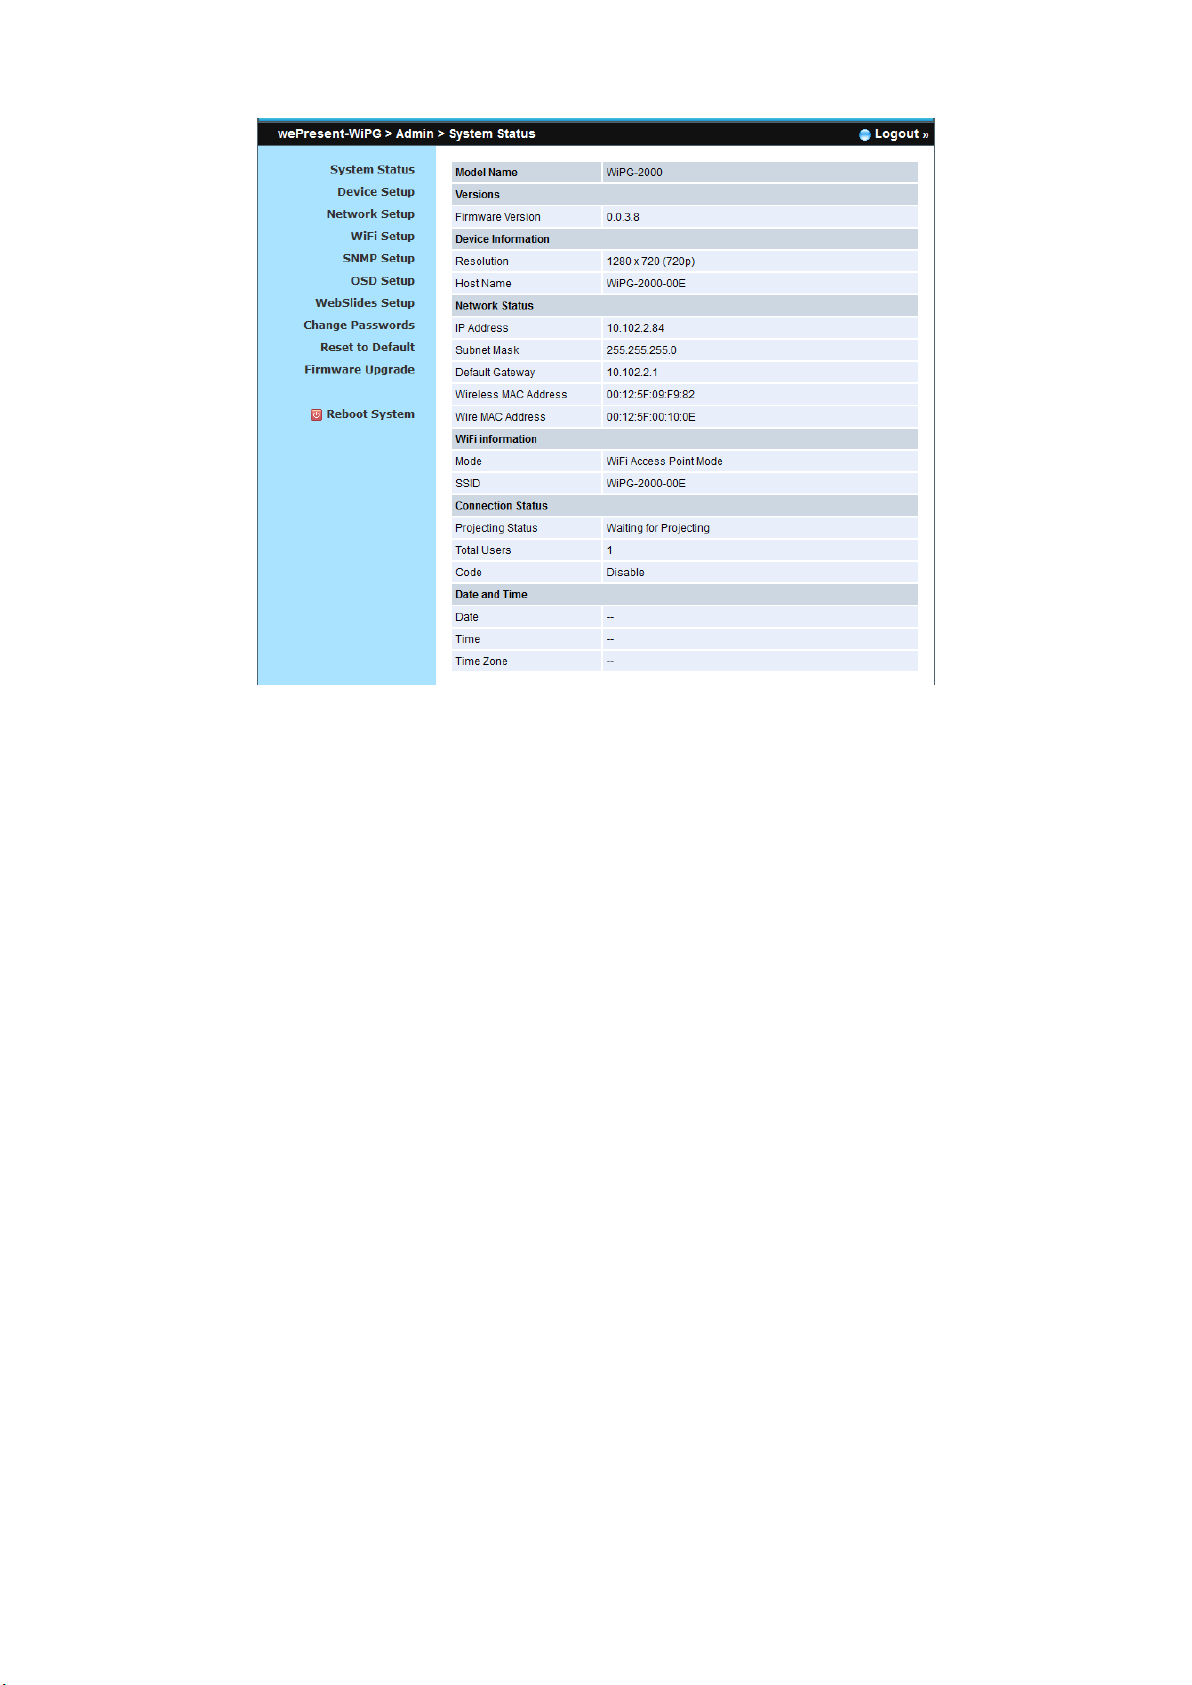
1) Click on “System Status” option, it will show current system status.
Model Name: Product model name
Versions:
Firmware version no.: Product firmware version number.
Device Information:
Resolution: Device output resolution.
Host Name: Device network hostname.
Network Status:
IP address:IP address of WiPG-2000 device.
Subnet Mask:subnet mask
Default Gateway:default gateway
Wireless MAC address:wireless MAC address
Wire MAC address:wire MAC address
WiFi Information:
WiFi Mode:Access Point/WiFi Station/Concurrent AP-Station Mode
SSID:Current SSID or the connected WiFi AP name.
Connection Status:
Projecting status: “Waiting for projecting” or “Projecting”
Total Users: It shows how many users login to wePresent WiPG-2000.
Code: It will show current Code
Date and Time:
Date: Current date.
Time: Current time.
Time Zone: Current Time zone.
Page 55
55
10.6 Device Setup
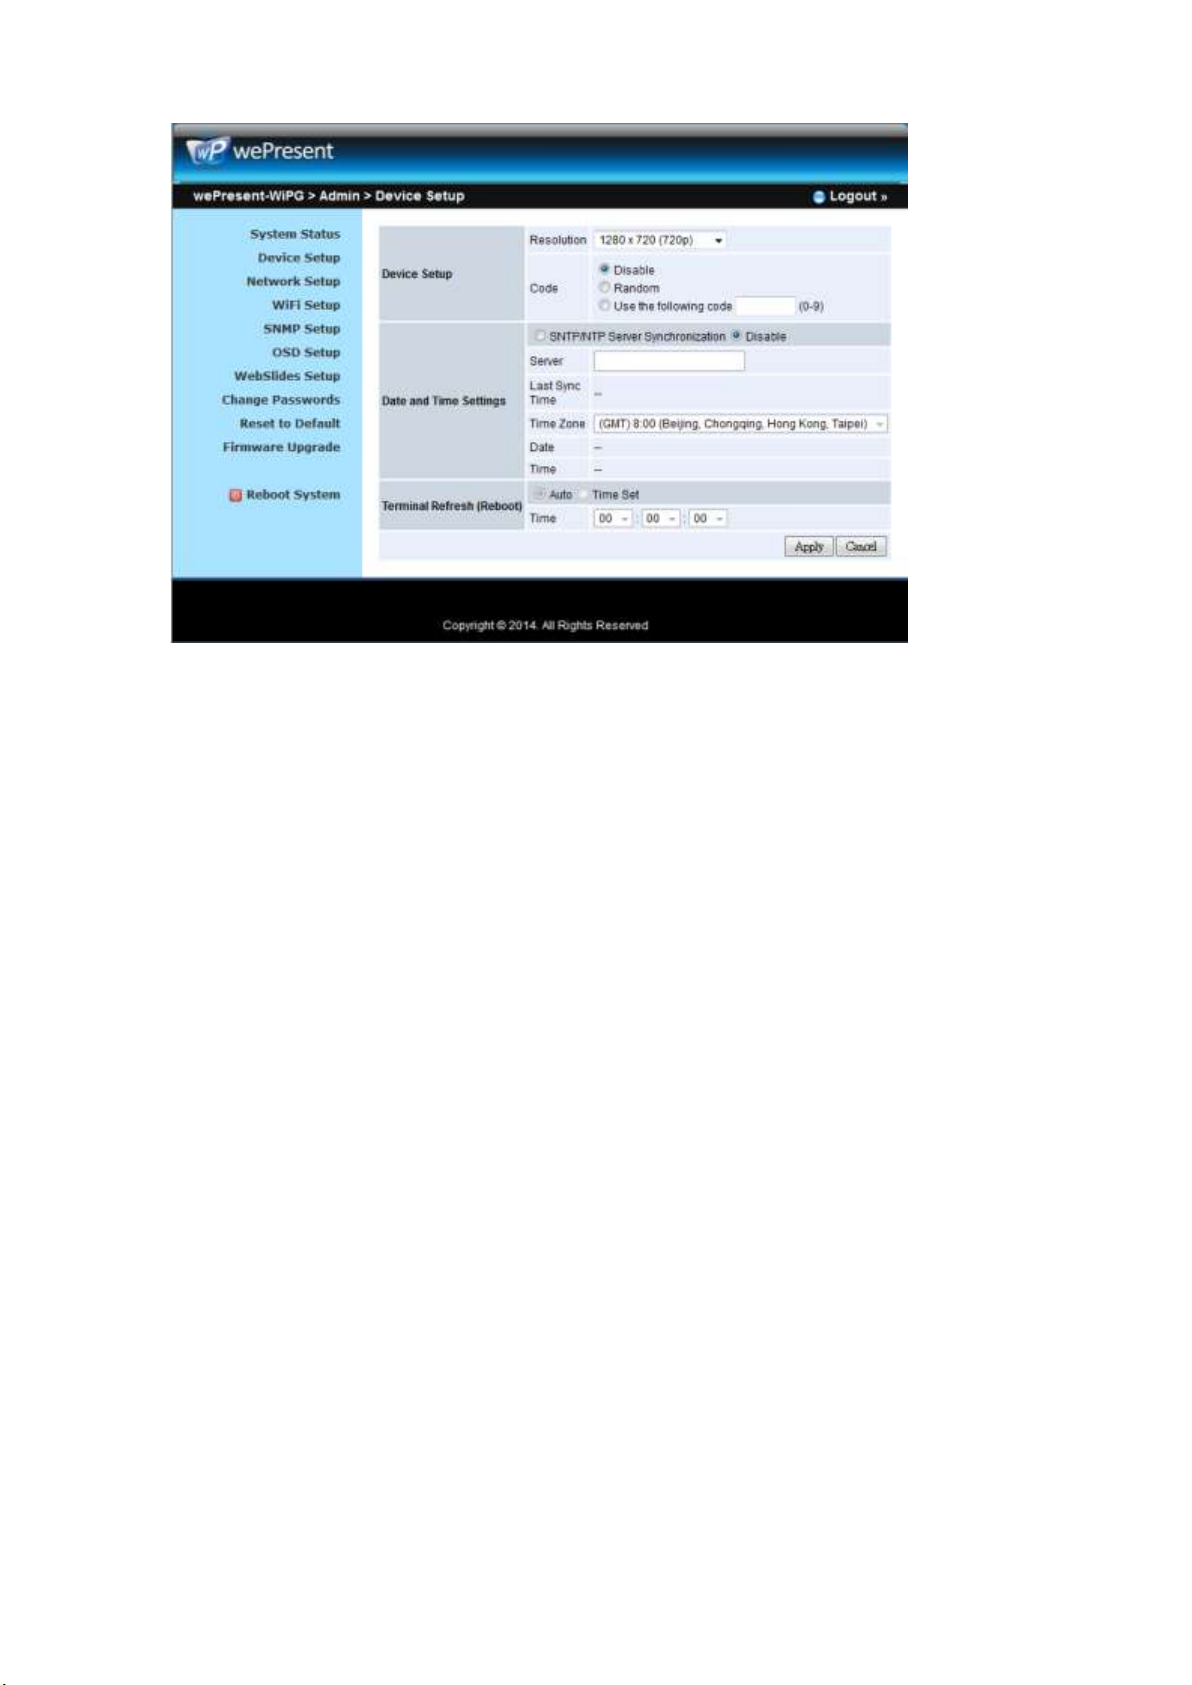
1) Click on “Device Setup” option, it will show the device setting items,
Choose <VGA> or <HDMI> output option
<Resolution>:
VGA: UXGA(1600*1500), WXGA+(1440*900), WXGA(1360*768, 1280x768,
1280x800) ,XGA(1024*768), and SVGA(800*600). The default value is
XGA(1024*768).
HDMI: 720p, 1080i, 1080p
<Code>: You can select “Disable”, “Random”, or “Use the following code” to
set a specified 4-characters Number.
2) Click on “Date and Time Settings” option, it will show the time setting items,
Choose <SNTP/NTP Server Synchronization> or <Disable> to specify the
time server or disable this feature.
<Time Zone>: Specify the time zone.
Page 56
56
10.7 Network Setup
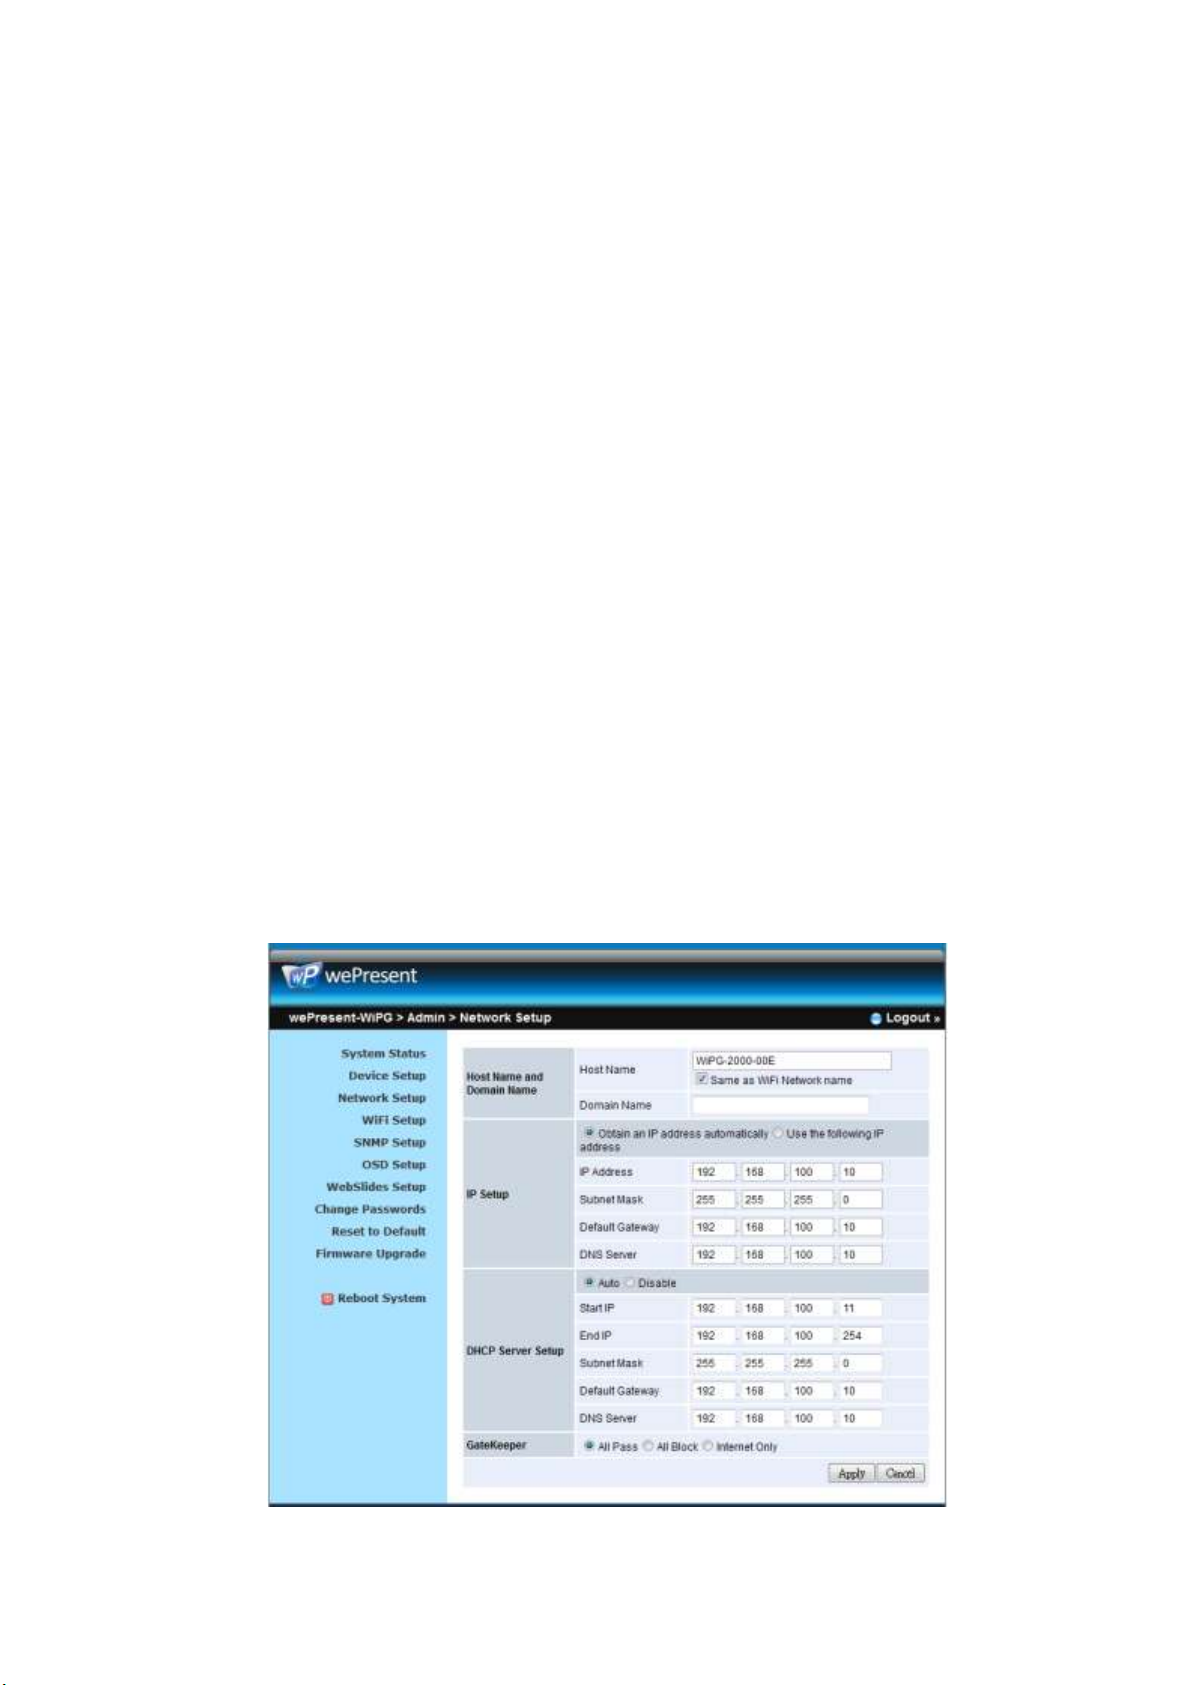
1) Click on “Network Setup” option, it will show the network setting items,
< Host Name and Domain Name>
Host Name: Enter the hostname of this device.
Note: You can enable the “use the same name as network name”, it will use
the same name as SSID for the device host name.
Domain Name: You can also enter the domain name of this device if there is
DNS server available.
< IP Setup>
You can select “obtain IP address automatically” or “Use the following IP
address” to enter the IP address.
The default setting is as following:
IP Address: 192.168.100.10.
Subnet Mask: 255.255.255.0
Default Gateway: 192.168.100.10
DNS Server: 192.168.100.10
<DHCP Server Setup>
<Note: Auto-Configuration Network Setup on WiPG-2000>
The default setting of the wePresent WiPG-2000 box as DHCP server. When the
wePresent WiPG-2000 box is connected to a LAN that already has a DHCP server, the
wePresent WiPG-2000 box uses an IP address assigned by the server. When the
wePresent WiPG-2000 box is connected to a LAN that does not have a DHCP server,
the wePresent WiPG-2000 box becomes the DHCP server in the network.
Page 57
57
You can select “auto” option. WiPG-2000 will auto disable the DHCP server
setup when the existing DHCP server is detected. Or you can simply select
“Disable” option. When you choose “Auto” option, you can enter the below
information or keep it as default setting.
Start IP: 192.168.100.11
End IP: 192.168.100.254
Subnet Mask: 255.255.255.0
Default Gateway: 192.168.100.10
DNS Server: 192.168.100.10
< Gatekeeper>
Gatekeeper is designed for ensuring the enterprise network security within
wePresent WiPG-2000 box
“All Block” can block Guest Users(through wireless) to access all office
network(LAN),
“All Pass” can allow Guest Users(through wireless) to access all office
network
“Internet Only” can block Guest Users (through wireless) from office network
(LAN) but still reserve internet connection capability.
<Apply >: Press “Apply” button after configuration, and follow the reboot instruction
when applicable.
<Cancel>: Press button to abort action.
Page 58
58
10.8 WiFi Setup
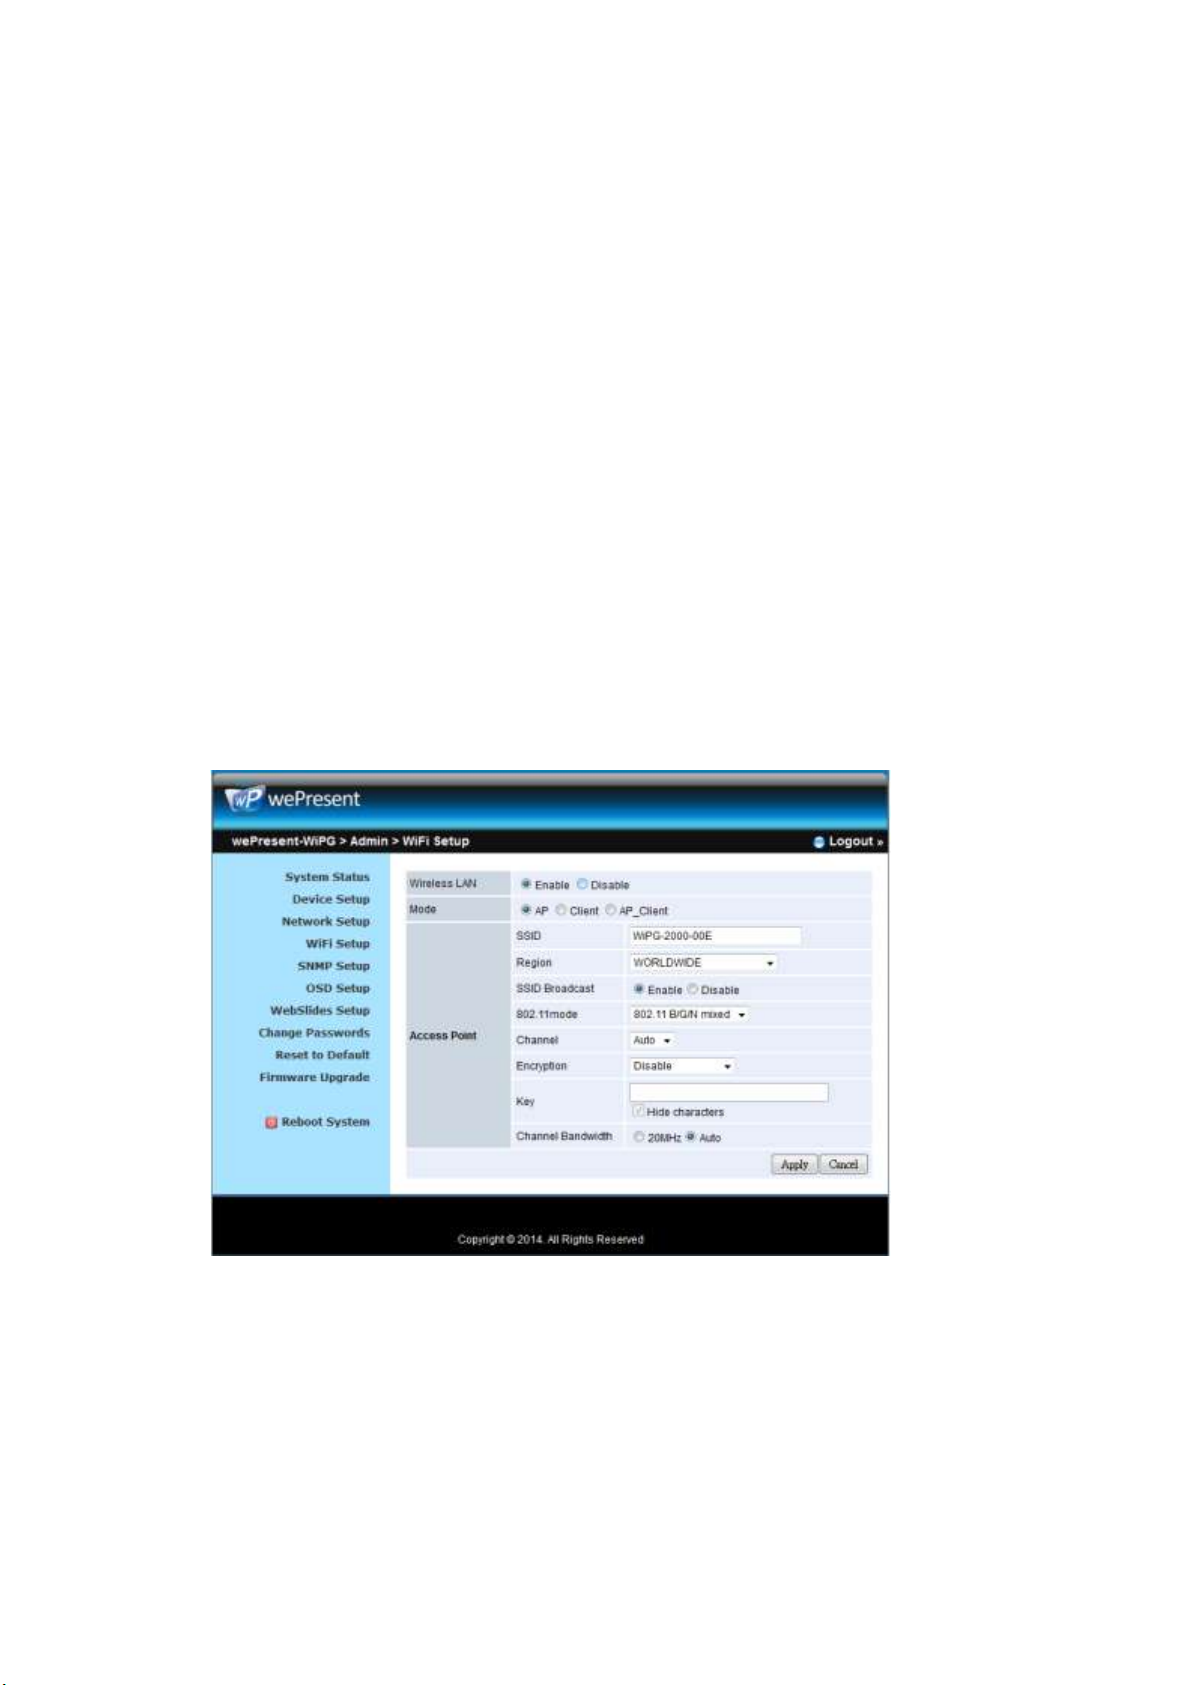
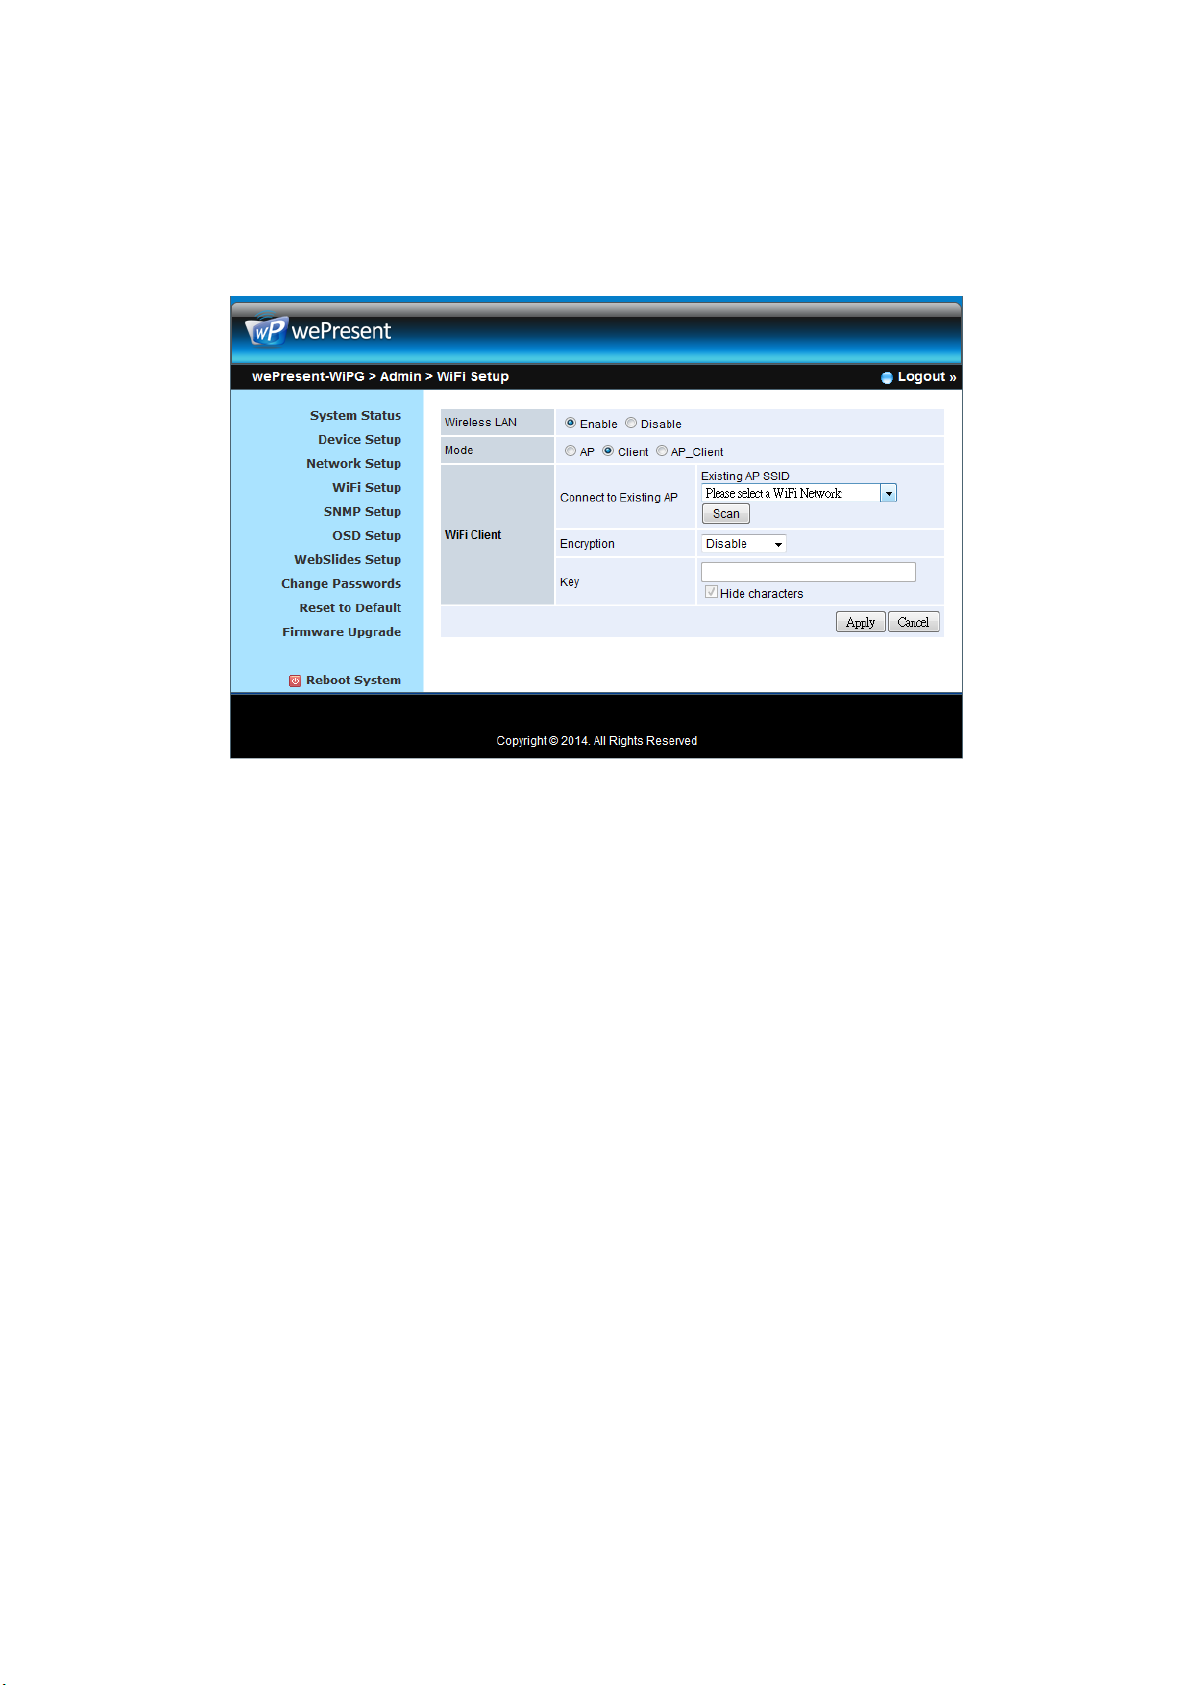
Wireless LAN: The default setting is “Enable”
Mode: Specify the WiFi Access Point mode, WiFi Station mode and
Concurrent AP and Station Mode.
< Access Point Mode>
SSID: You can change the default SSID and the maximum Length is 32 bytes.
SSID Broadcast: The default value is “Enable”
Channel: You can set a fixed channel or allow auto selection. The “Auto”
selection means after power on wePresent WiPG-2000, it will scan all of
wireless channels and select one clear channel automatically.
Encryption: you can select “Disable” or one of WEP/WPA PSK/WPA2 PSK/ WPA
Enterprise/ WPA2 Enterprise.
Key: If Encryption is enabled, you have to enter a key according to the
encryption mode you selected. (If the length of the key entered is not
sufficient or too long, a warning message will pop up.)
Channel Bandwidth: select from 20M or Auto (20M/40M)
< Station Mode>
Connect to Existing AP: The default setting is “Disable”. If you choose “Enbale”
you need to enter the existing AP SSID that you want to connect. When you
select “Enable” option, the following information needs to be entered
accordingly to the existing AP setting:
Encryption: Select “Disable” or one of WEP/WPA PSK/WPA2 PSK/ WPA
Enterprise/ WPA2 Enterprise.
Page 59
59
Key: If Encryption is enabled, you have to enter a key according to the
encryption mode you selected. (If the length of the key entered is not
sufficient or too long, a warning message will pop up.)
Note: The Encryption and Key information must be consistent to the exiting
AP configuration.
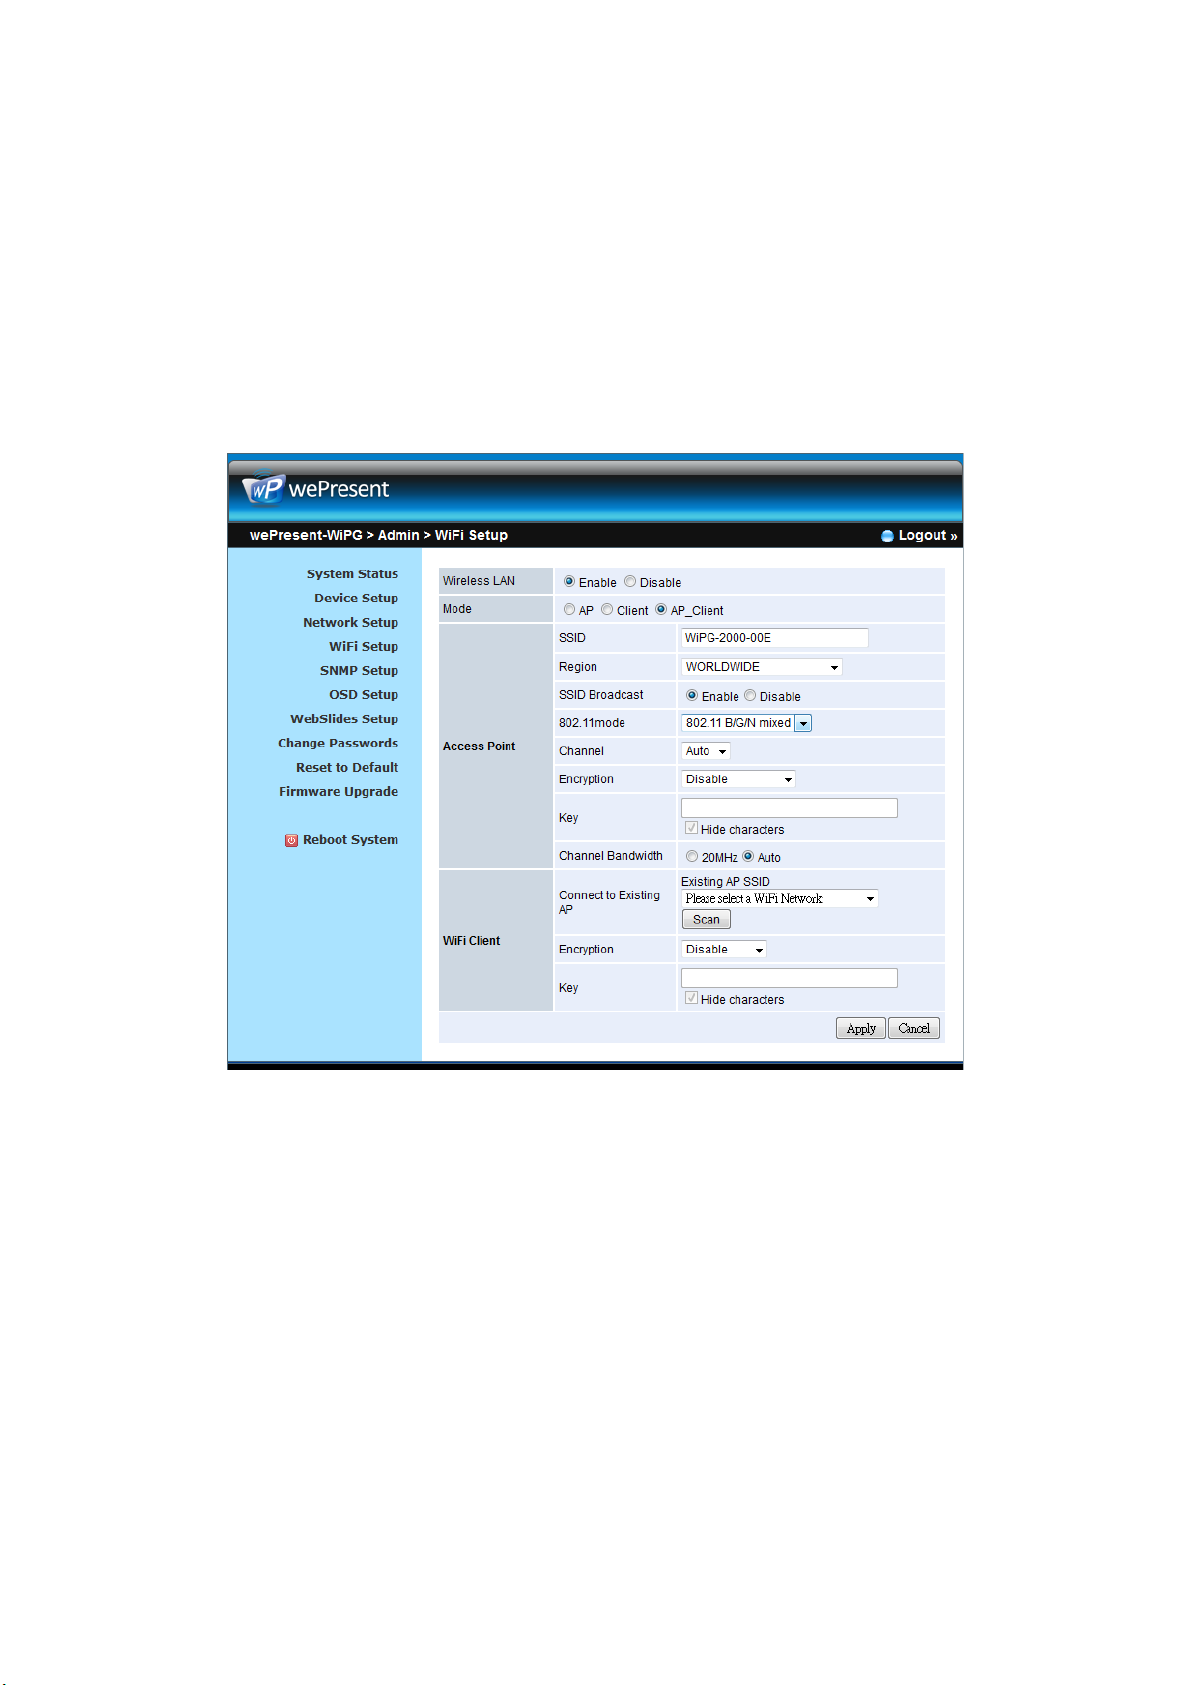
< Concurrent AP and Station Mode>
Access Point
SSID: You can change the default SSID and the maximum Length is 32 bytes.
SSID Broadcast: The default value is “Enable”
Channel: You can set a fixed channel or allow auto selection. The “Auto”
selection means after power on wePresent WiPG-2000, it will scan all of
wireless channels and select one clear channel automatically.
Encryption: you can select “Disable” or one of WEP/WPA PSK/WPA2 PSK/ WPA
Enterprise/ WPA2 Enterprise.
Key: If Encryption is enabled, you have to enter a key according to the
encryption mode you selected. (If the length of the key entered is not
sufficient or too long, a warning message will pop up.)
Channel Bandwidth: select from 20M or Auto (20M/40M)
WiFi Station:
Connect to Existing AP: The default setting is “Disable”. If you choose “Enbale”
you need to enter the existing AP SSID that you want to connect. When you
select “Enable” option, the following information needs to be entered
accordingly to the existing AP setting:
Encryption: Select “Disable” or one of WEP/WPA PSK/WPA2 PSK/ WPA
Enterprise/ WPA2 Enterprise.
Key: If Encryption is enabled, you have to enter a key according to the
Page 60
60
encryption mode you selected. (If the length of the key entered is not
sufficient or too long, a warning message will pop up.)
Note: The Encryption and Key information must be consistent to the exiting
AP configuration.
<Apply >: Press “Apply” button after configuration, and follow the reboot instruction
when applicable.
<Cancel>: Press button to abort action.
10.9 SNMP Setup
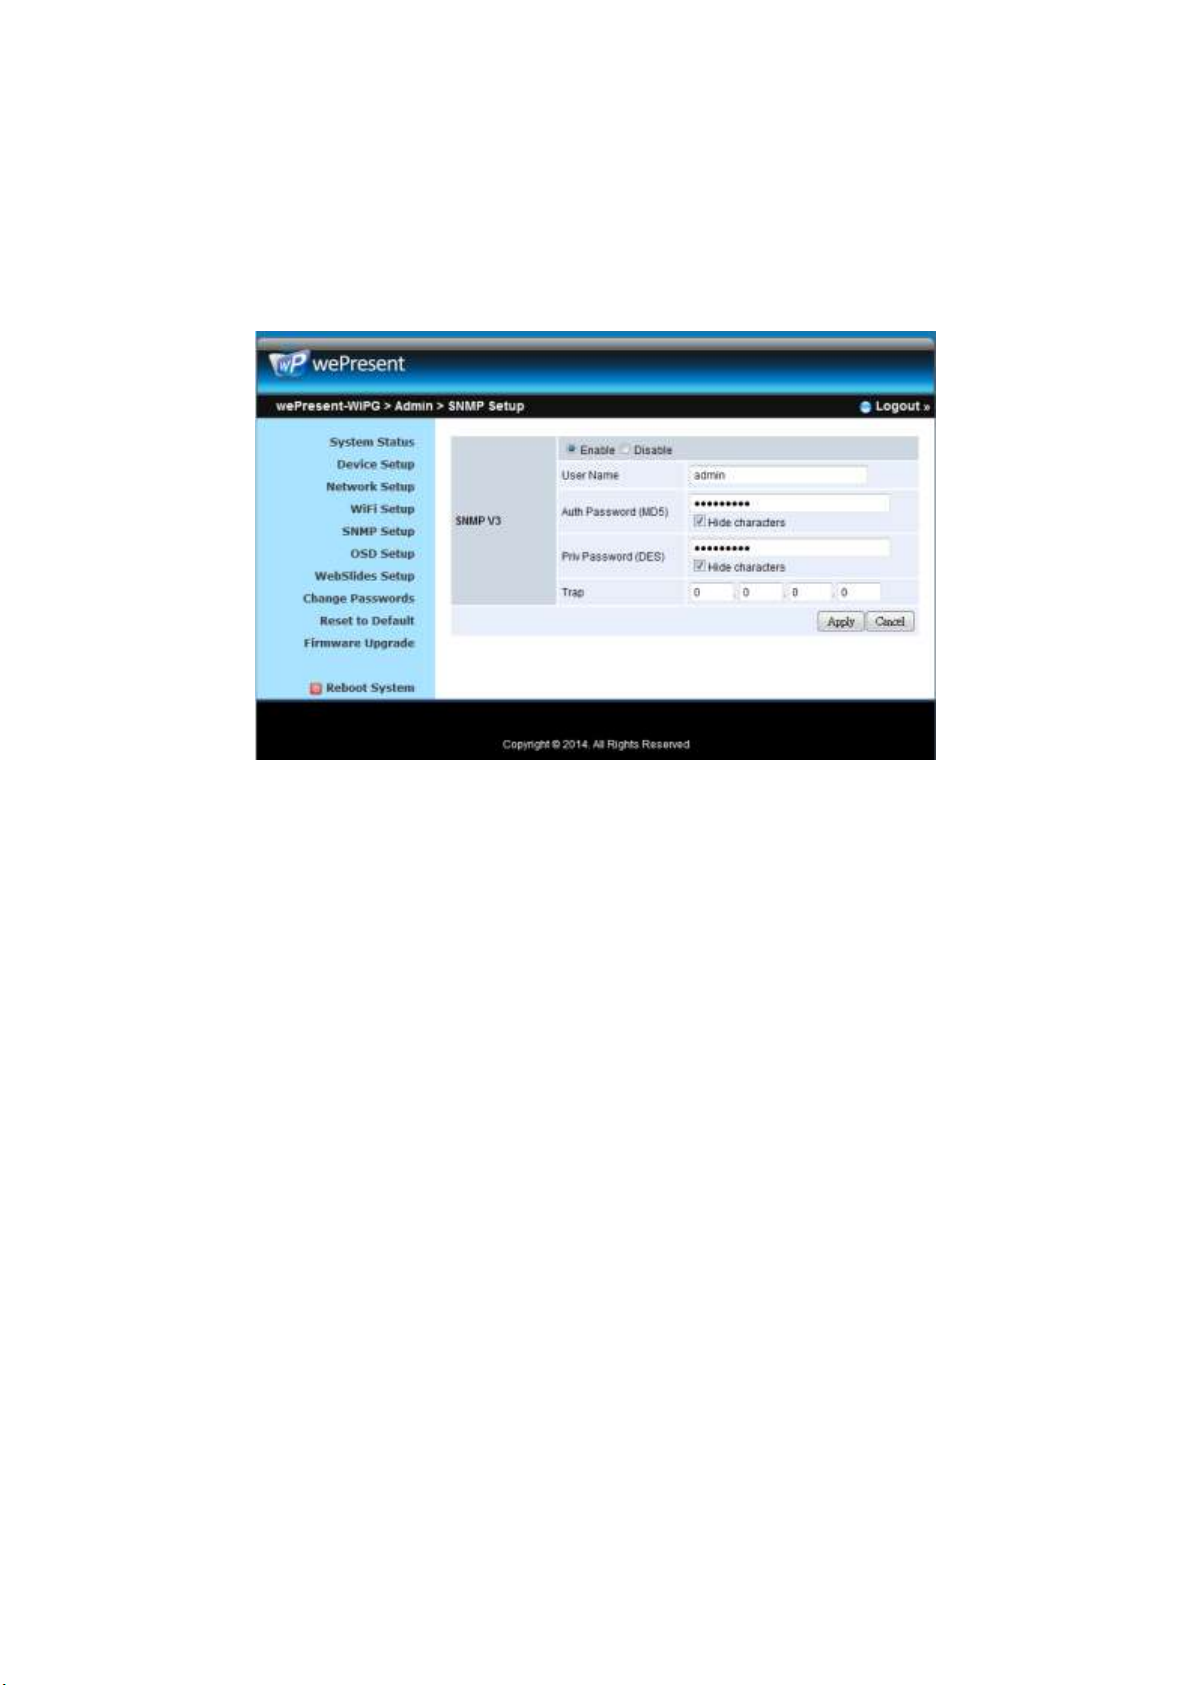
Enable or disable SNMP V3 service
User Name: configure the user name to manage this device through SNMP
Auth Password: configure the Auth password
Priv Password: configure the Priv password
Trap IP: configure the trap receiver IP
<Apply >: Press “Apply” button after configuration, and follow the reboot instruction
when applicable.
Page 61
61
<Cancel>: Press button to abort action.
Note:
For more information about SNMP V3, you can find it on USB token. \User
Manual\WiPG-2000_SNMP Instructions.pdf
10.10 OSD Setup
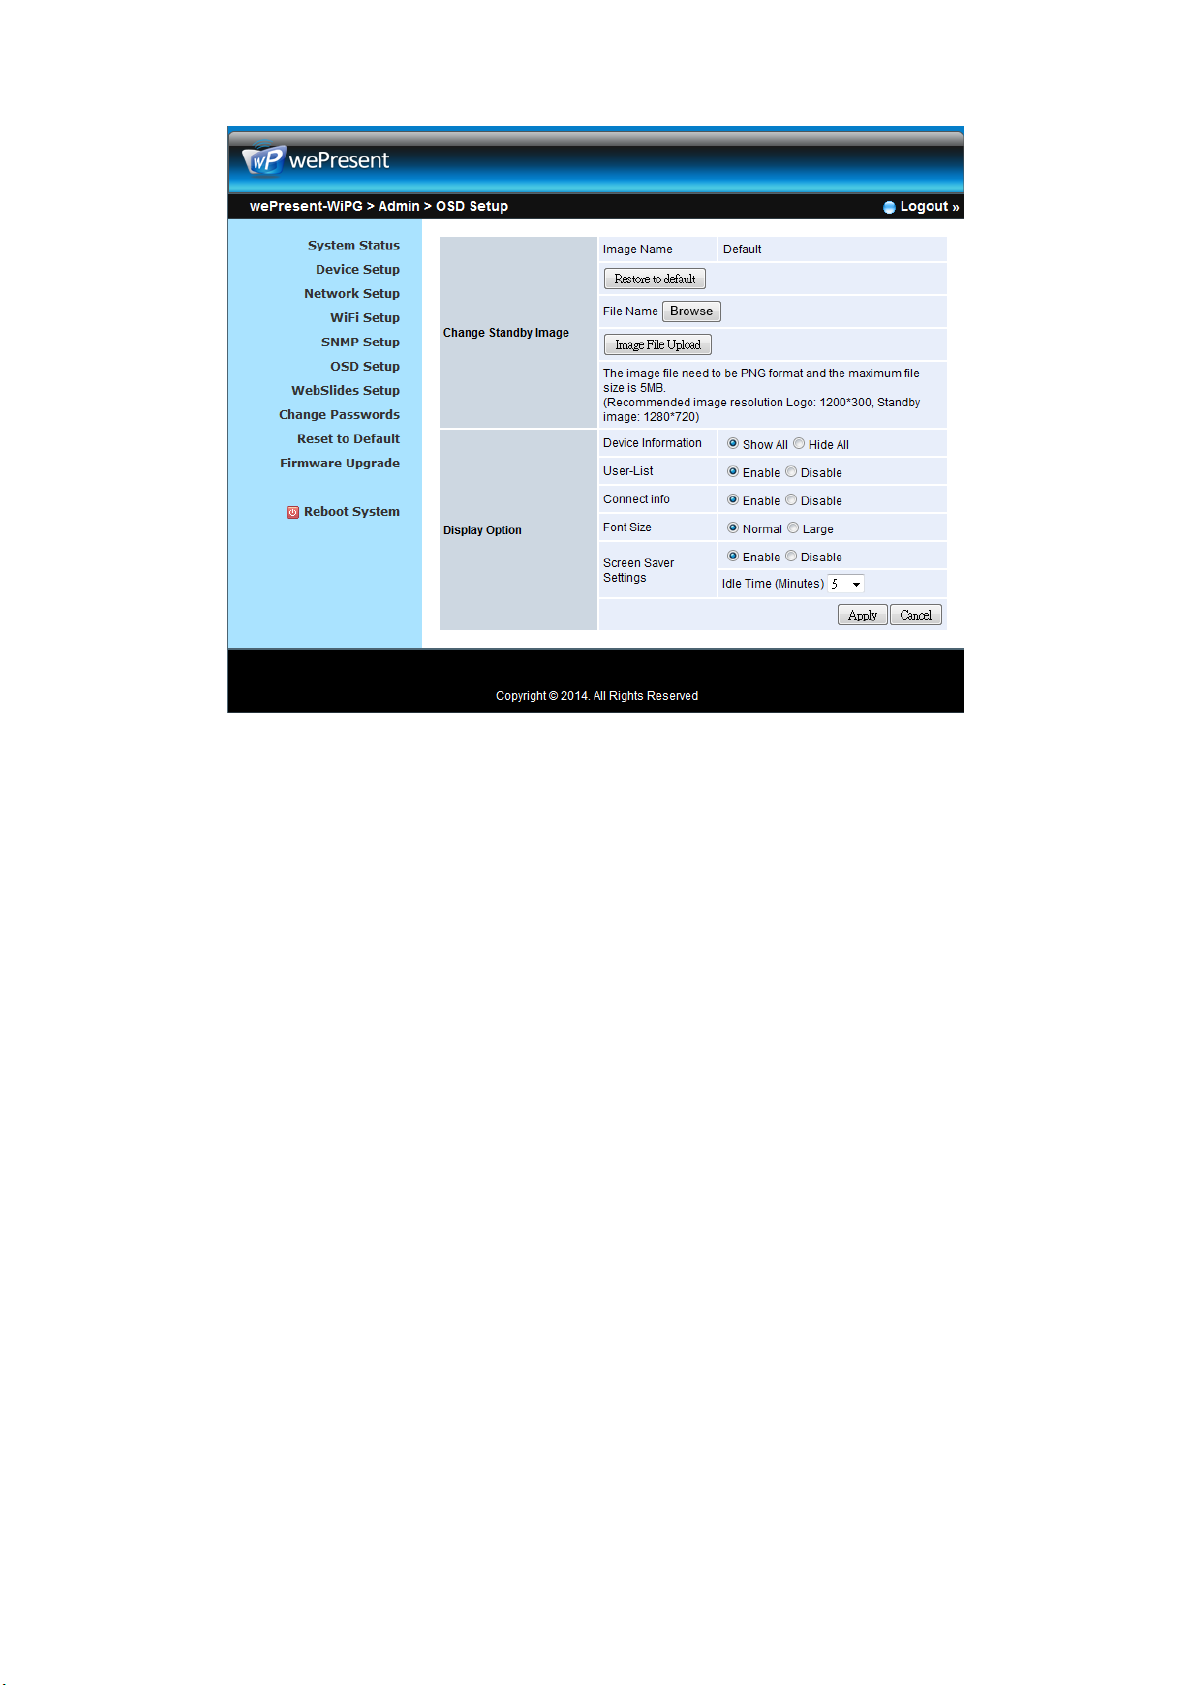
1) Click on “OSD Setup” option, you can:
Change Standby Image
<Reset to default>: Restore to default Logo image.
<Image File Upload>: Enter or browse the file name and upload the
customized Image. Please refer to remark on screen when select the file.
You can also adjust the following “Display Option”
Device Information: Show or Hide the device Info.
User List: Show or hide the User List.
Connection Info: Show or hide the overlay connection info.
Font Size: Adjust the Font size of system information.
Screen Saver Settings: Enable or disable the screen saver and also
configure the idle time(Minutes). (default is 5 mins)
<Apply >: Press “Apply” button after configuration, and follow the reboot instruction
when applicable.
<Cancel>: Press button to abort action.
Page 62
62
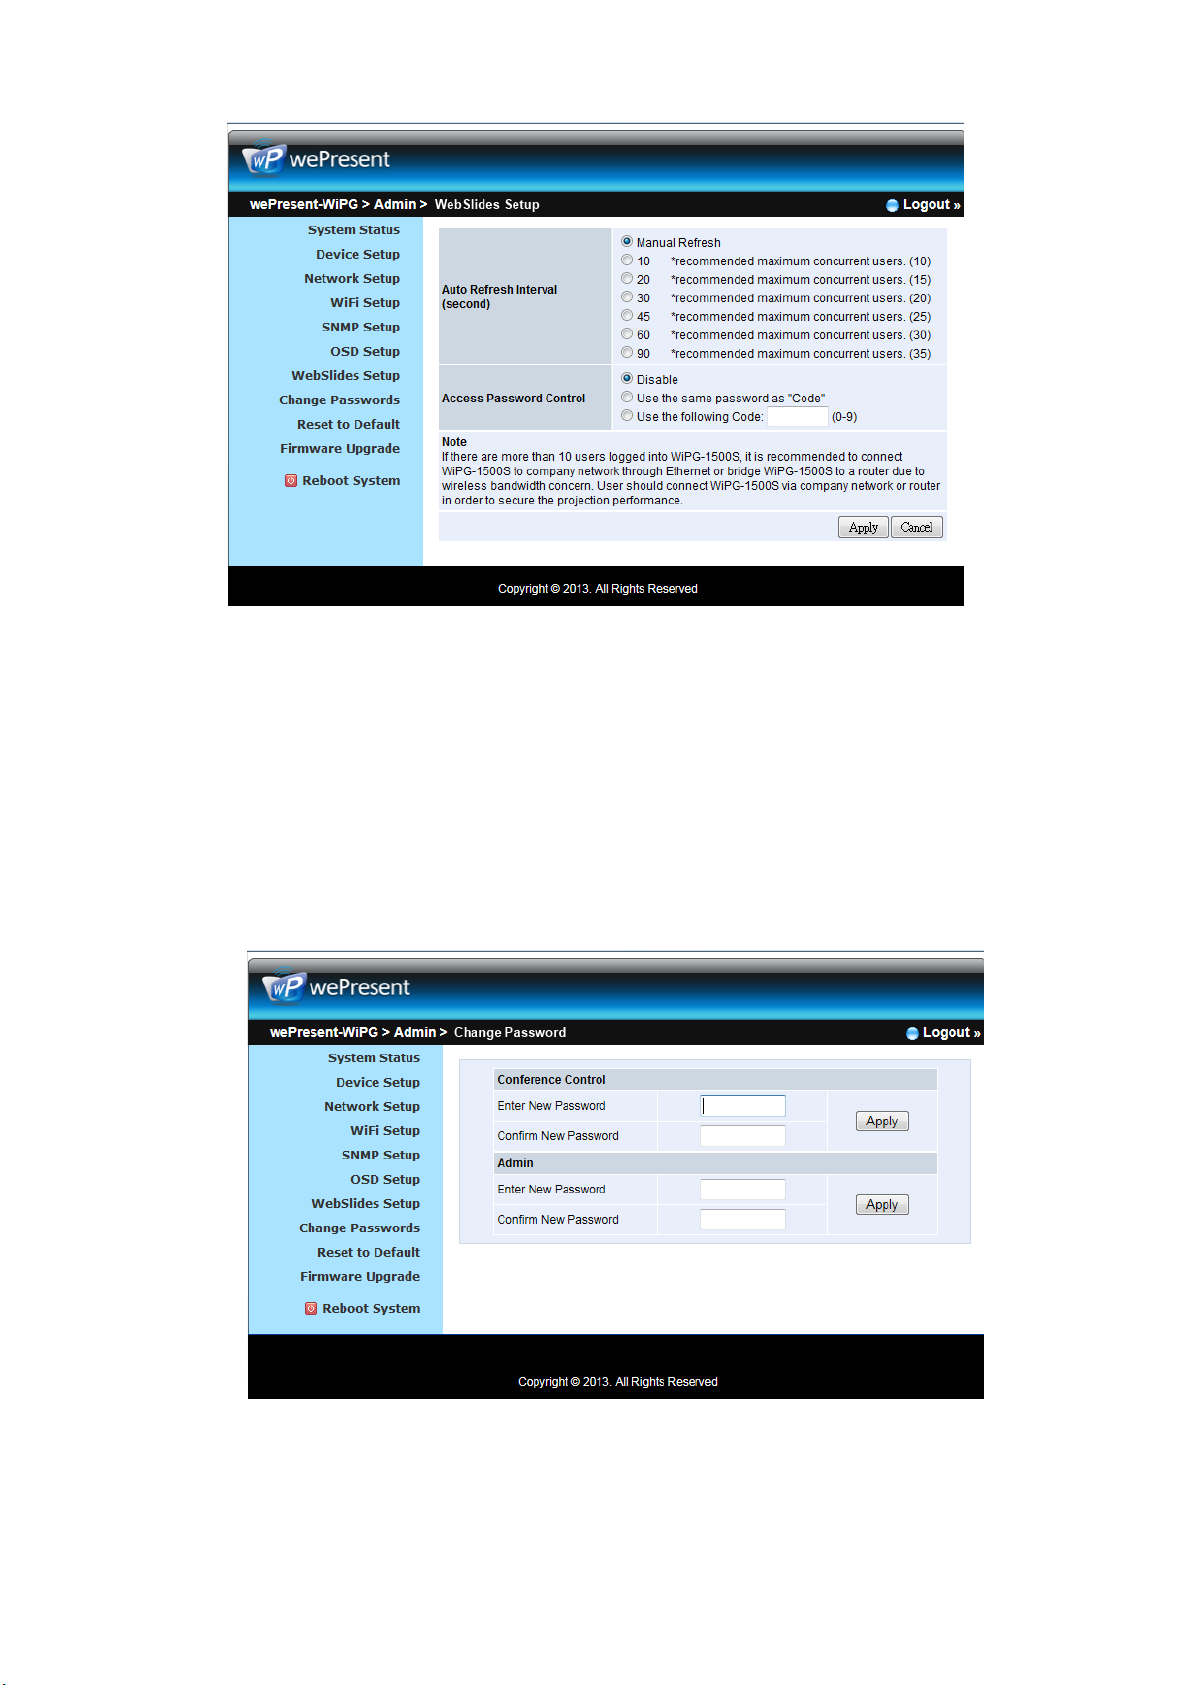
10.11 WebSlides Setup
1) Click on “WebSlides Setup” option, you can:
Adjust Auto ReFresh Interval, or activate “Access Password Control”
Please pay attention on the note for information.
<Apply >: Press “Apply” button after configuration, and follow the reboot instruction
when applicable.
<Cancel>: Press button to abort action.
Page 63
63
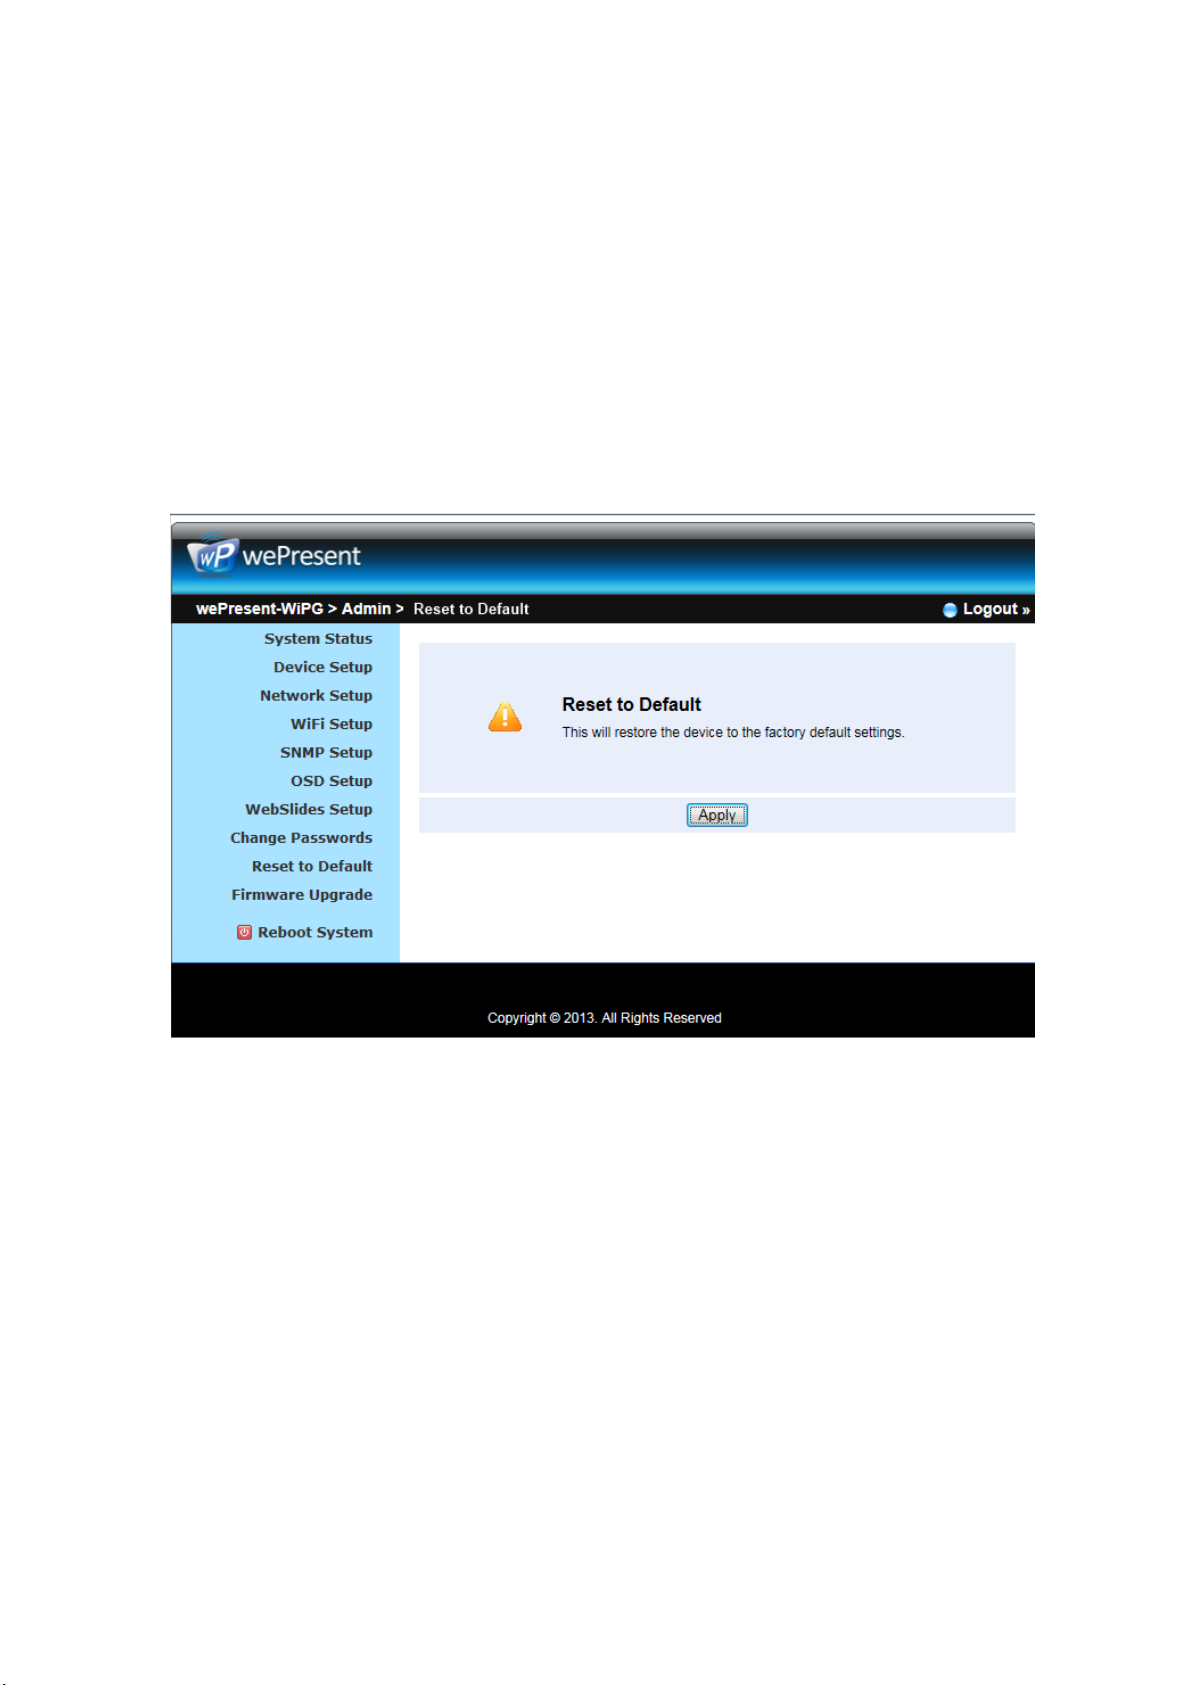
10.12 Change Passwords
1) Click on “Change Password” option, you can change the password setting for
“conference control” and “Admin”.
(Length: up to 8 characters)
<Enter New Password>
<Confirm New Password>
<Apply>: Confirm and Save modifications.
Page 64
64
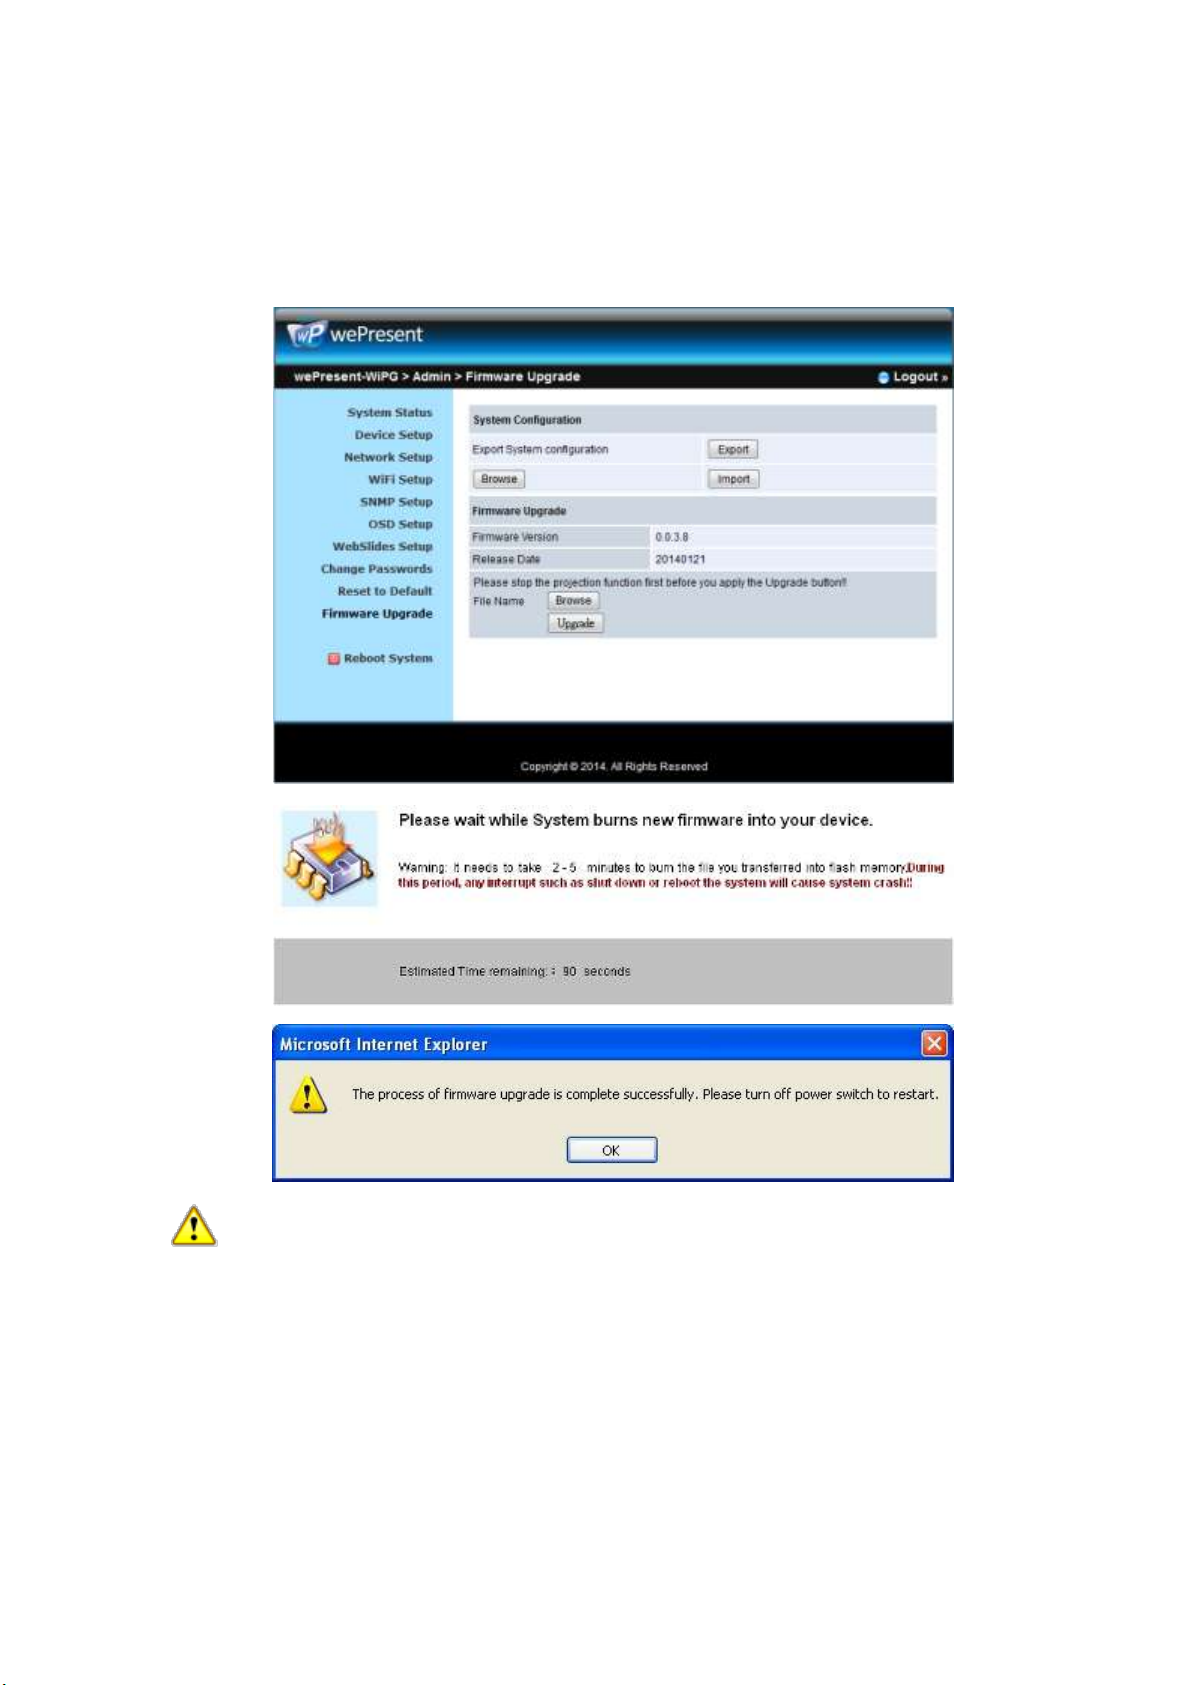
10.13 Reset to Default
1) Click on “Reset to Default” option to restore factory default settings.
<Apply>: Confirm and take action.
*** You can also restore factory default setting from WiPG-2000 box reset button.
You can find the reset button underneath the box. Please follow below procedures.
1. Press [Reset] button and Hold.
2. Turn on wePresent WiPG-2000 box.
3. Press more than 10 seconds and relief [Reset] button.
4. It will take effect to restore factory default settings.
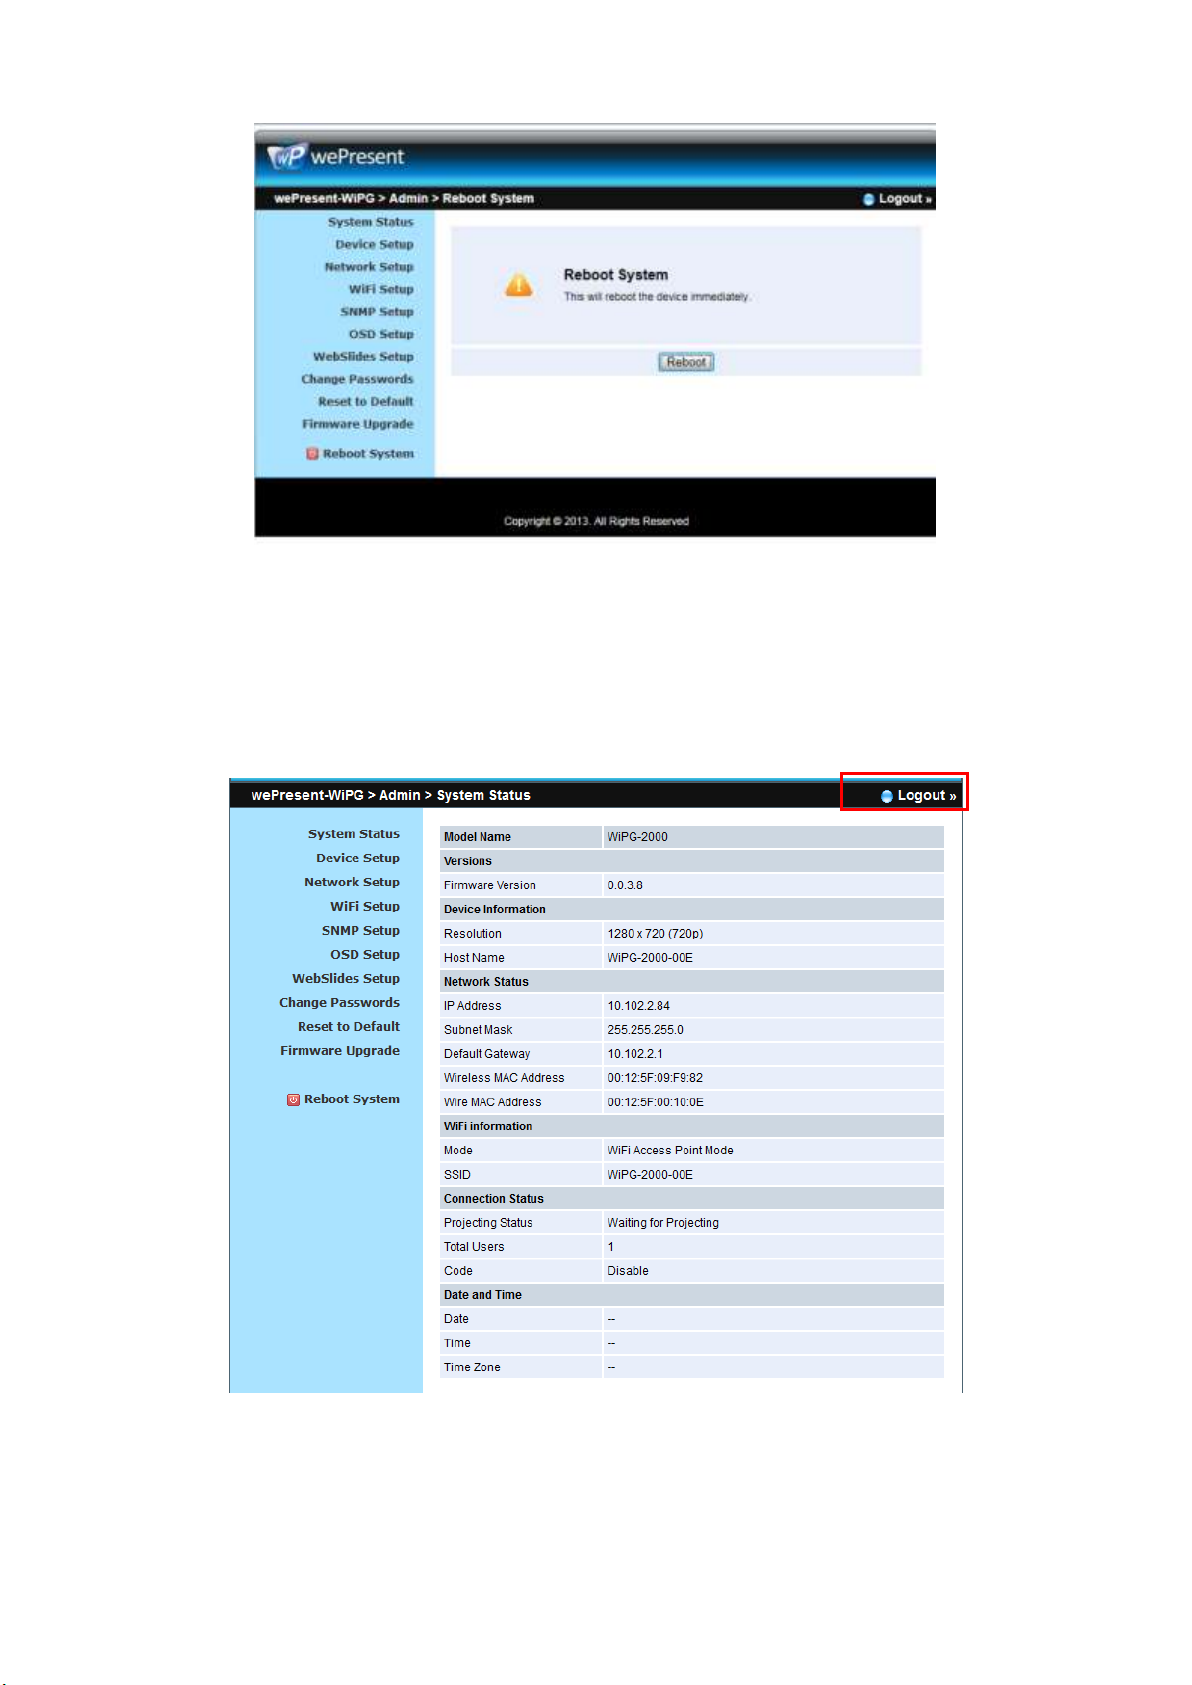
10.14 Firmware Upgrade
1) Click on” Firmware Upgrade” option to “import/export” system configuration and
upgrade firmware.
2) System Configuration Import and Export
Export: Export the system configuration to a configuration file
Import: Import the system configuration file to WiPG-2000
3) You can find the firmware version and release date here.
4) Firmware Upgrade
A. Firstly, you have to get latest firmware image file from your vendor.
Page 65
65
B. Click <Browse> to specify file name you want to upgrade.
C. Click <Upgrade> to start.
D. A warning message shown and count down counter on the screen.
E. After a few minutes, a complete message shown on the screen.
F. Restart wePresent WiPG-2000 box to take effect.
Warning: Don’t power off wePresent WiPG-2000 while firmware upgrade in
progress, otherwise you will damage your box and have to return device to your
vendor for fixing.
10.15 Reboot System
1) Click on “Reboot System” option, you can restart the system
Click on <Reboot >button: reboot system automatically.
Page 66
66
10.16 Logout
1) Click on “logout” on the up right corner, you can logout the administration
webpage and return back to the web management front page.
Page 67
67
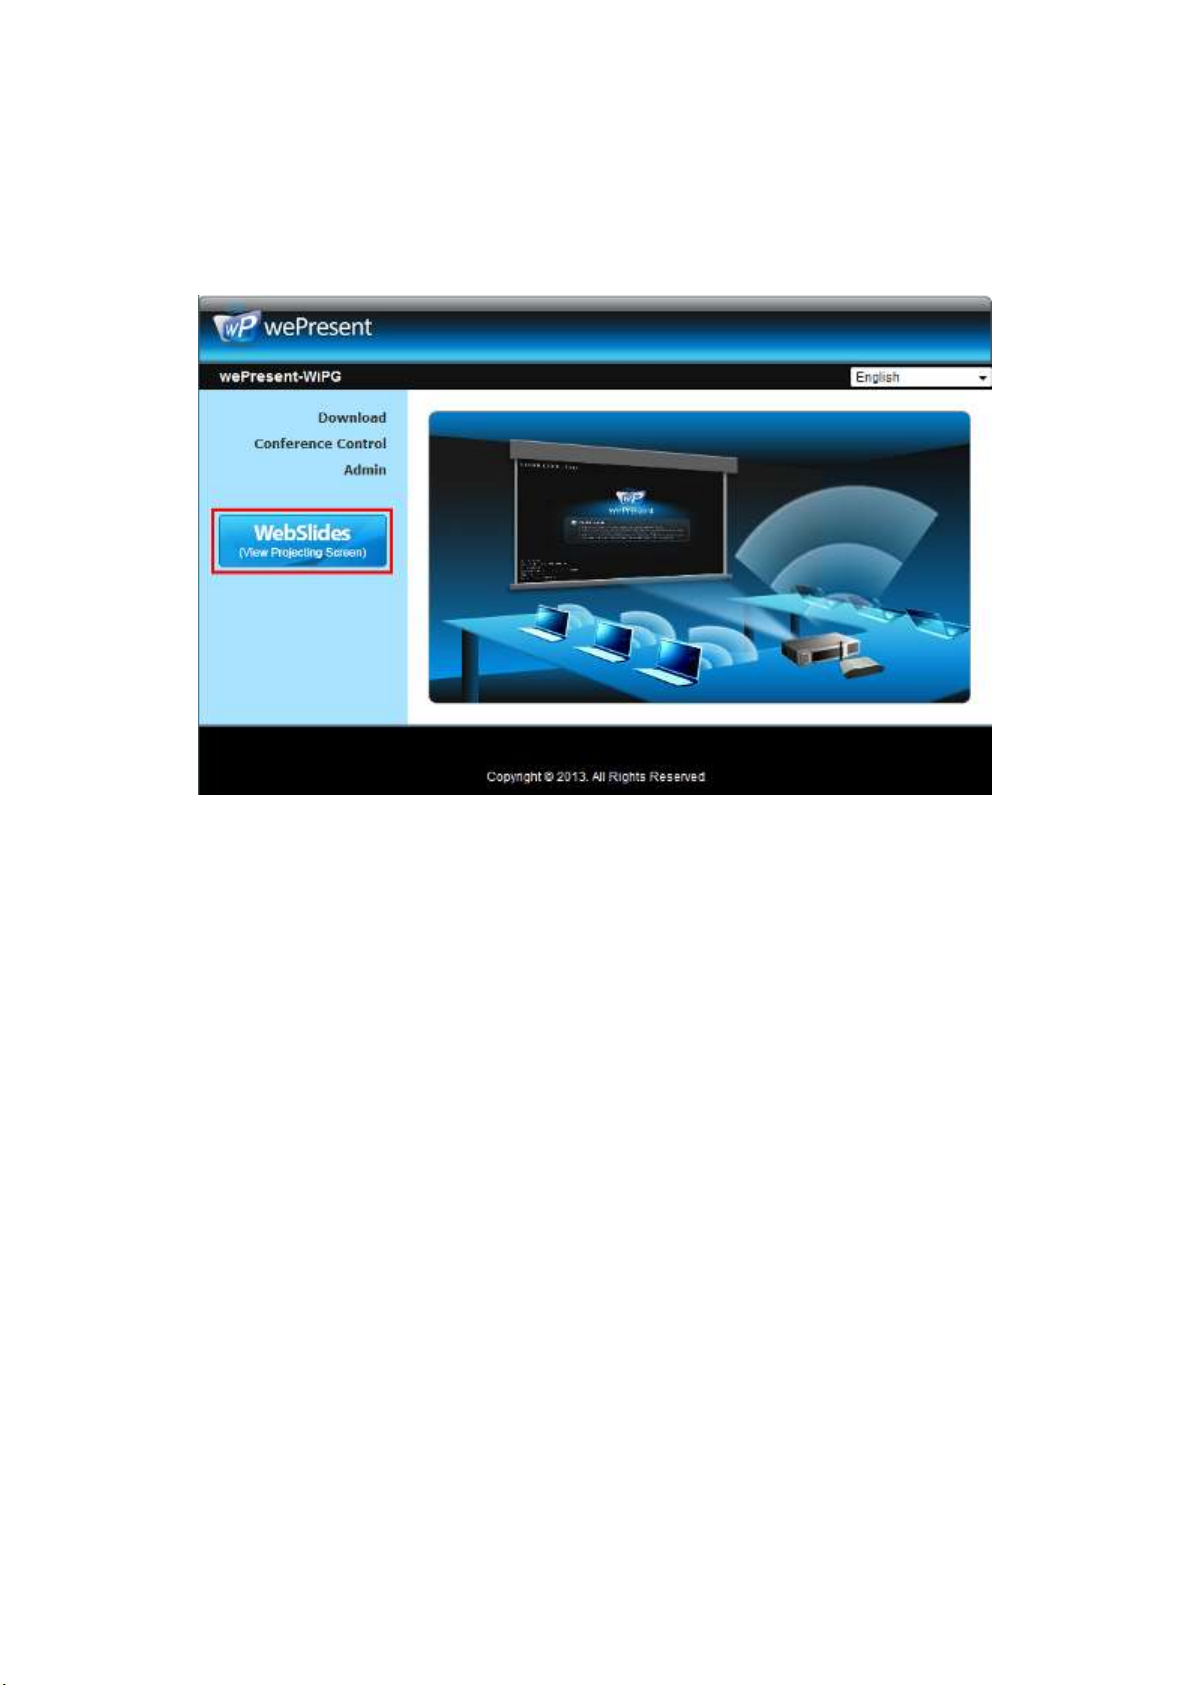
10.17 WebSlides
1) Press the “WebSlides” button to enter the WebSlides page.
2) Please refer to 8.10.5 Launch Webslides for more information.
Page 68
68
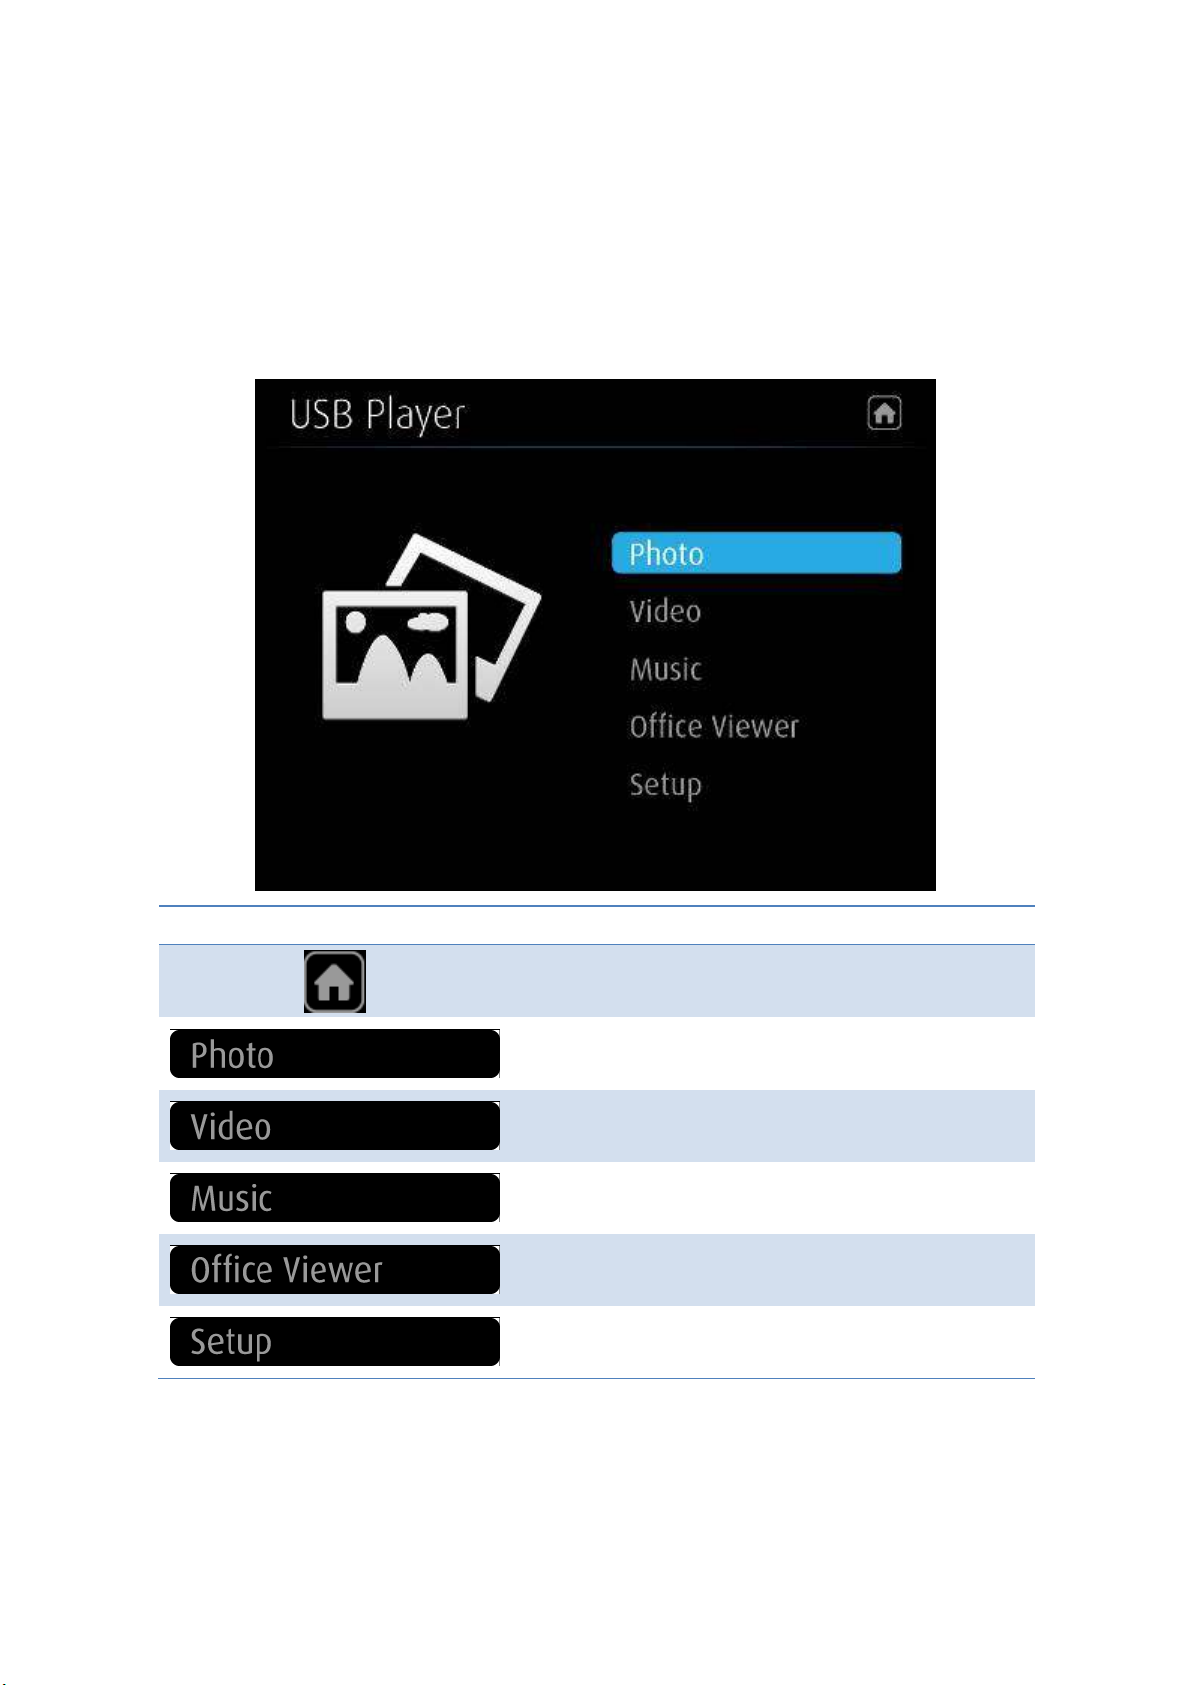
11 USB Player
The USB Player can playback the files stored in the attached USB drive, it can support
photo/video/music/office files.
Button
Description
Switch to Projection mode.
Enter photo viewer function.
Enter video player function.
Enter music player function.
Enter Office Viewer function.
Enter Setup Page.
Page 69
69
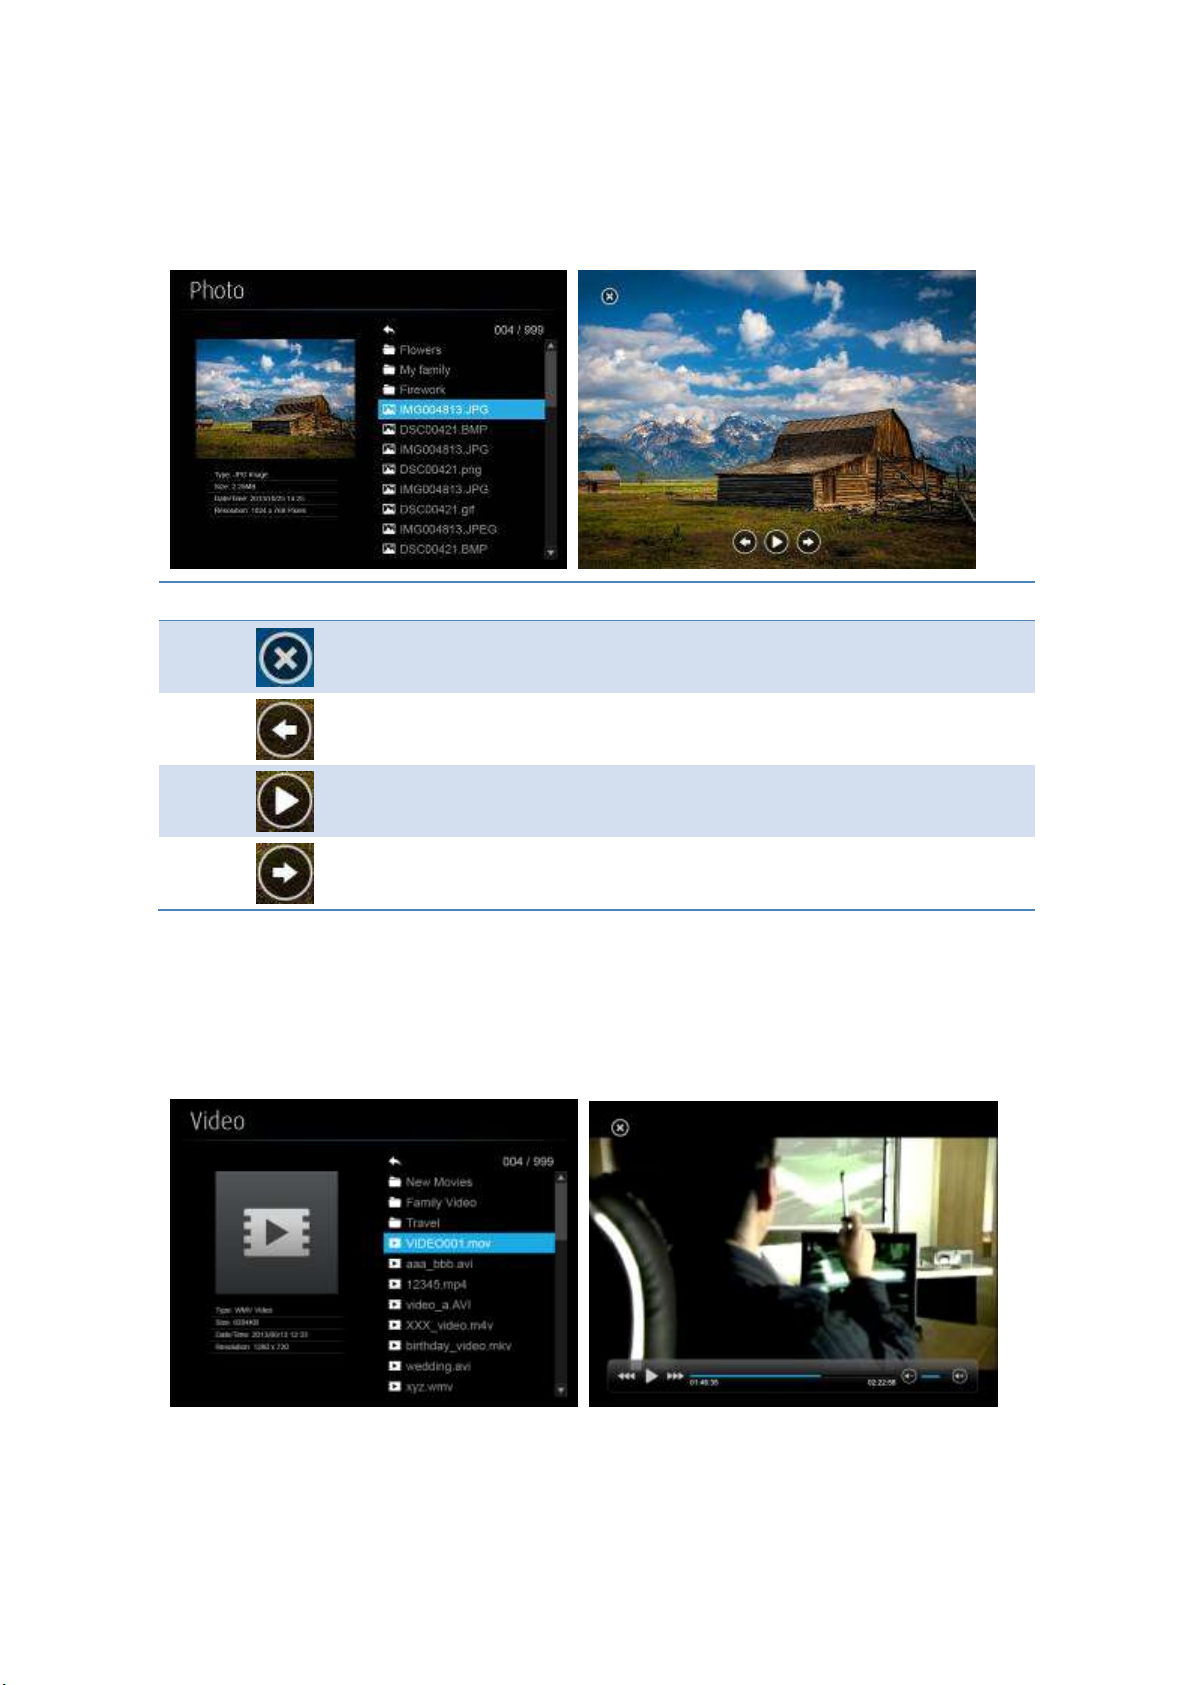
11.1 Photo Viewer
Open the folder and find the photo file to play on the local display.
Button
Description
Exit this file.
Go to previous file.
Start/Pause Slideshow.
Go to next file.
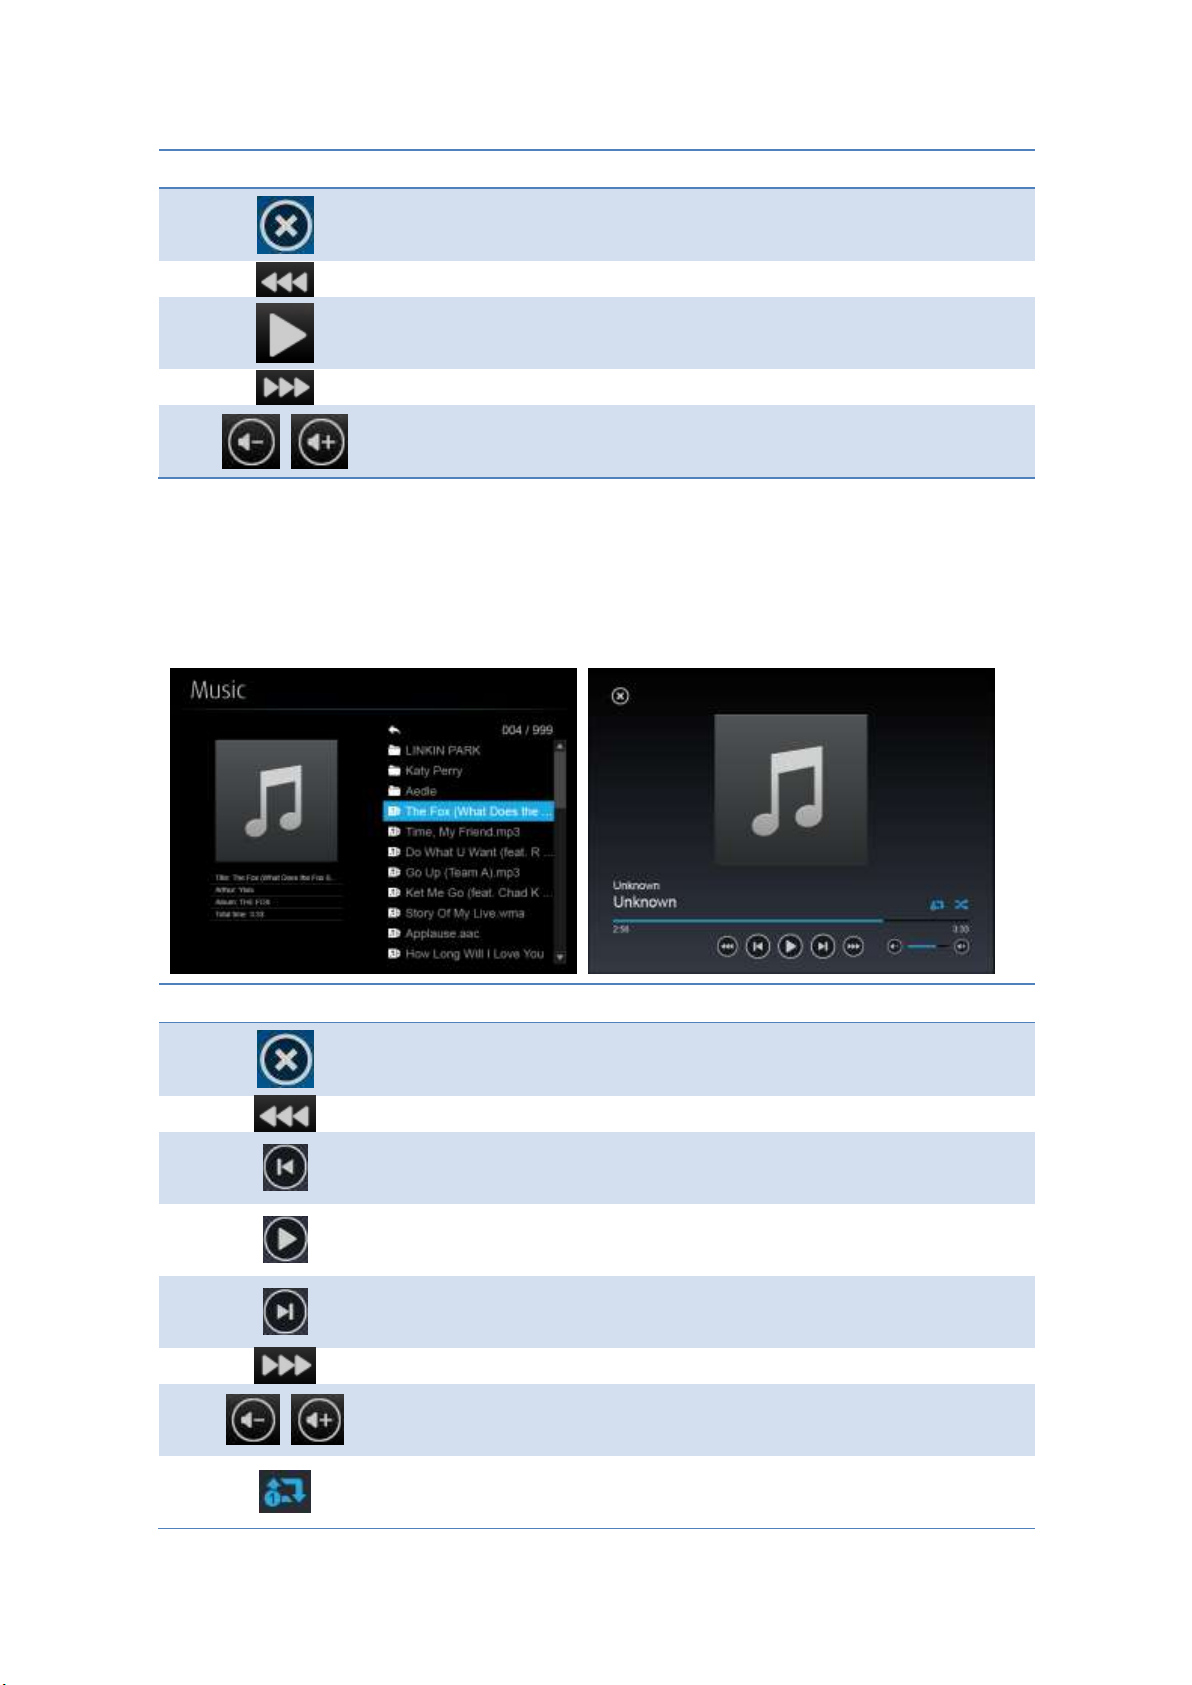
11.2 Video Player
Open the folder and find the video file to play on the local display.
Page 70
70
Button
Description
Exit this file.
Fast-rewind. (2x/4x/8x)
Play/Pause.
Fast-forward. (2x/4x/8x)
Volume level increase/decrease.
11.3 Music Player
Open the folder and find the music file to play on the local display.
Button
Description
Exit this file.
Fast-rewind. (2x/4x/8x)
Go to previous file.
Play/Pause.
Go to next file.
Fast-forward. (2x/4x/8x)
Volume level increase/decrease.
Repeat All files/Repeat Single File
Page 71
71
Shuffle.
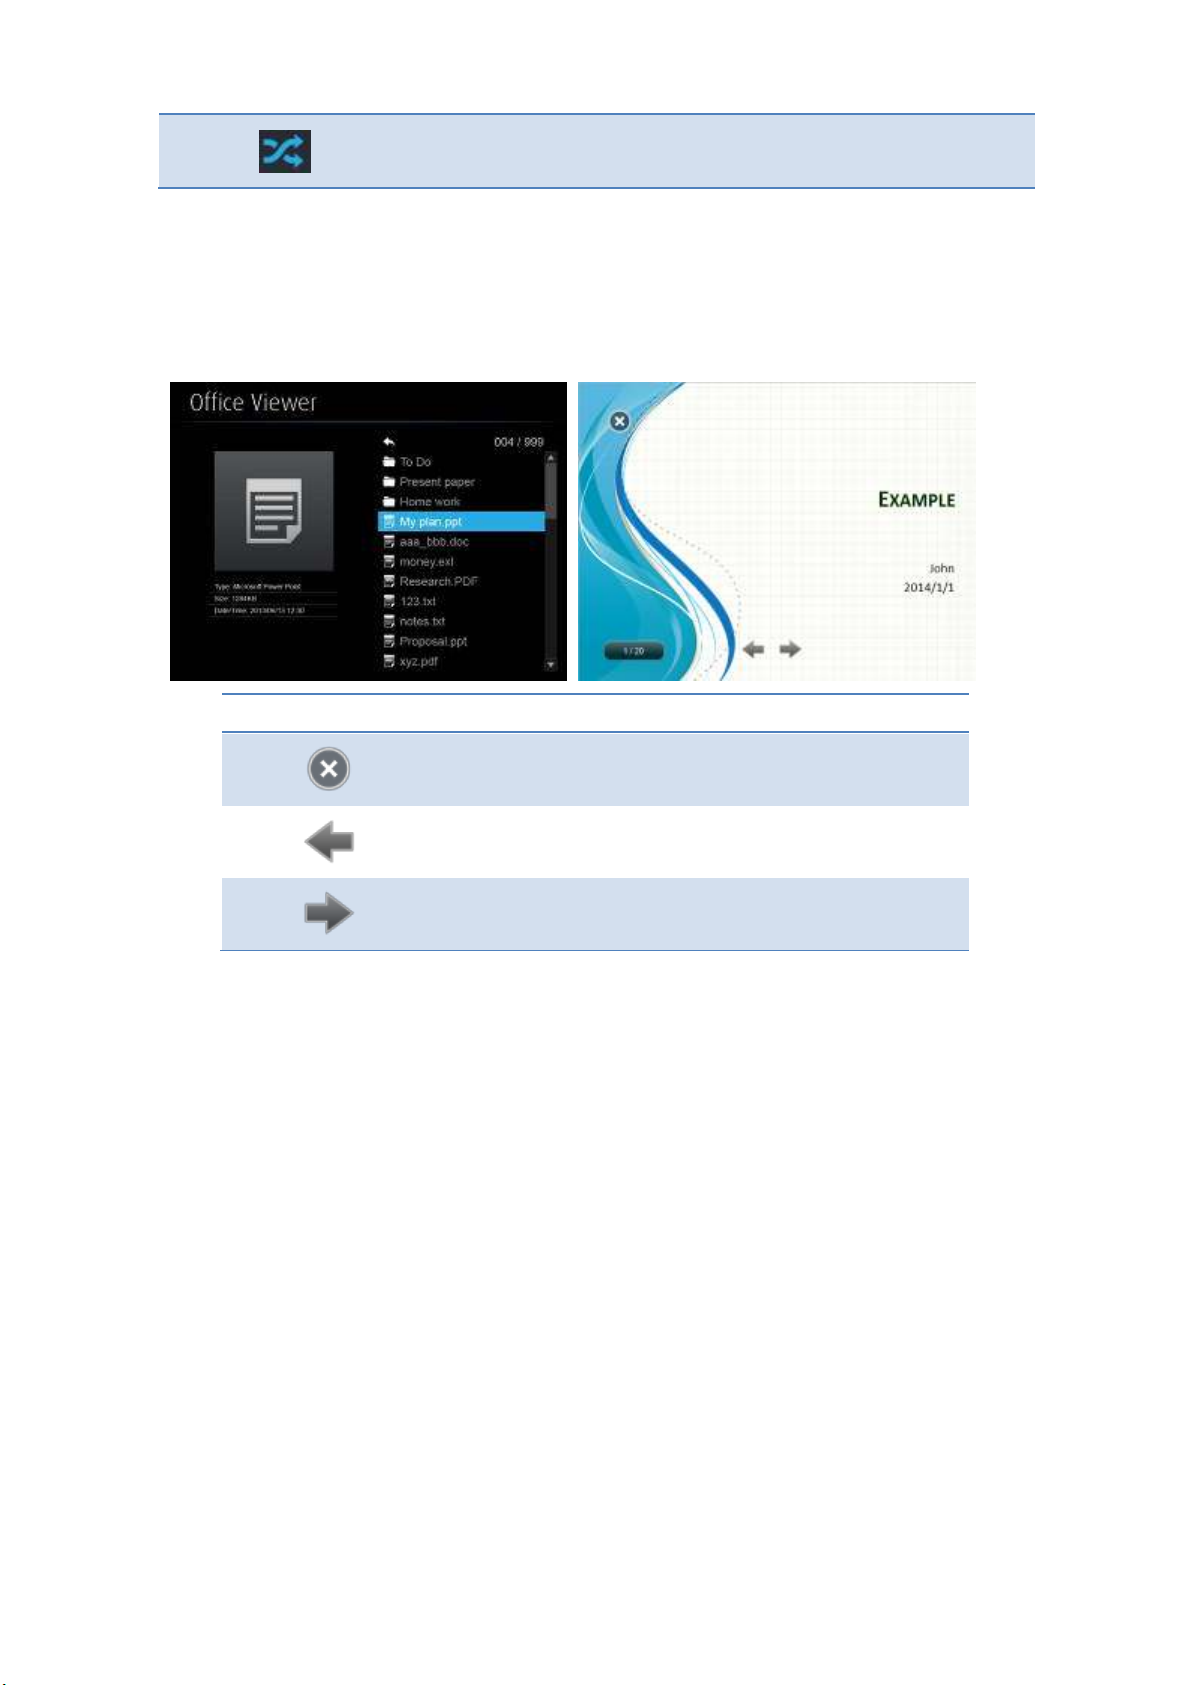
11.4 Office Viewer
Open the folder and find the document file to play on the local display.
Button
Description
Exit this file.
Go to previous page.
Go to next page.
Page 72
72
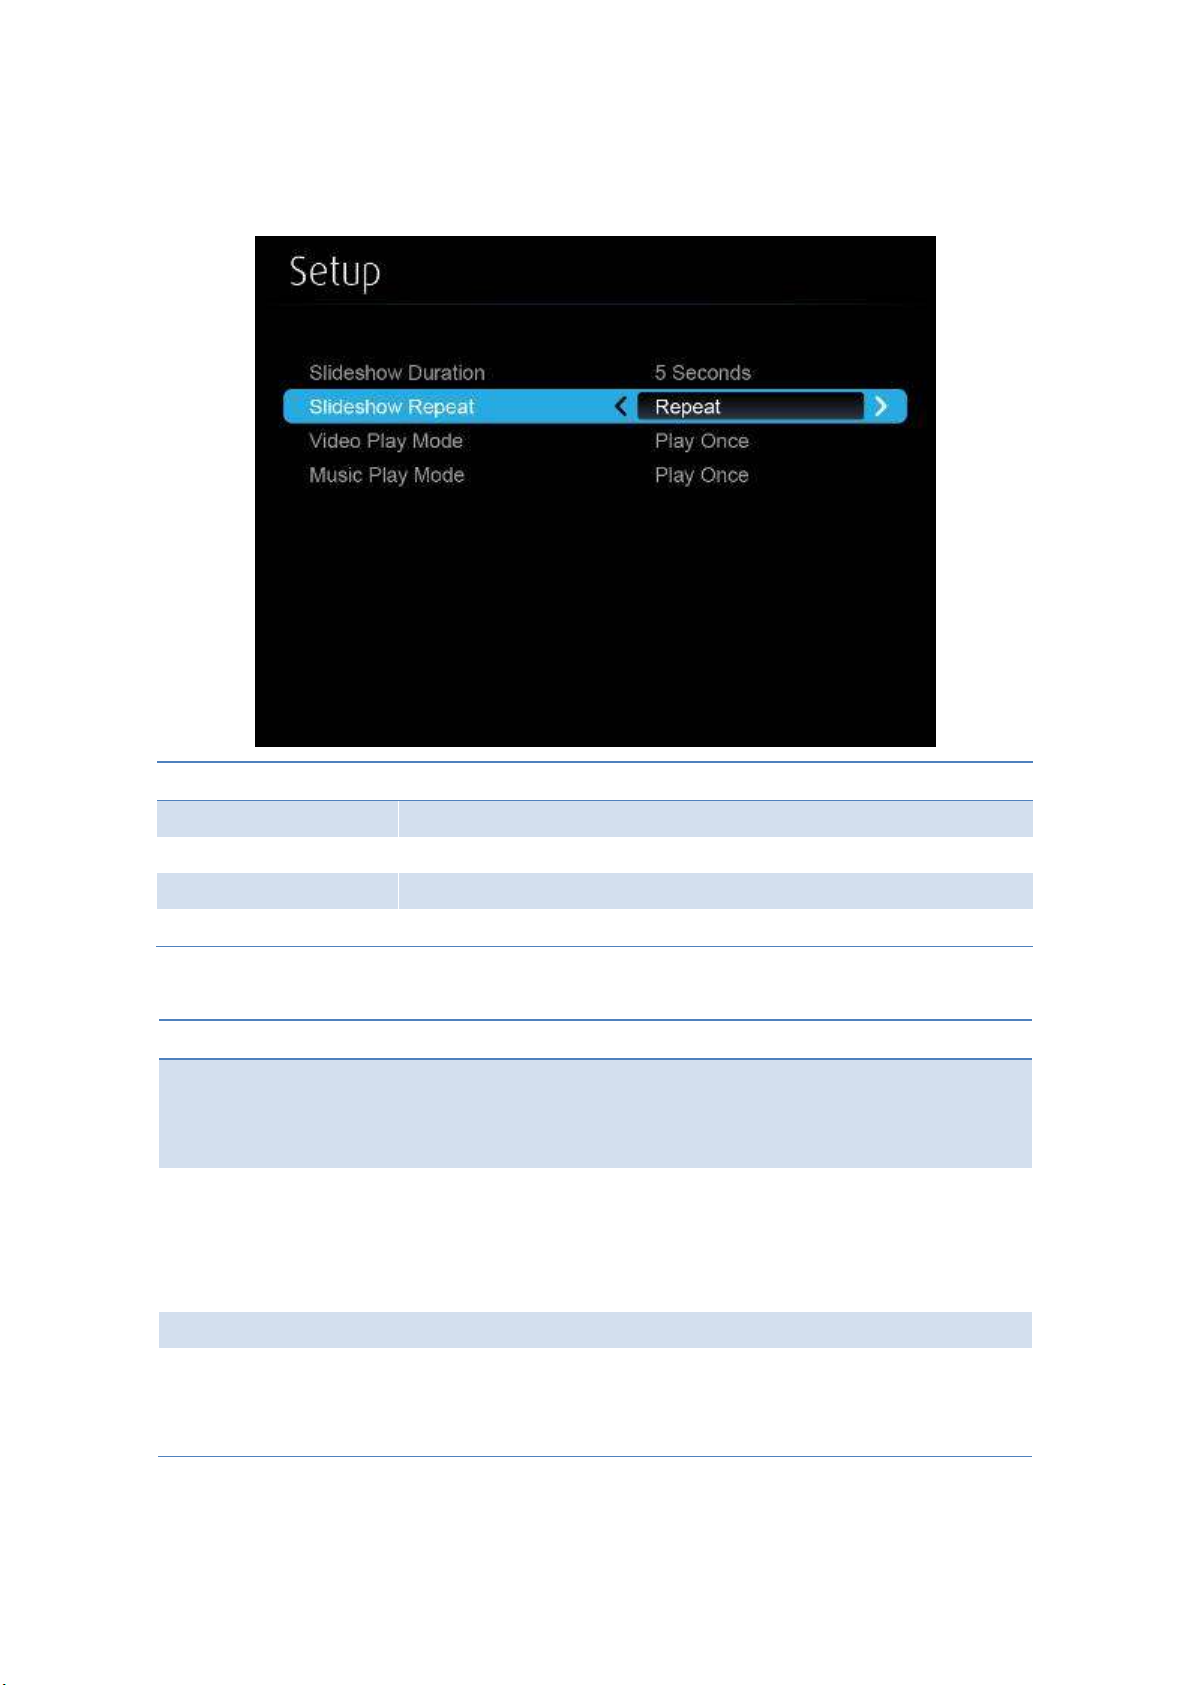
11.5 Setup
Items
Description
Slide Show Duration
5/10/20/30 seconds.
Slide Show Repeat
Repeat on/off.
Video Play mode
Repeat on/off.
Music Play mode
Repeat single file, Repeat all files.
Note:
Item:
Value
Supported File Format
MPEG-1 / MPEG-2 / MPEG-2 TS / MPEG-4 /
MWV9 / MOV / Motion JPEG / MKV / ASF /
DVR-M5
Supported Video Codec
MPEG-1 / MPEG-2 / MPEG-2 TS / MPEG-4* /
WMV9** / QuickTime / Motion JPEG
* Microsoft MPEG-4 v1-3 is not supported.
** Only WMV3/WVC1 is supported.
Supported Audio Codec
LPCM / AAC / MP3 / WMA
Supported Office File
Word, Excel, PowerPoint(up to Office 2010), Pdf.
Details:
http://www.awindinc.com/WiFi-Doc/format.html
* All formats support up to 1920x1080, 30fps, and 20Mbps.
* These file formats might include video and audio codecs which are not supported.
 Loading...