

Page 1
OPERATOR’S MANUAL
16" Electric Chainsaw
Model # 4016
IMPORTANT:
Read this instruction manual carefully
before putting the chainsaw into operation
and strictly observe the safety regulations!
Keep this instruction manual for future reference!
Questions? Problems?
DO NOT RETURN TO STORE
Store personnel where the winch was purchased
are not trained to handle technical questions.
In order to answer questions in the most efcient and
speedy manner, contact Customer Service at:
(888) 315-3080 M-F 8-5 CST or
by email: partsandservice@greatlakestec.com
Page 2

TABLE OF CONTENTS
Package Contents . . . . . . . . . . . . . . . . . . . 2
Specications . . . . . . . . . . . . . . . . . . . . . . .3
Important Safety Information . . . . . . . . . . . 3
Before Operating Saw . . . . . . . . . . . . . 3
While Operating Saw. . . . . . . . . . . . . . 4
Kickback Safety Precaution. . . . . . . . . 5
Extension Cords . . . . . . . . . . . . . . . . . 7
Chainsaw Components . . . . . . . . . . . . . . .7
Assembly . . . . . . . . . . . . . . . . . . . . . . . . . . 8
Chain Lubricating Oil . . . . . . . . . . . . . . . . . 9
Chain Tension Adjustment . . . . . . . . . . . . . 9
Chain Lubrication Verication. . . . . . . . . . . 9
Chain Brake Operation. . . . . . . . . . . . . . . . 9
Cutting Instructions. . . . . . . . . . . . . . . . . . 10
Maintenance. . . . . . . . . . . . . . . . . . . . . . . 12
Guide Bar and oil Holes. . . . . . . . . . . 12
Sprocket . . . . . . . . . . . . . . . . . . . . . . 12
Saw Chain Sharpening . . . . . . . . . . . 12
Carbon Brushes. . . . . . . . . . . . . . . . . 12
Maintenance Chart . . . . . . . . . . . . . . . . . . 13
Exploded View & Parts List . . . . . . . . . . .14
Warranty. . . . . . . . . . . . . . . . . . . . . . . . . . 15
The WEN product you purchased has been factory pre-assembled for your convenience. Due to
packaging restrictions, guide bar and saw chain installation will be necessary. After opening the
carton, check for damage or missing parts. Use the content list below to check for missing parts.
PACKAGE CONTENTS
(1)-power head
(1)-guide bar
(1)-saw chain
(1)-scabbard
(2)-brushes
(1)-Wrench
(1)-owner’s manual
2
Page 3

CHAINSAW SPECIFICATIONS
SPECIFICATIONS
Model 4016
Motor 120V, 60Hz, 13A
Saw Chain Oregon 91VG, 3/8” Pitch
Bar Length 16”
Chain Speed at No Load 11.5m/s
Lubrication of Chain Automatic Lubrication
Chain Oil Required Yes
Oil Tank Capacity 90 cc (3.17 uid ounces)
Weight 7 LB
BAR AND CHAIN
Chainsaw Size 16"
Oregon Bar/Chain Combo 509535
Oregon Chain S54
3
Page 4

IMPORTANT SAFETY INFORMATION
Warning – When using an electric chain saw, basic safety pre-
cautions should always be followed to reduce the risk of re,
electric shock, and injury to persons, including the following:
READ ALL INSTRUCTIONS.
Make sure you read and understand all instructions Important Safety Information on pages 2 through
4. Improper use of this chain saw can cause severe injury or death from re, electrical shock, and
body contact with moving chain, on falling wood.
BEFORE OPERATING SAW
1. Read and understand this owner’s manual before operating chain saw.
2. Watch what you are doing .Use common sense .Do not operate saw when you are tired.
3. Use chain saw for cutting wood only .Do not use chain saw for purpose not intended. Do not use for cutting
plastic, masonry, etc.
4. Only well-instructed adults should operate chain saw. Never allow children to operate chain saw.
5. Use only electrical voltage noted on model plate of chain saw.
6. Use only extension cords marked for outdoor use.
7. Do not operate chain saw
• While under the inuence of alcohol, medication, or drugs
• In rain or in damp or wet areas
• Where highly ammable liquids or gases are present
• If saw is damaged, adjusted wrong, or not fully and securely assembled
• If trigger does not turn saw on and off. Chain must stop moving when you release trigger. Have
faulty switch replaced by authorized service center.
• While in a hurry
• While in tree or on a ladder unless trained to do so
8. Wear snug-tting clothes when operating chain saw. Do not war loose clothing or jewelry. They can get
caught in moving saw chain.
9. Wear the following safety gear when operating chain saw.
• Heavy-duty gloves(wear rubber gloves when working outdoors)
• Steel-toed safety footwear with non-skid soles
• Eye protection such as safety glasses, goggles, or face screen
• Safe hard hat
• Ear mufers or ear plugs
• Hair covering to contain long hair
• Face or dust mask (if working in dusty areas)
4
Page 5

10. Before cutting, always provide the following:
Clear work area
Secure footing
Planned retreat path from falling tree
11. Inspect tree before cutting down. Make sure there are no dead limbs or branches that may fall on you.
12. To reduce the risk of electric shock, this saw has a polarized plug (one blade is wider than the other).This
plug will t in a polarized outlet only one way. If the plug does not t fully in the outlet of your extension
cord, reverse the plug. If it still does not t, a polarized extension cord will be necessary. Do not change
the plug in any way.
WHILE OPERATING SAW
1. Stay alert. Use common sense wile operating chain saw.
2. Keep work area clean. Cluttered areas invite injuries.
3. Be aware of extension cord while operating chain saw. Be careful not to trip over cord. Keep cord away
from chain and operator at all times.
4. Keep children, animals, and bystanders away from chain saw and extension cord. Only chain saw user
should be in work area.
5. Do not cut down a tree unless you are trained or have expert help.
6. If two or more persons perform bucking and felling operations at the same time, provide plenty of distance
between operations. Provide distance of at least twice the height of tree being felled.
7. Secure wood you are cutting by suing clamps or chocks.
8. Grip chain saw rmly with both hands. Never operate chain saw with one hand. Never use hand guard as
handle.
9. Keep nger off trigger until ready to make cut.
10. Before starting chain saw, make sure chain is not touching anything.
11. To guard against electrical shock, avoid body contact with grounded objects such as pipes, fences, and
metal posts.
12. Keep all parts of body away from chain when saw is running.
13. Do not force chain saw while cutting. Apply light pressure. It will do the job better and safer at he rate for
which it was intended.
14. Cut small brush and saplings with extreme care. Slender material may catch in chain and be whipped
toward you. This could also pull you off balance.
15. When cutting limb or tree trunk that is under tension, use extreme caution. Be alert for wood springing
back. When wood tension is released, limb could spring back and strike operator causing severe injury
or death.
5
Page 6

16. Carry chain saw from one place to another
• With saw stopped and unplugged
• By holding front handle (never use hand guard as handle)
• With nger off trigger
• With guide bar and chain to rear
KICKBACK SAFETY PRECAUTIONS
Warning – Kickback may occur when the nose or tip of the
guide bar touches on object, or when the wood closes in the
cut. Tip contact in some cases may cause a lightning fast
reverse reaction, kicking the guide bar up and back towards
the operation. Pinching the saw chain along the top of the guide bar
may push the guide bar rapidly back towards the operator. Either
of these reactions may cause you to lose control of the saw which
could result in serious injury to user.
Kickback is the name given to a sudden, rapid upward movement of the saw cutting mechanism in an upward
arc towards the operator. Kickback occurs when the upper quadrant of the bar nose comes in contact with a
solid object or is pinched. The rotational force of the chainsaw can be reversed in the opposite direction of the
chain movement. This may ing the bar up and back in an arc towards the operator. Serious injury or even
death can result from contact between the moving saw chain and the operator.
The best protection against injury due to kickback is to avoid situations that can cause kickback:
- Hold the chainsaw rmly with both hands and maintain a secure grip.
- Be aware of the location of the bar nose at all times while cutting.
- Never bring the nose of the guide bar in contact with any object. Never cut limbs with the nose of the guide
bar. Be especially careful when cutting saplings, brush and small hard limbs that may easily pinch the cutting
chain.
- Don’t cut above shoulder height. Don’t overreach or use the chainsaw while standing on a ladder or tree.
- Never use the chainsaw one-handed.
- Begin and continue cutting at full throttle.
- Use extreme caution when entering a previous cut.
- Do not attempt plunge cuts if you are not familiar with this cutting technique.
- Stand to the side of the cutting path of the chainsaw.
- Cut with a correctly sharpened, properly tensioned chain at all times.
Save these instructions. It is your guide to safe and proper operation of this chain saw.
6
Page 7

EXTENSION CORDS
If you use an extension cord, be sure to use one heavy enough to carry the current your electric saw will
draw. An improper gauged extension cord will cause a drop in wire voltage resulting in loss of power and
overheating. Use only extension cords having an electric rating not less than the rating of the product.
The following table shows the correct size to use depending on cord length and machine ampere rating.
AMERICAN WIRE GAUGE RATING CHART
EXTENSION CORD
LENGTH (FEET)
AMPS
0 TO 10.0 18 18 16 16 14 14 12 12
10.1 TO 13.0 16 16 14 14 14 12 12 12
13.1 TO 15 14 12 12 12 12 12 12 --
15 TO 18 14 12 12 12 12 12 -- --
25 50 75 100 125 150 175 200
AWG
CHAINSAW COMPONENTS
1. SPROCKET COvER
2. LOCKING KNOB
3. OIL TANK CAP
4. SCREW
5. FRONT HANDLE
6. CHAIN BRAKE LEvER
7. GEAR BOX
8. OUTPUT OIL HOLE
9. CHAIN TENSION
ADjUSTABLE WHEEL
10. SPIKE BAR
11. SCREW
12. FASTENING STUD
13. SPROCKET
14. OIL TANK
15. GUIDE BAR
16. INPUT OIL HOLE
17 ADjUST BLOCK
7
Page 8
ASSEMBLY
WARNING - Check the chain tension before each use.
Always use protective gloves.
INSTALLING THE GUIDE BAR AND SAW CHAIN
1. Loosen the locking knob counter clockwise and remove the
sprocket cover
2. The adjust block should already be attached to the guide bar. Make sure
the adjust block is turned all the way counter-clockwise and then put the
saw chain on the guide bar.
3. Place the guide bar onto the bar studs and the chain around the sprocket.
Make sure the chain cutters on top of the guide bar face in the direction
that the chain runs. See below picture.
4. Install the sprocket cover by turning the locking knob clockwise. Don’t tighten it before adjusting
chain tension.
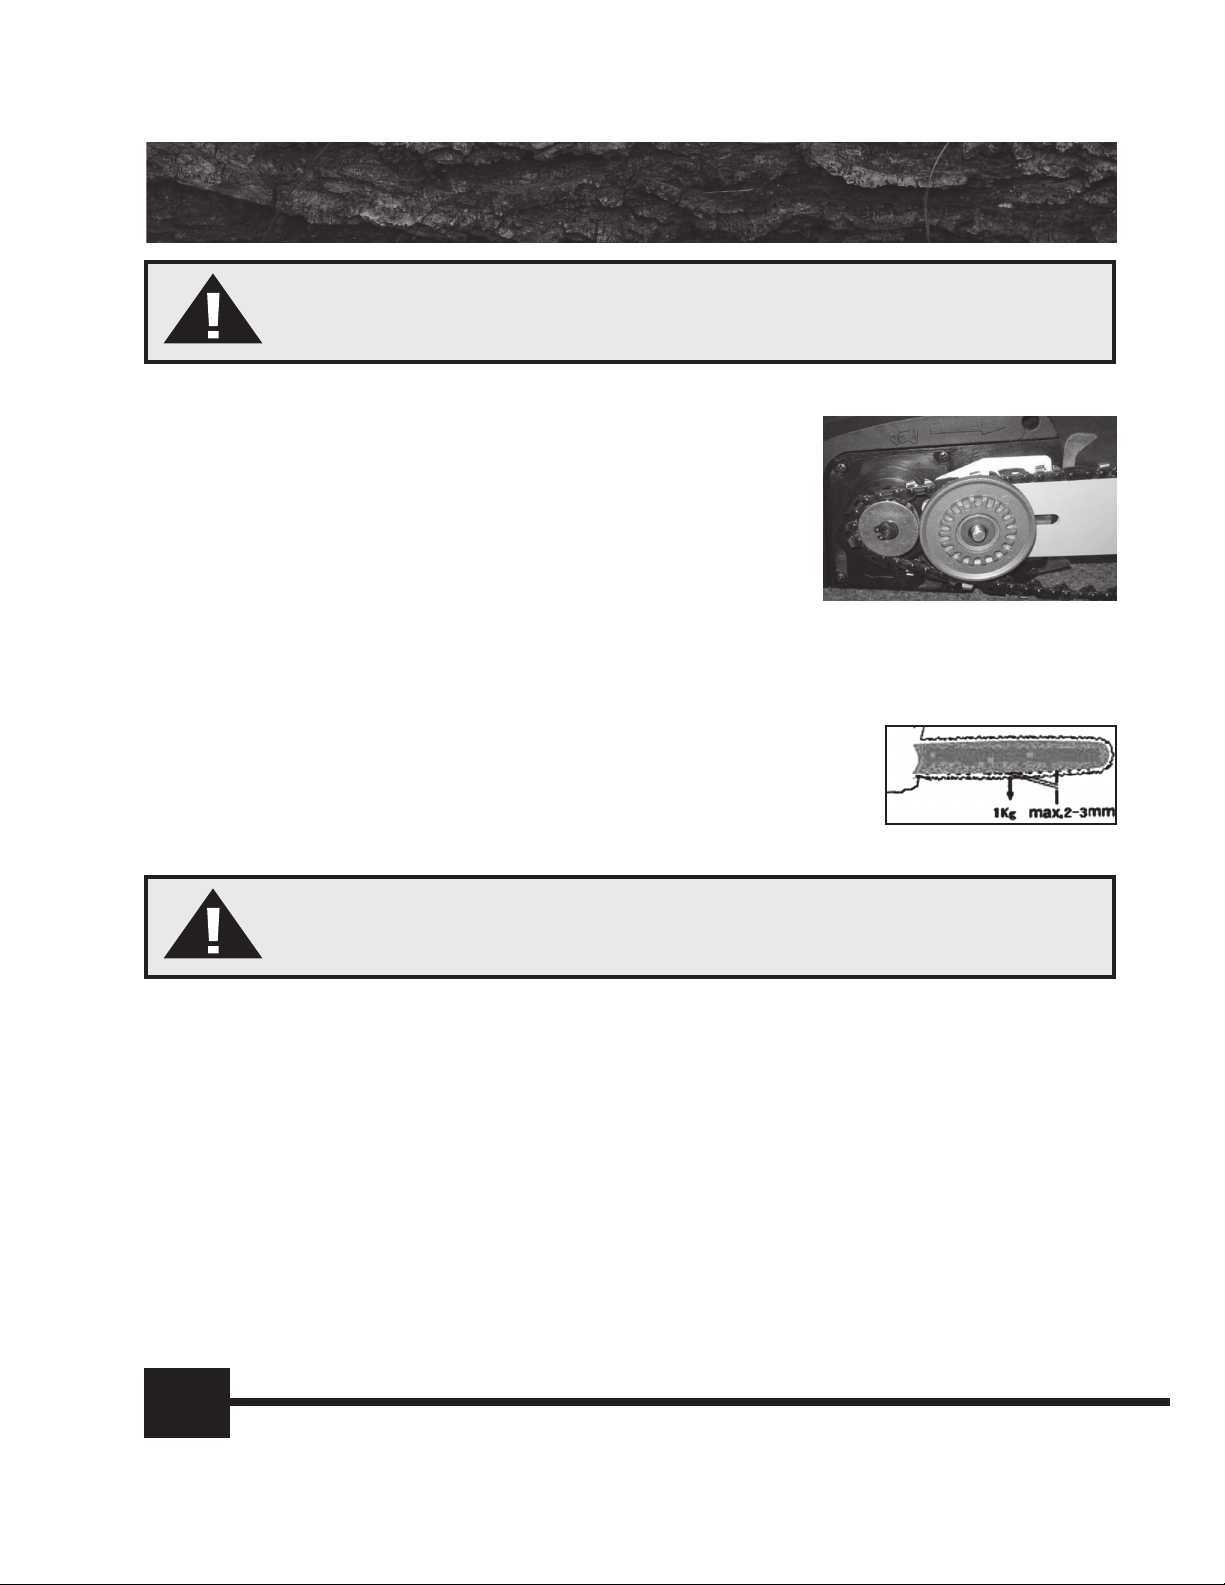
5. Adjust the chain tension by turning the tension wheel clockwise. The chain is
correctly tensioned when it is still possible to raise it by 2-3 mm in the middle of
the guide bar.
6. Tighten the sprocket cover by turning the locking knob clockwise.
WARNING - Never try to run the chainsaw without sprocket
cover securely tightened.
Caution: Proper saw chain tension is extremely important. If saw chain is too tight, the guide
bar and saw chain will be quickly damaged. If the saw chain is too loose, it may get out of
the guide bar groove and cause an injury.
Note: A new chain will stretch so adjust the tension after a few cuts. Watch saw chain tension
carefully for the rst half hour of cutting.
8
Page 9

CHAIN LUBRICATING OIL
Use high quality chain lubricating oil to minimize wear between the saw chain and guide bar while in use.
We recommend using SAE No. 30 in the summer and SAE No. 10 in the winter or when cutting resinous
wood. Check the oil level prior to each use.
Oil tank capacity: 90 cc (3.1 uid ounces)
WARNING - Never use waste or reclaimed oil. This results in
damage to the oil pump, saw chain and guide bar.
CHAIN TENSION ADjUSTMENT
WARNING - Always loosen locking knob before turning tension wheel otherwise sprocket cover and tension wheel will be
damaged. Do not over-tighten locking knob.
1. Loosen the locking knob.
2. Using gloved hand, hold the guide bar nose up and turn the tension wheel clockwise. The chain is correctly
tensioned when it is still possible to raise it by 2-3 mm in the middle of the guide bar.
3. Tighten the sprocket cover by turning the locking knob clockwise.
WARNING - Never touch the chain while chainsaw is running.
Unplug chainsaw from power source before adjusting the saw
chain tension. Not doing so may cause severe personal injury
or death.
CHAIN LUBRICATION vERIFICATION
To test if chain lubricating oil is adequately dispensed onto the guide bar, hold the guide bar above a dry
surface and run the chainsaw for 30 seconds. A thin line of “thrown” oil should be seen on the dry surface.
Never operate the saw without chain lubrication. Even running the saw without lubrication can cause irreparable harm to the entire cutting attachment.
CHAIN BREAK OPERATION
The chain brake stops the rotation of the chain during kickback. The chain brake does not prevent kickback.
An efcient chain brake stops the chain in 1/10th of a second or less by pushing the front handle guard forward. The chain brake is designed to only stop the chain, if activated, during certain kickback situations. The
system must be properly maintained and in good working order for the chain brake to stop the rotation of the
chain.
To release the chain brake, pull the hand guard back towards the operator until a noticeable click is heard.
9
Page 10

CUTTING INSTRUCTIONS
Before use: Check that the chain brake works properly and is not damaged. Visually inspect
the entire saw to ensure all components are free from damage and work properly. Check the
chain tension and adjust if necessary.
WARNING - Always follow safety procedures. Use the chainsaw only for cutting wood and not other types of materials.
Do not use the chainsaw as a lever for lifting, moving or
splitting objects. Never cut in high wind, bad weather, poor visibility conditions, or in extreme temperatures. Always check for dead
branches which may fall during cutting operations.
In all circumstances, the operation of a chainsaw is a one man job. Keep all
other people away from the cutting area. It is difcult enough to take care of
your own safety without assuming responsibility for the safety of others.
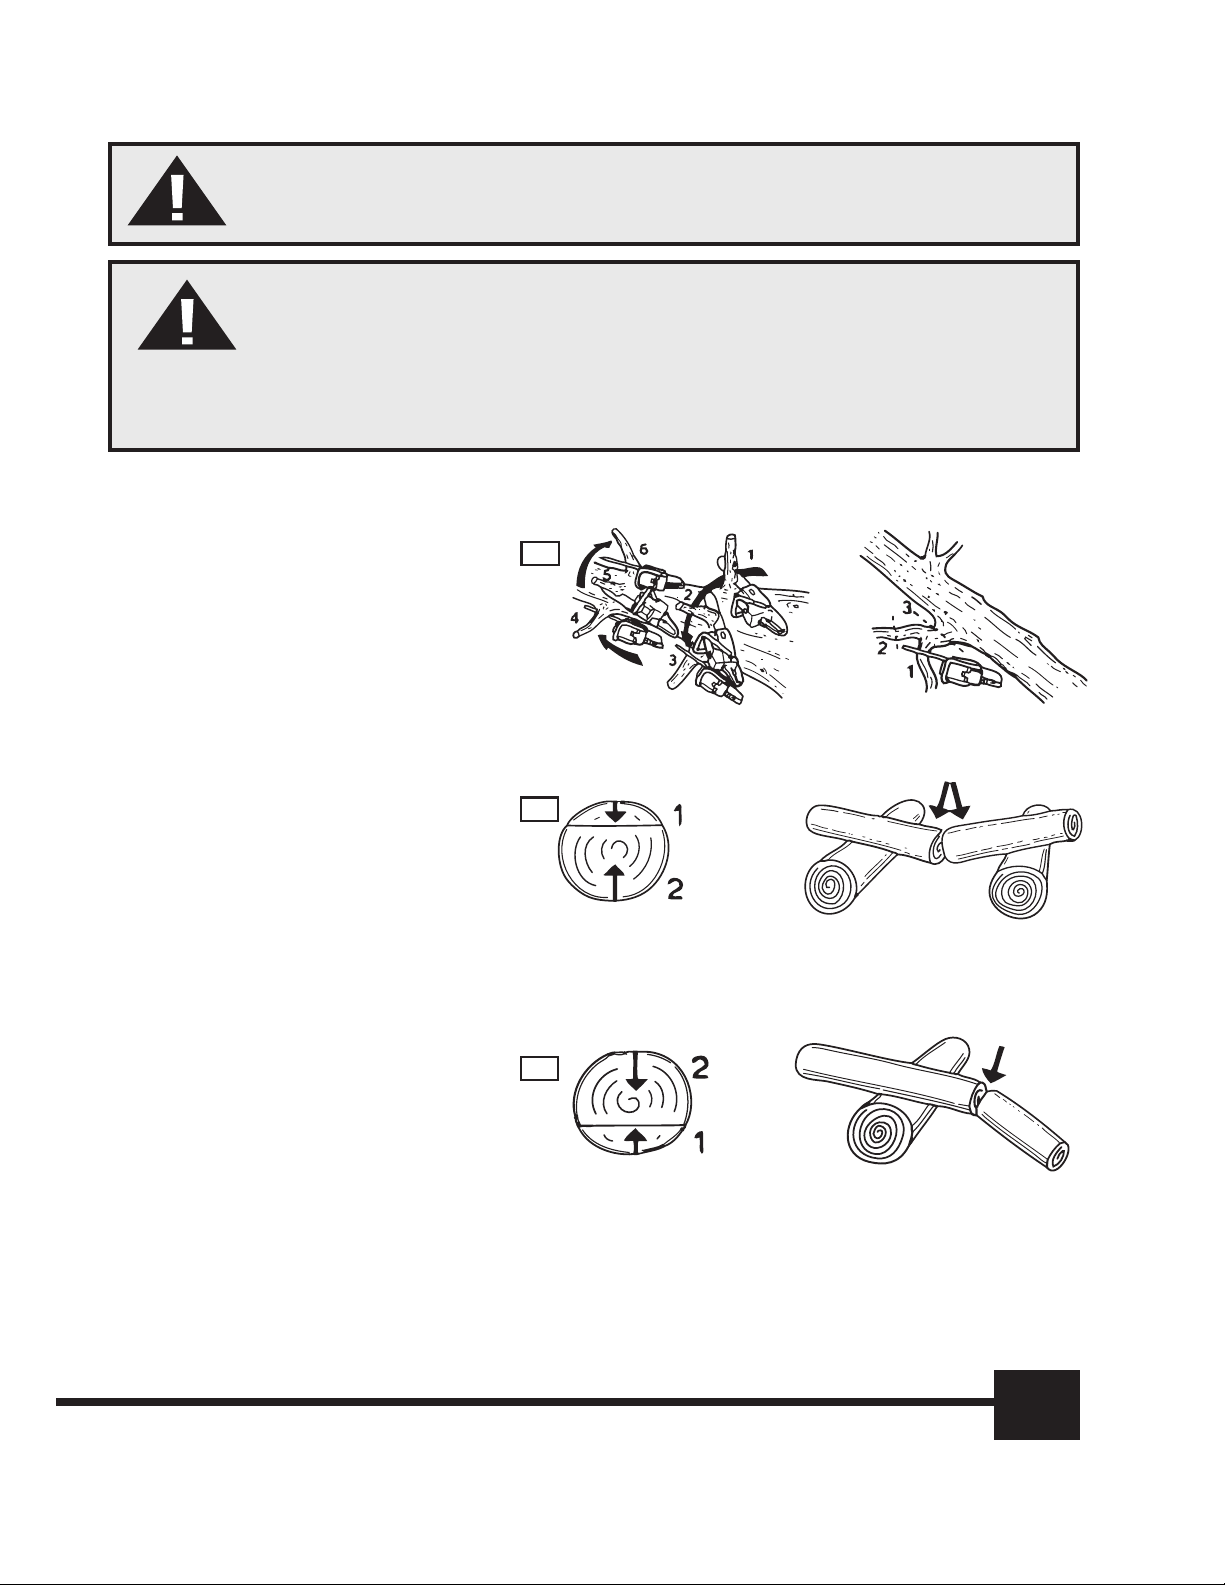
- Before felling a tree, study the surrounding area to determine where you
want the tree to fall. Select a retreat path. The path should be at a 45 degree
angle from the tree fall line. (Fig.14)
- Clear the work area before beginning the cutting process. Remove the
undergrowth from the base of the tree and check the area for obstacles so a
clear retreat path exists.
14
- Start by cutting off any branches up to shoulder height. Do not cut above
shoulder height and always use two hands in gripping the saw.
Never use the saw one-handed.
- Begin the cut on the side to which the tree is to fall. Cut a notch about 1/3rd
of the way into the tree. The position of the notch is important since the tree
will try to “fall” into the notch. (Fig.15)
- The felling cut is made on the opposite side of the notch at about 2” above
the center of the notch. Do not cut through to the notch with the felling cut.
The wood between the notch cut and the felling cut will act as a hinge when
the tree falls, guiding it in the desired falling direction. (Fig.15)
- When the tree starts to fall, turn off ignition switch, place the chainsaw on the
ground and retreat to a safe position at least 10’ from the trunk.
- To fell bigger trees with diameters exceeding twice the bar length requires
specialized skills and should not be attempted without proper training.
10
15
Page 11
WARNING - A majority of kickback accidents occur
during limbing.
WARNING - Never attempt to cut logs while they are in a
pile or when a couple of logs are lying together. Such at-
tempts drastically increase the risk of kickback which can
result in serious or fatal injury. When bucking, do not stand on the
log. Make sure the log will not roll downhill. If bucking on a slope,
stand uphill of the log.
LIMBING – THE REMOvAL OF
BRANCHES FROM A FELLED
TREE. (FIG.16)
Do not use the nose of the guide bar.
Be careful and cautious and avoid
contacting the log, other limbs or
objects with the nose of the guide bar.
Be extremely cautious of limbs under
tension.
These limbs can spring back towards
the operator and cause loss of control
resulting in injury. Always stand to the
left of the trunk and maintain a secure
footing. Always use both hands when
cutting.
16
17
BUCKING
The sawing of a log or fallen tree into
smaller pieces. (Fig. 17-18)
When bucking up a log, check to see
where the log is supported and determine
which way the two halves will fall when
cut. If the log is under tension, always
start with a relieving cut (1) at compression side. Then make a bucking cut (2) at
tension side. If the saw pinches, stop the
engine and remove the saw from the log.
18
11
Page 12
MAINTENANCE
GUIDE BAR AND OIL HOLES
Clean guide bar before use. Follow instructions for removing and installing guide
bar and saw chain. Remove guide bar and clean groove of the guide bar with a
small screwdriver. Clean oil holes with a wire (see below). Check the sprocket
and the clutch and clean the bar mount area before installing the bar. Guide bar
with sprocket nose should be lubricated with grease using a lubricating syringe.
Invert the symmetrically shaped guide bar every 8 working hours or each time
the chain is removed to ensure uniform wear. Check the bar rails frequently for
wear and remove burs and square up the rails using a at le. Clean the Oiler
port on the saw every time the saw chain and guide bar are removed.
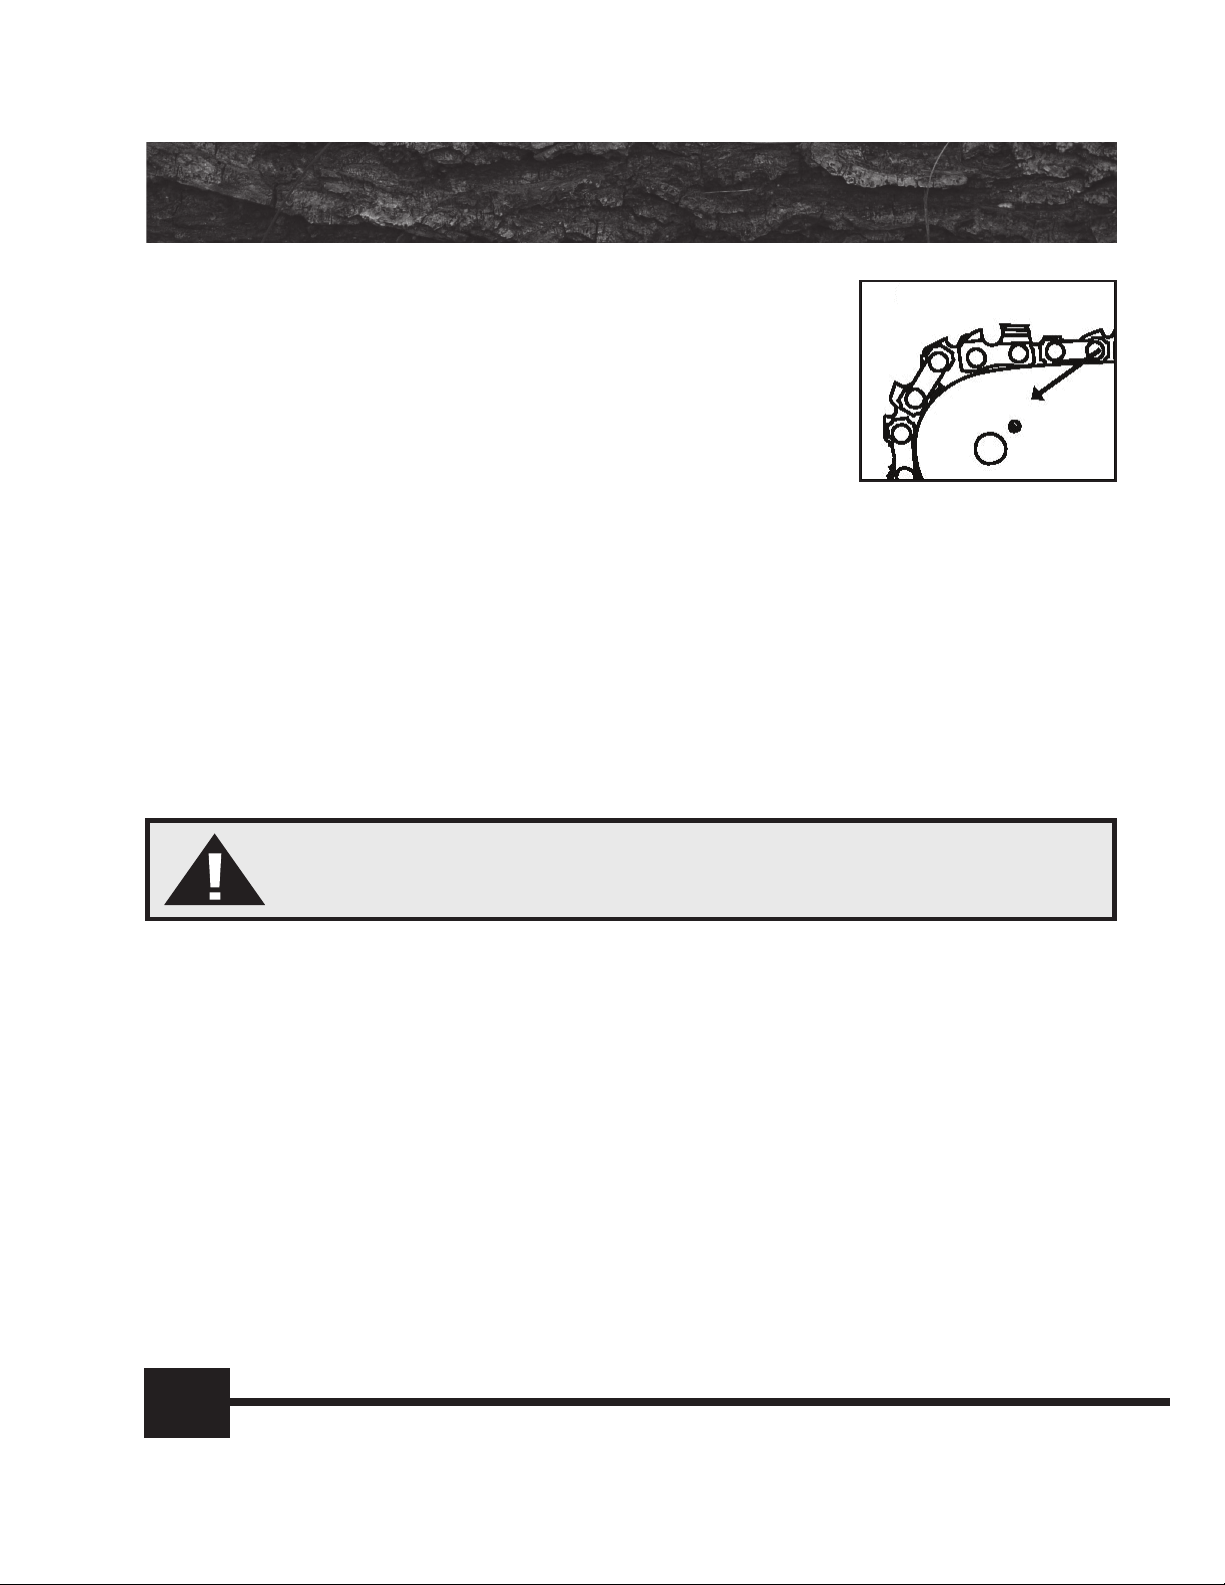
SPROCKET
A damaged drive sprocket will cause premature wear or damage of the chainsaw.
Check the sprocket when installing a new chain. When outer diameter of sprocket is worn 0.5mm (0.020”) or
more, replace it. Always clean sprocket, clutch and bar mount area before installing guide bar.
SAW CHAIN SHARPENING
It is advisable to have professional shops sharpen saw chains. It is beyond the expertise of the typical home
owner to sharpen saw chains. An improperly sharpened saw chain will not cut effectively, require more physical effort, and cause high vibrations and a higher rate of wear.
CARBON BRUSHES
Before accessing the carbon brushes, be sure that the
chainsaw is disconnected from the power source.
1. Check the condition of the carbon brushes after 50 hours of use of your new chainsaw. If the brushes are
worn to 1/8 inch in length, replace them.
2. Remove the motor cove to inspect the brushes.
3. Replace them if necessary.
REPLACING THE GUIDE BAR
1. To replace the guide bar, remove the adjust block by loosening the screw holding the adjust block to
guide bar.
2. Use the replacement bar recommended by manufacturer. Attach the adjust block to new guide bar by
tightening the screw.
3. Refer to "Installing Guide Bar and Chainsaw" section in manual (p. 8)
12
Page 13

MAINTENANCE CHART
After nishing work or daily
Before starting work
Please note that the following maintenance intervals
apply for normal operating conditions only. If you daily
working time is longer than normal or cutting conditions
are different, shorten the specied intervals accordingly.
Visual inspection x
Complete machine
Clean x
Switch Check operation x
Oil tank Clean x
Chain lubrication Check x
Inspect, also check the sharpness x
Saw chain
Check chain tension x
Sharpen x
Check (wear, damage) x
Weekly
Monthly
If faulty
If damaged
As required
Clean and turn over x x
Guide bar
Deburr x
Replace x x
Chain sprocket Check x
All accessible screws
and nuts
Chain catcher on
sprocket cover
Power cord
Retighten x
Check x
Replace sprocket cover x
Check x
Replace x
13
Page 14

EXPLODED VIEW & PARTS LIST
14
Page 15

EXPLODED VIEW & PARTS LIST
ITEM# DESCRIPTION QTY
1 SCREW ST4.2X16 18
2 LABEL 1
3 RIGHT HANDLE 1
4 O-RING 1
5 OIL CAP 1
6 POWER CORD 1
7 CORD SLEEVE 1
8 CORD BRACKET 1
9 BREAK SPRING 1
10 CAPACITOR 1
11 SWITCH 1
12 SWITCH LOCK BUTTON 1
13 WIRE POLE 1
14 WIRE CLIP 1
15 HANDLE GRIP 1
16 LEFT HANDLE 1
17 PLASTIC RING 1
18 BEARING 6001 1
19 FAN 1
20 ARMATURE 1
21 SHIELD RING 1
22 BEARING 608 1
23 LABEL 1
24 WIND SHIELD 1
25 SCREW ST4.8X50 2
26 STATOR 1
27 HOUSING 1
28 CARBON BRUSH 2
ITEM# DESCRIPTION QTY
29 BRUSH HOLDER 2
30 SPRING 2
31 LABEL 1
32 MOTOR COVER 1
33 NEEDLE BEARING HK0810 1
34 RED PAPER PAD 1
35 SHIELD RING 2
36 WASHER 1
37 HELICAL GEAR 1
38 NEEDLE BEARING HK1010 2
39 TORSION 1
40 SPINDLE 1
41 OIL OUTPUT MOUTH 1
42 OIL OUTPUT PIPE 1
43 GEAR BOX 1
44 SPIKE BAR 1
45 OIL PUMP 1
46 CAM 1
47 GEAR BOX COVER 1
48 SHIELD RING 1
49 WASHER 1
50 SPROCKET WASHER 2
51 SPROCKET 1
52 OIL RESISTANCE PLATE 1
53 OIL INJECTION PIPE 1
54 SPRING 1
55 OIL INPUT MOUTH 1
56 OIL TANK 1
ITEM# DESCRIPTION QTY
57 SWITCH BUTTON 1
58 ROLL WHEEL 1
59 LINK BLOCK 1
60 SWITCH 1
61 SCREW ST4.2X10 2
62 WASHER 2
63 BRAKE GUARD 1
64 SCREW ST4.2X42 9
65 FRONT HANDLE GUARD 1
66 FRONT HANDLE 1
67 BRAKE LINK ROD 1
68 BRAKE ROD 1
69 SPRING 1
70 SCREW M4X6 1
71 GUIDE BAR 1
72 BIG RIVET 1
73 DRIVER BLOCK 1
74 ADJUST BLOCK 1
75 WASHER 1
76 SAW CHAIN 1
77 SCABBARD 1
78 STEEL RING Ø55X2 1
79 SPROCKET COVER 1
80 STEEL RING Ø10X1 1
81 TENSION WHEEL 1
82 LABEL 1
83 LOCKING KNOB 1
15
Page 16

LIMITED WARRANTY
WEN Products warrants its power tools to be free of defects in materials and from workmanship for a period of one (1) year from date of original purchase. We will repair or replace, at our option, any tool covered by this warranty that after inspection is found to be
defective in materials or workmanship during the warranty period. If the product is used for
commercial, professional or income producing purposes, the limited warranty period is 90
days. If used for rental purposes, the limited warranty period is 30 days.
This limited warranty applies only to the original owner and is not transferable to subse-
quent owners. The limited warranty begins on the date of purchase by the original owner
and extends for the fore-mentioned time periods. This limited warranty does not apply to
normal wear and tear, misused, abused, and altered tools. Repairs by unauthorized personnel will void the warranty.
For warranty service, please contact us at 1-888-315-3080 or write to us at WEN Products,
PO Box 1110, Dundee, IL 60118. To acquire service, you will have to provide proof of pur-
chase and may be asked to ship the tool back to us freight prepaid.
Under no circumstances shall WEN Products be liable for any indirect, incidental or conse-
quential damages from the sale or use of this product. Some states do not allow the exclusion or limitation of incidental or consequential damages. Some states do not allow limitations on the length of an implied warranty. This warranty provides you with specic legal
rights and you may have other rights that vary from state to state.
16
Page 17

NOTES
17
Page 18

 Loading...