

Page 1
WELLS MANUFACTURING
265 Hobson Street, Smithville, Tennessee 37166
telephone: 314-678-6314
fax: 314-781-2714
www.wells-mfg
.com
OWNER'S MANUAL
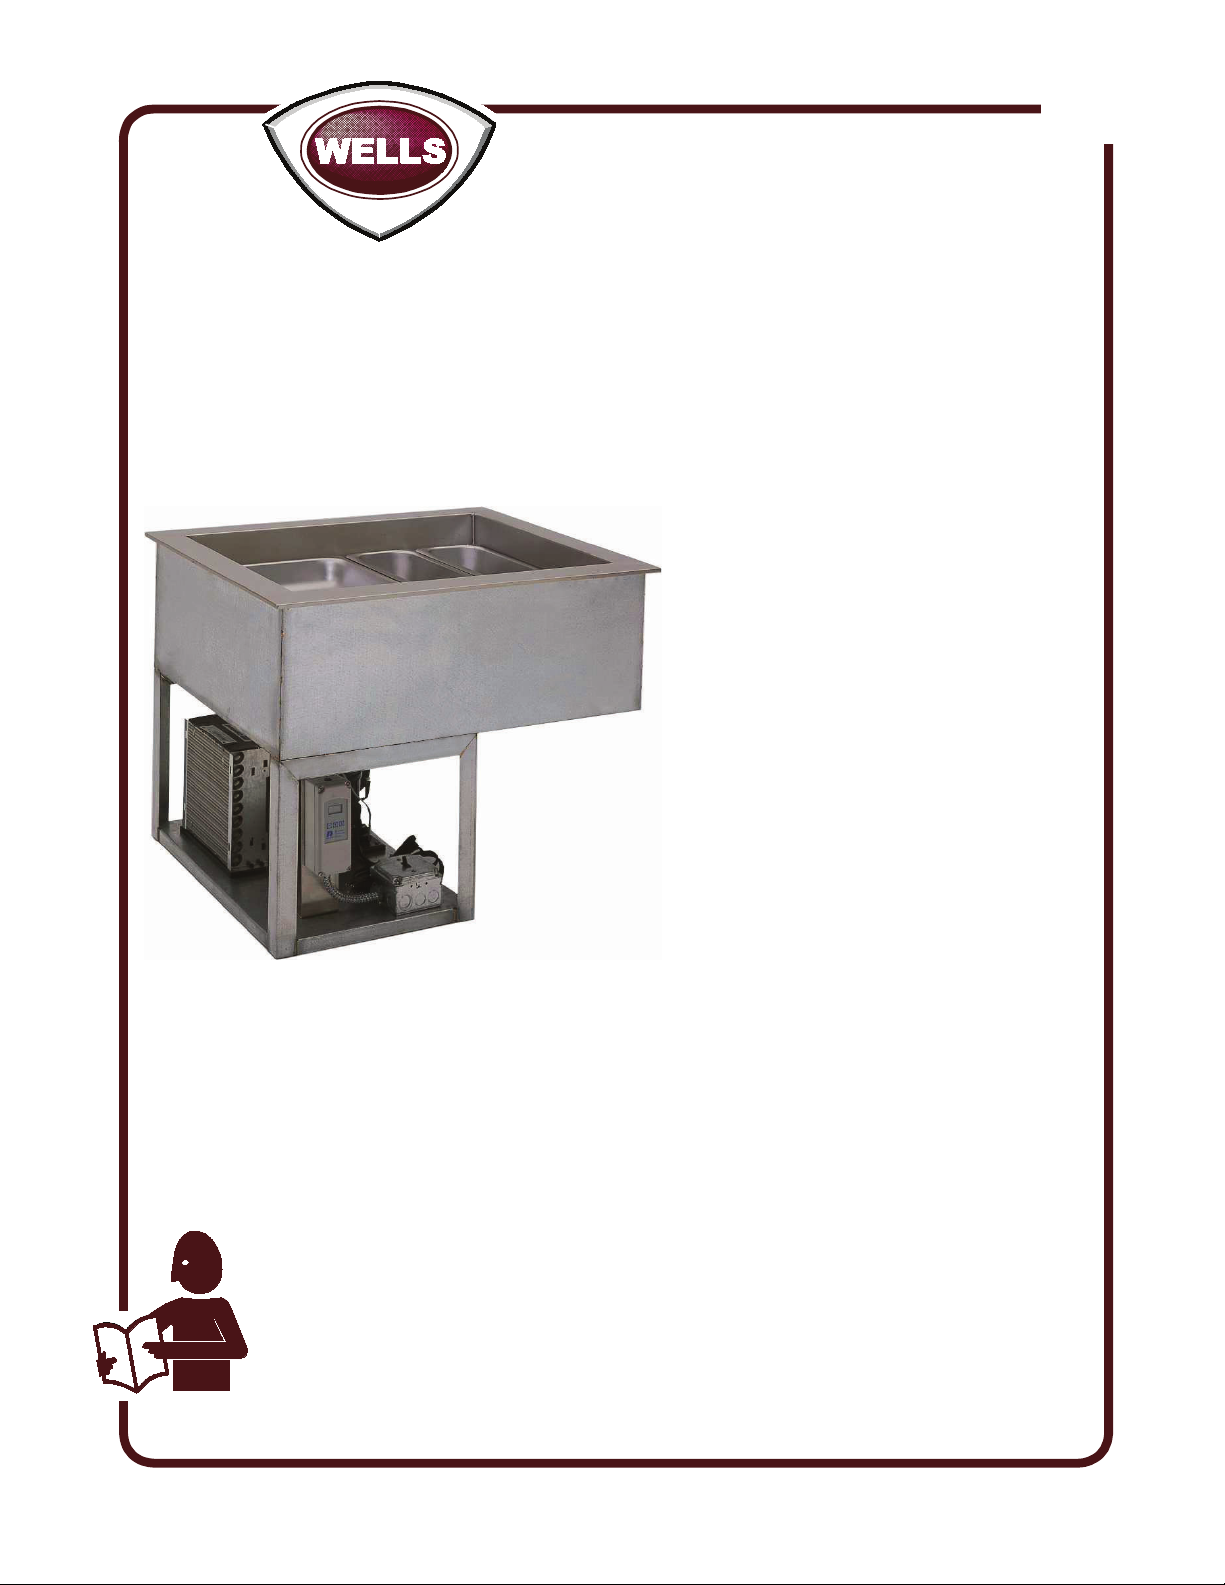
DROP-IN REFRIGERATED
COLD PANS, NSF7
RCP-7050, RCP-7067,
RCP-7100, RCP-7200,
RCP-7300, RCP-7400,
RCP-7500, RCP-7600.
DROP-IN REFRIGERATED
COLD PANS, NSF2
RCP-050, RCP-067,
RCP-100, RCP-200,
RCP-300, RCP-400,
RCP-500, RCP-600.
405
Model RCP-7200
This manual is considered to be part of the appliance and is to be given to the OWNER or
MANAGER of the restaurant, or to the person responsible for TRAINING the operators of
THIS MANUAL MUST BE READ AND UNDERSTOOD BY ALL PERSONS USING OR
DROP-IN REFRIGERATED
COLD PANS, SLOPE TOP NSF7
RCP-7100ST, RCP-7200ST,
RCP-7300ST, RCP-7400ST,
RCP-7500ST, RCP-7600ST.
DROP-IN REFRIGERATED
COLD PANS, SLOPE TOP NSF2
RCP-100ST, RCP-200ST,
RCP-300ST, RCP-400ST,
RCP-500ST, RCP-600ST.
INCLUDES INSTALLATION, USE,
CARE, SERVICE AND DIAGRAMS.
IMPORTANT: DO NOT DISCARD THIS MANUAL
this appliance. Additional manuals are available from your WELLS DEALER.
INSTALLING THIS APPLIANCE. Contact your WELLS DEALER if you have any
questions concerning installation, operation or maintenance of this equipment.
2M-305101 Rev.
H
04/18
Page 2

LIMITED EQUIPMENT WARRANTY
Wells Manufacturing warranties new products to be free from defects
in material and/or workmanship for a period of one [1] year from the
date of original installation, except as noted below. Defects that occur
as a result of normal use, within the time period and limitations defined
in this warranty, will at Wells’ discretion have the parts replaced or
repaired by Wells or a Wells-authorized service agency.
THIS WARRANTY IS SUBJECT TO ALL LISTED CONDITIONS.
Repairs performed under this warranty are to be performed by a Wellsauthorized service agency. Wells will not be responsible for charges
incurred or service performed by non-authorized repair agencies.
In all cases, the nearest Wells-authorized service agency must be used.
Wells will be responsible for normal labor charges incurred in the repair
or replacement of a warrantied product within 50 miles (80.5 km) of
an authorized service agency. Time and expense charges for anything
beyond that distance will be the responsibility of the owner. All labor
will need to be performed during regular service hours. Any overtime
premium will be charged to the owner. For all shipments outside the
U.S.A. and Canada, please see the International Warranty for specific
details.
It is the responsibility of the owner to inspect and report any shipping
damage claims, hidden or otherwise, promptly following delivery.
No mileage or travel charges will be honored on any equipment that is
deemed portable. In general, equipment with a cord and plug weighing
less than 50 lb. (22.7 kg) is considered portable and should be taken or
shipped to the closest authorized service agency, transportation prepaid .
CO NTAC T
Should you require any assistance regarding the operation or
maintenance of any Wells equipment; write, phone, fax or email
our service department. In all correspondence mention the
model number and the serial number of your unit, as well as
the voltage or type of gas you are using.
Business hours are 8:00 a.m. to 4:30 p.m. Central Standard Time
Telephone 314.678.6314
Fax 314.781.2714
Email customerservice@star-mfg.com
www.wells-mfg.com
WARRA
THE FOLLOWING WILL NOT BE COVERED UNDER WARRANTY.
• Any product which has not been installed, cleaned, maintained,
or used in accordance with the directions published in the appropriate
installation sheet and/or owner’s manual as well as national and local
codes, including incorrect gas or electrical connection. Wells is not liable
for any unit which has been mishandled, abused, misapplied, subjected
to chlorides, harsh chemicals, or caustic cleaners, damaged from
exposure to hard water, modified by unauthorized personnel, damaged
by flood, fire, or other acts of nature [or God], or which have an altered
or missing serial number.
• Installation, labor, and job checkouts, calibration of heat controls, air
and gas burner/bypass/pilot adjustments, gas or electrical system
checks, voltage and phase conversions, cleaning of equipment,
or seasoning of griddle surface.
• Replacement of fuses or resetting of circuit breakers, safety controls,
or reset buttons.
• Replacement of broken or damaged glass components, quartz heating
elements, and light bulbs.
• Labor charges for all removable parts in gas charbroilers and hotplates,
including but not limited to burners, grates, and radiants.
• Any labor charges incurred by delays, waiting time, or operating
restrictions that hinder a service technician’s ability to perform service.
• Parts that fail or are damaged due to normal wear or labor for
replacement of Items that can easily be replaced during a daily cleaning
routine. such as but not limited to silicone belts, PTFE non-stick sheets,
knobs, control labels, bulbs, fuses, quartz heating elements, baskets,
racks, and grease drawers.
• Components that should be replaced when damaged or worn, but have
been field-repaired instead [eg. field-welded fry pots].
• Any loss of business or profits.
ADDITIONAL WARRANTIES
Specialty/chain specific versions may also have additional and/or
extended warranties.
NTY EXCLUSIONS
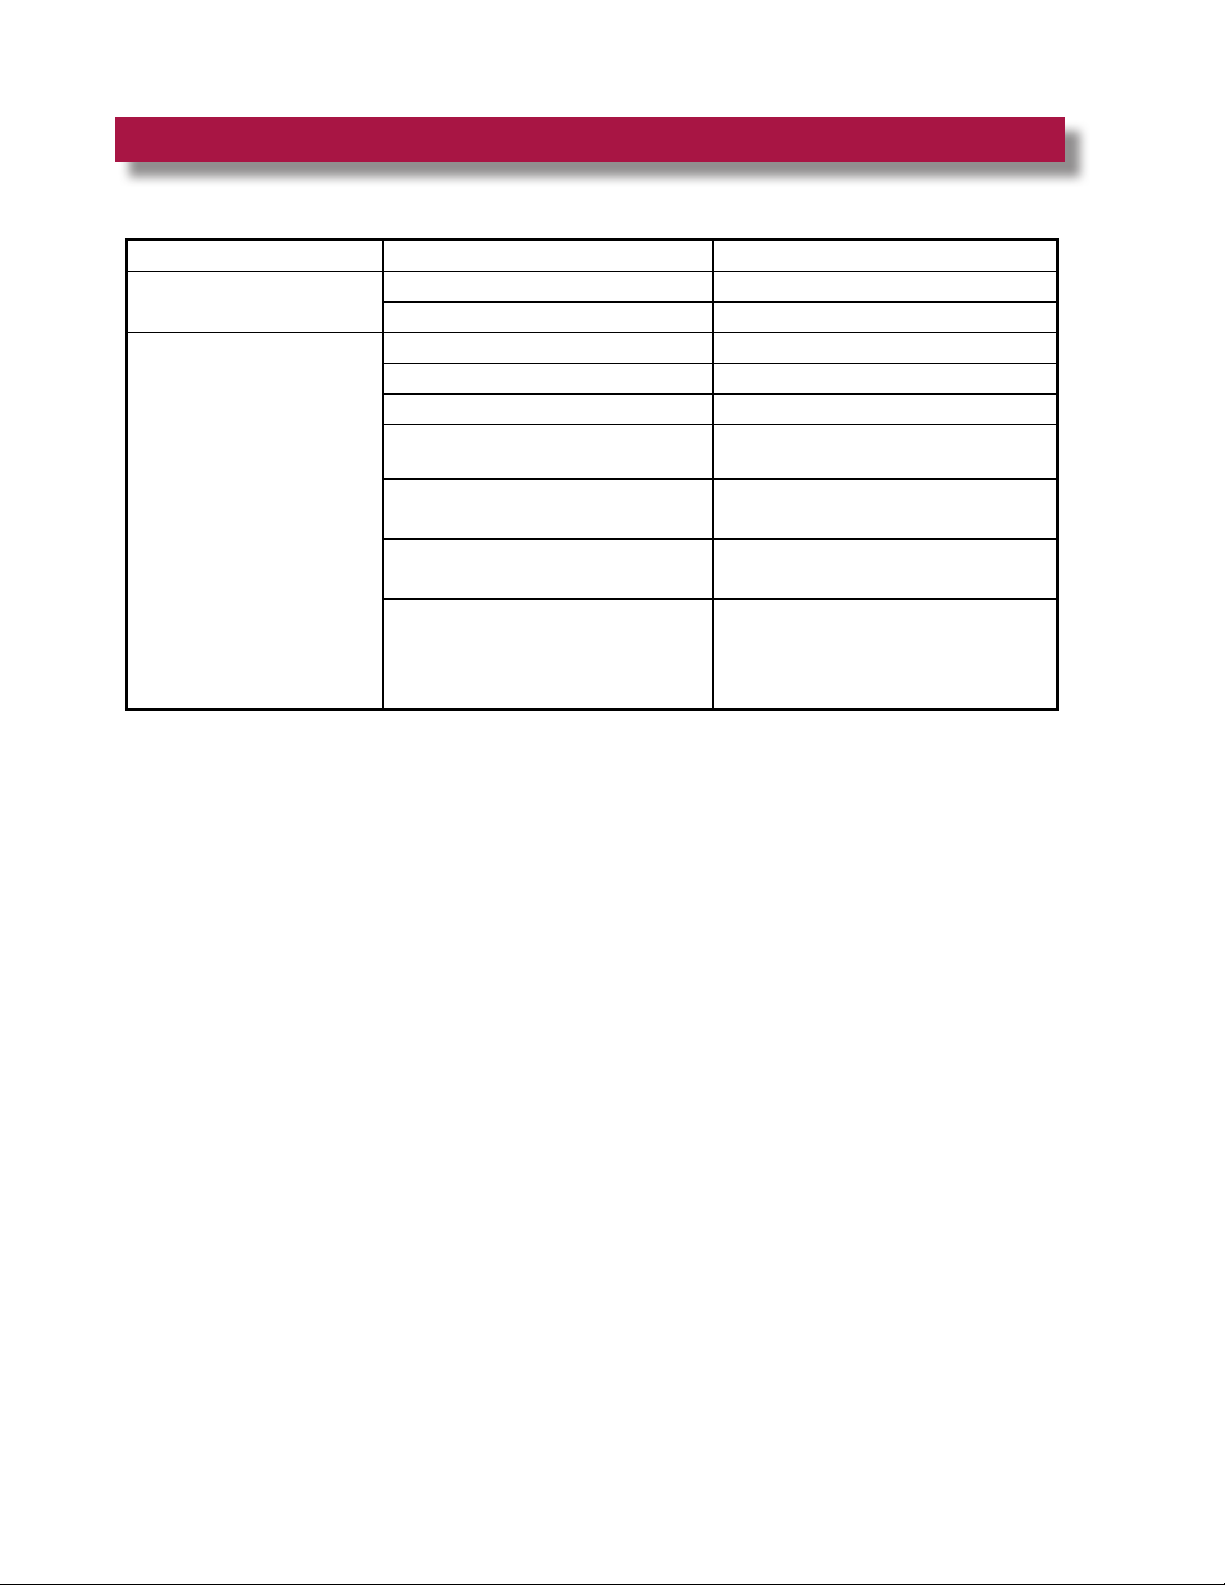
PRODUCTS PARTS LABOR
universal ventless hoods 2 years 1 year
canopy hoods 2 years 1 year
“Cook’n Hold” equipment [HW10,
HWSMP, LLSC7, LLSC7WA, LLSC11,
2 years 1 year
an d LLSC 1 1WA]
cast iron grates, burners, and burner
shields
original Wells parts sold to repair
Wells equipment
1 year
90 days
Service First 1 year
The fore going warrant y is in lieu of any and a ll other warranti es expresse d or implied and c onstitutes the e ntire warranty. 2M-Z22393 • Rev A • 02.2018
Page 3
TABLE OF CONTENTS
WARRANTY
INTRODUCTION & SPECIFICATIONS 1
FEATURES & OPERATING CONTROLS 2
PRECAUTIONS & GENERAL INFORMATION 3
AGENCY LISTING INFORMATION 4
INSTALLATION 5, 6, 7
OPERATION 8
CLEANING INSTRUCTIONS 9
MAINTENANCE INSTRUCTIONS 10, 11
OPERATING INSTRUCTIONS 12, 13
TROUBLESHOOTING SUGGESTIONS 14
WIRING AND REFR. DIAGRAMS 15
BLANK PAGE FOR NOTES 16
ACCESSORY PARTS & SERVICE DATA 17
INTRODUCTION
Thank you for purchasing this Wells Manufacturing appliance.
Proper installation, professional operation and consistent maintenance of this appliance will ensure that
it gives you the very best performance and a long, economical service life.
This manual contains the information needed to properly install this appliance, and to use and care for
the appliance in a manner which will ensure its optimum performance.
ELECTRICAL & REFRIGERATION SPECIFICATIONS
MODELS HP
RCP-050, RCP-067
RCP-7050, RCP-7067
RCP-100, RCP-200, RCP-300
RCP-7100, RCP-7200
RCP-100ST, RCP200ST, RCP300ST
RCP-7100ST, RCP7200ST
RCP-400, RCP-7300, RCP-400ST
RCP-7300ST
RCP-500, RCP-600, RCP-500ST,
RCP-600ST, RCP-7400, RCP-7400ST
M405 p/n 2M-305101 Owmers Manual Drop-In Refrigerated Cold Pans
RCP-7500, RCP-7500ST
RCP-7600, RCP-7600ST
1/4 5.5 8 15 38 R-134a 28 oz. 440 162 NEMA 5-15P
1/4 5.5 8 15 38 R-134a 28 oz. 440 162 NEMA 5-15P
1/3 7 11 15 29 R-404a 24 oz. 500 174 NEMA 5-15P
1/2 7.5 12 15 33 R-404a 32 oz. 500 174 NEMA 5-15P
3/4 15.3 21 30 59 R-404a 54 oz. 500 174 NEMA 5-20P
AMPS 120VAC 1ø REFRIGERANT
TOTAL MCA MFS LRA TYPE AMT. HIGH LOW CORD
PRESSURE POWER
(psig) SUPPLY
1
Page 4

FEATURES & OPERATING CONTROLS
IL2961
PAN RAIL SUPPORT
PAN RAIL
TEMPERATURE
CONTROL UNIT
POWER
SWITCH
POWER
CORD
AIRFLOW
REFRIGERATION
CONDENSER
DRAIN
OPTIONAL
DRAIN
SCREEN
PAN ADAPTER BAR
NOTE:
This is a general arrangement drawing only. Actual component positions may vary between units.
2
Page 5

PRECAUTIONS AND GENERAL INFORMATION
This appliance is intended for use in commercial establishments
only, and is intended to hold pre-chilled prepared food for human
consumption. No other use is recommended or authorized by the
manufacturer or its agents.
Operators of this appliance must be familiar with the appliance use,
limitations and associated restrictions. Operating instructions must be
read and understood by all persons using or installing this appliance.
Food must be kept in appropriate inserts. Never place food directly
into the tank.
Cleanliness of this appliance is essential to good sanitation. Read and
follow all included cleaning instructions and schedules to ensure the
safety of the food product.
Disconnect this appliance from electrical power before performing any
maintenance or servicing.
This appliance is not jet stream approved. Do not direct water jet
or steam jet at this appliance, or at any control panel or wiring. Do
not splash or pour water on, in or over any controls, control panel or
wiring. Do not wash oor around this appliance with water or steam
jet.
The technical content of this manual, including any wiring diagrams,
schematics, parts breakdown illustrations and/or adjustment
procedures, is intended for use by qualied technical personnel.
Any procedure which requires the use of tools must be performed by a
qualied technician.
This manual is considered to be a permanent part of the appliance.
This manual and all supplied instructions, diagrams, schematics, parts
breakdown illustrations, notices and labels must remain with the
appliance if it is sold or moved to another location.
This appliance is made in the USA. Unless otherwise noted, this
appliance uses all American-sized hardware.
WARNING:
ELECTRIC SHOCK
HAZARD
All servicing requiring
access to non-insulated
electrical components must
be performed by a factory
authorized technician.
DO NOT open any access
panel which requires the use
of tools. Failure to
follow this warning can
result in severe electrical
shock.
CAUTION:
RISK OF
DAMAGE
DO NOT connect or
energize this appliance
until all installation
instructions are read and
followed. Damage to the
appliance will result if the
instructions are not
followed.
M405 p/n 2M-305101 Owmers Manual Drop-In Refrigerated Cold Pans
3
Page 6

AGENCY LISTING INFORMATION
STD 2
STD 7
UL471
This appliance performance tested to NSF Standard 7 for storage of
potentially hazardous foods. This appliance meets NSF Standard 7
only when pan rails are installed in the lowest position, otherwise it
meets NSF Standard 2.
RCP units are ETL listed for US and Canada
RCP units are evaluated to UL standard 471.
Components used in the manufacture of this unit are Underwriters
Laboratory recognized.
4
Page 7

INSTALLATION
UNPACKING & INSPECTION
Carefully remove the appliance from the carton. Remove all protective
plastic lm, packing materials and accessories from the Appliance
before connecting electrical power or otherwise performing any
installation procedure.
Carefully read all instructions in this manual and the Installation
Instruction Sheet packed with the appliance before starting any
installation.
Read and understand all labels and diagrams attached to the
appliance.
Carefully account for all components and accessories before discarding
packing materials. Store all accessories in a convenient place for later
use.
RCP units must remain upright at all times (shipping and installation)
to prevent damage to the condensing unit. If the unit is accidentally
tipped, allow unit to sit upright for at least 24 hours before connecting to
electric power.
COMPONENTS
1 ea. PAN RAIL
1 - 5 ea. PAN ADAPTER BAR ( quantity differs with unit)
PREPARATION
Cutout dimensions for tank units and control panels are listed on the
Installation Instructions provided with the unit.
Provide at least 1” clearance around the condensing unit chassis.
Countertop must be at and level before the unit is installed. After
cutout is made, add stiffeners or bottom braces to counter as required
to support unit weight.
IMPORTANT:
Refrigeration system is air cooled. Recommend louvered grills or
equivalent openings front and rear, each with a minimum size of
twice the surface area of the condenser, to provide adequate air
circulation.
NOTE: The condenser fan is provided with a fan guard.
DO NOT remove the condenser fan guard.
Provide louvered grills and service access below control panel. Provide
access to the POWER SWITCH and TEMPERATURE CONTROL UNIT
located at the front of the condenser.
Verify that provided sealants are applied to the underside of the top
ange prior to setting the unit into the cutout.
After installation, apply a thin bead of food-grade silicone sealant
around the ange to seal it to the counter.
M405 p/n 2M-305101 Owmers Manual Drop-In Refrigerated Cold Pans
Avoid storing ammable or combustible materials in, on or near the
appliance.
Clean the unit thoroughly after installation and before rst use.
NOTE: DO NOT discard
the carton or other packing
materials until you have
inspected the appliance for
hidden damage and tested it
for proper operation.
Refer to SHIPPING DAMAGE
CLAIM PROCEDURE on the
inside front cover of this
manual.
WARNING:
RISK OF PERSONAL
INJURY
Installation procedures must
be performed by a qualied
technician with full knowledge
of all applicable electrical and
plumbing codes. Failure can
result in personal injury and
property damage.
IMPORTANT:
Unit must remain in an upright
position during installation
to prevent damage to the
refrigeration system.
IMPORTANT:
Refrigeration system is air
cooled. Recommend louvered
grills or equivalent openings
front and rear, each with a
minimum size of twice the
surface area of the condenser,
to provide adequate air
circulation.
IMPORTANT:
Access is required for the
operation of the drain valve
and for maintenance of the
refrigeration unit. Provide
adequate access to the drain
valve and refrigeration unit.
IMPORTANT:
Unit ange must be sealed
to the counter top. Damage
caused by leaks due to
improper installation is NOT
covered by warranty.
5
Page 8
INSTALLATION
WARNING:
ELECTRIC SHOCK
HAZARD
All servicing requiring
access to non-insulated
electrical components must
be performed by a factory
authorized technician.
DO NOT open any access
panel which requires the use
of tools. Failure to
follow this warning can
result in severe electrical
shock.
CAUTION:
RISK OF
DAMAGE
DO NOT connect or energize
this appliance until all
installation instructions are read
and followed. Damage to the
appliance will result if these
instructions are not followed.
CAUTION:
ELECTRIC SHOCK
HAZARD
Cord -connected units are
equipped with a three-prong
plug for your protection
against electric shock. Never
cut the large round prong
from the plug, or twist a blade
to t an existing receptacle.
ELECTRICAL INSTALLATION
1 Refer to the nameplate. Verify the electrical service power.
Voltage and phase must match the nameplate specications.
Wiring the unit to the wrong voltage can severely damage the
unit, or cause a signicant decrease in performance.
2. Available electrical amperage must meet or exceed the
specications listed on the specications sheet provided with
the unit.
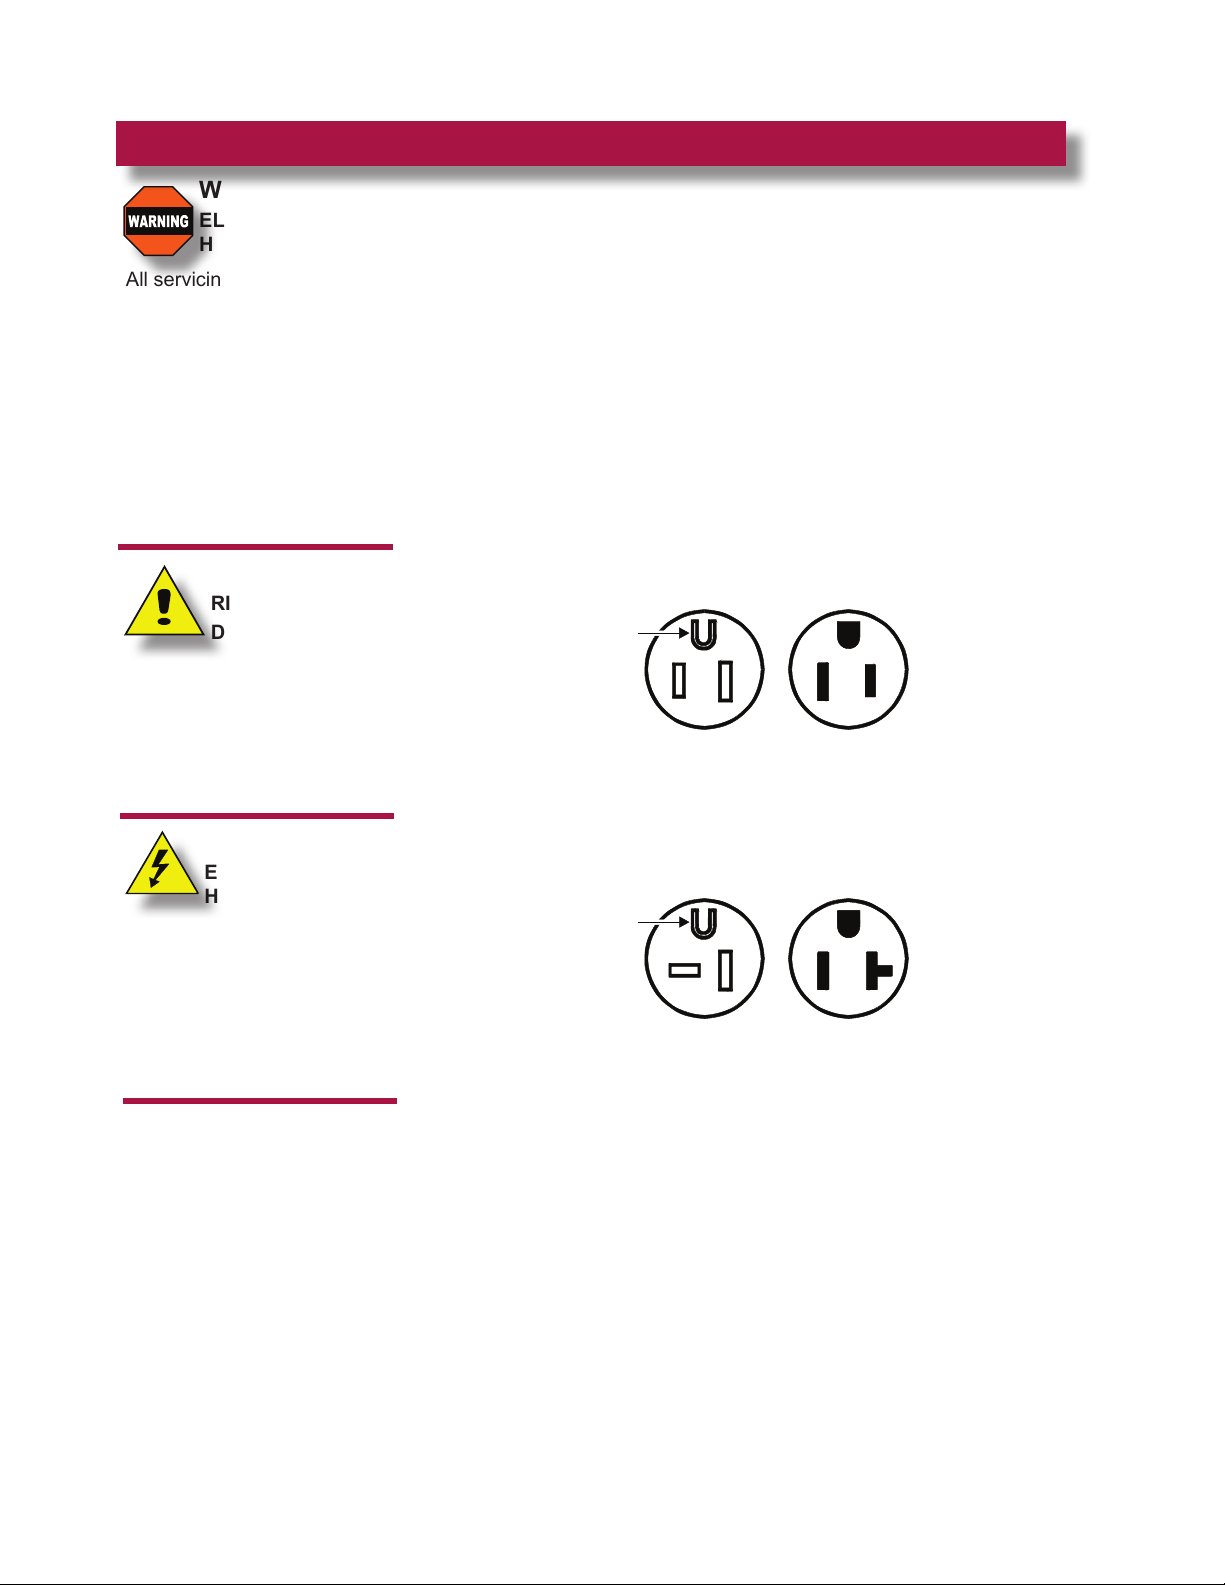
a. Units are equipped with a three-prong (grounding) plug for your
protection against electrical shocks. This must be plugged into
a properly grounded matching receptacle.
b. RCP-100 through RCP-600 and RCP-7100 through RCP-7400
are equipped with a NEMA 5-15P plug and require a matching
NEMA 5-15R receptacle.
GROUND
PIN
NEMA 5-15P
PLUG
c. RCP-7500 and RCP-7600 are equipped with a
NEMA 5-20P plug and require a matching NEMA 5-20R
receptacle.
GROUND
PIN
NEMA 5-20P
PLUG
NEMA 5-15R
RECEPTACLE
NEMA 5-20R
RECEPTACLE
IL2960
IMPORTANT:
Contact a licensed electrician
to install the correct circuit
and receptacle (cordconnected units) or to install
and connect electric power
(eld-wired units).
IMPORTANT:
Damage due to being
connected to the wrong
voltage or phase is NOT
covered by warranty.
6
Page 9

INSTALLATION
USE A
SPUD
WRENCH
0.25”
0.85” dia.
SINK
DRAIN
SPUD
WITH
CROSS
GUARD
OR ...
GRIP
HERE
WHEN
ATTACHING
DRAIN
FITTING
GASKET
NUT
IL2958
PLUMBING INSTALLATION
Install 1” drain valve (provided by others) on unit drain. Plumb to
an appropriate waste as required by local plumbing and sanitation
ordinances. Consult local codes for approved drain congurations.
IMPORTANT:
DO NOT allow the sink drain spud to turn during installation. Hold the
spud with an appropriate cross-guard-style spud wrench, or carefully
grip the center threaded portion with a strap wrench or slip-joint pliers to
immobilize the drain spud during drain tting installation.
DO NOT grip the drain spud nut or gasket.
IMPORTANT:
Plumbing connections must
be made in compliance with
all Federal, State and Local
Codes and Ordinances.
IMPORTANT:
All drain plumbing
installations must be
performed by a qualied
plumber.
M405 p/n 2M-305101 Owmers Manual Drop-In Refrigerated Cold Pans
7
Page 10

OPERATION
CAUTION:
ELECTRIC SHOCK
HAZARD
DO NOT splash or pour water
onto control panel or wiring.
RCP units are designed
to hold REFRIGERATED
PRE-CHILLED product at
serving temperature.
RCP units should not be used
to chill product, nor to hold
product for long term storage.
OPERATION NOTES
1. Never place food directly in cold tank. Always use insets or
food pans.
2. Use only pre-chilled products. Stir product occasionally to
maintain an even temperature.
3. Use perforated bottom strainer plates when operating units
with ice. Perforated bottom strainer plates are optional and
must be ordered separately.
4. Models RCP-7100(ST) thru RCP-7600(st) are NSF-7 listed
for use with potentially hazardous foods.
5. Periodically clean condensing coils to remove accumulated
dust and debris. Failure to clean coils will decrease
performance and may void the warranty.
See CONDENSER CLEANING, page 8.
DAILY START-UP
1. Turn POWER SWITCH (located on condensing unit) ON.
Allow unit to run for approximately 30 minutes to reach
operating temperature.
2. Add necessary adapter bars or adapter plates. Adapter bars
provided with the unit are designed to hold 12” x 20” food
pans up to 6” deep.
3. Install appropriate food pans or insets. Place pre-chilled
product in food pans.
DAILY SHUT-DOWN
1. Turn POWER SWITCH OFF. Remove product, food pans
and adapters.
2. Allow unit to defrost before cleaning.
See CLEANING INSTRUCTIONS, page 7.
8
Page 11

CLEANING INSTRUCTIONS
PREPARATIONS: Turn POWER SWITCH OFF. Unplug unit or
disconnect from electric power.
Allow unit to defrost before proceeding.
Remove any insets, pans and/or adapter tops
(if used). Drain water from tank.
FREQUENCY: Daily
TOOLS: Warm Water and Mild Detergent
Solution: 10 Parts Warm Water to 4 Parts Vinegar
Plastic Scouring Pad
Clean Cloth or Sponge
Food-Grade Silicone Sealant
1. Remove pan adapter bars, pan rail and drain screen. Wipe
interior of tank using a clean cloth or sponge and mild
detergent.
2. Use a plastic scouring pad to remove any mineral deposits.
3. Rinse tank thoroughly with a vinegar and water solution to
neutralize all detergent / cleanser residue.
4. Clean pan adapter bars and pan rail with a cloth or sponge
dampened in clean water. Dry thoroughly, then reinstall.
CAUTION:
ELECTRIC SHOCK
HAZARD
DO NOT splash or pour water
onto control panel or wiring.
IMPORTANT: DO NOT use
steel wool for cleaning
5. Check drain screen, clean if necessary and reinstall.
6. Periodically inspect warmer ange-to-counter seal. Reseal
with food-grade silicone sealant if necessary.
7. Inspect condenser. Clean if required.
8. Inspect cooling louvers in counter. Remove any lint or debris.
9. Reconnect to electric power. Turn POWER SWITCH ON only
when unit is to be used.
Procedure is complete
M405 p/n 2M-305101 Owmers Manual Drop-In Refrigerated Cold Pans
9
Page 12

MAINTENANCE INSTRUCTIONS
CAUTION:
PERSONAL
INJURY HAZARD
Disconnect appliance from
electrical power before
cleaning condenser coil.
CAUTION:
PERSONAL
INJURY HAZARD
Condenser coil ns are sharp.
Use care to avoid cuts while
cleaning the condenser.
CONDENSER COIL CLEANING INSTRUCTIONS
The condenser coil must be kept clean to allow adequate air ow for
proper heat dissipation. Recommend this procedure be performed
monthly.
1. Turn POWER SWITCH OFF. Disconnect unit from electrical
power.
2. Remove louvers or access panel to allow coil to be reached.
3. Using a stiff bristle brush, brush lint and debris from the
condenser ns. Brush vertically, top to bottom. Collect and
discard all lint and debris gathered from this operation
IMPORTANT: The ns of the condenser coil are delicate and easily
damaged. Use care to brush only in a vertical motion to avoid
damaging the coil ns.
5. Wipe the fan blades to remove accumulated lint.
5. Reconnect to electrical power. Test for proper operation.
10
Page 13

MAINTENANCE INSTRUCTIONS
CARE OF STAINLESS STEEL
1. The surface can be damaged by mechanical abrasion, hard
water deposits and chlorine:
a. NEVER use steel wool, wire brushes or metal scrapers to clean
the appliance. These will damage the surface.
b. Hard water deposits left behind when water is evaporated will
attack the surface and allow the stainless steel to rust.
c. Chlorides from chlorinated cleansers, calcium / lime / rust
removers (e.g. muriatic acid), even heavily chlorinated city water
will attack the surface and allow the stainless steel to rust.
d. DO NOT use any highly caustic cleaners. Use of highly caustic
cleaners will damage the surface.
e. LIMIT USE of strong caustic cleaners on warmers. Rinse
thoroughly with a vinegar and water solution to neutralize any
residue. Failure to do so may cause damage to the surface and
allow the stainless steel to rust.
f. Cleaners containing ammonia will attack the surface and allow
the stainless steel to rust.
2. Use the proper tools in the proper way to clean your Wells cold
pan.
a. Soft cloth and plastic scouring pads are safe to use on stainless
steel surfaces.
b. Stainless steel pads may be used ONLY IF the scrubbing motion
is in the direction of the visible grain. DO NOT use a circular
motion.
c. In the absence of visible grain, use only soft cloth or plastic
pads. Scrub only in a linear motion along the longest axis of the
equipment.
CAUTION:
PERSONAL
INJURY HAZARD
Disconnect appliance from
electrical power before
cleaning.
Wells refrigerated cold pans
are constructed of high quality
stainless steel. As long as
the stainless steel surface is
intact, the equipment will not
rust or corrode.
Recommendation:
A water softening device or a
cartridge-type ltration device
may be used to minimize lime
and calcium build-up.
3. Use only non-chloride and non-ammonia cleansers:
a. DO NOT use any cleanser listed as “chlorinated”.
b. DO NOT use any cleanser listing “ammonia” or “ammonium” in its
contents.
c. Contact your cleaning materials supplier for suitable alkaline
cleansers.
4. Keep your Wells cold pan clean. Clean frequently to avoid
build-up of hard stubborn stains and hard-to-remove deposits.
a. Rinse thoroughly with a vinegar and water solution to neutralize
any residue.
b. For discoloration caused by using the warmer in dry operation,
use a cleaner made specically for stainless steel.
c. Wipe dry with a soft, clean, dry cloth.
d. Restore the surface by using a polishing product specically
made for stainless steel after each cleaning.
M405 p/n 2M-305101 Owmers Manual Drop-In Refrigerated Cold Pans
11
Page 14
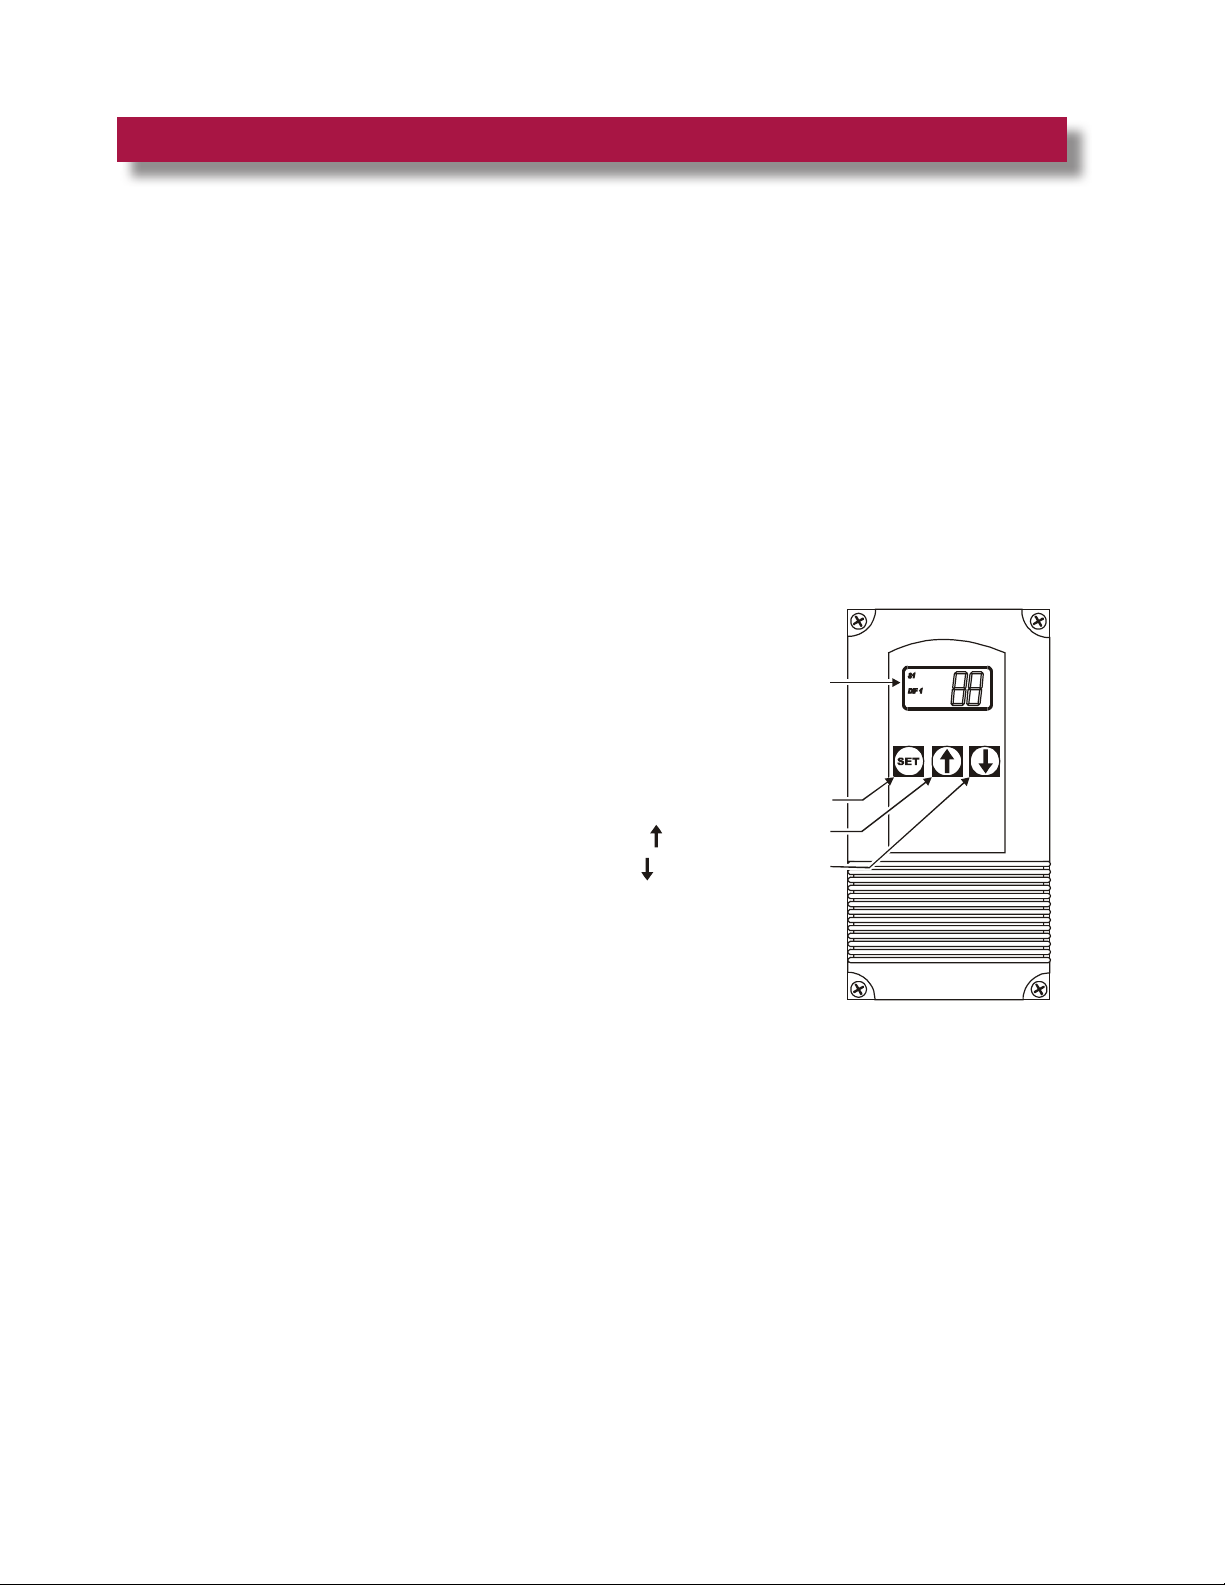
OPERATING INSTRUCTIONS
LCD READOUT
“SET” KEY
“ ” KEY (INCREASE)
“ ” KEY (DECREASE)
IL2957
IMPORTANT:
DO NOT adjust the differential
settings of the refrigeration
system. Field adjustments
of the differential settings
must be made by qualied
refrigeration personnel only.
Unauthorized adjustment of
the differential settings will
void the warranty.
The temperature setting
of the NSF-7 Refrigerated
Cold Pan has been pre-set
at the factory to meet most
applications. An electronic
temperature control maintains
food temperature between
33ºF (.05°C) and 44ºF
(6.6°C).
TEMPERATURE ADJUSTMENT
RCP-100(ST) thru RCP-600(ST)
1. The temperature has been preset at the factory to meet most
applications.
2. If temperature adjustments are required, the pressure switch,
located on the condensing unit, is adjustable. Temperature
adjustment must be performed by a qualied refrigeration
personnel only.
3. Normal temperature setting would be 28ºF.
RCP-7100(ST) thru RCP-7600(ST)
The LCD Display provides a readout of the sensor temperature
during normal operation. Use the following to change the setpoint
temperature:
1. To start programming, press SET key once. This will access the
Fahrenheit/Celsius mode. The readout will show the current
status, either F (degrees Fahrenheit) or C (degrees Celsius).
Press either “up arrow” (é) or “down arrow” (ê) to toggle between
F and C designation.
2. Press SET again to access the setpoint. The LCD will display
the current setpoint, and the S1 annunciator will blink off and on
to indicate that control is in the setpoint mode.
Press either “up arrow” (é) to increase the setpoint, or “down
arrow” (ê) to decrease the setpoint to the desired temperature.
Factory setpoint is 21°F (-6°C).
12
Page 15

OPERATING INSTRUCTIONS
3. Press the SET key again to access the differential. The LCD will
display the current differential, and the DIF1 annunciator will blink
off and on to indicate that control is in the differential mode.
IMPORTANT: DO NOT adjust the differential settings of the
refrigeration system. Field adjustments of the differential settings
must be made by qualied refrigeration personnel only.
Unauthorized adjustment of the differential settings will void the
warranty.
Press either “up arrow” (é) to increase the differential, or “down
arrow” (ê) to decrease the differential to the desired setting.
Factory differential is 3ºF (.
4. Press the SET key again to access the Heating / Cooling mode.
The LCD will display the current mode. Either “C1” for cooling or
“H1” for heating. The control must be set to C1 for proper
operation of the cold pan.
5. Press the SET key again to complete programming. Programming
ends automatically if no keys are pressed for 30 seconds. Any
settings that have been input to the control will be accepted at that
time.
IMPORTANT:
DO NOT adjust the differential
settings of the refrigeration
system. Field adjustments
of the differential settings
must be made by qualied
refrigeration personnel only.
Unauthorized adjustment of
the differential settings will
void the warranty.
NOTE:
The controller has both
“heating” and “cooling”
modes. Heating mode is
not used on the RCP-series
units. The control must be set
to “cooling” (C1) for proper
operation of the cold pan.
6. Control settings are stored in non-volatile memory. Loss of power
to the unit will not require reprogramming.
M405 p/n 2M-305101 Owmers Manual Drop-In Refrigerated Cold Pans
13
Page 16
TROUBLESHOOTING
SYMPTOM POSSIBLE CAUSE REMEDY
No power to unit
Food not kept cold enough
Circuit breaker tripped Reset circuit breaker
Power switch OFF Turn power switch ON
Food not chilled to start Add only pre-chilled food
Food too thick Stir thick food frequently
Setpoint too high Set to desired temperature
Condenser cooling louvers or coil
plugged
Refrigerant level low
Clean condenser louvers and/or coil
Contact Authorized Wells Service
Agency for Repairs
Internal damage
NSF-7 operation using wrong rail
position
Contact Authorized Wells Service
Agency for Repairs
For holding critical foods, pan rails
must be assembled using the lower
pan rail supports. Also pans can be
no deeper than 4”.
14
Page 17

WIRING AND REFRIGERATION SCHEMATICS
M405 p/n 2M-305101 Owmers Manual Drop-In Refrigerated Cold Pans
15
Page 18

NOTES:
16
Page 19

ACCESSORY PARTS & SERVICE
DESCRIPTION PART NO.
DRAIN SCREEN 2V-Z17446
ADAPTER BAR FOR 12” X 20” PANS O3-303100
PERFORATED BOTTOM PLATE STRAINER
FOR RCP-100 (1 PC) M2-22107
PERFORATED BOTTOM PLATE STRAINER
FOR RCP-200 (1 PC) O3-303102
PERFORATED BOTTOM PLATE STRAINER
FOR RCP-300 (2 PC) O3-303103
PERFORATED BOTTOM PLATE STRAINER
FOR RCP-400 (2 PC) O3-303104
PERFORATED BOTTOM PLATE STRAINER
FOR RCP-500 (2 PC) O3-303105
PERFORATED BOTTOM PLATE STRAINER
FOR RCP-600 (3 PC) O3-303106
PAN RAIL FOR RCP-7100 WS-22696
PAN RAIL FOR RCP-7200 WS-22697
PAN RAIL FOR RCP-7300 WS-22698
PAN RAIL FOR RCP-7400 WS-22699
PAN RAIL FOR RCP-7500 WS-22700
PAN RAIL FOR RCP-7600 WS-22701
IMPORTANT: Use only factory
authorized service parts and
replacement filters.
For factory authorized service, or to
order factory authorized
replacement parts, contact your
Wells authorized service agency, or
call:
Wells Manufacturing
265 Hobson Street
Smithville, Tennessee 37166 U
Service Dept.
phone: (314) 678-6314
fax: (314) 781-2714
Service Parts Department
can supply you with the name
and telephone number of
the WELLS AUTHORIZED
SERVICE AGENCY
nearest you.
.S.A.
CUSTOMER SERVICE DATA
please have this information available if calling for service
RESTAURANT _____________________________ LOCATION _____________
INSTALLATION DATE ________________________ TECHNICIAN ___________
SERVICE COMPANY ________________________________________________
ADDRESS ___________________________ STATE ______ ZIP__________
TELEPHONE NUMBER (_____)_____-_________
EQUIPMENT MODEL NO. _______________
EQUIPMENT SERIAL NO. _______________
VOLTAGE: (check one) 120 _______
M405 p/n 2M-305101 Owmers Manual Drop-In Refrigerated Cold Pans
17
Page 20

WELLS MANUFACTURING
265 Hobson Street, Smithville, Tennessee 37166
telephone: 314-678-6314
fax: 314-781-2714
www.wells-mfg.com
 Loading...