

Page 1
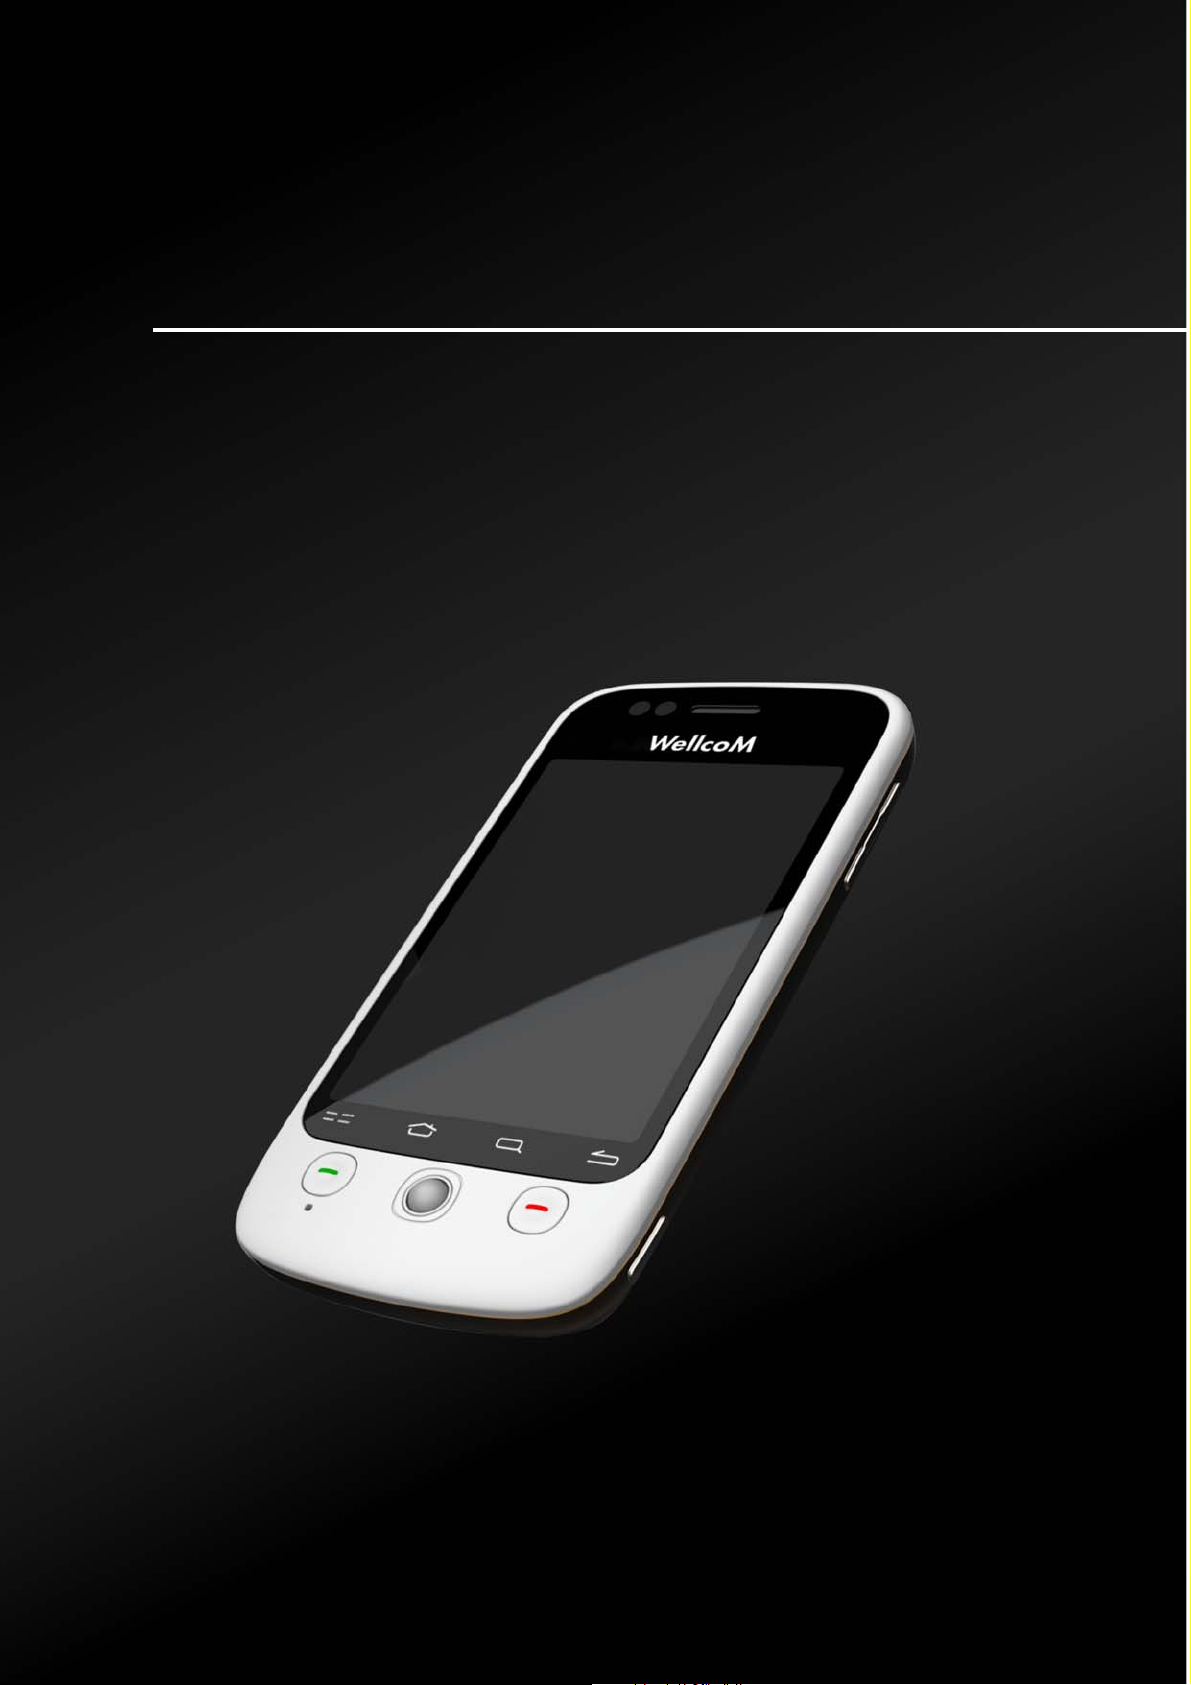
WellcoM A88
USER'S MANUAL
Page 2

Table of Contents
Chapter 1: Getting Started.................................................................... 1
1.1 Your Phone .................................................................................................. 1
Front ........................................................................................................................ 1
Back......................................................................................................................... 1
Top........................................................................................................................... 2
Side.......................................................................................................................... 2
1.2 Accessories ................................................................................................. 3
1.3 Installing the SIM Card, Battery and Memory Card .................................. 3
SIM card.................................................................................................................. 3
Battery ..................................................................................................................... 4
Memory card ........................................................................................................... 5
1.4 Charging the Battery................................................................................... 5
1.5 Using Headset ............................................................................................. 5
1.6 Turning the Phone On or Off...................................................................... 6
Chapter 2: The Basics........................................................................... 7
2.1 The Home Screen ........................................................................................ 7
Status Bar Icons....................................................................................................... 7
Shortcut Menu ......................................................................................................... 9
Application Drawer............................................................................................... 11
Using Widgets....................................................................................................... 11
Setting the wallpaper............................................................................................. 11
2.2 LED Indicators ........................................................................................... 12
2.3 Adjusting the Volume ............................................................................... 12
2.4 Contacts ..................................................................................................... 14
Adding a Contact................................................................................................... 14
Searching for Contacts .......................................................................................... 14
Importing Contacts................................................................................................ 15
Backing Up Contacts............................................................................................. 16
Favorite Contacts................................................................................................... 16
Chapter 3: Using the Phone ............................................................... 17
3.1 Voice Calls ................................................................................................. 17
Making a call......................................................................................................... 17
Answering a call.................................................................................................... 18
Ending a call.......................................................................................................... 19
Chapter 4: Entering Information ........................................................ 20
4.1 On-Screen Keyboard................................................................................. 20
Using on-screen keyboard..................................................................................... 20
Setting the Input Method....................................................................................... 21
Changing the Input Method................................................................................... 21
4.2 Configuring phone keyboard settings .................................................... 21
Chapter 5: Email & Messaging........................................................... 22
To open Messaging................................................................................................ 22
5.1 Text Message............................................................................................. 22
Creating and sending a text message..................................................................... 22
i
Page 3

Table of Contents
Receiving and Managing Messages ...................................................................... 23
5.2 Multimedia Message ................................................................................. 26
Creating and sending an MMS message ............................................................... 26
5.3 Voice Message........................................................................................... 27
Recording voice..................................................................................................... 28
Managing recorded voice...................................................................................... 28
5.4 E-mail Accounts ........................................................................................ 29
Setting up an Internet e-mail account.................................................................... 29
To open Email ....................................................................................................... 29
5.5 Using E-mail............................................................................................... 31
Composing and sending an E-mail........................................................................ 31
Receiving e-mails.................................................................................................. 31
Reading and replying to e-mails............................................................................ 32
Managing E-mail folders....................................................................................... 32
Customizing e-mail settings.................................................................................. 32
Chapter 6: Using the Internet............................................................. 34
6.1 Connecting to the Internet........................................................................ 34
Wi-Fi...................................................................................................................... 34
Cellular Data Network........................................................................................... 35
Starting a Data Connection.................................................................................... 36
6.2 Browsing a Web Page............................................................................... 37
Managing a Web Page........................................................................................... 37
Chapter 7: Using Bluetooth................................................................ 40
7.1 Connecting to Bluetooth Devices............................................................ 40
Chapter 8: Multimedia Applications .................................................. 41
8.1 Photos and Videos .................................................................................... 41
Taking a photo....................................................................................................... 41
Recording video..................................................................................................... 42
Reviewing a photo................................................................................................. 42
Reviewing a video................................................................................................. 43
Configuring camera settings.................................................................................. 43
8.2 Viewing Photos & Videos ......................................................................... 45
To view photos in the album................................................................................. 45
To Configure Camera & Video Playback settings ................................................ 47
To playback videos in the album........................................................................... 47
8.3 Using Music Player ................................................................................... 47
Music Screen ......................................................................................................... 47
Playing Music........................................................................................................ 48
Changing Playback options................................................................................... 48
Creating a Playlist.................................................................................................. 48
Chapter 9: Using GPS......................................................................... 50
9.1 Using GPS Tracker.................................................................................... 50
Turning on GPS..................................................................................................... 50
Hiding GPS Window............................................................................................. 50
ii
Page 4

Table of Contents
Managing Tracking Data....................................................................................... 51
Chapter 10: Programs......................................................................... 52
10.1 Browser .................................................................................................... 54
10.2 Calculator................................................................................................. 54
10.3 Calendar ................................................................................................... 54
10.4 Camcorder ............................................................................................... 54
10.5 Camera ..................................................................................................... 55
10.6 Clock......................................................................................................... 55
10.7 Contacts ................................................................................................... 56
10.8 Dialer ........................................................................................................ 56
10.9 Documents To Go ................................................................................... 56
Word To Go® Viewer........................................................................................... 56
Sheet To Go® Viewer........................................................................................... 57
Slideshow To Go® Viewer ................................................................................... 57
PDF To Go® Lite.................................................................................................. 57
10.10 eBuddy ................................................................................................... 58
10.11 Email....................................................................................................... 58
10.12 Facebook................................................................................................ 58
10.13 File Browser........................................................................................... 58
Managing Files and Folders .................................................................................. 58
10.14 Gallery .................................................................................................... 59
10.15 Gmail ...................................................................................................... 59
10.16 Google Talk............................................................................................ 59
10.17 GPS Tracker........................................................................................... 60
10.18 Java ME Apps ........................................................................................ 60
Online.................................................................................................................... 60
My Code................................................................................................................ 60
10.19 Maps ....................................................................................................... 60
10.20 Market..................................................................................................... 61
10.21 Messaging.............................................................................................. 61
10.22 Music ...................................................................................................... 61
10.23 Note pad ................................................................................................ 62
10.24 RoadSync Calendar .............................................................................. 62
10.25 RoadSync Mail....................................................................................... 62
10.26 Rss reader.............................................................................................. 63
10.27 Settings .................................................................................................. 63
10.28 SIM Toolkit ............................................................................................. 64
10.29 Videos..................................................................................................... 64
10.30 Voice Dialer............................................................................................ 64
10.31 Voice Note.............................................................................................. 64
10.32 YouTube ................................................................................................. 65
Chapter 11: Managing Your Phone.................................................... 66
11.1 Phone Settings ........................................................................................ 66
Wireless Controls .................................................................................................. 66
Call settings........................................................................................................... 66
Sound & display.................................................................................................... 66
Security & location................................................................................................ 67
iii
Page 5

Table of Contents
Applications..................................................... 68
SD card USB Mass Storage & phone storage........................... 68
Date & time ..................................................... 68
Locale & text.................................................... 68
About phone .......................................................................................................... 68
11.2 Changing Basic Settings ........................................................................ 69
Date and Time ....................................................................................................... 69
Setting Alarms....................................................................................................... 69
Display Settings..................................................................................................... 70
Ring Settings ......................................................................................................... 70
11.3 Using Wireless Control........................................................................... 70
11.4 Using RoadSync...................................................................................... 71
Set up RoadSync for the first time ........................................................................ 71
Customize RoadSync............................................................................................. 71
Start Synchronization ............................................................................................ 72
Update RoadSync.................................................................................................. 73
11.5 Protecting Your Phone ........................................................................... 73
Enable or Disable SIM card PIN........................................................................... 73
Enabling Password Protection............................................................................... 73
11.6 Resetting the Phone................................................................................ 73
Safety Information .................................................................................................. 74
Specifications ......................................................................................................... 78
iv
Page 6
Chapter 1: Getting Started
Chapter 1: Getting Started
1.1 Your Phone
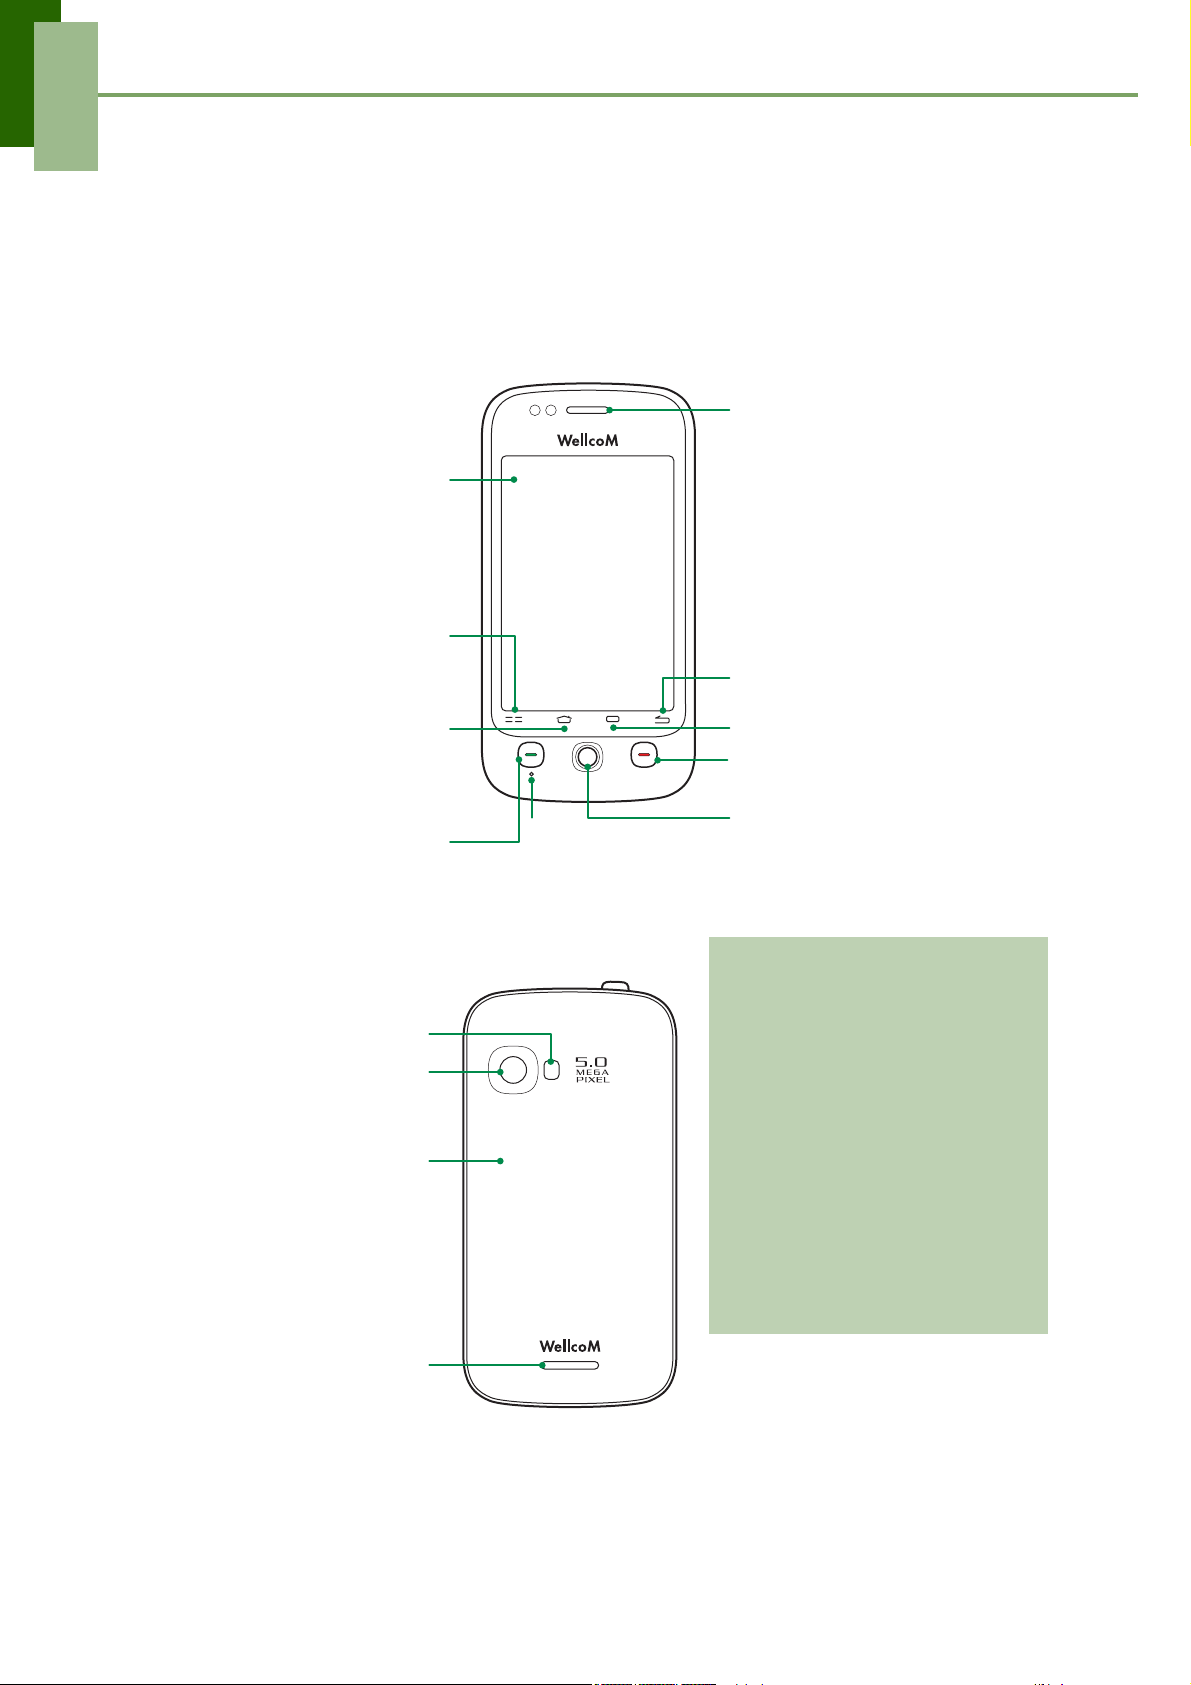
Front
Earpiece
Touch screen
Menu:
• Press to unlock the phone.
• Press to view menu options.
Return
Home:
• Go back to Home screen.
• Long press to bring up
recent activities
Browser
End: End or reject a call.
Talk / Send:
• Activate the Dialer.
• Make or answer a call.
Back
Flash LED
5 Megapixels camera:
See “Photos and Videos”
on page 41.
Back cover:
Push and slide
downwards to open the
cover.
Speaker
MIC
Trackball: move to select
an option.
LED Alerts
Your phone is equipped with
2 LED indicators:
• Green: Send button
• Red: End button.
For more information, see
“LED Indicators” on page 12.
1
Page 7
Chapter 1: Getting Started
e
s
Top
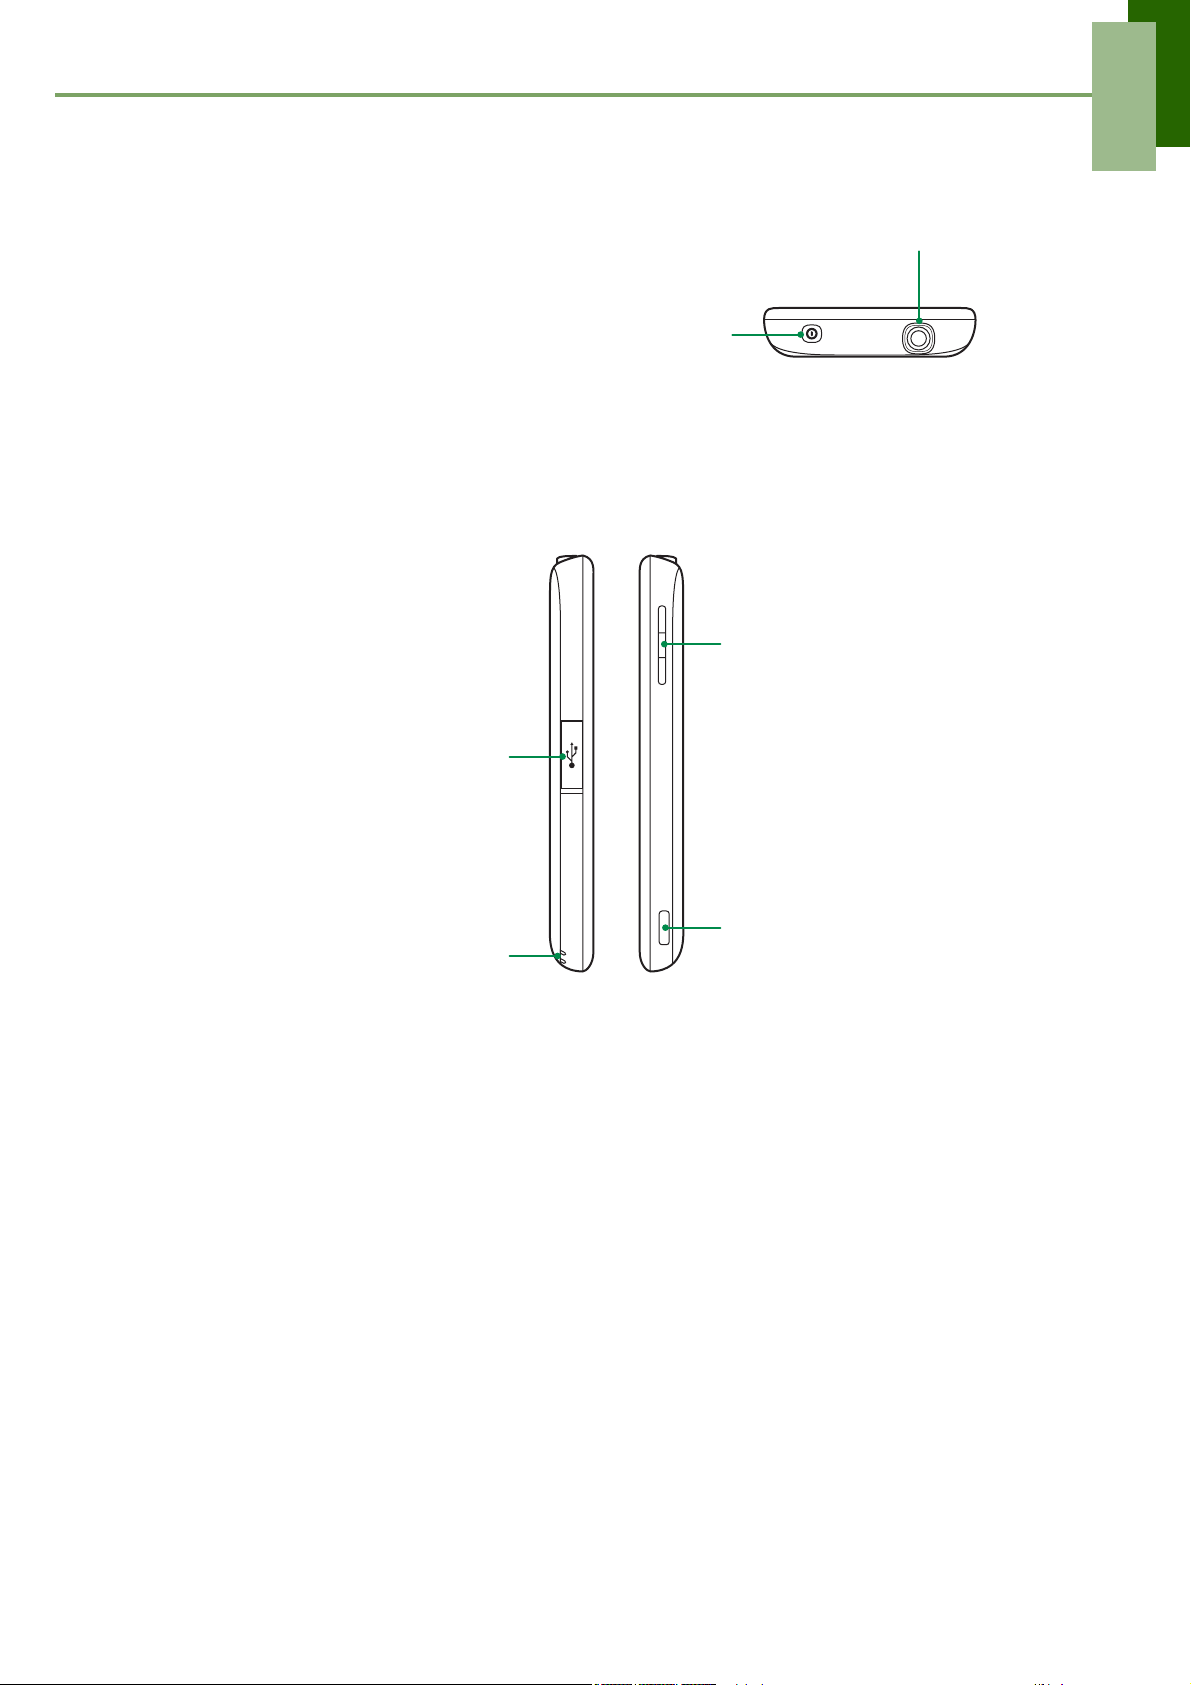
Earphone jack: Use a headset for hands-free conversation or listening to music.
Power:
• Press and hold for 5 seconds to turn the phone on or off.
• To save battery, quick press to temporarily turn the screen
on or off.
Side
Volume: Press upwards or
downwards to increase or
decrease the volume. Slide
down the key fully to enter
vibrate mode.
Micro USB port:
• Connect USB cable to PC as a
modem /USB mass storage.
• Connect USB cable and the AC
adapter to charge the battery.
Strap hole
Shutter:
• Press the shutter to activate
camera.
• In Camera mode, press to tak
a photo or video. See “Photo
and Videos” on page 41.
NOTE: The battery can also be charged while connecting to a computer.
2
Page 8
Chapter 1: Getting Started
1.2 Accessories
Your package comes with the following items. If any of them is missing, please
contact your retailer.
• Phone
• USB cable
• AC adapter
• Li-Ion battery
• Earphone
• Quick Start Guide
• User manual (micro SD card)
1.3 Installing the SIM Card, Battery and Memory Card
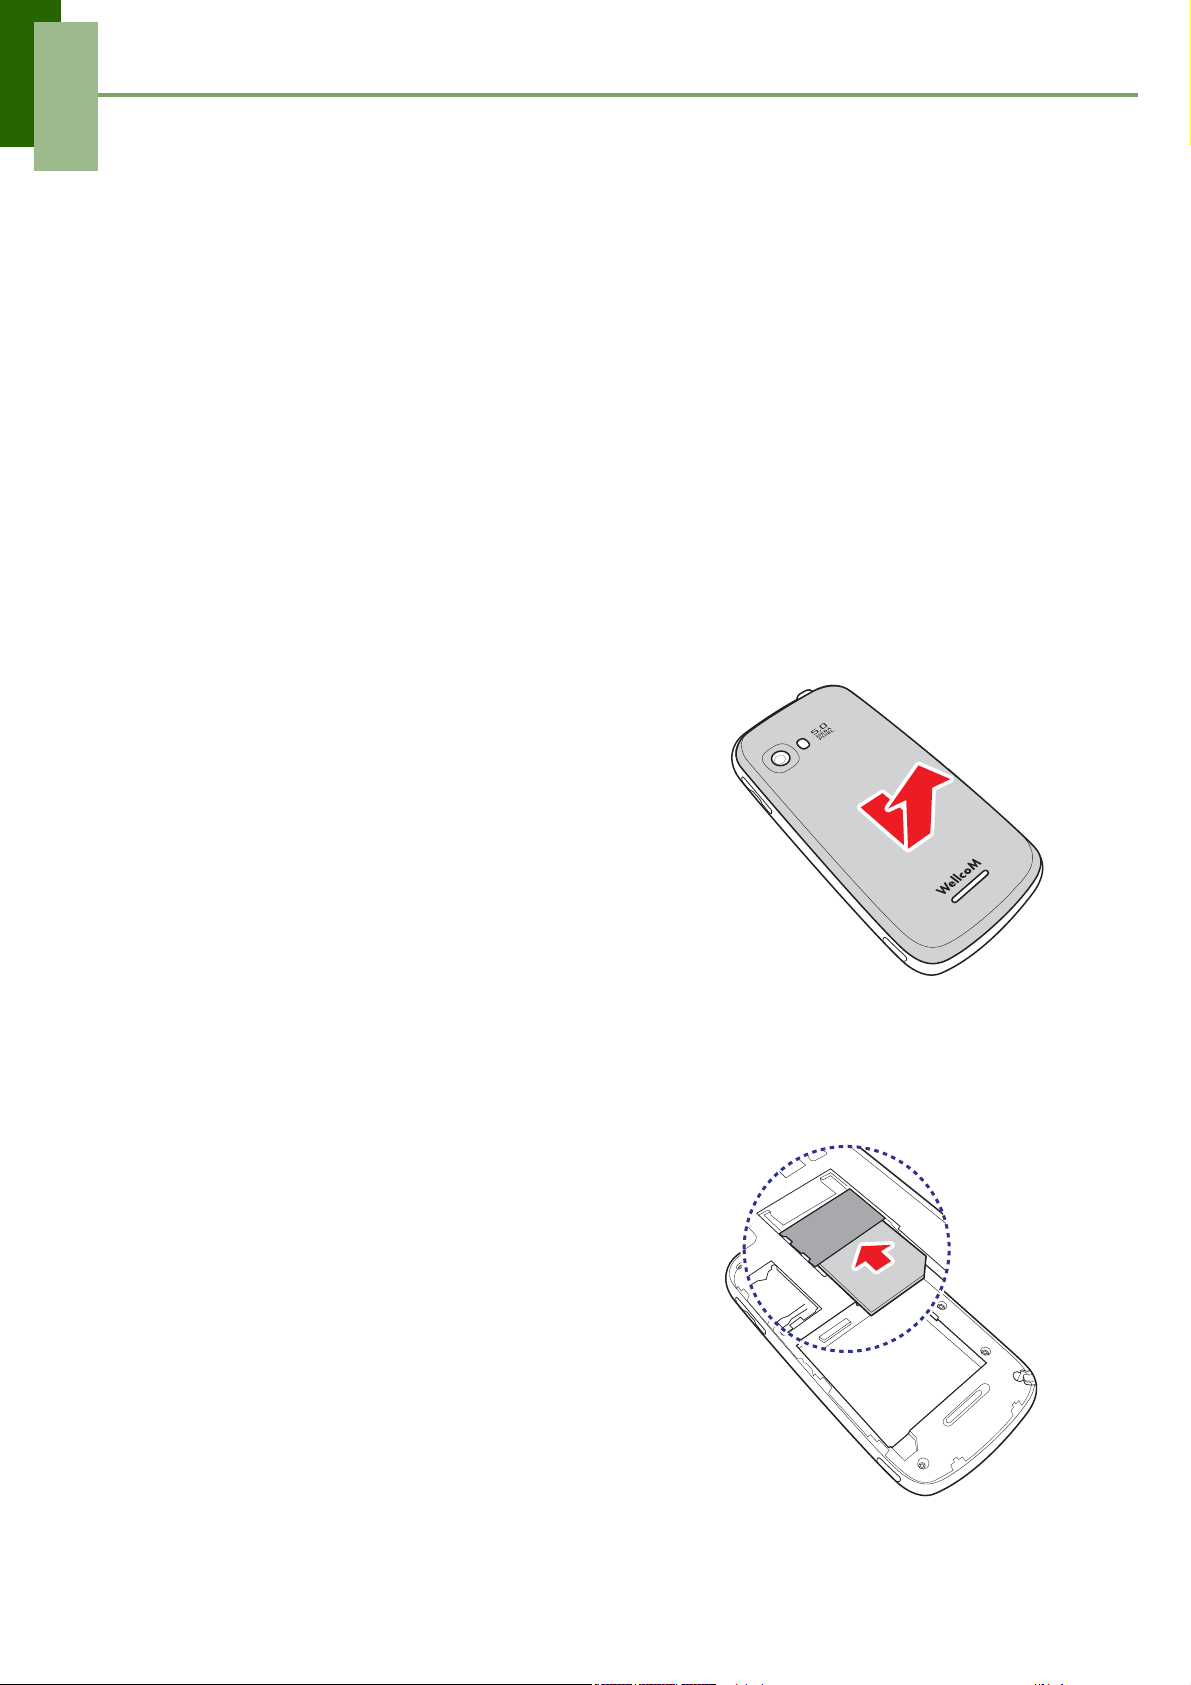
To remove the back cover
1. Turn the phone off.
2. Push and slide downwards to open the
back cover.
SIM card
The SIM card contains your phone number, memory storage, and network service
details.
To install the SIM card
Insert the SIM card as shown. Make sure the
gold contacts are facing down and the cut-off
corner facing towards the battery slot.
To remove the SIM card
1. Remove battery.
2. Use your finger to slide the SIM card from the
card slot.
3
Page 9
Chapter 1: Getting Started
Battery
Your phone comes with a rechargeable Li-Ion battery. Battery life varies depending on
the network and applications used and the type of connections attached to your
phone.
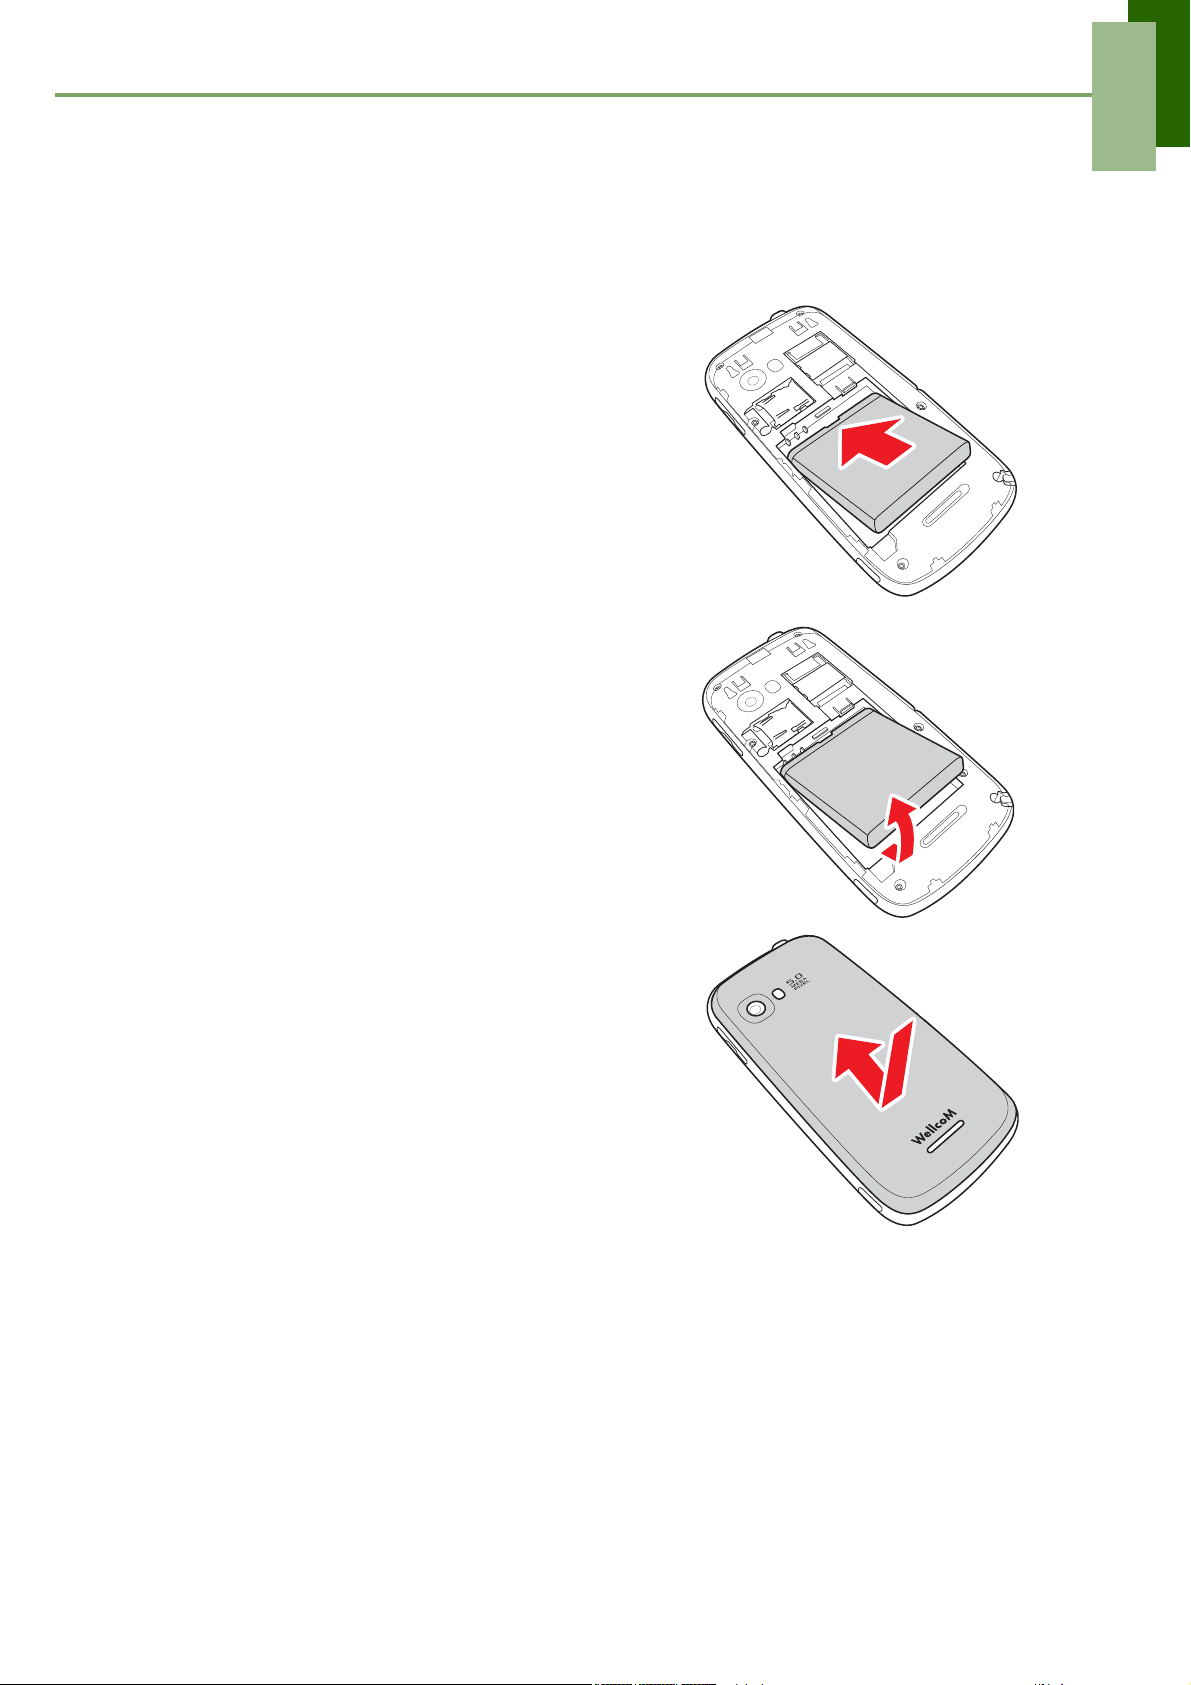
To install the battery
Insert the battery. Make sure the contacts of the
battery are aligned with the connectors on the
battery slot.
To remove the battery
Use your fingertip to lift the battery tab and
remove the battery.
To replace the back cover
Secure the hooks on the back cover with
designated holes on the phone and close the
back cover.
NOTE: To ensure battery performance and avoid the risk of fire:
• Use only original batteries designated for the phone.
• Do not store the battery in temperatures below -10ºC or higher than 45ºC.
4
Page 10
Chapter 1: Getting Started
Memory card
You will need a microSD® card to store photos, music, videos and other data.
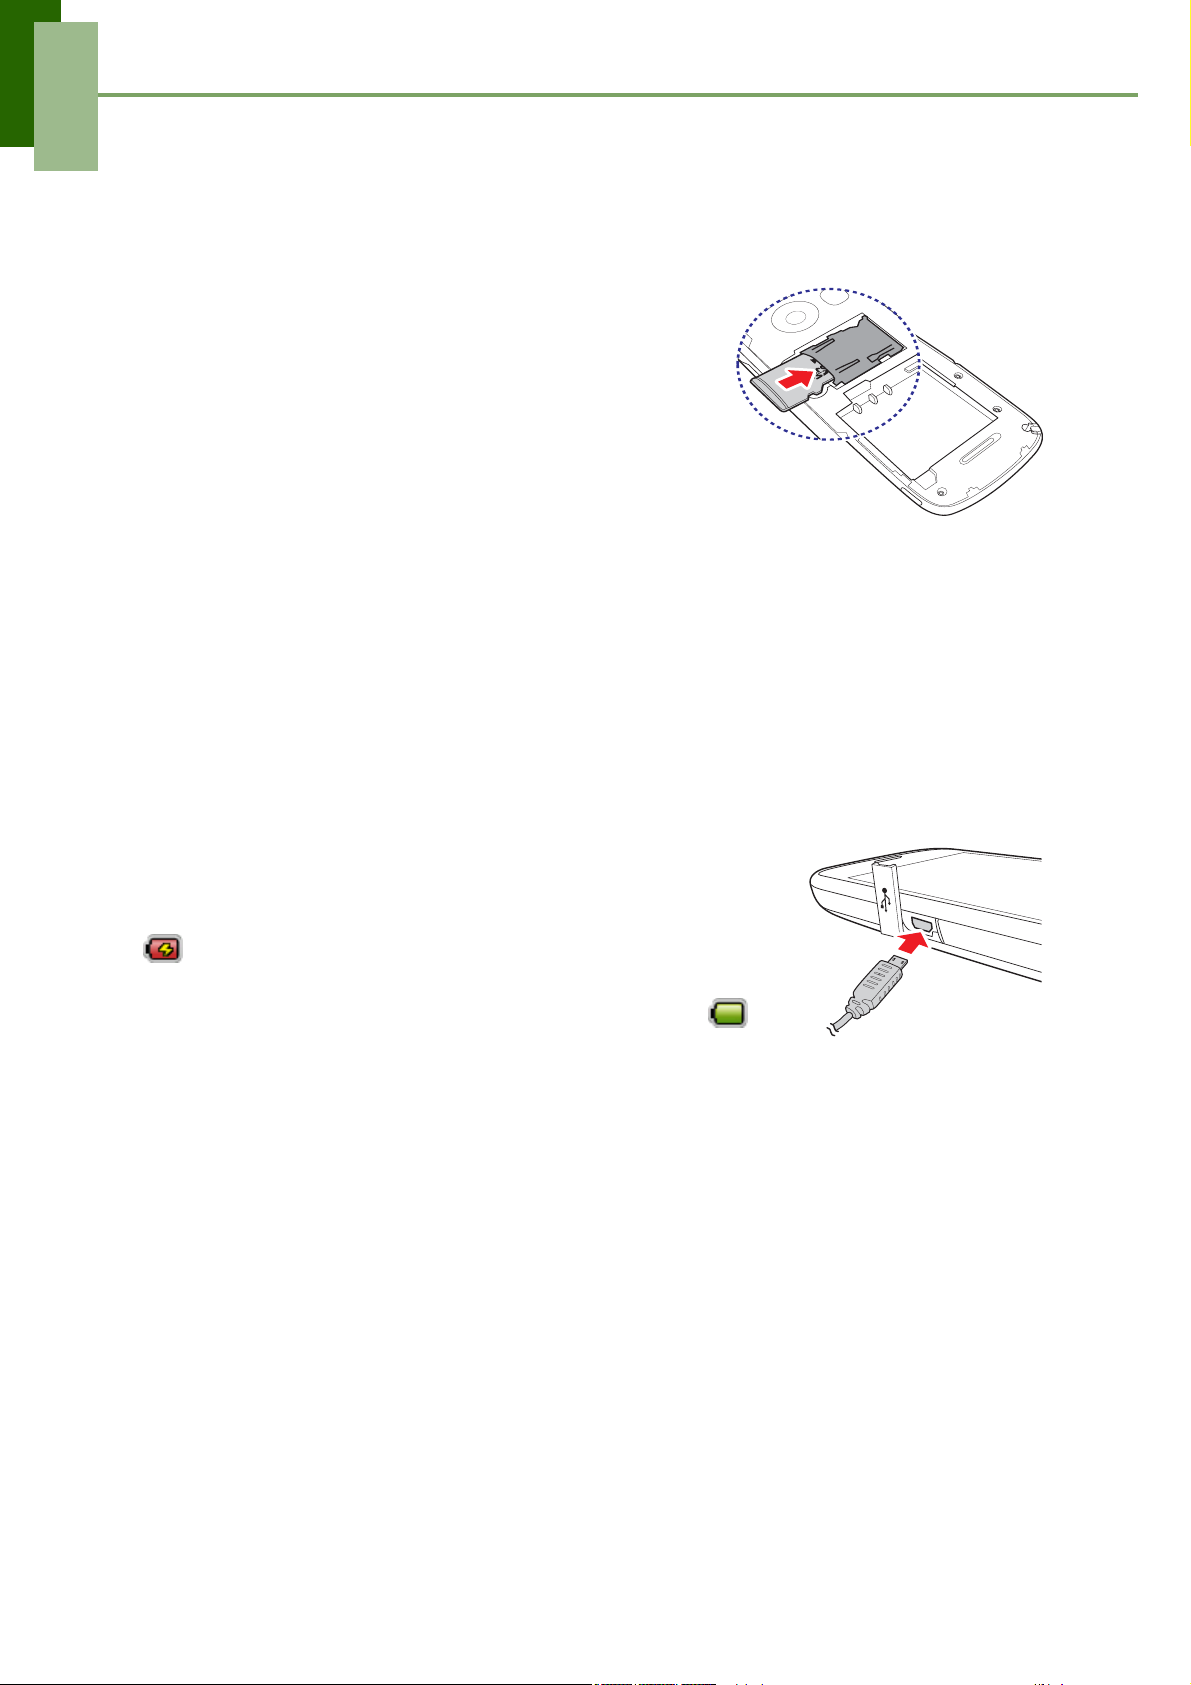
To install the memory card
1. Insert the memory card with the gold contacts
facing down.
2. Push the memory card until it clicks into place.
To remove the memory card
1. For safety removal, go to Settings > SD card,
USB Mass Storage & phone storage >
Unmount SD card.
2. Push the memory card down to eject it from the slot.
NOTE: To check for memory card compatibility, please refer to the memory card
documentation.
1.4 Charging the Battery
The battery out of the box is only partially charged. To fully charge the battery, charge
it for 2 hours.
1. Open the Micro USB port cover.
2. Plug the battery charger as shown in the diagram.
3. Plug the AC adapter to the wall outlet to start charging.
When the battery is charging, the red LED is activated; the
icon is also displayed on the status bar. When the
battery is fully charged, the red LED disappears and the
green LED is activated; if the phone is turned on, the
icon is also displayed on the status bar.
NOTE:
• The battery can also be charged when you connect your phone to the
computer.
• To ensure safety, do not remove the battery from the phone while the AC
adapter is connected or while it is being charged.
1.5 Using Headset
For hands-free conversation or listening to music, plug a headset to headset jack.
NOTE:
• When using a headset, your ability to hear outside sounds may be limited.
Do not use headset if it will endanger you.
• Do not set the volume to its maximum with a headset as it may damage your
hearing.
5
Page 11
Chapter 1: Getting Started
1.6 Turning the Phone On or Off
After installing the SIM card and charging the battery, you are now ready to turn on
your phone.
To turn on your phone
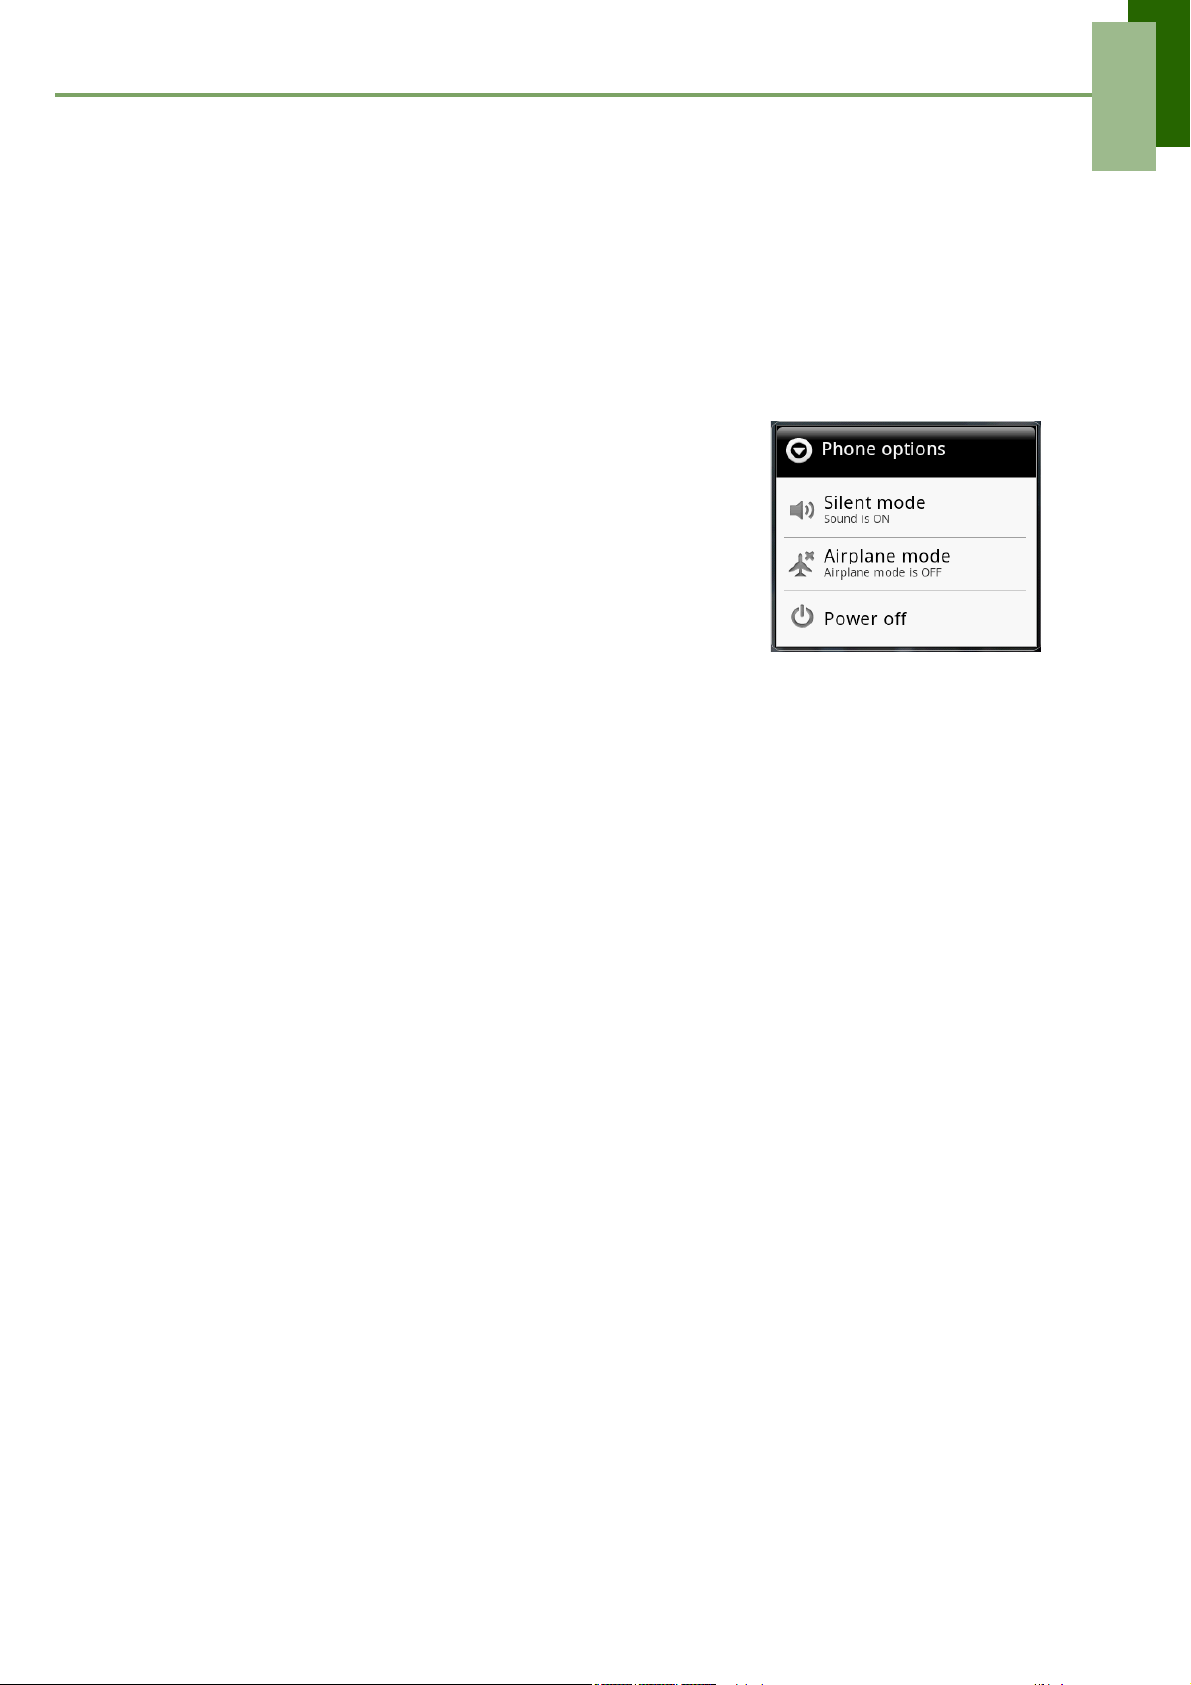
Press and hold the power button until the phone vibrates.
To turn off your phone
1. Press and hold the power button for 5 seconds.
2. A pop-up window appears, tap Power off.
3. Select OK to confirm.
To set your phone to Sleep mode
To set your phone to sleep mode, press the power
button briefly. This will turn the display off.
To turn the display on, press again the power button
briefly.
6
Page 12
The Basics
Chapter 2: The Basics
2.1 The Home Screen
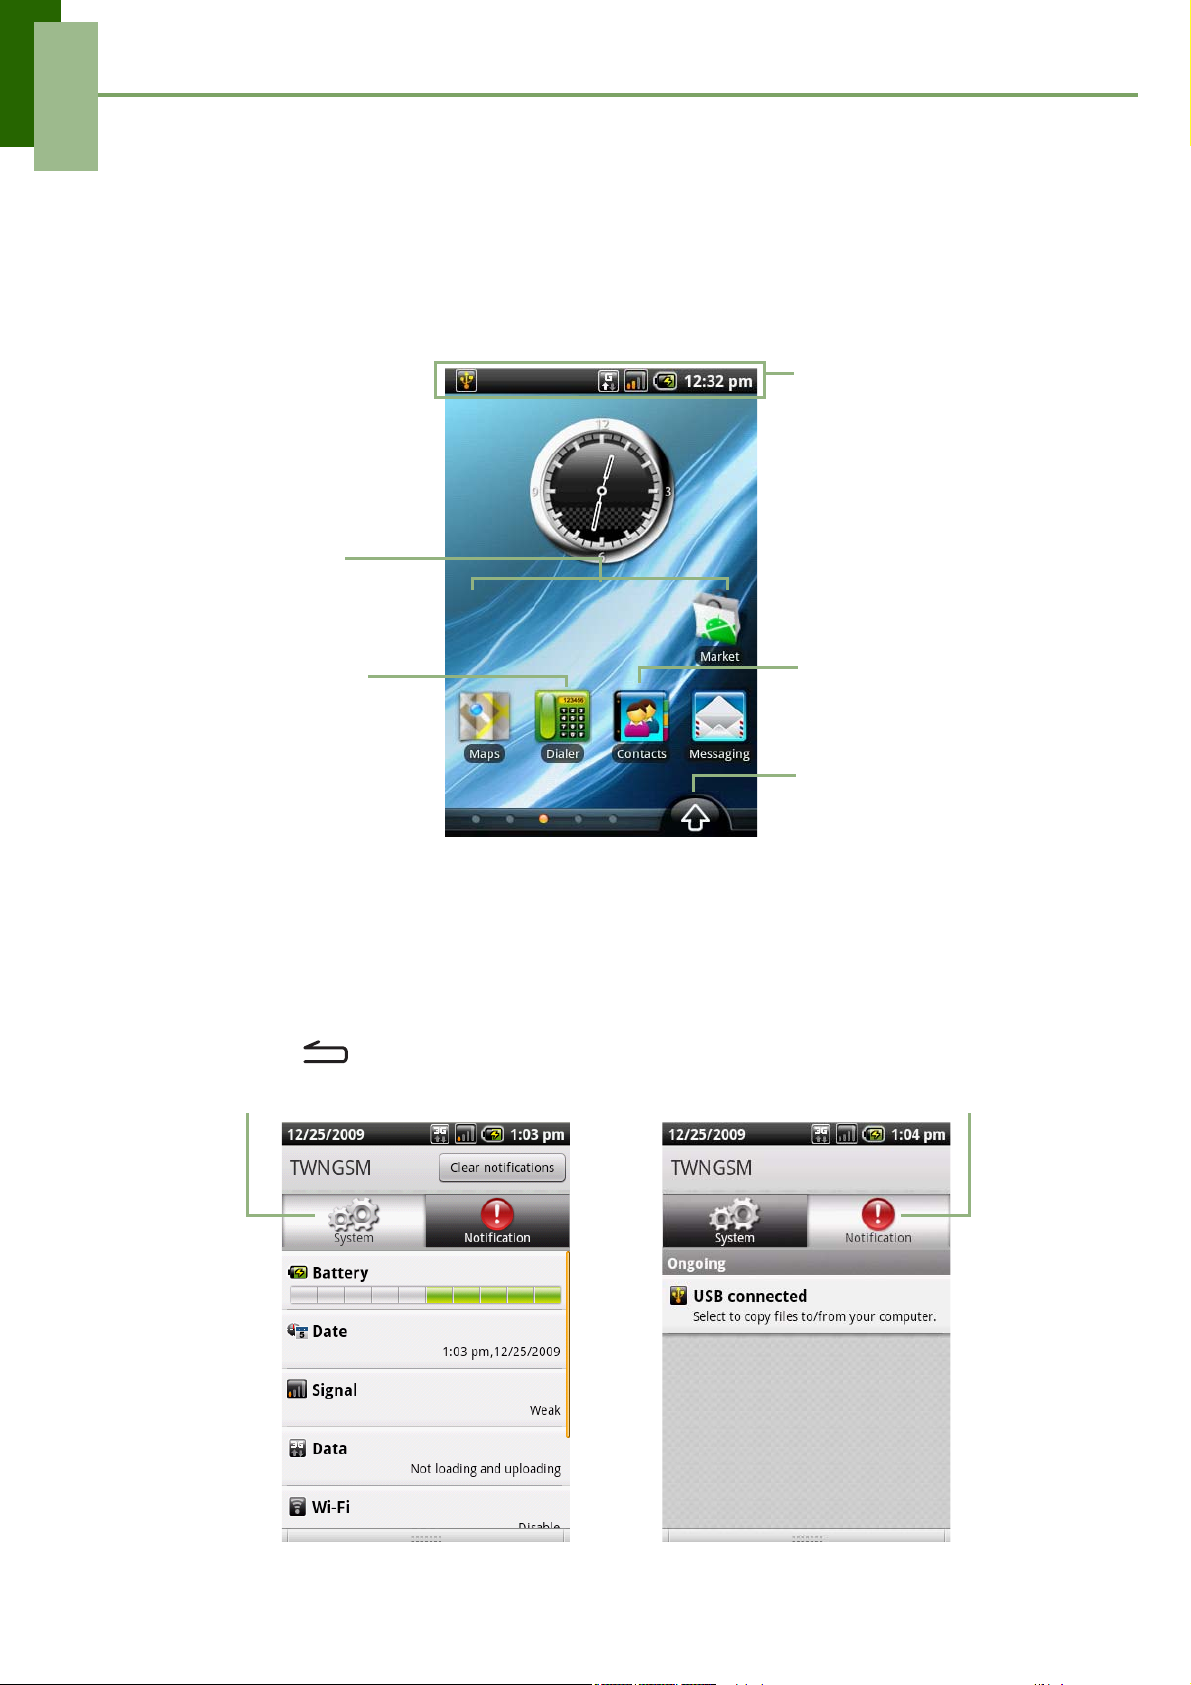
From Home screen, you can quickly access common features and view notifications
of missed calls, received messages, battery and connection status.
Status bar
• Displays status and
notification icons
and the clock.
• Message,
appointment, task,
Shortcut Menu
Tap an icon to access the
function.
and connection
notifications are
also displayed here.
Tap to open the
Dial keypad.
Tap to open the
Contacts screen. See
“Contacts” on
page 14.
Application Drawer
Tap to view the
programs and settings
of the phone.
Status Bar Icons
The Status bar icons indicate different types of information. Tap the status bar and
scroll down to view notifications or view system information easily. To close the
window, press .
Tap to display the system information. Tap to display the notifications.
7
Page 13
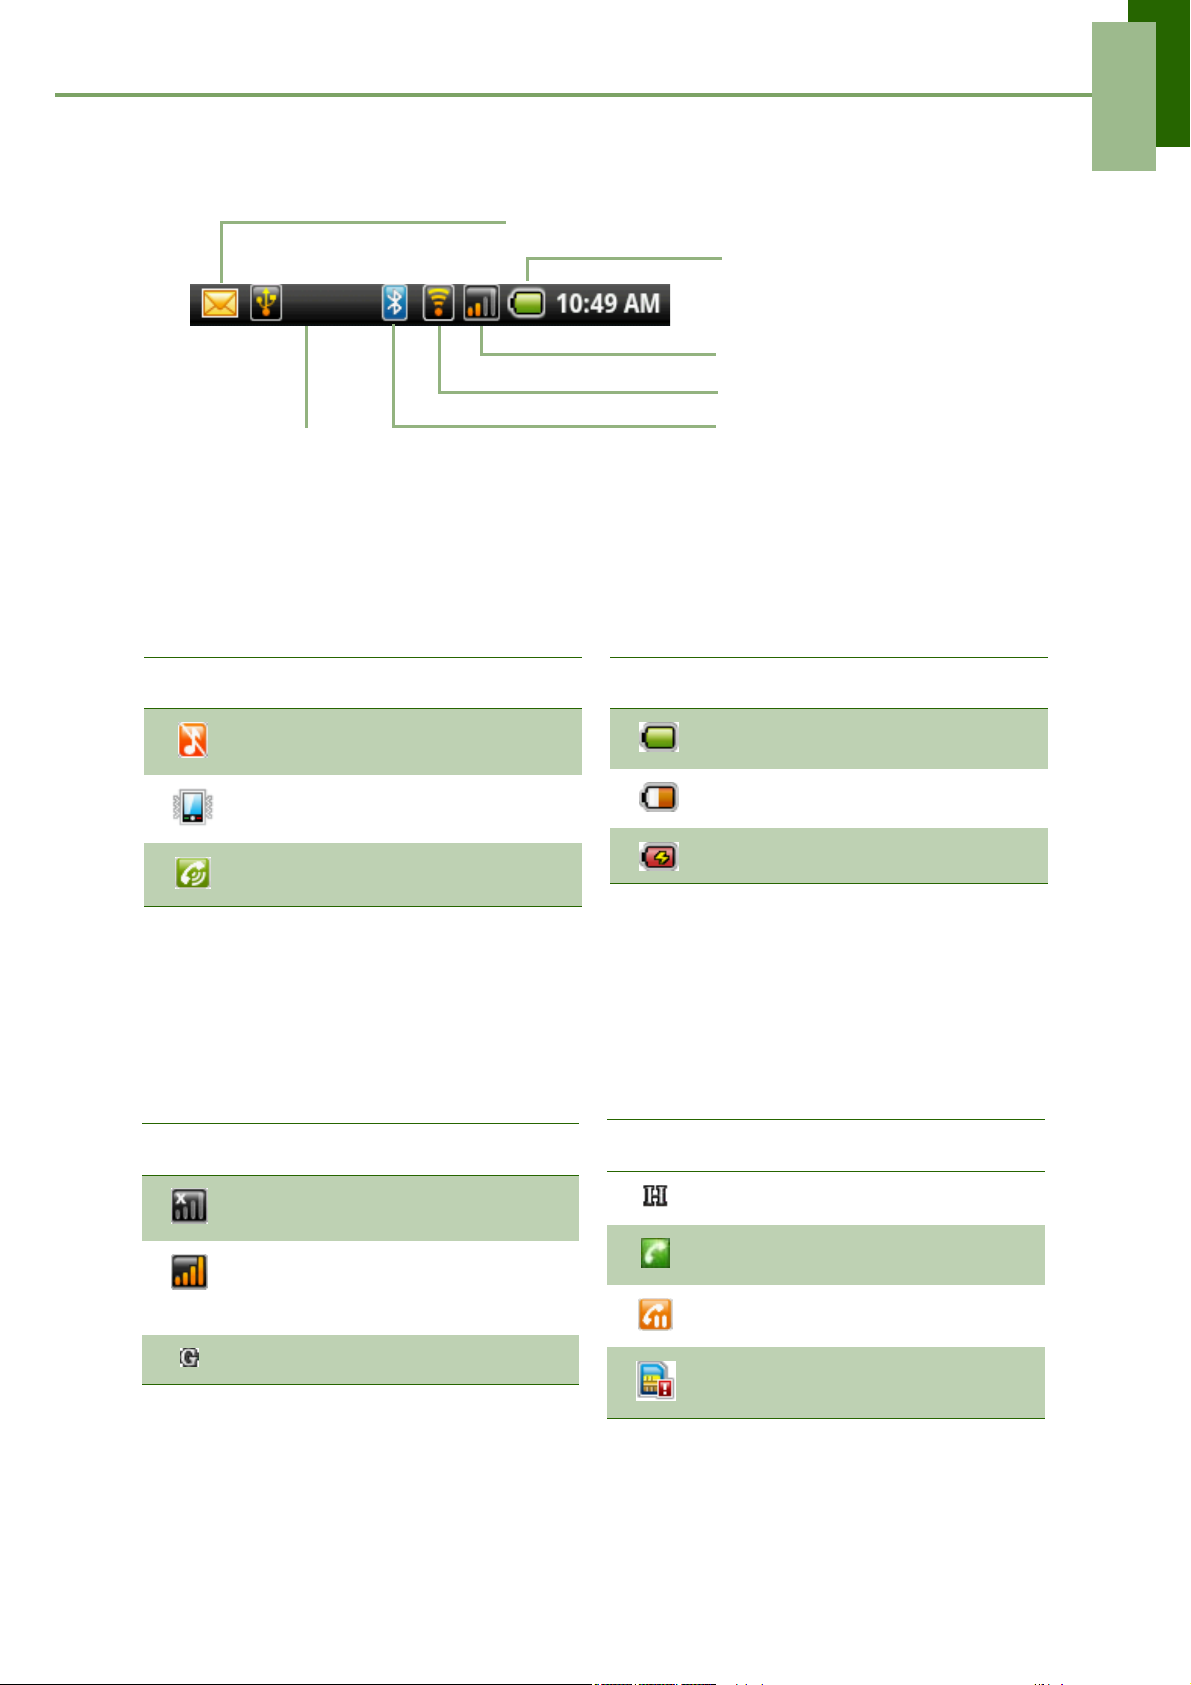
The icons on status bar indicates the following information:
Ph
Notification icon
Battery icon
Phone network icon
Wi-Fi icon
Bluetooth icon
USB connection
icon
The Basics
Volume icon
The following icons may appear on the
volume icon area.
Icon Description
Volume is muted.
Vibrate mode is activated.
Speakerphone is on.
Battery icon
The following icons may appear on the
battery icon area:
Icon Description
Battery is full.
Battery is low.
Battery is charging.
To charge the battery, see “Charging the
To adjust the volume, see “Adjusting the
Battery” on page 5.
Volume” on page 12.
one Network icon
The following icons may appear on the phone network icon area.
Icon Description
No network signal
Maximum signal strength. Fewer
bars indicate lower signal
strength.
GPRS network is in use.
Icon Description
HSDPA network is in use.
Call is in progress.
Call is in hold.
No SIM card inserted.
8
Page 14
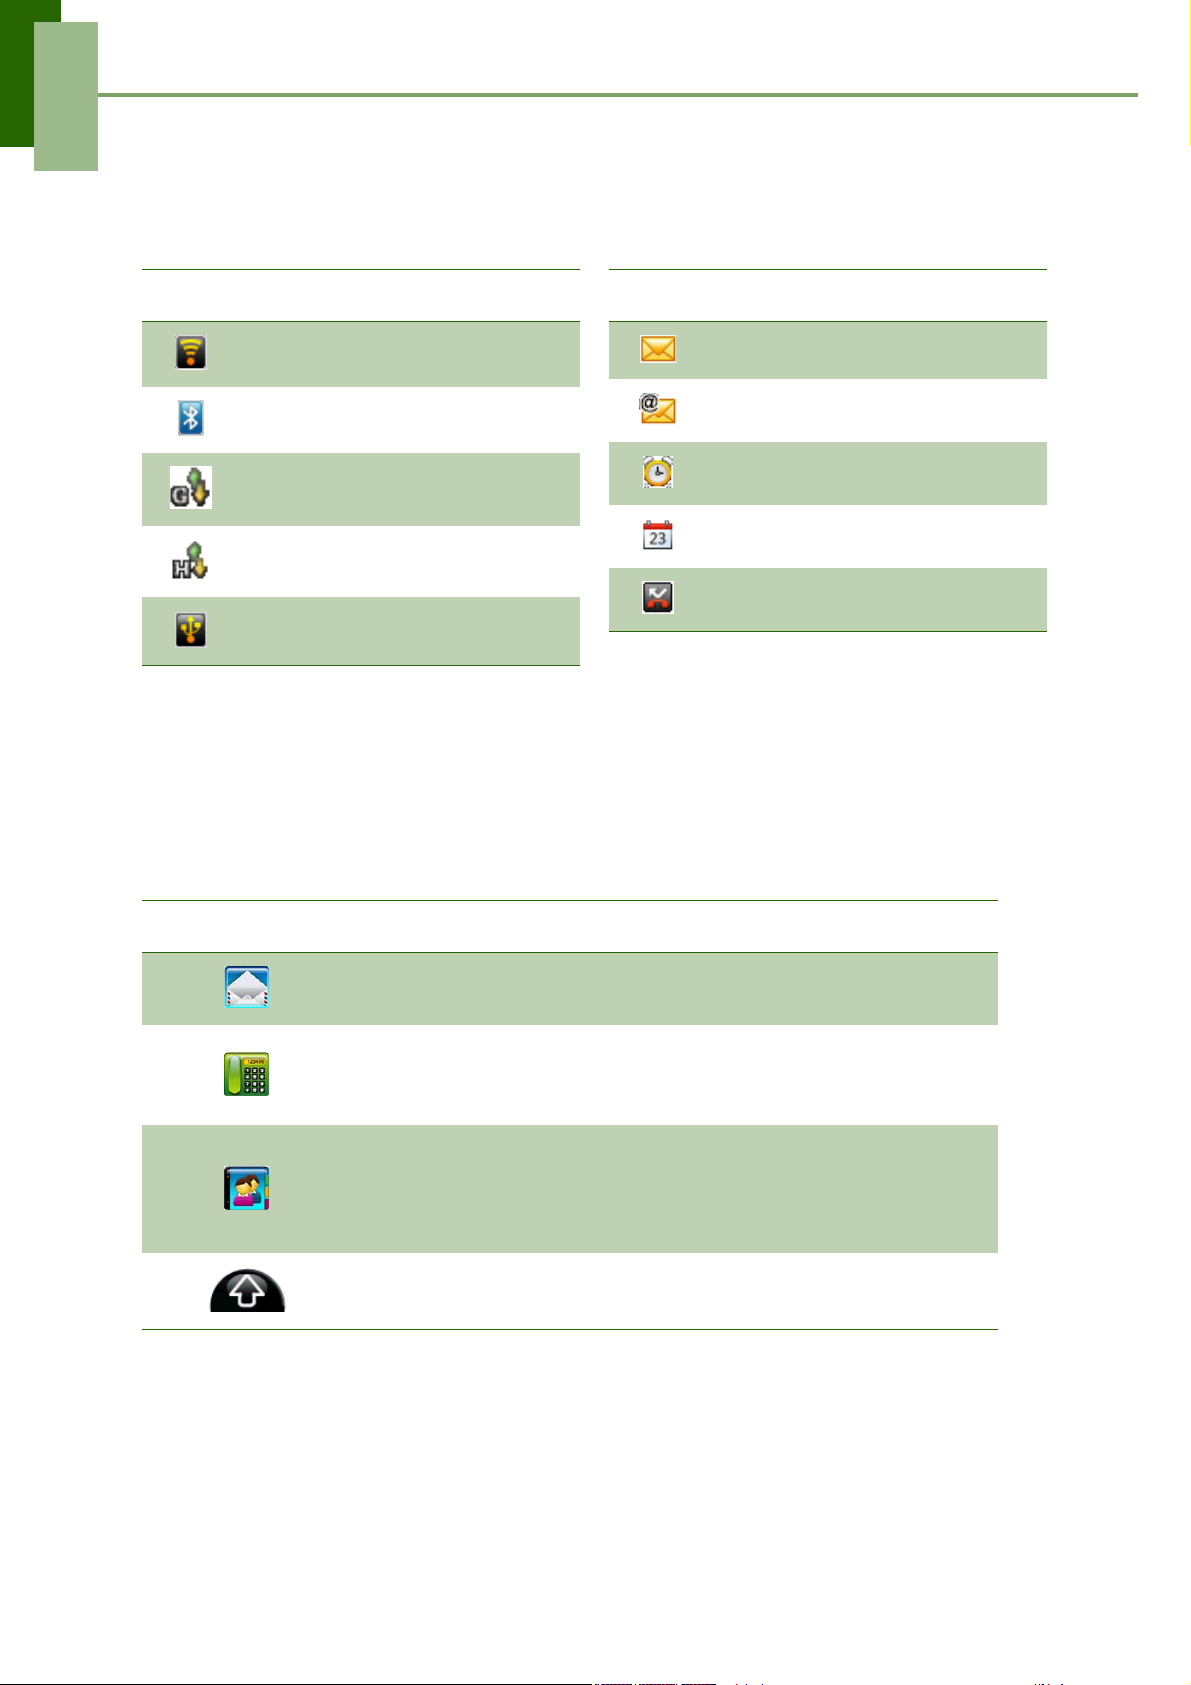
The Basics
Connection icon
The following icons may appear on the
connection icon area.
Icon Description
WiFi is connected.
Bluetooth connection is active.
GPRS data connection is active.
HSDPA data connection is
active.
Phone is connected to PC via
USB connector.
Notification icon
The following icons may appear on the
notification icon area.
Icon Description
New text message notification
New email notification
Alarm
Task notification
Missed call notification
Tap the status bar and scroll down to
view the details.
Shortcut Menu
The Shortcut menu displays notification or other information of each menu item. To
easily access the menu, tap the item on the Home screen. By default, the following
applications are displayed:
Icon Menu Item Description
Messaging
Dialer
Contacts
Application
Drawer
Displays message notification. Tap to
access Messaging menu. See page 22.
Displays phone keypad. Tap to enter the
phone number and make calls. See
page 17.
Displays contacts saved on the phone.
Tap to select the contact to make a
phone call or send text message. See
page 14.
Tap to access the Application Drawer.
See page 7.
9
Page 15
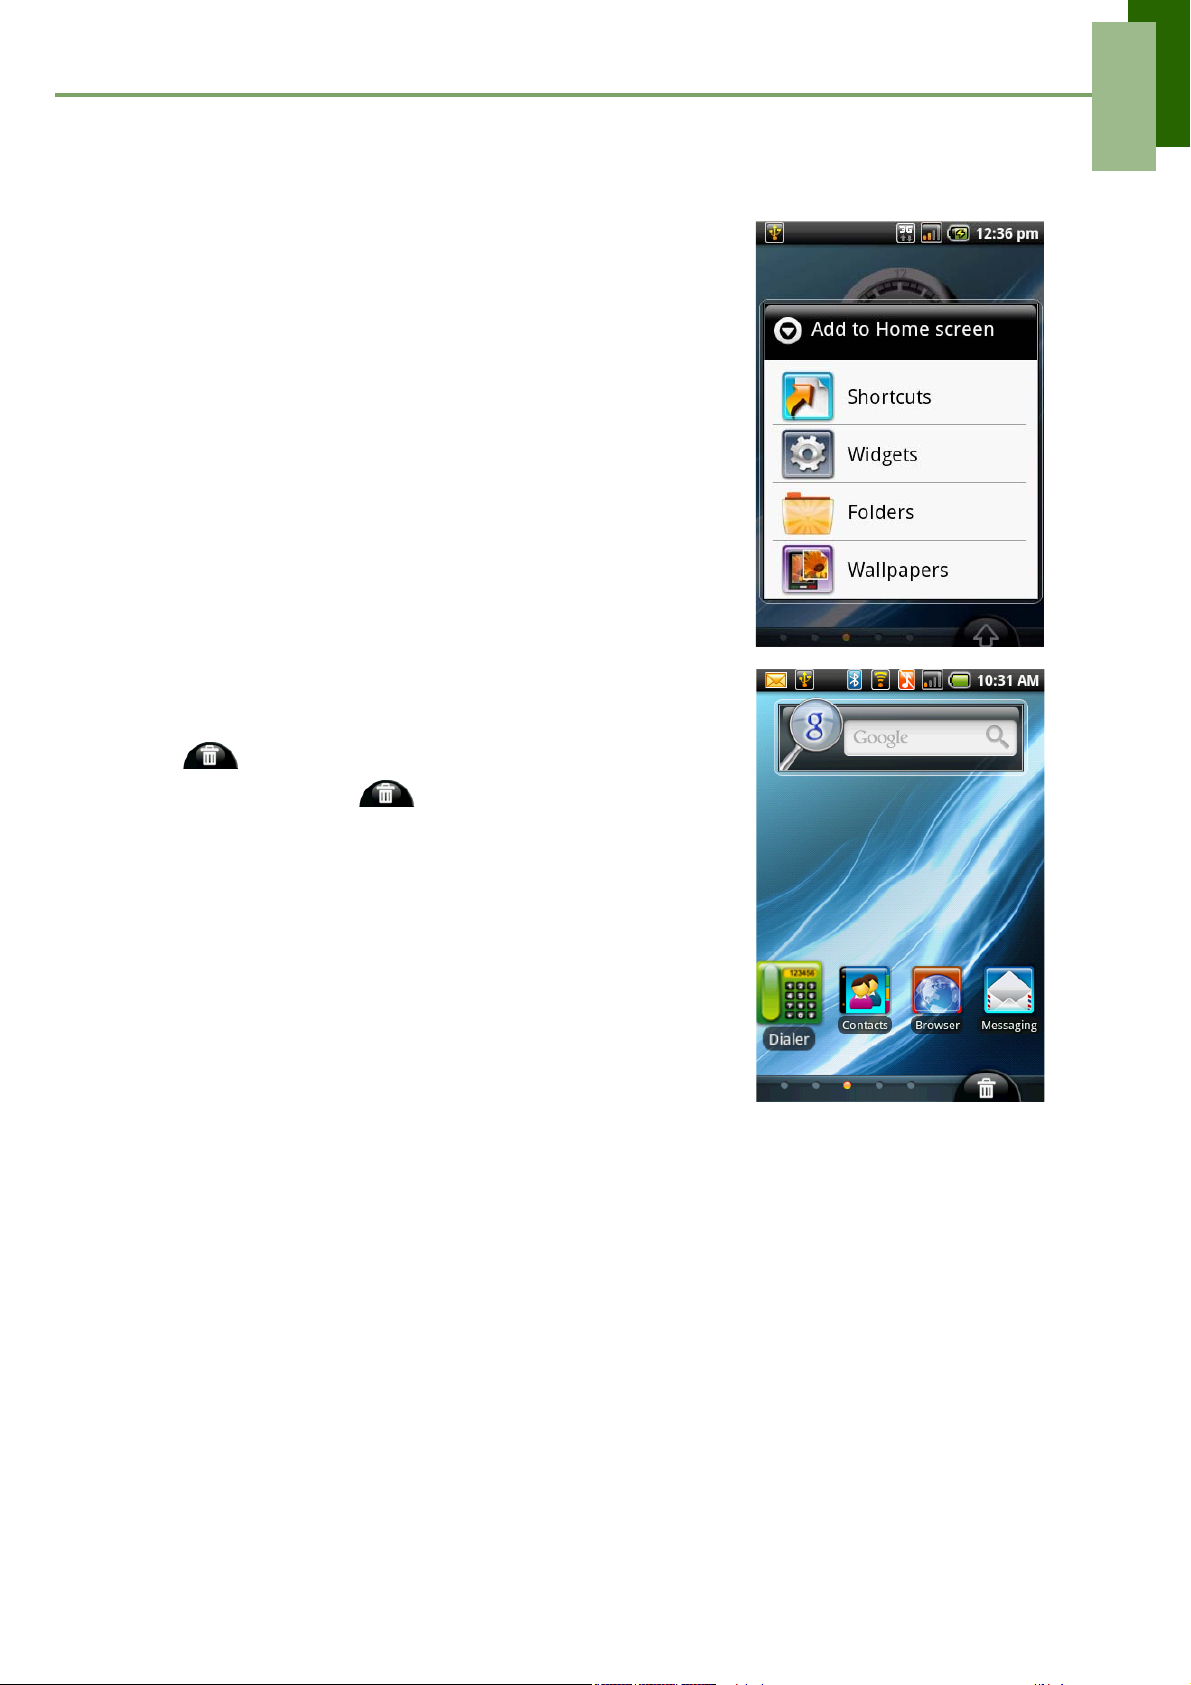
Customizing the Shortcut menu
To add a shortcut:
1. Tap Menu > Add > Shortcuts.
2. Tap Applications to display the list of applications.
3. Tap to add the items that you want to appear on the
Home screen.
To remove a shortcut:
1. Tap the desired shortcut icon and hold. The icon
enlarges.
The Basics
2. appears at the bottom of the Home screen.
3. Drag the icon to to delete.
4. The shortcut icon is then removed.
10
Page 16
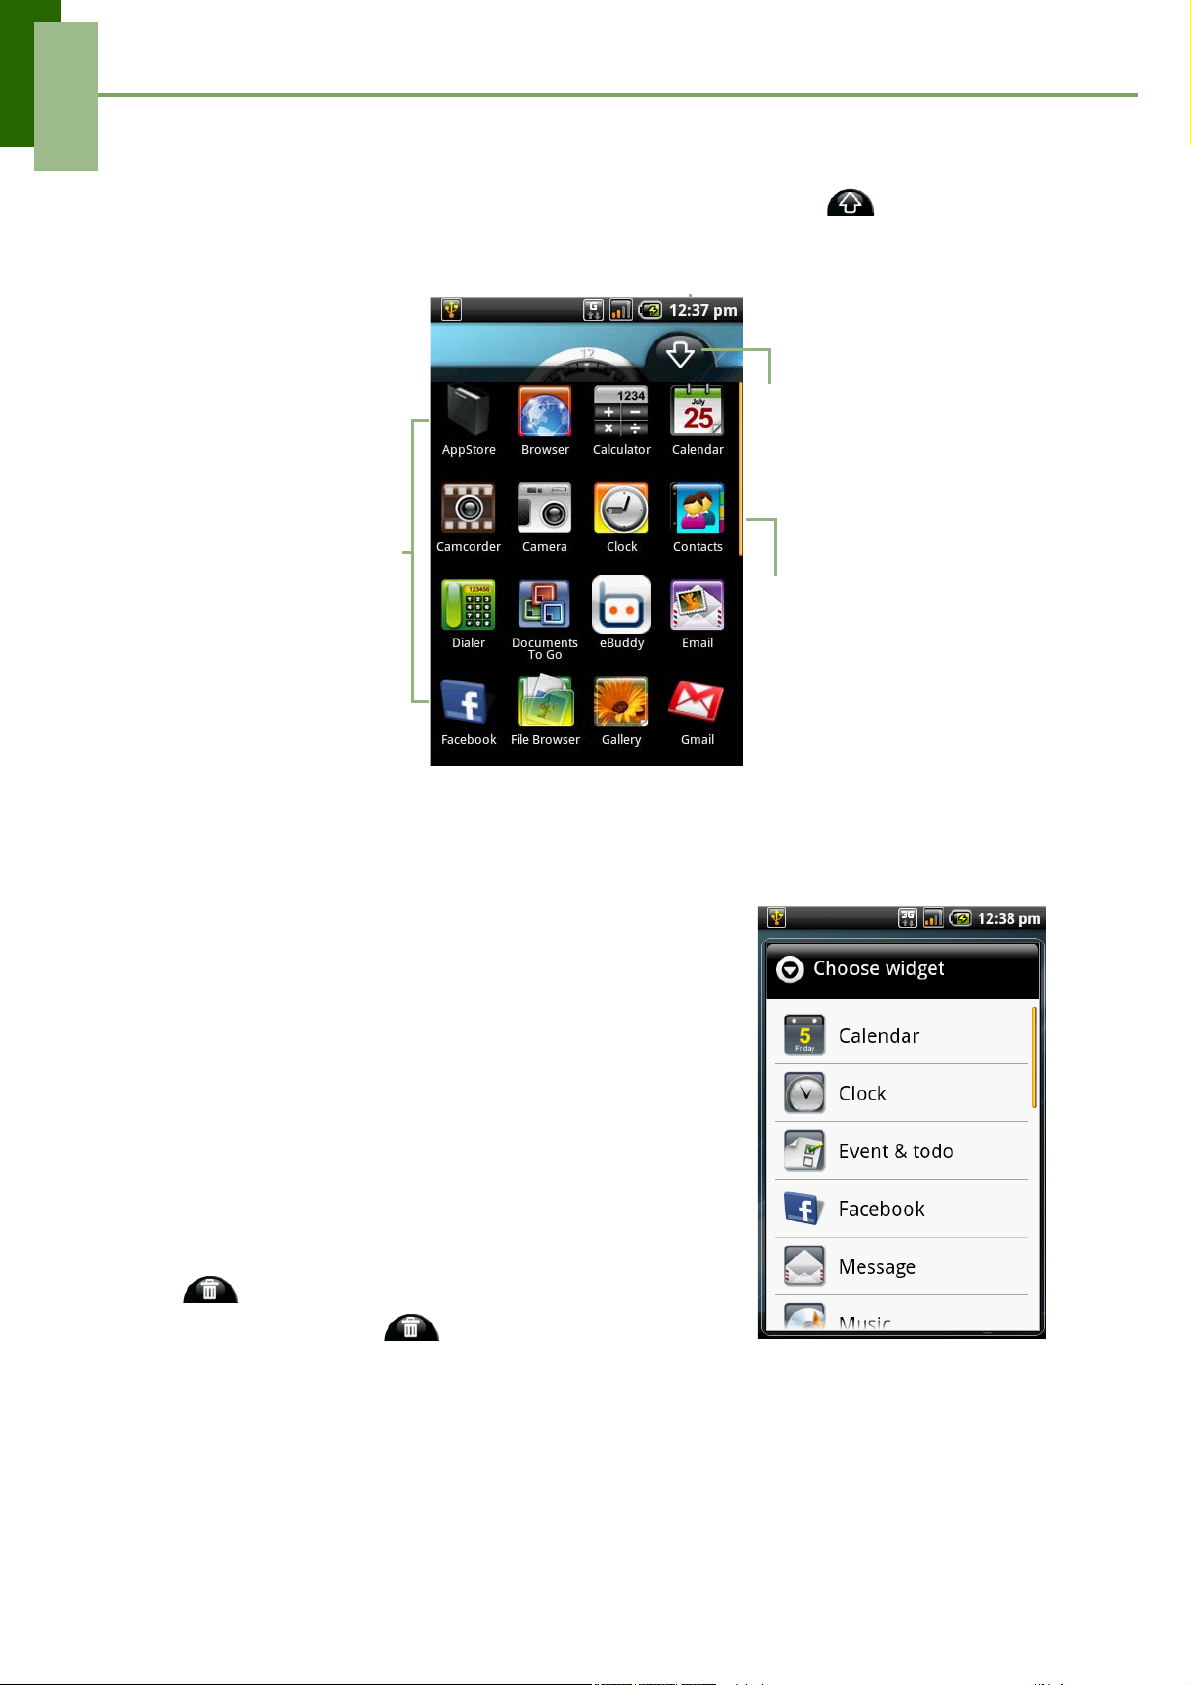
The Basics
Application Drawer
The Application Drawer contains all programs and settings. Tap to display the
menu.
Tap to open/close the
Application Drawer.
Tap an icon to open the
program.
Slide down the scroll bar
to access more programs
in your phone.
Using Widgets
Save time with live updates right on Home screen and
get all of your personalized updates in one place.
You may add and customize the Widgets on Home
screen as you like.
1. From Home Screen, tap Menu > Add > Widgets.
2. A list of all available widgets is displayed. Tap to
select the widget you want to appear on Home
screen.
To remove widgets:
1. From Home screen, tap the desired widget and
hold. The widget enlarges.
2. appears at the bottom of the Home screen.
3. Drag the widget to to delete. The widget is
then removed.
Setting the wallpaper
You can customize the wallpaper of your Home screen with default wallpaper or with
pictures taken with your phone.
11
Page 17
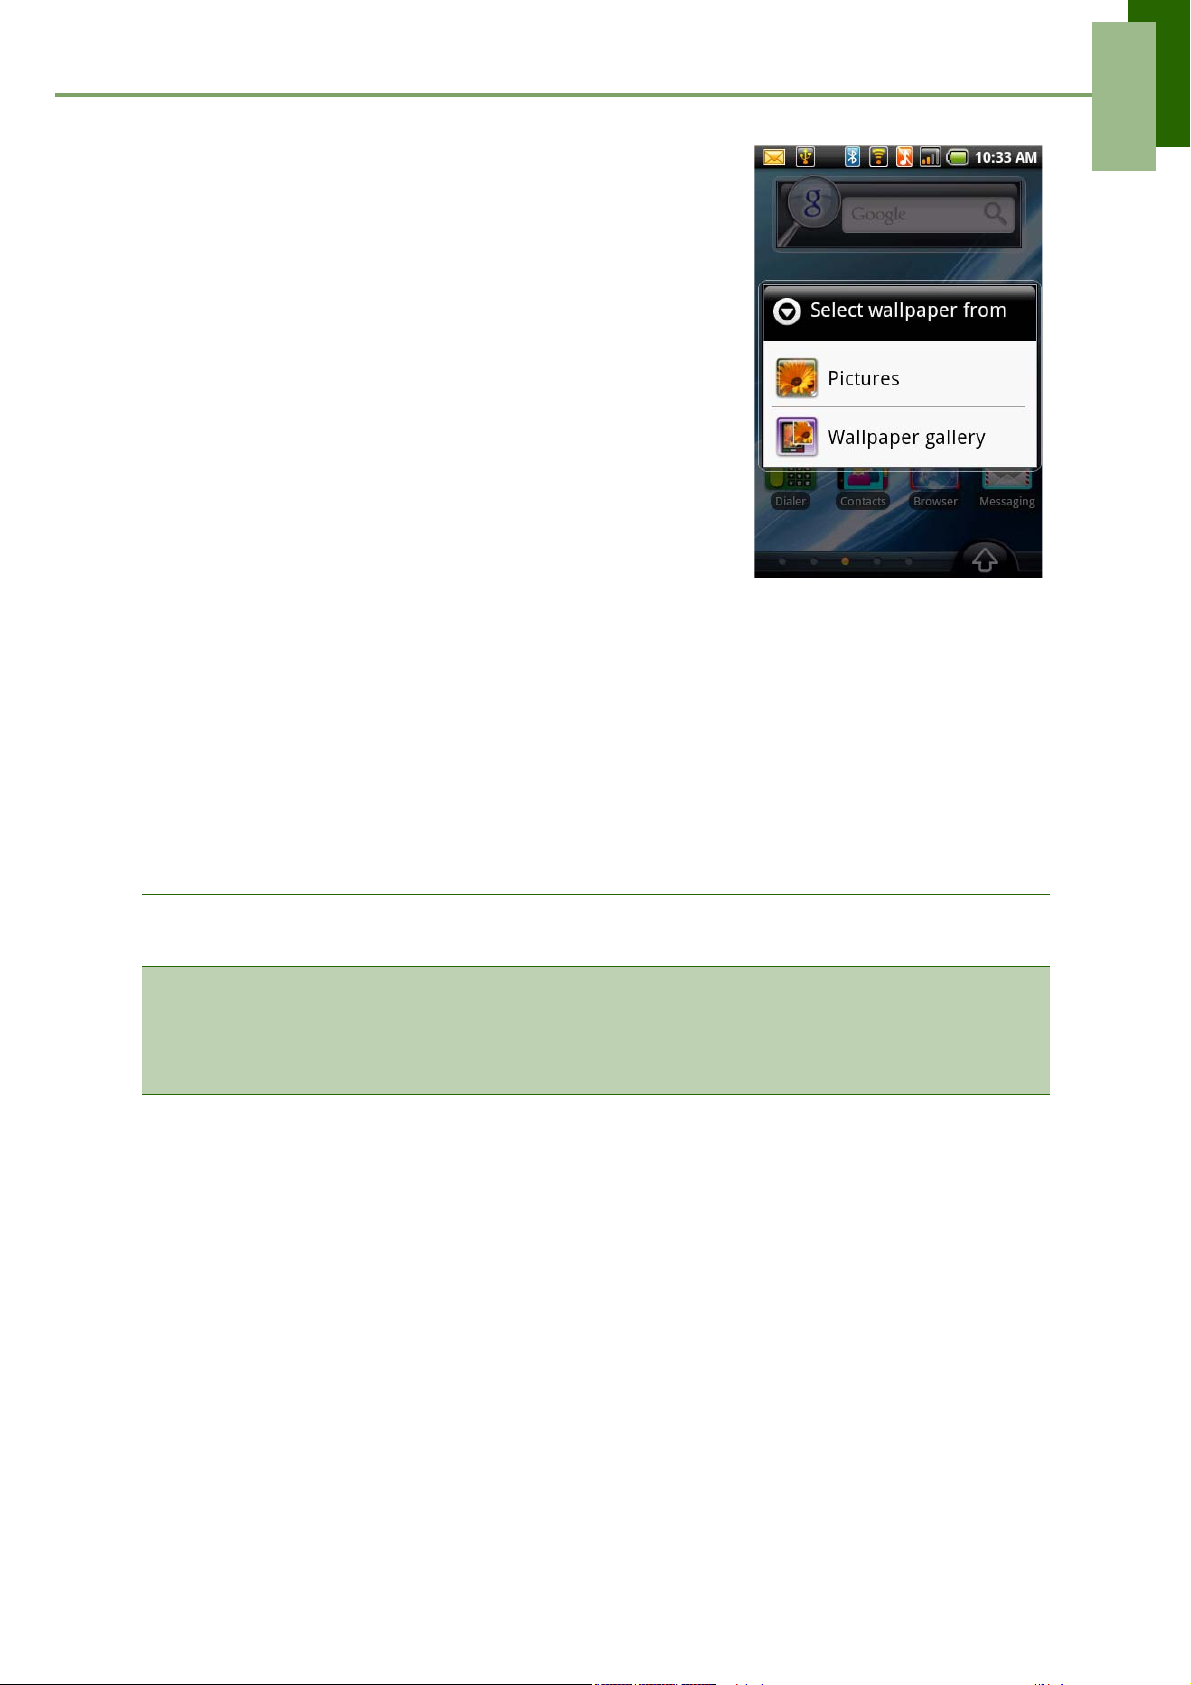
Set wallpaper from Pictures
1. From Home Screen, tap Menu > Wallpaper.
2. Select wallpaper from is displayed on screen.
3. Tap Pictures.
4. You will see thumbnail images of all pictures. Tap to
select the picture you want to use as wallpaper.
5. Drag your finger to select the crop area and tap
inside the box to crop the image.
6. Tap Save and the cropped image appears as
wallpaper on Home screen.
Set wallpaper from Wallpaper gallery
1. From Home Screen, tap Menu > Wallpaper.
2. Select wallpaper from is displayed on screen.
3. Tap Wallpaper gallery.
4. All system wallpapers are displayed. Tap to preview
the wallpaper.
5. Tap Set wallpaper to apply your selection.
The Basics
2.2 LED Indicators
Your phone has 2 LED indicators: green and red. Whether your phone is turned on or
off, the LED indicators provide useful information.
LED Location
Green
(solid)
Red
(solid)
NOTE: When the phone is on, pressing the Send or End key will light all the LED
indicators.
Send
button
End button Phone
Phone
State
Phone
On / Off
On / Off
Indication
Battery is fully charged.
Battery is charging.
2.3 Adjusting the Volume
Your phone features three types of volume which can be adjusted separately:
• Media volume: Set the volume for music and videos.
• Ringer volume: Set the volume for incoming calls and notifications.
• In-call volume: Set the volume during a call.
12
Page 18
The Basics
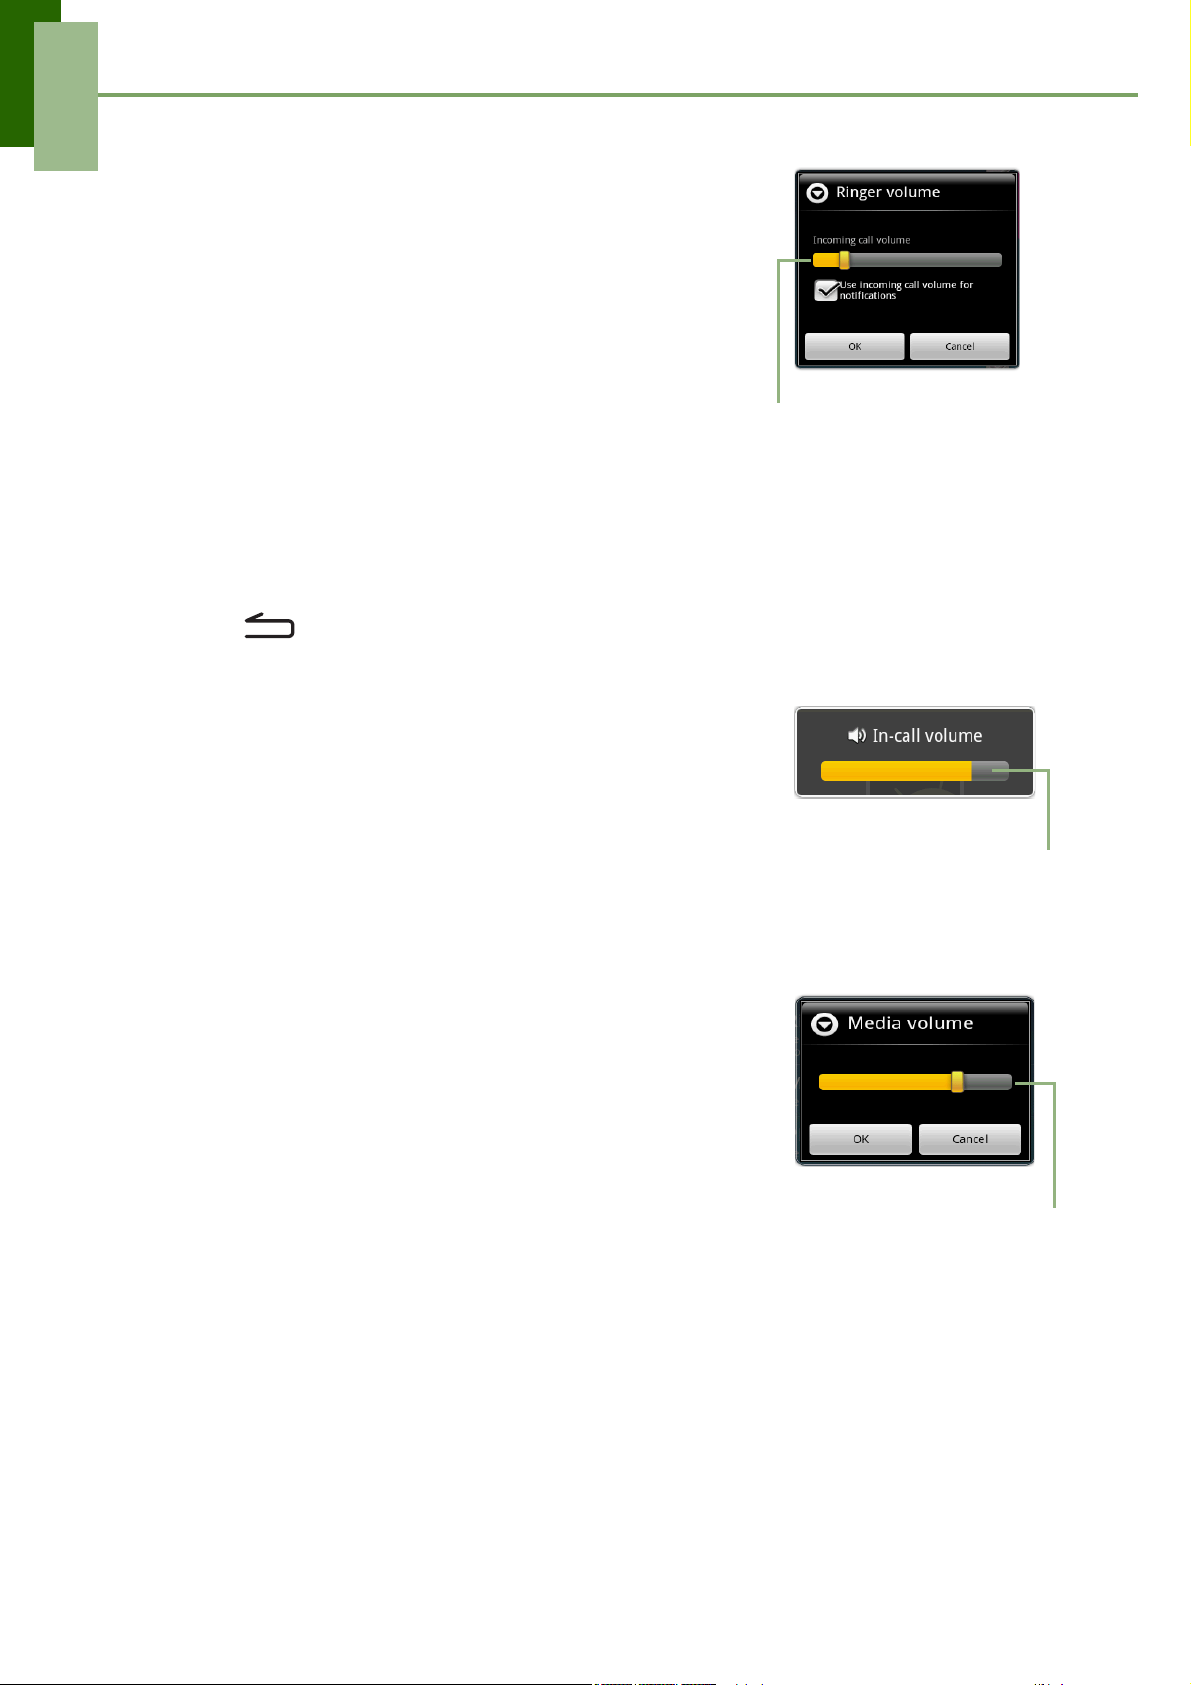
To adjust ringer volume
1. Tap Application Drawer > Settings> Sound &
display.
2. Tap Ringer volume or slide the volume button on
the right panel of your phone to activate the volume
window.
3. Tap the slider of the volume you want to adjust.
4. Do either of the following:
a. Drag the slider up to increase or drag the slider
down to decrease volume.
b. Tap Silent mode to set the phone to silent
mode, or drag down the slider until it clicks in place to switch to silent mode.
NOTE: When the phone is set to silent mode, all sounds are turned off except
media and alarm.
3. Tap OK to save your settings.
4. Tap to exit the menu.
Ringer volume slider
To adjust in-call volume
1. During a phone call, slide the volume button on the
right.
2. Increase or decrease the volume by:
• Sliding the volume button up or down
• Using your finger to drag the slider up or down
on the screen.
To adjust media volume
1. Tap Application Drawer > Settings> Sound &
display.
2. Tap Media volume to activate the volume window.
3. Tap the slider of the volume you want to adjust.
4. Increase or decrease the volume by:
• Sliding the volume button up or down
• Using your finger to drag the slider up or down
on the screen.
5. Tap OK to confirm.
In-call volume slider
Media volume slider
13
Page 19
The Basics
2.4 Contacts
Contacts is your phonebook that lets you store names, phone numbers, e-mail
addresses and other information. Contacts are stored in the phone memory. You can
save information such as names, pictures, phone numbers, e-mail addresses, etc.
You can also add the frequently used contacts to the favorites list. See “Favorite
Contacts” on page 16.
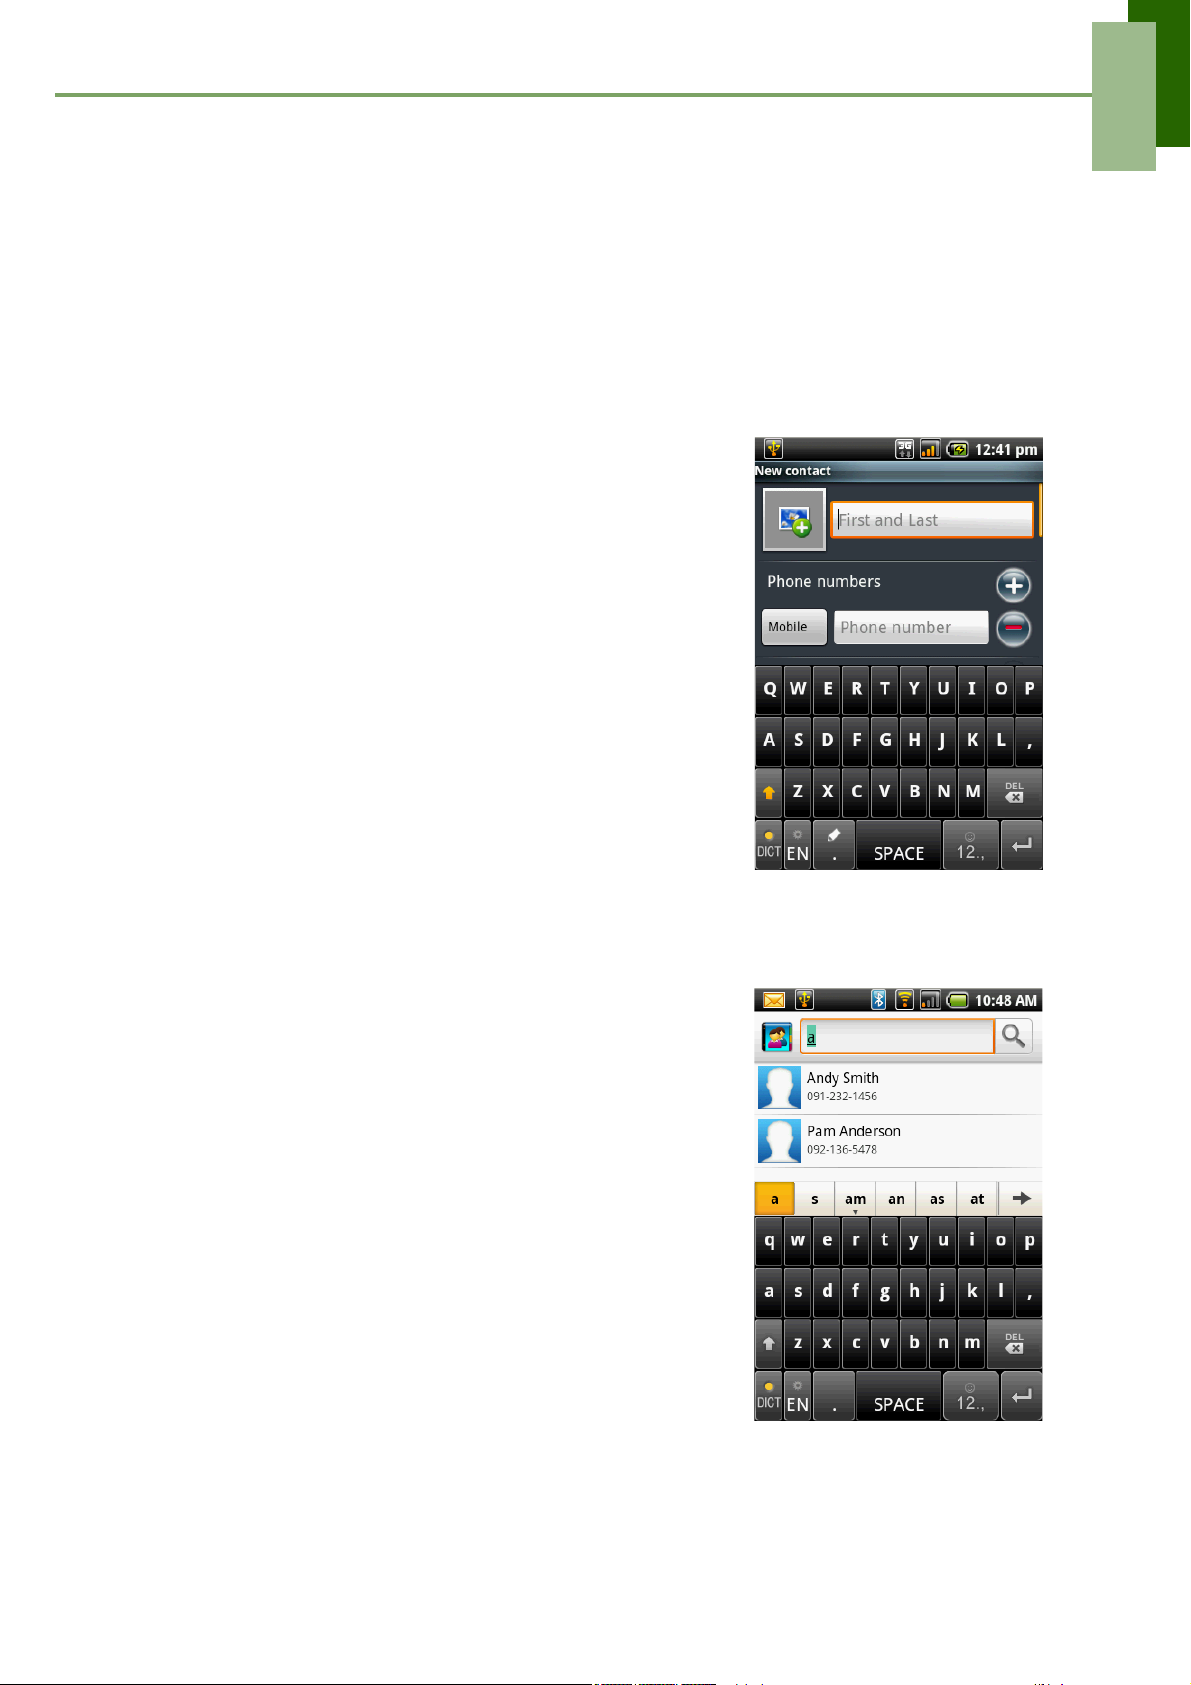
Adding a Contact
1. On Home screen, tap Contacts.
2. Tap Menu > New > Create contact. The New
contact window appears.
3. Tap each field to enter the contact information with
the on-screen keypad.
TIPS:
• To add picture, tap Menu > Add Icon, then
select a picture file or take a photo of the
contact immediately. To take a photo of the
contact, select Menu > Capture picture.
• To assign a ring tone, tap Ringtone then
select a tone from the list.
4. Tap Done to save.
Searching for Contacts
On Contacts screen, do any of the following to easily
search for contacts:
• Tap Menu > Search.
• Type the first few letters of the contact to search.
The list is filtered as you type.
• Tap an alphabetical index to view contacts that start
with the letter. For example, to view names that
start with “k”, tap “k” and the list of contacts will be
displayed.
• To filter the contacts list by categories, tap Menu >
By group, then select one of the following options:
All contacts, Contacts with phone numbers, or
My Contacts.
14
Page 20
The Basics
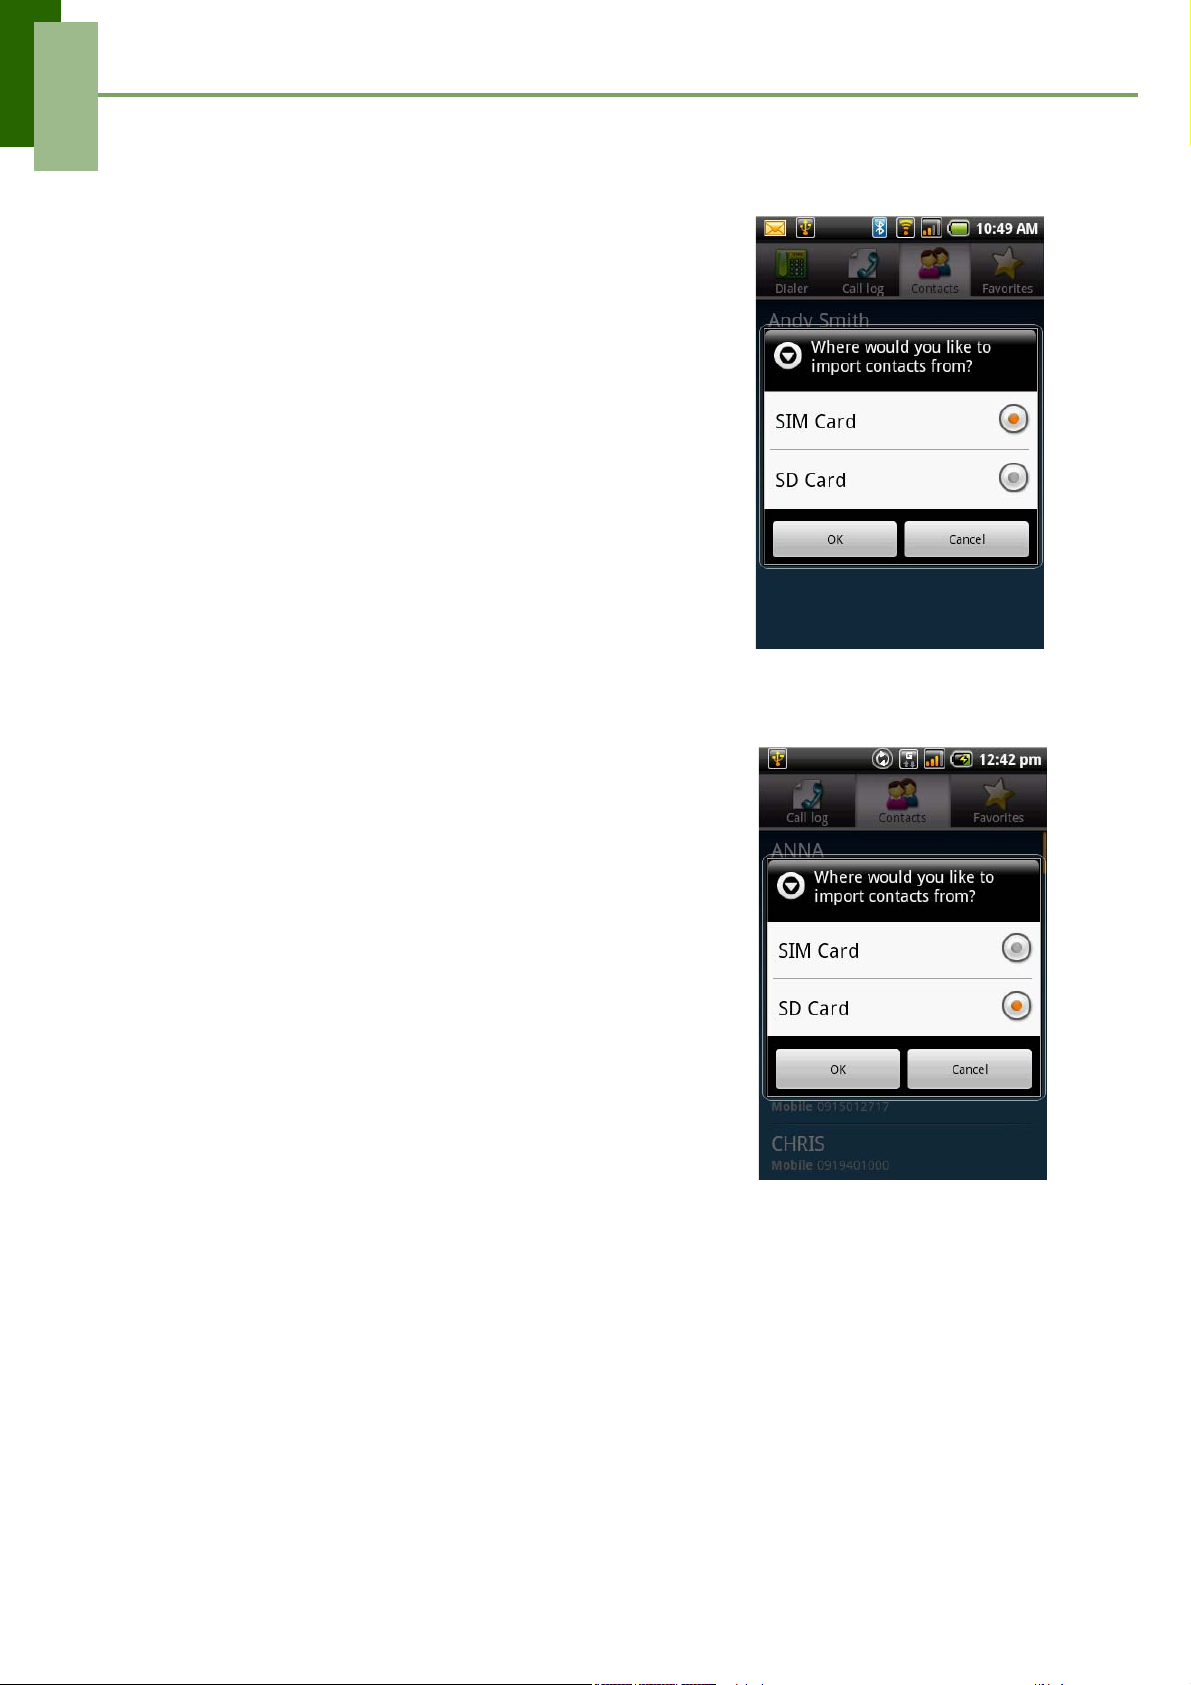
Importing Contacts
Copy SIM contacts to the phone
1. From Home screen, tap Contacts.
2. Tap Menu > Import > SIM Card.
3. Tap OK.
NOTE:
• To copy a single contact, simply tap the
contact, then edit contact information as in
“Adding a contact“.
• To copy all contacts, tap Menu > Import All.
All contacts on the SIM card are imported.
Copy SD contacts to the phone
1. From Home screen, tap Contacts.
2. Tap Menu > Import > SD Card.
NOTE:
• To copy a single contact, tap simply tap the
contact, Tap Import one VCard file, and tap
to select the contact you want to copy. Then
edit contact information as in “Adding a
contact“.
• To copy all contacts, tap Import all VCard
files. All contacts on the SD card are
imported.
3. Tap OK.
15
Page 21
The Basics
Backing Up Contacts
You can copy the contacts to SD card to back up the contact information or import
contacts from SD card to your phone.
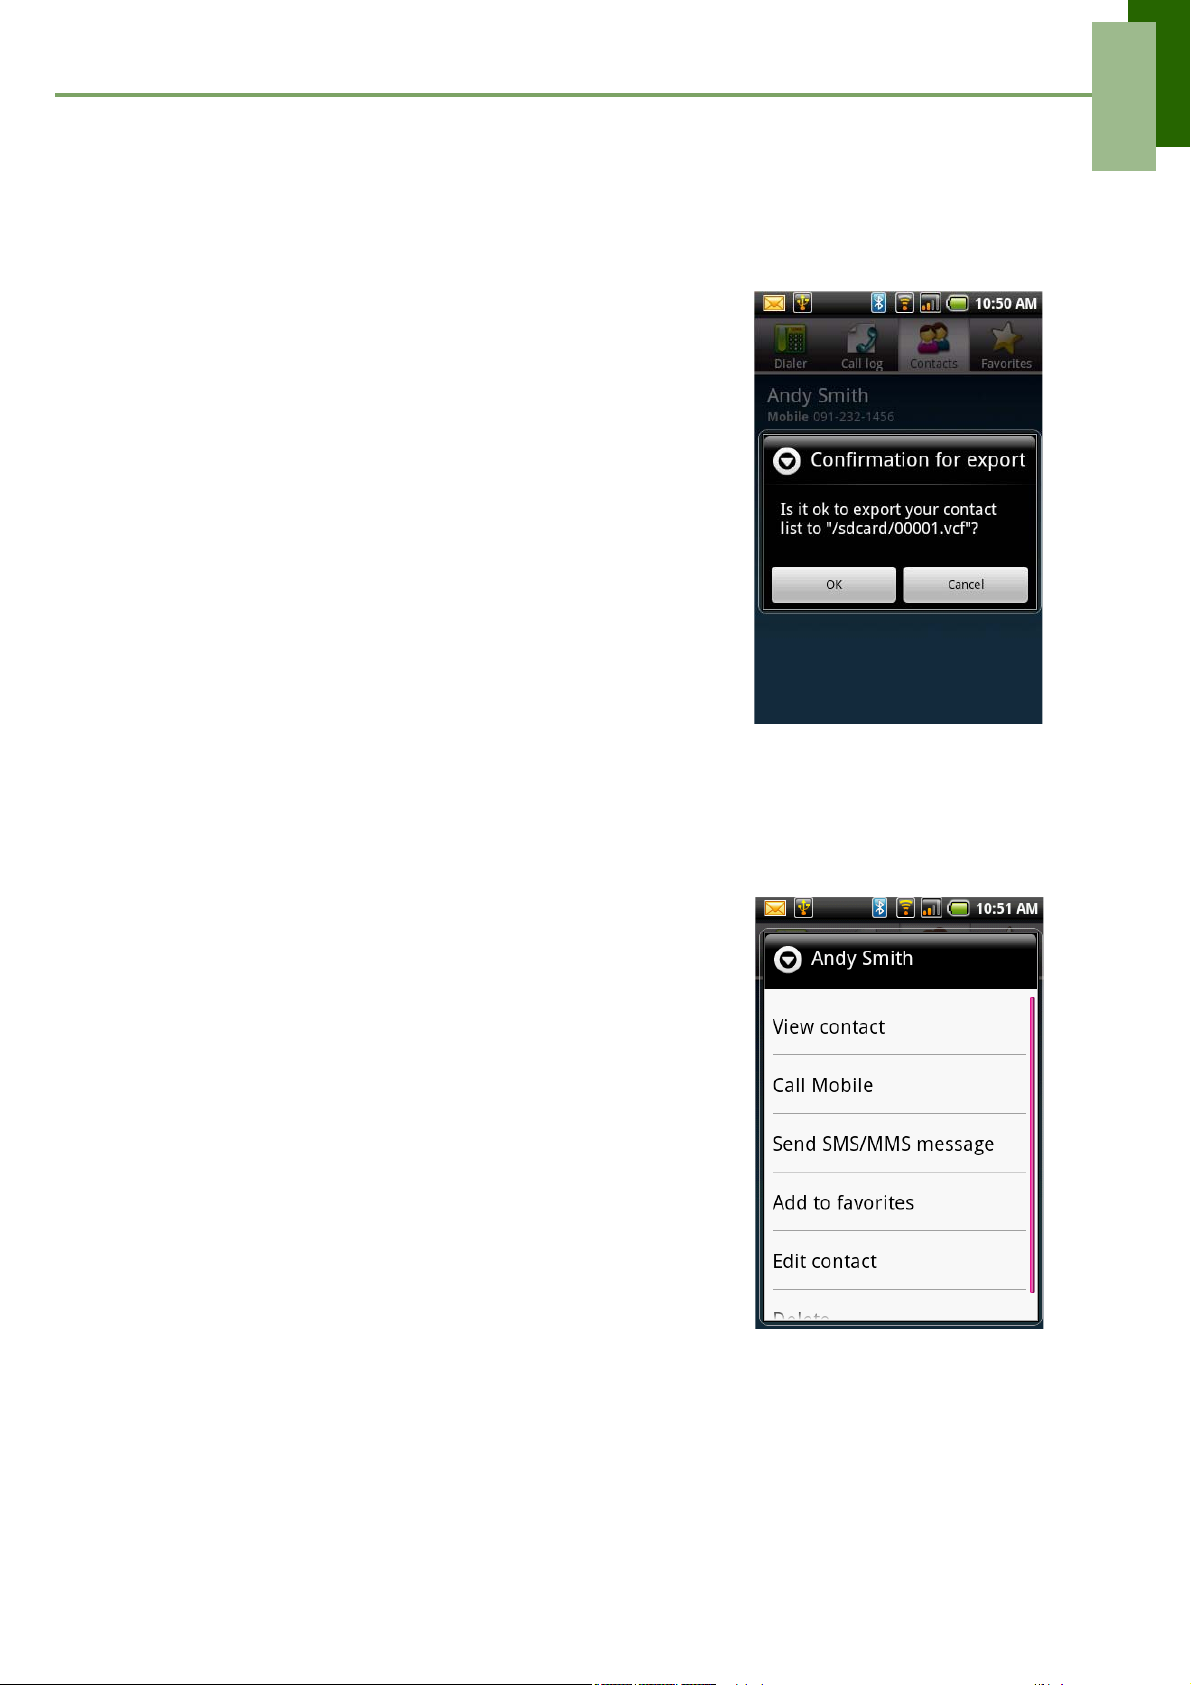
Export contacts to SD card
1. From Home screen, tap Contacts.
2. Tap Menu > Export contacts.
NOTE:
• Copying contacts to SD card will overwrite the
old backup file.
3. A warning message pops up, tap OK to proceed. All
contacts are copied to SD card.
Import contacts from SD card
1. On Home screen, tap Contacts.
2. Tap Menu > Import > SD card.
3. Tap OK.
4. The backup contacts are copied to the phone.
Favorite Contacts
You can add the most frequently called contacts to the favorite contact list which helps
you to access the contacts quickly and easily.
Add to Favorites
1. From Home screen, tap Contacts.
1. From the contact list, tap the desired contact and
hold.
2. The contact submenu appears, tap Add to
favorites.
3. A golden star will appear next to the contact name.
4. The contact is now in the favorites list.
Remove from Favorites
1. From Home screen, tap Contacts.
2. Tap Favorites tab, the favorites list is displayed.
3. Tap the desired contact and hold to display the
submenu.
4. Tap Remove from favorites.
5. The contact will be removed from the favorites list.
16
Page 22
Chapter 3: Using the Phone
Chapter 3: Using the Phone
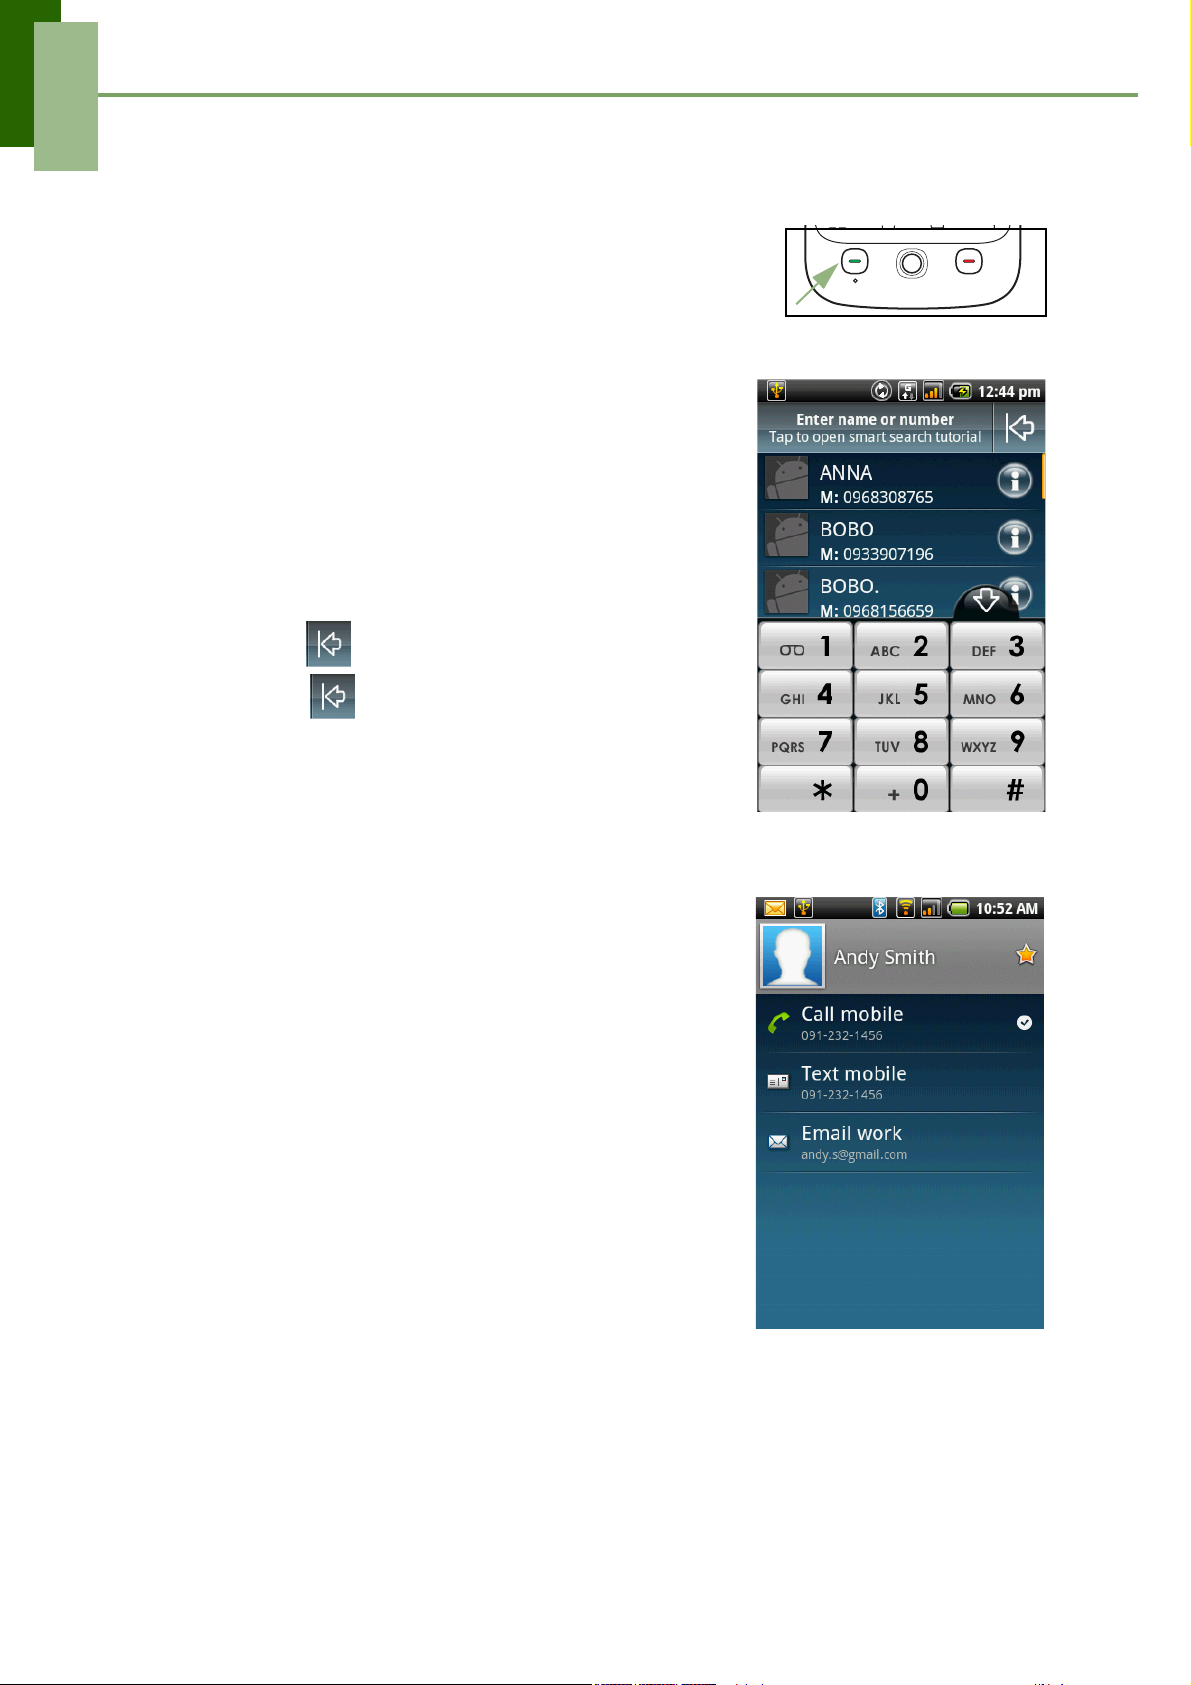
To open Phone screen, do any of the following:
• On Home screen, tap Dialer.
• From any application screen, press the Send key.
3.1 Voice Calls
Making a call
To make a call from the Phone screen
1. From Home screen, tap Dialer.
2. Tap the phone number on the keypad.
NOTE: Tap to erase a wrong number. Tap and
hold to erase the entire number.
3. Tap phone number or press the Send key to dial.
4. To end the call, press the End key.
To make a call from Contacts
1. From Home screen, tap Contacts.
2. Tap the desired contact.
3. Tap Call mobile, Call work, or Call home. Or,
press the Send key to dial the default number.
17
Page 23
To make emergency calls
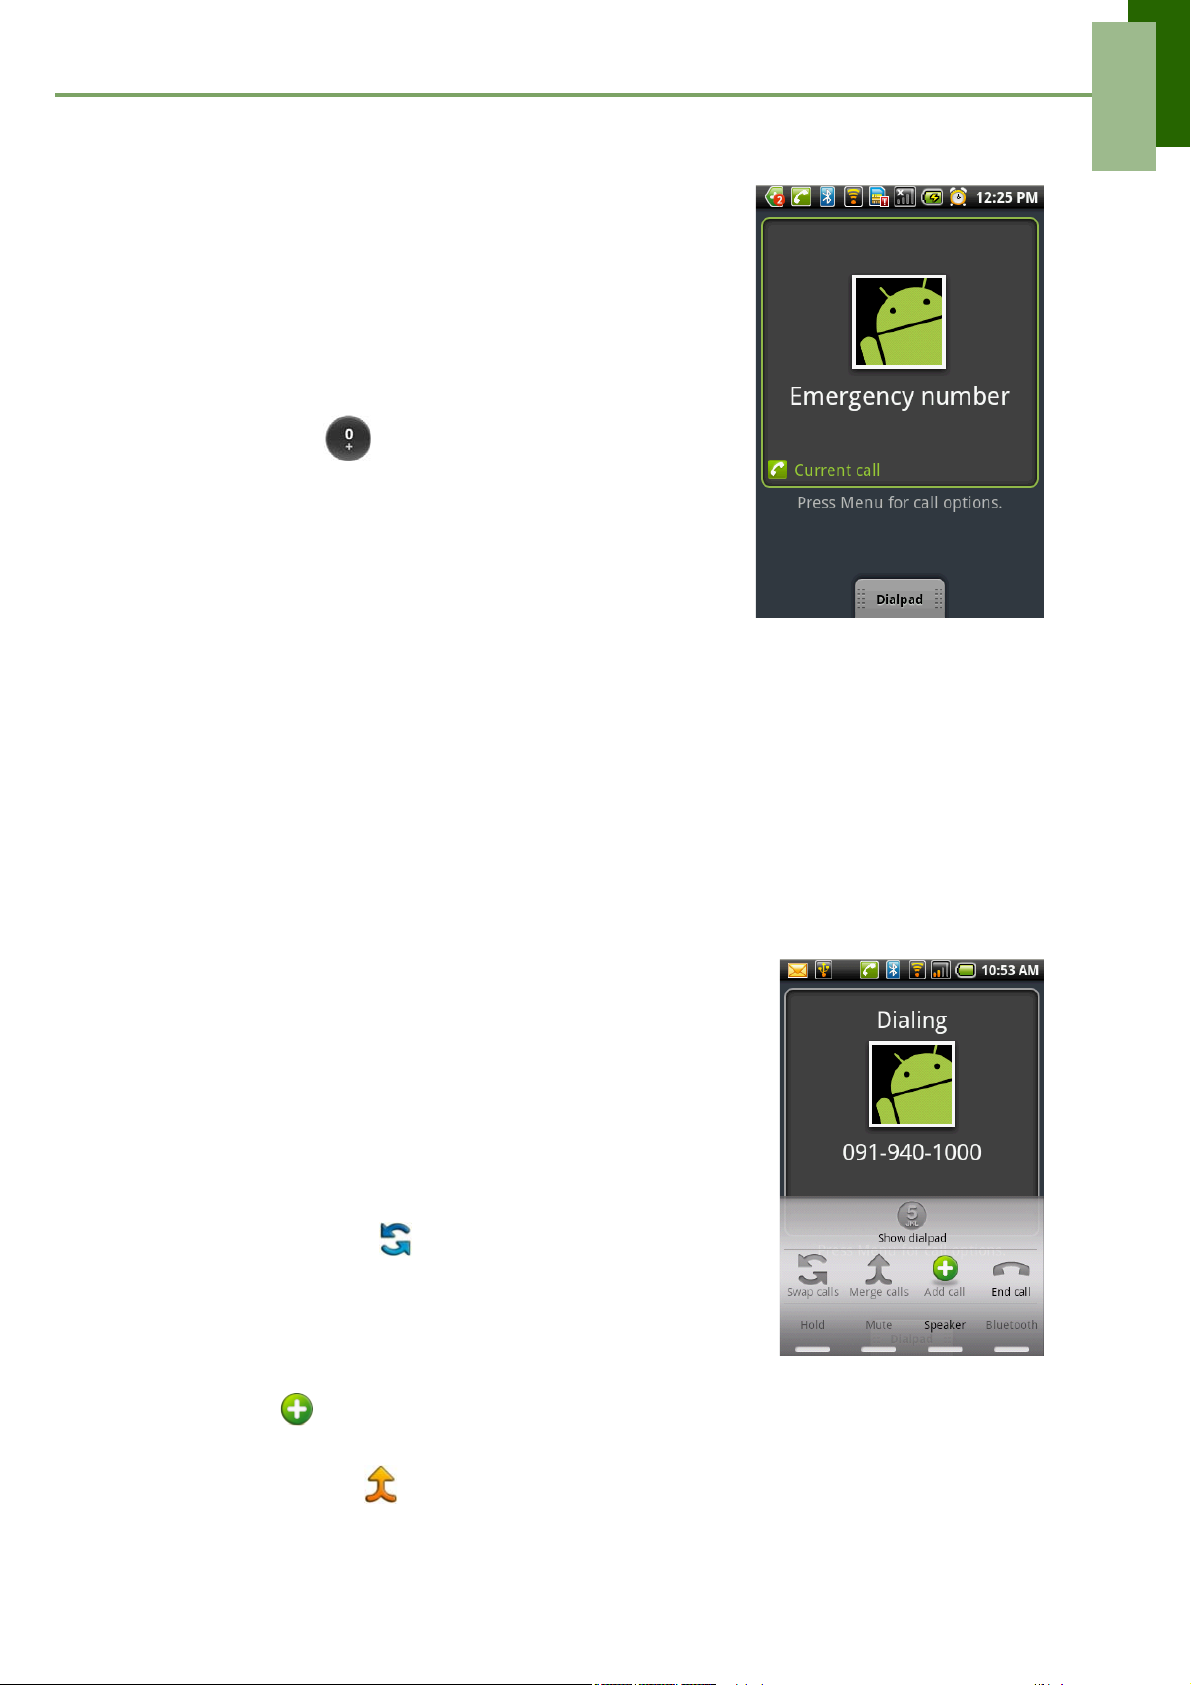
Emergency calls without a SIM card:
1. Open Phone screen.
2. Tap the emergency number on the keypad.
3. Tap the phone number or press the Send key.
To make international calls
1. Open the Phone screen.
2. Tap and hold until the international prefix code
“+” is displayed.
3. Enter the country code, area code, and the phone
number.
4. Tap the phone number or press the Send key.
Answering a call
Chapter 3: Using the Phone
When you receive an incoming call:
• The phone rings if the ring volume is turned on.
• A notification message appears on the screen.
To accept or reject an incoming call
• To accept the call, press the Talk / Send key.
• To reject the call, press the End key.
To put a call on hold
If you are having a call conversation and there is
another incoming call, tap Hold to put the first call on
hold.
To unhold a call, tap Hold again.
To switch between calls
If you are having a call conversation and there is
another incoming call, tap Hold to put the first call on
hold. Tap Swap calls to switch between calls.
To set up conference calls
1. If you are already having a call conversation, tap
Hold to put the call on hold.
2. Tap Add to display the dialpad and then enter
the second number you wish to call.
3. Tap Merge calls to set up the conference call.
18
Page 24
Chapter 3: Using the Phone
NOTE: Conference call is a network service. Check with your network provider for the
availability of this function.
To manage other voice call features
• Tap Speaker to activate or deactivate the Speakerphone.
• Tap Mute to mute or unmute the microphone.
• To view the call history, tap Menu > Dialer > Call log.
Ending a call
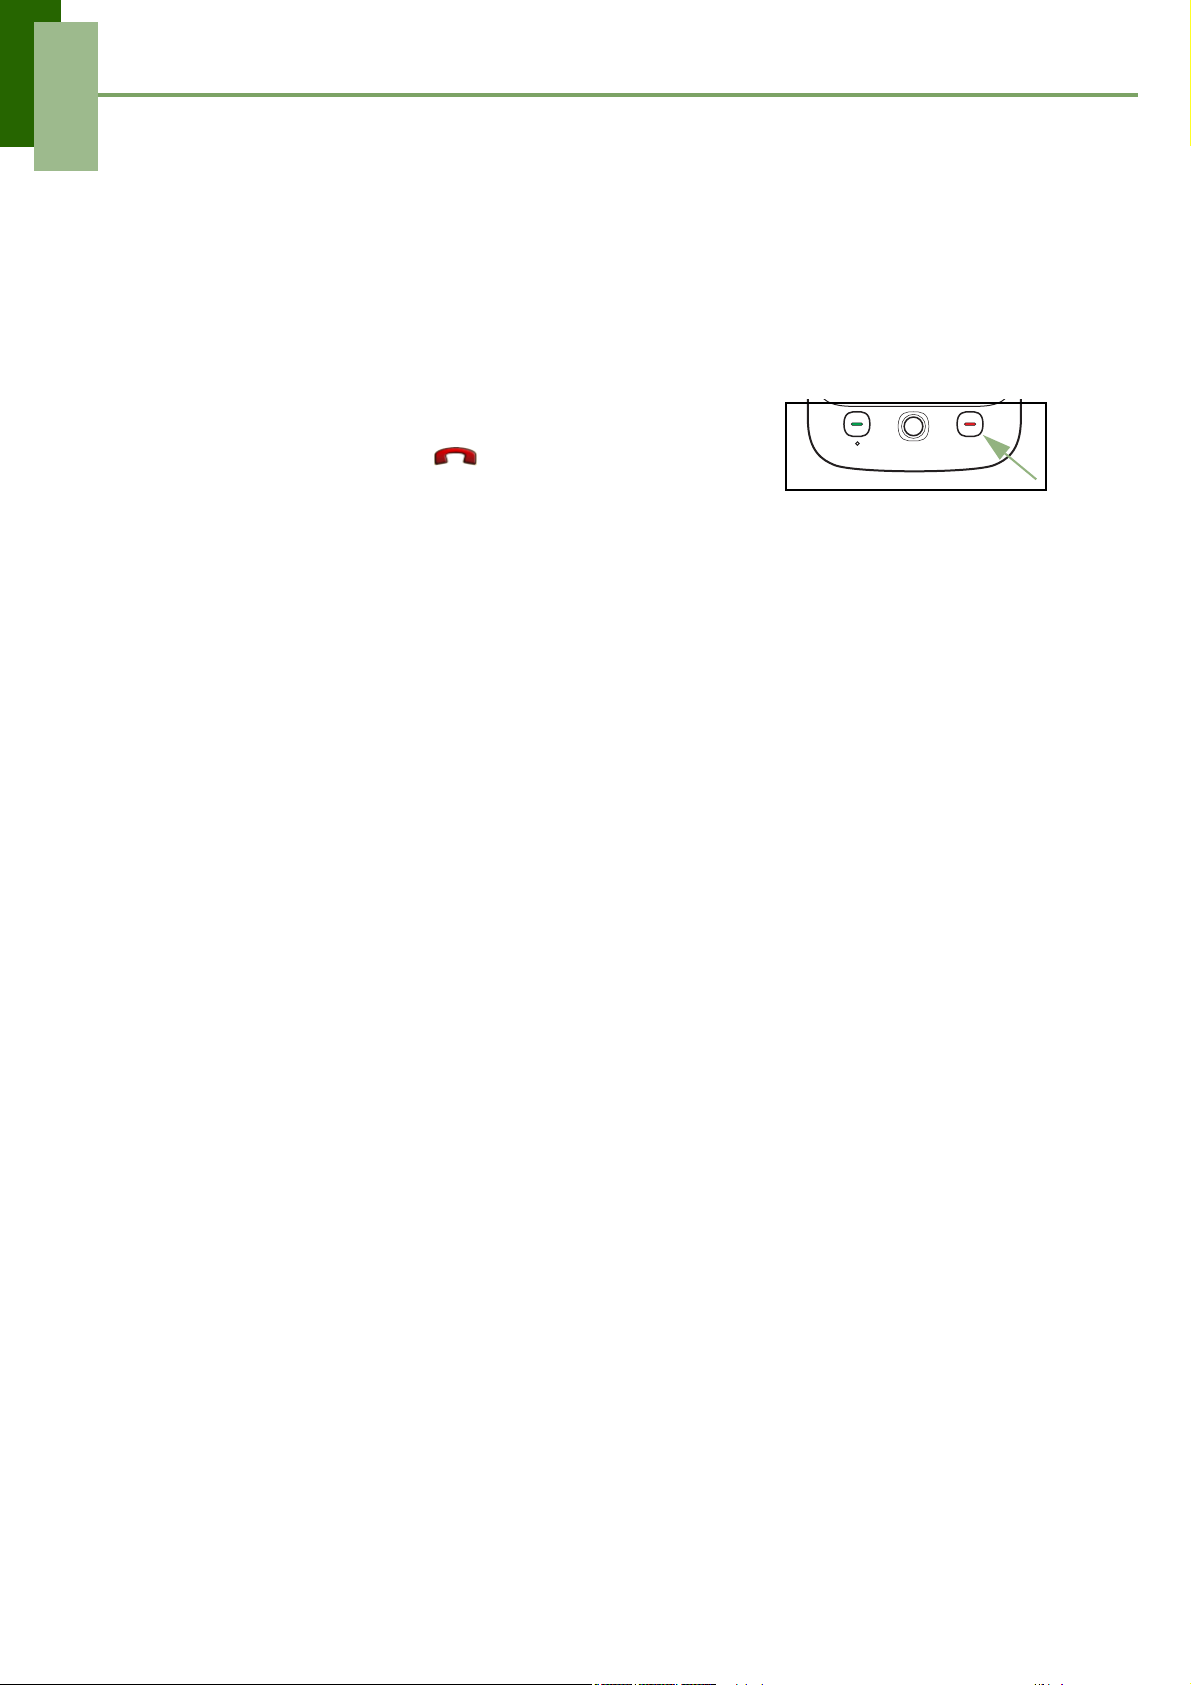
To end a call, tap End call or press the End key.
19
Page 25
Chapter 4: Entering Information
Chapter 4: Entering Information
4.1 On-Screen Keyboard
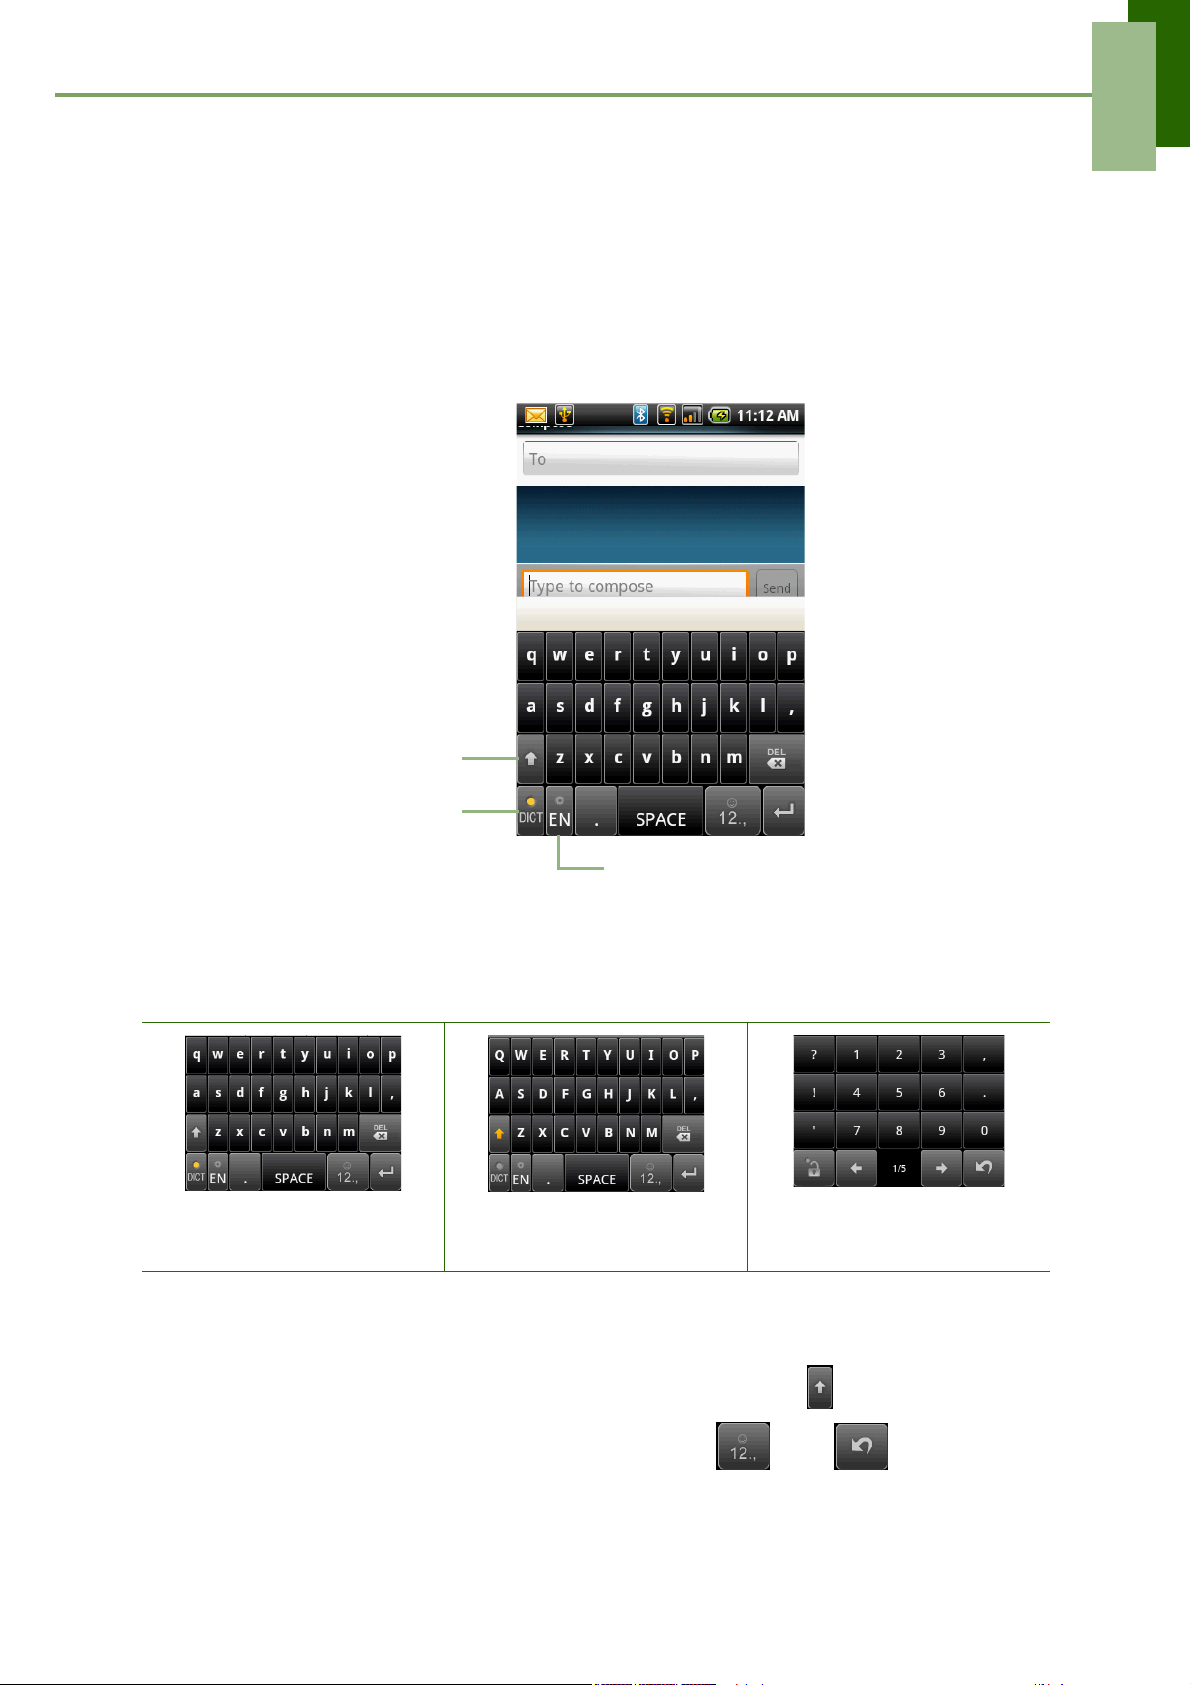
On-screen keyboard appears in portrait mode when an application requires text input,
such as messaging, and writing e-mails. The keyboard input method is activated by
default.
CAPs Lock selector
arrow
Tap to toggle between
upper case or lower case
text input method.
Dictionary: Tap to enable
dictionary.
Input method selector: Tap choose
your preferred input method.
Using on-screen keyboard
Tap the screen to display the on-screen keyboard.
Lowercase keyboard
(default)
Uppercase keyboard Numbers and symbols
• Use the keys on the on-screen keyboard as you would a computer keyboard.
• Tap the keys to enter the characters.
• To toggle between upper and lower case letter display, tap .
• To display the numeric and symbols keyboard, tap . Tap to toggle back.
20
Page 26
Chapter 4: Entering Information
Setting the Input Method
Your phone supports several text input methods, select your preferred method.
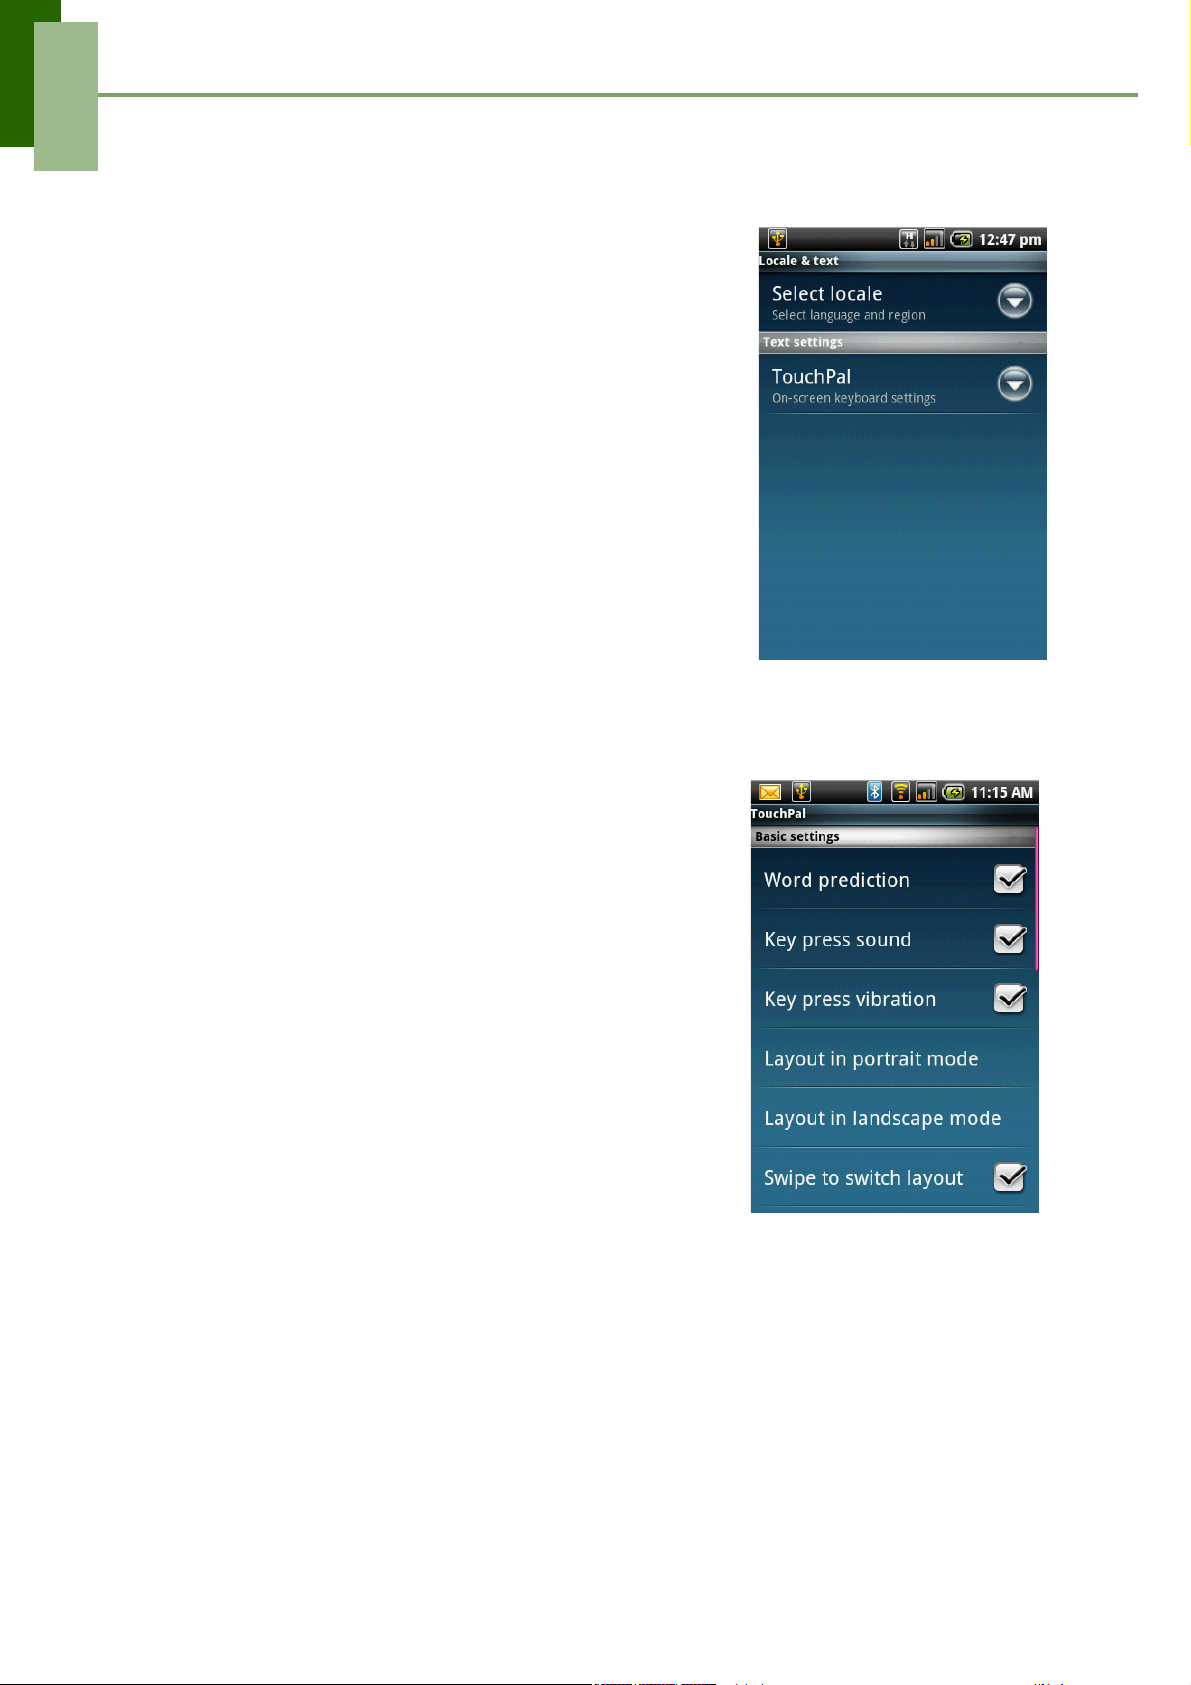
1. Tap Application Drawer > Settings > Locale &
text.
2. In Text settings, you will see a list of the input
methods. Select and check the options you prefer.
Changing the Input Method
1. Long-press on any text-field in program. For
instance, in Messaging, tap and hold the field
“To:”.
2. The Input Method Screen pops up.
3. You may select one of the available Input Methods
to use.
4.2 Configuring phone
keyboard settings
You can make use of the keyboard aids to help you
when input text with the phone keyboard.
1. Tap Application Drawer > Settings > Locale &
text.
2. Tap TouchPal.
3. You can check all applicable options.
• Word prediction: enables word prediction
function.
• Key press sound: phone sounds when user
presses any key on the on-screen keyboard.
• Key press vibration: phone vibrates when
user presses any key on the on-screen
keyboard.
• Layout in portrait mode.
• Layout in landscape mode.
• Swipe to switch layout: enables swipe to
change layout orientation function.
• Enable mixed language input: Check to enable text input in different
languages.
• Select languages: Select the languages you want to use and switch among
on main keyboard.
• Predict next word: Predicts automatically the next word when entering text.
• Enable prediction: Predicts automatically the word when entering text.
• Correct mistyping: Corrects automatically mistyped words.
• Slide-down symbols: Slide down on keys to input symbols.
• Relevant words: Slide on candidates for relevant words.
21
Page 27
Chapter 5: Messaging
Chapter 5: Email & Messaging
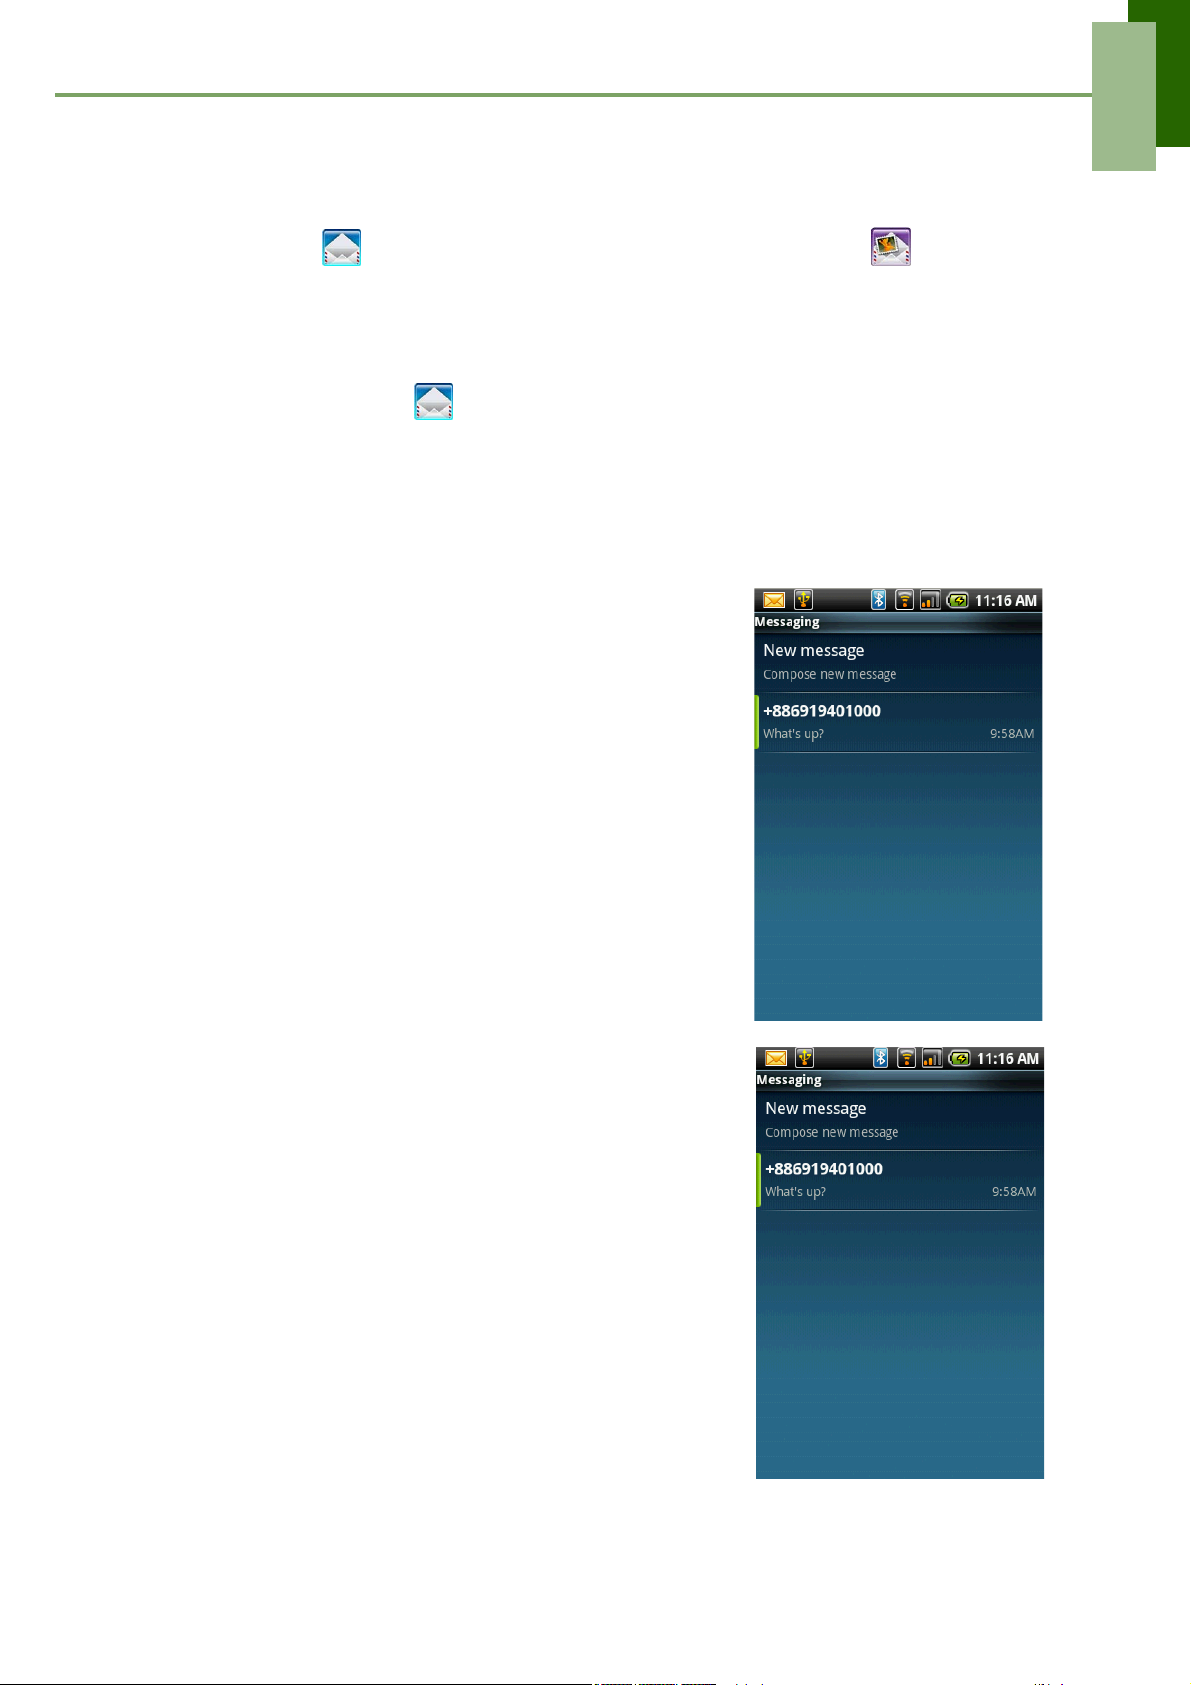
Use Messaging to access text and MMS messages. Use Email to send and
receive email messages via your internet e-mail accounts.
To open Messaging
• On Home screen, tap .
• From the Application Drawer, tap Messaging.
5.1 Text Message
A text message can only contain letters, numbers and
symbols.
Creating and sending a text message
Your phone offers several ways to create and send a
new text message.
From Messaging screen
1. Tap New message.
2. Compose screen is displayed.
3. In the To field, enter the recipient’s phone number.
TIP: To add recipients from Contacts, tap To and
enter at least two numbers of a contact
number or two characters of a contact name.
Then the corresponding contact will be listed
for you to select from.
4. Type your message in the Type to compose field.
5. Tap Send or press the Send button to send your
message.
22
Page 28
Chapter 5: Messaging
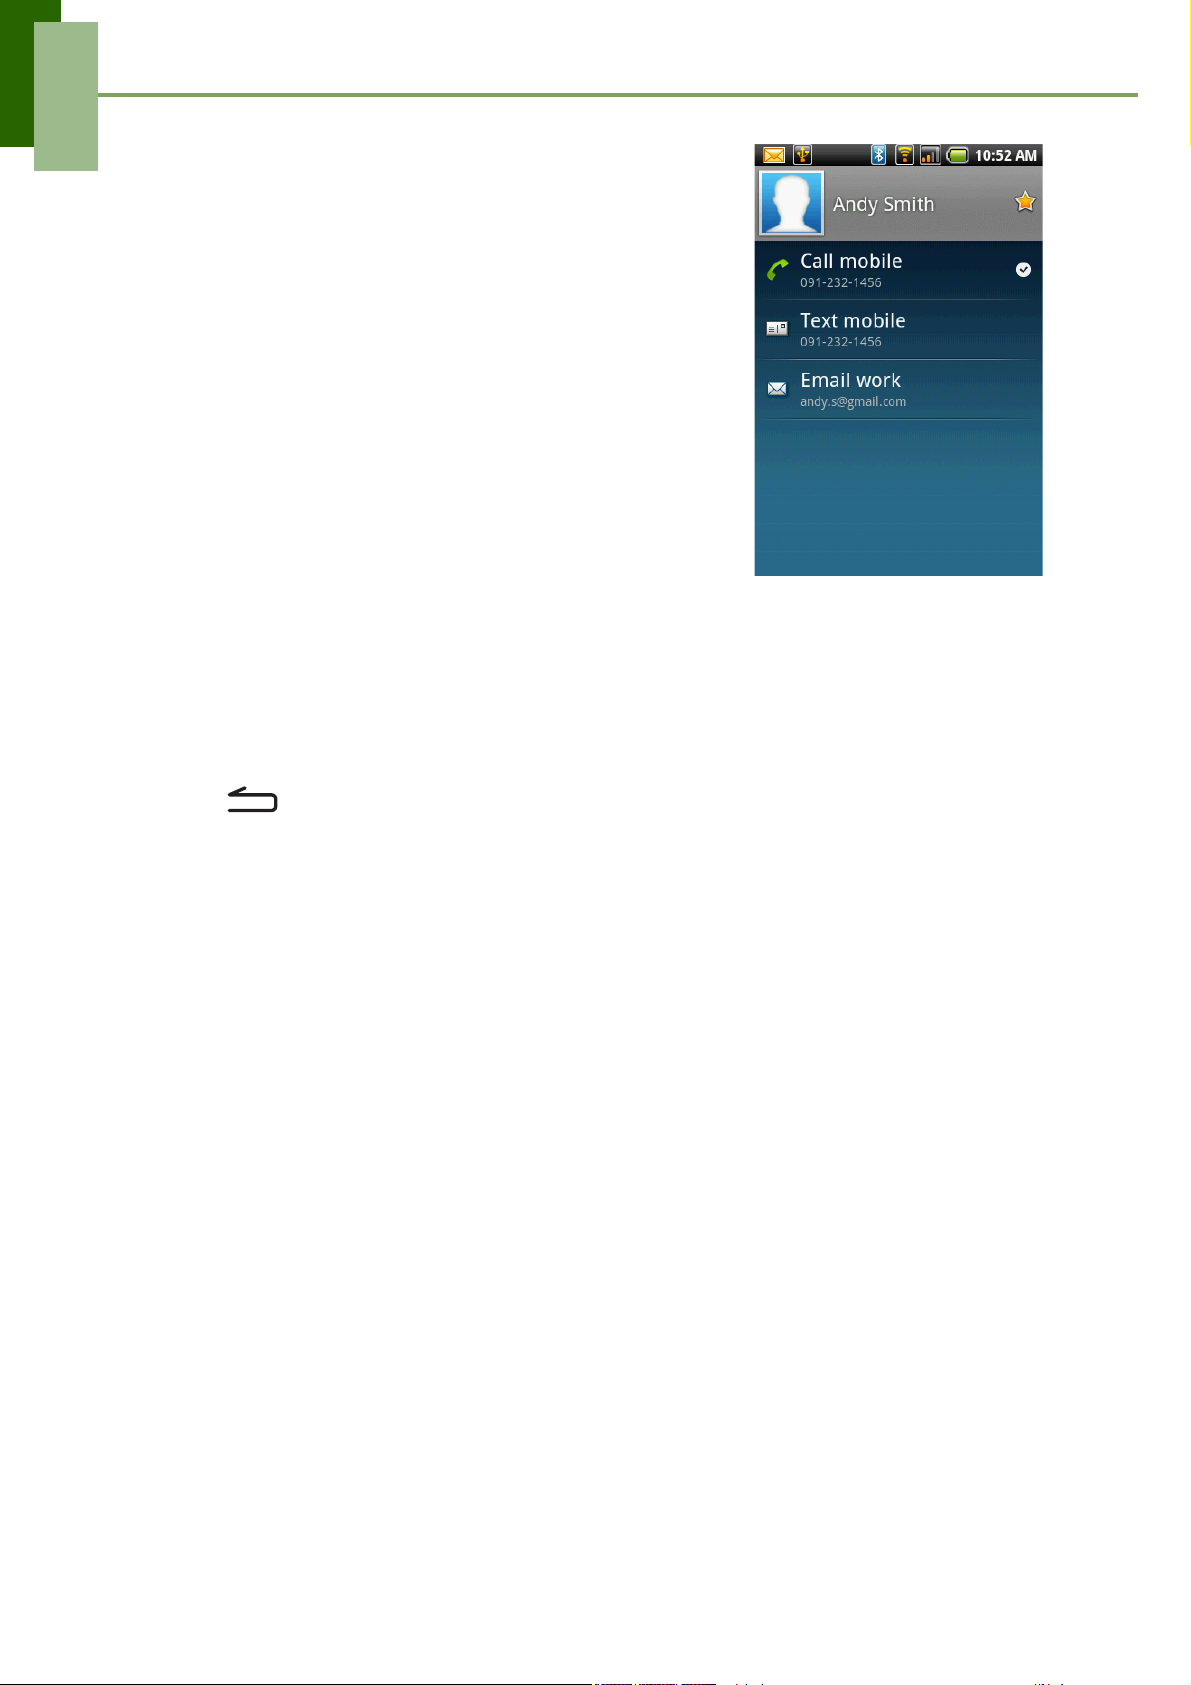
From Contacts
1. From Home screen, tap Contacts.
2. Tap a contact to display the contact information.
3. Tap Text mobile.
4. Compose your message.
5. Tap Send.
From Call log
1. From Home screen, tap Contacts.
2. Tap the Call log tab to view all call history.
3. Tap a call from the Call log.
4. Tap Send SMS/MMS message.
5. Compose your message.
6. Tap Send.
Note: If you exit Messaging before sending, unsent message will be automatically
saved as a draft.
To request message delivery notification
1. In Messaging, tap Menu > Settings to access SMS and MMS settings.
2. Tap to check Delivery reports check box.
3. Tap to exit the menu.
Receiving and Managing Messages
When you send and receive messages from a contact, these messages are grouped
as a message thread. A message thread looks like an exchanged conversation.
To reply to a text message
1. Tap Application Drawer > Messaging.
2. Tap a message thread to open it.
3. Tap Type to compose to enter your message.
4. Tap Send.
23
Page 29
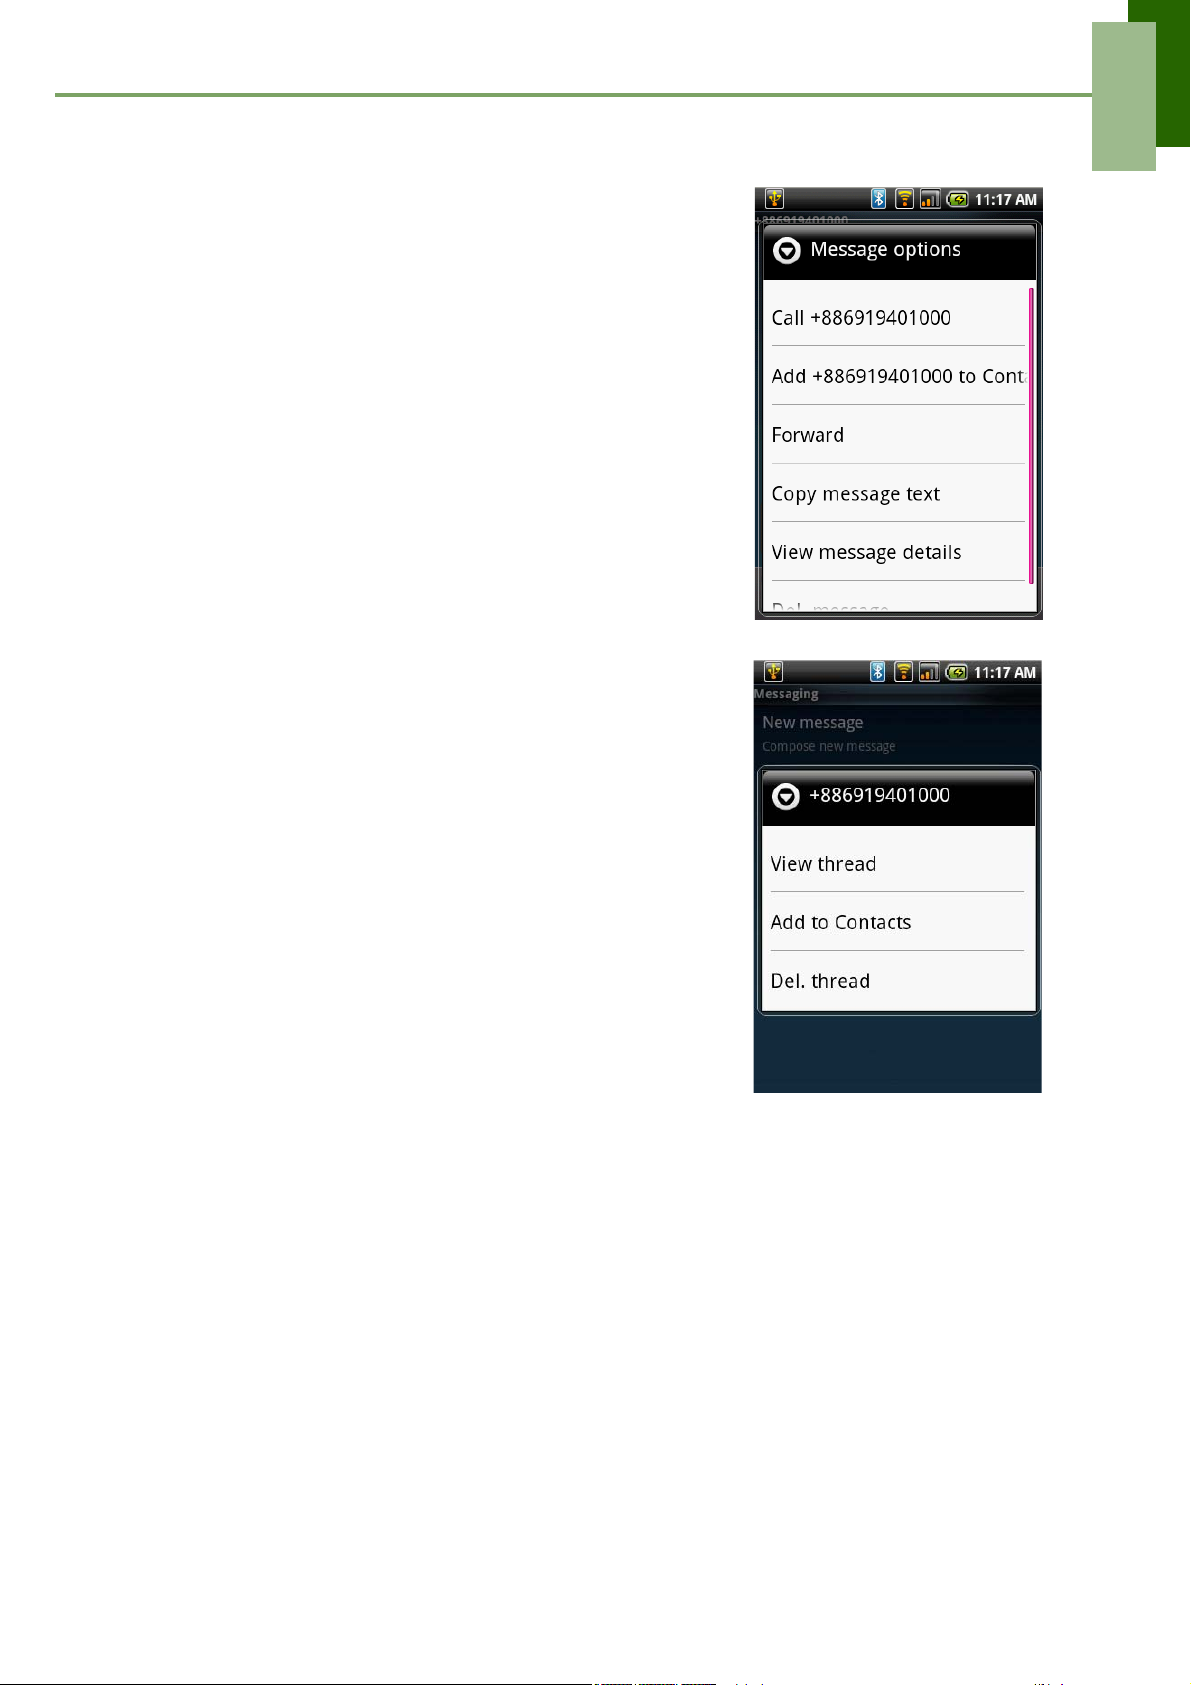
To forward a text message
1. Tap Application Drawer > Messaging.
2. Tap to view a message thread.
3. Tap and hold a message to display the message
options.
4. Tap Forward.
5. In the To field, enter the recipient’s phone number.
6. Tap Send.
Chapter 5: Messaging
To delete all text messages
You can delete all text threads in the Messaging.
1. Tap Application Drawer > Messaging.
2. Tap Menu > Del. threads.
3. Tap OK to confirm.
To delete one message thread
1. Tap Application Drawer > Messaging.
2. Tap and hold the message thread you want to
delete.
3. Tap Del. thread.
To delete a message within a thread
1. Tap Application Drawer > Messaging.
1. Tap the message thread to open it.
2. Highlight the message to delete by flicking your
finger downward across the sender the message.
3. Tap and hold the highlighted message.
4. Tap Del. message.
24
Page 30
Chapter 5: Messaging
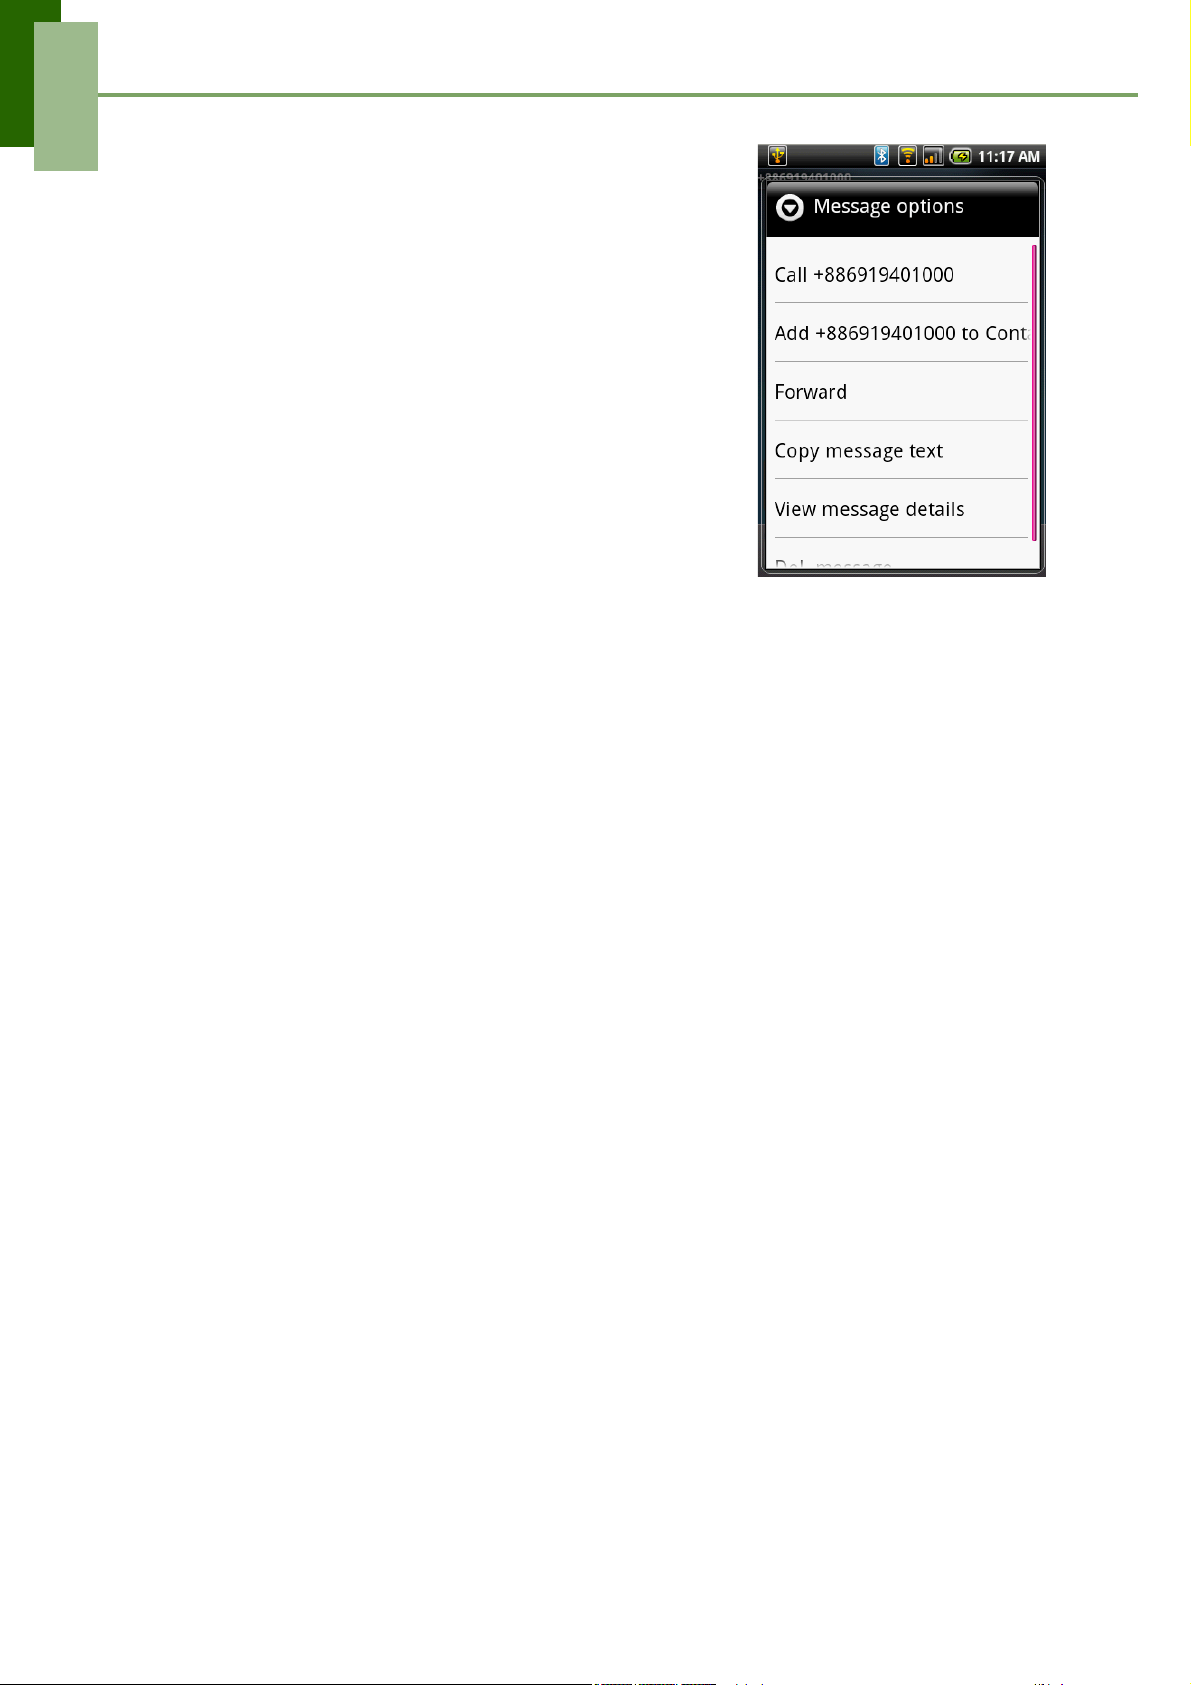
To copy message text
You can use this function to copy the text from a
message to a new message you are composing.
1. Tap Application Drawer > Messaging.
2. Tap a message thread to open it.
3. Tap and hold the message to display the submenu
options.
4. Tap Copy message text.
5. Go to New Message.
6. Tap and hold Type to compose.
7. Tap Paste to paste the copied texts to your new
message.
25
Page 31
Chapter 5: Messaging
5.2 Multimedia Message
A Multimedia message or MMS can contain letters, an image, an audio or video file.
Creating and sending an MMS message
Your phone offers several ways to create and send an MMS message.
From the Messaging screen
1. Tap Application Drawer > Messaging.
2. Tap New Message.
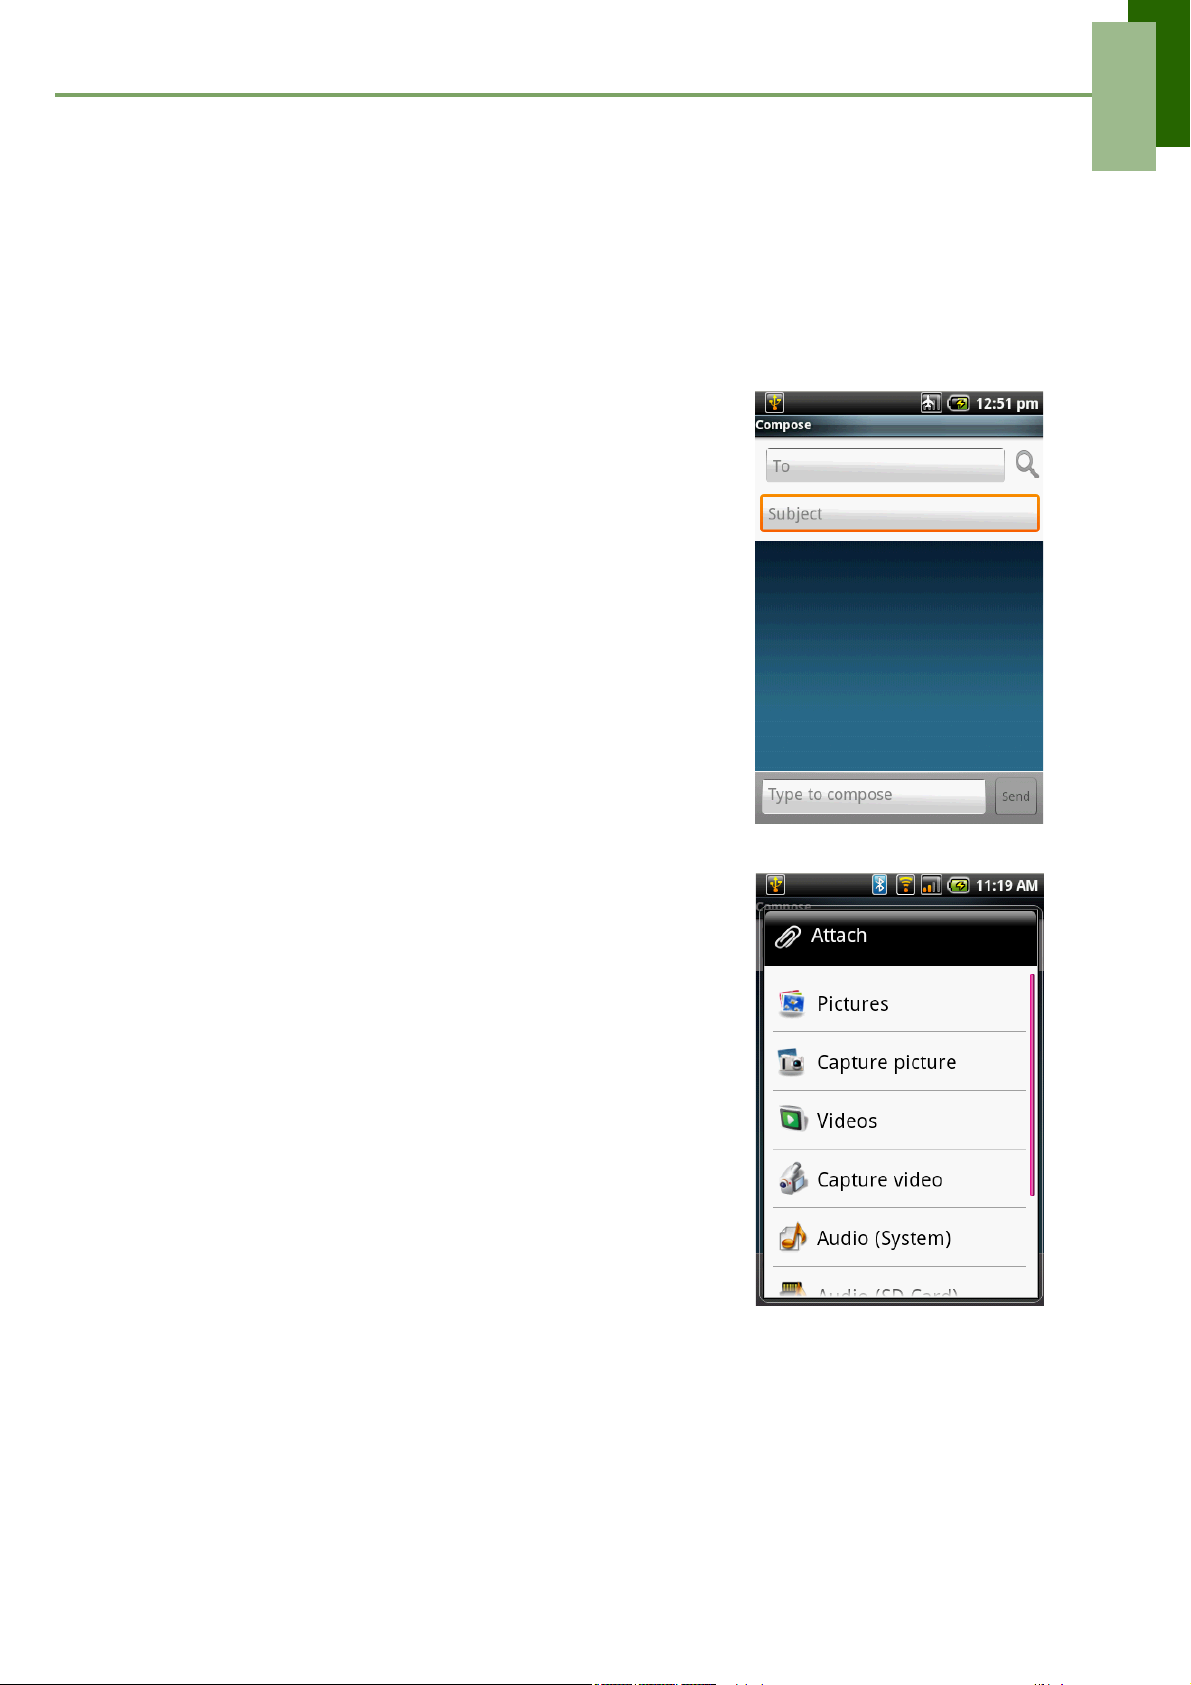
3. Tap Menu > Add sbj.
4. The message automatically converts to a MMS
message.
5. In the To field, enter the recipient’s phone number
or email address.
TIP: To add recipients from Contacts, tap To and
enter at least two numbers of a contact
number or two characters of a contact name.
Then the corresponding contact will be listed
for you to select.
6. Enter the Subject.
7. To insert a picture or video file, tap Menu > Attach.
8. To insert text, tap Type to Compose, then enter
your message.
9. To insert an audio file, tap Menu > Attach > Audio.
10.Tap Send.
From Contacts
1. From Home screen, tap Contacts.
2. Tap a contact.
3. Tap Menu > Text Mobile. The message window is
displayed
4. Tap Menu > Add sbj to convert to MMS message.
Tap subject to enter the Subject.
5. To insert a picture or video file, tap Menu > Attach.
6. To insert text, tap Type to Compose, then enter
your message with on-screen keypad.
7. To insert an audio file, tap Menu > Attach > Audio.
8. Tap Send.
26
Page 32
Chapter 5: Messaging
From the Call log
1. From Home screen, tap Contacts > Call log.
2. Tap a call from the Call log.
3. Tap Send SMS Message.
4. Tap Menu > Add sbj to convert to MMS message. Tap Subject to enter the
Subject.
5. To insert a picture or video file, tap Menu > Attach.
6. To insert an audio file, tap Menu > Attach > Audio.
7. To insert text, tap Type to Compose, then enter your message with on-screen
keypad.
8. Tap Send.
5.3 Voice Message
Your phone supports sending of Voice message.
To create a voice message
1. Tap Application Drawer > Messaging.
2. Tap New Message.
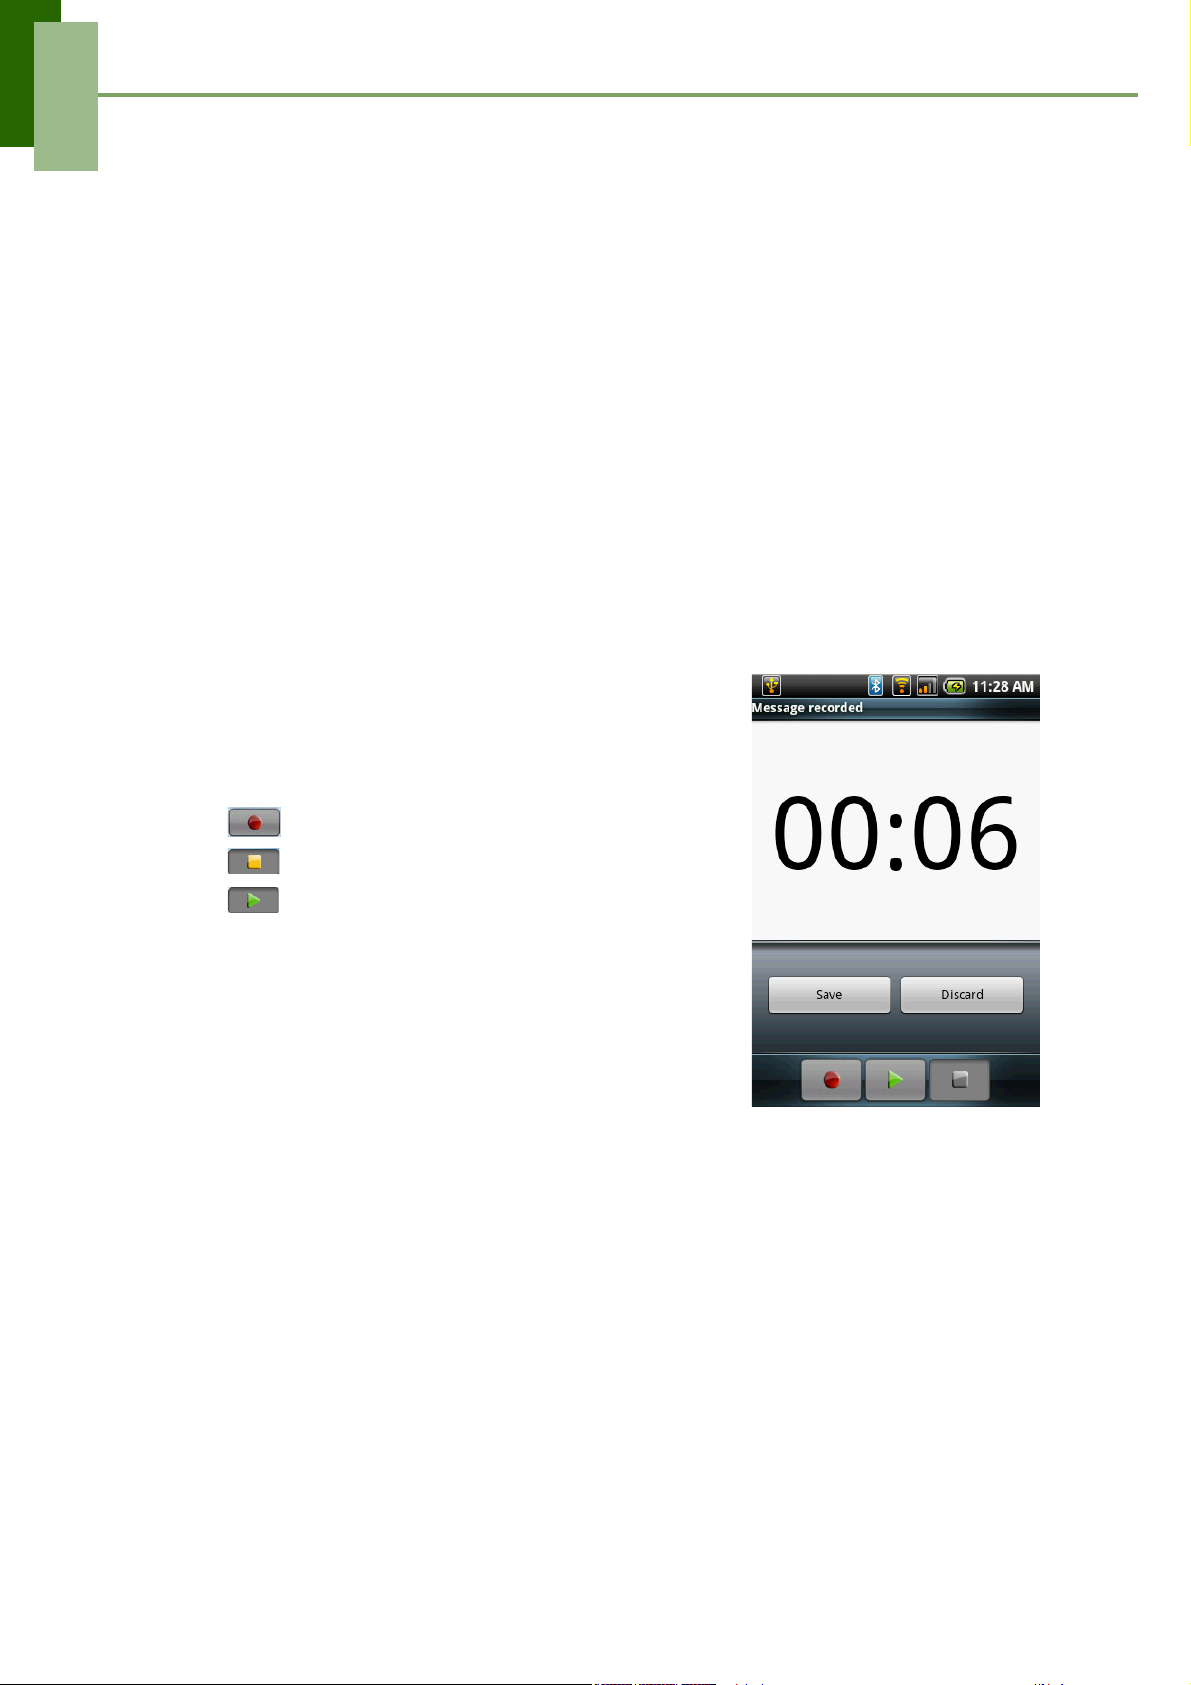
3. Tap Menu > Attach > Record audio.
4. Tap to record your message.
5. Tap to stop recording.
6. Tap to listen to your recording.
7. Tap Save to proceed or Discard to return to the
compose message screen.
8. Tap Play to listen to your recording again, or tap
Remove to delete your recording from the MMS
message.
9. Enter the mobile phone number in the To field.
10.Tap to enter your text message and tap Send.
27
Page 33
Chapter 5: Messaging
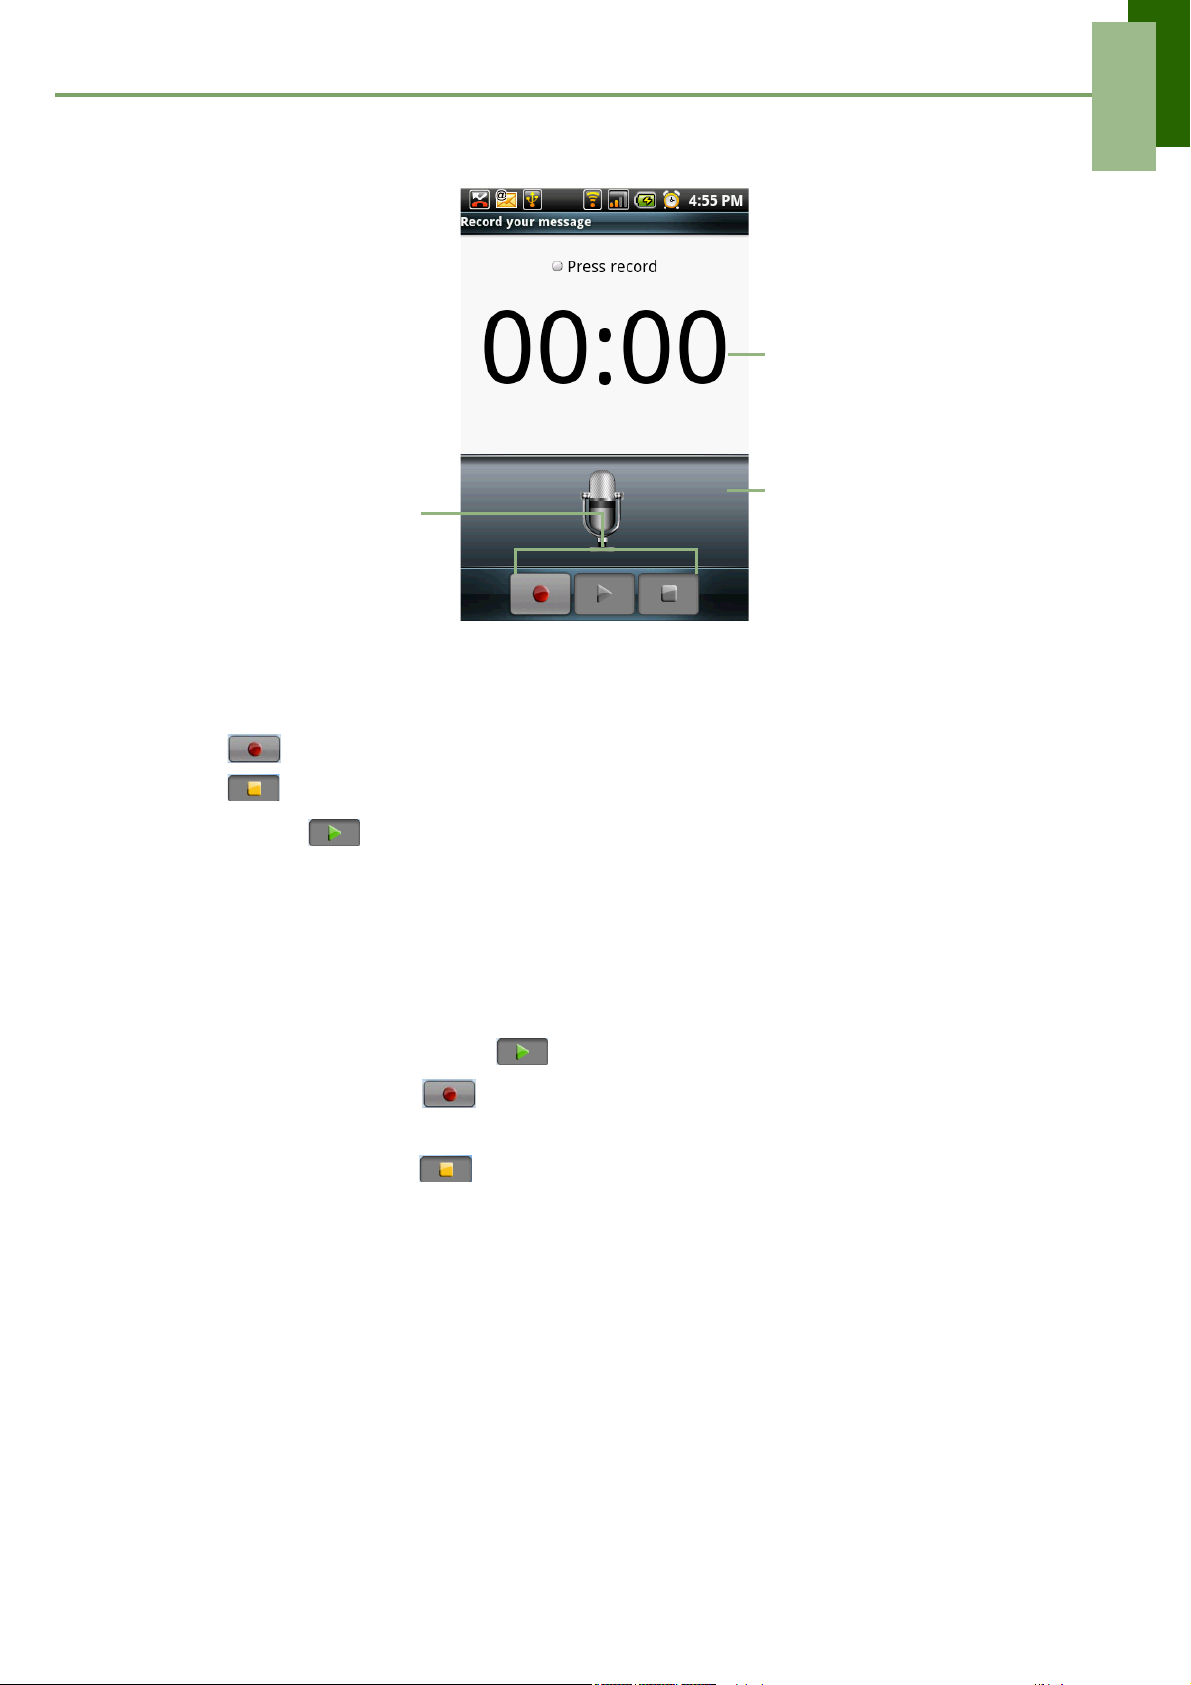
Displays recording
information.
Tap buttons to record, stop
and play.
Recording voice
1. Tap or Record to record your message.
2. Tap or Stop to stop recording.
NOTE: Tap to play voice.
3. Tap Send.
4. In the To field, enter the mobile phone number.
5. Tap Send.
Managing recorded voice
• To listen to the recording, tap to play.
Equalizer
• To redo recording, tap to record.
• To save recording, tap Save.
• To stop recording, tap to stop.
28
Page 34
Chapter 5: Messaging
5.4 E-mail Accounts
Your phone can send and receive e-mails just as you do with a computer. Your phone
supports Internet e-mail: e-mail account provided by an Internet Service Provider
(ISP) or web-based e-mail, such as Gmail, Hotmail, Yahoo! Mail, etc.
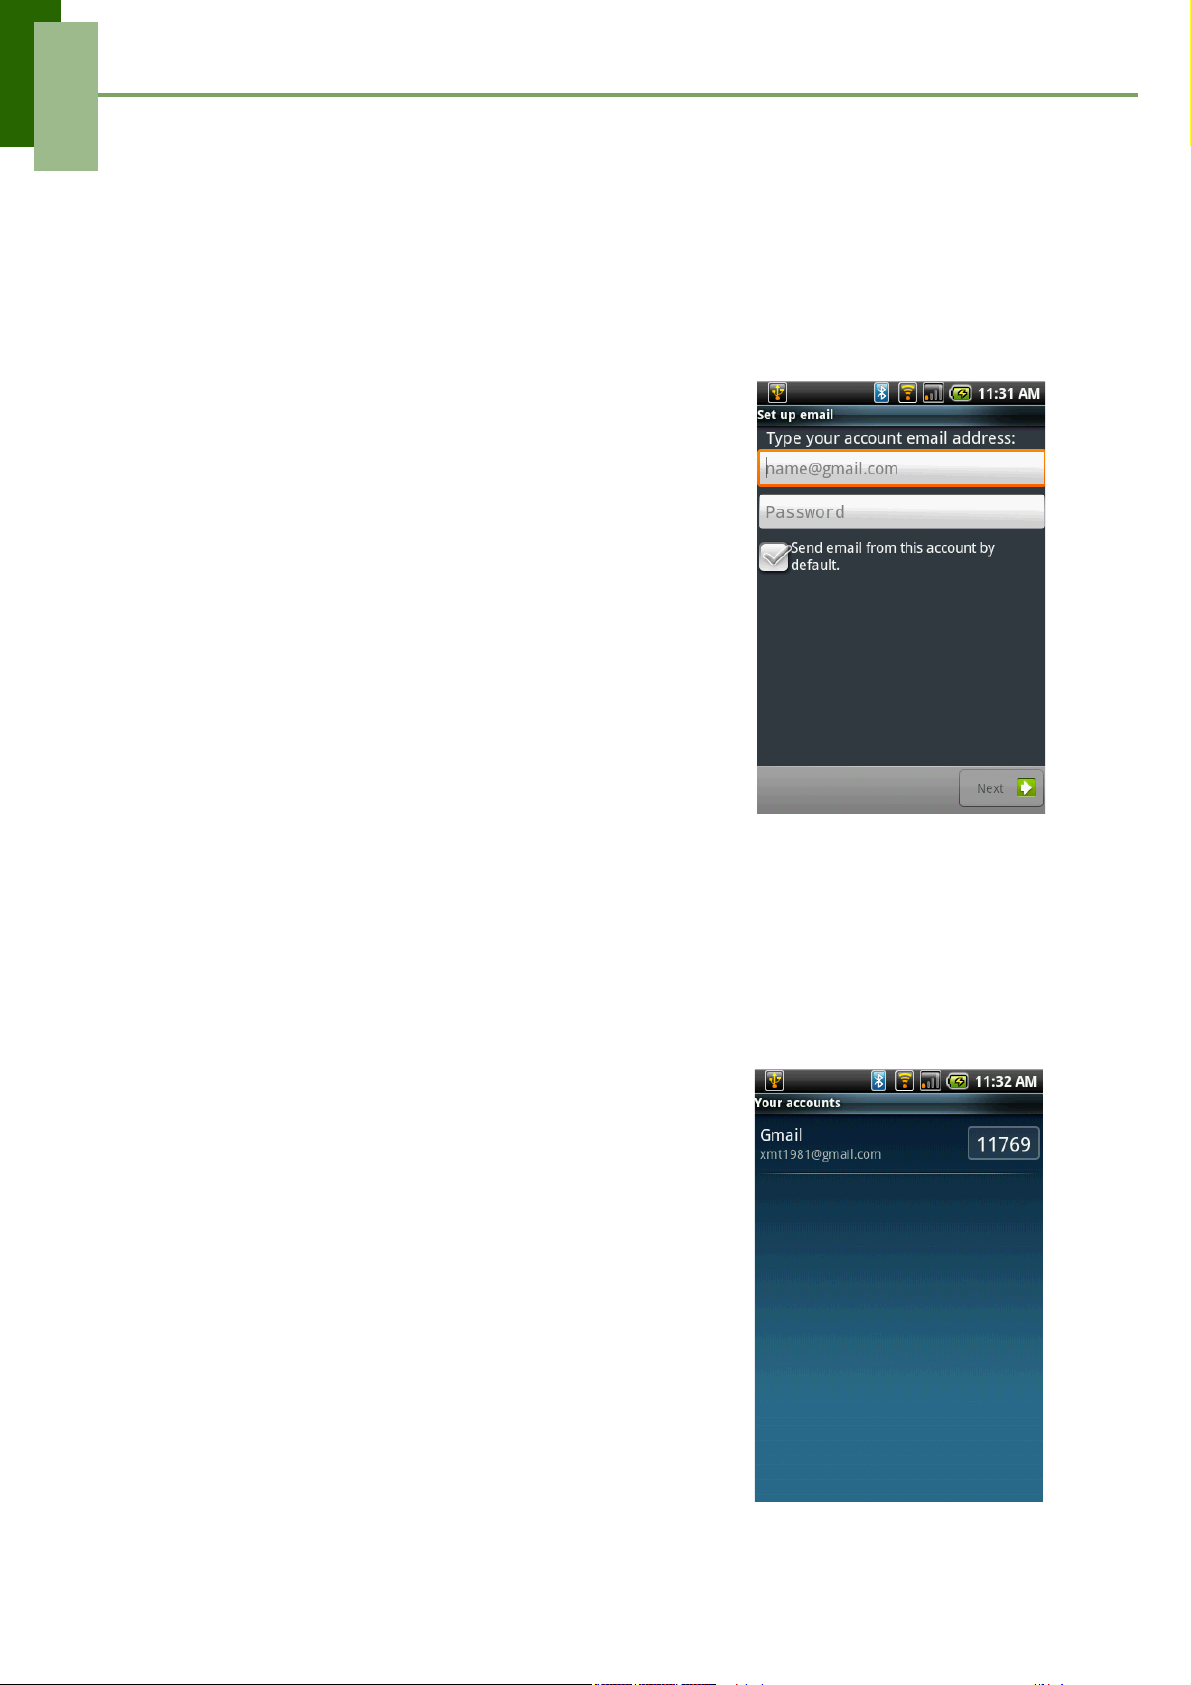
Setting up an Internet e-mail account
1. Tap Application Drawer > Email.
2. Select your e-mail account provider.
3. Enter your E-mail address and Password.
4. Tap Next.
5. The phone will automatically retrieve the e-mail
settings.
• If the e-mail settings are pre-configured, the
E-mail setup wizard displays a successful
message, tap Next.
• If the e-mail settings are not found, tap Manual
setup.
6. Enter Your Name and the Account display name,
then tap Next.
NOTE: The Account display name is the name
shown on Home screen and the Email
screen.
7. In Automatic Send/Receive, select how often you
want the phone to connect to the server to send and
check for e-mails.
8. Tap Done.
To open Email
From the Application Drawer, tap Email to view your
emails.
To select an account
1. Tap Application Drawer > Email.
2. The account picker screen lists the available email
accounts.
3. Tap the account you want to access.
29
Page 35
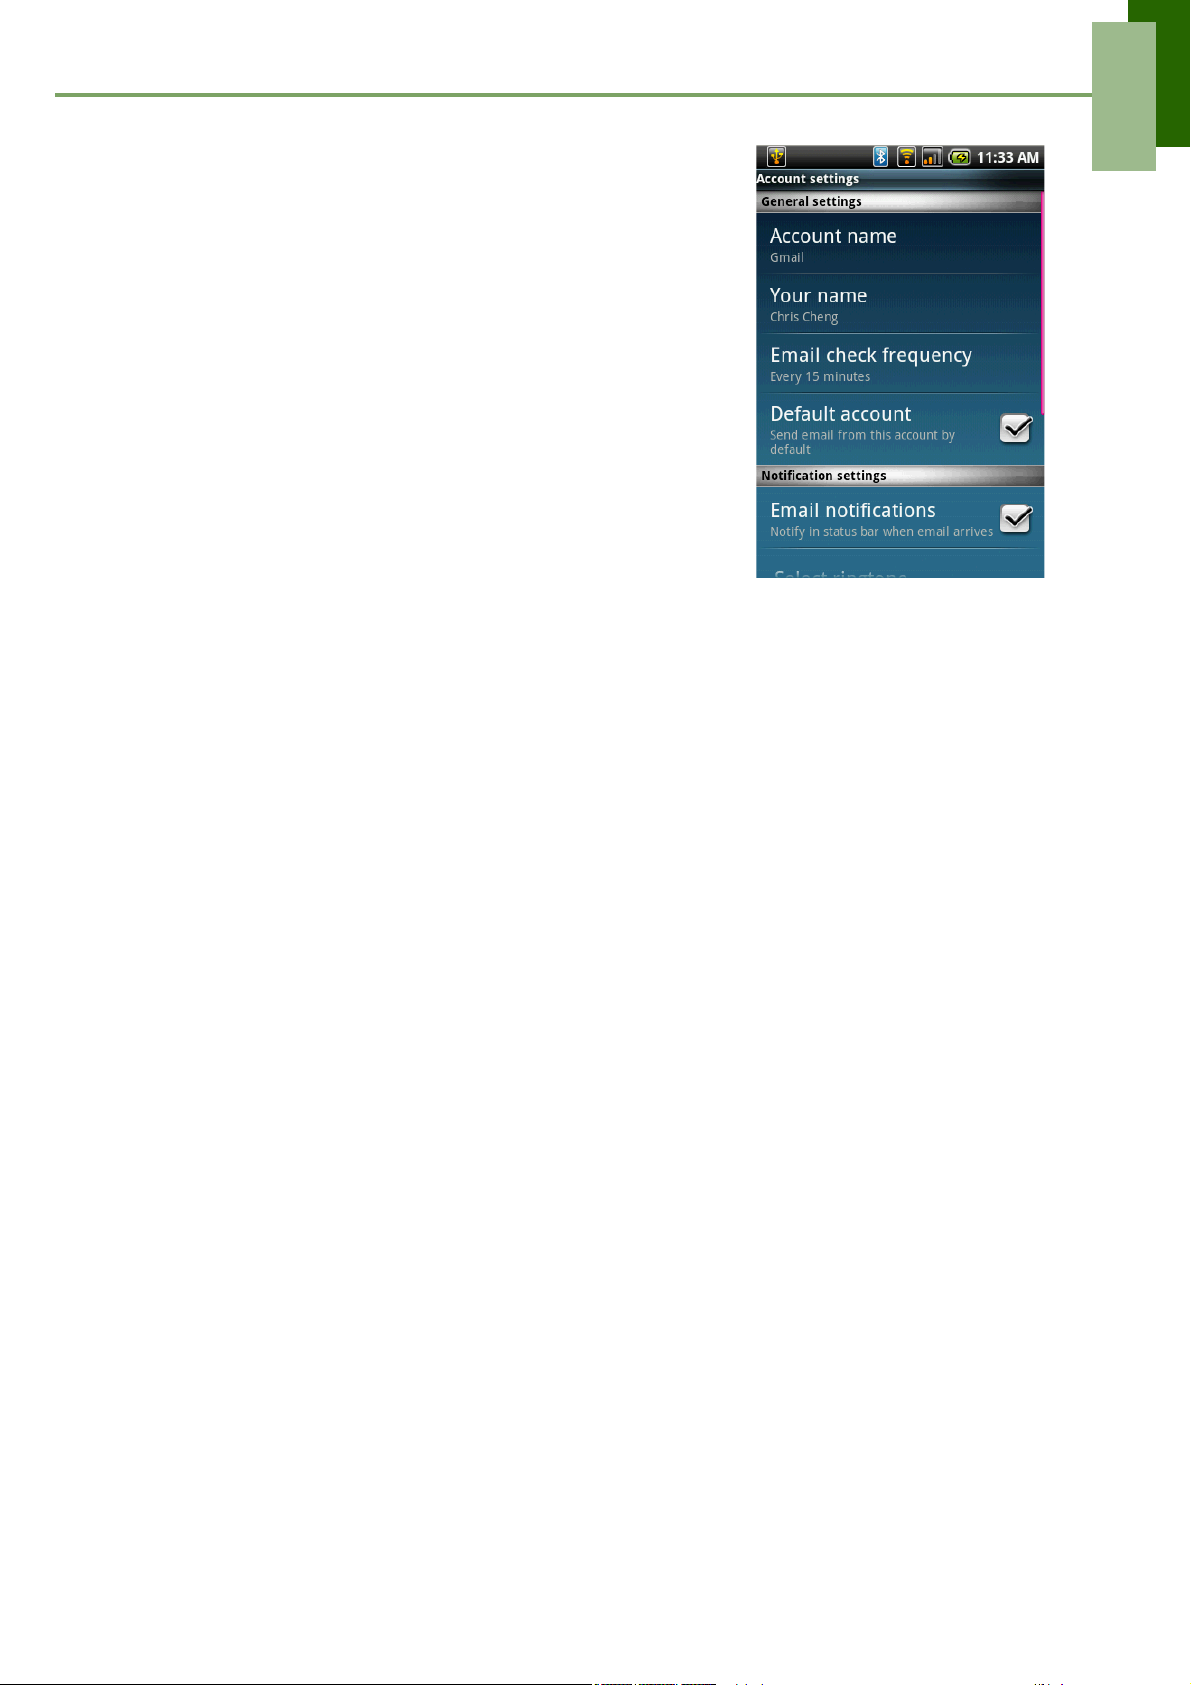
To configure email settings
Configure message settings using the Settings
submenu.
1. On Your accounts screen, tap to select an email
account.
2. Tap Menu > Settings to open the email setting
menu.
Chapter 5: Messaging
30
Page 36
Chapter 5: Messaging
5.5 Using E-mail
Composing and sending an E-mail
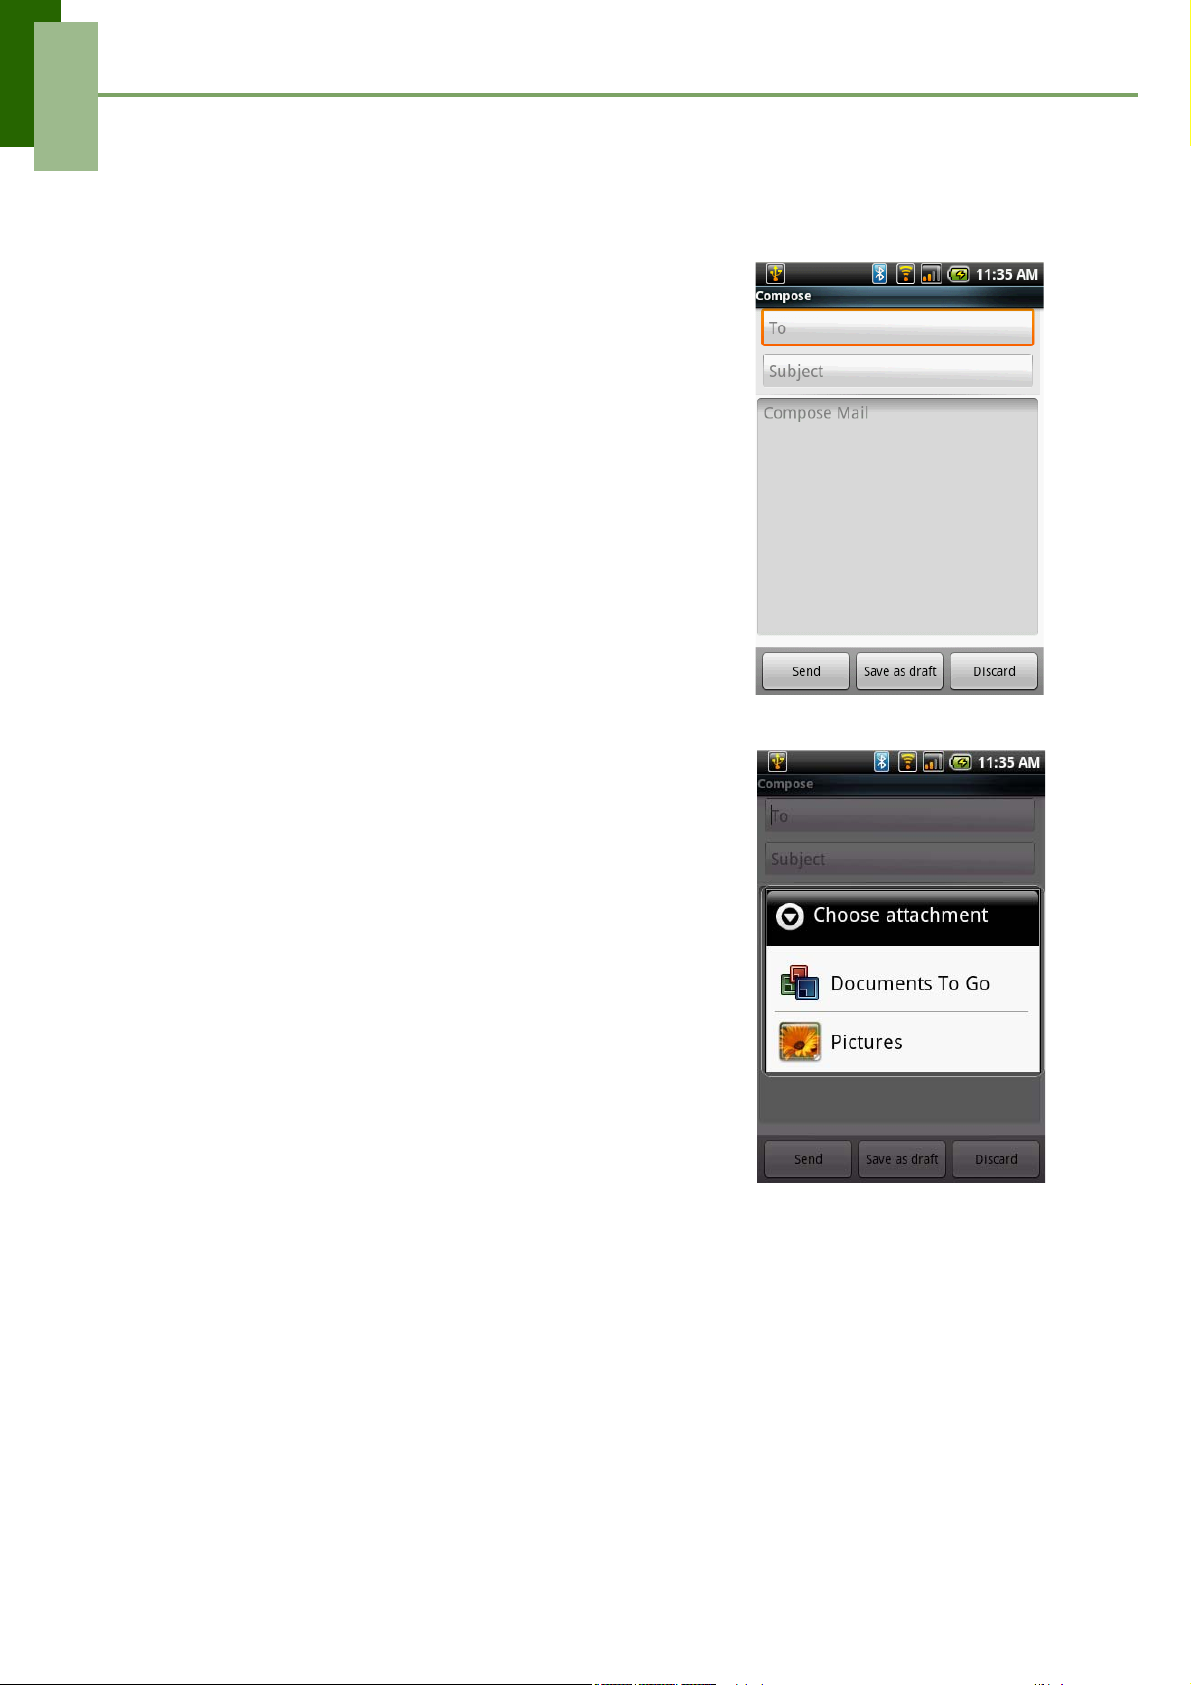
1. Tap Application Drawer > Email, then tap
an e-mail account.
2. Tap Menu > Compose.
3. In the To field, enter the recipient’s e-mail address.
TIP: To add recipients from Contacts, tap To or tap
Menu > Add Recipient, then select the names.
4. Enter the Subject.
5. Compose your email.
6. Tap Send.
Sending an E-mail from Contacts
You can send an e-mail to a contact with an e-mail
address stored in Contacts.
1. On Home screen, tap Contacts.
2. Tap a name to open contact.
3. Tap Send e-mail.
4. Enter the Subject and compose your email.
5. Tap Send.
Adding attachments to an e-mail message
1. Before sending your message, tap Menu > Attach.
2. Select the picture you want to attach.
Receiving e-mails
E-mails are automatically received in your Inbox when
your phone connects to wireless network.
To manually receive e-mails
1. Tap Application Drawer > Email, then tap an e-mail
account.
2. Tap Menu > Send/Receive.
31
Page 37
Chapter 5: Messaging
Reading and replying to e-mails
The Inbox displays the email headers. When you open the e-mail, it shows only a part
of the message, unless it is a very short message. Download the e-mail to view the
complete content.
To download attachments
• With POP3 e-mail accounts, attachments are downloaded when you download the
complete message.
• With IMAP4 e-mail accounts, tap the attachment to mark it for download. The
attachment is downloaded the next time you connect to your e-mail server.
NOTE: Only supported file types can be opened on your phone.
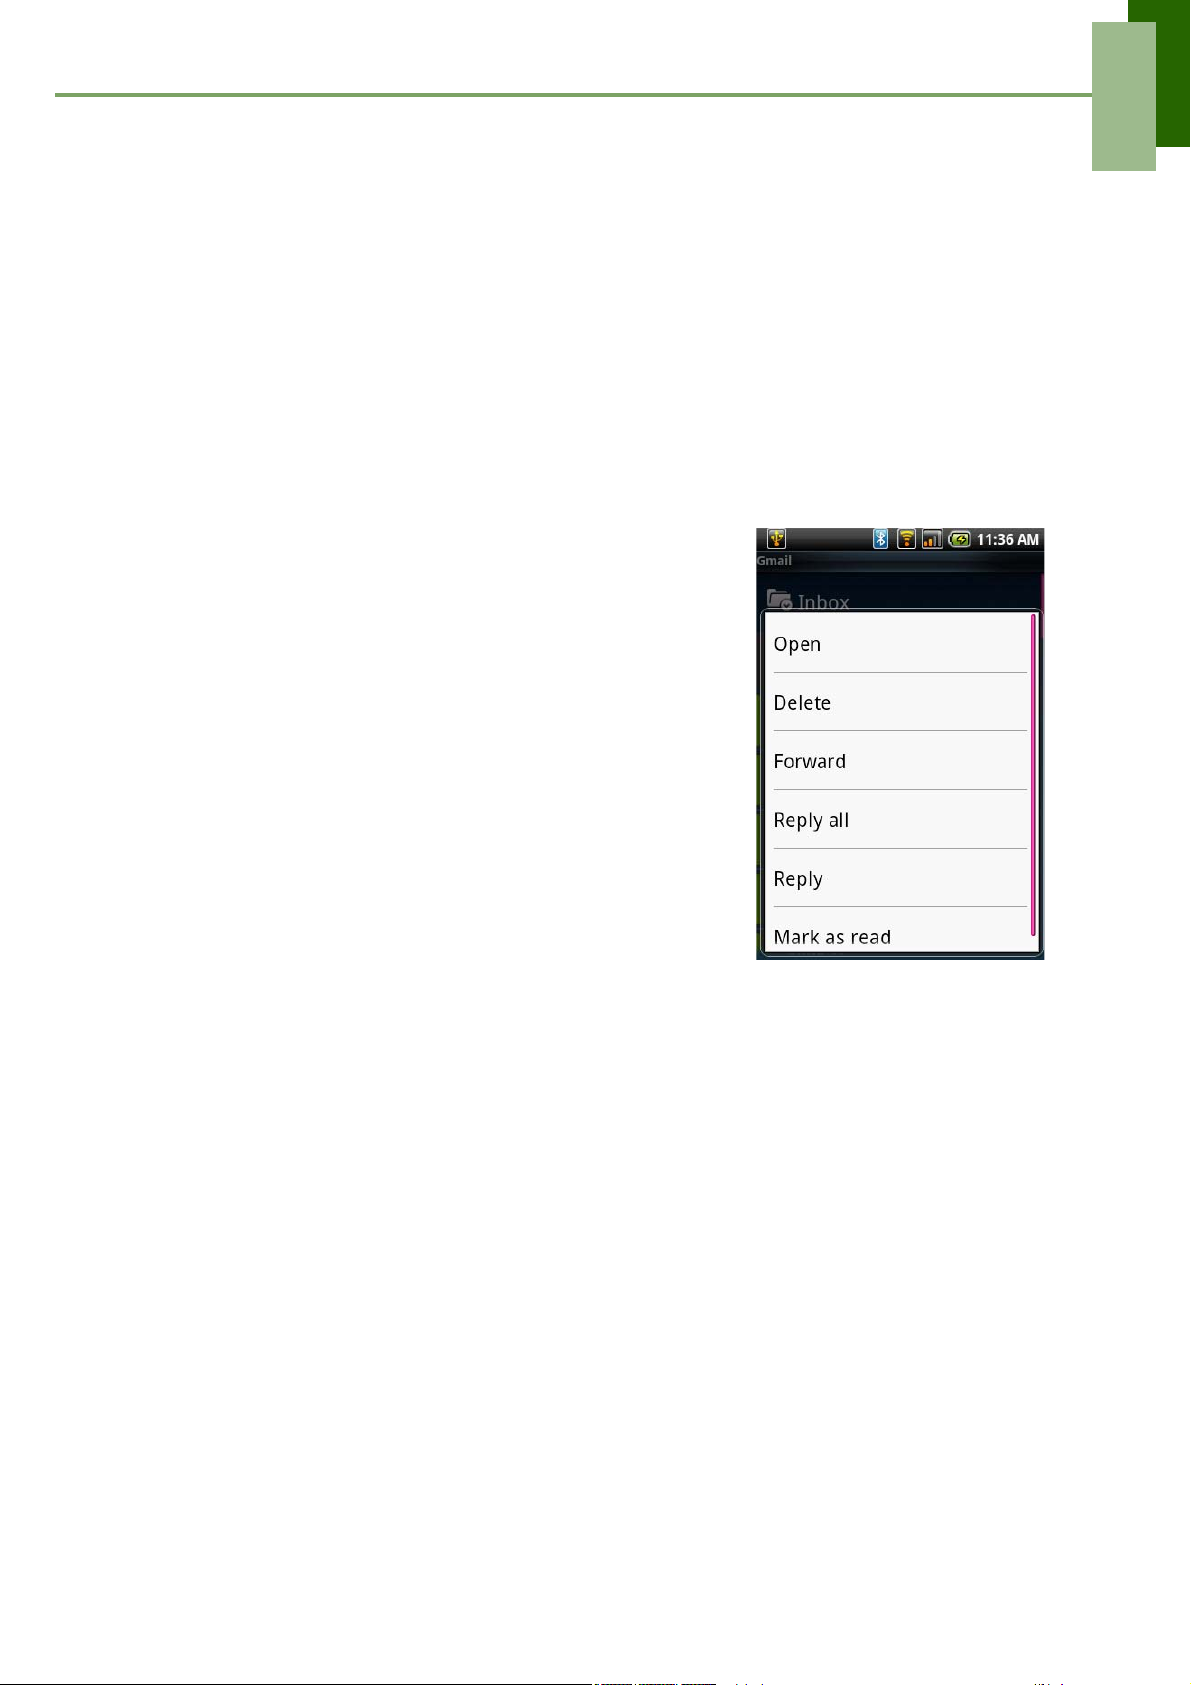
To reply or forward an e-mail
1. Open the message.
2. Do any of the following:
• Tap Reply or Reply all to reply the email.
• Tap Menu > Forward. Then enter the recipient
in the To field.
3. Compose your message.
4. Tap Send.
Managing E-mail folders
To delete an e-mail
1. Tap Application Drawer > Email, then tap an e-mail
account.
2. Tap Inbox to view the inbox messages.
3. Tap and hold the message to delete.
4. Tap Delete.
To move between messaging accounts
If you are viewing the messaging list screen of one account and you want to view the
list of another account, tap Menu > Accounts, then tap the account you want to view.
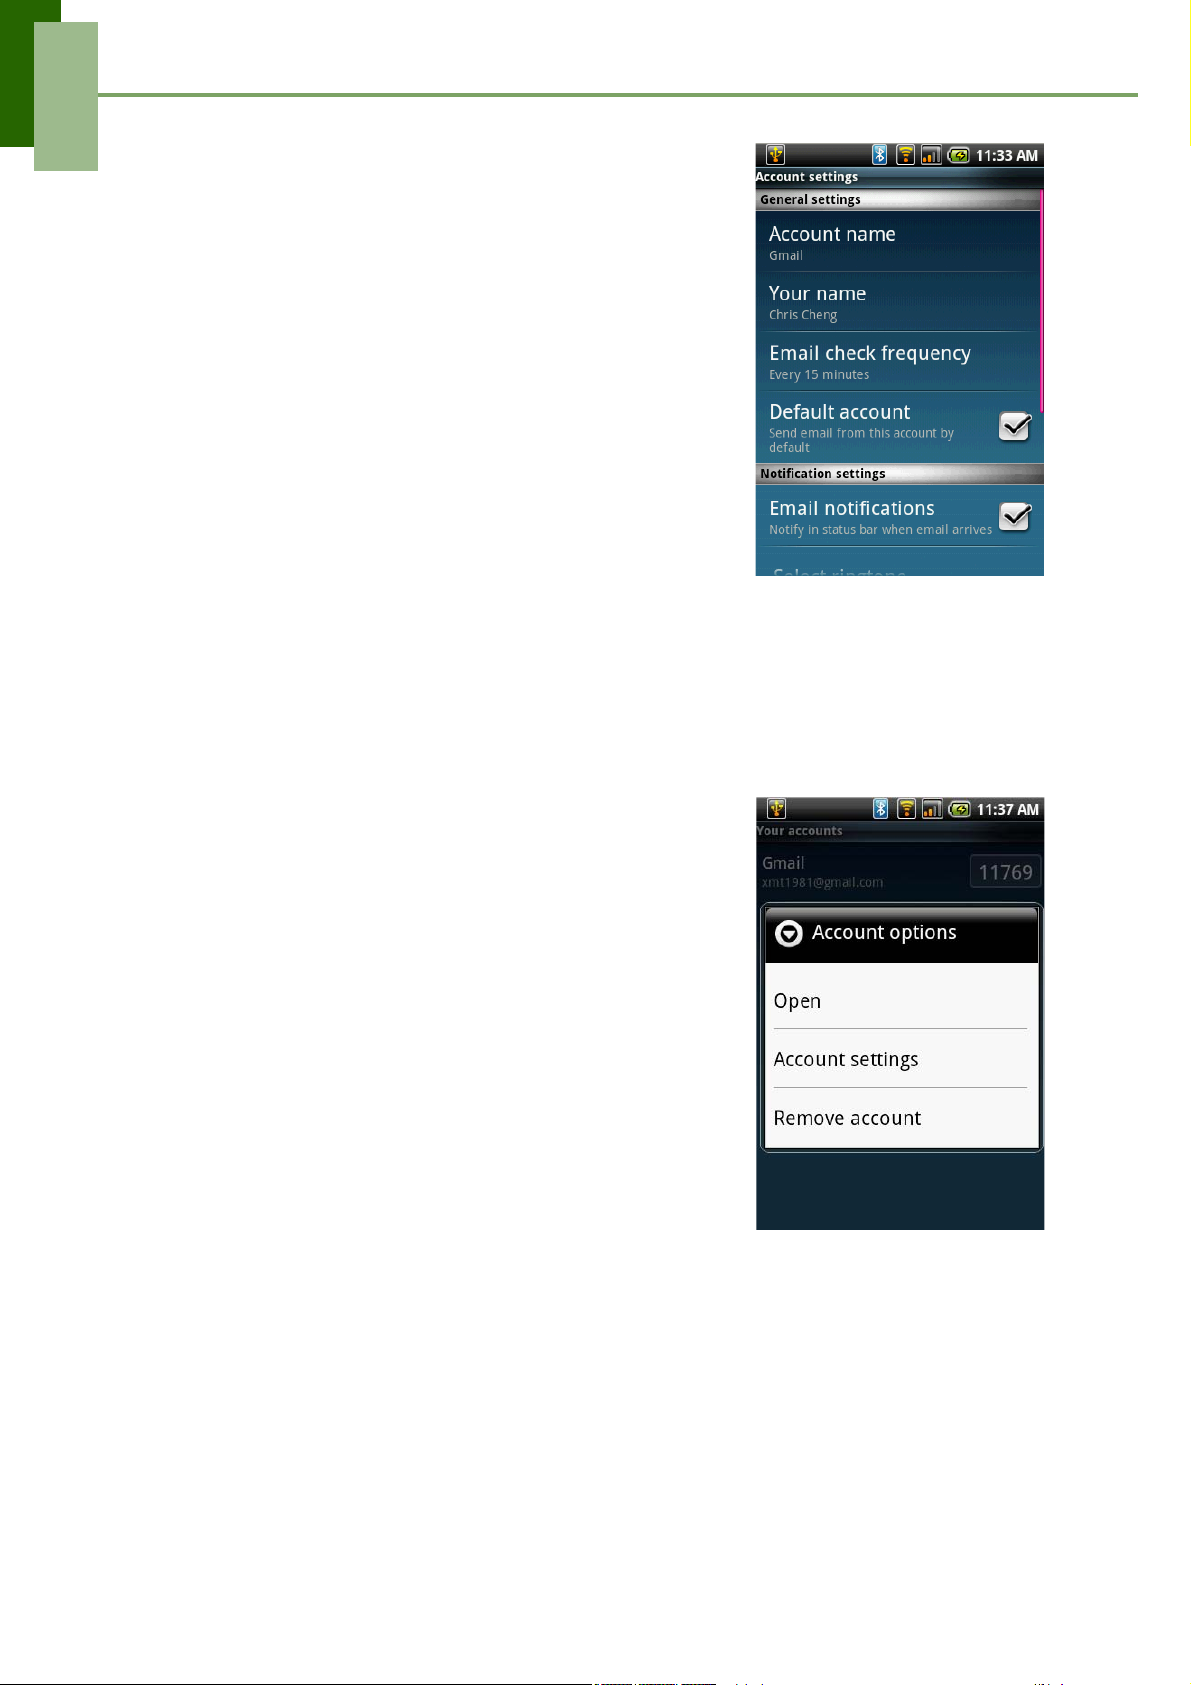
Customizing e-mail settings
You can configure the general settings of your email account such as Account name,
email checking frequency, default account, and server settings.
32
Page 38
Chapter 5: Messaging
To set up your account name
1. Tap an e-mail account.
2. Tap Menu > Settings to view the email account
settings and make adjustments.
3. Tap Account name to change the account name.
4. Tap OK to confirm.
To set up the email checking frequency
1. Tap an e-mail account.
2. Tap Menu > Settings to view the email account
settings and make adjustments.
3. Tap Email check frequency You can set the phone
to automatically check for new email every 5 mins,
every 10 mins, every 15 mins, every 30 mins, every
hour, or never.
To set up default account
1. Tap an e-mail account.
2. Tap Menu > Settings to view the email account settings and make adjustments.
3. Tap Default account to send email from this account by default.
To delete an e-mail account
1. Tap Application Drawer > Email.
2. Tap and hold the account to delete.
3. Tap Remove account.
4. Tap OK to confirm.
33
Page 39
Chapter 6: Using the Internet
Chapter 6: Using the Internet
6.1 Connecting to the Internet
Your phone connects to the Internet via:
•Wi-Fi
• Cellular Data Networks
Wi-Fi
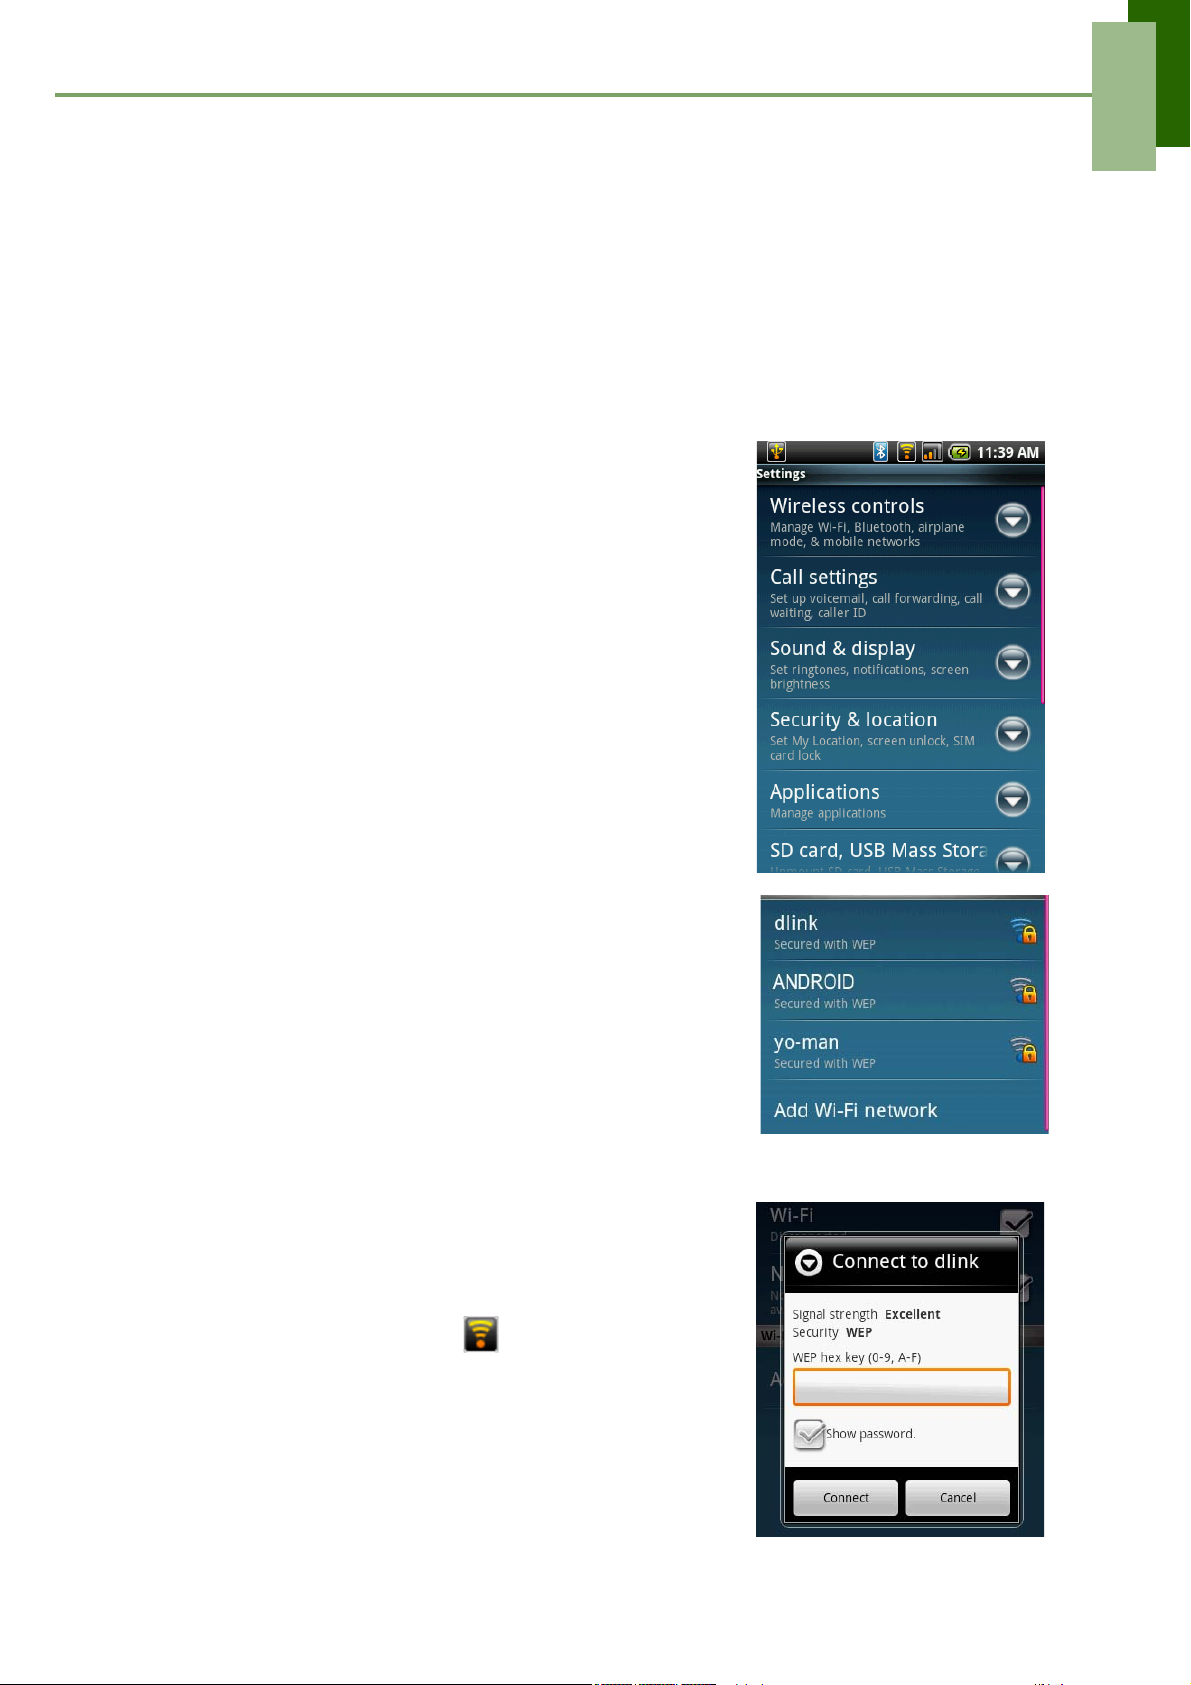
To turn Wi-Fi on or off
1. From the Home screen, tap Application Drawer >
Settings to access Wireless controls.
2. Tap to check the Wi-Fi function and turn Wi-Fi on or
off.
To connect to a Wi-Fi network
1. Turn Wi-Fi on.
2. Tap Wi-Fi settings. The phone scans for Wi-Fi
signals.
3. Detected networks are displayed below. Tap a
network connection then tap Connect.
4. If you select an unsecured network, the connection
is automatically established. Otherwise, proceed to
the next step.
5. To connect to a secured connection, you will be
prompted for the network key. Enter the key, then
tap Connect.
When Wi-Fi is connected, the connection icon is
displayed on the status bar.
34
Page 40
Chapter 6: Using the Internet
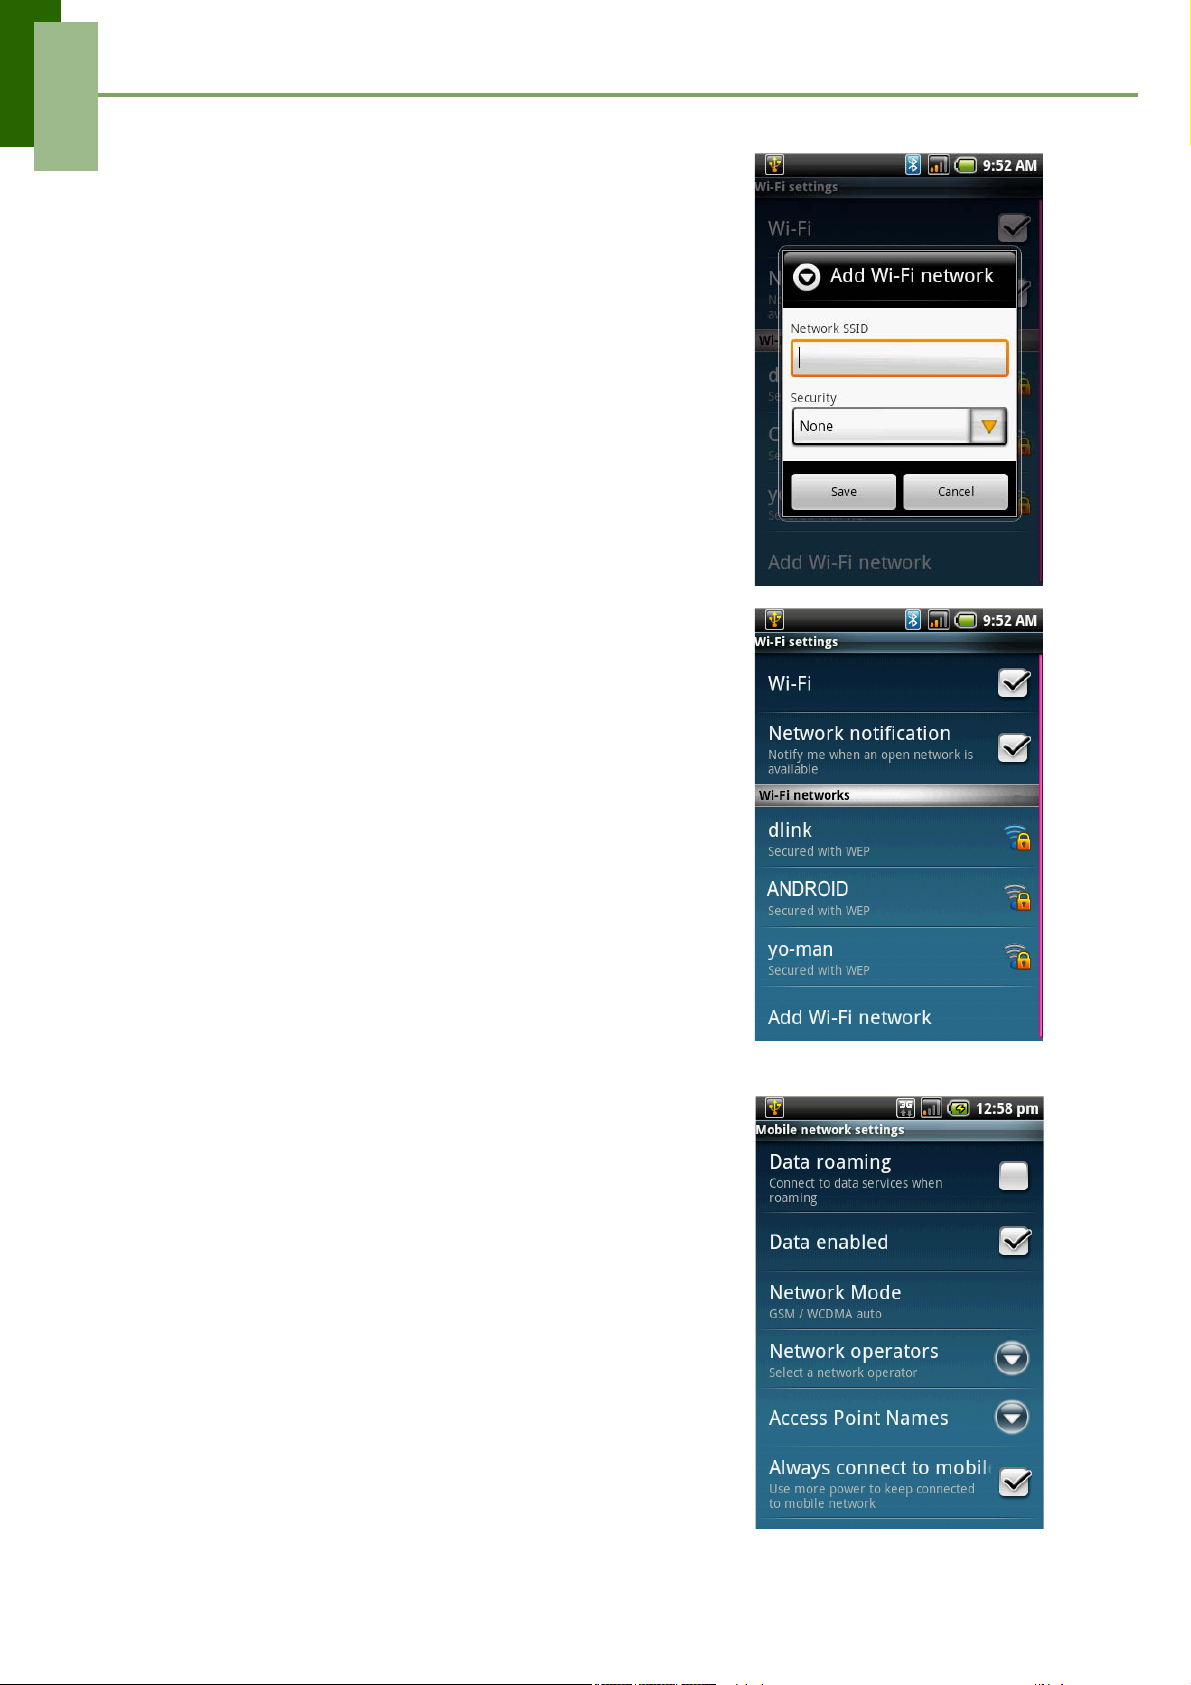
To add Wi-Fi network
1. From Home screen, tap Application Drawer >
Settings to access Wireless Controls.
2. Tap Wi-Fi Settings.
3. In Wi-Fi networks, tap Add Wi-Fi network. A new
window is displayed.
4. Follow the on-screen instructions and enter
necessary information, then tap Save to store
settings.
To configure Wi-Fi settings
1. From Home screen, tap Application Drawer >
Settings to access Wireless Controls.
2. Tap Wi-Fi Settings.
3. Tap Menu > Advanced.
Note: If you use static IP, enter the IP settings
as required.
4. In IP settings, Enter the information for IP address,
gateway, netmask, and DNS. Tap OK to save your
settings.
Cellular Data Network
Check the availability of these connections with your
network service provider and obtain the following
information:
• Access Point Name
•Proxy
•Port
•User name
• Password
35
Page 41
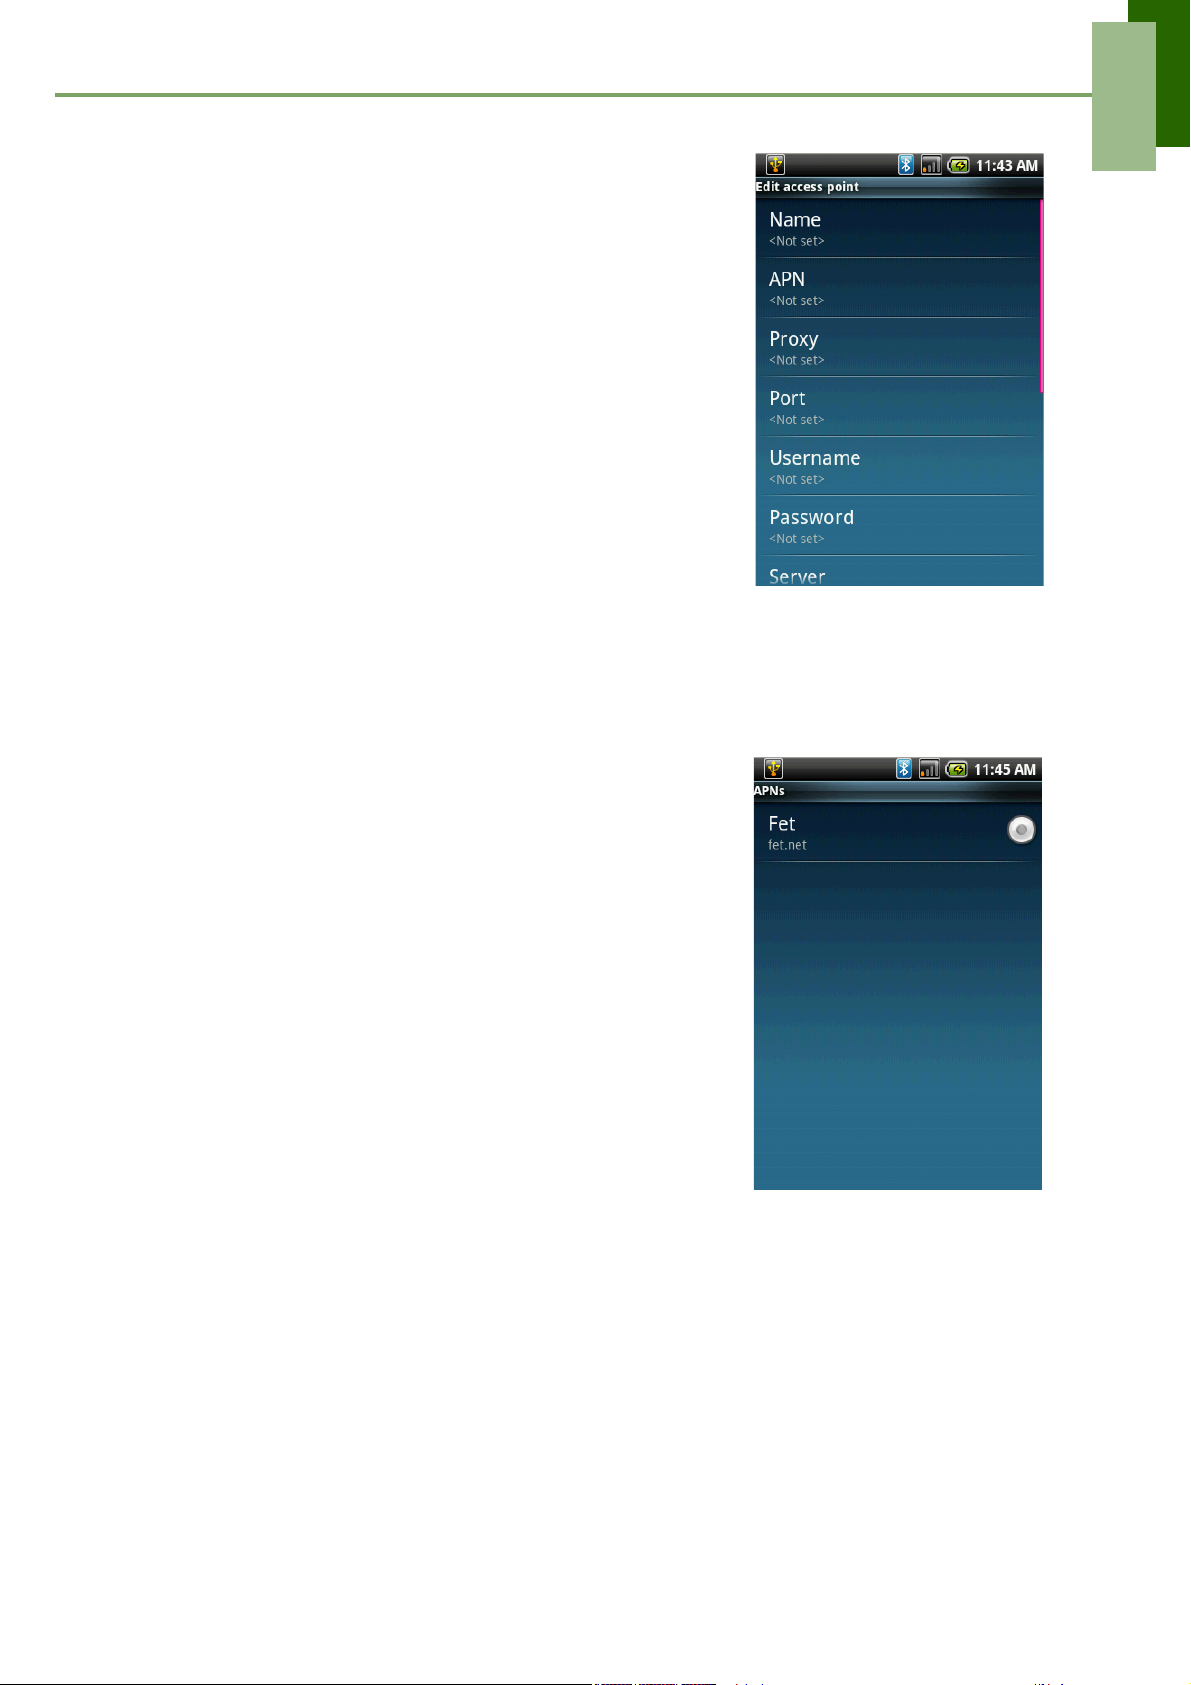
To set up wireless data connection
1. Tap Application Drawer > Settings > Wireless
Controls.
2. Tap Mobile network settings > Access Point
Names.
3. Tap Menu > New APN.
4. Enter a name for the connection.
5. Tap OK.
6. Enter the APN, then tap OK.
7. Enter the Proxy, Port, Username, and Password
(if available) etc., then tap OK to save your settings.
Starting a Data Connection
Chapter 6: Using the Internet
Data connection is automatically activated when the device is turned on. If you set up
multiple data connections, select the connection you want to use manually.
To manually start a data connection
1. Tap Application Drawer > Settings.
2. Tap Wireless controls > Mobile networks >
Access Point Names.
3. A list of connections will be displayed. Tap the radio
button to select the connection you want to use.
36
Page 42
Chapter 6: Using the Internet
6.2 Browsing a Web Page
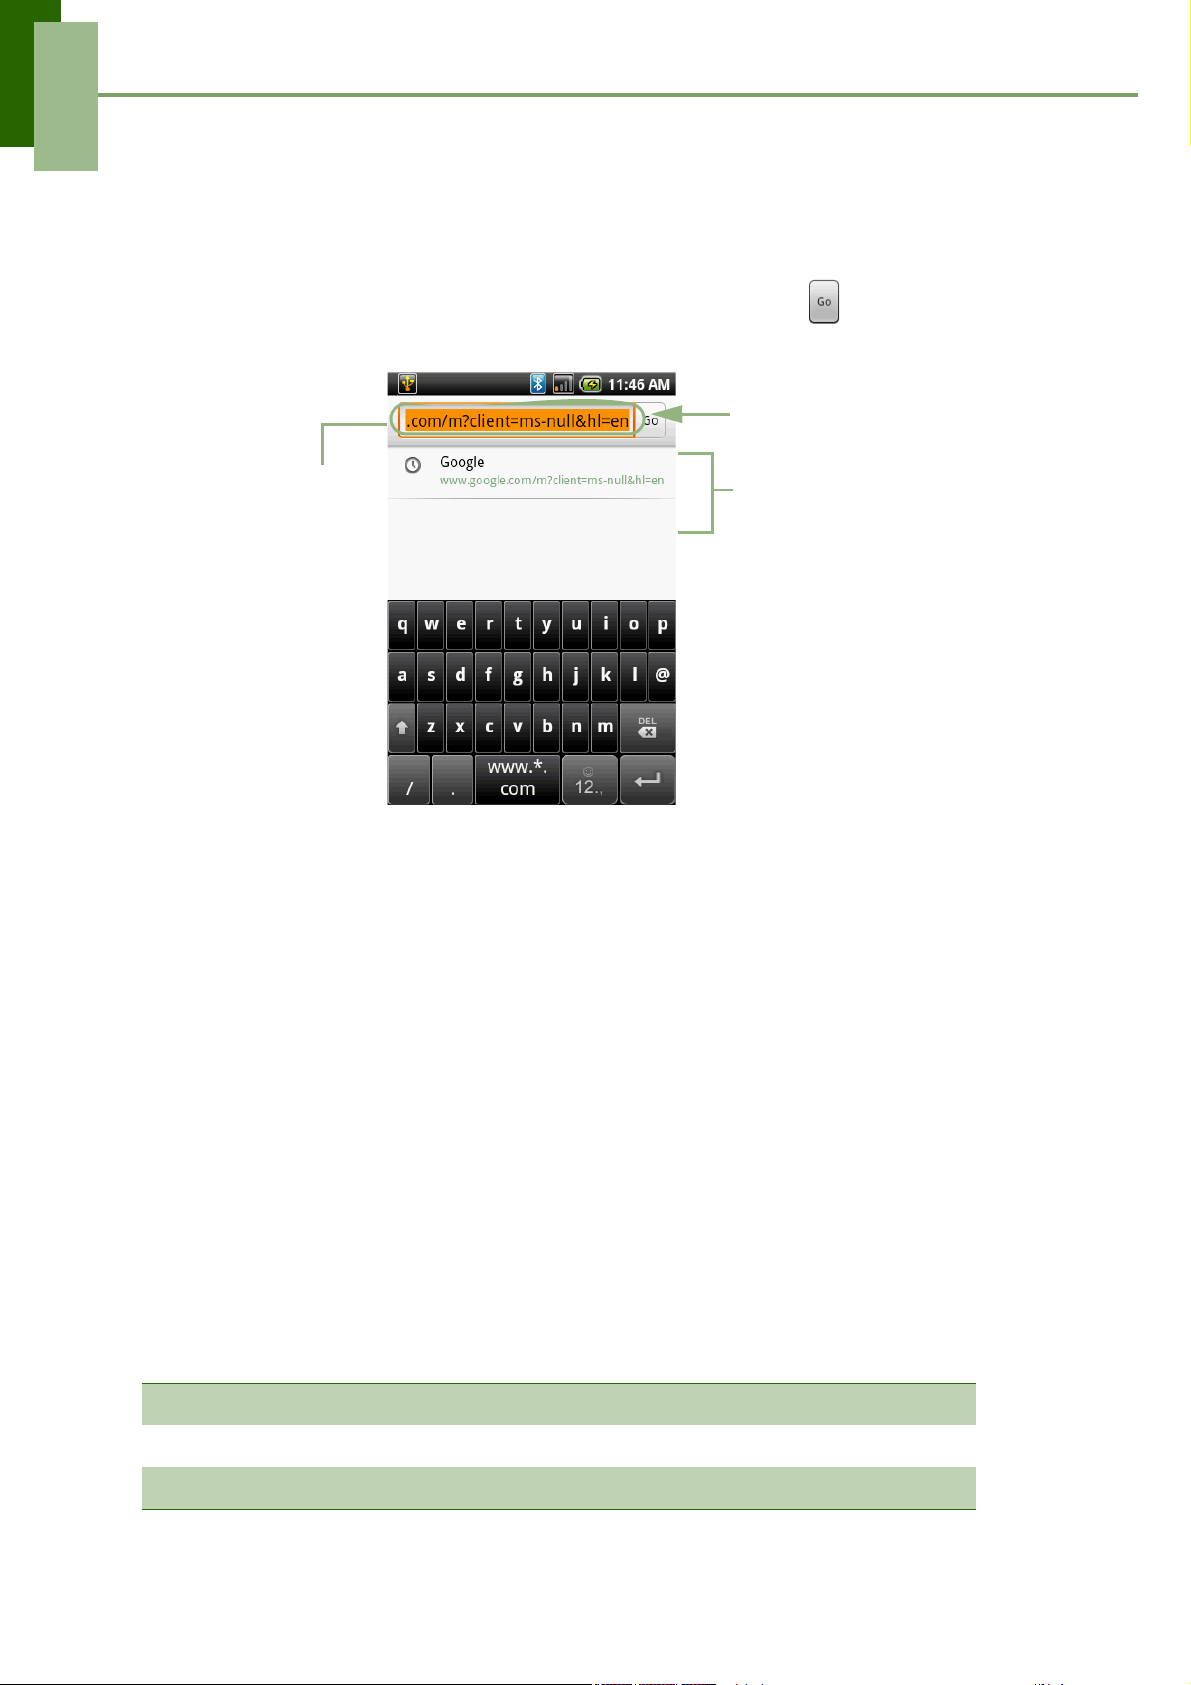
1. Tap Application Drawer > Browser
2. Tap Menu > Go.
3. An address bar appears on screen. Type the URL then tap .
Tap to enter the
website.
Address bar
To scroll the page
• Use finger gestures
To scroll up or down, swipe your finger down or up. To scroll left or right, tap and
swipe your finger to the right or left.
• Use the scroll bars.
Recently viewed
websites is
listed.
To set the Home page
1. While viewing a web page, tap Menu > Settings > Set home page.
2. Enter the URL of the page that you want to set as home page.
3. Tap OK to save your settings.
Managing a Web Page
While viewing a web page, tap Menu to change view settings or apply other functions.
The following table lists the Menu options. Depending on the function, some options
may be unavailable.
Go Tap to enter the URL of a web page to visit.
Bookmarks Tap to select from the list of saved favorite web pages to visit.
New Window Open a web page in a new window.
37
Page 43

Chapter 6: Using the Internet
Refresh Tap to refresh page.
Forward Tap to go to the next page.
Find on page Tap to find the text on the web page.
Select text Tap to select text on the web page.
Save page Tap to save the web page.
Page Tap to view web page information.
Share page Tap to send this web page via email or messaging.
Exit Tap to close the Browser and return to Home screen.
Download Tap to view the download history.
Zoom Out Tap to activate zooming functions.
Tap within the page to go back to normal view.
Page Content
Setting
Privacy settings Tap to configure privacy settings:
Tap to configure browser settings:
• Set text size: adjusts text size.
• Set text encoding: sets text encoding.
• Block pop-up windows: blocks pop-up windows when
browsing a web page.
• Load images: displays or hides images when loading the
web page.
• Page setting: adjusts page size setting. Available options
are: Auto fit page, Normal, and Auto fit screen width.
• Enable JavaScript: enables/disables JavaScript on web
page.
• Open in background: opens new web page window
behind the current one.
• Set home page: enters URL and sets as home page.
• Clear cache: deletes all cached contents.
• Clear history: clears the browser navigation history.
• Accept cookies: allows sites to save ad read cookie data.
• Remember form data: remembers the data typed in forms
for later use.
• Clear form data: clears all the saved form data.
Security setting Tap to configure security settings:
• Remember passwords: saves usernames and passwords
for web sites.
• Clear passwords: clears all the saved passwords.
• Show security warning: shows warning when the web site
has security problem.
Advance settings Tap to view and adjust gear settings or reset all settings to
factory default.
38
Page 44

Chapter 6: Using the Internet
To use the Google Search Widget
From Home screen, you can browse the internet right away with the Google Search
function.
1. On Home screen, swipe left to show Google Search.
1. Tap the Google Search widget, then type the text to search.
2. Tap .
39
Page 45
Chapter 7: Using Bluetooth
Chapter 7: Using Bluetooth
Bluetooth modes
• On: Bluetooth is turned on. Your phone detects
other Bluetooth devices, but your phone is not
visible to others.
• Discoverable: Bluetooth is turned on and your
phone is visible to other Bluetooth devices.
• Off: Bluetooth is turned off.
To turn Bluetooth on or off
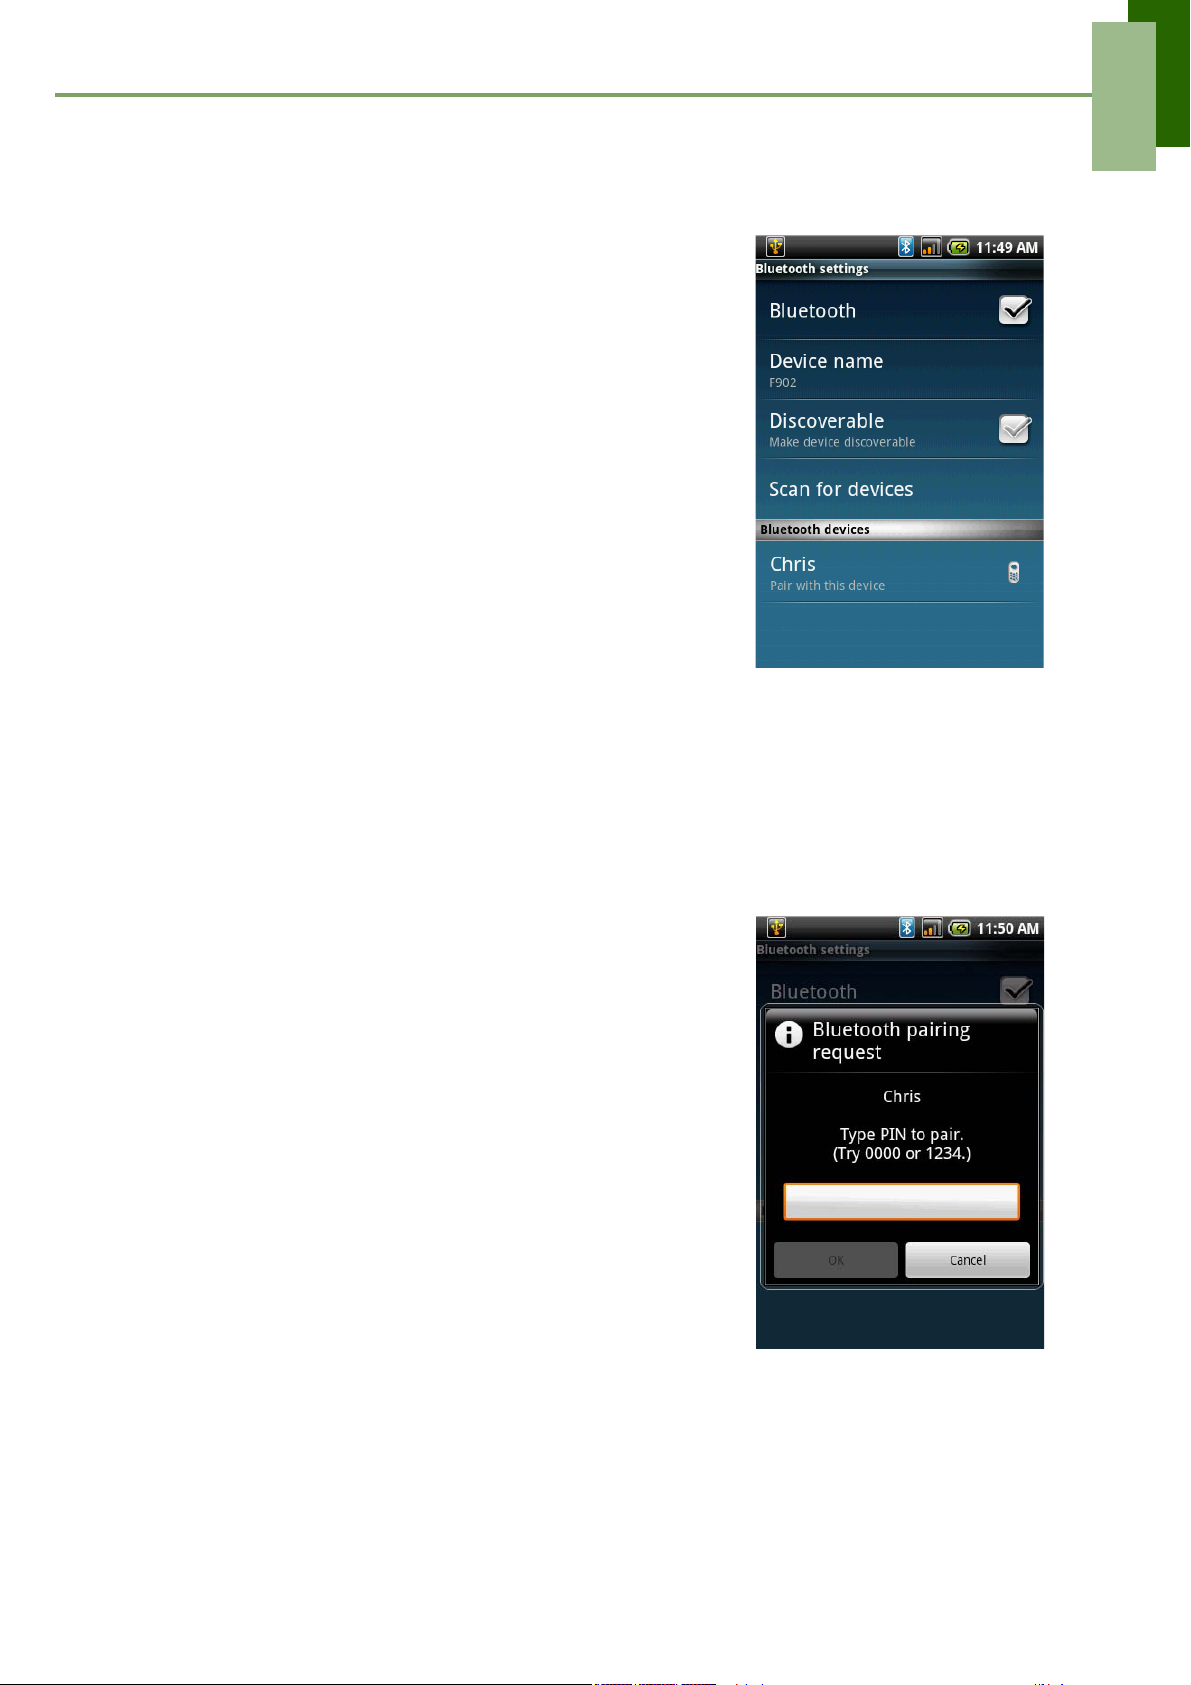
1. Tap Application Drawer > Settings > Wireless
Controls.
2. Tap Bluetooth Settings.
3. Tap to check Bluetooth and activate.
4. To make your phone visible to others, check
Discoverable to make this phone visible to other
devices.
7.1 Connecting to Bluetooth Devices
A connection to a Bluetooth device is called a partnership. You need to pair and
create a partnership with a Bluetooth device to exchange information.
1. Tap Application Drawer > Settings > Wireless
Controls.
2. Tap Bluetooth Settings to view the menu options.
3. To search for a new device, tap Scan for devices.
4. Tap the device to connect.
5. To start pairing, enter the Passcode, then tap OK.
NOTE: The passcode you enter on your phone
must be the same passcode to be entered
on the other Bluetooth device.
6. If you connect with an audio device which only
supports HSP/HFP, "Connected to phone audio"
will be displayed on the screen.
7. If you connect with audio device which supports
HSP/HFP/A2DP, "Connected to phone and
media audio" will be displayed on the screen.
NOTE: Tap and hold the selected device to enter
device options menu.
NOTE: Once a partnership has been created, connecting to that device again will
no longer require entering the passcode.
40
Page 46
Chapter 8: Multimedia Applications
Chapter 8: Multimedia
Applications
8.1 Photos and Videos
Your phone is equipped with a 5.0 megapixels camera to take photos and videos.
Taking a photo
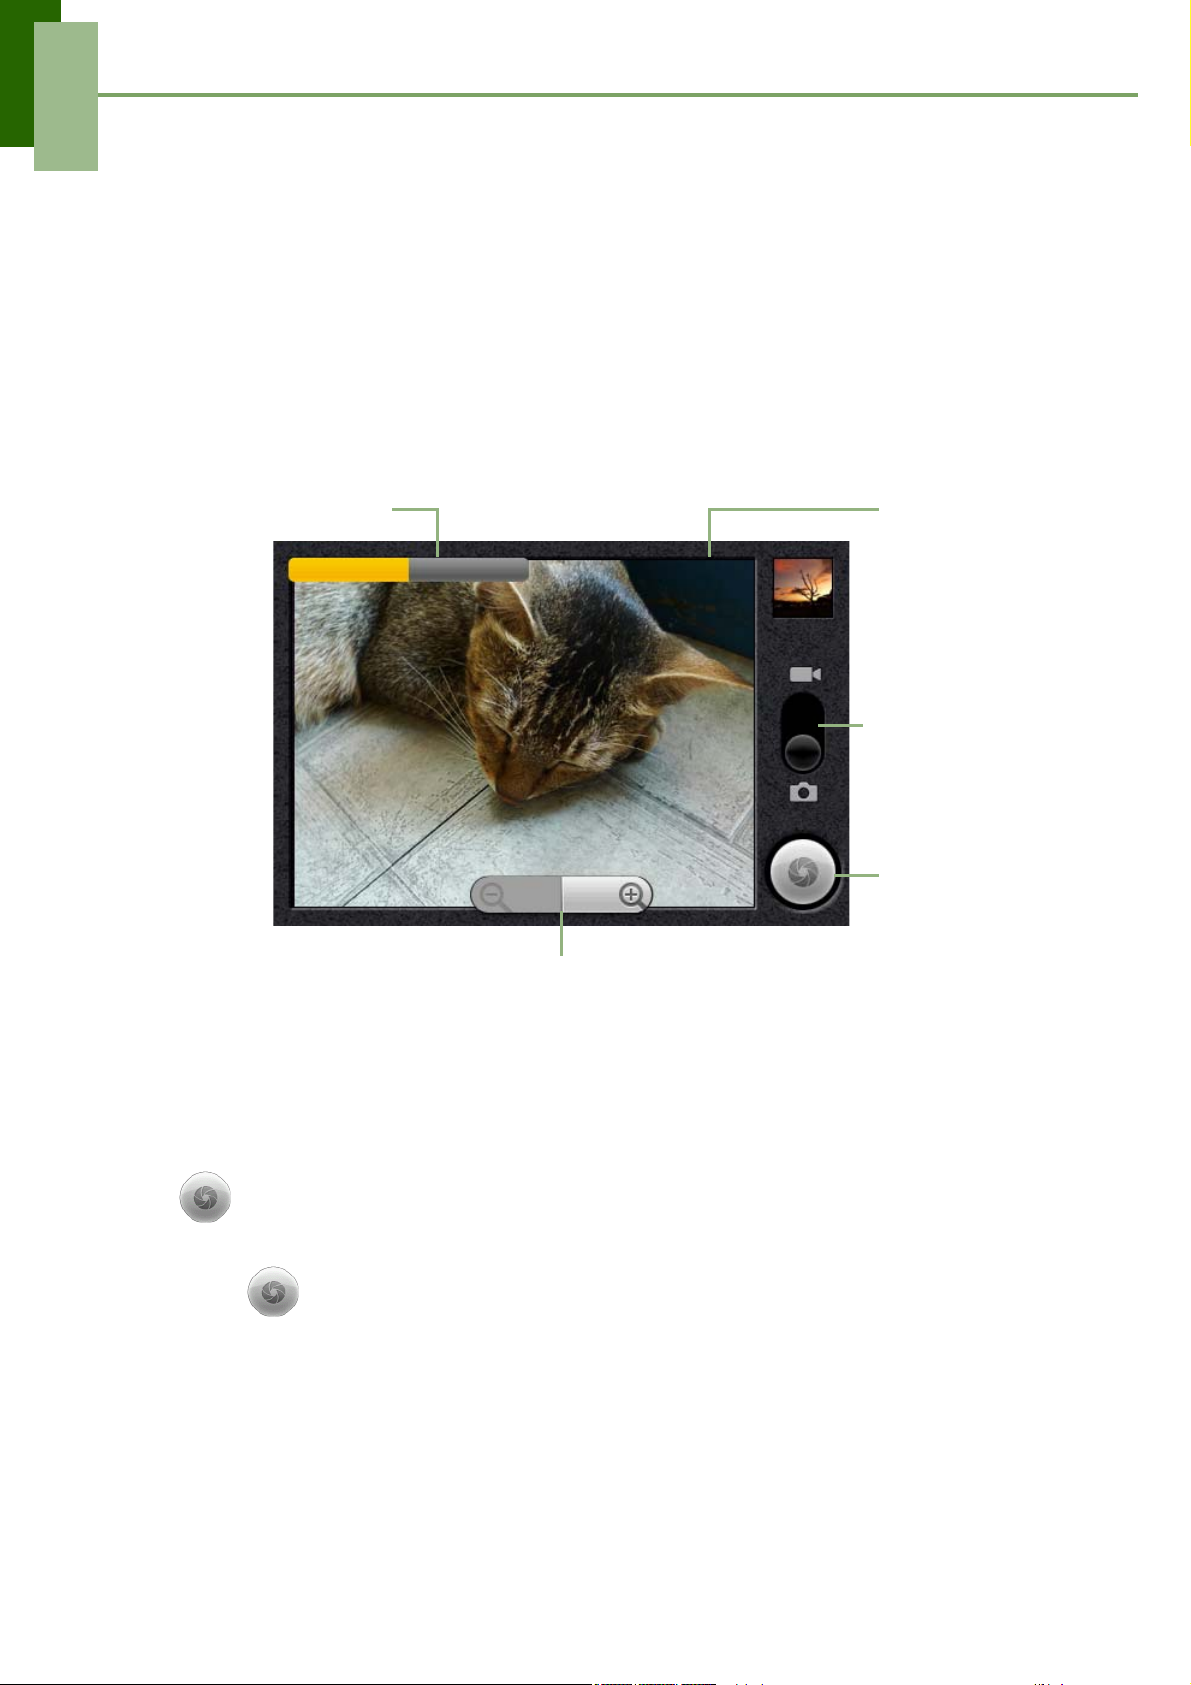
Tap to adjust the brightness
of the image.
Tap “+” or “-” to zoom the image in or out.
1. Tap Application Drawer > Camera. The screen automatically switches to
landscape view.
Displays the
last image.
Swipe to switch
between video
and camera
mode.
Tap to take a
photo.
NOTE: To activate the camera at anytime, press and hold the shutter button on the
side.
2. Aim the phone at the subject, then half press the shutter button or tap and hold
to focus.
3. The focus frame turns white to indicate focus is set, fully press the shutter button
or tap to take the shot.
41
Page 47
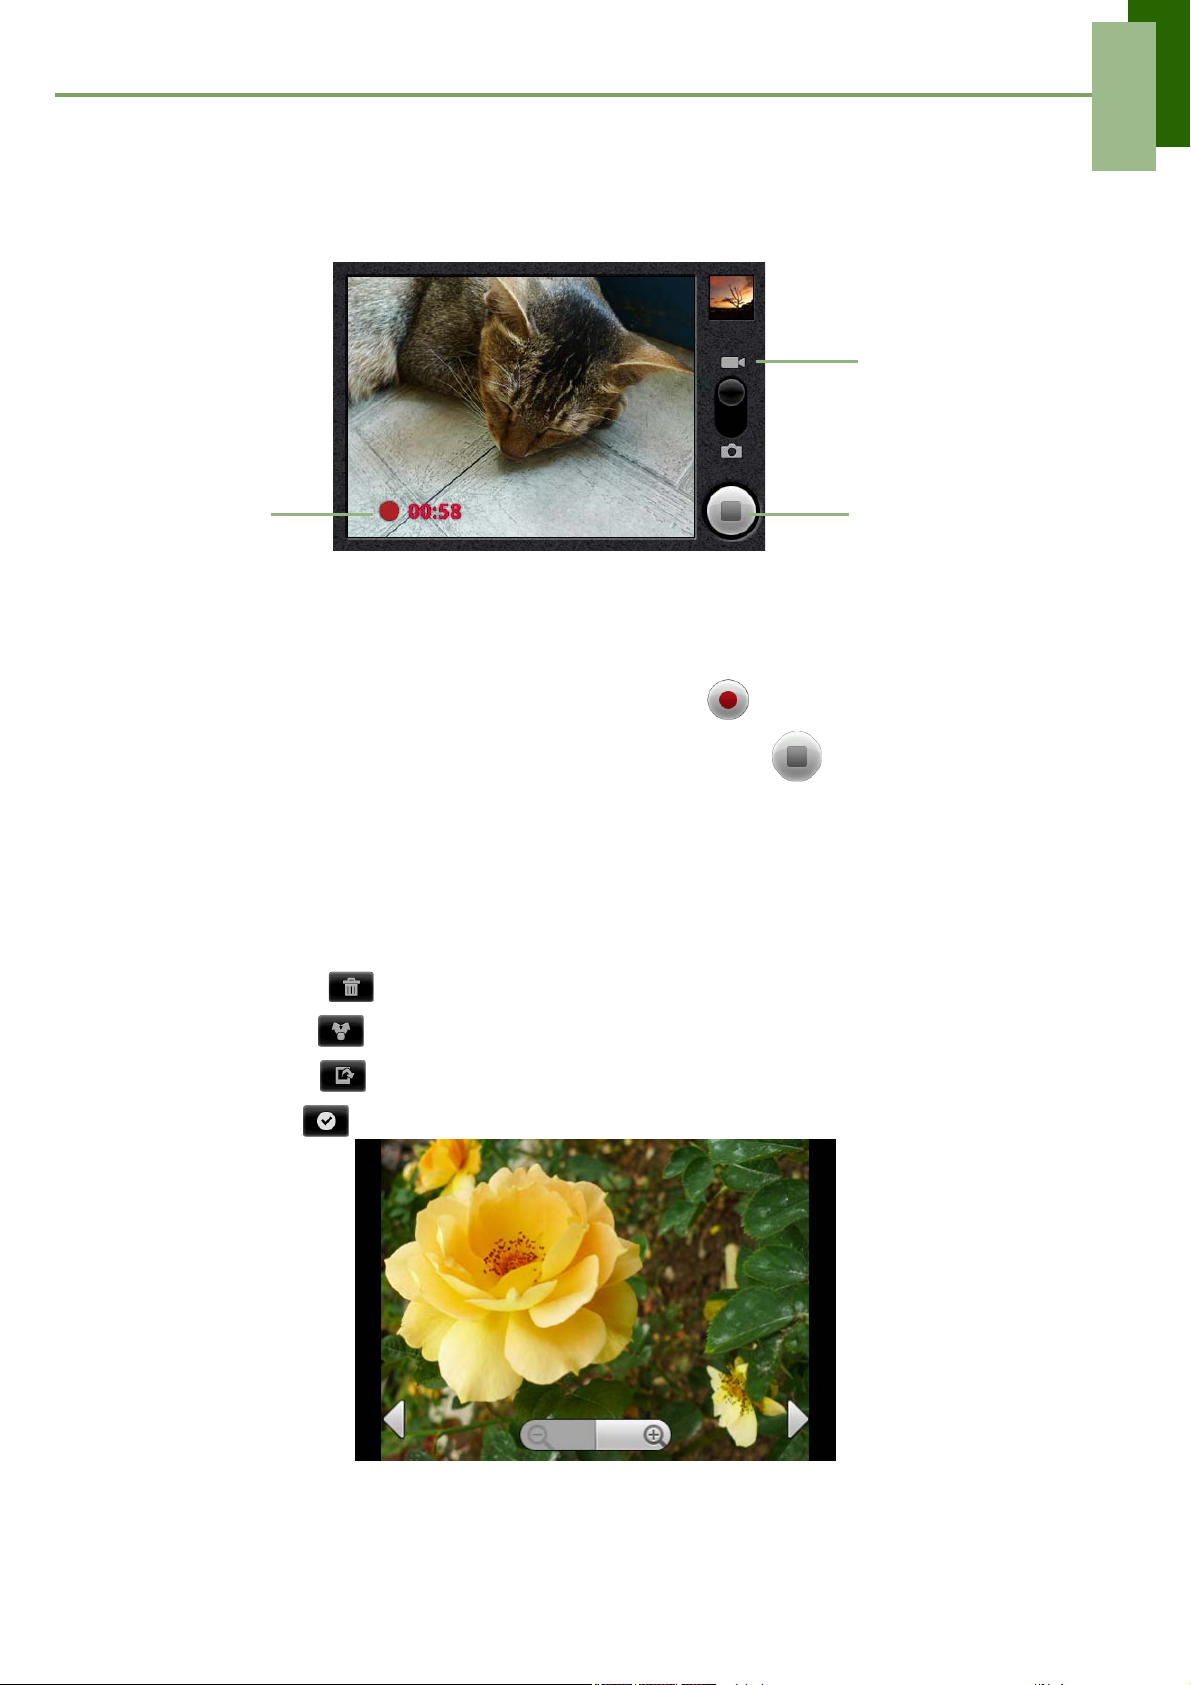
Recording video
Chapter 8: Multimedia Applications
Indicates capture
mode.
Indicates
remaining
recording time.
Press to record
video.
1. Tap Application Drawer > Camcorder.
2. Aim the phone at the subject.
3. To start recording, press the shutter button or tap .
4. To stop recording, press the shutter button again or tap .
Reviewing a photo
After taking a shot, a thumbnail image is displayed at the lower left corner of the
screen.
1. Tap the thumbnail to view the image in full screen size.
• Tap DELETE to delete the picture and view the next picture.
• Tap SHARE to share the picture via Email or Messaging.
• Tap SET AS to set the image as Contact icon or Wallpaper.
• Tap DONE to save your settings.
42
Page 48
Chapter 8: Multimedia Applications
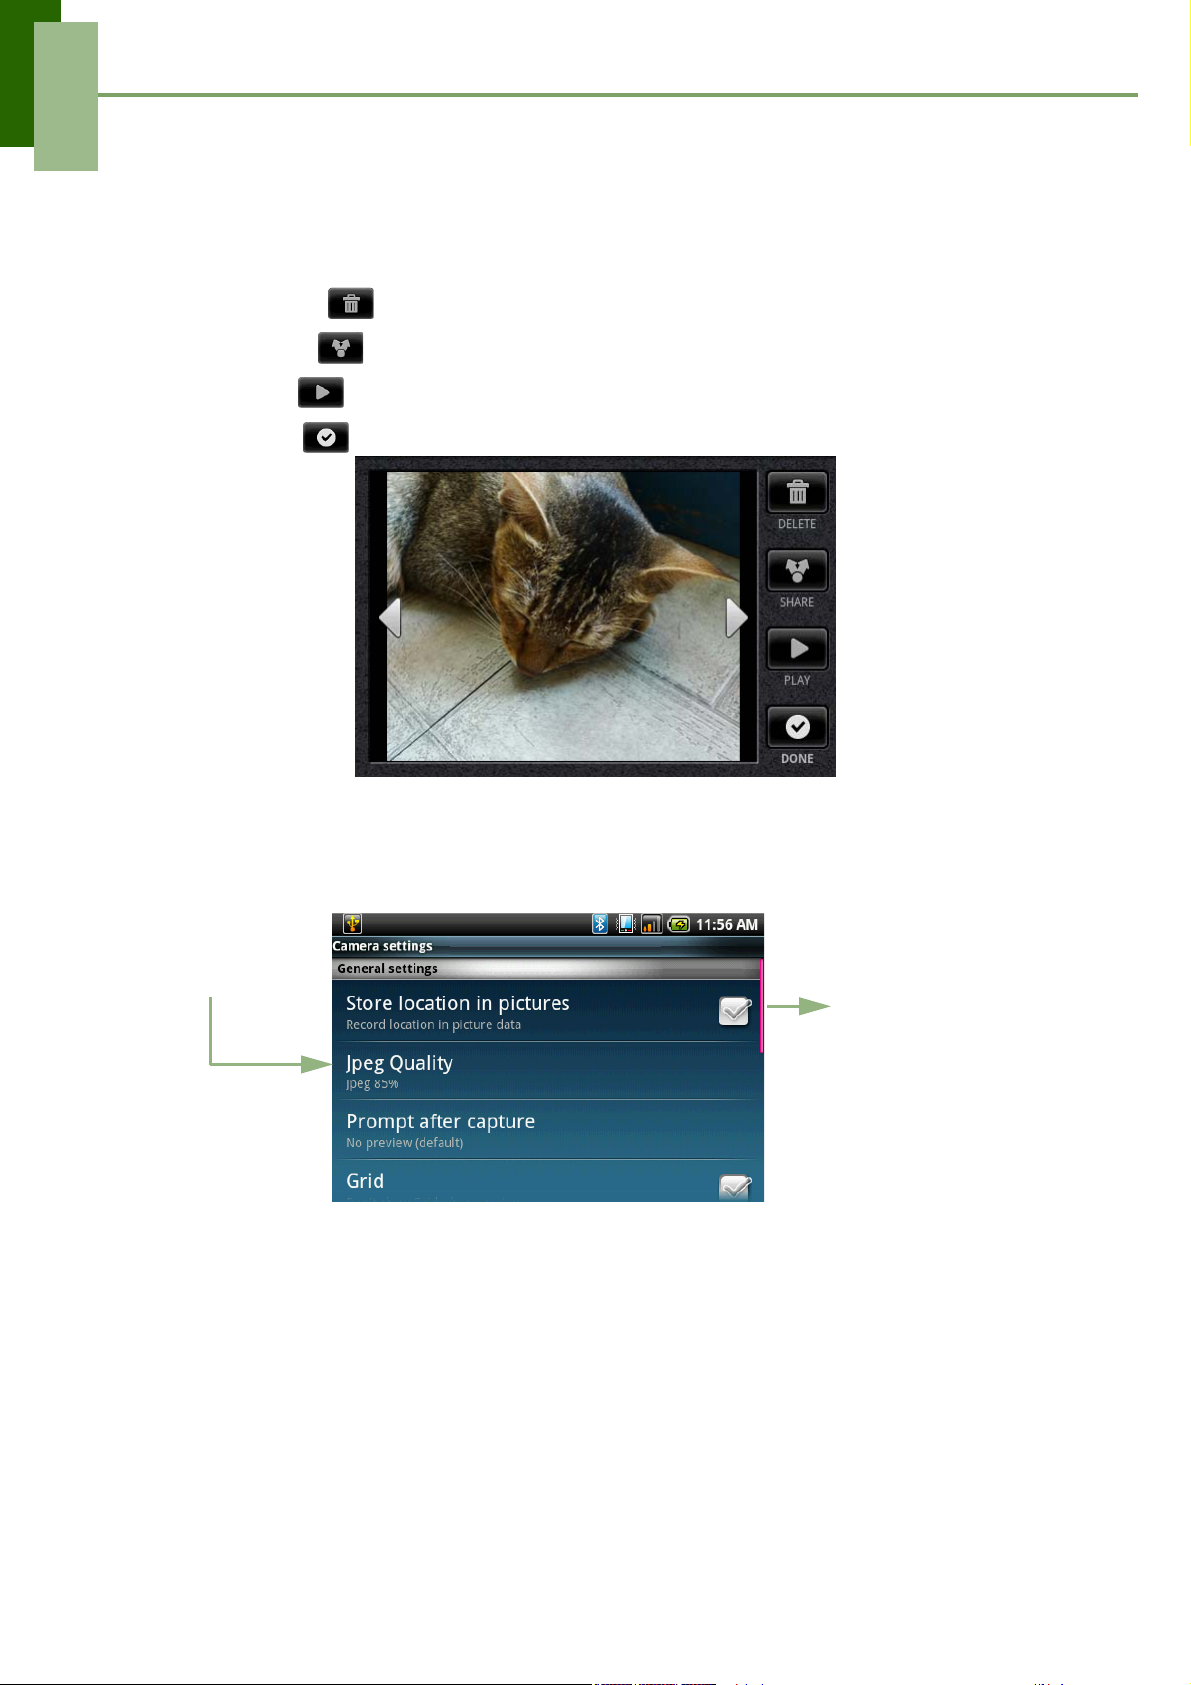
Reviewing a video
After recording a video, the video thumbnail is displayed at the lower left corner of the
screen.
1. Tap the video thumbnail to playback the video in full screen mode.
• Tap DELETE to delete the picture and view the next picture.
• Tap SHARE to share the picture via Email or Messaging.
• Tap PLAY to playback the video clip.
• Tap DONE to save your settings.
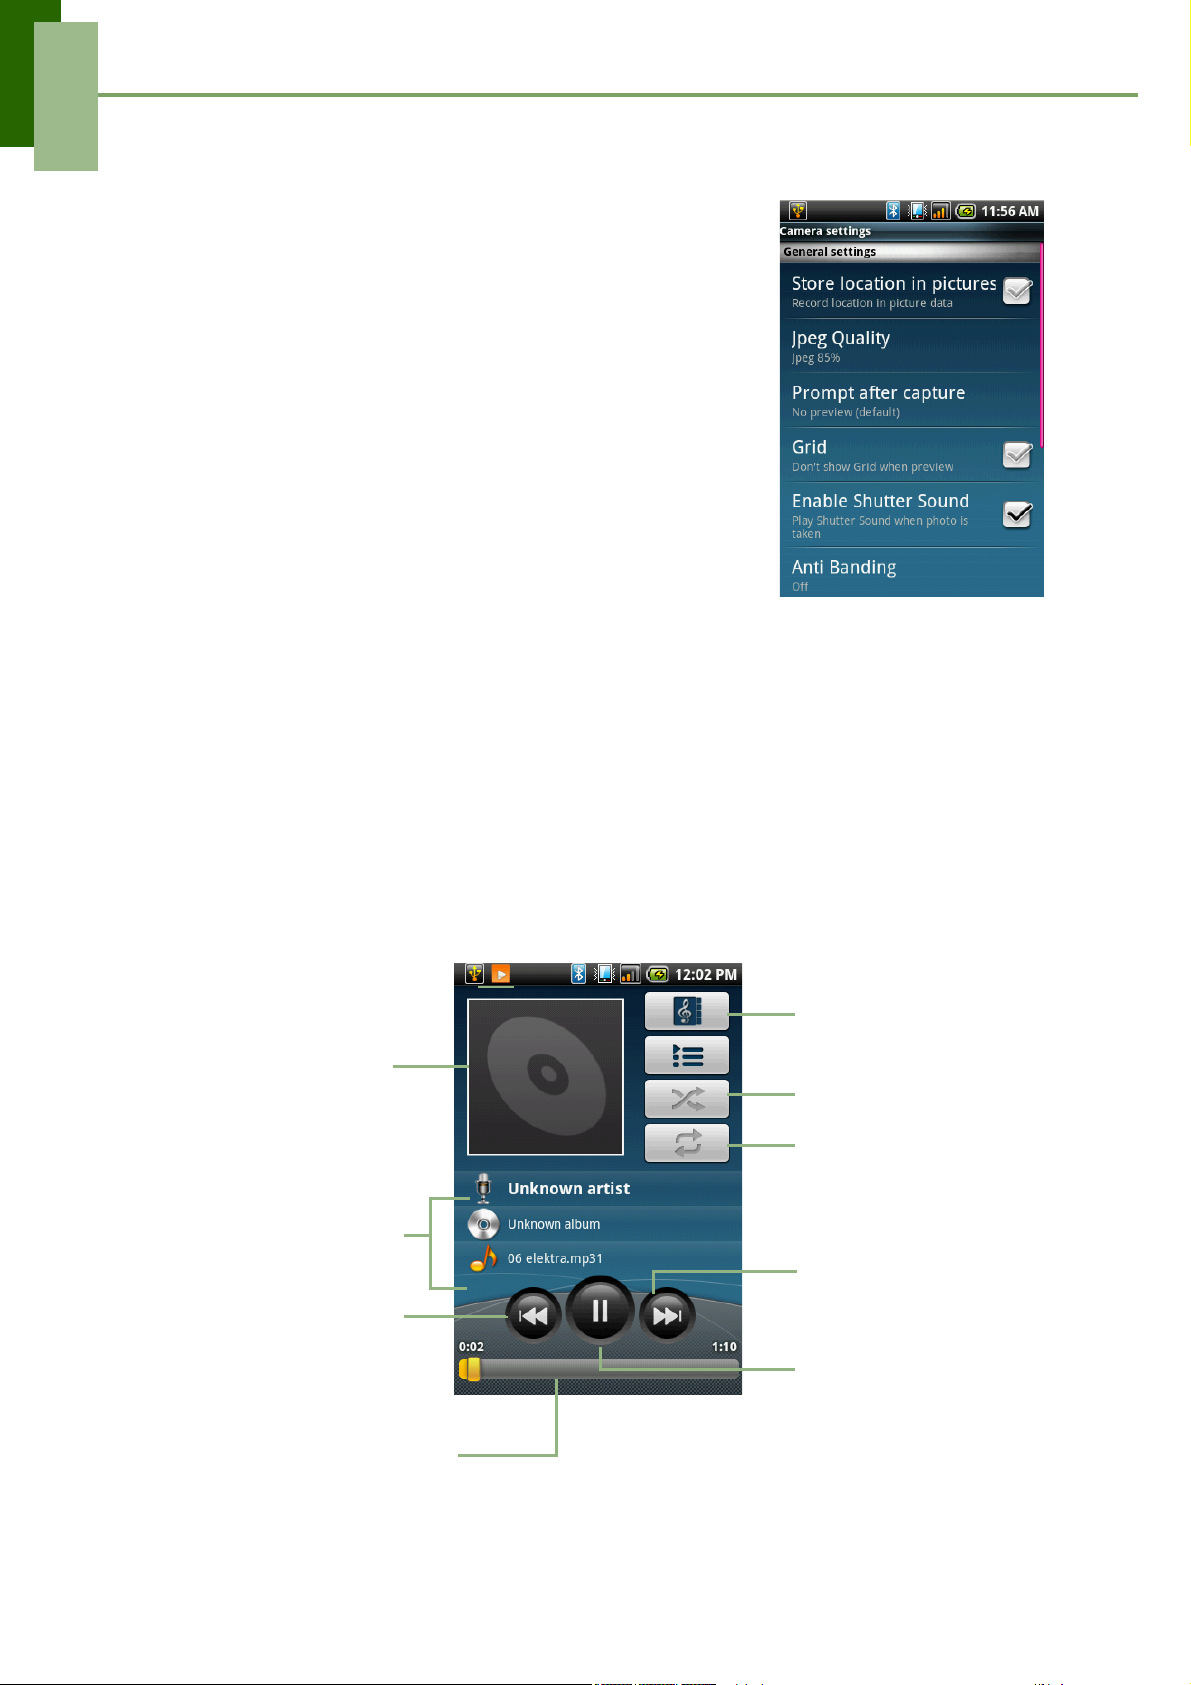
Configuring camera settings
On the camera screen, tap Menu > Settings.
Tap an option to
select.
Use the slider to scroll
the page for more
options
43
Page 49

Chapter 8: Multimedia Applications
Tap to view and adjust the general settings of your camera
Mode Setting Available options
Photo mode
Store location in pictures
Jpeg Quality Super fine, Fine, Normal, Basic
Prompt after capture No limit, No preview, 3 seconds, 5 seconds, 10
Grid Show/Hide grid when preview
Shutter sound Turn the shutter sound on/off/
Anti Banding Off, 50 Hz, 60 Hz, Auto
Resolution 5M (2560 x 1920), 3M (2048 x 1536), 2M (1600
White Balance/Lighting
Color Effect None, Sepia, Negative, B/W, Bluish, Reddish,
Flashlight
Resolution Record in H263 or MPEG4 format
Record location in picture data.
seconds
x 1200), 1M (1280 x 960), L (640 x 480), M
(320 x 240)
Auto, Incandesce, Fluorescent, Daylight,
Cloudy
Greenish
Off, Auto, On.
Video mode
Prompt after capture No limit, No preview (default), 3 seconds, 5
seconds, 10 seconds
Quality VGA (640*480), CIF (352*288), QCIF
(176*144),
Video duration 1 minute (for sharing), 10 minutes, 30 minutes,
60 minutes, 120 minutes.
44
Page 50
Chapter 8: Multimedia Applications
8.2 Viewing Photos & Videos
To view photos in the album
1. Tap Application Drawer > Gallery
2. Tap Camera Pictures to view the images in
thumbnails.
3. Tap an image to view.
4. To view previous/next image, tap the left/right arrow
keys on the screen.
To play slideshow
1. While viewing an image, tap Menu > Play Slide
Show.
2. Tap screen again to stop slide show.
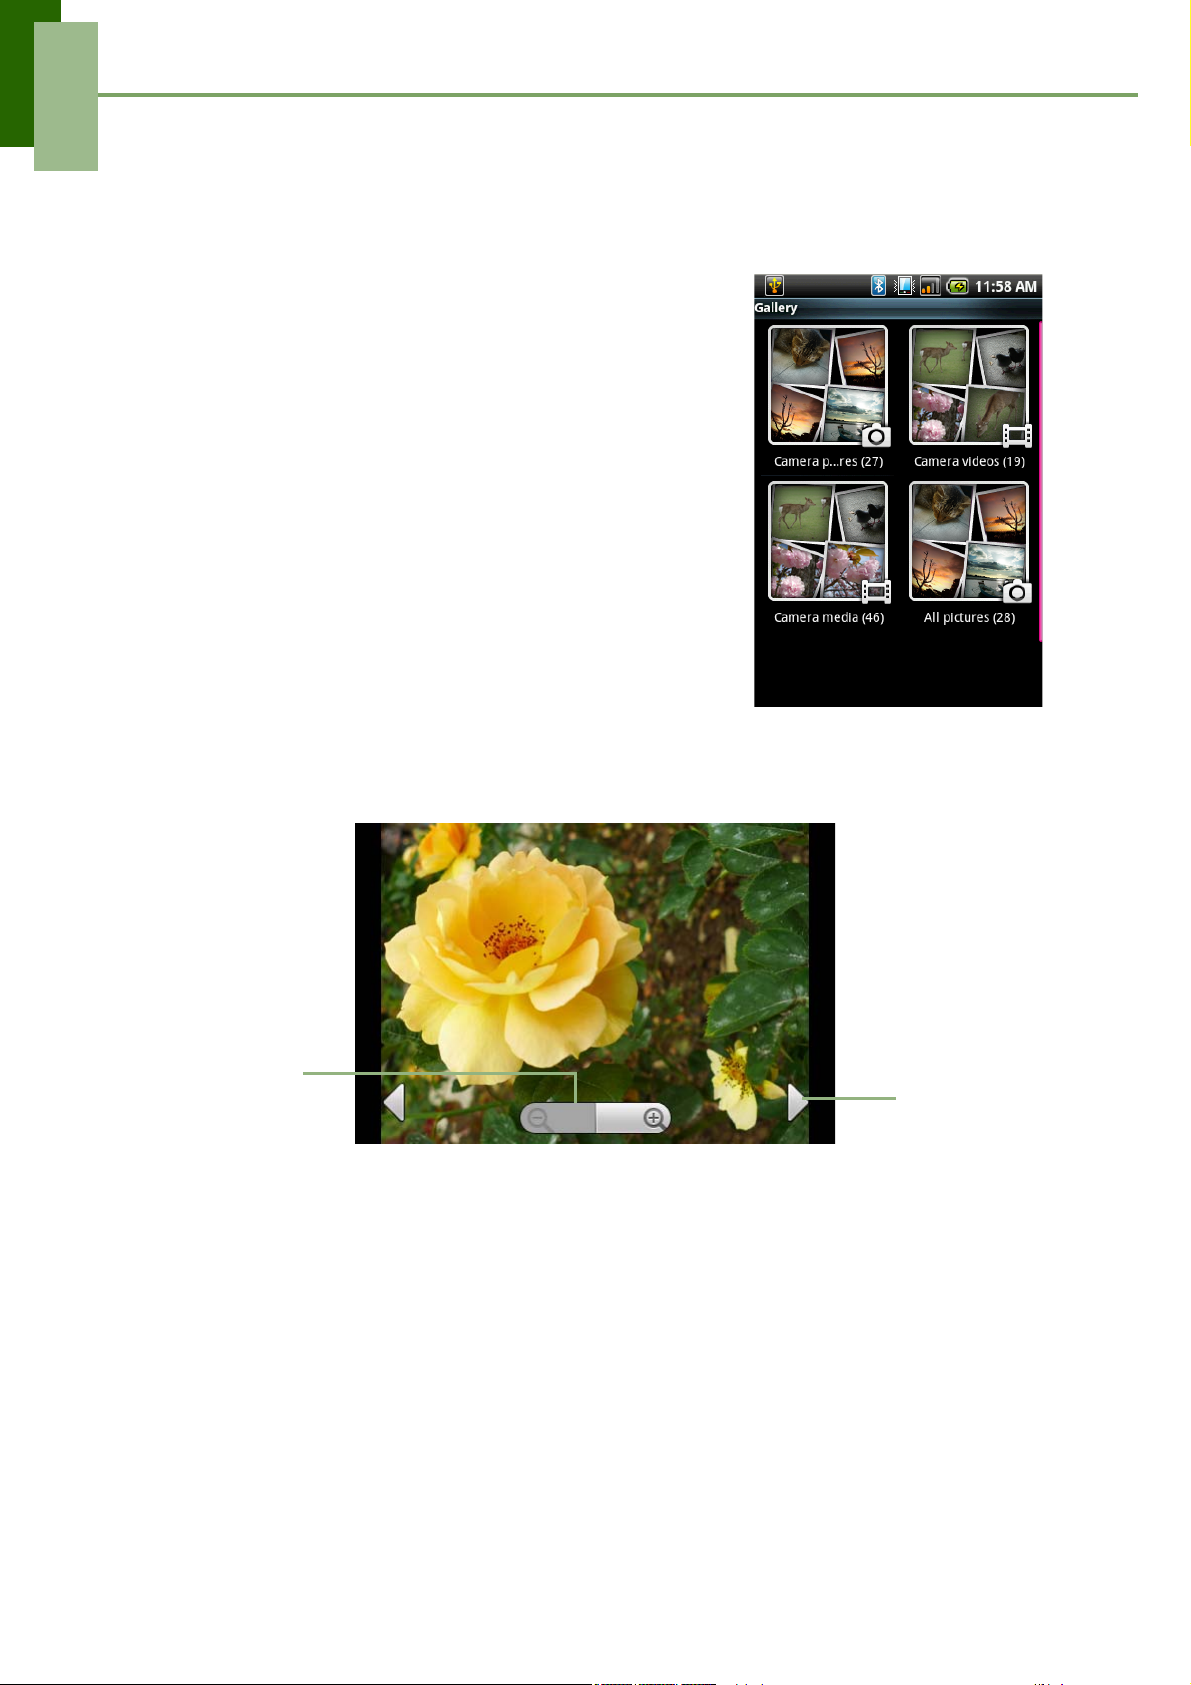
To zoom the image
While viewing the image, tap the screen to show the zoom bar.
Tap to zoom out /
in.
Tap to view the
next image.
45
Page 51
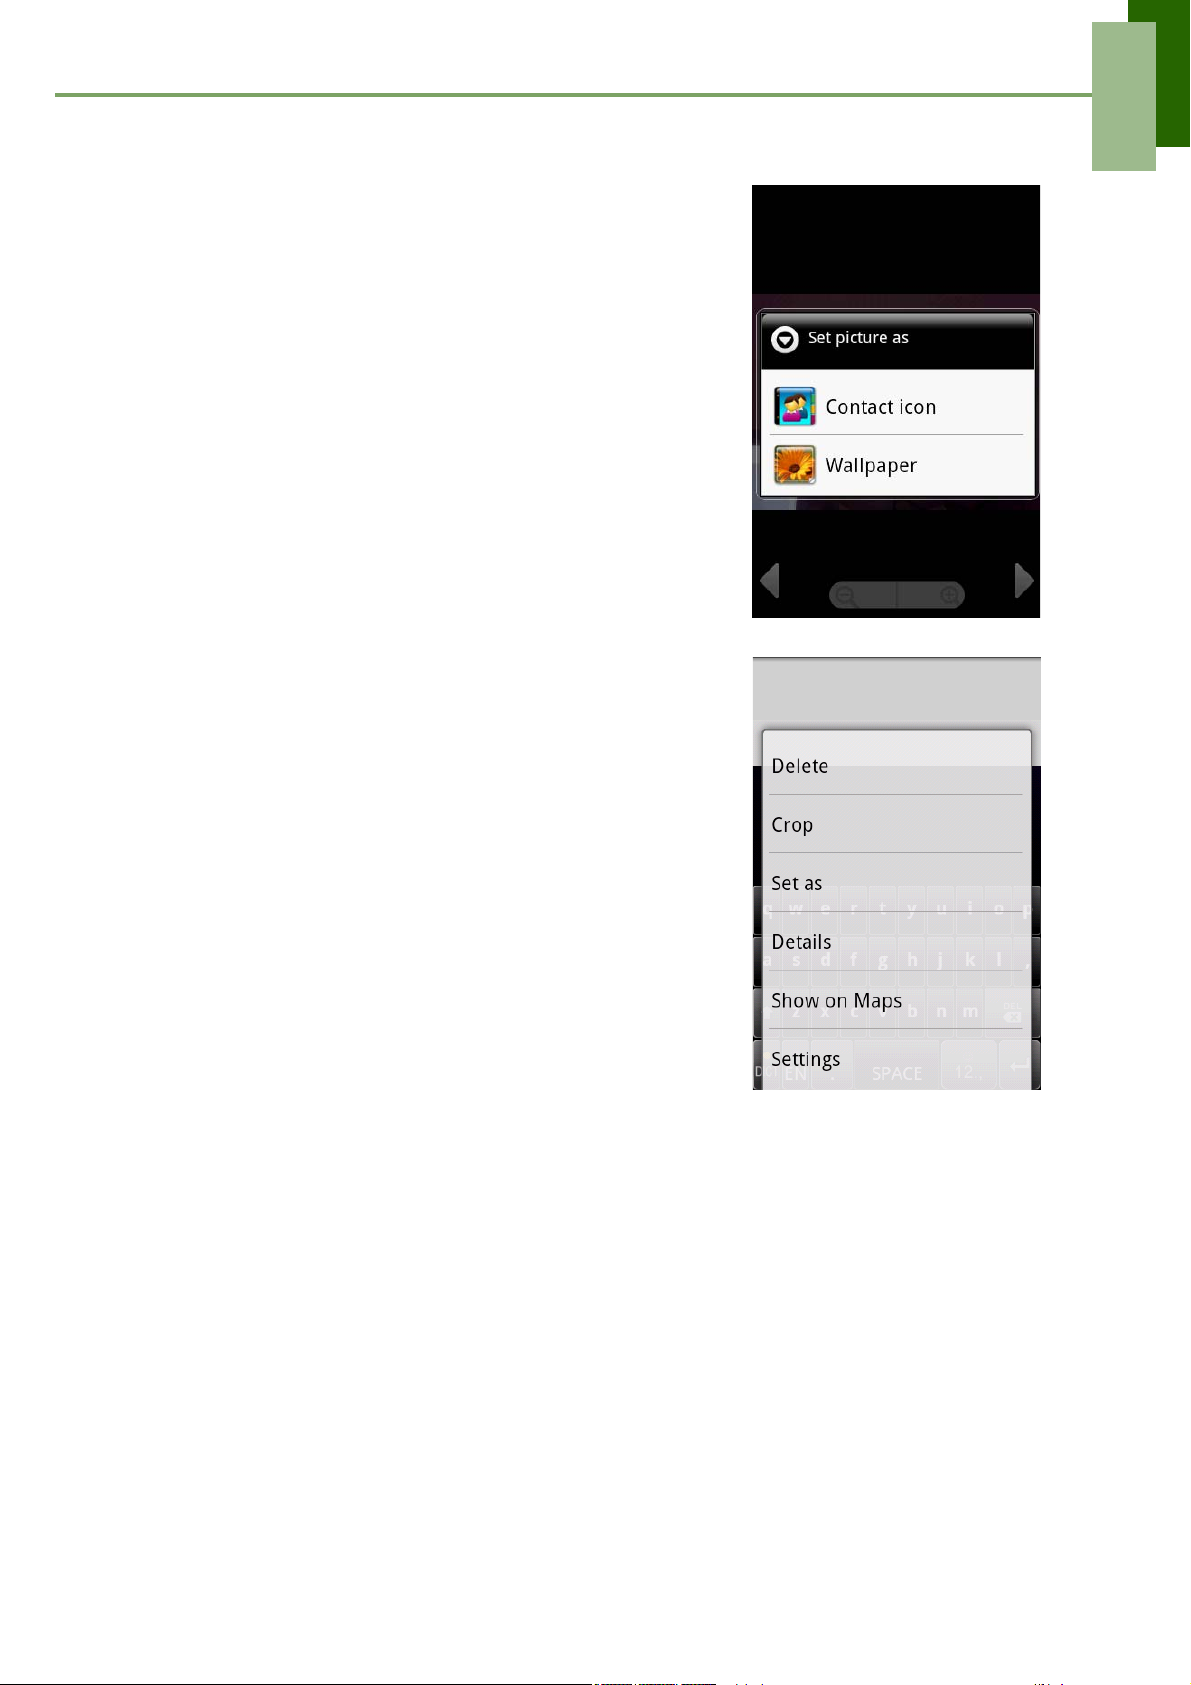
To set the image as Wallpaper
1. While viewing the image, tap Menu > Set as >
Wallpaper.
2. Drag your finger to select the crop area and tap
inside the box to crop the image.
3. Tap Save to set the image as wallpaper.
To save image to Contacts
1. While viewing the image, tap Menu > Set as >
Contact icon.
2. Tap the contact name to add image.
3. Drag your finger to select the crop area and tap
inside the box to crop the image.
4. Tap Save to save the image as contact icon.
To edit an image
Chapter 8: Multimedia Applications
While viewing the image, tap Menu > Rotate.
• To rotate image, tap Rotate.
• To crop, tap Menu > Crop.
• Drag your finger to select the crop area.
• Tap inside the box to crop.
• Tap Menu > Save As to save image.
• To flip image, tap Flip the image upside down.
• To mirror image, tap Mirror.
• To change the image size, tap Resize.
• Tap + or - to increase/decrease the image
size.
• Tap Save to confirm your changes.
To view file properties
1. While viewing the image, tap Menu > Details.
2. The file information are displayed.
3. Tap OK to return to the image.
46
Page 52
Chapter 8: Multimedia Applications
To Configure Camera & Video Playback settings
1. Tap Application Drawer > Gallery > Camera
pictures.
2. Tap Menu > Setting.
3. Camera general settings are displayed. You can
change the camera display size, sort picture orders,
and set up slideshow settings.
To playback videos in the album
1. Tap Application Drawer > Gallery > Camera
videos.
2. All saved videos clips are displayed in the folder.
3. Tap the video to playback.
8.3 Using Music Player
You can transfer your music to your phone from the computer.
Tap Application Drawer > Music.
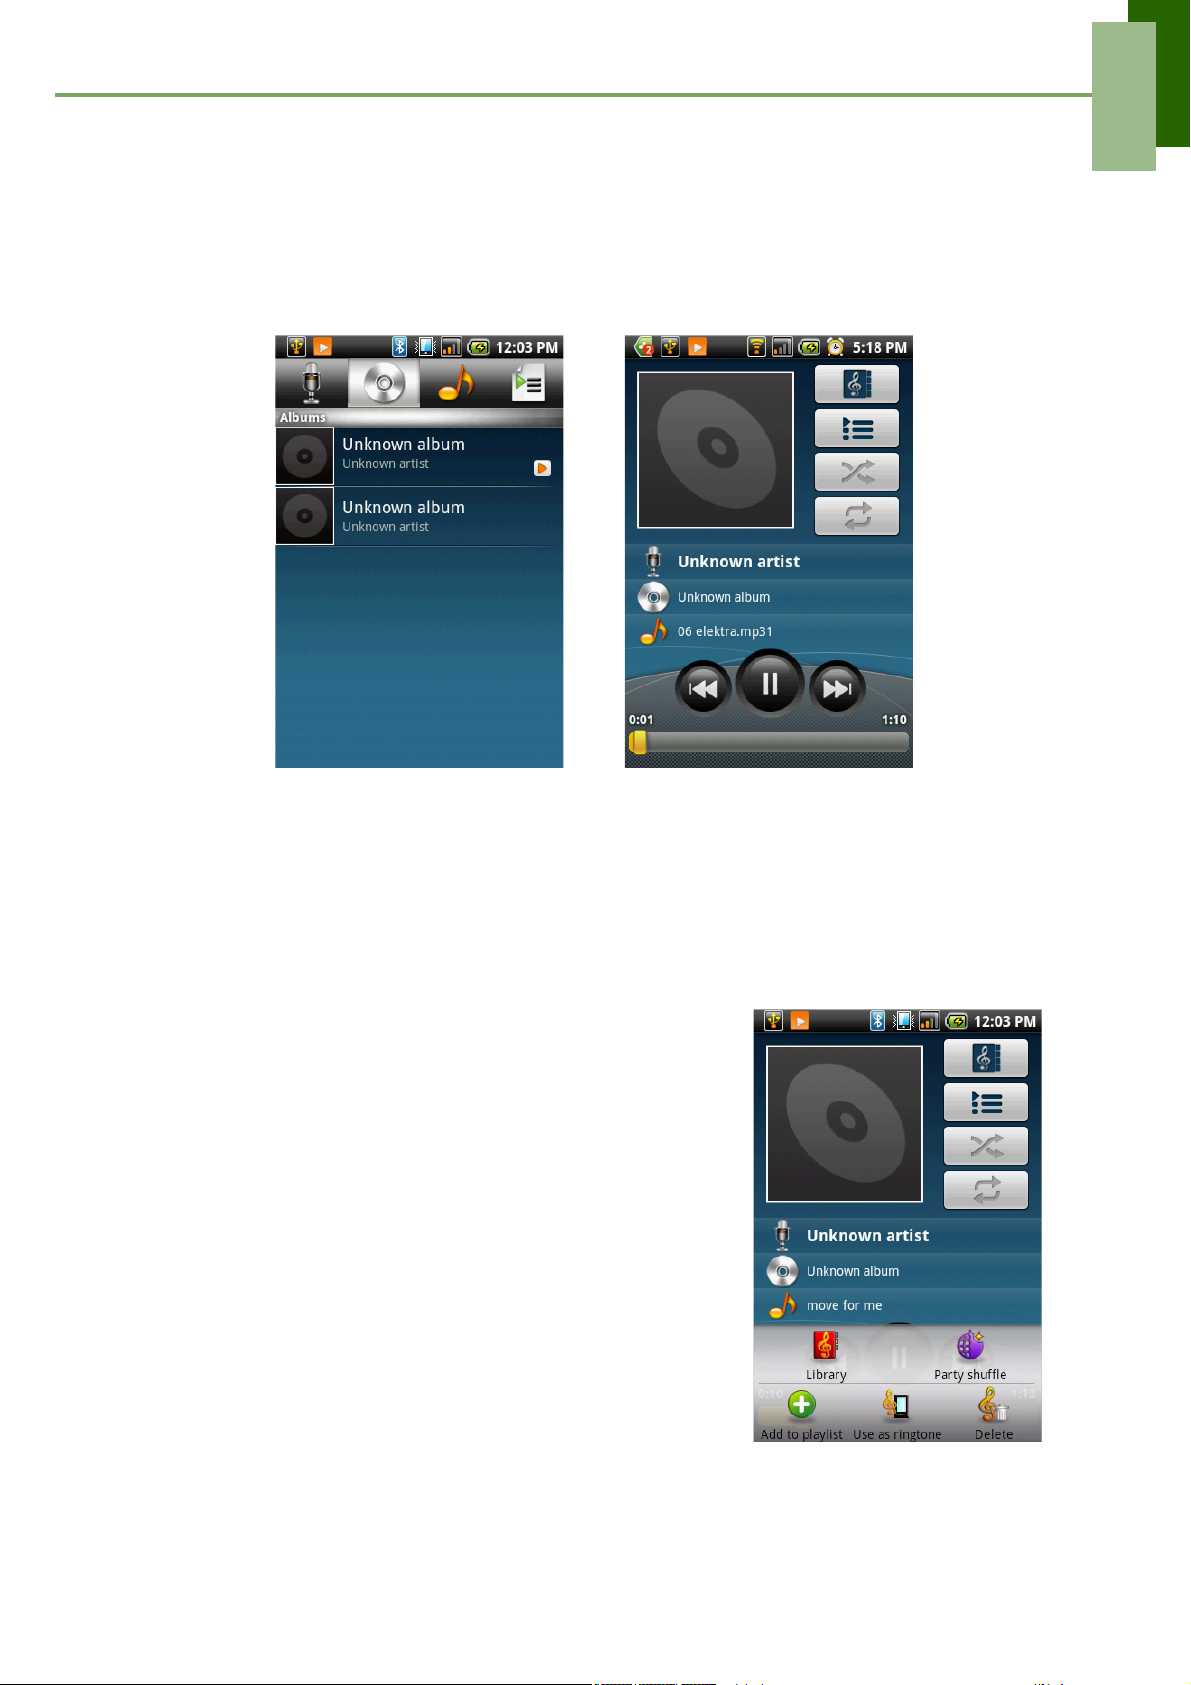
Music Screen
• Playback screen: Displays the playback area with the playback controls.
Tap to go to Playlist.
Album art picture or
animation
Audio information display
area.
Tap to shuffle.
Tap to enable or disable
the repeat function.
Tap to go to the next song.
Tap to go to the previous
song.
Slide to go forward or backward.
47
Tap to play or pause the
song.
Page 53
Chapter 8: Multimedia Applications
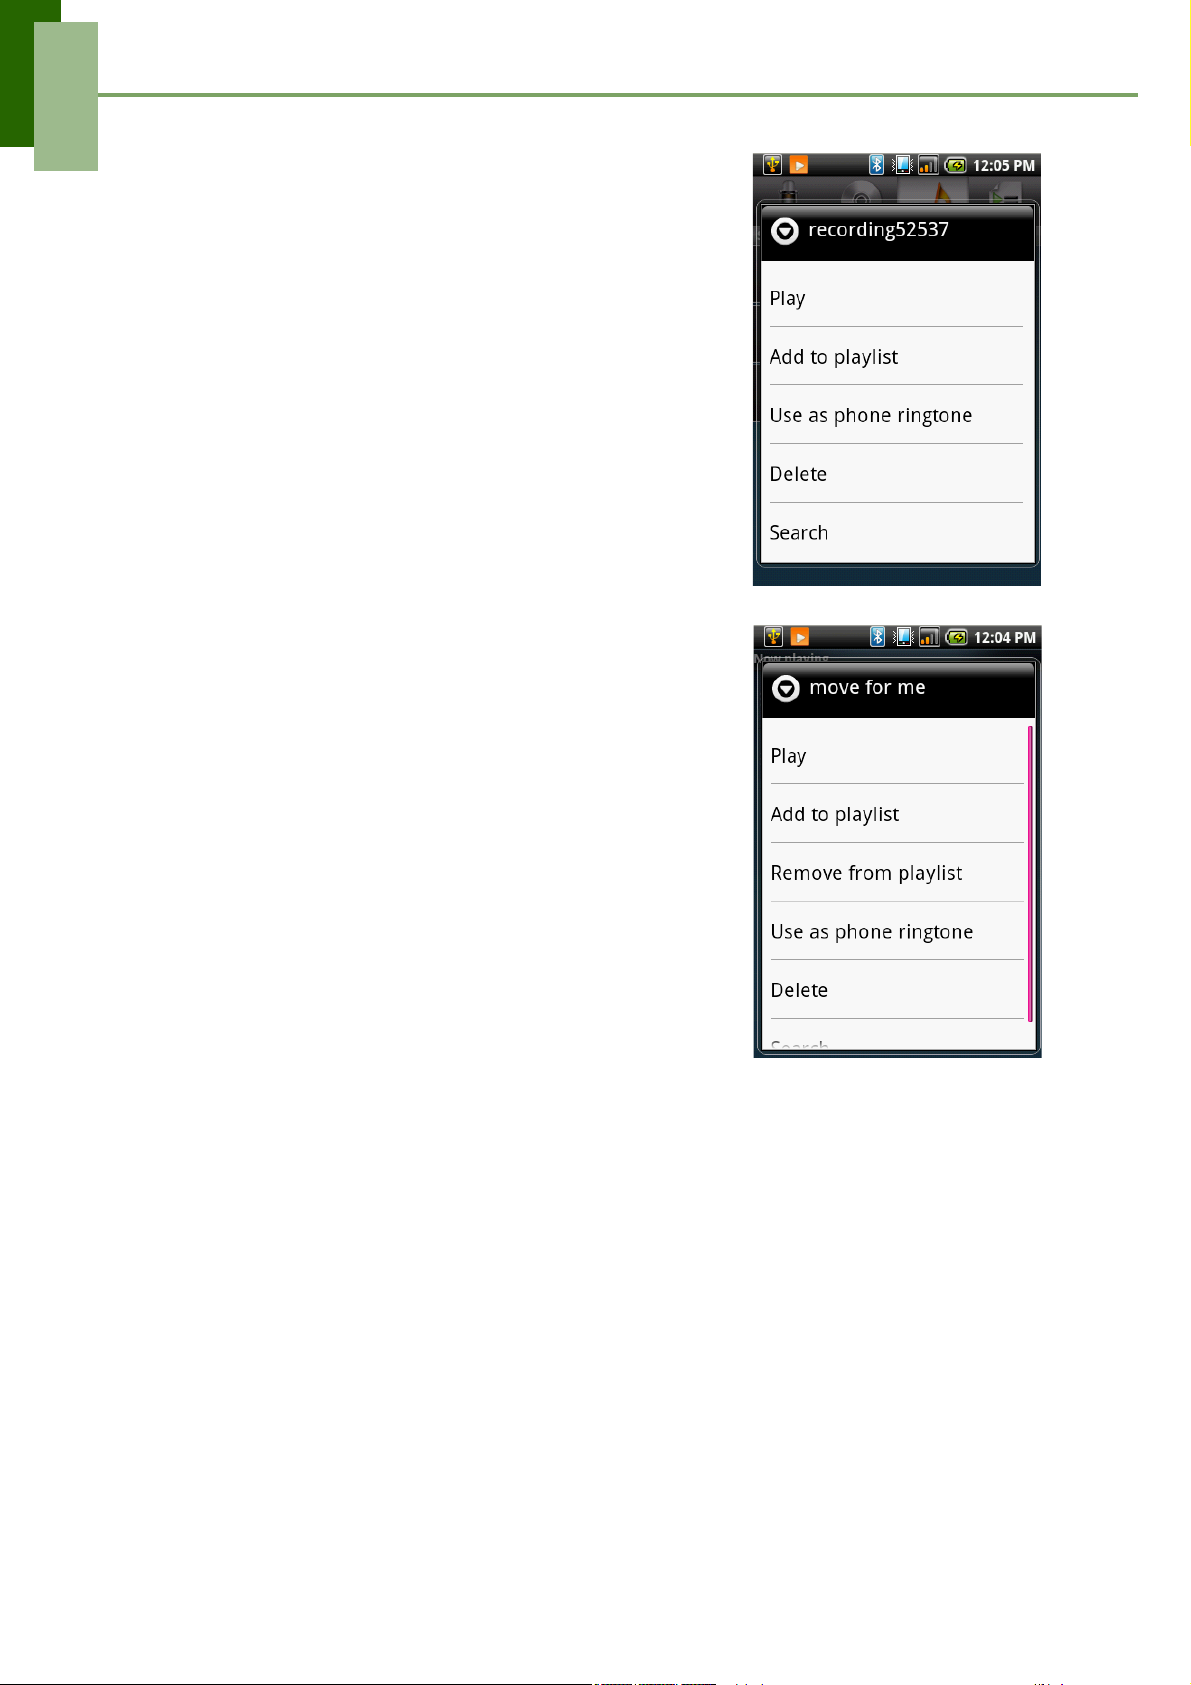
• Library screen: Displays folder categories which makes searching for media files
quick and easy. It contains the following categories: Artists, Albums, Songs, and
Playlists.
• Now Playing screen: Displays the list of songs currently playing and those on
queue for playback. Use the icons on the left of each media file to arrange the
sequence of files for playback.
Library Screen Now Playing Screen
Playing Music
To play music
1. Tap Application Drawer > Music.
2. The Library screen is displayed.
3. Tap Songs, and all songs on the phone will be
displayed.
4. Tap to select the song, then tap Play.
Changing Playback options
While in Playback screen, tap Menu.
• Tap Library to go to the Music Library screen.
• Tap Party shuffle to play all songs in shuffle order
• Tap Add to playlist to add the song to a preferred
playlist
• Tap Use as ringtone to set this song as ringtone.
• Tap Delete to delete this song.
Creating a Playlist
Add songs to a specific playlist or create a playlist.
48
Page 54
Chapter 8: Multimedia Applications
1. Tap Application Drawer > Music.
2. The Library screen is displayed.
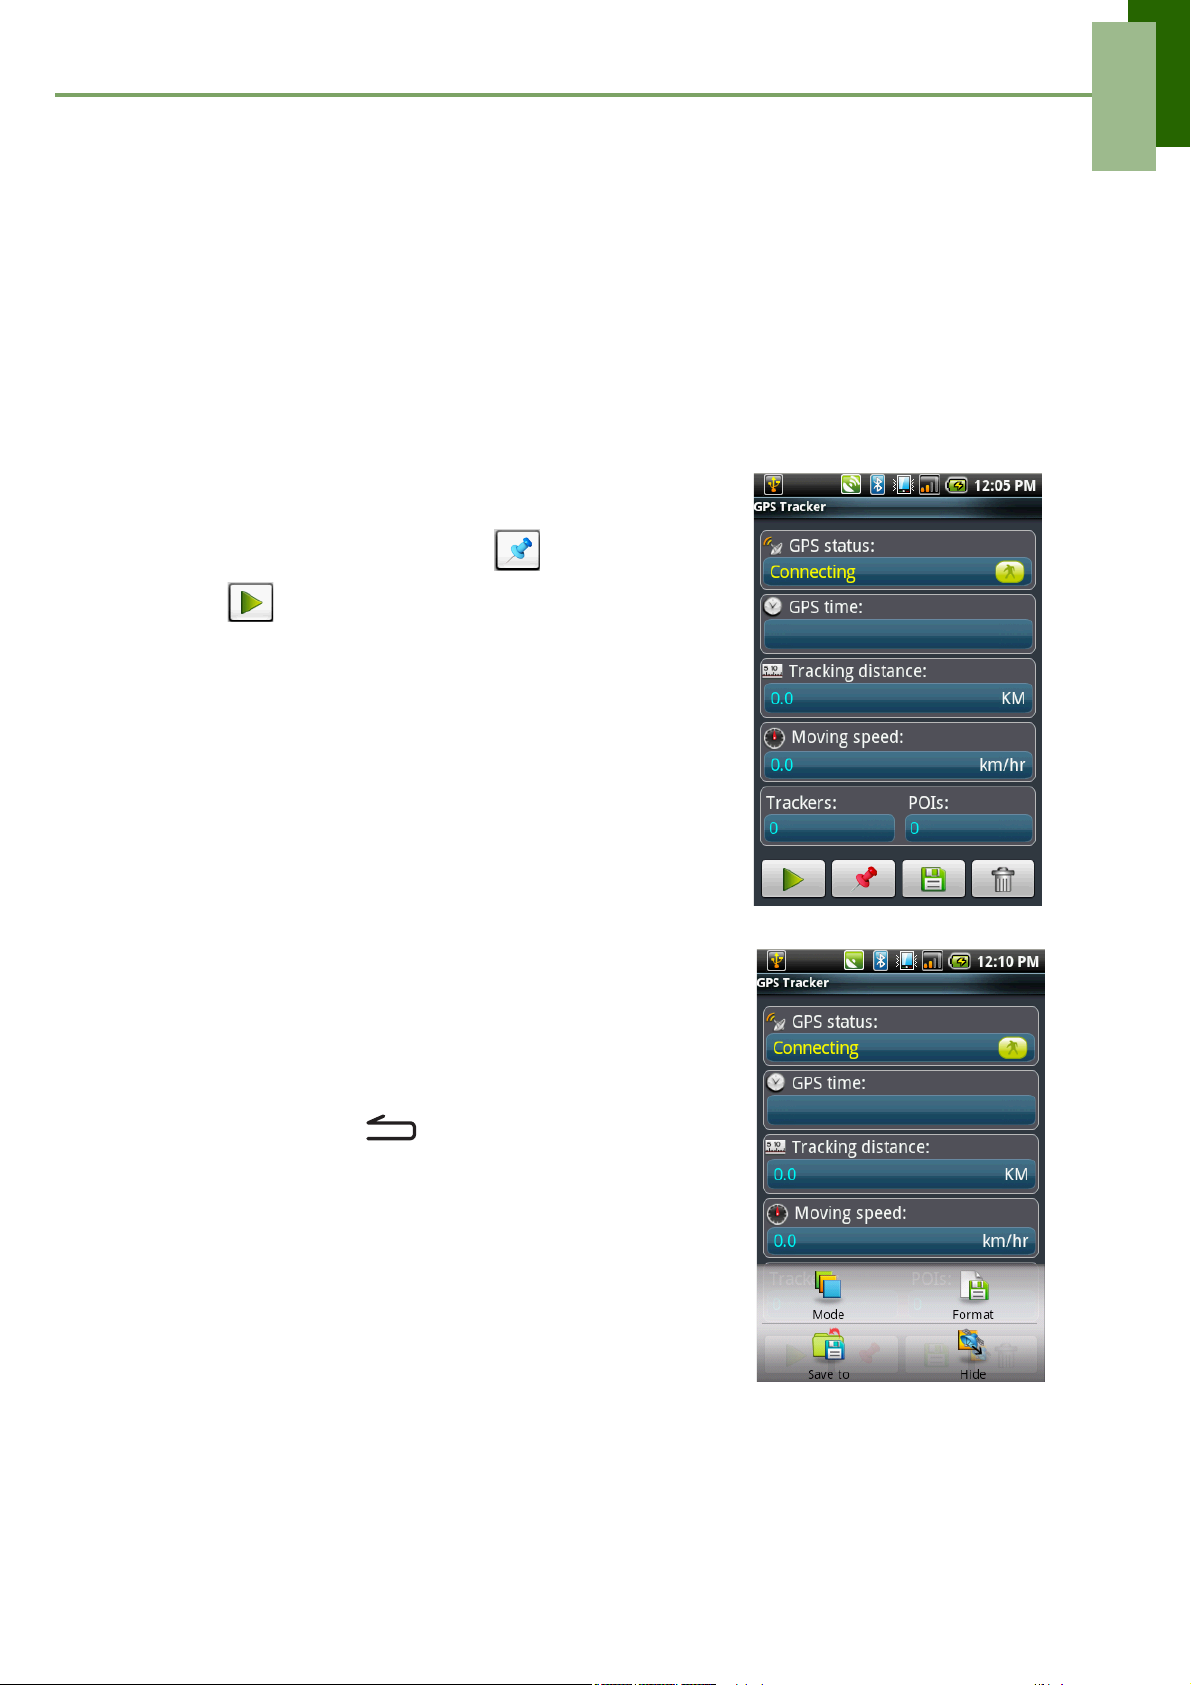
3. Tap and hold the song you want to add.
4. Tap Add to playlist.
5. Select from the current playlist or tap New to create
a new playlist.
NOTE: If you create a new playlist, enter the playlist
name now.
6. The song has been added to the playlist.
To remove a music file from playlist
1. Tap Application Drawer > Music.
2. The Library screen is displayed.
3. Tap and hold the song you want to delete.
4. Tap Remove from playlist.
5. The song is now removed from the playlist.
49
Page 55
Chapter 9: Using GPS
Chapter 9: Using GPS
Your phone supports a GPS tracker to record your position, your speed, and track
distance. You can also save the data as personal sports record.
9.1 Using GPS Tracker
Turning on GPS
1. Tap Application Drawer > GPS Tracker. The
phone automatically starts connecting to GPS.
2. When GPS is connected, tap to set POI.
3. Tap to start tracking.
4. You can view your tracking distance, speed,
trackers and the number of POIs on screen.
5. Tap Menu > Mode to set your mode: Walk,
Bicycle, or Car.
Hiding GPS Window
To use other applications and keep the GPS tracking
on at the same time, do the following:
1. In GPS Tracker, tap Menu.
2. Tap Hide to hide tracking application in
background.
NOTE: If you tap , the GPS Tracker will stop
tracking
50
Page 56
Chapter 9: Using GPS
Managing Tracking Data
You can save the Tracking data for your personal
record.
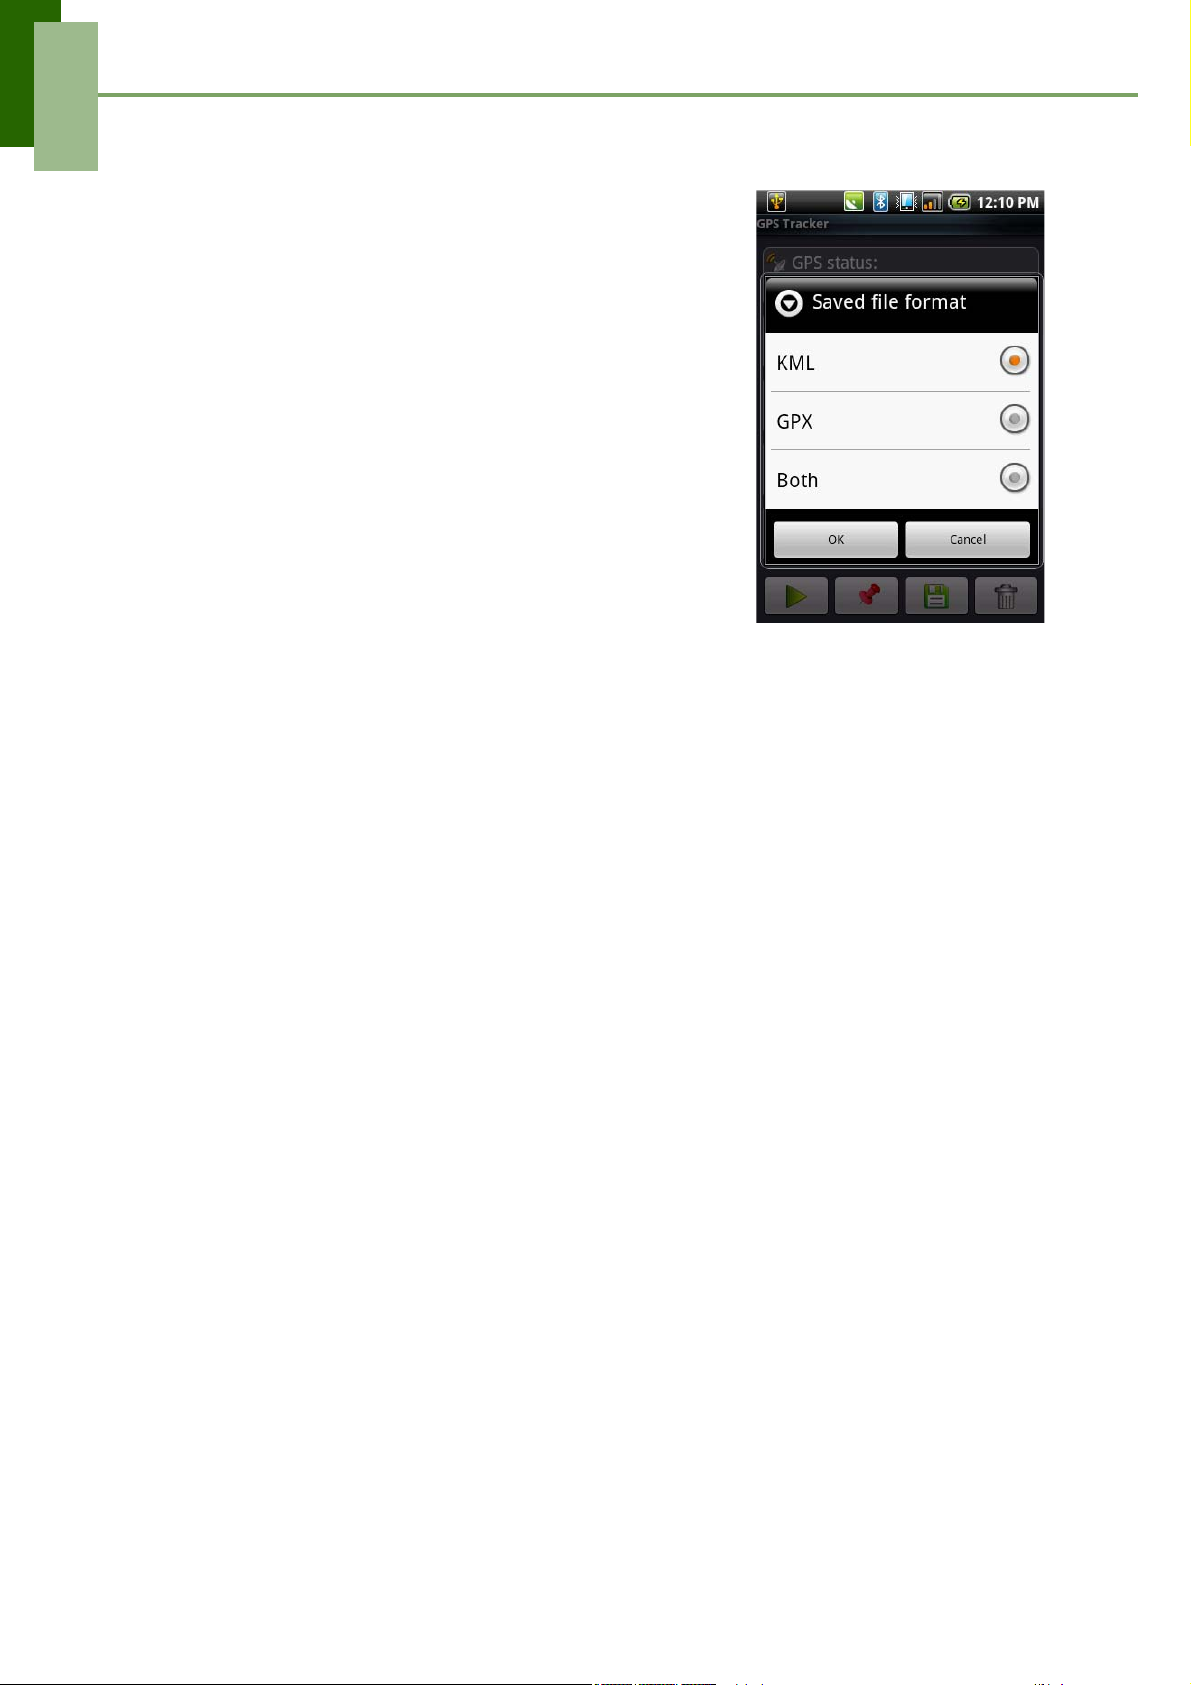
Set GPS File Format
1. Tap Application Drawer > GPS Tracker.
2. Tap Menu > Format.
3. Tap to chose the file format. You can save the GPS
tracking record in the following file formats: KML,
GPX, or Both.
4. Tap OK to confirm.
Save GPS File
1. Tap Application Drawer > GPS Tracker.
2. Tap Menu > Save to.
3. Enter default path to save the file in your SD card.
4. Tap OK to confirm.
51
Page 57
Chapter 10: Programs
Your phone comes with the following pre-installed programs.
Programs Description
Browser Browses the web and download files from the Internet. See
page 37.
Calculator Performs basic arithmetic functions, such as addition,
subtraction, multiplication, and division. See page 54.
Calendar Creates and tracks schedule or appointments. See page 54.
Camcorder Records videos clips.
Camera Captures still images and record videos. See page 45.
Chapter 10: Programs
Clock Sets up alarm clock, global time, timer, and stop watch.
Contacts Stores names, numbers, e-mail and other information. See
page 14.
Dialer Makes and receives phone calls. See page 17.
Documents To Go Uses Document To Go applications such as Word To go,
Sheet To Go, Slideshow To Go, and PDF To Go Lite.
eBuddy Chat on your mobile phone with all your friends on MSN,
Yahoo!, AIM, Gtalk, ICQ and Facebook.
Email Sends and receives e-mail messages. See page 22.
Facebook Logs in and uses facebook applications on your device.
File Browser Manages audio, video and picture files. See page 58.
Gallery Views and edits photos and videos. See page 45.
Gmail Google’s web-based email service.
Google Talk Google’s instant messaging program.
52
Page 58
Chapter 10: Programs
Programs Description
GPS Tracker Records and tracks your training information such as
training time, tracking distance, moving speed, and tracks.
Java ME Apps
Maps Google’s mapping service to search for places of interest.
Market Find applications and fun games which you can download
Messaging Sends and receives all types of messages, such as text
Music Plays and manages the music and audio files on your
Note Pad Creates notes for drafts. See page 62.
RoadSync
Calendar
RoadSync Mail Configures email settings for RoadSync Mail.
Downloads and installs Java applications in your device.
See page 60.
and install on your phone here.
message, MMS, and voice messages. See page 22.
phone.
Configures calendar options for RoadSync Calendar.
Rss Reader Gets live update of your favorite news or web sites.
Setting Configures the phone settings, wireless settings and call
settings of your phone.
SIM Toolkit Directly connects to and use services provided by your
mobile service provider.
Videos Plays back the video clips.
Voice Dialer
Read and record predefined texts to be recognized and used
by your phone for voice dialing,
finding a contact and
others.
Voice Notes Record voice notes.
Youtube Online video streaming service that allows you to view,
search, and upload videos.
53
Page 59

Chapter 10: Programs
10.1 Browser
Open the Browser to view web pages. See “Browsing a Web Page” on page 37.
10.2 Calculator
With Calculator, you can perform basic arithmetic functions on your phone.
Tap Application drawer > Calculator.
10.3 Calendar
The Calendar lets you schedule and sound alarms for appointments, meetings and
other events. Scheduled appointments for the day can be displayed on Home screen.
To schedule an event
1. Tap Application drawer > Calendar.
2. Tap Menu > New event.
3. Enter event details.
4. Select the dates for From and To field.
NOTE: For an all-day event, check All Day.
5. To set repetition, select the repetition from the list.
6. To set a reminder, select the reminder time from the list.
7. When finished, tap Save to return to the calendar.
TIP: From the Calendar screen, tap a day or a time slot then tap Menu > New event
to set a new appointment on the tapped date or time.
To add a new task
1. On the Calendar screen, tap Menu > New task.
2. Enter event details.
3. Select the dates for From and To field.
4. Enter task descriptions.
5. To set priority, select from the list.
6. When finished, tap Save to return to the calendar.
TIP: From the Calendar screen, tap a day or a time slot then tap Menu > New Task to
set a new appointment on the tapped date or time.
10.4 Camcorder
Record video clips with this phone. “Photos and Videos” on page 41.
54
Page 60
Chapter 10: Programs
10.5 Camera
Capture images with this phone. “Photos and Videos” on page 41.
10.6 Clock
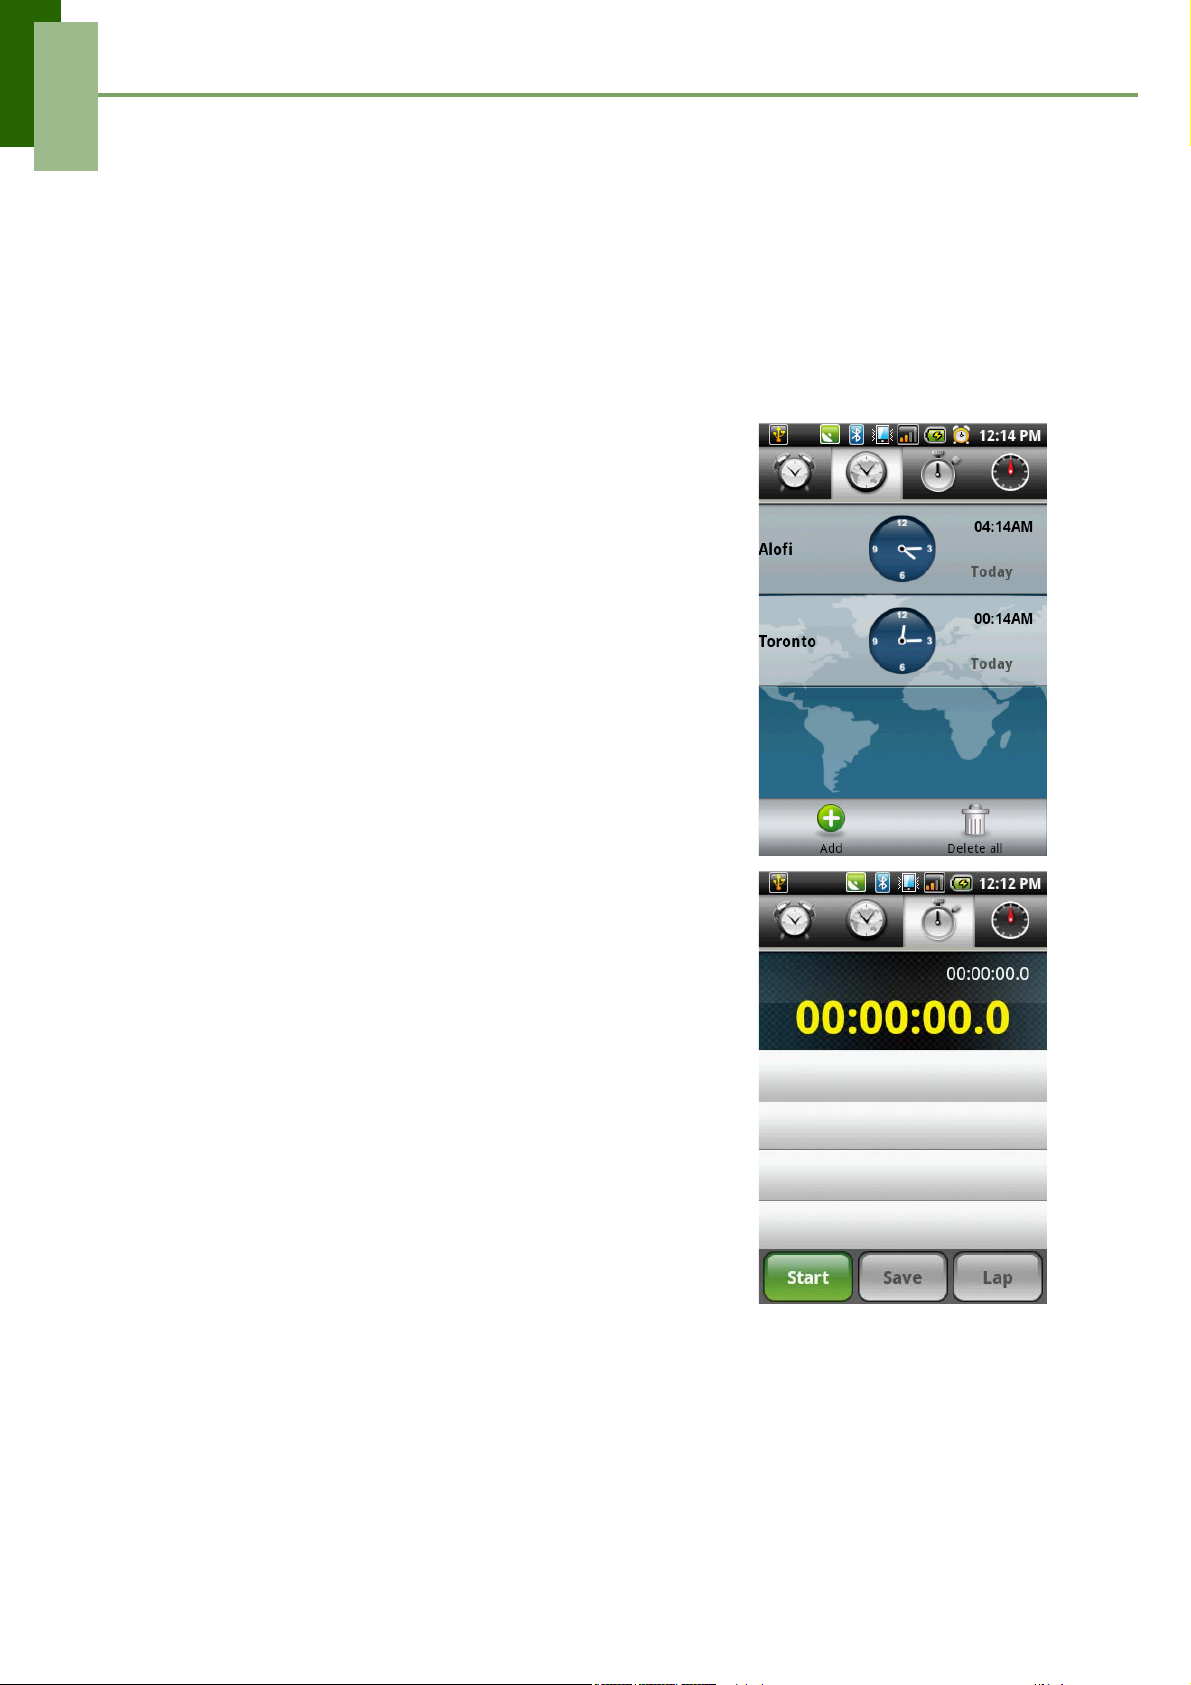
The clock function contains alarm clock, global time, timer, and stop watch. For Alarm
clock settings, see page 69.
Viewing world clock
Use World clock time to view the current time in
different locations.
1. Tap Application drawer > Clock.
2. Under world clock tab, the current time of selected
cities is displayed.
3. Tap Menu > Add to select from the world major
cities list.
4. The current time of the selected cities are shown on
the atlas screen.
Using Stop watch
1. Tap Application drawer > Clock.
2. Tap to go to Stop watch tab.
• Tap Start to start and time elapsed will appear
on screen.
• Tap Lap to record the time for finishing one
lap.
• Tap Restart to continue counting.
• Tap Reset to reset the stop watch.
• Tap Save to save the counting results.
55
Page 61
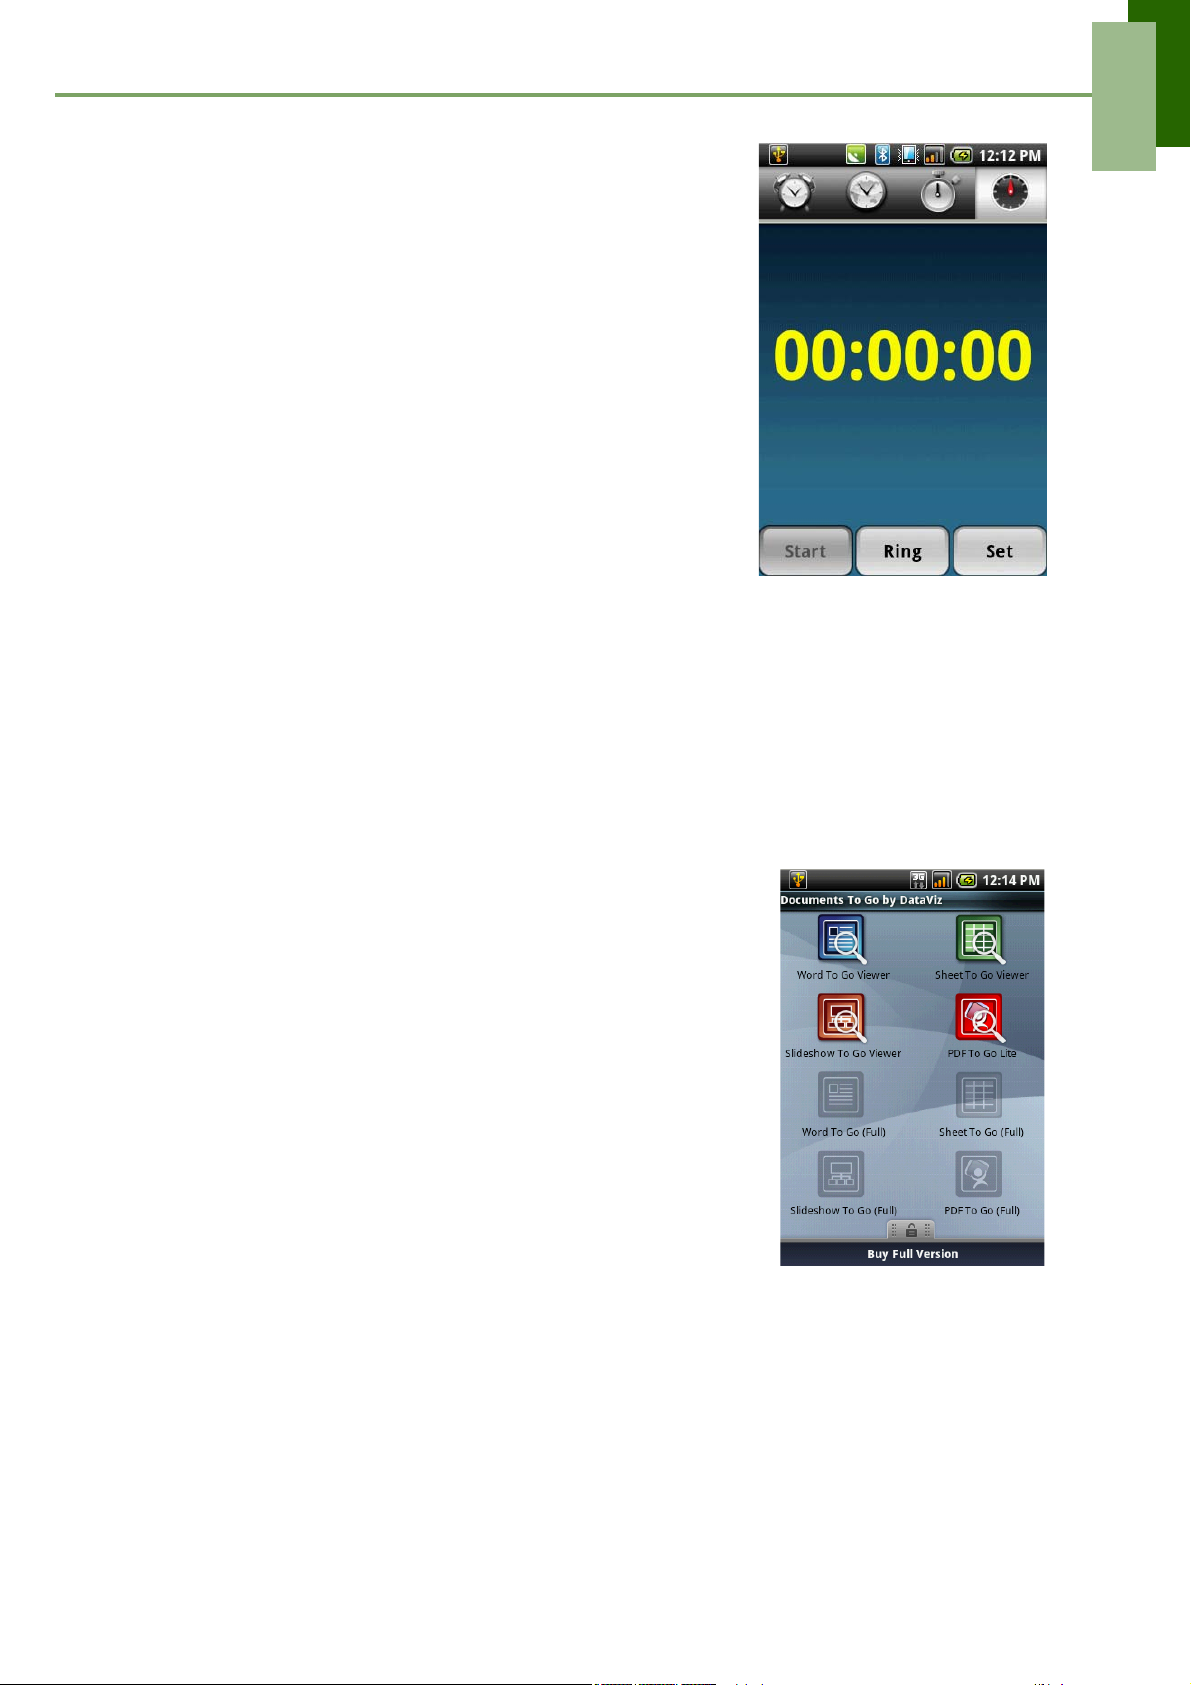
Using countdown timer
1. Tap Application drawer > Clock.
2. Tap to go to countdown timer tab.
• Press Set to set the countdown time.
• Tap Start to start and time elapsed will appear
on screen.
• Tap Ring to set ringtone when time’s up.
10.7 Contacts
View or manage your contact list. See “Contacts” on page 14
Chapter 10: Programs
10.8 Dialer
Use Dialer to make phone calls or manage contact list. See page 17
10.9 Documents To Go
Documents To Go allows you to open Microsoft®
Office and Adobe file formats.
Word To Go® Viewer
Word To Go® Viewer allows you to view Microsoft®
Word documents (.doc and .docx). It supports
embedded pictures, font color, bold, italics, underline,
bulleted, numbered list and more.
To open Word To Go Viewer
1. Tap Application drawer > Documents To Go >
Word To Go Viewer.
2. Tap Open File.
3. Tap the file you want to open.
• Slide your finger on the screen to pan or go through other pages.
4. To close the file, tap Return.
NOTE: To create a new document or edit an existing document, purchase the full
version of Documents To Go.
56
Page 62

Chapter 10: Programs
Sheet To Go® Viewer
Sheet To Go® Viewer allows you to view Microsoft® Excel spreadsheets (.xls and
.xlsx). It supports cell and number formatting, row and column alignment, formulas,
and fast finger-friendly panning.
To open Sheet To Go Viewer
1. Tap Application drawer > Documents To Go > Sheet To Go Viewer.
2. Tap Open File.
3. Tap the file you want to open.
• Slide your finger on screen to pan through the sheet.
• To view other worksheets on file, tap Menu > View > Worksheets, then tap
the worksheet name you want to view.
4. To close the file, tap Return.
NOTE: To create a new spreadsheet or edit an existing spreadsheet, purchase the full
version of Documents To Go.
Slideshow To Go® Viewer
Slideshow To Go® Viewer allows you to view Microsoft® PowerPoint presentations
(.ppt and .pptx). It supports slide view, outline view, speaker notes, images, charts,
font formatting, and effortless slide “flick” navigation.
To open Slideshow To Go Viewer
1. Tap Application drawer > Documents To Go > Slideshow To Go Viewer.
2. Tap Open File.
3. Tap the file you want to open.
4. To close the file, tap Return.
NOTE: To create a new presentation or edit an existing presentation, purchase the full
version of Documents To Go.
PDF To Go® Lite
PDF To Go® Lite allows you to view Adobe® PDF files (.pdf). It supports page view,
word wrap, multiple zoom levels, auto-rotate, embedded images, and more.
To open PDF To Go Lite
1. Tap Application drawer > Documents To Go > PDF To Go Lite.
2. Tap Open File.
3. Tap the file you want to open.
• Tap the screen to bring up the zoom controls.
• Slide your finger up or down to view the next or previous page.
4. To close the file, tap Return.
Purchase Documents To Go
To get the full version of Documents To Go:
57
Page 63

Chapter 10: Programs
1. Tap the lock tab .
2. Tap Buy. Browser is launched and you will be redirected to www.dataviz.com.
3. Follow the on-screen instructions to complete purchase.
10.10 eBuddy
Use eBuddy to chat on your mobile phone with all your friends on MSN, Yahoo!, AIM,
Gtalk, ICQ and Facebook.
Tap Application drawer > eBuddy.
10.11 Email
Use Email to Connect to your remote mailbox to retrieve your new e-mail messages,
or view your previously retrieved e-mail messages offline. See “Using E-mail” on
page 31.
10.12 Facebook
Facebook application lets you connect to facebook with a single tap. You can log in to
your facebook account and get connected with your friends anytime.
10.13 File Browser
File Explorer lets you browse the contents of your phone.
1. Tap Application drawer > File browser.
2. Tap the folder list and tap the folder you want to explore.
Managing Files and Folders
• To open an item, tap it.
• To move, copy, delete, rename, or set the picture as Contact icon or Wallpaper,
tap and hold the item then tap the option.
• To paste an item, tap Menu > Paste.
• To sort items, tap Menu > Sort, then select an option.
• To search for a file, tap Menu > More > Search.
58
Page 64
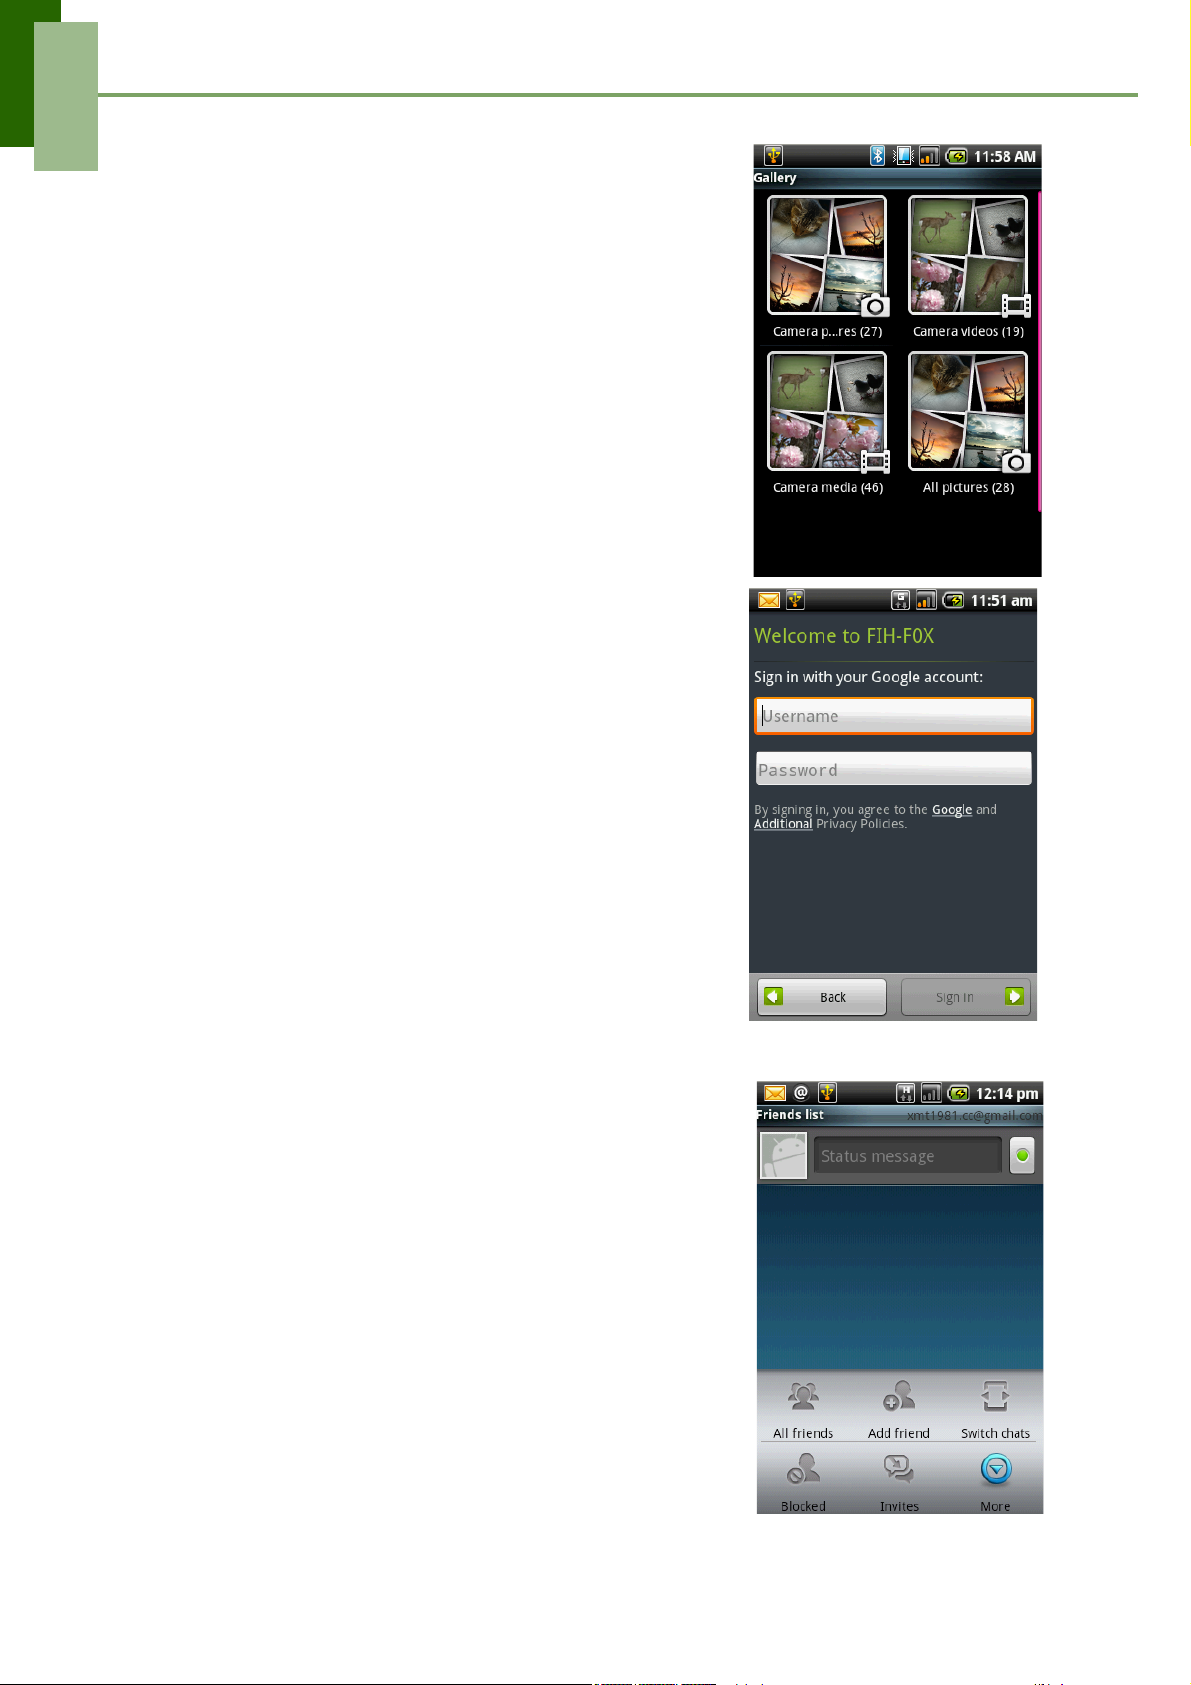
Chapter 10: Programs
10.14 Gallery
You can view the captured images, recorded video
clips, and downloaded images in the Gallery.
1. Tap Application drawer > Gallery.
2. The picture folder and video folder are displayed.
3. Tap to view the camera pictures or camera videos.
4. The images or videos will be displayed in
thumbnails.
5. To view photos or videos, see “Viewing Photos &
Videos” on page 45.
10.15 Gmail
Gmail is Google's web-based email service. Google
Mail is configured when you first set up your phone.
Depending on your synchronization settings, Google
Mail on your phone is automatically synchronized with
your Google Mail account on the web.
1. Tap Application Drawer > Gmail.
2. Tap Create or Sign in your Google account.
3. Follow the on screen instructions to login or create
your Gmail username and password.
4. Once logged in, you can begin reading and sending
emails from your Gmail account.
10.16 Google Talk
Google Talk is Google's instant messaging program.
To sign in to Google Talk
1. Tap Application drawer > Google Talk.
2. Tap Create or Sign in your Google account.
3. Follow the on screen instructions to login or create
your Gmail username and password.
4. Once logged in, you can begin using Google Talk and
do any of the following:
• View friend’s list: Tap Menu > All friends
• Add friends to friend’s list: Tap Menu > Add friends.
• To switch to different chats: Tap Menu > Switch
chats.
• To block a person: Tap Menu > Blocks.
59
Page 65
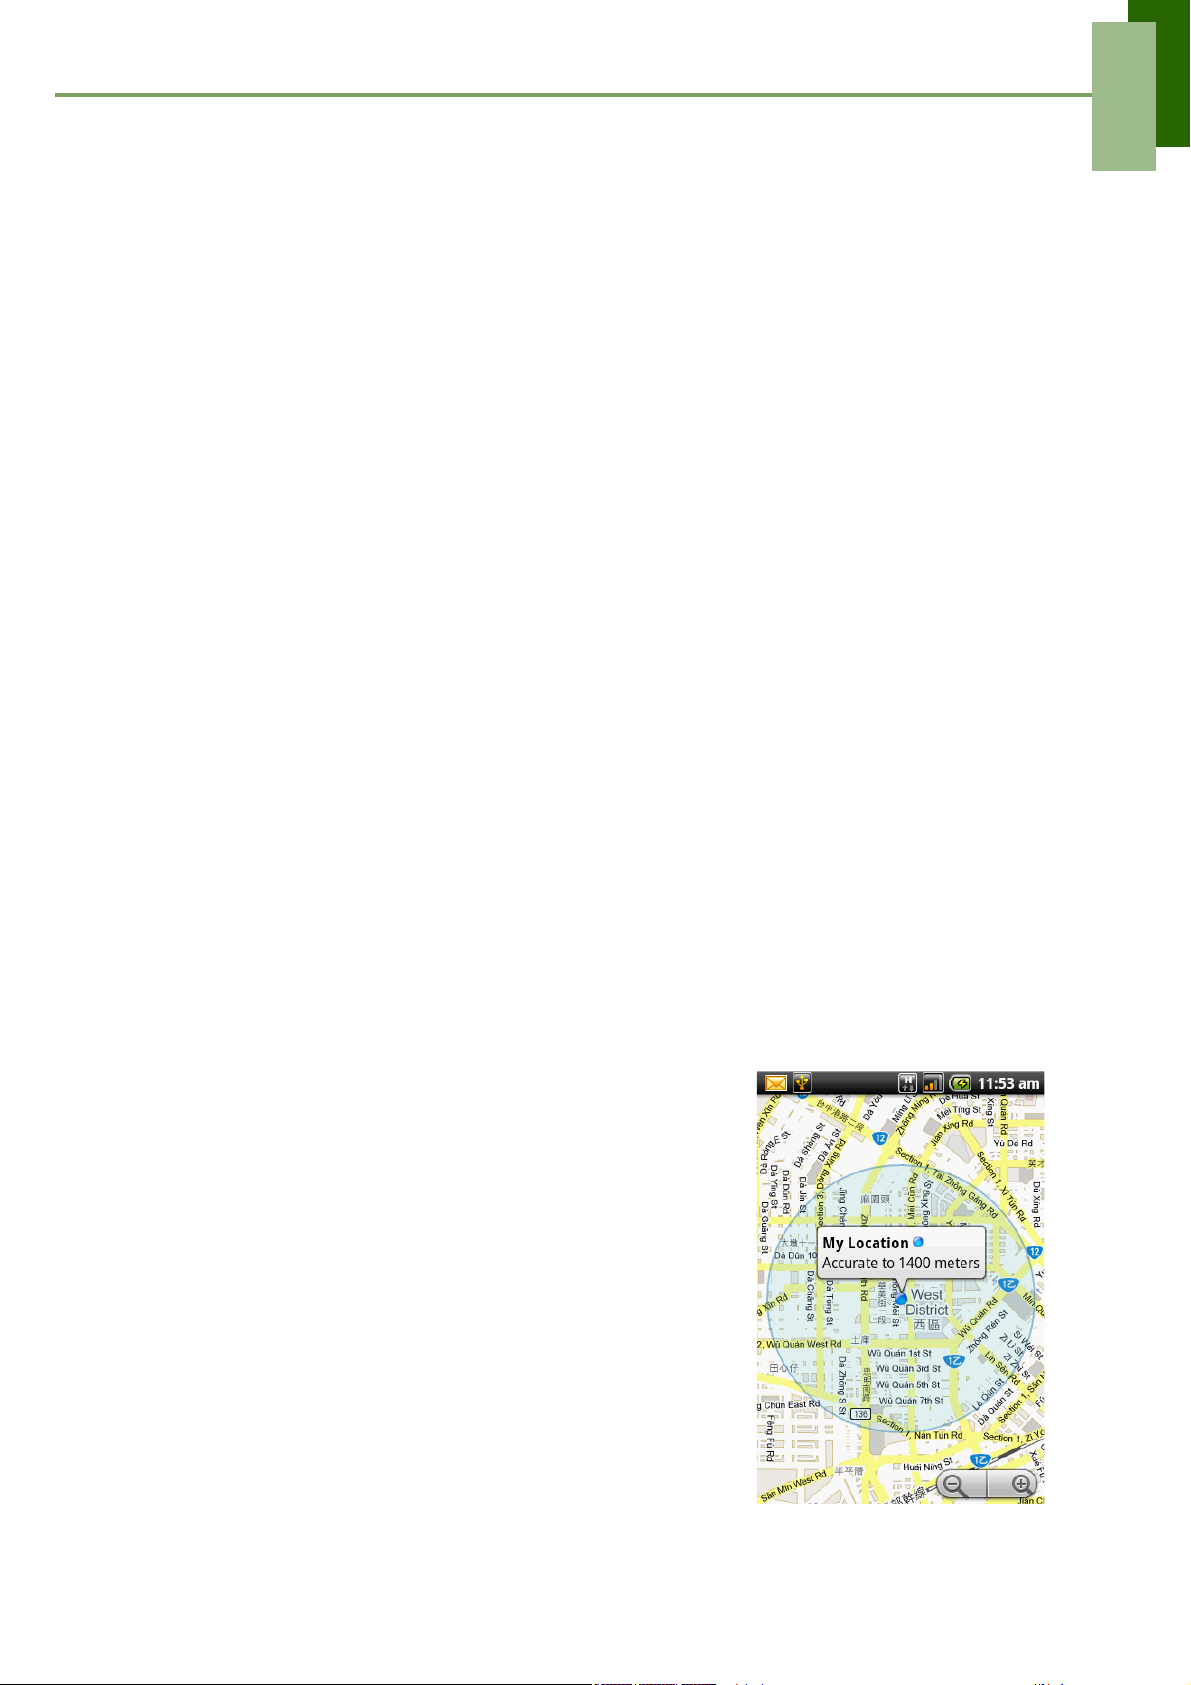
Chapter 10: Programs
• To invite a person to your chat: Tap Menu > Invites.
• To configure Google Talk settings: Tap Menu > More > Settings.
• To Sign out: Tap Menu > More > Sign out.
• To view terms and privacy: Tap Menu > More> Terms & Privacy.
10.17 GPS Tracker
Use GPS Tracker to record the time and speed of your training. See “Using GPS
Tracker” on page 50.
10.18 Java ME Apps
Use Java Me Apps to download and install Java applications in your device.
Online
Online is a Java application that comes pre-installed on your device.
Tap Application drawer > Java ME Apps > Online.
My Code
My Code is a Java application that comes pre-installed on your device. Use My Code
to compose personalized video signature that you can attach to multimedia messages
you send.
1. Tap Application drawer > Java ME Apps > My Code.
2. Follow the on-screen instructions to use the application.
10.19 Maps
Maps is Google's mapping service to search for places of
interest.
To open Maps
1. Tap Application drawer > Maps.
2. Do any of the following:
• To search for a place of interest: Tap Menu > Search
then type in a keyword to begin search.
• To get direction: Tap Menu > Directions.
• To select a Map mode: Tap Menu > Map mode then
tap Map, Satellite, or Traffic.
• To go back to my location: Tap Menu > My Location.
• Tap Joint Latitude and tap Allow and share to
share your location with friends.
• To clear the map: Tap Menu > More > Clear Map.
60
Page 66
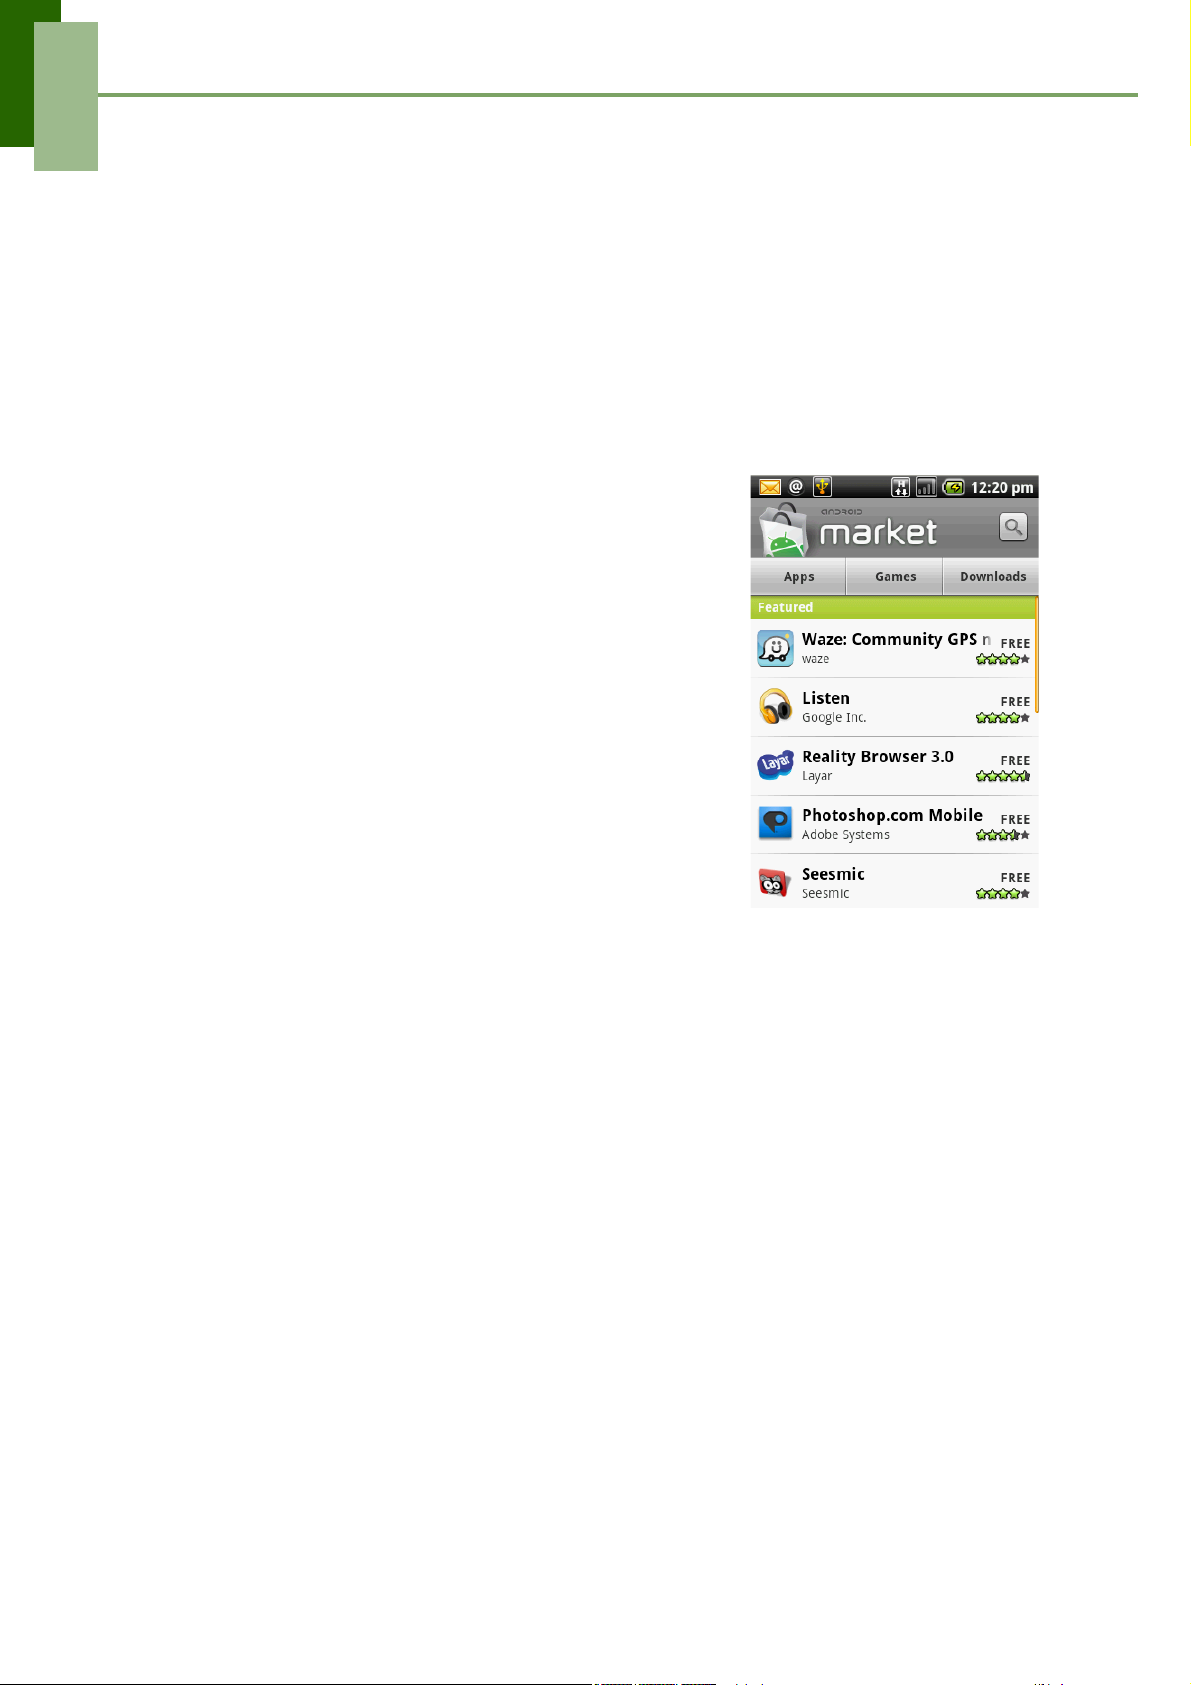
Chapter 10: Programs
• To view terms, privacy, and notices: Tap Menu > More > Terms, Privacy &
Notices.
• To view information about Google Map: Tap Menu > More > About.
10.20 Market
Android Market allows you to find and download applications and fun games to your
phone.
To start using Android Market
1. Tap Application drawer > Market.
2. Tap Accept after reading the terms of services.
3. Tap Next to setup your Google account.
4. Tap Create to create a new account or Sign in to
sign in your existing account.
5. Once you are signed in you can begin searching and
downloading programs from the market. Tap Apps
to view the list of applications available and tap
Games to view the list of games available. You can
also tap Downloads to view the programs you have
previously downloaded.
10.21 Messaging
Use the Messaging to send or receive text and MMS messages. See page 22.
10.22 Music
Use the Music player to play music files or recorded voice files. See “Using Music
Player” on page 47.
61
Page 67
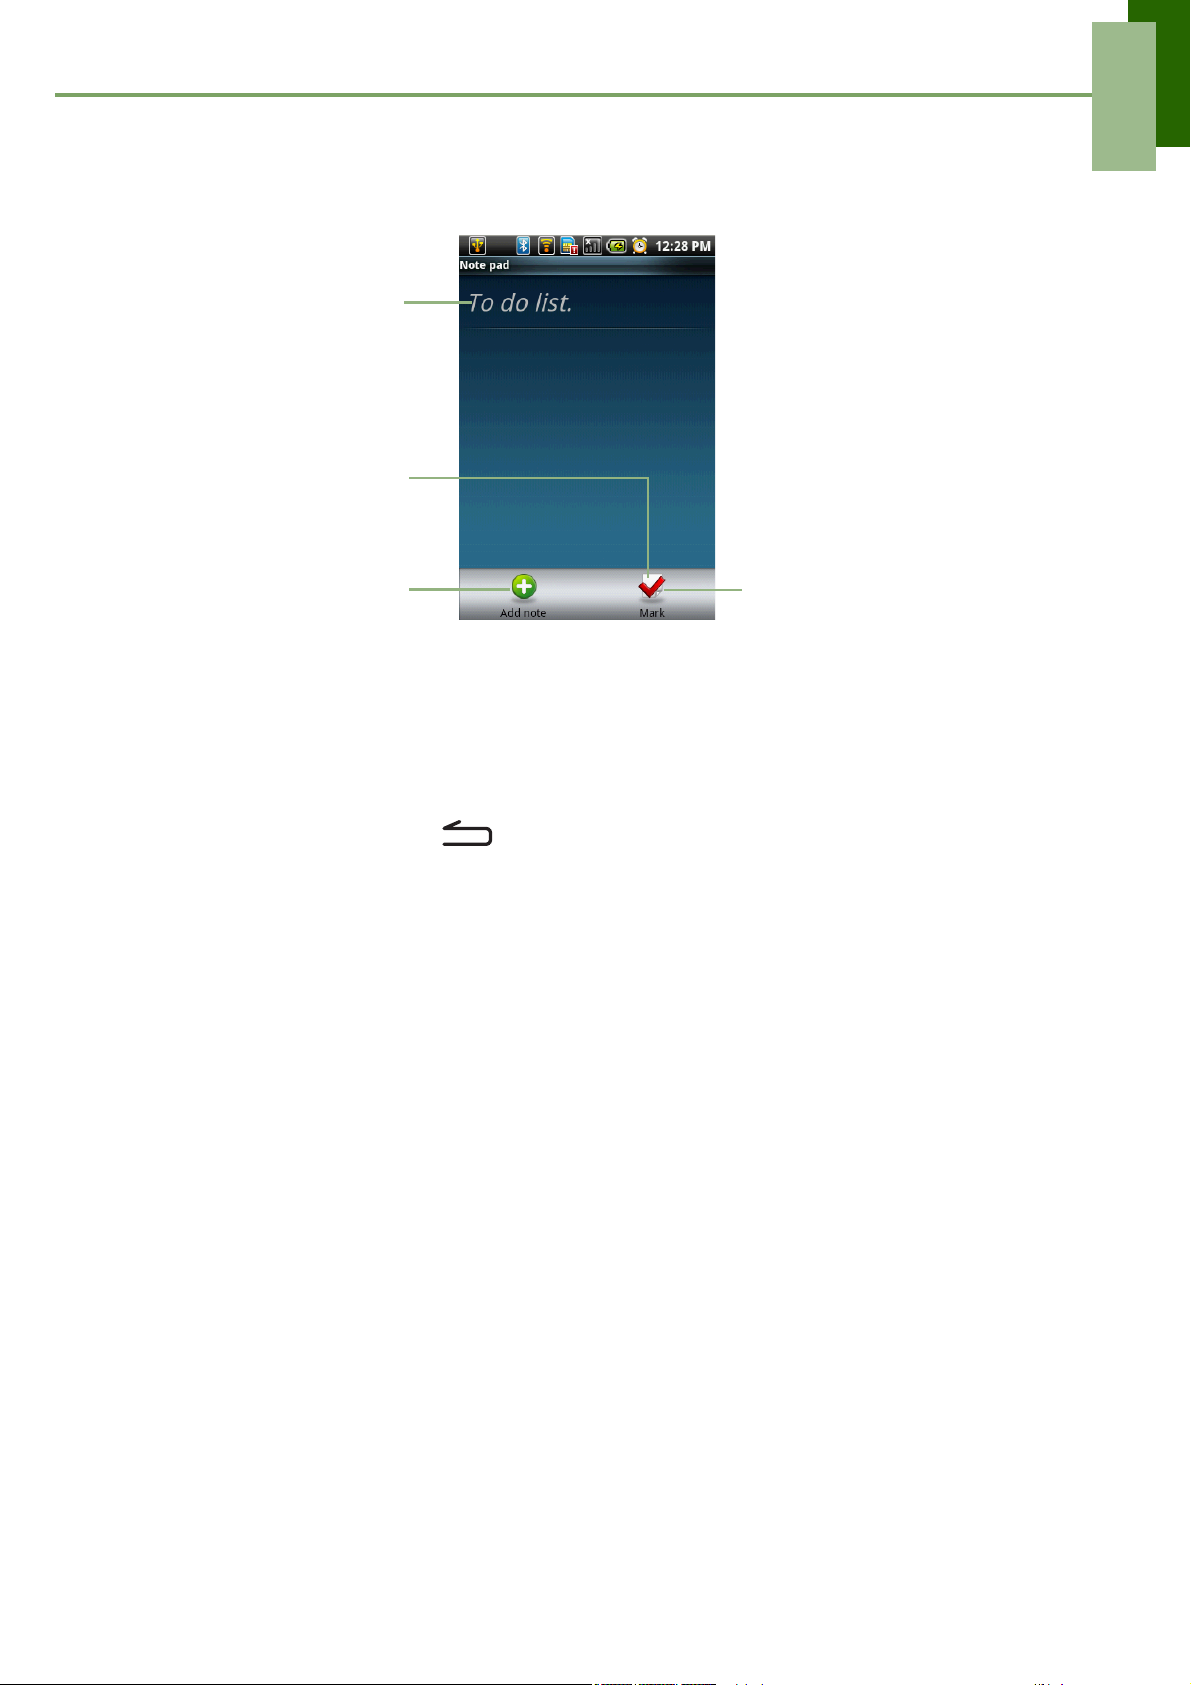
Chapter 10: Programs
10.23 Note pad
Use the Note pad to write down notes as you would on a note pad.
Saved notes are
displayed here.
Tap to add a new note.
To create a note
1. Tap Application drawer > Note pad.
2. Tap Add note.
3. Enter your notes with phone keyboard or on-screen keypad.
4. Tap Menu > Edit title to add a title to the note.
5. When you are done, tap to return to Note pad screen. The notes is
automatically saved.
Tap to mark the note.
10.24 RoadSync Calendar
Use the RoadSync Calendar to view and add events or appointments on your
calendar.
NOTE: RoadSync must be set up first to use this application. See “Using RoadSync”
on page 71.
To open RoadSync Calendar
1. Start synchronization first. See “Start Synchronization” on page 72.
2. Tap Application drawer > RoadSync Calendar.
3. Do any of the following:
• To add an event, tap Menu > New event.
• Slide your finger on screen to pan the calendar.
• To change the calendar view, tap Menu > Agenda, Day, Week, or Today.
• To edit e-mail settings, tap Menu > Settings.
10.25 RoadSync Mail
Use the RoadSync Mail to send and receive e-mails on your device.
62
Page 68
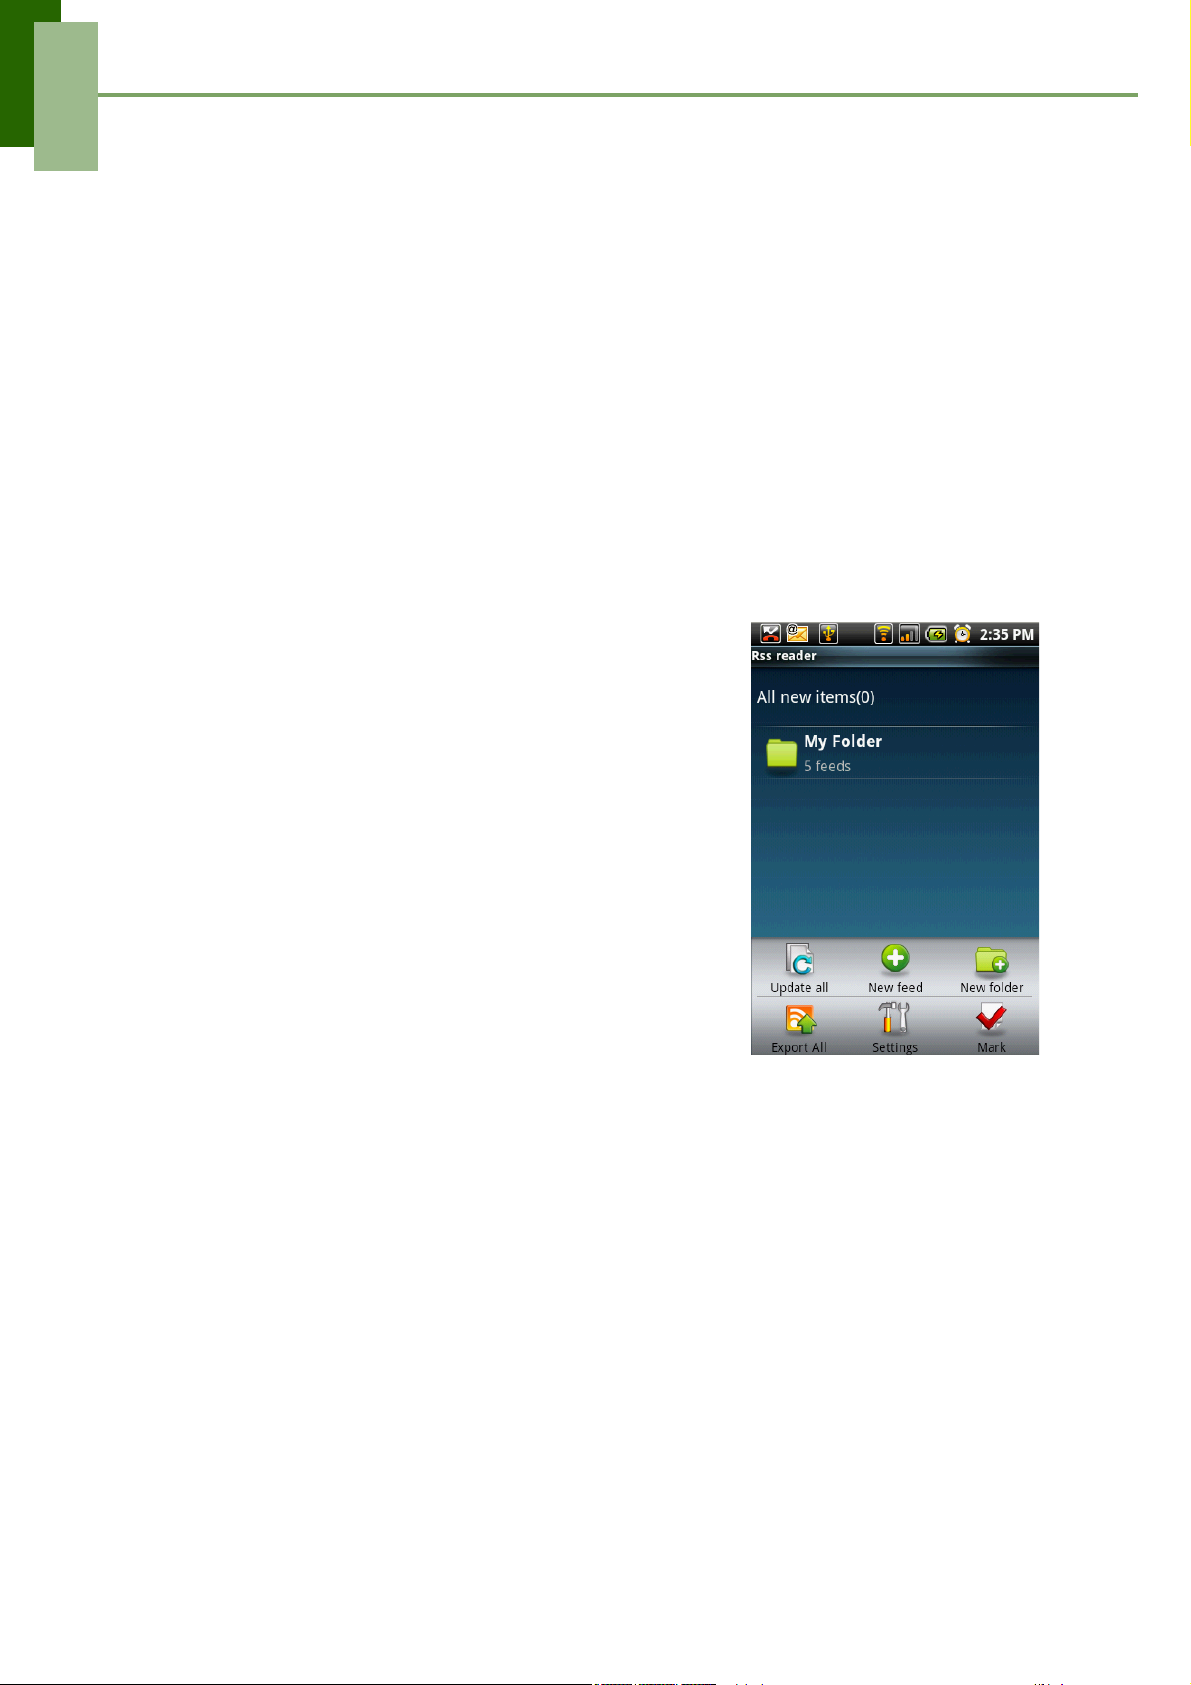
Chapter 10: Programs
NOTE: RoadSync must be set up first to use this application. See “Using RoadSync”
on page 71.
To open RoadSync Mail
1. Tap Application drawer > RoadSync Mail.
2. Do any of the following:
• To view a message, tap the message.
• To create a new message, tap Menu > New message.
• To reply to or forward a message, tap Menu > Reply / Forward.
• To flag a message, tap Menu > Flag.
• To manually sync e-mail, tap Menu > Sync.
• To delete e-mail, tap Menu > Delete.
• To view other folders, tap Menu > More > Folders, then the folder.
• To edit e-mail settings, tap Menu > More > Settings.
• To view on-line help, tap Menu > More > Help.
10.26 Rss reader
Use the Rss Reader to get live update of your favorite
web sites.
Add a new Rss Feed
1. Tap Application Drawer > Rss Reader.
2. Tap Menu > New feed.
3. Tap an import option:
• Import from OPML file: Select a file from the
SD card.
• Import OPML from Internet: Enter the URL to
import OPML from.
• Manual Add: Manually enter a URL.
• Import from Google Reader: Sign in to
Google Reader to import feed.
4. Tap OK to confirm.
Update Rss Feed
1. Tap Application Drawer > Rss Reader.
2. Tap Menu > Update all to update the RSS feeds.
3. New feeds will be displayed in RSS feed inbox.
10.27 Settings
In the Settings menu, you can view and make adjustments for Wireless Control, Call
settings, phone general setting and security settings. See page 66.
63
Page 69
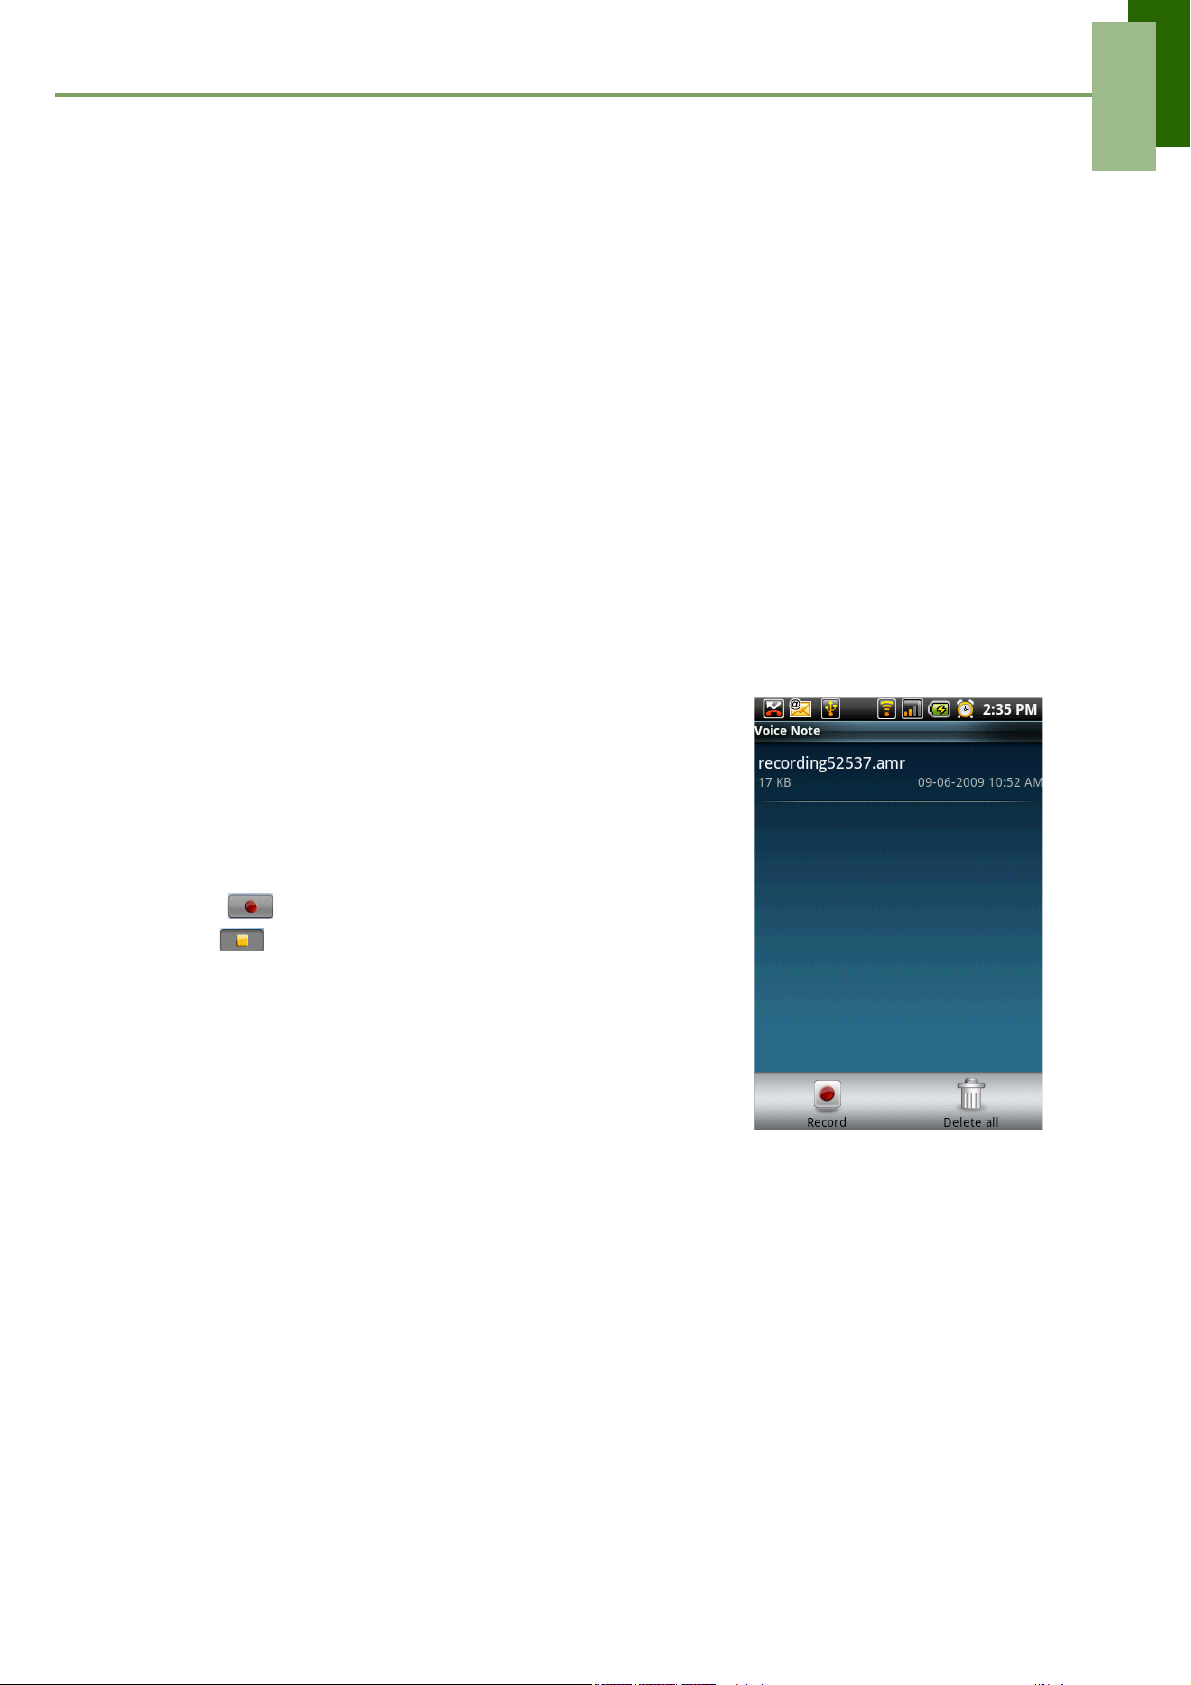
Chapter 10: Programs
10.28 SIM Toolkit
Directly connect to and use services provided by your mobile service provider.
Tap Applications drawer > SIM Toolkit.
10.29 Videos
You can playback the video clips captured with your phone. See “Photos and Videos”
on page 41.
10.30 Voice Dialer
Read and record predefined texts to be recognized and used by your phone for voice dialing,
finding a contact and others.
Tap Applications drawer > Voice Dialer.
10.31 Voice Note
To record a voice note
1. Tap Menu > Voice Note.
2. Tap Menu > Record.
3. The recording screen is displayed.
4. Tap to record your voice. To stop recording,
tap .
To play a voice note
1. Tap Menu > Voice Note.
1. A list of voice notes are displayed. Tap the voice
note you want to listen.
2. The voice note is played with the Music player.
64
Page 70
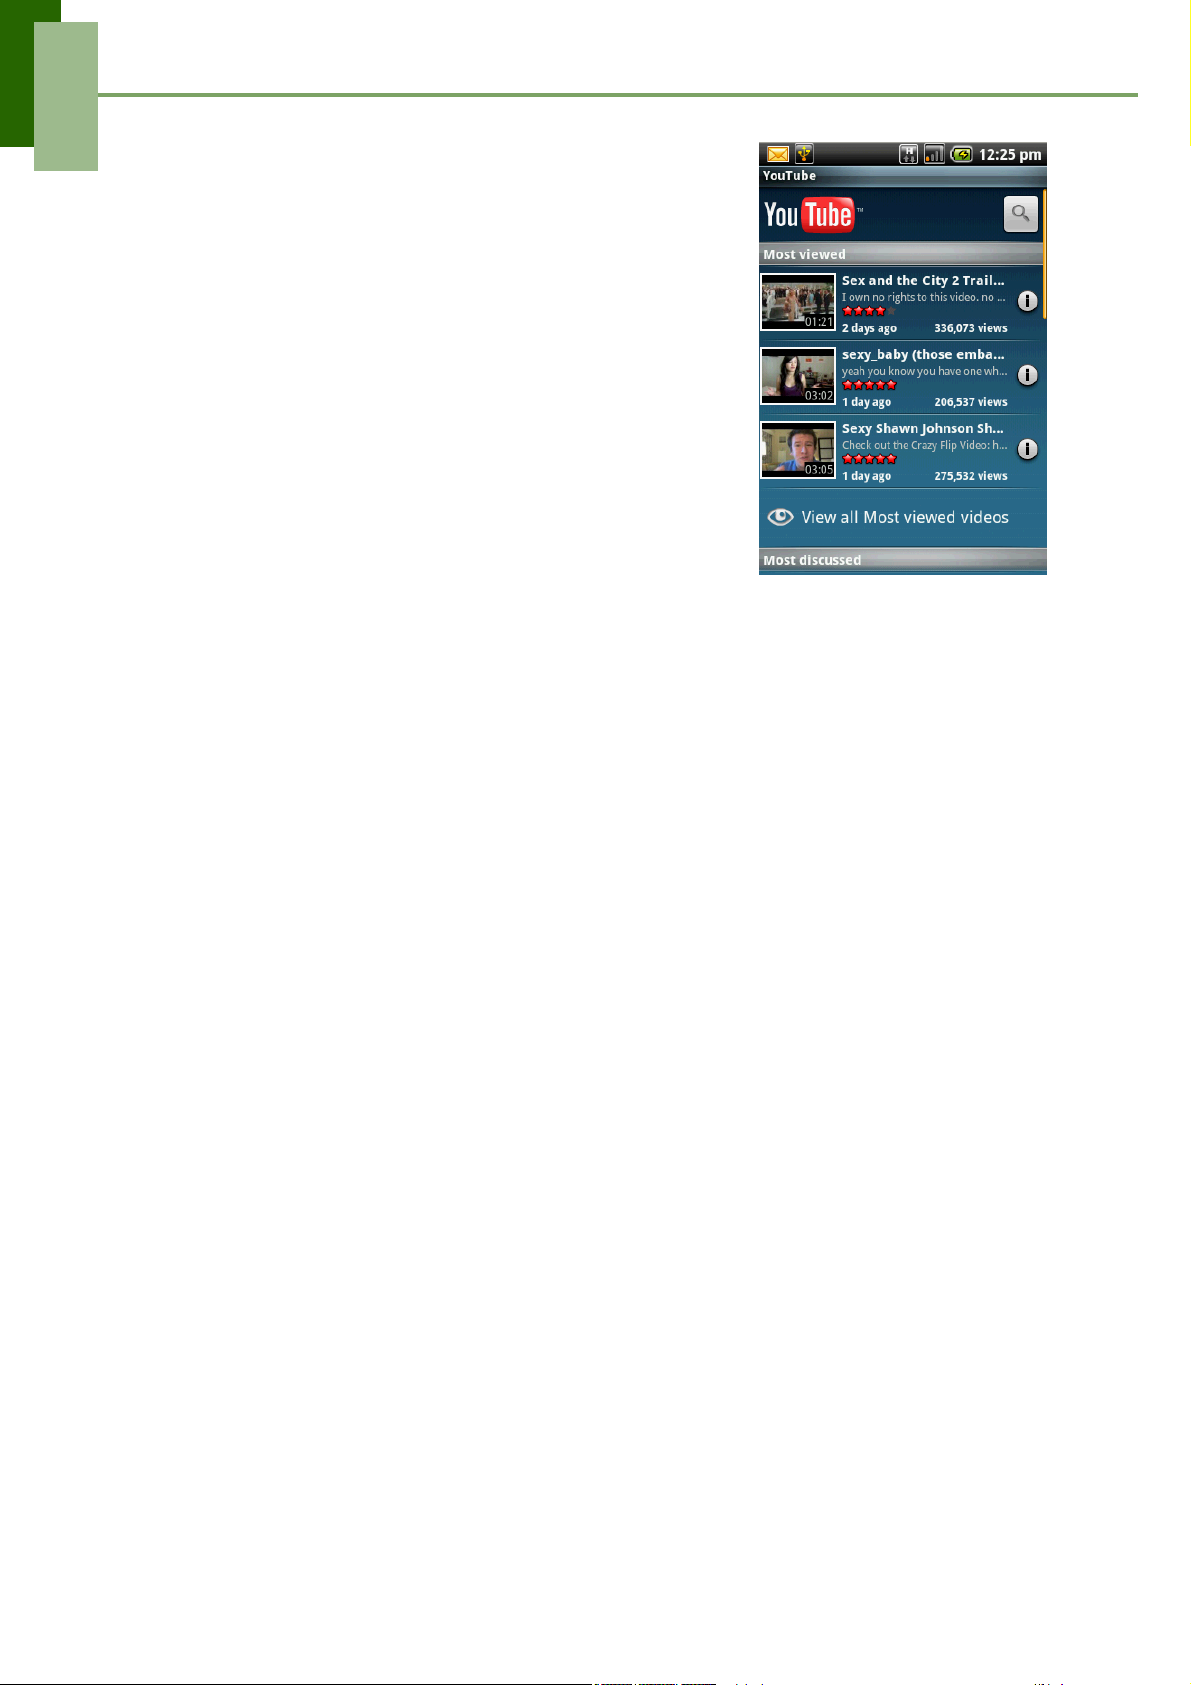
Chapter 10: Programs
10.32 YouTube
YouTube is an online video streaming service that allows
you to view, search, and upload videos.
To start using YouTube
1. Tap Application drawer > YouTube.
2. Videos are grouped into categories, such as
Featured, Most popular, Most viewed, Top rated, and
more. Tap a category to see the available videos for
that category.
3. Tap a video to play it.
65
Page 71

Chapter 11: Managing Your Device
Chapter 11: Managing Your Phone
11.1 Phone Settings
Tap Application drawer > Settings to view and adjust the settings of your phone.
The Settings menu is categorized into: Wireless Controls, Call settings, Sound &
display, Security & location, Applications, SD card, USB Mass Storage & phone
storage, Date & time, Locale & text and About phone.
Wireless Controls
Application Description
Wifi settings Set up and manage wireless access points.
Bluetooth settings Manage connections, set device name, and discoverability of the
phone.
Mobile networks Set options for roaming, networks, and Access Point Names.
Airplane mode Disable all wireless connections.
Call settings
Application Description
Fixed Dialing
Numbers
Voicemail Set voice mail number
GSM call settings Additional GSM only call settings.
Managed fixed dialing numbers
Sound & display
Application Description
Silent mode Turn silent mode on/off. All sounds except media & alarms are
silenced.
Ringer volume Adjust ringer volume for incoming calls and notifications.
Media volume Set volume for music and videos.
Phone ringtone Set your default incoming call ringtone.
Phone vibrate Phone vibrates for incoming calls.
Notification
ringtone
Audible touch
tones
Audible selection Enable/disable sound when making screen selection.
Set your default notification ringtone.
Enable/disable sound when using dial pad.
66
Page 72

Chapter 11: Managing Your Device
Application Description
SD card
notifications
Orientation Switch orientation automatically when rotating phone.
Animation Show animation when opening & closing windows.
Light Sensor Switch LCD backlight brightness setting by manually.
Brightness Adjust the brightness of the screen.
Screen timeout Adjust the delay before the screen automatically goes off.
Notification LED Enable/disable LED effect for call/message notification.
Screen Turn-On Set the keys to turn the screen on.
Enable SD card notification sounds.
Security & location
Application Description
Use wireless
networks
Enable GPS
satellites
Set location in applications (such as maps) using wireless networks.
Check to enable GPS satellites.
GPS Ephemeris
Auto Download
AGPS Adjust AGPS settings.
Share with Google Allow/Disallow Google to use location for improved search and
Require pattern Check to enable screen lock pattern.
Set security
question and
answer
Use visible pattern Check to set visible pattern for screen lock.
Use tactile
feedback
Set unlock pattern Tap to set the unlock pattern.
Set up SIM card
lock
Visible passwords Show passwords as you type.
Enable/Disable to download Ephemeris updates from server.
other services.
Set your security question and answer to unlock screen.
Check to use tactile feedback for screen lock.
Lock SIM card and change SIM card pin.
67
Page 73

Chapter 11: Managing Your Device
Applications
Application Description
Unknown sources Allow install of non-market applications.
Manage
applications
Development Set options for application development.
Manage and remove installed applications.
SD card USB Mass Storage & phone storage
Application Description
Unmount SD card Unmount the SD card for safe removal.
Format SD card Format all data on SD card.
Factory data reset Delete all data on the phone and restore to factory default settings.
Unmount/Eject
UMS device
Select the UMS (USB Mass Storage) device to unmount for safe
removal.
Date & time
Application Description
Automatic Check to use network provided values.
Set date Tap to set date for your phone.
Set time zone Set time zone of your current location.
Set time Tap to set time for your phone.
Use 24-hour
format
Select date format Set the preferred date format.
Set the clock to 24-hour format.
Locale & text
Application Description
Locale Select language and region for your phone.
Text settings Choose the preferred text input method.
About phone
Display the software version, phone status and the processor information.
68
Page 74
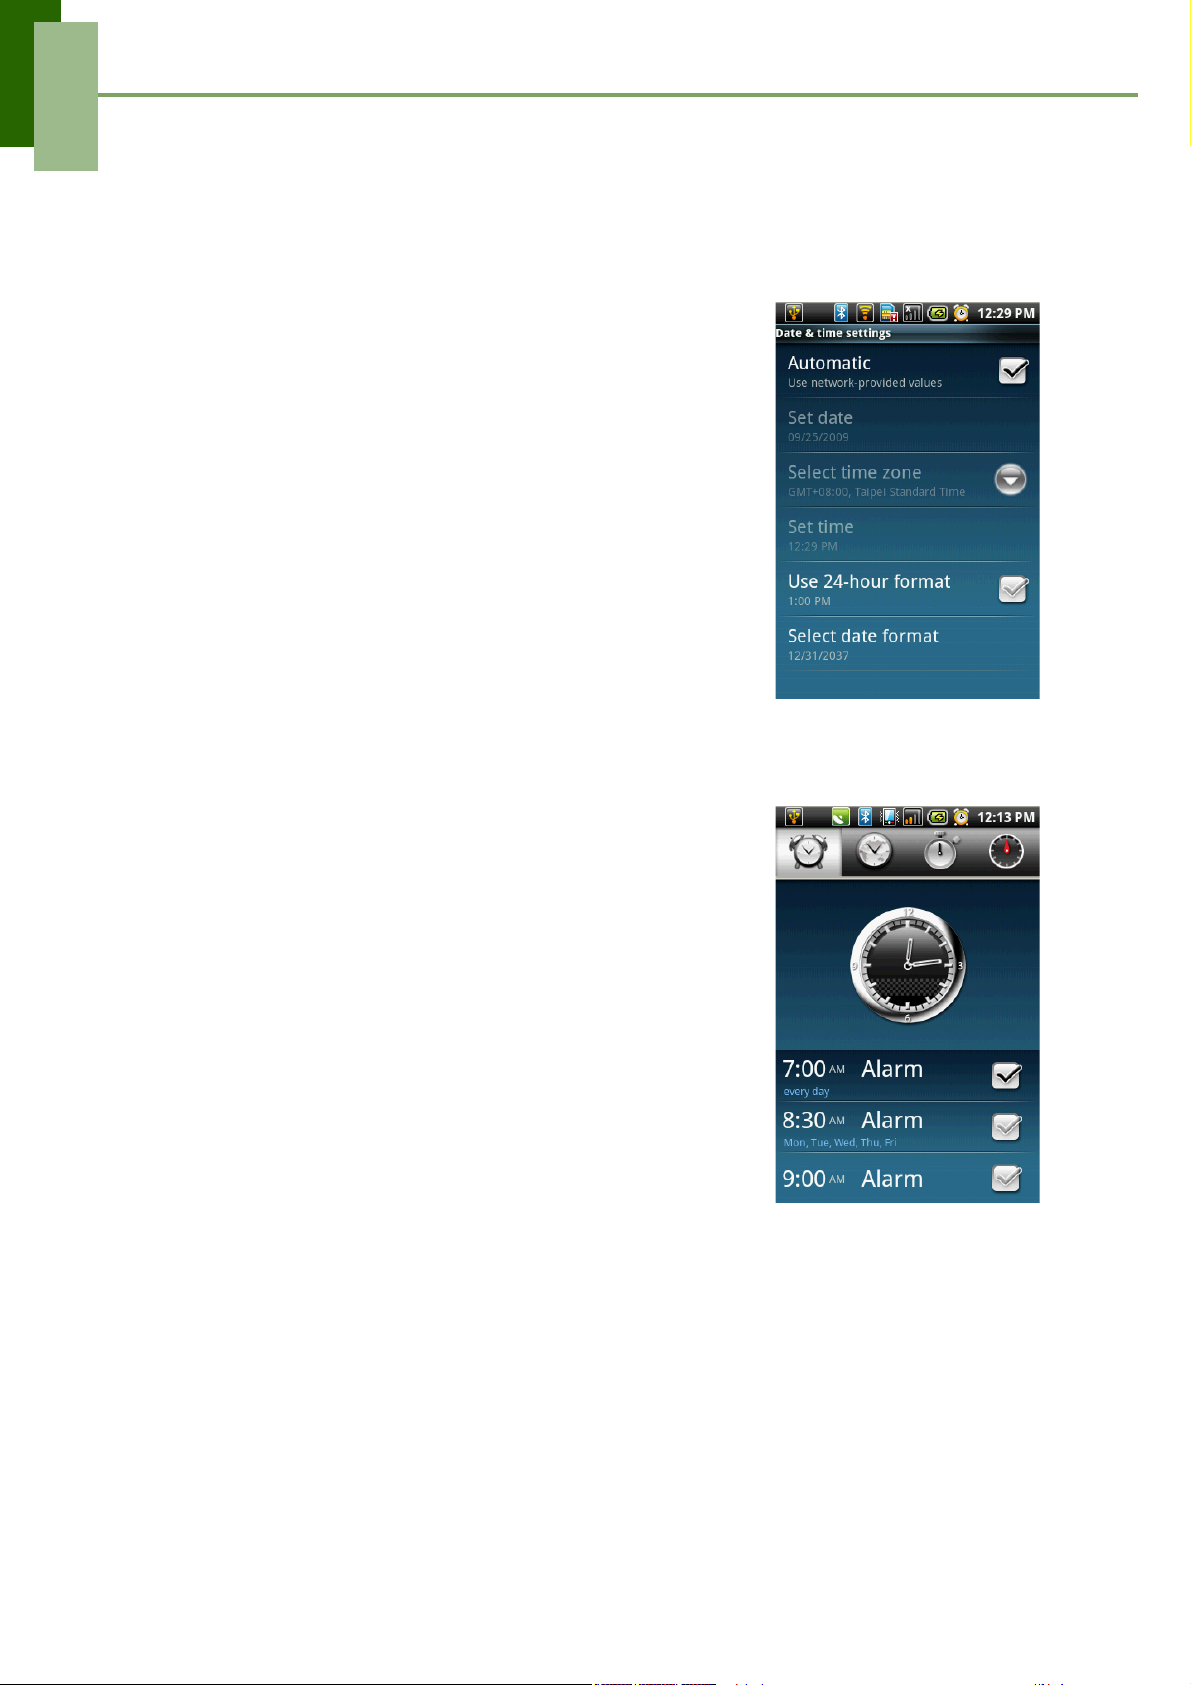
Chapter 11: Managing Your Device
11.2 Changing Basic Settings
Date and Time
To set the date and time
1. Tap Application drawer > Settings > Date & time.
2. Set date.
3. Select the time zone from the list.
4. To adjust the time, tap the hour, minute, second or
AM/PM field, and use the up and down arrows to
increase or decrease the value.
5. To adjust the date, tap the month, day, or year field,
and tap + or - to increase or decrease the value.
6. Tap Set to apply the values.
Setting Alarms
You can set up three alarms on your phone.
To set the alarm
1. Tap Application drawer > Clock.
2. Under Alarm clock tab, tap to select from the
existing alarm clock settings or tap Menu > Add
alarm to set up a new alarm.
3. Tap Time open a clock and set the time for the
alarm. To enter the time numerically, tap the hour,
minute or AM/PM field and use the up and down
arrows to change the values.
4. Tap Ringtone to set up the preferred ringtone when
your alarm sounds.
5. Tap Vibrate to enable/disable vibration when the
alarm sounds.
6. Tap Repeat to select a day to sound the alarm. Tap OK to confirm.
7. Tap Label, and enter an alarm description.
8. Tap Time open a clock and set the time for the alarm.
• To enter the time numerically, tap the hour, minute or AM/PM field and use
the up and down arrows to change the values.
9. To turn on the alarm, check Turn on alarm.
TIP: To sound an alarm even when your phone set to silent or vibrate mode, tap the
More tab, and check Sound alarms even when the phone is set to silent or
vibrate.
69
Page 75

Chapter 11: Managing Your Device
Display Settings
The display settings of your phone affect the battery and external power level.
To turn off backlight when the phone is idle
1. Tap Application Drawer > Settings > Sound & display to enter the submenu.
2. In the Display settings, tap Screen timeout.
3. Select from the screen timeout list. Your setting is automatically saved.
To adjust brightness
1. Tap Application Drawer > Settings > Sound & display to enter the submenu.
2. In Display settings, tap Brightness.
3. Drag the Brightness slider to adjust brightness settings.
4. Tap OK when finished.
To change the screen orientation
1. Tap Application Drawer > Settings > Sound & display to enter the submenu.
2. In Display settings, tap Orientation.
3. Check the box to automatically switch the screen orientation when rotating the
phone.
Ring Settings
You can assign a ring tone and a ring tone type for various events such as an
incoming call, new message received, among others.
To change the ring tone and ring type of an incoming call
1. Tap Application Drawer > Settings > Sound & Display.
2. On the Sound settings tab, tap Phone ringtone.
3. Select the Ring tone from the lists.
4. Tap OK when finished.
To change the ring tone of other events
1. Tap Application Drawer > Settings > Sound & Display.
2. On the Sound settings tab, tap Notification ringtone.
3. Select the Ring tone from the lists.
4. Tap OK when finished.
11.3 Using Wireless Control
Wireless Manager provides shortcuts to access Wi-Fi, Bluetooth, and Phone
connection settings.
1. Tap Application Drawer > Settings > Wireless Controls.
2. To turn on or off Wi-Fi, Bluetooth or Phone, simply tap their corresponding bars.
3. To change connection settings, tap Menu, then select the setting to change.
70
Page 76
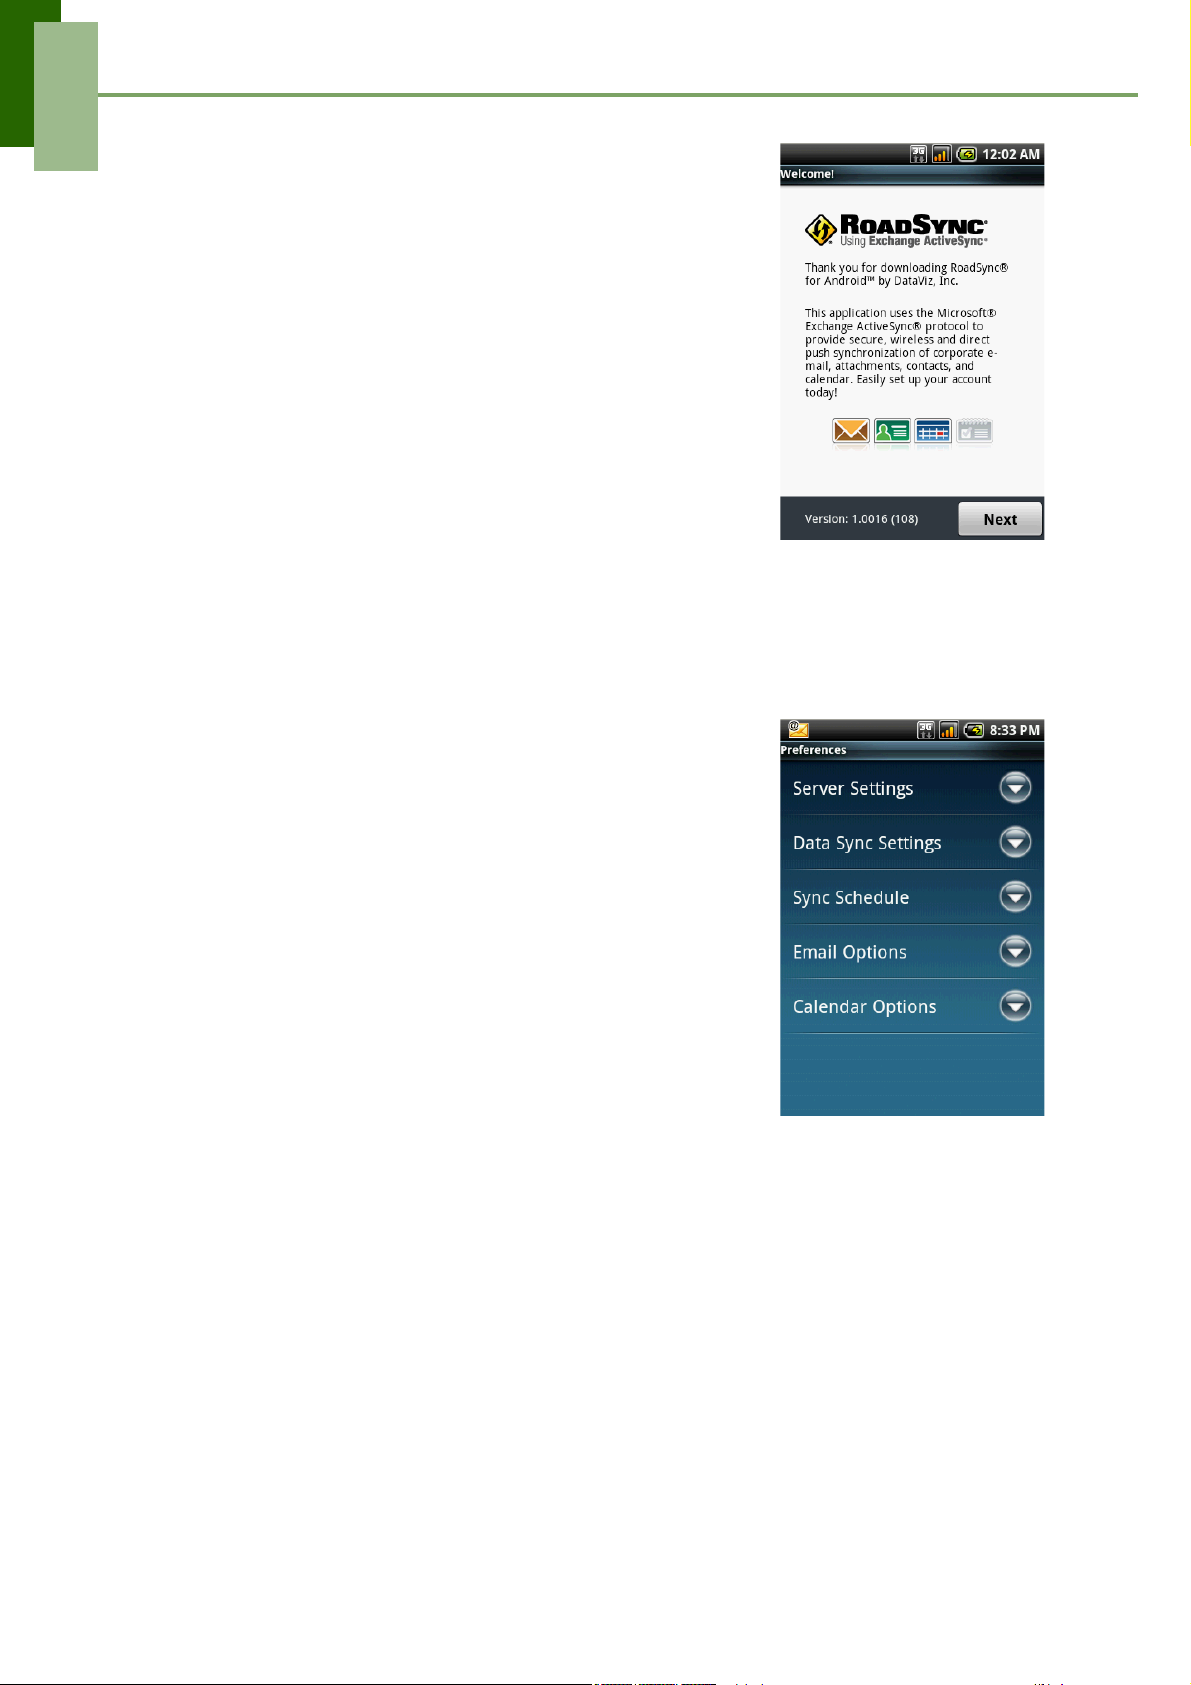
Chapter 11: Managing Your Device
11.4 Using RoadSync
RoadSync provides secure, wireless and direct push
synchronization of corporate e-mail, calendar, contacts
and attachments.
Set up RoadSync for the first time
1. Tap Application drawer > RoadSync.
2. The setup wizard appears. Tap Next, then follow
the on-screen instructions.
3. Read and accept the license agreement. Touch
Accept.
4. Enter your name and e-mail to register RoadSync.
Touch Register.
5. Enter your Exchange account information: User Name, Password, Server
address, Domain and SSL option.
6. Tap Finish.
Customize RoadSync
After registering RoadSync for the first time, the
Preferences screen is displayed automatically. Use
the Preferences screen to customize synchronization
settings.
To access the Preferences screen at some other time,
tap Application drawer > RoadSync > Settings.
Server Settings
Tap to edit server settings such as User name,
Password, Server address, Domain, and enable or
disable SSL.
Data Sync Settings
Tap to choose the data to synchronize. Tap to select the check boxes of the following:
• E-mail: To sync Inbox messages and attachments.
• Calendar: To sync Exchange appointments to RoadSync Calendar application.
• Contacts: To sync Exchange contacts to built-in Contacts application.
• Show status icon: To display the RoadSync icon on the notification bar when
synchronization is in progress.
Sync Schedule
Tap to set the synchronization schedule.
• Peak schedule: To set the time interval for synchronization during a peak
schedule.
71
Page 77
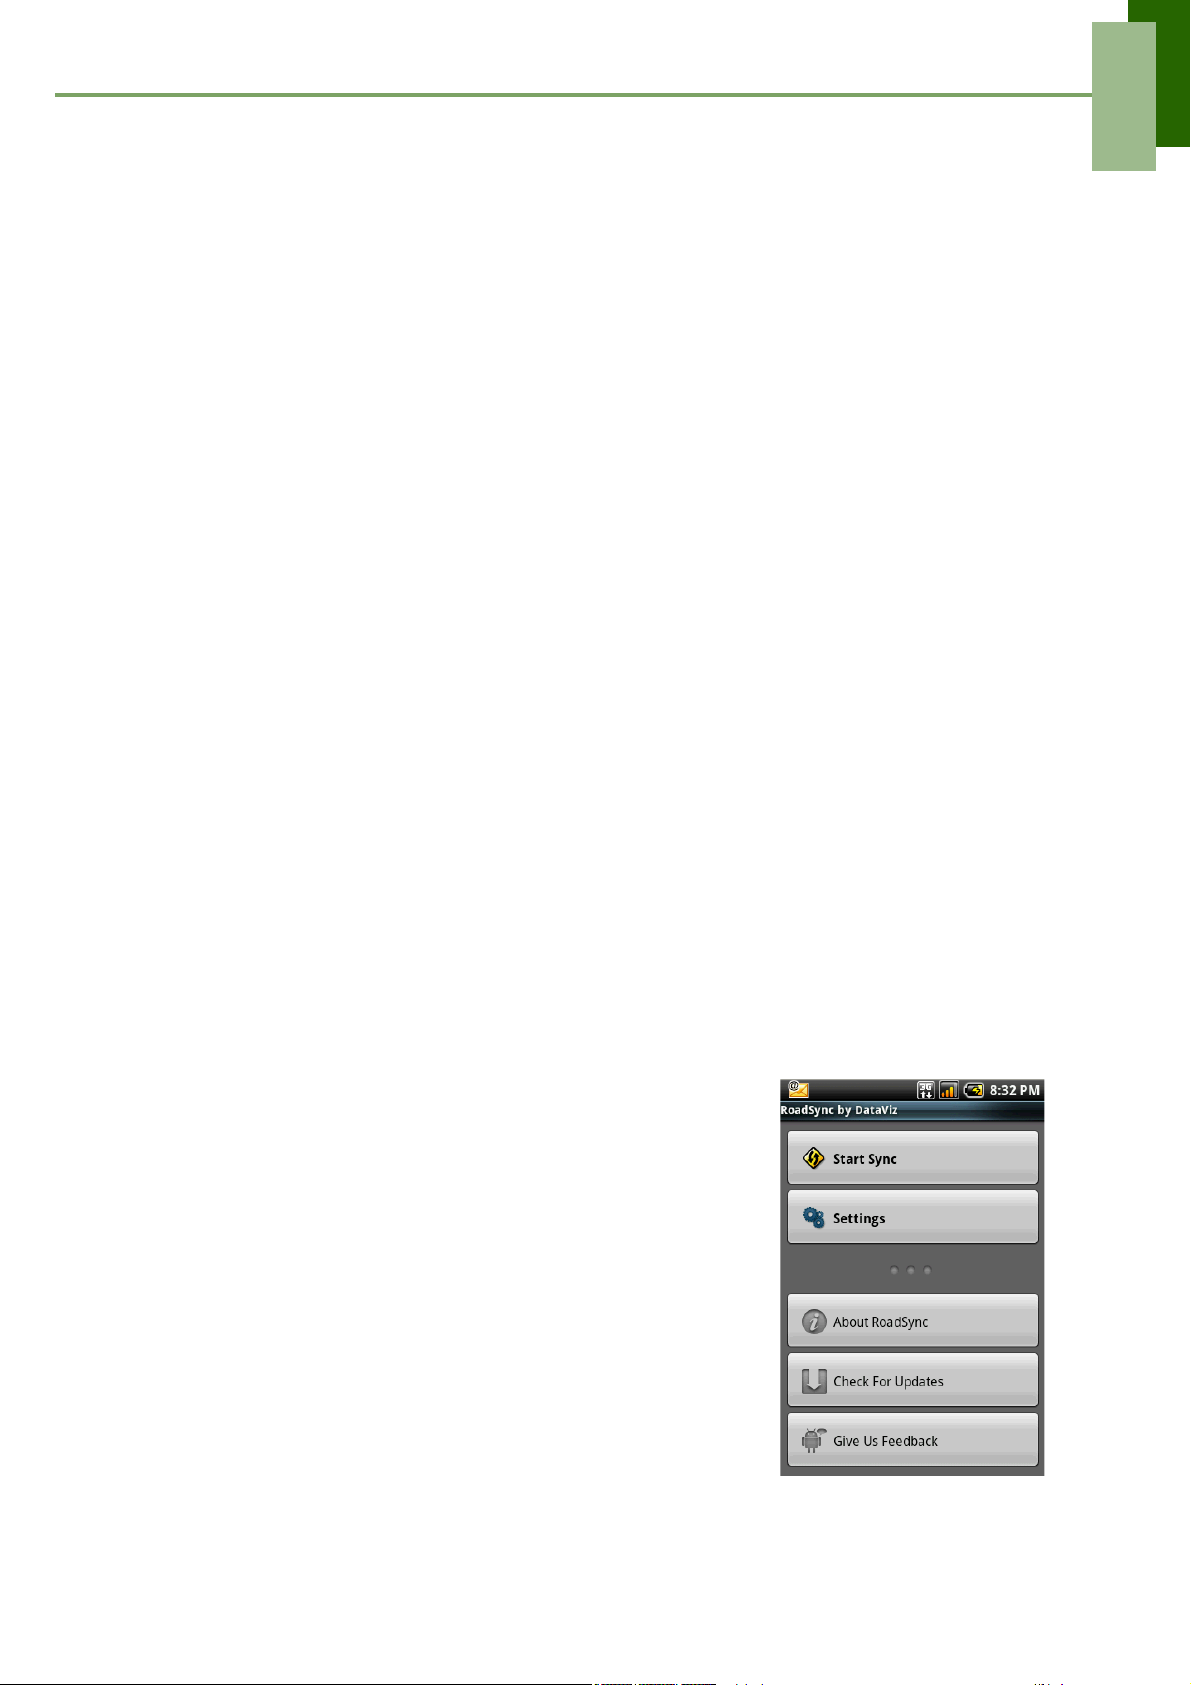
Chapter 11: Managing Your Device
• Off peak schedule: To set the time interval for synchronization during an off peak
schedule.
• Peak start time: To set the peak start time. Tap the [+] or [-] buttons to adjust the
time. Tap to select AM or PM. Tap Set to complete.
• Peak end time: To set the peak end time. Tap the [+] or [-] buttons to adjust the
time. Tap to select AM or PM. Tap Set to complete.
• Peak days: Tap to choose the days of the week to set the peak day(s).
• Sync when roaming: Tap to enable synchronization even when roaming.
NOTE: Additional charges may be incurred when you use this function.
Email Options
Tap to configure the e-mail settings.
• E-mail download size: To set the maximum size of the e-mail to download.
• Auto download: To automatically download incomplete message upon opening it.
• Signature: To customize and add your signature to e-mails you send.
• My e-mail address: To enter the e-mail address to exclude when sending or
replying e-mails to all.
• Status bar: Select this check box to display notification on the status bar when a
new e-mail arrives.
• Select ringtone: To set the e-mail notification ringtone.
• Vibrate: To enable the device to vibrate when a new e-mail arrives.
• LED Indicator: To set the color of the LED indicator that is lit when a new e-mail
arrives.
Calendar Options
Tap to configure the calendar settings.
• Calendar date range: To set the date range to synchronize.
• Set alerts & notifications: To turn alerts and notifications on or off when an
appointment is due.
• Select ringtone: To set the calendar notification
ringtone.
• Vibrate: To enable the device to vibrate when an
appointment is due.
• Set default reminder: To set the default reminder
time before an appointment is due.
Start Synchronization
1. Tap Application drawer > RoadSync.
2. On the RoadSync main screen, tap Start Sync to
start synchronization.
3. To manually stop synchronization, tap Stop Sync.
72
Page 78

Chapter 11: Managing Your Device
Update RoadSync
Tap Application drawer > RoadSync > Check For Updates.
11.5 Protecting Your Phone
You can protect your phone from unauthorized users by requiring the PIN code or
entering a password.
Enable or Disable SIM card PIN
When PIN code is enabled, you are required to enter the PIN code before making a
call.
1. Tap Application Drawer > Settings > Security & location.
2. On the SIM card lock tab, tap Set up SIM card lock.
3. Tap Lock SIM card to use PIN to use the phone. Check to enable, uncheck to
disable.
4. Enter the current PIN code.
5. To change the PIN code, tap Change PIN.
6. Enter the old PIN code.
7. Enter the new PIN code and confirm.
Enabling Password Protection
When Password is enabled, you are required to enter the password every time the
phone is turned on.
1. Tap Application Drawer > Settings > Security & location.
2. Tap Set security question and answer.
3. Enter your question and answer, tap Next to save your settings.
11.6 Resetting the Phone
With Clean Boot, you can reset your phone to its factory defaults.
1. Tap Application Drawer > Settings > SD card & phone storage.
2. On the Internal phone storage tab, tap Factory data reset.
3. Tap Reset phone to reset.
73
Page 79

Safety Information
Safety Information
Please read before proceeding
• Use only the batteries and power adapter provided by the manufacturer. Use of
unauthorized accessories may void your warranty.
• Do not remove the battery while the phone is charging.
• Avoid using the phone near electromagnetic sources such as TVs, radios, and
microwave ovens.
• Unplug the power adapter from the wall outlet during lightning storms to avoid
electric shock or fire.
• Do not expose the phone or the battery to direct sunlight.
• Do not store your phone in temperatures higher than 60ºC or 140ºF.
• Do not use harsh chemicals or detergents to clean your phone.
• Do not handle the phone with wet hands while it is being charged. This may cause
an electric shock or serious damage to the phone.
SAFETY PRECAUTIONS FOR BATTERY USE
• Use only approved battery.
• Keep the battery dry and away from any liquid since this may cause a short circuit.
• Keep the battery away from metal objects since this may cause a short circuit.
• Do not use damaged or deformed batteries.
• If the battery emits a foul odor, discontinue use.
• Keep the battery away from babies and small children.
• If the battery leaks:
• Do not allow the leaking fluid to come in contact with your skin, eyes or clothing. If already in contact, rinse with clean water immediately and seek medical
advice.
• Keep the battery away from fire since this may cause the battery to explode.
• Do not attempt to open or service the battery yourself.
• Do not dispose battery in fire or water.
• Recycle or dispose used batteries according to the local regulations.
ROAD AND ENVIRONMENTAL SAFETY
• Turn off the phone in areas with a potentially explosive atmosphere or where
flammable objects exist such as gas stations, fuel depots, and chemical plants
among others. Sparks from these areas could cause explosion or fire and result in
injury or even death.
• Do not use hand-held phones while driving a vehicle. Use hands-free devices as
an alternative.
74
Page 80

Safety Information
SAFETY IN AIRCRAFT
Do not use the phone on board an aircraft. The phone’s network signals may
cause interference to the navigation system. As a safety measurement, it is against
the law in most countries to use the phone on board an aircraft.
Copyright © 2009. All Rights Reserved.
Android is a trademark of Google Inc. Use of this trademark is subject to Google
Permissions.
Bluetooth and the Bluetooth logo are trademarks owned by Bluetooth SIG, Inc.
Java, JME and all other Java-based marks are trademarks or registered trademarks
of Sun Microsystems, Inc. in the United States and other countries.
The prediction engine of the input method is TouchPal, provided by COOTEK.
© 2009 DataViz, Inc. and its licensors. All rights reserved. DataViz, Documents To Go
and InTact Technology are trademarks or registered trademarks of DataViz, Inc.
© 2009 DataViz, Inc. and its licensors. Word To Go™, Sheet To Go®, Slideshow To
Go®, PDF To Go® and icons are trademarks or registered trademarks of DataViz,
Inc. All rights reserved.
© 2009 DataViz, Inc. and its licensors. All rights reserved. DataViz and RoadSync are
registered trademarks of DataViz, Inc.
SAR Information
THIS MOBILE DEVICE MEETS GUIDELINES FOR EXPOSURE TO RADIO WAVES.
Your mobile device is a radio transmitter and receiver. It is designed not to exceed the
limits for exposure to radio waves recommended by international guidelines. These
guidelines were developed by the independent scientific organization ICNIRP and
include safety margins designed to assure the protection of all persons, regardless of
age and health.
The exposure guidelines for mobile devices employ a unit of measurement known as
the Specific Absorption Rate or SAR. The SAR limit stated in the ICNIRP guidelines is
1.06 W/kg averaged over 10 grams of tissue. Tests for SAR are conducted using
standard operating positions with the device transmitting at its highest certified power
level in all tested frequency bands. The actual SAR level of an operating device can
be below the maximum value because the device is designed to use only the power
required to reach the network. That amount changes depending on a number of
factors such as how close you are to a network base station. The highest SAR value
under the ICNIRP guidelines for use of the device at the ear is 0.385 W/kg. Use of
device accessories and enhancements may result in different SAR values. SAR
values may vary depending on national reporting and testing requirements and the
network band. Additional SAR information can be found on the Cellular
Telecommunications Industry Association (CTIA) website at www.wow-com.com.
FCC Notice
Your device may cause TV or radio interference (for example, when using a telephone
in close proximity to receiving equipment). This device complies with part 15 of the
FCC rules. Operation is subject to the following two conditions: (1) This device may
75
Page 81

Safety Information
not cause harmful interference, and (2) this device must accept any interference
received, including interference that may cause undesired operation. Any changes or
modifications not expressly approved by the manufacturer could void the user's
authority to operate this equipment.
WEEE Notice
The WEEE logo on the product or on its box indicates that this product must not be
disposed of or dumped with your other household waste. You are liable to dispose of
all your electronic or electrical waste equipment by relocating over to the specified
collection point for recycling of such hazardous waste. Isolated collection and proper
recovery of your electronic and electrical waste equipment at the time of disposal will
allow us to help conserve natural resources. Moreover, proper recycling of the
electronic and electrical waste equipment will ensure safety of human health and
environment. For more information about electronic and electrical waste equipment
disposal, recovery, and collection points, please contact your local city center,
household waste disposal service, shop from where you purchased the equipment, or
manufacturer of the equipment.
RoHS Compliance
This product is in compliance with Directive 2002/95/EC of the European Parliament
and of the Council of 27 January 2003, on the restriction of the use of certain
hazardous substances in electrical and electronic equipment (RoHS) and its
amendments.
European Union Regulatory Conformance
The equipment complies with the RF Exposure Requirement 1999/519/EC, Council
Recommendation of 12 July 1999 on the limitation of exposure of the general public to
electromagnetic fields (0–300 GHz). This equipment meets the following conformance
standards: EN 300 328, EN 301489-1, EN 301489-7, EN 301489-17, EN 301 511, EN
301 908-1/2EN 50332-1, EN 62209-1, EN50332-1/-2, EN 300440, EN 301489-24.
Changes or modifications to this product not authorized by the manufacturer could
void the EMC compliance and negate your authority to operate the product. This
product has demonstrated EMC compliance under conditions that included the use of
compliant peripheral devices and shielded cables between system components. It is
important that you use compliant peripheral devices and shielded cables between
system components to reduce the possibility of causing interference to radios,
televisions, and other electronic devices.
We, hereby, declare that this cellular, Wi-Fi, & Bluetooth radio is in compliance with
the essential requirements and other relevant provisions of Directive 1999/5/EC.
Intellectual Property Right Information
Right to all technologies and products that comprise this device are the property of
their respective owners:
This product has an Android platform based on Linux, which can be expanded by a
variety of Java-Script-based application SW.
Google, the Google logo, Android, the Android logo, Gmail, and YouTube are
trademarks of Google Inc.
Bluetooth and the Bluetooth logo are trademarks owned by Bluetooth SIG, Inc.
76
Page 82

Safety Information
Wi-Fi, the Wi-Fi CERTIFIED log, and the Wi-Fi logo are registered trademarks of the
Wireless Fidelity Alliance.
Java, JME and all other Java-based marks are trademarks or registered trademarks
of Sun Microsystems, Inc. in the United States and other countries.
microSD is a trademark of SD Card Association.
The prediction engine of the input method is TouchPal, provided by COOTEK.
77
Page 83

Specifications
Radio Band & Standard
GSM/GPRS/EDGE 850 / 900 / 1800 / 1900
WCDMA 850 / 1900 / 2100
Connectivity
GPS GPS / AGPS
Wi-Fi 802.11 b/g
Bluetooth 2.0 + EDR
USB USB 2.0
Power
Battery Rechargeable Li-Ion 1230mAh
Specifications
Power Adapter AC input: 100-240V, 50 / 60Hz, 0.2A max.
DC output: 5V, 1A
Temperature
Operating -15ºC to 55ºC
Non-operating / Storage -20ºC to 70ºC
Charging 0ºC to 40ºC
Humidity
Operating 10% to 90% non-condensing
Non-operating / Storage 5% to 95% non-condensing
78
Page 84

INDEX
A
Android Market 61
Appointment
schedule 54
B
Battery 4
charging 5
Bluetooth 40
connecting 40
Browser 54
C
Calculator 54
Calendar 54
Call
answer a call 18
conference call 18
make a call 17
Camcorder 54
Camera 55
settings 43
Camera
using 44
Clock 55
countdown timer 56
stop watch 55
world clock 55
Contacts 14, 56
add image 46
searching 14
File Browser 58
Folders
managing 58
G
Gallery 59
Gmail 59
Google Talk 59
GPS
using 50
GPS Tracker 60
H
Home screen 7
I
Icons
Battery 8
Connection 9
Notification 9
Phone Network 8
Status Bar 7
volume 8
Input method 21
Internet 34
Browsing 37
connect data connection 36
connecting 34
J
Java ME Apps 60
D
Dialer 56
Display
backlight 70
brightness 70
orientation 70
Documents To Go 56
E
eBuddy 58
E-mail 33
E-mail 31
Email 58
F
Facebook 58
File
managing 58
1
K
Keyboard
on-screen 20
L
LED 1, 12
M
Maps 60
Market 61
Memory card 5
slot 2
Menu
Application drawer 11
Shortcut menu 9
Messaging 22, 61
e-mail 29
Voice 27
Page 85

INDEX
Messaging
SMS, text 25
Messaging
MMS 26
SMS, text 22
Music Player 61
Using 47
N
Notes
using 62
Voice note 64
P
Password 73
Phone
answering a call 18
making a call 17
password 73
protect 73
reset 73
settings 63
Phone settings 66
Photo
edit 46
set as wallpaper 46
slideshow 45
taking photos 41
viewing 42, 45
zoom 45
PIN code 73
Power
button 2
turn on and off 6
Programs 52
alarms 69
basic 69
date and time 69
display 70
keyboard 21
ring tone 70
Shutter button 2
SIM
install 3
remove 3
SIM Toolkit 64
Slideshow 45
T
Text
entering 20
V
Video
playback 47
recording 42
viewing 43
Videos 64
Voice Dialer 64
Volume
adjusting 12
slider 2
W
Wireless control 70
Y
YouTube 65
R
RoadSync 71
Customization 71
set up 71
Synchronization 72
Update 73
RoadSync Calendar 62
RoadSync Mail 62
Rss reader 63
S
Screen
orientation 70
Settings
2
Page 86

Page 87

 Loading...