

Weldex WDD-4399HD User Manual
V.1.0

Acknowledgment
Company and product names published in this manual are trademarks or registered trademarks of
their respective owners.
If this document is translated from the original English version by Weldex Corporation, all reasonable
endeavors will be used to ensure the accuracy of translation. Weldex Corporation shall not be liable for
any translation errors contained herein or for incidental or consequential damages in connection with
the furnishing or use of this translated material.
Due to continuous development of our products, the information in this document is subject to change
without notice. Weldex Corporation shall not be liable for errors contained herein or for incidental or
consequential damages in connection with furnishing or use of this material. Contents of this
publication may be preliminary and/or may be changed at any time without any obligation to notify
anyone of such revision or change, and shall not be regarded as a warranty.
DISCLAIMER
•While every effort has been made to ensure that the information contained in this guide is accurate
and complete, no liability can be accepted for any errors or omissions.
•Weldex Corporation reserves the right to change the specifications of the hardware and software
described herein at any time without prior notice.
•No part of this guide may be reproduced, transmitted, transcribed, stored in a retrieval system, or
translated into any language in any form, by any means, without prior written permission of Weldex
Corporation
• Weldex Corporation makes no warranties for damages resulting from corrupted or lost data due to a
mistaken operation or malfunction of the Digital Video Recorder, the software, the hard drives,
personal computers, peripheral devices, or unapproved / unsupported devices.


TABLE OF CONTENTS
TABLE OF CONTENTS
INTRODUCTION
Features----------------------------------------------------------------------------------- 6
Package Contents ----------------------------------------------------------------------- 7
Specifications ----------------------------------------------------------------------------8
INSTALLATION
Hardware Overview ------------------------------------------------------------------ 11
Disassembling-------------------------------------------------------------------------- 12
Installing the camera on a ceiling or wall-----------------------------------------13
Adjusting the monitoring direction of the camera------------------------------14
WDD-4399 USER MANUAL
Connection - sensor input and alarm output-------------------------------------15
Dimensions----------------------------------------------------------------------------- 16
NETWORK INSTALLATION & SETUP
Network Initial Setup ----------------------------------------------------------------17
IP Scan Tool ----------------------------------------------------------------------------18
VLC Player Installation --------------------------------------------------------------- 20
WEB Viewer
WEB Viewer Login --------------------------------------------------------------------22
WEB Viewer Functions -------------------------------------------------------------- 23
Configuration - AUDIO&VIDEO
Video Profile ----------------------------------------------------------------25
Video Setup ------------------------------------------------------------------ 26
This document contains confidential and proprietary information of Weldex Corporation.
4

TABLE OF CONTENTS
WDD-4399 USER MANUAL
Configuration - AUDIO&VIDEO
Audio Setup ----------------------------------------------------------------- 27
Camera Setup --------------------------------------------------------------- 28
Configuration - NETWORK
TCP/IP ------------------------------------------------------------------------ 31
PORT --------------------------------------------------------------------------32
SNMP ------------------------------------------------------------------------- 33
DDNS ------------------------------------------------------------------------- 34
HTTPS ------------------------------------------------------------------------ 35
IP FILTER --------------------------------------------------------------------36
UPnP/BONJOUR------------------------------------------------------------- 37
Configuration - EVENT
FTP ----------------------------------------------------------------------------38
SMTP -------------------------------------------------------------------------39
SCHEDULE ------------------------------------------------------------------- 40
MOTION DETECTION ------------------------------------------------------41
SENSOR ---------------------------------------------------------------------- 43
NETWORK UNLINKED ---------------------------------------------------- 44
STORAGE -------------------------------------------------------------------- 45
Configuration - SYSTEM
INFORMATION --------------------------------------------------------------46
USER -------------------------------------------------------------------------- 47
DATE/TIME ----------------------------------------------------------------- 48
MAINTENANCE -------------------------------------------------------------49
LOG --------------------------------------------------------------------------- 51
TROUBLESHOOTING
Troubleshooting -----------------------------------------------------------------52
This document contains confidential and proprietary information of Weldex Corporation.
5
Features
INTRODUCTION
INTRODUCTION
This manual provides information on installation and operation of the WDD-4399 IP camera. The
WDD-4399 is a stand alone, non-PC based, fully embedded video codec capable of encoding video and
audio from an analog video/audio source in real time.
Features
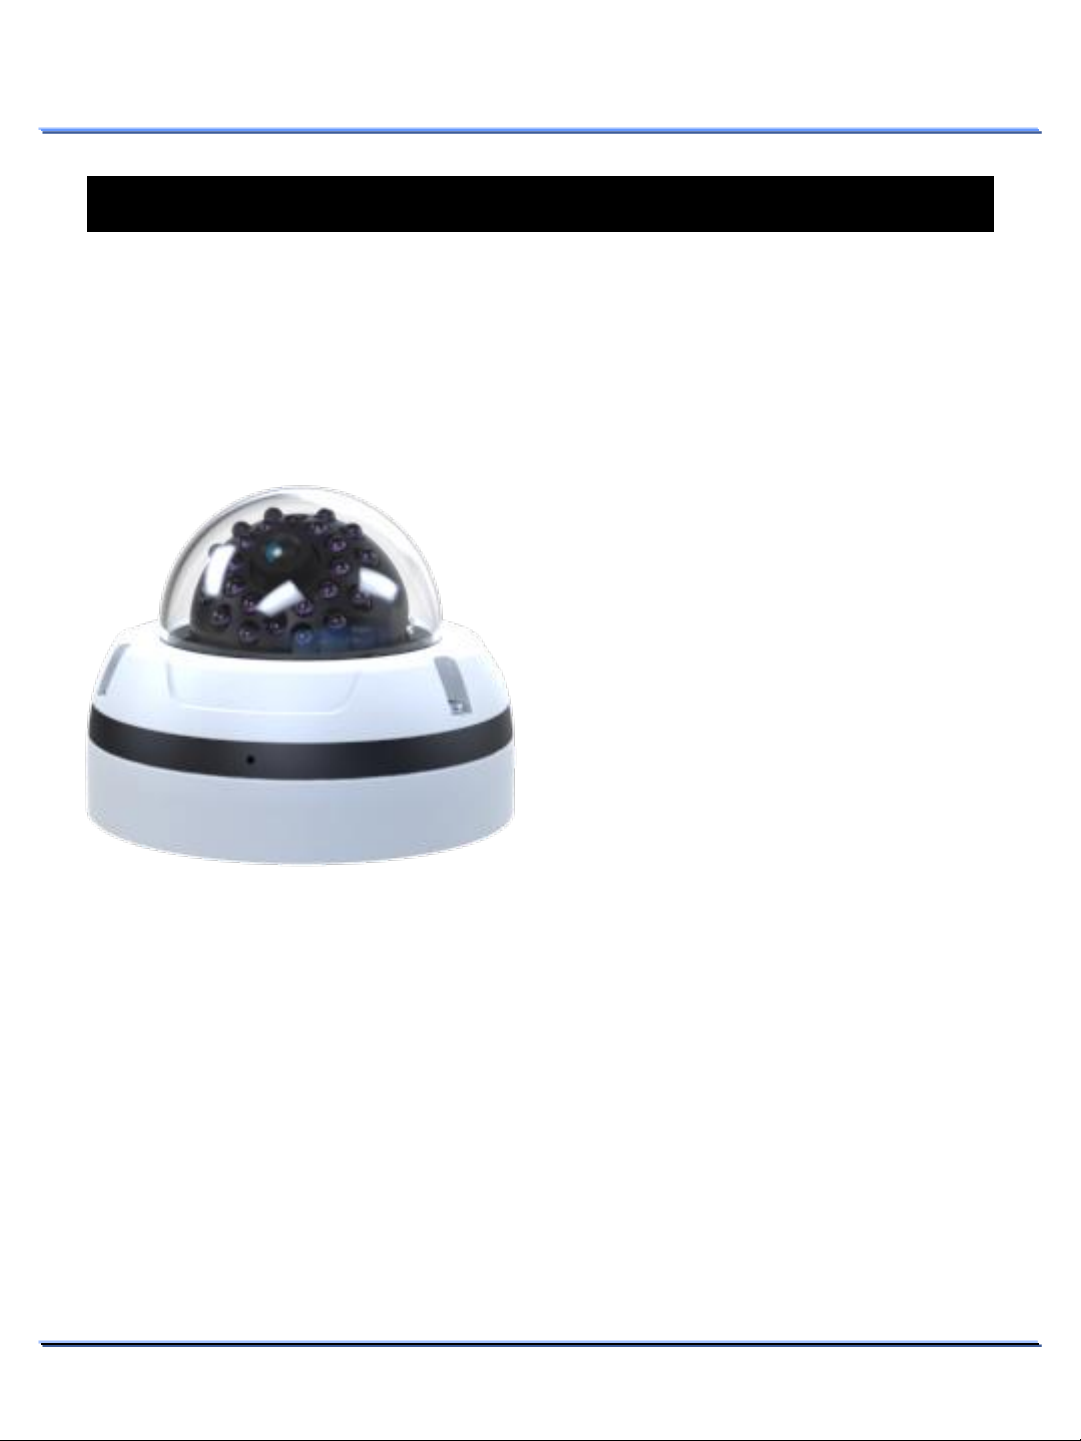
• 2Megapixel Full HD IP Dome Camera
• Up to 30fps @1080p (H.264)
• Progressive Scan
• Dual Streaming (H.264 & MJPEG)
• Power over Ethernet
• Compact Design / Rugged Weatherproof
Housing
• Built-In Micro SDHC Slot for Storing Snapshots
& Video Clips
• Infra-Red LED Day/Night (WDD-4399HDN
only)
• F1.4 f=4.3mm Fixed Lens
PC Requirements
• CPU : Intel Core2Duo 2.4GHz or above
• Memory : 2 GB or above
• Resolution : 1024x768 or higher
• Operating system : Window XP, Window Vista, Window 7
• Web browser : Internet explorer 7.0 or higher, Firefox, Chrome, Safari
This document contains confidential and proprietary information of Weldex Corporation.
6

Package Contents
Package Contents
INTRODUCTION
IP Camera – WDD-4399 Installation CD
& Manual
Plastic Anchor
L Hex Key & L Wrench Screw
Mounting Template
12VDC Power Supply with
Power Code (Optional)
This document contains confidential and proprietary information of Weldex Corporation.
7

Specifications
Specifications
INTRODUCTION
Section WDD-4399HD WDD-4399HDN
Image Sensor Sony IMX122 1/3” 2.1Megapixel CMOS
Scanning System Progressive Scan
Camera
Lens ⑴
Electronic Shutter
Speed
White Balance AWB / MANUAL / INDOOR / OUTDOOR
Backlight
Compensation
ACCE Low / Middle / High / Off
AGC Low / Middle / High
Day & Night Auto / BW / Color
2D/3D-NR 2DNR / 3DNR / SMART NR
S/N Ratio More than 50dB
Min. Illumination
Compression H.264 @HP, MJPEG
1.0Lux(Color) , 0.5Lux(BW) , 0.02Lux(Sens-up
F1.4 f=4.3mm Fixed Lens
Auto / Flk
NTSC : 1/30sec ~ 1/50,000sec,
PAL : 1/25sec ~ 1/50,000sec
BLC / HLC / Off
x60)
Simultaneous multiple streams
Streaming
Video
Resolution
Frame Rate ⑵
Output NTCS/PAL 1Vp-p 75ohm composite
This document contains confidential and proprietary information of Weldex Corporation.
H.264 streaming over UDP,TCP,HTTP or HTTPS
MJPEG streaming over HTTP or HTTPS
640x480, 800x480, 800x600, 1024x768,
1024x720, 1280x1024, 1920x1080
up to 30fps @1080p
8

Specifications
INTRODUCTION
Section WDD-4399HD WDD-4399HDN
Compression G.711 /AAC
Audio
Networking
Storage
Motion Detection On / Off (12 Zone Selectable)
Alarm and Event
Management
Security Security
Sensor & Trigger out 1ch NO/NC input & 1ch active low output
Notifications Event notification using SMTP, FTP
Input Internal C-MIC (-30dB)
Output 1x Line Out
Interface 10/100 Mbps Ethernet, RJ-45
IPv4, IPv6, TCP/IP, HTTP, HTTPS, UPnP,
Protocols
ONVIF Version 2.0 Support
Users ⑵
File Format MP4
SDHC
RTP/RTSP, SMTP, FTP, DHCP, NTP, DNS, DDNS,
SNMP
8 Clients monitoring at the same time
Built-in Micro-SDHC Slot, 4GB ~ 32GB
Stores snapshots & video clips
Multi-level user access with password protection,
IP address filtering,
HTTPS encrypted data transmission
IR LED -
Illumination
Illuminate Distance - 80 ~ 100 ft
Firmware Supports Firmware upgrade
Maintenance
Application Application
This document contains confidential and proprietary information of Weldex Corporation.
Dual Booting Support for Firmware Recovery
Factory Reset Restores to factory default settings
SDK available for application development and
system integration
Controllable 20 IR
LEDs by CDS sensor
9

Specifications
INTRODUCTION
Section WDD-4399HD WDD-4399HDN
Power Supply 9 VDC ~ 28 VDC Input
Power
Housing
Environmental
System
Power over Ethernet
(PoE) ⑶
Power Consumption -
IR LEDs On
Power Consumption -
IR LEDs Off
Weather Proof IP66 rated housing
Vandal Proof Metal housing
Installation Easily adjustable 4-axis Type
Operating
Temperature
Humidity 10 ~ 90% RH, non condensing
Operation System Embedded Linux
Dimensions 106 Φ x 80mm(h)
Weight 800 g
IEEE 802.3af
Max 6W
Max 4W
-10℃ ~ 60℃
Note
This document contains confidential and proprietary information of Weldex Corporation.
(1) Other lens options are available. Please contact Weldex Corporation for more information.
(2) Number of simultaneous connections will be reduced if 1080p@30fps is used.
(3) If PoE and external power are connected at the same time, external power will be used. If
external power is removed, it will switch to PoE and vice-versa. The camera might reboot
during power switching.
10

Hardware Overview (Appearance)
①
Dome cover for the lens and unit protection.
②
Press and hold this button for 5 seconds while the unit is turned
-
-
③
④
Use this set screw to lock the case to the
⑤
Network
⑥
Used for s
⑦
Power input port (not needed if
⑧
Use this port to output audio to speakers.
⑨
Network
INSTALLATION
Hardware Overview
❶
❷
INSTALLATION
❺
❻
❼
❽
❾
❹
❸
Item Description
Dome cover
Factory reset switch
C-MIC hole
Main body Set Screw Hole
Ethernet port
Sensor-in/Alarm-out port
Power-in port
Audio-out port
Video-out port ⑴
Note
(1) Video output connector is used only for installation purposes. It should not be used for
recording or surveillance purposes.
System LED should be turned ON when performing factory reset.
The LED next to the switch will flash 3 times after a successful
reset.
port.
ensor input & alarm output.
port.
on.
main body.
PoE is being used).
This document contains confidential and proprietary information of Weldex Corporation.
11
Disassembling
Precautions before installation
Ensure you read out the following instructions before installing the camera:
• Select an installation site (ceiling or wall) that can endure at least 5 times of the camera weight.
• Stuck-in or peeled-off cables can cause damage to the product or a fire.
• For safety purposes, keep anyone else away from the installation site. And put aside personal
belongings from the site, just in case.
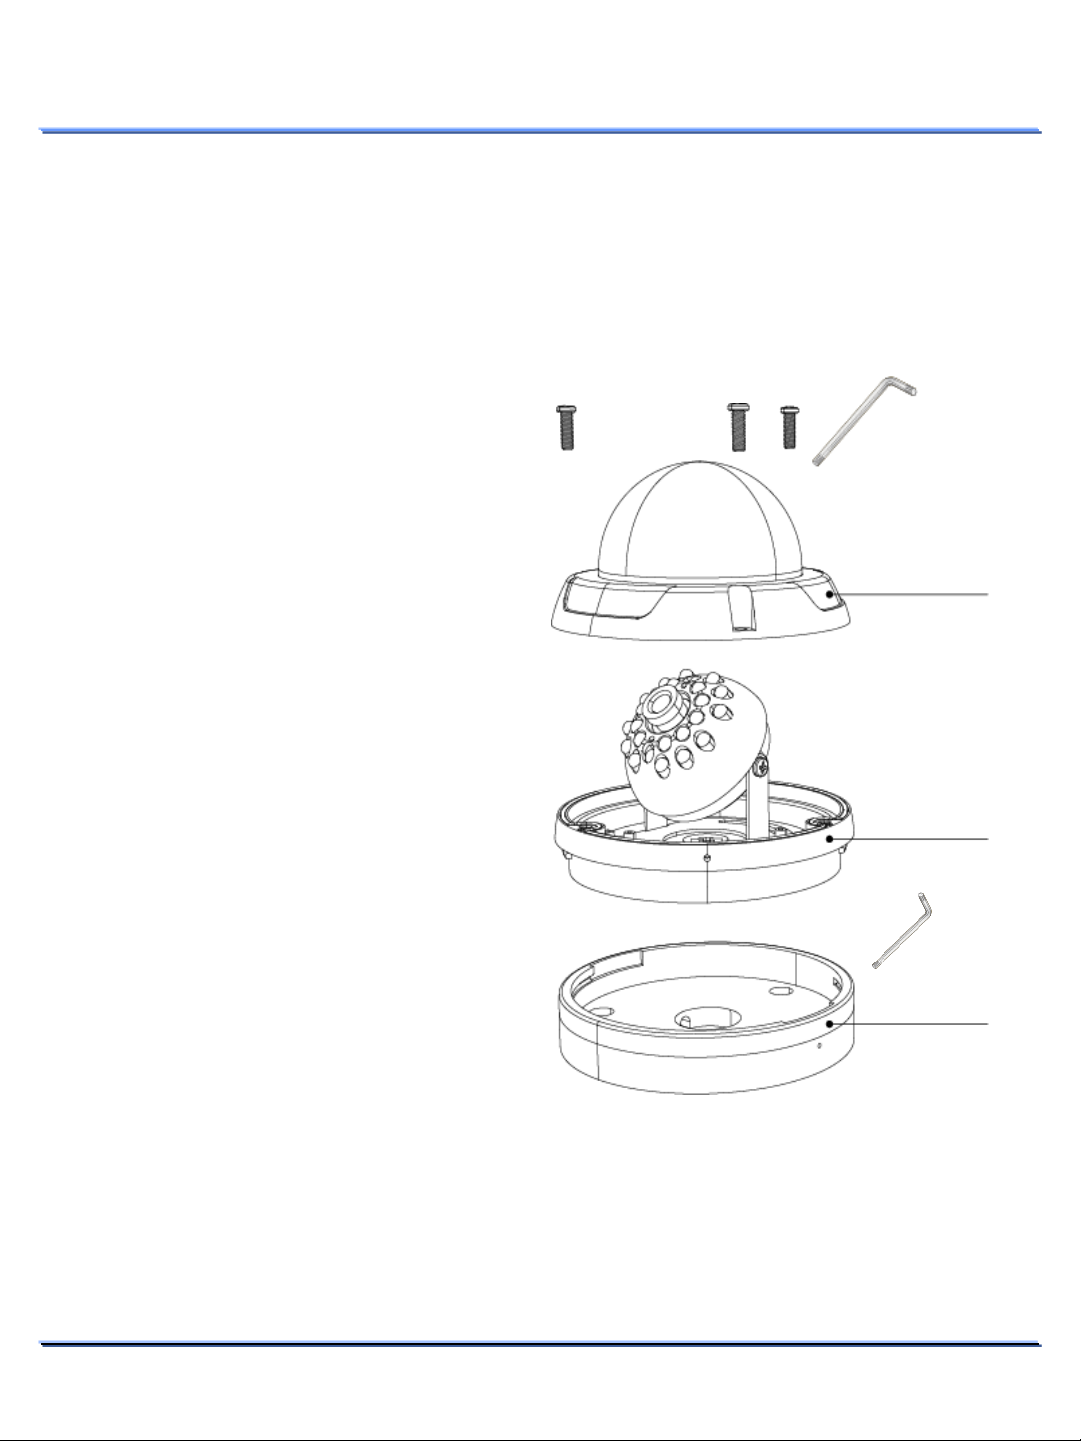
Disassembling
1. Using the L-wrench provided, loosen 3
screws by turning them counterclockwise
and remove the dome cover.
2. Using the L-wrench provided, turn the socket
set screw counterclockwise.
3. Turn the main body counterclockwise and
separate it from the case.
INSTALLATION
Dome Cover
Main Body
This document contains confidential and proprietary information of Weldex Corporation.
Case
12
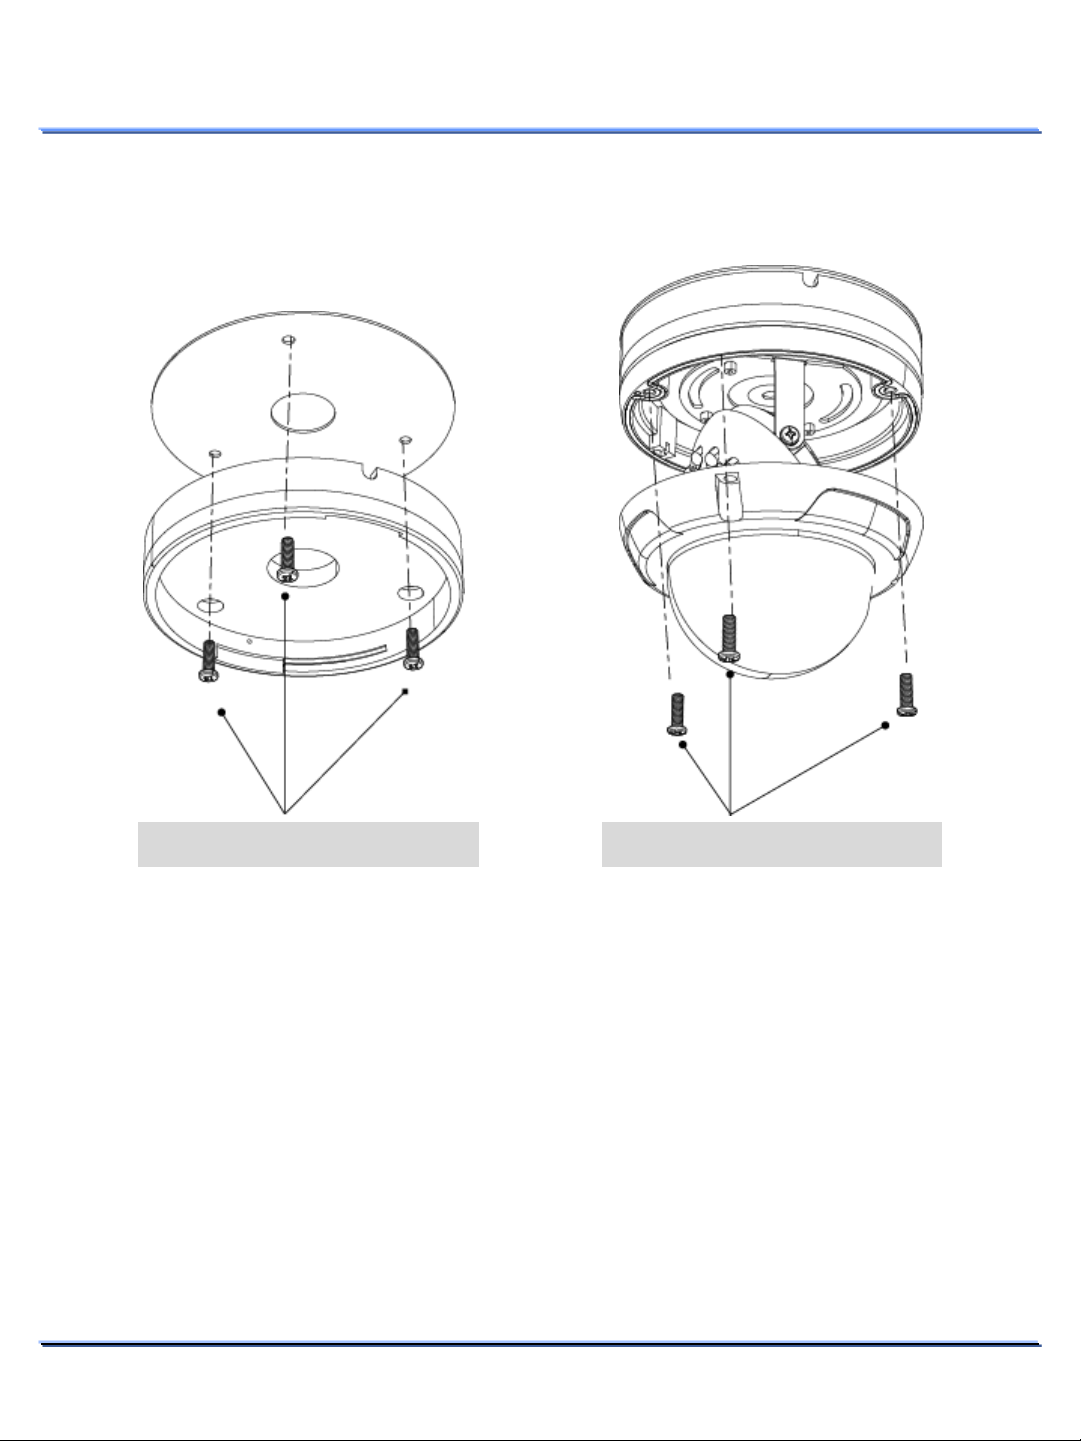
Installing the camera on a ceiling or wall
Installing the camera on a ceiling or wall
INSTALLATION
M4 tapping screw x 3(supplied) M3 tapping screw x 3(supplied)
1. Affix the mounting template (supplied) to the mounting surface
2. Drill holes (diameter 5mm, more than 35mm deep) on the ceiling by matching to the holes on the
case bed, and insert plastic anchors (HUD 5) fully into the holes. Fix the case bed on the ceiling by
using Tapping Screws (PH M4xL30).
3. Connect ethernet and accessory cables and arrange cable running not to damage or squeeze them.
4. Pass the ethernet and power accessory cables through the hole you want to pass them when
mounting the main body on the case.
5. Secure the main body on its case with the 1 socket set screw.
6. Assemble the Dome Cover. For waterproof purpose, fix and secure the bolt using L-wrench
provided.
This document contains confidential and proprietary information of Weldex Corporation.
13
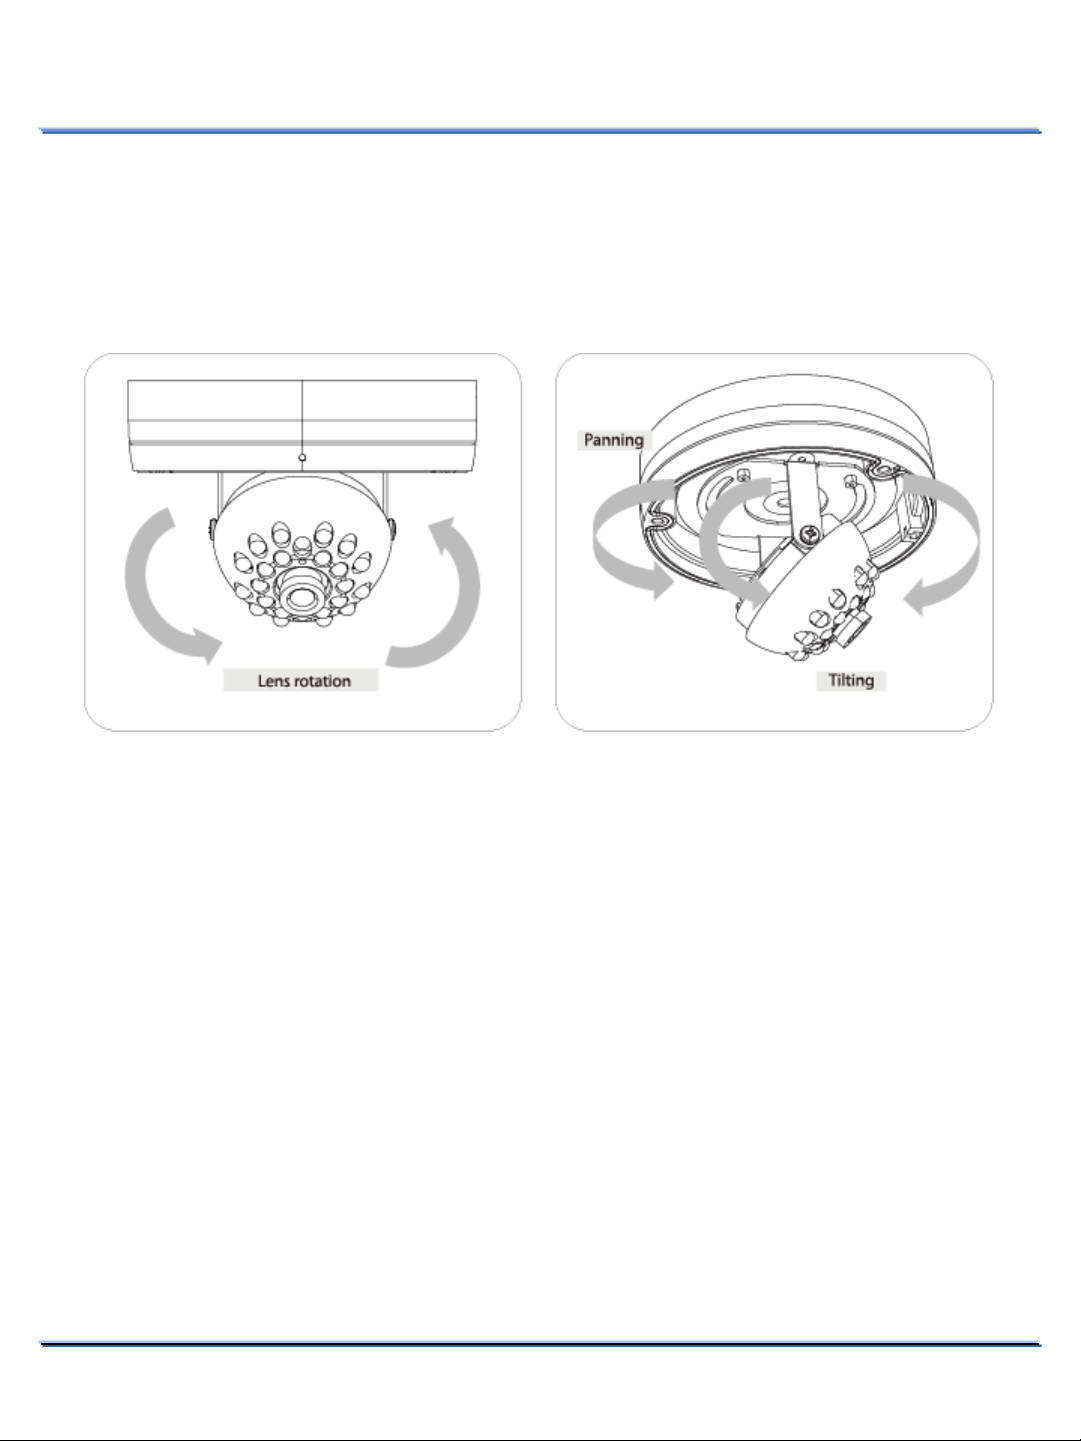
Adjusting the monitoring direction of the
camera
Adjusting the monitoring direction of the camera
You can adjust the camera direction only when the camera is fixed on the ceiling.
You can adjust the camera to point in any direction by using the pan, tilt mechanism.
INSTALLATION
1. Adjust the panning angle so that the camera settles in the right horizontal position.
2. Adjust the tilting angle so that the camera settles in the right vertical position.
3. Control rotating angle of camera.
This document contains confidential and proprietary information of Weldex Corporation.
14
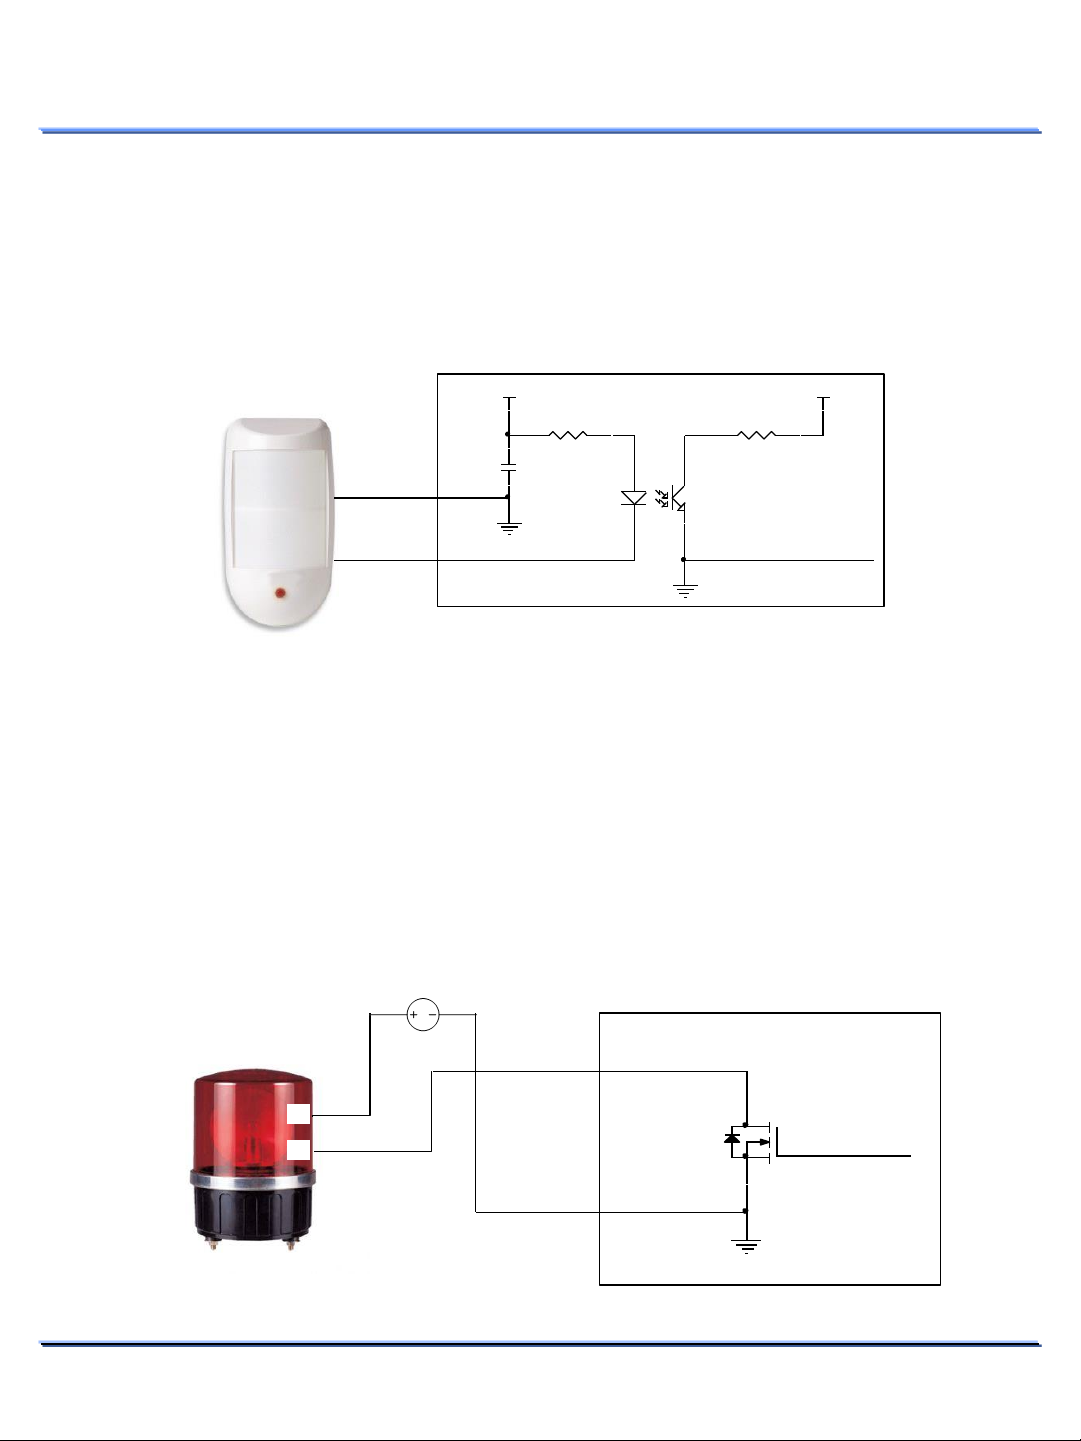
Connection sensor input and alarm output
Resistor
Photo Coupler
12
43
+3.3V
Resistor
+3.3V
Capacitor
Power FET
GND
Connection - sensor input
Connect the sensor’s NO or NC wire to the red wire of the accessory cable.
Connect the sensor’s GND to the black wire of the accessory cable.
Camera
Sensor
Black wire
GND
INSTALLATION
NO or NC
Red wire
Connection - alarm output
Connect the alarm device’s GND wire to the yellow wire of the accessory cable.
Connect the accessory cable’s white wire to the GND of the power supply where the device is
connected to.
Only DC alarm device are supported. If alarm devices 2A or higher are used, an external relay is
required.
Alarm device
(+)
DC Power
Supply
Camera
Yellow wire
(-)
White wire
This document contains confidential and proprietary information of Weldex Corporation.
15
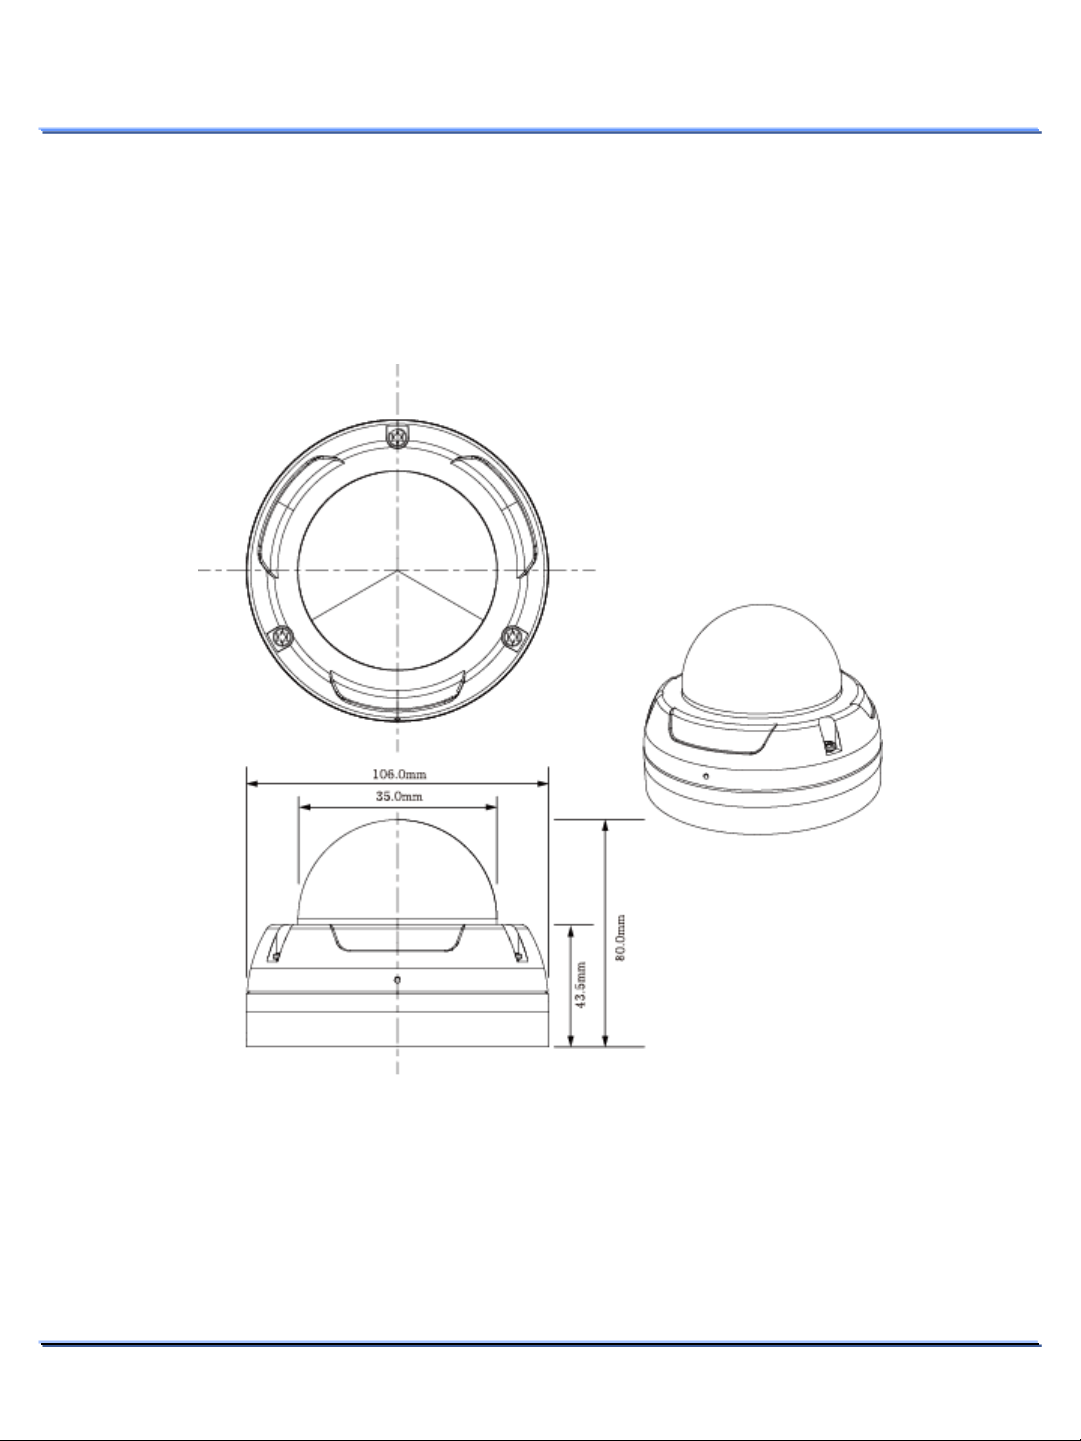
Dimension
Dimensions
INSTALLATION
This document contains confidential and proprietary information of Weldex Corporation.
16
 Loading...