

Page 1
Welch Allyn Spot Vital Signs LXi
Service Manual
Enter
7
21
7
3
5
8
9
62
01
BP
AM
SYS
TEMP
SpO2
PULSE
/min
mmHg
mmHg
F
DIA
%
Weight
Respiration
Pain
4 WEST
Reading
Patient ID 0123456789
Height
Send/Next Reading
Clear
7
21
7
3
5
8
9
62
01
BP
4 WEST
AM
SYS
TEMP
SpO2
PULSE
/min
mmHg
mmHg
Reading
F
DI
A
%
Enter
Patient ID 0123456789
Weight
Respiration
Pain
Height
Send/Next Reading
Clear
BRAUn
Page 2

Page 3

Welch Allyn Spot Vital Signs LXi
Service Manual
Page 4

ii Welch Allyn Spot Vital Signs LXi
Copyright 2005 Welch Allyn. All rights are reserved. No one is permitted to reproduce or duplicate, in any
form, this manual or any part thereof without permission from Welch Allyn.
Welch Allyn assumes no responsibility for any injury to anyone, or for any illegal or improper use of the
product, that may result from failure to use this product in accordance with the instructions, cautions,
warnings, or statement of intended use published in this manual.
Welch Allyn
®
, Spot Vital Signs®, and SureTemp® are registered trademarks of Welch Allyn.
Braun ThermoScan
™
LNCS
is a trademark of, and SET®, LNOP®, and Masimo® are registered trademarks of, Masimo
Corporation. Possession or purchase of a Masimo SpO
is a registered trademark of the Braun Company.
®
-equipped device does not convey any express or
2
implied license to use the device with unauthorized sensors or cables which would, alone or in
combination with this device, fall within the scope of one or more of the patents relating to this device.
Nellcor
®
and Oxi-Max® are registered trademarks of Nellcor Puritan Bennett Inc.
Software in this product is Copyright 2005 Welch Allyn or its vendors. All rights are reserved. The software
is protected by United States of America copyright laws and international treaty provisions applicable
worldwide. Under such laws, the licensee is entitled to use the copy of the software incorporated with
this instrument as intended in the operation of the product in which it is embedded. The software may not
be copied, decompiled, reverse-engineered, disassembled, or other wise reduced to human-perceivable
form. This is not a sale of the software or any copy of the software; all right, title, and ownership of the
software remain with Welch Allyn or its vendors.
For information about any Welch Allyn product, call Welch Allyn Technical Support:
USA +1 800 535 6663
+ 1 315 685 4560
Canada +1 800 561 8797 China +86 21 6327 9631
European Call Center +353 46 90 67790 France +33 1 55 69 58 49
Germany +49 7477 9271 70 Japan +81 3 3219 0071
Latin America +1 305 669 9003 Netherlands +31 157 505 000
Singapore +65 6419 8100 South Africa +27 11 777 7555
United Kingdom +44 207 365 6780 Sweden +46 85 853 6551
Australia +61 2 9638 3000
+800 074 793
Manual Material No. 704432 Rev.
Welch Allyn
4341 State Street Road
Skaneateles Falls, NY 13153 USA
Printed in USA
B
Page 5

Contents
1 - Safety Summary . . . . . . . . . . . . . . . . . . . . . . . . . . . . . . . . . . . . . . . . . 1
Introduction. . . . . . . . . . . . . . . . . . . . . . . . . . . . . . . . . . . . . . . . . . . . . . . . . . . . . . 1
Warnings and Cautions. . . . . . . . . . . . . . . . . . . . . . . . . . . . . . . . . . . . . . . . . . . . . 1
General Warnings. . . . . . . . . . . . . . . . . . . . . . . . . . . . . . . . . . . . . . . . . . . . . . 1
Blood Pressure Warnings. . . . . . . . . . . . . . . . . . . . . . . . . . . . . . . . . . . . . . . . 2
Temperature Warnings . . . . . . . . . . . . . . . . . . . . . . . . . . . . . . . . . . . . . . . . . . 4
SpO
Warnings. . . . . . . . . . . . . . . . . . . . . . . . . . . . . . . . . . . . . . . . . . . . . . . . 5
2
General Cautions . . . . . . . . . . . . . . . . . . . . . . . . . . . . . . . . . . . . . . . . . . . . . . 6
Blood Pressure Cautions . . . . . . . . . . . . . . . . . . . . . . . . . . . . . . . . . . . . . . . . 7
Temperature Cautions . . . . . . . . . . . . . . . . . . . . . . . . . . . . . . . . . . . . . . . . . . 7
SpO2 Cautions . . . . . . . . . . . . . . . . . . . . . . . . . . . . . . . . . . . . . . . . . . . . . . . . 7
Electrostatic Discharge (ESD) . . . . . . . . . . . . . . . . . . . . . . . . . . . . . . . . . . . . . . . . 8
Symbols . . . . . . . . . . . . . . . . . . . . . . . . . . . . . . . . . . . . . . . . . . . . . . . . . . . . . . . . 9
Safety Symbols . . . . . . . . . . . . . . . . . . . . . . . . . . . . . . . . . . . . . . . . . . . . . . . 9
Button Symbols . . . . . . . . . . . . . . . . . . . . . . . . . . . . . . . . . . . . . . . . . . . . . . . 9
Connection Symbols . . . . . . . . . . . . . . . . . . . . . . . . . . . . . . . . . . . . . . . . . . 10
Agency Symbols. . . . . . . . . . . . . . . . . . . . . . . . . . . . . . . . . . . . . . . . . . . . . . 10
iii
2 - Overview . . . . . . . . . . . . . . . . . . . . . . . . . . . . . . . . . . . . . . . . . . . . . . 11
Purpose and Scope. . . . . . . . . . . . . . . . . . . . . . . . . . . . . . . . . . . . . . . . . . . . . . . 11
Other Applicable Documents . . . . . . . . . . . . . . . . . . . . . . . . . . . . . . . . . . . . . . . 11
Contents Checklist . . . . . . . . . . . . . . . . . . . . . . . . . . . . . . . . . . . . . . . . . . . . . . . 12
Possible Attachments . . . . . . . . . . . . . . . . . . . . . . . . . . . . . . . . . . . . . . . . . . . . . 12
Service . . . . . . . . . . . . . . . . . . . . . . . . . . . . . . . . . . . . . . . . . . . . . . . . . . . . . . . . 13
Technical Assistance . . . . . . . . . . . . . . . . . . . . . . . . . . . . . . . . . . . . . . . . . . 13
Field Replacement Units . . . . . . . . . . . . . . . . . . . . . . . . . . . . . . . . . . . . . . . 13
Service Loaners . . . . . . . . . . . . . . . . . . . . . . . . . . . . . . . . . . . . . . . . . . . . . . 13
Service Intervals . . . . . . . . . . . . . . . . . . . . . . . . . . . . . . . . . . . . . . . . . . . . . . . . . 13
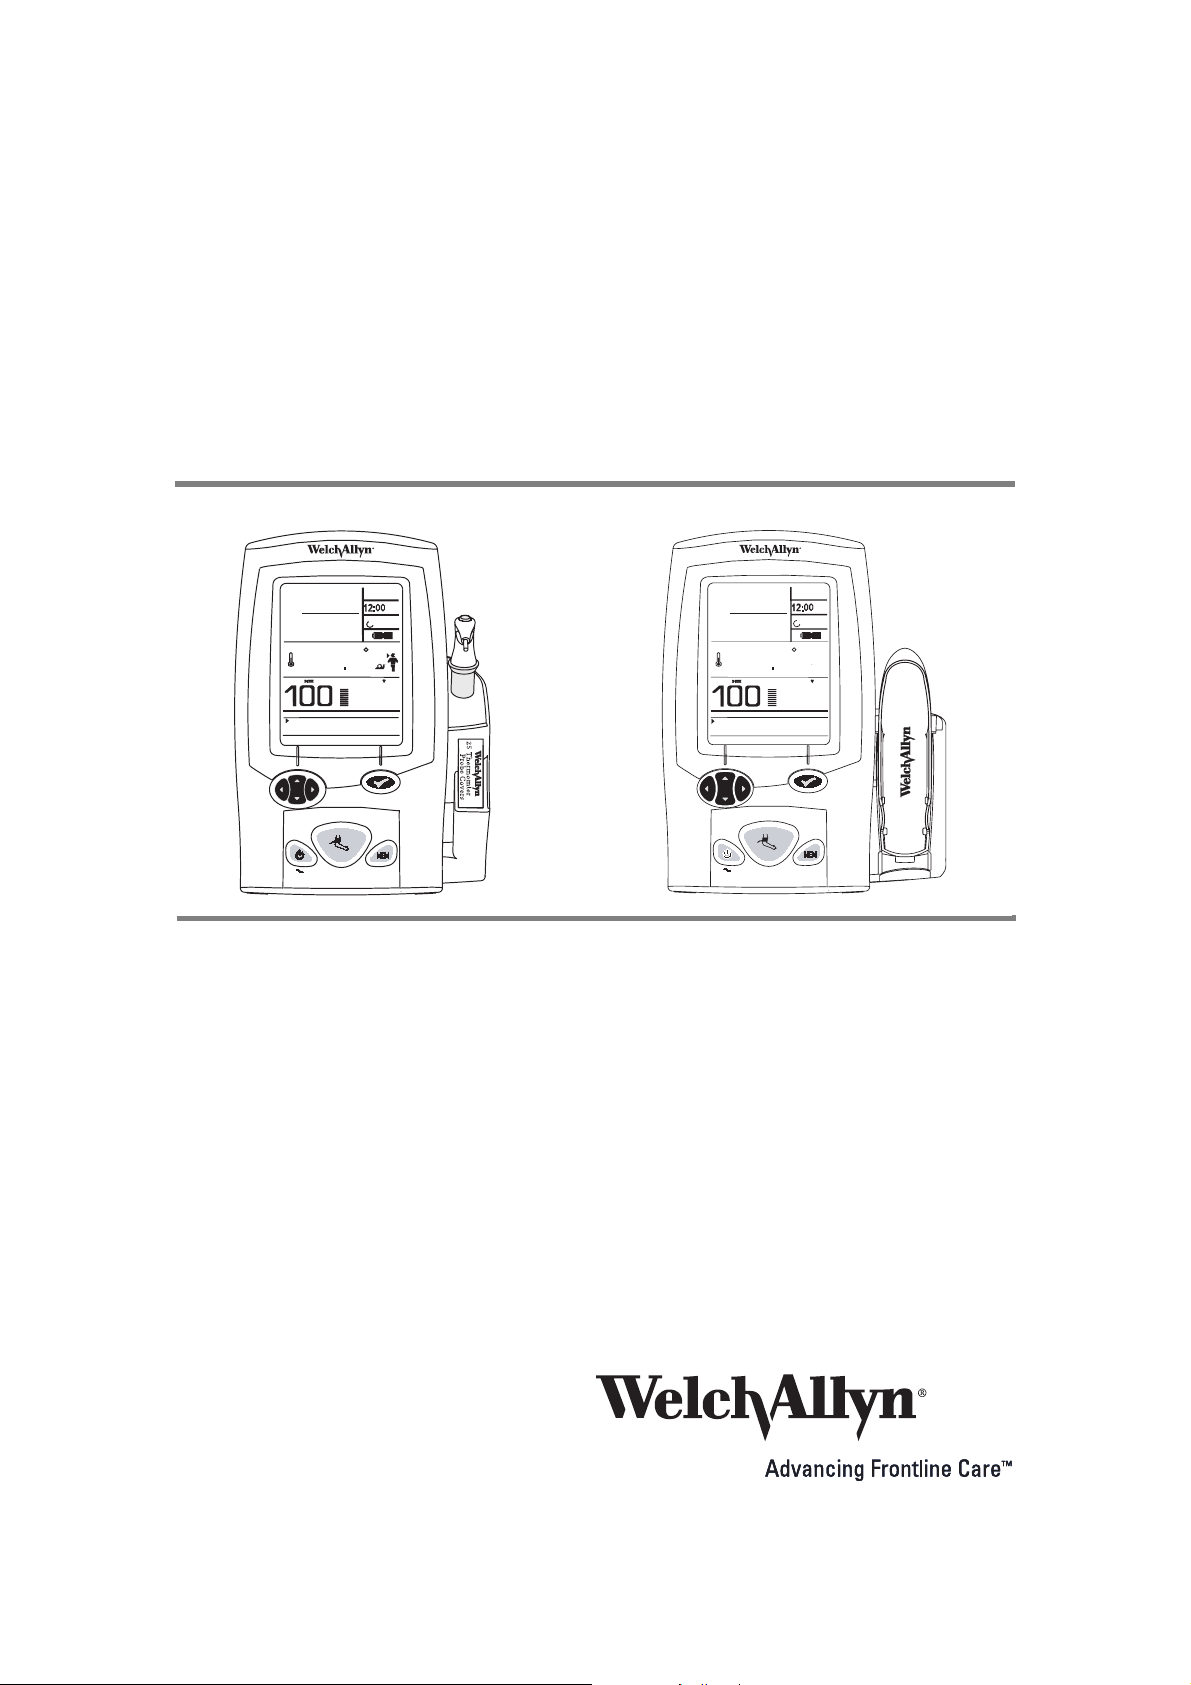
Spot Vital Signs LXi Configurations. . . . . . . . . . . . . . . . . . . . . . . . . . . . . . . . . . . 14
Controls . . . . . . . . . . . . . . . . . . . . . . . . . . . . . . . . . . . . . . . . . . . . . . . . . . . . . . . 14
Display Window . . . . . . . . . . . . . . . . . . . . . . . . . . . . . . . . . . . . . . . . . . . . . . . . . 16
Connections . . . . . . . . . . . . . . . . . . . . . . . . . . . . . . . . . . . . . . . . . . . . . . . . . . . . 18
Braun ThermoScan PRO 4000 Lock. . . . . . . . . . . . . . . . . . . . . . . . . . . . . . . 19
Blood Pressure Hose and Cuff . . . . . . . . . . . . . . . . . . . . . . . . . . . . . . . . . . . 19
Thermometer . . . . . . . . . . . . . . . . . . . . . . . . . . . . . . . . . . . . . . . . . . . . . . . . 19
SpO
Sensor . . . . . . . . . . . . . . . . . . . . . . . . . . . . . . . . . . . . . . . . . . . . . . . . 20
2
Quick Reference Card . . . . . . . . . . . . . . . . . . . . . . . . . . . . . . . . . . . . . . . . . 20
AC Power Transformer . . . . . . . . . . . . . . . . . . . . . . . . . . . . . . . . . . . . . . . . . 21
Battery . . . . . . . . . . . . . . . . . . . . . . . . . . . . . . . . . . . . . . . . . . . . . . . . . . . . . 21
Page 6

iv Contents Welch Allyn Spot Vital Signs LXi
Standby Mode . . . . . . . . . . . . . . . . . . . . . . . . . . . . . . . . . . . . . . . . . . . . . . . . . . 21
3 - Functional Overview . . . . . . . . . . . . . . . . . . . . . . . . . . . . . . . . . . . . . 23
Self Test . . . . . . . . . . . . . . . . . . . . . . . . . . . . . . . . . . . . . . . . . . . . . . . . . . . . . . . 23
Internal Configuration Mode . . . . . . . . . . . . . . . . . . . . . . . . . . . . . . . . . . . . . . . . 24
Functional Verification . . . . . . . . . . . . . . . . . . . . . . . . . . . . . . . . . . . . . . . . . . . . . 28
Blood Pressure Functional Check. . . . . . . . . . . . . . . . . . . . . . . . . . . . . . . . . 28
Temperature Functional Check . . . . . . . . . . . . . . . . . . . . . . . . . . . . . . . . . . . 29
Masimo SpO
Nellcor SpO2 Functional Check . . . . . . . . . . . . . . . . . . . . . . . . . . . . . . . . . . 32
Functional Check. . . . . . . . . . . . . . . . . . . . . . . . . . . . . . . . . . 32
2
4 - Calibration . . . . . . . . . . . . . . . . . . . . . . . . . . . . . . . . . . . . . . . . . . . . . 33
Connections . . . . . . . . . . . . . . . . . . . . . . . . . . . . . . . . . . . . . . . . . . . . . . . . . . . . 34
Voltage Calibration . . . . . . . . . . . . . . . . . . . . . . . . . . . . . . . . . . . . . . . . . . . . . . . 34
Blood Pressure Calibration . . . . . . . . . . . . . . . . . . . . . . . . . . . . . . . . . . . . . . . . . 35
Configuration Calibration. . . . . . . . . . . . . . . . . . . . . . . . . . . . . . . . . . . . . . . . . . . 35
5 - Troubleshooting . . . . . . . . . . . . . . . . . . . . . . . . . . . . . . . . . . . . . . . . 37
Error Codes. . . . . . . . . . . . . . . . . . . . . . . . . . . . . . . . . . . . . . . . . . . . . . . . . . . . . 37
Battery Voltage Check. . . . . . . . . . . . . . . . . . . . . . . . . . . . . . . . . . . . . . . . . . . . . 39
Window Display Check. . . . . . . . . . . . . . . . . . . . . . . . . . . . . . . . . . . . . . . . . . . . 39
Blood Pressure Calibration Check. . . . . . . . . . . . . . . . . . . . . . . . . . . . . . . . . . . . 39
Temperature Functional Check . . . . . . . . . . . . . . . . . . . . . . . . . . . . . . . . . . . 40
Masimo SpO
Nellcor SpO
Functional Testing Procedures . . . . . . . . . . . . . . . . . . . . . . . . . . . . . . . . . . . . . . 40
Current Test . . . . . . . . . . . . . . . . . . . . . . . . . . . . . . . . . . . . . . . . . . . . . . . . . . . . 41
Noise Levels . . . . . . . . . . . . . . . . . . . . . . . . . . . . . . . . . . . . . . . . . . . . . . . . . . . . 41
Button Test . . . . . . . . . . . . . . . . . . . . . . . . . . . . . . . . . . . . . . . . . . . . . . . . . . . . . 41
Interface Test . . . . . . . . . . . . . . . . . . . . . . . . . . . . . . . . . . . . . . . . . . . . . . . . . . . 41
Pneumatic Tests . . . . . . . . . . . . . . . . . . . . . . . . . . . . . . . . . . . . . . . . . . . . . . . . . 42
Temperature Test . . . . . . . . . . . . . . . . . . . . . . . . . . . . . . . . . . . . . . . . . . . . . . . . 42
Overpressure Test . . . . . . . . . . . . . . . . . . . . . . . . . . . . . . . . . . . . . . . . . . . . . . . 42
Service Work Checklist. . . . . . . . . . . . . . . . . . . . . . . . . . . . . . . . . . . . . . . . . . . . 43
Spot Vital Signs . . . . . . . . . . . . . . . . . . . . . . . . . . . . . . . . . . . . . . . . . . . . . . 43
Functional Check. . . . . . . . . . . . . . . . . . . . . . . . . . . . . . . . . . 40
2
Functional Check . . . . . . . . . . . . . . . . . . . . . . . . . . . . . . . . . . 40
2
6 - Disassembly and Repair . . . . . . . . . . . . . . . . . . . . . . . . . . . . . . . . . . 45
Key Pad Disassembly . . . . . . . . . . . . . . . . . . . . . . . . . . . . . . . . . . . . . . . . . . . . . 48
SpO2 Circuit Board Disassembly . . . . . . . . . . . . . . . . . . . . . . . . . . . . . . . . . . . . 49
Masimo . . . . . . . . . . . . . . . . . . . . . . . . . . . . . . . . . . . . . . . . . . . . . . . . . . . . 49
Nellcor . . . . . . . . . . . . . . . . . . . . . . . . . . . . . . . . . . . . . . . . . . . . . . . . . . . . . 50
Blood Pressure Circuit Board Disassembly . . . . . . . . . . . . . . . . . . . . . . . . . . . . 51
LCD Inverter Ballast Board Disassembly . . . . . . . . . . . . . . . . . . . . . . . . . . . . . . 53
LCD Disassembly . . . . . . . . . . . . . . . . . . . . . . . . . . . . . . . . . . . . . . . . . . . . . . . . 53
Pump Disassembly . . . . . . . . . . . . . . . . . . . . . . . . . . . . . . . . . . . . . . . . . . . . . . . 54
RS232-Communication Circuit Board Disassembly . . . . . . . . . . . . . . . . . . . . . . 54
Fan and Power Circuit Board Disassembly . . . . . . . . . . . . . . . . . . . . . . . . . . . . . 55
Thermometry Circuit Board Disassembly . . . . . . . . . . . . . . . . . . . . . . . . . . . . . . 55
Page 7

Directions for Use Contents v
SureTemp Plus . . . . . . . . . . . . . . . . . . . . . . . . . . . . . . . . . . . . . . . . . . . . . . . 55
Braun ThermoScan PRO 4000 . . . . . . . . . . . . . . . . . . . . . . . . . . . . . . . . . . . 57
7 - Technical Overview . . . . . . . . . . . . . . . . . . . . . . . . . . . . . . . . . . . . . . 59
System Description. . . . . . . . . . . . . . . . . . . . . . . . . . . . . . . . . . . . . . . . . . . . . . . 59
Battery System. . . . . . . . . . . . . . . . . . . . . . . . . . . . . . . . . . . . . . . . . . . . . . . 59
Battery Charger . . . . . . . . . . . . . . . . . . . . . . . . . . . . . . . . . . . . . . . . . . . . . . 59
“CPU I/O” Power Supply . . . . . . . . . . . . . . . . . . . . . . . . . . . . . . . . . . . . . . . 59
CPU Core Power Supply. . . . . . . . . . . . . . . . . . . . . . . . . . . . . . . . . . . . . . . . 59
+5V Supply. . . . . . . . . . . . . . . . . . . . . . . . . . . . . . . . . . . . . . . . . . . . . . . . . . 60
Clock/Calendar Power. . . . . . . . . . . . . . . . . . . . . . . . . . . . . . . . . . . . . . . . . . 60
Mod F NIBP Power. . . . . . . . . . . . . . . . . . . . . . . . . . . . . . . . . . . . . . . . . . . . 60
SpO
and Thermometer Power . . . . . . . . . . . . . . . . . . . . . . . . . . . . . . . . . . 60
2
LCD Power . . . . . . . . . . . . . . . . . . . . . . . . . . . . . . . . . . . . . . . . . . . . . . . . . . 60
External Load (RS-232) Power . . . . . . . . . . . . . . . . . . . . . . . . . . . . . . . . . . . 61
SureTemp Plus Thermometer Interface . . . . . . . . . . . . . . . . . . . . . . . . . . . . 61
Braun ThermoScan PRO 4000 Thermometer Interface . . . . . . . . . . . . . . . . 61
SpO
Description . . . . . . . . . . . . . . . . . . . . . . . . . . . . . . . . . . . . . . . . . . . . . . . . 61
2
Bar Code Scanner Description . . . . . . . . . . . . . . . . . . . . . . . . . . . . . . . . . . . . . . 62
Printer Description . . . . . . . . . . . . . . . . . . . . . . . . . . . . . . . . . . . . . . . . . . . . . . . 63
Interconnect Diagram . . . . . . . . . . . . . . . . . . . . . . . . . . . . . . . . . . . . . . . . . . . . . 64
8 - Field Replaceable Units . . . . . . . . . . . . . . . . . . . . . . . . . . . . . . . . . . 65
9 - Specifications . . . . . . . . . . . . . . . . . . . . . . . . . . . . . . . . . . . . . . . . . . 69
Performance . . . . . . . . . . . . . . . . . . . . . . . . . . . . . . . . . . . . . . . . . . . . . . . . . . . . 69
Blood Pressure Accuracy . . . . . . . . . . . . . . . . . . . . . . . . . . . . . . . . . . . . . . . 69
Temperature Specifications . . . . . . . . . . . . . . . . . . . . . . . . . . . . . . . . . . . . . 70
SpO
Specifications . . . . . . . . . . . . . . . . . . . . . . . . . . . . . . . . . . . . . . . . . . . . . . 71
2
Masimo Sensor Accuracy Guide . . . . . . . . . . . . . . . . . . . . . . . . . . . . . . . . . 71
Masimo Patents . . . . . . . . . . . . . . . . . . . . . . . . . . . . . . . . . . . . . . . . . . . . . . 71
Nellcor Sensor Accuracy Guide . . . . . . . . . . . . . . . . . . . . . . . . . . . . . . . . . . 72
Nellcor Patents . . . . . . . . . . . . . . . . . . . . . . . . . . . . . . . . . . . . . . . . . . . . . . . 72
Mechanical . . . . . . . . . . . . . . . . . . . . . . . . . . . . . . . . . . . . . . . . . . . . . . . . . . . . . 73
Electrical . . . . . . . . . . . . . . . . . . . . . . . . . . . . . . . . . . . . . . . . . . . . . . . . . . . . . . . 73
Patents . . . . . . . . . . . . . . . . . . . . . . . . . . . . . . . . . . . . . . . . . . . . . . . . . . . . . . . . 73
Battery . . . . . . . . . . . . . . . . . . . . . . . . . . . . . . . . . . . . . . . . . . . . . . . . . . . . . . . . 73
Environmental. . . . . . . . . . . . . . . . . . . . . . . . . . . . . . . . . . . . . . . . . . . . . . . . . . . 73
Wireless Radio . . . . . . . . . . . . . . . . . . . . . . . . . . . . . . . . . . . . . . . . . . . . . . . . . . 74
Guidance and Manufacturer’s Declaration . . . . . . . . . . . . . . . . . . . . . . . . . . . . . 74
Emissions and Immunity Information . . . . . . . . . . . . . . . . . . . . . . . . . . . . . 74
10 - Maintenance and Service . . . . . . . . . . . . . . . . . . . . . . . . . . . . . . . . 77
Cleaning . . . . . . . . . . . . . . . . . . . . . . . . . . . . . . . . . . . . . . . . . . . . . . . . . . . . . . . 77
Spot Vital Signs LXi . . . . . . . . . . . . . . . . . . . . . . . . . . . . . . . . . . . . . . . . . . . 77
Blood Pressure Cuff . . . . . . . . . . . . . . . . . . . . . . . . . . . . . . . . . . . . . . . . . . . 77
Blood Pressure Hose and Cable. . . . . . . . . . . . . . . . . . . . . . . . . . . . . . . . . . 77
SureTemp Plus Thermometer . . . . . . . . . . . . . . . . . . . . . . . . . . . . . . . . . . . 77
Braun ThermoScan PRO 4000 Thermometer . . . . . . . . . . . . . . . . . . . . . . . 78
Page 8

vi Contents Welch Allyn Spot Vital Signs LXi
SpO2 Sensors. . . . . . . . . . . . . . . . . . . . . . . . . . . . . . . . . . . . . . . . . . . . . . . . 78
Printer. . . . . . . . . . . . . . . . . . . . . . . . . . . . . . . . . . . . . . . . . . . . . . . . . . . . . . 78
Battery Replacement . . . . . . . . . . . . . . . . . . . . . . . . . . . . . . . . . . . . . . . . . . . . . 79
Spot Vital Signs LXi . . . . . . . . . . . . . . . . . . . . . . . . . . . . . . . . . . . . . . . . . . . 79
Braun ThermoScan PRO 4000 . . . . . . . . . . . . . . . . . . . . . . . . . . . . . . . . . . . 80
Printer. . . . . . . . . . . . . . . . . . . . . . . . . . . . . . . . . . . . . . . . . . . . . . . . . . . . . . 80
A - Repair Test Specifications . . . . . . . . . . . . . . . . . . . . . . . . . . . . . . . . 81
General Unit Test . . . . . . . . . . . . . . . . . . . . . . . . . . . . . . . . . . . . . . . . . . . . . . . . 81
A-D Noise Test . . . . . . . . . . . . . . . . . . . . . . . . . . . . . . . . . . . . . . . . . . . . . . . 81
Leak Test . . . . . . . . . . . . . . . . . . . . . . . . . . . . . . . . . . . . . . . . . . . . . . . . . . . 81
Inflation Test. . . . . . . . . . . . . . . . . . . . . . . . . . . . . . . . . . . . . . . . . . . . . . . . . 81
Dump Test . . . . . . . . . . . . . . . . . . . . . . . . . . . . . . . . . . . . . . . . . . . . . . . . . . 81
Pneumatic Accuracy Test . . . . . . . . . . . . . . . . . . . . . . . . . . . . . . . . . . . . . . . 81
Valve Control Test. . . . . . . . . . . . . . . . . . . . . . . . . . . . . . . . . . . . . . . . . . . . . 82
Voltage Calibration . . . . . . . . . . . . . . . . . . . . . . . . . . . . . . . . . . . . . . . . . . . . 82
Blank Mode Current Test . . . . . . . . . . . . . . . . . . . . . . . . . . . . . . . . . . . . . . . 82
Back Light (Idle) Current Test . . . . . . . . . . . . . . . . . . . . . . . . . . . . . . . . . . . . 82
Valve/Pump Mode Current Test . . . . . . . . . . . . . . . . . . . . . . . . . . . . . . . . . . 82
Interface Test . . . . . . . . . . . . . . . . . . . . . . . . . . . . . . . . . . . . . . . . . . . . . . . . 82
Temperature Option Requirements . . . . . . . . . . . . . . . . . . . . . . . . . . . . . . . . . . 82
Accuracy Test . . . . . . . . . . . . . . . . . . . . . . . . . . . . . . . . . . . . . . . . . . . . . . . . 82
Temperature Probe Test . . . . . . . . . . . . . . . . . . . . . . . . . . . . . . . . . . . . . . . . 83
SpO
Option Requirements . . . . . . . . . . . . . . . . . . . . . . . . . . . . . . . . . . . . . . . . 83
2
SpO2 Functional Test . . . . . . . . . . . . . . . . . . . . . . . . . . . . . . . . . . . . . . . . . . 83
SpO2 Mode Current Test . . . . . . . . . . . . . . . . . . . . . . . . . . . . . . . . . . . . . . . 83
Fail Safe Test. . . . . . . . . . . . . . . . . . . . . . . . . . . . . . . . . . . . . . . . . . . . . . . . . . . . 83
Over Pressure Test . . . . . . . . . . . . . . . . . . . . . . . . . . . . . . . . . . . . . . . . . . . . 83
Over 15 mmHg. . . . . . . . . . . . . . . . . . . . . . . . . . . . . . . . . . . . . . . . . . . . . . . 83
B - Supplies and Accessories . . . . . . . . . . . . . . . . . . . . . . . . . . . . . . . . 85
Blood Pressure . . . . . . . . . . . . . . . . . . . . . . . . . . . . . . . . . . . . . . . . . . . . . . . . . . 85
Temperature . . . . . . . . . . . . . . . . . . . . . . . . . . . . . . . . . . . . . . . . . . . . . . . . . . . . 86
Pulse Oximetry . . . . . . . . . . . . . . . . . . . . . . . . . . . . . . . . . . . . . . . . . . . . . . . . . . 87
Masimo Accessories . . . . . . . . . . . . . . . . . . . . . . . . . . . . . . . . . . . . . . . . . . 87
Nellcor Accessories . . . . . . . . . . . . . . . . . . . . . . . . . . . . . . . . . . . . . . . . . . . 88
Miscellaneous. . . . . . . . . . . . . . . . . . . . . . . . . . . . . . . . . . . . . . . . . . . . . . . . . . . 89
Service Contracts . . . . . . . . . . . . . . . . . . . . . . . . . . . . . . . . . . . . . . . . . . . . . . . . 89
C - Miscellaneous Mounting Accessories. . . . . . . . . . . . . . . . . . . . . . . 91
Wall Mount Kit . . . . . . . . . . . . . . . . . . . . . . . . . . . . . . . . . . . . . . . . . . . . . . . . . . 91
Mobile Stand Kit . . . . . . . . . . . . . . . . . . . . . . . . . . . . . . . . . . . . . . . . . . . . . . . . . 93
DPAC Mounting Accessory. . . . . . . . . . . . . . . . . . . . . . . . . . . . . . . . . . . . . . . . . 95
Printer Mounting Accessory . . . . . . . . . . . . . . . . . . . . . . . . . . . . . . . . . . . . . . . . 96
Scanner Mounting Accessory. . . . . . . . . . . . . . . . . . . . . . . . . . . . . . . . . . . . . . . 97
Spot LXi . . . . . . . . . . . . . . . . . . . . . . . . . . . . . . . . . . . . . . . . . . . . . . . . . . . . . . . 99
Accessories . . . . . . . . . . . . . . . . . . . . . . . . . . . . . . . . . . . . . . . . . . . . . . . . . . . . 99
Page 9

1
1
Safety Summary
Introduction
All users of the Spot Vital Signs LXi must read and understand the safety summary, and
all additional specific warnings and cautions located throughout the documentation.
Warnings and Cautions
Familiarize all operating personnel with the general safety information in this summary.
Specific warnings and cautions are also found throughout this manual.
General Warnings
A warning statement in this manual identifies a condition or practice, which if not
corrected or discontinued immediately, could lead to patient injury, illness, or death.
These warnings pertain to the entire Spot Vital Signs LXi device.
WARNING The information in this manual is a comprehensive guide to the
operation of Spot LXi. For best results, read this manual thoroughly before using
the device.
WARNING Spot LXi is designed for medical clinician use. Although this manual
may illustrate medical spot-check techniques, only a trained clinician who knows
how to take and interpret a patient’s vital signs should use this device.
WARNING Spot LXi is not intended for use in environments that are without
health care practitioner supervision.
WARNING Spot LXi is not intended for continuous monitoring. Do not leave
the device unattended while taking measurements on a patient.
WARNING To ensure data integrity, save readings and clear the Spot LXi display
between patients.
WARNING The Spot LXi is not defibrillator proof.
WARNING Spot LXi is not intended for use during patient transport.
WARNING This device is not suitable for use in the presence of a flammable
anesthetic mixture with air or oxygen or nitrous oxide. An explosion may result.
WARNING To ensure patient safety, use only accessories and supplies (i.e.,
cuffs, hoses, temperature probes, SpO
supplied with Spot LXi. Using unapproved accessories with Spot LXi can affect
patient and/or operator safety.
sensors, etc.) recommended for or
2
Page 10

2 Safety Summary Welch Allyn Spot Vital Signs LXi
WARNING Take care to prevent water or other fluid from entering any
connectors on the device. Should this occur, dry the connectors with warm air.
Check the accuracy of all operating functions.
WARNING Every three months, inspect the blood pressure cuff, SpO
and other accessories for fraying or other damage. Replace as necessary.
WARNING Do not use Spot LXi on patients who are on heart/lung machines.
WARNING Electric shock hazard. There are no user-serviceable parts inside Spot
LXi other than battery replacement (see “Battery Replacement” on page 69). An
operator may only perform maintenance procedures specifically described in this
manual. For service, refer the device to an Authorized Service Center.
WARNING This device is not intended for hand-held use during operation.
WARNING Do not autoclave.
WARNING This device complies with current required standards for
electromagnetic interference and should not present problems to other
equipment or be affected by other devices. As a precaution, avoid using this
device in close proximity to other equipment.
WARNING Welch Allyn is not responsible for the integrity of any mounting
installation. Welch Allyn recommends that the customer contact their Biomedical
Engineering Department or maintenance service to ensure professional
installation for safety and reliability of any mounting accessory.
WARNING The Spot LXi consists of high-quality precision parts. Protect it from
severe impact and shock. A qualified service technician must check any Spot LXi
that is dropped or damaged for proper operation prior to further use. Do not use
the Spot LXi if you notice any signs of damage. Contact the Welch Allyn
Customer Service Department for assistance.
cable,
2
WARNING Do not use an SpO
simultaneously on the same limb. Doing so may result in inaccurate pulse rate
and perfusion readings.
WARNING The USB port is for service only. Do not use this connection for any
external equipment connections.
Blood Pressure Warnings
These warnings pertain to the Spot LXi blood pressure feature.
WARNING Spot LXi is not intended to measure BLOOD PRESSURE on
neonatal patients. The AAMI SP10:2002 standard defines neonates as children 28
days or less of age if born at term (37 weeks gestation or more); otherwise up to
44 gestational weeks.
WARNING To ensure pediatric blood pressure accuracy and safety, the Child
Reusable Two-Piece Blood Pressure Cuff (4500-01), Infant Durable One-Piece
Cuff (5082-82-4MQ), and the Infant Disposable One-Piece Cuff (5082-92-4MQ)
are the smallest cuffs approved for use with young children and infants. The
child’s arm must fit within the range markings on the cuff.
WARNING Avoid compression of the blood pressure hose or cuff tubing of Spot
LXi. This may cause system errors to occur in the device.
finger clip sensor and a blood pressure cuff
2
Page 11

Service Manual Safety Summary 3
WARNING Patients who are experiencing moderate to severe arrhythmias may
give inaccurate blood pressure measurements.
WARNING Spot LXi does not operate effectively on patients who are
experiencing convulsions or tremors.
WARNING Use only Welch Allyn blood pressure cuffs and/or hoses. Using other
manufacturers’ blood pressure cuffs and/or hoses may produce inaccurate blood
pressure readings.
WARNING When several blood pressure measurements are taken on the same
patient, regularly check the cuff site and extremity for possible ischemia, purpura,
and/or neuropathy.
WARNING Do not allow a blood pressure cuff to remain on the patient more
than 10 minutes when inflated above 10 mmHg. This may cause patient distress,
disturb blood circulation, and contribute to injury of peripheral nerves.
WARNING Do not place the cuff on any extremity that is used for intravenous
infusions or any area where circulation is compromised.
WARNING Excessive cuff tightness may cause venous congestion and
discoloration of the limb.
WARNING Wrapping the cuff too loosely (preventing proper inflation) may result
in errors.
Page 12

4 Safety Summary Welch Allyn Spot Vital Signs LXi
Temperature Warnings
These warnings pertain to the Spot LXi temperature feature.
SureTemp® Plus
These warnings are specific to the SureTemp Plus thermometer option.
WARNING Use only Welch Allyn probe covers. Using other manufacturers’
probe covers or no probe cover may produce temperature measurement errors
and/or inaccuracy.
WARNING Long-term continuous monitoring beyond three to five minutes is
not recommended in any mode.
WARNING Oral/axillary probes (blue ejection button at top of probe) and blue
removable probe wells are used for taking oral and axillary temperatures only.
Rectal probes (red ejection button) and red removable probe wells are used for
taking rectal temperatures only. Use of the probe at the wrong site will result in
temperature errors. Use of the incorrect removable probe well could result in
patient cross-contamination.
WARNING The thermometer connectors and probe are not waterproof. Do not
immerse or drip fluids on these items. Should this occur, dry the connectors and
probe with warm air. Check all functions for proper operation and accuracy.
WARNING Do not take an axillary temperature through patient’s clothing. Direct
probe cover to skin contact is required.
WARNING Do not autoclave.
WARNING Use Welch Allyn single-use disposable probe covers to limit patient
cross-contamination.
WARNING Incorrect insertion of probe can cause bowel perforation.
WARNING Washing hands greatly reduces the risk of cross-contamination and
nosocomial infection.
WARNING To ensure optimal accuracy, always confirm that the correct mode is
selected.
Page 13

Service Manual Safety Summary 5
Braun Thermoscan PRO 4000
These warnings are specific to the Braun ThermoScan PRO 4000 thermometer option.
WARNING Keep the probe window clean, dry, and undamaged at all times to
ensure accurate measurements. To protect the probe window, always keep the
thermometer in the storage cover while transporting or when not in use.
WARNING Only use Braun ThermoScan probe covers with this thermometer.
Using other manufacturer’s probe covers or no probe cover may produce
temperature measurement errors and/or inaccuracies. If the thermometer is used
without a probe cover attached, clean the lens (see “Braun ThermoScan PRO
4000 Thermometer” on page 78).
WARNING Do not autoclave.
WARNING The thermometer is not waterproof. Do not immerse or drip fluids
on it. Should this occur, dry the thermometer with warm air. Check for proper
operation and accuracy.
SpO2 Warnings
These warnings pertain to the Spot LXi SpO2 feature.
WARNING Only use Spot LXi with Masimo or Nellcor SpO2 option with Masimo
or Nellcor brand sensors and accessories, respectively. Using the wrong or
unapproved sensors or cables may cause improper performance.
WARNING The SpO
sensor and extension cables are intended for use only for
2
pulse oximetry measurements. Do not attempt to connect these cables to a PC
or any similar device.
WARNING Before using, carefully read the sensor Directions for Use, including
all warnings, cautions, and instructions.
WARNING Do not use a damaged sensor or pulse oximetry cable or a sensor
with exposed optical components.
WARNING Incorrect application or a long duration of use of an SpO
cause tissue damage. Inspect the sensor site periodically as directed in the
sensor’s Directions for Use.
WARNING Certain ambient environmental conditions, sensor application errors,
and certain patient conditions may affect SpO
WARNING Do not immerse the sensor or patient cables in water, solvents, or
cleaning solutions (the sensors and connections are not waterproof). Do not use
irradiation, steam, or ethylene oxide for sterilization.
WARNING The SpO
in the Spot LXi device is not intended for use as an apnea
2
monitor.
sensor may
2
readings and pulse signal.
2
WARNING Consider the SpO
an early warning device. As a trend toward
2
patient deoxygenation is indicated, use laboratory instruments to analyze blood
samples to completely understand the patient’s condition.
Page 14

6 Safety Summary Welch Allyn Spot Vital Signs LXi
Caution If the accuracy of any measurement is in question, check the patient’s
vital sign(s) with an alternate method and then check to verify the device is
functioning properly.
Caution Place the device on a secure surface or use one of the optional
mounting accessories.
Caution Do not place fluids on or near the device.
Caution It is recommended that the device is used within stated operating
temperature ranges (see “Environmental” on page 73). The device will not meet
its performance specifications if used outside these temperatures ranges.
Caution For proper patient electrical isolation, use only a Welch Allyn power
supply (4500-101A) to charge Spot LXi and its attached peripheral devices. Do not
use an external charger while the printer is attached to Spot LXi.
Caution Always unplug the AC power transformer from the outlet before
moving the mobile stand to a new location.
Caution The basket has a three-pound weight limit. Take care not to exceed
this limit.
Caution Only use a 9V battery with the Health-o-Meter scale. Remove and
discard the wall mounted power supply.
Caution When using the Health-o-Meter scale, remove the two hex nuts on the
RS-232 cable, as supplied, before screwing the cable into the scale base.
WARNING Tissue damage can be caused by incorrect application or duration of
use of a Nellcor OxiMax sensor. Inspect the sensor site as directed in the sensor
Directions for Use.
WARNING Do not use the sensors during magnetic resonance imaging (MRI)
scanning. Induced current could potentially cause burns. The MS board pulse
oximeter may affect the MRI image, and the MRI unit may affect the accuracy of
the oximetry measurements.
WARNING Carefully route patient cabling to reduce the possibility of patient
entanglement or strangulation.
WARNING Failure to cover the Nellcor OxiMax sensor site with opaque material
in high ambient light conditions may result in inaccurate measurements.
General Cautions
A caution statement in this manual identifies a condition or practice, which if not
corrected or discontinued immediately, could lead to equipment failure, equipment
damage, or data loss.
These cautions pertain to the entire Spot Vital Signs LXi device.
Page 15

Service Manual Safety Summary 7
Caution Minimize extremity and cuff motion during blood pressure readings.
Caution If the blood pressure cuff is not at heart level, note the difference in
reading due to the hydrostatic effect. Add the value of 1.80 mmHg (.2 kPa) to the
displayed reading for every inch (2.5 cm) above heart level. Subtract the value of
1.80 mmHg (.2 kPa) from the displayed reading for every inch (2.5 cm) below
heart level.
Caution Proper blood pressure cuff size and placement is essential to the
accuracy of the blood pressure determination. See Reusable Two-Piece Cuff
Measurements or Durable One-Piece Cuff Measurements of the Directions for
Use for sizing information.
Caution The position and physiologic condition of the subject can affect a blood
pressure reading.
Caution The SureTemp Plus feature only operates with the probe well in place.
Caution Do not use alkaline batteries in the Braun ThermoScan PRO 4000.
Caution Biting the probe tip may result in damage to the probe.
Caution The pulse oximeter is calibrated to determine the percentage of
arterial oxygen saturation of functional hemoglobin. Significant levels of
dysfunctional hemoglobin such as carboxyhemoglobin or methemoglobin may
affect the accuracy of the measurement.
Caution Some sensors may not be appropriate for a particular patient. If at
least 10 seconds of perfusion pulses cannot be observed for a given sensor,
change sensor location or sensor type for perfusion to resume.
Caution Physiological conditions, medical procedures, or external agents that
may interfere with the pulse oximeter’s ability to detect and display
measurements include dysfunctional hemoglobin, arterial dyes, low perfusion,
dark pigment, and externally applied coloring agents such as nail polish, dye, or
pigmented cream.
Caution When selecting a sensor, consider the patient’s weight and activity
level, the adequacy of perfusion, the available sensor sites, the need for sterility,
and the anticipated duration of monitoring.
Blood Pressure Cautions
These cautions pertain to the Spot LXi blood pressure feature.
Temperature Cautions
These cautions pertain to the Spot LXi temperature feature.
SpO2 Cautions
These cautions pertain to the Spot LXi SpO2 feature.
Page 16

8 Safety Summary Welch Allyn Spot Vital Signs LXi
Electrostatic Discharge (ESD)
Electrostatic discharge is a sudden current flowing from a charged object to another
object or to ground. Electrostatic charges can accomulate on common items such as
foam drinking cups, cellophane tape, synthetic clothing, untreated foam packaging
material, and untreated plastic bags and work folders, to name only a few.
Electronic components and assemblies, if not properly protected against ESD, can be
permanently damaged or destroyed when near or in contact with electrostatically charged
objects. When you handle components or assemblies that are not in protective bags and
you are not sure whether they are static-sensitive, assum that they are static-sensitive
and handle them accordingly.
• Perform all service procedures in a static-protected environment. Always use
techniques and equipment designed to protect personnel and equipment from
electrostatic discharge.
• Remove static-sensitive components and assemblies from their static-shielding bags
only at static-safe workstations - a properly grounded table and grounded floor mat and only when you are wearing a grounded wrist strap (with a resistor of at least 1
megohm in series) or other grounding device.
• Use only grounded tools when inserting, adjusting, or removing static-sensitive
components and assemblies.
• Remove or insert static-sensitive components and assemblies only with monitor
power turned off.
• Insert and seal static-sensitive components and assemblies into their original staticshielding bags before removing them from static-protected areas.
Always test your ground strap, bench mat, conductive work surface, and ground cord
before removing components and assemblies fromtheir protective bags and before
beginning any disassembly or assembly procedures.
Page 17

Service Manual Safety Summary 9
Pb
IPXØ
Navigation Buttons Select
Blood Pressure Memory
Power On/Off
MEM
Symbols
The following symbols are associated with the Spot Vital Signs LXi.
Safety Symbols
Identifies information within the
manual to avoid injury.
Caution: consult accompanying
documents
Handle with Care Transport Temperature
Storage Humidity Recycle
Class II Equipment Equipment is not protected against
Type BF Equipment On/Off
Do not dispose of this product as
unsorted municipal waste. Prepare this
product for reuse or separate
collection as specified by Directive
2002/96/EC of the European
Parliament and the Council of the
European Union on Waste Electronic
and Electrical Equipment (WEEE). If
this product
directive does not apply.
is contaminated, this
Identifies information within the
manual to avoid equipment failure.
Internally Powered, Lead Acid
Battery
the ingress of liquid.
Non-ionizing radiation (RF
transmitter)
Button Symbols
For more specific disposal information,
see www.welchallyn.com/weee,
or contact Welch Allyn Customer
Service at +44 207 365 6780.
Mode of Operation: Continuous
Page 18
10 Safety Summary Welch Allyn Spot Vital Signs LXi
CERTIFIED TO:
CAN/CSA STD C22.2 NO. 601.1
CONFORMS TO:
UL STD 60601-1
IEC 60601-1
EMC Framework of Australia
The CE mark on this product indicates that it has been tested to and conforms with
the provisions noted within the 93/42/EEC Medical Device Directive.
European Regulatory Manager
Welch Allyn Ltd.
Navan Business Park
Dublin Road
Navan, County Meath, Republic of Ireland
Tel.: 353 46 90 67700
Fax: 353 46 90 67756
C
US
166292
EC REP
Connection Symbols
USB Connection Serial Port Connection
Agency Symbols
Page 19

11
2
Overview
Purpose and Scope
The Spot Vital Signs LXi Service Manual is intended as a reference for maintenance and
repair to the field replaceable unit (FRU) level and are listed on
provides the technical qualified service person with troubleshooting information, repair
procedures, and calibration and performance verification instructions. A technical
overview of the Spot LXi subsystems is provided as an introduction to the device’s
circuitry and pneumatics.
This manual is intended for the technical qualified service person. Service training classes
on Welch Allyn’s products are available. Contact Welch Allyn Technical Service for
information.
Other Applicable Documents
The Spot Vital Signs LXi Directions for Use manual is also available. Refer to this
document for information other than maintenance and repair.
Welch Allyn 9600 Plus Calibration Tester Directions for Use - for all models.
Braun ThermoScan PRO 4000 User’s Guide - for models 450E0, 45NE0, 45ME0.
page 65. This manual
Masimo Directions for Use - for models 45MT0, 45ME0.
Nellcor Directions for Use - for models 45NT0, 45NE0.
Page 20

12 Overview Welch Allyn Spot Vital Signs LXi
Contents Checklist
Unpack the Spot LXi and any applicable accessories and then inspect for missing items.
Retain the shipping materials in the event of shipping damage or for return, if necessary,
to Welch Allyn for repair or warranty service. Report any signs of shipping damage to the
carrier. Report any missing or damaged items to the Welch Allyn Service Center near you.
All Spot LXi devices include the following components:
Spot LXi Device. This device automatically measures and displays blood pressure, pulse
rate, and temperature.
Directions for Use Manual. Read this manual thoroughly before using Spot LXi. Save
this manual for reference.
Warranty Card. This card validates the Spot LXi warranty. Fill out the warranty card and
mail it today.
Blood Pressure Cuff. One cuff with connectors. Other size cuffs are available separately.
Blood Pressure Hose. Latex-free pressure hose with connectors to attach various sizes of
blood pressure cuffs to the Spot LXi.
AC Power Transformer and Cord Assembly. Provides power to the Spot LXi and charges
the internal battery.
Quick Reference Card. Attach this quick operating guide to the device handle, mobile
stand, or wall mount.
Possible Attachments
Spot LXi may include the following items based on the model and accessories purchased:
SureTemp Plus Temperature Probe, Well, and Covers. One oral temperature probe
(blue ejection button and well) and one box of 25 single-use, disposable probe covers.
Braun ThermoScan PRO 4000 Thermometer and Covers. One ear thermometer; one
box of 20 single-use, disposable probe covers; one rechargeable battery pack; and
one lock release pin.
Wireless Radio and Mounting Bracket. Attach these items to the back of the mobile
stand or wall mount basket.
Barcode Scanner and Mounting Bracket. Attach these items on the basket of the
mobile stand or wall mount.
Pulse Oximetry (SpO
with adult and pediatric patients. Other sensors are available separately.
Printer. Attach to the basket of the mobile stand or wall mount. The printer comes with a
roll of paper. Rolls of paper and labels are available separately.
). The finger clip SpO2 sensor and extension cable are for use
2
Page 21

Service Manual Overview 13
Caution Unauthorized repairs will void the warranty.
Service
A Welch Allyn Service Center must perform all repairs on products under warranty.
Qualified electronics personnel or a Welch Allyn Service Center should repair products out
of warranty.
Technical Assistance
If you have an equipment problem that you cannot resolve, call the Welch Allyn Service
Center nearest you for assistance. Technical service telephone support is available on
normal business days.
If you are advised to return a product to Welch Allyn for repair or routine maintenance,
schedule the repair with the service center nearest you.
Before returning a product for repair, you must obtain authorization from Welch Allyn.
Service personnel will give you a Service Notification number. Please note this number on
the outside of your shipping box. Returns without a Service Notification number will not
be accepted for delivery.
Field Replacement Units
Included with the Service Manual is a complete list of field replacement units. Order
spare parts from your local Welch Allyn Service Center.
Service Loaners
Service loaners are provided, on request, if a Welch Allyn Service Center provides repair
service. Loaners for products repaired while under the original warranty, or while under
service contract, are provided free of charge and are shipped within 48 hours of
notification of need.
For service repairs outside of warranty or contract, loaners are available for a nominal
charge and shipment is subject to availability. Loaners are shipped pre-paid; however, this
charge is added to the service charges.
Service Intervals
Verify Spot Vital Signs LXi on an annual basis for blood pressure, temperature, and SpO2
accuracy.
Page 22

14 Overview Welch Allyn Spot Vital Signs LXi
BP
AM
SYS
TEMP
SpO2
PULSE
/min
mmHg
mmHg
F
DIA
%
Weight
Respiration
Pain
4 WEST
Reading
Patient ID 0123456789
Height
Send/Next Reading
Clear
Power button: controls
power to the device.
Blood Pressure Start/Stop button:
initiates a new blood pressure cycle.
Pressing again aborts an active blood
pressure measurement.
Navigation button: move
throughout the options in
the Navigation Window or
to increase/decrease
parameter units.
Select button:
accepts the current
option.
SureTemp Plus
thermometer:
remove the probe to
take a temperature.
Memory button:
recalls up to 50 most
recent readings.
Probe cover
storage area:
storage space for one
box of probe covers.
Charging LED: indicates
when device is plugged in and
charging the battery.
Removable probe
well: store the
temperature probe
here when not in use;
remove to clean or
replace to eliminate
cross-contamination.
Spot Vital Signs LXi Configurations
Table 1. Available Versions of Spot Vital Signs LXi
REF Description
450T0 Blood Pressure with SureTemp Plus Thermometer
450E0 Blood Pressure with Braun ThermoScan PRO 4000 Thermometer
45MT0 Blood Pressure with Masimo SpO
45ME0 Blood Pressure with Masimo SpO
45NT0 Blood Pressure with Nellcor SpO
45NE0 Blood Pressure with Nellcor SpO
and SureTemp Plus Thermometer
2
and Braun ThermoScan PRO 4000 Thermometer
2
and SureTemp Plus Thermometer
2
and Braun ThermoScan PRO 4000 Thermometer
2
Controls
Figure 1. Spot LXi Front Panel with SureTemp Plus Thermometer
21
7
9
8
7
3
5
62
01
Enter
Page 23
Service Manual Overview 15
BP
4 WEST
AM
SYS
TEMP
SpO2
PULSE
/min
mmHg
mmHg
Reading
F
DI
A
%
Enter
Patient ID 0123456789
Weight
Respiration
Pain
Height
Send/Next Reading
Clear
BRAUn
Blood Pressure Start/Stop button:
initiates a new blood pressure cycle.
Pressing again aborts an active blood
pressure measurement.
Navigation button: move
throughout the options in
the Navigation Window or
to increase/decrease
parameter units.
Select button:
accepts the current
option.
Braun ThermoScan PRO 4000
thermometer: store the probe
covers toward the back of the
thermometer housing; remove the
thermometer to access the covers.
Memory button:
recalls up to 50 most
recent measurements.
Power button: controls
power to the device.
Charging LED: indicates
when device is plugged in
and charging the battery.
Charging LED: indicates
the thermometer battery
is charging.
Figure 2. Spot LXi Front Panel with Braun ThermoScan PRO 4000 Thermometer
7
21
01
3
5
7
9
8
62
Page 24

16 Overview Welch Allyn Spot Vital Signs LXi
Select
Display Window
Note
Before using Spot LXi for the first time, you must program an initial configuration
screen.
1. Press the Power button. The display window shows the initial configuration screen.
Figure 3. Initial Configuration Screen
Change Local Defaults Menu
Model No.: 45NTO
Serial No.: 2005040004
Language:
BP Units:
Temperature Units:
Height Units:
Weight Units:
Date Format:
Time Format:
2. Use the Select button to access the options and accept the entries, and use the
Navigation buttons to move through the menu.
3. The word “Exit” appears at the bottom of the list after you have programmed all
items in the menu. You must program all items before you can start to use the device.
4. Scroll to Exit and press the Select button to save the entries.
Page 25
Service Manual Overview 17
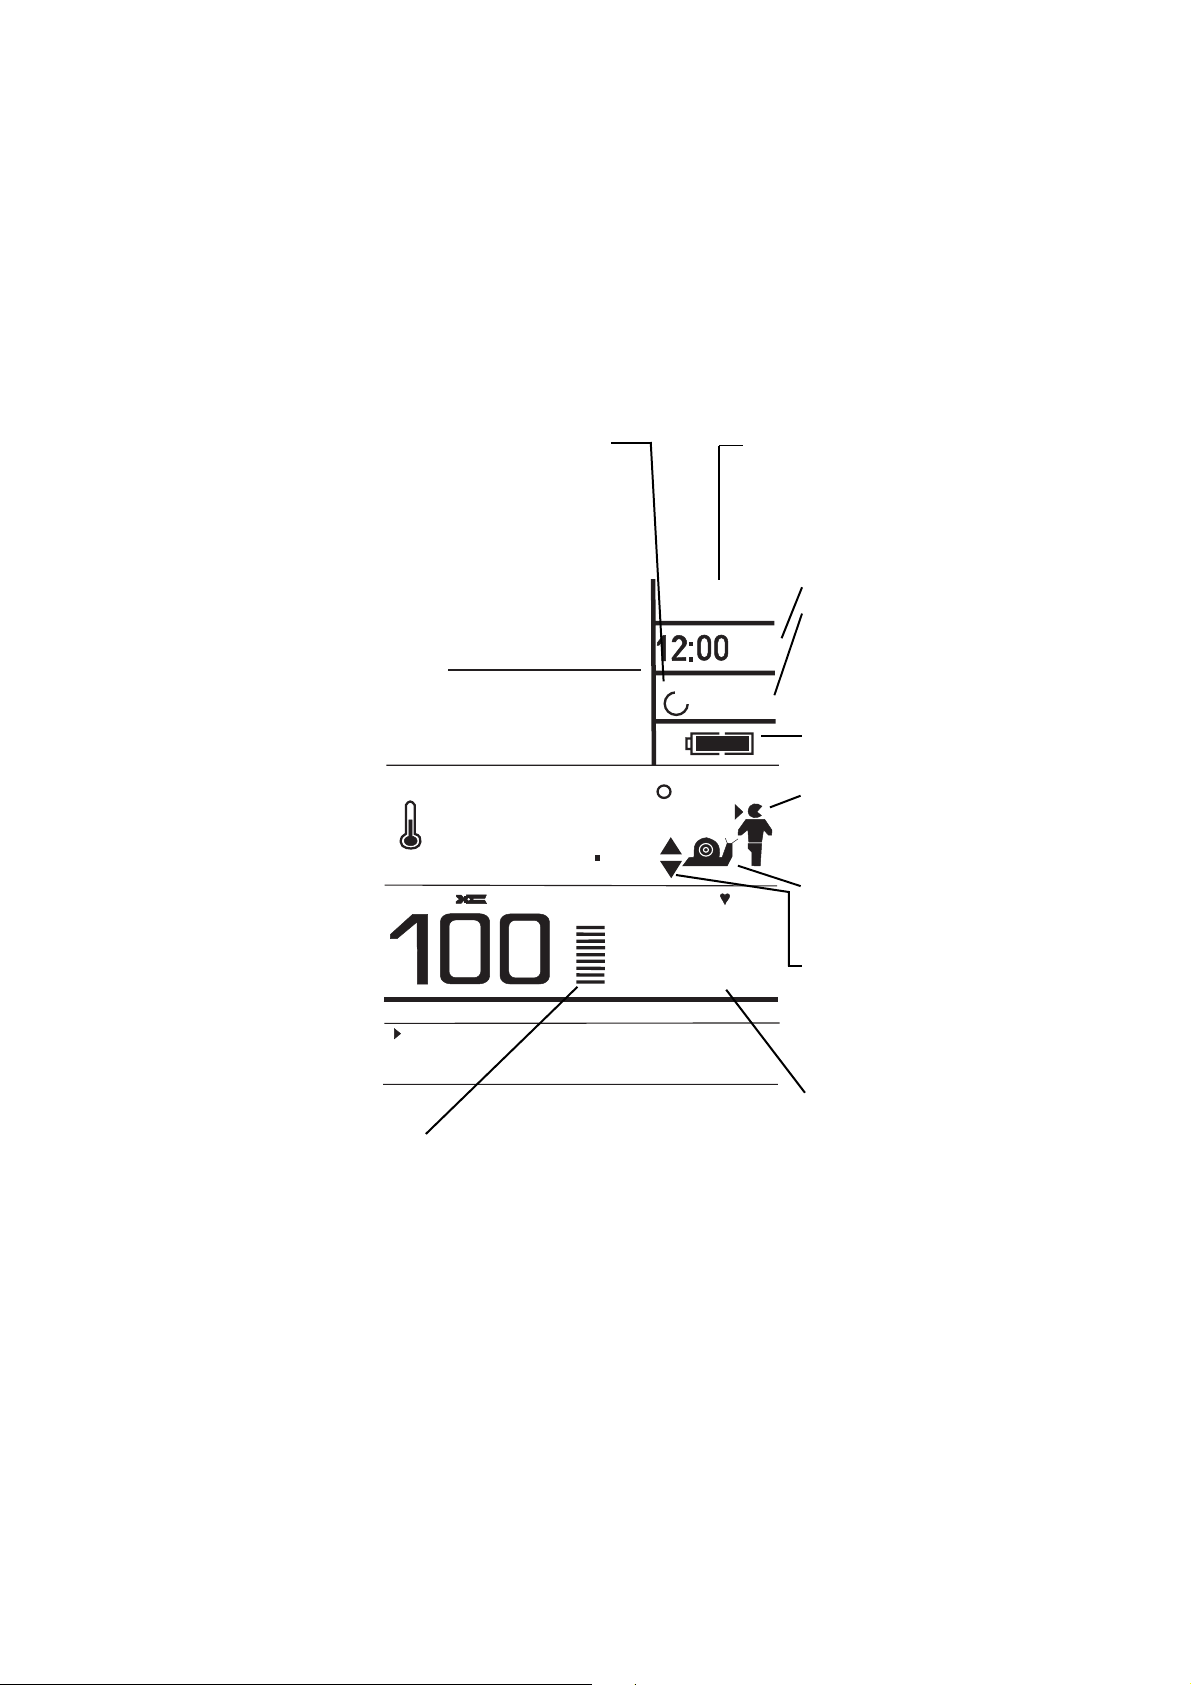
{
{
{
{
Systolic and Diastolic
display: if MAP is turned on,
the screen toggles between
the systolic and diastolic
values, and the word “MAP”
and the MAP value.
SpO
2
display: shows the
percent saturation of arterial
hemoglobin. For devices with
SpO
2
only.
Pulse Signal Bar Graph: shows
the strength of the pulses detected.
Pulse display: shows the pulse
rate.
Temperature display and
indicator: shows the
temperature in Fahrenheit or
Celsius.
Thermometer probe setting
indicators: shows temperature
mode. For devices with SureTemp
Plus thermometer only.
Battery level indicator:
displays the battery charge level.
Reading number indicator:
shows what reading the device is
on. Spot LXi retains up to 50
readings in memory.
Clock: shows the current time.
Location identifier: shows
where the device belongs. If no
location is entered, this area
displays the date.
Navigation Window:
shows menu options, error
messages, or temperature
conversion.
Thermometer probe setting
indicators: shows Monitor
Mode. For devices with SureTemp
Plus thermometer only.
Connectivity indicator:
shows the wireless
intranet signal strength.
Out-of-range indicator: shows
the patient’s temperature reading
above or below the measurement
range limits. For devices with
SureTemp Plus thermometer only.
The liquid crystal display (LCD) may indicate any of the following: systolic blood pressure
(mmHg or kPa), diastolic blood pressure (mmHg or kPa), MAP (mmHg or kPa),
temperature ( F or C), temperature mode, pulse rate, pulse signal level, SpO2 percent,
department location, date, time, record number, height (in or cm), weight (lb or kg),
respiration rate, pain level, connectivity signal strength, and battery charge level.
Figure 4. Display Window
BP
SYS
mmHg
21
DIA
mmHg
7
TEMP
9
8
SpO2
Patient ID 0123456789
Weight
Height
Respiration
%
Pain
Clear
Send/Next Reading
7
3
5
4 WEST
Reading
01
F
PULSE
62
Enter
AM
/min
Page 26
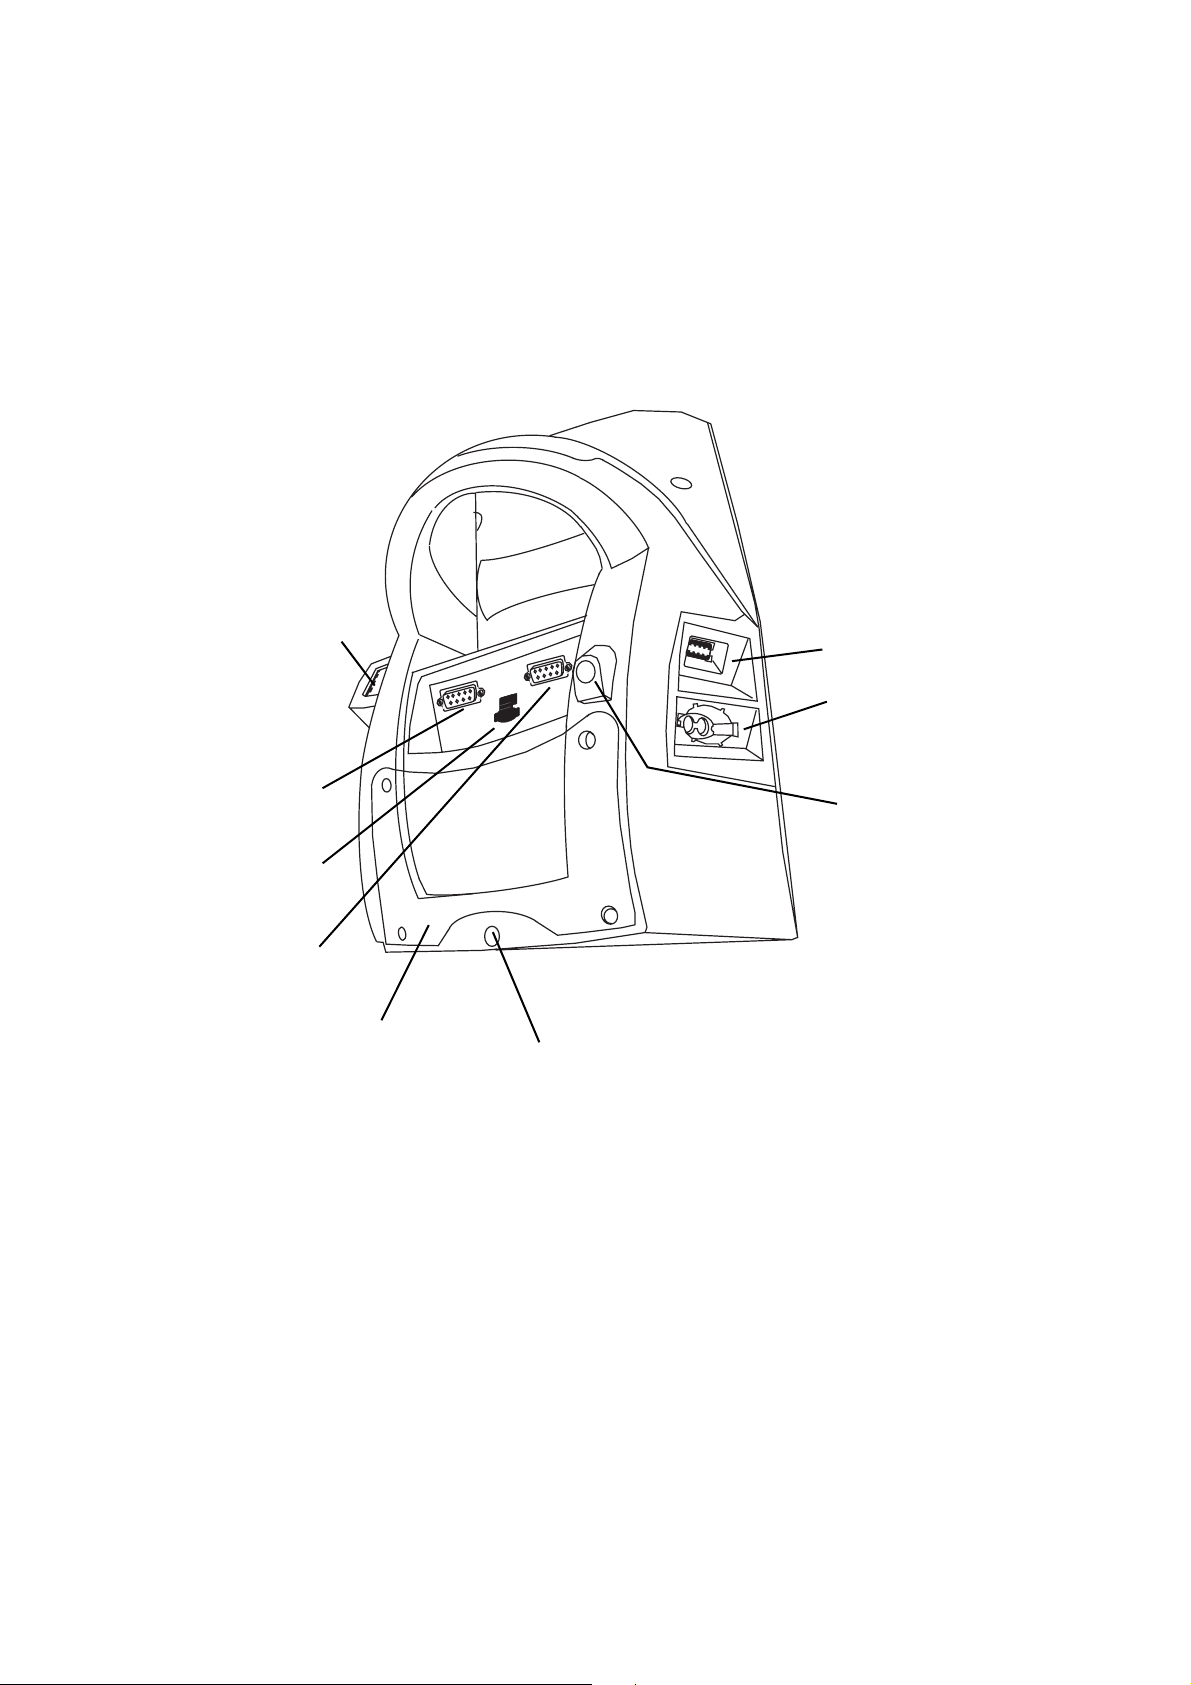
18 Overview Welch Allyn Spot Vital Signs LXi
SureTemp Plus thermometer
connection port (for units
with SureTemp Plus only)
Port I for external
device connection
USB connection for PC
(behind plug)
Port II for external
device connection
SpO2 cable connection port
(for units with SpO
2
only)
Blood pressure hose
connection port
DC power connection port
Mobile stand or wall
mount screw connection
Battery door
Connections
Use the following instructions to connect the blood pressure hose, thermometer probe,
and optional attachments to the Spot Vital Signs LXi.
Figure 5. Spot LXi Side and Rear Panel Connections
Page 27
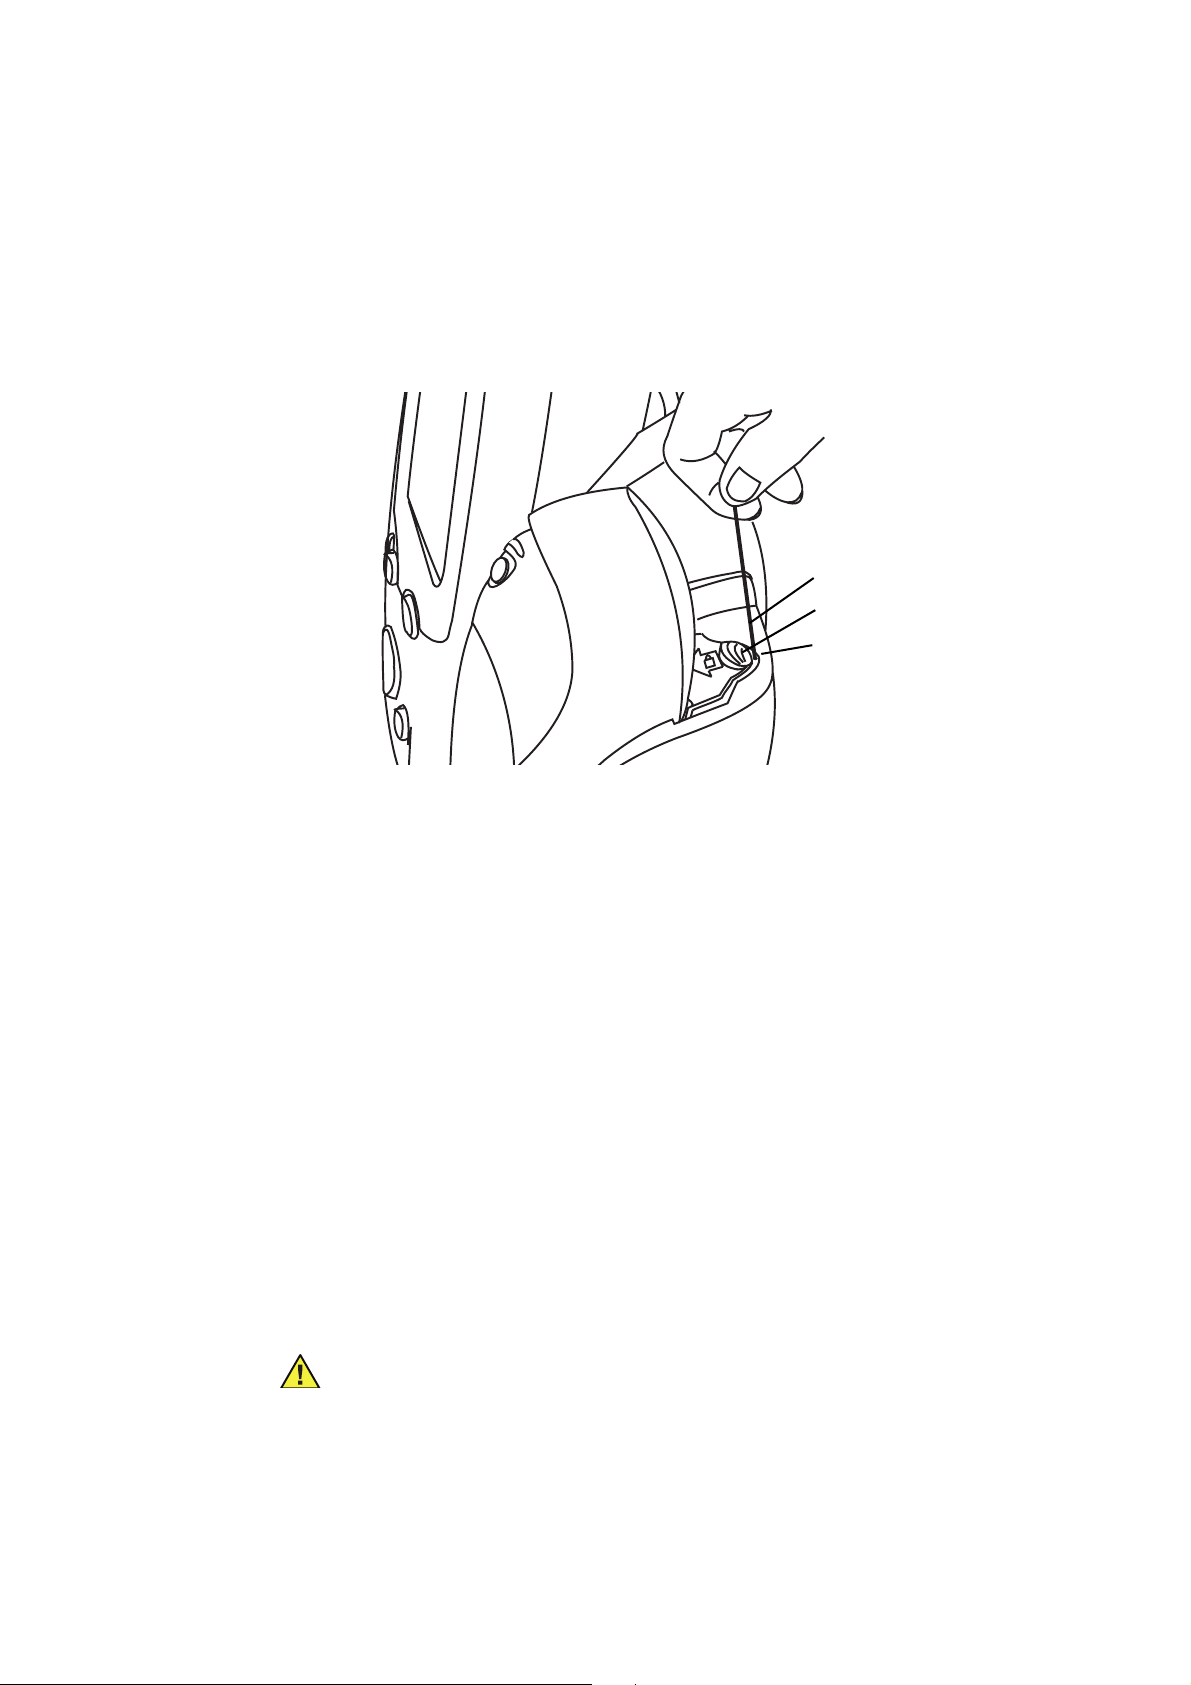
Service Manual Overview 19
Lock release hole
Lock release pin
Lock tab
Caution The SureTemp Plus feature only operates with the probe well in place.
Braun ThermoScan PRO 4000 Lock
Press the lock tab toward the Braun ThermoScan PRO 4000 thermometer until it clicks. To
release the housing, insert the lock release pin into the lock release hole until the lock tab
snaps back.
Figure 6. Spot LXi with Braun ThermoScan PRO 4000 Lock
Blood Pressure Hose and Cuff
Identify and have available the Spot LXi, blood pressure cuff, and the blood pressure hose.
1. Inspect the blood pressure hose; notice that one end has a single, gray connector
fitting and the other end has two white fittings.
2. Squeeze the side tabs on the gray connector and completely push the blood pressure
hose connector into the blood pressure hose connection port until it clicks into place
(see
Figure 5 on page 18).
3. Twist the white connectors on the blood pressure hose and cuff connectors together.
Thermometer
Spot LXi is available with either the SureTemp Plus thermometer or the Braun
ThermoScan PRO 4000 thermometer.
SureTemp Plus
SureTemp Plus is available with two probes and matching wells; one for oral/axillary
temperatures (blue ejection button and probe well) and one for rectal temperatures (red
ejection button and probe well).
1. Align the probe well with the tabs facing up and down into the round opening of the
SureTemp Plus housing on the right side of Spot LXi. Push it into place.
Page 28

20 Overview Welch Allyn Spot Vital Signs LXi
Caution Do not use alkaline batteries in the Braun ThermoScan PRO 4000
thermometer.
Note
Use only Masimo or Nellcor SpO2 sensors and accessories with the Spot LXi with
Masimo or Nellcor configurations, respectively.
2. Align the temperature probe connector with the SureTemp Plus thermometer
connection port on the back of the Spot LXi (see
insert the connector into the port one way.
3. Press the tab on the connector and push it until it clicks into place.
4. Insert the temperature probe into the probe well.
Figure 5 on page 18). You can only
Braun ThermoScan PRO 4000
1. Open the package of rechargable batteries and follow the installation guide provided.
2. Open the box of probe covers as directed on the box and slide the box into the metal
3. Hold the Braun thermometer at a 45° angle then insert the probe and the top of the
guides toward the back of the thermometer housing with the opening at the top and
perforation facing forward.
thermometer into the housing.
4. Lower the bottom portion of the thermometer into the housing until it snaps into
5. Slide the thermometer housing into the thermometer slot on the right side of the
6. Push the lock tab forward to prevent the thermometer housing from falling out of
SpO2 Sensor
Spot LXi is available with a wide variety of SpO2 sensors and ships with a reusable finger
clip sensor.
1. Align the shape and pin configuration of the extension cable connector to the SpO2
2. Push the connector firmly into the SpO
3. Align the opposite end of the extension cable to the sensor cable connector and
place. If you do not properly seat the thermometer, it could fall out of the holder and
become damaged.
Spot LXi device.
Spot LXi (see
To release the lock, insert the lock release pin into the lock release hole.
cable connection port on the left side of the Spot LXi device.
into place (see
firmly push them together.
Figure 6 on page 19).
Figure 5 on page 18).
cable connection port until you hear it click
2
Quick Reference Card
Attach the Quick Reference Card to the Spot LXi handle, mobile stand, or wall mount
using the supplied plastic cable tie.
Page 29

Service Manual Overview 21
AC Power Transformer
Battery
Note
The operator can use the Spot LXi with AC or battery power (after charging the battery).
1. Insert the round transformer connector into the AC power connection port on the
2. Insert the line cord into the line connector on the transformer then plug the power
Charge the battery for 6 hours before initial use. Charge the device an additional hour if it
includes a Braun ThermoScan PRO 4000 thermometer. If there is an external printer,
connect the printer to the Spot LXi, enable it in the Internal Configuration Mode (see
“Initial Configuration Screen” on page 16 if this is the first time you power on the device
and then Table 7 on page 26), and then charge the Spot LXi for an additional 4 hours.
While Spot LXi is charging, the charging LED (~) flashes and the battery level indicator
segments on the display continuously sequence.
charging LED is solid and the battery level indicator is steady with all segments
continuously shown on the display.
If the device includes a Braun ThermoScan PRO 4000 thermometer, the charging LED
below the thermometer will illuminate orange as it is charging. When the battery is fully
charged, the LED will power off.
To assure proper electrical isolation, replace the AC power transformer/charger
using only the Welch Allyn specified part.
back of the Spot LXi (see
cord on the transformer into the AC main power source to charge the battery.
Figure 5 on page 18).
When the battery is fully charged, the
If the device has an external printer, the charging LED on the printer will flash orange and
green when Spot LXi is plugged into the AC main power source.
Note
There is no hazard associated with leaving the battery in the device, even if the
device is not used for long periods of time.
Standby Mode
The Standby Mode conserves battery power. The device goes into Standby Mode if it is
not used for two minutes. Press any button to bring the Spot LXi out of Standby Mode.
Page 30

22 Overview Welch Allyn Spot Vital Signs LXi
Page 31

23
3
Self Test
Functional Overview
This functional verification procedure helps to confirm the proper operation of the Spot
Vital Signs LXi and options. This procedure supports the requirements of routine
preventative maintenance. It is not necessary to disassemble the Spot LXi to perform this
procedure.
For the calibration procedures, see “Calibration” on page 33. If the Spot LXi fails certain
functional tests or a circuit board is replaced, the device may require calibration. It is
necessary to disassemble the Spot LXi for calibration.
Always perform this functional verification procedure after performing any calibration. This
procedure contains additional tests that are not included in calibration procedures.
The Spot LXi performs a self-test each time the device is powered on. Press the Power
button to turn the device on or off. Upon each power up, the display lights up, a beep
sounds, and the Spot LXi displays the model and serial numbers. If the internal self-check
is successful, the display shows its normal functions (see
values blank, and the device is ready for operation. If the self-check fails, an error code is
shown in the Navigation Window (see “Error Codes” on page 37).
Spot LXi automatically powers off when not used for 30 minutes.
Figure 4 on page 17) with all
Page 32

24 Functional Overview Welch Allyn Spot Vital Signs LXi
Select
Configuration Menu
Version
Numbers
Manual
Parameters
External
Devices
Save Readings
Buttons
Lockout
Defaults
Event Log
Battery
Date/Time
Blood Pressure
Temperature
Location
Identifier
Internal Configuration Mode
You can change several device operating parameters in the Internal Configuration Mode.
When changed, these settings become the default power-up settings. You will also see
non-changeable device configurations for technical service purposes.
To Enter the Internal Configuration Mode:
1. Turn the Spot LXi off.
2. Press and hold the Select and Power buttons for 5 seconds. The device enters the
Internal Configuration Mode and the Configuration Menu screen appears on the
display.
Figure 7. Internal Configuration Mode Menu
3. Use the Navigation buttons to move through the menu options and then press the
Select button to access the options or accept a change. See the following tables for
descriptions of the menu options.
4. Press the Power button to exit the Internal Configuration Mode.
Page 33

Service Manual Functional Overview 25
Table 2. Configuration Menu Options
Setting Description
Version Numbers* Displays the software and hardware version numbers in the Spot LXi device.
Battery* Displays the battery level.
Location Identifier Allows the entry of the device’s location (e.g., the department name). Follow the
Date/Time Changes the date and time formats or updates the actual date and time. See
Blood Pressure Changes the blood pressure options. See
Temperature Changes the temperature options. See
Manual Parameters Changes the manual parameters defaults. See
External Devices Enables or disables available external devices. See
Save Readings Saves the current patient reading at a preselected time interval or upon request. See
Buttons Lockout Secures Spot LXi so unauthorized people cannot use the device or access data without
Defaults Allows the user to select the default settings for the device and reset the unit to the
Event Log* Displays the recent button presses, errors, measurements, measurement sites, battery
* Displayed information only; operator cannot change.
display prompts and use the Navigation and Select buttons to enter up to 10
characters.
“Date/Time Menu Options”
available settings.
available settings.
Options”
for available settings.
for available settings.
Options”
Table 8, “Save Readings Menu Options” for available settings.
enacting the proper key sequence. To override the buttons lockout feature,
simultaneously press the Left Navigation button and the Select button.
default settings. See
state changes, and patient reading send events.
for available settings.
Table 4, “Blood Pressure Menu Options” for
Table 5, “Temperature Menu Options” for
Table 6, “Manual Parameters Menu
Table 7, “External Devices Menu
Table 9, “Change Local Defaults Options” for available settings.
Table 3,
Table 3. Date/Time Menu Options
Setting Description
Date Format Displays the date in one of the following styles:
Date Changes the date on the Display Window and in patient readings. If a location is
Time Format Displays the time in one of the following styles:
Time Changes the time on the Display Window.
• mm/dd/yyyy example: July 16, 2005 = 07/16/2005
• dd/mm/yyyy example: 16 July 2005 = 16/07/2005
entered (see “
will not appear on the Display Window; the location will.
• 12-hour example: 5:00 PM
• 24-hour example: 17:00
Location Identifier “ in Table 2, “Configuration Menu Options”), the date
Page 34

26 Functional Overview Welch Allyn Spot Vital Signs LXi
Table 4. Blood Pressure Menu Options
Setting Description
BP Calibration Check Prepares the Spot LXi for calibration. Only qualified personnel should verify the Spot
Blood Pressure Units mmHg or kPa.
Mean Arterial Pressure (MAP) On or off.
LXi blood pressure calibration. For more details, see “Blood Pressure Calibration” on
page 35.
Table 5. Temperature Menu Options
Setting Description
Temperature Units Fahrenheit (°F) or Celsius (°C).
Temperature Mode SureTemp Plus models only: Oral, Pediatric Axillary, Adult Axillary, and Last Mode. In
Last Mode the device takes the next temperature in the mode in which the previous
temperature was measured. Rectal Mode is available only when the rectal probe (red
ejection button) and probe well are attached.
Table 6. Manual Parameters Menu Options
Setting Description
Height On or off.
Height Units Inches (in) or centimeters (cm).
Height Default Changes the default patient height displayed in the Navigation Window.
Weight On or off. Even if weight is enabled here, if weight scale is enabled in the External
Weight Units Pounds (lb) or kilograms (kg).
Weight Default Changes the default patient weight displayed in the Navigation Window.
Respiration On or off.
Pain Level On or off.
Devices Menu, you cannot manually enter the weight.
Table 7. External Devices Menu Options
Setting Description
Information System On or off. You must enable this option to send patient readings wired or wirelessly.
Barcode Patient ID On or off. You must enable this option to send patient readings wirelessly.
Barcode Clinician ID On or off.
Weight Scale On or off. Spot LXi can connect to a scale and the weight will appear on the display
Wireless Module None or DPAC. You must enable DPAC to send patient readings wirelessly. The
Printer On or off.
Printer Paper Plain or labels. Only available if the Printer is enabled.
window (see “Technical Overview” on page 59 for scale details).
wireless radio is available as an accessory.
Page 35

Service Manual Functional Overview 27
Table 8. Save Readings Menu Options
Setting Description
Save Mode Manual or automatic. If automatic, Spot LXi saves readings at a preselected time
Auto Save Interval Changes the amount of time before automatically saving the current patient reading.
Reading Full Action Auto Overwrite, Ask Overwrite, Do not Overwrite. Spot LXi can save 50 patient
interval. For either option, Spot LXi automatically saves the measured parameters into
memory before automatically powering off when not used for 30 minutes.
Only available if Automatic Save Mode is enabled.
readings in memory. Upon reaching reading 51, the device may automatically overwrite
reading 1, ask the user if he/she wants to overwrite reading 1, or disable the ability to
take another reading until at least one reading is erased.
Table 9. Change Local Defaults Options
Setting Description
Language English, Dansk, Nederlands, Finnish, Français, Deutsch, Italiano, Norsk, Español,
BP Units mmHg or kPa.
Temperature Units Fahrenheit (°F) or Celsius (°C).
Height Units Inches (in) or centimeters (cm).
Weight Units Pounds (lb) or kilograms (kg).
Date Format Displays the date in one of the following styles:
Time Format Displays the time in one of the following styles:
Português, Svenska, or Chinese.
• mm/dd/yyyy example: July 16, 2005 = 07/16/2005
• dd/mm/yyyy example: 16 July 2005 = 16/07/2005
• 12-hour example: 5:00 PM
• 24-hour example: 17:00
Page 36

28 Functional Overview Welch Allyn Spot Vital Signs LXi
Right female
fitting
Accurate, calibrated
pressure meter or
sphygmomanometer
T-connector
Bulb and valve
4” tubing
Right blood
pressure cable
connection
Functional Verification
Blood Pressure Functional Check
The calibration check is a simple, yet valuable test to determine that the unit is sensing
pressure accurately. Verify the pressure measurement accuracy of the Welch Allyn Spot
LXi with an accurate, calibrated pressure meter or sphygmomanometer.
To perform the functional check:
Have the following equipment available:
• Accurate, calibrated pressure meter or
sphygmomanometer
• T-connector • Bulb and valve (5088-01)
• Female fittings (12P524-1) (quantity 2 each)
• 4” tubing with an inside diameter of
approximately .250” (quantity 3 each)
1. Disconnect the blood pressure cuff from the blood pressure tubing.
2. Attach two pieces of the 4” tubing to the T-connector. Verify that the tubing is
positioned perpendicular to each other.
3. Attach the pressure meter or sphygmomanometer to one of the tubes and the bulb
and value assembly to the second tube.
4. Push a female fitting into the third piece of 4” tubing and connect the opposite end of
the tubing to the T-connector.
5. Twist the blood pressure tubing fitting that connects to the right blood pressure cable
connection port to the female fitting and connect the opposite end of the blood
pressure tubing to the blood pressure cable connection port. Verify that all
connections are tight.
Figure 8. Blood Pressure Calibration Tubing Connections
6. Enter the Internal Configuration Mode (see “Internal Configuration Mode” on
page 24).
Page 37

Service Manual Functional Overview 29
UKUS EUAUS
Two prongs in the
power adapter
7. Press the Navigation button to highlight “Blood Pressure” on the display and press
the Select button.
8. Press the Navigation button to highlight “BP Calibration Check” on the display and
press the Select button.
9. Press the Select button to close the valve.
10. Verify that the pressure meter is on and the thumb screw valve is closed. Inflate the
device manually to about 250 mmHg.
11. Drop the pressure to 200 mmHg, wait 15 seconds for stabilization, and take a
reading.
12. Repeat for 150 mmHg, 50 mmHg, and 0 mmHg (all measuring downscale).
If the calibration at any point is outside of ±3 mmHg, call Welch Allyn Technical
Service for assistance.
Temperature Functional Check
The 9600 Plus Calibration Tester takes approximately 20 minutes to heat to the lowest
setting. When testing several thermometers at all three temperatures, it is
recommended to test all probes at one Calibration Set Point Temperature before
proceeding to the next Calibration Set Point Temperature.
To further expedite testing start at the lowest Calibration Set Point Temperature. The 9600
Plus Calibration Tester does not have an internal fan, this causes a longer cool down time
than warm up time.
Refer to the 9600 Plus Calibration Tester Directions for Use manual for specific
information regarding the LCD window or the control buttons.
1. Choose the proper mains plug insert and slide it over the two prongs in the power
converter.
Figure 9. Power Adapter and Mains Plug Inserts
2. Plug the power adapter into the 9600 Plus Calibration Tester
opposite end into a wall outlet.
(Figure 9) and the
3. Place the 9600 Plus Calibration Tester on a level surface away from sunlight, drafts,
and other sources of heat or cold.
4. Observe the Set Point Mode in the upper left hand corner of the LCD display. If the
unit displays a "D", it is in Default Mode and will heat to the lowest Set Point
Page 38

30 Functional Overview Welch Allyn Spot Vital Signs LXi
Caution Store thermometers for testing in the same room as the 9600 Plus
Calibration Tester for approximately 30 minutes prior to testing to allow for
thermal accommodation.
Temperature. If you do not want to conduct testing at this Set Point Temperature,
press and hold the Temperature Selection button to select the desired setting. The
temperature display will flash before staying on continuously to indicate the 9600 Plus
Calibration Tester has stabilized and is ready for use.
Welch Allyn SureTemp Plus Thermometers
To begin functional verification of the SureTemp Plus thermometer:
1. Remove the probe from the probe well and clean it with either a 70% isopropyl
2. Place the thermometer in Monitor Mode, refer to the thermometer’s Operator's
3. Insert the probe into the Thermistor Device Port.
alcohol solution, a 10% chlorine bleach solution, or a non-staining disinfectant. Let
the probe air dry. Do not apply a probe cover.
Manual.
Figure 10. 9600 Plus Calibration Tester with the Welch Allyn SureTemp Plus Thermometer
4. Wait for approximately one minute or until temperature on the thermometer is stable
for ten seconds. Compare the thermometer's temperature reading to the 9600 Plus
Calibration Set Point Temperature. If the temperatures are within ±0.1° C (±0.2° F),
the thermometer is within calibration.
5. Test all available thermometers for calibration verification at the current Calibration Set
Point Temperature. Proceed to the next Calibration Set Point Temperature, see
“Changing the Calibration Set Point Temperature” on page 32.
Page 39

Service Manual Functional Overview 31
Caution Store thermometers for testing in the same room as the 9600 Plus
Calibration Tester for approximately 30 minutes prior to testing to allow for
thermal accommodation.
Braun ThermoScan Pro 4000
To begin functional verification of the Braun ThermoScan PRO 4000 thermometer:
1. Clean the probe tip with a cotton swab slightly moistened with isopropyl alcohol,
2. Place the Braun ThermoScan Pro 4000 in Calibration Mode using the following steps.
3. Apply a new probe cover. Place the probe firmly into the Ear Device Port.
remove excess alcohol with a clean cotton swab, and let air dry for 5 minutes.Do not
use any chemical other than alcohol to clean the probe window.
a. Push and release the I/O MEM button to turn the product on. The display shows
symbols and functions. The Braun ThermoScan Pro 4000 performs an automatic
self check. After a few seconds you hear a beep and see three dashed lines, a
sound symbol, and ° C or ° F on the display.
b. Push the I/O MEM button again and keep it pressed for the following steps:
• After approx. 3 seconds the “OFF” symbol flashes on the display (keep
pressing the button).
• When you hear a beep, release the button immediately.
• The Braun TheromScan Pro 4000 is now in calibration check mode and the
display is flashing and showing the “CAL” symbol.
Figure 11. 9600 Plus Calibration Tester with the Braun ThermoScan Pro 4000
4. Wait approximately three seconds, press the thermometer Start button, and watch for
the "Exac Temp" light to flash.
5. Leave the thermometer in the 9600 Plus Calibration Tester until you hear a beep.
6. Remove the Pro 4000 Thermometer from the 9600 Plus Calibration Tester and read
the temperature in the thermometer’s display. If the temperatures are within ±0.2° C
(±0.4° F), the thermometer is within calibration.
7. Wait one full minute before taking another reading with the same thermometer.
Repeated measurements in short sequence may cause higher readings.
Page 40

32 Functional Overview Welch Allyn Spot Vital Signs LXi
8. The device will exit CAL mode after four minutes.
9. Test all available thermometers for calibration verification at the current Calibration Set
Point Temperature. Proceed to the next Calibration Set Point Temperature, see
“Changing the Calibration Set Point Temperature”.
Changing the Calibration Set Point Temperature
To scroll from one set point to the next, press and hold the Temperature Selection button
until a beep is heard. The newly selected set point appears in the upper left corner of the
LCD display. The device’s current temperature is displayed, starts to flash, and continues
flashing until the cavity reaches the equilibrium at the new set point.
Masimo SpO2 Functional Check
Use the Masimo Tester to perform to functionally check the Masimo sensors.
1. Orient the Masimo Tester such that the mini-D connector mates with the SpO2
connector on Spot LXi.
2. Power on Spot LXi and confirm the SpO2 reading in the Display Window is 81%± 3%
and the pulse reading is 61 bpm ± 1 bpm.
3. Place the thumb and index finger on the gray buttons on either side of the Masimo
Tester connector, press the buttons firmly, and gently pull to remove the tester.
There is no way to change the functionality of the SpO2 module. If the SpO2 is out of
calibration, contact Technical Service.
Nellcor SpO2 Functional Check
Use a Nellcor-approved SpO2 simulator (SRC-MAX ) to check the SpO2 functionality.
1. Orient the simulator such that the connector mates with the SpO2 connector on Spot
LXi.
2. Power on Spot LXi and confirm the SpO2 reading in the Display Window is 81%± 3%
and the pulse reading is 61 bpm ± 1 bpm.
3. Place the thumb and index finger on either side of the simulator connector, press the
buttons firmly, and gently pull to remove the simulator.
There is no way to change the functionality of the SpO
functioning properly, contact Technical Service.
module. If the SpO2 is not
2
Page 41

33
4
Calibration
This chapter provides procedures to perform all adjustments required to calibrate the
Spot LXi to conform to Welch Allyn specifications. Calibration requires qualified personnel
to open the device housing.
WARNING Electric shock hazard. There are no user-serviceable parts inside Spot
LXi other than battery replacement (see “Battery Replacement” on page 79). An
operator may only perform maintenance procedures specifically described in this
manual. For service, refer the device to an Authorized Service Center.
Note
Gather the following tools to have available during the procedures.
Always disconnect the sealed lead-acid battery in the Spot Vital Signs LXi before
performing any calibration function.
Description Part Number Qty Source
Blood Pressure Test Volume Repair Fixture 401028 1 Welch Allyn
Spot LXi Repair Software 401710 1 Welch Allyn
Serivce Manual, Spot LXi 704432 1 Welch Allyn
Tester, Calibration, 9600 Plus 01802-110 1 Welch Allyn
Blood Pressure Y-Tube, No Fittings 1/8 Tube 5082-183 1 Welch Allyn
Pliers 1 Tool/Supply Store
Wire Cutter 1 Tool/Supply Store
Tweezers 1 Tool/Supply Store
#2 Phillips Screwdriver 1 Tool/Supply Store
T10 Torx Driver 1 Tool/Supply Store
Cable Tie Tool 1 Tool/Supply Store
*Setra Pressure Meter 2270-01 1 Setra +1 800 257 3872
*Netech Pressure Meter 2000 in 1 Netech +1 800 547 6557
Masimo SpO2 Tester 1593 1 Masimo +1 800 326 4890
Nellcor SRC-MAX SpO
Cable, USB A to 5 pin mini 1 Electronics Supply Store
Digital Volt Meter with 4 1/2 Digit Display 2 Electronics Supply Store
Power Supply: 0-20 Vdc adjustable with 0-3A
output
Tester SRC-MAX 1 Nellcor +1 800 635 5267
2
1 Electronic Supply Store
Page 42

34 Calibration Welch Allyn Spot Vital Signs LXi
Description Part Number Qty Source
IBM compatible computer Windows 2000, XP,
NT4
* Only requires one of the pressure meters
1
Connections
1. Connect the blood pressure pneumatic tubing to the Spot LXi and to the test station.
2. Connect the USB cable to the Spot LXi and the computer.
3. Start the Spot Vital Signs LXi repair software on the computer.
4. Connect the power supply to the Spot LXi.
Figure 12. Connect Diagram
Voltage Calibration
1. Follow the steps in
2. Adjust the power supply to 5.5 Vdc ±0.1 Vdc and power on Spot LXi.
3. Select Calibrate > Voltage in the repair software. The Spot LXi display window goes
blank.
4. Read the voltage on the digital multi-meter (DMM) connected to the power supply.
5. Type the voltage reading in the Actual Voltage field and click the Calibration button.
6. Click the Ok button to accept the inputs.
7. Click the Ok button to answer the question in the text dialog box “Are you sure you
want to make changes permanent?”
8. Enter your initials in the Calibration Signature field to complete the voltage calibration.
“Connections”.
Page 43

Service Manual Calibration 35
Blood Pressure Calibration
1. Follow the steps in
“Connections” on page 34.
2. Adjust the power supply to 6.5 Vdc (± .25 Vdc).
3. Enter the
“Internal Configuration Mode” on page 24. Use the Navigation and Select
buttons to select Blood Pressure > BP Calibration Check.
4. Set the test station volume to 500 cc and use the Spot LXi Navigation and Select
buttons to close valve (the Window Display shows “Open Valve”).
5. Click the Calibrate Zero button.
6. Use the bulb and the calibrated digital pressure meter to manually inflate the device
to 200 mmHg and enter the pressure meter reading from Spot LXi in the Calibration
Gain text field.
7. Click the Ok button to accept the inputs.
8. Click the Ok button to answer the question in the text dialog box “Are you sure you
want to make changes permanent?”
9. Enter your initials in the Calibration Signature field to complete the blood pressure
calibration.
Configuration Calibration
1. Follow the steps in
“Connections” on page 34.
2. Power on Spot LXi.
3. Select Unit > Configuration in the Spot LXi Repair Software.
4. Verify the settings are correct and click the Ok button.
If any of the settings are incorrect click the correct button to change the settings.
If you update the Spot LXi clock in this menu, the device clock resets itself to match
the PC clock. You may manually set the time in the
“Internal Configuration Mode” on
page 24.
Page 44

36 Calibration Welch Allyn Spot Vital Signs LXi
Page 45

37
5
Troubleshooting
This chapter provides helpful information in troubleshooting the Spot Vital Signs LXi.
Error Codes
The following tables of error codes provide a quick reference of the descriptions and
probable causes of error codes.
Table 10. General Error Codes
Code Description Corrective Action
C12 Device outside operating temperature
C13 Low battery level. Charge battery.
E30 Internal malfunction. Contact Technical Service.
E31 Internal malfunction. Contact Technical Service.
E32 Internal malfunction. Contact Technical Service.
E33 Internal malfunction. Contact Technical Service.
E38 Date and time not set. Set date and time (see “Date/Time Menu Options” on
E42 Internal malfunction. Contact Technical Service.
E44 Internal malfunction. Contact Technical Service.
E45 Internal malfunction. Contact Technical Service.
range.
Change ambient temperature.
page 25)
Table 11. Blood Pressure Error Codes
Code Description Corrective Action
C01 Blood pressure reading cancelled by user. Retake blood pressure reading.
C02 Unable to release cuff pressure. Check tubing for kinks and connection integrity.
C03 Inflation too quick. Check tubing and connections.
C04 Air leak. Check blood pressure cuff and tubing connections.
C05 Unable to determine blood pressure. Check connections; restrict patient movement.
C06 Unable to determine blood pressure. Check connections; restrict patient movement.
C07 Internal NIBP error. Device will power down.
E10 Cuff pressure limits exceeded. Device will power down.
E11 Cuff pressure duration exceeded. Device will power down.
Page 46

38 Troubleshooting Welch Allyn Spot Vital Signs LXi
Table 11. Blood Pressure Error Codes
Code Description Corrective Action
E20 Internal NIBP error. Device will power down.
Table 12. SureTemp Plus Temperature Error Codes
Code Description Corrective Action
C22 Temperature time limit exceeded. Remove probe from patient.
E0.1 Probe heater error. Retake reading. If problem persists, replace probe.
E0.2 Thermometer probe or device malfunction. Replace probe. If problem persists, contact Technical Service.
E0.4 Probe is over temperature. If problem persists, contact Technical Service.
E0.5 Unable to determine temperature. Retake reading. If problem persists, replace probe.
E0.6 Probe data error. Retake reading. If problem persists, replace probe.
E0.7 Broken thermometer probe. Replace probe.
E0.8 Cannot read the probe’s configuration
information.
E0.8 Temperature module data error. Contact Technical Service to return the device.
E0.8 Cannot read the device’s Error Log. This problem will correct itself. If it persists, contact
E0.9 Broken thermometer probe. Replace probe.
E4.0 Internal temperature malfunction. Retake temperature. If problem persists, contact Technical
E4.1 Internal temperature malfunction. Retake temperature. If problem persists, contact Technical
E4.2 Internal temperature malfunction. If problem persists, contact Technical Service.
E4.3 Internal temperature malfunction. If problem persists, contact Technical Service.
E4.4 Temperature malfunction. Restart device. If problem persists, contact Technical Service.
E4.5 Temperature malfunction. Restart device. If problem persists, contact Technical Service.
E4.6 Temperature malfunction. Restart device. If problem persists, contact Technical Service.
E4.7 Cannot initialize thermometer. If problem persists, contact Technical Service.
E4.8 Thermometer needs to be calibrated. Contact Technical Service.
E4.9 Probe well missing or installed improperly. Reinstall probe well.
E5.0 Temperature heater error. If problem persists, contact Technical Service.
E5.2 Heater failsafe failure. If problem persists, contact Technical Service.
A^! Device outside operating temperature
range.
Av! Device outside operating temperature
range.
b^ Internal temperature malfunction. Contact Technical Service.
bv Internal temperature malfunction. Contact Technical Service.
Contact Technical Service.
Technical Service.
Service.
Service.
Change ambient temperature.
Change ambient temperature.
Page 47

Service Manual Troubleshooting 39
Table 13. SpO
Code Description Corrective Action
C8 Faulty SpO
C9 SpO
E7 Internal SpO
Error Codes
2
sensor. Replace sensor.
2
time limit exceeded. Remove sensor from patient.
2
error. Retake reading.
2
Battery Voltage Check
1. Follow the steps in
2. Set the power supply to 6.5 Vdc (+0/-0.25 Vdc).
3. Use a DMM to check the battery voltage. If the voltage is less than 6.0 Vdc, charge
the battery.
To charge the battery, place the battery back into the Spot LXi and connect the charger
for 8 hours. Let the device sit idle for one day and recheck the battery voltage. If the
voltage is below 6.0 Vdc, replace the battery (see “Battery Replacement” on
page 79).
4. Power on Spot LXi. If the device does not power on:
a. Verify the power supply is connected to the device and turned on.
“Connections” on page 34.
b. Change the main PCB (see “Disassembly and Repair” on page 45).
c. Change the display PCB (see “LCD Inverter Ballast Board Disassembly” on
page 53).
Window Display Check
Watch the Spot LXi window display during power on and verify the LCD segments light up
for one to two seconds before the device goes into its normal operating mode. If the
device has any LCD segments that do not light, change the window display (see “LCD
Disassembly” on page 53).
Blood Pressure Calibration Check
Perform two or three blood pressure cycles to verify proper cuff inflation/deflation and the
readings. If Spot LXi does not inflate or deflate properly perform the following procedure.
1. Open the Spot LXi housing (see “Disassembly and Repair” on page 45).
2. Check Spot LXi for pinched tubing and reroute if necessary. Re-run the blood pressure
cycle to confirm the problem is fixed.
3. Power off Spot LXi and enter the Internal Configuration Mode (see “Internal
Configuration Mode” on page 24).
4. Use the Navigation and Select buttons to select Blood Pressure > BP Calibration
Check.
5. Verify the valve on Spot LXi is closed (the menu choice shows “Open Valve”).
Page 48

40 Troubleshooting Welch Allyn Spot Vital Signs LXi
6. Use the bulb to manually inflate the device to 250 mmHg and confirm Spot LXi meets
the leak test specification (see “Leak Test” on page 81).
Temperature Functional Check
Use the 9600 Plus Caligration Tester to check the SureTemp Plus or Braun ThermoScan
PRO 4000 thermometer accuracy (see “Temperature Functional Check” on page 29).
Masimo SpO2 Functional Check
Use the Masimo Tester to check the functionality of the SpO2 module of Spot LXi (see
“Masimo SpO2 Functional Check” on page 32).
Nellcor SpO2 Functional Check
Use a Nellcor approved simulator to check the functionality of the SpO2 module of Spot
LXi (see “Nellcor SpO2 Functional Check” on page 32).
Functional Testing Procedures
Perform the functional testing procedures in this section before returning Spot LXi into
service.
Verify you are using a calibrated pressure meter with an accuracy of better than ±3 mmHg
and that the calibration certificate is traceable to NIST.
Subtract the rated accuracy of the pressure measurement standard from the ±3 mmHg
rated accuracy of Spot LXi. This is the pass/fail criteria to determine if the device is within
calibration. If the differences between Spot LXi and the pressure measurement standard
are within the pass/fail criteria at all specified pressures then the device is within
calibration.
1. Follow the steps in
2. Enter the
buttons to select Blood Pressure > BP Calibration Check.
3. Connect to the 500 cc cylinder.
4. Select Test > Calibration in the repair software. The dialog box displays the device
manometer reading, battery reading, and valve and pump status.
5. Use the Navigation and Select buttons to select Blood Pressure > BP Calibration
Check.
6. Verify the valve on Spot LXi is closed (the menu choice shows “Open Valve”).
7. Use the hand bulb to verify Spot LXi is within calibration specification at the target
pressures of 250±5 mmHg, 150 ±5 mmHg, 50 ±5 mmHg, and 0 mmHg with each
reading within ±3 mmHg of the target pressure except for the 0 mmHg reading which
is within ±1.0 mmHg.
“Internal Configuration Mode” on page 24. Use the Navigation and Select
“Connections” on page 34.
8. Set the power supply to 5.6 Vdc (+0.3/-0.0 Vdc). Verify the voltage reading meets the
specification (see “Voltage Calibration” on page 82).
After completing this test, return the power suppy to 6.5 Vdc (+0/-0.25 Vdc).
Page 49

Service Manual Troubleshooting 41
Current Test
1. Follow the steps in
2. Power off Spot LXi and then power on in normal mode.
3. Select Test > Current Levels in the Spot LXi Repair Software. Use the reading from
the current meter and record the following current levels:
a. Sleep State
b. Patient DAQ Mode
c. Valve Pump Mode
The test result is a pass or fail result.
4. Select Ok to exit the dialog box.
Noise Levels
1. Follow the steps in
2. Select Test > Noise Levels in the Spot LXi Repair Software and press the Test button
to retrieve Spot LXi’s internal pressure channel noise level. The test result is a pass or
fail result.
3. Select Ok to exit the dialog box.
“Connections” on page 34.
“Connections” on page 34.
Button Test
1. Follow the steps in
2. Select Test > Button Test in the Spot LXi Repair Software and press each button on
Spot LXi while verifying that the computer acknowledges each button in the “Test
Buttons” display.
3. Select Ok to exit the dialog box.
Interface Test
1. Follow the steps in
2. Select Test > Display > all on in the Spot LXi Repair Software to confirm the Window
Display shows all of the segments.
3. Select all off in the Spot LXi Repair Software to confirm the Window Display clears all
of the segments.
4. Select Test Pattern in the Spot LXi Repair Software to confirm the Window Display
shows a checkerboard pattern.
5. Select Normal in the Spot LXi Repair Software to confirm the Window Display
returns to the normal display.
6. Select on in the backlight Spot LXi Repair Software to confirm the Window Display
backlight comes on.
“Connections” on page 34.
“Connections” on page 34.
Page 50

42 Troubleshooting Welch Allyn Spot Vital Signs LXi
7. Select off in the backlight Spot LXi Repair Software to confirm the Window Display
backlight goes out.
8. Select annunciator to confirm the buzzer of Spot LXi is on. Select Ok to exist the test
and turn the buzzer off.
9. Select Ok to exit the dialog box.
Pneumatic Tests
1. Follow the steps in
2. Attach the test system to the 100 cc cylinder. Select Test > Pneumatic > Leak Test.
The software tests for leaks and provides a Pass or Fail indication.
3. Attach the test system to the 500 cc cylinder. Select Dump Test . The software tests
for the dump speed and provides a Pass or Fail indication.
4. Attach the test system to the 250 cc cylinder. Select Inflation Test. The software
tests for the inflation time and provides a Pass or Fail indication.
5. Attach the test system to the 100 cc cylinder. Select Valve Control Test. The
software tests for valve control and provides a Pass or Fail indication.
6. Select Ok to exit the dialog box.
Temperature Test
See “Temperature Functional Check” on page 29 to test either the SureTemp Plus or the
Braun ThermoScan PRO 4000 thermometer.
Overpressure Test
1. Connect the UUT pneumatic tubing, see
“Connections” on page 34.
Figure 12 on page 34.
2. Disconnect and close the tubing connected to the test volumes.
3. Start a blood pressure cycle and observe the pressure meter. Slowly squeeze the
bulb to increase the pressure. Verify the unit displays an E10 error condition when the
pressure is between 296 mmHg and 329 mmHg.
Page 51

Service Manual Troubleshooting 43
Service Work Checklist
Spot Vital Signs
Model Number Serial Number BP Cycle Count Technician Date
Test Test Data Pass/Fail Test Specification
Unit SW Version
SPO2 SW Version
Thermometry SW Version
Unit Pressure @ 0 mmHg +/- 1 mmHg
Unit Pressure @ 50 mmHg +/- 1 mmHg
Unit Pressure @ 150 mmHg +/- 1.5 mmHg
Unit Pressure @ 250 mmHg +/- 2.0 mmHg
Test Voltage @ 5.5 V +/- 0.1 VDC
Current Test – Sleep State < 0.5 A
Current Test – Patient DAQ < 1.25 A
Current Test – Valve Pump < 2.0 A
Noise Level < 0.05 mmHg
Button Test Pass/Fail
Interface Test Pass/Fail
Leak Test <= 6mmhg in 15 seconds
Dump Test < 10 Seconds
Inflation Test < 7 Seconds
Valve Control Test Pass/Fail
Over Pressure Test 296 to 329 mmHg
SPO2 Sensor - Massimo 81% +/- 3% 61bpm +/- 1bpm
SPO2 Sensor - Nellcor 90% +/- 1% 60bpm +/- 1bpm
Temperature Calibration Suretemp Plus 96.8 +/- 0.2F 105.8 +/- 0.2F
Temperature Calibration Braun Pro 4000 96.8 +/- 0.2F 105.8 +/- 0.2F
Temperature Cal Key Suretemp Plus 97.3 +/- 0.2 F
Page 52

44 Troubleshooting Welch Allyn Spot Vital Signs LXi
Page 53

45
6
Disassembly and Repair
This chapter provides the instructions for removing and replacing serviceable modules in
the Spot Vital Signs LXi.
In general, re-assembly procedures are the reverse order of the disassembly procedures.
WARNING Electric shock hazard. There are no user-serviceable parts inside Spot
LXi other than battery replacement (see “Battery Replacement” on page 79). An
operator may only perform maintenance procedures specifically described in this
manual. For service, refer the device to an Authorized Service Center.
Note
To disassemble Spot LXi:
1. Gather the following tools to have available during the procedures.
Always disconnect the sealed lead-acid battery in the Spot Vital Signs LXi before
performing any repair function.
Description Part Number Qty Source
Blood Pressure Test Volume Repair Fixture 401028 1 Welch Allyn
Spot LXi Repair Software 401710 1 Welch Allyn
Serivce Manual, Spot LXi 704432 1 Welch Allyn
Tester, Calibration, 9600 Plus 01802-110 1 Welch Allyn
Blood Pressure Y-Tube, No Fittings 1/8 Tube 5082-183 1 Welch Allyn
Pliers 1 Tool/Supply Store
Wire Cutter 1 Tool/Supply Store
Tweezers 1 Tool/Supply Store
#2 Phillips Screwdriver 1 Tool/Supply Store
T10 Torx Driver 1 Tool/Supply Store
Cable Tie Tool 1 Tool/Supply Store
*Setra Pressure Meter 2270-01 1 Setra +1 800 257 3872
*Netech Pressure Meter 2000 in 1 Netech +1 800 547 6557
Masimo SpO2 Tester 1593 1 Masimo +1 800 326 4890
Nellcor SRC-MAX SpO
Cable, USB A to 5 pin mini 1 Electronics Supply Store
Digital Volt Meter with 4 1/2 Digit Display 2 Electronics Supply Store
Tester SRC-MAX 1 Nellcor +1 800 635 5267
2
Page 54

46 Disassembly and Repair Welch Allyn Spot Vital Signs LXi
Battery Door
Screws (4 places)
Top, back housing
screws (2 places)
Description Part Number Qty Source
Power Supply: 0-20 Vdc adjustable with 0-3A
output
IBM compatible computer Windows 2000, XP,
NT4
* Only requires one of the pressure meters
1 Electronic Supply Store
1
2. Disconnect the power and all accessories from the Spot LXi.
3. Remove the four screws holding the battery door using a phillips-head screwdriver.
Remove the battery door to expose the battery.
4. Tip the Spot LXi backward and slide the battery out. Disconnect the one-way
connector.
5. Remove the two screws inside the battery housing that are identified with arrows
molded into the housing and the two screws at the top of the back upper housing.
6. Hold the device together, lay the back housing on the bench, and carefully lift the top
housing off.
Page 55

Service Manual Disassembly and Repair 47
7. Remove the screw and slightly lift the circuit board from the right facing side and
disconnect the flex cable.
8. Lift and disconnect the wire harnesses and the pneumatic tubing.
9. Disconnect the red electrical connector and the gold ribbon connector.
Page 56

48 Disassembly and Repair Welch Allyn Spot Vital Signs LXi
10. Lift the flap on the beige connector to remove the main board.
Key Pad Disassembly
1. Gently pull the button switch array out of the cover.
2. Align and push the new button switch array into place.
Page 57

Service Manual Disassembly and Repair 49
SpO2 Circuit Board Disassembly
Masimo
1. Lay the LCD flat on an ESD mat.
2. Find the double-stack of circuit boards and remove the four corners screws. Carefully
lift the circuit board straight up.
Note
To assure proper SpO2 operation, replace the SpO2 board using only the Welch
Allyn specified part.
To assure patient electrical isolation, after the main board is nearly back in
position, verity that the SpO
2
flex cable is freely floating in space and is not
pressed up against the main board.
Page 58

50 Disassembly and Repair Welch Allyn Spot Vital Signs LXi
3. Remove the three screws on the circuit board located behind the LCD.
Nellcor
4. Slightly rock the circuit board back and forth while lifting straight up.
5. Replace with a new circuit board.
1. Lay the LCD flat on an ESD mat.
2. Remove the three screws on the circuit board located behind the LCD.
Page 59

Service Manual Disassembly and Repair 51
3. Slightly rock the circuit board back and forth while lifting straight up.
4. Replace with a new circuit board.
Blood Pressure Circuit Board Disassembly
Remove the four screws and carefully lift the circuit board straight up. There is one
stationary connector.
Page 60

52 Disassembly and Repair Welch Allyn Spot Vital Signs LXi
Page 61

Service Manual Disassembly and Repair 53
LCD Inverter Ballast Board Disassembly
This is a small board held in place with two-sided tape. It is located towards the bottom of
the main board. Remove the connector at each end and pull straight up.
LCD Disassembly
1. Remove the main board. At the bottom of this board is a circuit board with a pink
connector at the bottom.
2. Pull the brown tabs of the top connector forward and remove the ribbon cable.
3. Turn the board over, pull back the soft rubber holders, and remove the LCD.
4. Replace with a new LCD.
Page 62

54 Disassembly and Repair Welch Allyn Spot Vital Signs LXi
Pump Disassembly
1. Snip the wire ties (2 places).
2. Disconnect the pneumatic tubing and unhook the wiring.
3. Replace with a new pump.
RS232-Communication Circuit Board Disassembly
1. Remove the pneumatic connector from the pump and the two screws.
2. Release the catch and remove the cover and inner handle assembly.
3. Remove the connection port panel.
4. Inside the back housing, remove the two screws.
5. Slide the board straight out and remove the connector.
6. Replace with a new circuit board.
Note
For proper blood pressure operation, replace the pump using only the Welch Allyn
specifed part.
To assure patient electrical isolation, route the pump wires through the rear
housing clip feature (near the pump terminals) and held in place with a tiewrap to
the holes in the rear housing at the back of the battery compartment.
To assure patient electrical isolation, do not modify the length of the pump wires.
Page 63

Service Manual Disassembly and Repair 55
Fan and Power Circuit Board Disassembly
Note
This is a small board held in place with two-sided tape and one connector. Remove the
screw before disconnecting the connector.
To prevent buildup of hydrogen gas, replace the fan using only the Welch Allyn
specified part.
Thermometry Circuit Board Disassembly
Note
SureTemp Plus
Note
1. Remove the two screws located at the thermometer housing with a T-10 torx wrench.
To assure patient electrical isolation, trap the flex cable to the thermometer pod
behind the clip on the main housing adjacent to the main board connection point.
To assure patient electrical isolation, verify that the correct flex cable is used to
connect the thermometer pod to the main board. The Braun and SureTemp Plus
flex cables are slightly different in length and are not interchangeable.
To protect the user from high voltage, properly install the thermometer pod
insulating paper separating the LCD ballast wires from the housing crack.
Do not attempt to repair or clean the solder joints on either SureTemp Plus board.
Incorrect flux or technique can degrade thermomter accuracy.
Save the fish paper.
2. Locate the path of the notched tabs on the housing. Slide the housing up and out
following this path and set the case aside.
Page 64

56 Disassembly and Repair Welch Allyn Spot Vital Signs LXi
3. Remove the four screws from the mounting plate and save the fish paper. This
exposes the circuit board.
4. Remove the three screws on the board (one on top and one on either side of the
probe well cover) and lift the board out of the housing.
5. Disconnect all connectors and replace with a new board.
Page 65

Service Manual Disassembly and Repair 57
Braun ThermoScan PRO 4000
1. Remove the two screws located at the thermometer housing with a T-10 torx wrench.
Save the fish paper.
2. Locate the path of the notched tabs on the housing. Slide the housing up and out
following this path and set the case aside.
3. Remove the springs and posts. Carefully rock the board back and forth while lifting
straight up.
4. Disconnect all connectors and replace with a new board.
Page 66

58 Disassembly and Repair Welch Allyn Spot Vital Signs LXi
Page 67

59
7
Technical Overview
System Description
The Spot Vital Signs LXi automatically measures systolic and diastolic pressure (excluding
neonates), pulse rate, temperature (oral, adult axillary, pediatric axillary, rectal, and ear),
and pulse oximetry (SpO2) as well as calculates Mean Arterial Pressure (MAP).
Furthermore, Spot Vital Signs LXi allows the entry of height, weight, respiration rate, and
pain level. Spot Vital Signs LXi also calculates Body Mass Index (BMI) following height and
weight entry.
The device is intended to be used by clinicians and medically qualified personnel. It is
available for sale only upon the order of a physician or licensed health care provider.
Refer to the Spot Vital Signs LXi Directions for Use manual for complete information.
Battery System
Spot LXi includes a 6 Volt, 6 amp-hour sealed lead-acid battery that supplies all power to
the device. An external power supply charges the battery. The battery is always on-line
(floated) rather than switching out when attached to the external power supply.
Spot LXi uses a fuse and a shunt diode for protection against reverse battery connections.
The fuse is located on the main board in the negative battery line and a reverse battery
connection causes it to blow and require repair. The negative line location is more likely to
short the battery (+) wire to ground than short the battery (-) wire to the VBUS node.
Battery Charger
Provides two levels of power to fast-charge or to float the battery at fixed voltages using
software control. The fast-charge level rapidly brings the battery up to near-full capacity (7
Volts) using software to not overcharge the battery. The float level, set per the
manufacturer’s recommendation, slowly tops-off the battery and can stay on indefinitely.
“CPU I/O” Power Supply
Provides power to the I/O pins of the DragonBall MPU and the attached peripheral IC’s.
The nominal voltage is set to a value of 3.15 Volts so that both the 3.0 Volt MPU and 3.3
Volts peripherals can operate within specifications. Spot LXi uses buck switching topology
for efficiency and an on-off power latch directly controls the power supply.
CPU Core Power Supply
Powers the MPU core only and operates at the recommended Dragonball voltage range
of 1.8 +/- 0.1 Volts; 2.0 Volts absolute max.
Page 68

60 Technical Overview Welch Allyn Spot Vital Signs LXi
The +3.15 Volt supply powers the +1.8 Volt supply for efficiency and, more importantly, for
power sequencing. During power-on the +1.8 Volt supply cannot exceed the +3.15 Volt
supply. The R207/C182 further delays the +1.8 Volt supply. During power-off, D106
prevents the +1.8 Volt supply from exceeding the +3.15 Volt supply by more than a partial
diode drop.
+5V Supply
Provides supply to miscellaneous loads that require more than 3.15 Volts. The Power
Latch controls the supply and the average load current is small, so efficiency is not
important.
Clock/Calendar Power
The Clock/Calendar U19 receives power from two sources. During power on the clock
runs from the +5 Volt supply and during power down the clock receives power directly
from the battery potential using a voltage divider. Capacitor C131 provides power to the
U19 during the battery exchanges. Zener D102 prevents overvoltage to U19 in the case of
operation directly from the charger.
Mod F NIBP Power
This module is powered directly from VBUS through an EMI filter. Software via BP-PWRON-BAR controls the power. Level shifter Q115 / Q104 assures that the module remains
off when the MPU is unpowered.
SpO2 and Thermometer Power
A common structure supplies SpO2 and thermometry. A single push-pull driver delivers
squarewave power to a pair of isolation transformers, one for SpO2 and the other for
thermometry. THERM-PWR-BAR activates the driver under software control. Level
shifter Q118, Q119 assures that the module remains off when the MPU is unpowered.
In the push-pull (forward) configuration, VBUS is multiplied by the transformer turns ratio
and supplied to the input of the rectifier diodes. This is filtered and passed through lownoise 5-Volt linear regulators to supply power to the parameter modules.
LCD Power
The LCD data interface connects directly to the +3.15 Volt MPU I/O power supply. This
powers the driver ICs inside the LCD pane and assures the data interface to the LCD is
always powered when the unit is powered.
The contrast (bias) supply to the LCD panel and the LCD CCFL backlight both derive
power indirectly from a pre-regulator. A software control can shut down the pre-regulator.
For efficiency, it is implemented as a buck switcher operating directly from the battery.
The primary purpose of the pre-regulator is to protect the backlight inverter / ballast from
battery voltages that it cannot tolerate and to control current out of the unregulated
ballast. The voltage is set to the low side of 5 Volts to reduce battery consumption, while
still driving the CCFL with adequate voltage.
Page 69

Service Manual Technical Overview 61
External Load (RS-232) Power
There are two power outlet means on the Spot LXi – RS-232 port power and the Braun
PRO 4000 charger.
Two isolated power supplies provide power to each of the external RS-232 ports. This
power is available to external devices on pin 9 of each serial connector whenever the
software enables the corresponding RS-232 port.
SureTemp Plus Thermometer Interface
The SureTemp Plus OEM module is located in an optional pod and is connected to the
main PCB via a flex cable.The Thermometer Probe connection is located on a separate PC
board. It is connected to the SureTemp Plus OEM module by a ribbon cable. The
electrical interface to the thermometer pod is a 6-pin ribbon connector, Molex 52271-0690
or equivalent.
Braun ThermoScan PRO 4000 Thermometer Interface
The interface to the Braun ThermoScan PRO 4000 thermometer is located in the optional
pod and connects to the main PCB via a flex cable. The communications link is a single
duplex current loop that also charges the Braun battery pack.
The presence or absence of current passing through the Braun ThermoScan PRO 4000
charge contacts controls the interface charge LED, located within the pod, which mimics
the Braun ThermoScan Pro 4000 Base Station (type 6021).
SpO2 Description
A shielded flat-flex cable connects the user interface sensor connector J8 to the SpO2
electronics.
The Masimo SpO2 module mates to the Masimo Adaptor Board that, in turn, mates to the
Main board. This provides power and communications to the module from the Main
board.
The Nellcor SpO
communications to the module, and brings the sensor signals to the main board where
EMI and ESD can be controlled. The sensor signals pass through the main board to the
mating connector for the shielded flat-flex cable.
module mounts directly to the Main board. This provides power and
2
Page 70

62 Technical Overview Welch Allyn Spot Vital Signs LXi
Bar Code Scanner Description
The bar code scanner is the IMAGETEAM™ 3800/3900, programmed as follows:
Parameter Setting Factory Default
Terminal Interfaces:
Baud Rate: 9600 9600
Data Bits: 7 7
Stop Bits: 7 7
Parity: Even Even
Handshaking: None None
Output:
Scan Rate: 67 s/s 270s/s
Beeper Volume: Off High
Trigger Mode: Manual Trigger, Low Power Manual Trigger
Lower Power Time Out: 5 seconds -
Data Editing:
Prefix1: <STX><SOH><DC2> (Ctl-BAR) None
Suffix1: <CR><LF> <CR><LF>
NOTES:
1. Applies to all symbologies.
The bar code scanner interfaces to Spot LXi through an isolated RS-232 DB-9 Female
connector. A standard IMAGETEAM™ 3800/3900 cable is required for use with the
scanner.
Page 71

Service Manual Technical Overview 63
Printer Description
All models of the Ap1300 printer use an industry standard RS-232 interface. The default
parameters are 9600 baud, 8 data bits, 1 stop bit, and no parity.
Serial data is expected in standard RS-232C format with -12 Volt meaning ‘mark’ or ‘1’ and
+12 Volt a logical ‘0’, with reference to the common ground. The serial data output line,
TxD, transmits XON/XOFF and status information to the host at the same Baud rate and in
the same format as the serial data input. The hardware busy line is true (nominal -12 Volt)
when busy. Both serial output lines will relax to approximately 0 Volt when the Ap1300 is
in sleep mode and the user must allow a short period after awakening before relying on
the values of these signals.
The Ap1300 has three operating modes, when not actually printing.
Idle Mode Ready to accept data, but no data are in the buffer
awaiting printing and the printer motor is not running.
Sleep Mode Effectively switched off.
Spool Mode Active, but storing data for later printing.
Different color combinations on the front-panel LED indicate the modes. No light is
emitted in sleep mode.
Table 14. LED Pattern Table
Pattern Battery Buffer Mode
Constant Green Running Normal
Fast Flashing Green Running Spool *
Long Green - Short Red Battery Low Normal
Short Green - Short Red Battery Low Spool *
Short Green - Long Orange Trickle Charging Normal
Long Orange Flash Trickle Charging Spool *
Fast Flashing Orange Fast charging Spool (Printing prohibited)
Fast Flashing Red Error Condition Spool (Printing prohibited)
No Light Flat or in sleep mode
* Spool may have resulted from Paper Out or Head Up conditions)
No hardware power switch is fitted, as power control is either automatic or by command
from the host computer. To save power, the printer enters sleep mode after a period of
inactivity, factory-set to 30 seconds, but prorammable from the host. It can also be
programmed to stay idle indefinitely or to go to sleep on command.
The Ap1300 utilizes Fujitsu FTP-628MCL 103 printer mechanism, with a fixed (parallel)
print head with 384 horizontally-arranged thermal elements. A stepper motor advances
the paper and the printing takes place in a single-dot row for each step of the paper. Each
printed dot is approximately 1/8 mm square. The printing speed and dot density are
controlled according to the battery voltage and the head temperature.
Page 72

64 Technical Overview Welch Allyn Spot Vital Signs LXi
The Spot LXi provides two levels of power to fast-charge or to float the battery at fixed
voltages using software control. The fast-charge level rapidly brings the battery up to
near-full capacity (7 Volts) using software to not overcharge the battery. The float level, set
per the manufacturer’s recommendation, slowly tops-off the battery and can stay on
indefinitely.
Interconnect Diagram
Item Description Item Description
A1 PCA, Main, Spot LXi W1 Assy, Power Harness, Spot LXi
A1-F1 Fuse, FlastBlo, 5A W1-A1 PCA, Power Interface, Spot LXi
A2 PCA, Serial Interface, Spot LXi W2 Flex, Main, Spot LXi
A3 Display, LCD, 320 x 240, Mono W3 Cbl Flx, 1/2mm, 15 POS
A4 Inverter, LCD W4 Assy, Ballast Harness, Spot LXi
A5 Assy, Battery, Spot LXi W5 Assy, LCD Gnd Harness
A5-F1 Wire Protection Fuse W6 Assy, Cable, Flat Flex, SpO
A6 Assy, Fan Unit Cooling Wire Clip, Side Entry, .375 Wide
A7 PCA, Masimo Adapter, Spot LXi Foam Strip, 2 Sided Adhesive
A8 Masimo MS-11 SpO
Shield, Masimo EMI W8 Cbl, Flx, 1mm, 8POS
Tape, Copper, Masimo Shield W9 Cbl, Flx, Braun, Spot LXi
A9 PCA, SureTemp Plus, OEM w/o EDAC
A10 PCBA, BP OEM, (MOD F)
A11 Assy, Pump, and Tubing, Spot LXi
A11-F1 Filter, Air, 1/8 Barbs
A12 Assy, Transducer Tubing, Spot LXi
A13 PCA, EDAC, Spot LXi
A14 Nellcor MP506 SpO
A15 PCA, Braun Interface, Spot LXi
2
PCB
2
W7 Cbl, Flx, 1mm, 6POS
2
BLK Black
BRN Brown
RED Red
ORN Orange
GRN Green
BLU Blue
PNK Pink
Wire Color
Page 73

5
5
4
4
3
3
2
2
1
1
D D
C C
B B
A A
BATTERY
+
+
-
+
FAN
+
+
THERMOMETER
INTERFACE
(EDAC) BOARD
Mini-D
LCD
Pinout on LCD is
reversed from
standard Molex
assignment.
1
151
30
SERIAL II
1
USB
DEVICE
VBUS
POWER
SERIAL I
CN1
3
3
2
CN2
W4
W5
J2
J3
J1
A2
J11
J10
W3
A3
A4
A1
W1
A5
A6
A7
A8
A9
A10
W6
W7
W1-A1
MAIN
BOARD
INVERTER /
BALLAST
SERIAL
INTERFACE
BOARD
BATTERY
FAN
POWER
INTERFACE
BOARD
J4
W1-A1-J 3
W1-A1-J P2
+
center = +
Ferrite
POWER
J104
LCD
J106
JTAG
A1-J5
RESET
S3
J107
BACKLIGHT
J110
X1 X3
SERIAL
INTERFACE
J108
SPO2 SENSOR
J6 P6
SPO2 FPC ASSY
SPO2
J8
Ferrite
FFC
FFC
W2
CHARGER
J102
SPO2 CONTR OL SENSOR
J101
MASIMO
ADAPTOR BOARD
P102 P101
POWER H ARNESS
P1P3
SENSORCONTROL
A8-J3 A8-J1
MASIMO SPO2
BOARD
Shield
J103
THERMOMETER
FFC
SURE TEMP
PLUS OEM
BOARD
A9-J1
PROBECONTROL
1
6
A9-J3
W8
1
8
J90
J5
SURETEMP
PLUS
PROBE
J105
NIBP CONTROL
NIBP BOARD
M
A10-J80
PUMP
A11
A13
PUMP &
TUBING
A12
FILTER
FFC
A10-P6
VALVE
SENSOR
A10-J81
1 1
1 1
2
2
1
1
2
1
1
1 1
1
A5-F1
1
1
1
PRODUCT ENCLOSURE
Note: This page depicts interconnect for basic unit plus Masimo
SPO2 and SureTemp Plus Thermometer options.
BLOOD
PRESSURE
CUFF
TRANSDUCER
TUBING
A11-F1
Spot Lxi Interconnect Diagram
K Burdick
B
12/6/05 1 of 2
A
Source document:
-
-
40700-HDD
THIS INFORMATION IS THE
PROPERTY OF WELCH
ALLYN. IT IS SUBMITTED IN
CONFIDENCE AND IS NOT
TO BE DISCLOSED OR
UTILIZED WITHOUT
WRITTEN PERMISSION.
APPROVALS DATE
WELCH ALLYN
CHECK
PROJ. MGR.
TITLE
SIZE
NUMBER
REV
DATE
DRAWN BYPCA Mat'l # (ref)
SHEETPCB Mat'l # (ref)
CHG-GND
BAT-GND
+5LCD
SERA-EN
USB-RCV
SERA-CTS-BAR
USB-ID-BAR
USB-VPO
SERA-TX-BAR
SERA-PF-BAR
SERA-RXE
USB-VMO
SERA-RTS-BAR
USB-VM
SERB-CTS-BAR
USB-VP
SERB-RXE
SER-SYNC
SERB-EN
USB-OE-BAR
USB-SUSPND
SERB-PF-BAR
SERB-RTS-BAR
SERB-TX-BAR
BLKPNK
WHT
VBUS-IO
BLK
RED
WHT
ORN
GRN
BLU
BLU
GRN
LCD-VEE
LCD-D1
LCD-D2
LCD-D3
LCD-D0
LCD-VDD
LCD-LACD
LCD-LSCLK
LCD-LP
LCD-FLM
CHG-IN
VBUS
BAT-IN
BLK
RED
BLK
RED
RED
SPO2I-RESET-BAR
SPO2I-TX
SPO2I-RX
SER-GND
BLK
RED
ZC+5V
ZC+5V
DGNDDGND
DGND
+3.15V
DGND
+3.15V
DGND
DGND
+HST-IF
+5V
DGND
GND-IO
DGND
GND-ZBX
GND-ZBI
GND-ZB
GND-ZCDGND
GND-ZD
GND-ZE
ANODE
IR-C
RED-C
CATH
INNER
INNER
123456789
10
A1-F1
FUSE 5A
DTE
DCD
RXD
TXD
DTR
DSR
RTS
CTS
1
3
5
7
9
2
4
6
8
MNT8
MNT7
D4/NC
D5/NC
D6/NC
D7/NC
DISP-ON
VDD
CP
FRM
VEE
LOAD
VSS
D0
D1
D2
D3
15
14
13
12
11
10
9
8
7
6
5
4
3
2
1
DET+
GND-DIGI
DIGICAL
DET-
LED (8)
LED (1)
INNER
123456789
10
MNT6
NOPOP
12
34
56
78
910
1112
1314
1516
1718
1920
ANODE
CATH
INNER
INNER
DIGI-CAL
OUTER
LED(1)
OUTER
LED(8)
DIGI-GND
1
2
3
4
5
6
7
8
9
10
4
6
5
7
8
9
10
11
12
13
14
15
16
17
18
20
19
21
22
23
24
3
2
1
25
26
27
28
29
30
1
2
3
4
5
6
7
8
D107
1 2
MNT21 MNT22
12345
2
1
2
1
MNT9
MNT24
A1-JP2
0
Cut out for MS-11
1 2
DTE
DCD
RXD
TXD
DTR
DSR
RTS
CTS
1
3
5
7
9
2
4
6
8
MNT10
GND
HOST-WAKEUP-BAR
POWER
TXRXRESET-BAR
12345
6
1
2
3
4
5
6
7
8
9
10
11
12
13
14
15
CTS-BAR
C-LOCK
+12V
ANA-OUT
+5VD
+5VA
123456789
1011121314
MNT5
+5VA
RSTRXDAV
TX
123456789
10
MNT4
12
2
1
3
4
5
6
2
1
HOST_TX
VBUS
GND
HOST_DSR
HOST_RX
GND
PWR_ON
ECG_SYNC
1234567
8
MNT23
Page 74

5
D D
LCD-D0
1
LCD-D1
2
LCD-D2
3
LCD-D3
4
5
6
7
8
LCD-VEE
9
10
LCD-VDD
11
LCD-LACD
12
DGND
LCD-LSCLK
13
LCD-LP
14
LCD-FLM
15
J106
LCD
A1-F1
FUSE 5A
J105
NIBP CONTROL
VBUS
HOST_TX
GND
HOST_DSR
GND
PWR_ON
ECG_SYNC
HOST_RX
1234567
8
VBUS
D107
1 2
DGND
DGND
BAT-IN
1
SER-GND
C C
B B
2
3
4
CHG-IN
5
CHG-GND
6
J104
POWER
MNT8
MNT7
BAT-GND
4
2
1
X3
X1
DGND
DGND
J110
DGND
BACKLIGHT
A1
MAIN
BOARD
J5
JTAG
NOPOP
12
34
56
78
910
1112
1314
1516
1718
1920
HOST-WAKEUP-BAR
TXRXRESET-BAR
6
W9
FFC
+3.15V
GND-ZC
GND
POWER
J103
12345
THERMOMETER
S3
RESET
12
J102
SPO2 CONTR OL
GND-ZB
+3.15V
DGND
MNT9
MNT10
3
12345
J107
DGND
SPO2I-TX
SPO2I-RX
SPO2I-RESET-BAR
+5VA
CTS-BAR
+12V
+5VD
C-LOCK
ANA-OUT
123456789
1011121314
1
A14-J2 A14-J1
CONTROL SENSOR
A14
NELLCOR
SPO2
BOARD
+5LCD
A1-JP2
0
1 2
Cut out for MS-11
J108
SERIAL
INTERFACE
J101
SENSOR
DET+
GND-DIGI
DIGICAL
DET-
INNER
123456789
1
LED (8)
LED (1)
10
SERA-PF-BAR
SERA-EN
SERA-CTS-BAR
SERA-RXE
SERA-TX-BAR
SERA-RTS-BAR
+HST-IF
+5V
SER-SYNC
SERB-PF-BAR
SERB-EN
SERB-CTS-BAR
SERB-RXE
SERB-TX-BAR
SERB-RTS-BAR
USB-ID-BAR
USB-SUSPND
USB-OE-BAR
USB-VP
USB-VM
USB-RCV
USB-VPO
USB-VMO
DGND
SPO2 SENSOR
ANODE
CATH
INNER
INNER
DIGI-CAL
OUTER
LED(1)
OUTER
LED(8)
DIGI-GND
GND-ZBI
GND-ZBX
MNT5MNT6MNT4
2
1
2
3
4
5
6
7
8
9
10
11
12
13
14
15
16
17
18
19
20
21
22
23
24
25
26
27
28
29
30
1
J6
1
2
3
4
5
6
7
8
9
10
W6
FPC
J8
SPO2
Mini-D
A15-J1
CONTROL
6
1
PRODUCT ENCLOSURE
A A
5
4
3
2
A15
BRAUN
INTERFACE
BOARD
A15-J2
WELL
CONTACTS
CHG/DATA
GND
2
1
Note: This page depicts interconnect for Nellcor SPO2 and Braun
Thermometer options only.
THIS INFORMATION IS THE
PROPERTY OF WELCH
ALLYN. IT IS SUBMITTED IN
CONFIDENCE AND IS NOT
TO BE DISCLOSED OR
UTILIZED WITHOUT
WRITTEN PERMISSION.
APPROVALS DATE
CHECK
PROJ. MGR.
Source document:
40700-HDD
-
TITLE
Spot Lxi Interconnect Diagram
-
SIZE
B
DATE
DRAWN BYPCA Mat'l # (ref)
1
WELCH ALLYN
NUMBER
12/6/05 2 of 2
K Burdick
REV
SHEETPCB Mat'l # (ref)
A
Page 75

8
65
Field Replaceable Units
The following list identifies the available FRUs for Spot Vital Signs LXi. To order an FRU,
contact Welch Allyn Technical Support.
Table 15. Spot LXi Base Components
Component Number Object Description
400163 ASSY, POWER HARNESS, SPOT LXi
400170 ASSY, PUMP HARNESS
400198 PCA, SERIAL INTERFACE, SPOT LXi
400199 PCA, MAIN, SPOT LXi
400200 BASE UNIT, SURETEMP, NELLCOR - SPOT LXi
400203 BASE UNIT COMPONENTS, SPOT LXi
400207 LANGUAGE COMPONENTS, ENG, SPOT LXi
400208 ASSY, PUMP & VALVE TUBING SPOT LXi
400387 PBCA BP OEM, (MOD F)
400720 ASSY, BALLAST HARNESS, SPOT LXi
400732 ASSY, BATTERY, SPOT LXi
421051-12 TUBING,1/8 X 1/4 X 2.50
421051-9 TUBING,1/8 X 1/4 X 0.95
59P586 FOOT, RUBBER
620028-E LABEL, CAUTION
620217 FITTING, "T", 1/8 X 1/16X 1/8
700101 HSG, HANDLE, LXi
700102 HSG, HANDLE INSERT, LXi
700103 HSG, REAR, LXi
700105 HSG, BATT DOOR, SPOT LXi
700110 BUMPER, LCD, SPOT LXi
700113 HSG, BEZEL, SPOT LXi
700114 SWITCH ARRAY, SPOT LXi
700115 WINDOW, LCD FRONT, SPOT LXi
700119 INVERTER, LCD
700824 HOUSING, FRONT, SPOT LXi
700851 BRACKET, MOUNTING, SPOT LXi
Page 76

66 Field Replaceable Units Welch Allyn Spot Vital Signs LXi
Table 15. Spot LXi Base Components
700852 PCB, POWER INTERFACE, SPOT LXi
704423 HSG, PANEL, SPO2-BLANK, LXi
401427 LABEL, ICON ID, SPOT LXi
700863 CBL,FLX, 1/2mm,15POS,1.0"
704375 CBL,FLX, 1/2mm,30POS,6.0"
703956 LABEL, BATTERY
701040 FITTING, PLASTIC L, 1/16 X 1/16
701502 Valve,Pneumatic,6PSI,5V,TH
703077 STANDOFF, PCB, BROACHING, #4 X .500 LG
703118 BATTERY CLIP, AA, SINGLE
703354 DISPLAY,LCD,320X240,BLITE,MONO,3.3V,5.7"
703355 FILTER, AIR, 1/8 BARBS
703842 TUBING, SILICONE, .063ID X .125OD X 5.50
Table 16. SureTemp Plus Components
Component Number Object Description
02692-100 PROBE ASSY,ORAL 9FT
02894-0000 ASSY,PRB WLL,BLUE,OEM,M690_692
20500-025 PACKAGING ASSY, CLEAR 25PK
400194 ASSY, SURETEMP+ COMPONENTS, SPOT LXi
400195 PCA, SURETEMP+, OEM W/O EDAC, CALIBRATED
400196 PCA, EDAC, LXi
700111 HOUSING, THERM OEM POD, LXi
700112 PLATE, POD MOUNTING, LXi
700858 CBL,FLX,1MM,6POS
700859 CBL,FLX,1MM,8POS
70999-0000 LABEL,SURETEMP TECHNOLOGY
02692-100 PROBE ASSY,ORAL 9FT
Table 17. Braun ThermoScan PRO 4000 Components
Component Number Object Description
400652 PCA, BRAUN INTERFACE, SPOT LXi
700112 PLATE, POD MOUNTING, LXi
700820 HSG, BOTTOM, BRAUN POD, SPOT LXi
700822 HSG, BRAUN POD, SPOT LXi
704365 WINDOW, BRAUN POD, SPOT LXi
700859 CBL,FLX,1MM,8POS
703161 SECURITY LOCK, BRAUN POD, SPOT LXi
Page 77

Service Manual Field Replaceable Units 67
Table 17. Braun ThermoScan PRO 4000 Components
Component Number Object Description
400652 PCA, BRAUN INTERFACE, SPOT LXi
703162 LATCH, BRAUN POD, SPOT LXi
703164 CONTACT, BRAUN POGO, SPOT LXi
703165 SPRING, COMPRESSION
703192 COVER, BRAUN SECURITY, SPOT LXi
Table 18. Masimo SpO2 Components
Component Number Object Description
008-0648-00 MASIMO - ADULT RESU. SENSOR
008-0692-01 MASIMO - 8' INTERFACE CABLE
400192 PCA, MASIMO OEM, SPOT LXi
400205 MASIMO SPO2 COMPONENTS, SPOT LXi
400555 PCA, MASIMO ADAPTOR, SPOT LXi
400610 ASSY, CABLE, FLAT FLEX, SPO2
704422 HSG, PANEL, SPO2-MASIMO, LXi
Table 19. Nellcor SpO2 Components
Component Number Object Description
400183 PCA, NELCOR OEM, SPOT LXi
400201 NELLCOR SPO2 COMPONENTS, SPOT LXi
400610 ASSY, CABLE, FLAT FLEX, SPO2
620377-1 "NELLCOR WORKS HERE" LABEL
704421 HSG, PANEL, SPO2-NELLCOR, LXi
DOC-10 CABLE, SP02 EXTENSION, NELCOR
DS-100A DURASENSOR,ADULT,DS-100A
Page 78

68 Field Replaceable Units Welch Allyn Spot Vital Signs LXi
Page 79

69
9
Specifications
Performance
This section describes normal ranges for Spot Vital Signs LXi.
Blood Pressure Accuracy
Blood pressure accuracy meets or exceeds AAMI SP10:2002 standards for non-invasive
blood pressure accuracy (± 5 mmHg mean error, 8 mmHg standard deviation). Blood
pressure accuracy is validated for pressure measurement using the upper arm only.
Cuff Pressure Range 0 to 300 mmHg
Systolic Range 60 to 250 mmHg
Diastolic Range 30 to 160 mmHg
Blood Pressure Determination Time Typical: 15 seconds
Mean Arterial Pressure Range 40 to 190 mmHg
Pulse Rate Range
(using SpO
Pulse Rate Range
(using Blood Pressure determination)
Pulse Rate Accuracy (using SpO
determination)
Pulse Rate Accuracy
(using Blood Pressure determination)
Overpressure Cutoff 315 mmHg ±15 mmHg
1
Specification applies to device performance and was validated with Biotek and Nellcor simulators.
determination)
2
25 to 240 bpm
35 to 199 bpm
2
With Motion: normal physiologic range (55 to 125 bpm) ± 5 digits
Without Motion: 25 to 245 bpm ± 3 digits
Low Perfusion: 25 to 245 bpm ± 3 digits
1
1
±5.0%
Page 80

70 Specifications Welch Allyn Spot Vital Signs LXi
Temperature Specifications
Temperature Range
SureTemp Plus
Braun ThermoScan PRO 4000
Calibration Accuracy
SureTemp Plus
Braun ThermoScan PRO 4000 for displayed
temperature ranges
Display Resolution 0.1° F or ° C
SureTemp Plus Predict Time
Oral
Adult Axillary
Pediatric Axillary
Rectal
± 0.4° F (±0.2° C) 95.9° to 107.6° F (35.5° to 42° C)
±0.5° F (±0.25° C) (outside this temperature range)
Approx. 12 to 15 seconds (age 18 years and older)
Approx. 10 to 13 seconds (age 17 years and younger)
80° to 110° F (26.7° to 43.3° C)
68° to 108° F (20° to 42.2° C)
±0.2° F (0.1° C) (Monitor Mode)
Approx. 4 to 6 seconds
Approx. 10 to 13 seconds
Page 81

Service Manual Specifications 71
SpO2 Specifications
Masimo Sensor Accuracy Guide
Accuracy specified when used with Masimo SET pulse oximetry monitors or with
licensed Masimo SET pulse oximetry modules using PC series patient cables, during no
motion. Numbers present ± 1 standard deviation. Plus or minus one standard deviation
represents 68% of the population. SpO
accuracy from 25 to 240 bpm.
accuracy from 70% to 100%. Pulse rate
2
Performance Measurement Range SpO
Pulse Rate: 25 - 240 beats per minute (BPM)
Perfusion 0.02% to 20%
Accuracy Saturation: 70% to 100%
No Motion: Adults, Pediatrics ± 2 digits
Motion: Adults, Pediatrics ± 3 digits
Low Perfusion: Adults, Pediatrics ± 2 digits
Pulse Rate Accuracy Pulse Rate: 25 to 250 bpm
No Motion: Adults, Pediatrics, Neonates ± 3 digits
Motion: Adults, Pediatrics, Neonates ± 5 digits
Low Perfusion: Adults, Pediatrics, Neonates ± 5 digits
: 1 to 100%
2
Neonates ± 3 digits
Neonates ± 3 digits
Neonates ± 3 digits
Table 20. Masimo Sensor Accuracy Guide
Saturation Accuracy Pulse Rate Accuracy
Sensor Weight Range No Motion Motion No Motion Motion
LNOP-ADT > 30 kg ± 2% ± 3% ± 3 bpm ± 5 bpm
LNOP-PDT 10 to 50 kg ± 2% ± 3% ± 3 bpm ± 5 bpm
LNOP-NEO < 10 kg ± 3% ± 3% ± 3 bpm ± 5 bpm
LNOP-NEOPT < 1 kg ± 3% ± 3% ± 3 bpm ± 5 bpm
LNOP-DCI > 30 kg ± 2% ± 3% ± 3 bpm ± 5 bpm
LNOP-DCIP 10 to 50 kg ± 2% ± 3% ± 3 bpm ± 5 bpm
Masimo Patents
The Masimo sensors and cables are covered under one or more of the following U.S.A.
patents: 5,758,644; 5,823,950; 6,011,986; 6,157,850; 6,263,222; 6,501,975; and other
applicable patents listed at www.masimo.com/patents.htm.
Page 82

72 Specifications Welch Allyn Spot Vital Signs LXi
Nellcor Sensor Accuracy Guide
Accuracy specifications are based on controlled hypoxia studies with healthy,
non-smoking adult volunteers over the specified saturation SpO2 range. Pulse oximeter
SpO2 readings were compared to SaO2 values of drawn blood samples measured by
hemoximetry. All accuracies are expressed as + “X” digits. This variation equals + one
standard deviation (+
Table 21. OxiMax Sensor Models, Single Patient Use
1 SD), which encompasses 68% of the population.
Sensor Models SpO
1
± 2
MAX-AI
MAX-PI* ± 2
MAX-II ± 2
2
MAX-RI
1
The accuracy specification under motion conditions is ± 3. For a definition of motion, contact Nellcor
Technical Services or your local Nellcor representative.
2
The accuracy specification has been determined between saturations of 80% to 100%.
Range
2
70% to 100%
± 3.5
Table 22. OxiCliq Sensor Models, Single Patient Use
Sensor Models SpO
OXICLIQ-PI ± 2.5
Range
2
70% to 100%
Table 23. Reusable Sensor Models
Sensor Models SpO
D-YS (Infant to Adult) ± 3
D-YS and D-YSE ± 3.5
D-YS and D-YSPD ± 3.5
DS-100A ± 3
OXI-A/N (Adult/neonate) Adult: ± 3
OXI-P/I (Pediatric/infant) ± 3
Range
2
70% to 100%
Neonate: ± 4
Nellcor Patents
Covered by one or more of the following US Patents: 4,802,486; 4,869,254; 4,928,692;
4,934,372; 5,078,136; 5,351,685; 5,485,847; 5,533,507; 5,577,500; 5,803,910; 5,853,364;
5,865,736; 6,083,172; 6,708,049; Re. 35,122 and foreign equivalents.
Page 83

Service Manual Specifications 73
WARNING This device is not suitable for use in the presence of a flammable
anesthetic mixture with air or oxygen or nitrous oxide. An explosion may result.
Operating Temperature 50° to 104° F (10° to 40° C)
Storage/Transport Temperature Device with SureTemp Plus: -13 to 131 F (-25 to 55 C)
Device with Braun ThermoScan PRO 4000: -4 to 122 F (-20 to 50 C)
Relative Humidity 15 to 95% (non-condensing)
Operating Altitude -557 to 16,000 ft. (-170 to 4877 m)
Mechanical
Electrical
Patents
Dimensions Height: 10.63 “ (27 cm)
Length/Braun: 8” (20.32 cm)
Length/SureTemp Plus: 7.5” (19 cm)
Depth: 5.25” (13.34 cm)
Weight 7.5 lbs (3.4 kg)
Mounting Self-supporting on rubber feet
Custom mobile stand
Custom wall mount
Portability May be hand-carried when held by the rear handle
Power Requirements Patient-rated isolation transformer is connected to AC mains:
North American Version: 120VAC, 60Hz. 0.20A Input, 8VDC, 0.75A Output
International Version: 240VAC, 50Hz 0.10A Input, 8VDC, 0.75A Output
Australian Version: 240VAC, 50Hz, 13VA Input, 8VDC, 0.75A Output
Patents Pending
Battery
Sealed lead acid, with external charger.
The Spot LXi battery is 90 to 100% charged after 6 hours of charging. The rechargeable
batteries in the Braun ThermoScan PRO 4000 thermometer requires an additional 1 hour
to charge and the rechargeable batteries in the external printer require an additional 4
hours to charge. The battery automatically charges when Spot LXi is powered through the
AC power transformer. An operator can use the device while the battery is charging;
however, the battery charges faster when the instrument is not in operation.
Environmental
Page 84

74 Specifications Welch Allyn Spot Vital Signs LXi
Wireless Radio
Wireless Network Interface IEEE 802.11b DSSS, WiFi compliant
Frequency 2.4 to 2.4835 GHz
Guidance and Manufacturer’s Declaration
Emissions and Immunity Information
Electromagnetic Emissions
The Spot Vital Signs LXi is intended for use in the electromagnetic environment specified below. The customer or user of the Spot Vital Signs
LXi should assure that it is used in such an environment.
Emissions Test Compliance Electromagnetic Environment - Guidance
RF emissions
CISPR 11
RF emissions
CISPR 11
Harmonic emissions
Group 1 The Spot Vital Signs LXi uses RF energy only for its internal function. Therefore, its RF
emissions are very low and are not likely to cause any interference in nearby electronic
equipment.
Class B The Spot Vital Signs LXi is suitable for use in all establishments, including domestic
establishments and those directly connected to the public low-voltage
power supply network that supplies buildings used for domestic purposes.
Class A
IEC 61000-3-2
Voltage fluctuations/
flicker emissions
IEC 61000-3-3
The Spot Vital Signs LXi is intended for use in the electromagnetic environment specified below. The customer or user of the Spot Vital Signs
LXi should assure that it is used in such an environment.
Immunity Test IEC 60601
Electrostatic discharge
(ESD)
IEC 61000-4-2
Electrical fast transient/
burst
IEC 61000-4-4
Surge
IEC 61000-4-5
Complies
Test Level
± 6 kV contact
± 8 kV air
±2 kV for power supply
lines
±1 kV for input/output
lines
±1 kV differential mode
±2 kV common mode
Electromagnetic Immunity
Compliance Level Electromagnetic Environment - Guidance
± 6 kV contact
± 8 kV air
±2 kV for power supply
lines
±1 kV for input/output
lines
±1 kV differential mode
±2 kV common mode
Floors should be wood, concrete, or ceramic tile. If floors are
covered with synthetic material, the relative humidity should
be at least 30%.
Mains power quality should be that of a typical commercial or
hospital environment.
Mains power quality should be that of a typical commercial or
hospital environment.
Page 85

Service Manual Specifications 75
Voltage dips, short
interruptions, and
voltage variations on
power supply input
lines.
IEC 61000-4-11
Power frequency
(50/60Hz)
magnetic field
>95% dip in 0.5 cycle
60% dip in 5 cycles
30% dip for 25 cycles
>95% dip in 5 seconds
>95% dip in 0.5 cycle
60% dip in 5 cycles
30% dip for 25 cycles
>95% dip in 5 seconds
3 A/m 3 A/m Power frequency magnetic fields should be at levels
Mains power quality should be that of a typical commercial or
hospital environment. If the user of the Spot Vital Signs LXi
requires continued operation during power mains
interruptions, it is recommended that the Spot Vital Signs LXi
be powered from an uninterruptible power supply or battery.
characteristic of a typical location in a typical commercial or
hospital environment.
IEC 61000-4-8
Electromagnetic Immunity
The Spot Vital Signs LXi is intended for use in the electromagnetic environment specified below. The customer or user of the Spot Vital Signs
LXi should assure that it is used in such an environment.
Immunity Test IEC 60601
Test Level
Compliance
Level
Electromagnetic Environment - Guidance
Portable and mobile RF communications equipment should be used no closer
to any part of the Spot Vital Signs LXi, including cables, than the
recommended separation distance calculated from the equation applicable
to the frequency of the transmitter.
Recommended separation distance
Conducted RF
IEC 61000-4-6
Radiated RF
IEC 61000-4-3
3 Vrms
150 kHz to 80 MHz
3 V/m
80 MHz to 2.5 GHz
3 Vrms
3 V/m
d = (1.17)
d = (1.17) 80 MHz to 800 MHz
d = (2.33) 800 MHz to 2.5 GHz
P
P
P
P is the maximum output power rating of the transmitter in watts (W)
where
according to the transmitter manufacturer and
d is the recommended
separation distance in metres (m).
Field strengths from fixed RF transmitters, as determined by an
electromagnetic site survey,
each frequency range.
a
should be less than the compliance level in
b
Interference may occur in the vicinity of equipment marked with the
following symbol:
Note 1: At 80 MHz and 800 MHz, the higher frequency range applies.
Note 2: These guidelines may not apply in all situations. Electromagnetic propagation is affected by absorption and reflection from structures,
objects, and people.
a
Field strengths from fixed transmitters, such as base stations for radio (cellular/cordless) telephones and land mobile radios, amateur radio,
AM and FM radio broadcast and TV broadcast cannot be predicted theoretically with accuracy. To assess the electromagnetic environment due
to fixed RF transmitters, an electromagnetic site survey should be considered. If the measured field strength in the location in which the Spot
Vital Signs LXi is used exceeds the applicable RF compliance level above, the electrocardiograph should be observed to verify normal operation.
If abnormal performance is observed, additional measures may be necessary, such as reorienting or relocating the electrocardiograph.
b
Over the frequency range 150 kHz to 80 MHz, field strengths should be less than 3 V/m.
Page 86

76 Specifications Welch Allyn Spot Vital Signs LXi
Recommended Separation Distances Between Portable and Mobile RF Communications Equipment and the Spot Vital Signs LXi
The Spot Vital Signs LXi is intended for use in an electromagnetic environment in which radiated RF disturbances are controlled. The customer
or user of the Spot Vital Signs LXi can help prevent electromagnetic interference by maintaining a minimum distance between portable and
mobile RF communications equipment (transmitters) and the Spot Vital Signs LXi as recommended below, according to the maximum output
power of the communications equipment.
Separation Distance According to Frequency of Transmitter (m)
Rated Max. Output
Power of Transmitter
(W)
150 kHz to 80 MHz
d = (1.17)
80 MHz to 800 MHz
d = (1.17)
800 MHz to 2.5 GHz
d = (2.33)
0.01 0.117 0.117 0.233
0.1 0.37 0.37 0.74
1 1.17 1.17 2.33
10 3.70 3.70 7.37
100 11.70 11.70 23.30
For transmitters rated at a maximum output power not listed above, the recommended separation distance
d in meters (m) can be estimated
using the equation applicable to the frequency of the transmitter, where
P is the maximum output power rating of the transmitter in watts (W)
according to the transmitter manufacturer.
Note 1: At 80 MHz and 800 MHz, the separation distance for the higher frequency range applies.
Note 2: These guidelines may not apply in all situations. Electromagnetic propagation is affected by absorption and reflection from structures,
objects, and people.
P P P
Page 87

77
Caution Prevent water or other fluids from entering any connectors. If the
connectors get wet, dry them with warm air. Check all measurement functions.
Caution Do not sterilize or autoclave the Spot LXi device.
Caution DO NOT immerse or soak the probe in any type of fluid.
Caution DO NOT use steam, heat, or gas sterilization on the probe.
Caution DO NOT autoclave the probe.
10
Maintenance and Service
Cleaning
WARNING Before performing any maintenance or service to the Spot LXi,
disconnect the AC power line from the electrical outlet.
Spot Vital Signs LXi
As necessary, clean the device with a cloth slightly dampened with either 70% isopropyl
alcohol, 10% chlorine bleach solution, or mild detergent in water, or use PDI Sani-System
Cloths. Never immerse Spot LXi in any type of fluid.
Blood Pressure Cuff
Before washing the Reusable Two-Piece Cuff, remove the two connectors and bladder,
close off tubes with plugs (available as accessory 5082-163), and close the hook and loop
fasteners. After washing, allow the cuff to air dry. Re-assemble the tube fittings.
Never press with an iron.
Blood Pressure Hose and Cable
Wipe the pressure hose with a damp cloth moistened in a mild detergent solution. Do not
immerse hose.
SureTemp Plus Thermometer
Temperature Probe
Page 88

78 Maintenance and Service Welch Allyn Spot Vital Signs LXi
Caution DO NOT use hard or sharp objects to clean the probe well. This could
damage the probe well and cause the device to not function properly.
Caution DO NOT use steam, heat, or gas sterilization on the probe well.
Caution DO NOT autoclave the probe well.
WARNING Do not immerse the sensor in water, solvents, or cleaning solutions
(the sensors and connections are not waterproof). Do not use irradiation, steam,
or ethylene oxide for sterilization.
Press down on the connector tab and slide the connector out of the port to remove the
temperature probe.
Regularly wipe the probe with a cloth dampened with warm water and a mild detergent
solution, a 70% isopropyl alcohol solution, or a 10% chlorine bleach solution.
Removable Probe Well
1. Remove the temperature probe from Spot LXi (see “Temperature Probe” on page 77).
2. Grasp the well under the probe opening and pull up gently to remove it from the
3. Swab the inner and outer surface of the probe well with a cloth dampened with a mild
4. Dry all surfaces thoroughly before re-assembling the device (see “SureTemp Plus” on
device.
detergent solution, 70% isopropyl alcohol, or 10% chlorine bleach solution. Immerse
the probe well in mild detergent solution as necessary for cleaning.
page 19) for reassembly instructions.
Braun ThermoScan PRO 4000 Thermometer
Use a soft cloth slightly moistened with alcohol to clean the thermometer display and
exterior. Do not use abrasive cleaners.
Damage to the probe window or the presence of dirt or cerumen on the probe window
can affect the accuracy of your temperature measurement. To clean the window, gently
wipe it with a cotton swab slightly moistened with alcohol and immediately wipe dry with
a clean cotton swab. Allow to dry at least five minutes before taking a temperature.
Every month, clean the Braun ThermoScan PRO 4000 charging contacts within the Spot
LXi housing with a swab slightly dampened with alcohol.
SpO2 Sensors
Printer
Clean the reusable SpO2 sensor with a 70% isopropyl alcohol solution. Do not immerse
the sensor.
The printer label kit comes with a two-step head cleaner. Follow the directions provided
with the cleaner.
Page 89

Service Manual Maintenance and Service 79
Caution Only use the Welch Allyn 4500-84 lead acid battery. Using an incorrect
battery will cause damage to the Spot LXi and void the warranty.
Caution Do not break the shrinkwrap around the battery.
The battery is a non-spillable lead-acid battery and must be recycled or
disposed of properly according to national or local regulations.
One-way
connector
Battery Replacement
Spot Vital Signs LXi
If necessary, replace the internal battery after heavy use or the battery no longer charges.
1. Power off the Spot LXi and disconnect the AC power transformer cord.
2. Remove the four screws holding the battery door using a phillips-head screwdriver.
3. Tip the Spot LXi backward and slide the battery out. Disconnect the one-way
Remove the battery door to expose the battery.
connector and then attach a new battery to the connector as shown. The one-way
connector ends only connect one way. Do this as quickly as possibly to prevent loss
of clock time.
Figure 13. Battery Removal and One-way Connector
4. Slide the battery into the compartment as far as it will go. Push the connector down
into the case next to the battery.
5. Replace the battery door and tighten each of the four screws.
6. Connect the AC power transformer to the Spot LXi and allow the new battery to
charge for approximately 6 hours. The rechargeable batteries in the Braun
ThermoScan PRO 4000 thermometer requires an additional 1 hour to charge and the
rechargeable batteries in the external printer require an additional 4 hours to charge.
You can use the Spot LXi during this charging period via the AC power cord.
If Spot LXi displays the E38 error code after power up, set the date (see “Date/Time
Menu Options” on page 25).
Page 90

80 Maintenance and Service Welch Allyn Spot Vital Signs LXi
Braun ThermoScan PRO 4000
Welch Allyn supplies a rechargeable battery pack with the Braun ThermoScan PRO 4000
thermometer.
1. Open the battery compartment.
2. Remove the battery pack and replace with a new battery pack, verify the poles are in
the right direction.
3. Slide the battery door back in until it snaps into place.
If the battery is completely discharged, the LEDs will not illuminate. Allow the unit to
charge at least 15 minutes before proceeding.
Printer
1. Open the battery compartment.
2. Remove the battery pack and replace with a new battery pack, verify the poles are in
the right direction.
3. Slide the battery door back in until it snaps into place.
Allow the printer to charge at least 15 minutes before proceeding.
Caution Do not use alkaline batteries in the Braun ThermoScan PRO 4000
thermometer.
The battery is a rechargeable battery and must be recycled or disposed
of properly according to national or local regulations.
Caution Do not use alkaline batteries in the printer.
The battery is a rechargeable battery and must be recycled or disposed
of properly according to national or local regulations.
Page 91

81
A
Repair Test Specifications
This appendix refers to the Spot Vital Signs LXi without pneumatics (tubing and cuff),
temperature probe, SpO2 probe, or main battery attached, unless otherwise noted.
Use the Repair Software for the performing the tests on the Spot Vital Signs LXi. The
standard test voltage, unless otherwise stated is 6.5 Vdc (+0/-0.25 Vdc). Unless
otherwise stated, all calibrated volumes are ±10cc of the stated volume.
General Unit Test
A-D Noise Test
The A-D Noise Test is defined as the amount of noise on the Spot LXi A-D pressure
channel; over a 1 second sample time while 0.0 mmHg is applied to the Device pressure
port. The maximum limit is 0.050 mmHg.
Leak Test
The Leak Test is defined as the amount of pressure drop that is recorded over a 15-second
interval with a 100cc cylinder attached to the Spot LXi pressure port and that volume
having a stabilized pressure of 250 mmHg. The limit is 5 mmHg maximum.
Inflation Test
The Inflation Test is defined as the amount of time the Spot LXi pump can inflate a 250 cc
cylinder from 5 mmHg to 210 mHg. The limit is 7 seconds, maximum.
Dump Test
The Dump Test is defined as the amount of time it takes Spot LXi to deflate a 500 cc
cylinder from 260 mmHg to less than 15 mmHg. The limit is 10 seconds.
Pneumatic Accuracy Test
Enter the Internal Configuration Mode to perform this test (see “Internal Configuration
Mode” on page 24).
Perform an Auto-zero before starting this test (
on page 35 through
comparison of Spot LXi’s pressure measurement and applied pressure at 0, 50, 150, and
250 mmHg. The specification for each reading is within ±3 mmHg of the target pressure
except for the 0 mmHg reading which is within ±1.0 mmHg.
“Blood Pressure Functional Check”, Step 1
Step 5 on page 35). The Pneumatic Accuracy test is defined as the
Page 92

82 Repair Test Specifications Welch Allyn Spot Vital Signs LXi
Valve Control Test
Connect a 100 cc cylinder to the Spot LXi pressure port and pressurize to 160 mmHg.
Give Spot LXi the commands to open the valve for 10 mmHg/s, 15 mmHg/s, and 25
mmHg/s. Record each pressure drop: 4 to 12 mmHg, 4 to 15 mmHg, and 4 to 25mmHg,
respectively.
Voltage Calibration
Calibrate the Spot LXi battery voltage measurement circuit at 5.5 Vdc (+0.1/-0.0 Vdc).
After performing a successful battery measurement circuit calibration, Spot LXi’s memory
will store a calibration signature of up to four printable characters.
Blank Mode Current Test
The Blank Mode Current Test is defined as the amount of current drawn through the
battery terminals. All LCD segments, the back light, and the SpO2 mode are all turned off.
The limit is 200 mA maximum.
Back Light (Idle) Current Test
The Back Light Current Test is defined as the amount of current drawn through the
battery. All LCD segments and the back light are turned on while the SpO2 mode is turned
off. The limit is 400 mA maximum.
Valve/Pump Mode Current Test
The Valve/Pump Mode Current Test is defined as the amount of current that is drawn
through the battery terminals; Spot LXi is in the Blank Mode while the valve and pump are
actuated to on. The limit is 700 mA maximum.
Interface Test
When given the proper commands, the Display Window will turn on or off all segments
and turn on or off the back light. When given the proper command, the buzzer sounds to
verify operation. The user determines the pass/fail criteria.
Temperature Option Requirements
Accuracy Test
Verify the accuracy of the temperature module is within ±0.2° F for readings with a nomal
temperature of 97.3° F (36.3° C) using a Cal Key (5200-25). Verify Spot LXi can read a
temperatures of 96.4° F (35.8° C) and 106° F (41.1° C) within ±0.3° F/±0.2° C using a
Welch Allyn 9600 Plus Calibrator.
Page 93

Service Manual Repair Test Specifications 83
Temperature Probe Test
Spot LXi displays “ORL” after you remove the blue thermometer probe from the blue
probe well.
SpO2 Option Requirements
These tests are only valid on Spot LXi models with the Masimo or Nellcor SpO2 option.
SpO2 Functional Test
See
“Masimo SpO2 Functional Check” or “Nellcor SpO2 Functional Check” on page 32
for the functional test.
SpO2 Mode Current Test
The SpO2 Mode Current Test is defined as the amount of current, less the Blank Mode
Current, that is drawn through the battery terminals, placing Spot LXi in the Blank Mode,
actuating the SpO2 mode and applying any SpO2 signal to the device. The maximum limit
is 120 mA maximum.
Fail Safe Test
Over Pressure Test
Verify that Spot LXi can detect over pressure on the pneumatic system between
296.0 mmHg and 329 mmHg.
Over 15 mmHg
Verify that Spot LXi can detect static pressure over 15 mmHg for 180 seconds.
Page 94

84 Repair Test Specifications Welch Allyn Spot Vital Signs LXi
Page 95

85
B
Supplies and Accessories
Blood Pressure
Table 1. Reusable Two-Piece Blood Pressure Cuffs (1 per pack)
REF Size REF Size
4500-01 Child 4500-03 Large Adult
4500-02 Adult 4500-04 Thigh
Table 2. Durable One-Piece Blood Pressure Cuffs (5 per box)
REF Size REF Size
5082-82-4MQ Infant 5082-86-4MQ Adult
5082-83-4MQ Small Child 5082-87-4MQ Large Adult
5082-84-4MQ Child 5082-88-4MQ Thigh
5082-85-4MQ Small Adult
Table 3. Disposable One-Piece Blood Pressure Cuffs (5 per box)
REF Size REF Size
5082-92-4MQ Infant 5082-96-4MQ Adult
5082-93-4MQ Small Child 5082-97-4MQ Large Adult
5082-94-4MQ Child 5082-98-4MQ Thigh
5082-95-4MQ Small Adult
Table 4. Miscellaneous Supplies and Accessories
REF Description REF Description
4500-30 Blood Pressure Hose (5ft/1.5M) 5200-08 Calibration T-Connector
Page 96

86 Supplies and Accessories Welch Allyn Spot Vital Signs LXi
Temperature
Table 5. SureTemp Plus
REF Description
02895-000 SureTemp Plus Oral Probe and Well (9 feet/2.7M)
02895-100 SureTemp Plus Rectal Probe and Well (9 feet/2.7M)
02894-0000 SureTemp Plus Oral Well
02894-1000 SureTemp Plus Rectal Well
06138-000 SureTemp Plus Temperature Calibration Key
01802-110 9600 Plus Calibration Tester
05031-101 Disposable SureTemp Plus Probe Covers (1,000 covers, packaged 25/box)
Table 6. Braun ThermoScan PRO 4000
REF Description
04000-200 Braun ThermoScan PRO 4000 Thermometer (for North America, South America, and
04000-600 Braun ThermoScan PRO 4000 Thermometer (for Europe, Middle East, and Africa)
05075-800 Braun ThermoScan PRO 4000 Disposable Probe Covers (Case of 800 covers for North
04000-800 Braun ThermoScan PRO 4000 Disposable Probe Covers (Case of 800 covers for Europe,
01802-110 9600 Plus Calibration Tester
53020-0000 Braun ThermoScan PRO 4000 Rechargeable Battery Pack
4500-53 Braun Locking Key
Asia Pacific)
America, South America, and Asia Pacific)
Middle East, and Africa)
Page 97

Service Manual Supplies and Accessories 87
Pulse Oximetry
Masimo Accessories
Table 7. Adhesive Sensors: Single-Patient Use
Catalog # Description Weight Range Quantity
LNOP-ADT Adult sensor >66 lbs (30 kg) 20
LNOP-PDT Pediatric sensor 22 to 110 lbs
(10 to 50 kg)
LNOP-NEO Neonatal sensor <22 lbs (10 kg) 20
LNOP-NEOPT SofTouch neonatal preterm sensor <2.2 lbs (1 kg) 20
Table 8. Reusable Sensor
Catalog # Description Weight Range Quantity
LNOP-DCI Finger clip probe - adult >66 lbs (30 kg) 1
LNOP-DCIP Finger clip probe - pediatric 10 to 50 kg 1
20
Table 9. Sensor Cables
Catalog # Description Weight Range Quantity
PC-04 4-foot cable with sensor connector NA 1
PC-08 8-foot cable with sensor connector NA 1
PC-12 12-foot cable with sensor connector NA 1
Page 98

88 Supplies and Accessories Welch Allyn Spot Vital Signs LXi
Nellcor Accessories
Table 10. OxiMax Adhesive Sensors: Single-Patient Use
Catalog # Description Weight Range Quantity
MAX-AI MAX-A Adhesive Sensor, adult >66 lbs (30 kg) Case of 24
MAX-PI MAX-P Adhesive Sensor, pediatric 22 to 110 lbs
(10 to 50 kg)
MAX-II MAX-I Adhesive Sensor, infant 6.5 to 44 lbs
(3 to 20 kg)
MAX-RI MAX-R Adhesive Sensor, adult nasal >110 lbs (50 kg) Case of 24
Table 11. OxiMax OxiCliq® Sensors: Reusable Cable with Adhesive Sensor Bandage
Catalog # Description Weight Range Quantity
OC-3 OxiCliq Sensor Cable (3 ft / 91cm) N/A 1
OXICLIQ-PI OxiCliq P, pediatric 22 to 110 lbs
(10 to 50 kg)
Case of 24
Case of 24
Case of 24
Table 12. OxiMax Resuable Sensors
Catalog # Description Weight Range Quantity
DS-100A Durasensor® DS-100A finger-clip sensor, adult >88 lbs (40 kg) 1
OXI-A/N Oxiband® OXI-A/N, adult/neonatal < 6.5 lbs or > 88 lbs
(<3 kg or >40 kg)
OXI-P/I Oxiband OXI-P/I, pediatric/infant 6.5 lbs to 88 lbs
(3 to 40 kg)
D-YS Dura-Y® D-YS, multisite sensor >2.2 lbs (1 kg) 1
D-YSE D-YSE ear clip for Dura-Y sensor >66 lbs (30 kg) 1
D-YSPD PediCheck™ D-YSPD pediatric spot-check sensor 6.5lbs to 88 lbs
(3 to 40 kg)
Table 13. OxiMax Sensor Cables
Catalog # Description Weight Range Quantity
DOC-10 DOC-10 (10 ft/3M) N/A 1
1
1
1
Page 99

Service Manual Supplies and Accessories 89
Miscellaneous
REF Description
4500-60 Mobile Stand
4500-62 Wall Mount
4500-84 Lead Acid Battery
700860 Directions for Use
700862 Quick Reference Card
704432 Service Manual
4500-150E Training Video
4500-100 Carrying Case
4500-101A AC Power Transformer (desktop transformer, line cord not included)
4500-400 Line Cord (United States/Canadian/Japanese version)
4500-402 Line Cord (European version)
4500-404 Line Cord (United Kingdom version)
4500-406 Line Cord (Australian Version)
4500-408 Line Cord (South African version)
4500-500 Printer with Mounting Bracket
4500-505 Printer Rechargeable Battery Pack
4500-510 Printer Paper (10 rolls)
4500-520 Label Paper (10 rolls) and Cleaning Kit
4500-910 Barcode Scanner with Mounting Bracket
4500-920 DPAC Wireless Radio
4500-925 Cable for Wired Connectivity
Service Contracts
REF Description
4500-BT0 Blood Pressure with Thermometry
4500-BTS Blood Pressure with Thermometry and SpO
2
Page 100

90 Supplies and Accessories Welch Allyn Spot Vital Signs LXi
 Loading...