

Page 1

LIMITED
Thermo Menu
Service Manual
WARRANTY
Instrumentation purchased new from Welch
Allyn is warranted to be free from defects in
material and workmanship under normal
use and service for a period of one year from
the date of first shipment from Welch Allyn.
This warranty shall be fulfilled by Welch
Allyn or its authorized representative repairing or replacing at Welch Allyn's discretion,
any such defect, free of charge for parts and
labor.
Welch Allyn should be notified via telephone
of any defective product and the item should
be immediately returned, securely packaged and postage prepaid to Welch Allyn.
Loss or damage in shipment shall be at
purchaser's risk.
Welch Allyn will not be responsible for loss
associated with the use of any Welch Allyn
product that (1) has had the serial number
defaced, (2) has been repaired by anyone
other than an authorized Welch Allyn Service Representative, (3) has been altered,
or (4) has been used in a manner other than
in accordance with instructions.
THIS WARRANTY IS EXCLUSIVE AND IN
LIEU OF ANY IMPLIED WARRANTY OR
MERCHANTABILITY, FITNESS FOR PARTICULAR PURPOSE, OR OTHER WARRANTY OF QUALITY, WHETHER EXPRESSED OR IMPLIED, WELCH ALLYN
WILL NOT BE LIABLE FOR ANY INCIDENTAL OR CONSEQUENTIAL DAMAGES.
Model 650
Directions For Use
7420 Carroll Road, San Diego, CA
(619) 621-6600 or (800) 854-2904
70777-000C
Page 2
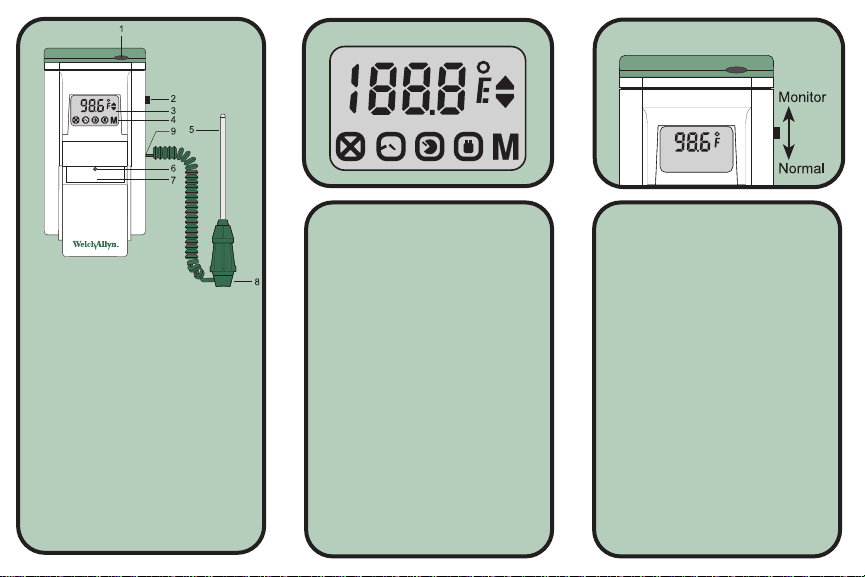
321
1. Probe storage channel
2. Normal/Monitor mode
select switch
3. Display
4. Display indicators
5. Probe
6. Battery access screw
7. Probe cover box holder/
battery access door
8. Ejection button
9. Probe cord connector &
receptacle
Note: Temperature measurement
displays in this
booklet are in °F. International units
will display measurements in °C.
SETUP
1. Unpack the Welch Allyn Thermometer System. Check for any
damage that may have occurred
during shipping.
2. Select the desired probe (oral
probe - green body, rectal probe
- red body).
3. Insert the probe cord connector
into the probe receptacle. Check
that the connection is secure.
4. Observe the 7-second display
test, ensuring that no display segments are missing (Fig. 2).
Directions For Use
5. Insert the probe shaft into the
probe storage channel (Fig. 1).
6. Remove the tab from a box of 25
Welch Allyn disposable probe
covers and insert the box into the
holder on the thermometer.
OPERATION
1. Select the temperature mea-
surement mode (normal or monitor - Fig. 3). Most temperatures
are taken in the normal mode.
2. Withdraw the probe from the stor-
age channel and observe the display test. The unit will then display 84.0°F (28.9°C) with the low
temperature arrow ON until the
probe temperature rises above
84.0°F (28.9°C).
Page 3

54
6
3. Load a probe cover onto the
probe. Hold the probe collar with
thumb and forefinger, being careful not to hold or press the "eject"
button. Press the collar down
firmly to secure the cover (Fig. 4).
4. Take the temperature:
FOR ORAL TEMPERATURES,
insert the probe tip gently into the
patient's slightly opened mouth.
Carefully slide the probe under
the tongue on either side of the
mouth to reach the sublingual
pocket.
FOR RECTAL TEMPERATURES, gently insert the probe
only 1 cm (3/8 of an inch) inside is
the rectal sphincter (less for infants and children).
Incorrect insertion can cause
bowel perforation. (FIG. 5) Tilt
the probe to insure good tissue
contact and continue to keep buttocks separated until measurement cycle is complete.
5. During a temperature measurement cycle in the NORMAL mode,
a continuously increasing temperature should be observed on
the display. When the final temperature has been reached, a tone
will sound and a temperature will
be displayed. When using the
MONITOR mode, allow the temperature readout to stabilize for 3
minutes. The patient may then be
WARNING:
continuously monitored for as long
as necessary.
6. After the temperature measurement is complete, eject the probe
cover by firmly pressing the "eject"
button on the probe. (Fig. 1 ).
7. Insert the probe into the storage
channel to clear the display, in
preparation for another temperature. (Fig. 6).
FEATURES
1. Two Temperature Measurement Modes. Normal mode pro-
vides a rapid means of oral or
rectal temperature taking under
most conditions. Monitor mode
Page 4

generally used for long term monitoring or when difficult situations
prevent accurate temperatures
from being taken in the normal
mode.
SELF TESTS
Two internal tests are activated each
time a temperature is taken:
1. Calibration Check: an internal
check for proper calibration.
2. Microprocessor Self Check: an
internal check for proper microprocessor operation, including a
test of the entire system.
78
ERROR INDICATORS/BATTERY
REPLACEMENT
1. Error Indicators. One of four
indicators may appear on the display: Malfunction, Broken
Probe, Probe Position, and Low
Battery (Fig. 7).
2. Battery Replacement. To
replace the batteries, remove the
battery compartment access
screw behind the probe cover
box (Fig. 8). Slide the access
cover to expose the batteries.
Replace with three new AA
Alkaline batteries. A 25 second
display test is automatically
performed following battery
replacement.
SPECIFICATIONS
• Range: 84.0°F - 108.0°F
(28.9°C - 42.2°C).
• Battery Capacity: Up to 1000
hours normal use.
• Calibration Accuracy: +/-0.2°F
(+/-0.1°C).
• Dimensions: length 7 inches;
width 3.7 inches; height 2.4
inches; weight 13 ounces.
CLEANING AND STERILIZATION
Normal cleaning procedure is to wipe
with alcohol, warm water, or nonstaining disinfectant.
ACCESSORIES AVAILABLE
• Calibration Key for verifying calibration - inserts in place of probe
plug and provides correct reading of 97.3°F (22.06°C).
• Oral and rectal probes
CUSTOMER SERVICE
For customer service, please call
(800) 854-2904
 Loading...