

Welbilt ABMY2K2 Instruction Manual
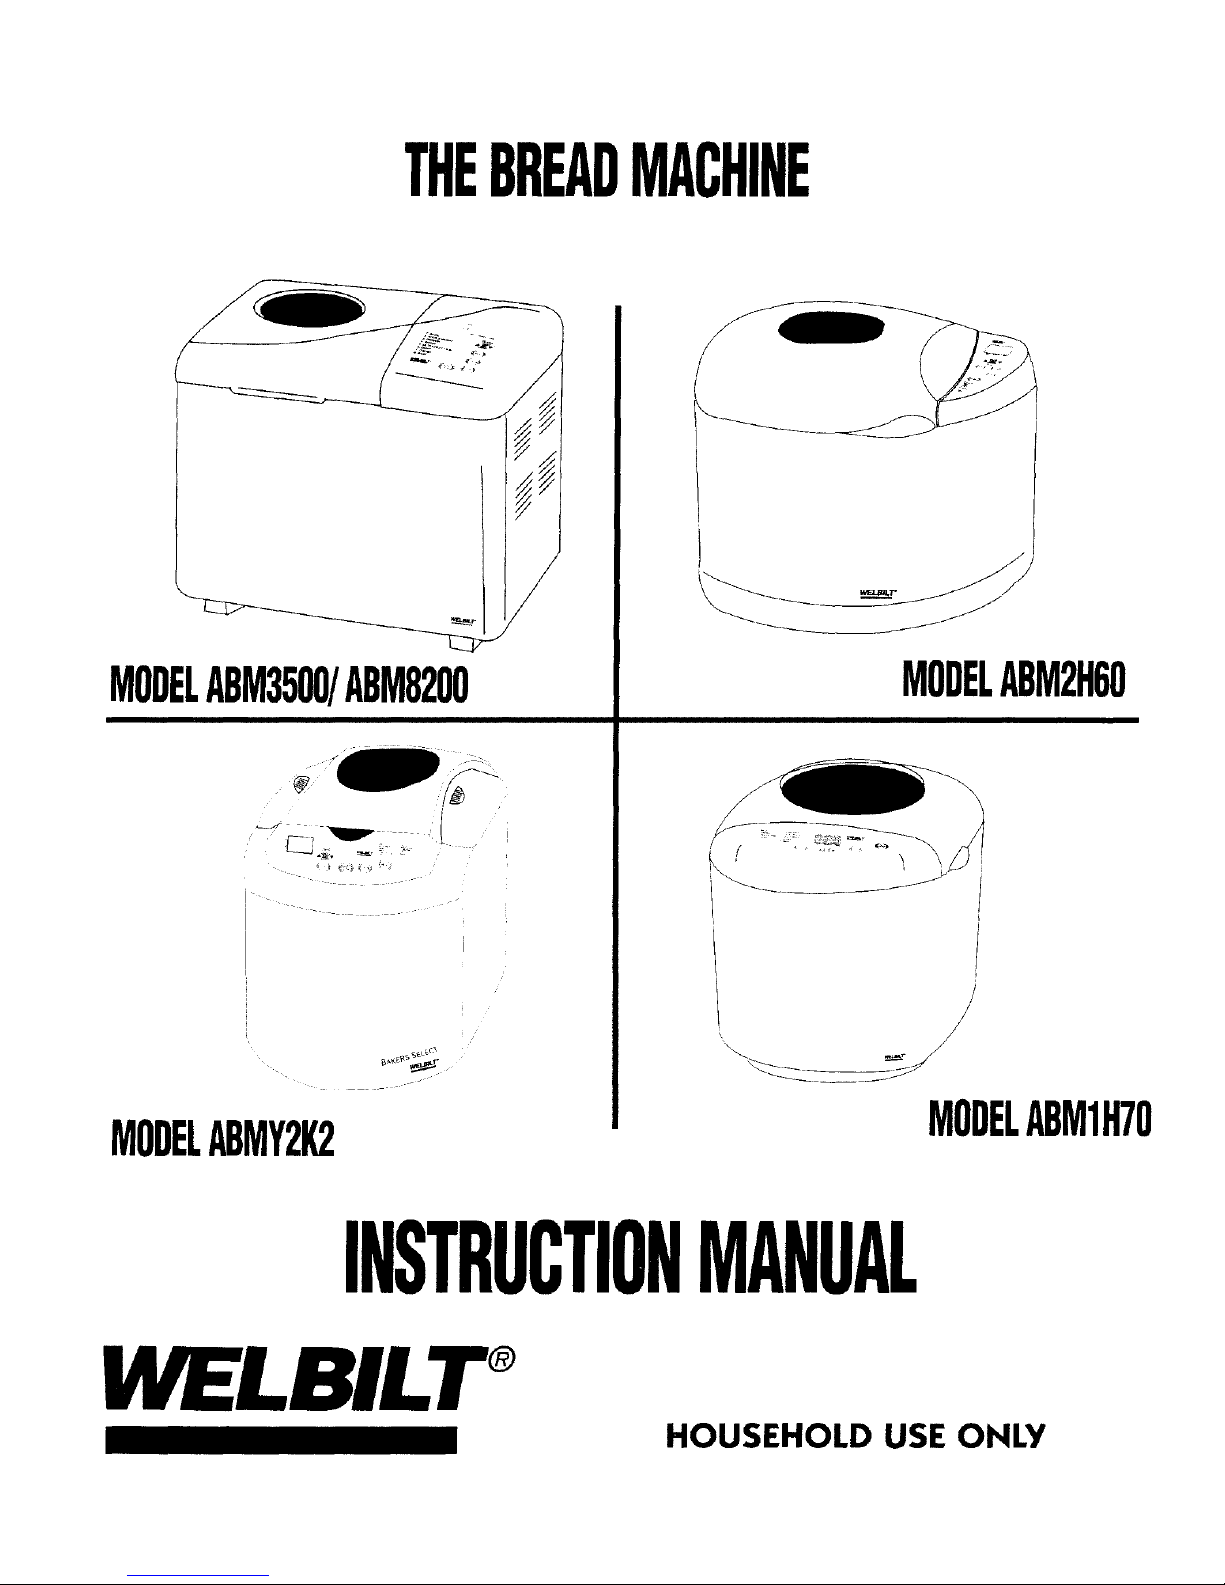
THEBREADMACHINE
MODELABM3500/ABM8200
MODELABM2H60
MODELABMY2K2
/
MODELABM1H70
INSTRUCTIONMANUAL
WELBILT ®
HOUSEHOLD USE ONLY
IMPORTANTSAFEGUARD
WHEN USING ELECTRICAL APPLIANCES, BASIC SAFETY PRECAUTIONS SHOULD ALWAYS BE
FOLLOWED, INCLUDING THE FOLLOWING:
,
2.
3.
4.
5.
6.
,
,
9.
10.
!1.
12.
13.
14.
15.
16.
17.
18.
19.
20.
Readall instructions carefully.
Do not touch hot surfaces. Use handles or knobs and a potholder. Do not close or clog the steam
vent openings under any circumstances.
To protect against electrical shock, do not immerse cord, plug, or any other part of this bread
machine, in water or other liquid.
Close supervision is necessary when any appliance is used by or near children.
Unplug the power supply cord when the appliance is not in use, or before cleaning.
Allow to coo! before putting on or taking off any parts.
Do not use or operate the appliance with a damaged cord or plug, or after the appliance malfunc
tions or has been damaged in any manner. Return appliance to the nearest authorized service
facility for examination, repair or adjustment.
The use of accessory attachments not recommended or sold by the manufacturer may cause
injuries.
Do not use outdoors.
Do not let the power supply cord hang over the edge of table or counter, or touch hot surfaces.
Do not place the appliance on or near hot gas or electric burners, or in a heated oven.
Extreme caution must be used when moving an appliance containing hot contents or liquids.
To disconnect, press STOP,then remove plug from wall outlet. Grip plug and pull from wall outlet.
Never pull on the cord.
Do not use the bread machine for other than intended use.
Avoid contact with rnoving parts during operation.
Do not pour any ingredients directly into the bread machine -- only into the baking pan. The baking
pan must then be placed in the machine.
Do not operate this appliance in the presence of explosive and/or flammable fumes.
This appliance is intended for HOUSEHOLD USE ONLYand not for commercial or industrial use.
To avoid damaging the machine, do not place the baking pan or any object on top of the unit.
Do not clean with scouring pads. Pieces can break off the pad and touch electrical parts, creating a
risk of electric shock.
Do not use bread machine for storage purposes nor insert any utensils, as they may create a fire or
electric shock.
SAVETHESEINSTRUCTIONS
HOUSEHOLD USE ONLY
This appliance has a polarized plug (one blade is wider than the other). As a safety feature, this plug will fit
in a polarized outlet only one way. If the plug does not fit fully in the outlet, reverse the plug. If it still does
not fit, contact a qualified electrician. DO NOT ATTEMPT TO DEFEATTHIS SAFETYFEATURE.
A short power-supply cord is provided to reduce the risk of becoming entangled in or tripper over a longer
cord. An extension cord may be used if precautions are taken in their use. If an extension cord is used:
1. The marked electrical rating of the extension cord should be at least as great as the electrical rating of
the appliance, and
2. The cord should be arranged so that it will not drape over the countertop or tabletop where it can be
pulled on by children or tripped over accidentally.
1
AboutYourBreadMachine
The 5 bread machines in this manual make REGULAR(1 lb.) or LARGE (1 1/2 lb.) loaves of breads.
The ABM8200 or the ABM2H60 also makes EXTRA LARGE (2 lb.) loaves of breads.
The ABM3500 and ABM1H70 have 28 settings: The ABMY2K2 has 31 settings: The ABM2H60 and
ABM8200 have 41 settings. See "Setting Chart", page 10.
Special ULTRA FASTsetting allows you to complete the breadmaking process in 58 minutes.
Special recipes must be used for this cycle.
A Fruit and Nut beep signals when it is time to add ingredients, such as fruits, nuts or chips. It will
maintain ingredients' shape and texture rather than be chopped up by the kneading blade. If you
use the TIMER to delay baking, you may add all the ingredients at once and bypasss the function;
however your fruits, nuts, or chips may get somewhat chopped.
• You can control the crust color of your fresh homemade breads to satisfy your need.
• 13-HOUR PROGRAMMABLE TIMER lets you wake up to hot baked bread in the morning.
• Big VIEWING WINDOW allows you to watch the breadmaking process.
A KEEPWARM function prevents the bread from getting soggy by keeping finished bread
warm up to an hour after the baking is completed. This function stops when the unit is
turned OFF!STOPor unplugged.
Your breadmachine has POWER LOSS MEMORY, which resumes cycle where it left off when
experiencing a short-term power loss.
Do not cover the bread machine with towels or other materials that may prevent steam from
escaping. Some steaming from vents is normal.
• Do not place any objects on top of the bread machine.
Unplug the unit and wait until it cools, then remove any spilled ingredients or crumbs from the
baking chamber of the bread machine by wiping with a damp sponge or cloth. See "Care and
Cleaning", page 16.
IMPORTANT: Always add ingredients in the order they are specified in the recipe. For
best results, accurate measuring of ingredients is very important. Do not put larger
quantities than recommended into the baking pan as it may produce poor
results and may damage the bread machine.
ABM3500, ABMY2K2,and ABM1H70are designed for making1 or I 1/2 lb. loaf of bread only,
sodo notuse2 lb. recipe for these three models.
NOTE:Themodel of yourbreadmachineis located onthe control panel.
2
BEFORE YOUR FIRST USE
Enjoy using your Welbilt Bread Machine. Before your first use, please take a few minutes to read this
Instruction Manual and keep it handy for reference. Pay particular attention to the safety instructions we
have provided for your protection.
Carefullyunpackthe breadmachineand removeall packagingmaterials,To removeanydust that may
haveaccumulatedduring packing,wipe the baking pan, kneadingbladeandoutside surface of the bread
machinewith a clean,damp cloth. Donotusescouringpadsor any abrasivesonanypart of the
breadmachine.
Plug the cord into a 120-volt AC outlet. The cord length of this bread machine was selected to reduce the
possibility of tangling or tripping over a longer cord. If more cord length is needed, use a UL certified
extension cord rated no less than 15 amperes and 120 volts. The longer cord should be arranged so that it
will not drape over the countertop where it can be pulled on by children or tripped over.
TABLEOFCONTENTS
OPERATING INSTRUCTION SECTION
Important Safeguards 1
About Your Bread Machine 2
Before Your First Use 3
Know Your Bread Machine:
ABM3500!8200 4
ABMY2K2 5
ABM1H70 6
ABM2HCO 7
Control Panel 8
Setting Descriptions 9-11
Using Your Bread Machine 11-14
Using the Timer 15
Slicing and Storing Bread 15
Care and Cleaning 16
Bread Machine Cycle Times 17
Know Your Ingredients 18-20
Measuring Your Ingredients 21
Recipe Tips 22
RECIPESECTION
Basic White Bread 23
Ultra-Fast Setting 23
Egg Bread 23
Ultra-Fast Setting 23
Onion Bread 24
Rye Bread 24
Honey Oats Bread 24
Pesto Bread 25
Ultra-Fast Setting 25
Cheve-Cracked Pepper Bread 25
Ultra Fast Setting 25
100% Whole Wheat Bread 26
Shredded Wheat Bread 26
French Bread 31
Cranberry Walnut 32
Rich Sweet Bread 28
Cinnamon Raisin Bread 28
Holiday Bread 29
About Quick Breads 29
Apple Walnut Loaves 30
Banana Nut Bread 30
Irish Soda Bread 30
Corn Muffin 30
Soft Pretzel 31
Dinner Rolls 31
Danish Pastries 32
Bread Sticks 32
Cinnamon Rolls 33
Pizza Crust 33
Bagels 34
Egg Bagels 34
Sun Dried Tomato Bagels 34
Finnish Rye Bread 35
Russian Black Bread 35
Dark Pumpernickel 35
Gluten Free Breads 36
Gluten Free Potato Bread 37
Gluten Free Cinnamon Raisin 37
Gluten Free Mock Light 37
Gluten Free Brown & White Rice Bread 38
Gluten Free Romano Bean Bread 38
Gluten Free Cheddar Loaf 38
Gluten Free Cardamom Fruit Bread 39
Strawberry Jam 39
Cake Mix-Cake 39
HELP SECTION
Troubleshooting 40
Need Help 41-43
Baking Tips For Yeast Bread 44-45
Limited Warranty 46
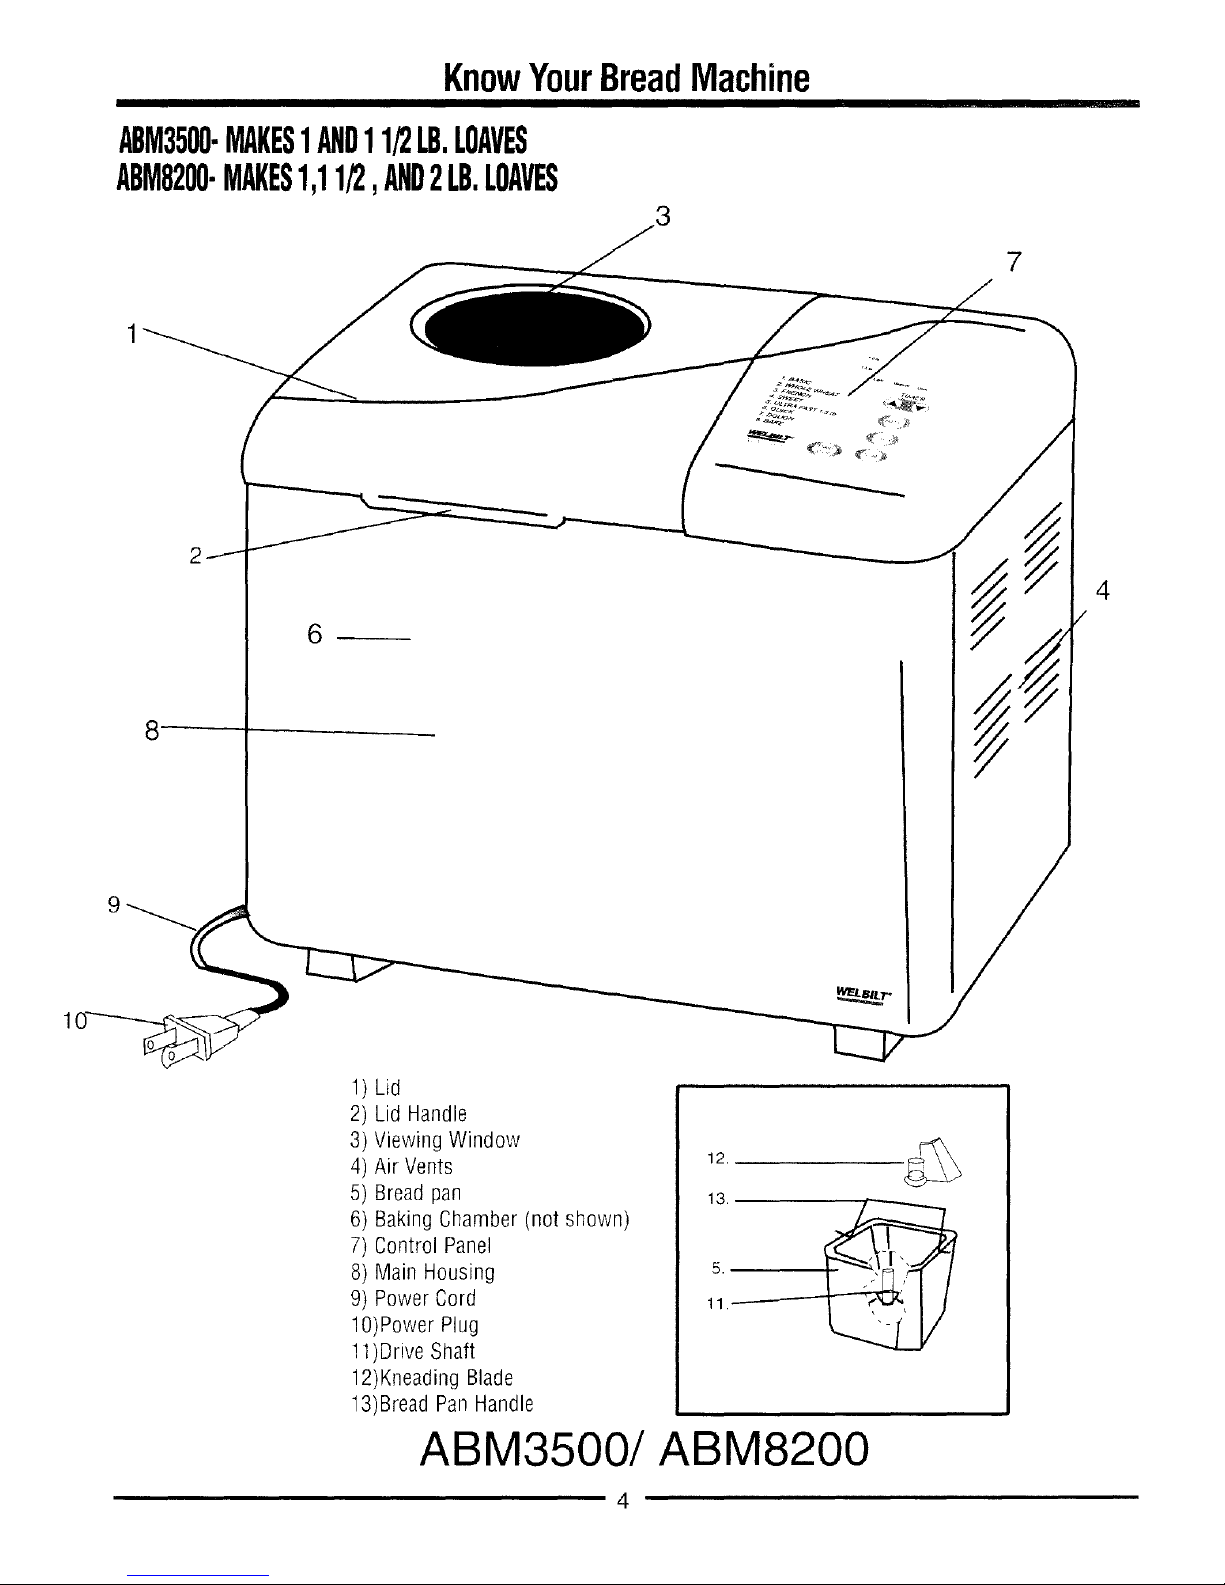
KnowYourBreadMachine
ABM3500-MAKES1AND11/2LB.LOAVES
ABM8200-MAKES1,11/2,AND2LB.LOAVES
.
6
4
1) Lid
2) Lid Handle
3) Viewing Window
4) Air Vents
5) Bread pan
6) Baking Chamber (not shown)
7) Control Panel
8) Main Housing
9) Power Cord
!O)Power Plug
11)Drive Shaft
12)Kneading Blade
13)Bread Pan Handle
12.
13._
5.
11
ABM3500/ABM8200
4
KnowYourBreadMachine
ABMY2K2-MAKES1AND11/2LB.LOAVES
2
1
6
3
/
1
2
3
4
5
6
7
8
Lid
Viewing Window
Air Vents
Bread pan
Baking Chamber (not shown)
Control Panel
Cool-Touch Body
Power Cord
9 Power Plug
10)Drive Shaft
11)Kneading Blade
12)Bread Pan Handle
ABMY2K2
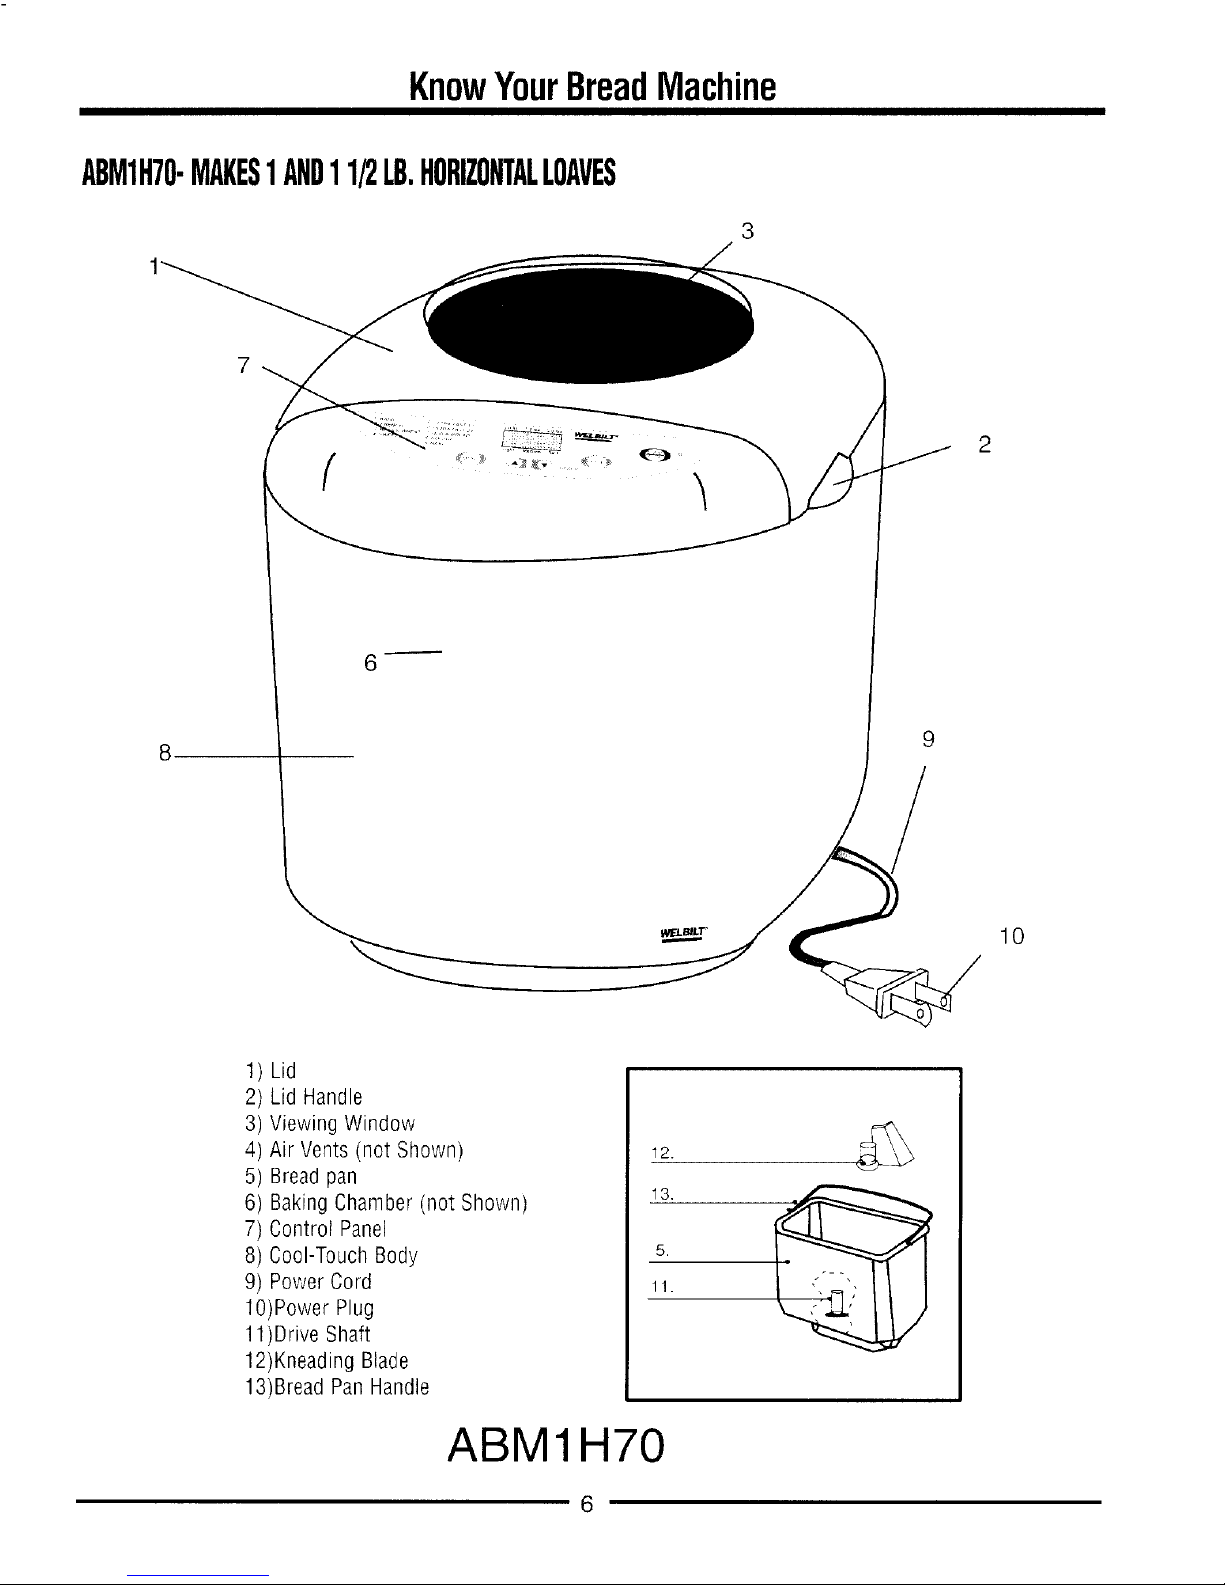
KnowYourBreadMachine
ABM1H70-MAKES1AND11/2LB.HORIZONTALLOAVES
3
9
/
10
1) Lid
2) Lid Handle
3) Viewing Window
4) Air Vents (not Shown)
5) Bread pan
6) Baking Chamber (not Shown)
7) Control Panel
8) Cool-Touch Body
9) Power Cord
lO)Power Plug
11)Drive Shaft
12)Kneading Blade
13)Bread Pan Handle
12.
13,
5.
11.
ABM1H70
6

KnowYourBreadMachine
ABM2H60-MAKES1AND11/2AND2LB.HORIZONTALLOAVES
3
.
8, /
.
/
14/ELB/L1"_
m
.
.
10.
1) Lid
2) Lid Handle
3) Viewing Window
4) Air Vents
5) Bread pan
6) Baking Chamber (not shown)
7) Control Panel
8) Cool-Touch Body
9) Power Cord
lO)Power Plug
11)Drive Shaft
12)Kneading Blade
13)Bread Pan Handle
12.
13.
5.
11.
ABM2H60
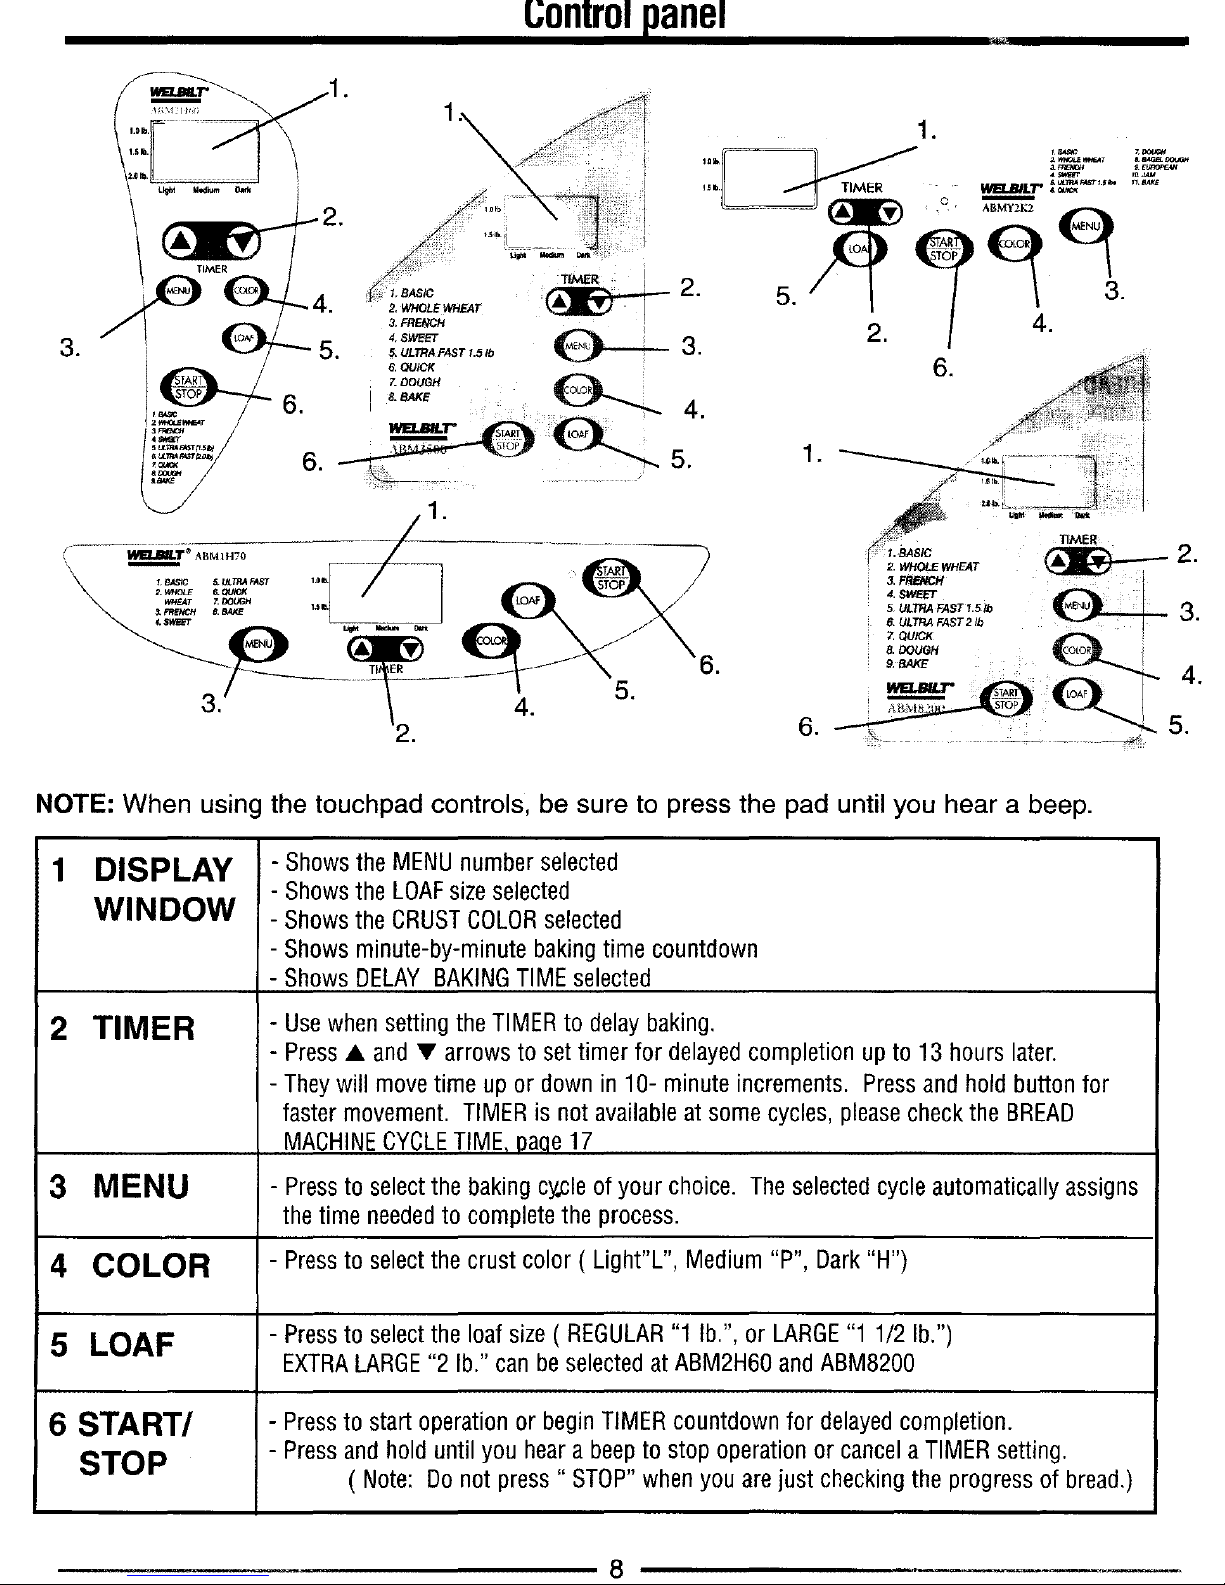
Controlpanel
,
.
NOTE: When using
1 DISPLAY
WINDOW
2 TIMER
3 MENU
4 COLOR
5 LOAF
6 START/
STOP
the touchpad controls, be sure to press the pad until you hear a beep.
- Showsthe MENUnumber selected
- Showsthe LOAFsizeselected
- Showsthe CRUSTCOLORselected
- Shows minute-by-minute baking time countdown
- Shows DELAY BAKINGTIMEselected
- Usewhen setting the TIMERto delay baking.
- Press• and • arrows to settimer for delayedcompletion upto 13 hours later.
- Theywill move time up or down in 10- minute increments. Pressand hold button for
faster movement. TIMERis not availableat somecycles, pleasecheck the BREAD
MACHINECYCLETIME,paqe 17
- Pressto selectthe bakingcycle of your choice. The selectedcycle automatically assigns
the time neededto complete the process.
- Pressto selectthe crust color ( Light"L", Medium "P", Dark"H")
- Pressto selectthe loafsize ( REGULAR"1 lb.", or LARGE"1 1/2 lb.")
EXTRALARGE"2 lb." can beselectedat ABM2H60 andABM8200
- Pressto start operationor beginTIMERcountdown for delayed completion.
- Pressand hold until you hear abeepto stop operation or cancela TIMERsetting.
( Note: Do not press" STOP"when you arejust checking the progress of bread.)
8
SE'FrlNGDESCRIPTIONS
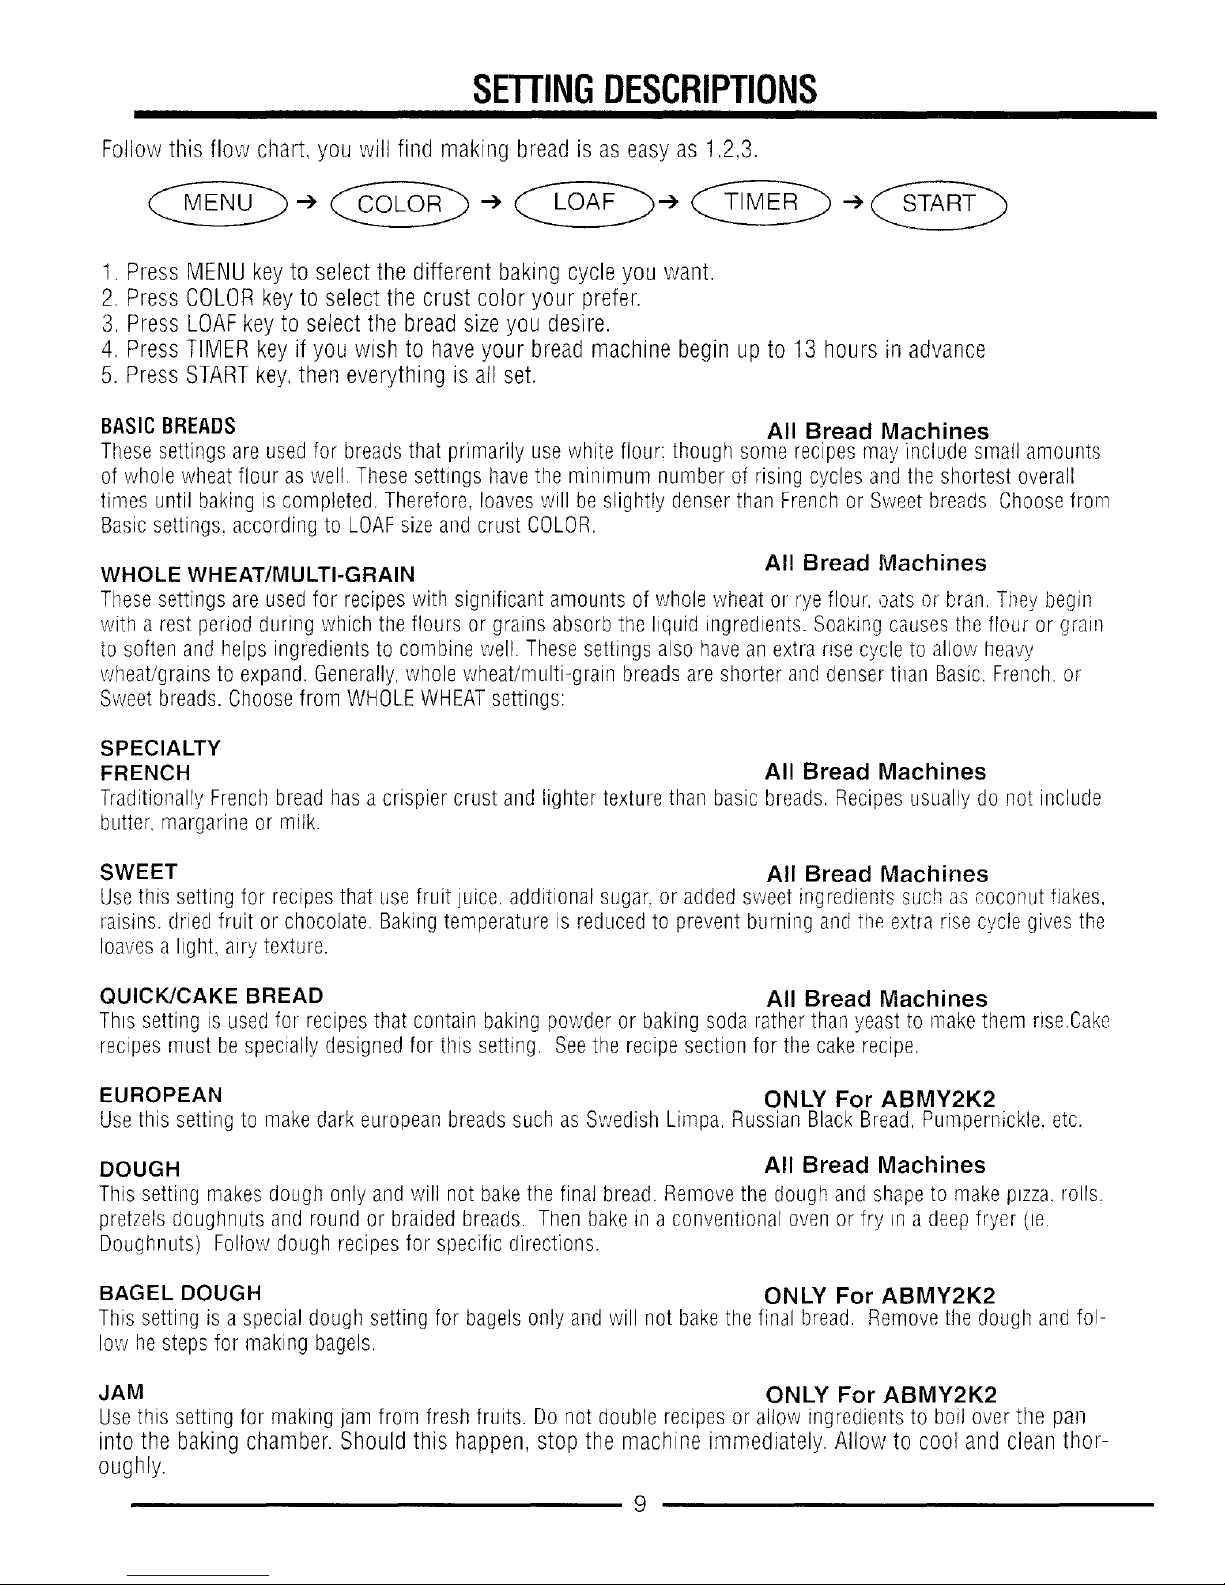
Follow this flow chart, you will find making bread is as easy as ! ,2,3.
I. Press MENU key to select the different baking cycle you want.
2. Press COLOR key to select the crust color your prefer.
3. Press LOAFkey to select tile bread size you desire.
4. Press TIMER key if you wish to have your bread machine begin up to 13 hours in advance
5. Press START key, then everything is all set.
BASIC BREADS All Bread Machines
These settings are used for breads that primarily use white flour: though some recipes may include small amounts
of whole wheat flour as well These settings have the minimum number of rising cycles and the shortest overall
times until baking is completed. Therefore, loaves will be slightly denser than French or Sweet breads Choose from
Basic settings, according to LOAF size and crust COLOR.
WHOLE WHEATtMULTI-GRAIN All Bread Machines
These settings are used for recipes with significant amounts of wllole wheat or rye flour, oats of bran. Ti_ey begin
with a rest period during which the flours or grains absorb the liquid ingredients. Soaking causes the flour or gram
to soften and helps ingredients to combine well. These settings also have an extra r_secycle to allow heavy
wheat/grains to expand. Generally, whole wheat/multi-grain breads are shorter and denser than Basic. French or
Sweet breads. Choose from WHOLE WHEAT settings:
SPECIALTY
FRENCH All Bread Machines
Traditionally French bread has a crispier crust and lighter texture than basic breads. Recipes usually do not include
butter, margarine or milk.
SWEET All Bread Machines
Use this setting for recipes that use fruit juice, additional sugar, or added sweet ingredients such as coconut flakes,
raisins, dried fruit or chocolate. Baking temperature is reduced to prevent burning and ti_eextra rise cycle gives the
loaves a light, airy texture.
QUICK/CAKE BREAD All Bread Machines
Th_ssetting _sused for recipes that contain baking powder or baking soda rather than yeast to make them rise.Cake
recipes rnust he specially designed for this setting. Seethe recipe section for the cake recipe.
EUROPEAN ONLY For ABMY2K2
Use this setting to make dark european breads such as Swedish Limpa. Russian Black Bread, Pumpernickle. etc.
DOUGH All Bread Machines
This setting makes dough only and will not bake the final bread. Remove the dough and shape to rnake pzza, rolls.
pretzels doughnuts arrd round or braided breads. Then bake in a conventional oven or fry in a deep fryer (m
Doughnuts) Follow dough recipes for specific directions.
BAGEL DOUGH ONLY For ABMY2K2
This setting is a special dough setting for bagels only and will not bake tile final bread. Remove the dough and fo!-
low he steps for making bagels.
JAM ONLY For ABMY2K2
Usethis setting for making jam from fresh fruits. Do not double recipes or allow ingredientsto boil over the pan
into the baking chamber. Should this happen, stop the machine immediately. Allow to cool and clean thor-
oughly.
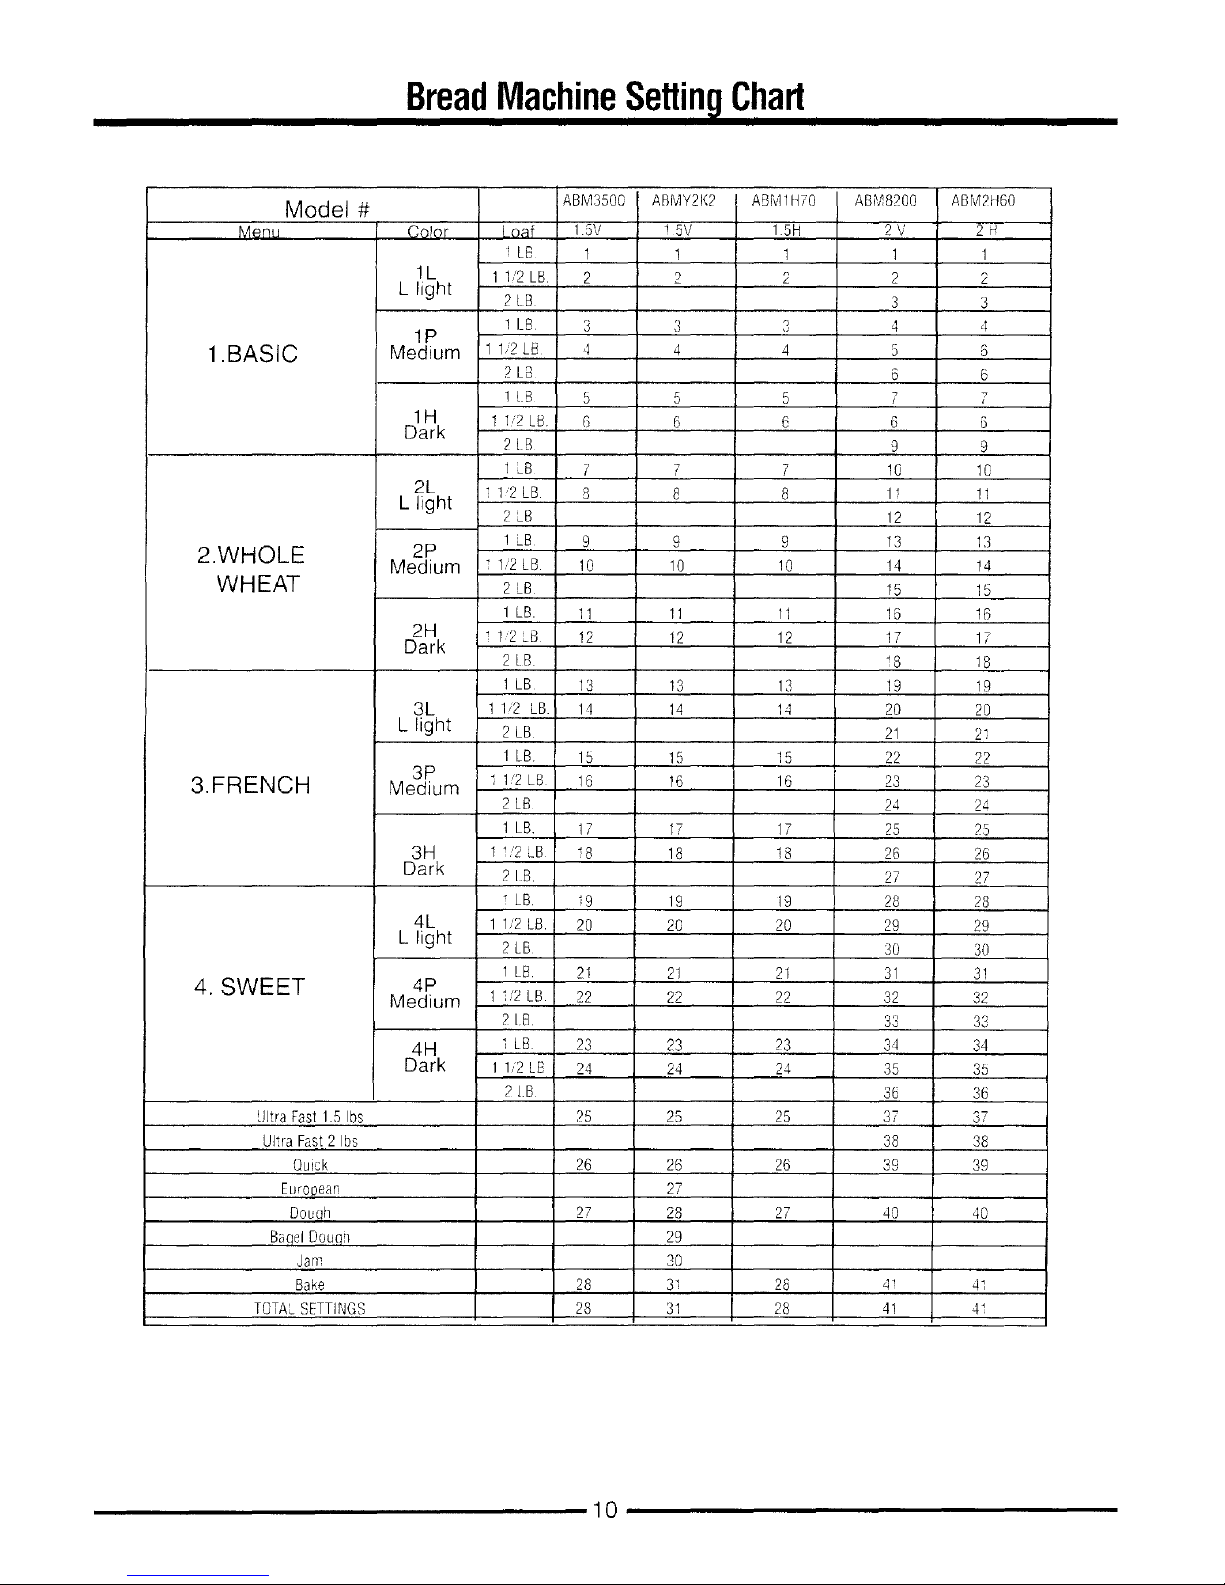
BreadMachineSettin Chart
Model #
MARL]
1 .BASIC
2.WHOLE
WHEAT
3.FRENCH
4. SWEET
UJtraFast 1.5 Ibs
Ultra Fast 2 Ibs
Quick
European
Douah
Baq_l Douql
Jan_
Bake
TOTALSETTINGS
Co_or Loaf
1L 11/2 LB.
L Fight 2t B
1LB
1P
Medium 11,2LB
2LB
lIB
1H 11/2 LB,
Dark
21B
I_B
2L i 1/2LB
L light 2LB
! LB
2P
Medium 1/2LB
2LB
1LB.
2H 1 12 _B
Dark
2[B
1LB
3L 112 LB.I
L Fight 2 LB
1LB
3P i 1'2 LB
Medium
2LB
1 LB.
3H I i/2 cB
Dark 2 IB
LB.
4L 1 1/2 LB.
L light 2 LB
1LB.
1i/2 LB.
21B
I LB
I 1/2LB
21B
ABM3500 ABMY2K2
15V i 5V
1 1
2 2
3
4
3
4
ABM1H7B
1.5N
1
2
3
4
5 5 5
6 6 6
Y 7 7
8 8 8
9
10
9
10
g
!0
11 11 11
12 i2 12
13
14
13
14
15 15
16 16
13
14
15
16
17 17 17
i8 18 18
i9 19
20 20
21
22
21
22
19
20
21
22
4P
Medium
4H 23 23 23
Dark 24 24 24
25 25
26 26
27
27 28
29
30
28 31
28 31
28
28
ABM8200
2V
1
2
3
4
5
6
7
6
9
10
12
13
!4
15
!5
17
18
19
20
21
22
23
24
25
26
27
28
29
3O
3I
32
33
34
35
36
37
38
39
4O
41
41
ABM2ttBO
2H
1
2
3
4
6
6
7
6
9
10
11
12
13
14
15
16
17
18
19
20
21
22
23
2_4
_5
26
27
28
29
30
31
32
3S
34
35
36
37
38
39
4O
41
41
10
BAKE All Bread Machines
This setting is especially helpful when making gluten-free breads. After the first rise, stop the machine
and cancel the cycle by pressing the STOP key until it beeps. Set tile machine to the BAKE setting and
press the START key.
Usin lYourBreadMachine
The bread settings in these units will combine ingredients, knead and make bread from start to finish automatically The
DOUGHsetting makes dough for a variety of recipes for you to shape and bake m your oven. To delay compietion, the
automatic T!MER may be programmed to make bread or dough while you are at york or asleep iSee 'Usii g Tile Tirner",
sage 15)
The recipes included with this booklet have been thoroughly tested to ensure best results Recipes have been created by
ilome economists specifically for these bread machines an,d may no_,p,oduce acceptable resLfltsin other similar bread
-naehh]es
FORALL SETTINGS, FOLLOWTHESE INSTRUCTIONS:
1
3
0pel the id and remove the baking _an [._,pulhng stra,ght m : 1tile nan-
d e. t is important to remove the baking can from _ne dlllI ramer _nan
putt ng mgredients into the pan wh le _ ts -"o_ace:o avoid acc_aen[a ,
sp I!ing ingredients into the bakmg cnamoer.
Attach the kneading blade onto the shaft inside the baking pan by lining
Lipthe flat side of the blade with the flat side on the shaft. Push the blade
firmly onto the shaft.
Select a recipe from the recipe section of this booklet. When following
the recipes:
- Measure ingredients carefully and accurately To measure liquids,
use a see-through liquid measuring cup and cheek tile nreasuremeHt at
eye level When measuring dry ingredients, use a standard dry measur-
mg cup and !evel the ingredients with a straightedge knife Inaccurate
measurement, even slightly, can make a diflerence in results, Use
standard measuring spoons and level off with a straightedge knife.
See Measuring Your Ingredients", page 21.)
- Always add ingredients into the baking san in the order listed.
- Always add yeast last. Besure the yeast does not touch the liquid
Warning:
Place vour bread machine
whereitis level stab!e and
secure
•Be sure to set the kneading
blade firmly into place other-
wise the blade may come off
durirrg operation vfhich Ha,/
affect tire knead ng or
mixing.
•Be sure the shaft s clean of
any residue (ie. dougt_)This
will ensure tile kneading b!ade
will fully seat into place.
Becareful not io nrx ttre yeast
with any of the wet ingredi-
ents especially when using
the delayed timer feature
Otherwise the b_eadmay not
rise properly.
Breadmaking Tip:
After 5 minutes of knead-
ing open the lid of the
bread machine and check
ingredients. /- ---- . _ i-
%,--dL_-_ Dry _- W'_-/
_,,, _,_ f Inaredie ls Yeast
(ie. flour) _ L,._..,J
the dough consistency. The
dough should from a sort,
tacky ball If too dry. add
tiquid: if too wet. add flour -
- 1/2 to 1 tablespoon at a
time
11

4
5
6
7
Usinv YourBreadMachine
Place the baking pan back into the
unit.Push down on the pan until / o o -_
you bear it click firmly into place. >_._._
Fold the handle down. /_J_ .-..... "_'_,'\ ....
-- /I_ _/;," r
/ /_ _ - ._\ \ !
Close the lid. Connect the plug to a
!20- volt AC-only outlet. You wil!
hear a beep and the display will be
blank.
Choose the correct setting for your
recipe by pressing the MENU but-
ton. Each time MENU is pressed,
you will hear a beep and the num-
ber in the display window will
advance to the next cycle.
...... { tli
........ -
Press the COLOR button to choose
the crust color you prefer. You have
three choices. Light, Medium. or
Dark. When you press the button,
you will hear a beep, and the display
window will show the color your
selected•
!c_b
2o_b
L4ghr ',_di_m 03rk
t_:;t.....
, _,_,r ,_,, i ¸ 2r
_r x R
Special Note:
If the baking pan is not
installed properly or firm-
ly clicked into place, the
kneading blade will not
operate.
Caution:
This appliance has a polarized
plug (one blade is wider than
the other)• As a safety feature.
this plug will fit in a polarized
outlet only one way. It the plug
does not fit fully in the outlet.
reverse the plug• If it still does
not fit, contact a qualified elec-
trician. Do not attempt to defeat
this safety feature.
Special Note:
The Whole Wheat settings
begin with a rest period dur-
ing which the flours or grains
absorb the liquid ingredients,
Soaking causes the flour or
grain to soften and helps in-
gredients to combine well.
There is no blade action dur-
ing this period.
Note:
"L' means Light color
"P" means Medium color
"H" means Dark Color
12
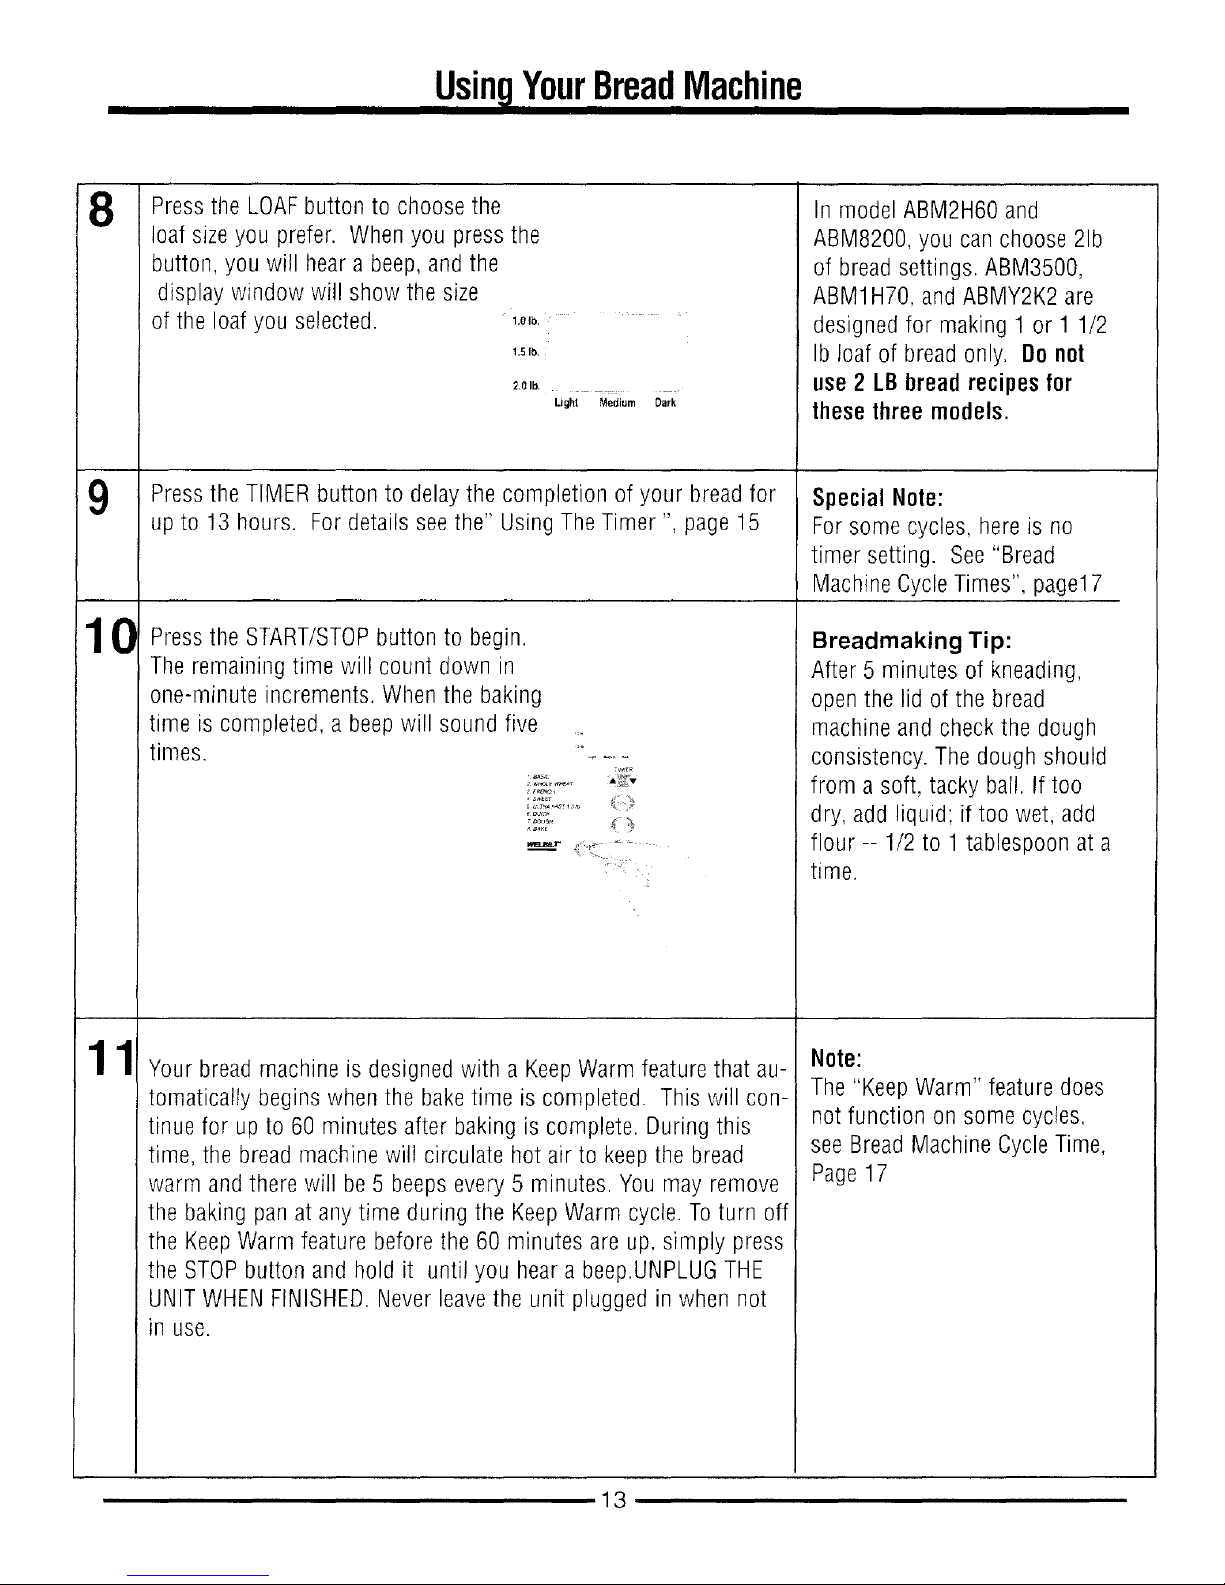
UsinvYourBreadMachine
8
9
10
11
Press the LOAF button to choose the
loaf size you prefer. When you press the
button, you will hear a beep, and the
display window will show the size
of the loaf you selected. -1.o,b.
1.5 lb.
2,0lb.
Light Medium Dark
Press the TIMER button to delay the completion of your bread for
up to !3 hours. For details see the" Using The Timer ", page 15
Press the START/STOP button to begin.
The remaining time will count down in
one-minute increments. When the baking
time is completed, a beep will sound five
times.
eQulc_
• j;
Your bread machine is designed with a Keep Warm feature that au-
tomatically begins when the bake time is completed. This will con-
tinue for up to 60 minutes after baking is complete. During this
time, the bread machine will circulate hot air to keep the bread
warm and there will be 5 beeps every 5 minutes. You may remove
the baking pan at any time during the Keep Warm cycle. To turn off
the Keep Warm feature before the 60 minutes are up, simply press
the STOP button and hold it until you hear a beep.UNPLUG THE
UNIT WHEN FINISHED. Never leave the unit plugged in when not
in use.
In model ABM2H60 and
ABM8200, you can choose 21b
of bread settings. ABM3500,
ABM1H70. and ABMY2K2 are
designed for making 1 or 1 1/2
Ib loaf of bread only. Do not
use 2 LB bread recipes for
these three models•
Special Note:
For some cycles, here is no
timer setting. See "Bread
Machine Cycle Times", page17
Breadmaking Tip:
After 5 minutes of kneading,
open the lid of the bread
machine and check the dough
consistency. The dough should
from a soft, tacky ball. If too
dry, add liquid; if too wet, add
flour -- 1/2 to 1 tablespoon at a
time.
Note:
The "Keep Warm" feature does
not function on some cycles,
see Bread Machine Cycle Time,
Page 17
13
Usin lYourBreadMachine
12
13
14
This bread machine has a convenient viewing window so that you
may watch the progress of the bread as it is mixed, kneaded and
baked. Occasionally, some moisture may form in the window dur-
ing baking. You may lift the lid to look inside during mixing and
kneading stages. However, DO NOT OPENTHE LID DURING THE
BAKING CYCLE (approximately the last hour or so) as this may
cause the bread to collapse.
To remove the bread from the bakinq pan, use pot holders or oven
mitts and pull straight up oil the handle. Turn the pan upside down
and shake tile bread out onto a wire cooling rack. Tile baking pan
has a nonstick finish so the bread should come out easily. Do not
use metal utensils to remove bread as they may scratch the non-
stick surface. If you have difficulty removing bread from the baking
san. slide a flat rubber or plastic spatula along the sides of the pan
to loosen the loaf. Turn the pan over and shake the !oaf out.
Allow the bread to cool before slicing (See "Slicing and Storing
Bread", page 15). If the kneading blade remains in the bottom of
the baking pan, fill the baking pan with warm water to loosen. If
the kneading blade remains in the bottom of the bread, use the
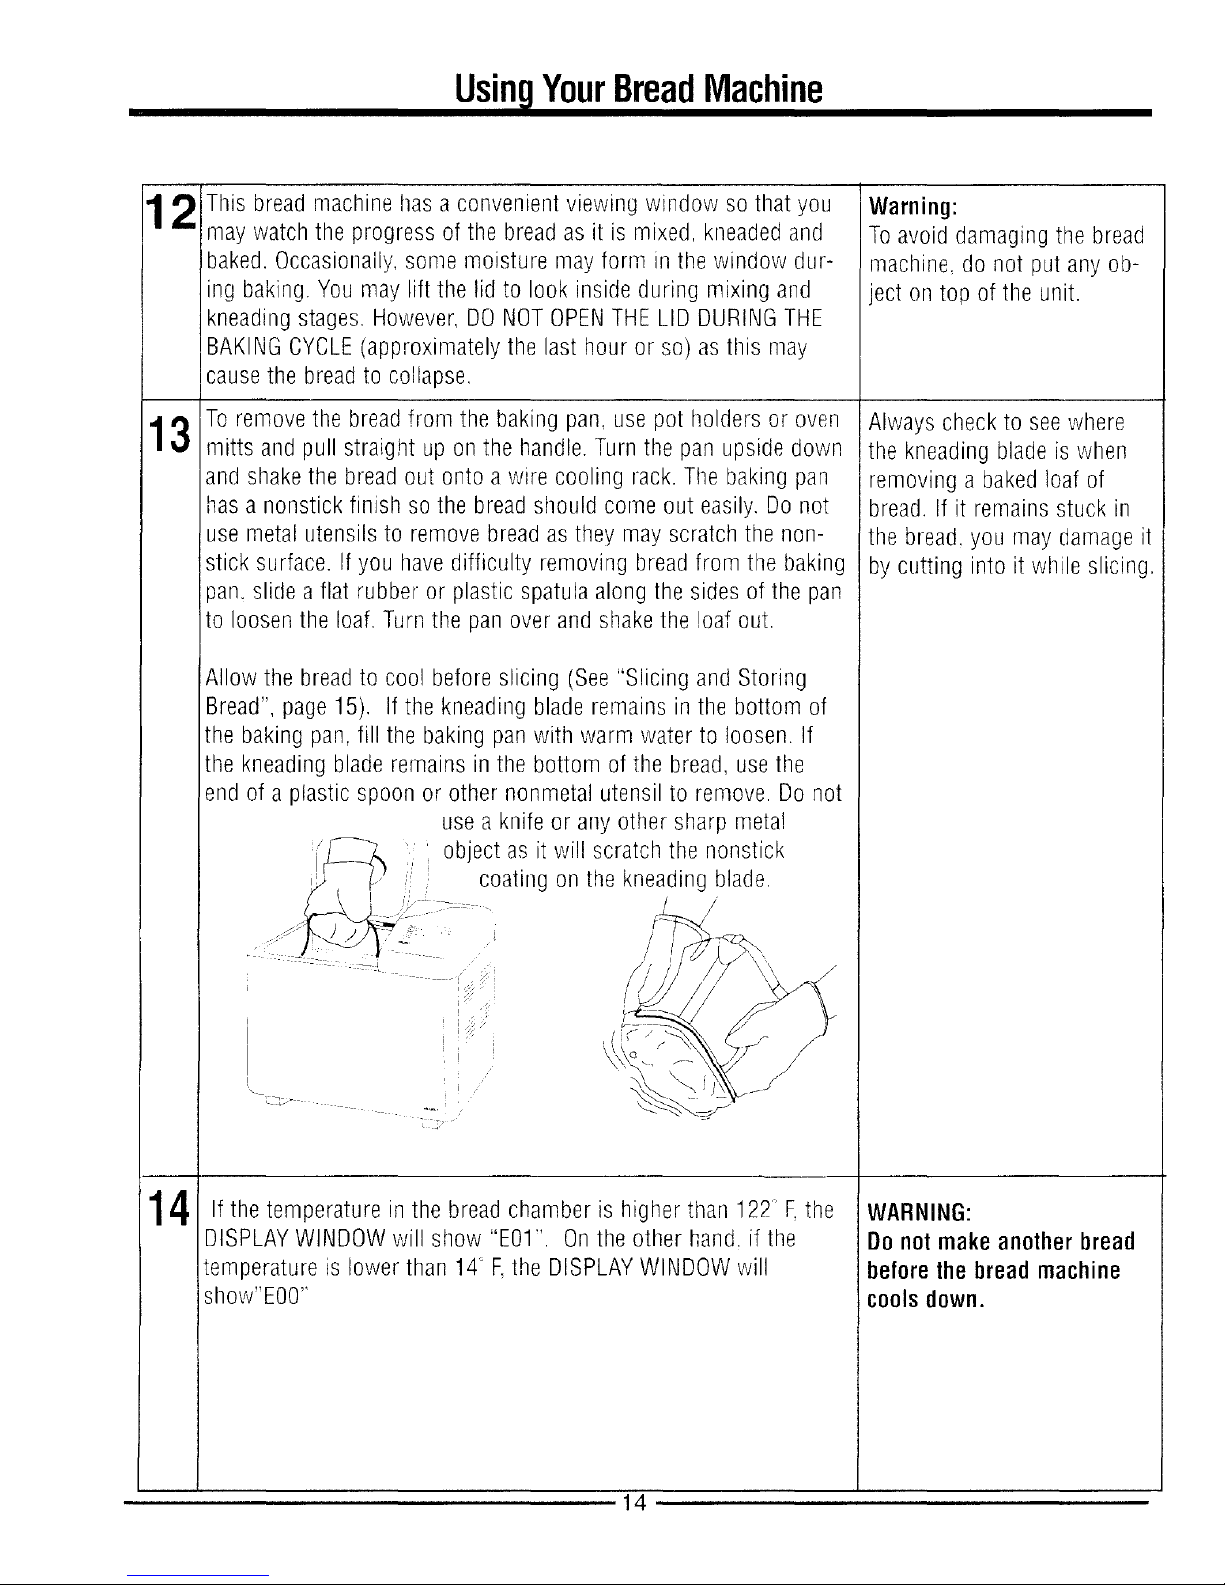
end of a plastic spoon or other nonmetal utensil to remove. Do not
use a knife or any other sharp metal
will scratch the nonstick
on the kneading blade.
t / '/
/
///I /7 ',", /
I>u.?/ s y
If the temperature in the bread chamber is higlTer than 122' F,the
DISPLAY WINDOW will show "E01" On the other hand. if the
temperature is lower than 14 F,the DISPLAY WINDOW will
show"E00"
Warning:
To avoid damaging the bread
machine, do not put any ob-
ject on top of the unit.
Always check to see where
the kneading blade is when
removing a baked loaf of
bread. If it remains stuck in
the bread, yOLlmay damage it
by cutting into it while slicing.
WARNING:
Do not make another bread
before the bread machine
cools down.
14
 Loading...