


There never has been as much interest in home bread baking as since the introduction of the first automatic bread machines in 1987. Since then. millions of people have learned to enjoy the pleasure and gratification of making and serving fresh homemade bread to family and friends. And to think that the best part of all is that the bread machine does all of the work and only requires a few minutes of your time and attention.
Before using the Bread Machine for the first time, please read the instructions contained in this manual. Follow the steps carefully and use the ingredients specified in the recipes.
If you should have any questions about your Welbilt Bread Machine. please write to:
DELETED BECAUSE THEY WENT OUT OF BUSINESS Check with http://www.tritronicsinc.com/
IMPORTANT SAFEGUARDS HOUSEHOLD USE ONLY
When using electrical appliances, basic safety precautions should always be followed, including the following:
1.Read all instructions before using the appliance.
2.Do not touch hot surfaces. Use the appliance’s handles or knobs.
3.To protect against electrical shock, do not immerse power cord, plugs, or the appliance in water or other liquid.
4.To prevent injuries or burns, do not insert your hand into the appliance when it is operating.
5.Close supervision is necessary when any appliance is used by or near children.
6.Unplug the appliance from the wall outlet after use and before cleaning. Allow the appliance to cool before attaching or removing parts.
7.Do not operate any appliance with a damaged power cord or plug, or after the appliance malfunctions, or after the appliance has been damaged in any manner. Return appliance to the nearest authorized service facility for examination, repair or adjustment.
8.The use of accessory attachments not recommended by the appliance manufacturer may cause injuries.
9.Do not use the appliance outdoors.
10.Do not let cord hang over edge of table or, counter or touch hot surfaces.
11.Do not place the appliance on or near a hot gas or electric burner or in a heated oven.
12.Extreme caution must be used when moving an appliance that contains hot liquids.
13.When using an extension cord, always attach the plug to the appliance first, then plug the extension cord into the wall outlet. To disconnect, first turn any appliance controls to OFF, then disconnect the plug from the wall outlet.
14. Do use any appliance for anything other than its intended use.
This unit has a short power supply cord to reduce the risk resulting from becoming entangled in or tripping over a longer cord. An extension cord may be used if you are careful in its use. If a longer detachable powersupply cord or extension cord is used, (1) the marked electrical rating of the cord set or extension cord should be at least as great as the electrical ration of the appliance, and (2) the cord should be arranged so that it will not drape over the countertop or tabletop where it can be pulled on by children or tripped over accidentally. If the appliance is of the grounded type, the extension cord should be a grounding type 2-wire cord. The power cord must be kept dry and must hot be bent or have anything put on top of it.
SAVE THESE INSTRUCTIONS FOR LATER USE
To reduce the hazard of potential shock, this item has a polarized plug(one blade is wider than the other),which will fit only one way in a polarized outlet. If the plug does not fit the outlet properly, turn the plug the other way; if it still does not fit, contact a qualified electrician for assistance. Never use this plug with an extension cord unless it fits properly. DO NOT ATTEMPT TO DEFEAT THIS SAFETY FEATURE.
Table of Contents |
|
Your Welbilt Bread Machine |
5 |
Control Panel |
6 |
Using Your Welbilt Bread Machine |
7 |
Tips For Best Baking Results |
9 |
Suggestions For Maximum Enjoyment and Safety |
10 |
Getting Started |
11 |
Inserting and Removing the Bread Pan |
12 |
Kneading, Rising, and Baking Cycles |
13 |
How to Make Bread or Dough |
15 |
Recipes and Baking Guide |
17 |
Cleaning Instructions |
44 |
Consumer Assistance |
45 |
Trouble Shooting Guide |
46 |
Specifications |
48 |
Limited Warranty |
49 |

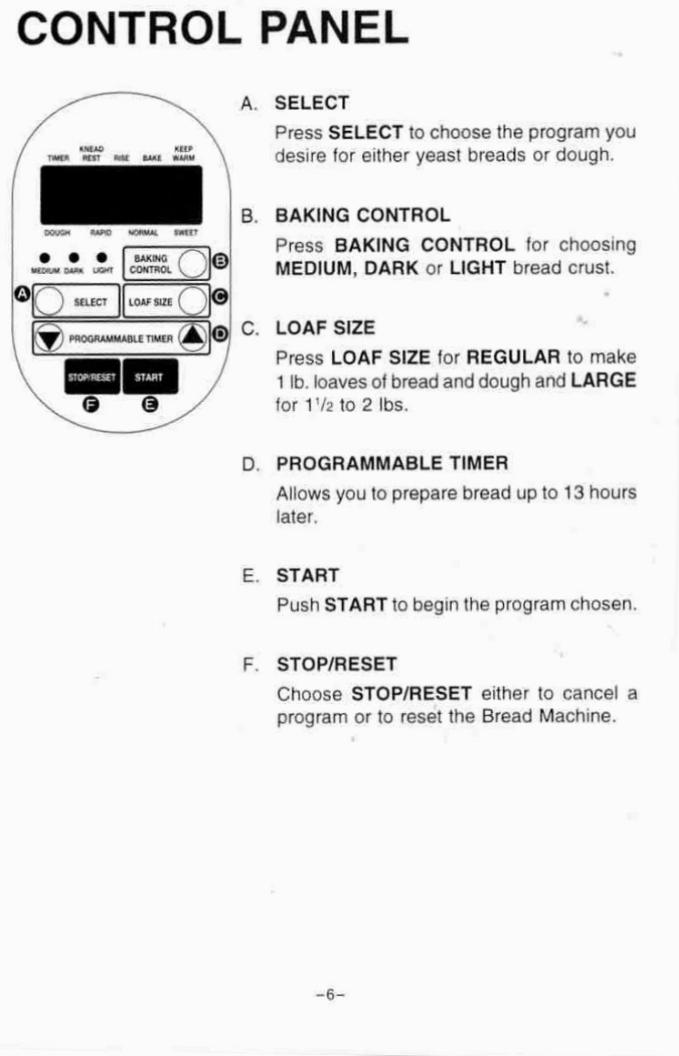
USING YOUR WELBILT® BREAD MACHINE
Before using your Bread Machine for the first time, be sure o carefully read all of the instructions included in this manual.
1.You can make any of the delicious recipes included with your Bread Machine. You also can use bread machine pre-mixes sold in many specialty stores or through mail order catalogs. Be sure that you never exceed 1-1/2 teaspoons of yeast when baking bread from scratch (unless specified in your Welbilt recipe) or when using any other recipe or pre-mix.
2.You also can use any 2. 3 or 4 cup flour capacity recipe from many of the bread machine cookbooks available from your local bookstore or library. Never exceed teaspoons of yeast if baking bread in the Bread Machine.
3.It you wish to convert a favorite family recipe for use in your bread machine, find a similar one in this booklet to see how to scale it down proportionately. Never exceed 1 /2 teaspoons of yeast when baking bread in the Bread Machine.
4.For best results, never exceed the maximum amount of four cups of flour if you plan to bake the bread in the appliance.
5 Before making your bread or dough determine the size loaf or the amount of dough you plan to make. You can use 2. 3, or 4 cups of flour depending on the recipe. Press the LOAF SIZE button to choose either REGULAR for 1 lb. loaf of bread or dough or LARGE for 1 1/2 to 2 lbs.
6.When making basic yeast bread like white, wheat and raisin, set the bread machine on the NORMAL setting by pressing the SELECT button. Determine the type of crust desired by pressing the BAKING CONTROL button for MEDIUM, DARK or LIGHT. To make yeast dough for baked goods that will be hand shaped and baked in your kitchen oven, press the SELECT button for DOUGH NORMAL. The bread machine will knead and rise the dough which will then be removed and hand shaped.
7.If you are making bread or dough which contains a greater quantity of eggs, sugar or butter, set the bread machine on the SWEET bread setting by pressing the SELECT button. If you are baking the bread in the bread machine determine the type of crust desired by pressing the BAKING button for MEDIUM, DARK or LIGHT. To only make sweet bread dough, press the SELECT button until DOUGH SWEET appears on the readout
8.If you wish to make yeast bread using the RAPID setting, the entire bread making process will be shortened by 30 minutes. To use this optional function, press the SELECT button until either RAPID NORMAL, or RAPID SWEET, appears on the readout. Determine how you wish to have your bread baked by selecting MEDIUM, DARK or LIGHT.
9.After selecting the appropriate loaf size, type of program, and baking cycle, press START.
10.You can also set your bread machine to make an endless variety of yeast breads to be ready up to 13 hours later when using the NORMAL or SWEET bread setting only. Press the SELECT button for either NORMAL or SWEET. Choose the appropriate baking setting by pressing the BAK ING CONTROL button for MEDIUM, DARK or LIGHT.
Using the PROGRAMMABLE TIMER arrow up or arrow down buttons, you can set your bread machine to have your bread ready, up to 13 hours later. Never use perishable ingredients like eggs. when using the PROGRAMMABLE TIMER. Never use absorbent ingredients like oats or other whole grains, since they will absorb the liquid before the bread making process begins. The PROGRAMMABLE TIMER cannot be used when using the RAPID or DOUGH setting.
TIPS FOR BEST
BAKING RESULTS
1.All ingredients must be at room temperature.
2.Yeast is what causes the dough to rise. It is a living single cell organism that is sold dehydrated. When mixed with water, yeast is reactivated. Unfortunately, yeast can be adversely affected by extreme temperatures. If the ingredients being used are not at room temperature, the yeast may not be activated effectively.
3.Yeast also can be adversely affected by temperatures that are too hot. Only use room temperature water (75° – 80°F) even though the yeast package may specify something totally different.
4.Always measure ingredients carefully. Spoon flour into the measuring cup and level off with a blunt knife. Do not pack down.
5.Always use bread flour unless otherwise specified. It is available in most supermarkets.
6.Do not open the lid during operation since this can adversely affect the quality of the bread.
7.Be careful not to unplug the Bread Machine during use. If this should happen, or if there is a power failure, you will not be able to go back o where it left off. However, if the Bread Machine was not in the baking cycle and the dough had been kneaded at least once, you can remove it, hand-shape and bake it in a conventional oven.
8.if you try to use the Bread Machine immediately after baking a loaf of bread, the yea may be killed since the appliance will be very hot. If you press the START button the Bread Machine will beep and not knead. This is your warning that the pan should be removed and the unit be allowed to cool down.
SUGGESTIONS FOR MAXIMUM ENJOYMENT AND SAFETY
1.The baking portion and lid of the Bread Machine become extremely hot during baking. Always use a kitchen mitt or pot holder when touching these parts.
2.Do not operate this appliance on the same circuit as other high voltage appliances.
3.Position the Bread Machine at least 4 inches from the f of the counter or working surface. Do not place any flammable materials or objects on top of the appliance when plugged in or during operation.
4.Do not use the Bread Machine near any electrical equipment like radios, TVs, or stereos since poor reception or interference may occur.
5.Always use the Bread Machine on a clean, dry work surface away from exposed elements, direct sunlight, or other sources of heat or cold.
6.Only use the Bread Machine on a non-flammable work surface or counter. Never use on floor or on carpeting or on top of any cloth objects like tablecloths or placemats.
7.Never stick your hand or any kitchen utensils into the bread pan during operation.
8.Do not use accessories or attachments not included or recommended by Welbilt.
9.Do not put any components in the dishwasher.
10.Do not attempt to tamper with or make any adjustments to the electrical components or parts.
11.Do not use this appliance other than for its intended use.
GETTING STARTED
Your Welbilt® Bread Machine has twelve separate programs to choose from.
Making Bread Automatically:
Choose the NORMAL, SWEET, RAPID/NORMAL, RAPID/SWEET, REGULAR or LARGE capacity program when making bread automatically, by pressing the SELECT and LOAF SIZE buttons. The Bread Machine will knead and rise the dough twice and then bake it to perfection.
Making Yeast Dough Automatically:
Choose the DOUGH/NORMAL or DOUGH/SWEET, REGULAR or LARGE capacity program, by pressing the SELECT and LOAF SIZE buttons. The Bread Machine will knead and rise the dough twice. At the end of the program you will remove the dough and hand-shape it according to your recipe. Dough will then be baked in a conventional oven.
INSERTING AND REMOVING THE BREAD PAN
1.Before using the Bread Machine for the first time, be certain to wash the bread pan and dough blade with warm water and mild dishwashing liquid. Towel dry. Never put the bread pan and blade in the dishwasher.
2.All mixing, kneading, rising, and baking, when appropriate, take place in the bread pan. The pan is covered with a non-stick fluorine coating which will scratch if not treated and cared for properly. Clean and treat the pan as you would a non-stick frying pan.
3.To reinsert the pan, place over the locking mechanism located on the bottom of the baking compartment. Push down. To remove the pan, pull up.
4.Remember to insert the kneading blade on the shaft located in the bread pan before adding your ingredients. It is not necessary to remove the kneading blade after you make every loaf of bread. Always be certain that the dough hook is securely screwed in the pan..
5.Since the bread pan will be hot after the baking cycle, always use a kitchen mitt or pot holder when removing it;
6.To remove the bread from the pan, remove the dough hook, invert upside down and gently shake up and down until the loaf slides out. If the bread does not come out of the pan easily, use a non-metallic kitchen utensil to pry it out.
KNEADING, RISING, AND BAKING CYCLES
This chart is provided so that you will better understand how your Welbilt® Bread Machine works.
|
NORMAL |
RAPID |
DOUGH |
|||
|
(MINUTES) |
(MINUTES) |
(MINUTES) |
|||
PROGRAM |
Reg |
L |
Reg |
L |
Reg |
L |
Mixing/First Kneading |
10 |
15 |
10 |
15 |
10 |
15 |
Rest |
28 |
32 |
8 |
12 |
30 |
30 |
Second Kneading/ |
12 |
23 |
12 |
23 |
12 |
23 |
Add Nuts/Fruit |
|
|
|
|
|
|
First Rise |
20 |
20 |
10 |
10 |
20 |
20 |
Punch Down |
2 sec |
2 sec |
2 sec |
2 sec |
2 sec |
2 sec |
Second Rise |
60 |
60 |
60 |
60 |
— |
— |
Baking |
50 |
50 |
50 |
50 |
— |
— |
Total Program (hour:min) |
3:00 |
3:20 |
2:30 |
2:50 |
1:12 |
1:28 |
Keep Warm (hours) |
3 |
3 |
3 |
3 |
— |
— |
|
SWEET |
RAPID SWEET |
SWEET DOUGH |
|||
|
(MINUTES) |
(MINUTES) |
(MINUTES) |
|||
PROGRAM |
Reg |
L |
Reg |
L |
Reg |
L |
Mixing/First Kneading |
10 |
15 |
10 |
15 |
10 |
15 |
Rest |
28 |
32 |
8 |
12 |
30 |
30 |
Second Kneading/ |
12 |
23 |
12 |
23 |
12 |
23 |
Add Nuts/Fruit |
|
|
|
|
|
|
First Rise |
20 |
20 |
10 |
10 |
20 |
20 |
Punch Down |
2 sec |
2 sec |
2 sec |
2 sec |
2 sec |
2 sec |
Second Rise |
60 |
60 |
60 |
60 |
— |
— |
Baking |
50 |
50 |
50 |
50 |
— |
— |
Total Program (hour:min) |
3:00 |
3:20 |
2:30 |
2:50 |
1:12 |
1:28 |
Keep Warm (hours) |
3 |
3 |
3 |
3 |
— |
— |
Mixing/First Kneading: The Bread Machine will intermittently mix the ingredients So, 2 minutes at which time it will then begin to knead the dough to (arm a smooth, elastic ball.
Second Kneading: Knead the dough makes the gluten elastic enough to form the structure of the bread.
Add Fruit/Nuts: The Bread Machine will beep B times, 5 minutes before the end of the second kneading. This is the best time to add ingredients like nuts and raisins, etc.
First Rise: When dough has been well-kneaded, the gluten forms thin elastic strands that make up the structure of the bread. As the yeast develops and multiplies, it produces carbon dioxide gas. The gas becomes trapped in the gluten strands, forming bubbles. As these bubbles collect, the dough expands and rises.
Punch Down: The Bread Machine kneads the dough for 30 seconds to deflate it,
Second Rise: The gluten strands are now strong enough to support the loaf. The yeast will once again produce carbon dioxide gas and the dough will rise to its maximum height.
Baking: The bread will be baked to perfection when using any program except DOUGH.
Keep Warm: I you are unable to remove the bread immediately after baking, the Bread Machine will keep the loaf warm to reduce the effects of the condensation that will form between the bat and the pan. Nevertheless, always remove the bread as quickly as possible after the baking cycle.
 Loading...