

Page 1
Easy Ba--~n8
SPECIRCATIONS
MODEL: ABM4000
POWER REQUIREMENT: 120V, 60Hz.
POWER CONSUMPTION:
HEATER: 420 WATTS
MOTOR: 75 WATTS
RECIPES & INSTRUCTION- MANUAL
t
f
,
I
.
J
t
'1
I
"
,
.
o
.
P.O. Box 220709
Great Neck. New York 11021
I
b
t
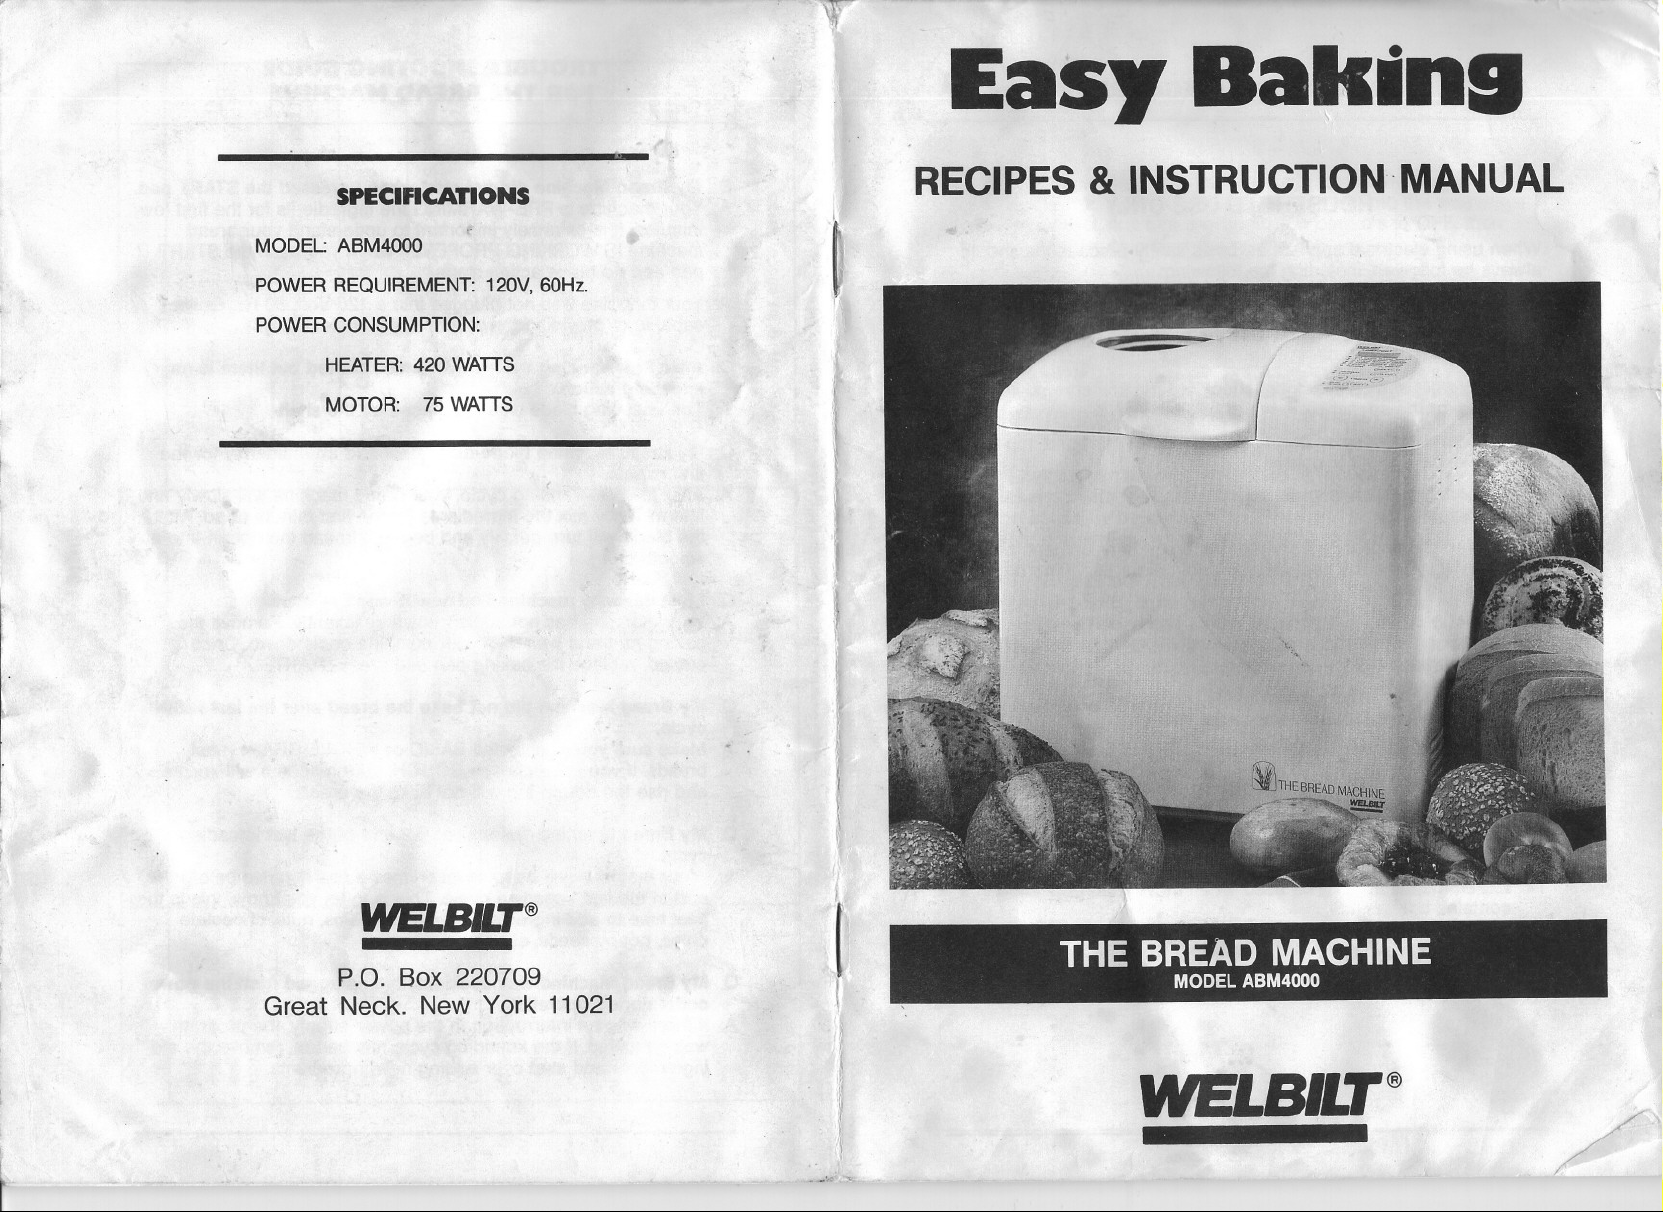
THE BREAD MACHINE
MODEL ABM4000
I
i
WELSILT@
I
-'
/
L
/"
~
Page 2

F r
IMPORTANT SAFEGUARDS
HOUSEHOLD USE ONLY
When using electrical appliances, basic s~fetyprecautions should
always be followed, including the following:
1. Read all instructions before using the appliance.
2. Do not touch hot surfaces. Usetheappliance's handles or
knobs.
3. To protect againstelectrical shock,do not immersepower cord,
plugs, or the appliance in water or other liquid.
4. To preventinjuries or burns,do not insert your hand into the
r
"
appliance when it is operating.
5. Close supervision is necessary when any appliance is used by
or near children.
6. Unplug the appliance from the wall outlet after use and batorn
cleaning. Allow the appliance to cool beforeattaching or
removing parts.
7. Do not operate any appliance with a damagedpowor cord or
plug, or afterthe appliance malfunctions,or after thu nppllflnoo
has been damaged in any manner.
8. The use of accessory attachmentsnot recommQndodby the
appliance manufacturermaycause injuries.
9. Do not use the appliance outdoors.
10. Do not let the appliance's power cord hang OVQrthe edge of
a table or counter.
11. Do not placethe appliance on or near a hot g88 or electric
burner or in a heatedoven.
12. Extremecaution must be used when moving on appliance that
contains hot liquids.
I
I
,
13. When using an extension cord, always attach the plug to the
appliance first, then plug the extension cord into the wall outlet.
To disconnect, first turn any appliance controls to OFF,then
disconnect the plug from the wall outlet.
14. Do not use any appliance for anythingother than its intended
use.
SAVE THESE INSTRUCTIONS
FOR LATER USE
This unit hasa short power supply cord to reduce the risk resulting
from becoming entangled in or tripping over a longer cord. An
extension cord maybe used if you are careful in its use.If a longer
detachable power supply cord or extension cord is used, (1)the
marked electrical rating of the cord set or extension cord should be
at least as great as the electrical ration of the appliance, and
(2)the cord should be arranged so that it will not drape over the
countertop or tabletop where it can be pulled on by children or
tripped over accidentally. If the appliance is of the grounded type,
the extension cord should be a grounding type 2-wire cord. The
power cord must be kept dry and must not be bent or have any-
thing put on top of it
To reduce the hazard of potential shock, this item has a polarized
plug (one blade is wider than the other),which will fit only one way
in a polarized outlet Ifthe plug does not fit the outlet properly,turn
the plug the other way, if it still does not fit, contact a qualified
electrician for assistance.Never use this plug with an extension
cord unless it fits properly.DO NOT ATTEMPTTO DEFEATTHIS
SAFETYFEATURE.
2
..
. --- - ---
3
Page 3
Easy Baking
Recipes & Instruction Manual
Published by Cookbook Resource USA, Ltd
Responsibility for the success and/or originality of the recipes for this book
contained herein rests with Welbilt Appliance, Inc. All rights reserved.
No part of the contents of this book may be reproduced by any means
without permission of the copyright co-owners. Cookbook Resource USA
is a registered trademark of Cookbook Resource USA, Ltd.
WELBIL Pi) is a registered trademark of Welbilt Appliance Inc.
Milwaukee/1995
copyrights C>1992 & 1993 by
Cookbook Resource USA, Ltd.
Welbilt Appliance, Inc.
and
-
Before using the Bread Machine for the first time, please read the instructions
contained in this manual. Follow the steps carefully and use the ingredients
If you should have any questions or problems, please write to:
Welbilt Bread Machine Customer Service
Monday to Friday, 9:00 AM to 5:00 PM Eastern time
specified in this book.
P.O. Box 220709
Great Neck. New York 11021
Or call us at
1-800-872-1656
CONTENTS
Instruction Manual
Control Panel...
Bread Machine Programs
ProgrammableTimer
YourWelbilt Machine ...
Suggestionsfor Safety& Enjoyment
Kneading,Rising & Baking Cycles:CHART
Kneading,Rising & Baking Cycles:STEP-BY-STEP
Inserting/Removing Pan & Cleaning
Insider's Guide to Easy Baking
Traditional Yeast Breads
Gluten-Free Breads
Quick Breads
Yeast Breads Made Automatically
Basic Breads
BasicWhite Bread """""""'"''
BasicWhite BreadVariations
RyeBread ...
Onion Bread
Cinnamon Nut RaisinBread
Egg Bread ''''''''''''''''''''''''''''''''
Chevre-Cracked Pepper Bread
Whole Grain Breads
100%Whole Wheat Bread
Sunflower OatmealBread
Honey Oats'N' Barley Bread
Dark PumpernickelBread
Triple Wheat Bread ......
Shredded Wheat Bread
8
9
10
11
12
13
14
15
16
21
24
25
26
27
28
29
30
31
32
33
34
35
36
37
(continued next page)
4
5
Page 4
CONTENTS (confd.)
Hand-Shaped Breads
Pizza Dough ...........
Pizza Dough Variations
Bagels ............
French Bread
Cinnamon Rolls
Bread Sticks.
Holiday Bread
Gluten-Free
Brown & White Rice Bread
"Mock" Light RyeBread
Cinnamon RaisinBread
Cheddar Loaf
Quick Breads
Banana Nut Bread
CornBread........
Irish Soda Bread
Apple Walnut Loaf
Breads
38
39
40
42
43
44
45
46
48
50
52
54
55
56
57
~
I
Instruction Manual
Practical Solutions
Trouble Shooting for The Bread Machine 63
58
)
6
--- ---
7
Page 5
\1
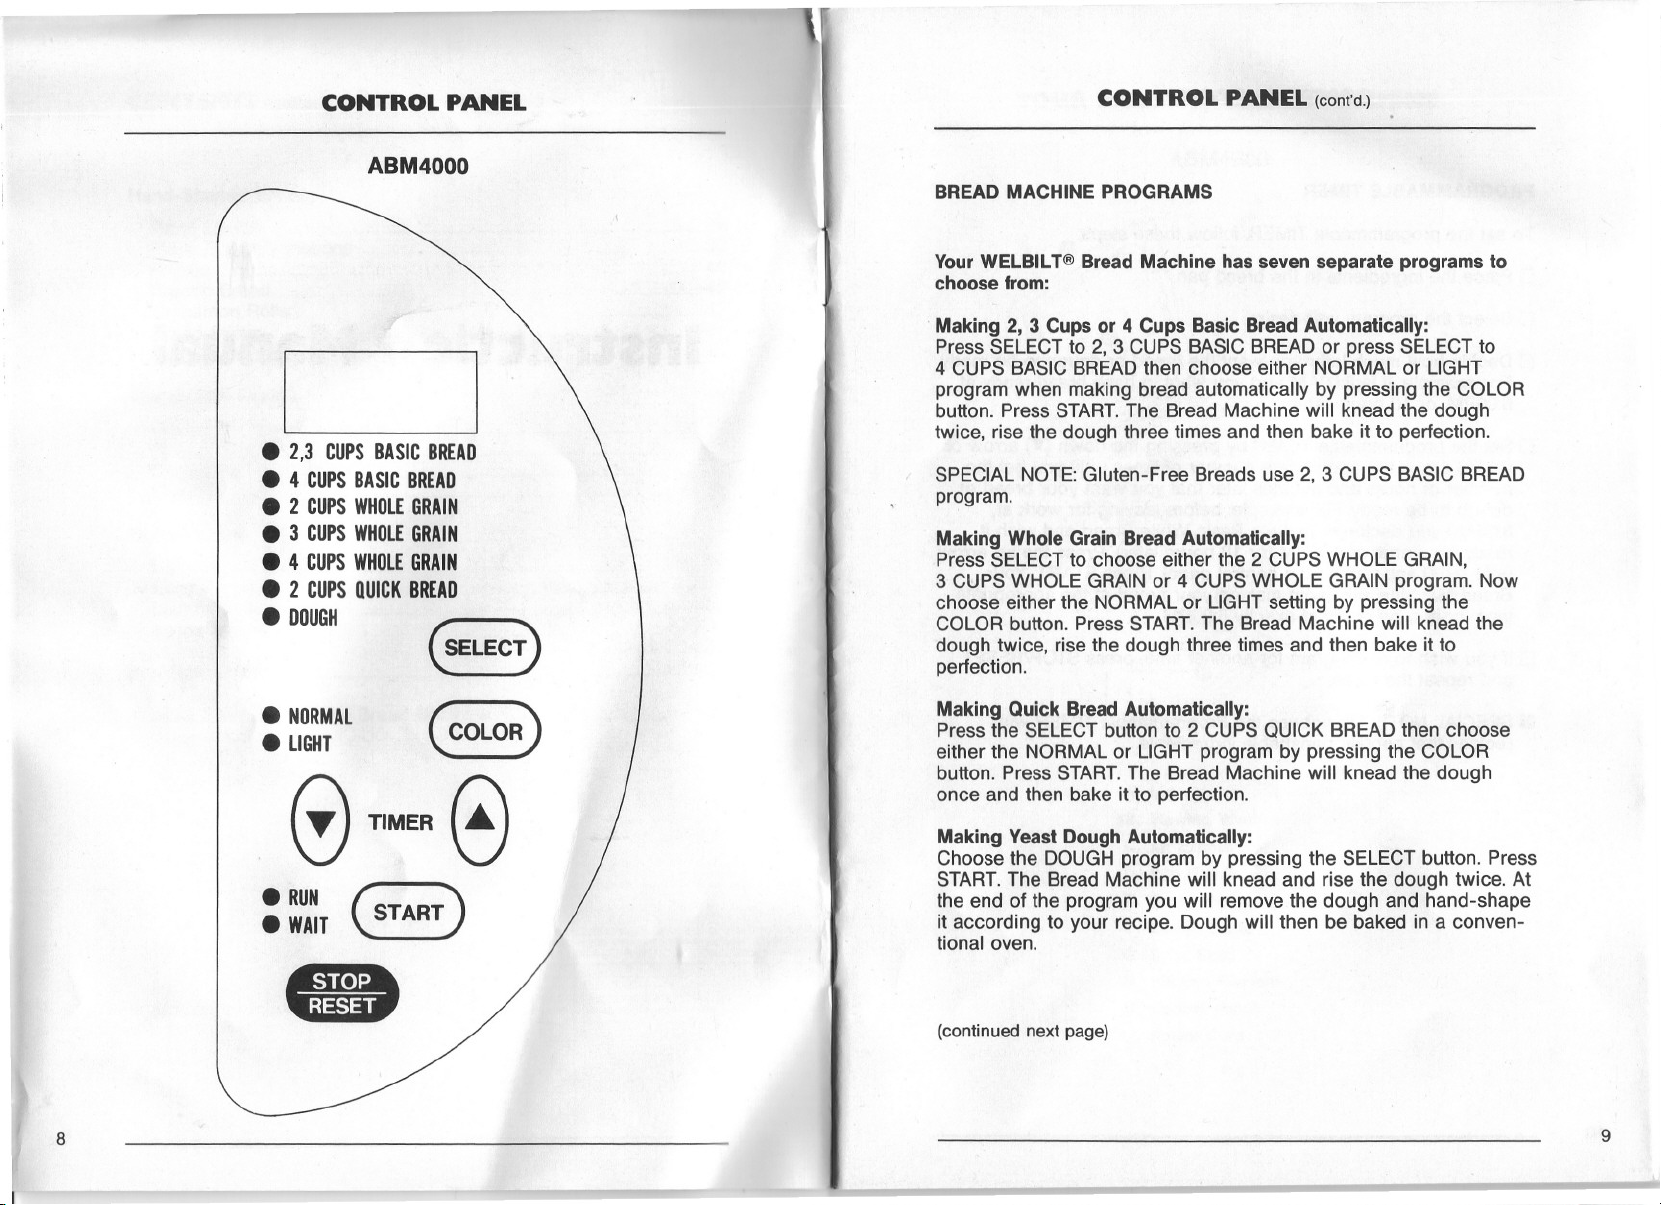
CONTROLPANEL
ABM4000
.2,3 CUPSBASICBREAD
.4 CUPSBASICBREAD
.2 CUPSWHOLEGRAIN
.3 CUPSWHOLEGRAIN
.4 CUPSWHOLEGRAIN
.2 CUPSQUICKBREAD
. DOUGH~
~
CONTROL PANEL (cant'd.)
BREAD MACHINE PROGRAMS
Your WELBIL T@Bread Machine has seven separate programs to
choose from:
Making 2, 3 Cups or 4 Cups Basic BreadAutomatically:
PressSELECTto 2, 3 CUPS BASICBREADor press SELECTto
4 CUPS BASICBREADthen choose either NORMALor LIGHT
program when making bread automatically by pressing the COLOR
button. Press START.The Bread Machine will knead the dough
twice, rise the dough three times and then bake it to perfection.
SPECIAL NOTE: Gluten-Free Breads use 2, 3 CUPS BASIC BREAD
program.
MakingWhole Grain Bread Automatically:
PressSELECTto choose either the 2 CUPSWHOLEGRAIN,
3 CUPSWHOLEGRAINor 4 CUPSWHOLEGRAINprogram. Now
choose either the NORMALor LIGHTsetting by pressing the
COLORbutton. PressSTART.The Bread Machine will kneadthe
dough twice, rise the dough three times and then bake it to
perfection.
. NORMAL
. LIGHT
CCOLOR)
. RUNr::::::\
. WAIT~
MakingQuick Bread Automatically:
Pressthe SELECTbutton to 2 CUPS QUICKBREADthen choose
either the NORMALor LIGHTprogram by pressing the COLOR
button. Press START.The Bread Machine will kneadthe dough
once and then bakeit to perfection.
Making Yeast Dough Automatically:
Choosethe DOUGHprogram by pressingthe SELECTbutton. Press
START.The Bread Machine will knead and risethe dough twice. At
the end of the program you will removethe dough and hand-shape
it according to your recipe. Dough will then be baked in a conven-
tional oven.
-
(continued next page)
8
.
9
Page 6
CONTROL PANEL (cant'd.)
PROGRAMMABLE TIMER
To set the programmableTIMER,follow these steps:
D Placethe ingredientsin the bread pan.
D Select the program you desire.
D Decide how muchlater you want the bread or dough to be ready.
For example: it is 8:00AMand you wantto have bread ready at
6:00PM,or 10hours later.
D Setthe programmableTIMER by pressingthe down (~) arrow or
up (.) arrow the appropriate number of times until you getthe
number of hours and minutes later that you want your bread or
dough to be ready.For example:beforeleaving for work at
8:00AMyou decide to make a Basic White Bread and wish it
ready for dinner at 6:00PM(or 10 hours later).Press the up arrow
until 10:00appears on the control panel.Press START.Your
Bread Machine will begin making your breadat the appropriate
time for it to be ready at exactly 6:00PM.
D If you wish to re-program for anothertime, press STOP/RESET
and repeat the steps.
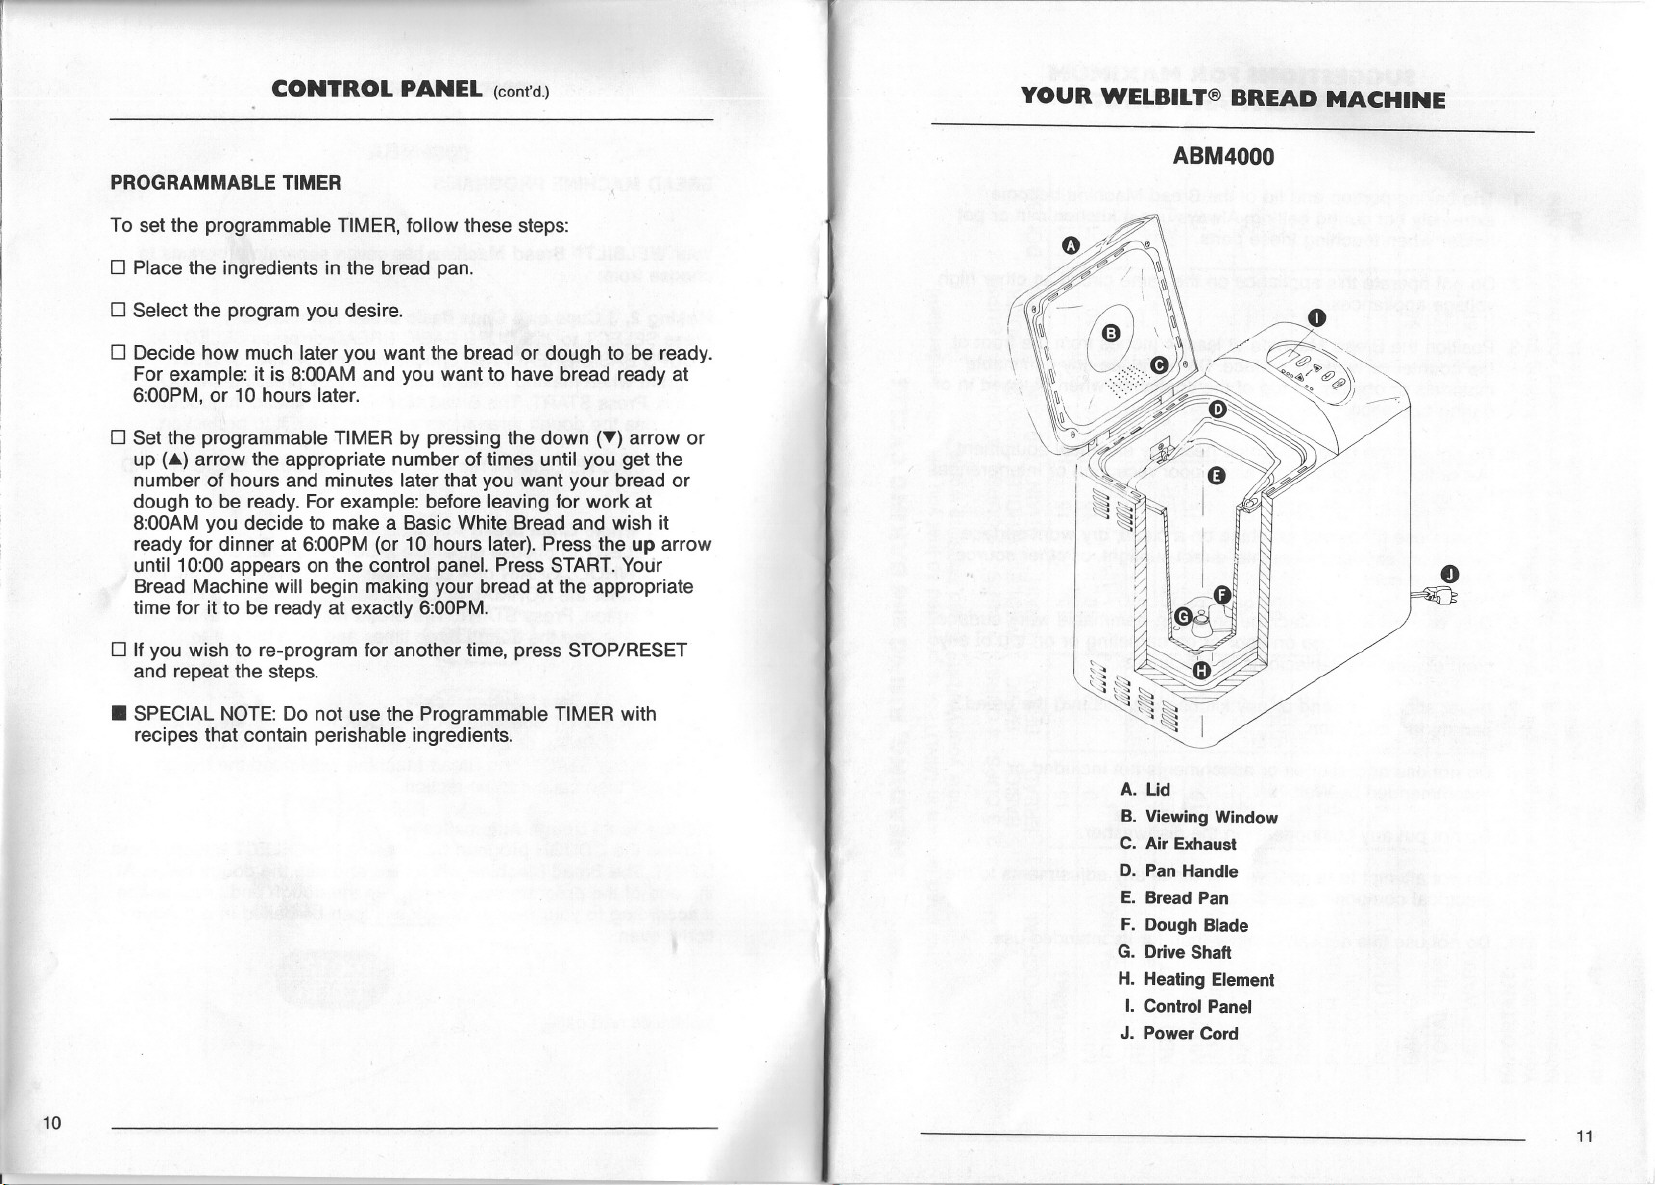
YOUR WELBILT@BREAD MACHINE
ABM4000
.,
10
. SPECIAL NOTE: Do not use the Programmable TIMER with
recipes that contain perishable ingredients.
A. Ud
B. Viewing Window
C. Air Exhaust
D. Pan Handle
E. Bread Pan
F. Dough Blade
G. Drive Shaft
H. Heating Element
I. Control Panel
J. Power Cord
11
--- --
Page 7
SUGGESTIONSFOR MAXIMUM
ENJOYMENT AND SAFETY
1. The baking portion and lid of the Bread Machine become
extremely hot during baking.Always use a kitchen mitt or pot
holder when touching these parts.
2. Do not operatethisappliance on the same circuit as other high
voltageappliances. .
3. Positionthe Bread Machine at least 4 inches from the front of
the counter or working surface.Do not place any flammable
materialsor objects on top of the appliance when plugged in or
during operation.
4. Do not use the Bread Machine nearanyelectrical equipment
like radios,TVs,or stereos since poor reception or interference
may occur.
5. Always use the Bread Machine on a clean, dry work surface
away from exposed elements,direct sunlight, or other sources
of heat or cold.
6. Only usethe Bread Machine on a non-flammable work surface
or counter.Neveruseon floor or on carpeting or on top of any
cloth objects like tablecloths or placemats.
7. Never stick your hand or any kitchen utensils into the bread
pan during operation.
8. Do not use accessoriesor attachmentsnot included or
recommendedbyWelbilt.
9. Do not put any components in the dishwasher.
10. Do not attemptto tamper with or make any adjustmentsto the
electrical componentsor parts.
11. Do not use this appliance other than for its intended use.
J:
C!'
;:)
o
o
-g (I)~o
as 0..0«
1;) ;:)-W
... 0;:) a:
~ C\lOIII
.,. §
III'" (l)W
.. Q) 0 J
Z
~ ~ a~~
u == en ~;:C!'
Q ~~
Z S~ ~~Z
- >'Q) ;:)0«
~ 10.~ OJ:~
C ;;13 (t) ;:C!'
m 0 as
en~ (I)
-C 0..~ Z
'! -c
Q)
- as ;:)0-
te ~ e? oJ:C2
Q E III C\I ;:C!'
Z o.~
- en=(I)
= ~~ B~~
fi ;:):; ~ III~
Z 0
- >. (I)
Z
- ~ ~ 0..
a .e:: 0 ;:)2~
;;.s::. O(l)w
~ (t)~a:
~
0 - III
Z
.s::. C\I
~~
t::
as
.s::.
U
.~ ~
.s::. «
I- a:
C!'
o
a:
0..
0..
10 C\I 10
.... ....
0
....
I
10
0
.... ....
10
0 10
....
....
10
0 10 W 10 co
.... ....
10
C\I 10
.... ....
10 0 10
.... ....
C!' z
z j::
C!'I-
a:
xa:
W
w
III
I I I I
0..
10 W
W
III
0..
W
W
III
0..
W
III
0..
W
w
III
0..
W
w
III
(I)
8'
I-
z
;:)
C
z 0
«
.......
W
I-
5 0
a:
LL
I-
(I)
0
(I)
W
0 ;:)
a:
«
CIO 10
....
10
....
10 co
....
....
CIO I'--
....
10 I'--
....
C!'z
zO 0 00
-0
C\I
co
10
10
10
C\I
C\I
8'
z
C
LiS
I="
z
(I)
a:
C!'
Z
w
CiS CiS
a: 0.. a:
10
10
....
0
0
I I I I
10
10
CIO
....
0
0
10
10
CIO
....
0
0
10
10
CIO
....
0
0
10
10
....
0
0
10
10
....
0
0
I="
(I)
a:
5'
z
z
z
;:
;:
0
0 W
O_
0
00
J:
J:Z
C!'
Z
zO
Z
;:)w
o.. a: III
0
(t)
I I
....
0
0
CIO
....
10
10
0
co
(oj
0
10 10 10
10
(oj
0
10 10
(t)
(oj
10
10 CIO
....
10
(oj
10
10 CIO010
10
(oj
5'
a:
W
:I:
I::.
C!'
...J
C!'
z
z
2
CiS
«
0
I-
I
10
10
10
10
10
10
10
10
10
10
a:
..1II_C!'a:
I-:!::Q)
Z 0
""'~.a2
0..
~ Q)asa: >-.
W
a:;::no~
W
o ...a.;: 0
D.SE(I).c
!!>-.!_as
Q)
£-c
.s::.Q)
"'Ue::
Q)aso
o.E..
E-c5i
o.mE
0... en
-.c«
e::...
as:J .
o.o~
CI>'as
e::-c1;)
.- e::
~ase::
.s1;).Q
Q):no
.c::-cas
-e::Q)
.~ :J ~
-co-
Q)::.c
U e::0 .
asase::(I)
Q.t::-Cl-
en0 e::Z
-o.asw
e::E -
Q).- -c 0
.- >.asW
-g Q) o.a:
C»EI-C!'
e::Q)a:z
.- ...«-
Q)XI-w
;;Q)(I)J:
-enQ)1-
m;;;;C!'
E '.c::z
...en en-
as:!:: :J~
~ :J o.a:
,en .....
Q)e?:J~
"'_0>
o.en>.,
=Q) e::W
'i.c Q)a:
Q).s::.o..
Q).s::.~
(I)
-
e::-
:2Q)~w
u.!a:z
ase::w-
~~0..J:
-casOo
as:Ja:«
Q) Cl
~
o..
"'0
;:)
z
12
13
Page 8
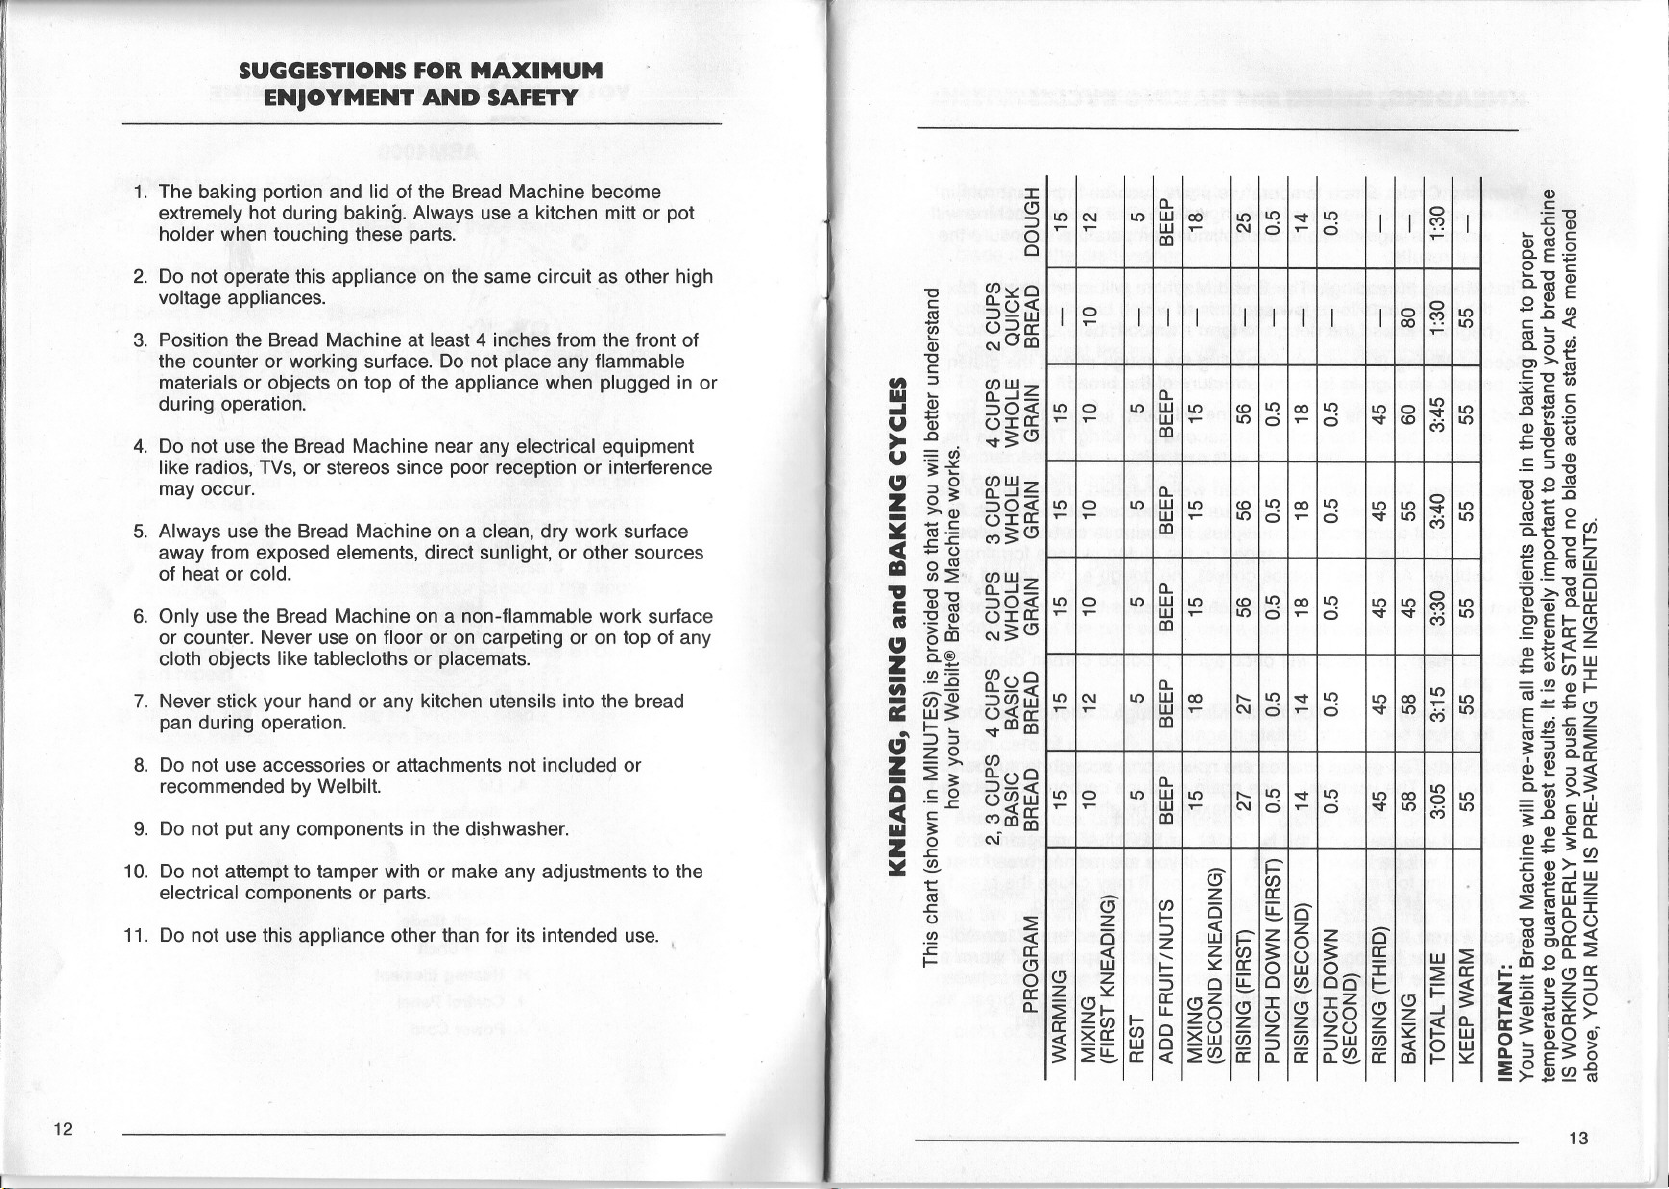
KNEADING, RISING and BAKING CYCLES(cant'd.)
INSERTING AND REMOVING THE BREAD PAN
WarmingCycle: Sincetemperature plays such an important role in
making good bread and dough, your Welbilt Bread Machine will
warm the ingredientsto the optimumtemperatureto ensure the
best results.
First Mixing(Kneading):The BreadMachine will intermittentlymix
the ingredientsfor a few seconds at which time it will then
begin to kneadthe dough to form a smooth ball.
Second Mixing(Kneading): Kneadingthe dough makesthe gluten
elastic enough to form the structure of the bread.
Add Fruit/Nuts: The Bread Machine will beep several times a few
minutes before the end of the second kneading. This is the best
time to add ingredients like nuts and raisins, etc.
First Rising: When dough has been well-kneaded, the gluten forms
thin elastic strandsthat make up the structure of the bread.As
the yeastdevelopsand multiplies,it produces carbon dioxide
gas.The gas becomestrapped in the gluten strands forming
bubbles.As these bubbles collect, the dough expands and rises.
First Punch Down: The Bread Machine kneads the dough for a few
seconds to deflateit.
Second Rise: The yeastwill once again produce carbon dioxide
gas.
Second Punch Down: The Bread Machine again kneads the dough
for a few seconds to deflate it again.
Third Rise: The gluten strands are now strong enough to support
the loaf. The yeastwill once again produce carbon dioxide gas
and the dough will rise to its maximumheight.
Baking: If you are using the NORMALor REGULARprogram,the
bread will be baked to perfection. If you are making bread that
cOf.'ltainstoo much sugar in the recipe,it may cause the bread
to overbake.Set your machine on the lightestsetting.
Keep Warm: If you are unable to removethe baked bread immedi-
ately after baking,the Bread Machine will keep the loaf warm as
to reduce the effects of the condensationthat will form between
the loaf andthe pan.Nevertheless,always removethe bread as
quickly as possible after the baking cycle is completed.
1. Beforeusing the Bread Machine for the first time, be certainto
wash the breadpan and dough blade with warm water and mild
dish-washing liquid. Towel dry. Never put the bread pan and
blade into the dishwasher.
2. All mixing, kneading,rising and baking (when appropriate)take
place in the bread pan. The pan is covered with a non-stick
coating which will scratch if nottreatedand cared for properly.
Clean and treat the pan as you would a non-stick frying pan.
3. To reinsert the pan, place over the locking mechanism located
on the bottomof the baking compartment.Push down. To
removethe pan, pull up.
4. Rememberto insert the kneading blade on the shaft located in
the bread pan before adding your ingredients.
5. Since the breadpan will be hot after the baking cycle, always
use a kitchen mittor pot holder when removing it.
6. To remove the bread from the pan (for model #ABM4100T,
first removethe dough hook), invert upside down and gently
shake up and down until the loaf slides out. If the bread does not
come out of the pan easily,use a non-metallic kitchen utensil to
pry it out.
CLEANING INSTRUCTIONS
If taken care of properly,your Welbilt@Bread Machine will provide
you with manyyearsof use and hundreds of loaves of delicious
bread.
1. Aftereach use,unplug the Bread Machine. Let the unit cool
down to room temperature.Wipe out the baking compartment
and the inner lid with a clean, damp cloth or sponge.
2. Removethe kneading blade from the pan. It may be necessaryto
fill the pan with water in order to loosen the blade from the shaft.
Cleanthe pan and blade with warm water and mild dishwashing
liquid. Never use abrasive or strong household cleaners since
they will damage the non-stick finish. Towel dry.
3. Wipe down the cabinet of the BreadMachine with a clean,damp
cloth or sponge.Towel dry.
14
15
Page 9
INSIDER'S GUIDE TO EASY BAKING
Your Welbilt BreadMachine produces delicious baked goods with
ease.This marvelousmachine asks only that you carefully follow
the recipe instructions! In basic cooking, normally "a pinch of this
and a dash of that" is fine, but not for automatic bread machines.
Using an automatic Bread Machine requires you accurately
measureeach ingredient (especiallyyeastand water)for best
results.For best results,have your ingredientsat roomtemperature
65° to 85°F, unlessotherwise specified.
TRADITIONALYEASTBREADS
The mention of fresh-baked bread evokes different memoriesfor
different people. But,there's one thing certain aboutall good yeast
breads.They're always moist and meaty.Pinch or squeezea slice
of good bread.It will, slowly but surely,resume its original shape.
PREPARATIONFOR GOODRESULTS
Your Bread Machine produces satisfyingresults if you carefully
follow directions and use the indicated ingredients.
Bread Flour: Now available in most supermarketsin 5 lb. bags,
bread flour is higher in gluten than unbleached all-purpose flour.
Gluten,a natural protein found in wheat flour, makes dough elastic
when efficiently kneaded.This high gluten content produces higher
volume loaves.Breadflour is the flour of choice when working with
yeast and whole grain breads, unless otherwise specified. Never
use flour that has been sitting in an open bag or container for more
than six months or during an extended period of high humidity.
Active Dry Yeast: Use only dry yeast- never compressed cake
yeast.The amountgiven in the recipe is for ,activedry yeast. For
conversion to fast-rising yeast, seechart below. Check its expiration
date.Yeastis the leavening agent that causes dough to expand or
"rise." Liquid and warmth bring yeast back to life. When reactivated,
yeast releasescarbon dioxide bubbles that make well-kneaded
dough rise.
If the yeast is close to the expiration date or the expiration date
has passed,it should be discarded and fresh yeast purchased.
Never useyeastfromtorn or previouslyopened packets. If using
bulk yeastfrom a jar, always store properly according to the
manufacturer'sinstructions on the package. To check ifyouryeast
good, proof your yeast.
is still
HOWTO PROOFYEASTFOR BREADMACHINES
Startwith a clear plasticor glass 1-cup measure. Pour in % cup
of water (110°-115°F).Add 1 teaspoonsugar and stir until
dissolved.Next,add 2%teaspoons active dry yeast (one %-ounce
package)and stir.Setaside for 10minutesto ferment. After 10
minutes,a crest of foam similar to root beer foam should have
developed with the crest at the rim of the cup. If foam crests
below rim, discard and buy fresh yeastfor your Bread Machine.
Conversion Chart for Fast-Rising Yeast
1%teaspoons active dry yeast = 1 teaspoon fast-rising yeast
2%teaspoons active dry yeast = 1%teaspoonsfast-rising yeast
1 tablespoon active dry yeast = 2%teaspoons of fast-rising yeast
EXCEPTION:In the ABM4100T.1%teaspoons active dry yeast equals
1%teasponsfast-rising yeast
16
Estimated Equivalents
2 cups flour = 1 lb. bread
3 cups flour = 1%Ibs. bread
4 cups flour = 2 Ibs.bread
Sweetener and,Salt: Nevereliminatethe sweetener in the recipe.
Yeastusesit as energy on which to grow. Salt also plays an
important role. It helps stabilize the rising process so that the dough
rises evenly.
Insider's Guide 17
Page 10
INSIDER'S GUIDE TO EASY BAKING (cant'd.)
Non-fat Dry Milk: Always use non-fat dry milk to prevent
spoilage and to maintainthe proper balanceof wet to dry
ingredients.Ifthereare eggs in the recipe, never use the pro-
grammabletimer in order to preventspoilage.
Shortening: Always use stick butter/oil. It has less moisturethan
tub butter and less air than whipped. Measure:1 stick = % cup =
8 tablespoons.
Water and Liquids: Water and all other liquid ingredients should
be at approximately80°F. If you do not havea thermometerto
measuretemperature,use room temperature liquids.
HOW TO JUDGE IF THINGS ARE GOING WELL
Ingredients for Success
Always measurethe ingredientscarefully using U.S.standard
measuring cups and spoons. Kitchen flatware and coffee cups vary
in size and should never be used.All ingredients should be at room
temperature unless otherwise noted in recipe. Since you will be
using all natural ingredients to makeyour homemade bread,the
quality of the ingredients is important.Sinceflour is milled from
wheat, and other grains, the quality and make up of the flour will
vary from crop to crop, from year to yeareventhough the mills
make every attemptto blend the grains for proper consistency.
Nevertheless,you may see that your bread does not come out
the same when using flour from a different brand. If this is the case,
we suggest that you experiment. (If,for example,the bread made
from brand "X" bread flour does not providea satisfactory loaf of
bread, try another brand. The same applies to yeast.)Some
packages of yeastwill provide greater rising activity than others.
If your bread does not rise well, try another package of yeast or
another brand. We havealso seen that certain brands of yeast work
better with certain brands of flour. (Experimentuntil you find the
combination that works best for you.)
Although the quality of the bread should not be affected by th'e
type/source of water used,extremely hard or soft water can deter-
mine whether a loaf of bread is good or bad.If your water falls in
this category,only make bread using bottled spring water with a low
mineral content or try to substitute the water with low fat milk.
Dough Development
After the first kneading cycle, the ball of kneaded dough should
be smooth and elastic.The top of the dough should be slightly
sticky and should begin to fill out on the bottom of the pan while
rising. If the dough appears stiff and lumpy,it is too dry. Dough that
is too dry can result in short loaves of bread which appear
overbaked.
HINT:Dueto varying flour conditions,the dough mayappear
too dry after kneading the first couple of minutes. If this is the
case,press STOP/RESET.PRESSSTARTand add additional
water,a tablespoon at a time, until the dough appears elastic.
. Do not exceed the following recommendations for:
2, 3 Cup Flour Capacity:
No more than 2 tablespoons additional water.
4 CupFlour Capacity:
No more than 3 tablespoons additional water.
When measuringflour never scoop it out of the bag or the
canister with the measuring cup. Always spoon the flour into the
cup. Insert a clean kitchen knifeinto the flour a couple of times to
eliminate clumps or air pockets. Leveloff the top of the cup with the
knife.Neverpack the flour down.
If the dough appears to be very loose and sticky, it is too moist.
You can overcome this problem by making sure you measurethe
ingredients properly or add less water (approximately one to two
tablespoons less)to compensatefor a higher than normal moisture
content of the flour. (Doughthat is too moist can result in over-
risen, collapsed, wrinkled loaves of bread.)
18
r
Insider's Guide 19
Page 11

INSIDER'S GUIDE TO EASY BAKING (cont'd.)
Baking
Always setyour Bread Machine on the proper baking settingas
specified in the recipe.If the bread bakestoo dark, try a lighter
setting. If the bread continues to bake too dark the dough may be
too dry inhibiting the bread to rise properly. (Tryadding one to two
tablespoons of additional water for better baking results.)Too much
sugar in a recipe may also cause bread to overbake.The same is
true with dried fruits. Try cutting down on the amount called for in
the recipe by 25 to 50%.
Do not use your BreadMachine if the room temperature is lower
than 65°F since the dough will not rise well and the loaveswill be
short. If the ambienttemperatureis higher than 85°F the dough can
over-rise and the bread can possibly collapse or wrinkle during
baking and the crumb texture will be coarse.
GLUTEN-FREEBREADS
It is estimatedthat at leastone out of 2,500Americans has celiac
diseaseand suffersfrom gluten intolerance.This disease is
categorized by injury to the primarysmall intestine lining associated
with the ingestion of specific proteins (gluten)found in wheat,
barley,oats and rye.The only known treatmentfor celiac disease is
strict adherence to a gluten-free diet.
YourWelbilt BreadMachine has been developed to handle
gluten-free doughs with ease.The recipes found in the Gluten-Free
section of your EasyBaking cookbook havebeen developed
without using any grains or ingredientsthat contain gluten.
THE FINISHEDPRODUCT
For a crisp, crunch crust,always removethe breadfrom the
Bread Machine after the baking cycle. Removefrom the pan and let
coolon a wire rack in a draft free location. For a softer crust,
immediatelyplace the baked loaf of bread in an open plastic bag or
loosely wrap in foil.
The size of the bakedloaf of bread will vary from loafto loaf due
to ingredients and ambient condition. Nevertheless,the general rule
is that the breadsize should be near the top of the pan to 1-inch
below.
SPECIAL NOTE: GLUTEN-FREE BREADS
Since making gluten-free yeast bread is different than
traditional baking, carefully read the following information.
ffJ
(continued next page)
20
r
-- -
Insider's Guide 21
Page 12

INSIDER'S GUIDETO EASY BAKING (cont'd.) .
PREPARATIONFORGOODRESULTS
. Carefullyfollowdirections inyour EasyBaking recipes, and use
the indicated ingredients for successful gluten-free baking!To
facilitatepurchasinggluten-freeingredients,call: .
DietarySpecialties
P.O.Box 227,Rochester,NY 14601
PH: (800)544-0099
Yeast: Check with the yeast manufacturer to insure that the yeast
is gluten-free. Only use active dry yeast when making these recipes.
Gluten-Free Flour: Only use flour that is certified to be gluten-
free. Buy it from a reliable source to insure freshness.
Eggs: While whole eggs are called for in the recipes, you can
also use a half cup of any egg substitute when two eggs are called
for in the recipe. If there are eggs in therecipe, do not use the
ProgrammableTimerin order to prevent spoilage.
Lecithin: Softens the loaf and improves texture. Granular and
liquid are interchangeable since they measure the same.
Xanthan Gum: Manufactured from corn, xanthan gum acts as a
substitute for the gluten and gives structure so that the gluten-free
dough rises well.
Vinegar: While not effecting the flavor of the bread, gluten-free
vinegar helps to strengthen the dough to rise better and should be
used when specified.
Lactose Intolerance: You may substitute the non-fat dry milk in
the recipe with a powdered milk substitute. Vitamite@or Lacto-
Free@ derived from soy, work well. Those sensitive to soy may use
dry baby formula made from a acceptable food substance.
HOW TO JUDGE IF THINGS ARE GOING WELL
Dough Development
Afterthe Bread Machine begins to knead for the firstfew minutes,
look at the dough which looks likea batter. Ifitappears to be too
dry,add water 1 teaspoon at a time up to a maximumof 2 table-
spoons. Use rubber spatula if needed to be certain all ingredients
mixproperly.Whenthe dough is the rightconsistency, itwillswirl
around the machine and have a definiteraised markon top. Ifthe
dough is smooth on top and has no markings,itprobably is too
moist;the bread willhave a coarse texture.
Baking
Alwaysset yourBread Machine on the proper bakingcycle as
specified in the recipe. When the baking cycle is finished,test the
bread for doneness witha toothpick.Ifnot quite done, leave the
baked bread in the machine for an extra 10 minutes.
Mostloaves willbake about 1-inch below the top of the pan.
However,those that contain additional ingredients, such as dried
fruitsand nuts, may bake higher.Since gluten-free breads are made
with non-traditionalingredients,the bread's texture willbe slightly
different.Nevertheless,the bread willbe picture perfect and tasty.
As withall fresh homemade bread, gluten-free bread is best eaten
within24 hours ofbeing baked.
Pleasecarefully read Instruction Manual before proceeding.
Referto the Practical Solutions Guide at the back of this
book for additional baking assistance.
22
Insider's Guide 23
Page 13

INSIDER'S GUIDE TO EASY BAKING (cont'd.)
QUICK BREADS
The secret to makingmoist quick breadis to mix the ingredients
just enough as to not overwork the flour and developtoo much
gluten. This is just the opposite of makingyeast breads and dough.
With the Welbilt Bread Machine the mixingaction gently, although
effectively,mixesand blends the ingredientsfor best results. By first
creaming the butter/oil and then cutting in the dry ingredients,the
flour particles become coated. Do not be concerned if there are
small lumps in the batter before the breadbegins to bake.They will
eventuallydisappear.
Organization is Essential:The Welbilt Bread Machine is pro-
grammedto eliminate any of the guesswork. However,it is essential
that you be well organized when making quick breads. Startby
preparing all ingredientsas indicated in the recipe. Havethem
ready to add when listed in directions. Do not deviate from the
specified sequence since that could affect how the quick breads
turn out.
Ingredient Temperature: Ingredients must be at room temper-
ature when making quick breads.Butter/oil that is too cold will not
cream easily with dry ingredientsand the quick breads will be
tough and chewy.
Pleasecarefully read Instruction Manual before proceeding.
Referto the Practical Solutions Guide at the back of this
book for additional baking assistance.
Recipes
~
BASICWHITE BREAD
Everyone's badmouthingwhite bread these days.Sometimes,
however,only white bread will do. So we developeda recipe to
easeyour guilt. It's moist and meaty and has no preservatives.
Add ingredients in the order listed.All ingredients must be at
room temperature.
1 lb.loaf
active dry yeast 1 teaspoons
bread flour
granulated sugart
salt
nonfat dry milk
butter/oil
water
2)4 cups 3 cups
4 teaspoons
1 teaspoon 1 teaspoons 2 teaspoons
4 teaspoons 2 tablespoons 2 tablespoons
4 teaspoons
% cup + 1 TBL
1 lb. loaf 2 lb. loaf
2 teaspoons 2 teaspoons
2 tablespoons
2 tablespoons
1 cup + 1 TBL 1)4 cups + 1 TBL
.
4 cups
2 tablespoons
2 tablespoons
24
AUTOMATICBREADPROGRAM
o Press SELECTto 2, 3 cups (1 Ib, 1Y2Ib) BASIC BREAD or 4
cups (2 Ib) BASIC BREAD
o Press COLORto NORMAL
o Press START.
o After baking, pressSTOP/RESET.Removebread from Bread
Machine and baking pan. Coolon rack.
Basic Breads 25
Page 14

BASIC WHITE BREAD VARIATIONS
RYE BREAD
Letyour imaginationtake wing when baking variations of Basic
White Bread.Pleasenote that when usinga flavoring high in salt,
such as dried soup/dip mix,eliminate salt in the basic recipe.
After adding nonfatdry milk for Basic White Bread,add one or
more of flavorings.Adjustthe amountaccording to taste, but please
don't exceedthe maximumamount stated.Nextadd the salt,sugar,
bread flour and yeast.Continue with directions for Automatic Bread
Program.
o Nuts:chopped walnuts,pecans,peanuts- 1 lb. loaf use Y-acup;
1%lb.loaf use % cup; 2 lb. loaf use % cup.
o Dried Herbs:basilleaves,oregano leaves,Italian spices,fine
herbs,etc. - 2 to 3 teaspoons.
o Spices:powderedor ground spices (onion powder, cardamon,
etc.)- use2 to 3 teaspoons.Do not use garlic or cinnamon as
they will be the cause of a shorter loaf.
o Dried Fruit: raisins,chopped prunes,chopped dates,craisins -
1 lb. loaf use % cup; 1%lb. loaf use %cup; 2 lb. loaf use%cup.
(Do not useapricots as they will cause a shorter loaf.)Reduce
the sugar in the recipe for 1 lb. loaf to 2 teaspoons; 1%lb. loaf to
1 tablespoon;2 lb. loaf to 2 tablespoons.
o Grated or ShreddedCheese:Parmesan,Romano,Swiss,Cheddar
Cheese - 1 lb. loaf use 1 cup; 1Y2lb. loaf use 1% cups; 2 lb. loaf
use 2 cups. Reducethe water in the recipe for 1 lb. loaf by
1tablespoon;1%lb.loafby2tablespoons;2lb.loafby3tablespoons.
NOTE:Seed such as sunflower,poppy or sesame are not recom-
mended for this recipe. The amount of fat in them will throw off
the recipe.
Chewy RyeBreadis the ultimatedeli sandwich bread.Since rye
flour has very little gluten, it is to be mixed with breadflour so that
it rises properly. The caraway seeds are what give this bread its
characteristic flavor.
Add ingredients in the order listed (exceptcaraway seeds).
All ingredients mustbe at room temperature.
active dry yeast
medium rye flour
bread flour
brown sugar
salt
nonfat dry milk
butter/oil
water
carawayseeds
1 lb. loaf
1~ teaspoons
% cup
1~ cups
4 teaspoons
1 teaspoon
1 tablespoon.
4 teaspoons
% cup + 1 TBL
2 teaspoons
1~ lb. loaf
2 teaspoons
1 cup
2 cups
2 tablespoons
1~ teaspoons
2 tablespoons
2 tablespoons
1 cup + 1 TBL
1 tablespoon
2 lb. loaf
2 teaspoons
2 cups
2 cups
2 tablespoons
2 teaspoons
2 tablespoons
2 tablespoons
1Y.;cups + 1 TBL
1~ tablespoons
AUTOMATICBREADPROGRAM
o Press SELECTto 2, 3 cups (1 Ib, 1~ Ib) BASIC BREADor 4
cups (2 Ib) BASICBREAD
o PressCOLORto NORMAL
o Press START.Whenthe Bread Machine beeps before the end of
the last kneading,add the caraway seed.
o Afterbaking,press STOP/RESET.Removebread from Bread
Machine and baking pan. Coolon rack.
26 Basic Breads
Basic Breads 27
Page 15

ONION BREAD
CINNAMON NUT RAISIN BREAD
The humble onion is found inevery cuisine. Its most famous"r~;
is in French onion soup. Today dried onion soup mixis added to
recipes more often than served as soup. So, we tried it in yeast
dough. The resultingbread satisfies the most extreme craving for
onions.
Add ingredients in the order listed (exceptdry onion mix).
All ingredients must be at room temperature.
1 lb. loaf
active dry yeast 1);2teaspoons 2 teaspoons 1);2teaspoons
bread flour
granulatedsugar 2 teaspoons 1 tablespoon 2 tablespoons
nonfat dry milk 4 teaspoons 2 tablespoons 2 tablespoons
butter/oil
water
dry onion soup
mix
2Ji cups 3 cups 4 cups
4 teaspoons 2 tablespoons
Ye cup 1 cup + 1 TBl
4 teaspoons 2 tablespoons
1);2 lb. loaf
2 lb. loaf
2 tablespoons
1Ji cups
1 packet (1 oz)
AUTOMATICBREADPROGRAM
o PressSELECTto 2, 3 cups (1 Ib,1)1;; Ib) BASICBREADor 4
cups (2 Ib) BASIC BREAD
o Press COLORto NORMAL
o Press START.When the Bread Machine beeps before the end of
the last kneading,add the dry onion mix.
o After baking, press STOP/RESET.Removebread from Bread
Machine and baking pan. Coolon rack.
Remember when Momfixedraisin toast for breakfast or a snack?
Well,we've gone a littlefurther by adding cinnamon, chopped nuts
and dark brown sugar to our raisin bread.
Add ingredients in the order listed(except raisins and nuts).All
ingredientsmustbeat roomtemperature.
2 lb. loaf
2 teaspoons
4 cups
2 teaspoons
1 TBl + 1 TSP
2 teaspoons
2 tablespoons
2 tablespoons
1Ji cups + 1 TBl
% cup
% cup
active dry yeast
bread flour
cinnamon
dark brown sugar
salt
nonfat dry milk
butter/oil
water
raisins
chopped nuts
1 lb. loaf
1);2 teaspoons
2Ji cups
);2teaspoon
2 teaspoons
1 teaspoon
4 teaspoons
4 teaspoons
% cup + 1 TBl
YJcup
YJcup
1);2 lb. loaf
2 teaspoons
3 cups
% teaspoon
1 tablespoon
1);2 teaspoons
2 tablespoons
2 tablespoons
1 cup+ 1TBl
);2cup
);2cup
AUTOMATICBREADPROGRAM
o PressSELECTto 2,3 cups (1 Ib, 1)1;;Ib) BASIC BREAD or 4
cups (2 Ib) BASIC BREAD
o Press COLORto NORMAL.
o Press START.Whenthe Bread Machine beeps before the end of
the last kneading,add the raisins and chopped nuts.
o After baking, press STOP/RESET.Removebreadfrom Bread
Machine and baking pan. Coolon rack.
28 Basic Breads
Basic Breads 29
Page 16

EGG BREAD
CHEVRE CRACKED-PEPPER BREAD
Our Egg Bread is toothsome yet light. Maybe one morning you'll
be lucky and find some leftover Egg Bread in the kitchen to make
some of the World's Best French toast!
Add ingredients in the order listed.All ingredients must be at
room temperature.
active dry yeast
bread flour
granulated sugar
salt
nonfat dry milk
egg yolk
butter/oil
water
1 lb. loaf
1 teaspoons
2);,;cups
1 tablespoon
1 teaspoon
1 tablespoon
1 large
1 tablespoon
% cup
1 lb. loaf
2 teaspoons
3 cups
2 tablespoons
1 teaspoons
2 tablespoons
2 large
2 tablespoons
1 cup minus 1 TBL
AUTOMATICBREADPROGRAM
D PressSELECTto 2, 3 cups (1 Ib, 1~ Ib) BASIC BREAD or 4
cups (2 Ib) BASIC BREAD
D Press COLORto NORMAL
D PressSTART.
D After baking, press STOP/RESET.Removebread from Bread
Machine and baking pan. Coolon rack.
2 lb. loaf
2 teaspoons
4 cups
2 tablespoons
2 teaspoons
3 tablespoons
3 large
3 tablespoons
1);,; cups minus 1 TBL
What isall this fussabout black pepper?While some people
cough and sneezeas fashionable waiters grind it onto salads,other
diners cry, "More, more!" So, here's a bread that will knock your
socks off. Not only is it chock full of this current star of spices, but
chevre adds a pungenttwist.
Add ingredients in the order listed (except black pepper).
All ingredients must be at room temperature.
1 lb. loaf
active dry yeast 1 teaspoons 2 teaspoons
bread flour
granulated sugar
salt
nonfat dry milk
soft goat cheese
water
cracked black
pepper
2);,;cups
4 teaspoons
% teaspoon
4 teaspoons 2 tablespoons 3 tablespoons
1 ounces
% cup
2 teaspoons 1 tablespoon 3 tablespoons
1 lb. loaf 2 lb. loaf
2 teaspoons
3 cups 4 cups
2 tablespoons
1 teaspoon 1 teaspoons
2);,;ounces
1 cup minus 1 TBL
2 tablespoons
3 ounces
1);,; cup minus 1 TBL
AUTOMATICBREADPROGRAM
D PressSELECTto 2, 3 cups (1 Ib, 1~ Ib) BASIC BREAD or 4
cups (2 Ib) BASIC BREAD
D Press COLORto NORMAL
D PressSTART.Whenthe Bread Machine beeps before the end of
the last kneading,add the black pepper.
D After baking, press STOP/RESET.Removebread from Bread
Machine and baking pan. Coolon rack.
30 Basic Breads
..
Basic Breads 31
Page 17

100%WHOLE WHEAT BREAD
SUNFLOWER OATMEALBREAD
Just about everyone is concerned about adding more fiber to their
diet.Well,our 100%WholeWheatBread adds a substantial amount
of nutritious,full-flavoredfiber.
Add ingredients in the order listed.All ingredients must be at
room temperature.
1 lb. loaf
active dry yeast
whole wheat flour
salt
nonfat dry milk
honey
butter/oil
water
1J.J! teaspoons
2J.J!cups
J.J!teaspoon
1 tablespoon
Y.Icup
1 tablespoon
% cup + 1 TBl
AUTOMATIC BREAD PROGRAM
0 Press SELECT to 2 cups (1 Ib), 3 cups (1)1 Ib) or 4 cups (2Ib)
WHOLE GRAIN
o Press COLOR to NORMAL.
o Press START.
o After baking, press STOP/RESET. Remove bread from Bread
Machine and baking pan. Coolon rack.
1J.J!lb. loaf
2 teaspoons
3 cups
1 teaspoon
2 tablespoons
Y.Icup
1 tablespoon
1Y.Icups minus 1 TBl
2 teaspoons
4 cups
1J.J!teaspoons
3 tablespoons
YJ cup
1J.J!tablespoons
1J.J!cups
2 lb. loaf
\\
,
I
I
I
\
in a whole wheat,oatmealand honey baseevoke visions of fields
ripe with golden grains.
Add ingredients in the order listed (except sunflower seeds).All
ingredients mustbe at room temperature,unless otherwise noted.
1 lb. loaf
active dry yeast
whole wheat flour
uncooked oatmeal
bread flour
salt
granulated sugar 1 teaspoon
nonfat dry milk
butter/oil
honey
water
sunflower seds YJ cup
hulled
1J.J!teaspoons 2 teaspoons
1 cup 1J.J!cups
YJ cup
% cup
J.J!teaspoon
2 tablespoons
1 tablespoon
1 tablespoon YaCUP
% cup
1J.J!lb. loaf 2 lb. loaf
4J.J!teaspoons
2J.J!cups
J.J!cup % cup
1 cup
1 teaspoon
2 teaspoons
3 tablespoons
2 tablespoons
1J.J!cups
1J.J!teaspoons
-
Y.Icup
-
Y.Icup
1 cup + 3 TBlS
J.J! cup
1% cups
J.J! cup
AUTOMATICBREADPROGRAM
o Press SELECTto 2 cups (1 Ib), 3 cups (1)1 Ib) or 4 cups (2 Ib)
WHOLEGRAIN
o Press COLORto NORMAL.
1
o Press START.Whenthe Bread Machine beeps before the end of
the last kneading, add the sunflower seeds.
o After baking,press STOP/RESET.Removebread from Bread
Machine and baking pan.Coolon rack.
This one is definitelyfromthe Heartland!Crunchy sunflower seeds
32 Whole Grain Breads
Whole Grain Breads 33
Page 18

HONEYOATS'N' BARLEYBREAD
DARK PUMPERNICKELBREAD
Studies indicate that oat bran is even more beneficialthan health-
fulwheat bran. So, we couldn't resist adding some to one ofour
whole grain breads. Lotsof oatmeal plus crunchy barley make this
bread a sure hit.
Add ingredients in the order listed. All ingredients must be at
room temperature, unless otherwise noted.
active dry yeast
whole wheat flour
uncooked oats
oat bran
uncooked barley
bread flour
granulated sugar
salt
nonfat dry milk
butter loil
honey
water
1 lb. loaf
1)1:;teaspoons
1 cup
)I:;cup
3 tablespoons
2 tablespoons
% cup
1)1:;teaspoon
)I:; teaspoon
1 tablespoon
1 tablespoon
% cup + 2 TBLS 1)1:;cups + 2 TBLS
1)1:; lb.loaf
2 teaspoons
1)1:;cups
% cup
13 cup
)i cup
1 cup
2 teaspoons
1 teaspoon
Yacup
1 tablespoon
% cup
% cup
13 cup
)i cup
2)1:;cups
1)1:;teaspoons
3 tablespoons
4 tablespoons
113 cups
AUTOMATICBREADPROGRAM
o Press SELECTto 2 cups (1 Ib),3 cups (1Yz Ib)or 4 cups
(2 Ib)WHOLEGRAIN
o Press COLORto NORMAL.
o Press START.
o Afterbaking, press STOP/RESET.Remove bread fromBread
Machine and baking pan. Coolon rack.
2 lb. loaf
There's something about pumpernickelthat begs for a big pot of
soup and a roaringfire.Perhaps its darkness recalls winter nights
in the Slaviccountries of its origins.
Add ingredients in the order listed (except chocolate). All
ingredients must be at room temperature, unless otherwise noted.
1)1:; lb. loaf
active dry yeast
medium rye flour
bread flour
onion powder
salt
milk
dark molasses
butter loil
water
unsweetened chocolate,
melted
1 tablespoon
1 cup
2 cups
1 teaspoon
)I:; teaspoon
)l:; cup
)i cup
1 tablespoon
)i cup + 2 TBL
1
ounce
AUTOMATICBREADPROGRAM
o Press SELECT to 3 cups (1Yz Ib) or 4 cups (2 Ib) WHOLE GRAIN
o Press COLOR to NORMAL.
o Press START.When the Bread Machine beeps before the end of
the last kneading, add the melted unsweetened chocolate.
o After baking, press STOP/RESET. Remove bread from Bread
Machine and baking pan. Coolon rack.
1.
2 lb. loaf
4)1:; teaspoons
113cups
2% cups
4 teaspoons
% teaspoon
% cup
13 cup
4 teaspoons
13cup + 2 TBL
1)1:;ounces
34 Whole Grain Breads
Whole Grain Breads 35
Page 19

TRIPLE WHEAT BREAD SHREDDED WHEAT BREAD
Now, if you thought our 100% Whole Wheat Bread was good, wait
until you try this one.Triple wheat,triple treat! Whole wheat flour,
wheat germ and wheat bran plus dark molassescreate a loaf
brimming with fiber.
Connoisseurs of shredded wheat know their favorite cereal has
no added sugar or salt.It's just pure,wholesome goodness in a
delightfully crunchy form. The idea of basing a bread on breakfast
cereal was intriguing,as is the spicy hint imparted by light
molasses.
Add ingredients in the order listed. All ingredients must be at
room temperature, unless otherwise noted. Add ingredients in the order listed. All ingredients must be at
1 lb. loaf 1)1;; lb. loaf 2 lb. loaf
active dry yeast 1)1;;teaspoons 2 teaspoons 4 teaspoons
whole wheat flour
wheat germ
wheat bran
cracked wheat
bread flour
salt
nonfat dry milk 1 tablespoon 2 tablespoons
butter/oil
dark molasses
water
AUTOMATICBREADPROGRAM
1 cup 1)1;;cups 2 cups
YJ cup )I;;cup % cup
YJ cup
2 tablespoons
% cup 1 cup 2 cups
)I;; teaspoon 1 teaspoon 1)1;;teaspoons
2 teaspoons 1 tablespoon
2 tablespoons
% cup
)I;;cup
Y.I cup
Y.Icup
1)1;;cups minus 1 TSP
% cup
YJ cup
3 tablespoons
2 TBL + 2 TSP
4 tablespoons
1% cups
\
o Press SELECTto 2 cups (1 Ib), 3 cups (1y.!Ib) or 4 cups
(2 Ib) WHOLE GRAIN
o PressCOLORto NORMAL.
o Press START.
.0 Afterbaking,pressSTOP/RESET.RemovebreadfromBread
Machine and baking pan. Coolon rack.
room temperature, unless otherwise noted.
1 lb. loaf
active dry yeast
whole wheat flour
bread flour
salt
nonfat dry milk 1 tablespoon
butter/oil
light molasses 3 tablespoons
mini-shredded
wheat biscuits
water
1)1;;teaspoons 2 teaspoons
1Y.I cups 2 cups 2% cups
% cup 1 cup 1YJcups
)l;; teaspoon 1 teaspoon
2 tablespoons
% cup 1 cup
1 cup 1Y.I cups + 1 TBL 1YJcups
1)1;; lb. loaf
3 tablespoons 4 tablespoons
Y.Icup
2 lb. loaf
1 TBL + 1 TSP
1)1;;teaspoons
4 tablespoons
1YJ cups
AUTOMATICBREADPROGRAM
o Press SELECTto 2 cups (1 Ib), 3 cups (1y.!Ib) or 4 cups
(2 Ib) WHOLE GRAIN
o Press COLORto NORMAL.
o Press START.
o After baking, press STOP/RESET.Removebread from Bread
Machine and baking pan. Coolon rack.
36 Whole Grain Breads Whole Grain Breads 37
Page 20

PIZZA DOUGH
PIZZA DOUGH VARIATIONS
It's time to changethe timeworn phrase"As Americanas apple
pie" to "As American as pizza pie!" Our country is so taken with
pizza that entire restaurantchains are devoted to it.They even
promise to deliver hoton the spot, or your next one's free. Why
bother with carryoutpizza when you can makeyour own in about
the time it takes to haveone delivered?
Add ingredients in the order listed.All ingredients must be at
room temperature.
% cup water
2 tablespoons ofive oil
1 teaspoon saft
2% cups bread flour
1% teaspoons active dryyeast
DOUGH PROGRAM
o Press SELECT to DOUGH.
o Press START.
o At the end of the program press STOP/RESET. Remove dough
from the Bread Machine. Dough is ready for hand shaping, rising
and baking.
HAND-SHAPING
o Place dough on a lightly floured surface. Cover dough with
a clean cloth, and let dough restfor 10 minutes.Cut into halves.
Presseach evenly into a lightly greased 12-inch pizza pan. Prick
dough all over with a fork.
o Bakein a 4000F preheated oven for 12 to 15 minutes,until crust
is lightly browned.Yield:2 12-inch crusts.
o Removefrom oven and spread/sprinkle crust with your favorite
pizzatoppings.Returnto oven for 10to 15 minutes,until toppings
are bubbling and/or melted.
VARIATIONS
o Substitute1~to 1 cup whole wheat flour for same amount of
bread flour.
o Add 1 tablespoon crushed herbs (oregano,Italian spices,etc.)
to ingredientsjust before adding oil.
o Add 1 cup gratedor shredded cheese(gratedParmesan,
Romano,shredded Cheddar,pepper jack) to ingredientsjust
before adding oil.
38 Hand-Shaped Breads
r -- --
'j
')
Hand-Shaped Breads 39
Page 21

BAGELS
BAGELS (contd.)
There's nothing in this world like a chewy bagel - smothered with
cream cheese and lavished with lox. Bagelsjoin the melting pot of
ethnic foods Americanscall their own. Yet they remain unique in the
realm of yeast breads.A lot of kneadingmakesthem chewy, and
boiling them in sugar gives them their shine. Pile on the seeds,salt
or onions - and mazeltov!
Add ingredients in the order listed.All ingredients must be at
room temperature.
1 cup water
1% teaspoons salt
2 tablespoons granulated sugar
3 cups bread flour
214 teaspoons active dry yeast
DOUGH PROGRAM
o Press SELECT to DOUGH.
o Press START.
o At the end of the pr.ogram press STOP/RESET. Remove dough
from the Bread Machine. Dough is ready for hand shaping, rising
and baking.
HAND-SHAPING
o Bring 3 quartswaterto boil in a largepot.Stir in 3 tablespoons
of sugar.
o Place dough on a lightly floured surface. Let dough rest for
5 minutes.
o Cut dough into 9 equal pieces.Rolleach into a smooth ball.
Flattenballs,and poke a hole in the middle of each with your
thumb. Next twirl the dough to enlarge the hole and even out the
dough.around it.Coverbagels with a clean cloth, and let restfor
10 minutes.
o With a large metal spatula, carefullytransfer bagels to boiling
water,three at a time. Let boil for 1 minute,turning bagels over
midway. Removebagelsfrom water with a slotted spoon and
drain briefly on a clean towel. Transfer drained bagels to baking
sheetssprinkled with corn meal,four to five bagels per sheet.
o If desired,glazetops of bagelswith egg white and sprinkle with
poppy or sesameseeds, course salt and/or reconstituted dry
onions. Bake bagels in 375°F preheatedoven for 20to 25
minutes,until well-browned. Yield:9 bagels.
40 Hand-Shaped Breads
I.
Hand-Shaped Breads 41
Page 22

'r-
FRENCH BREAD
,"..'.~::" '. Q
Have you ever noticed that the French have a flair for th~ fi~er
things in life?This is especially true when it comes to bread!
Add ingredients in the order listed.All ingredients must be at
room temperature.
1 cup + 2 tablespoons water
1 teaspoon salt
2 teaspoons granulated sugar
3 cups bread flour
2 teaspoons active dry yeast
DOUGH PROGRAM
o Press SELECT to DOUGH.
o Press START.
o At the end of the program press STOP/RESET. Remove dough
from the Bread Machine. Dough is ready for hand shaping, rising
and baking. .
HAND-SHAPING
o Place dough on a lightly floured surface. Letdough rest for
5 minutes.
o Cut dough into halves. Roll each portion in a long rope and place
in trough of a lightly greased,double-trough baguettepan
(maximum3-inchwidetrough)..
o Glaze each baguettewith egg white.Slash 5 times diagonally
with a very sharp knife or a pair of scissors. Place in a warm,
draft-free spot to rise until doubled in size, about 45to 60
minutes.
o Glaze unslashedportions again with egg white. Bake in a
400°F preheatedovenfor 25 to 30 minutes,until deep brown.
Yield: 2 baguettes.
CINNAMON ROLU
We have yet to meet a person who does not like cinnamon rolls.
The recipe that follows is simple to prepareand is not overly sweet
Prepareone recipe for Holiday Bread(see"Contents" for page).
Do not add raisins.Use hand-shaping technique shown on this
page.
Brown Sugar- Cinnamon Filling:
% cup dark brown sugar
2 teaspoons cinnamon
2 tablespoons softened butter
(Mix together to form a soft paste.)
Icing:
3 tablespoons softened butter
2 teaspoons unbleached all-purpose flour
% cup Confectioner's sugar
% teaspoon vanilla extract
(Blend all ingredients until smooth.)
HAND-SHAPING
o Place prepared dough on a lightly floured surface. Let dough rest
for 5 minutes.
o With a lightly floured rolling pin, roll dough into a ~-inch thick
rectangle.Square off edges. Spreadevenly with brown sugar-
cinnamon filling. Roll up lengthwise,jelly-roll fashion. Pinch
edgestogether.
o Slice into 1-inch thick rounds. Place on a lightly greased baking
sheet Cover with a clean cloth. Place in a warm, draft-free spot
to rise until doubled in size,about 1 hour.
o Bake in a 350°F preheated oven for 15to 20 minutes,until
golden brown. Removeand coolon a rack.When cooled to room
temperature,drizzle with icing.
42 Hand-Shaped Breads
Hand-Shaped Breads 43
Page 23

BREAD STICKS
HOLIDAY BREAD
Bread sticks are simple to makeandfun to eat.They also make
wonderful gifts for familyand friends.
Prepareone recipe for Pizza Dough (see"Contents" for page).
Use hand-shaping technique shown on this page.
Optional Toppings:
1 large egg beaten with 1 teaspoon water
2 tablespoons finelygrated Parmesanor
sharp Cheddar Cheese
1 tablespoon seeds or herbs/spices
HAND-SHAPING
o Place dough on a lightly floured surface. Let dough restfor
5 minutes.
o With a lightly floured rolling pin, roll dough into a ~-inch thick
rectangle.Square off edges.
o Optional Toppings: Brush the surface with egg wash. Sprinkle
lightly with grated Parmesanor Cheddar cheese,or desired
seeds,herbsor spices.
o Cut into 8-inch long by ~-inch wide strips. Carefully place on
a lightly greased baking sheet,allowing %-inch between each
bread stick.
o Bake in 375°F preheated oven for 15to 20 minutes,until golden
brown.
Nothing is as festive as Holiday Bread- rich with raisins.
Add ingredients in the order listed (exceptfor raisins).All
ingredients must be at roomtemperature.
% cup water
2 tablespoons butter/oil
2 large eggs
1% teaspoons salt
2 tablespoons granulated sugar
3 cups bread flour
2% teaspoons active dry yeast
% cup raisins
(candied fruit maybe substituted)
DOUGH PROGRAM
o Press SELECT to DOUGH.
o Press START. When the Bread Machine beeps before the end of
the last kneading, add the raisins.
o At the end of the program press STOP/RERSET. Remove dough
from the Bread Machine. Dough is ready for hand shaping, rising
and baking.
HAND-SHAPING
o Place dough on a lightly floured surface.Letdough rest for
5 minutes.
44 Hand-Shaped Breads
o Divide dough into thirds. Roll each portion into a 14-inch rope.
Place ropes side-by-side on a greased baking sheet. Braid ropes
and tuck ends under securely. Cover with a clean cloth. Place in
a warm, draft-free spot to rise until doubled in size,about45 to
60 minutes.
o Brushbraidwith egg white. Bake in 375°F preheatedoven for 25
to 30 minutes,until deep golden brown.
Hand-Shaped Breads 45
Page 24

,.
BROWN & WHITE RICEBREAD
ThiS will be your standard daily fare.Easily prepared, it is good
toasted or plain.Sandwiches will now be on your menu again!
Carefullyfollow the directions on the next page. Making gluten-
free bread differs from traditional baking.For additional information,
referto "Gluten-Free Breads" in the Insider's Guide.
Liquid Ingredients:
1% cups water
114cup vegetable oil
3 large eggs, lightly beaten
1 teaspoon vinegar
Dry Ingredients:
% cup nonfat dry milk
1% teaspoon salt
3 tablespoons granulated sugar
1 tablespoory xanthum gum
2114 cups white rice flour
1 cup brown rice flour
2% teaspoons active dry yeast
BROWN &WHITE RICEBREAD (cant'd.)
INGREDIENTPREPARATION
Placelightly beateneggs into the BreadMachine pan. Add the
rest of the liquid ingredients to pan.Stir together with a rubber
spatula.Measuredry ingredientsinto a medium-size bowl. Whisk
together thoroughly. Place dry ingredients into Bread Machine pan
on top of liquids. All ingredients must be.atroom temperature.
AUTOMATIC BREAD PROGRAM
o Press SELECT to 2,3 CUPS BASIC BREAD.
o Press COLOR to LIGHT.
o Press START.
o After baking, press STOP/RESET. Remove bread from the Bread
Machine and baking pan. Coolon rack.
46 Gluten-Free Breads
NOTE: If dough appears dry, add
1 teaspoon water at a time up to
a maximum of 2 tablespoons.
Gluten-Free Breads 47
Page 25

"MOCK" LIGHTRYE BREAD
"MOCK" LIGHTRYE BREAD (confd.)
You'll find it hard to believe that this ryebread recipe is really
gluten-free. Now a real,grilled Reubensandwich can be more than
a dream.
Carefully follow the directions on the next page.Making gluten-
free bread differs from traditional baking. For additional information,
refer to "Gluten-Free Breads" in the Insider's Guide.
Liquid Ingredients:
1% cups water
4 tablespoons vegetableoil
2 tablespoons molasses
3 large eggs, lightly beaten
1 teaspoon vinegar
Dry Ingredients:
% cup nonfat dry milk
1% teaspoons salt
% cup light brown sugar,
firmly packed
1 tablespoon xanthum gum
2 tablespoons caraway seeds
2% cups white rice flour
1 cup brown rice flour
2114teaspoons activedry yeast
NOTE:
If dough appears dry, add
1 teaspoon water at a time up to
a maximum of 2 tablespoons.
INGREDIENTPREPARATION
Place lightly beaten eggs into the Bread Machine pan. Add the
rest of the liquid ingredients to pan.Stir together with a rubber
spatula.Measure dry ingredients into a medium-size bowl. Whisk
together thoroughly. Place dry ingredientsinto Bread Machine pan
on top of liquids. All ingredients must be at room temperature.
AUTOMATIC BREAD PROGRAM
o Press SELECT to 2, 3 CUPS BASIC BREAD.
o Press COLOR to LIGHT.
o Press START.
o After baking, press STOP/RESET. Remove bread from the Bread
Machine and baking pan. Coolon rack.
48 Gluten-Free Breads
Gluten-Free Breads 49
-
Page 26

...
CINNAMON RAISIN BREAD
Few things can beatthesmellofcinnamonbread.Especiallywhen
it's filled with plump,juicy raisins.Paired with a dish of homemade
applesauce,you have a snack fit for a king!
Carefullyfollow the directions on the next page.Making gluten-
free bread differs from traditional baking.For additional information,
referto "Gluten-Free Breads"in the Insider's Guide.
Liquid Ingredients:
1113cups water
% cup vegetable oil
3 large eggs, lightly beaten
1 teaspoon vinegar
Dry Ingredients:
112cup nonfat dry milk
1112teaspoons salt
3 tablespoons granulated sugar
2114teaspoons xanthum gum
:V4cup raisins
1112teaspoons cinnamon
2 cups white rice flour
1 cup + 2 tablespoons brown
rice flour
211.,teaspoons active dry yeast
CINNAMON RAISIN BREAD (cant'd.)
INGREDIENTPREPARATION
Place lightly beateneggs into the Bread Machine pan.Add the
restof the liquid ingredientsto pan. Stir together with a rubber
spatula.Measuredry ingredientsinto a medium-size bowl.Whisk
together thoroughly. Place dry ingredientsinto Bread Machine pan
01)top of liquids. All ingredients mustbe at room temperature.
AUTOMATIC BREAD PROGRAM
o Press SELECT to 2, 3 CUPS BASIC BREAD.
o Press COLOR to LIGHT.
o Press START.
o After baking, press STOP/RESET. Remove bread from the Bread
Machine and baking pan. Coolon rack.
50 Gluten-Free Breads
NOTE: Ifdough appears dry, add
1 teaspoon water at a time up to
a maximum of 2 tablespoons.
Gluten-Free Breads 51
Page 27

CHEDDAR LOAF
CHEDDAR LOAF (cent'd.)
Atender,flavorfultreat.When made with mild cheddar, the
appearance of this loaf is nothing short of gorgeous. However,
lactose-intolerant cooks maywant to usean aged, sharp cheddar.
A "yummy" loaf with fewer "tummy" problems.
Carefully follow the directions on the next page. Making gluten-
free bread differs from traditional baking. For additional information,
referto "Gluten-Free Breads" in the Insider's Guide.
Liquid Ingredients:
1112 cups water
114cup vegetable oil
3 large eggs, lightly beaten
1 teaspoon vinegar
Dry Ingredients:
1/4 cup nonfat dry milk
1112teaspoons salt
3 tablespoons granulated sugar
1 tablespoon xanthum gum
1112cups grated cheddar cheese
10/4 cups white rice flour
1114cups brown rice flour
2'4 teaspoons active dry yeast
NOTE: If dough appears dry, add
1 teaspoon water at a time up to
.a maximum of 2 tablespoons.
INGREDIENTPREPARATION
Place lightly beaten eggs into the Bread Machine pan. Add the
rest of the liquid ingredients to pan. Stir together with a rubber
spatula. Measure dry ingredients into a medium-size bowl. Whisk
together thoroughly. place dry ingredients into Bread Machine pan
on top of liquids. Allingredients must be at room temperature.
AUTOMATIC BREAD PROGRAM
o Press SELECT to 2, 3 CUPS BASIC BREAD.
o Press COLOR to LIGHT.
o Press START.
o After baking, press STOP/RESET. Remove bread from the Bread
Machine and baking pan. Coolon rack.
52 Gluten-Free Breads
Gluten-Free Breads 53
..:...
Page 28

BANANA NUT BREAD
CORN BREAD
We've seen manyan eye light up at the mention of Banana Nut
Bread.It hasto be one of the most popular quick breads around.
Premeasureingredient groups (sifttogether ingredient Group D).
Place in bowls near BreadMachine.All ingredients must be at room
temperature.
A 2112tablespoonsbutter/oil
11.cup granulated sugar
If. cup dark brown sugar,packed
B
1 cup mashedripe banana
2 large eggs
C % cup chopped walnuts
D 1% cups unbleachedall-purpose flour
1 teaspoon baking soda
1 teaspoon salt
E % cup milk
AUTOMATICBREADPROGRAM-
o Place ingredient Group A in BreadMachine pan. Press SELECT
for Quick Bread.PressCOLORfor LIGHT.PressSTART.Mix for
1 minute and 15seconds, scraping down sides of pan with
spatula if necessary.
o Add ingredient Group B. Mix for 1 minute and 15 seconds,
scraping down sides of pan if necessary.
o Add ingredient Group C, then D and then E.Scrape down sides
of pan if necessary.
o Lower lid. After baking, press STOP/RESET.RemoveQuick
Bread from Bread Machine. Coolon rack.
Have you ever noticed how mostquick breads resemble cake?
Well, corn breadis one quick bread that can be described as
savory rather than sweet
Premeasureingredient groups (sifttogether ingredient Group C).
Place in bowls near Bread Machine. All ingredients must be at room
temperature.
A
3 tablespoons butter/oil
2 tablespoons granulated sugar
B
2 large eggs
C
11f3 cups unbleached all-purpose flour
1f2 cup cornmeal
21f2 teaspoons baking powder
D
% cup milk
AUTOMATICBREADPROGRAM
o Place ingredient Group A in Bread Machine pan.PressSELECT
for Quick Bread.Press COLORfor LIGHT.PressSTART.Mix for
1 minute and 15seconds,scraping down sides of pan with
spatula if necessary.
o Add ingredient Group B. Mix for 1 minute and 15 seconds,
scraping down sidesof pan if necessary.
o Add ingredient Group C, then D. Scrape down sides of pan if
necessary.
o Lower lid. After baking, press STOP/RESET.RemoveQuick
Breadfrom Bread Machine. Coolon rack.
54 Quick Breads
I
I-
Quick Breads 55
Page 29

--- .
IRISH SODA BREAD
You won't want to wait for St Paddy'sDayto enjoy this raisin-
studded,butterybread.
Premeasureingredientgroups (sift together ingredient Group B).
Place in bowls near Bread Machine. All ingredients must be at room
temperature.
A
~ cup buttermilk
1 large egg
11/2 teaspoons caraway seeds
B
2 cups flour
1/4cup granulated sugar
11/2 teaspoons baking soda
1/4teaspoon salt
c
1/2 cup raisins
AUTOMATICBREADPROGRAM
o Place ingredient Group A in Bread Machine pan. PressSELECT
for Quick Bread.PressCOLORfor LIGHT.PressSTART.Mix for
2 minutes,scraping down sides of pan with spatula if necessary.
o Add ingredient Group B. Mix for 1 minute,scraping down sides of
pan if necessary.
o Add ingredient Group C. Scrape down sides of pan if necessary.
o Lower lid. After baking, press STOP/RESET.RemoveQuick
Bread from Bread Machine. Coolon rack.
APPLEWALNUT LOAF
The glorious aromaof baking apples, cinnamon and nutmegis this
recipe's hallmark.
Premeasureingredient groups (sift together ingredient Group D).
Place in bowls near Bread Machine. All ingredients must be at room
temperature.
A 1/2 cup granulated sugar
2 tablespoons vegetable oil
B
1 large egg
1 tablespoon milk
c
1 cup grated peeled Granny Smith apple
1/2 cup chopped walnuts
D 11/2 cups unbleached all-purpose flour
% teaspoon baking soda
1/4 teaspoon baking powder
1/4 teaspoon salt
1/4 teaspoon ground cinnamon
1/4 teaspoon ground nutmeg
AUTOMATICBREADPROGRAM
o Place ingredient Group A in Bread Machine pan. PressSELECT
for Quick Bread.PressCOLORfor LIGHT.Press START.Mix for
1 minute and 15seconds,scraping down sides of pan with
spatula if necessary.
o Add ingredient Group B. Mix for 1 minute and 15 seconds,
scraping down sidesof pan if necessary.
o Add ingredientGroup C,then D and then E.Scrapedown sides
of pan if necessary.
o Lower lid. After baking, press STOP/RESET.RemoveQuick
Bread from,BreadMachine. Coolon rack.
56 Quick Breads
-
-
Quick Breads 57
-
- - --
Page 30

T
Practical Solutions to Easy Baking
The following tips will provide you with practical solutions to problems you might
experience when using your Bread Machine. Read the Instruction Manual also. It will
guide you to understand the usage of this appliance to achieve maximum enjoyment
BASIC and WHOLE GRAIN YEAST BREADS
Problem
Cause
Solution
Dough/Bread did
not rise enough.
Problem
Ingredients were not at room temperature.
Ingredients were not placed in Bread Machine
pan in the recipe's recommended order.
Yeast did not activate.
Low gluten flour used.
High altitude.
Pnct:k:aJ SoIatioas
BASIC and WHOLE GRAIN YEASTBREADS(cont'd.)
Cause
Ingredients must be at room temperature unless
otherwise noted.
Place ingredients in Bread Machine pan in the
recommended order.
Be certain yeast is fresh; check expiration date
on back of package. Proof yeast as necessary.
(See Insider's Guide.)
Do not reduce amount of sugar or sweetener
called for in recipe; do not use artificial
sweeteners.
Too much salt used, inhibiting dough to rise. Use
amount specified in recipe.
Unless otherwise noted, always use bread flour.
For every 1000 feet above 3000 feet sea level,
reduce the water by 1 tablespoon, up to 4 table-
spoons maximum.
Solution
Bread collapses
when baked.
Bread touches lid.
Bread does not bake
thoroughly.
Bread burns.
Dough rose unevenly.
Weather very hot and/or humid. Do not bake bread in Bread Machine until cooler
Too much or wrong type of yeast was used.
Ingredients were not measured properly.
Lid was up.
Ambient temperature lower than 70°F.
Baking temperature is too high.
Make sure water is no warmer than room temper-
ature (65° to 85°F.) Flour is very absorbent and
absorbs moisture from air during periods of
excessive humidity. If dough too sticky, bread can
collapse. Reduce water or liquid in recipe by 2 to
3 tablespoons. Let appliance knead for 1 to 2 min-
utes; if dough appears too dry, add additional
water 1 tablespoon at a time, up to 3 tablespoons.
and less humid; reduce yeast by 25 to 50%. If
recipe calls for 1% teaspoons, try 1% teaspoons
down to 1 teaspoon.
Use specified amount of either active dry or fast-
rising yeast
Measure ingredients carefully. Use U.S. Standard
measuring cups and spoons.
Do not open lid during final rising and baking
cycle.
Use appliance in warmer location.
Set Bread Machine on lower setting.
Recipe has been modified.
Reduce amount of sweetener and shortening.
Page 31

0>
o
Practical Solutions
HAND-SHAPEDBREADS
Problem
Dough does not
stretch when rolled
out or shaped.
Bread browns too
quickly.
Cause
Gluten needs to rest
Oven may not be calibrated properly.
Changesin weather mayaffect moisture contents
of ingredients.
Solution
Cover dough with a clean cloth and let rest for
5 to 10 minutes before proceeding.
Test oven temperaturewith an oven thermometer.
If temperatureis not the same as thermostat
setting,have oven serviced.
Addan additional 1 to 2 tablespoons of water to
recipe the next time bread is made.
Jfbread continues to brown too quickly, tent a
sheet of aluminum foil over bread or rolls to slow
down browning process.
Problem
Ingredients are not
well blended.
Bread does not bake
thoroughly.
Bread Burns.
Bread does not rise
enough.
Bread collapses
when baked.
Cause
Ingredients were not combined as recommended.
Bread Machine lid was up.
Ingredients were not measured properly.
Bread baked on Normal setting.
Recipe needs to be modified. Reduce quantity of shortening or sweetener.
Yeast did not activate.
Ingredients were not at room temperature. Ingredients must be at room temperature.
Wrong flour to liquid ratio. Increase flour. If that doesn't totally solve
Combine and mix dry and liquid ingredients. Add
as instructed in the recipe.
Lid must be down while baking.
Measure ingredients carefully.
Use U.S. Standard measuring cups and spoons.
Check that your dry and liquid measuring cups
are exactly the same size.
Bake bread on Light
Be certain yeast is fresh; check expiration date
on package.
Be sure that yeast has been properly stored.
problem, increase xanthan gum.
Solution
Loaf is small,
misshapen.
Too much flour was used.
Gluten-free baking questions can be answered by calling Red Star Yeast Celiac Hotline
at BOO-4-CELIAC between 9 a.m. and 5 p.m. Central time.
Measure flour carefully. Be careful not to pack
into measuring cup.
.
Page 32

-.
..
1:0
.Ie
!~
Oa:
-11:1
ti~
VCJ
is
!O
C
.-
e
Q)
Q,
E
S!
E
0
C
0
...
.2
-
:I
1ii
'0
Q)"2
o
1;)0
:Jc
EQ)
m
J!J'-
c
Q)Q)
'-.s::.
(5
...
OIm
cm
.- Q)
="2
c(:J
Q)
III Q)
:=I
tV
CJ
'E
as
.s::.
o
0
t-
CIIC
C-
"C'a...
E
tVCCII
:Q
a.
CII
2
.!!:: iii
ev..ao-
e-.cc
......0- CII
",c"i=g
!:c=...
::IOCIICJI ::lev
!D'a..5
'0
°
'6
C 01
.-
m
as
'0
.f!i
C
Q)
'6
e
01
.5
ii
e
:J 01
m 'Oc 'OC
as as'-
Q)
Eai
'.90
eo
a.e
'C
Q,
e
Q,
Q,
as
-
as
-g
'0
'0
as
(5
C
e
Q) Q)
J!J
..,
.- c
-gQ)
...E
OIO 'S 01 'S
.EE
-
0
C
!
tV'
J!Ji
c'a
CIIC
.- CII
i:i2
...-
Gi
-. O..a a Oc
"E
as
:J
o
>-
:!::
01 en
C
i
m
B
...
as
0
c
0 0
Q):::J'
c-
.--
.s::..s::.
001
as'- ...:J
:E...J
Q)m Q)m
...:J
alQ)
-...
Q) Q)
cn
!!! !!!
.a .a
e e
Q)
E
J!!
E
01
'C 'C
1ii
'O
as
J:I
(5
C
m
as as
'0 '0
as
e
J:I
'O
C
=>
Q)
m
::>
:>.
=0
:JC C
-0
eO
asQ,
om
J!J'O
CC
Q)as
i
010
.501
e.!§
:J:J
mm
as as
Q)Q)
:EE
:>.
"t:
Q)
Q,
e
Q,
'0
e
:J
m
as
Q)
E
(5
C
e
J!J
C
Q).
:J
0
>-
-
C
=:
Q)
m
:::J'
- ...
E
01
:::i m Q) Q) Q,'- m m Q,:S::
c
Q)C
c-
._
.s::....
oas
aso
:EOI
as'-
...:J
alQ)
-...
Q)Q)
cn
Q)
Q,
E
.S!
E
01
1ii
'O
Q)
as
J:I
(5
c
m
as
Q)
...
J:I
° o
0
-
.c
(II
CII . ...
ob ::I 0":
'as
'a.!!
asQ,
ee
..aO
uCII
._
.E
u
0
iii
C
..a
'a
as
CII
...
..a
u
's
dI
C
'2
0 c'O-Q)- co
.s::.
m .as as as as .
- '0 q:: ° J:I 0I:g
'0
C
as
:s::.a as:u Q),g.- C
Q)
J!J'o:g ... as 'O
'-EQ)-:J... °
S!
:R
.2 mf5 0... ° 0'0.'"J:I-
m
'0
-
c ...Q)J!J...';:::'Oasas:o=
:J
0
'O-'O'OasQ)'OS!
E Q)"E.s::.aJc
as
Q)
°
:J
32Q)3232.;
-g
II:
-c
"0Q,
.
'iU
'0
32
J:I
"2
q::
'6
......
0
'0
E c
c
Q) ...
Q) Q)
J:I 'O
m
as 0
.s::. Q,
Q)
Q,
'u 32
Q)
II:
'aCJI
'a::l
!DCII
's '0
,-- =
'0 0 . .
a>'E C m . C
> 0 Q)._aso
°.E 8.-="8 E
m...m:t::°J:lmQ)
moas .as- -
Q)"""Q)"'Q)00l...
Q)c N1iil:jc32...
e'OE=",Q)
Q)m. Q)c >Q)
Q) cO'$(Q)-mQ)
0 ..> :J E :2 e Q)
c!35.s::.,g
Q).9Q,
Q)o'-Q)Q)cm m
8..s.s::.°0ast-.Q)
...oQ,Q,g":a>.s::.
0 0 '6 -8
Easasooo'-
:0=.- J:I J:I C Q,.s::..2.
0
m
01
c
as
...
0
01
C
(II
CII
asO
CIIC
... CII
.!!!
TROUBLESHOOTING GUIDE
FOR THE BREAD MACHINE
Q: My BreadMachine did not start when I pressed the STARTpad.
A: Your machine is PRE-WARMINGthe ingredients for the first few
minutes.It is extremelyimportantto understand your bread
machineISWORKINGPROPERLYwhen you push the START
pad and no blade action starts.
A: Your machine was not plugged into a 120 Volt, 60 Hz.Outlet
capable of providing the proper watts of electricity.
Q: After Pre-Warmingcycle my machinestarted but there Is no
kneading action.
A: The kneading bladewas not placed on the shaft.
Q: My Bread Machine blade turns slow and Intermittently for the
first minute.
A: Afterthe pre-warming cycle, your bread machine will slowly and
intermittentlymixthe ingredients for the first minuteor so. After,
the blade will turn quickly and begin to kneadthe dough into a
smooth ball.
Q: I just used my machine and now It won't re-start.
A: Your machine has not cooled down sufficiently. Removethe
baking pan and wait until your machine cools down. Once
cooled, replace the baking pan and press START.
Q: My Bread Machine did not bake the bread after the last RISING
cycle.
A: Make sure you've selected BASICor WHOLEGRAINyeast
breads.If you havechosen DOUGH,your machine will knead
and rise the dough but will not bakethe bread.
Q: My Bread Machine "beeps" at the end of the last kneading
cycle.
A: Your machine will beep severaltimes a few minutes before the
end of the last kneading cycle. This is to letyou know, this is the
besttime to add ingredients such as raisins, nuts, chocolate
chips, poppy seeds,etc.
Q: My Broad Machine we. accidentally unplugged from the power
outlet during operation.
A: If there WOIftn interruption Inthe power supply,the program
was cnncoled. If the kneading cycle has begun,removethe old
ingredients find startover adding new ingredients.
l 62
63
 Loading...